


Dan Vadas
-
Posts
3,261 -
Joined
-
Last visited
Content Type
Profiles
Forums
Gallery
Events
Everything posted by Dan Vadas
-
Good news about the card being able to be flattened . If you want to get some good card of the right sizes try buying some from GPM in Poland - it's specially made for card models, great quality, and comes in various sizes. I suggest you buy a lot more than you need, and maybe also some other accessories (PE etc) to make the postage worthwhile. Danny
-
Yep, exactly half the size, and not just in wood . No reason to panic just yet Jan . First off - the card you used looks to be a rather nasty one. It obviously has a "grain", and therefore will bend much more readily in one direction than the other. Perhaps gluing the parts at 90 degrees may be an easy fix. Otherwise I suggest you invest in a couple of sheets of good quality card and start over. Second - cut out the whole area to be laminated from the full sheet of card, dampen it SLIGHTLY and leave under flat weights until you are ready to start cutting. Can't hurt to try it . Danny
-
Thanks Pat. Yes, two or three coats of Testor's Dullcote usually does the trick as a finish. I also give the card two coats of Mohawk Nitrocellulose Lacquer before I start cutting anything. Danny
- 295 replies
-
- 4
-

-
- amatsukaze
- halinski
- (and 2 more)
-
Thanks all for the kind comments . Yes indeed popeye, they will also swivel. Both "directions" seem to work very well indeed . Moving along to one of the last major sub-assemblies - the Torpedo Tubes. These are made in a similar fashion to the gun turrets, except for the tubes themselves. The pics should be fairly self-explanatory. I used my new large hole punch to make the 3.4mm holes for the tubes in the turrets : I tried two "methods" of doing the railings, one using 0.2mm hard brass rod for the rails, the other using the same size in soft wire. The soft wire was far easier, and there was very little difference in the outcome : Danny
.thumb.JPG.97530b40d637ebd22ead13e804a0c875.JPG)
.thumb.JPG.094f36743d98505560fa16f1910b46da.JPG)
.thumb.JPG.21523bb38a010f111a134271bf26b1cb.JPG)
.thumb.JPG.7cad02542ec5d02037f09d94c95258dc.JPG)
.thumb.JPG.4158c87ae25029ef98d154f59f471e33.JPG)
.thumb.JPG.062bdd0f6901a55dc4b9762f47af4463.JPG)
- 295 replies
-
- 13
-
-
- amatsukaze
- halinski
- (and 2 more)
-
Hmm .... that's odd - I thought this was the way it's ALWAYS done. It's how I've been doing it all along . Nice work Slog. Danny
- 244 replies
-
- 4
-
-
- borodino
- dom bumagi
- (and 1 more)
-
Nice translation Thomas, this should help Ron immensely . Perhaps you should be our resident Polish Card Kit translator . Danny
-
Thank you both . I used CA glue - my soldering torch has decided to stop working . Danny
- 295 replies
-
- 1
-
-
- amatsukaze
- halinski
- (and 2 more)
-
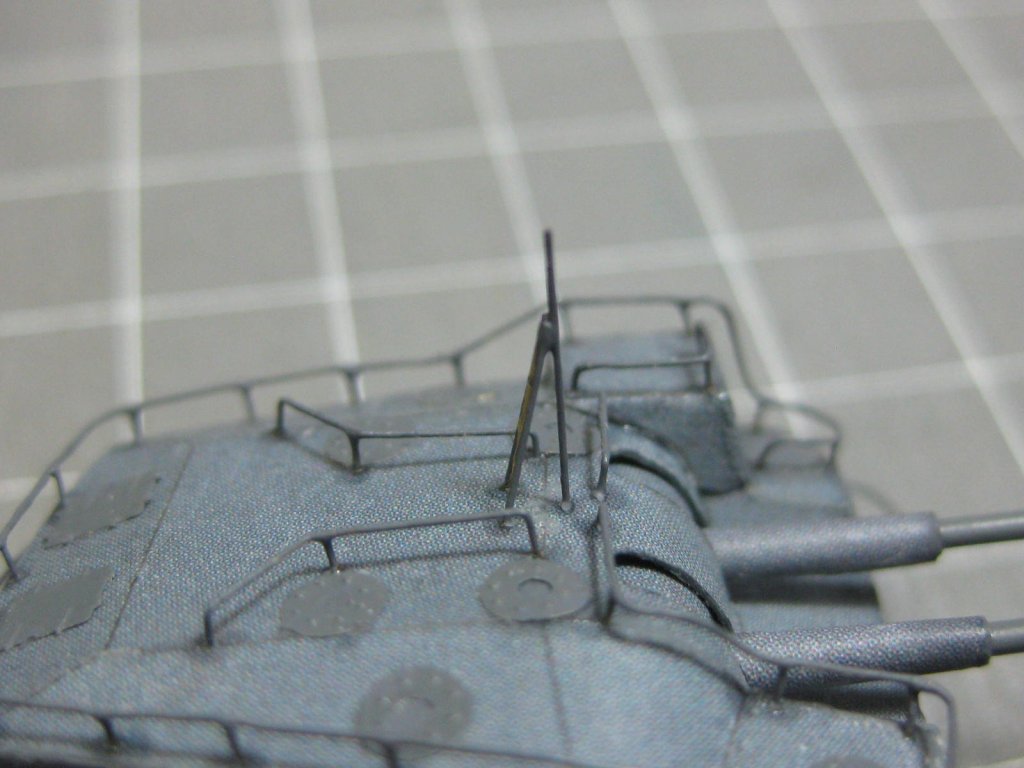
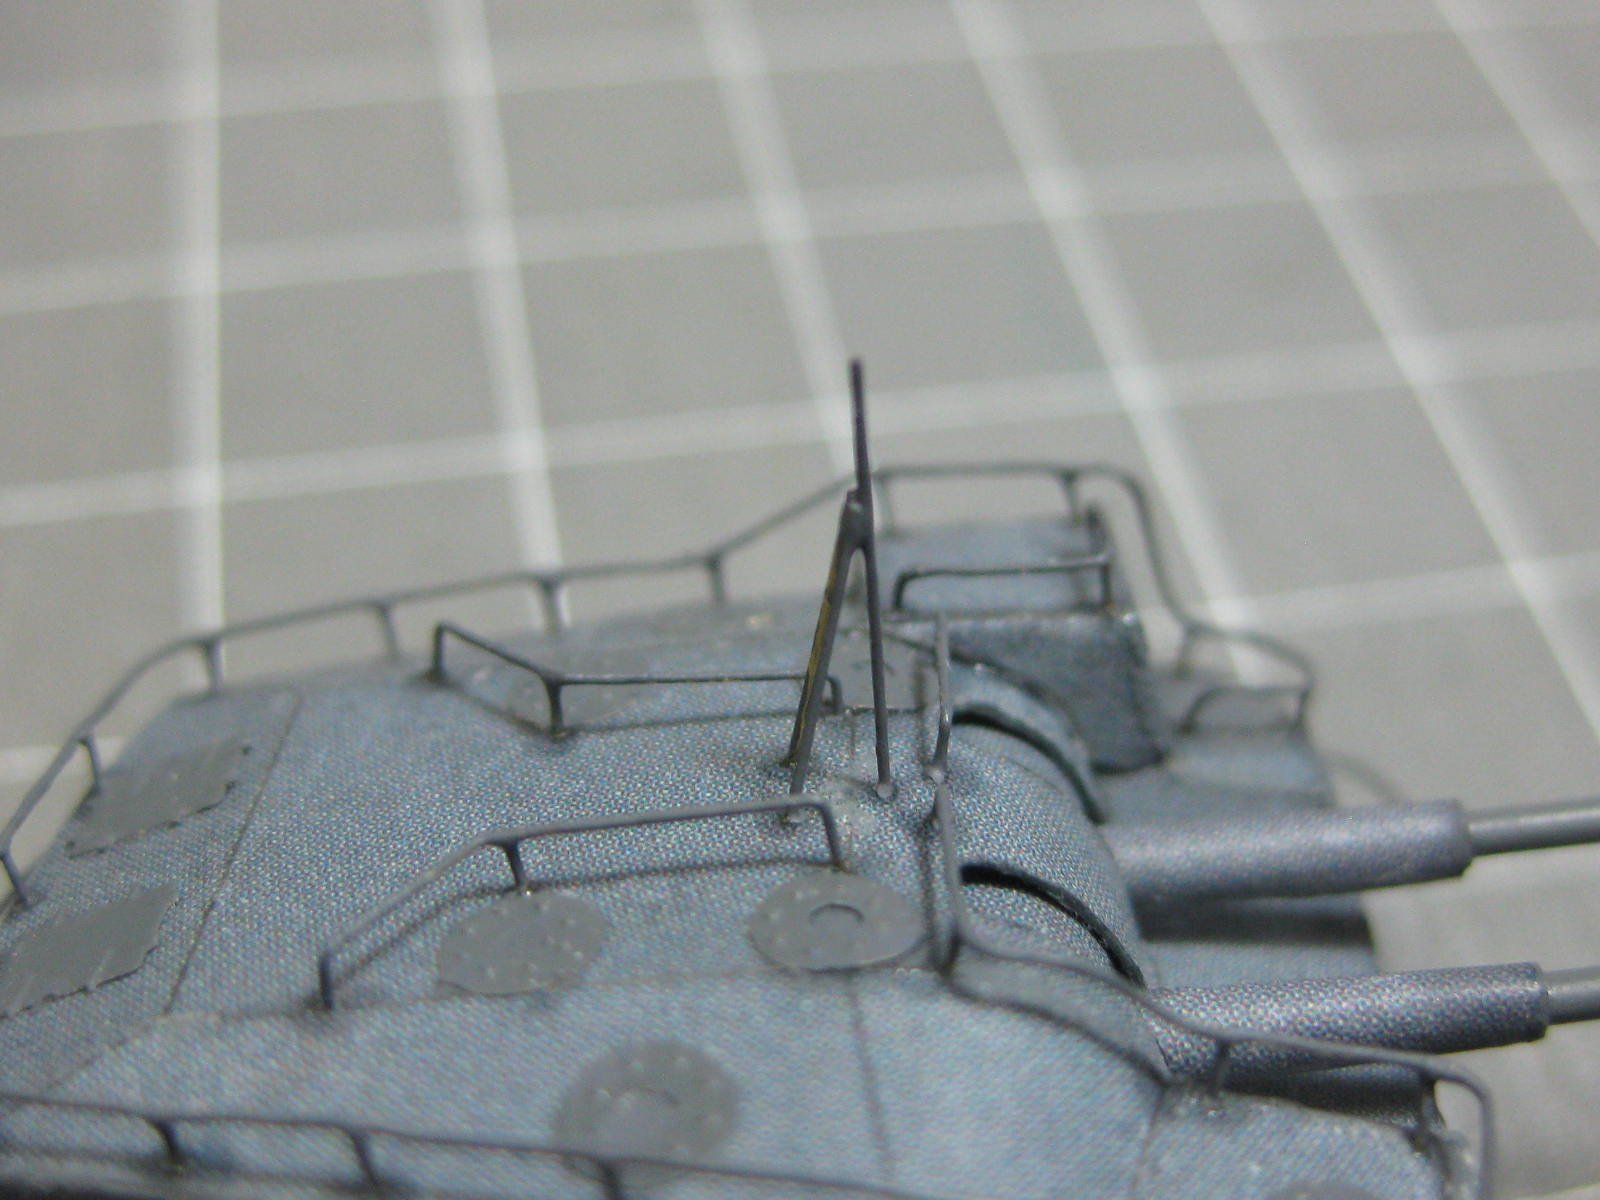
Thanks guys , I've been really crook the last week or so - the worst case of Flu I've ever had the misfortune of having . Fortunately the symptoms are on the way out, and I can continue building. Only the runny eyes are a bit of a handicap, but hopefully they'll clear up shortly . I've managed to finish the three Gun Turrets, despite my woes. The instructions were rather vague about how the turret Pivots went together, and I'm not sure if they are meant to actually pivot or not, but I worked out a way of doing so. Here's the diagram - I've fitted part 100b BETWEEN 100d and 100e : And here are the parts cut out for one pivot. I've already glued on the edging bands to the two larger discs : The main "working" parts of the pivot. The disc 100b needed a lot of dry-fitting before establishing how far "up" the axle 100a it needed to go to get the right clearances : Top and bottom views of the assembly fitted together. Discs 100d and 100e are glued together. Care had to be taken not to get any glue on 100b/100a : The pivot glued to the base of the turret, along with four gussets. Not shown in the pics is a small stub of 1.0mm brass wire in the centre of the pivot. This will locate into a corresponding hole in the deck to make later fitting much easier and more accurate : The last of the wire work on the turrets is what I assume to be a small antenna : And finally I've fitted the gun barrels. Note the working barrel elevators : Danny
.thumb.JPG.4a26e14b6d70045b5797bad6745ca050.JPG)
.thumb.JPG.5cbd14bf5e06f813dad9d169c31438ad.JPG)
.thumb.JPG.f5cbf12ce70c4165e4ccd72510b2dba5.JPG)
.thumb.JPG.1ff9fda8c50159efce612292f06448cc.JPG)
.thumb.JPG.6951a4d04ee9c84b6c9bf07b457f46ad.JPG)
.thumb.JPG.116e1839bd9c9593bf89fdd98787dbe0.JPG)
.thumb.JPG.d00040cd373872e771b94f17f3da5398.JPG)
.thumb.JPG.5c722021800806d369e638b527de9dd7.JPG)
.thumb.JPG.cacc1b18f4678f843f6f41b482fdef6d.JPG)
.thumb.JPG.d4c331ca49bd19c53862a66d48a12517.JPG)
- 295 replies
-
- 26
-
-
- amatsukaze
- halinski
- (and 2 more)
-
Ron, when you said the instructions were basic, you weren't kidding - I hope you can work them out . There are far fewer diagrams and more written directions than in mine, so Google Translate is going to get a workout, lots of luck with that . I've translated (most of) mine successfully, if you have a problem with a word that won't translate into anything sensible, just ask and I or someone else may be able to help. Here's a start for you - "cz." means "part/parts". Basically, if you follow the numbering sequence you will be on the right track. But sometimes it's better to skip ahead a step or two to make parts fitting more logical (i.e. less chance of damage to parts/assemblies already fitted etc). When I work on a sub-assembly I try to fit as many parts as possible to it before gluing the sub-assembly to the deck - this lessens the chances of damaging already fitted assemblies. Also, try and work out where all the rigging points on the decks are before doing much else with them. Then fit the afore-mentioned "eyebolts", making sure that the "tails" don't interfere with anything under the deck (some trimming of bulkheads etc may be necessary to clear them). Danny
-
Jon, give him a break - his last update was 19 hours ago . Danny
- 56 replies
-
- 4
-
-
- sd-14 cargo ship
- card
- (and 1 more)
-
No probs Ron . Can you put up a pic of a section of your plans (any section) so I can see what you're up against? The "plans" for mine are computer rendered "pics" which aren't very clear at all in some stages. I think I'd have preferred Line Drawings. Danny
-
You've done well . If you hadn't glued the decks to extra card you would have finished up with warps everywhere (trust me, I know. My first card model has a warp in one of it's decks because I wasn't aware of laminating them ). As for the little white dots - if it works out that they are fixing points for rigging I strongly advise that you fit "eyebolts" to them before attaching the deck. I use 0.2mm blackened brass wire, bent double and both "legs" pushed through a 0.4mm hole, and then spread flat on the underside and CA glued in place. You can buy a huge roll of it cheaply on E-bay. Danny
-
Unlucky there Jeff . Just remember - there is virtually NOTHING on a wooden model that can't be fixed with some Isopropyl Alcohol, a knife, a bit of new deck timber and the right attitude . The bulkheads will simply glue back on - I hope you still have the broken pieces, otherwise make a few new bits from leftover ply. I've had to fix a much more serious problem before when I dropped my HMS Vulture and broke the Stem off. It only took about 4 hours, and the second attempt actually turned out a bit better than the first . See THIS LINK for some inspirations. BTW - Happy Birthday. Danny
-
Have you done any more work on SD14 lately Kevin? I'm looking forward to an update. Danny
- 56 replies
-
- 6
-
-
- sd-14 cargo ship
- card
- (and 1 more)
-
Hi Nick. Are you still building this model? I'm looking forward to updates. Danny
-
.... continued. Gluing the top to the sides begins with the straight join at the front of the turret : Next are the rounded edges : Moving on to the cube on the left side : Finally the large areas at the back of the turret : Before fitting any railngs I glued on the PE Doors and Hatches. I used 0.2mm wire for the railings, starting with the legs on the top section : Then I bent, rolled and fitted the trickier pieces at the front : I used CA to glue the rails to the legs, one at a time : Then the side railings using the same methods : Danny
.thumb.JPG.c2bd36611bbada9b4cf623b5b5eca4c5.JPG)
.thumb.JPG.a98c21c35ac15f19bdeef142c0b20228.JPG)
.thumb.JPG.852ef6e91dfbac32061386e24e291ff4.JPG)
.thumb.JPG.b92a846b0a970d68cc39a2acbf6c444b.JPG)
.thumb.JPG.bf8bf88171e86da857c15ab1649555b8.JPG)
.thumb.JPG.a6ebc4ea7f2df1bd288b87e786b30367.JPG)
.thumb.JPG.10eed0b6b79bed2205b02ae58c92868e.JPG)
.thumb.JPG.a2d980d6beab4cf21ea60f8f59114a70.JPG)
.thumb.JPG.3ab0bd55939cafc7321638b6e1c32252.JPG)
.thumb.JPG.48b6eafd2c289aaca00f079d90389745.JPG)
.thumb.JPG.6dd8b3859a1e5b7b73999dda60aaaf2f.JPG)
.thumb.JPG.dc44651bb5ffb3363a49098a6ee473e6.JPG)
- 295 replies
-
- 22
-
-
- amatsukaze
- halinski
- (and 2 more)
-
Thank you Fernando. With a pre-coloured Card kit the hardest part is getting the joins to fit together with the minimum of gaps. A wooden kit has a much bigger margin for error. The three Main Turrets, which are all identical. Here are most of the card parts for one turret - the base on the left has already been folded and glued : Before cutting out the turret top I cut the two slots for the barrels. I used my punch to do the rounded ends first, then a scalpel to join them : The movable barrel base. I strongly suggest that anyone making this kit, or something similar, to actually get them to work freely. This allows you to move the barrels up or down when fitting the railings later : The barrel "boots" fitted to the turret base. The 1.0mm brass tubing barrels haven't been glued in yet, as they would get in the way of future work : Next step was to fit the turret sides : The turret ops cut out. Most of the edges are bevelled : Continued in next post .....
.thumb.JPG.c246c785d95fa66cb7ab20c09ff68515.JPG)
.thumb.JPG.8ba19f08482bcd09b3df2abca00b2f3b.JPG)
.thumb.JPG.d4c590ca717f3cd7bdd6f0461954925a.JPG)
.thumb.JPG.6f2111b3cf8d4d21444730ecc81af31b.JPG)
.thumb.JPG.20ab3709b1e382433c8d5229f521a68b.JPG)
.thumb.JPG.d9faebc3236d8f96895f89903932c223.JPG)
.thumb.JPG.354a0ff0c1a89e3ef5e1e30008ef61a3.JPG)
.thumb.JPG.48e433dfb72a1baaef2d0872ef305da3.JPG)
.thumb.JPG.df24adbec4fcebcf67b3a3edca0886c8.JPG)
- 295 replies
-
- 13
-
-
- amatsukaze
- halinski
- (and 2 more)
-
And to think that you don't want to do a Period Ship because of the Rigging .... trust me, it's a lot easier than using PE . Especially THAT amount. Danny
-
Nice job Fernando. I've found the Selleys PVA to be a bit on the thin side, which is OK for some applications. I used Fuller Maxbond (available at hardware stores), which is a lot thicker and grabs quickly. Yep, that would be another reason.
-
Count me in too J (do you have a name to go with the initial? ), although like Slog I'm more into Steel Ships at the moment. I've about had my fill of the 18th Century for now, after making a dozen or so . Danny
-
Yay, another Card build . I'll be following along as well Ron. Funny to think that the Austro-Hungarian Empire had a Navy, both countries now being land-locked . Although of course the Empire included part of Yugoslavia which is on the Adriatic. Danny

-
It's not a silly question Jan, in fact I was going to suggest to Clare that he buys some decent modelling card from GPM if he hasn't done so already. Good card makes a world of difference. I'd say around 0.30mm or 0.35mm would be OK for hull skins. That's the thickness supplied for mine. Danny
- 106 replies
-
- 2
-
-
- digital navy
- v108
- (and 3 more)
.JPG.439d1fc6e1f72b99c9914beb9fd6b81e.JPG)
.JPG.d65147a525e1803e30ee6ebe8f7be433.JPG)
.JPG.dbc2351560447cb4712bc8fba4edc527.JPG)
.JPG.8b6f0b74434b42fd770aa8914a9848c7.JPG)
.JPG.53eb1f353f101da15708523a8eb1b2a1.JPG)
.JPG.cbb5f01bb22f7f01e169ccf1c9e1fc25.JPG)
.JPG.f81e6c6c65e8a1a91898801519258c69.JPG)
.JPG.296b114800b394047fd5cd6c71a5fcfb.JPG)
.JPG.ee623e0c3f9ba20a819a14a0363da94a.JPG)
.JPG.8d2b42804bfc7200d574418a585c0ea2.JPG)
.JPG.e6fc551fc58fe41e9bac285afff8ee1e.JPG)
.JPG.a3c607c71339d4788ffda610c81f84a1.JPG)
.JPG.82b813bcbe175b854224cc0b3962f26a.JPG)
.JPG.be084445d23421aaab862867e69a8455.JPG)
.JPG.9604816c413b2868fcc4b63ca1668595.JPG)
.JPG.641ca24601da915ffb58526054188f77.JPG)
.JPG.3f3ae041e5231b9cc6d4d6d71eb0ef6b.JPG)
.JPG.5f74cc9db6860037c06fa7ce935b5bd5.JPG)
.JPG.31b636b1397c017377b2a85cb7bb3517.JPG)
.JPG.f9a0920e4cbf18e0aeeaf6cc63510e8a.JPG)
.JPG.c054da493797afe6fbf7afa80a848a95.JPG)
.JPG.c08b1e3864e6d2e489c0b20e0ebc837e.JPG)
.JPG.4c3f779a1969d5f49c53519cf0d312fa.JPG)
.JPG.a88d67819b8c0709e8dd4b4bf3483339.JPG)
.JPG.8447e2c9c99209500562248eebd6998e.JPG)
.JPG.cf9cd19f1cca2d5ddae4455773f7a7ee.JPG)
.JPG.4a6853ed85f6a2fa9dfcbcd071091ced.JPG)
.JPG.2043cac964d1efaffa3adf868e9bb940.JPG)
.JPG.062757dc993252fc4dbff5feacda3807.JPG)
.JPG.4a2107bbfd1ac9926c3a80d16f071f5c.JPG)
.JPG.35eb72a3dedc5e9e481c7196088a6717.JPG)
.JPG.810ec10467e49734a899297816c28cdd.JPG)
.JPG.e804916f8a79caeaf61f5e7c77ff4e7d.JPG)
.JPG.8fc72d30b7b88d2984c60d3cbb55c41f.JPG)
.JPG.f0e8cd57c60192ca1786961cc11cd416.JPG)
.JPG.1ccf0da1a5e602e69b65df275899cf19.JPG)
.JPG.f9f147bcd6a156911e28805ba0a50169.JPG)