


Dan Vadas
-
Posts
3,261 -
Joined
-
Last visited
Content Type
Profiles
Forums
Gallery
Events
Everything posted by Dan Vadas
-
Jeff, I didn't look at your last pic properly, or for that matter read all the post (sorry ). Yes, the frame has to come out again to get it to sit down all the way. Don't panic, there is an easy solution . Buy a bottle of Isopropyl Alcohol (aka Rubbing Alcohol) from a Drugstore or Supermarket. Brush it on both sides of the bulkhead to soften the glue. The stuff evaporates rather quickly, so you will have to apply it several times before it will start to work. You can also soak a paper towel or small cloth in it and place it in the corners between the bulkhead and keel. To slow down the evaporation even more, cover the cloth or towel in Cling Wrap as tightly as you can. Keep "working" the bulkhead from side to side if you can as the glue starts to soften. Eventually you will be able to pull it out. When it's out clean up the gunky mess that is all that is left of the glue by scraping it off. Then re-adjust the slots in the bulkhead and/or keel until you can get the bulkhead to sit down properly. Then glue it back in. Next time, check for a good fit (an easy slide in/out, not TOO tight) BEFORE reaching for the glue. Danny
-
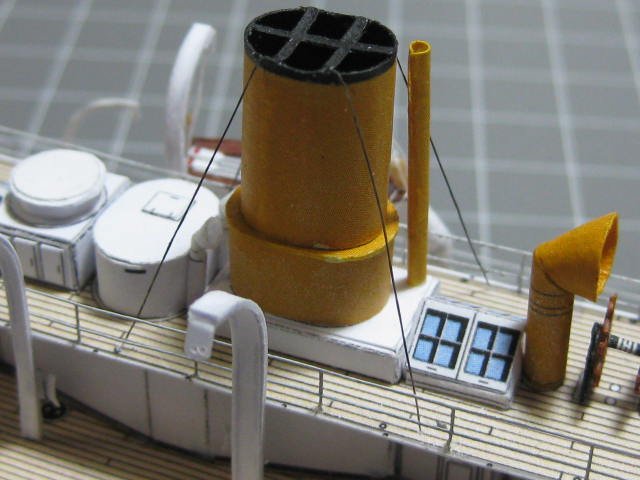
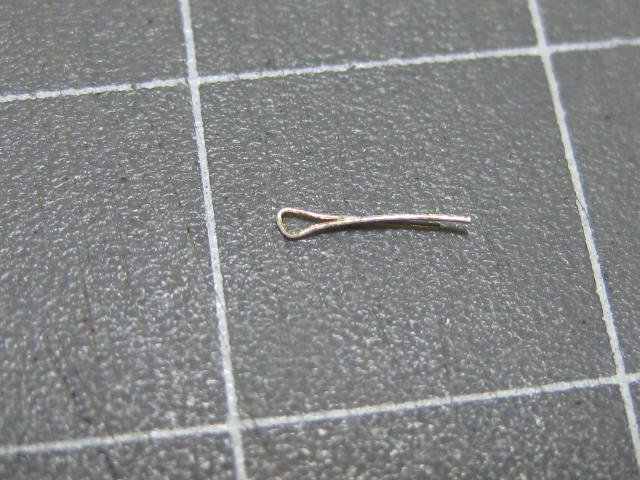
I've held off rigging the rest of the Boats, as I think they'll get in the way of the last step - the Rigging. Now I'm REALLY getting silly. Waiting on Amatsukaze to arrive has "forced" me to find things to do . Actually, I'm only making the pieces below in case I need to on a future build, and to work out how and what to make them from. Also to give me an indication of how long it takes. What I'm talking about is Eyebolts. At this scale they can be a little tricky to avoid making them look over-size. I've come up with three methods, and I'll try them all to see which one works the best. First up I tied a knot in the end of the rigging line and pushed the line through the (open) Breast Deck from underneath until the knot seated under the deck. Then I rigged the Funnel : That method works OK if the deck isn't enclosed like the Main Deck is. There is obviously no eyebolt visible. The 2nd method is to use a small piece of the rigging line, doubled over itself and glued together. I've found that Roket Card Glue will stick the fishing line together, one of the few glues that will. In the pics below I've already threaded the rigging line through the "eyebolt" and glued it back to itself to simulate a splice. I've painted the line with grey Acrylic, which does the job as long as you don't handle it too much. I'll touch these up before fitting : I've rigged up one of the Anchor Cranes with the fishing line eyebolts. They work OK, but I have to be careful not to try to push them into the hole too hard as they can spread the "ring" part of the eyebolt : Looking at the pic above I need to do a bit more work to the end of the railing. Looks like I've forgotten to glue one end . The 3rd method is to use some scraps of left-over Railing (0.15mm) to make brass eyebolts. I'll try these out for the Mast Rigging later. Danny
.JPG.77cd04ffa146719f02b435285c1a06e5.JPG)
.JPG.2ecf38928559ebf80f1268f2bef759ac.JPG)
.JPG.7f8e77ad76562c4042266e2309cf2ead.JPG)
- 193 replies
-
- 10
-

-
- cerberus
- paper shipwright
- (and 1 more)
-
Hi again Saif, Thanks for the kind words . First off, throw the brown glue away and get a bottle of White Carpenter's Wood Glue (also known as PVA glue) - it's a lot easier to clean up with either a damp cloth for large areas, or a small (damp) paintbrush or cotton tip for smaller ones. Clean the excess glue off as soon as you can. Your clamps are a bit big, but if they are the best you can get then try removing the plastic coating of one of them to see if they grab better. You could also try gluing a piece of sandpaper into the jaws to see if that helps them grab. Your method for bending the planks is a good one - depending on the wood you probably only need to soak it for an hour or so. Harder woods take longer, and hot water works faster also. When the wood is soaked enough to bend, put it in some kind of Jig to let it dry before using it. It will hold it's shape when dry. If you "overbend" it a little bit (make the bend a bit more round) it will make it easier to clamp. Danny
-
Hi Saif, and welcome to Model Ship World. That's a pretty good job of planking for a first wooden ship build, and it will look even better when you sand the planking smooth and lacquer it. Trust me, you will be amazed at the difference . You have made a few mistakes, but they are really only technical ones. I made most of the same mistakes when i built my first wooden ship - the instructions never tell you everything, do they? . To improve your NEXT ship I'll point out the ones I can see. Please take my criticism in the way it is intended - to make you a better modeller, and to make the job easier for you. These will be the "missing pieces" from the Kit's Instructions . (I wish someone had told me these things before I'd started my first ship ). 1. Add more bulkheads or filler pieces to the "false" framing, especially in those areas where you have tight bends like the Bow and Stern. This will give you more area to glue and clamp the 1st planks. You can make these pieces from any scrap you have, like the pieces that are left over from the frame sheets, or any extra wood you have. They don't have to look pretty because they won't be seen later. Shape them a little bigger than needed and glue them to the sides of the bulkheads where needed. 2. "Fairing" the frames to get the planks to sit flat on the edges of the bulkheads is a critical step. You have done a pretty good job of it, but there are one or two areas where you could have spent a bit more time on. Use a strip of planking on the edges of the bulkheads and sight down it to make sure the plank sits neatly on each bulkhead in a smooth curve. Pay most attention to where the plank meets the Stem at the bow and the Sternpost in front of where the rudder will go. I cut the "dummy" piece of planking at an angle to make sure the outer face of the plank will sit where it should. 3. When laying the 1st Planking try to make it as if it was the ONLY planking. This will take longer, but it will make the 2nd Planking much easier and with a better result. If you make any mistakes with the 1st planking you will see where you need to modify your 2nd planks to get them to fit properly. Sand the 1st planking smooth, and fill any hollows with wood filler and sand again until it's right (if you have done Step 2 properly you shouldn't have any ). 4. Throw away the Planking Nails supplied with the Kit, or if they are REAL brass (and not just plated steel which will eventually rust) keep them for something else - the heads make good Door Knobs . I see you have been using the technique of using plastic-headed Drawing Pins on the EDGES of your 2nd planking - do the same with the 1st planking. The brass nails do nothing to hold the planks in place that good shaping, gluing and clamping can't do. 5. Use shorter lengths of plank instead of laying them the full length of the hull. It's a lot easier to work with those planks that are a bit tricky to lay. Make sure you end the plank half-way across a bulkhead, or glue a small piece of scrap to the side of the bulkhead if needed to give the ends of both planks something to sit on. Don't end two planks next to each other on the same bulkhead. 6. Most planks will need some work done to them. Do this before reaching for the glue. Shape the plank as neatly as possible, and keep bending and trimming it until it can almost sit on the bulkheads without using a clamp. If you have shaped your plank correctly the clamp or pin should only have to stop the plank from moving until the glue dries. 7. Now for the hardest step. At the bow you have at least two areas where the planks end in a sharp point a long way from the Bow. Instead of me trying to explain how to avoid this, read the "Planking Tutorial" in THIS LINK . It also covers a lot of what I've already explained. 8. Above all else - take your time and enjoy building your ship . Remember - it's not a race, it's a hobby . I wish you well in completing your model. Danny
-
Thanks Eddie, I'll give it a go . Danny
-
Oh dear, Jeff. You ARE in trouble then . Learning how to glue two pieces of wood together is a MUST in this game . Seriously though, what kinds of glue have you been using? There are different techniques for different glues to get them to bond successfully. In the case of your split bulkhead, Carpenter's White Glue (PVA) would be the best option, it will need clamping and allowing to dry for a minimum of 5 to 6 hours. BTW - you don't need to pull the bulkhead back off to glue it - just glue and clamp the split with the bulkhead still attached. Danny
-
Gluintg metal to wood
Dan Vadas replied to Jerryi's topic in Metal Work, Soldering and Metal Fittings
When using one of those Epoxy double-"syringes" I cut the two plungers apart so I can use them one at a time. If they stay together, inevitably one side will shoot out a heap more than the other. I get much better control over the proportions this way. When I have the quantity I need I pull the plunger back slightly to suck the epoxy in the tip back in. It avoids leaving messy tips. Danny -
Thanks all . Pav, it's never really been about how much it costs (up to a point ), rather the very awkward way of ordering and paying for a model from Poland - they certainly don't make it easy like any American, UK or Asian Site. I won't know which direction I'll be going for a few days, as soon as I do I'll let you know. Thanks again. Danny
- 193 replies
-
- 3
-
-
- cerberus
- paper shipwright
- (and 1 more)
-
Thanks a lot Pav, I will take you up on the offer of buying yours if I can't get the Amatsukaze . The Malaysian one worries me for a couple of reasons - first, what is a "RM" in currency? That does not compute ! Secondly, this cute little bit : I know some of those Asian kids are pretty smart, but a 6-year-old building this model ??? And it seems it's not suitable for anyone over the age of 14, so that counts me out . As for the other one, it always makes me suspicious when I see this : Sounds like an Asian pirate knock-off. Thanks for the effort you have put in for me, and I'll let you know in a couple of days whether I'll be buying yours. Danny
- 193 replies
-
- 3
-
-
- cerberus
- paper shipwright
- (and 1 more)
-
It only took me 3 hours , but I've rigged the Gig (the smallest boat). The rest won't take anywhere near that long, as I've made all the blocks and worked out a much easier way of stropping them. Here are some pics of the gig on the davits. The rigging line is 2lb breaking strain fishing line, 0.13mm thick. To give you an idea of how small this boat is : Danny
.JPG.3e3101e7a1e9dedcd39e65a9c1f04e1f.JPG)
.JPG.3dd7192d89a8619edc0dc7b4e0d90de5.JPG)
.JPG.a3bdb3f61fb8eabf621822a00fff6ca5.JPG)
.JPG.b373751b7bd8335f44f2fc2424b711c3.JPG)
- 193 replies
-
- 17
-
-
- cerberus
- paper shipwright
- (and 1 more)
-
Thanks Pat. I agree . My next model won't arrive for a while (if it does at all ) so I'm rethinking how I rig the Boats. I've decided to do it the way it SHOULD be, with a proper block on the boat end of the tackle. I started by cutting two pieces of stock 0.5mm thick, sanding both edges at a 45 degree angle, and gluing them together to make the groove. These blocks are only 1.5mm long. Here's one next to one of Chuck's tiny 1/8" blocks : 6 done, 6 to go. They take me about 5 minutes each to make : Here's a tip I thought of after I almost lost one when cutting it off the stock. Pretty self-explanatory : Danny
.JPG.3622f2f37fa4eef09fdc14b881031380.JPG)
.JPG.403ef5482c56618eb3dace1fa6746787.JPG)
.JPG.aae324e74214c0a7e8171712db77cd37.JPG)
.JPG.16878af4b936f5d5b99e7c55673d6031.JPG)
.JPG.a97ffc5248e9893cf16e1cd808c4bb02.JPG)
- 193 replies
-
- 12
-
-
- cerberus
- paper shipwright
- (and 1 more)
-
I'm doing a cheat on the next bits - the masts. I know that this model is "merely" a learning exercise for me before progressing to something more difficult, but rolling 2mm diameter tube 70mm long AND making it look good is still beyond my skill. So I'm making the masts from something I'm much more familiar using - wood . I used the 7-10-7 method to mark out the piece (I'm doing both masts from the one piece, much easier) : Next it gets turned into an octagon using a sanding stick : And finally rounded off : Danny
.JPG.088d9143740ddf46730330cc63c50e9b.JPG)
.JPG.f9b7e8713308d4cda76018c08ae67334.JPG)
.JPG.a41d19bc189c62971859f5bb8daeb46c.JPG)
.JPG.b17e7c8a0d6199ceebf2efdf68133cce.JPG)
- 193 replies
-
- 11
-
-
- cerberus
- paper shipwright
- (and 1 more)
-
Thanks John. But wait ...... there's more . I've made and fitted the Anchors, Anchor Chains and Cranes. The chain is after-market stuff from Builders in Scale. The kit chain (printed version seen below) measures out at 25 links per inch, the "real" stuff is 27 links - CLOSE ENOUGH : Apart from the Masts and associated rigging, and rigging the boats she's finished (although these could take a while ). After I took these pics I finished the final touch-up on the damaged printed areas and gave her a coat of Matt Clear. Danny
.JPG.f4727a7a4f5d709d9046e2488fea1680.JPG)
.JPG.ab4dacb3d836fc5b0dbd0c1bd7c64fac.JPG)
.JPG.25c9a66c6e356899a130275b98eeda1d.JPG)
- 193 replies
-
- 14
-
-
- cerberus
- paper shipwright
- (and 1 more)
-
Maybe Slog, but I'm more inclined to think that my problem is more of a Paper issue. I had two lots printed - my daughter did the first lot at work (she owns the place ) on plain 80gsm photocopy paper and they seem fine. I've used quite a few pieces from this lot when I wanted a thinner paper to roll etc. The 2nd lot I had done professionally, and they used what looks to be matte or low-gloss Photo paper - that's the one that gives me all the trouble. Both lots were done on a Laser printer (I think ). Perhaps it was a combination of both. Danny
- 193 replies
-
- 4
-
-
- cerberus
- paper shipwright
- (and 1 more)
-
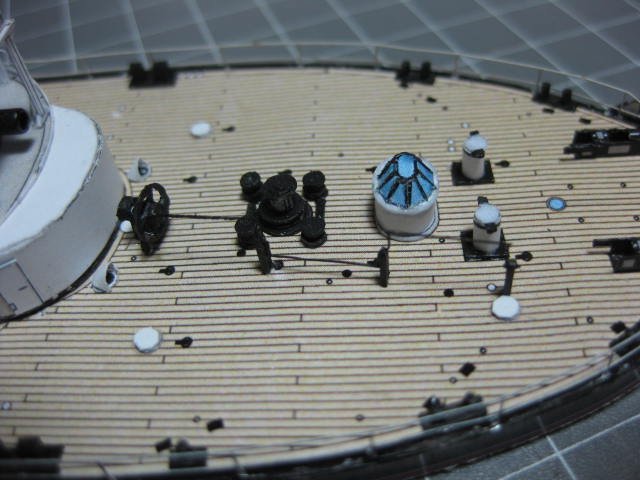
All the Railings are now fitted. They were a quite enjoyable area of the build. I have a lot of touch-up to do, especially on the black printing. I'm not at all happy with the quality of the printing, I don't know if it was the wrong choice of paper, ink or Setup but it flakes off if you look at it sideways : A bit of fun - the cranks for the forward Pump. I made this from a scrap of the PE used for the Railings - it was almost a perfect length fit between the sections : Some more bits that I've fitted - the Cranes, side ladders, lifebelts and Navigation Lights : An overall look at my progress : Danny
.JPG.436911a99ec5312443dbe921e47b1a03.JPG)
.JPG.060f02deff6ea7913613a27c8dd5ef32.JPG)
.JPG.7a4477cb572146e7e787a9e1ca26dbd5.JPG)
- 193 replies
-
- 18
-
-
- cerberus
- paper shipwright
- (and 1 more)
-
Thanks Ken, Greg and Chris. Greg, that Link to Tom's is just what I was looking for. The price is OK as well . Thanks mate. Danny
- 193 replies
-
- 2
-
-
- cerberus
- paper shipwright
- (and 1 more)
-
Chris, the ship I'm building now, HMVS Cerebus is at 1:250 scale and printed correctly. The NEXT ship, IJN Amatzukaze is at 1:200 . I'm looking for 1:200 accessories for my next one at the moment. DDanny
- 193 replies
-
- 3
-
-
- cerberus
- paper shipwright
- (and 1 more)
-
Oops, until I looked at the right pieces - $AUD100 .
- 193 replies
-
- 2
-
-
- cerberus
- paper shipwright
- (and 1 more)
-
It's 1:200 scale Ken. I found their Railing/Ladder set, the price ($USD50.00 plus shipping) is in the stratospheric bracket but it looks like a very detailed set. They have a Link to a distributor in Hong Kong that look like they have a more realistic approach to pricing . Of course, the link to their Australian distributor doesn't work . Thanks for the tip. Danny
- 193 replies
-
- 2
-
-
- cerberus
- paper shipwright
- (and 1 more)
-
Thank you Pat, Chris, Slog and Popeye. Your comments are always appreciated . News on the Bismarck front - not good, it won't be happening anytime soon. Halinski's model is out of print at the moment (they are revising it and it will take some time before it's a goer again). However, I just bought a (relatively) easier model from them - IJN Amatsukaze, a Japanese WW2 destroyer which will get my skills up a lot more before I tackle the big monster . I bought this kit because it's one of the few that ARE currently available, and it also comes with Laser-cut hull formers. I also got a set of lathe-turned gun barrels to suit the ship. All up cost was $USD67 (inc Shipping) which is a tad over $AUD90.00. That's pretty reasonable I think. I'll probably have to source some PE ladders, railings, AA guns etc from SOMEWHERE. GPM have them, but I'm over trying to deal with them . A Build Log of her will be started as soon as I get the kit . Danny
- 193 replies
-
- 8
-
-
- cerberus
- paper shipwright
- (and 1 more)
-
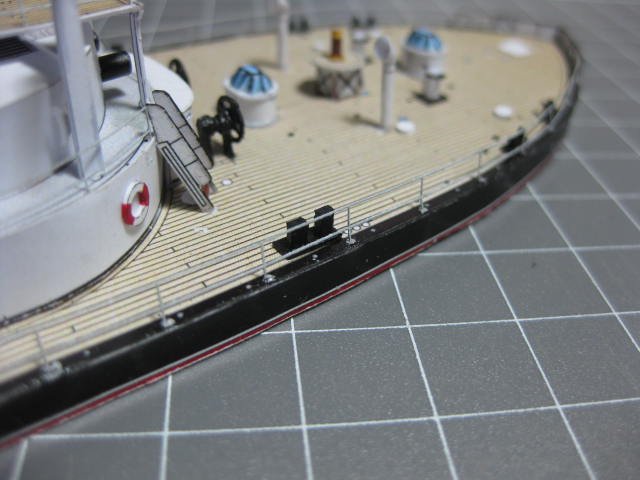
Hmm ... a scary thought seeing as I'm building a paper model . Thanks Greg and Nils. I've made all the Bollards. Four of these, the Towing Bollards, are rectangular (1.4 x 1.0mm) and made wholly from paper. The other 9 probably disqualify this as being a Card build, as I made the round bits from wooden dowel instead of trying to roll the 17 0.8mm diameter pieces from paper . I'll let them dry thoroughly before painting them matt black: To try to prevent losing the tiny pieces as I was cutting them I built a "dam". It worked too, I didn't lose one : Danny
.JPG.8fd06e047885cdd2aa6348feb737b825.JPG)
.JPG.ce8b7ef52b4886e66f916dffd25de33d.JPG)
.JPG.52b9e15c37bde5d5db8ad3327e33db73.JPG)
- 193 replies
-
- 11
-
-
- cerberus
- paper shipwright
- (and 1 more)
-
Rigging Question (Probably first of many!)
Dan Vadas replied to Bluto 1790's topic in Masting, rigging and sails
Jim, iiihmb's pic above is pretty much how it was done on most English ships of the era. Danny -
As I'm going to rig the tackles for the boats I needed a Cleat on each davit to tie off the line. I cut these from 80gsm CA stiffened paper. They scale out to about 12", which may be a bit large but should look OK once the rope coils go over them. I left a tag to glue it to the back side of the davit : Danny
.JPG.d8519a684a0cd8c5e177628f14af4968.JPG)
.JPG.e7a88d193e806ae9d75ec1dfb4b7fddd.JPG)
- 193 replies
-
- 10
-
-
- cerberus
- paper shipwright
- (and 1 more)
-
Just glue it back together with PVA, clamp it and let it dry. It's no big deal. Danny
-
Harpin
Dan Vadas replied to piratepete007's topic in Building, Framing, Planking and plating a ships hull and deck
Pete, the only things I could think of that would qualify would be the Cheeks (scroll down in the post and look at the following ones). Other than that I haven't got a clue . Danny