javajohn
-
Posts
214 -
Joined
-
Last visited
Content Type
Profiles
Forums
Gallery
Events
Everything posted by javajohn
-
My Mother once told me she used to rub whiskey on my gums when I was teething to numb the pain. It's probably why I like a good single malt scotch.
- 227 replies
-
- 10
-

-

-
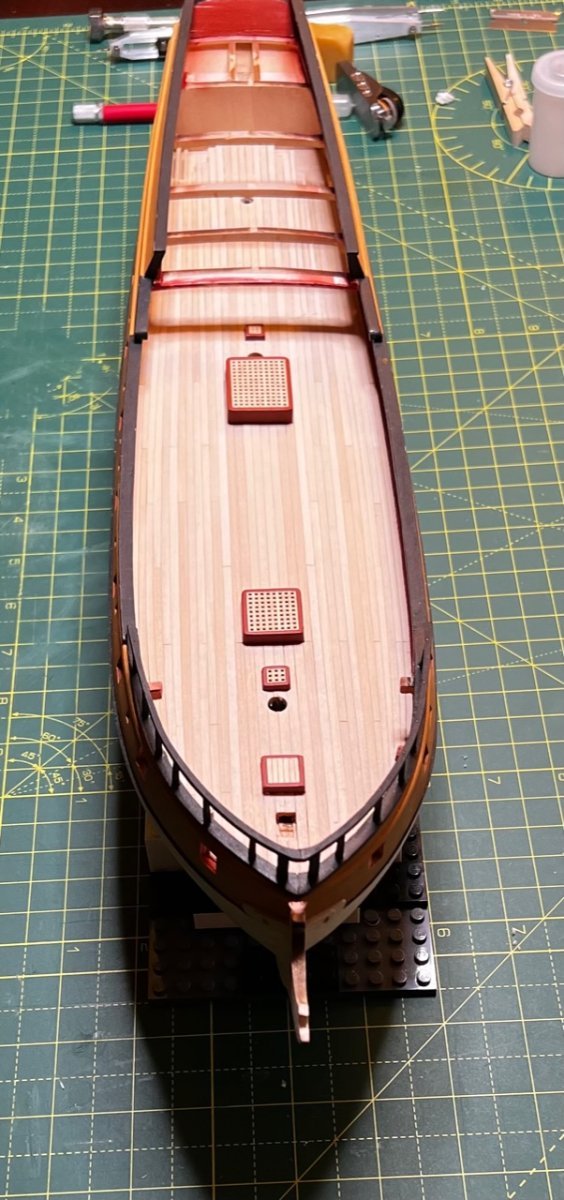
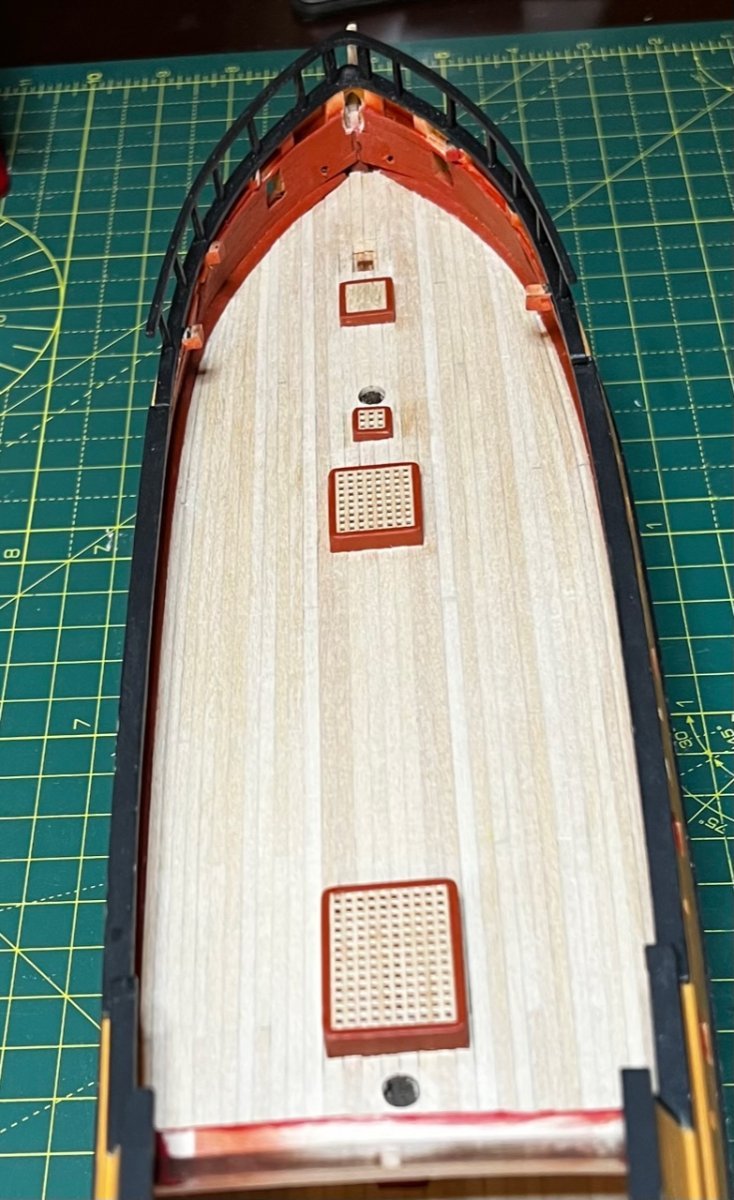
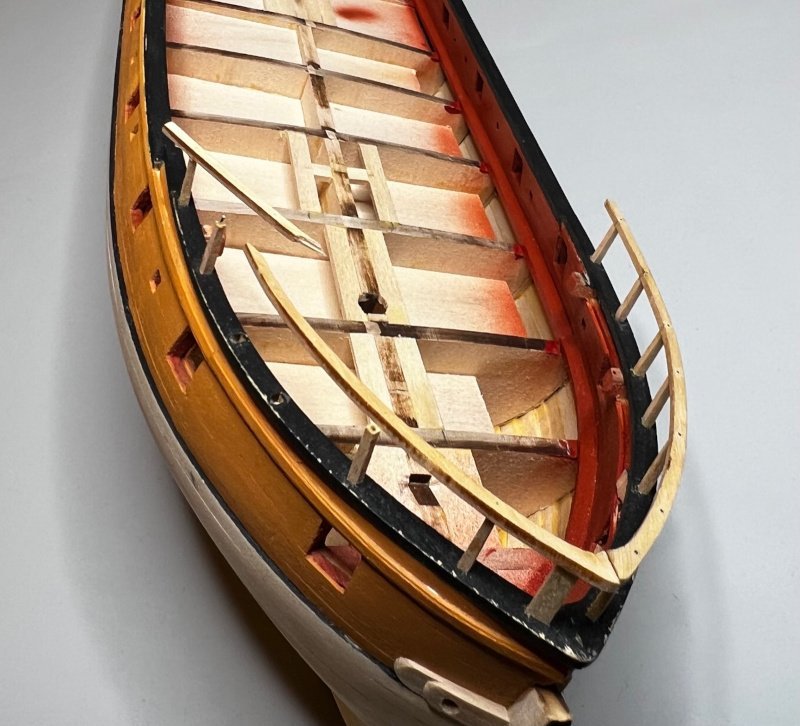
I finally finished planking the gun deck. It turned out better than I expected, so I'm pretty happy with how it turned out. Basswood is soft and the edges of the planks could "dent" if I wasn't careful; just a slight bend the wrong way or applying too much pressure with a pair of tweezers while placing the plank could ruin it! That happened to me more than once. I used the pencil lead method to mimic the caulking between the planks. It turned out to be a bit inconsistent and a bit light, but I think once I apply a finish it will look good. The planking under the forecastle deck would have been more of a challenge had I not removed the beams. I didn't bother fixing the area around the bowsprit because it really won't be visible. I also didn't bother too much with the planking under the quarter deck because it will only be visible from the ladderway. The photos show it unfinished. I think I will coat it with wipe-on poly to protect it and bring out the seams. Next up: chesstrees, anchor pads, hull painting, then I think I'll work on the screen bulkhead which should be a fun project.


-
Really great advice here. @jpalmer1970 mentioned rubber bands. I have rubber bands that I cut into strips. I use hemostats to clamp the ends of the bands once I've positioned them. @Bob Cleek mentioned get the best tools you can afford. Take this advice to heart! I kick myself every time I try to save money and go with a cheap tool. I bought a box of cheap plastic clamps that I ended up throwing away because they were more frustrating than useful. I use single-edge razor blades quite a bit. I use them for trimming and to score planks to simulate where the ends meet.
-
Byrnes Table Saw Configeration
javajohn replied to Guyuti's topic in Modeling tools and Workshop Equipment
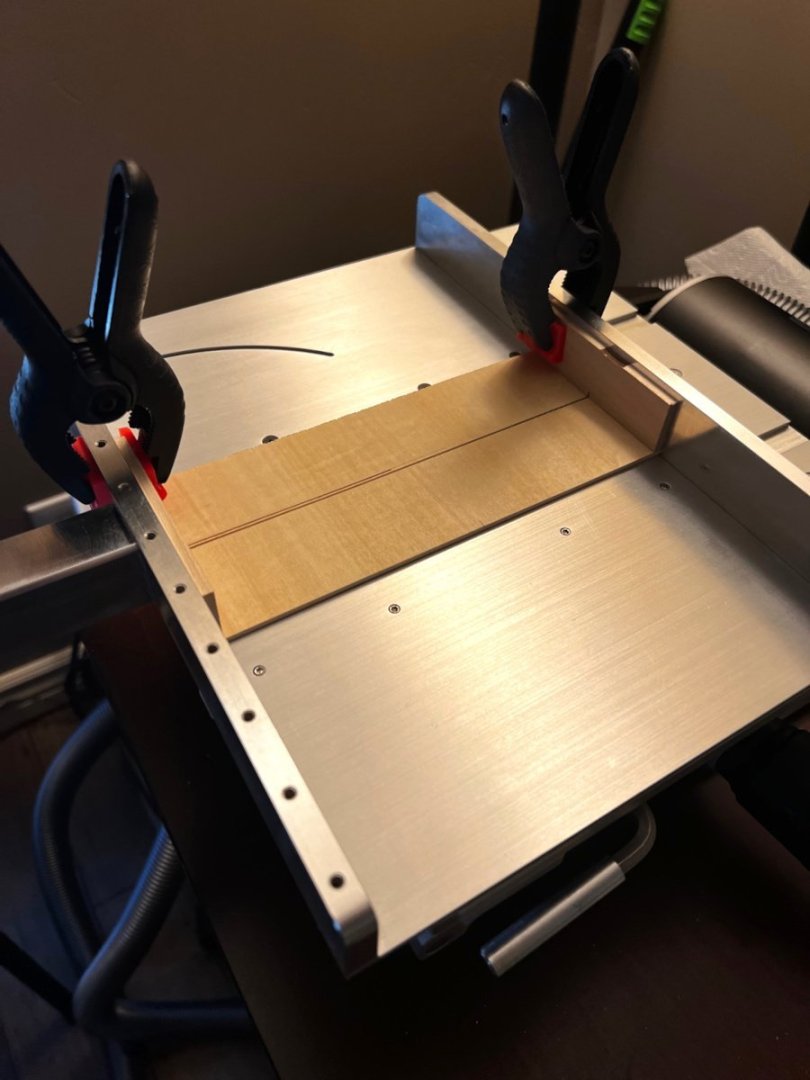
I used the sliding table with a jig for making gratings the first time and it really helped to prevent wandering or yawing of the piece as I cut grooves. It was easier and much faster than using the micrometer stop which resulted in a less than stellar attempt. I talk about my grating journey in my Rattlesnake build. @Roger Pellett - good advice on painting the miter pin! I agree with others the extended fence and miter bar are essential. I have not had an opportunity to use the rip taper gauge and didn't purchase the tilting table. That 90T 0.03 blade is definitely the workhorse. -
Ed, After seeing your chesstree, I took another look at the plans. There is a sheave in the bulwark just forward of the chesstree. I missed it and will have to add it to my build. The line goes through the chesstree sheave, then passes through the bulwark via another sheave and is belayed to a cleat on the inner bulwark. What I don't understand is why that sheave is so much smaller than the others.
-
Ed, Thanks for the very informative explanation of your process for making the chesstrees! Your covering boards look great! I think it is natural for us as modelers to obsess over details . Choose your battles based on skill and don't fret over things beyond them! It's all about learning and improving. I get much satisfaction over accomplishing something I've never done before, even though my work won't make it into the ship model hall of fame 🙂
-
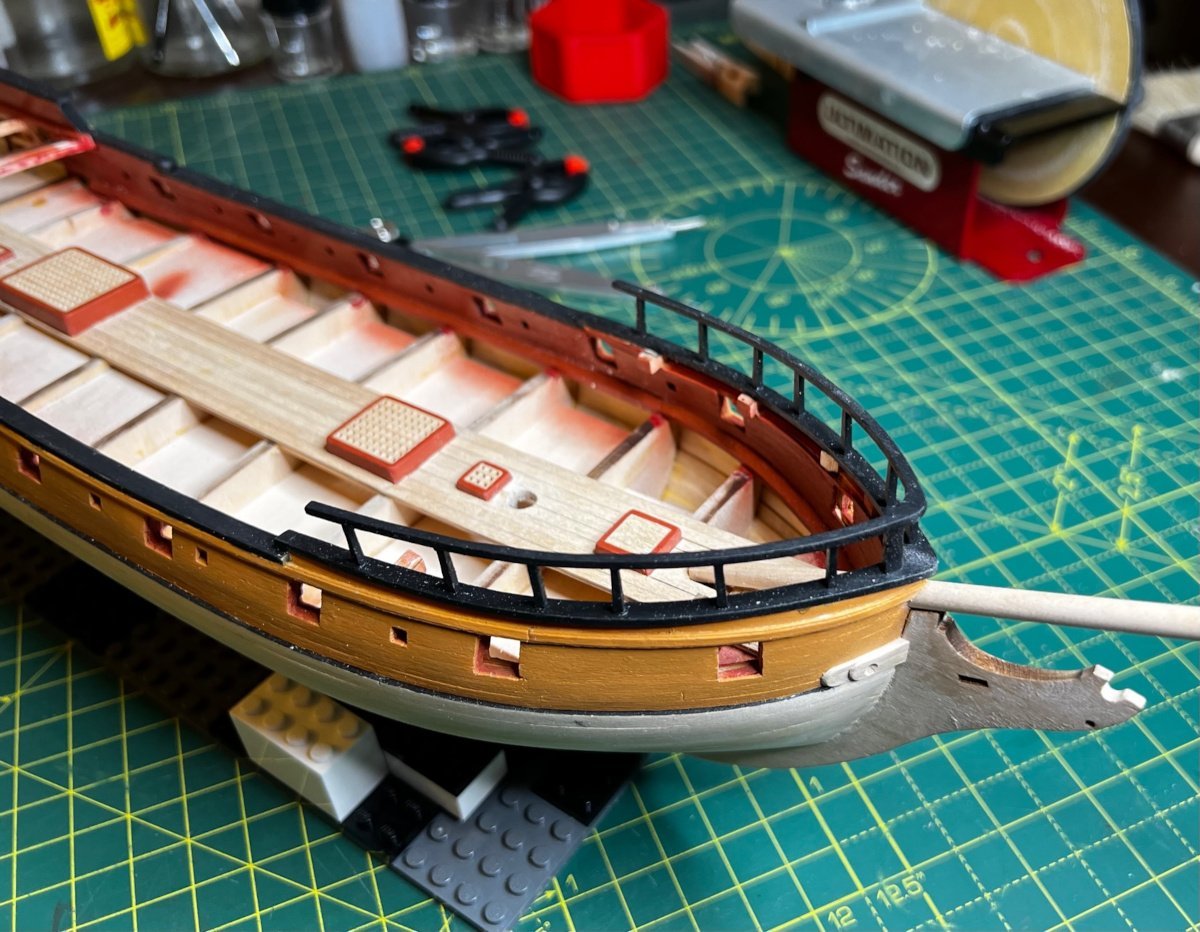
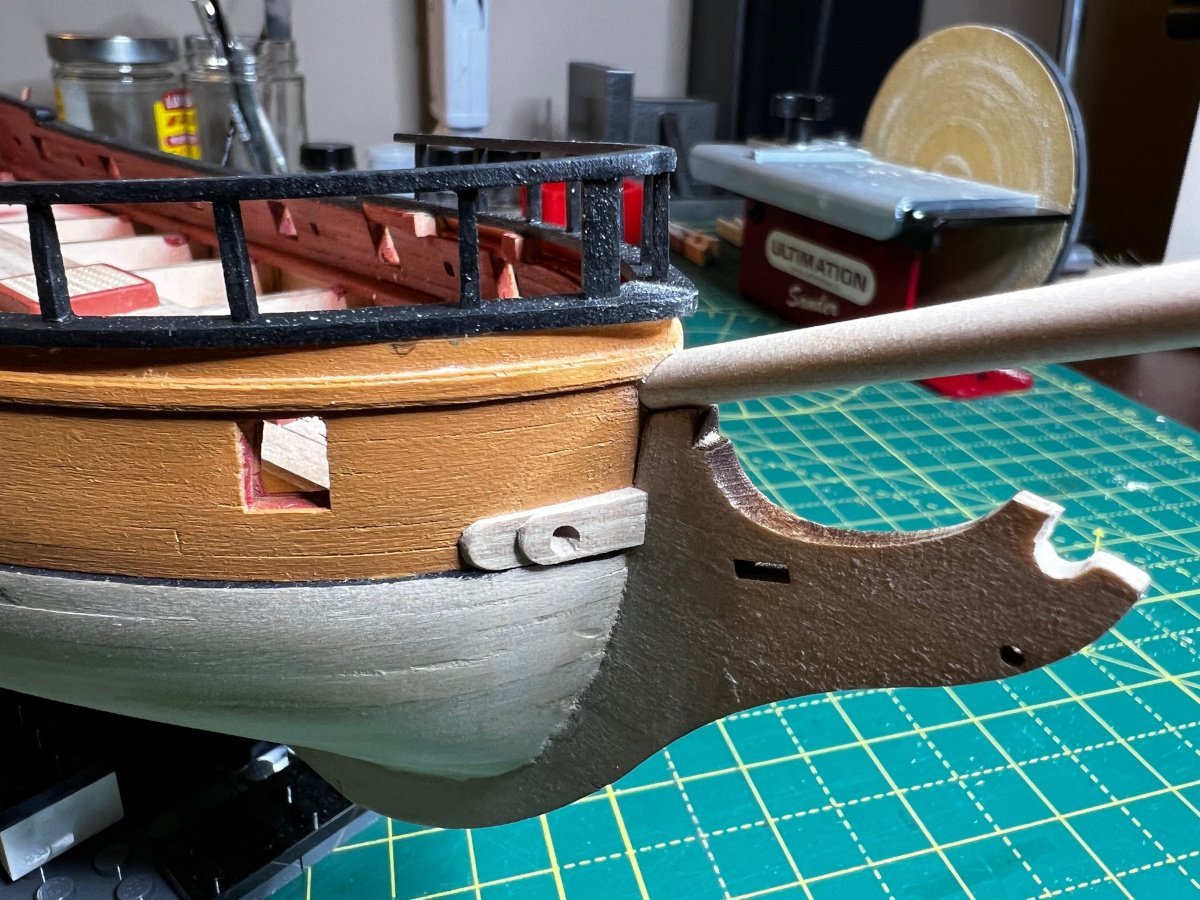
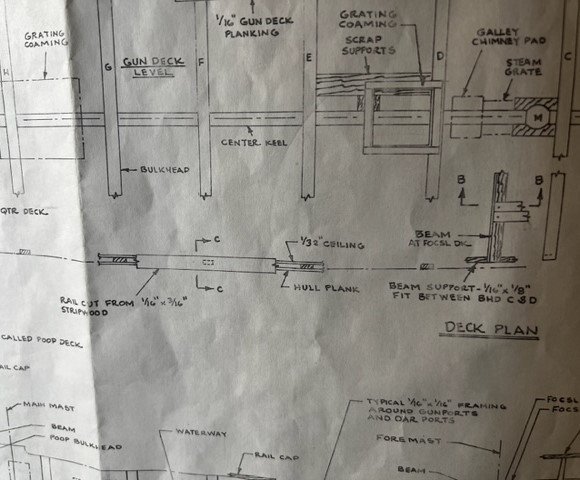
It's been a while since my last post, so I thought I'd better give an update. I started making progress on the deck, painted the railings, and drilled the hole for the bowsprit. I discovered the hard way that power tools aren't well suited for making holes in the ship - one slip and a large area can be ruined, so I drilled a small pilot hole and then used files to get the hole to the proper size. I've not planked a tapered deck before, so this will be a challenge for me. The Chappelle plans are washed out and didn't print well, so I'm guessing about how it tapers at the bow. I think I have it figured out based on other build logs and some of the tutorials on the site. I also purchased an Ultimation manual disc sander that you can see in the background of one of the pictures. It works great for squaring up the ends of the planks and allows for very precise and controlled sanding to length. I'll spring for a Byrnes disc sander someday! When I started painting the railings, my thumb was where it should not have been! I broke the railing (twice!). Bowsprit test fit. I don't think I will need to install the bowsprit before planking the forecastle deck, but I will check all that after the gun deck planking is complete. You can also see my silly Lego jig to hold the ship 🙂 It is getting close to the time when I'll need a proper jig (or final stand) to hold the ship up. Here's a picture of the planking so far. I did what the instructions recommend and installed the hatches with supports first and then planked around them. That made it a bit more difficult to get the initial run of the planks to line up. In hindsight, it would have been better to install the first two planks from bow to stern first and then cut out the sections for the hatches, install the hatches, and only then continue with planking around the hatches. That would ensure everything lined up. I decided to plank some of the area past the quarter deck because the decking might be seen from the stairwell on the quarterdeck. I'm not sure about that, but adding the additional planks is trivial.

-
@Gregory Hmmm... the Campbell plans show no overhang inboard, but the MSW Lankford plan does.
-
I also concur with Kenneth and Dave. I made the fatal mistake of not thinning the bulwark frames enough, so on the gun deck of my model the cap rail doesn't extend over the inboard side. That of course is not correct, but I will chalk that up to learning experience. There is one section of the plan sheet that clearly shows the cap rail centered on the bulwark.
-
She's looking good, Ed! You are well on your way to a beautiful model.
-
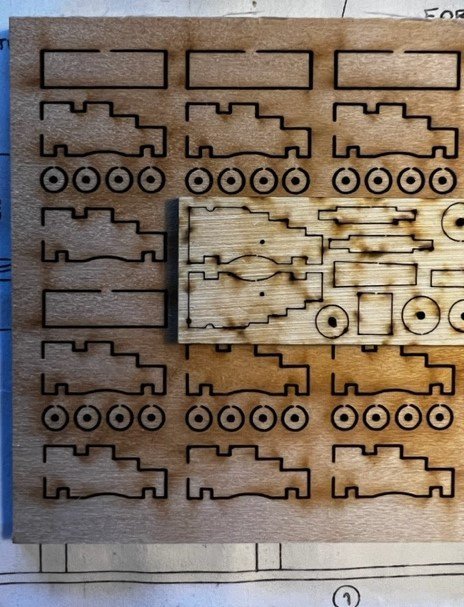
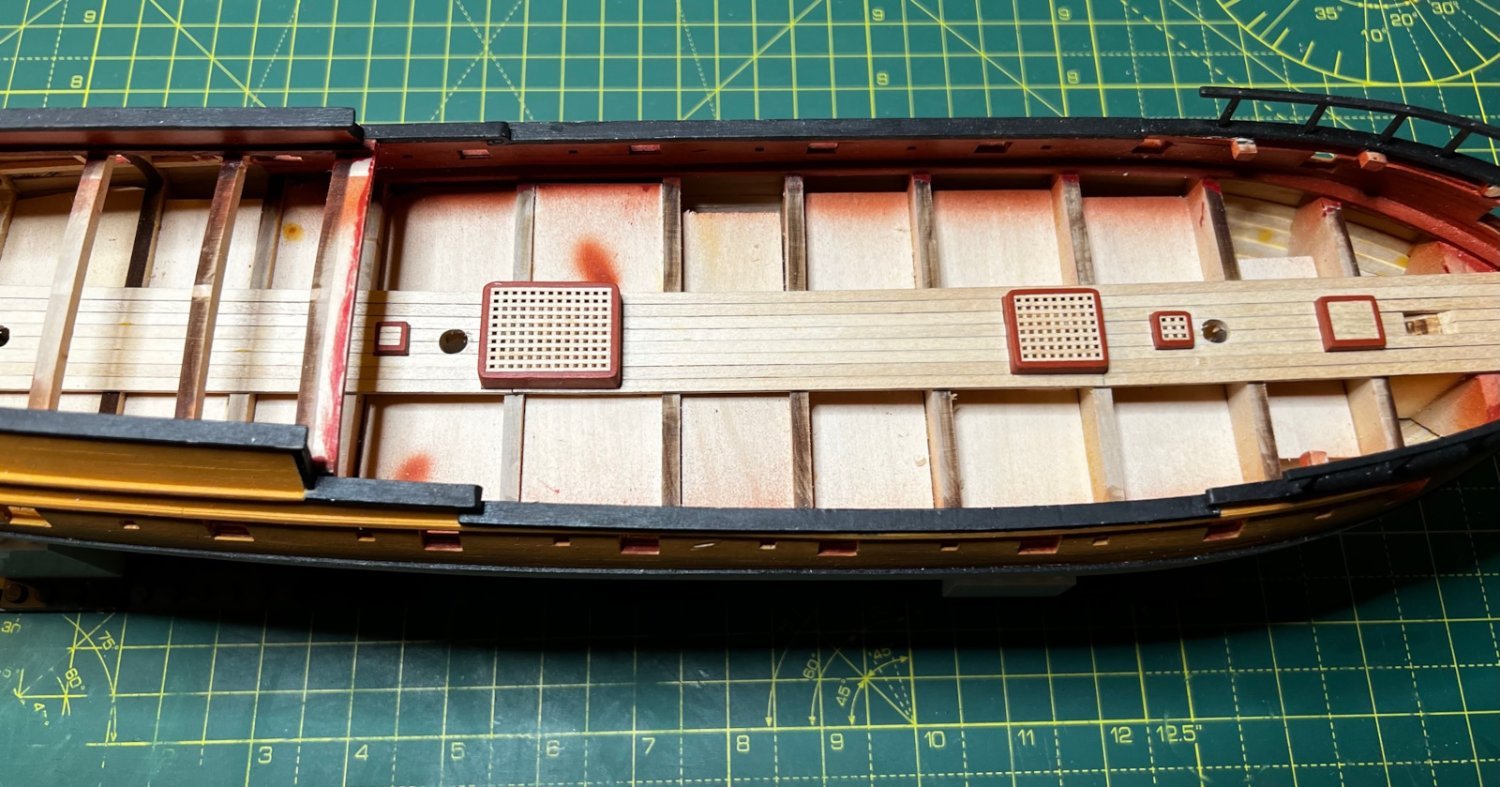
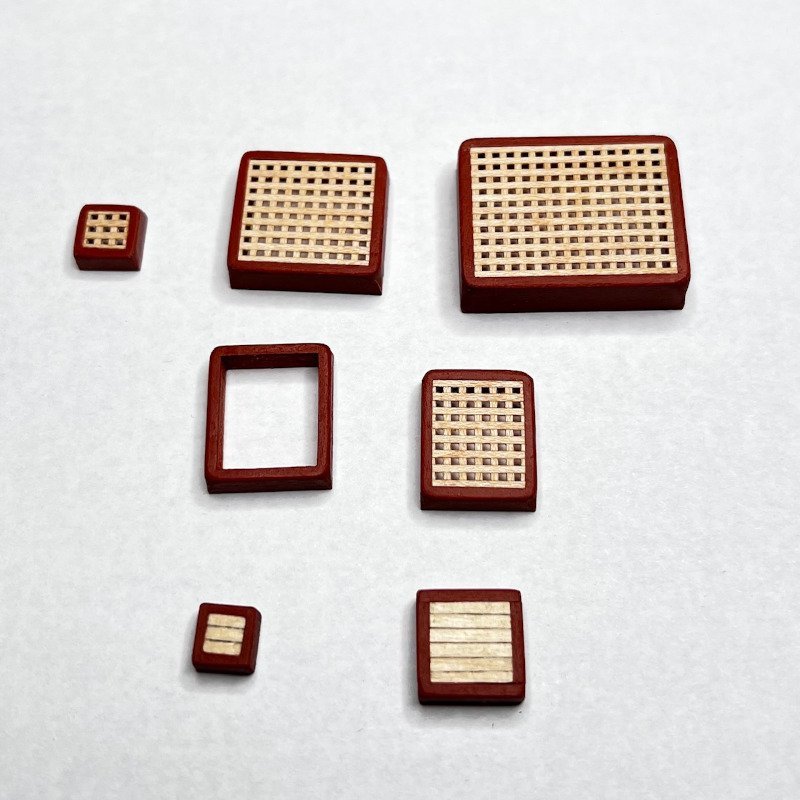
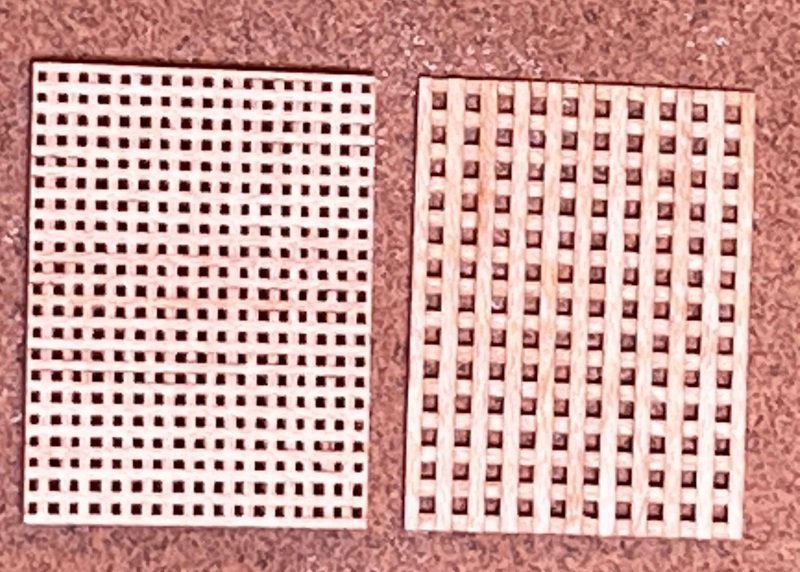
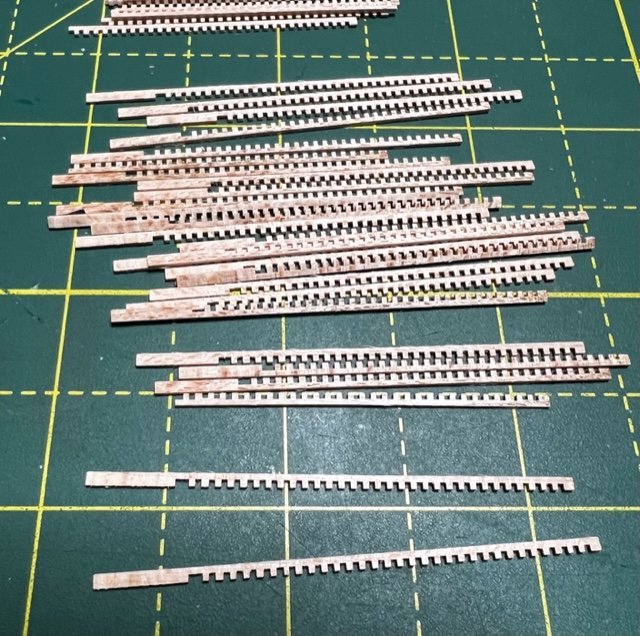
I finally had a few hours to spare and finished the gratings. I used the technique that @allanyed mentioned above, and the results are much better than my previous attempt. The new gratings are to scale too, so look much better. I didn't put in the camber on the ledges; I will attempt that on my next model. I have the sliding table for the saw, so I built a jig to fit it. This made the cuts more precise. No worries about yawing! Old vs. New: Gratings 2.0 now with squarer holes! And here is the final set of hatches and gratings. Maple may not have been the best wood to use because the grain really shows up, but it is still much nicer than the burned up cherry that came with the kit! I am very pleased with the results, and I learned a lot making them!
-
@allanyed thank you for that fascinating information. The techniques you show seems to me will produce much more accurate gratings and are far simpler and less prone to screwups than the techniques I used. I also had the direction backwards. I thought the battens went athwartships; some of my modeling books show pictures that are incorrect. Based on your post, my 1.6" gratings are way too small. I have some 0.04" kerf blades that would scale to 2.6", right in the sweet spot. So, I'm going to remake them using your techniques.
-
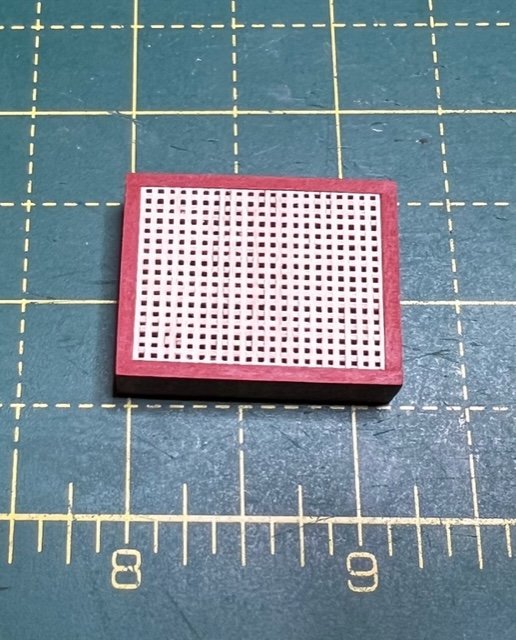
I got more time to work on the gratings. Here's my attempt. This is the largest one, and it turned out pretty good, considering I've never done this before. I broke a few of the tabs while inserting the ledges between the grooves. The grating isn't glued in place yet, as I am still wondering if is too fine for the scale. Should I just go with it, or remake them at 0.03 inches (my other saw blade thickness)? I also need to smooth the edges of the coamings and repaint!
-
I used my Jim Byrnes saw to create the grating pieces. I have the micrometer accessory for the Byrnes saw which was put to good use adjusting the fence for each cut. I must say the Jim Byrnes saw is just incredible for this type of work. I've never done it before and found it was pretty easy to do. The only real issue I had is the saw blade I bought is probably too fine both in kerf and number of teeth. The blade I used to cut the pieces out is a 3" 280 tooth blade. The maple burned slightly which means I should have used a blade with a lower tooth count. I went ahead and completed them, though, since the burning is very minor. The blades I bought are 0.025" kerf, so this would translate to about 1.6" square holes for the grate at scale. I'm wondering if that is too small? Next step is to cut the 0.025"x0.025" strips that lay in the grooves. That will be a challenge since my stock is 1/16' thick. I need to get that down to 0.025" and don't have a thickness sander.
-
@Ed Ku20 Thanks for the kind words! I bought some diamond dental burs from Amazon and used a dremel. Here's a link: bur set They are cheap and probably won't last very long, but they work. Basswood is not the best wood for this detail. When I get ready to carve the stern carvings, I'll switch to wood more suitable for carving. I don't remember precisely, but I recall I used some of the leftover wood from the billets used for the bulkheads to create those pieces.
-
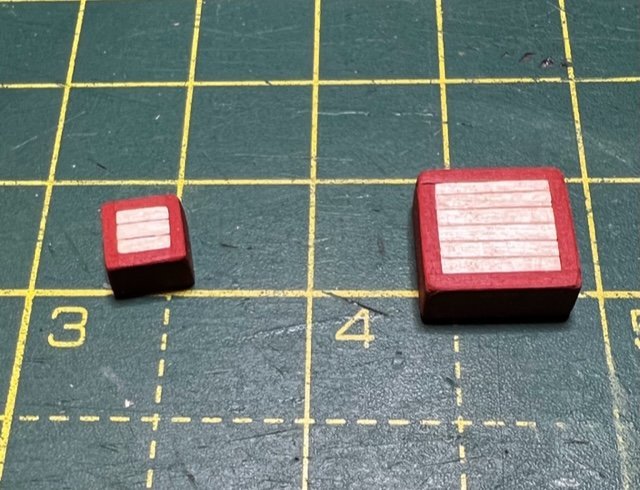
I'm waiting for wood to make the gratings. I received the sawblades. In the meantime, I made the two scuttles. Robert Hunt's Mamoli practicum says they would not be gratings. I didn't put a lip on the coamings that he suggests. I'm not sure anyone will see the larger scuttle when the model is complete since it will be mostly covered by the forecastle deck, but it was good practice for me!
-
Hi Glenn, I double-checked again and I did receive 1:64 6-pounder cannons. Chuck sells many different sizes. I downloaded and printed the plan sheet from Syren to compare. It states the scale is 3/16" to 1" and the 6-pounder is identical size to what I purchased. John
-
What a nice model! You've inspired me to keep pushing on with my rattlesnake build.
- 152 replies
-
- 3
-

-
-
- rattlesnake
- Model Shipways
- (and 1 more)
-
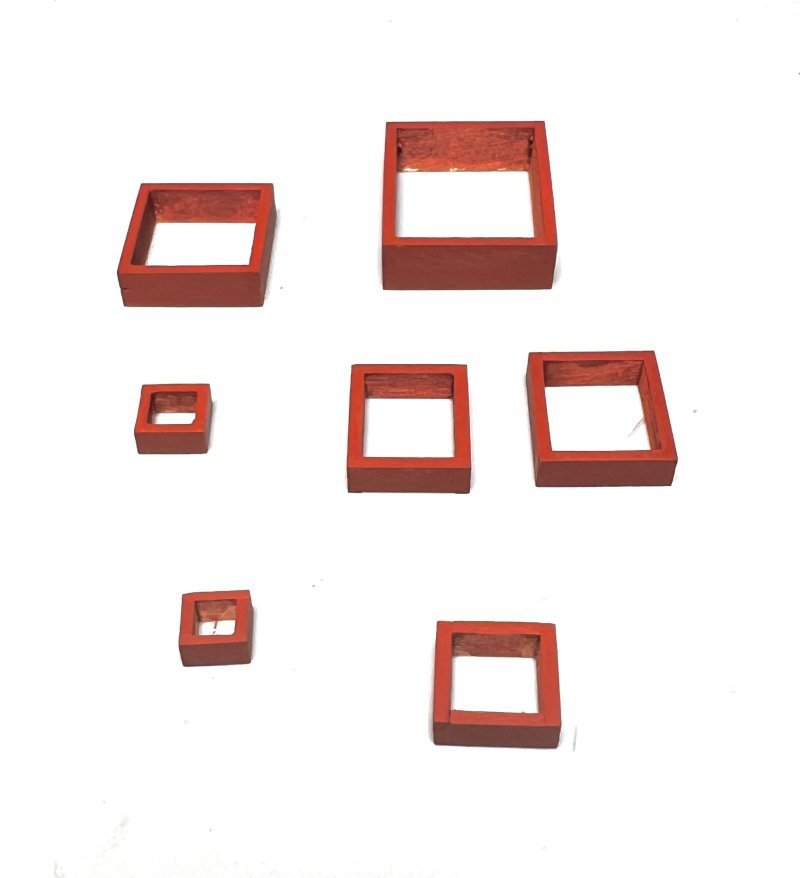
A little bit of progress this week - I built and painted all of the coamings. However, the gratings that came with the kit are trash and unusable. There is so much burnt resin on them that they can't be cleaned up. So, I decided I'll make my own gratings. I'm waiting on some saw blades from Malco, and I need to get some wood. In the meantime, I'll build the deck supports for the coamings and work on other bits. The instructions for the Rattlesnake and also Bob Hunt's practicum for the Mamoli Rattlesnake have you make the coamings first. Reading on this topic in the forum leads me to the conclusion that the instructions are backwards. You should make the gratings first, then build the coamings around them to ensure the gratings are flush against the coamings. I'll do that on my next model.
-
I wondered as well; had I followed the order of the instructions, I'd have lots of little shards of wood scattered across my workbench that used to be railings!
-
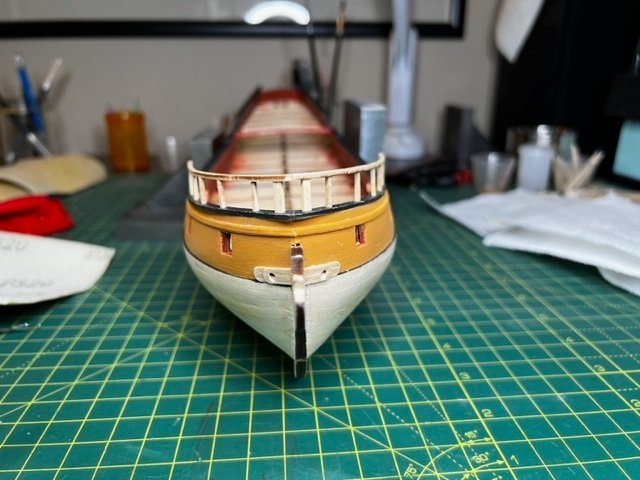
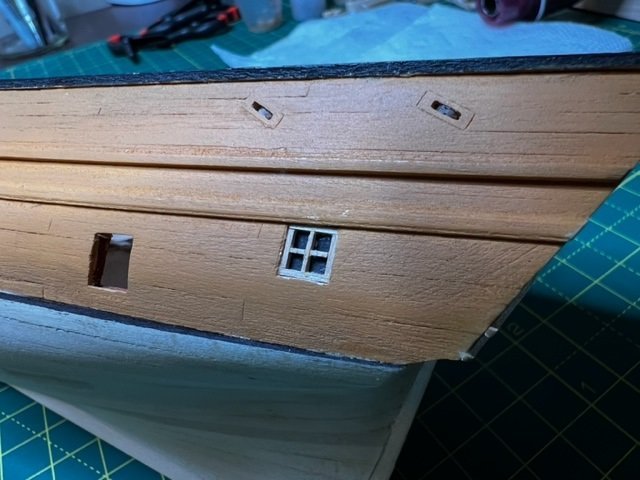
I made a bit of progress this week. I finished the windows, hawse bolsters and the forecastle railings. I'll hold off painting anything until the deck is done. It will need quite a bit of touchup anyway from all of my rough handling. It will take a mighty steady hand not to get paint on the windows! When that time comes, I am going to repaint the bulwarks above the quarterdeck, the molding strip and outboard cap black. Everything needs several more coats, too. Next step is to start working on the decks. I had thought about using a better wood than basswood, but I'll probably just stick to what's in the kit. The plans call for a ladder from the quarterdeck down to the gun deck. Based on some testing using a cutout for the stairs, looking down the opening you would be able to see much of the unexposed gundeck. So, I think I will plank some of it near the bottom of the stairs.
-
That's an excellent repair job, Ed! Mine broke too, but I was more fortunate in that it only cracked at the rabbet line, so I was able to glue it without using pins. Breaking keels and beams seems to be the norm for the rattlesnake!
-
@Gregory yes, the barrels are 29.75mm. I'm looking forward to your research! I'm going to working on some outer-hull details now - the windows and railings. I've added the pieces of what I think are called hawse bolsters to the bow as well.
-
She's looking good Ed! Those twists and bends are indeed a bear! Sanding a painting will make all the difference. In my build log, I posted some before-after pictures of the hull sanding.
-
@Gregory I bought six pounders based on what the kit plans specified. The dimensions are nearly the same as the carriages and cannons that came with the kit. That's why I didn't bother test the fit before I made the gunports. Here's a picture of the two sets - the Syren parts are the lighter color on top. The carriages are almost identical in size, Syrens are a tiny bit larger. The big difference is the size of the trucks - Syren's are noticeably larger, but certainly more realistic. John