HOLIDAY DONATION DRIVE - SUPPORT MSW - DO YOUR PART TO KEEP THIS GREAT FORUM GOING! (Only 13 donations so far - C'mon guys!)
×


allanyed
-
Posts
8,149 -
Joined
-
Last visited
Content Type
Profiles
Forums
Gallery
Events
Everything posted by allanyed
-

Hull Planking Question
allanyed replied to tomsimon's topic in Building, Framing, Planking and plating a ships hull and deck
Try different methods with some scrap material and see what works best for you. Perhaps this type of CA is a good way to go for you, but gap glue is just a thick slow cure CA. As it is a slow cure, it is just as easy to go with PVA. Gaps on a first layer of planking, if tiny are no issue. If large, mix a little saw dust with the PVA, fill the gap, let cure for a few minutes and sand. Easy, and none of the toxic fumes and stinging eyes. Allan -
Thanks Bob, we all get sucked into this kind of thing now and then. Personally, I have probably been taken in more often than most. Stuff happens to all of us. Merry Christmas.
-
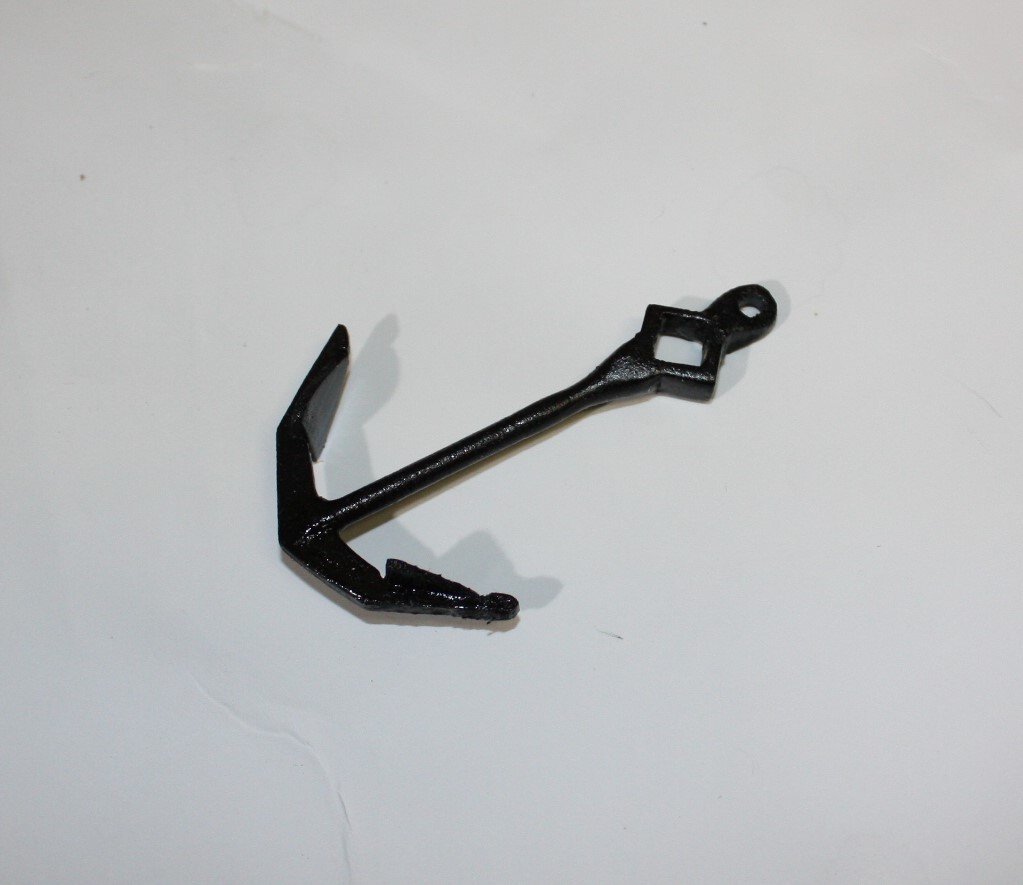
Jon, If they were closer I'd go see Ross and Andy and ask how much they would want for that anchor!!! Thank you very much for this information. What a Christmas gift that anchor would make!!! Then again, the HOA here might frown on such a large decoration in the yard, not to mention the woman in the next room that has put up with most of my nonsense these past 51 years. Allan
- 86 replies
-
- 4
-

-

-
- schooner
- effie m morrisey
- (and 1 more)
-
I bought the drill bit set with pin vice loss leader that Bob Cleek recommended. DO NOT WASTE YOUR MONEY!!!! The only good thing about the set is the box and even that has issues as the tubes have covers on each end and several of the ends that are in holes in the bottom of the box stick so when you pull the tube out, the bits fall out, thankfully into the box. These bitts are so bad I have had trouble drilling through hard wood with the ones I have tried, forget about copper or brass. Maybe I got a bad set, but these are the worst I have ever tried to use. The pin vice is terrible as it will not hold the smallest bits tightly. You get what you pay for most of the time, but this time I did not even get that much. Back to HSS jobber bits. Allan
-
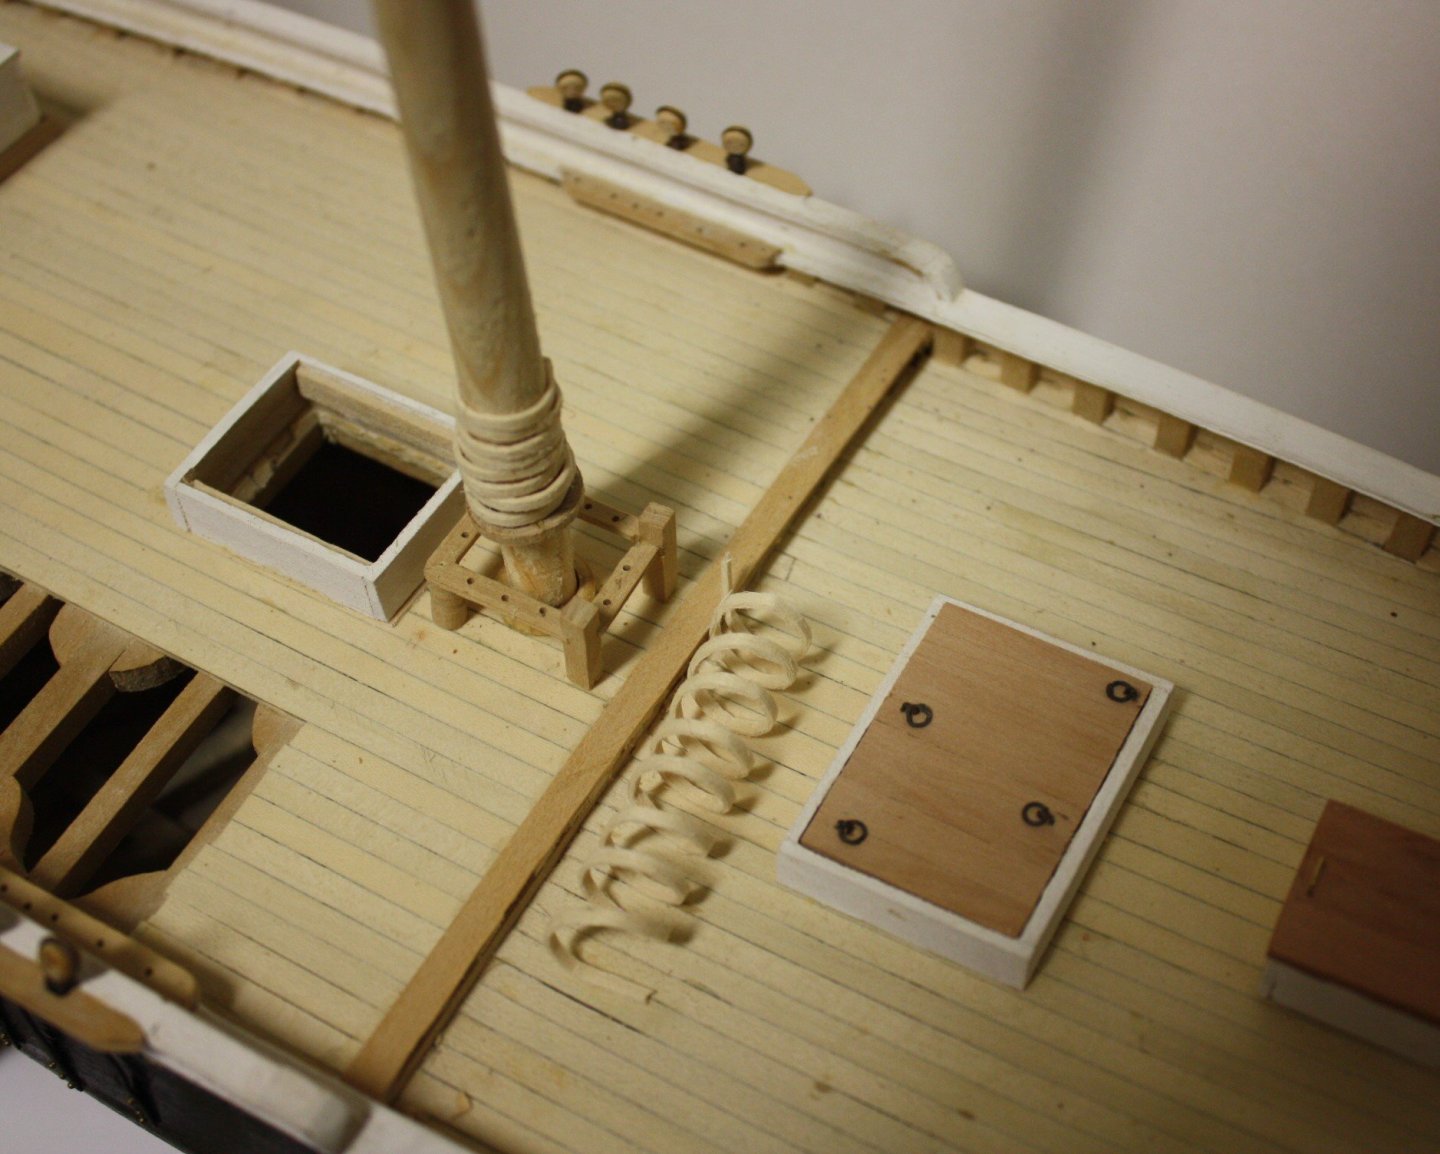
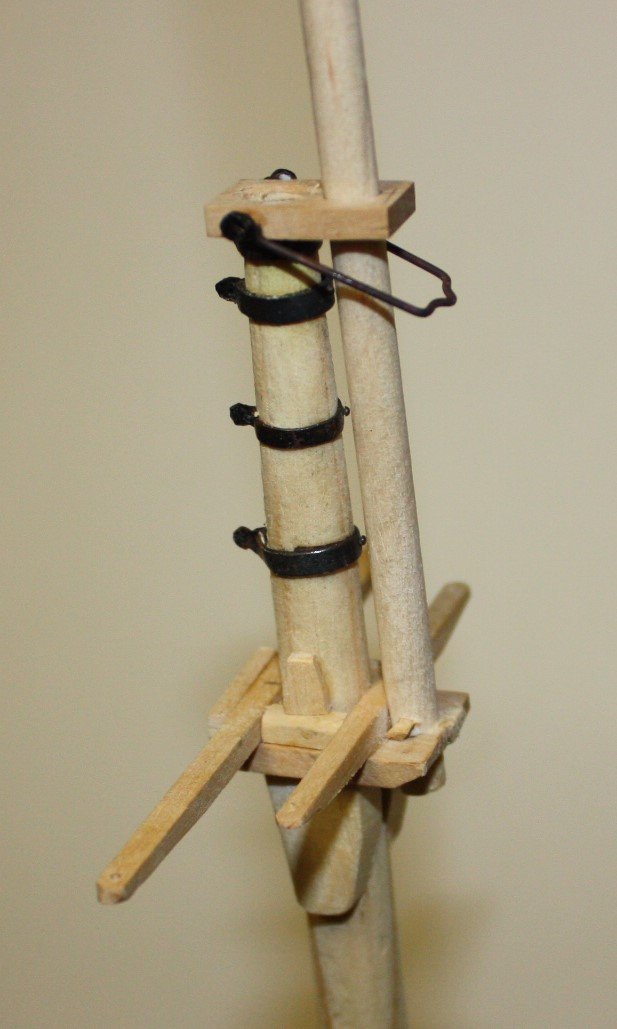
Couple update photos. The spiral is holly strip that was soaked in water for five minutes then wound round the mast and clamped to keep it from unwinding. 45 minutes later it was dry and holding it's shape. Once dry, I cut rings with an overlap and beveled opposing sides on each end of the rings. PVA and a clip to hold in place for a few minutes and they were then sanded to get off any fuzz and placed on the mast. These need to go on before the boom rest is glued in place. Yes, I forgot and had to break off the ring and make a new one. Thought I would have learned by now...... The top has a few eyes to be secured in place, otherwise, pretty much done. Allan

- 86 replies
-
- 8
-
-
- schooner
- effie m morrisey
- (and 1 more)
-
Keith, I took the shape from one of the drawings of Ernestina/Effie that I downloaded from the Library of Congress. She had a bank anchor when first in service, then went to an iron stock anchor and curved arms at a later date as can be seen in "modern" photos of her before she was stripped for her current rebuild. The drawing from the LOC plus a drawing on page 316 in the American Fishing Schooners by Chapelle gave me what I needed for a fair representation of the anchor for the late 1800s when she was launched to fish the Grand Banks. I think it would still be appropriate to have an iron stock anchor for later times, but along with the anchor, the deck layout was changed dramatically for her later roles so there would be a lot more than changing just the anchor style. Druxey, yes, 7 years since I worked on her. I am sure I would have gotten back to her at some point, but when the ship yard that ordered the BoothBay 65 model wanted to buy this model as well I was very very happy. That yard is the one currently rebuilding Ernestina thus their interest in having a model of her. Schooners are a nice diversion from 17th and 18th century projects, but I will likely be going back to that era when this model is shipped. Hope to have this one done in the next two to three months as masts are now under construction. Allan
- 86 replies
-
- 3
-
-
- schooner
- effie m morrisey
- (and 1 more)
-
Blocks and rigging size for Olympia 1:232
allanyed replied to The_Full_Broadside's topic in Masting, rigging and sails
TFB, I will be curious to see how this works out and what type of wood you use if you actually can make these to scale. Assuming the lines are about 1" diameter, or smaller, this would be 0.004" diameter hole in the block at your scale. I do not believe you can find drill bits that small. The smallest I have ever read about are 0.006 (#97) and not generally available. The smallest most common available is #80 (0.0135) which is more than triple the diameter that you would need in order to be be close to scale. Good luck. Allan -
Hull Planking Question
allanyed replied to tomsimon's topic in Building, Framing, Planking and plating a ships hull and deck
What Richard describes is true, but I do the same thing without the CA. Less stink, less eye irritation, less hassle in general. Takes an extra half a minute waiting for the glue to start curing before letting go, then setting it aside and go to something else for a few minutes. Ship modeling from me is not about saving a few minutes here and there. If time is not on your side, CA might be the answer, but keep in mind the risks outlined above. Allan -
Blocks and rigging size for Olympia 1:232
allanyed replied to The_Full_Broadside's topic in Masting, rigging and sails
Also, if the blocks are wood, they would be internally stropped, further complicating things at this scale. After a quick look in their books I do not see that either McNarry or McCaffery go into these kinds of blocks. They could even have been made of metal by the time this vessel was underway rather than wood. Allan -
Hi Dave Looking at the drawings of Bounty on the RMG collections site, it appears that the keel was 12" wide (5mm at 1:60) ) so building it up makes some sense, or make a new keel the proper dimension. If building it up, it might actually be easier to make the rabbet by tapering the top edge of the plank to match the angle of the frames as you go. Allan
-
Eastern PA ain't too bad Joe. Our oldest lives in Gilbertsville, not far from Valley Forge. Beautiful countryside! Anxious to see your rigging and sails. There have been a lot of posts lately on making sails. Unfortunately, many insist on using cloth and sewing which is impossible to keep in scale, taking away from an otherwise nice build. Allan
-
Welcome Charlie!!! Glad to have you aboard. Some great models around your area, including at the small museum at the US Merchant Marine Academy in Kings Point and the NY Yacht Club. I have not been to the academy for quite some time (missed our reunion last year) but once the Covid is a distant memory, there are/were some great things there including the double wheel from Connie. If memory serves there was at least one model of America at the NYYC. Allan
-
Kathy, Volume II, pages 24-30 of The Fully Framed Model by David Antscherl gives step by step instructions on the paint, brushes, and technique for even the most intricate of designs. Worth the cost of the book just for this information. Keep in mind there are acrylics, and there are acrylics. Artist tubed acrylics are the best way to go when compared to the little bottles of craft paints. Allan
-
Now the topper would be if you are from Western PA and a Steeler fan!!! Go Stillers...... (I had the good fortune to have grown up in Pittsburgh) Allan
-
Planking pins/nails
allanyed replied to DaveBaxt's topic in Building, Framing, Planking and plating a ships hull and deck
Dave, What ship are you building and what is the scale? Thanks Allan -
Planking pins/nails
allanyed replied to DaveBaxt's topic in Building, Framing, Planking and plating a ships hull and deck
Regarding treenails or trennals or trunnels, bamboo is probably the strongest for its size. It is RELATIVELY easy to make by splitting bamboo skewers found in any grocery store and then running them through a good drawplate such as that from Jim Byrnes. That said, a lot depends on the scale your model is. If 1:96, to stay in scale, the holes you are drilling should be about the size of a #80 bit (0.013" diameter) and the pins or trennels you use should be that small or there is the danger of having out of scale dots and what looks like the measles all over the hull. If the scale is larger, say 1:48 it is much easier as you can go to a #71 bit or thereabouts and making the trennals is doable and would show nicely. If in doubt, don't pin or use trennals. Pre taper and bend the planks with heat so they hold the shape and you will not need pins or clamps just some PVA, a little finger pressure and a minute or less to let the glue begin to cure and hold the plank in place. Allan -
Greg. Assuming the tie for the halyard, or the halyard itself is hitched directly to the yard with a timber hitch, there is no hardware needed on the yard for this particular line. If you are asking about other hardware, there may also be the brace pendants, blocks for the lifts, leechlines and buntlines and the truss. Allan
-
Mark, At your scale of 1:78 a 25 foot boat would be about 3.85 (97.7mm) inches long and the overall length of the oars would be in the neighborhood of 2" to 2.15" (50mm -54.7mm) Again, hope this is of some help to you. Allan
-
For these smaller yards, two single blocks makes sense to me. 😀 I just wasn't sure if they were shown on the plans. Thank you for the clarification. Allan PS, Sorry for addressing you by Nic, just assuming (which is rarely a good thing) by your screen name you are Nic Damuk
-
Mark, The Art of Making Masts, Yards, Gaffs, Booms, Blocks and Oars as Practised in the Royal Navy, Steel and Goddard, London gives dimensions of each part of the oars including the handle, loom, body and blade which add up to the total length. Steel does mention that the length of the oars was about 2 1/2 to 3 1/2 X the beam of the boat. Some information on both ship's sweeps and ship's boats oars follows. Also, Up to 1780 Victory would have carried six boats from four oared cutters to launches over 30 feet long. After 1780 she would have had the launch replaced with a long boat of similar size plus another 4 oared cutter of about 18 feet for a total of seven boats. Hope this helps. Allan DIMENSIONS OF OARS FOR BARGES, LIGHTERS & SHIPS' BOATS Breadth or Length Loom Blade Handle (Square) Tonnage Sweep Handle Loom Body or Blade Broad Thick Diam Shank Inner Outer Inner Outer of Tons feet ft. in. ft.in ft.in. ft.in. in. in. in. in. in. in. 130 27 1-3 11-0 6-0 9-0 4 ¼ 4 7 3 ½ 1 1 ¾ 20 21 1-0 8-6 4-6 7-0 4 3 1/8 6 ¼ 2 7/8 7/8 1 ¾ Breadth in Ft In 7-0 20 0-10 6-0 6-10 6-4 4 3 1/8 6 1/8 2 7/8 7/8 1 ¾ 6-0 19 0-10 5-0 7-2 6-0 3 7/8 3 6 2 ¾ 7/8 1 ¾ 5-0 18 0-10 4-0 7-6 5-8 3 7/8 3 6 2 ¾ 7/8 1 ¾ 4-6 17 0-10 3-6 7-4 5-4 3 ¾ 2 7/8 5 2 ¾ 7/8 1 ½ 4-0 16 0-10 3-0 7-4 5-4 3 ¾ 2 7/8 5 2 ¾ 7/8 1 ½
-
Well, we did not get a full meter of snow like Binghamton, NY got in the past day or so, but it will be in the 40's (Fahrenheit) the next couple nights. BRRRRR. Actually, most of my modeling years were in New Jersey and it was the same there, albeit with the furnace going in winter. 😃
-
Nic, Depending on the weight of these yards, wouldn't ties and blocks also be present? Are these shown/described in the plans? It is unlikely that the halliard would go directly from the yard, through the sheave and straight down to a belay point without a tie and blocks. I am not at all sure on these smaller vessels if that would be the case, just me being curious. 😄 Allan
-
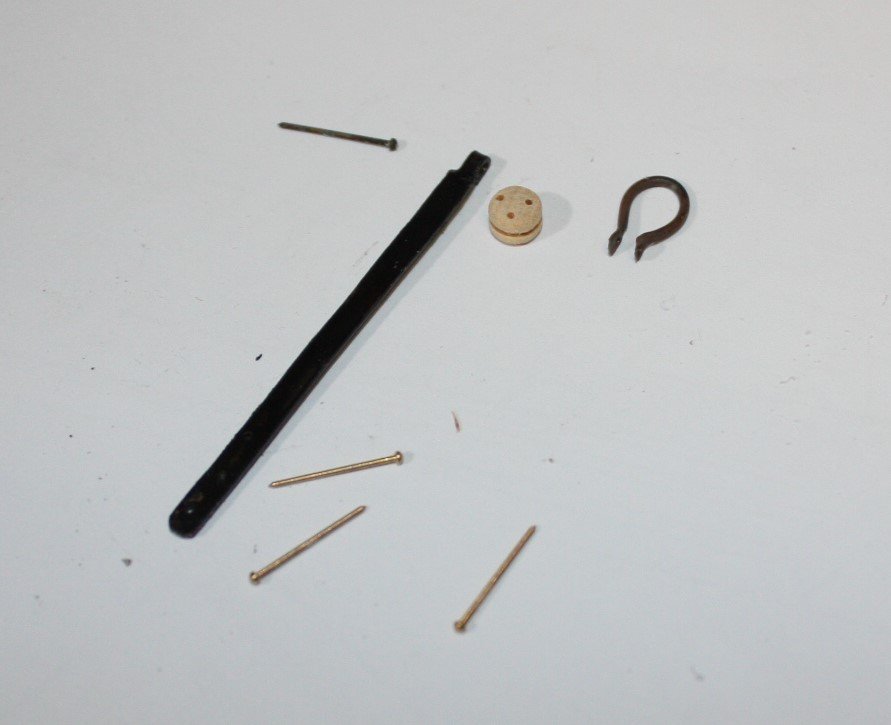
Found an error or omission on the drawings which meant having to reset to make more deadeyes and strops. I had two extra, but needed four but got it done. Set up takes longer than actually making these pieces at times, thus a good idea to always make a few extras, maybe more than a few. The deadeye rigs include all the pieces in the photo below, so a bit of work goes into setting up each one. The strops are made of brass rod that was heated with a torch to soften them. A flat was formed at the end of each piece with a hammer and punch. The punch was and old nail punch ground down to a diameter near that needed on the ends of the rod. A hole was then drilled in these flats of each strop and the flats filed to make them round. I tried making these eyes at the end of the strop by bending the ends into an eye, but they were far to large given the diameter of the strop, which is to scale. The photo below shows the parts before assembly, including the three "bolts" that go through the strap and into the hull. The straps were cut from copper sheet and one end filed to a narrower dimension, folded over a stainless steel pin and soft soldered. I have never been good at getting these straps cut into strips evenly and have to do a lot of filing. I am considering making sandwiches of wood and plate and cutting strips with a slitting blade on my small table saw similar to how Keith described doing this in his Germania build log. If anyone has a trick to making these more efficiently and precisely, I would love to learn how you do it. Allan
- 86 replies
-
- 12
-
-
- schooner
- effie m morrisey
- (and 1 more)
-
Greg, Lines 30 and 31 look like they are made fast to the masts so might be stays. What do your plans identify these lines as? The topsail yards would have likely had a double block seized to the center of the yard and two single blocks, one for each tie with a loop around the top of the top mast . A line came up from the deck, rove through a single block, down and through one sheave of the double block, up and around the masthead, back to the double block, up to the other single block and then back to the deck. There is a very clear drawing on page 85 in Lees Masting and Rigging. While it is particular to British ships, it may be close to what was done on US ships. Again, from Lees, for a topgallant yard the tie was hitched to the yard, rove through a sheave in the top of the mast, and set up with a halliard, probably to the trestle tree of the lower mast. There would be a double block seized into the end of the tie and single block seized to the lower trestle tree. The hauling part of the halliard was belayed to the bitts near the mast. Allan