Nazir
-
Posts
35 -
Joined
-
Last visited
-
 PeSt reacted to a post in a topic:
Albatros by Nazir - FINISHED - OcCre - Scale 1:100 - first non-solid hull build
PeSt reacted to a post in a topic:
Albatros by Nazir - FINISHED - OcCre - Scale 1:100 - first non-solid hull build
-
GrandpaPhil reacted to a post in a topic:
Avos 1806 by Nazir - Master Korabel - Russian tender - my second build
-
GrandpaPhil reacted to a post in a topic:
Albatros by Nazir - FINISHED - OcCre - Scale 1:100 - first non-solid hull build
-
Canute reacted to a post in a topic:
Drill Bits
-
mtaylor reacted to a post in a topic:
Drill Bits
-
Keithbrad80 reacted to a post in a topic:
Drill Bits
-
JpR62 reacted to a post in a topic:
Drill Bits
-
This is why I love this Forum.....so much helpful advice for what to many may be a trivial question(s)--- including bonus humor (e.g. reference to Rumple of Old Bailey!!)......I learn so much and it makes the hobby easier and much much more enjoyable for a true novice (on my second build, Tender Avos) like me--Thx to all! Nazir
-
Moltinmark reacted to a post in a topic:
Albatros by Nazir - FINISHED - OcCre - Scale 1:100 - first non-solid hull build
-
Wahka_est reacted to a post in a topic:
Albatros by Nazir - FINISHED - OcCre - Scale 1:100 - first non-solid hull build
-
I have drill bits that are 40+ yrs old and cant really judge if they are good or not.... 1. Can someone recommend a good quality set that would have all the bits for ship modeling? 2. Should it be metric or inches? Both? 3. Should I get two sets--one for normal sizes and another for micro sizes 4. Is there a box u can recommend where I can put some of my current bits and sort them by size...I have seem some on Amazon but not sure how to judge quality 5. How do I tell if my current bits are worth keeping? 6. If I just keep current bits loose, is there good tool to measure diameter that u can recommend? THX!! Nazir
-
How to get build listed in index
Nazir replied to Bill97's topic in How to use the MSW forum - **NO MODELING CONTENT**
Moderators; I have added the word "Completed" to the title of my Albatross first build.....How do I assure that when it shows up in the build log that it shows up as COMPLETED? Thx Nazir -
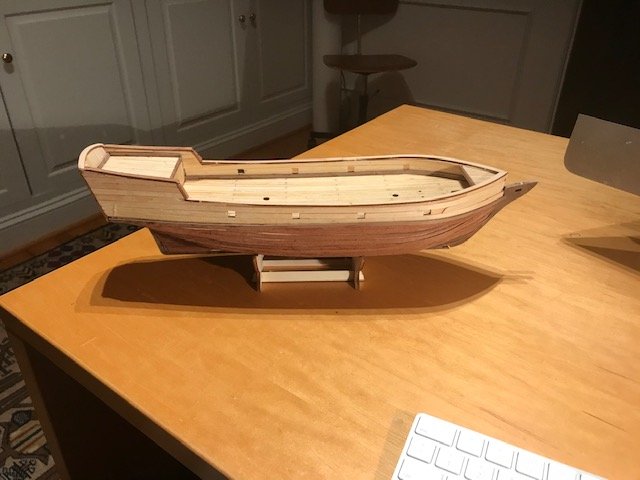
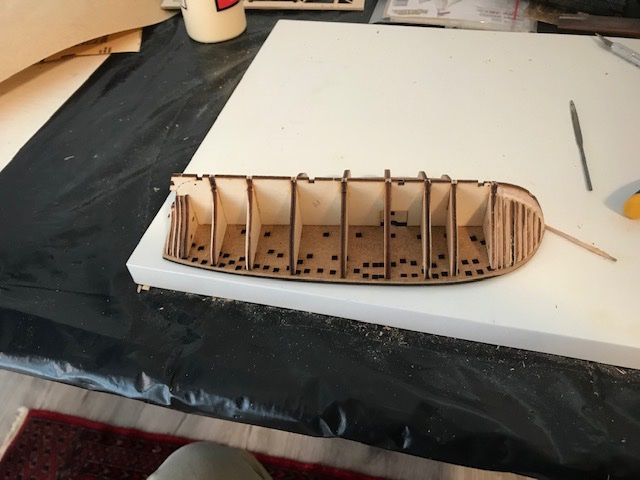
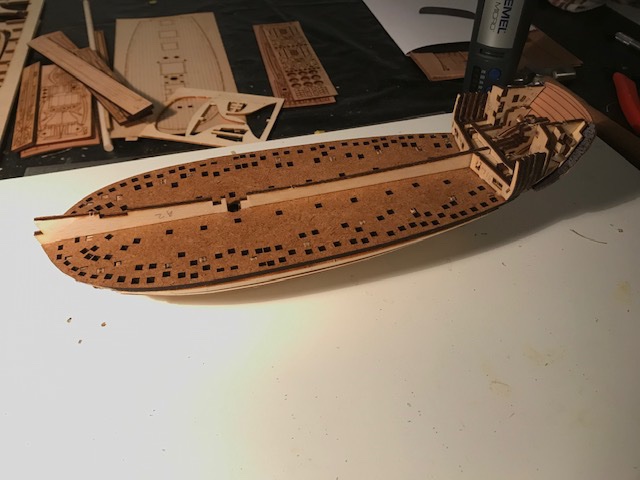
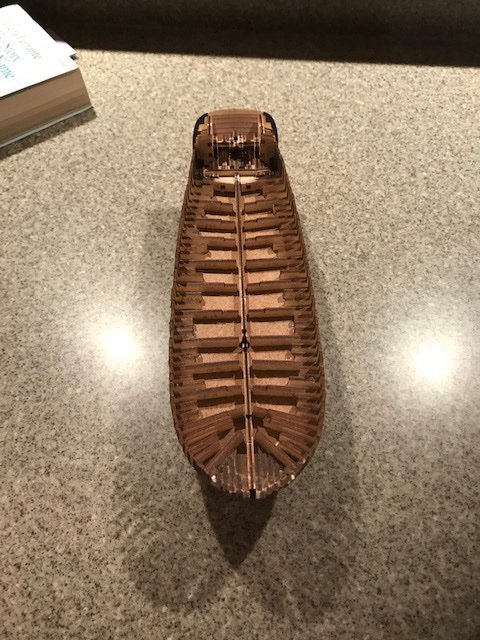
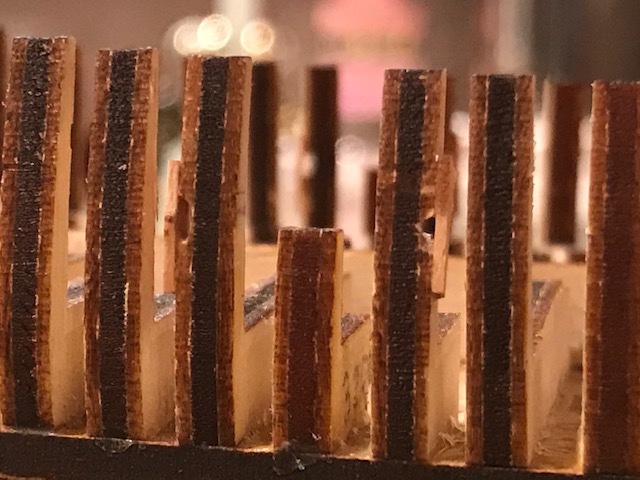
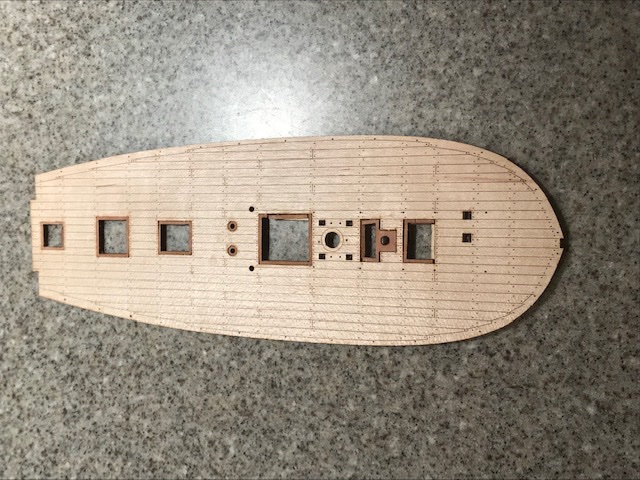
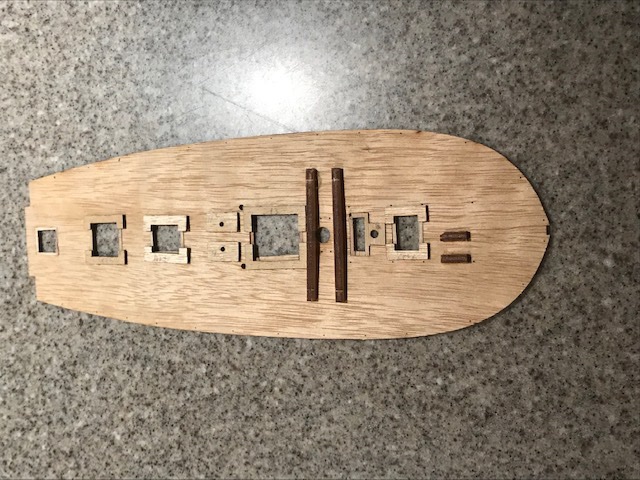
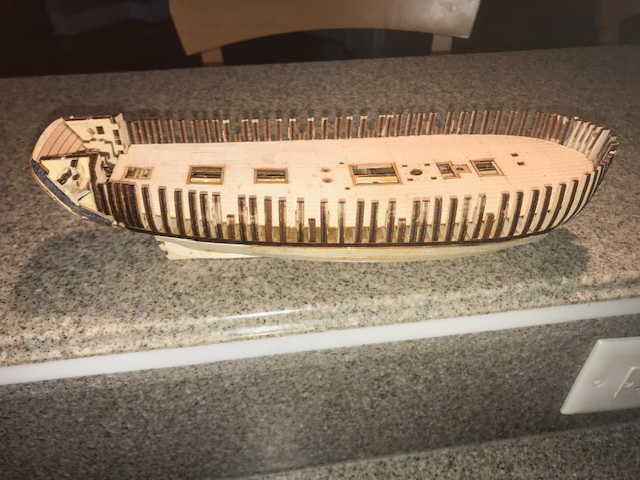
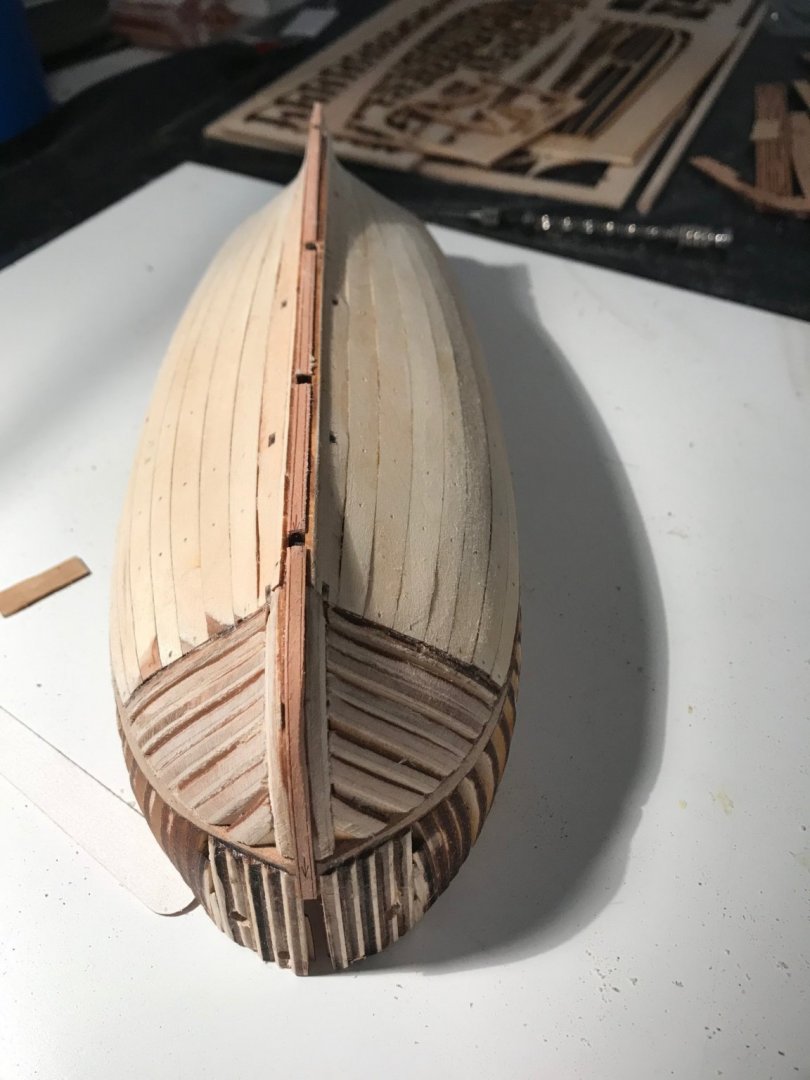
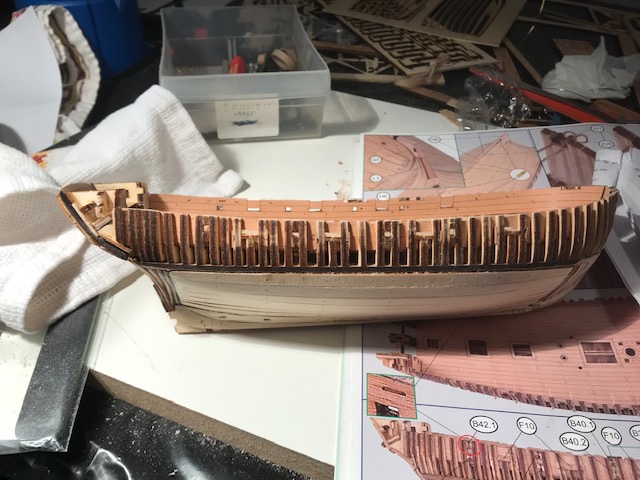
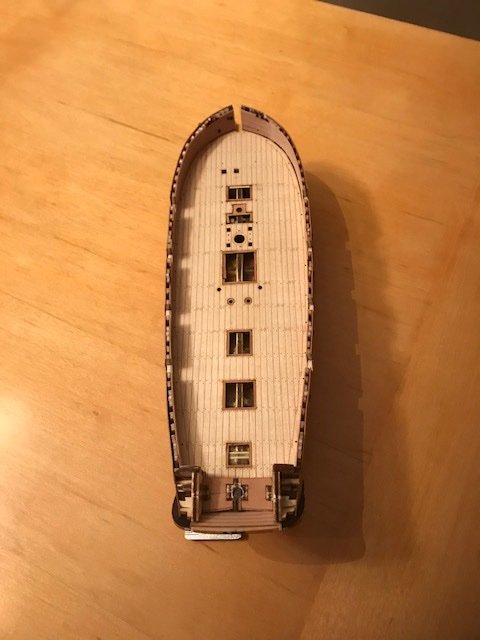
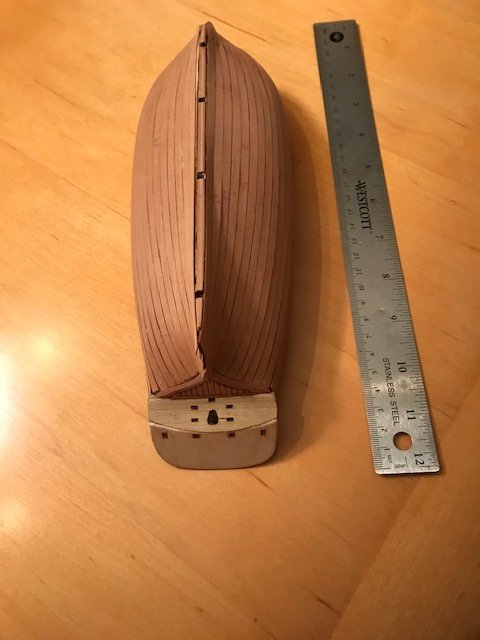
This is my second build. The first was Albatros by Occre. 1. The reason I bought this ship was that I was intrigued after reading the review in MSW. It looked very small and rather difficult but I decided to live dangerously. The version I bought included the (sewn) sails but not the simulated nails on the veneer planking 2. I will organize my log by categorizing it into "phases"; these just follow my own "intuitive" sense of what groups of steps constitute a phase. Phase 1: Assembling the hull and first planking. The frames go into the main plate. I think the design here is brilliant. By telling us how much to bevel (through the use of lines drawn into the frames) and by placing asymmetrical notches in the main plate for the frames to attach, the design makes it much easier to avoid errors and the curvature is near perfect right from the start. And the resulting hull is really solid. Also I learnt from my mistakes only to use PVA glue in this phase. My small rotary Dremel was really helpful. The design of the first planking is also amazingly impressive. By building the curvature into the planks, by cutting it to the exact size, by placing notches in the frames for the first planks and finally by the use of holes for "temporary" nailing, the builders have thought through the process in a clever, thoughtful and user-friendly manner. Here are 2 pics, for this Phase, one for the framing and the second for the planking. Phase 2: Assembling the Stern frame, including upper keel frame, latrine etc. This is a very tricky phase and I made near-fatal errors at a couple of points. There are a lot of steps and one has to be really patient with dry fitting and not rushing to glue stuff without checking and rechecking. And, oh yes, numbering the pieces on both sides before cutting them from the plates is a must. And make sure you bevel on the side with the marked lines and attach the pieces with the bevel facing the direction specified. One error I made was following the direction to "wet" some pieces for 5 minutes per instruction manual before "hand curving" the piece to the desired shape. I had warned me against this but went ahead anyway. It worked for the pieces from the C plate (C1) but piece G1 ended up with a sharp curve after wetting and in addition the wood came apart in the middle (not split but the plywood just separated). On hindsight I should have either wet it for only a minute or so or used a clothe's iron. I think as the curvature is minimal one can get by without any help, just gluing it on with a clamp. But I glued the pieces and recurved it using clamps and it ended up fine. The second error was in step #24 when the pieces C1/H2 are attached to the rest of the stern assembly. Make sure you use this pic in the manual to guide you. I didn't insert it as far into the stern assembly as I should have. An hour later I found the error and luckily the glue had not fully set so I redid this step. See pic for end result. https://modelshipworld.com/clubs/?f1[0]=0 Phase 3: Adding the "ribs" i.e. the approximately 70 pieces that are glued to deck and are the basis for veneer planking etc. This phase looks simple but turned out to be trickier than I expected. As always it is a good idea to pencil in part#s before removing from the plate; also follow instructions re: penciling in lines connecting laser marks on BOTH sides of 16 of the ribs (8 on left, 8 on right--#s are B12,14,19,21,25,27,31,33)) ; you will also notice a laser engraved mark on one side of each of these 16 ribs; these are used later along with the pencilled on the same side to align ports inserts and finishing planking). On the non-engraved side, you have to place a notch where you drew a pencilled line in 8 places on each side (ie 8 on port, 8 on starboard). It is really important to look at pic #45 and realize that the notches are placed on the bow side of some of the ribs, and on the stern sides of some of the ribs. The notches are used to create holes that hold pins that then get used later (not sure how yet!) Phase 4: Deck Preparation. Again, a few major errors but with some helpful advice salvaged!....The tricky part here is installing the coamings on top and the coamings supports from below. These are used to support the deck furniture. I made the mistake of removing the inserts from the coamings; as a result when trying to sand and fit them into the holes, they would split; and I couldn't lower them to the .4 mm height below deck either as they would also split there, if they hadn't already; so I ended up patching them and gluing them flush with the deck, figuring that even if the furniture/fixture wasn't recessed below deck level, it would be ok--best I could do! Phase 5: Gluing Deck Also, on the reverse side of deck, be really really careful in gluing supports, bollards, etc to recognize that you need to be near-exact in their placement as they fit into notches in the keel below and if you are off by more than a tiny amount the deck will not be flush. Despite dry-fitting deck, I made this mistake, had to remove after gluing the deck (luckily I caught error in time) and redid everything after trimming some of the supports and the upper keel and rib supports as well. Phase 6: Gluing Inner Bulwark finishing Planking and Sanding: The Inner bulwark planking went well, with a few twists: a. I had to trim a little (<1mm) off the stern end on both side to fit the plank. I used the gunport cuts in the wood to align everything and that worked well..I was relieved that the tiny holes drilled in the prior step at each gunport all lined up with the pins set in the holes etc..Dont immerse plank in water..just dab a little wet cloth at the bow end for 10-15 seconds to help shape the plank to the hull. b. The drilling of the 3 holes in forelugs (actually just a redrilling) thru the plank split the plank in one place and I had to reglue the split part. looks ok but could have been much worse c The instructions on drilling holes #4.1 in the bulwark planking (2 on each side thru the sheaves/slits toward the stern end) are not really clear....u have to drill from the inside/deck side out thru the small slits/sheaves (<1mm bit) d...Finally, u have to sand the top of bulwark/plank using a sanding block across both sides to help even out the tops of the plank with the bulwarks Sanding is tedious. I used Durasand sticks ---worked much better than using paper directly or the cheap sticks I got thru Amazon. Not sure it is as good as it should be but I am ok with it. see pic. QUESTIONS:I decided that from time to time I'd stop and ask for advice on topics that I think of as I am building...here are the ones I have fro this week: 1. I have drill bits from 40 yrs ago.....how do I decide whether they are good or should be thrown out? 2. The engraving on sizes has worn out...how do I check the size? 3. Should I buy a set of good quality US made bits? any brand recommendations? 4. Should I buy metric or inch-based? Both? 5. In addition to #3 should I keep multiple backup cheap small bits?...looks like the pros go thru a lot of them. Phase 7: Second Planking Again, the design is so good....the strip fit near perfectly. I did not need the last plank near the keel except for a sliver on one side....the black veneer for the decorations is a nice touch. And even though I had screwed up by gluing the "counter" well before I should have, the fit between the counter and the planking was "acceptable"--not in the the class of Peta but not bad for a second build Phase 8...Waterways etc This part is tricky but is going well.....Can any one advise me on how one precisely measures the small segments where the waterways go? I can never get the piece to fit just right Thanks for the recommendations re: drill bits/calipers; will order at Amazon today. Another question: I had ordered some clamps from Amazon a while back and am quite disappointed in the quality; they are plastic and despite very little use they are either breaking or malfunctioning. Can anyone recommend a good metal+plastic combo clamp? Also when they say 1 " or 2" etc , do they mean how wide the camp can open up?


-
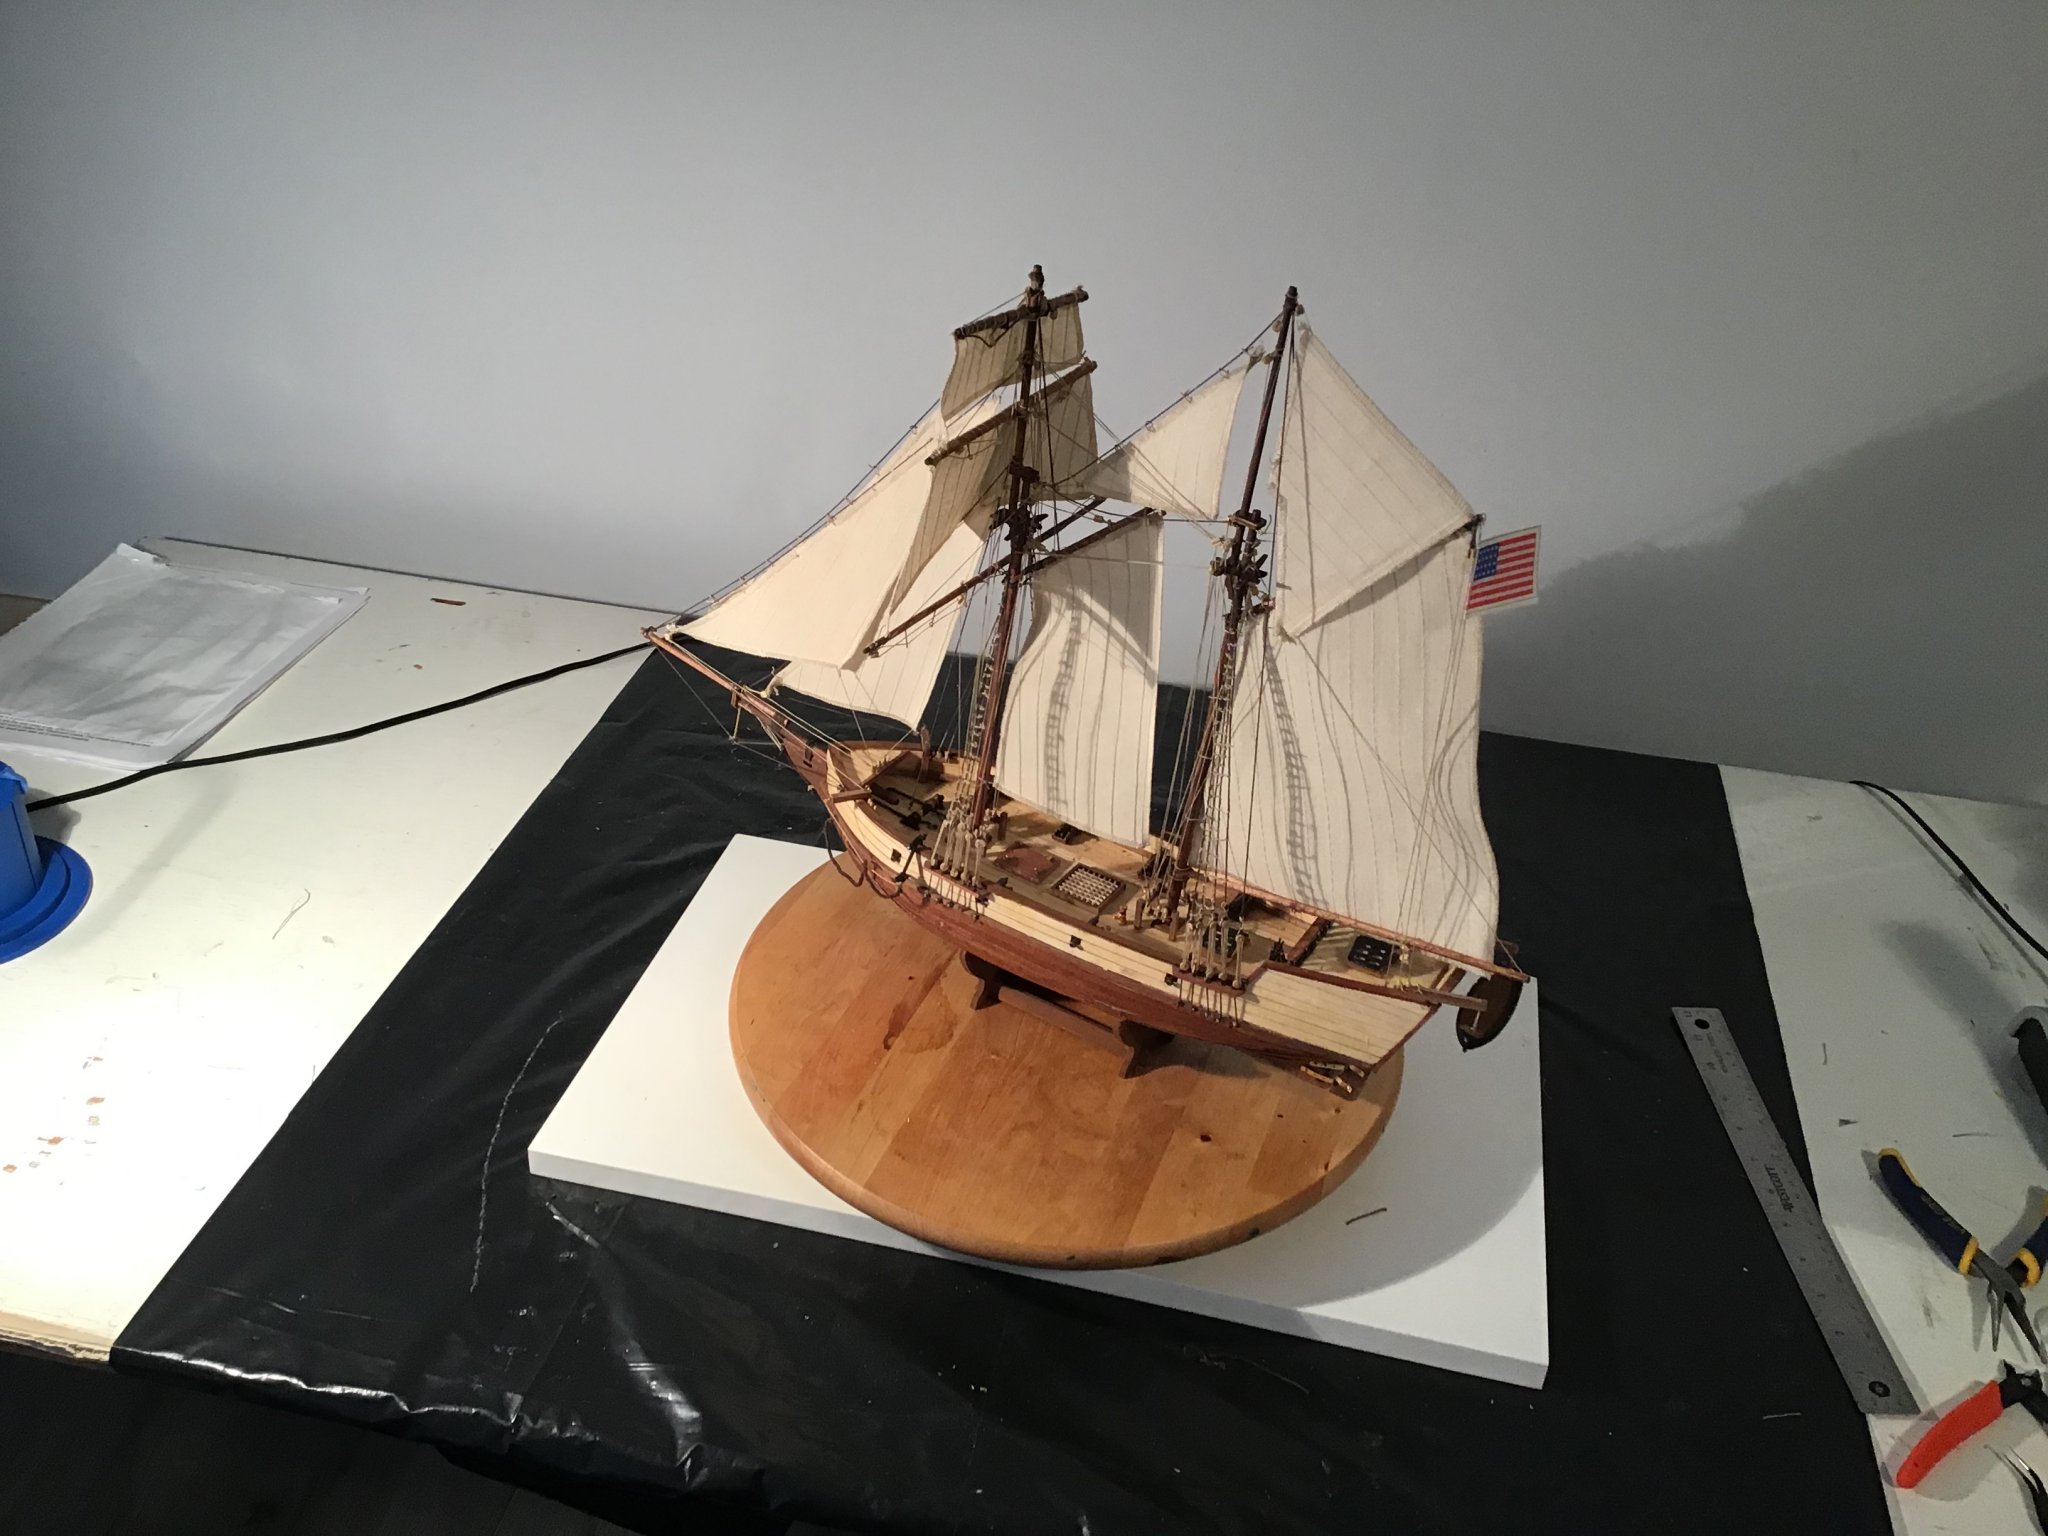
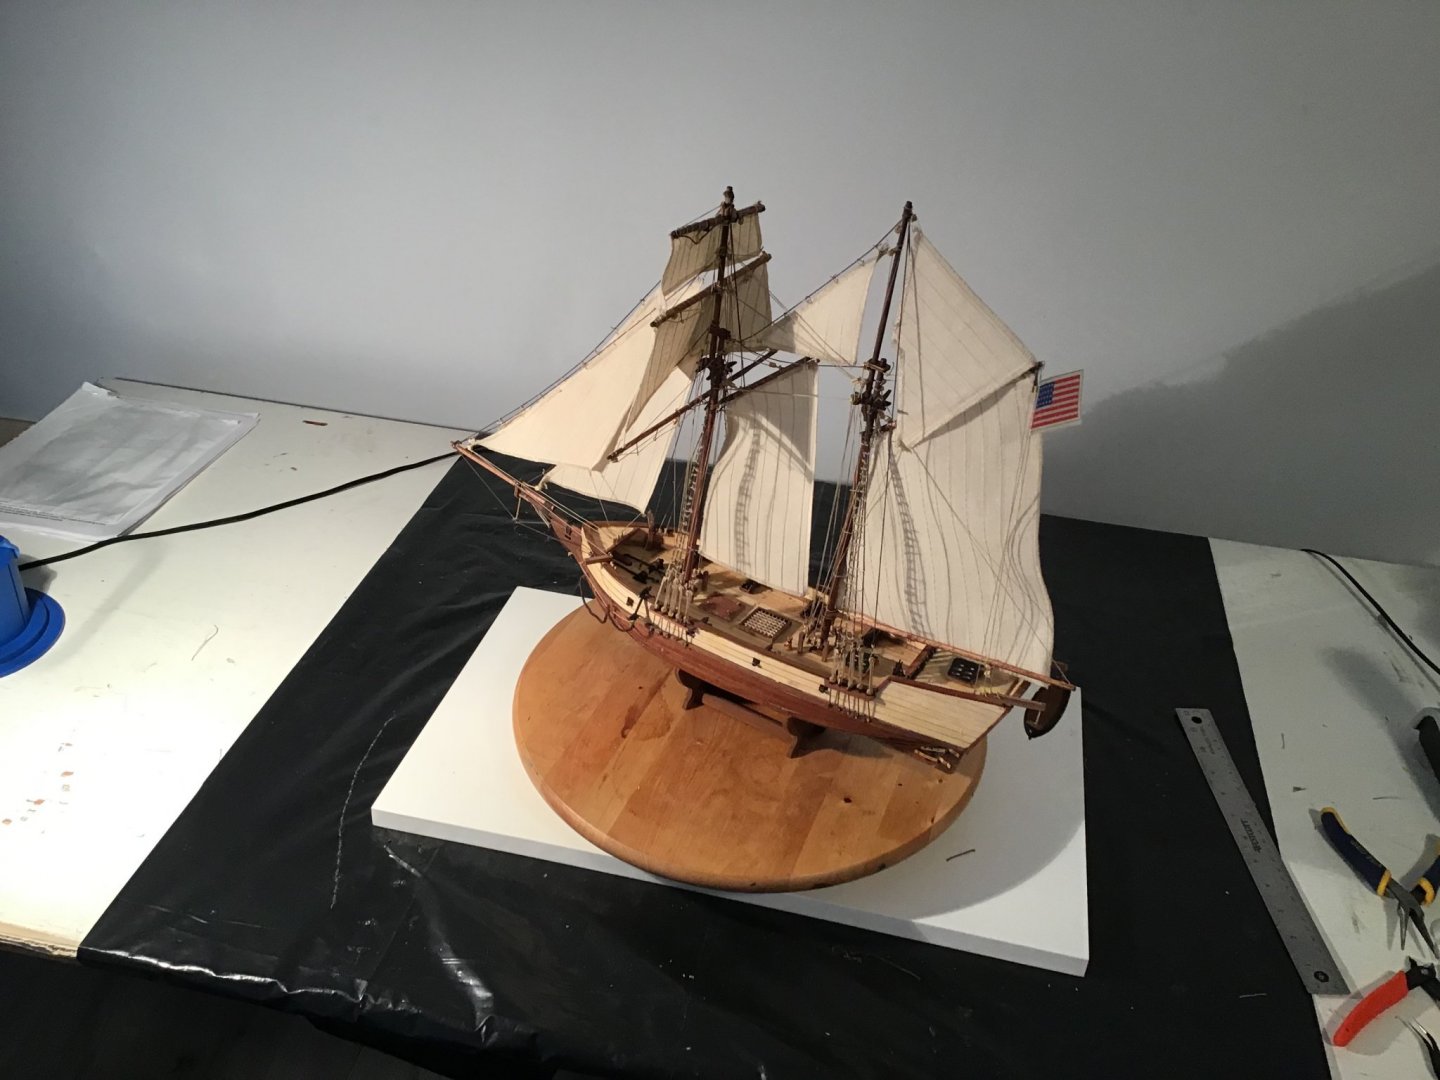
I have finished the Albatross....just cant believe it; almost gave up at a few points. Thanks to all who gave advice and encouragement--this is a great community. Here is a pic. I will be writing more detailed notes on dos and donts and what I liked and did not like about the model but couldn't wait to let u know I finished it. THX!!!
-
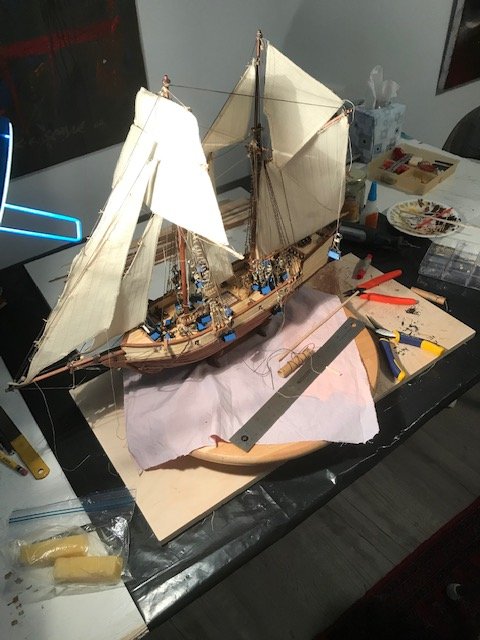
Well the sails are up (see pic) but I am having a devil of a time "belaying" lines. Am using a tweezer but can't get the pin to catch the thread from below per a you tube video. Do I need another tool or is there a compromise that is acceptable?
-
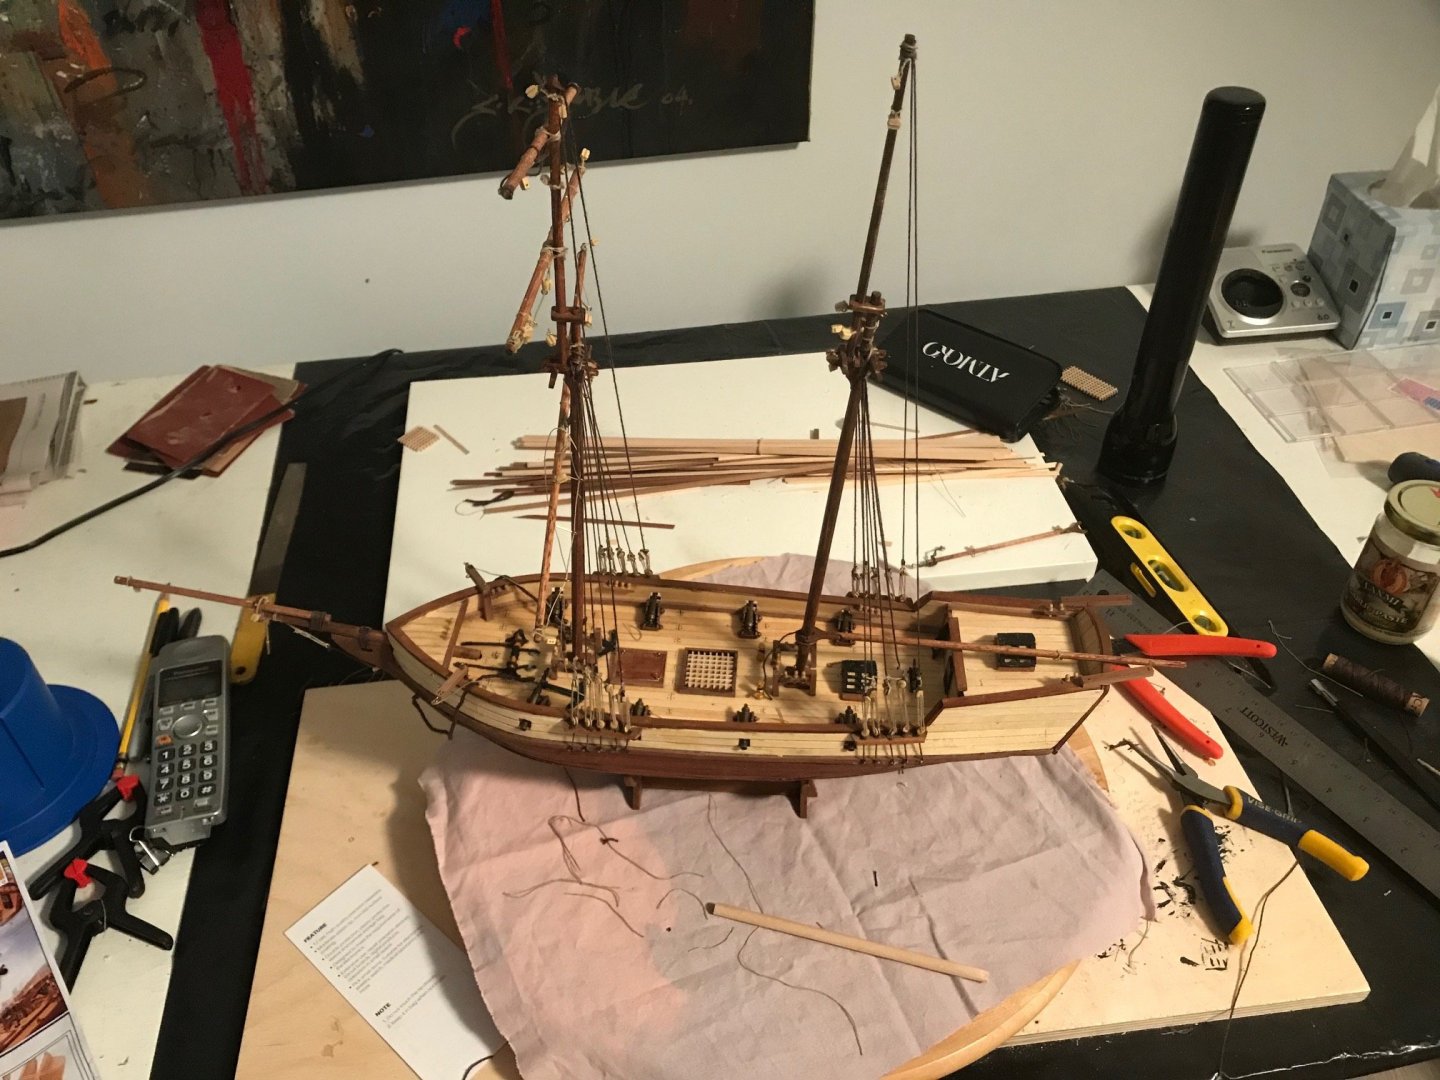
Well, I have finished the ratlines and have started the rest of the rigging. My big question is: Should I "belay" each line as I complete it OR just number it with blue tape and wait till the end to belay it. I have only finished about 20% of the rigging and was using the blue tape approach but am wondering if it will all be one tangled mess when I finish. Any advice would be appreciated.
-
Well folks..I am finally hopeful that I will finish this model -- my first (see current status in pic). I have started the rigging. I have two questions and two suggestions: Question 1: Some of the pulleys have one hole and some have two. The instructions are clear on which goes where. But they are unclear on one point. Am I to assume that if a pulley has two holes, the thread should go into one and come back through the second? And that if there is only one hole then you just bring the thread back? What is the significance of one vs two holes? (Follow up----I think I figured it...the two holes seem to serve two different purposes) Question 2: As the finished model is being passed on to my grandson, I would like to enclose it in a plastic/plex case so he doesn't drop it and destroy 8 months worth of work. Can I buy one or build one easily (any plans?) Suggestion 1: Many of the holes in the pulleys are not "cleanly" drilled and the thread will not go through easily. I would suggest you use a drill to widen the holes just a tad before mounting them. Suggestion 2: I would also first put the thread thru a needle before putting needle with thread thru pulley hole---much much easier esp in hard to reach spots!
-
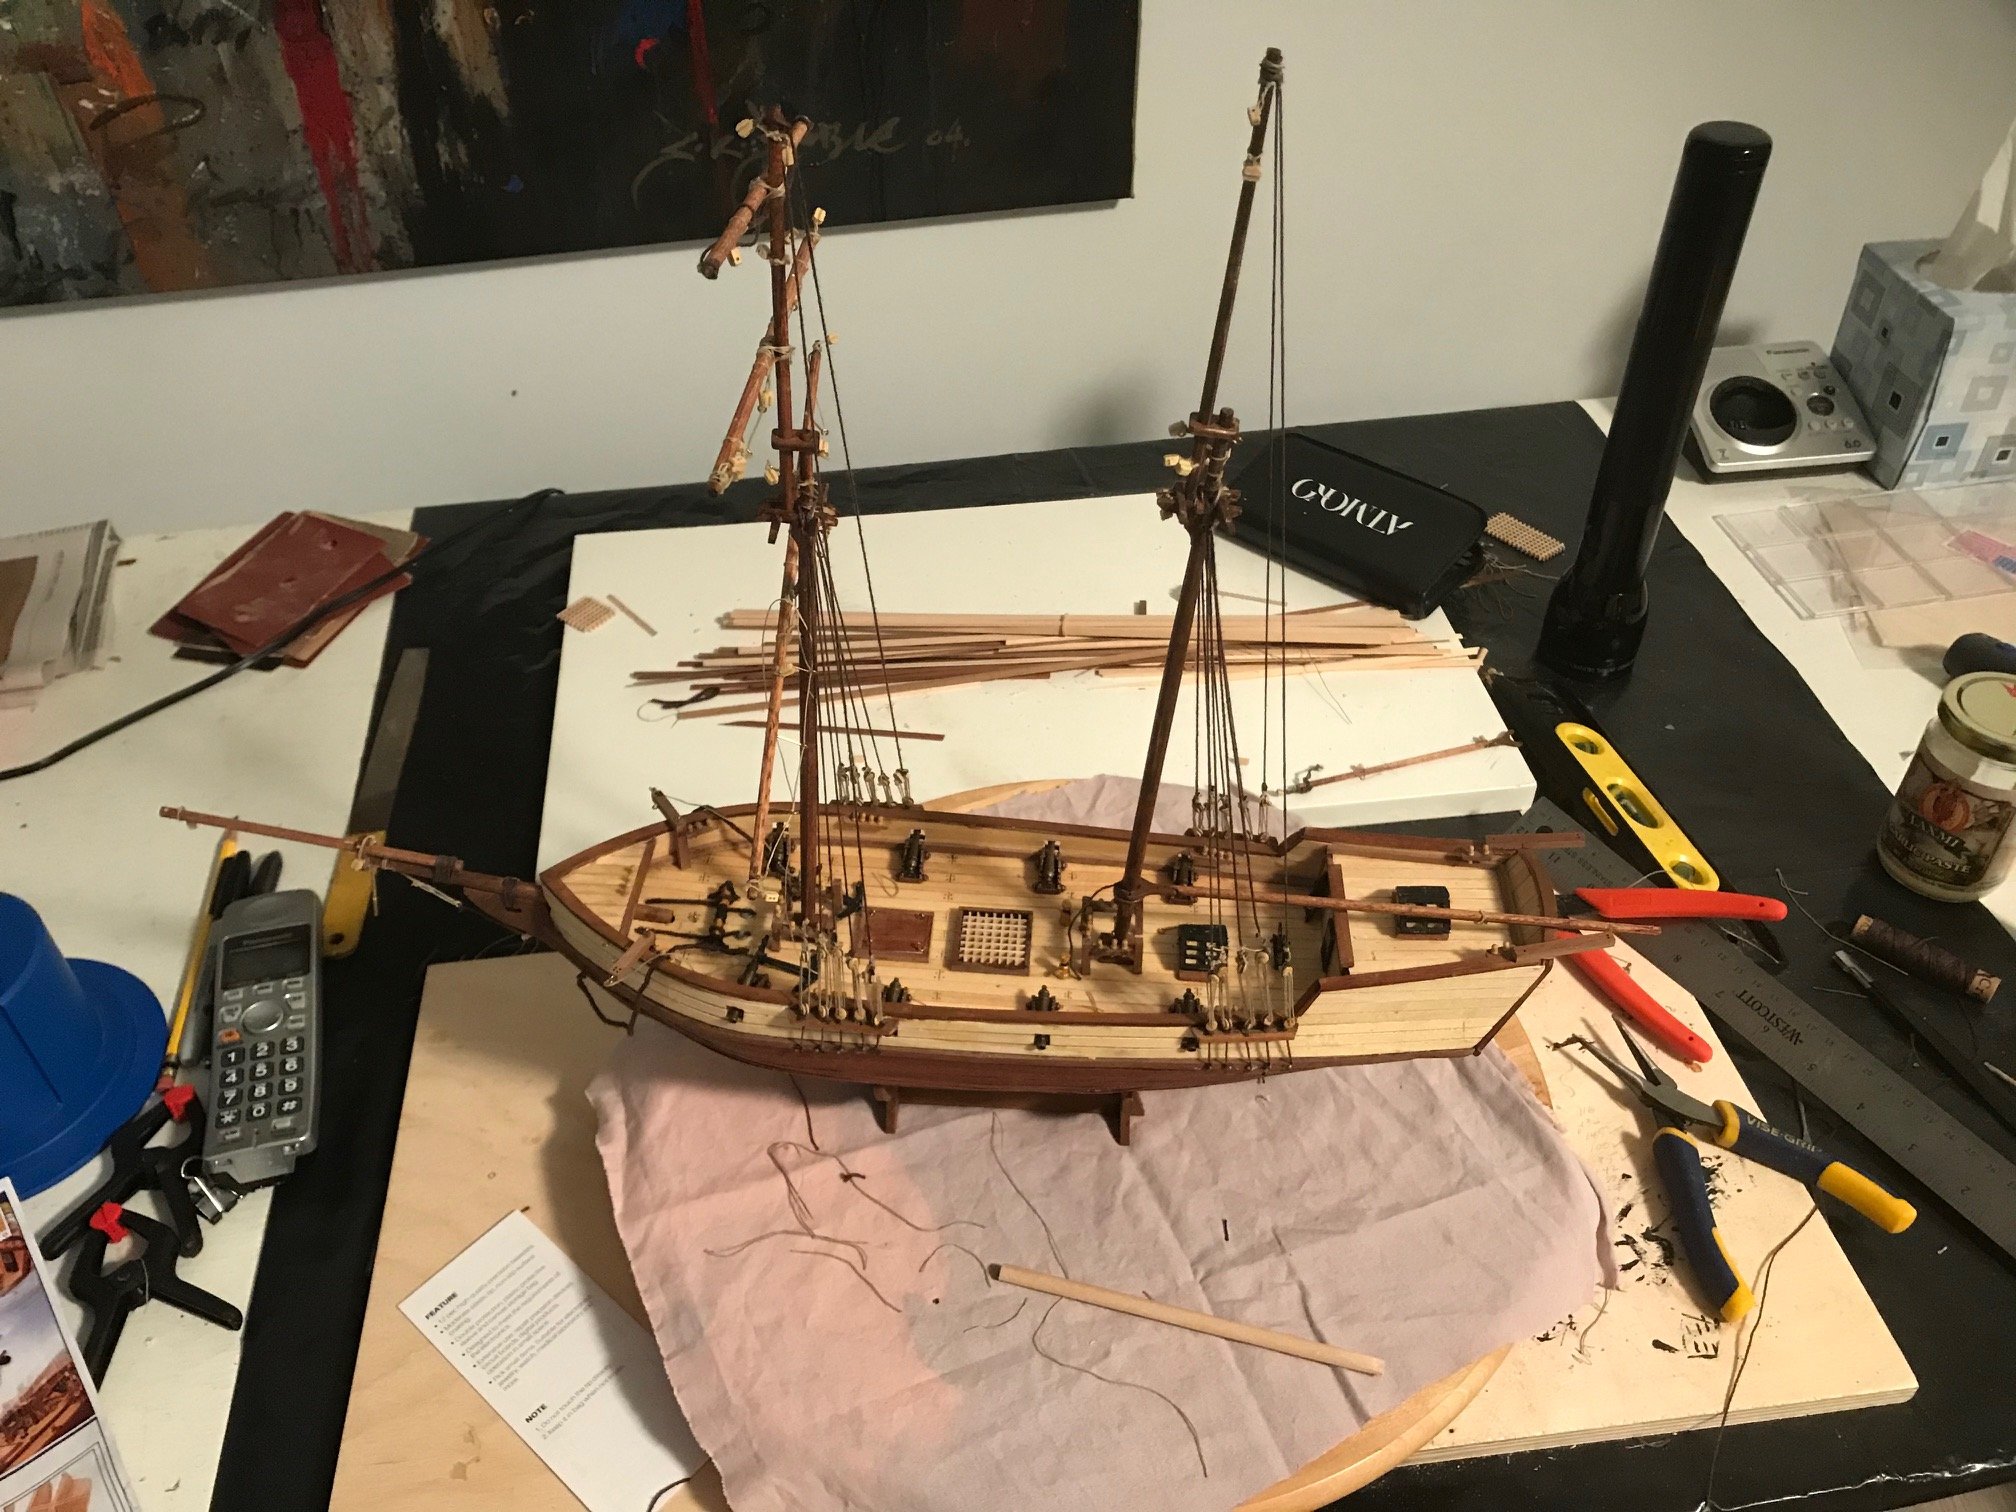
So the model is almost ready for the rigging and installation of masts and I think I will take a break and spend some time learning about tying knots and other topics in rigging. I am quite pleased with how things are going right now--see pic--- but feel the rigging will be overwhelming--hope I can make it through
-
Hi Folks: As those who have followed my build know by now, it has been a tough slog. But I am entering a much more enjoyable phase now. Why you may ask? The answer is "Tools I wish I had Bought Sooner". When I was growing up in Calcutta, India, a friend introduced me to Western music (both pop and classical). One record that I remember buying (vinyl of course) was Bing Crosby's "Songs I Wish I had Sung" in which he paid tribute to popular songs of other artists like Al Jolson (April Showers), Nat King Cole (Mona Lisa), Bob Hope (Thanks for the Memory) and others. On that theme I give my tribute to "Tools I wish I had Bought Sooner". I recently splurged and bought the following: 1. A Dremel 8050 2. A Zona razor kerf saw with mitre box 3. A hand spring-loaded drill 4 Sanding sticks from Zona Every one of these tools has made it MUCH easier to do the tasks and I am really enjoying the process much more. One question: One of you recommended a book on the basics of rigging. Are there one or two articles with illustrations that would show me how to tie the basic knots in the rigging process that any of you can recommend? Thx Nazir
-
Mr Coyle (apologies if I got this wrong): Thx very much for your prompt reply. I will follow your suggestion re: eye bolts and pins. Re "basics" I am attaching two pics that I hope will give examples of what I mean. In the first, I am not sure how to tie the knot to make the thread tight and secure (should I add some glue at the end...if so which kind...diluted PVA? and where do I "dab" it?). In the second pic I have no idea how to construct the "steps" i.e. rungs of the ladder so to say...how to construct the red horizontal lines so they look neat and tidy and secure? Hope this helps you get a picture of what I need to learn....Thx again Nazir

-
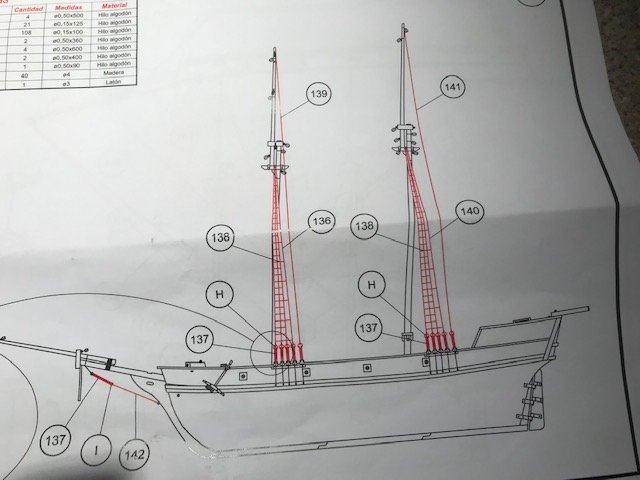
I badly need help on the next step in two areas. I am starting to put the deck "furniture" so to say and beginning the first steps in rigging/masting. 1. On the first there are a number of "pins" and "eye bolts" that go in different places with different thickness to the wood in each place. Yet all the pins and eye bolts supplied in the kit are of the same length, and often longer than the thickness of the wood. Am I supposed to cut the pins/eye bolts down to an appropriate size? And should I drill a "starter" hole to facilitate the hammering of the pin or eye bolt 2. Re: masting/rigging this is my first time and there are virtually no directions in the manual on the basics of how to do this. I am winding my way thru MSW but could use help on some "key" articles on this topic Thx
-
Barry You mentioned that Occre sent you detailed "rigging" instructions that helped a lot and were not included with kit; where can I get them? Can you post a pdf file? Nazir
-
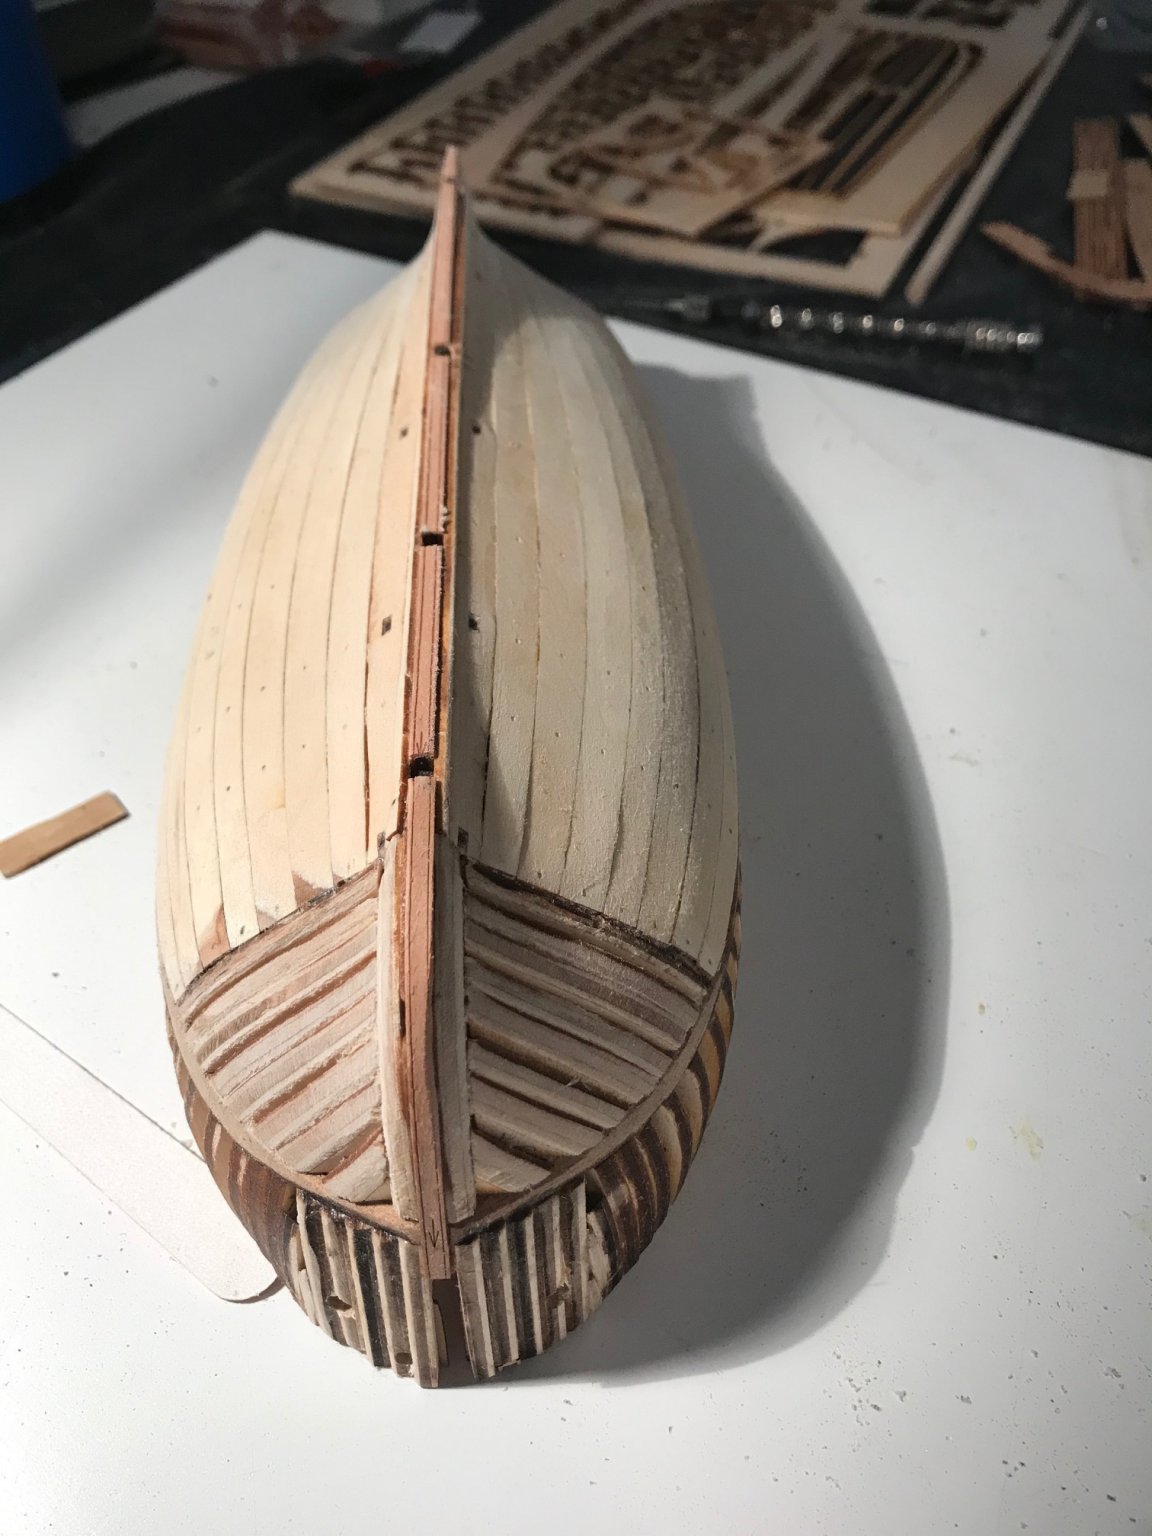
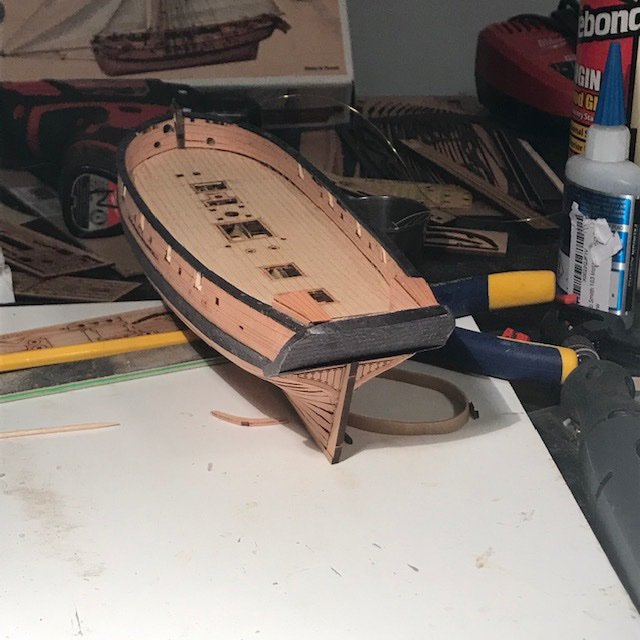
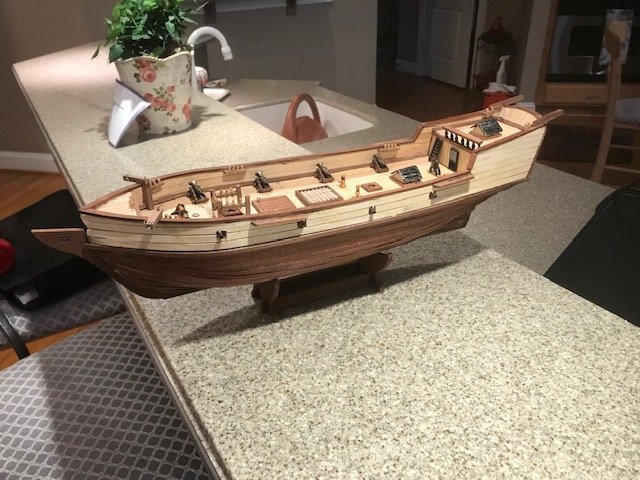
The 3 critical mistakes I made in the building of the hull are: 1. inadequate attention to fairing; this was entirely my fault...there was enough warning on this from MSW folks. I recently saw a video of a modeler fairing using the Dremel 8050 drill---made it look so easy..I think I will get one. 2. not correctly doing the first planking (plywood); I connected the "paired" pieces ie from the two sides of the hull instead of just bringing them up to the center keel piece and stopping short of having the two planks touch each other; in all fairness, the illustrations in the kit were misleading. 3. Using the wrong kinds of glue and too much of it...Ive gotten much better at this and now that the hull is done I think things will move more smoothly--see pic from today below