allanyed
-
Posts
8,149 -
Joined
-
Last visited
Content Type
Profiles
Forums
Gallery
Events
Everything posted by allanyed
-

USF Essex by mtbediz - FINISHED - 1:50
allanyed replied to mtbediz's topic in - Build logs for subjects built 1801 - 1850
Just checked in on your build Mustafa. She looks very well made. I hope you don't mind me asking, but as you have not yet finished the knee of the head, will you be tapering it up and down as well as fore and aft? It should go down to about 6" wide (or maybe less) at the forward edge near the top and then widen as it goes down and as well as towards the stem. Great work!! Allan -
Bonjour Michel, Can you post some photos? I assume you meant deck not desk. Assuming the deck received the same kind of stoning by the deck hands, the color would likely be more of a greyish white for pine or oak unless they used teak or mahogany on the actual construction which would have been imported and maybe far too costly. As to the thickness, assuming the deck planks are somewhere around 2 or 3 inches thick, and the kit scale is 1:62, the deck should be about .82mm (for 2" planks) or 1.23 mm (for 3" planks) thick rather than 2.5mm Allan
-
Ernestina Morrissey by Jond - FINISHED - 1:48
allanyed replied to Jond's topic in - Build logs for subjects built 1851 - 1900
Hi Jon Could Ross or anyone else at the yard explain why the two planks are not shaved down to match the edge of the adjacent planks? It appears that they do have gain all the way aft to match the others as if they were lap straked. Very curious. There are also some short narrow pieces five strakes up from the keel that match to a single wide strake. Was the idea to match the hull just prior to the current rebuild or was this something the yard did on their own? I can maybe understand it if this was configuration before the current rebuild as it may have had to do with when she was motorized around 1926 for sailing to the Arctic for scientific studies. Allan -
Hi Dave, Aside from the kit containing the rope which is probably a good way to go, why would you want to use black? Standing rigging should be a dark brown as it was typically coated with Stockholm tar and the running rigging would be tan. Just wondering 😀 If you want to go with rope from Syren or some other supplier, or make your own, you can use Lees Masting and Rigging tables as well as the chart available here at MSW prepared by Dan Vadas which I believe was based on Lees ratios and will give you the rope circumference of every line. At the scales we normally work with, the only way to get exact circumferences for every line is to make your own, but there are so many that are close in size, 5 to 10 sizes would probably be more than enough depending on the vessel and scale. It all starts with ratios compared to the length of the main mast. Dan's information is really good except for ships from 1670 to 1711 as he used the wrong calculation for the length of the main mast. Allan
-
Druxey, to be clear are you using cloth "silkspan" or paper? There appears to be two different materials with the same name. I only remember the cloth "silkspan" when I was a kid, but now, if you buy silkspan on line, it is paper. To be sure, I am sure that silk is stronger, but I found that the silkspan paper is quite robust with several coats of paint. It can be punctured pretty easily with a needle, but I have had no problems at all with tearing. Of course making the paint style grommets helps as do the reinforcing pieces, and boltropes as they prevent tearing when puncturing holes for the various lines. I plan to try the cloth silk down the road, perhaps on Ernestina, to see how they compare. The price is definitely different! Allan
-
Planking methods
allanyed replied to Charlie pal's topic in Building, Framing, Planking and plating a ships hull and deck
I prefer to do the wales first then work up and down from there. As these need to be exact, if you work any other way there is the danger of them not being where they belong. Even a few thousandths creep due to width variations of the other planks can create problems when you get to the wales especially if working from the garboard then up. When working down from the wales, care does need to be taken as you near the garboard so the advice of measuring carefully is a must to prevent one strake being grossly over sized or under sized in width. Also keep in mind that each plank also needs to be tapered in width as it goes forward and often widened as it goes aft. You cannot use planks that are of even width across their entire length which is a huge problem with the material provided in kits if they are put on as they come from the box and not tapered before putting the in place. As mentioned above it is great advice to read the tutorials here at MSW on planking, it will help you avoid a lot of problems. Allan -
Electric sword or reciprocating saw
allanyed replied to stuglo's topic in Modeling tools and Workshop Equipment
Stuglo, Micromark has its place as their catalog is great to see what is available either through them, or through a search on one's own to find the same thing and sometimes, not always, at better prices. I have been to their facility in the past when you could shop at their store and at that time at least, they did not make anything, but were strictly distributors. When in doubt about buying gadgets from any supplier, this site is wonderful in lending experience of others that have tried these gadgets. Some worked out, others not so much. Regarding the saw, where would you use it in the model construction? Allan -
Stitching sails with sewing machine
allanyed replied to Jorge Hedges's topic in Masting, rigging and sails
I am in agreement with many of the comments above regarding sewn sails being grossly out of scale. Assuming on a full size sail the stitches are about 1/8" apart, perhaps more, perhaps less, at 1:48 they would have to be a few thousandths of an inch apart. I don't think this is possible with any sewing machine. Sorry to be a naysayer, but sewn sails really stand out and not in a good way. Just my own personal thoughts. Allan -
Stitching sails with sewing machine
allanyed replied to Jorge Hedges's topic in Masting, rigging and sails
Jorge, This is easy for me to say, but maybe hard to do, but consider throwing out the cloth sails and read on line or in books the best ways to make sails. Silkspan or silk cloth used on model airplanes are great substitutes. Making Sails for Ship Models from Silkspan, Parts 1 & 2 - YouTube is a good video on how to do this and Sail Making Supplement booklet by David Antscherl from Seawatch Books is a great tutorial on making sails. Allan -
So you have used silk cloth with acrylic paints with success? The material is certainly not inexpensive, but it is out there. Thanks Eberhard. Allan
-
Druxey and Eberhard, Just to be clear, are you talking about silkspan paper or silk cloth? Silkspan is a non-woven paper while silk such as K&S Aero cloth is silk cloth. Thanks for all your input! Allan
-
Eberhard, that is an interesting idea. I just checked on silkscreen material and this may be a good thing to test if no one out there has already tried. So far I found thread count from 83 TPI to 305 TPI and thickness from 34 to 100 micron. (0.083 to 0.1 mm if my math is correct) I think it a bit strange that they mix imperial and metric when describing the measurements. I just spent 20 minutes I will never get back looking for the thickness of 30 ounce duck canvas which I believe is close the thickness of sail cloth. Hopefully a member will know the thickness of old sail cloth so the silkscreen material can be compared regarding closeness to scale. Allan
-
I agree with all of the above, researching is fun, writing is fun, but the sexy part is the building and even more fun. Finding boat and ship knowledgeable proof readers should not be a problem even within this membership. It is a shame Bob Freidman at SeaWatch books is not taking on any new book projects. He took most of the pain out of the process but I am not so sure there are many, or any more for that matter, like him out there. Allan
-
Keith, The silkspan is a pain in the neck to handle compared to cloth because it is a bit fragile when wet and unpainted. But, it is far closer to scale than any cloth material I have used and with the acrylic coating is pretty robust and will last as long as cloth sails. There is no way to sew cloth and have it appear to be at scale for the scales most of use so I trust what Eberhard said as well as David Antscherl and his wealth of experience in many art media. Keep in mind there are three thicknesses of silkspan, but I have not seen anyone offering all three in recent years. I remember using silk cloth and dope 40 years ago for model airplanes and it was extremely strong. Other than the smell of the dope, I wonder if there are any other disadvantages to using silk as opposed to silkspan, if it can be conveniently found. Eberhard, the booklet is available from SeaWatch Books for $7 plus shipping. I believe shipping to France is charged at $13. Thanks for the tips on thickening the paint with gel for the grommets. Allan
-
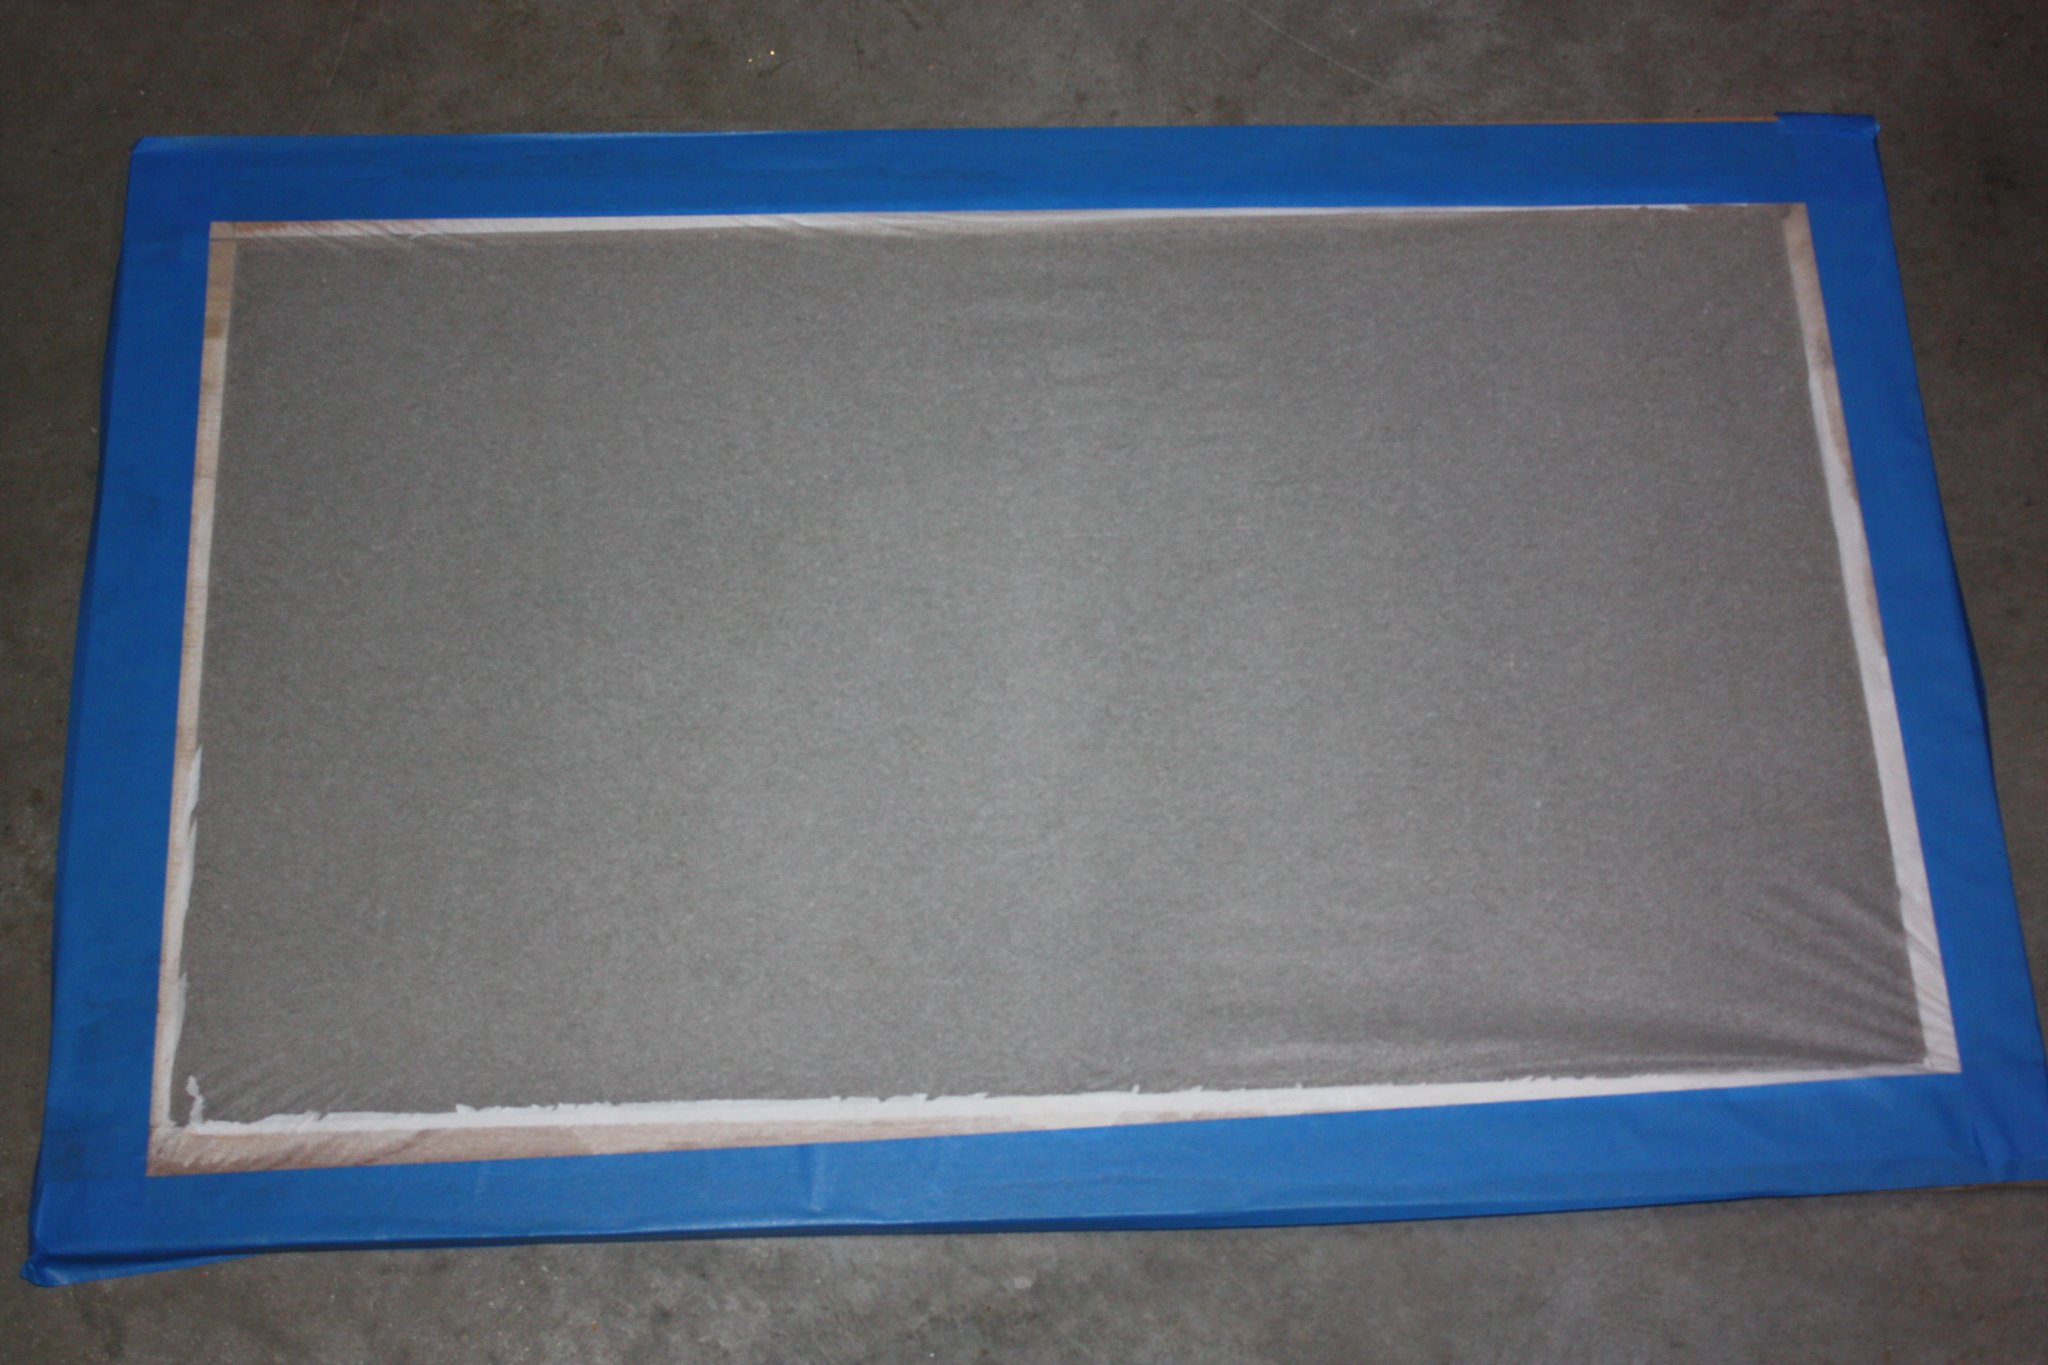
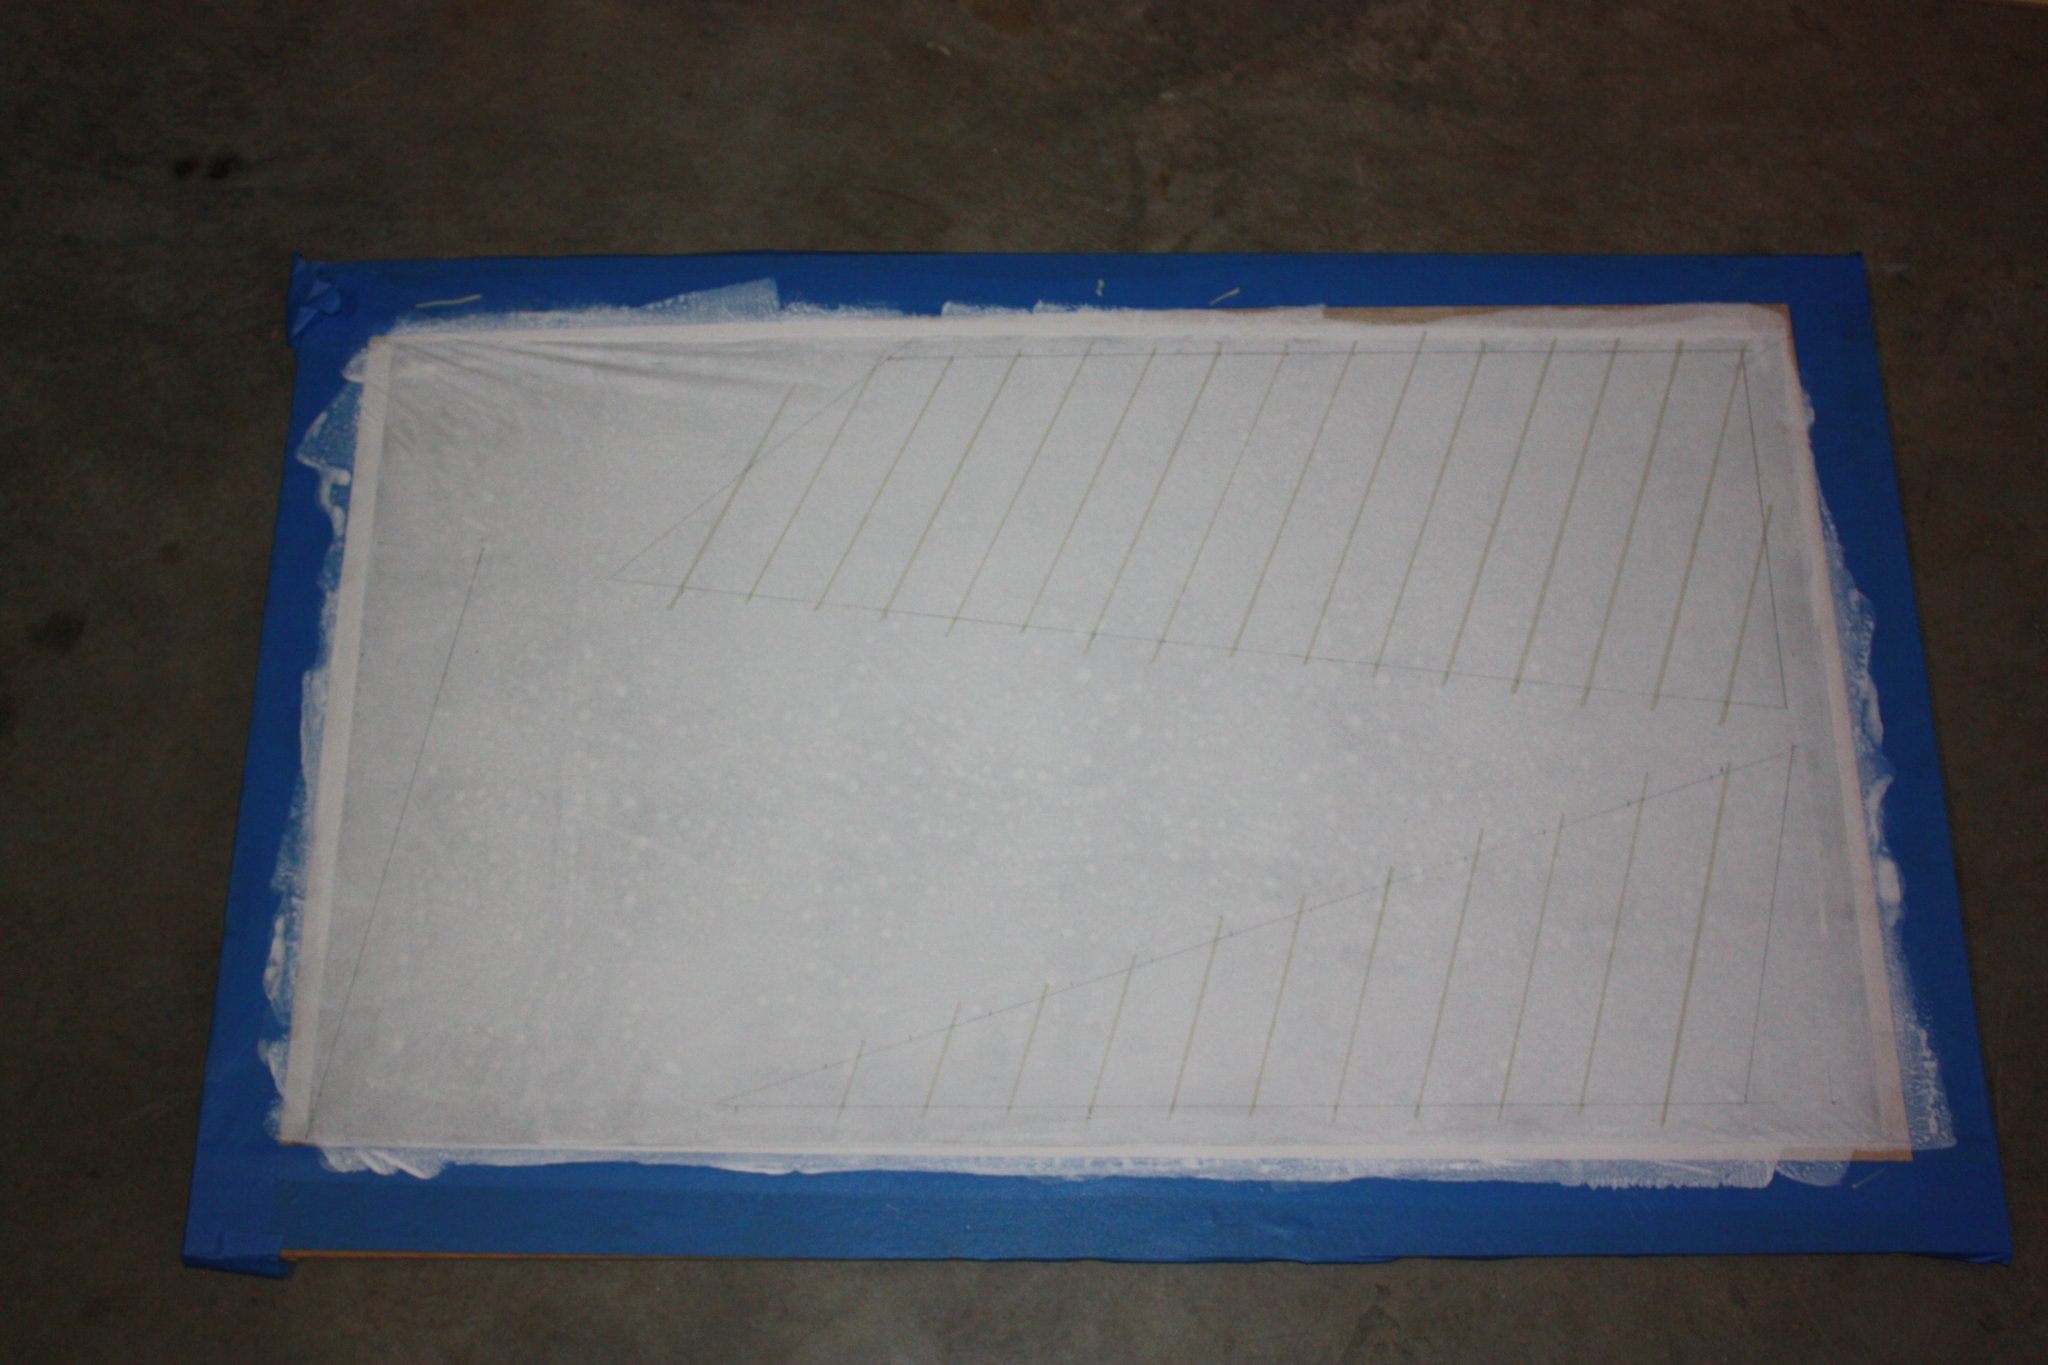
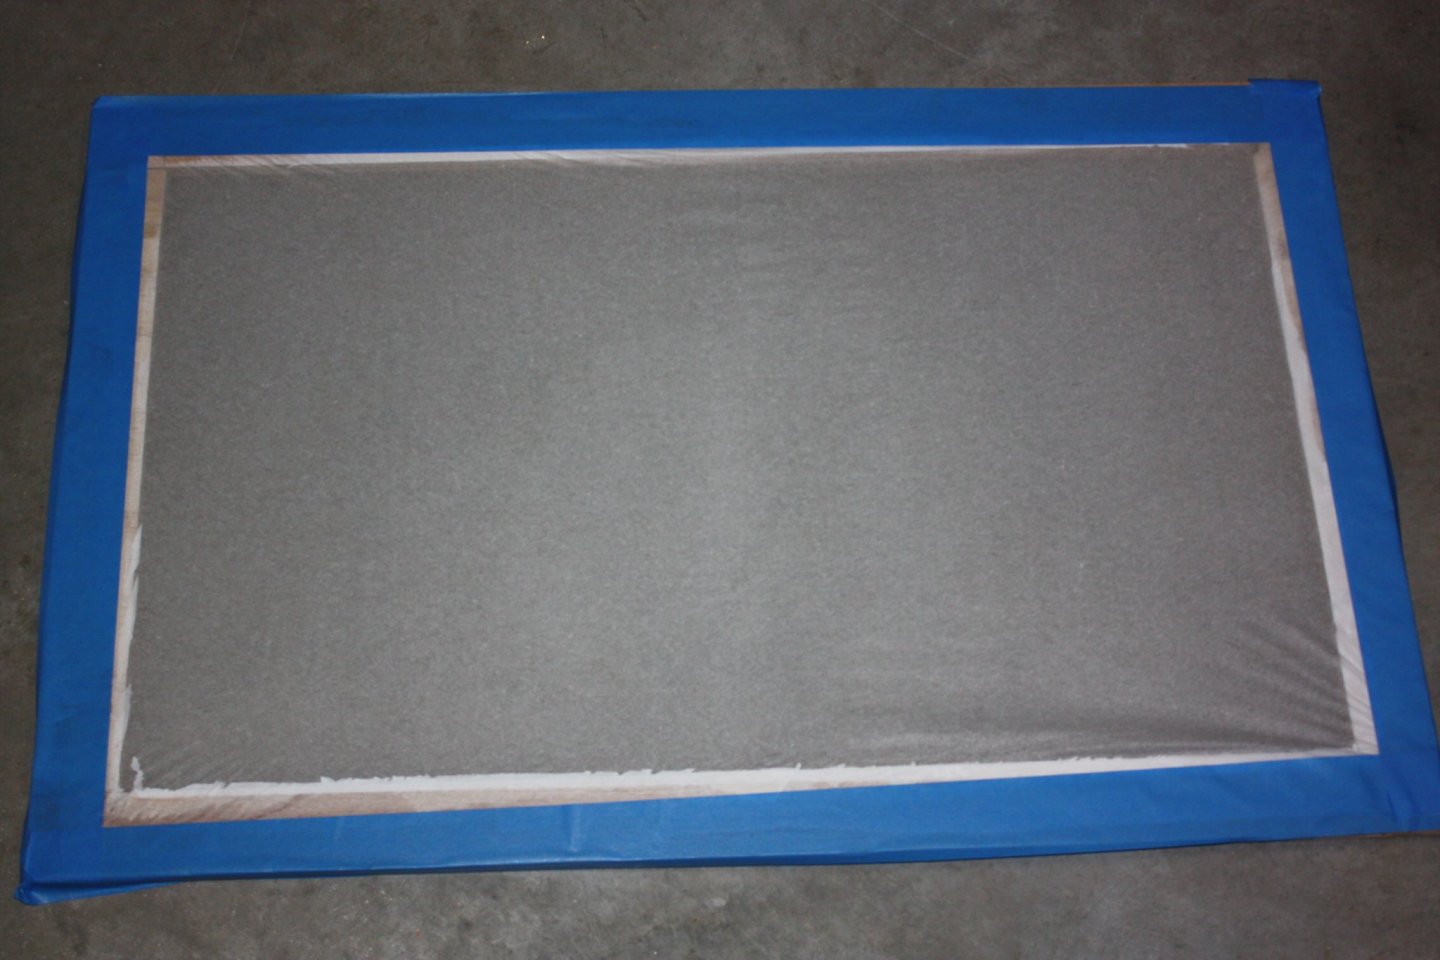
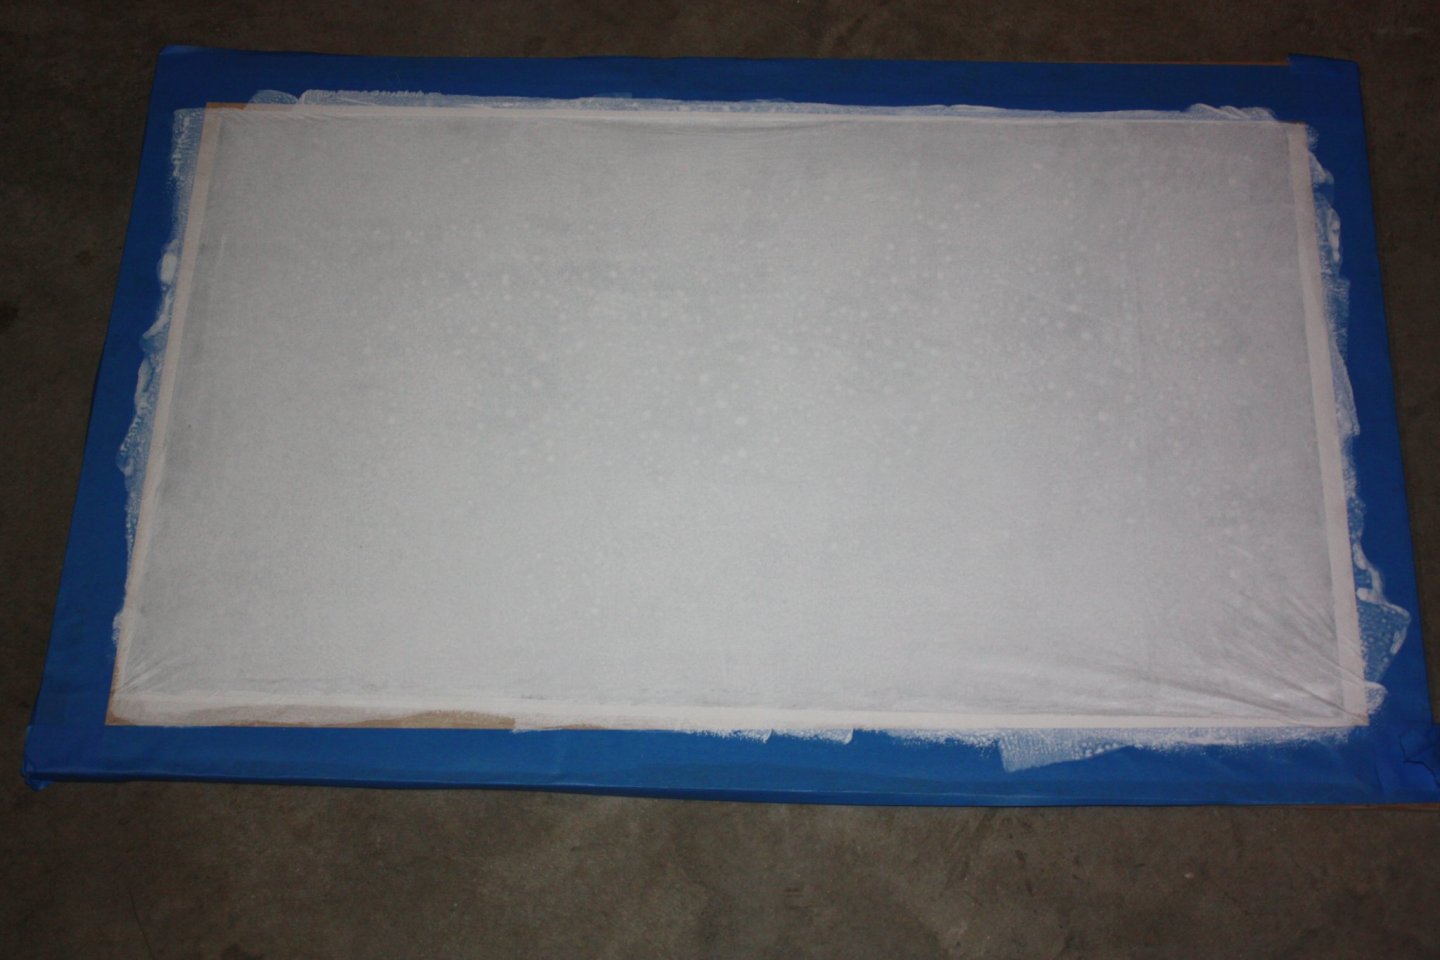
For those who have studied David Antscherl's booklet on making sails, much of what follows will be familiar. There are some differences though. I started with making two frames and matching plugs, one for the larger sails and one for the smaller sails. When starting I found that due to the large sizes of four of the sails it was easier to lay out the silkspan on the board while dry and cutting to match the outside dimensions of the frame, less about an inch all around. Once this was done I wetted the silkspan with water in a spray bottle while it laid on the board and frame and then applied tape starting with the short leg on one end. Once taped on the first side the silk span can be gently pulled to remove major wrinkles. One of the long sides was then tapped and again, major wrinkles pulled out. The last two sides were then taped down. When I went to the local Michael's store, lacking a true artist store nearby, to pick up the materials I would be needing I found they had no gummed brown paper tape so I used painter's masking tape to tape down the wetted silkspan. I had absolutely no problems with the tape as it adhered to the wetted material very well. I removed the plug once the silkspan was wetted down and laid it on a couple blocks so the sagging material did not touch the floor. Once dry the frame was laid back on the plug. This is not necessary, but having the plug gave me assurance that I would not tear the material by mistake. Just be sure to remove the frame and span as soon as it is painted so it does not stick to the plug. The sails on this vessel are to be white rather than a canvas color so for the paint I used tubed artists' titanium white acrylic paint, not unbleached white. I diluted the paint with water to create a soupy mix and painted the silkspan with the first coat using a foam roller. Smaller setups can be coated using a wide brush. The plug was again removed and the frame set aside to dry. Once dry the frame can go back on the plug or left off and a second coat of paint thinned to the same viscosity as the first coat was applied. Note that as careful as I thought I was, there were still some wrinkles at one corner. It turned out to have no affect at all in the finished sails. Once the second coat was dry I reinserted the plug and drew the sails. I have seen a video where the sail was painted with a single coat of paint straight from the tube without being thinned so this may be an alternative method for me to try on the next project. The next step was to apply the sail panel seams. The size of the sails precluded the use of a bow pen as it would run out of paint before the long seams could be completely drawn. Reloading the bow pen and starting where the line ended does not make for a clean line so I was at a loss on how to make the seams. After seeing a video on sail making with silkspan I tried cutting strips of silkspan to about 2" width (0.08") but the long pieces were misery to handle and apply to the sail. It worked well on the small sails and matte medium works beautifully in "gluing" the seam down and is totally clear when dry. I found Liquitex brand paint markers with a 2mm wide tip and thought to give this a try. The tip can be cut smaller before being primed if the lines are to be smaller than 2mm. I bought several colors that might be a good match. They do offer an unbleached titanium which I think would work very well on old canvas sails, but was far too dark for these sails. I wound up using their "parchment" shade and even this was a little too dark. It was the closest I could find so I tried a few practice strokes then coated the lines with a thinned mixture of the titanium white I used on the sails. It leaves the lines visible but more subtle. The three lines on the left are straight from the pen, the four on the right are after receiving the thinned top coat of titanium white. The thinned paint was about 2 parts paint to 1 part water so less viscous than the original coats. The second photo below shows the seams on the foresail and staysail before the top coat was applied. The reinforcing pieces can be cut and applied using matte medium as an adhesive at this point, but I was worried that the sails might need some trimming for a proper fit on the boat. I doubt this would be a problem for square sails, but for large triangular and trapezoid shaped sails, I found it easier to cut the sail a bit over sized at this point. Fresh scalpel blades are a must when cutting this material, a good reason to use these instead of Xacto and other similar knives. The blades are far cheaper when bought in 100 piece packs and are as sharp if not sharper. The sail was then placed on the boat to make sure the size was correct, and then the reinforcing pieces were applied. Next up was the bolt rope. I used tiny dots of carpenter's glue, then once cured, coated the entire rope with matte medium. I had difficulty using only matte medium without gluing the ropes in place first, but others may find it better to forgo the pre-gluing and just use the matte medium. When applying the bolt rope the sail was laid on a flat surface, the sail pulled tight in all directions, and held in position with some small weights to keep it tight during this process as it was no longer on the frame. If done on the frame, the sail will already still be tight. I tried making grommets with a small brush as described in the sail making booklet but had trouble making these consistently round and all the same size. I then made a small brass applicator of the diameter that I needed and dotted the grommets with this. The grommet material was the same titanium white used up to this point, but darkened with burnt umber to match the color of the running rigging line. Once dry I trimmed the sail material where it overhung the bolt rope. Next up were the reef points. Each one was threaded through the sail at the appropriate position and knotted on one side. Each laid down in different positions and would not hang down which I believe is a normal occurrence. First some matte medium was applied at the hole and left to dry. Once dry I placed some weight on each one, in this case using small clamps. Each point was then coated with matte medium and let dry before cutting to the proper length. Next up will be rigging the sails in place. Allan

-
TMJ The only thing I recall below the orlop level on any rates are filling rooms and magazines, at least in the 18th Century and into the 19th Century. These would be enclosed with light rooms, etc, no open platforms. Allan
-
I have never heard of heating a glued plank, but as they say, live and learn. When you heat the plank they should expand so when they cool they will shrink and I and surprised you have no gaps. Can you post a photo? Allan
-
Thanks Gary, very much appreciated! Not so much working fast as just being lucky to have a lot of hours available. I do stay out of the work shop after 4:30 or so. I found that happy hour in these retirement communities starts a lot earlier than in our past neighborhoods and a martini and power tools, scalpels, and chisels, do not work well together. Allan
-
There are numerous things to compliment on your model, but one of the many that I love seeing are the proper edges of the gratings. So many otherwise nice models have gratings that are not closed on the outer edges. There are times when I actually make the gratings first then adjust the openings and/or ledges slightly to fit the grating having the outer border a solid run versus teeth like ends. Allan
-
Jarod, I just watched the segment on the fiberglass application. This was extremely well filmed and explained. I enjoyed the segment on the bomber maiden flight as well!!! I take it from your accent, you are in the middle of Canada which is as you say, a bit of a ride to the ocean. Allan
-
glue for planking
allanyed replied to BOB S.'s topic in Building, Framing, Planking and plating a ships hull and deck
Carpenter's glue such as Titebond and other brands is what I have always used with success. For metal to wood, CA is OK but I prefer epoxy as it is not shear sensitive like cyanoacrylate glues. Allan -
TMJ Interesting question! If the ship was ballasted with Belgium blocks, there was not need for anything else to keep them from shifting as the were flat sided and stacked along the curvature of the hull. If river bed stone stone was used, I suppose it depended on the size of the stone. If the stones were the size of an Idaho potato, they would weigh about 4 pounds so maybe were prone to moving around, but if more like the size of a melon it would weigh in the neighborhood of 25 pounds and not so likely to move around. Keep in mind that the stones would likely settle and lock together. If there were pebbles and sand dumped in between it would probably wind up with a Brazil nut effect so the same situation would exist in the upper portion anyway. I will be interested to see any contemporary information. Allan
-
Hi Joe, Just took a seat on this ride and enjoying it thoroughly. The detail on the engines &c. are great. Regarding the engines, what is the finish materials that you used? From the photos, the finish looks great. Also, what is the wood that you used for the deck planks? Thanks Allan
-
I love horror movies, wish someone had filmed your incident, NOT. Would sure make a great commercial!!! I am VERY happy that all ended well and I thank you very very much for your building log, it has been a true pleasure to follow. It has also opened my mind to new subjects for future projects. Do you have a new project in the making? I for one will definitely follow your build if you start a log. Thank you very much for sharing. Allan
-
There are pictures of the rudder head cover but I cannot copy and post as they are in published books. The Fully Framed Model shows it in Volume II on page 280 as does Lavery on page 14 of Arming and Fitting English ships of war. The cover was sometimes actually a bench seat on larger ships that sat over the rudder head where it came into the ward room or other aft area depending on the number of decks and accommodation layout. Sorry I don't have anything more detailed to show you. Allan