rtropp
-
Posts
936 -
Joined
-
Last visited
Content Type
Profiles
Forums
Gallery
Events
Everything posted by rtropp
-
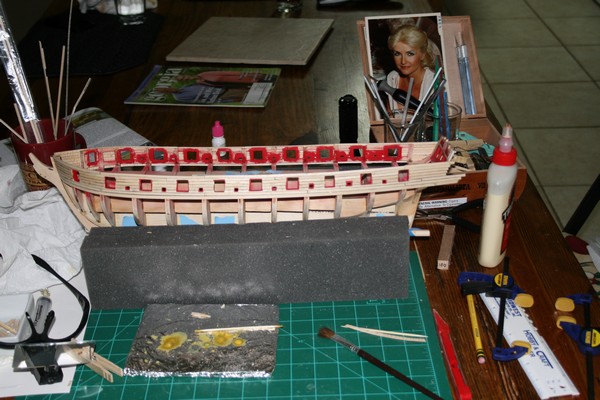
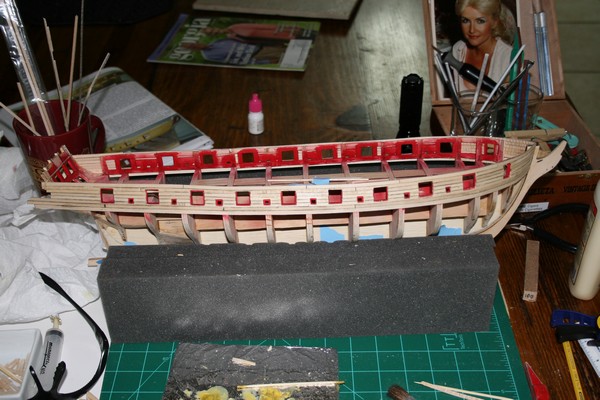
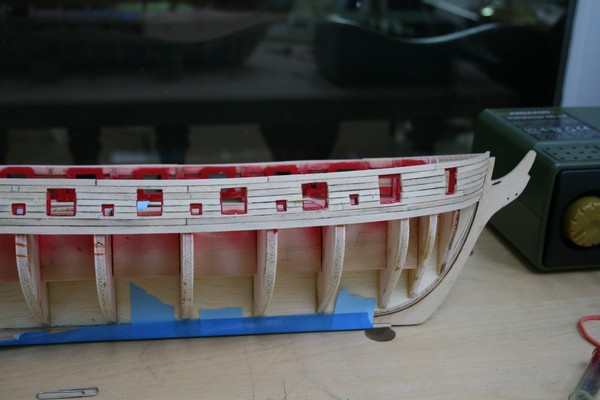
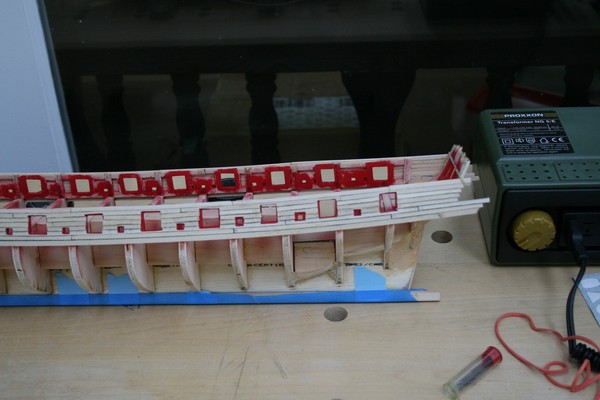
Ok, time for a progress report. I committed to finishing the planking above the wales by today, and have accomplished that... sort of. The problem with the red paint is it really makes the errors stand out. The planking is not too bad, but the ports will need trimming. I will do the cutting as shown by Dirk using a flat chisel to even things out. On many ports there will be too much of an edge. I will have to figure that out when I get to it. Perhaps, even having some of the ports closed... that is if I can do a better job when I get to the port lids. I had a couple of places where the planks were not close enough to the ones below. So, instead of filler, I took some scrap from the planking and sanded them down to use as a wedge. I don't think I ever worked with slivers of wood that thin. You kind of make one out on the third picture, third port. Not sure if I should trim the portholes now or wait until I am working on the lids. Also, really tempted to sand what I have to see how it will look, but I am pretty sure I should wait until I have more of the planking done to avoid scratches. I appreciate any suggestions. Meanwhile I will start on the stern planking next. Richard
-
What do you use your mill for ?
rtropp replied to captainbob's topic in Modeling tools and Workshop Equipment
Hi Martin I have seen a couple of threads, including the one you mentioned, that relate to Milling. Funny thing is that on none of them do I see and pictures of actually milling a part, or mention of parts that have been milled. I am thinking that actual examples, even pictures or parts made by milling is what Cap'n Bob was hoping for in this thread. The only actual use I have seen, thus far, is for drilling. So, unless something comes about to change my mind, or I win a lottery, milling is probably on the back burner for me. Richard -
Hi Bob, I thought I would tag along for the build. I am getting more and more interested in scratch, or at least Bashing, and I have appreciated your thoughts on other threads. Richard
-
X-Y Attachment for Dremel
rtropp replied to Martin W's topic in Modeling tools and Workshop Equipment
I agree Bob, curiosity is not a reasonable excuse for that kind of out lay. At least not while there are other tools that are a higher priority. Perhaps if I pick up another consulting assignment . also, If I keep adding power tools I'll have to build another room. That really makes the purchase expensive Richard -
Floyd, I noticed on Dirk's Syren site that you are ordering some wood. I ordered some a while ago just to test apple and boxwood. Where do you get your wood from. I am looking for additional outlets. Thanks Richard
-
X-Y Attachment for Dremel
rtropp replied to Martin W's topic in Modeling tools and Workshop Equipment
Bob: The reason, for me, is to learn how to use one. I am doing that with other tools for which I have no experience. (White collar background with almost no use of power tools.) In general: Given my new retirement, I have time to pursue things that look interesting. Milling looked to be very interesting for making parts, both wood and metal. I think that its usefulness will depend on whether I start scratch building. (Since I also dabble in fine art, using a mill to turn out parts for sculptures also seems like it would be interesting.) I tried to find a local course in Georgia, but they all seem to be focused on full size equipment and am not sure that would help. I am still not decided on how to approach this. I don't want to invest too much for a learning experience. I'd rather invest cheaply, then upgrade if I found it useful. So far, my choices look like either, the Vanda Lay mill with my trusty, 35 year old dremel, the Proxxon as a lower end entry, or just follow EBay and see if I can find a used one that has a return policy. Since it is not an urgent need, I will be interested in seeing the Vanda Lay review that is planned. Thanks, Richard -
compound table for Dremel work station
rtropp replied to rtropp's topic in Modeling tools and Workshop Equipment
Floyd, I appreciate that. Sometimes its hard to let go of old, trusted tools. They were just made better. Bob's work station looks a good deal sturdier than the one I just bought and as mentioned in the "x-y for dremel" thread, the newer dremel workstations are too flimsy to function as a mill. So, I have to consider how much I am willing to pay for an education. It doesn't pay at all if the tool won't do the job. That would just be frustration. So I will have to decide, if I really want the learning experience, do I get a low end mill like the Proxxon, or or something even less expensive, like the Vanda Lay mill. Their difference in price after all is said, is not that much. Bob, Thanks for the pictures, they give me a good idea of my table options. There is another thread "X-Y For Dremel" in tools and I think that it has as much, or more information. I have already been posting to it. Wish I had seen it before I started this one. I think we should close this one down and all of us use that one so we keep all of this in one place. Sorry for the duplication, but I really appreciate the experiences shared. Much Thanks, Richard -
compound table for Dremel work station
rtropp replied to rtropp's topic in Modeling tools and Workshop Equipment
Casey, The shaper / router also takes polishing and grinding bits. That frees up two hands to manipulate the piece ... just saying Richard -
Thanks to all for your thoughts. There is the challenge of improving hand skills and I am sure that will continue for me, but I am not a purist. Part of the fun for me learning and using new tools. Also, I think they will be useful as I begin kit bashing or go to the dark side (begin scratch building.) Yes, there are those tools that just were bad ideas, and still will be. Thankfully being able to sell on EBay cuts that cost down to manageable size. Floyd, Given my skills, the speed control seems to be important. For instance, I bought the proxxon pencil sander vs. the microlux because of the speed control. I found that I am constantly changing the speed as well as the sandpaper to match the work I am doing. I figured that the same would be true for the workbench sander. Also the proxxon is less expensive. Unless the guides or platen are really below par, it should work for me. Another reason for buying the Proxxon sander is that I have my eye on the Byrnes saw, and that will set back my budget. I have some samples of wood coming my way and if they make as much difference as I have been hearing, I will need a good table saw and that is where I think I would need the most precision I can get. The wood I ordered are only a few samples but they are not cheap so less waste is important. Dgbot, I will get the 80 tooth blade. Also, I have spent a lot of time on Youtube lately and it helps to get an idea of the safety requirements. I have been looking for local training but all of it is based on full size machines and I am not sure the skills are transferable. My career has been white collar and at this stage I want to learn more about miniature tools including table saws, milling and lathe and the internet has been my most useful source. Books just aren't the same. Ok, time to get back to the boat. My goal is to have the planking above the wales completed at most by the end of the labor day weekend. Richard.
-
compound table for Dremel work station
rtropp replied to rtropp's topic in Modeling tools and Workshop Equipment
cdogg, dremel makes a shaper / router table # 231. might be what your looking for. Amazon has it for about $30. Richard -
compound table for Dremel work station
rtropp replied to rtropp's topic in Modeling tools and Workshop Equipment
Bob, How old is your workstation? Richard -
X-Y Attachment for Dremel
rtropp replied to Martin W's topic in Modeling tools and Workshop Equipment
great thread. I hope you are all still watching it. My objective is to learn more about milling and its application to wood ship modeling. I was looking for an inexpensive solution for learning. I have the Dremel Work Station, but from what I am reading, the work station isn't really stable enough to give decent results with an x-y added. Bob, I thought I read that you were using that combination. How does it work for you? The proxxon x-y looks to be about $100 on Amazon so it is not a cheap solution but if it works with the dremel, it would be cheaper for me than most other solutions. (already have the dremel and the workstation.) Also, how complex is the drilling you had to do to make it all fit? JPett, I took a look at the Vanda Lay site. I appreciate the tip because they look to have some pretty well built equipment. But, I saw that they also have the Acra Mill Plus. I wanted to ask that, if the purpose is milling, why get the drill stand ($119 plus cost of proxxon x-y)over the mill stand ($229 with x table, another $40 for Y table accessory)? I appreciate everyone's input to this thread. I had asked questions about dremel for milling and it seems most of my answers were here. Thanks Richard -
What do you use your mill for ?
rtropp replied to captainbob's topic in Modeling tools and Workshop Equipment
Hi, In another thread about tools, I was trying to find out if there is a compound / x-y table that would fit on a Dremel Workstation for rotary tool. Wait... don't yell at me. I know I said Dremel and some would consider that sacrilegious. I have never done any milling and I wanted to try out some of the basic practices before considering the value of purchasing a fairly expensive tool. I already have the Dremel Workstation for the rotary tool. I hoped to set up something on the cheap to provide an initial learning experience. I understand their is compound table available for the Proxxon rotary stand so I had hoped there would be something similar that would fit, or could by jury rigged, onto the Dremel. I appreciate any suggestions, Richard -
My thought process so far: Table Saw: I looked at the Byrnes saw on their site as well as read comments on MSW. I priced with added components that sounded important for my use, i.e., extended rip fence and zero clearance insert, I do not think I would need the tilting table, at least not at this time. It comes with a 24tooth carbide blade. I am not sure if I would need a 36 tooth, or the 80 tooth early on. The Byrnes is kind of a stretch, but given the cost of wood such as Swiss Apple, I would want to avoid producing too much trash, and the Byrnes is the only saw for which there is consistently good reviews. Sanding: I have created sanding jigs, and they work reasonable for very small end cuts, etc. but, given the amount of sanding I do, I still lean towards the small workbench sander with its adjustable guides. The Byrnes looks great but is a third more expensive. I suspect I can get away using the Proxxon for sanding. Milling: I think I understand your applications. I need to learn more about milling, perhaps try it out. I am going to continue looking for a reasonably effective x-y table to use with my Dremel work stand. If I find the Dremel sanding set up limiting, I can always consider upgrading. If not, there would not have been that much of an investment. Scroll saw: The jury is still out on this but they are inexpensive enough that it should not be too much of burden if I run across a real need. So, I will hold off for now. Conclusion... at least for now: So, given the great advice from everyone I am leaning towards buying the Proxxon Sander because I expect to use it as soon as it arrives. Wonder how well it would do chamfers. The I would spend the extra for the Byrnes Table saw, even if I have to delay the saw. If anyone knows of a source for information (book, YouTube, etc.) about the type of Milling that Dirk discusses for wood models, please let me know. All I can find seems to related to metal milling. But, better get back to the boat or I will never move past the planking. Again, I appreciate the time and help you all. Richard
-
Floyd, Asat, I appreciate the info. Seems the table saw is much used. As I wrote earlier, I had always thought the table saw was for cutting strips from sheets. I am curious. What kinds of cutting gets the most use in kit building? I was using my jury rigged sander so much that replacing it with a proper tools seemed like a good idea. I was concerned that the Byrnes sander did not have speed control. It would seem useful to be able to adjust the speed to the delicacy required by the piece. My tendency is to work slower so as not to cut the wood to quickly. You all do not seem to have missed having speed control. How do you handle more fragile or delicate work? Thanks, Richard
-
I am about to show my lack of knowledge about power tools. Please bear with me. I am not familiar with milling. I did some research on Youtube. It seemed to be a lot of grinding and shaping metals, but I can see where it would apply to wood parts. I need to try my hand at it to see how it works. Then I could value the purchase. Right now I have Dremels. The Dremel workstation (rotary tool holder) looks similar to the Micromot drill stand. I do not know if the Dremel Workstation would take the Micromot compound table. I am checking in a few places to see if anyone knows of one for the Dremel. There are a bunch on Amazon, and less expensive, but I am not sure if they will fit or have the same functions. On Amazon, many are called x-y tables. I did not think of the table saw as a primary tool for kit building. I thought it was used mostly for cutting wood sheets down to strips or for cutting larger pieces to usable sizes. I was not even sure it worked as a chop saw given the small size of the parts. I would appreciate if you could give me an idea of what you use it for in your Syren build. I am disappointed to hear that the sander may not be very useful. I had hoped it would be very useful for smoothing, shaping, and squaring parts, giving them additional "polish" to make up for my lack of manual dexterity. Meanwhile, I am making progress on the upper planking and that is rewarding. It just takes a long time to cut around the ports. I had two layers that were just straight planks between ports. Boy did that seem easy after all the shaping. . Thanks, Richard
-
Does anyone know if there is a compound table for the Dremel Rotary Workstation, or one that will work with the dremel rotary workstation? I want to try my had at precision drilling and milling but would rather not replace all my Dremel equipment to do this. Thanks, Richard
-
Hi again, I have an opening in my budget for a couple of power tools. I am considering the Proxxon 37060 Disc Sander TG 125/E and the Proxxon 37088 Scroll Saw DS 115/E. I looked at the Byrnes sander, and it looks great, but does not have a variable speed and from the description, cannot have a variable speed as an attachment. That is a deal breaker for me because I need to be able to slow things down. Moving the part to the center of the sanding disk would probably not work for me. Any suggestions or thoughts are appreciated. Richard
-
Well, I am making some progress on the planking above the wales. I was not cutting closely enough and the sanding was ruining the lines. I forced myself to cut more closely and it looks a lot better, at least to me. I almost tore it down again, but if I keep doing that I will never get anywhere. Augie, I made use of the alcohol suggestion for removing glue it helps. Dirk, I will use your suggestion for cutting the portholes to even out the ones I have. This may leave too much space around the ports on some but I will deal with that later. Perhaps keep some of the portholes closed As I said, if I keep tearing down I will never get on with the next part. Larry, you were right, for the small parts holding it is best. I will post more pictures when I get the planking done above the wales. Thanks everyone for your suggestions. Richard
-
Mike, Thanks for the nice words. I have had that workbench of quite awhile. I obtained it when I began wood sculpting years ago. It's a nice sturdy base for working and the vises on the sides as well as the dogs on top are very helpful, especially for setting up jigs for various reasons. I am still considering the best use when modeling. I am using it as a base to work on with another table for setting up Dremel and other jigs. I am thinking that I should be doing the reverse, working on table and using the bench for power equipment set ups. I would need to buy a heavy table to accomplish this and I really have my eye on a couple of Proxxon tools, sander and scroll saw. Decisions, decisions, decisions. Its a tough life but someone has to do it. Richard
-
Just a quick note. I removed the rest of the planks around the ports and am redoing all of them. I think one of the problems was that I was working too quickly. So, the progress is slow but I am learning to handle knife a little better. I should have so pictures soon. Richard
-
Augie, Terrific piece of work. Its great for me to be able to reference it as I work on my kit. At my early stage, I can only imagine how it feels to finally case it and put it on display. Thanks for getting it all on the forum. Richard
- 1,668 replies
-
- 1
-

-
- syren
- model shipways
- (and 1 more)
-
Augie, Thanks for the 70% rubbing alcohol tip. The way I am going I will have plenty of opportunity to try it. Dirk The way you cut the gun ports looks a lot simpler. I need to get a couple of blades that fit and will try it. That method should straighten out the planks I have already glued up. I suspect I will end up with openings that are little greater than 1/32. Not sure yet if that is a big problem. Richard
-
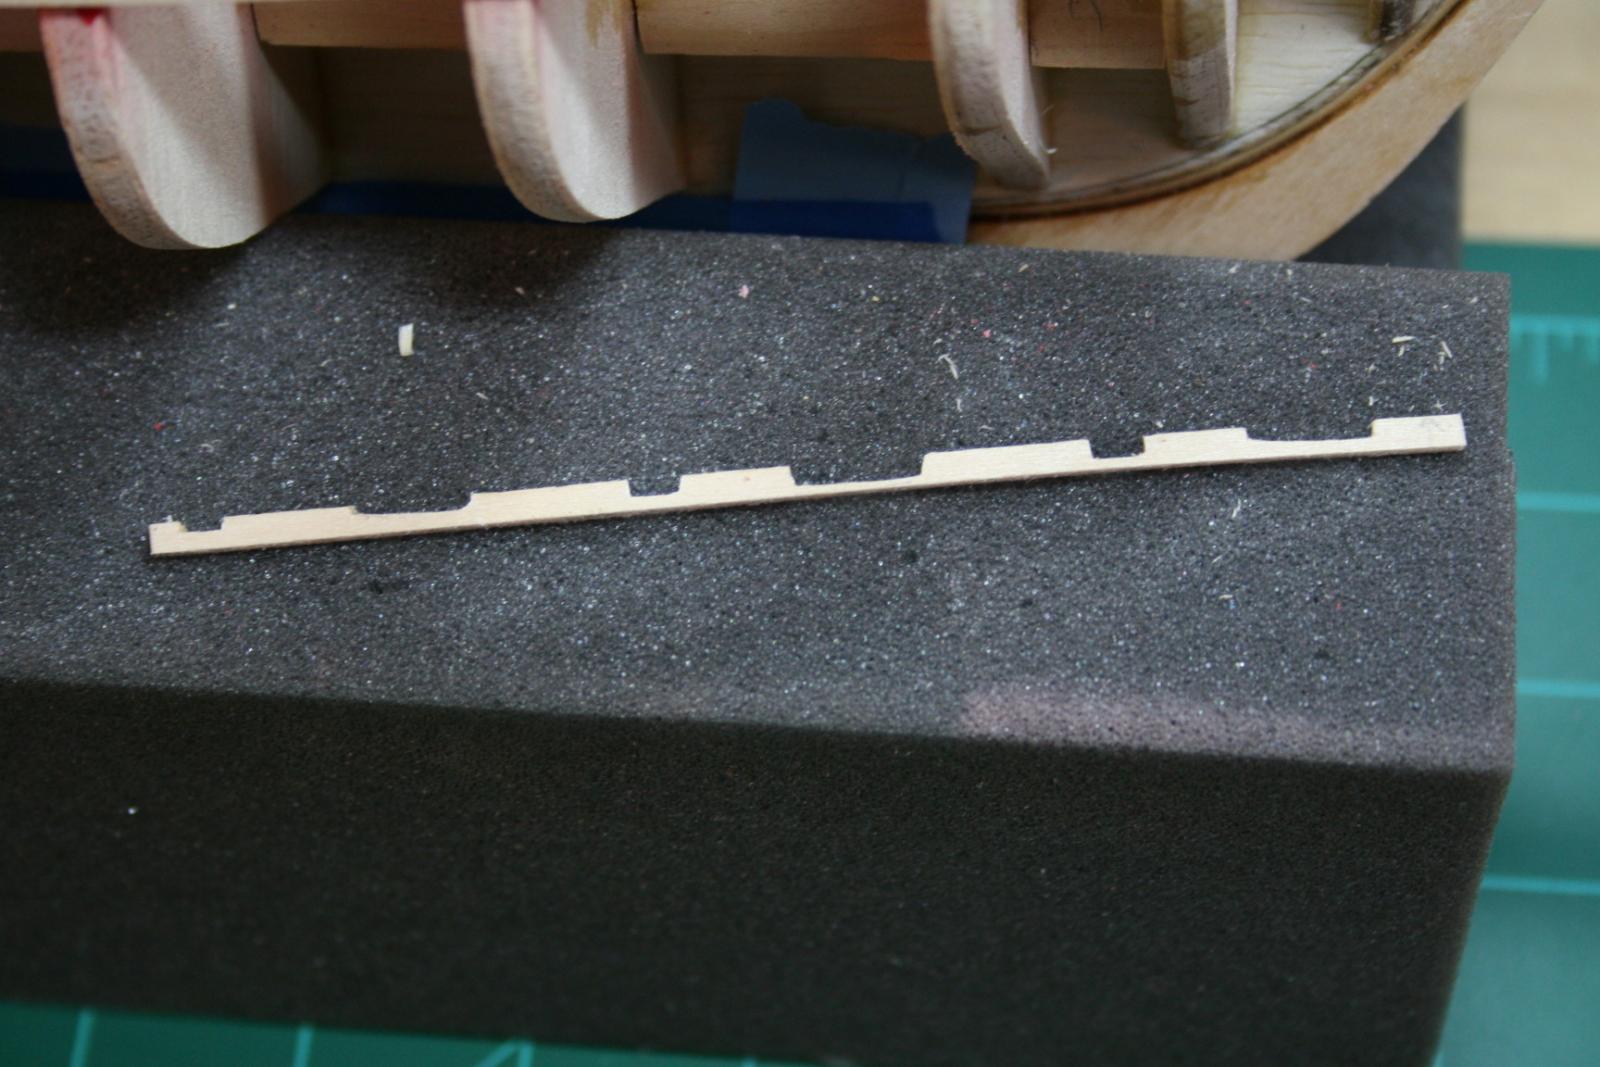
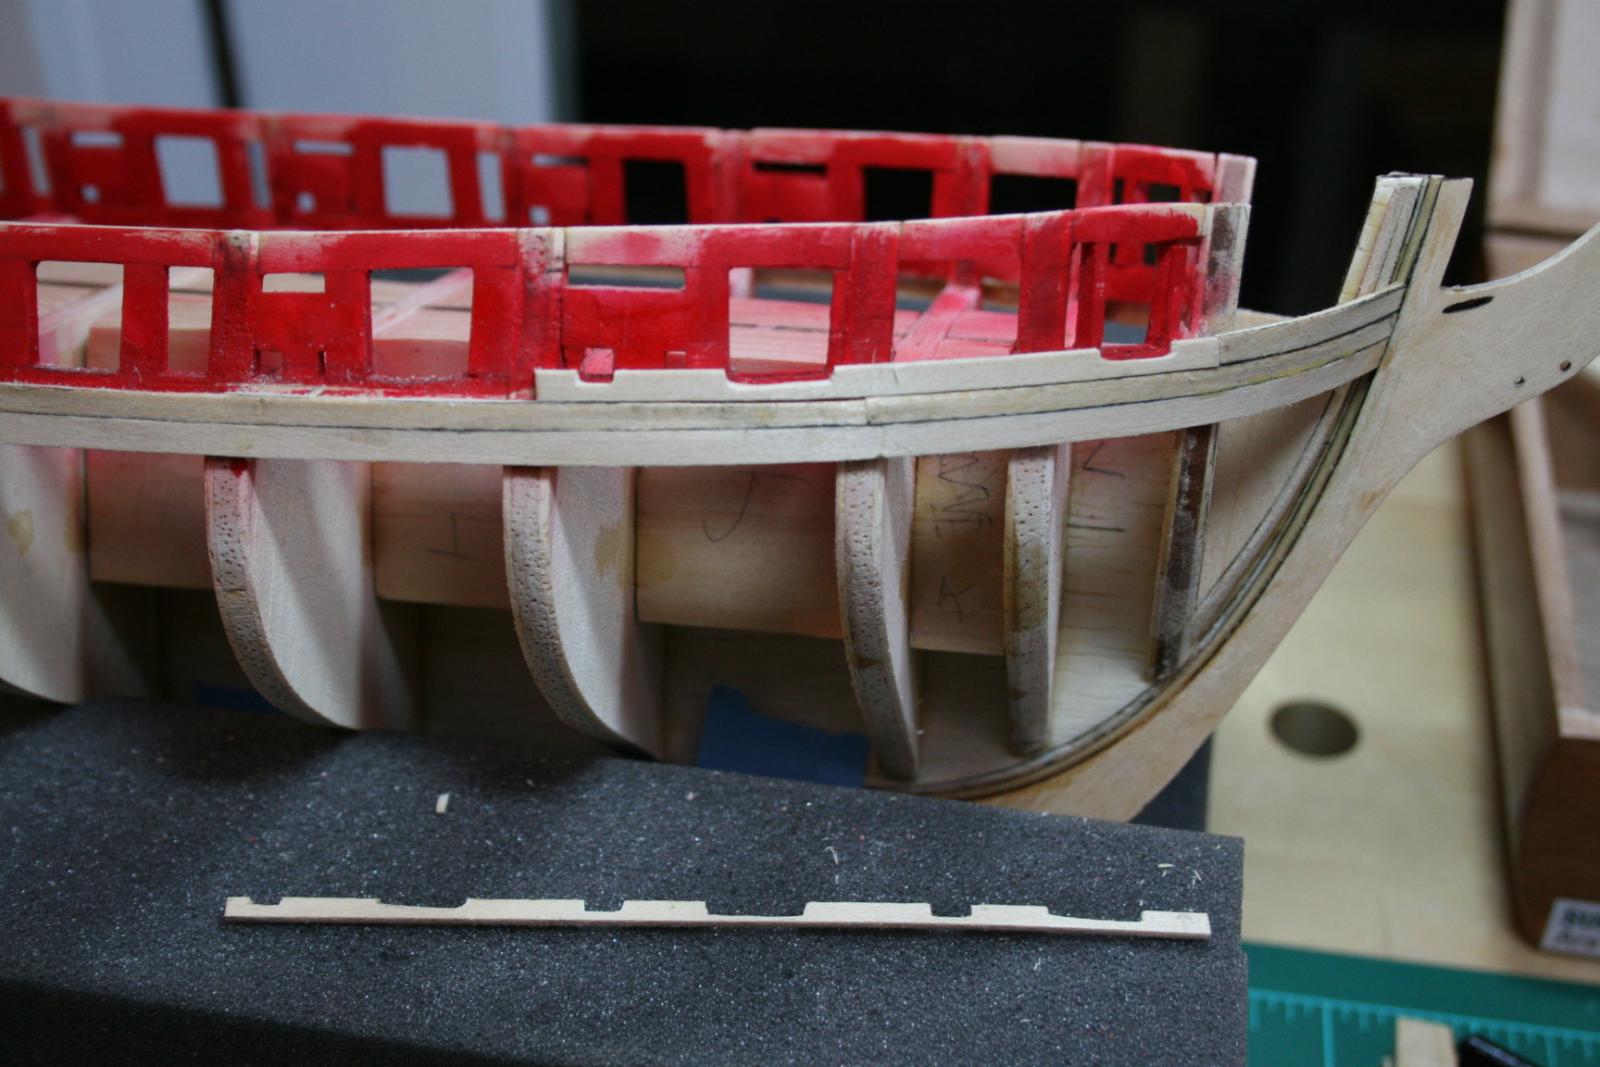
Well, finished cutting away the really bad gun port planks and began replacing them with not really bad planks... ok, there not really good either.. not yet anyway. After removing the planks, I had to sand and repaint. Not sure if I made it worse, but since it is an internal part it should not show. As I was rebuilding I thought of a quote, really a rule, that I learned with my healthcare clients. "Primum non nocere." This means "First, do no harm." It is hard to deconstruct when the outcome is potentially worse than the initial problem. Luckily this is wood and not people. Once the refinishing was completed, I went back to planking. I measured using the boat itself as a template to scribe the cutting lines. I cut with a number 11 Xacto or an Xacto saw blade so that the notch is smaller than needed. Then I sand for what seems like hours with small metal files and 1/8" wide sanding sticks. (the sanding sticks have been a life saver.) The area is so fragile that I cannot see how I would use an electric sander, even my small Proxxon pen sander. My metal files are very fine but they are scribed on each side. I would like to find a set where only on side is scribed so I can file down one edge without biting into another. So far I have spent four plus hours and only have one very mediocre plank completed and another plank that is about 75%. I believe I am able to see some improvement as I climb the learning curve. The picture below shows the replacement plank on the boat. Wish I could say that it is the one I tore out but it isn't. On the ship cradle is the second plank in progress. This picture shows a close up of the in-progress plank. Is pretty close to complete but need to work on straightening out the edges. I think I am hesitating a lot in working the notches to get them a little straighter because I am worried that I will cut through the bottom and break the plank. (That would be frustrating.) Honestly, It's hard to believe that I am working on pieces that small. It's not woodworking, it feels more like surgery. Richard


-
Larry, Not sure I have mastered one handed solitaire with cards and don't want to get glue all over my phone I have found that wood clothespins (the kind with the spring) are working well without marring the surface of the plank. It is proving helpful, at least with the upper planking. Since the fit is so critical, I want to make sure that a distraction doesn't cause me to move the plank once it is placed. Once I move past planking around the darn ports, I think that, as you suggest, just holding the plank will be easiest. The PVA seems to firm up pretty quickly. Floyd, I have ordered the thicker CA but, for now, I am using just PVA does seem to work so I may continue with it for the planking. It should hold the plank at the bow. I am using the plank bender shown a couple of post up and it really seems to work on the bow curves. All, I am going through what Dirk calls Deconstruction. It is not a pretty sight. Other than just cutting away the plank, is there anything that can be used to weaken the bond of the PVA so I can just pull it off without damaging the surrounding work? I have the CA de-bonder but do not know of anything similar for PVA. Thanks all Richard