NavyShooter
-
Posts
692 -
Joined
-
Last visited
Content Type
Profiles
Forums
Gallery
Events
Everything posted by NavyShooter
-
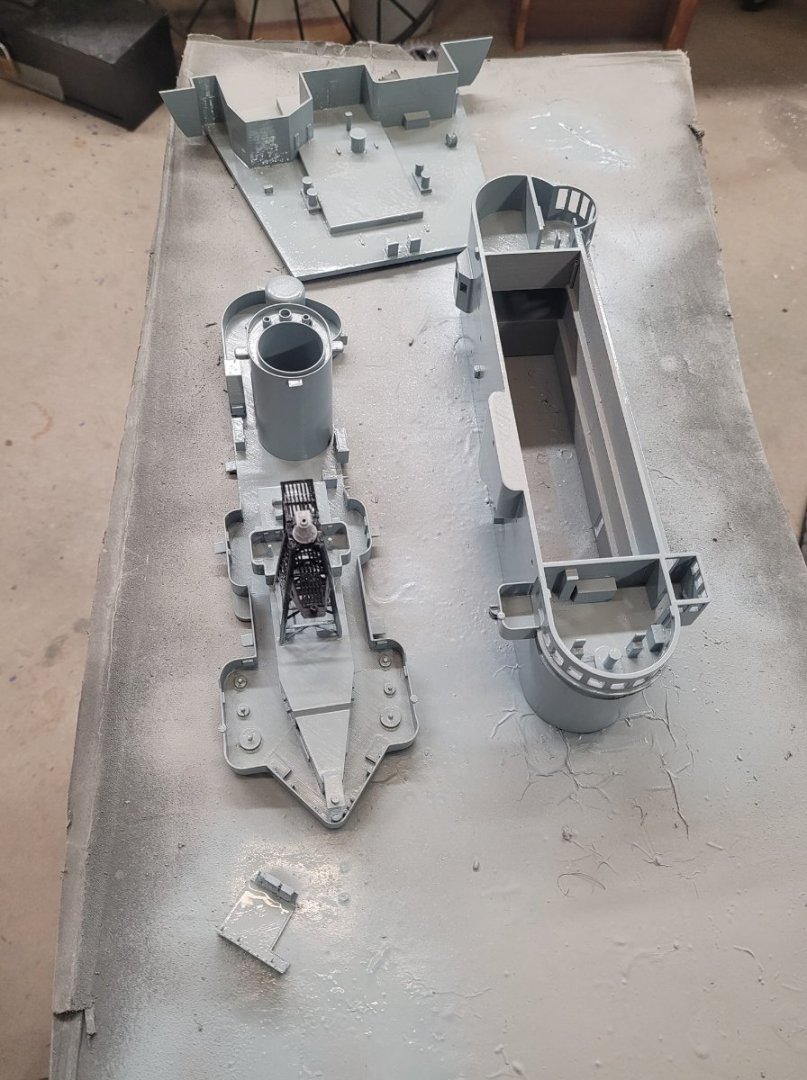
 If you note the 2x round holes in the top surface, those are 10mm diameter, and 5mm deep. I have some magnets...plan is to add them and the island will be held on by magnets. 🙂
 -
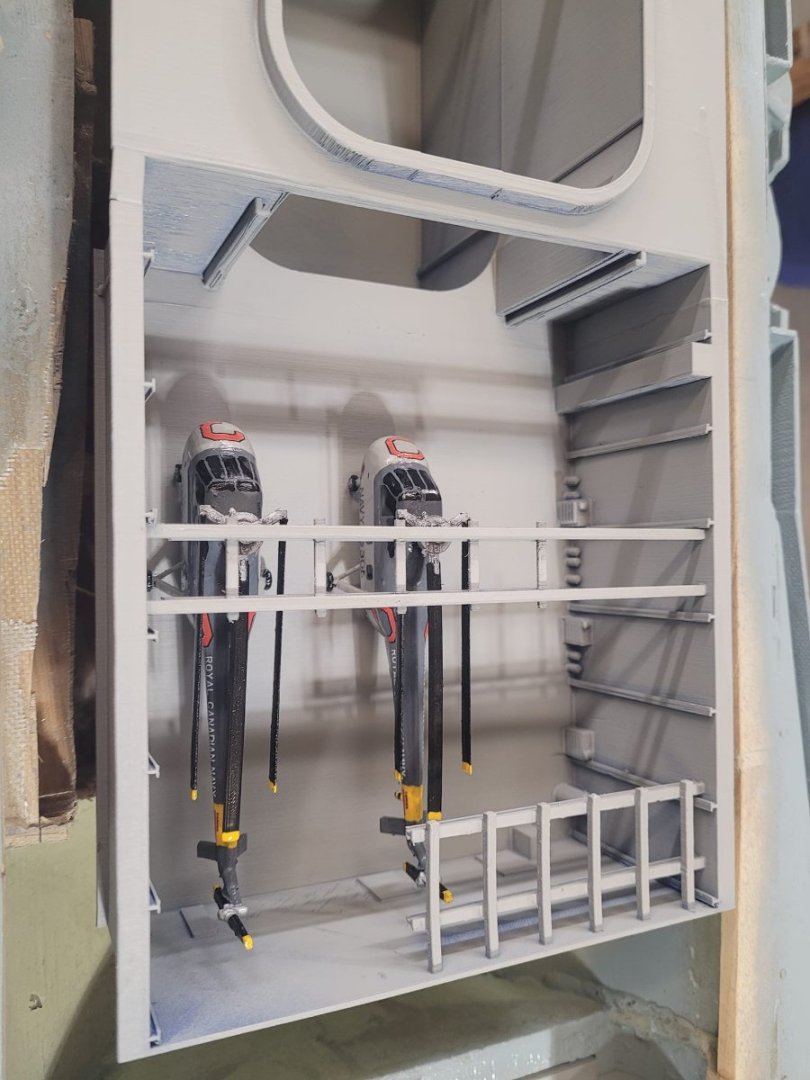
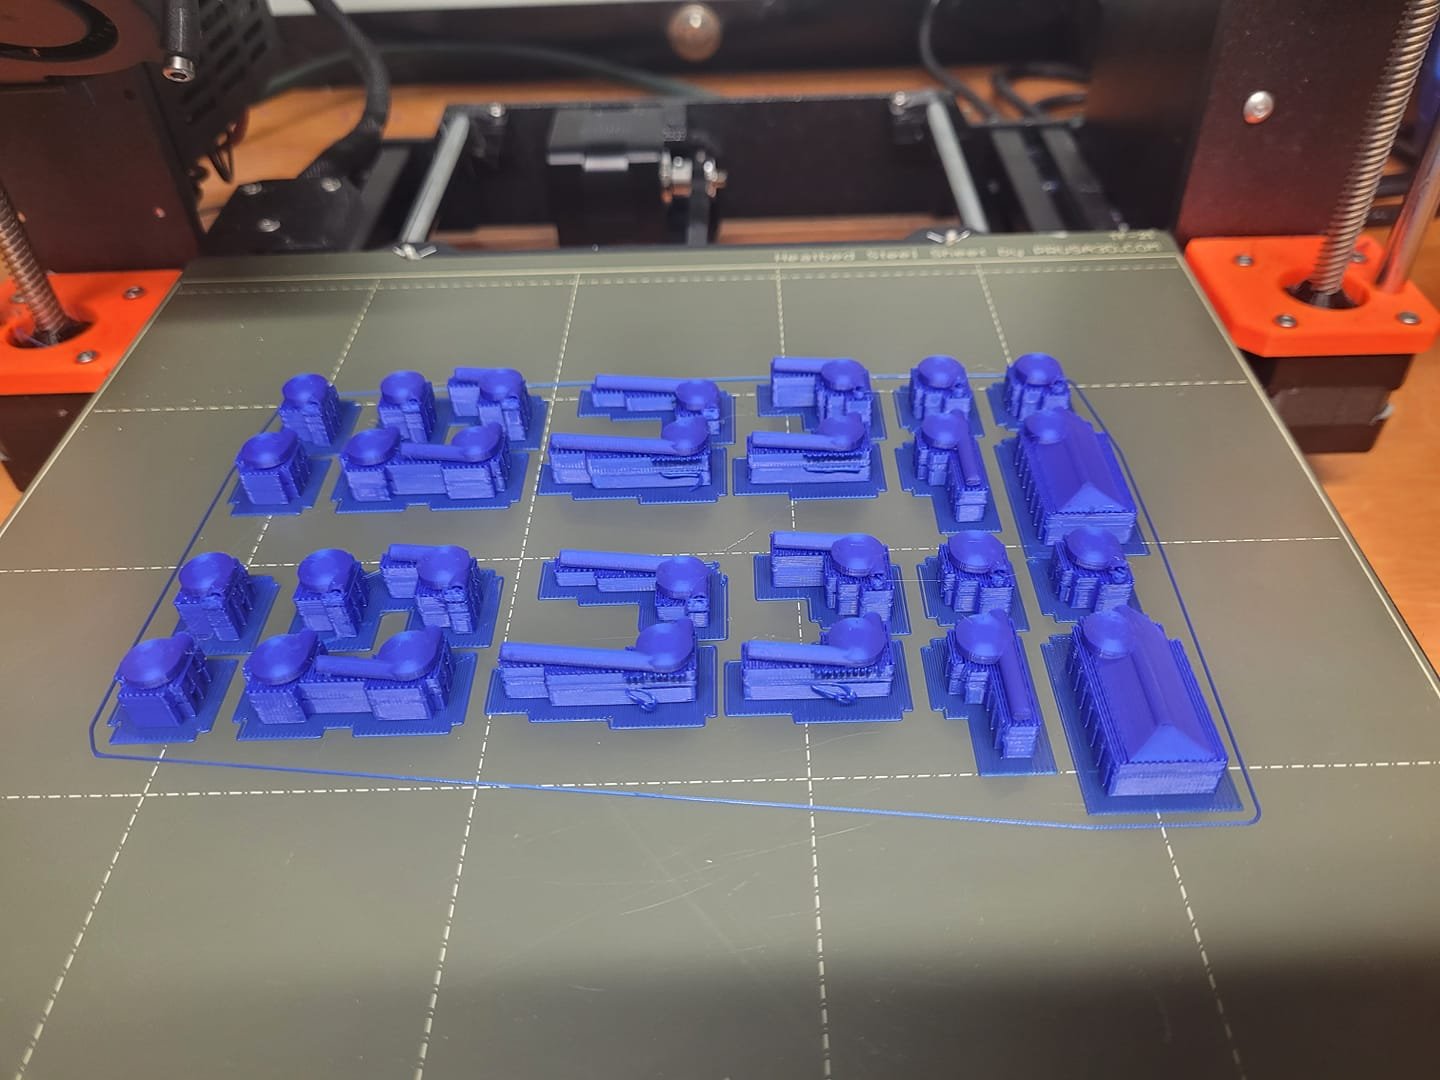
I've been pondering how to attach the 3D printed island to the deck, and have come across a solution. I took the 3D design, and superimposed it on a simple block - and made it a negative space/shape. So, now I'm left with a pair of blocks the size and shape of the inside of the base of the island. I will simply be able to attach these blocks to the deck, and drop the island onto them, and it should stay on. Note, the 'room' is actually visible space through a door in the island, so I built a space to be 'seen' in the shadows. I'll probably stick an LED light in it too just for the effect. This will take about 6 hours to print, so I'll let it run while I'm at work tomorrow and we'll see how it fits! Considering I'm planning to bring the ship to a show in a week and a half, I've made myself a list of priority items to complete in the time I have. Priority 1 - Build a keel block/carrying support Priority 2 - Assemble and test the elevator system Priority 3 - Mount the Island and get some LED lights working and the Radar dish spinning Priority 4 - Detail painting in the Hangar deck I suspect I'll be lucky to get the first 3 done. We'll see what the week brings!

-
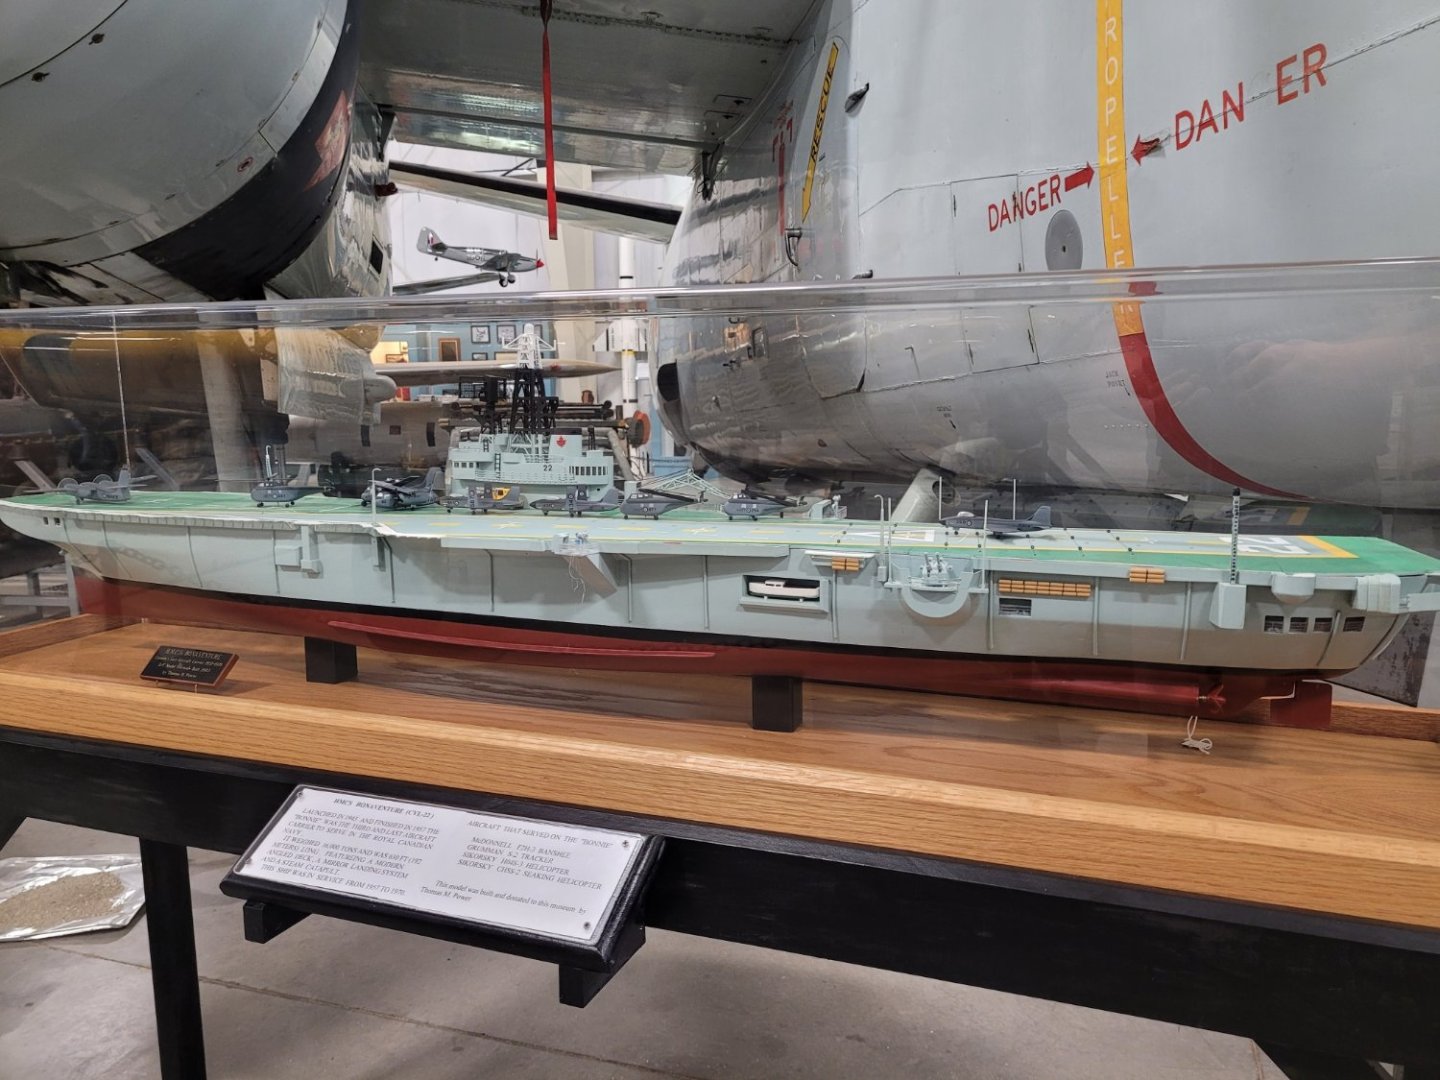
So...the most inspiring build, and the one that I'm really judging my own build against is that of Dan Linton. His model is on display at the National Aviation Museum in Ottawa, and I recall seeing it there when I visited with the family about 2 years ago, but did not get a picture....that said, there's an old website called "Carrier Builders" where Dan did a 7 page build log showing much of the scratch-built detail that he put into his construction, and I have looked to his pictures and build log for insight. Here's the 7 pages, and one of his photos: Building a 1:144 R/C HMCS Bonaventure: Part 1 (carrierbuilders.net) Building a 1:144 R/C HMCS Bonaventure: Part 2 (carrierbuilders.net) Building a 1:144 Scale R/C HMCS Bonaventure: Part 3 (carrierbuilders.net) Building a 1:144 Scale R/C HMCS Bonaventure: Part 4 (carrierbuilders.net) 1:144 r/c HMCS Bonaventure: Part 5: The Details (carrierbuilders.net) HMCS Bonaventure: 1:144 scale r/c: Part 6: Air Wing (carrierbuilders.net) HMCS Bonaventure: Part 7: Display (carrierbuilders.net) I am personally in awe of this man's skill, and have attempted to reach out to him a couple of times through a club in Ottawa, but haven't had much success.
-
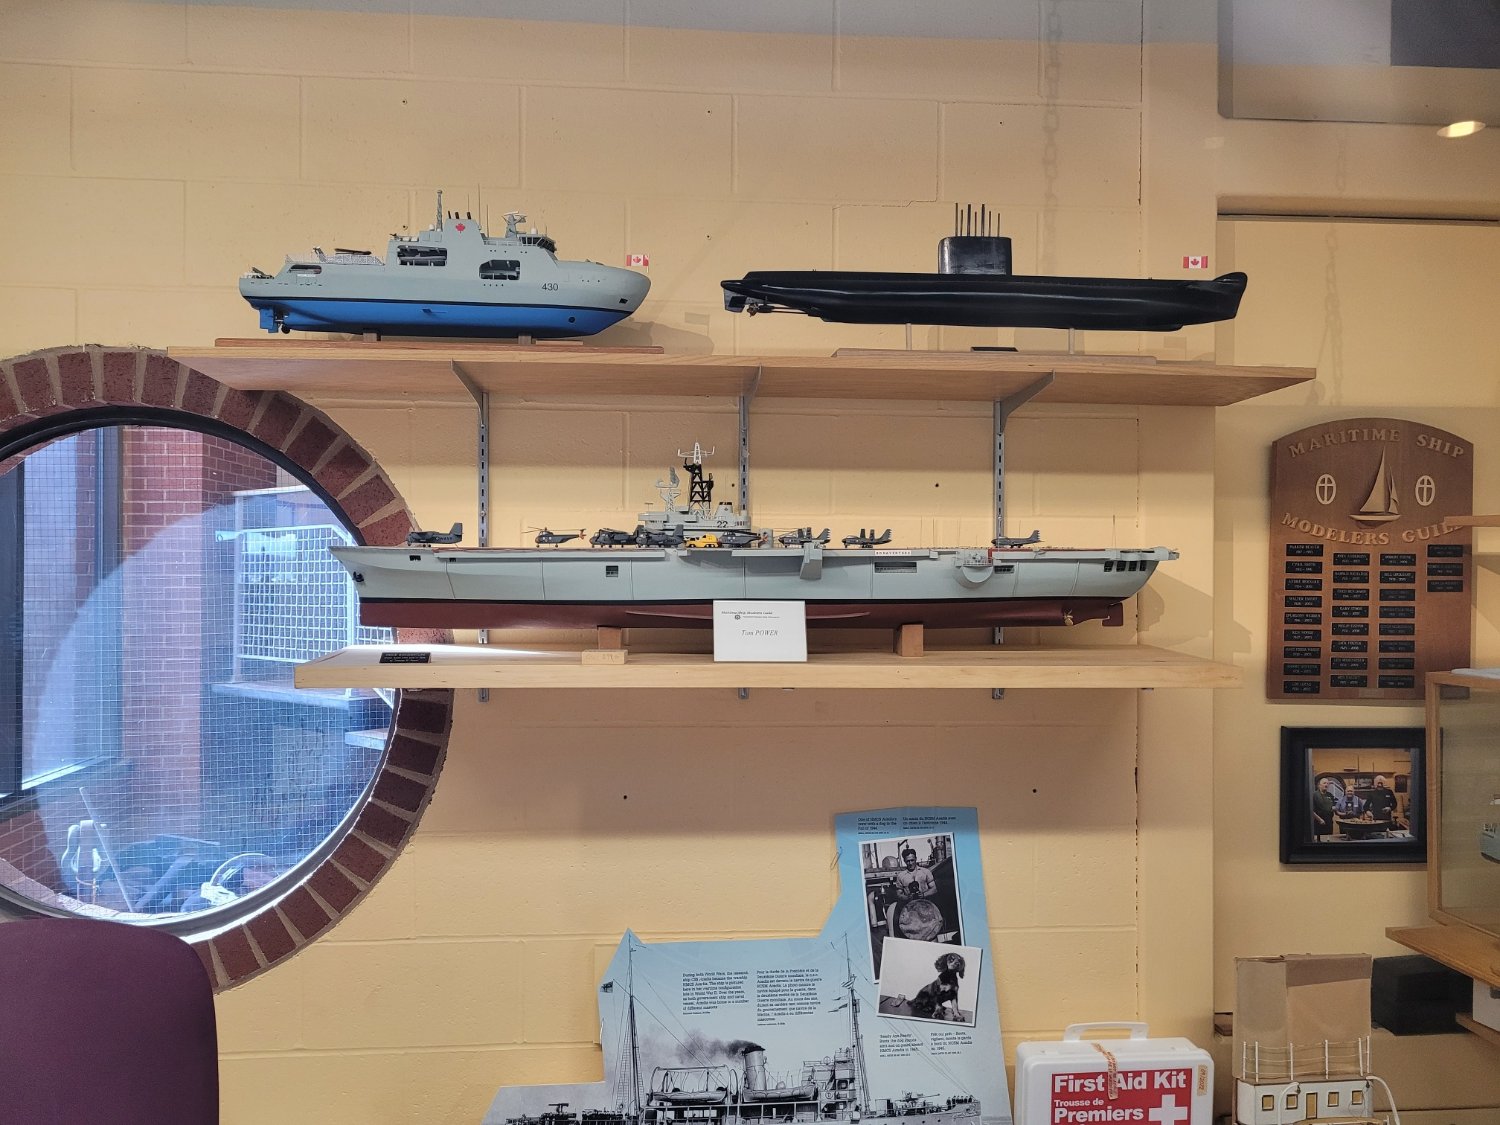
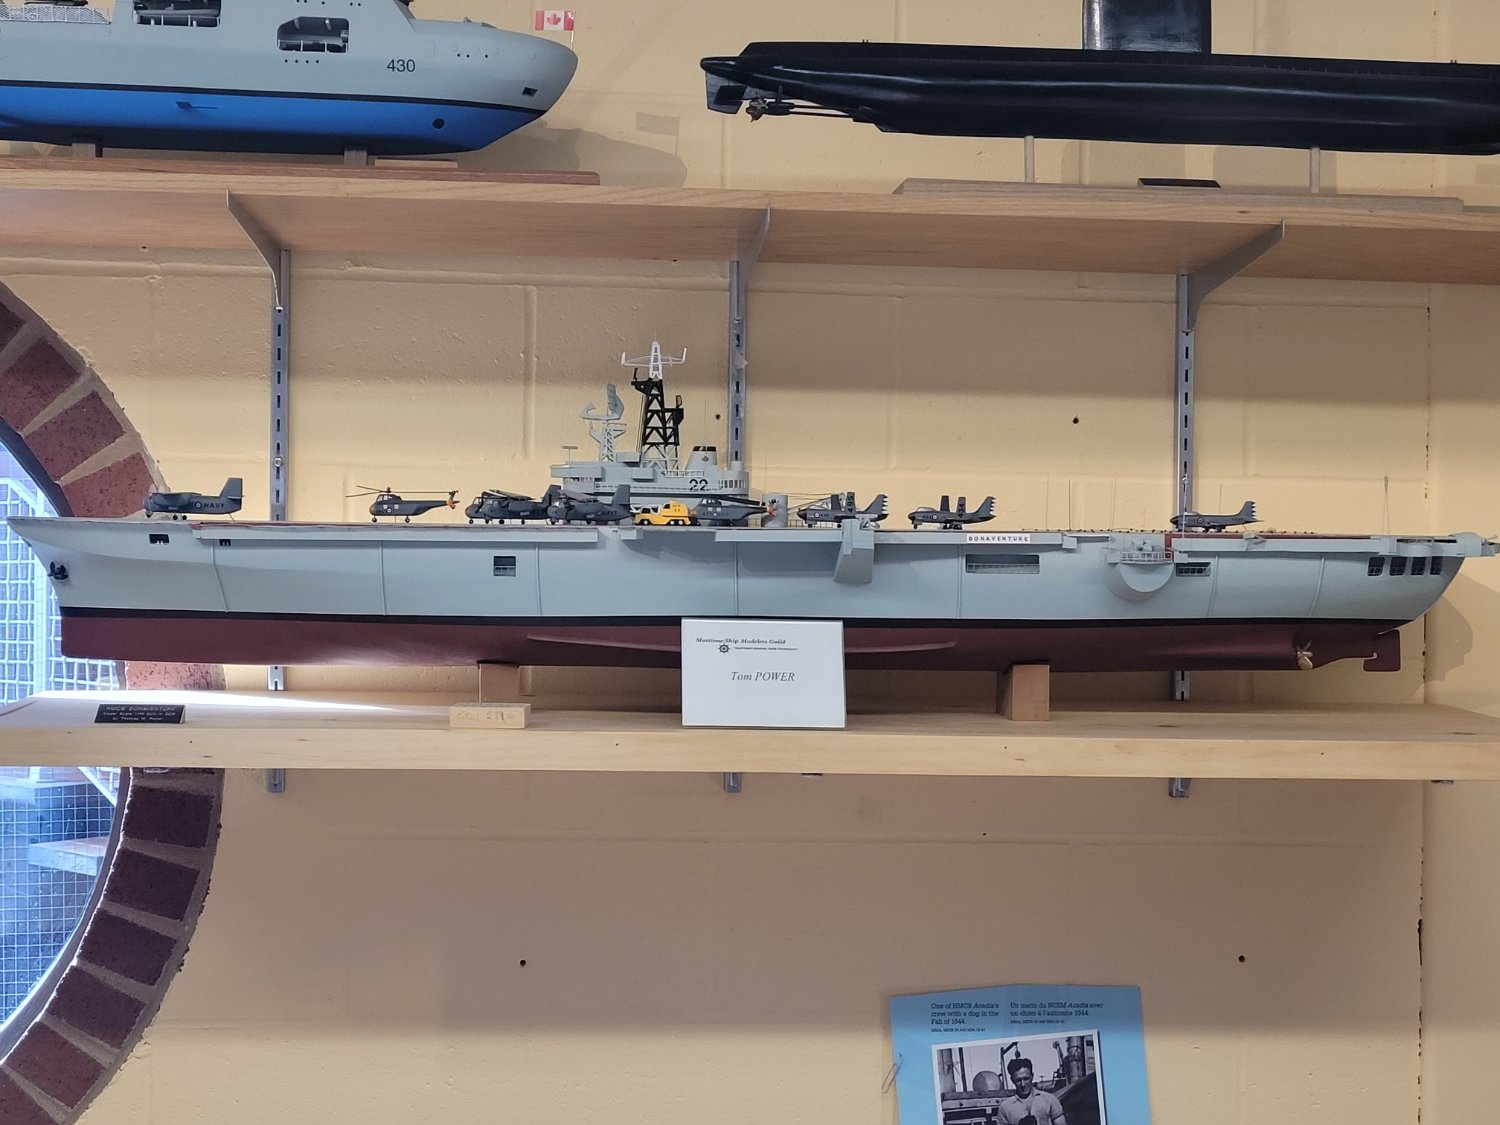
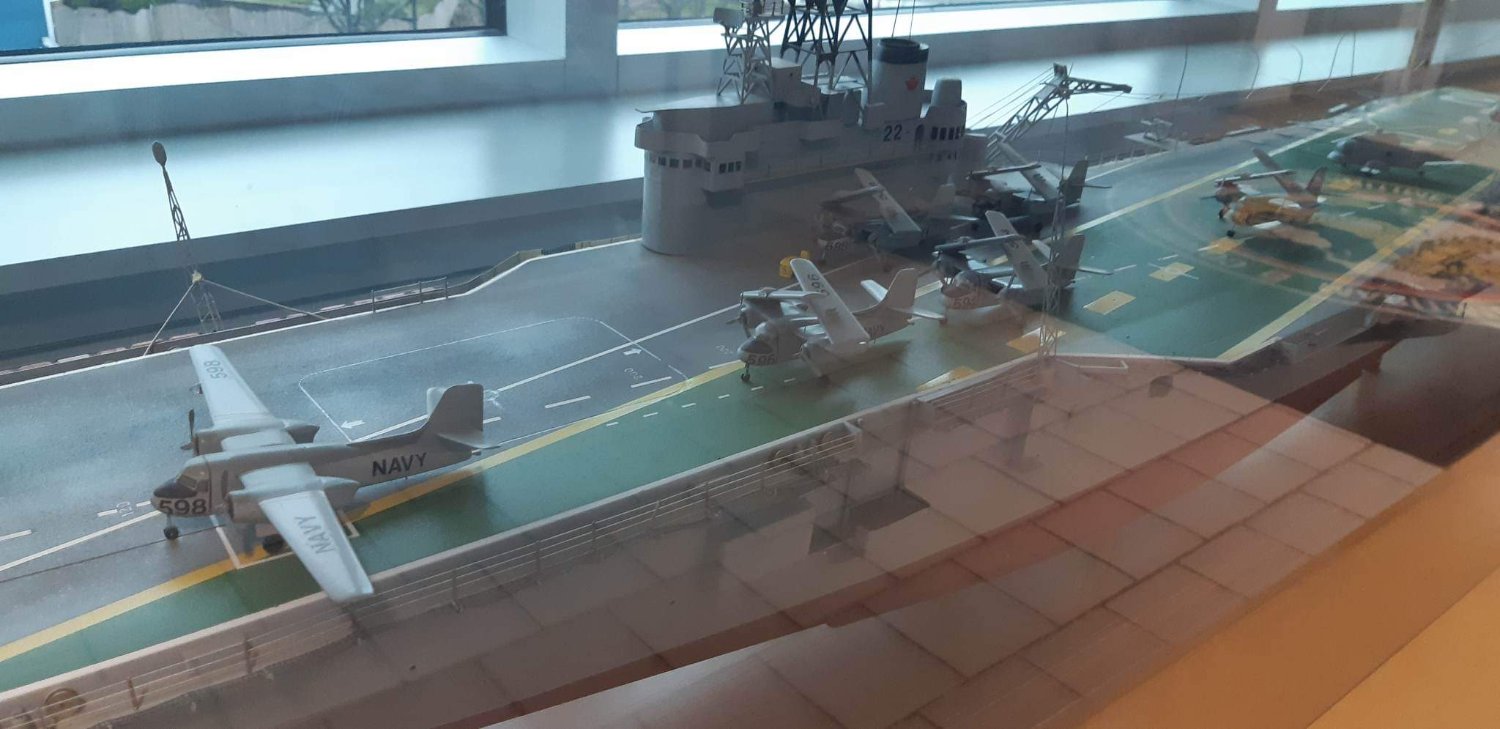
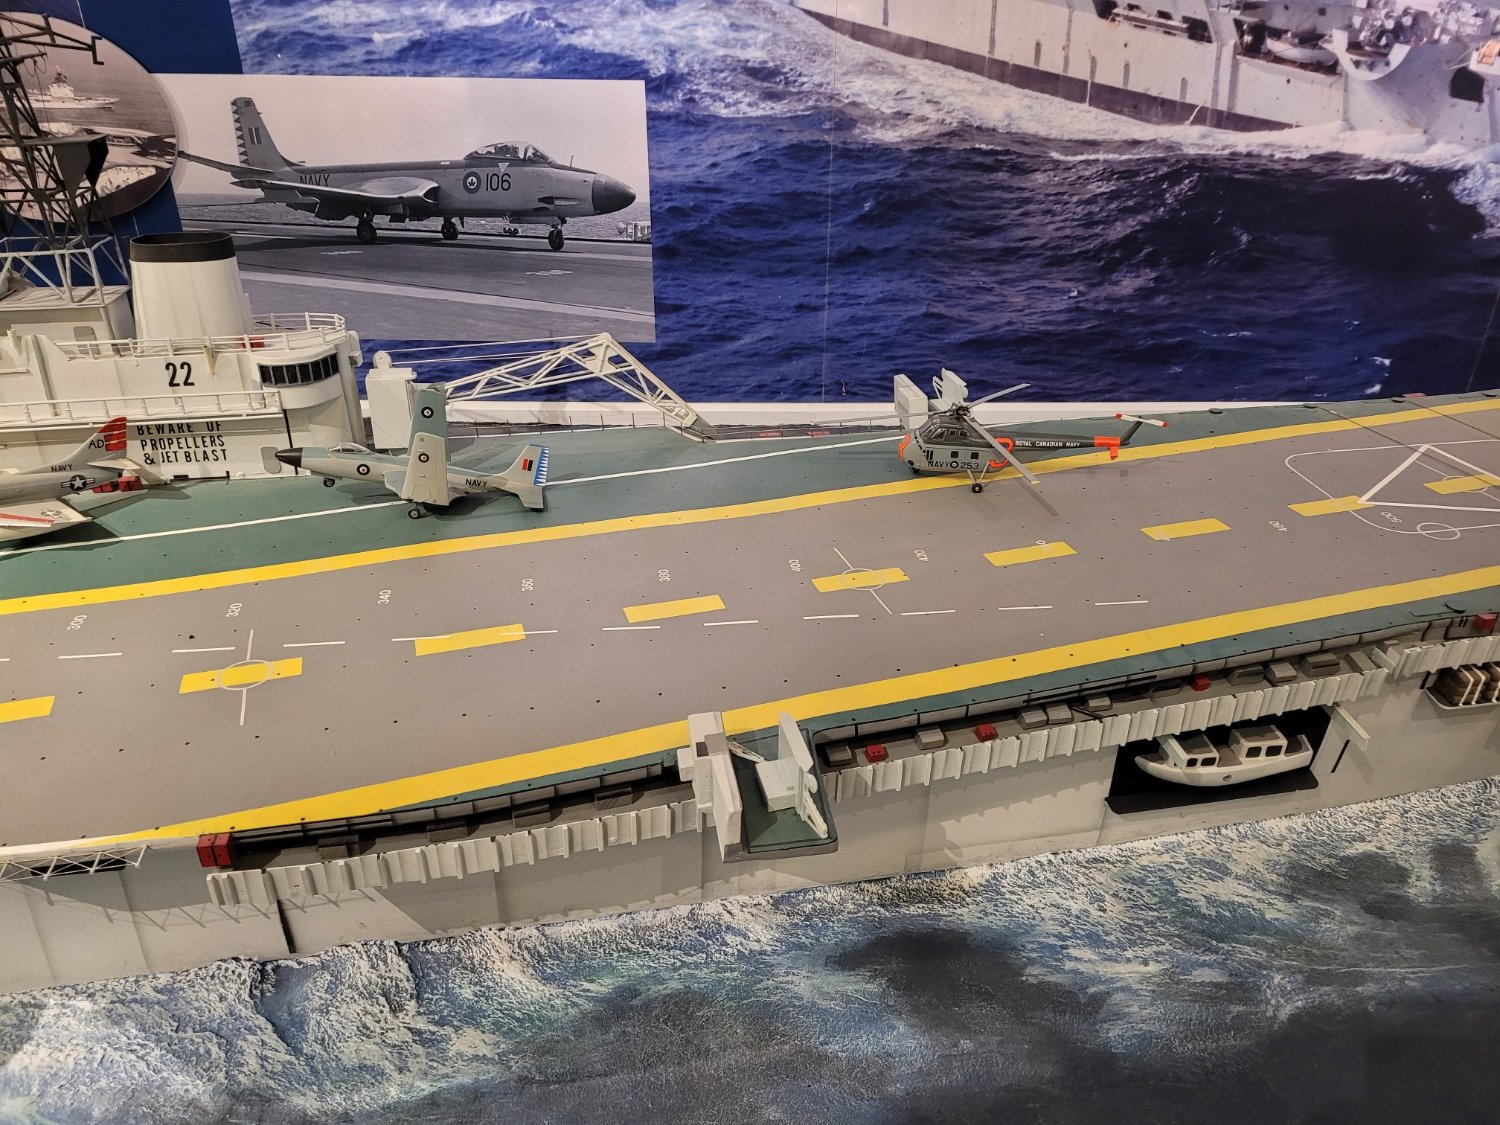
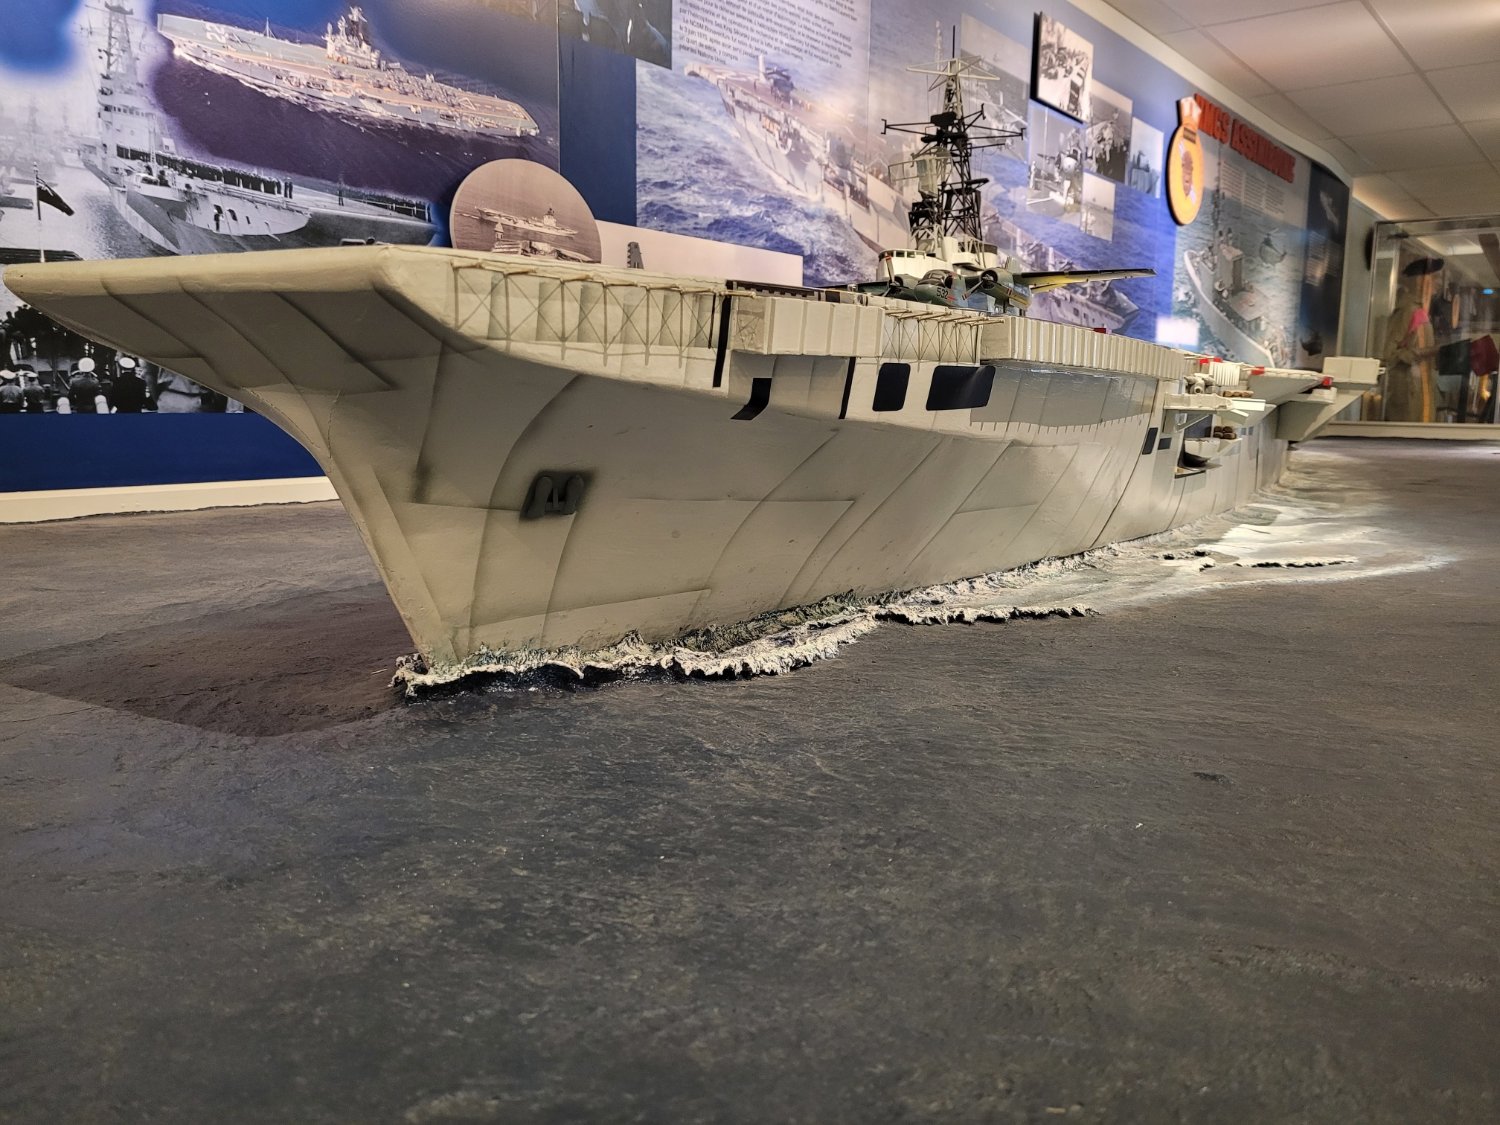
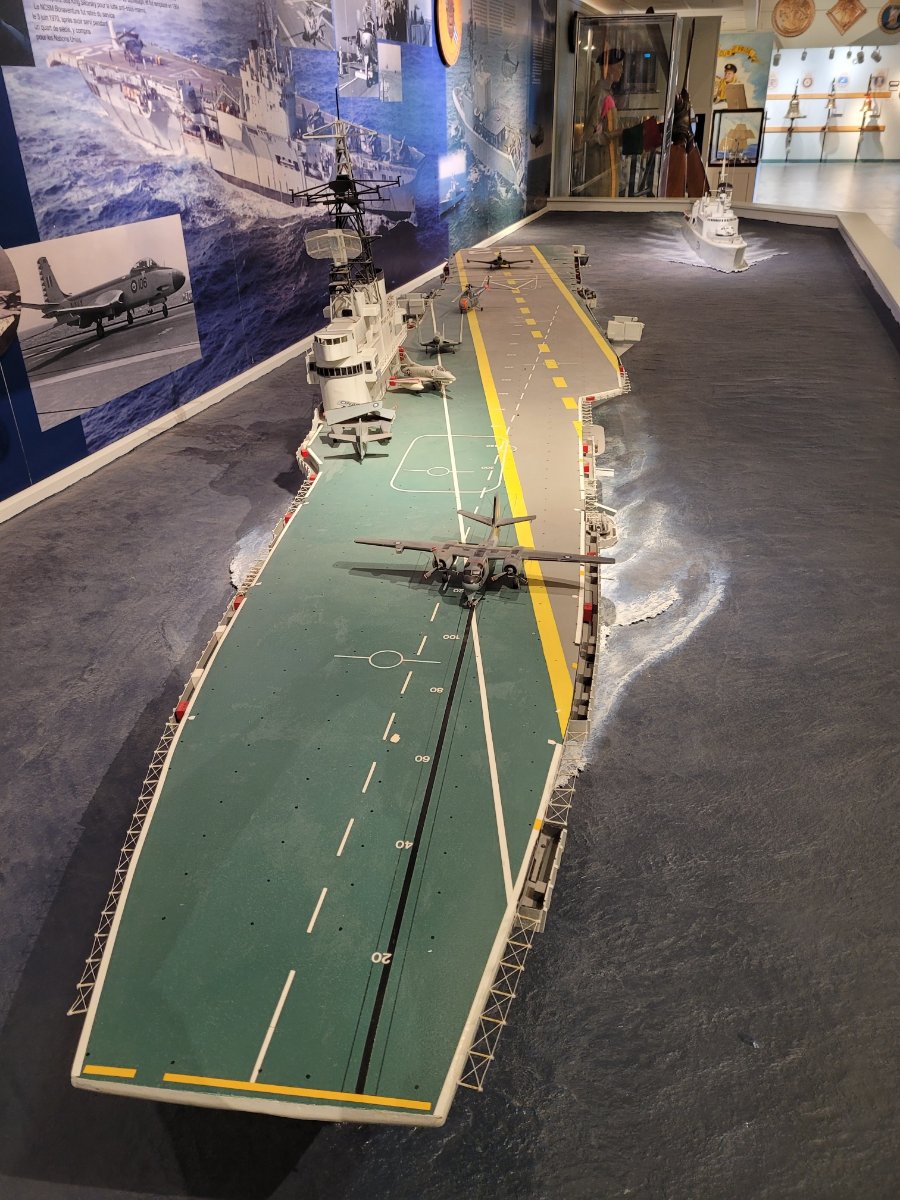
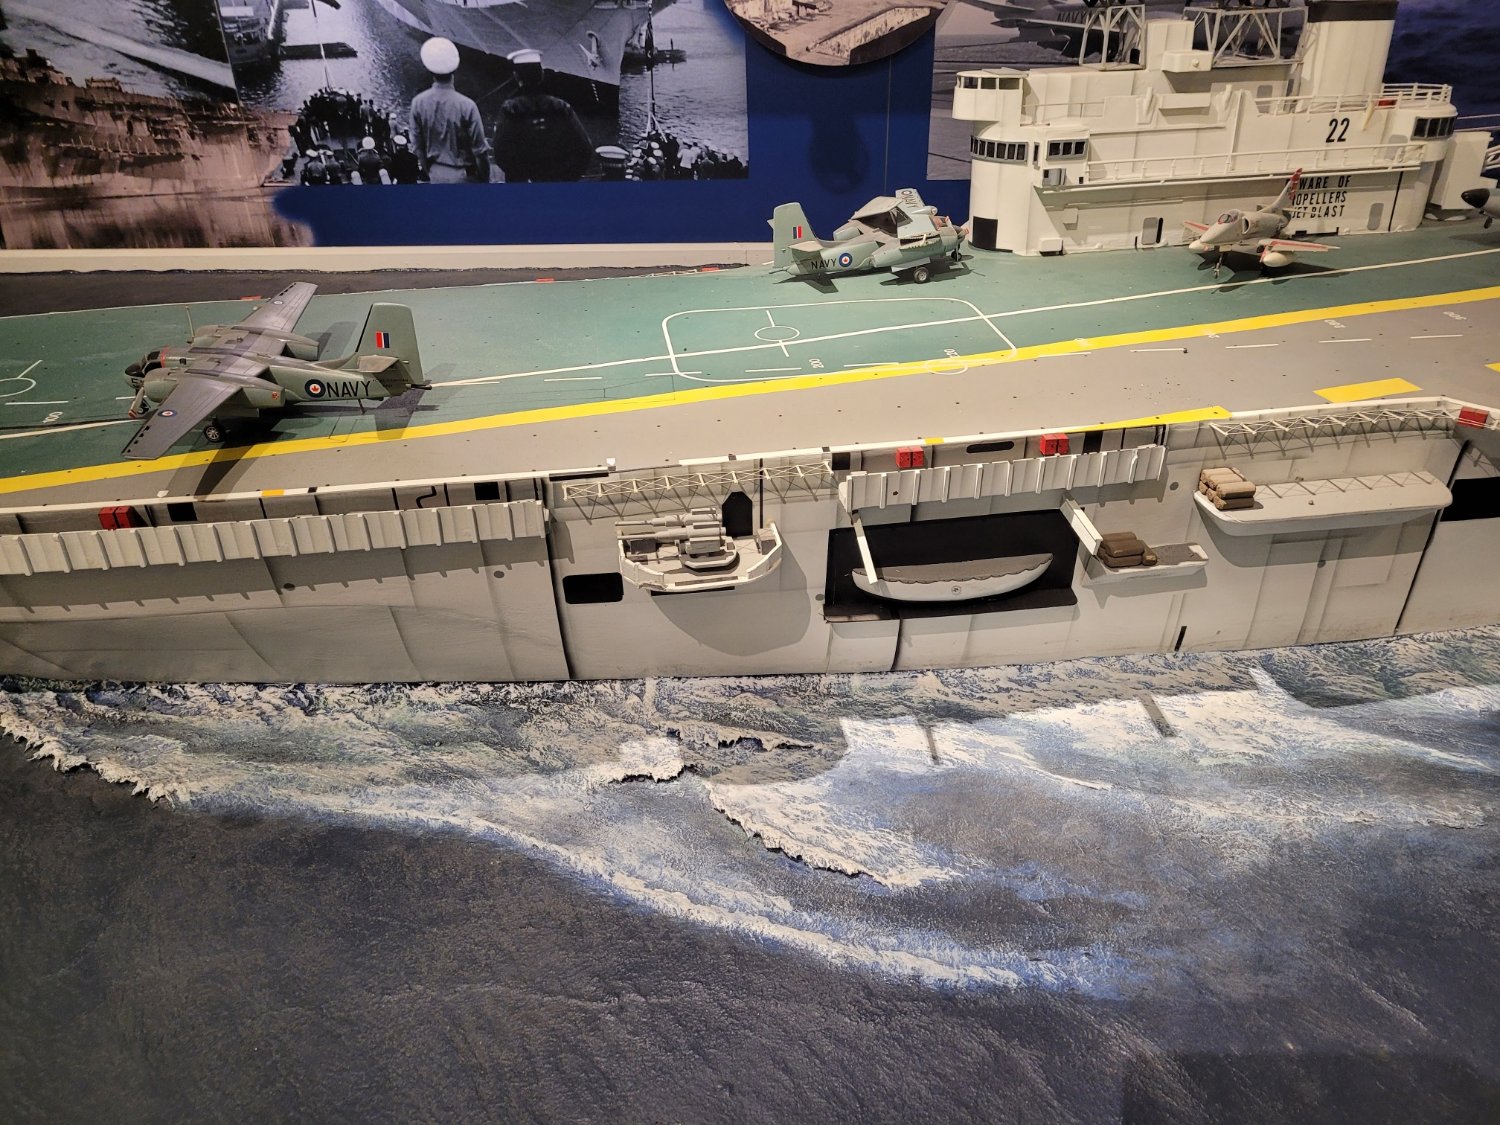
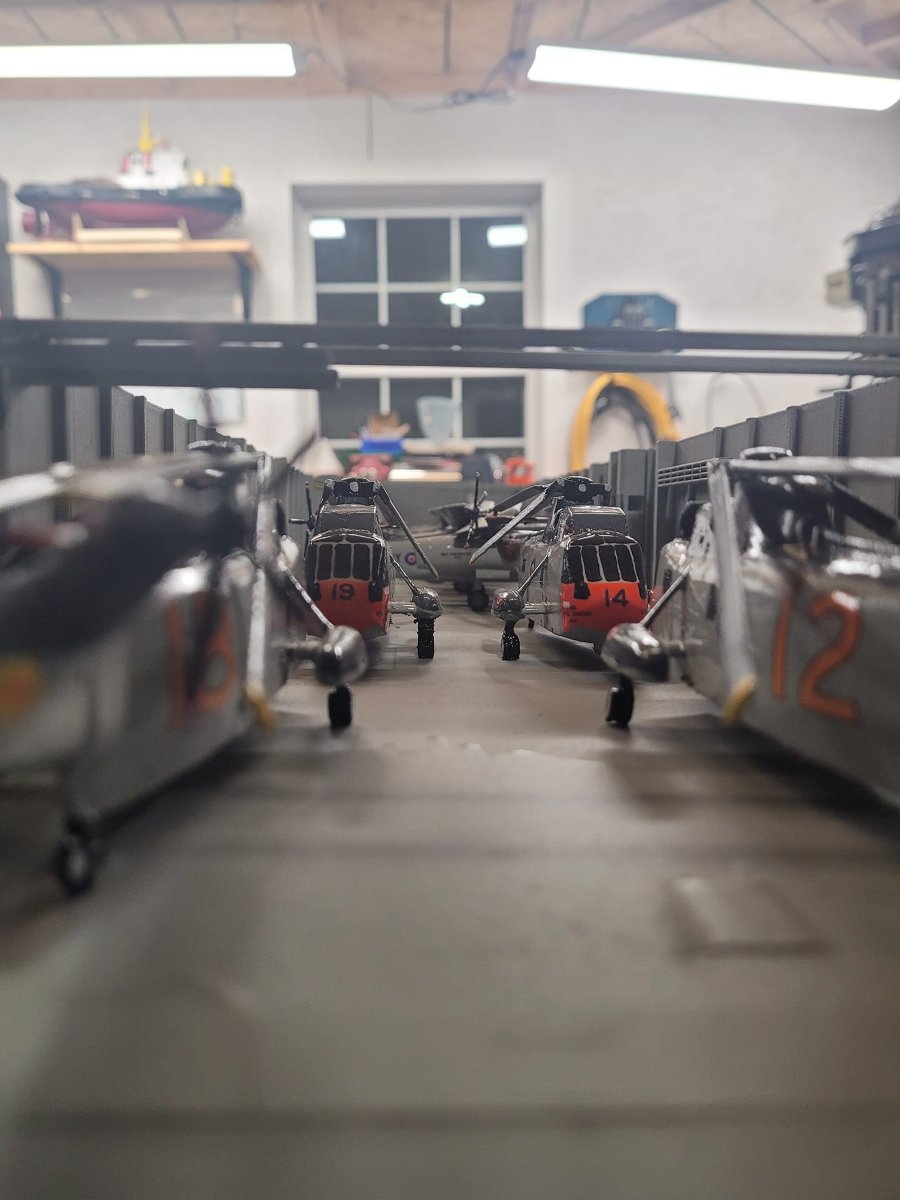
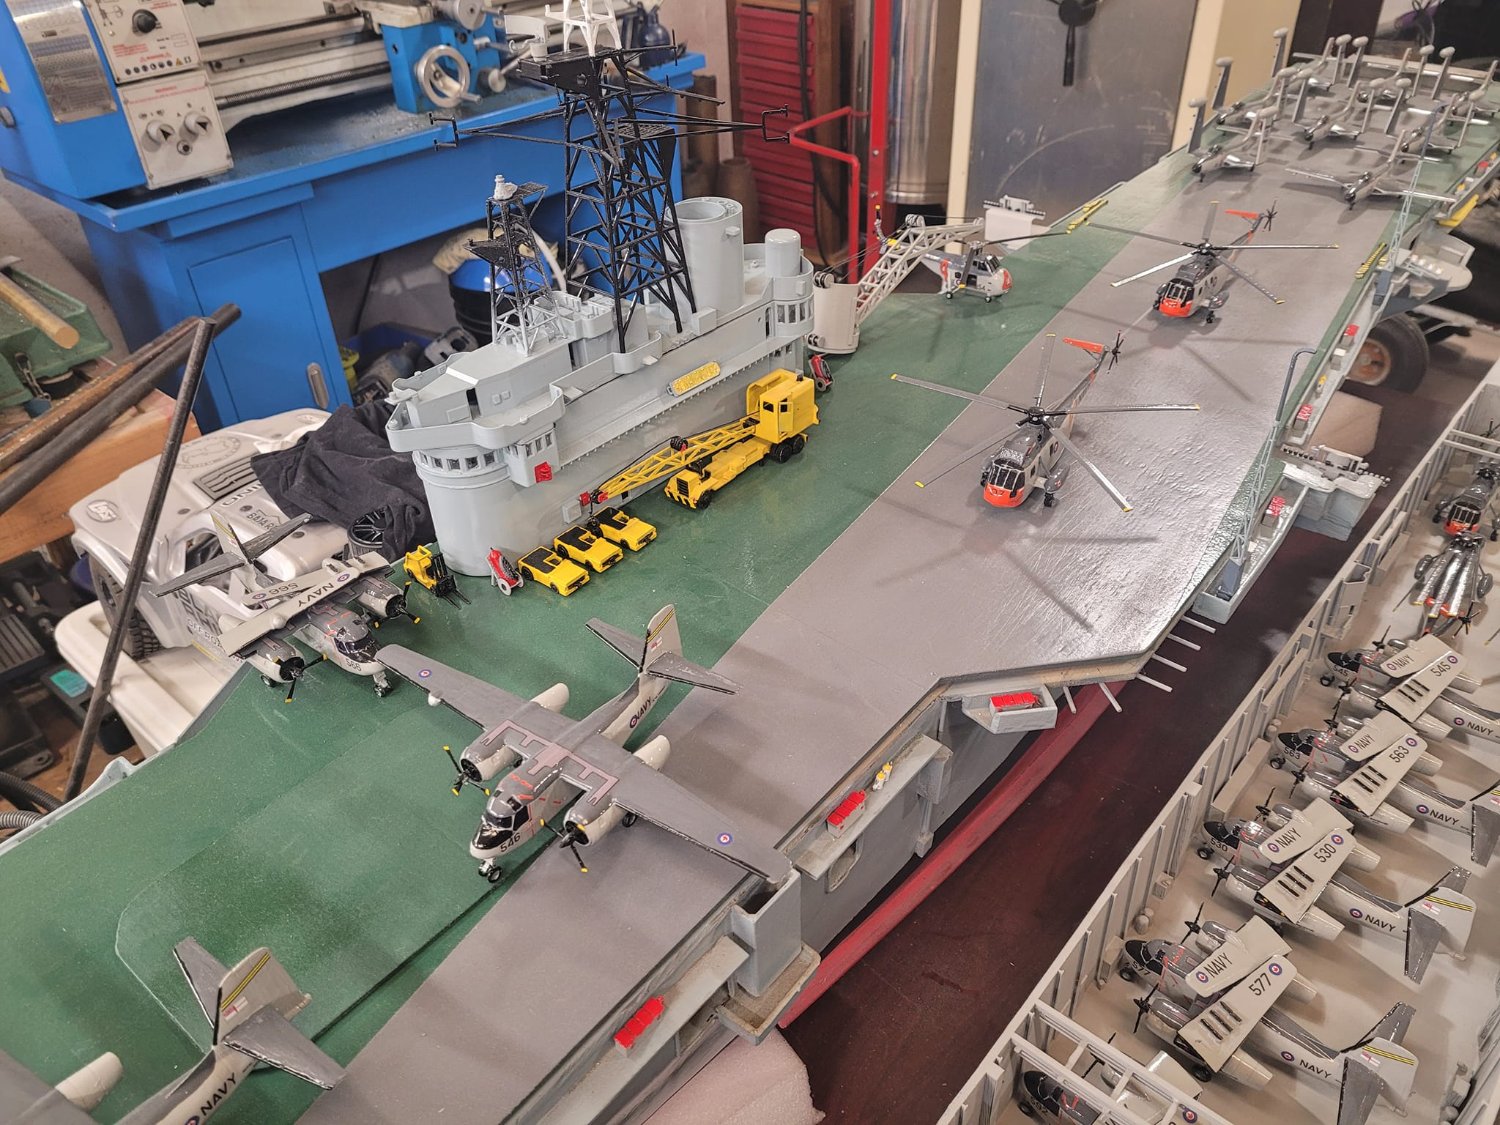
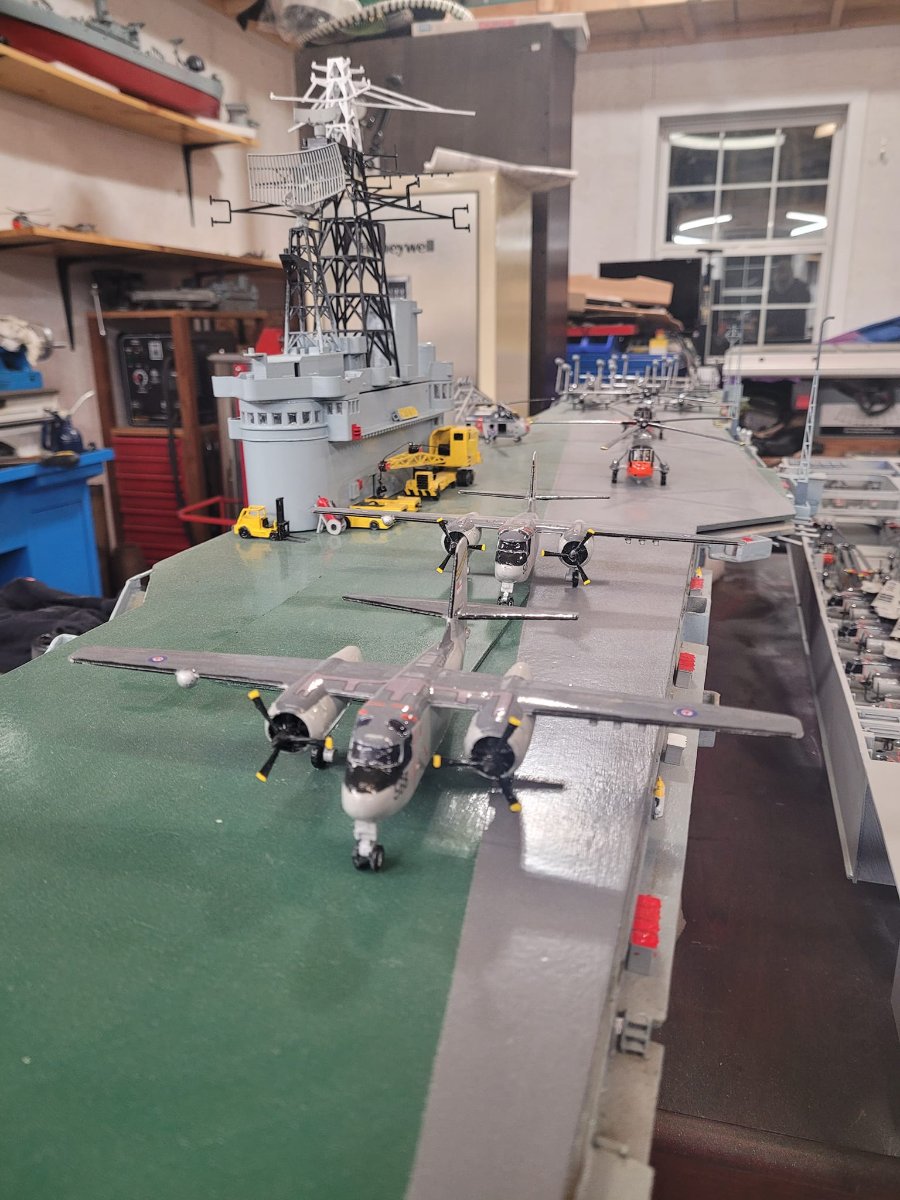
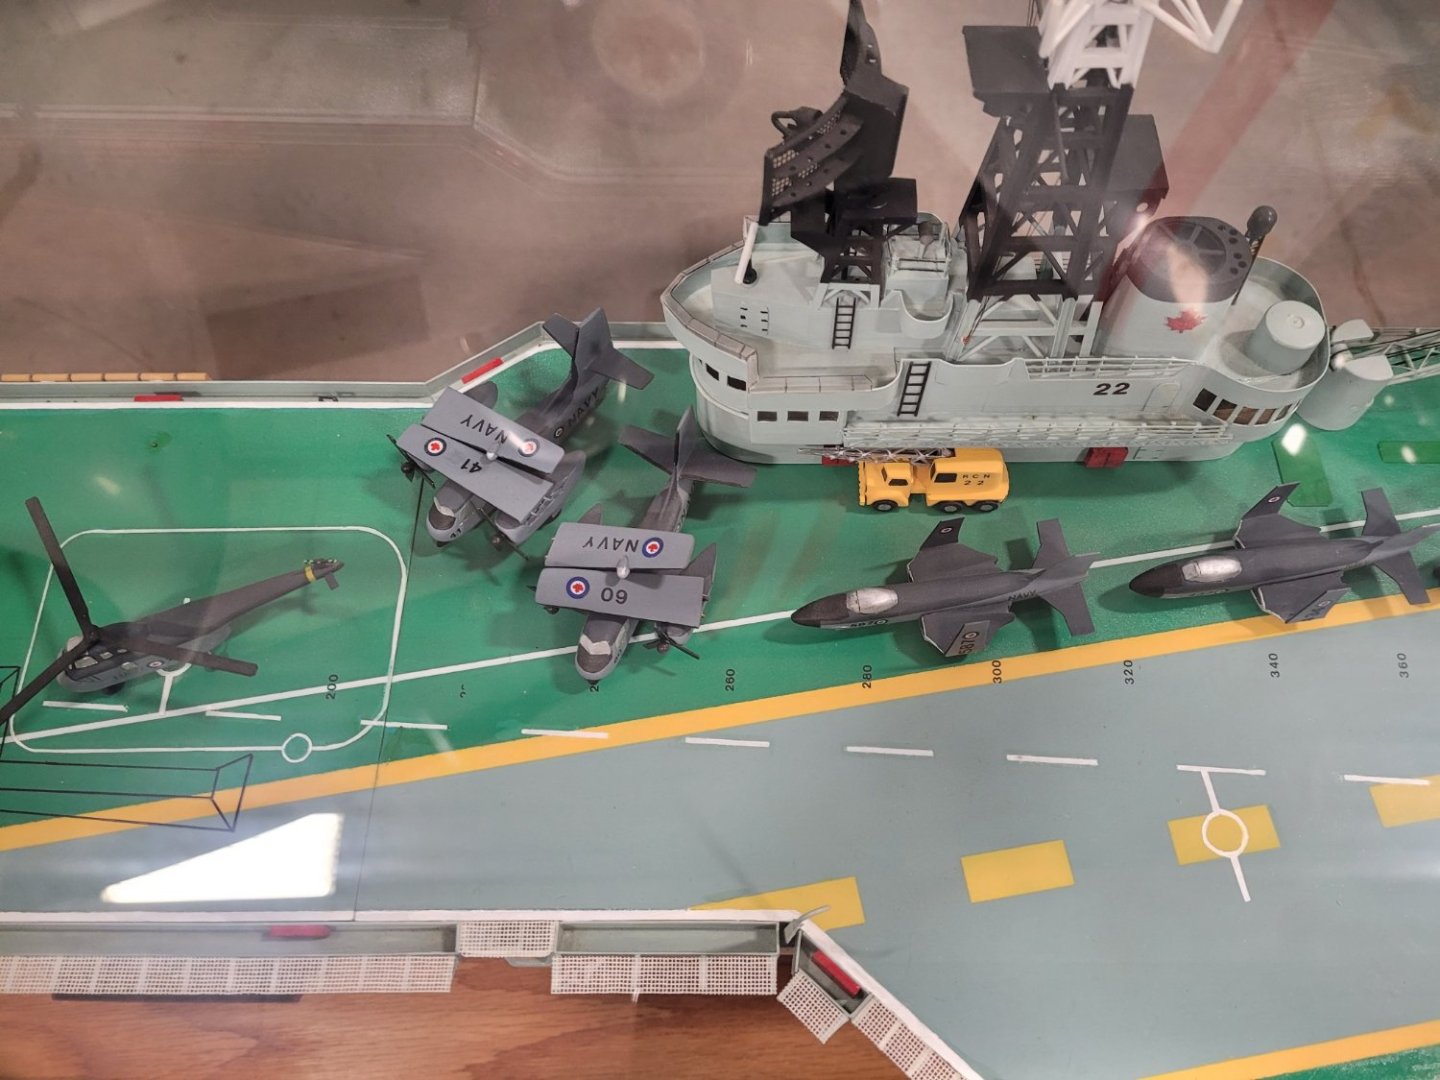
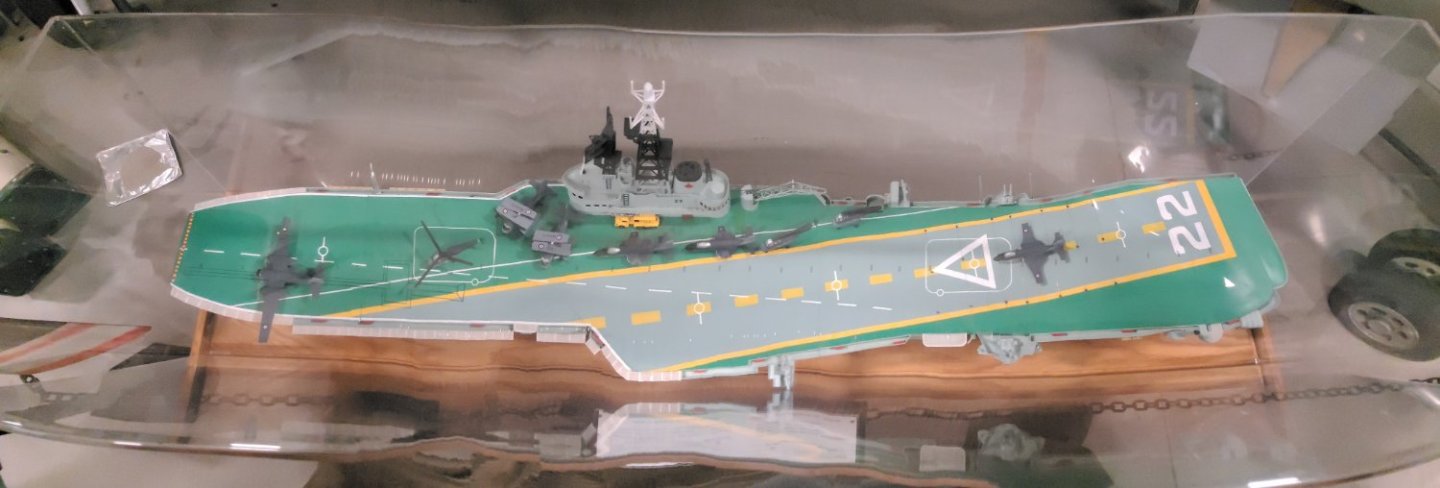
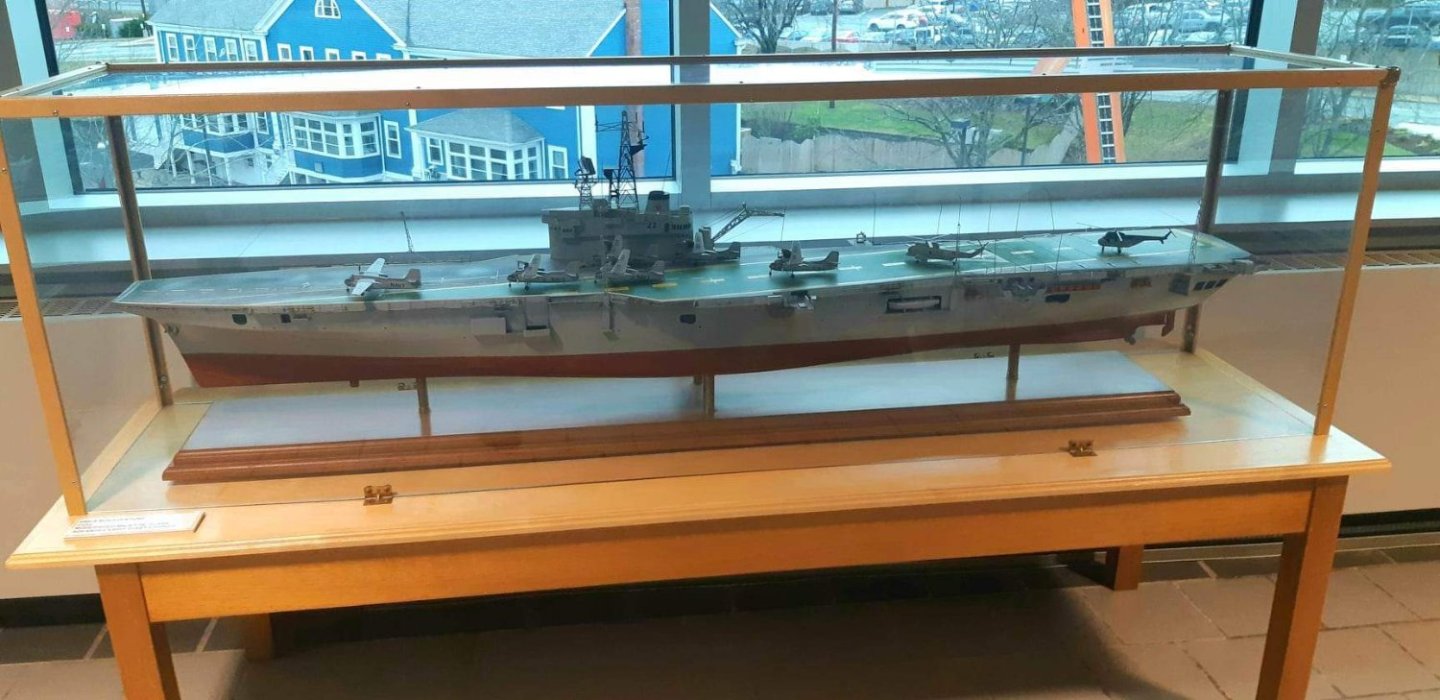
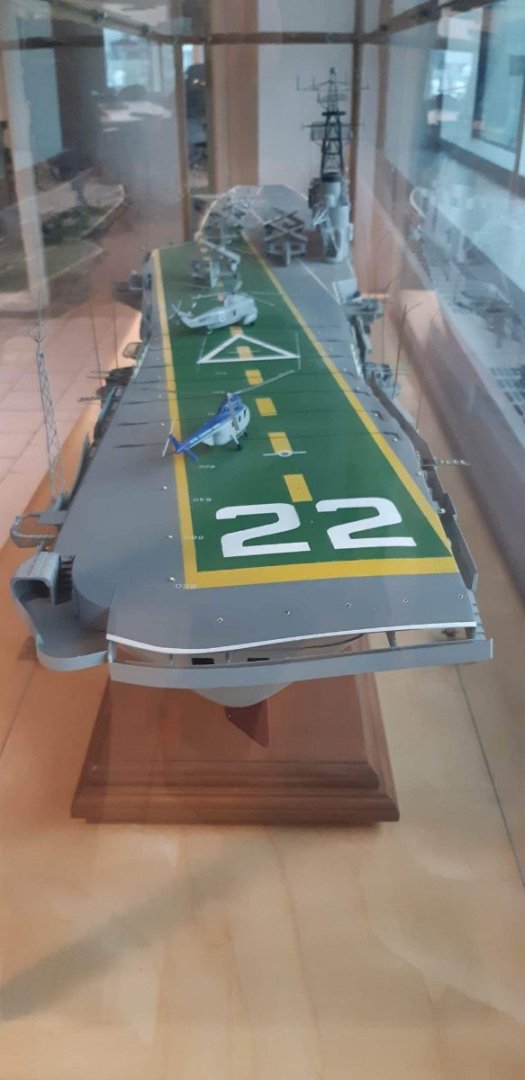
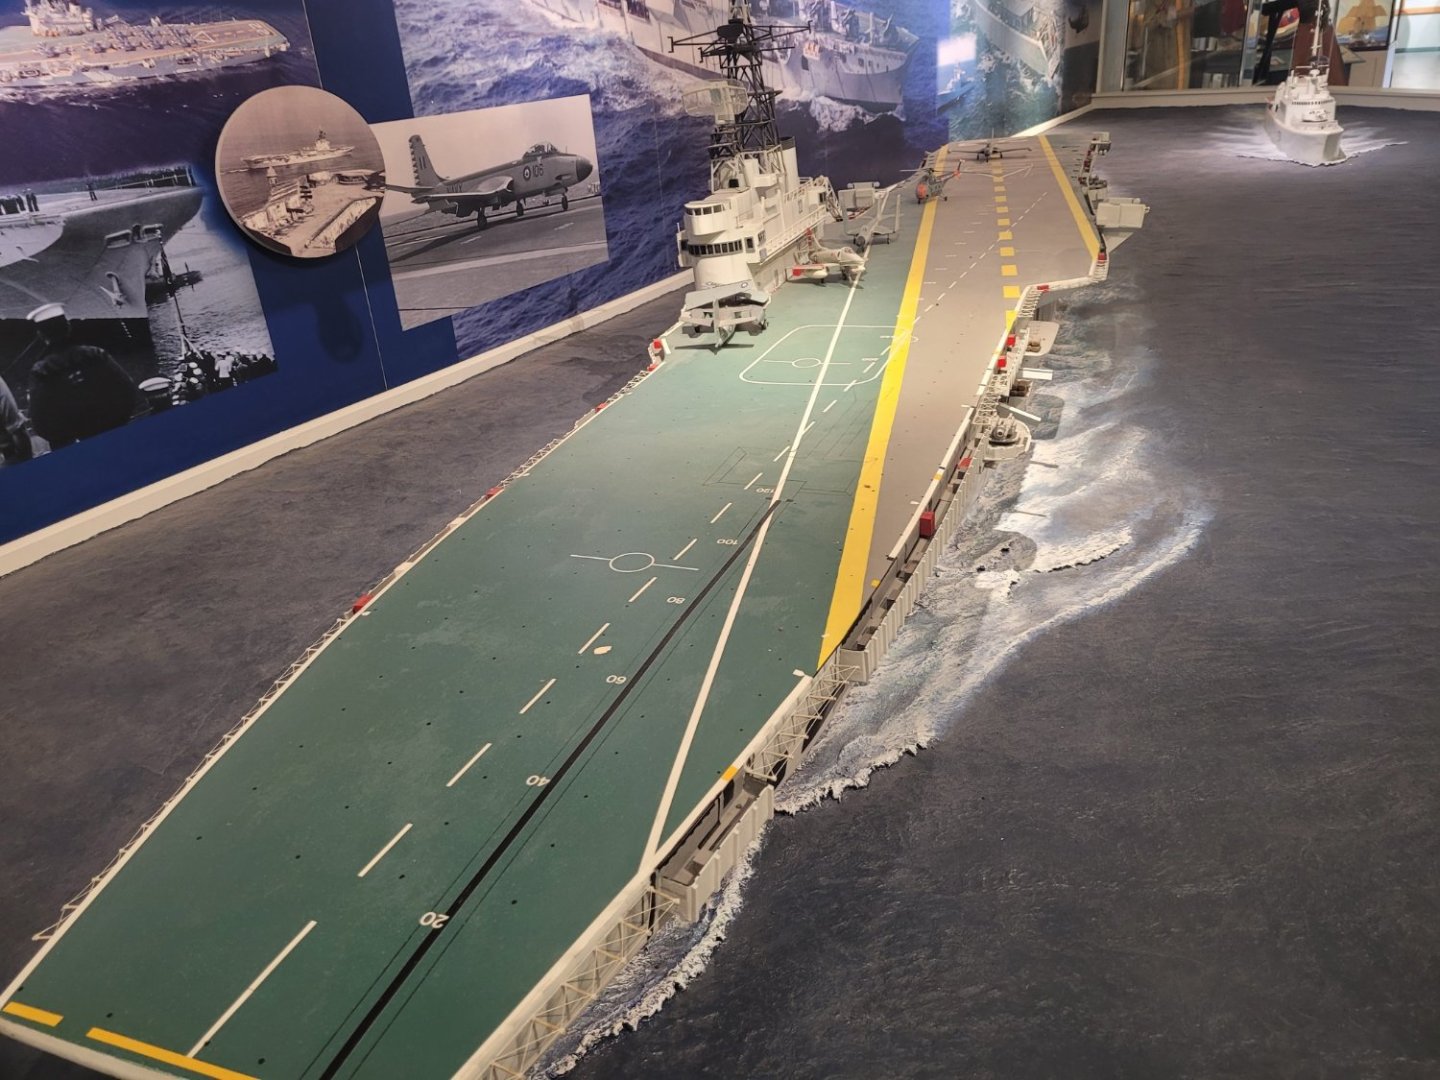
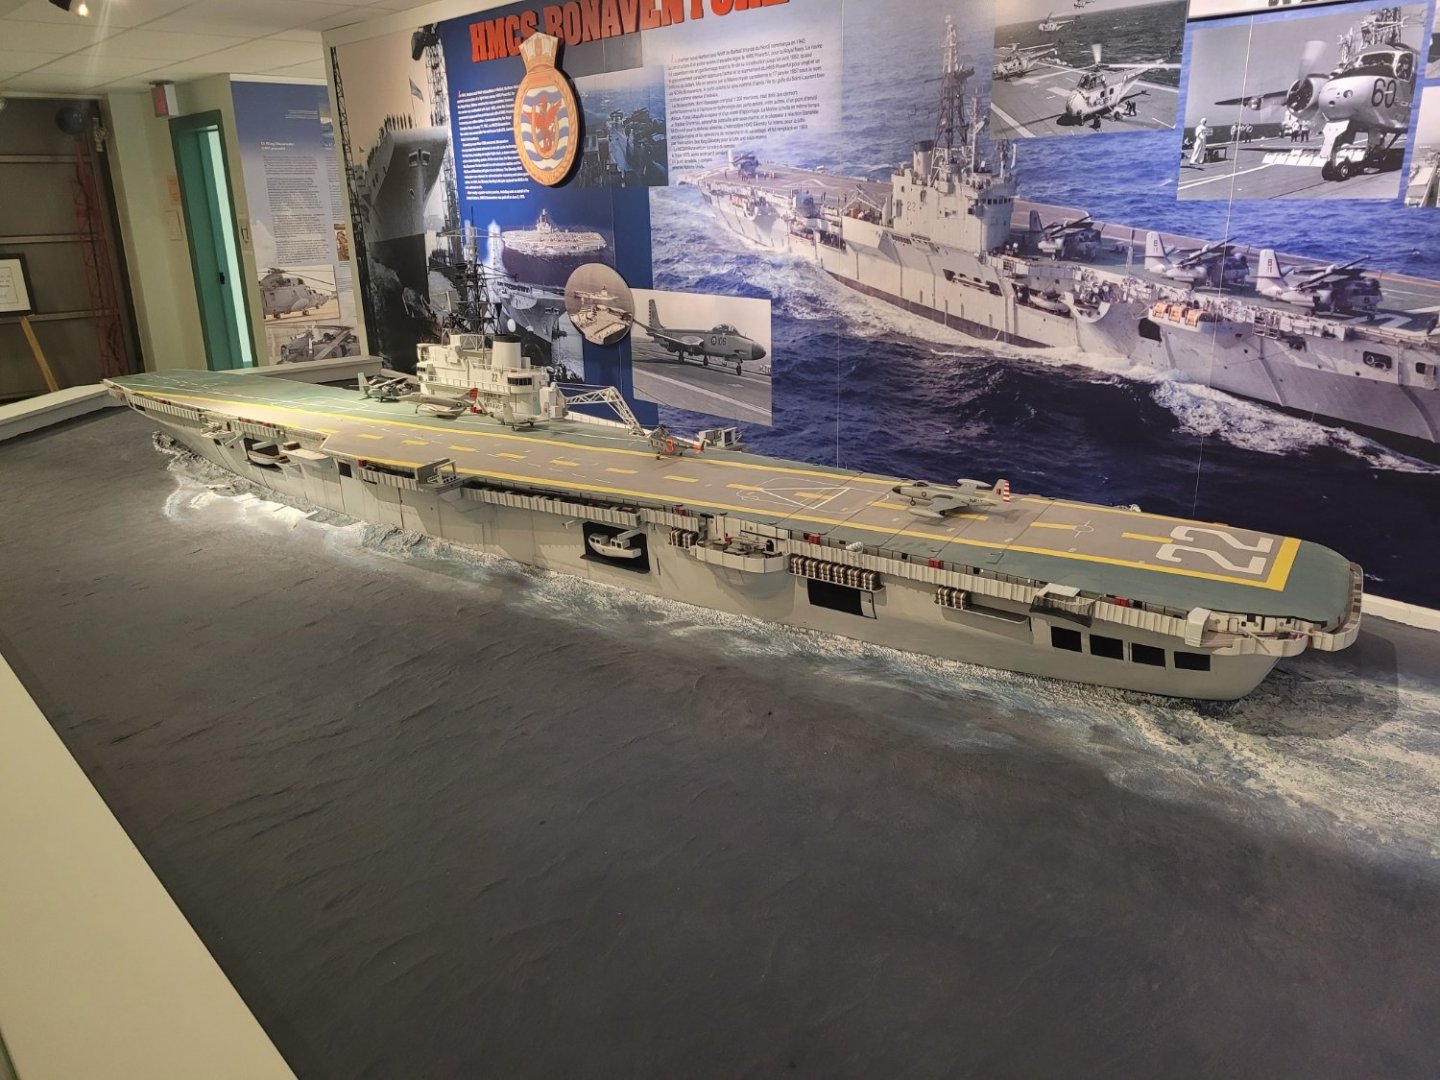
I am lucky to live in the city where HMCS Bonaventure was homeported back in the day. There is an institutional memory associated to her, and there are 4 other models of her in the area which I am aware of. I have, over the past year, visited 3 of the 4, and a friend of mine who has the clearances and approvals visited and photographed the Bonnie that is in the Maritime Forces Atlantic Headquarters building for me. I have been pondering the question of 'how much detail is enough'? And 'what does right look like'? as a part of this build process. I had the chance to meet the builder of two of them - the one at the Maritime Museum and the one at the Atlantic Canada Aviation museum were both built by the same person. He's a great person, and works as a model builder at the Maritime Museum, and has for several decades. So....what does right look like? I can see some examples of what wrong looks like - in particular, the model at the MARLANT HQ has the flight deck colours reversed. The angled deck section should be gray, the rest of the deck green. There is an early photo I've found that might show the whole deck as green - but...that's a mix-up. There's also some in accuracy in the aircraft - the blue on the HSO4 is quite obviously wrong. But, to be sure, the models are certainly representative, and there is no one who would ever question that it is "THE BONNIE" that they are portraying. Then there's the question of detail - how much is enough? If I look at the large scale (appears to be 1/48) at the Shearwater museum, they have had some damage done to the model years ago (apparently a kid was standing on it?) and so some of the original details were lost, and have been replaced with paper printed details that have been glued in place to give the image of 'stuff' being in the catwalks on the sides of the flight deck. The other models all have varying levels of detail, there are some with fire fighter boxes, some have spools, there are some ladders, deck cranes, etc. The one 'standard' seems to be that there must be aircraft on deck. And that must be a 'mix' of aircraft - always include Trackers, and some helos. So, in looking at the other 4 Bonnies in the area - from 1/200, to 1/144, to about 1/48, I can honestly say that with the amount of variation between them, and the amount of detail that I have on mine already, I think I've exceeded 'museum quality' for the local museums at least. Which, I think, means that I have 'enough' detail, even though I'm still making more. All this to say, I'm pretty pleased with how my Bonnie is coming along....but read along to the next post to see the 'WOW' standard that I'm sort of judging myself against. NS


-
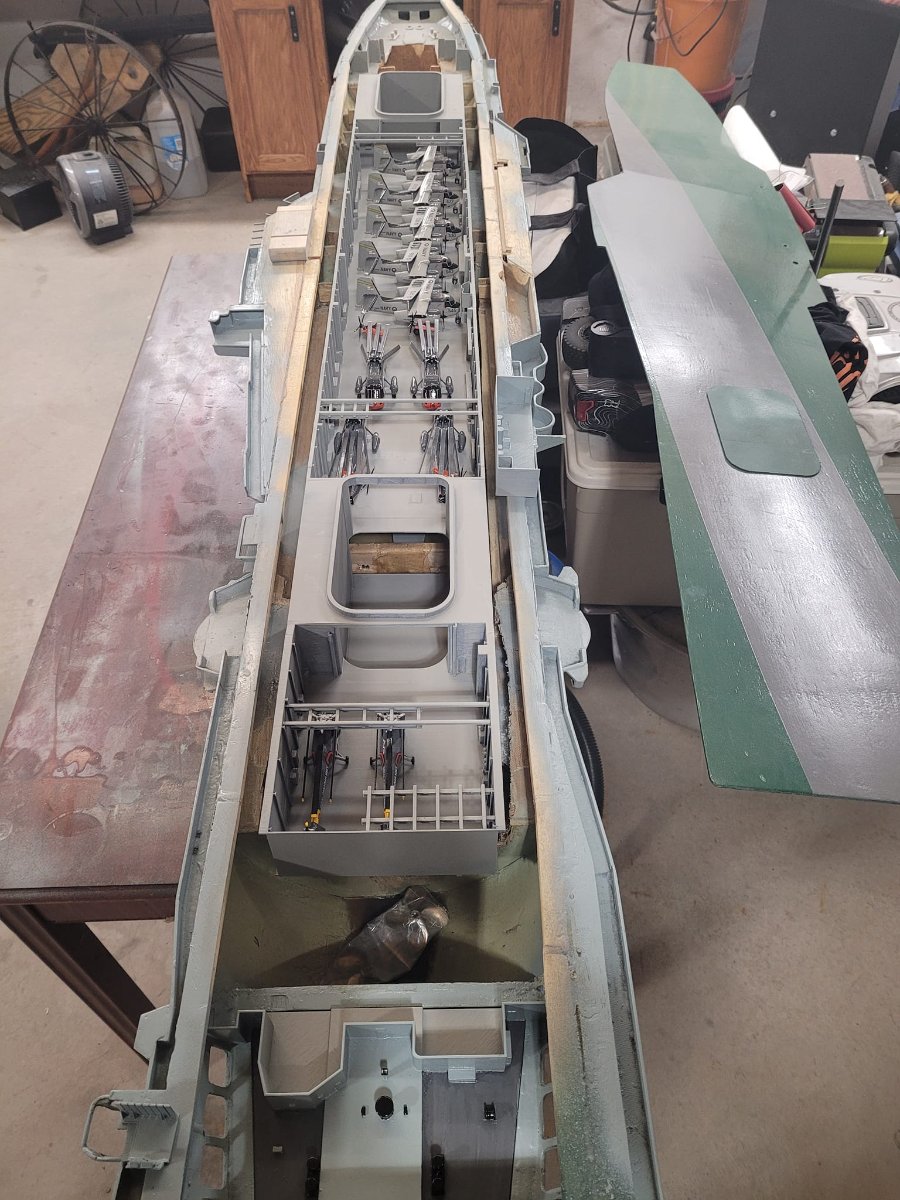
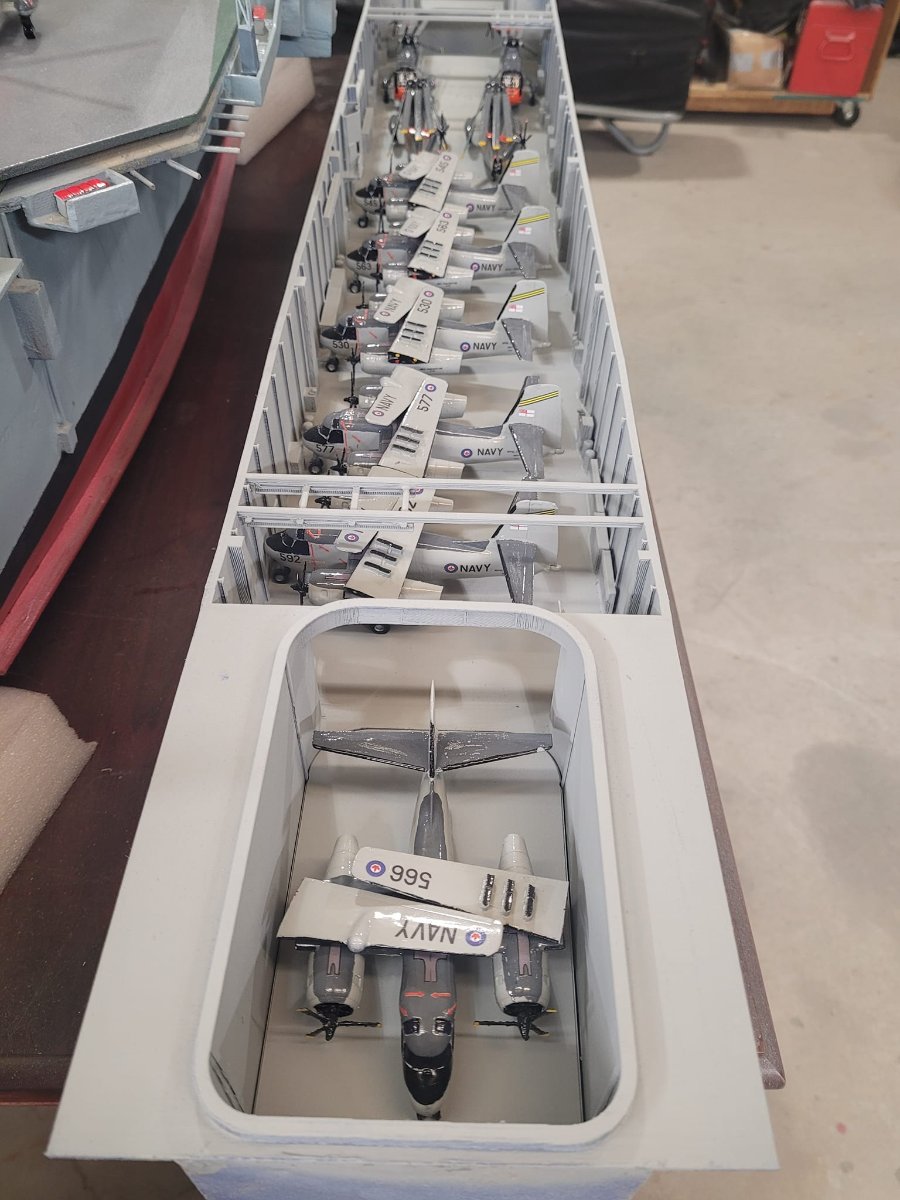
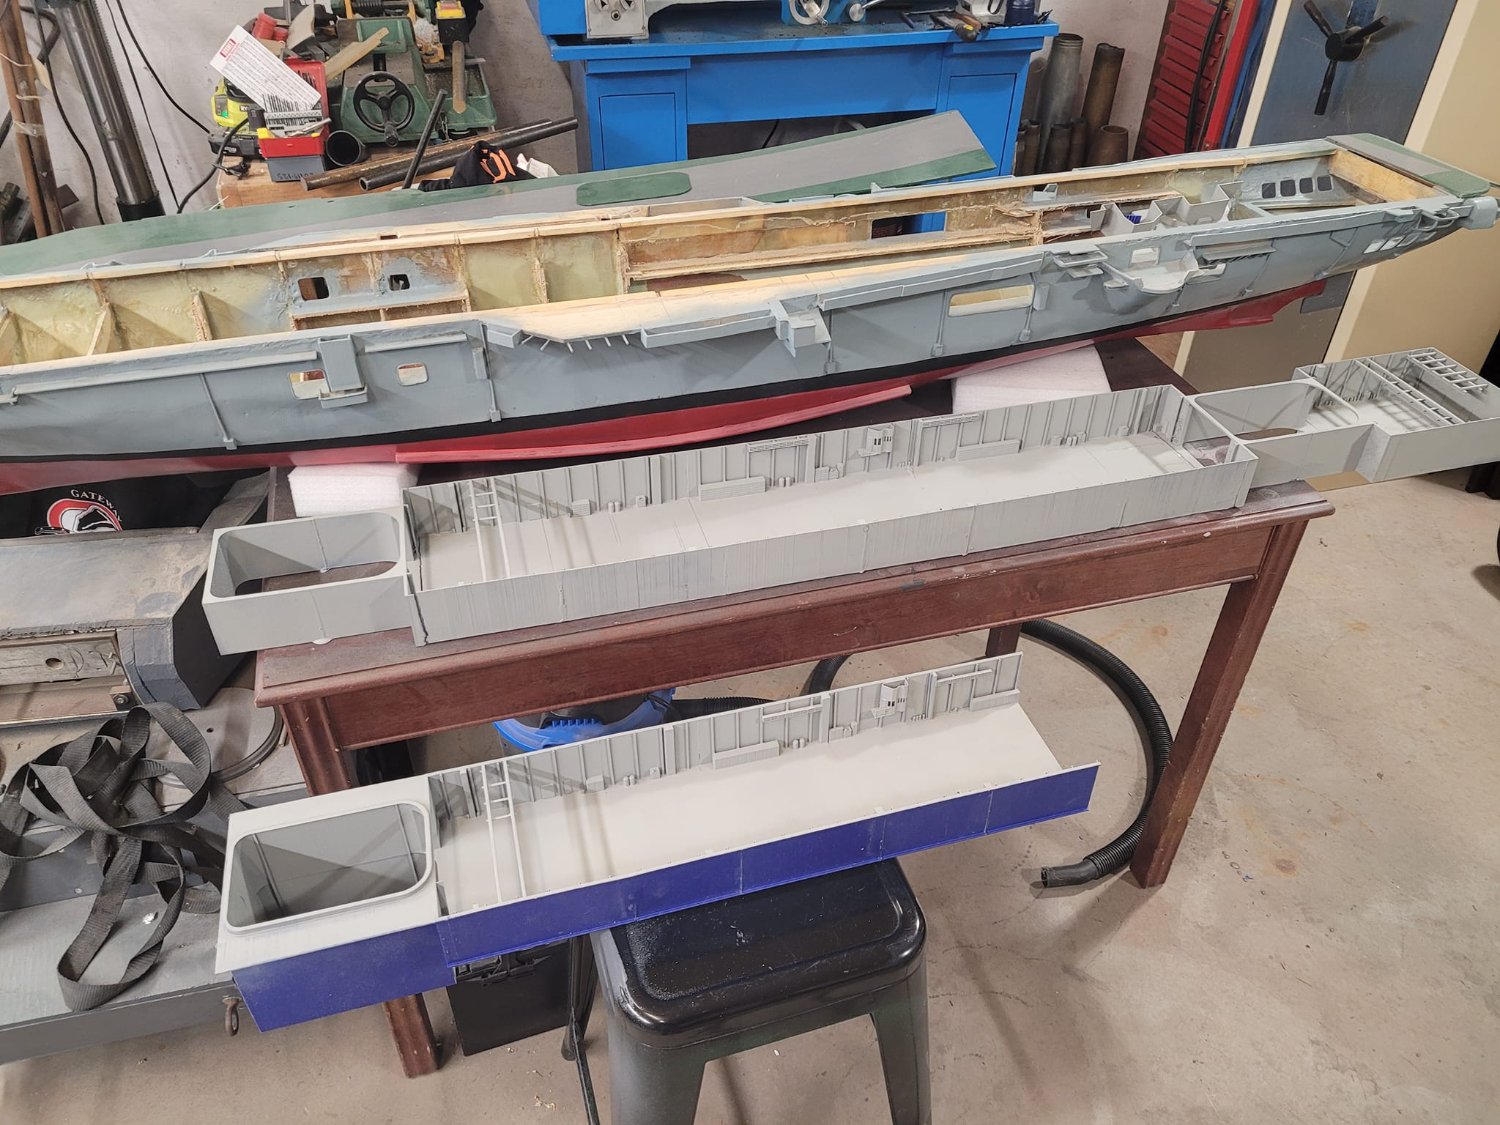
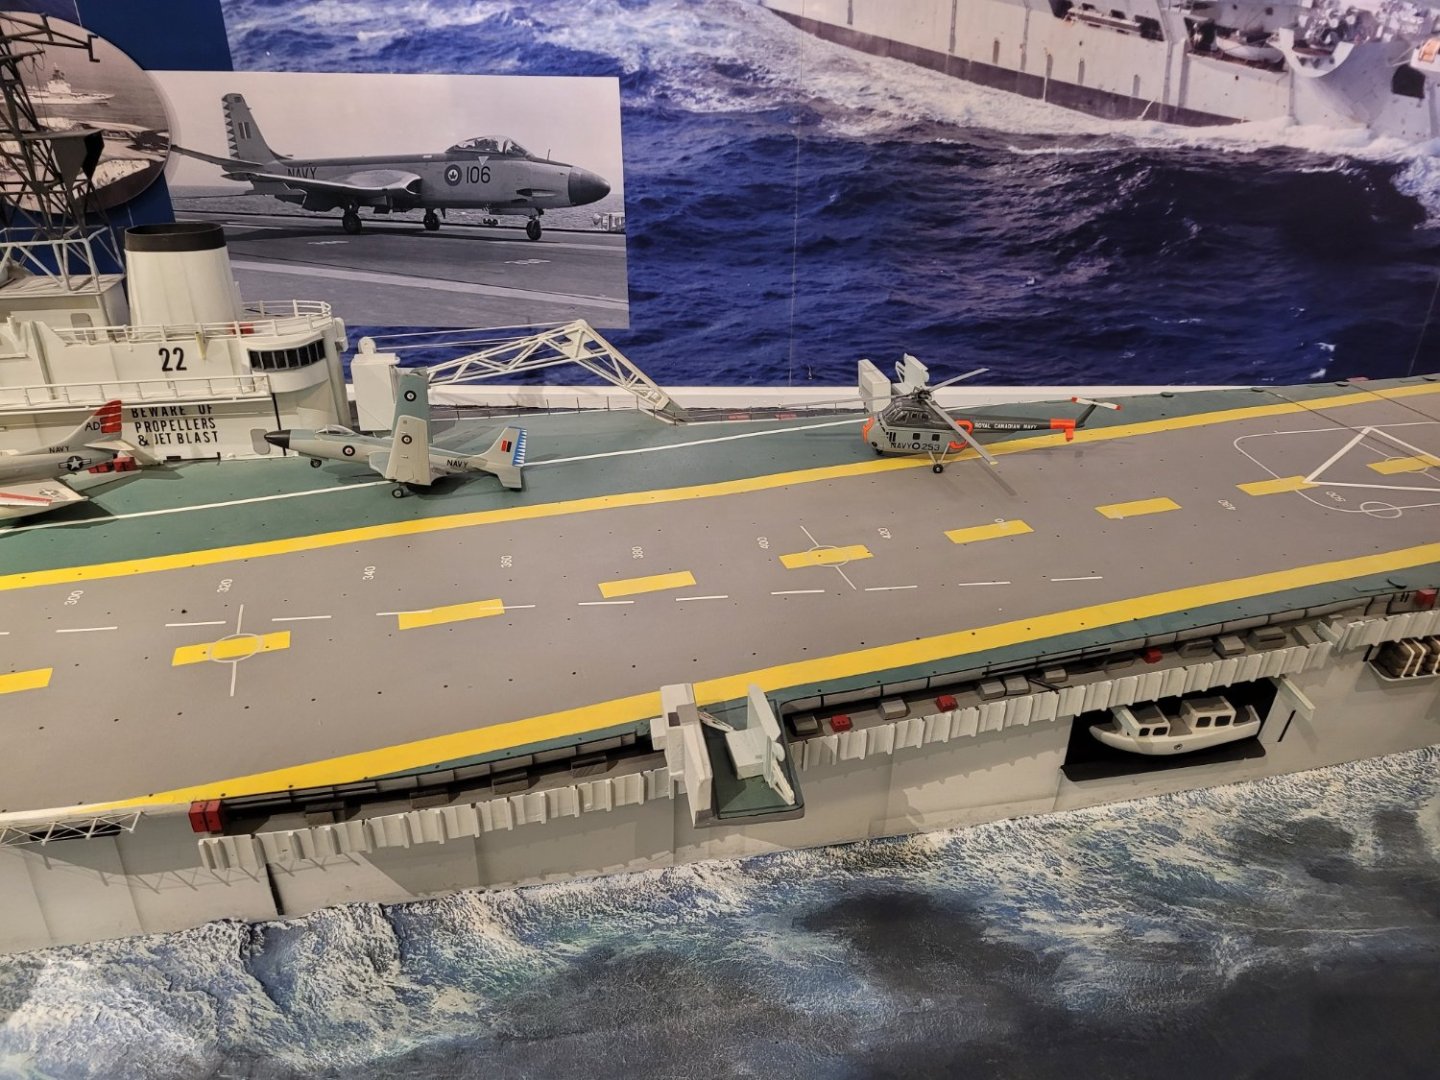
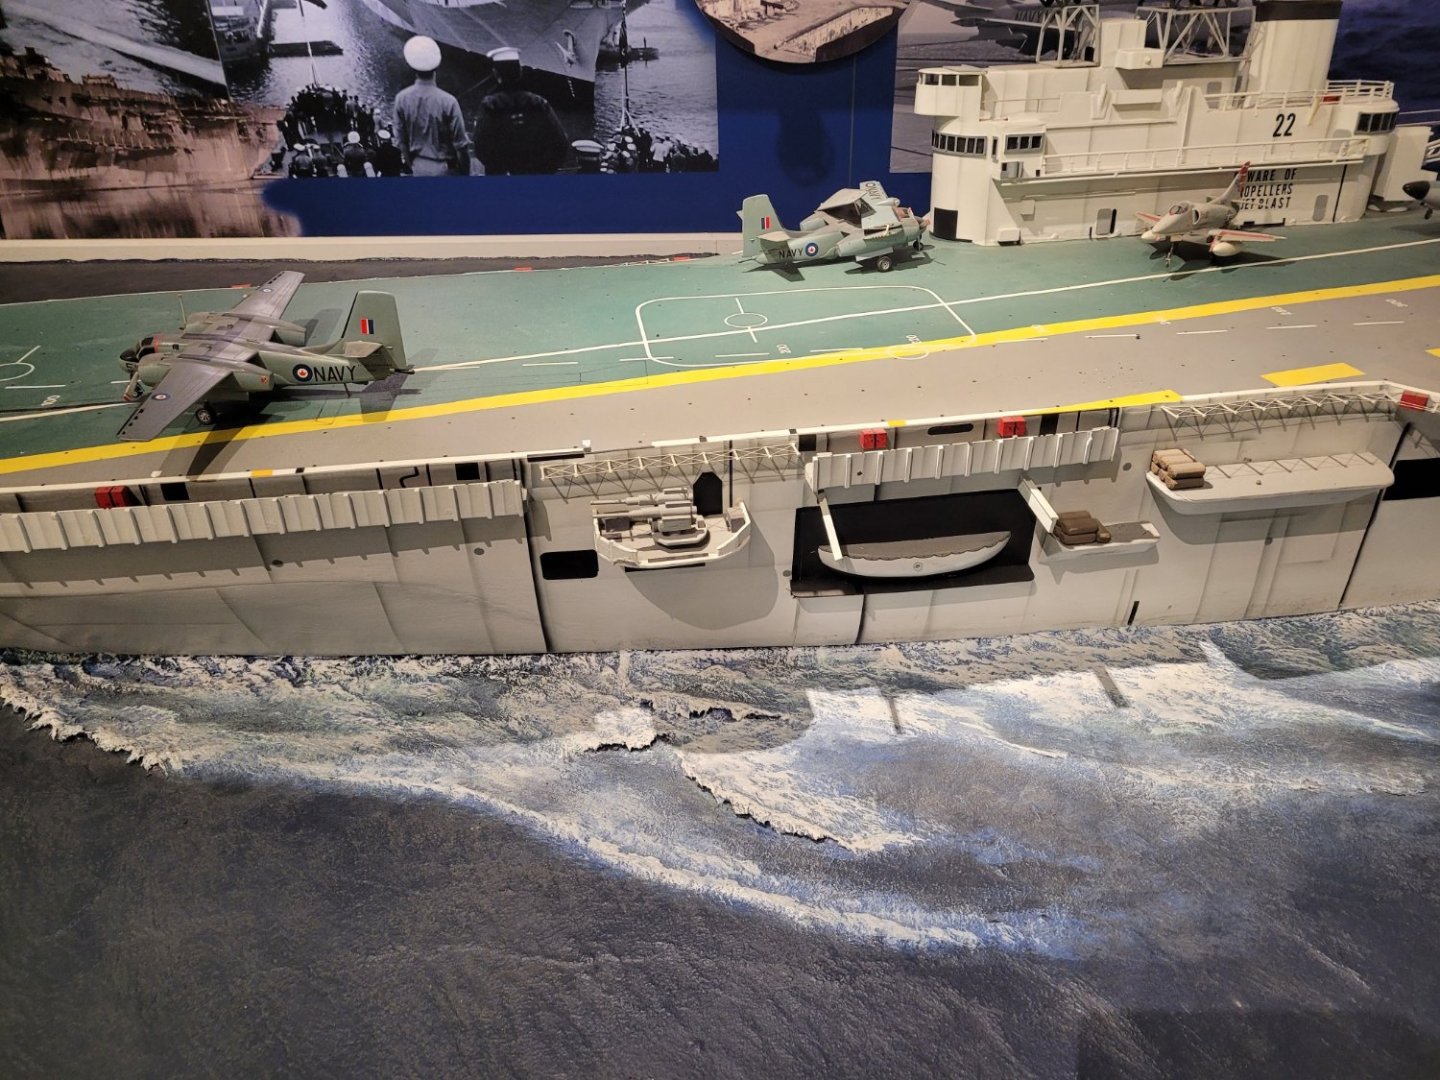
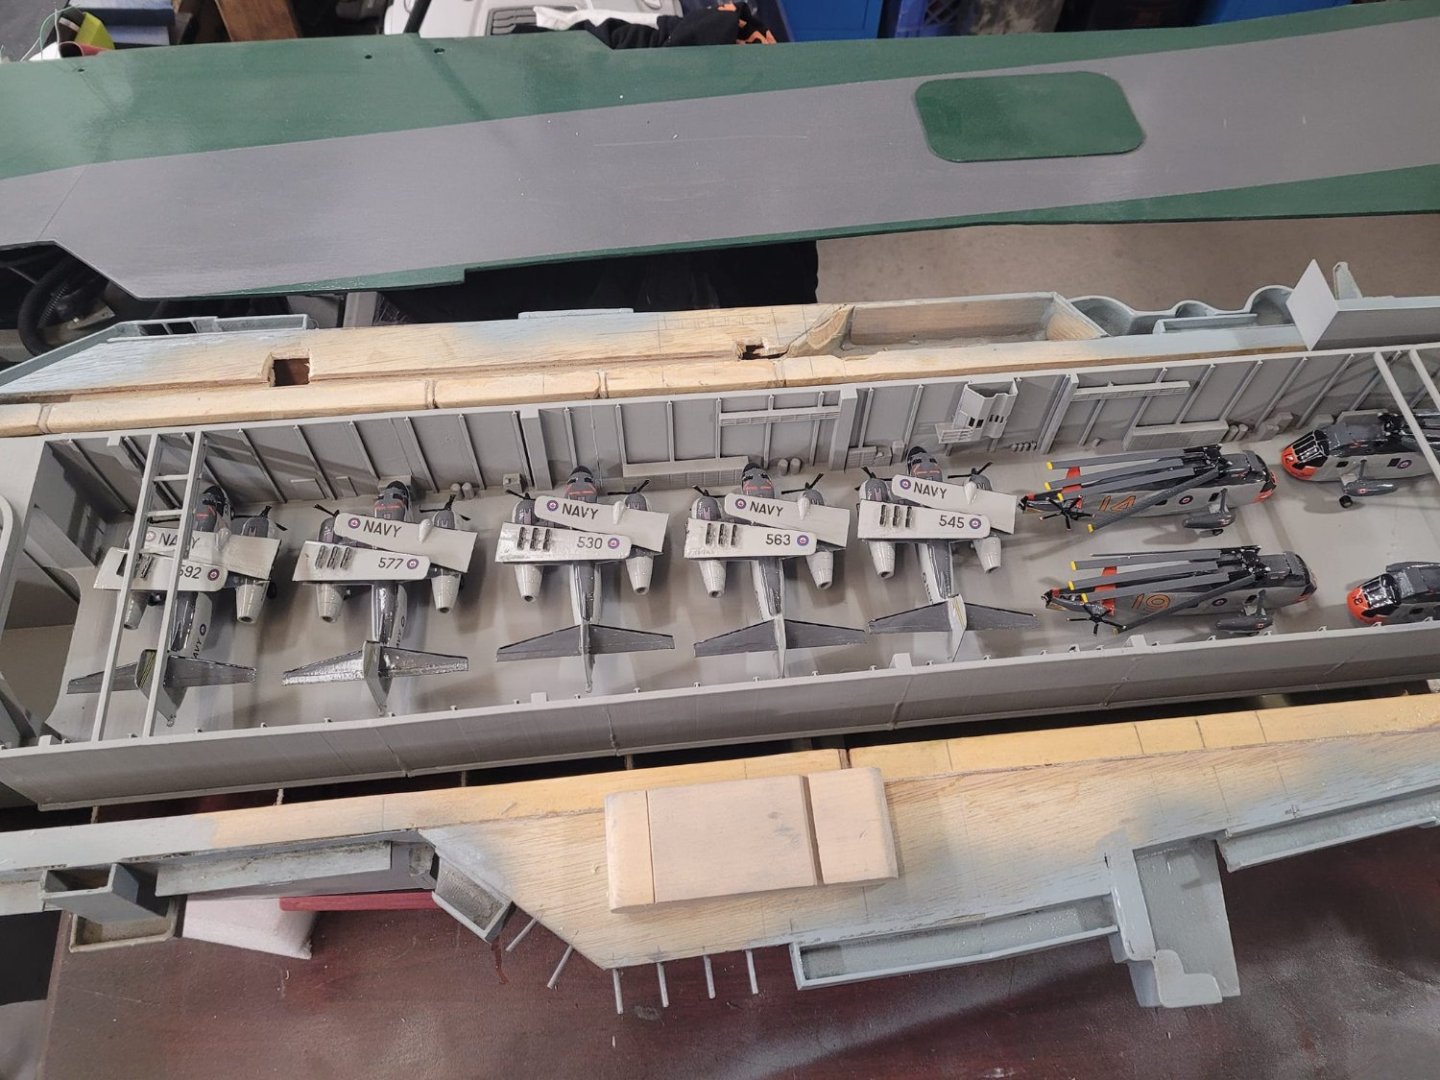
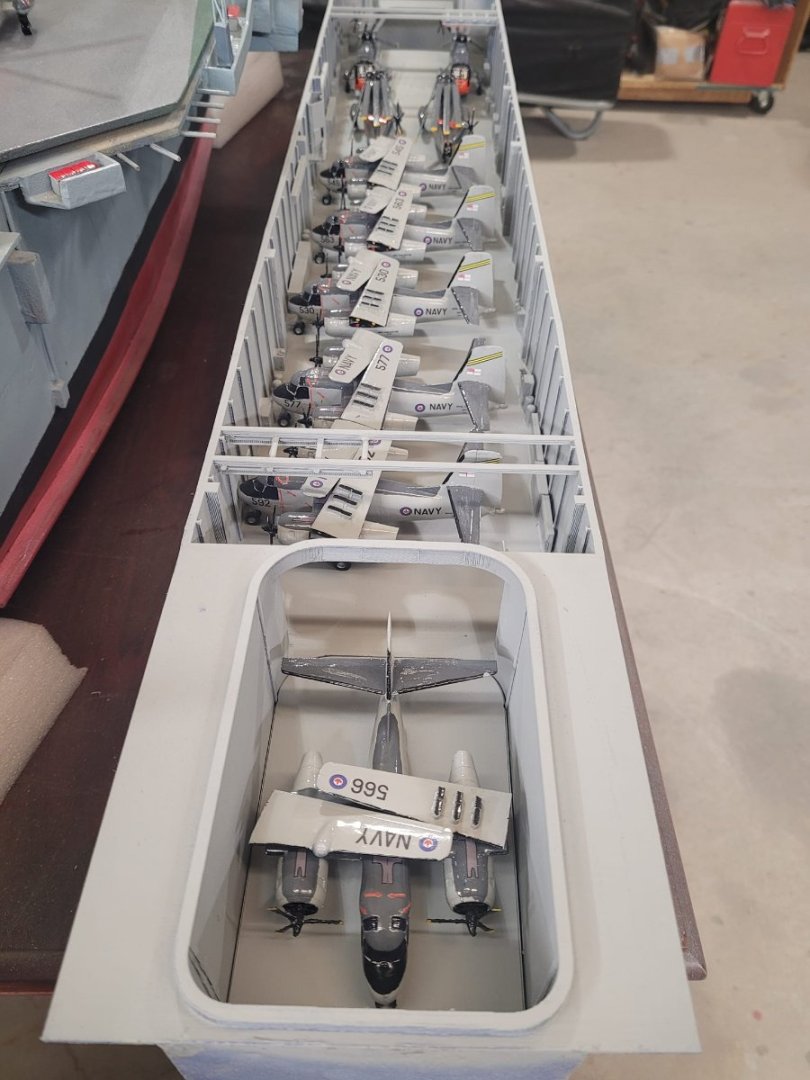
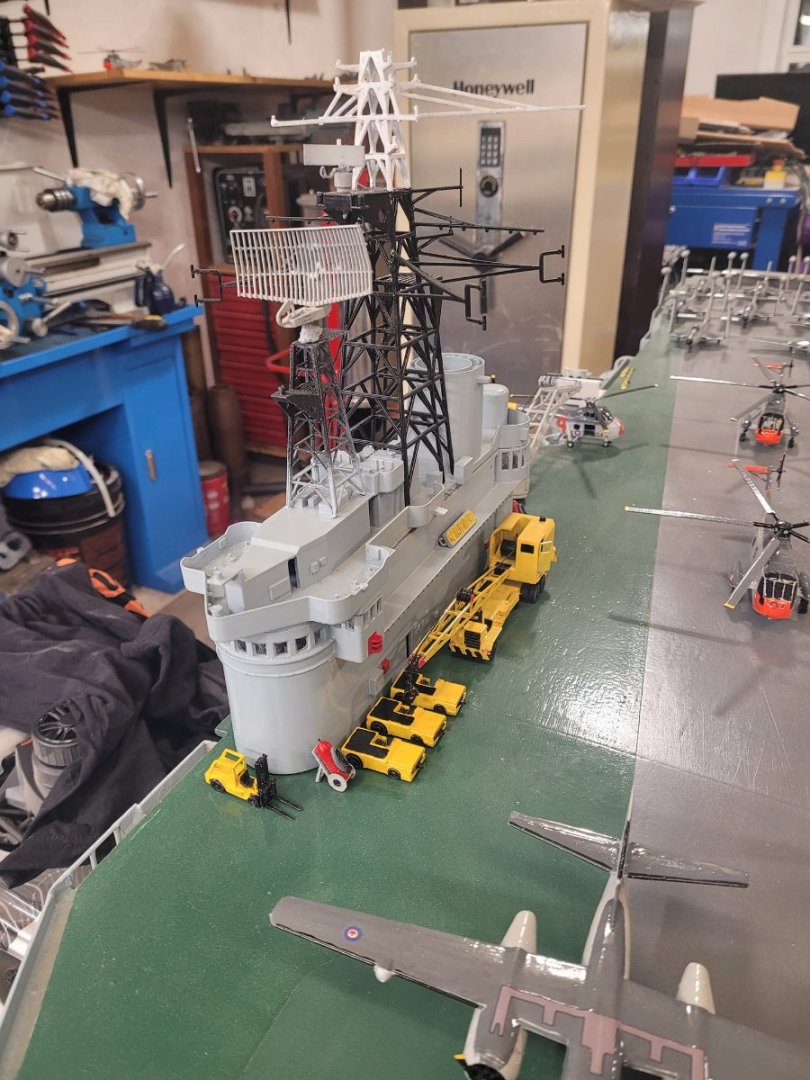
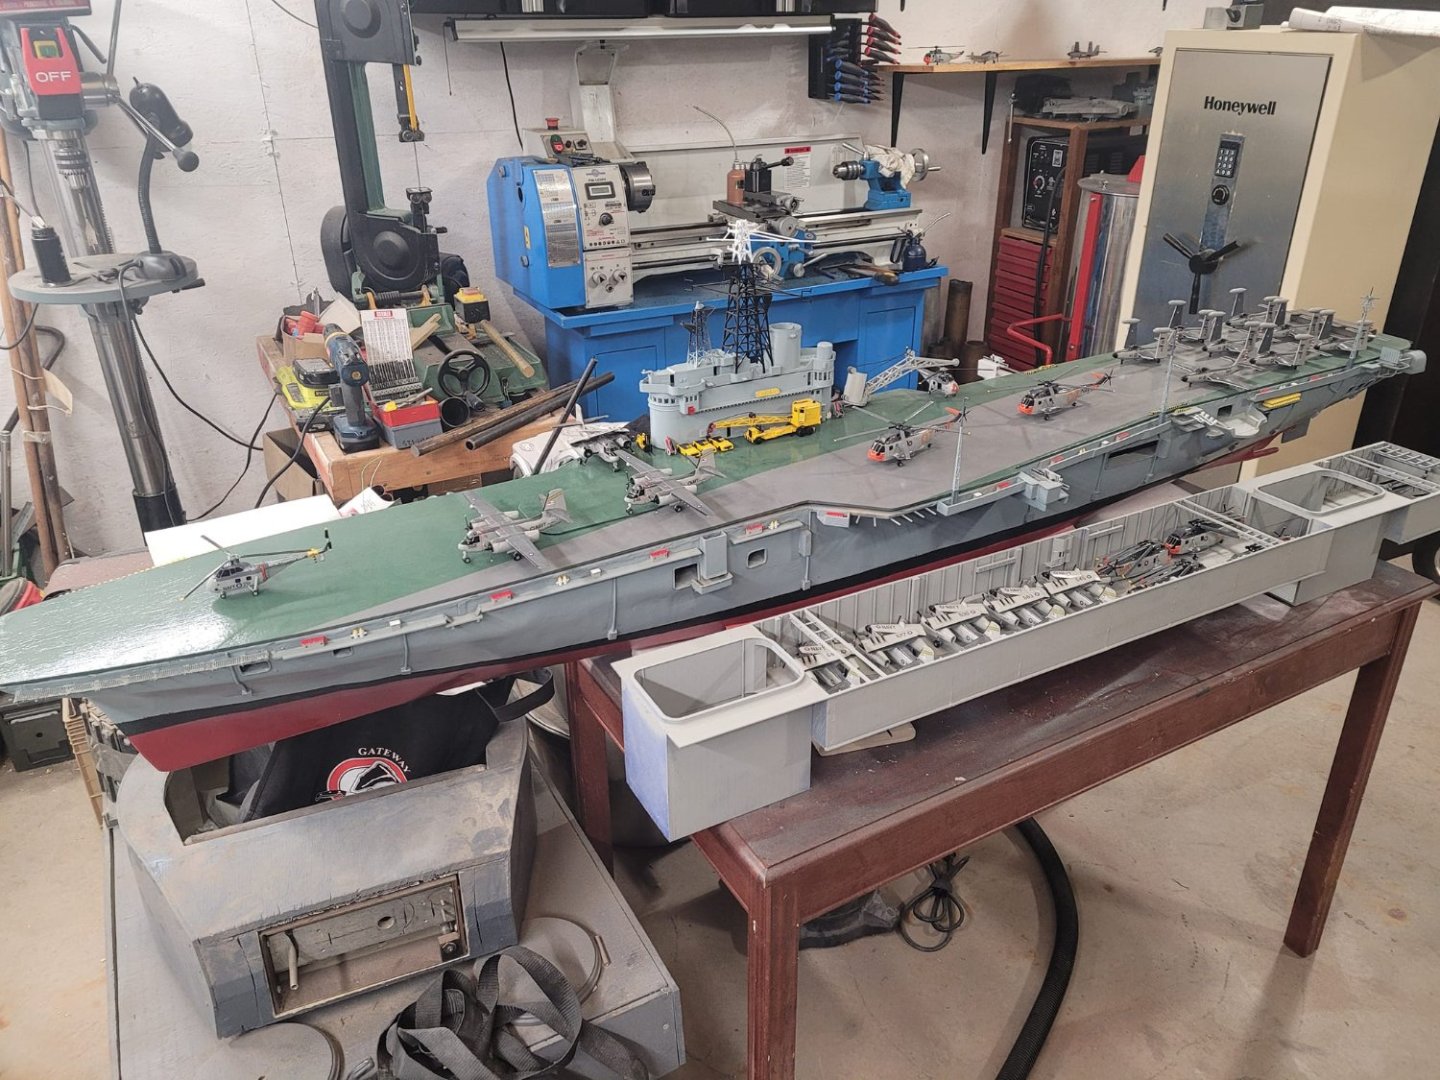
Alrighty....a little update on the Bonnie. I'm bringing her in 'as is' condition to a display at the Halifax International Boat Show in 2 weeks, so I decided to dress her up and see what 'as is' condition looks like. I have printed and assembled the new hangar deck, which has the necessary wells for the elevator lift mechanisms. The hangar deck is going to be a lift-in/lift-out module that will fit below the flight deck when I'm all finished, and the flight deck is going to get sliced up with 'hatches' to allow access to remove the entire module, as well as provide access to the anchor deck area, and the rudder area below the aft cable deck. I didn't glue any of the accessories in place, in fact, none of them are really in the right spots, I just wanted to get some imagery to share with a couple of folks so they could get an idea of what I'll be bringing along to the show. I'm quite pleased with the progress - there's still a long way to go, but getting the elevators figured out has let me move the bar along considerably. NS


-
One module left to print....and here's how the window glass turned out:
-
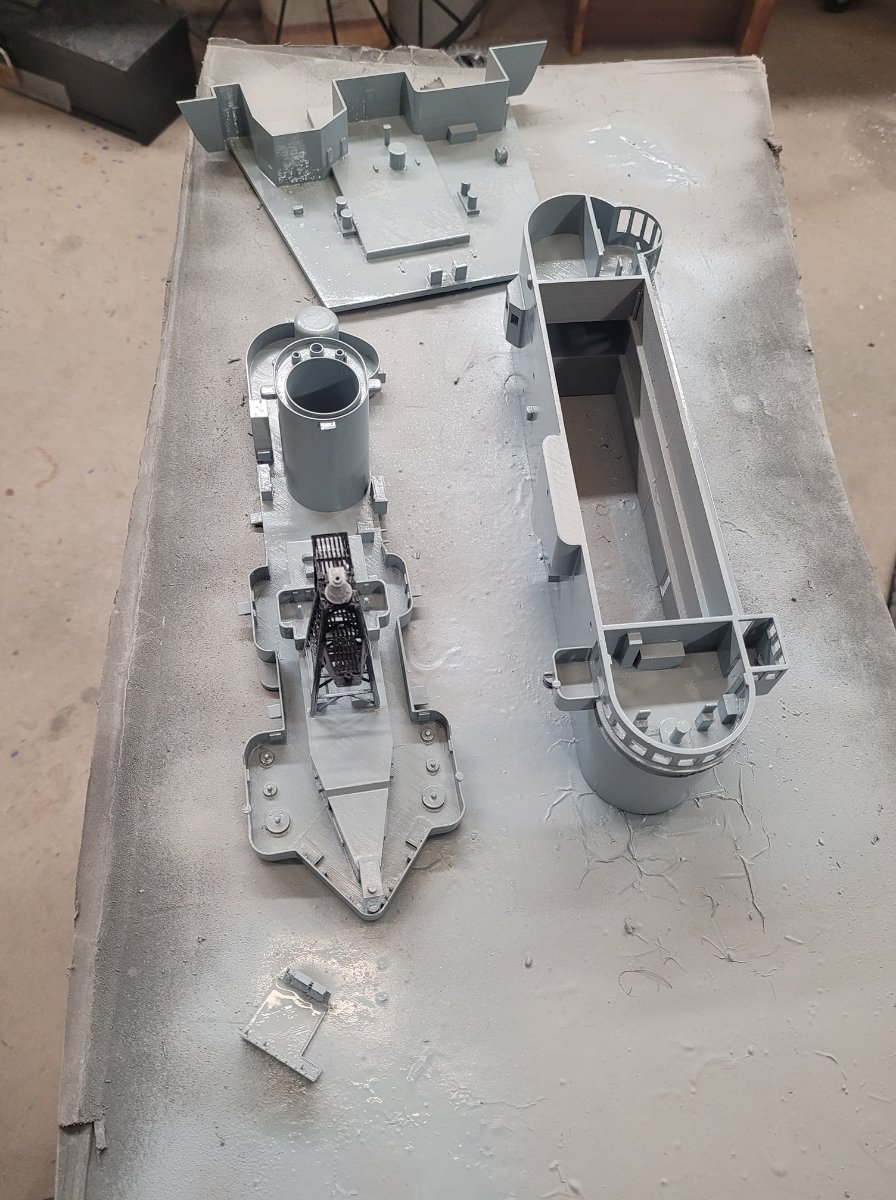
A bit of work today on the ship. The hangar deck is about 75% printed - and I've done some more work on the island too.

-
She's right on about 7 feet long. Definitely too big for the bathtub...but the good news was that with the front seat folded forward, I was able to fit her into my CR-V. 🙂 BARELY!
-
Your work is inspiring! Having watched the build over the past several months, seeing it develop and the detail that you've laid your hands to come to completion...well done. You are a master of the art of model ship building! NS
-
I grabbed some window making solution/glue, and have given it a try on one of the old versions of the Island. Here's the application, the material, and the dried window. I'm quite pleased!
-
Alrighty....home from a busy vacation with the family...now I can relax! Spent part of today out in the shop puttering away on the forward elevator part of the project....here's how Version 1 looks: I'll call it "almost functional" - but not very reliable yet. I have some work ahead of me.
-
F4U-1A Corsair by DocRob - FINISHED - Tamiya - 1/32
NavyShooter replied to DocRob's topic in Non-ship/categorised builds
Your problems have been overcome - patience is a good thing! -
And...having read a few of the 3D design threads...here's what I started on this evening:

-
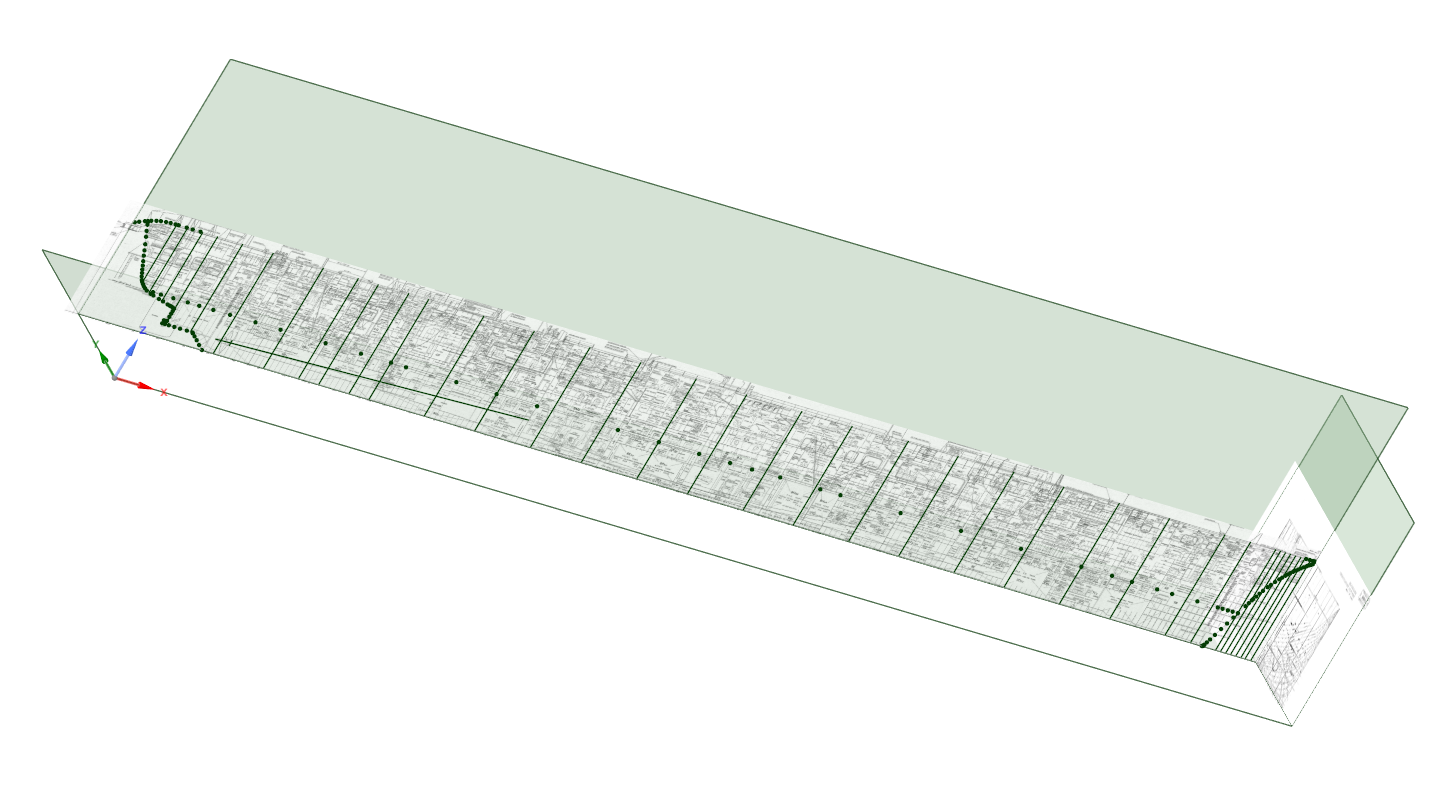
Here's my 2nd try at this...first time I tried on my own and it wasn't very pretty. This is HMCS Bonaventure's hull plan. Aiming for 1/96 scale.

-
Hi everyone from Brisbane Australia
NavyShooter replied to Ray Durant's topic in New member Introductions
Welcome aboard! -
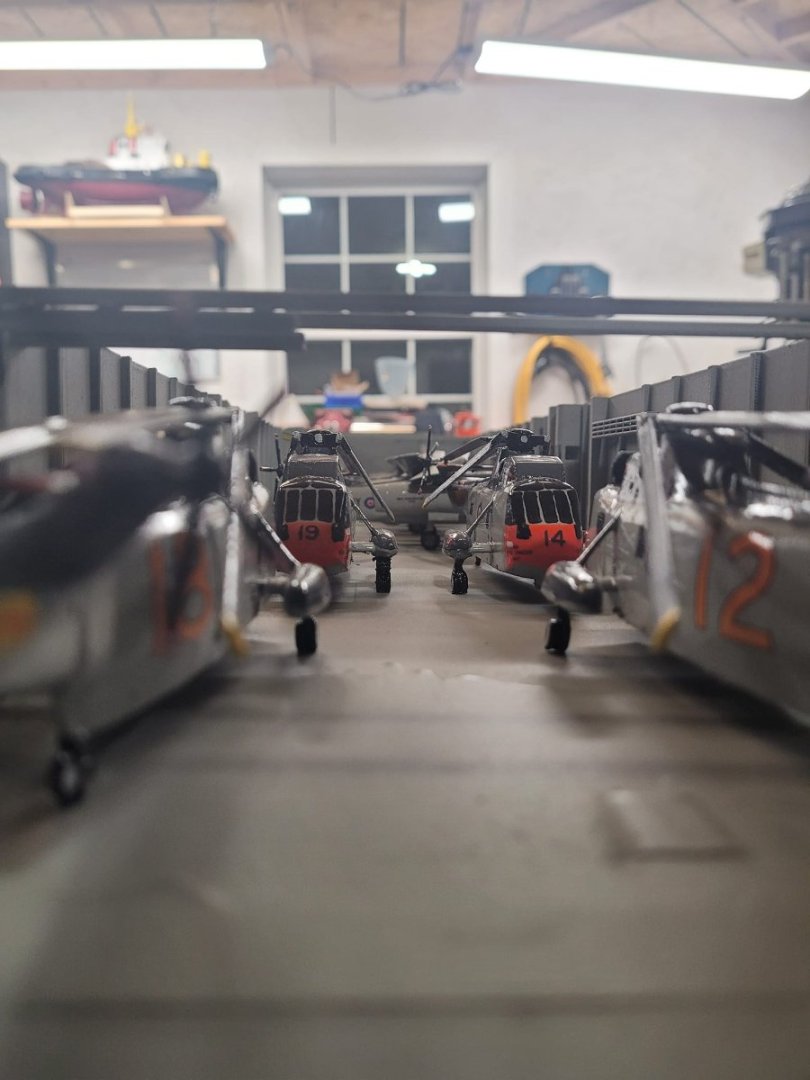
Here's short video of the Sea King spooling up on the flight deck. Lots left to do, but it's on the way!
-
The arrestor spools printed quite well!
-
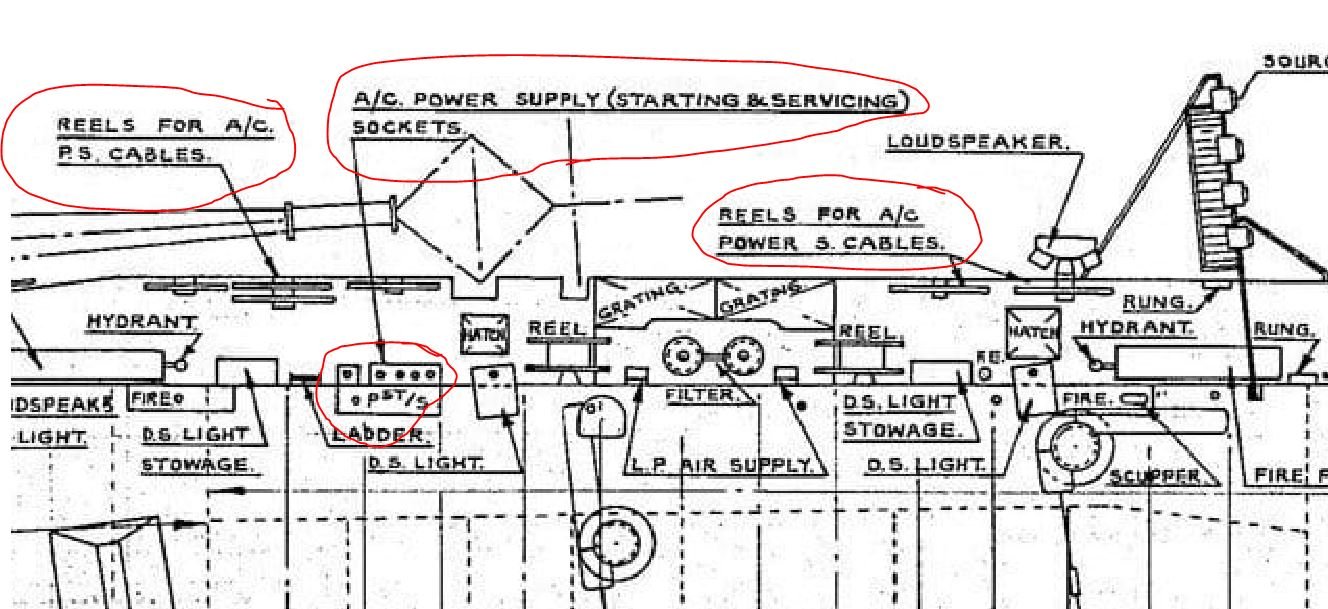
On the actual ships, they used pistons and chain hoists - one on each corner of the lift. I have an image of it somewhere that I'll dig up. The pistons were horizontally arranged.
-
It was pointed out to me by a Sea King pilot that I had the blades rotating the wrong way...so I had to rectify that. New blades have been printed, and are now on the way to paint. Including for the static aircraft. In other news, I saw an update from Bob Griffin (who's in the UK and is building a model of the HMS Victorious) showing his new aircraft lift. I reached out to him to find the source of the scissor lift, and have now ordered a pair of similar ones for myself. My project has been slightly stalled on this aspect, as I have to figure out the elevators before doing a bunch of other stuff. -I can't re-print the hangar deck until I figure out the elevators -I can't fit the electronics and other hardware until I figure out the hangar deck -I can't cut the access holes in the flight deck until I fit the hangar deck There are a bunch of 'to do' items that have been pending this step, and these mini scissor lifts are exactly what I've been looking for I think.
-
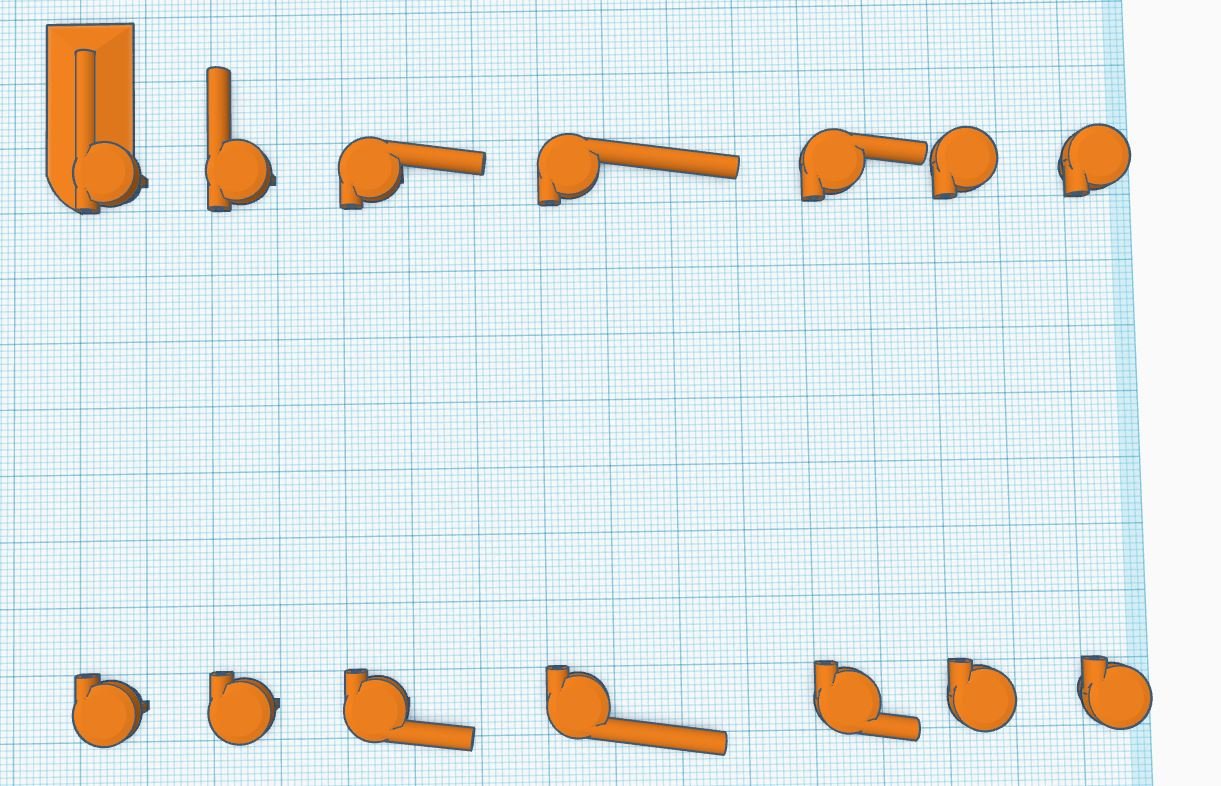
Today I got a bit more 3D design work done. Problem #1 that I had to solve was the rotor blades on the Sea King actually spin the opposite direction to that shown in the pictures I've posted...so I've redone the file, and will print some new blades when I get home tonight. With that fixed, I have to ponder whether or not I'm going to fix the 3D file for the folded version of the rotor blades...I might just leave them. After that, I still had a bit of time to play with, so I finished the design on the arresting wire spools. Bonnie has 7 wires - and only a few of them are 'the same'. So, some calipers and some sketch time later, here's what we have. I'm going to print 2 of each of them I think. One that will be 'no wire' for display only. The other set I'll do with elastic 'wire' between them. They are on 6mm pins, so they'll be able to be switched out if I'm going to have the aft elevator in use or anything like that.
-
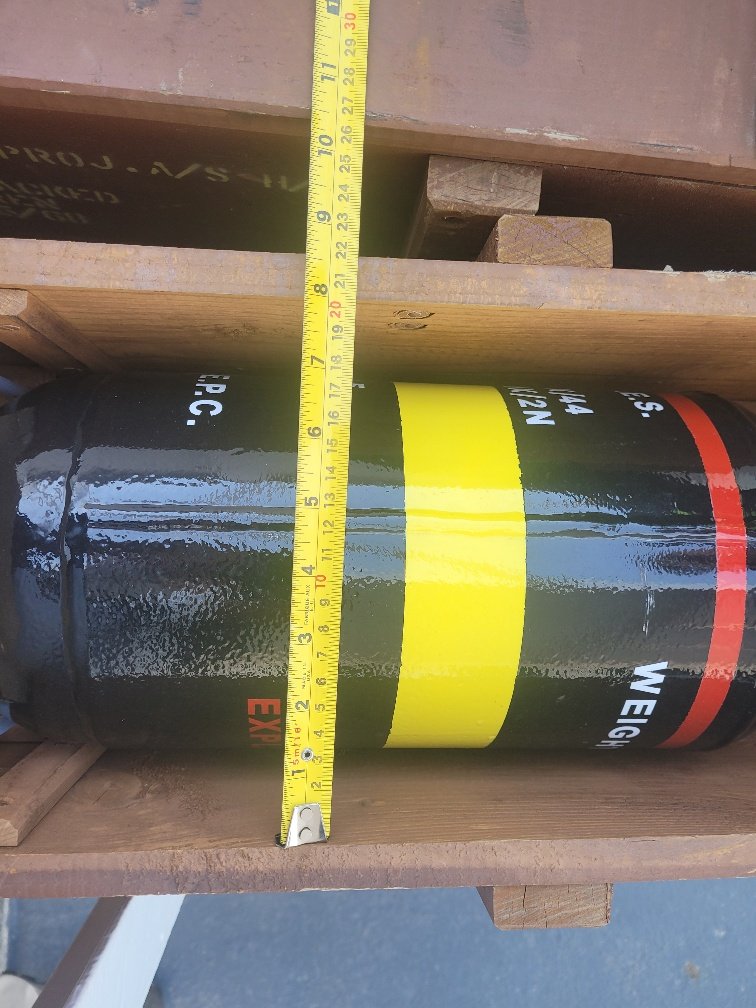
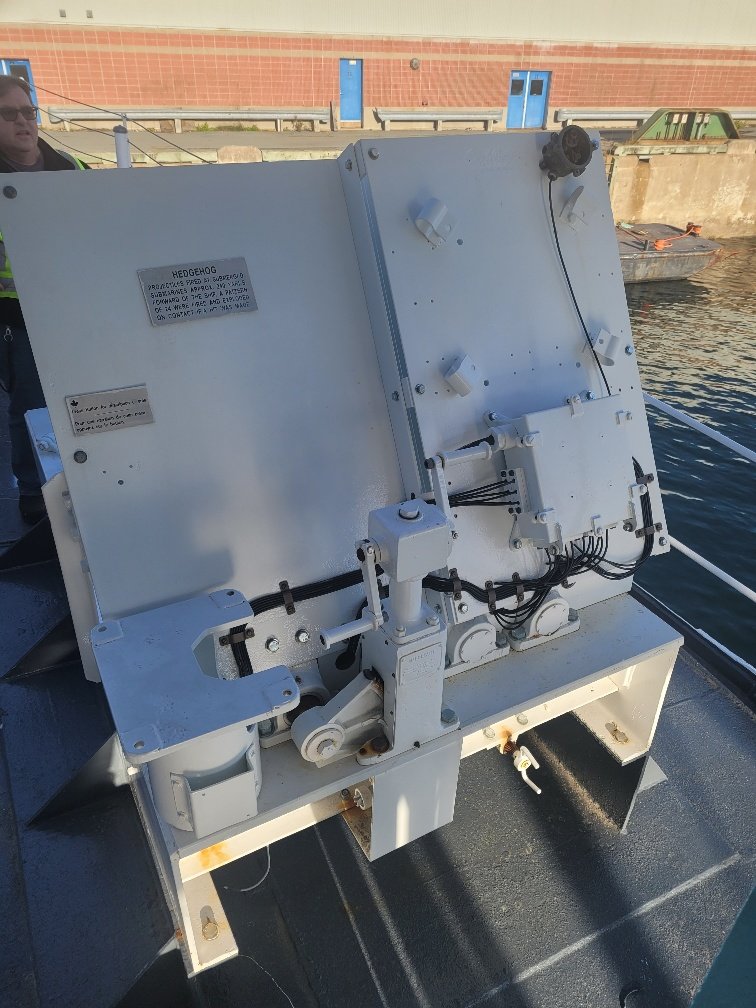
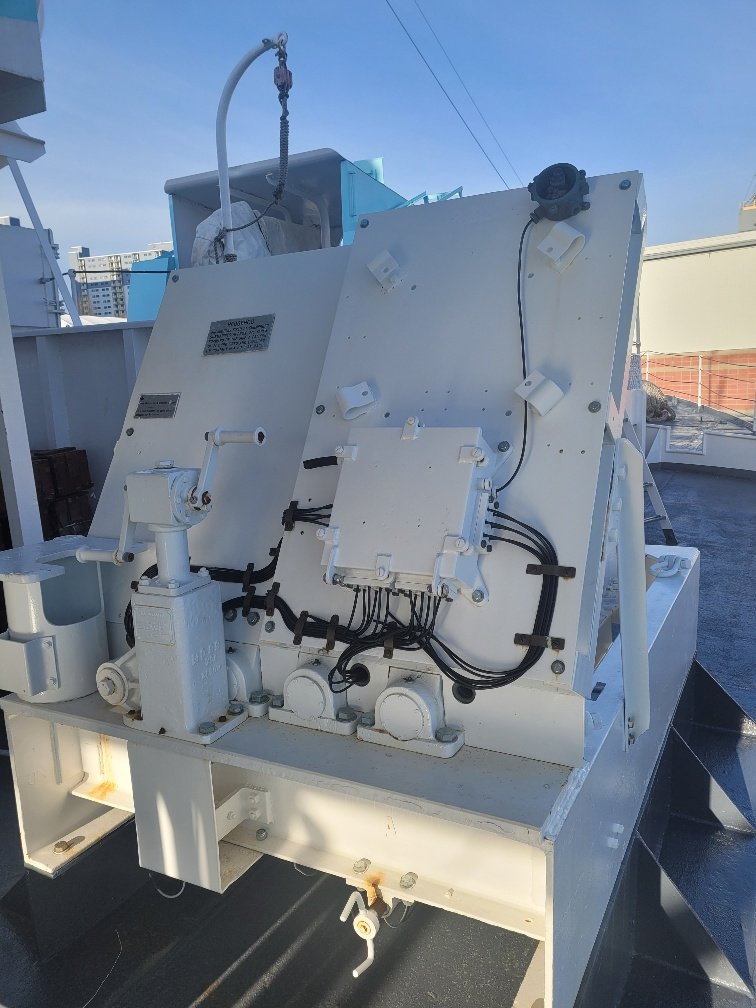
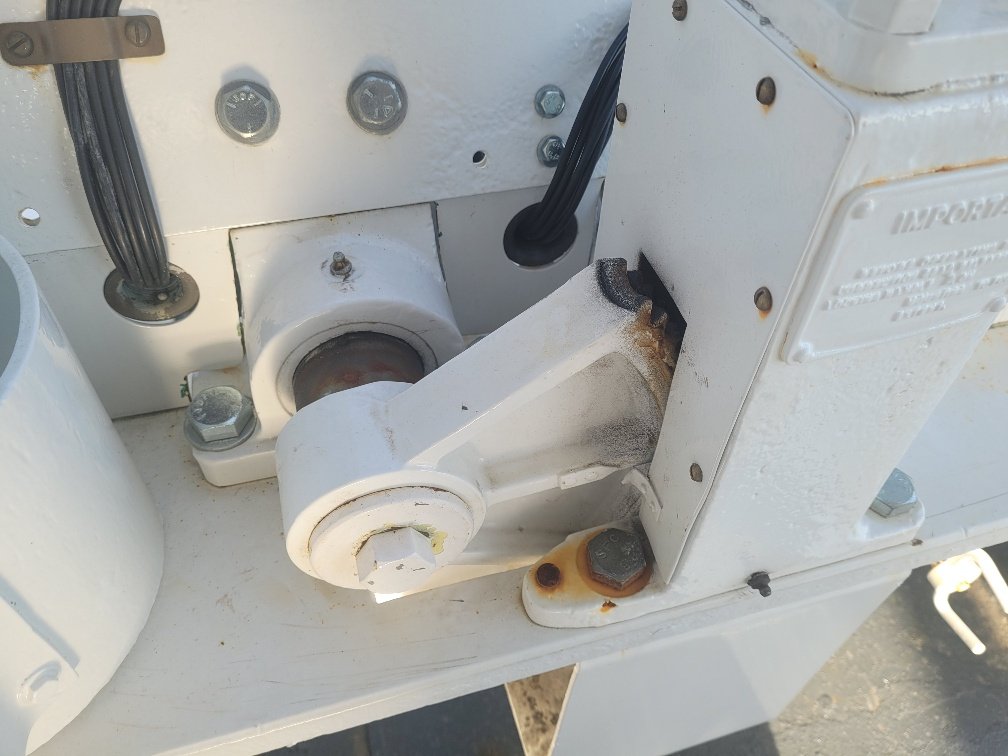
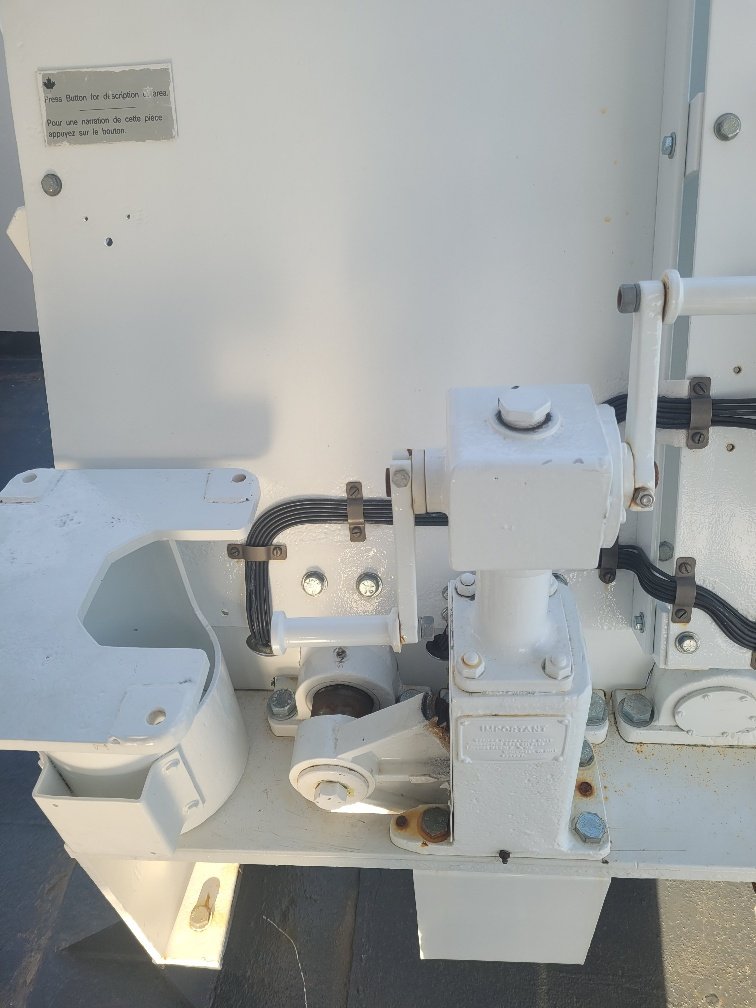
Here are the ammo crates with detailed photos of the Hedgehog projectiles themselves.
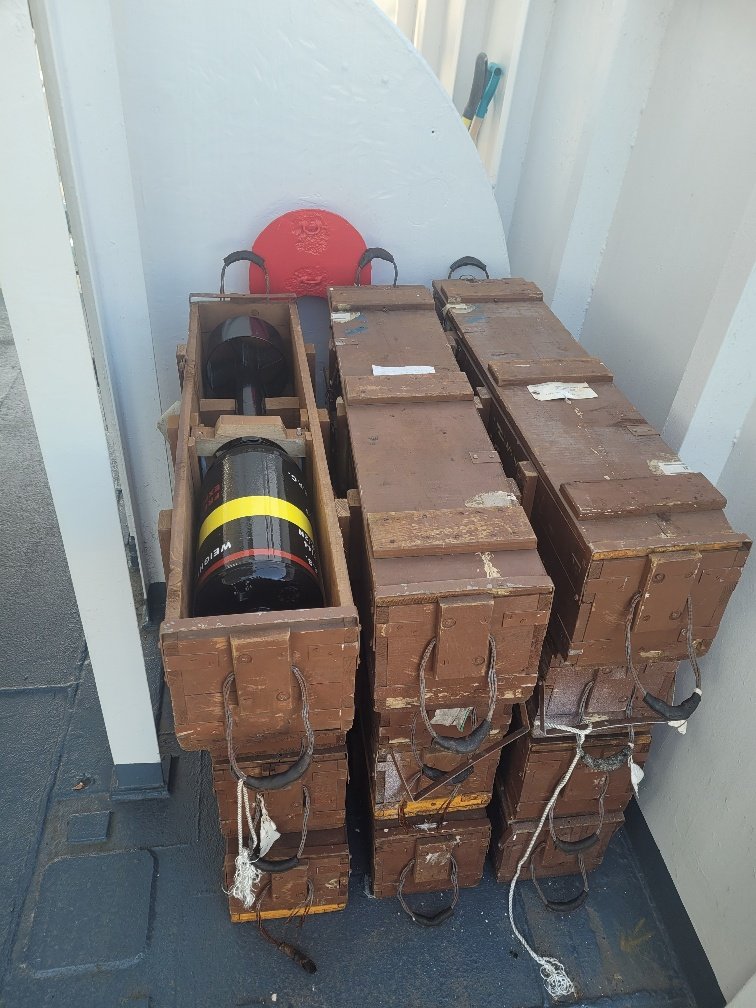
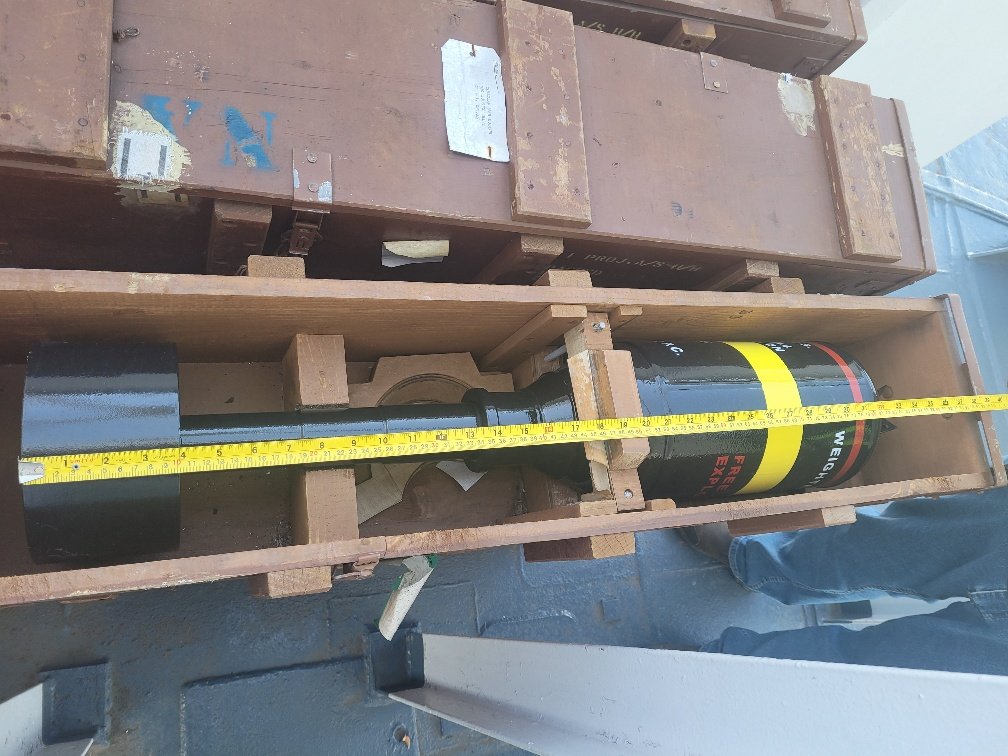
-
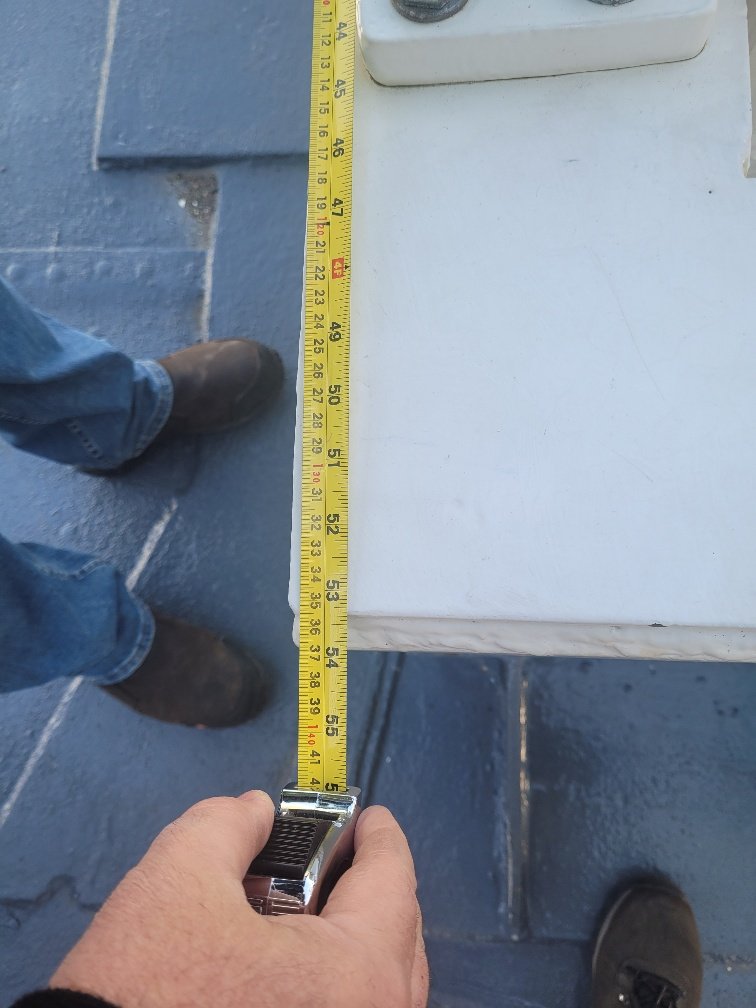
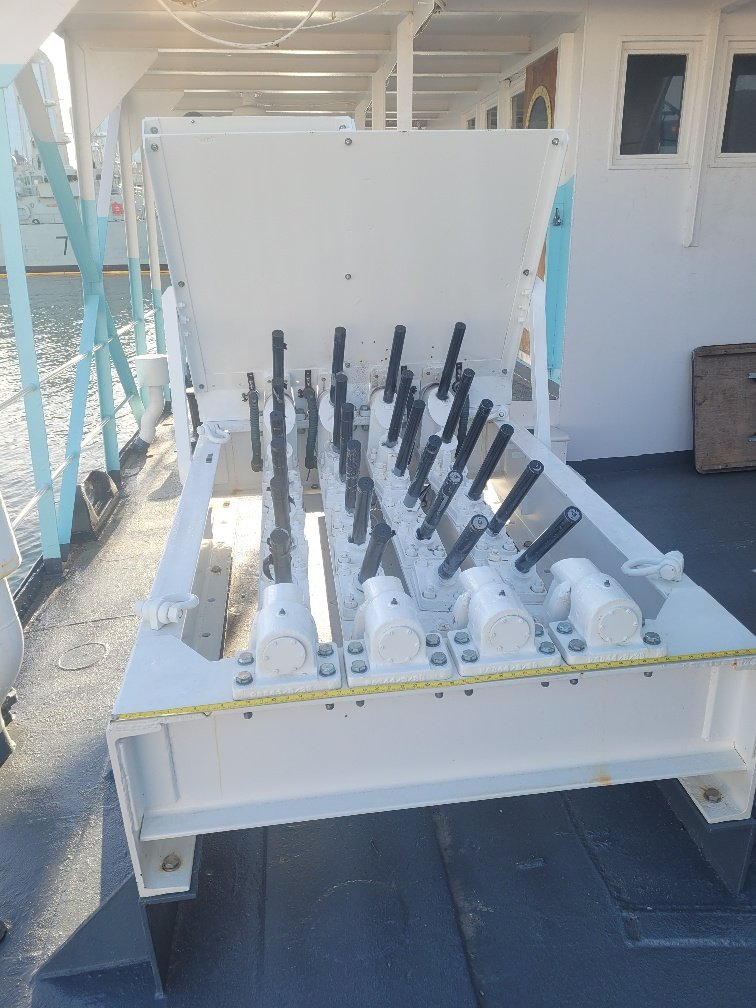
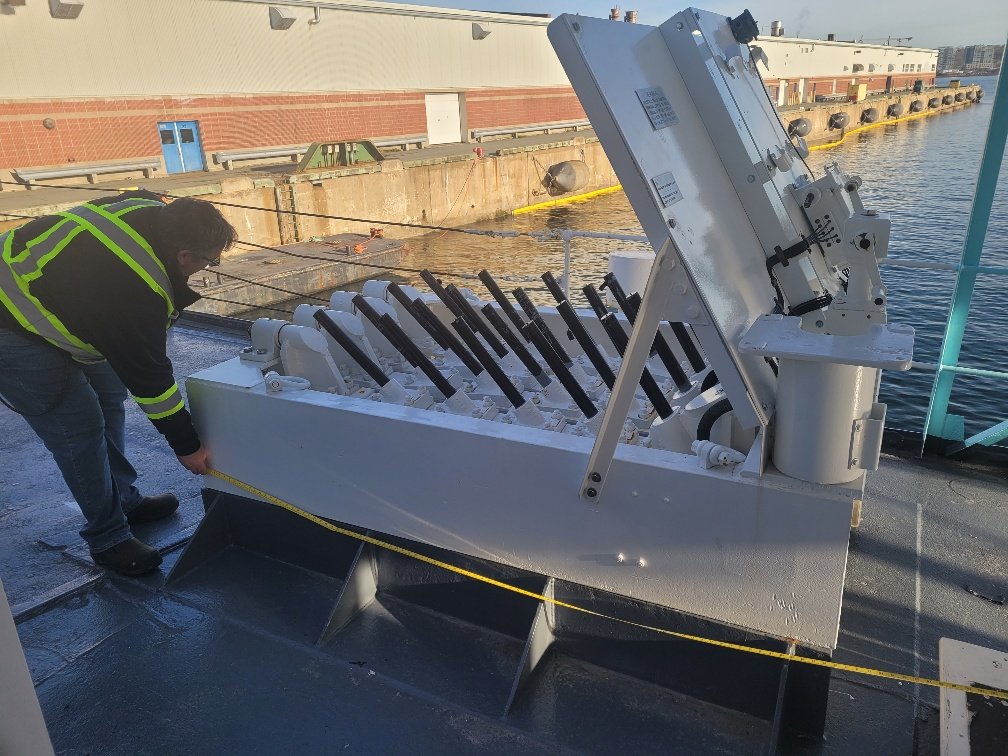
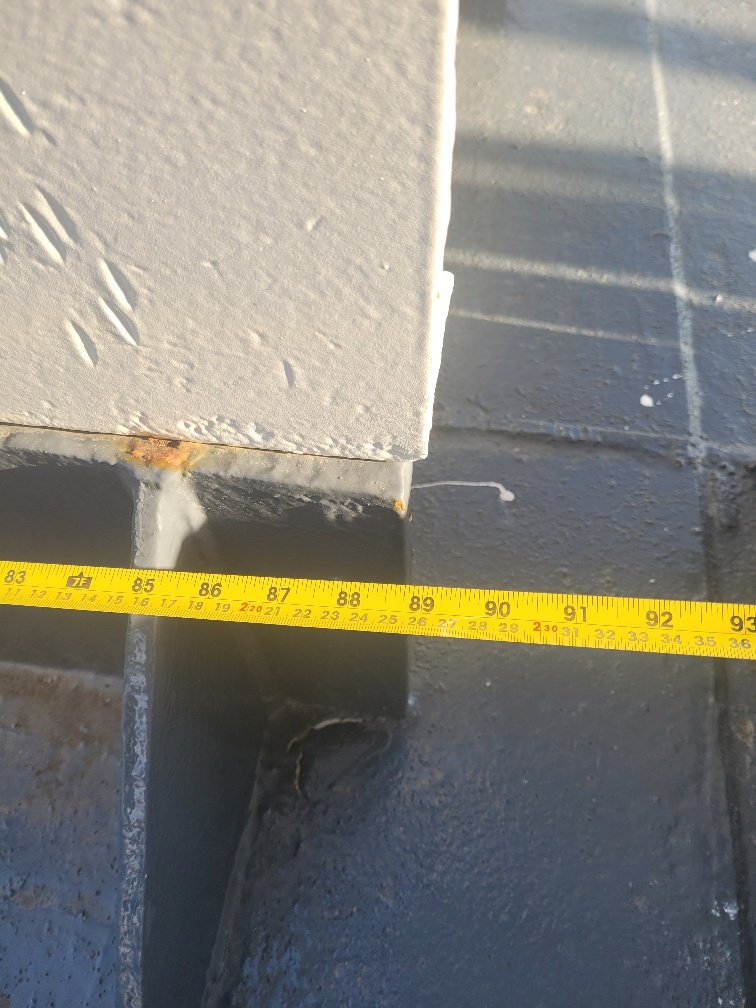
Additional photos of the launcher.
-
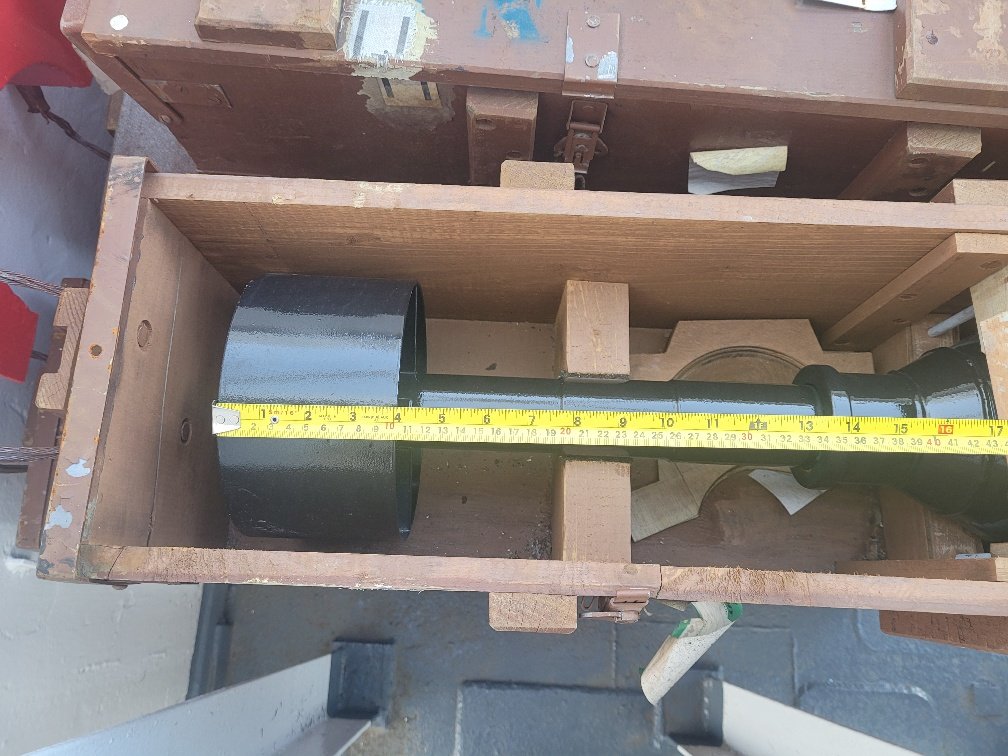
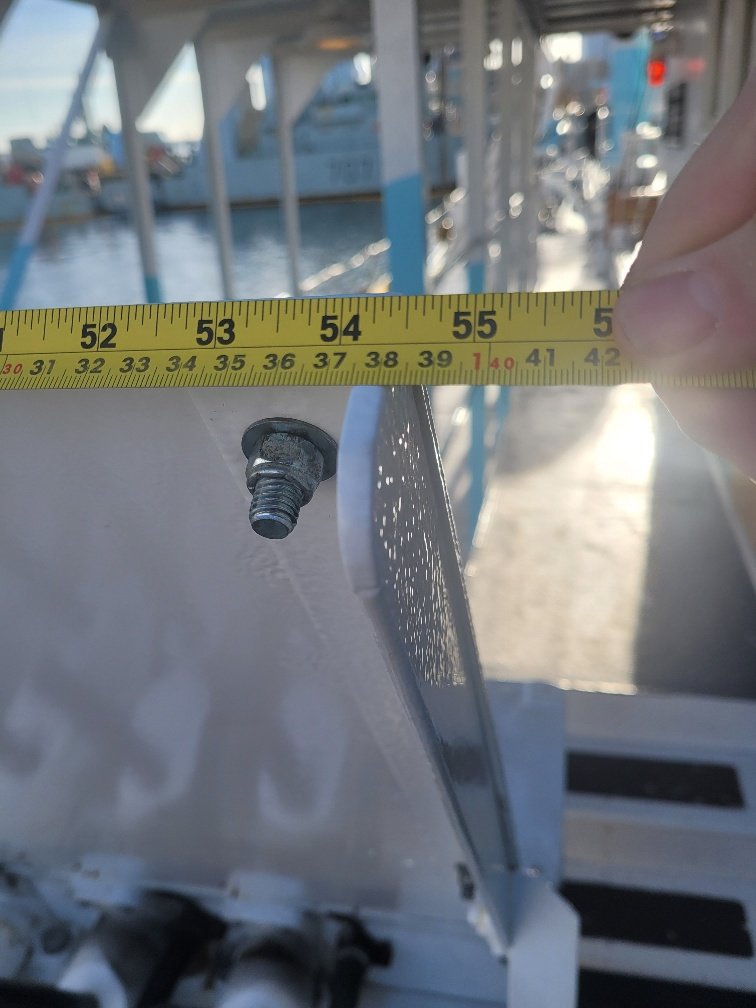
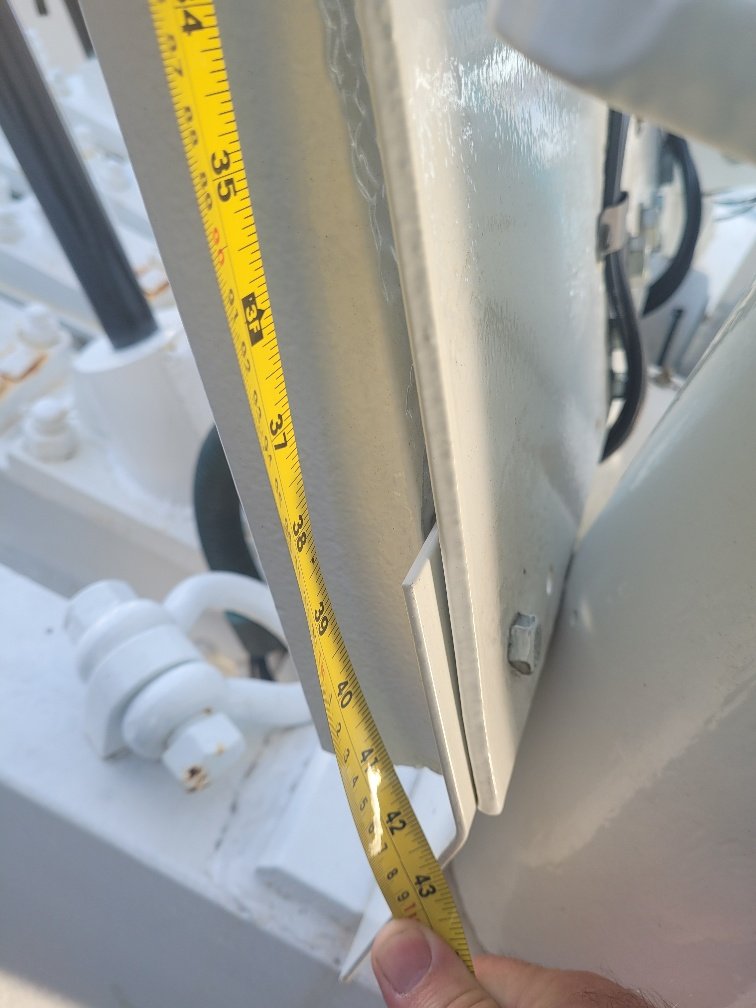
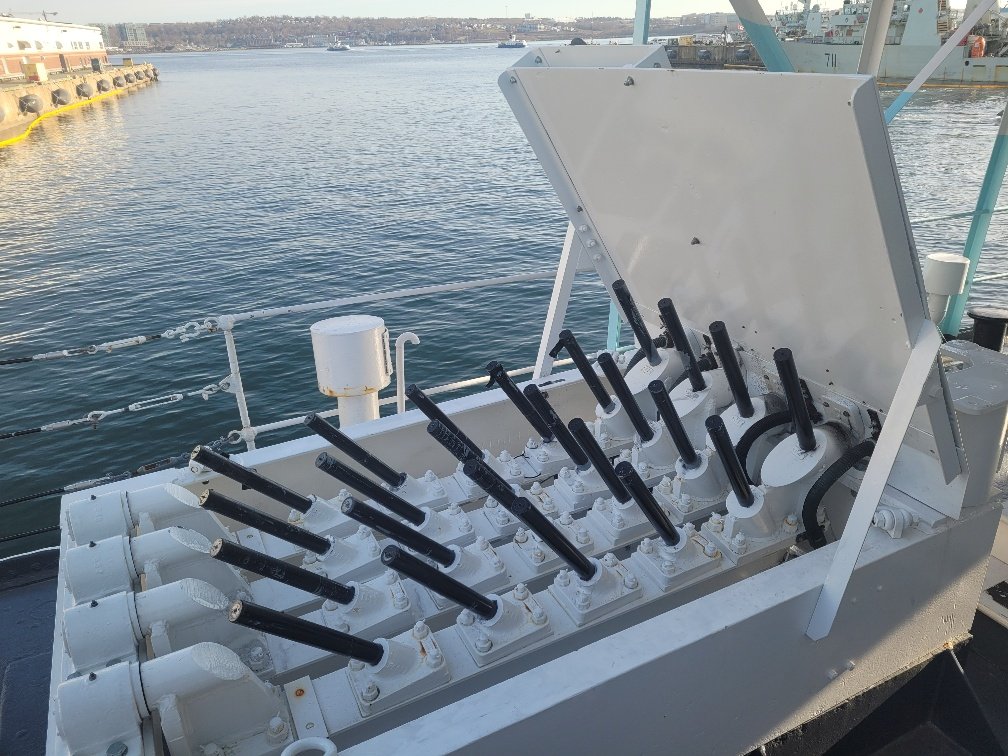
Goodday, I paid a visit to HMCS Sackville this morning, and took some detailed photos of the ship's hedgehog launcher for a gent on another forum. I thought that this forum might appreciate the detailed pictures as well as a reference guide in case it's needed. Here are some useful dimensions: Overall length is 88.75 inches Overall Width is 53.3 inches Height of rear shield is 42.5 inches Width of rear shield is 54.5 inches Projectile length is 37 inches Length of Projectile stabilizing fin is 4 inches Diameter of projectile appears to be 7.5 inches
-
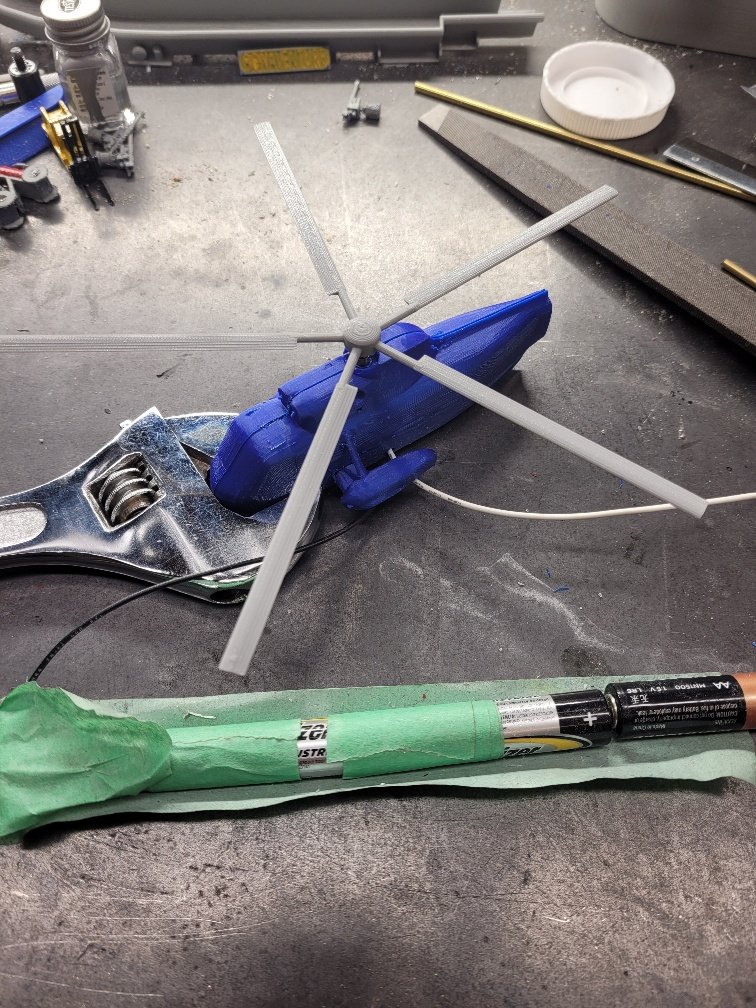
After a short hiatus due to life things going on, I got back to doing some work on the Bonnie. Last night I did some work on the motorized Sea King. This is a draft print of the aircraft, with some shimmed in bits to fit the motor inside and it seems to work OK. Intent is to have the aircraft on deck, with the helo starting power cables going to the edge of the flight deck where I'll plug it in. Rotors will spin at about 30 rpm, which is about right for a starting helo.


-
Another New Guy Introduction
NavyShooter replied to Petes Shipyard's topic in New member Introductions
I feel your pain...I joined the Navy in 1992 with a couple of ships on the slipways in my parent's basement....and they never did end up finished. I moved to Halifax, and after a 26+ year career have now slid into the Public Service and am no longer spending months away from home....so I'm stepping back into the model building world. I'm bringing a 3D printer with me though, so my projects have been focused on that basis. (3D Printed Liberty Ship, and an HMCS Bonaventure model that I'm bringing to completion and fitting out with 3D printed bits. Welcome back!