von_bednar
-
Posts
49 -
Joined
-
Last visited
-
 Mirabell61 reacted to a post in a topic:
Tramp Steamer by von_bednar - 1/100 scale - 1920s/30s - 3d printed with scratch built elements.
Mirabell61 reacted to a post in a topic:
Tramp Steamer by von_bednar - 1/100 scale - 1920s/30s - 3d printed with scratch built elements.
-
Mirabell61 reacted to a post in a topic:
Tramp Steamer by von_bednar - 1/100 scale - 1920s/30s - 3d printed with scratch built elements.
-
von_bednar reacted to a post in a topic:
Best Wood Saws
-
Canute reacted to a post in a topic:
Best Wood Saws
-
mtaylor reacted to a post in a topic:
Tramp Steamer by von_bednar - 1/100 scale - 1920s/30s - 3d printed with scratch built elements.
-
mtaylor reacted to a post in a topic:
Best Wood Saws
-
Peanut6 reacted to a post in a topic:
Tramp Steamer by von_bednar - 1/100 scale - 1920s/30s - 3d printed with scratch built elements.
-
thibaultron reacted to a post in a topic:
Tramp Steamer by von_bednar - 1/100 scale - 1920s/30s - 3d printed with scratch built elements.
-
Bob Cleek reacted to a post in a topic:
Best Wood Saws
-
KeithAug reacted to a post in a topic:
Tramp Steamer by von_bednar - 1/100 scale - 1920s/30s - 3d printed with scratch built elements.
-
KeithAug reacted to a post in a topic:
Tramp Steamer by von_bednar - 1/100 scale - 1920s/30s - 3d printed with scratch built elements.
-
von_bednar reacted to a post in a topic:
Best Wood Saws
-
I'm a big fan of Japanese style pull saws. I'm not a very skilled woodworker, and I feel the pull saws give me a much better control over my cuts than traditional saws. They come in many shapes and sizes (including detail saws great for small scales), and you can get them from quite cheap to really expensive artisanal stuff. I only have a couple of cheap ones, but enjoy using them much more than the handful of "hobby" saws I got when I started with model making. However, I agree with bob - for a lot of cuts a good hobby knife is more than sufficient. I use my pull saws for dowels and wood sheets - bigger stuff. The really tiny stuff like few mm wide planks get the hobby knife, or even clippers to trim them.
-
von_bednar reacted to a post in a topic:
Greetings from Western New York
-
 Thank you! It means a lot, especially because I see all the amazing woodworking skills on show here and I feel like I'm cheating when 3d printing. I hope that one day to have a decent workshop and get my woodworking skills even in the same ballpark as others on here (your work included, I'm stunned by your models!). As for 3d printing issues. Sadly we are not there yet with 3D printing to be as simple as everyday paper printing. It's getting there, but as of right now 3d printing is still a hobby in its own right. So there's a bit of a learning curve and a bit of trial and error, but like in any hobby, once you're over those early hurdles, it's pretty plain sailing. It also helps if you have some experience with CAD or 3d modelling, as you can design against limitations of the printer. I'm by no means an expert myself, but would recommend people give it a try if they are open to picking up a new hobby - especially that nowadays you can get a basic setup for less than couple wooden model kits --- ...and while on topic of 3d printing. I printed the anchor winch I designed and it seems quite out of place on my model. I think its too big and "vintage" for the ship. I made the same mistake as with the XIX century covers above - I love the designs, but they just don't feel right for this model. So I guess I will go back to anchor winch that was included with the original model... and maybe work on some XIX steamer down the line More updates to come.
 -
von_bednar reacted to a post in a topic:
Tramp Steamer by von_bednar - 1/100 scale - 1920s/30s - 3d printed with scratch built elements.
-
 von_bednar reacted to a post in a topic:
Schooner Wyoming by O.B.one - FINISHED - scale 1:1167 - Bottle - 3d printed
von_bednar reacted to a post in a topic:
Schooner Wyoming by O.B.one - FINISHED - scale 1:1167 - Bottle - 3d printed
-
von_bednar reacted to a post in a topic:
USS Takelma (ATF 113) by steamschooner - 1/96 scale - fiberglass and styrene
-
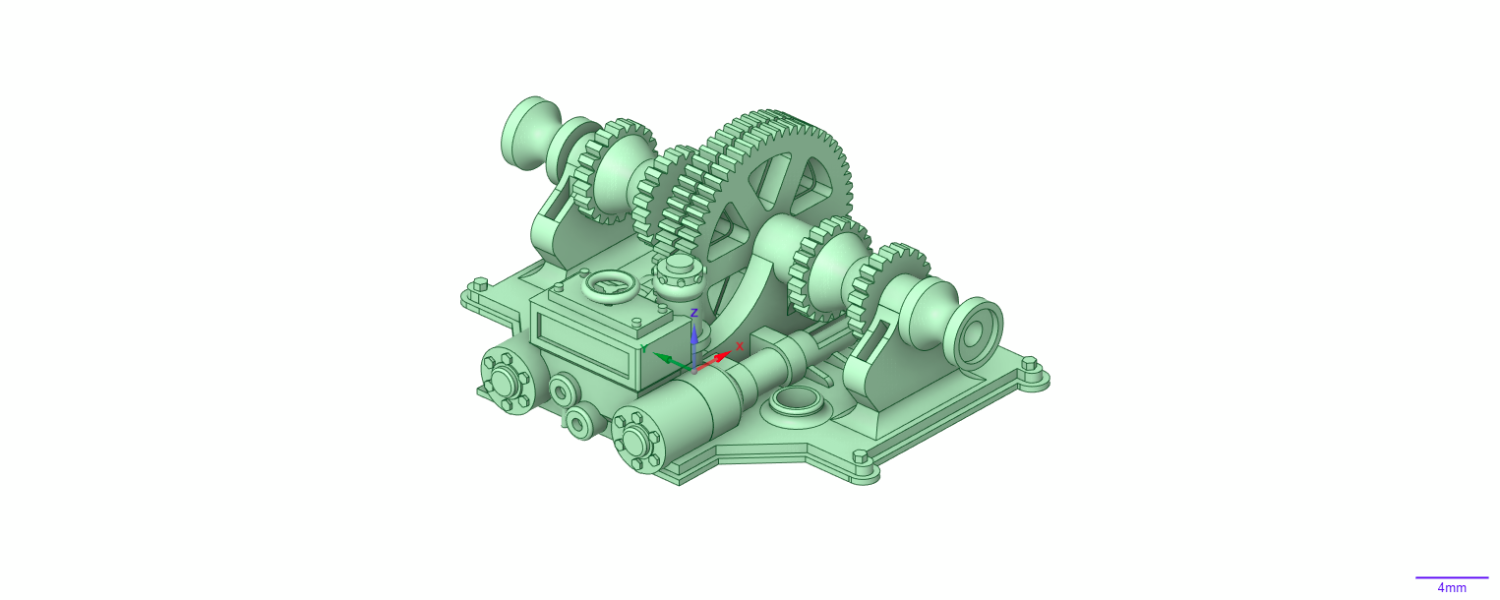
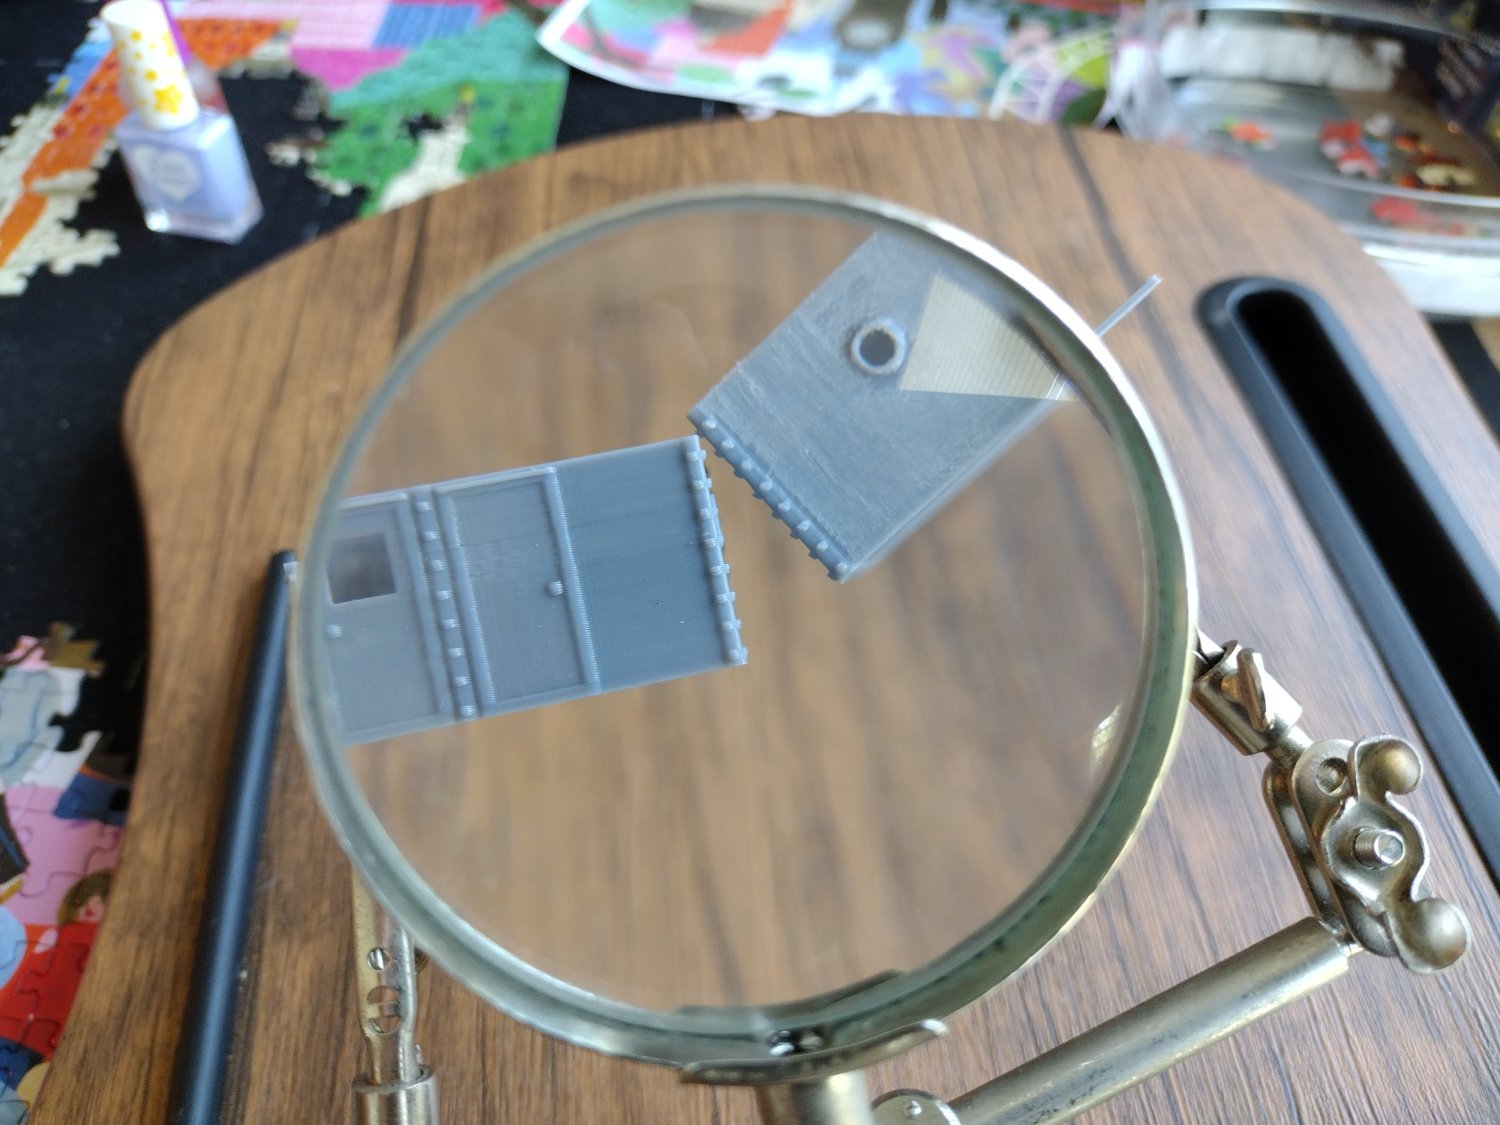
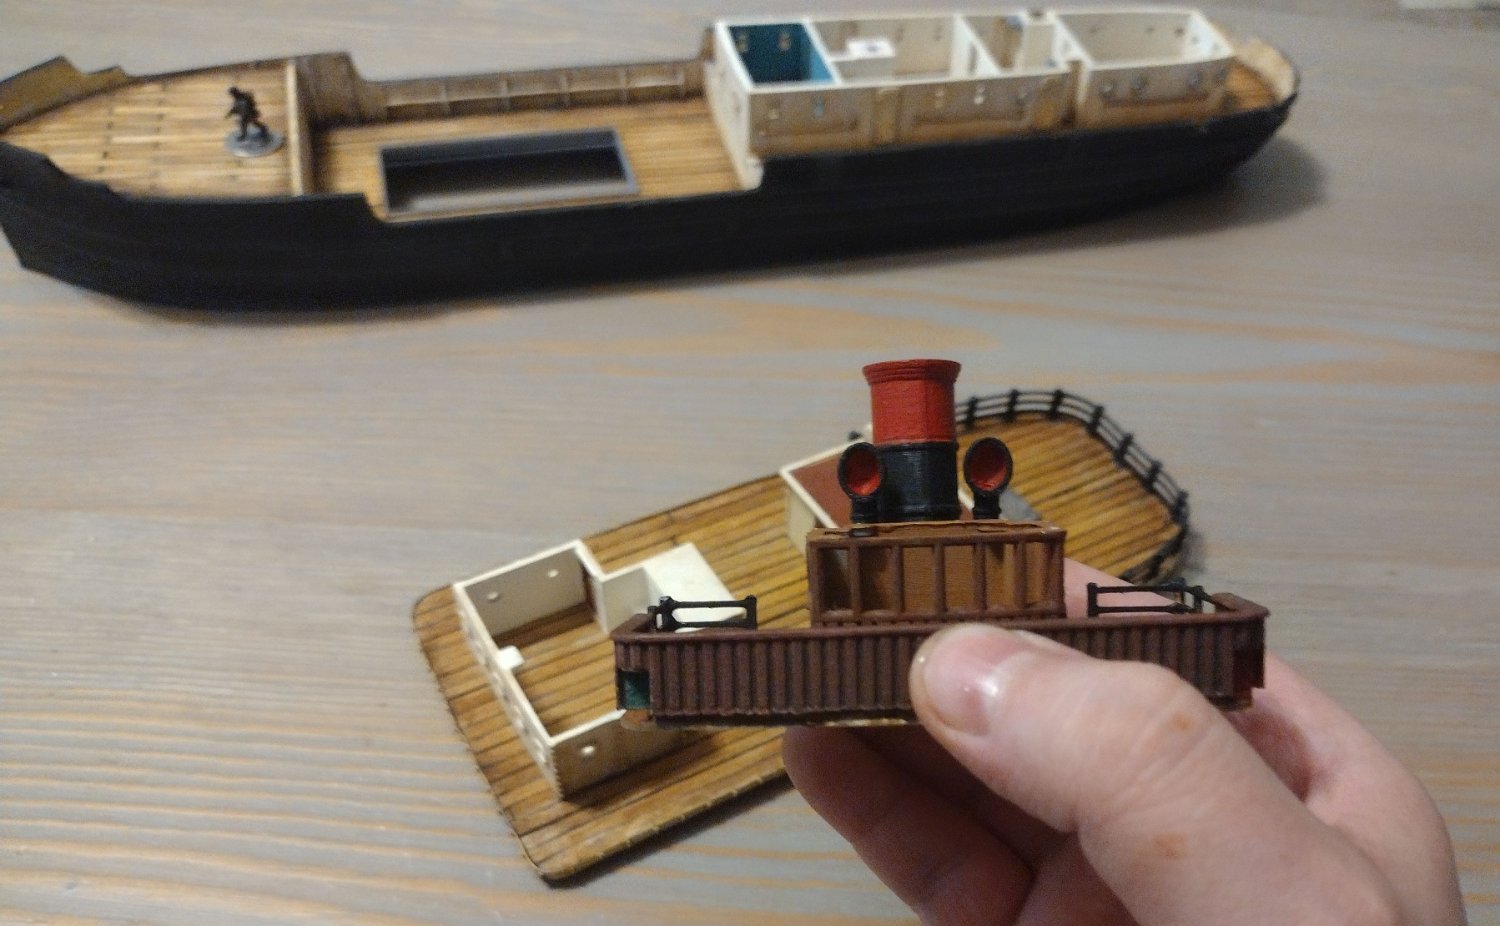
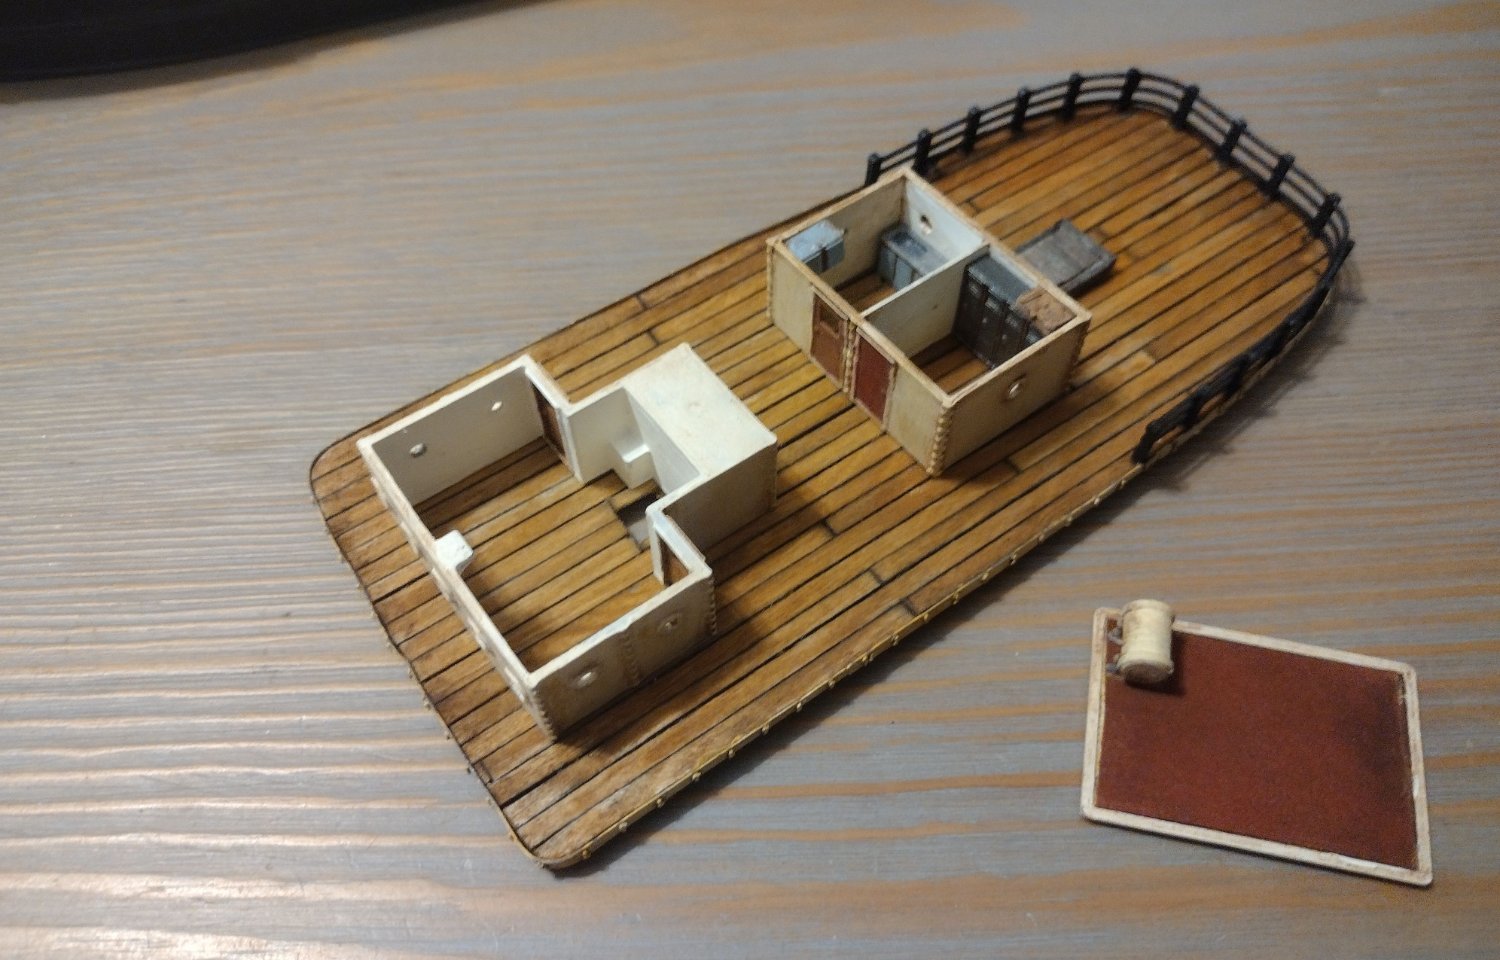
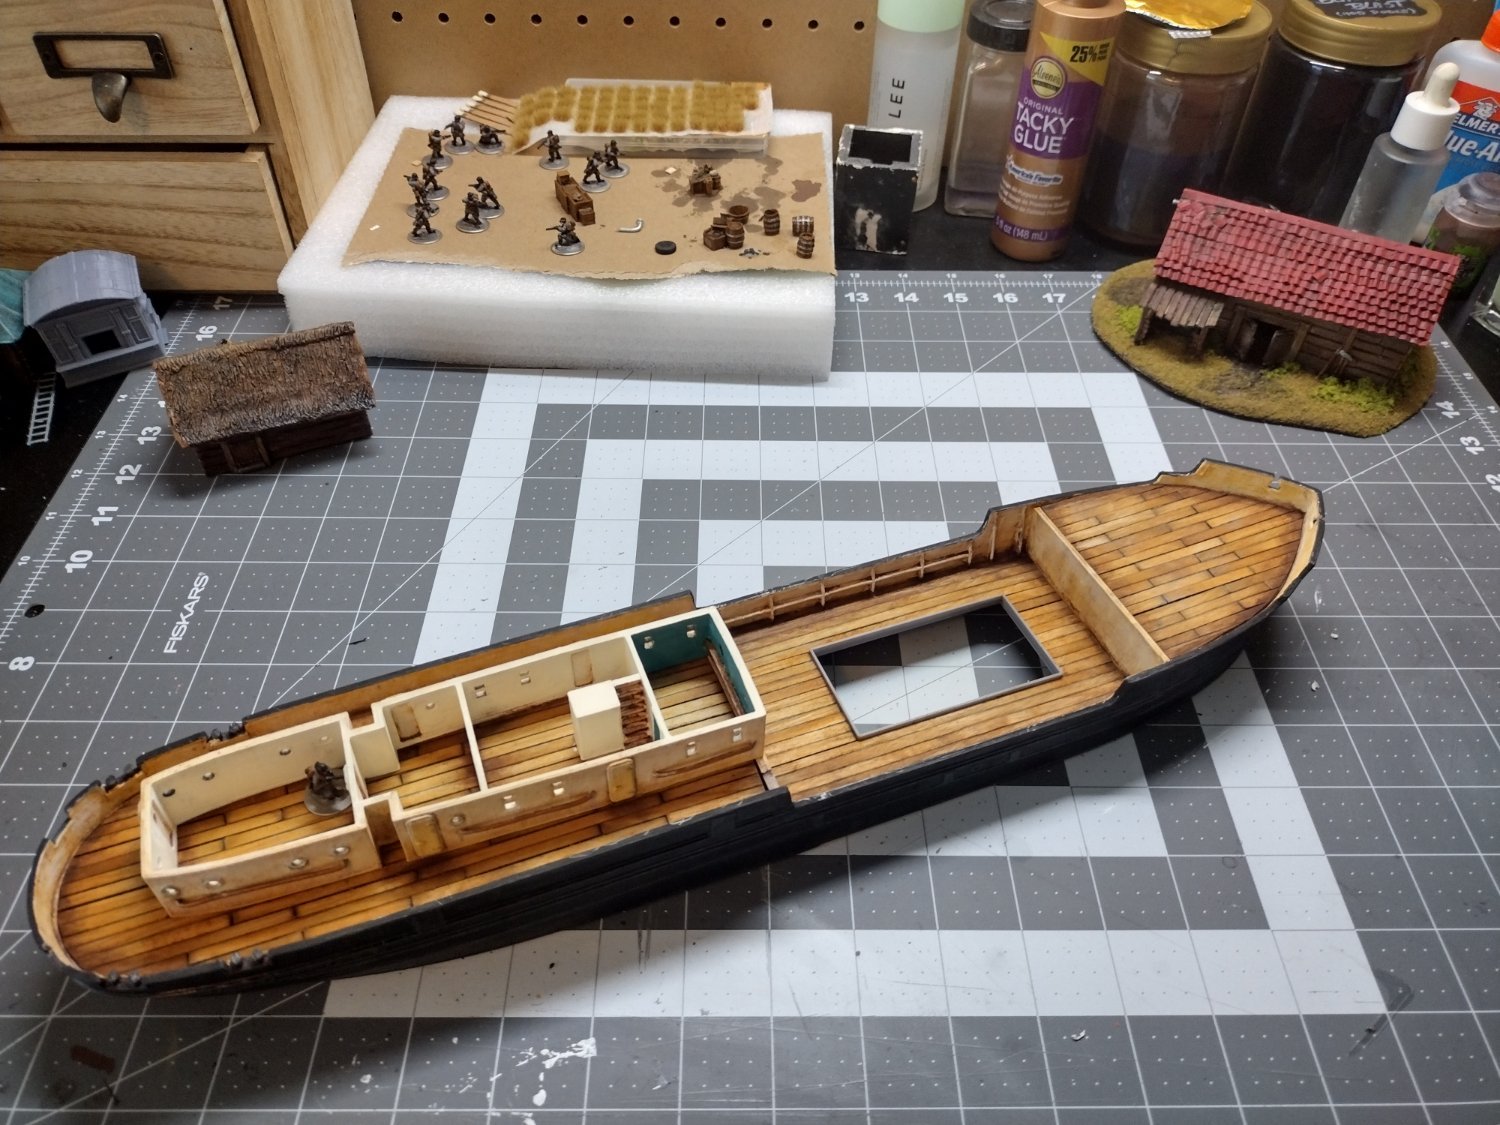
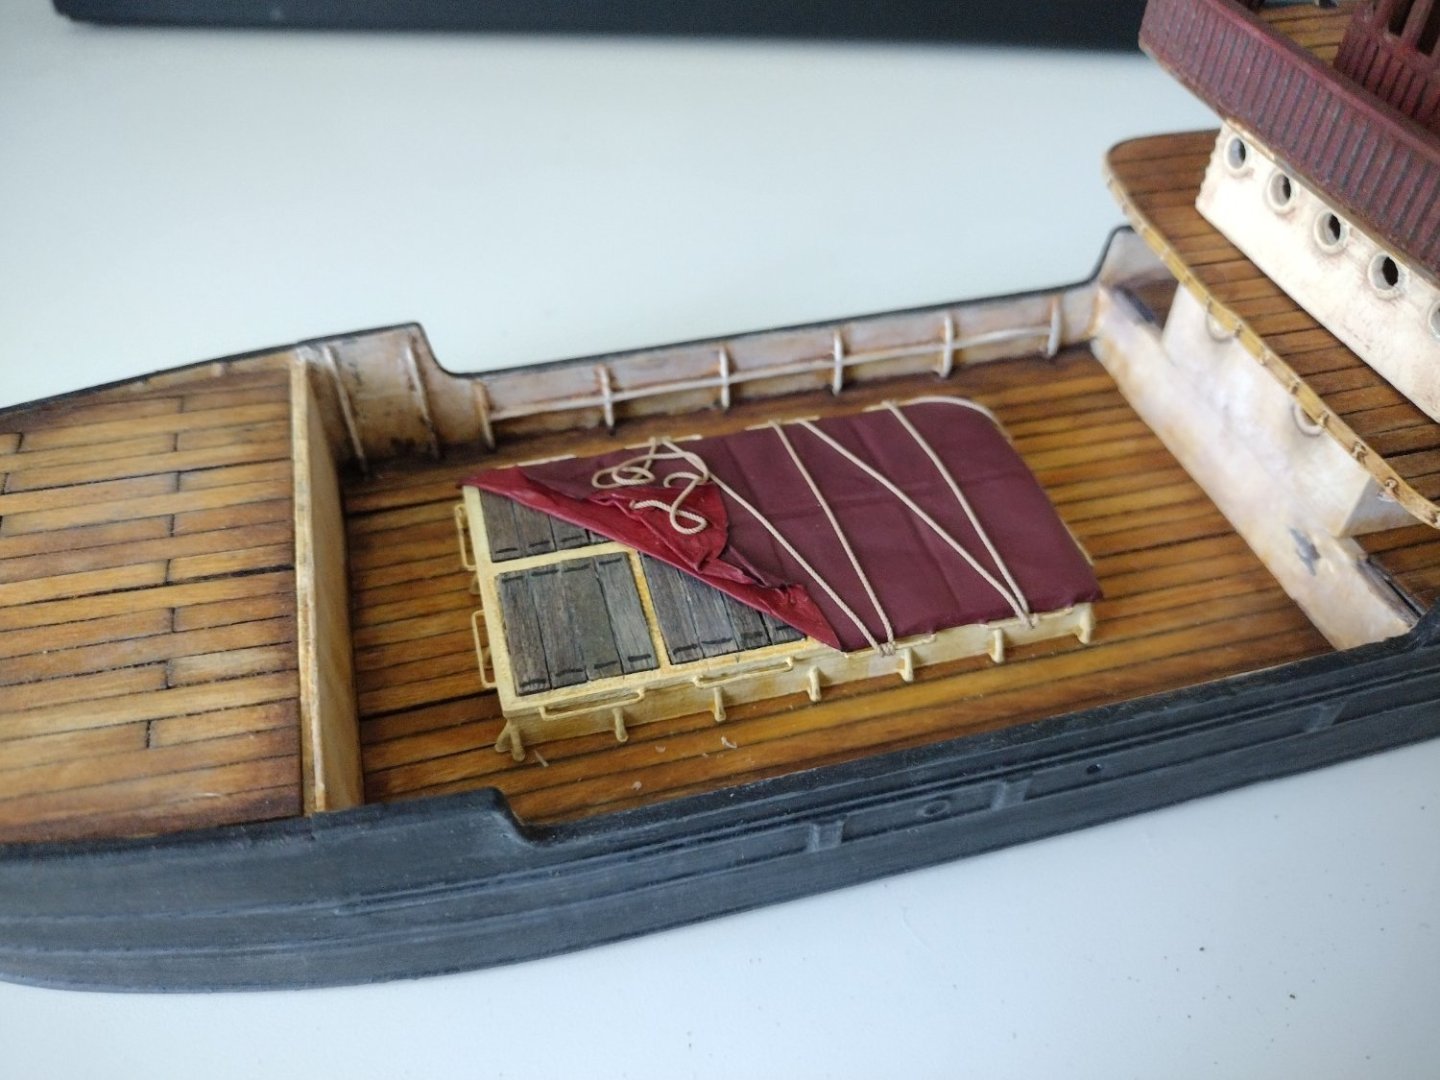
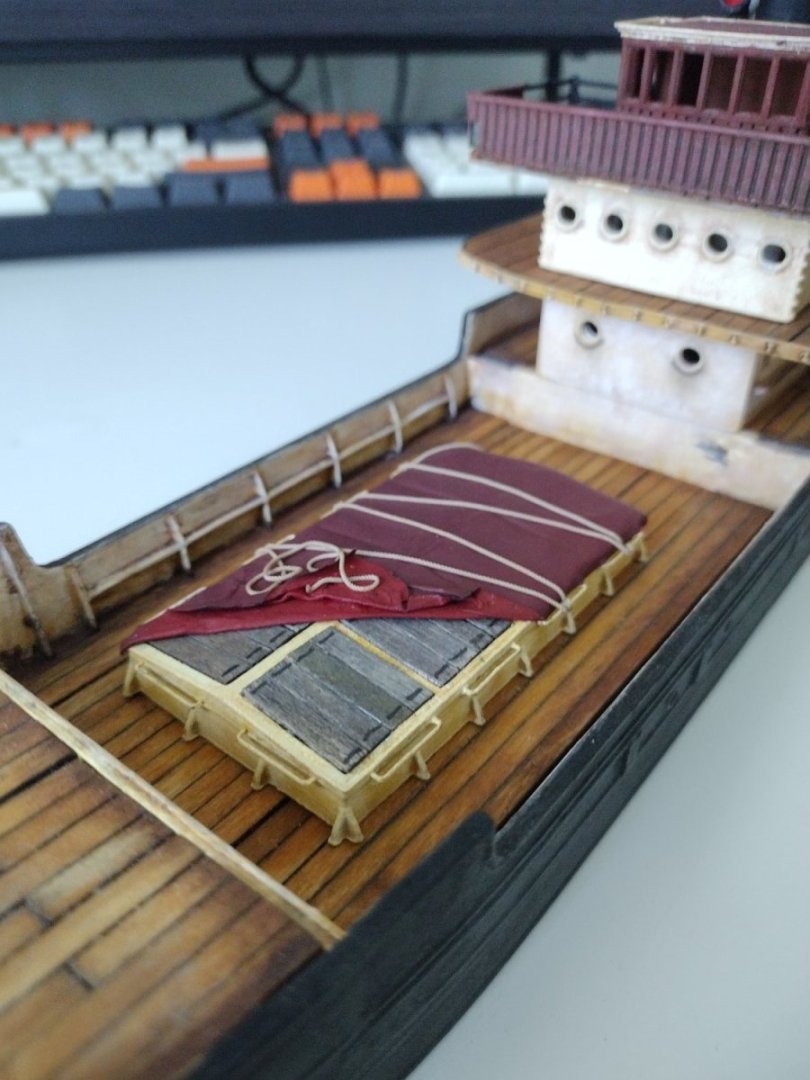
*** UPDATE 4 *** Finally some proper progress to report... not major, but progress nonetheless. I basically spent the last two weeks working on a design for the cargo cover I can be happy with and spent bulk of that time on research. Mainly because I realized that I know very little about the minutia of how those cargo covers "work." I mean, I knew that under those tarps there's an opening leading to the hold, but not how it's constructed to be both solid enough to be walked on yet allow of loading of huge cargo... and sources explaining it in detail were few and far between. So I went on a research spree. Eventually, after combing through any and all photos, diagrams and videos I could get my hands on I found a glimpse of workers opening a cargo hold in some archival footage from the late 30s! It showed a metal frame covered with large wooden planks that were being removed by workers. I also assume the metal frame could be disassembled and removed as later in the same footage the opening didn't have the frame when they were loading large pallets of cargo with a crane. I wish I had saved the video, because I can't find it anymore and it was the only bit of media I've seen showing "what's under that tarp" on a pre WW2 steamer. Anyway, equipped with this knowledge I decided to try to recreate that style of cargo cover for my model. The frame is a single 3d printed piece (so you can remove it from the cargo "hole" and have a large opening without worrying about how the frame is actually constructed in real life). It took some trial and error to get everything just right as I needed it to fit the existing opening, work well with the size of wood I'm using (coffee stirrers) and allow me to add the "handrails" for the rope. The handrails are actually staples, as my entry level 3d printer can't print any thinner than .4mm, but I think they work pretty well. I painted the frame to match the other metal parts of the ship, then cut and stained the planks to look aged (it's supposed to be pretty "well loved" working vessel after all). For the tarp, I remembered seeing some train modeller using painted parchment paper with good success. Unfortunately it seems the key to his success was using lacquer paint, as my attempts with acrylic flaked like crazy. So there was another period of trial and error of using different papers for the tarp. In the end a black art paper had the right mix of fine texture, and being both rigid and flexible enough to simulate tarp being removed. Oh yeah, I decided to uncover a bit of the cargo cover, showing what's underneath. After all, I did all this research, I should show it off Also, I wanted the cargo cover to be a bit of a focal point for the ship. A bit of scale rope (a little oversized, but I wanted to see the rope texture) tied the whole thing together (pun intended). Oh yeah, and in the end I decided to paint the tarp burgundy, keeping with my existing color palette. I tested some other colors, but they were either standing out or blending in too much... and I've seen this kind of burgundy cover on tramp steamers photos (from mid XX century, but still), so I used that to convince myself that it's ok All in all, I'm pretty happy with how it turned out: ...next on my agenda is the windlass (or is it the anchor winch - I should really learn the proper nomenclature). The one that came with the original 3d printable model is both really simple (it was for a 1/200 scale model, so bit low on detail) and too new for my liking (the 2005 King Kong movie used a 1956 ship for its SS Venture, and the included windlass looked electric), so I decided to make my own. I've been messing with it for better part of a week and I'm almost ready to print. It's loosely based on some late XIX / early XX century steam models I found in photos and drawings. I took different elements and combined them together into something that looks interesting (at least to me), still seems plausible and, most importantly, will print on my cheapo 3d printer. Here's a little preview, I think it's keeping up with the "comic book reality" that I'm aiming for:


-
von_bednar reacted to a post in a topic:
Araraquara by Zocchi - 1:100 - Brazillian Cabotage Liner
-
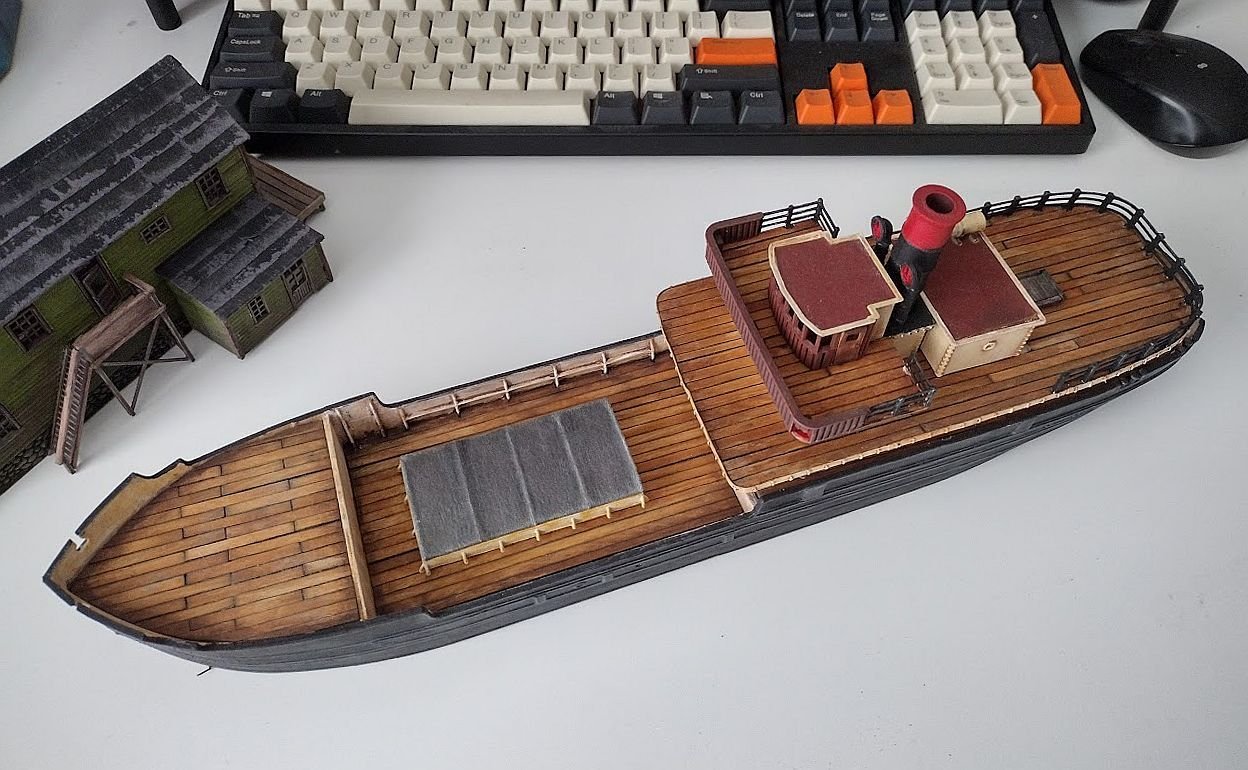
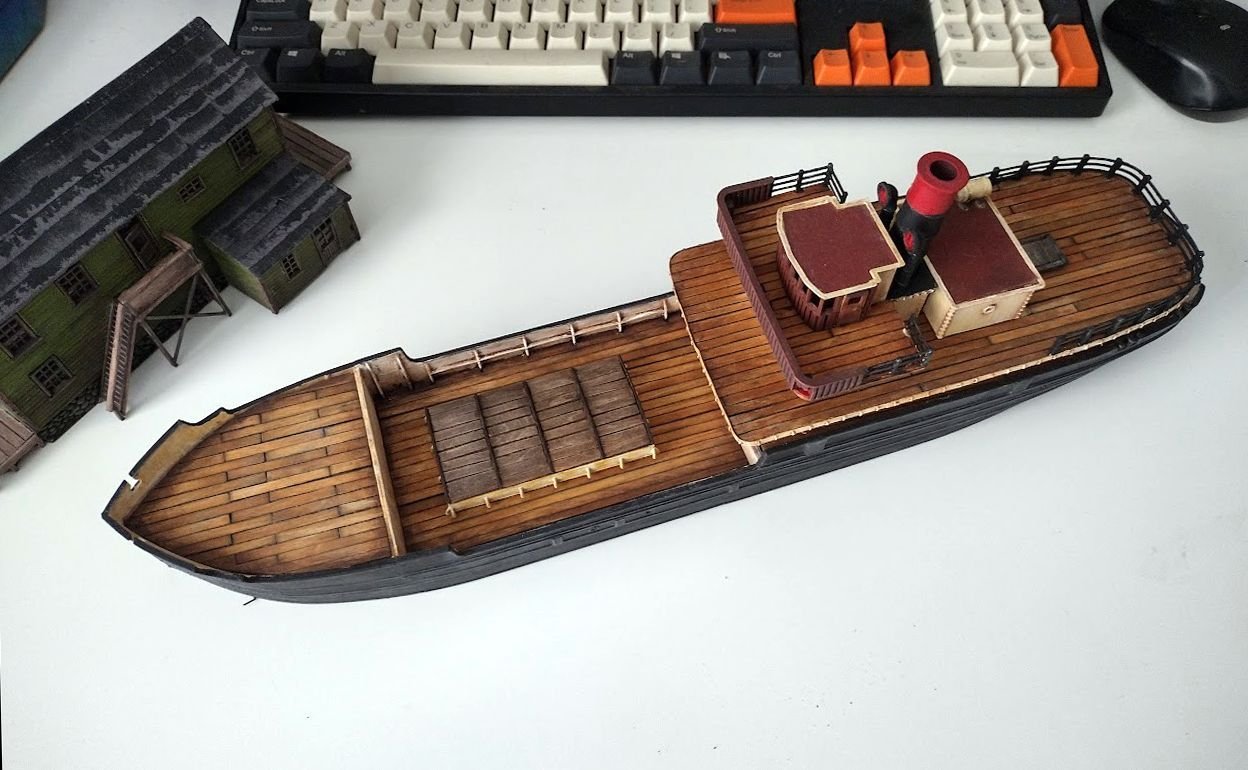
Oh wow, it's been a while! So, the project was put on hiatus because my 3d printer broke down and it took me way too long to fix it. Then life got in the way, and once I fixed the printer I got side tracked with other projects. Now it's finally time to get back to the steamer! The first thing I decided to tackle was the cargo cover. I made two so far and I'm not quite happy with either. I couldn't find any good reference photos for early XX century cargo ships, so I found something from late XIX century ship that looked interesting and tried that, but I'm not sold on those. Now I'm thinking maybe I should make a more true to life cover, instead of trying to be fancy? Does anyone have any good reference photos of tramp steamers 1920s/30s where I could see the cargo cover? Even better if I can see what's underneath the tarp (I assume they used tarps/canvas to cover the hatch at the time). If not, any advice on making a decent cargo cover? Maybe I should make the tarp the same color as the roofs. I went with grey because I didn't want to make it seem like I'm using a limited palette (even though I am ) but now it really sticks out. Also, I used a cleaning wipe for the tarp (facial tissue ripped too easily when I tried to shape it onto the cover), any other approaches to making those (I think I've seen someone using painted parchment paper somewhere in the past). Anyway, this weekend I'll focus on the foredeck with mast and the thing that pulls the anchor chains (I really should learn the proper nomenclature). What size of chain would be appropriate for anchors on this ship in 1:100 scale? I got some 1.5mm wide chain but it looks like it might be too small for an anchor. Finally, please excuse the haphazard photos. Not only my workbench is a mess so I took a quick pic from my computer desk (where I was also storing some other projects...as the workbench is a mess ), but also the phone camera is doing something to the color/contrast to make it really harsh - the colors are more subdued in real life.
-
 von_bednar reacted to a post in a topic:
Starlight by AJohnson - FINISHED - Paper Shipwright - 1:250 scale - CARD - Clyde Puffer
von_bednar reacted to a post in a topic:
Starlight by AJohnson - FINISHED - Paper Shipwright - 1:250 scale - CARD - Clyde Puffer
-
von_bednar reacted to a post in a topic:
Starlight by AJohnson - FINISHED - Paper Shipwright - 1:250 scale - CARD - Clyde Puffer
-
Amazing job Andrew! I can't believe it was just a sheet of paper not so long ago. Makes me want cardboard a try
-
von_bednar reacted to a post in a topic:
Starlight by AJohnson - FINISHED - Paper Shipwright - 1:250 scale - CARD - Clyde Puffer
-
Welcome abroad Kris! Plenty of good advice on here already, but as someone also new to the hobby, let me throw my 2 cents. First, and I can't stress this enough - start small. Pick a smaller vessel from the period you're interested and start doing research on it. I started, well not big per se - maybe medium, and there were already multiple times were I felt I bit of more than I could chew. This translated to days where I didn't even feel like working on my model as it was hard to see any meaningful progress when you have so much more to do. My next model will be considerably smaller. I'm also using non-traditional materials, although I'm 3d printing bits I design vs building them from styrene/sintra. You can definitely make a model using just those, especially if you're already pretty familiar with the material, but going against the tried-and-true methods means you might it be a little more tricky on some parts. Depending on the scale you're thinking of working, picking up some wooden coffee stirrers could also be a good idea if you'd like to add some wooden detail to your model. This is how I'm planking my decks and it works relatively well. Finally, for me the most challenging part was the hull. I come from wargaming background and never made anything close to a realistic hull before. In the end I opted for a pre-made hull for my model, but for my next one I'm planning using free paper model plans as a template to build the frame and then plank accordingly. If you don't know where to start a paper model might be a good inspiration - especially if you're trying to figure out how you can build a ship using a single material. You could very easily take parts of that paper model and use them as a template to trace on sintra/styrene. It also will let you see progress much faster - which for me is a big factor when getting into a new hobby. I will be using that idea to create the frame for my next model. Looking forward to seeing what you make
-
Thank you for the kind words. I really want the model to look used and "lived in" and hope that the weathering and detailing I have planned will only add to the effect The differentiation between the planks was a bit of a happy accident. I started with getting a soft pencil rubbed on the edges of the planks, but it was slow going (mainly because the wood I use is not perfectly even so getting even coverage was tricky), so I changed to a Conte pencil I had. The pencil is graphite or charcoal suspended in a clay or wax. Because it's so soft it gets into the nooks and carnies of the wood... and when the wood is treated with some boiled linseed oil afterwards the black darkens and expands nicely. The good news is I mainly wargame solo, so I can confirm that the model will be treated well even during games
-
As far as I know, all 3d printed plastic is porous to some extent. Usually it's not an issue as the interior structure of the print (usually some kind of crosshatching) will stop any deformation from moisture. I was trying to research porosity of different 3d printable materials after the fact, but couldn't find any hard data from a trusted source. From the look of it, the PLA type plastic I used would be as porous as soft wood of similar thickness. My problem was printing a thin (sub 1mm) false deck. At this scale you don't have that internal structure, just "walls" which is plastic squirted in overlapping lines. There's a decent strength along the length of each line, but less so between two lines side to side. I just printed with default settings which was layers at opposite 45 degree angles, but I wonder if a different approach would be more resistant? Using a concentric fill or even overlapping lines at random angles might create a more sturdy surface. It's definitely something I want to test and/or research one day. As for mistakes - it took me a while to accept them. I was really overwhelmed by the level of skill of the members of this forum and felt a bit inadequate to post the mess I made. I was almost ready to give up on this model, but remembered that things like this happen when I work on other things (mainly graphic design) - at some point it just looks bleak, but if you keep chugging along I'll be able to turn it into something half decent, and often learn a new thing or two along the way. So I decided to do just that... and fixing that curved deck (well, almost, but it used to look like almost like a cross section of a bowl before) really put new wind in my sails.
-
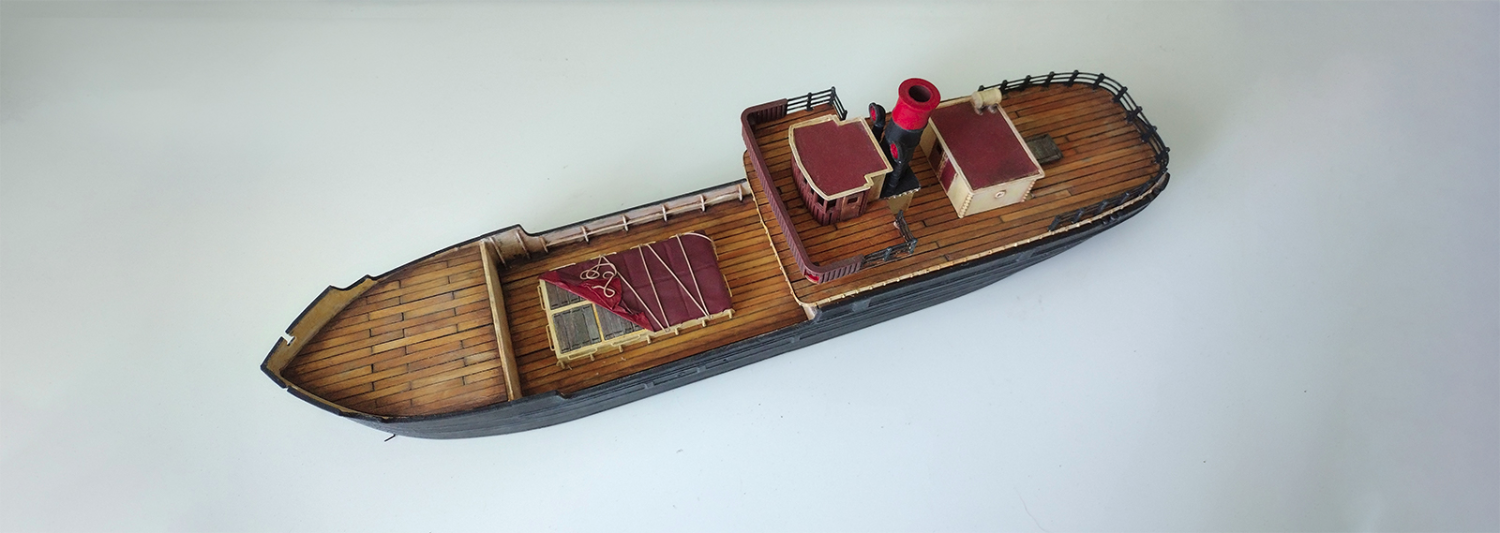
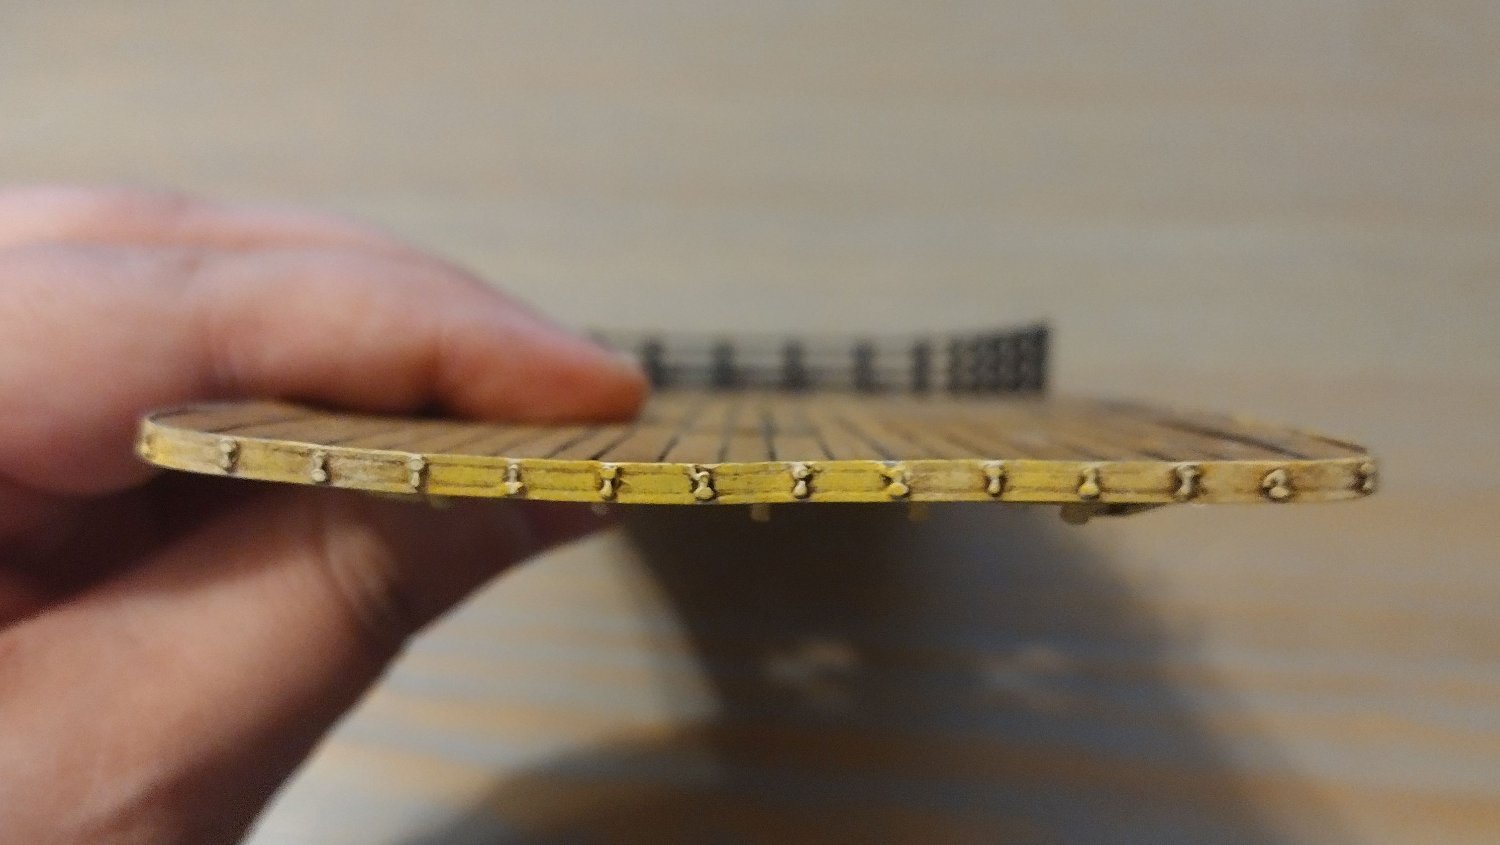
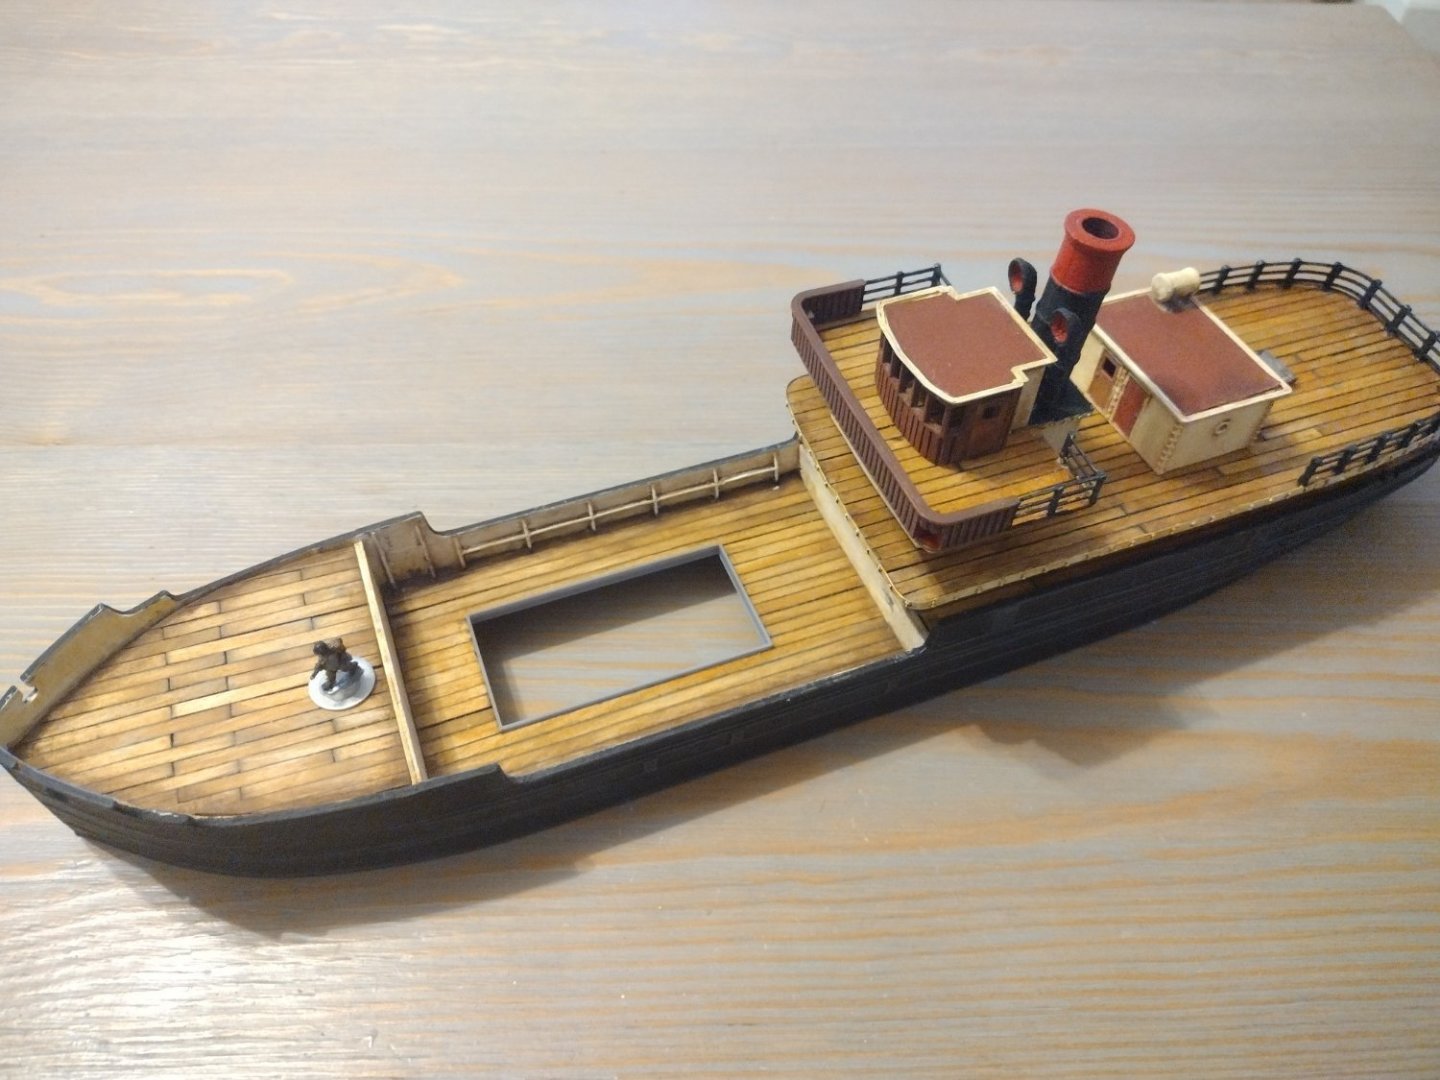
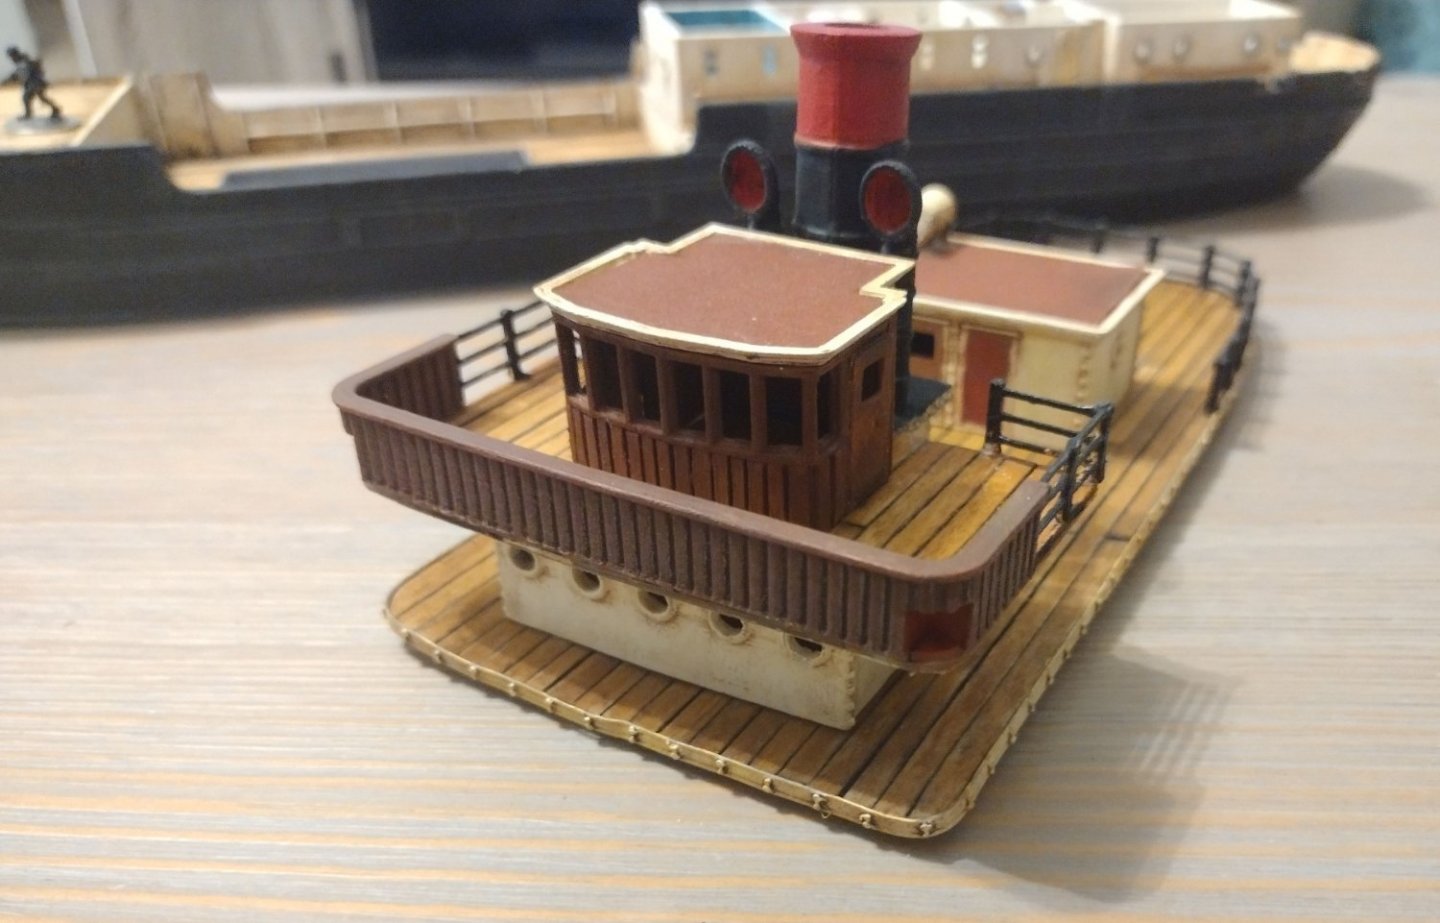
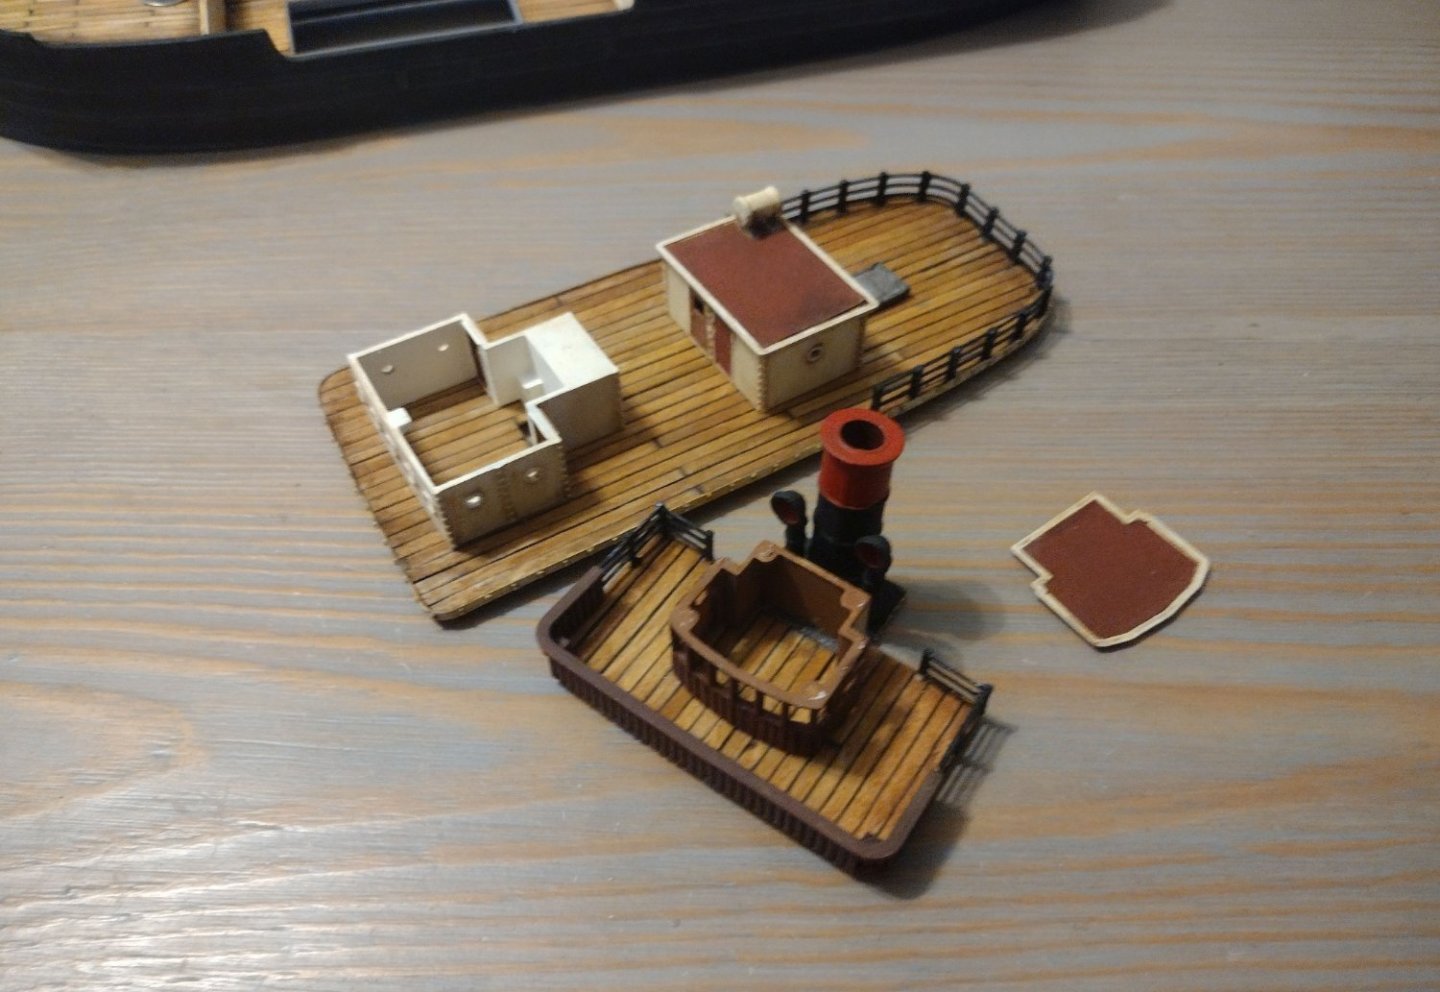
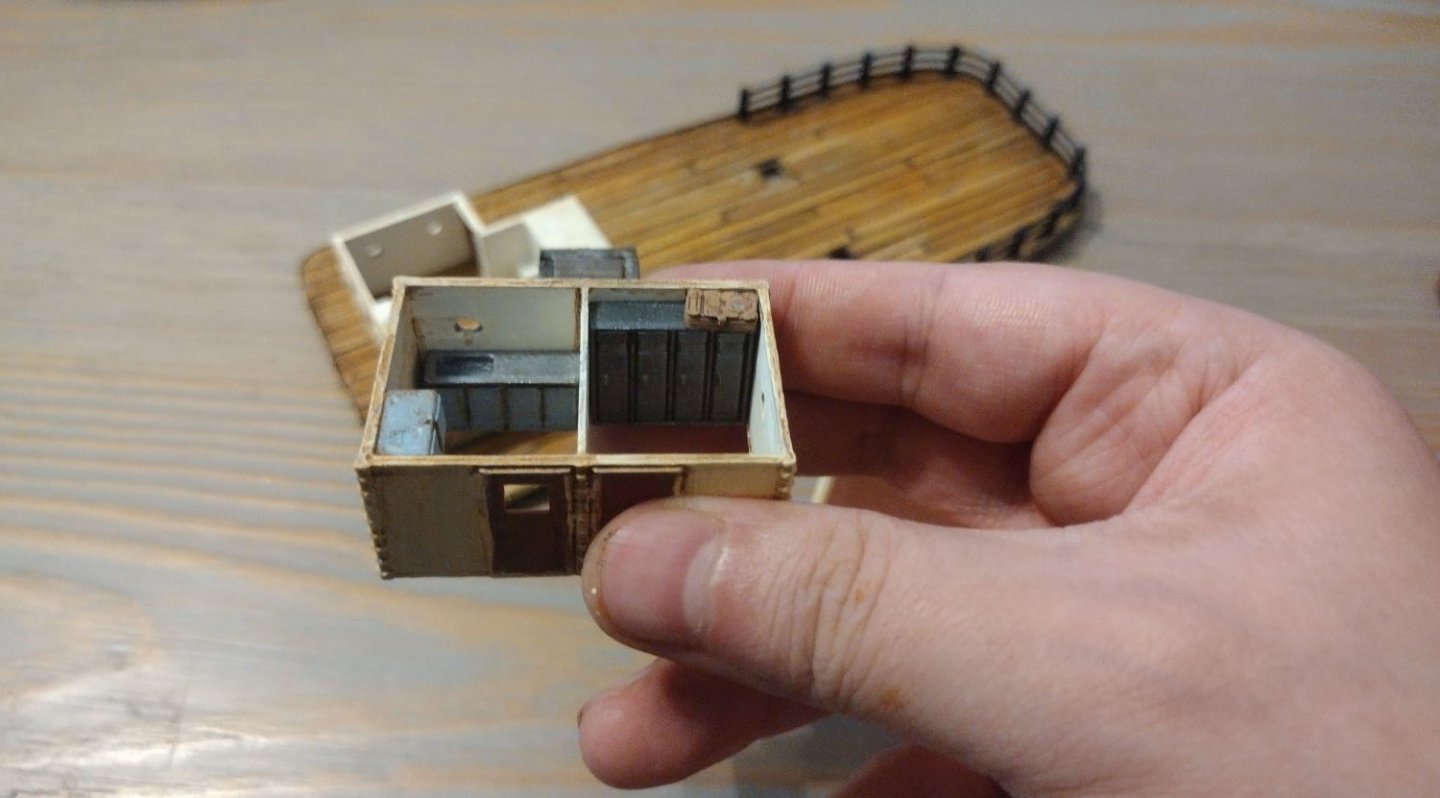
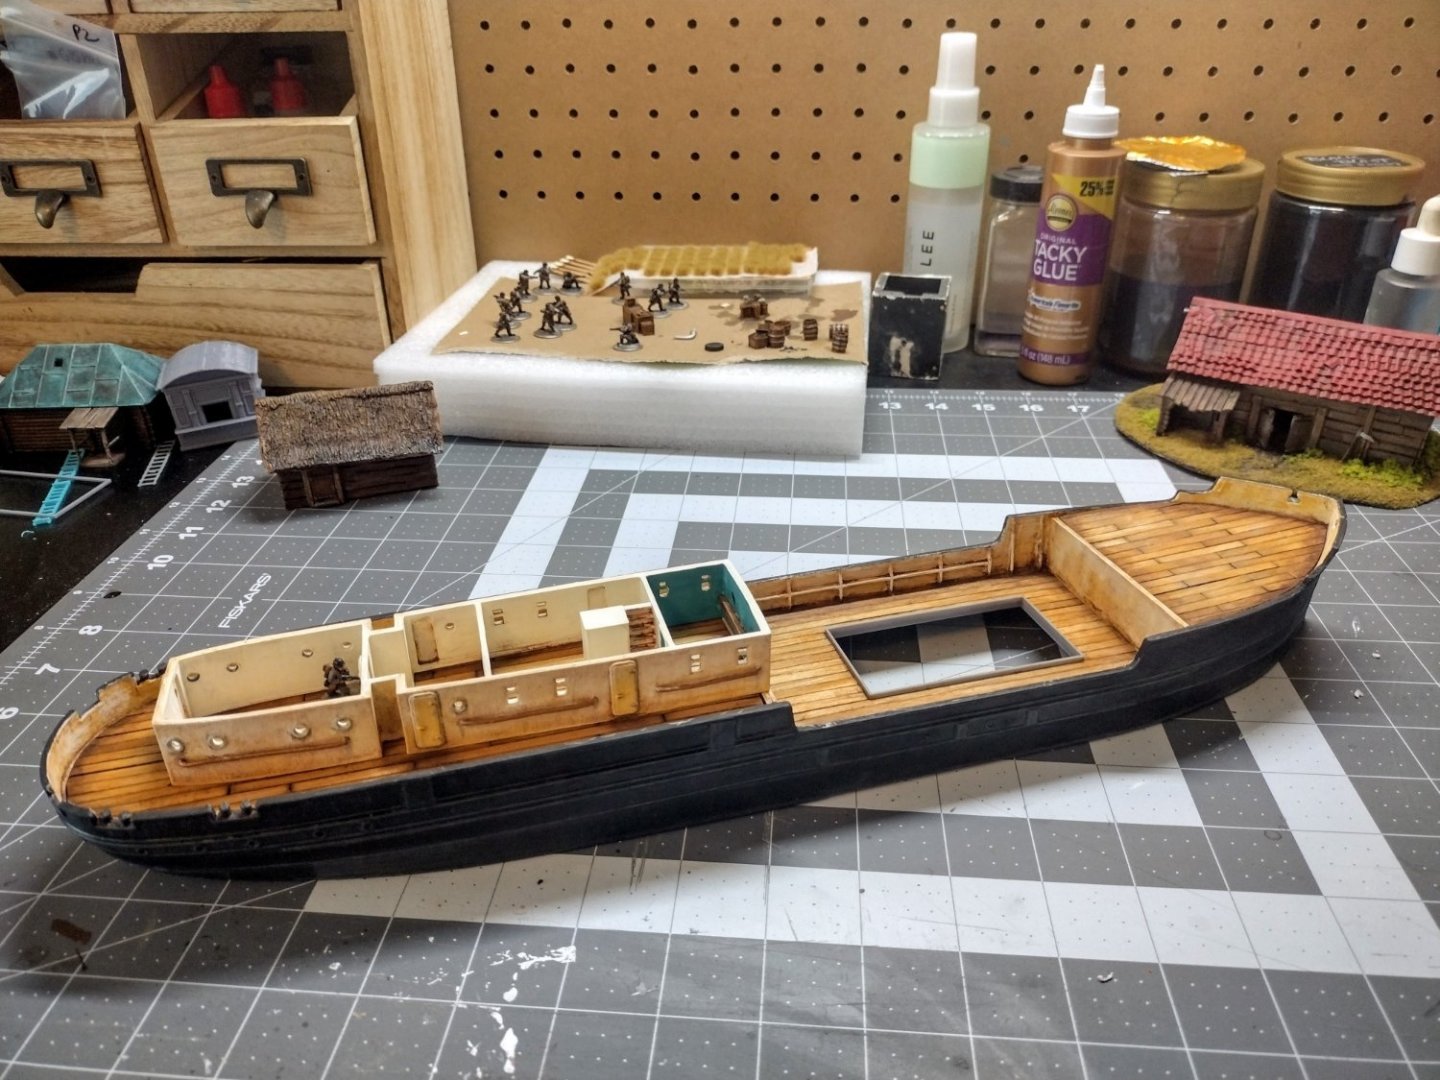
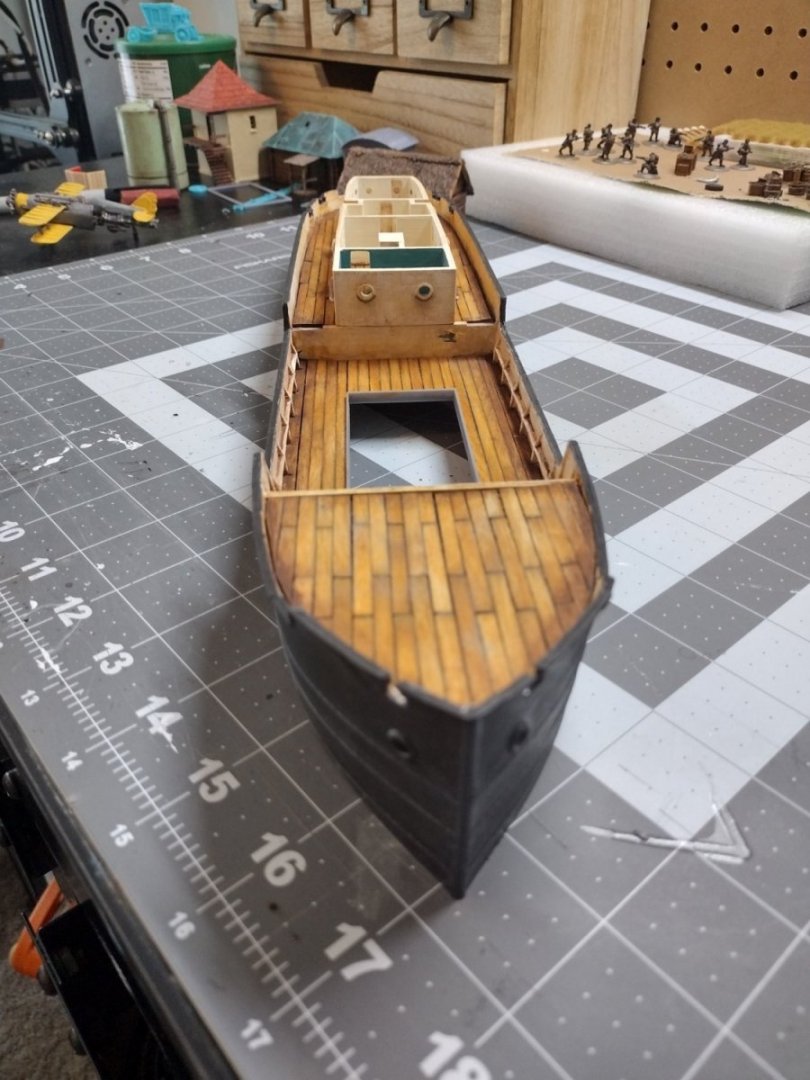
*** UPDATE 3 *** Well, this is an overdue update. I've been slowly chipping away on the model for the last few weeks, but there was a lot of trial and error and progress was quite incremental. I kept telling myself I will take some photos when I have some actual progress to show and didn't even notice then all this little progress actually added up to something. What I need to do is to actually take in-progress photos, but to do this I really need to get better about cleaning up my workspace, because otherwise I will just end up posting photos of a huge mess with a model hidden somewhere inside Anyway, this is how the model looks now: The aft decks and superstructure are pretty much done. I mean, the top deck and railing still need a bit of painting touch-up and there's bunch of details / greebles to add, but the general shape is there and I'm relatively happy with it. My painting definitely improved as I got more familiar how the paints react with each other (I'm using cheap craft paint, so there's a bit of fiddling with them to make them look ok on 3d printed parts). Making the roof covers out of some fine sandpaper was also a good call - it keeps with the "color palette" of the model and adds interesting texture. My cutting was far from perfect, but I will add some details to those roofs and hope those will hide the most jarring mistakes. As this will also be a model used for wargames the decks and roofs are removable and held in place using tiny magnets. At first I wanted to hide all the magnets using some detail that makes sense for the room, but I soon discovered that I'm basically pushing the limits of my printer too hard so I can only make very basic details if I want them to be that small and it also requires designing it with clean multiplies of the nozzle size. My efforts can be seen in the smallest building which I decided would be an armory and maybe a med bay. Seeing the effect compared to the amount of time it takes to actually print decently I decided to just incorporate the magnets into the structure when possible, and when not - use small tabs. The buildings were pretty easy to design and print, but one thing that was not as fun was the post processing. When printing straight lines with FDM the layer lines are quite visible and are even more visible when you think of painting it in something different than just solid color. So for all of the buildings I had to do decent amount of sanding to smooth it out. This is the best photo I took trying to show it, and while it doesn't look too bad here, it really does in person and even more so once painted. Another hiccup that really kept me from posting update was that the middle deck developed quite a curve. Well, it turns out 3d printed PLA plastic is quite porous - to the point that if you use watered down wood glue it will warp similar to how thin mdf or cardboard does when the glue shrinks and pulls it together. Sadly I discovered it after I already planked the whole false deck and not wanting to redo the wood again I tried bunch of different things to straighten it out over a course of a week or so. They kinda worked. The deck is not perfectly straight, but it's good enough for my first model that I have at this point decided is mainly a learning experience (although it will still get some use in wargames). Although that porosity can also be a bit of an asset. A thin enough print can be bent into a shape and covered with some thinned wood/PVA glue to help it hold that shape afterwards. This is how the aft railing was made to curve around the back. It probably would have kept the shape just held with CA glue, but that I think the shrinking PVA helped at least a bit. Next on my agenda is finishing the railings, adding some detail to the back decks... although I'm honestly playing it by ear here, so we will see what will be added next. At least this time I will try to keep a log and update more often. Fred.


-
Coming into ship modelling from a unusual angle
von_bednar replied to von_bednar's topic in New member Introductions
Thanks all for the warm welcome! @E Z Breeze I'm actually thinking of using a paper model as a base to scratchbuild my next model. It's not from a magazine, but a free pdf I found and I hope to use the frame and try my hand at planking with some wood We will see how this will go. @Nirvana Yep, had to scale the model up, and because most of it was lacking detail I opted to also remake much of the superstructure and detail. It's slow going, but it's going - which also reminds me, I really need to update my build topic. -
Welcome aboard! Looking forward to seeing your uncle's creation and see what you'll get up to! I'm a new in this hobby myself and I wish I had a family member who would have given me the "modelling" bug earlier as I'm having a blast working on my first model!
-
Oh! A topic that I feel that I can actually help, as it relates to my background (graphic design). I agree with David that printing a copy of it will be the easiest option here, especially that you have a nice frame around it, so you won't have to worry about matching the transition between hull black and your paper black. If that's not an option, the second best approach would be using dry-rub/letraset lettering, as they are still pretty readily available and pretty easy to use (you can even order custom ones online). I would advise against using a traditional plotter to cut this lettering, as it is so small that the blade might "get in the way" of getting a neat cut. Laser cutter would the trick tho and it would be my third recommendation (and first if you have your heart set on making a stencil). As for printing, just like Ron said, home printing will fade with time. The normal office paper is made to be cheap, not long lasting. You can get acid free paper in art stores, sometimes even per sheet if you don't need a whole pack. If you have a relatively recent printer at home (like not much older than a decade), the ink/toner will last couple decades on a good, acid-free paper. If you want to make it really long lasting, art stores will sell UV resistant fixatives (usually in spray cans) that will prolong the time to start fading considerably OR you can take a file to your local printer (not Staples or Kinko's - a specialty/commercial printer, most bigger cities will have at least one) and they can print it for you with archival inks on quality archival paper that will last even longer. If it was me, I would use decent acid free paper, print at home (both recent laser and inkjet printers will do fine here), use a spray fixative once the page has dried (just let it "air itself out" for half an hour to be sure) then cut to size and glue. --Fred.
-
Ooops. Previously I pasted (crtl+V) them instead of properly uploading so I think that might have been the issue. Re-uploaded, so hopefully they work now. If anything, at least we have another pun out of it
-
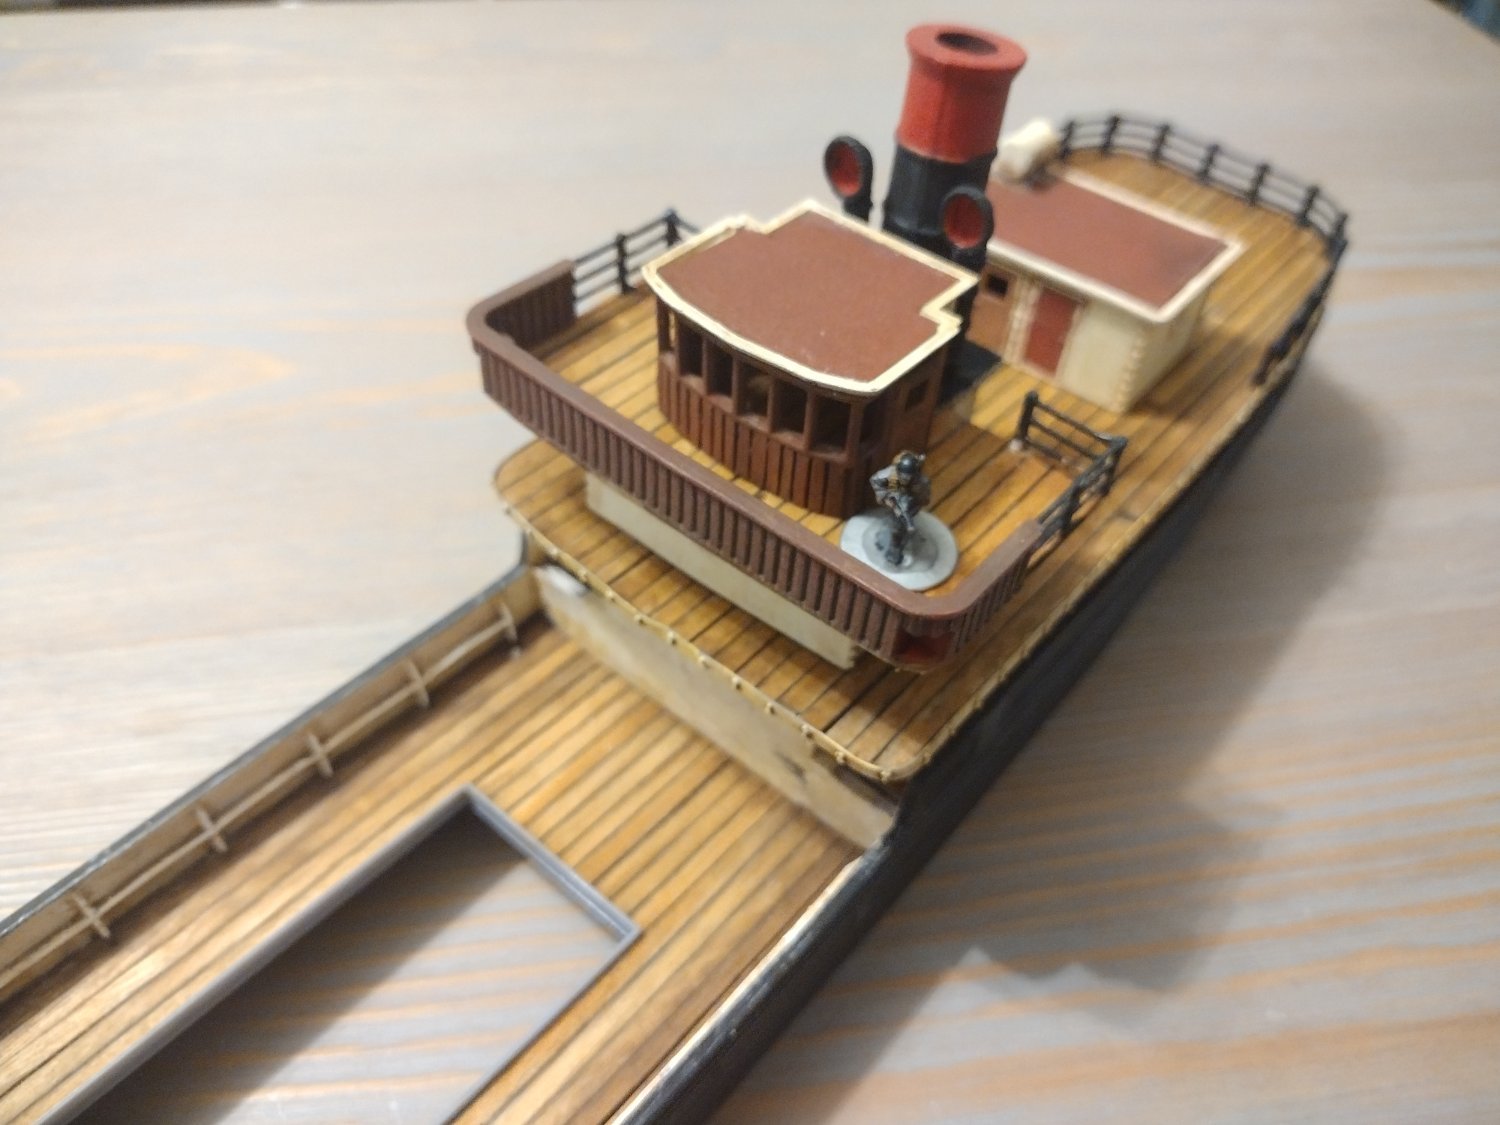
*** UPDATE 2*** Some progress finally happened this week! First superstructure floor printed and installed/glued. It's not much, but truth be told I spent most of this time trying to get that "rustbucket" look just right. I'm not a great painter and am using the cheap craft paints you find in supermarkets, so it took some trial and error to get something looking not too plain nor too cartoony. I might have gone a little overboard (some pun intended ) with it, but as in my mind the ship is used by bunch of sea gallivanting rogues I think it's ok and fits with the idea of "cinematic realism" I'm aiming for. Not much done apart apart from the painting. The only detail I added is some coated paperclips which I used for the railing as I was not 100% happy with the "railing" I previously 3d modeled. In the end I haven't changed the metal doors to wooden ones like I planned, and I'm kinda kicking myself about it. I feel dark brown "wood" would make for a better contrast on the superstructure. Will probably go with that on the next floor then. I'm planning just a few touch ups on the existing decks (bring some more contrast to the square windows, fix some mistakes) and will move to the next floor to superstructure next. My thinking is to get the "big" parts done first and then move to the details like the derrick, windlass, barriers etc.

-
Thanks Shooter. I was going to add the interior doors yesterday, but work was busy and I was too tired to do anything yesterday. Hope will be able to get it done tonight so I have it ready and printed for some hobby time this weekend. I'm also thinking of changing some of the exterior doors to wooden to match the movie better. Hope to have something more to show this weekend. @thibaultron Thanks for the info - was already looking for a King Kong (or just a good gorilla toy) around 8cm high to match the movie, but it looks like I'll end up 3d printing one as I didn't find anything that really works for me. Also, I think the steamer Roger is working is the SS Benjamin Noble - some awesome scratch building in there, hope I'll be able to make something that advanced one day