Jaager
-
Posts
3,084 -
Joined
-
Last visited
Content Type
Profiles
Forums
Gallery
Events
Everything posted by Jaager
-

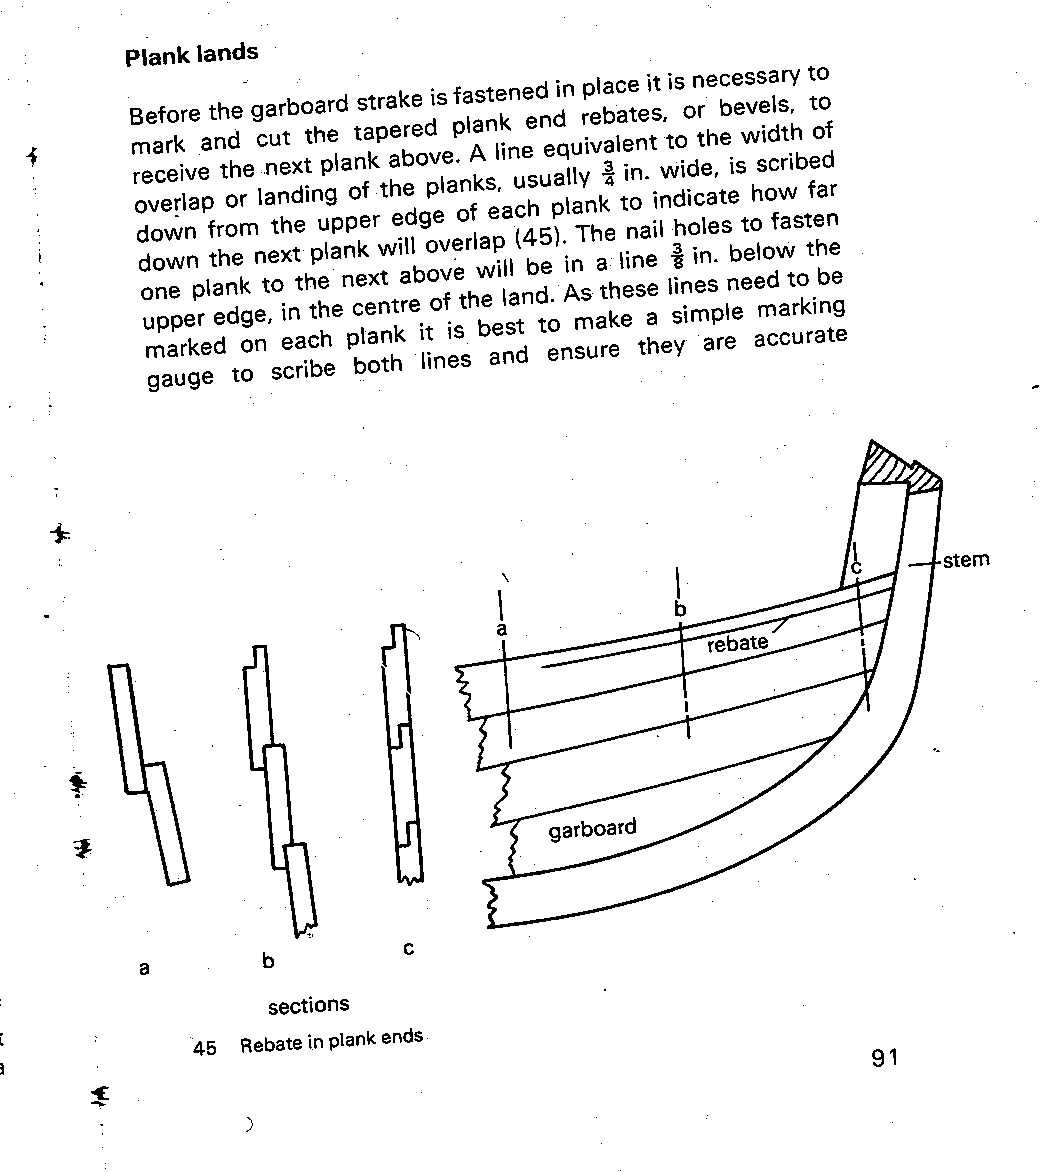
Lapwing 1816 Revenue Cutter
Jaager replied to iMustBeCrazy's topic in CAD and 3D Modelling/Drafting Plans with Software
Craig, That sounds like more fun. I would so this using the Station Sandwich Method. (I developed it, so of course I would.) Anyway, The only frames that I would need to loft would be the midlines of the bends at each station. About as many as the molds (bulkheads). Actually, I would not draw them. I would extract their curves from the Body plans. Draw the moulded dimension, site the deck level, port sills, wale, - Mirror and meld. The spaces would be filled with Pine, bonded using double sided tape. I would regularize the bend locations. For most vessels, the stations ARE the midlines of the bends. Because of the bevel, even between most stations, a perpendicular hole within the body of a frame will not hit all of the frames in that grouping. BUT, perpendicular holes outside the shape of the center most station and outside the moulded shape curve of the outermost station WILL work to align the group of bends and spaces. Once group of frames and spaces are bonded together, ( PVA for the spaces above the LWL and tape for the spaces below) the bevels for the group are sanded. It is a strong unit. Your vessel is two bends per station. I would glue up one bend before assembling the sandwich. The other bend would be actually one frame of the bend at each station. Depending on your scale, 1/4" or 3/16" should be OK, 1/8" shaky, the tape should hold the timbers below the LWL at the ends. If the deadwood is chosen to be continuous bow to stern in your build, it would be a keel width piece that fills the space between the bends above the keel. PVA bond that, and the unit is even more secure. Locator dowels inside the frames at each station will exactly align two sequential station sandwiches. The shape is identical. When everything (all of the sandwiches) between the hawse timbers and the stern framing is assembled, the whole hull is solid and can be final shaped outside and inside as a strong unit. The glue on the double sided tape does not like ethanol, so the spacer Pine pieces can be removed when it is done. I wait until the clamps and keelson is fitted. The keel, stem and sternpost go last. The hawse timbers and stern framing have to be done the same way any other framing method, although I use the temporary filler, shape as a solid method there too. Bottom line, 12 + 15 +1 = 28 bends - traditional method - 3 x 28 = 84 frame outlines - outside and inside curves to plot. 112 if you use the staggered frames as the plans have it. 15 stations = 15 curves to extract (no plotting or drawing needed) and 15 moulded shapes to draw, my way. And I do that and easy way. I have a series of disks with diameters in scale from 15" to 3". I position a disk that is the diameter of the scantling thickness at each known level (cutdown - outer edge of keelson, floor head, fut 1 head, deck, rail - whatever the scantling table gives me). I place transitional diameters between them. Then I draw a line that is at a tangent to the disk, to get the moulded shape. It takes a lot less time than typing this did. In all candor I would probably have to plot station 15. I do all this using a raster based drawing program. The lines are slightly faceted, but sanding the wood solves that. -
Lapwing 1816 Revenue Cutter
Jaager replied to iMustBeCrazy's topic in CAD and 3D Modelling/Drafting Plans with Software
What research and experience has shown me: In post #41 - the frames from H fore to 10 aft are all bends (paired frames with alternating, overlapped, butt joins) . There is a significant shift, narrowing, and air gap as they rise. They are still paired bends. They would have been assembled with chock lumber pieces holding the gap and the bolts and dowels that held the pair together would go thru the chock wood. The chocks would not be a lot larger than the bolt diameter, so as not to impede air circulation. They did not use glue, so the strength of the bend structure would be the same, timbers touching or spaced apart. The same as washers on a bolt. Between the bends would have had temporary or fixed chocks too. They may or may not have been knocked out when the planking firmed up the structure. The cant frames forward of H and aft of 10 would have had their own chocks. The result would not be very attractive. Not worth showing in a model. Little wonder that most models with visible framing from back when is at least a bit stylized. Most old tests do not show this, but they don't show how to drive a nail either. So you are going POB. .....groan. Imagining this as POF - an obsession, I admit - I would side glue the bend paired frames and not narrow the sided dimension. A single frame flying in the wind would be weak. End grain to end grain glue joints are not reliable and can withstand almost no stress. A glued up bend is a strong structure. To me, the upper - topside - above the LWL - framing structure is functional only and has all the visual attraction of the 2x4 framing in a single family dwelling. I plank over it. Because I hide it, and because it makes the whole significantly stronger, I fill the spaces between the bends above the LWL with the same wood as the frames -and also glued. Trying to figure out the join angles of the cant frames makes my head hurt, so I would frame using square to the keel bends thru M forward and 15 aft. The hull below the LWL can then be totally planked over - with proper support for single layer planking, or partially or totally not planked .... for show. Just an alternative to consider. -
And where appropriate, a round profile scraper might could convert a square bottom to a rounded groove, if careful. Maybe a reverse profile scraper also round over a top edge. I wonder what effect a carbide sharpening stone would have on the outer edges of a 3" slitting blade? Ruin it or or the wood or cut a groove?
-
Using a rock tumbler type, home made machine for the mass rounding of edges is here. I bought an economy actual rock tumbler from HF on sale and the 20% coupon, in case I every get that far. I will have to experiment to see if a flapper can be added.
-
I can across this site doing a search for an out of print book The Shellback's Library There are over 1,300 reprint nautical publications here. Chart your course thru our site. We are a small reprint publishing house established in 1998. We offer thousands of books and publications. Our products are one of three types; bound books, bookleted boat plans or data sheets. Unlike many vendors, we have carefully researched our nautical products and so we can provide a description, often with pictures, of each craft or subject. contact D.N.Goodchild phone number is southeast corner of Pennsylvania Lots of interesting titles - but one filled a hole in by library I figured that it was worth a $40 risk for a 1670 book with the sizes of spars and rigging. I ordered the book - paid using PatPal - the money was deducted from my account. No further communication from the vendor. No email, no book. I initiated an inquiry thru PayPal and after time and hoop jumping - but no response from the vendor - I received a full refund today. The book: Hardcover Elephant Folio THE BOATSWAIN'S ART, or THE COMPLETE BOATSWAIN by >Henry Bond, Teacher of Navigation, Surveying, and other parts of the Mathematicks, near Ratcliff-Cross. The Scale is made in Brass or Wood by Joseph Hone on Tower-Wharf. Wherin is shewed a true Proportion for the Masting, Yarding,a nd Rigging of any Ship, whose Length, Breadth, and Depth is known: with Rules for the Sizes and Lengths of all sorts of Rigging that belongs to any Ship. Also the use of an opening Scale, that if the length of the Main Mast be put upon it with a pair of Compasses, you may measure upon the Scale the Lengths and Thickness of all the other Masts and Yards; and also the Sizes, the Lengths and the number of Fathoms of every Size for the Rigging of any Ship, without altering the Scale. Also here is added a Plain and Easie Rule for Rigging andy Ship by the Length of its own Masts and Yards. London, Printed by W. Godbid, for William Fisher at the Postern-Gate near Tower-Hill, and Benjamin Hurlock over against St. Magnus-Church on London-Bridge near Thmes-Street. 1670 So goes the title page for this substantive and influential early work on ship-building, rigging and management, originally published in1670. Our reprint retains the type style and form of the original and is completely reset in that style, with the exception of the extender "s'ses", e.g., (from above) "Wherein is fhewed a true Proportion for the Mafting, Yarding, and Rigging of any Ship, whofe . . . etc." All other seventeenth century attributes and spelling are retained however. An example of the original title page and that of our reprint is shown below. Included in the compilation are "A Plain and Easie Rule" (1676) as mentioned above and also "The Sizes and Lengths of Rigging for all His Majesties Ships and Frigats." (1660) Henry Bond, Wm. Fisher & Edward Hayward, 105 pages SOME OTHER TITLES OF varying relivance Square Rig MARINE ... Diderot's Maritime Volume from the great Encyclopedia of he an d'Alembert. (Fifteenth and Sixteenth Century) Dideriot and D'Alembert, 100 pages, Pub No. 0052 MASTING; MASTMAKING; AND RIGGING OF SHIPS ... also Tables of Spars, Rigging, Blocks, Chain, Wire and Hemp Ropes, etc., relative to every class of vessel. Robert Kipping, 236 pages, Pub No. 0054 SEAMAN'S FRIEND, THE ... A Treatise on Practical Seamanship; A Dictionary of Sea Terms; Customs and Usages of the Merchant Service; and Laws. Richard Henry Dana, 275 pages, Pub No. 0055 STEEL'S ELEMENTS OF MAST-MAKING; SAIL-MAKING . . ... A "must-have" text for the serious modeler and anyone with a ship-of-the-line or a frigate. Claude S. Gill, 300 pages, Pub No. 0056 YOUNG SEA OFFICER'S SHEET ANCHOR, THE ... The first real seaman's manual. d Arcy Lever, 255 pages, Pub No. 0057 KEDGE ANCHOR OR YOUNG SAILOR'S ASSISTANT, THE ... Appertaining to the Practical Evolutions of Modern Seamanship, Rigging, Knotting, Splicing, Blocs, Purchases, Running-Rigging William Brady, 400 pages, Pub No. 0096 OLD WOODEN WALLS, THE ... Their construction, equipment, etc. Being an abridged edition of the Falconer's celebrated Marine Dictionary. Claude S. Gill, 202 pages, Pub No. 0282 BOATSWAIN'S ART, OR COMPLETE BOATSWAIN, THE ... Rigging ships in 1670 -" the masting, yarding and rigging of any ship whose length, breadth and depth is known." Henry Bond, Wm. Fisher & Edward Hayward, 105 pages, Pub No. 0284 COMPLETE SHIPWRIGHT, THE ... "Plainly & demonstratively teaching the proportions used by experienced shipwrights according to their custom of building." Edmund Bushnell, 76 pages, Pub No. 0285 NOSE AGAINST THE GLASS IS FRUSTRATING! Are we dealing with another Norwegian Blue Parrot here?
-
Rather than balance the rail on a knife edge and have a problem with its horizontal orientation, I would probably fix the timber heads first. If they are timber heads in the original construction, My shipyard would have left the sides perpendicular to the centerline. Check the plans for the shape. If cant frames were used ( probably fore only ) they would likely have the angle of the cant. The rail would have a 3 point base and a significantly more secure bond.
-
The angles at the bow are far from as bad as they could be and most commonly are. 1. Do not try to use one piece to be the rail. Outside of Redwoods et al. normal trees do not grow that tall, that clear and straight. The joins were not a straight butt either. The scarph is more involved. By using pieces, with the curves sawn, instead of bent, no spring back will occur. The wood will not "want" to return to its natural shape. 2. Given the curve in question, you may get by using the kit supplied material. For a serious curve, a wider piece of stock ( at least for a buff bow ) is used and the actual rail is spilled from it. Alternatively, a wider piece of wood of an appropriate species (Maple, Cherry, Pear, etc.) that is the needed thickness would be bought. It would surprise me if your kit supplied species takes to scraping the outboard OoGee or whatever pattern into it. The harder, tighter species do this much better. The color can be adjusted by using a wood dye. Bending: wet heat works best. The water - steam transfers heat to the interior faster and more efficiently than dry. No matter what you read, no sort of ammonia that you can access will aid in bending wood. What did that was anhydrous ammonia, commercial only, explosive, toxic,dangerous and it would probably dissolve you if you got on you. The household ammonia cleaner will only discolor and deform the surface fibers of wood.
-
Converting a Backyard Shed into a Model Workshop
Jaager replied to Hank's topic in Modeling tools and Workshop Equipment
Hank, If the spacing and thickness of the floor joists leave something to be desired, perhaps another layer of subflooring - with staggered seams., first? If you use long countersink drywall screws, it can be undone, or later repurposed. Under the bottom shelf on the left and under the cabinets on the right, at first I thought, under the cabinet lights, but they look long enough that a full on 4 foot LED ceiling fixture would fit. They are so light weight and pull so little current that a couple of big boys should work. And a large, wall mounted, battery powered clock. Some of them "talk" to the Bureau of Standards everyday a self correct- who knows, maybe they work for the NSA too? -
I would not insure that one, or pay a private yard if it was a navy contract build. 2-3-4 are on adjacent beams and touch. So is 1-5 At least they are not all butting on the same beam, or every other one, as I saw recently. But it is likely a mistake in any case. With a sequence with 5 and 1 at the ends, it can never work.
-
The ASA ( now ABS ) published their first set of rules in 1870. They came into existence in 1862. Their initial focus was the qualifications of ship captains. I would be more than surprised if their rules were not a direct swipe from Lloyd's of London, who have been doing this since the middle of the 17th C. We do not have a problem with getting timber that is long enough. Using planks that are longer than 40 feet - southern US coastal Pine was tall and straight - until they cut it all down - and before 1775 the RN could use it also - anyway - longer than 40 feet in scale is a more common mistake. Why not use 40 feet as the length, and a proper 4 strake pattern? It would be best practice for any country. It would be what they did if they could or were not running a con. The strength of wood when exposed to the force of the sea is not subject to a national fashion or the century. When larger wooden hulls were first being developed, they learned pretty quickly when they got it wrong. The sea does not forgive foolish mistakes.
-
New Young Model Builder from Minnesota LOOKING FOR ADVICE
Jaager replied to Kenna's topic in New member Introductions
I have an old Model Boats #2 catalog - English and from 1970 or earlier. It features plans for pond boats and other adaptations of sailing ships for actual use in water. The point and take home lesson from it is that the physics and physical properties of water do not scale. In order to sail and not turn turtle, the hulls have to be adapted to a different shape. It looks like the hulls are much deeper below the waterline and may also have more beam, than the prototype. It does not look like the adaptations are much like a scaled down version of the original below the waterline. I suspect that there is serious engineering design, rules, and principles involved in this sort of adaptation. I well may be wrong about this, but there may be more to this than simply scaling the hull of a scale model. -
A question about varnish.
Jaager replied to danbloch's topic in Painting, finishing and weathering products and techniques
Dan, If you look at SpyGlass' photo, you will see drifts of wood scrapings. A vac will get most of it, but a solvent rub will get what is left. SpyGlass was not saying not to apply a clear finish, he was saying it is good to: Mask - blue painters tape or green frog tape or the old crepe paper masking tape if you must. Cover any areas that will have wood glued to it, but just those areas and maybe a hair less. So that there is not a bare zone outside the glued on structure - neat looks and all that. . PVA bonds to porous surfaces - the polymers invade the substance of the wood. A smooth glassy surface = no bond. Now, you can prime and coat the whole deck with shellac, and then scrape the shellac off of the bonding sites, but it takes real talent and skill not to take off too much or scrape too deeply. Prevention is easier. Commercial varnish vs shellac - mostly a personal preference situation. But most varnishes work better if the surface is primed first. The common and traditional primer for other clear finishes or paint is half strength shellac. You really have to work hard to find something that is not compatible with shellac. Old style varnish is boiled ( cooked to polymerize it - so that it will dry in your lifetime) linseed oil in mineral spirits. Modern stuff is plastic ( like polyurethane ) in either mineral spirits or lately water. It tends to be both thicker than shellac and glossy. If you apply 10 coats, shellac can be glossy too. It is just not a look that you want for this type of surface. Buffing the surface of a clear coated surface, before the next coat, produces a smoother and better looking surface. Tradition is to use 0000 steel wool. BUT, steel wool leaves bits of itself behind. If it is not totally removed, the steel residue can rust and stain a model. Shellac is soft enough that a plastic abrasive pad will smooth it without having to worry about rust. -
A question about varnish.
Jaager replied to danbloch's topic in Painting, finishing and weathering products and techniques
That is exactly what I recommend that you use. For the first coat, cut some it 50:50 with shellac thinner. Long ago and far away, that used to be methanol - wood alcohol - but if your drink it, your liver metabolizes it to formaldehyde - and you die. It all seems to be ethanol now - with a trace of something noxious and emetic - and is called denatured alcohol. Drug store alcohol has too much water and water turns shellac white. That is why shellac is not used on tabletops - not everyone uses a coaster. My local hardware has this brand and pints or quarts of denatured alcohol. I checked Home Depot and Slowes - they only list quarts of Zinsser. I go the hardware store route. An old tee shirt square is as good as anything else for application. The first coat will just soak it and not leave all that much on the surface. The next full strength coat will cover the surface, but it is not thick enough material to need skilled brush application. a soft rag is enough. Alcohol repairs mistakes and a Scotch-Brite pad will smooth the surface, if needed. You can use a single edge razor blade to to smooth the surface, with an alcohol cleaning, before you apply any shellac. But if you have open pores, the dust from using sand paper may fill them some. Scrapping does not leave any residue behind. -
A question about varnish.
Jaager replied to danbloch's topic in Painting, finishing and weathering products and techniques
I have no direct experience with plaster of paris as a filler. I remember it from a book on fine furniture finishing. I thought it strange too. The best I could speculate about it is that the particles are translucent when exposed to shellac. Otherwise, Black Walnut would look like it had white measles. .... I checked my library and I can't find it. It may have been pumice. Anyway, it was so startling that it stuck with me. "Never mind." It is better to never use a species of wood where a coat of half cut shellac is not an effective sealer. -
strakes #3 and #4 butts are on adjacent beams.
-
The only way I can see that there can be 5 numbers in a four butt shift is if the four refers to the number of planks between two planks having their butt on the same beam. The repeating sequence actually involves five planks. The first picture above, numbering from the top down = Beam 1 - beam 3 - beam 5 - beam 2 - beam 4 The second, top down = beam 1 - beam 4 - beam 2 - beam 3 The American "Lloyds" ASA 1870 " No butts of adjoining plank should be nearer each other than the space of two beams ( when a stake intervenes the distance of one beam will be allowed). No butts should meet on the same beam unless there be three stakes between them." The second picture fails that rule.
-
Converting a Backyard Shed into a Model Workshop
Jaager replied to Hank's topic in Modeling tools and Workshop Equipment
A light colored vinyl tile flooring, that is peel and stick should be quick, easy for rolling stools and machine stands, and give a better chance of recovering dropped or jumping parts, as well as helping with the lighting. Wet swabbing or a ruff leak - a blue million seams would not be good for the subfloor. By using Liquid Nails, it seems that you do not share Moriarty's philosophy of having a reverse gear faster than the forward gears. -
A question about varnish.
Jaager replied to danbloch's topic in Painting, finishing and weathering products and techniques
The satin finish or matte is because of scale effect. What is gloss in RL, is not when viewed 50-100 times farther away. Pore filling implies that the wood supplied actually has pores. The ideal species of wood used for a ship model should have pores that are too small to be noticed. Varnish is a verb as well as a noun and a specific type of product. As a verb it covers any sort of clear finish. If you did not have to deal with pesky pores, the traditional, most forgiving, most compatible with other coatings or paints, has the least problem with out of scale buildup, not at all toxic - is shellac. It comes premixed or as flakes. The flakes offer near water clear to garnet, depending on the type chosen. Mask any areas where deck houses, bitts, hatch coaming (the spell checker here - a database with nautical words, and suggestions would be helpful). A sand n' sealer would fill the pores, but it is also way out of scale thick when dry. Check for fine finishing on up scale furniture methods, but maybe mixing plaster of paris with half strength shellac, scraping the surface when dry, and applying full size shellac over that. A significant segment here subscribes to the better living thru chemistry and "modern" synthetics and plastic polymer products. Some of us are dinosaurs, who prefer more traditional materials. -
Paul, Answering this quick and dirty:

-
building the flying fish/ help with masts
Jaager replied to Retiredsailor1973's topic in Masting, rigging and sails
Also, search the name rwiederrich in the scratch build forum. Excellent exposition of 1/96 masting and rigging on 1850's clippers at 1:96 - a scale that gets into miniature territory, where art competes with technical. -
A question about glue.
Jaager replied to danbloch's topic in Building, Framing, Planking and plating a ships hull and deck
My personal bias: Contact cement is really terrible for anything on a ship model. It tends to oxidize and fail in a decades time line. You get one shot at placement, no fine adjustment possible. Duco is not a good choice and fails any serious strength test. Hide glue I have not tried it, but really old school is hide glue flakes melted in a glue pot. Messy and time consuming, but it should last a couple hundred years. I tried Franklin liquid hide glue as a reversible wood to wood bond - it held too strongly for my purposes. Old Brown Glue is said to be a better choice, but this type is probably too aqueous to play nice with wood. The pot type has a lot less water. CA, some love it and a lot of us moldy figs really hate it and do not touch it. Epoxy, the thing to use for metal to wood, but too messy and ugly for wood to wood. PVA - the go to for wood to wood. The closer the two surfaces, the stronger the bond. It comes white (dries clear), yellow ( aliphatic ) dries amber and has partial to complete water resistance -depending on the formula used. It also comes white pH7 - bookbinders strictly for rigging done using natural fibers. If you coat both surfaces with PVA, let it dry, put the two surfaces together and iron it, the heat allows a bond. It is a contact cement of sorts. I doubt that the strength is anything like a wet PVA bond. A proper PVA bond is stronger than the lignin that holds the wood fibers together. Foaming type would be awful to mess with. Resorcinol glue is the thing if you are building a full size PT boat, not worth the trouble on a model. Your bonding - PVA and clamping or weight. East coast US, what with the humidity, I prefer Titebond II. -
I am not sure that Holly has a pith that is a bother. I am guessing that it is as hard as the rest of the wood, or it will pop up as you do your final slices and you can discard it then. With your thinner billets, I am guessing that the physics of drying will have any checking go in the thin direction. But a disaster if it is otherwise. If you took a quarter sawn slice that is the diameter of the log, with the pith in the center and in the middle, your ambition to have a wide board may be thwarted if it cups as it drys. No definitive answer here. You pays your money and takes your chances.
-
building the flying fish/ help with masts
Jaager replied to Retiredsailor1973's topic in Masting, rigging and sails
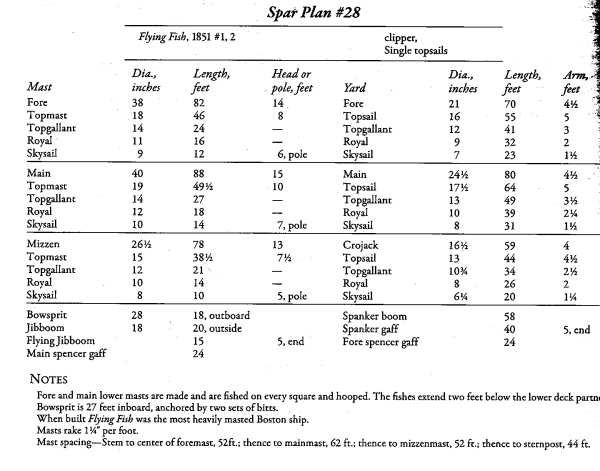
A vessel with the name Flying Fish is the subject of at least two kits. Since you name 3 masts, it is likely that you have the Model Shipways clipper, 1/96 scale. The other is a Grand Banks two masted fishing schooner. Another, but not a kit is USS Flying Fish, a NY pilot schooner, a tender for the U.S. Ex. Ex. squadron, sold at Hong Kong as rotten, repaired, renamed (Spec) and was a notorious opium smuggler, that out sailed most everything that chased her. For the clipper: The data from which has a copy at Amazon -right now - it has all of the particulars needed for the spars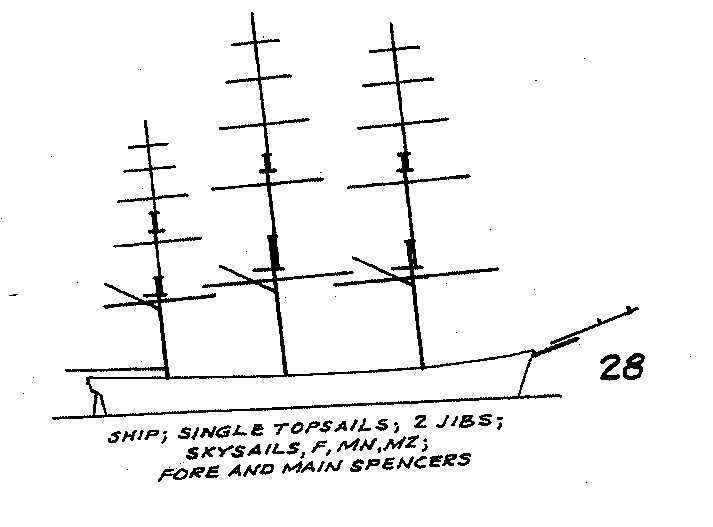

-
New Young Model Builder from Minnesota LOOKING FOR ADVICE
Jaager replied to Kenna's topic in New member Introductions
Kenna, Broken record here, but just be aware that by doubling the length, the final model will be 8 times larger. 2x length x 2x width x 2x depth, 2x2x2=8. When you enlarge, do a clear metric ruler first and check for any machine inaccuracy. Home type scanner copiers have a paper currency anti counterfeit factor. Architect copiers would not/ could not abide this sort of error factor. About enlarging the plans, no single part of a model requires the full size of the plans. They are all small sections of it. The smaller sections are easier to use, too. The keel and the lower masts are the largest parts. A keel is made up of shorter segments. You do not need a whole intact plan of a mast to make one. The interesting part is the upper section. -
Converting a Backyard Shed into a Model Workshop
Jaager replied to Hank's topic in Modeling tools and Workshop Equipment
It would be difficult to over praise the improvement an in-line cyclone type trap makes in dealing with collected saw dust, A cloth bag or straight to a vac chamber/filter just ain't in it once you see the difference. My old Sears 16gal shop vac was like being near a jet engine - had to use ear muff sound protection. I bought a Festool Midi because it was supposed to be quiet. It is, but it is expensive as 'ell and turns itself off after 15 min. I bought a 16 gal Rigid from Home Depot that is about as quiet, pulls a hurricane, stays on, and costs less than 20% what the Festool did. I do not need hearing protection, but I still can't listen to Beethoven when its on. Now on to your question. This is what I have now: https://www.rockler.com/dust-collector-remote-switch The remote uses a common low cost battery. I unplug it when I am done - because I live in a condo and it may use the same frequency as some garage door remotes. You can guess how I discovered that. I ain't low cost, but a low cost model that clued me in on this tech, burned out.