


Stockholm tar
-
Posts
866 -
Joined
-
Last visited
Reputation Activity
-

 Stockholm tar got a reaction from tkay11 in Sherbourne by Stockholm tar - Caldercraft - 1/64
Having fitted the boom, the next job was to make the gaff. This was made in a similar fashion, its dimensions being taken from the AOTS Alert book. The gaff tapers rather more along its length than the boom, with its maximum width being closer to the mast. Again, I made similar modifications to the kit-supplied jaws (they are actually the same fitting as for the boom) in that they were first split in two, each half being shaped to fit the gaff end, and then glued to the spar on either side.
The other fittings are as follows (from the jaws end): an eyebolt on top of the spar, just above the jaws, to take the lower double-block of the throat halliard; a stop, on top of the spar, just aft of this to retain the mainsail throat lashing; a strop for the small double blocks (one each side) for the mainsail brails; another strop, fitted about midway along the gaff, to which were attached two small single lead blocks, again for the brails; two stops on top of the spar, for the rigging span to which is attached one of the single blocks of the peak halliard tackle; further aft, a strop for a second single block for the peak halliard tackle; at the after end, a stop to retain the mainsail peak lashing; finally, an eyebolt in the end of the gaff to which is fitted a small single block for the ensign halliards. I decided to paint the entire gaff black, including the jaws, and gave the spar a light covering of beeswax.
I thought there might have been similar problems of movement with the after end of the gaff, as there had been with the boom. However, having dry-fitted the spar, in its hoisted position on the pin inserted in the mast, I found it was quite firm and that further measures were not necessary. I also surmised that the process of gluing would significantly reduce any movement. Due to this concern, I had initially intended to fit vangs at the end of the gaff, made fast to belaying pins on each quarter – but then discovered that these items of rigging weren’t fitted at that date. There is, therefore, a spare belaying pin aft on each side. I had a slight worry that the pin in the aft side of the mast might not be dead centre – or the end of the gaff would be off to one side or the other – and it was just slightly out. On the real ship it wouldn’t necessarily have been all-square in any case.
Having decided that it would be best to lace the gaff to the head of the mainsail before fitting the spar, I now set about making the sail itself. This was cut from an old, thin, handkerchief, its size being about half that of the actual sail area in order to reduce its bulk when furled. Naturally I made it with a full-length head, to be laced along the length of the gaff, narrowing towards the foot. To represent the seams, I teased out equidistant strands from the cloth, about a centimeter apart, which seemed about right. The operation had to be done very carefully, as the strands could break quite easily, using a pair of tweezers. Around the sail’s edge I made a narrow hem, using a fabric glue, to which I added a scale boltrope (on the traditional larboard, or port, side). I then added reef bands and reef points, with strengthening pieces at the peak, throat, tack and clew (I now realise that those at the peak and throat are a little over large, something I will have to watch with the other sails.)
Then it was time to put the kettle on. When it was reasonably hot, but not boiling, I poured the water onto a teabag – for staining the sail, of course (!) – in one of my wife’s small baking trays. When the resultant ’brew’ was about the right colour I put in the sail, spreading it out so that it was completely submerged, and left it for a couple of hours. As the sail changed colour quite quickly, I had look at it every now and then to see how it was progressing. Removing it from the tray when a suitable shade, I spread it out to dry overnight. When dry I found that, besides being a good colour, the cloth had puckered somewhat – which made it look even more realistic.
Now I had to attach it to the gaff, for which I used a needle and .25 black rigging cord. Fastening the cord around the spar at the jaws end I proceeded along the length of the gaff, piercing the sail just under the bolt rope (approximately every centimetre) with the needle, and forming a marline hitch along the spar as it progressed. A brief smear of glue under the line fixed each hitch around the spar when tightened, and a little touch-up with diluted black paint covered any excess that was visible.
The next operation was to attach the gaff to the mast. As mentioned the spar was quite firm when dry-fitted, but the CA glue applied to the pin prevented any real further movement. I then fitted the parrel, in similar fashion as for the boom. With that done, the next task was to stretch out the luff, or leading edge, of the sail and lash the tack down to the eyebolt in the boom, using the loop I had formed in the boltrope. This stretched out the sail, and I could then concentrate on fitting the sail hoops. As I mentioned earlier, I had unfortunately already glued the crosstrees in place, which meant that I would have to fit the hoops around the mast. This suggested that they would have to be of a bendable material, and copper strip presented itself as a workable solution – some of which I just happened to have. Making the hoops was straightforward although, being a soft metal, it was quite easy to bend the strips out of shape if too much pressure was applied. There are eight hoops in all and I eventually worked out, with a bit of trail and error, how long they would have to be, including the overlap for glueing the ends. I seem to remember a high-tech piece of string came into the the process! They also have to be a loose fit, to give the illusion that they could run freely on the mast. Following a little experimentation, I finally painted them a near buff colour, which I thought suitable to represent wood. Being metal this took a little while, as there are about three coats, which also included those inside each hoop so that no copper was visible.
I fitted the hoops by cutting small equidistant slots in the luff of the sail the width of the hoop, carefully bent each just enough for it to pass around the mast, pushed one end through the slot in the sail, and then closed it against the other end, fixing it with touch of CA glue.
Furling the sail into the mast, which I had decided would best be done on the model, had to be attempted rather carefully. First of all I attached the two brails on each side, which I would actually use to furl up the sail, threading them through the blocks already fitted. Dampening the sail, with a light wetting from a spray bottle helped with the process. Then it was just a case of gently pulling on each of the four brails, two being attached to the clew and two at about the middle of the leech, and lifting the sail from underneath until it was as close in to the mast as was possible. During the process I was careful that the sail furled with a natural look, and that the folds hung evenly. When it was dry, I was quite pleased with the result. The brails falls were made fast to the pins in the boom jaws, each one being finished off with a small coil. It then only remained to belay the clew outhaul to a cleat on the boom, glue down some of the reef points (which stuck out at odd angles) to the sail, and the job was done.
Next time: More items of running rigging, the shrouds.
-
 Stockholm tar got a reaction from Gregor in Sherbourne by Stockholm tar - Caldercraft - 1/64
Having fitted the boom, the next job was to make the gaff. This was made in a similar fashion, its dimensions being taken from the AOTS Alert book. The gaff tapers rather more along its length than the boom, with its maximum width being closer to the mast. Again, I made similar modifications to the kit-supplied jaws (they are actually the same fitting as for the boom) in that they were first split in two, each half being shaped to fit the gaff end, and then glued to the spar on either side.
The other fittings are as follows (from the jaws end): an eyebolt on top of the spar, just above the jaws, to take the lower double-block of the throat halliard; a stop, on top of the spar, just aft of this to retain the mainsail throat lashing; a strop for the small double blocks (one each side) for the mainsail brails; another strop, fitted about midway along the gaff, to which were attached two small single lead blocks, again for the brails; two stops on top of the spar, for the rigging span to which is attached one of the single blocks of the peak halliard tackle; further aft, a strop for a second single block for the peak halliard tackle; at the after end, a stop to retain the mainsail peak lashing; finally, an eyebolt in the end of the gaff to which is fitted a small single block for the ensign halliards. I decided to paint the entire gaff black, including the jaws, and gave the spar a light covering of beeswax.
I thought there might have been similar problems of movement with the after end of the gaff, as there had been with the boom. However, having dry-fitted the spar, in its hoisted position on the pin inserted in the mast, I found it was quite firm and that further measures were not necessary. I also surmised that the process of gluing would significantly reduce any movement. Due to this concern, I had initially intended to fit vangs at the end of the gaff, made fast to belaying pins on each quarter – but then discovered that these items of rigging weren’t fitted at that date. There is, therefore, a spare belaying pin aft on each side. I had a slight worry that the pin in the aft side of the mast might not be dead centre – or the end of the gaff would be off to one side or the other – and it was just slightly out. On the real ship it wouldn’t necessarily have been all-square in any case.
Having decided that it would be best to lace the gaff to the head of the mainsail before fitting the spar, I now set about making the sail itself. This was cut from an old, thin, handkerchief, its size being about half that of the actual sail area in order to reduce its bulk when furled. Naturally I made it with a full-length head, to be laced along the length of the gaff, narrowing towards the foot. To represent the seams, I teased out equidistant strands from the cloth, about a centimeter apart, which seemed about right. The operation had to be done very carefully, as the strands could break quite easily, using a pair of tweezers. Around the sail’s edge I made a narrow hem, using a fabric glue, to which I added a scale boltrope (on the traditional larboard, or port, side). I then added reef bands and reef points, with strengthening pieces at the peak, throat, tack and clew (I now realise that those at the peak and throat are a little over large, something I will have to watch with the other sails.)
Then it was time to put the kettle on. When it was reasonably hot, but not boiling, I poured the water onto a teabag – for staining the sail, of course (!) – in one of my wife’s small baking trays. When the resultant ’brew’ was about the right colour I put in the sail, spreading it out so that it was completely submerged, and left it for a couple of hours. As the sail changed colour quite quickly, I had look at it every now and then to see how it was progressing. Removing it from the tray when a suitable shade, I spread it out to dry overnight. When dry I found that, besides being a good colour, the cloth had puckered somewhat – which made it look even more realistic.
Now I had to attach it to the gaff, for which I used a needle and .25 black rigging cord. Fastening the cord around the spar at the jaws end I proceeded along the length of the gaff, piercing the sail just under the bolt rope (approximately every centimetre) with the needle, and forming a marline hitch along the spar as it progressed. A brief smear of glue under the line fixed each hitch around the spar when tightened, and a little touch-up with diluted black paint covered any excess that was visible.
The next operation was to attach the gaff to the mast. As mentioned the spar was quite firm when dry-fitted, but the CA glue applied to the pin prevented any real further movement. I then fitted the parrel, in similar fashion as for the boom. With that done, the next task was to stretch out the luff, or leading edge, of the sail and lash the tack down to the eyebolt in the boom, using the loop I had formed in the boltrope. This stretched out the sail, and I could then concentrate on fitting the sail hoops. As I mentioned earlier, I had unfortunately already glued the crosstrees in place, which meant that I would have to fit the hoops around the mast. This suggested that they would have to be of a bendable material, and copper strip presented itself as a workable solution – some of which I just happened to have. Making the hoops was straightforward although, being a soft metal, it was quite easy to bend the strips out of shape if too much pressure was applied. There are eight hoops in all and I eventually worked out, with a bit of trail and error, how long they would have to be, including the overlap for glueing the ends. I seem to remember a high-tech piece of string came into the the process! They also have to be a loose fit, to give the illusion that they could run freely on the mast. Following a little experimentation, I finally painted them a near buff colour, which I thought suitable to represent wood. Being metal this took a little while, as there are about three coats, which also included those inside each hoop so that no copper was visible.
I fitted the hoops by cutting small equidistant slots in the luff of the sail the width of the hoop, carefully bent each just enough for it to pass around the mast, pushed one end through the slot in the sail, and then closed it against the other end, fixing it with touch of CA glue.
Furling the sail into the mast, which I had decided would best be done on the model, had to be attempted rather carefully. First of all I attached the two brails on each side, which I would actually use to furl up the sail, threading them through the blocks already fitted. Dampening the sail, with a light wetting from a spray bottle helped with the process. Then it was just a case of gently pulling on each of the four brails, two being attached to the clew and two at about the middle of the leech, and lifting the sail from underneath until it was as close in to the mast as was possible. During the process I was careful that the sail furled with a natural look, and that the folds hung evenly. When it was dry, I was quite pleased with the result. The brails falls were made fast to the pins in the boom jaws, each one being finished off with a small coil. It then only remained to belay the clew outhaul to a cleat on the boom, glue down some of the reef points (which stuck out at odd angles) to the sail, and the job was done.
Next time: More items of running rigging, the shrouds.
-
 Stockholm tar got a reaction from Paddy in Sherbourne by Stockholm tar - Caldercraft - 1/64
Having fitted the boom, the next job was to make the gaff. This was made in a similar fashion, its dimensions being taken from the AOTS Alert book. The gaff tapers rather more along its length than the boom, with its maximum width being closer to the mast. Again, I made similar modifications to the kit-supplied jaws (they are actually the same fitting as for the boom) in that they were first split in two, each half being shaped to fit the gaff end, and then glued to the spar on either side.
The other fittings are as follows (from the jaws end): an eyebolt on top of the spar, just above the jaws, to take the lower double-block of the throat halliard; a stop, on top of the spar, just aft of this to retain the mainsail throat lashing; a strop for the small double blocks (one each side) for the mainsail brails; another strop, fitted about midway along the gaff, to which were attached two small single lead blocks, again for the brails; two stops on top of the spar, for the rigging span to which is attached one of the single blocks of the peak halliard tackle; further aft, a strop for a second single block for the peak halliard tackle; at the after end, a stop to retain the mainsail peak lashing; finally, an eyebolt in the end of the gaff to which is fitted a small single block for the ensign halliards. I decided to paint the entire gaff black, including the jaws, and gave the spar a light covering of beeswax.
I thought there might have been similar problems of movement with the after end of the gaff, as there had been with the boom. However, having dry-fitted the spar, in its hoisted position on the pin inserted in the mast, I found it was quite firm and that further measures were not necessary. I also surmised that the process of gluing would significantly reduce any movement. Due to this concern, I had initially intended to fit vangs at the end of the gaff, made fast to belaying pins on each quarter – but then discovered that these items of rigging weren’t fitted at that date. There is, therefore, a spare belaying pin aft on each side. I had a slight worry that the pin in the aft side of the mast might not be dead centre – or the end of the gaff would be off to one side or the other – and it was just slightly out. On the real ship it wouldn’t necessarily have been all-square in any case.
Having decided that it would be best to lace the gaff to the head of the mainsail before fitting the spar, I now set about making the sail itself. This was cut from an old, thin, handkerchief, its size being about half that of the actual sail area in order to reduce its bulk when furled. Naturally I made it with a full-length head, to be laced along the length of the gaff, narrowing towards the foot. To represent the seams, I teased out equidistant strands from the cloth, about a centimeter apart, which seemed about right. The operation had to be done very carefully, as the strands could break quite easily, using a pair of tweezers. Around the sail’s edge I made a narrow hem, using a fabric glue, to which I added a scale boltrope (on the traditional larboard, or port, side). I then added reef bands and reef points, with strengthening pieces at the peak, throat, tack and clew (I now realise that those at the peak and throat are a little over large, something I will have to watch with the other sails.)
Then it was time to put the kettle on. When it was reasonably hot, but not boiling, I poured the water onto a teabag – for staining the sail, of course (!) – in one of my wife’s small baking trays. When the resultant ’brew’ was about the right colour I put in the sail, spreading it out so that it was completely submerged, and left it for a couple of hours. As the sail changed colour quite quickly, I had look at it every now and then to see how it was progressing. Removing it from the tray when a suitable shade, I spread it out to dry overnight. When dry I found that, besides being a good colour, the cloth had puckered somewhat – which made it look even more realistic.
Now I had to attach it to the gaff, for which I used a needle and .25 black rigging cord. Fastening the cord around the spar at the jaws end I proceeded along the length of the gaff, piercing the sail just under the bolt rope (approximately every centimetre) with the needle, and forming a marline hitch along the spar as it progressed. A brief smear of glue under the line fixed each hitch around the spar when tightened, and a little touch-up with diluted black paint covered any excess that was visible.
The next operation was to attach the gaff to the mast. As mentioned the spar was quite firm when dry-fitted, but the CA glue applied to the pin prevented any real further movement. I then fitted the parrel, in similar fashion as for the boom. With that done, the next task was to stretch out the luff, or leading edge, of the sail and lash the tack down to the eyebolt in the boom, using the loop I had formed in the boltrope. This stretched out the sail, and I could then concentrate on fitting the sail hoops. As I mentioned earlier, I had unfortunately already glued the crosstrees in place, which meant that I would have to fit the hoops around the mast. This suggested that they would have to be of a bendable material, and copper strip presented itself as a workable solution – some of which I just happened to have. Making the hoops was straightforward although, being a soft metal, it was quite easy to bend the strips out of shape if too much pressure was applied. There are eight hoops in all and I eventually worked out, with a bit of trail and error, how long they would have to be, including the overlap for glueing the ends. I seem to remember a high-tech piece of string came into the the process! They also have to be a loose fit, to give the illusion that they could run freely on the mast. Following a little experimentation, I finally painted them a near buff colour, which I thought suitable to represent wood. Being metal this took a little while, as there are about three coats, which also included those inside each hoop so that no copper was visible.
I fitted the hoops by cutting small equidistant slots in the luff of the sail the width of the hoop, carefully bent each just enough for it to pass around the mast, pushed one end through the slot in the sail, and then closed it against the other end, fixing it with touch of CA glue.
Furling the sail into the mast, which I had decided would best be done on the model, had to be attempted rather carefully. First of all I attached the two brails on each side, which I would actually use to furl up the sail, threading them through the blocks already fitted. Dampening the sail, with a light wetting from a spray bottle helped with the process. Then it was just a case of gently pulling on each of the four brails, two being attached to the clew and two at about the middle of the leech, and lifting the sail from underneath until it was as close in to the mast as was possible. During the process I was careful that the sail furled with a natural look, and that the folds hung evenly. When it was dry, I was quite pleased with the result. The brails falls were made fast to the pins in the boom jaws, each one being finished off with a small coil. It then only remained to belay the clew outhaul to a cleat on the boom, glue down some of the reef points (which stuck out at odd angles) to the sail, and the job was done.
Next time: More items of running rigging, the shrouds.
-
 Stockholm tar got a reaction from st george in Stern of the HMS Victory
Methinks that's a line from Moby Dick, right – or is it that film with Nicole Kidman?
I think though, it might take us 'OTHERS' a little while to realise it's a joke, when we're discussing a (supposedly) serious subject.
-
Stockholm tar reacted to hamilton in HMS Blandford by hamilton - FINISHED - from Corel HMS Greyhound - 1:100
OK let's try again.....
Next after fiddling with the lengths of the lower masts, here is what I arrived at....
These are just the raw dowels set in the mast holes - the rake in the mizzen isn't accurate and the rake in the foremast shouldn't be there at all. Anyway, this is just to demonstrate relative size...
Here are the foremast cheeks and bibbs which I made as 1 piece instead of separately, thinking that to make separate parts at this scale would simply be too tough.
Here is the foremast top, unfinished. Corel's laser cut part was accurate with respect to dimensions, except the thickness (1.5mm) which would have made the top much too bulky after adding the planking and the margins. So I traced the laser cut part onto a 1/32 thick sheet of lime and planked it using .5mm x 3mm strips. The margins are also 1/32"lime.
It looks a little mongrelly here, but after painting it's much better (sorry for the bad focus!)
Finally here are a couple of the shots of the fore mast dry fitted. It's not exactly finished yet - I still have to paint the bolsters and the mast head cleats and also reduce the latter's size so they don't look so bulky....
You may notice the holes drilled in the forward edge of the top for the crow's feet, which I plan on adding. My worry here is that the smallest blocks I have are 3mm, which even at that small size is too big for the crow's feet tackle. A suitable euphroe I can probably manage, but the tackle blocks will be a challenge. I'm not sure how much I can reduce the size of the 3mm blocks supplied by corel (which at any rate are very fragile things) though I might be able to do something with 1/8" blocks supplied by model shipways and leftover from previous builds (though these are slightly larger than the corel ones!!
Anyway that's a future worry. Hope you're all enjoying the day - now back to work!!
hamilton
-
 Stockholm tar got a reaction from jud in HMS Victory by AntonyUK - FINISHED - Scale 1:36 - cross-section
Anthony,
I would think all the decks are caulked, and I believe I have seen a photo of the lower deck being so treated. If you also look at photos of the Victory's decks, I think you will see they are. Naturally the weather decks are the most important in keeping water out, but if you think about it all of the decks would get wet at some stage, from washing down periodically, pump water, etc. So yes, I would do it.
An interesting piece of information from the curator Andrew Baines recently, is that the Victory is to be again caulked using the traditional methods, during her refit. After having used a synthetic mastic substance for several years, he said that the modern material just didn't flex with the temperature, as traditional hemp would do - and was a source of leaks! Surprise, surprise, it just goes to show that the tried and tested (over several hundred years) techniques are often the best.
She's looking very good so far, I shall be following with interest.
-
 Stockholm tar got a reaction from riverboat in Le Mirage by Sjors - FINISHED - Corel - Wood - 1:75
Or just place a sign – Mind the Gap! (Sjors has probably heard this if he's travelled on the London tube)
You're doing a good job on Mirage Sjors, very neat. Can you tell me though, when this book comes out, can I buy it through Amazon? I think it would make good bedtime reading – I'd be asleep in no time!
-
 Stockholm tar got a reaction from realworkingsailor in HMS Pegasus by realworkingsailor - Amati/Victory Models - 1/64
Well, you have another one now, as I am looking more and more at your splendid build.
Well done Andy, you're certainly taking great pains with her – and it shows!
-
 Stockholm tar got a reaction from trippwj in Le Mirage by Sjors - FINISHED - Corel - Wood - 1:75
Or just place a sign – Mind the Gap! (Sjors has probably heard this if he's travelled on the London tube)
You're doing a good job on Mirage Sjors, very neat. Can you tell me though, when this book comes out, can I buy it through Amazon? I think it would make good bedtime reading – I'd be asleep in no time!
-
Stockholm tar reacted to Jim Lad in Stag by Jim Lad - FINISHED - Scale 1:96 - English Revenue Cutter of 1827
Well, I almost had the rigging done! All rigging was secured yesterday afternoon until I turned around quickly with a pair of tweezers in my hand, caught the port after brace and carried it away!
The brace is now re-rigged but still to be trimmed and re-secured, so apart from a slightly cock-eyed yard (due to no tension on the port brace) and the unfinished brace, she's rigged.
Next time in at the museum I hope to get her finished (visitor numbers allowing) as once the brace is re-done there's only cleaning up of Irish pennants, attaching rope coils and the anchors to do - the anchors and cables are made and simply awaiting attachment.
Here are some photos of her as of yesterday.
John
-
Stockholm tar reacted to Jim Lad in Stag by Jim Lad - FINISHED - Scale 1:96 - English Revenue Cutter of 1827
The spiders have been busy on the Stag again.
The headsail rigging is now in place and the boom is set up, but not fully rigged as yet. The gaff has also been fitted but is still awaiting its rigging. She's really starting to look like a cutter now.
The line running from the peak of the gaff to the masthead is a temporary expedient to hold the gaff in position until the peak halliards have been rigged.
This will be the last update for a while as we're off to Queensland next week to visit family.
John
-
Stockholm tar reacted to popeye the sailor in Gothenborg by Popeye the sailor - Billing Boats - 1:100 scale
I have an update on the Goth......the lower fore shrouds are finished and waiting for the ratlines. I'd like to get the others done before I get to them though, so it will be a while. I picked up where I left off, tying on more dead eyes.
painting the individual dead eyes does have it's own drawbacks. the assembled shrouds aren't all the same height.......and that's OK, I feel........it looks more natural this way. much the same respect as the gun port lids........I think they could practice ten times a day, and in the heat of battle, could never open them all to the same amount. I also took the time to look at the yards......just like the bow spirit yards, I want them to have some movement. they will be suspended by block pulley assemblies and fastened to the mast with rope strung with perrels. holes were drilled to thread the blocks and lashings, and wound to hide the attachment points.
I was going to do three rows of perrels, but I think they are a bit too large. I had bought these beads a while ago, to do this.
I settled on two rows. now I didn't make those little deviders that go between the perrels.....too small to even mess with, so I tied them together in a couple of places and painted them flat black to kill the sheen {and the white thread.....should have used black}
I went back to work on the shrouds
starboard side is complete......the back stay riggind is all that's left. now to complete the port side.
the second stay has been added to the bow spirit. this is the first of the two that will support the boom portion of the spirit assembly.
I also added the last of the upper main mast stays.........it did cause a bit of slack in the lower stays. it's not much......I will see what the back stays will do to take it up. if it don't, well I'll just fix it then.
the port side shrouds are complete
the outer boom stay is now in place
blocks are added to the lower fore mast yard and the spanker yard of the mizzen mast
which brings me to where I am now. I had run out of that type of thread for the dead eyes and running rigging. I was hoping I could find it.......and I finally did.....in a dollar store, no less. of course, I had to buy the kite in order to get it........the admiral told me to get two of them....they were only $2.50 so, I figure there's still time to introduce the grand sons to kite flying....I have other string to substitute. the
bundle of thread {it's too small to be called string........although it is what one would percieve it is}...with what I had before, I was able to do a couple of builds before this one. these are larger.......should last me a long time! so now, I'm laying the first pairs of shroud lines for the main and mizzen masts
-
Stockholm tar reacted to chris watton in Newsworthy updates from Chris Watton
OK, finished!
Well, almost - still needs a figurehead and carronades, but apart from that, it is done - now I have months of PC based work to look forward to.
Sorry about the quality of the pics (and background) - we can now renovate the room with nice oak flooring and putting some colour on the walls (and changing those awful curtains..), now that I have just vacated the space.
Will be taking it at the end of October - have to admit that it doesn't seem that big now, after having it around for so long - almost become part of the furniture.
Need to find a nice sturdy base to attach it to..
-
 Stockholm tar got a reaction from mtaylor in Warning points...
Brian,
No – as in no, I don't want to confess it... as I can't, not having any, so far as I know...
-
 Stockholm tar got a reaction from Jay 1 in Sherbourne by Stockholm tar - Caldercraft - 1/64
Hello Paddy,
Many thanks for your vote of confidence. I'm not sure about her being the 'icing on the cake' – perhaps more the substantial base!
It's interesting how much interest cutters have generated, and it looks like you're going to be another convert. I don't know if you intend building Sherbourne, another kit, or indeed scratch, but I think you will have a lot of fun – and I daresay a few headaches.
You say you are new to ship modelling but, after having seen your Triton cross section, I think you'd make a splendid job with a cutter. I wish you luck when you get to that point, and I for one will be following with interest.
-
Stockholm tar reacted to popeye the sailor in Sherbourne by Stockholm tar - Caldercraft - 1/64
yes...I will be......you build is in my watch list. I had a very extensive list back on the old MSW. I was a newbie back then {still am in some ways}....I wanted to see and learn as much as I could.
I was kidding about being a secret......it's so nice to see some of your work. hope to see more.
-
Stockholm tar reacted to Sumner in HMC Sherbourne by Sumner - Caldercraft - Scale 1:64 - kitbashed to 1763 NMM plans - First wooden ship build
The error is more clearly apparent when you compare the final picture in my previous post with this shot from the NMM plans of the Sherbourne.
Note the fuller curve of the stern, compared to flatter curve on my model. In my enthusiasm to fair the bulkheads, I oversanded the aft-most bulkhead which created a much flatter curve on the stern. If not corrected at this point, the model would not look as it did in the plans.
To fix this, I traced the shape of the final bulkhead using the original piece of wood that it was cut from in the kit. When I taped that piece of paper to the model, the difference was significant.
The red-shaded areas in this picture clearly show where I over-faired the final bulkhead.
Next, I marked out the area on the template where the sternpost will stand, and glued strips of 0.5mm walnut to the template.
I then cut out the middle of the template so it would better fit the size of the stern, and glued it in place.
Afterwards I filled in the gap with filler and sanded it smooth. Here's the end result:
Definitely closer to the curve shown in the NMM plans, I think.
After using so much filler, I was concerned that the hull might not allow the PVA used with the second planking to properly grip the hull. I'm not sure whether that concern was well founded or not. At the time, I searched on MSW 1.0 and didn't find any information that clearly stated whether that was an issue. So, I took the step of painting the hull with PVA to give the glue something to grip when I started the second planking.
Whether that made a difference or not, I cannot say. But I didn't have any issues with using PVA for the second planking, as I'll show in my next post.
-
Stockholm tar reacted to Sumner in HMC Sherbourne by Sumner - Caldercraft - Scale 1:64 - kitbashed to 1763 NMM plans - First wooden ship build
And so the build continued, with the first layer of planking taking me about a month to complete. I actually got to enjoy this phase of the build and the routine that came with it, although I was happy to finish it.
As you can tell, there was a lot of clinkering caused by my amateur planking job. This happened because I didn't shape the planks properly and therefore had to apply too much horizontal force to the planks in an effort to have them lie properly against the hull. I was able to fix this with a decent amount of sanding, using Tamiya tape to protect the keel and stem from being damaged..
In the end, I was pretty happy with the end result. I felt that I'd learned a lot and was pleased to see the sweet lines of the cutter emerge from a stack of CNC-cut plywood and basswood strips!
The next step after sanding was to fill the hull and sand again to get the smoothest possible surface for the second layer of planking.
At this point, I was more or less ready to start the second layer of planking. Thanks to the inspiration and encouragement of Daniel (aka Siegfried), Kester (aka Stockholm Tar) and Laerte (who seems to have disappeared or changed his name since the Great Crash), I decided to try doing a clinker hull, which was more typical of early cutters like the Sherbourne.
At this point, as you may be able to tell from the picture below, I'd made a pretty serious mistake that needed to be fixed before I could begin planking:
-
 Stockholm tar got a reaction from popeye the sailor in Sherbourne by Stockholm tar - Caldercraft - 1/64
Popeye,
I can assure you I certainly had no intention to keep my Sherbourne a secret – and had actually begun posting photographs of her. No, I hadn't started a build log from the beginning, but since it was suggested, I have now started one as you can see – although of course, it is in retrospect. As you can imagine, this has meant getting the old brain-box working – and that department is often not the best of tools! Much of the construction was some time ago now, but it has been an interesting exercise – although the recall process has sometimes dredged up more than I care to remember!
Anyway, thanks for your kind words – and I have a feeling you will be following my log from now on!
-
Stockholm tar reacted to popeye the sailor in Gothenborg by Popeye the sailor - Billing Boats - 1:100 scale
thank you very much for your kind comment Kester.........and thanks for the update. I was told that she would be setting off on this year's tour, around April, if my memory serves me. your another of the fortunate, to have walked her decks, something that I can only dream about glad to hear that you had a good time. thanks again for the good word.....it's going to be very sweet to finally finish her.
I do wonder where Eric {seasick} has gone to? I haven't seen him around. he worked aboard the Gothenborg last year, but lamented that he would not be able to count himself as one of the crew..........perhaps he stole himself aboard anyway? time will tell.
-
 Stockholm tar got a reaction from Papa in Sherbourne by Stockholm tar - Caldercraft - 1/64
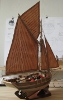
I thought you might like to see a few more pictures of the (slow) progress on my Sherbourne. The pictures were actually taken about a month ago, and my wife and I are now at our cottage, so work won't resume on her until the autumn.
I've now finished the shrouds apart from the ratlines, which I'm leaving off for access until later, and have in place some of the running rigging, including the burtons, top rope, boom topping lift, and throat and peak halliards for the mainsail. The latter is bent to the gaff and brailed into the mast:
-
Stockholm tar got a reaction from popeye the sailor in Gothenborg by Popeye the sailor - Billing Boats - 1:100 scale
Popeye,
You're Gothenburg is looking very good, and better then the real thing at the moment!
She was in Norrtälje, a small port not far from us last weekend, and my wife and I went to see her. Luckily there weren't that many people, so we managed to get on board more or less straight away and spent about an hour on board. She's looking a little down at heel at the moment, having just finished a European tour, Norrtälje being the last port of call before she returned to Gothenburg for a refit. I believe I heard her firing her salute the next day, from our cottage, as she left.
The latest is that she is to prepare for a second voyage to China in 2016.
-
Stockholm tar reacted to popeye the sailor in Gothenborg by Popeye the sailor - Billing Boats - 1:100 scale
I couldn't let you down Sjors.......I did get something accomplished. I started by rigging the lower stays for the mizzen mast. in the pictures, I saw that there were two.......one was with hearts, the other one I couldn't quite make out, so I used two smaller hearts {the small wood eyelets I made}.
then I did the upper stay for the mizzen
I wanted to do more with the shrouds, but duty called for Gibbs, and by then it was time for supper. I did do the two I had set up on the starboard side........I did not tie them off yet though......I want to get the rest of them done before I do that.
I can't wait to get the back stays on and tighten all these stays up......I have one more main stay to do yet, and there is one or two that are not as tight as I would like them to be. I think that if I try to correct them, it may upset the balance........this last stay that I speak of has the ability to make {one of them especially} matters worse........so I will have to be careful and stay on the positive side of 'absolute zero'. it will be shrouds now......with a couple more lines to be added to the bow.
-
 Stockholm tar got a reaction from Padeen in Sherbourne by Stockholm tar - Caldercraft - 1/64
With the mastcoat in place the mast provided made for a reasonably good fit, but to aid in its location I cut a slot in its heel, which secured it over the keel piece. I then tapered the mast from about half-way up its length using a small modelling plane, being careful to take just a thin sliver off with each stroke, and finishing off with a fine-grade sandpaper. (Btw, it is important to always have a sharp blade in the plane which, I find, also tends to reduce ’catching’.) This procedure took a little while, but I didn’t want to give the mast too much of a taper – and I think it resulted in a nice-looking spar. The kit’s topgallant mast was also, to my mind, a little on the thin side and I wanted to both beef it up and lengthen it. I therefore substituted my own from a suitable piece of dowel. Both the topgallant and the lower mast were made of similar dimensions to those given for the Alert, in the AOTS book.
Because of the above changes I was unable to use the ’cross trees’ and mast cap from the kit but I had decided to replace these in any case as, from my point of view, they were too small. Both parts are in fact the same, with similar-sized holes drilled for the lower mast and topgallant mast. Initially I attempted to adapt them but, when endeavouring to drill out one of the holes to enlarge it to take the head of the lower mast, it split in half – so that was that, I had to scratch them! The replacements turned out reasonably well, with separate ’trestle trees’ and ’cross trees’, into which the lower and topgallant masts fitted snugly, the lower ’cross tree’ structure resting on a pair of bibbs either side of the mast. I refer to them as ’cross trees’ and ’tressle trees’, but this is really a misnomer as they do not seem to have been fitted on cutters at this date. The structure I made more resembled an oblong-shaped ’box’, open at the top and bottom, with an off-center division passing between the two masts reflecting their differing circumferences.
Cutter lower masts and topmasts were in one piece at this date, hence the separate upper mast is referred to as the topgallant. The topgallant mast was also fidded abaft, or behind, the lower mast which meant that backstays were not normally required and could therefore dispensed with. Standing and running backstays were only fitted to the lower mast. As a further historical note, Sherbourne was very likely one of the last of her type to have this masting arrangement. From around 1780, cutter masts followed the practice on larger ships, with which we are perhaps more familiar, and were rigged with a lower mast and longer topmast, complete with proper crosstrees, trestle trees, bolsters, and backstays. There are also some differences with the shrouds. On Sherbourne these terminate just above the position of the gaff (fitting over a shoulder or stop) rather than going as far as the doubling, but with the later rig the shrouds passed around the lower masthead. The number of yards and their hoisting arrangements also differ from later practice, but more about these later, except to say that pins were inserted into the masts to take the yards when fitted.
The after side of the lower mast head was fitted with eyebolts to take the blocks for the throat and peak halliards and the boom topping lift, and stops were fitted in various positions for some of the rigging, such as the forestays when they they are fitted. At the base of the lower mast, I fitted a saddle around the aft side of the mast on which the boom jaws rest, whilst below them five cleats were equally spaced around the mast, to take the falls of the running rigging which might be belayed there. I’m not quite sure yet what all of these lines will be but, as I mentioned before, there is an overall lack of belaying points – so I think providing a few more will be an advantage. The cleats were painted black, as were the crosstrees, caps and masthead, whilst the mast itself was stained a reddish brown.
The topgallant mast, as mentioned, was a replacement. As with the lower mast, this was carefully tapered at its upper end, and given a snug fit at the heel to fit the crosstrees and mastcap. Not immediately obvious to the eye is the fid, made made fom a small cut-off nail, which passes through a hole drilled through the heel of the mast, and which rests on the upper edges of the ’trestle trees’. As mentioned it is not that noticeable, especially as the whole assembly is painted black – but at least I know it’s there! Just below this is the sheave hole for the toprope, the rope itself being made fast to an eyebolt on the port side of the mastcap. There is a corresponding eyebolt on the starboard side, for the toprope block.
At the upper end of the mast there are again stops for the rigging, and at the very top I fitted a truck. This was not provided for in the kit, but I think any mast looks unfinished without one! This was easy to make, being merely a suitably sized piece of dowel rod, with rounded edges and a small capping on the top. Four small holes, two on each side were then drilled, which will take the flag halliards when they are rigged. The topgallant mast was finished off similarly to the lower mast, with the lower end and masthead being painted black, and the spar itself being stained a reddish-brown colour. The masts were then lightly treated with beeswax.
I decided to glue the topgallant mast to the lower mast before stepping them as one unit – and in the process completely forgot about how I was going to fit the mast hoops, since they would not now of course, fit over my nicely-made crosstrees! This actually didn’t prove to be such a disaster, when I gave it a little more thought, and the problem was satisfactorily resolved as I will mention later.
I opted to glue the mast in place, with a smear of glue around the partners at deck level, and with a spot on the heel where it fits over the keel piece. The actual stepping of the mast went quite smoothly, and it made a close fit. To locate the cut out in the heel onto the keel piece, I had made a small pencil marks on the mast at deck level, which showed the fore and aft position. By slightly twisting the mast this way and that, as I pushed it home, I felt the heel ’lock’ in place. The mast was pretty much vertical in the athwartships plane, according to my homemade plumbob gauge, although to be sure I put some gentle pressure against the top end of the mast whilst the glue dried. The rake fore and aft was, of course, fixed by the kit design.
We now come to the boom. The dimensions, from the AOTS bible, called for a spar of 62’ in length, which works out to a model length of 27.62 cm. This was not much longer than the length given in the kit instructions, but again I opted to make my own spar, it being a little thicker at 9.2 cm at it’s maximum girth. Both ends are tapered from this point, approximately a third of the length of the boom from the mast. The sides of the boom at the mast end are then chamferred, to fit the jaws. Since the kit supplied jaws would, of course, no longer fit the thicker boom (but which I otherwise considered suitable) I first split them in half, shaped the tail end to fit, and then glued them to the spar on either side. Finally, I drilled a hole in each side at the tail end of the jaws, to take a couple of belaying pins for the mainsail brails. With the boom thus shaped I painted both ends black, including the jaws, and gave it a beeswax finish.
Fittings include: a preventer tackle beneath the boom, consisting of two double blocks fixed to two widely-spaced eyebolts, the fall of the line rove between them coming off of the after block, and being belayed to a small cleat on the side of the boom; two stops on top of the spar at its after end, between which the upper double sheet block strop is fastened; a sheave hole for the mainsail clew outhaul, which also belays to a small cleat on the boom; an eyebolt on top of the spar at the aft end, for the topping lift; another eyebolt, near the jaws, for the tack of the mainsail; there is also a small cleat for the ensign halliards.
Having finished all these fittings, it was then time to fit the boom to the mast. The mast end would rest, and be glued to, the boom saddle and I would further secure it (as with the yards) by a pin positioned in the mast. The aft end, however, could still move if not fixed so I decided, since the sails would be furled, to make a boom crutch. I had no reference for this (other than more modern ones I have seen) so I made it out of two simple, substantial-looking cross pieces, with a pin through them where they cross. I have it in mind that they fold when not in use, and can be stowed away. It is simply glued to the deck, behind the two lockers, but it made for a stable support for the aft end of the boom.
Two jobs remained to be done. The first was to fit the parrels, connecting the jaws to the mast, and here I opted to use the black parrel beads supplied with the kit. Then it was simply a case of tying a length of black rigging thread to one end of the jaws, through the hole already drilled, threading on the requisite number of beads required for it to pass comfortably around the mast (being careful not to make it too tight) and fastening the other end of the thread to the opposite jaws. A small touch of glue on the knot would prevent it from untying.
There was one other small job to do before the boom was finished. I thought a small footrope at the after end, overhanging the taffrail, might look the part. This was made from a length of black rigging thread, with simple overhand knots tied at intervals, and fastened to the spar. I fitted another stop to anchor the inboard end, the outer being fastened by a simple loop over the boom.
Next time: Some items of rigging, the gaff, and the mainsail.
-
Stockholm tar reacted to Blue Ensign in Sherbourne by Stockholm tar - Caldercraft - 1/64
Great photos kester, I just love the look of her
B.E.