.jpeg.882f0a147f14858c9e673da7e13d8ebe.jpeg)
RossR
-
Posts
535 -
Joined
-
Last visited
Content Type
Profiles
Forums
Gallery
Events
Everything posted by RossR
-
.thumb.jpeg.ffac2f8a24d212961a83eab4efb06a6c.jpeg) Nice work. Looks great. I struggled with the pin rail in front of the windlass on my Beagle. Yours looks really good.
Nice work. Looks great. I struggled with the pin rail in front of the windlass on my Beagle. Yours looks really good. -
Your boat is fantastic. Great work.
-
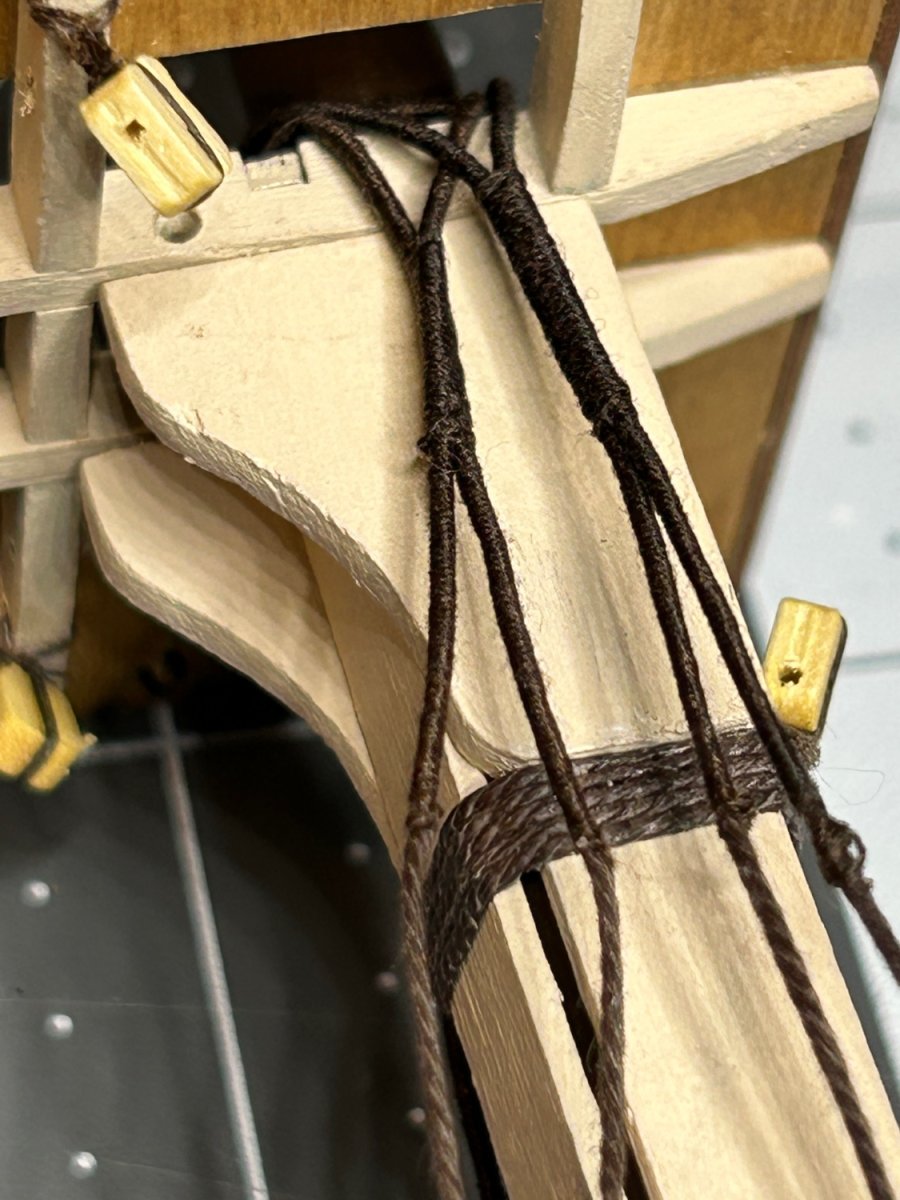
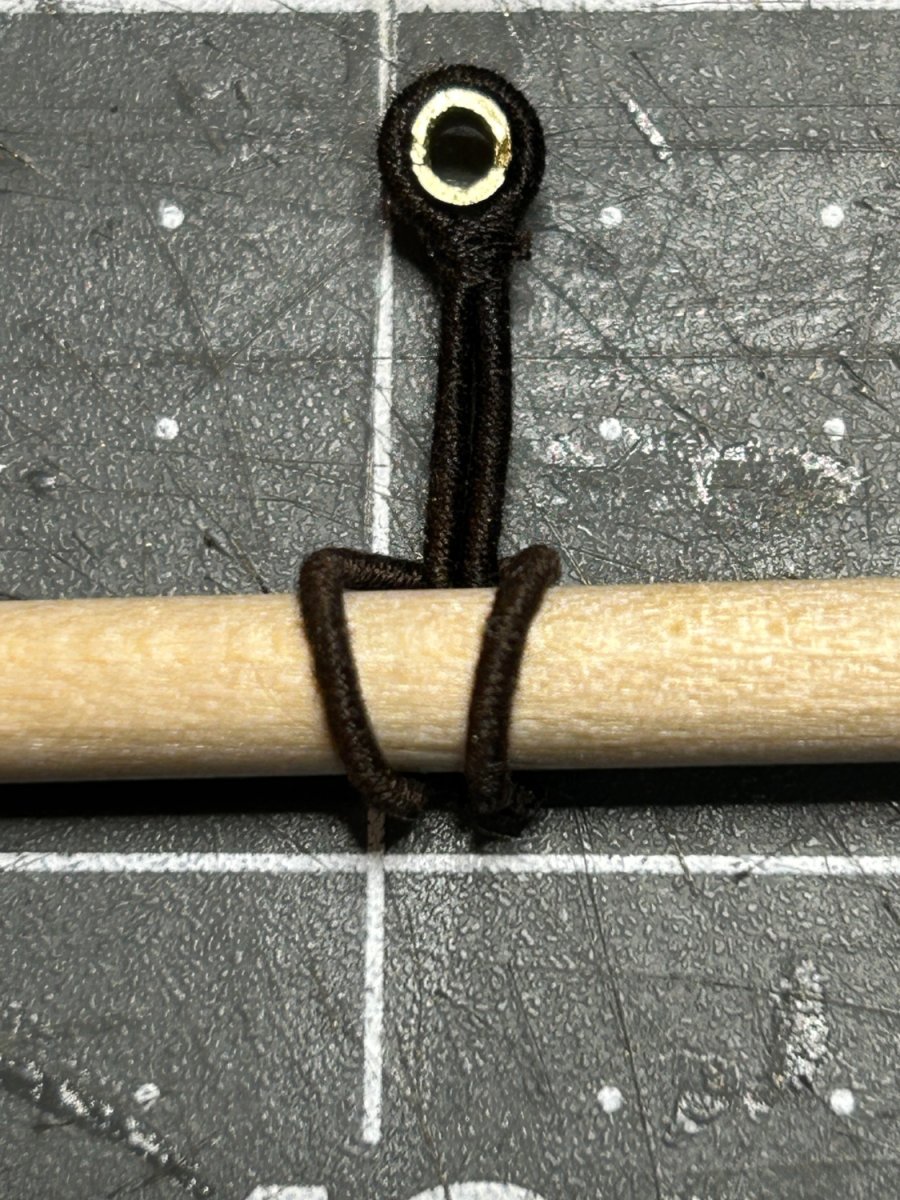
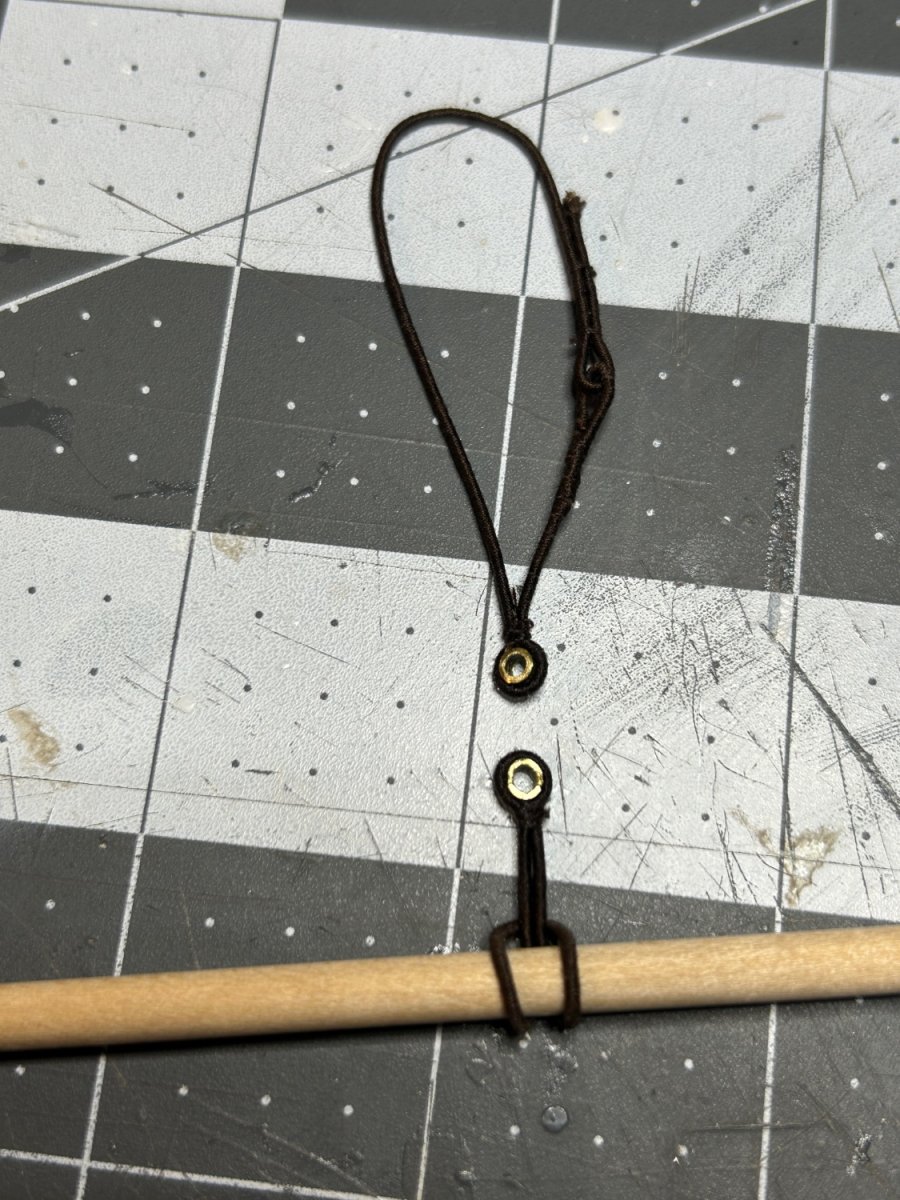
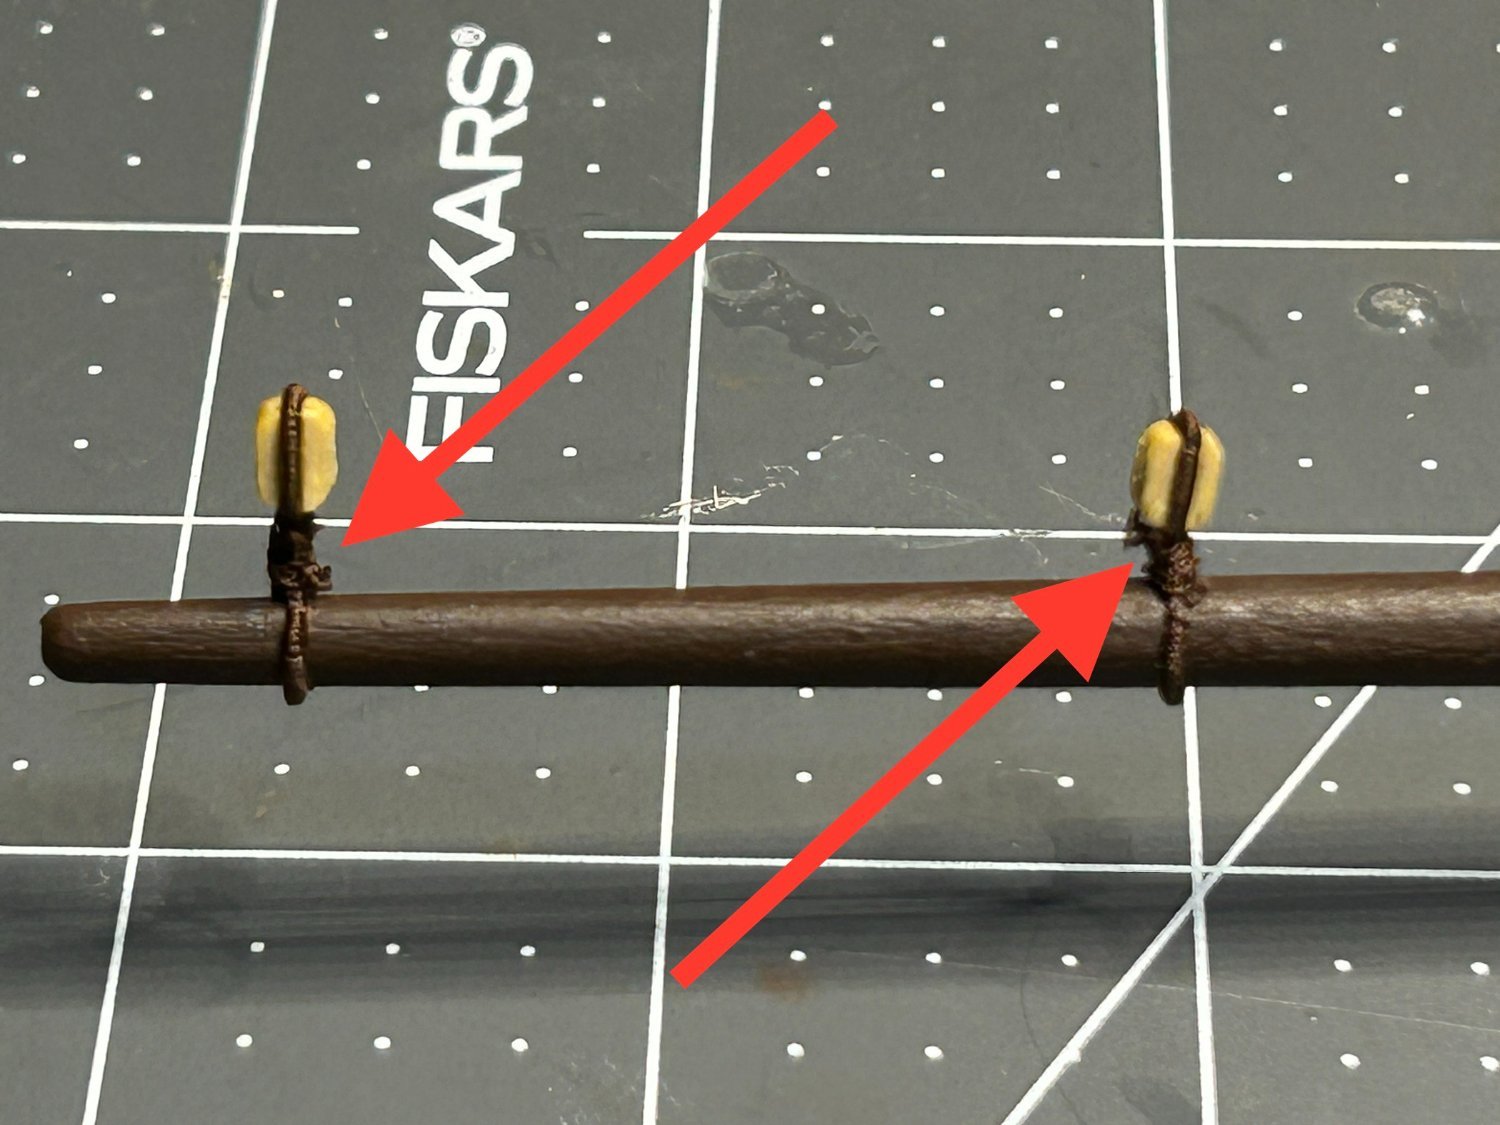
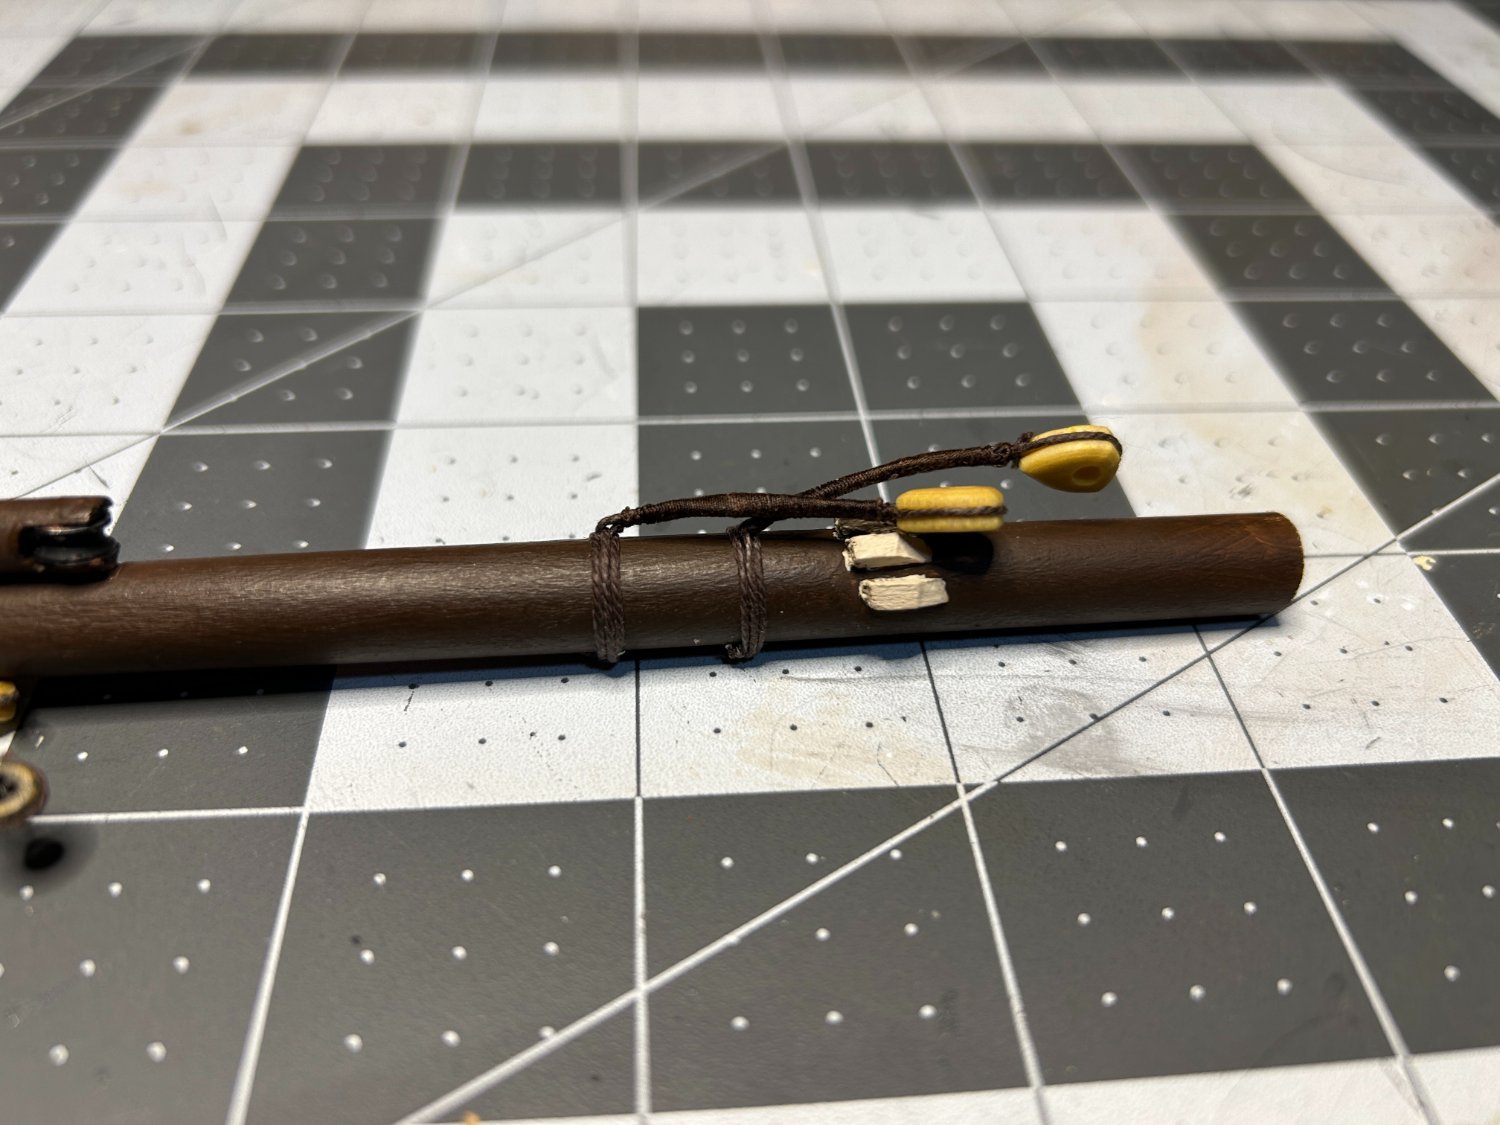
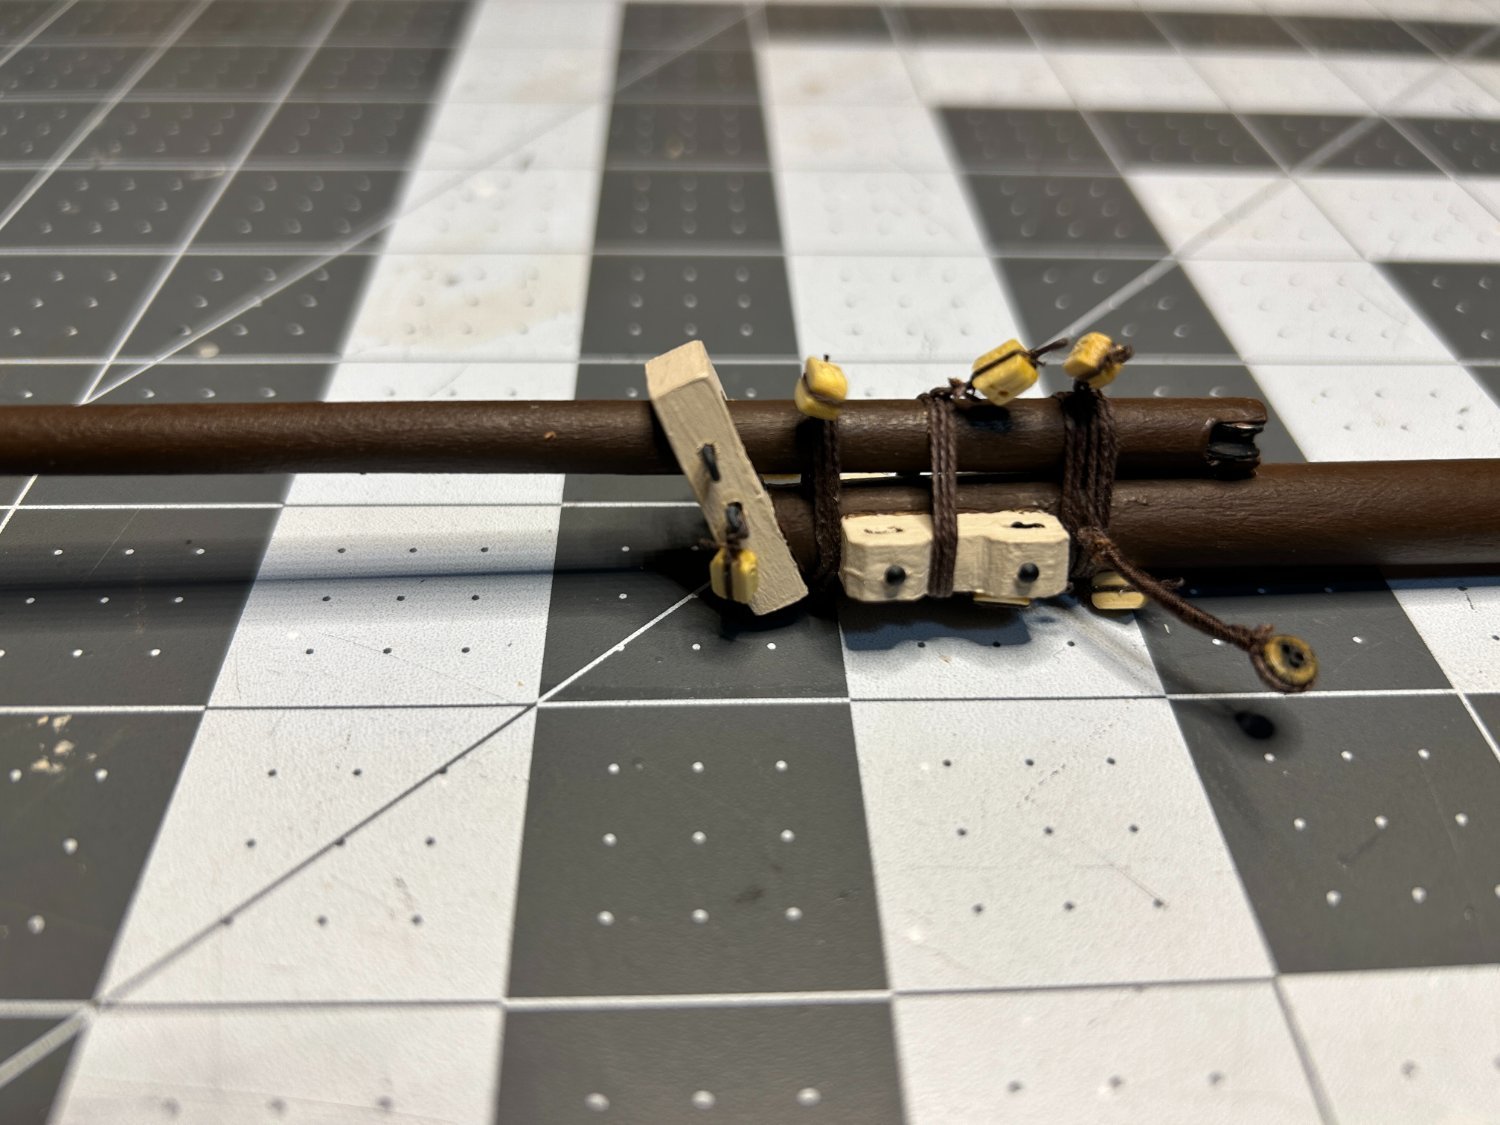
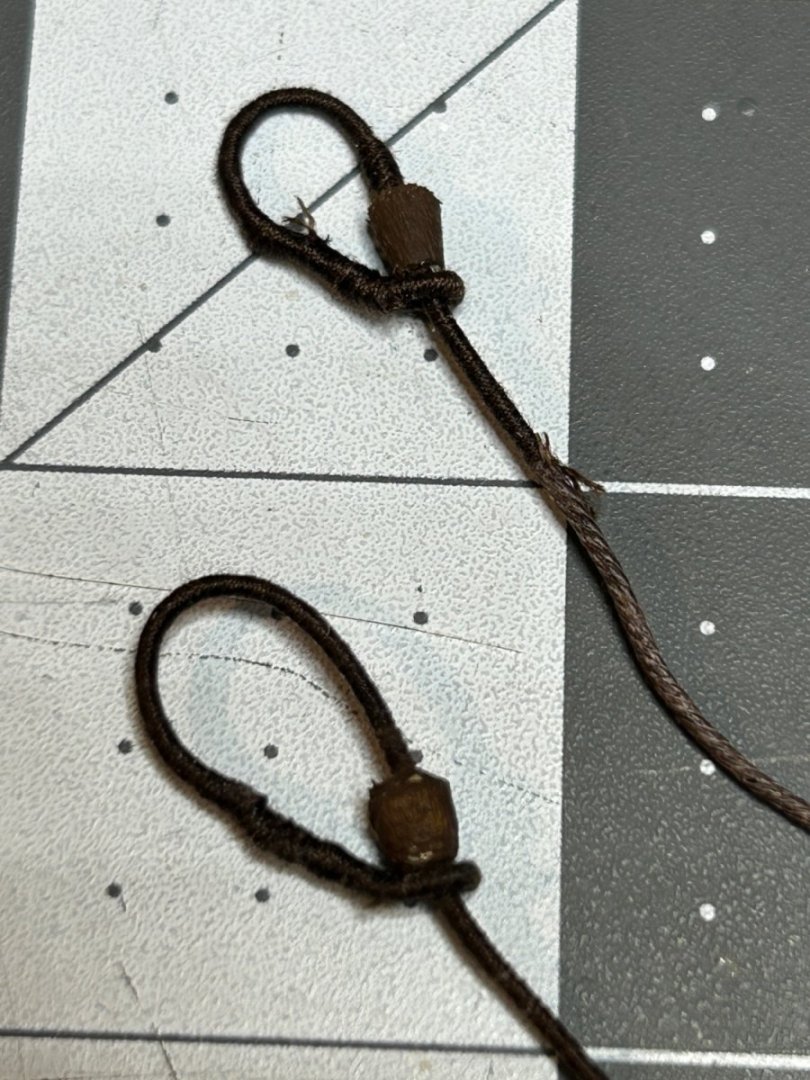
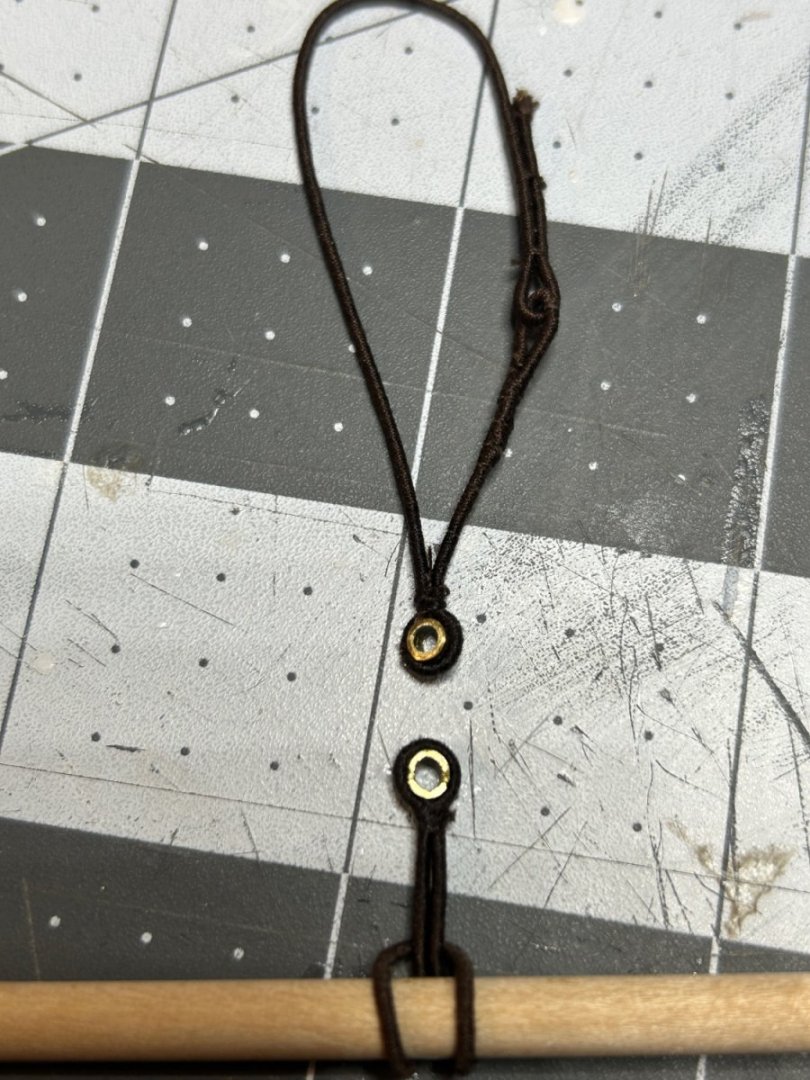
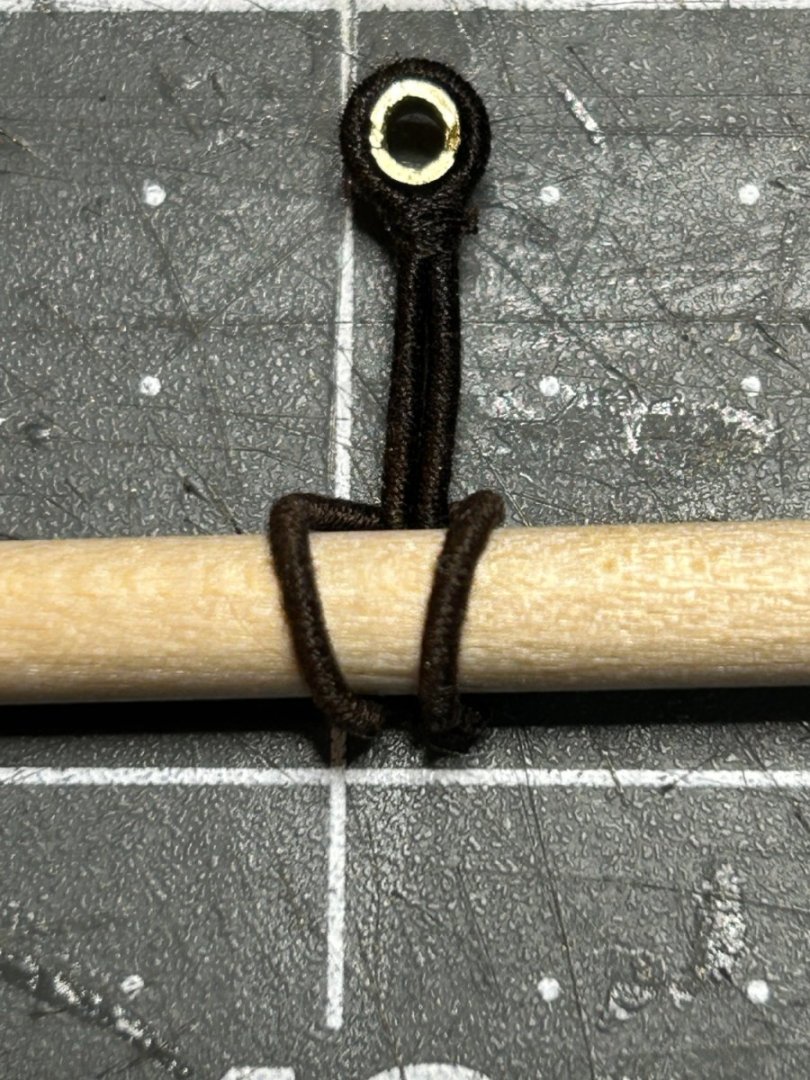
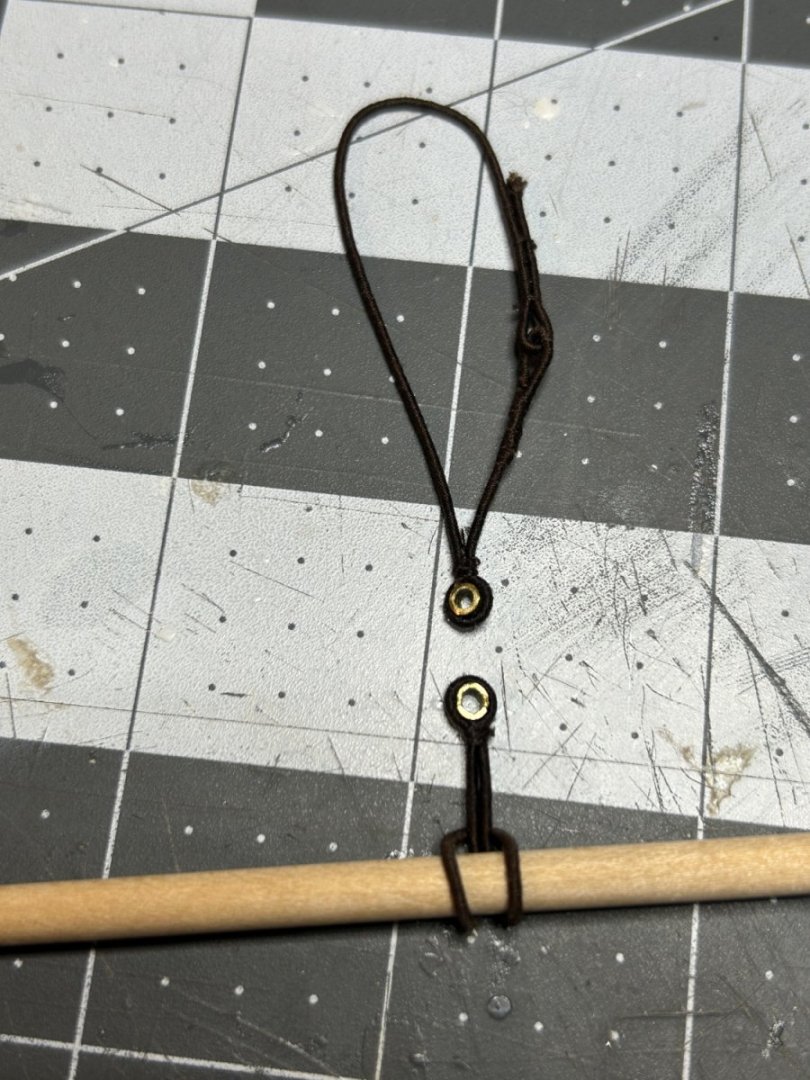
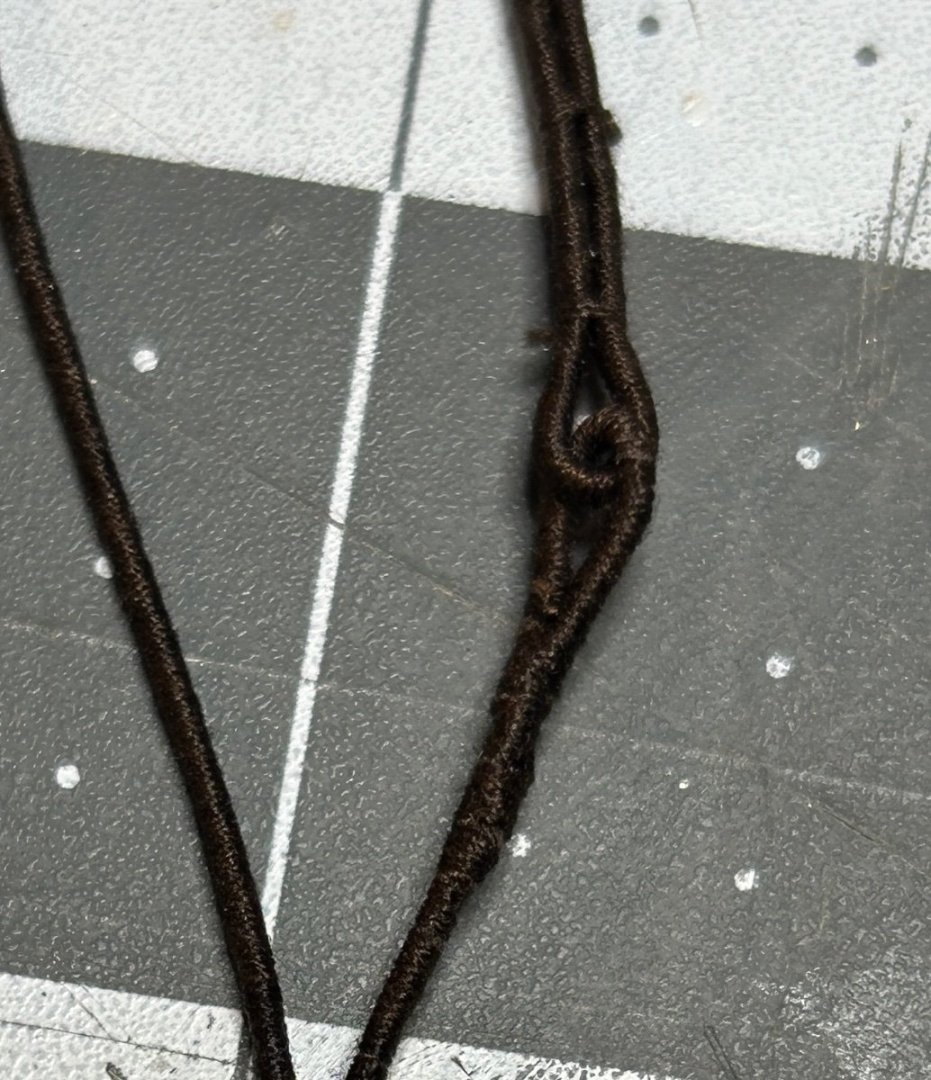
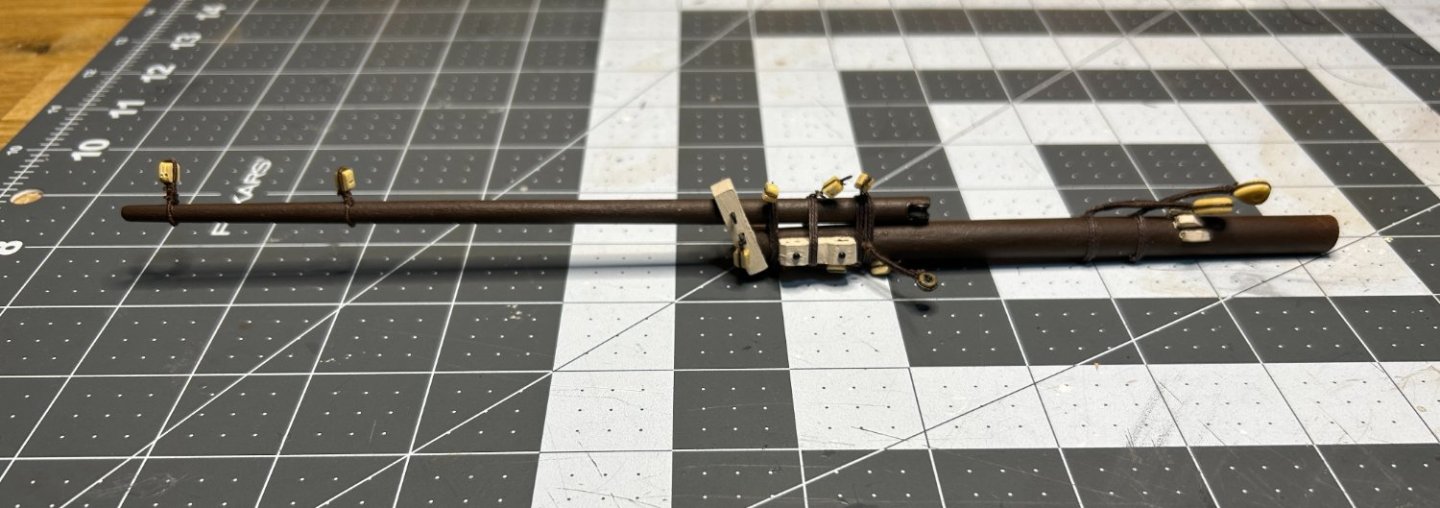
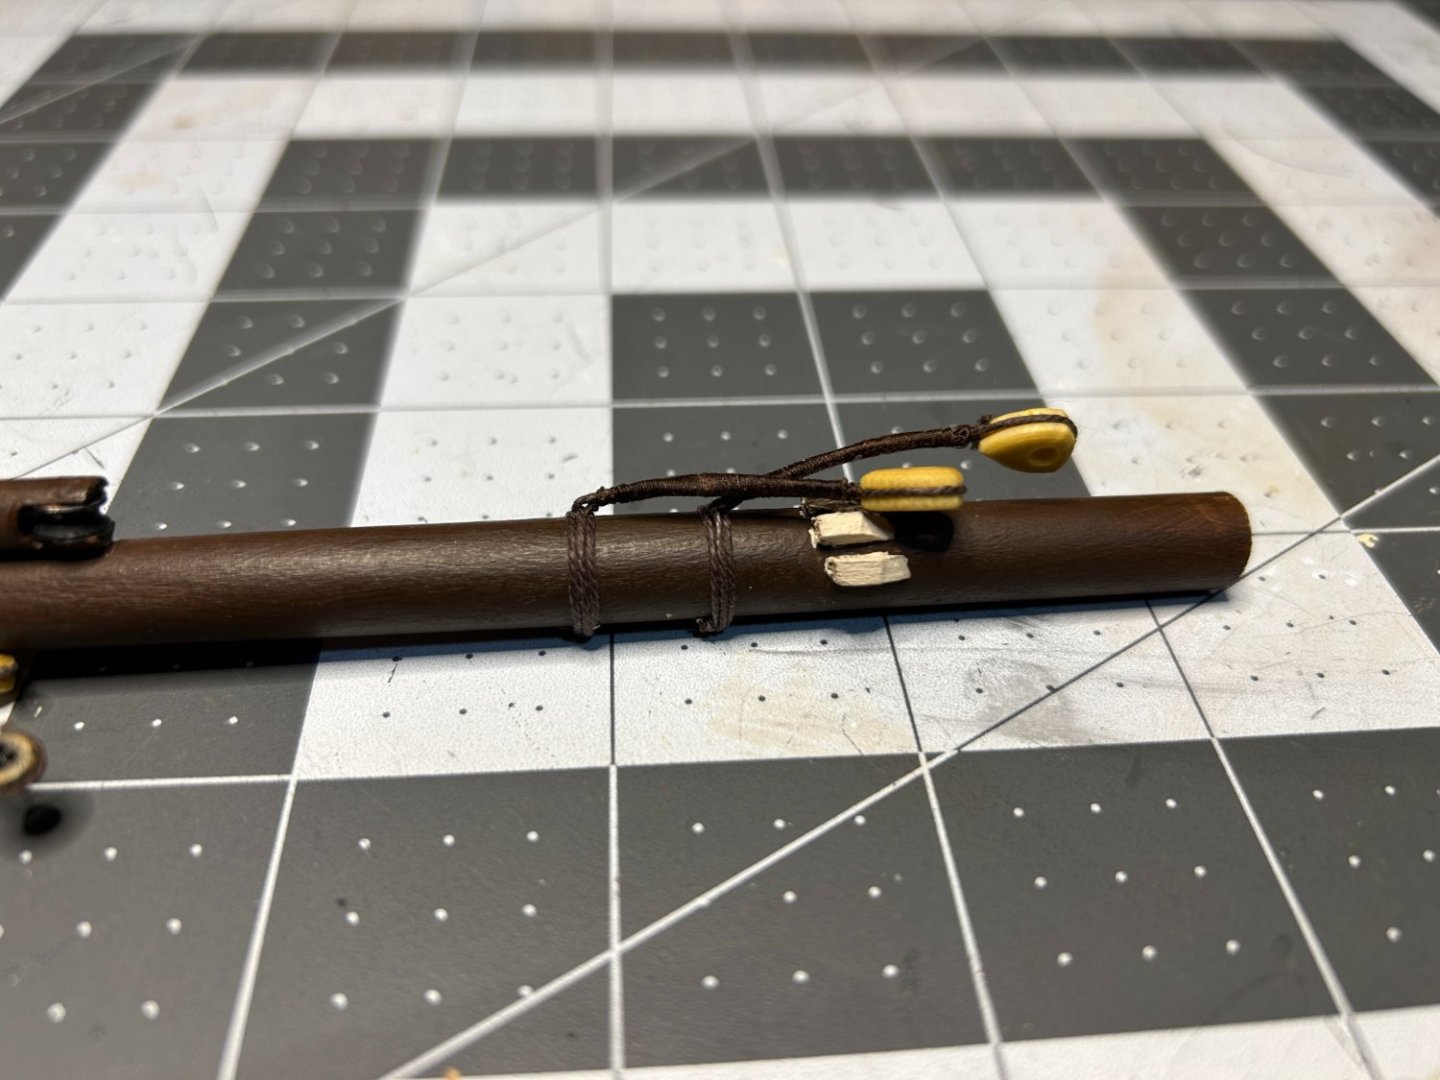
I haven’t made much progress on the ship. Fall projects and my daughter’s soccer season have kept me busy. When I have had time to get in the shipyard, I have been practicing some of the new skills I want to use in rigging the ship. Spent time practicing serving with my Serv-O-Magic and working on seizing the shrouds around the masts, putting together the slings for the yards and figuring out how I wanted to fabricate a mouse. The following pictures are of some of my practice attempts. I used the rope that came with the kit for practice. The fixed rigging on my model will use rope purchased from Syren. This is my attempt at serving the top portion of the shrouds. I will serve the entire length of the first should on each mast, the other shrouds will be served to just above the futtock stave. I need to work on cleaner knots where my serving ends, but am pretty happy with the results. next is a couple of attempts at a mouse. The loop that would wrap around the mast is too small on these attempts, but pretty happy with my progress on creating the small loop with a false splice. the mouse is build from a bit of basswood. The one on top turned out better. Again the knots need to be a little neater. Next is my attempt at a sling. The splice on the part that wraps around the yard is not very good, but I can hide it between the yard and the mast. The thimbles will be blackened on the model. overall pretty happy with my progress developing some better rigging skills.

-
Any chance you would offer it as POB and POF. At my current skill level I would be interested in POB, but I wouldn’t be up for the cost of POF. I hope you do get enough interest in the POF to move forward with the project. I think the hobby is better off with high end offerings like you are putting together. Good luck and I hope we see this model in some form soon. and following the build logs will be enjoyable and educational.
-
If POB is $275 I would guess at least $700. That is a lot of wood. I am not your target market for a kit like this since I am still relatively new to modeling, but I like that people like you are making higher end options. Maybe someday.
-
The instruction manuals for the models mentioned in the previous post can be viewed on the Model Expo web site. Great opportunity to see if you think they are as detailed as you are looking for.
-
There is a free online book available on the Modelexpo web site, How to Build First-Rate Model Ships. It has a drawing of how to cut down a regular sized sail if you are going to furl it.
-
Ships at Trafalgar - what kits are available?
RossR replied to bruce d's topic in Wood ship model kits
No model kits of French ship at Trafalgar are available? Seems like an opportunity for Syren or Vanguard. -
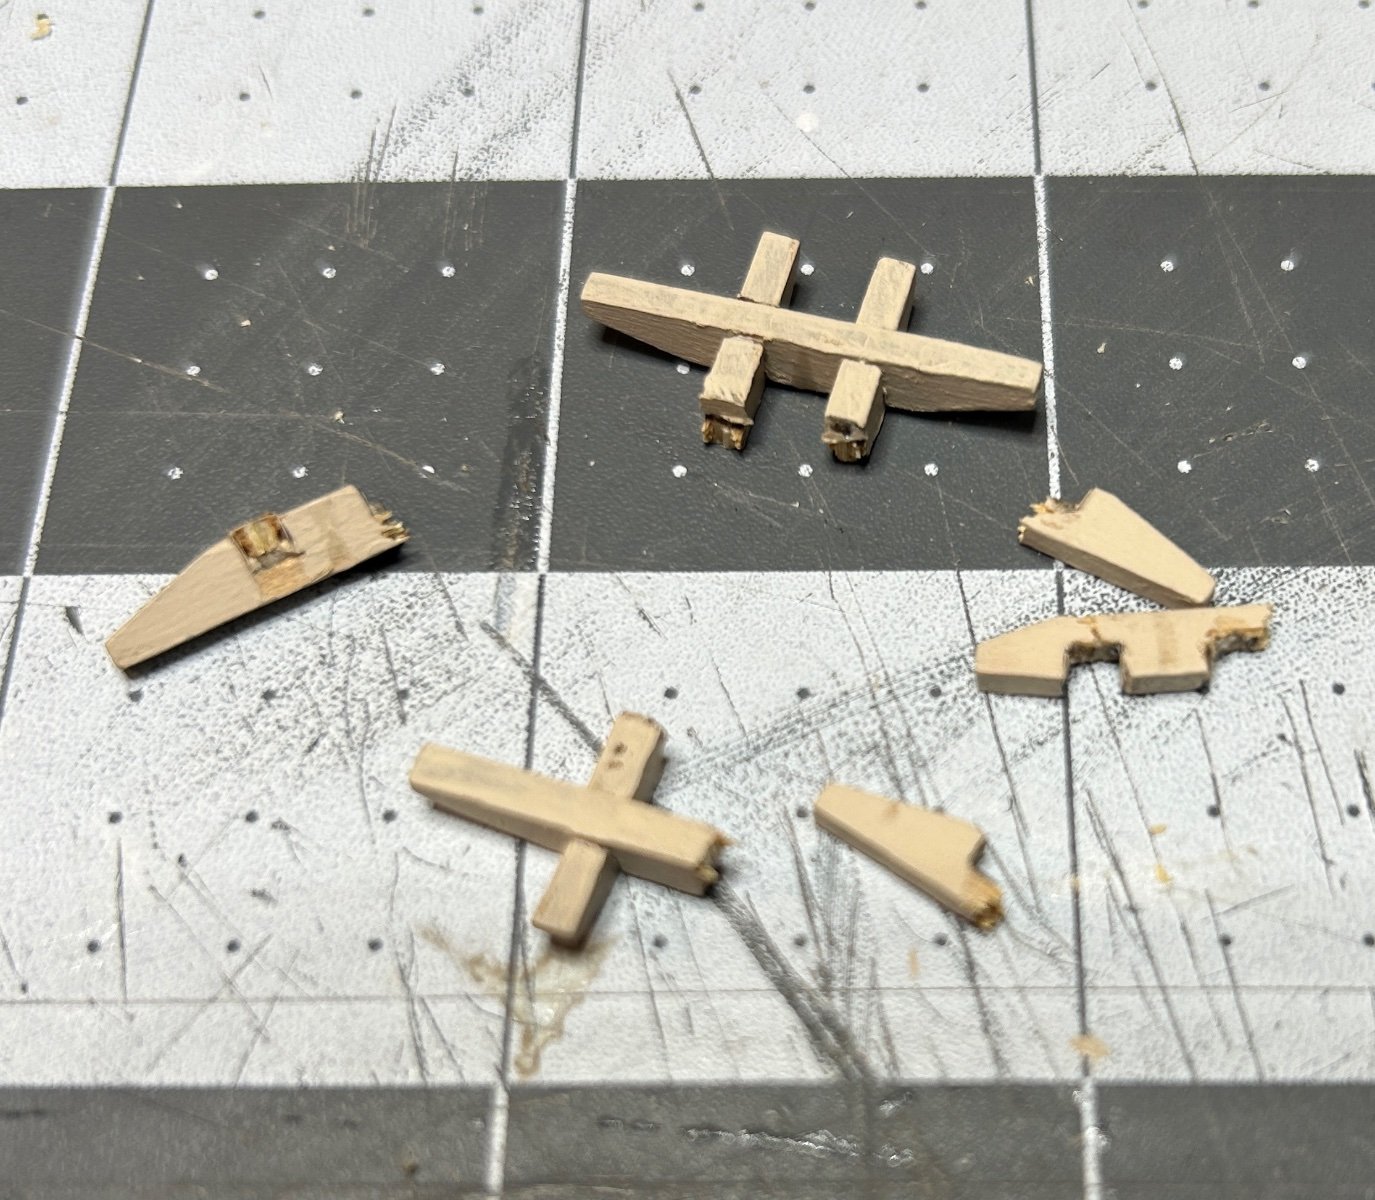
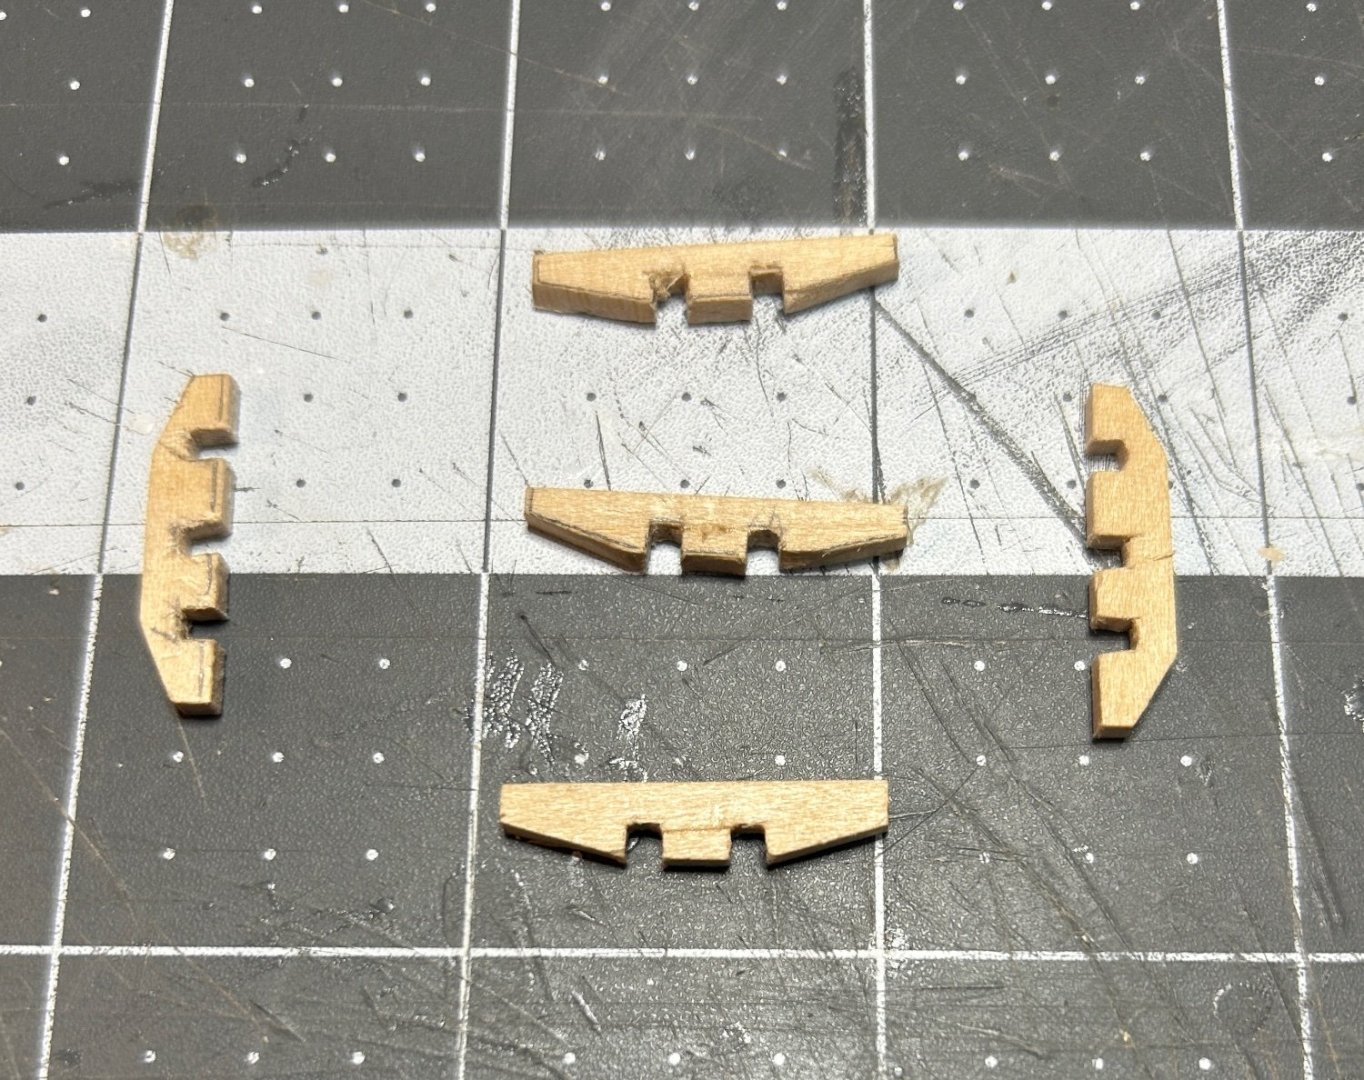
Sometimes mistakes create opportunities. I have been posting details of my build as items have been attached to the model. Sometimes I have build certain items weeks or months before I post about them. Even though I haven’t posted about it I have been busy fabricating the components of the fore mast assembly. This morning I put the final coat of paint on the cross tree for the transition from the fore top mast to the fore top gallant mast. At some point in the day I accidentally knocked the cross tree on the floor without realizing it. Later I must have rolled over it with my chair. Occre would gladly send me replacement parts, but I didn’t want to wait. So I decided this was an opportunity to fabricate a new cross tree from scratch. I used the plywood sheet that the laser cut pieces were cut from as the pattern and traced the pieces onto some 2mm x 5mm lime wood left over from the first layer of planking. I need to do a little more sanding and then paint and glue the pieces together, but I am pretty happy with the results.


- 142 replies
-
- 10
-

-
David Thank you. Your HMS Diana build has been a great resource for me. Fantastic job. A different Diana than I am building but similar era. I have a note to myself to look at your anchors when I get to that step on my build.
-
I have my bowsprit mostly assembled and have started attaching the various rigging components. I am pretty happy with how it is coming together for the most part. One area where I am not satisfied is on the jib boom. I tried to create a closed loop of served rope that would be seized to a block and the jib boom to attach the block. I struggled creating the splice. As an alternative I used a section of served rope and created an S shape with one loop of the S around the block and the other loop around the boom. I then seized the ends of each loop along with the middle section of the S between the block and the boom. I am not happy with the result. The section where the rope is seized looks clunky and not very clean. I will likely look to replace these blocks before the rigging begins. Hopefully I can get better at the splice needed to create the closed loop, or I may try using the technique illustrated on post #2111 and #2113 of Archjofo's build log for his La Creole French Corvette. His rigging is stunning. I doubt I will ever produce results as good, but his work provides something to strive for.


-
If planking your model the way an actual ship was planked is not the most important thing to you on a first model, consider looking at Occre. I built their HMS Beagle as my first model and am happy with the results. They may not be the most historically accurate models when it comes down to the finer details, but they can be built with minimal tools and no prior experience. For the Beagle and I think the Polaris, they have a series of about 100 short YouTube videos to help step by step. If planking in the historically correct way is a goal on your first model I would go with something other than Occre. Good luck.
-
I am not sure if it can be accessed from a mobile device. May require a laptop. I also think there is a minimum number of posts required before you can edit the signature. 10 or 25 I think.
-
I am not always a fan of tree nails, but the ones on your deck are very good. I like how subtle they are. Looking forward to seeing the rest of your build.
-
Great work on the bow. I struggled with that on mine. Yours looks fantastic. I remember being short on one size of wood on my Beagle, I think it was the 2x4 mm sapelli and Occre sent more no questions asked. I made a mistake on my Diana and they even replaced those parts. It does take 2-3 weeks to get the replacement/missing items shipped from Spain to the US, so be ready for the wait if you are in the US.
-
I received my Half Hull kit last week. I have about a year before I finish my current build, then I will start the Half Hull. Looking forward to following your build in the meantime. Good luck.
-
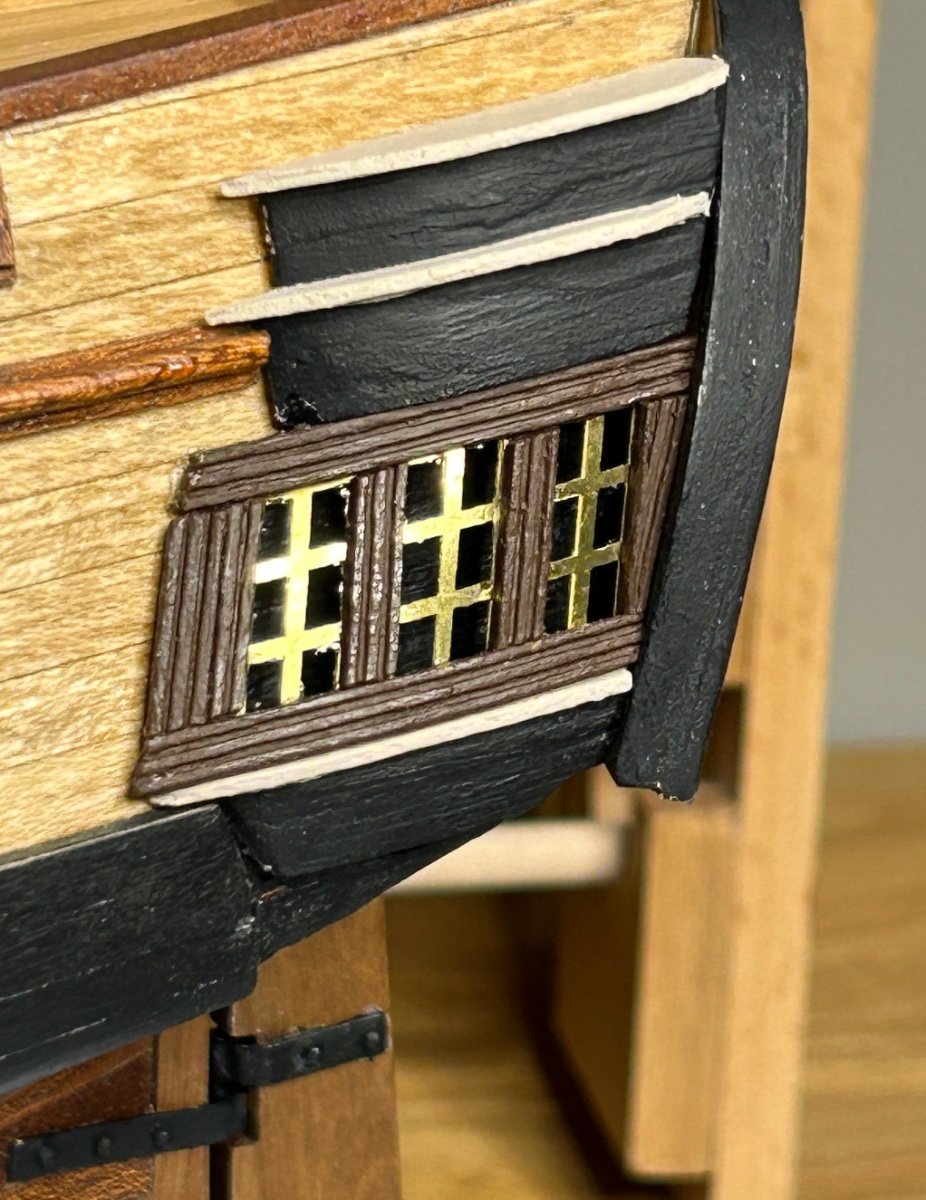
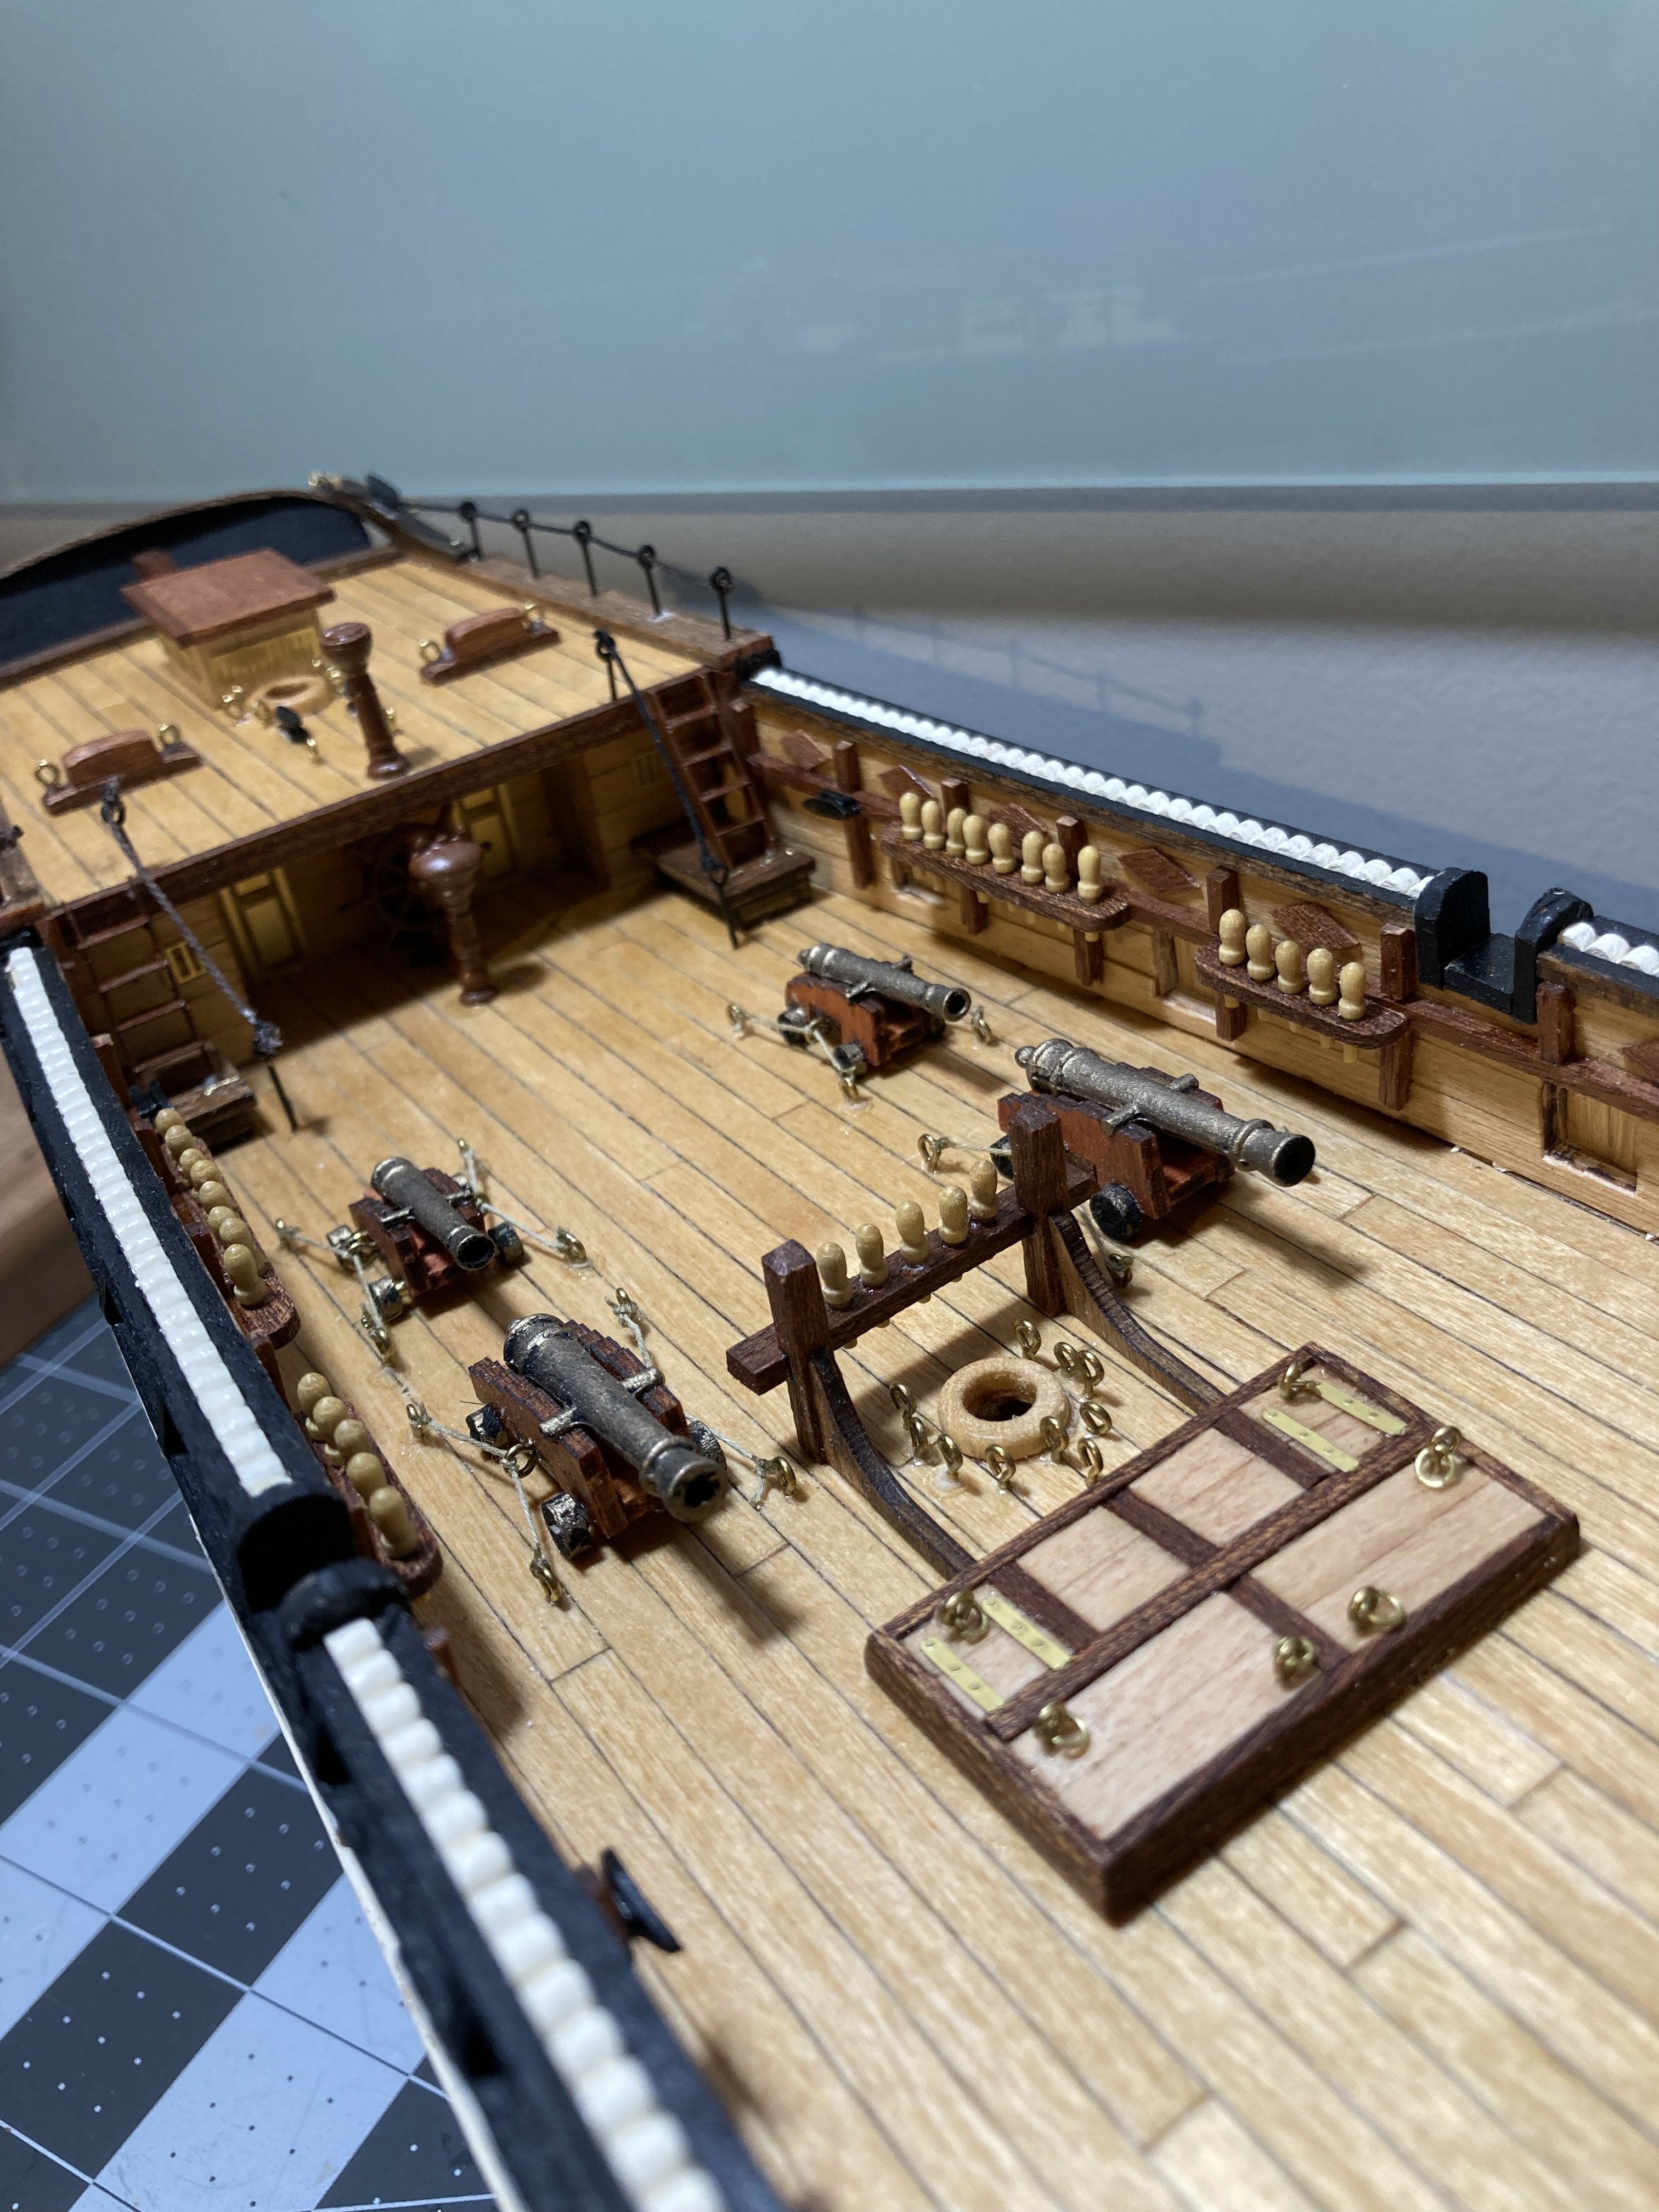
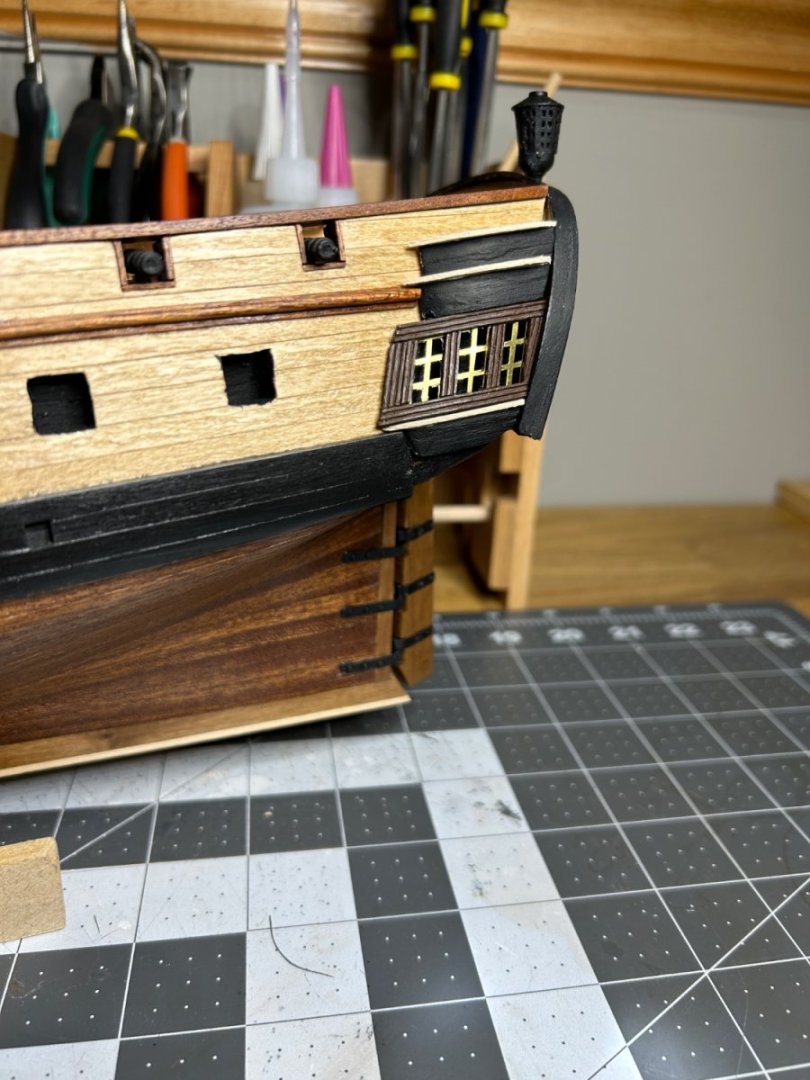
Here is my attempt at scratch building the gallery. I did use the brass provided by the kit for the dividers between the pains of glass.

-
It has been awhile since my last update. I haven’t had much time in the shipyard lately. My daughter’s soccer season has keep us busy. I did have some time to start fabricating the galleries from scratch. I didn’t like the way the kit provided pieces fit. I built these new upper and bottom pieces by cutting pieces out of some thin basswood and glueing them together. A little filing and sanding and I am getting close. Hopefully I can finest these up in the next few days.
-
Looks good. I like the drop plank below the wale. looking forward to seeing the rest of the planking.
-
Hard to believe you did all of this in a little over 3 months. Fantastic job.
-
Planking Book?
RossR replied to BWDChris's topic in Building, Framing, Planking and plating a ships hull and deck
Just ordered it myself. -
Planking Book?
RossR replied to BWDChris's topic in Building, Framing, Planking and plating a ships hull and deck
I am a fan of Occre. Building my second Occre ship right now. They are a great way to get started in the hobby, but they are not designed to be planked in the traditional way. The second layer of planking on the Occre models is very thin (about 0.5 mm). The bending or spiling that would traditionally be done really doesn't work with that material, and the bulkhead former (piece that the bulkheads attach to that runs the length of the ship) is not designed to have a rabbet cut into it. If you want to have fun building something and end up with something that looks good on your shelf, Occre is a great way to go. They have video series for some of their models and I would watch them and plank the model according to their instructions if you go with Occre even though it is not the traditional way to plank. If you really want to learn "the right way" to plank a ship, consider Allen's advice or maybe the half hull project from the NRG. I will be tackling that before building my US Brig Syren model that I have on the shelf. I would have failed at planking a ship in the traditional way on my first ship, but that's me. I get a little impatient. I have seen some first time modelers do a great job of planking on their first ship on MSW. Good luck. -
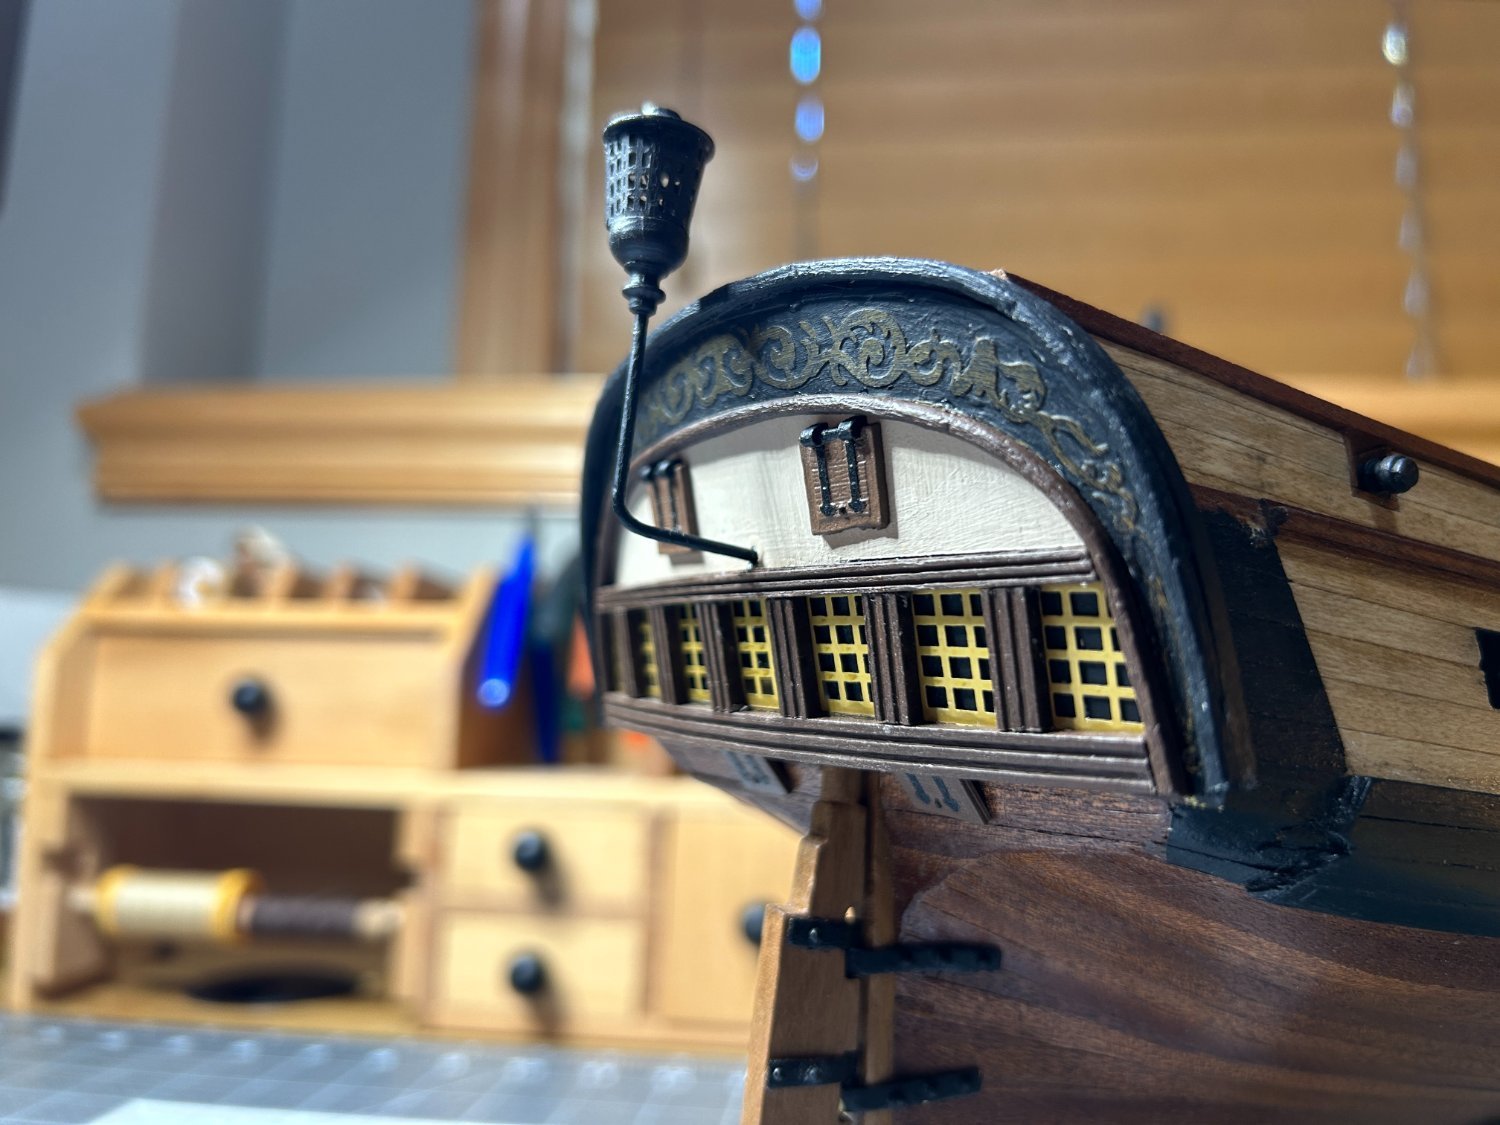
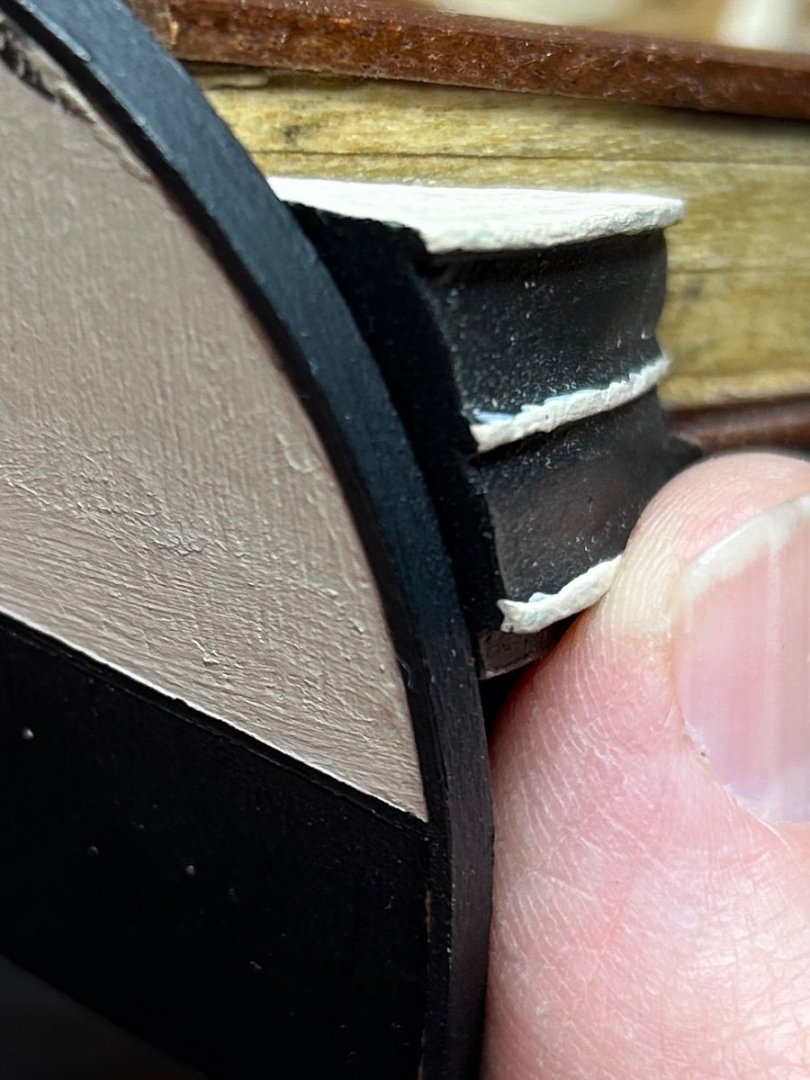
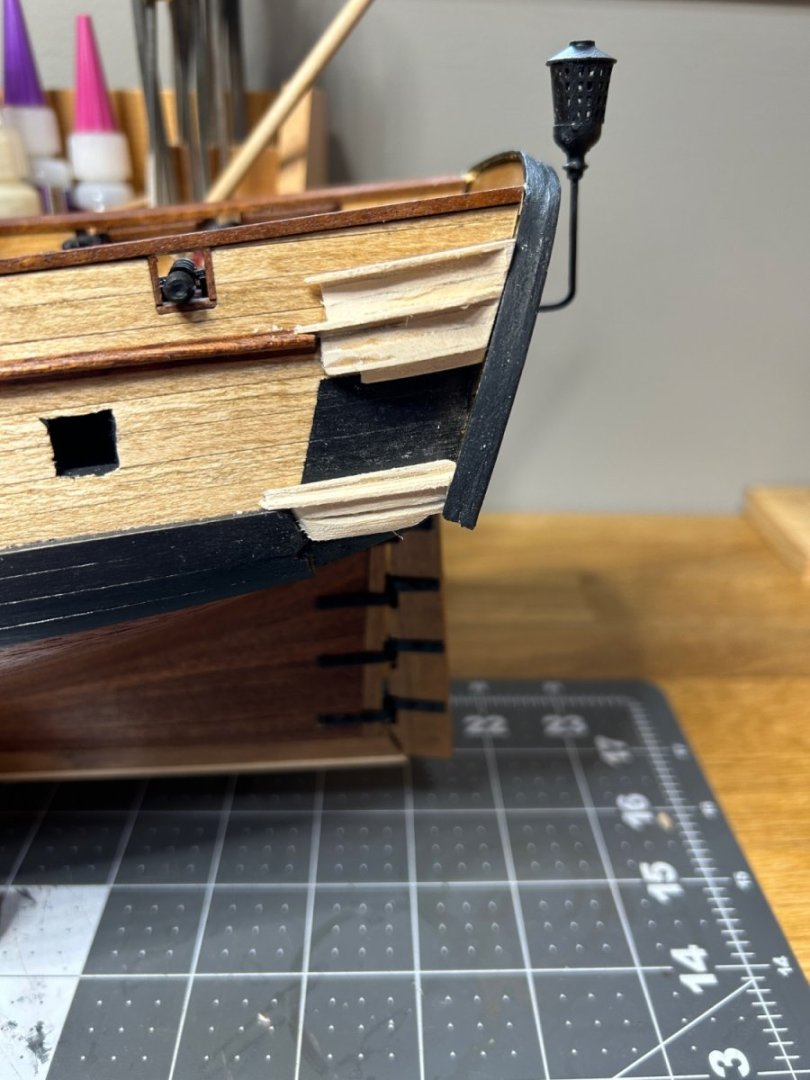
I spent quite a bit of time in the shipyard the last week. I finally finished putting together my Serv-O-Matic and started fooling around with that a little bit. I also started working on the chain plate. I don't care for the single brass wire that the kit came with for chain plate. I am going to use the instructions from my US Brig Syren that I have on the shelf as the basis for the chain plate on this model. I need to work out exactly how long the various components will be, but I started putting together some jigs for making various length components. I will be using dark annealed wire. Most of my time was spent working on the stern. The kit came with a large decorative piece of photo etched brass for the stern. I didn't like the look of that much brass on the ship. I decided to use some left over planking materials and the scrappers I purchased from Artesania Latina to make some trim for the lights on the stern. I added two other pieces of trim above and below the decorative scroll design on the photo etched brass piece. I still need to fill in a gap between the two trim pieces on the top, and touch up the paint after that. I am very happy with how this turned out. The bottom piece of trim is made 2mm x 5mm piece of basswood. To get that piece to match to curve of the stern I needed to pre-bend the piece. In the past I have struggled to successfully bend planks using heat. I think I haven't been patient enough. I didn't want to soak these because I thought it would distort the the grooves that I carved into the piece. I decided I needed to give using heat another try. I used a wood burning tool of my daughter's as the head source and took my time. I was able to match the curve of the stern without soaking the piece. I think this will give me confidence to start using heat more for bending planks. I will be continuing to work on the chain plate and finishing up the bowsprit in the next couple of weeks. I will also need to make some decisions on the gallery lights on the sides of the ship. I may attempt to build these from scratch instead of using the metal components that came with the kit. The way the stern has turned out gives me a little confidence in trying to build something myself.


-
I assume the second hole is to allow a second anchor on either side is the ship, but that is just a guess. Your workmanship is really impressive for your first build.