.jpeg.882f0a147f14858c9e673da7e13d8ebe.jpeg)
RossR
-
Posts
535 -
Joined
-
Last visited
Content Type
Profiles
Forums
Gallery
Events
Everything posted by RossR
-
.thumb.jpeg.ffac2f8a24d212961a83eab4efb06a6c.jpeg) I agree. I remember having a lot left. Any that you use going forward you will probably drill a hole and glue the nail in place. You won’t use them for the deck at all. Just glue for the deck.
I agree. I remember having a lot left. Any that you use going forward you will probably drill a hole and glue the nail in place. You won’t use them for the deck at all. Just glue for the deck. -
With your hull complete, what requires nails? Don't be intimidated. based on your progress so far, I think you will be happy with your results. I also build this kit as my first model and loved every minute of the build. I found the ships boats to be the hardest part, but based on your planking you should do fine.
-
Have you found the youtube videos that Occre produced for this kit?
-
Excited to see so many build logs for this kit right now. I have this one on the shelf and I am follow all of these closely.
- 16 replies
-
- 2
-

-
- half hull
- Half Hull Planking Project
- (and 2 more)
-
I like what you’re doing with your approach. I am taking a similar approach on my current build.
-
This was my first ship also. Have you been watching Occre’s YouTube videos on building this ship?
-
Very nicely done. I have this kit on the shelf and I am looking forward to getting started. Have you thought about how you will cut the slots for the bulkheads deeper yet?
- 82 replies
-
- 1
-
-
- half hull planking project
- half hull
- (and 2 more)
-
Hello from Duluth, Minnesota - and request for direction.
RossR replied to Joseph Lapp's topic in New member Introductions
Welcome. Nice to have another member from Minnesota. -
Contact cement would not be a good choice for gluing planks to bulkheads. It can be useful if applying a second layer of planking when 100% of the surface has contact with first layer. Occre suggests it for their double planked models, and it works well with the extremely thin second layer they provide. I am not sure I would use it with thicker material.
-
Have you decided if you will cut the planks out of a larger sheet like on this project or if you will edge bend thinner planks use a technique like the one Chuck has demonstrated? I have both the NRG kit and the Syren model on the shelf, so I will be curious which way you go.
-
What are you doing to prep the material before you blacken it? I have had good luck with a long soak in alcohol (I usually leave it in overnght) then a 20 minute soak in white vinegar after a rinse in distilled water I put it into the Brass Black solution. Then another rinse in distilled water. Sometimes the finish isn't very smooth, but you can buff it with a soft cloth. Also, how do you like your Veritas chisels? I just puchased them a week or so ago.
-
Great looking model. I can't wait to see what you build next.
- 233 replies
-
- 3
-

-
-
- Indefatigable
- Vanguard Models
- (and 1 more)
-
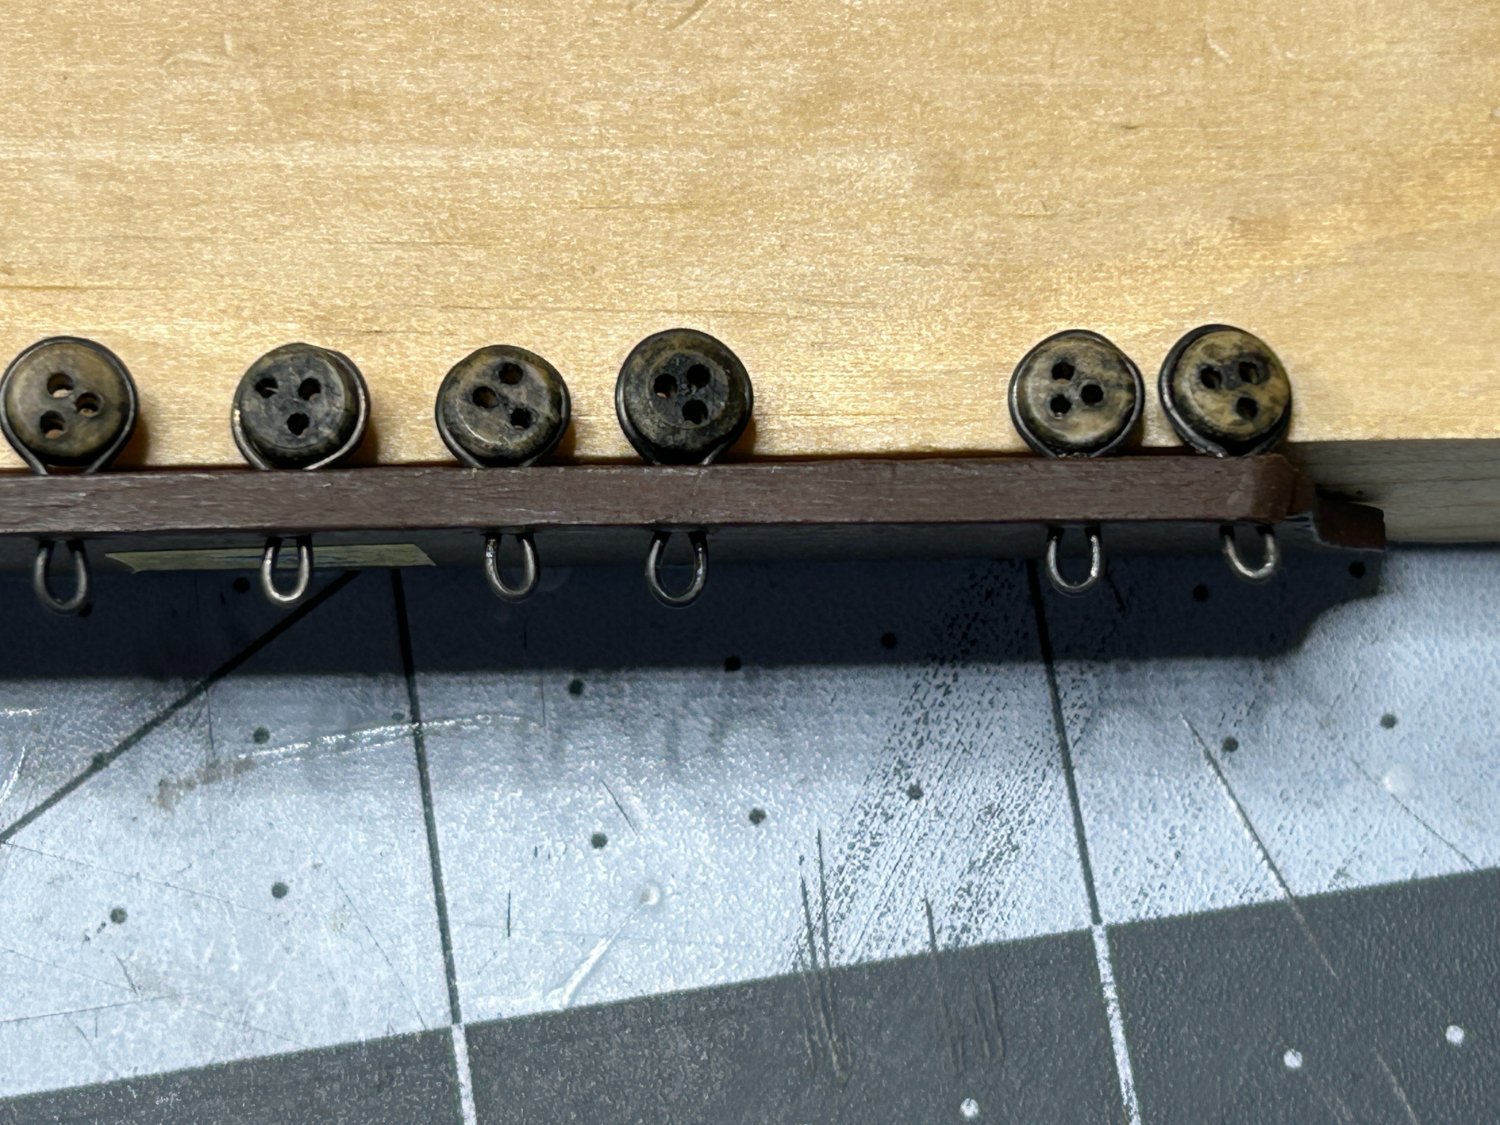
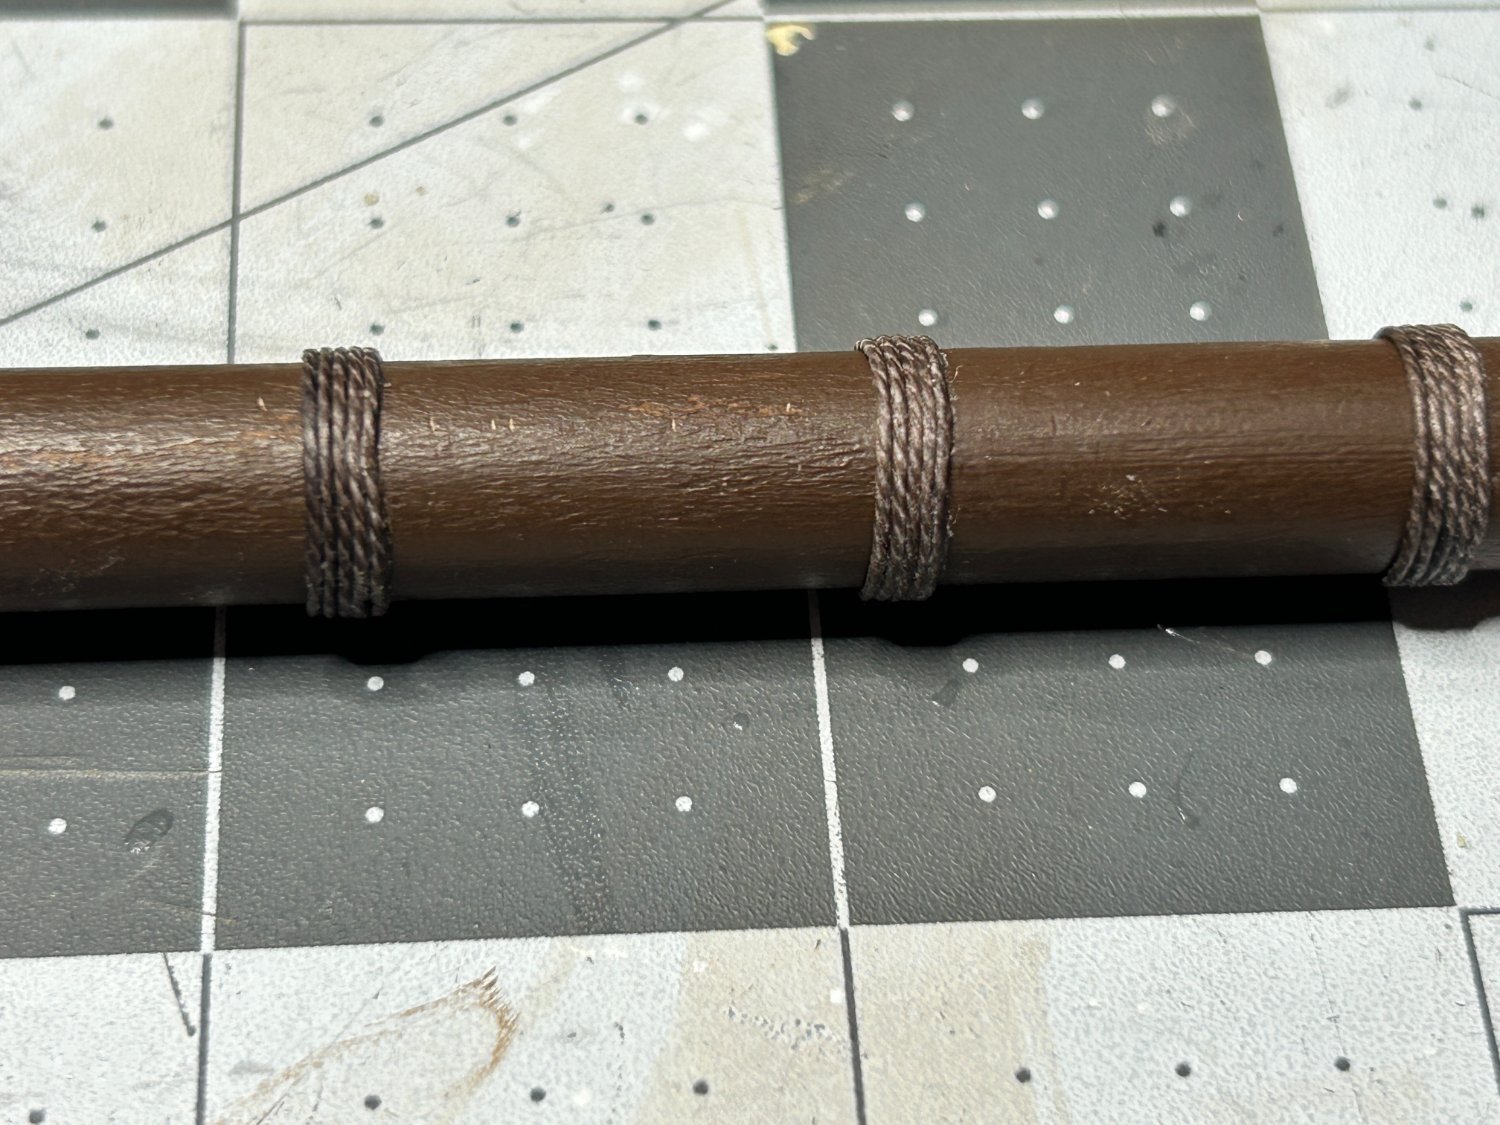
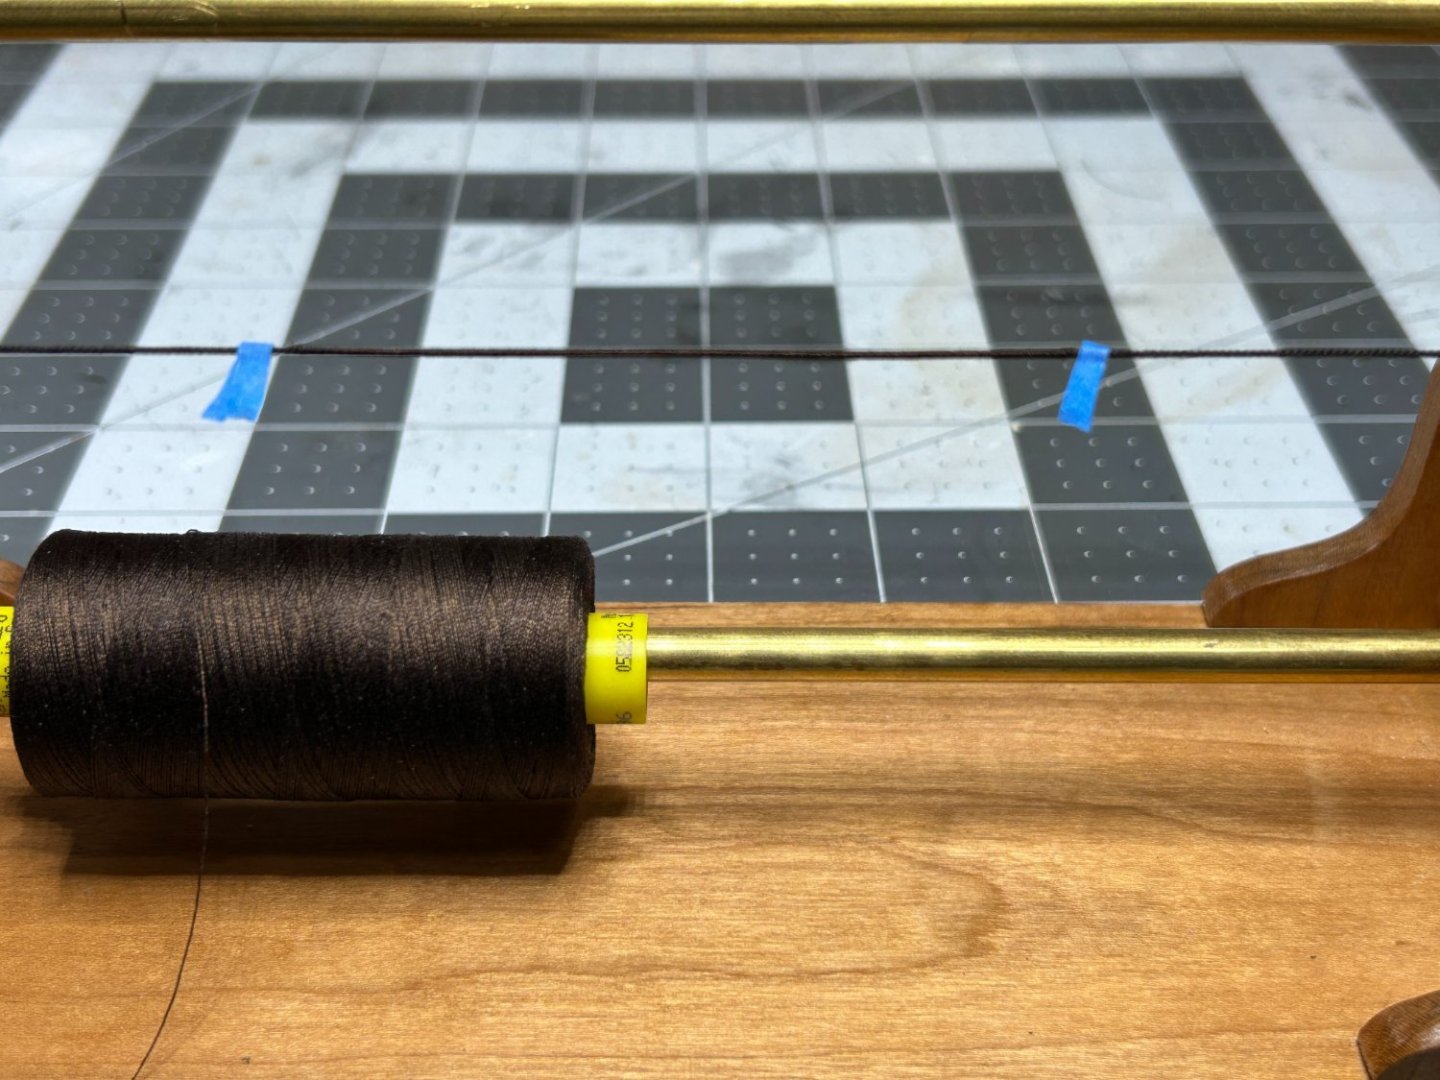
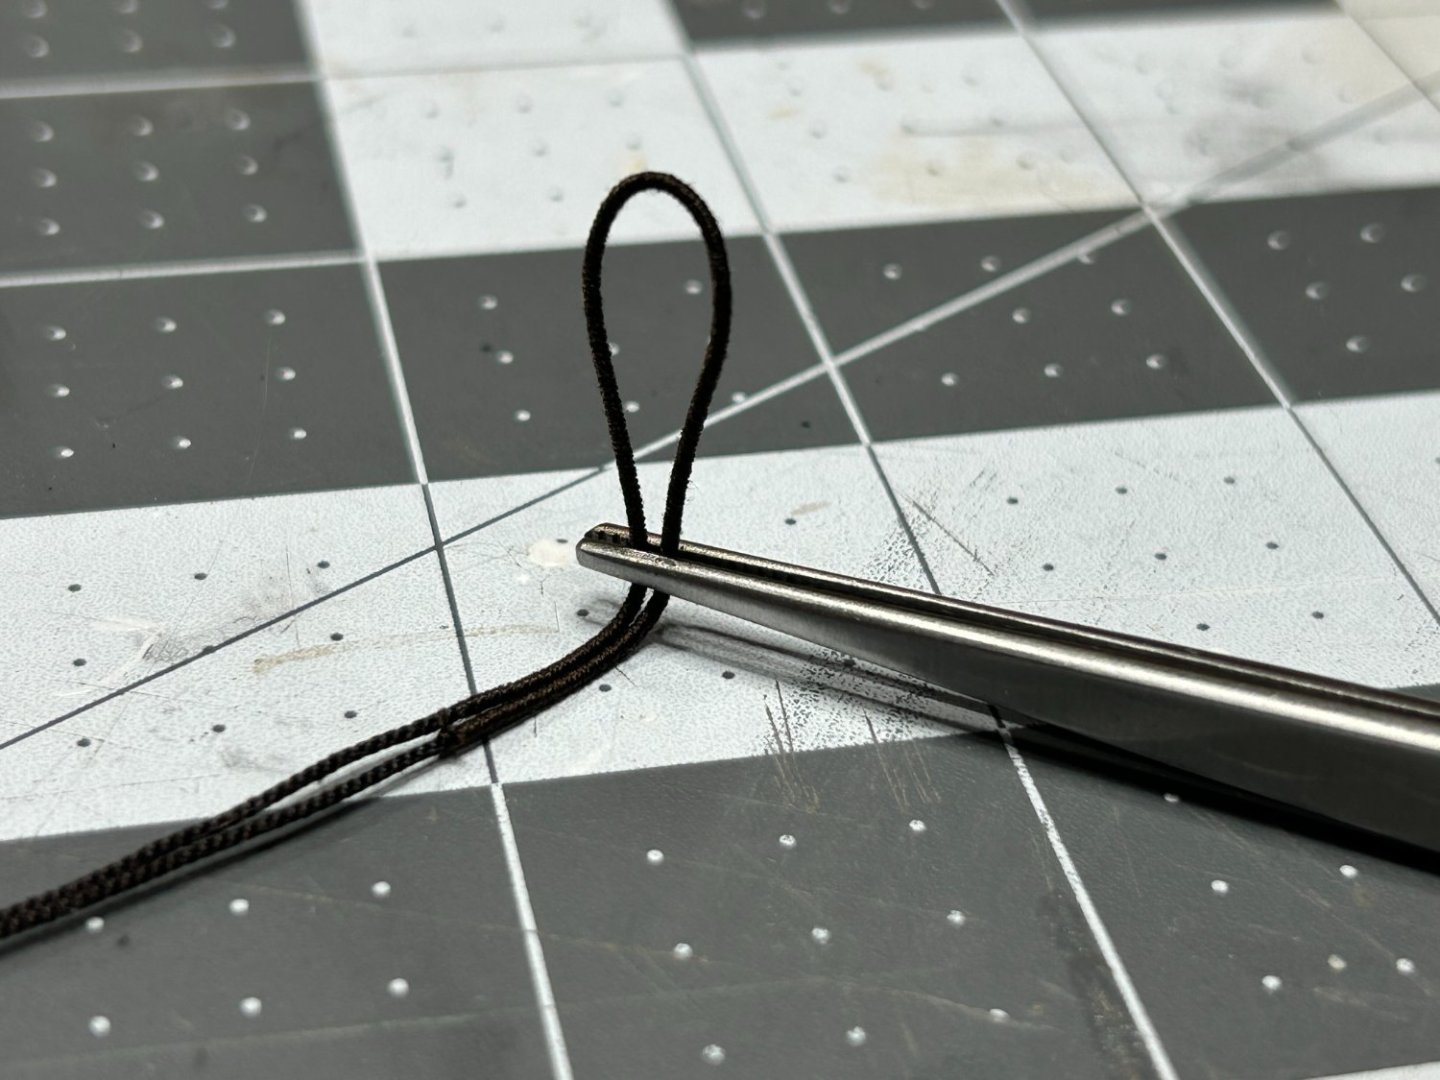
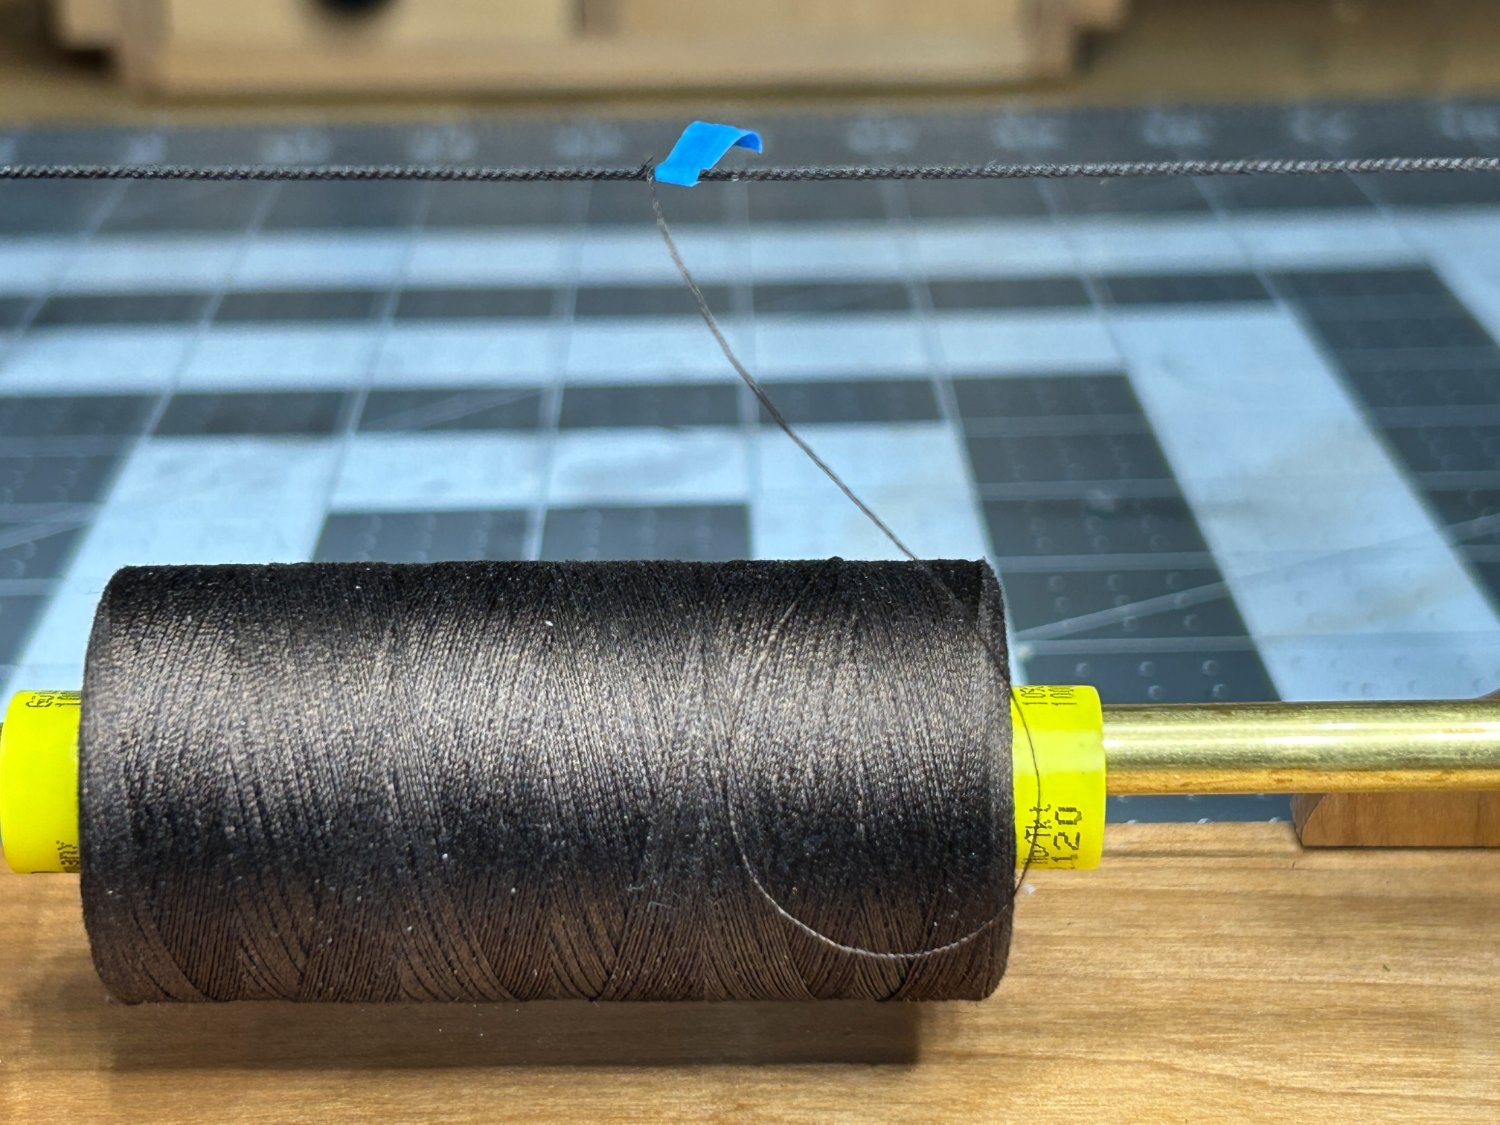
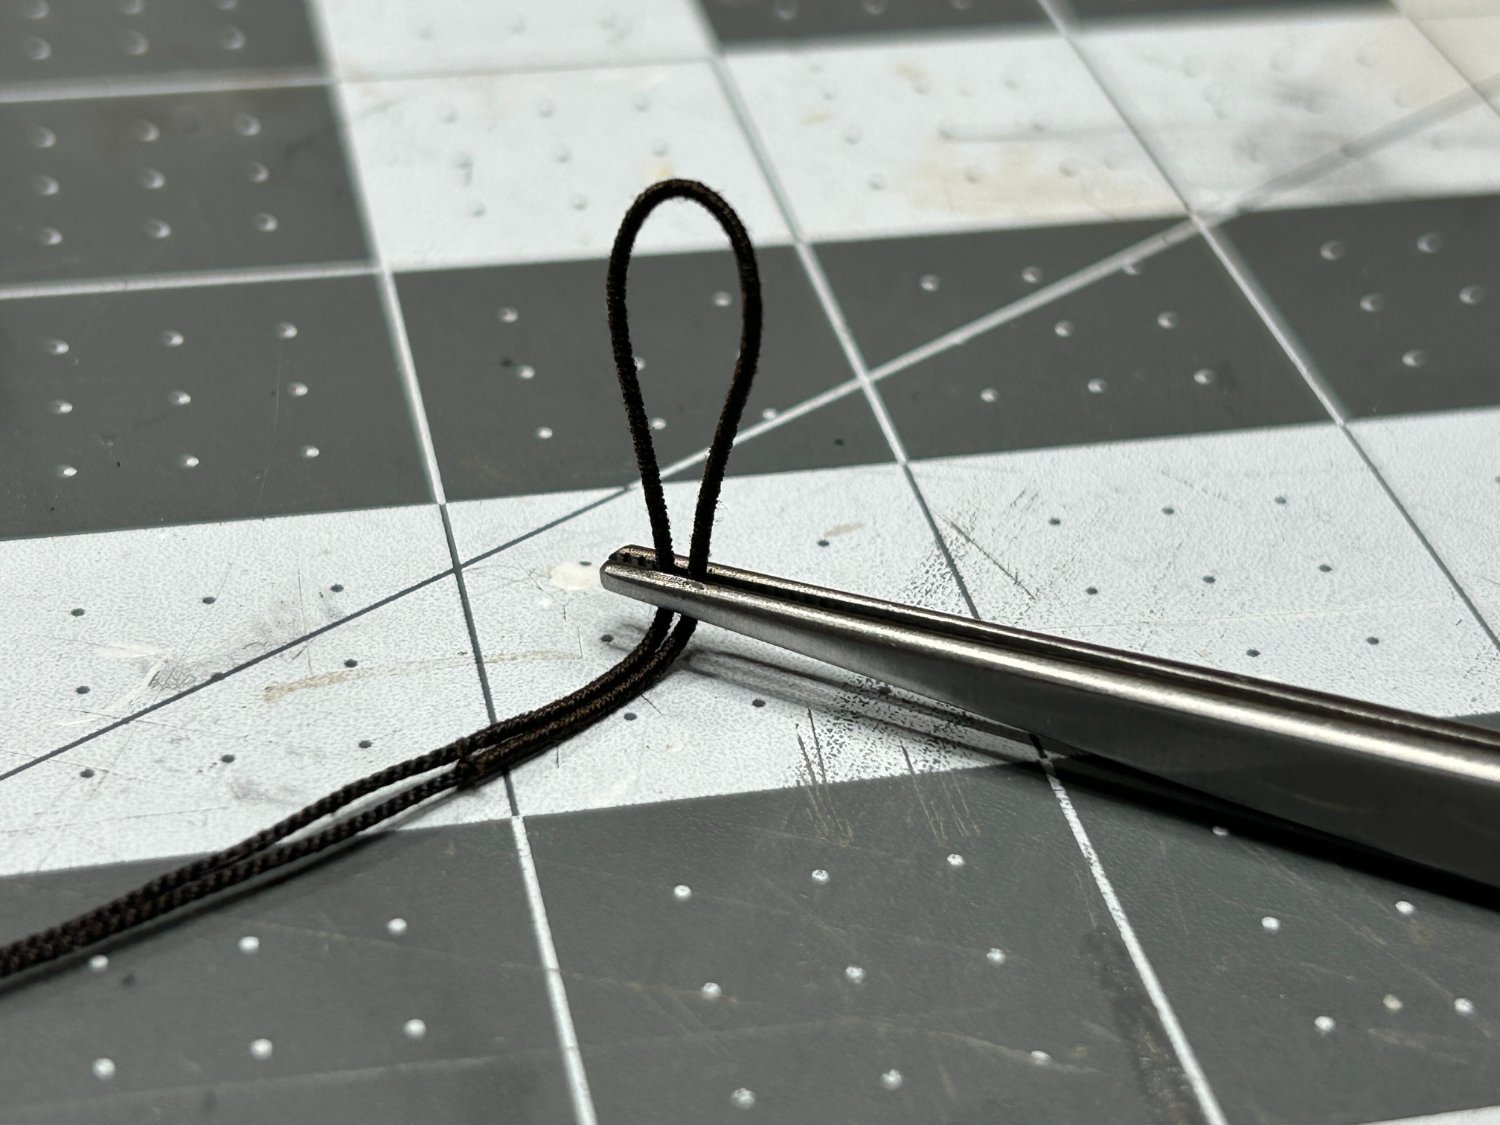
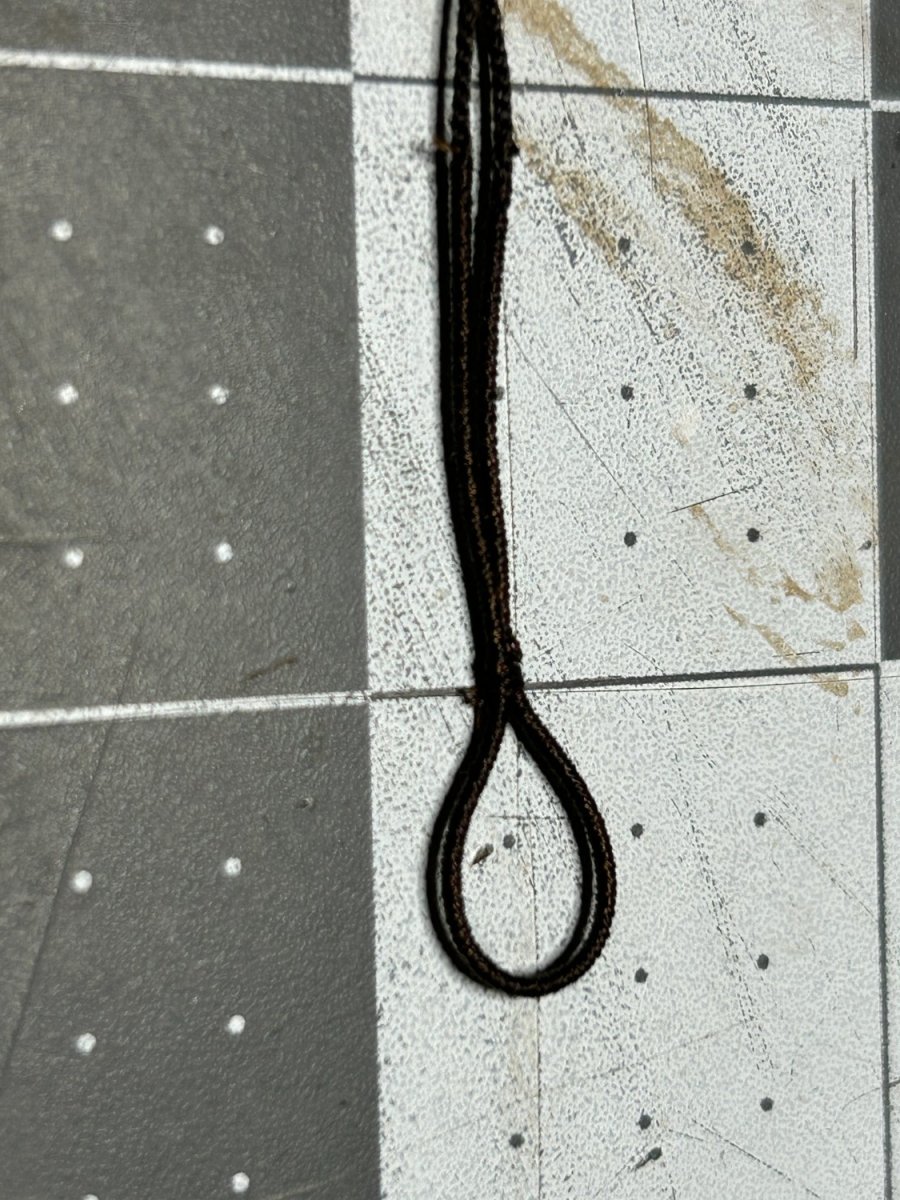
As I expected my progress has slowed a little bit. I did find some time on New Year's Day to make some progress. I was able to get the channels installed and the chain plate attached to the hull. There were a lot of conflicts with the gun ports, so I had to make adjustments to the standard arrangement on a number of deadeyes. I have seen the advice on the forum that you should judge your work from a distance of 24 - 30 inches since that is how close most people will be to your model when they view it. I think that is how I need to judge the chain plate. I am happy with the result, but from a couple feet away it looks more realistic than when you are zoomed in this close. I then started getting the main shrouds ready. I have a total of 9 shrouds on each side, so like on the foremast I will add the single shroud first. That one is served for the entire length of the shroud. Does anyone know why the first shroud was served the entire lenghth? The remaining shrouds will be served to just above the futtock stave. As I have mentioned in previous posts, I am using the Syren Serv-O-Matic. I am getting a little better at serving on this group of shrouds compared the ones on the fore mast. I start by placing two small peices of tape on the line to mark the portion that needs to be served. for this ship I am serving 2.75 inches. I use a needle to pass the serving line through the line being served and tie it off. After I get the 2.75 inches served I use the needle again to pass the serving line through the line and tie it off. I then create a small loop slightly bigger than the mast it will be placed on and seize the loop closed. I use a series of overhand knots on alternating sides of the line to simulate the seizing. When I was ready to start using the Serv-O-Matic I reached out to Chuck to ask for a recommendation on the type of thread to use for the serving. I didn't ask for a recommendation on the color. I think I ended up choosing a color that is identical to the color used on the rope I purchased from Syren. That may be a realistic look (I assume the line and the serving are coated with the same material), but at 1/85 scale it is a little difficult to see that the line is served unless you are really close. I think on my next ship I will make sure I have a slightly lighter or darker color just to make the serving a little more visable. After placing the shrouds over the mast, I am very happy with the way this turned out. I will need to make sure that I keep the lines nice and neat at the mast as I start connecting the deadeys. I feel that I have improved at my knots on the serving and the seizing. Next I will add the top mast and the topmast shrouds. I should have a little time this weekend, so hopefully I can post about it after later next week.


.thumb.jpg.af8455cbcb07938bd09ac1c630806641.jpg)
- 142 replies
-
- 12
-
-

-
Really excited to see someone building one of Occre’s trains or streetcars. The amount of detail on these models looks fantastic. I suspect a lot of the passion at Occre is about this subject matter.
-
Excited to follow along.
-
“A little progress”. I would say that is more than a little progress in less than 2 weeks. Looks great. Can’t wait to follow your build.
- 96 replies
-
- 4
-
-
- Sphinx
- Vanguard Models
- (and 2 more)
-
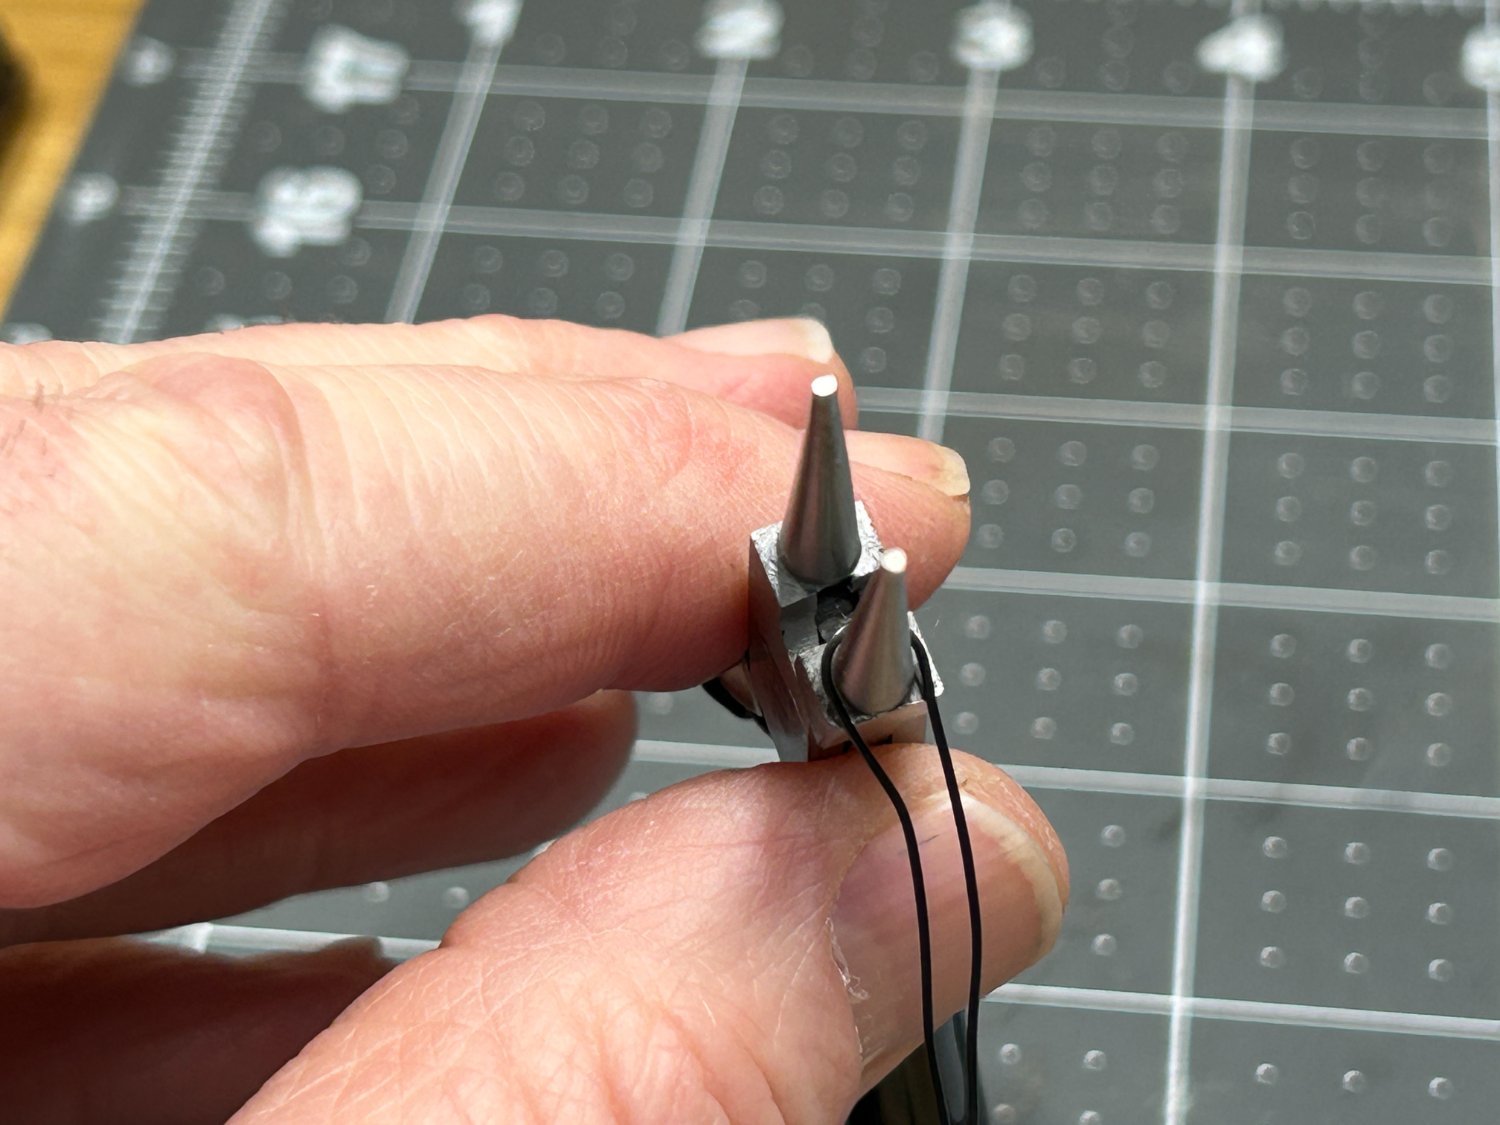
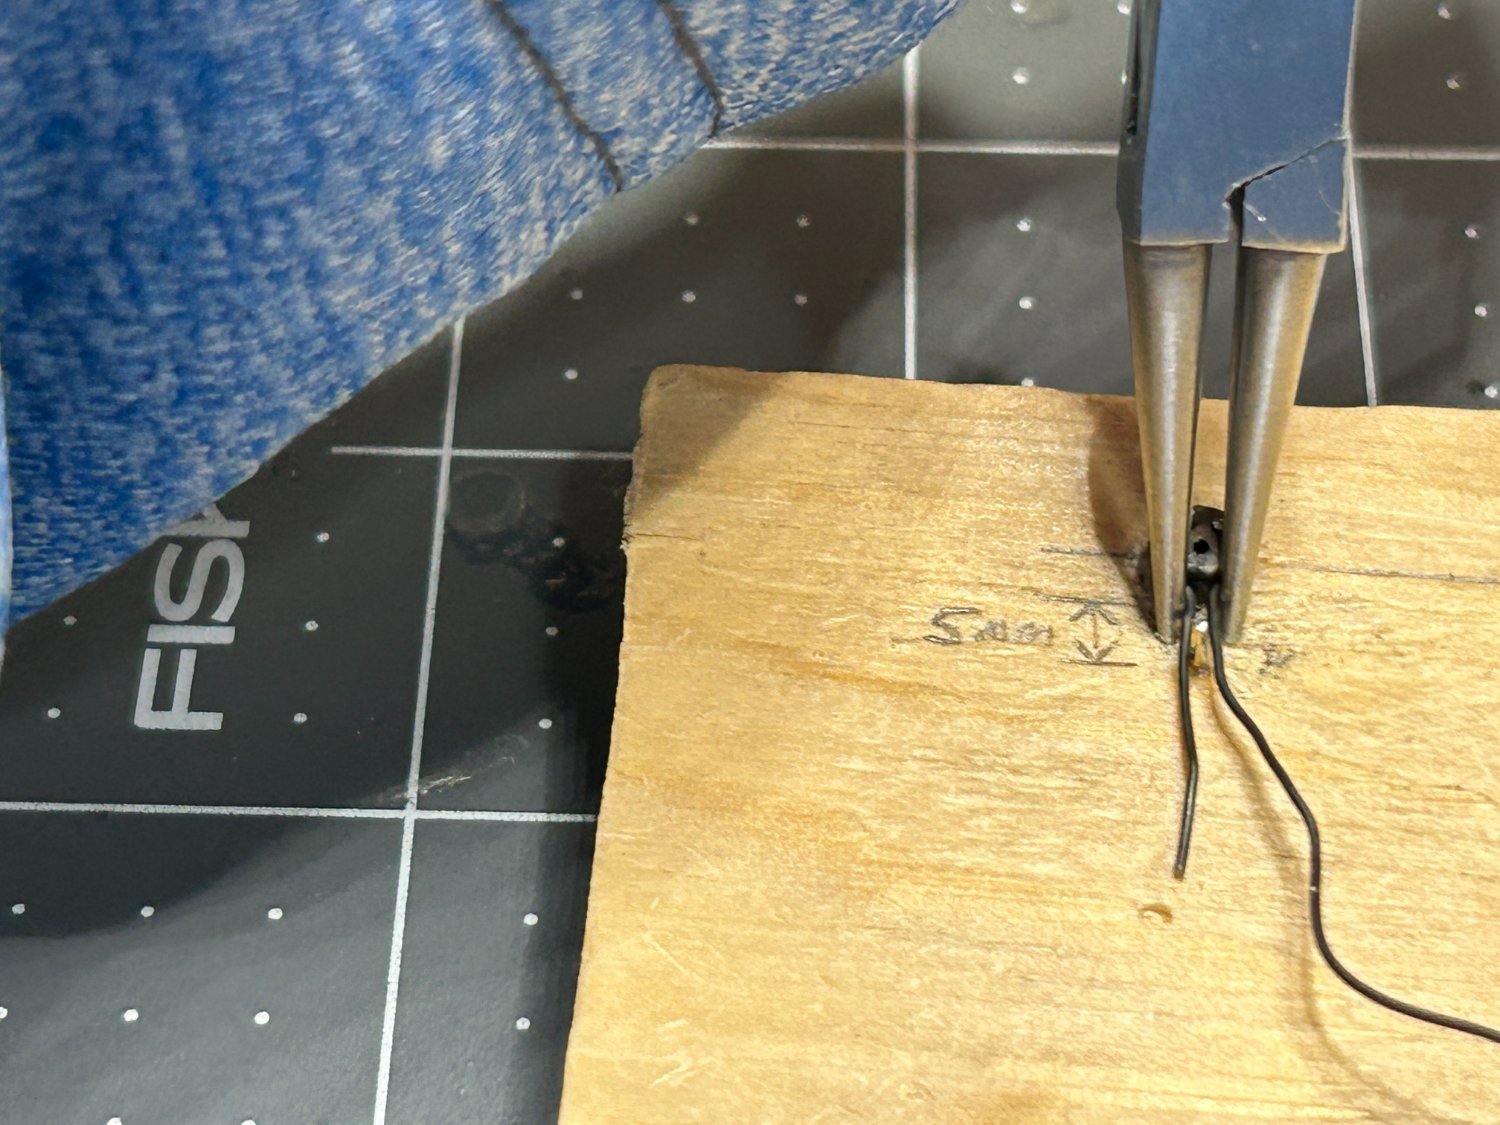
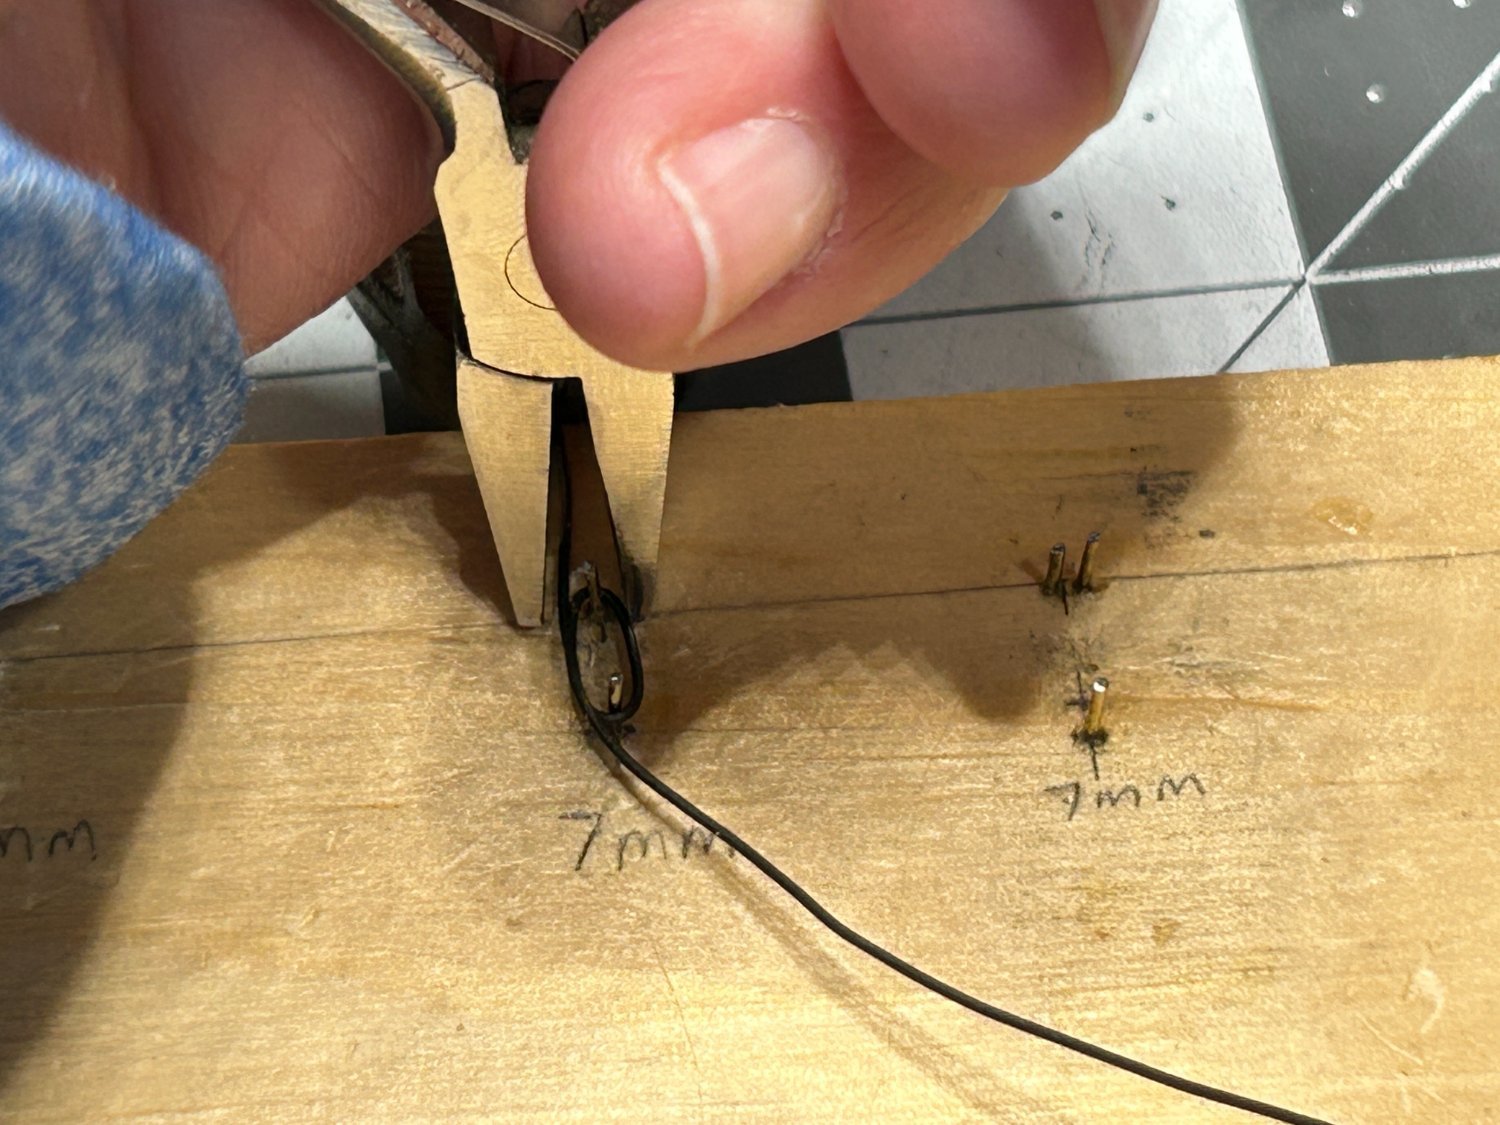
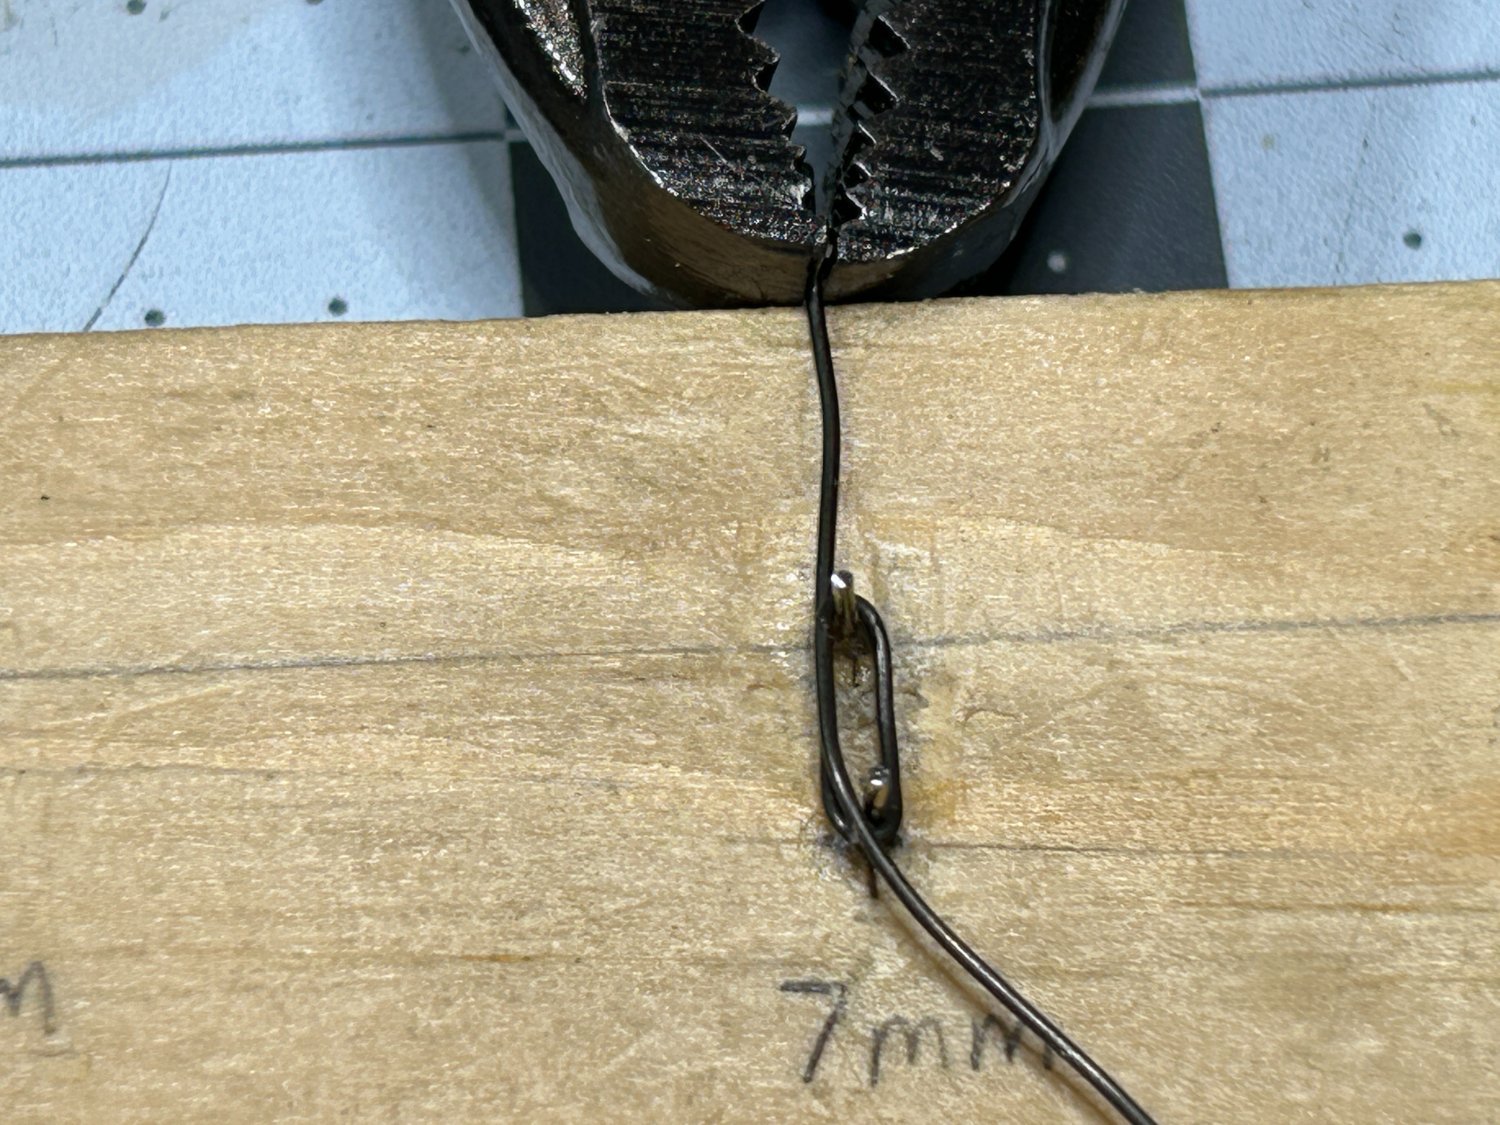
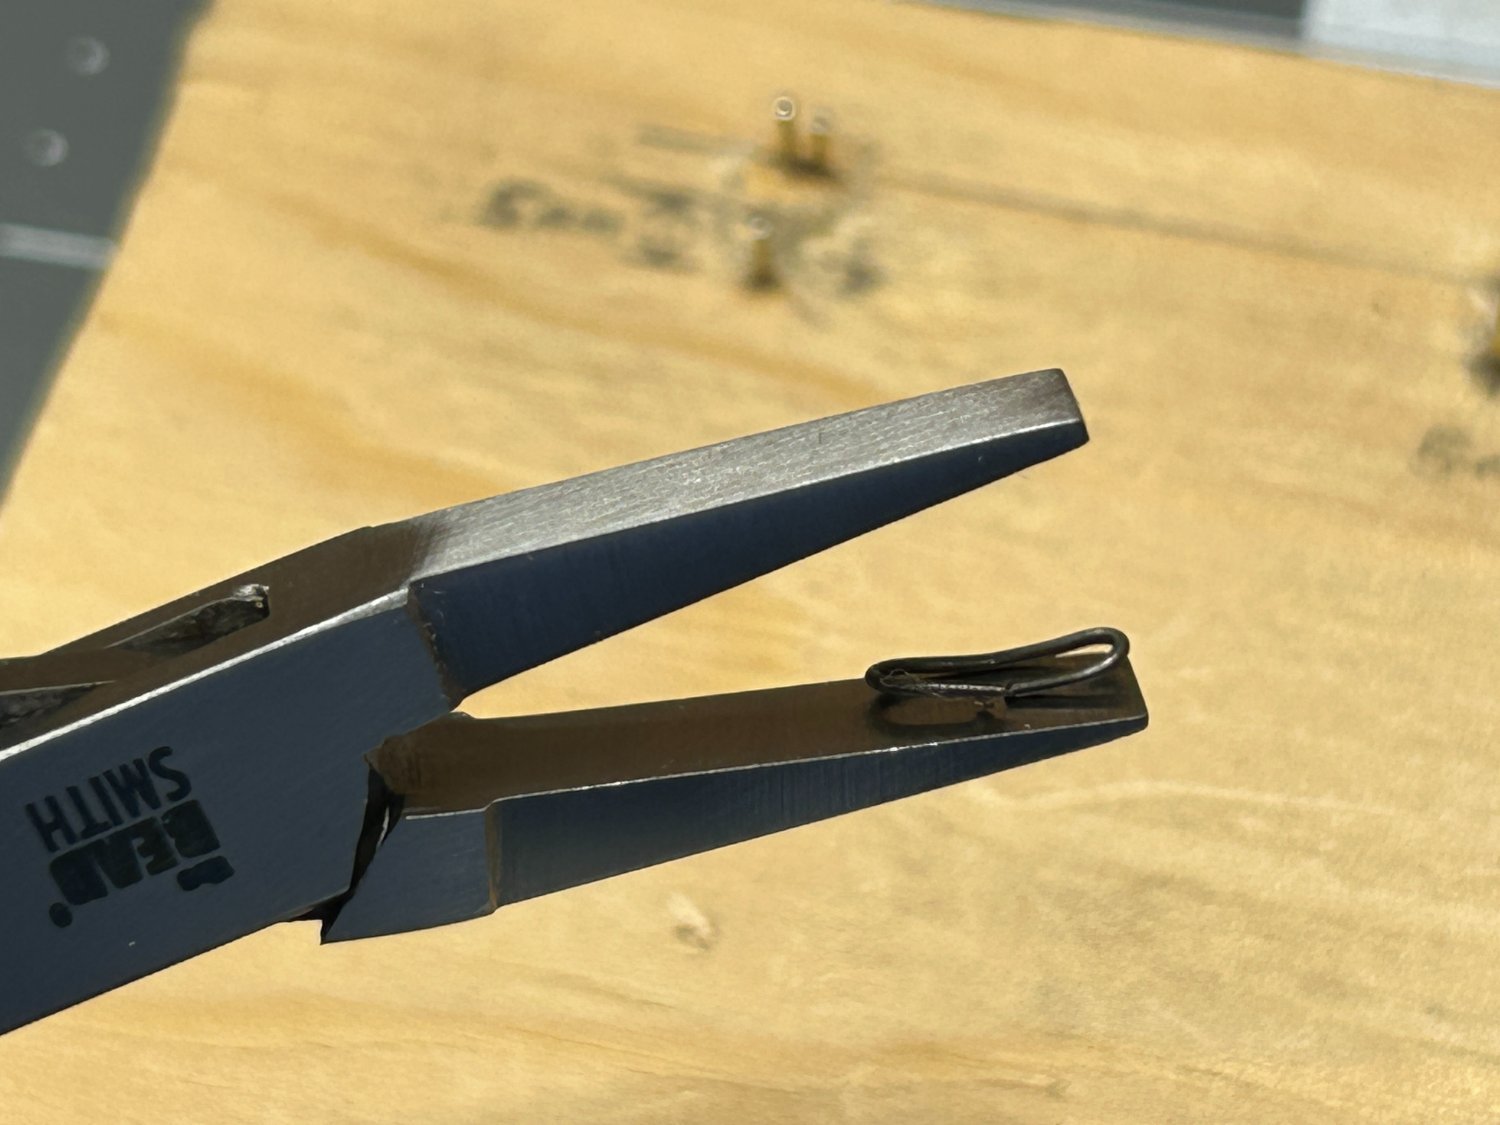
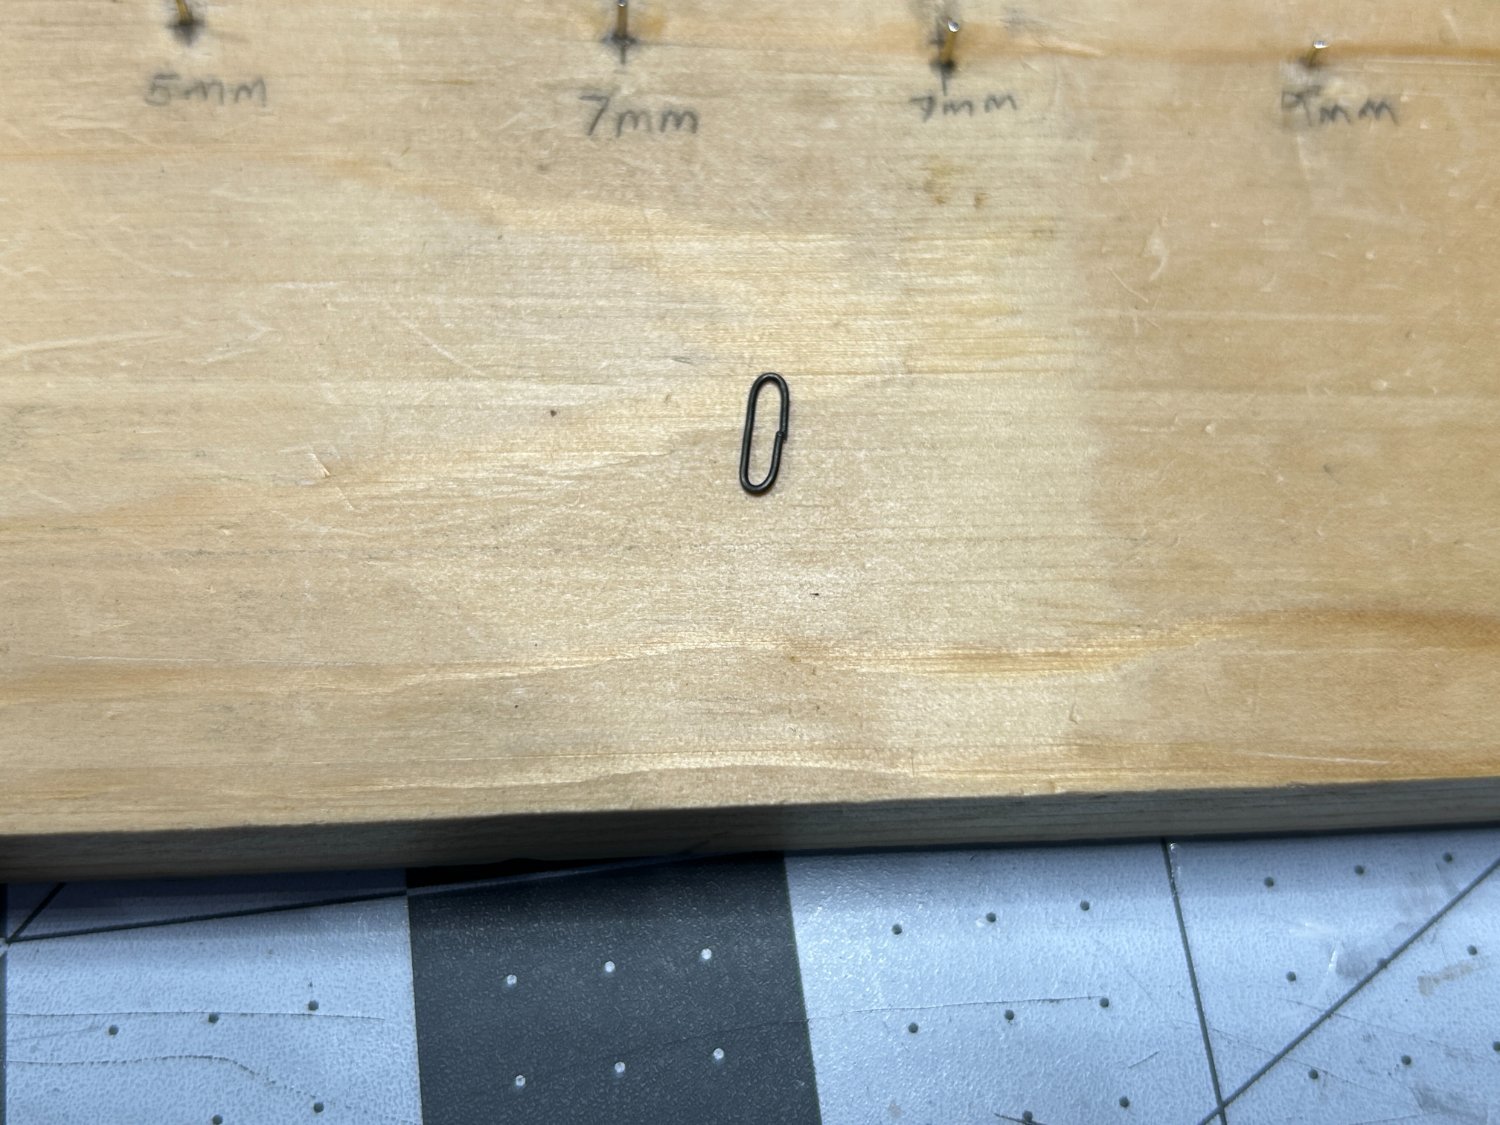
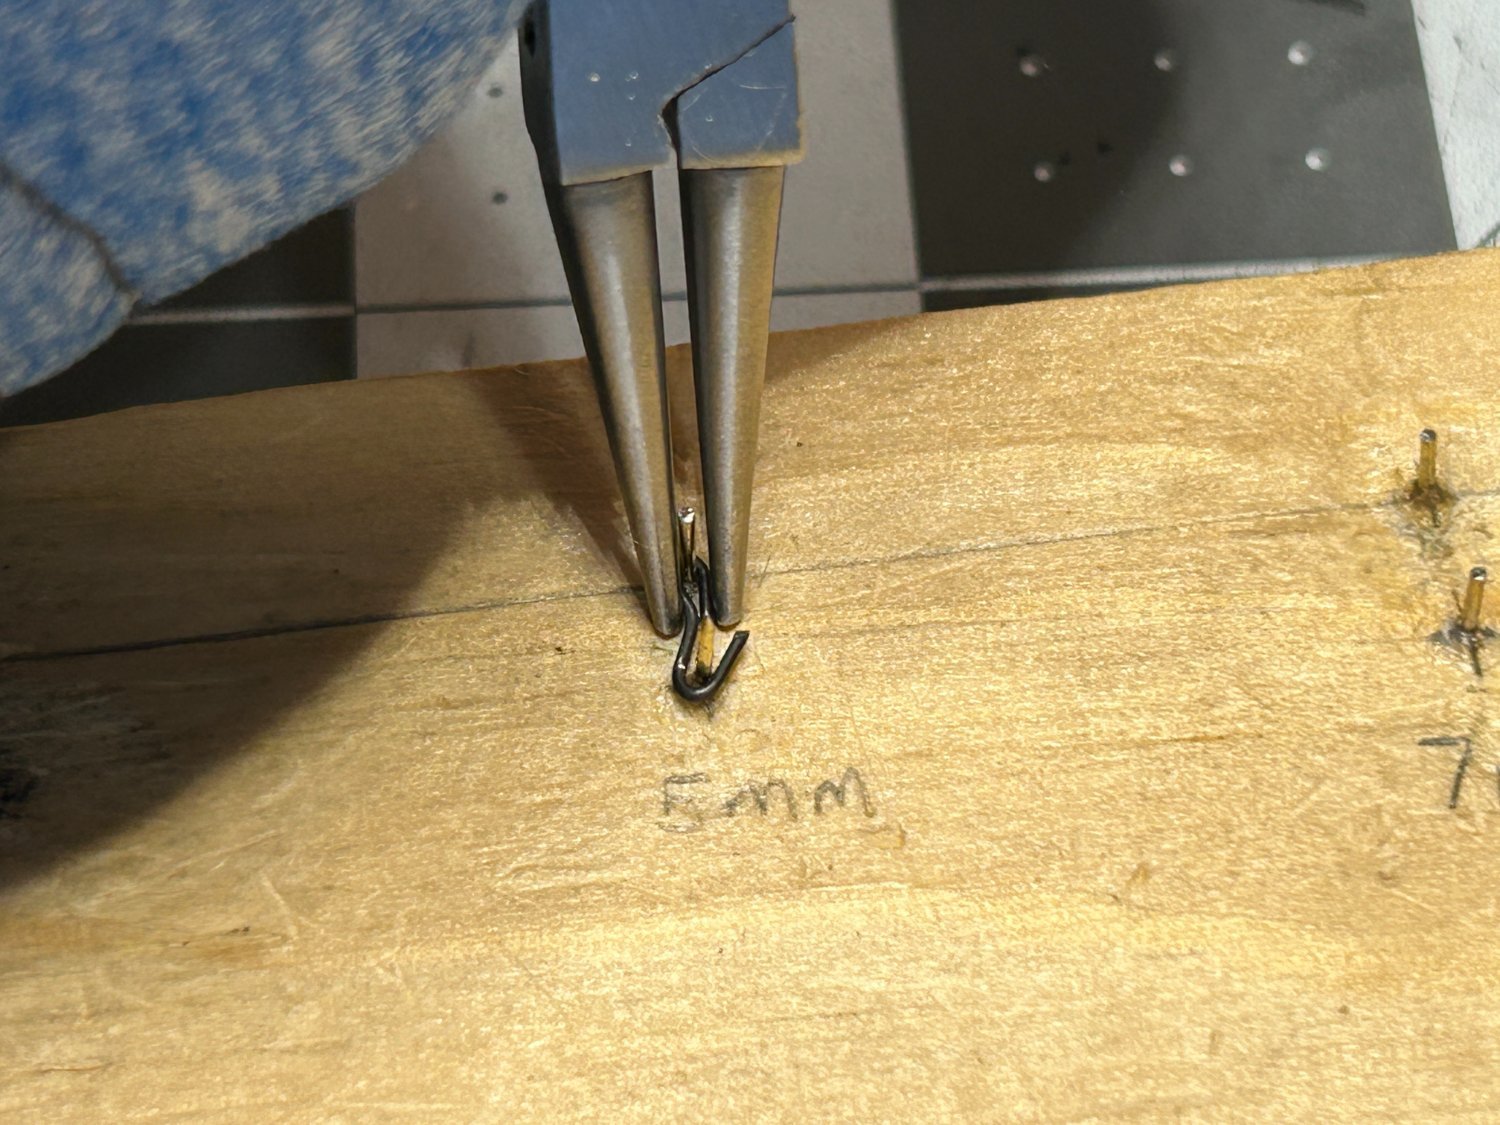
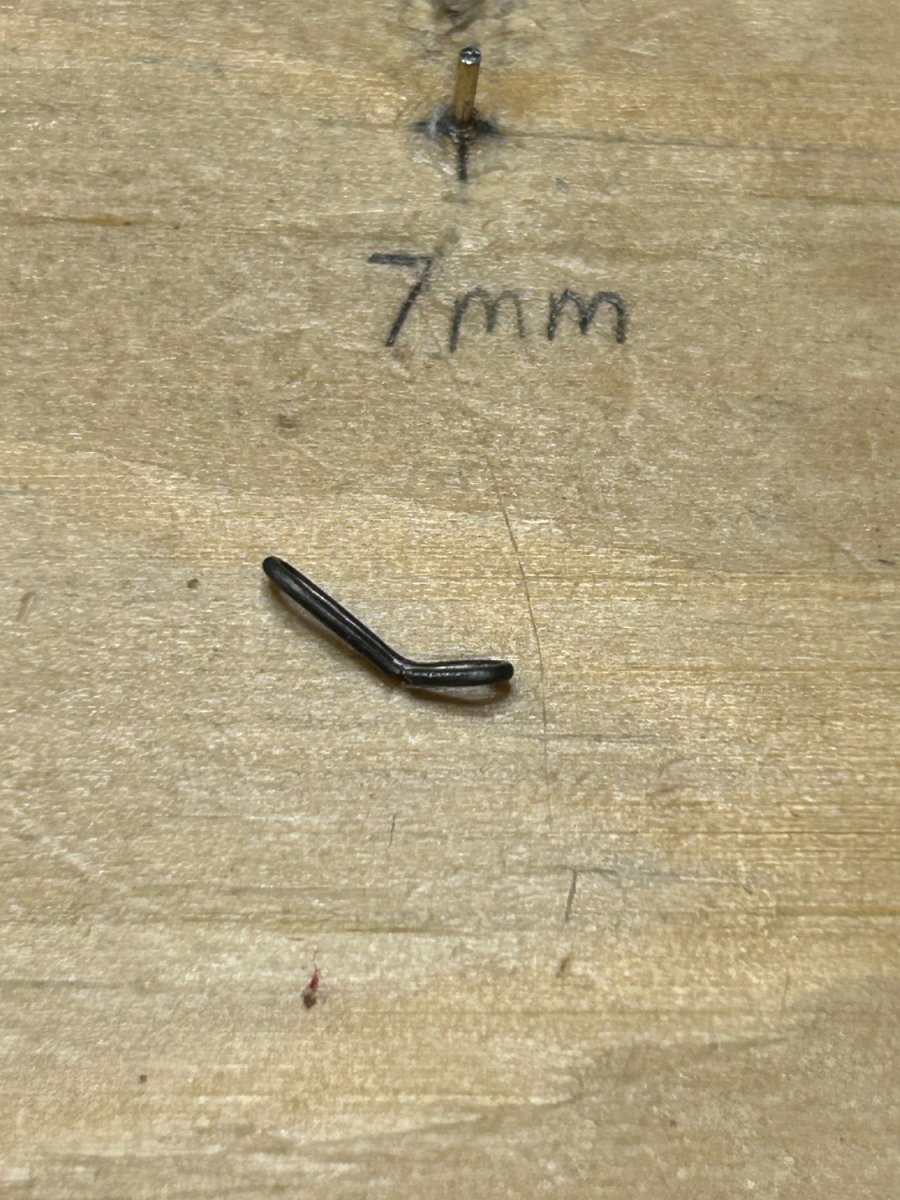
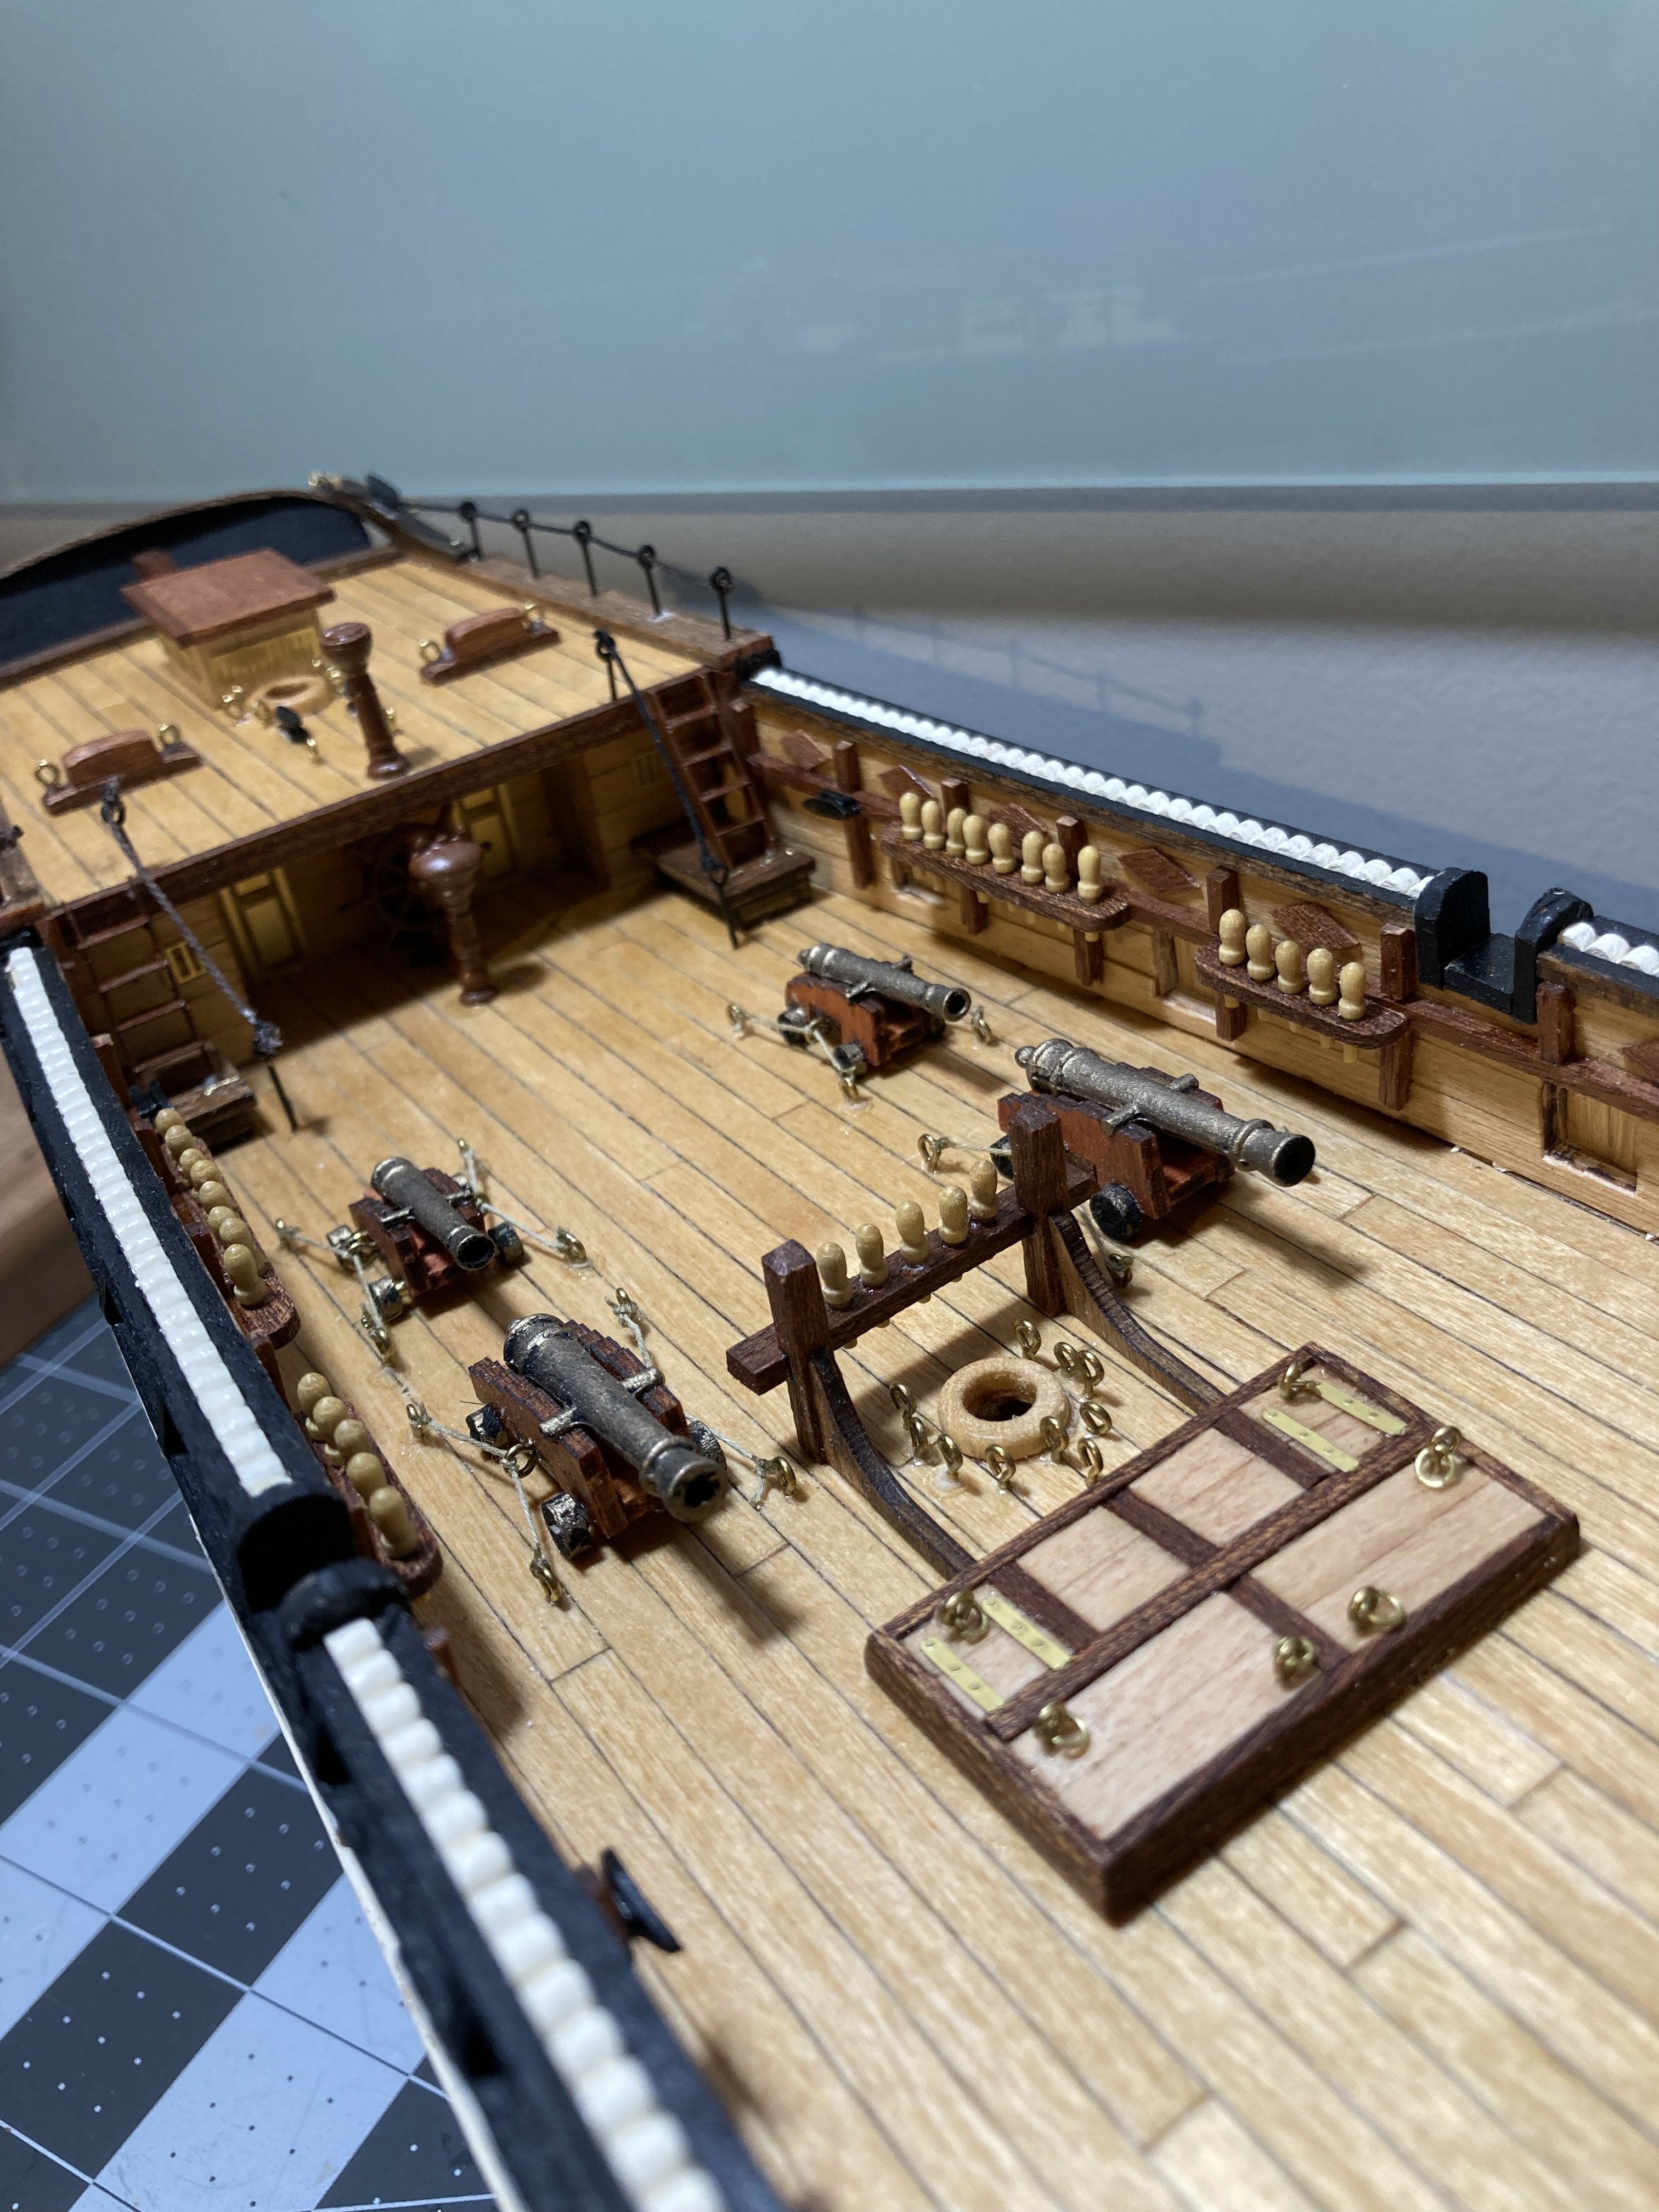
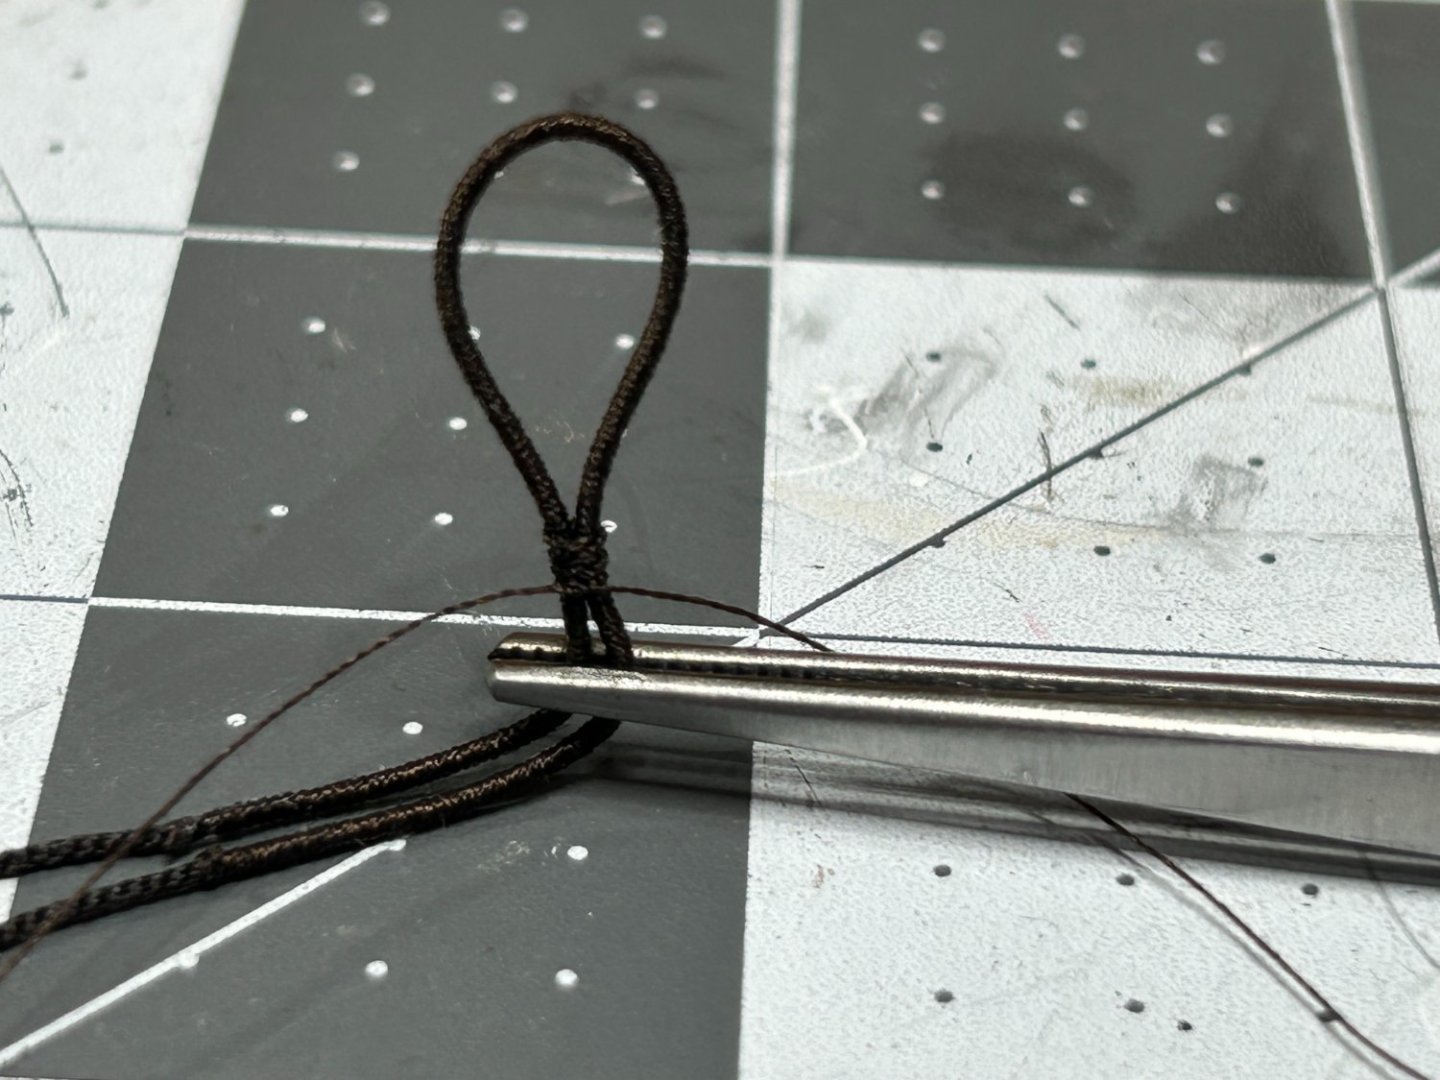
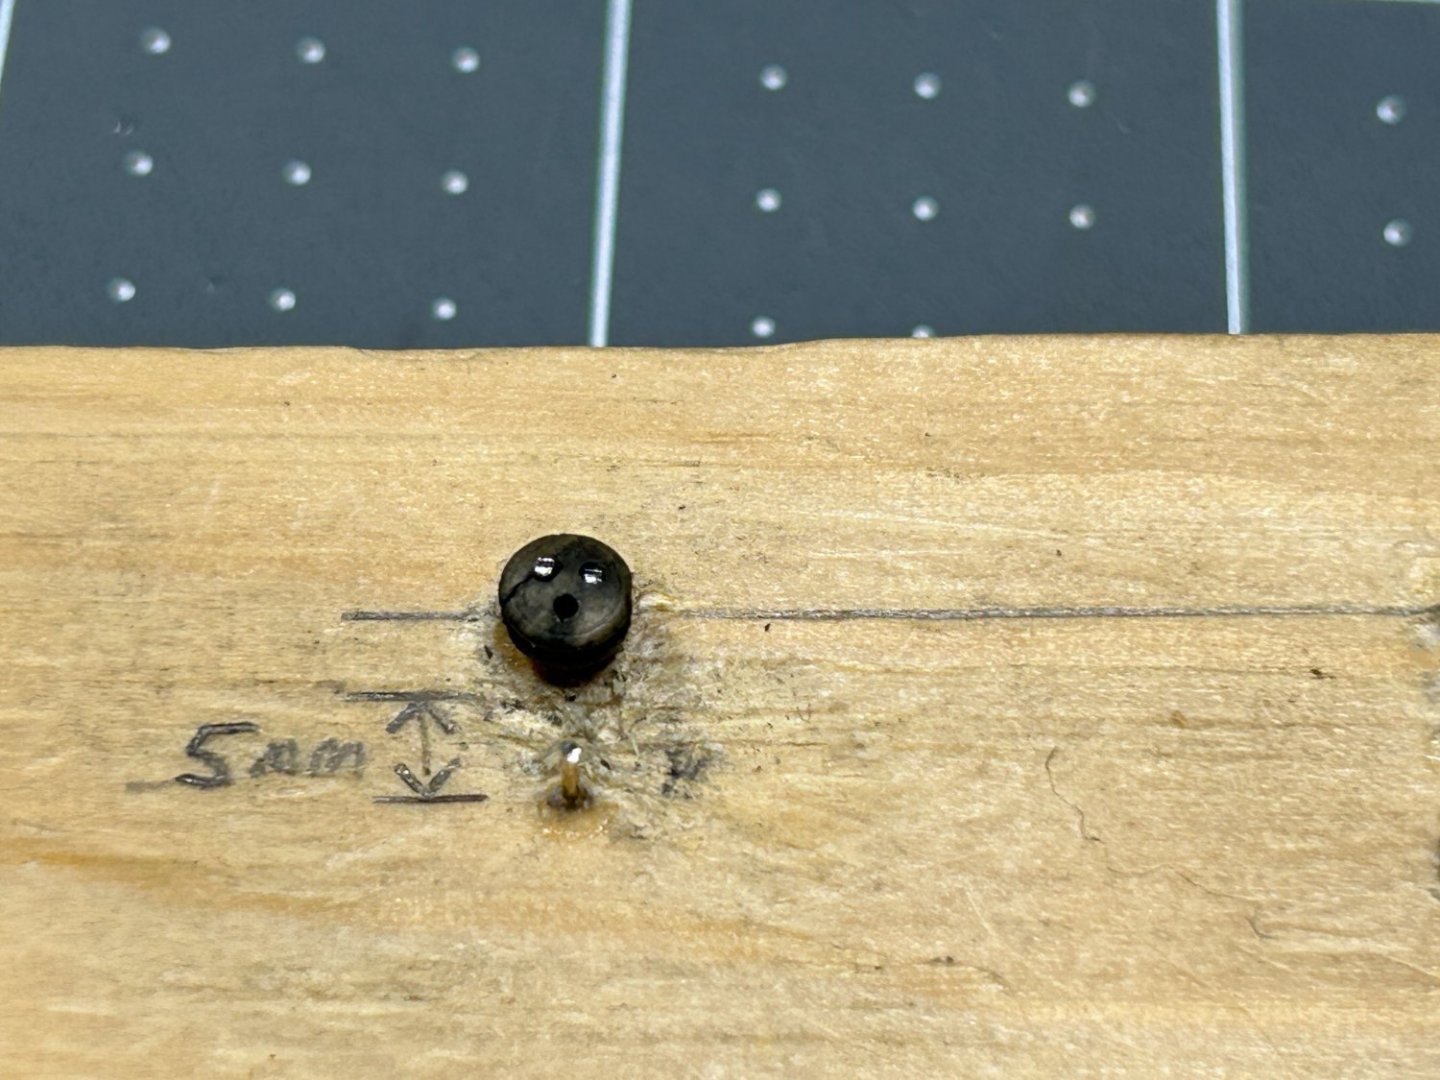
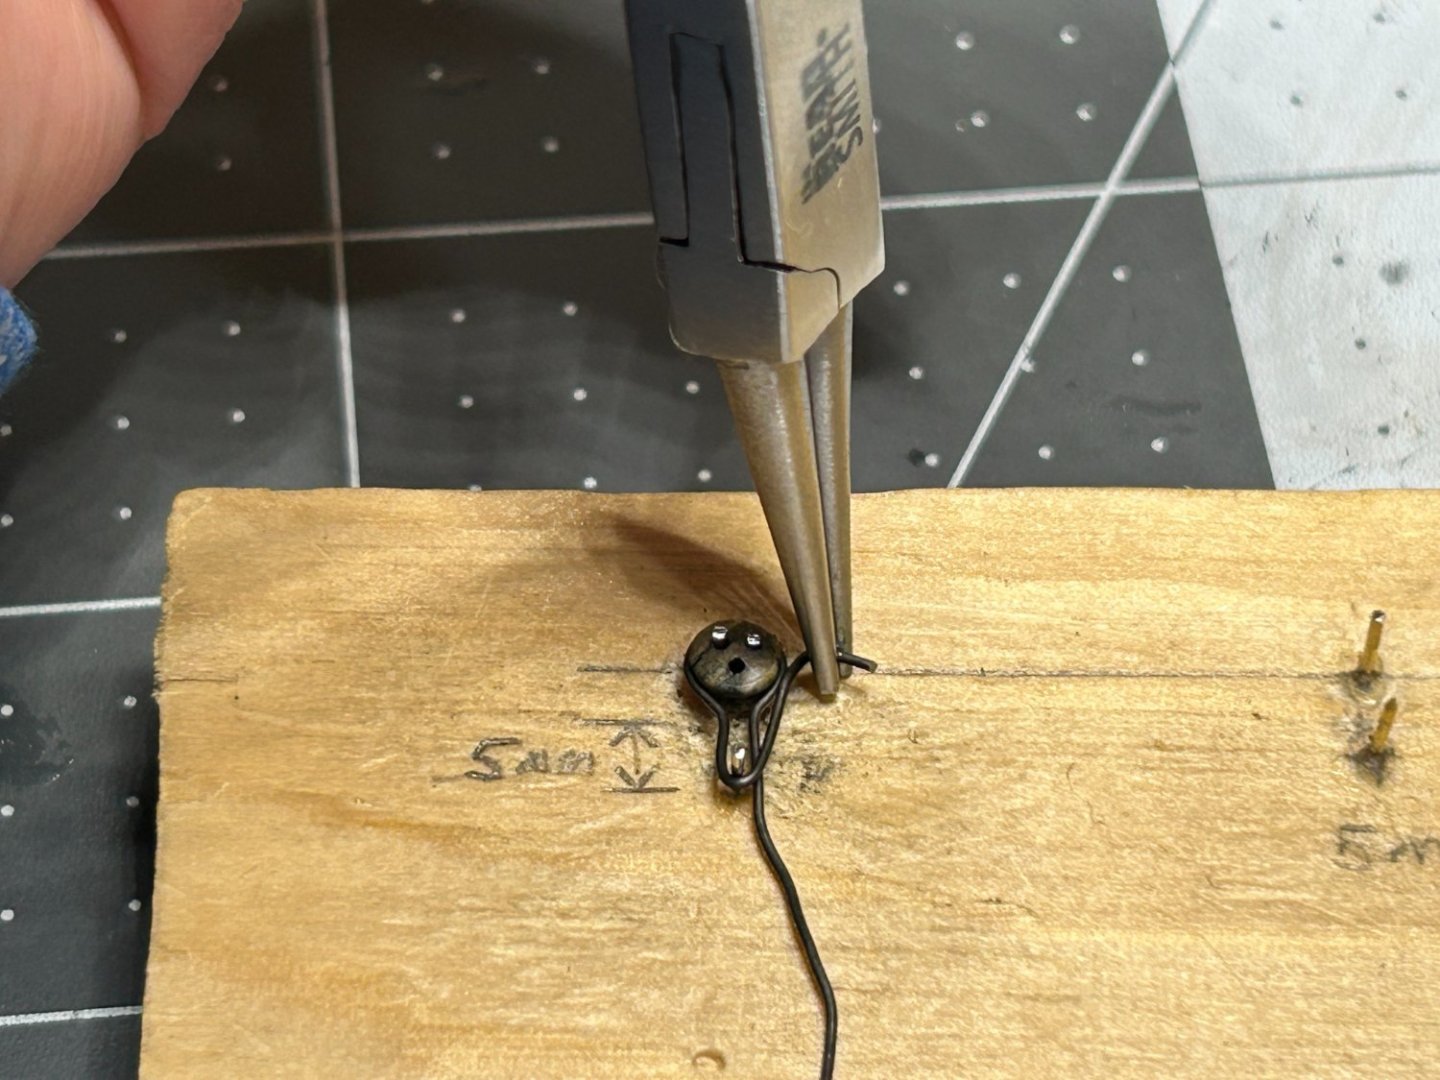
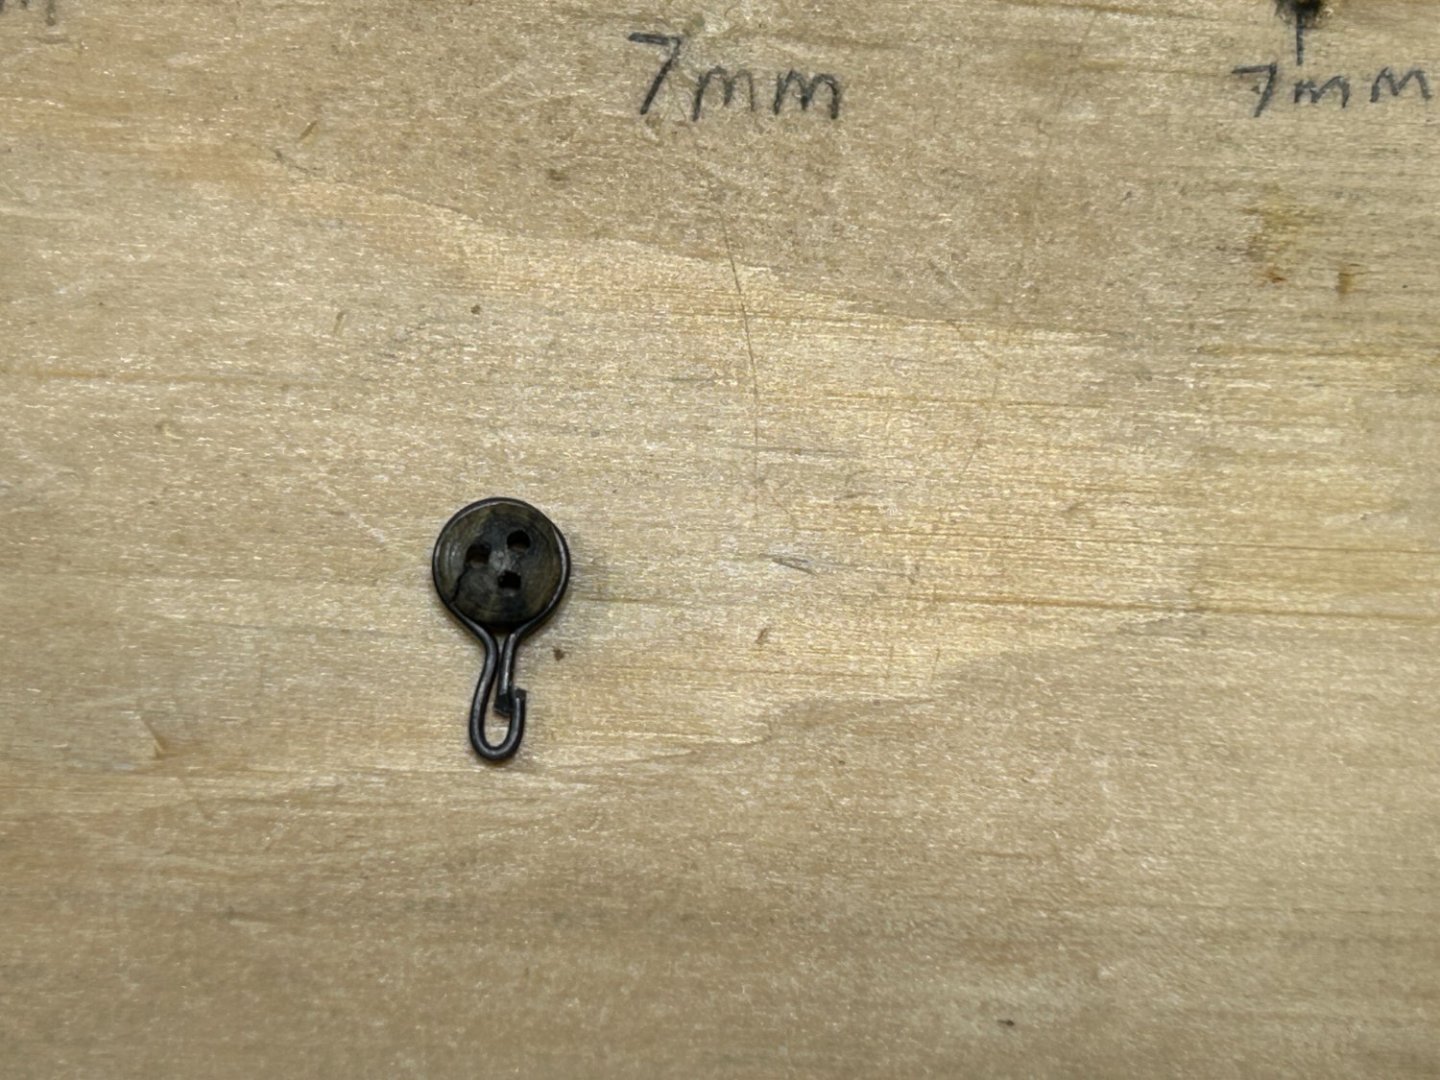
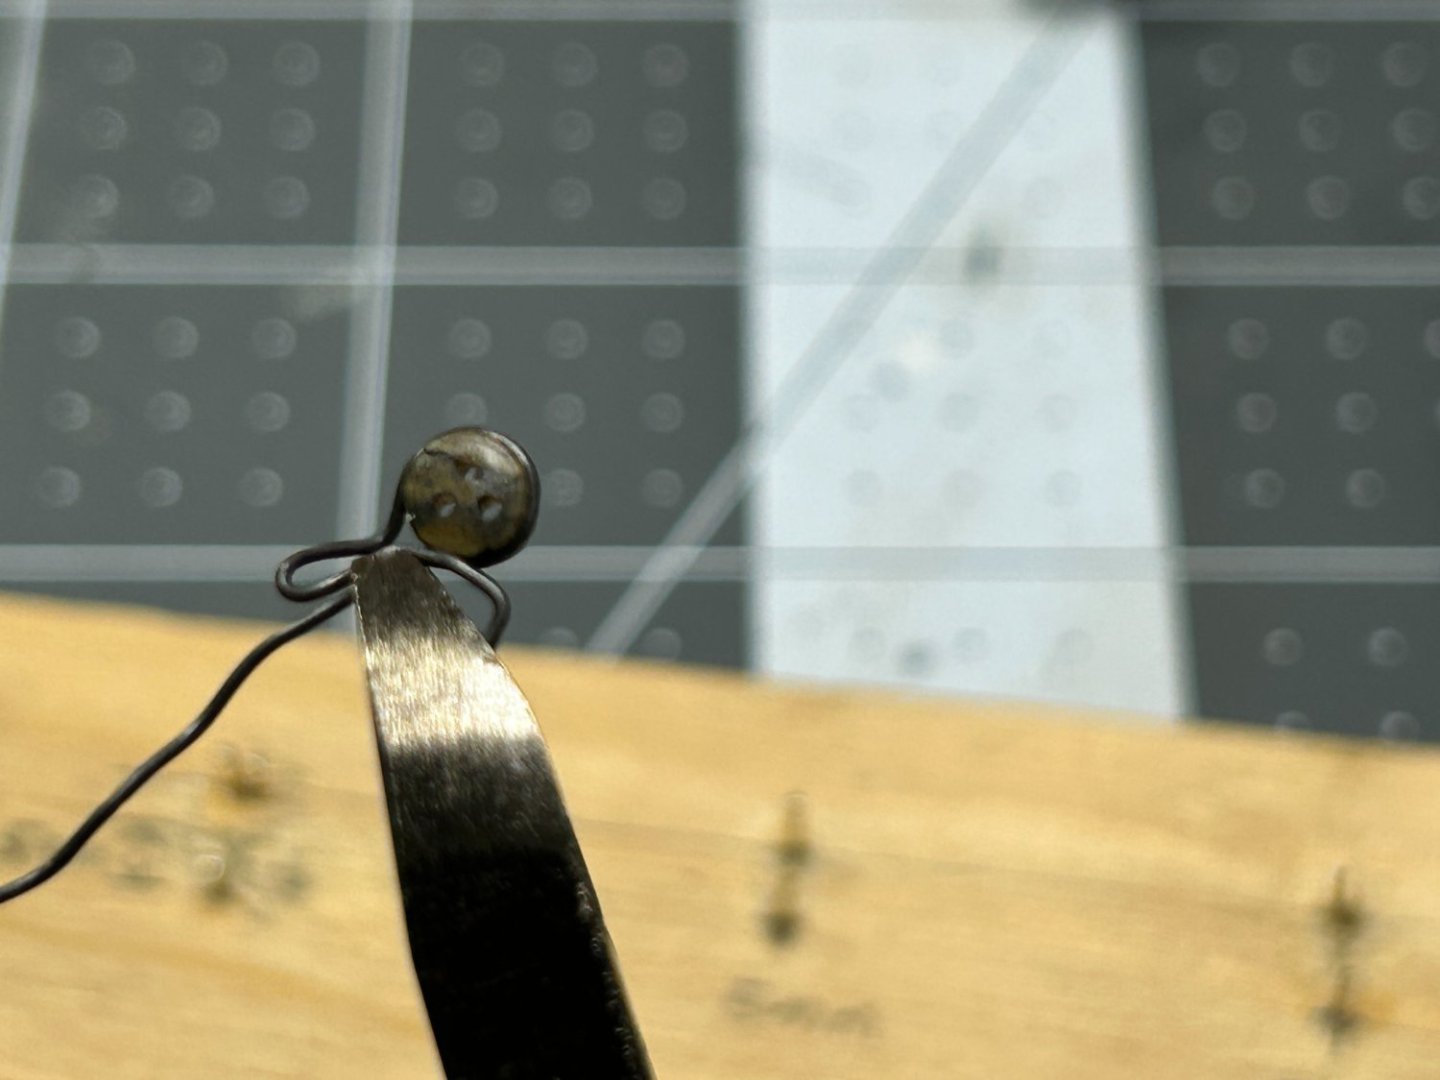
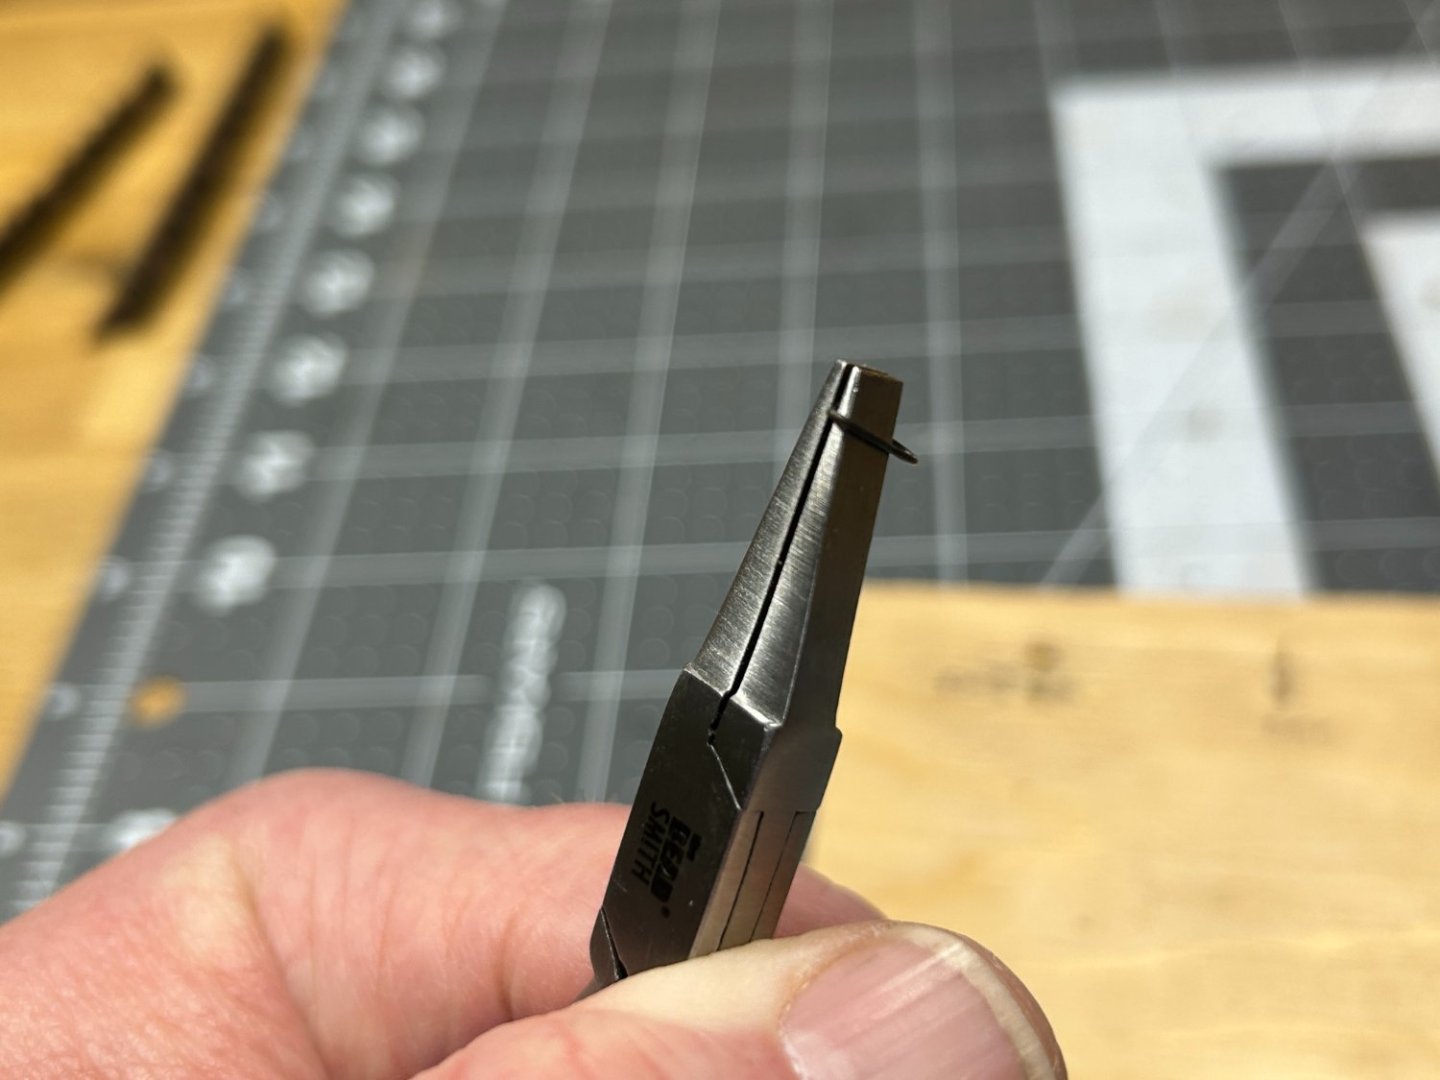
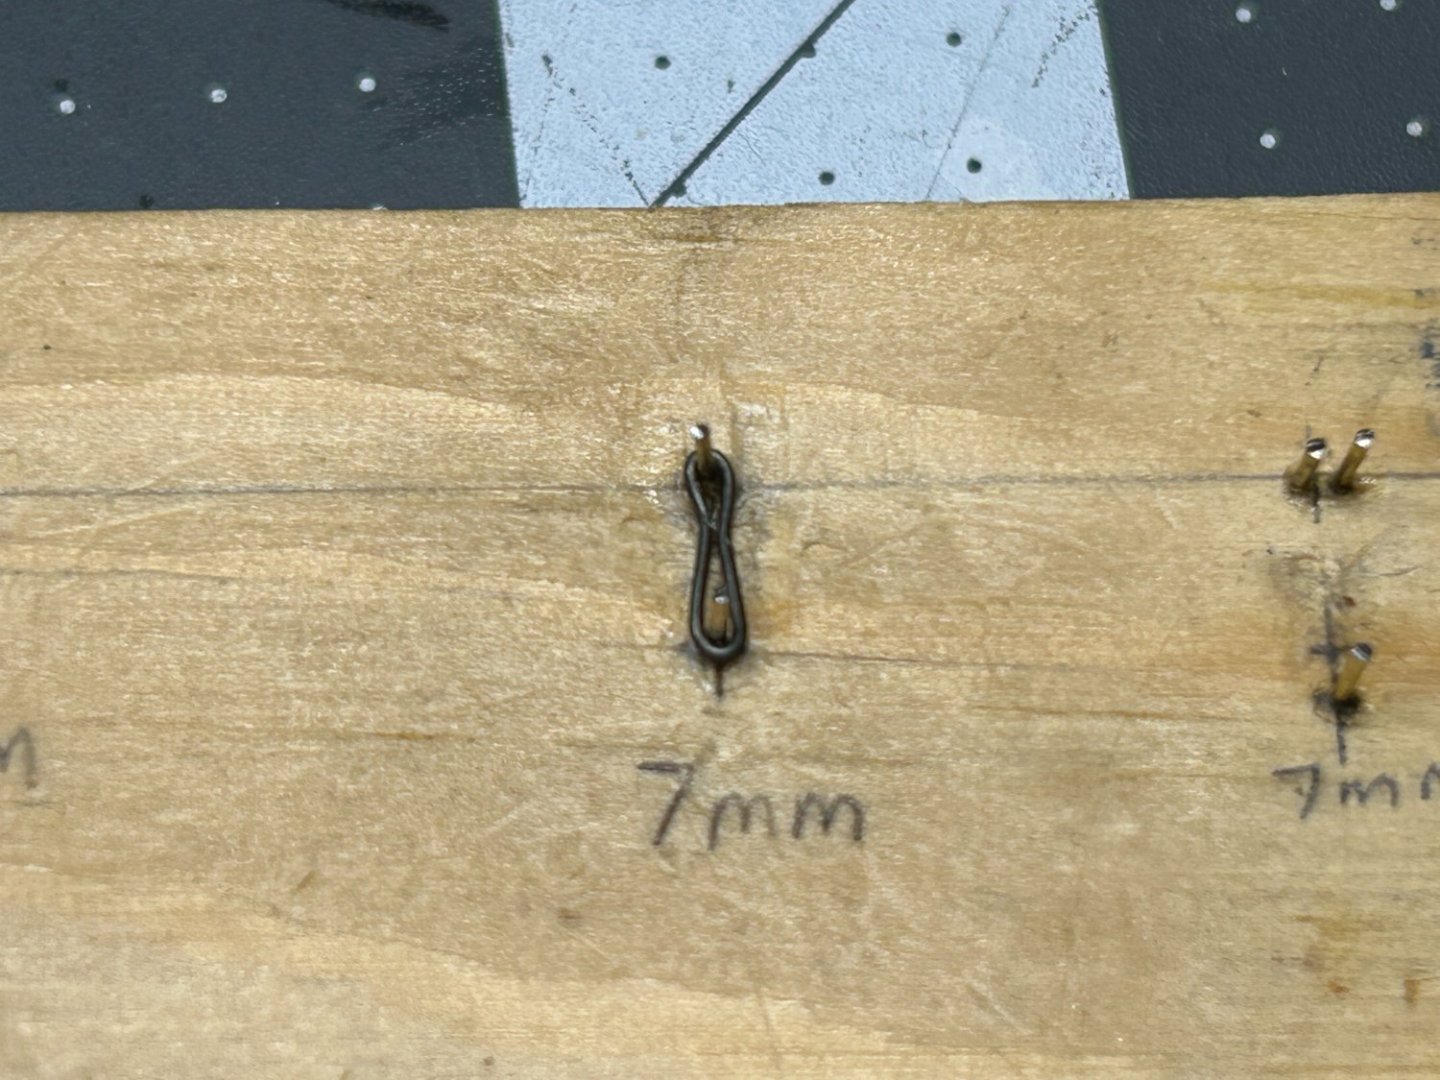
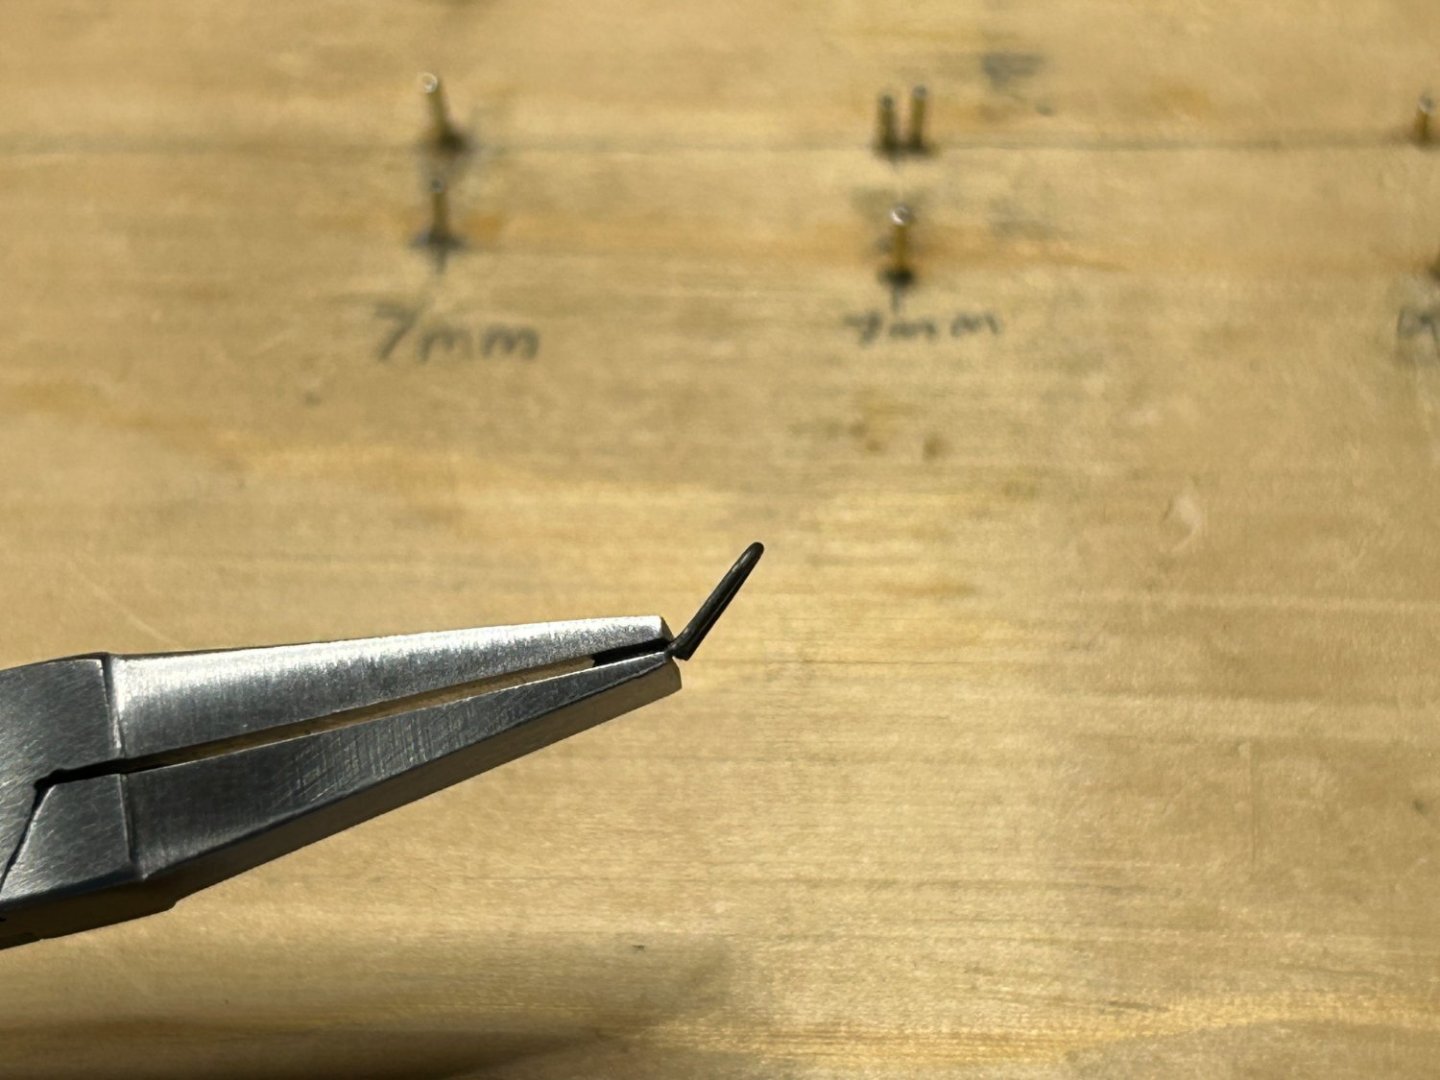
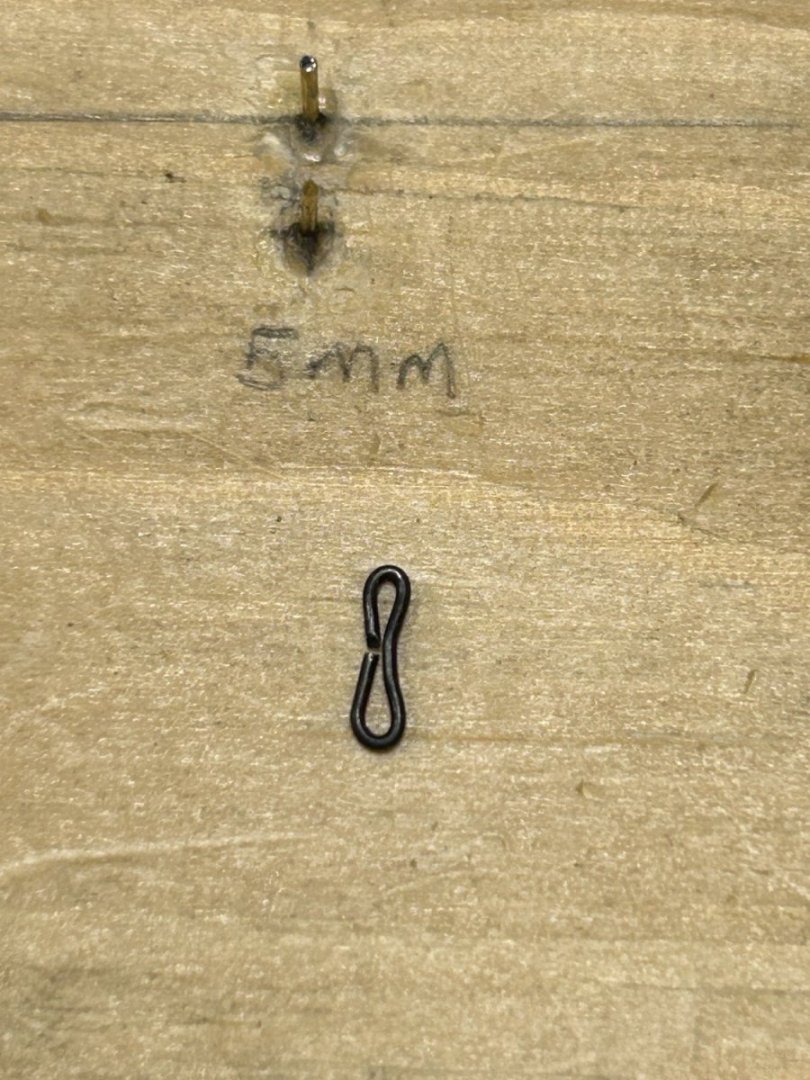
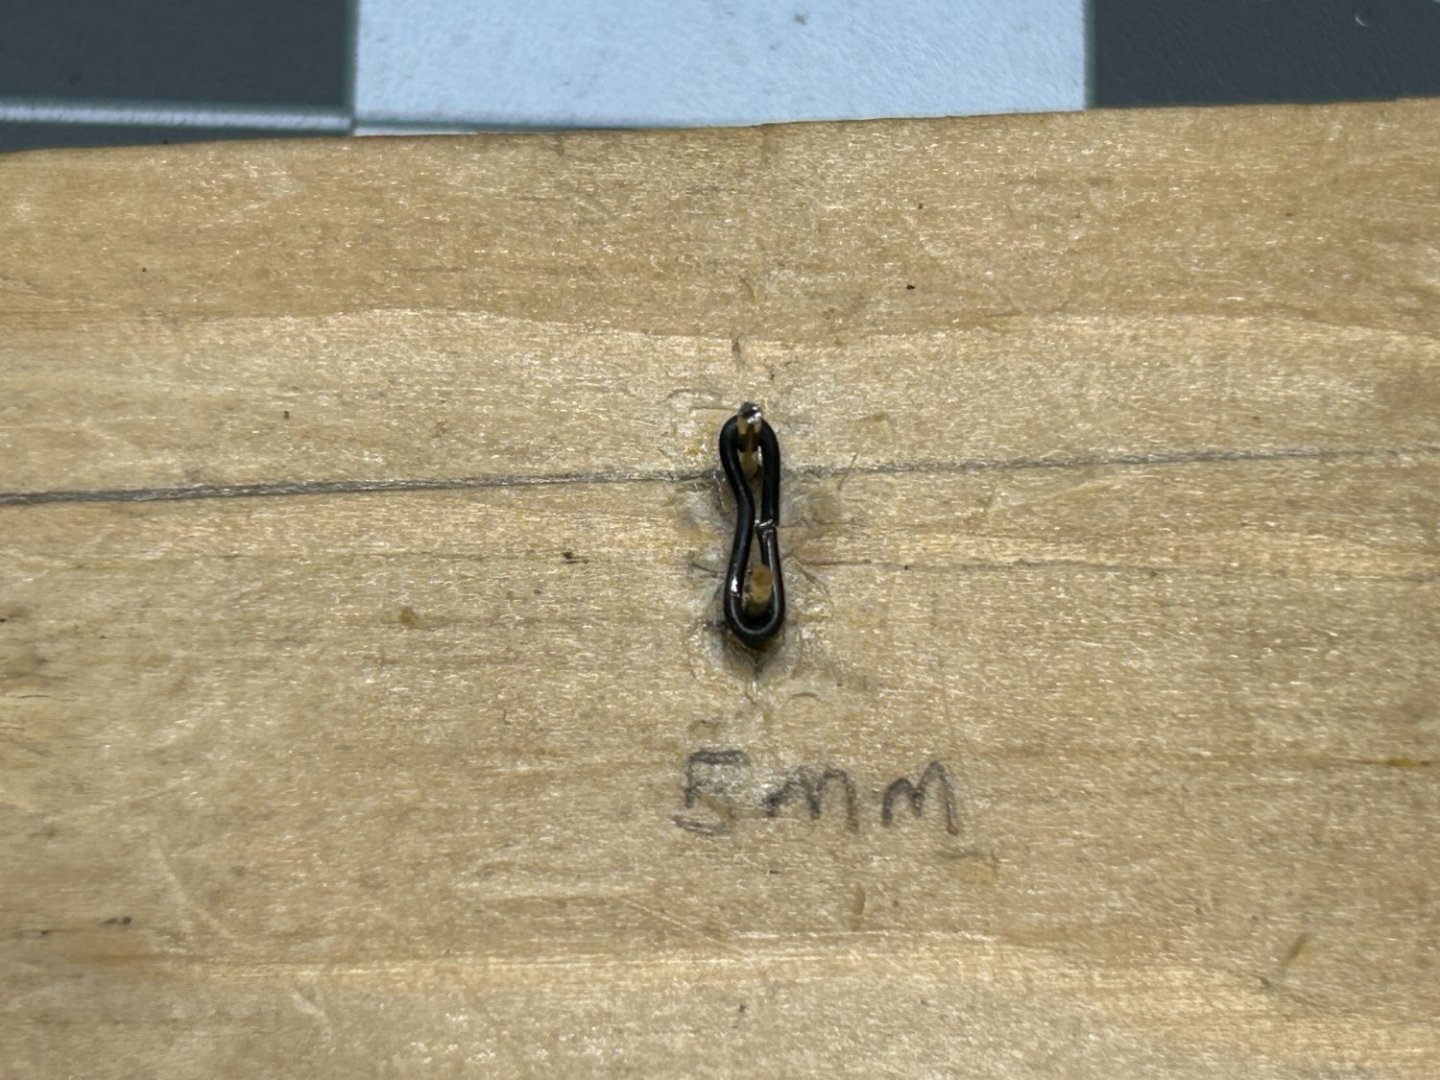
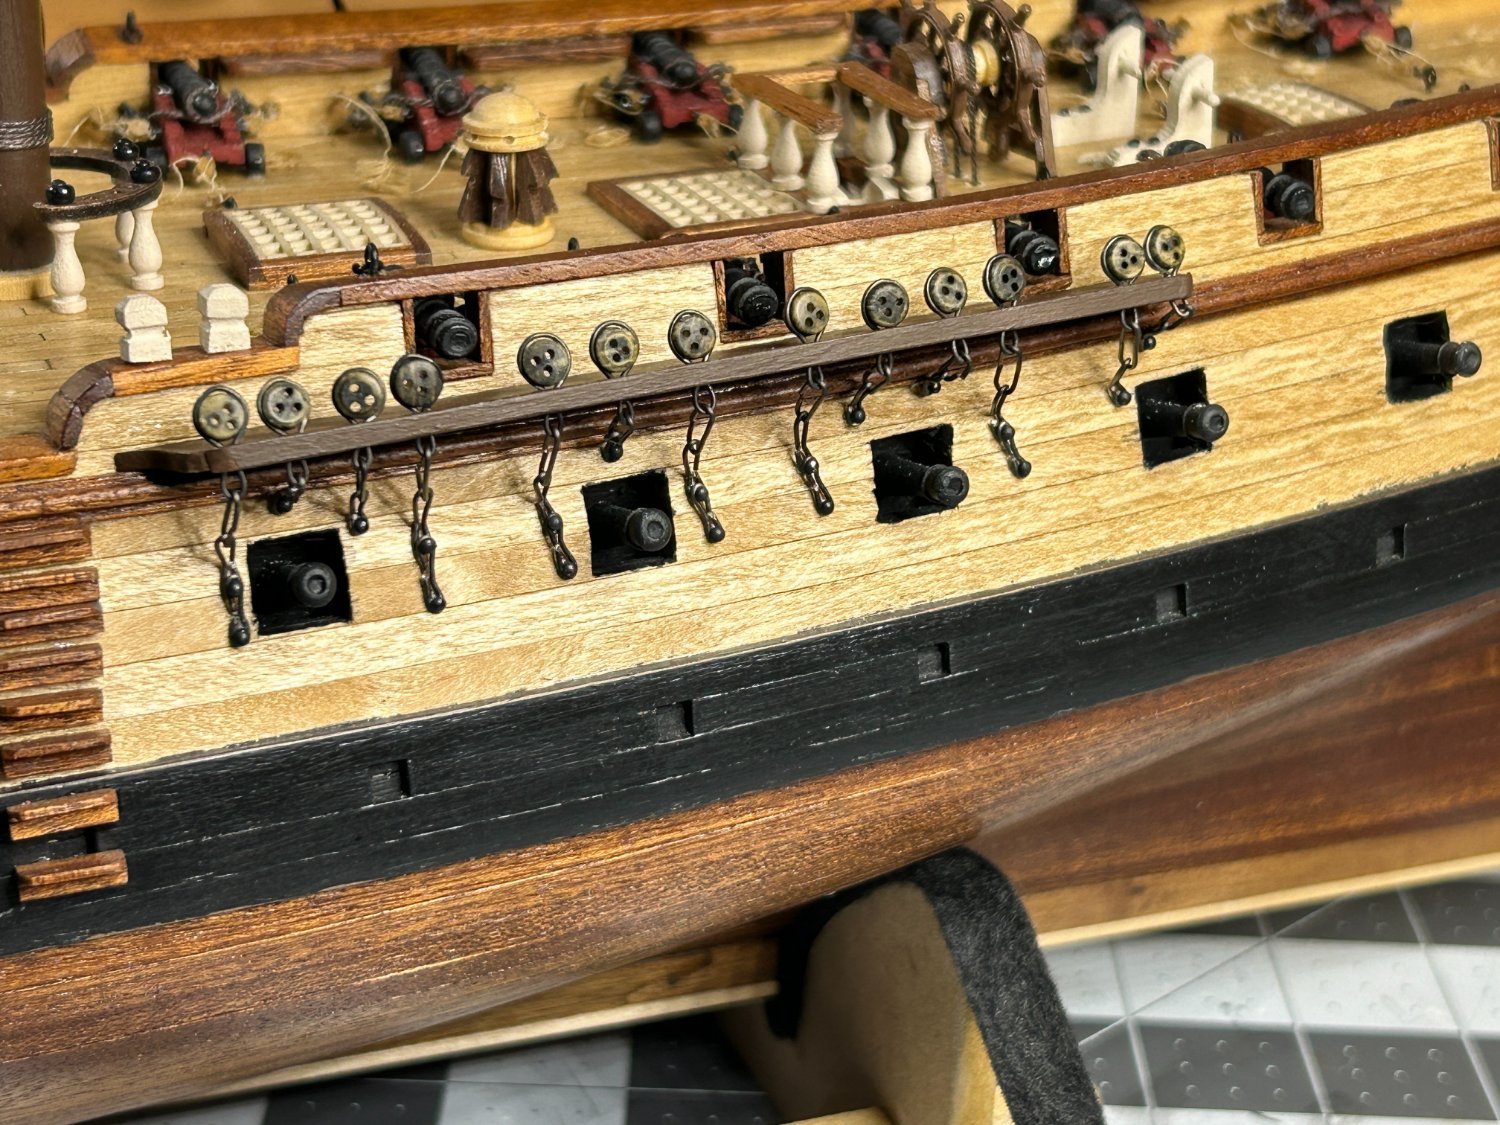
I didn't expect to have an update this soon. I had one last day off for the Christmas holiday on Tuesday and made some progress getting the chain plate components ready. I thought I would give a little more detail on my process with the main mast than I did when I posted about the fore mast. I am using 24 gauge black annealed wire. I think it might be just a little on the heavy side for my scale, but I think it is not so over scale to look too big. As I said in my earlier post, I am deviating from the plans provided by Occre which instructed to use a single strand of brass wire for the chain plate. I am using the instructions for the US Brig Syren from Model Shipways as my basis for the chain plate. I started with the deadeye strops. My jig was set up to create a strop that would measure about 5 mm from the bottom of the deadeye to the bottom of the strop. I start by by creating a loop with the wire and wrapping it around the deadeye. I use round tipped pliers to pinch the wire tight around the deadeye and wrap the wire around the bottom nail on the jig. Then simply cut the two ends to create the strop. I then placed the deadeyes in the channel and glued a strip of 1 mm x 2 mm wood to the channel to secure the deadeyes. Next I assembled the middle links. After trying a few different lengths to figure out the right combination, I settled on a length of 7mm. I used a small vise grip pliers to hold one end of the wire and created a loop around the nails on my jig. I then used a flat tipped pliers to create the shape I wanted. I cut the loose ends of the wire and then used the flat tipped pliers to flatten and improve the shape of the middle link. Pretty happy with the final result. I will need to pry open the links to attach the middle links to the toe links and the strops. The process for the toe links started the same as the middle link, except when I cut the loose end I was careful to make the cut about 1/3 from the end of the loop. I then placed the loop back onto the jig and used the round tipped pliers to close the loop. I then used the flat tipped pliers to add the bend in the link. The last item is the preventer link. This piece is slightly smaller at 5mm. The process is the same as the toe link except the cut to remove the loose ends of the wire is made in the middle. I will make a few extra items in some different lengths to make adjustments to fit around the gun ports. This is probably more detail that most of you want or need about how I made my chain plate components. Next up will be serving the shrouds and getting the channels installed on the ship and the chainplate secured at the correct angles.


- 142 replies
-
- 10
-
-
Give us an update after you get a chance to use then. I am very interested in these also.
-
I am impressed with your repair and that you had the patience to pull it off. Your craftsmanship is very impressive. How think was the wood on your second layer of planking?
-
I often have trouble sleeping, think too much about work, and find 1-2 hours working on the model clears my head and I sleep great. Good luck and I am looking forward to your HMS Victory build.
-
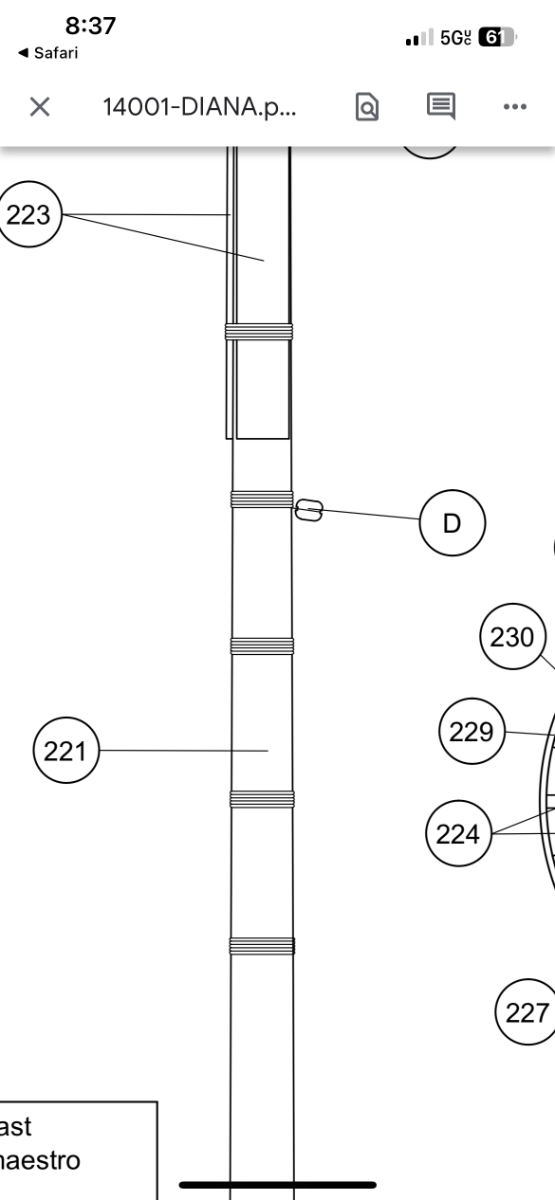
Allen Please Don’t use me as a historically accurate source of information. You have forgotten more about ships than I will ever know. After looking online for quite awhile I did recently acquire a used copy of Lees book. It isn’t easy to find without paying an arm and a leg. I am always a little nervous buying a book used online, but I found someone who seemed trustworthy. I haven’t had time to read much yet, but hope to use to improve my rigging in the future. This may be a case of me misreading the plans. Below is a clip from the plans. I may have incorrectly thought this block was attached to the woolding. The blocks are used for the downhaulers for some of the stay sails As I mentioned in my post, I saw this technique in a YouTube video used to attach blocks to a bow sprit. Probably should have questioned it more. Hopefully moving forward I can use Lees book to do a better job. As always, that’s for the feedback. Ross

-
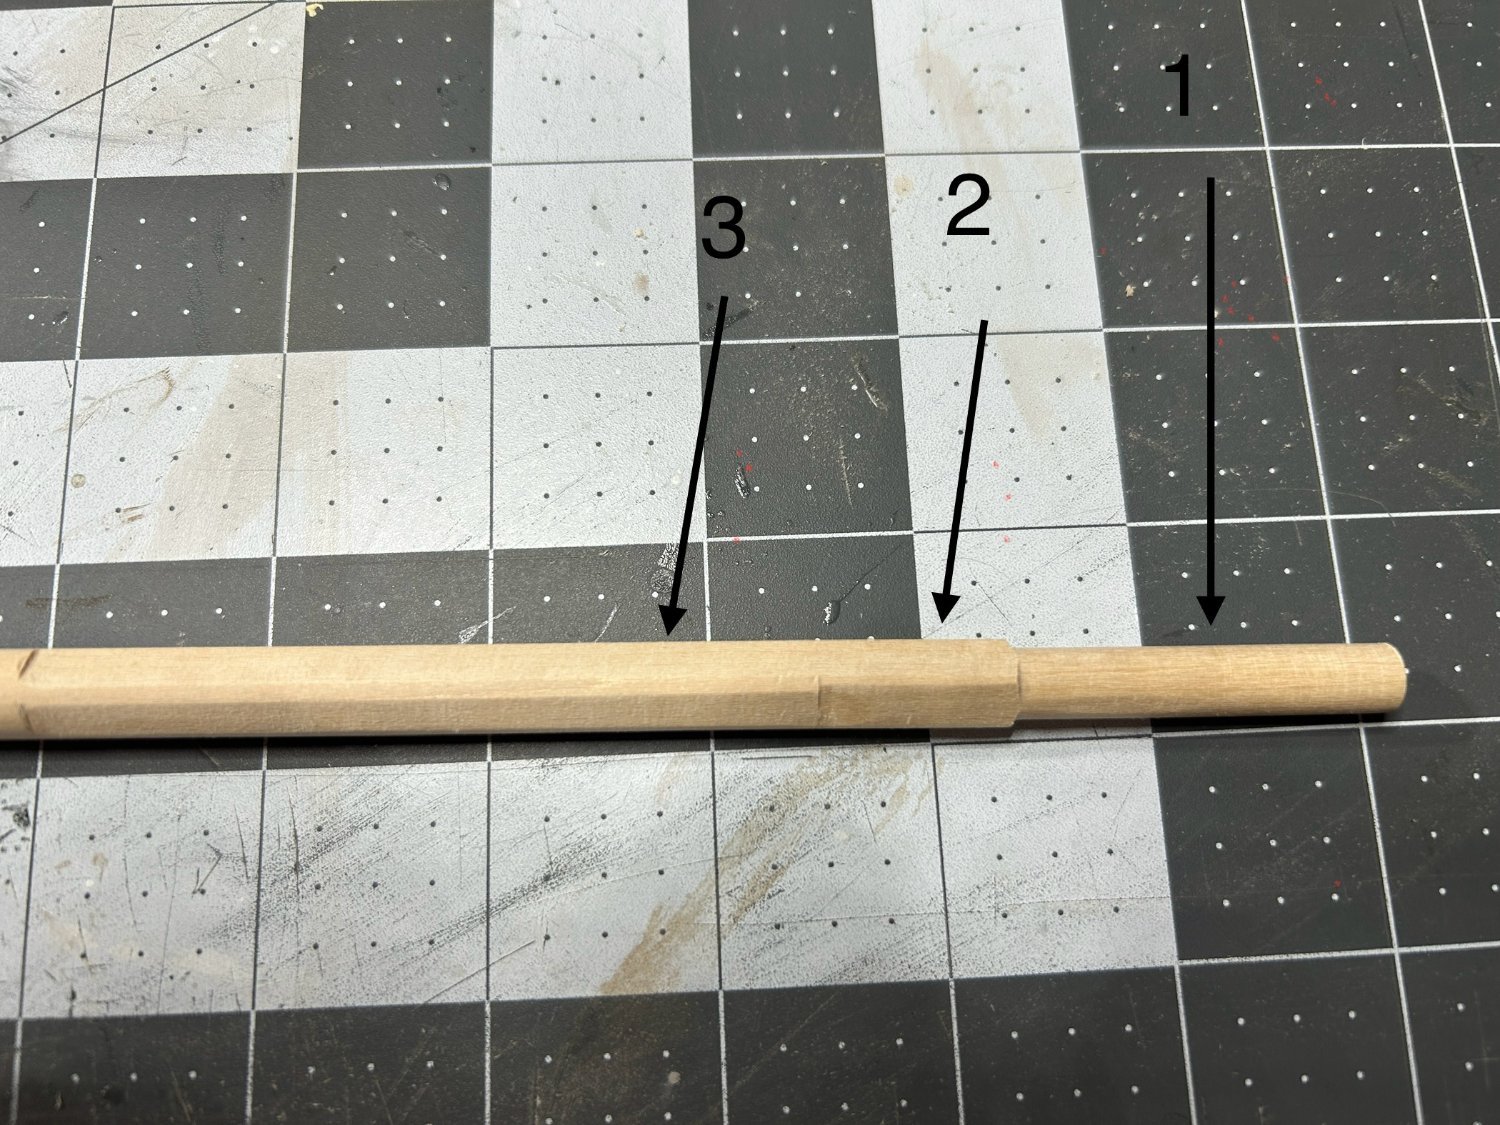
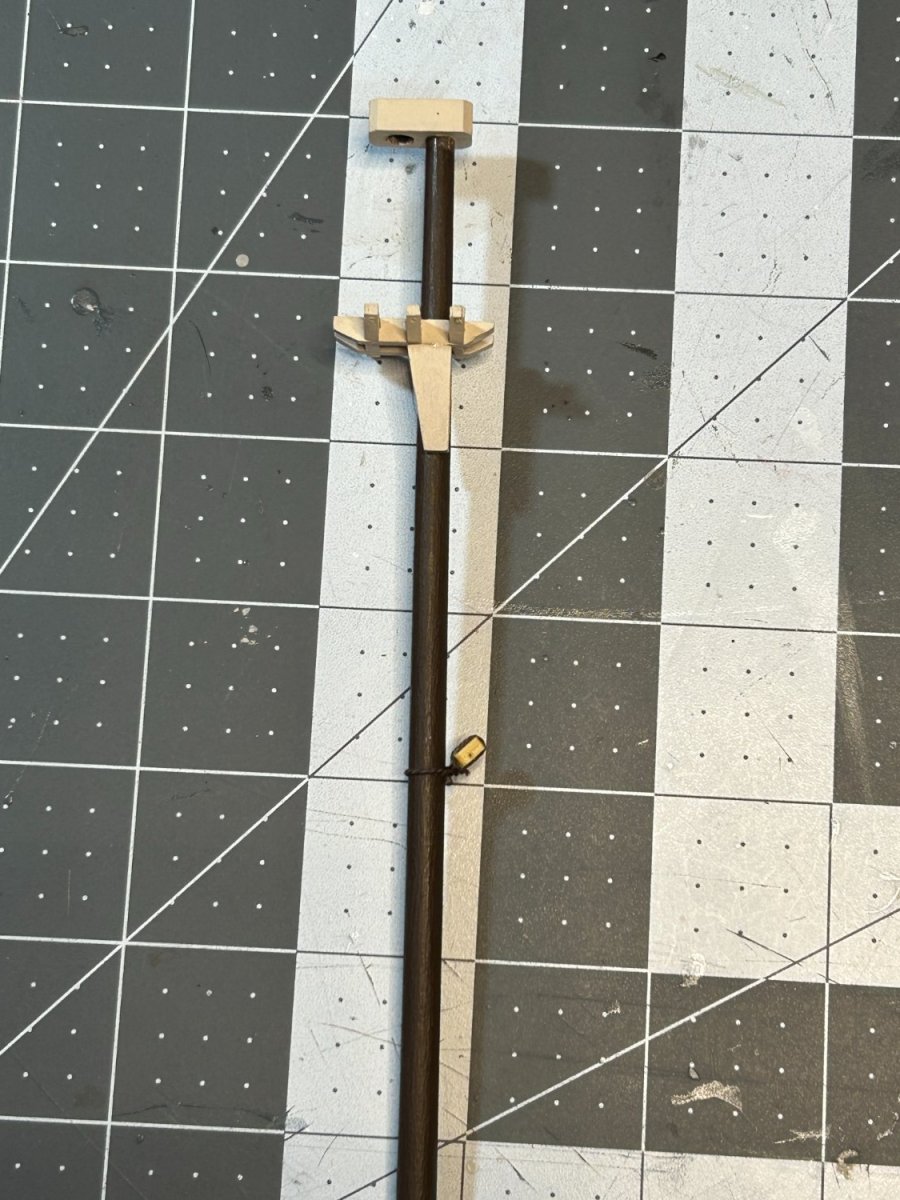
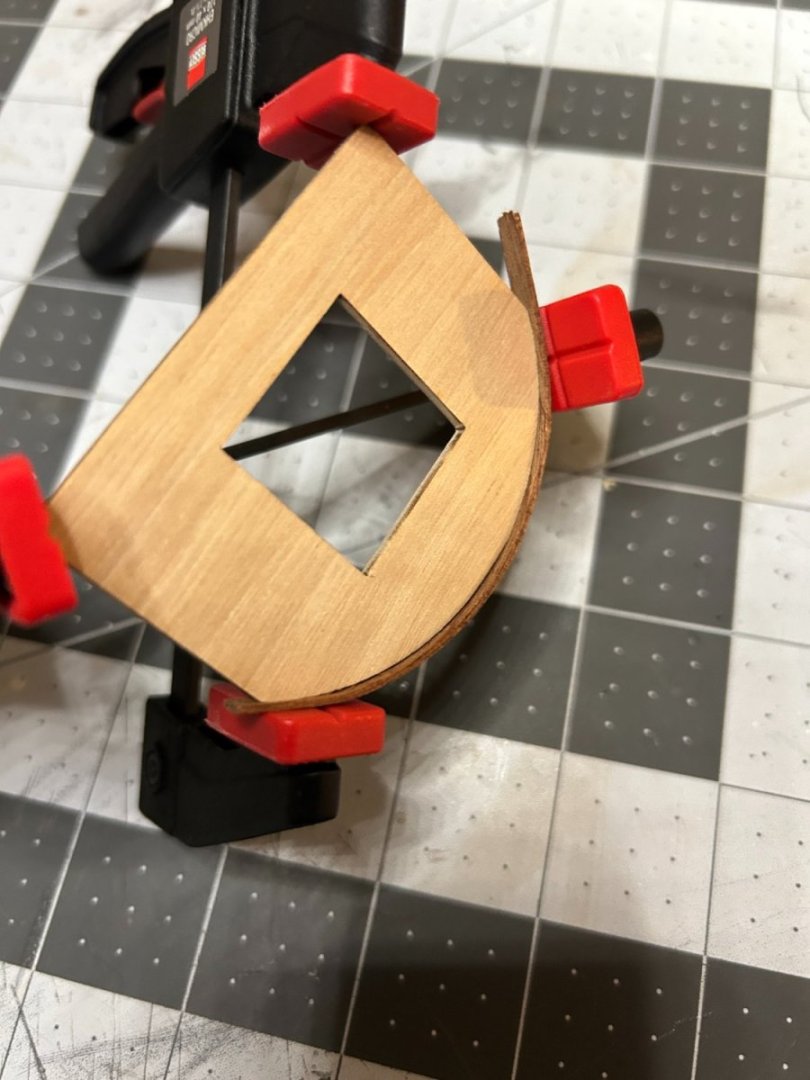
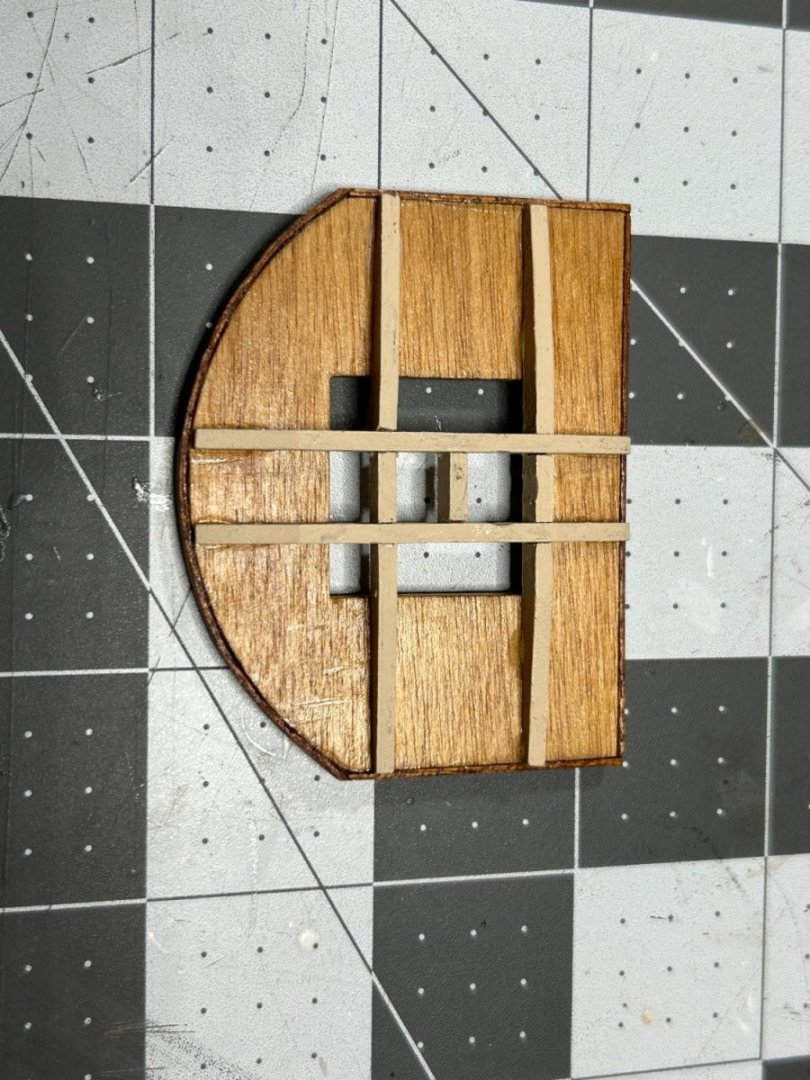
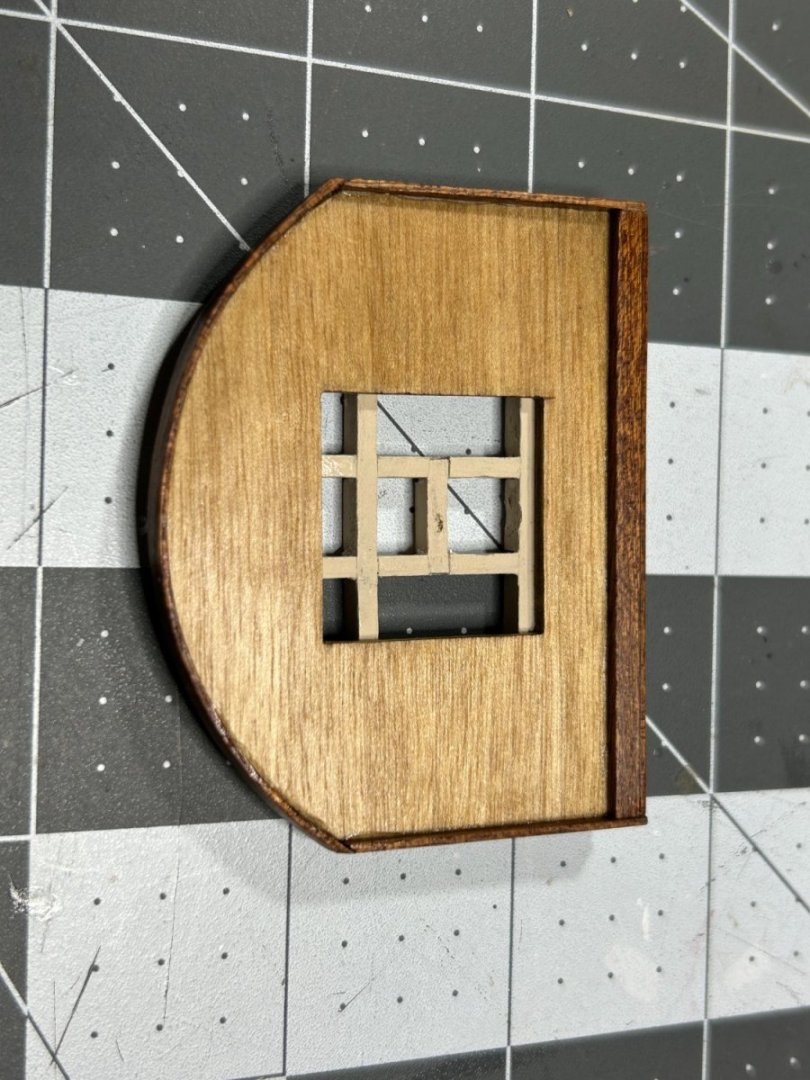
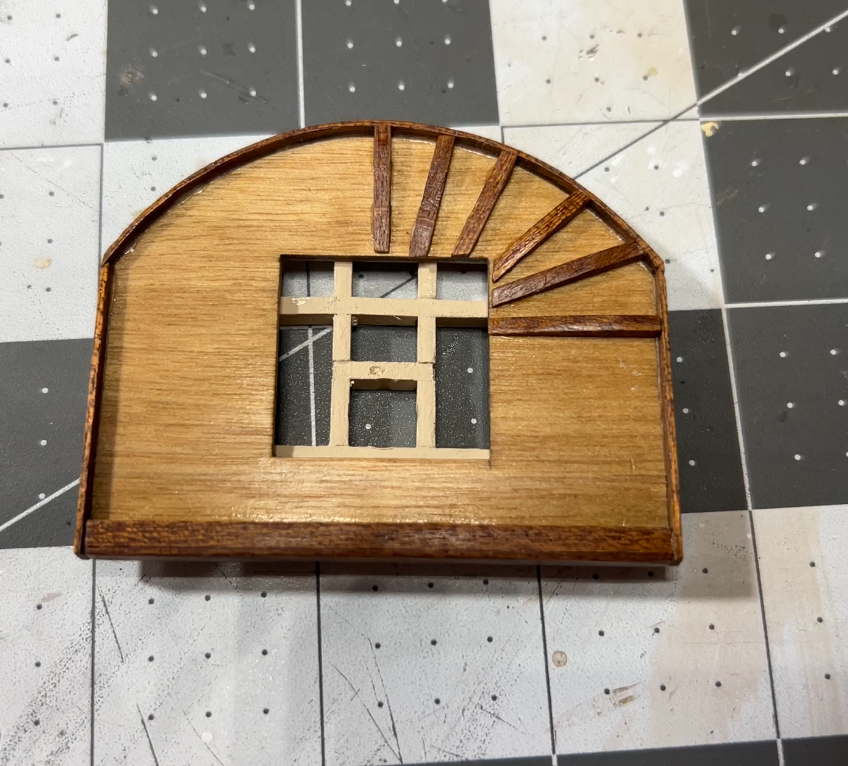
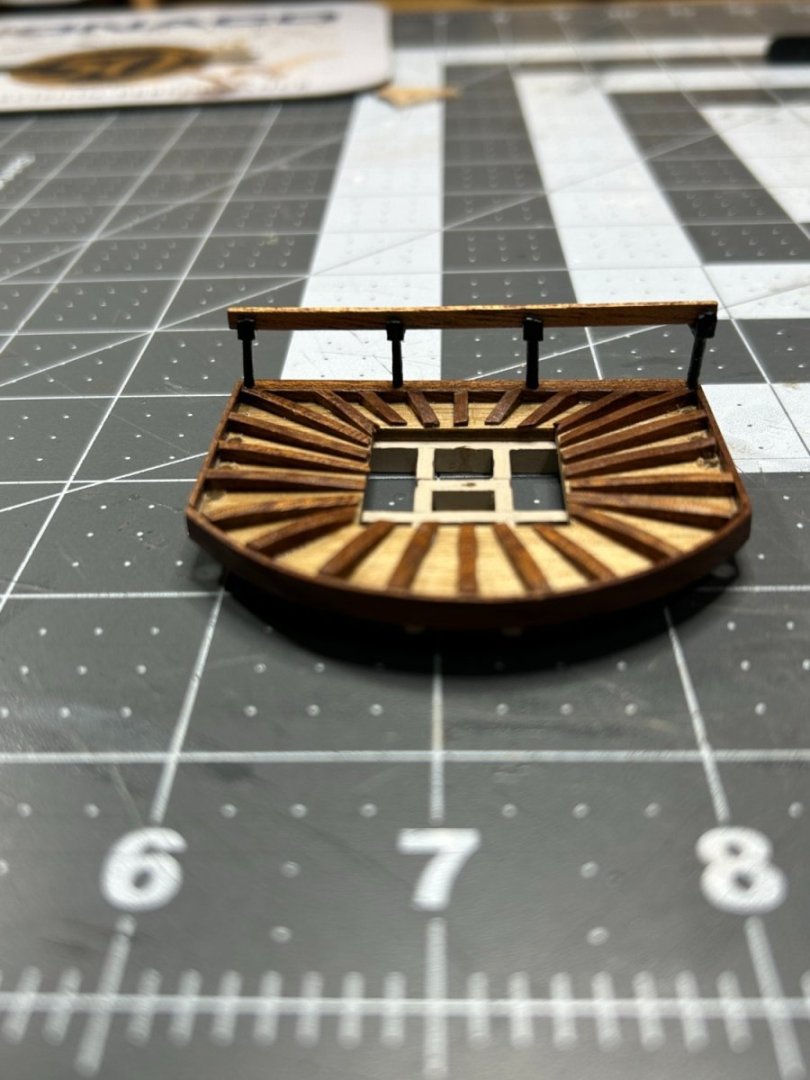
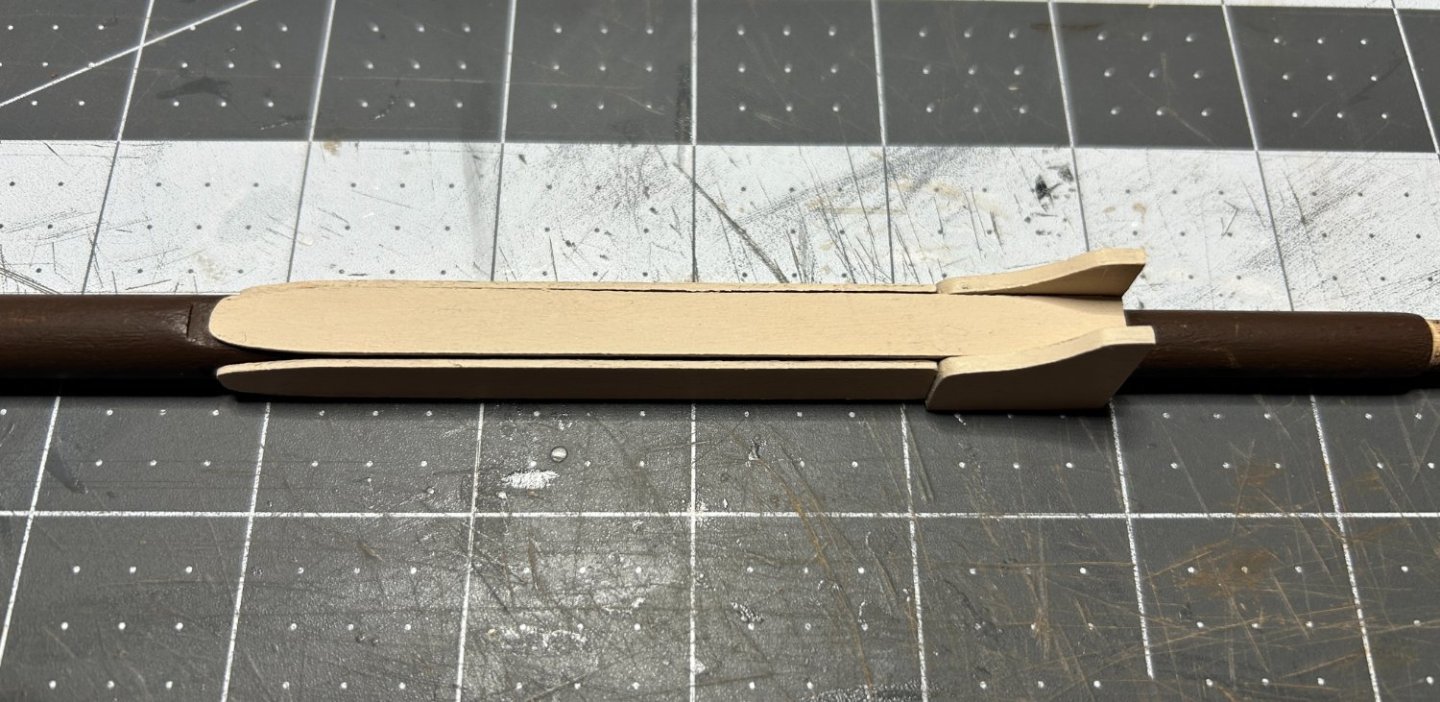
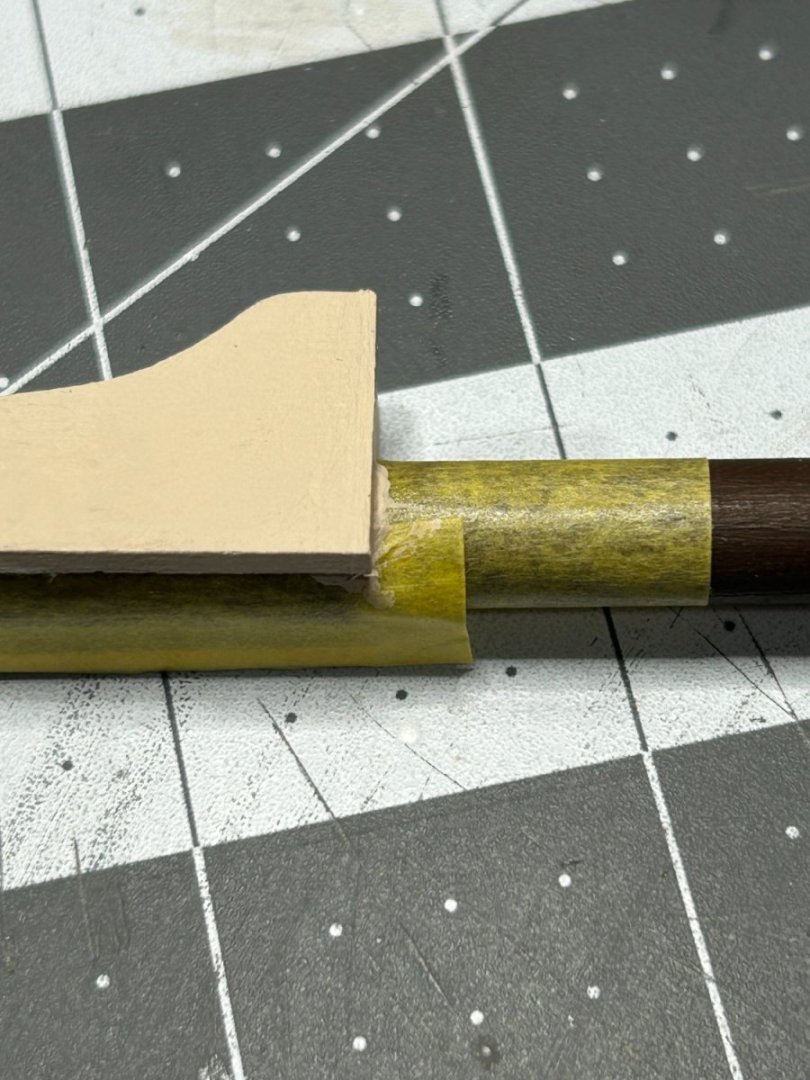
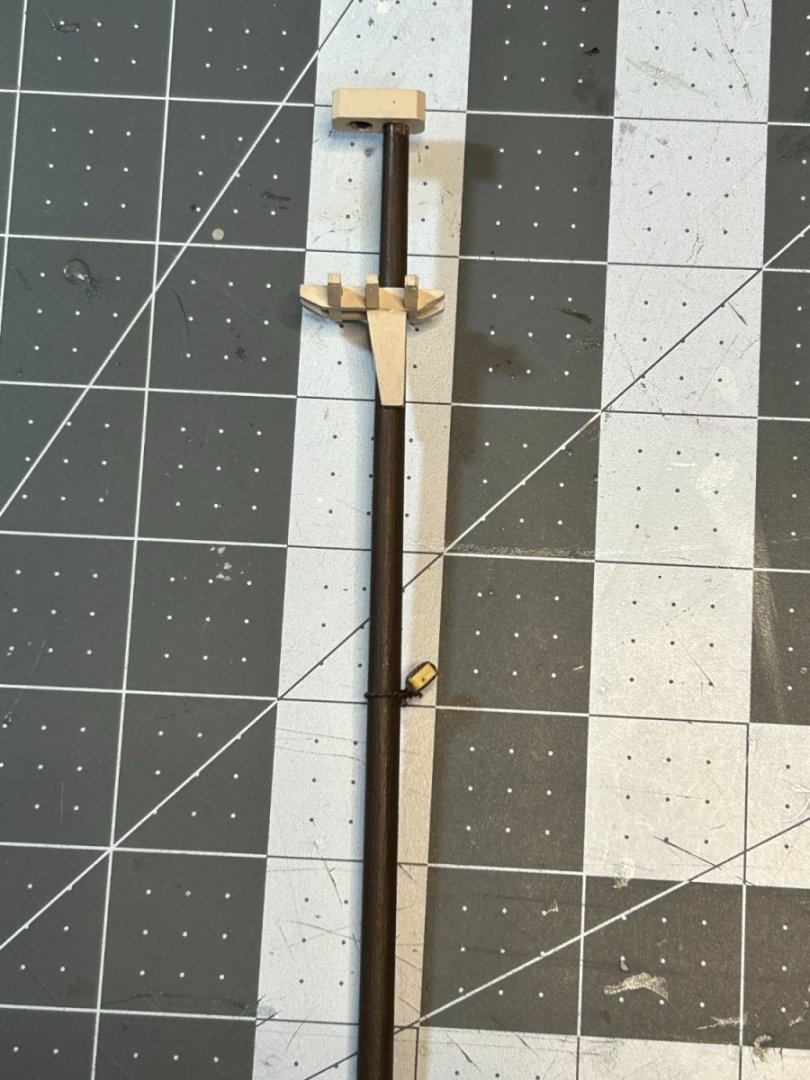
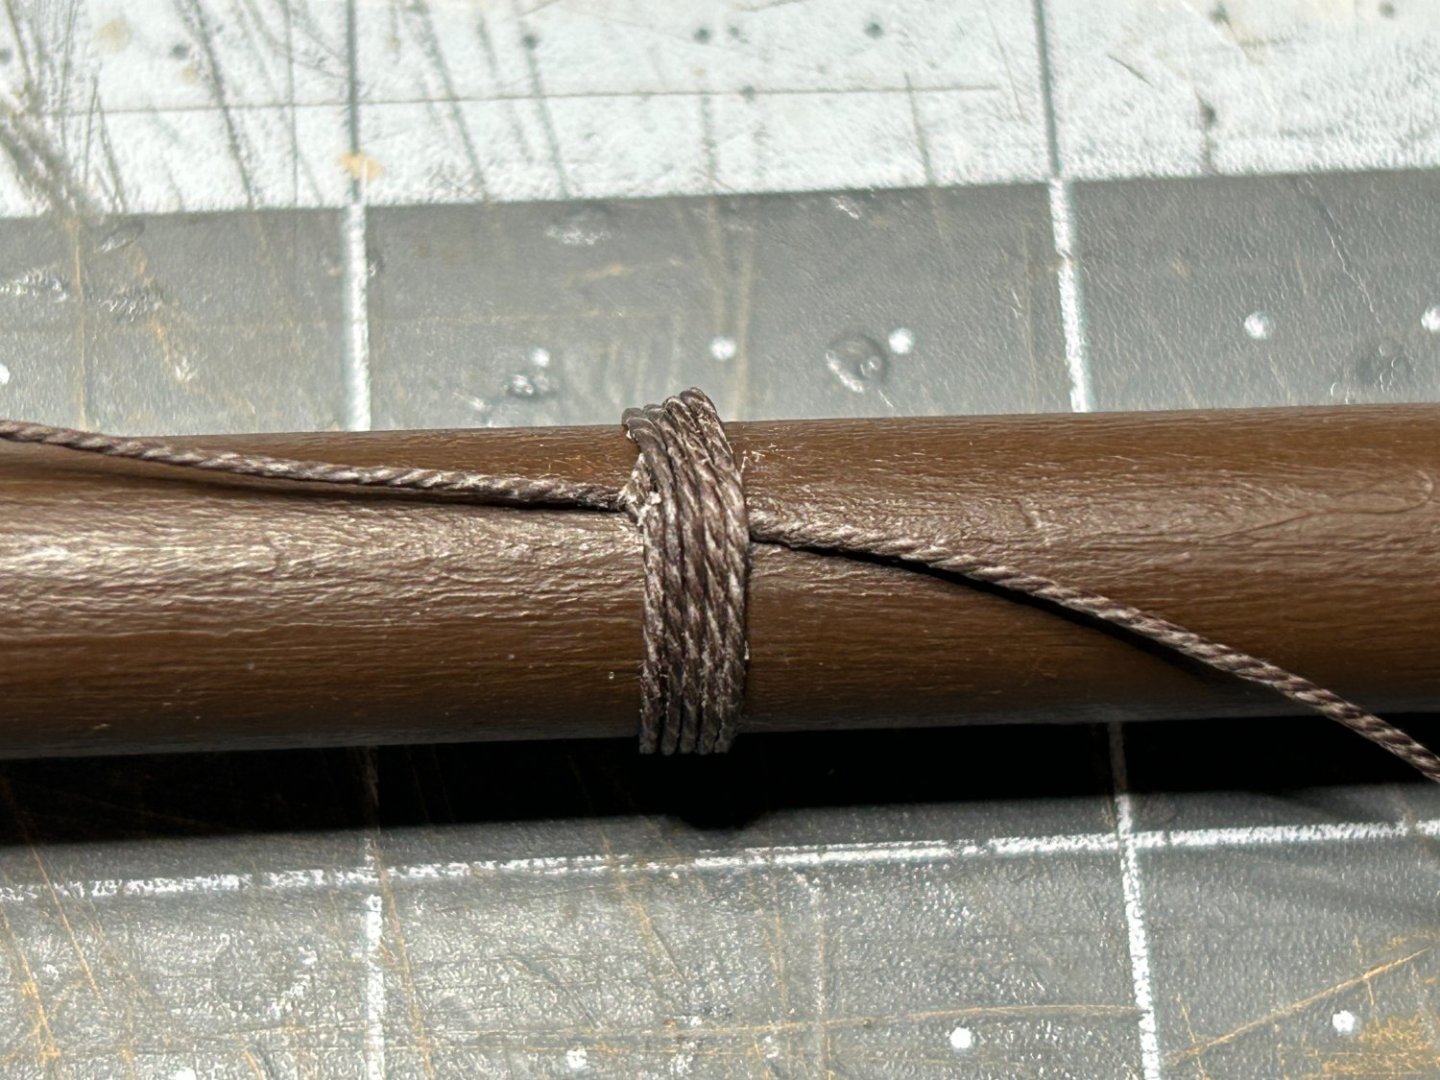
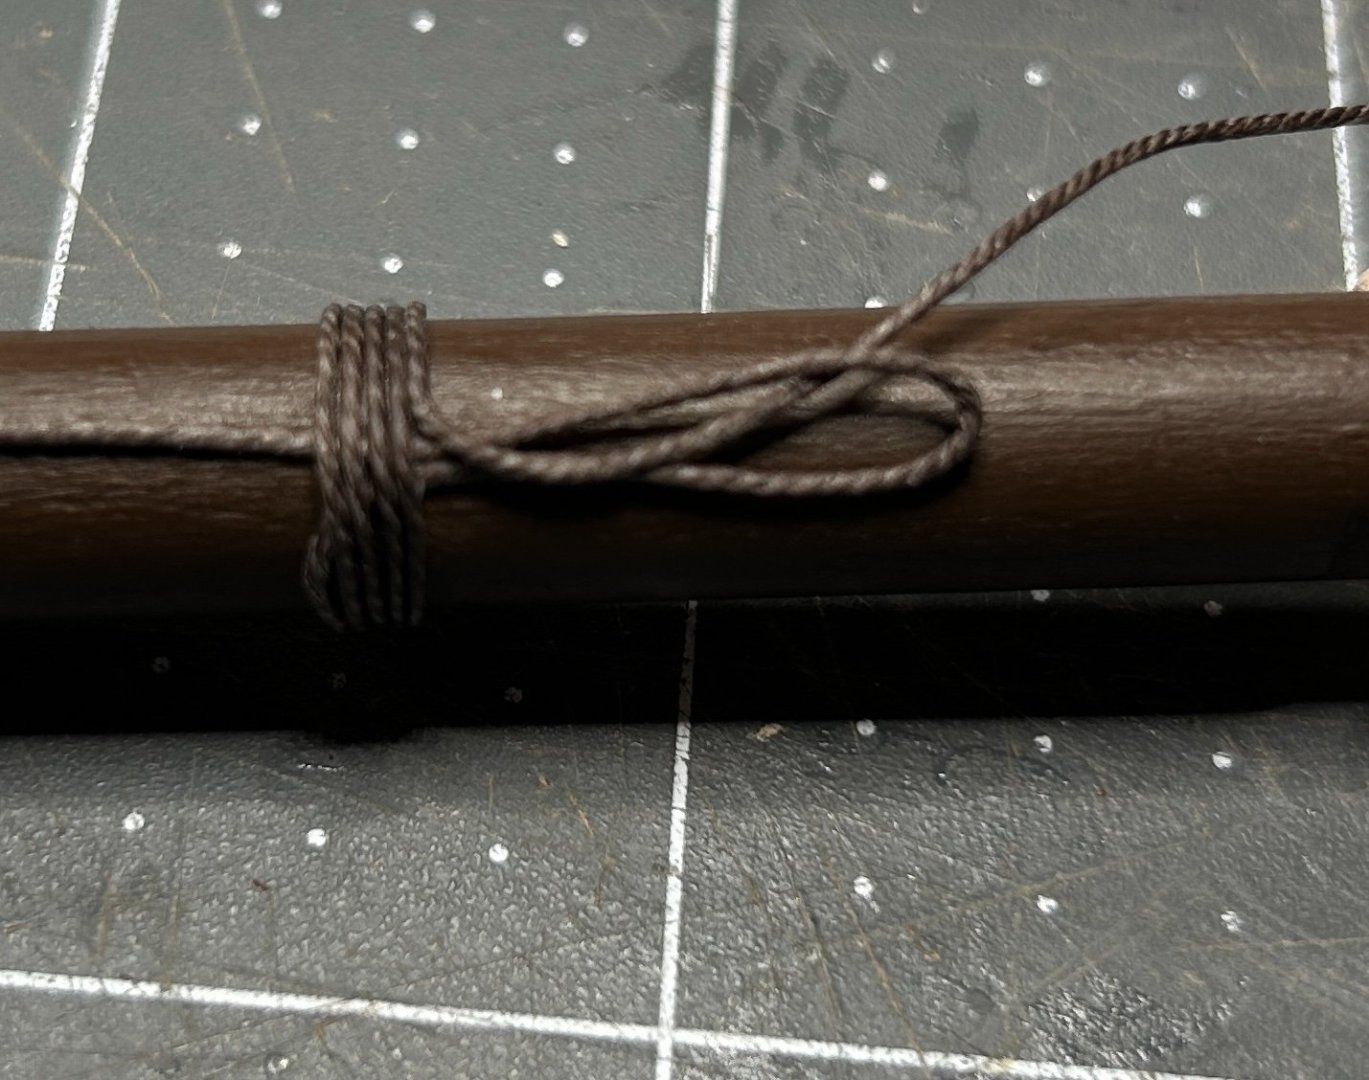
Thanks for all the views and likes on my earlier posts. I realized that I didn't document the building of the foremast components very well, so I took a lot more pictures of the the construction of the main mast and will share them here. On this model the foremast and mainmast are nearly identical except for the main mast being slightly taller. The first thing I did was remove the top from the plywood sheet. I then soaked a section of 1mm x 4mm Sapelli in hot water and used the top as a form and clamped the sapelli to the top to create the curved trim piece for the front of the top. I applied a coat of Minwax Honey Oak stain to the top and then a couple of coats of shellac to the top and the Sapelli trim pieces. The trestle tree is attached to the bottom of the top is painted an off white color that I have been using on the ship. The trim pieces were installed as well as a 2mm x 3mm piece of Sapelli along the aft edge of the top. This provide a solid base for the stanchions that hold the rail along the aft side of the top. Next up was adding the ribs on the top surface of the top. The ribs were made of 2mm x 2mm Sapelli and each rib was beveled toward the center of the top. I created the bevel with a 5 inch disc sander. I added the bevel to the end of a longer piece of wood then cut the length off that I needed for the rib and used the disc sander to add the angles needed at each end of the rib. I have a very inexpensive disk sander that cost about $35 from Menard's on sale. It has its limitations, but, like a lot of people when they start in a hobby like this they can't afford the best of all tools. I found that if I am careful setting the angles on the table and the T-square I can get good results. The distance between the table and the disk is a little bigger than ideal, so really small pieces are a problem, but this is a case where an less expensive tool can still be a good value compared to the more expensive sanders if you understand and accept its limitations. I still hope to get a better machine someday, but I won't feel bad about the $35 spent on this one. After adding the stanchions I fabricated the rail out of a piece of 1/16 x 1/8 inch African Mahogany purchased at a local hobby shop. The kit supplied 1mm x 4mm Sapelli for this and I found it didn't "look" right. The material was too thin to fit snuggly in the stanchions and the 4mm dimension looked way too big for the purpose. I needed to sand the 1/16 inch material a little bit thinner to fit into the stanchions, but I am much happier with this material. I did the same thing with railings on the deck of the ship. The next step was to start fabricating the main mast. a 10 mm dowel was provided for this purpose. the top section needs to be reduced to 8 mm to fit the opening on the trestle tree and for the cap. I reduce the dowel by scoring a line with an Exacto knife and using the knife to remove a little bit of material above that line. I then use a small plane to remove additional material. I then carefully put the dowel into my drill and use sand paper to round the section that has been planed. Arrow #1 in the below picture shows this section of the mast. I then sanded either side of the mast flat on a section just below the narrowed section to facilitate gluing the bibs on securely. Arrow #2 shows this section. I then sanded the section below the bibs and on the front of the mast flat to facilitate gluing the cheeks. I didn't sand this section as much, because the material for the cheeks was thinner than the bibs and I wanted to minimize the step between the bib and the check. Arrow #3 shows this section. The bibs were laser cut plywood and the cheeks were fabricated out of 1 mm x 8 mm Lime wood. They were painted the same off white as the trestle tree They were glued to the mast after the mast was painted dark brown. At this point I ran into a problem. I didn't get the bibs attached level with each other. I already had the checks attached and didn't want want to remove everything. I decided to add a shim to the top of the the bib that was too low. After sanding and paint, it hardly shows. Next up was the top mast. This started as a 6 mm dowel that tapered down to 4 mm at the top. I used a plane to remove most of the material and then my drill and some sand paper to smooth everything out and get the taper just right. I sanded the areas that the bibs were glued to so I would have a flat surface, and assembled the cross tree from the laser cut parts. The top gallant mast is made from a 4 mm dowel that was tapered down to 3 mm at the top using the same method as the top mast. The blocks for both sets of the lifts are attached to a single line and attached to the mast using a clove hitch. The blocks for the halyards are seized to the mast above the clove hitch for the lifts. Next was the wooldings. I used this technique on my HMS Beagle, I think Eck recently demonstrated it on his Indefatigable build log also (I think it was Eck, it was one of the other great Indy build logs I am sorry). I create a loop with my line and then wrap the line across itself towards the loop. then pass the line through the loop and pull snug. If adding a block I just seize the block to a loop of line and pass the wooding through the loop. There is a Youtube video demonstrating this on the bow sprit of a Santisima Trinidad build. Next up will be the channels and chain plates. Work will be keeping me busy for the next 4 - 6 weeks, so I probably won't have anything to post for quite awhile. Thanks, and enjoy the holidays over the next week or so.


-
They aren’t separate goals, but I believe by choosing a ship like the Beagle for my first build may have slowed my skill development compared to building simpler builds like some of the Modelshipways kits. I just prioritized a kit I found more interesting. Skills still developed, just at a different pace and different order perhaps.
-
I started with HMS Beagle and my second build is the frigate Diana both from Occre. I have enjoyed hundreds of hours building these and don’t regret my choice of models. However, I have no doubt that my skill as a model builder would have been better served starting smaller. As I am a couple years into the hobby I do wonder if I went about this the right way. Decide if you primary goal is to develope skills that will result in later building your “master piece” or are you willing to sacrifice some of your skill development for a subject matter you find more interesting. I have the US Brig Syren on the shelf and I won’t start that one until I am confident my skills will do it justice. while the cost of a kit is high, the per hour cost of the hobby is incredibly low compared to my other hobby of golf. Good luck on your next build whatever you decide.
-
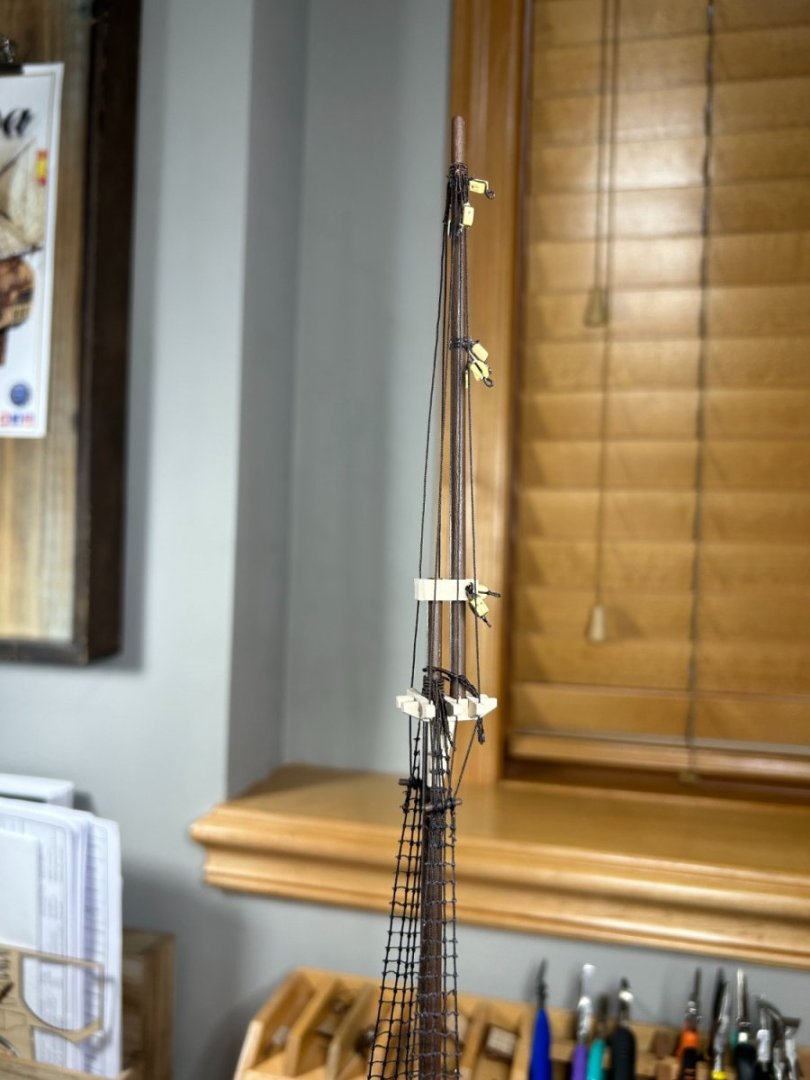
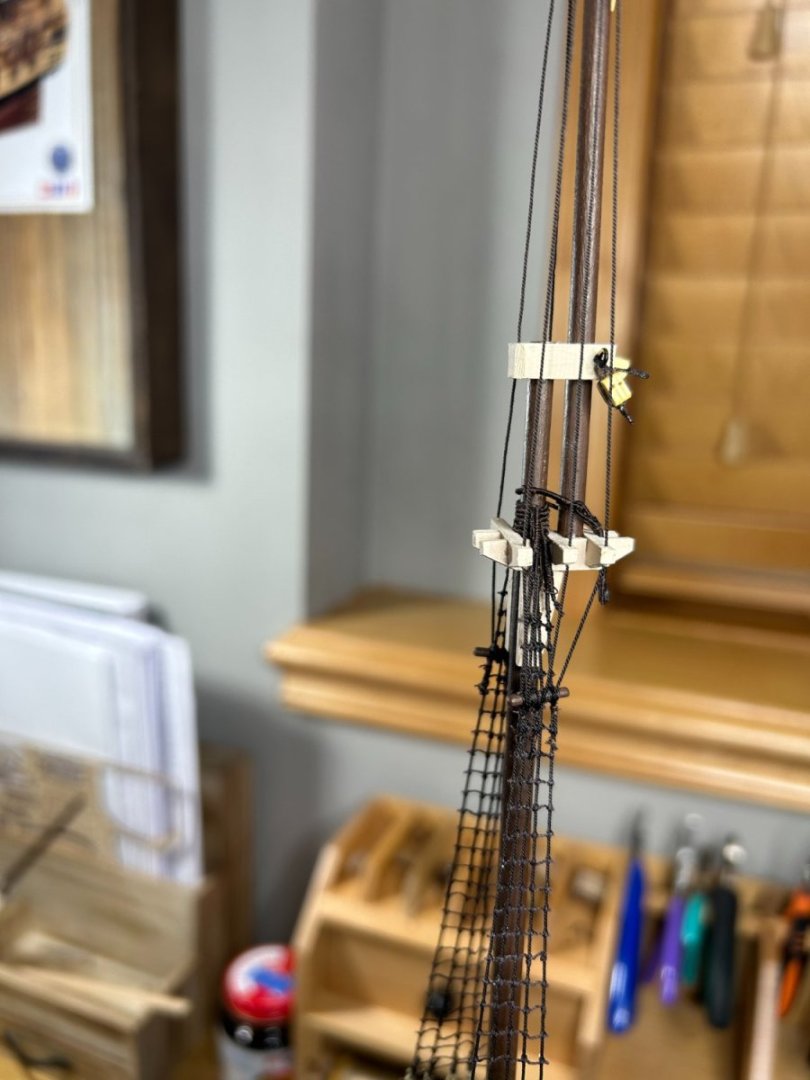
I have finished the top gallant shrouds on the foremast. My plan is to build each mast and then add the shrouds for that mast. After the three masts are installed with their shrouds I will add the bow sprite which I have already build and add the stays and back stays, then I will start building and adding the yards. I am pretty happy with the rigging so far. The futtock shrouds and stave just below the top gallant shrouds were tough to get tied properly. Not a lot of space to work with. Now on the the main mast. I don't think I took very many pictures when I built the fore mast, so I will try to get a few more as I build the main mast.
- 142 replies
-
- 10
-


.jpg.5ac203e77a5d526861e46b26cbfff443.jpg)