Der Alte Rentner
-
Posts
292 -
Joined
-
Last visited
Content Type
Profiles
Forums
Gallery
Events
Everything posted by Der Alte Rentner
-
 Did my homework.. Spun my wheels, and made these parts no less than three times. (too much whittling, ugh). Installed them and then made a little progress on the planking front. For the foreseeable future, I'll be working upside down...
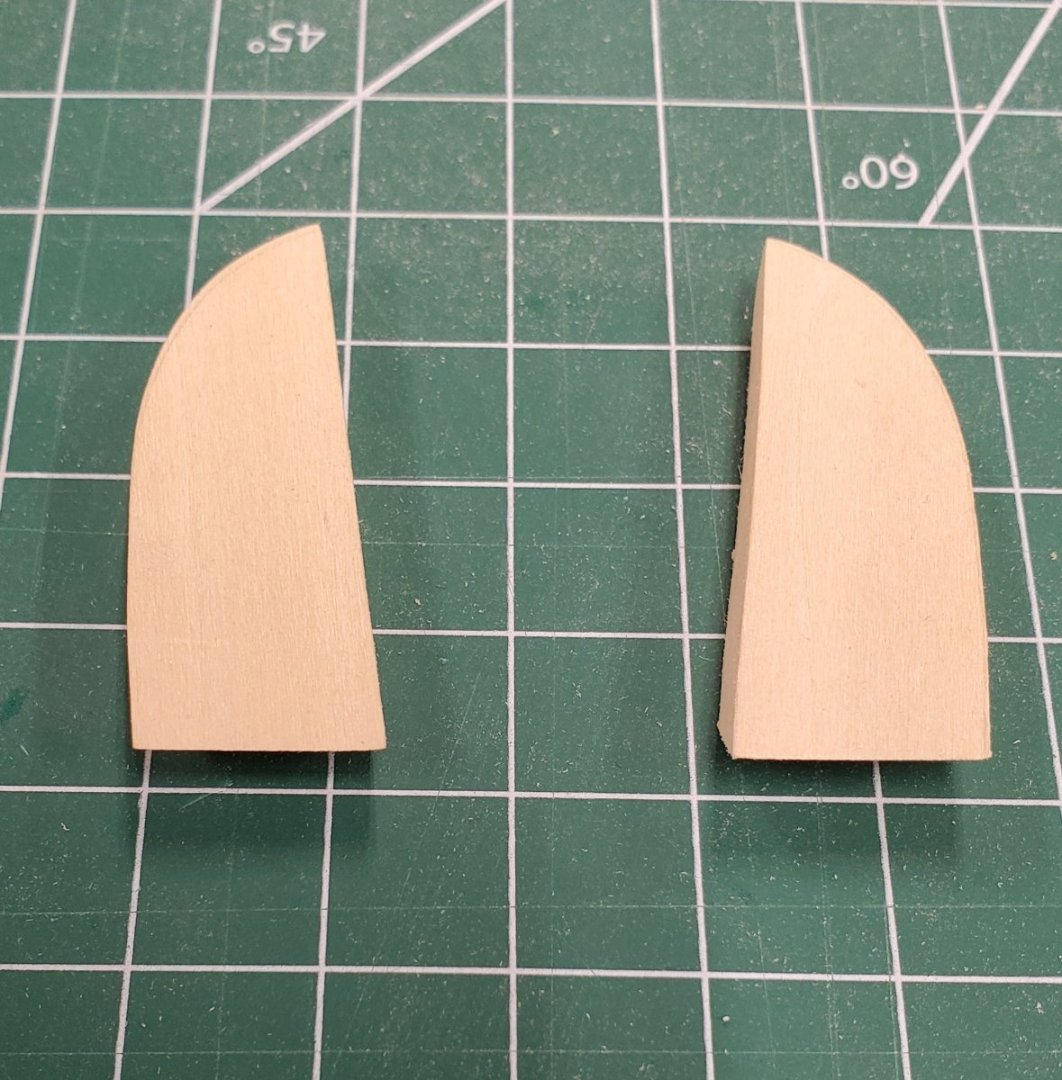


-
Thank you kindly, sir! Many hours at the shop today with little to nothing to show for it. I'll resume after the pulled-out hair grows back. I suspect there will be wood putty application in the immediate future..
-
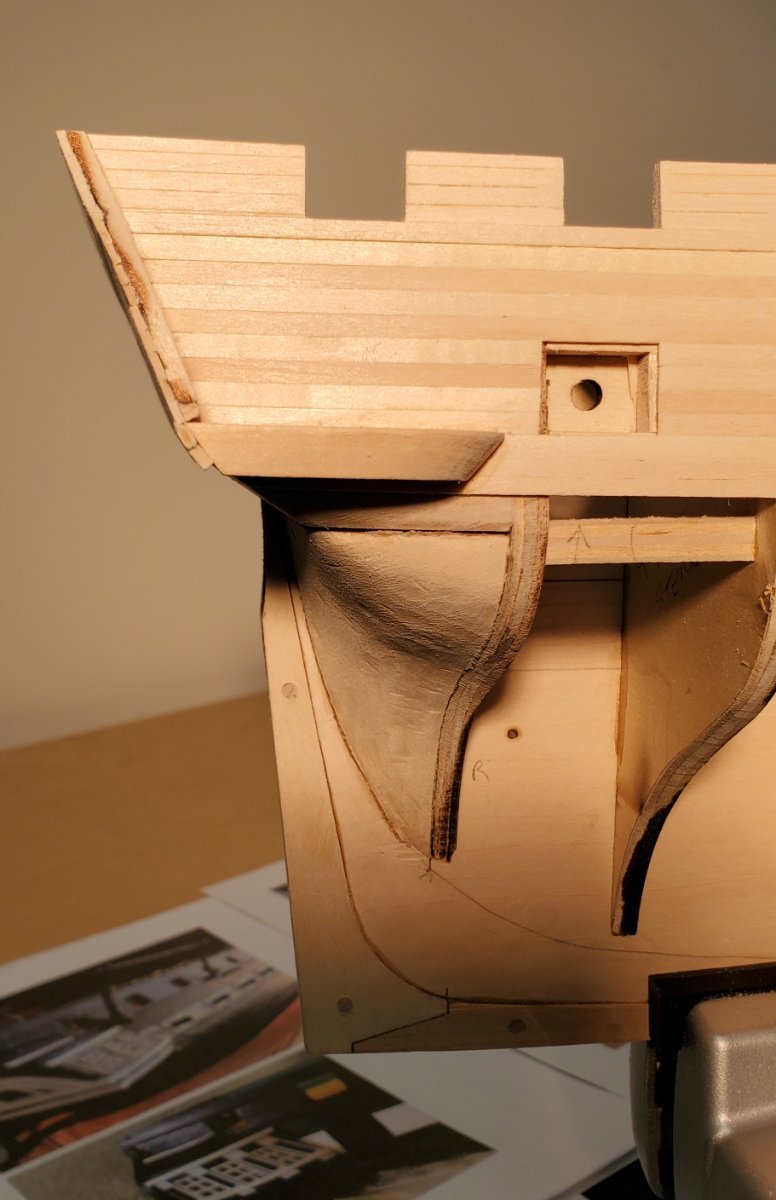
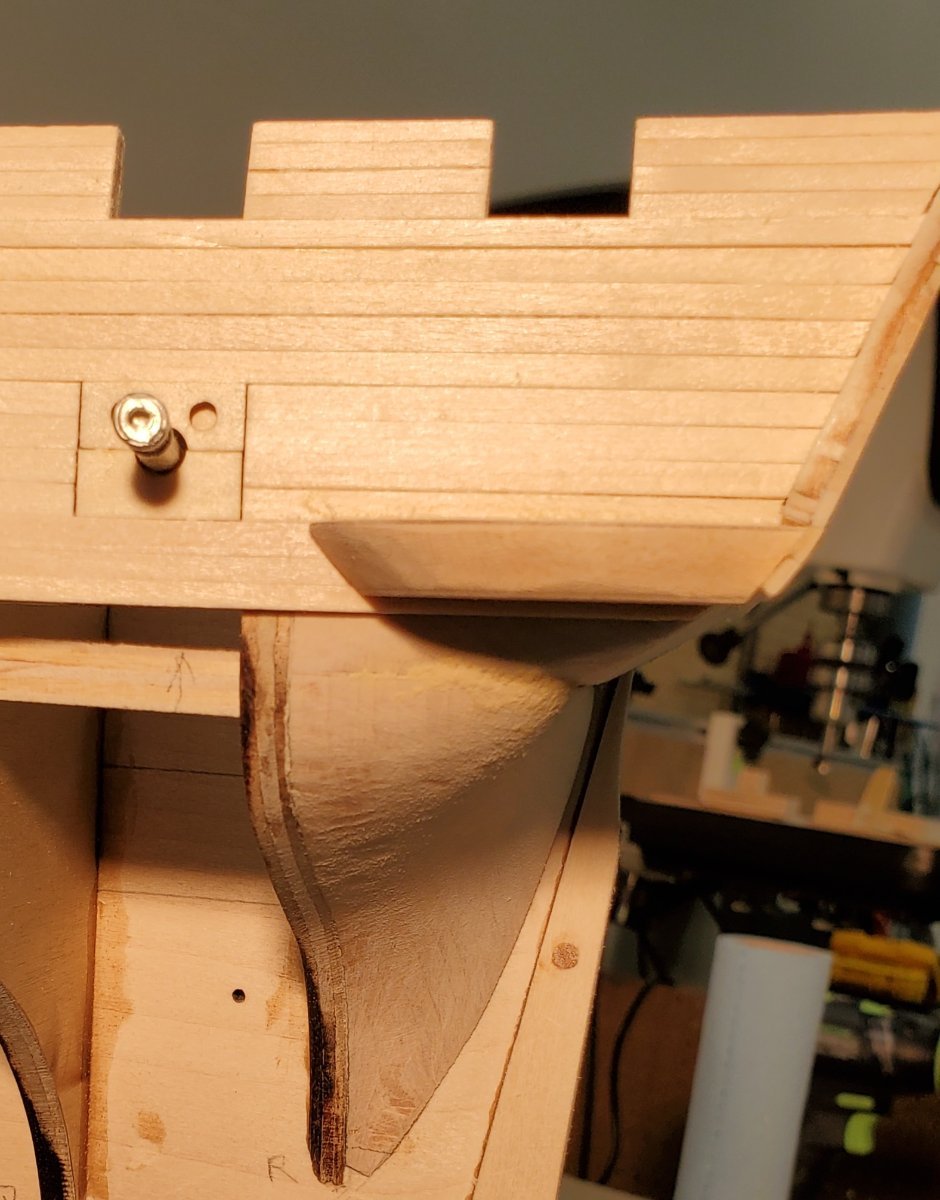
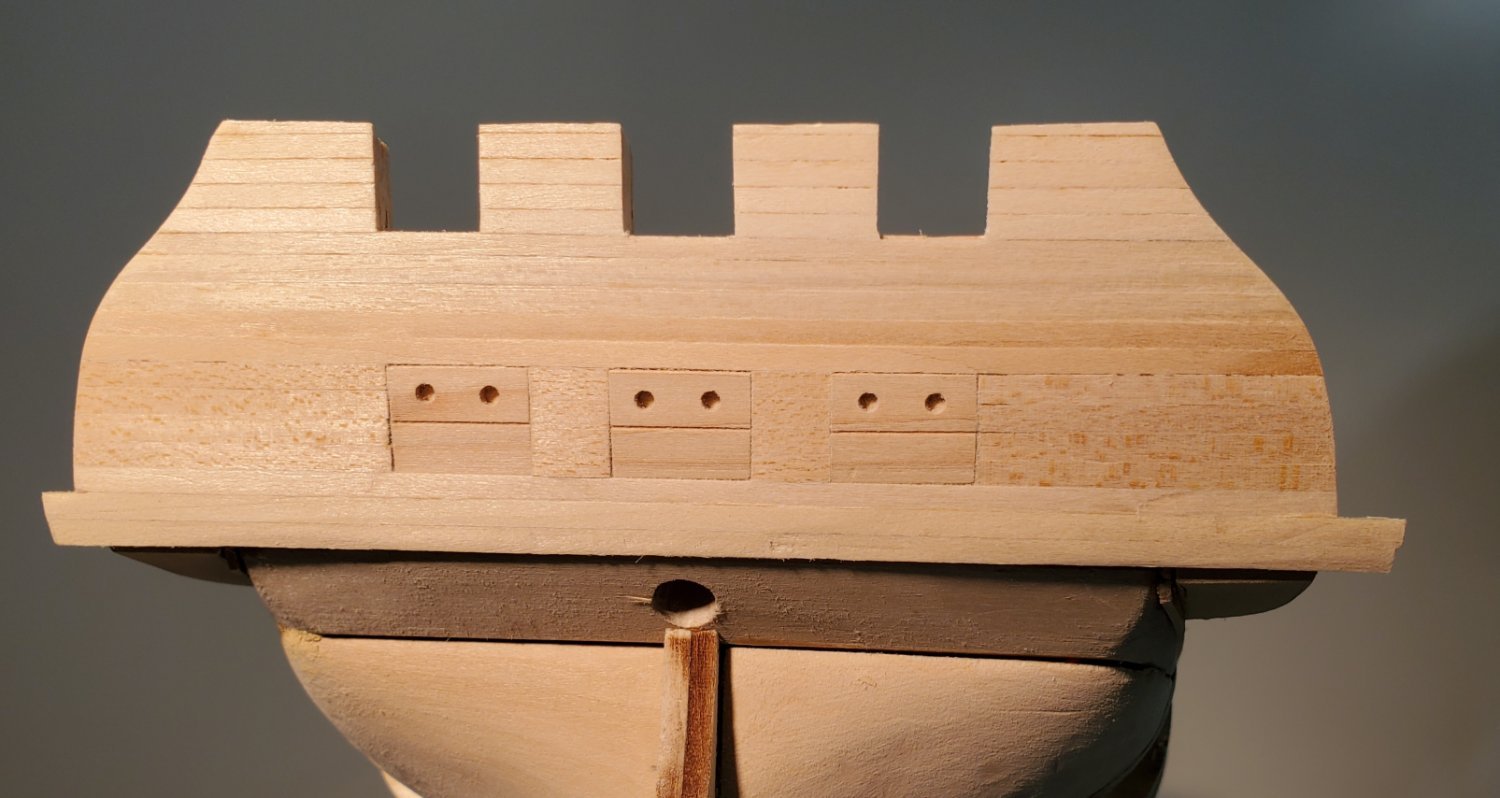
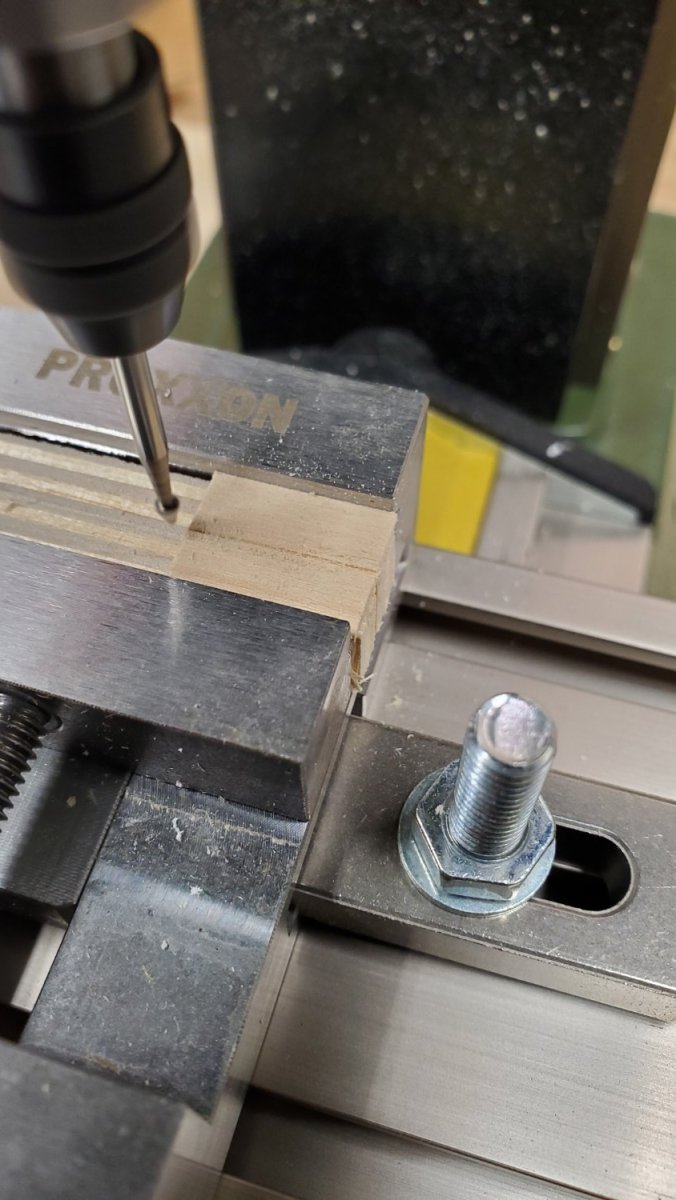
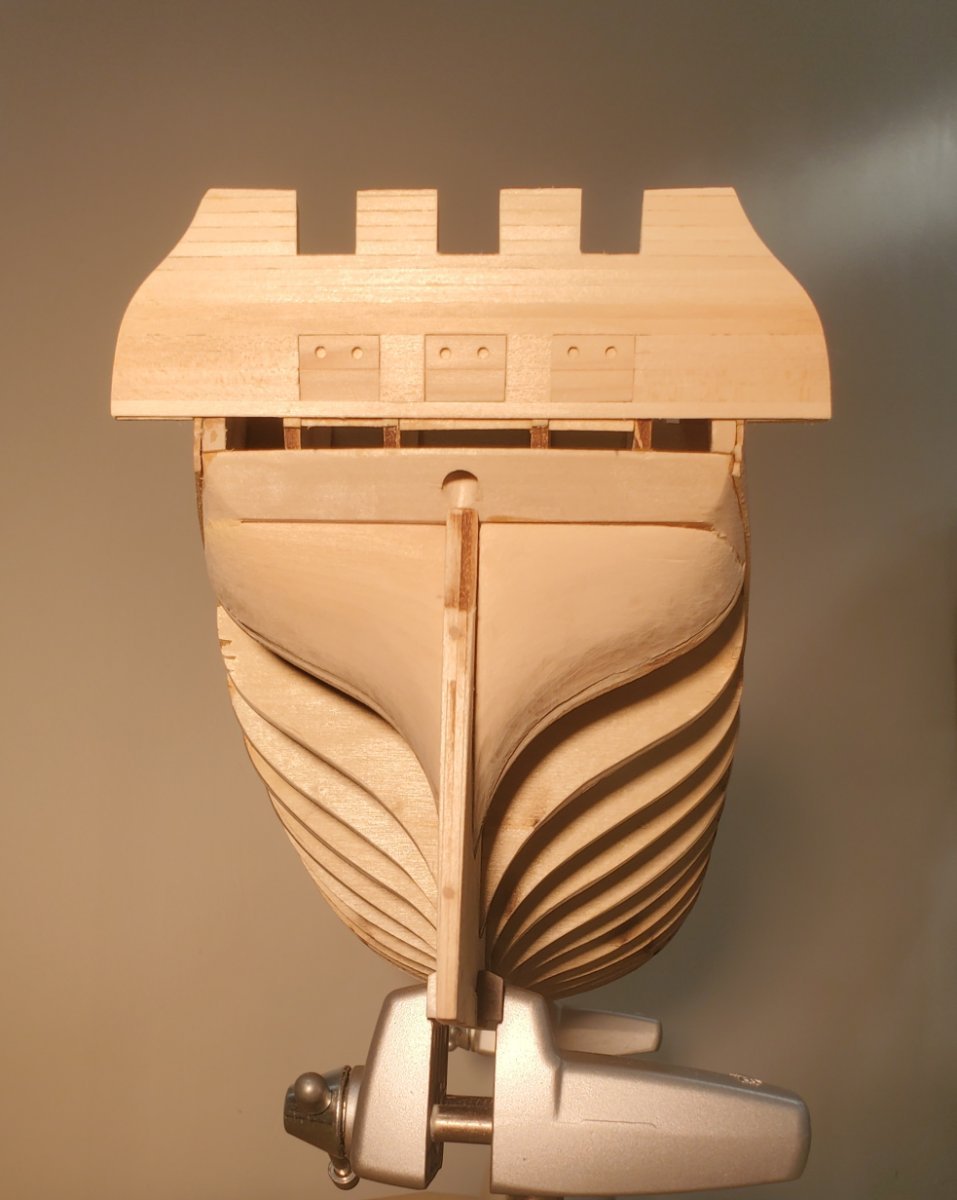
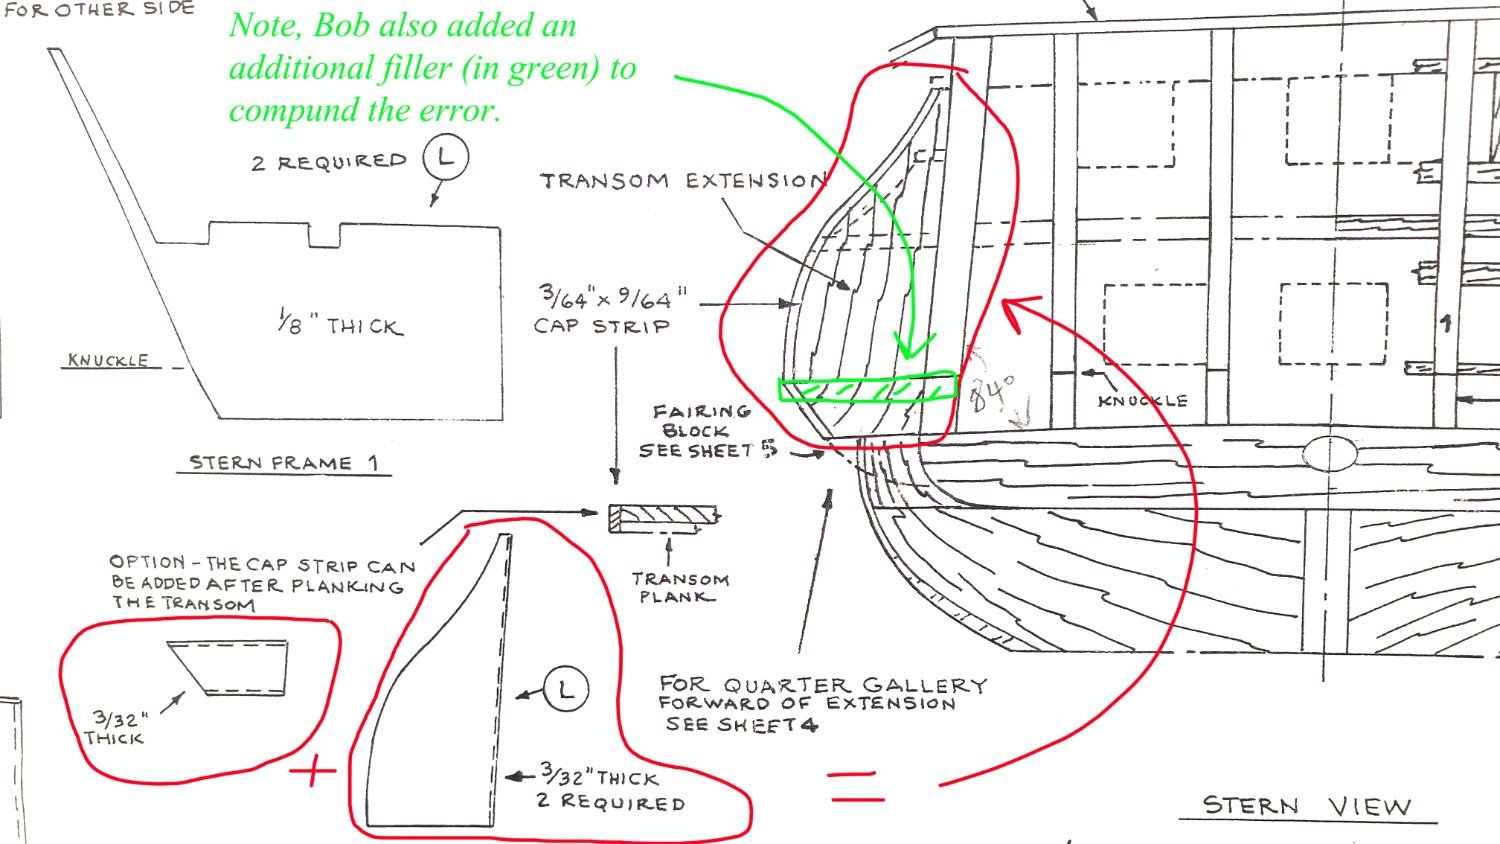
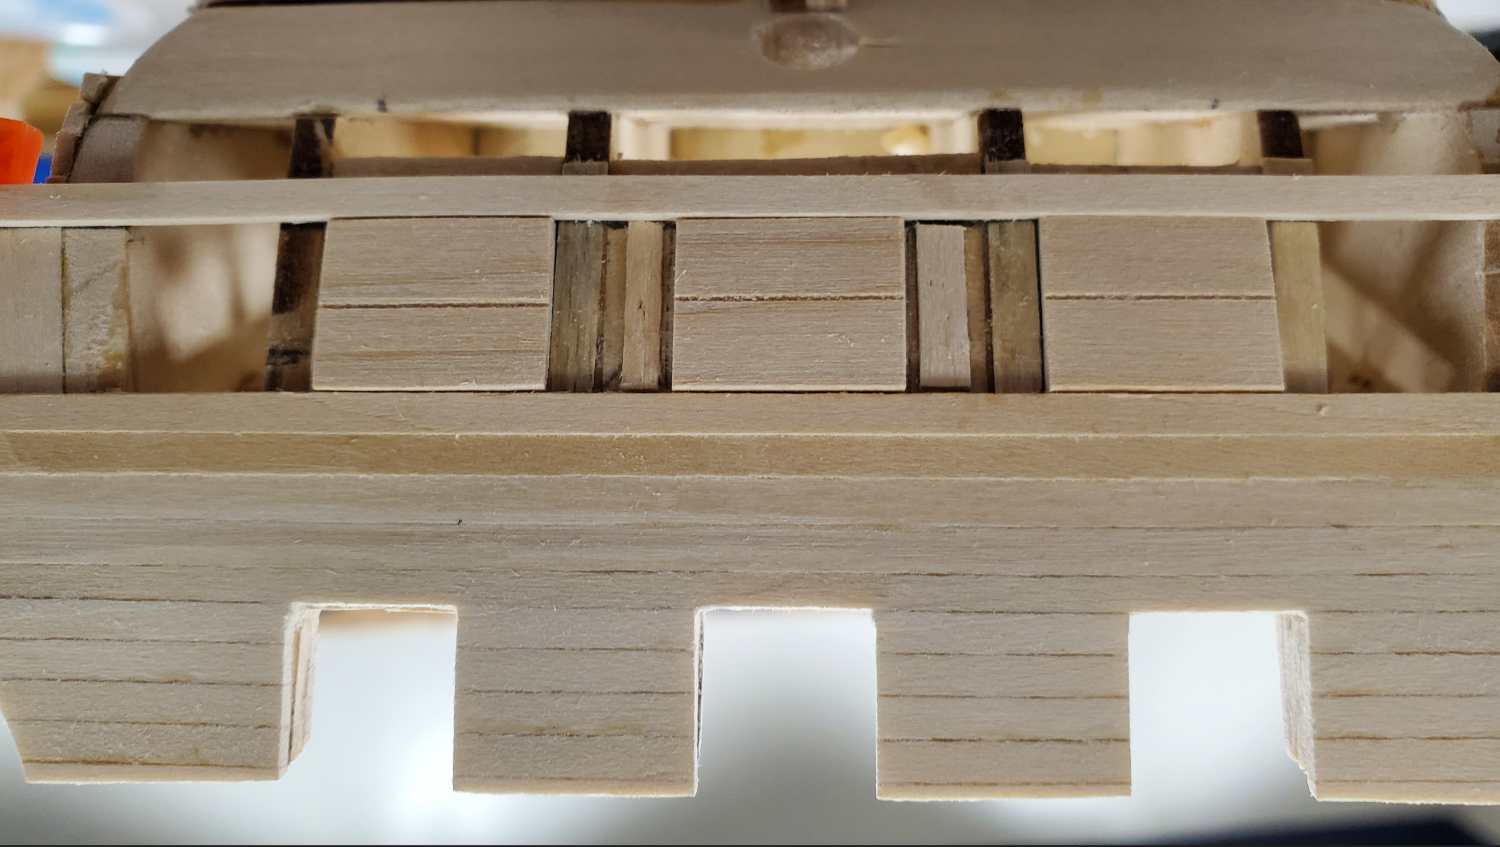
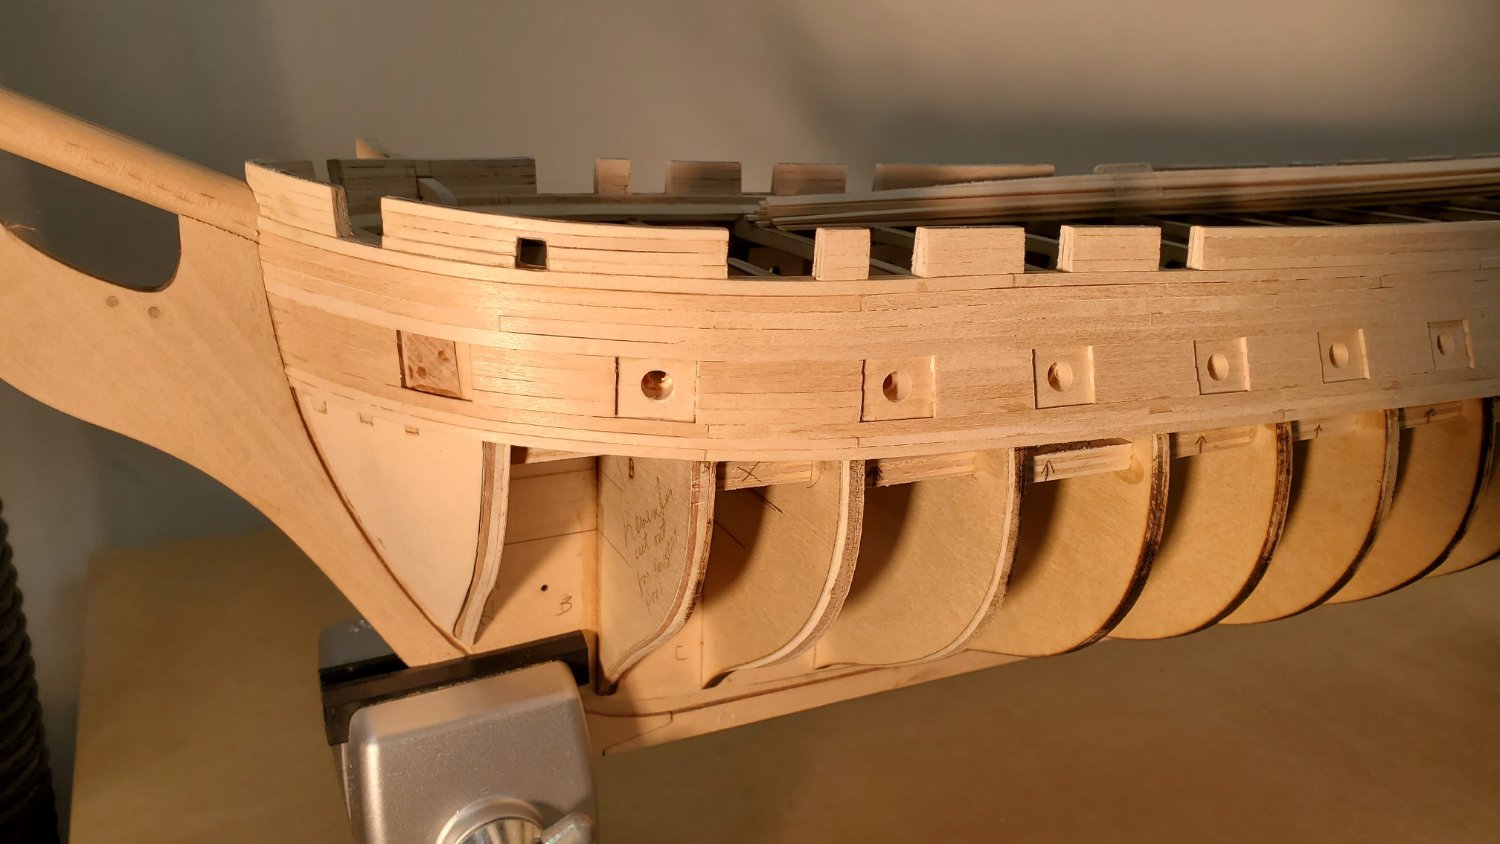
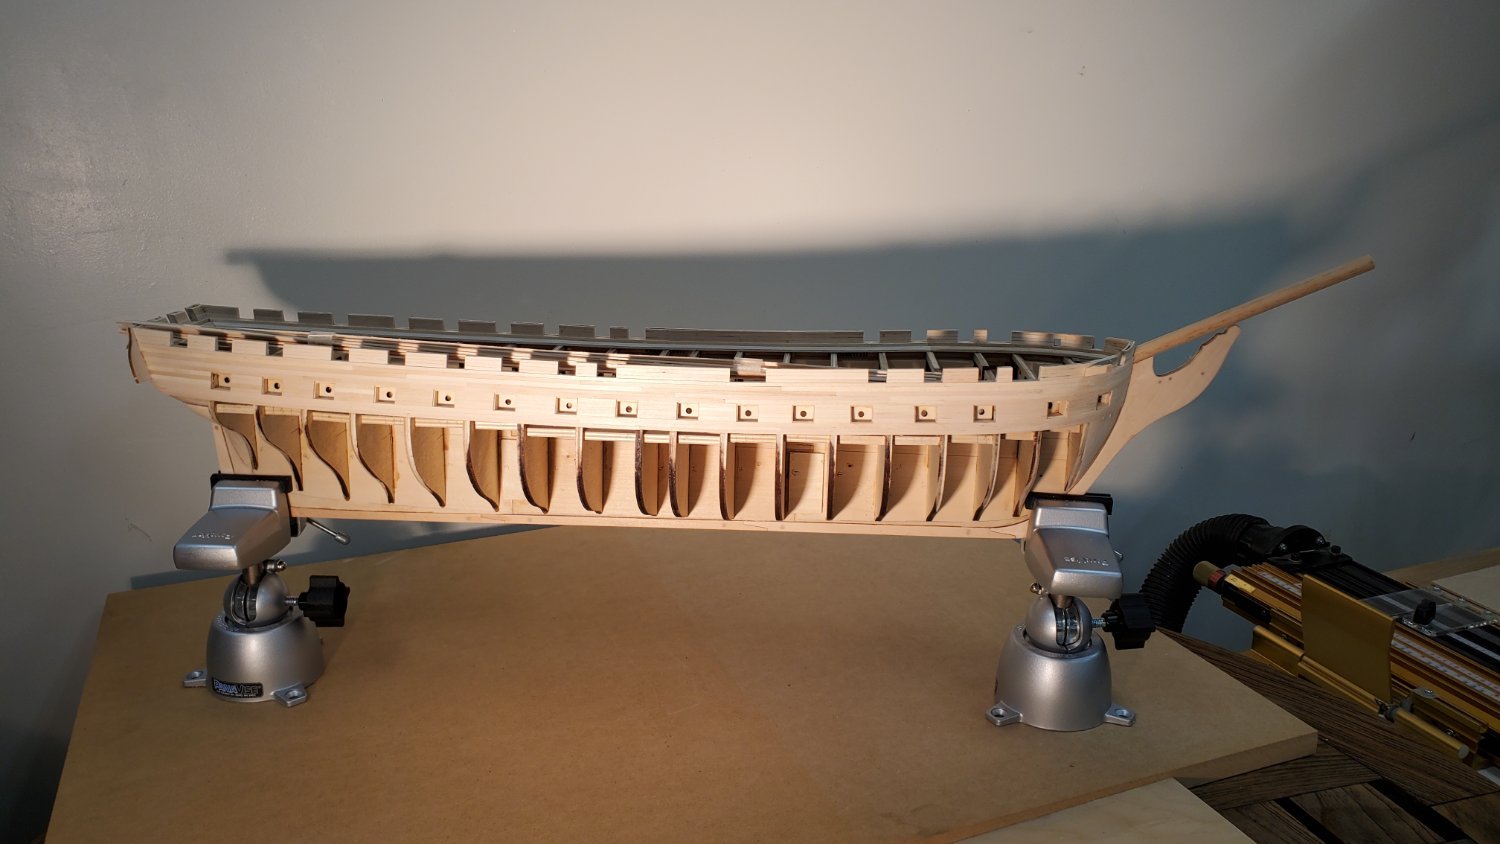
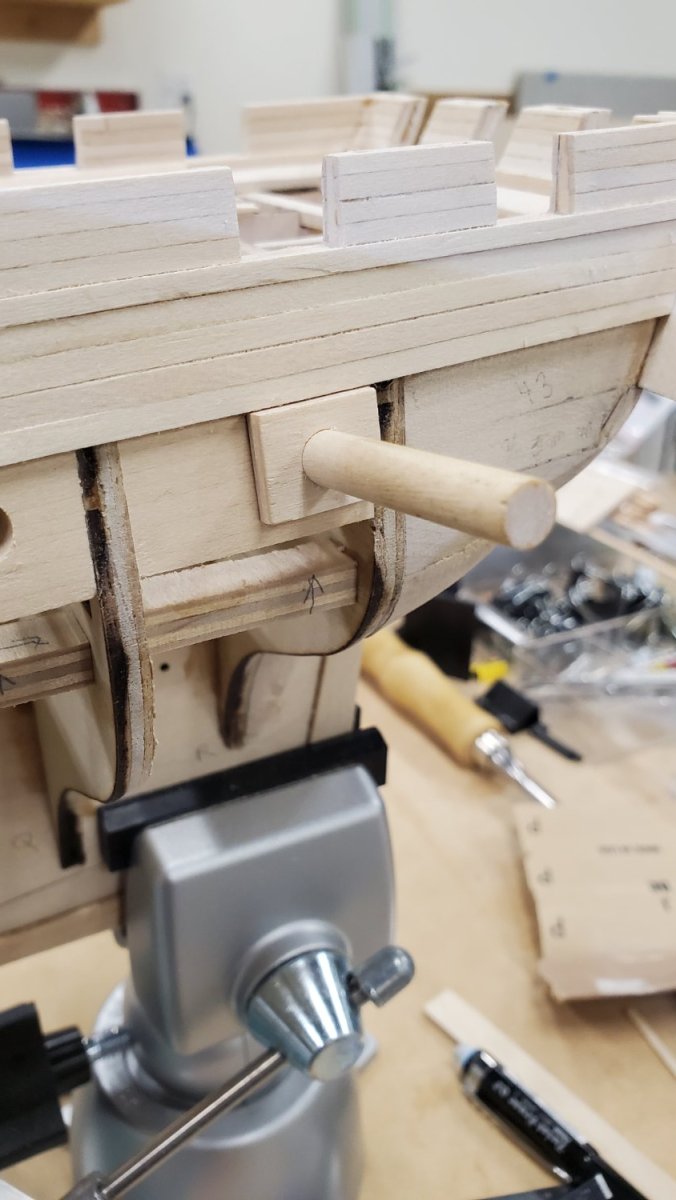
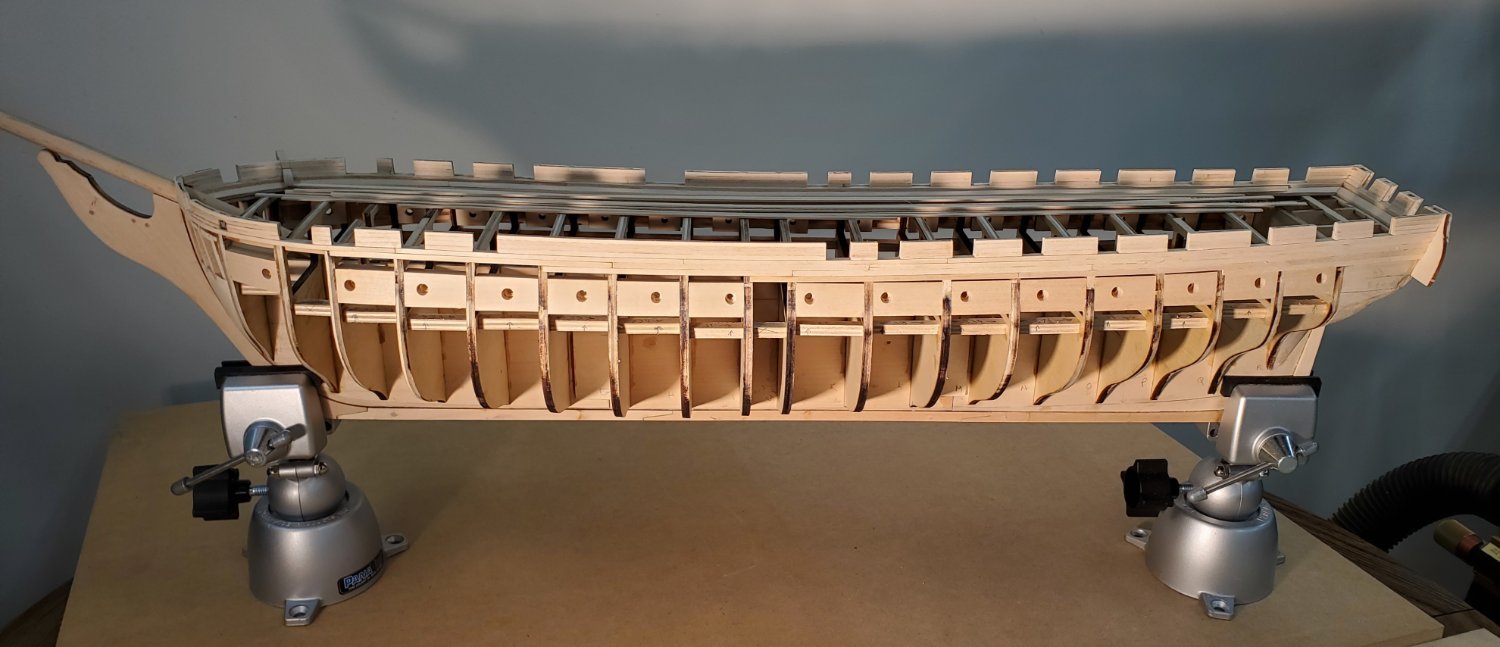
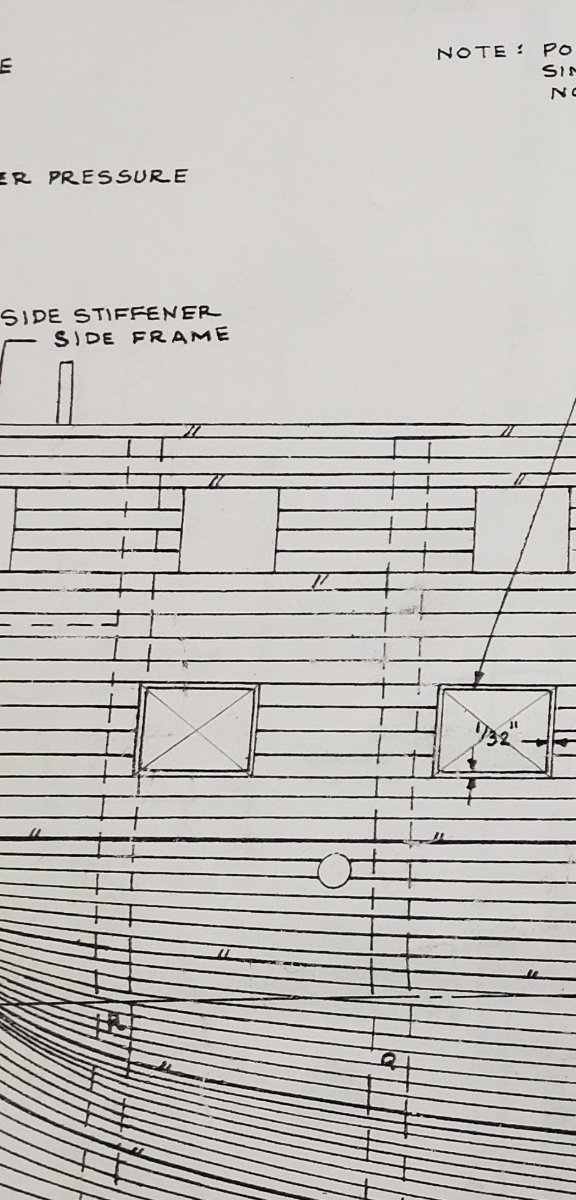
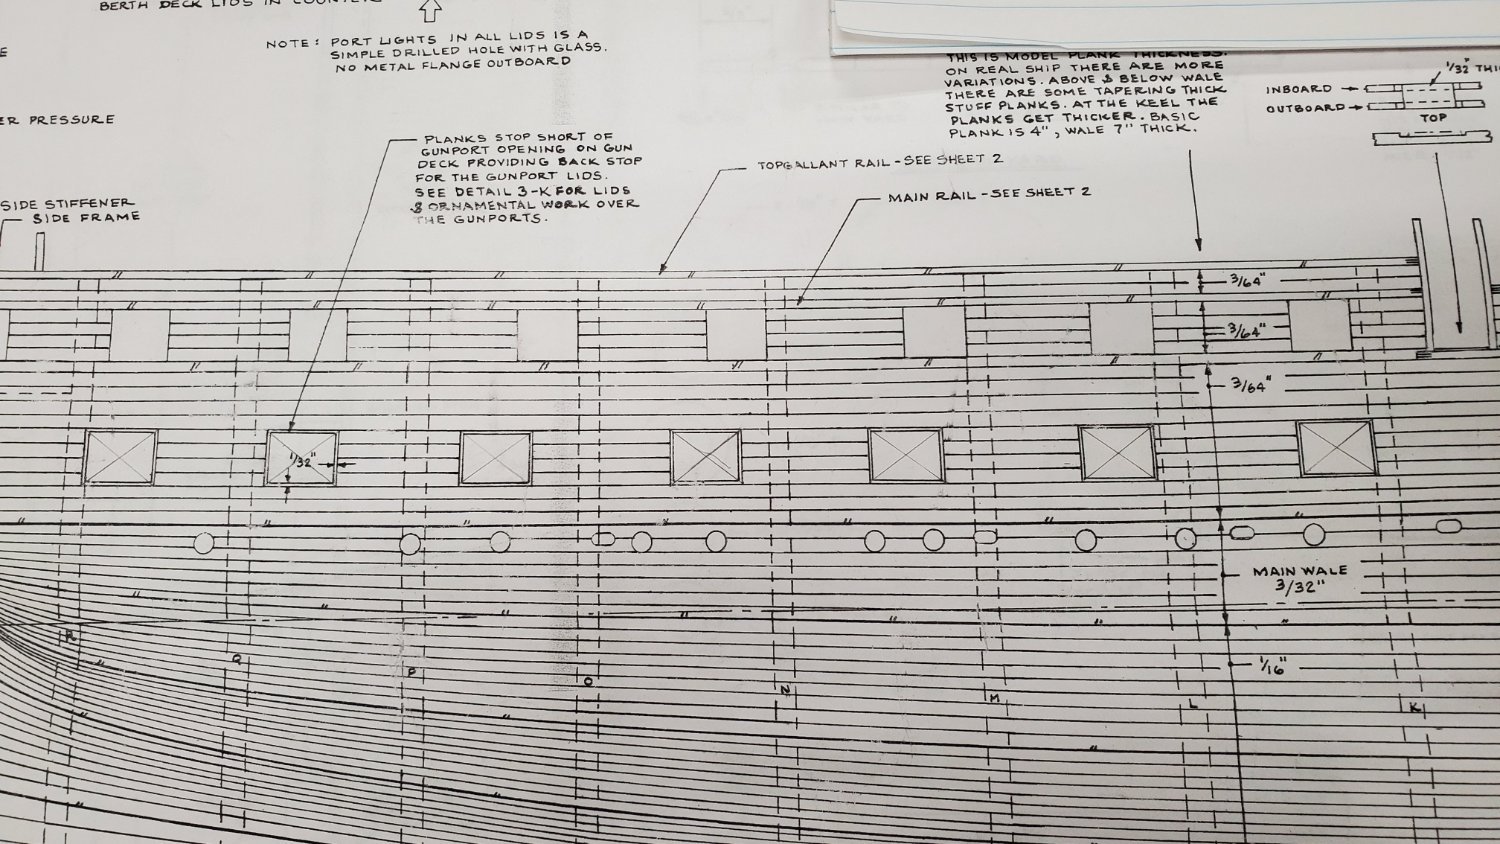
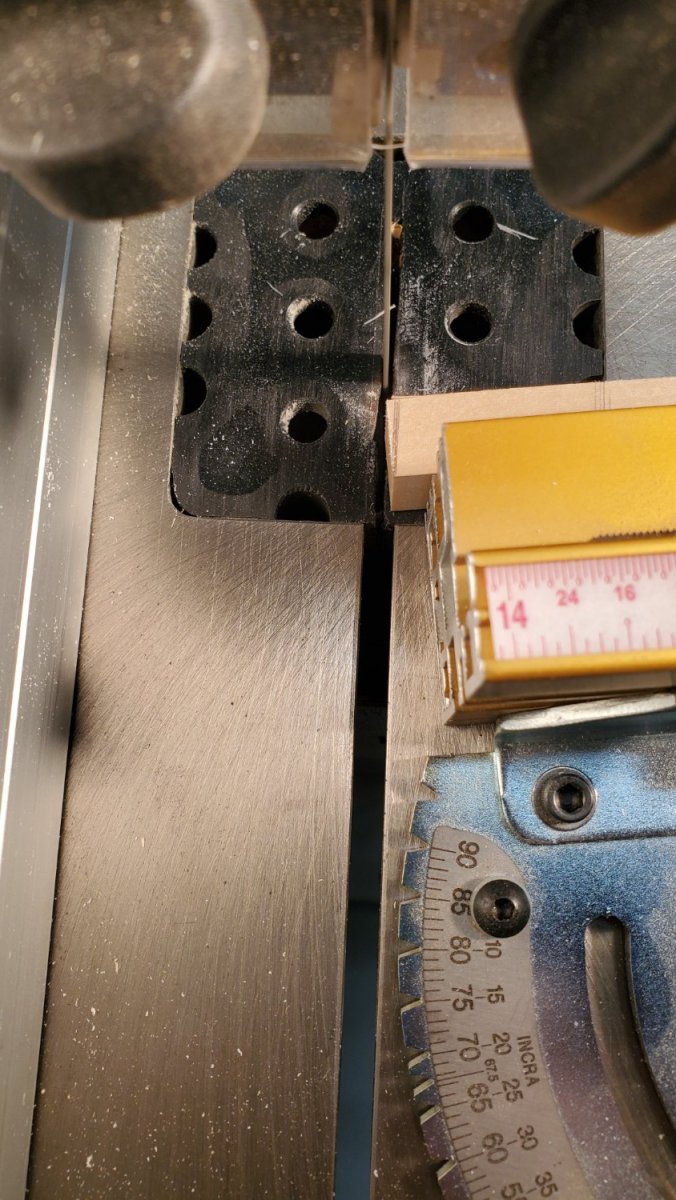
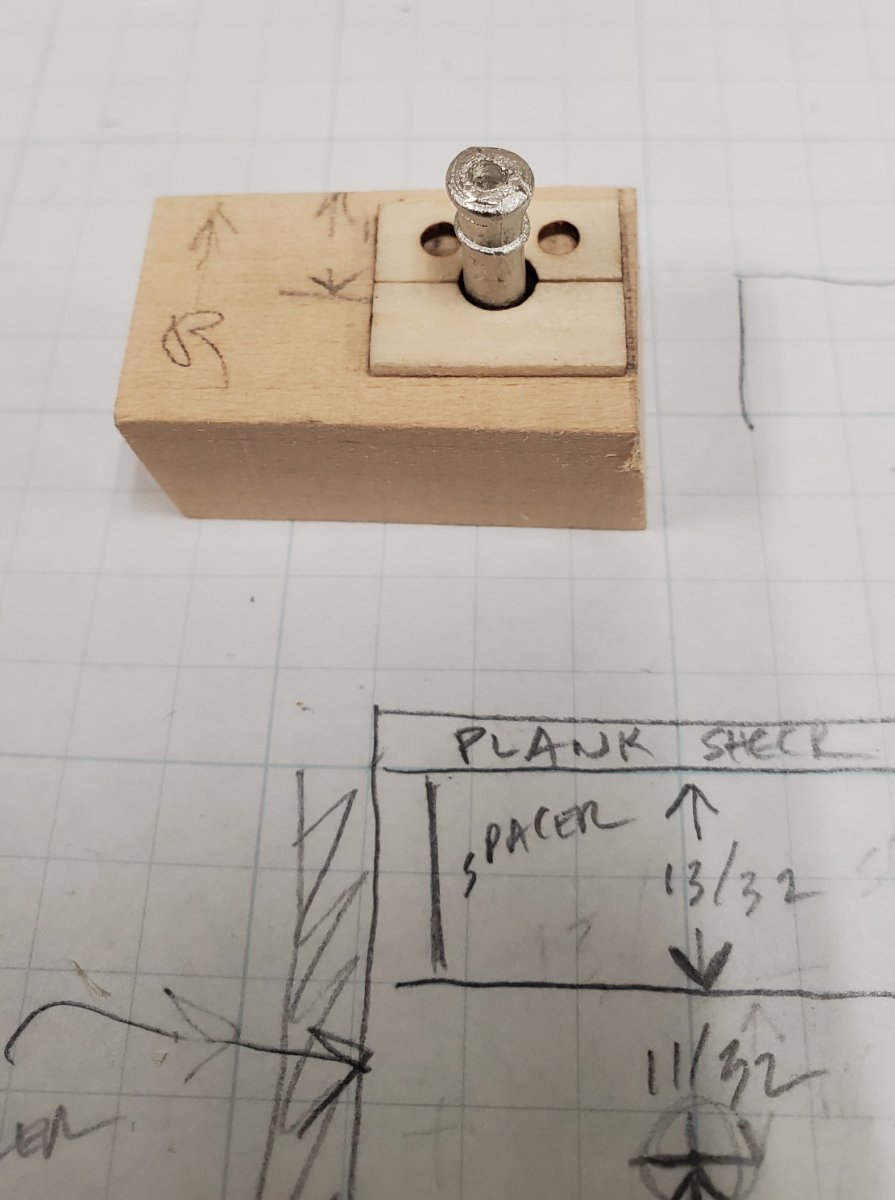
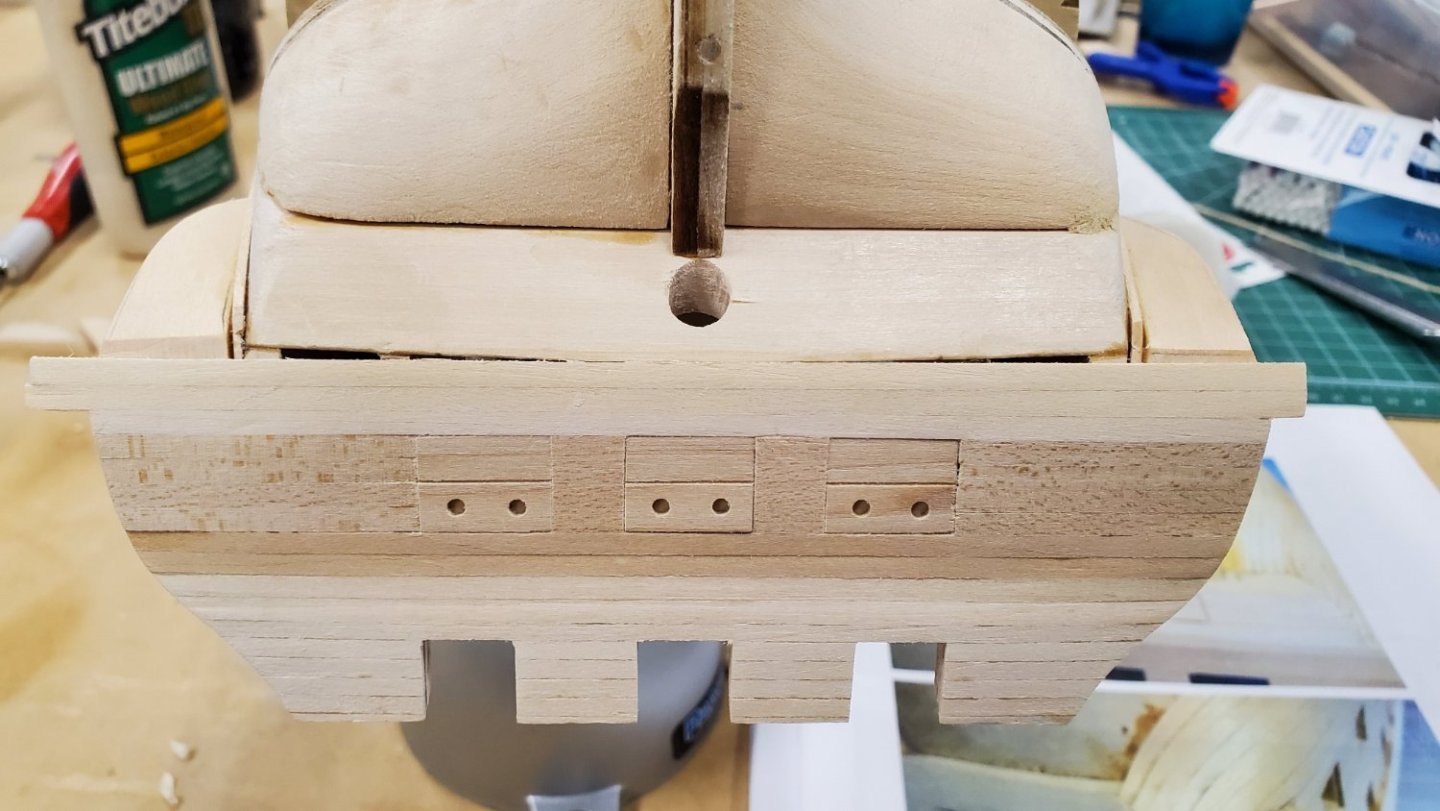
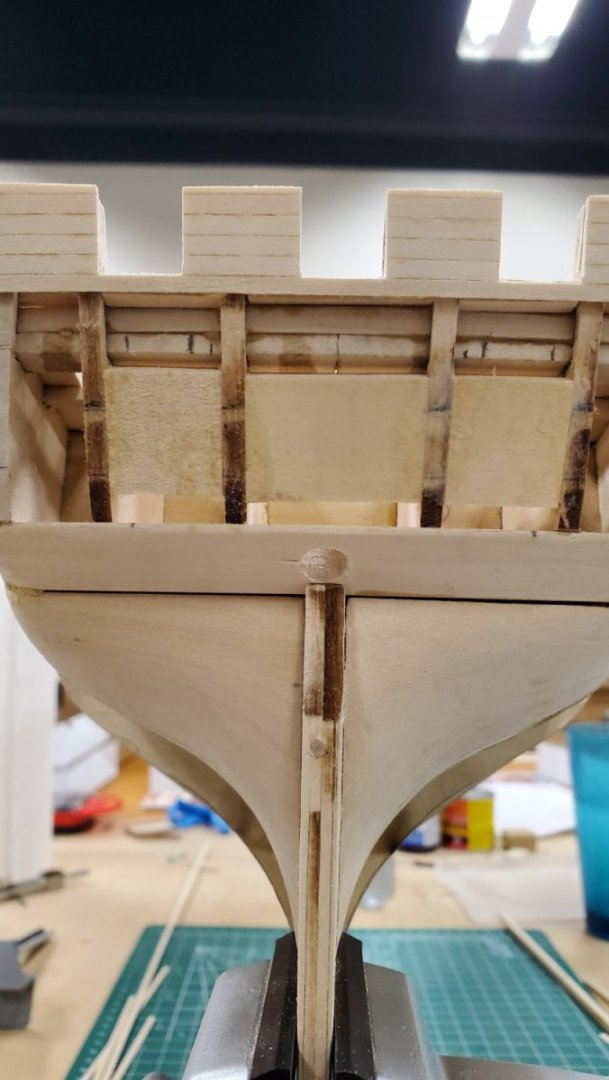
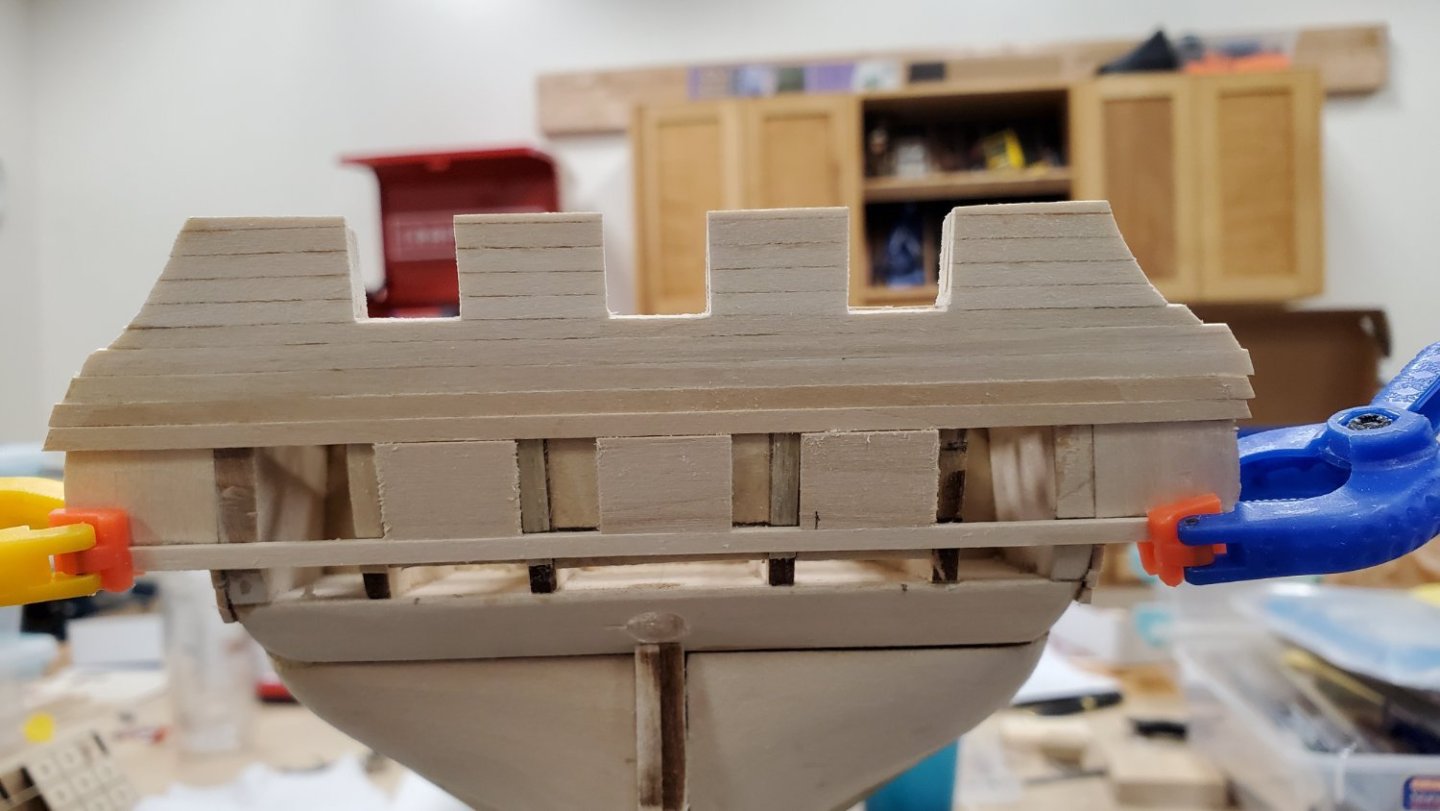
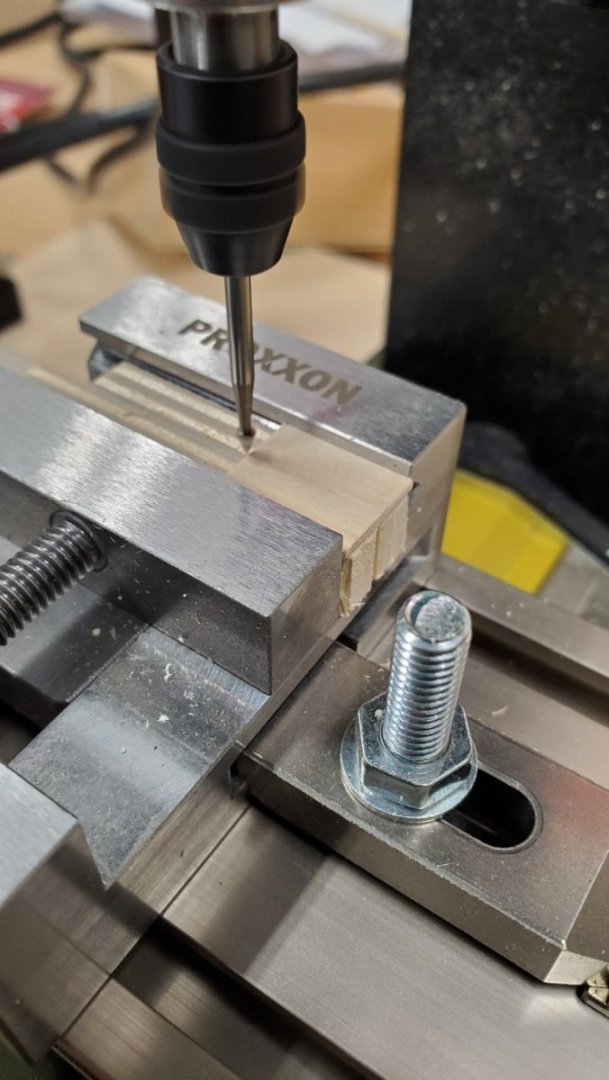
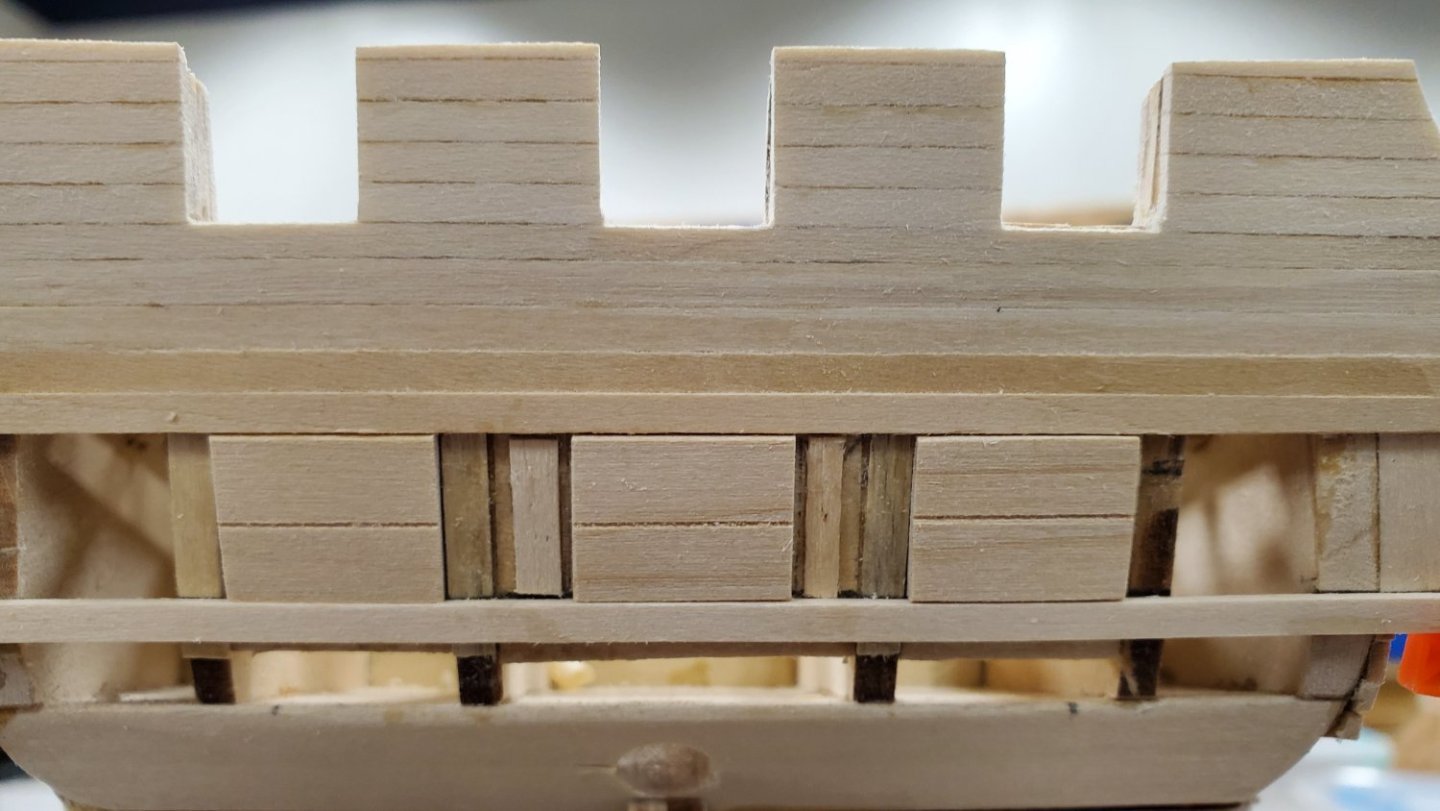
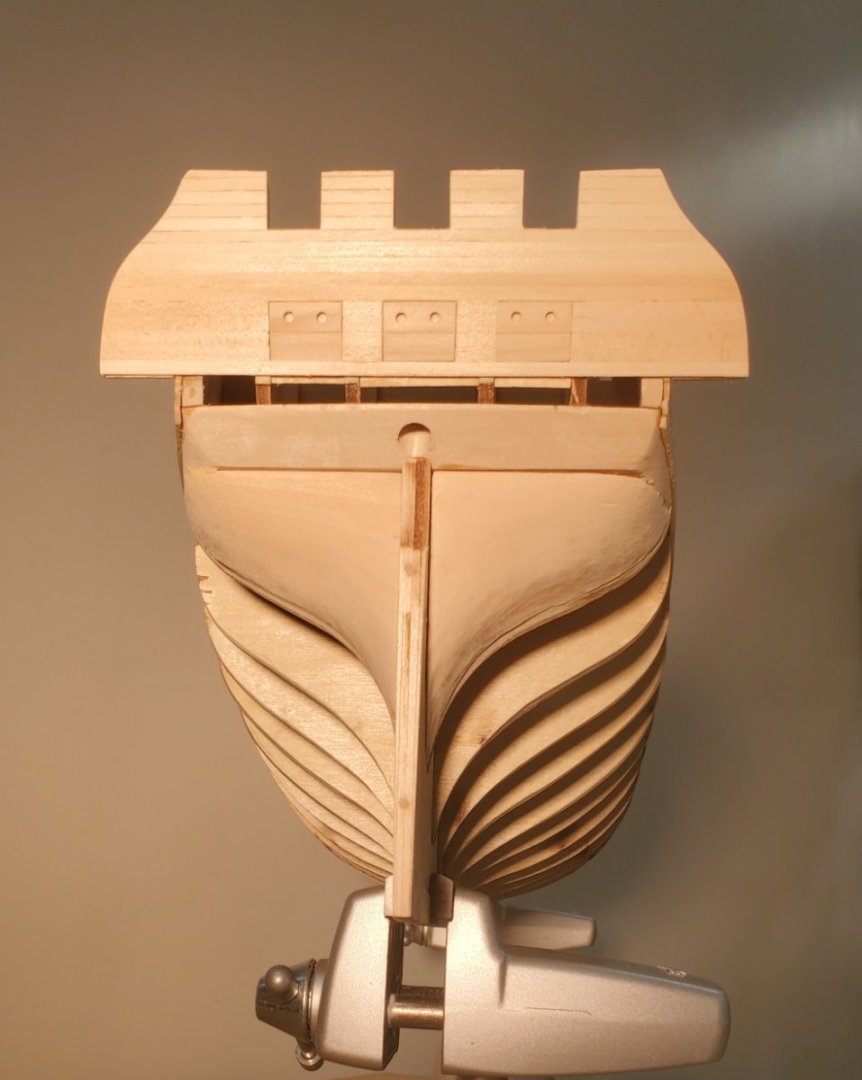
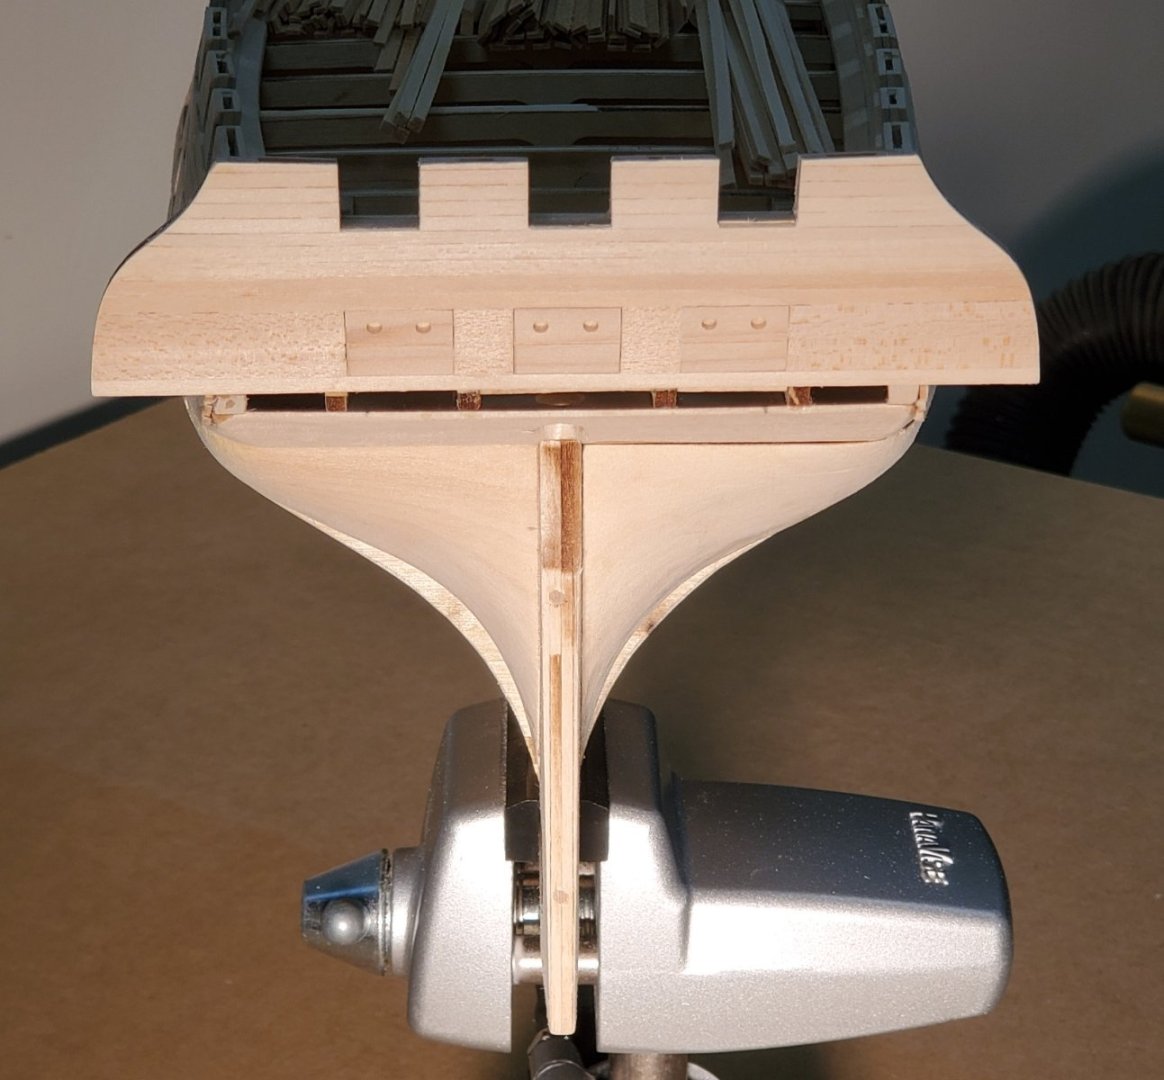
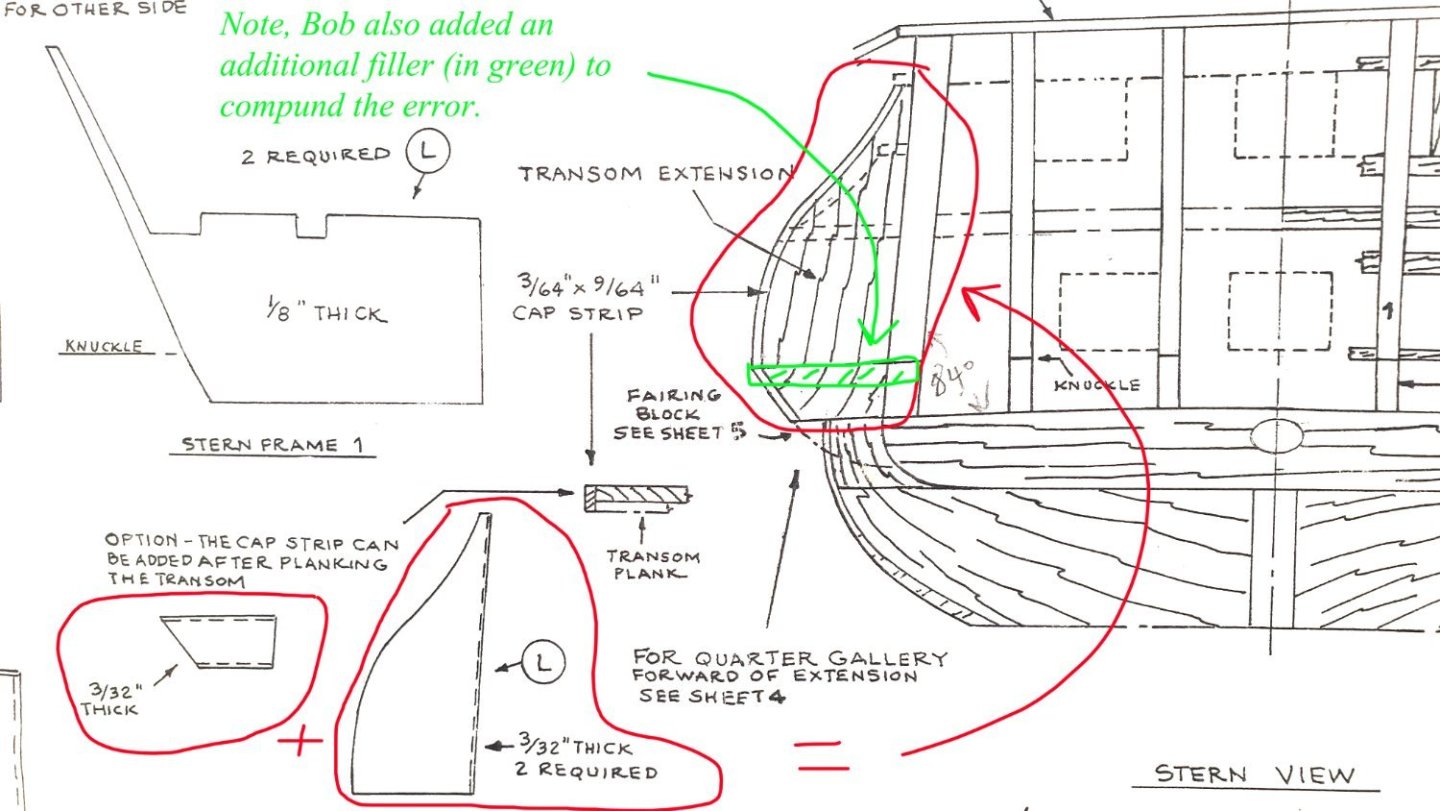
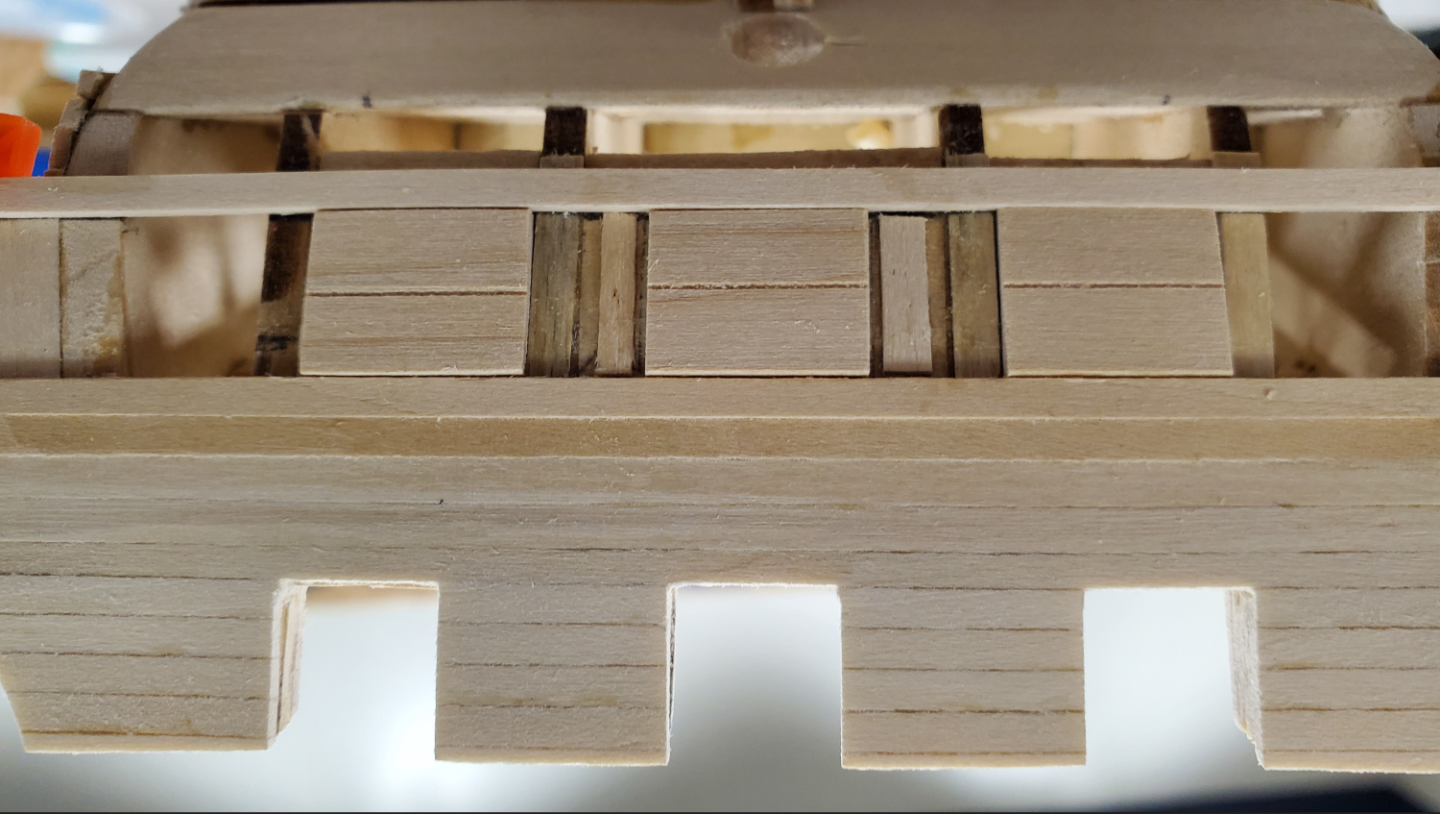
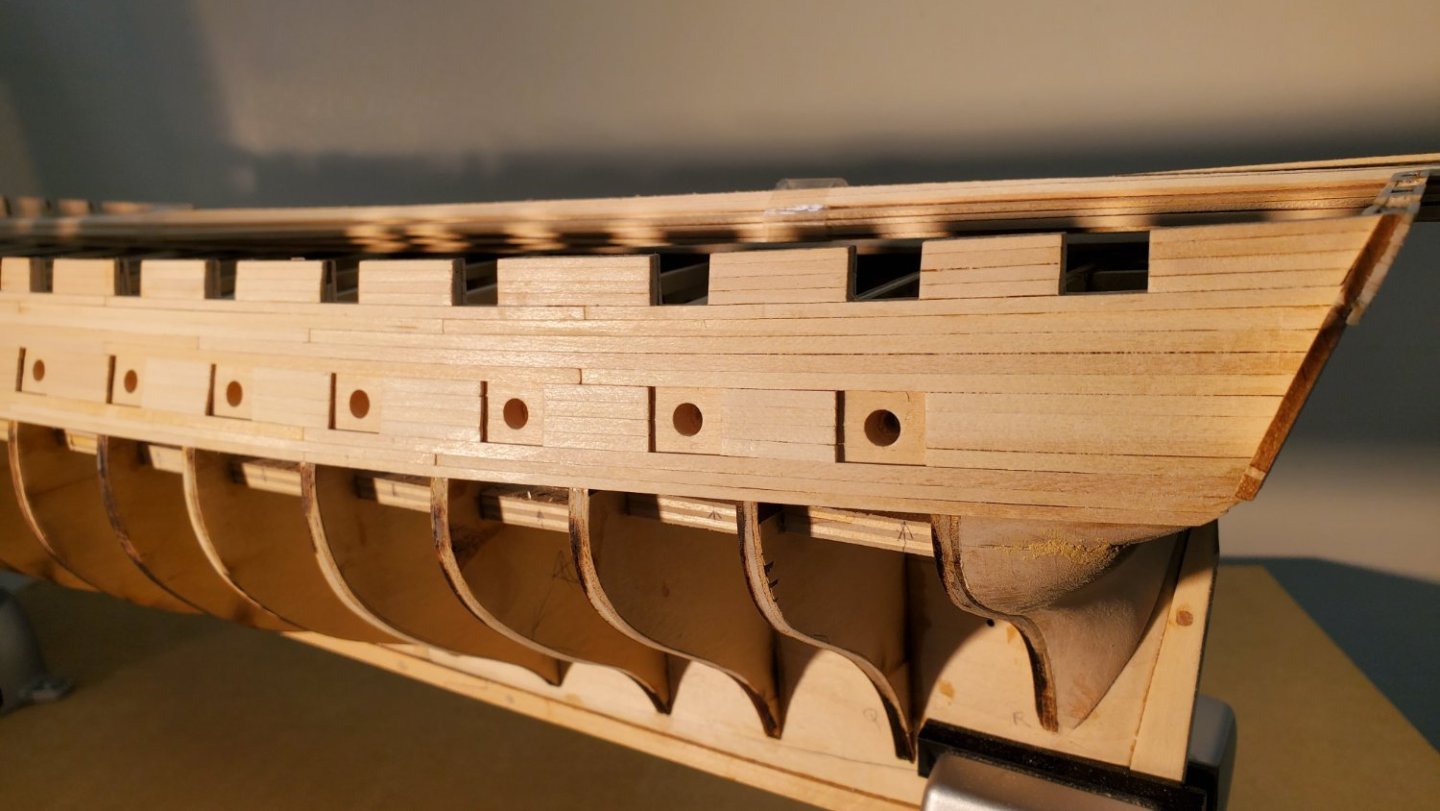
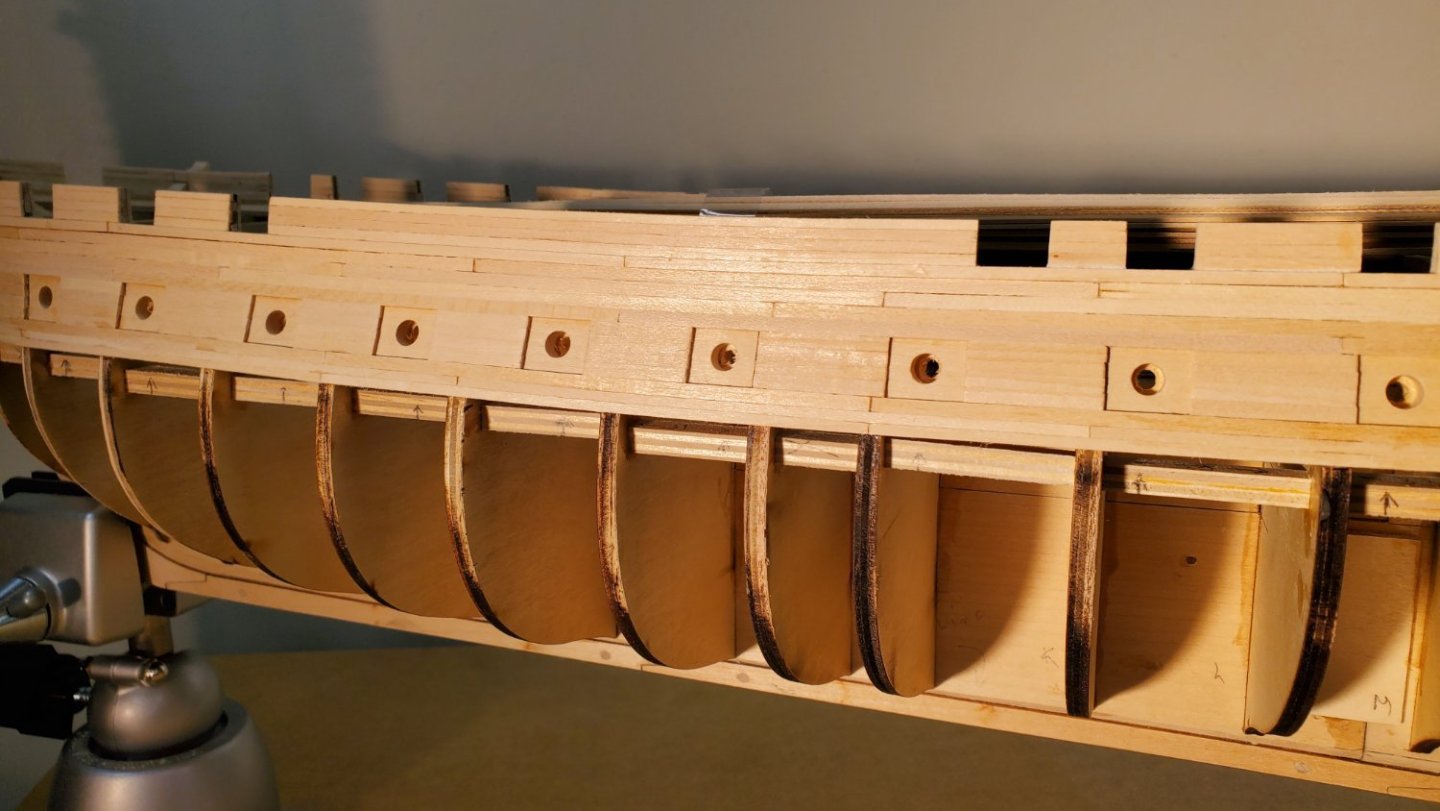
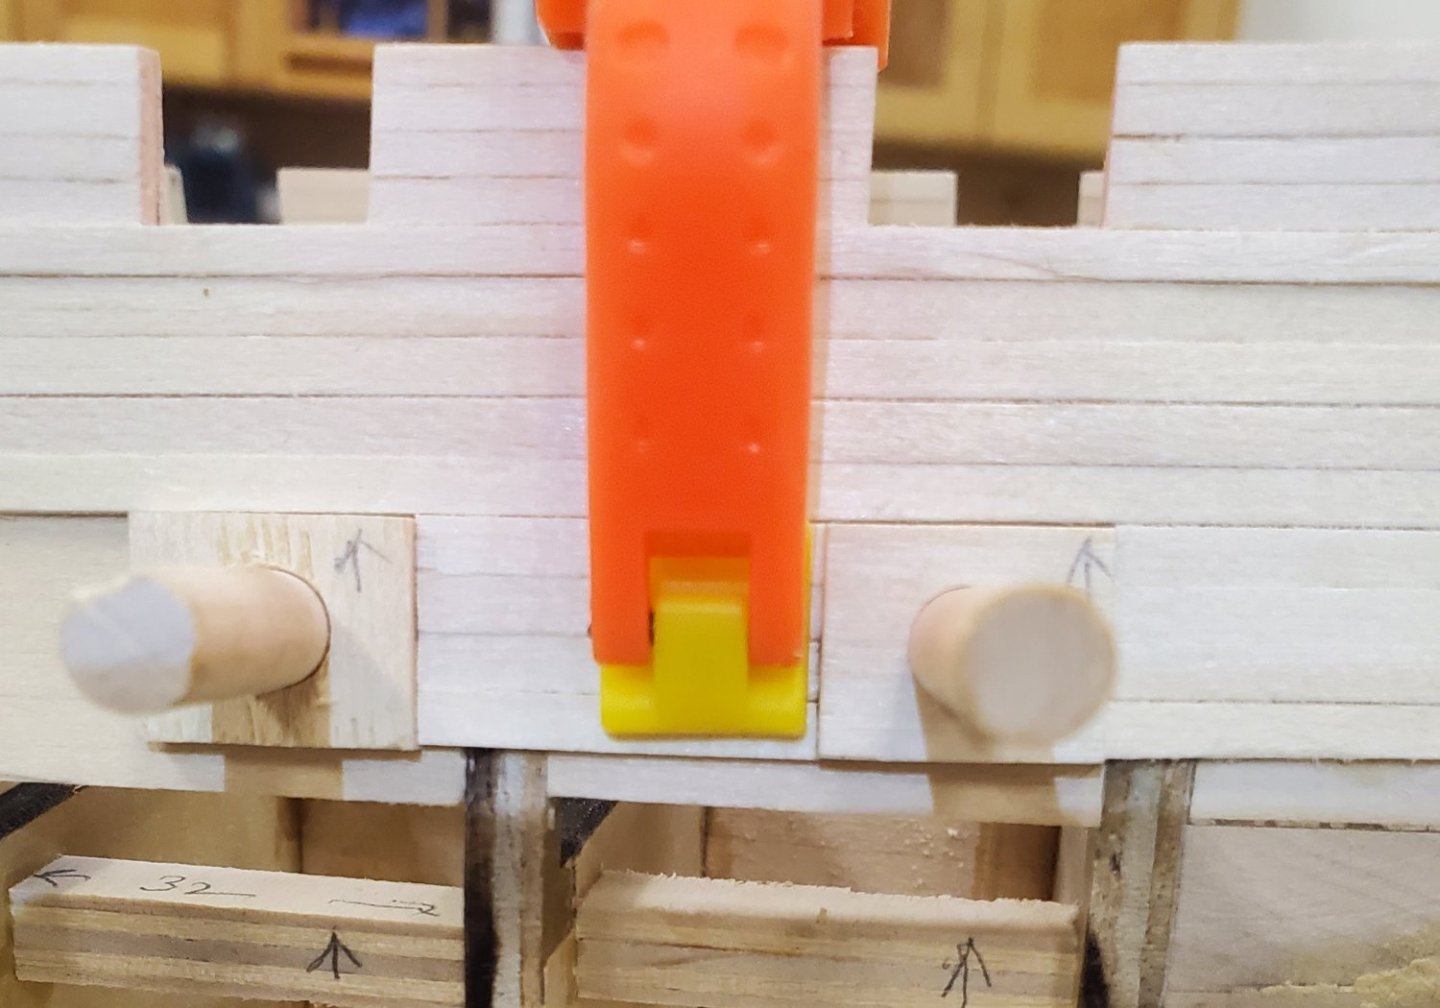
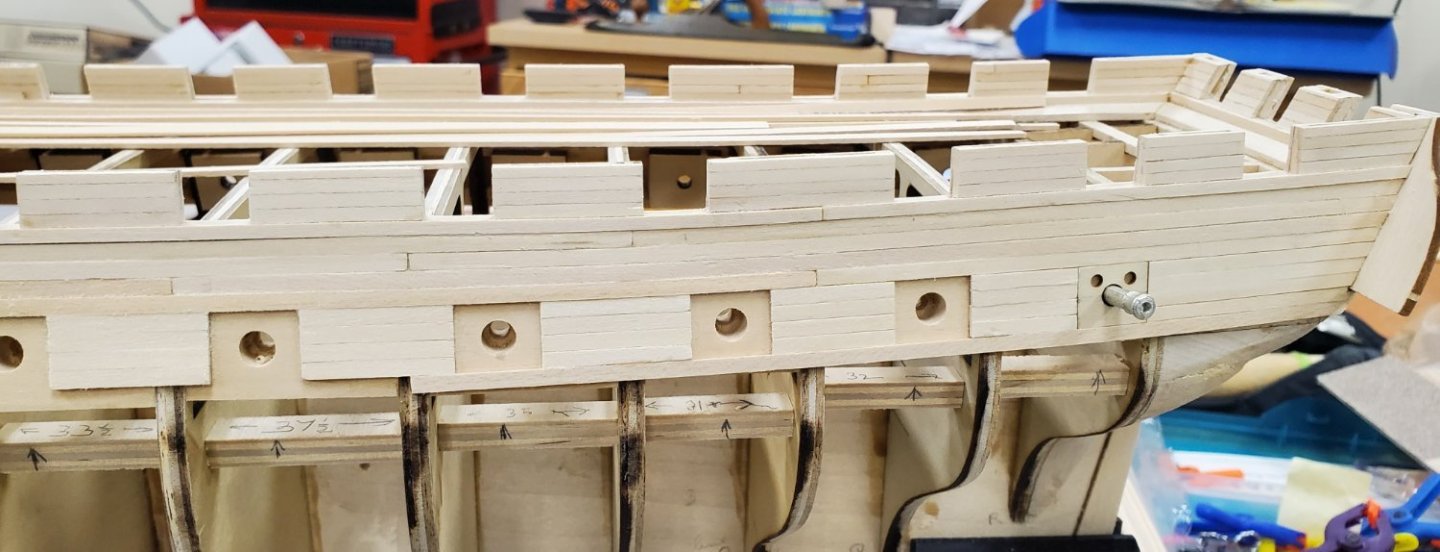
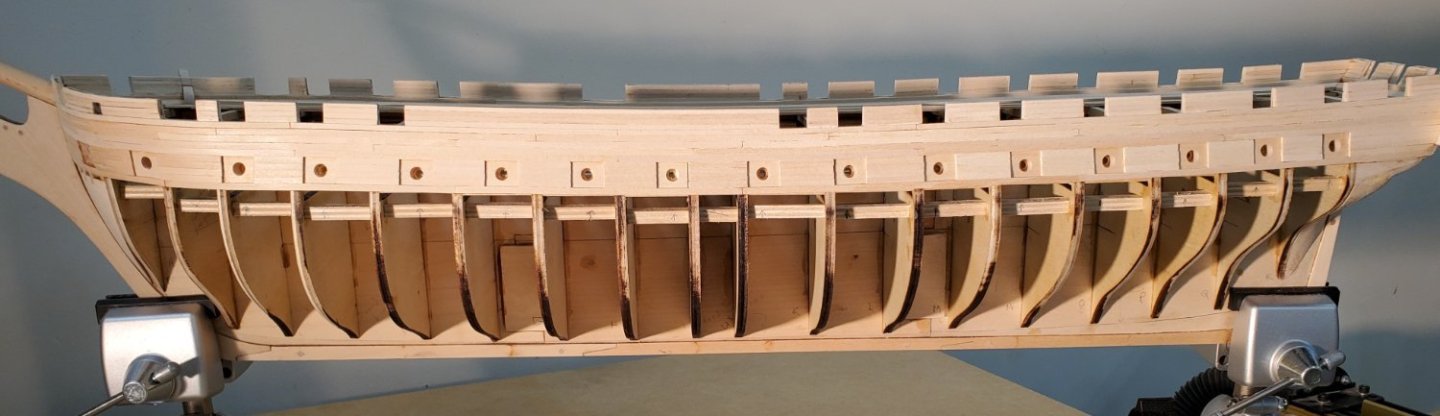
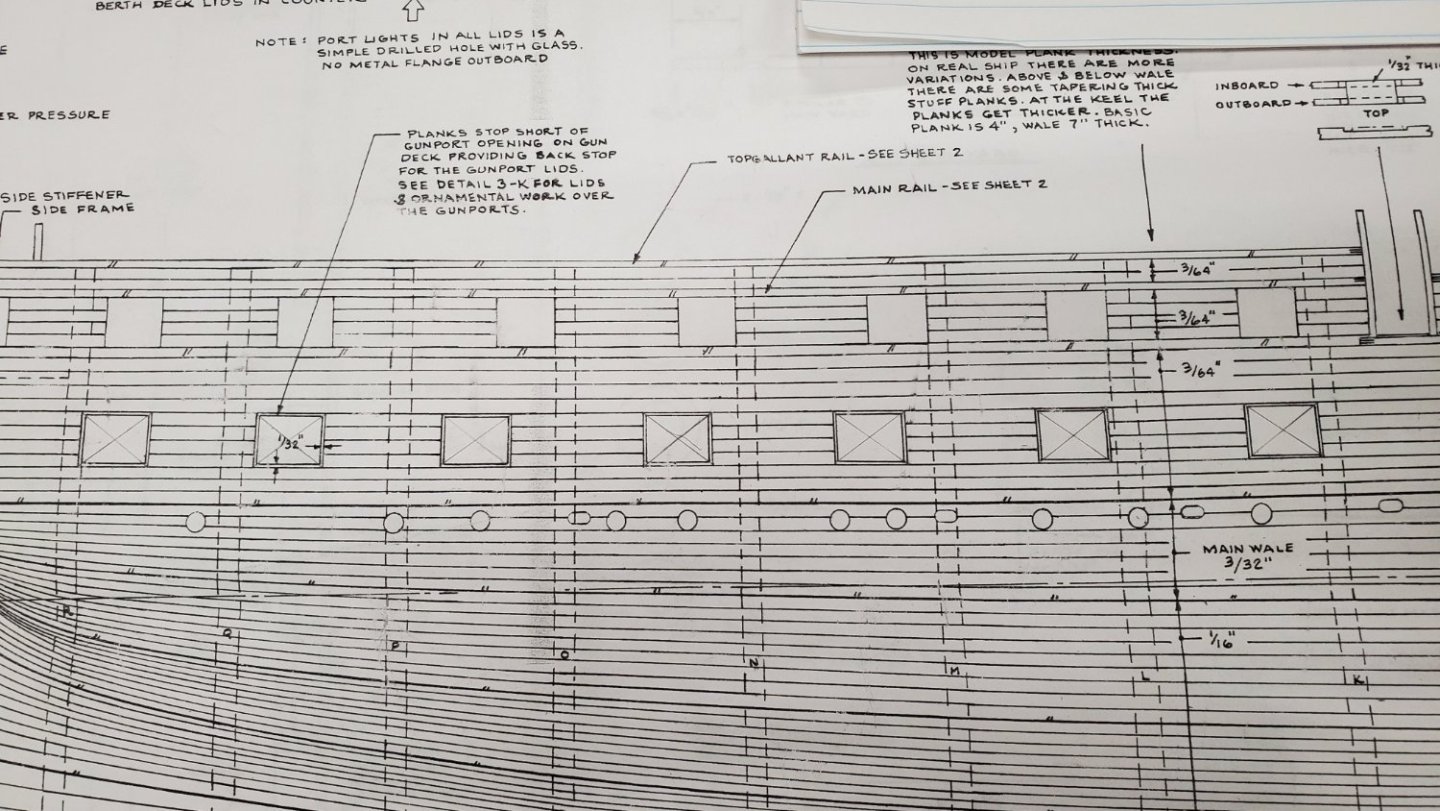
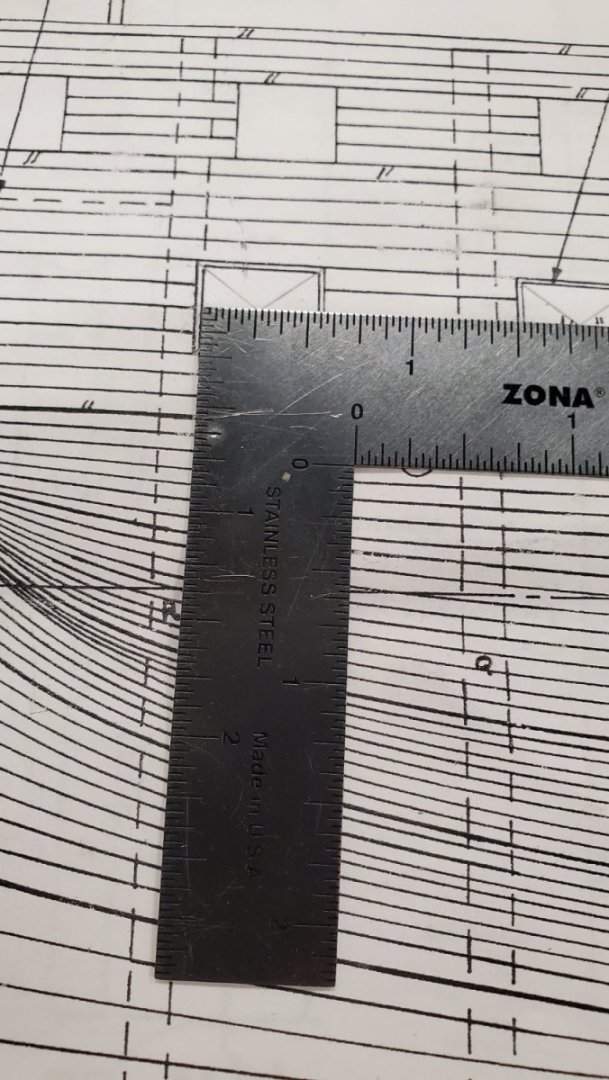
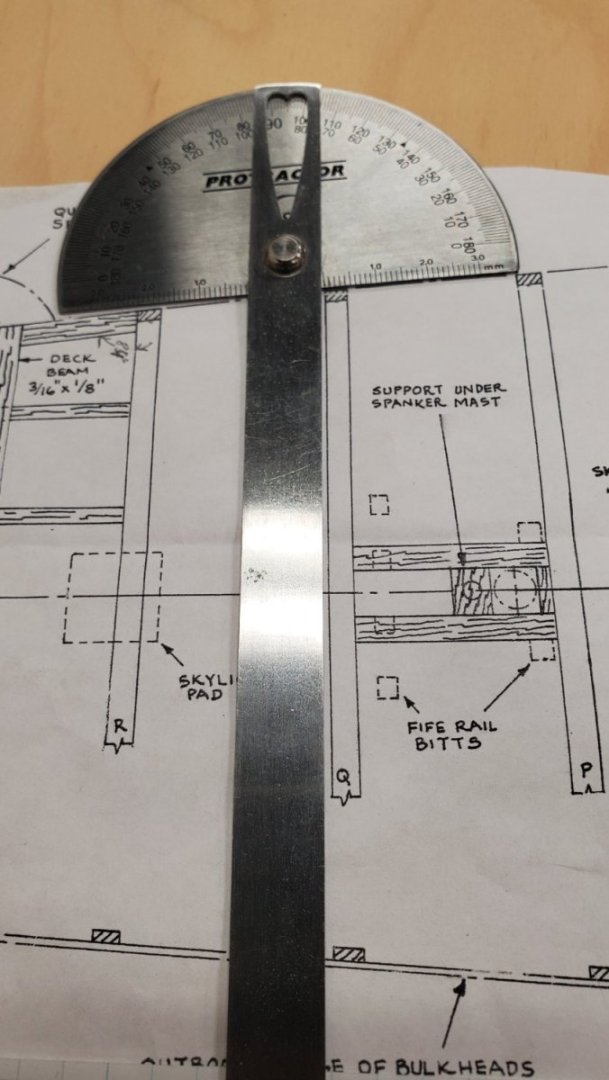
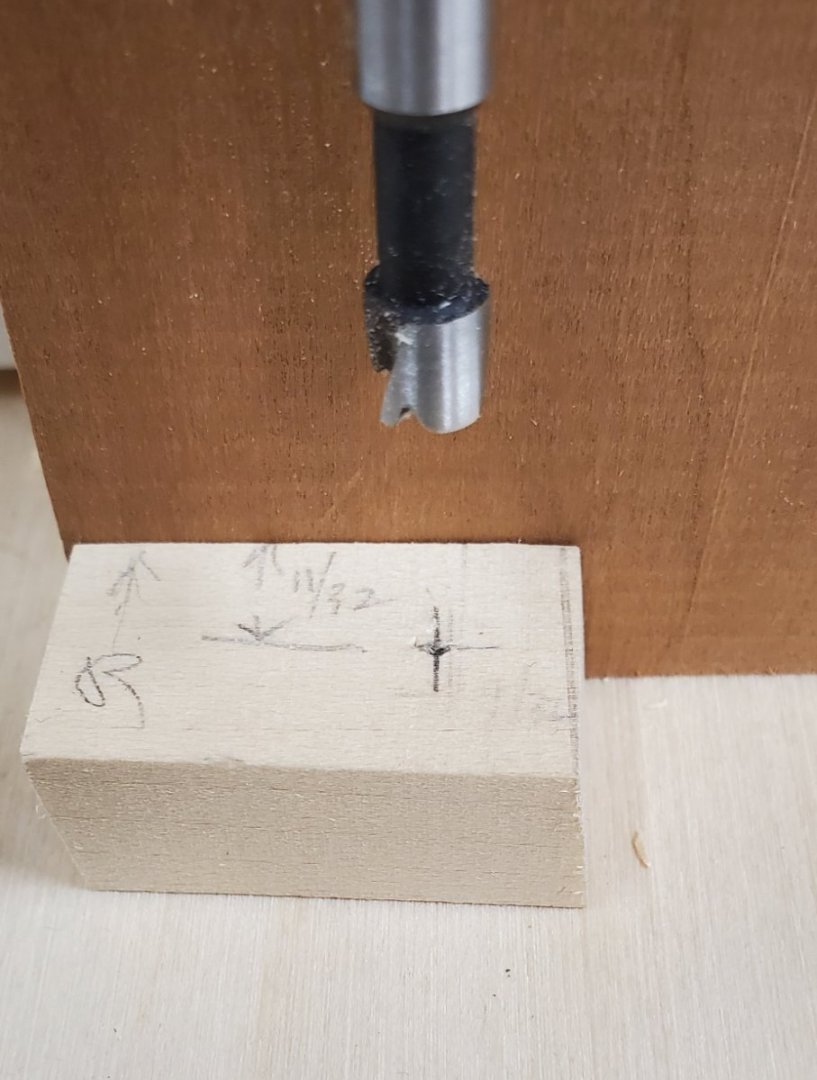
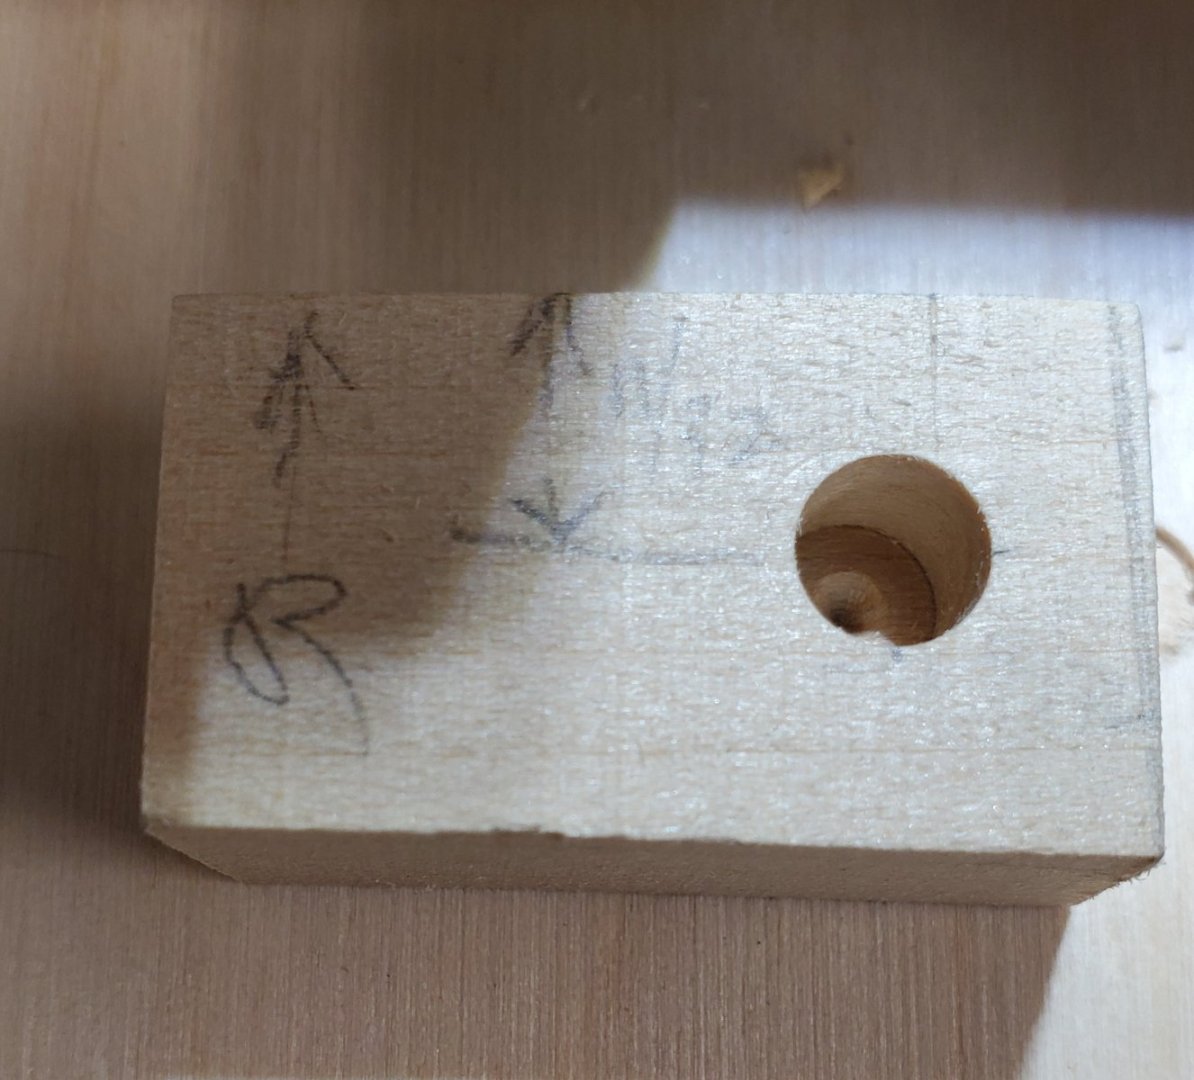
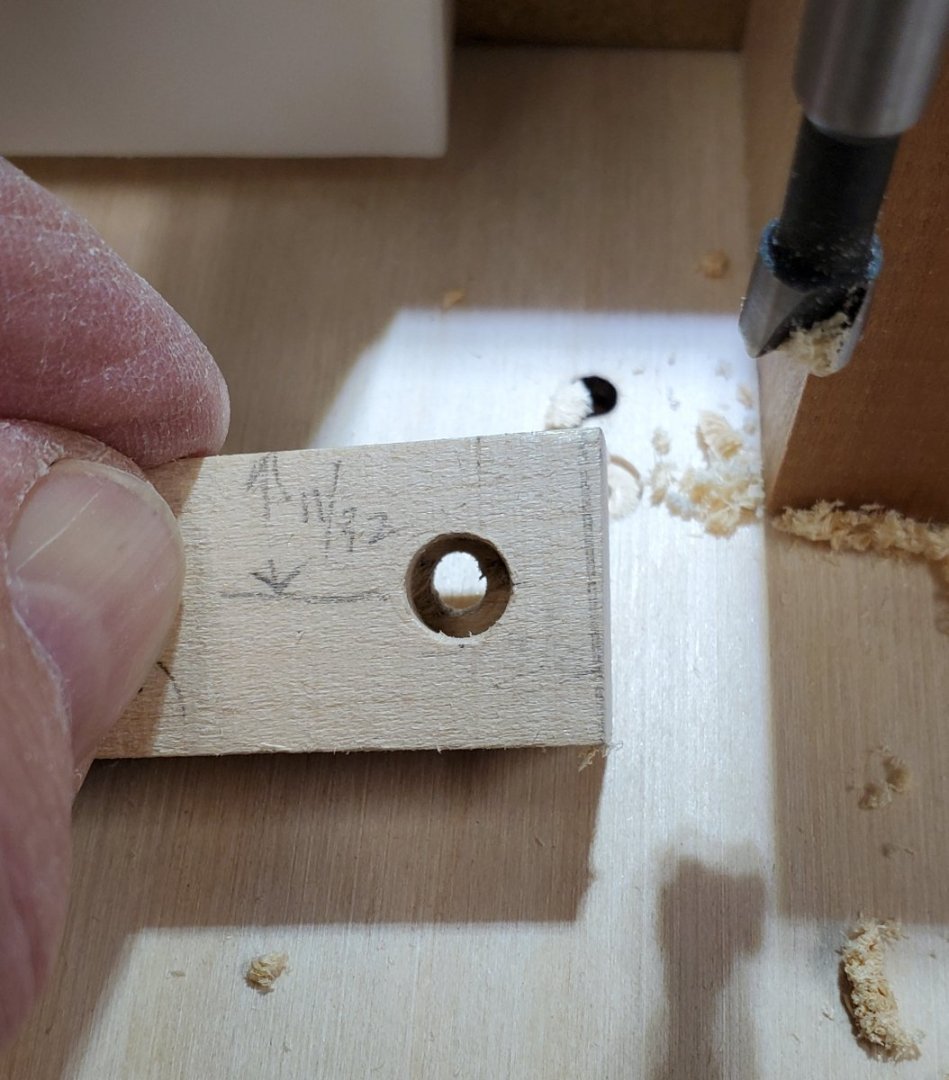
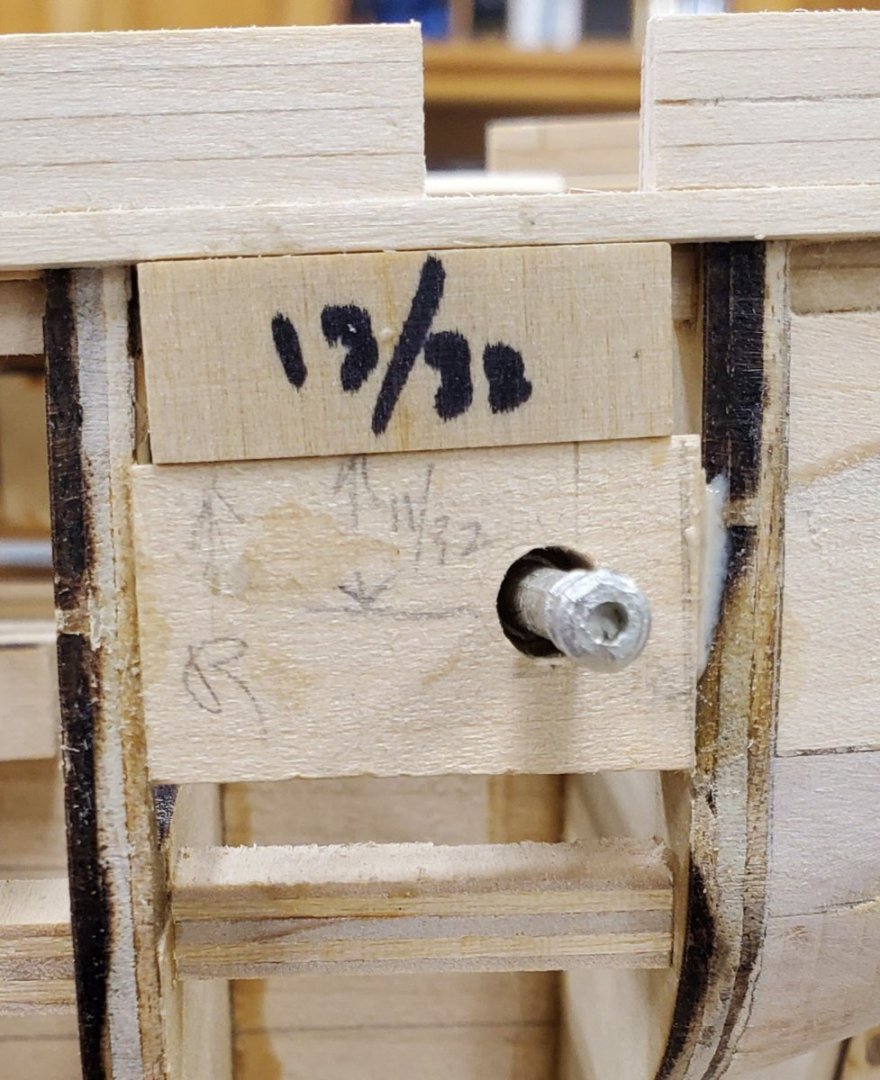
2023 Dec 14. Planked the part of the stern transom. After much deliberation, I have decided to move to Chapter 6 in the Practicum and continue planking to the keel. Chapter 4 diverts to the spar deck details, after planking a portion of the stern transom (Chapter 4.1). I’d rather work with the hull upside down when I start planking and from what I’ve seen in the Practicum, this is slightly problematic if I carry on with instruction in Chapters 4 and 5. Now that I’ve had the benefit of a couple of days intense study of the process laid out in Chapter 4.1 and continuing with Chapter 6, I’m more than a little miffed at Bob Hunt. In Chapter 4.1 Bob observes that “..with the transom extensions ending where they do, this alignment is off and I had to compensate for it by adding a small piece of 3/32” wood to the bottom of the transom extensions to make them slightly longer”. Then in Chapter 6.1.1 “Planking the Counter”, Bob addresses the counter extension, which attaches to the transom extension. For Pete’s sake, why wasn’t this counter extension added to the transom extension when that was installed? Furthermore, one could ask, why wasn’t the laser-cut piece for the transom extension made to include this extra material. To futz with this crap now is a royal pain and could have easily been avoided. Sigh… This photo could come after the diagram, but it illustrates the filler material I just added per Hunt Practicum instructions in chapter 4.1 Adding that counter extension will be an adventure now... Okay, enough carping, I’ll deal with it later… So, in keeping with my switch to filler blocks vs. gunport framing, I added three blocks where the stern gunports should go. In retrospect, I should have made these long enough to touch the counter, but it is what it is. I then made blanks of the gunports so that I could position the plank below the ports – see photos below. Since I will keep these doors closed, and since there won’t even be a gun sticking out of the port, I opted to dress up the blanks to look like the closed port cover. I made good use of my Proxxon micro mill to carve the horizontal center line simulating where the upper and lower cover meet. Then I positioned the mill to put center marks where the two holes in the upper cover are supposed to be. Finally, I drilled 3/32” holes. Always looking for a way to use the Proxxon micro mill.. Looking good. (The port covers are not glued in, but man they aren't coming out easily either. May not be a problem? I think I'd like them out when adding hinges later. A problem for another time.)

-
Oh my! How did I miss that one! Adding it to my list of references. Thanks for the tip
-
Among finished build logs to consult for inspiration and insight, don't forget XKEN https://modelshipworld.com/topic/11935-uss-constitution-by-xken-model-shipways-scale-1768/
-
USS Constitution by mtbediz - 1:76
Der Alte Rentner replied to mtbediz's topic in - Build logs for subjects built 1751 - 1800
I would love to know how my stern gunports ended up so far apart (vertically).
-
I'm only missing the tip of an index finger, and it's been challenging at times to deal with the fine-motor-skill work. I can't imagine doing it with one hand. Simply amazing.
-
Glad they're working out for you.
-
My thoughts exactly. Glad to have them confirmed by such an accomplished builder. Bottom's Up!
-
Hmmm, I hadn't thought of that. Since I'm still hoping to keep a natural wood finish, I have been considering skipping the cladding too. Apart from Hipexec, I may be in the extreme minority on this. Decision on painting will be postponed until I finish planking the hull. I'm still perusing chapters 4 and 6 in the Practicum, but think it'll be easier to turn the hull over to do the planking and to that end, having exposed bulkheads for my clamps would be beneficial. Gee, have I made my decision? Thanks Jon Peter
-
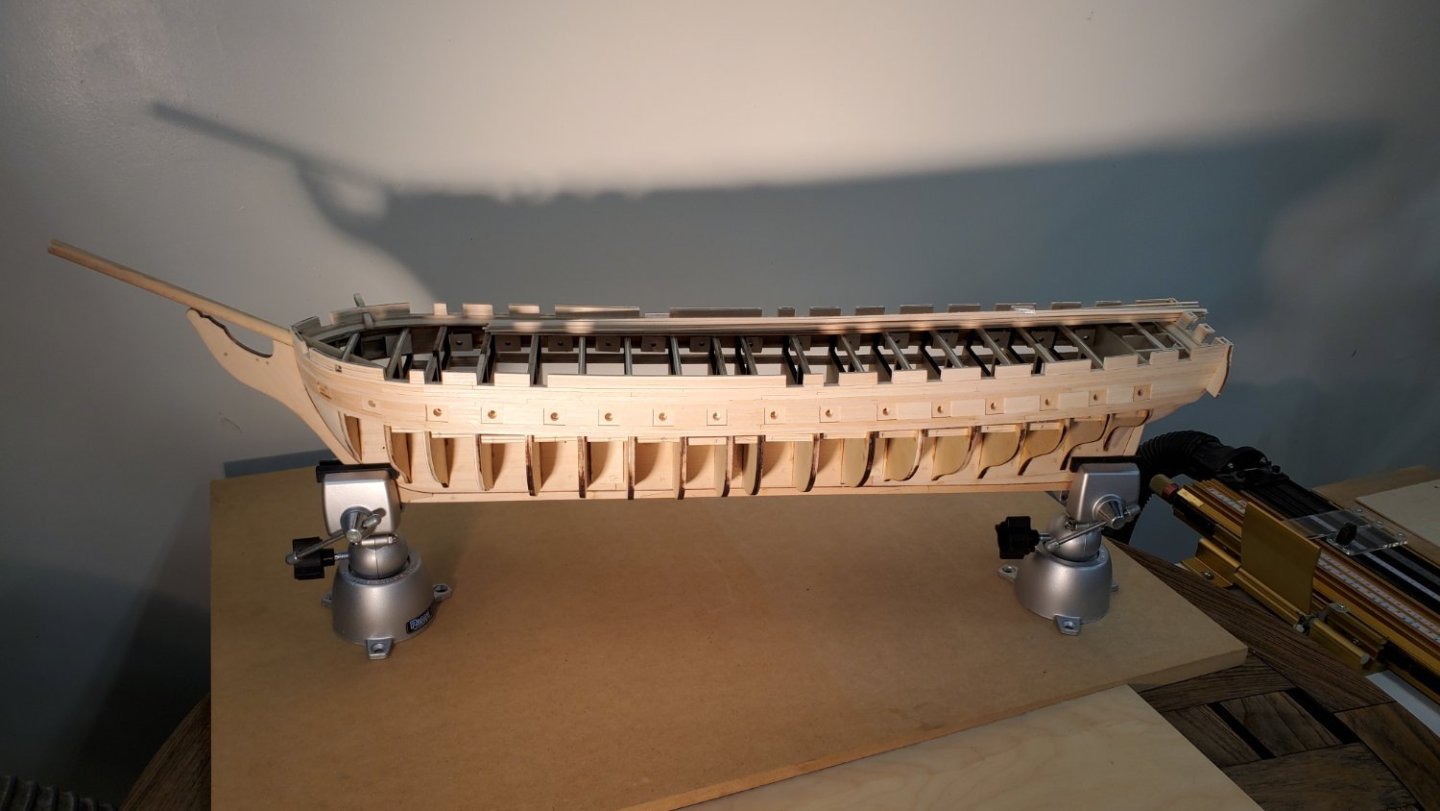
Not much changed since yesterday, but I did add two more rows of 3/32 x 3/64" planking to take me to the end of Chapter 3.4 in the Hunt Practicum. I was planning to continue planking to the keel, but noticed that Bob shifts attention to building a stand in Chapter 3.5 then moves on to the Spar Deck. He doesn't return to planking the hull until Chapter 6. To those of you who've done the Practicum, is there any good reason to postpone planking until Spar Deck is more or less finished? Seems to me that I can more easily plank with the hull clamped upside down. If the spar deck is done first, I think I'll have to plank with the hull in the stand. Thoughts?


-
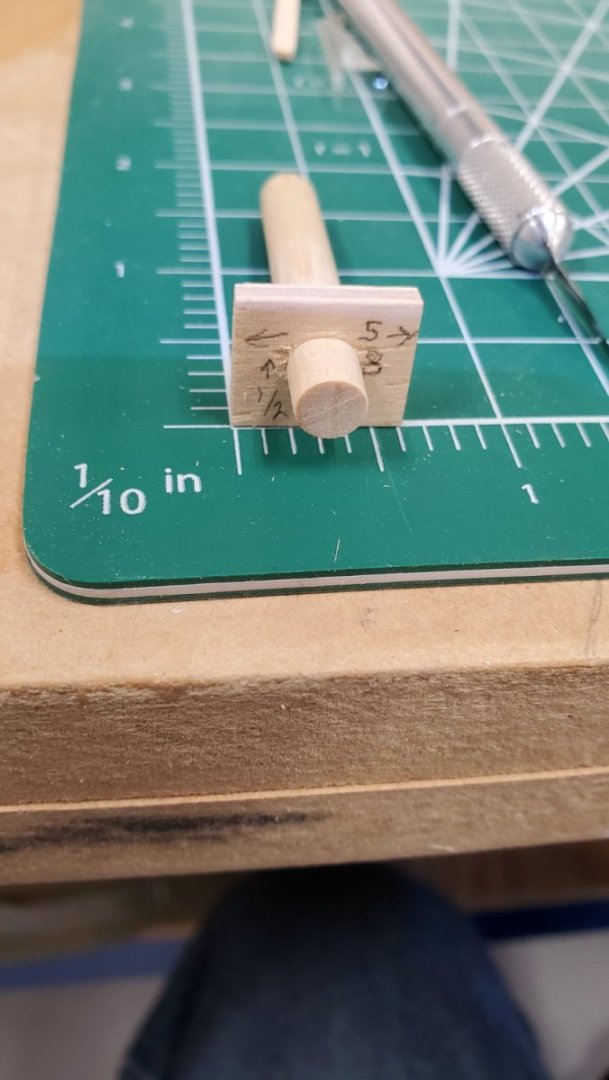
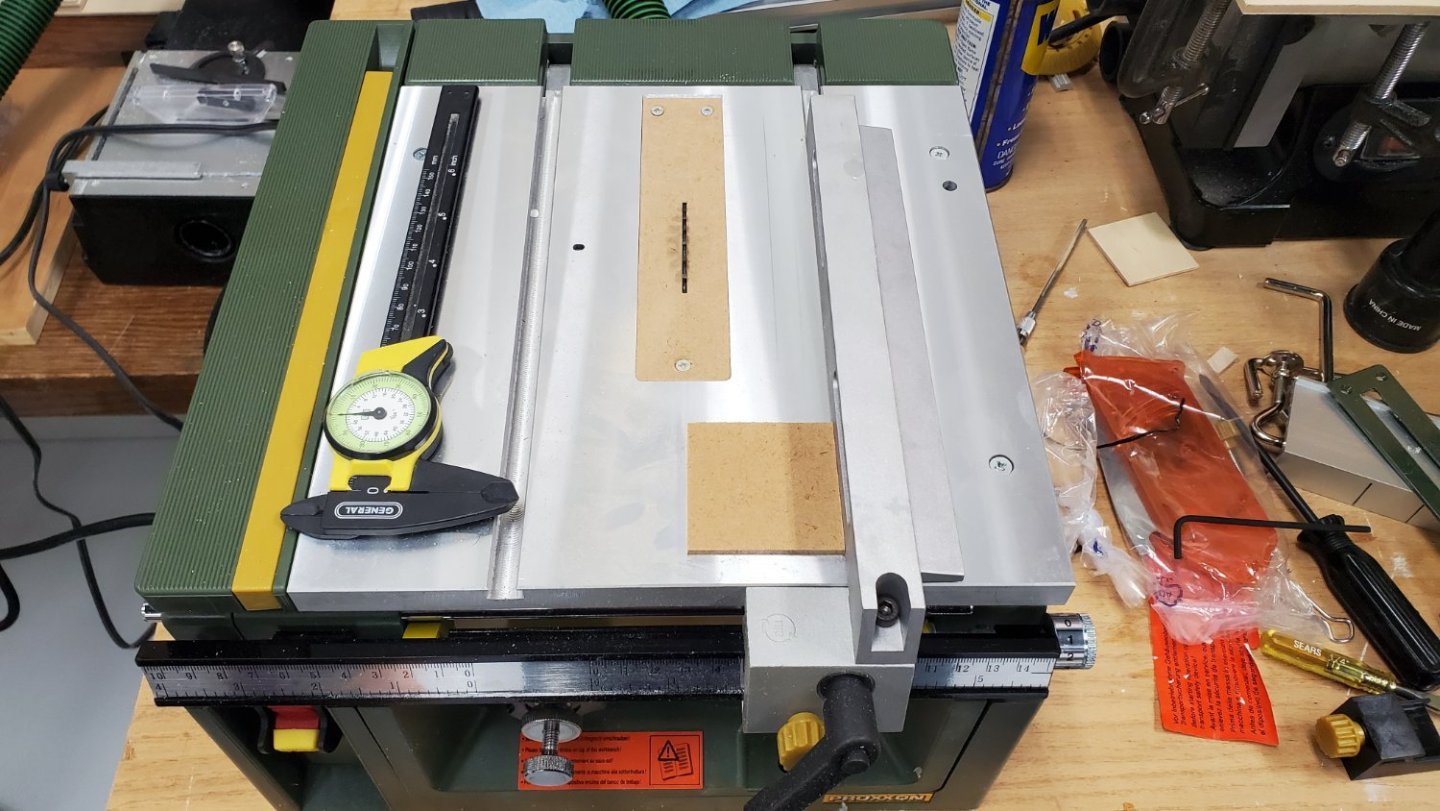
I didn't need the drill press, but I did invest in two other Proxxon tools. The lathe and the micro milling machine with compound table. I haven't used the lathe yet, probably won't need it until it's time to tackle the yard arms, but the milling machine has proved useful already. Most recently, I used it to find the exact center of the 1/2 x 5/8" plugs I made to position the planking around the gunports. I'm feeling nostalgic for my days as an apprentice tool and die maker under my uncle's tutelage. My favorite machine was the Bridgeport milling machine. Ah, those were the good old days. If Byrnes does start selling their saws again, I might take another look, but the Proxxon saw is pretty darned nice. Once you figure out how to do the micro adjustments, you can get fantastic accuracy on a cut.
-
Quick update. Two strakes of the 1/8" x 3/64" planking to go after enclosing the port side gun ports. I made little plugs (using the Proxxon saw to absolutely nail the 1/2 x 5/8" dimensions), to help facilitate the planking around the gunports. My method for locating the center holes in the filler blocks proved also to be spot on. As evidenced by dry fitting the gunport covers and cannon. Called it a day with two strakes to go before I switch to the narrower stock for the task of planking to the keel. The fun will begin in earnest then... Now that I've constructed the gunport frames two different ways, I had to ask myself, Self, which was the better method? Since I plan to have the covers closed around the cannons, I did find the filler block method to be easier to implement than the Bob Hunt's (or the MSW kit's) method. Had I not had the disk sander and band saw, which made shaping the blocks to fit easier, the framing method might have had the edge. But the added gluing surface provided by the filler blocks swings the vote back to the latter. (Rita, in case you decided to check back in, thanks again for breakfast this morning - and thanks for your continued interest in the build).

-
USS Constitution by mtbediz - 1:76
Der Alte Rentner replied to mtbediz's topic in - Build logs for subjects built 1751 - 1800
Wow, you're setting quite the pace. Once again, excellent workmanship. I'm taking notes... -
Celebrated the anniversary of my Natal Day at the ship yard today. 1. Set up my new tool with zero clearance insert. Haven't needed it yet on Conny, but have set it up to deal with the finishing touches on one of the projects that sidelined me since October. It may not be a Byrnes, but this is pretty sweet. (Proxxon) 2. Got the port side gunport filler blocks installed and began planking starting at the stern. A couple of concerted effort days at the ship yard, and I'll have the port side planked down to the level I left off at on the starboard side. Then the fun really begins. See you in about a week. note the Micro Mark unit in the upper left corner. Completely useless... (one of the projects that had me sidelined. The Proxxon saw made quick work of netting exact 2" square game tiles.)


-
Aha! Thanks for the clarification. and Happy Saint Nicholas Day.
-
Sorry about the time lag in asking this question, but the photo you sent shows the gun-port covers installed, but not the cannons. Was there a reason they weren't installed. I'm going through hoops on the port side of my build to do those ports a different way. Had I opted to simply keep the covers closed, I could have saved a ton of time by not worrying about where and how the cannons would install (on either side). Filler blocks are the easy way to go in that case. Just curious... Don't forget to leave your boots outside the front door for Saint Nicholas tonight. Best Peter
-
and it may yet pan out! I did use the Contact page to send them a message after all, and lo and behold: I just received an email reply, "A ticket was issued for replacement stock for the USS Constitution". The 1/8 x 3/64" stock will likely arrive too late to do me any good, but I sure will need the 3/32 x 3/64" stock. I can't easily make that myself - though I did just take possession of a Proxxon Micro table saw. Maybe I could rip my own, but I'd rather not. Thanks yet again targa! Best
-
USS Constitution by mtbediz - 1:76
Der Alte Rentner replied to mtbediz's topic in - Build logs for subjects built 1751 - 1800
An added benefit of applying the varnish is that the copper plating will now remain copper colored. Once again, beautiful workmanship! -
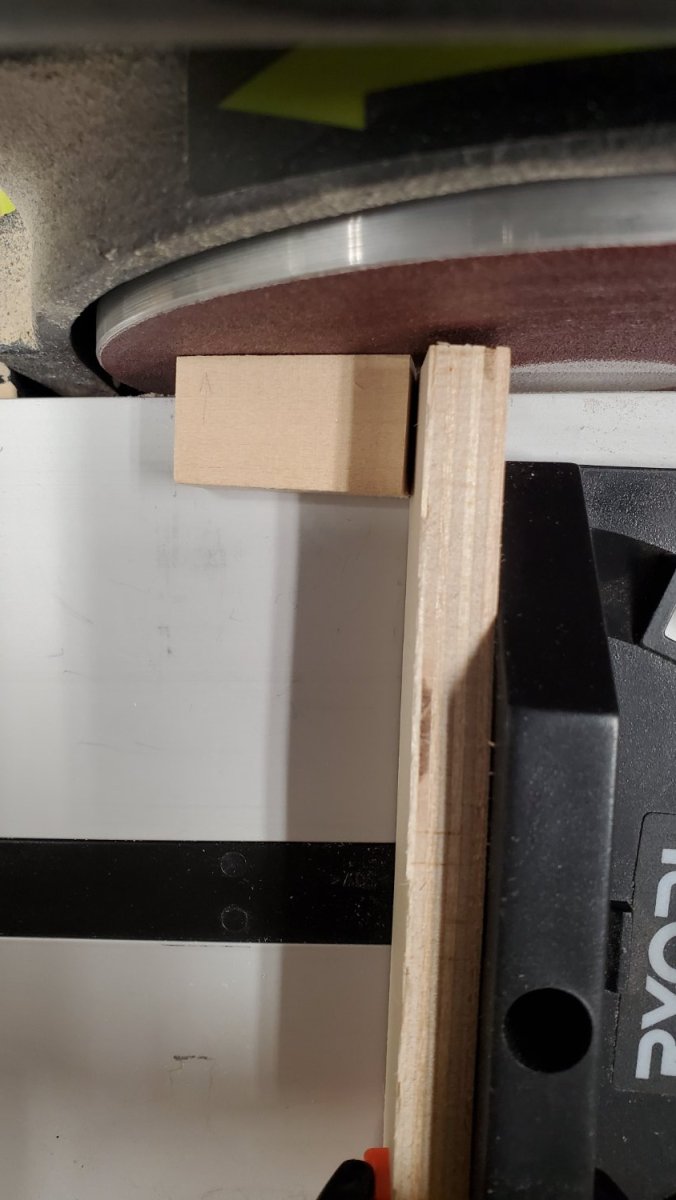
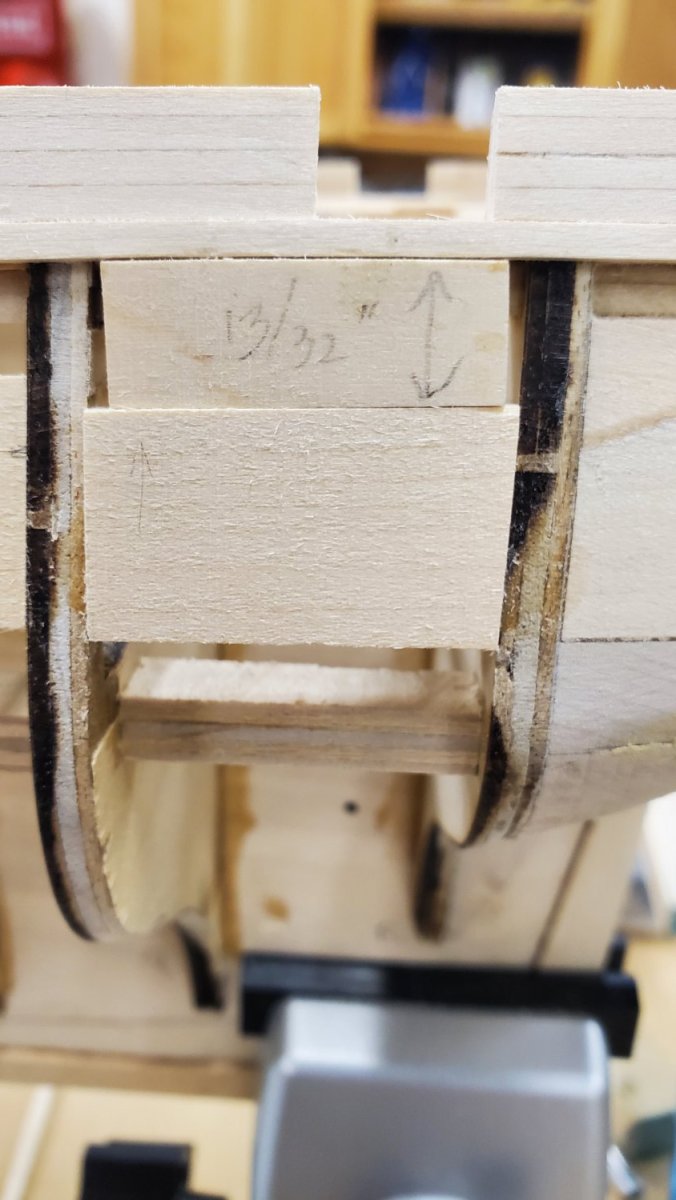
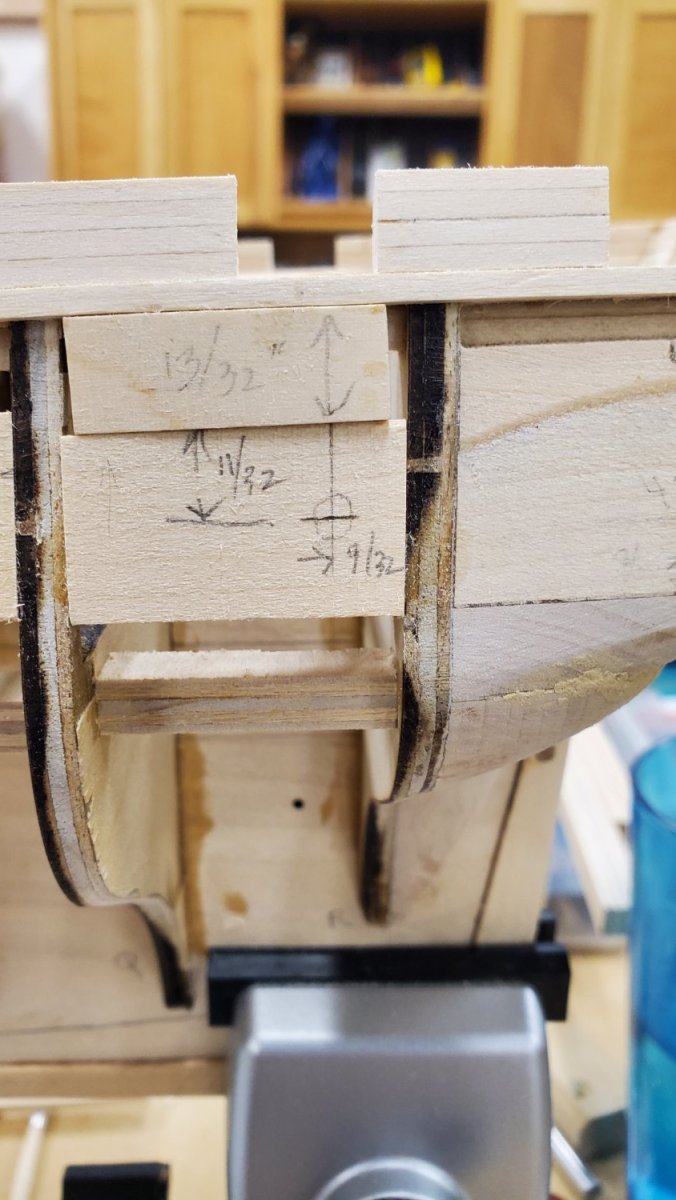
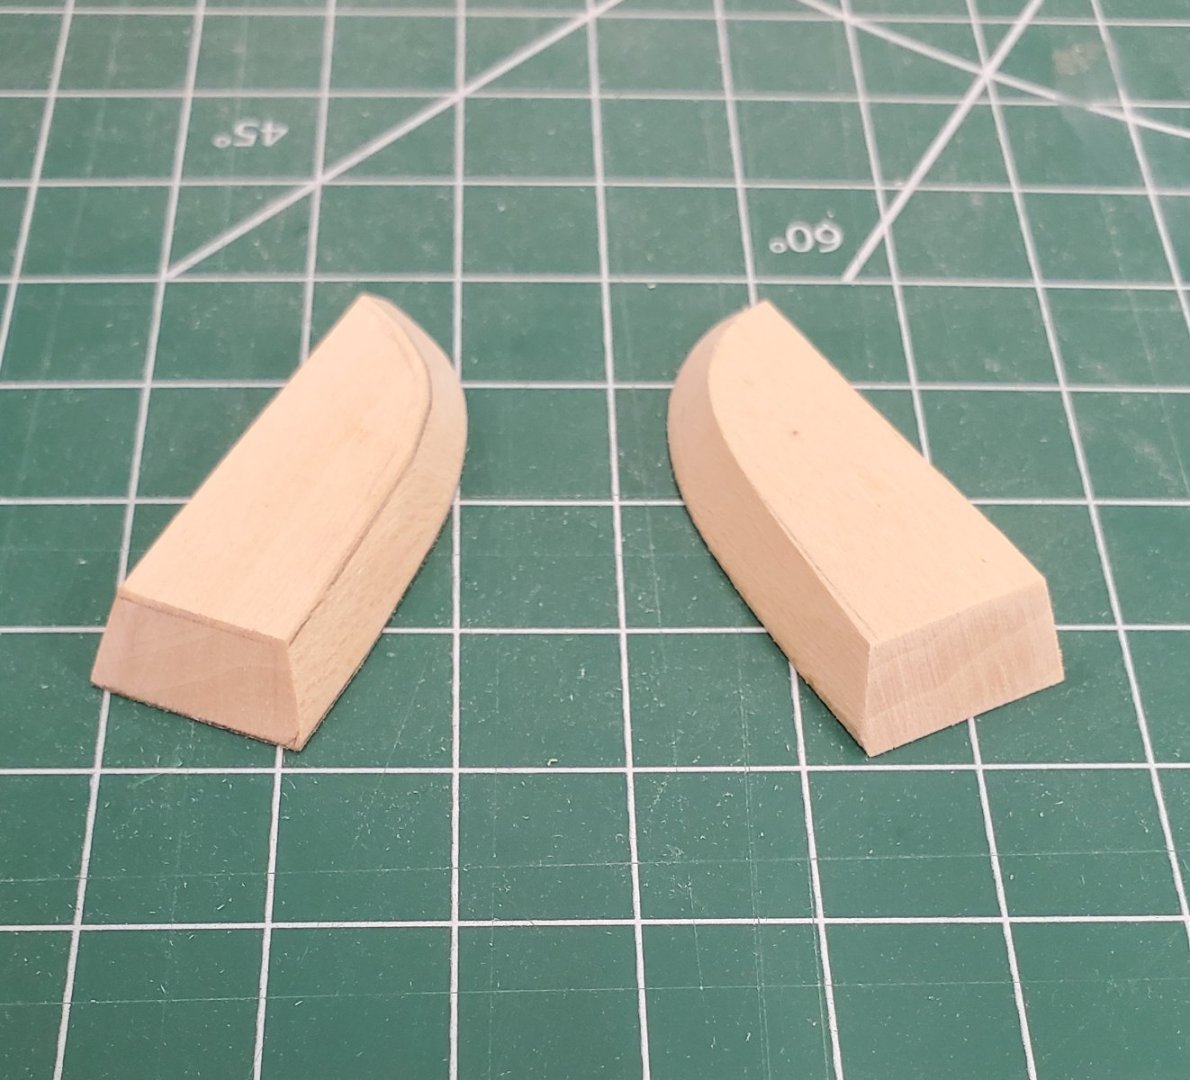
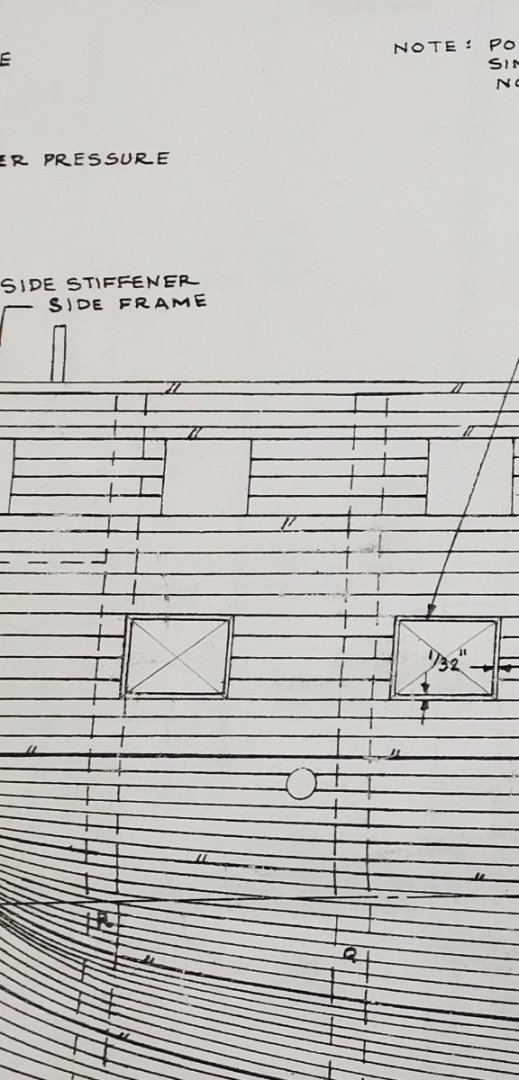
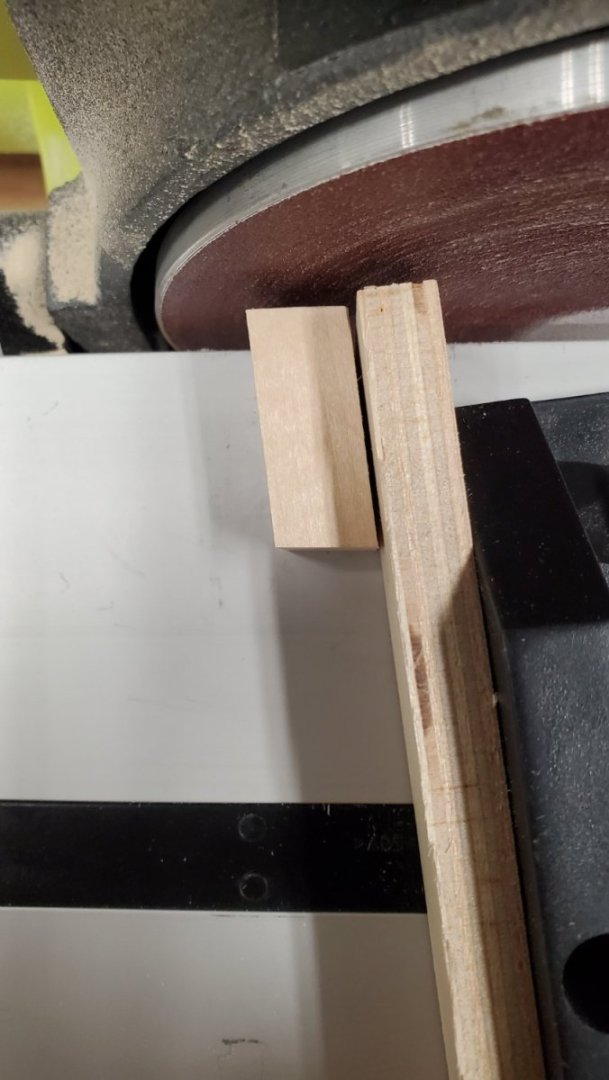
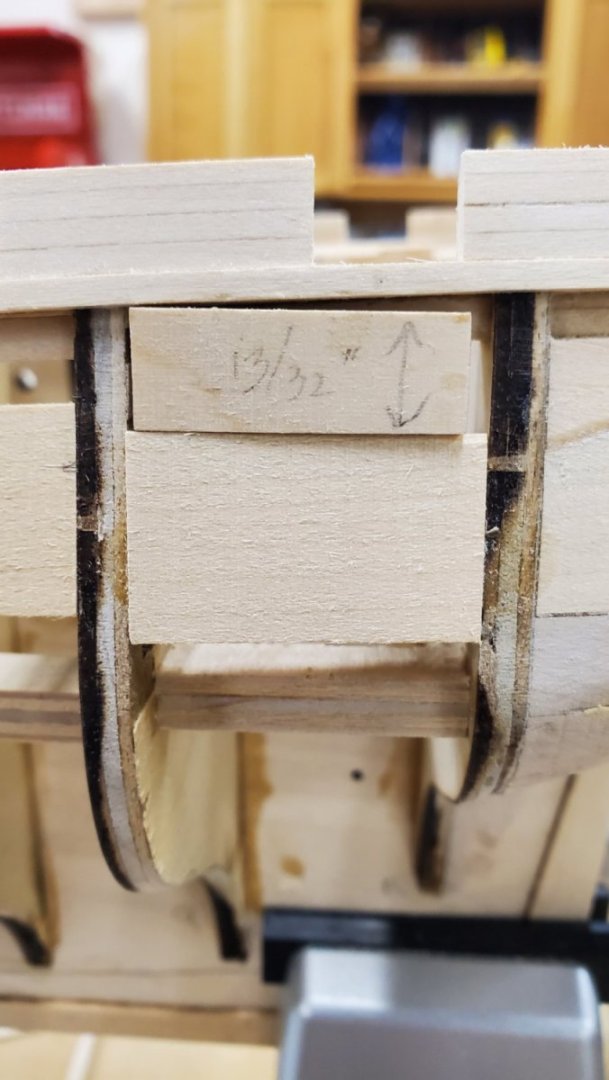
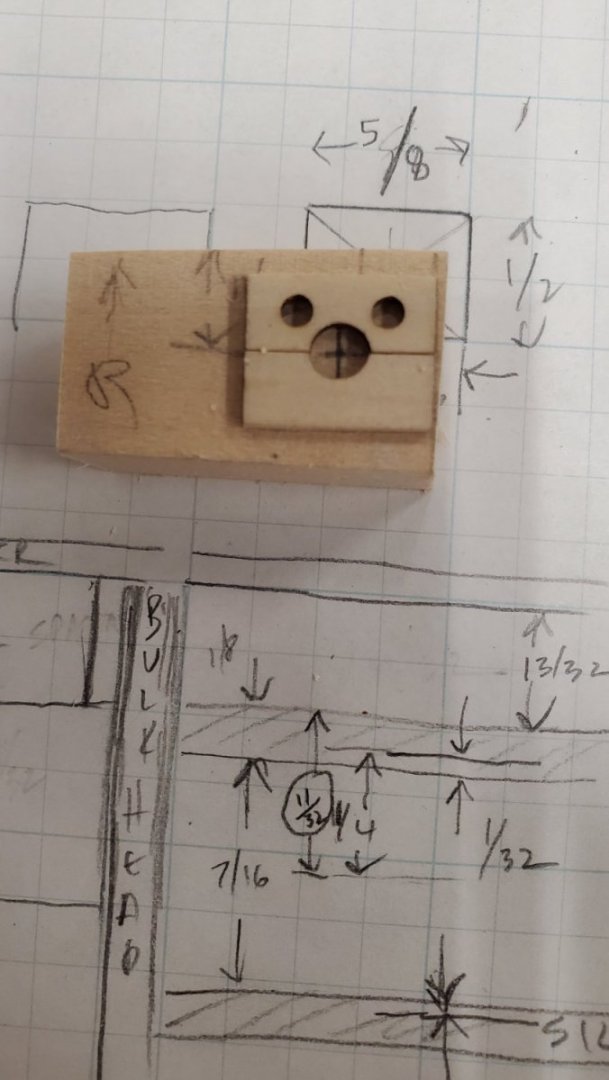
I'm starting the port side gun ports now, and as mentioned several times, am taking a new approach. I'm going to make filler blocks and drill a pair of holes to fit the false cannons. For the first hole I'll use a 1/4" forstner bit to provide space for the width of the cannon. The second hole will be the same diameter as the holes in the false cannon backs provided with the kit. The filler blocks will be cover the full width between bulkheads. The outer and inner edges must be parallel to facilitate drilling the holes. First I took some spare basswood and made some 3/4 x 1/2" strips. These will be cut to fit between the bulkheads. To keep the outer and inner edges of the blocks parallel, I needed to angle the ends to accommodate the differing angles at the edge of the bulkhead. I measured the angle both on the plans and on the hull. Turns out they were the same. Once the first angle cut was made, I measured the distance between bulkheads to mark the cutting point for the other end of the block. I did the "rough" cuts on the bandsaw using a miter gauge. Fine tuning was done with a disk sander. Once the block was the correct width and shape to fit in between the bulkheads, I had to taper the top edge to be parallel with the bottom of the outer plank sheer. Once that was done, I needed to find the spot on the block where the cannon center should be. I marked the center point and drilled the 1/4' diameter hole deep enough to match the depth of the stop of the false cannon backs on the starboard side. After that hole was drilled, I went in for a second pass with the smaller drill. When it comes time to plank the port side around the gun ports, I'll insert a cannon, place the gunport covers where around it and plank to the cover. At this point, I've only done the one between bulkhead R and Q. Sadly, I did that twice. Worse, I did it correctly the first time and moved the hole a smidge to far forward the second time. The mistake is obvious in the photos below. I figure no one will notice that the sternmost cannon on the port side will be a couple of mm forward of its mate on the starboard side. I think this will take less time and provide a better fit than the method (Bob Hunt Practicum) that I used on the starboard side. It will certainly give me more accurate placement for the cannons and provide plenty of gluing surface for the gunport covers, which will be closed around the cannons. If I were to keep the covers open, I'd be repeating the process on used on the starboard side. rough cut using the miter gauge and the bandsaw Close the gap using the same angle at the disc sander. The distance from the bottom of the outboard plank sheer to the center of the cannon hole is 3/4". I had the 13/32" spacer from doing the starboard side and used it to get the filler block parallel to the plank sheer. (add the two fractions to get to the 3/4" distance. The mistake I made was forgetting that the 1/32" had to be subtracted from the bulkhead to the vertical center mark. In the plans the gunport opening needed 1/32" of bulkhead surface to allow for gluing. Not necessary for filler blocks... But to locate the cannons precisely opposite their starboard counterparts, I need to factor that into my calculations. again, this one cannon will be a smidge too far forward compared to its counterpart on the starboard side, but I'm not going to mess with doing this one a third time. One nice benefit of cutting the blocks this way is that the fairing will be minimal..


-
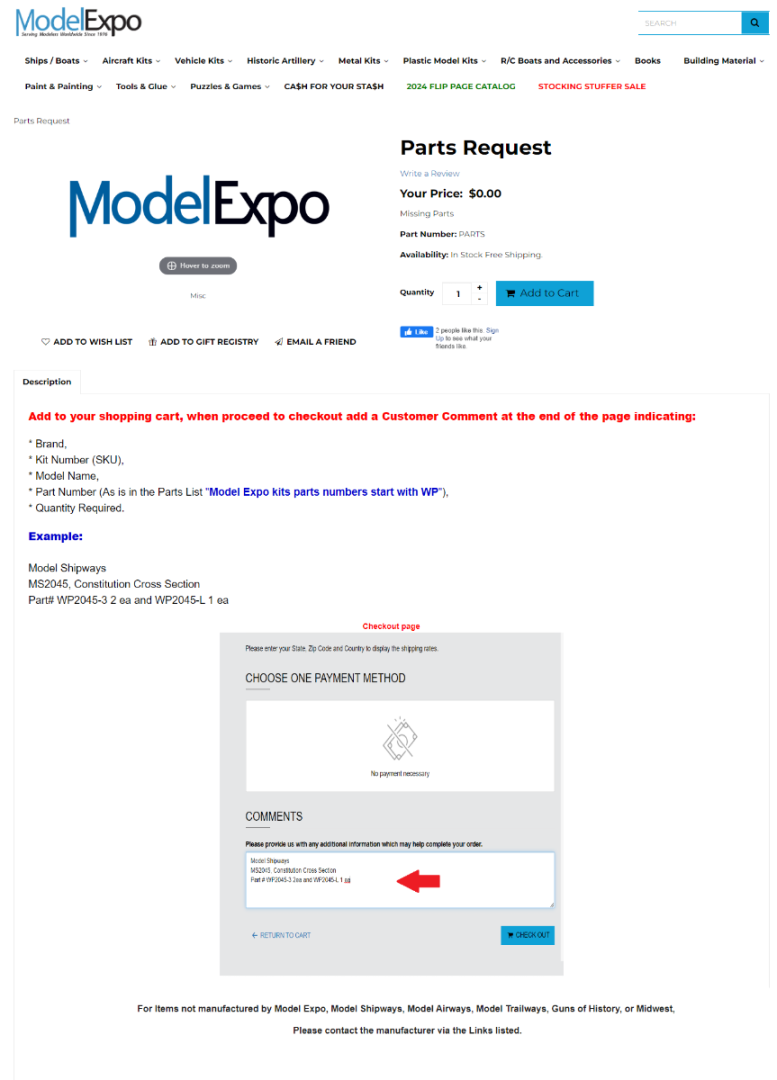
Fail... Clicking where it says "Click here" returns this: However, there's no place on the page where a cursor works. Assuming these were just directions, I searched for the part number from the kit (WP 3660 1/8" x 3/64" slats). The instructions suggest loading up the shopping cart, then providing detail in Comments at checkout. Since the part wasn't found on the search, there was no way to add the material to the shopping cart. And since the Contact Page has this warning, "(Sending Parts requests thru our regular Contact Form Below will Delay your Request, Please use the Link Above)", I didn't bother using the contact page. Emails and phone calls to Model Expo have never been returned, so why bother. I went with plan B for now. Bought 1/8" x 1/16" stock at Ace Hardware and used my thickness sander to shave off 1/64". Actually, that was plan C. Plan B was to contact the supplier that Model Expo uses to get the materials for their kits. I did order stock from him, but the wood he provided is decidedly darker and grainy. I will use this for all the planking starting two rows below the gun covers. At least both sides of the hull will match, and if I don't paint, it should look pretty nice. I am NOT impressed with Model Expo. They will not permit contact past point of sale. That seems like a lousy way to run a business. Thanks for the suggestion. Sorry it didn't pan out.
-
I may try again, though I've already purchased replacement stock. Unfortunately the supplier provided a much darker wood. I think as long as I'll use that below where I left off on the Starboard gunports, the color contrast won't bother me - if I decide not to paint... Thanks for the tip targa4403
-
They have ignored repeated emails and phone calls, and have not sent any replacement stock. I've unsubscribed to their site and won't buy another thing from Model Expo. I went another route on the stock. Yikes! how did I miss your post? You're probably right. But finding one isn't so easy. I'll be back in the shipyard starting tomorrow and will reassess my need for one. My beef with the one I did buy was the horrible clamping on the fence. Also, to be practical for small pieces that one would be cutting on a saw of this size, the safety gear only interferes. How well can you dial in the fence for repeated cuts? Does that screw clamp put dimples in the guide rod?
-
USS Constitution by mtbediz - 1:76
Der Alte Rentner replied to mtbediz's topic in - Build logs for subjects built 1751 - 1800
Now that's some advice I'll be taking to heart. Nicely done