Der Alte Rentner
-
Posts
1,018 -
Joined
-
Last visited
Content Type
Profiles
Forums
Gallery
Events
Everything posted by Der Alte Rentner
-
 That had occurred to me. The channels are marked to indicate fore and aft, top and bottom. What I am thinking about is whether to try to angle the slots for the chainplates in the channels. I could just fudge it by making the slots wide enough that there's plenty of wiggle room to maneuver. If I make them as narrow as Hunt did, they're barely wider than the kit provided channels - no fudge factor there.. And my perfectionist side is nagging at me about the length between the deadeye and the loop. Remake them with two fewer twists? Back off bro! 😁
 -
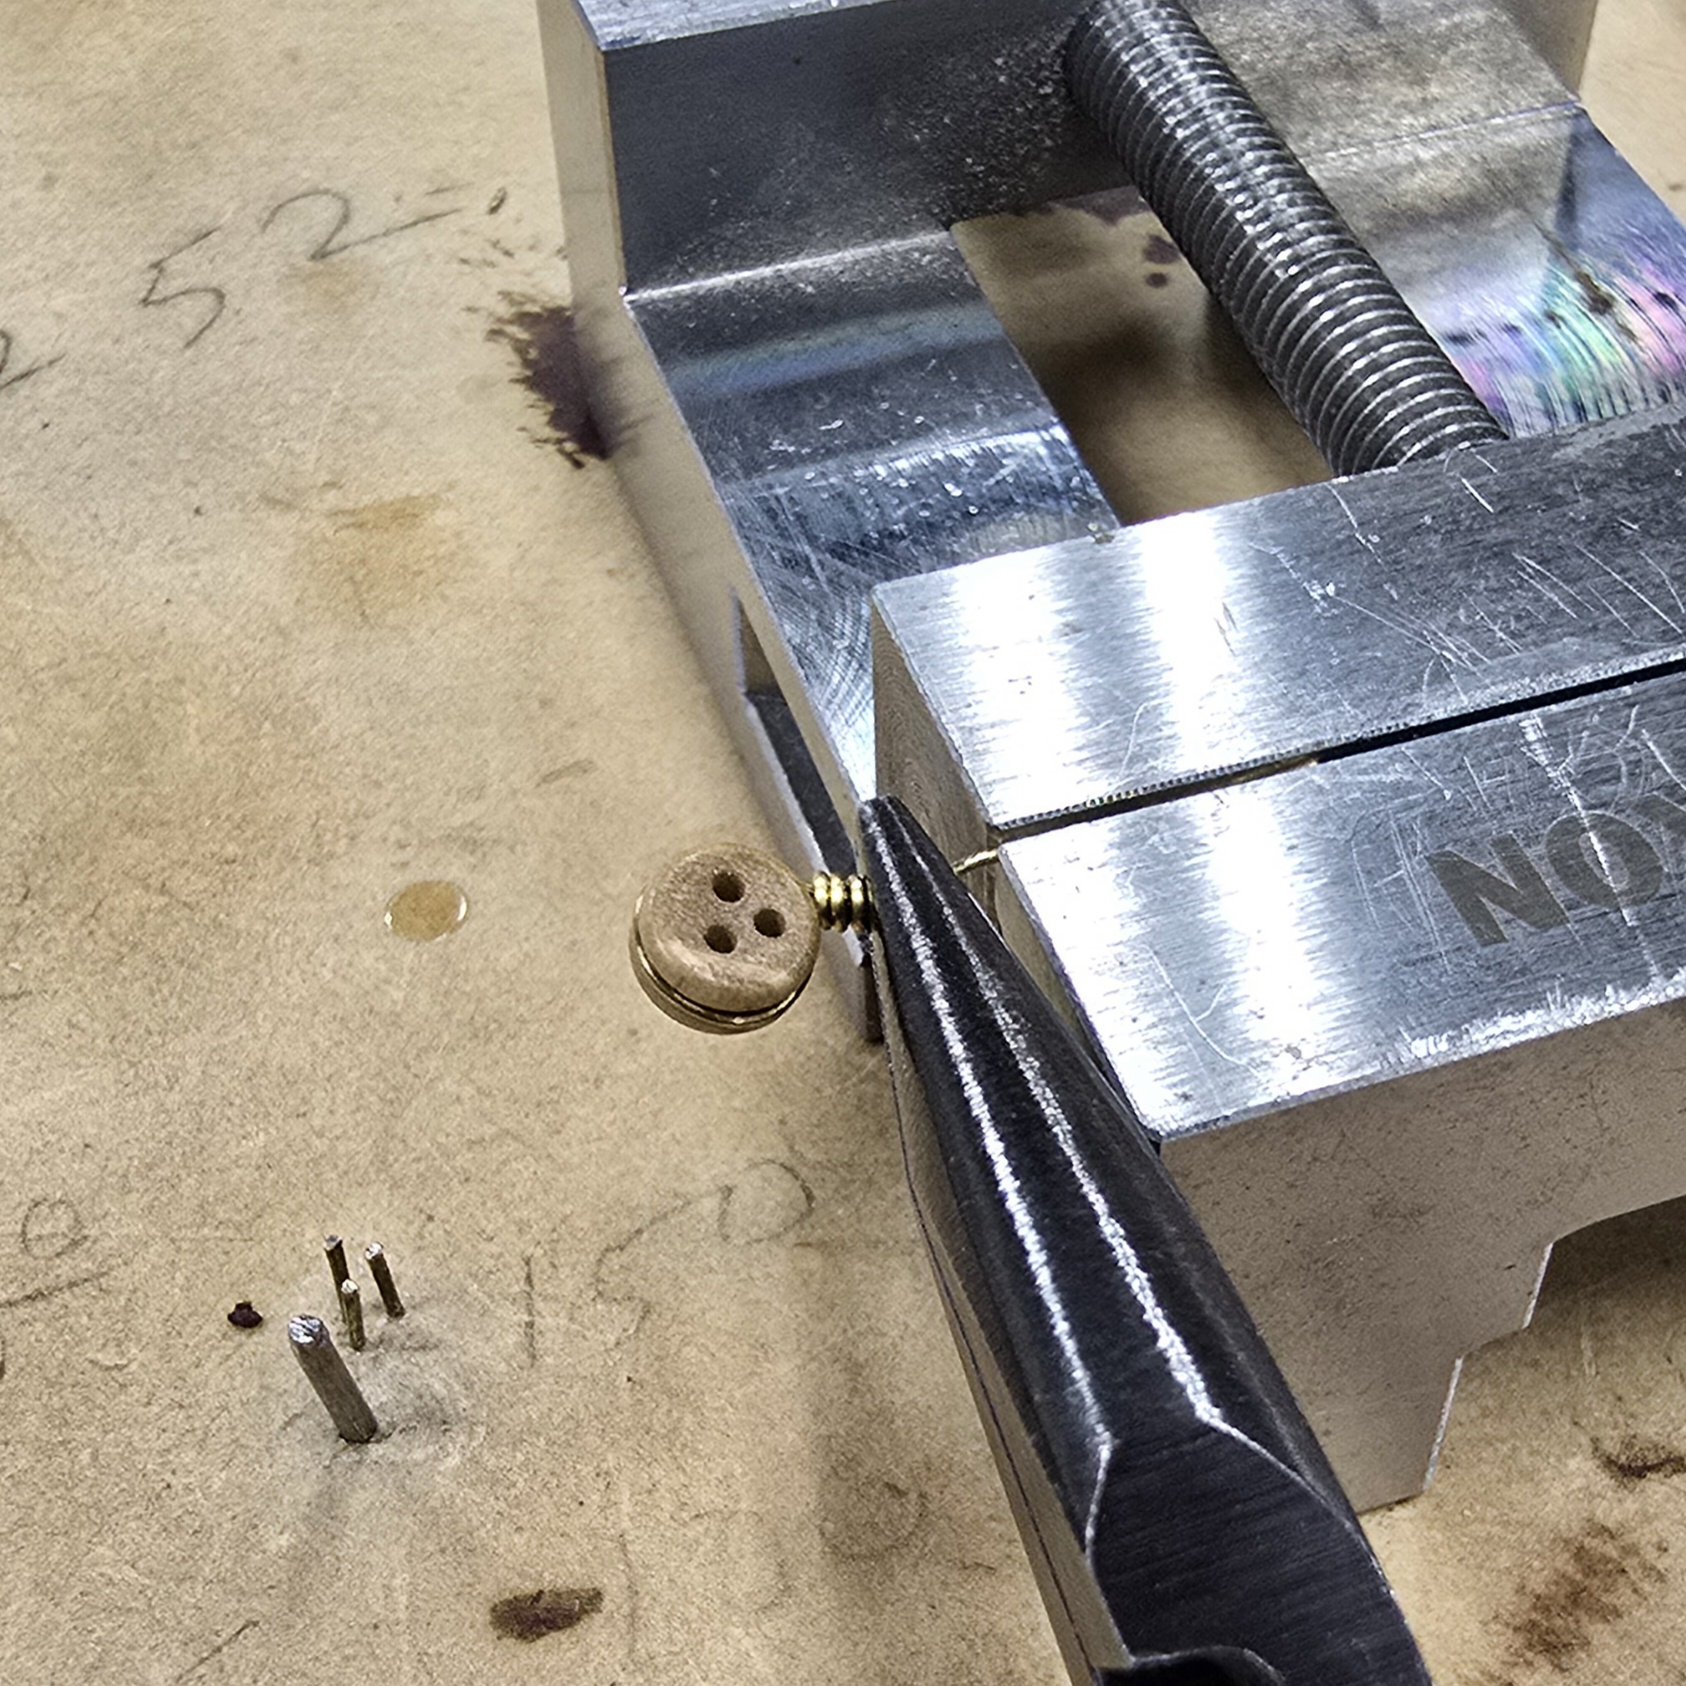
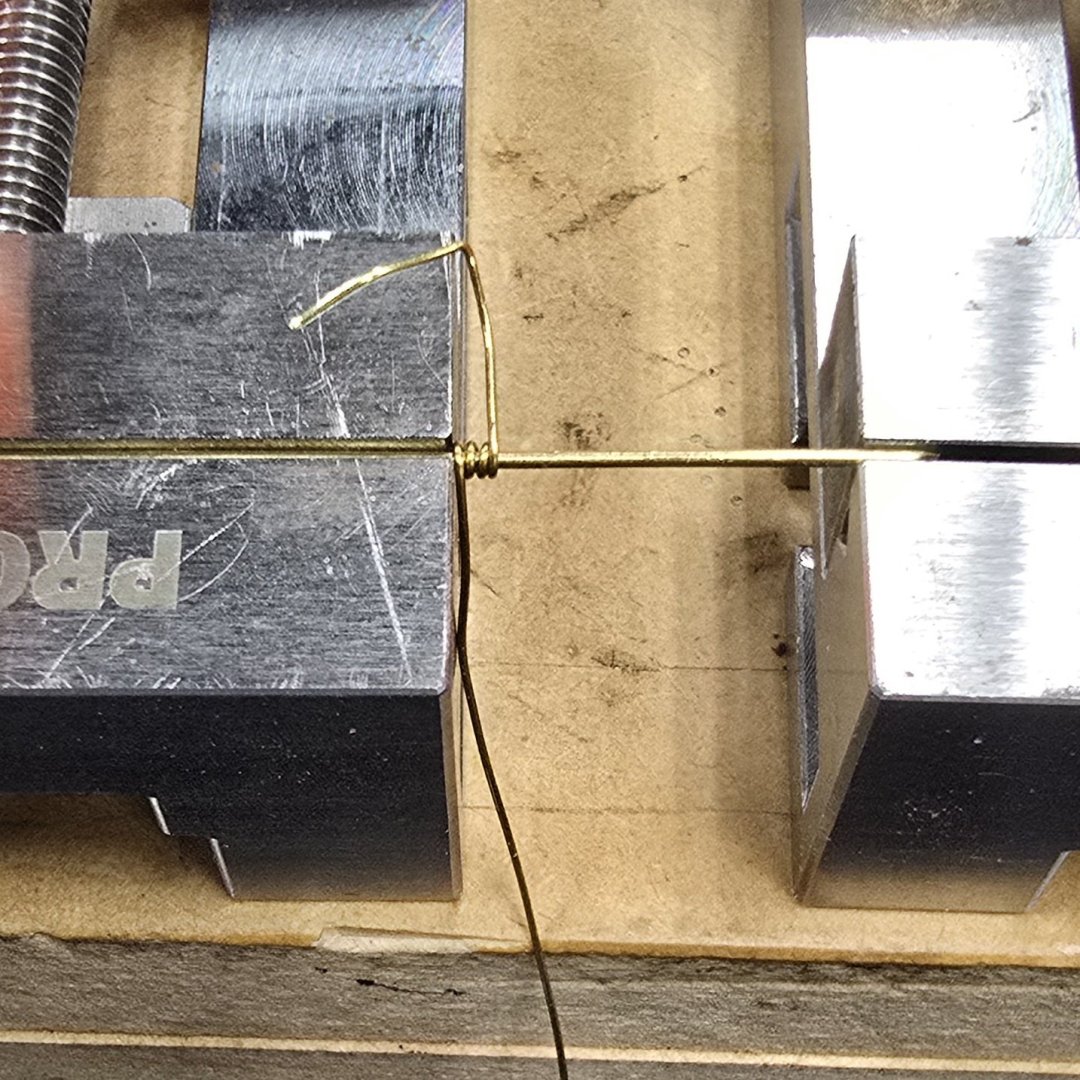
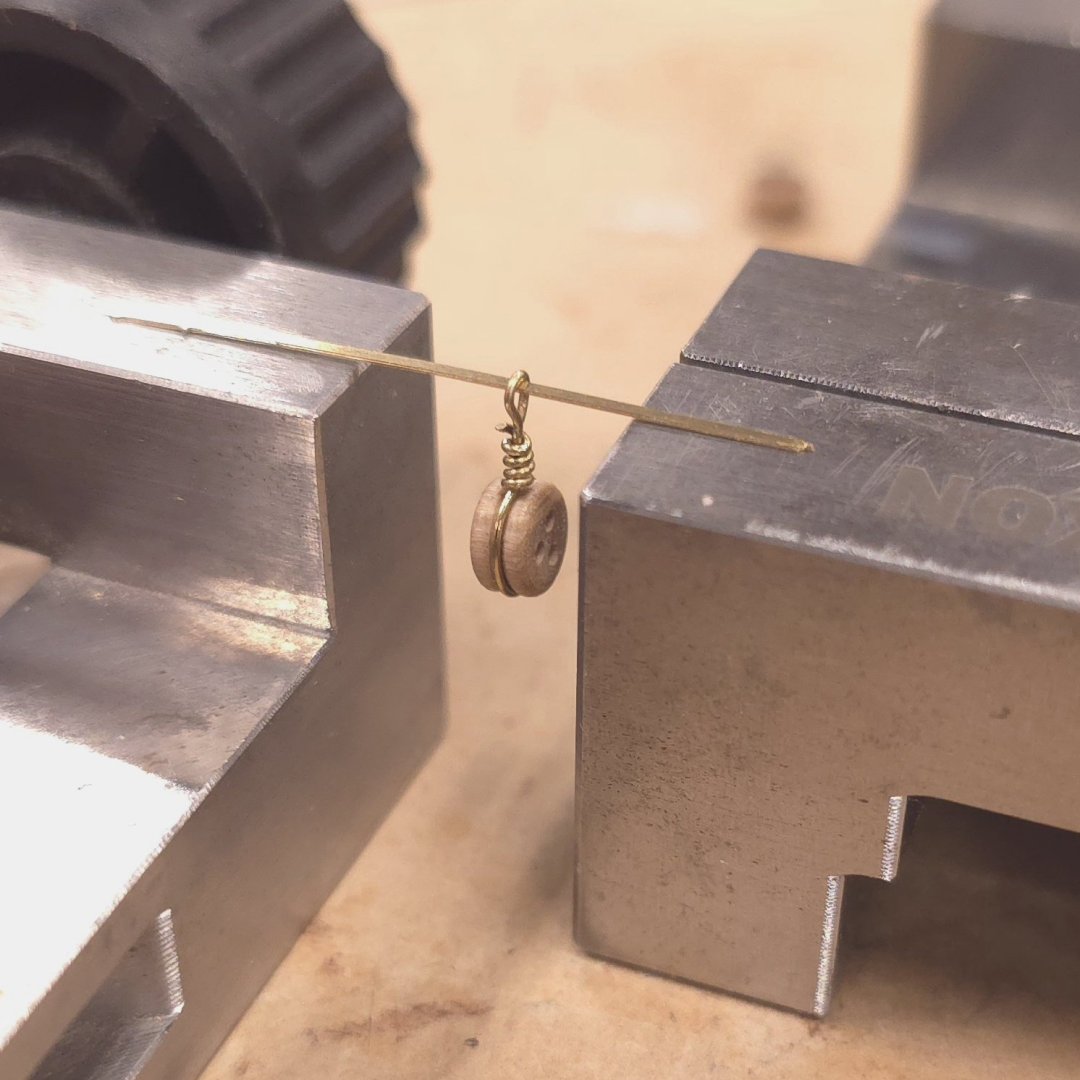
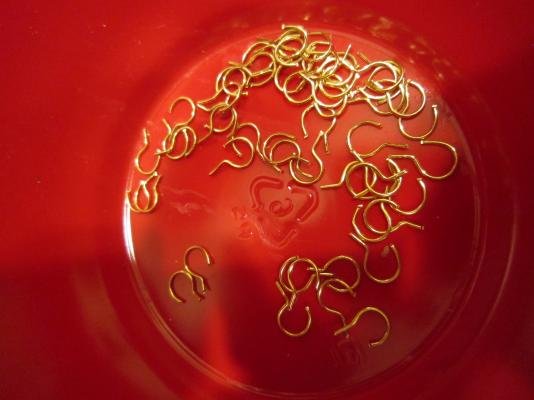
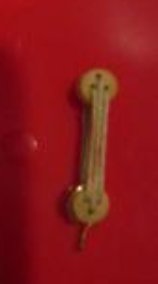
On my first go-around I wrapped .45 mm wire around a .8 mm rod. I purchased some .6 mm rod, that I intended to swap the .8 mm rod out with. Forgetting my intention, I wrapped the .6 mm rod around the .8 mm rod and liked the result so well that I made 18 of the 5/32" dead eyes for use on the channels and chain plates for the main mast. Since I already had 10 of the 5/32" dead eyes from the first attempt, I wanted to finish that batch using the same .45mm wire. To reduce the amount of tweaking after the initial wrap, I swapped the .6 mm rod for the .8 mm rod and wrapped the .45mm wire around that. I now have 16 of those, which I will use for the foremast. My concern in using the .45 mm wire was that the loop, which would attach to the chain plate, wouldn't hold up under tension during rigging. After some experimenting, I realized this was not really an issue. Bottom line: it's easiest to work the .45 mm wire then the .6 mm rod. For the remaining smaller diameter deadeyes, that's the option I will go with. I don't think the casual observer will notice a difference.

-
Beautiful model. very nice save.
-
Very nicely done! Congrats. Now all you have to do is rig them..😁 (oh, and thanks for including the photo of the dime - for nostalgia's sake. I can't remember the last time I actually handled change of a dollar.) (lastly, does Tom know you're crossing over into his field? I noticed the kit from Model Airways on the floor.)
-
It just dawned on me that we may have been thinking of different things. I was referring to the rod I twist the wire around. If that were a tad thinner, I'd have a narrower sleeve to pass the wire through, resulting in less tweaking to snug things up - as if I were seizing. You are probably thinking I should use a thicker wire for the strop. I don't think I'll be able to wrap that as easily or as nicely around the .8 mm rod to form the sleeve. I'll know soon enough if .7 mm wire will work better as the strop or the tool to make the strop. For what it's worth, I did try double wrapping the .45 mm wire around the deadeye. Unfortunately the groove around the deadeye was too narrow to accommodate two wraps. One side was riding higher than the other, and I didn't want to bother with widening the grooves on the deadeyes marginally to mimic the look of the real deal. I also tried using the .8 mm rod as the strop, but couldn't achieve the result Mustafa did, and, it was too thick to wrap around itself like the .45 mm wire. I could spend a week trying different things, but I'm happy enough with the above to call it a win.
-
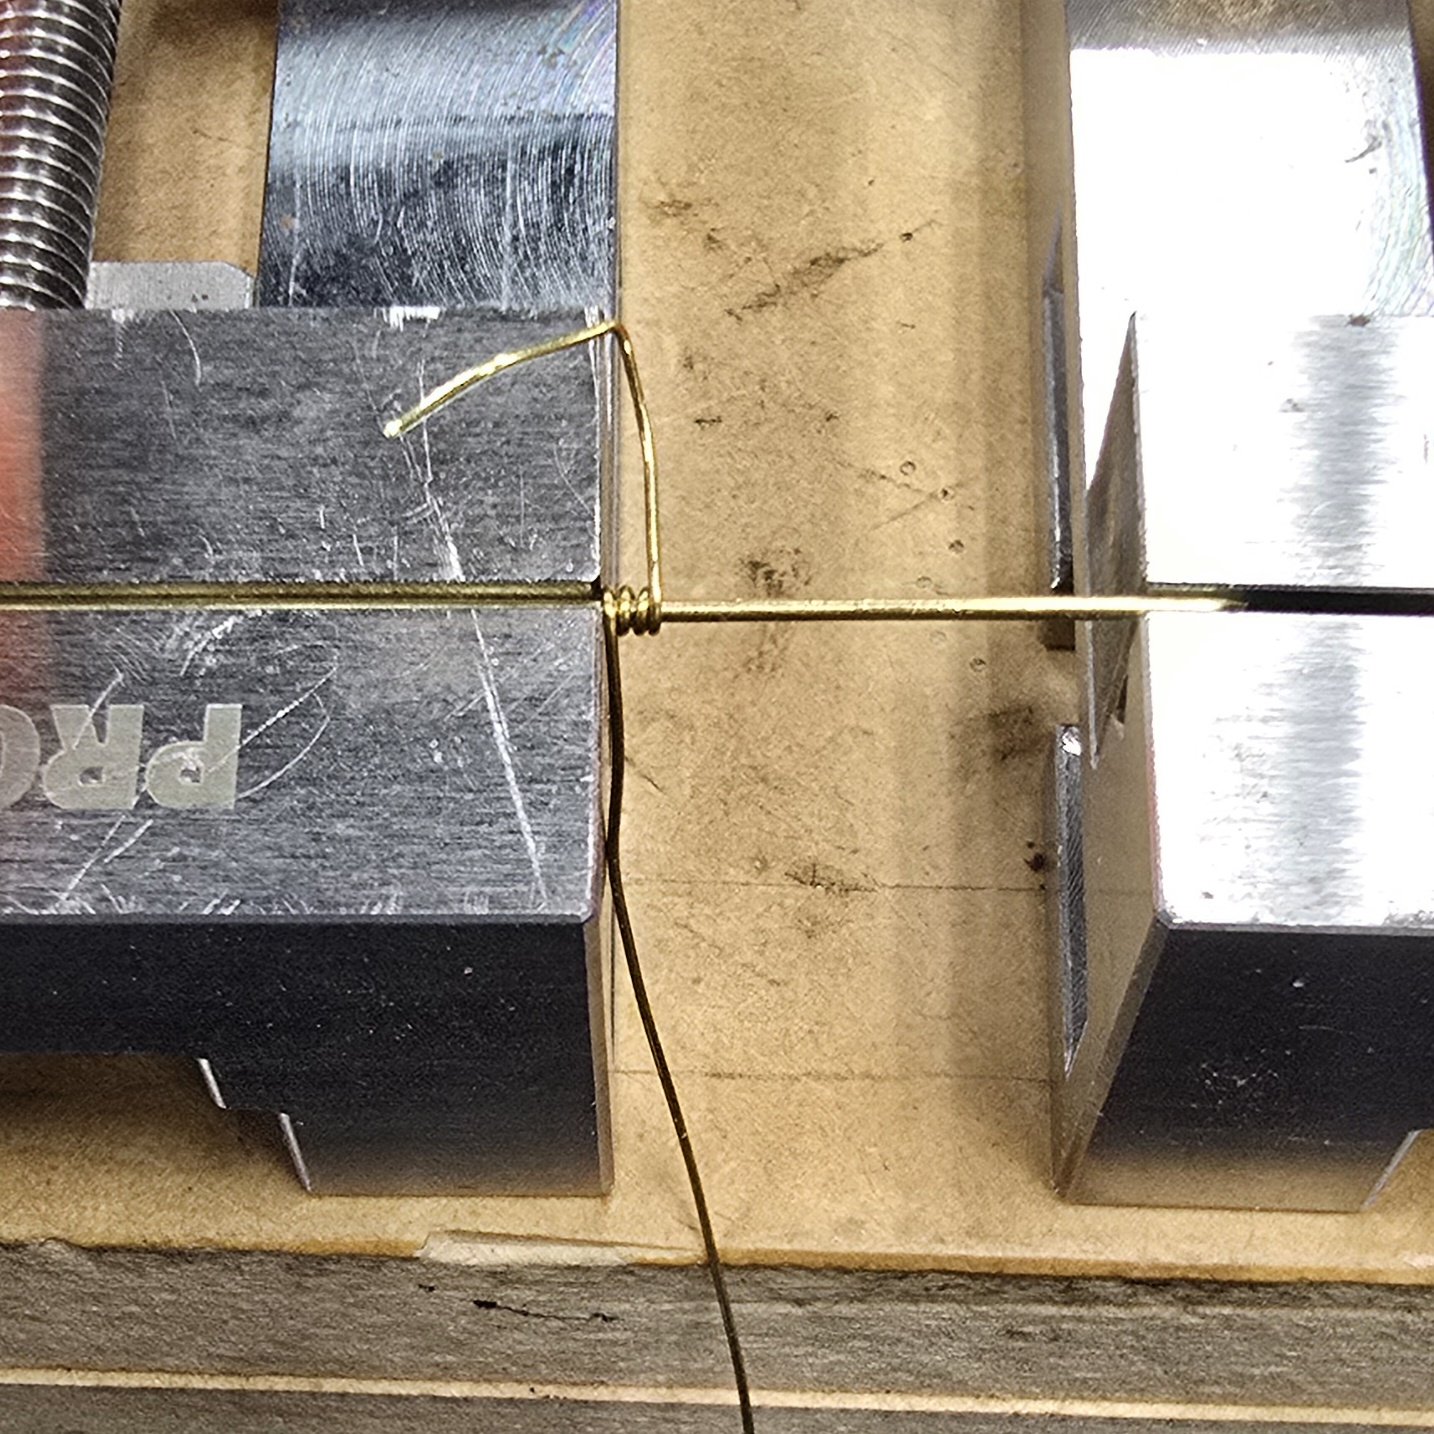
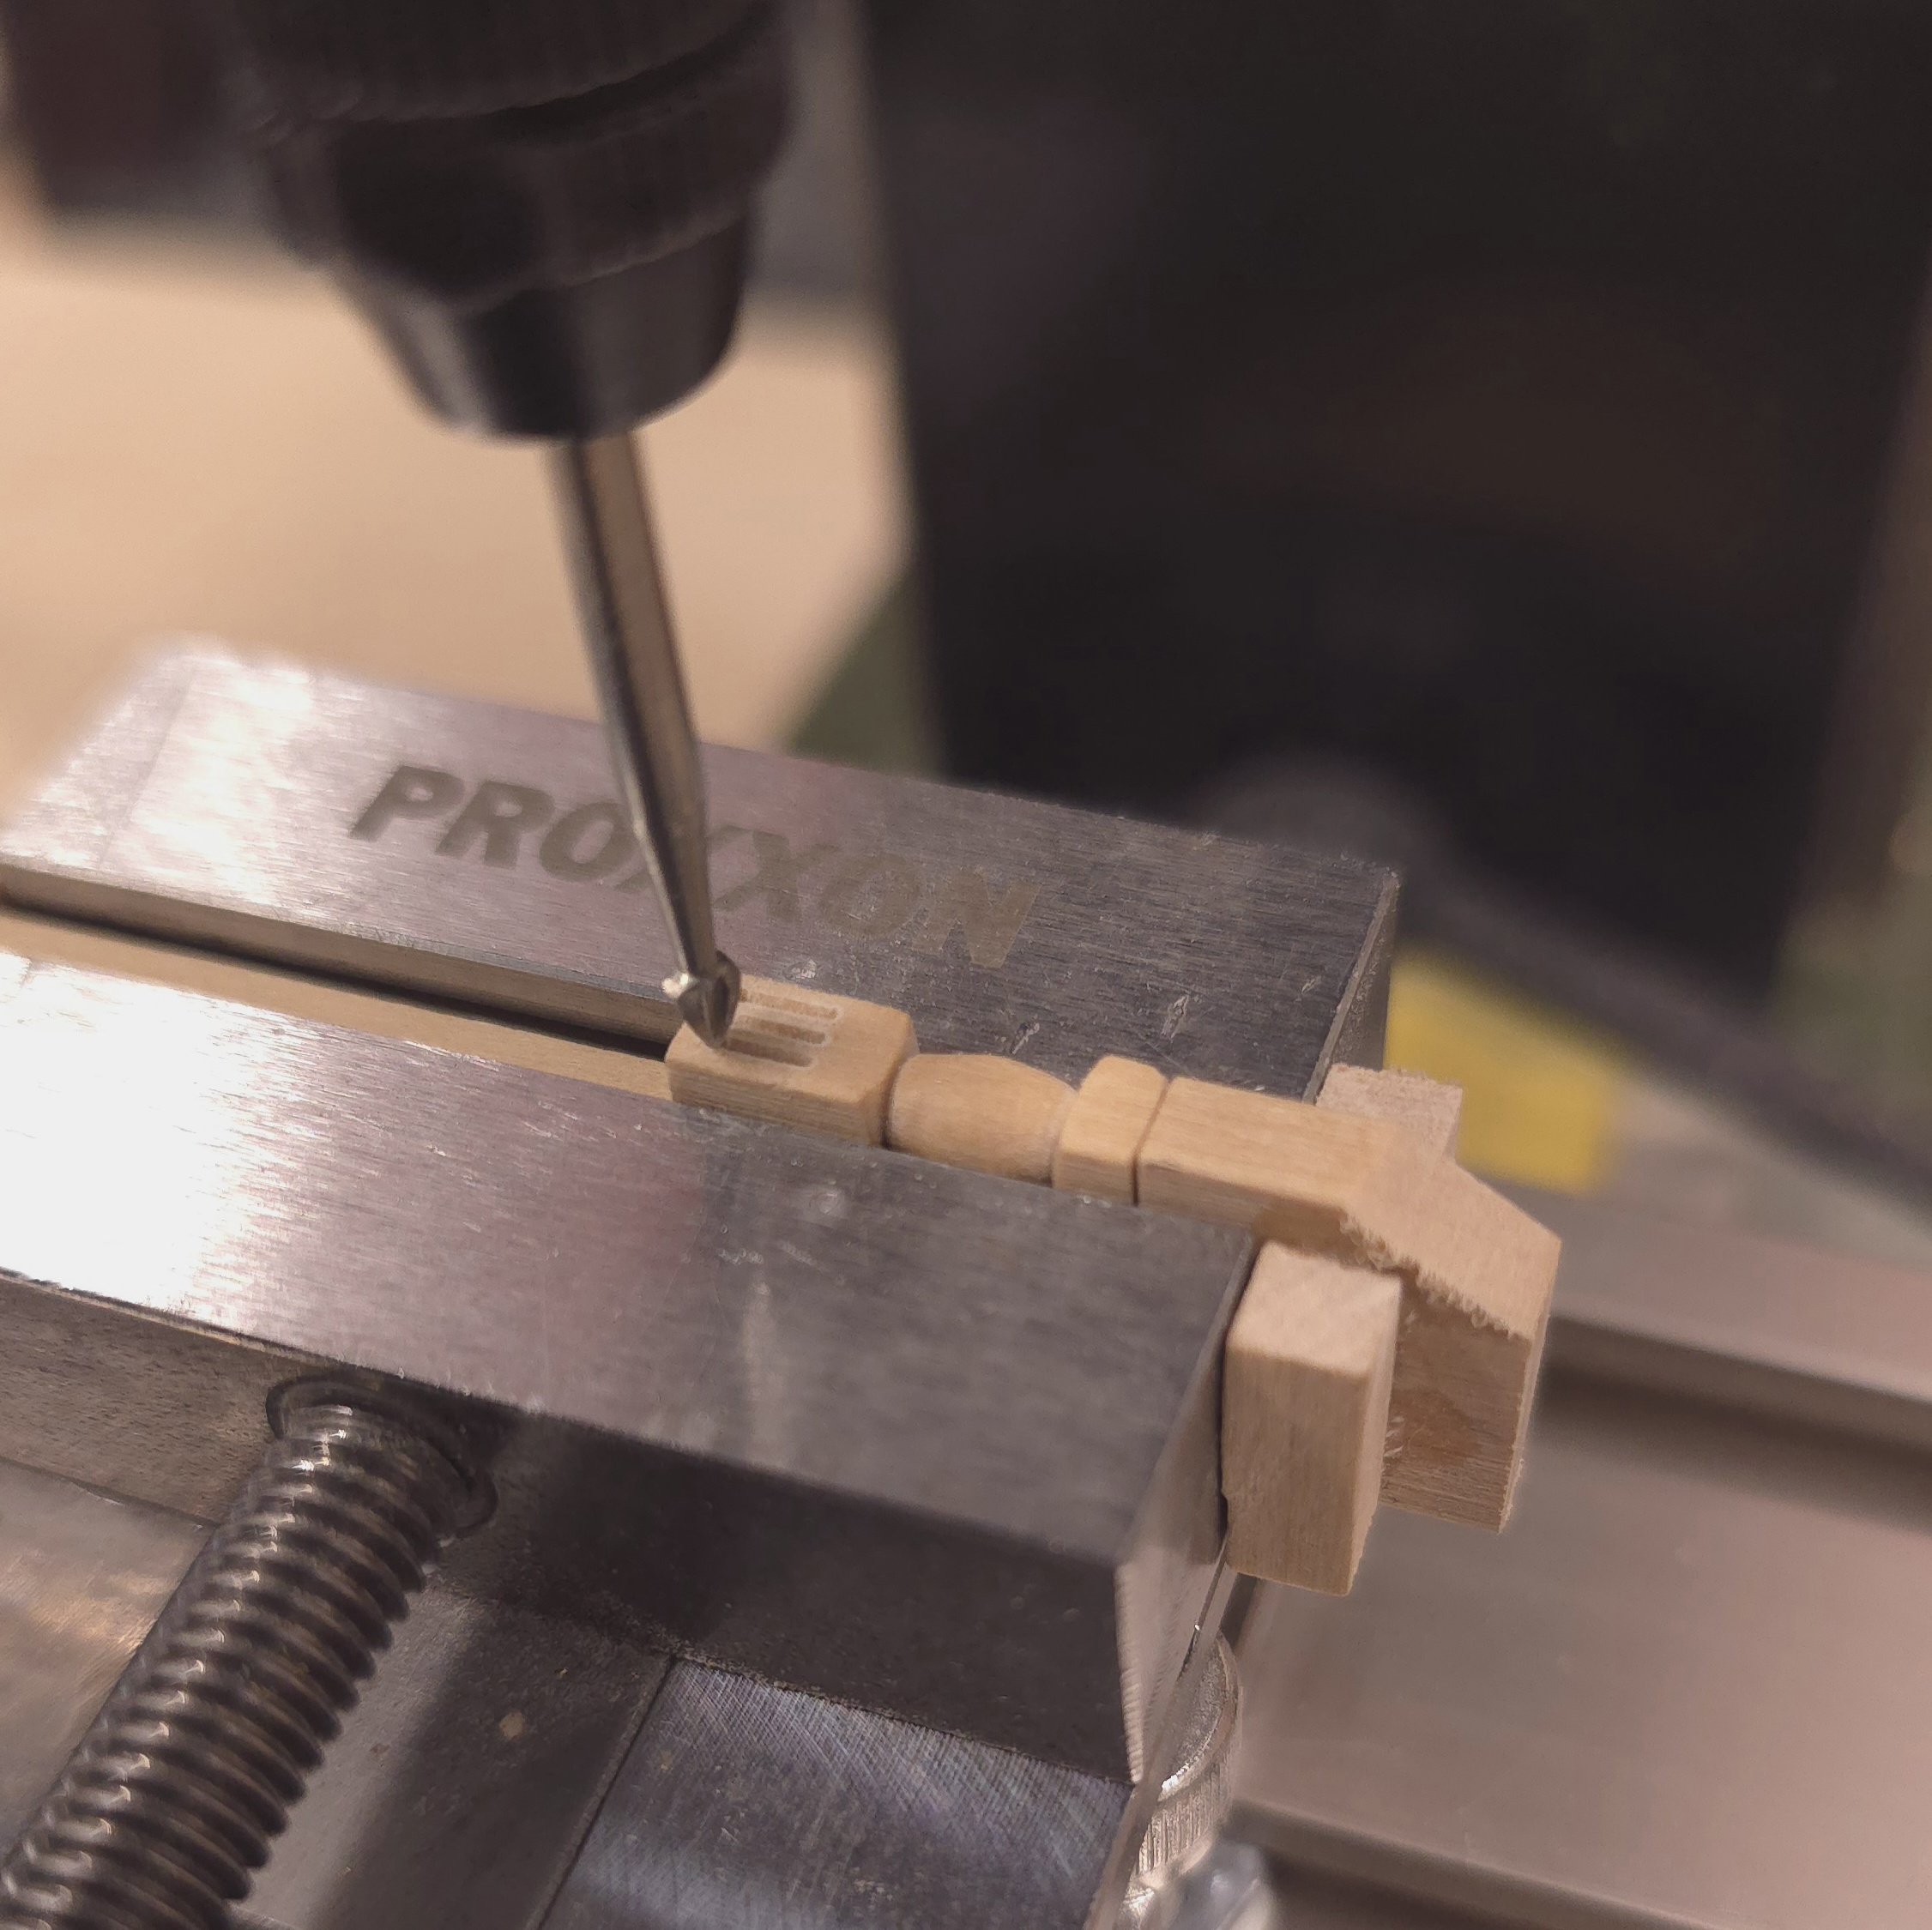
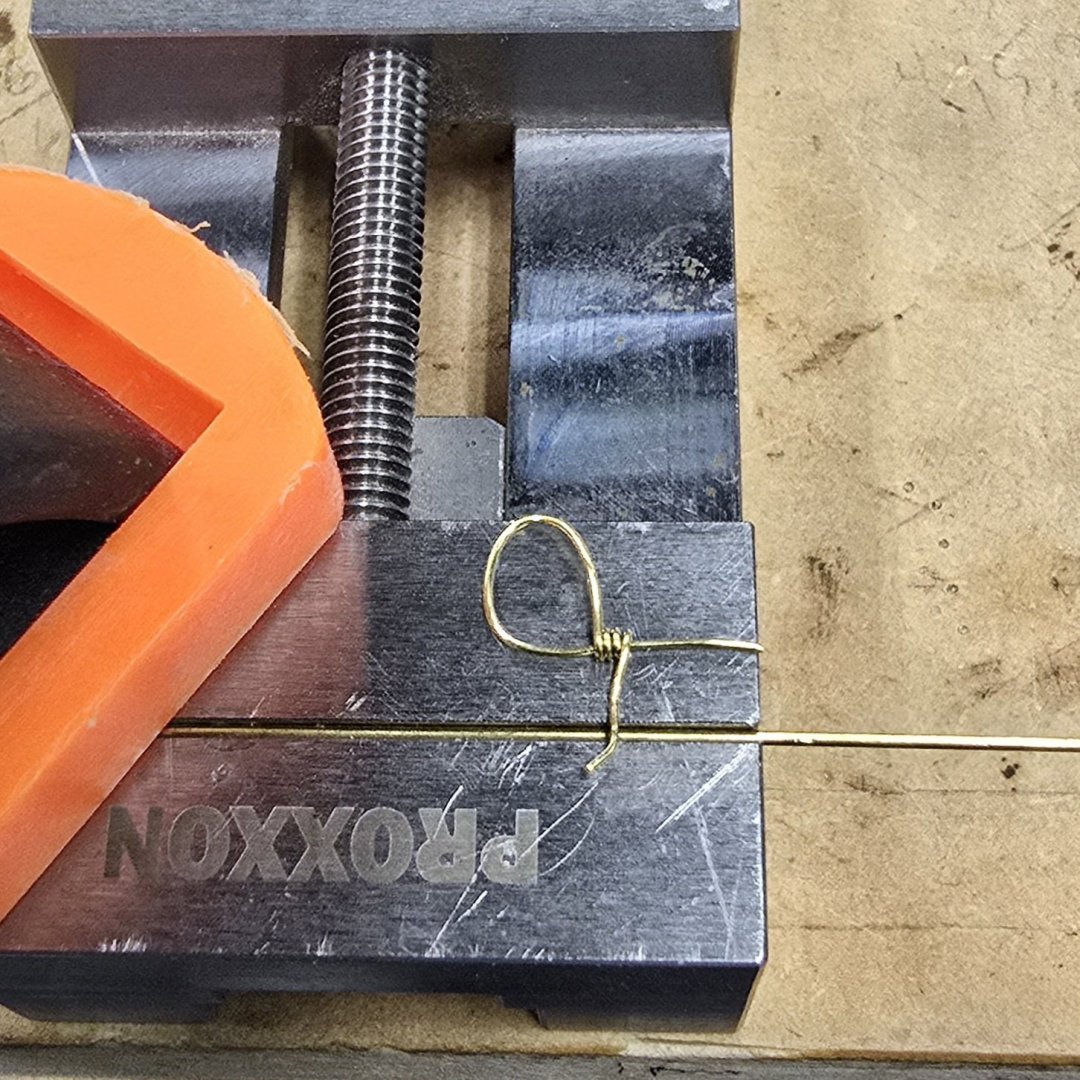
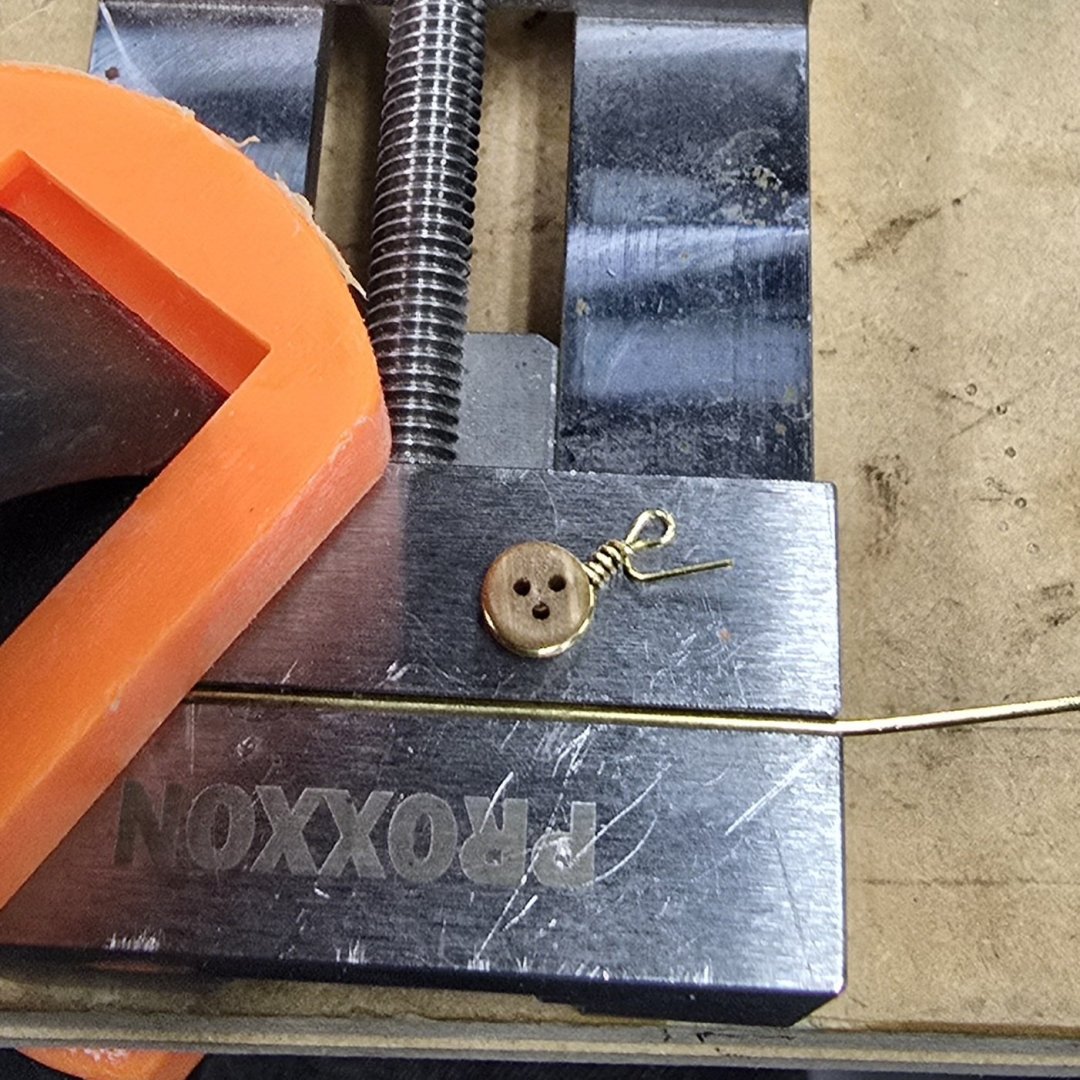
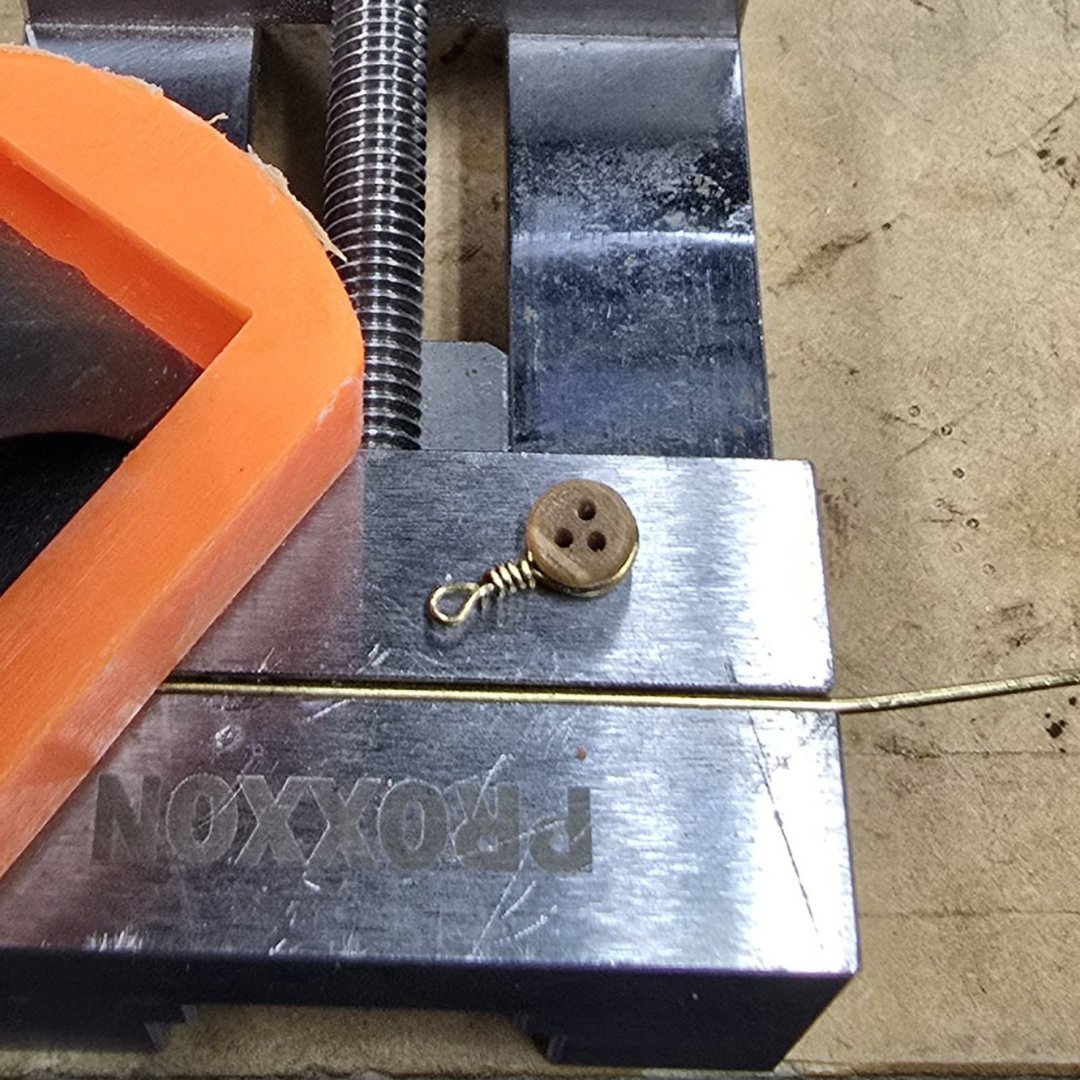
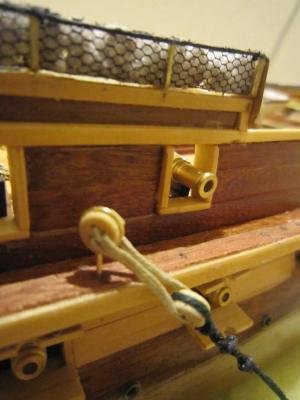
Exactly. And because I didn't see anything actually connecting the deadeye to the chain plate, I became oncerned that, if I'm tugging on the deadeye during rigging, that it might come undone. So, I've been experimenting with methods of stropping the deadeye with brass wire, and ending up with a loop for the chainplate to pass through later. I won't show you the failed or less than desirable results, but I think I'm on to something: The diameter of the brass rod clamped between the vices is .8 mm. The diameter of the wire that I'm wrapping around the rod is .44 mm. I think if I had some .6mm rod on hand, I'd have even better results. I should be receiving some point .7 mm rod tomorrow. So, I won't be doing much more than this trial run today. Wrap brass wire tightly around a secured rod of diameter slightly larger than the wire. Bend the wire into a loop and pass the end through the coil. Snug everything up with pliers Form a tighter Loop at the other end. Clean things up with snippers and needle nose pliers One down. Before anyone asks, I tried simply twisting the wire like most others have done, but doing so weakened the thin brass which resulted in the occasional snap while forming that final loop for the chain plate. Frankly, I think this looks better too. Also, my deadeyes will ride proud of the channel a bit, as they do in the photos you provided of the Constitution last week. Ken's were flush against the channel.

-
It's amazing how clearly the mind works when you're out in nature.. While riding my bicycle and turning the problem of deadeye/chain plate marriage over in my head, I realize that a drawback to my plan above is that the hole I want to pass the hook at the bottom end of the deadeye through - is at the wrong end of the chain plate. Since the lengths of the chain plates will vary across the span of the channels, the predrilled hole will need to be at the bottom and a U shaped hook bent at the top where it mates with the deadeye strop. If I want to use the kit provided chain plates, I'll have to change my approach. XKen didn't explain how, or even IF, he attached the deadeyes to the chain plate, so I had to look elsewhere for ideas. Mustafa's approach certainly looks great and will make adjusting the length of the chain plates easy. KMart and Tom (used to sail) used a different technique, which may (or may not?) be easier to do. I'll have to do some experimentation to see which works best for me. For what it's worth, the closeups provided by Jon suggest that I should double wrap a smaller diameter wire around the deadeye instead of using a single thick rod as all three of the above have done. How to do that and fashion an integrated pin at the bottom of the strop? Back to the bicycle!
-
I'll decide after I see just how snugly the strops hold the deadeyes. I think it might be beneficial to be able to rotate the deadeyes a bit when it comes time to actually do the rigging. I'll experiment with my hook idea the next time I'm in the shipyard. Weather is too perfect this time of year to spend much prime daylight time indoors. Best
-
USS Constitution by mtbediz - 1:76
Der Alte Rentner replied to mtbediz's topic in - Build logs for subjects built 1751 - 1800
Did you use the mill to do the chamfering? Or eye-ball it? -
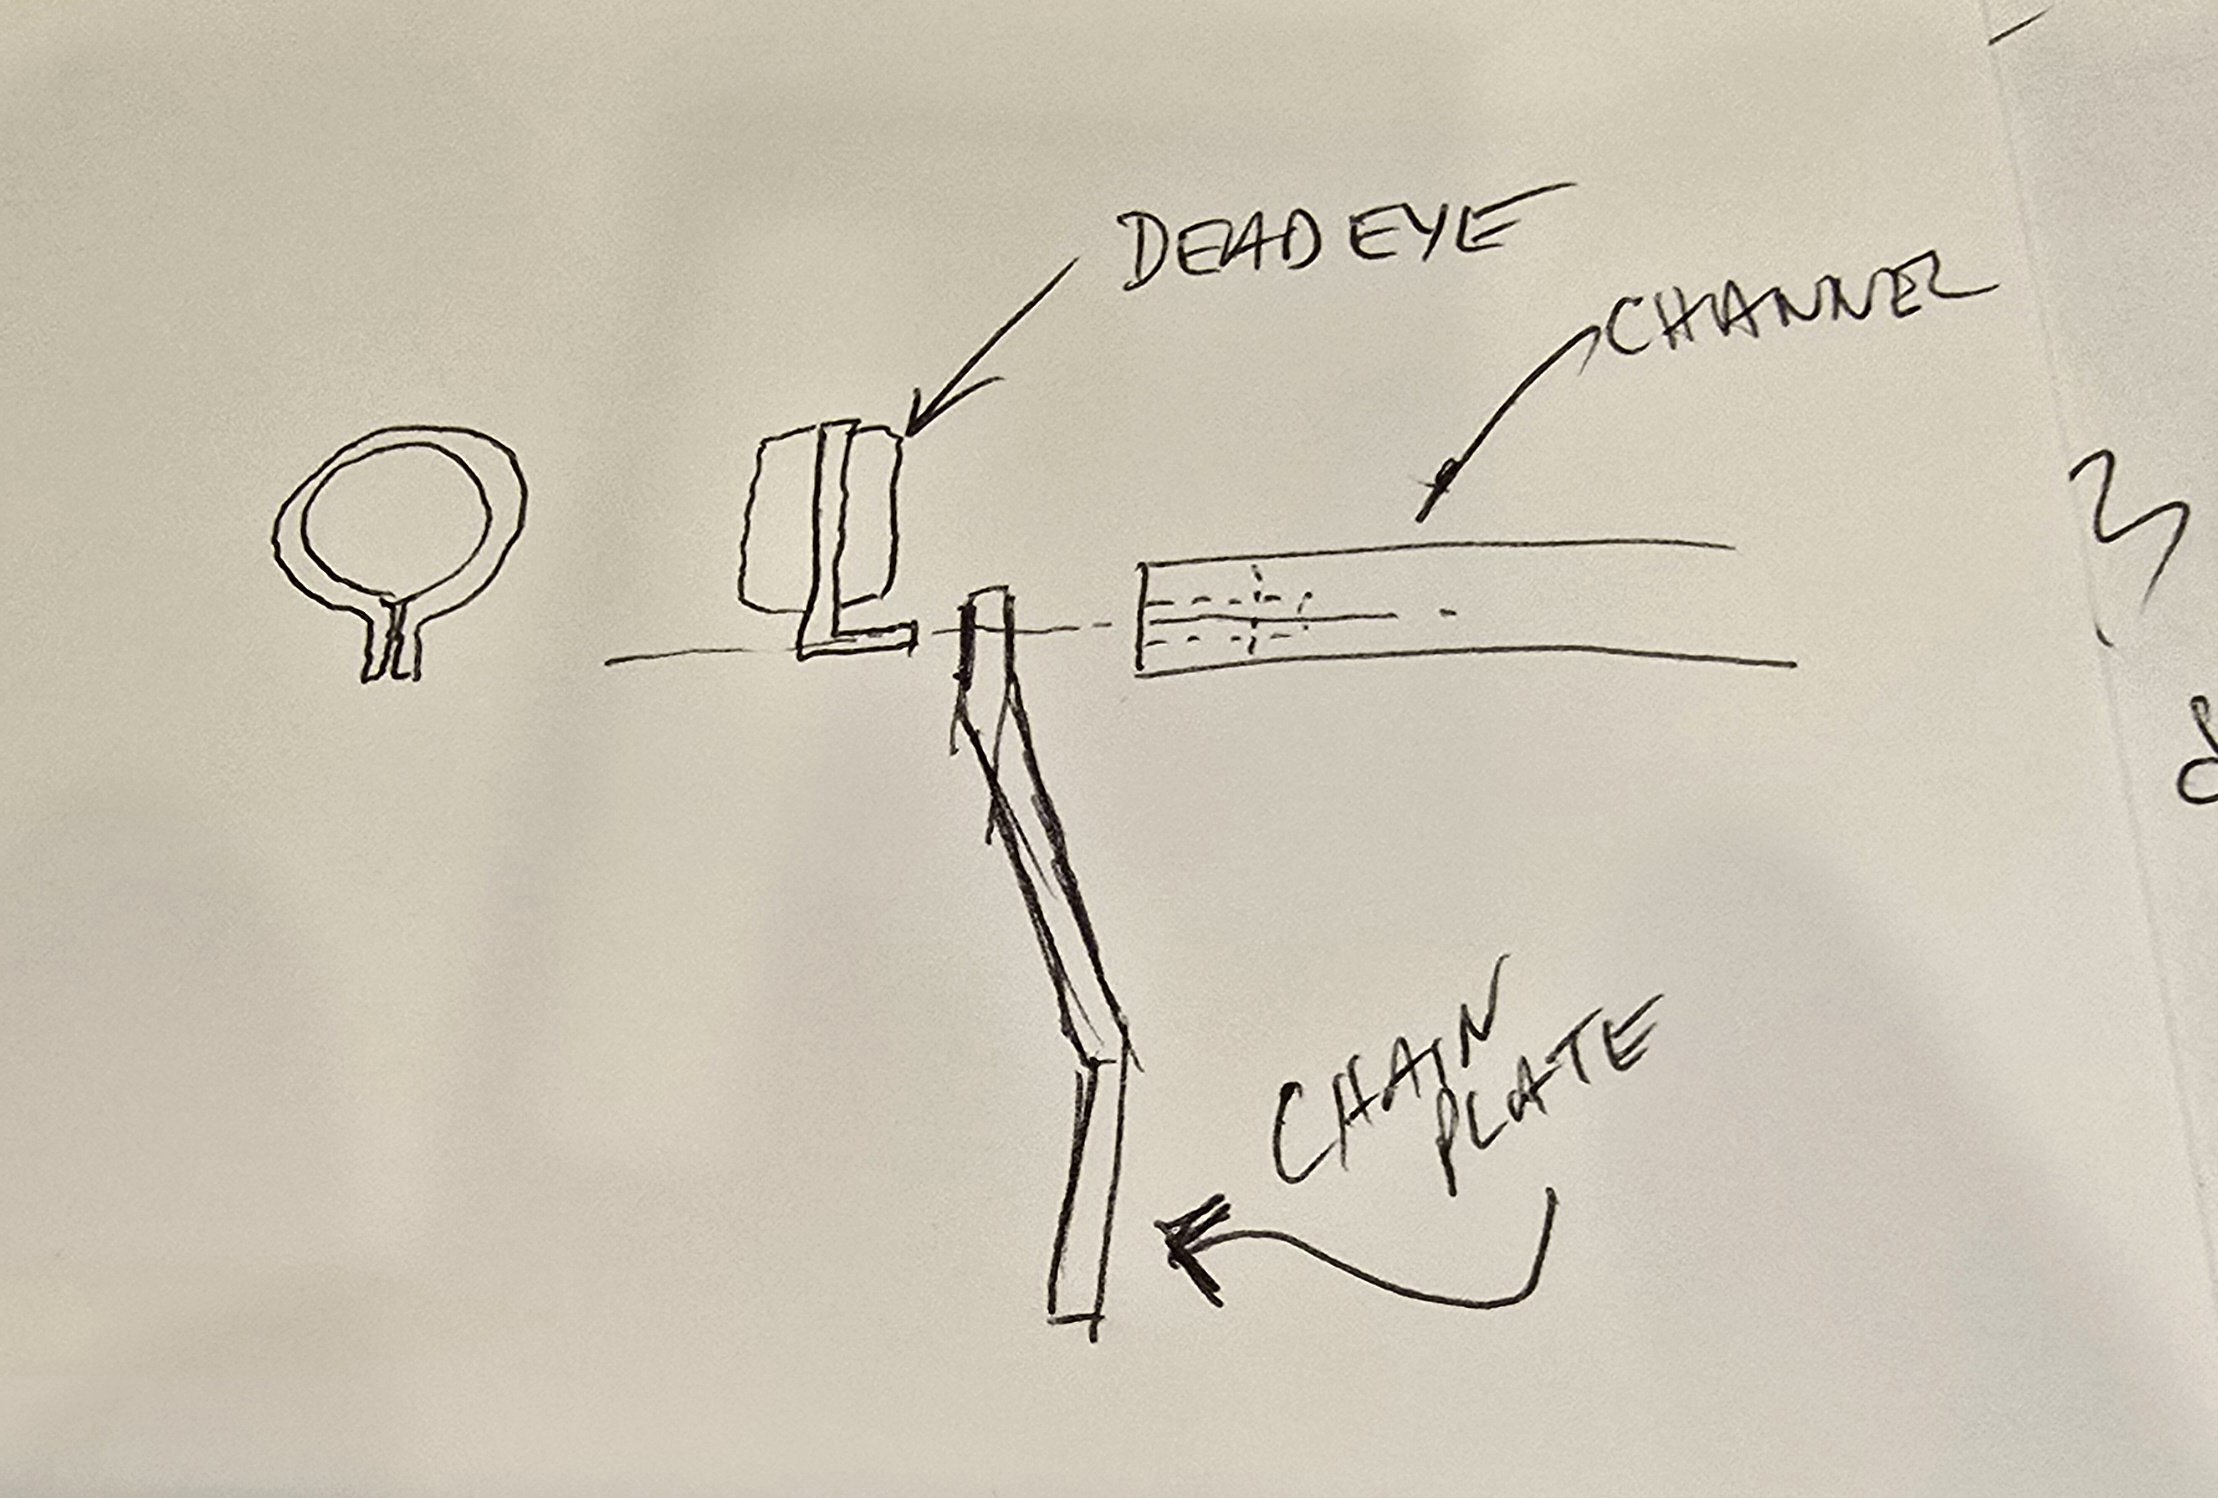
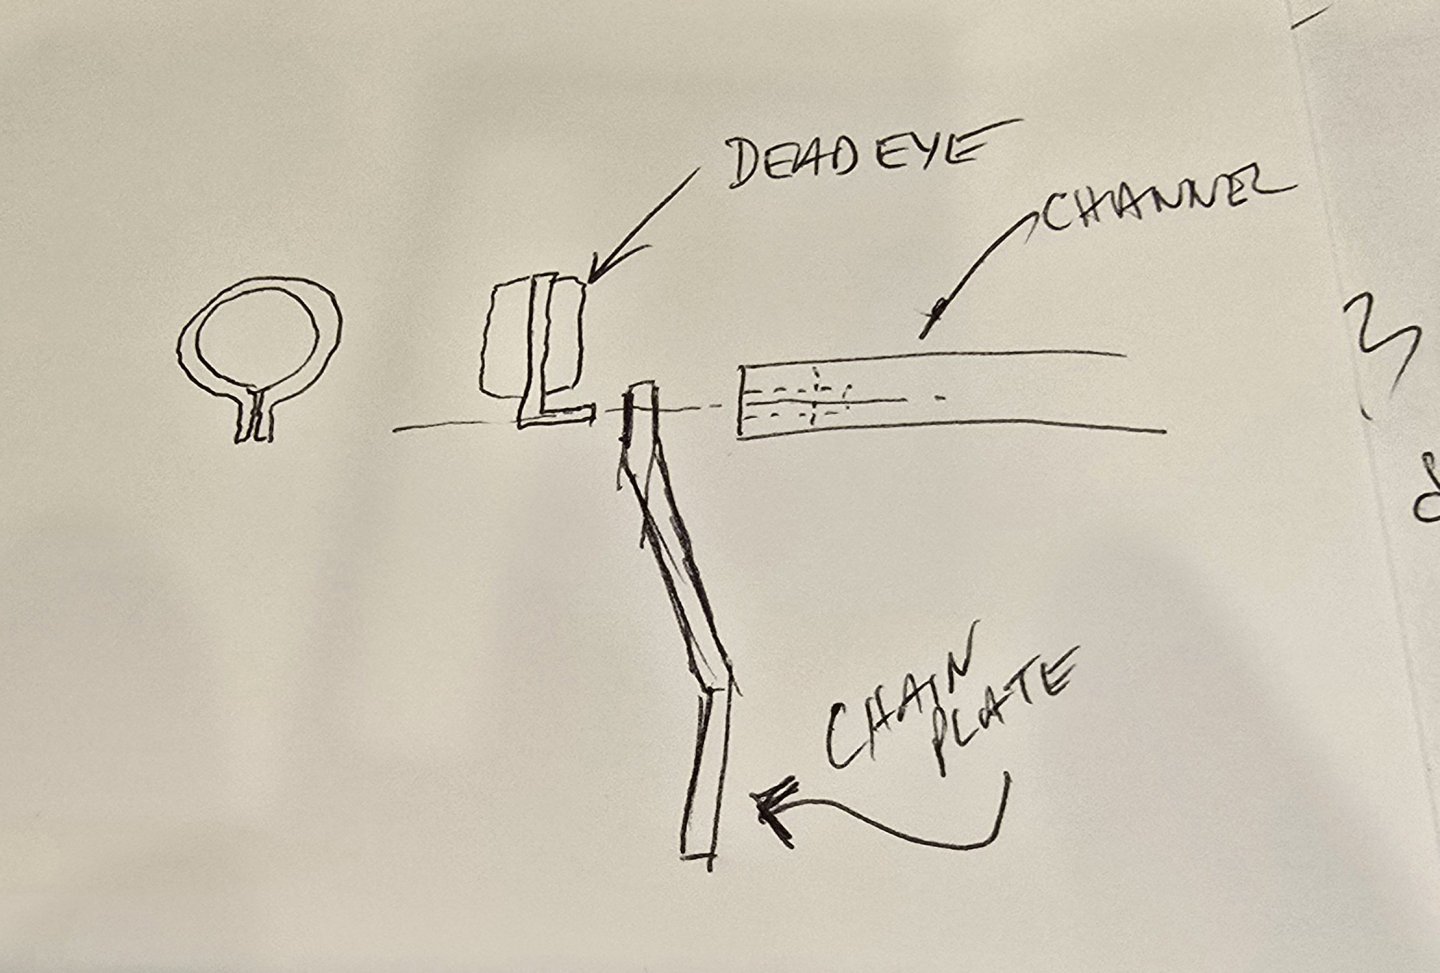
Today is being spent doing research on chainplates and channels. In my reading (mostly HipExec's Constructo build), I've learned that I may already be in hot water in that I didn't pin the pin rails to the bulwarks. Probably too late to do anything about that now, sigh.. I hope the C/A glue holds up during rigging. And this leads me to conclude that I am going to have to figure out how to get pins into the already constructed fife rail stanchions. But I digress.. Chainplates and Channels: Because I don't want to do any soldering (Hunt method), can't figure out what XKen did to connect his deadeyes to the chainplates, would like to be able to use the kit provided chain plates, and am lazy by nature, I'm looking to find an easier but effective method of tackling this problem. I may have hit upon a simple technique of securing both deadeye and chainplate to the channel. Here's what I'm thinking, Bend brass rod around the deadeye similarly to how HipExec did this: but bend the straight portion of it 90 degrees to make a hook. The hook would then pass through a hole in the chain plate and be sunk into a hole drilled into the channel. If the channel is pinned into the hull, this looks to be a very solid way to anchor the deadeyes. (pardon the sketchy sketch - pun intended😁.) Ignore the split in the ring on the left. If I did that, I'd probably have to make my own chain plates, which would be wider than the kit provided hardware, to accommodate a slot instead of a small hole. Thoughts?
-
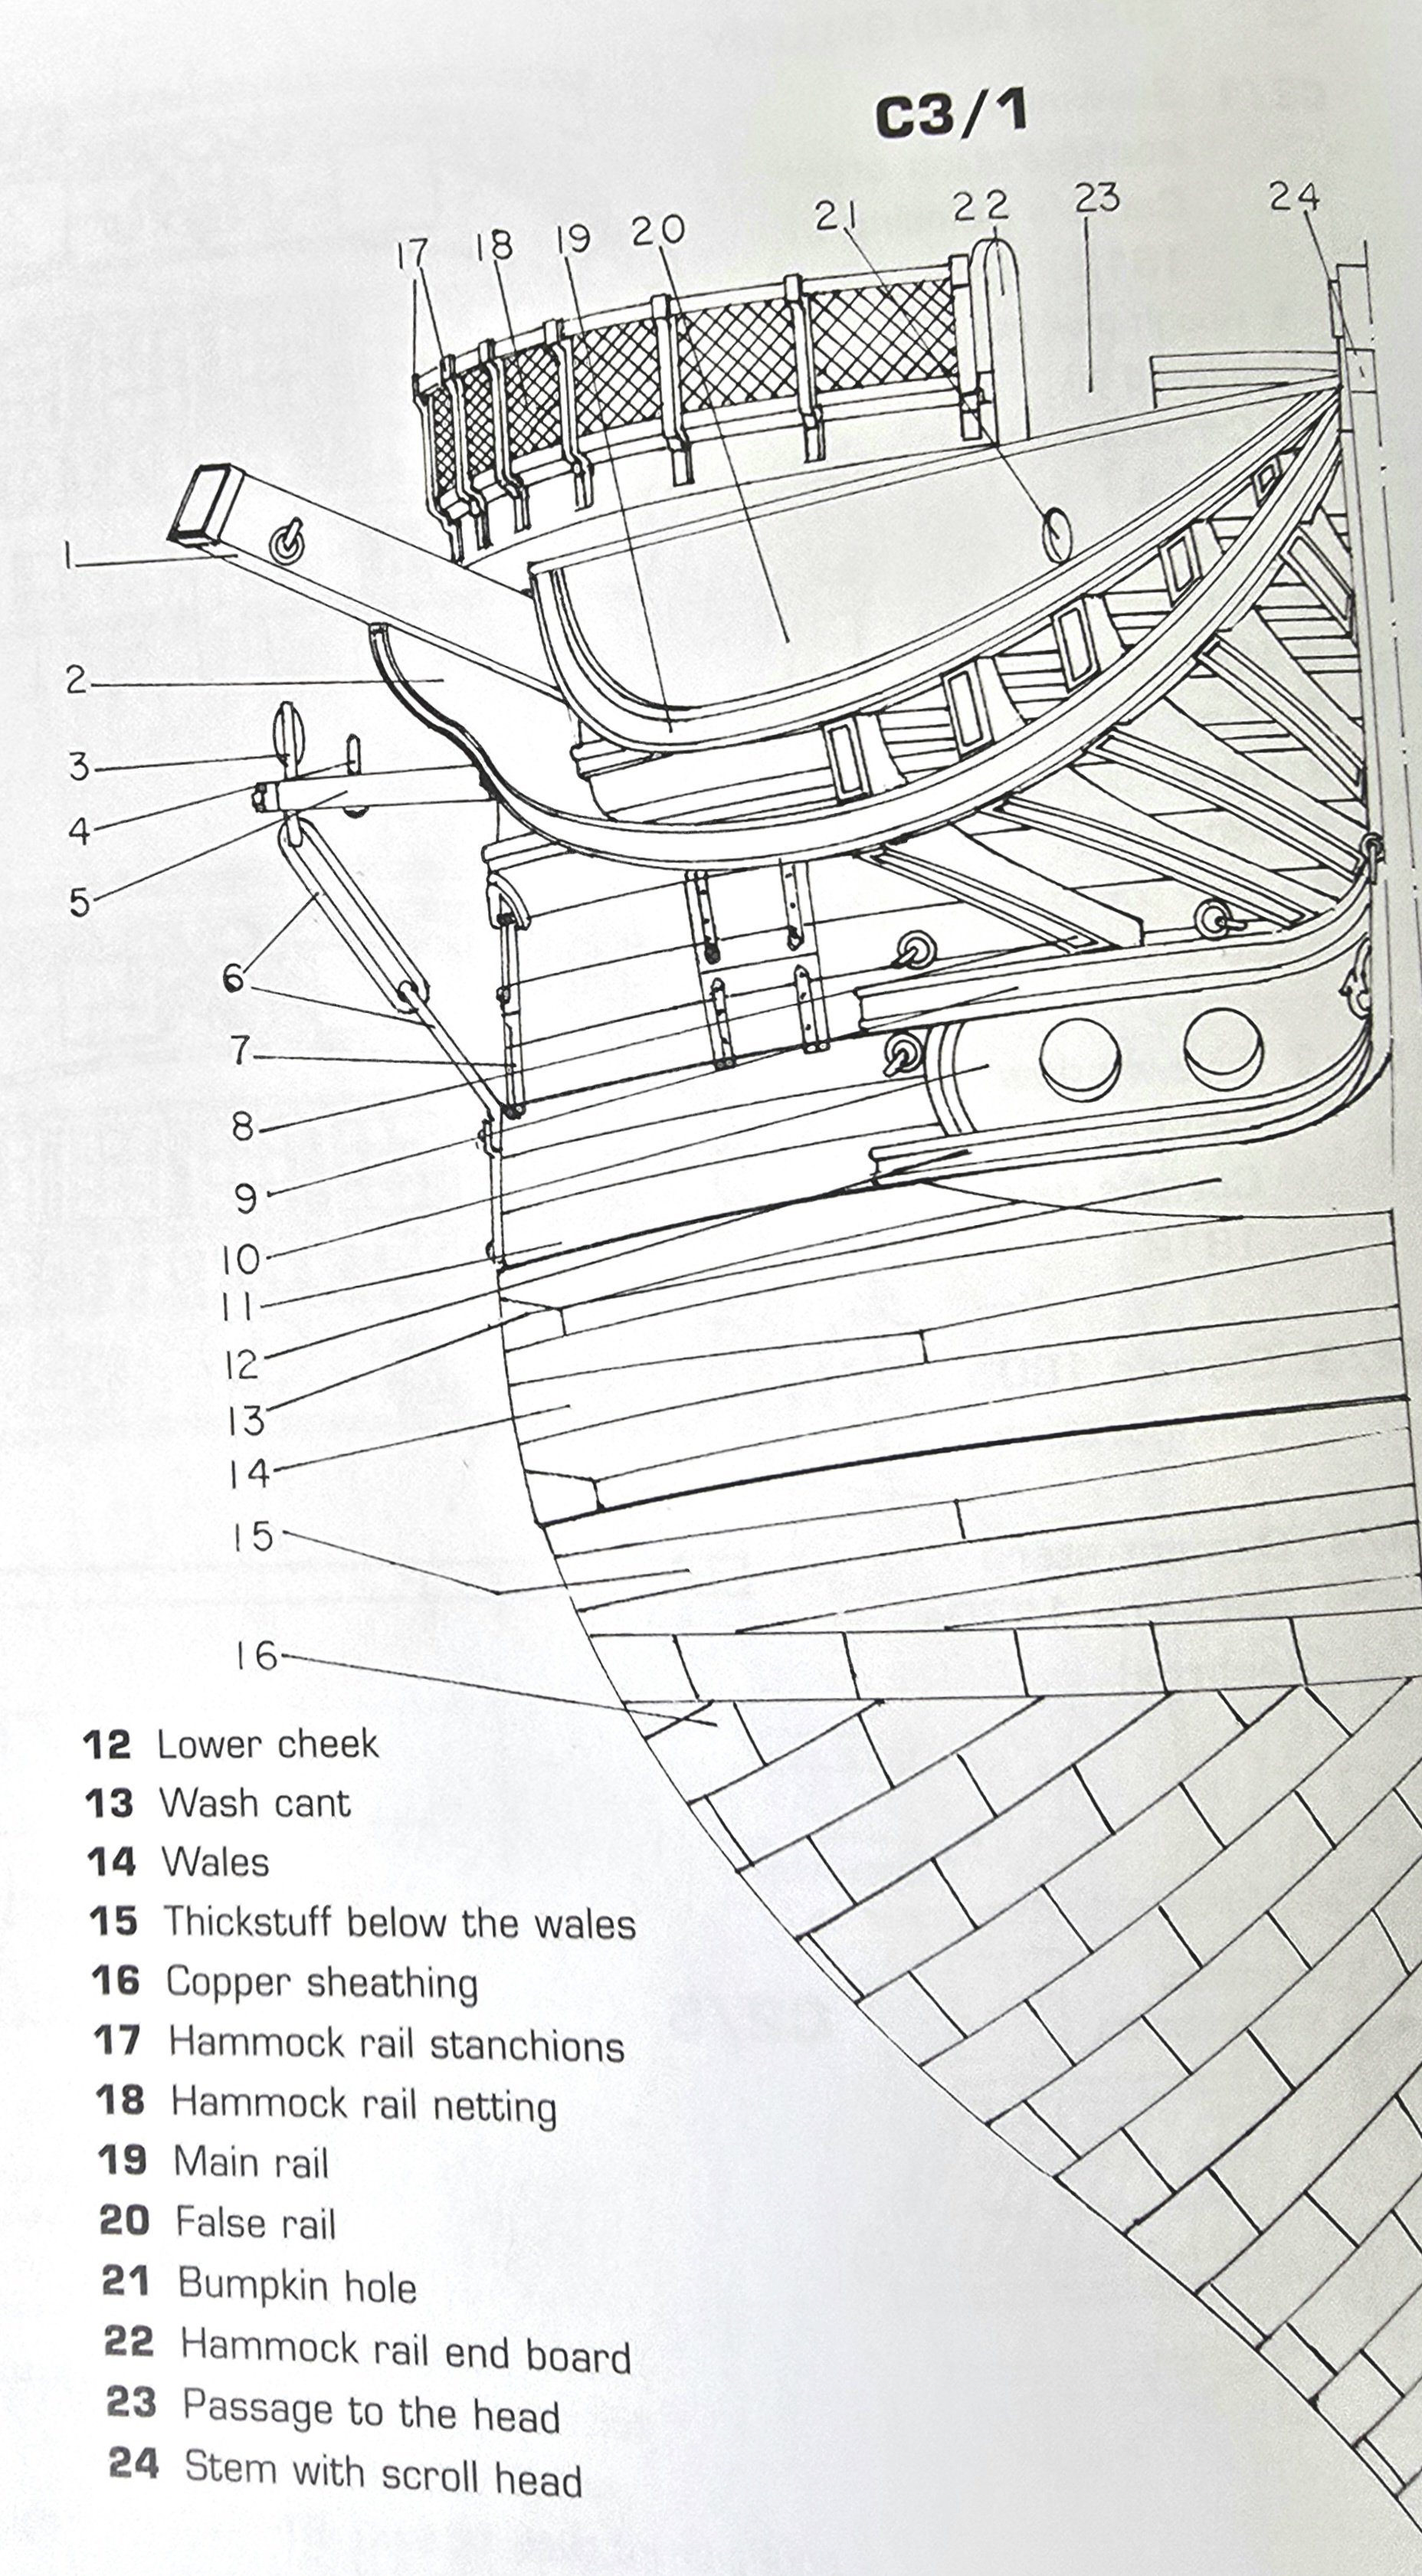
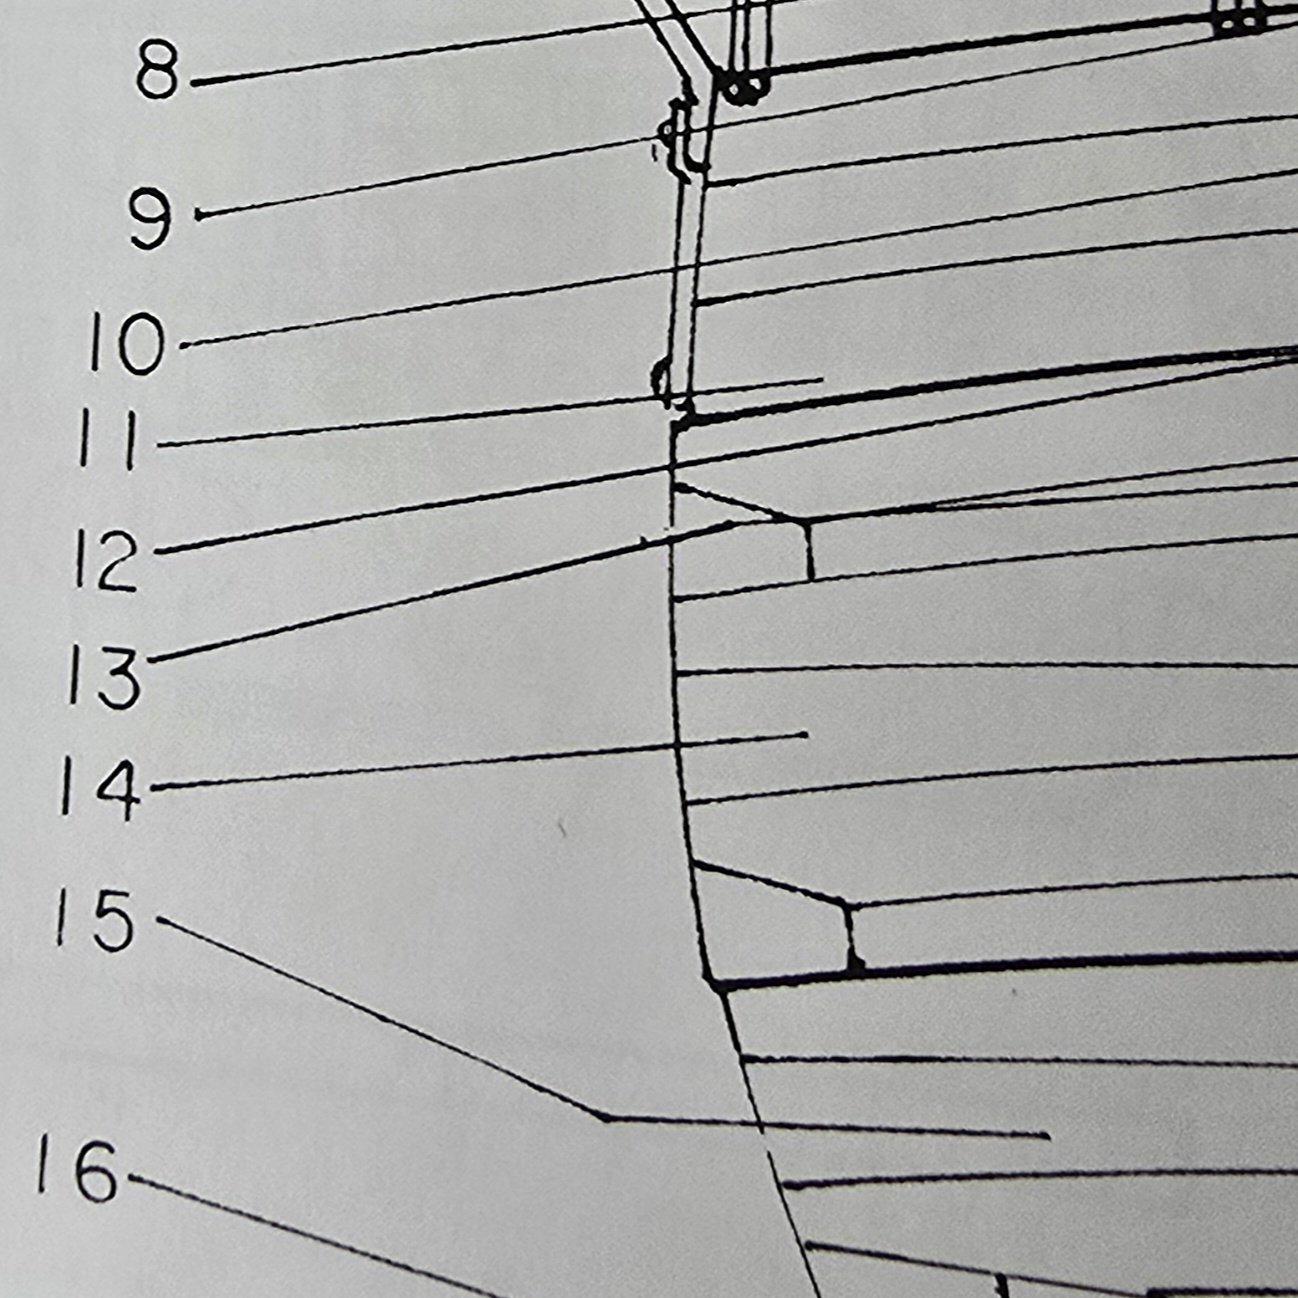
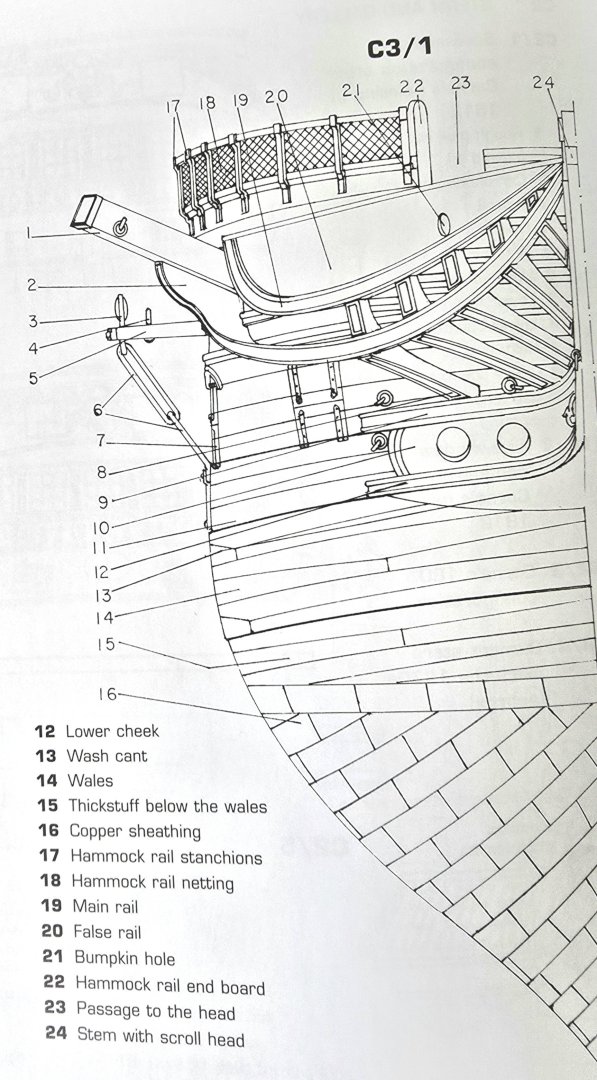
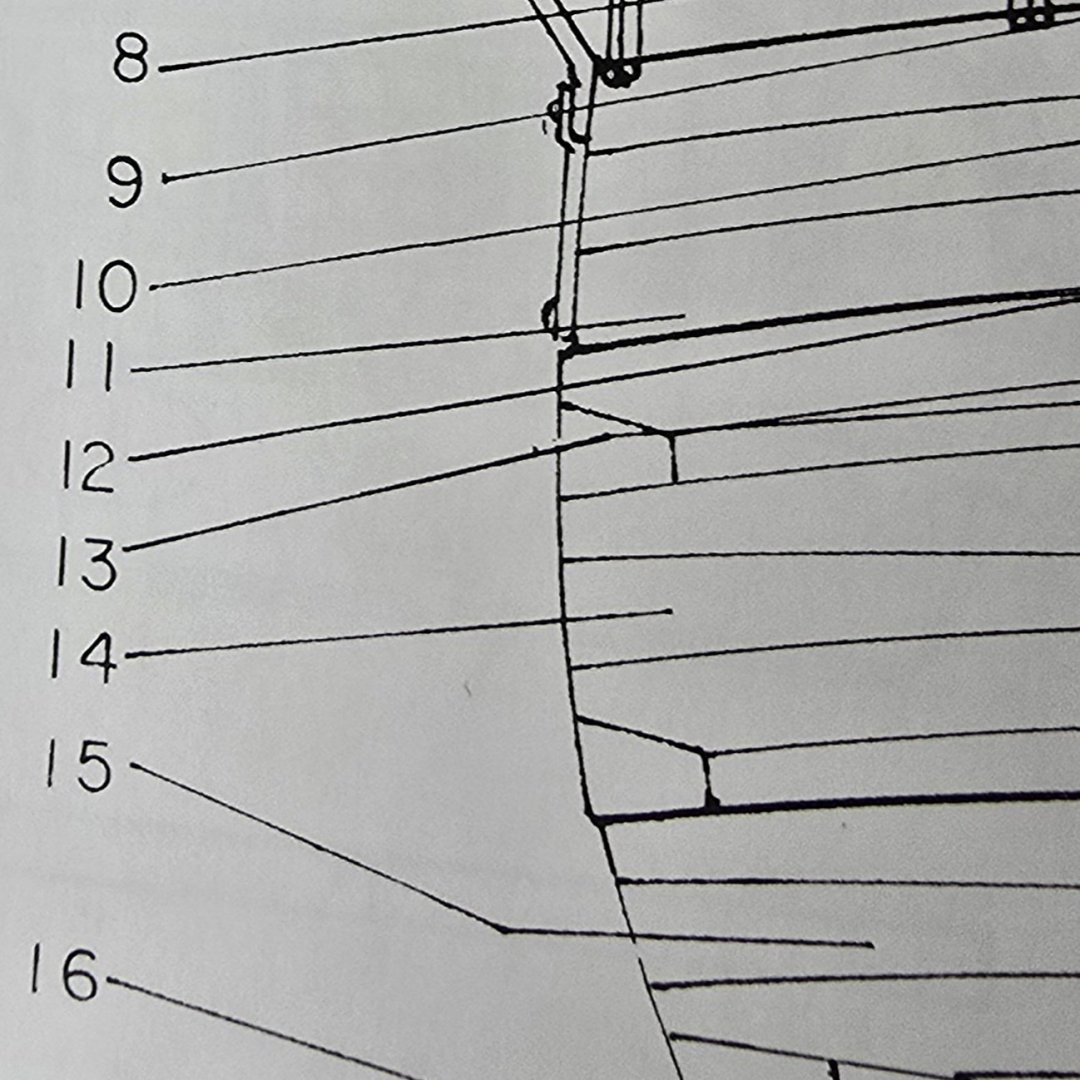
From Karl Heinz Marquardt's Anatomy of the Ship.. Note item 14 in the index - Wales.
-
I know I'm responding well over a decade past when you posted this, but, I these components were likewise tarnished in my kit. (While I did purchase this kit first, I decided almost immediately that the plans and instructions were deficient (at least for me - a novice modeler) and purchased the MS kit as well. That one too has issues, but more people at MSW post logs for that version of the Constitution, so I switched boats in midstream). I occasionally refer to the Constructo kit book because I chose to use your build's color scheme vs the black and tan everyone else is using. I had thought to use some Constructo components as well, but due to scale differences, I struck out on that front. However, I still root around in the box and last time I looked, the transom and bowsprit decorations were as badly stained as yours. I wonder if this had to do with the fact I bought the kit around the same time as you did, but having it sit on the shelf for almost a decade before opening it - brass parts tarnished over time? Or if Constructo just produced a bad batch. I still check in here to see how you tackled some parts of the build. Today, I'm looking at making chain plates and wondering how you went about this, and whether I can use Constructo components for this as well. If you're still checking in, hope all's well with you. Best DAR
-
I feel certain that you will be hearing shortly from our in-house historian, Jon. I checked with the AI assistant I use most frequently, Grok. I asked him if he knew definitively whether or not the 1797 version of The Constitution had wales. Here's his response: "Yes, the original 1797 USS Constitution definitively included wales as a key structural element in its hull construction. Wales—thick, longitudinal strakes of heavy planking—were standard in 18th-century warship design to reinforce the hull against stresses from guns, rigging, and sea conditions. For Constitution specifically, contemporary records from her builder, George Claghorn, and Secretary of War James McHenry confirm their installation during final assembly at Edmund Hartt's Boston shipyard. In a January 1797 progress report to Congress, McHenry noted: "The whole of the frame is raised, and is ready for planking; the wales are prepared, and it is expected will be on and fastened this month."ca2519 This places the wales' fastening just before her October 1797 launch. As launched, the hull featured a broad yellow ocher band painted from near the hawse holes down to the top of the main wales, with the bends (lower hull) tarred black below and the upper works black above.6e94d2 Gun ports were positioned at the gun deck level and above the wales, with the original gun streak (a reinforced strake for port sills) running from just above the wales to the upper gun port sills. Disagreements in model plans or historian interpretations might stem from later refits (e.g., 1803–1804 or 1812) that altered planking details, simplified diagrams in some drafts, or debates over exact thicknesses/locations. However, primary sources leave no doubt about their presence in the 1797 build. If you're referencing a specific thread on Model Ship World, feel free to share the link for more tailored advice!"
- 233 replies
-
- 2
-

-
- Model Shipways
- constitution
- (and 5 more)
-
USS Constitution by mtbediz - 1:76
Der Alte Rentner replied to mtbediz's topic in - Build logs for subjects built 1751 - 1800
As always, I study your work before I tackle a new part of my build. Two thoughts came to mind as I revisited your post above: 1. Once again, my decision not to go with the black and white paint scheme will leave me at a disadvantage. I won't be able to easily touch up any glue smears or missteps when I add channels and chain plates to my Conny. I'm really going to have to be careful.. 2. Man, oh man! your galleries look fantastic! -
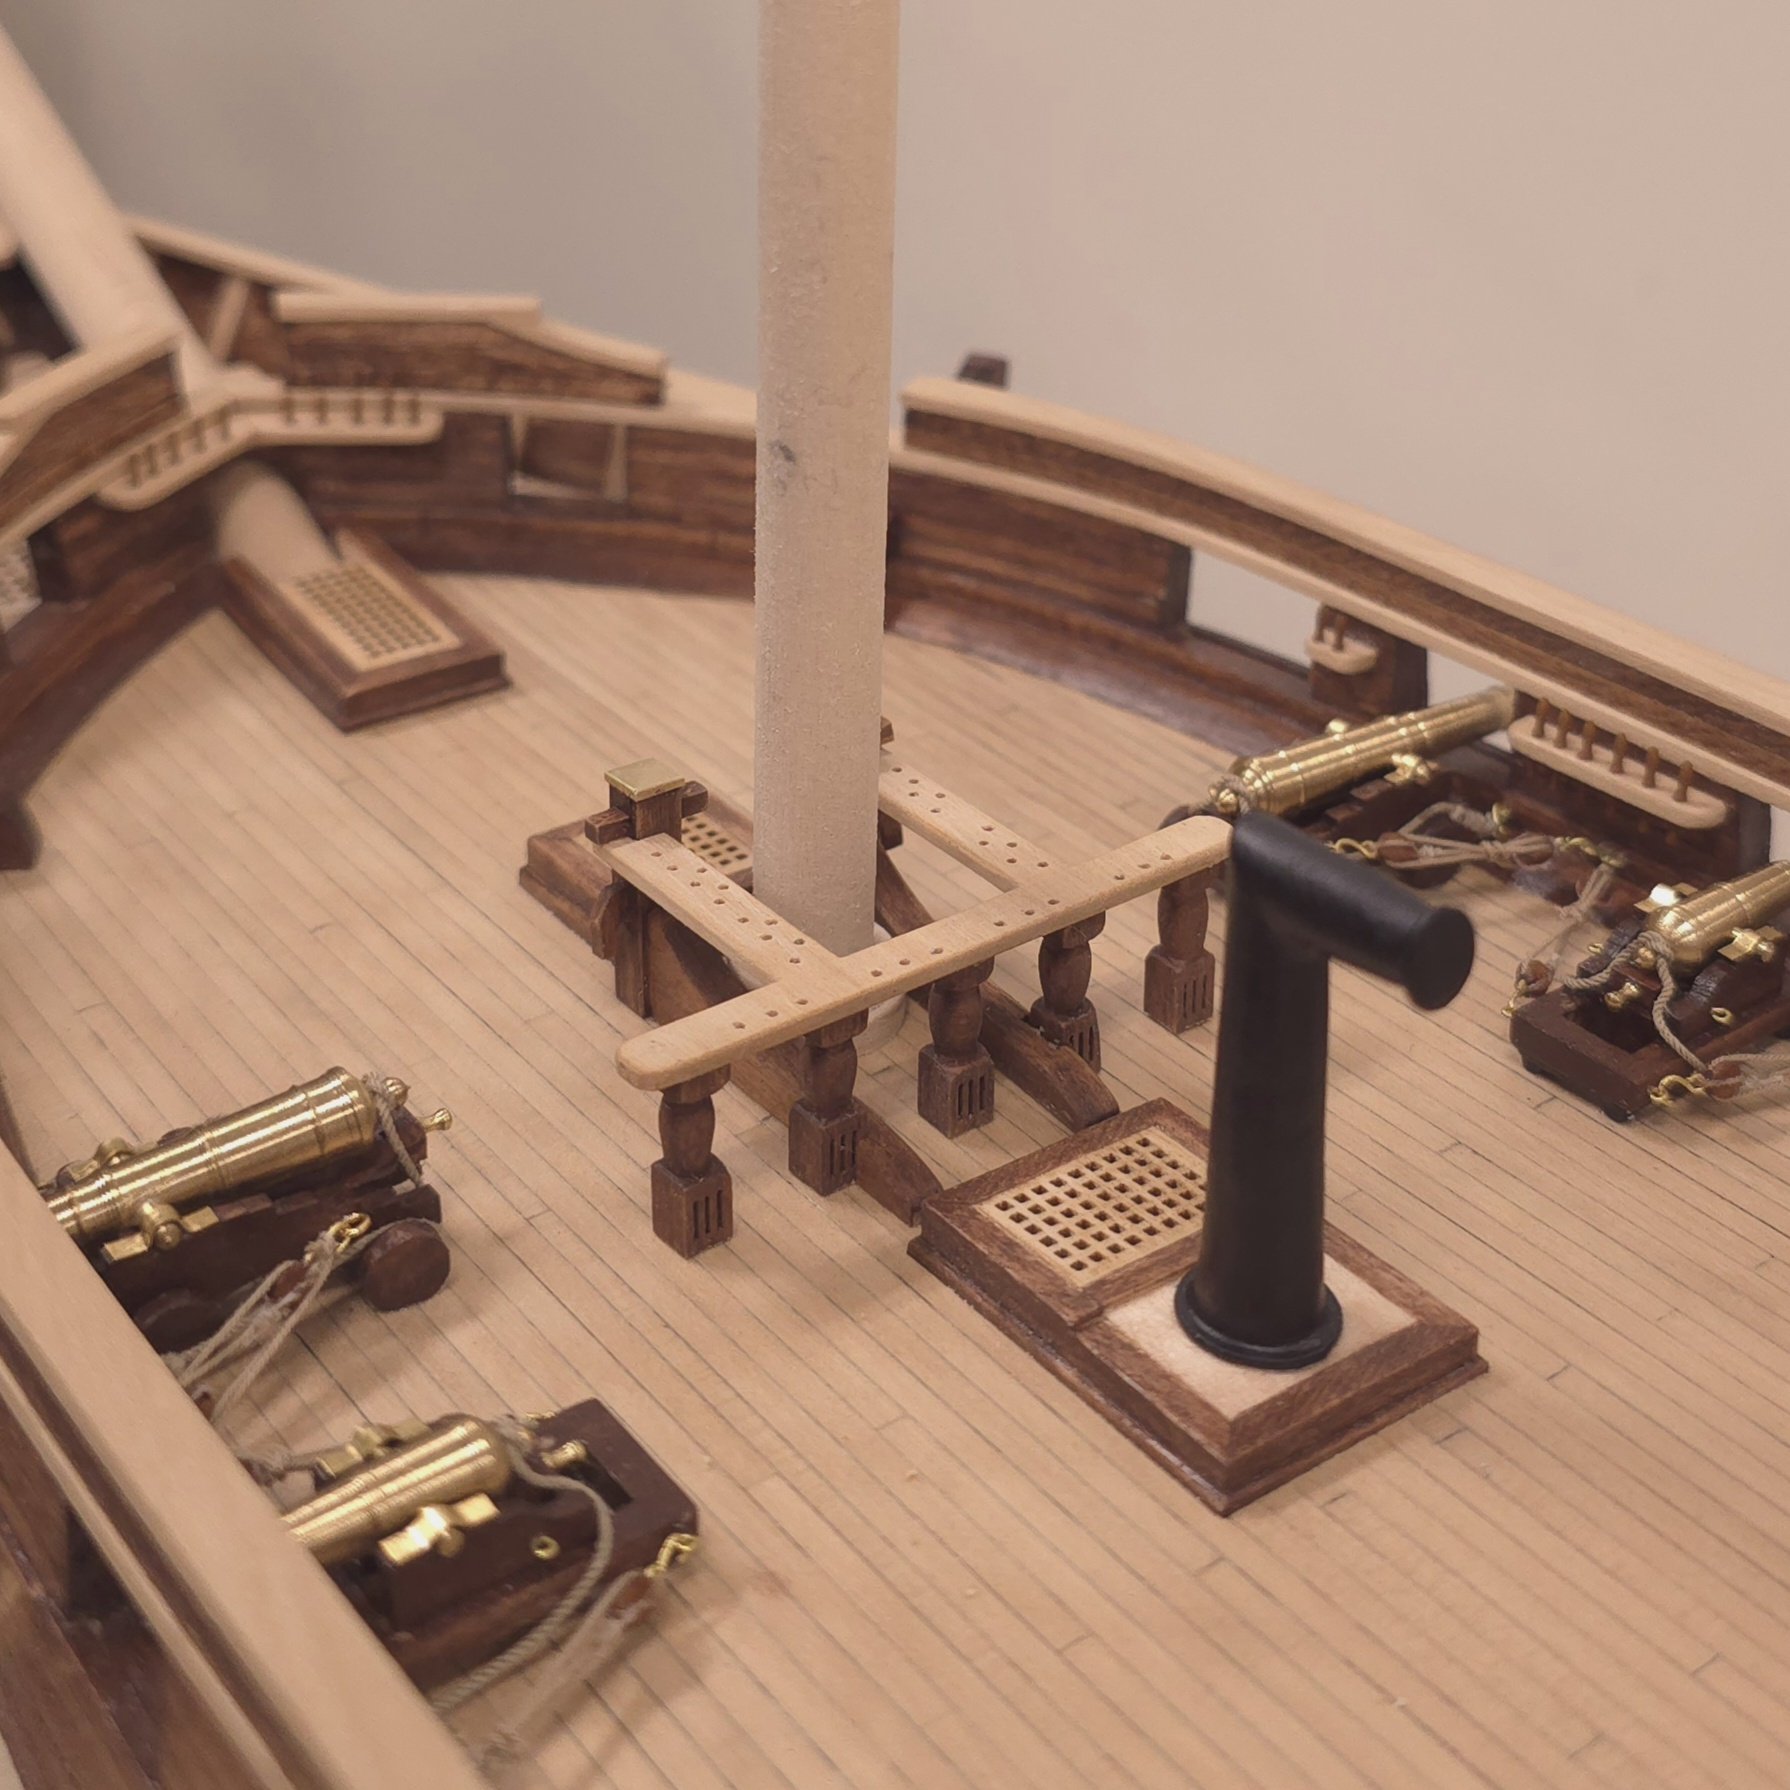
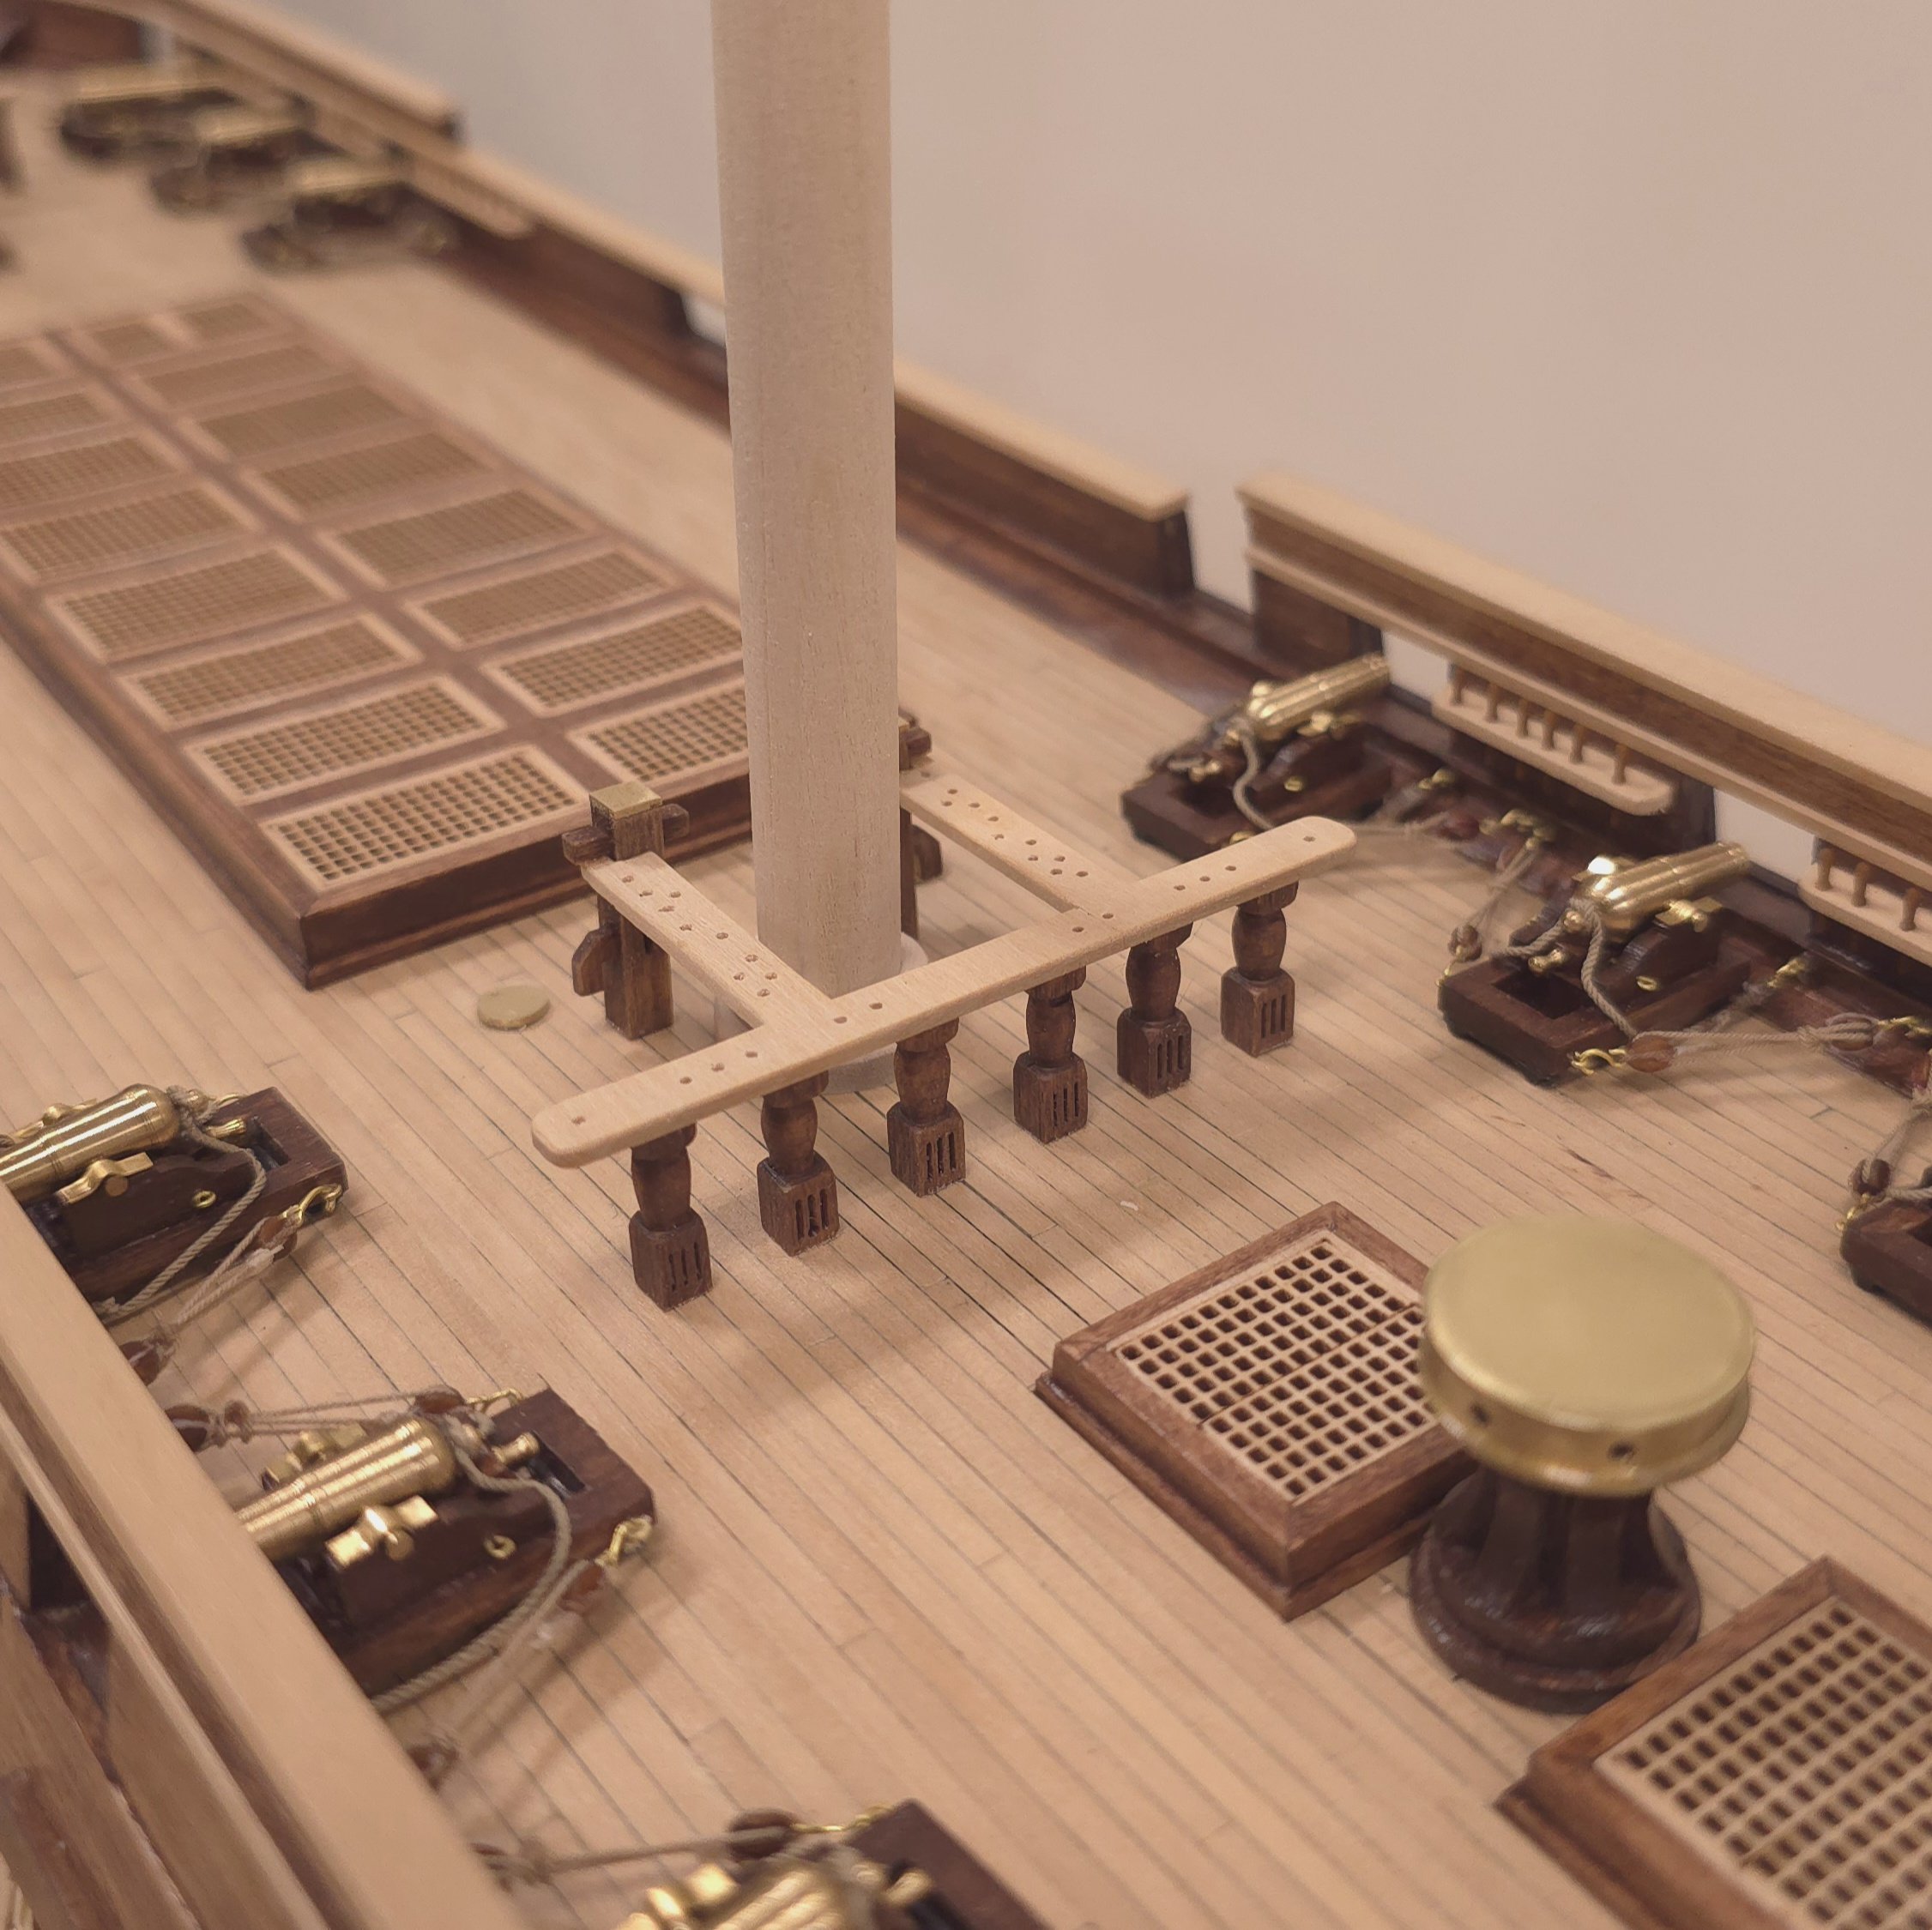
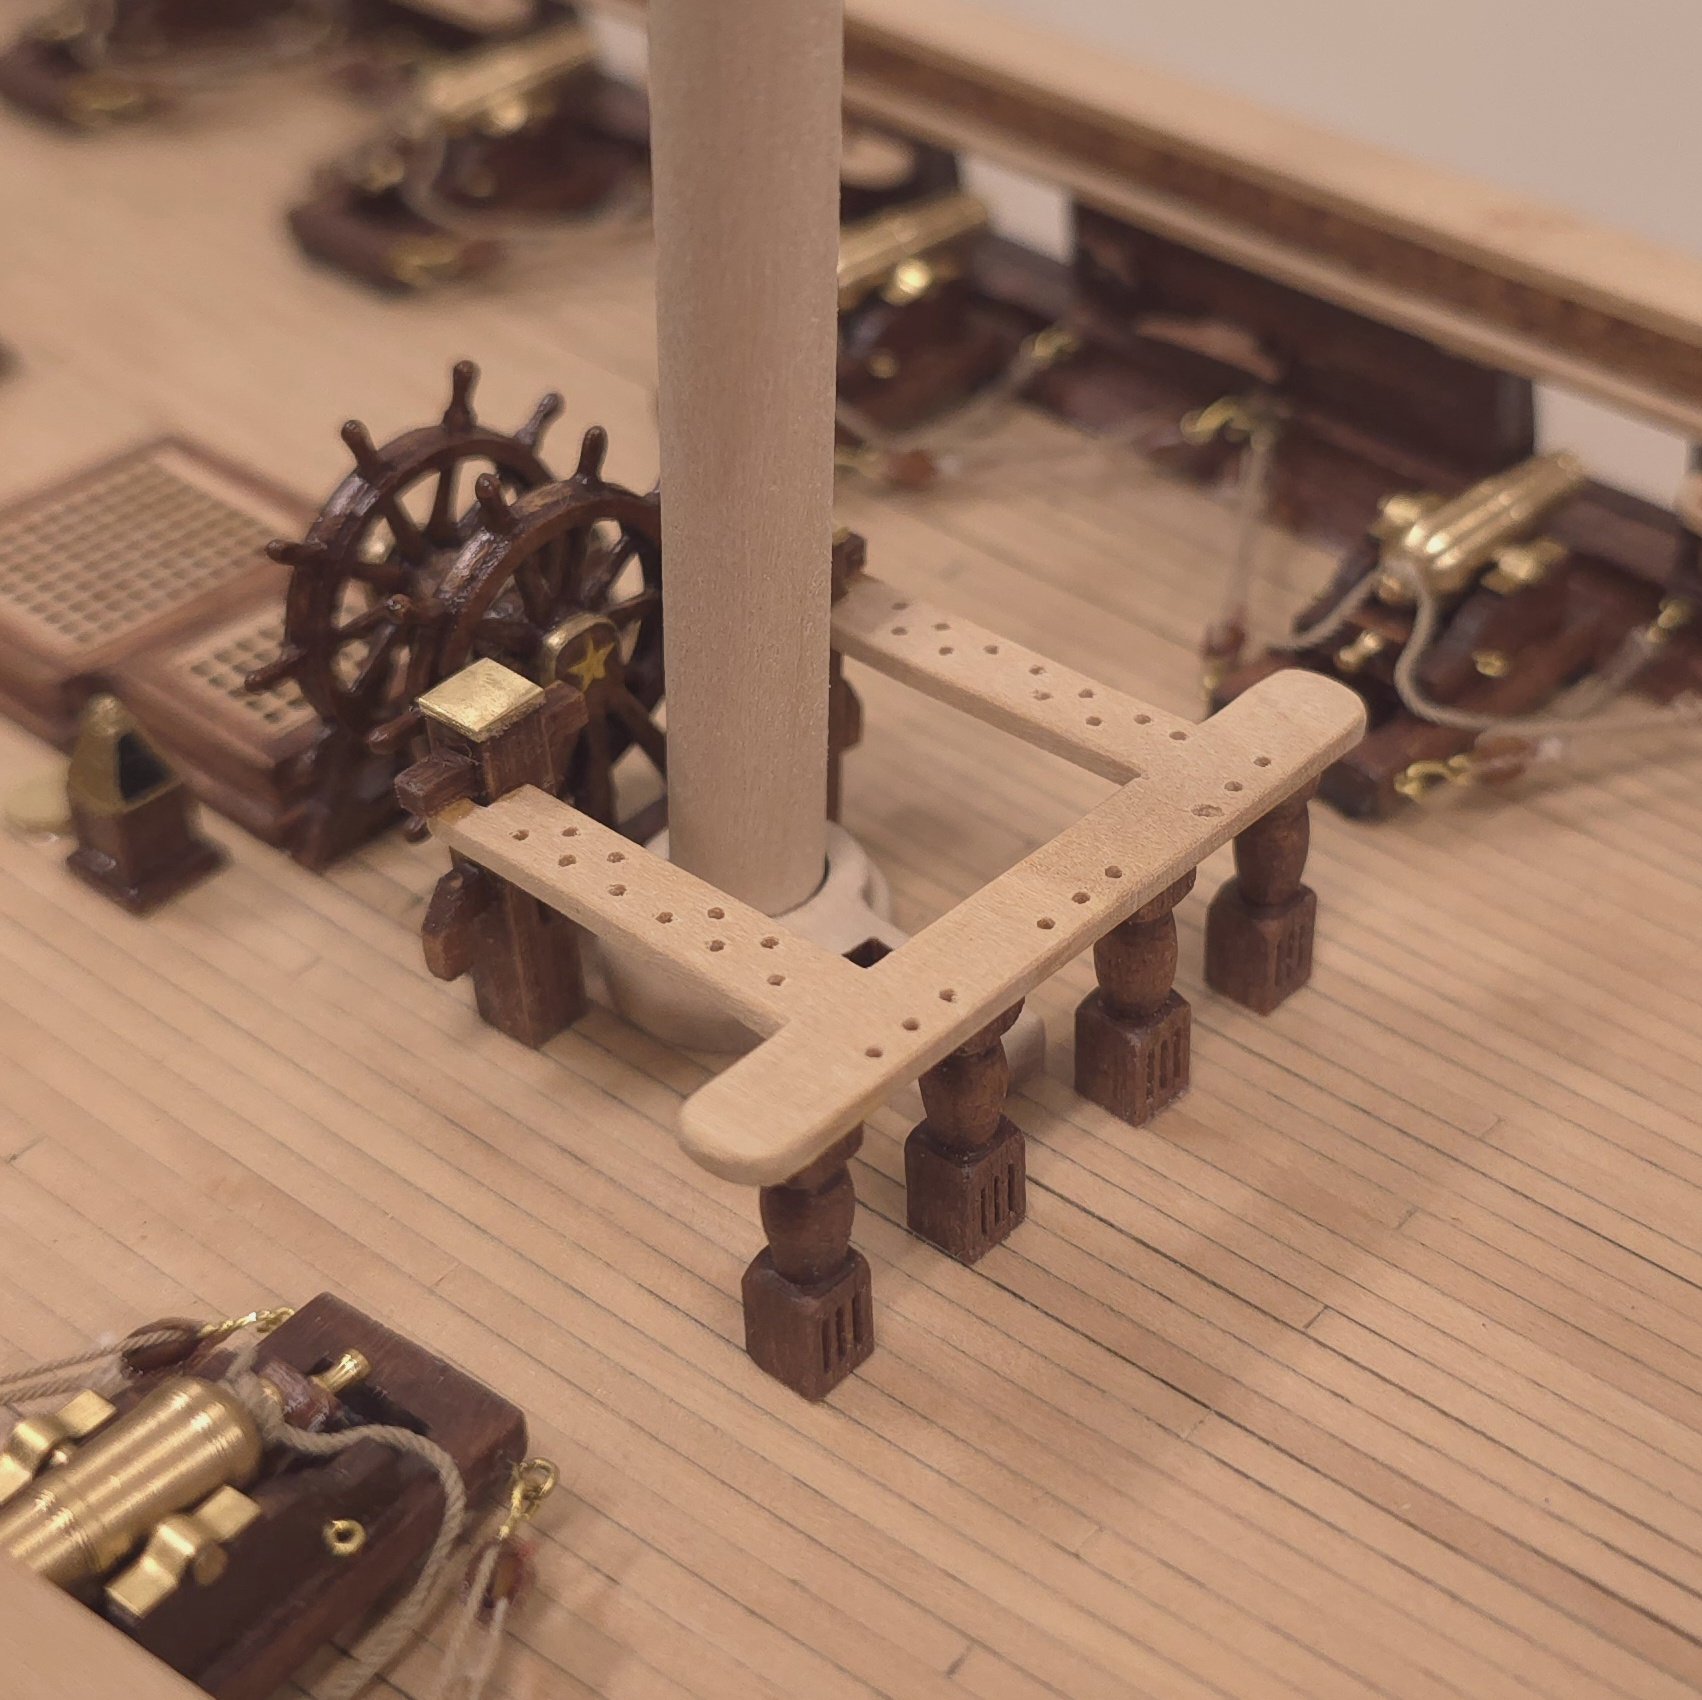
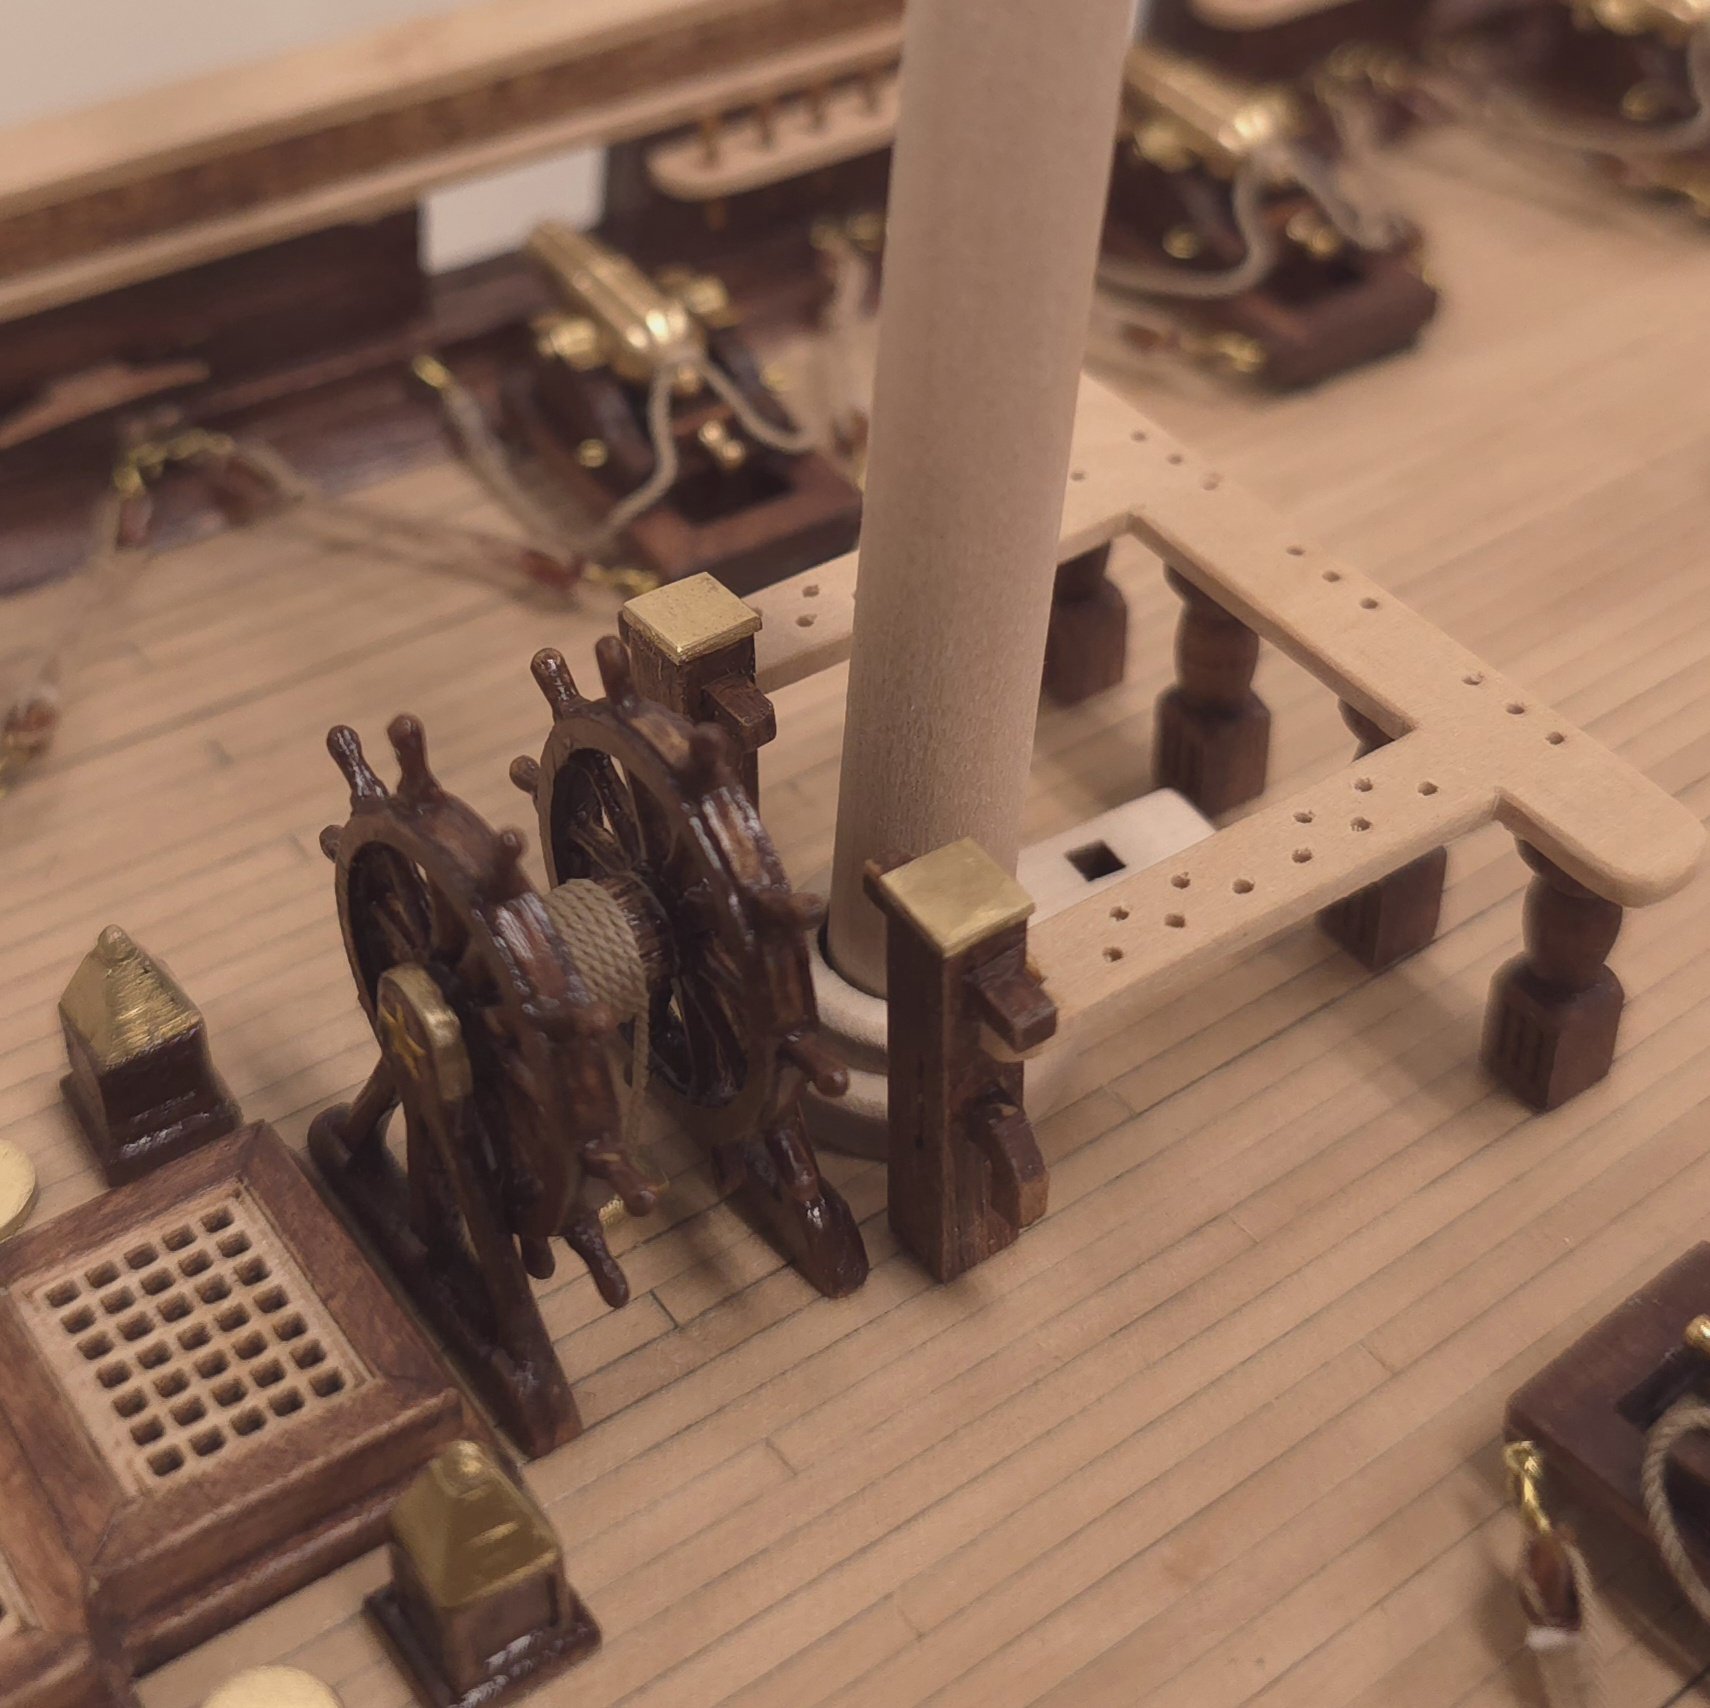
To those who are at or past the installation of the fife rails, when is the best time to glue these to the spar deck? I'm thinking that gluing in the masts and their wedge/boots may be problematic once the fife rails are permanently affixed. Comments/advice, anyone?
-
Me too, at the rate I'm going. I'm approaching my mid seventies as well, but, I'm going for, he who dies with the most toys wins! For what it's worth, the Hunt practicum calls for copper on the ridding bitts, not brass. If you can get some 1/4" brass or copper dowel, you can file an end of it down to get you close to square. Then use a disk or belt sander to clean up the end, slice off a narrow strip with a band or hacksaw and epoxy the clean side to the top of a ridding bitt blank. When the epoxy has cured, fine tune the filing to flush up the edges. Finish off the tops with 400, 600, 1200, etc. sand paper to get a nice shiny surface.
-
If you plan to do any more model building, I highly recommend getting the proxxon mill. It's a Time Saver on so many fronts. Absent investing in another tool, you are correct. Try to find a 5/32 square piece of stock and cut slices from the loaf. I believe, if memory serves, that you've already painted some components brass. If that's the case go with the wood cap and paint option.
-
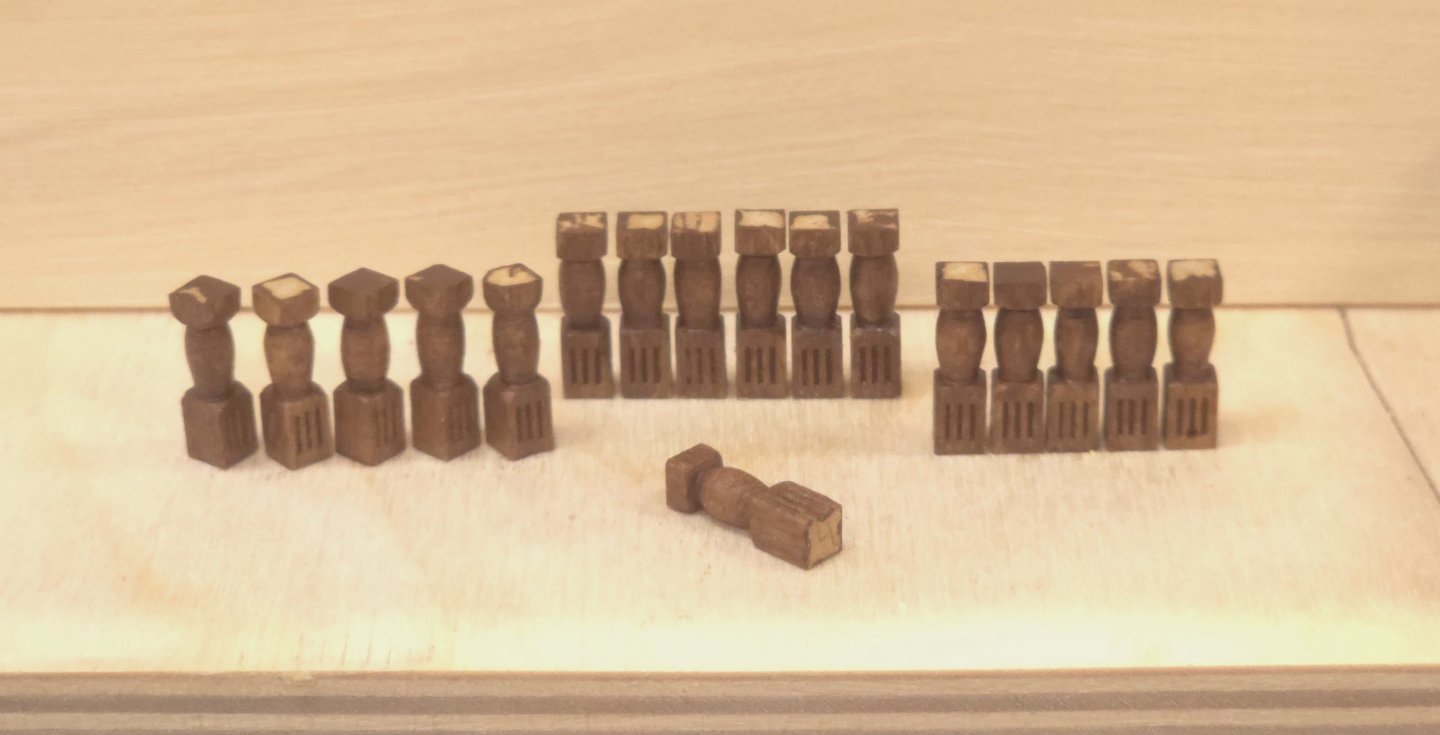
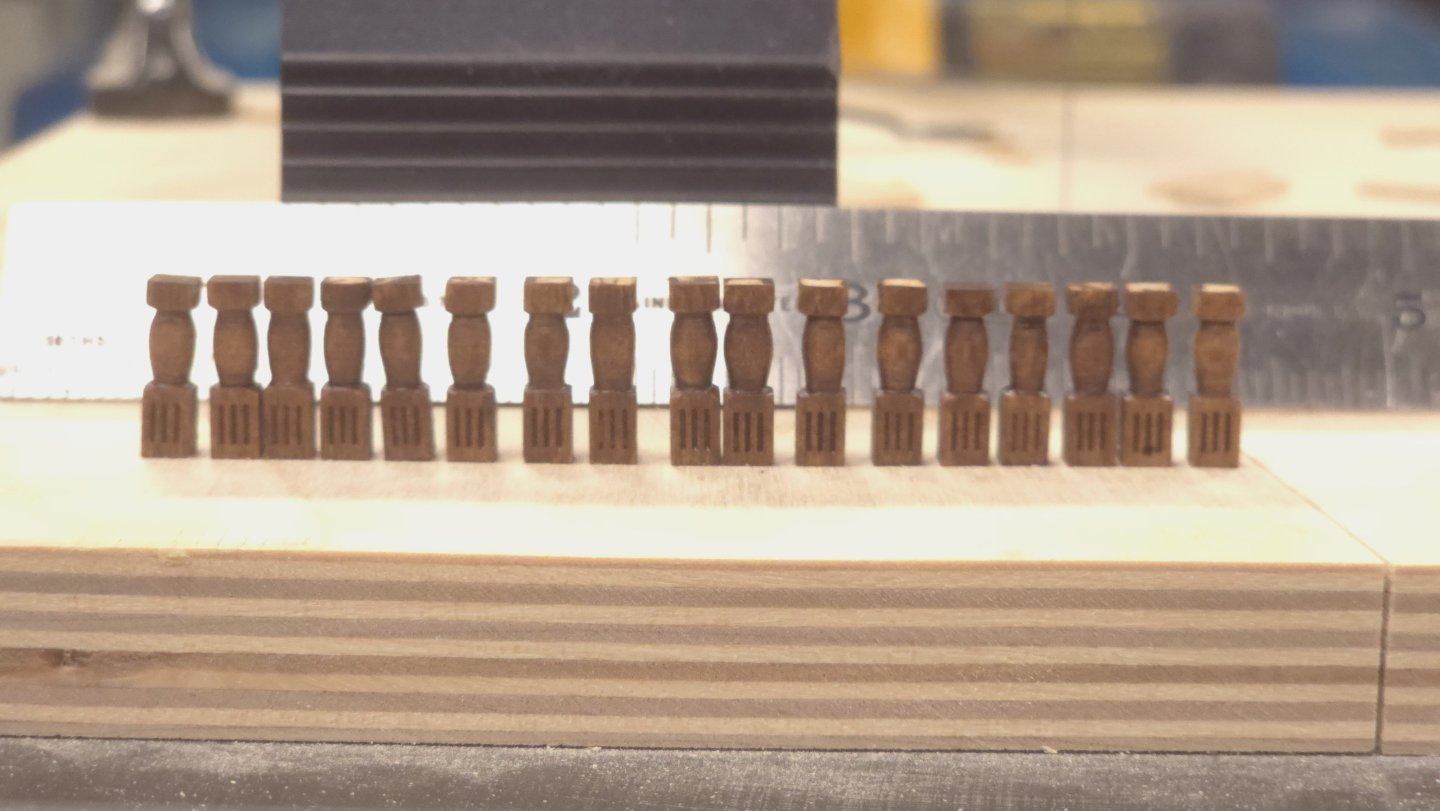
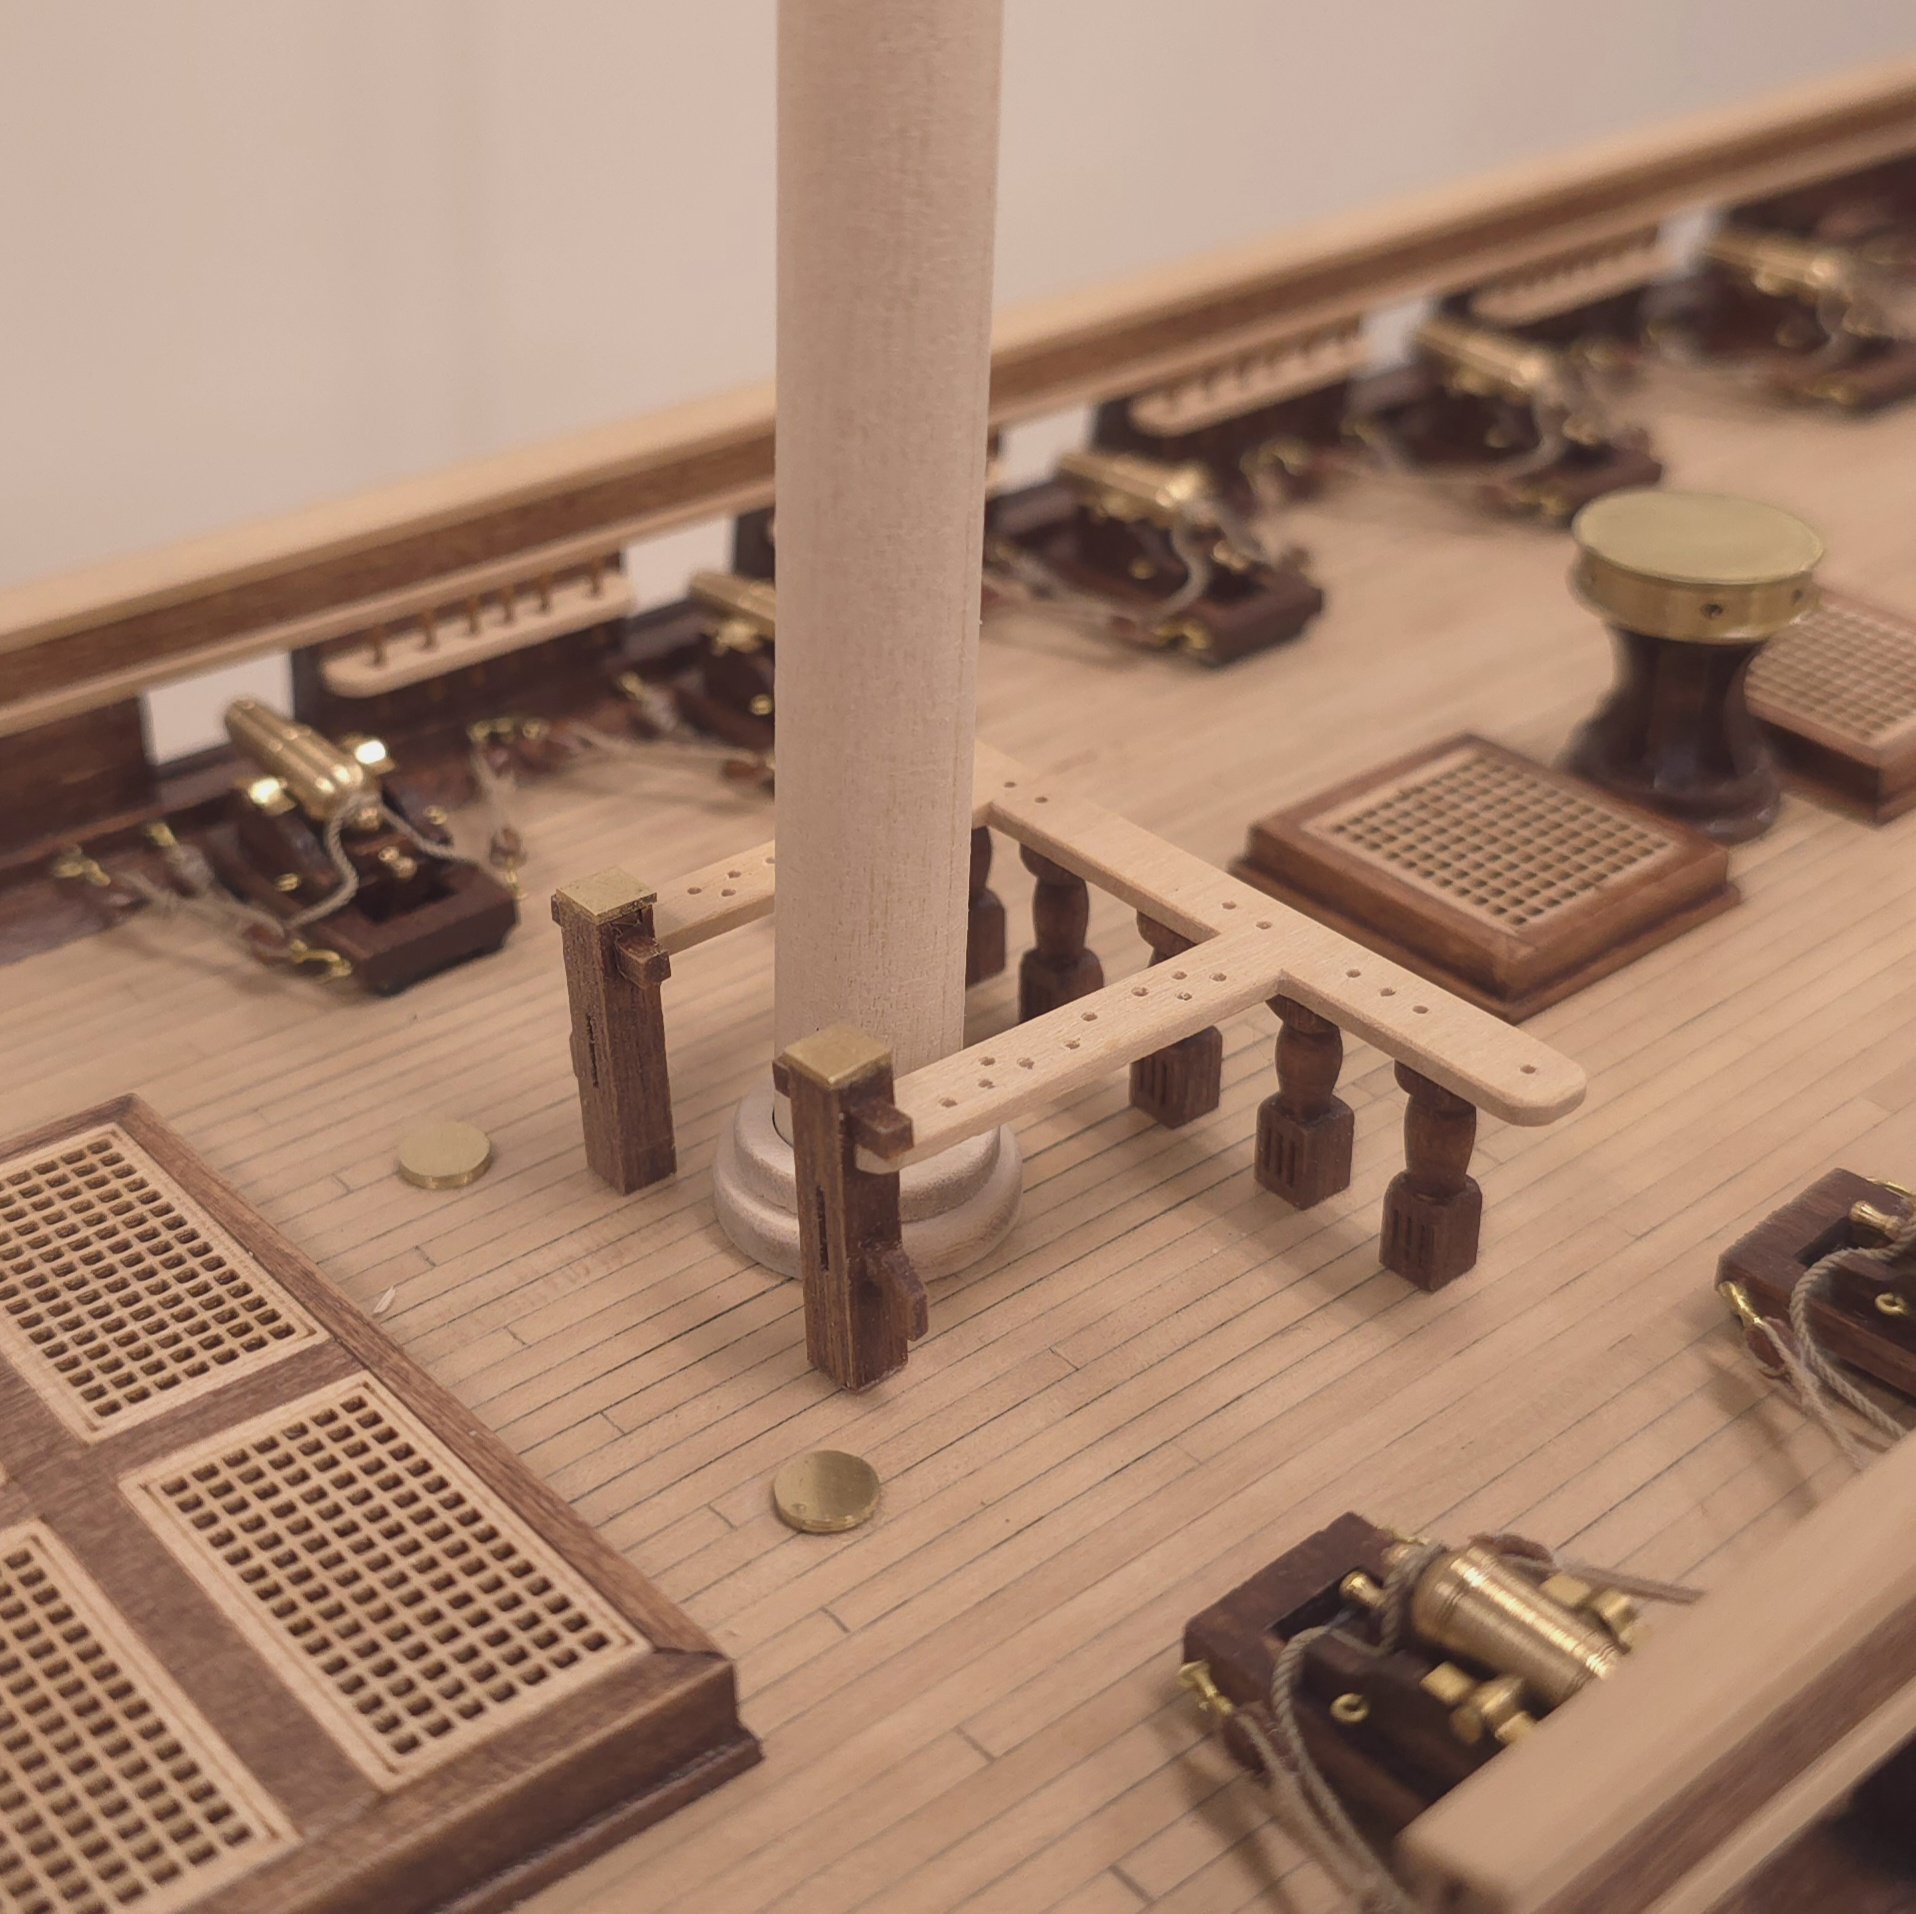
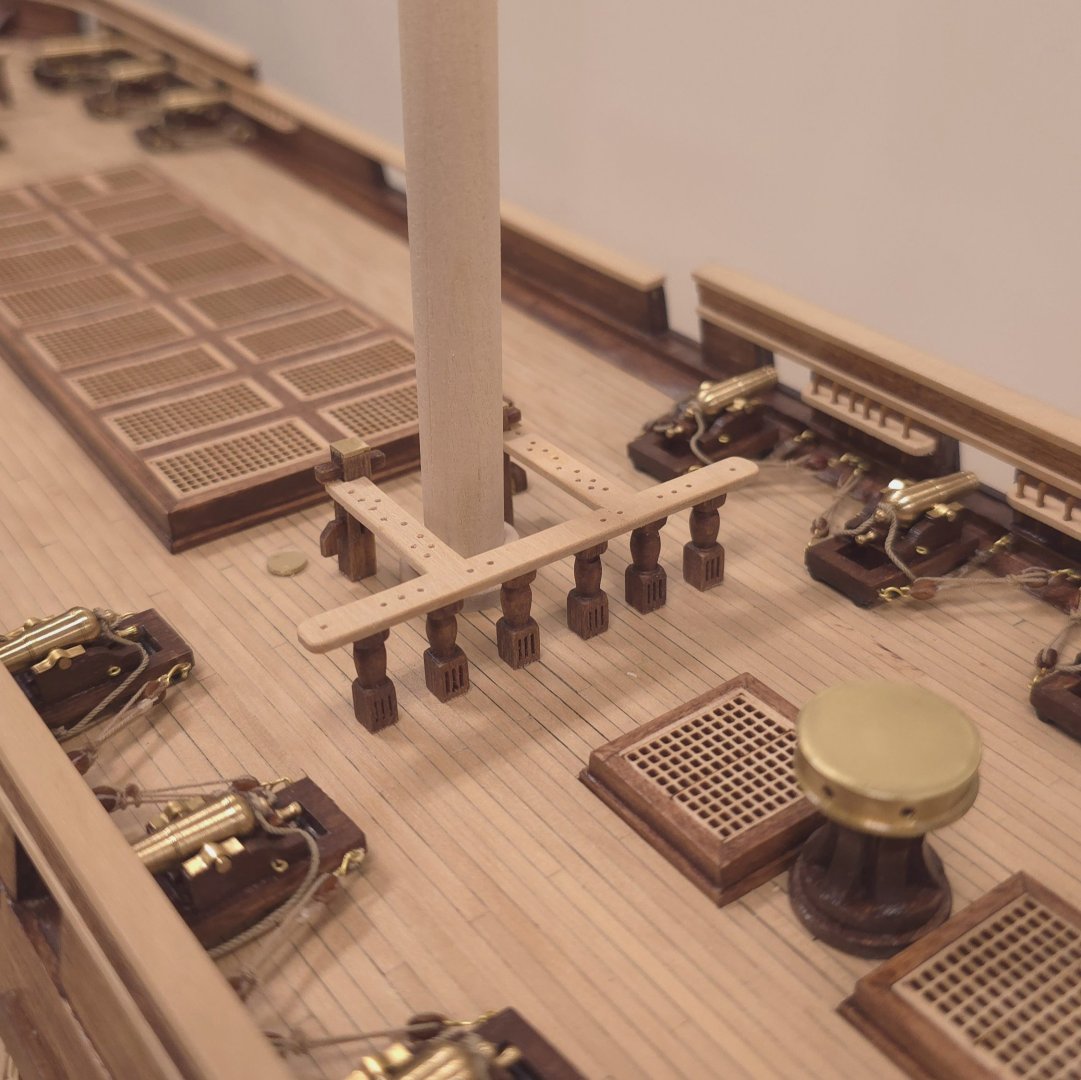
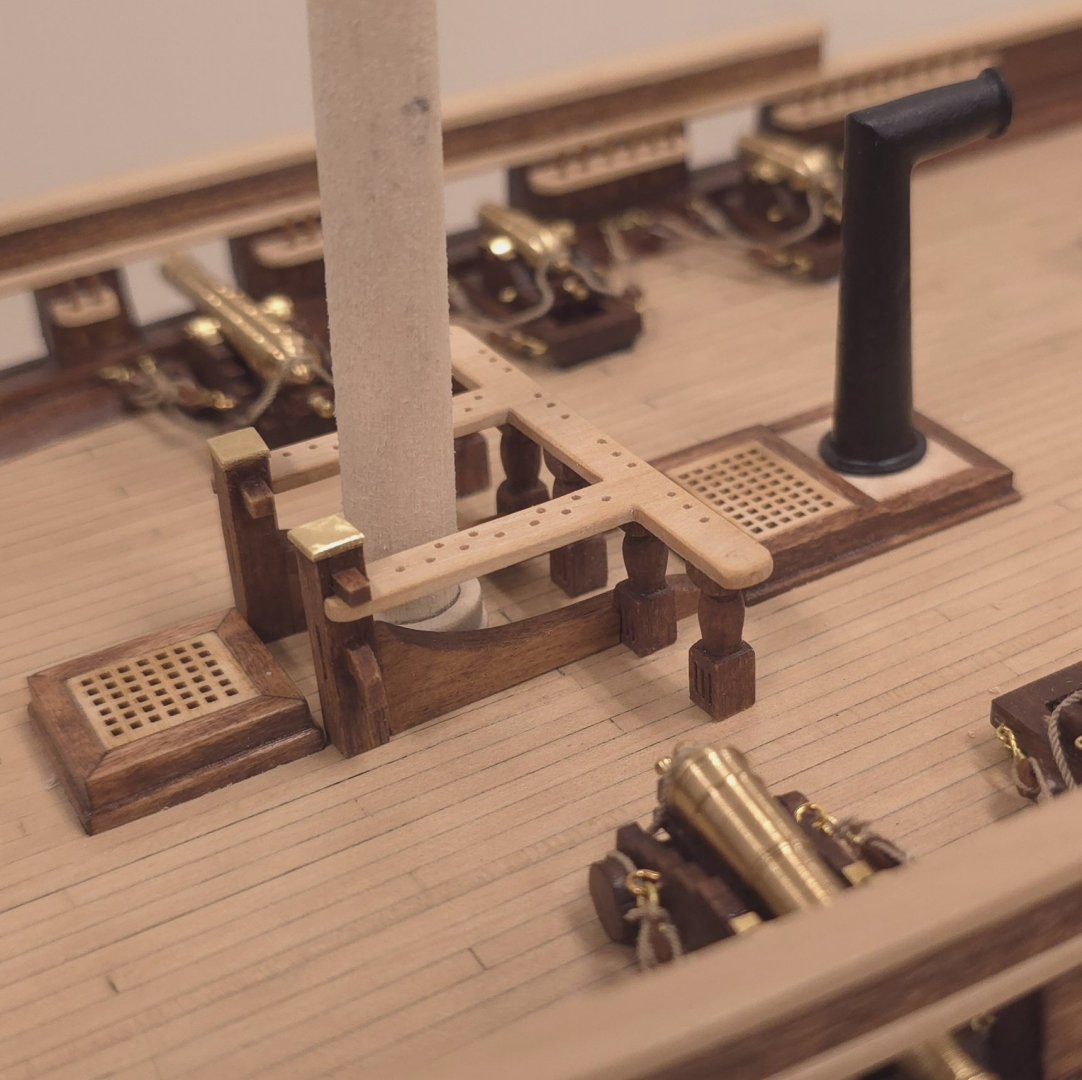
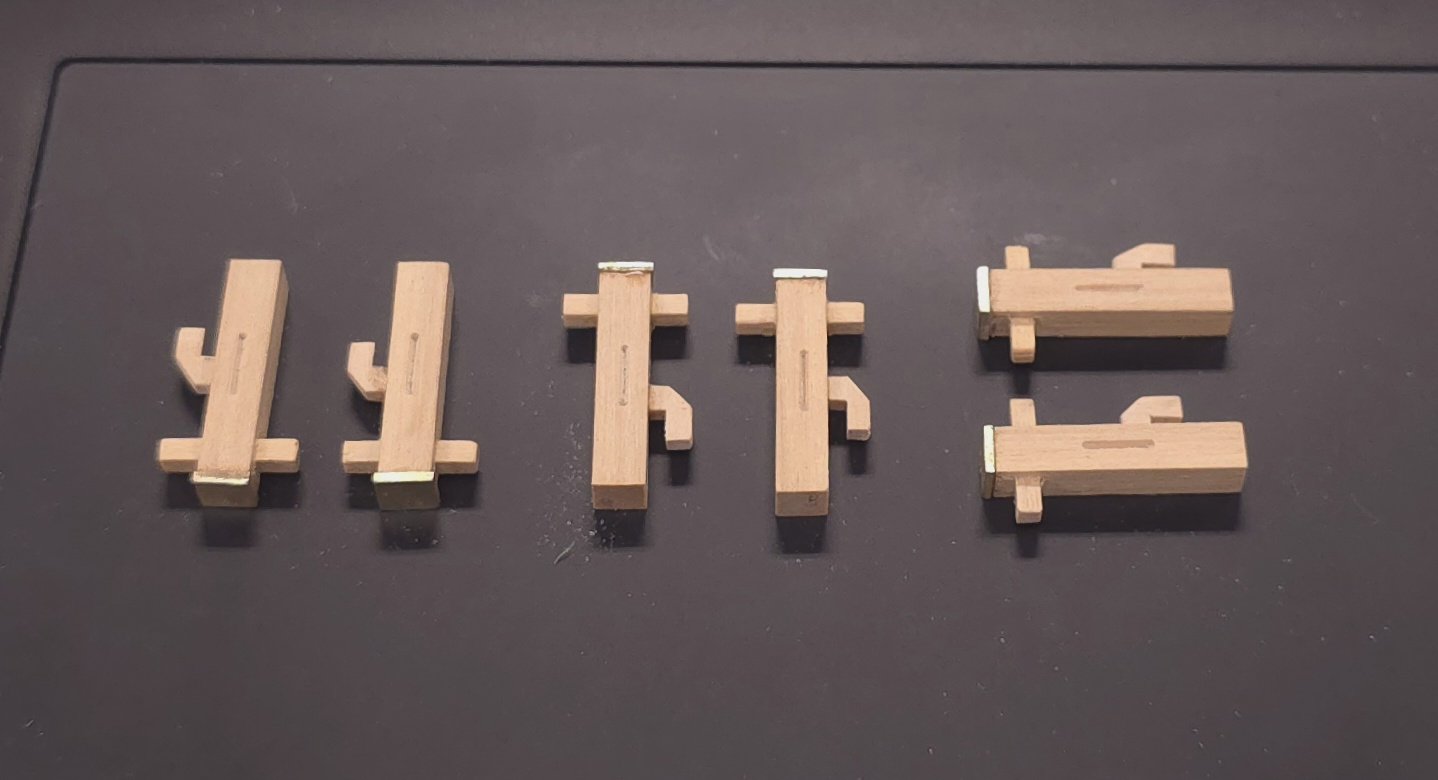
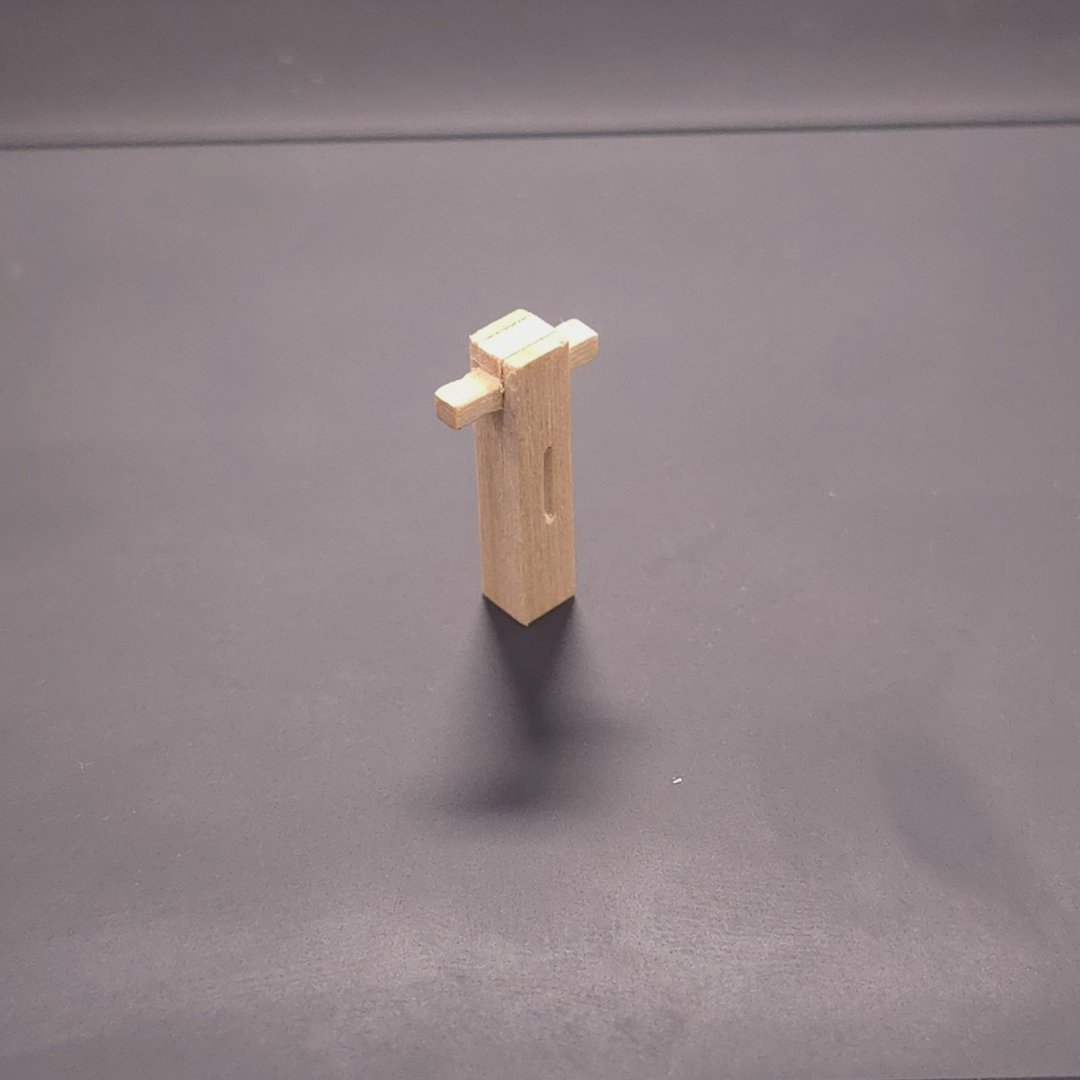
Construction of the fife rails is finally completed. Like Mustafa with the chain plates and channels, this task took much longer than I expected. And I still need to apply poly and glue the rails to the deck. Before you ask Gregg, I forgot to drill holes for nails at the bottom of the ridding bitts and stanchions. I guess I'll be doing this the old fashioned way - masking tape and careful positioning.. This was mostly just finicky busy work, and several times I broke things and had to redo them. Let me just say, I'm glad I'm finally done with this. Oh, and once again, I was disappointed by the kit and the plans. The knee that was attached to the ridding bitt/fife rail assembly for the foremast, ended up leaving a space much narrower than the outside diameter of the mast wedge/boot pair. You guessed it, I had to redeploy the lathe to shave material off the latter. (Note: I learned later that, in the real world, the wedge - the smaller diameter ring, is really a bunch of individual wedges used to fill the gap between the mast and the deck collar to support the mast. The boot - the larger diameter ring, is a protective cover that seals the area around the mast where it passes through the deck, preventing water from entering the ship.) Assemblies in position, but not yet glued in..


-
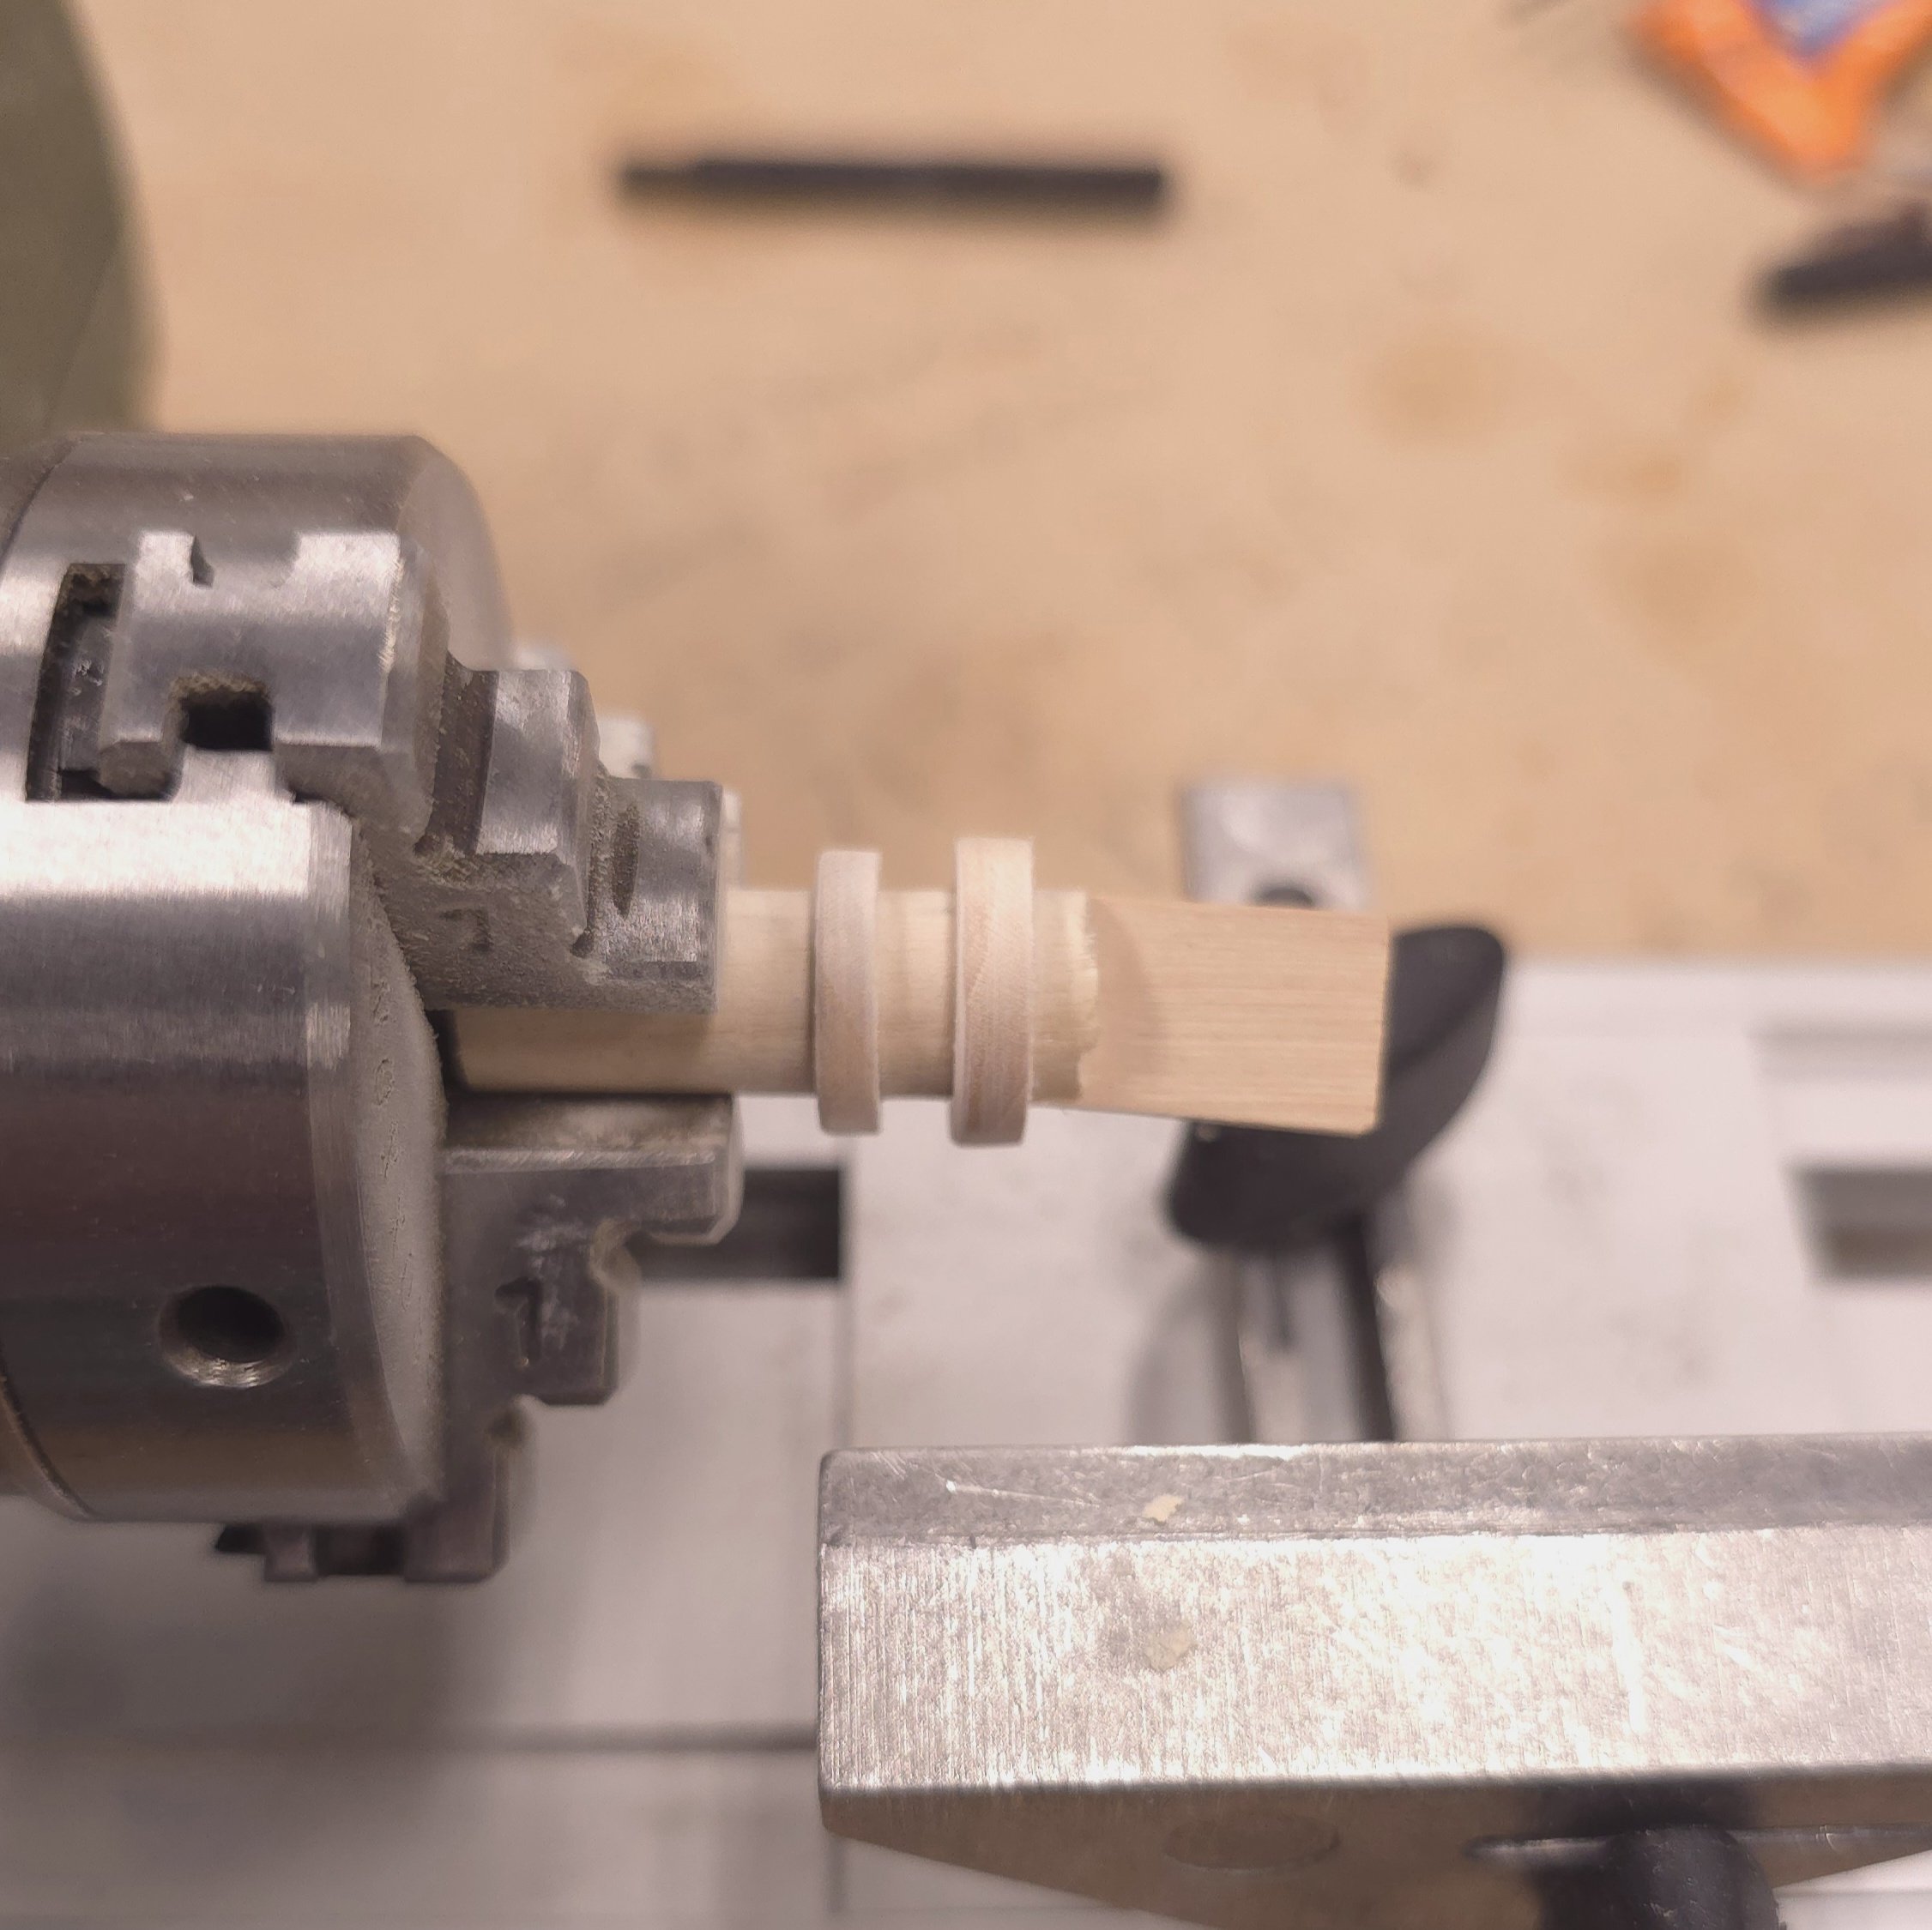
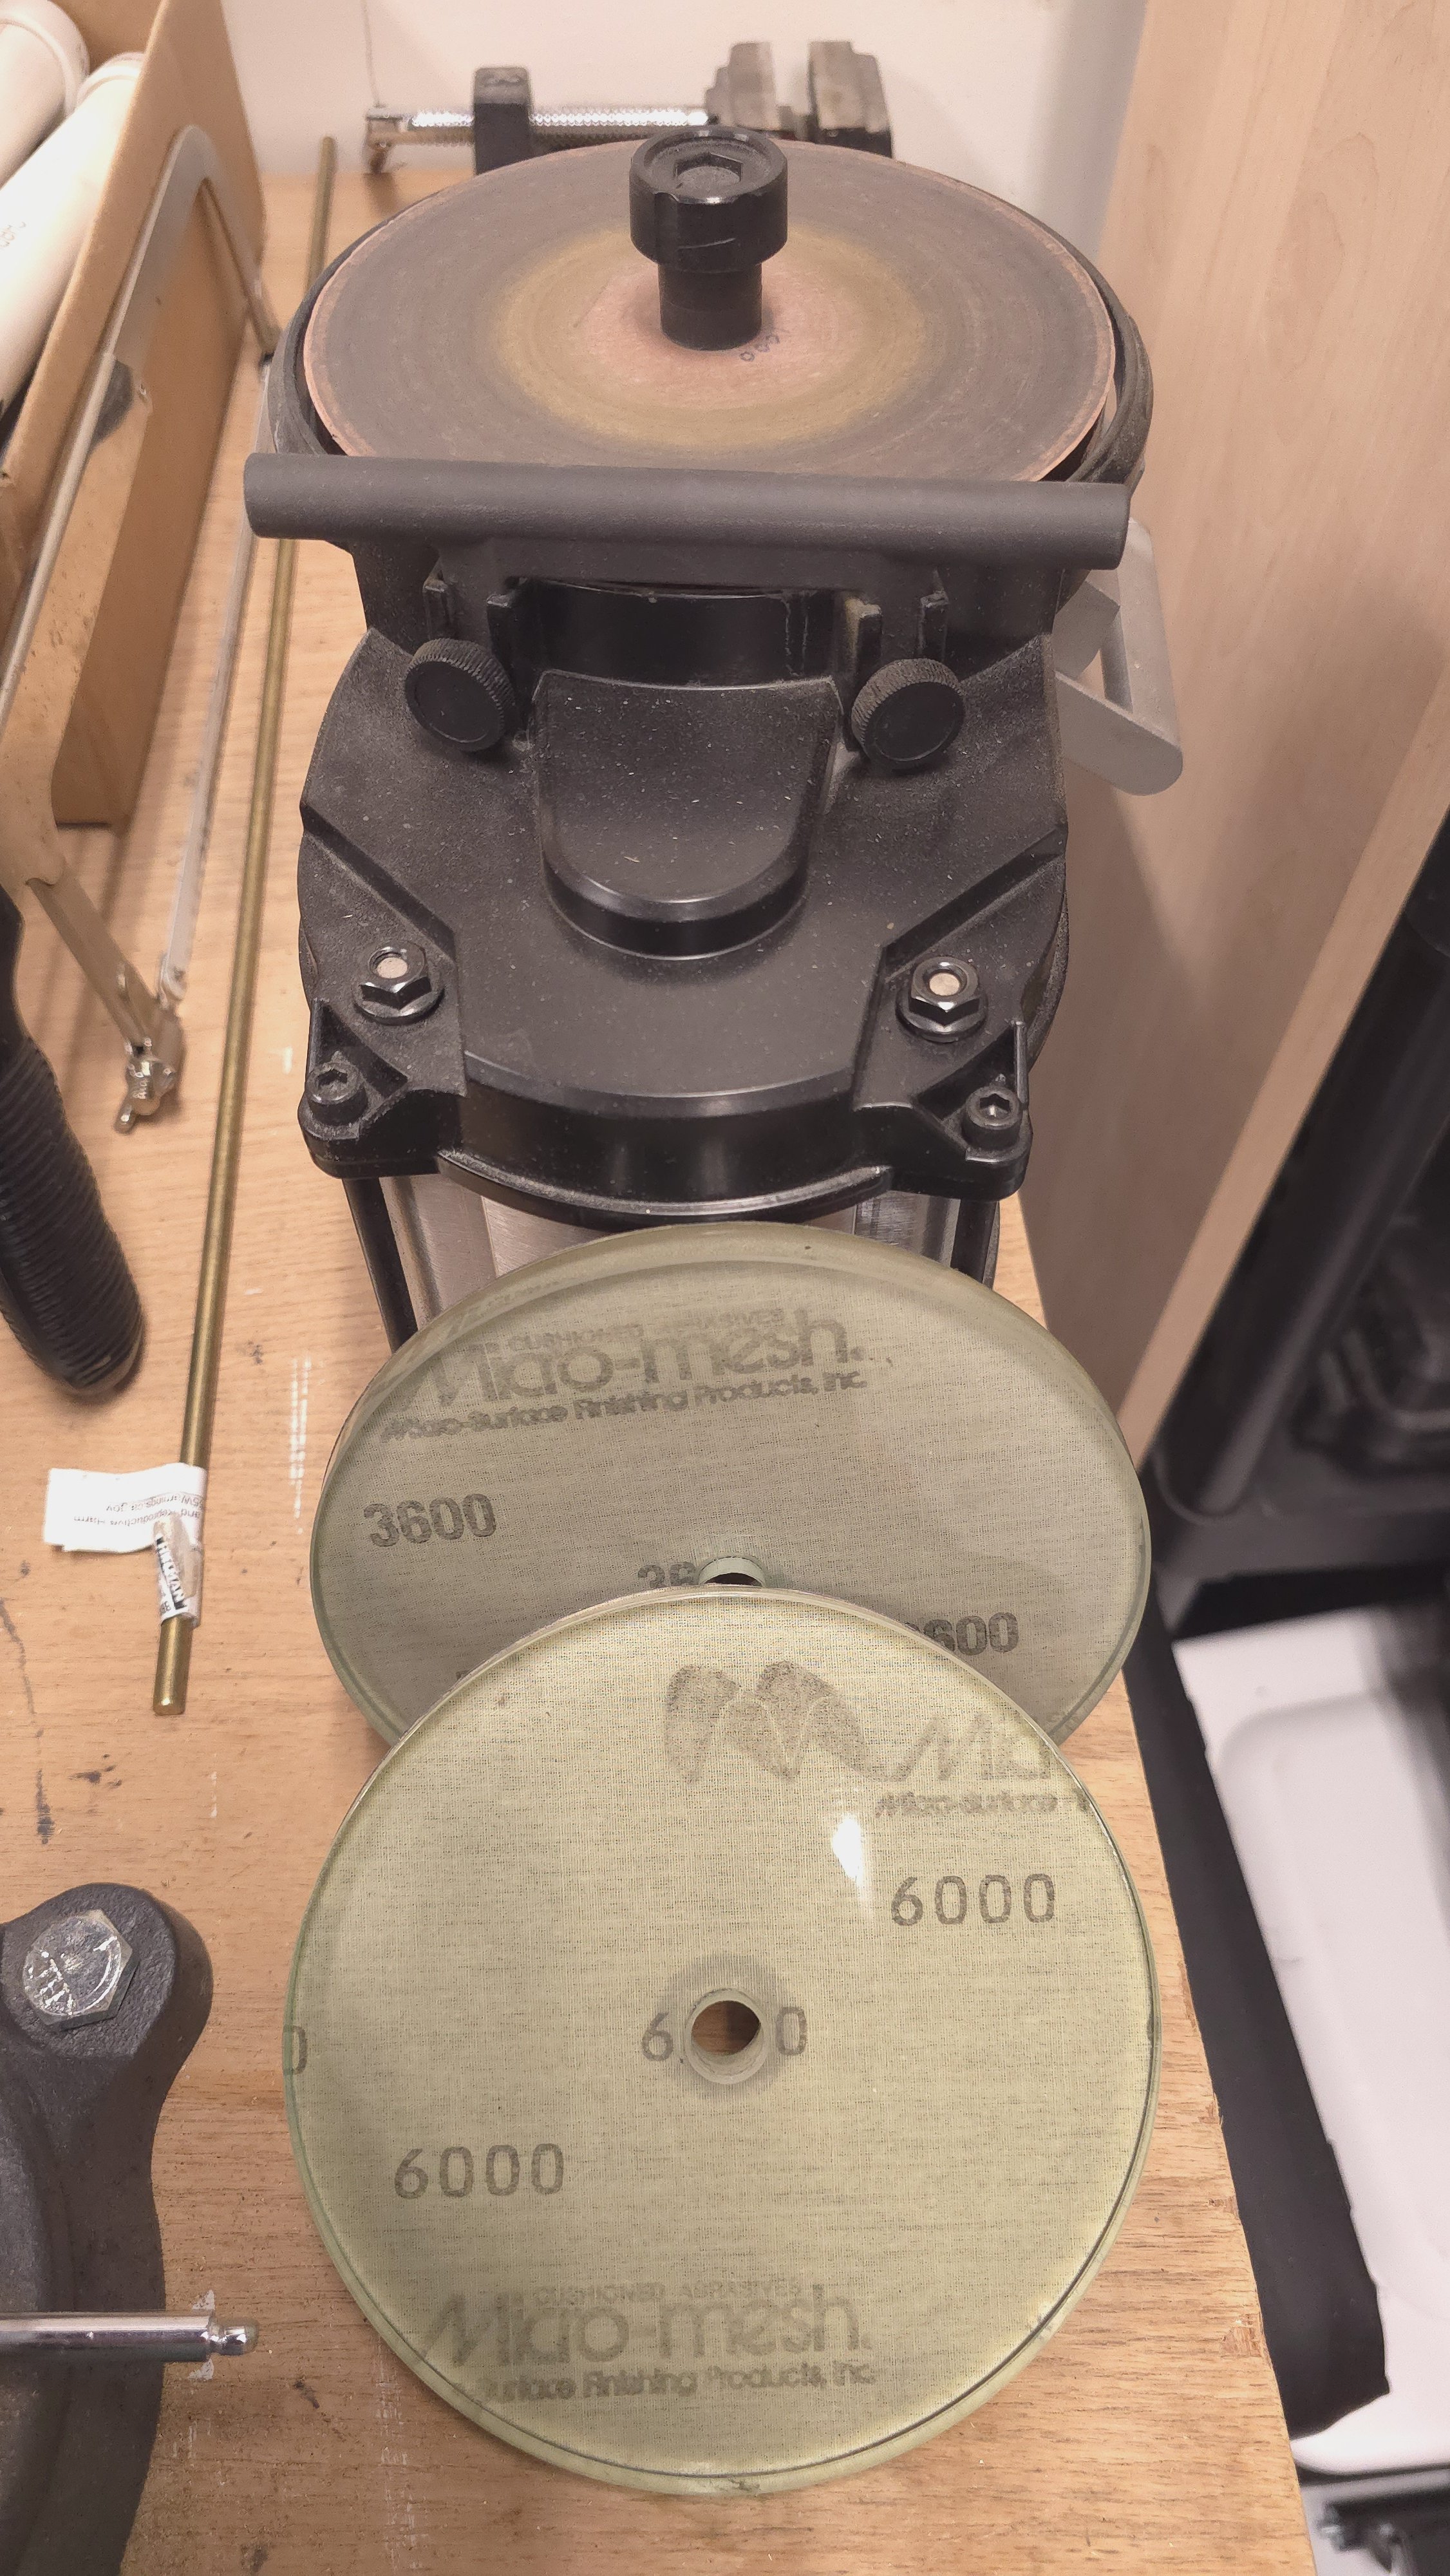
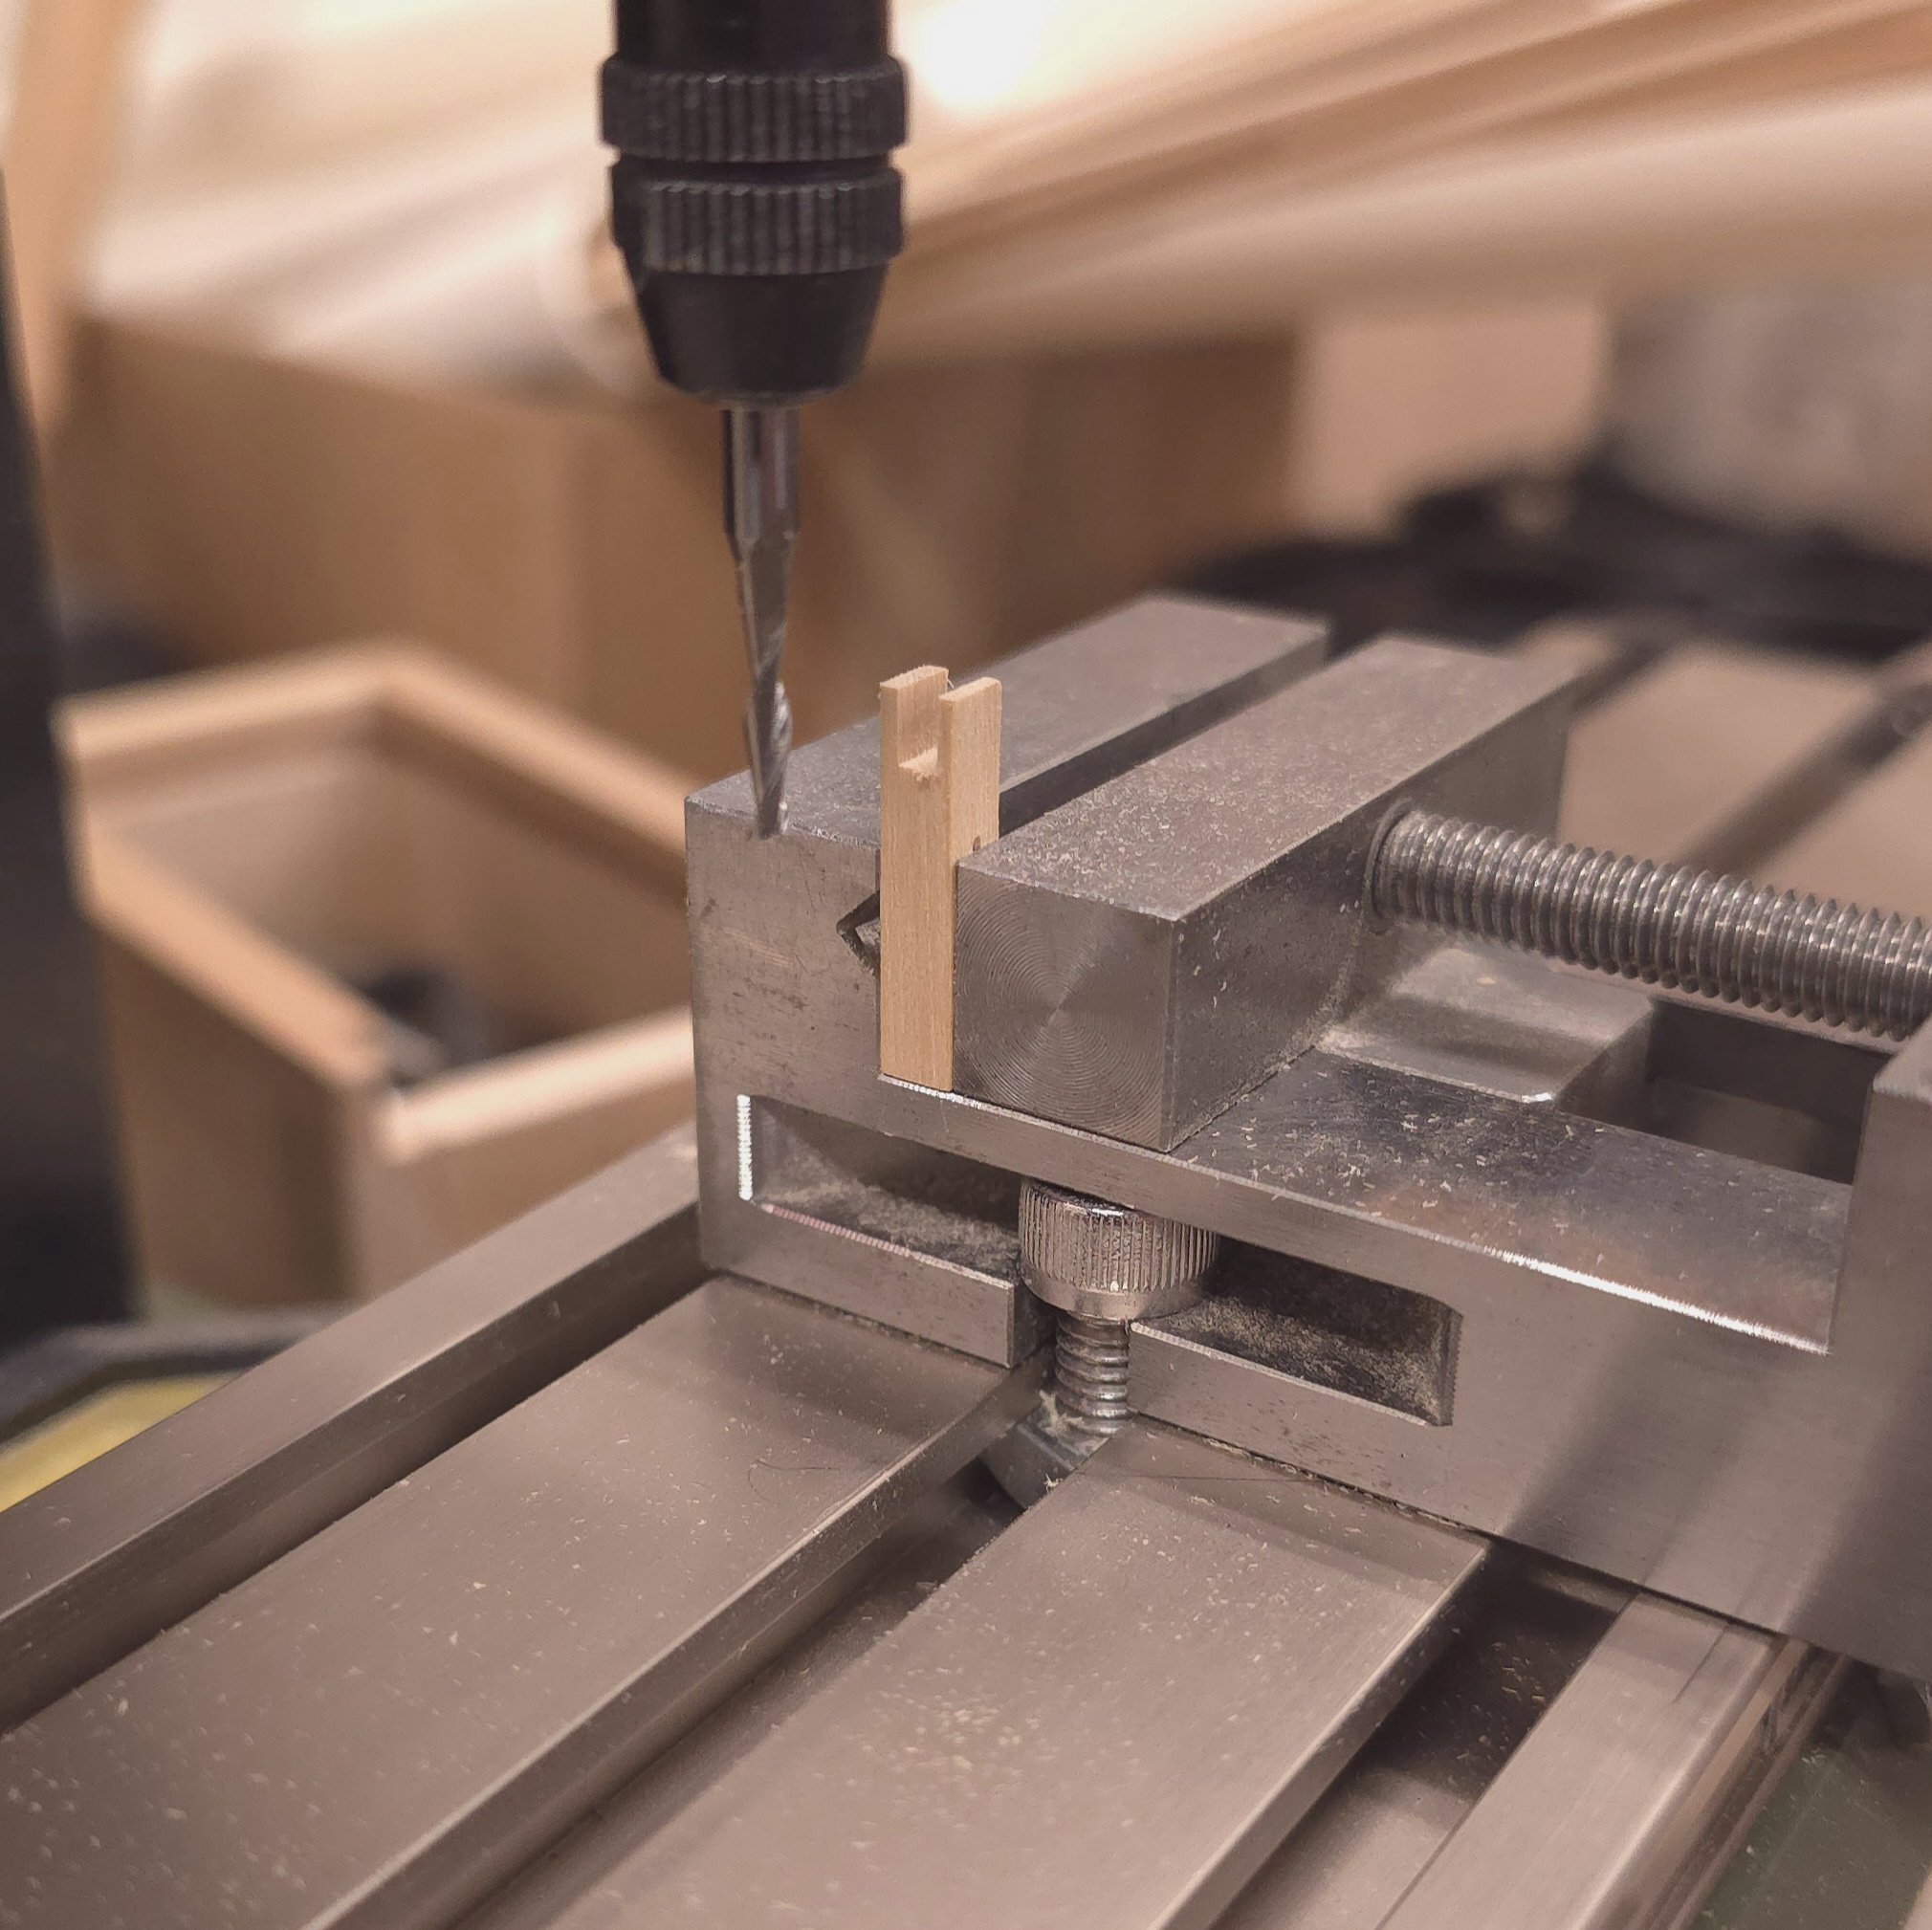
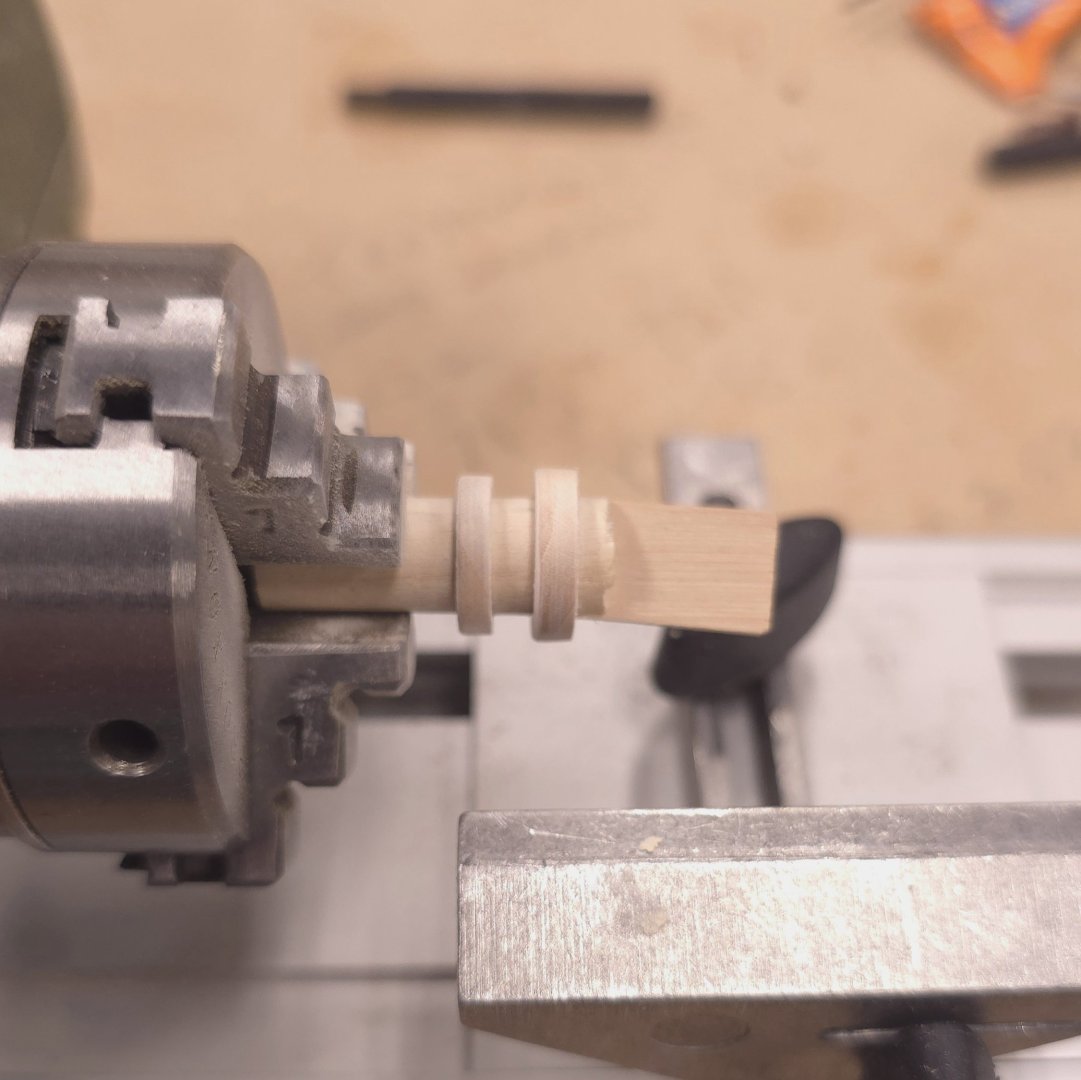
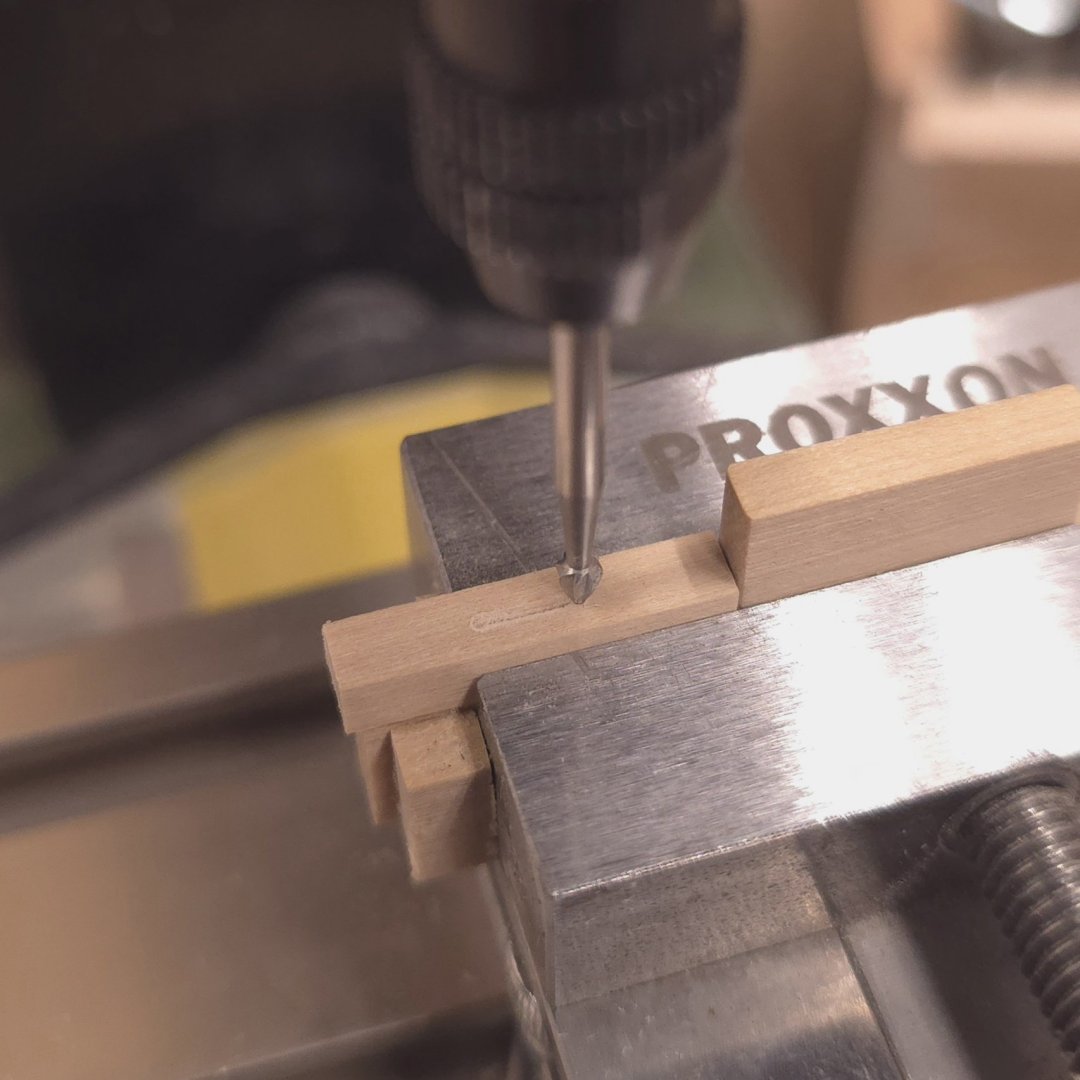
Sorry, I just now realized I didn't take any photographs of the process. I used the Proxxon mill and the dividing attachment on a quarter inch round piece of brass stock. If you look back to previous posts, you will see how I square off round dowl - see binnacles... With the dowel in the dividing attachment, first I cleaned off the end, then repositioned the mill above the dowel and took off roughly half millimeter slices at 0, 90, 180, and 270° of rotation until I got square stock roughly the dimensions of the top of the ridding bitt. Mine weren't entirely square, so I made them a smidge oversized. (Only you and I will know that.. 🤫). Then I shifted the cutting bit 1 mm in from the end, and started taking off half millimeter slices every 45°. Eventually I just hand rotated the dividing attachment to fashion a circular nib of about 1mm in diameter to serve as locating pin for the cap to facilitate centering it on top of the ridding bitt, on top of which I had drilled a 1/16". Finally I used a hacksaw to slice the cap from the dowel. Rinse, repeat While the cap was still attached to the rod, I polished it using 1000, 3600, 6,000 grit sanding discs. I have a machine (Work Sharp), which I use to sharpen chisels and such, that allows me to do this kind of polishing.

-
Ridding bitt construction is done. Next up, staining and Fife rail assembly.
-
Gotta love Legos and magnets
-
USS Constitution by mtbediz - 1:76
Der Alte Rentner replied to mtbediz's topic in - Build logs for subjects built 1751 - 1800
While taking a lunch break, I took a few minutes to go back and look at Mustafa's post number 26. You are correct, in that post, there's a photo of a grating with a blue frame around it. If you fast forward to more recent posts, you'll see that that blue frame is long gone. I think Mustafa only used that as decoration for the picture. Knowing Mustafa workmanship, I'm pretty sure the grating was the correct thickness. -
I admit that I gave that more than passing thought. But that meant setting up the lathe again. Since I already had the milling machine more or less ready to go, I opted for the approach outlined above. Since I knew I was going to be adding a brass cap, I wasn't worried about the look of the top after the woodworking.
-
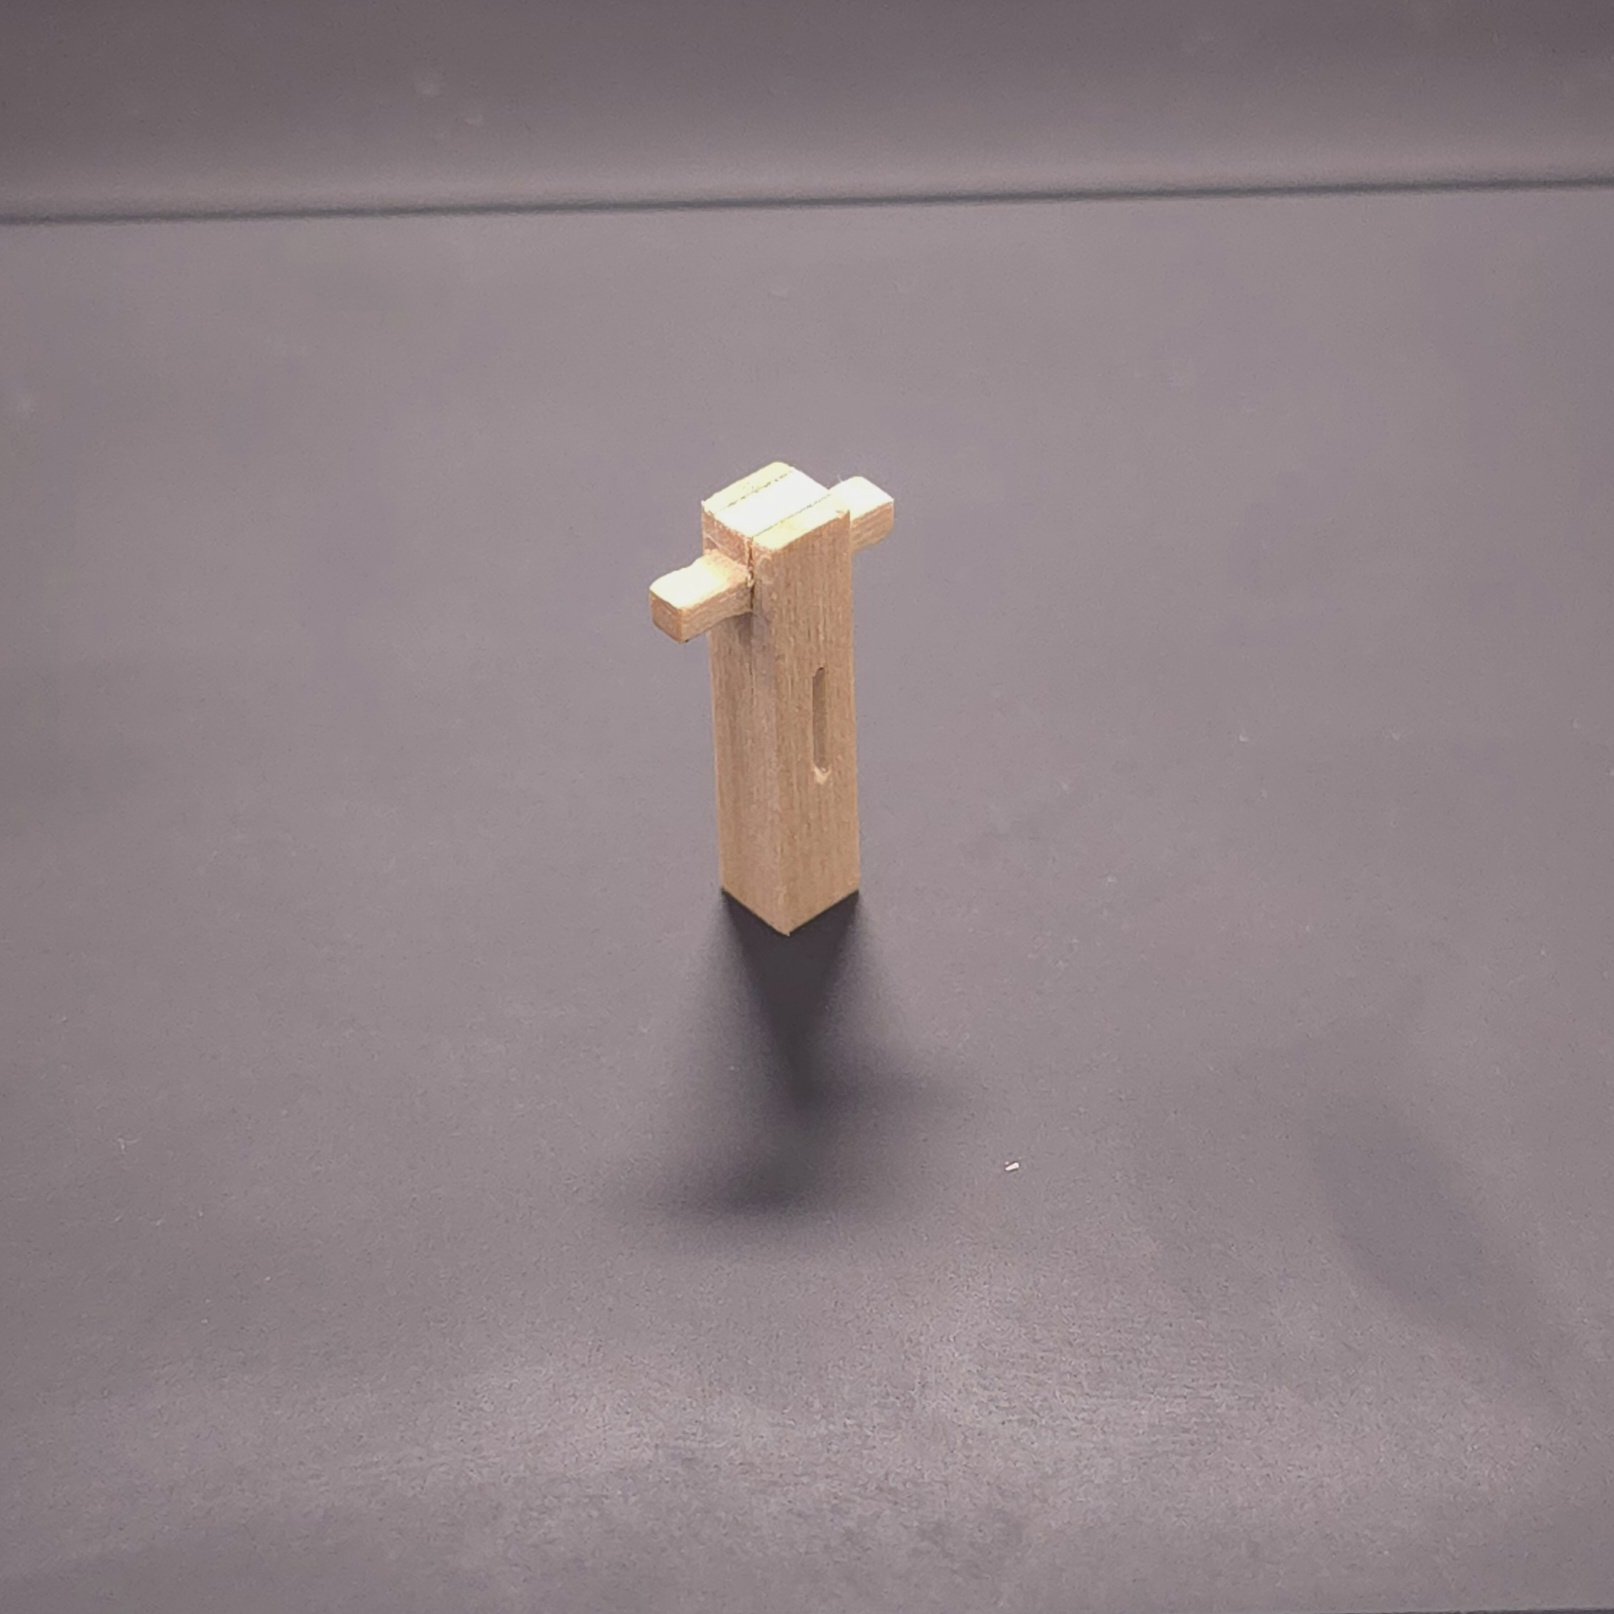
Since I ready faked the sheaves, not just on the stanchions, but also the ridding bitts, I'm in no immediate rush for round cutters less than a millimeter in diameter. That doesn't mean I'm not going to shop for them, while I'm looking for something that'll cut a square hole 2 mm across for the wooden post that passes through the top of the ridding bites. (Hunt uses round brass stock, which I may resort to if I can't fit a square piece.) Mustafa, if you are reading this, how did you manage to get square posts into your ridding bitts? For larger woodworking projects, I have a tool that's a combination chisel/drill. Great for cutting mortises. I doubt I'm going to find anything small enough to work here.. Since I posted this response to Woodartist, I've taken a different direction. See proof of concept below: I plan to put a 1/32" inch thick brass cap on top of the ridding bitt to finish it off.


-
You have all the best toys! I'm not even going to try to find a 6 mm cutter. I've opted for another option, perhaps a little bit more involved than just painting the black stripes as Jon suggested, but resulting in a reasonable facsimile of a sheave.