


jim_smits
-
Posts
650 -
Joined
-
Last visited
Reputation Activity
-

 jim_smits got a reaction from egkb in HMS Ballahoo by jim_smits - FINISHED - Caldercraft
Standing rigging done....! That's another big step out of the way! Now I'm onto plan 3 of 3 and the running rigging and the booms. The end is in sight.
-
 jim_smits reacted to DavidM in HMS Ballahoo by jim_smits - FINISHED - Caldercraft
It looks superb Jim
David
-
 jim_smits got a reaction from GuntherMT in HMS Ballahoo by jim_smits - FINISHED - Caldercraft
Standing rigging done....! That's another big step out of the way! Now I'm onto plan 3 of 3 and the running rigging and the booms. The end is in sight.
-
 jim_smits got a reaction from Stockholm tar in HMS Ballahoo by jim_smits - FINISHED - Caldercraft
Standing rigging done....! That's another big step out of the way! Now I'm onto plan 3 of 3 and the running rigging and the booms. The end is in sight.
-
jim_smits got a reaction from GuntherMT in HMS Ballahoo by jim_smits - FINISHED - Caldercraft
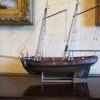
Finally received the base for the Ballahoo together with a couple of support columns.
I've got a shorter support column on order as well due to the large gradient on the keel. In the meantime I have shortened the rearmost column to fit. Measured up the base and drilled a couple of holes to fit wooden dowel up through the columns and into the keel of the ship to keep it stable.
The base itself was mdf so I have given it a couple of coats of paint. Currently it is a dark brown but I may well mix in some yellow ochre and try and match the colour of the columns. Also needs a gentle sand between coats and then a final varnish to keep it as good condition as possible.
I may upgrade to a full properly finished base at some point.
-
 jim_smits got a reaction from DavidM in HMS Ballahoo by jim_smits - FINISHED - Caldercraft
Finally received the base for the Ballahoo together with a couple of support columns.
I've got a shorter support column on order as well due to the large gradient on the keel. In the meantime I have shortened the rearmost column to fit. Measured up the base and drilled a couple of holes to fit wooden dowel up through the columns and into the keel of the ship to keep it stable.
The base itself was mdf so I have given it a couple of coats of paint. Currently it is a dark brown but I may well mix in some yellow ochre and try and match the colour of the columns. Also needs a gentle sand between coats and then a final varnish to keep it as good condition as possible.
I may upgrade to a full properly finished base at some point.
-
jim_smits got a reaction from egkb in HMS Ballahoo by jim_smits - FINISHED - Caldercraft
Finally received the base for the Ballahoo together with a couple of support columns.
I've got a shorter support column on order as well due to the large gradient on the keel. In the meantime I have shortened the rearmost column to fit. Measured up the base and drilled a couple of holes to fit wooden dowel up through the columns and into the keel of the ship to keep it stable.
The base itself was mdf so I have given it a couple of coats of paint. Currently it is a dark brown but I may well mix in some yellow ochre and try and match the colour of the columns. Also needs a gentle sand between coats and then a final varnish to keep it as good condition as possible.
I may upgrade to a full properly finished base at some point.
-
 jim_smits got a reaction from mort stoll in HMS Snake by drtrap - Caldercraft
Looks like every shroud is served to just above the futtock stave with the anterior shroud serving extending to below the stave.
-
 jim_smits got a reaction from drtrap in HMS Snake by drtrap - Caldercraft
Looks like every shroud is served to just above the futtock stave with the anterior shroud serving extending to below the stave.
-
jim_smits got a reaction from GuntherMT in HMS Ballahoo by jim_smits - FINISHED - Caldercraft
Another quick update from last night.
Finished both foremast backstays and belayed to bulwark belaying pins. Finally finished the effect by adding a coil of rope. Formed the coil around two pins in a small block of wood and drowned in diluted PVA. Allowed to dry and trimmed off the ends.
Then used the excess from the belayed line to form a loop which is threaded through the coil and back over the belaying pin. Used a clip to tension the lines in the correct position and again drowned in diluted PVA to fix in position. Really happy with the results!
-
jim_smits got a reaction from egkb in HM Schooner Ballahoo by egkb - FINISHED - Caldercraft - 1:64 Scale - First Proper Wood Build
Hot tips....:
File the ends perfectly flat and clean
Ensure that the tension on the ring is holding the gap shut
This will ensure that the silver will flow over the gap.
If you're using flux/silver paste it will only require a second of heating. Anymore and the brass ring will itself melt.
-
jim_smits got a reaction from DavidM in HM Schooner Ballahoo by egkb - FINISHED - Caldercraft - 1:64 Scale - First Proper Wood Build
Hot tips....:
File the ends perfectly flat and clean
Ensure that the tension on the ring is holding the gap shut
This will ensure that the silver will flow over the gap.
If you're using flux/silver paste it will only require a second of heating. Anymore and the brass ring will itself melt.
-
jim_smits got a reaction from egkb in HM Schooner Ballahoo by egkb - FINISHED - Caldercraft - 1:64 Scale - First Proper Wood Build
Hopefully that will work for you.
I will recommend buying a soldering pencil torch and silver silder paste. Get the learning curve out the way and it is dead easy to use and joint will be rock solid.
-
jim_smits got a reaction from egkb in HM Schooner Ballahoo by egkb - FINISHED - Caldercraft - 1:64 Scale - First Proper Wood Build
Great effort mate.
Are you using soft solder with an iron or silver solder with a torch?
-
jim_smits reacted to egkb in HM Schooner Ballahoo by egkb - FINISHED - Caldercraft - 1:64 Scale - First Proper Wood Build
Hi again Folks..
Have hit on a method for doing the Deadeye Strops.. the Method owes much to Jim Smits description for making Strops over on his own Ballahoo Build (I'm not as talented as Jim so I had to adapt it somewhat! in fact I'm kinda rubbish at this sort of stuff )
Anyhoo here goes.. There are photos at the bottom somewhere ! Oh and any changes in the font or font size isn't highlighting or indicating anything other than some sort of issue within my Google Chrome & MSW interface..
1. wrap suitable wire (regular electrical wire in my case, comprising of 0.5mm strands of copper, and there are loads of it in even a few inches of the stuff) around a dowel, 9mm approx will do.. but don't be too worried over this as they are easily trimmed to length once circular. I ran the length of wire through some emery paper a few times to clean it up first.
2. remove the coil you created by wrapping from the dowel and cut across the coil with snips.. this will produce a bumper load of individual rings.
3. flatten approx 2 or 3mm of each end of the ring (I squashed them in a mini vice, but pliers will work as will smacking them with a hammer! )
4. squeeze the now slightly flattened ends together so as to form an overlap 2 to 3mm or so will do (we now have nice flat ends touching each other which will give loads of surface area for the soldering bit later)
5. put this ring into a suitable holder so as to have the join upwards, just to make the soldering work easier to reach.. again I put them into the jaws of the mini vice.
6. heat up the iron, and away you go.
7. pop the dead eye into place, close up the strop around it, I find putting a sowing needle or similar into the opposite end helps keep this part open slightly.. you will produce a bowling pin kind of shape.. incidentally I use a round nose pliers to do the squeezing. I suggest keeping the join near the bottom, that way if it fails at some stage your rigging won't become slack, as may happen if the join is towards the top where the deadeye is... gluing the strops in place in the channels should stop any issues.
See Photo for outcome.. it needs fine tuning (less blobby looking solder for a start) but it works! and if it doesn't quiet fit (too big for example) than simply trim a small amount off the Ring (stage 2 above) and try again.
All the Very Best Folks
Eamonn
-
 jim_smits got a reaction from Beef Wellington in HMS Ballahoo by jim_smits - FINISHED - Caldercraft
Another quick update from last night.
Finished both foremast backstays and belayed to bulwark belaying pins. Finally finished the effect by adding a coil of rope. Formed the coil around two pins in a small block of wood and drowned in diluted PVA. Allowed to dry and trimmed off the ends.
Then used the excess from the belayed line to form a loop which is threaded through the coil and back over the belaying pin. Used a clip to tension the lines in the correct position and again drowned in diluted PVA to fix in position. Really happy with the results!
-
jim_smits got a reaction from DavidM in HMS Ballahoo by jim_smits - FINISHED - Caldercraft
Hi all,
Next update on the build has been start work on the two pairs of back stays, one each for the fore and main masts. Started off with the foremast by cutting two lengths of 0.75mm thread and serving around 5cm at the end of each line. As per the shrouds the served end is formed into a loop and a false splice used to fix in place. Added a 5mm block onto the end of the lines.
There are a couple of other components to put together to create the backstay assembly:
Block stroped to a rigging hook and;
Double block stroped with a small loop to accept a second line.
Lines are added to these blocks
The whole assembly is then threaded up and a hook added to the end and all suitably tensioned.
The free line is then belayed to a pin on the bulwark.
Takes a little while but looks good. Need to repeat for the main mast.
-
jim_smits got a reaction from DavidM in HMS Ballahoo by jim_smits - FINISHED - Caldercraft
Ratlines done! Not that many compared to other builds but still good to get them done. Onto the stays.....
First mate is on board providing 'help'.......
-
jim_smits got a reaction from drtrap in HMS Ballahoo by jim_smits - FINISHED - Caldercraft
Another quick update from last night.
Finished both foremast backstays and belayed to bulwark belaying pins. Finally finished the effect by adding a coil of rope. Formed the coil around two pins in a small block of wood and drowned in diluted PVA. Allowed to dry and trimmed off the ends.
Then used the excess from the belayed line to form a loop which is threaded through the coil and back over the belaying pin. Used a clip to tension the lines in the correct position and again drowned in diluted PVA to fix in position. Really happy with the results!
-
jim_smits got a reaction from egkb in HMS Ballahoo by jim_smits - FINISHED - Caldercraft
Another quick update from last night.
Finished both foremast backstays and belayed to bulwark belaying pins. Finally finished the effect by adding a coil of rope. Formed the coil around two pins in a small block of wood and drowned in diluted PVA. Allowed to dry and trimmed off the ends.
Then used the excess from the belayed line to form a loop which is threaded through the coil and back over the belaying pin. Used a clip to tension the lines in the correct position and again drowned in diluted PVA to fix in position. Really happy with the results!
-
 jim_smits got a reaction from tkay11 in HMS Ballahoo by jim_smits - FINISHED - Caldercraft
Hi all,
Next update on the build has been start work on the two pairs of back stays, one each for the fore and main masts. Started off with the foremast by cutting two lengths of 0.75mm thread and serving around 5cm at the end of each line. As per the shrouds the served end is formed into a loop and a false splice used to fix in place. Added a 5mm block onto the end of the lines.
There are a couple of other components to put together to create the backstay assembly:
Block stroped to a rigging hook and;
Double block stroped with a small loop to accept a second line.
Lines are added to these blocks
The whole assembly is then threaded up and a hook added to the end and all suitably tensioned.
The free line is then belayed to a pin on the bulwark.
Takes a little while but looks good. Need to repeat for the main mast.
-
 jim_smits got a reaction from WackoWolf in HMS Ballahoo by jim_smits - FINISHED - Caldercraft
Another quick update from last night.
Finished both foremast backstays and belayed to bulwark belaying pins. Finally finished the effect by adding a coil of rope. Formed the coil around two pins in a small block of wood and drowned in diluted PVA. Allowed to dry and trimmed off the ends.
Then used the excess from the belayed line to form a loop which is threaded through the coil and back over the belaying pin. Used a clip to tension the lines in the correct position and again drowned in diluted PVA to fix in position. Really happy with the results!
-
jim_smits got a reaction from GuntherMT in HMS Ballahoo by jim_smits - FINISHED - Caldercraft
Hi all,
Next update on the build has been start work on the two pairs of back stays, one each for the fore and main masts. Started off with the foremast by cutting two lengths of 0.75mm thread and serving around 5cm at the end of each line. As per the shrouds the served end is formed into a loop and a false splice used to fix in place. Added a 5mm block onto the end of the lines.
There are a couple of other components to put together to create the backstay assembly:
Block stroped to a rigging hook and;
Double block stroped with a small loop to accept a second line.
Lines are added to these blocks
The whole assembly is then threaded up and a hook added to the end and all suitably tensioned.
The free line is then belayed to a pin on the bulwark.
Takes a little while but looks good. Need to repeat for the main mast.
-
 jim_smits got a reaction from mcpwilk in HMS Jason by Beef Wellington - Caldercraft - 1:64 - Artois-class frigate modified from HMS Diana 1794
Looking great Jason. See you've halted Snake at the same point as I have and been distracted.....
I've gone the other way. Can we compare Diana to my Ballahoo....?!