
Sjors
-
Posts
5,536 -
Joined
-
Last visited
Reputation Activity
-

 Sjors got a reaction from marktiedens in HMS Snake 1797 by Sjors - FINISHED - Caldercraft - Scale 1:64
Thanks for the likes.
Deck is planked and have the first coat of Danish oil.
Bulwarks are painted in the colors by Mike_H 🙂
Make the waterline and place also a plank so I know where I can put the copperplates.
Sjors
-
 Sjors got a reaction from AJohnson in HMS Snake by Mike_H - FINISHED - Caldercraft - 1:64
Go on Mike 🙂
Great example for me.
I also make a copy of that yellow and black on the bulwarks.( if you don't mind )
Just love it!
Sjors
-
 Sjors reacted to Mike_H in HMS Snake by Mike_H - FINISHED - Caldercraft - 1:64
And here are the catheads. For the first time I embellished the kit design: rather than just drilling four holes where the catfall would run through the sheaves, I drilled-out and then-chiselled out slots into which I could fit some sheaves.
Holes drilled at an appropriate angle to be vertical when installed. Reverse side shows that the dremel is only a fair drill press
Best description is probably gouge-, not chisel-out the slots.
Here they are with 1 mm discs cut from 3 mm dowel. Centering the holes in the discs proved beyond me. A trial fit using two pins (nails) seems to look ok
And the finished product now pinned in place with 1 mm brass rod
Quite a lot of fun!
-
 Sjors got a reaction from src in Enterprise by src - Constructo - 1:51 - or Lessons in Adapt Improvise and Overcome
He Sam,
I’ll be waiting for you 😃👍
Don’t stay away to long......
Sjors
-
 Sjors got a reaction from popeye the sailor in HMS Vanguard by marktiedens - Model Shipways - scale 1:72
What a great build!
Sjors
-
Sjors reacted to Mike_H in HMS Snake by Mike_H - FINISHED - Caldercraft - 1:64
Headworks done. Not trivial as the provided parts and drawings are what a draftsman wold describe as being of nominal scale. Once you work that out, and engage low gear and defensive driving mode, it was all quit pleasing. The bow rails and cheeks go on first, and take quite a lot of sanding (cheeks) and trimming to length (rails) before all is good.
Next comes the "bow head rail frames", or grating supports, as might be said with fewer words. Easy enough to paint and glue, at which point it is apparent that the grating sits much too high (wish I had re-read @Beef Wellington before I glued). The fore support was firmly glued in place so I just took a saw to it, and chopped the top off. For the aft support, I could prise it off, and then filed-out the slot as deep as would allow the support to fit above the bow rail. Photographed it at that point:
That meant that the lower rail slots in the aft support were not in the right place - so I "moved" them, filling the old slots with milliput, sanding down and filing new slots, and then painting, again. Not the RH slot has been eased slightly to allow the rail to rotate
With that, the supports could be glued again and the lower rails added. I used thick CA, but the rails needed a little persuasion to adopt the right position, so needed clamping while the glue set.
Now, the next job is to fit the grating, but as many have discovered before me, the slots in the grating and in the knee of the head, for the gammoning, do not aline, at all. BUT Petrejus says they shouldn't, because the gammoning is not simply would around the bowsprit and through the slots. Instead they cross over to create an "hour-glass' shape. (Steele say the same, too)
I bit of fiddling with a dummy bowsprit and a bit of thread shows that all is good!
Upper rails to install and then we are done! (naturally I had a glue nightmare at this point, but deep breath, clean it up, all's good)
Quite a lot of fun, really, and IRL it looks good. In these photos you can see that the paint has taken a bit of a hammering, and the glue is not as neat as some manage. I used gloss varnish on the grating, which I think looks great. It should be said that this really was a painstaking process, as a great deal of dry fitting is needed, but you cannot do that for a part until the previous parts are glued and secure. It's a case of gradually trim and sand to shape, paint, wait, glue, wait, repeat six times, on both bows. Fun though, as I say.
Catheads next.
-
Sjors reacted to gsxdent59 in San Ildefonso by gsxdent59 - OcCre - 1/70
Now i finish the left side of the ship. The same job with the gunports... To be continued....
-
 Sjors got a reaction from GrandpaPhil in Nuestra Señora del Pilar by Anja & Sjors - FINISHED - OcCre - Scale 1:46
Thanks for the likes and everyone who is visiting from time to time.
Ratlines are done!
I can not see any ratline for a while now.....
I don't count them but there are a lot.
Pictures are a little bit bad because she is to big to get het in one shot....
Sjors
-
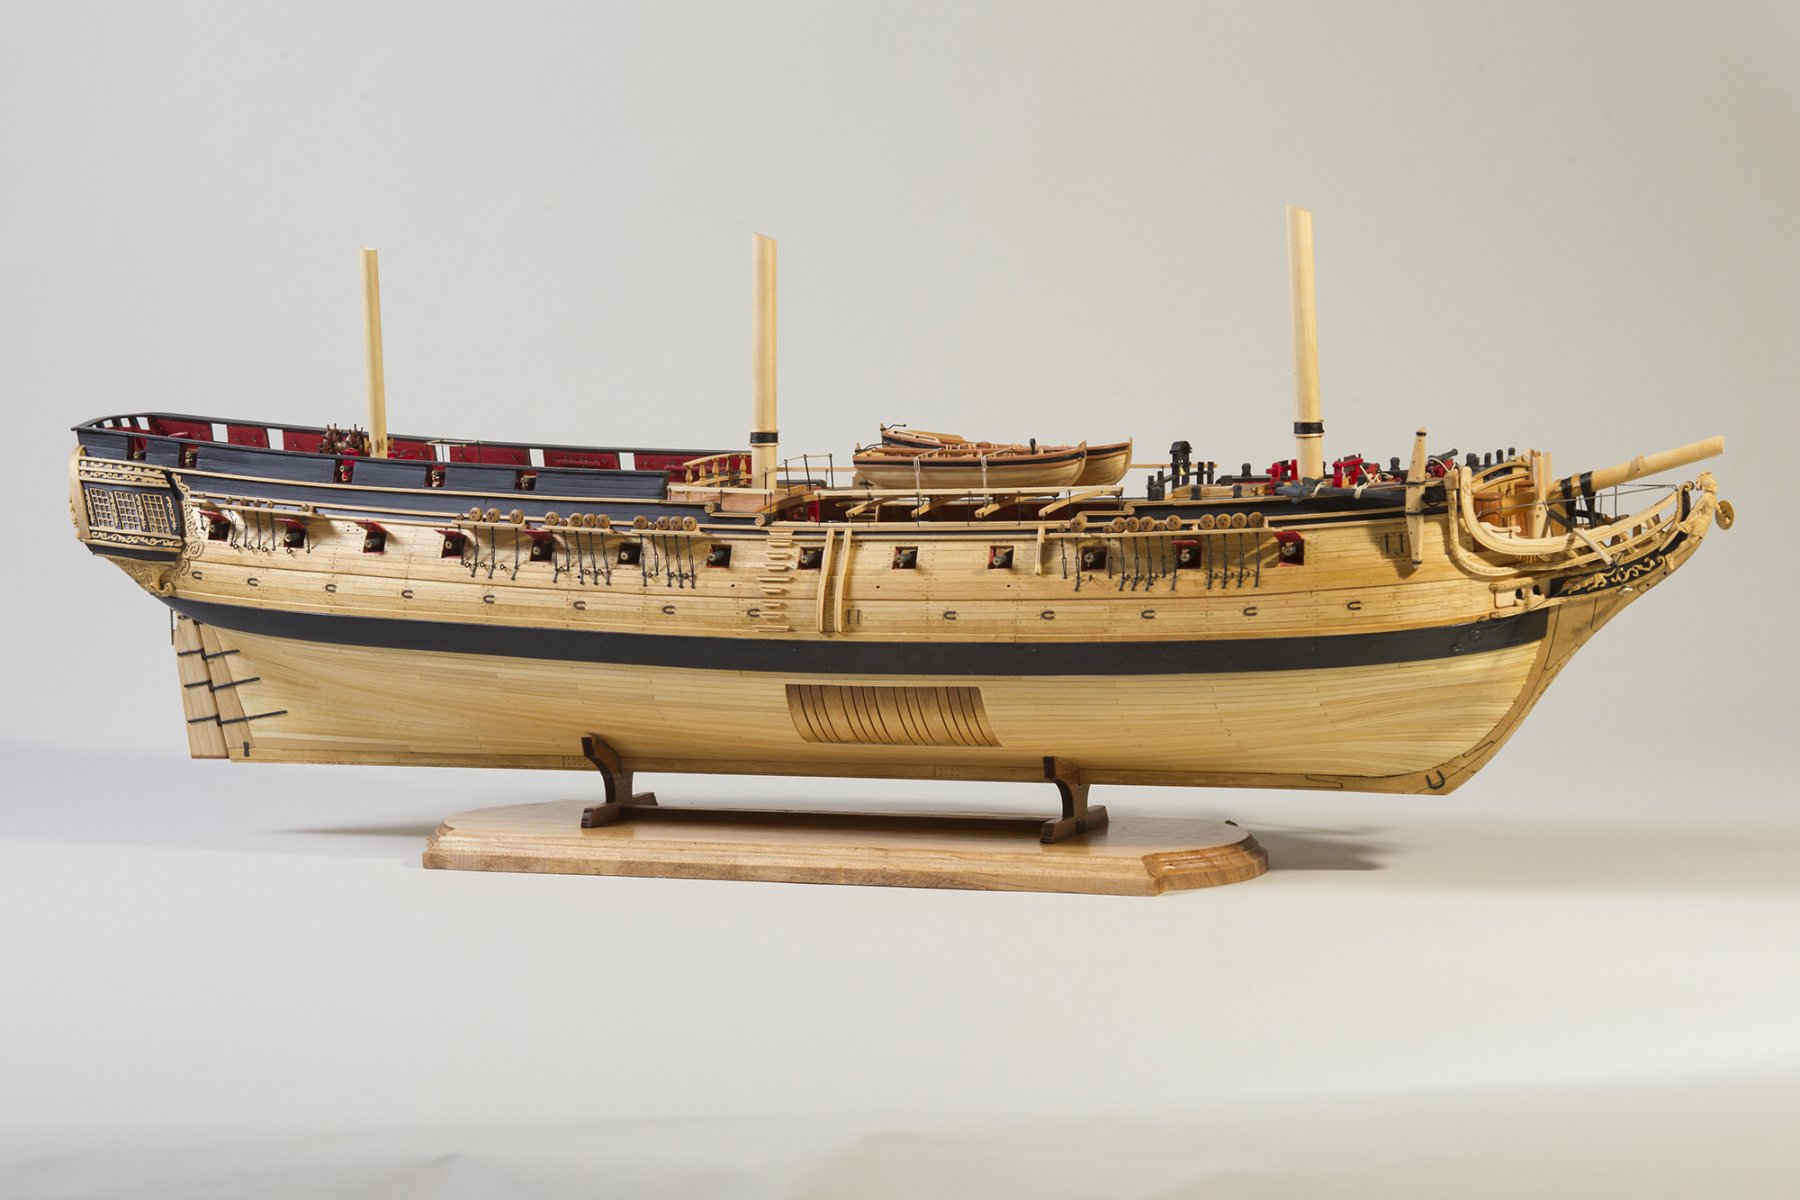
Sjors got a reaction from popeye the sailor in HMS Snake 1797 by Sjors - FINISHED - Caldercraft - Scale 1:64
And a little update again.....
Thank for the likes and the visiting.
Second planking done and after a few hours of sanding I'm happy how she is.
It is so smooth the I can not trust my fingers 🙂
On the picture it looks otherwise but that's the light I believe.
I have now a good underground for the paint nd the copper plaates.
But first the inner bulwark and deck planking.
Sjors
-
Sjors reacted to marktiedens in HMS Vanguard by marktiedens - Model Shipways - scale 1:72
Thanks Sjors - at the rate I`m building you will have all your present builds done & will have started a few more before I get to the masting & rigging.
Mark
-
Sjors got a reaction from marktiedens in HMS Vanguard by marktiedens - Model Shipways - scale 1:72
What a great build!
Sjors
-
Sjors reacted to marktiedens in HMS Vanguard by marktiedens - Model Shipways - scale 1:72
Hi - added the rest of the cannons to the deck plus the chimney & gratings.
Before finishing off this area, I thought I would move to the bow deck area & work on the head rails. First thing I had to do was chisel out the top of the wales so the gratings would sit on the supports properly. after a lot of filing to the head rail slots in the supports, they were glued in place along with the upper cheek rail.
Then, the middle & lower head rails were shaped & glued in place - this took almost a whole day to get them even on both sides. Finally, the gratings were added. Got a bunch more to do yet in that area.
Mark
-
Sjors reacted to marktiedens in HMS Vanguard by marktiedens - Model Shipways - scale 1:72
update - finished up the poop deck by adding some bitts, a few timberheads, stern brackets, the skylight, & a bunch of eyebolts. I used liquid window maker for the skylight windows.
Next, the bow railings & timberheads were installed. The cap rails, railings, & timberheads were all laser cut to shape and fit nicely - basically just had to assemble, paint them & glue them on & cut 4 short sections out for the last 4 cannons.
Thanks for looking in.
Mark
-
Sjors reacted to marktiedens in HMS Vanguard by marktiedens - Model Shipways - scale 1:72
Update - poop deck on & planked. The cap rails were added & the carronades were finally finished & set in place with all the rigging. The carronades are shown in the retracted position thus the lack of slack in the breech ropes. The railings will be added later - if not, I would surely knock them loose. Need to add a few more things & then on to the pointy end of the ship.
Mark
-
 Sjors got a reaction from Dfell in HMS Snake 1797 by Sjors - FINISHED - Caldercraft - Scale 1:64
And a little update again.....
Thank for the likes and the visiting.
Second planking done and after a few hours of sanding I'm happy how she is.
It is so smooth the I can not trust my fingers 🙂
On the picture it looks otherwise but that's the light I believe.
I have now a good underground for the paint nd the copper plaates.
But first the inner bulwark and deck planking.
Sjors
-
 Sjors got a reaction from Mick_S in HMS Snake 1797 by Sjors - FINISHED - Caldercraft - Scale 1:64
And a little update again.....
Thank for the likes and the visiting.
Second planking done and after a few hours of sanding I'm happy how she is.
It is so smooth the I can not trust my fingers 🙂
On the picture it looks otherwise but that's the light I believe.
I have now a good underground for the paint nd the copper plaates.
But first the inner bulwark and deck planking.
Sjors
-
 Sjors got a reaction from Rustyj in HMS Snake 1797 by Sjors - FINISHED - Caldercraft - Scale 1:64
And a little update again.....
Thank for the likes and the visiting.
Second planking done and after a few hours of sanding I'm happy how she is.
It is so smooth the I can not trust my fingers 🙂
On the picture it looks otherwise but that's the light I believe.
I have now a good underground for the paint nd the copper plaates.
But first the inner bulwark and deck planking.
Sjors
-
Sjors reacted to Mike_H in HMS Snake by Mike_H - FINISHED - Caldercraft - 1:64
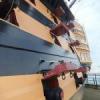
The straps on the gudgeon and pintles (you can never use those words too ofter) are done, and with it everything to do with copper is completed. I'm happy with the outcome, but I must say I found it more frustrating than expected. I attempted to followed Jason's, @Beef Wellington, workflow of: bend strap around a dowel, glue at the bend onto the gudgeon/pintle, drill for a trimmed nail and attach the strap square to the stern-post. In fact I did this on the rudder and I rather messed it up as the glue was remarkably reluctant to bond. This arose because I had pre-painted the straps with undercoat and two coats of copper, and between them adhesion was not strong enough.
On the hull I marked a pencil line square to the sternpost held the strap in place and then marked for drilling at the extreme hole. I trimmed a nail to about 3 mm long, and then inserted. The nail were leftover from my Artesania Latina build as they had round, un-countersunk heads. A 0.7 mm hole gave a slight interference fit with the nail, so no glue was needed. I then did the extreme hole on the reverse side. Drilling and nailing the other holes then completed the strap. The concave nature of the hull naturally pulled the strap tight around the pintle.
Getting the nail heads to sit flat was a struggle and I wasn't willing to brute force them (given my experience with fitting the false deck all those months ago). I also don't much like the paint finish. In retrospect I certainly wouldn't add the the copper paint before attaching. So as in everything to do with this project, I reckon I know a lot more at the end of task than at the beginning.
And here are the results of that journey:
What next? Bow rails I think.
-
Sjors reacted to Mike_H in HMS Snake by Mike_H - FINISHED - Caldercraft - 1:64
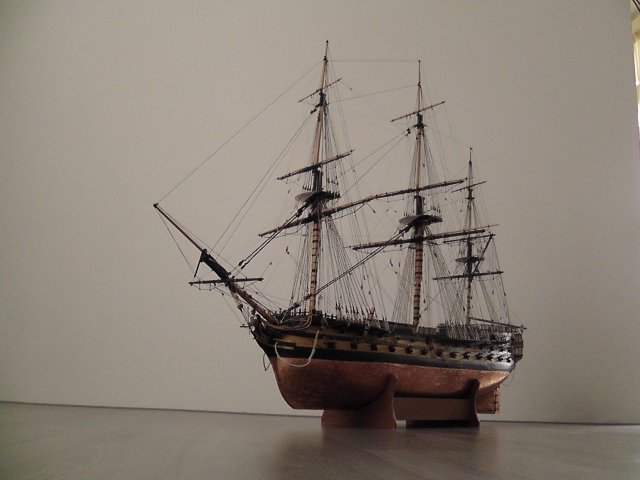
Copper is done! Just need to paint the sternpost, the leading edge of the rudder and the straps, and then attach the straps to the gudgeons and pintles.
The learning:
2 drops of thick CA per tile hold a tile in place with a finger and a the tips of a pair of tweezers (I reserve a pair for working with CA since then end up with a coating), remove finger, remove tweezers, in that order, or you risk the tiles coming off stuck to your finger A little bit of glue seepage occurs - but don't worry (see cleaning!) cut with a pair of scissors. each tile takes about a minute to lay, unless it needs trimming, then it's about 10 minutes the waterline batten makes the final edge pretty easy and hides the inevitable imperfections getting a perfectly aligned edge on the sternpost is hard, but I left an overhang and then filed with as small metal file. Worked very well there, and on the rudder. The file tends to wrap the edge of the tile around the edge which is useful... the keel, rudder and sternpost are all 5 mm wide, a tile is 0.2 mm thick, so the covered thickness is 5.4 mm, but a tile is 5.6 mm wide, giving a 0.2 mm overhang (more if you have been a bit zealous with the sanding). I tried trimming the tiles but couldn't get the width accurate or indeed the cut edge straight. But really, who cares about 0.2 mm overhang? I would have left it but it was very obvious in the few places where I had sanded too much. I tried filing and it worked a treat, eventually wrapping the tile around those butting up to it be sparing and reuse your trimmings, there are very few spare tiles. In the picture below the pot on the left is unused trimmings, and on the right is the remaining tiles (26 of them), and there are about 800 on the ship
So cleaning:
Whatever patina you want on your copper I think you need to get the glue off, and probably the finger grease so I
soaked a scrap of rag with CA glue remover and gave the copper a good rub down. It took about 5 minutes but i could see the large marks softening and coming off. I then soaked another rag in iso-propyl alcohol (propan-2-ol to the chemists - see more in minute) and wiped over again. It came up clean but the tarnish was obvious from some angles and quite blotchy. Patina:
You can find many an article on this forum, but most usually conclude that it's a matter of taste. Well my taste owes quite a bit to Patrick O'Brian who refers periodically to a glimpse of salmon-coloured copper appearing as Surprise heels in the wind. I was reluctant to use an abrasive polish as they almost inevitably leave a powdery residue. And, full transparency, I'm a chemical engineer, so chemical cleaning seemed natural. You can find a discussion of "pickling" here where "Sparex" is used to clean brass. Sparex is an expensive form of sodium hydrogen sulphate (NaHSO4), which in turn is a partly neutralised form of sulphuric acid (and much safer in concentrated form). You can buy it very cheaply from pool-supply companies (described as sodium bi-sulphate) where it is sold for lowering the pH of things like hot tubs.
make up a volume of acidic solution. I use a recycled 600 ml supermarket soup tub. Aim for about 50 ml of NaHSO4 in about 250 ml of hot water (add the powder to the water, not vice versa. This way the solution starts weak and gets more concentrated, where as the other way it starts very concentrated and then weakens. If anything goes wrong, you want the former, not the latter to spill on your workbench). You end up with a solution at roughly pH 1 which is not all that dangerous, but glasses and gloves are called for. I do this at my model building desk, but a a kitchen sink might make more sense. make up a volume of alkali solution. About 60 ml of sodium bicarbonate (baking soda) in about 250 ml of hot water - it won't all dissolve but that's ok. wearing gloves, dampen a cloth in the acid solution and wipe the copper all over. Don't go crazy and soak the whole ship. I wiped one half of the hull for about 2 minutes, then dunked the cloth again and wiped that half for another 2. then take another cloth, and dampen it in the alkali solution and wipe over the acid-treated copper. You will hear a bit of fizzing, nothing worse. You now have copper tiles covered in a dilute sodium sulfate (Na2SO4) solution, which when dry would leave a dusting of white crystals. take another cloth soaked in clean water and wipe off the Na2SO4 solution. Dry with a cloth and repeat. now do the other half of the hull. To dispose of the solutions it seems best to neutralise one with the other. In a sink very gently pour a little of the acid into the alkali container - it will foam like mad, so start very slowly, eventually it will calm down and once you have mixed them all it should be a pretty neutral solution of Na2SO4 that can go down the drain. Rinse out your cloths - I give the acid cloth a slow dunk in the alkali first This gave a very shiny uniformly coloured copper finish. Which is what I want. To keep that finish I then applied two coats of acrylic satin varnish.
Here are the results:
-
Sjors reacted to Mike_H in HMS Snake by Mike_H - FINISHED - Caldercraft - 1:64
And so copper...
In short, it's a joy. Slow and steady and according to a plan - pretty much the heart-beat of model ship building. I find the copper tiles really quite forgiving:
nicely annealed so they bend very easily, cut with a small pair of scissors, the rolled edges are very helpful with slight gaps, since the reflections at the joins make it very hard to detect glimpses of walnut with two dots of medium-gel CA they "float" about on the hull surface waiting to be aligned And the plan? Broadly inspired by the Petrejus' drawing in his incomparable Modelling the Irene (as an aside, if, like me, you are new to modelling, this book has such a wealth of beautiful line drawings, that it doesn't matter what you are trying to build, from wherry, to four-decker, there is so much to be learnt). Anyway, his plan...
From the keel up he shows the copper sheets laid following the natural run of the hull until about the belly-line of the hold (that's my plan), a set of stealers fore and aft before another band eventually meeting a band of two laid horizontally at the water-line. Because the Snake's keel is not parallel to the water-line, I'm not convinced that a horizontal band is sensible, or indeed that steelers for the converging lines are needed.
This is where I am up to. And I think I have decided to carry-on just following the natural line of the hull, meaning that the line of tiles will "droop" below the water-line batten. But I might go and have a look at others' work.
-
Sjors reacted to Mike_H in HMS Snake by Mike_H - FINISHED - Caldercraft - 1:64
A little light relief:
Stern Facia Knees. Quite the easiest installation to date. Angles easy to sand, dab or two of CA, and it's done.
Side Steps and Fenders. Keeping the steps aligned was a challenge, but not really a great one. The Fenders I made entirely from 4x2 walnut strip, rejecting the pair (not six?!) provided in 2 mm ply. Took the radical decision that in my work-a-day ship the 1st Lieutenant would not be paying for yellow ochre paint on parts to be rubbed against quays, boats and other surfaces, or stamped upon by tarry feet. So all are work-a-day black. I'm pleased to have them visible.
Fitted the rudder. A modest challenge since the white-metal castings varied from fair to poor, but most importantly varied. The length of the pins on the pintles needed to be trimmed, the spikes on the gudgeons were elliptical, and the holes in the gudgeons needed drilling out. Squared-up the cutouts on the ruder first, and then glued the pintles in, snug in the top corners of the cutouts. Clamped the rudder in place and then marked a level on the sternpost giving the bottom of each pintle, so the top of each gudgeon. Fixed the top gudgeon: drilled for the locating pin 1.5 mm lower than the marked level. Glued the gudgeon. Checked for alignment. All good, repeated for 2nd, 3rd and 4th. Naturally everything was fine until the last one - as I hurried to get done by lunch. Hole too hight, cutut too short, locating pin snapped. Had some lunch, then carefully remedied.
But now onto some serious stuff. Here's a glint of copper:
-
Sjors reacted to Mike_H in HMS Snake 1797 by Sjors - FINISHED - Caldercraft - Scale 1:64
Looks sweet, Sjors. I’ll have to keep moving or you’ll catch me!
Mike
-
 Sjors got a reaction from FrankWouts in HMS Winchelsea by rafine 1/48
Hello Bob,
it’s still difficult to find build logs if you don’t know the era of the ship......
And to seek the whole forum......
But i find you and you’re beautiful work.
Your skills are still great!
Sjors
-
Sjors got a reaction from FrankWouts in HMS Winchelsea by rafine 1/48
Found you !
Wow Bob.
Is this not to big for you???? 🙂
It is your usual great work.
I have problems to find someone again with this new layout of the forum.
Or maybe I'm to old 😞
Just joking..every new thing has his good and less good things.
But your build is great!
I will follow you again.
Sjors
-
Sjors got a reaction from AJohnson in HMS Snake 1797 by Sjors - FINISHED - Caldercraft - Scale 1:64
And a little update again.....
Thank for the likes and the visiting.
Second planking done and after a few hours of sanding I'm happy how she is.
It is so smooth the I can not trust my fingers 🙂
On the picture it looks otherwise but that's the light I believe.
I have now a good underground for the paint nd the copper plaates.
But first the inner bulwark and deck planking.
Sjors