

Padeen
-
Posts
181 -
Joined
-
Last visited
Reputation Activity
-

 Padeen got a reaction from Sjors in Le Mirage by Sjors - FINISHED - Corel - Wood - 1:75
Hi Sjors,
Yes, every thing's all right, thanks. It's just that I have had very little available time for MSW of late... I hope to be more present from now on.
-
Padeen reacted to flyer in HMS Pegasus by flyer - FINISHED - Victory Models
After a long break, work continued on the standing rigging of the foremast.
The last of the ratlines (for this project) were put in place on the fore topmast. Stays and backstays were put in according to the kit’s drawings.
A jib stay was added and put in according James Lees description ‘for smaller ships’. (No falls for the aft end of the stay and the outhauler – easier setup.)
The work continues under the watchful eye of the captain
Topmast stay tackle
Fore top
The block stropped to the starboard side of the fore topmast cap caries the jib stay
Traveller with jib stay and out hauler. The single block on the traveller is for the downhauler of the jib.
The standing rigging nears completion
-
Padeen reacted to michael mott in Bristol Pilot Cutter by michael mott - 1/8 scale - POF
Jay, John, thanks for the input on the cabin top planking. I'm torn about it because I really like the pinstripe planking, Like that on the power boats and the water taxi that was featured here on MSW 1, but it does feel a bit over the top on this boat. I'm just going to have to build one of those power boats down the road.
I did some other stuff today while I think about the Cabin.
Doing this took my mind away from the service this morning-- I placed a wreath at the Stony Plain Remembrance on behalf of the Royal Arch Masons... always a sobering memorial
Michael
-
Padeen reacted to mtaylor in Bristol Pilot Cutter by michael mott - 1/8 scale - POF
I think I'll just put my head down on the workbench and whimper.
-
Padeen reacted to michael mott in Bristol Pilot Cutter by michael mott - 1/8 scale - POF
John,
Now would I tell a fib!
Adeline,
Thanks for your compliment, the tools I used are a jewelers saw with a very fine blade. a couple of lowly needle files, and a 1/8th diameter round file for the initial hogging off the round part at the bottom, The wire wheel is a large bench grinder type about 6 inches in diameter, when I make the next one I will show the files as the shaping is done,
and by the way those "proofs" are all smoke and mirrors;~)
Joe,
Thanks the rigging is a series of models all in themselves, again I think of the line by Remco about treating every part as an independent model. I am having to think about how it all works by doing a lot of reading about the way things are done. what are the best ways to set the lines from an operational point of view. I try to put myself in the position of if I were on this boat how would I want to work and tie off these lines. Knowing how to sail a small boat definitely helps even though I don't know all the nautical terms for things.
Nils, I,m happy that you are enjoying the build.
Bob,
The cleat is made of ordinary 1/8th inch thick brass sheet stock I had cut a bunch of 1 inch strips off the large sheet I purchased many years ago for some commercial work I was doing at the time. I have enough to last the rest of my lifetime.
Druxey, thank you!
I have to go into town this afternoon I am going to see if I can find a small key-chain compass, anywhere up to 3/4 inch in diameter, for another little piece of the puzzle, at this scale there is no reason why it shouldn't work properly
PS its snowing again on top of the earlier stuff that didn't melt away!!
Michael
-
Padeen reacted to Stockholm tar in Sherbourne by Stockholm tar - Caldercraft - 1/64
At this point I thought it a good time to fit some items of the running rigging – those which belay at the foot of the mast and the small pinrails inside the shrouds, access to these areas being much easier without the shrouds in place. These were the toprope, the throat and peak halliards, and the boom topping lift – all four lines being 0.50mm. in circumference, their purchases 0.25mm. Incidentally, the short pin rails inside the shrouds only contain six pins per side, which I estimate as not being enough for any additional rigging, and the foremost pin on each side already belays the rigged burton pendants. However I fitted them – and will probably resort to shroud cleats later in the build.
The first line to be rigged was the toprope, which was used to raise or lower the topgallant mast. There has been some debate as to whether this was actually left in place, but I decided to include it out of interest. Having treated the line with beeswax, I fastened one end to an eyebolt in the larboard (port) side of the mastcap, threaded it (to starboard) down and through the sheave hole in the foot of the topgallant mast, and then up and through a single 5mm block fastened to another similar eyebolt, on the starboard side mastcap. From there it runs down the mast and is seized to the upper 3mm double block of a purchase, a similar lower double block being fastened to the deck at the foot of the mast, just outboard of the anchor cable. The line was rove between both blocks, coming off of the top one and belaying to one of the mast cleats on the starboard side. (My favoured method for fixing the lower blocks to the deck is to twist some thin wire around the score in the block, forming a ’tail’ which can then be carefully be painted black, and glued into a hole drilled in the deck. When positioning, the block should ideally be orientated in the direction of pull towards the pin.
The throat halliard was seized to the upper of two double 5mm blocks, secured to an eyebolt in the aft side of the mast just above the shrouds. It then runs down and through a sheave of the lower block and is then rove until all the sheaves are taken up, finally coming off of the top block. It then runs down inside the starboard shrouds and again is seized to the upper 3mm double block of a purchase, the lower block being fastened to the deck close to the 4th pin in the rail, to which the fall was belayed.
The peak halliard runs through four 5mm single blocks, two being fitted to eyebolts on the after side of the mast, with two being attached to the gaff. The end of the halliard was first seized to the upper block of the two on the mast, situated just below the doubling. From there it runs to the block at the peak of the gaff, threads up through it from below and then runs back again to the upper block on the mast, reeves down through that and then runs to the second block on the span at mid-point on the gaff. It threads down through that and then reeves through the lower mast block, from where it runs to the deck on the larboard side, and is seized to the upper 3mm double block of the purchase. Again the lower 3mm block is fastened to the deck near the rail as previously described, and the fall rove between them, coming off the top block. It is belayed to the fourth pin in the rail.
The final piece of running rigging fitted at this stage was the boom topping lift. This simply runs from an eyebolt fitted at the end of the boom and reeves through a 5mm single block, which is bent to a strop fitted around the after end of the lower mastcap. From the block it runs down to the deck on the starboard side, and again is bent to the upper 3mm block of the purchase. The lower block is positioned at the after end of the rail, and the fall is belayed to the last pin.
There are, of course, other lines to be rigged inside the shrouds and to the foot of the mast, but these will have to be done when the shrouds are in place. With that in mind the fitting of the ratlines will, thankfully, be left until as late as possible!
The shrouds went next over the masthead in pairs – or rather in this case, around the mast below the doubling – following the burton pendants. There are four per side. I used 1mm black, waxed, thread and they followed in the normal way: the first and second to starboard, first and second to larboard, third and fourth to starboard, third and fourth to larboard.
The shrouds, and the other items of rigging, were set up with the model raised to a more comfortable working position – on top of a small work box, with a cloth on top to secure it from slipping! The approximate amount of thread required for each pair of shrouds, including an additional length for turning in the deadeyes, was then centred round the mast. To pass the seizing, I temporarily fixed the shroud ends by employing a drill stand – which was of a similar height – positioned a short distance from the model. Once fastened to this, the now near-horizontal shrouds were given some slight tension (but obviously not enough to pull the model off the box!) by carefully moving the stand.
This then left my hands free to attend to the seizing, using black 0.25mm thread. The seizing was merely a series of overhand knots close against each other, and passed alternately above and below each pair of shrouds, until a suitable length was produced. The ends were then cut short and fastened with a small drop of glue. The finished eye was then bedded down on the mast stop, the shrouds being lined up with the lower deadeyes on the channels.
When turning in the upper deadeyes the same procedure was followed with all four shrouds, beginning with the first pair to starboard. First, the distance between the upper and lower deadeyes for each shroud had to be gauged, and to do this I used a short piece of stiff wire of the appropriate length, the ends of which were bent at right angles. These ends were then passed through the centre (ie the upper and lower) hole of each deadeye, the wire being thick enough to be ’push fitted’.
With the upper and lower deadeyes thus connected by the wire ’spacer’, the groove in the upper deadeye was then smeared with glue and the end of the shroud passed around it from the fore side. It was then crossed over its standing part at the top of the deadeye, and held with self-closing tweezers. Following some slight adjustment, in which the shroud was worked taught (but not too tight), the glue was then left to dry. The end was then backed up the shroud, cut off at an appropriate length, and glued to the standing part – on the fore side of each shroud to starboard, and the after side to larboard. The wire spacer was then removed from the deadeyes, in order to to reeve the lanyards.
The lanyards for each pair of shrouds were rove as each was finished, using O.25mm tan, waxed thread. I gauged the length of each lanyard as being six times the distance between the holes in both deadeyes, with an additional length for fastening off on the shroud. Beginning with the first pair of shrouds to starboard, the lanyards were all rigged in the traditional way – starting from the right hand hole in the upper deadeye, the lanyard being passed from inboard. (Naturally I couldn’t use the traditional wall knot, so a simple overhand knot had to suffice!) With all the holes in both deadeyes taken up, the lanyard comes inboard off of the left hand hole of the lower deadeye, and then runs to the shroud above the upper deadeye, where it is fastened. Before I did this however I rigged all the shroud lanyards, leaving them with long ends, in order to be able to make final adjustments. As each was done, the lanyard could be finished off, the end being passed through the gap between the shroud and the upper deadeye (I used a needle for this) and then hitched to the former. The end was then cut off close and given a touch of glue.
The final job was to pass three small seizings around the lower shrouds, one just above the deadeye, another at the end of the tail length, and one in between, for which I used 0.25mm tan thread. With that done the shrouds were finished.
Next time: the standing backstays. The next will also be the first instalment in ’real’ time, rather than in retrospect, since work on the model is now up to date. I also have a suspicion that the captain may also be coming aboard...
-
Padeen reacted to mtaylor in Licorne by mtaylor - 3/16" scale - POF - TERMINATED LOG
No pressure on this site, is there?
I'm going to bow to pressure, even though it's against my better judgement. I guess don't want Sjors to hit me up for piccy's.
Here she sits with various implements of destruction lying about... The black square is where the broken frame was. Still have a lot of sanding and some re-working of joints before I cut gunports and lay in the ebony wales.
The black X's, in case you're wondering, are for the frames I can remove after the chain wale goes on. A top rail fits in there. I'm thinking about removing those early just in case she decides to implode/explode/self-destruct when I start removing the build board down the road.
-
Padeen reacted to tlevine in HMS Atalanta 1775 by tlevine - FINISHED - 1:48 scale - from TFFM plans
The sixth beam set is relatively straight forward. The aft bulkhead for the boatswain's cabin was temporarily removed to make installation easier. The pillar is supposed to go through the hatch coaming. I cheated and it is simply glued to the surface of the coaming. There is a tenon on the superior aspect of the pillar with a mortise on the under surface of the beam.
-
Padeen reacted to michael mott in Bristol Pilot Cutter by michael mott - 1/8 scale - POF
Sherry, thanks for your kind words.
John, thanks yes I think I will get a round tuit.
I had to rearrange the workshop again today, I was bumping the build table every time I used the mill, and I was walking round it too much to do any other work. so basically I have just swapped the build and work tables positions and kept them lengthwise in the shop.
This arrangement will work better I think.
Today I thought for a change of pace I would try a cleat the model one is 1 inch long which equates to an 8 inch cleat in scale. I modeled it roughly on the one in the background.
Thinking about the complexity of the shape and realizing that the most complicated area to make is the underside I tackled it while it was still part of the 1 inch bar
First the lower sections were cut off with the jewelers saw,then the bottom sides were filed with a couple of needle files then the wings were tapered with a flat file and given a wire wheel treatment. which makes it look a bit like a casting.
Next the top curve was cut with the jewelers saw to remove the cleat from the stock.
Then a couple of .011" counter bores down .050 and then drilled through with a .067" drill some # 1 round headed wood screws were reworked on the lathe to make them a facsimile of a domed cheese head screw. and the cleat cleaned up with files and emery first 220 then 320 then 600 a final polishing with a bit of steel wool.
Mounted it on the deck, and cleated the tackle for the bob stay. then coiled the rope without any glue or other means, one of the beauties of working rigging.
Michael
-
Padeen reacted to Sjors in Le Mirage by Sjors - FINISHED - Corel - Wood - 1:75
Guys,
It is very easy !
Where the most replays are and the most pages is the Le Mirage !
But I can not blame you two.....age..... ( hide and seek )
For the change a few pictures.
The mizzen mast is finished what concern the rigging !
I don't know it anymore where all those ropes are going.
Backwards, forwards, down, above, under, up, seeing and not seeing,hiding and visible....
It's not perfect but I'm happy who it looks.
So Read Admiral and Lieutenant Commander....take a good look!
Or where glasses...and no sun glasses please !!!!
-
 Padeen got a reaction from SpencerC in Why not paint your ship?
Indeed, if one is looking for authenticity, a fully planked model should also be painted. Why don't we all do that ? Well, I guess for most of us it's just a matter of aesthetics: some find natural wood or stained wood looks better, others don't want their beautiful job of a planking to be hidden under a coat of paint, some are afraid to spoil the model with a poor painting job... For instance I did not paint the hull of my fisrt model beacause the contrast between the different woods pleased me (and the model was not based on any particular boat anyway) but I will paint the second one trying to respect the colour scheme of its period and country both for authenticity and for aestetic reasons (I don't like the look of walnut).
As for museum models, I think that many models were made as shipyard prototypes (like the Admiralty models with partially planked hulls and no masts) so they were left unpainted. Then maybe modelers thought that this was perfection and where inclined not to paint their models (a bit as we constructed buildings with white columns, taking inspiration from Greek and Roman temples, not knowing that they were painted at the time).
Just my two cents' but I think the main answer is "aesthetics".
-
Padeen reacted to vths in HMS Fly by vths - Victory Models - Scale 1:64 - Second wooden kit build
A small update that I'm putting here with sore index finger, too many treenails and just one side of the hull is done.
-
Padeen reacted to Jim Lad in Francis Pritt by Jim Lad - FINISHED - Scale 1:48 - Australian Mission Ship
Well, a little sawdust has actually been produced. The 'backbone' of the 'Pritt' is about halfway there. It looks a bit odd at the moment with only the after end done and no stem, but I forgot to take my stock of wider timber to the museum with me so I had nothing to use to cut the curved pieces for the forward end - next time.
Here's the keel, sternpost and skeg/after deadwood, anyway.
John
-
Padeen reacted to Dan Vadas in HMS Vulture 1776 by Dan Vadas - FINISHED - 1:48 scale - 16-gun Swan-class sloop from TFFM plans
Druxey, thanks for chiming in on Spyglass's query - I had no idea what he was talking about . Now I do (I think ) .
John - :D .
Forecastle and Quarterdeck Waterways
I've made and fitted the 12" wide Forecastle and Quarterdeck Waterways. These are the first steps in planking a deck (or two ). I used card templates to determine the outer shapes, then transferred those to the inner edges, and cut them all from sheet stock :
The same Scraper used for the previous decks' waterways was employed to shape these. There will be a little more work done to the ends of both later on :
I've also fitted the King Planks to both decks using a string down the centre line - the same method was used for the previous decks. The King Planks are 6.4mm (12") wide - a measurement and calculation for the remaining 13 deck strakes came up with the figure of 4.3mm maximum width for the Forecastle and 4.45mm for the Quarterdeck. Both decks have tapered planks, and also two Dropped planks each - more about these soon.
A closeup of the scarf joint in the quarterdeck waterway :
Danny
-
Padeen reacted to chris watton in Newsworthy updates from Chris Watton
Hiya!
Got back from Italy last night - never get used to the drive, it's so long!
They loved Victory, and I shall be left alone to complete the drawings and instructions for the model, which is good. After Victory, I have couple of different projects to start work on, as they have enough period ships in the pipeline for now. The frigate will have to wait a while longer..
Revenge is almost ready, this should be followed by the RC capable Scottish fishing boat. After this, I don't know.
Anyway, I took a couple of (bad) pictures of Victory next to Vanguard. It wasn't until I seen Vanguard again for the first time since starting Victory that I realised just how big it was - I always thought Vanguard was large, but is dwarfed by Victory! Oh yes - Victory now has her figurehead (exact scale - not as big as you see on other kits...) - and some flags...
-
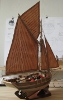
 Padeen got a reaction from GrandpaPhil in Le Camaret by Padeen - FINISHED - Constructo - WOOD - 1:35 (first model)
18/03/2012
Well, I've not opened a bottle yet: maybe when I will have a case done for Le Camaret... And as I don't have a clear idea on how to rig the legs yet, I leave that for when I have a chance to go back to the seacoast (Remark 2013: not done yet...) and I give you a few more shots of my now finished model:
---
(Remark 2013: more pics in the completed model gallery...)
24/02/2013
She does not have a case yet but she is now at my parents', having survived a three-hour train trip in an overcrowded wagon last Christmas with only one wound: a ring connecting the "upper gaff?" to the upper part of the mast broke. It was easily repaired with a new brass ring and she now stands proudly in my parents' bedroom waiting for me to come back and fetch her!
-
Padeen reacted to michael mott in Bristol Pilot Cutter by michael mott - 1/8 scale - POF
I had a go at a smaller block today out of Maple. it is the front one, the brass is .015" x .125" the pins are .031"
the shell length is .45" width .33" and thickness .25" which all translates to a block in scale just over 3 1/2 long x 2 inches thick good for scale 3/8 rope.
I think that most of the blocks will be bigger than this one but at least I know I can make them this small and still have them functional. most of the blocks will be as big as the rear one which is the same size as the apple one.
I'm really glad this is not a fully rigged ship of the line, or I would go bonkers.
Michael
-
Padeen reacted to Sjors in San Ildefonso by Sjors - FINISHED - OcCre - 1:70
It takes still a little bit more then 116 months before I'm retired, I can do something in the spare hours that I have left……
The mast are done.
Everything is dry fit, so I can put all the stuff that's need on to the mast.
And no, not the shrouds and ratlines after that.
There is also a bowsprit that I have to do.
When that is done, I can go to the fun part
-
Padeen reacted to wefalck in Treenail detail option?
Actually, on the real thing there were no treenails in the decks. What you see (or rather mostly not, except when really standing on a deck) are wooden plugs that cover the holes drilled for iron bolts (at least in later ships). The plugs do not show end-grain (as would treenails do) but were cut so that the grain runs in the same direction as the planks. The idea was to make them almost invisible for aesthetic reasons.
It seems to be a fashion among modellers to use treenails to show how much effort they put into a model. There is also some mechanical reason, as the treenail securely fastens the plank. Otherwise, I would ignore them on a true 'scale' model.
wefalck
-
Padeen reacted to Dan Vadas in HMS Vulture 1776 by Dan Vadas - FINISHED - 1:48 scale - 16-gun Swan-class sloop from TFFM plans
Thank you John and Raphael - in answer to your question I use "Birchwood-Casey Brass Black".
Capstan Step
The upper Capstan Step is made in similar fashion to it's lower counterpart. Three pieces of Boxwood were jointed together using rebates :
The step was then sanded down into a wedge shape to allow for the sheer of the quarterdeck. This is necessary to ensure the axis of both capstans align vertically :
The hole for the capstan shaft was also drilled, slightly oversize to allow for alignment. Blackened brass bolts were also added :
Two views of the fitted step and capstans. Some tidying work is still needed :
Danny
-
Padeen reacted to Jim Lad in Stag by Jim Lad - FINISHED - Scale 1:96 - English Revenue Cutter of 1827
Well, she's finished at last!
The last couple of details were finished at the museum yesterday. As you can see from the photographs, she still needs a proper stand and case - plus a bit of a clean off of odd dust particles before she's permanently cased - but she is complete at last.
I must say I'm quite pleased with the way she's turned out. I think I've got the spars fine enough to look realistic and make her look light and fast rather than just over sparred, but that's just my opinion.
The next model is currently in the planning stage and a new building log will appear shortly.
John
-
Padeen reacted to Ulises Victoria in Vasa by Ulises Victoria - FINISHED - Corel - Scale 1: 75 - Royal Ship
Okay okay... maybe just the first one.
And thanks for your words, Padeen!
-
Padeen reacted to Ulises Victoria in Vasa by Ulises Victoria - FINISHED - Corel - Scale 1: 75 - Royal Ship
Hello all. A small update just to show I have not been procrastinating
I finished placing all deadeyes in the shrouds, and I'm working on the stays at the moment. When they are done I will rig the lanyards and lastly the dreaded ratlines. Next: Running rigging. Again: Sorry for bad photos.
-
Padeen reacted to Dan Vadas in HMS Vulture 1776 by Dan Vadas - FINISHED - 1:48 scale - 16-gun Swan-class sloop from TFFM plans
Thanks Popeye, John, Kevin, Grant, Aldo and Tony.
Not as hard as it looks John and Popeye - the strakes could be inserted from each end (they meet behind a bulkhead ).
Been like that almost since "Day 1" Grant . But I'm not complaining .
I've finished and fitted all the port side hanging knees. A few need their tops sanded slightly to match the tops of the beams. Most of them will be almost invisible when the deck planking goes on, but I'm not sure which ones can be caught a glimpse of so I detailed them all. The three in the middle of the pic will DEFINITELY be invisible, but hey ..... we all know they're in there :
A view through the port side stern light. The glue is still wet on the last one I fitted :
From the waist :
And through a starboard gunport :
Danny
-
Padeen reacted to vths in HMS Fly by vths - Victory Models - Scale 1:64 - Second wooden kit build
Thanks guys, you make me go further, so here's the almost finished boat. The bow is yet to be finished, as well as the oars, rudder, hook, etc. But these tiny thingies can wait, so now I can get back to the build.