


captainbob
-
Posts
3,498 -
Joined
-
Last visited
Reputation Activity
-
 captainbob reacted to Bedford in Maine three-masted schooner by Bedford - 1:54 - RADIO
Yeah I must admit, I came home today, drove into the garage and there she was on the bench and I thought WOW that looks good! The epoxy has given it a warmer tone and it is beautiful. My son saw it today and said the same as Hipexec but he then saw the pencil marks preserved for all time under the epoxy, there is filler there too that you can't really see in the pics as well as traces of glue. I had always intended to paint it so I didn't worry about keeping it "clean" so it has to be painted. I never paint my static ships because I love the timberwork but this is different.
She has reached a milestone..........
Today she went down the slipway.
This is empty, you may be able to see a small black mark on the stern post, this is the sailing water line, she has a lot of ballast to take on yet.
After carefully putting rocks into her I finally got her to that line, one rock missed the boat, as it were!
Not a drop of water got in, not even through the shaft seals, I did add a smeare of vaseline (petroleum jelly) to them.
It was a very strange feeling, putting on of my tallships into the bath tub. It felt wrong to be honest. But I am so happy with it.
The placement of the rocks to get her to float level along her length confirmed what I thought, the centre of gravity is forward of centre so this will be considered when attaching the fin keel. I did put a mast in at one point and try and pull her over but she resisted quite well, makes me wonder if my original idea of just extending the keel along her length by adding mild steel plate would work, I may have to find a way to test this concept.
On another note I have been wondering how much weight she would be able to carry and have been guessing about 6kg all up, I weighed all the rocks when I pulled them out of the hull and she will weigh 5.7Kg all up and could easily run to 6Kg if I had to. I am now confident that I will be able to put plenty of ballast below the hull to keep her upright because at present I have 4.25 Kg to play with.
-
 captainbob got a reaction from canoe21 in Lettie G Howard by captainbob - FINISHED - 1:48 - POB - schooner
What a great time of the year, not only the holidays, but all the college football games. I’m not going to get much done on this build for the next three weeks. I did manage however to clean up the bulkheads and dry fit them, that’s when I found out #14 (third from end) was bad. You can see in the first picture #14 is not big enough. So it was back to the drawing board, so to speak, I use DraftSight, and I did find the error. Picture two shows both #14 bulkheads and then how the new part lines up.
And with that I’ll say Merry Christmas to all, with wishes for a great 2014.
Bob
-
 captainbob got a reaction from avsjerome2003 in Lettie G Howard by captainbob - FINISHED - 1:48 - POB - schooner
What a great time of the year, not only the holidays, but all the college football games. I’m not going to get much done on this build for the next three weeks. I did manage however to clean up the bulkheads and dry fit them, that’s when I found out #14 (third from end) was bad. You can see in the first picture #14 is not big enough. So it was back to the drawing board, so to speak, I use DraftSight, and I did find the error. Picture two shows both #14 bulkheads and then how the new part lines up.
And with that I’ll say Merry Christmas to all, with wishes for a great 2014.
Bob
-
 captainbob got a reaction from yvesvidal in Lettie G Howard by captainbob - FINISHED - 1:48 - POB - schooner
What a great time of the year, not only the holidays, but all the college football games. I’m not going to get much done on this build for the next three weeks. I did manage however to clean up the bulkheads and dry fit them, that’s when I found out #14 (third from end) was bad. You can see in the first picture #14 is not big enough. So it was back to the drawing board, so to speak, I use DraftSight, and I did find the error. Picture two shows both #14 bulkheads and then how the new part lines up.
And with that I’ll say Merry Christmas to all, with wishes for a great 2014.
Bob
-
 captainbob got a reaction from CaptCraig in Lettie G Howard by captainbob - FINISHED - 1:48 - POB - schooner
What a great time of the year, not only the holidays, but all the college football games. I’m not going to get much done on this build for the next three weeks. I did manage however to clean up the bulkheads and dry fit them, that’s when I found out #14 (third from end) was bad. You can see in the first picture #14 is not big enough. So it was back to the drawing board, so to speak, I use DraftSight, and I did find the error. Picture two shows both #14 bulkheads and then how the new part lines up.
And with that I’ll say Merry Christmas to all, with wishes for a great 2014.
Bob
-
captainbob reacted to mtaylor in Licorne by mtaylor - 3/16" scale - POF - TERMINATED LOG
I just realized it's been quite a long time since this has been updated. So here goes....
Gunports have cut out, final shaped and the cracks between planks filled and sanded. The whole thing has been sanded with 600 grit. I've cut the wales, shaped the bends and will, I hope, get them on by end of this weekend. I'm testing some JB Weld "Wood Weld" epoxy to see how it holds. As a backup, I have regular epoxy just in case.
I also found a source locally for MinWax Wipe On Poly which I'll use for a finish instead of the varnish I was planning on using.
Here's the pics.. an overall shot and close up just for kicks and grins. (Click the pics to enlarge).
If I don't get a chance to update this before then, here's wishing everyone a wonderful holiday no matter what you celebrate. We'll be doing a quiet, low-key Christmas. Just the three of us... and a fire in the fireplace.
-
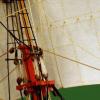
captainbob reacted to trippwj in Harriet Lane by trippwj - Model Shipways - 1:144 Scale
So - progress continues (SLOWLY!!!). Too much time on the road this month, but home now through mid-January (with any luck, at least...)
Moving along with the rigging - one backstay left to install on the main mast and then start belaying all these lines.
The doublings get rather busy at this scale!
Not the best shot, but gives you an idea of the number of lines involved even at this small scale!
Once I get the lines all belayed will start on the ratlines - using fine embroidery thread to try and stay in scale. WIll be putting them on about 3/32" apart. I may go blind in the process......
-
captainbob reacted to Bedford in Maine three-masted schooner by Bedford - 1:54 - RADIO
I last used fibre glass and epoxy resin in my late teans, so long ago, I am finding that with a more thoughtful approach and the right stuff it isn't that bad to work with. Climactic considerations aside.
The micro sphere filler is working beautifully and having isopropyl alcohol and acetone at hand means not much mess. Very cheap paint brushes help too, I clean them by binning them and reaching for a new one.
Here you can see how the mixture with micro spheres is filling the gaps nicely, I am using it at about the consistency of honey.
The forward ribs need more filler in the aft part of the joint to the planks. There is a very good reason I did not "fair" the entire width of the rib and that is because the line drawing I got the shapes from shows the profile of the hull at that precise point at 90 degrees from the keel. Given that the ribs are 10mm thick if I had faired the entire face of the rib I would have effectively moved the profile astern by 5mm so I only faired the forward half up front and the rearward half astern.
My next epoxy mix will be one of simmilar consistency with which I will go over the glassed area on the exterior to reseal what I have sanded and fill the glass sheet better to allow sanding back to a smooth finish. The micro spheres are supposed to sand well. Then once I have coated those two patches of cloth I will add more micro spheres to really thicken the mix and prop the hull up on its bow so I can fill the gaps on the rear faces of the forward ribs.
-
captainbob reacted to pete48 in Muscongus Bay Lobster Smack by pete48 - FINISHED - Midwest Products - SMALL
Thank you Popeye Shawn and Micheal, after the kit I pretty much went to the otherside , after the hull and deck were done on the kit, the rest of the parts from the kit is still in the box ( thats when I went to the other side) I forgot to pack a lunch, anyone got any spinach ?
-
captainbob reacted to shawn32671 in Fantail Launch II by shawn32671 - FINISHED - Midwest Products - SMALL
I forgot to include pictures with the tiller and rudder control horn installed and ready to add the R/C. Now it looks completed. Adding a link after the pictures to part 5 (Final update) YouTube picture show video of the build.
Final build log picture show video of the Fantail Launch II: https://www.youtube.com/watch?v=K9ptZPkz0s4
-
captainbob reacted to michael mott in Bristol Pilot Cutter by michael mott - 1/8 scale - POF
Thanks John and Bob for stopping by.
This evening I replaced the fife rail with a slightly longer one with shaped ends it is hard maple.
The first rail
And the new one
The new one has a greater scope for operation.
I have also begun shaping the forward hatch, it will have a pair of lights that will hinge up.
Michael
-
captainbob reacted to michael mott in Muscongus Bay Lobster Smack by pete48 - FINISHED - Midwest Products - SMALL
Pete I can see that you are slowly being drawn to the dark side. with these builds.
Michael
-
captainbob reacted to popeye the sailor in Muscongus Bay Lobster Smack by pete48 - FINISHED - Midwest Products - SMALL
aye Michael.............the gray area has been breached! I do hope he remembered to bring a lunch!
-
 captainbob got a reaction from themadchemist in Fantail Launch II by shawn32671 - FINISHED - Midwest Products - SMALL
I always did my first test in the bath tub. I didn't have to go anywhere.
Bob
-
 captainbob got a reaction from popeye the sailor in Lettie G Howard by captainbob - FINISHED - 1:48 - POB - schooner
Steve, I've never signed my boats, but maybe I should start.
Bob
-
captainbob got a reaction from popeye the sailor in Bristol Pilot Cutter by michael mott - 1/8 scale - POF
Fine work, Michael. And it's about time you got around to making the foreman a chair.
Bob
-
 captainbob got a reaction from pete48 in Lettie G Howard by captainbob - FINISHED - 1:48 - POB - schooner
Keith, I was going to answer but John and Frankie beat me to it. Thanks friends.
Tom, I bought 1/8” plywood for the profile and bulkheads. As for the larger slots, yes they are the masts and the foremost is for the Sampson post which would not have to go below decks on a model but I put the slot in anyway. The rake of the masts is shown on the inner profile drawings.
Popeye, Michael & Augie thanks for the well wishes. And yes, Popeye I have copies of the bulkhead drawings I made.
Bob
-
 captainbob got a reaction from EqPierre in Lettie G Howard by captainbob - FINISHED - 1:48 - POB - schooner
Finally! I made sawdust today. I cut the parts out on the skill saw now I need to go back and sand to the line, but it feels good to get started. I should mark the date somewhere, like in the records of ships where you see, “KEEL LAID ON:” Dec 18, 2013.
I decided to go POB for this boat. You can see my CAD drawing on letter size paper in the picture. The box with the 2” inside gives me the size to enlarge to. If anyone wants a copy let me know.
Bob
-
captainbob got a reaction from pete48 in Fantail Launch II by shawn32671 - FINISHED - Midwest Products - SMALL
I always did my first test in the bath tub. I didn't have to go anywhere.
Bob
-
 captainbob got a reaction from molasses in OGALLALA by molasses - FINISHED - 1/96 scale - BOTTLE - Prairie Schooner
Wow. I'd be pleased with all of it not just the deck planking. Good work.
Bob
-
captainbob got a reaction from canoe21 in Lettie G Howard by captainbob - FINISHED - 1:48 - POB - schooner
Finally! I made sawdust today. I cut the parts out on the skill saw now I need to go back and sand to the line, but it feels good to get started. I should mark the date somewhere, like in the records of ships where you see, “KEEL LAID ON:” Dec 18, 2013.
I decided to go POB for this boat. You can see my CAD drawing on letter size paper in the picture. The box with the 2” inside gives me the size to enlarge to. If anyone wants a copy let me know.
Bob
-
 captainbob got a reaction from shawn32671 in Fantail Launch II by shawn32671 - FINISHED - Midwest Products - SMALL
I always did my first test in the bath tub. I didn't have to go anywhere.
Bob
-
captainbob reacted to Rustyj in Bomb Vessel Granado by Rustyj - FINISHED - 1:24 - cross-section
Thanks Tim.
Hi Chris. I’ve played with it a bit. It is as thin as water. The best way I found to do it on
something this large is to use a cut up cotton tee shirt. Using rubber gloves of course I
dipped the tee shirt in the dye squeezed the excess out and then rubbed it in. At the ends
I did tape it off and used a small brush to better control it. I’m very happy with the way
it came out. After it dried I also installed three rows of planking below the wales. That
is the extent of hull planking I will do.
-
captainbob reacted to Elia in Arethusa 1907 by Elia - Knockabout Banks Fishing Schooner
Shipwrights - a little progress on my dearest Arethusa. Third time is a charm, at least for me and the yellow cove. I redid one last section of it on the starboard bow, eliminating the last offensive (to me) waver. Done. Yipee! I have added the ship's name and hail port in the appropriate locations, using Woodland Scenic Dry Transfer letters, and have repainted much of the upper hull black. I have completed the checker board guide installations, the boom buffer, the cleats, the chocks, and the stanchion located ringbolts. I have also installed guide pins for the deck furniture to ensure proper placement and to ensure better retention of the components. It is surprising how much time all of those little elements time.
Though not show here in photos I have completed 16 of the 20 double wire strops for the deadeyes, have stained the deadeyes (Minwax Ebony stain), and have fabricated/soldered much of the catheads. I hope to show all of these elements assembled in the not too distant future.
Cheers,
Elia
-
captainbob reacted to Bedford in Maine three-masted schooner by Bedford - 1:54 - RADIO
I needed to get some 1.5 x 1.5 timbers but didn't want to order them and wait so I worked out a way to cut them without too much fuss. I won't call them "whales" but I have forgotten what they are called, you will see them in the following pics.
The hull planks are 1.5mm thick so I glued two down on my cutting board with a third jammed between them on edge.
Once the glue had dried I just had to hold the plank between the two that were glued down and run a blade along one of them to cut into the stock piece. Three runs with the blade then move the plank along and repeat until the whole plank is partially cut through. Then lay it flat and just gently finish the cut freehand which is easy because there is now a good deep guiding groove.
Finally onto the epoxy, why is it that every time you do something like this bugs appear out of nowhere and land on it ?
I am using the "West Systems" epoxy as recommended and the mob I got it from have mixing cups for it that are marked with the part A level and then you top it up to the part B level. There are different scales for different ratios and there are 10%, 20% and 30% markes for adding additives like acetone for thinning. They only cost a couple of dollars so I got two, they are brilliant!