


spill50
-
Posts
30 -
Joined
-
Last visited
Content Type
Profiles
Forums
Gallery
Events
Posts posted by spill50
-
-
-
@Patrick Matthews I like it, if it does the job for 20+ years, then it must be doing something right. I do like the idea of the magnetic sheets. If I didn't have a 3D printer mine would probably look something like yours
")
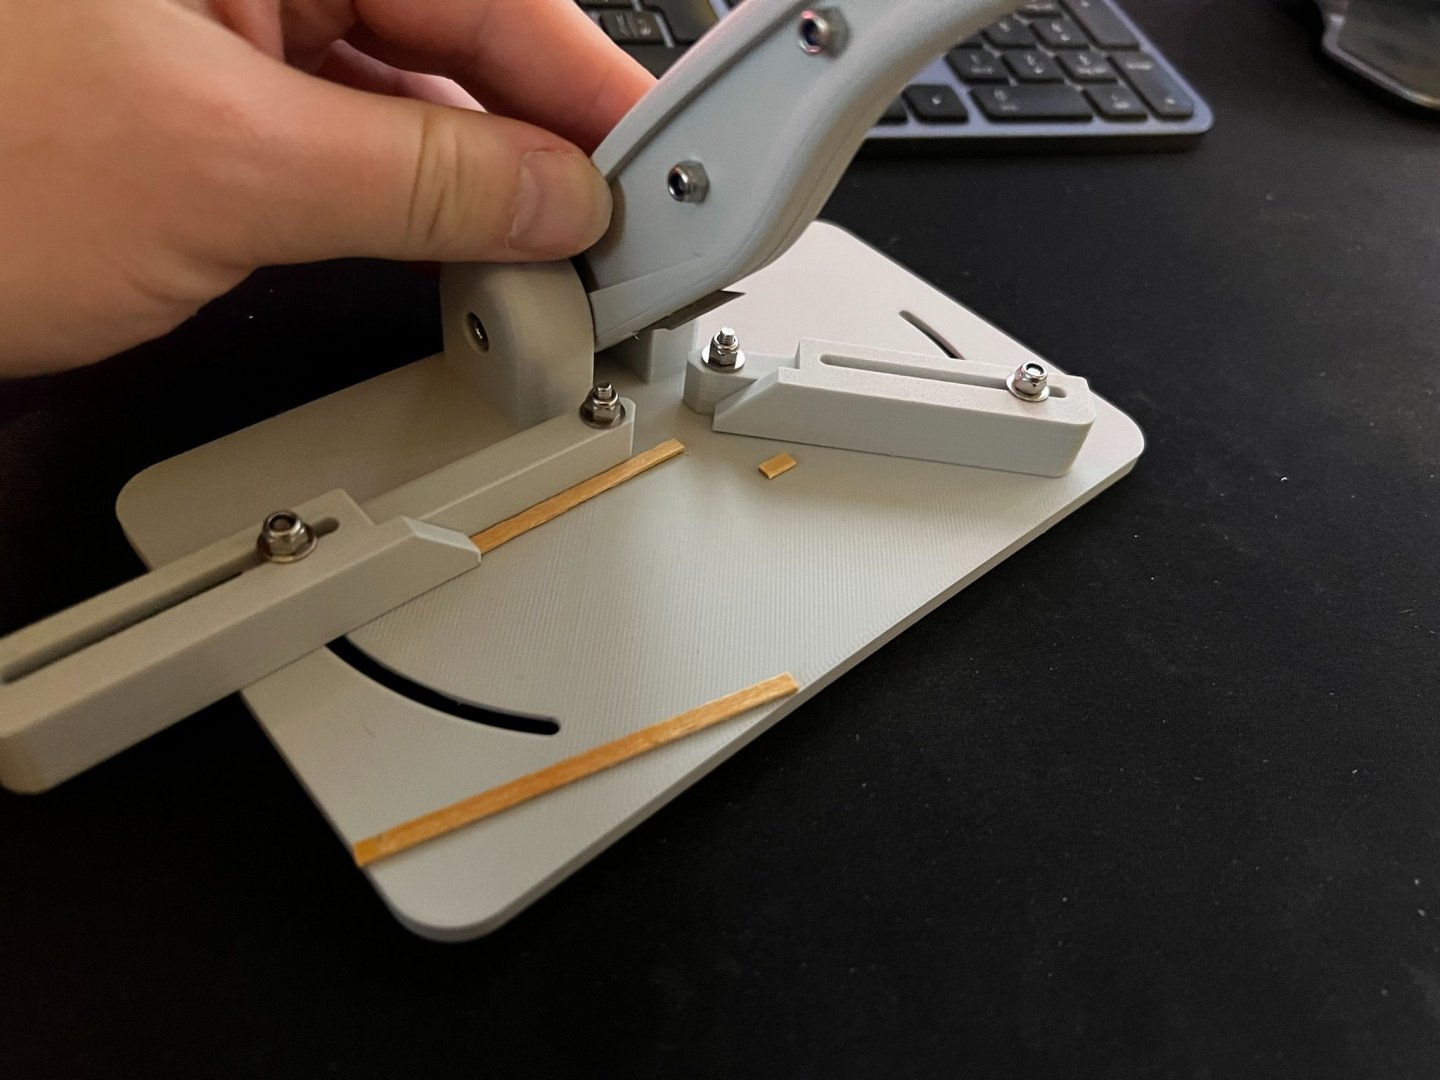
Yeah the blades I will change to the square single edged ones, the scalpel blades are just what I had to hand but it will be a pain to change. The plastic is quite hard and not even scratched yet but we'll see how it holds up after a few 100 cuts
and the fence only goes out to 55mm so that needs tweaking for longer repeat cuts. Great thing about 3D printing is I can just print a fence with different geometry in a few minutes.
I'll post V2 when it's done.
-
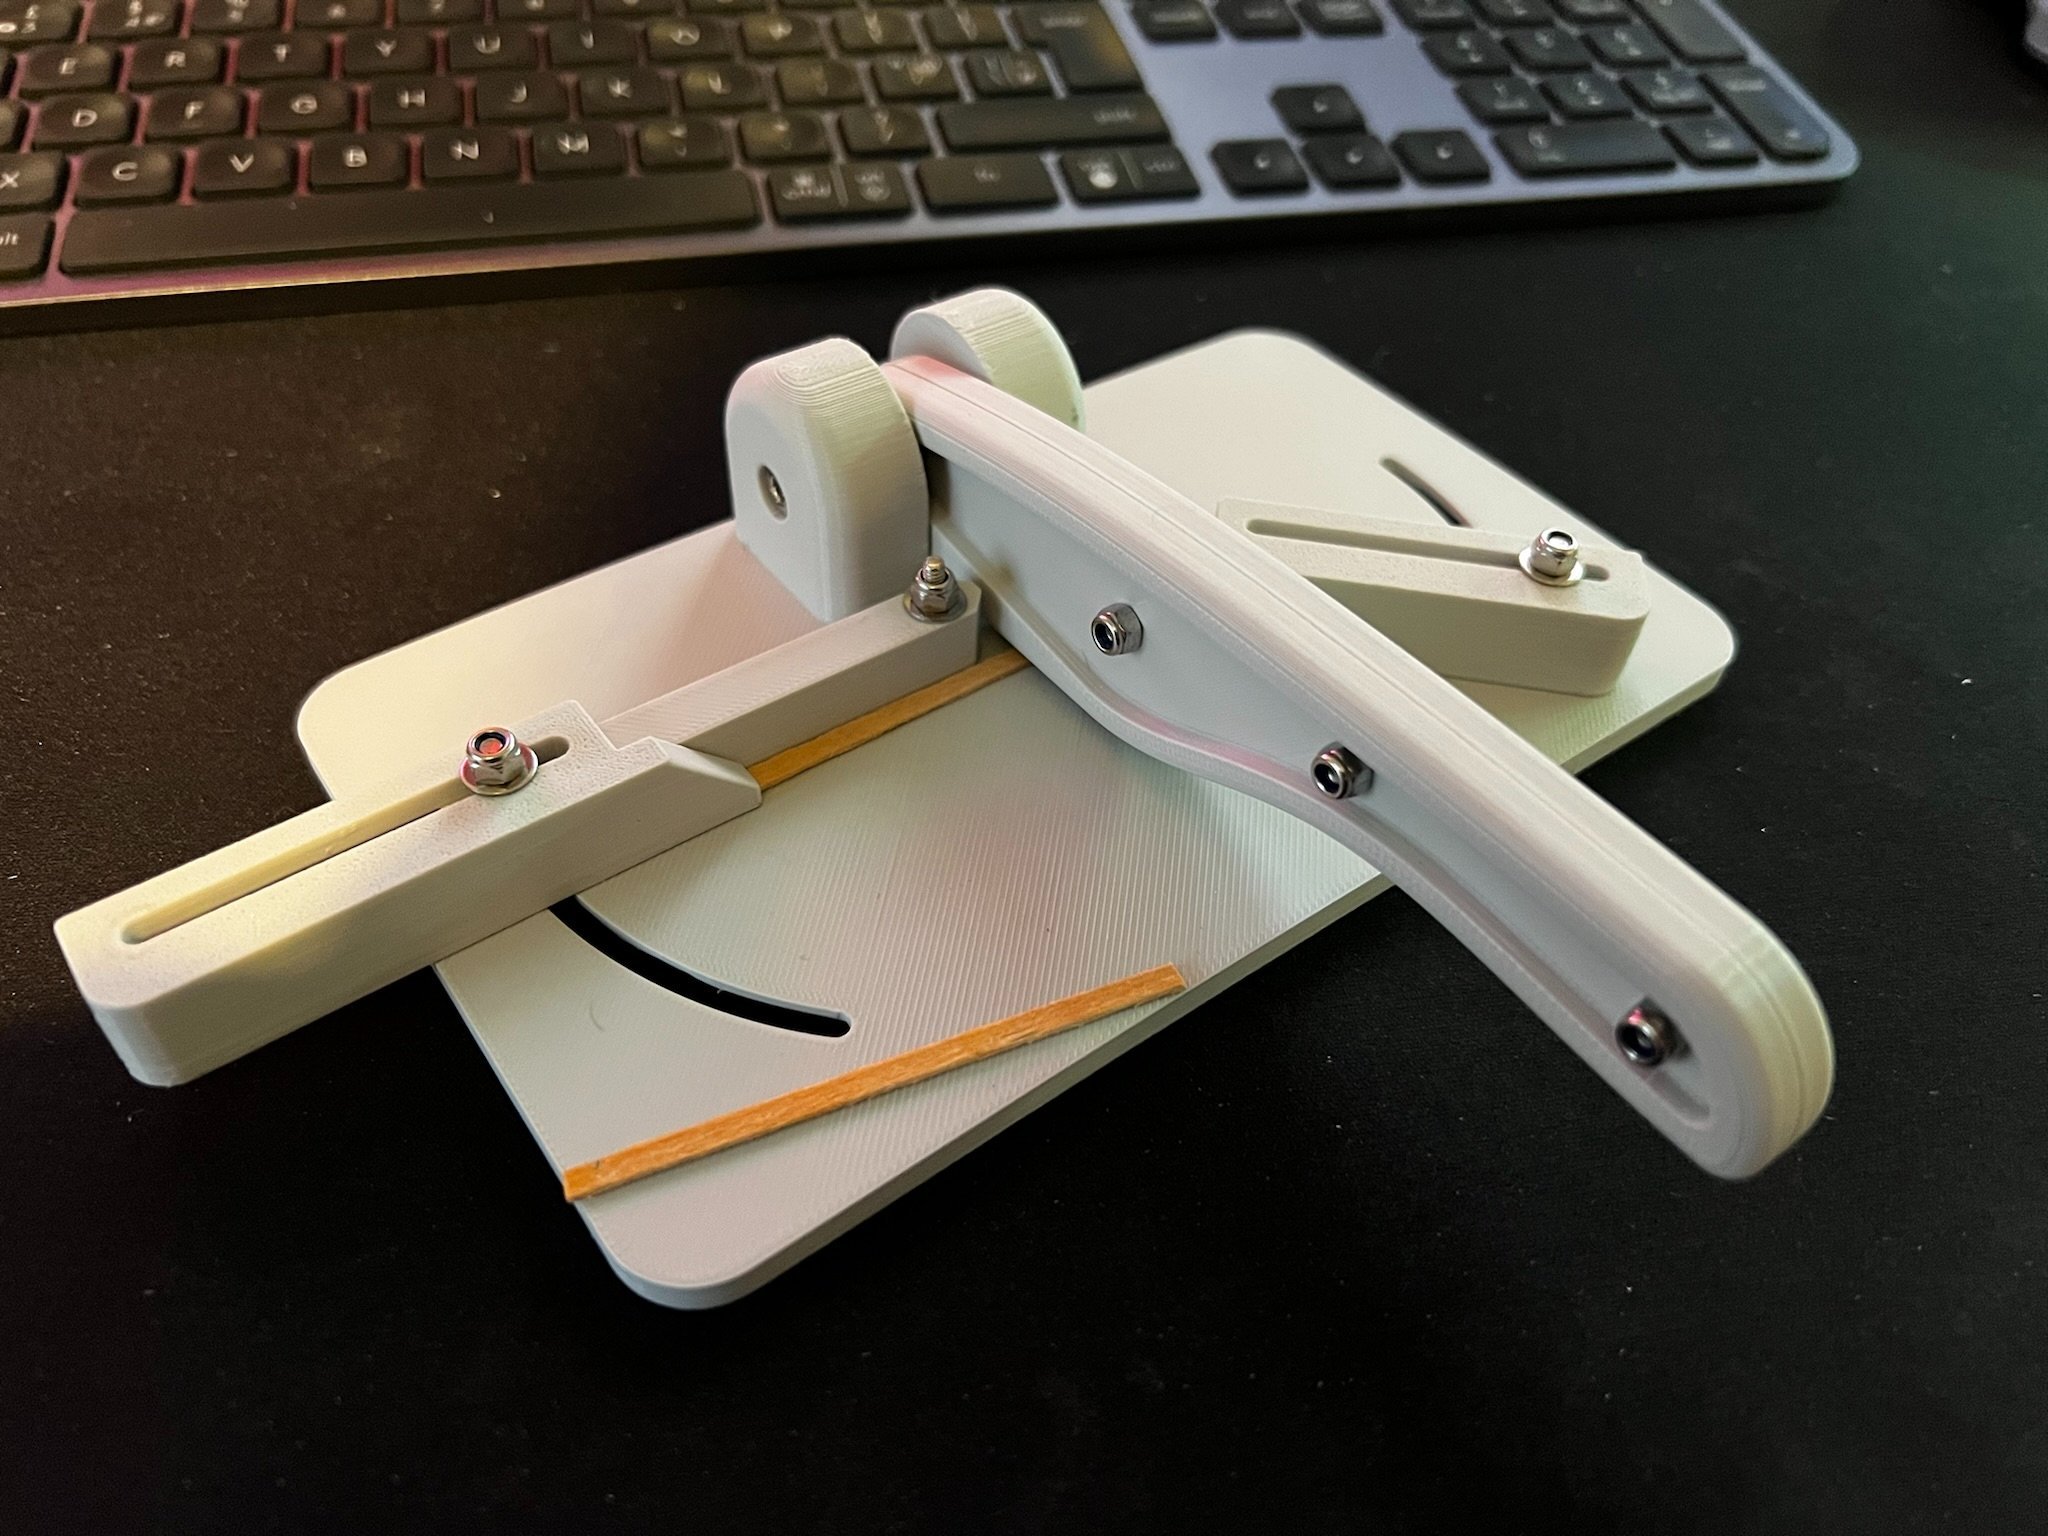
Not been around for a while but I recently bought a new ship kit to keep me occupied over Christmas (no doubt a lot longer than that). I need a plank cutter for making multiple repeat 90 degree cuts. Yes I know I could have bought one, but I figured I would make use of my other hobby and 3D print one and thought people here might like to see it.
It takes a Swann Morton scalpel blade and lets me do any angle between 45 and 90 with adjustable/removeable fences to make repeat cuts.
This is the first version and already thinking about changes to improve it. Probably change it to use standard double edged razor blades among other things.

-
-
Thanks Mark,
Yes, I do have a large drill press it's pretty old and I got it second hand so not sure it is accurate enough to drill a 0.8mm hole without breaking the bit. I've only used it for woodwork.
I guess I will only find out if I try it
Thanks for the advice though, I think the small dent will be the key to stop the bit wandering.
-
Hi all,
It's been a while but I'm finally returning to my first build the Thermopylae. I'm just at the point where I'm building all the items for the deck and it requires some pretty intricate work.
I need to drill 0.8mm and 1mm holes in 2mm brass rod for the davits. Does anyone have any advice on the best/easiest way of doing this?
I don't have a metalworking lathe or mill so I'm looking for a "low tech" way of doing it.
Thanks,
Richard
-
Hi, yes it's been quite 'interesting' but I have thoroughly enjoyed it so far and I'm really pleased with the standard I have achieved on yes, my first wood build.

I have arrived at a couple of tricky bits and my first attempt at bending the strip that runs around the stern was not too successful. Trying to find a way of doing the quite tight bend with a diameter of about 6cm.
I'm hoping to get some more build time on this over the summer. I have taken on a significant role in a new startup so time has been a but short over the past year
I purchased this book when I first got the kit to do some research https://www.amazon.co.uk/Tea-Clippers-History-Development-1833-75/dp/0851772560 which has a section on the Thermopylae, it was a great read.
-
Sorry to hear you can't see the photos. I have them hosted via my Google Drive. I'd be happy to upload them to flickr if you like. Or send you a link to download them all.
-
I got it from Cornwall Model Boats http://www.cornwallmodelboats.co.uk/acatalog/mantua_thermopylae.html
I've ordered several times from them and always received a great service.
-
-
Hi ricklabz,
Yes it did, I got the 2 large double sided plans and some A4 sheets stapled together with English instructions. I haven't done much on it lately as I've had lots of work on but since my last update I have built the 2 cabins and finished the hand rails.
Richard
-
-
Hi Spencer, no not yet. I've started shaping the handrails but not had much time to work on it this week.
Richard
-
wow your launch just looks fantastic. Gonna go check out your Syren now.
Good stuff!
-
and the rest.
Handrail channels, 1 down 5 to go.
and the other 5.
Here are the 2 crew heads shaped to follow the contour of the insides of the bulwarks and to sit slightly on top of the handrails when fitted.
That's it for now folks. next I'll be doing the handrails which means I have to do some more tricky lateral bending, this time with some Beech 2x3mm.
Richard
- popeye the sailor, Aussie048, 3qq and 1 other
-
 4
4
-
Hi everyone,
Well I've been hard at work this weekend and have some updates for you.To begin with a spot of lateral bending some 2x3mm Walnut. The 2 bits for the bow were pretty easy to do but the tight curve of the stern proved to be a bit of a pain. this is the first time I've had to soak timber to bend it and I basically messed up big time on the first attempt. However the second attempt (shown below) I'm actually pretty happy with.
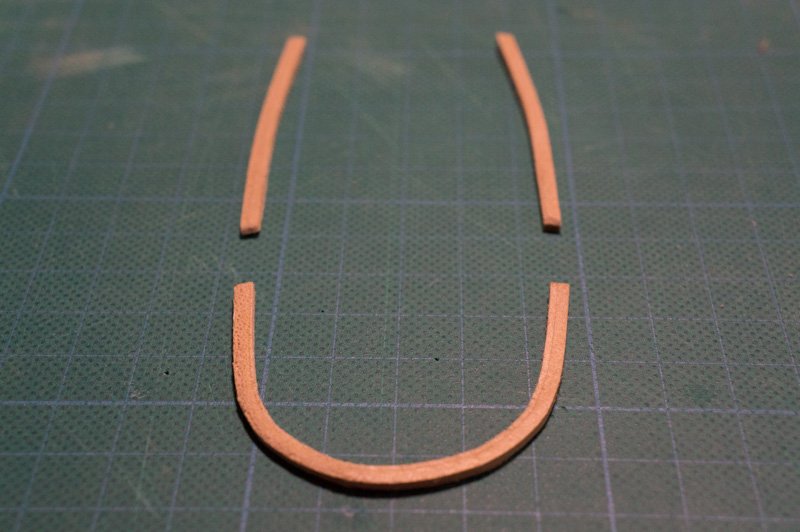
Clamped while drying.
and Gluing it all in place when dry.

I'll add a couple of photos of the other bits I worked on tonight, need to go back to work

-
Hi all,
Thanks for all your comments everyone. Well as promised I have lots more photos. Enjoy!
Here are the deadeyes and single blocks that came with the kit. Mantua do versions of each, 1mm smaller but they don't seem to do chainplates and strops for that size deadeye.

Here's the rigging line they supplied. I think there is 0.25mm, 0.5mm and 1.25mm. The 1.25mm does seem a bit thick.


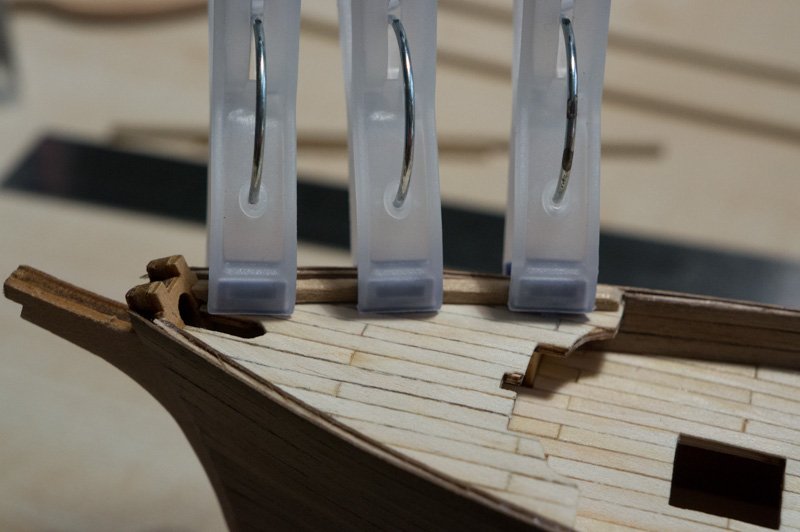
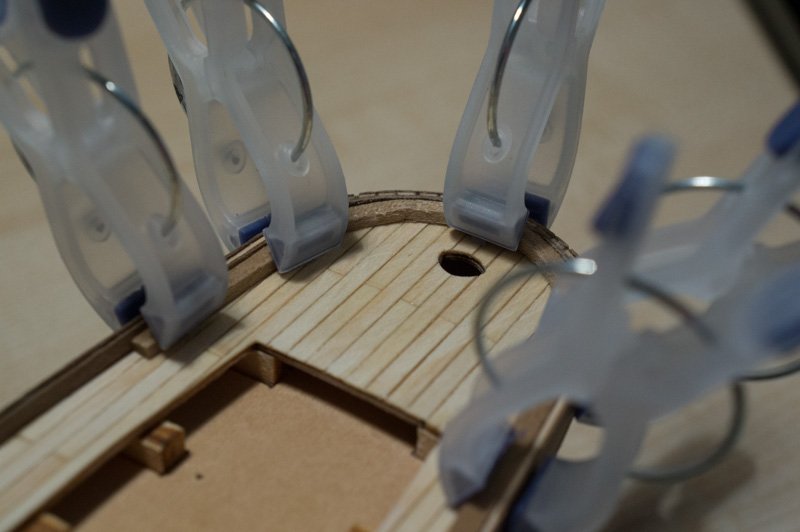
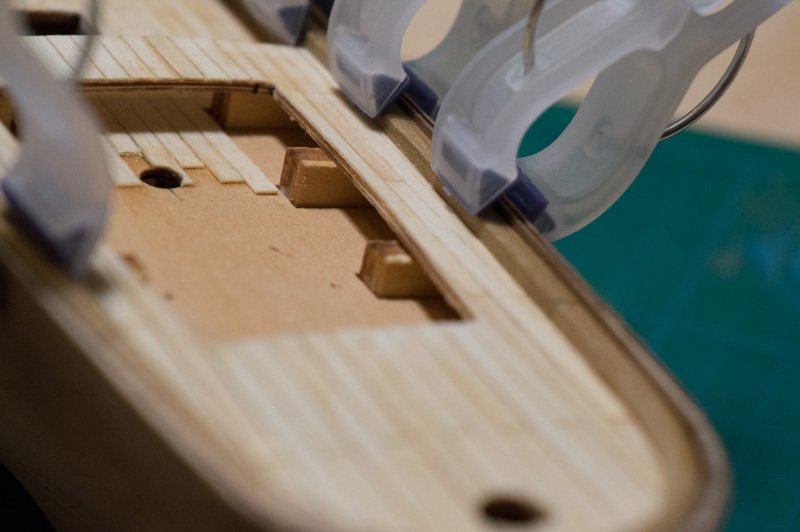
These were taken while applying the second layer of planking 0.5mm x 3mm Walnut on the hull and inner parapets.


And these are of the completed planking.


Richard
- tasmanian, popeye the sailor and 3qq
-
3
-
Hi all,
Yeah I've been hard at work on the second layer of hull planking. I've finished planking the inner bulwarks and finished one side of the hull and half way through the other side. Hoping to either have it complete tonight or tomorrow night. I've ordered some varnish and paint so hopefully it will arrive in a couple of days.
One thing I not 100% on is the colour to paint the hull above the water line. The instructions say dark brown, but the photo on the box looks dark green and all the reference pictures I can find seem to be green. I'll probably go with a dark green, but any thoughts are welcome.
Steve - Thanks for your comments and the book list, very helpful. I actually picked up "The Tea Clippers - Their History and Development 1833-1875" by David R MacGregor a couple of weeks ago. A really good book. I'd like to pick up a book on rigging before I get to that stage, I think it would be helpful. I've seen photos of some pages from Masting & Rigging the Clipper Ship, It looks like an amazing book and I've found it for around £30 online.
Anyway more photos shortly, I promise.
Richard
-
-
Hi all,
Well it's been a while but I've finally had a spare evening and as promised I have a few new photos to share, nothing too exciting. I've finished planking the deck. I've left the bit under the aft deck as this will be completely hidden. I'll be starting on the second layer of hull planking next.


Richard -
Hi Spencer,
Funny you should ask, tonight I actually have some free time to work on it. I'll post some pics later tonight.
Richard
-
Thanks Nils,
Yeah I'm enjoying it. Unfortunately I've not had much spare time since my last update but I have now finished the planking on the main deck. So I'll post a photo when I get home tomorrow.
Richard
-
Do you think about planking deck with veneer instead drawing lines ?
No I hadn't thought of using veneer. With it being my first wood kit I'm trying to stick to how things are done in the instructions.
Thanks,
Richard
-
Thanks guys,
ZyXuz - This sounds like a good method, I'll have to try it on my next build.
Brian C - Yeah, I don't mind this scale but it would have been nice.
Richard


3D Printed Plank Cutter
in Modeling tools and Workshop Equipment
Posted
@max142 I've made some adjustments and printing a new version of it this evening. Once I've dialled in the design and worked out the quirks, I'll share the files.