HOLIDAY DONATION DRIVE - SUPPORT MSW - DO YOUR PART TO KEEP THIS GREAT FORUM GOING! (Only 13 donations so far - C'mon guys!)
×


Pete Jaquith
-
Posts
343 -
Joined
-
Last visited
Content Type
Profiles
Forums
Gallery
Events
Everything posted by Pete Jaquith
-
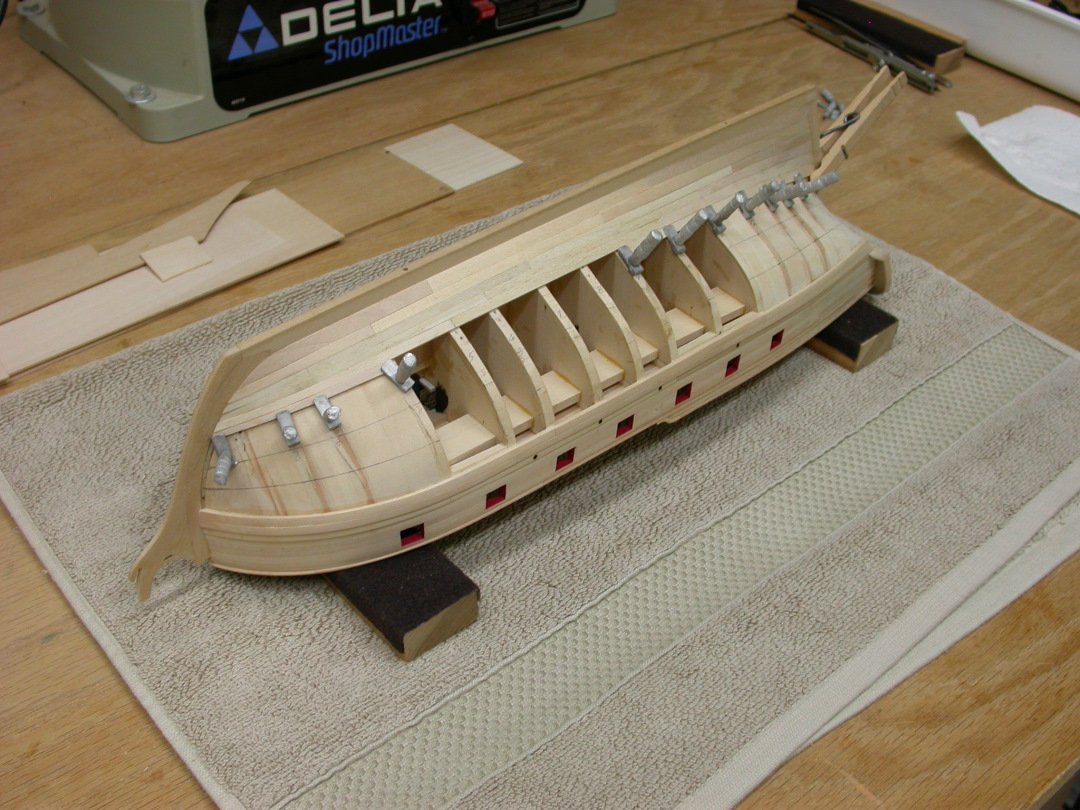
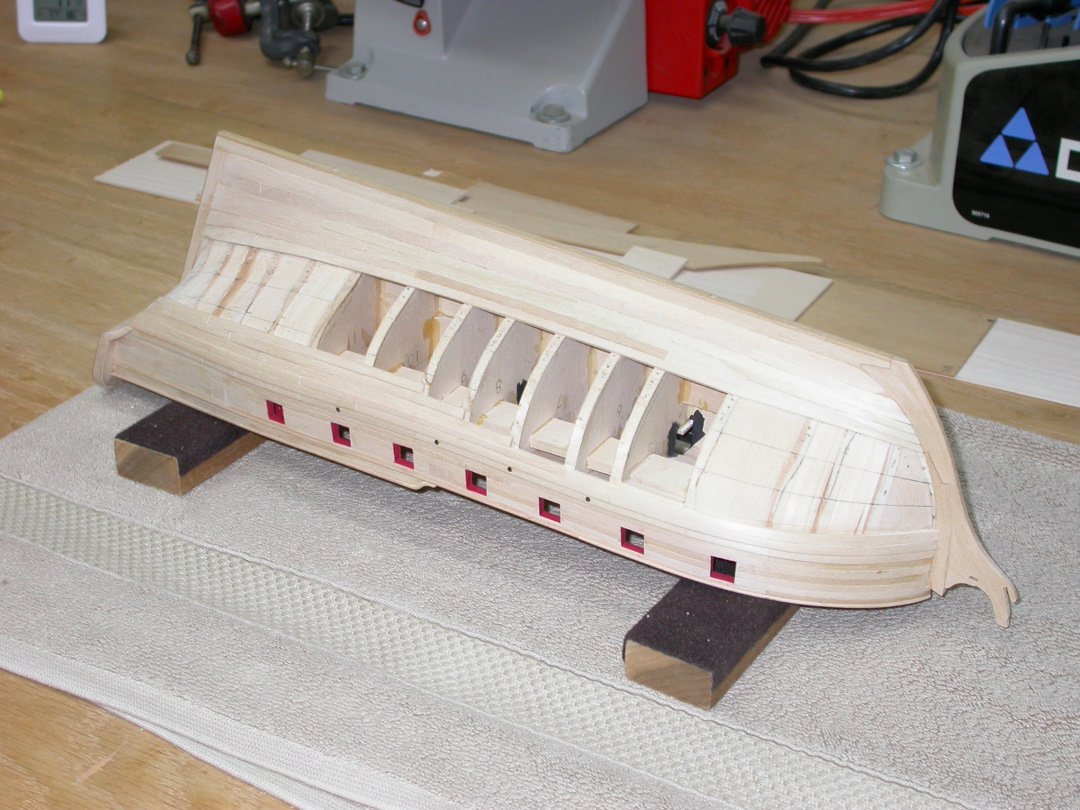
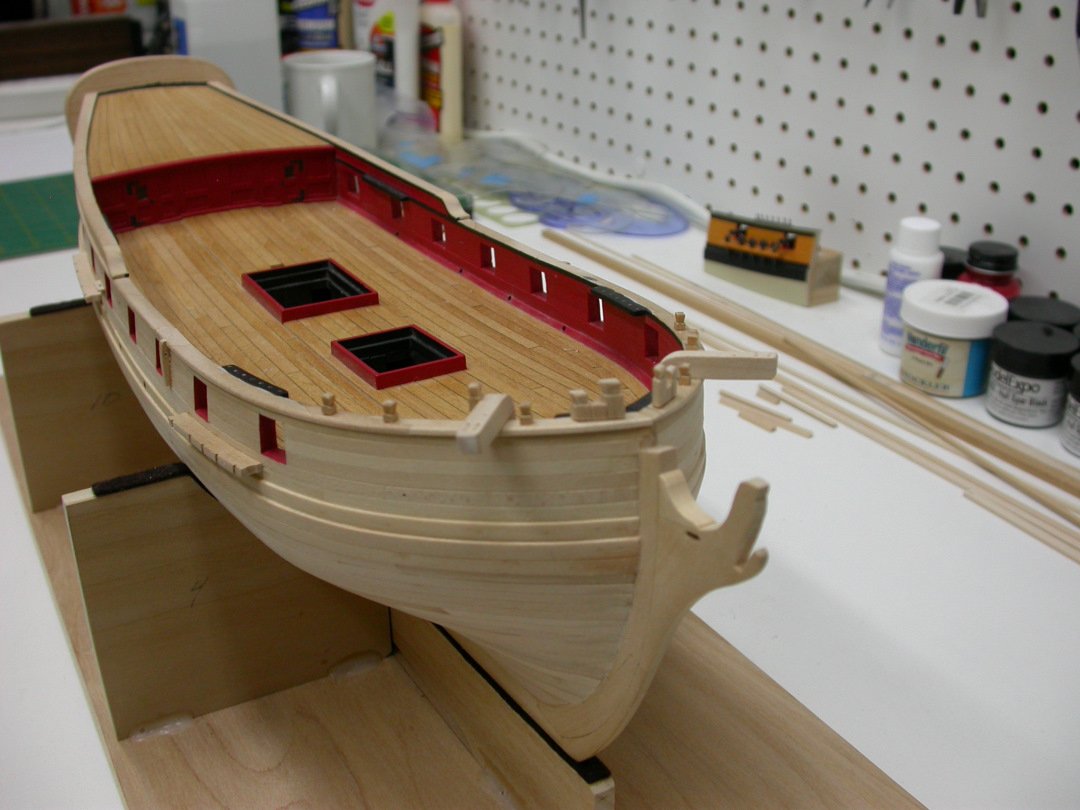
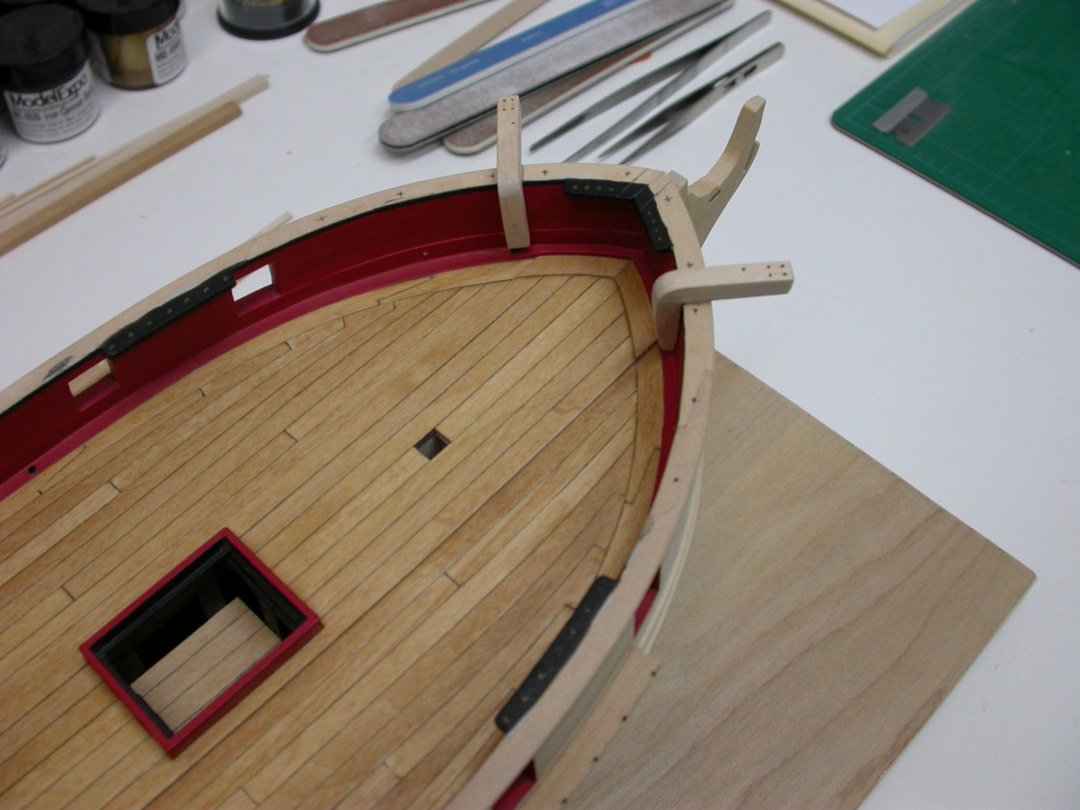
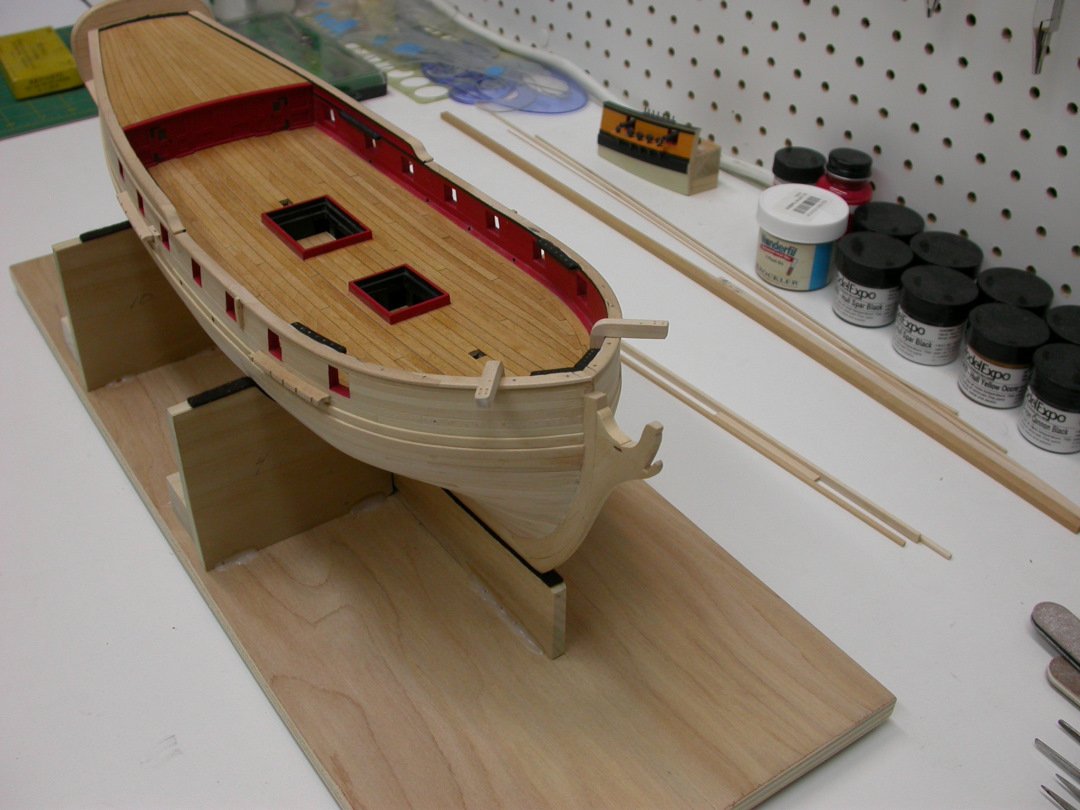
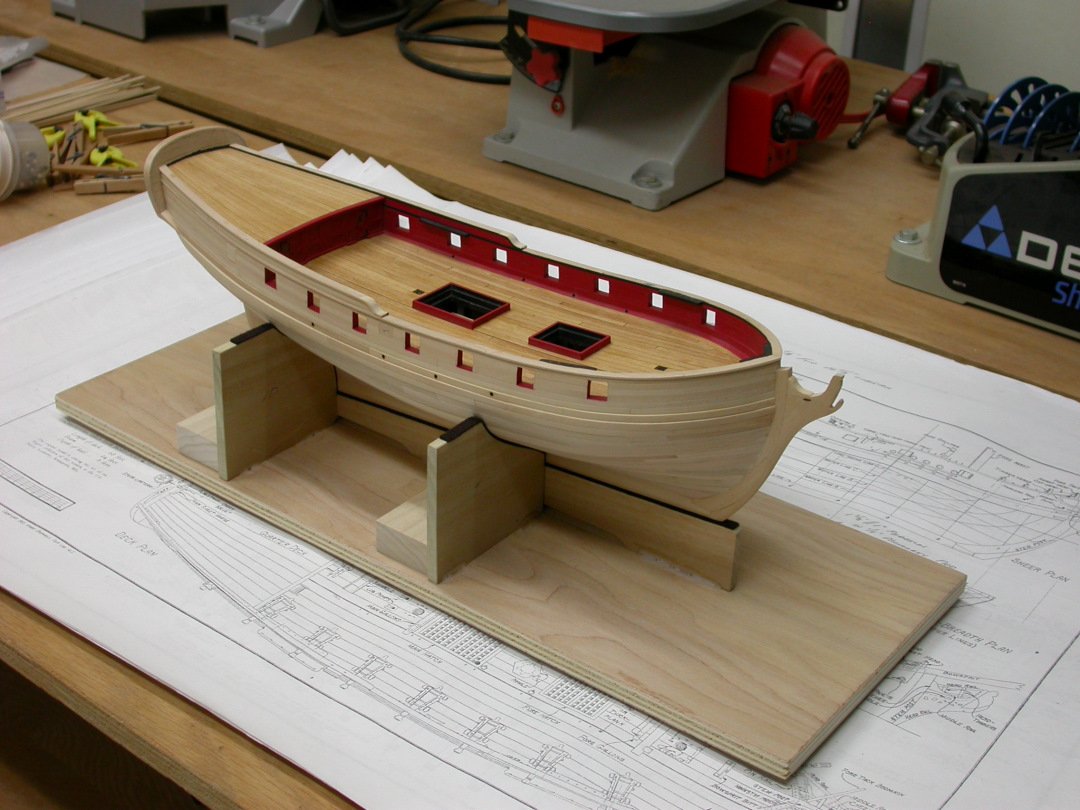
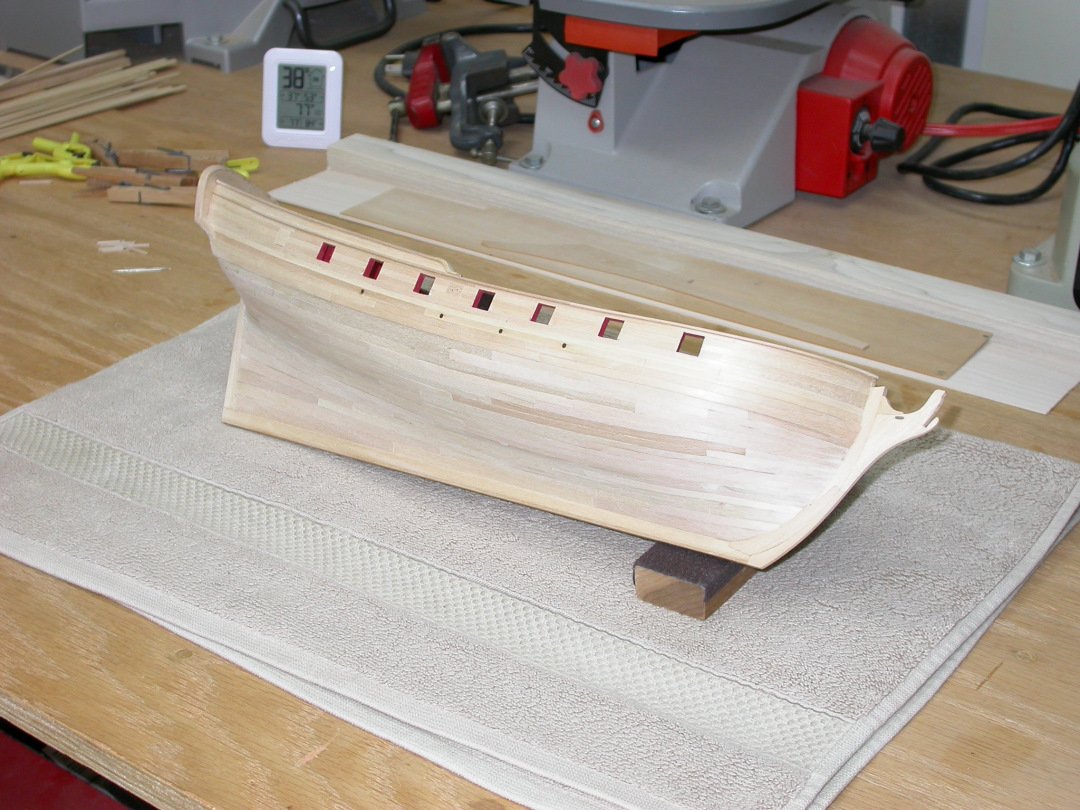
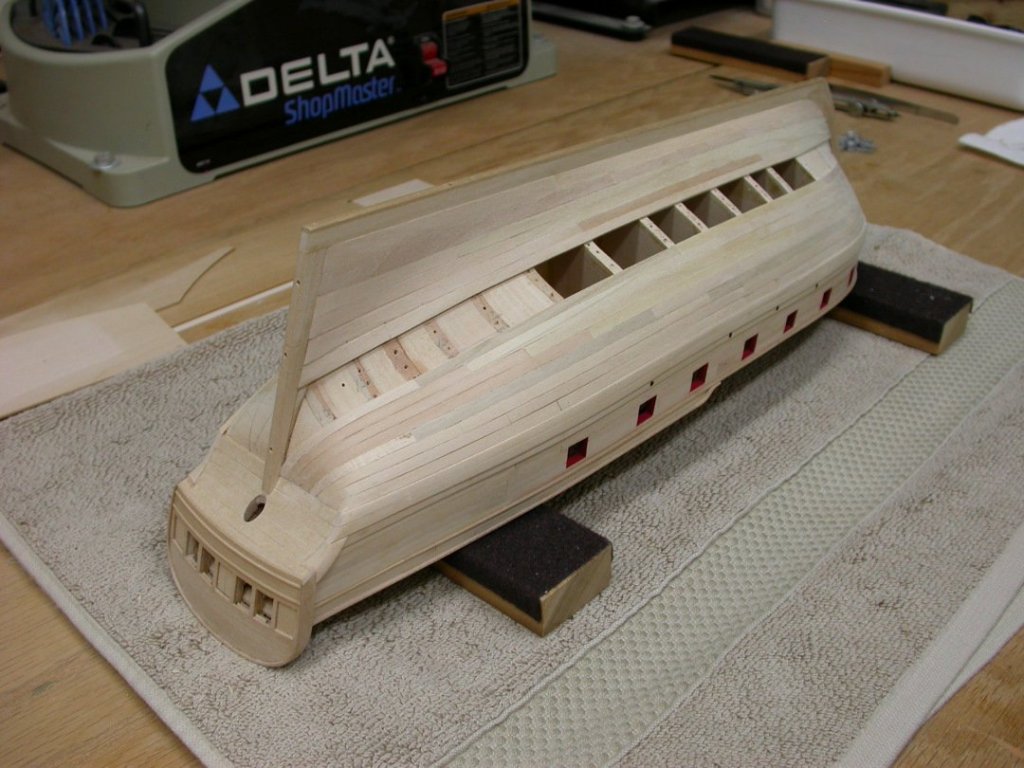
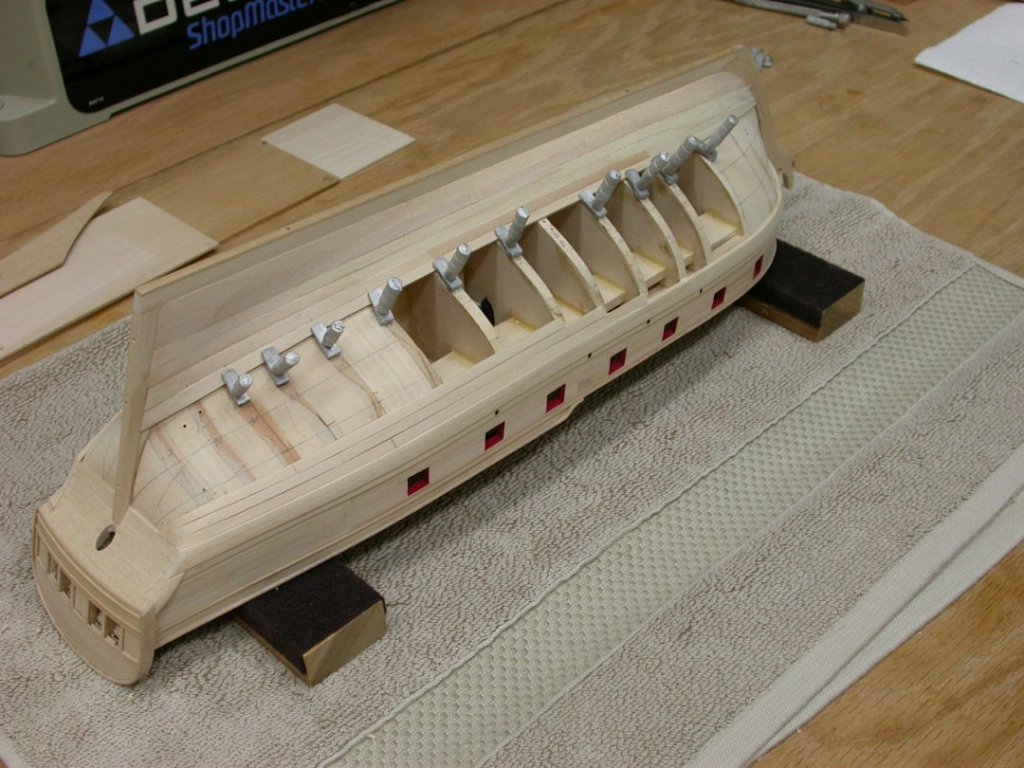
 With the Brig Fair American hull planking complete, construction continued with fabrication and installation of upper hull outfit. This work continues outfit of the bow zone: Knightheads were fabricated/dry fitted from 3/32” x 3/16” strip wood. Knighthead installations were reinforced with .025 brass pins. Timberheads were fabricated/dry fitted from 3/32” sq. stock. Timberhead installations were reinforced with .020 brass pins. Because of their delicate nature, knightheads and timberheads will be installed after cutting the bowsprit notch. Catheads and their attached timberheads will be installed after hull paint. Many fiddly little pieces here but it is starting to look like a real ship. Next steps will continue with fabrication and dry fitting of the bowsprit, bowsprit bitts, and the jibboom.
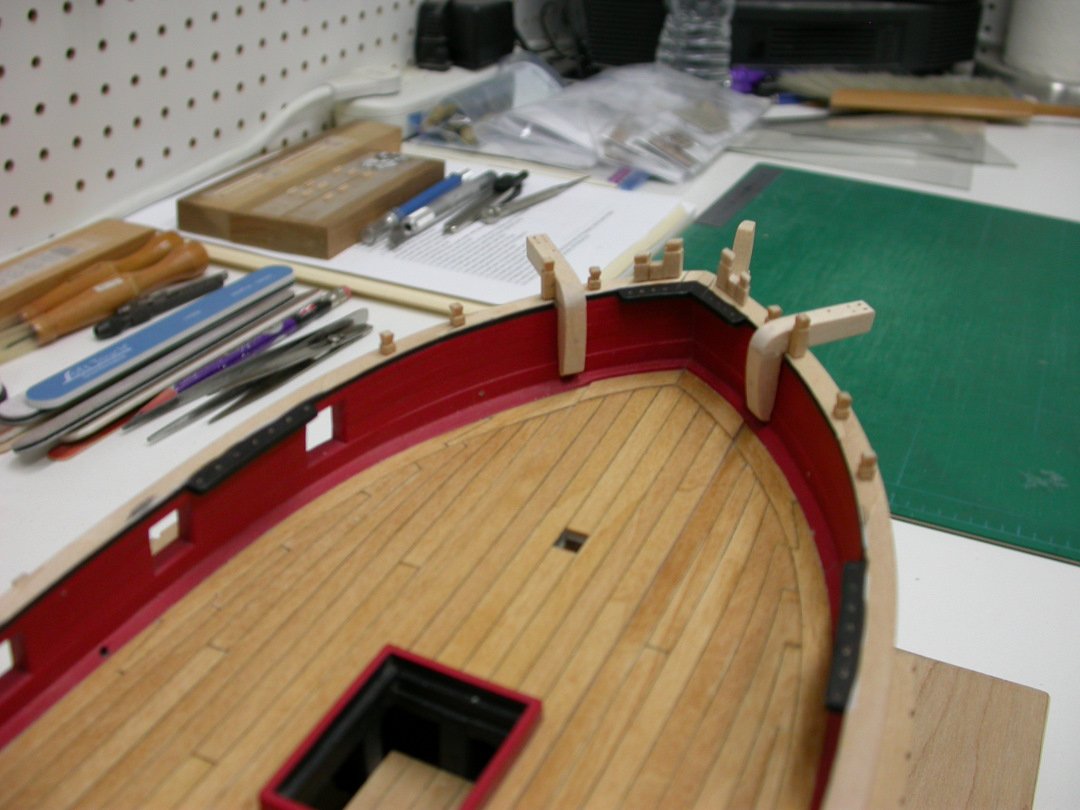
-
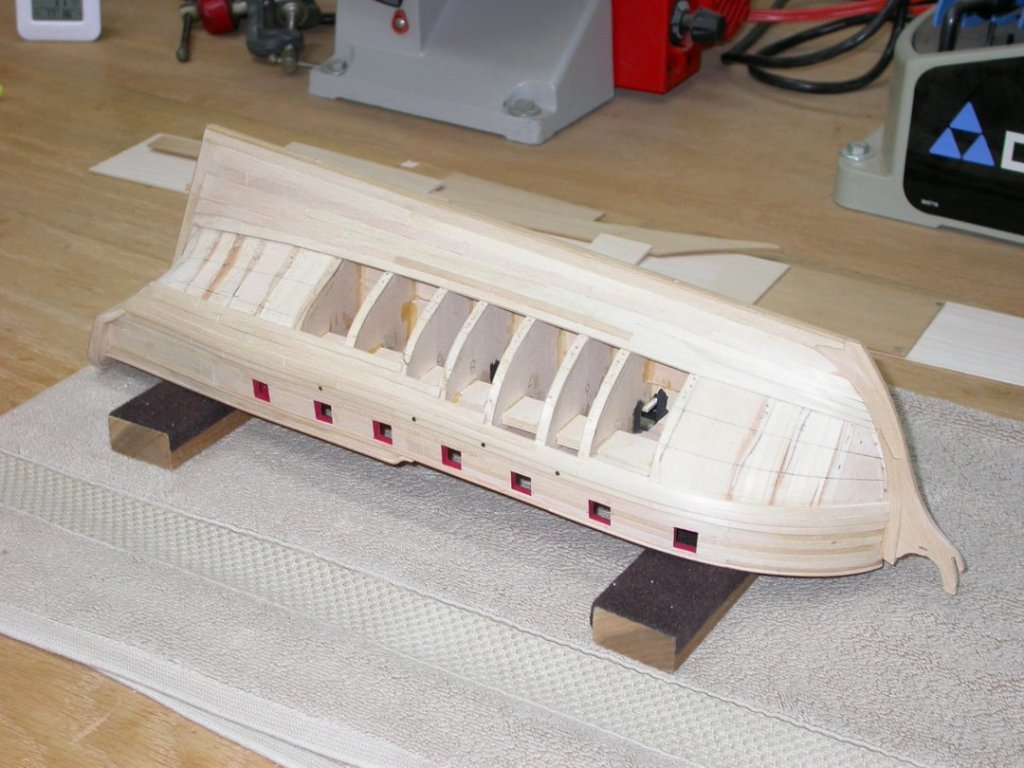
Working the knightheads and timberheads. Many small fussy parts here for my eyes. I will hold off final installation until after cutting the bowsprit notch.
-
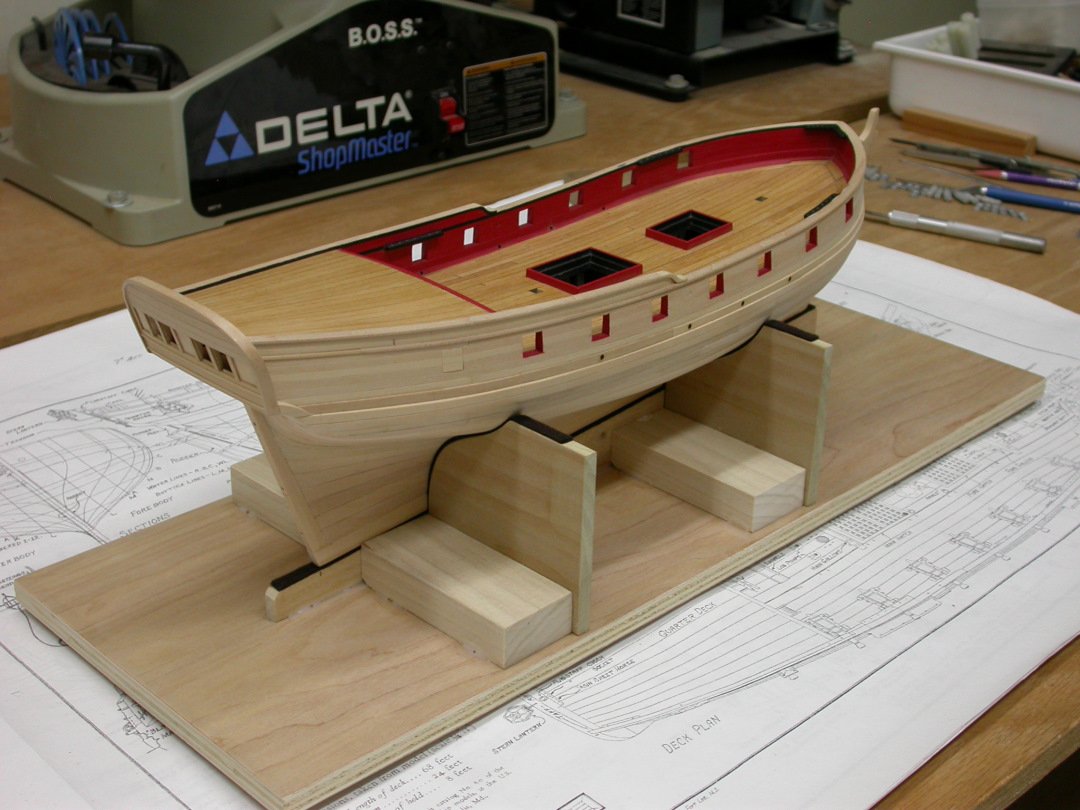
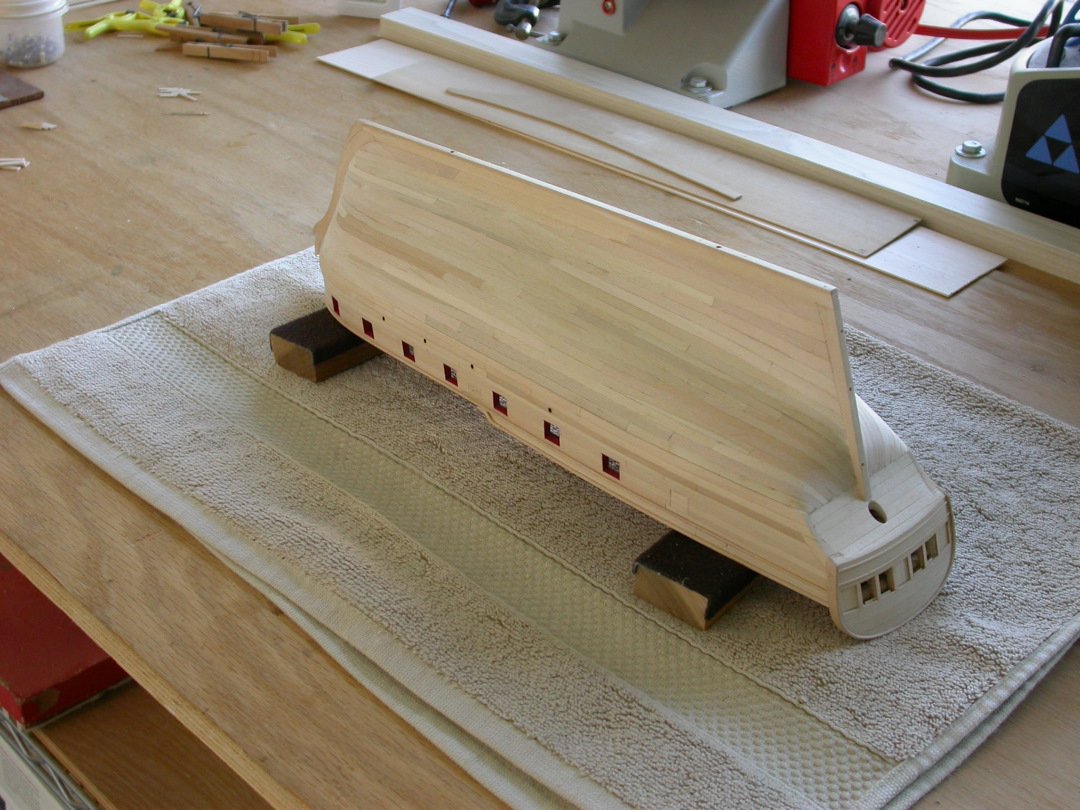
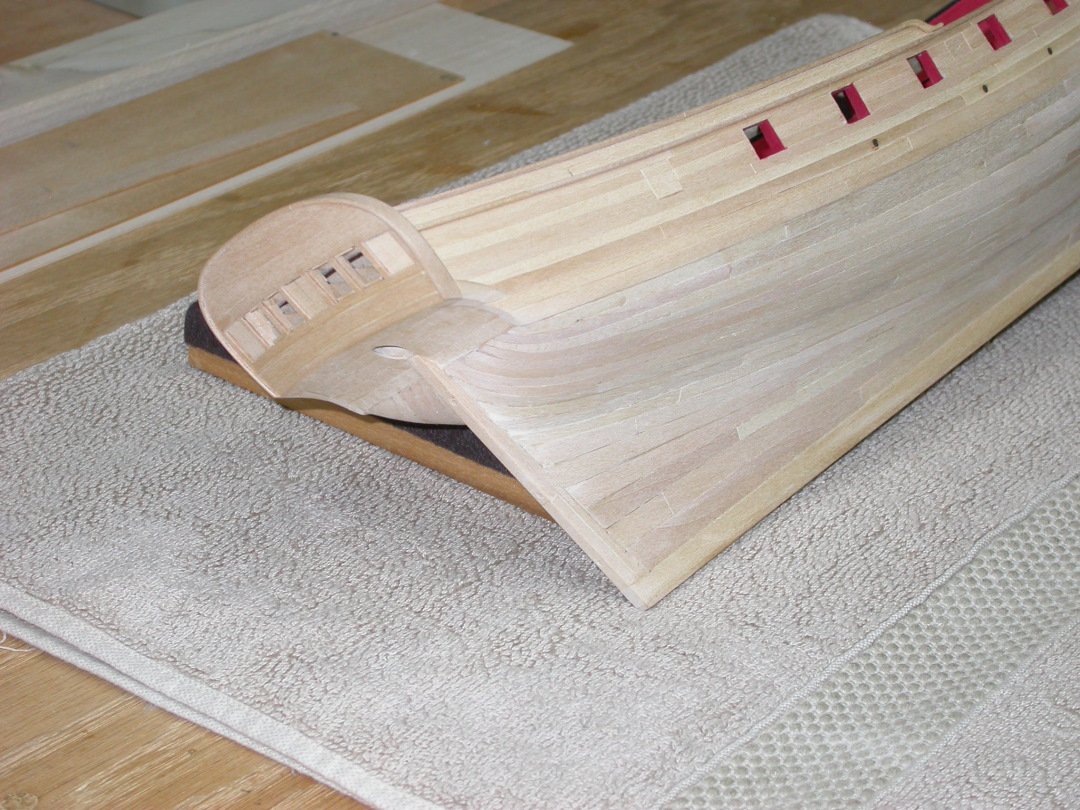
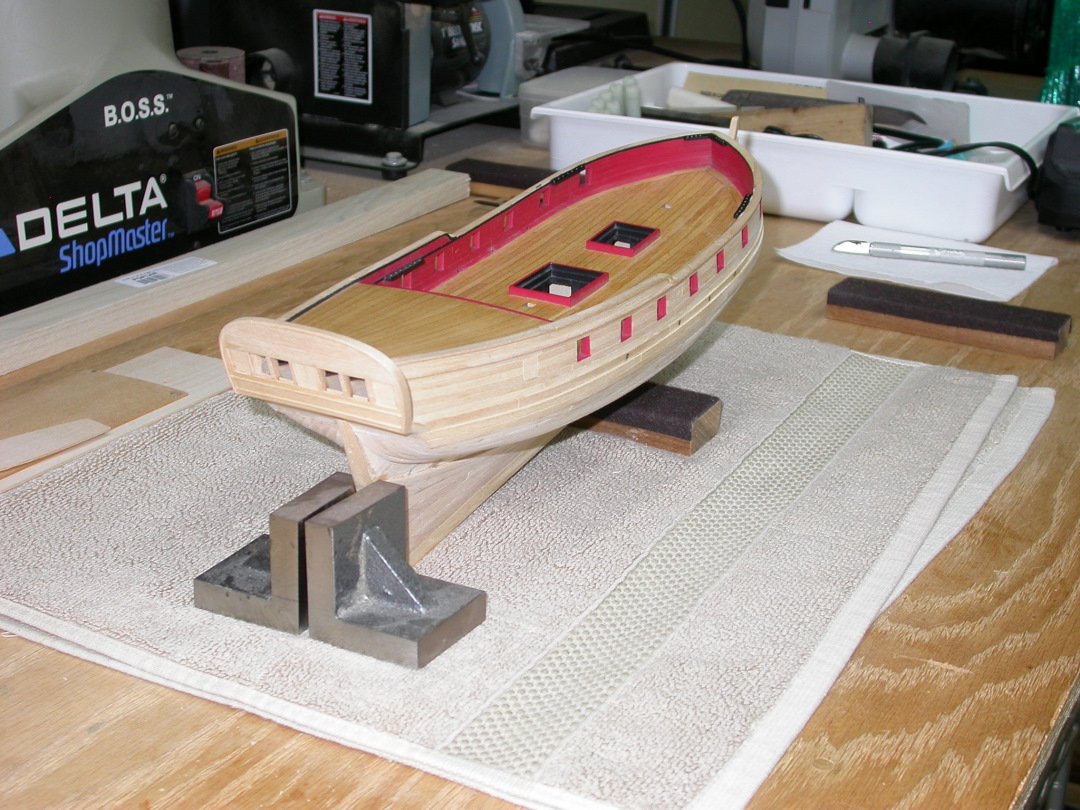
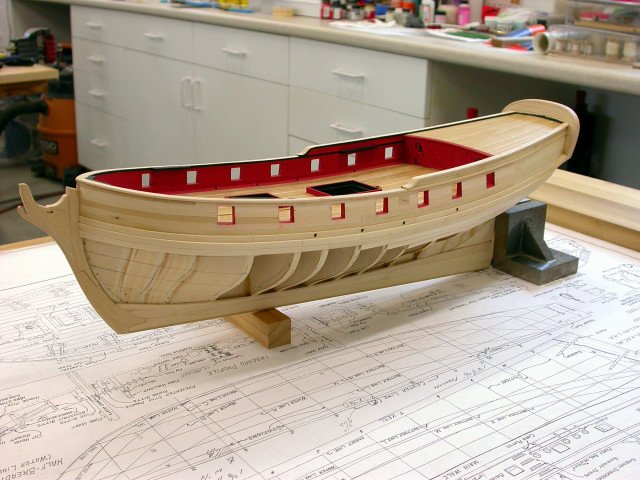
With the Brig Fair American hull planking complete, construction continued with fabrication and installation of upper hull outfit. The next zone to be addressed was the bow zone. Note that cheek knees, head rails, and head rail knees will be addressed later in the build: P/S hull attachments were laid out in the bow zone (due to plan inaccuracies, I chose to lay out and check all bow attachments at this point). Catheads were fabricated/dry fitted from 3/16” x ¼” strip wood. The catheads are pinned in place with 3/64” dowels. The catheads will be installed after hull paint. Fore tack fairlead holes were drilled thru the forward bulwarks. A few small steps in completing upper hull outfit. Next steps will continue with the knightheads and timberheads.
-
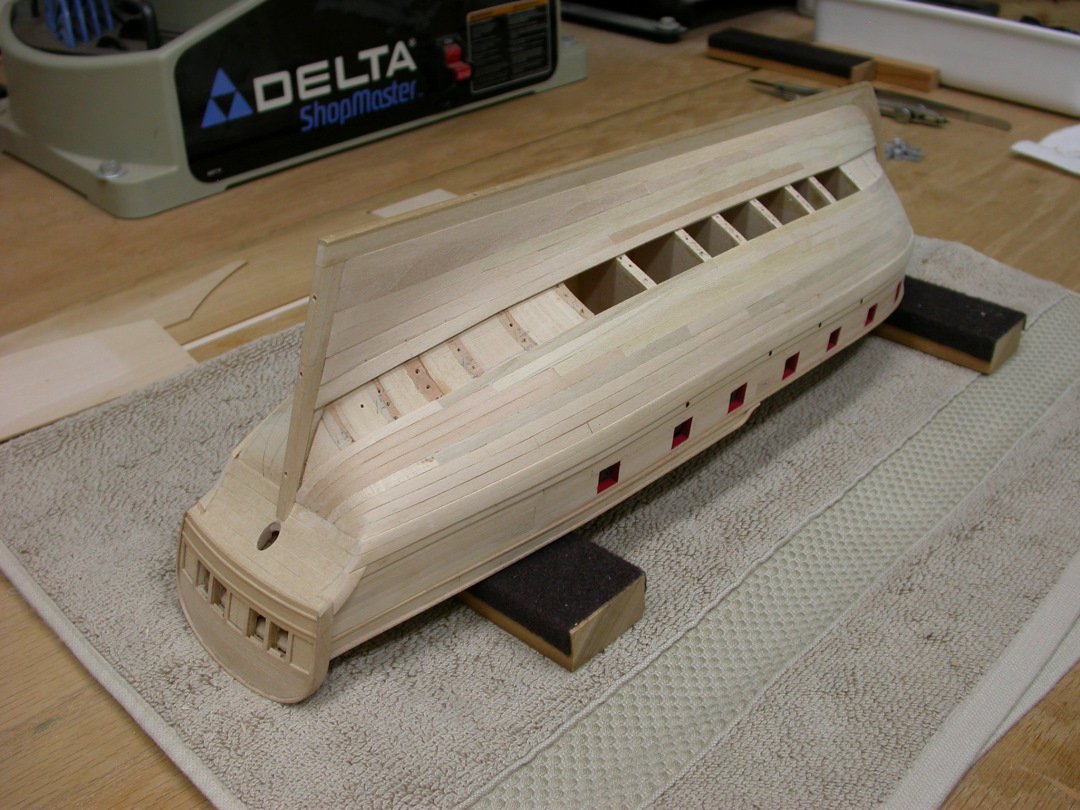
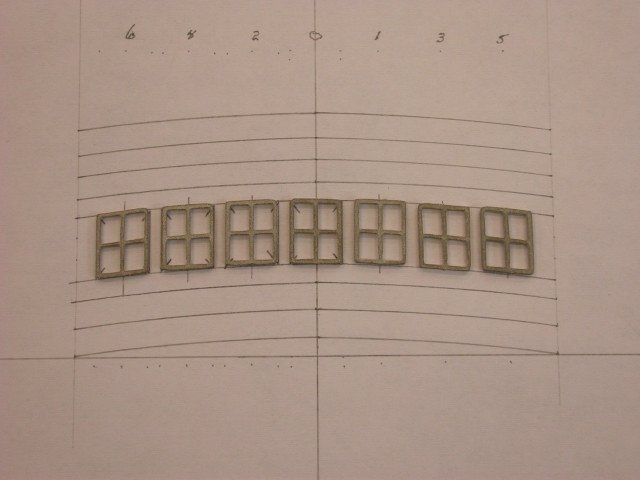
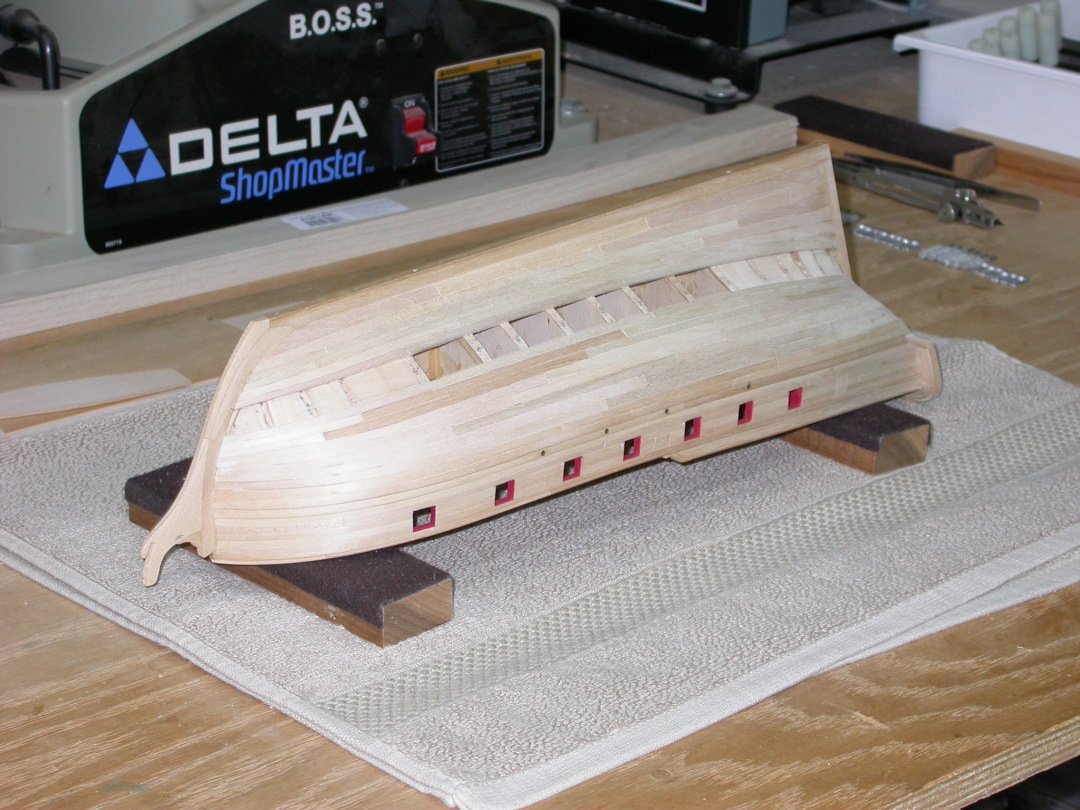
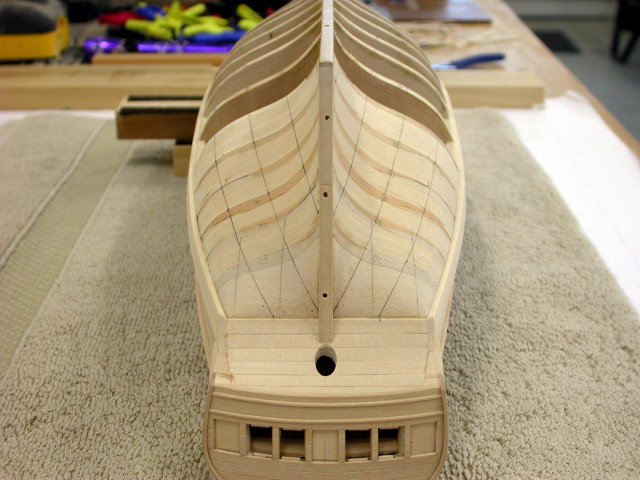
With the Brig Fair American hull planking complete, construction shifted to fabrication and installation of upper hull outfit. The first zone handled was the P/S hull sides: P/S hull attachments were laid out. Channels were fabricated/installed from 3/32” sheet stock. A spindle sander was used to shape the inner surfaces. Deadeyes and chain plates will be installed after hull paint. Channel caps were fabricated from 3/64” x 3/32” strip stock. The channel caps will be installed after hull paint. Chess trees were fabricated/installed from 3/32” x 3/32” strip stock. Main tack fairlead holes were then drilled thru the P/S bulwarks. Gangway steps were fabricated/installed from 1/32” x 3/32” and 3/64” x 1/16” strip stock. They were assembled with the aid of double sided scotch tape. The remaining steps will be installed after hull paint Quarter badges were dry fitted to the hull. Note that the windows still require framing out and the quarter badges will be installed after hull paint. There will be many additional details added in this zone after paint: i.e. deadeyes & chain plates, channel caps, gangway steps, quarter badges & windows, and gunport hinges for the closed aft gunport. Next steps will continue with upper hull outfit.

-
After a few months of full scale shipbuilding activities, I am returning the my "Fair American" build. I am currently working on P/S hull attachments including channels, gangway steps, quarter badges, chess trees, and main/fore tack fairlead holes. Description and pictures to follow. My full scale activities included a recent SNAME/ASNE webinar on modern "Asian Warship Design, Production Engineering, and Construction Practice". Over 500 attendees and many interesting questions, all in an attempt to influence USN design and acquisition practice. Regards from the shipyard, Pete
-
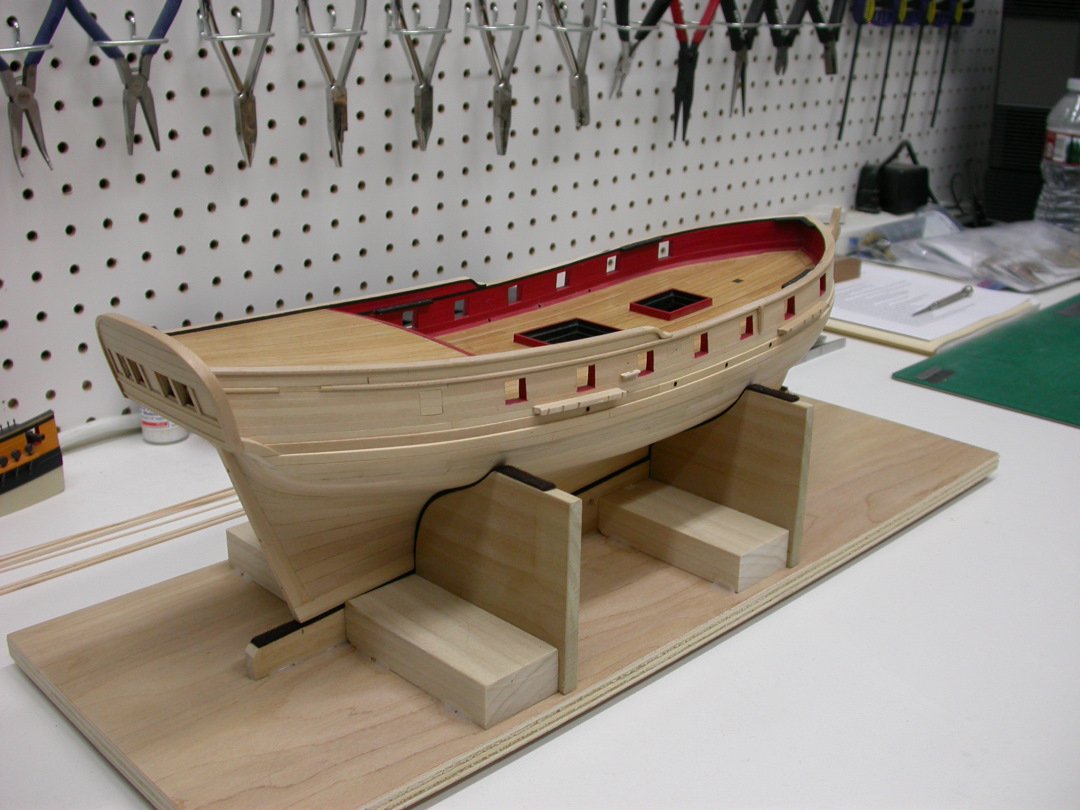
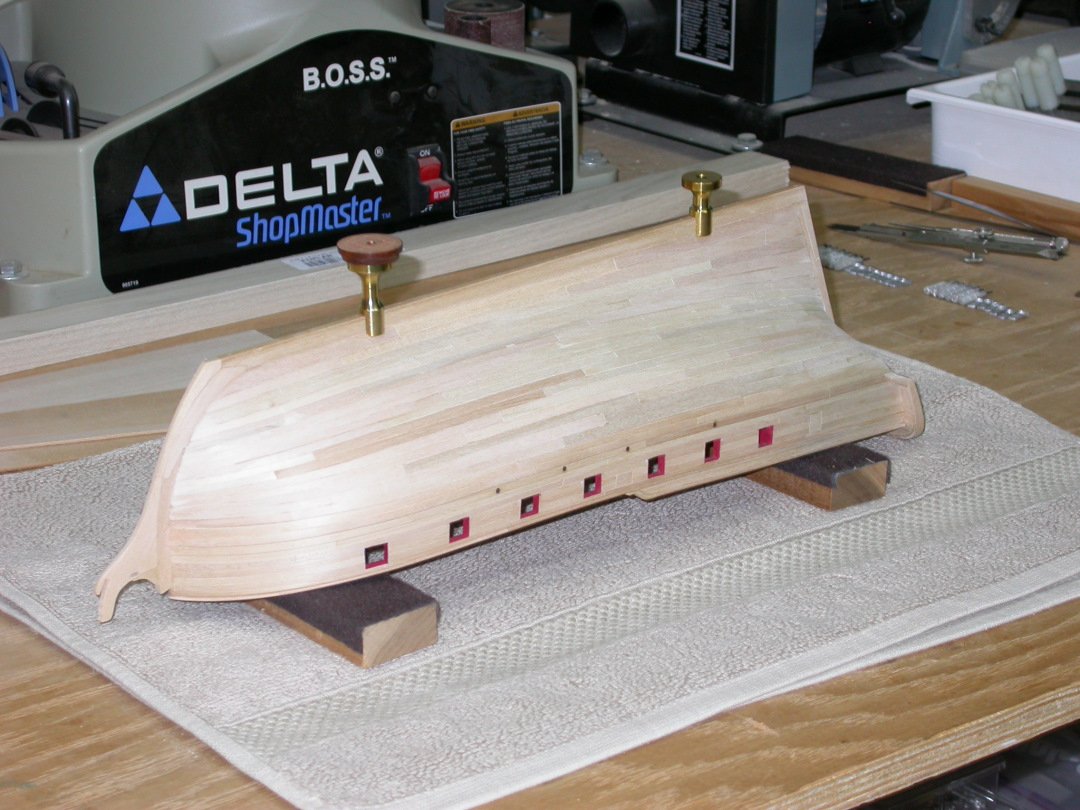
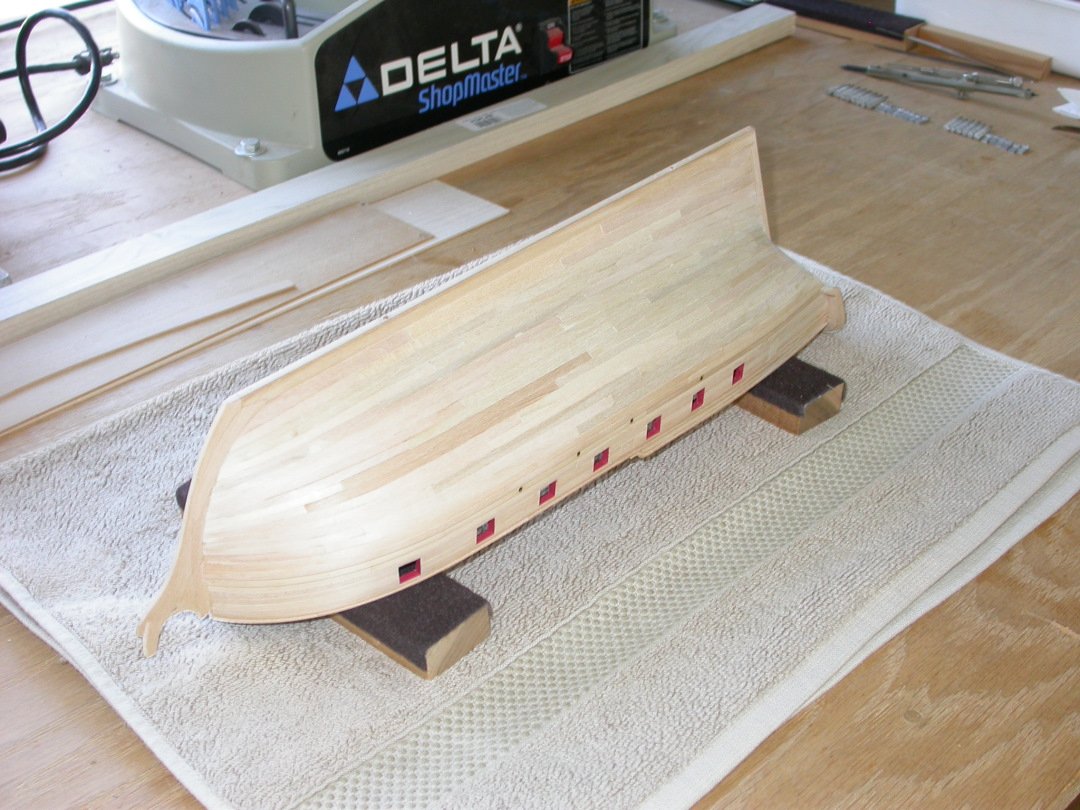
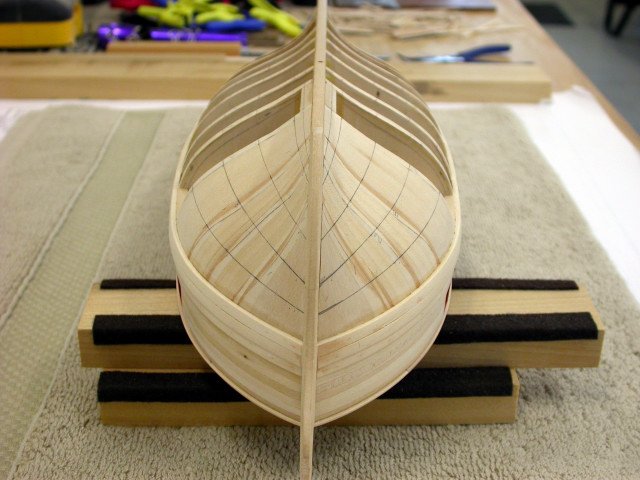
With the Brig Fair American hull planking complete, the next step was building a construction cradle. The cradle was designed to hold the hull upright with the waterline parallel to baseline. The construction cradle was lined with peel-and-stick felt tape. With hull planking complete, construction will now focus on external hull outfit. The hull outfit sequence has been designed to facilitate painting and minimize potential handling damage. Hull outfit prior to paint includes channels and gangway steps; dry fitting the quarter badges; chess trees, fairlead and hawse holes; catheads, knightheads, and timberheads; cheek knees, bleak head, and transom trim; and cutting the bowsprit notch. At the same time, I also plan to fabricate and dry fit the bowsprit and start fabrication of deck furniture. These assemblies will be held off for painting with their installation sequenced to ensure good access for cannon rigging. Regards from the shipyard, Pete Jaquith

-
Dwight, Correct, I used two steel rulers as guides/restraints as I pushed on opposite corners to deform the window frames to follow the transom curve.
-
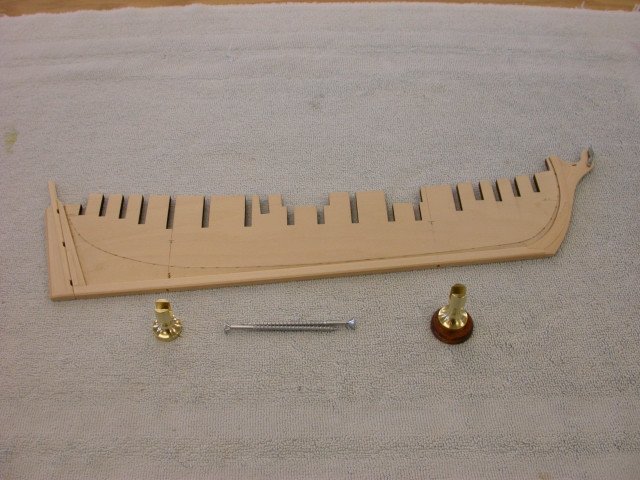
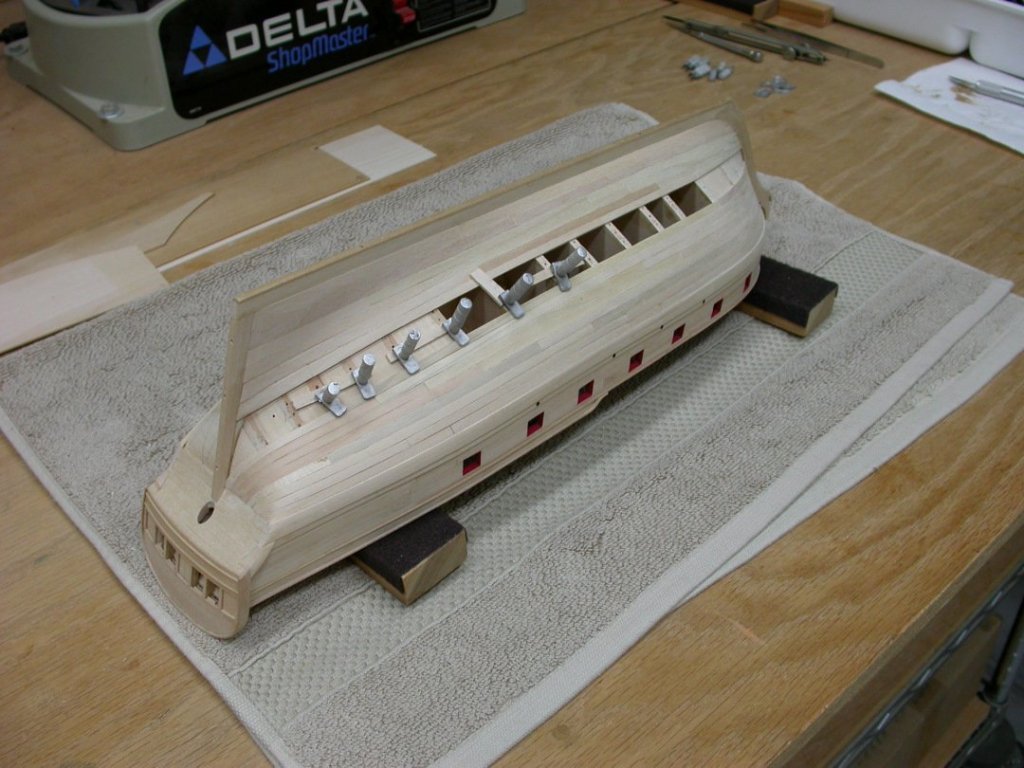
With the Brig Fair American hull planking complete, the next step is confirming the pedestal fit. The pedestals had been initially fitted to the keel subassembly. At this point, they required minor adjustment to suit the hull planking. This task was accomplished at this point to avoid the need for adjustment at completion. Next steps include: (a) building a construction cradle. Regards from the shipyard, Pete Jaquith
-
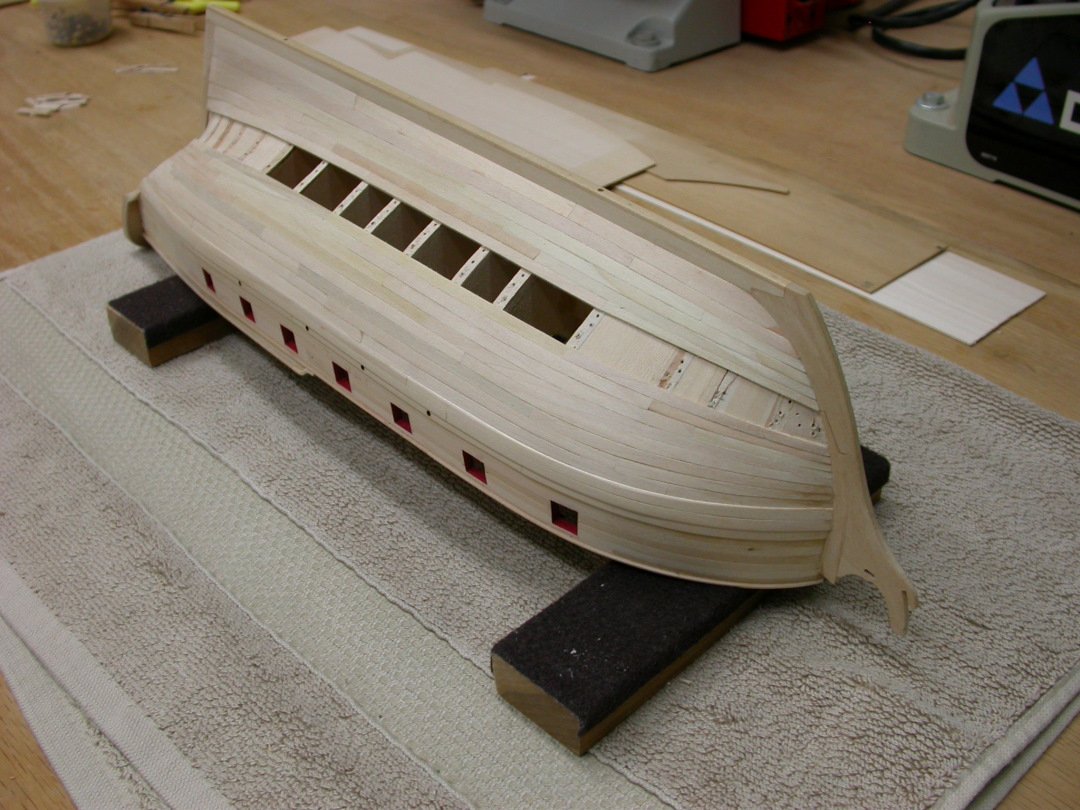
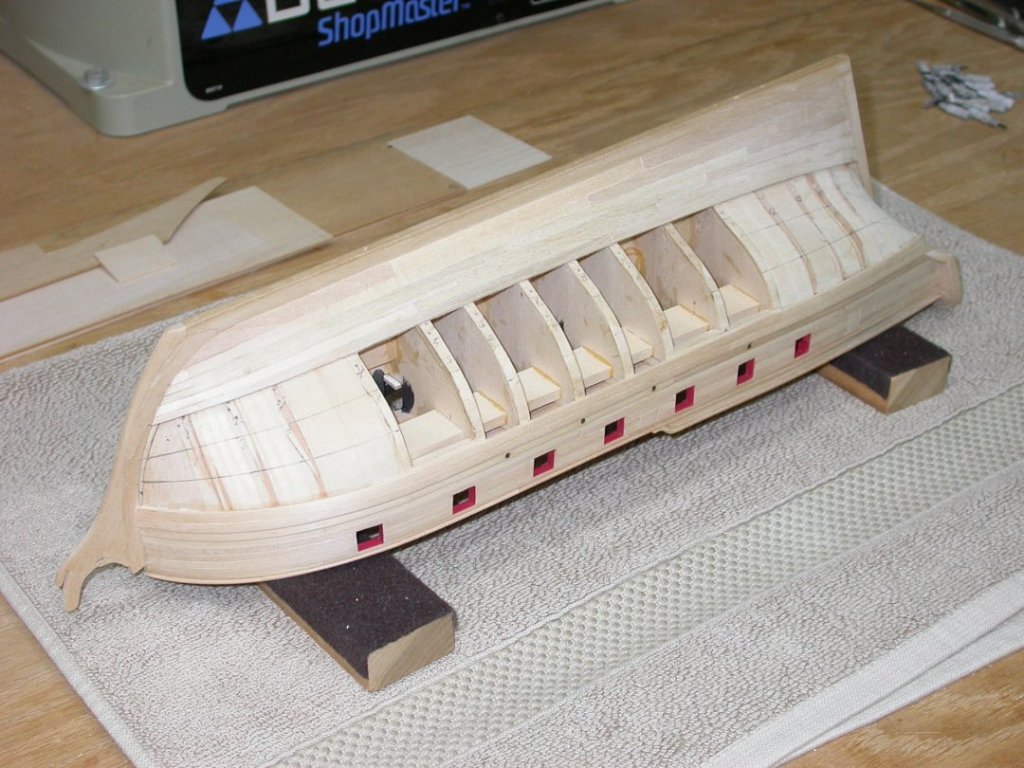
With the Brig Fair American garboard and broad strakes, and lower “A”, “B”, and “D” Belt planking complete; a major construction milestone was completed: “C” Belt Strakes #9-12 – The third four strakes below wales (#9-12) were the last strakes installed. Note that lower “C” Belt strake #12 was the closing strake. These planks were ~9” wide amidships tapering to ~6” wide at the stem and 13-15” wide at the stern post. Fair Planking – After completion of planking (a major milestone), limited wood filler was used to fill a few open seams and the hull was lightly sanded using fine sanding sticks. Lessons learned from hull planking include: Layout of planking belts and strakes is key Proportional dividers are great for dividing up planking belts Shaped planks were cut from sheet stock using ships curves (I may try Chuck’s heat bending technique on my next project) Fine sanding sticks from the beauty supply shop are great for fine tuning planks Filling the forward/after hull bays with basswood blocks provided need planking support Planks were edge glued with white glue – to date despite 7 years of storage and significant temperature and humidity swings from southern NH to the CA desert (60-100 degrees F and 15-90% humidity) I have not had any cracking or open seams. Next steps include: (a) confirming pedestal fit. Regards from the shipyard, Pete Jaquith

-
Greg, Plan sections, elevations, and details appear to be slightly different scales. Also, bulkheads were poorly cut and were often different P/S. This requires great care be could be a frustration to new modelers. This is part of the reason I added bass wood fillers between the FWD/AFT bulkheads. Regards, Pete
-
Thanks for your interest and likes. After 7 years away I am now starting to get back into ship modeling. Still have to sort of the rest of my tools and supplies but I am getting there. The Brig Fair American is a good looking model, but the kit has problems (bulkheads don't fair, bulwark height, etc.). I would not recommend it as a first build. Regards, Pete
-
With the Brig Fair American lower hull planking belts "A" and "B" Port, and "D" Port/Stbd. complete, work continued on lower hull planking: "A" and “B” Belt Strakes #1-8 Stbd. – Completed the first eight strakes below wales (#1-8). These planks were ~9” wide amidships tapering to ~4.5” at the stem and ~7.5” wide at the counter. Due to their shape, the fwd/aft planks were fabricated from sheet stock. Due to high temperatures in the shop (garage) during the afternoon and evening, I am currently only completing 1-2 plank strakes per day, however the end is in sight. Next steps include: (a) install “C” Belt P/S, the middle four strakes. Note that lower “C” Belt strake (#12) will be the closing strake. Regards from the shipyard, Pete Jaquith


-
Continuing with Fair American lower hull planking. D Belt P/S, A Belt P/S, and B Belt P are complete. With B Belt S working, I will post pictures at completion of B Belt. Regards, Pete
-
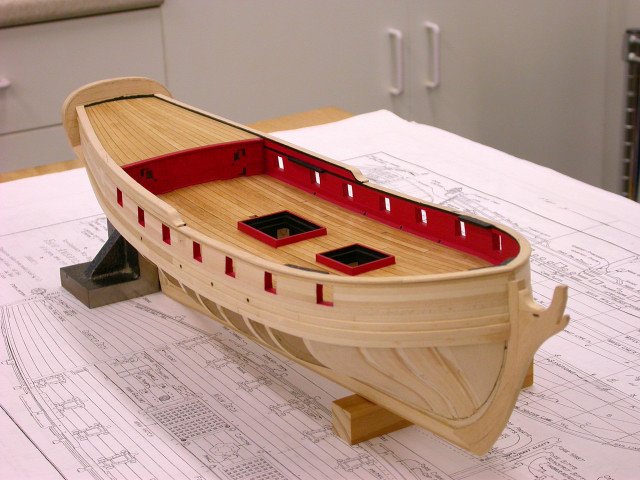
Matt, For decks I added liners at the deck edge (to support plank ends) and around the masts to reinforce rigging points. Regards, Pete
-
Matt, I have had good experience with filler blocks, both to assist in hull fairing and to support planking. I recommend something firmer than balsa such as bass, pine, or popular. I have attached pictures of my Fair American build for reference. Regards, Pete

-
Work continues on lower hull planking. With the Brig Fair American garboard and broad strakes and lower “D” Belt complete; work proceeded on “A” and “B” strakes: Completed "A" and "B" Belts Port - Completed the 1st eight strakes below the wales port. These planks are ~9" wide amidships tapering to ~4.5" wide at the stem and ~7.5" wide at the counter. Due to their shape, the fwd/aft planks were fabricated from sheet stock. My planking techniques included the following: Four planking belts were laid out and faired considering the maximum plank Shaped fwd/aft planks were cut from sheet stock using paper templates Plank width was determined/confirmed using proportional dividers Planks were cut using a single edged razor blade and ship’s curves Final sanding will follow completion of lower hull planking Next steps include: (a) Install “A” and “B” Belts Stbd., (b) install “C” Belt, the middle four strakes. It is planned that lower “C” Belt strake (#12) will be the closing strake. Regards from the shipyard, Pete Jaquith

-
Working along on the Brig Fair American lower hull planking. A" Belt Port, strakes #1-4 below the wales, is nearing completion. Bow and stern planks are splined and cut from sheet stock. I will post pictures at significant milestones. Regards from the shipyard, Pete
-
With planning for the Brig Fair American lower hull planking complete and some initial planking started; the following points describe the planking sequence: a. Garboard and Broad Strakes – The garboard and 1st broad strakes were the first planks installed. Due to their shape, they were fabricated from sheet stock. These strakes were wider than the normal amidships plank width, being 12” and 10.5” wide respectively. b. “D” Belt Strakes #13-16 – The first four strakes above the broad strake (#13-16) were the next strakes installed. Due to their shape, the fwd/aft planks were fabricated from sheet stock. These planks are ~9” wide amidships tapering to ~6” wide at the stem and growing to ~15” wide at the stern post. Next steps include: (a) complete installation of “A” Belt, the 1st four strakes below wales (#1-4); (b) install “B” Belt, the 2nd four strakes below wales (#5-8); and, (c) install “C” Belt, the middle four strakes (#9-12). Note that lower “C” Belt strake (#12) will be the closing strake. Regards from the shipyard, Pete Jaquith

-
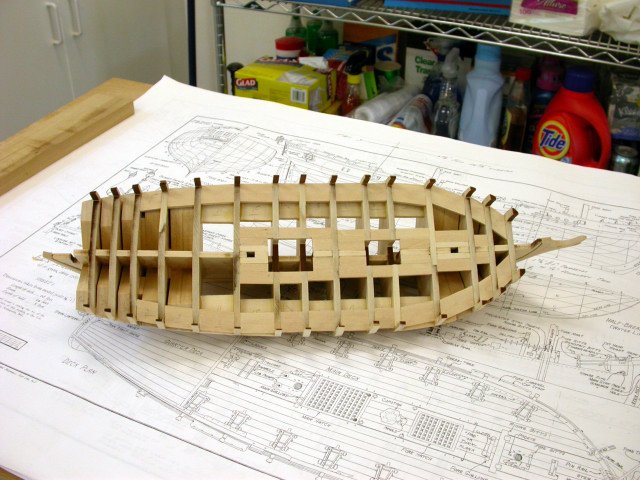
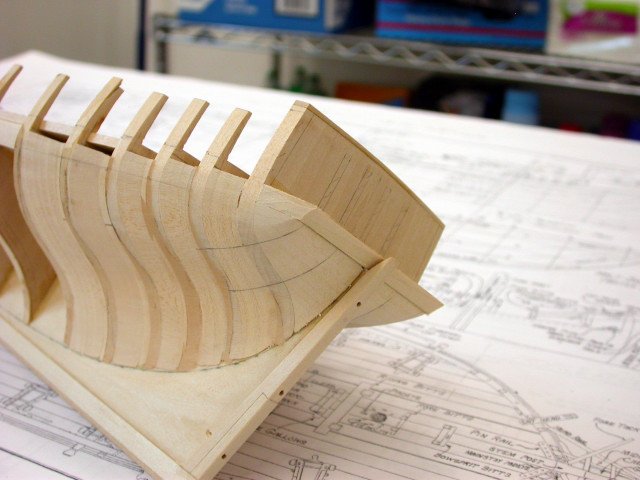
After surveying my 14 Gun Brig Fair American of 1868 build (in storage since 2011); I was pleased to find it survived with a minimum damage. As a result, I will restart the build log with planning and installation of lower hull planking (Note that I will repeat a few earlier posts in-order-to provide continuity). Planning and for lower hull planking included the following: a. Layout Planking Belts – The lower hull will be single planked with 1/16” basswood. After examining the hull girths at alternate bulkheads, the stem, lower counter, and stern post; an amidships plank width of 3/16” or 9” was selected. After laying out the garboard and 1st broad strakes, the remaining hull surface was divided into four planking belts. b. “A” & “B” Belts – “A” and “B” Belts, the 1st thru 8th strakes below the wales, will be ~9” wide amidships tapering to ~4.5” wide at the stem and ~7.5” wide at the counter. c. “C” & “D” Belts – “C” and “D” Belts, the 9th thru 16th strakes below the wales, will be ~9” wide amidships tapering to ~6” wide at the stem growing to 13-15” wide at the stern post. d. Garboard & 1st Broad Strakes – The garboard and 1st broad strakes will be wider than the normal amidships plank width, being 12” and 10.5” wide amidships respectively. e. Table of Hull Planking Butts – The Table of Hull Planking Butts was adjusted to reflect the addition of the above planking belts. f. Planning for Hull Planking – The hull planking arrangement and planning were developed using the guidelines outlined in the book “Planking the Built-Up Ship Model” by Jim Roberts, available from Model Expo. Regards from the shipyard, Pete Jaquith
-
The 14 Gun Brig Fair American, circa 1780 is based on Model No. 60 of the Henry Huddleston Rodgers ship model collection at the U.S. Naval Academy Museum, Annapolis, Maryland. The model is representative of many of the small ships used as privateers during the American War of Independence. The brig Fair American had a length of 68’ 0”, beam of 24’ 0”, depth of 8’ 0”, and tonnage of 130 tons. The model is based on the Model Shipways Fair American kit developed by Erik A. Ronnberg, Jr. and updated by Ben Lankford. The model is plank on bulkhead construction at 1/4” to the foot scale (1:48) with single planking and scratch built details/fittings. I made a number of changes in both model design and construction sequence and these were discussed in my earlier posts. My Fair American build has been in layup (storage) since 11/2011 due to conflicts with my consulting and full size shipbuilding projects. After working a number of full scale shipbuilding projects in the US and Canada and two home moves, I am now starting to resume my model shipbuilding. My shop/residence has moved from Hancock, NH to Indio, CA. My shop in Indio is located in my garage where summer temperatures limit construction to the morning hours. As I am still busy with several consulting projects, there may still be a need for short breaks in my construction activities. Note: This is a restart of my earlier 14 Brig Fair American build log posted in 2014-2015. The actual construction work on this model was started in 2011. Regards from the shipyard, Pete Jaquith
-
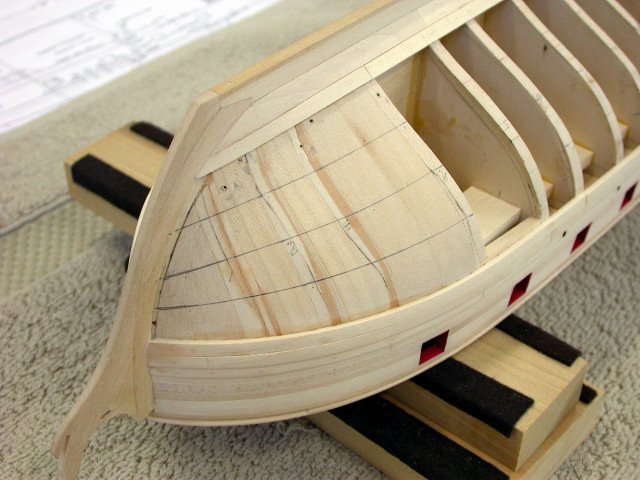
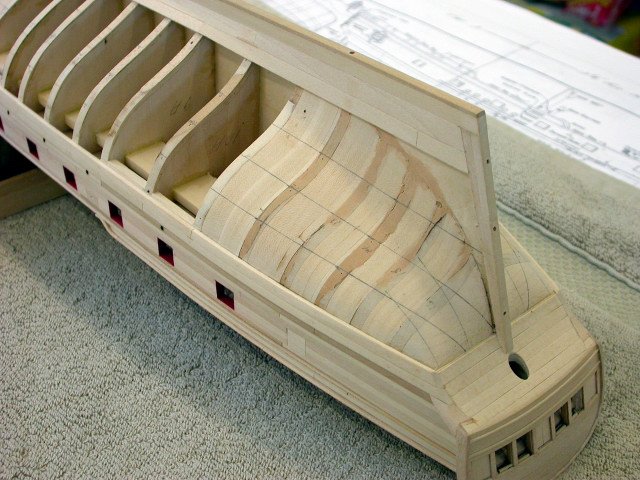
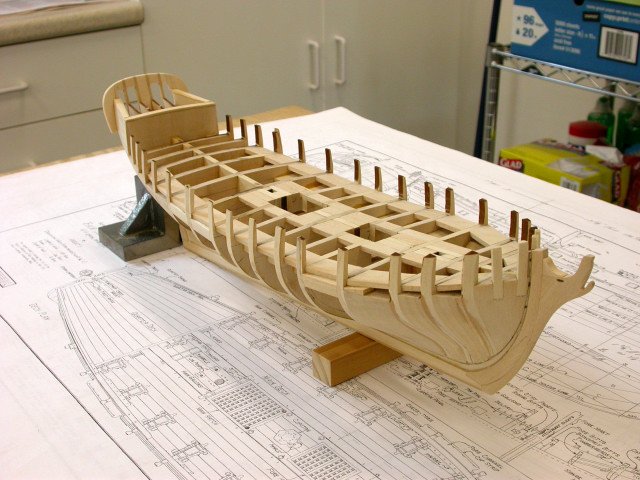
Bruce, I prefer to single plank. That said, with single planking it is important to carefully fair the hull and ensure adequate support for planks in areas of significant curvature. As Kurt noted, the number of bulkheads is a key factor. The following pictures from my "Fair American" build show how I filled in between bow and stern bulkheads to help fair this hull and provide more planking support. Pete
-
Filler Blocks
Pete Jaquith replied to olopa67's topic in Building, Framing, Planking and plating a ships hull and deck
On my 14 Gun Brig Fair American build, I used bass wood to fill the forward/after bays in the hull assembly. Fairing was done with course sandpaper wrapped around a large dowel. After fairing, this added support was a real help in planking. Regards, Pete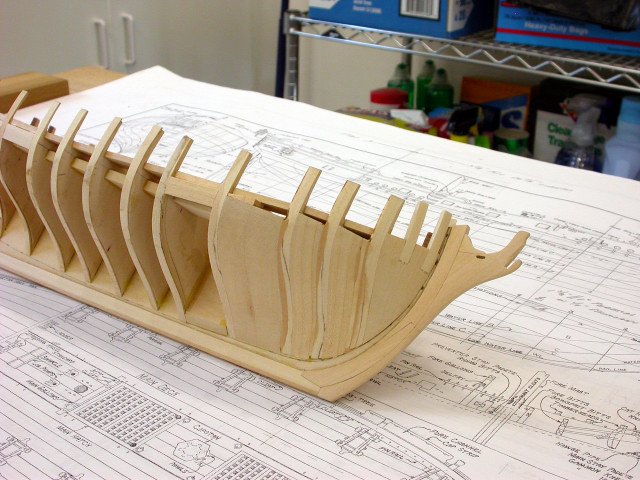


-
You found a good strategy for dealing with deck shear and camber. The attached picture shows the deck buildup on my Brigantine Newsboy of 1854 build.

- 356 replies
-
- 7
-

-
- red jacket
- finished
- (and 1 more)
-
The resurrection of the Flying Fish.
Pete Jaquith replied to Bill Voss's topic in New member Introductions
Bill, Very nice looking model.