
Supplies of the Ship Modeler's Handbook are running out. Get your copy NOW before they are gone! Click on photo to order.
×


popeye the sailor
-
Posts
15,993 -
Joined
-
Last visited
Content Type
Profiles
Forums
Gallery
Events
Everything posted by popeye the sailor
-
 another beauty KP love the paint....looks like it been around the block a few times. lots of cool detail!
 -
Fairey Gannet by RGL - FINISHED - Trumpeter - 1/72
popeye the sailor replied to RGL's topic in Non-ship/categorised builds
nicely done........took me a bit to figure out that you were simply missing a blade -
Mercedes 300 SL by kpnuts 1/16 italari
popeye the sailor replied to kpnuts's topic in Non-ship/categorised builds
sweet! very well done! I like the larger models too! -
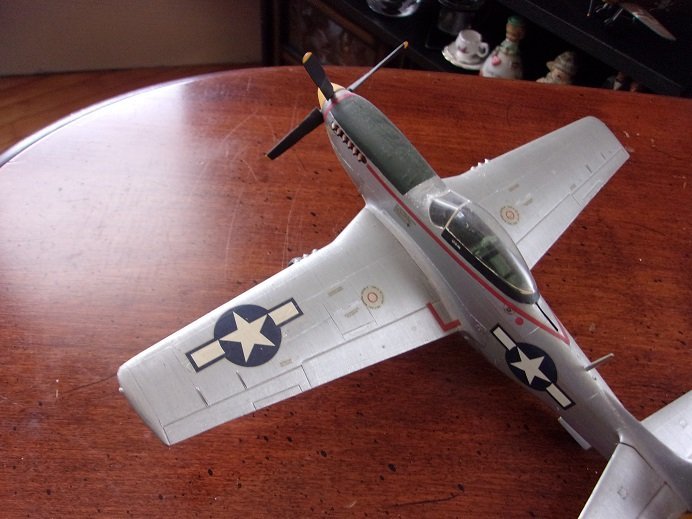
the molds for this kit likely covered several other kit subjects......some will even go as far as to include parts to make other variants too. you came out with a superb mustang E.G..........the paint looks great! it's a very smooth finish. it is still a little on the reflective side though......look at it a week or so down the road......it will tone down. the paint needs time to fully cure. I'm sure the main recipient of the process will much easier without all the rivets
-
got the parts out of the bottle this morning.......things went pretty well. the high rise manifold though is a newer part......not all of the chrome came off ....and on the difficult differential front.......I think it's a winner too now...the assembly and paint......
-
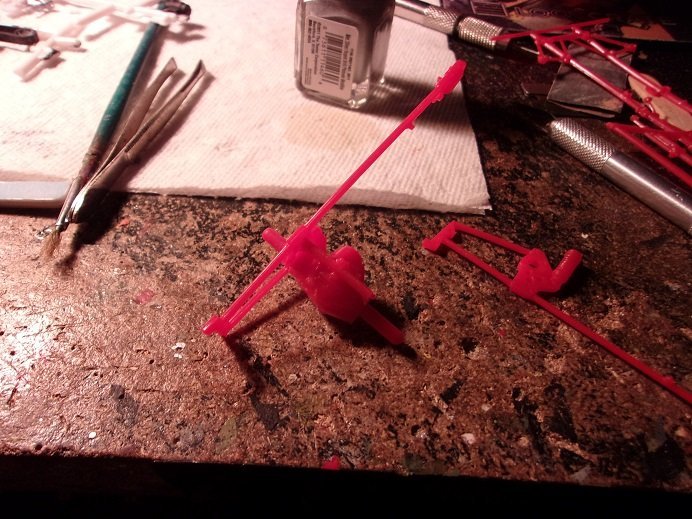
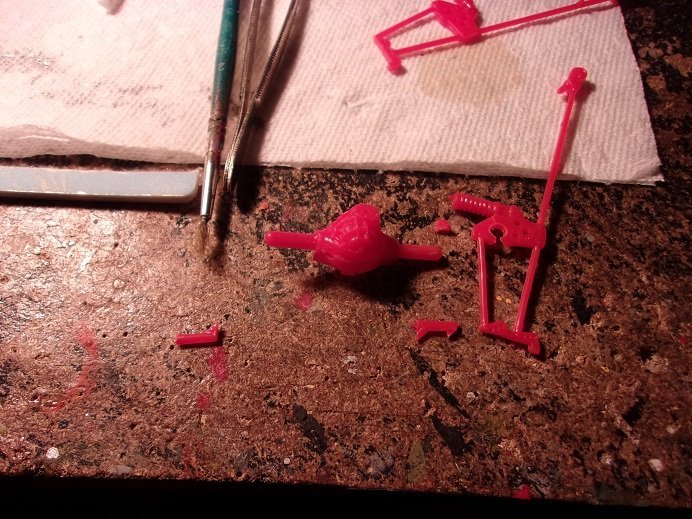
moving on.......... things took a downward turn here. I looked at it earlier and failed to notice it part of the differential has been assembled......but I didn't notice that the bracket / wheelie bar is backwards. there is a heavy presence of glue too, which means that it is really welded on there. I would say that the person saw this too.......likely the reason it was put back in the box and shelved. as most know, it is better to separate parts earlier than later....in this case.......years later. trying to source parts will be time consuming and costly, something I don't like to do.........so the best thing to do, is try to separate the parts. I have a set of thin razor saws.....I figure if I can cut around the shaft, seeing no evidence of glue around where the axle shaft protrudes, I might be able to break it free without much damage. the plastic is a hard plastic......the deed is done, but not without damage. the untouched axle part broke off and the crossbar above it broke off. the wheelie bar part broke too, but I have all the pieces...all clean breaks. I already glued back on the broken axle shaft...that is what's drying at the moment. I'm going to let it dry all night. the wheelie bar parts was also successfully glued back together.......same deal......gonna let it dry all night, and I'll clean the both of them up tomorrow. I'll add the crossbar when I assemble it. I turned to do some clean up to the chassis deck and remove the odd date stamp. I toyed around with a few other things before calling it an evening. it sounds horrible.......I know.......I've fixed worst than this. once painted, you'll never even see the repair he....hee........that's me Popeye calender AK-k-k---k-k-k-k-k-k

-
I just posted the Richard Earle car Mark.......
-
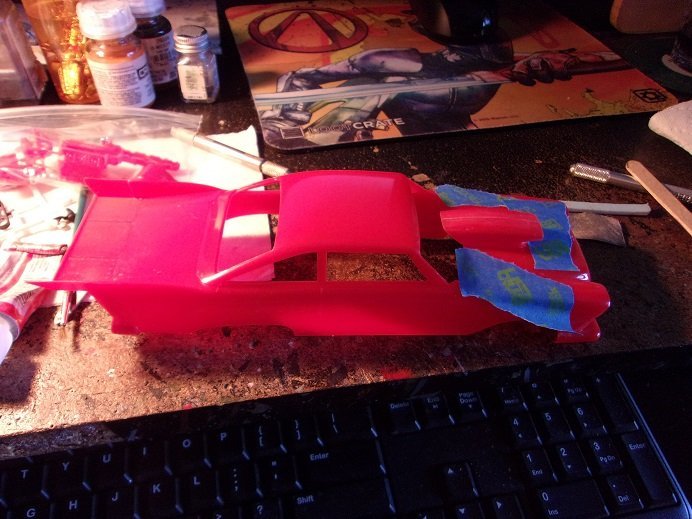
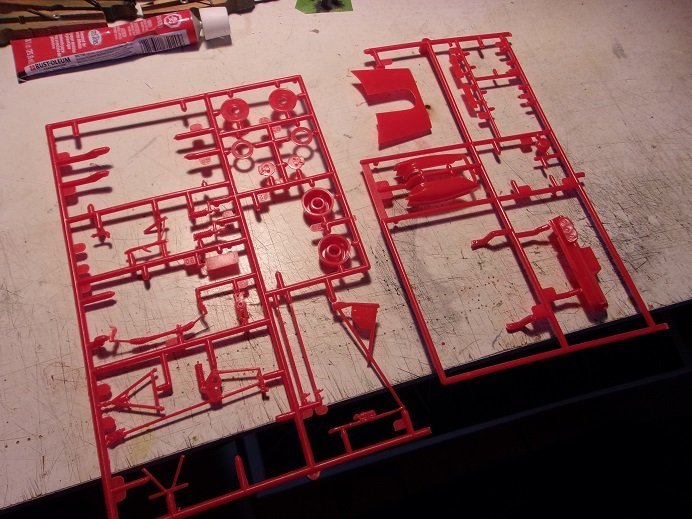
so...as I read through the instructions, anything that requires paint goes into the bottle. more will be added, I'm sure of it I did some clean up to the front of the body.......it's passable. I'm still thinking that the grille decal will cover the thin gap that spans across the hood line. after removing the tab that spanned across the opening of the engine well, I assembled the hoof scoop and cemented in on the hood. the hood looked out of flush with the opening so at this time I taped it in place. as the hood and scoop assembly dries, it might keep the shape. I also added the rear spoiler deck.......that went on pretty good. I cleaned up the rear corners before I added it. dog walk time......I'll be back.
-
this has to be a model.......I love how it looks the induction sticking out of the hood.......the headers.......considering what's in the kit, the person didn't have to do any drastic modifications.
-
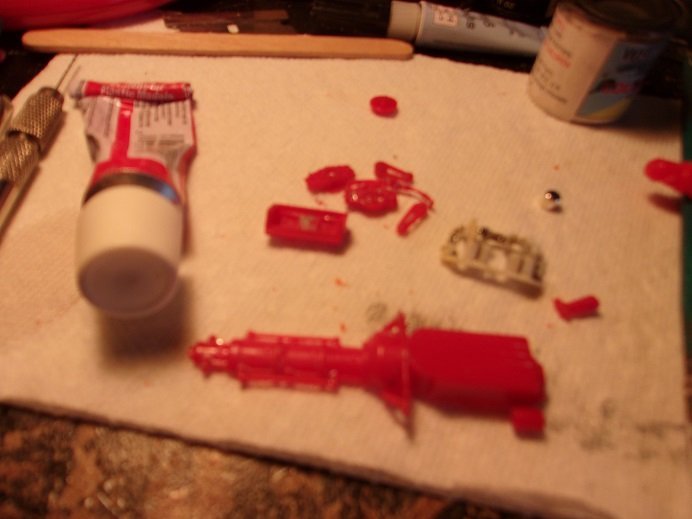
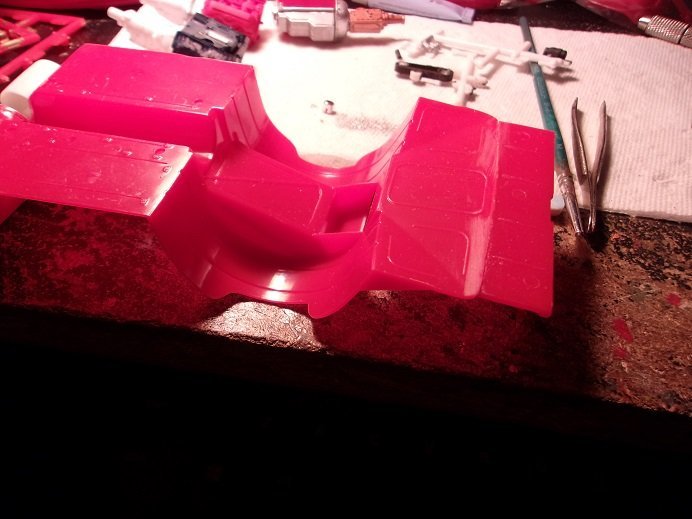
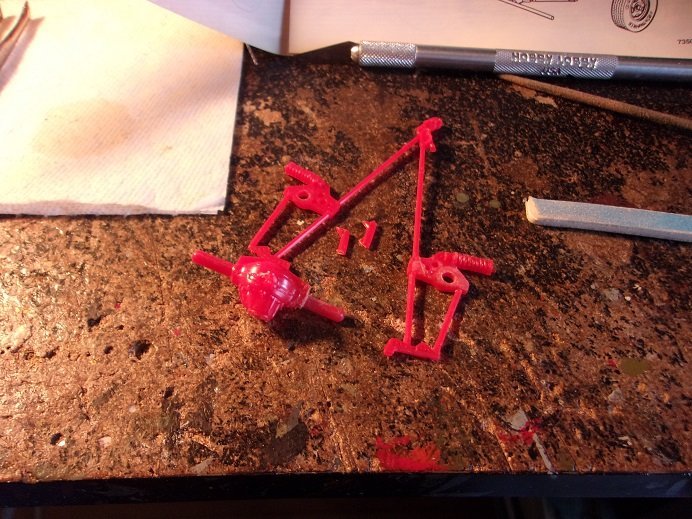
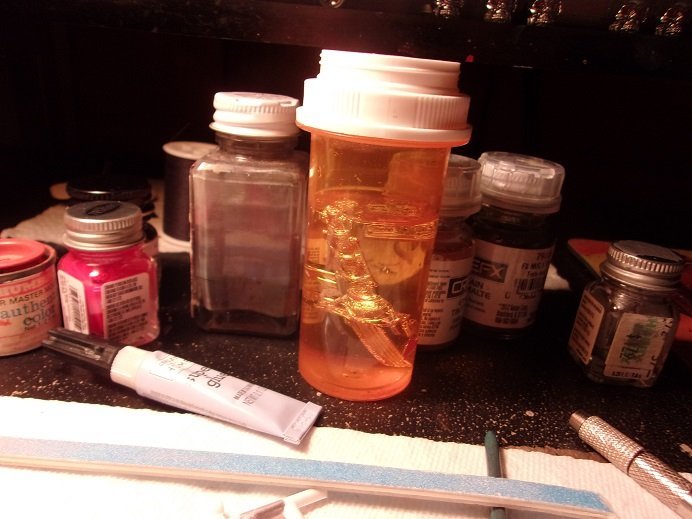
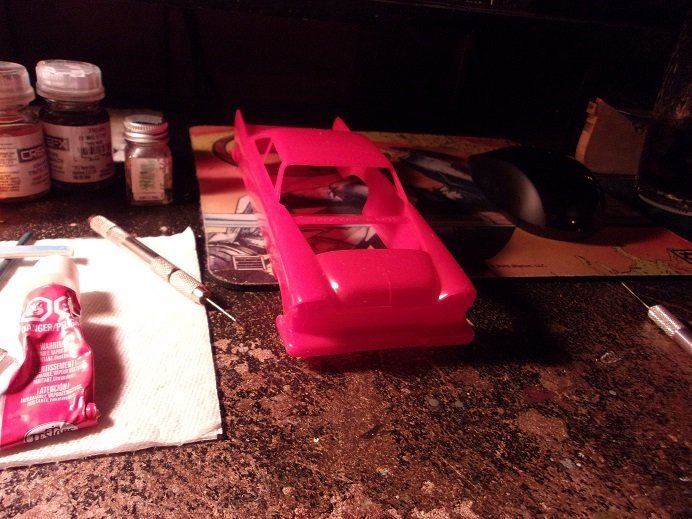
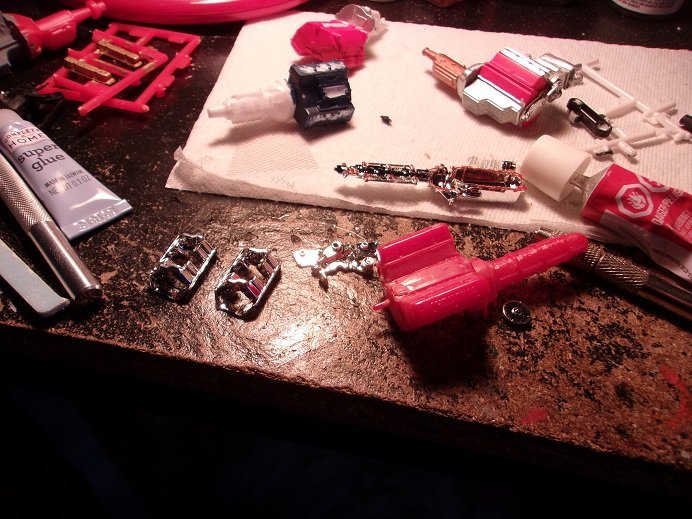
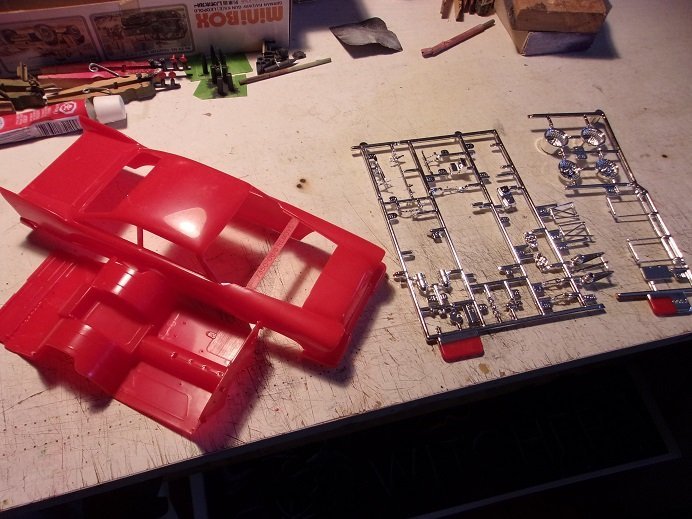
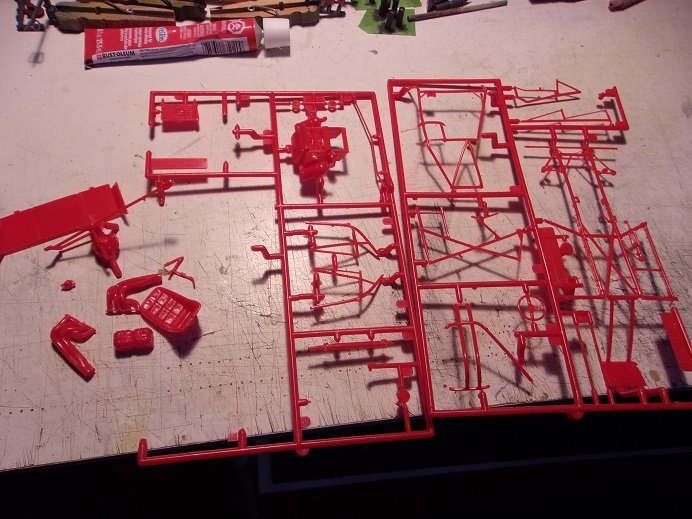
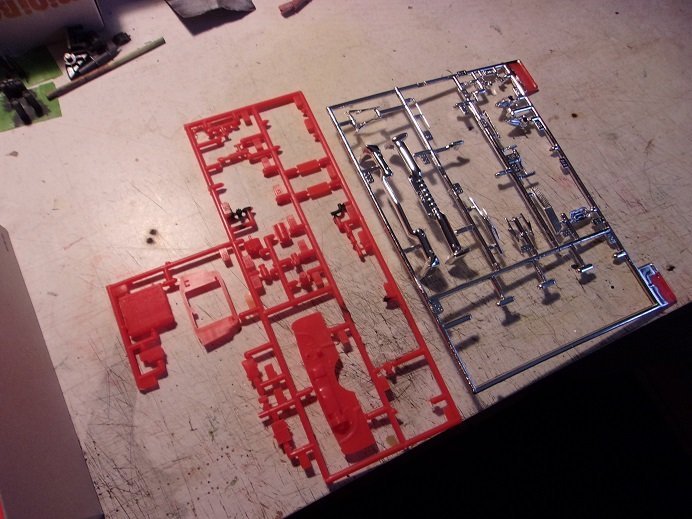
I'm sure that by now you've all read the story of how I came by this model. it's really something to imagine something as wild as this, and find out that there is an actual subject out there. I have to say though.......even though it took a short time to locate a kit, one gets a sense that the kit is a bit on the rare side. even Alan agreed with me......chances are, that this probably is one of their low production kits.....either that, or it sold like hotcakes!. as mentioned, it has the same set up like the 'Jukebox Ford' I built a while ago, so it might be safe to say that these two kits are part of a series {likely quite large too}. the Revell stock car series shared the same similarity......the chassis were all the same, right down to the engines. there was some assembly done in the kit......nothing too dramatic.......a few hiccups, but I can fix them. the molds for this model were tooled in 1991, as it states in two places on the model. one would be visible, so I removed it, keeping the other one for posterity. examining the contents, I saw that everything is here. the engine, which I have already taken apart......was my first focus. nothing is painted and the oil pan / tranny half is not the way I would have it. I was happy to see that the person wasn't in the habit of scraping his plated parts. the intake {on the right} didn't come off so good, and a small piece broke off. fearing that it could be seen, I quickly remembered that I had {the one on the left} an exact manifold in my spare part box. with quite a few kits of this time period, model manufacturers did a lot of parts plating, to make the finished model look more appealing. advancements in the paint department offers so much more, that it's not that big of a need anymore. the decals look pretty good too.......better than I thought they would. I don't see any micro cracking......usually, they tend to shrink, exposing them. there are a couple of creases........they might be a problem, but don't affect the important decals. I found that the front and rear were assembled to the body. the parts weren't cleaned up as I do......and there are some tiny gaps, but I can either fix them or let the decals hide them. the additional decking was also added to the rear edge of the chassis deck....clean it up and it will be Ok. I'm creating a pile of the plated parts I want to de chrome....the bottle is ready. not a whole lot of flash to deal with.......I'm impressed. nothing is broken either. the rest of the parts are just as good........little flash and nothing is broken. part of the differential is assembled....loose stuff.....both headers...looks like I'm in business. the tires are kinda shaggy though......there are flash bands around the slicks and front tires that needs to be cleaned up. I sandpaper the tread to rough them up anyway, so no harm....I've seen it before the glass looks really good......no scratches...........so yea, I'm in business I'll hang around a bit more and do a few thing. if I don't, the admiral will wonder why I was so adamant in getting this kit {I don't do catch and release} I'll clean things up a bit, the tires.......and get parts ready for the bottle. I'll be back.

-
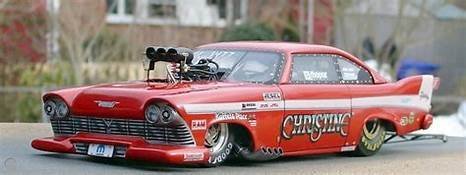
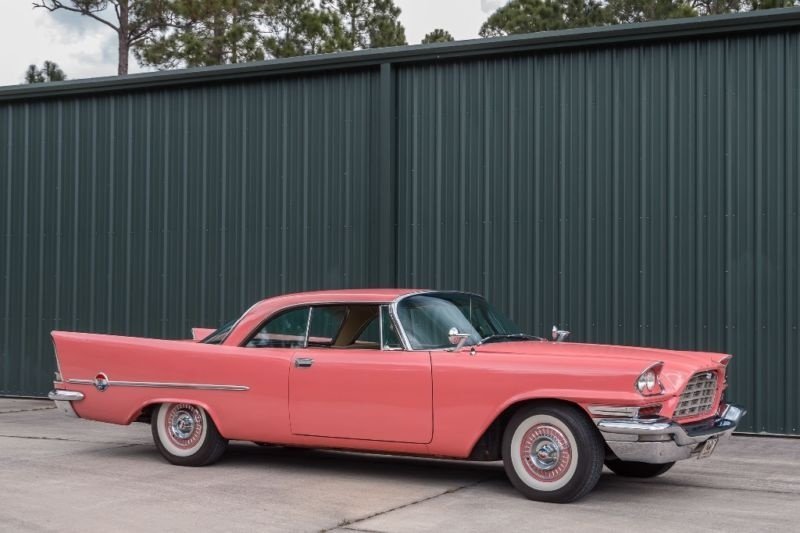
I suppose if this was the actual car...sure. according to specs I've seen, it could do the 1/4 mile in 16 seconds. pro modified cars aren't built like that though......the bodies are just a shell, over a 'single weight' {all cars must be built to this spec} chassis. they also bounced between full and mid size over the years they were built. I recall an old Plymouth wagon we had back in the day...it had a flat head six in it......we used it use it to inflate tires. my dad bought this adaptor that could be screwed into the #1 cylinder which had an air line fitting......he got it from J.C.Whitney. here's something stupid for you: I was told to blow up the tires on the tractor one day. getting the adaptor and stuff.........and out to the car, I drove it over to the tractor. it wasn't that far, I found out, because when I installed the adaptor and tried to restart the engine, it wouldn't start. in order for this to work, the engine had to be warmed up.......in modern car talk, all cars start in closed loop........when warmed it up sufficiently, it enters what they call open loop. closed loop ratio being more fuel, less air, and open loop is less fuel, more air. it's basic talk for the metering the fuel / air ratio. modern cars have a computerized fuel management system, where as, older cars with carbs {later carbs had computer sensors} had a choke /vacuum system. anywho.........after doing this a couple of times, and getting frustrated that things weren't going my way, I devised an idea. I would start the car, and remove the plug with the car running. I did say stupid.......right?!?!! don't worry folks, the car has a built in deterrent system grabbing the spark plug wire send me flying backwards.........that was about 40,000kv going through my arm! ultimately, I warmed up the car, before I was able to blow up the tractor tire dad was curious what took me so long.......so I told him. after he stopped laughing.......he gave me my next task. when I worked at Granite State Tire, one of the techs was having trouble opening a car hood. every time he tried to open the hood, he'd either get a jolt to the gut, or his fingers whenever he touched the hood. upon shutting the car off, he was able to open the hood, where he found that one of the plug wires was touching the underside of the hood!. this also solved why the car was stalling every time it rained Mercury Cougars......and I even owned a Comet......that were susceptible for cracked distributor caps. not only was it a rain issue, but it would also cause excessive piling on the point contacts. the pull was too great Mark.......it's a beast.......so narly that one can't imagine this not being on some sort of track. there are other cars that I've seen that would fit the bill.......how about a 1958 Chrysler 300...... wher there is a model....there is a way
-
Porsche 910 by kpnuts - Tamiya - 1/12 - PLASTIC
popeye the sailor replied to kpnuts's topic in Completed non-ship models
you did a nice job on this one as well.......looks sharp! well done on the engine and paint work -
Renault RE20 by kpnuts - Italari - 1/12 - PLASTIC
popeye the sailor replied to kpnuts's topic in Completed non-ship models
...and with an adjustable spoiler.........you did a super fine job! this is a great scale to do some really cool things -
good stuff!.........there are so many that can do amazing work!
-
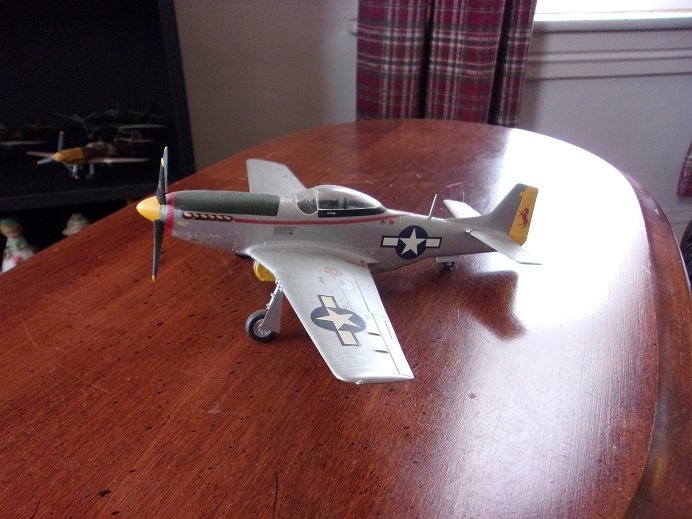
I built the 'big beautiful girl' some time back........didn't end up as the intended model, but it still looks good. I have the inner gear door open......if I had known that always liked this plane.......looks good no matter how you dress 'em up those gears are more resilient than you think.......dropped that model a couple of times........the gear doors came off! {go figure} she's a little dusty, but I did the paint with a brush. I remember the days when there was no rivets at all.........or panel lines. the plastic was a silver laced gray.......white......a sort of turquoise....black..... .and a cream color........oh, and red {I just recalled one model I did}. your process looks a lot smoother......great job
-
it's hard to do striping, unless it can be done with everything apart....I get the similar overspray and seepage here and there. ya did good
-
thanks OC.........I have so many blog....... Blogger......Word Press, and Weebly. most of them are build logs, but whenever I found something that was worth writing about, I would. I love to write.......I think you'll get a kick out of it
-
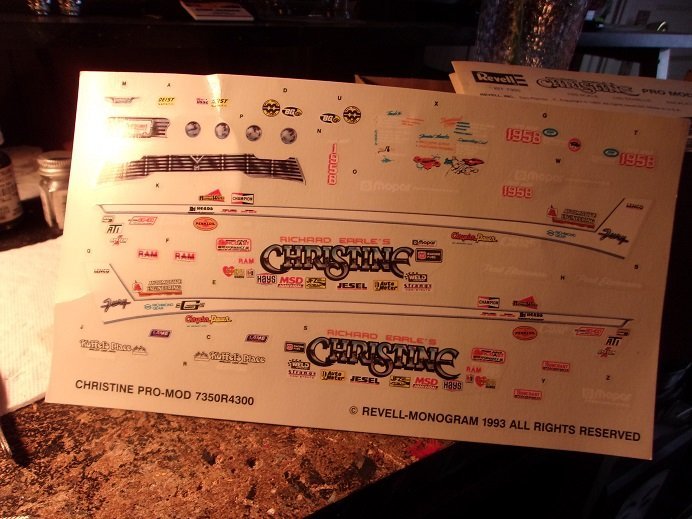
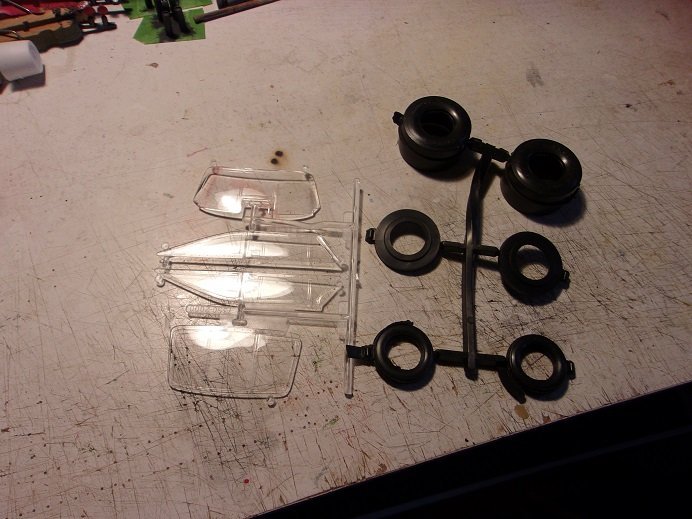
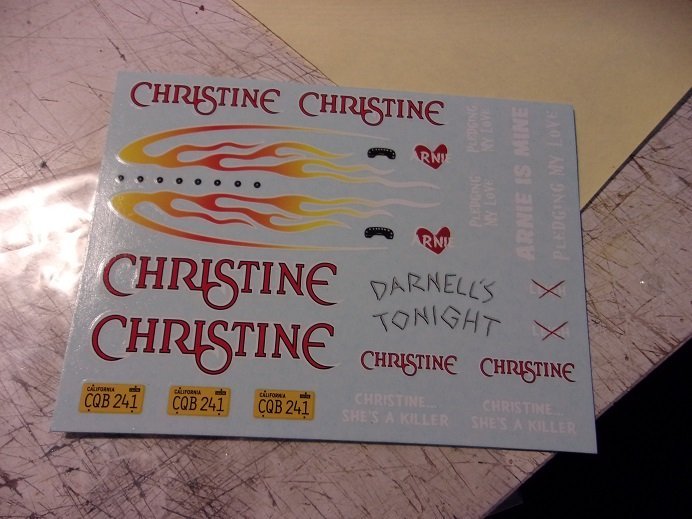
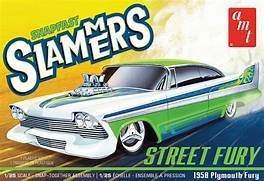
it's a nice kit.......the hard plastic for those who like that sort of thing. another thing I found out, was that in 1958, the Belvedere and the fury was the same model car......one had different features than the other. the body was the same style. in 1959, the body styles went their separate ways and became their own distinct models. I though it odd, during the research and again when I saw the name Belvedere molded into the rear quarter panels. there's little flash to deal with. I've done some clean up to the body, as well as assembling the main parts of the engine for some reason, the sprue with the exhaust parts is warped. above, I cut out the cast off tabs on the body, and assembled part of the front suspension. note the Ghost through the rear trunk deck. the tires are assembled...just a little touch ups for the back sides of the rims.......they should roll. they have a button style insert that shouldn't be cemented. I won't be dechroming any of the plated parts...the balance is pretty good. the dominant color is red, but I'll still paint. if it was a dark plastic.....you could likely get away with it, but with light colored plastics, it has a sort of transparency, that can be a turn off. when I was younger, I never gave it much thought.........if I only knew then what I know now these are the decals........they scream pro mod........either that, a stock car the only ones I will use, are the license plates. more on this soon


-
just for chucks and grins, I looked at the movie bio, to see what really happened to produce a possessed car. you would thing that someone connected with the building of the car, would be the root. true.......two auto plant workers died because of the car, but it had already been built, being prepped and readied to be driven out of the plant. so how did the car become possessed? ........a rogue fan belt.........self conscious body.......disgruntled radio....hard to say. they don't even give any reason........all that is known is that as long as the car is driven and loved, it's happy. it does tend to change the present owner to the reflection of it's evil self, before it ultimately kills them. unloved.......and the car falls into disrepair, until some other sap shows up..........didn't have to work too hard on Arnie no.......sorry, not my son..........he has a Santa Fe.........that's bad enough
-
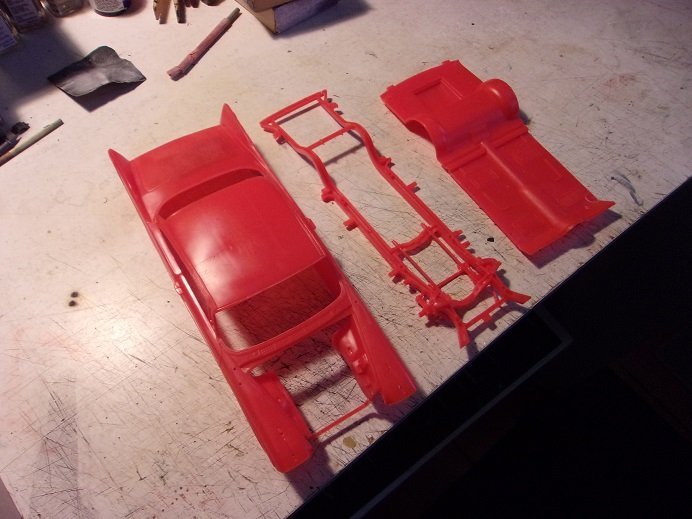
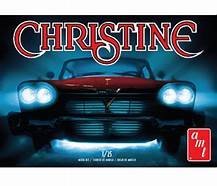
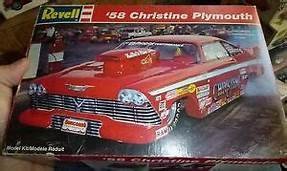
here is a kit with an interesting story. I have been fascinated about the history of models and the molds that made them....companies going out and the new ones that take their place. Companies change hands and molds move around even faster. take the 1:72 Fujimi Stuka I built a while ago........three other companies produced that very same model. this is also a prime example of how companies repurpose molds to suit other model subjects. I started writing blogs on this subject.....this particular model is the second installment. it all began........ the admiral and I were at Michael's craft store this past week.......she likes to do puzzles and wanted some puzzle glue, so she could mount one she liked. there was confusion over the frame for it, so the idea was to get exact measurements of the puzzle, so to get the correct frame. honest......I didn't say anything.....but she said that we could look at the models too {she knows my obsession well}. looking them over......they were kinda scant for anything really interesting....Hobby Lobby has a better selection, although I think they are even thinking of dropping the idea of carrying models. I was deciding between two of them, when the admiral pointed to Christine........the AMT logo quite prominent. the art is what caught my eye.......looking it over, my mind started to wander.........this would make a really cool looking pro modified I shouldn't have said it out loud though, because the admiral got negative about the idea, stating that she wanted to see her as intended. buzz kill! this kit would be perfect.......it even includes decals! of course, I didn't know what the decals looked like, but I'm sure they pertained to the subject at hand. the subject of movie cars {and trucks} is pretty extensive in the modeling medium, although there are only a handful of movies about angry autos. you don't see the Plymouth Valiant that Dennis Hopper drove in the movie "Duel".......instead, you see Ghostbusters, the Dukes of Hazard, Night Rider, The A Team, Rambo.........the list goes on. yes....and for all you do-gooders.........Batman! Christine to me.......is right up there with "Carrie"....good scary fun. Anyway.....we got home, and right away, my mind was going.......where does this model come from? I found that the model is actually produced by Round 2, but why the AMT logo? well......firstly.....keen to note that Round 2 models are actually made in China...they make that clear by an ink stamp copyright, instead of the mold imprinted date stamp that older model manufacturers did.....still do if viable. Round 2 tends to remove them, which makes it harder to trace their history. I looked up the model on Scalemates.......this subject in an old one. Johan came out with the first on the subject in the late 50's. it seems that Johan and AMT started out as die cast toy makers........they also made promo models for car dealerships. they were metal with an automotive finish, that gave the customer a visual experience when buying cars. some time after the plastic model kit craze started, AMT produced this model kit in 1983. I am not familiar with this series, but I looked at some finished models, and the way that the carbs and high hats protrude from the hood, made me wonder if there was an engine in there. there was a period of time where a lot of the detail {engine and undercarriage} was molded, meaning a lower parts count. of course....during this time, modelers were clamoring for the more detailed model, and the model medium was evolving at a very fast rate to make them happy. AMT also had a snap together kit of this subject as well......I may have seen that instead...dunno. not seeing a definite date stamp makes this hard to confirm, but I'm pretty sure these are the molds where Christine comes from. one can probably tell by the sprue numbers.......I dared not go to that extreme, since the admiral was getting perplexed with my obsession as it was. but.......if your going to go out on a limb....you may as well do it for a good reason! looking further down the time line, in 1993, Revell produced the model I envisioned......the Richard Earle's '58 Plymouth Fury pro modified "Christine"! you guessed it...... all hell broke loose! Amazon and E-bay was first......E-bay had two.......a broken kit for $30.00, and another for $65.00. E-mailing the guy about the complete kit took time, so I looked in Etsy and Mecari....they had nothing. I even sent an e-mail to Alan Bussie @ old model kits. meanwhile, the seller from E-bay replied that the model had already been sold.........shaz-but! Alan replied that he had only handled one such kit in his business's existence, and since his enterprise has grown as large as it has, he had stopped doing reserves. as my efforts were falling around me, like Army men, I thought of the last ditch remedy for the itch I have, and it was pointing towards buying the broken kit and scratch producing the parts I needed. I took another look in E-bay and saw another one.......this one was listed at $80.00 {time to get the taste tester, me thinks}. I hit the 'buy it now'......and I got it....much to the chagrin from the budget director. the reply notification came quickly.........I got it! checking the tracking number provided, I could see the model by Thursday, the 10th............the postal service being my friend {at the moment}, delivered it on the 8th.......yesterday! doing the traditional parts check, seeing that along the the bottom box side panel, it appears to have been razor cut, I'm happy to report that all the parts are here. whoever owned it assembled part of the engine and a few other aspects without painting anything........a bit of a cliffhanger, but not too tough a challenge, I'm hoping. there are some parts that are chrome plated, that require paint, so I will need to do some chrome removal. I've already taken the engine apart........good thing the person wasn't into scraping the chroming off the parts before gluing the intake manifold did break though....not too serious, but enough that I didn't want to use it........ as luck would have it, I happened to have the exactly manifold in my spare parts box! I've done a few more things, but I'll save it for the log {I've got some pictures too}. when the rolling of the credits was done, and the admiral was calmer.......as I was tinkering with the model, she asked if there would be any more surprises.......I guess she meant, "is that it?" "dunno.........there could be a sequel

-
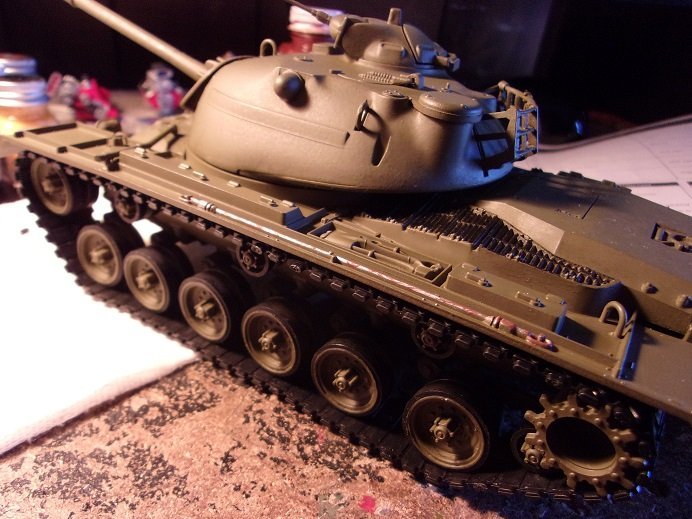
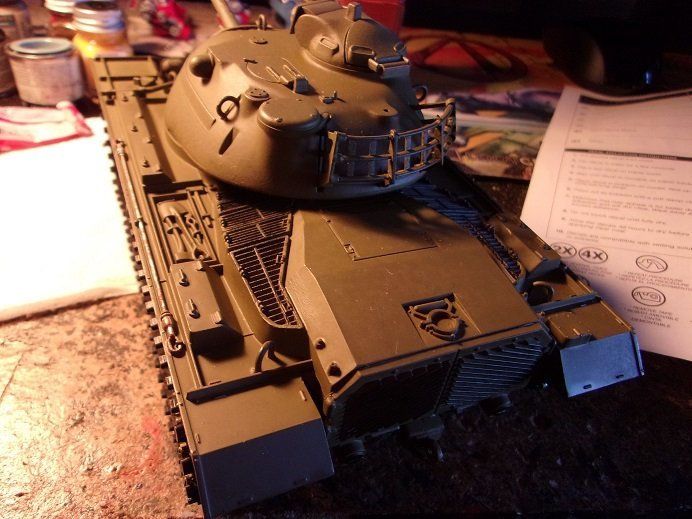
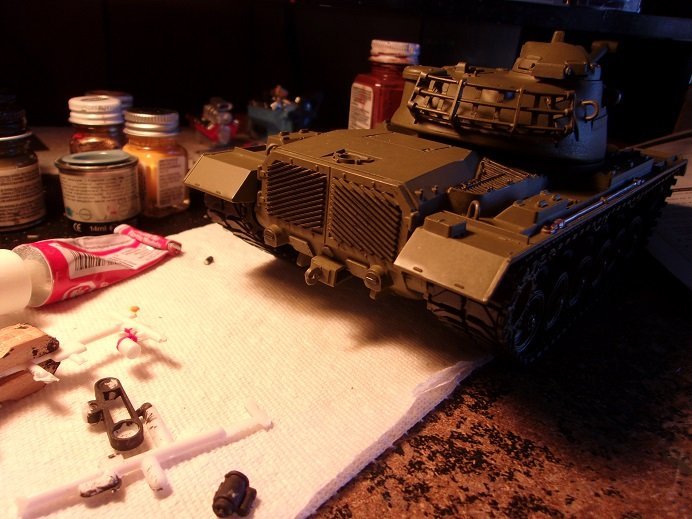
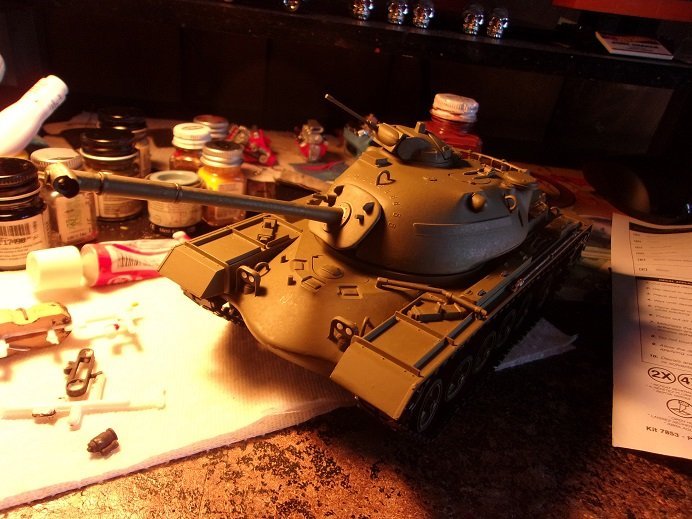
hello gents.......her are a few more pictures of the tank.......almost forgot I took these. they were still in the camera. I did the odds and ends, like highlight the grates and rear vents with flat black.........headlights........tools and cables.......just finish things. the decals are on it now, but I've yet to do the weathering thing......I will when I calm down. frantic search....don'tcha know yep.......been kinda crazy 'round here........enough that I truely believe that the admiral wanted to kill me but I persevered there is quite a story here.....so much so, that I even wrote a blog about it.. I'll tell ya the story in the next log {you'll love it J}

- 30 replies
-
- 12
-

-
the size of the model is what knocks me out! your ability to go this small Greg amazes me.....it's absolutely beautiful! I find this scale confusing......there are the 1:350 that are around three feet long........and then there are these. how is this so?
-
...or routine maintenance looks very nice!
-
superbly done!
-
love to try camo like that.........daunting you have such cool pictures!

