Charter33
-
Posts
455 -
Joined
-
Last visited
Content Type
Profiles
Forums
Gallery
Events
Everything posted by Charter33
-
Coming along nicely Chris. Background research and hunting down that extra detail to enhance a model kit is a very satisfying and rewarding aspect of any field of modelling, especially when you are committing so much time and effort to a project like this one. I regularly refer to my copies of Longbridge and McKay, but wasn't aware of Alan McGowan's book. I am now. Just found a copy - I'll have it by the weekend......thanks for bringing it to my attention! 👍😉 Cheers, Graham
-
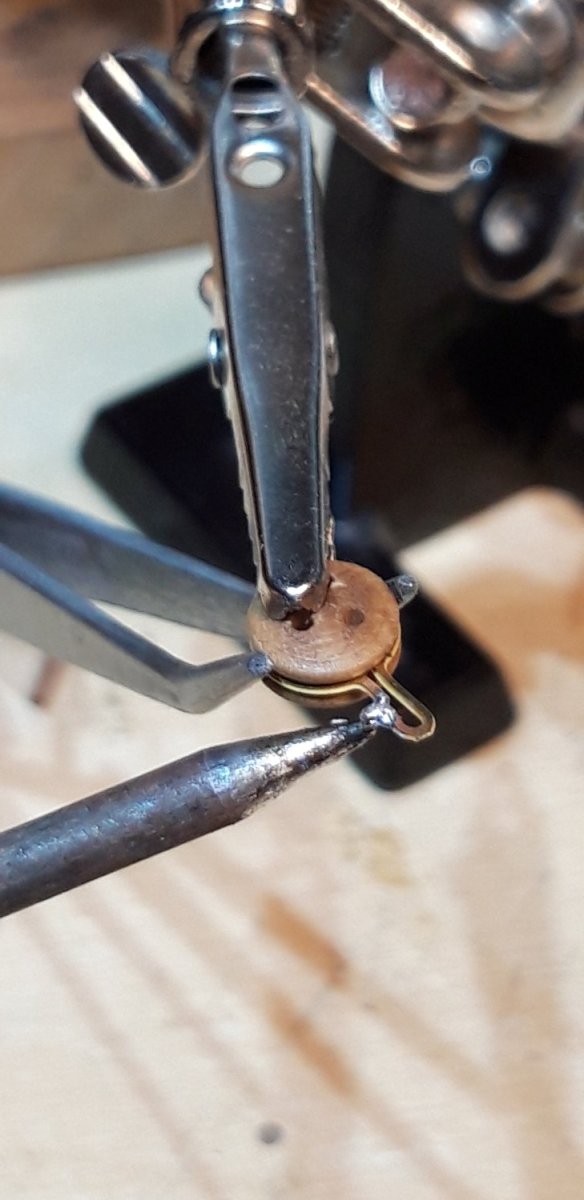
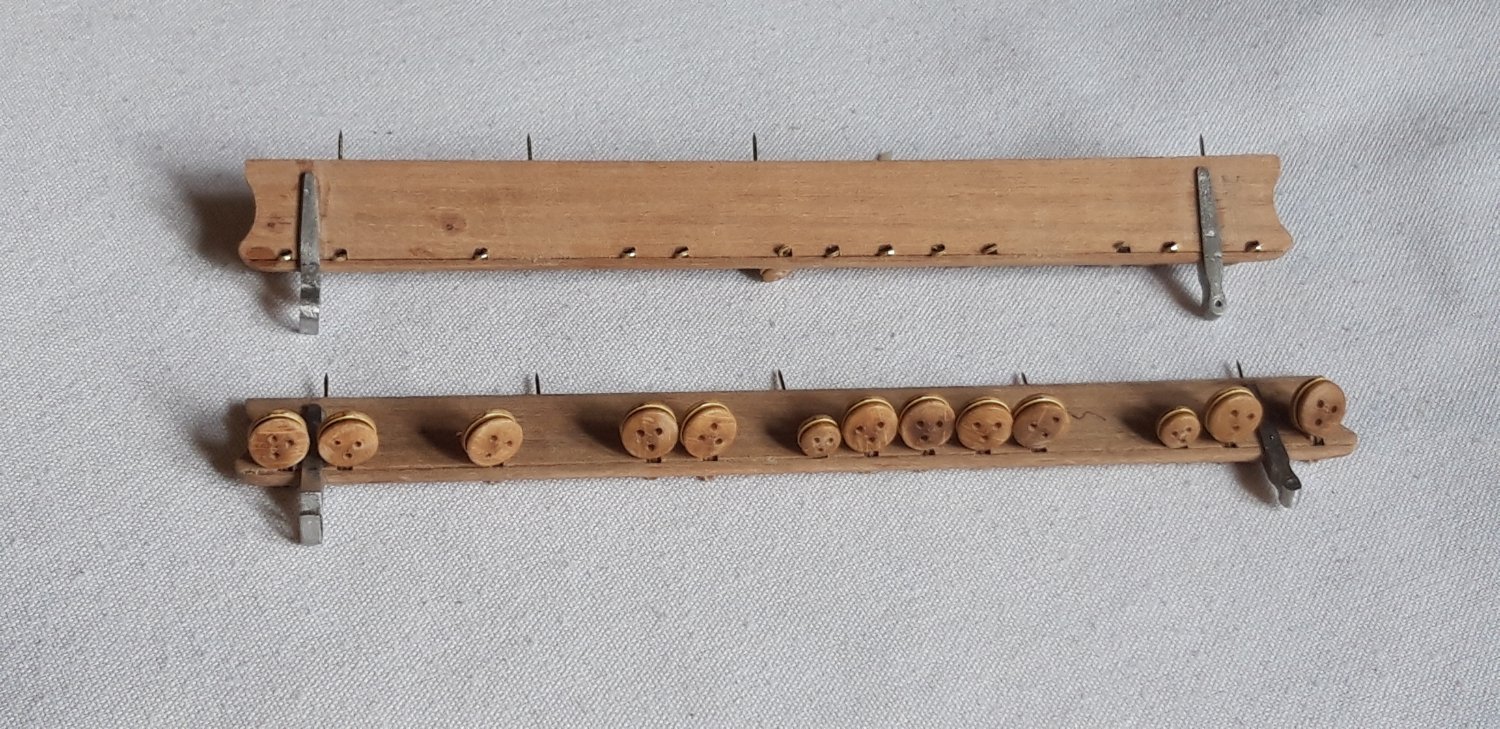
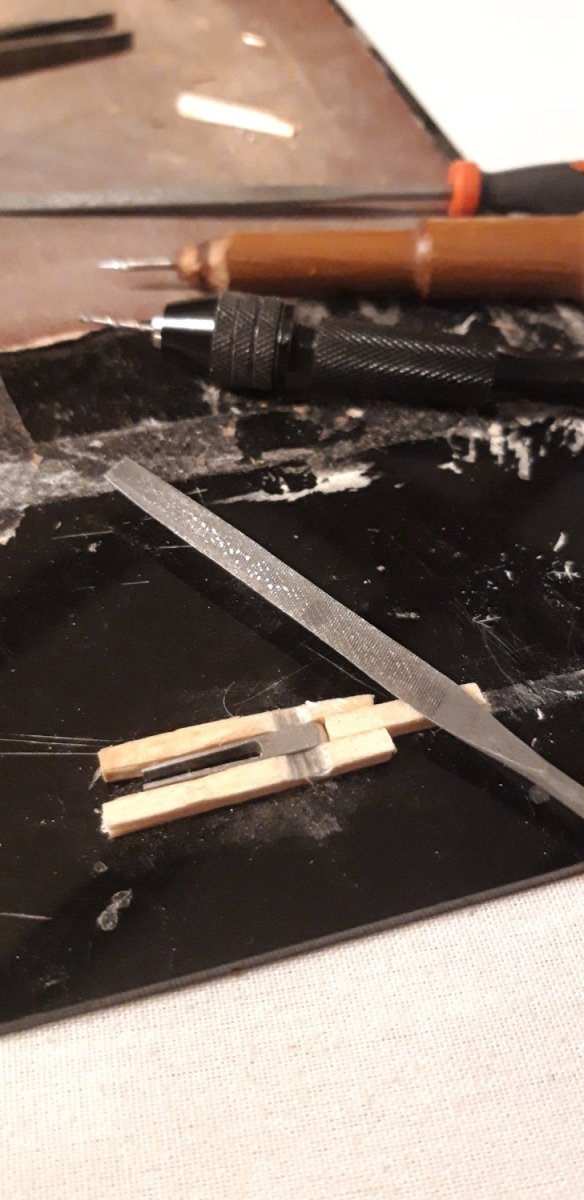
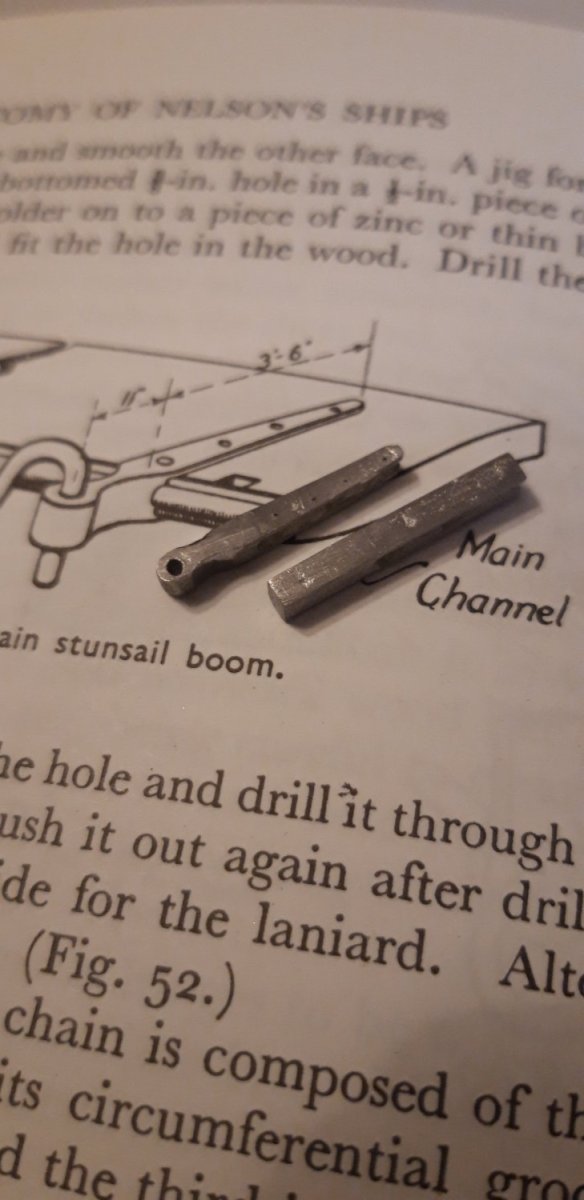
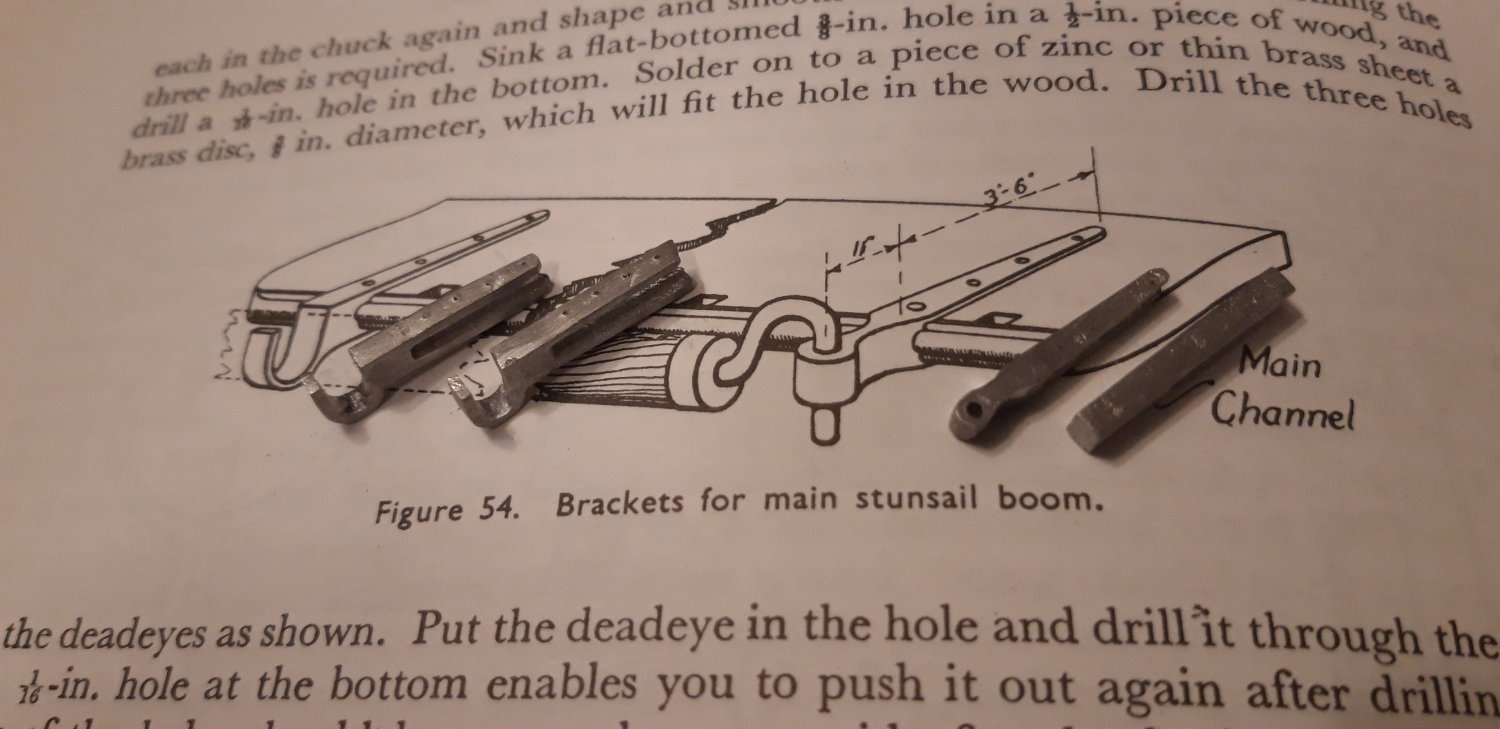
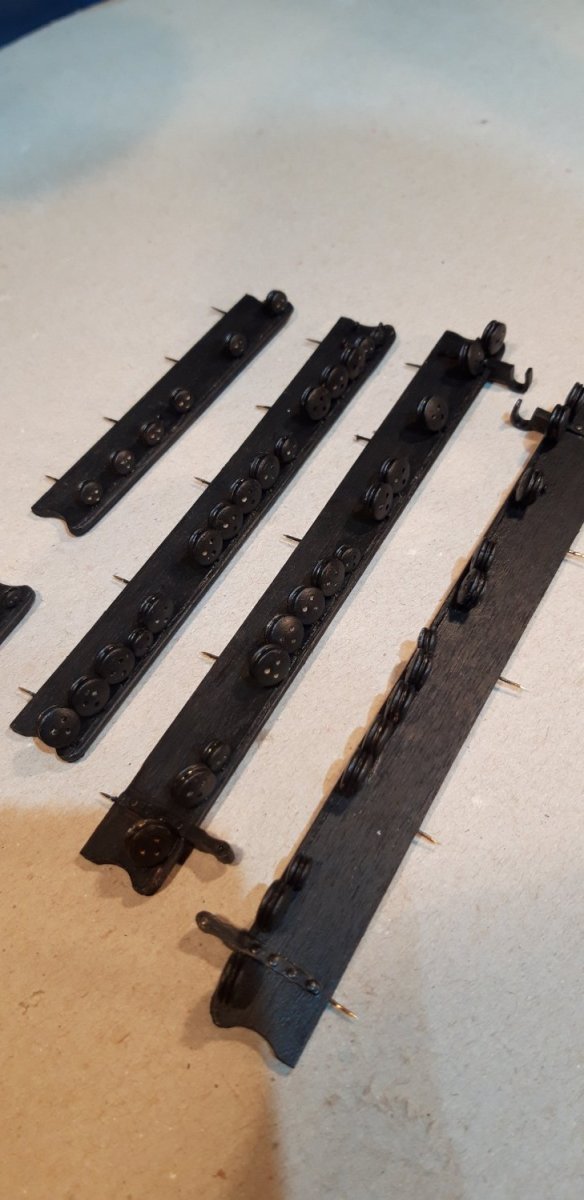
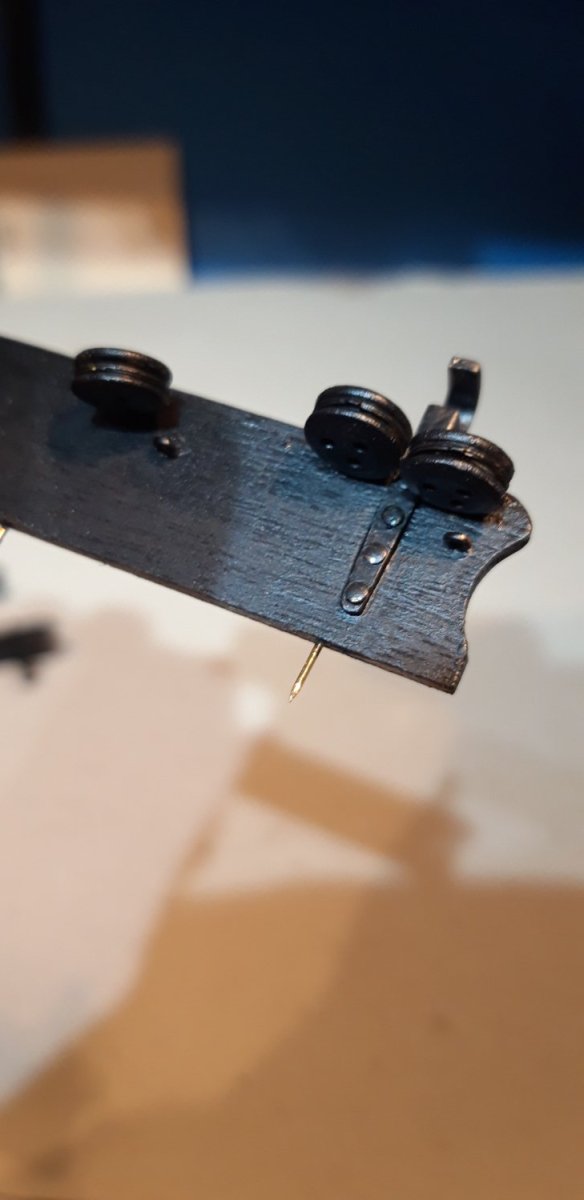
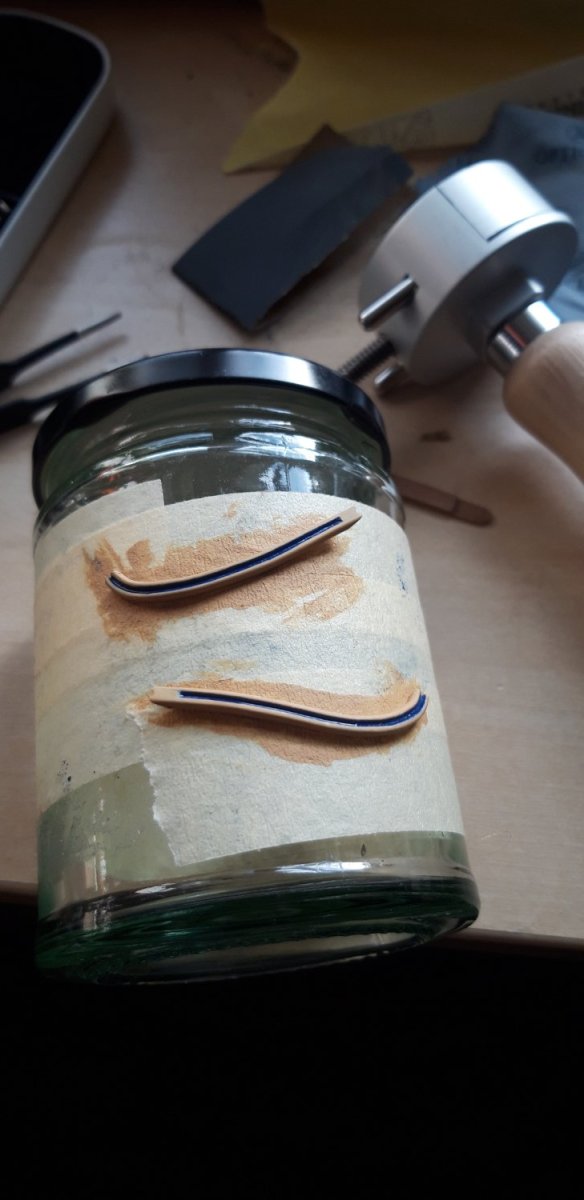
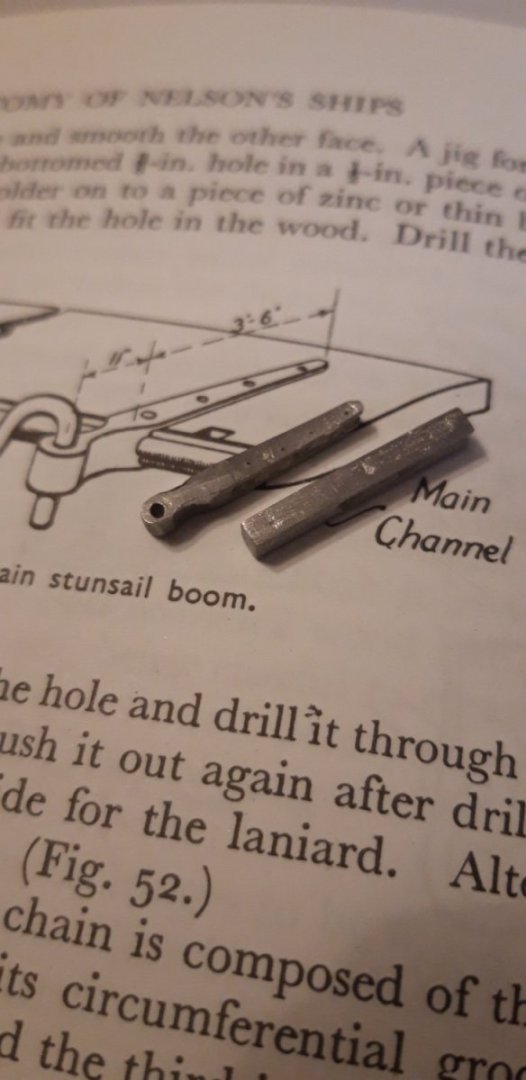
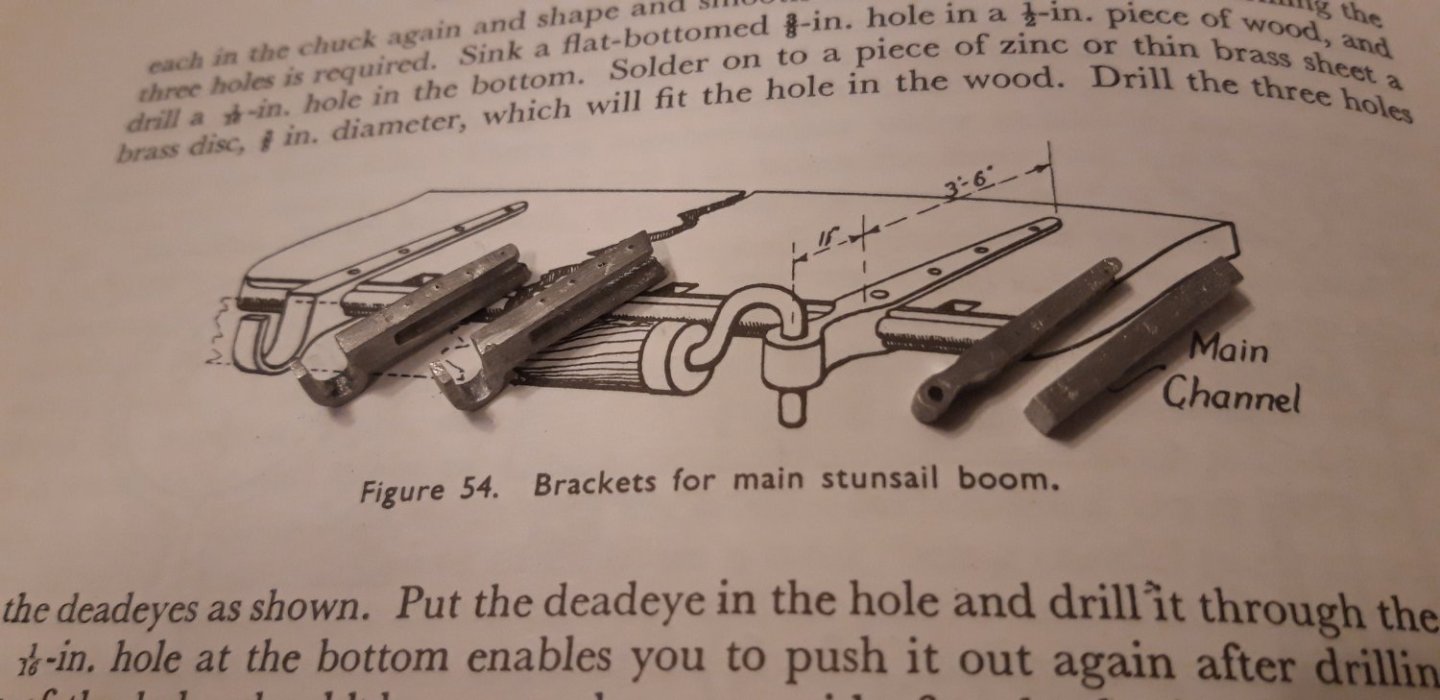
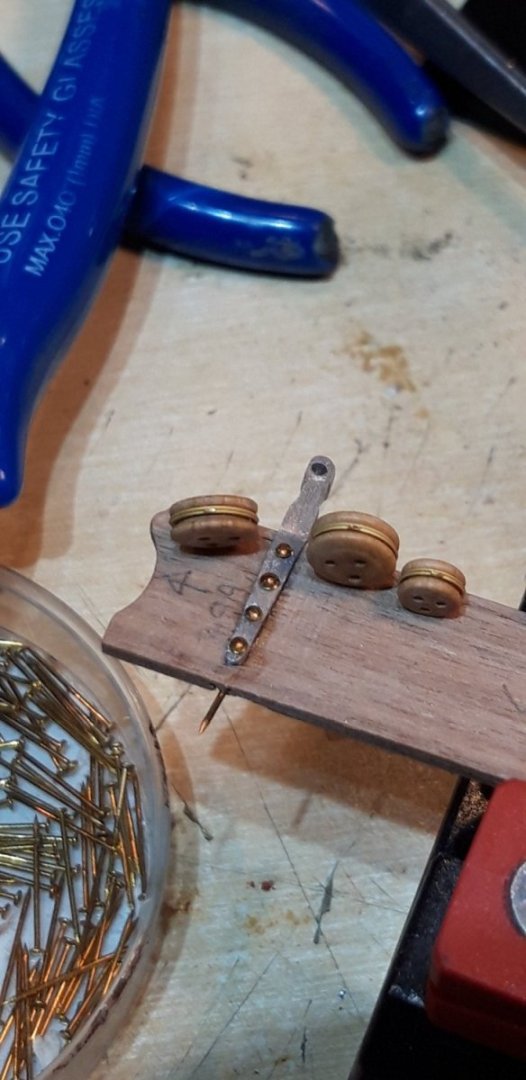
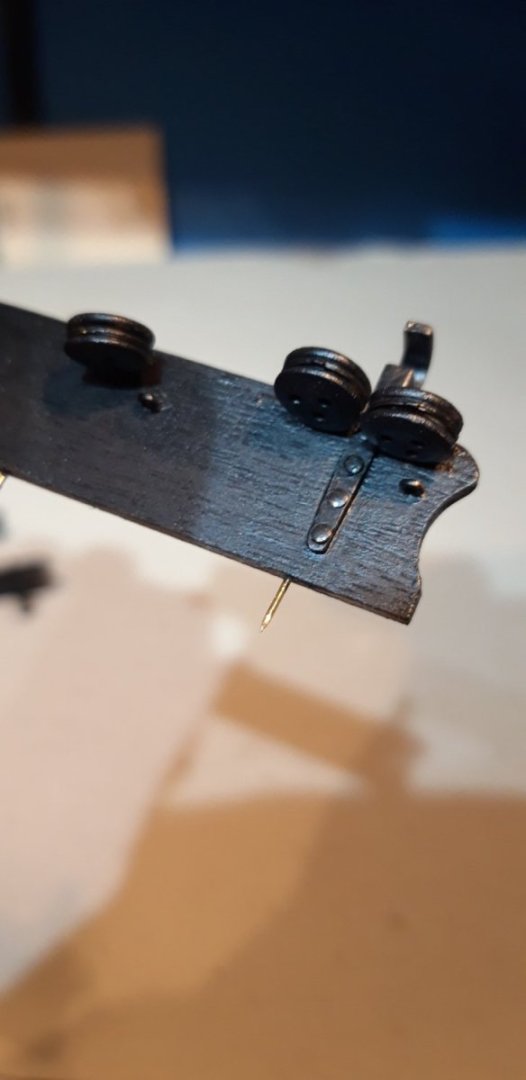
Thank you for the likes and kind and encouraging comments. Robert, I still visit your build log for inspiration. Have you managed to get your Victory mounted on that intriguing base that you were working on? I look forward to seeing it done...... First step with the channels, once they had been cut from the sheet and cleaned up, was to fit some mounting/location pins. These were made from fine brass lace makers pins with the heads cut off. Next the pin positions on the hull were marked and drilled with a 0.5 mm drill bit. Deadeyes were slotted into strops and the nib joint soldered, self locking tweezers keeping things together. A small hole at the bottom of each cut out in the channels acted as locating aids before the covering strip was glued in place. The white metal castings for the studding sail boom bracket and the support were filed to appear closer to the shape shown in Longbridge's illustration (page 94)...... ... the 'waist' just inboard of the ends achieved with a half round needle file and a simple jig constructed from matches.. Once glued in place, to simulate the method these components are fixed to the channel, the pin heads previously cut off were literally pressed into service. All the assemblies were painted... These are just dry fitted at the moment. I've decided to add the brass decorations to the hull first, and the advice is that it could also aid the fitting of the top row of gun ports - thanks Robert!😄 Cheers, Graham.


-
If you're thinking of using a PVA adhesive for the second planking layer you might get away with giving the hull's filler a brushed coat of watered down PVA. A little tip about viewing pictures on this site - when using a touch screen cell phone to look at build logs if you tap a picture it comes up in a format the lets you zoom in. On a PC try clicking on a picture, it can than be enlarged in the usual way. Good luck! Graham
-
Good progress Chris. There's a steep learning curve with this kit, but patience and perseverance pays off in the end. I found those quarter galleries a challenge too, and commented in my own build log on there were times when having as many arms as an octopus would help 🤣. Planking the middle deck is a great opportunity to practice the skills you need for later in the build, and your work here looks impressive - well done! The filler has done the trick on the first planking. Are you planning to seal the filler surface in any way to aid the bonding of the second layer of planks? Graham.
-
Welcome Chris, from another Caldercraft Victory builder. You've certainly got off to a flying start! It's a challenging model, but lots of enjoyable and rewarding tasks lay ahead. It may seem way ahead in the future, but it might be worth considering how you are going to display the model once complete. I mention this as some methods need a bit of preparation such as pre-drilling holes in the bottom of the keel etc. before progress with the hull construction interferes or makes the task more difficult. One technique I wish I had used, because at that time I was unaware of it, is the infilling of the spaces between some of the bulkheads, notably at the bow and stern, with a soft and carvable wood to help with the construction of the first planking. As you say, there are some truly inspirational build logs here on this site and time spent reading through them is genuinely time well spent. I always refer to the work of these very skilled builders together with the comprehensive instructions provided by Caldercraft. My build is only my second model ship. The first was nearly 40 years ago followed by long period of absence while a growing family took precedence. Good luck, I'll be following your progress with much interest. Cheers, Graham.
-
That's right - model making area at the far end, wood turning lathe on the right, and woodworking bench to the left at the near end.
-
There are quite enough gun ports and gun muzzles on a model of Victory to last a lifetime, without adding more to the workshop itself, Ron 🤣 ....but the Admiral's input to the build was a request for a weather vane above the door, and you've now planted the seed of an idea..... and I love a challenge!
-
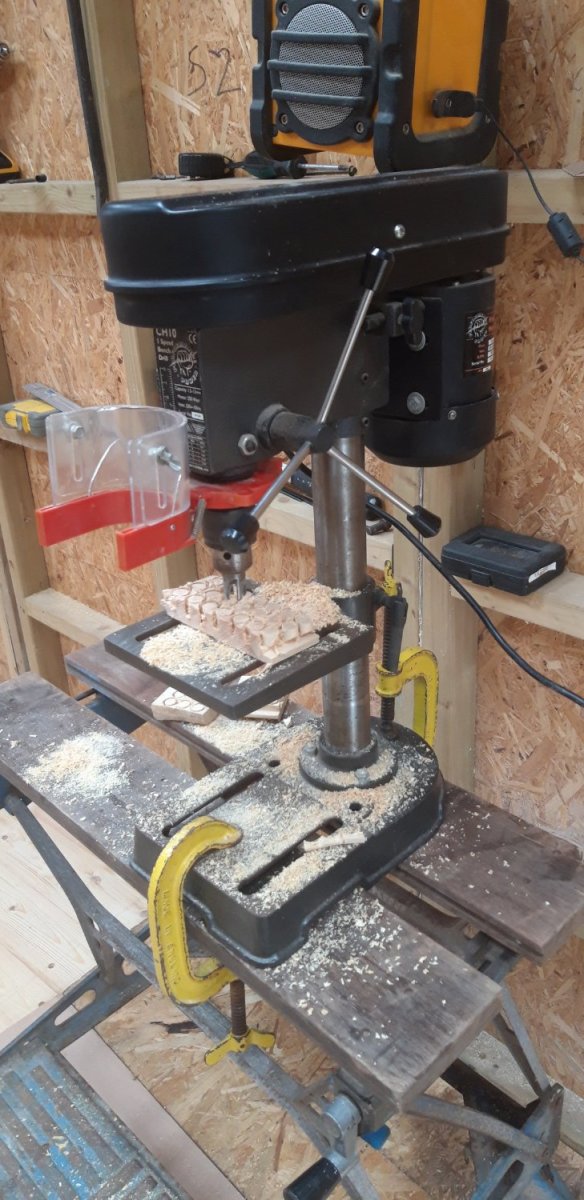
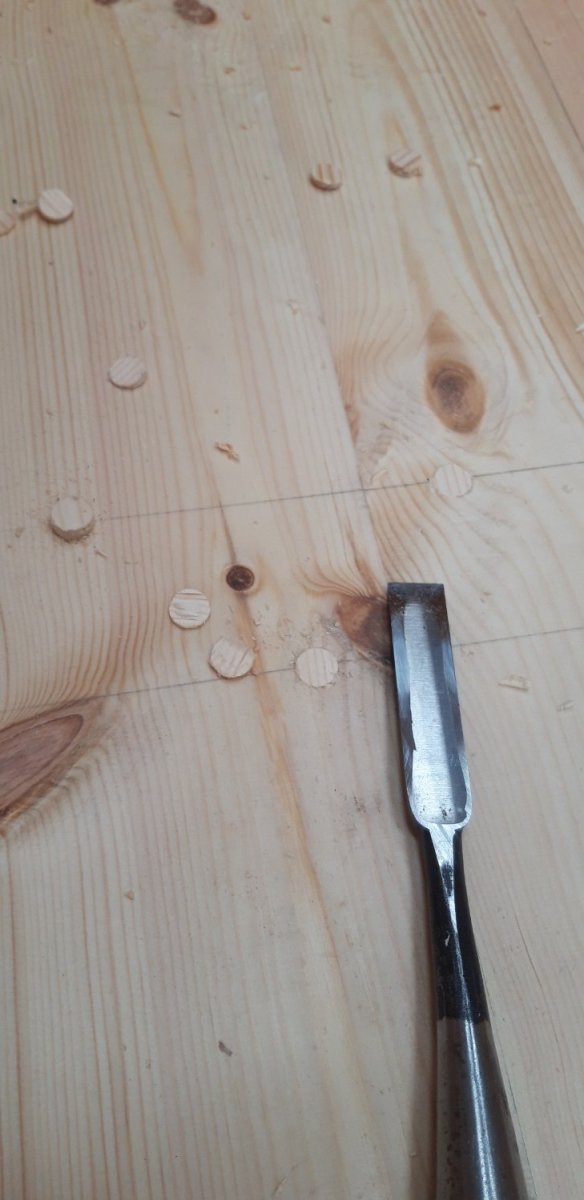
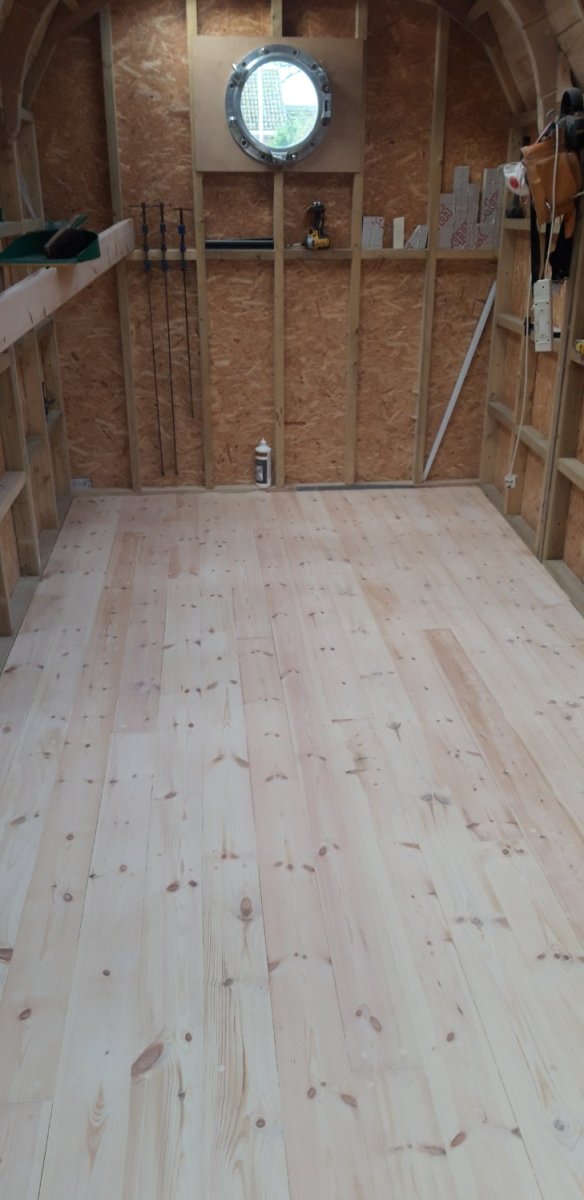
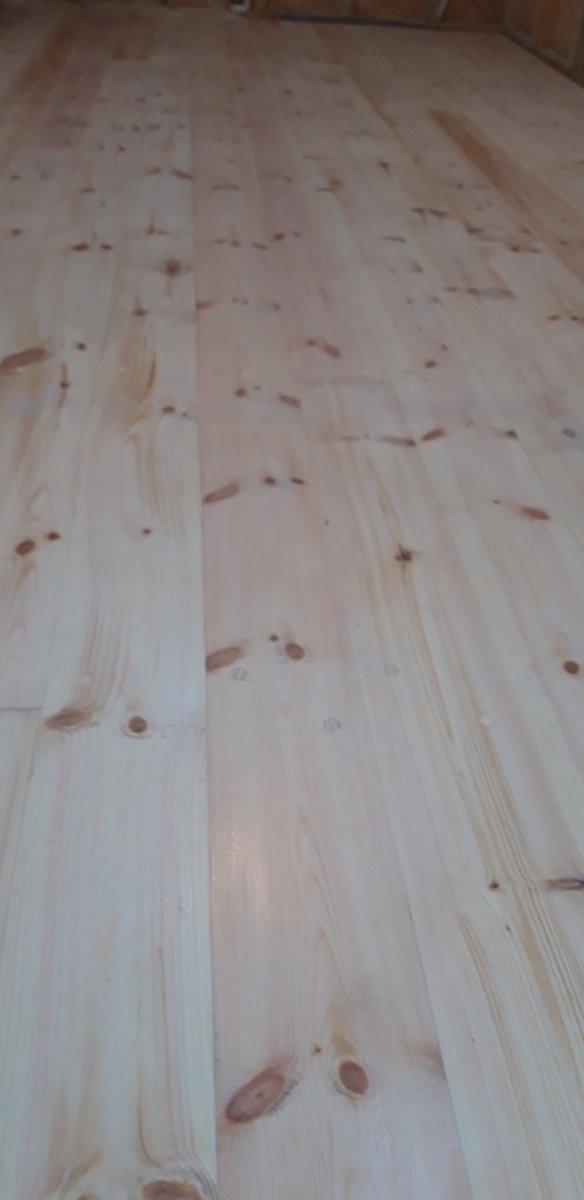
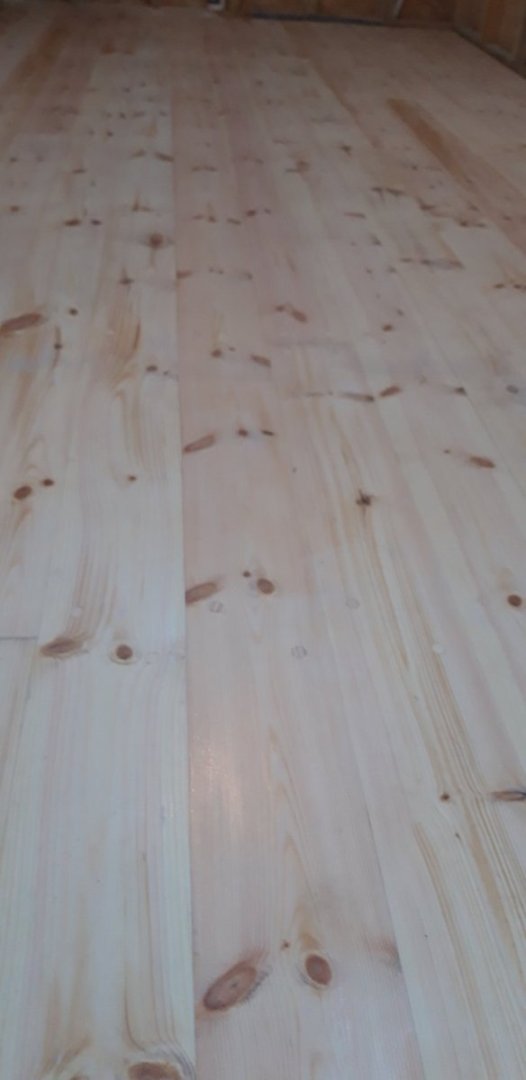
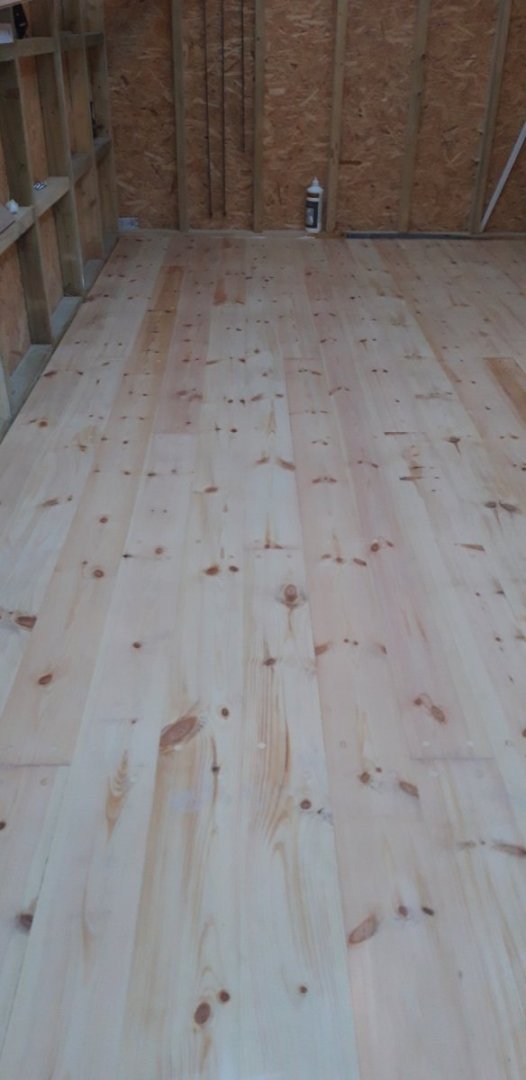
Installing the floorboards started with a plan, much used throughout the build, and now well worn.... In keeping with the nautical flavour there was only one method guiding the laying, the four step butt planking pattern. Once a board was cut to an appropriate length fixing holes were pre-drilled with a 12 mm spade bit and each piece secured to the sub-floor. A 1/2" plug cutter was used to convert offcuts of boards into covers for the screws. Mixing metric and imperial tools in this way resulted in a nice tight fit. Once these plugs had been glued in place a sharp chisel made quick work of getting them level and flat. The floor after sanding - No, not quite treenails, but visible at this scale? Oh yes, but nice and subtle..... The first coat of finish has been applied, the second and final coat will go on tomorrow evening after a light sanding. Cheers, Graham


- 89 replies
-
- 15
-

-

-
Totally agree Rodger, and tool protection is very high on my prority list. I'll be looking to fit a de-humidifier in there, especially after seeing what happened to one of my friends last year when a freak temperature swing of over 12 degrees one night made his pre-fab concrete workshop look like it had rained inside. He was mopping up pools of water and had to spend days dealing with surface rust on tools and equipment. I started preping the floor area yesterday and this included laying a vapour barrier on top of the OSB sub- floor base. The softwood boards have had nearly a week to acclimatise, so I plan to escape to the bottom of the garden later and begin fitting them...... Cheers, Graham
- 89 replies
-
- 10
-
-
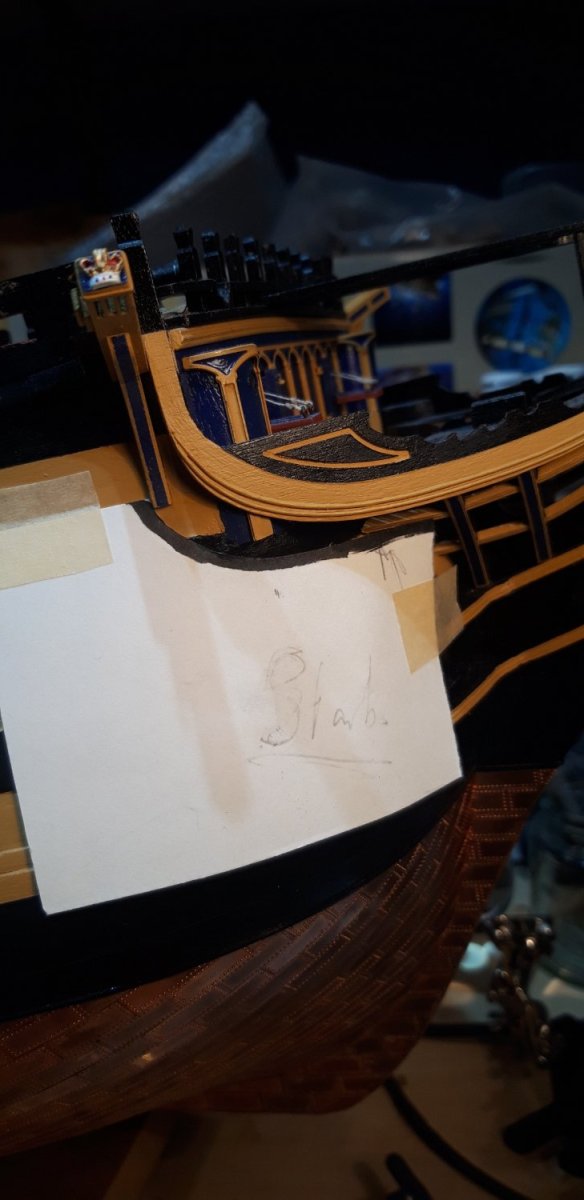
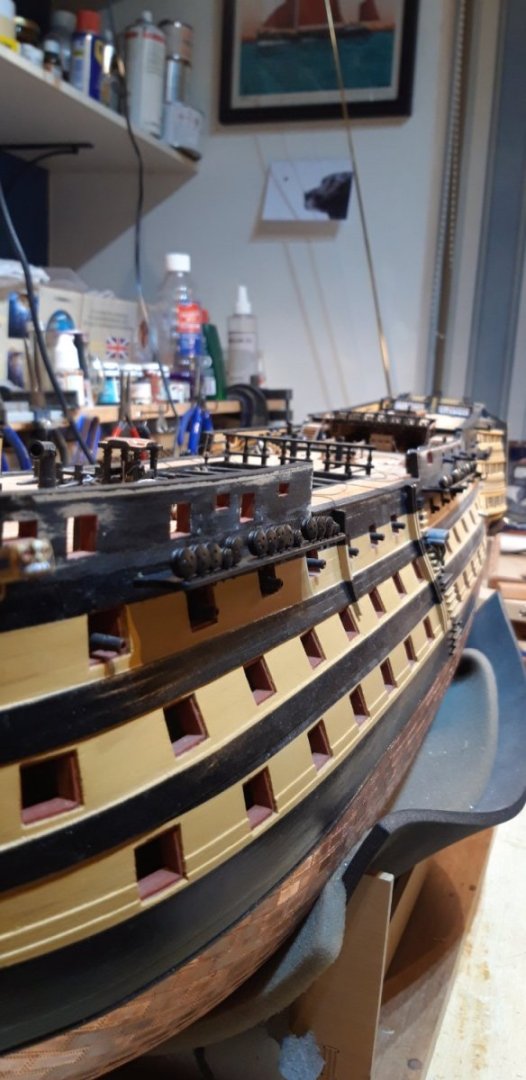
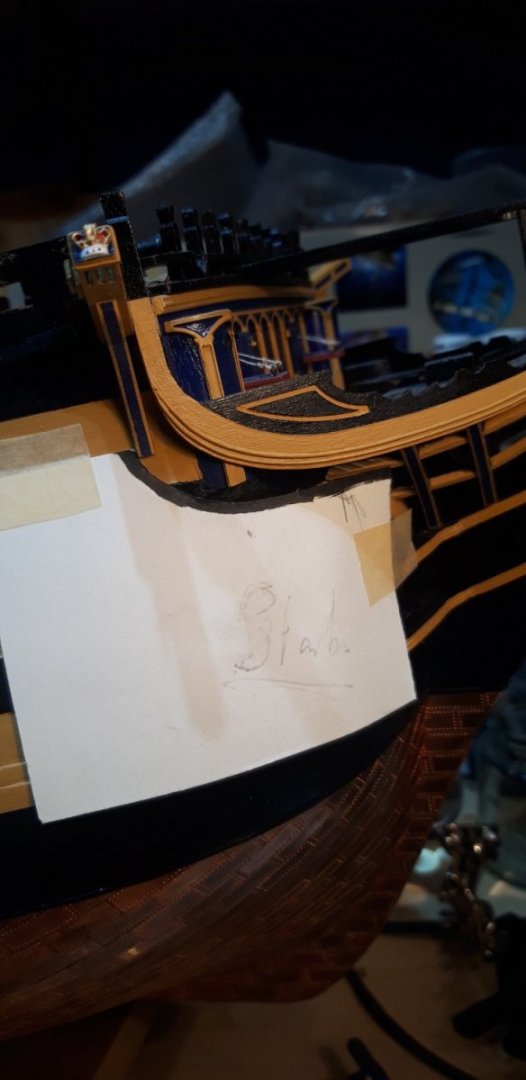
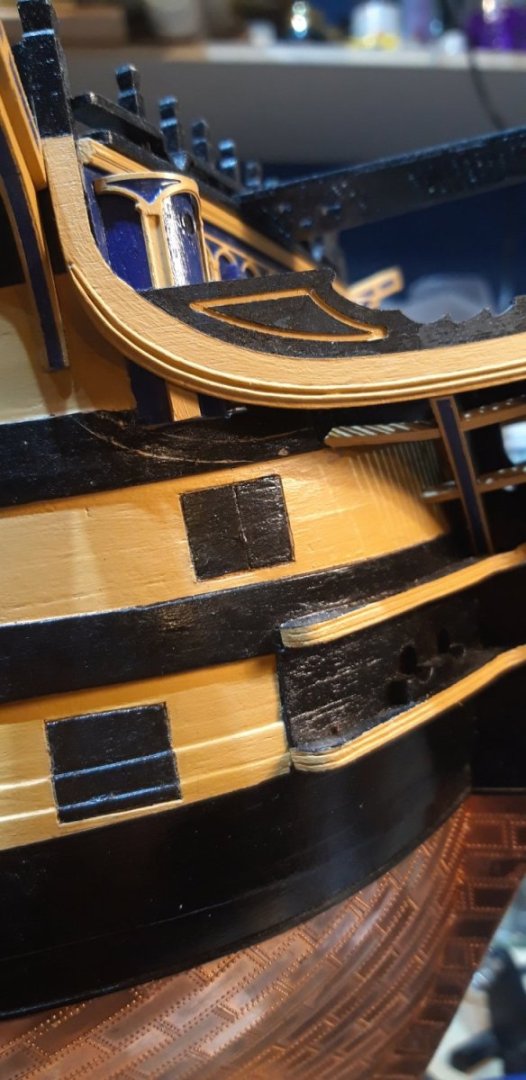
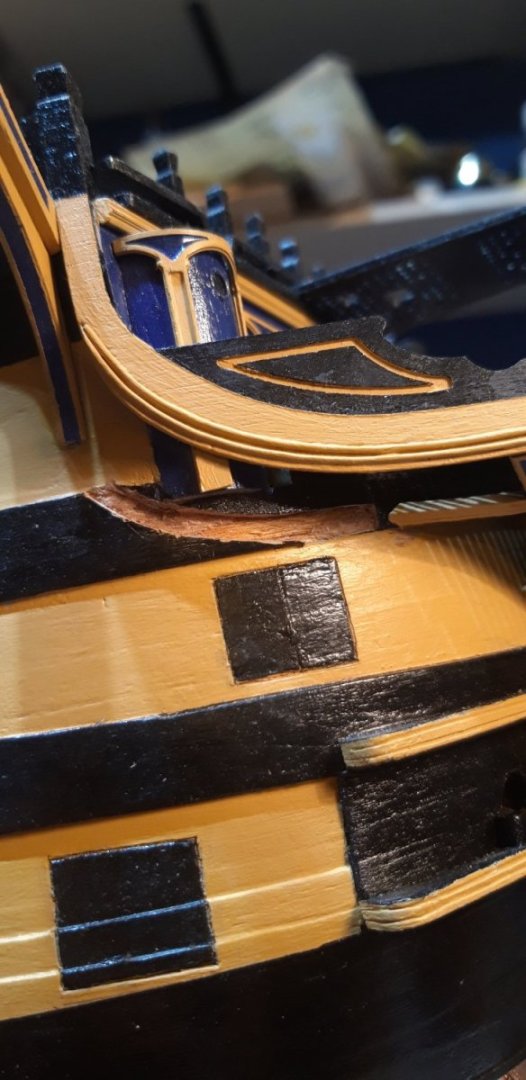
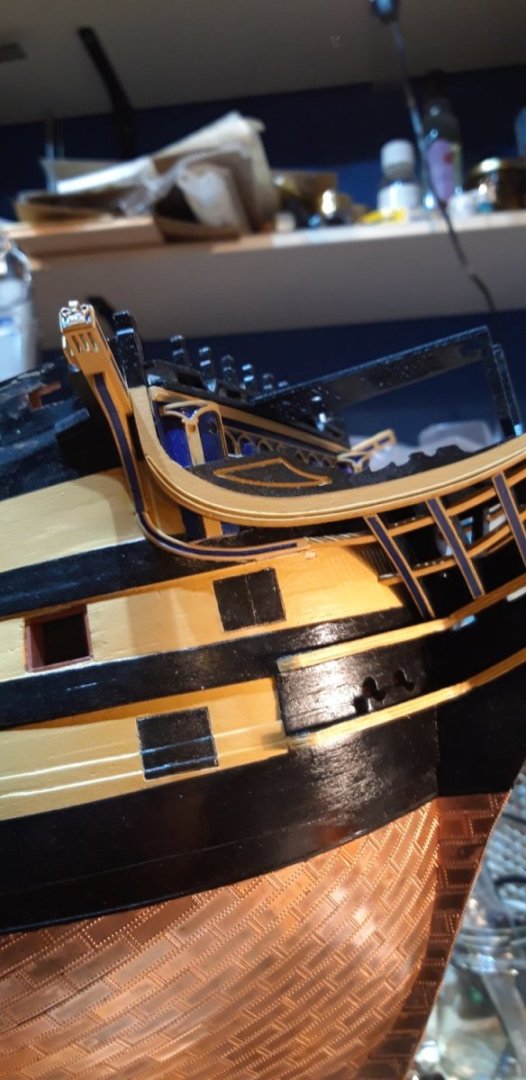
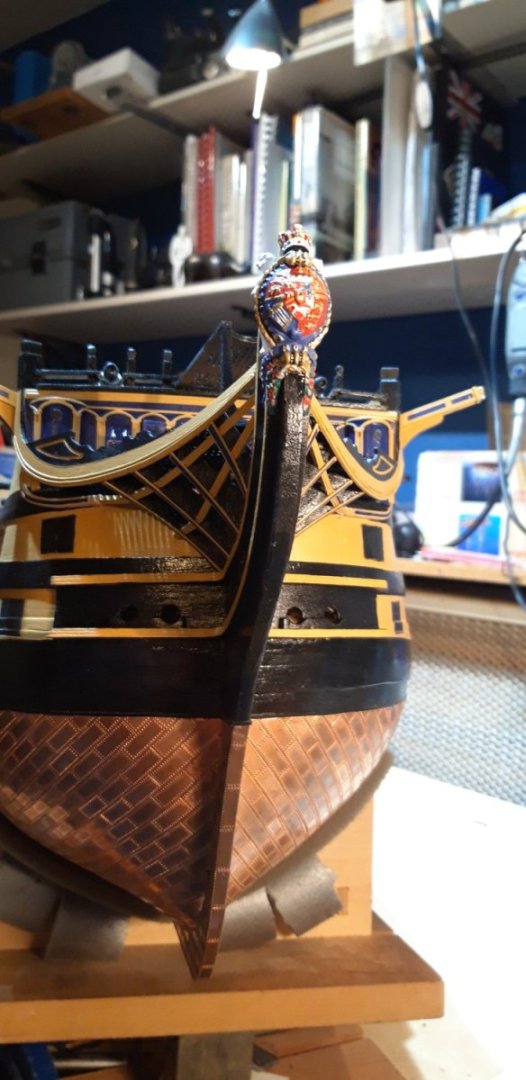
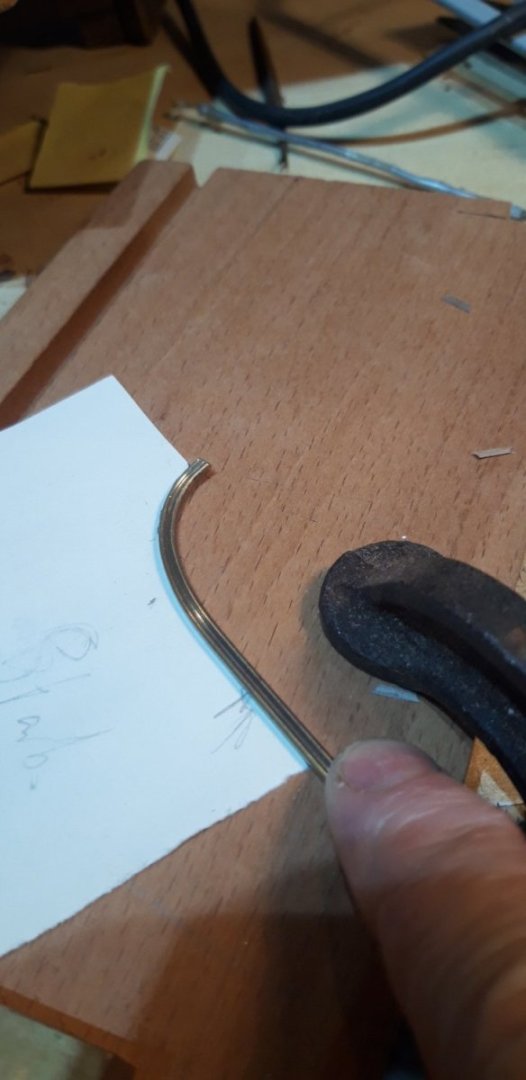
Reviewing the instruction manual for the hull I realized that I had missed one of the final steps on the bow, namely the brass moulding that runs from the base of the cat-heads to the upper bow rails. Before events temporarily halted progress I did get as far as annealing the strip of brass profile. Seems I'm not alone in this omission, this component is also conspicuous by its absence from the photograph of the otherwise completed hull example that adorns the front cover of the manual! 😄 First task was to make a card template to guide the shaping... The bending jig I made earlier in post #135 came in handy again After shaping the tricky job of marking out and then removing a section of wale to get the moulding to sit against the hull...... Dry fit.... Before painting the ends were filled with soft solder to be more in keeping with contemporary photographs Finally glued in place and after a bit of filler the paint work had its first touching up. I'll be checking it again under natural light tomorrow. A couple more views: Channels and chainplates next....... Cheers, Graham.


-
Wow - thanks for all those 'likes', very much appreciated. To be honest, Javlin, air conditioning hadn't occurred to me. Here in the UK it's not something that's usually found in domestic settings but I'll do a bit of research into it. Thanks for the suggestion. Once the flooring is down and sealed I'll be putting in insulation to help with heat retention and sound issues. At the same time the first fix for the electrics will be done. I was thinking of using an oil filled portable electric radiator that I have currently in storage for residual background heat. A good friend uses one of those diesel oil cab heaters for his workshop, but that's not really what I want. Did consider a small wood burning stove but decided it would be impractical. The building is tucked away and pretty much out of direct sunlight so I think using natural flow ventilation, from the french doors, porthole window and opening roof light will cope on hot sunny days.....🥵😄
-
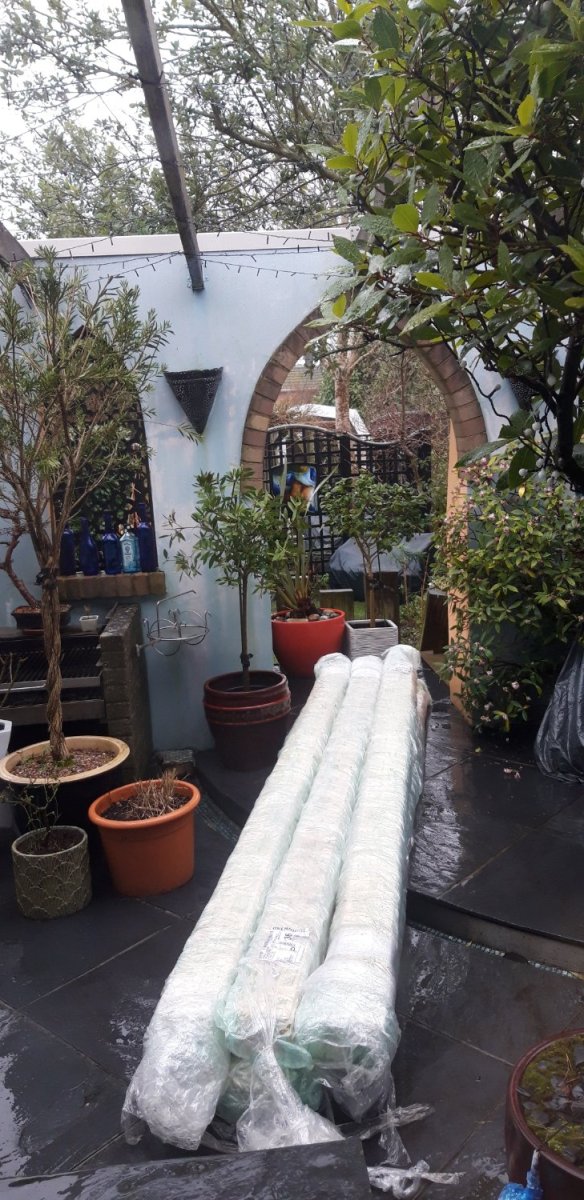
With the worst of the winter weather behind us, and a bit of financial jugging, work on the workshop is underway again. Just taken delivery of the tongue and groove softwood flooring. Six bundles, fortunately well wrapped against damage and the rain, manhandled through the house and into the garden. The workshop can just be seen through the arch. This is a slightly clearer view, the best that it can be seen from the house, and benefitting from the jasmine over the wooden arch having had it's annual trim. Another soggy day! The final addition to the exterior, the white gable end, is just visible. The boards are now unwrapped and stacked inside to adjust to the humidity etc. for a few days before laying starts. Another opportunity to add to the nautical aesthetic of the build perhaps.....we'll see! 😄 Cheers, Graham.


- 89 replies
-
- 15
-
-
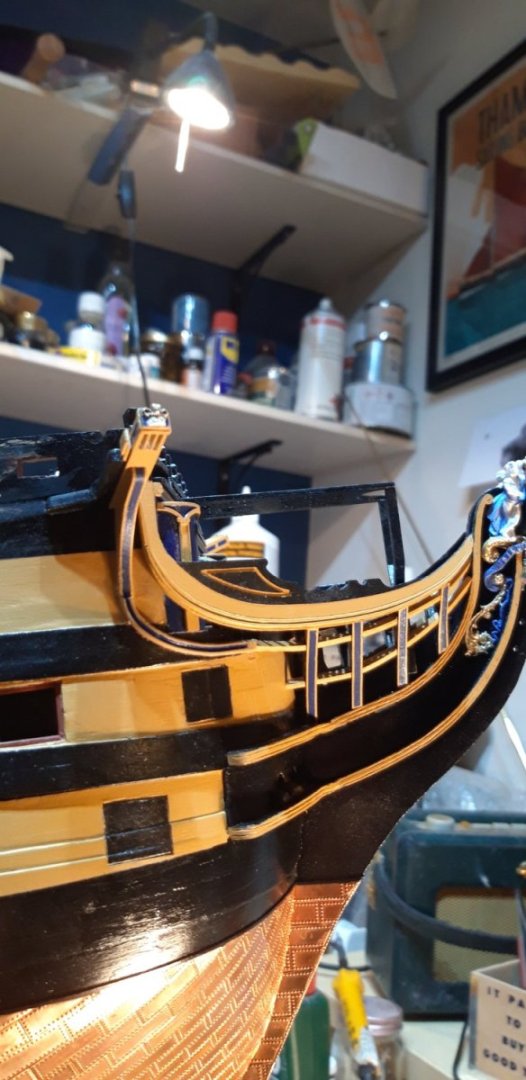
Your comment is much appreciated Ron. With reference to decoration on the figurehead, I based it on photographs found on the internet of the current design, a research source I also used for the stern decoration and the entry ports. Unfortunately there is often confusion and disparity when comparing contemporary images to earlier historic pictures. So much has changed over the years, and this includes styles of carving etc. as much as application of colour! The point I'm trying to make here is that it may not be an accurate rendition of what was there in the past, but hopefully it's close enough 😉
-
Well done, Ron, it's all coming together nicely!
-
Thanks for the likes and comments. Bit of a hick-up with the 1:1 workshop build at the moment. The main cause of my absence from the shipyard last year was the Admiral's garden project. It went a bit over budget so funds for the shed were diverted. Soon be back on track though, and I'll update both related threads in Shore Leave for anyone interested later.....
-
Oh yes, it's definitely a big project Ron, challenging but so satisfying once completed. Passing on a great piece of advice I was given by a much respected member of this site, Shipyard Sid, take your time and enjoy it. I shall be watching your progress with much interest. Cheers, Graham.
-
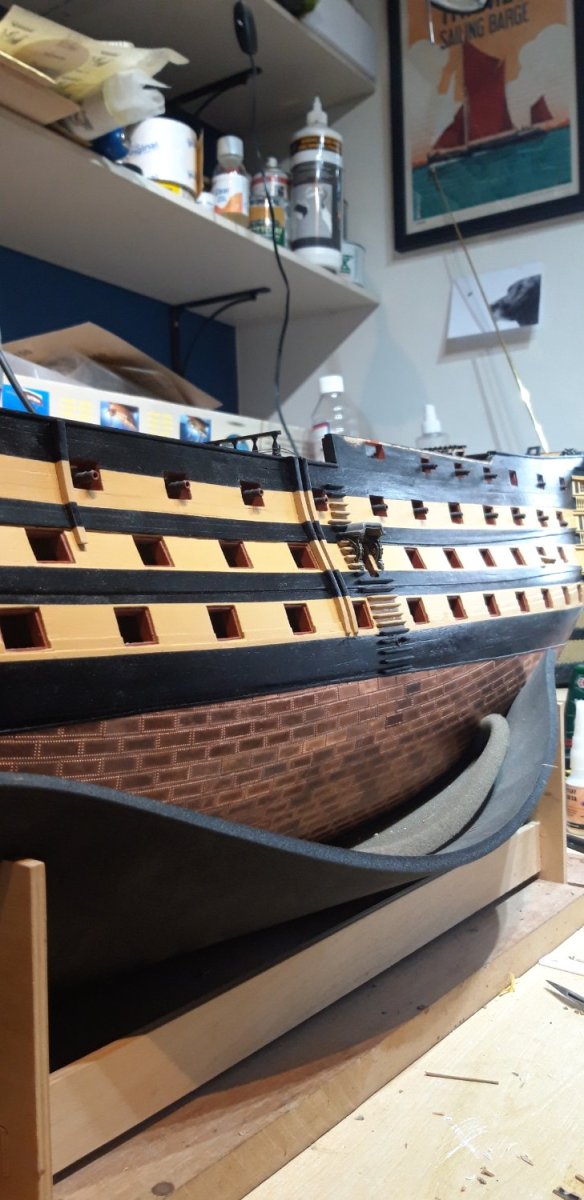
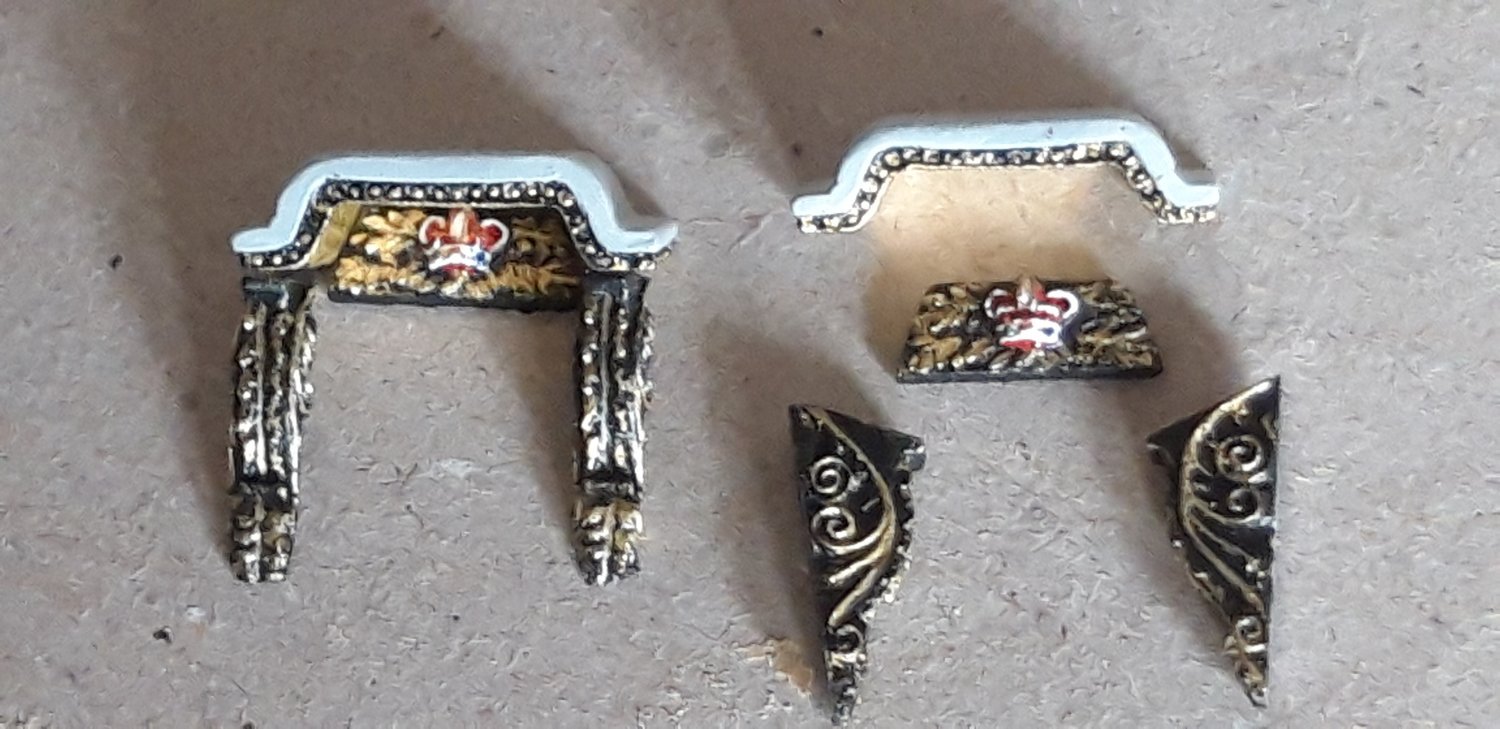
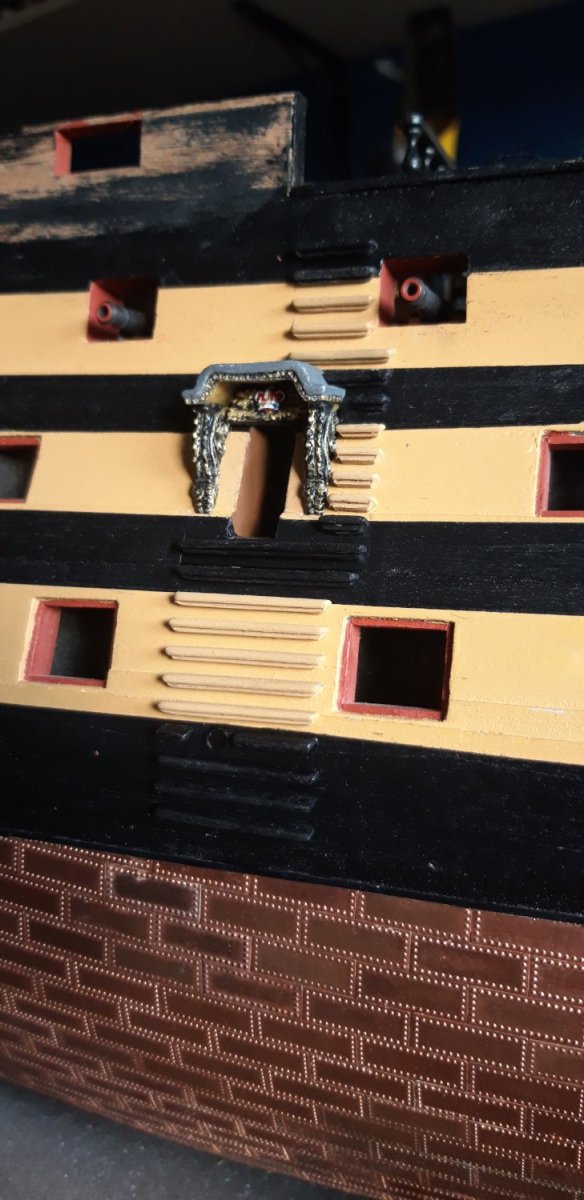
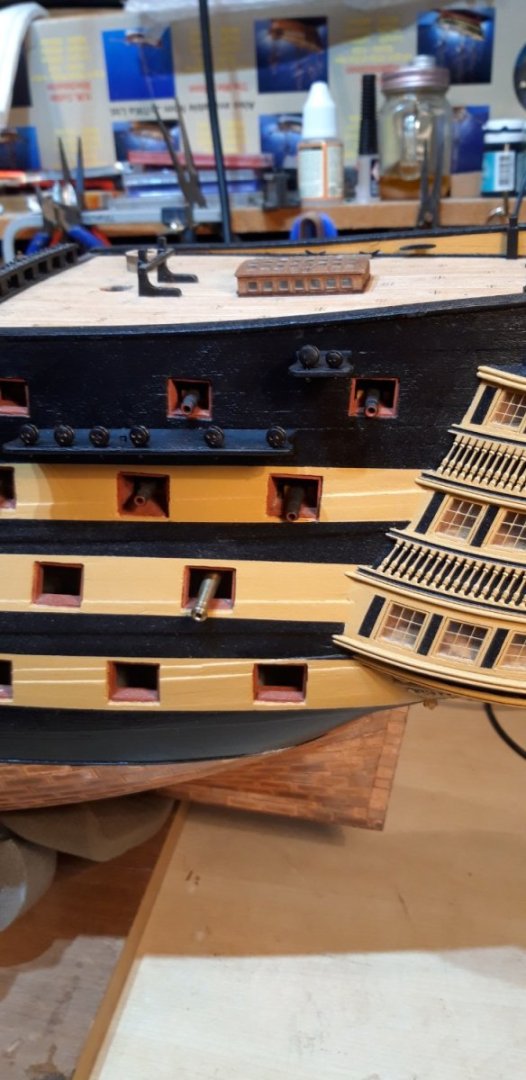
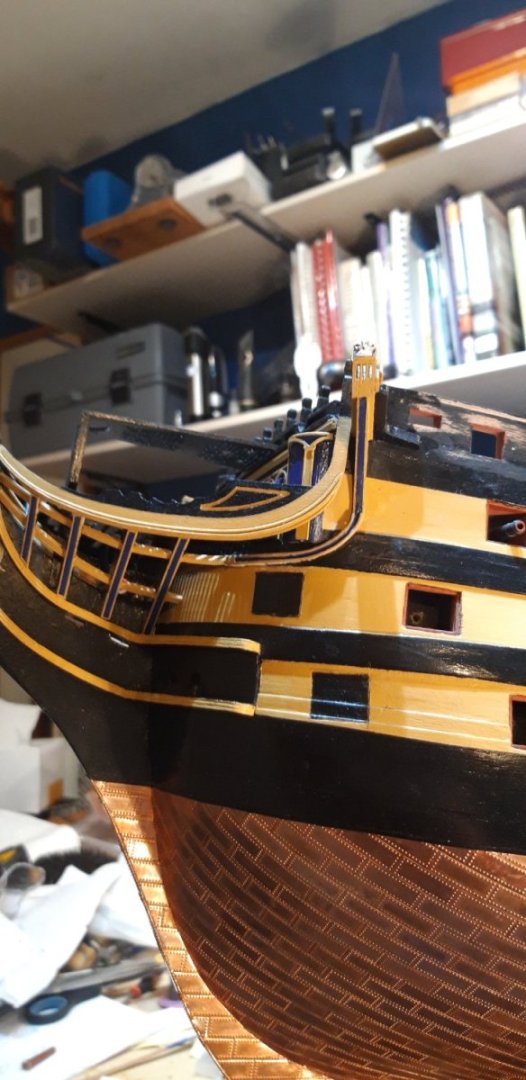
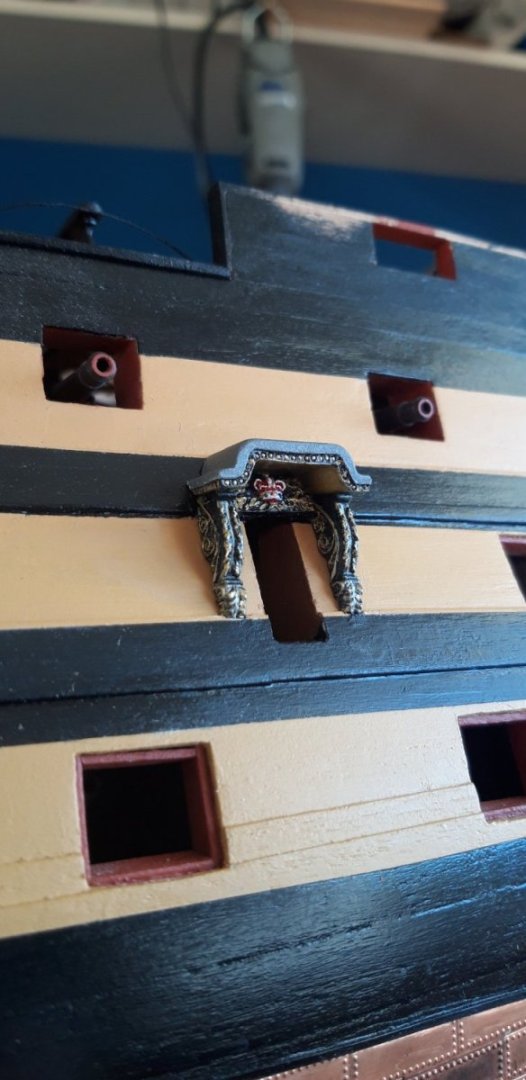
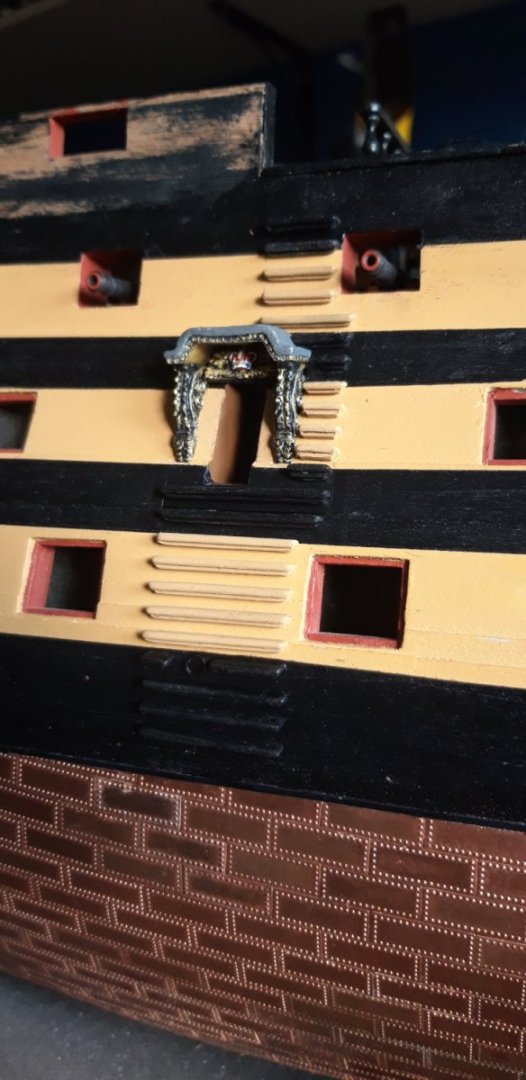
Back in the shipyard, and picking up from where I had got to on the Victory build. The first step was to get the white metal components for the two entry ports painted. These later additions to the vessel didn't exist when the ship was launched, neither were they fitted at the battle of Trafalgar. The models castings appear a little different to those shown in my 'go to' reference sources so I relied heavily on internet images. Tricky to achieve the result I had in mind, especially the line of rivets/studs under the front and side edges if the canopy. The colour of the sheathing on this first attempt was way out, so I had a go at mixing my own version of what I guess is lead from my small stock of enamels. These decorations were fixed in place with epoxy glue. An unexpected task next, and totally self inflicted. Sorting out the various parts that form the steps up to, around and above the port I found that the two steps immediately below the ports had gone AWOL. I think they had become detached from their walnut sheet back when I was tackling the belfry. Classic mistake - I put them somewhere 'safe'..... and they disappeared into another dimension. Eventually solved by converting a scrap piece of stock to the required profile and then deducing their length from the remnants of the hole where they once resided when originally machined. Masking tape helped align the steps and a couple of scaps of redundant planking made a simple 2 mm spacer for the gaps between them. Finally the fenders and chesstrees were painted and added. The three 'Victory' copper plates I mentioned back in posts #12 and #42 can be seen under each entry port. Good to be back at the work bench. Cheers. Graham


-
Coming on nicely Ron 👏
-
Just like you and Andrew, I too suffer from 'safe place' syndrome, but with one unmentioned addition.... once the work is done and lost item has been replaced, the missing part turns up! 🤣
-
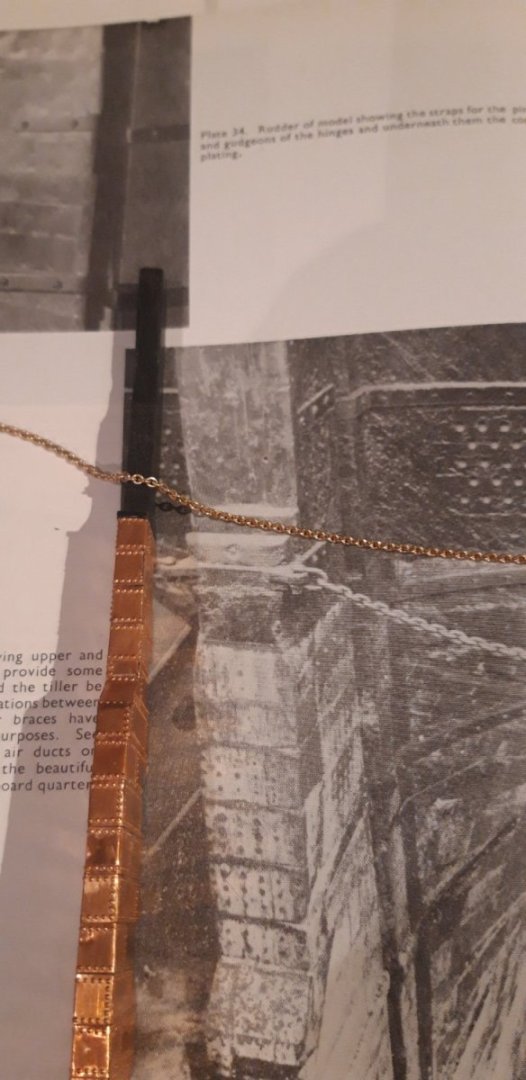
Allen is correct, Caldercraft is inaccurate. I couldn't find any definitive information in John McKay's 'Anatomy of the ship' book, Longbridge's 'The Anatomy of Nelson's ships' or any of the other published works I have in my library, so the following is based on personal observation so can only be regarded as a guide for consideration..... It also assumes that your HMS Vanguard's rudder and that of another vessel of the same scale are reasonably comparable. Longridge, plate 35, is a good photo of Victory's rudder and the chain in question. Using the thickness of the rudder as an appropriate datum it appears that this is equal to 10 chain links. Comparing my Victory's rudder to the chain the kit provides shows the model's rudder is equal to 5 links. To be closer to scale accuracy a chain of around 40 links per inch is possibly closer to what it should be. Graham.
-
Hi Ian, The chain provided by Caldercraft for my HMS Victory, which is also 1/72nd scale, has 19 links per inch/25 mm, with each link 2mm long (as close as my old eyes can tell!) Hope this helps. Graham.
-
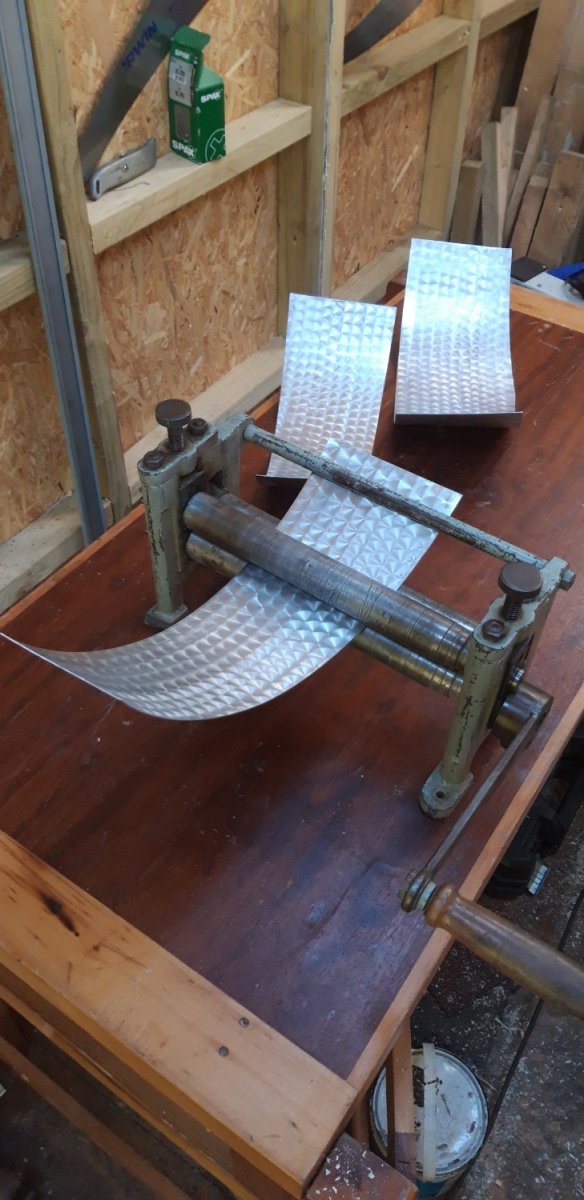
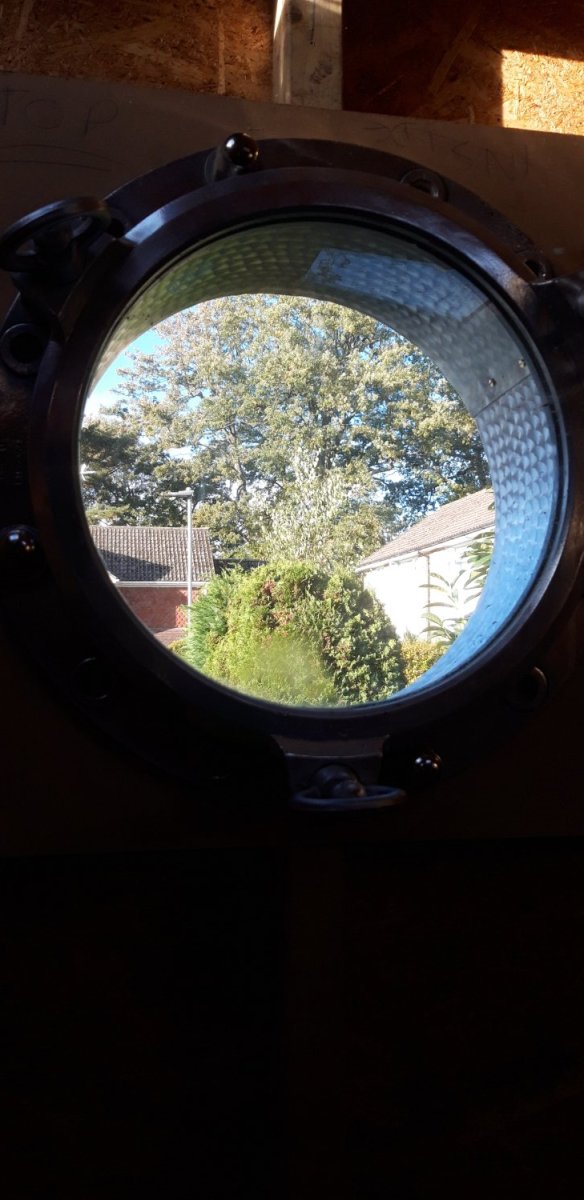
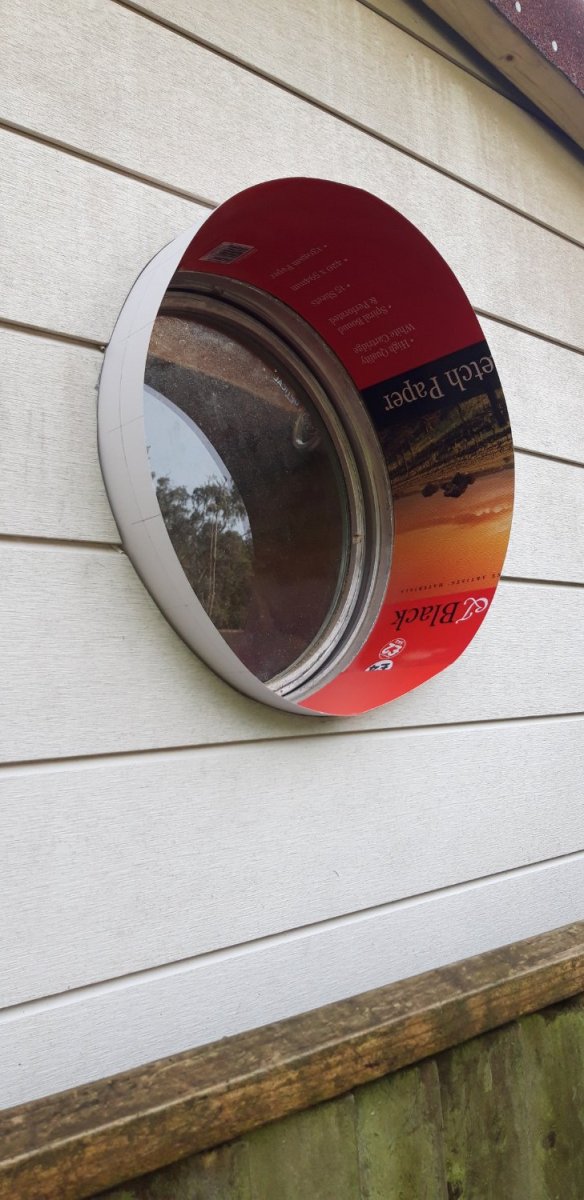
Thanks Canute. The ali sheet has been stored for a few years and needed something to hide all the dings and scratches. I used to use valve grinding paste and a piece of wooden dowel for this, but this time lashed up a tool using a dremel mandril, a 22 mm dia. disc of 4 mm thick softwood with the central hole recessed for the screw head, double sided tape and circles of abrasive Scotch Bright pad. The porthole faces north west and this finish catches the setting sun nicely on a good day. Cheers, Graham
-
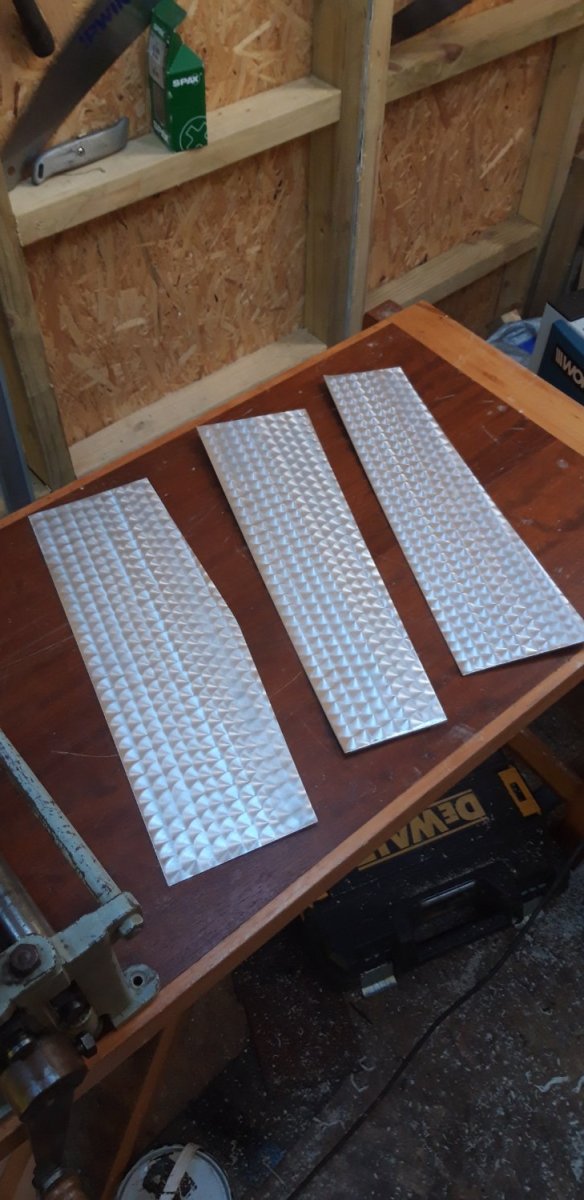
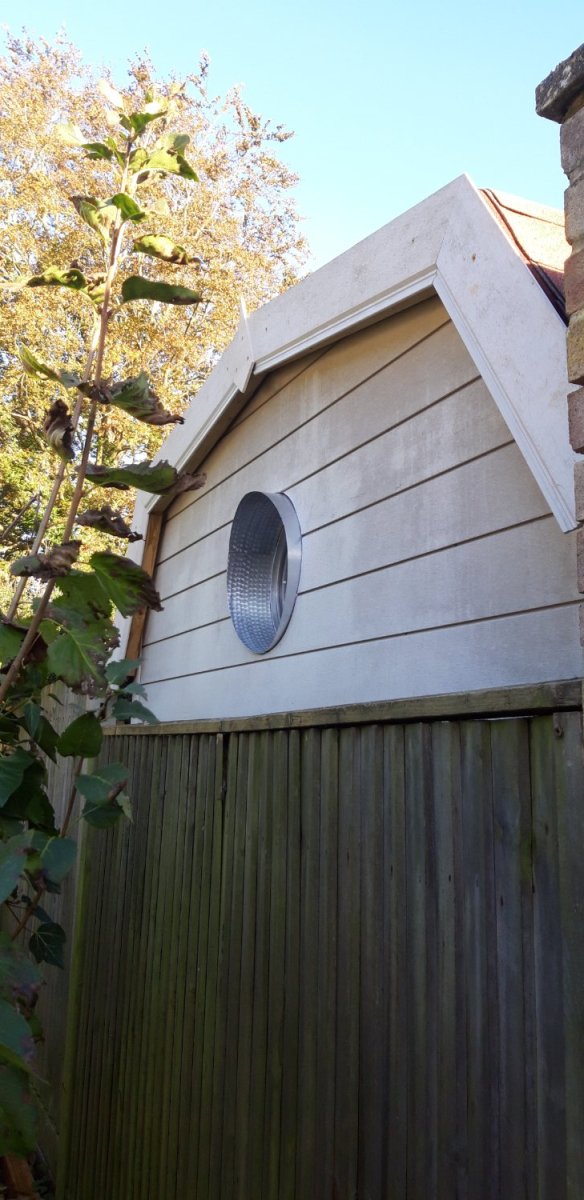
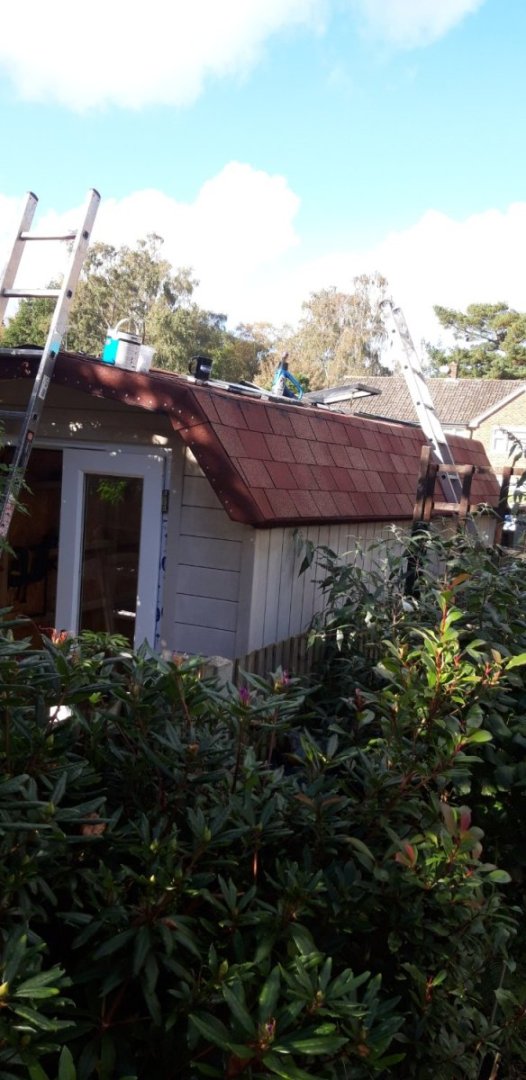
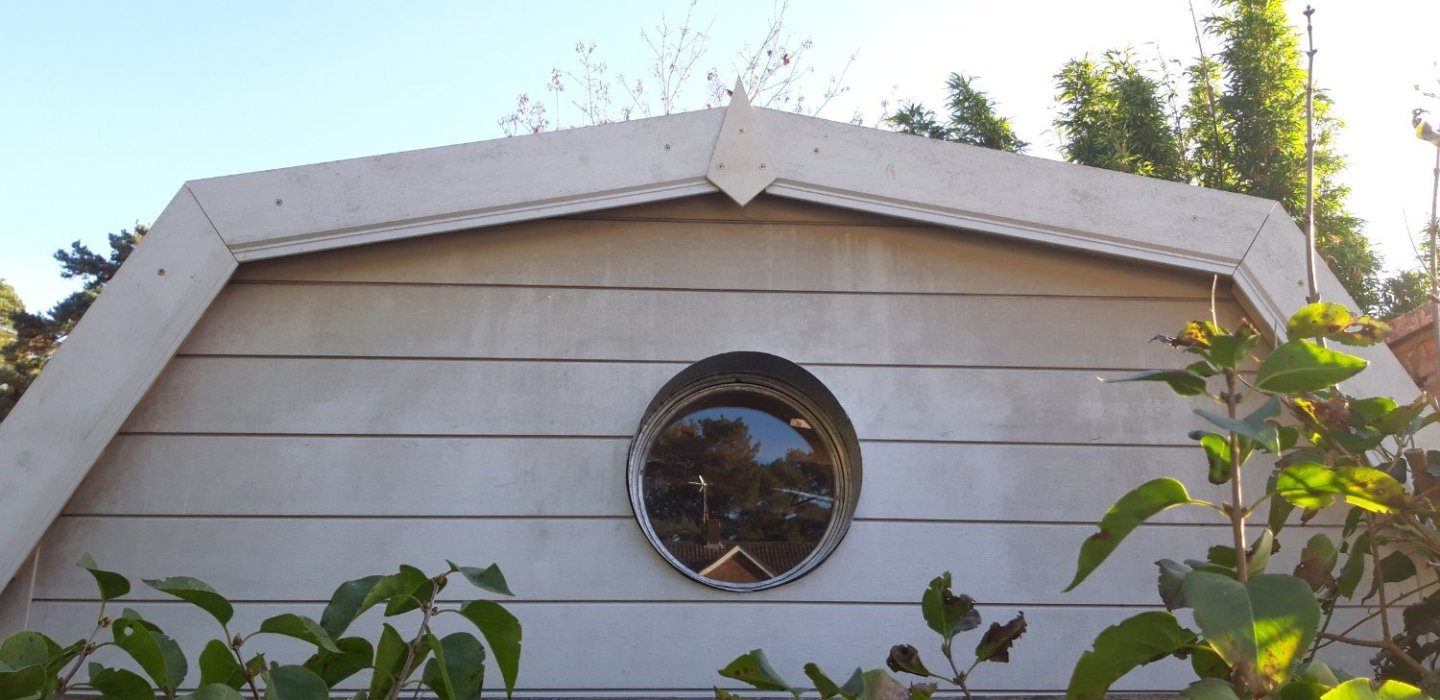
The roof shingles are now all sealed. This is my neighbour's view of the build, a better one then I have! The aluminium porthole lining panels have been cut to size, 'engine turned' and rolled to profile. These panels have had a preliminary fixing and my next job is to remove them and then re-fit with additional sealant. The barge board/ fascia board has also been completed on this gable end using the spare length of wall cladding I had left over. Once the front gable end has been finished I can start working on the interior beginning with the floor. Progress! Cheers, Graham.


- 89 replies
-
- 17
-
-
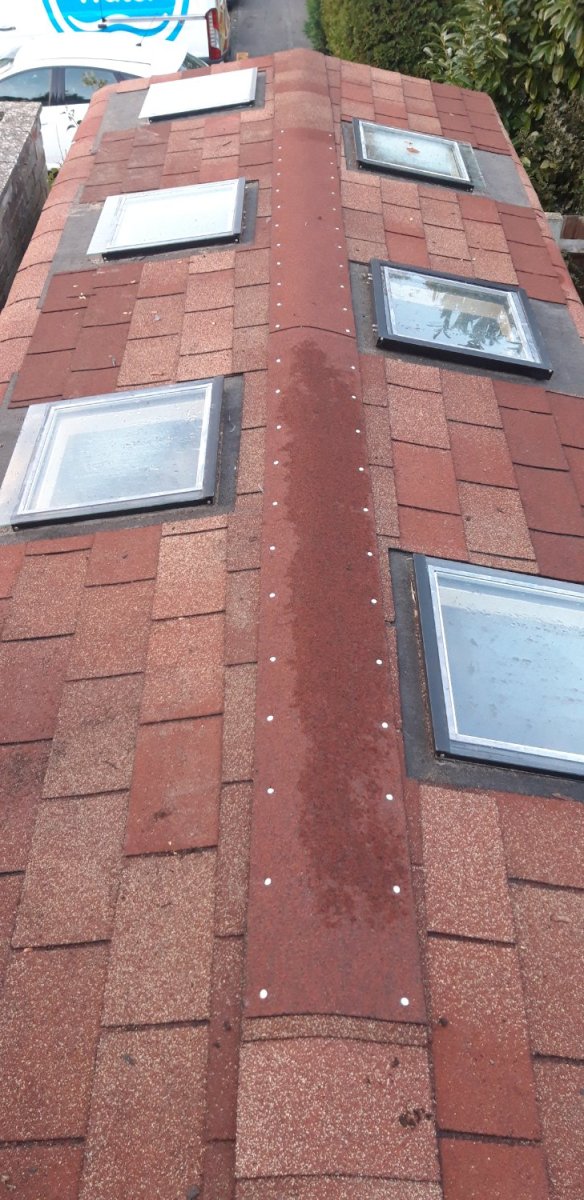
Bitumen shingles in place. The sun was setting as the top ridge was fitted so sealing with a heat gun and finishing edges with felt adhesive will have to wait until tomorrow... Top ridge was completed using offcuts of shingles and 'detail strip' minimizing waste. The roof has stood up to some exceptionally wet weather this week without any leaks which is encouraging. I'm going to neaten up the gable ends with facia boards, and apart from adding some guttering, and the porthole lining, the outside is pretty much finished. Cheers, Graham.

- 89 replies
-
- 11
-
-
-
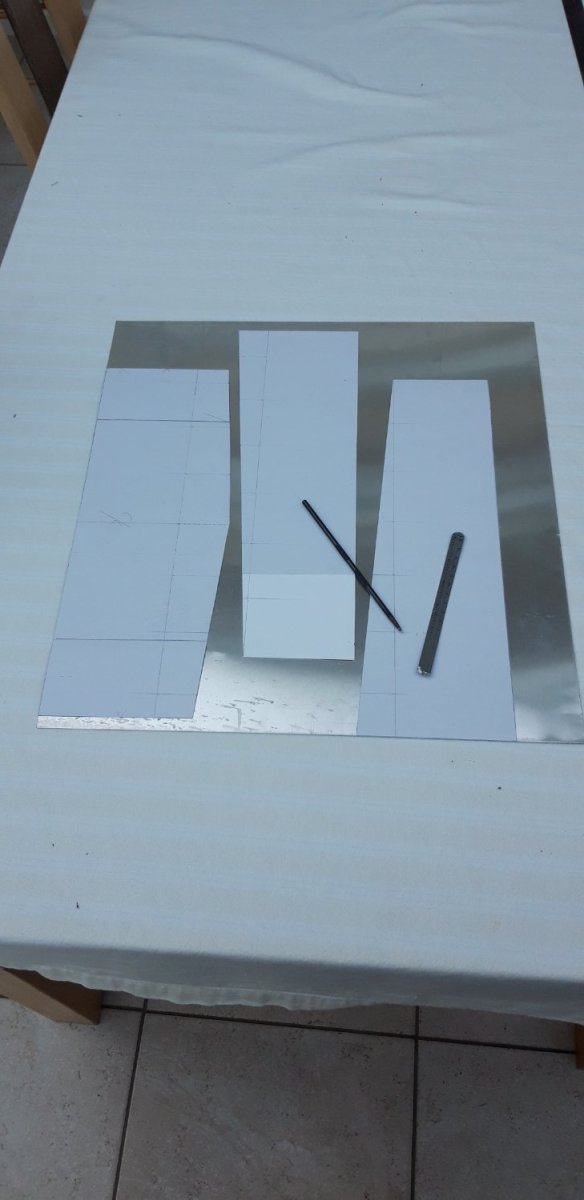
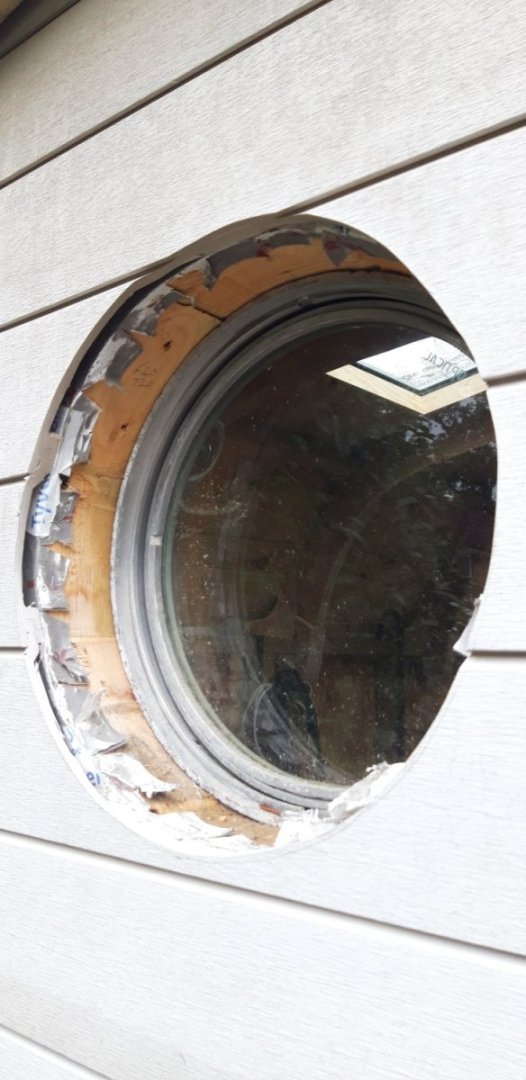
That's the plan! 😄 Storm 'Babet' has halted work on the roof shingles for a few days but I'm aiming to complete the last couple of rows and the top ridge tomorrow. In the meantime I'm working on the recess surrounding the porthole. Card template made, After adjusting the amount it projects out of the wall the template was cut to suit the available material, an offcut of aluminium sheet. I'll add more pictures once these have been cut out and shaped.... Cheers, Graham


- 89 replies
-
- 12
-

-