DelF
-
Posts
1,409 -
Joined
-
Last visited
Content Type
Profiles
Forums
Gallery
Events
Everything posted by DelF
-
 Thanks for the thought SpyGlass, but on reflection and considering Cochrane's penchant for prizes, I don't think he would ever have stowed his guns in the hold. That may have worked for the great navigator Cook when all he had to contend with were islanders' canoes, but I think Cochrane must have been almost permanently ready for action considering the number of vessels he snapped up. So, I'll have to stick to plan A and press on with the rigging
- 725 replies
-
- 1
-

-
- vanguard models
- speedy
- (and 1 more)
-
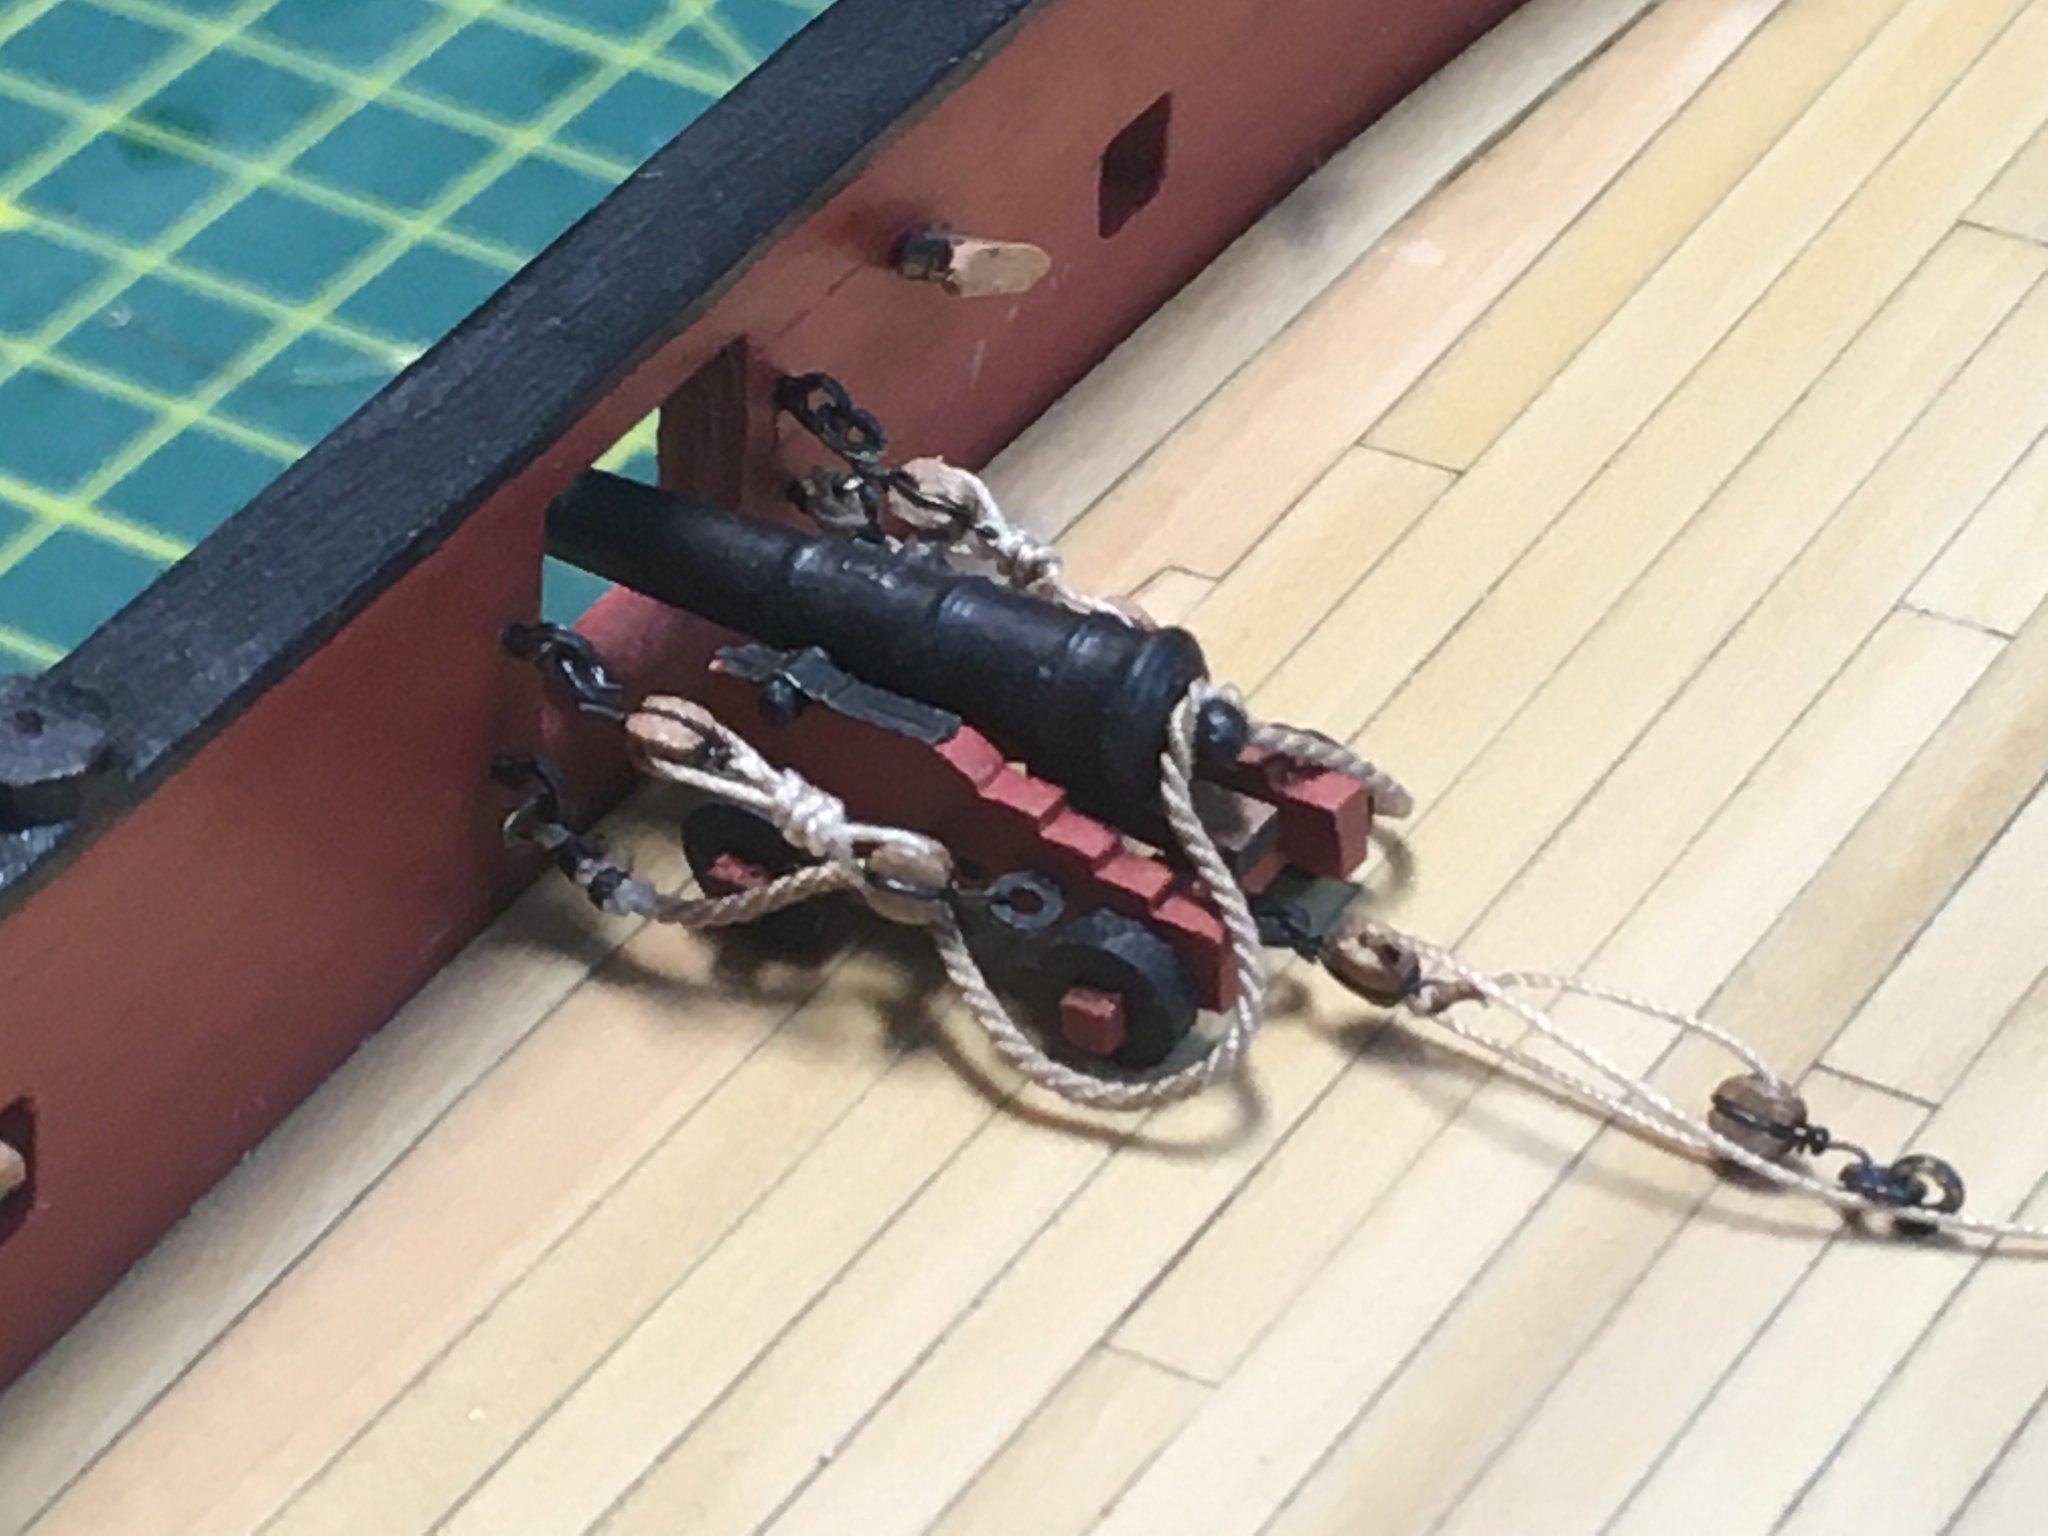
Hi SpyGlass Thank you so much for taking the time to put together such a helpful and informative post. That last picture captures exactly what I meant when I said I was thinking of lengthening the side tackle to let it hang more naturally and allow more frapping. I like the frapping on the breech ropes too. Here's a photo I took a few weeks ago: I've been putting off replacing the PE ringbolts, but I'm putting so much into these guns I think I may as well go the whole hog. Conversely, I may take a leaf out of Captain Cook's diaries and stow the guns in the hold! Thanks again for the kind words and encouragement. Derek

- 725 replies
-
- 6
-
-
- vanguard models
- speedy
- (and 1 more)
-
Thanks Edward and Vane. I've been so close to the work for the last few days that I'm probably not the best judge - your kind comments are very reassuring. Derek
- 725 replies
-
- 1
-
-
- vanguard models
- speedy
- (and 1 more)
-
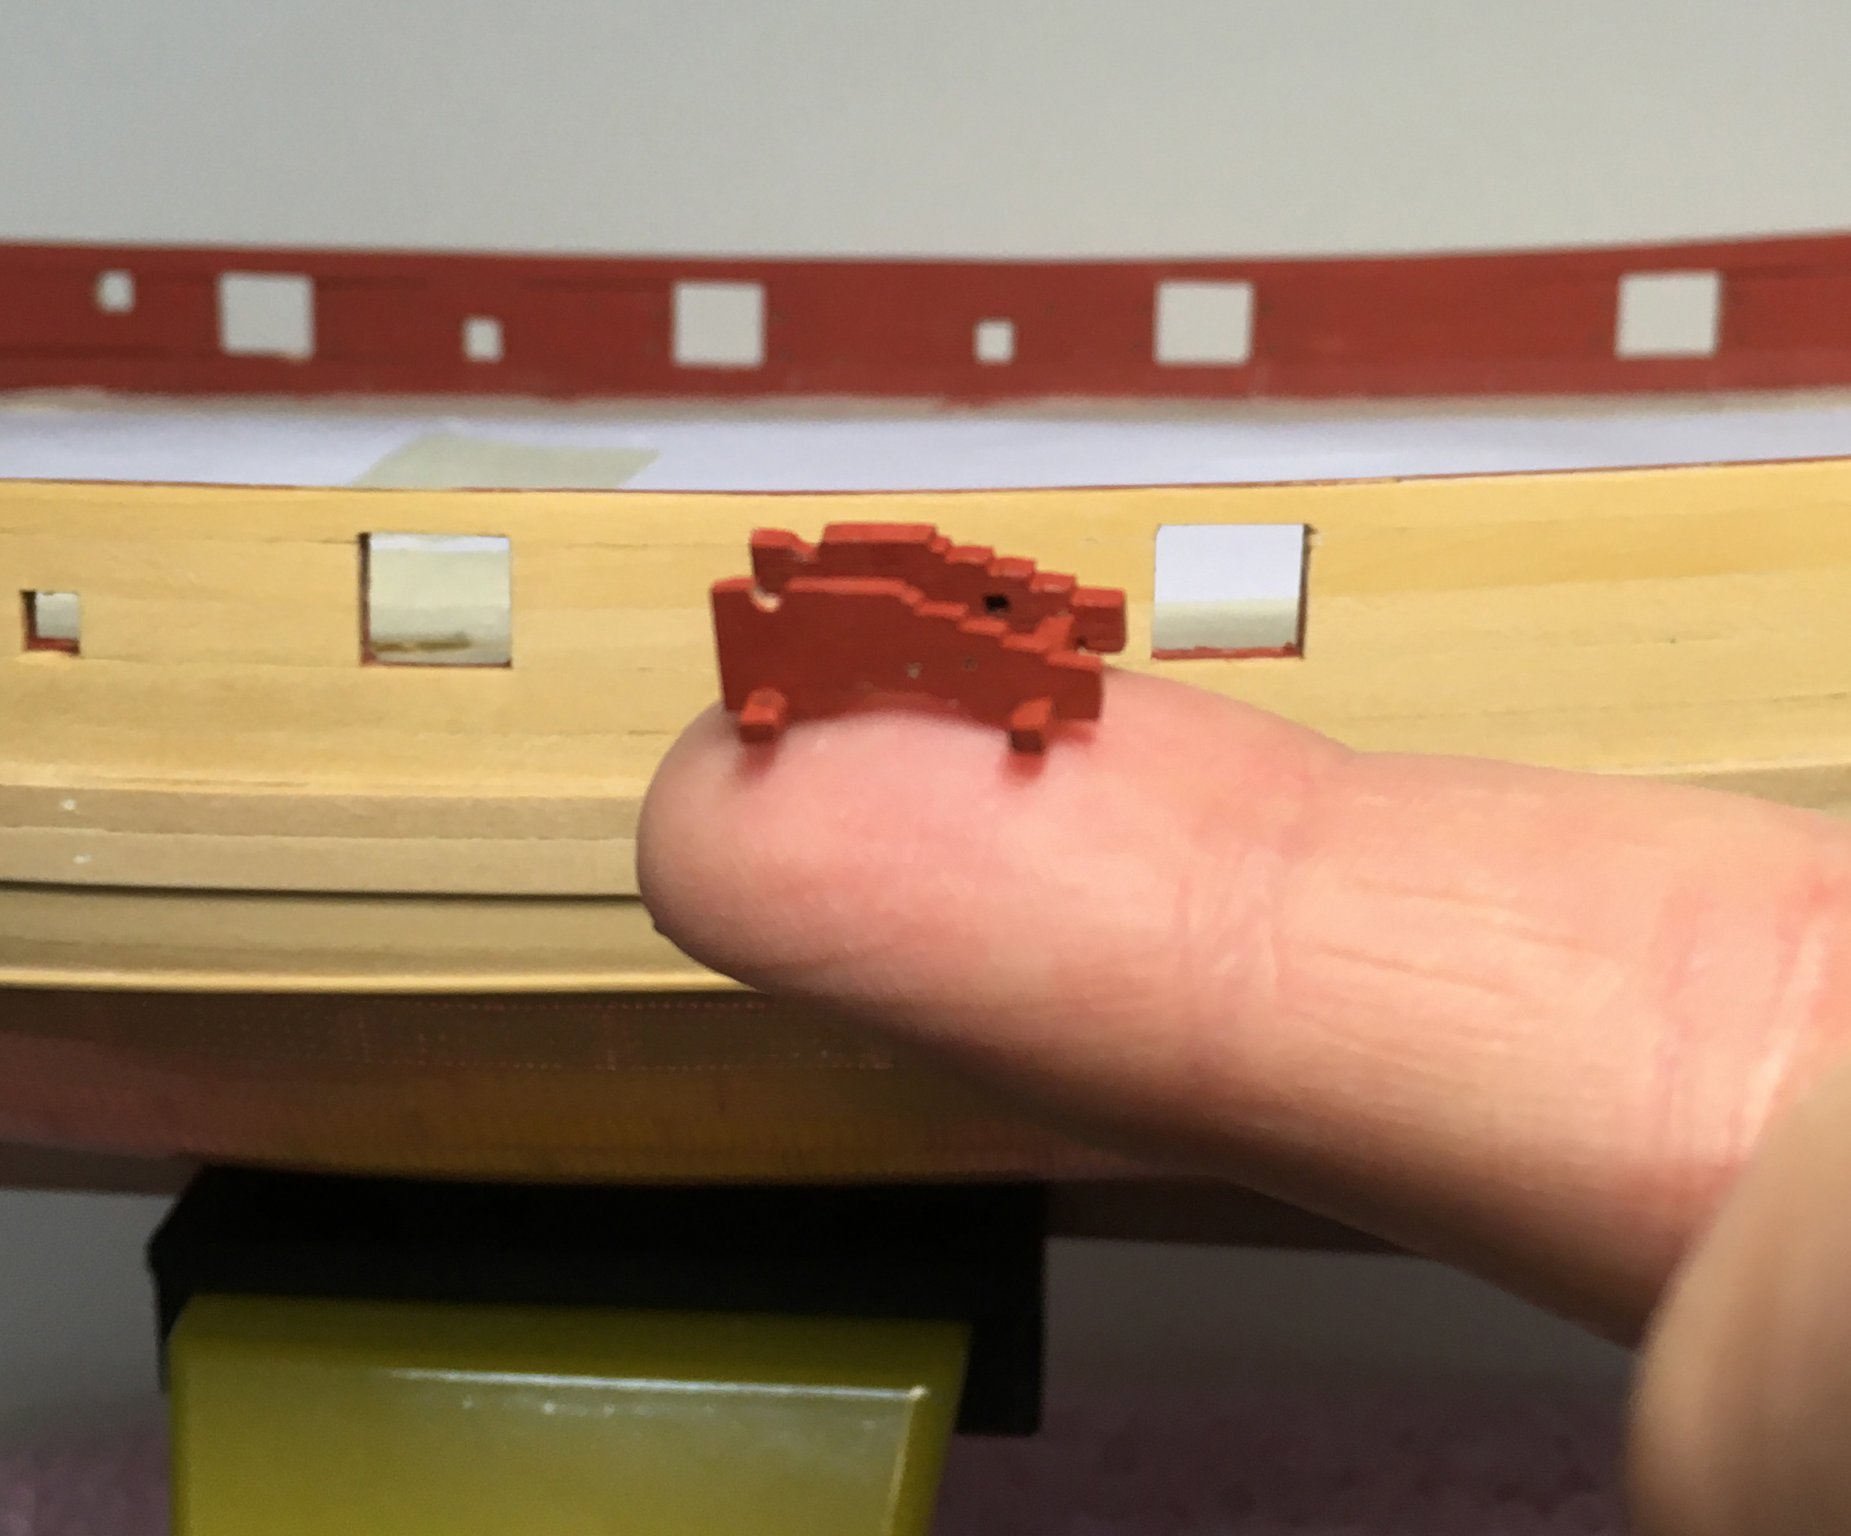
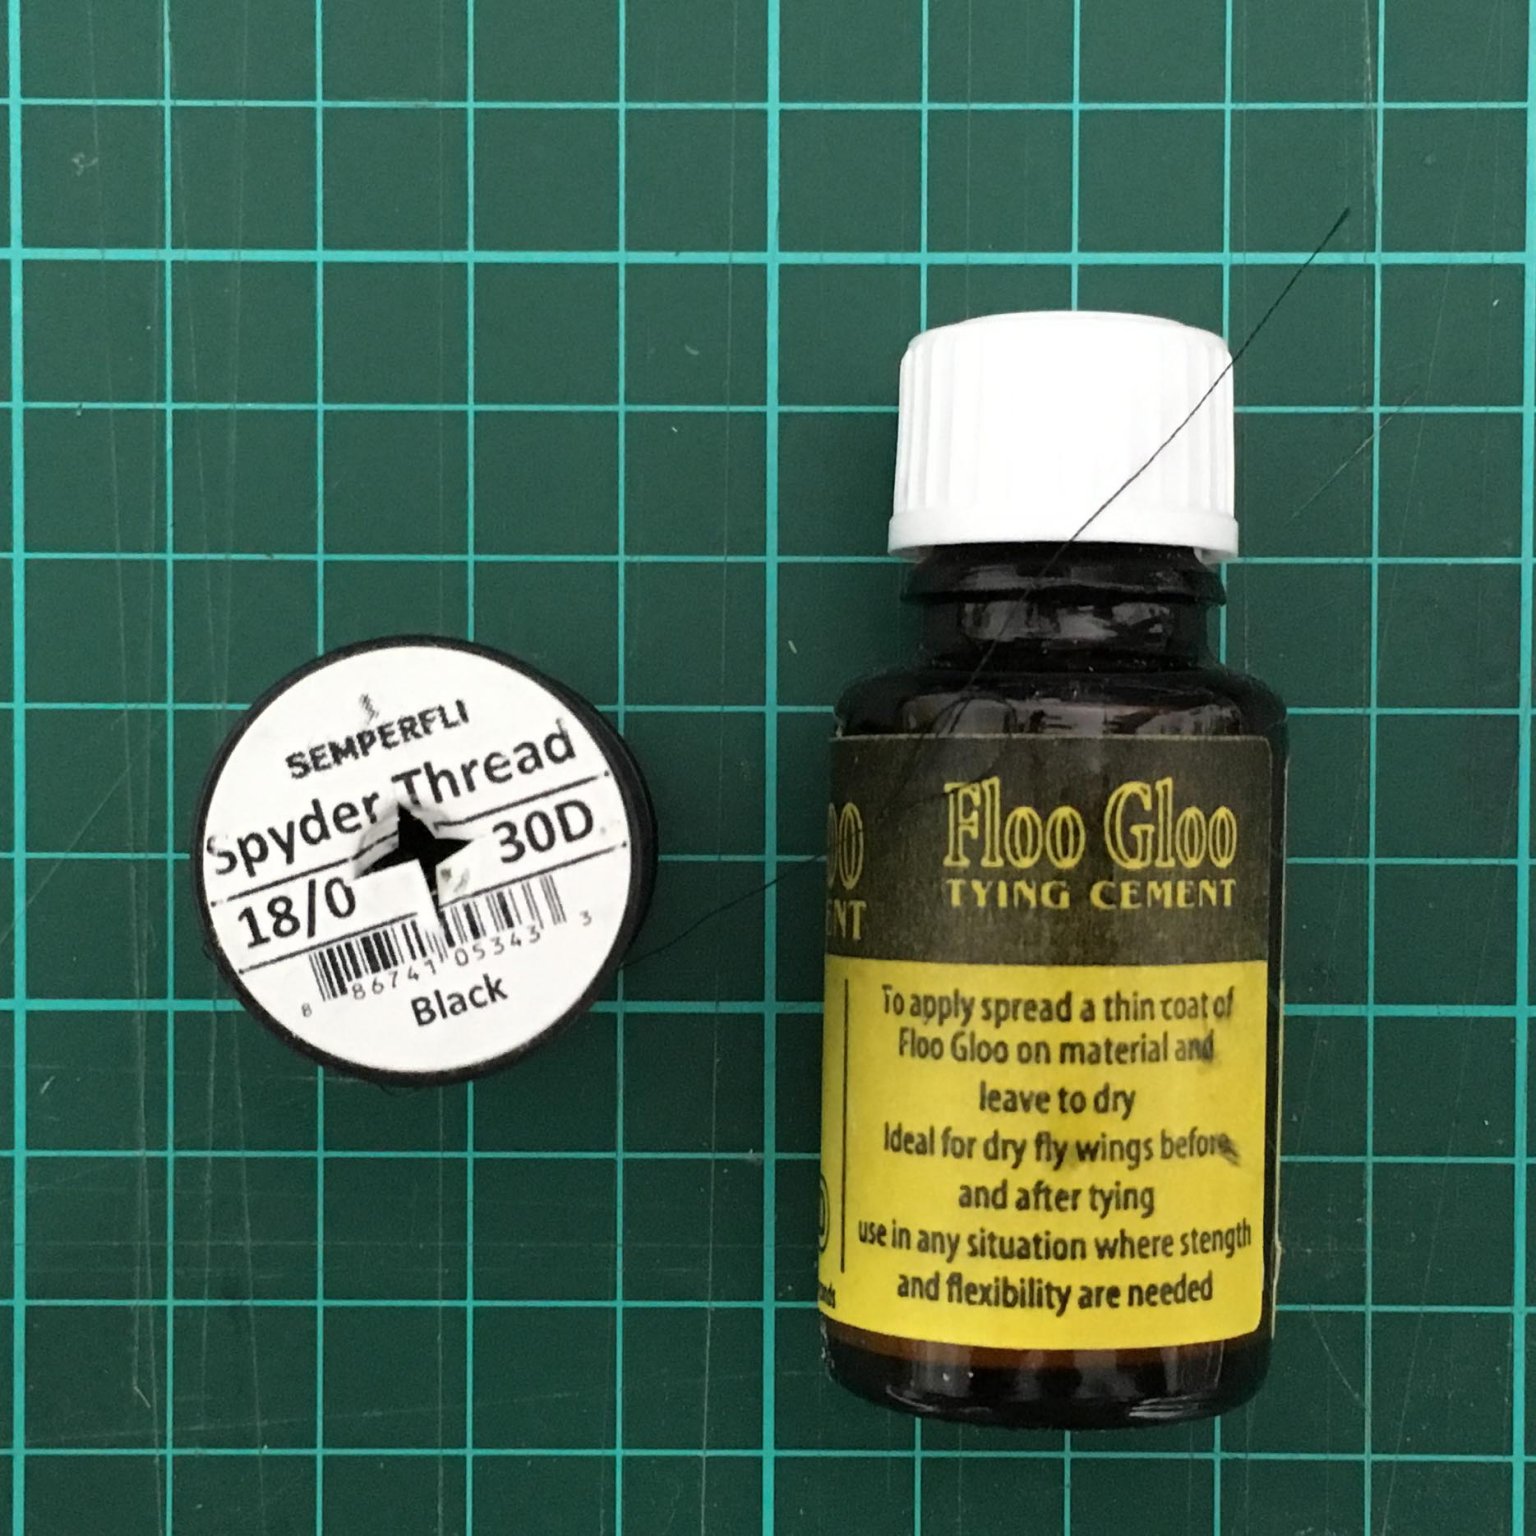
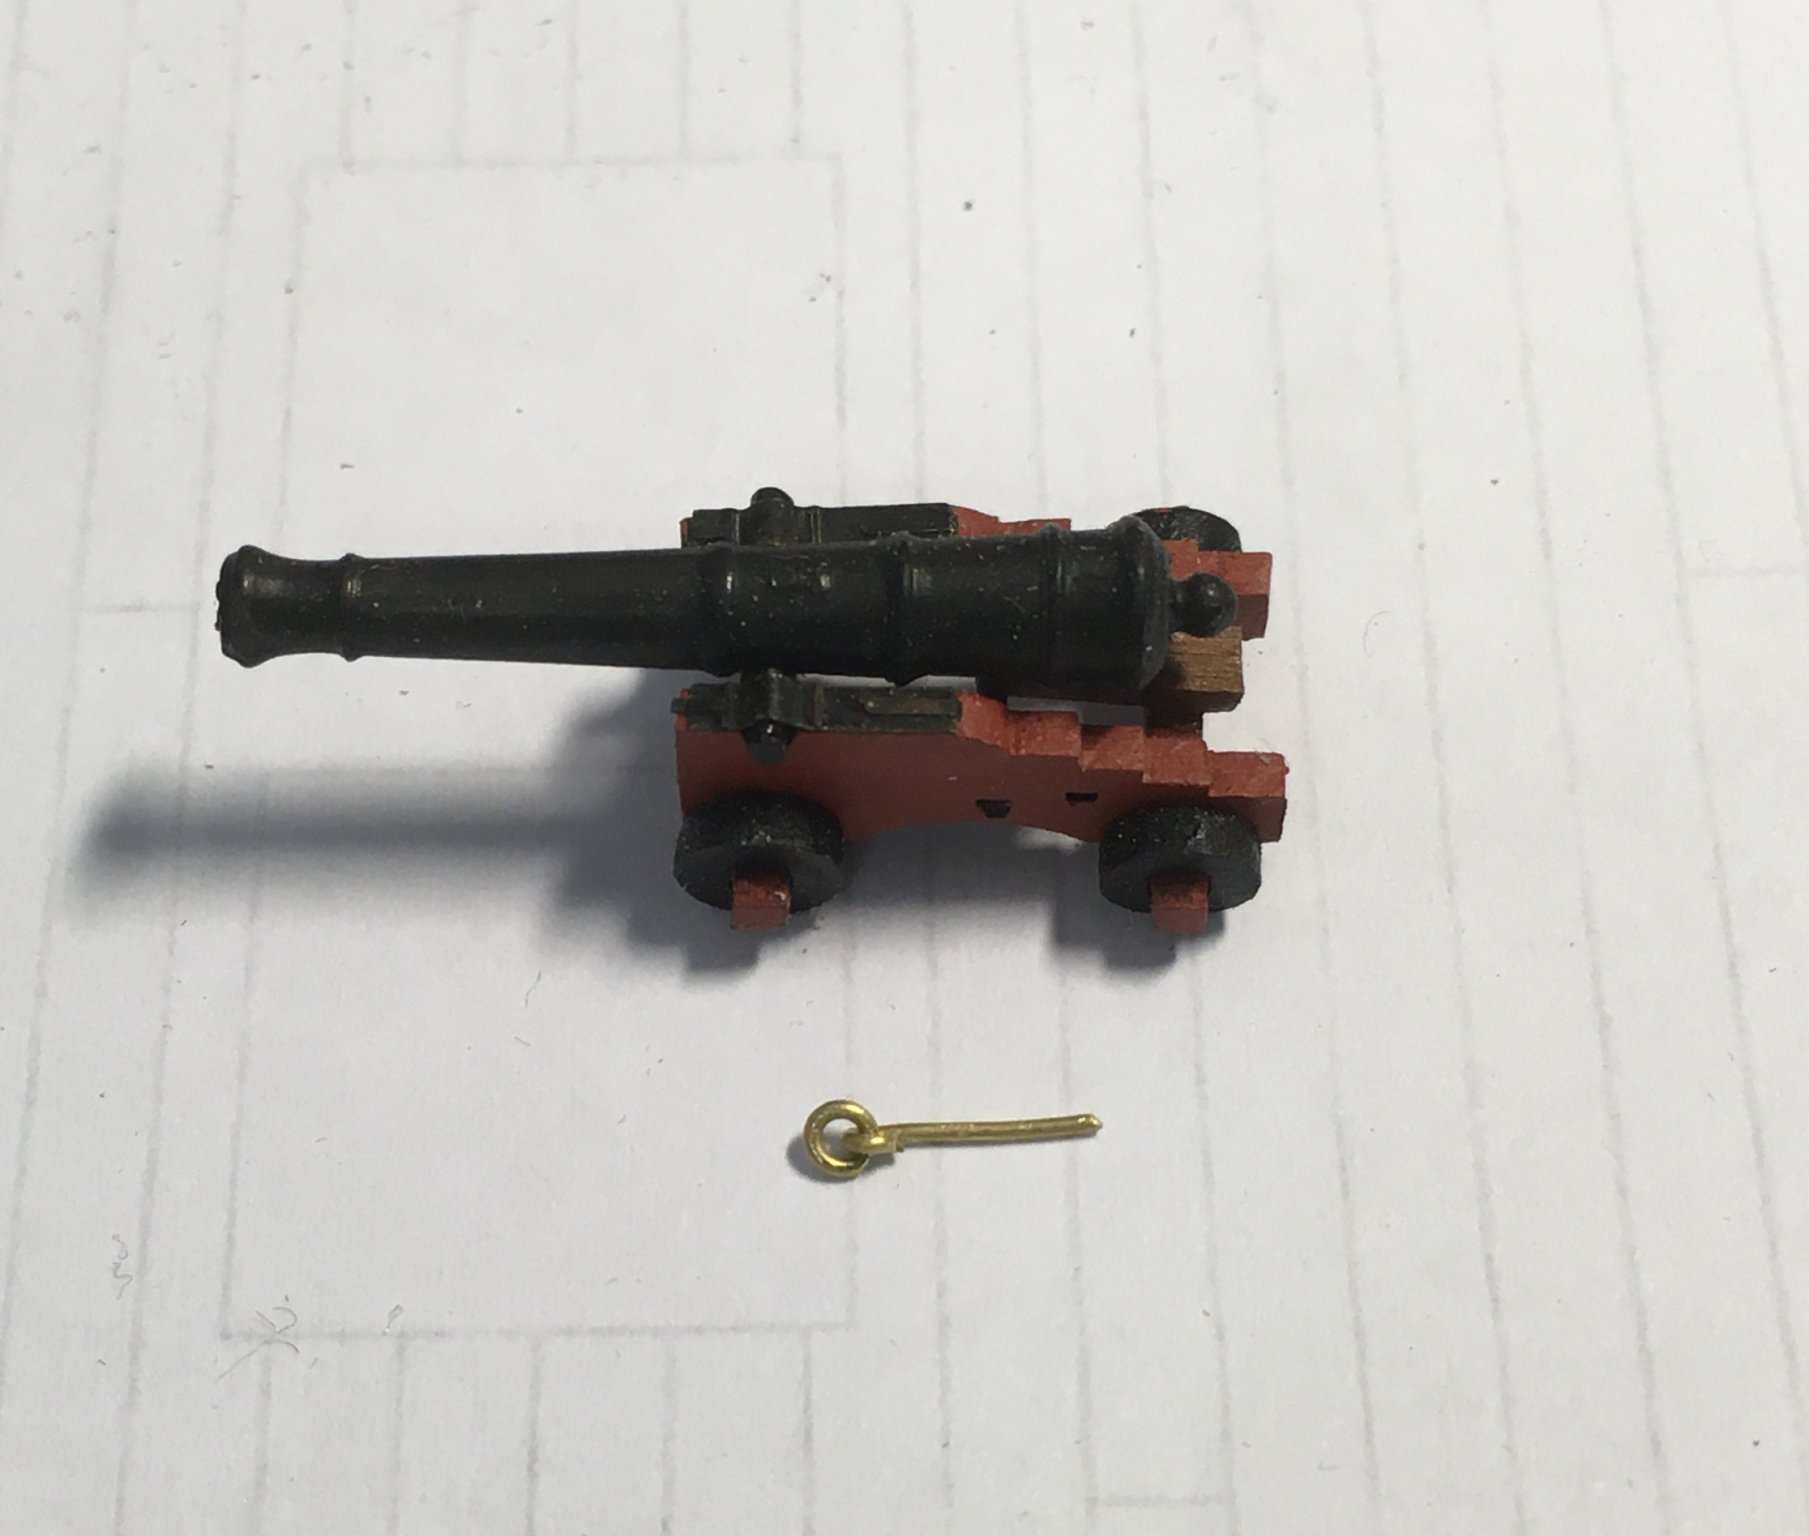
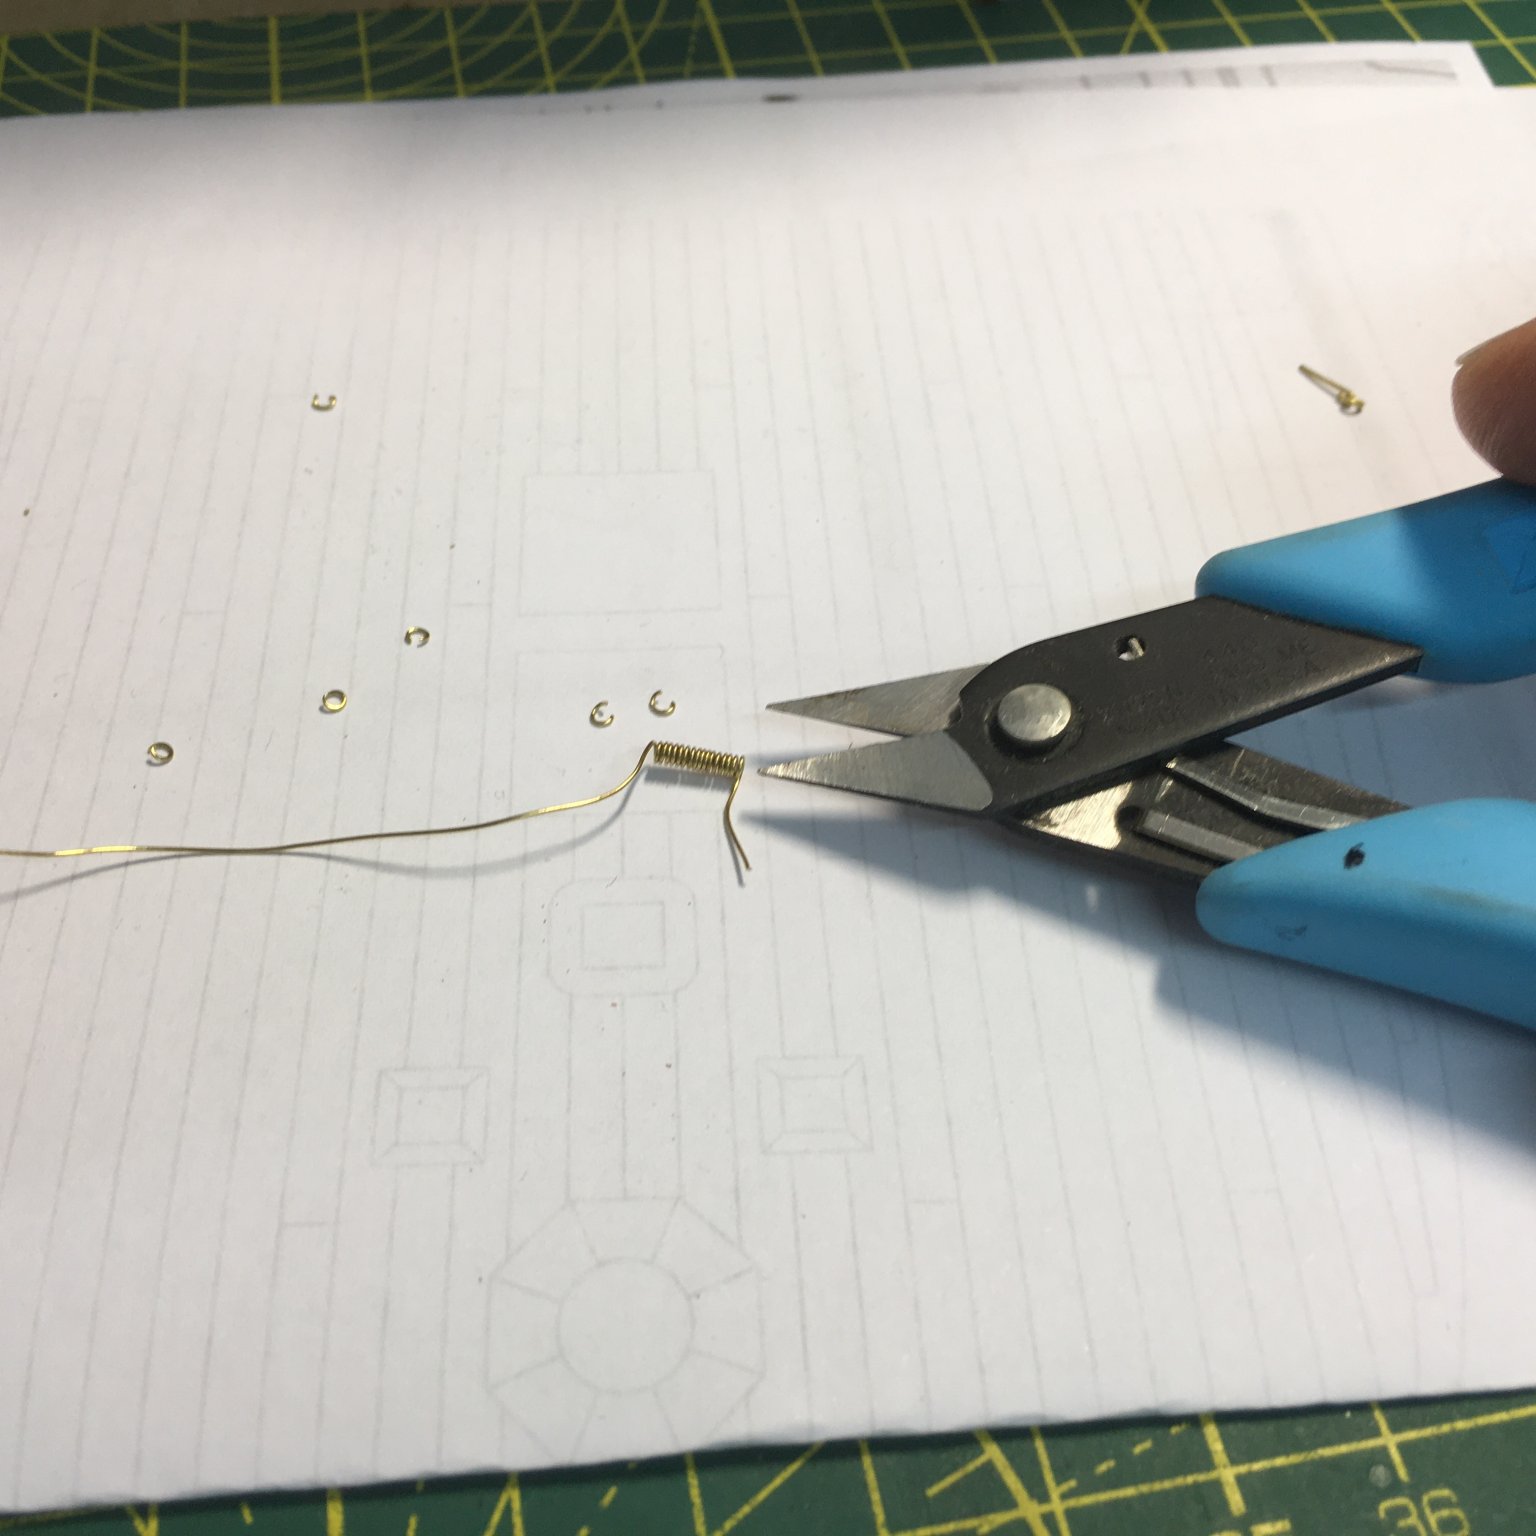
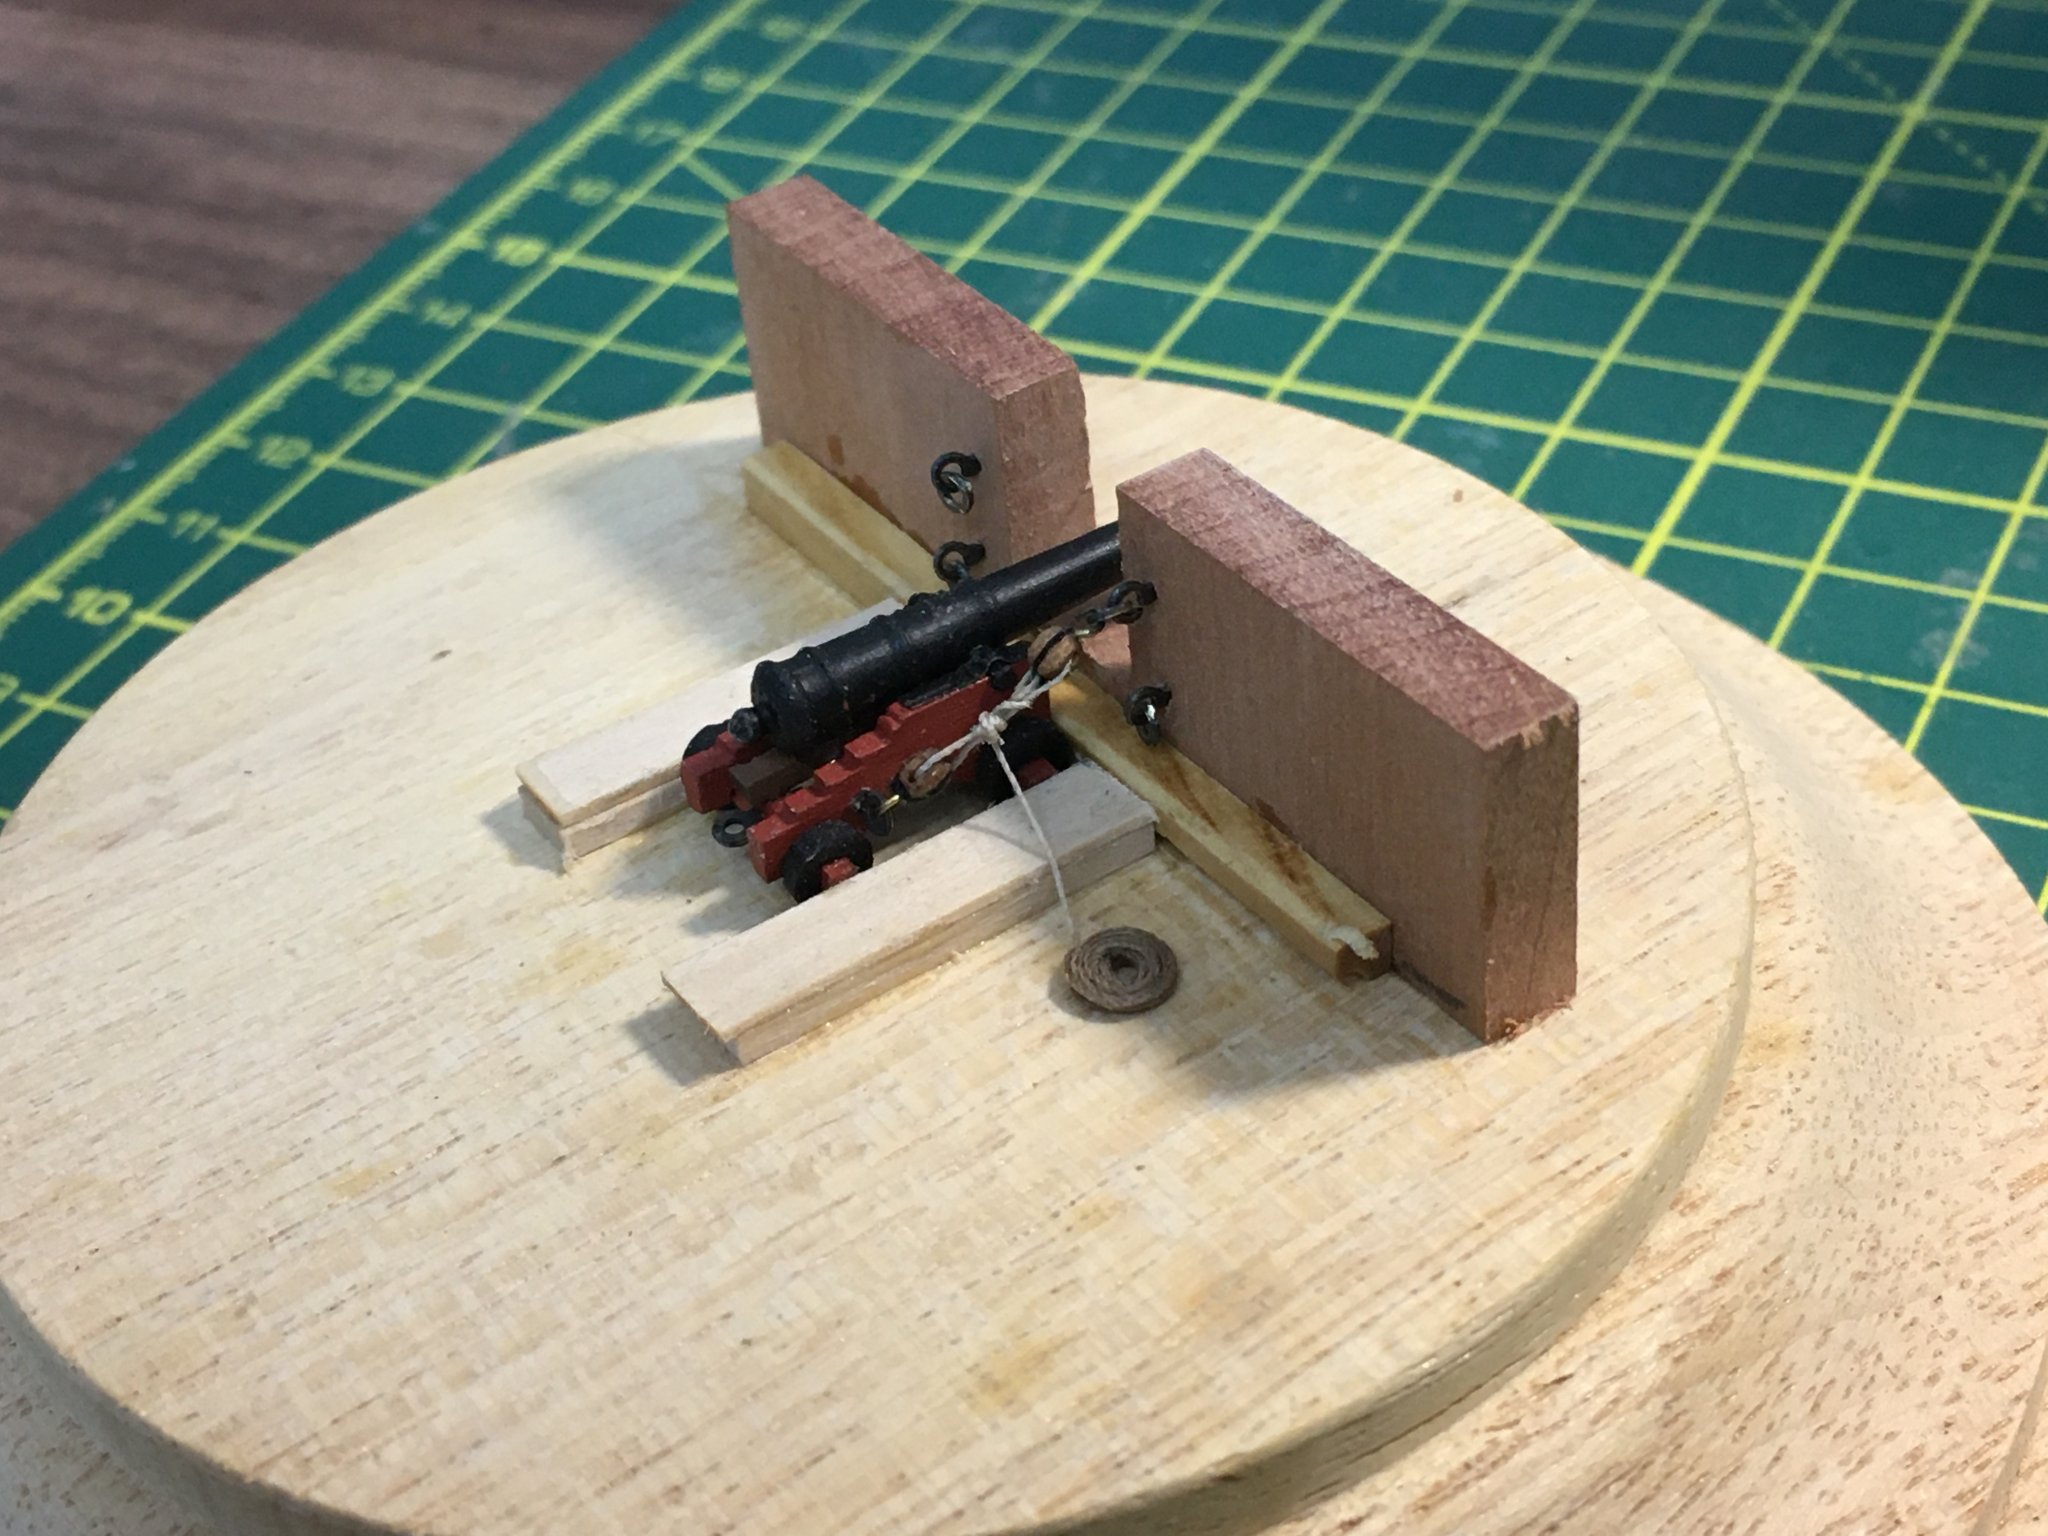
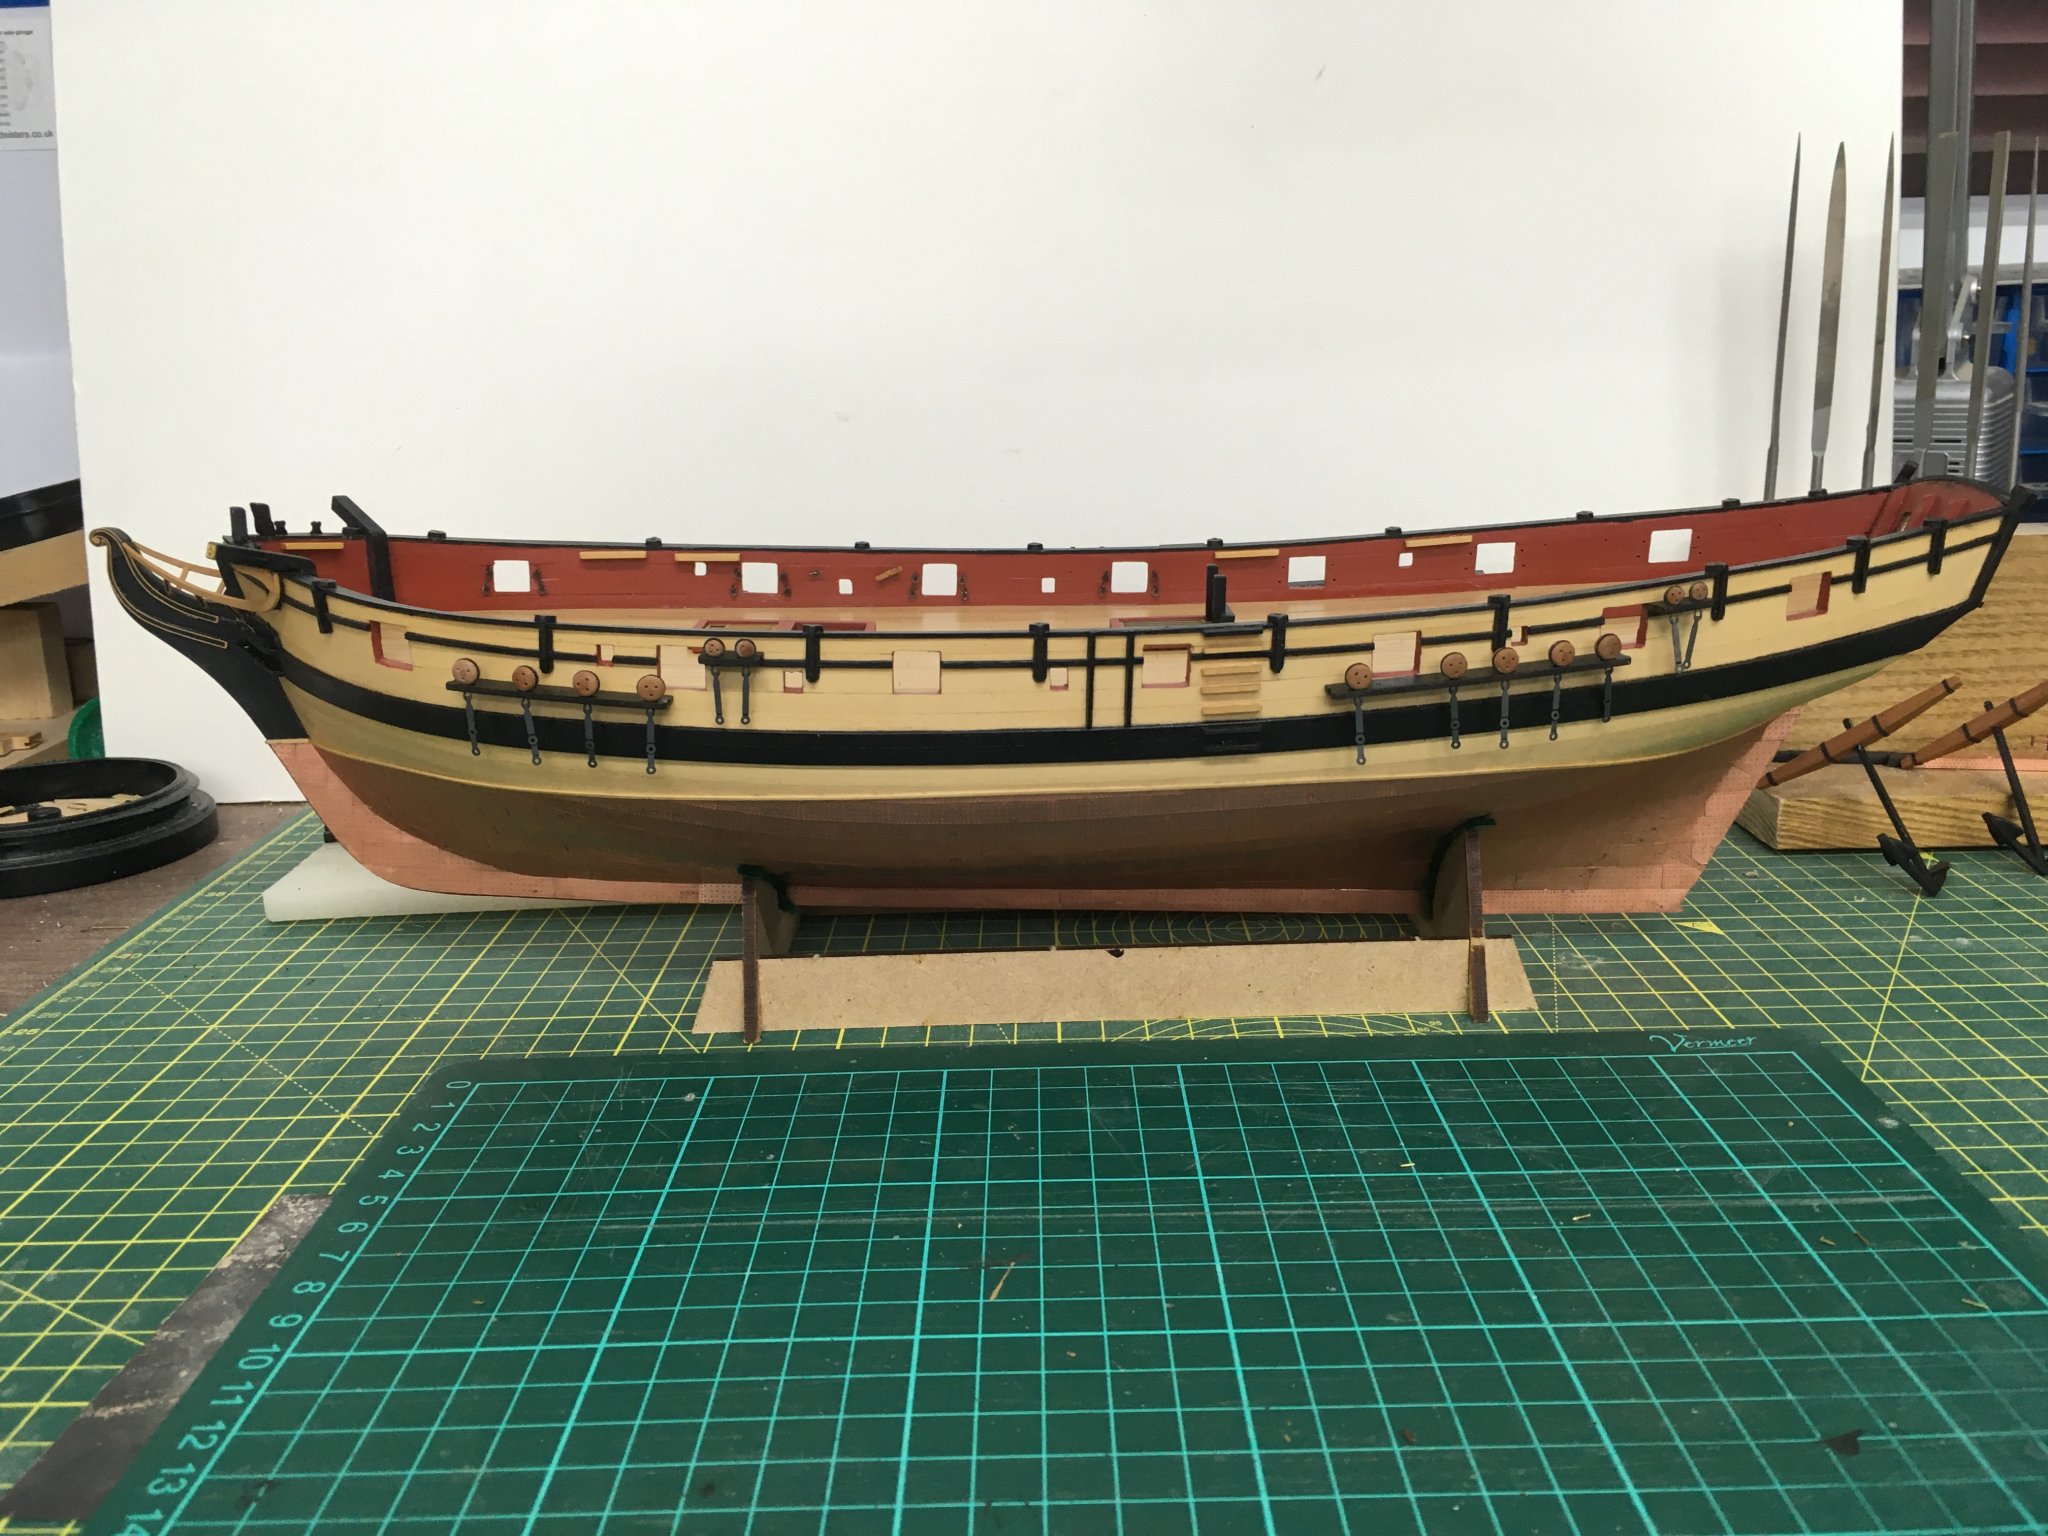
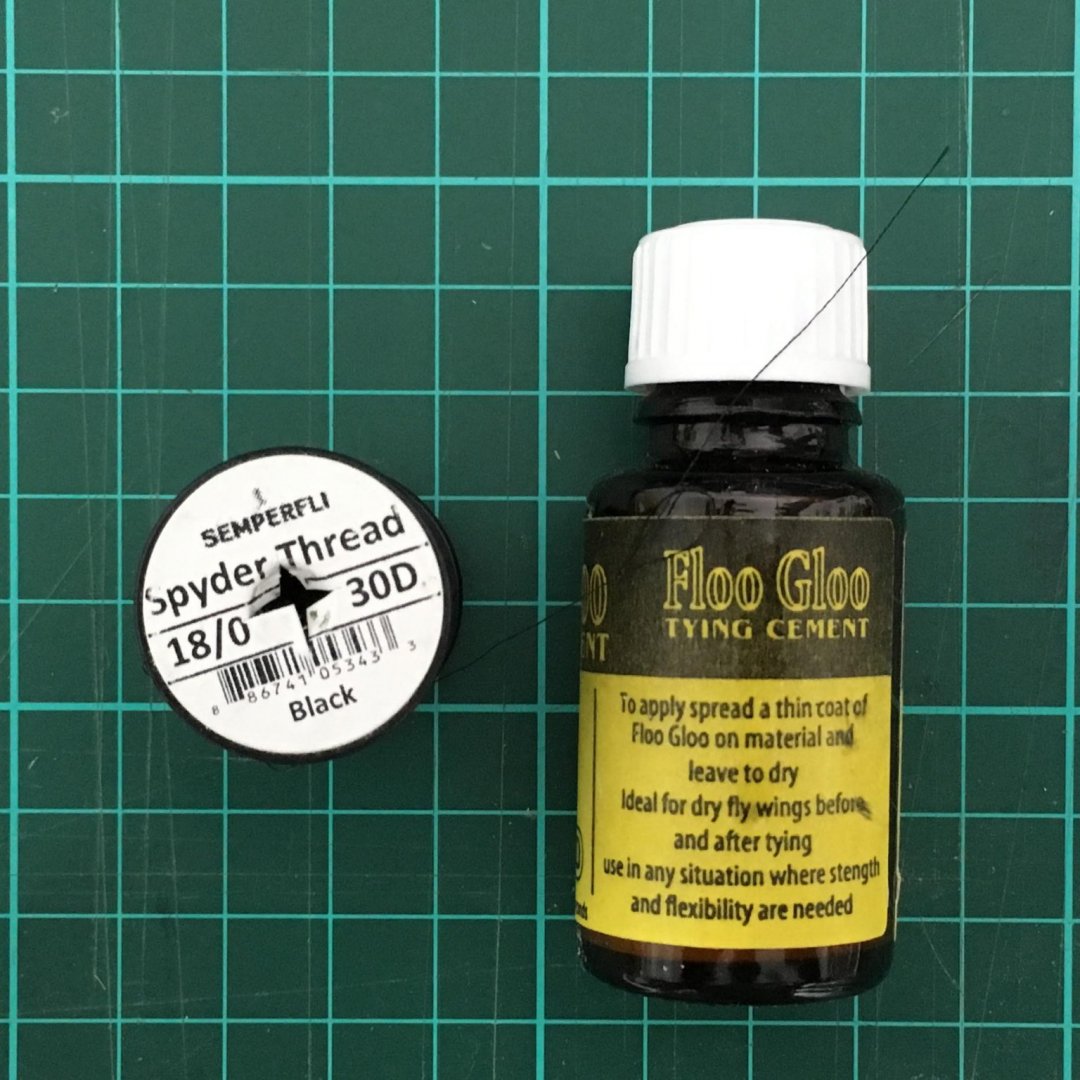
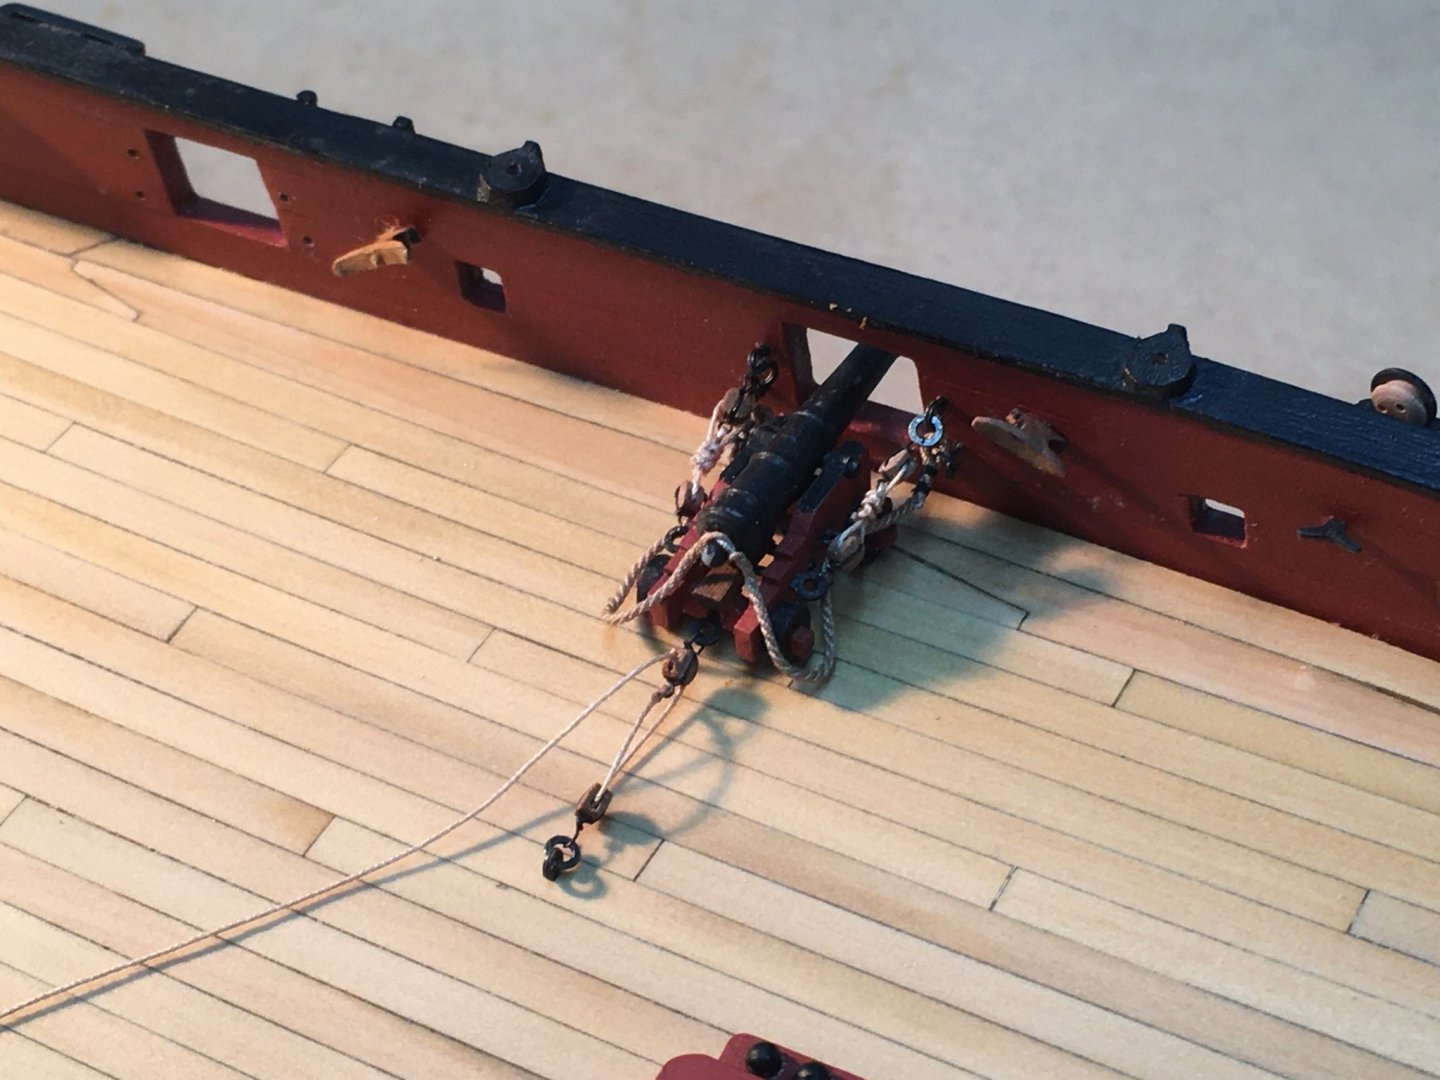
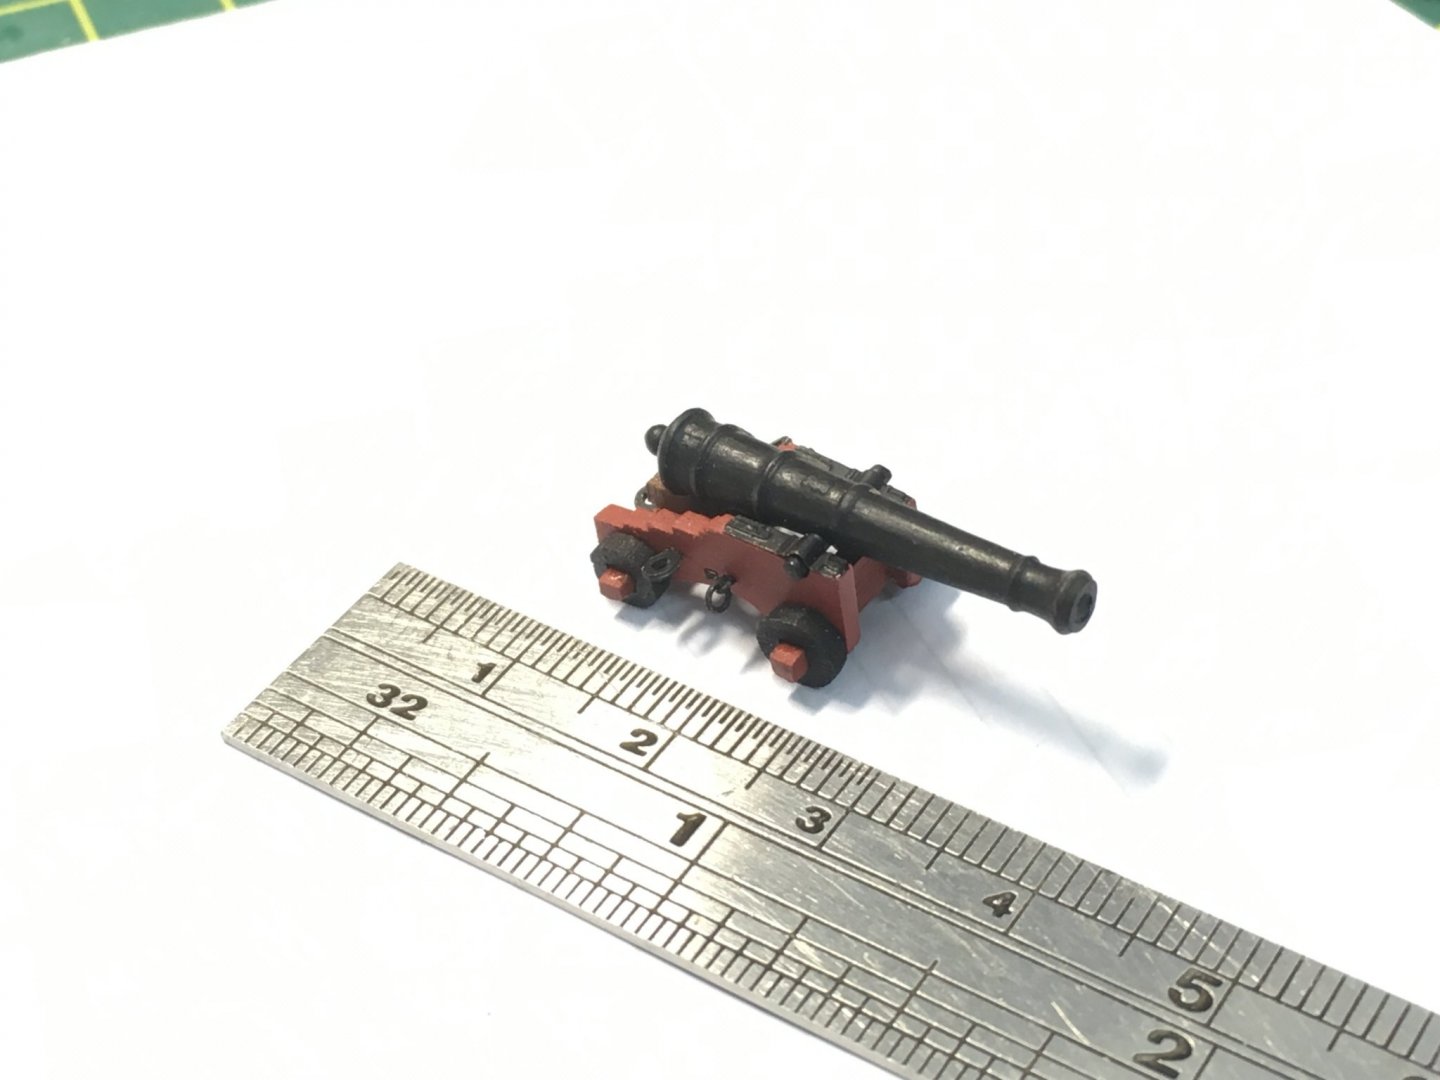
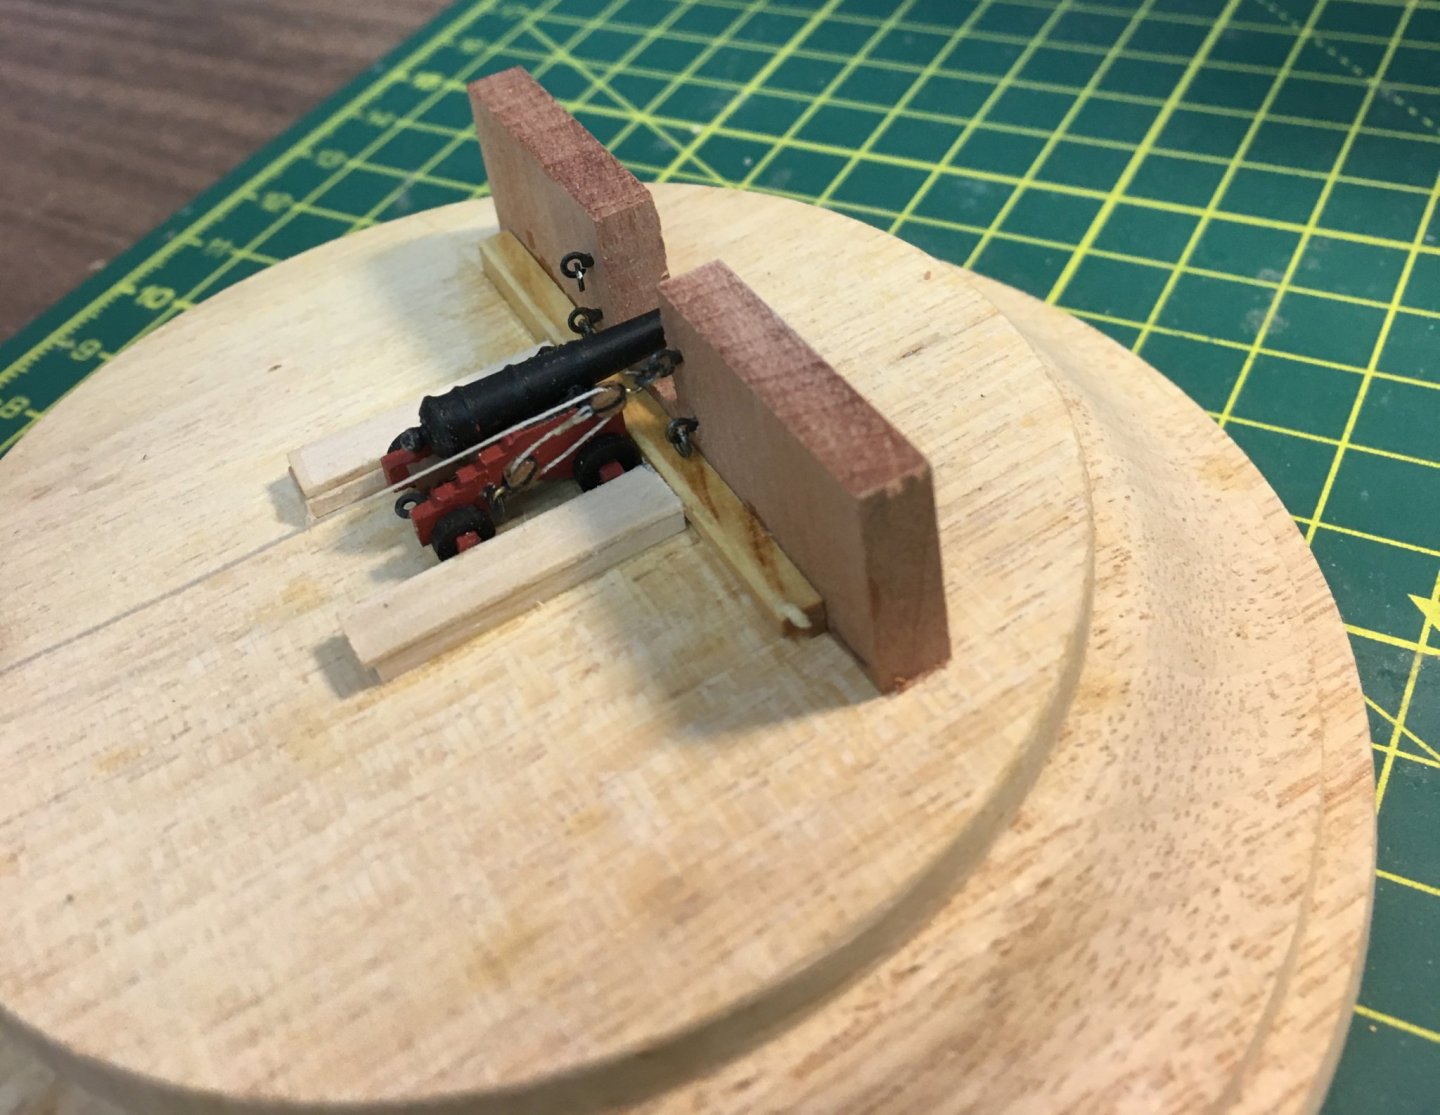
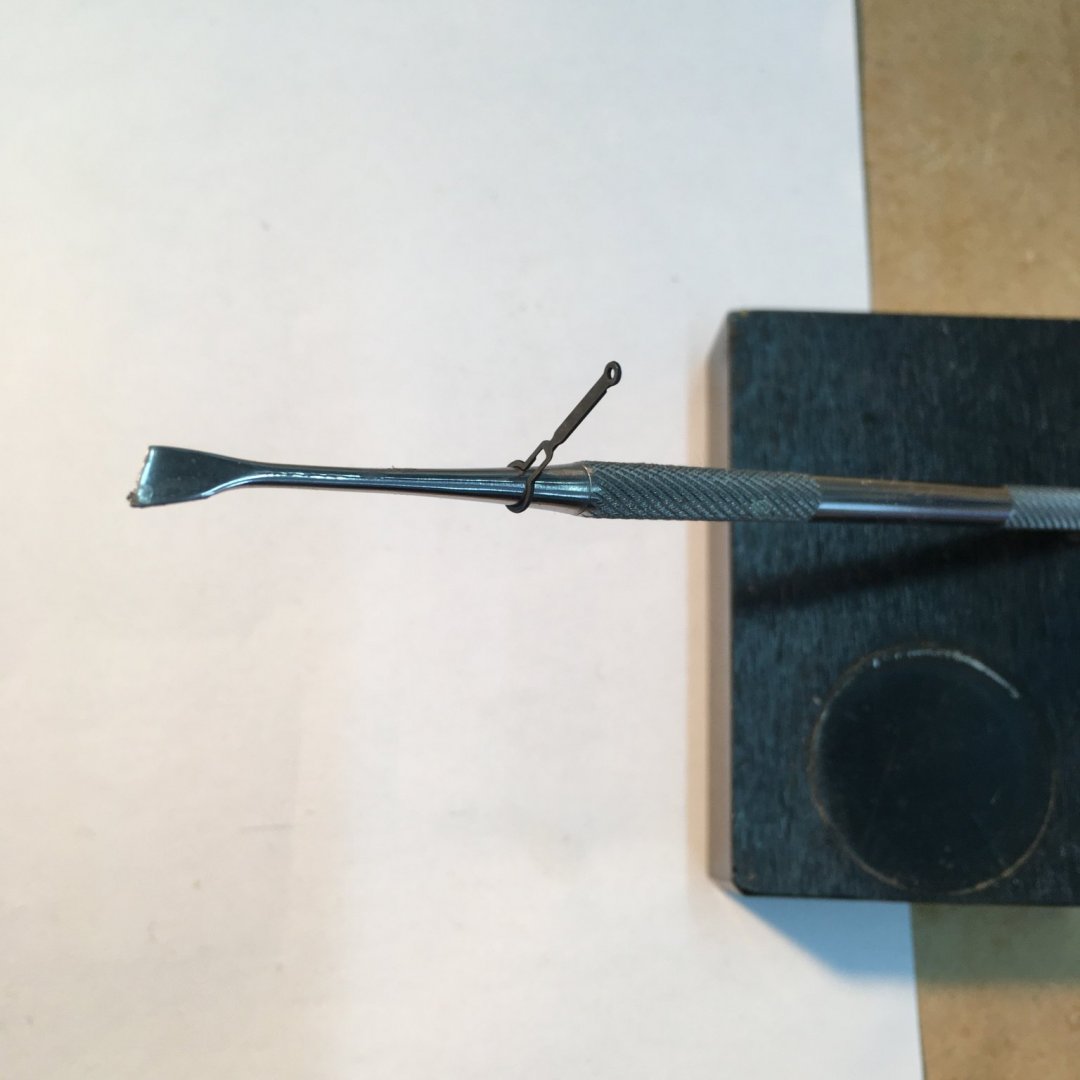
Cannon rigging #92 (ish) Sorry Ernie - other duties around the house and garden have limited the time available for more important dockyard work. I'm still not 100% comfortable with my first attempts at rigging the guns so I'm still experimenting. First, I wanted to see if I could incorporate a ring into the 2 mm blocks. There are tried and tested methods for this, but I wasn't sure how practical they would be with such tiny blocks. I started with a small jig consisting of a block of wood with three pins - one 0.5mm diameter to form the ring, and two of 0.3mm to fit the sheave holes. With the block pushed onto the pins the 0.2 mm wire is wrapped once round the pin... ...then round the block: One end of the wire is wrapped around the other as shown above then cut off as close as possible. The remaining end is formed into a hook with a pair of fine needle-nose pliers and the excess wire snipped off. I was quite pleased with the result: Dunking in acetone followed by Brass Black worked well. The wood looked a little dried out, probably due to the acetone, but a dab of matt varnish sorted that: For the seizings I decided to use fly fishing thread. The one I like is just 0.04 mm/ 0.0016" - arguably TOO fine at just 2.5 mm/ 0.10" real size, but I'd always rather err on the side of under scale than over scale. Here it is on the bobbin, and being used to seize the breeching: I tie the seizings in the normal way then put a tiny dab of the fly tying cement on the knots. Within a minute or two the excess line can be snipped off. Here's the first gun rigged temporarily to see the overall effect: I'm still not sure about the side tackles. Apart from anything else, they completely hide the neat little ringbolts I made on the carriage for the breechings. I've seen rigging where much more rope is left between the side tackle blocks, leaving space for more realistic frapping and allowing the whole tackle to hang down and show more of the breeching. Alternatively I could move the rear ringbolt onto one of the carriage steps. I'll do some more experimentation. Having said all that, it doesn't look too bad from a distance 😀. Derek


- 725 replies
-
- 15
-
-
- vanguard models
- speedy
- (and 1 more)
-
Congratulations on completing your first ship model - the first of many, I hope. Well done! Derek
- 41 replies
-
- 1
-
-
- thermopylae
- scientific models
- (and 3 more)
-
I second B.E.'s praise - those fashion pieces look beautiful, and your detailed explanations and photos will help other modellers. Derek
- 778 replies
-
- 6
-
-
- cheerful
- Syren Ship Model Company
- (and 1 more)
-
Tell the War Department that's fine, so long as she doesn't mind the furniture being 1:64 scale 😀
-
Looks good to me too Ernie - a very sound basis for your second planking.
-
Thanks Chuck & Vlad. I've just ordered Model Shipways' 18th Century Longboat - another Chuck-designed classic that should make a fine addition to the fleet. Derek
- 77 replies
-
- 2
-
-
- model shipways
- pinnace
- (and 1 more)
-
Welcome to the club! Very neat work on the counter, btw. Derek
- 778 replies
-
- 3
-
-
- cheerful
- Syren Ship Model Company
- (and 1 more)
-
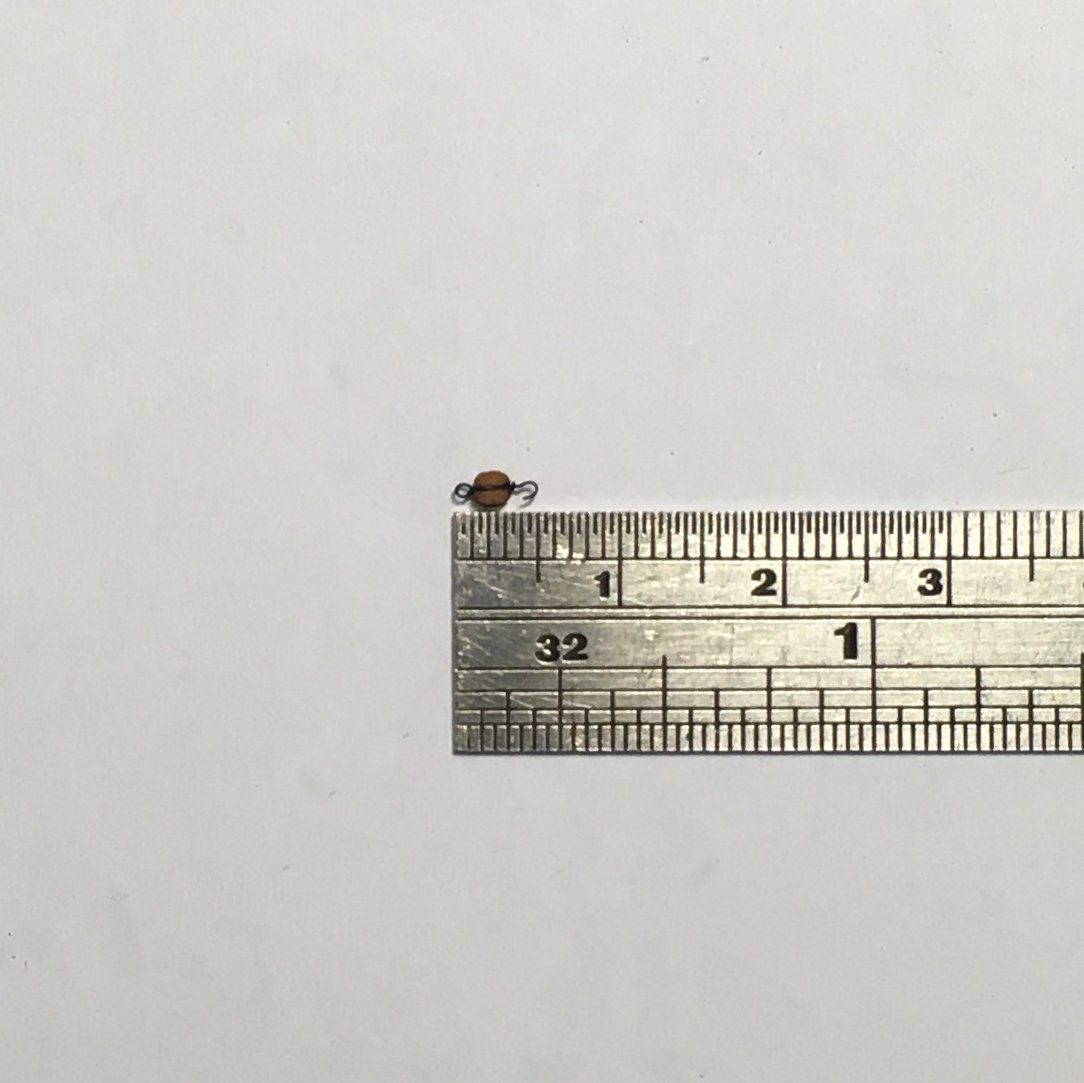
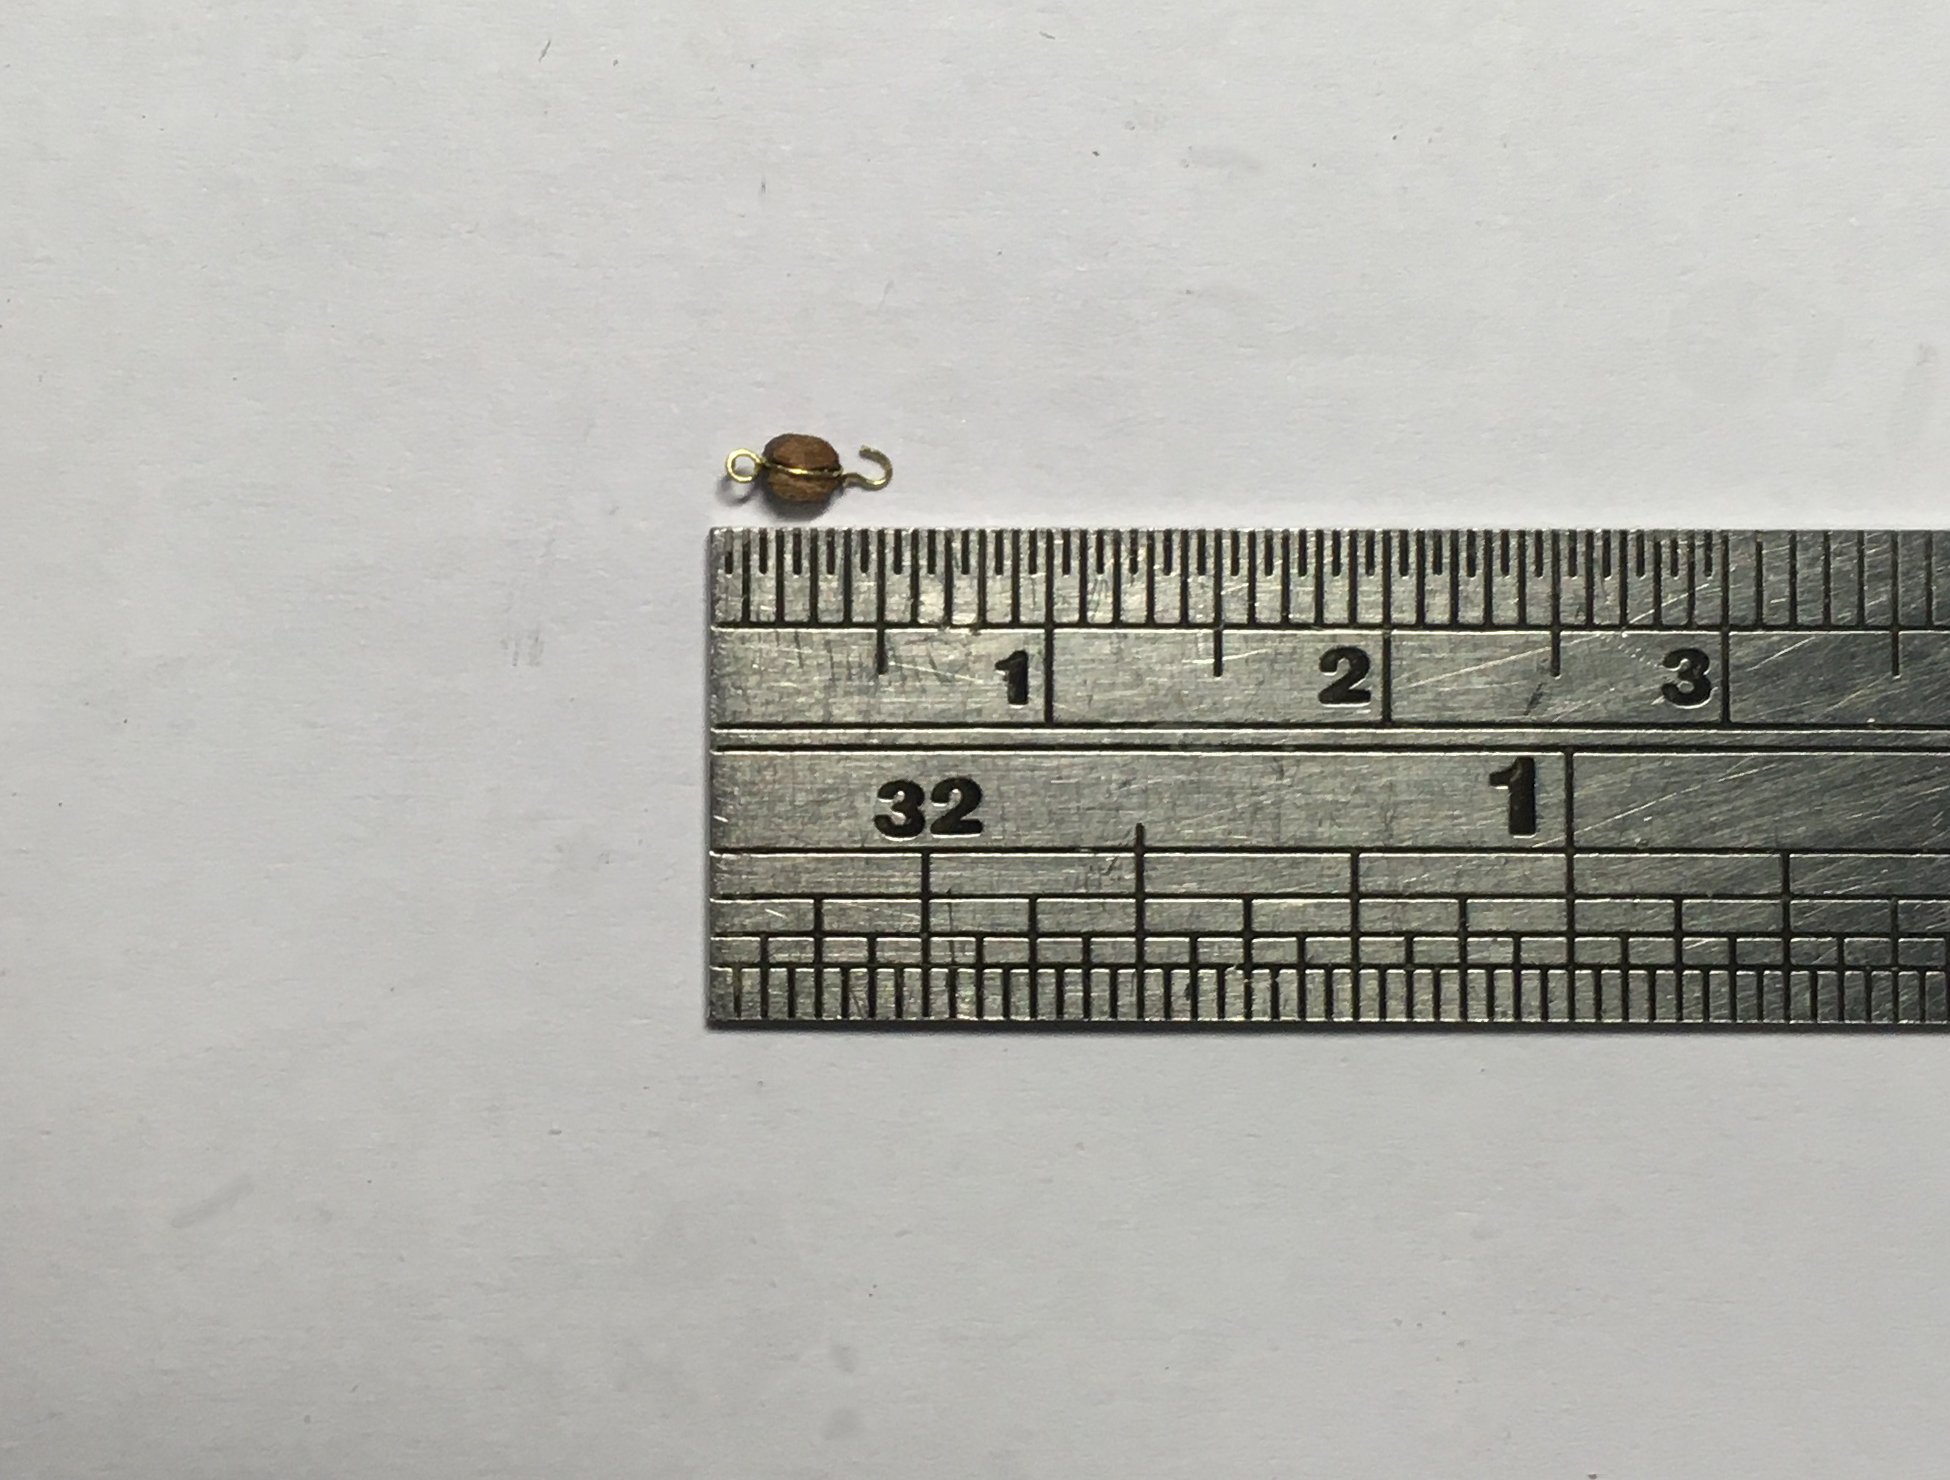
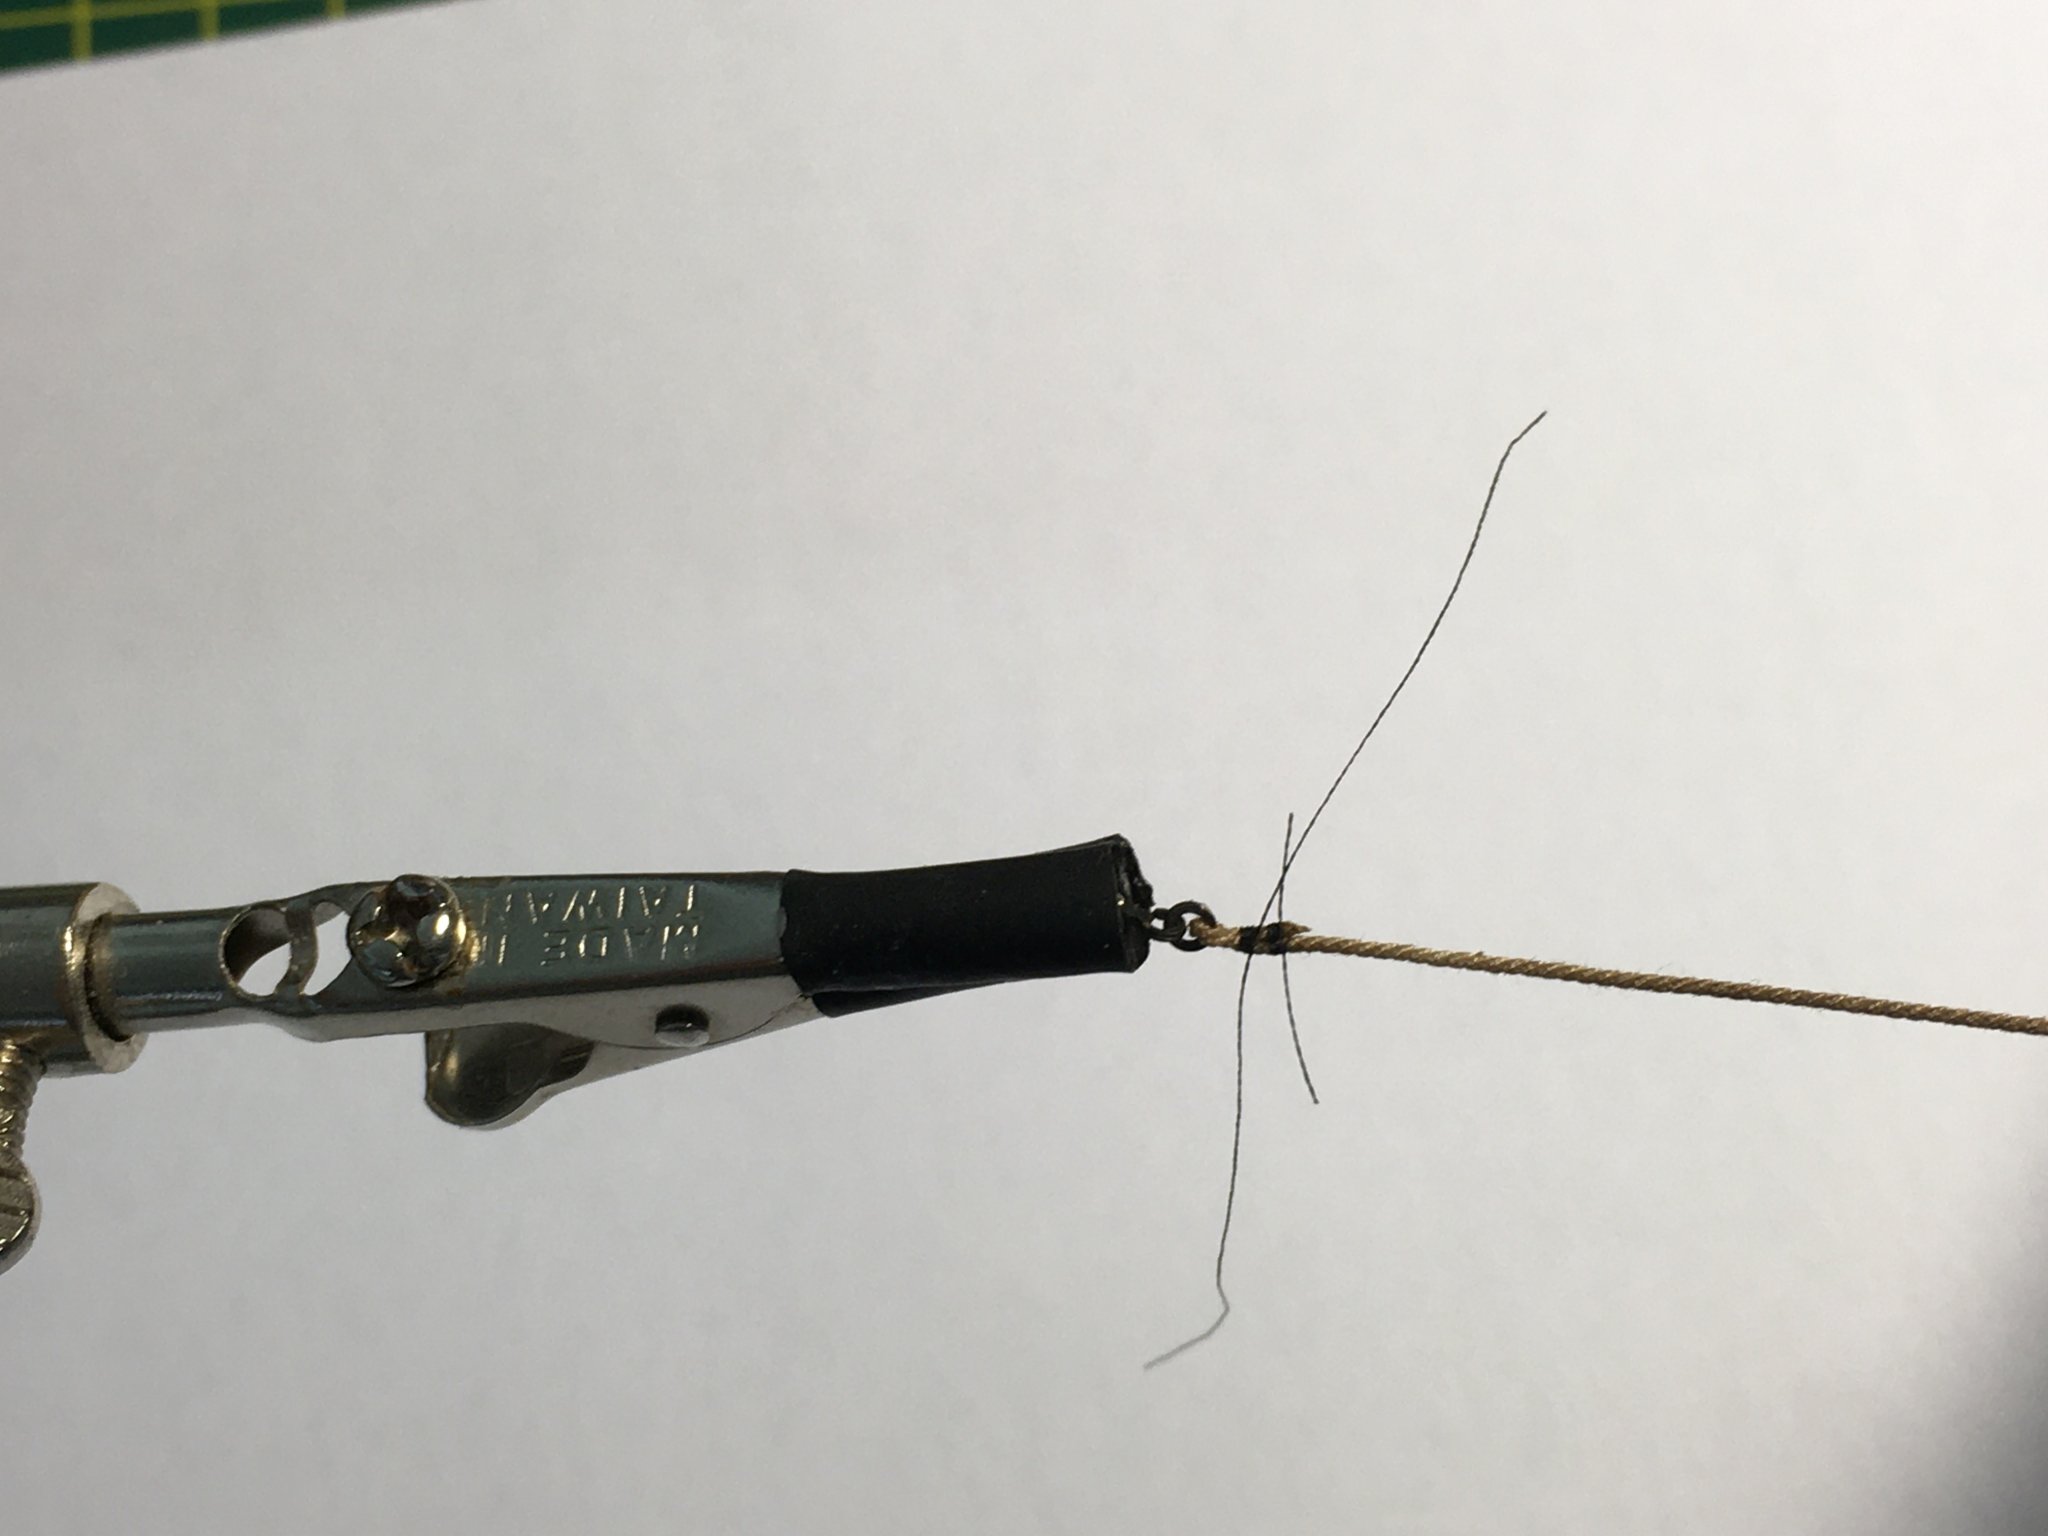
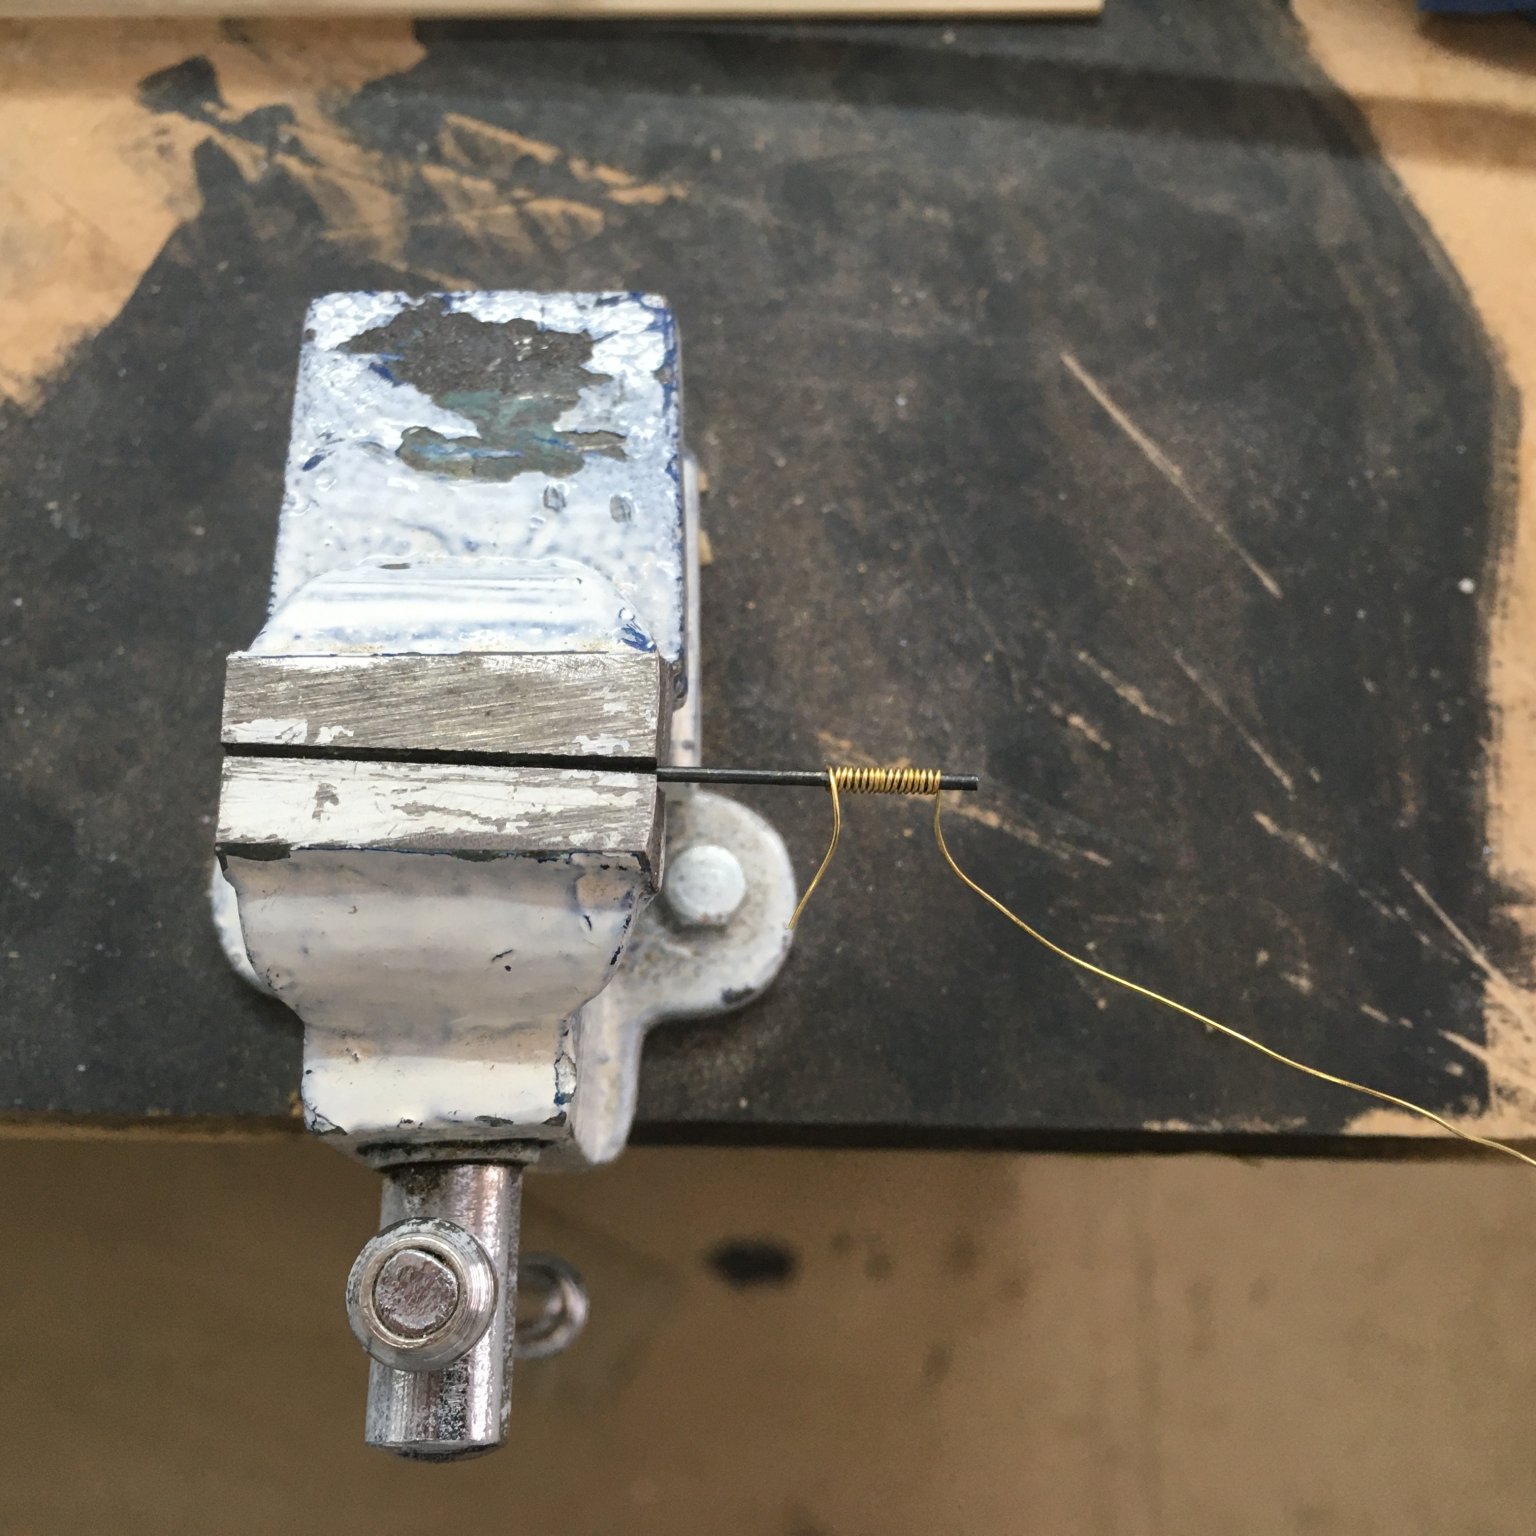
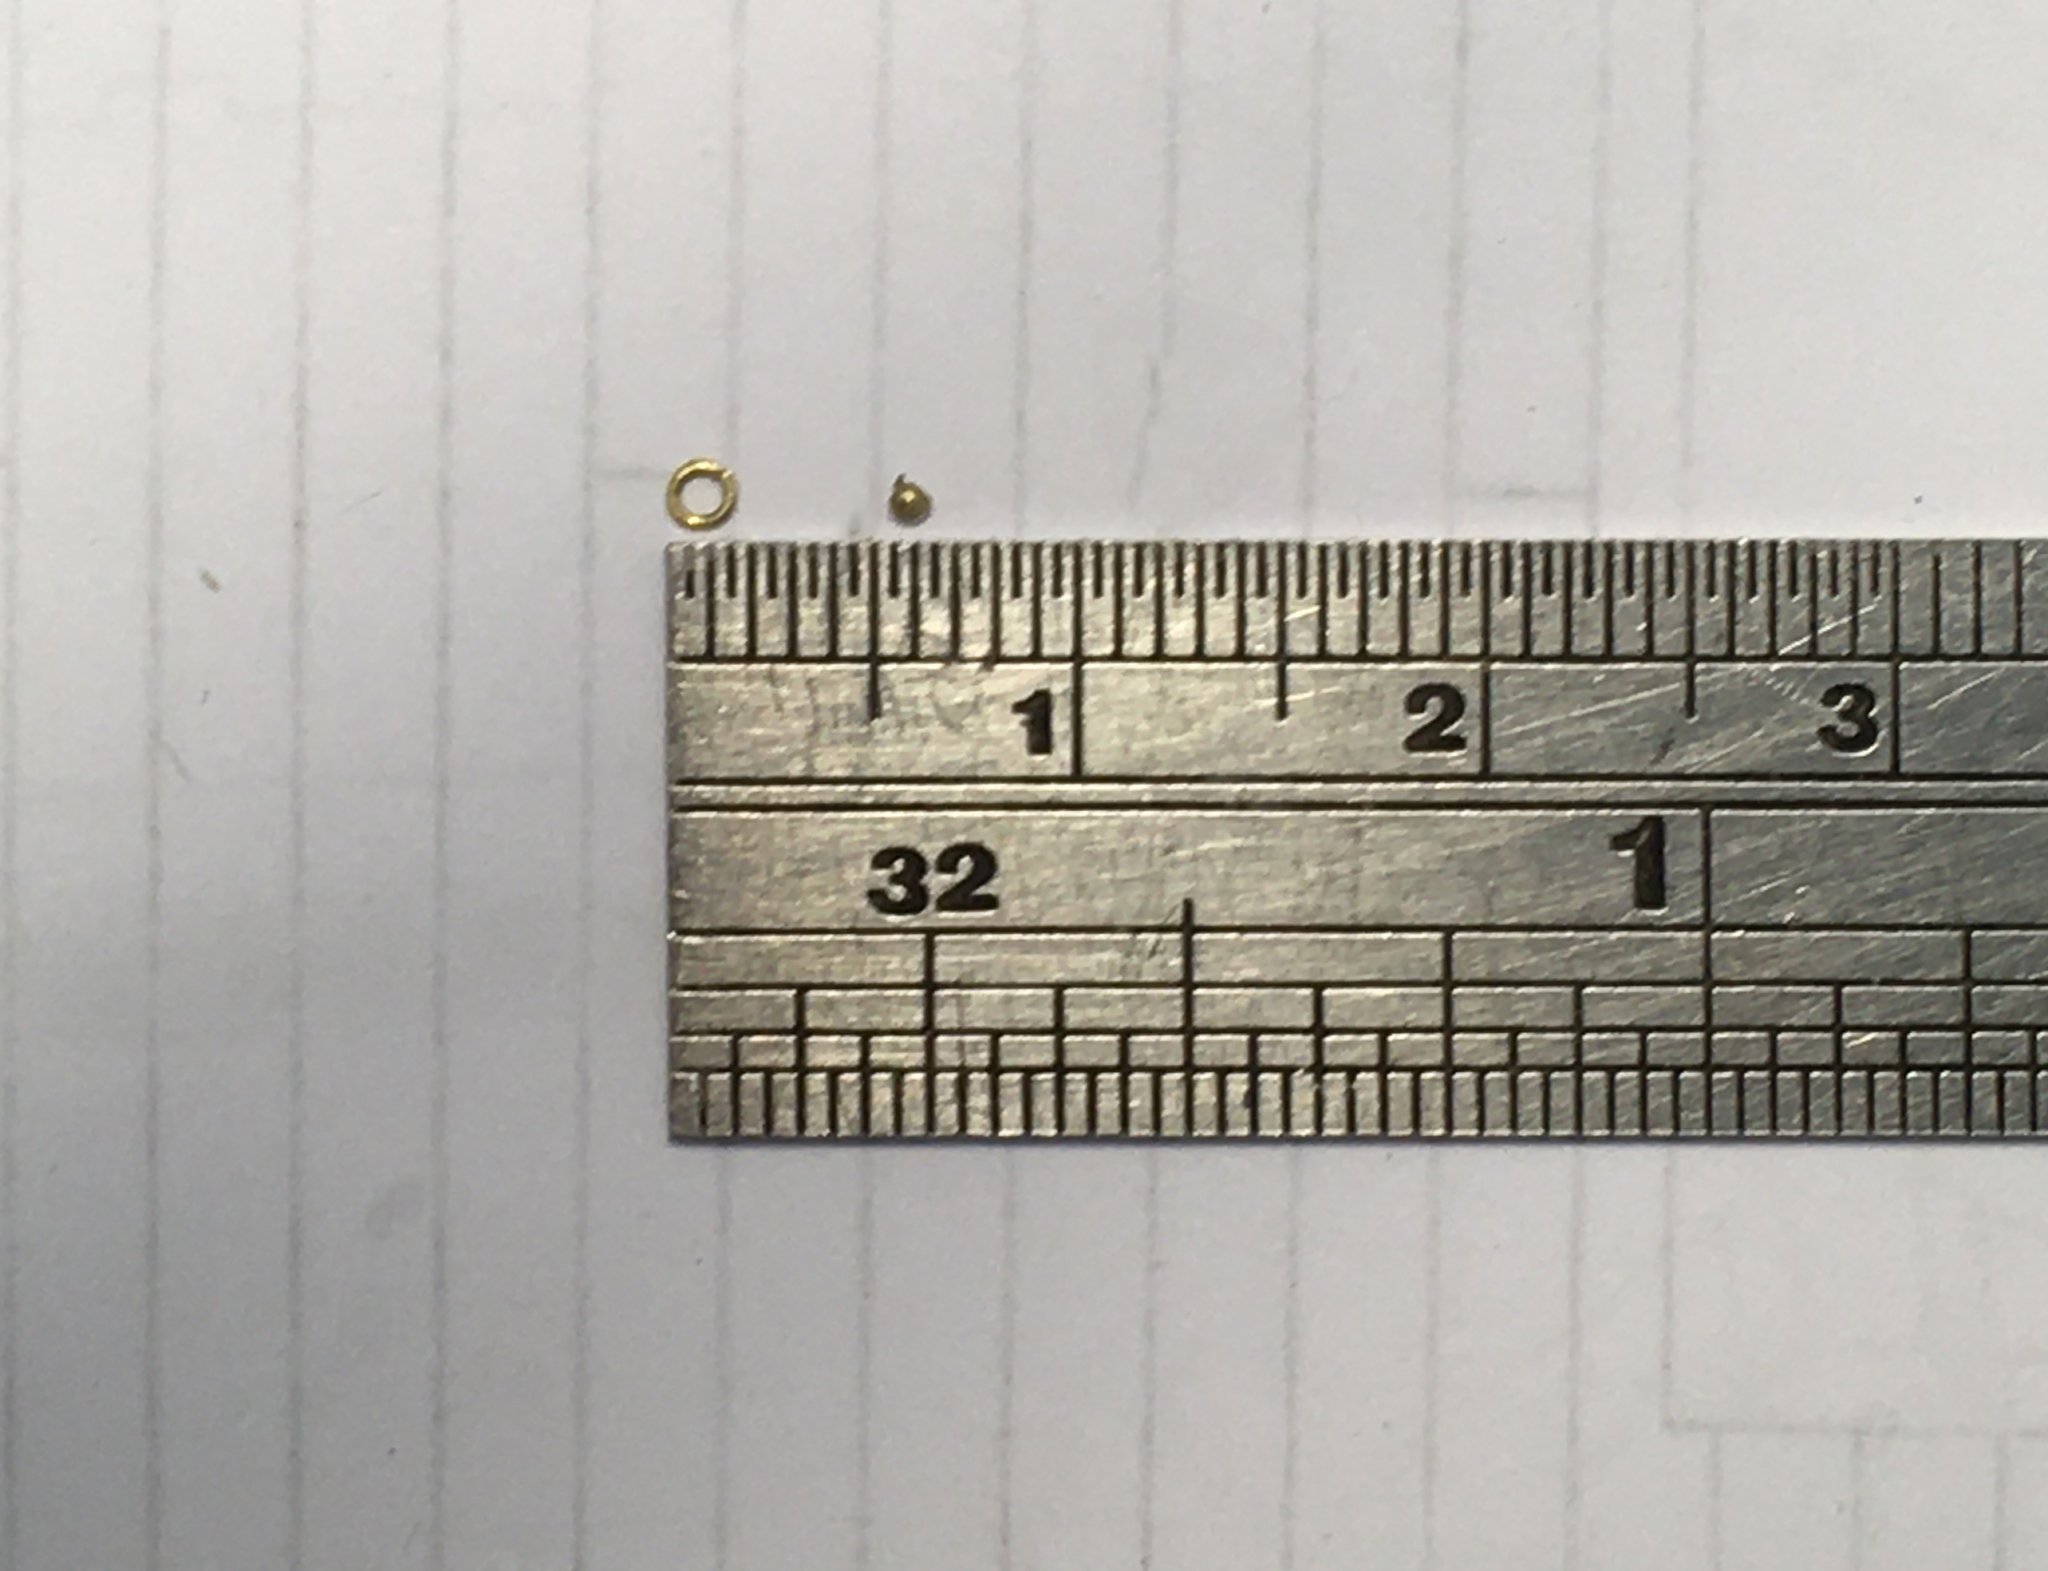
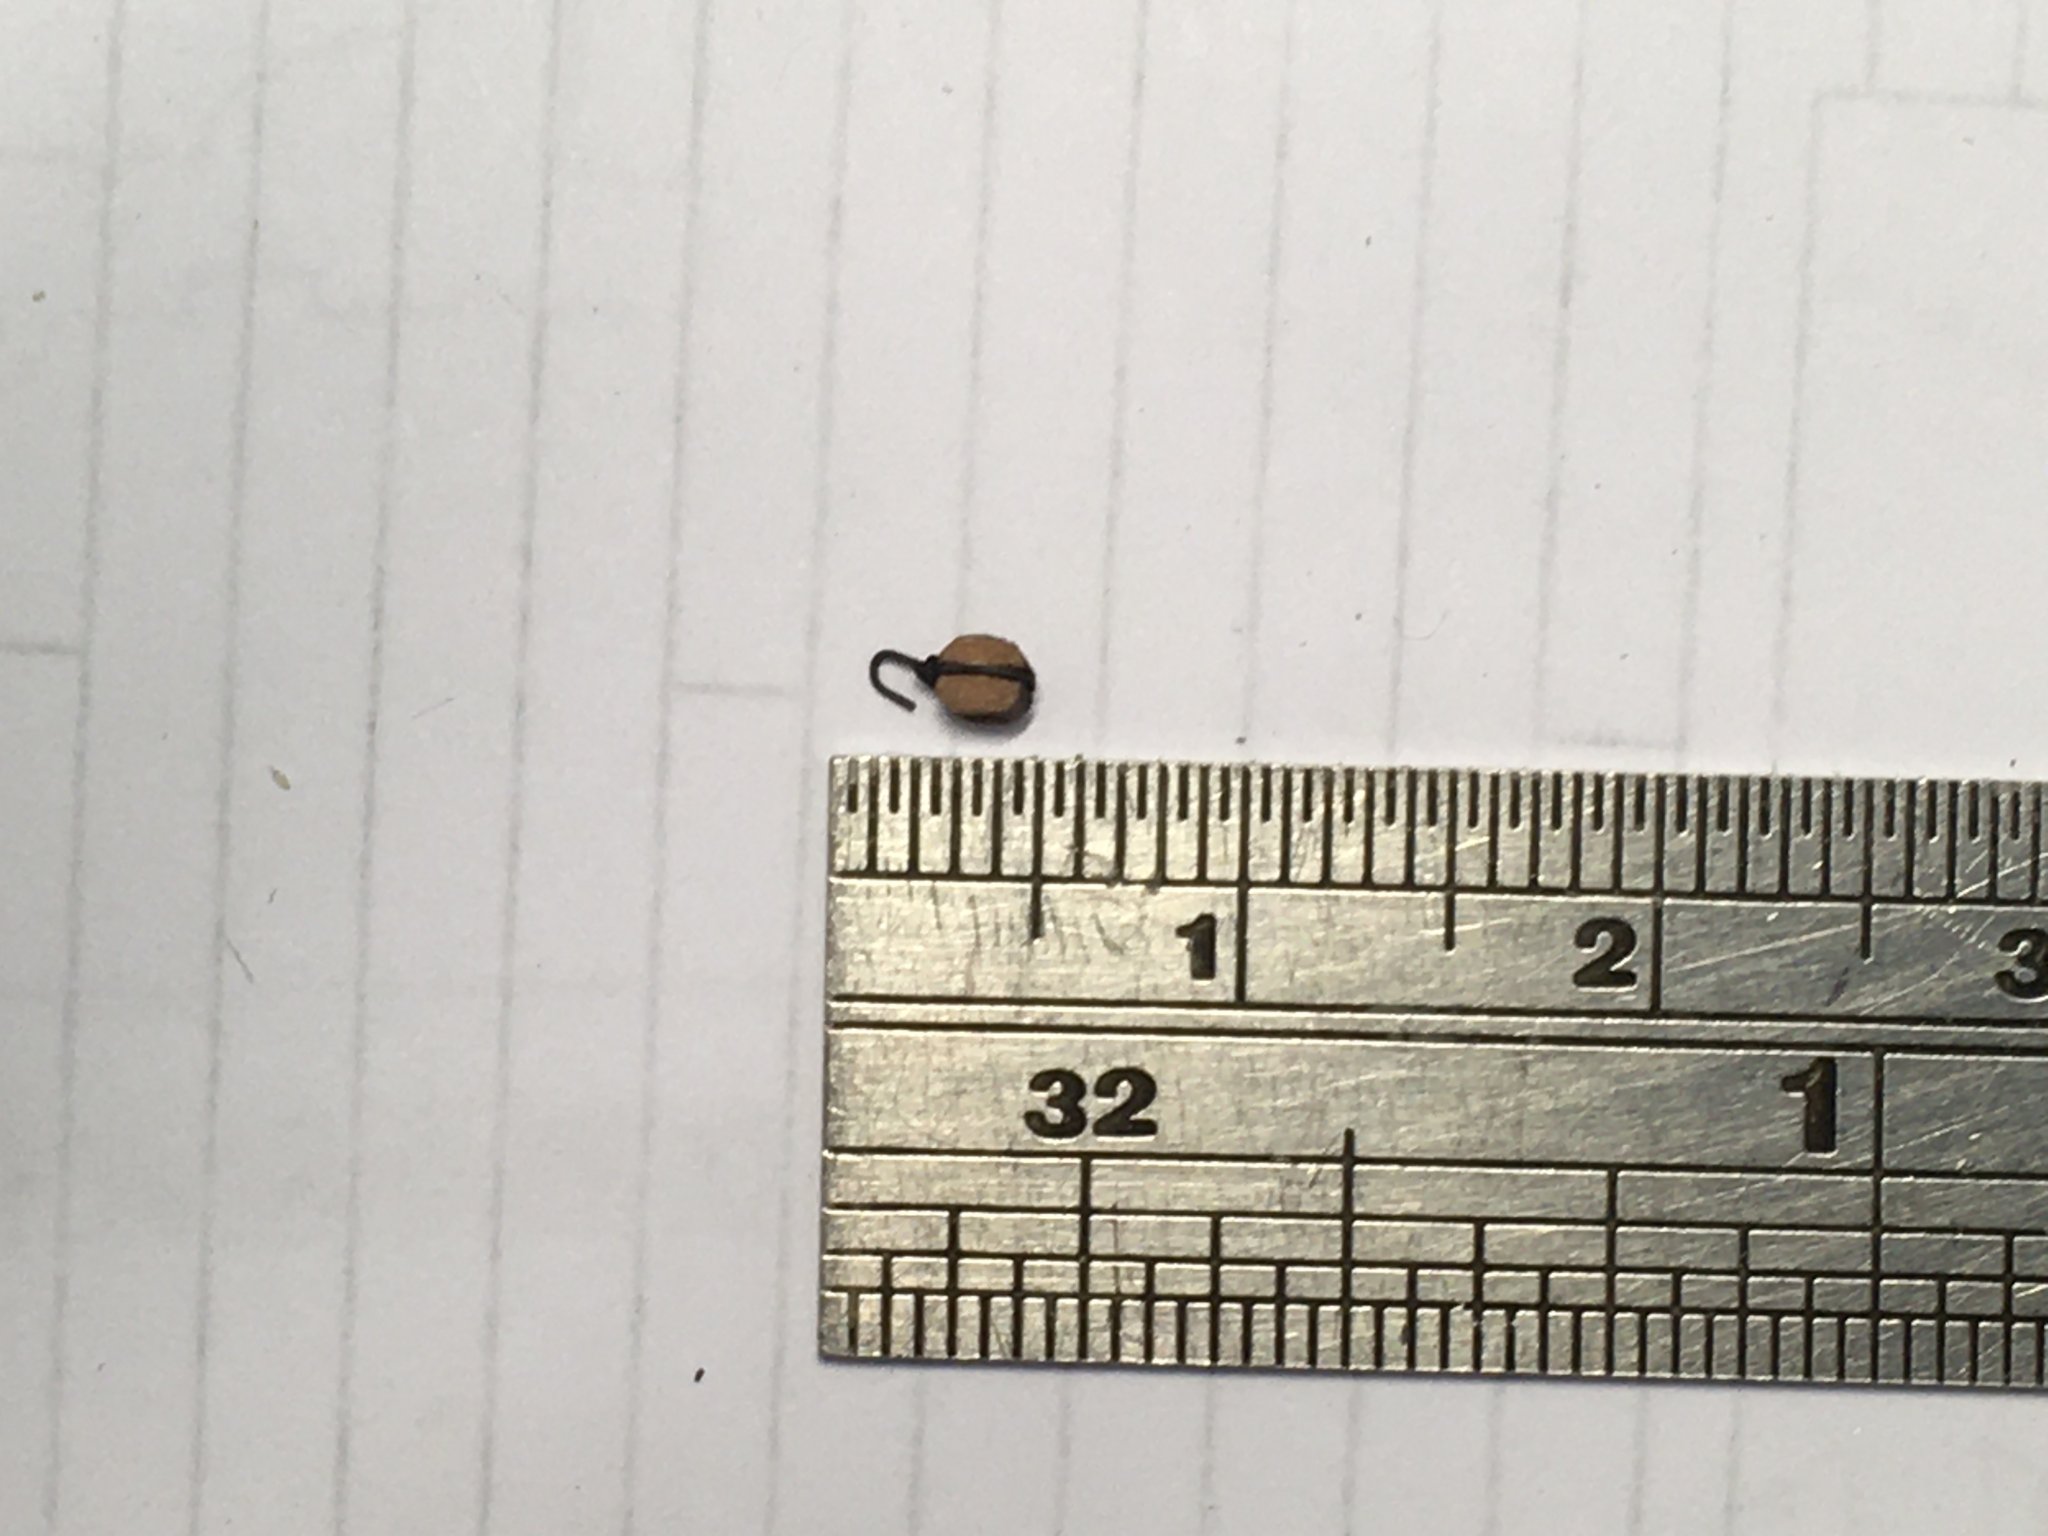
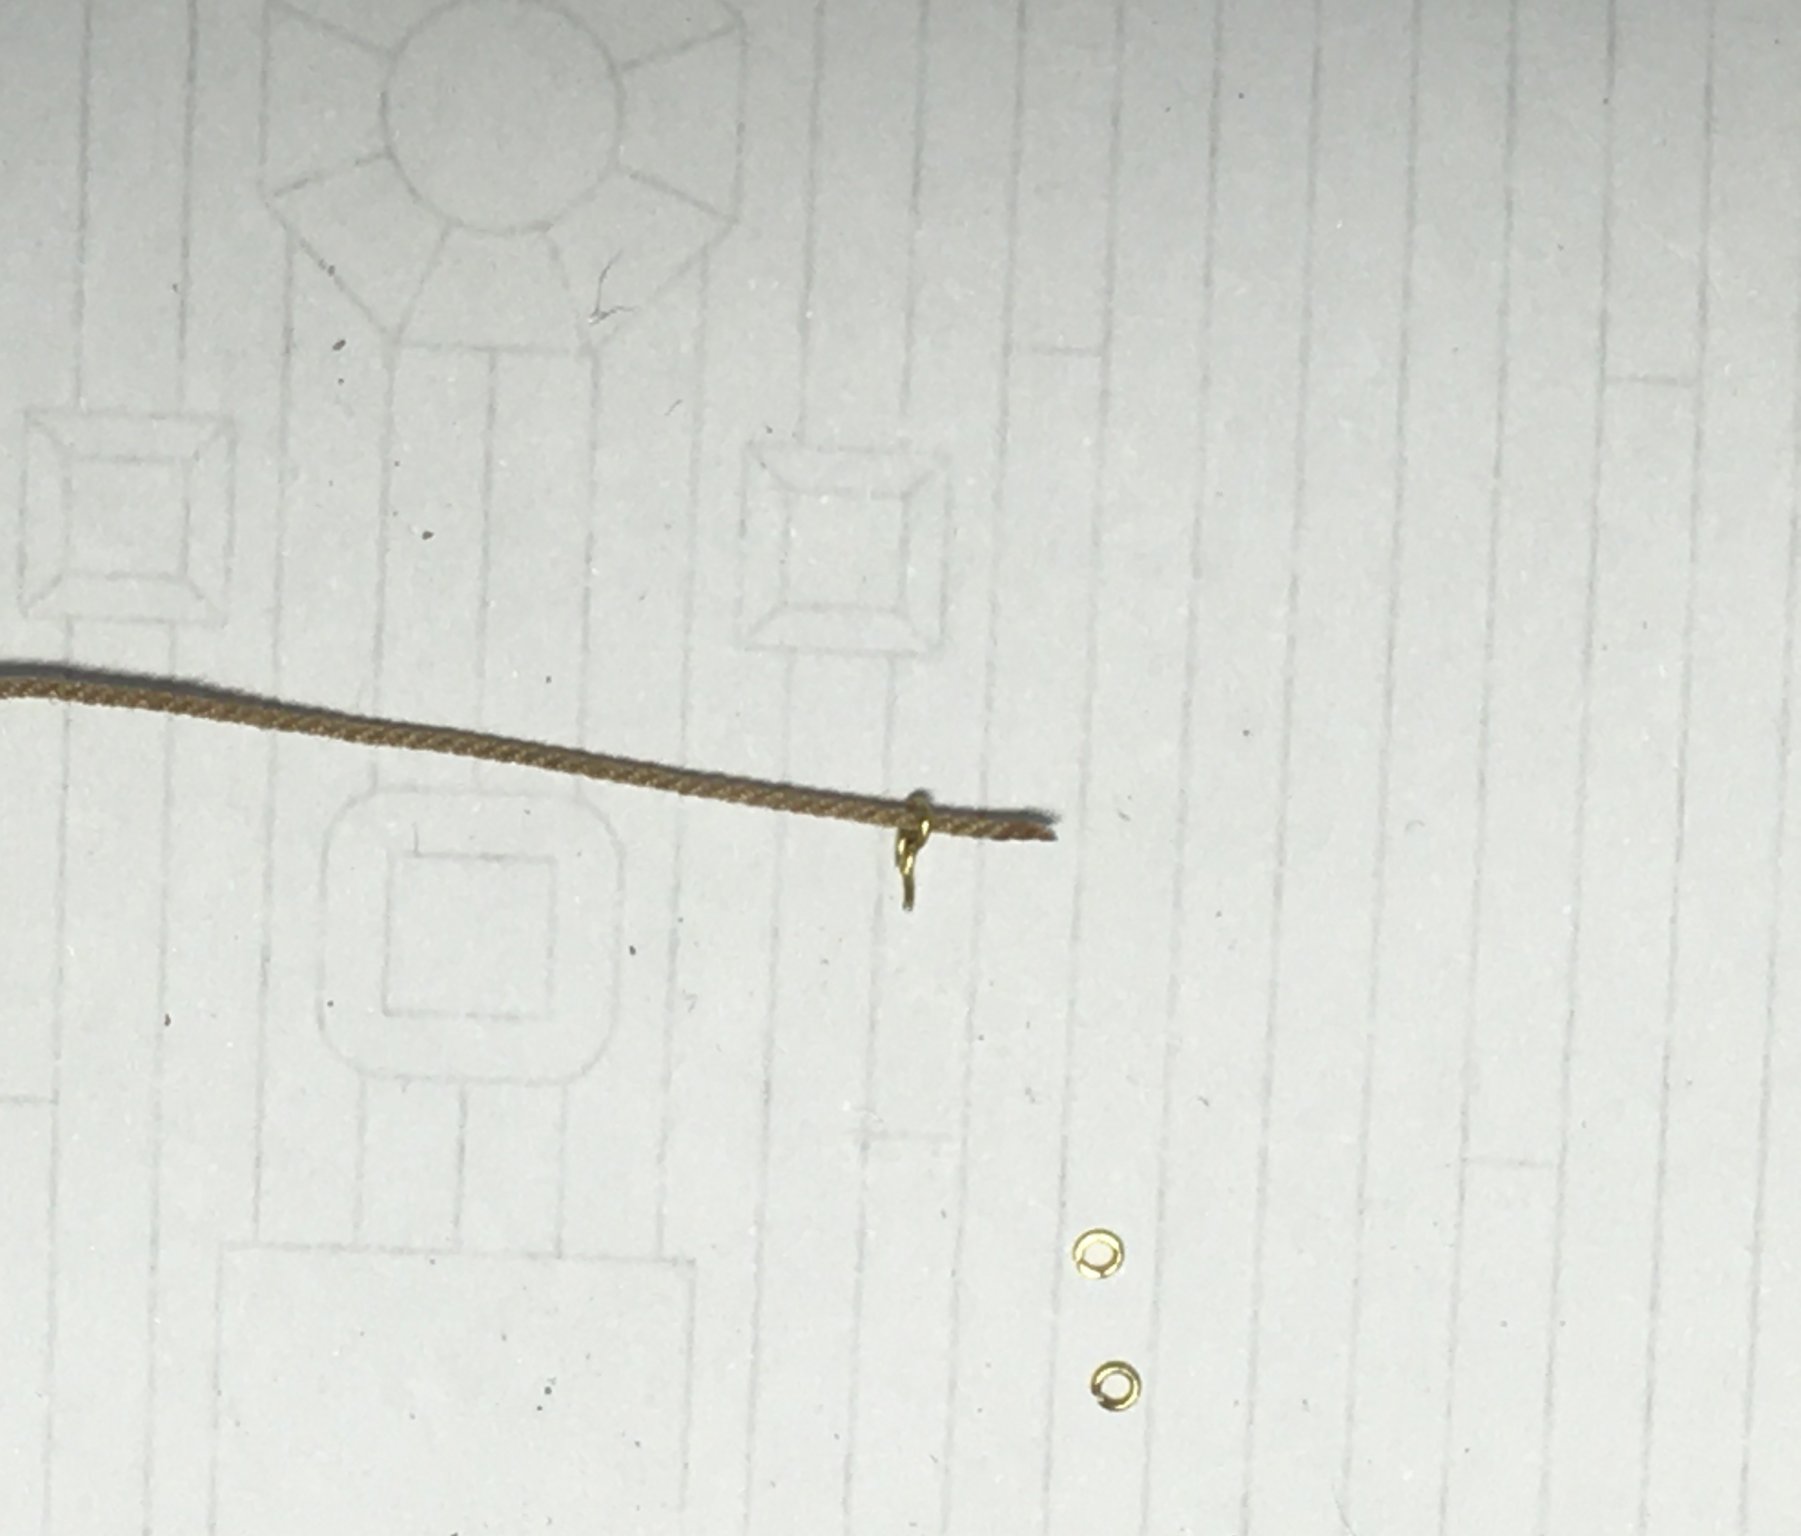
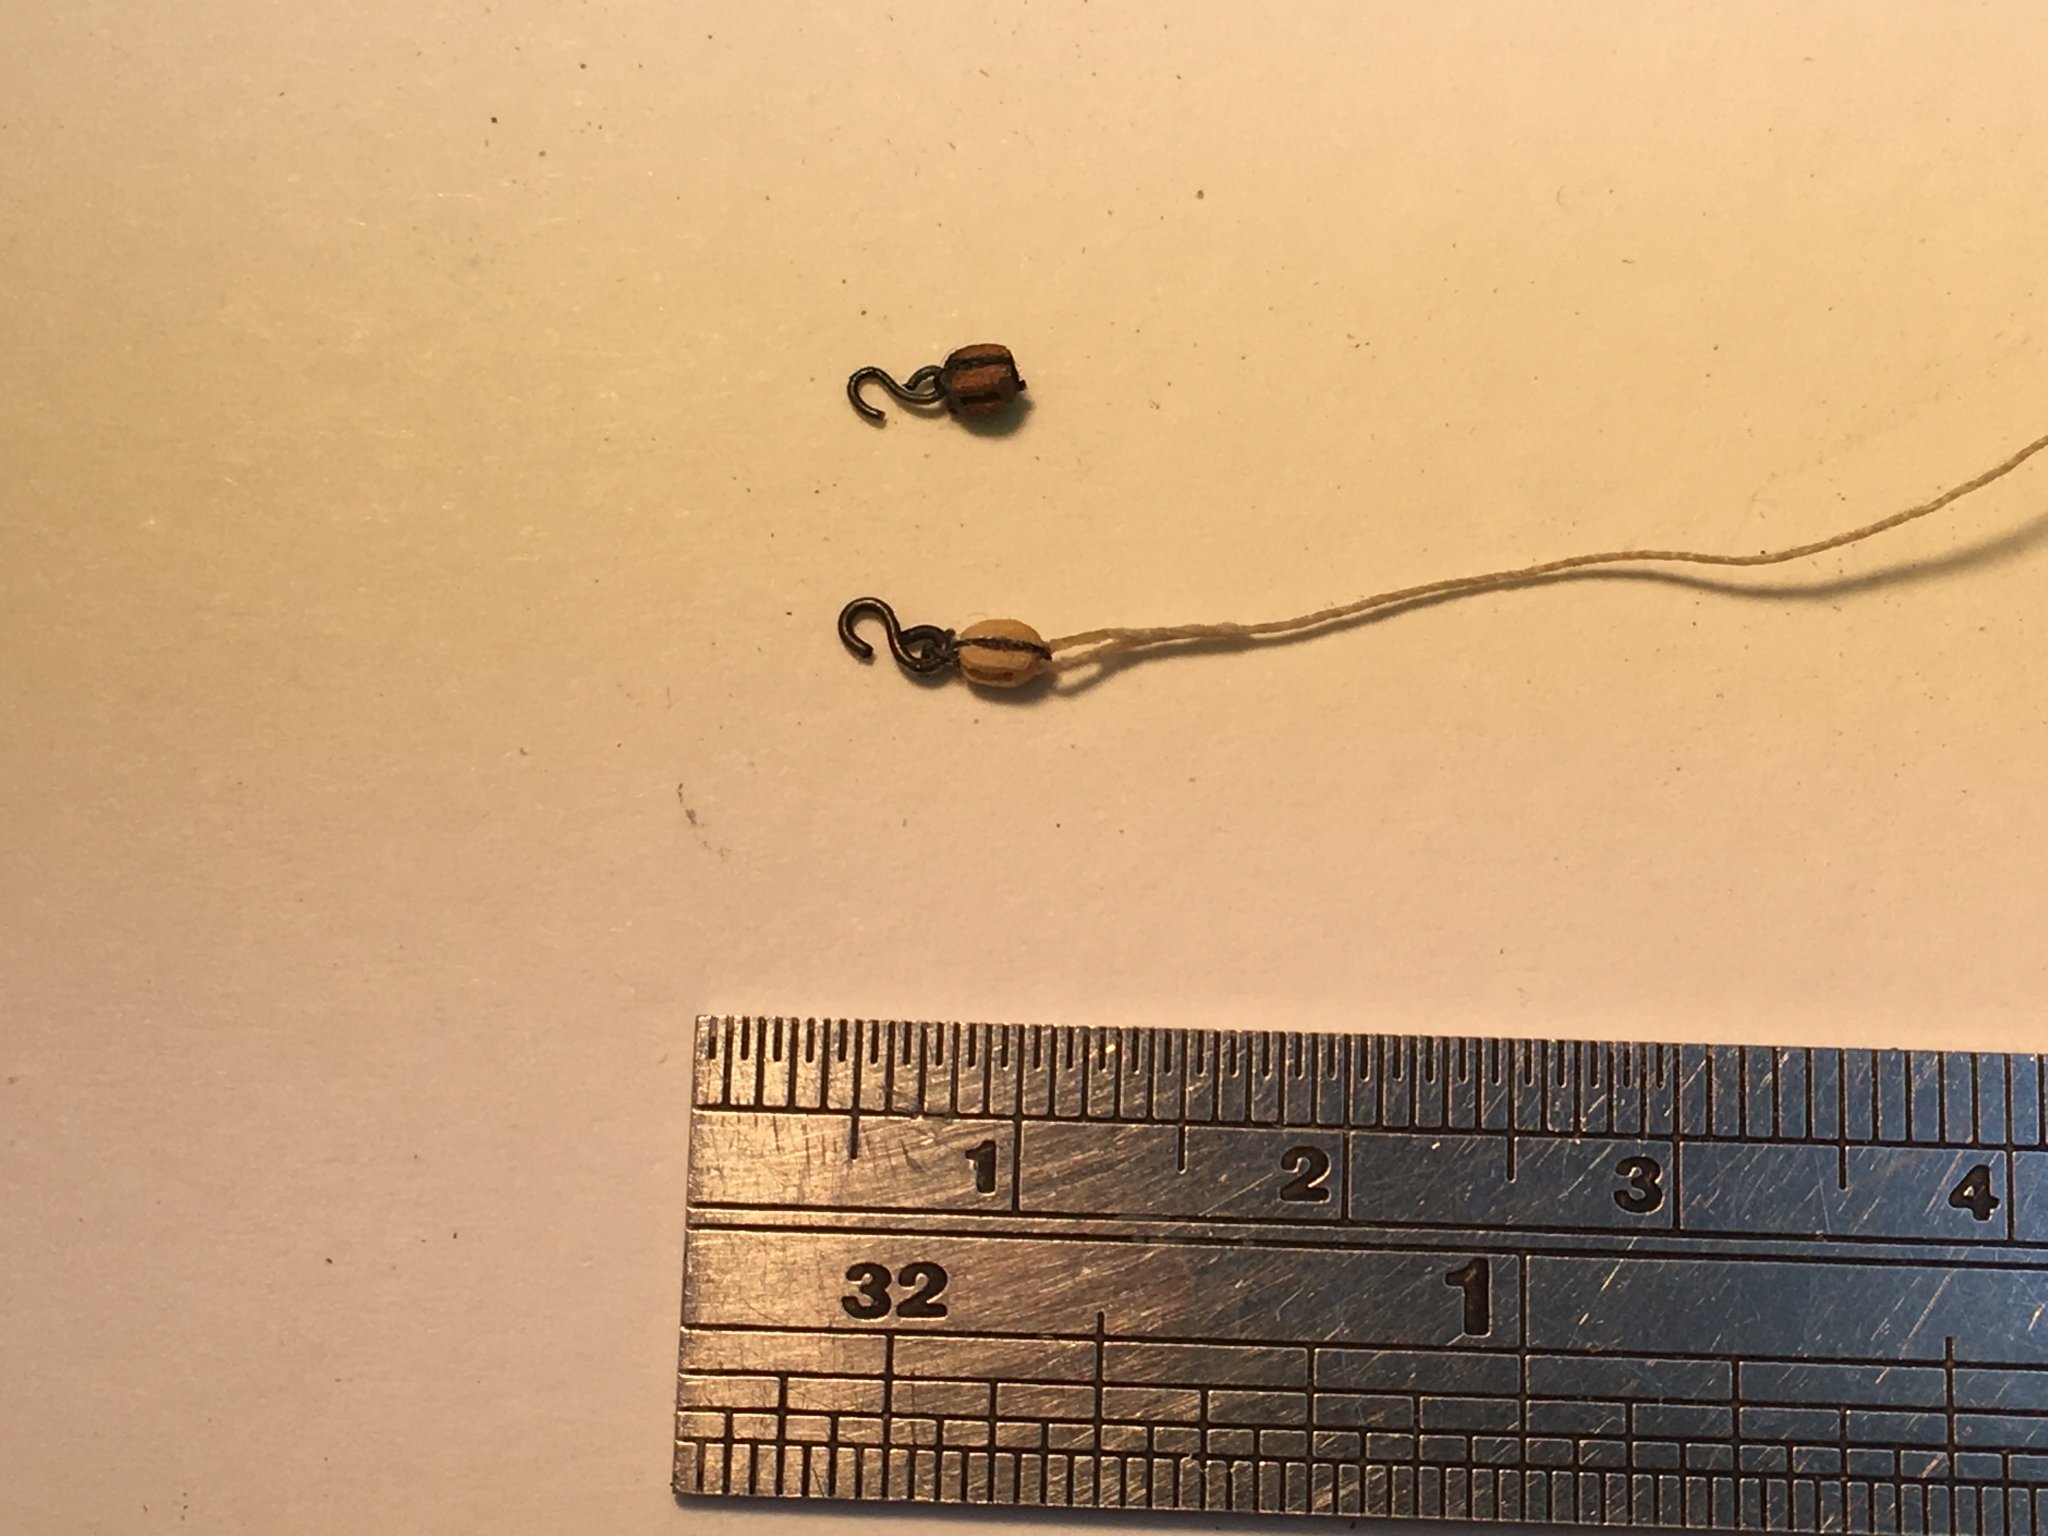
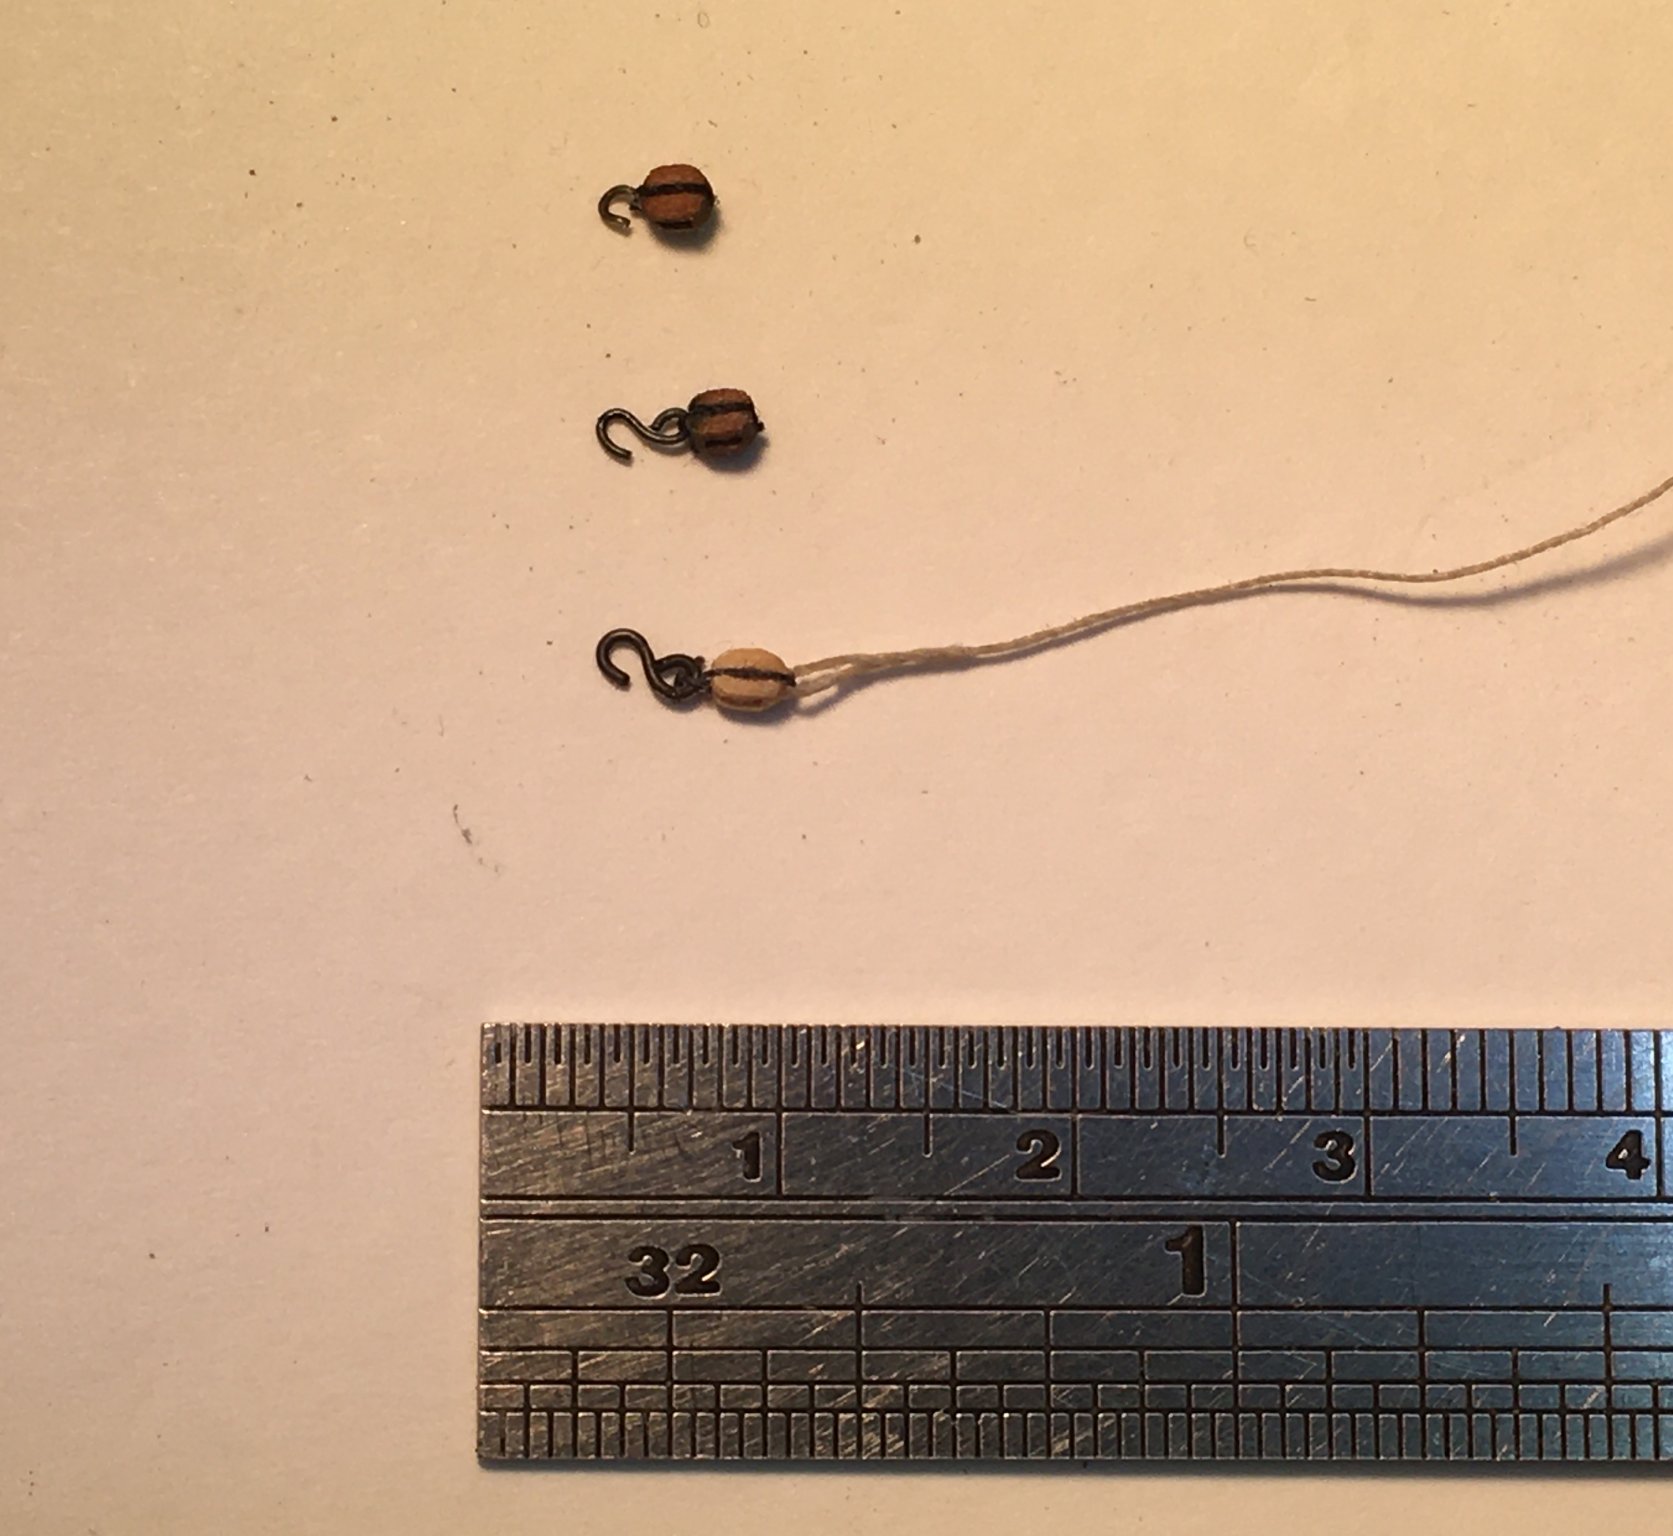
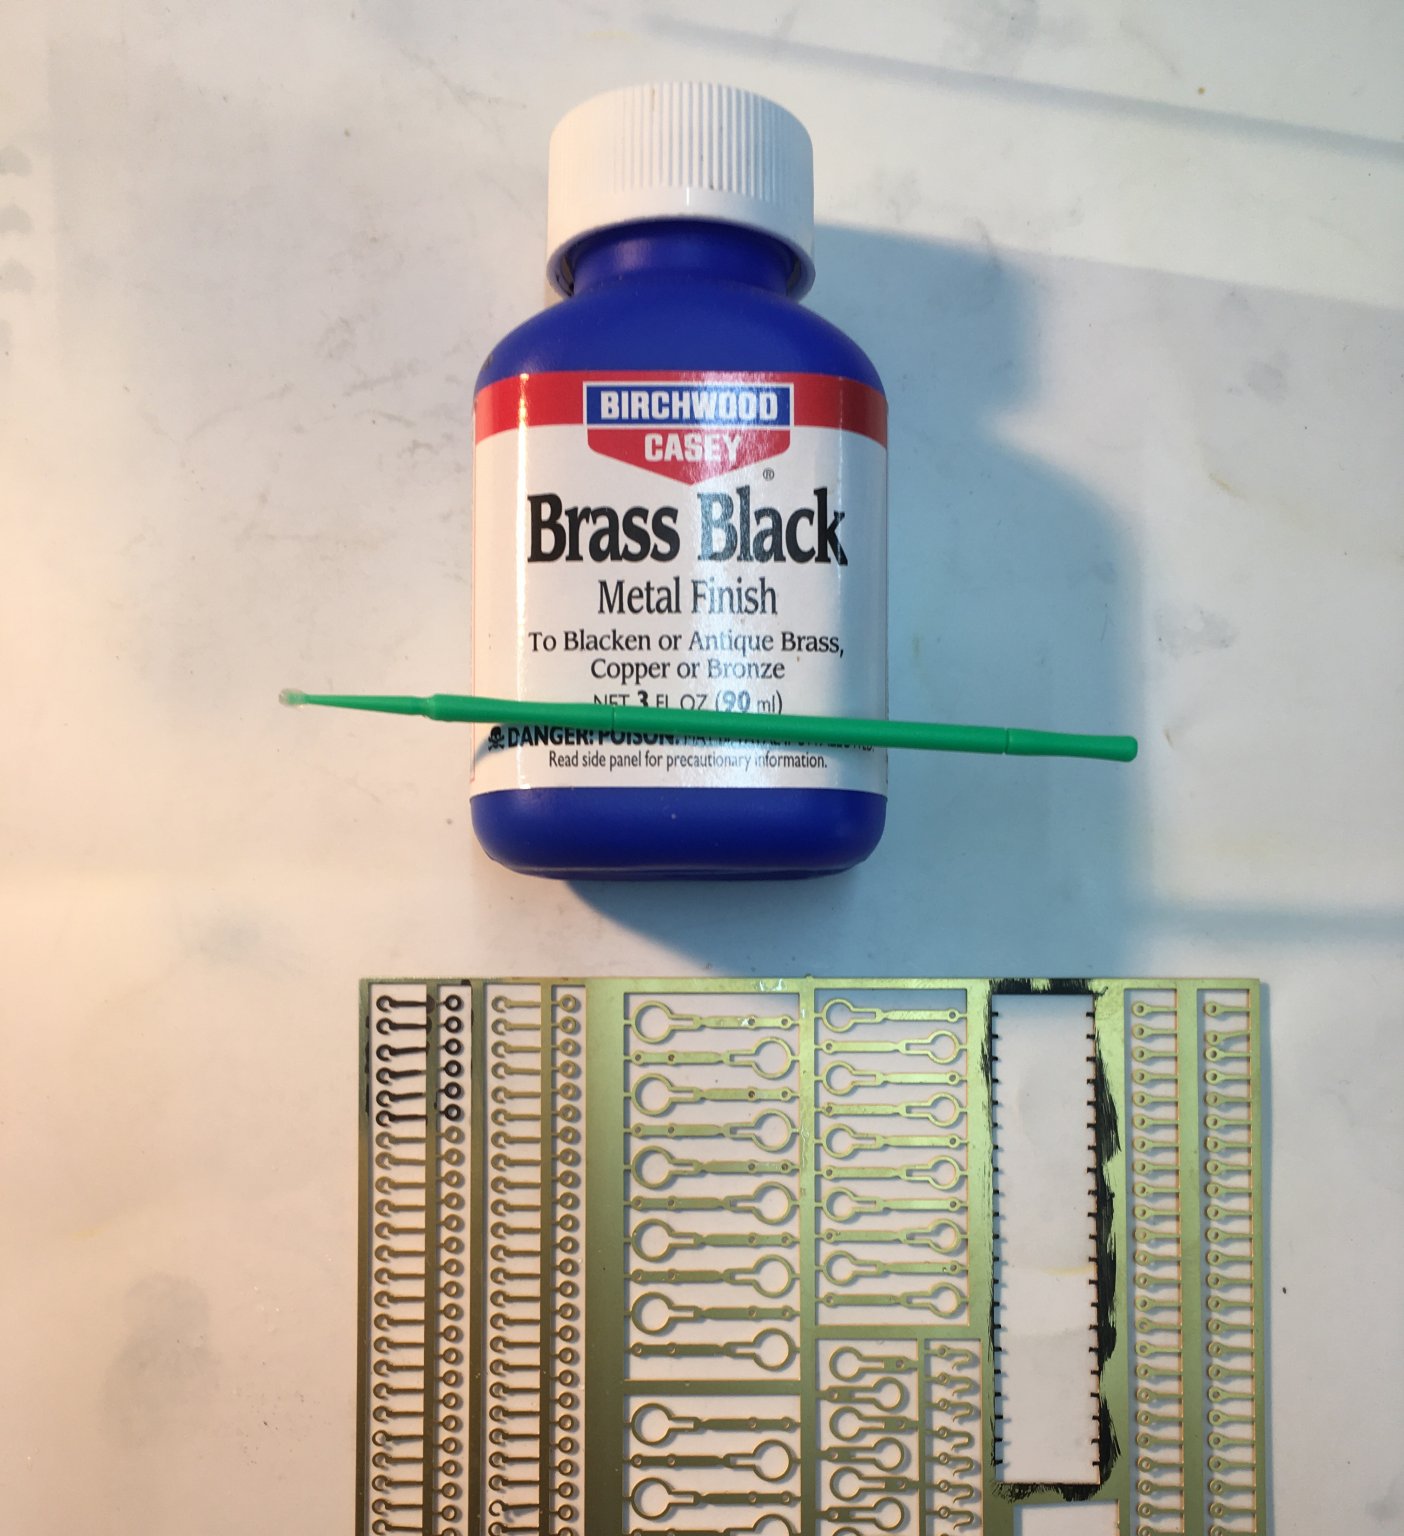
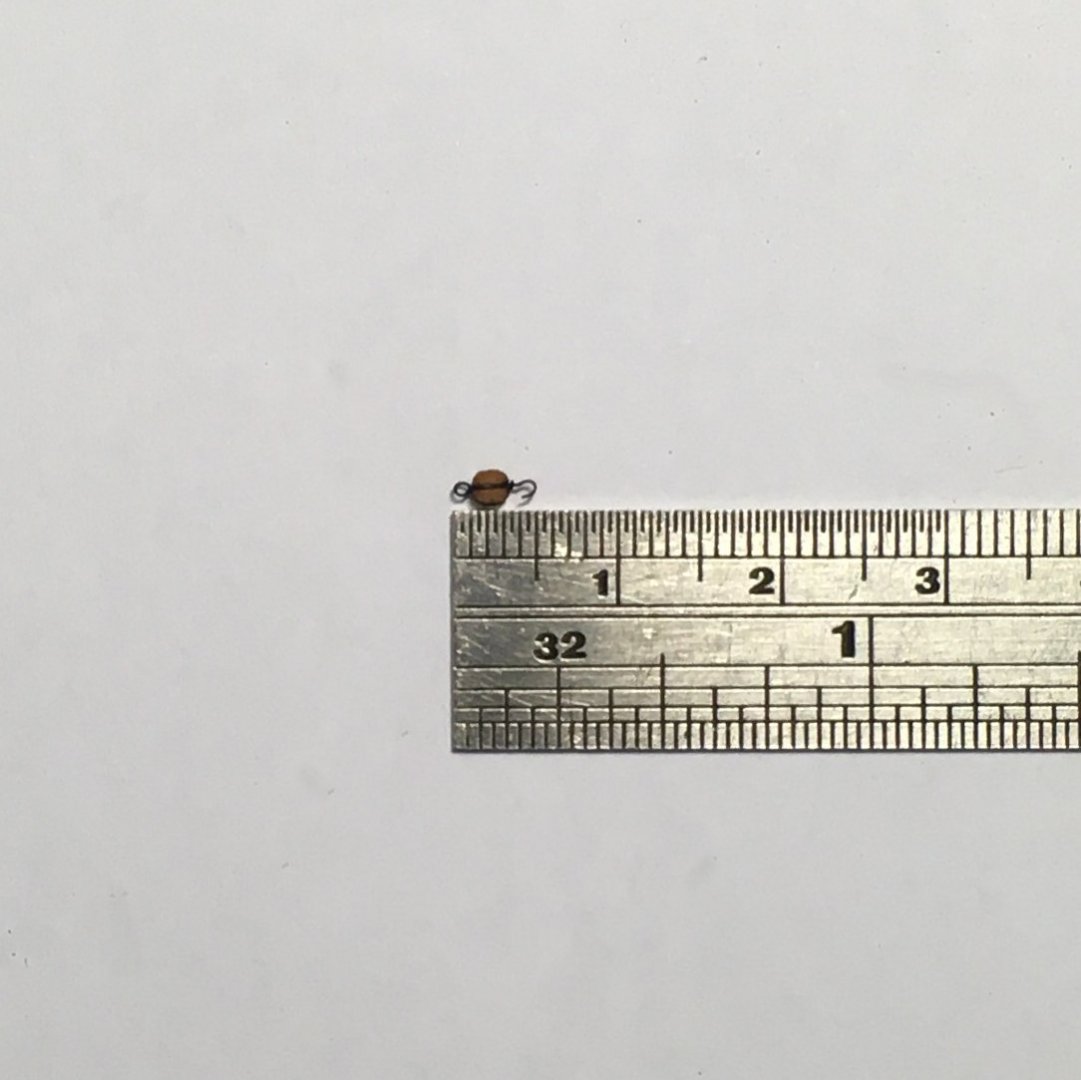
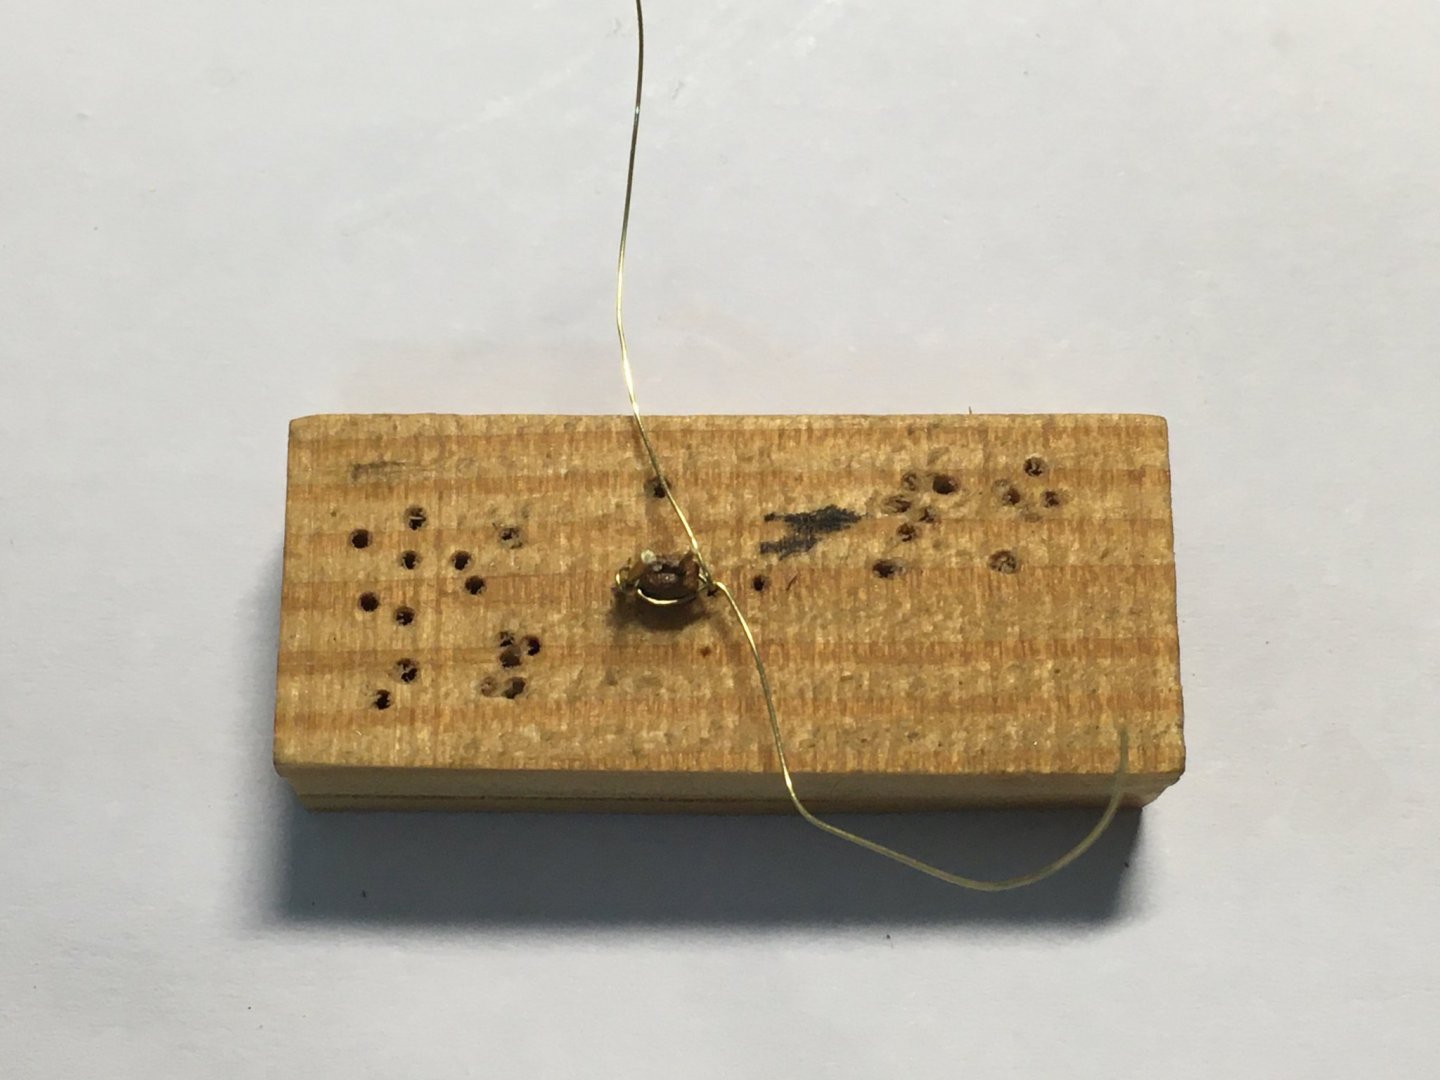
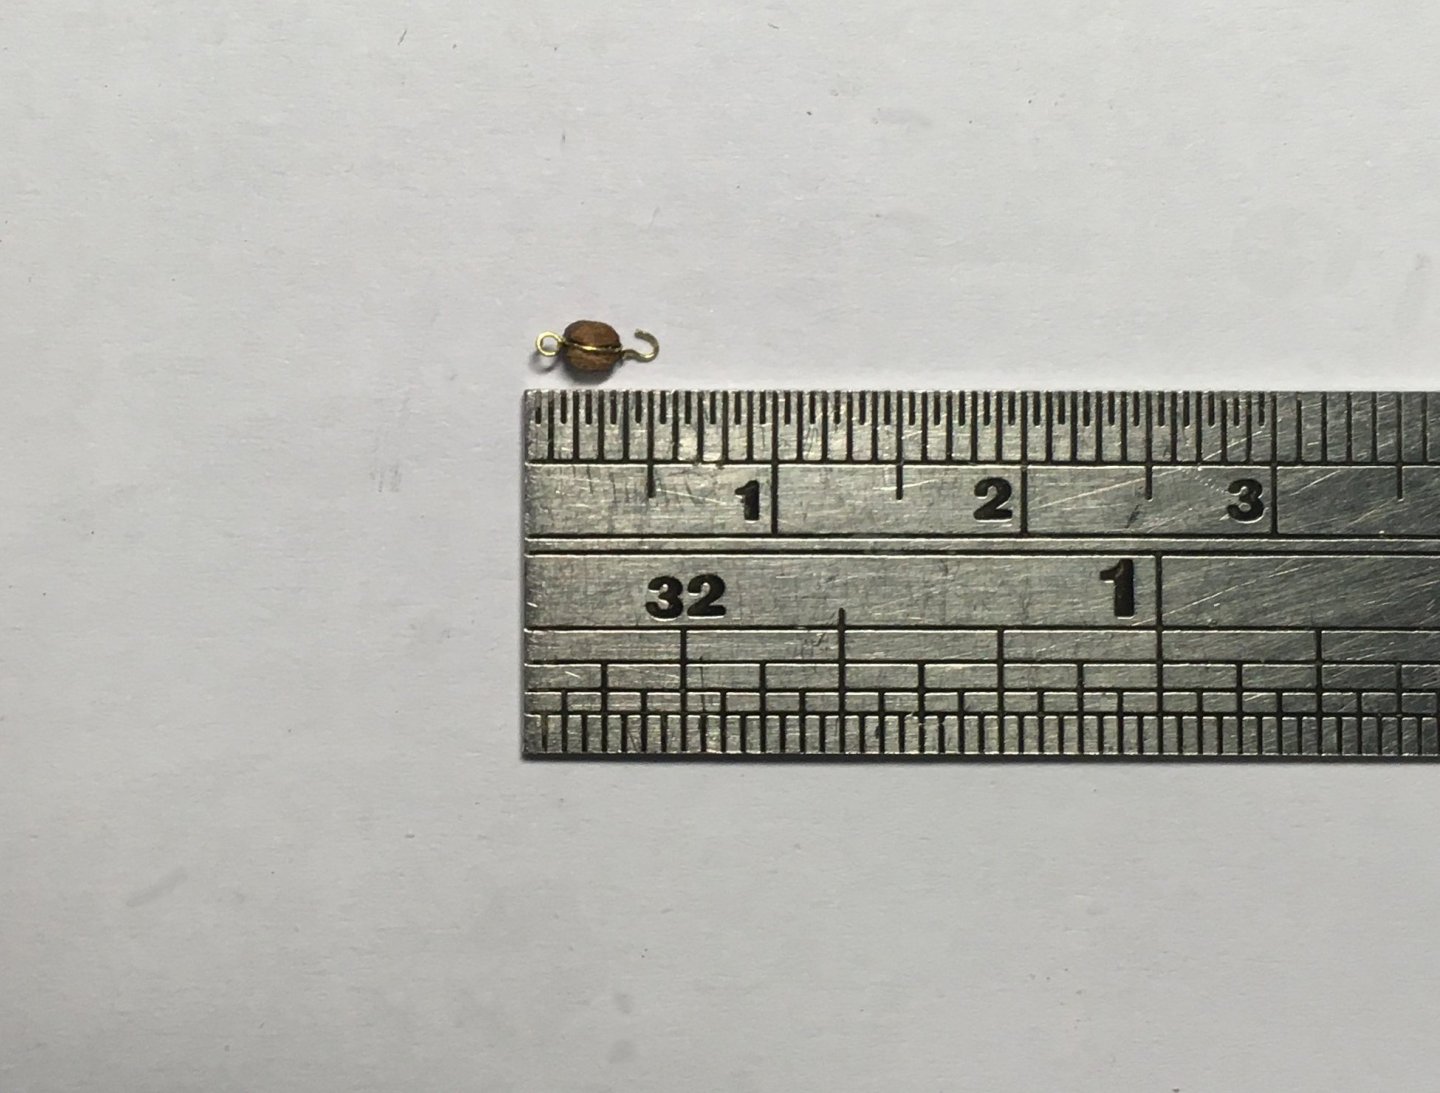
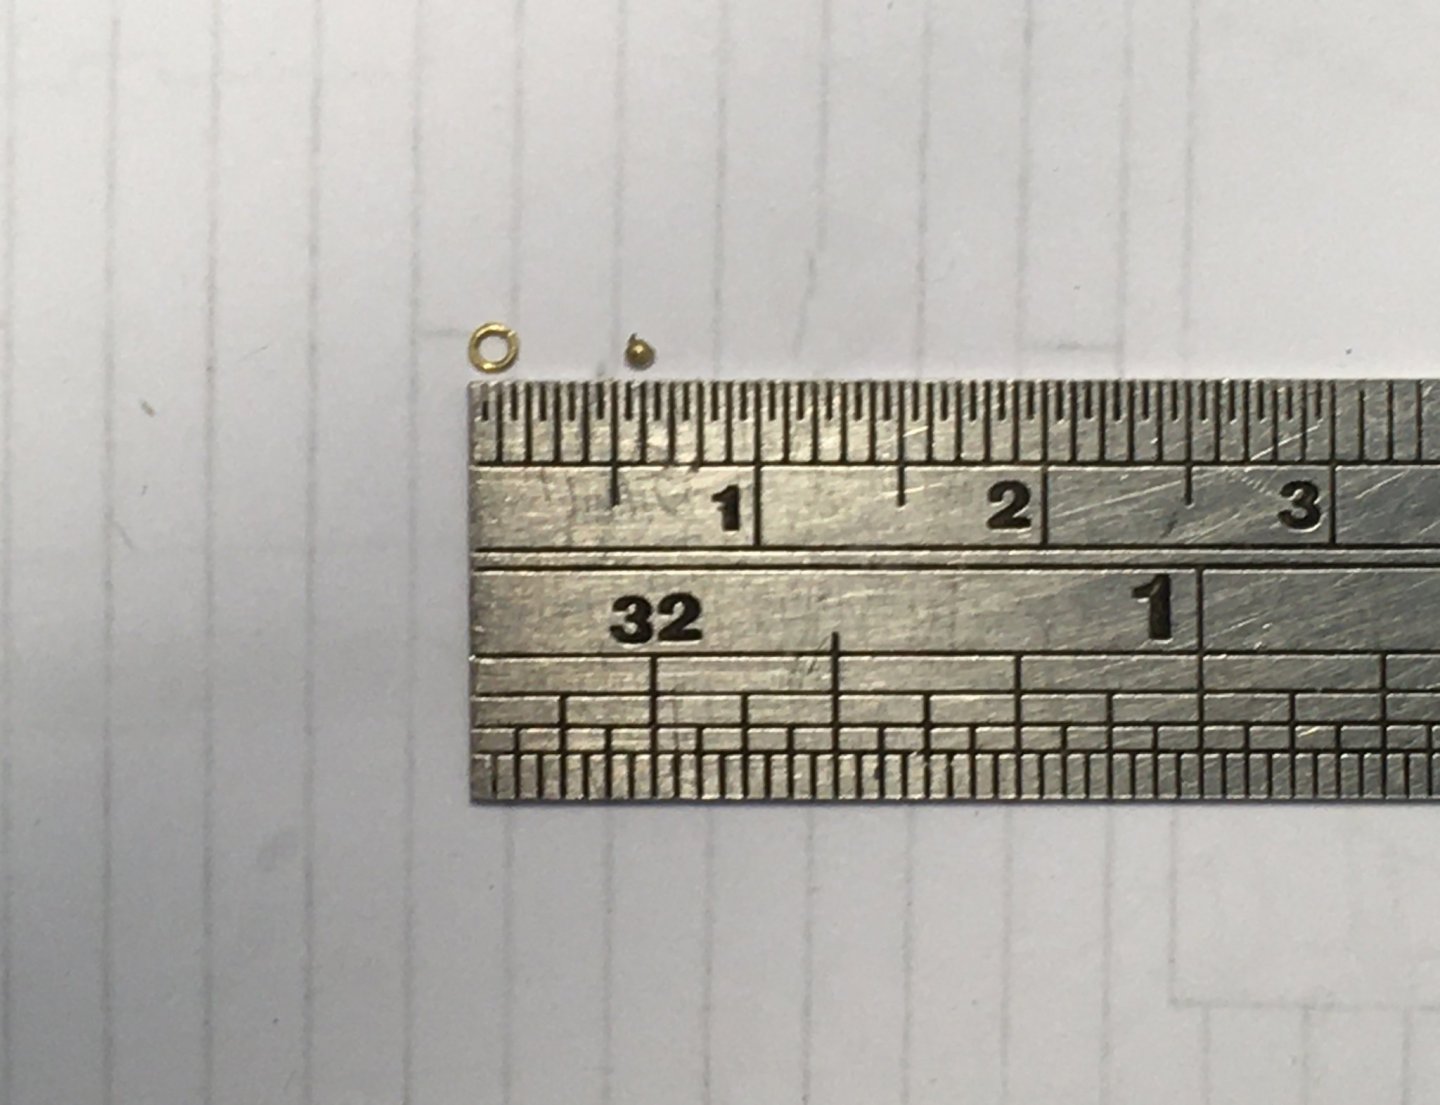
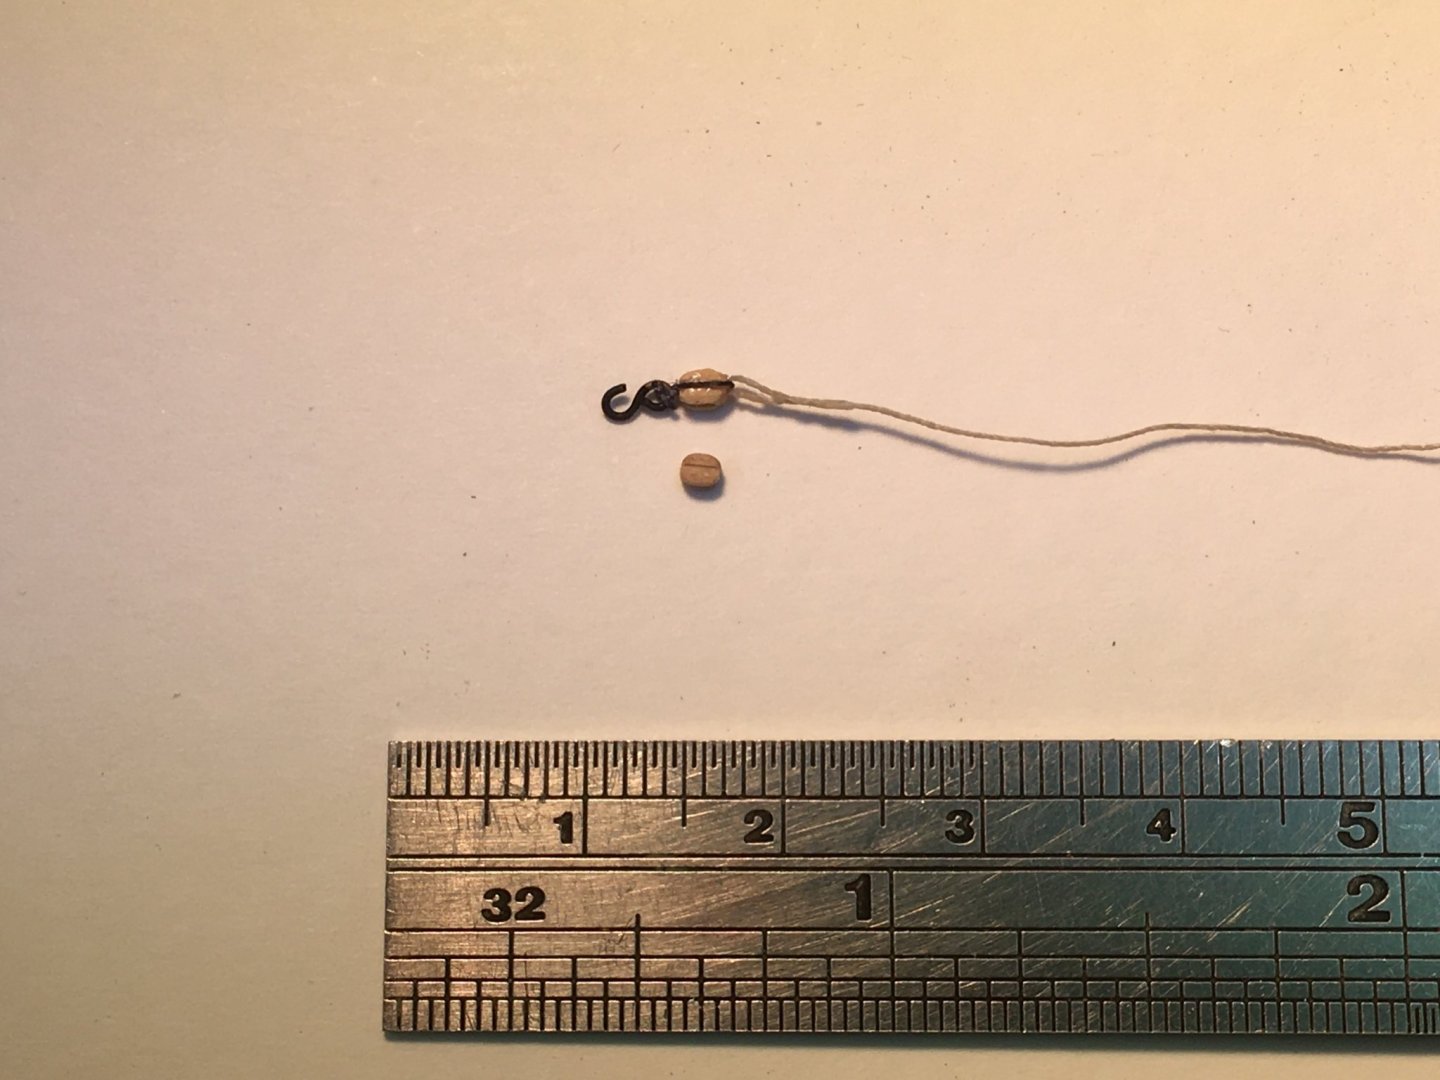
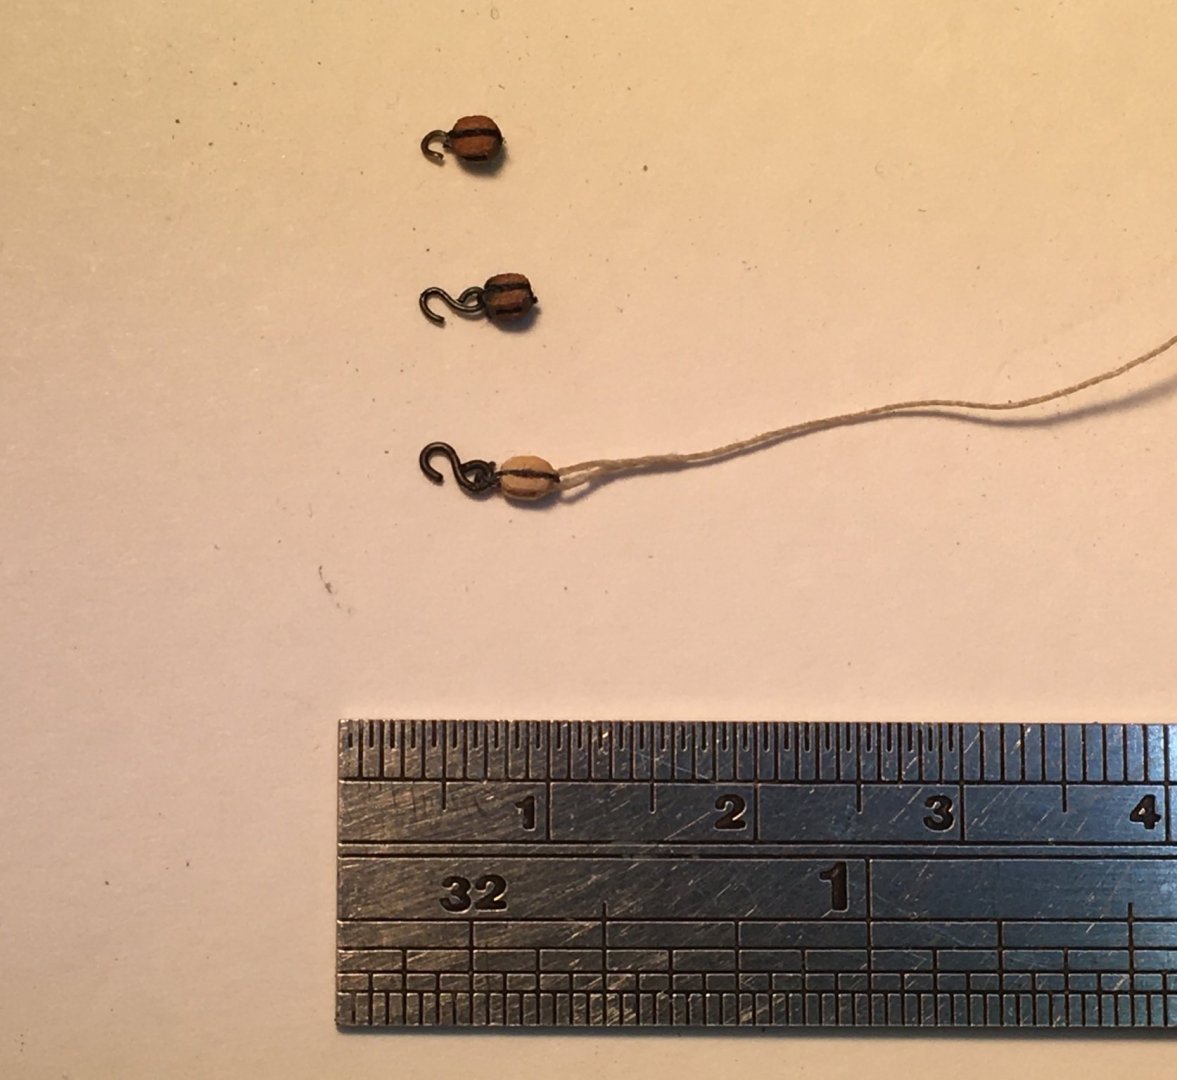
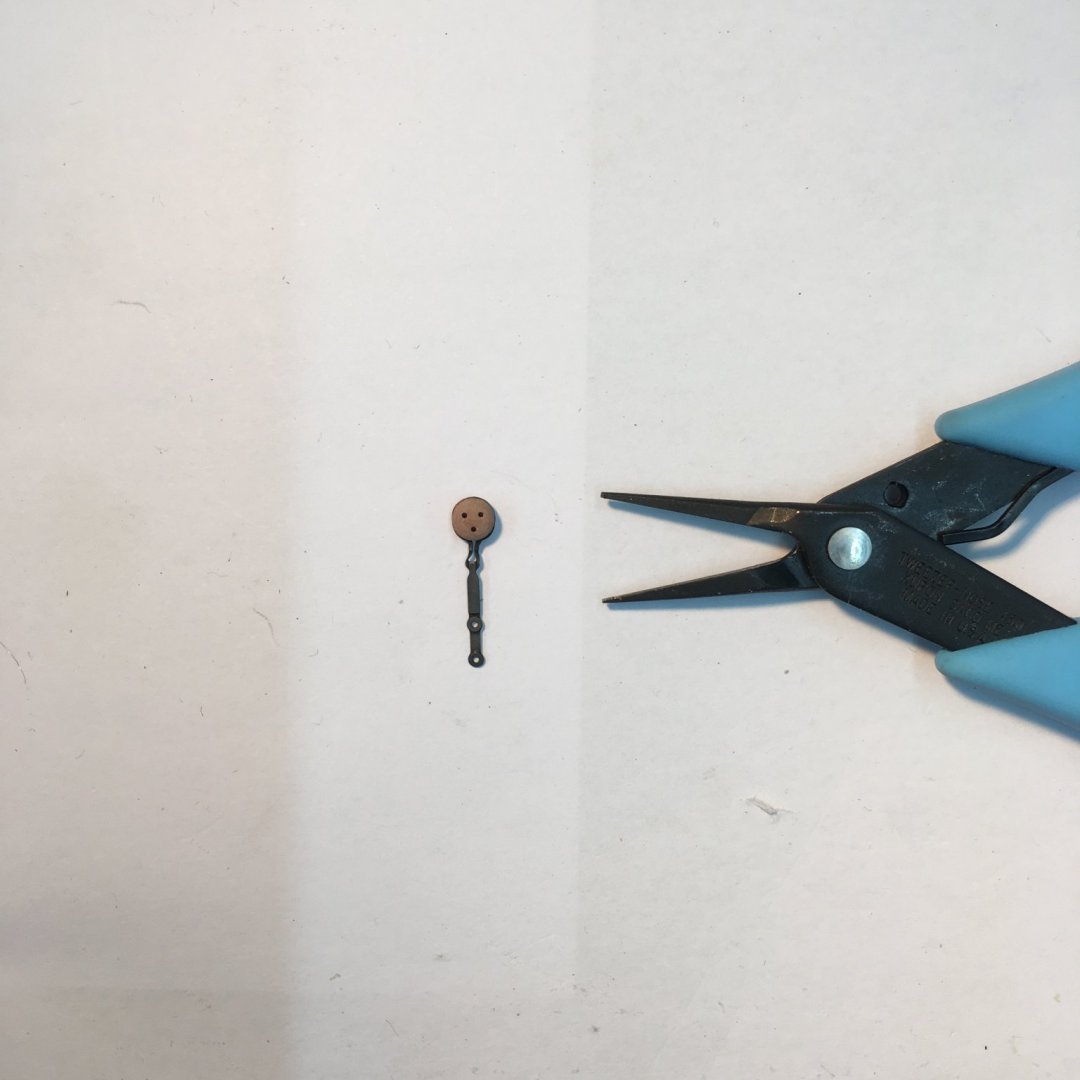
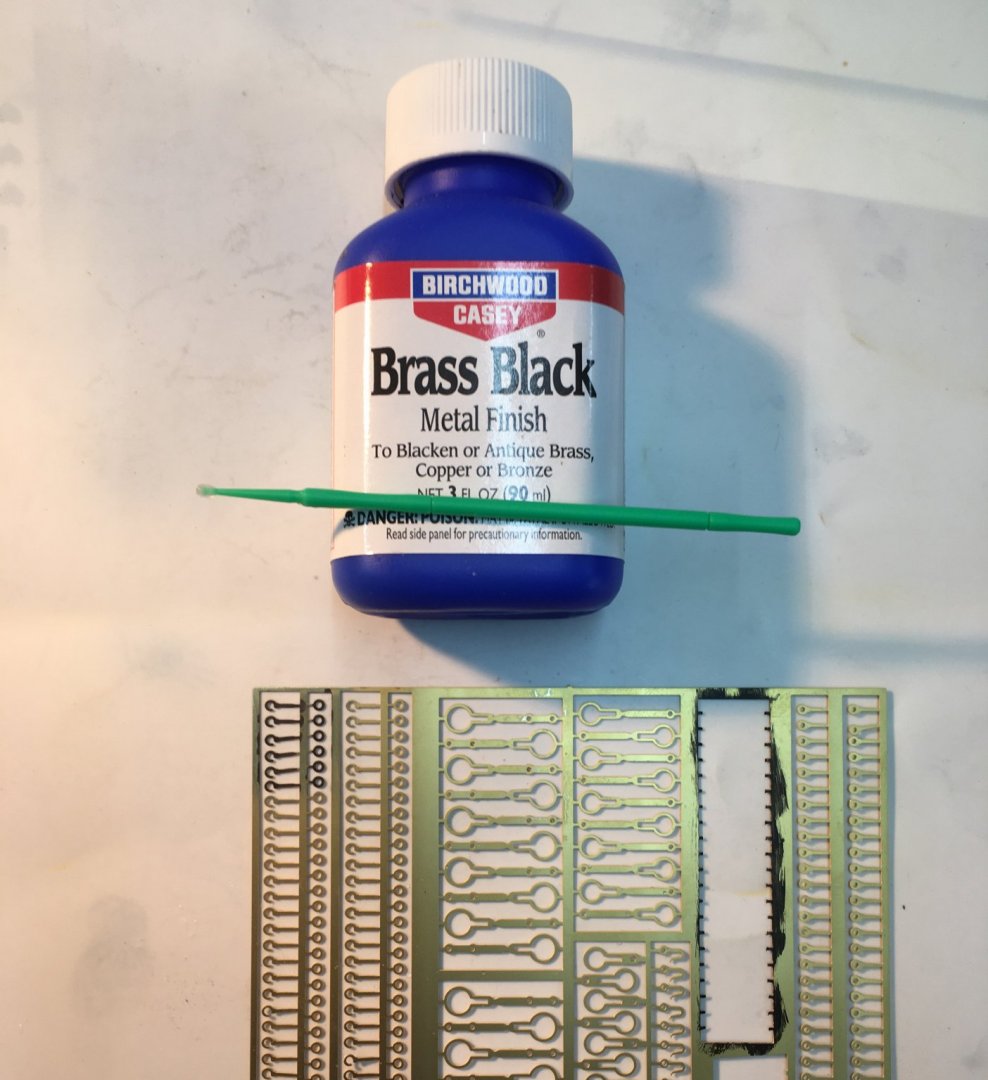
There's a danger this is going to turn into "the cannon rigging log", 'cos that's all I seem to be doing these days. Having said that I'm enjoying the challenge, including the opportunity to refresh old skills such as silver soldering. Having decided to fully rig the guns one of the first tasks has been to make the 28 ringbolts required for the breechings. I made my first attempt with 0.50mm brass wire... ...and quickly decided it was over scale. I settled on 30 s.w.g. / 0.32mm which equates to 20mm/0.8" at 1:64 scale. My method for making rings is fairly standard, starting by winding the wire round a 1.0mm drill bit... ...then cutting along the resulting coil with the smallest snips I could find: The wire I'm using is soft, so squeezing the individual pieces back into rings is fairly easy - apart from the inevitable tendency for rings to go pinging off to be lost in the black hole lurking in most workshops. I probably lost around one in five that way (and yes, I've read the entertaining forum topic on that phenomenon and tried the various solutions suggested, all to little or no avail. But I digress). I thought I could get away without soldering the rings, but unfortunately the brass is so soft and easily bent that I had great difficulty getting them to stay on their bolts. So, out with the silver soldering kit. For very small jobs like this I use silver solder paste which works a treat as the flux and solder are combined in the one material. The brass is so thin I found the solder melted into the join when I got within about 20 mm with the torch. Here's what happened when I got too close: Believe it or not, the blob on the right is all that was left of a ring the same size as the one on the left. Next, I fitted bolts by just bending a piece of wire round the rings and snipping it off short. Before going any further I checked the breeching would pass through the ringbolt: The breeching I'm using is 0.75mm rope I made on my Syren rope rocket. Another of my favourite tools. That test passed, I blackened then fitted the ringbolts: I'm happy with the size and appearance. Unfortunately they rather show up the photo etch rings for the side and train tackles, but I draw the line at making another three ringbolts for every carriage. I'm sure all will look fine when all the tackle is in place. On tackle, I've re-thought my approach to blocks and hooks. Although the method I described in a previous post works - gluing the hook in a hole drilled in the top of the block - the process involved is fiddly and nerve-wracking to say the least, and I'm not convinced the resulting tackle will be robust enough to withstand handling when I come to rig the guns. I can imagine a fair percentage failing. So, in search of another approach I ordered some 0.20 mm brass wire. This is 12 mm/0.5" at scale which seems reasonable. I can't photograph the process I used at this scale, and neither can I claim copyright. I got the idea from EdT's magnificent Young America log - here. Basically, you take a short length of wire, wrap it round the block, take one end and wrap it round the other, and shape the latter into a hook. I dropped the block complete with hook into acetone followed by Brass Black, which didn't seem to do the block any harm. This is the result: At 4 mm overall length I'm happy with that. Only another 83 to go! Derek


- 725 replies
-
- 10
-
-
- vanguard models
- speedy
- (and 1 more)
-
I really like that deep, rich red - to my eye it goes very well with the pearwood. Like you, I'm usually more interested in vessels of the Georgian era, but I could be seriously tempted by this little cracker. Derek
-
Very impressive Glenn. That cedar is beautiful, especially with the wipe on poly. If I hadn't known different I'd have assumed it was boxwood. I'm seriously tempted to add this ship to the dockyard waiting list. Derek
- 778 replies
-
- 4
-
-
- cheerful
- Syren Ship Model Company
- (and 1 more)
-
Thanks guys. I'm still a bit daunted by the amount of work involved in fully rigging the guns (I think I'll be well over Chris's estimate of 50 - 70 hours for the build!) but at least I now know it's possible, and hopefully worth the effort. My jigs are not usually that posh! The stand was lying around unused from a previous build - a Victory cross section that I built a picture frame for instead. Derek
- 725 replies
-
- 2
-
-
- vanguard models
- speedy
- (and 1 more)
-
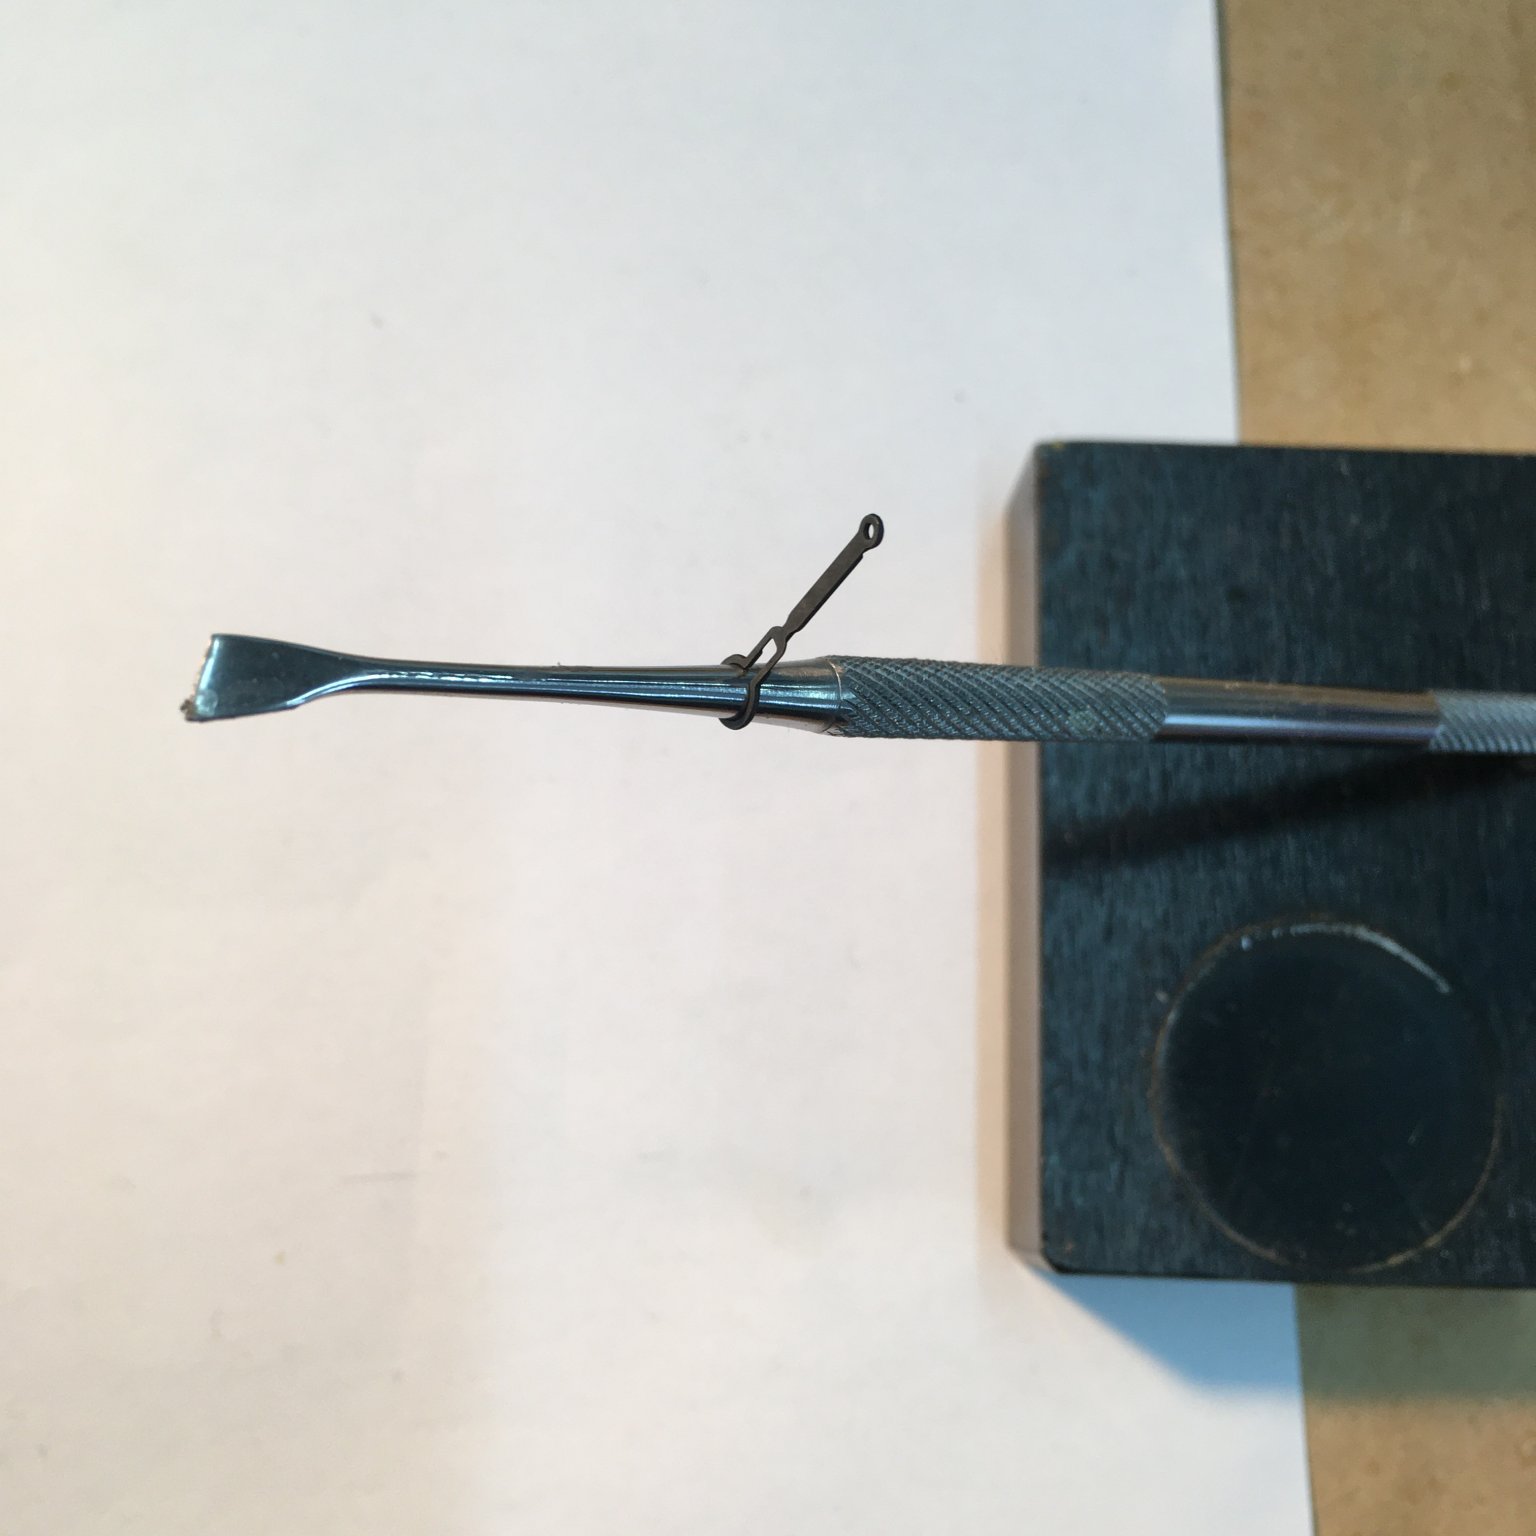
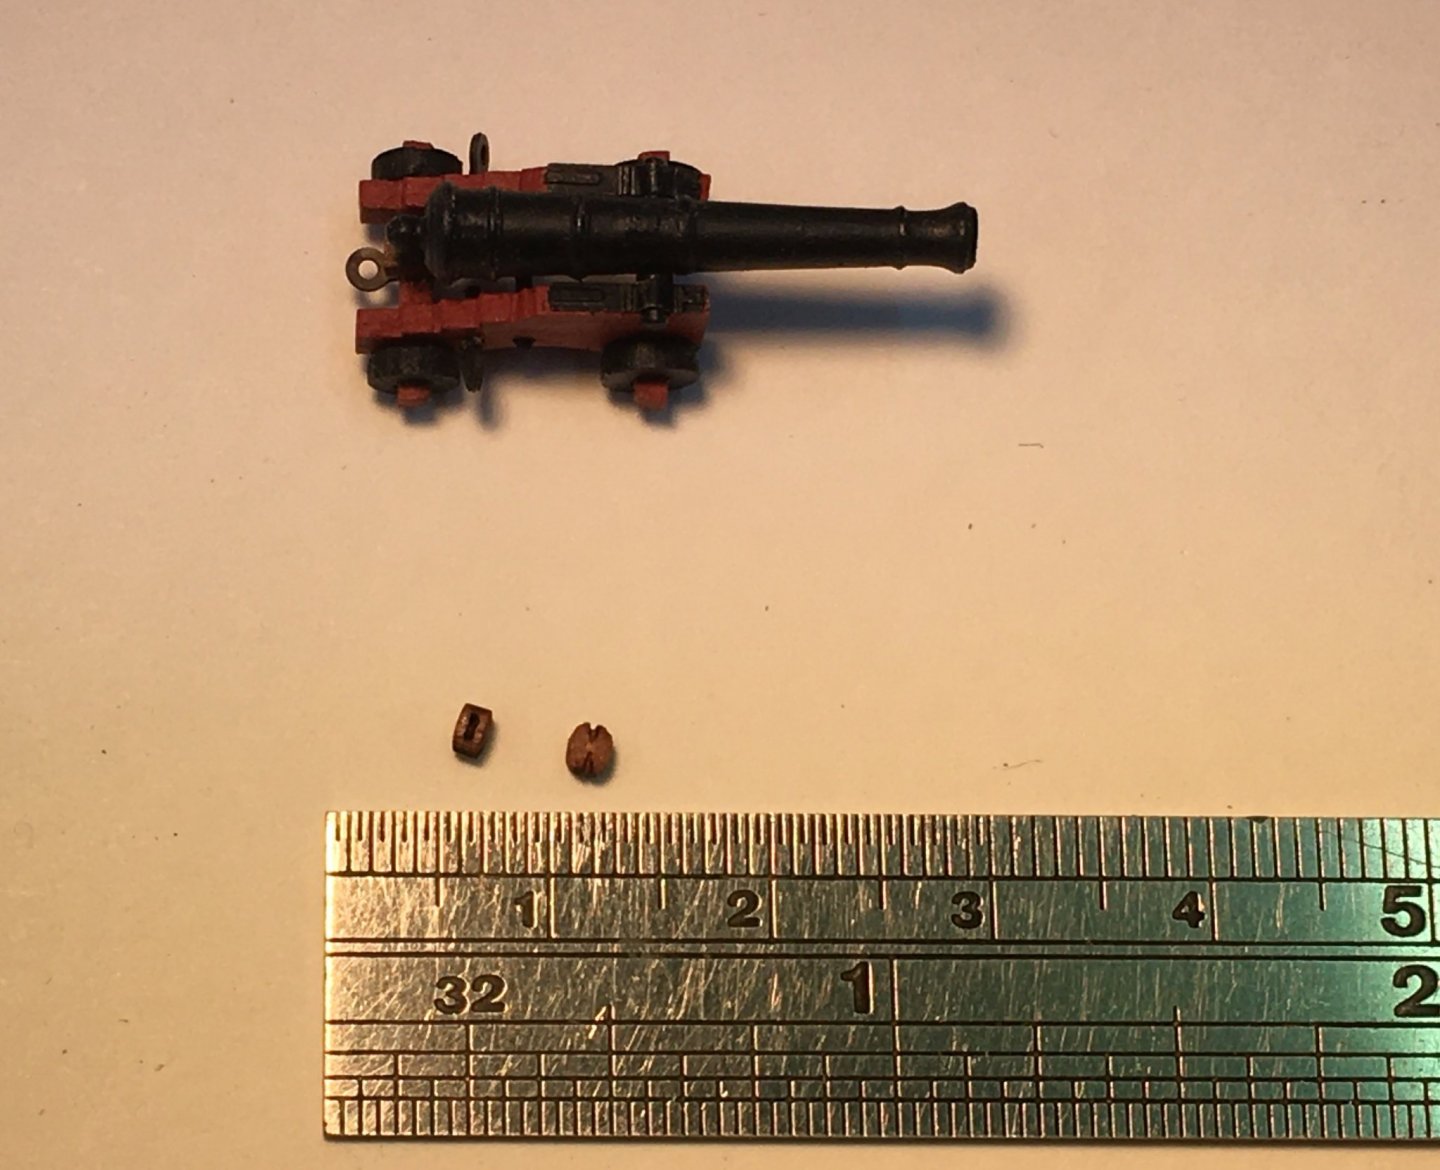
First attempts at cannon rigging Thanks (?!) everyone for encouraging me to fully rig all Speedy's 14 four-pounders. I wanted to have another go at making my own blocks. However I haven't been able to make anything acceptable at the required size, the smallest I can manage being about 2.75mm. Here it is with a Syren 2.0mm block for comparison: Syren blocks aren't available at the moment but I was able to order some from Vanguard and they arrived today. I'm very happy with the quality: ...nicely shaped, with good grooves for the strop. Here's my first go at adding a strop and hook: In both cases I made the hooks from brass wire, using the thinnest I have (0.33mm) for the new Vanguard block. Apart from my difficulty in achieving a consistent shape, I can't get them small enough to look right, so I had a re-think. Eventually I found I could drill a #80 hole in the end of a block, which is just right for the thinner wire. First, I pushed a short length of wire through the top sheave hole to prevent the shaft of the hook from interfering with the rigging line, then drilled through the top of the block until I hit the wire. Keeping the wire in place, I put a minute drop of CA on the hook and inserted the shaft in the block. No-one could have been more surprised than me when the glue held the hook, in what must be a truly tiny amount of wood. I've tried this before with tiny blocks and they've just crumbled under the drill, so it says a lot for the quality of Vanguard's pearwood. Here's the new hooked block alongside the previous attempts: The hook isn't perfect and I should be able to improve it, although at this scale I'm not sure how much it will show. I took Glenn and Blue Ensign's advice and made a little jig from scrap wood to rig the tackle off the model: This is just a test for the side tackle so I've not blackened the hooks and I'm just using some spare 0.1mm line. I'll probably dye it a bit darker for the real thing. This is my first go at frapping: Could do better, as my school reports often said! However I'm quite pleased with the scale and overall appearance of the tackle, and that's what I was most concerned about. As I said previously, if I couldn't have managed something small enough and neat enough I'd rather just leave the guns un-rigged. Onwards and upwards then. Derek


- 725 replies
-
- 11
-
-
- vanguard models
- speedy
- (and 1 more)
-
Thanks B.E., very helpful advice. I must admit I’ve been struggling to work out how to manage hooks that size. Derek
- 725 replies
-
- 1
-
-
- vanguard models
- speedy
- (and 1 more)
-
Those rubbing strakes really help to show off the lines of the hull. I found rapid acting aliphatic resin (Super 'Phatic brand) almost as fast as CA when I used it to glue a batten to define my Speedy's waterline. Derek
- 195 replies
-
- 1
-
-
- lady eleanor
- vanguard models
- (and 1 more)
-
I've just noticed in the Speedy instruction manual that Chris refers to the inhaul and outhaul tackle collectively as the training tackle. Probably where I got it from. My excuse anyway. Derek
- 725 replies
-
- 1
-
-
- vanguard models
- speedy
- (and 1 more)
-
OK, I can see I'm not going to get away without at least trying to rig the guns. Glenn - I think even 2.5mm blocks would be over-scale for 4-pounders. They'd be over 6 inches. Chris suggests 2.0mm which equates to almost exactly 5 inches. Not a huge difference, but I think it would show on such small cannon. I normally like to make my own blocks and I've previously tried 2mm but with very limited success. I've therefore ordered some 2mm pearwood blocks from Chris and I'll experiment. I'll blame you and VTH if I'm still struggling and cursing in a month's time😀. Derek
- 725 replies
-
- 3
-
-
- vanguard models
- speedy
- (and 1 more)
-
I suspect I got the terminology wrong, so the apology is mine. When I referred to training tackle I meant the rigging Blue Ensign calls side tackle. There's a very good review of cannon rigging here, in which the side tackle is called the outhaul tackle (because it is used to haul the gun outwards through the gunport) and also the gun tackle. The tackle used to haul the gun inboard is variously called the inhaul tackle and the training tackle. I think my confusion was caused because the gun/outhaul tackle can also be used to train (i.e. traverse) the gun. Confusing? Just a bit! Looking at Blue Ensign's Alert makes me tempted to try full rigging. On the other hand, Speedy has 14 4-pounders which will present an even greater challenge than Alert's 10 6-pounders. Decisions, decisions. Derek
- 725 replies
-
- 2
-
-
- vanguard models
- speedy
- (and 1 more)
-
For me, one of the benefits of airbrushing is that it lays such a thin coat of paint that it doesn't mask details, especially on small, fine parts. Using primer, I'd be worried that I'd lose some of that detail. I've only used primer once in the (very!) short time I've been airbrushing. I didn't find I needed it on photo etched parts provided they were properly prepared, either by chemical etching or light rubbing with a very fine sanding stick or steel wool. I didn't use it on Speedy's swivel guns either, where the airbrush covered the plastic barrels and brass mounts very well. As for wood, I tend to use sanding sealer which gives a very smooth finish for hand brushing and seemed to work equally well for airbrushing when I painted the channels. The only time I used primer was on Speedy's anchors which were bright white metal, which I felt might need a base coat. But I wasn't so concerned about detail in that instance. The common feature in all these cases where I didn't use primer is that they all involved small components that wouldn't be subject to much handling after painting. I imagine it would be very different if you were dealing with a whole ship's hull, for example. Obviously there are vastly more experienced people on the forum who can give much more information than I can. I just wanted to report my early experience which is that primer is not necessary in every situation. Derek
-
Lovely deck B.E. I believe it was you that put me on to the Swann Morton micro chisels some time ago, and they certainly earn their keep on a job like this - very neat work. Derek
- 195 replies
-
- 1
-
-
- lady eleanor
- vanguard models
- (and 1 more)
-
Do you plan to fully rig your guns on Alert? I'll certainly do the breeching but I'm not sure about the training tackle, especially at 1:64 scale. I might experiment a bit, but I suspect I'll struggle to get the tackle to look right at that scale, and if I don't I think it could detract from the model. What do you think? Derek
- 725 replies
-
- 1
-
-
- vanguard models
- speedy
- (and 1 more)
-
Thank you Don and Bill - much appreciated, and thanks as always for all the likes. I got on with the channels, deadeyes and chainplates today. The laser-cut channels were easy to fit, being perfectly matched to the curve of the hull. I followed the advice in the instructions and drilled holes for short pins in the back edges of the channels to make them extra secure. The chainplates came as photo etch parts and I decided to use blackening solution rather than paint, as described in an earlier post: The method I used was to rub the PE with a fine sanding stick followed by a cloth dipped in isopropyl alcohol, before applying Brass Black. After a minute or so I rinsed the PE in cold water, separated the chainplates from the sheet, rubbed them gently with a dry cloth to remove any loose surface blackening and dipped them in Brass Black again for a minute before final rinsing. To insert deadeyes you have to widen the loops in the deadeyes. I found the best way to do this was by slipping the chainplate over a tapered metal rod and pressing it down until the loop was wide enough. In this photo I'm using Glenn's doggy dental tool (again!): Once the deadeye was in place I use my fine-nose pliers to pinch the loop back up: Here's the port side in place. I've not nailed the chainplates in position - once I've completed the starboard side I'll fit the masts temporarily so I can line the chainplates properly up with the shrouds. I must say I'm impressed with the quality of the deadeyes and rigging blocks that come with Speedy - much better than other kits I've had. Btw, you can see in the photo that I've started the long and laborious process of fitting all the ironwork associated with the cannon - four rings in the bulwarks and one in the deck for each gun - ie ten pieces of photo etch for each of the 14 cannon. These I airbrushed for speed, which seemed to work very well. Derek

- 725 replies
-
- 14
-
-
- vanguard models
- speedy
- (and 1 more)
-
Hi Glenn I'd draw a distinction between aliphatic resin (also known as carpenter's glue and yellow glue) and the rapid aliphatic glues like Super 'Phatic. I use the former just like PVA - it is supposed to be stronger and sandable, but as far as I'm concerned it's virtually the same deal. I described the brand I use here in my Speedy log, but many manufacturers make their own versions, including well-known brands like Titebond. However this 'ordinary' aliphatic resin is very different to the rapid glue that your namesake from Scarborough, UK put me on to. Super 'Phatic (which I got here) really is different to PVA. It looks different, being much thinner and more penetrating, and grabs almost as fast as CA, especially if you hold it under pressure for a few moments. As you know from my Speedy log, I found it very useful for laying deck planks where after a few seconds it was stuck enough to lay flat against the sheer and solid enough to trim. I've only used that one brand, so I don't know how it compares with the one you ordered from Cornwall. If yours is as good, then I'm sure you'll find it provides a useful tool for those situations where CA is too fast and PVA too slow. I'll be interested to hear how you get on. Derek