DelF
-
Posts
1,409 -
Joined
-
Last visited
Content Type
Profiles
Forums
Gallery
Events
Everything posted by DelF
-
 Hi James I've checked all Keith Julier's books and unfortunately Clara May does not feature in any of them. I can only assume Google got it wrong. However the good news is you've found this forum, which has got to be the best source of information and advice on model ship building on the internet, with an incredibly knowledgeable and helpful community of modellers. On planking in particular, you will find lots of how-to guides and videos (look out especially for anything by Chuck Passaro of the Syren Ship Model Company, who is very active on the forum). Check out the Modelling Techniques tab near the top of the forum home page. Come back if you have any specific questions, and I'll try my best to help, or point you in the right direction. Best wishes Derek
 -
I guess we could do that if there was any boxwood of the right dimensions to be found in the world. Although I’m sure it be a bit pricey. Chris’ thought of lime is a good one. If you can get good castello boxwood it’s not too expensive. I made the spars for Royal Caroline from some 6mm and 10mm sheets, each about 100mm x 1000mm. They were about £30 for the two although the price has probably gone up since. I had plenty left over and used some to plank my recent pinnace. I may do the same for Speedy, but don’t tell Chris. Derek
-
Hi Ryland I've just found your log and I'm seriously impressed! You were kind enough to comment on my recently completed English Pinnace, also by Chuck, but having seen your workmanship I know I've still got a way to go. I was particularly impressed with your carpentry - beautifully clean and precise. I also like the painting technique you learned from Chuck. I don't usually pay much attention to painting as I prefer the look of natural wood, and as a consequence when I do use paint I usually just slap on a couple of coats with mixed results. I will certainly try the many-coat method in future if it leads to the finish you have achieved. Looking beyond my current project (HMS Speedy by Vanguard Models) I'd been edging towards the Queen Anne's Barge for my next build having seen Meddo's excellent log but now I'm seriously tempted by the Medway Longboat. Maybe I'll have to get both? Derek
- 263 replies
-
- 2
-

-
- Medway Longboat
- Syren Ship Model Company
- (and 1 more)
-
You're not kidding... Explains why my fat fingers couldn't assemble the parts unaided! Derek

- 725 replies
-
- 10
-
-
- vanguard models
- speedy
- (and 1 more)
-
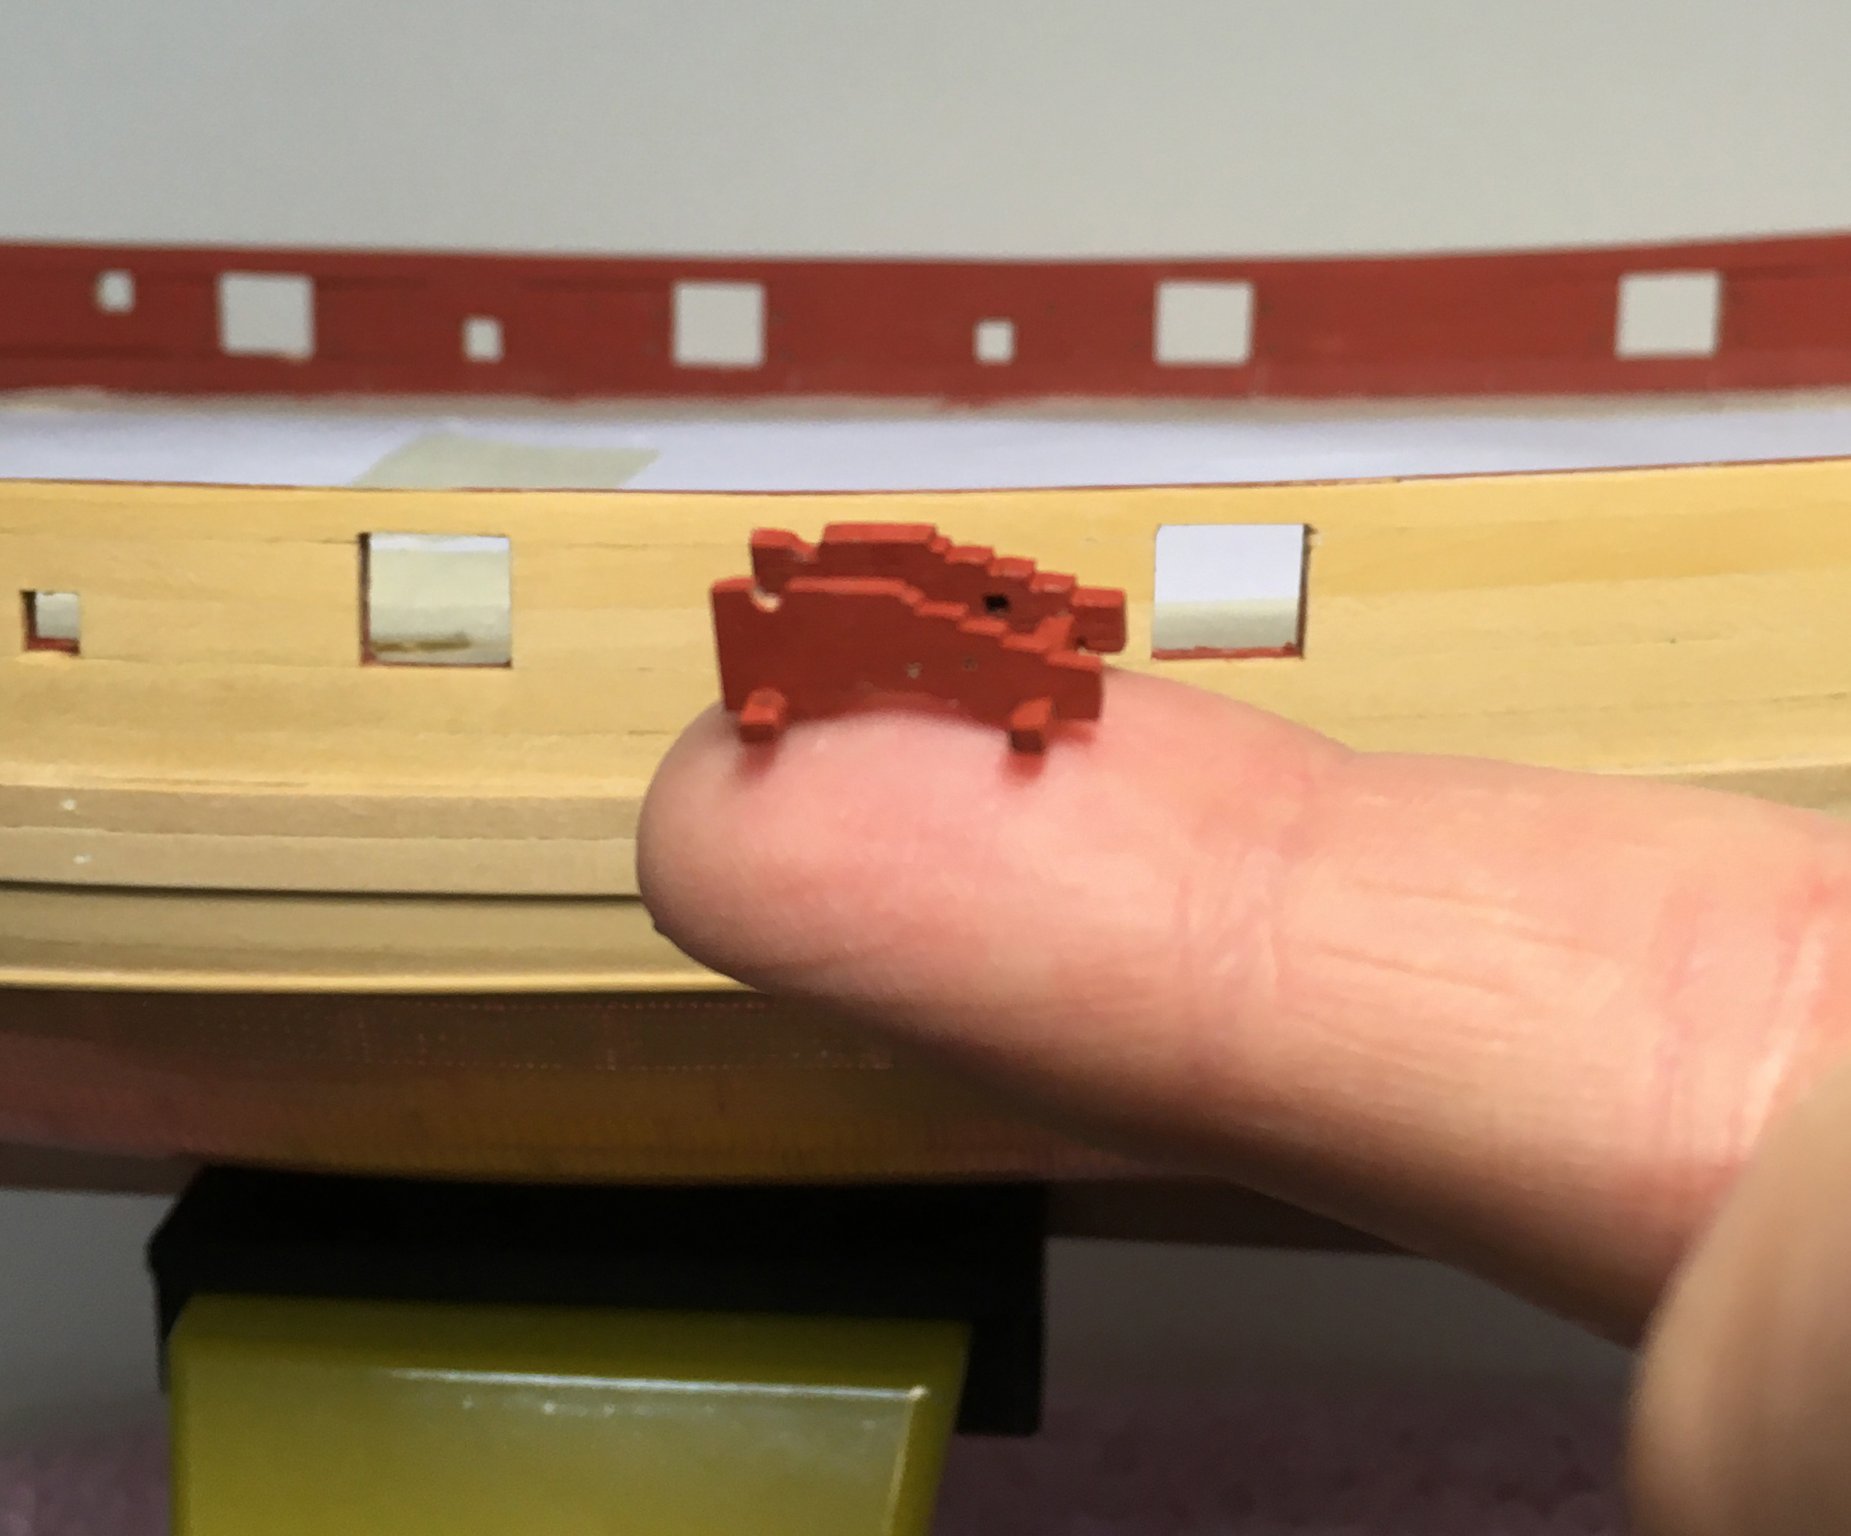
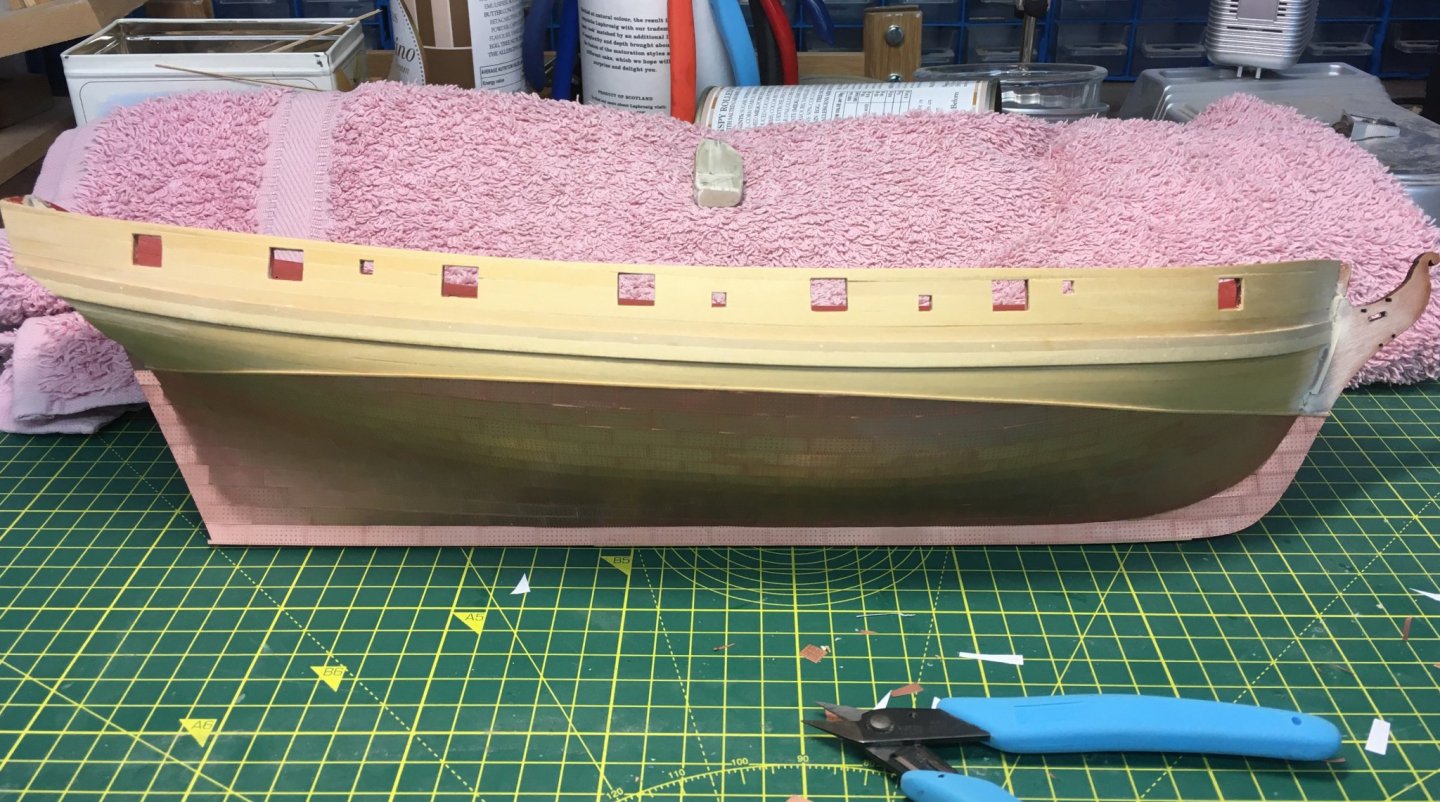
Port side coppering finished😁. Not the best pictures - I'll try to get some better ones when I get to the next stages. In the meantime I've made up a little jig to help assemble the gun carriages. Looking at this in close-up I can see the laser-cut components need a bit more tidying up! Derek


- 725 replies
-
- 15
-
-
- vanguard models
- speedy
- (and 1 more)
-
Six kits? That should last us ‘til the end of lockdown (I hope!).
-
Hi Mark Welcome to the Speedy club. I've just caught up with your log and will follow along. Your second planking looks really good, and I'll be interested to see how the Ronseal finish looks. I've not yet decided what to use on mine. Derek
-
Slow? You? 😂. If you were any faster you’d finish before you started!
-
Hi I've used the Proxxon 240/E bandsaw for several years for small-scale work. Like all Proxxon tools it is well made and (for a bandsaw) reasonably accurate. I've fitted a fence on mine to make straight cuts in thick stock - for thinner material I use a table saw. It will cut reasonably tight curves - I often use it to cut out rough shapes before final finishing with files and sandpaper - see here for examples. Although it's a small saw, with the right blade you can cut reasonable thicknesses of metal as well as wood. Obviously if you want to re-saw really big planks then you'll need a bigger machine. My scroll saw is also by Proxxon. See here for an example of its use by Blue Ensign when he built a 1:64 scale pinnace (I copy a lot from him!). You could also look at any of Marsalv's logs on this forum for more examples of what can be achieved with Proxxon tools. They aren't cheap, but you can save money by buying direct from Germany (until the EU transition period ends, that is). Hope that helps. Derek
-
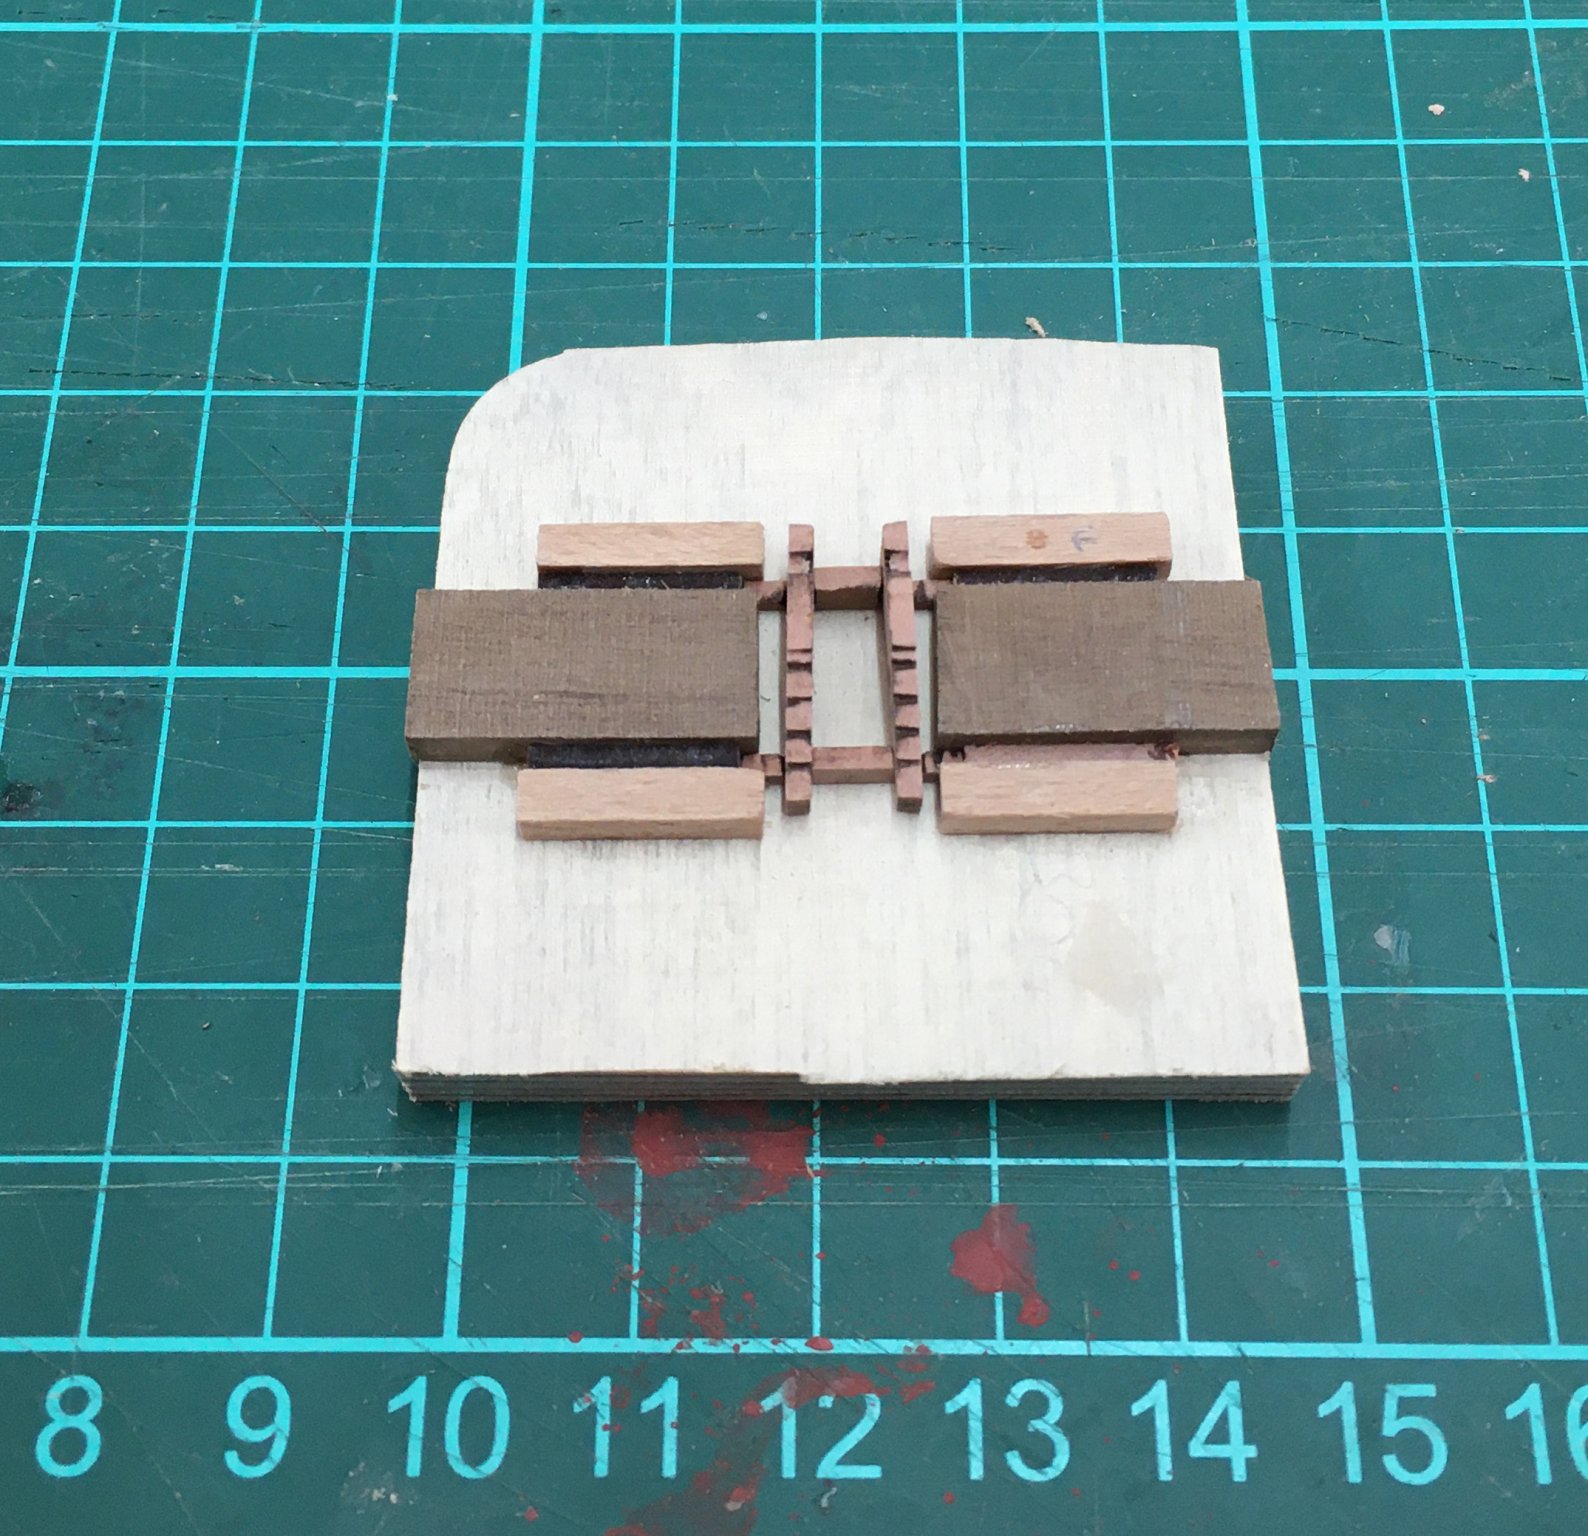
Slow but steady progress on the port coppering. I'm taking it slow because as I mentioned before I'm having to wear a mask to avoid adverse reactions to the CA and It gets very uncomfortable after a while. As a break, I've started preparing all the components for the 14 cannon. Being more used to 1/48 scale I'm finding the pieces TINY, to the extent that I can't assemble the carriages without assistance. I'm going to have to make up a little jig to hold everything in place while it's being glued. I tried to dry-fit a carriage (as described by Glenn in his Speedy log) but the pieces were so small and light I just couldn't get them to behave. Oh well, at least it keeps me away from the CA for a bit. Derek
- 725 replies
-
- 12
-
-
- vanguard models
- speedy
- (and 1 more)
-
Will you find any at 1/64 scale? They're usually far too fat and need sanding/turning down (I use a home made draw plate in combination with the Proxxon lathe - a drill or Dremel-type tool would do just as well). But at 1/64 the pin would need a handle of around 0.8mm diameter and a shaft 0.5mm to be in proportion. Once draped with rope would the PE pins stand out that much? I suppose you could always buy a few properly turned brass pins for locations where they will show more. For example 5mm pins from Cornwall Model Boats @ about 22p for 10 seem quite realistic. Either way you would have to paint them. I think I'll reserve judgement until I get to that stage (by which time Glenn will have finished Speedy and probably another two models beside! 😁) Derek
-
Well, thanks in part to the lockdown, I've now finished the first 14 books in the series and I'm waiting for number 15 to appear (June, I think). Thanks again for a great recommendation. I said in an earlier post how much I'd enjoyed the first volume, and I've been impressed with how well the author has kept up the standard of his work throughout the series. Derek
-
Looks excellent - well done! Derek
-
Wow! She’s really coming to life.
-
Thank you Edward, Chris, Glenn (X 2!), Eric and SpyGlass for your kind comments, and thanks as always for the 'likes'. Good recommendation Glenn. Amazon don't sell this exact set in the UK but I managed to get something similar. I tried out the scraper that looks closest to the one you use and it worked perfectly for getting excess glue from the angle between the batten and the hull. It made it a lot easier getting the port batten fitted as I was comfortable using CA this time. Thanks again Eric for suggesting brass sheet for scraping excess glue. I particularly like this method as I can easily cut a piece of brass to the exact size and profile I need, and I've used a couple of these scrapers to tidy up the hull. Derek
- 725 replies
-
- 5
-
-
- vanguard models
- speedy
- (and 1 more)
-
Hi Glenn I just remembered this exchange we had a few weeks ago, and realised I'd done nothing about it. I've now saved my recently completed Pinnace log and this Speedy log to date. The only method I could find in Chrome was to save each page separately as a full web page. It didn't take long though, and all the text and pictures are now saved on my hard drive and external backup. Thanks again for prompting me to do this. By coincidence, just after I finished saving the logs I was trying out a scraper I'd made from a piece of brass sheet (thanks EricWilliamMarshall for the suggestion) when I remembered I'd used exactly the same method to finish the decks on my Royal Caroline - but that was years before I kept logs. The learning point for me was the value of keeping logs, not just for others' benefit but to save oneself having to reinvent the wheel all the time! Derek
- 725 replies
-
- 1
-
-
- vanguard models
- speedy
- (and 1 more)
-
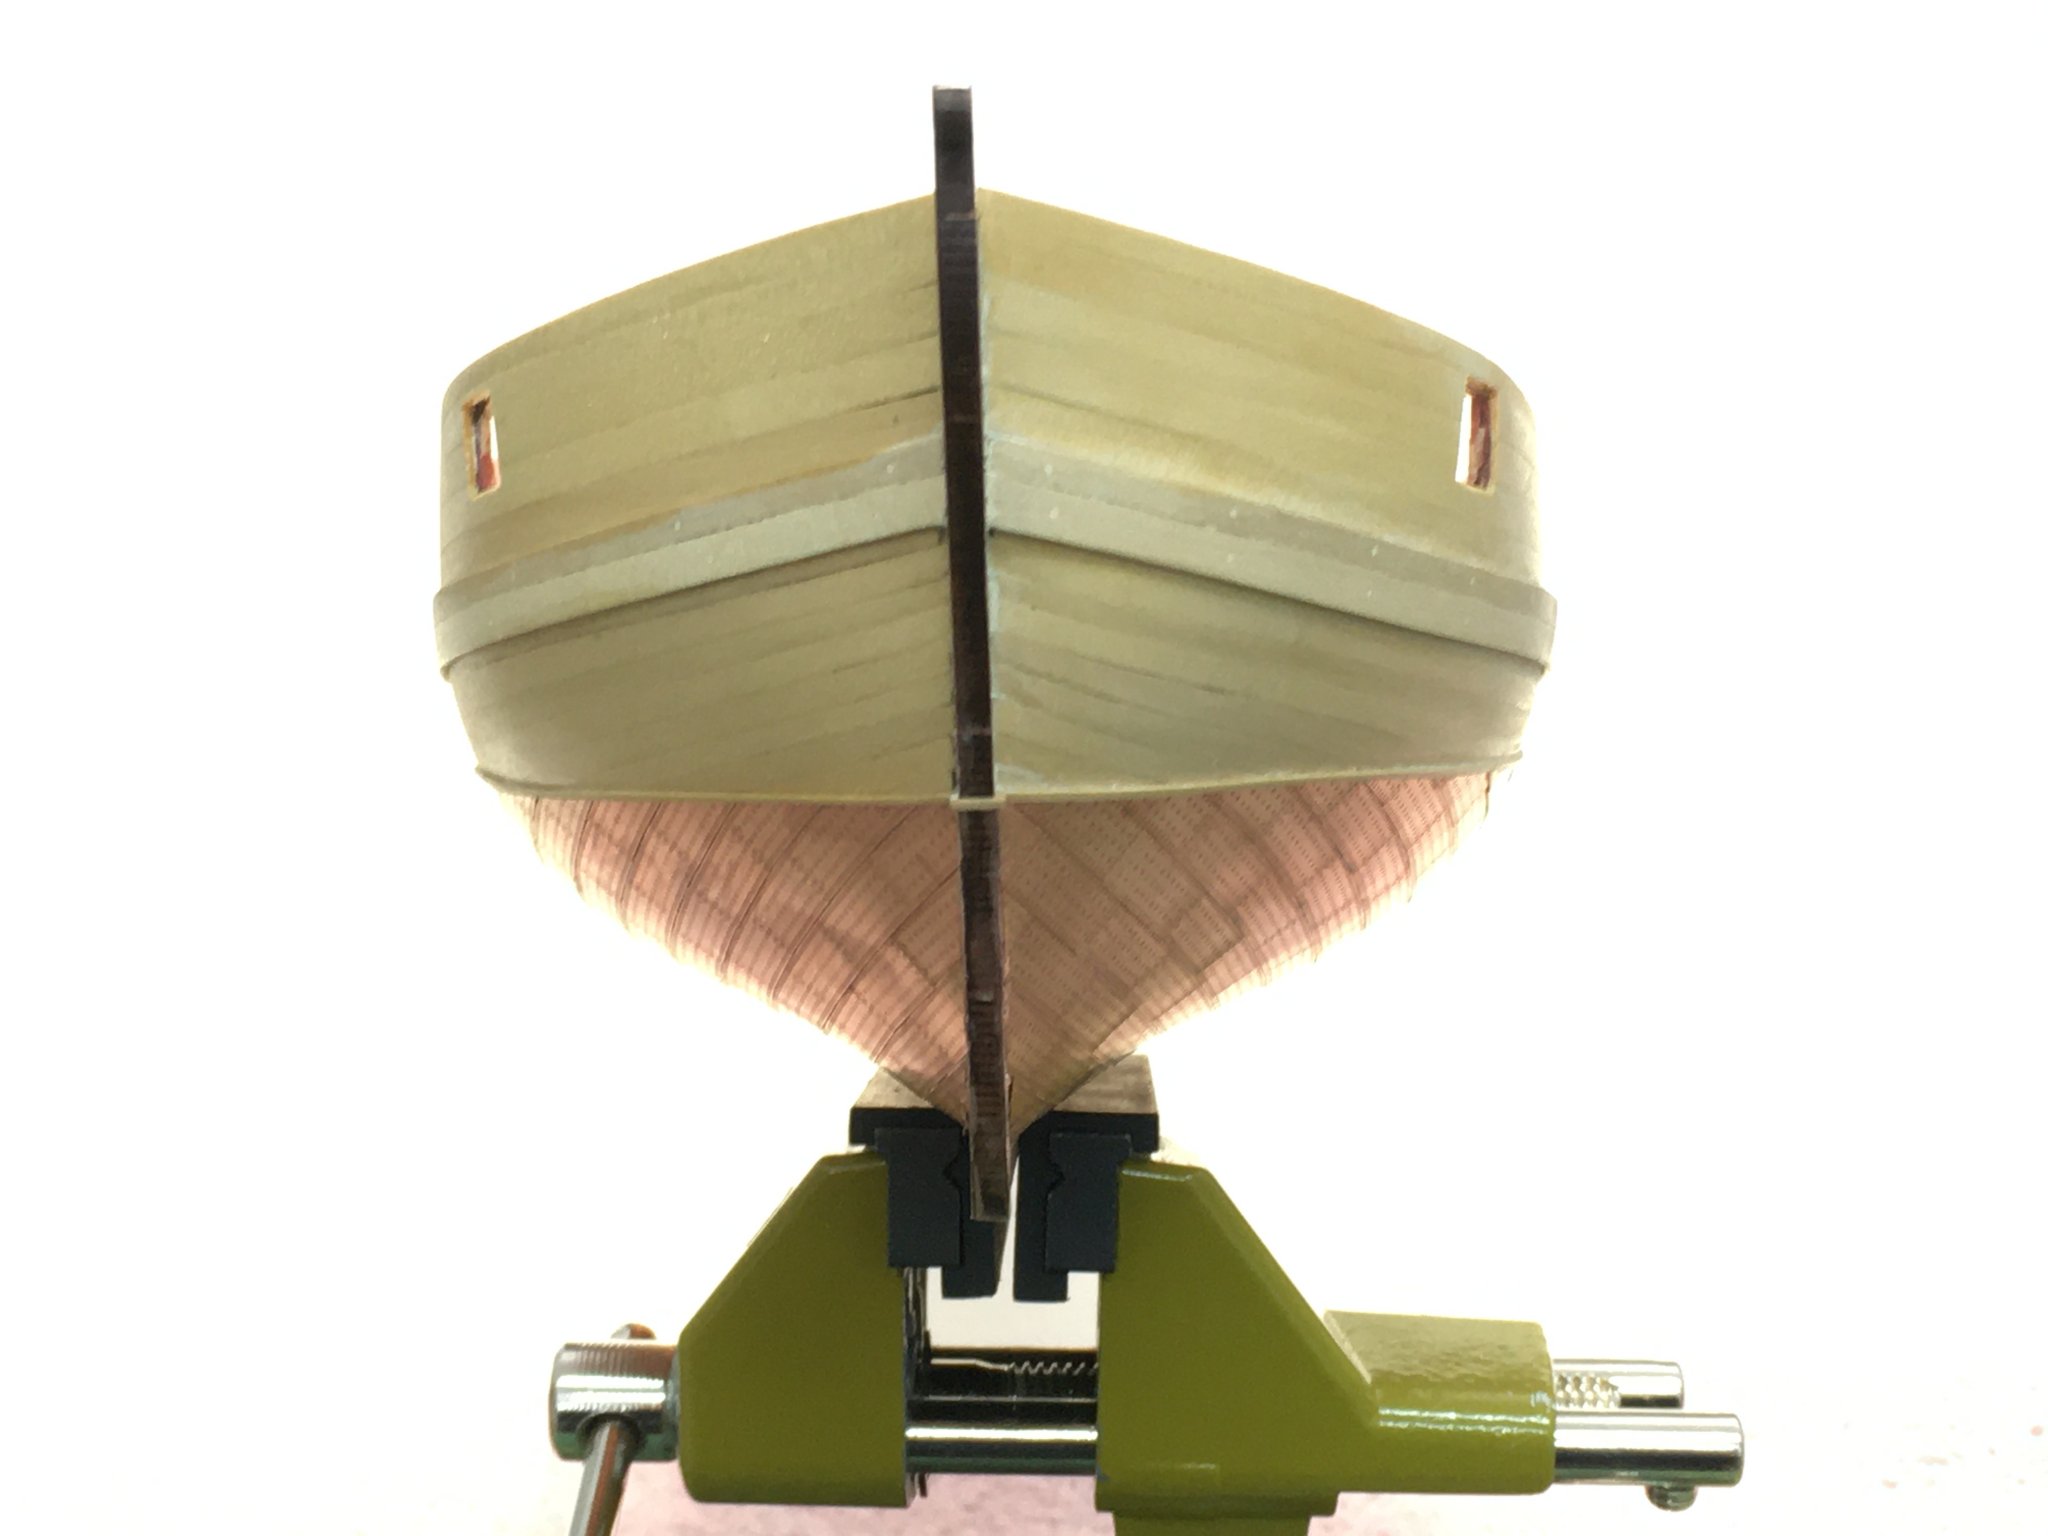
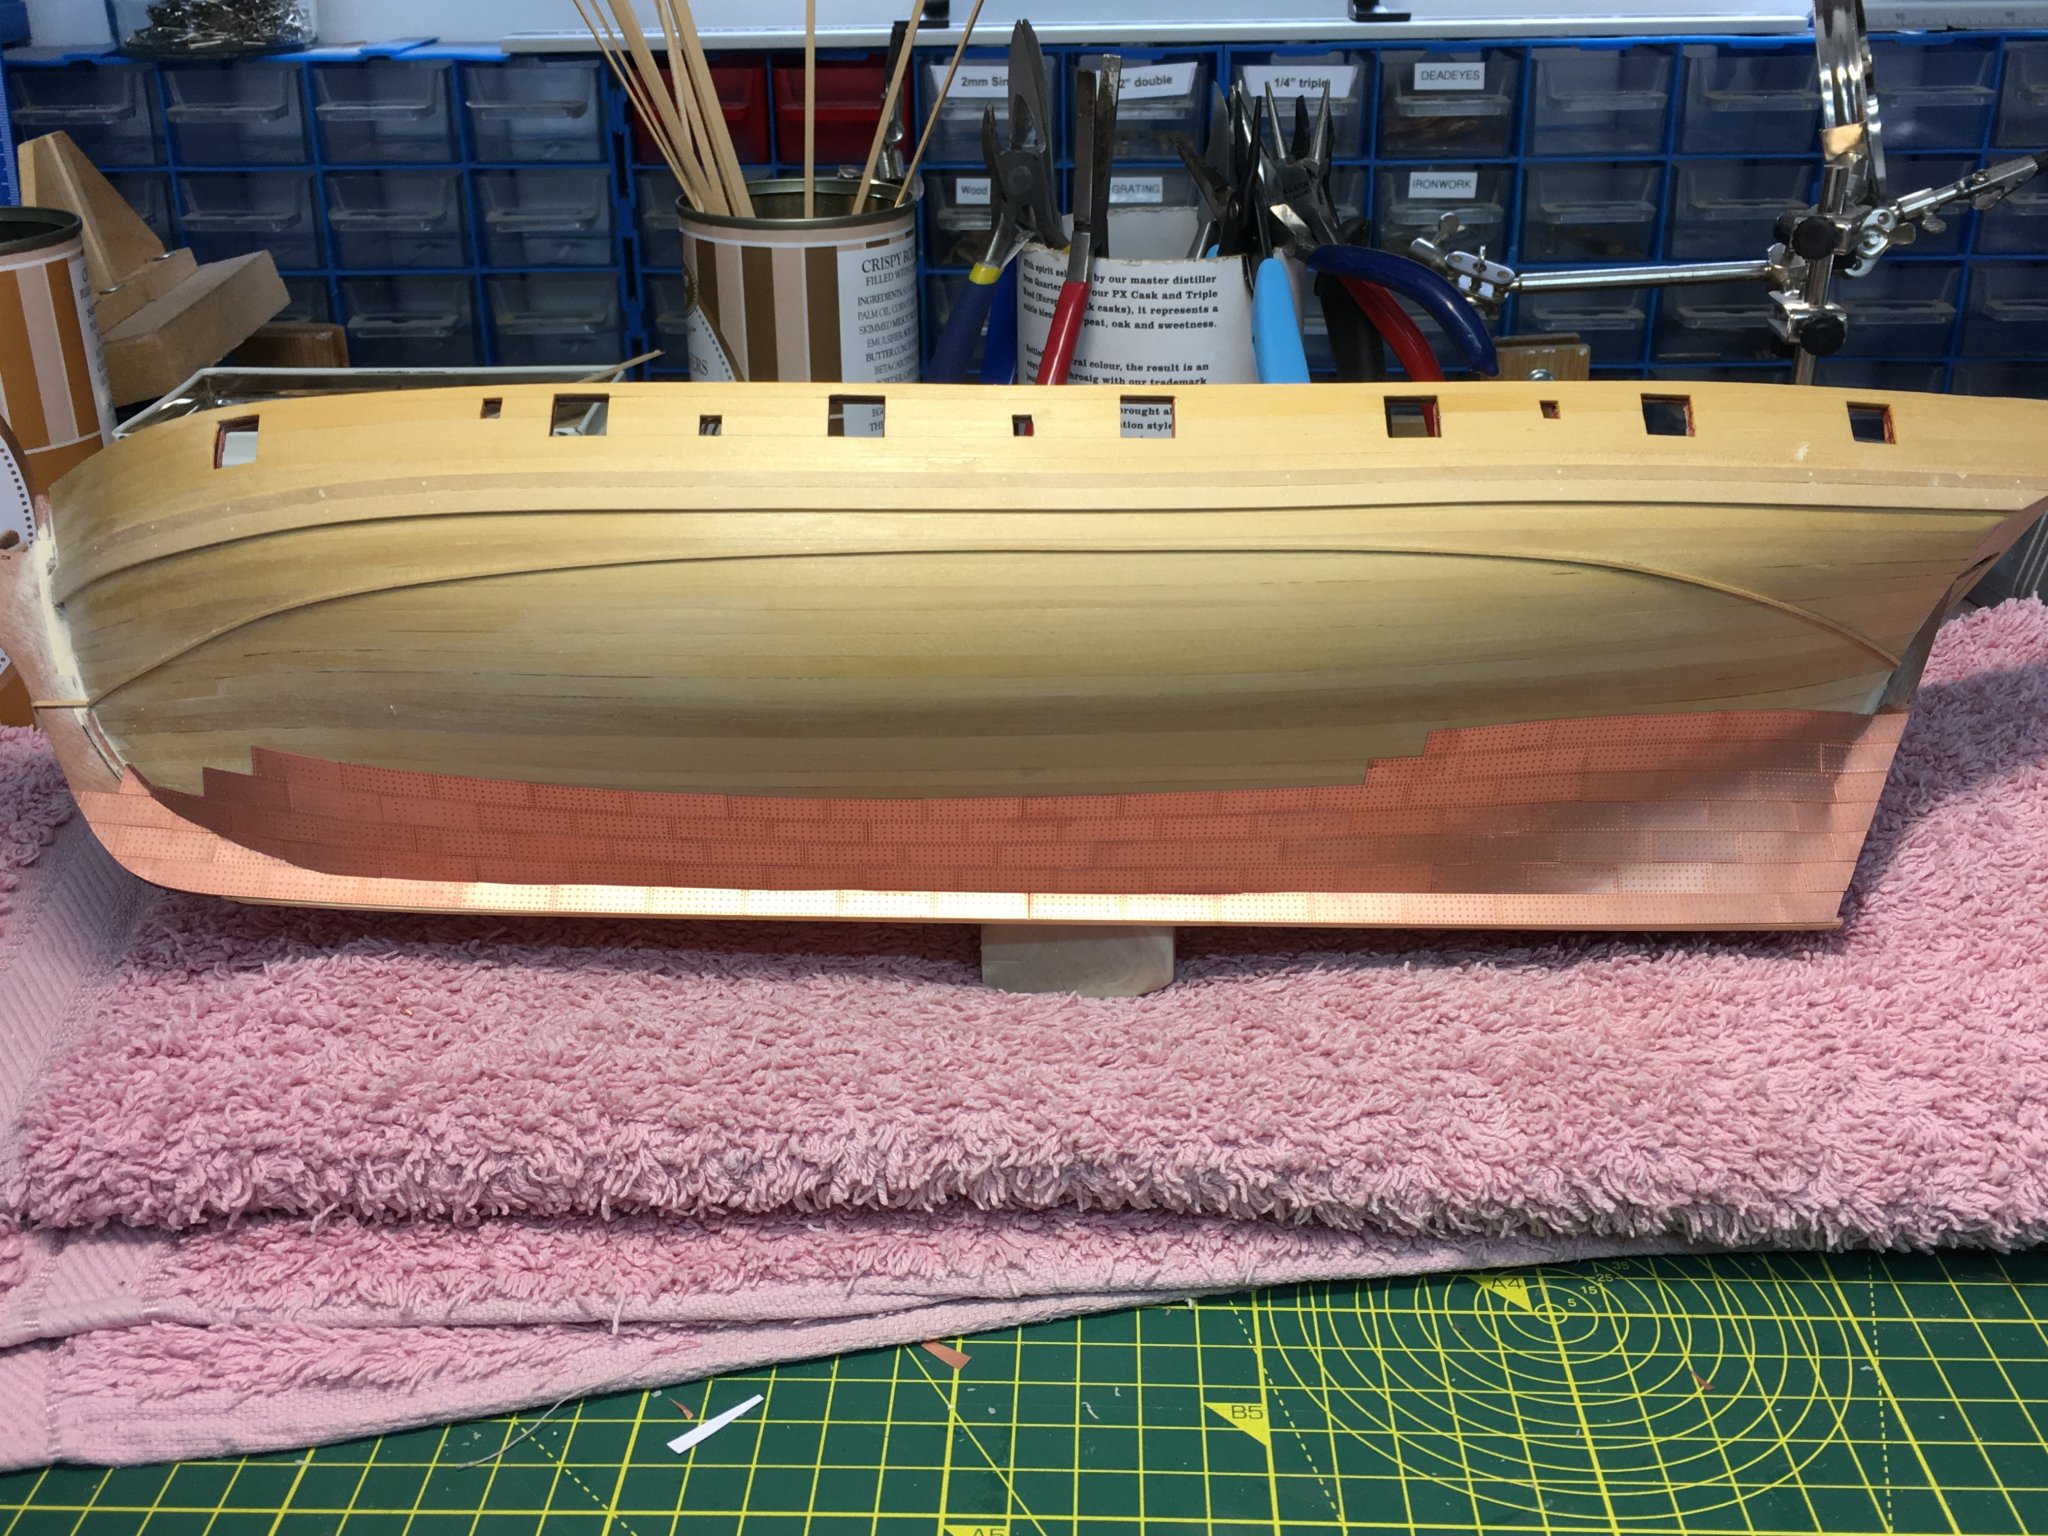
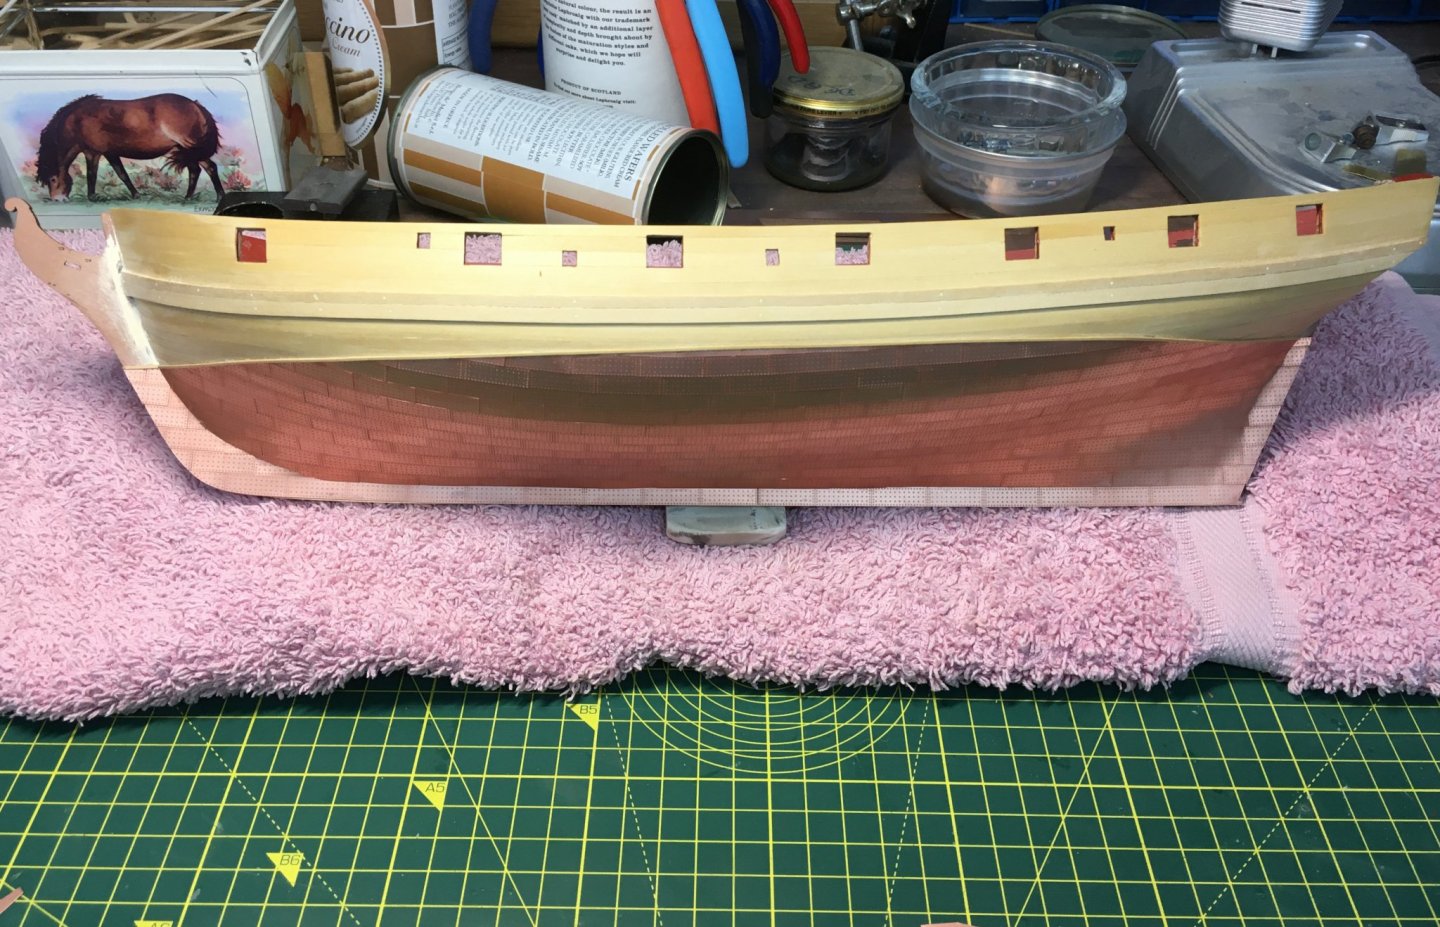
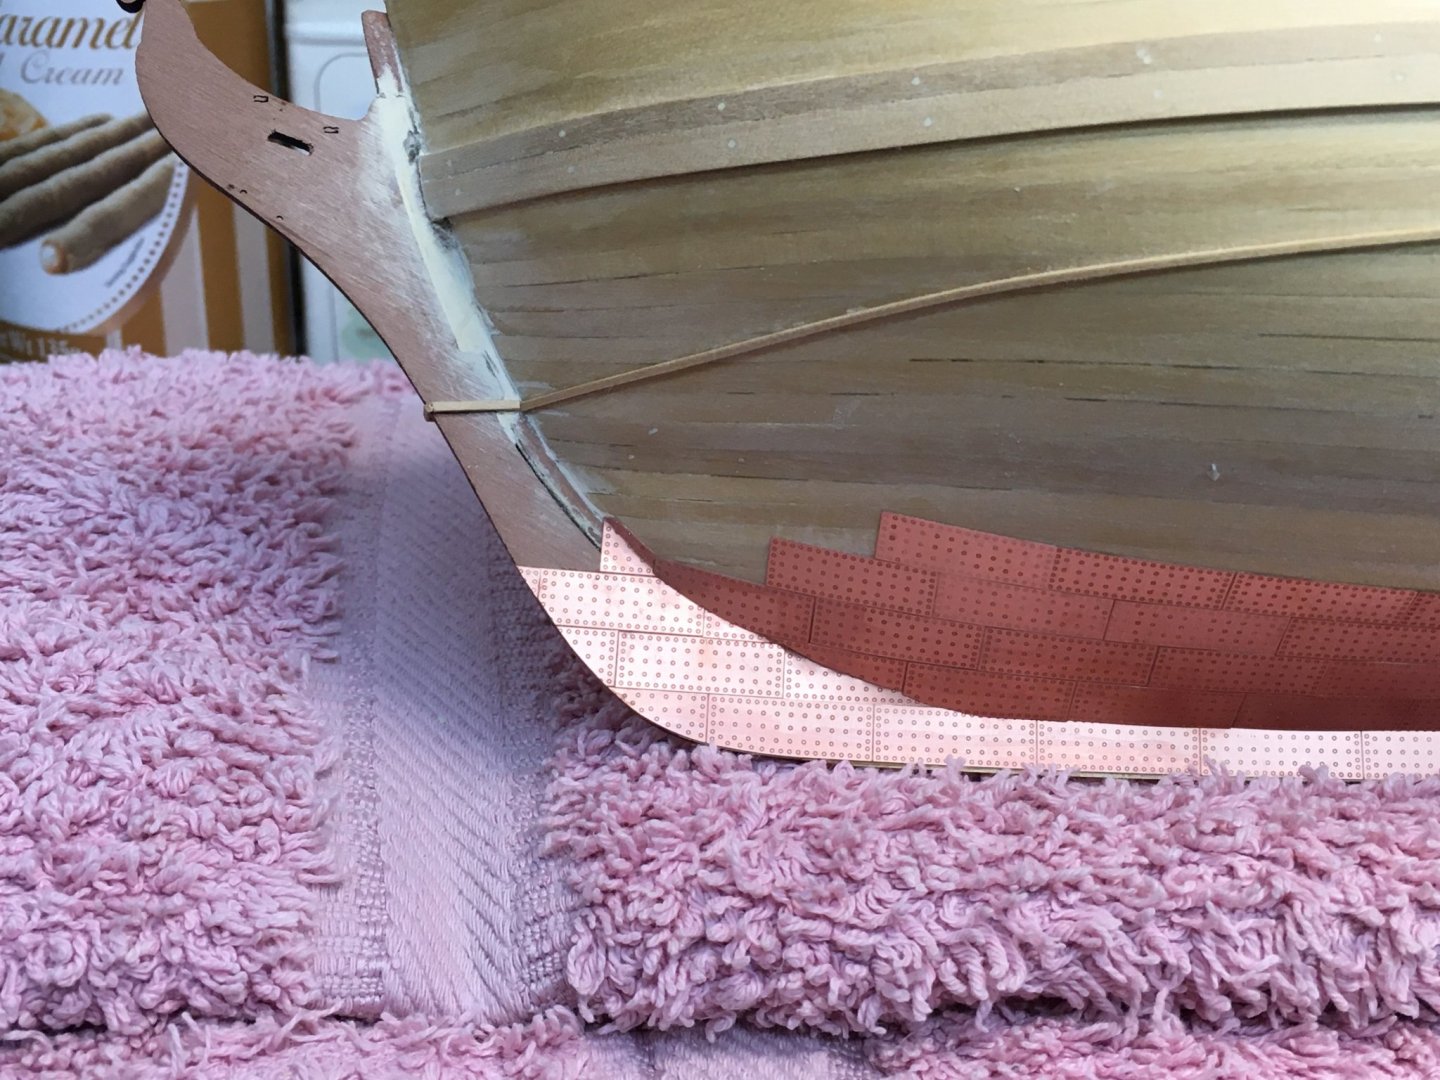
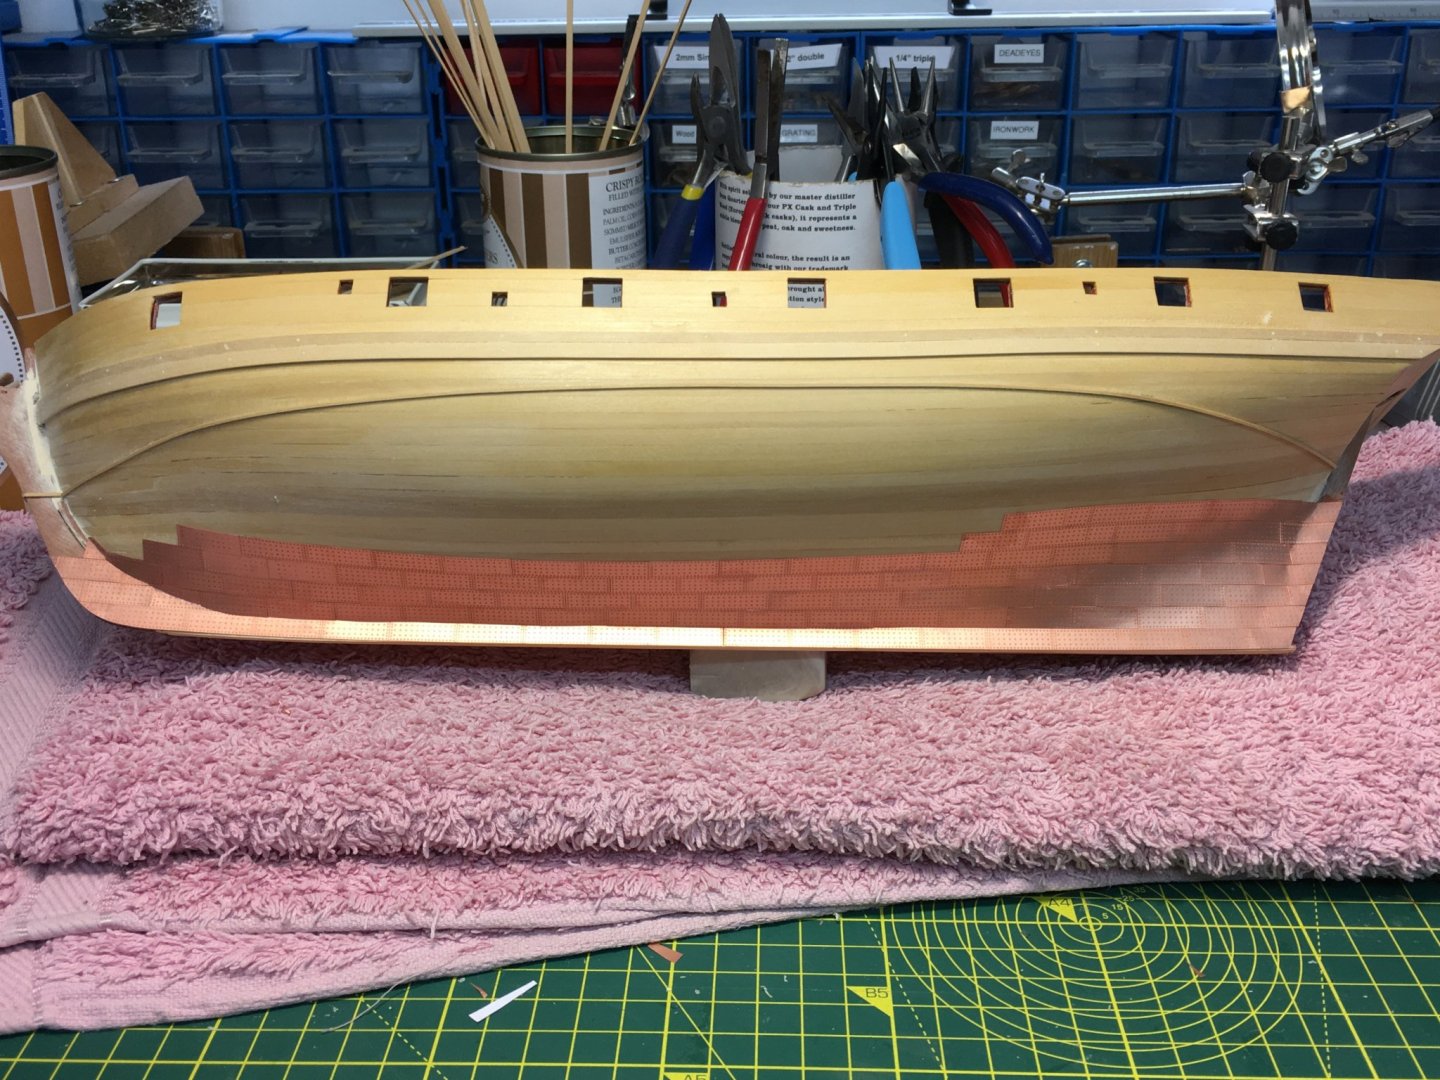
Coppering - finished the starboard side this morning. Overall I'm quite pleased as this was my first go. I'm also pleased I used a batten on the waterline as suggested by Glenn. Port next. Derek
- 725 replies
-
- 14
-
-
- vanguard models
- speedy
- (and 1 more)
-
More great progress. At this rate you'll beat Chris's benchmark of 50 hours to complete Speedy! Derek
-
Wearing a face mask and having a fan behind me blowing the fumes away has certainly helped. My nose has begun feeling a bit stuffy since I started coppering again, but nowhere near as bad as it was before when I was sneezing and my nose was running constantly. I still believe the best solution would be a vacuum system piped to the outside, but that will have to wait. Thanks for the suggestions Eric, I'll certainly try a piece of hacksaw blade. Brass works fine for me for scraping profiles - I'll try a small sheet as a flat scraper. Thanks SpyGlass. I used a box knife blade for initial shaping on my second planking before sanding, but found it a bit hit & miss. But that may have been my technique - if you look at earlier Speedy pictures you'll see the bloodstains! Derek
- 725 replies
-
- 1
-
-
- vanguard models
- speedy
- (and 1 more)
-
Hi Glenn Apologies if you’ve mentioned this and I’ve missed it, but have you applied a finish to your copper, or do you plan to? I see some people use varnish or lacquer whilst others prefer the copper to tarnish naturally. What’s your preference? Derek
-
Good point. I have a cabinet scraper I use for full-size jobs but it’s much too big for model work. But I should be able to make something similar on a smaller scale. I might just cut down the scraper as I rarely use it nowadays. Derek
- 725 replies
-
- 1
-
-
- vanguard models
- speedy
- (and 1 more)
-
More great progress. Will you mount all the swivels? I recall Chris saying that would have been unlikely on the real ship, but on the other hand it might seem a shame to leave any off. Derek
-
Thanks Vane - good tip about CA. I’ll try it on a spare piece before risking it on the ship! Derek
-
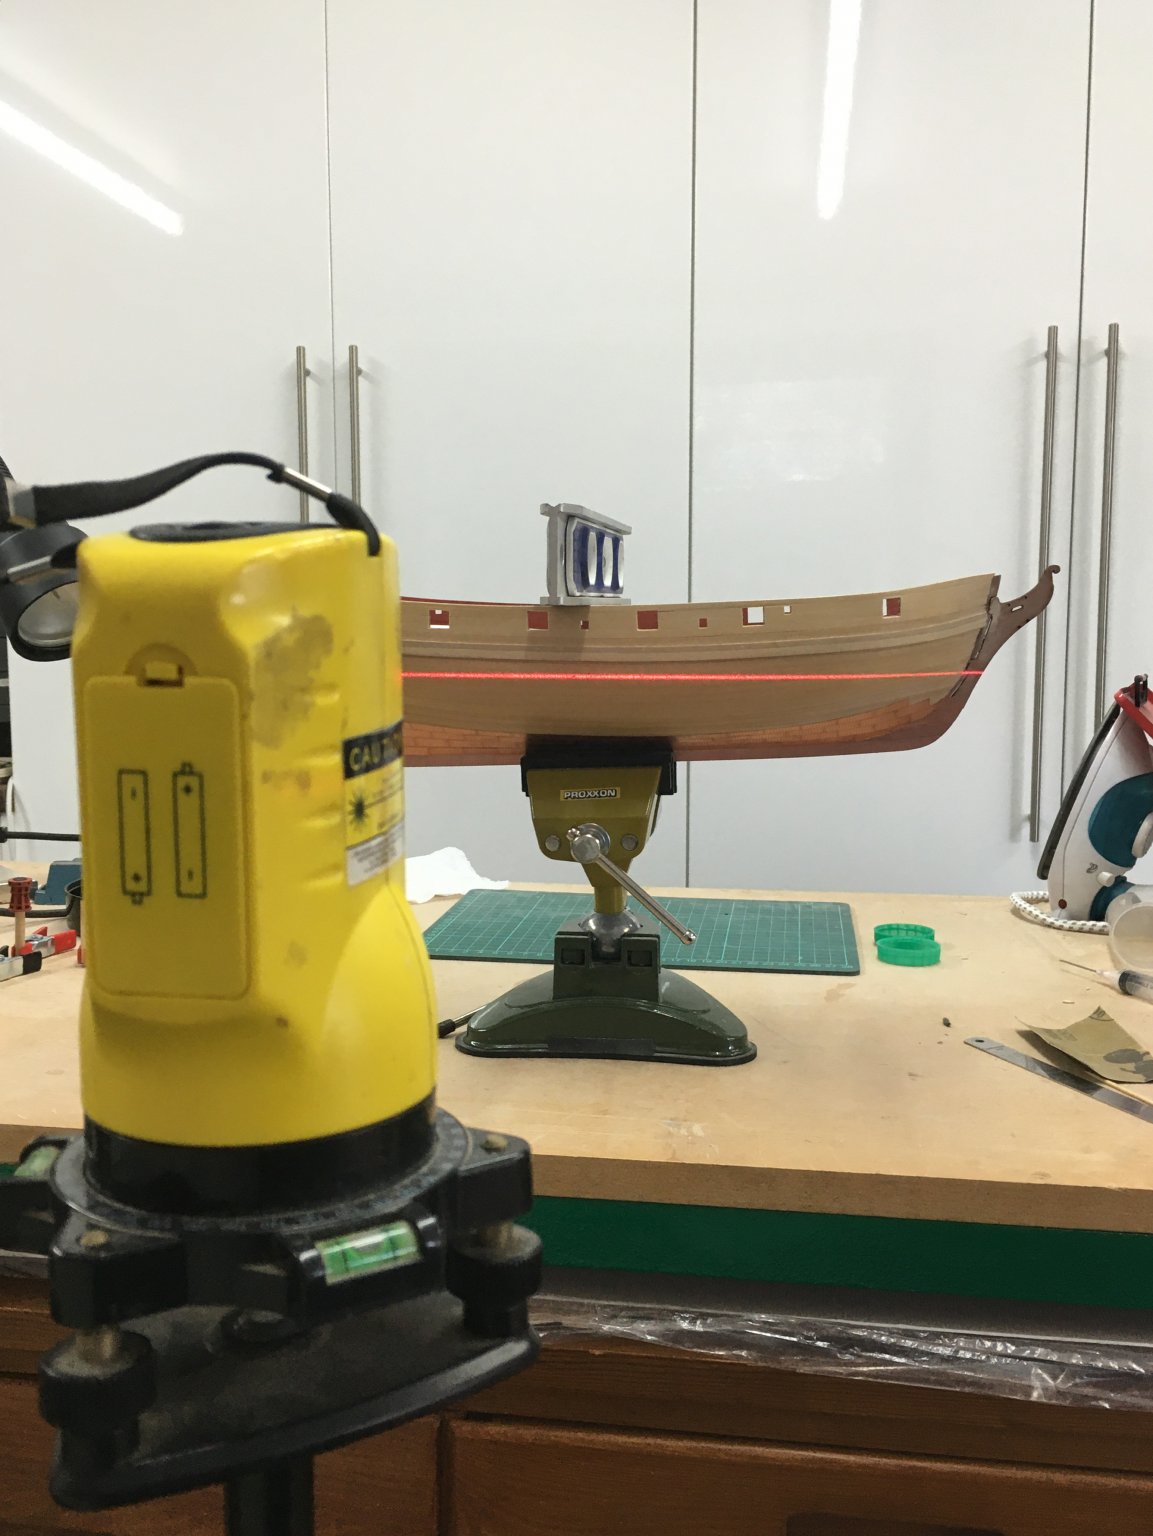
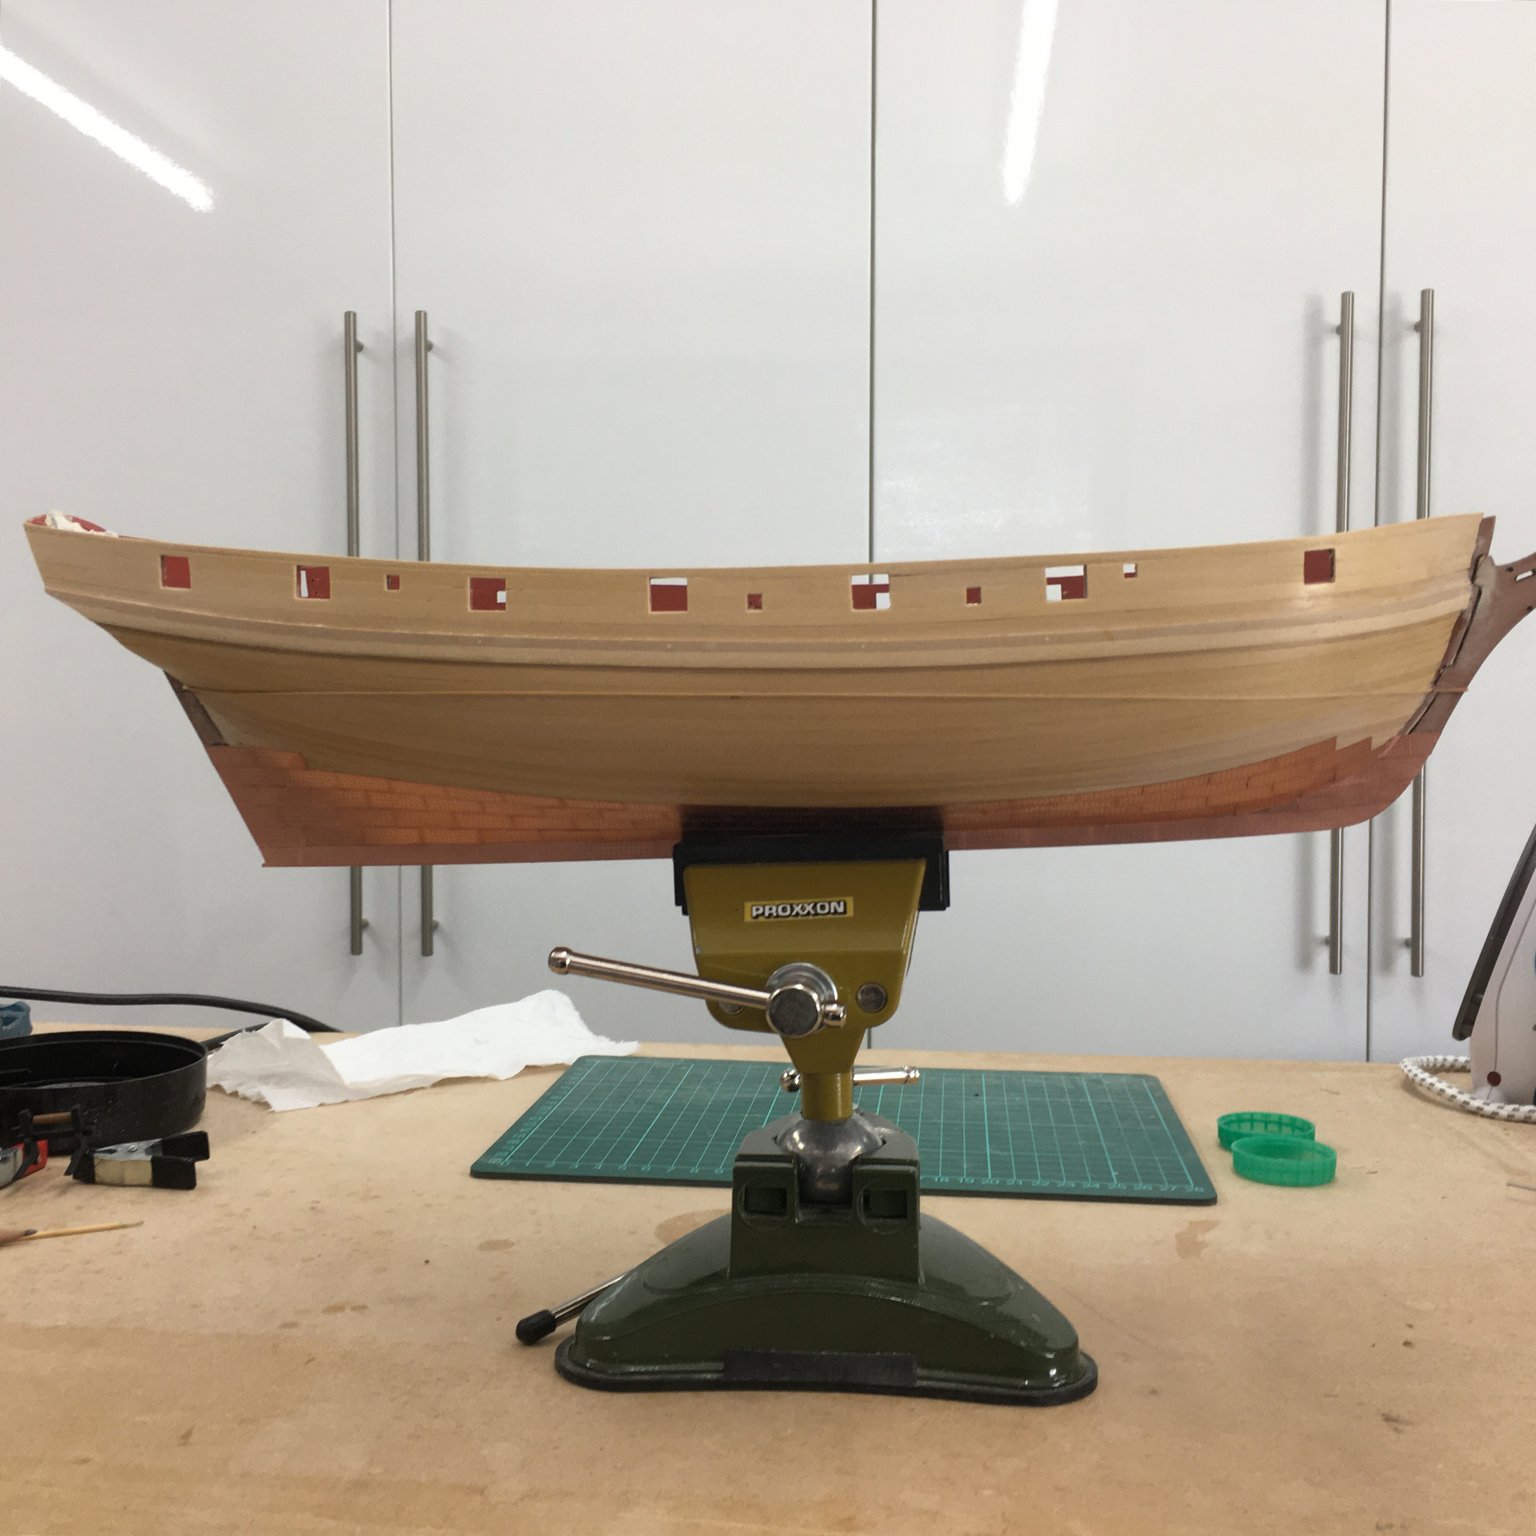
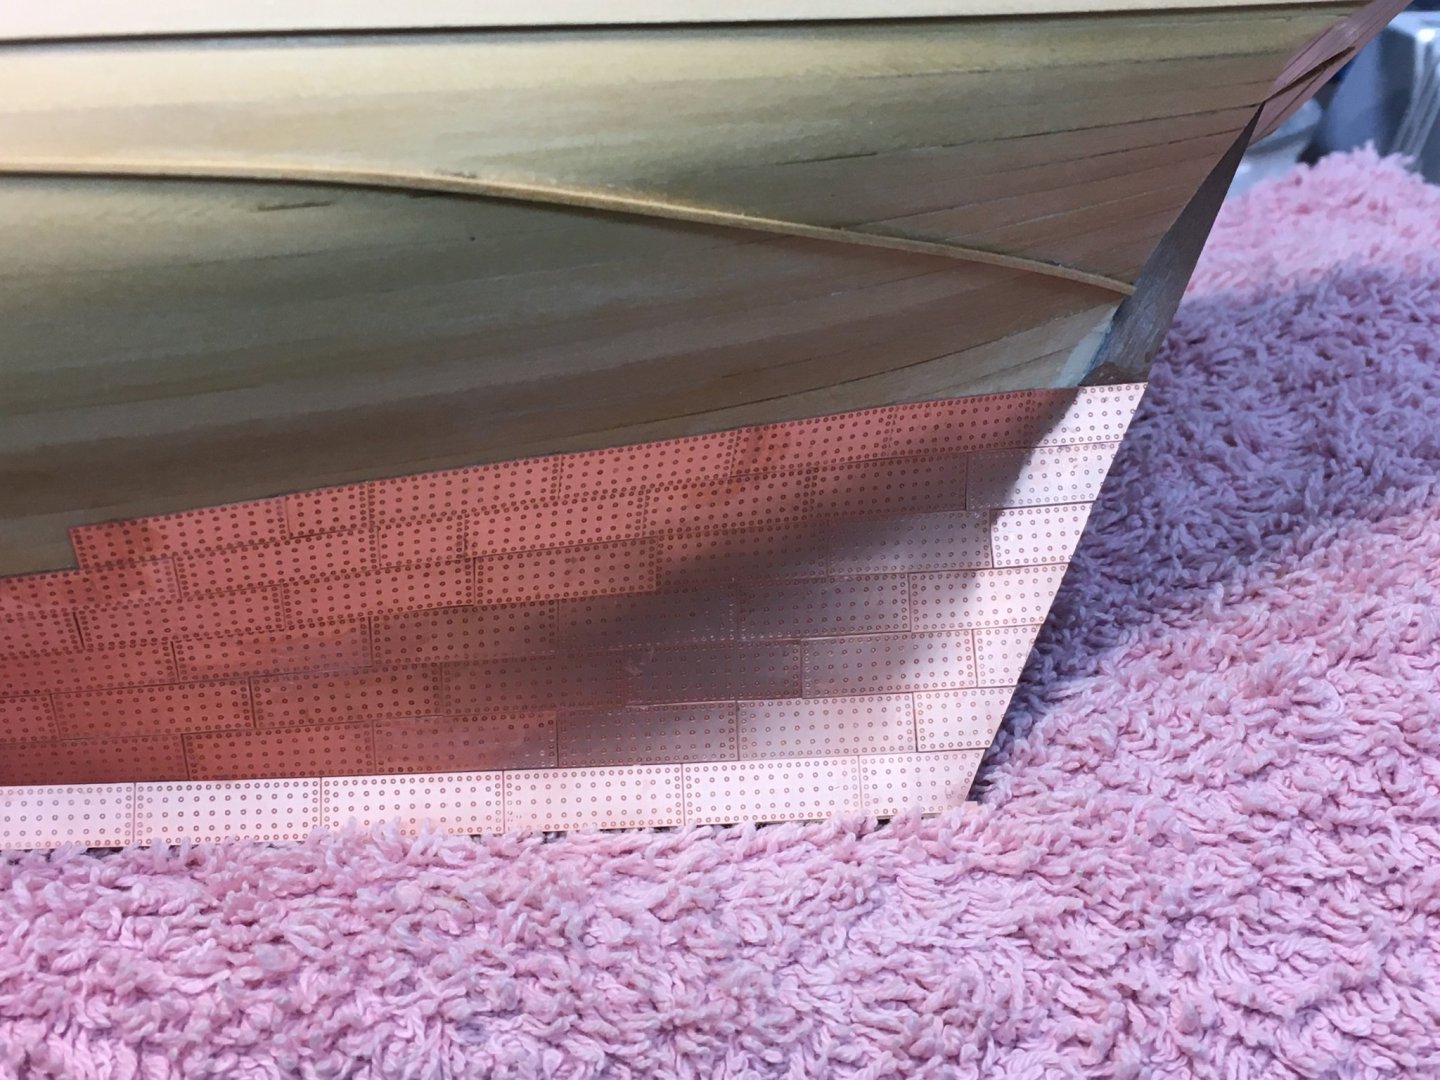
Thanks again for the likes and supportive comments. Much appreciated as always. A quick update. I wasn’t very happy with the waterline I’d drawn so I dug out my laser level – a tool I normally use for DIY jobs around the house. Along with the Proxxon stand which has a ball & socket joint, I was able to shine an accurate line on the hull, connecting the three points on the waterline I’d marked at the bow, stern and midships. Then came the hard bit. I wanted to follow Glenn’s lead in using a batten to define the upper edge of the copper. I understand this was full-size practice when the copper strakes were cut into the waterline rather than running parallel to it. Likewise on the model, the batten should make it easier to get the cut edges to line up along the waterline. I milled the 0.8mm X 0.5mm battens from some boxwood strips. The hard part was getting them to stick to the hull. I didn’t want to risk getting CA on the uncoppered parts of the hull, and after some abortive experiments with glue sticks I decided to try Super ‘Phatic as also recommended by Glenn. This very thin aliphatic resin has a comparatively fast drying time, and by pressing a few inches of the batten at a time against the hull with my fingers I was able to get it to stick. I started in the middle then worked outwards, first to the bow then the stern, holding each section for about two minutes. Laborious but it worked. It doesn't look straight, but I understand that's an optical illusion caused by the shape of the hull. The deeper draught aft is also very evident. I've now learned (thanks to a query to the MSW community) that this is called positive trim. Derek


- 725 replies
-
- 10
-
-
- vanguard models
- speedy
- (and 1 more)
-
Believe it or not I'm quite enjoying the coppering, despite the CA fumes. It's a new challenge, and for me that's half the pleasure of modelling. Having said that, I suspect I may not want to do it again once I've finished Speedy! Derek
- 725 replies
-
- 2
-
-
- vanguard models
- speedy
- (and 1 more)