DelF
-
Posts
1,409 -
Joined
-
Last visited
Content Type
Profiles
Forums
Gallery
Events
Everything posted by DelF
-
 Your whole build looks great so far, but I particularly like your etched deck. I don't think I would have planked over my Speedy deck if it had looked like Flirt's. Derek
- 109 replies
-
- 1
-

-
- Vanguard Models
- Flirt
- (and 1 more)
-
Have you got Scottish ancestry in your family Ernie? I always thought numpty was Scottish slang. My wife calls me a numpty noodle-head (often). Derek
- 725 replies
-
- 1
-
-
- vanguard models
- speedy
- (and 1 more)
-
Just me, but I didn’t paint Speedy’s cathead yellow ochre. I prefer the bare brass. Derek
- 436 replies
-
- 3
-
-
- vanguard models
- alert
- (and 1 more)
-
I'm not sure why airbrushing is recommended. Paint is fine if applied carefully (I use Admiralty Paints dull metal black for ironwork), otherwise I use a blackening solution such as Casey's Metal Black. BTW, I think your paintwork looks fine. Derek
- 436 replies
-
- 4
-
-
- vanguard models
- alert
- (and 1 more)
-
I've got the MF 70. Ideal for our scale of work. To misquote George Best, I spend most of my money on wine, whiskey, and ship modelling; the rest I just waste. Derek
- 725 replies
-
- 3
-
-
- vanguard models
- speedy
- (and 1 more)
-
Love it! I'm glad to see I'm not (quite) the world's worst cook. My approach has always been that if I do things badly enough in the kitchen I won't be asked to do them again. Doesn't always work, but in the main I'm only trusted to do veg prep and washing up (and even that requires a great deal of Senior Management supervision). Derek
- 725 replies
-
- 1
-
-
- vanguard models
- speedy
- (and 1 more)
-
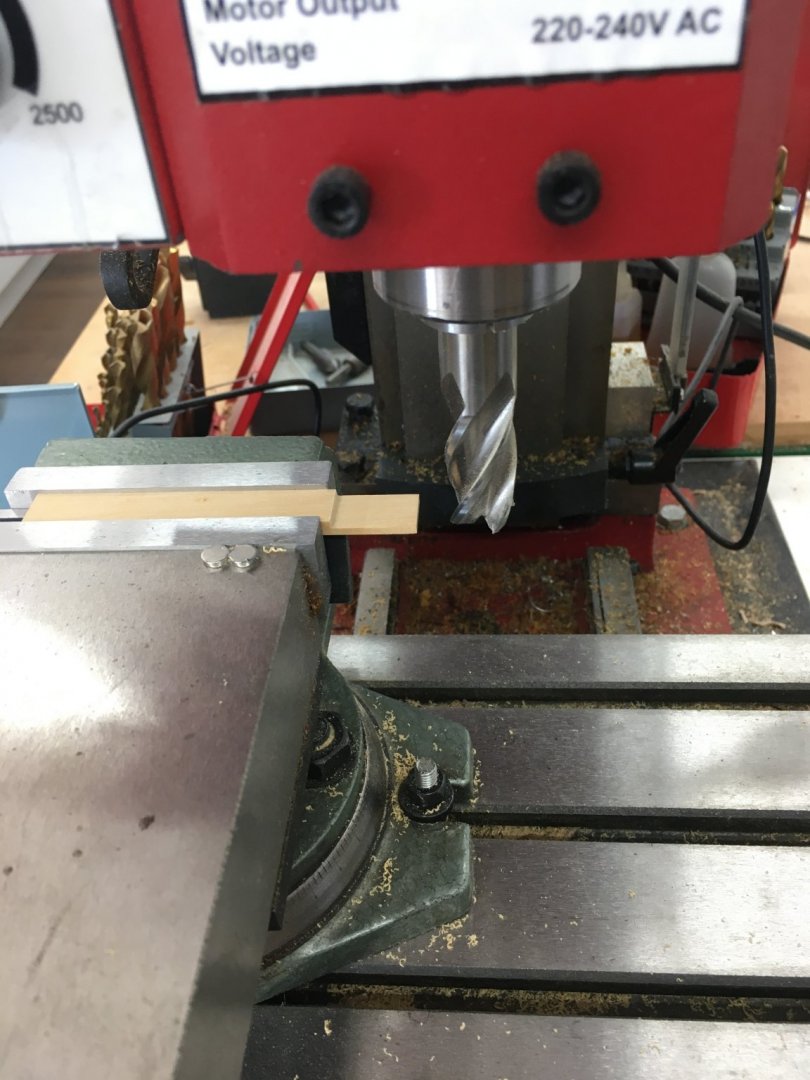
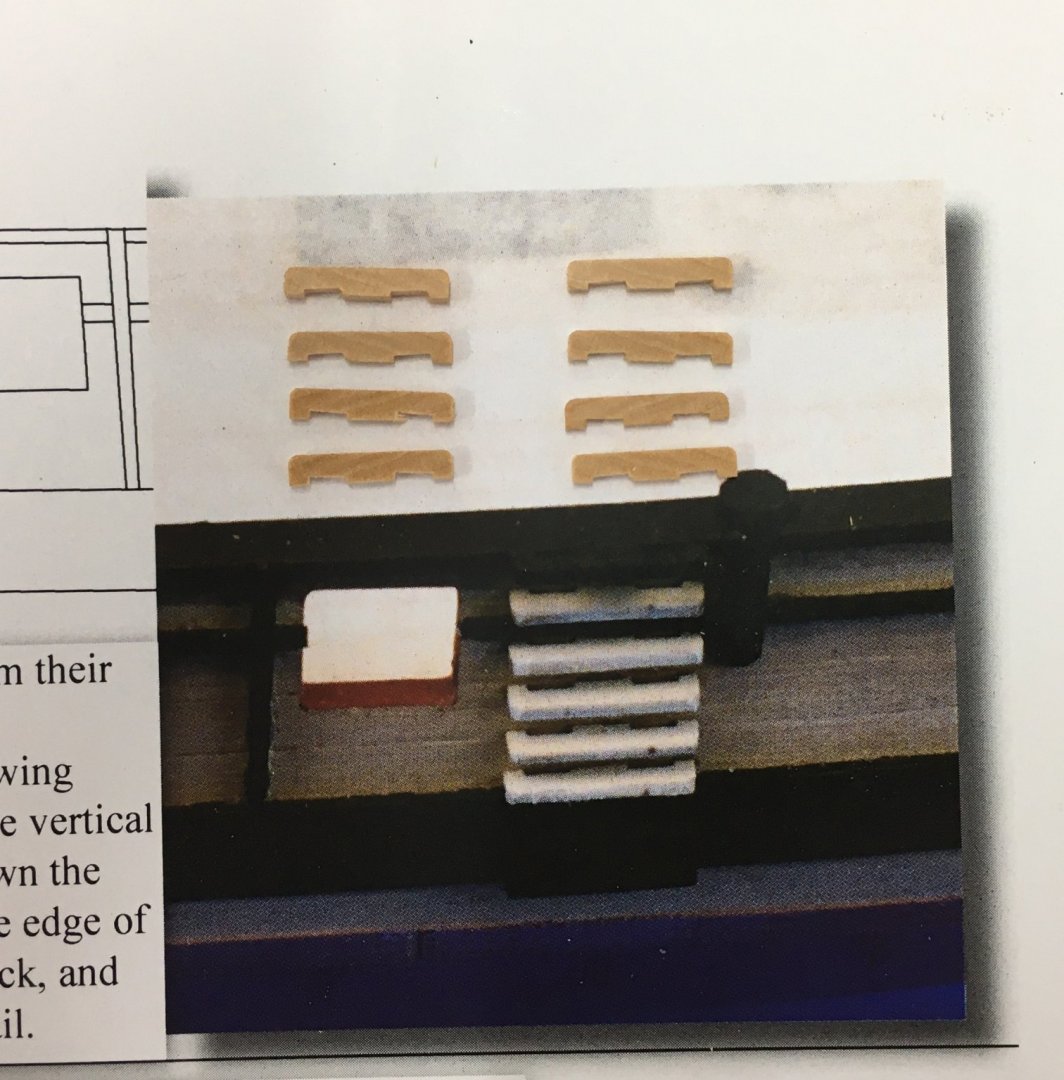
Glenn The Proxxon is great, especially for fine, detailed work. The limitation is size, with the widest end mill being 3 mm. Doesn't stop you doing wider cuts, it just takes longer. Have a look at Marsalv's work on this forum - he shows great ingenuity in getting the most from his Proxxon mill. Here's a couple of examples from my Royal Caroline. The first is the launch, where the mill made the rowlocks and the grooves on the oars handles: The second picture shows my first attempt at using the rotary table you can get as an optional extra. If you look at the fluting on the uprights, they were made using the table to turn the upright a precise number of degrees to make the flutes evenly spaced. Most of the other details on this fitting were also made with the mill, including the slots for the sheaves in the base and the shapes in the cross beam. You'll be pleased to know I replaced the belaying pins in the final model with more realistic ones (referring back to an earlier Speedy discussion!). Similarly, a lot of the detail here in the bitts and the belfry was wrought by the micro-mill. As another example, I made all my own deadeyes for the model and used the rotary table to make sure the three holes were correctly spaced and positioned. The possibilities are endless, and I get a lot of enjoyment figuring out jigs and methods for getting the most from my tools. Of course, people can and do make great models without mills and lathes and Byrnes saws, but for me power tools just get things done faster and more accurately. Derek

- 725 replies
-
- 6
-
-
- vanguard models
- speedy
- (and 1 more)
-
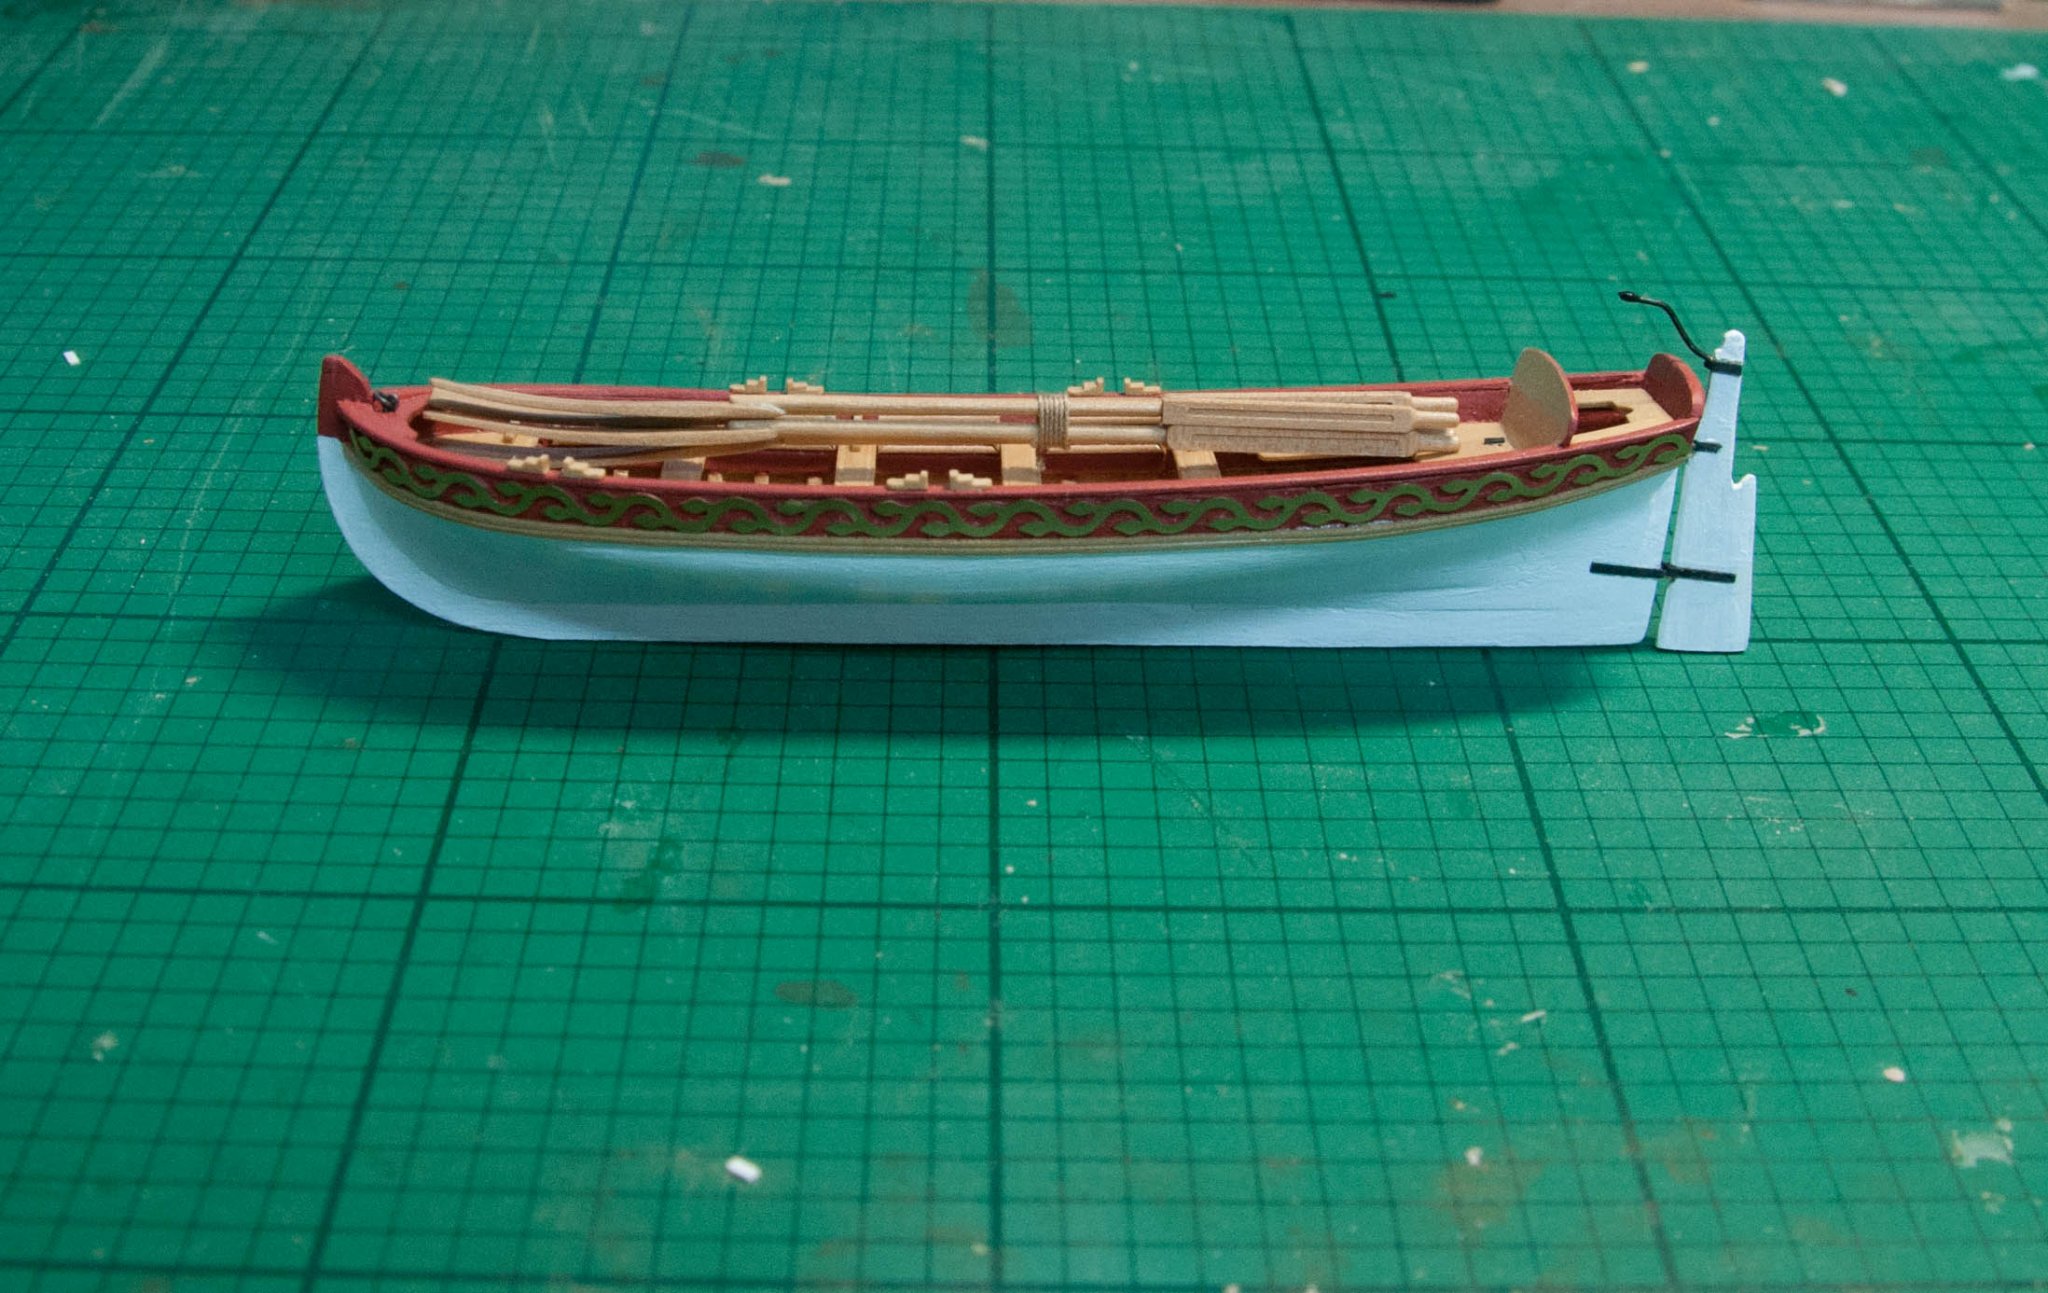
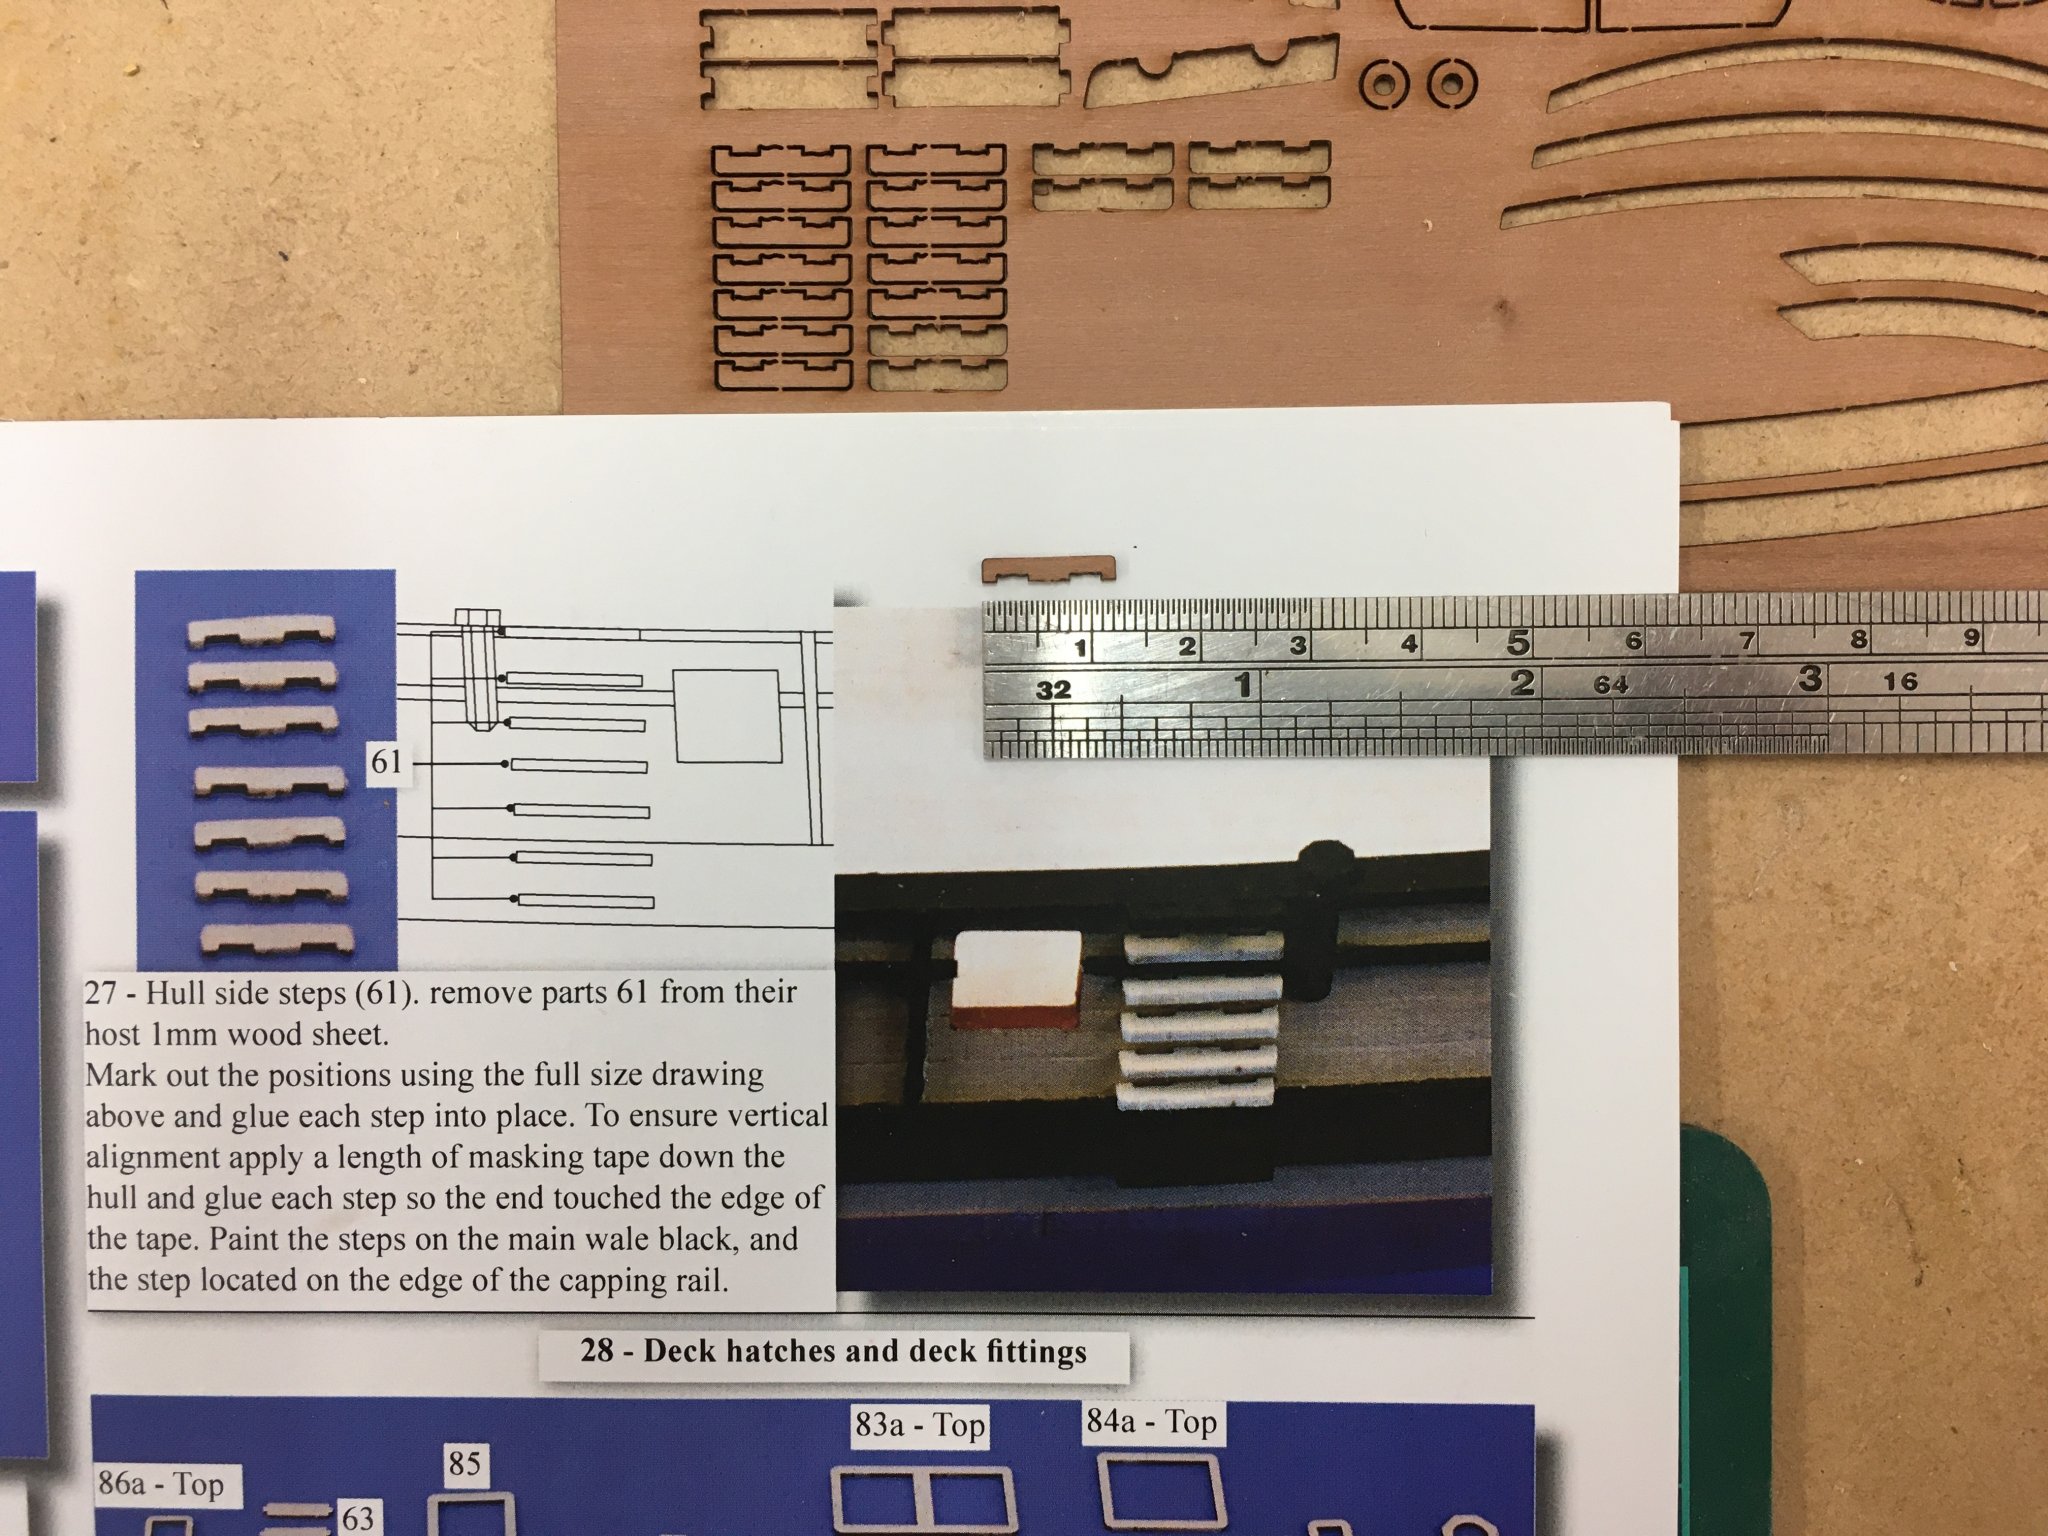
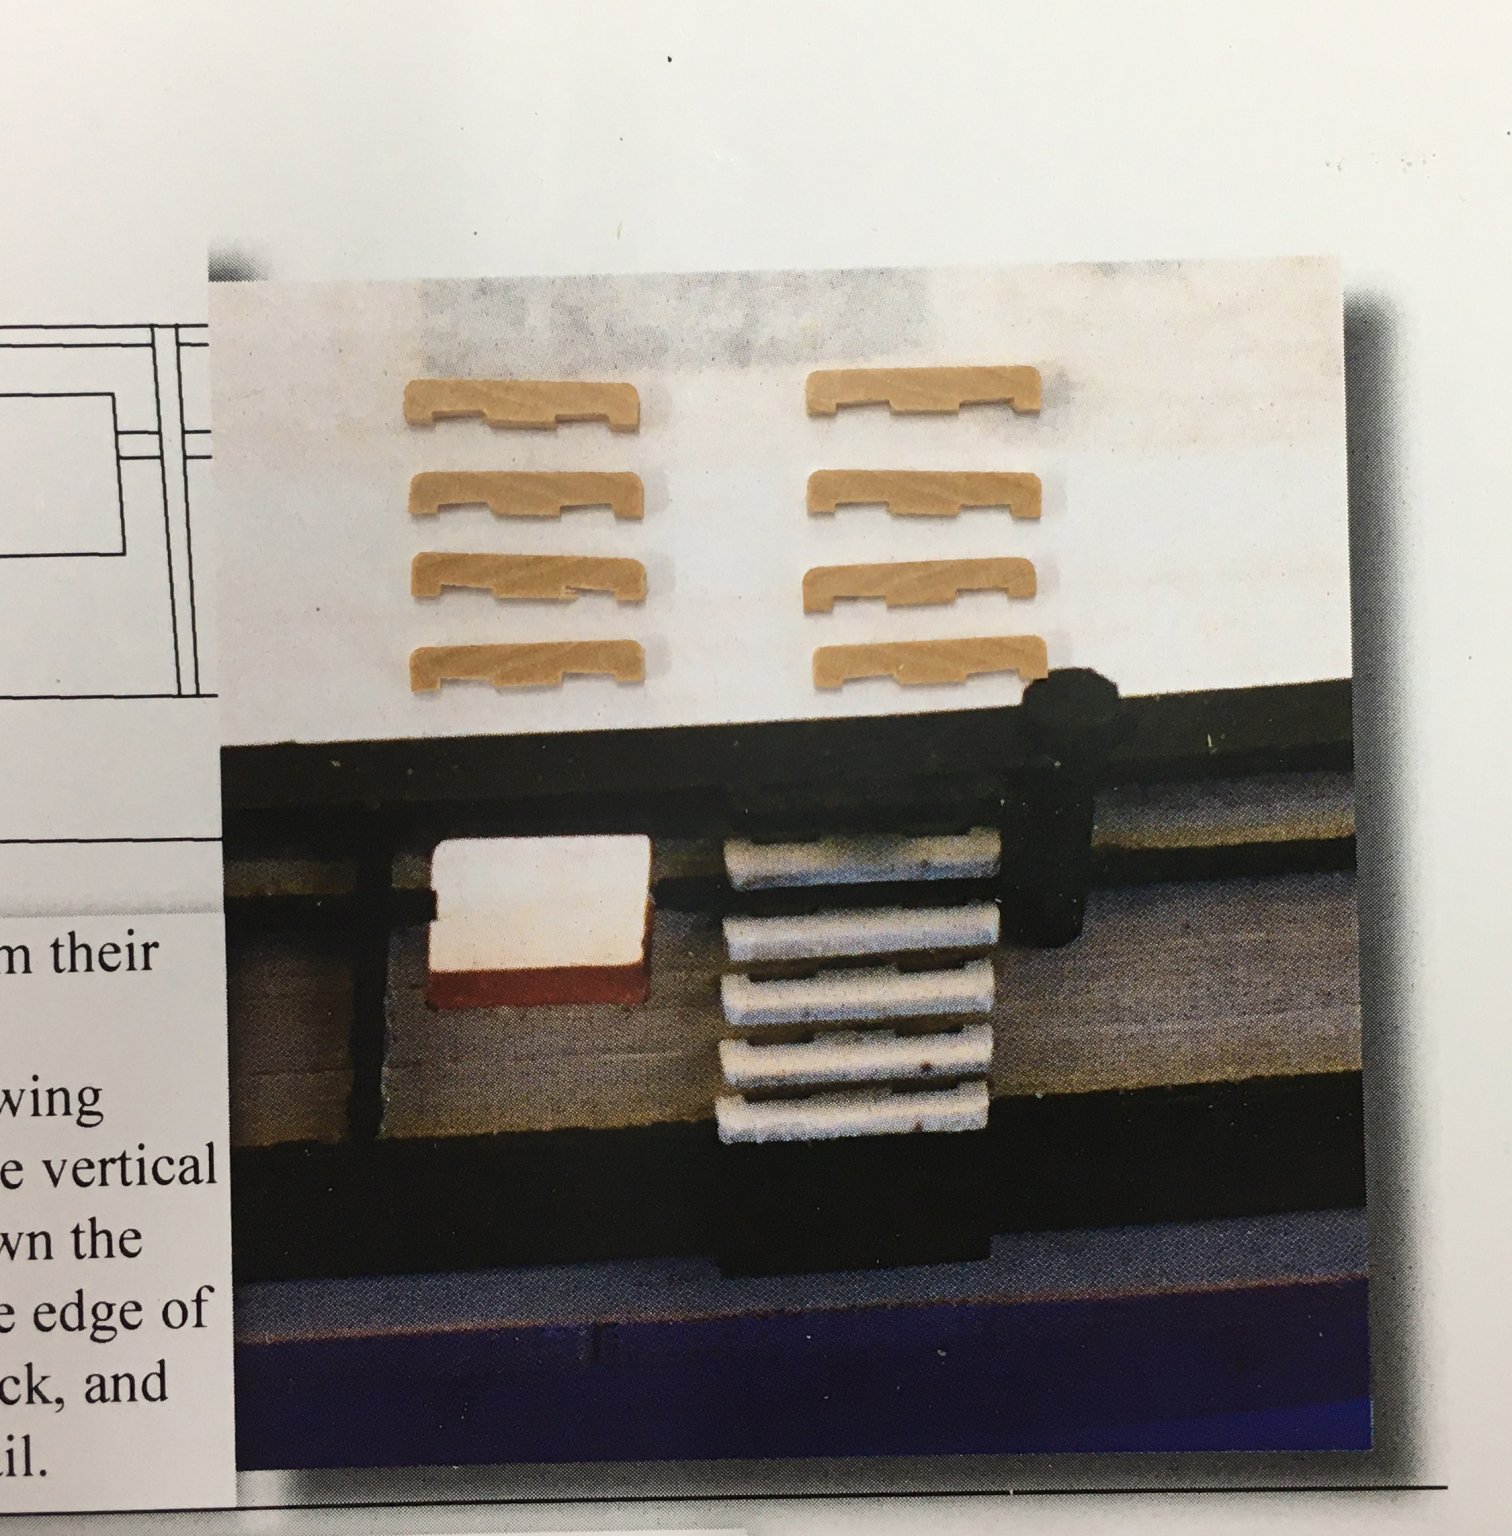
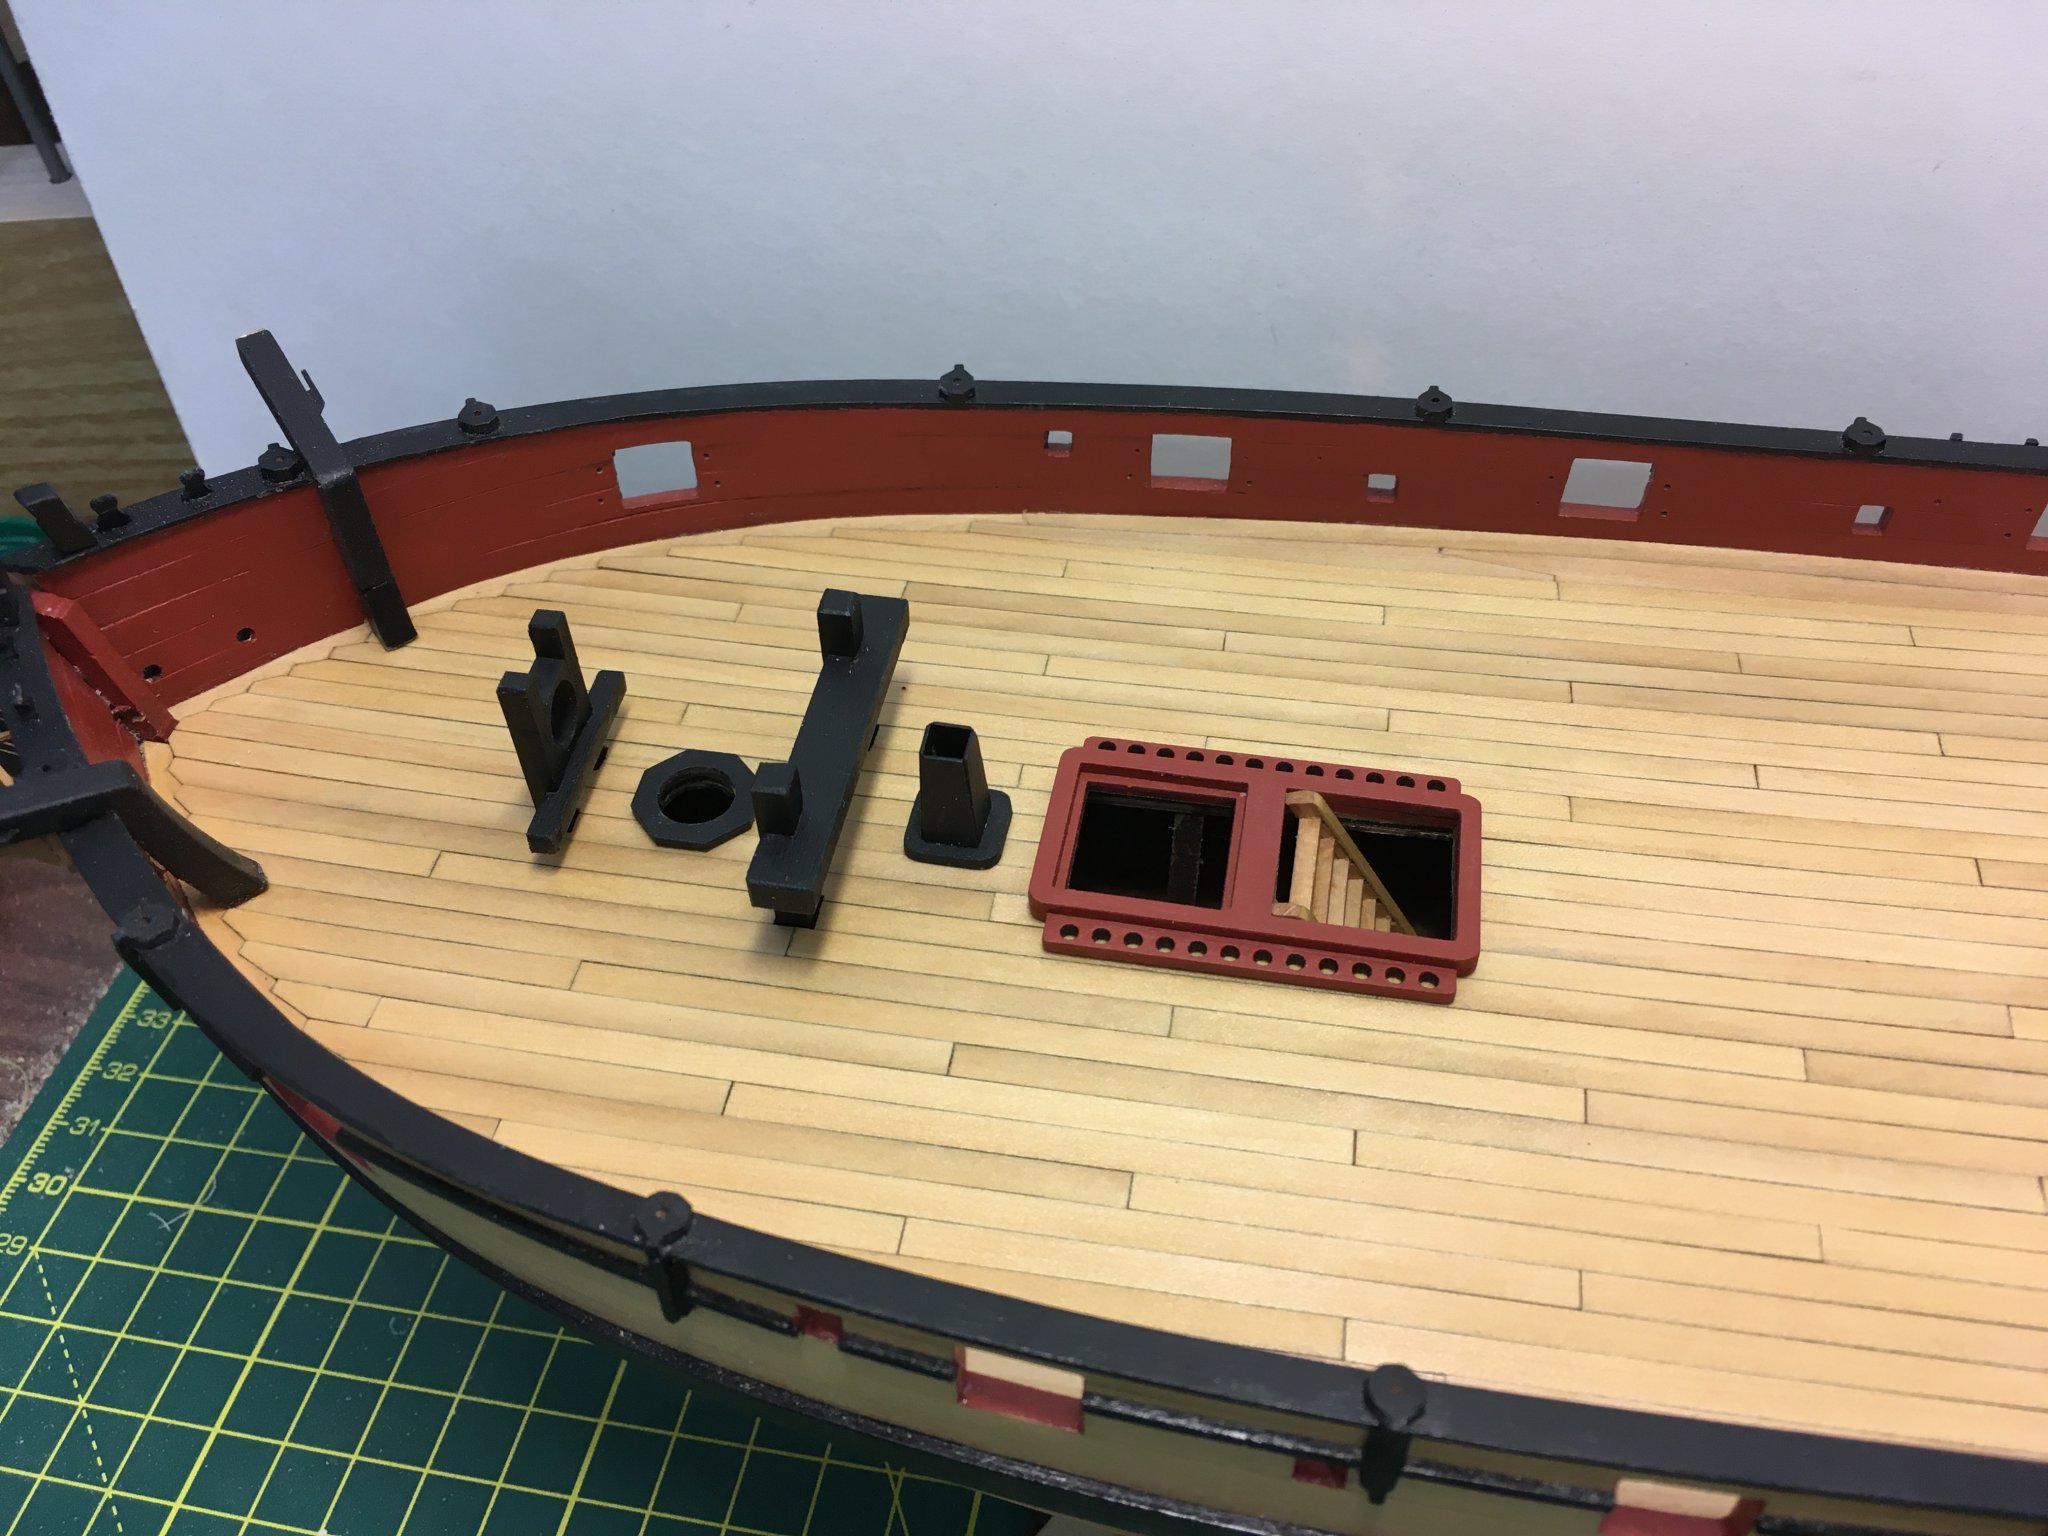
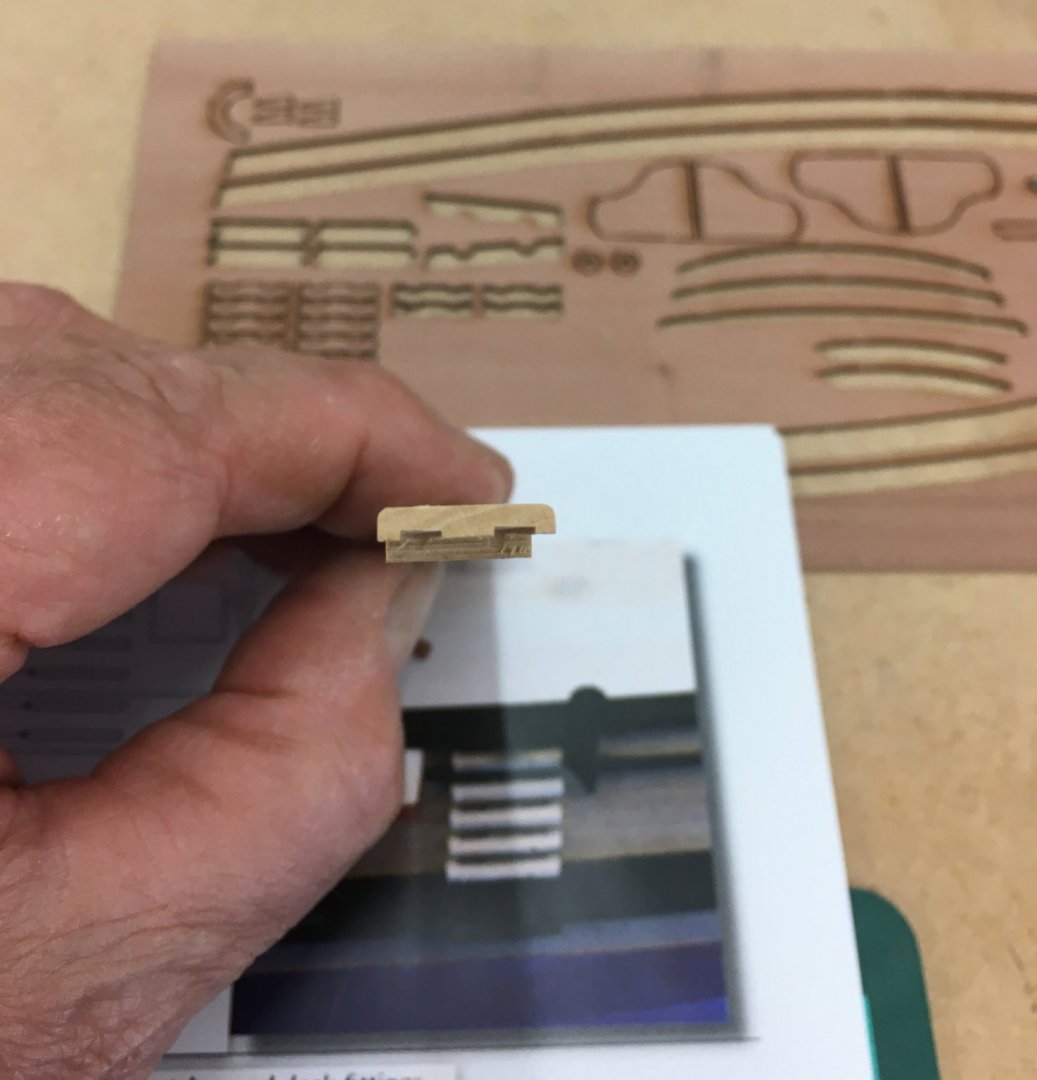
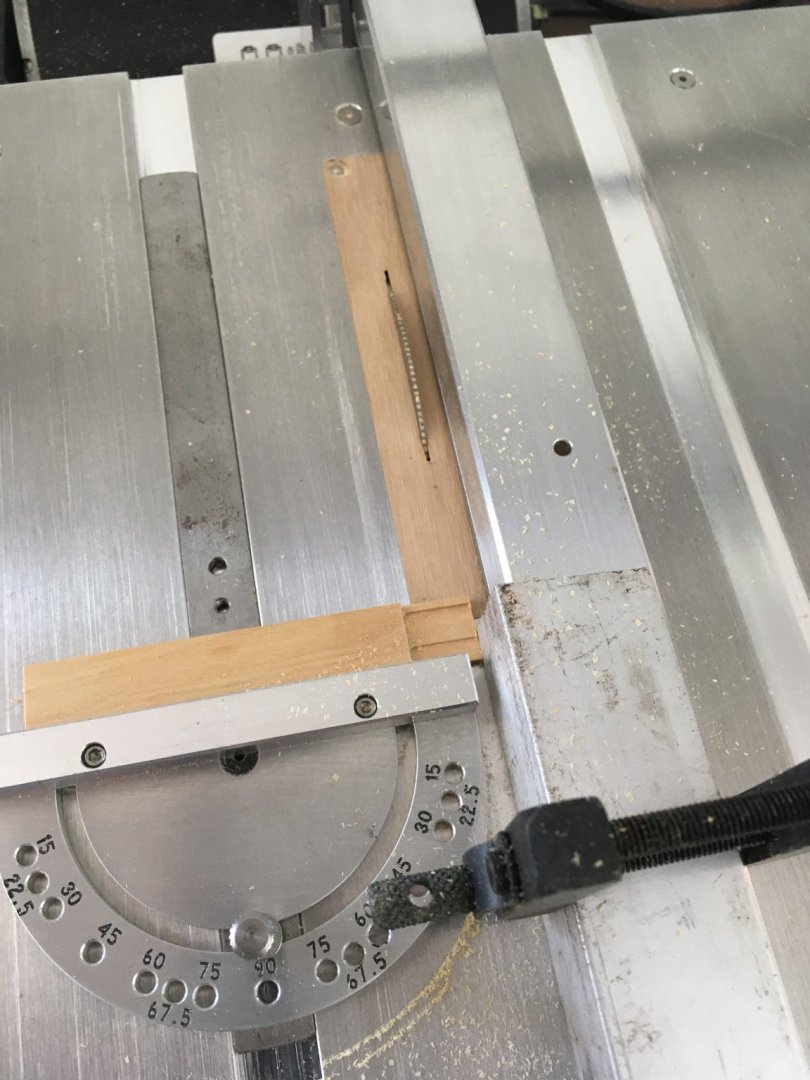
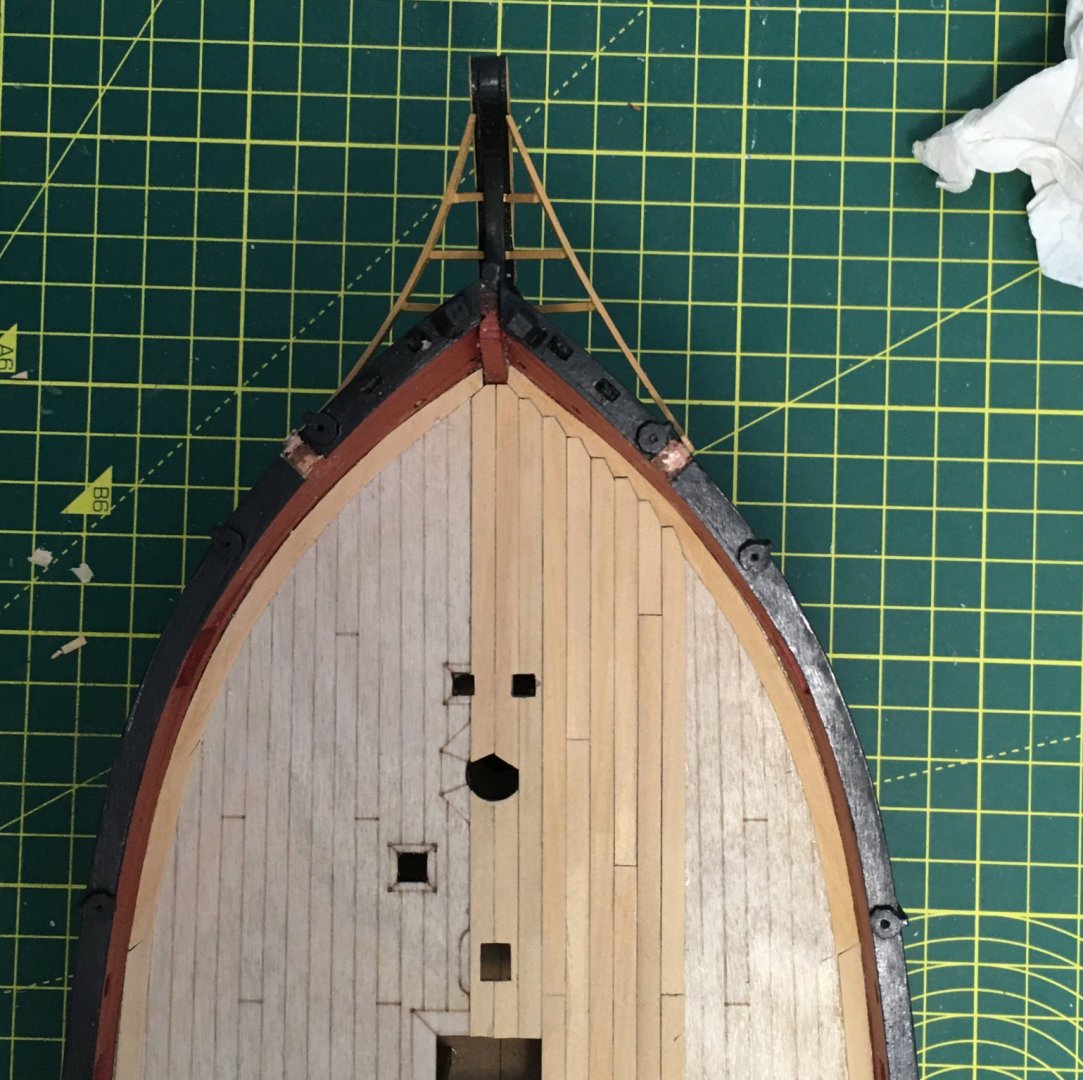
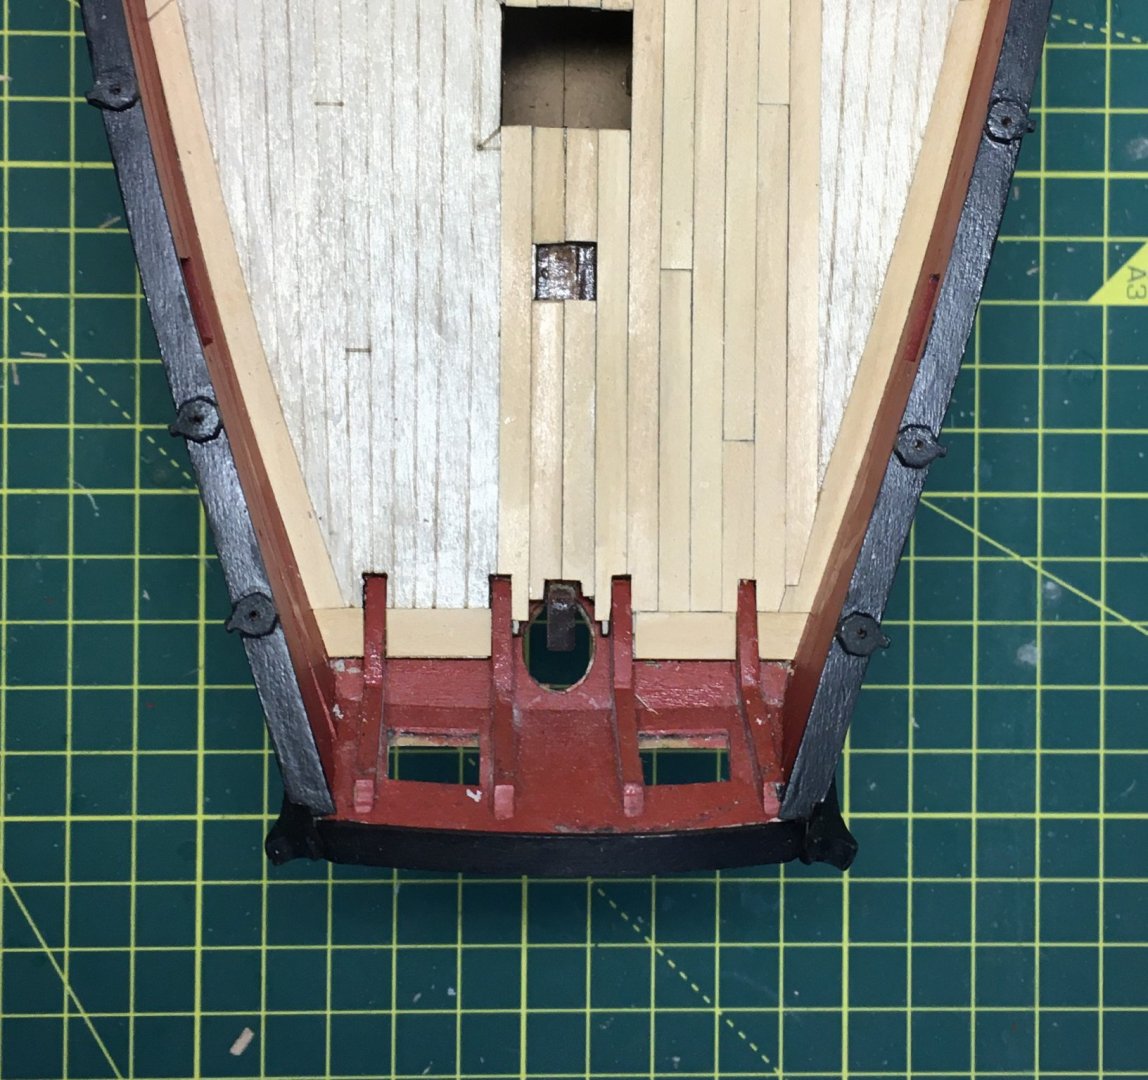
Another little diversion this morning. I was looking to fit the boarding steps that go both sides of the hull. These come as laser-etched components on a 1mm sheet of pearwood. Nothing wrong with them, but as some will be unpainted I'd prefer them to match the boxwood hull. I decided to use the supplied steps in the six positions that will be painted (on the wales and cap rail), but make eight of my own for the bare ones. I used the salami slicing method, which has worked for me in the past for things like gun carriages, and thought others might be interested in the technique. The steps are 12.5mm wide by 2.3 mm deep, so I started by trimming a boxwood offcut to 12.5mm, then reducing part of it to 2.3mm on the bigger of my two mills (technically it's a mini-mill, but it's big enough for me). Next I milled two 3.0 X 0.6mm grooves on my Proxxon micro mill. Incidentally, I sometimes see adverse comments about Proxxon tools on the forum. These usually take the form of "they're too expensive" or more commonly "they're not Bridgeport/Sherline/etc therefore they must be rubbish". All I can say is, look at the superlative quality of the work of people like Marsalv and Blue Ensign who use these tools extensively. Rant over. After rounding off the corners with a file I had the profile I wanted: Well, not quite. I realised after the event that I hadn't mounted the wood in the vice quite square so the grooves are at a slight angle. To be honest it won't show, but it illustrates that all tools are only as good as the numpty using them. Next it was back to the Byrnes saw to do the salami slicing. I set up a stop on the fence so that I could do repeat cuts, and it took less than a minute to do all eight steps. Here they are fitted and painted/shellaced (apologies for the blurry picture): Another method that would have worked equally well (and wasted less wood) is to start with 1mm strips of boxwood, cut eight pieces each 12.5mm X 2.3mm and glue them together into a solid block (like a loaf of bread with PVA between each pair of slices). Make the grooves and round the corners using whatever method suits - for example using a table saw to make the grooves. Then soak the block in denatured alcohol to loosen the glue. I think I first found this method in The Fully Framed Model and used it to make parrels. As I say, this method works fine but I find it messier. Hope you enjoyed the step-by-step guide (groan!). Derek


- 725 replies
-
- 8
-
-
- vanguard models
- speedy
- (and 1 more)
-
Looking fine Ernie. Slow and steady is the way to go. Derek
-
Looks better than my model did at the same stage - should make a very good base for your second planking. Well done. Derek
-
Great job on the winch. Chuck has a real talent for creating designs that turn two dimensional laser cut sheets into realistic 3D models. I was very impressed with the stern lanterns I got for Caroline. Derek
- 778 replies
-
- 4
-
-
- cheerful
- Syren Ship Model Company
- (and 1 more)
-
I can relate to angrifying, Sailor. I often feel angrified. Like all good made up words (including protrusionary) it sounds like it ought to be a proper word. Of course, English lends itself to the making up of words because it is so inconsistent. If you can have an artist, why not a paintist or a sculptist? Or an arter? Or a ship modellist? Perhaps we should start a separate thread on made up words? Derek
- 725 replies
-
- 1
-
-
- vanguard models
- speedy
- (and 1 more)
-
I don't find shellac interferes with glue as much as poly, but I'll still lightly scrape or sand the areas where the deck fittings go. I probably should have glued the deck fittings first, but I was too impatient! Thanks Chris. I still feel slightly guilty that I planked over your superb etched deck, but I hope I've made it clear that's just me adding my own twist to the model and not a reflection on your design. I love that word! I don't know about full-size practice, but I'm going to leave the pumps off the model until near the end. Precisely because they protrusionate so much. 😁 Come off it Glenn! I've seen your finished work and you can still teach me a thing or two. Derek
- 725 replies
-
- 4
-
-
- vanguard models
- speedy
- (and 1 more)
-
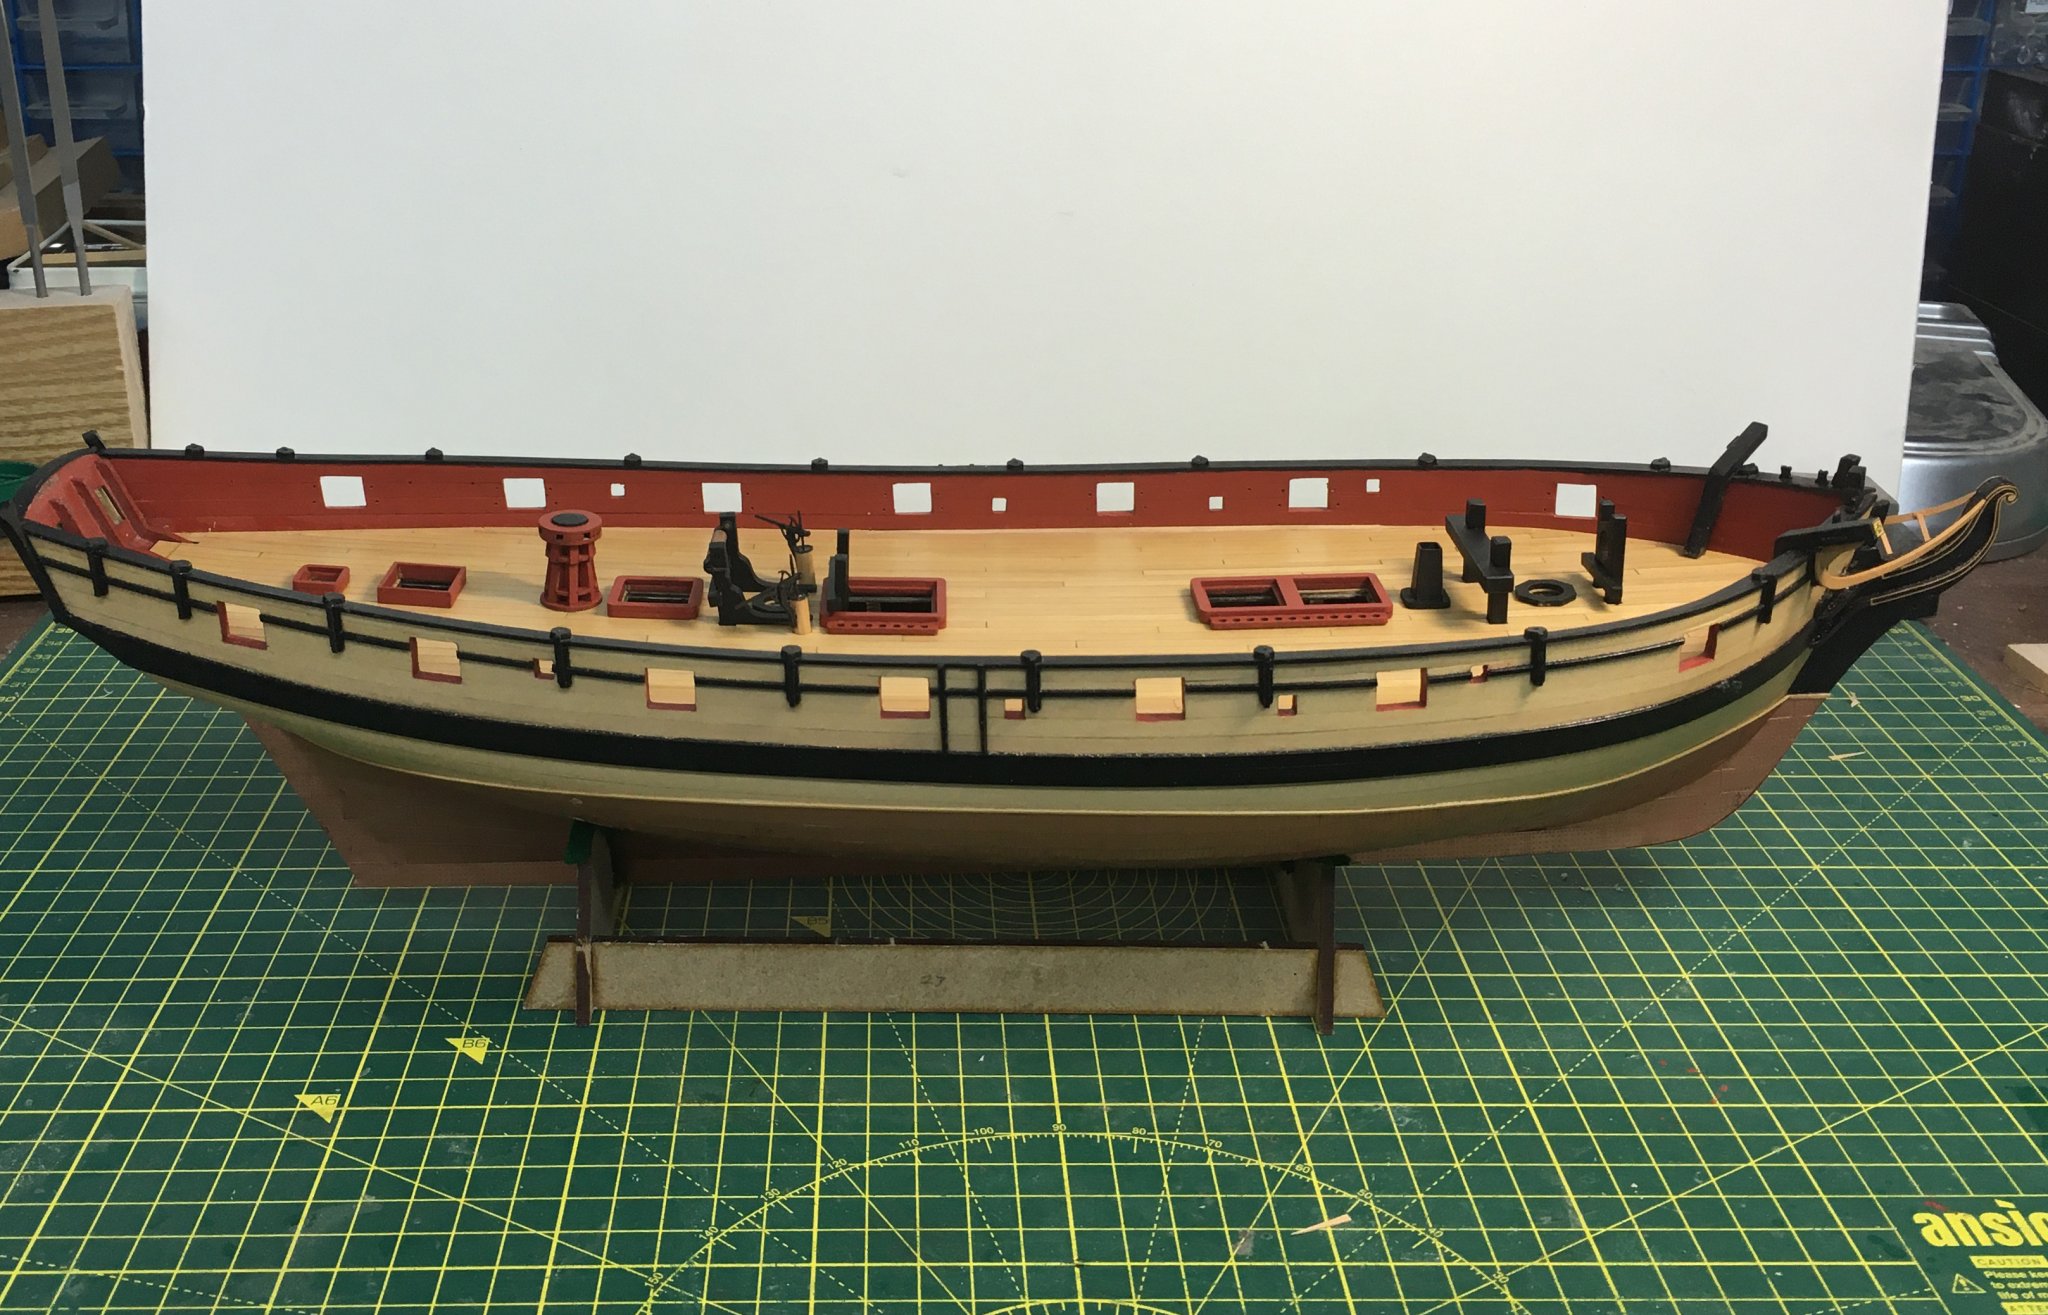
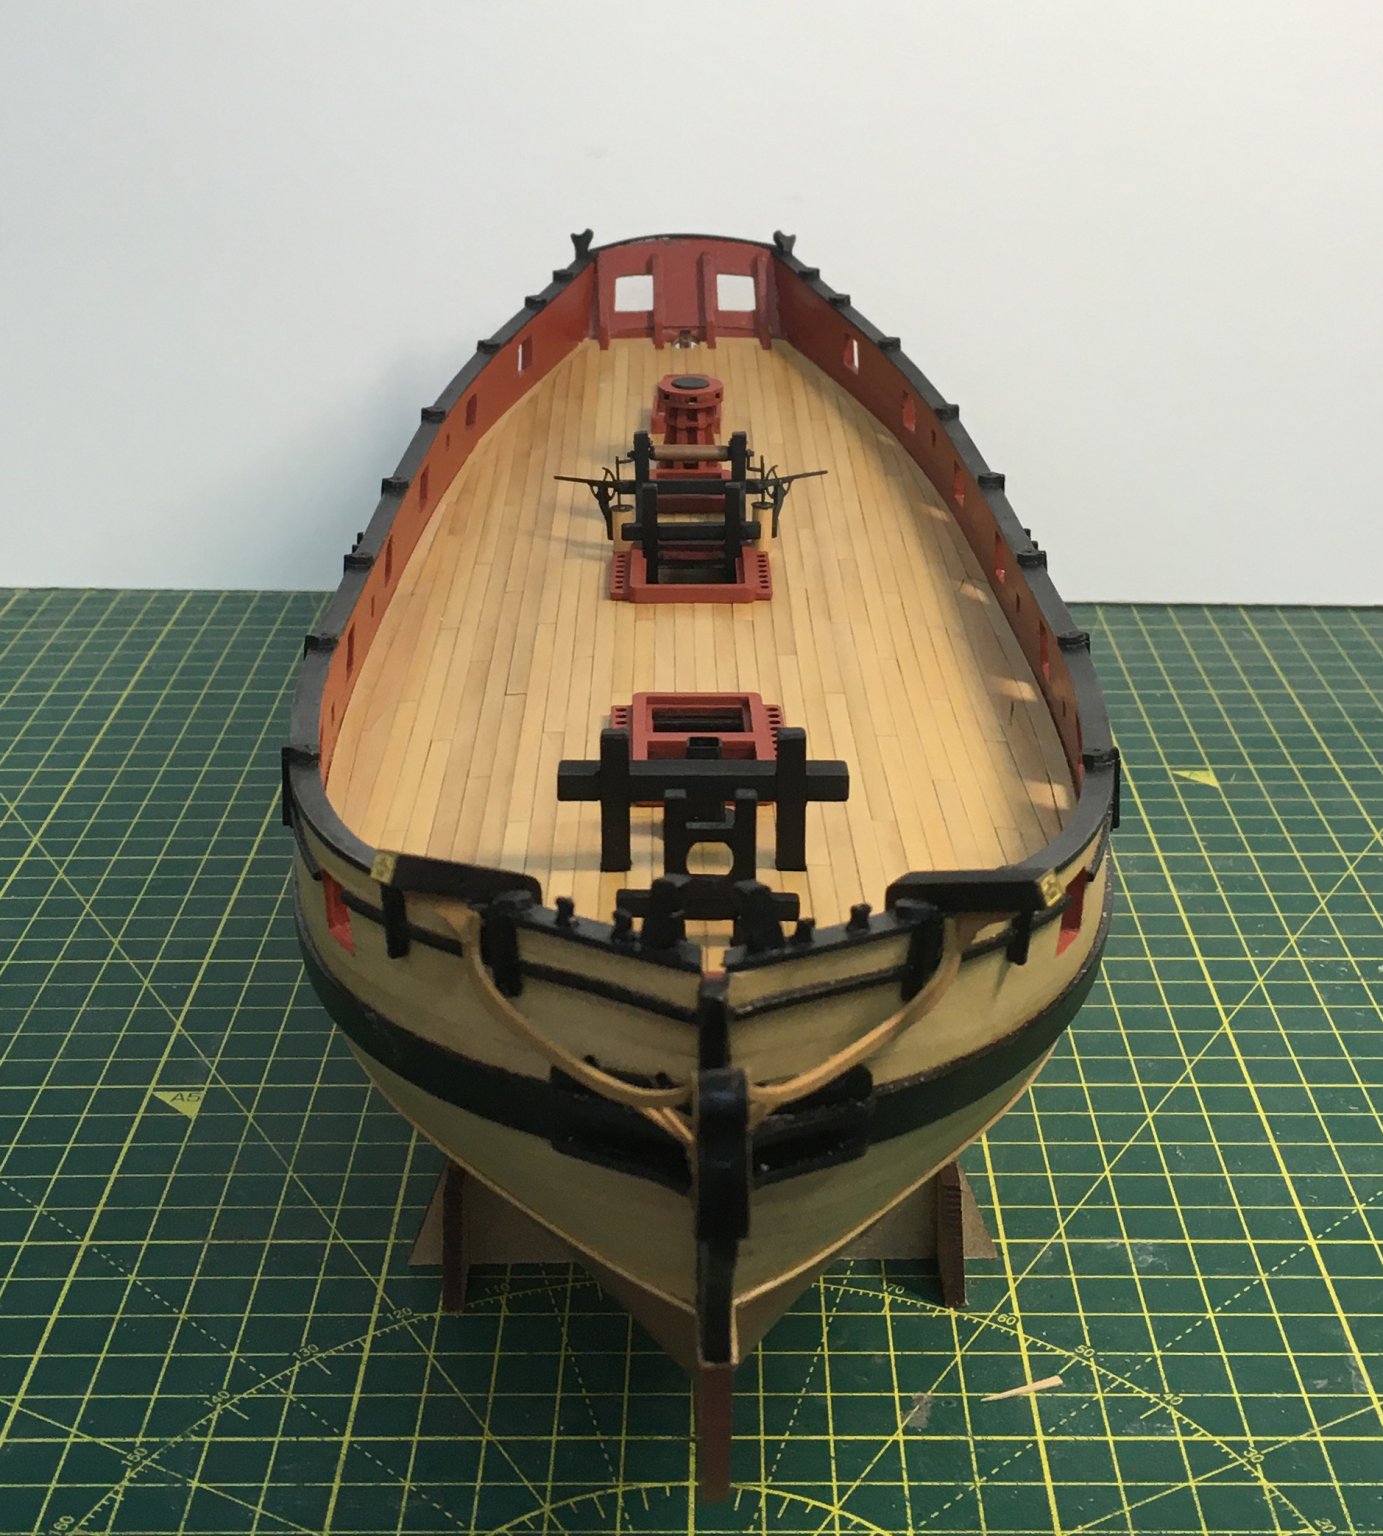
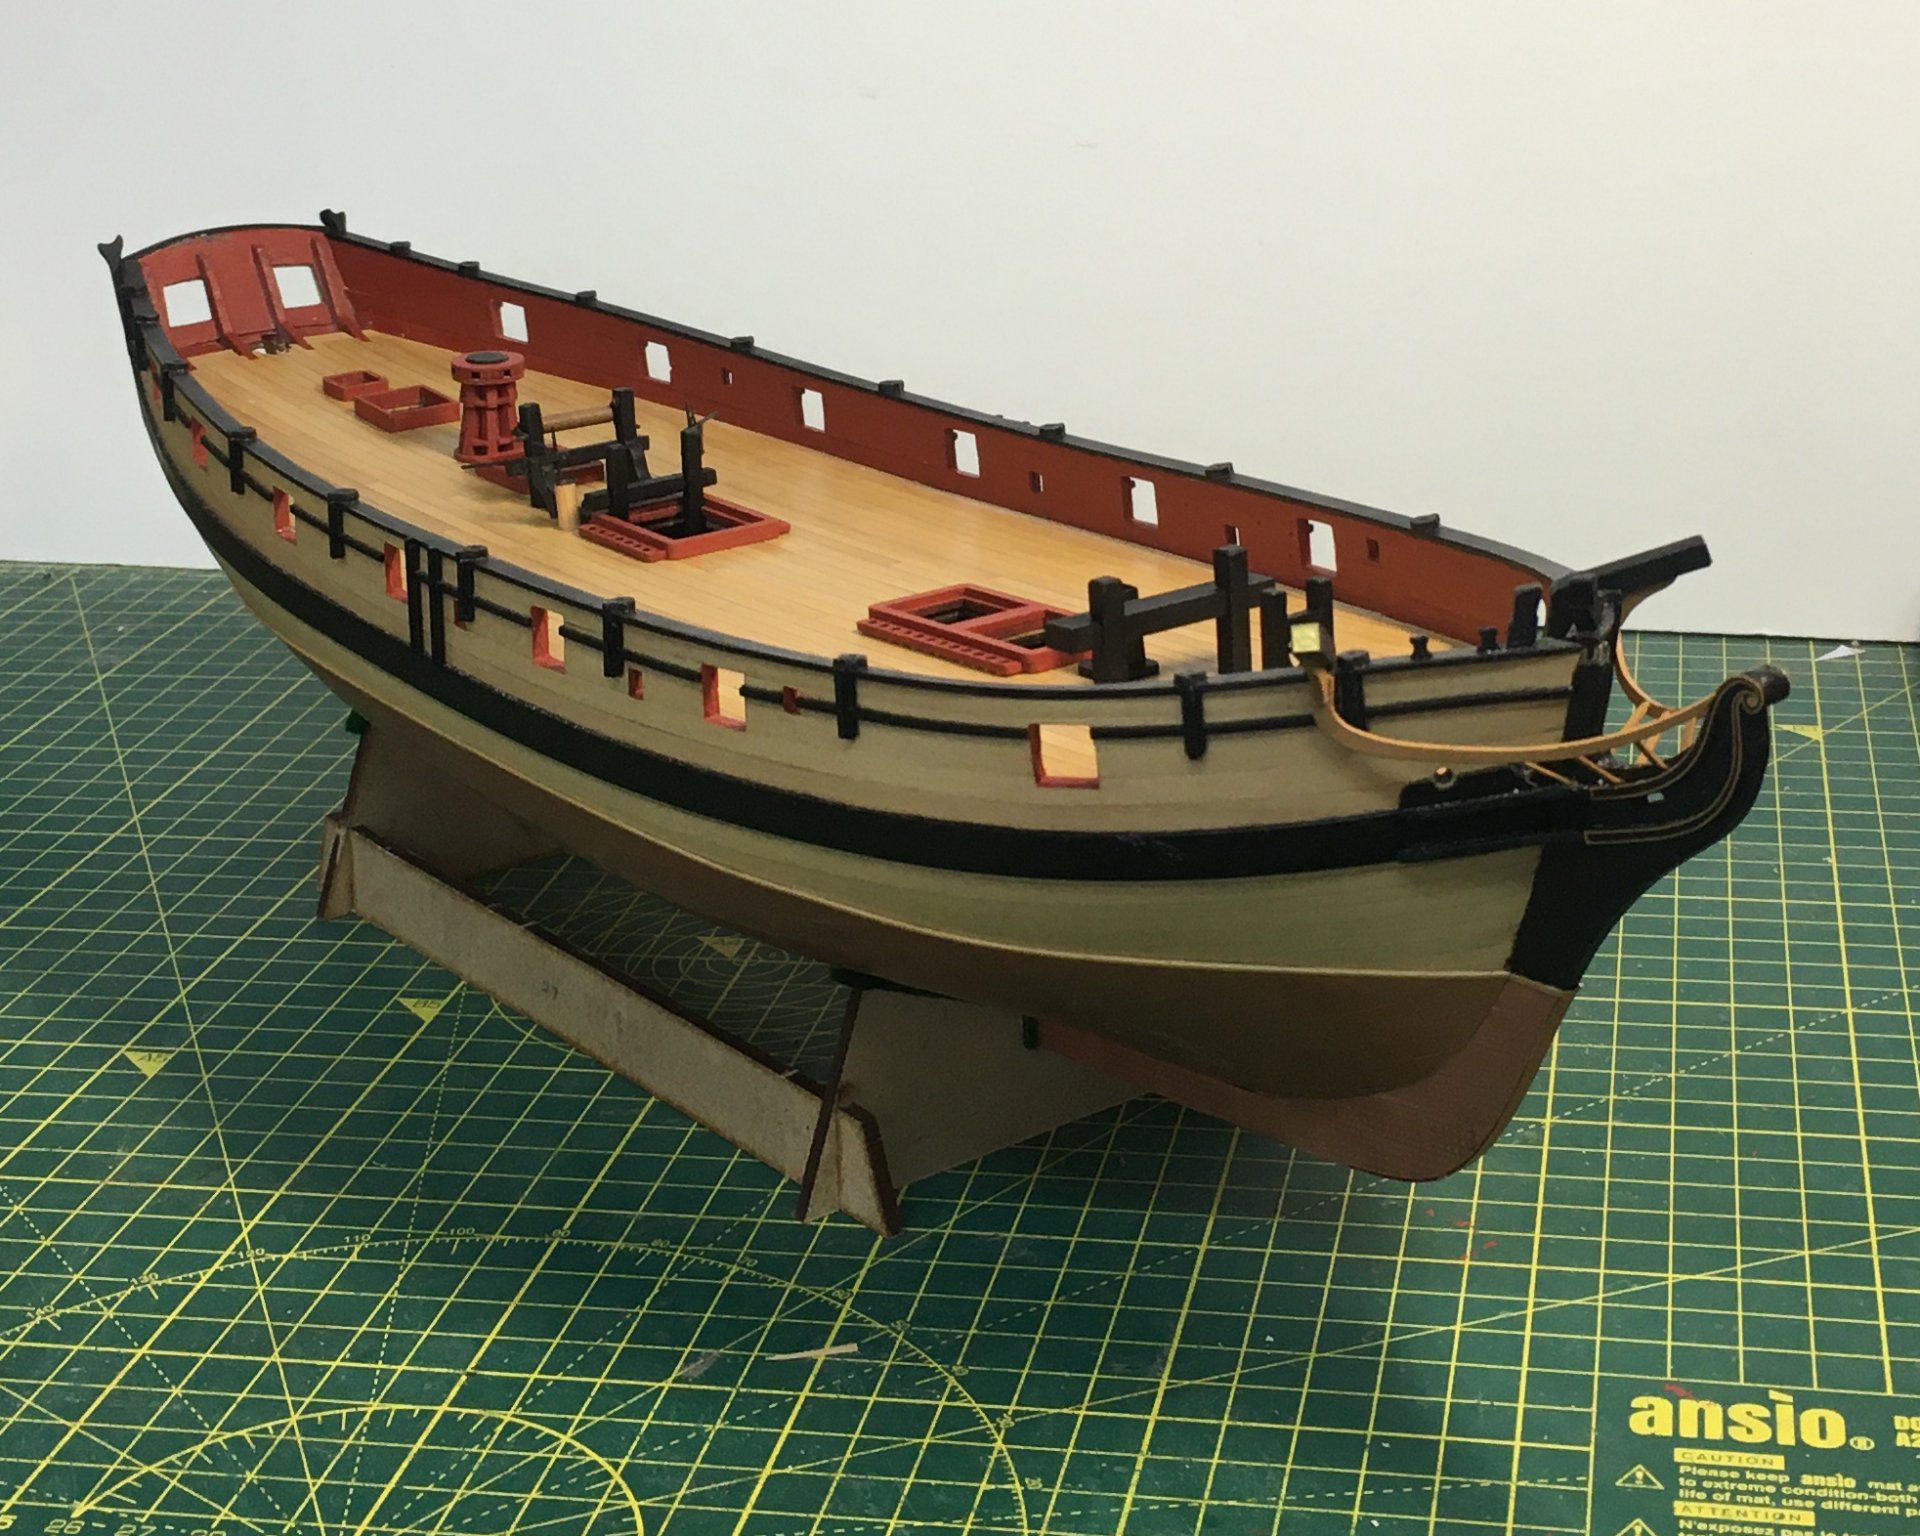
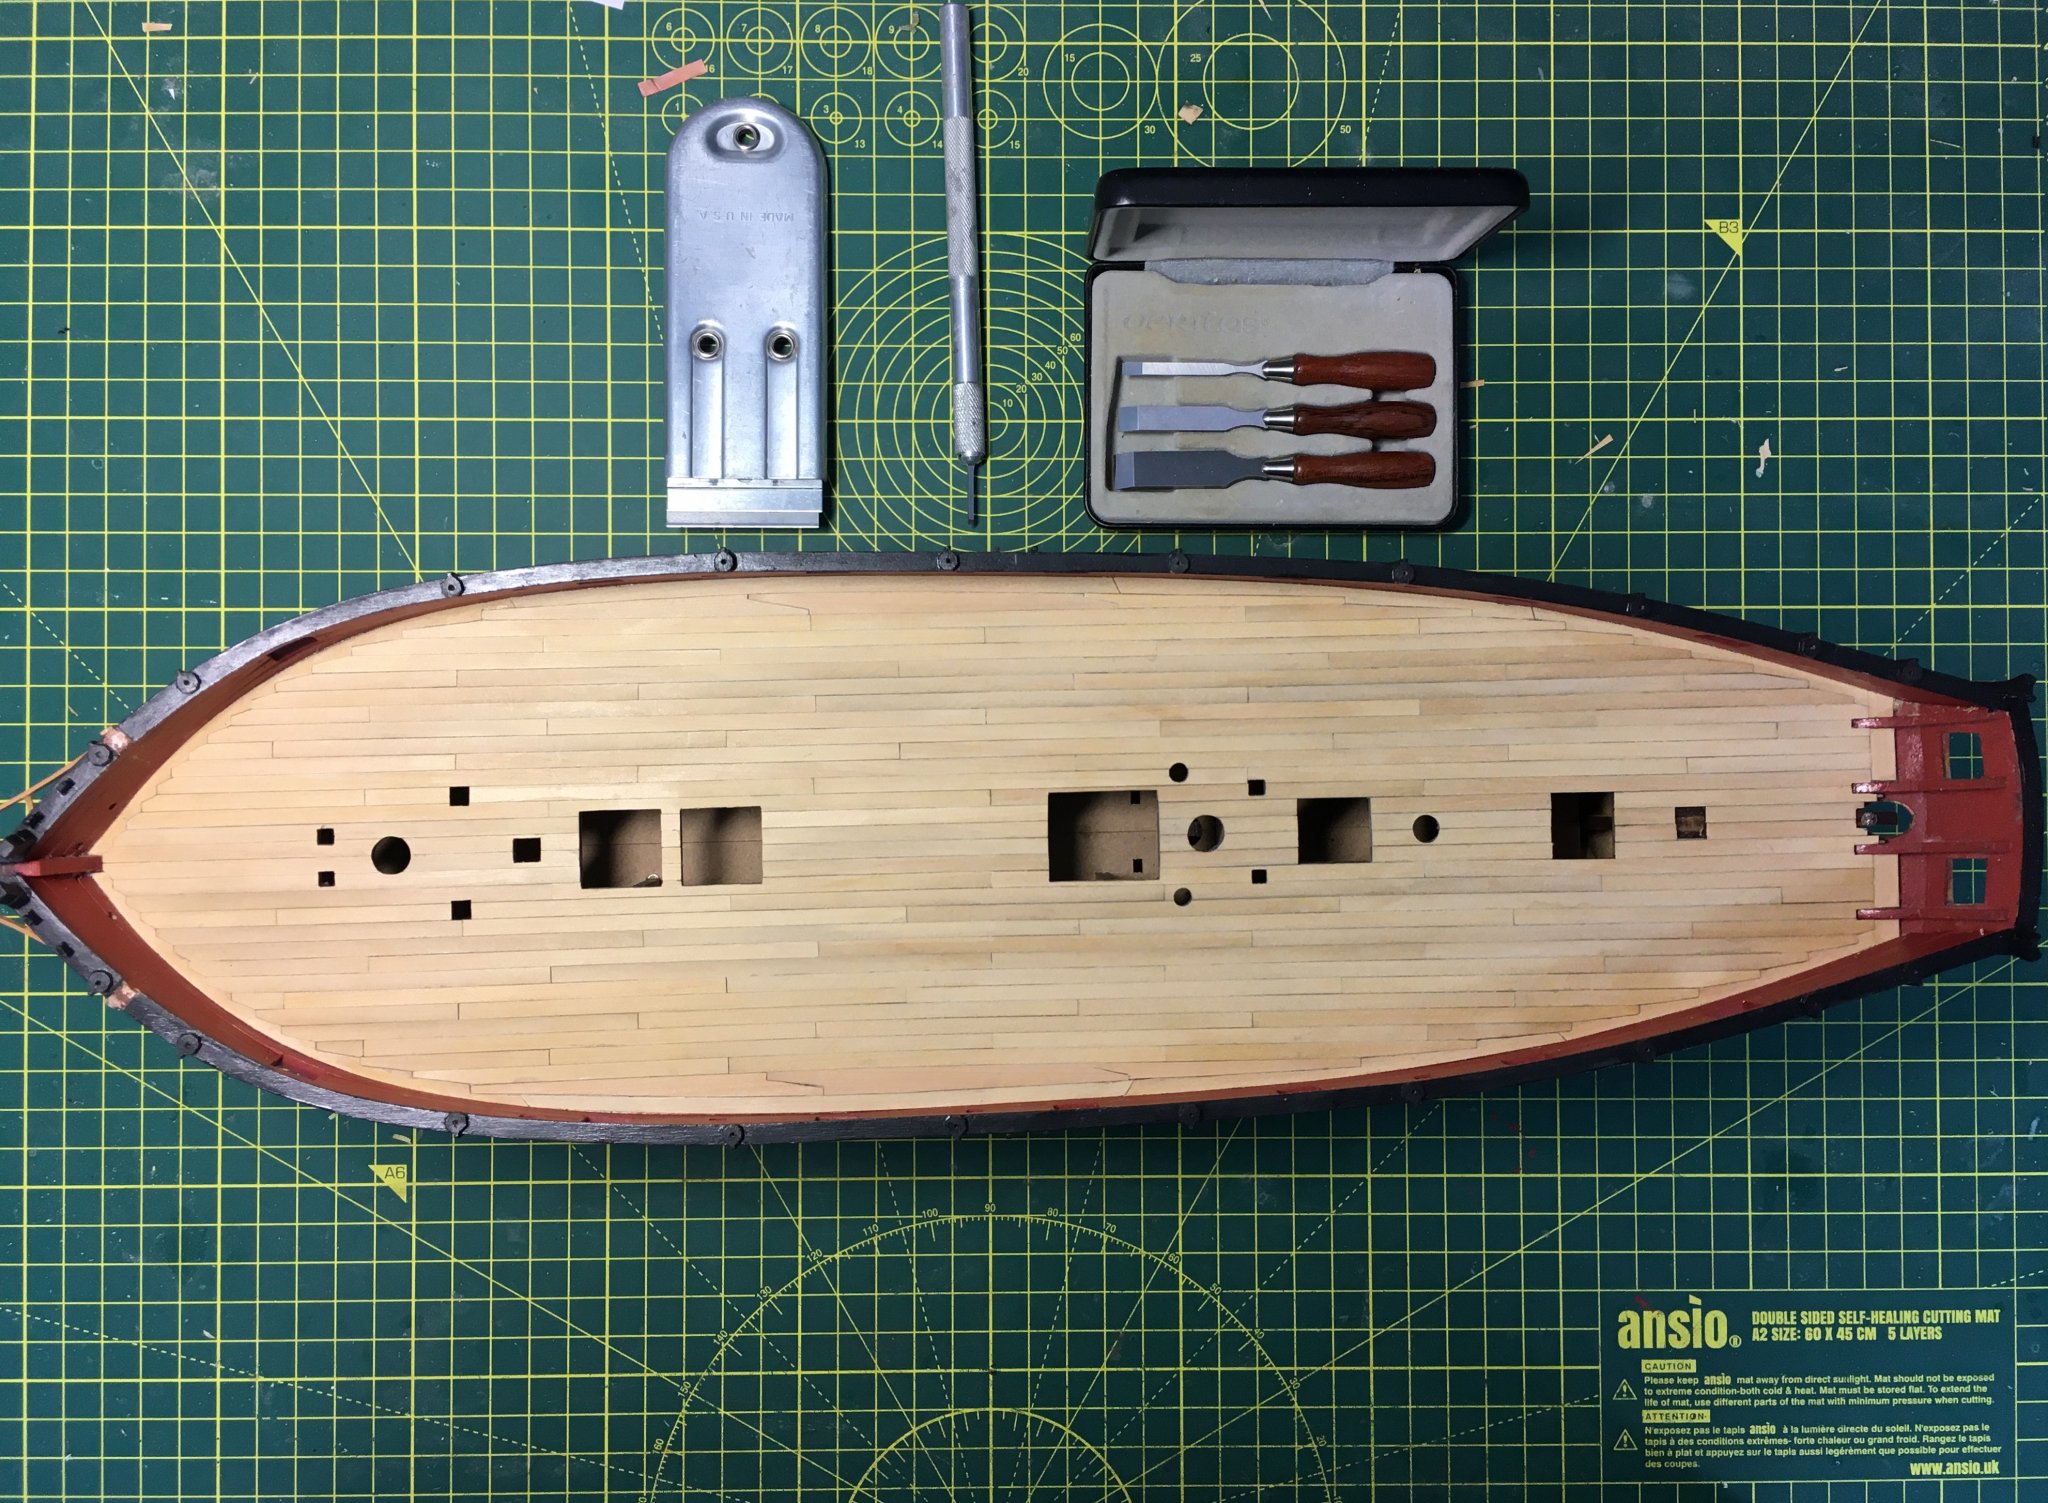
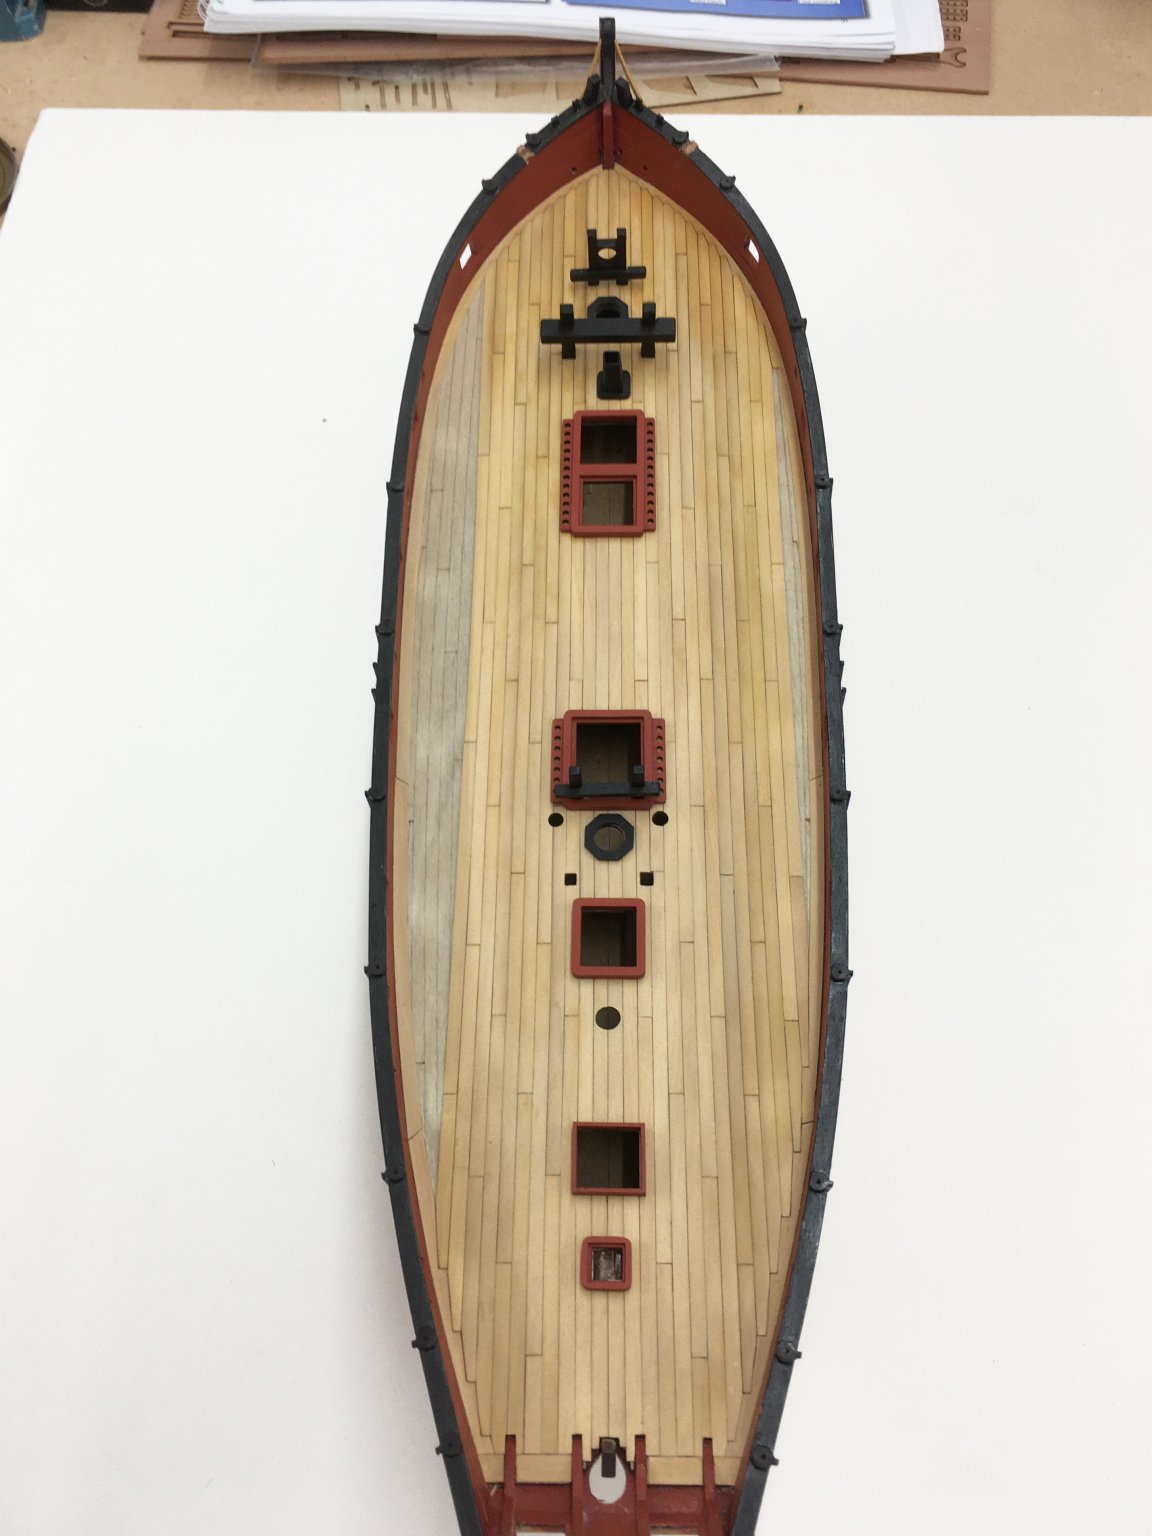
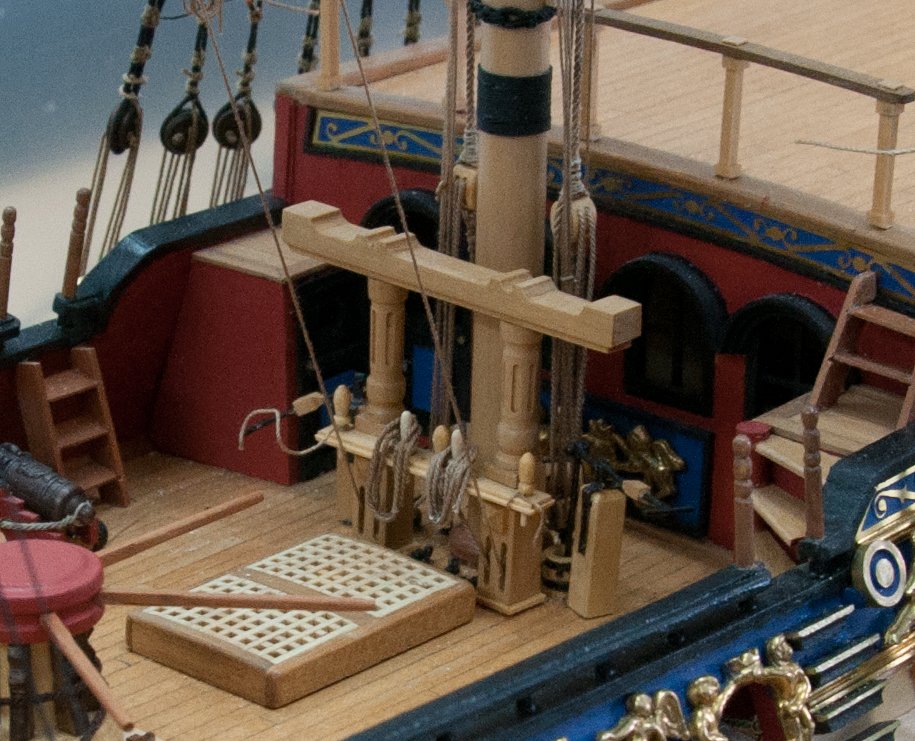
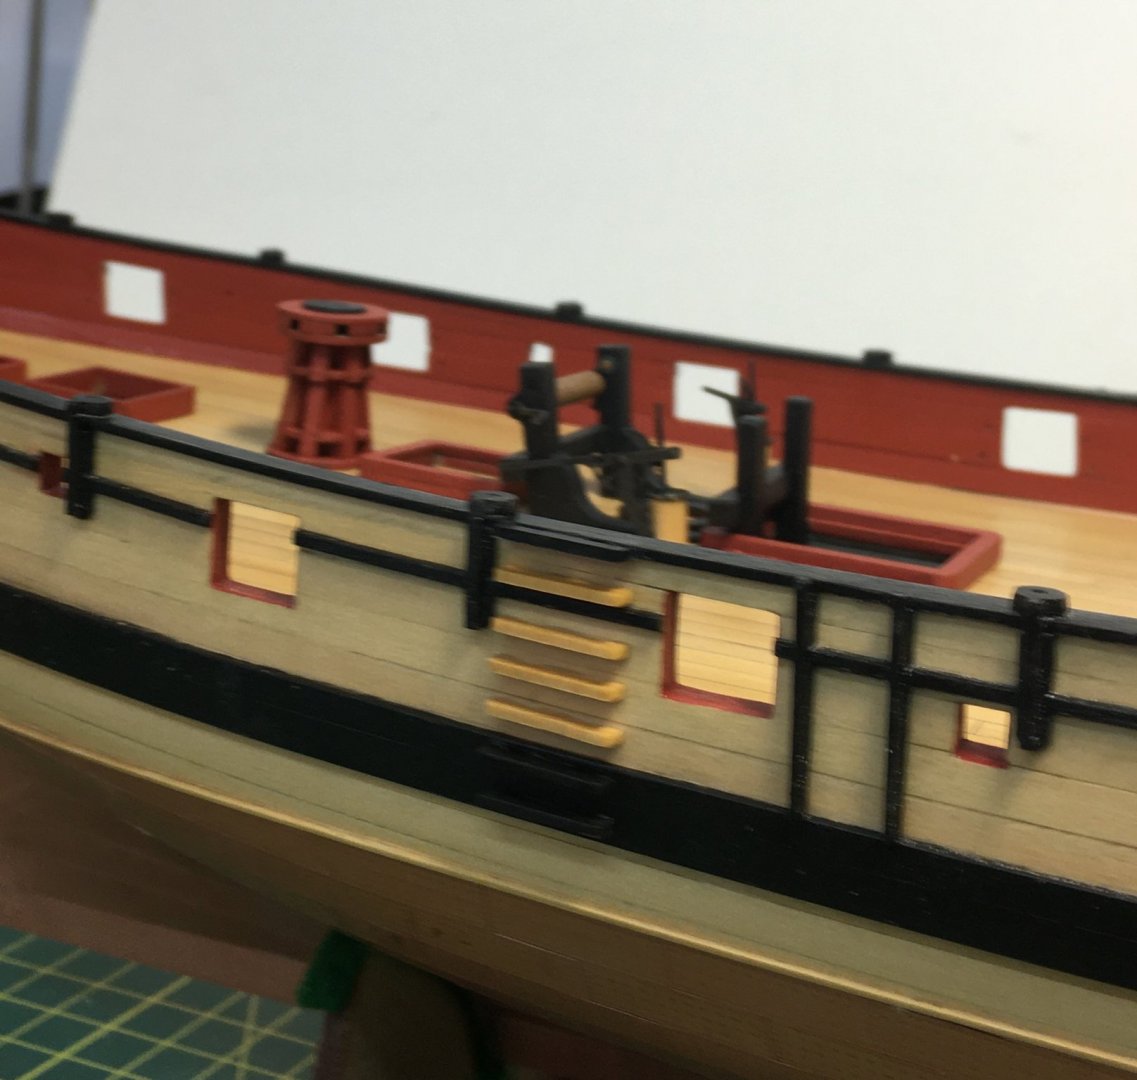
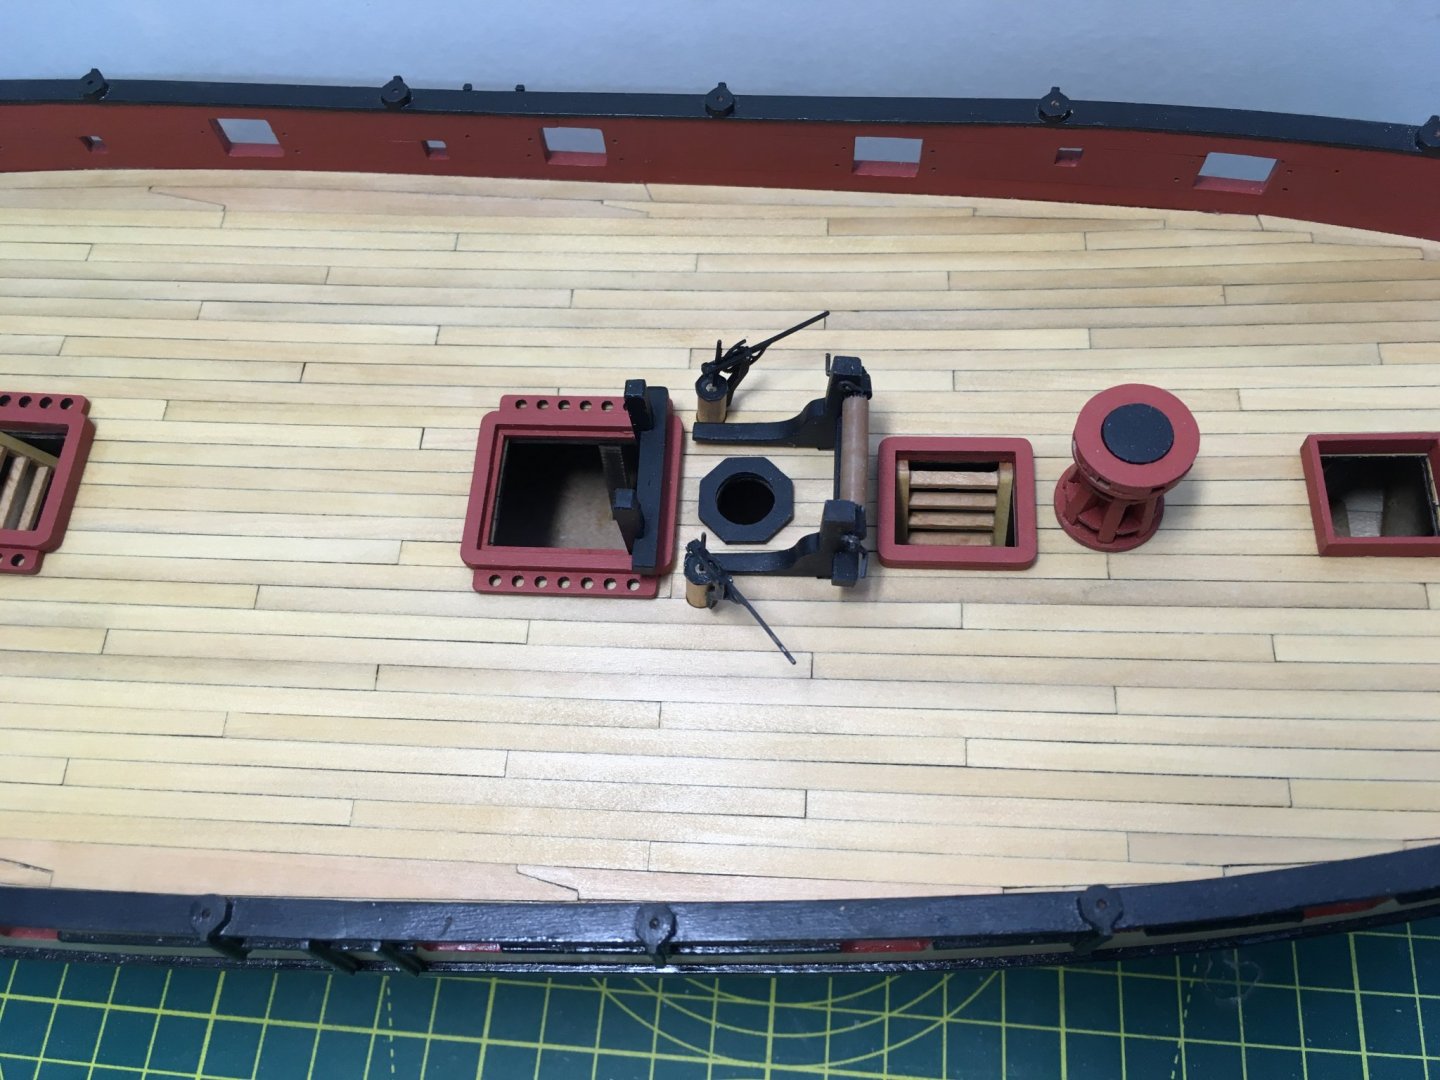
Today scraped the deck and applied one coat of shellac. Then I went for an easy task. Constructing the two ladders was light relief after decking for several days. Although I enjoyed doing it, joggling every strake of planks required a lot of concentration. I couldn't resist dry testing the deck furniture again just for the sheer pleasure of seeing Speedy looking more and more like a ship. I'll probably add some more coats of shellac before finally securing all the deck fittings. A few hull details tomorrow - boarding steps etc. Derek


- 725 replies
-
- 18
-
-

-
- vanguard models
- speedy
- (and 1 more)
-
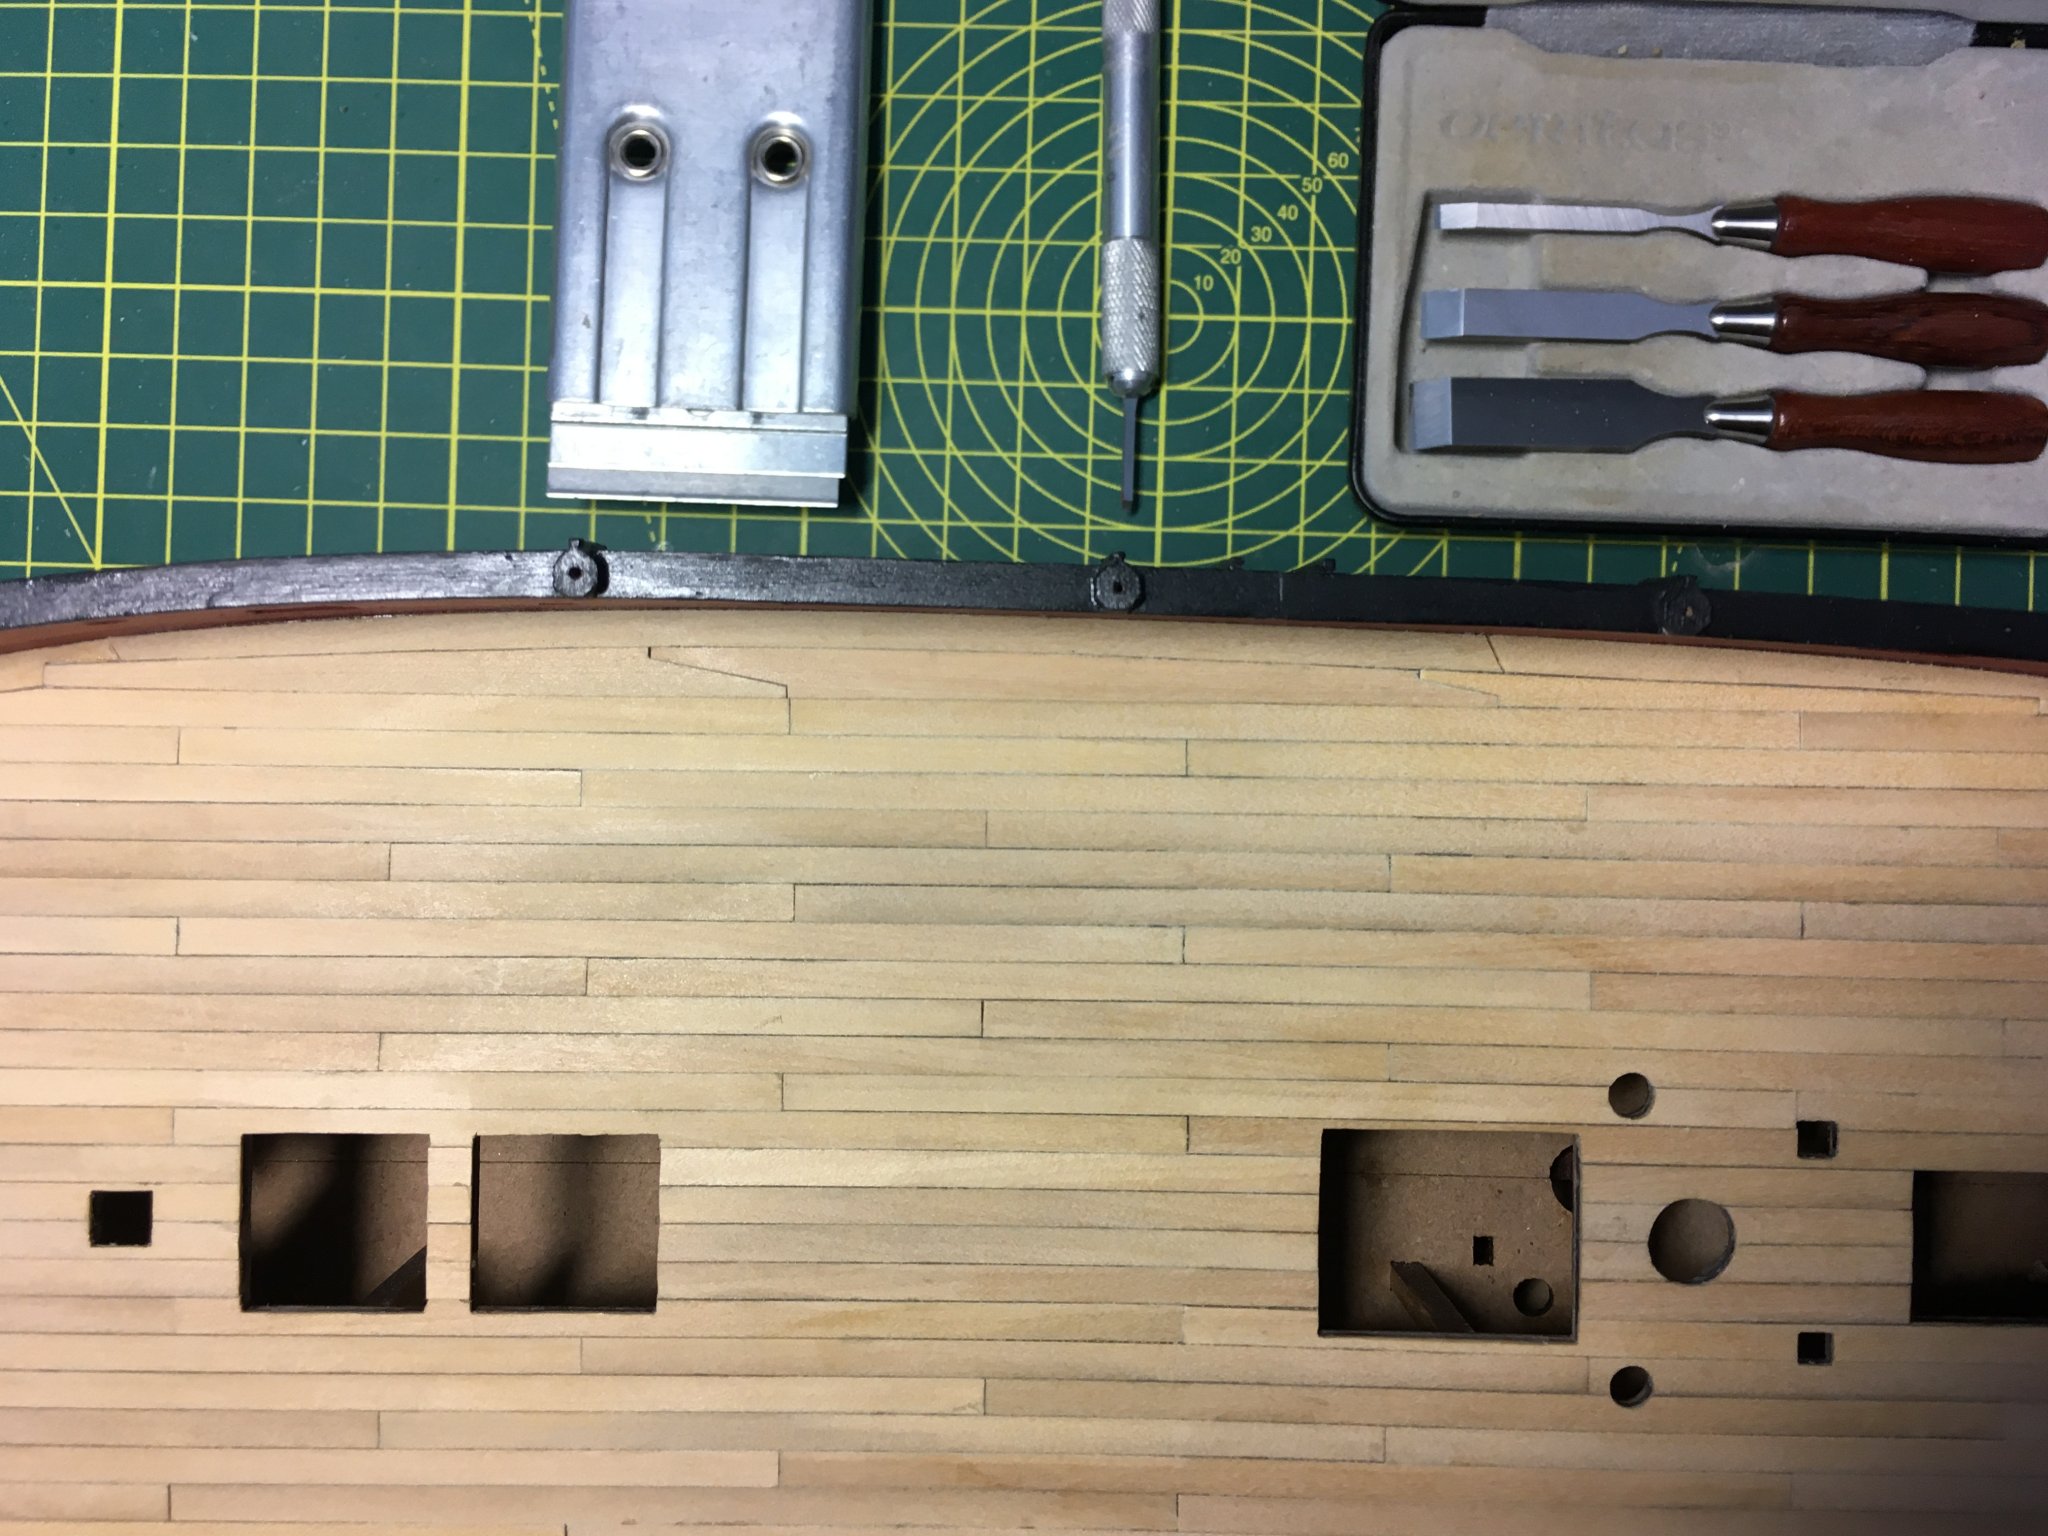
Thanks Glenn I used the miniature chisels for most of the cuts. For longer ones off the model I used the razor blade in the holder. It's marked Made in USA, but I can't remember where I got it. For longer ones on the model (ie on the margin planks, which are glued to the etched deck) I still used the miniature chisels. I cut the deck plank first, laid it on top of the margin plank, scribed round the outside with a fine point, and just carefully worked along the scribed line with the widest chisel. I did the shortest lines with the 1/16" chisel blade. The planks are so thin it was easy to cut though them with light finger pressure on the chisel. Once I'd chiselled round the scribed line I just gently lifted the waste part from the sub-deck with the finest chisel. Hope that makes sense. Derek
- 725 replies
-
- 3
-
-
- vanguard models
- speedy
- (and 1 more)
-
Looking really good Glenn. I’m sure you’re right to fit the gaff and boom first. Derek
-
I find planking is always the scariest part of the model. For me, the game changer has been edge bending as taught by Chuck Passaro. Look under Modelling Techniques on the menu bar. Good luck, and I look forward to your update. Derek
- 725 replies
-
- 3
-
-
- vanguard models
- speedy
- (and 1 more)
-
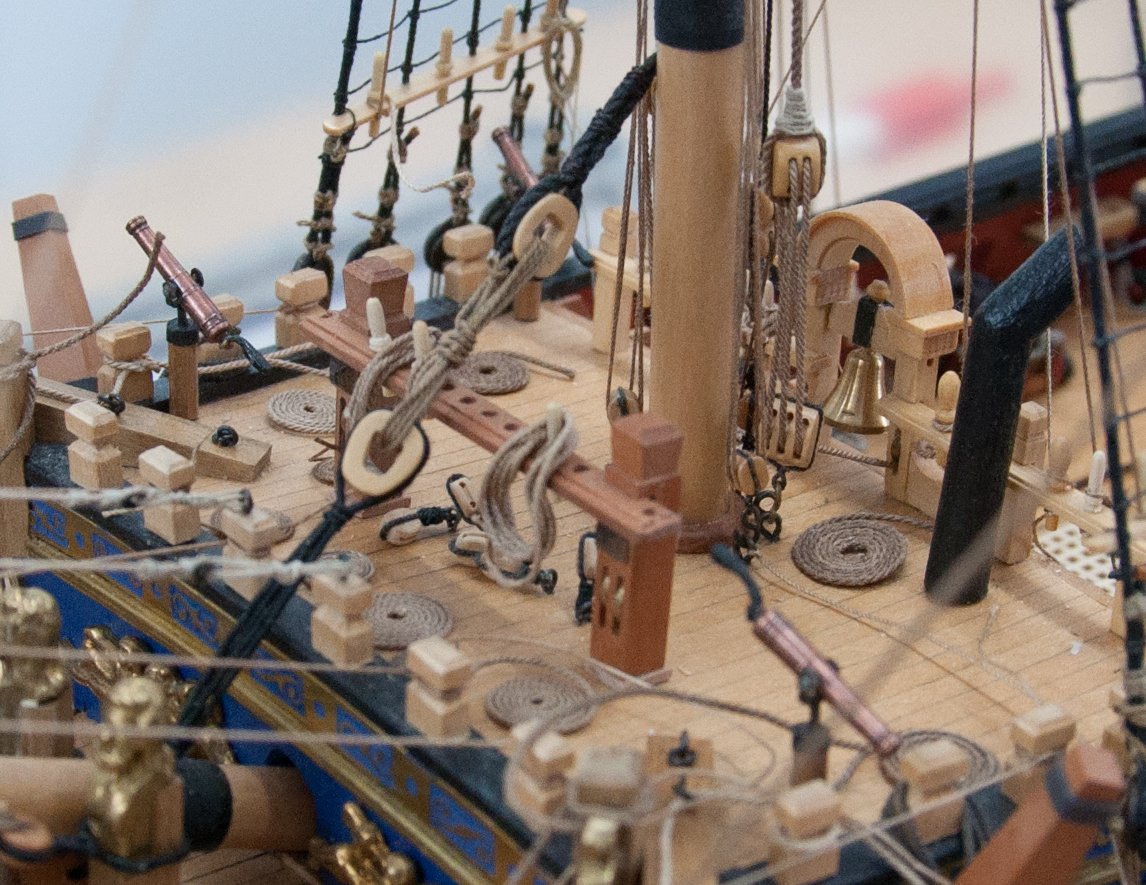
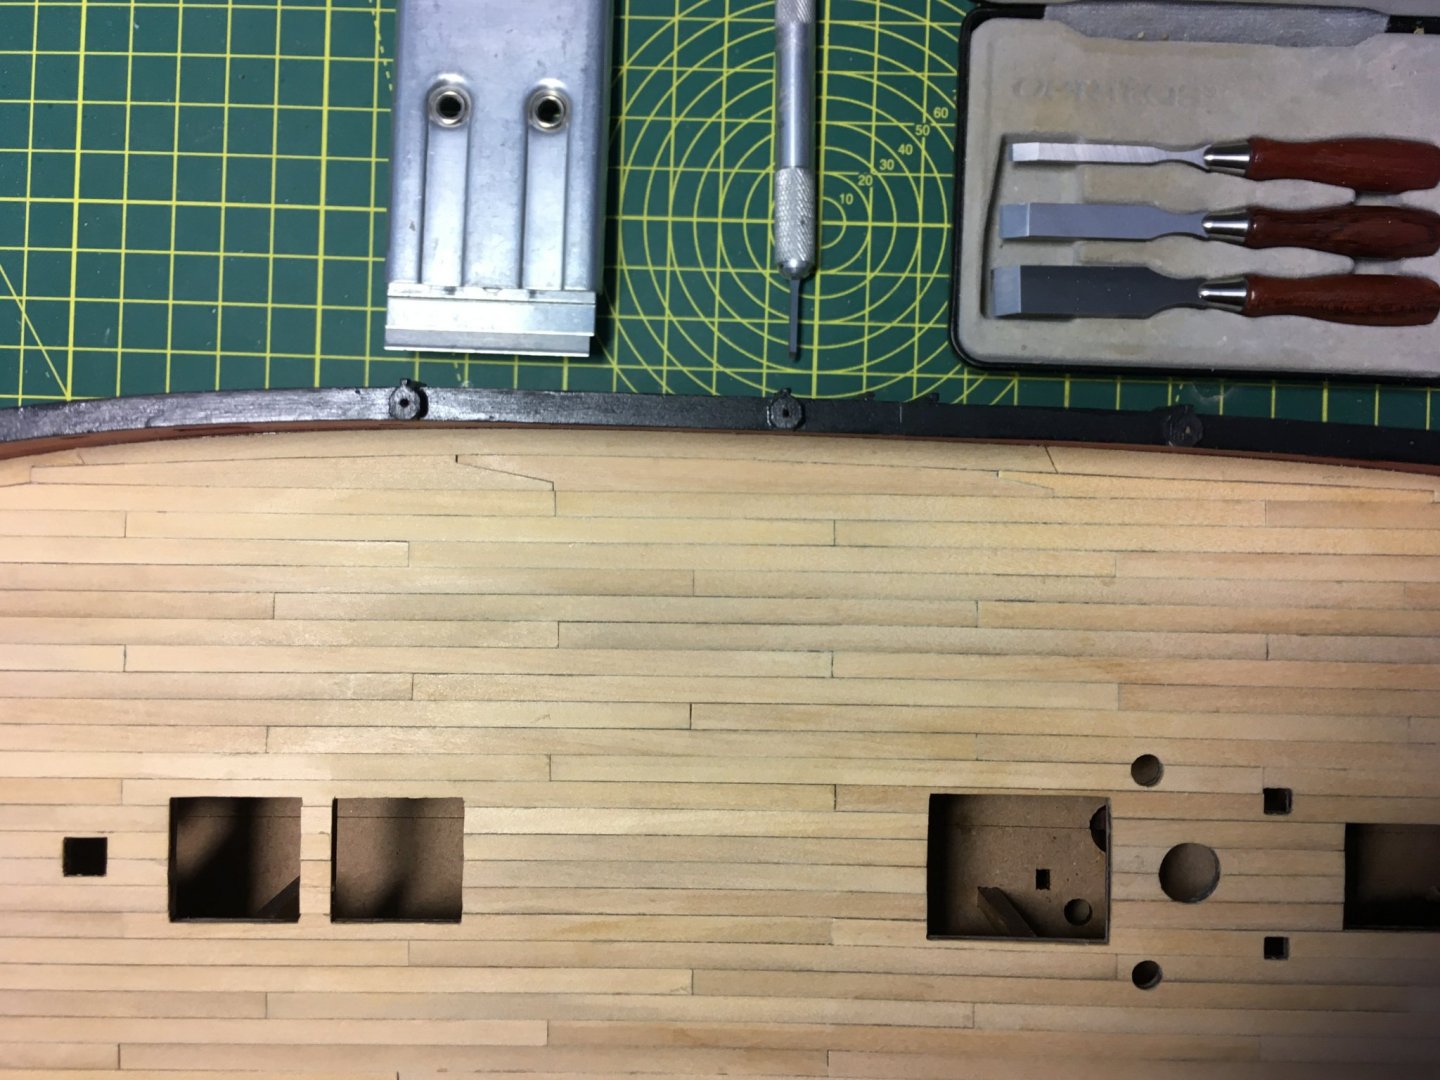
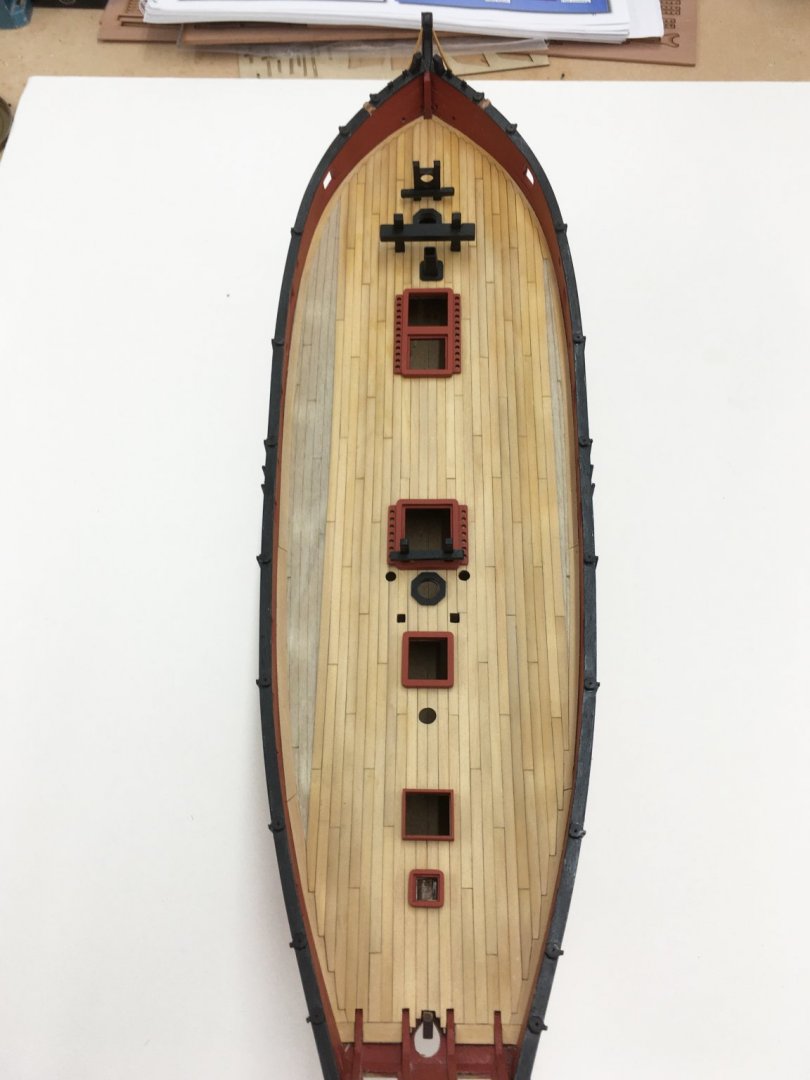
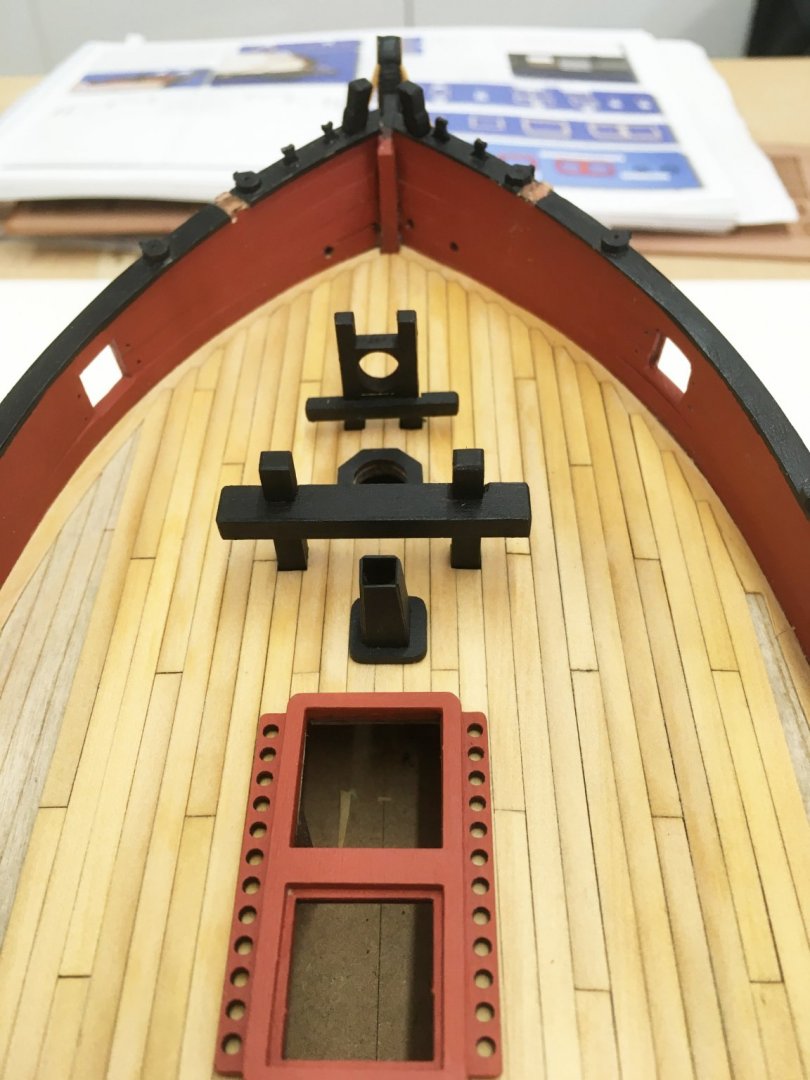
Thanks JpR62, Ernie and Maurice (spotted your name on the marvellous book you produced from your Alert log!), your comments are much appreciated. And thanks for all the likes. I've just finished planking the deck: All done bar scraping and applying a finish. I prefer scraping over sanding as I find it easier to get a more even result. As for finishing, I'll probably go for shellac as it brings out the warmth of the boxwood. In the photo I've included the main tools I used for the joggling. From the right, miniature Veritas chisels, a 1/16" chisel blade from scalpel makers Swann Morton, and a razor blade holder for the longer cuts. The hardest planks to fit were the wider ones next to the margin planks either side. I followed the etched deck in dividing these into three sections with scarph joints: On reflection, I probably should have planned the layout better to avoid the left scarph running into the joint in the next run of planks, but overall I'm pleased with the result. I've said elsewhere, and I'll stress again that my decision to do my own planking is in no way a criticism of the kit. There is nothing 'wrong' with the supplied etched deck; in fact it will be a boon to many, especially relatively inexperienced builders. This won't be the only time I depart from the out-of-the-box model, but in doing so I'll be trying to further enhance the kit, not make up for deficiencies or inaccuracies. I'm convinced that the kit as supplied will produce a superb model. Here's another example of how well the kit is designed and produced. I've taken the deck fittings off the model to finish the planking, and you can see the full extent of the bitts. In other kits I've built the bitts just sit on the upper deck and you usually have to pin them as well as glue them to ensure they are robust enough to withstand rigging under tension. Speedy's bitts on the other hand extend through the upper deck to where lugs on the bottom of each beam locate in holes in the lower deck. When I tried them for fit each set of bitts slotted straight into its location holes in the lower deck - not through any skill on my part but because the kit is made so well everything just fits perfectly. My next debate is whether or not to fit a waterway for historical accuracy and to neaten up the angle between the margin plank and the bulwarks. I'm a glutton for punishment so I probably will. Derek

- 725 replies
-
- 12
-
-
- vanguard models
- speedy
- (and 1 more)
-
Looking really good - smart paint work! I had to look closely at the first picture to see what was bothering you. Noticeable, but only just. However I know what it's like when you've spotted something like that - it niggles you until you do something about it. Unfortunately it looks like it might be the lower yellow rail that is out of line - the gap between the two lower yellow rails is slightly wider on the right than it is on the left. Fix that though, and the gunports might start to look out of whack. I'd be tempted to leave well enough alone. For me it doesn't detract from a fine looking model. Derek
- 436 replies
-
- 5
-
-
- vanguard models
- alert
- (and 1 more)
-
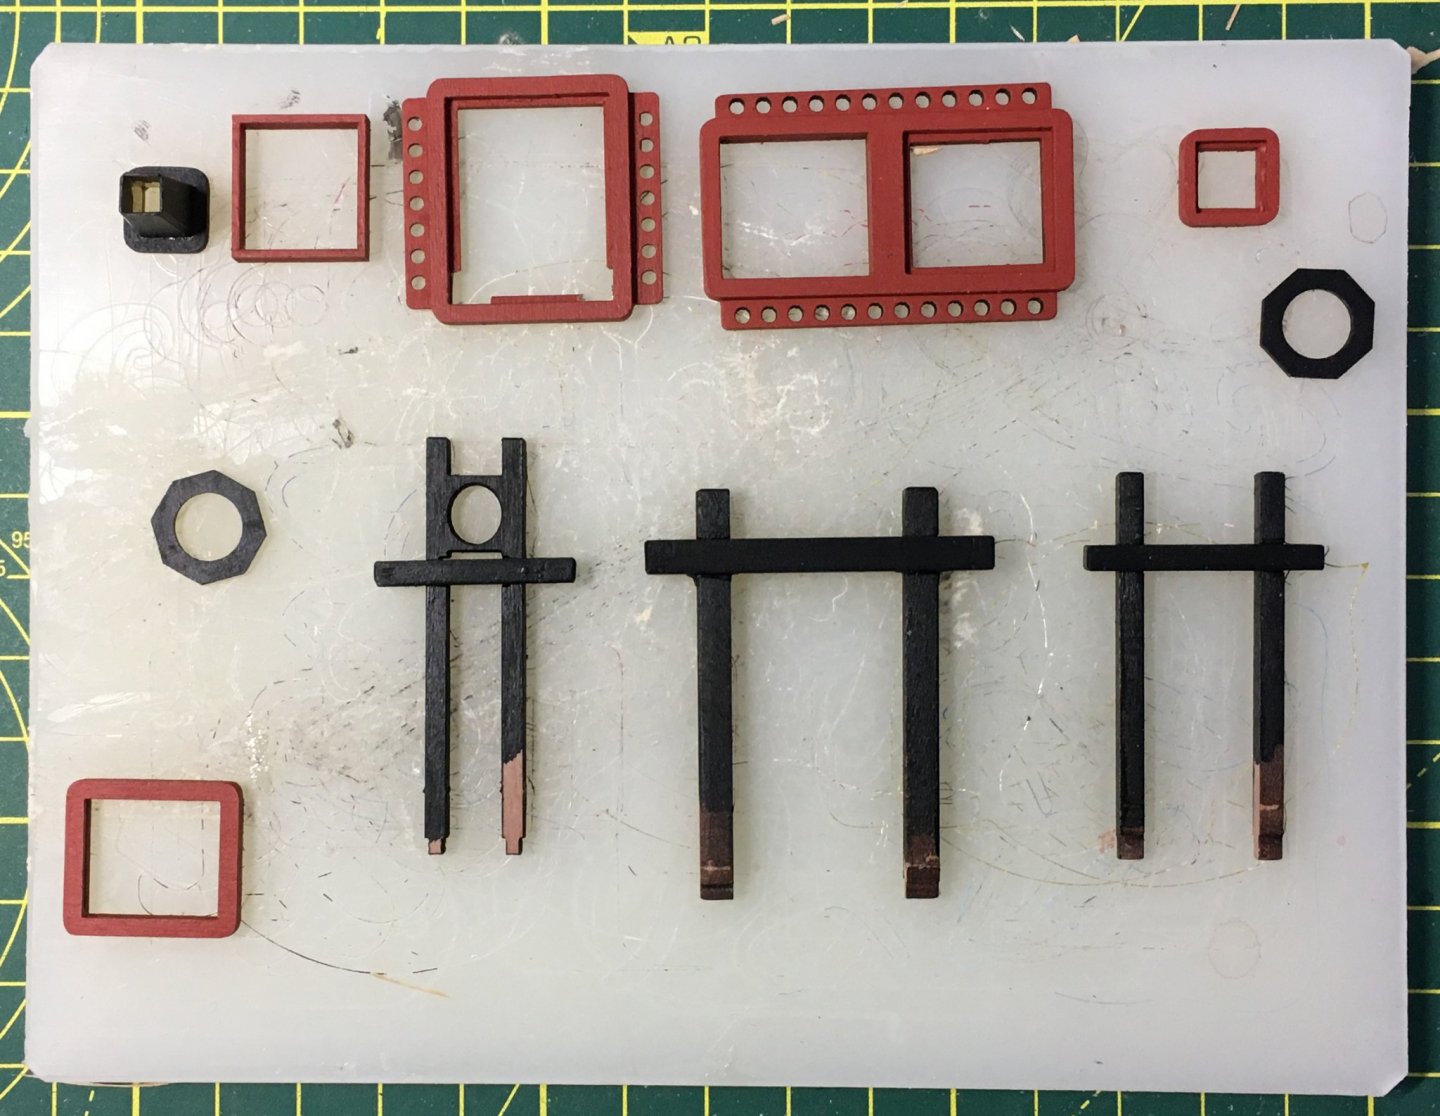
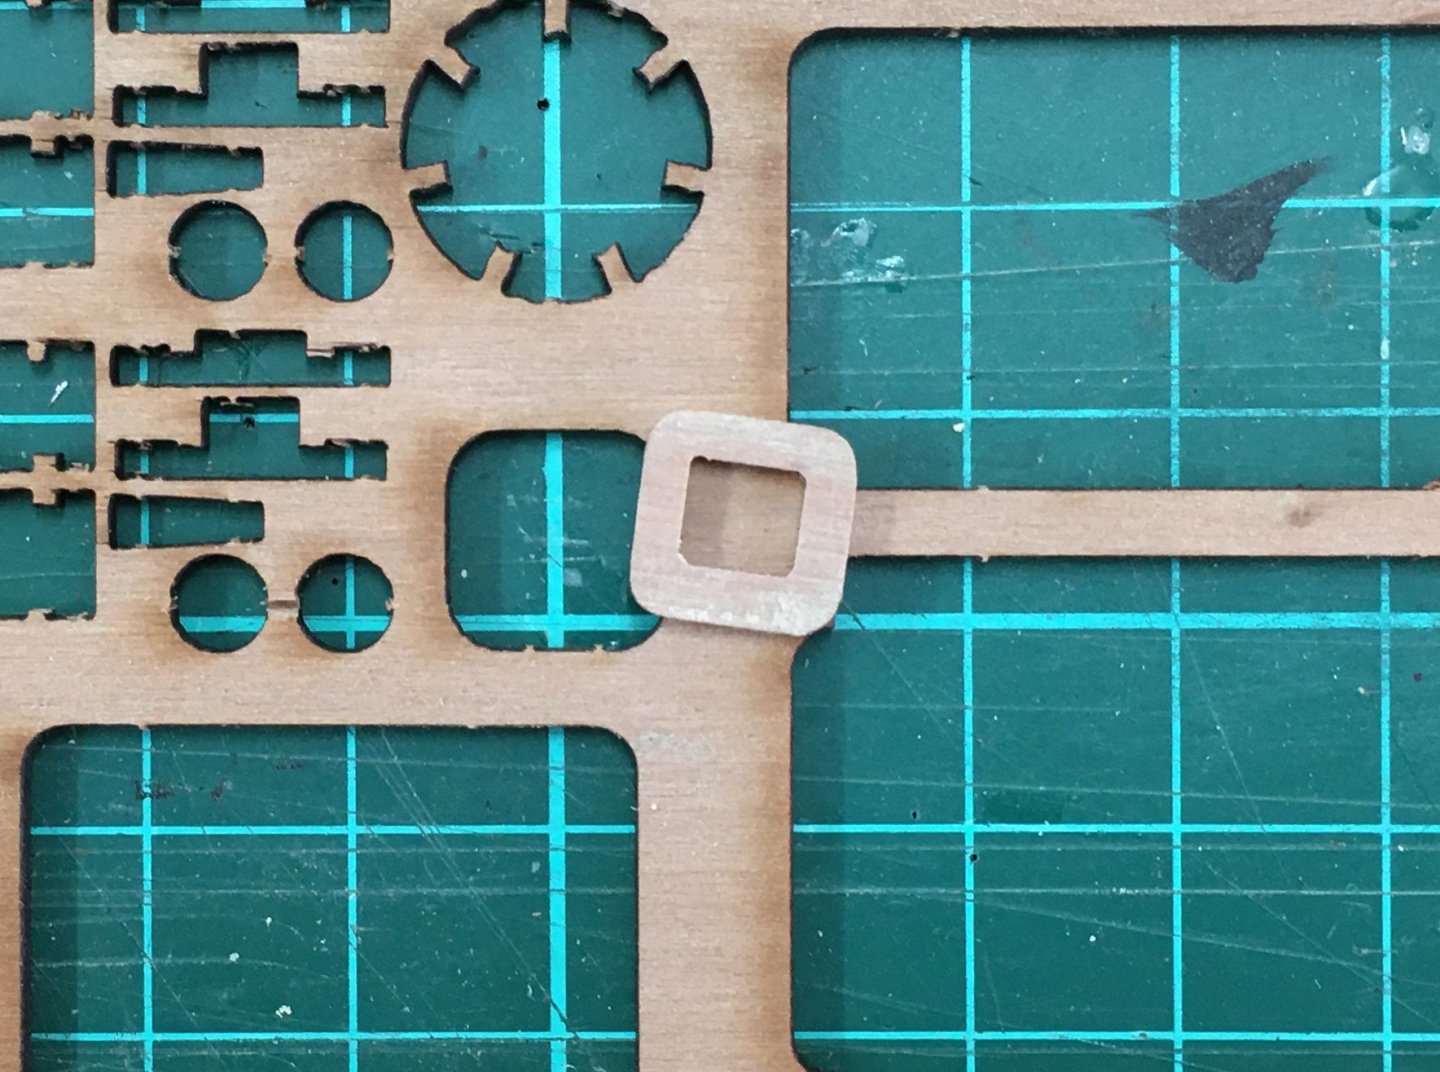
Deck planking proceeds slowly and carefully. To break it up a bit I've started preparing and painting some of the deck furniture: I managed to lose the original flue base. However it was an easy job to knock up a replacement using the hole in the laser sheet as a template: It's worth taking some time preparing the laser-cut wood components - filing/sanding off char and adding little refinements like chamferred edges on the ends of beams. Back to joggling. Cutting the last planks on each side will be an interesting challenge! Derek
- 725 replies
-
- 18
-
-
- vanguard models
- speedy
- (and 1 more)
-
Thanks Bill, much appreciated. Just thought I'd triple check. They do fit, with a minor modification: 🤪 Derek

- 725 replies
-
- 3
-
-
- vanguard models
- speedy
- (and 1 more)
-
Hi Glenn I’ve double checked and I’m ok 👍 That’s great Bill - I’m sure you won’t be disappointed. Vanguard Models is a one-man band, and that man is Chris Watton. Check out his update topic on this forum (I’m on my iPhone so can’t provide the link). It’s great to follow Chris’s updates as he designs and produces new kits, and he’s always open to suggestions for improvements and new models from fellow forum members. Best wishes Derek
- 725 replies
-
- 3
-
-
- vanguard models
- speedy
- (and 1 more)
-
Exactly right - that was my finding with the Speedy deck, which is why I eventually decided to plank over it. I thought long and hard about it though, not least because I don't want any newcomers to the forum or less experienced modellers to be put off Vanguard kits. Chris has done a superb job designing and producing these models and I would hate anyone to get the impression that there is anything 'wrong' with the etched decks or any of the other components. Built straight out of the box any Vanguard kit will deliver a superb model. It's just that serial kit bashers will always look for ways to make their own mark on a kit. I've bashed models in the past to make up for deficiencies in design and materials. Not so with Speedy - in a minor way I'm modifying the kit to further enhance the model, not correct it. Derek
- 195 replies
-
- 5
-
-
- lady eleanor
- vanguard models
- (and 1 more)
-
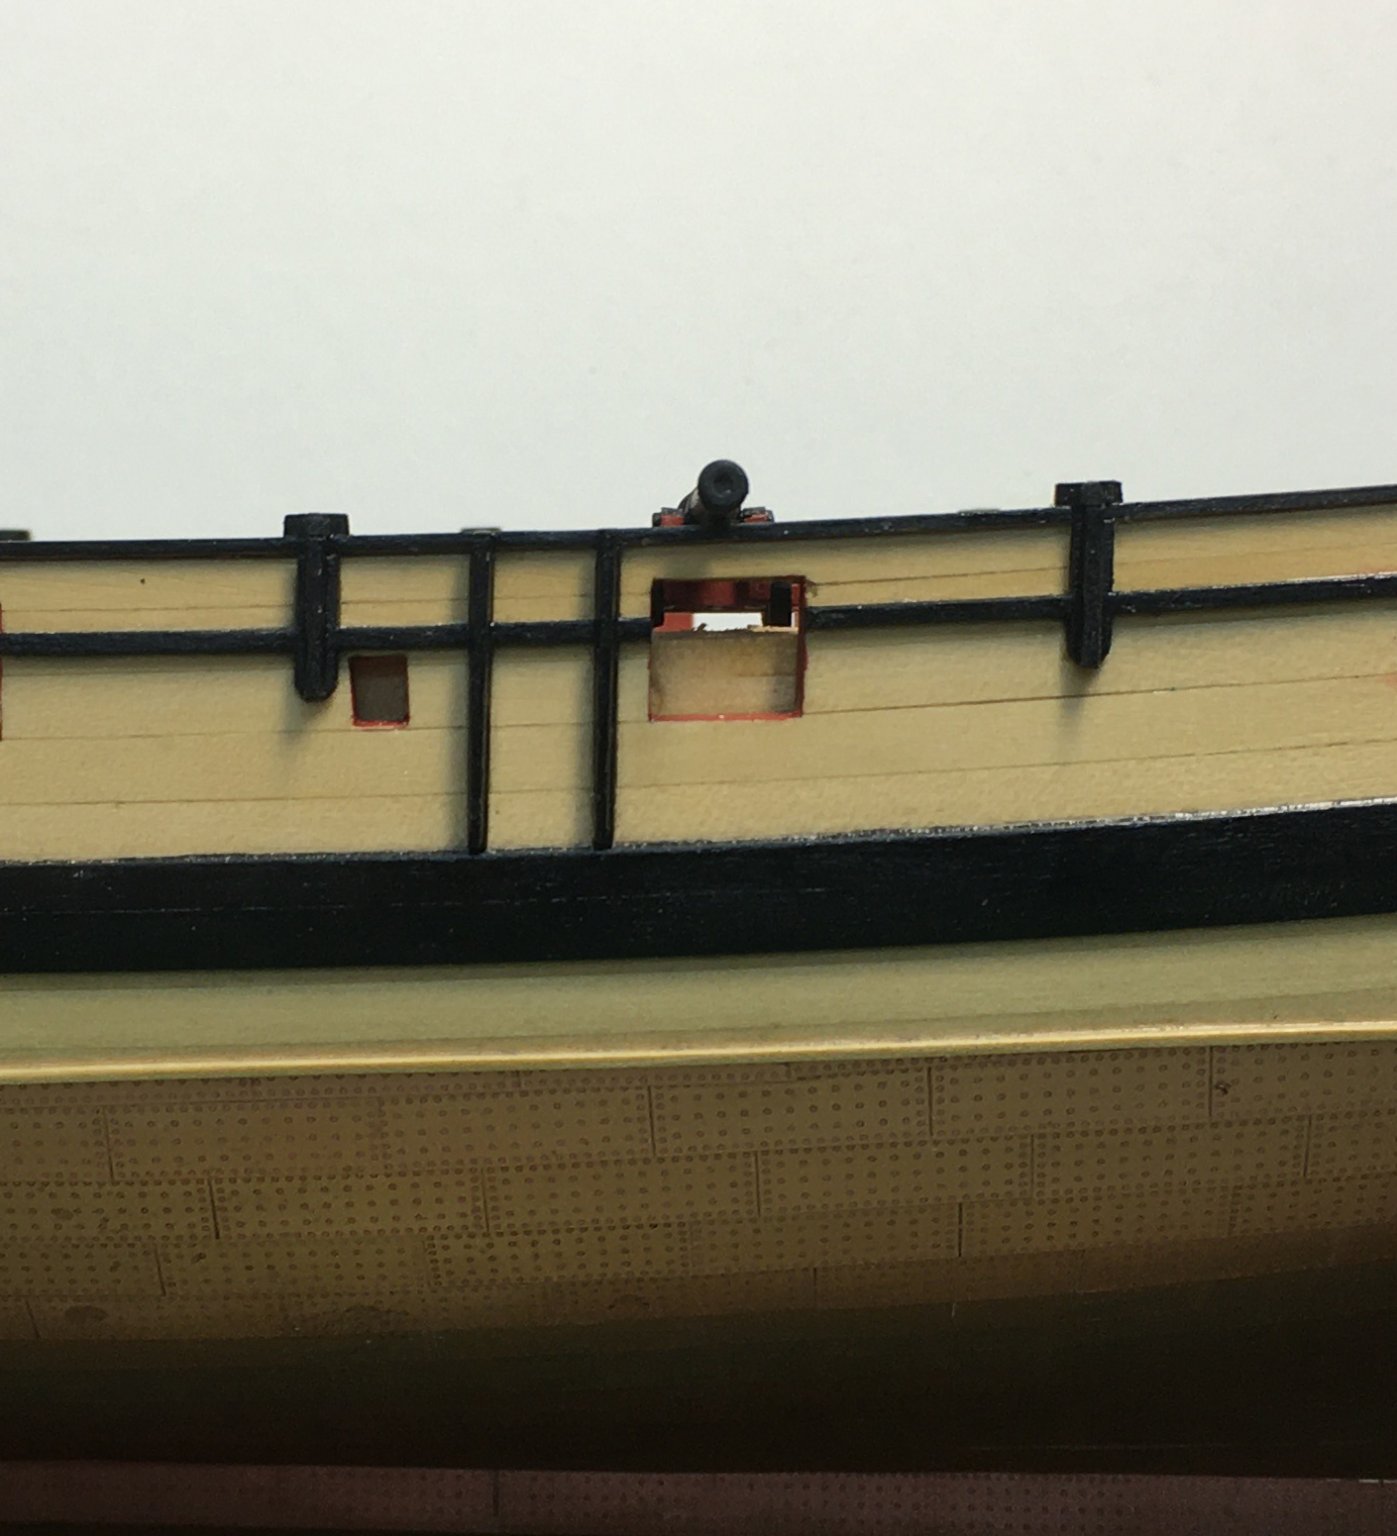
Thanks Edward, Glenn and Blue Ensign. I agree, the head rails are much better than others I've seen. I wish. Unfortunately Chris shows the deck planks tapering towards the stern - a refinement I feel neither capable nor inclined to follow. Neither am I mitring planks around hatch openings - I just feel the detail will be hidden too much by coamings to make it worthwhile. I also found it difficult to work out the butt shift pattern on the etched deck. In the end I just decided to go for 20' plank lengths, 9" wide (95mm X 3.5mm scale), following the 4-shift pattern described by Longridge in his Anatomy of Nelson's Ships (see here for details). One detail in the kit I am following is joggling - despite the fact that I'm not sure the normal rules are followed on the etched deck. My understanding is that you only joggle a plank into the margin if the snipe (the length of the plank that needs to be cut on the diagonal) is more than twice the width of the plank. On that basis, several planks either side of the mid-line in the bows would not be joggled - they would simply be cut on the diagonal across their full width to sit against the margin plank. However - and this is where appearance trumps realism for me (sorry purists!) - I just like the look of the joggling right the way round the margin plank. In a perverse (and probably masochistic) way I'm quite enjoying the task of chiselling out the necessary shapes and trying to get them as neat as possible. Here's progress so far: You'll note I had to remove the catheads. I tried to work under or round them but it wasn't practical. Fortunately I was able to free them without damage. Finally I must repeat my thanks to the two Glenns for two of their recommendations that are helping me greatly with this deck work. The first is the Super 'Phatic aliphatic resin recommended by Scarborough Glenn (see here), which I'm using to glue the planks. This works so fast it's almost like CA - a few seconds and it's stuck enough to lay flat against the sheer and solid enough to trim. It has really speeded up my deck laying. The second is the doggy dental tool recommended by Texas Glenn (see here). This is now my go-to tool for removing excess glue, and any general small scraping jobs. Not sure how I ever managed without it. Derek
- 725 replies
-
- 9
-
-
- vanguard models
- speedy
- (and 1 more)
-
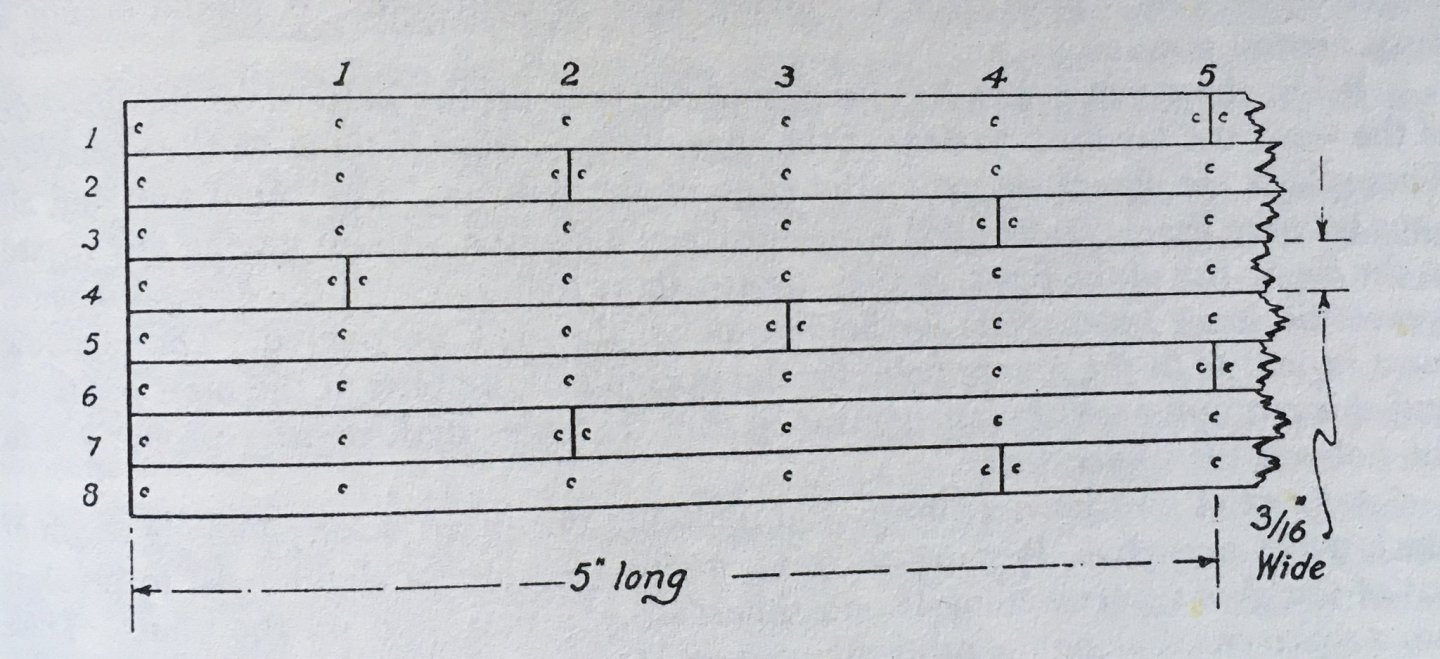
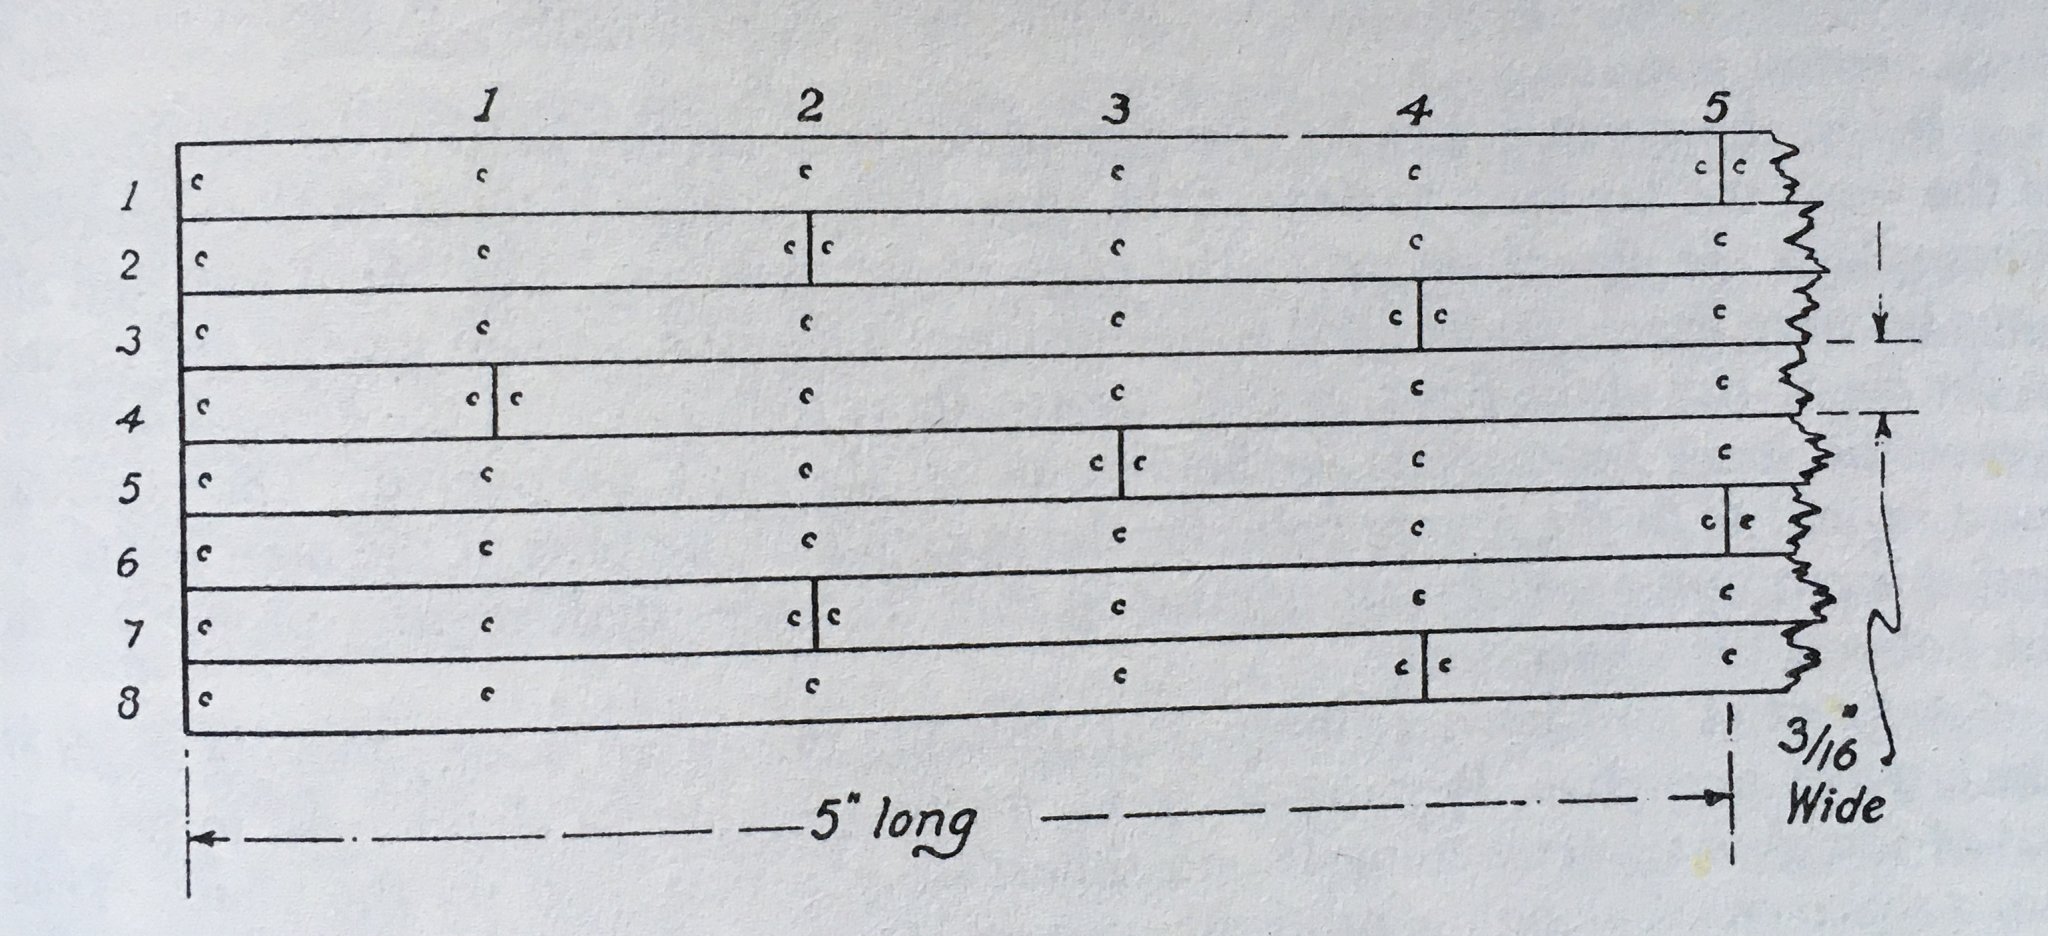
I find the simplest way to think of these planking schemes is as ratios of lengths. Longridge in his Anatomy of Nelson's ships uses the sequence 5:3:1:4:2, and in his case he's using inches. He was building Victory to 1:48 scale, so a 20 ft deck plank was exactly 5 inches long. If he started a line of decking with a five inch plank then every plank in that line would be five inches for as long as possible. The next line up, he started with a 3 inch plank, then finished the line with 5 inchers. The next line up started with a one inch plank, the next 4, then 2 then back to 5. Alternatively, if you work from the other side of your original 5 inch plank, the sequence becomes 5:2:4:1:3, Thus: This gives you the four step butt planking and avoids butts on adjacent beams. Simples. If you're working to a different scale and/or plank length, you can still use the same ratios. So on my current 1:64 Speedy build a 20 ft plank works out at 95mm. So my sequence/ratio is 95:57:19:76:38. Derek