


smarinid
-
Posts
56 -
Joined
-
Last visited
Content Type
Profiles
Forums
Gallery
Events
Everything posted by smarinid
-
Very Nice! Will be following so I can get a glimpse of what I am in for some day when I get brave lol.
-
Thanks guys but I no longer have this model! Yea! no worries
-
Thanks Robyn, I'll give it a try.
-
I recently had someone buy me a San Fran II but the kit was missing the parts sheet that held the decking and other parts. Anyone have a suggestion on how to go about procuring that particular parts sheet? Maybe one of you fellow builders has the remains of that sheet. If so, would it be possible to scratch build the parts from the remaining frame? Any assistance is greatly appreciated.
-
Thank you! I had a wonderful day! The build is slow. Other things going on but I am getting the first planking and a few other things done. More pics and a continuation of the log to come.
-
Thanks for the confidence builders folks. It helps. The bulwarks are there to stay. I am confident enough to get them planked and will see if that confidence is warranted . Hopefully I am not fooling myself but I think if I mess something up, it will be easier to fix than pulling the bulwarks off. That, I am afraid could really put a hurt to her. jastrzab, I am not completely certain That I want to blacken all the brass or not. I kind of like the "new" look of the shine. I am however, seriously considering "blueing" or blackening the cannons. I think in the time of the original San Fran, the cannons were not likely bright brass colored. Or maybe they were?? I love building these ships but they are not so much for me as my wife and kids. I love working with my hands and have fallen hard for building these ships as I have always thought they were beautiful, but for the most part I think I will let the family decide exactly what they like best. Of course I will need to show them the work being done here (MSW) so they can get an idea of what they like best. P.S. Go RED WINGS! I like football more but, we won't talk about the Lions
-
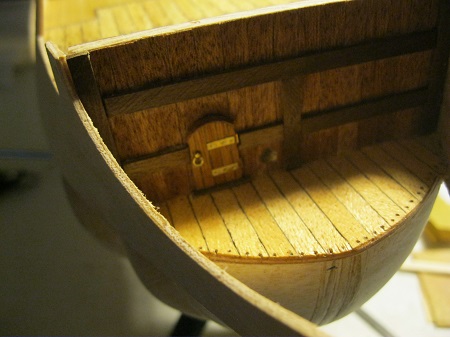
Have the bow planked and the door added. I also made one for the stern balcony access but have not put it on. I have too much to do there to worry about it at the moment. Like most, I didn't really like the kit parts. Gives it the "plastic" model look. Not that there aren't some very fine plastics out there. I just prefer to work with the wood as much as possible.
-
Very nice!
-
Looks awesome thus far! I am currently working (early stages) on the SF1. I hope it turns out as nice as this is shaping up to be. Nice work.
-
Looking great Matti! I'm certain your skills are up to the task. She will be a beautiful ship when done. Mark
-
Looking good Randy! I hope when I get to mine they will be as nice.
-
Being new to to this hobby, building any of it scares me, so a double dog dare might do just the opposite of its intent. However, with all of the things left to the builder to figure out (Thanks AL), it isn't even necessary for ddd. If I can't find the answer in MSW logs then, it's guess and by golly from there anyway.
-
Thanks for the welcome Keith. Bashing can be fun Randy! I am not certain of how much will be done on this particular build but if it's needed and or the mood strikes me I will certainly dive in "head first". I'm not sure if it is every manufacturer or just AL but it seems there are some particulars that are left to either common sense (and there is not much of that to be had...lol) or deductive reasoning. Exactly where things line up (AL made that "easy" when they put a lip on the bulkheads for the bulwarks to sit on, SF2) sometimes can be a bit confusing. Then I walk away and when I return, it will dawn on me what needs to be done. When I made the decision to build the John Alden, had it not been for rlb's log and the bashing he did, I may have ended up with a sloop much like the one on the box. That, in my opinion would have been criminal. This build will be done, I am certain, with much research into many of the SF build logs here at MSW (which in fact started when I first discovered MSW). I has been a pleasure reading the logs and seeing the great craftsmanship being displayed.
-
Hi Keith, Actually I am building the elder of the 2 SF's. I have a couple of sheets of softer wood stock but never even thought about replacing the bulwarks. Wish I had...lol. I also think you are likely correct in that it may be more difficult to shape having planked prior to application. I have read and seen your Swift bashing and it is awesome! I think it will take a few more builds before I can disregard much of the instructions but would certainly like to, considering the sparse nature of English in the manual.
-
Awesome! I applied the bulwarks but failed to plank them prior and now will be forced to plank them now. Might I also add that the bulwarks were everything BUT cooperative. It took several tries at steaming before I could get them bent to the desired shape let alone bend at all. I have to remember to slow down and re-read the directions on EVERY step. My problem is that when I begin to make a little progress, I pay more attention to putting things together and forget that I have the directions to help out. Even if I think I know what is going on, it is always better to double check. No more go, go, go.
-
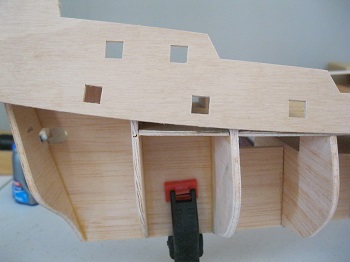
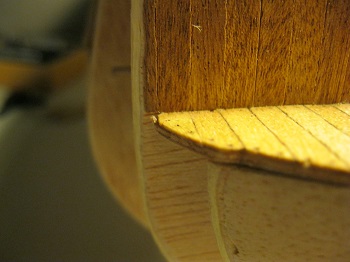
I have discovered a new issue! Yea!! As you can see in the pic, if I line up the bow area of the bulwarks, the rear of the bulwarks is too high. To line it up as directed with no deviations would mean that the side hull area of the bulwarks would be too low for the decking. To cure this I can only think to add a bit of wood stock to the rear bottom of the bulwarks before attaching them. Also to ensure that nothing breaks when I bend the bulwarks around the bow area, I will steam and bend that area prior to applying the bulwarks.

-
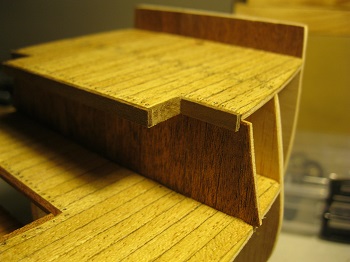
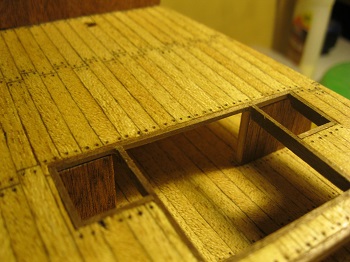
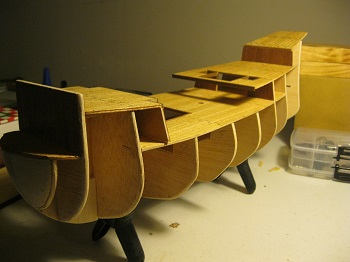
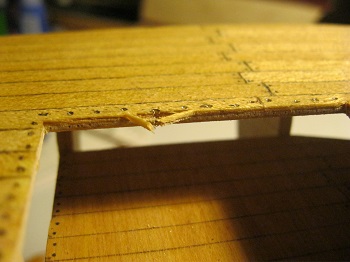
Finally. Decking is planked and applied. Tedious work to say the least. A word to the wise. When attempting to glue small pieces of your build (like small pieces of planking) with wood glue (by finger method) ALWAYS have a damp rag nearby to clean off excess glue or it will spread everywhere you do not intend it to. I found that the area in the next 2 pics, did not line up exactly so some adjustments, ie; sanding, trimming, will need to be done In this next pic, I wasn't certain of the correct wood stock to use or of it's exact placement. You can see what I have done but I think level with the deck was not right. Directly under the inside trim board (the longest trim piece center of the pic) was the planked wall. The placement of the trim caused it to sit on top of the wall which would have thrown off several areas. So I used my trusty Dremel tool and removed the trim board from beneath the decking as to ensure the proper fit. The next pic shows the bow area which will need some adjustment as well. With luck, not too much. The one on the right is (except for some adjustments) the semi-finished product. Hopefully I will be able to figure out what wood stock to use throughout the rest of the build. I have (on the color directions sheet) a color code for the types of stock however the right size and sometimes shape is difficult to decipher. Ooops! No I did not plank the lower deck. Only very little of it will be seen and once the finished product is in its case, one would have to look hard to see it.

-
Hi Randy. Just got done reading (and looking, WOW!) through your build log. Excellent work and some great ideas! I might have to borrow some for my SF (original) build. Oh, and Happy B-Day! Mark
-
Sounds like a plan Caroline, Thanks. I currently have the others in the coolest spot in the house and under books. I am hoping that will discourage them from doing the same. I will likely wait until tomorrow to try and fix it, when the heat index should be below the 110 it's been for about the last week. C'mon rain! Mark
-
Well, it would seem that issues may be something to deal with throughout this build . As I began attaching the bulkheads, I was stopped in my tracks on blkhd #3. I'ts warped. I live in Michigan and for the last week or so the temps have been running in the high 90's with the humidity between 85 and 90 something % I am not sure how well you might be able to see it in the pic but I certainly can in person. So, it's off to try to remedy this situation with the many ideas I have seen posted on MSW. If not, then it will be all about making another bulkhead from scratch. Oh well, I guess if it wasn't sometimes trying, then it may not be as fun building as it is. Upward and onward!


-
Caroline has been so kind as to reply and let's me know that I have nothing to worry about. I am thrilled to be able get the ball rolling on this build finally. Thanks again Caroline. Mark
-
Awesome work on a beautiful ship! Mark
-
Great build so far sir. Can't wait to see her finished and ready to launch. And Happy belated B Day! Mark
-
Well here goes nothin. Decided to brave a build log for my San Fran. My first ever build (John Alden sloop) was posted when finished. It may not have even been finished had it not been for another MSW member (rlb) who was gracious enough to re-post his pics after the the "great crash". Again, I thank you. I have questions (already...lol) about my SF so I thought it might be time to pick the brains of those in the know. In the pic below, I have arrows pointing to the area of the bulkheads that I am concerned will make the planking go awry. As you can see the blkhd (#s 4-7) does not transition around to the keel area in a smooth circular fashion ( as in the case of blkhd #3) but rather curved then semi straight then curved again. My question is, Does this area need to be removed to make a more smooth transition or will it not affect the planking too noticeably? I was looking on the SF build of vulcanbomber (Caroline) and it did not appear to have been removed. If it needs to be removed, I think it best that I do it prior to gluing the bulkheads. Yes? No? The other question I have (and it might be a dumb one) is the arrow at the rear top (transom area?). This appears it will need to be level with the false keel.


