


BLACK VIKING
-
Posts
476 -
Joined
-
Last visited
Reputation Activity
-

 BLACK VIKING reacted to Lt. Biggles in Boeing B-17F by Lt. Biggles - FINISHED - Revell - 1/72 - PLASTIC
Primed with Tamiya surface primer in a can, re sanded and filled where needed and primed again.
Will let it dry well for a few days.
-
BLACK VIKING reacted to Glenn-UK in HM Gun Brig Adder 1797 by Glenn-UK - Vanguard Models - 1:64
Build Log Index
Date: 23/08/2024
Time worked today: 3 hours.
Total time spent on build: 46 hours.
Carronade Eyebolts and Outer Stern Board
The eyebolts which are located on the inner bulwarks for the carronades were chemically blackened. The process I use for this works well and is as follows:
a) Soak the PE parts in acetone and agitate the solution for a few minutes
b) Transfer the PE parts to a soapy hot water solution. Agitate the solution for a few minutes
c) Rinse the PE parts and repeat a) above.
d) Rinse the PE parts in hot water and dry.
e) Place the PE parts in the blackening solution
f) Place the blackened PE parts on a paper towel and pat dry.
After fitting all the eyebolts I decided to dry fitted the various internal cleats and belay pin racks.
The next task was to fit the Outer Stern Board. Once that was done the two rudder post cheeks were then added. They did need to be trimmed to fit. The lower section of the rudder post cheeks were also painted white to match the hull.
The stern gunwale pattern was soaked in hot water for a few minutes and then clamped to the stern board assembly. This will be left to fully dry out before moving on to add all the gunwale patterns.
-
BLACK VIKING reacted to Baker in Mary Rose by Baker - scale 1/50 - "Your Noblest Shippe"
thank you all
Meanwhile painting has started. And we just got back from vacation.
First mowing the lawn, weeding, cleaning the car, refilling the fridge...
Applying masking tape to the clinker planking is a hopeless task.
so everything will be "free hand" painting.
more later
-
BLACK VIKING reacted to yvesvidal in Costa Passenger Coach by yvesvidal - OcCre - 1/32
I also started working on the chassis, as I need to plan for the couplers and their height:
The platforms on each end will have to be strengthened to be capable of accommodating some pulling. Again, OCCRE thought in terms of static model, here. The height of the platforms is also too large, due to the excessive size of the trucks. We will have to be creative....
Yves
-
BLACK VIKING reacted to Glenn-UK in HM Gun Brig Adder 1797 by Glenn-UK - Vanguard Models - 1:64
Build Log Index
Date: 22/08/2024
Time worked today: 4 hours.
Total time spent on build: 46 hours.
Wales and External Rails
As indicated in my last post the soaked wale patterns had been clamped to the hull. Once they were released a coat of varnish was brushed on followed by two coats of black paint.
Before fitting the wales I did add some tape to protect the bulwark patterns from any excess glue.
After applying the wales with wood glue they were added to the hull. I did use some clamps to hold them in place as the glue cured.
The next job was to fit the lower rail patterns. After the laser char was removed they were giving a coat of wood glue and then clamped to the hull.
After adding some tape to the bulwarks a coat of varnish was brushed on to the upper section followed by two coats of black paint.
The final task was to add the upper rails.
-
BLACK VIKING reacted to chris watton in Chris Watton and Vanguard Models news and updates Volume 2
I had the next boat file sent to me last night, for me to print and check - this time the 22 foot yawl (clinker planking again)
-
BLACK VIKING reacted to Richard Braithwaite in Trireme Olympias by Richard Braithwaite
Ben from Ropes of Scale was kind enough to send me some samples of his excellent polyester and cotton ropes to help me decide on a way ahead for the rigging. Here is a picture of his 1mm polyester rope passing through the main masthead casting alongside an extract of drawing MSR 7 by Owain Roberts ( © Estate of John F. Coates, reproduced with permission) and a photograph of the full size ship. the polyester runs satisfyingly freely over my machined fairlead radii, which is nice... The photo of the full size ship shows shrouds in addition to the fore and backstays specified in the design by Owain (see discussion above). Interestingly while hemp was specified for the shrouds and stays, polyester rope was specified for the main yard lifts for safety reasons...
The next image shows images of Bens polyester rope and cotton rope made off onto the main bits.
I have some more experiments to do with sp;icing, rope coils etc. but I think I'm inclining towards polyester rope (although the slightly "furry" cotton, at 1:24 scale, looks quite like the full size hemp on Olympias in a lot of images...). Im also quite keen not to provide too much food for moths etc on my boat...
-
BLACK VIKING reacted to Blue Ensign in Naval figure set by Blue Ensign – Vanguard Models - 1:48 /1:64 scales
Vanguard Naval Figure set .
I have long wished for a seated figure to include with my Navy board style builds that reveal interior detail thro’ the unplanked decking, altho’ I would use them even for a closed in deck, a little hidden secret of a model.
Thankfully Chris has come up with such a figure, and I have taken no time to have a play around with this resin figure set.
This is a pre-final production set.
The set I am looking at is the 1:48 scale version.
0275
0279
The seated figure comes in two halves, and very careful removal of the supporting struts is required, it would be so easy to snip away part of the piece in error.
The table is a separate part, and I modified it slightly for my purpose.
0313
The moulded in map was sanded flush, and one of the square shapes that represents a closed book, I think, was removed.
For the woodwork I am using enamel paints rather than my usual acrylics.
0307
Here the table and chair have been primed using Humbrol Matt desert yellow 93.
007
To complete the wood effect I used Revell satin wood brown 382 darkened with Humbrol matt scarlet.
For the items on the table, telescope, and inkwell/quill stand box, I used Vallejo acrylic paints.
For the open book, and sea chart, I found images on the net; these were reduced in size on a word doc and printed out.
I think a nicely printed out scale sea chart beats any moulded in feature.
The sitting figure
It made sense to me to paint the separate upper body part before attaching it to the lower body and chair.
The sitting figure seems to be of a Senior Captain (double epaulets) wearing a style of uniform around 1812.
It proved to be quite a challenge to pick out the detail and paint the uniform at this scale with its gold braid trimmings and brass buttons.
010
As an aid I printed out A4 photos of the figures, and the artwork on which they were based.
Eight different colour shades of Vallejo acrylics were used to complete the figures.
0073
0077
For those curious about such matters the chart covers the English Channel and western approaches.
0083
0093
The very fine detail of these figures required many touch-ins, and I used interim macro shots to highlight deficiencies in my painting.
0118
1:48 scale figure
I tend to only satisfy the macro monster to the extent of 9” viewing distance thro’ reading glasses.
I moved directly onto detailing the 1:64 scale set which is somewhat more of a challenge.
0065
Here is a comparison of the two scales.
095
The 1:64 scale figures have been added to the Great Cabin of Indefatigable. Fortunately, access thro’ the skylight made this retro fit possible.
The standing figure is spot on for scale, with the top of his head just below the deck beams.
0069
Whilst I was on a roll, I also completed the ‘Hornblower’ and ‘Pellew’ figures for scale comparison use on both Indy and Sphinx.
If you like a scale figure on your models these Vanguard offerings perfectly fit the bill, finely detailed and I particularly like the realistic pose of the sitting figure.
I think for a standalone tableau model I would opt for the 1:32 scale option which allows for more clear detailing. This is something I intend to pursue.
B.E.
21/08/2024
-
BLACK VIKING reacted to Old Collingwood in Milk delivery wagon by RGL - FINISHED - Miniart - 1/35
What a Crazy good project - love it Greg.
OC.
-
BLACK VIKING reacted to RGL in Milk delivery wagon by RGL - FINISHED - Miniart - 1/35
And that’s the set
-
BLACK VIKING reacted to chris watton in Chris Watton and Vanguard Models news and updates Volume 2
OK, I finally have the officers at table figure set available, after much changing and back and forth, and almost completely giving up on this little project. It is now done, however. I have printed off all 64th sets, and now working on 48th and then 32nd.
Officers at Table – VANGUARD MODELS
Here are a couple of pics from a set made by Blue Ensign, I sent a pre production set to to gauge feelings towards the set.
I have included two standing officers with each set, with each having a different hand/finger position, so you can choose whichever you think is best
-
BLACK VIKING reacted to hamilton in HMS Echo by Hamilton - Admiralty Models - 1:48 - cross-section
One last update before bed - I've installed the limber boards and one strake of the thick stuff at the floor heads - tomorrow this work will continue - hope to be able to finish the thick stuff and lower deck clamps then, and then the foot waling if there's time. I'm considering how to finish the model - I think I will fully plank one side inboard and outboard but leave the other side unplanked, except for the thick stuff inboard and below the wales outboard.
Bye for now
hamilton
-
BLACK VIKING reacted to Louie da fly in The San Marco mosaic ship c. 1150 by Louie da fly - FINISHED - 1:75
Working on the lateens.
Discovered I hadn't allowed for enough belaying points, so I had to add some eyebolts at the sides to take the standing ends of tacks and vangs/braces, and on the masts for the trusses. And belay the leading ends to the bitts.
I haven't permanently belayed anything yet - first I have to make sure all the forces balance so the ropes are all taut where they need to be.
Note that the point of balance for the foresail (and the central sail, if it comes to that) doesn't result in the sail hanging in the conventional "angled yard" configuration. That will be handled by judicious use of the controlling ropes - vangs/braces, tacks and sheets. But interestingly (as I discovered to my surprise) having the yard horizontal is totally ok for a lateener - quite a common configuration when running before the wind.
There are currently some unwanted wrinkles in the sails. This is my first attempt at using silkspan and I'm learning as I go. I'm hoping that if I damp the sails down and let them dry again with a bit of help in shaping, the wrinkles will vanish, or at least lessen. My lovely and beloved wife, on the other hand, thinks they add to the verisimiltude of the model (it is, after all, supposed to be a somewhat shabby merchant ship, a mediaeval equivalent to a tramp steamer), so I'm a bit torn as to whether I should fix it at all.
By the way, please excuse the messy table - that's just the way I work (and I'm certainly not going to tidy up just for a work-in-progress photo).
Steven
-
BLACK VIKING reacted to ERS Rich in F-51D Mustang by ERS Rich - Tamiya - 1/32 - PLASTIC
Korean War version of the Mustang, designated F-51D. A beautiful kit that’s been on the shelf awhile.
Here are the engine/cockpit/ equipment sections.
-
BLACK VIKING reacted to Glenn-UK in HM Gun Brig Adder 1797 by Glenn-UK - Vanguard Models - 1:64
Build Log Index
Date: 17/08/2024
Time worked today: 0.5 hours.
Total time spent on build: 38 hours.
Fitting Inner Bulwarks and Test Fit Deck Items
The two bow inner bulwark patterns were soaked in hot water for a few minutes and then clamped in position. Once the parts had fully dried out they were glued in place along with the two aft inner bulwark patterns. Plenty of clamps were used to hold the patterns in place as the glue cured.
Next was a dry fit of the inner transom pattern, which did require a little bit of sanding before it was aligned with the openings.
The excess aft outer bulwark pattern material was trimmed and sanded smooth and the outer upper transom pattern was then test fitted, it was not quite in the right position in the photo below. It needed to be be moved slight to the right.
Using a razor saw all the gun ports were opened. They will require filing and sanding before moving on to the next stage of fitting the inner rails. It was now a good time to test fit some of the deck items that I had previously constructed. There is still plenty of other work to complete before these deck items will be fitted.
-
BLACK VIKING reacted to Ronald-V in HMS Sphinx 1775 by Ronald-V - Vanguard Models - 1:64
After I installed the wales I found out that there were still a lot of seams on the top and bottom where the wales were not attached to the hull.
So with some diluted PVA and more nails 🤪 I was able to get it all right. Now just filled everything with wood filler (I think at least a hundred holes if not more 🥲)
But when sanded it should look great!
-
 BLACK VIKING got a reaction from flying_dutchman2 in The Flying Dutchman by BLACK VIKING - first scratch build
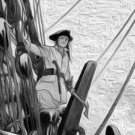
Hi all sorry for the long delay but life has got in the way. I've been working on the yards and sails. These have been made from a old shirt that has been cut and distressed by rubbing them with rough sandpaper and then painted with different greens and browns.
Next job more sails
Thanks for looking
Martyn
-
BLACK VIKING reacted to yvesvidal in Costa Passenger Coach by yvesvidal - OcCre - 1/32
We are now detailing one of the most important section (if not the most important...) of a passenger car: the lavatory!
The kit provides all the main parts:
The toilet bowl The seat made of wood and polished round to welcome the user. The lid, also made of wood as it was common on these cars, in the early 20th century. The overhead tank for flushing The sink and faucet The mirror to re-adjust your hair and face after the event... The toilet paper dispenser. I have added a piece of soap, the chain to flush, painted holes in the sink and bowl and the infamous brown paper that was used in those times. That paper (for those who never experienced it) was a thinner version of the brown wrapping paper, was not provided in self-cutting squares (you had to tear it with both hands) and had an incredibly abrasive capability on that part of your anatomy. The drains, as everybody knows, were a direct fall to the ground located between the rails.
Overall, that little bathroom is well rendered and provides a nice antique touch to the model.
Note that seat and lid (at that time) were made of wood, as plastic was introduced much later.
Sink and bowl were never perfectly clean on a passenger car, even in Second Class....
Now, is the time to start gluing one of the sides.....
Yves
-
BLACK VIKING reacted to Yann Kermeur in The Flying Dutchman by BLACK VIKING - first scratch build
Fantastic! it's really impressive and magnificent!
I could think that you work in the field of cinema and sets, congratulations again for this creation!
-
BLACK VIKING got a reaction from flying_dutchman2 in The Flying Dutchman by BLACK VIKING - first scratch build
Sorry for the late response as I've had one heck of a year as I lost my mum last year and we have moved back to Kent to be near No1 son .
I have attached some pictures for you to look at to show what I have been up to.
Thanks again for the comments and likes .
Martyn
-
BLACK VIKING got a reaction from flying_dutchman2 in The Flying Dutchman by BLACK VIKING - first scratch build
Hi all sorry I haven't posted for a while but life and stuff has got in the way. I have been slowly working away on the FD . I have finished the hull and have now put some details on the stern galleries and the sides. As I'm no good at carving I have used modelling clay to make the scary faces and strange fishy things and to make her look old and battered I have put some barnacles and clamy things on the sides. I need to find away of putting some smaller barnacles on the lower hull.
Thanks for looking.
Martyn
-
 BLACK VIKING got a reaction from Yann Kermeur in The Flying Dutchman by BLACK VIKING - first scratch build
Hi all .
I have been a bit busy on the FD . The planking has been finished and sanded down. I was going to second plank the hull but I like the look of it as she is meant to look all beaten up.
Next job planking the decks and capping the bulwarks. All the wood has been left over from all the other builds I have done so this has cost me next to nothing so far and quite pleased with the outcome. I'm not very good at carving so I plan to use modelling clay for the carvings so just wondering what the best one to use .
Thanks for following
Martyn
-
BLACK VIKING got a reaction from Yann Kermeur in The Flying Dutchman by BLACK VIKING - first scratch build
Hi all
I have now completed cutting out all the bulkheads and kell and have dry fitted to see how they fit and all seems fine.
Next job cutting out the decks from some 2mm ply .
Thanks for following.
Martyn
-
BLACK VIKING got a reaction from Yann Kermeur in The Flying Dutchman by BLACK VIKING - first scratch build
Hi all . I have cut out a few more bulkheads and the false keel . I must admit they take a lot longer than I thought but I'm not going anywhere so they will take as long as they take. As you can see from the pictures I have cut them way side the line so I can sand them down to the right level. Hopefully it's going to be a nice day tomorrow so I can cut some more.
Cheers for following
Martyn
-
BLACK VIKING reacted to Yann Kermeur in HMS Bounty's Jolly Boat by Yann Kermeur - Artesania Latina - Scale 1/25 - First build
Hi
Well, the job's off to a good start, and I think that's the easy part for the moment ...
The photoetched boards look good, with the part numbers already engraved on them .
so if I've understood correctly, it's better to sand the fields to remove the laser burn for better adhesion of the glue.