

puckotred
-
Posts
430 -
Joined
-
Last visited
Reputation Activity
-

 puckotred reacted to WackoWolf in Vasa by puckotred - DeAgostini - Scale 1:65
Nice, your keeping yourself busy, now that's a good thing.
-
puckotred reacted to baskerbosse in Vasa by puckotred - DeAgostini - Scale 1:65
Very nicely done!
You might want to know that Corel is not known for their accuracy.
Their Amphion kit is not actually of the Amphion, but rather another of F.H Chapman's designs, no 4 on plate XLIV in Chapman's "Architectura Navalis Mercatoria":
http://www.sjohistoriska.se/ImageVaultFiles/id_3074/cf_1787/44.JPG
I have difficulty comprehending the reasoning behind doing this, especially since the real Amphion plans exist, the stern still exist and there are even photos of her.
See "Daniel G Harris: Fredrik Henrik af Chapman: The First Naval Architect and his Work"
Pg 90-91 for the Amphion plans.
Model:
https://upload.wikimedia.org/wikipedia/commons/f/f3/Trtanj-Amphion.PNG
It is a nice model of a Chapman pleasure Yacht though.
It would be nice if more of the Chapman designs were issued as kits.
Very nice work!
Cheers,
Peter
-
 puckotred got a reaction from tasmanian in Vasa by puckotred - DeAgostini - Scale 1:65
Another tiny update:
Some color on the decorations
It's place:
Bronze cannon and ebony stain on the carriage
And while I'm waiting for the next parts to come I have some time with one of the other projects
Corel's Amphion
-
 puckotred got a reaction from coxswain in Vasa by puckotred - DeAgostini - Scale 1:65
Another tiny update:
Some color on the decorations
It's place:
Bronze cannon and ebony stain on the carriage
And while I'm waiting for the next parts to come I have some time with one of the other projects
Corel's Amphion
-
 puckotred got a reaction from Sjors in Vasa by puckotred - DeAgostini - Scale 1:65
Another tiny update:
Some color on the decorations
It's place:
Bronze cannon and ebony stain on the carriage
And while I'm waiting for the next parts to come I have some time with one of the other projects
Corel's Amphion
-
 puckotred got a reaction from fmodajr in Vasa by puckotred - DeAgostini - Scale 1:65
Another tiny update:
Some color on the decorations
It's place:
Bronze cannon and ebony stain on the carriage
And while I'm waiting for the next parts to come I have some time with one of the other projects
Corel's Amphion
-
 puckotred got a reaction from cobra1951 in Vasa by puckotred - DeAgostini - Scale 1:65
Another tiny update:
Some color on the decorations
It's place:
Bronze cannon and ebony stain on the carriage
And while I'm waiting for the next parts to come I have some time with one of the other projects
Corel's Amphion
-
 puckotred got a reaction from mtaylor in Navio Rayo Puesto de Combate by bryanc - Disarmodel (Spain) - 1:32 - 1748 (year she was built)
This is also on my next-to-do list. Will follow with interest!
-
 puckotred got a reaction from Canute in Navio Rayo Puesto de Combate by bryanc - Disarmodel (Spain) - 1:32 - 1748 (year she was built)
This is also on my next-to-do list. Will follow with interest!
-
 puckotred got a reaction from bryanc in Navio Rayo Puesto de Combate by bryanc - Disarmodel (Spain) - 1:32 - 1748 (year she was built)
This is also on my next-to-do list. Will follow with interest!
-
puckotred reacted to Jörgen in Endeavour by Passer - FINISHED - Amati - 1:80 - first build - Americas Cup J Class
Hello all.
My Endeavour is finished at last and I must say that the result is much better than I expected , I had a break for one year because all the time went to rebuild our house. The kit has been a very good as a first kit to learn basic skills. The only "boring" thing were the endless filling and sanding to achieve the high gloss on the upper hull. But this model has inspired me too try to build with more "scratshing" and I will try to do it on my Sherbourne (will start a new topic soon).
I hope you will enjoy the pictures. They are not the best because they shot with the mobile phone. My father has promised me to take better photos later.
Jörgen
-
puckotred reacted to mobbsie in Armed Launch by mobbsie - FINISHED - Panart - 1/16 - Small
Morning Gents,
Thank you all very much for your comments and for dropping in and thanks to all who hit the like button, all are very welcome and appreciated.
Piet and Brian welcome to the log guys, good to have you along.
I have an update guys which is pretty quick for me, just 17 days since my last one.
I think this is the correct time to apply a coat of W.O.P, the colour change is quite evident, the wood was also very thirsty.
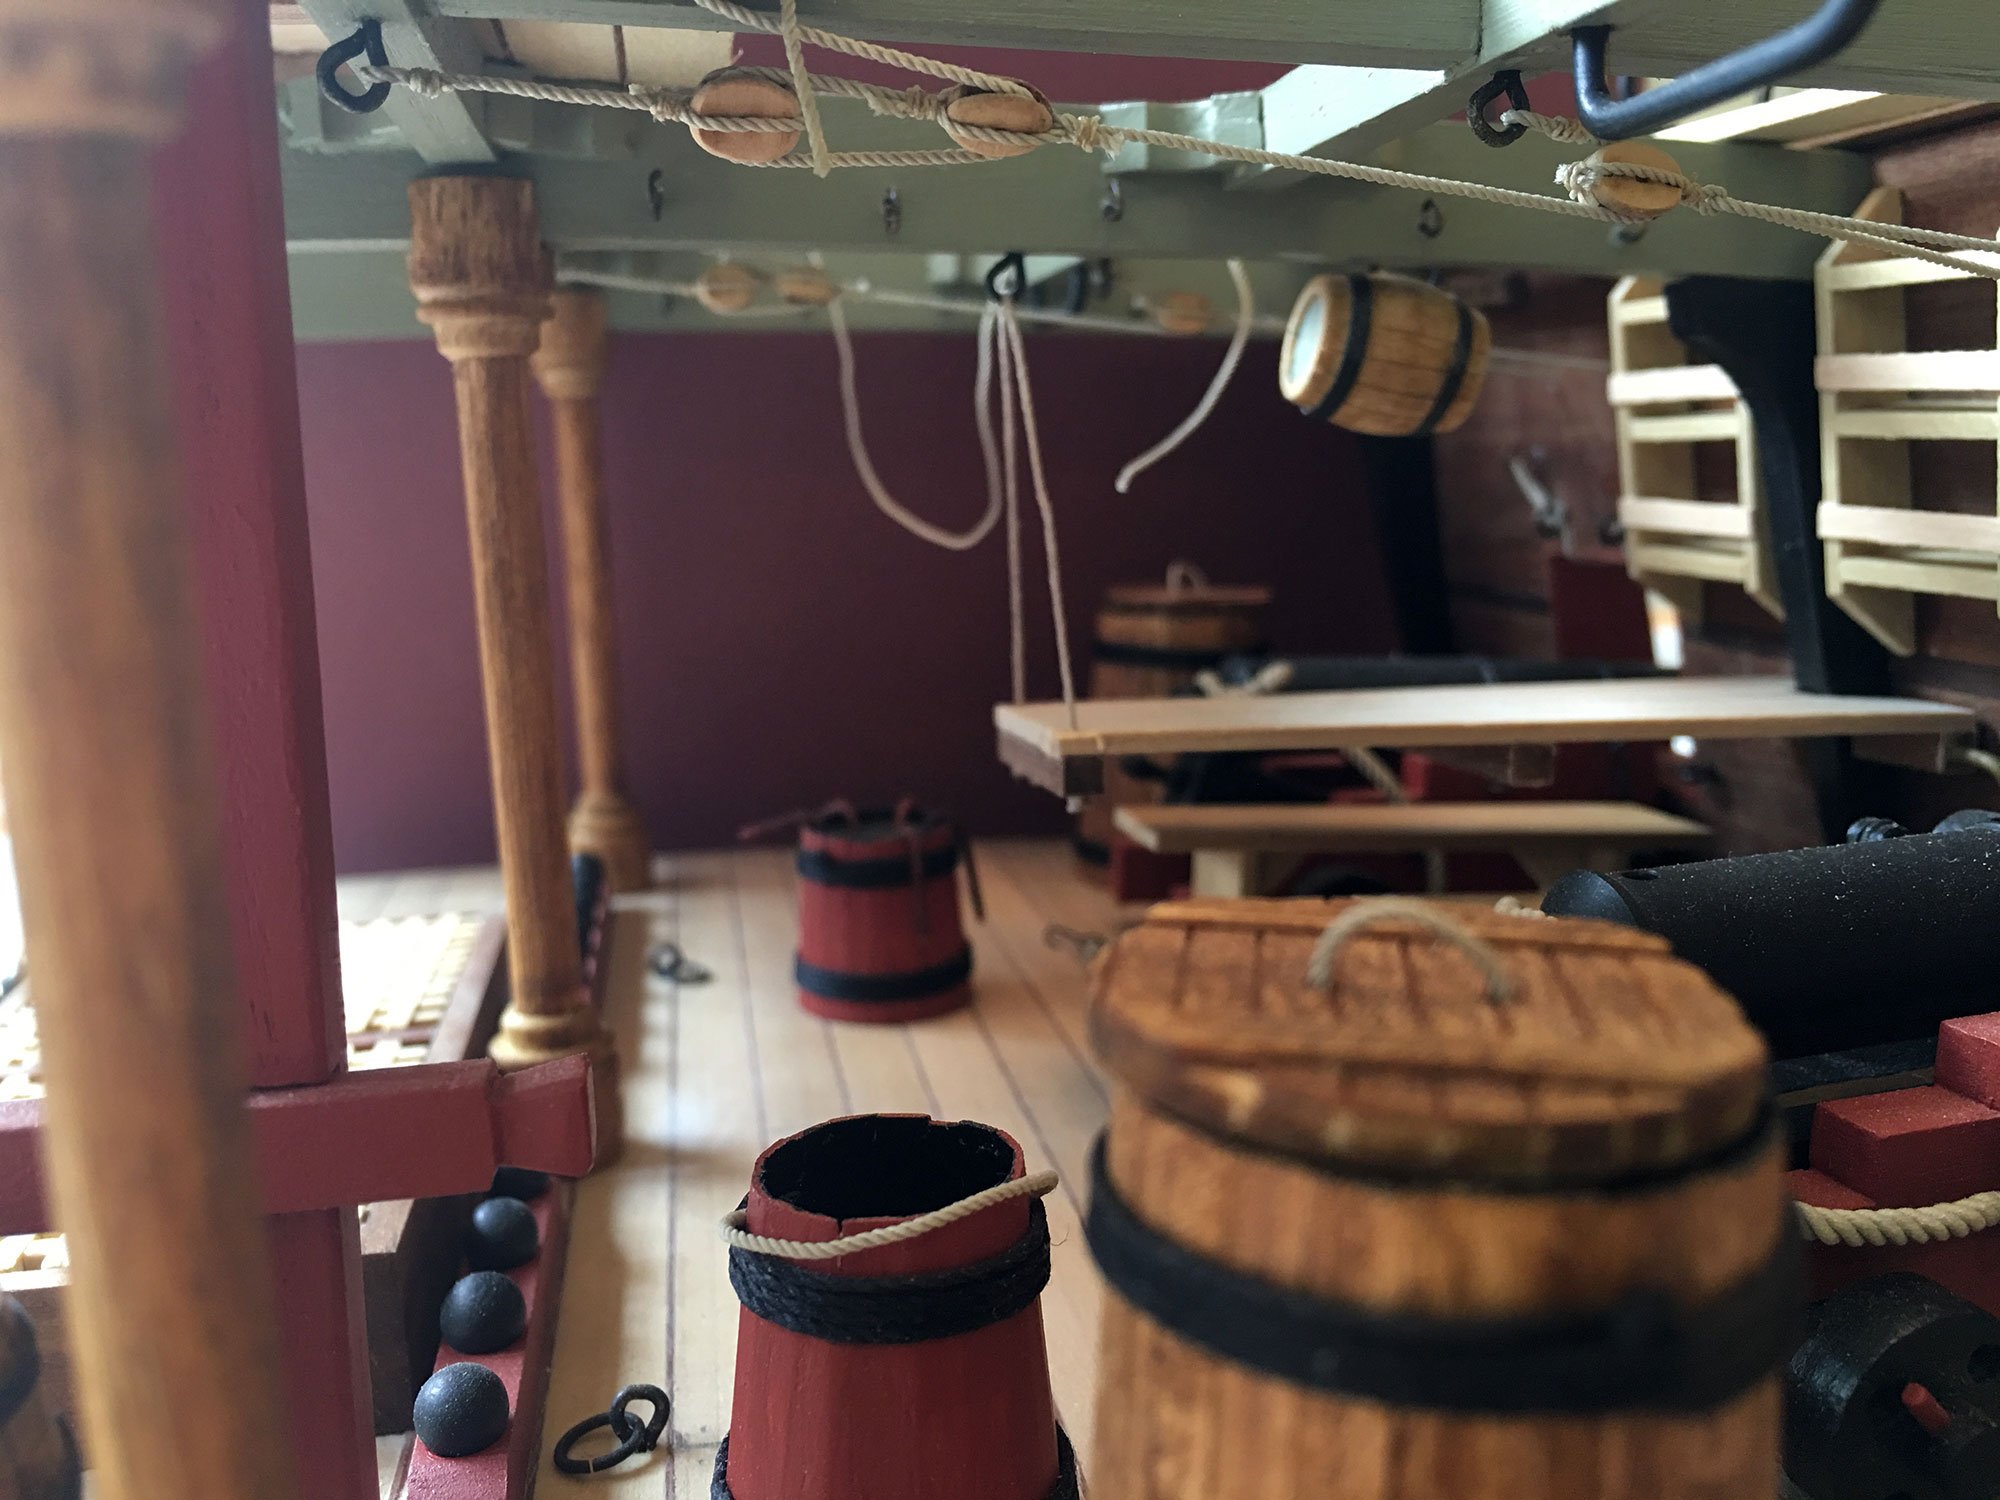
The Port and Starboard stern benches have now been fitted, the holes are for a pair of Belaying Pins, elbows can also be seen and are waiting to be fitted to the stern.
Forard stringer elbows made and ready for fitting and the forard locker cover fitted, all the elbows are made from Lime planks and have had cut down flathead pins pre-fitted, the locker cover is made from 2x2mm lime strip and 1x5mm walnut planks.
Aft elbows have now been fitted along with the rudder cap and tiller bar also the Swivel Gun Pedestals, the pedestals are 6x6mm Walnut square stock, the pedestals had to be shaped to fit the hull and cut out made for the Capping Rail. The tiller was a lot of fun trying to bend to shape, no matter what I tried it creased at the bend, in the end I sanded out a lot of the crease and settled for that, it's not too bad really. The Rudder Cap is a 10x10mm Lime block and the Tiller Bar is a 5x5mm Lime Stock. Lime is not the best of woods to work with.
Next step was for the Benches, Mast Seat, Mast Head, and Bench Elbows. I cut the Benches from Swiss Pear Boards, the size is 5x15mm, a 10mm hole needed to be made for the Mast seat and Bracing pieces fitted either side of the bench. The Mast Head was cut from a piece of Lime square stock, reamed out and pulleys fitted, I changed the small brass pulleys and made a couple of wooden ones from 6mm dowel. The seat elbows are made from Lime stock but I wasn't happy with these and changed them to Swiss Pear.
Next was to dry fit the stern Capping Rail and fit it around the Rudder Post. The Capping Rail is made from Swiss Pear, shaped and the outer edge decoration cut into it, this was then treated with Ebonising Solutions until the right colour was reached. The stern side rails were given the same treatment. The capping rail elbows were cut from a 10x10mm block of Swiss Pear stock, using a template made from the plans the shape was cut and sanded. These have now been dry fitted.
We have now a big leap ahead, All the capping rails have been fitted and I decided to put a length of rope (1mm Caldercraft) along the length of the decoration, more as a rubbing rope. The benches have been fitted along with the elbows, (I hate elbows). The Mast seat has been fitted underneath the bench and columns fitted beneath each of the other remaining benches. I cut the rowlocks from 6x6mm Walnut stack and shaped using my drum sander, they were drilled and pins fitted, these were then glued to the aping rail. the two Fairleads were cut from 6x6mm Walnut square stock these were also glued to the capping rail.
I've reached the limit of this download gents so I will wait until my next update to post the rest.
I hope you enjoy this update and as usual all comments whether good or bad are always welcome.
Be Good
mobbsie
-
puckotred reacted to Keith_W in HMS Royal William by KeithW - Euromodel - 1/72
Here are a few vanity shots ... just for fun.
Taken in the backyard on an Australian winter morning. Yes, the sun is out. Grass is green, and the sky is blue. But it is really cold!!
The other side. Decorations have been placed all the way to the front with the exception of the last piece. Once the beakhead railings go on, the last piece will be placed. The position of all the gunport holes have been finalized and cut out.
Note also the gaps in the decorations that I left for the fenders. I have not shown a picture of the fenders yet, but they have been cut, sanded, and ready to be installed. Because the top of the fenders need to reach the cap railings, the top of the fenders have not been trimmed. I do not want to leave the tops sticking out while I work on the rest of the ship, so I will leave off installing the fenders until I am ready to install the cap railings - which will come after the transom is completed.
You can also see that the pear planking in the front is a lighter shade than the rest of the ship. This is because it has been freshly sanded in preparation for the beakhead railings to go on. The darker shade of pear is what pear looks like when it has not been sealed and has been absorbing oil from my fingers for more than a year.
From the back. You will note that the top of the decorations look a little irregular. Can't be helped, that is the nature of what was supplied in the kit. Once the wooden caps go on, everything will be sanded until it is flat.
The completed repair of the re-positioned gunport I showed in my previous post. I saved all the offcuts from the decorations in case I might need them. In this case, I lengthened the decoration by gluing in parts that I had to remove from other pieces to accomodate gunports and so on.
Close up of the three windows which I replaced. In hindsight I could have left on Euromodel's supplied smaller windows instead of removing them - they are barely noticeable when the model is viewed in full. And my replacement doesn't look that great.
You can also see that I have filled in the gaps between the decorations with some epoxy putty and painted it over. Keith Julier says that the joints are almost invisible once you do this. Well, i'm no Keith Julier so my joints are still visible! I will probably go and sand them back a bit more to see if I can improve on this.
-
puckotred reacted to ggrieco in Heroine 1838 by ggrieco - FINISHED - Scale 1:24 - Western River Steamboat as she appeared before hitting a snag in the Red River
This week I started tying the two decks together with the side planking but, first I had to finish framing out the paddlebox.
Lighter vertical timbers were added between the main posts to frame out the windows and add support to the planking.
Before I could continue, I had to frame in the stairs. Since all the stringers were exactly the same, I decided to let the mill do the work.
First stringers going in.
Second stringers and starting to frame the paddlebox and forward deckhouse.
Planking the paddlebox and deckhouse.
Adding the stair risers and starting to plank the paddlebox.
Detail of the paddlebox planking. There were three strakes and then a moulding that continued the run of a short rail that ran the circumference of the deck. The rail, moulding and lower three planks were painted black. All the planking above was painted white.
-
puckotred reacted to ggrieco in Heroine 1838 by ggrieco - FINISHED - Scale 1:24 - Western River Steamboat as she appeared before hitting a snag in the Red River
This week I completed the posts for the boiler deck and started planing the planking for the sides. Luckily, unlike the deck, the side planking is of a uniform width and it should go on quickly.
All the posts finally in supporting the boiler deck
We know for the main deck, there was a nosing that covered the ends of the deck beams that consisted of a one inch thick plank the depth of the beam ends with a three inch diameter half round moulding on the face. I continued with that profile on the boiler deck
The post were more numerous adjacent to the paddlebox.
One of the surviving pieces of side planking. This 5 inch wide piece of tongue and groove planking was recovered from the lowere edge of the port paddlebox. It still has the remain of black paint on it.
Starting to plank the sides.
Detail of the doorway into the paddlebox. The posts and nailers for the aft end of the box haven't been added yet. We know the builder intentionally left two planks longer at the foot of the door the rest of the area inside the box was left unplanked to allow water to spill off the buckets.
-
puckotred reacted to ggrieco in Heroine 1838 by ggrieco - FINISHED - Scale 1:24 - Western River Steamboat as she appeared before hitting a snag in the Red River
This week I was finally able to finish the last major piece of the machinery. With the paddle wheel clutch mechanism in place I can drop the boiler deck in place. I will miss all the metalwork but, I'm really looking forward to the woodwork.
Heroine's port throw out lever. roughly forged from 3/8 inch strap. The handle is roughly octagonal at the strap and tapers to round.
The pins that engage the bearing are about one inch in diameter with a two inch head. Inserted through holes in the strap, the protruding ends were then hammered flat. The pins show a lot of wear from rubbing against the bearing.
Straps fresh from the mill.
Soldering the handles and pins to the straps.
Finished throw out parts.
Clutch mechanism installed. I decided to show the starboard side with the bearing engaged and the port side disengaged.
On to the boiler deck.
I have temporarily installed the boiler deck on poplar posts in about half of the post holes. Next week I'll replace them one by one with boxwood posts, aligning and plumbing them as necessary.
-
puckotred reacted to ggrieco in Heroine 1838 by ggrieco - FINISHED - Scale 1:24 - Western River Steamboat as she appeared before hitting a snag in the Red River
Hello Everybody,
I didn't get a chance to post last week. I took a few days off to take the family to the beach before the Memorial day weekend. We had a great time but returned to Tornadoes and floods in College Station.
Since my last post, I spent three days framing the boiler deck and two days tearing it apart and rebuilding it. One incorrect measurement threw several of the beams out of location. I think everything is finally correct and I should be able to drop the deck on the model in the coming week.
The deck before the rebuild.
After rebuild. The shifting of the deck beams is difficult to see but, I also found it necessary to extend the overhang of the walkway by a few inches. The notch in the doubled beam amidships will fit around the two posts supporting the feedwater pump lever.
I've been putting off securing the paddle wheels in place -- it's easier to move the model with the wheels off. Now that the boiler deck is going on, it's time to assemble the clutch mechanism for the paddle wheels.
Milling the pocket for the shaft end.
Before and after milling.
The final contour was hand filed.
Test fitting one of the throw-out bearings.
The original throw-out bearing weighed over 300 pounds. Amazingly, when we reassembled the the original pieces, the heavy bearing slid easily and smoothly along the shaft end with only the moderate pressure of one finger on each side.
-
puckotred reacted to ggrieco in Heroine 1838 by ggrieco - FINISHED - Scale 1:24 - Western River Steamboat as she appeared before hitting a snag in the Red River
Not many photos this week. With the engine complete I've moved on to the boiler deck. I'm going to attempt to build it flat and lay it onto its supporting posts. I've drawn the deck beams along the proper sheer in AutoCAD to get the proper beam spacing. I did the same for the main deck If all goes as planned, it should shorten to the proper length when bent to the sheer.
Kevin's sketch of the boiler deck cabin arrangement.
Boiler deck being assembled on a drawing of the flattened main deck.
This post was light on photos so I decided to throw these in. Our conservation lab has received a large number of artillery shells from the C.S.S Georgia and they needed wrenches to remove the fuses (the explosive has been rendered inert by years of submersion in salt water) The manager of the lab, Jim Jobling, came up with the idea of using socket wrench sockets for the job. It took me five minutes to mill down the teeth and they work beautifully.
-
puckotred reacted to ggrieco in Heroine 1838 by ggrieco - FINISHED - Scale 1:24 - Western River Steamboat as she appeared before hitting a snag in the Red River
This week I completed the last significant part of the machinery. We are fortunate to have the feedwater check valve still attached to one of the arms of one of the standpipes. The valve comes off of the standpipe at about a 45 degree angle. The probable location of the water line suggests that the valve could not have been on the port-most standpipe but the exact location could not be determined from the remains. I opted for the inboard port standpipe because it places the valve closest to centerline. In Alan Bate's Western River Steamboat Encyclopoedium he mentions that one method of preventing breakage in the long steam and water lines was to include a length of pipe with a large radius curve. This seemed to work well in this location.
Standpipe and check valve being lifted from the river.
Check valve parts fresh from the mill and lathe.
Check valve in place on the standpipe. The valve had a short foot cast into the bottom of the body. This indicated the the valve probably sat on a block to support its weight.
Safety valves and steam line from the steam drum to the engine added. This steam line will be slung from the deck beams of the boiler deck. I'm leaving the lever and weight off of the safety valve until the boiler deck goes in. I can only imagine how many times I'd knock it off if I had to work around it.
-
puckotred reacted to ggrieco in Heroine 1838 by ggrieco - FINISHED - Scale 1:24 - Western River Steamboat as she appeared before hitting a snag in the Red River
I had a pretty frustrating week trying to assemble the boilers. I'm not satisfied with the appearance of the .01 thick brass. Embossing rivet heads in it created some distortion in it that was difficult to eliminate. I'm just happy to be done with it.
Brass plates with embossed rivet heads.
Testing fit of boiler plates.
Blackened boiler plates.
The steam drums were constructed similar to the mud drums with the addition of the flanged pipe for the steam supply line.
Front of firebox and panel inserts blackened.
Panels inserted.
Kevin's notes point out that Heroine probably had a brick lined ash pan but not an ash trough to the side of the vessel. He points to an example excavated from the wreck of the New Orleans. Several firebricks were found in Heroine's remains measuring 4" X 8 1/2" X2 1/8.
Brick lining of the firebox
Brick lined ash pan added. I added the wooden plugs where the boiler caps should be. They will provide a fastening point for the boilers breaching and will not be seen.
Boilers almost complete. I still have to add the feedwater check valve and safety valves.
Next week I will finally get to work on the upper works. After a frustrating week with brass sheet, I'm looking forward to getting back to woodwork. Below is Kevin Crisman's reconstruction of Heroine's profile.
-
puckotred reacted to ggrieco in Heroine 1838 by ggrieco - FINISHED - Scale 1:24 - Western River Steamboat as she appeared before hitting a snag in the Red River
I got a little bit more of the boilers done this week. We have very little of the actual boilers so they will be a little simplified. I will be including the mud drums, steam drums and safety valves. Fortunately, we do have a standpipe and check valve for the feedwater line. I'll add the check valve next week.
All the parts for the standpipes.
The standpipes actually stood several inches taller and ended with a flange for the boiler tube. The sheathing of the flame bed sat on the arched webbing.
Completed standpipes minus the checkvalve. I didn't notice until looking at the photos this morning that the webbing didn't seat properly on the tops of the tubes in a couple of spots. I'll have to correct that on monday.
Making the mud drums and steam drums.
Dummy endcaps for the boilers. Everything else will be sheathed in .01 thick brass.
Covering the boiler tubes.
Port side of boiler sheathed. I still need to add wide strips on the boiler tubes to represent the overlapping plates. The holes for the standpipes still haven't been drilled underneath so it doesn't sit flush on deck yet.
-
puckotred reacted to ggrieco in Heroine 1838 by ggrieco - FINISHED - Scale 1:24 - Western River Steamboat as she appeared before hitting a snag in the Red River
This week I finally got back to the boilers. We only have a handful of pieces for the boiler so the appearance is a little generic. I decided to go with a wood for that will be sheathed with brass and blackened. Unfortunately, I didn't get many photos this week so I wasn't able to show all the steps I wanted.
Milling the boiler tubes. The capacity of the TAIG mill prevented me from milling all tubes at once so I had to mill them in pairs.
First pair off the mill. I tried to mill these with a 10 percent stepover but only got through half of it in 3 hours. I switched over to 25 percent and you can see the difference about halfway through the part. The previous photo is being milled at 25 percent and you can see the rough finnish.
Handful of pieces from the feedwater system. The top flange on the standpipe supported the boiler tube and the arched webbing on the crosspiece supported the boiler sheathing.
Experimenting with the location of thefront of the boilers and the standpipes.
The jig i used to crossdrill the standpipes.
Standpipes with bases added. I still need to add the rest of the flanges and the webbing in between.
Boiler ready to be sheathed.
-
puckotred reacted to ggrieco in Heroine 1838 by ggrieco - FINISHED - Scale 1:24 - Western River Steamboat as she appeared before hitting a snag in the Red River
This week I finished up the plumbing, reach rods and the other bits that tie the engine to the main shaft. I decided to go with an oil finish for the wood and was able to oil the cylinder timbers, pittman and flywheel. It gets a little tight with all the machinery and I wanted to make sure I got everything before moving on. I'm leaving the throw-out bearings and bearing caps off until the upper works are a little farther along -- I may need to remove the paddlewheels temporarily.
Bronze cam frame bearings and caps added.
Cam rods in to determine the length of the reach rods.
Reach rod handles.
Engine just about complete. The steam exhaust stack will be blackened. Next week, on to the boilers.
Feedwater pump and pre-heater.
Starboard side.
Port side.
-
puckotred reacted to ggrieco in Heroine 1838 by ggrieco - FINISHED - Scale 1:24 - Western River Steamboat as she appeared before hitting a snag in the Red River
This week I nearly completed the feedwater pump. We know the type of pump and location from a post that is bolted into the cylinder timbers at the after end of the crosshead slide. A linkage to the crosshead would have moved a lever that activated two pumps. A low pressure pump (aft side of post) would have drawn water through the side of the vessel somewhat below the waterline and pushed it into the preheater (shroud around steam exhaust). A more heavily constructed high pressure pump then pulled the water from the preheater and delivered it to the boilers.
Pumo lever and linkage.
Support posts for the pump. I cut these a little long and the cross piece at the top is only temporary. The top end will be cut off at the upper deck and fastened to the upper deck beams. The plates on the sides of the post will guide the reach rods.
Pump lever linked to cross head. Fitting the shroud around the steam exhaust.
Determining the run of the reach rods and plumbing. With the water lines and reach rods it gets pretty busy in this area. I didn't quite get it all together and will have till next week to finish.
The low pressure pump is still a little too tall but I left it in to give an idea about the whole set-up.
-
puckotred reacted to ggrieco in Heroine 1838 by ggrieco - FINISHED - Scale 1:24 - Western River Steamboat as she appeared before hitting a snag in the Red River
I finally completed the paddle wheels to the point I can start tying the drive train to the engine. This week I was able to get most of the pittman/crosshead assembly done. Just the feedwater pump and reach rods to finish before moving onto the boilers.
U-joints for the reach rods.
Crosshead slides.
Testing the fit of the crosshead and end of the pittman.
Pittman ends freshly milled.
Straps soldered to pittman ends.
Finished pittman strap with bearing, wedge and keys before blackening.
After blackening with bolts added.
Flywheel end of pittman.
Crosshead end of pittman.