catopower
-
Posts
1,900 -
Joined
-
Last visited
Content Type
Profiles
Forums
Gallery
Events
Everything posted by catopower
-
 The Swampscott dory is a really nice looking boat. I built that kit back when it was still made by Laughing Whale. It was something like the 5th wooden kit I'd ever built, and I remember the hull was just a tad crooked. Your's looks great. Probably just need to lower the keel and clip some more ballast to the end of it.
 -
Nice work on your Endeavour Harlequin. I love the look of a well done Corel kit!
-
I'll add that the Yen is also at its lowest point in 24 years, so it is also an excellent time to buy a Woody Joe or other kit from Japan. Good source, as I always recommend, is Zootoyz.jp. Excellent service. Shipping from Japan is expensive, but the exchange rate helps out there too.
-
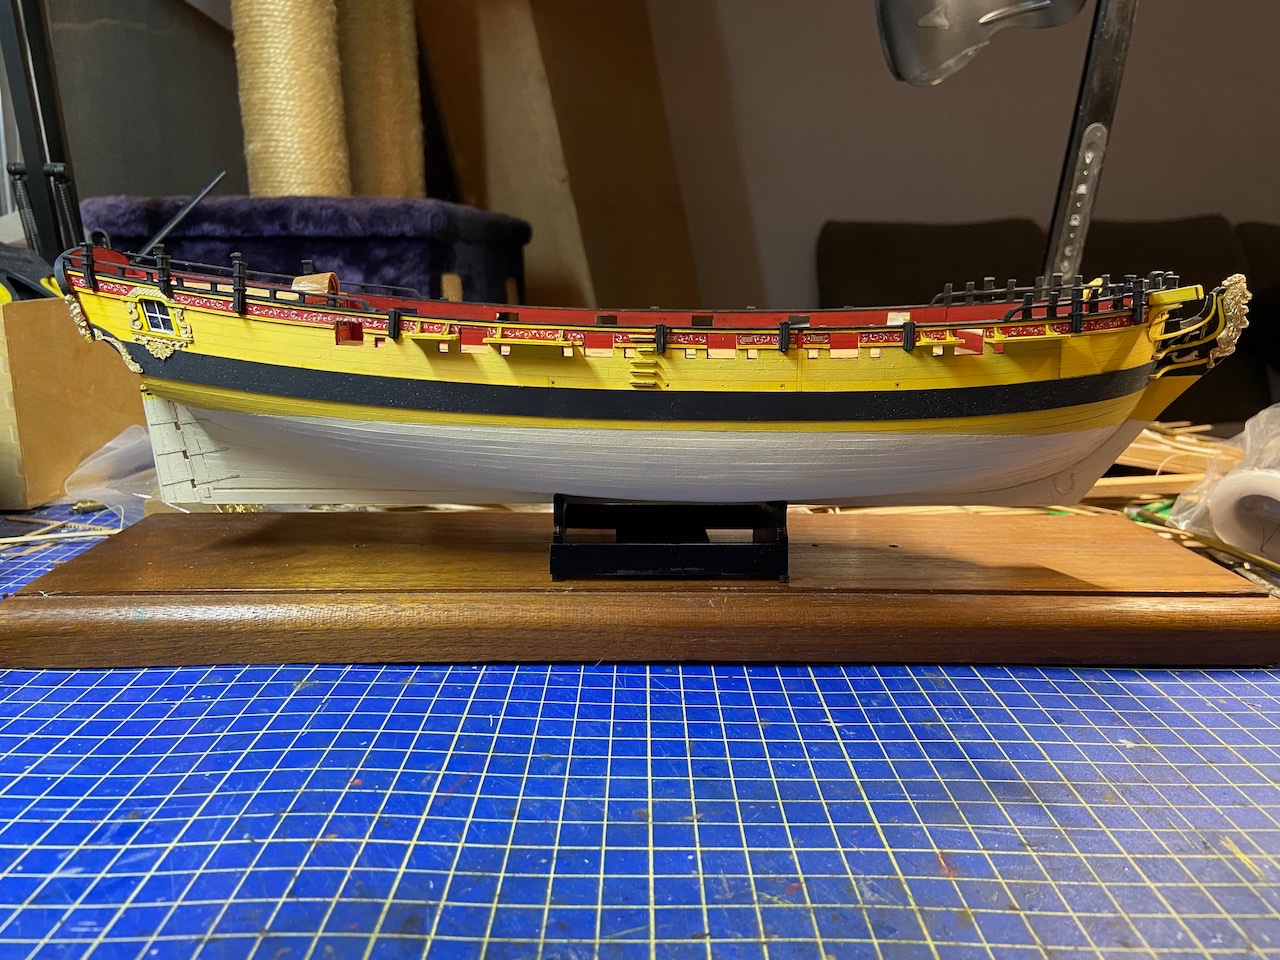
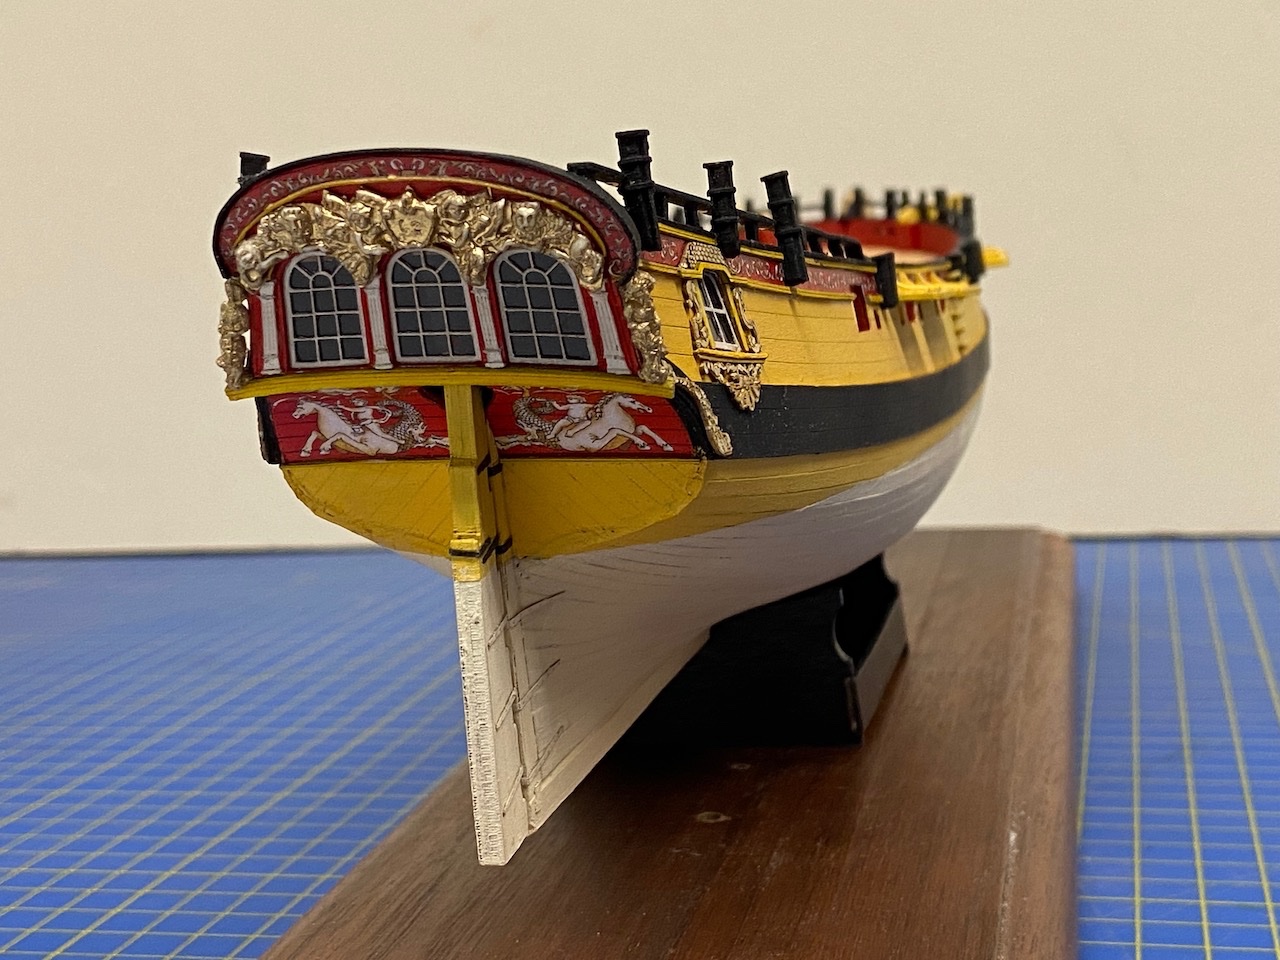
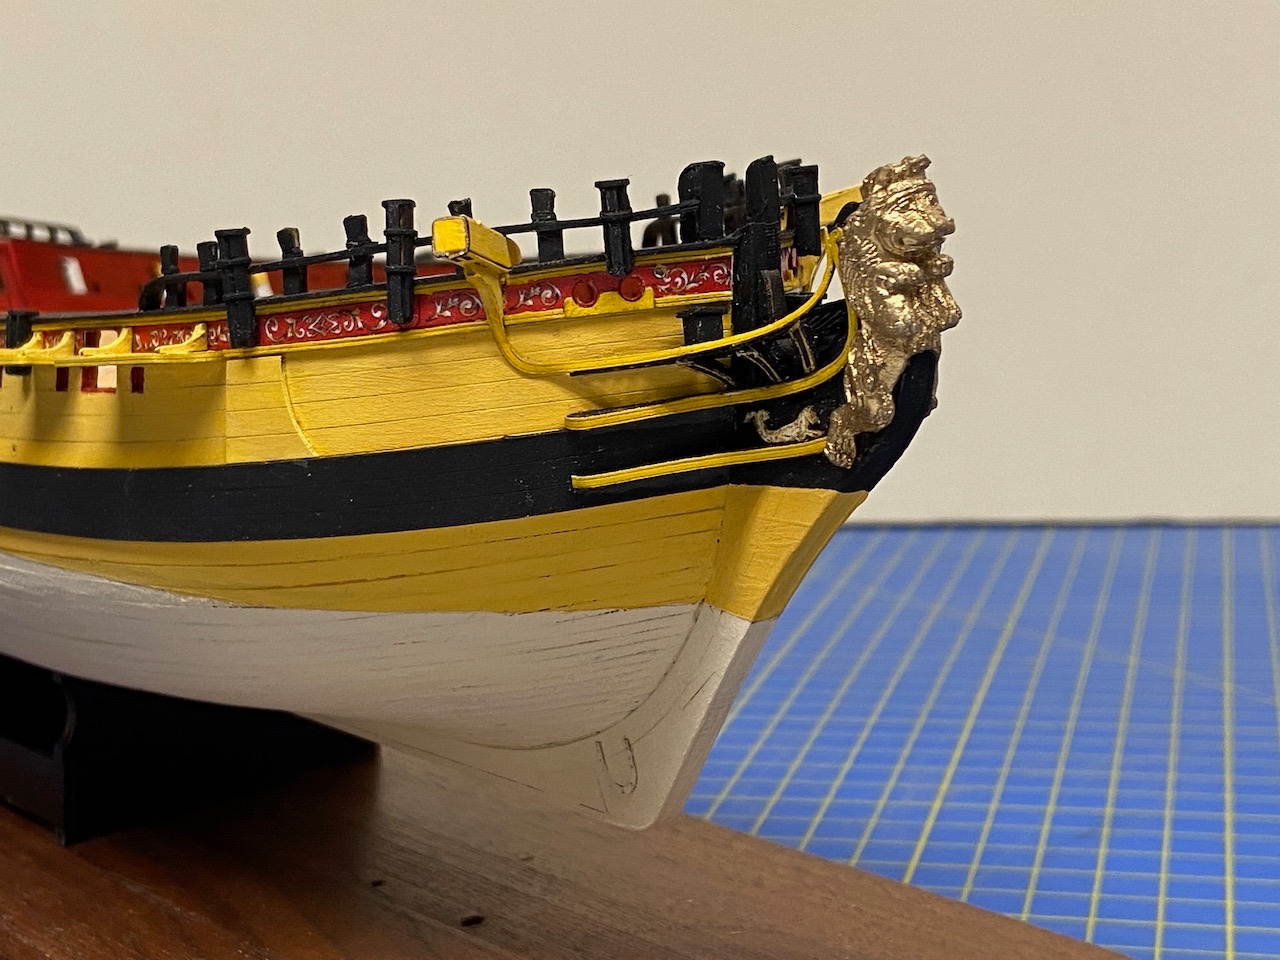
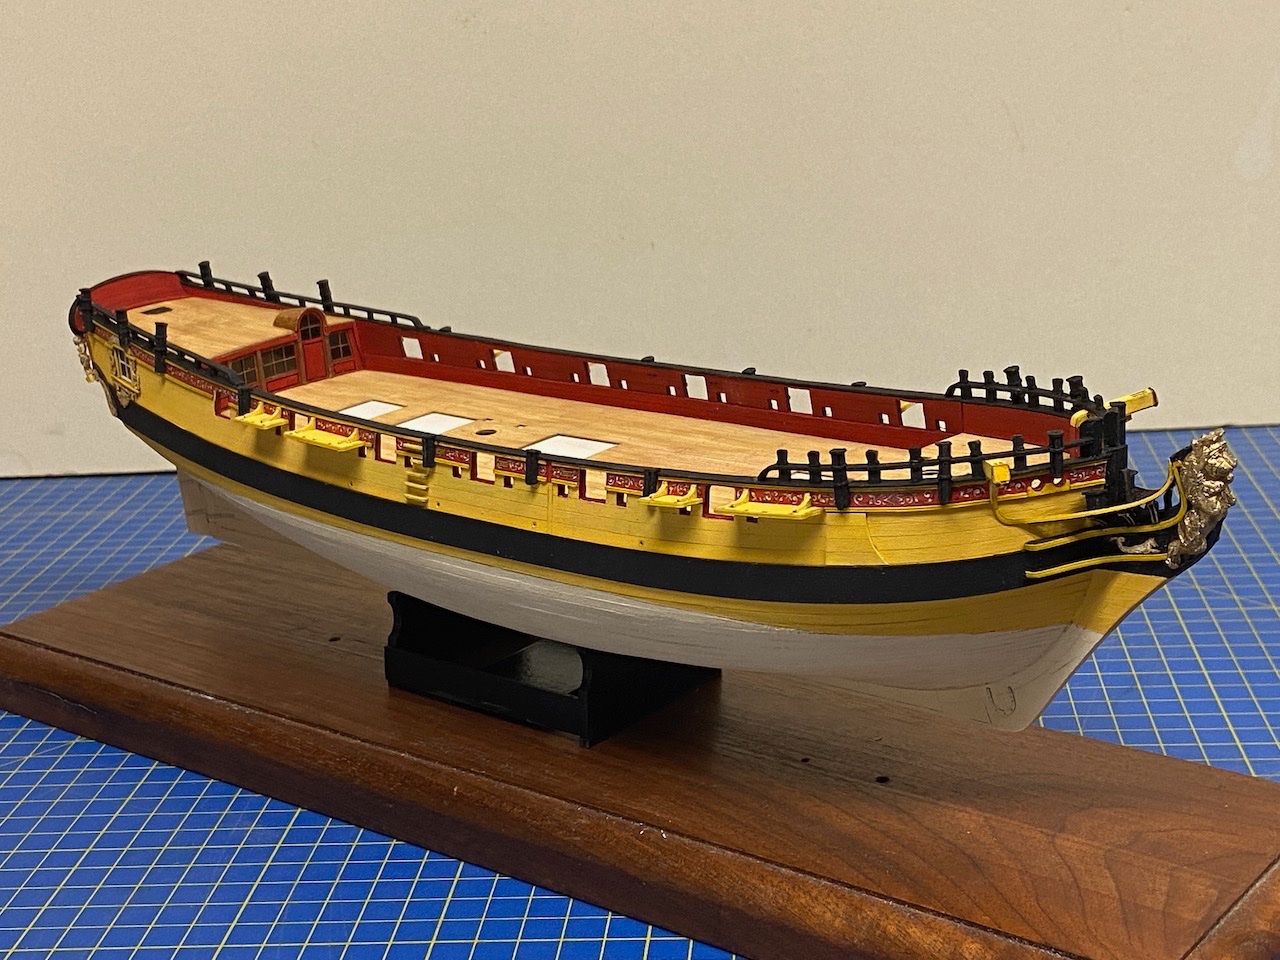
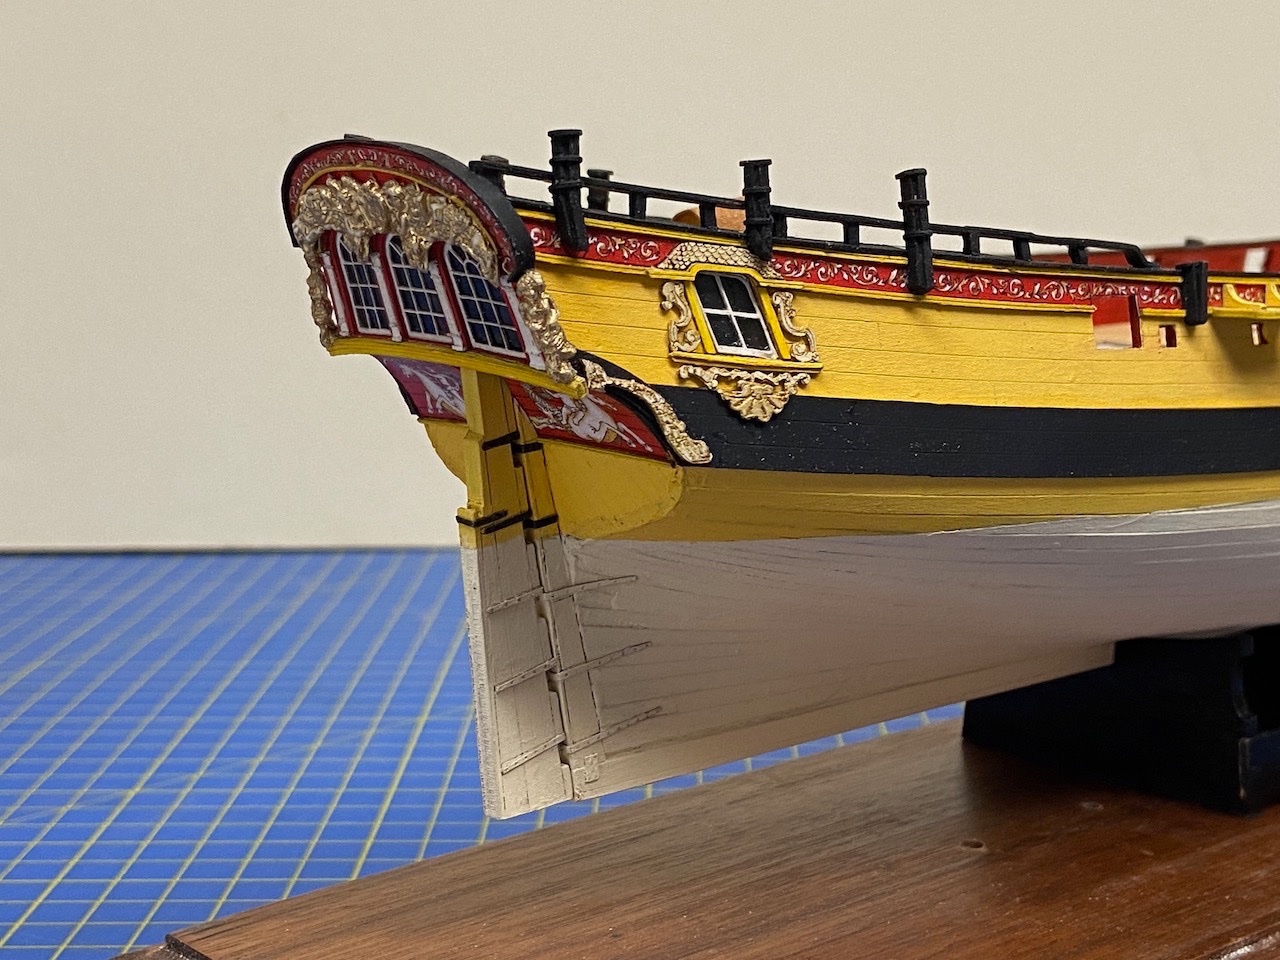
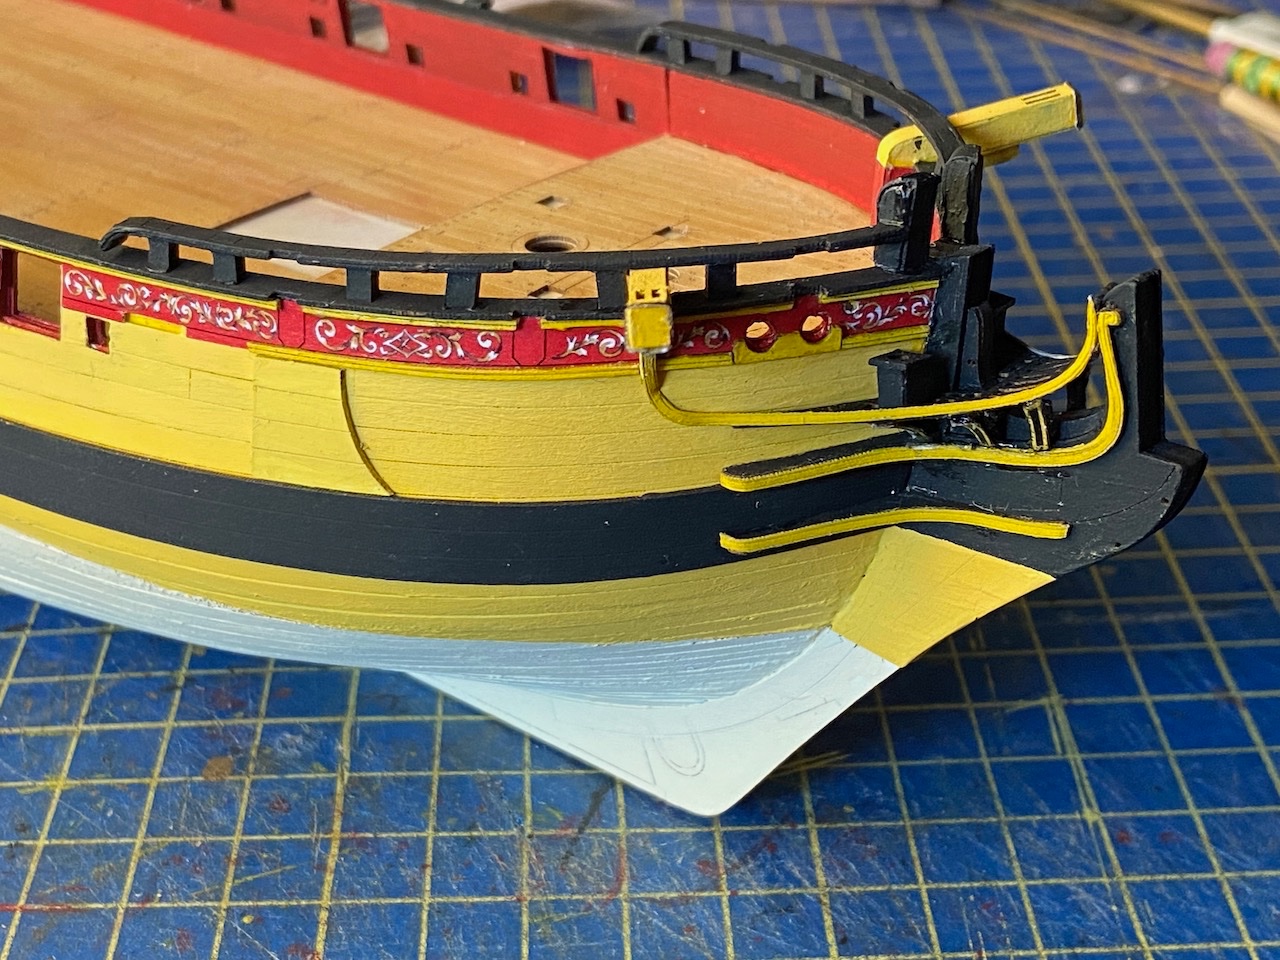
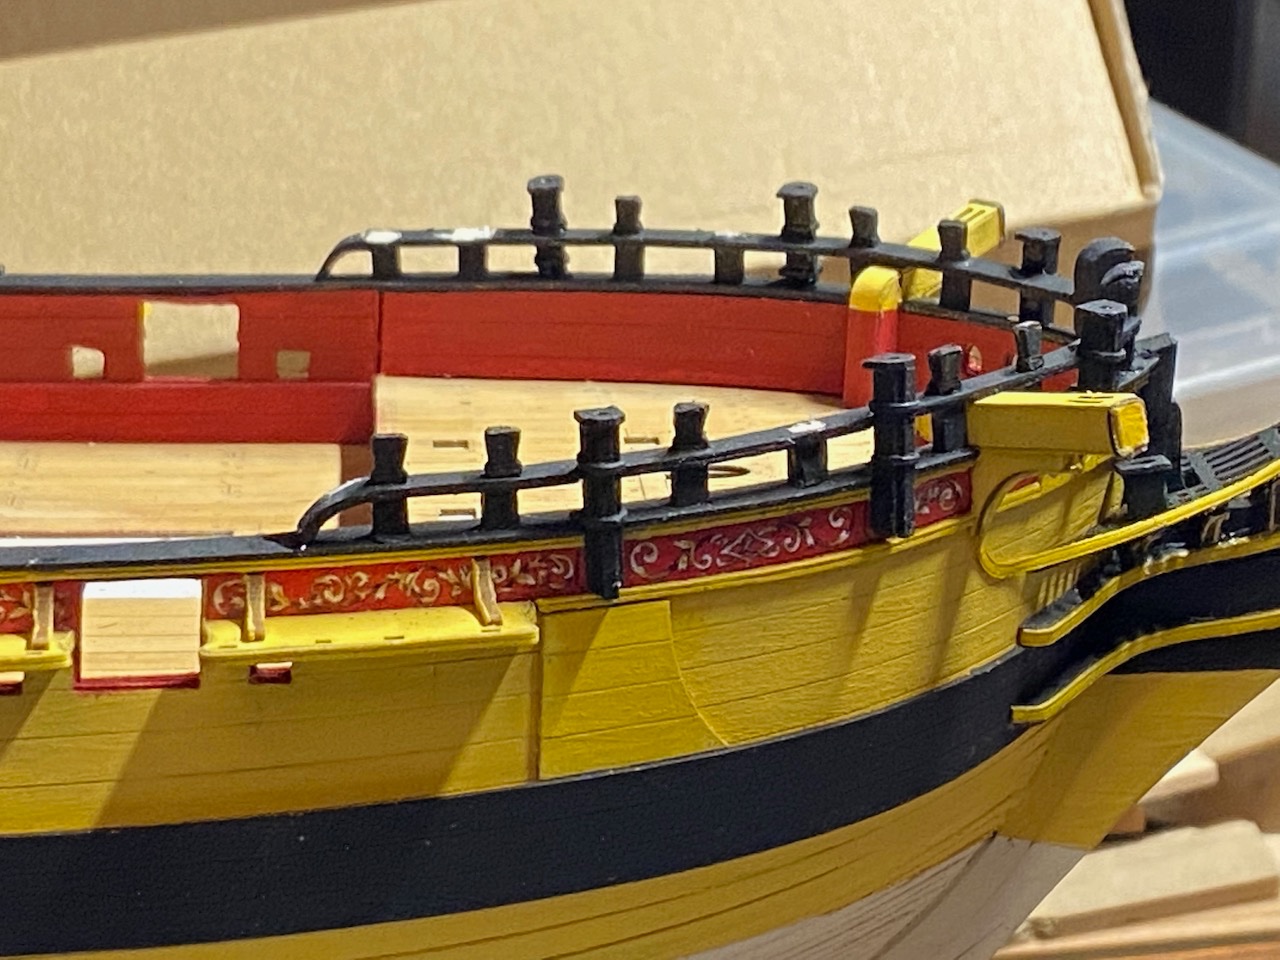
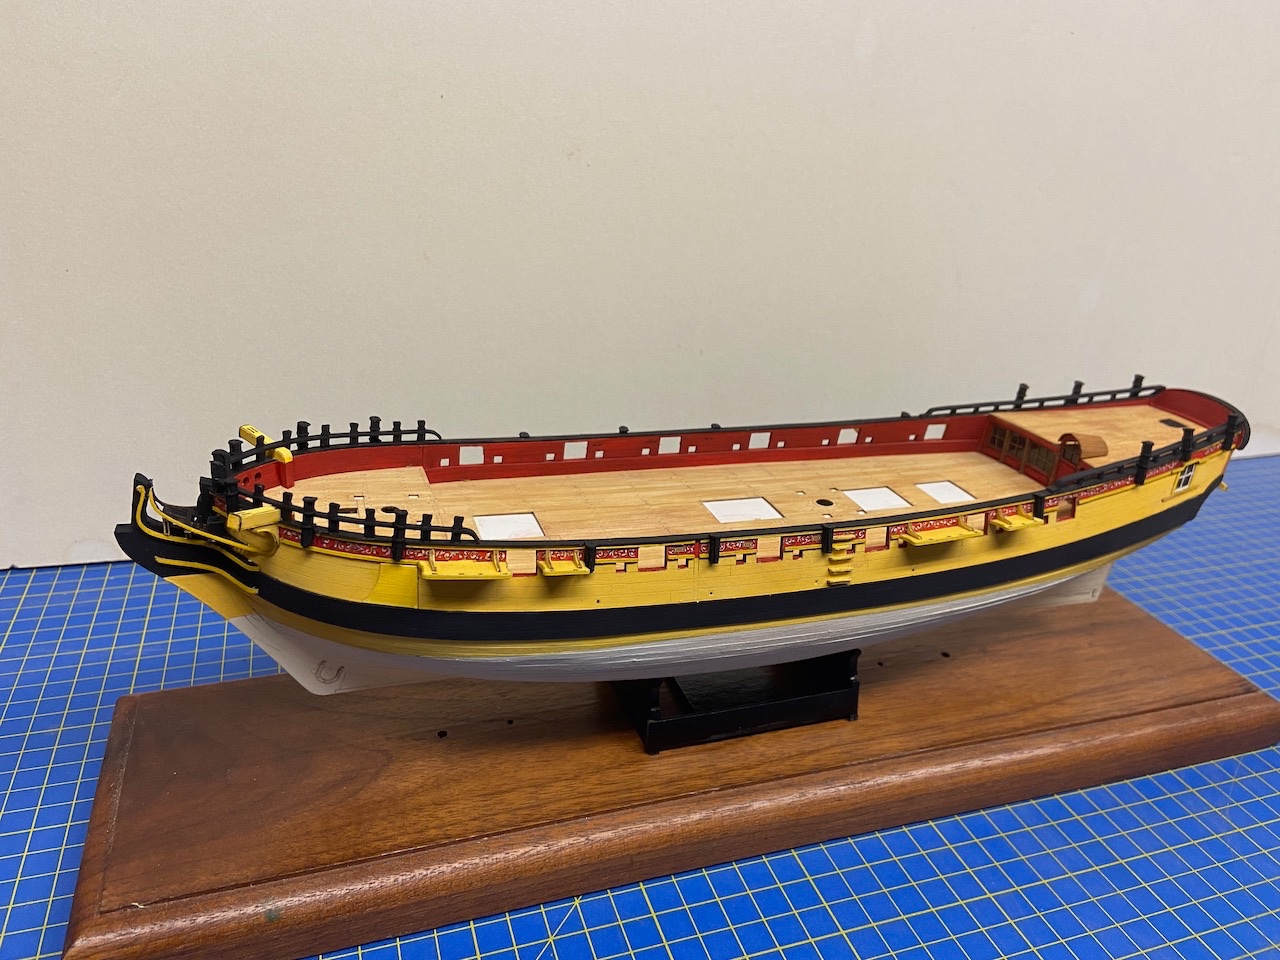
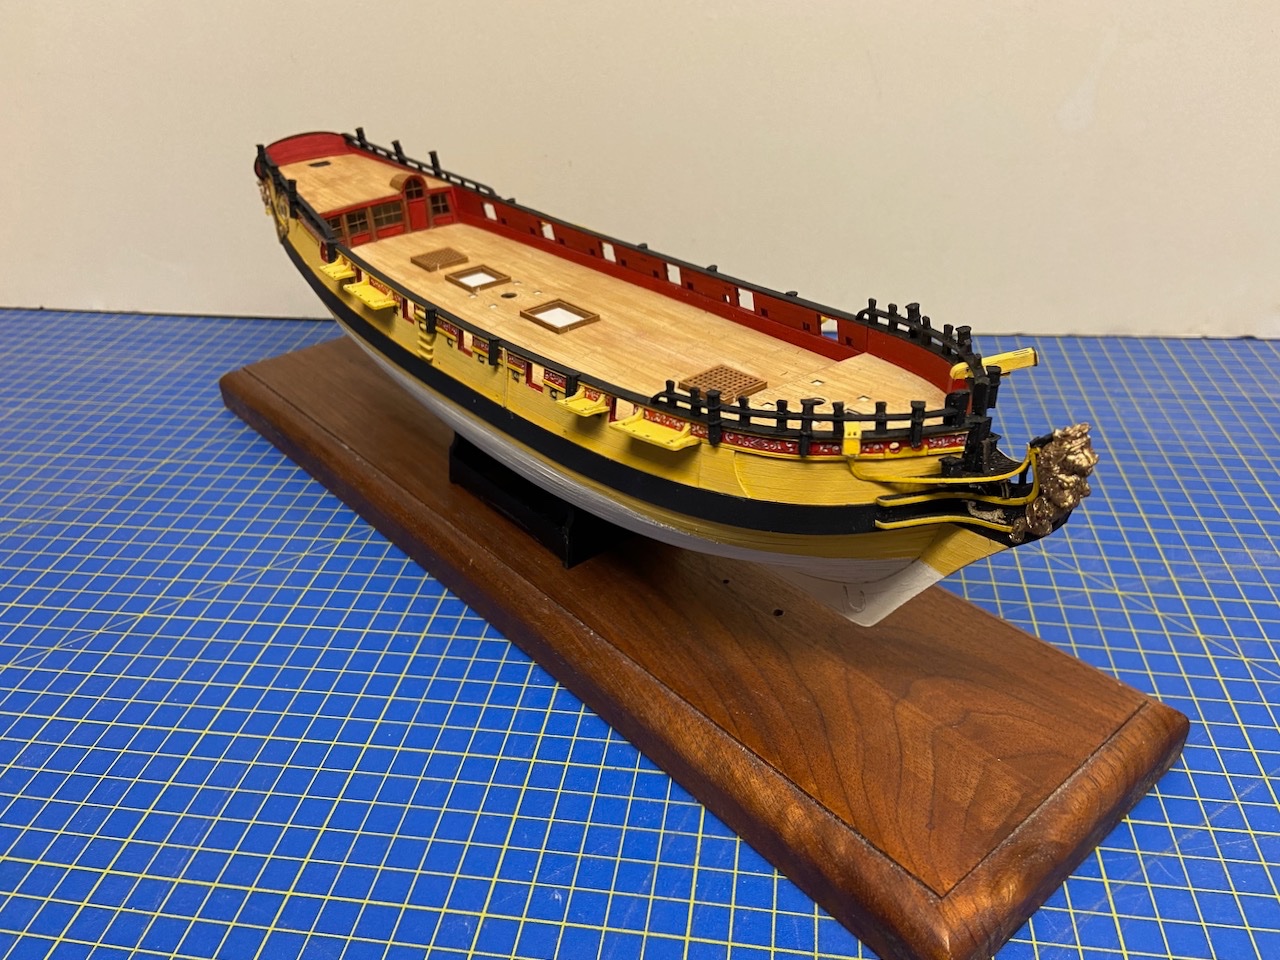
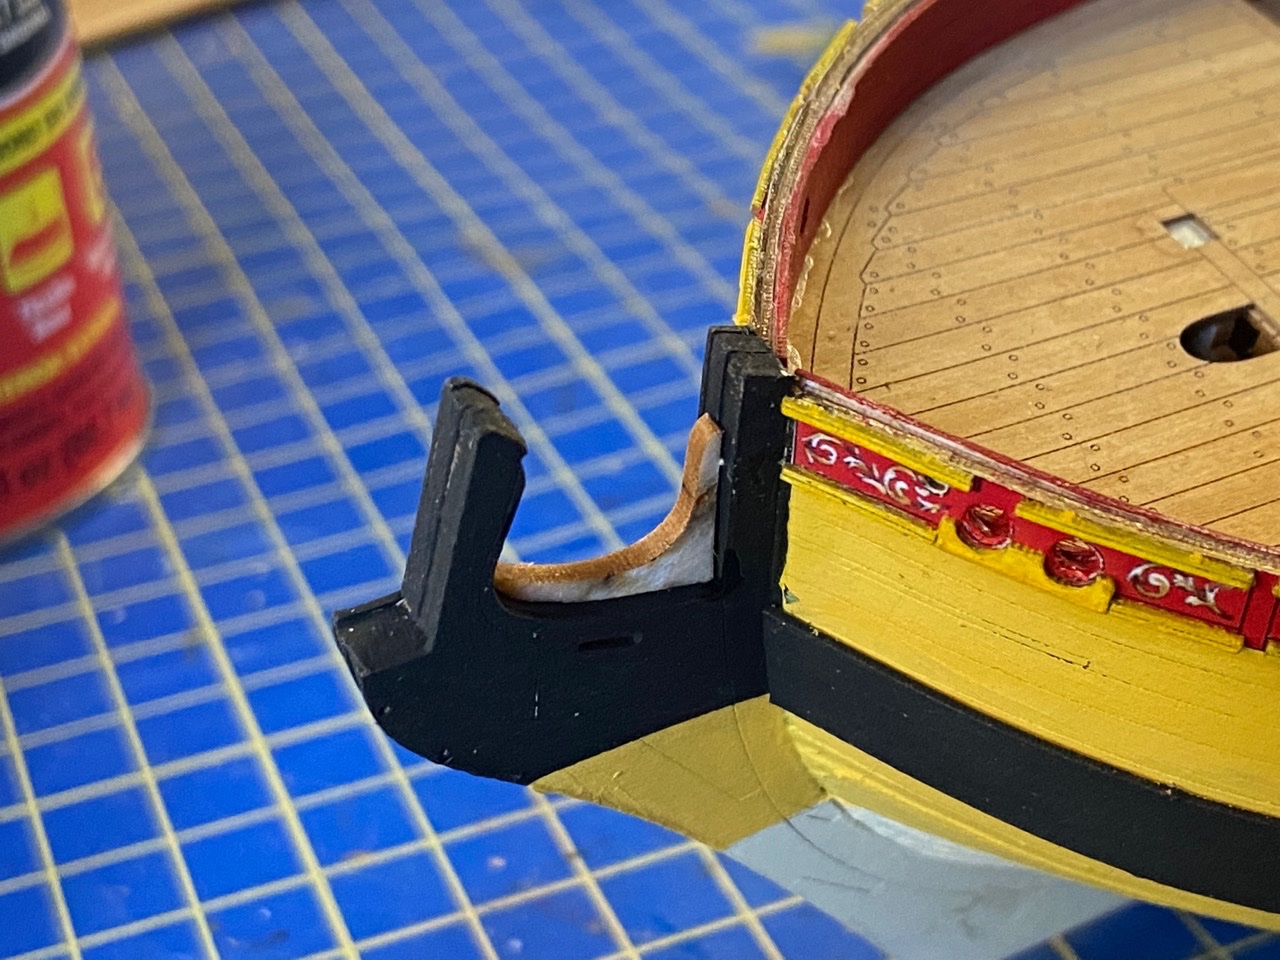
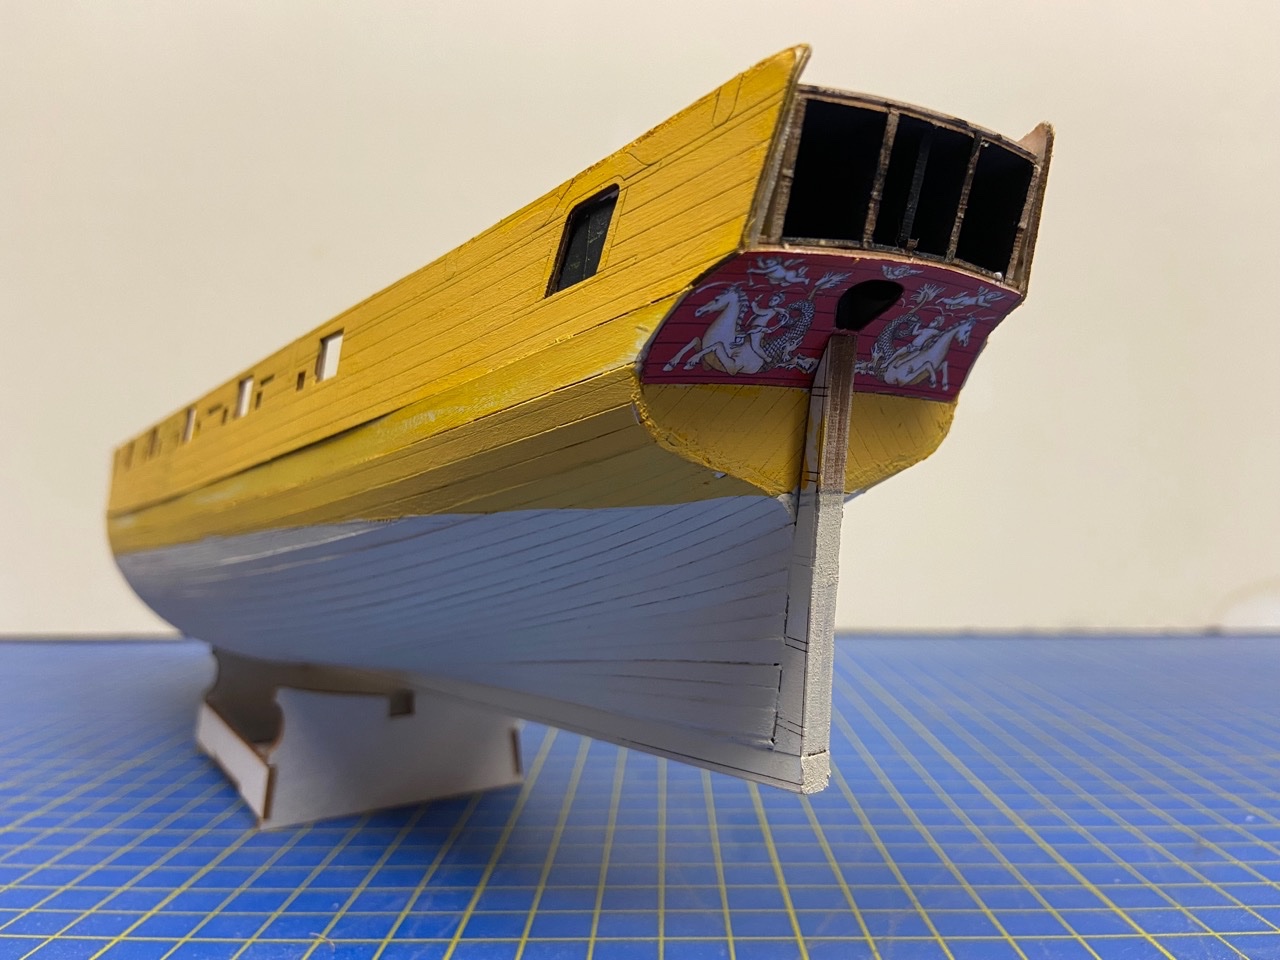
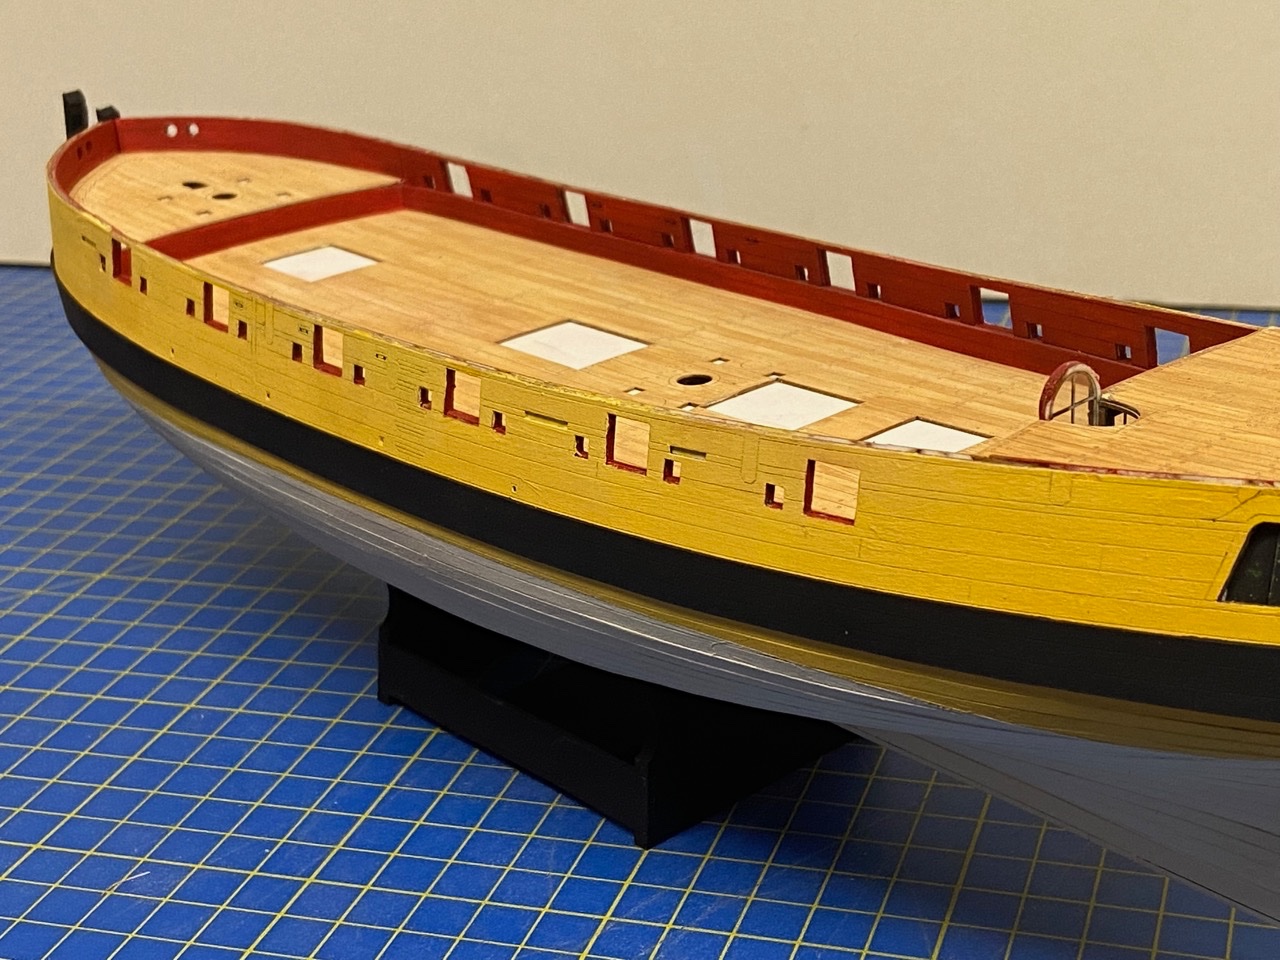
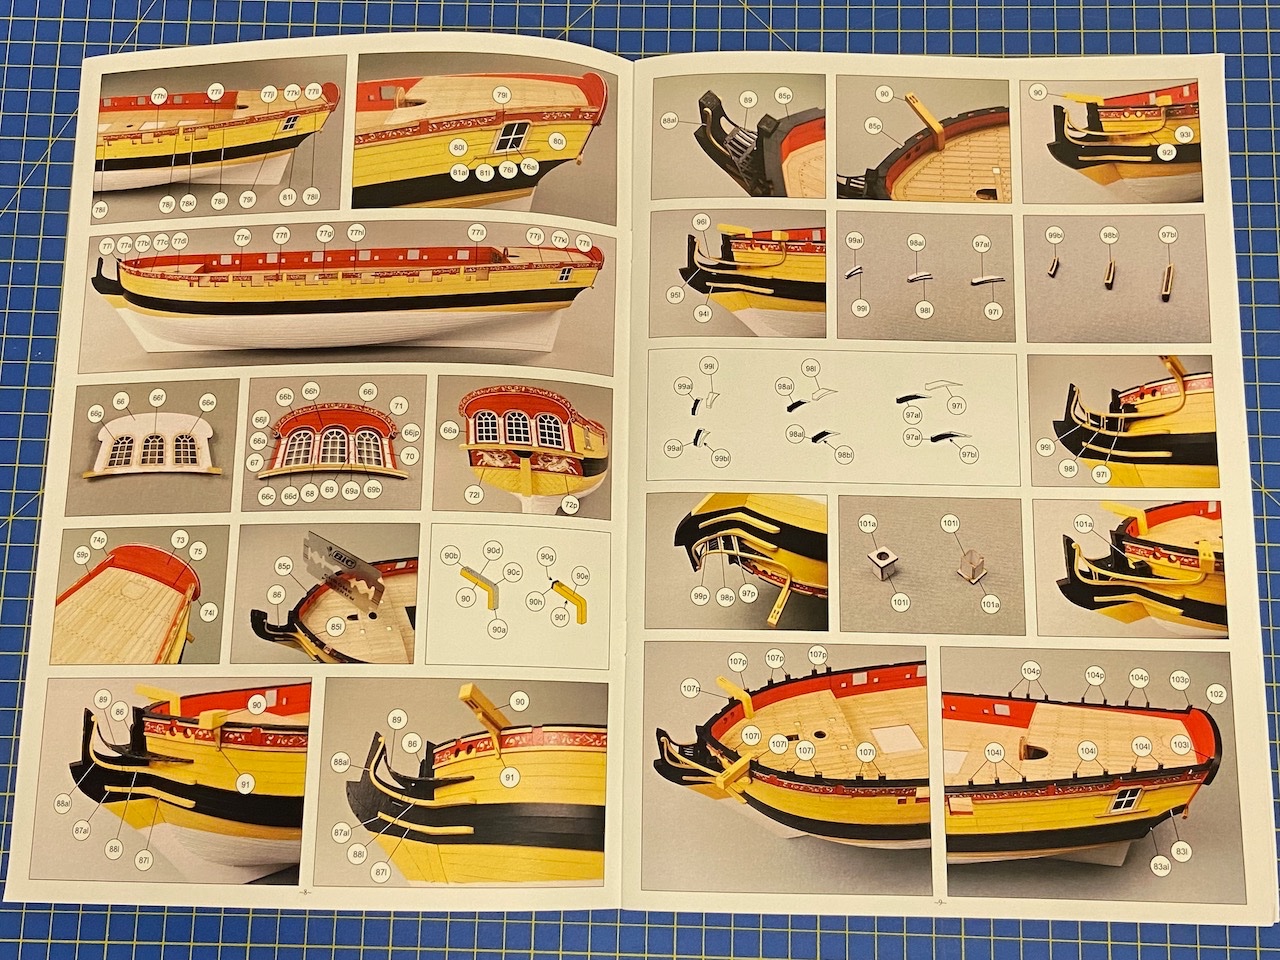
There's a bit of a big leap here from my last post, which didn't have any of the railings. That was a bit of a challenge, mostly in trying to keep all the timber heads straight, as well as adding the swivel gun stanchions. The small timber head pieces that stick up from the rail at the bow are simply glued on to the rail. The pieces are very small, and a bit tricky to mount properly over the lower parts that form rail stanchions. On top of that, they need to be straight. I thought mine were okay, but a closer look showed I was wrong. So, I ended up removing some of the timber heads, cleaning them up, and re-mounting them. Finally, I come to one of the big steps in the model’s construction, one that I have been waiting anxiously for: the figurehead and decorative carvings. The figurehead itself and the carvings across the top of the transom and along its sides are made of cast resin and come pre-painted in a bright gold finish. Apparently, in more recent kits, these come un-finished. The figures at the sides of the transom were a bit tall to fit easily, tucked into the spaces for them, so I had to trim the bottoms of these until they fit, after which I could glue them into place. In addition, there were a number of highly decorative laser-etched card pieces that made up the decorations around the quarter gallery windows, as well as some kind of dolphin decorations that fit along the nearby fashion pieces at the stern. I pre-painted all of these using some gold-colored acrylic paint that was included in the kit. Later on, in order to make the details on these decorations stand out more, I thinned down some brown paint and carefully brushed it into the recesses of the scroll work. Then, I re-applied some gold paint to the high spots on the decorations. Note also that I added the rudder into place, along with the rudder hinges. It’s definitely not perfect. I placed the rudder hinges according to the markings that were visible on the rudder and on the hull’s sternpost. Not perfect, but it looks okay. I have yet to add eyebolts for the mounting of the preventer chains, which would provide an alternative method of steering the ship if the tiller gets shot away in battle. It also would keep the rudder from floating away if it ever breaks loose in battle or in a severe storm. At the bow, these models feature an object that you rarely see on a kit model. If you look at the base of the stem you can see the horseshoe, which helps fasten the components of the stem together. At this point, the model shows off the level of detail provided in this kit, and it gives a sense of how detailed all of these laser-cut card kits from Shipyard are. I’ve come to realize that I am going to absolutely finish building not only this kit, but I’m going to have to build their other 1/72 scale laser-cut card kits, HMS Alert, Papegojan, possibly the Le Coureur, and most definitely, their massive HMS Mercury kit. At least, that is, unless something happens to change my mind about the kits. By the way, I found the details a bit washed out on the decorative pieces, so I've started to give them a wash of brown paint to try to fill in the deep set areas and give the details a bit more contrast. Hopefully, that's starting to show. For now, I’ll be working on this kit, and I’m afraid the apparent progress will start to slow down a lot as I get more and more into the smaller details. I’m starting to consider a few options, like what color the hatch coamings and the gun carriages will be, what I’m going to be doing about the sails, how I will be mounting the model, whether I’m going to use the provided laser-cut card blocks and deadeyes or use wooden ones, etc. Regarding the hatch coamings and deck details, the kit instructions call for most every structure on the deck to be painted red, except for the hatch coamings and gun carriages, which are shown to be left a natural wood color. I was contemplating painting these items red as well. But, now, I'm wondering if I should just paint all the deck furniture a natural brown color? Any thoughts? There seems to be a more recent trend in wooden ship modeling to paint deck furniture red. The old tradition was leaving things natural. But, that was to show off the wood of a model. This model is not wood, so there's no need to show off wood. Still, wood colored deck furniture will make the model look more like it's wooden cousins, which is part of a valid visual effect for a paper/card model. Opinions are welcome! Below, you can see the hatch coamings dry fit into place to give some idea of what I'm talking about.
- 108 replies
-
- 14
-

-
review HMS Wolf 1754, 10-gun Brig (Snow) - Shipyard - 1/72 - CARD
catopower replied to catopower's topic in REVIEWS: Model kits
Very nice BenD! Interestingly enough, I must have an older kit. Mine still has brass cannons, and while the figurehead and carvings are cast resin, mine came pre-painted! My swivel guns need to have the handles made for them, but the instructions really don't make it clear just how to do that. I guess it won't matter for the new crop of kits anyway. By the way, you're right about paint needing thinning. But, on the upside, there's WAY more paint provided than you'll need for this kit. -
Very nice, meticulous work, Johnny. I think there may be some light at the end of the tunnel... Your project is reminding me that I need to get back to completion of a couple Woody Joe projects I've got!
- 63 replies
-
- 2
-

-
-
- Finished
- Khufus Solar Boat
- (and 1 more)
-
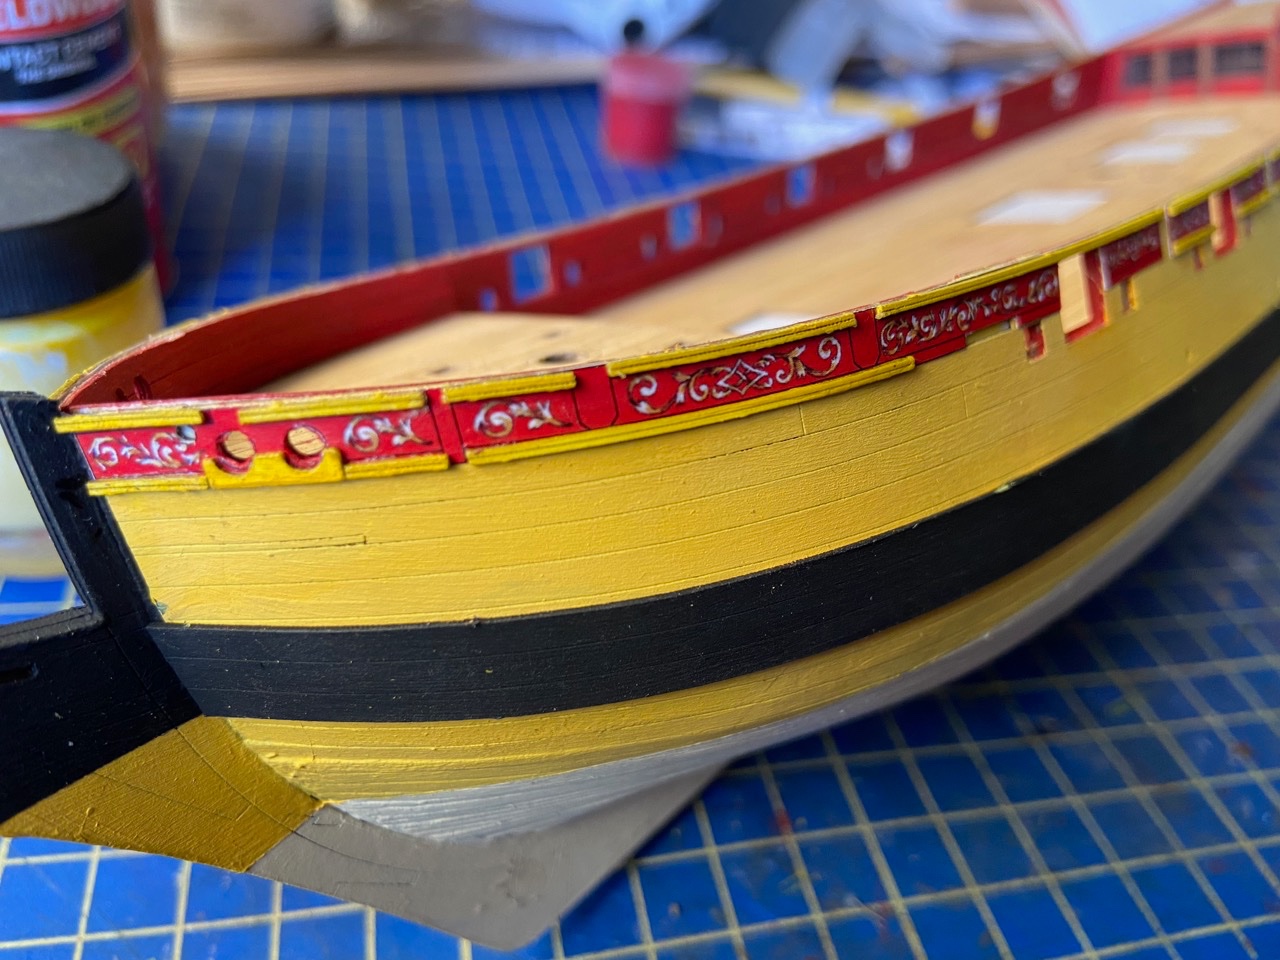
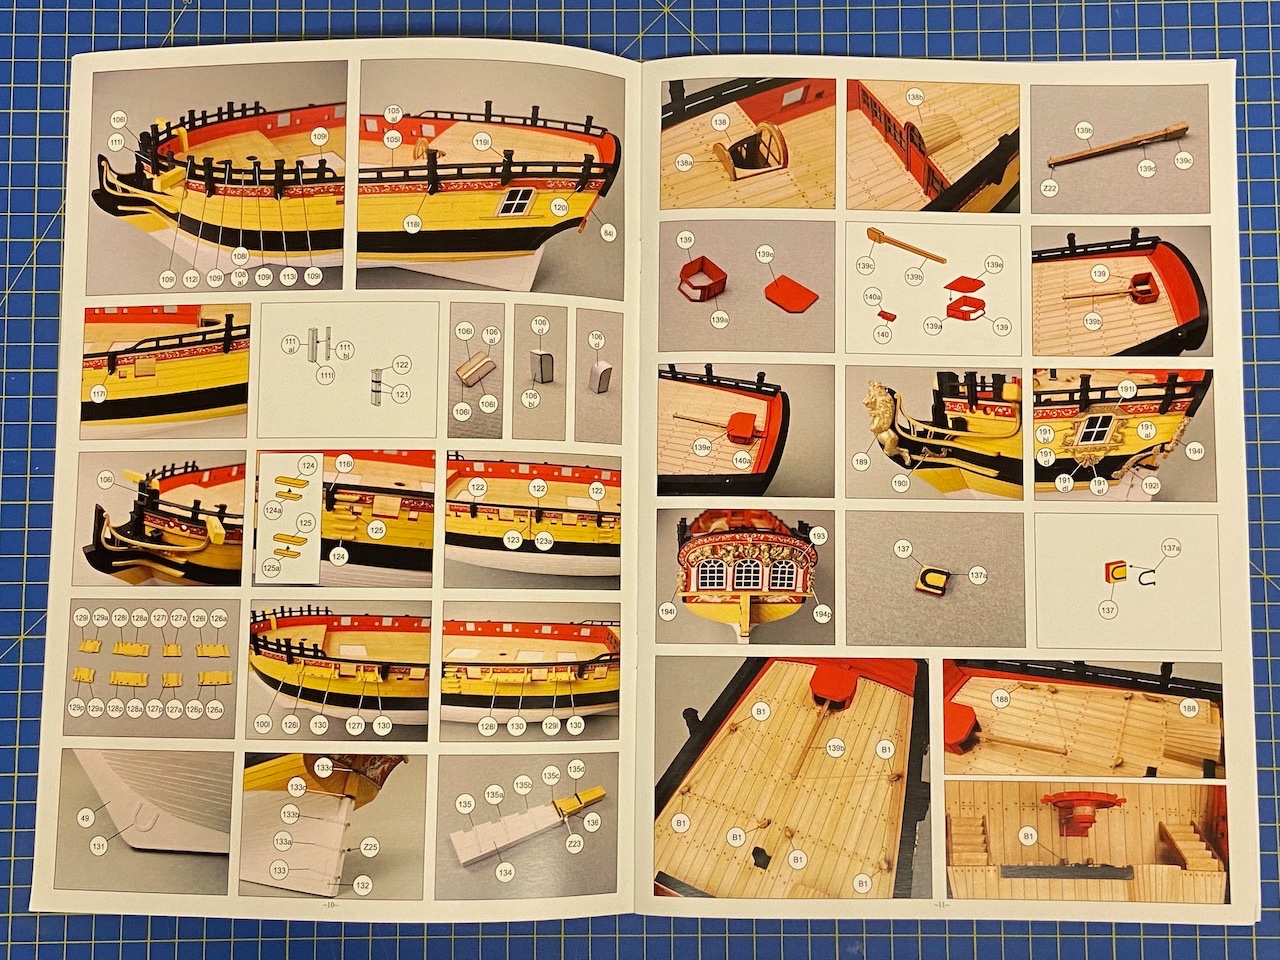
Next step was to add the friezes to the hull. This comes as, if I recall exactly, five separate pieces for each side of the hull. The gun ports and sweep ports provide the perfect guides for alignment of these printed pieces of paper. This printed paper, by the way, is the only thing in the whole kit that needs to be cut by hand. Then, the build actually gets a little tricky, when it comes time to add all the moldings that border the friezes. You have to look at the instructions very carefully to make sure the right pieces go in the right places. It can be very easy to get mixed up, and there are also some REALLY TINY pieces. With no extra pieces provided, this is one place where you have to be super careful with the build. Below, you can see the first really noticeable mistake. I didn’t notice when I glued the clear acetate to the back of the quarter gallery window frames and the frames on one side got deformed in the process. I left it, rather than trying to fix it and probably destroying it. I may eventually see if I can make the deformity less noticeable. But, for now, it’s only really noticeable in a close-up photo. The next mistake, which I did manage to overcome was this knee. I thought it was a single piece, but turns out there was a second piece. They were supposed to be glued together to form one, thicker knee. But, the instructions don’t really make it clear and I only figured it out when I found the second piece. I just sliced the second piece in half and glued each slice to either side of the knee that was already in place. Problem solved! The stern gallery was another one of those cool detailed assemblies that would really stand out on the model. This one was 29 pieces, including the frieze. And, here’s the model at this stage, with all the moldings in place. I was afraid that some of these molding pieces might get knocked off, so I made sure to brush some diluted Aleene’s Tacky Glue along the edges of the molding pieces to help secure them. Even so, I’m extra careful with the model as I’m working on it.
- 108 replies
-
- 12
-
-

-
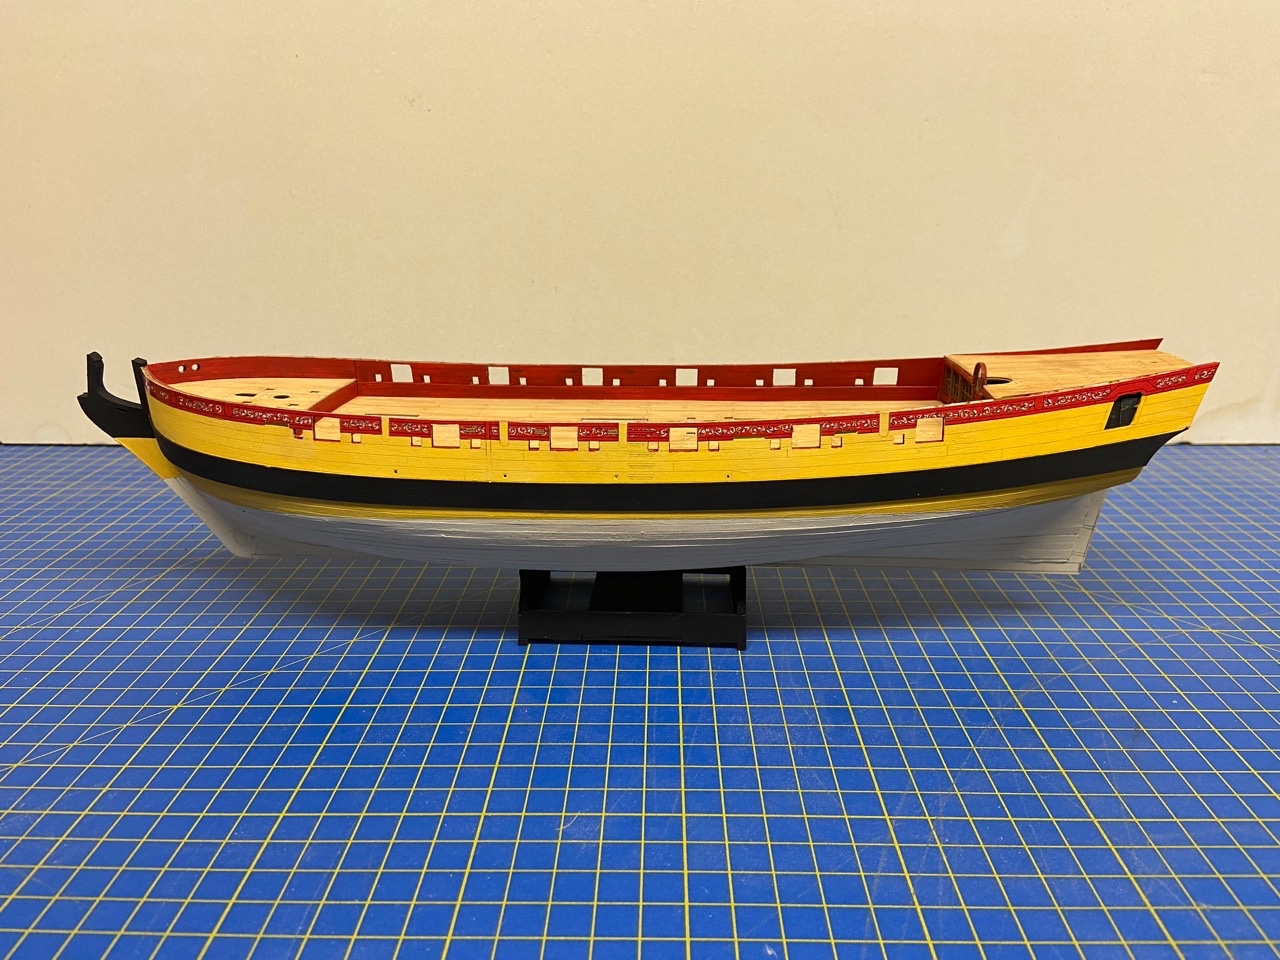
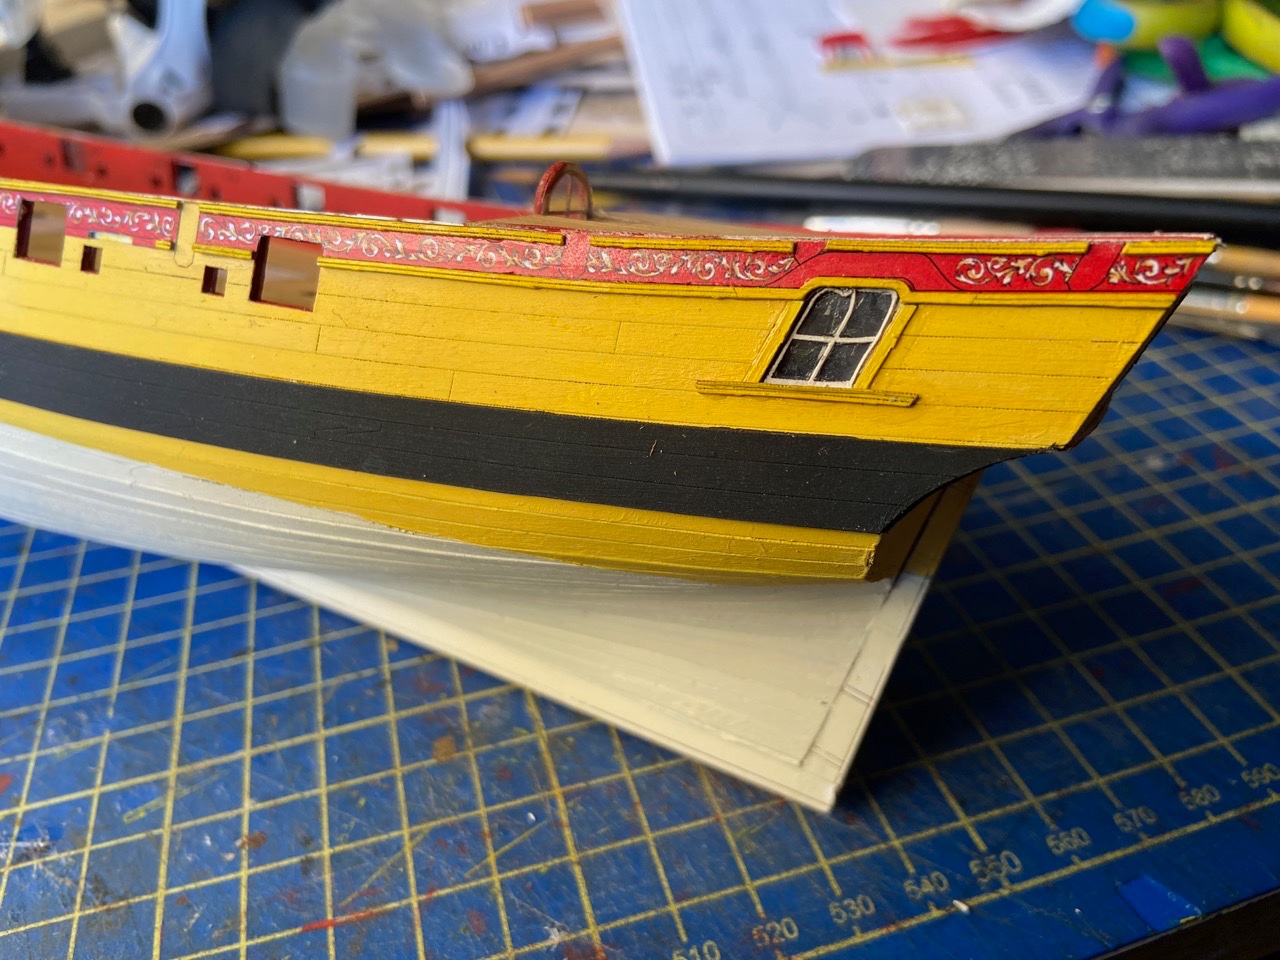
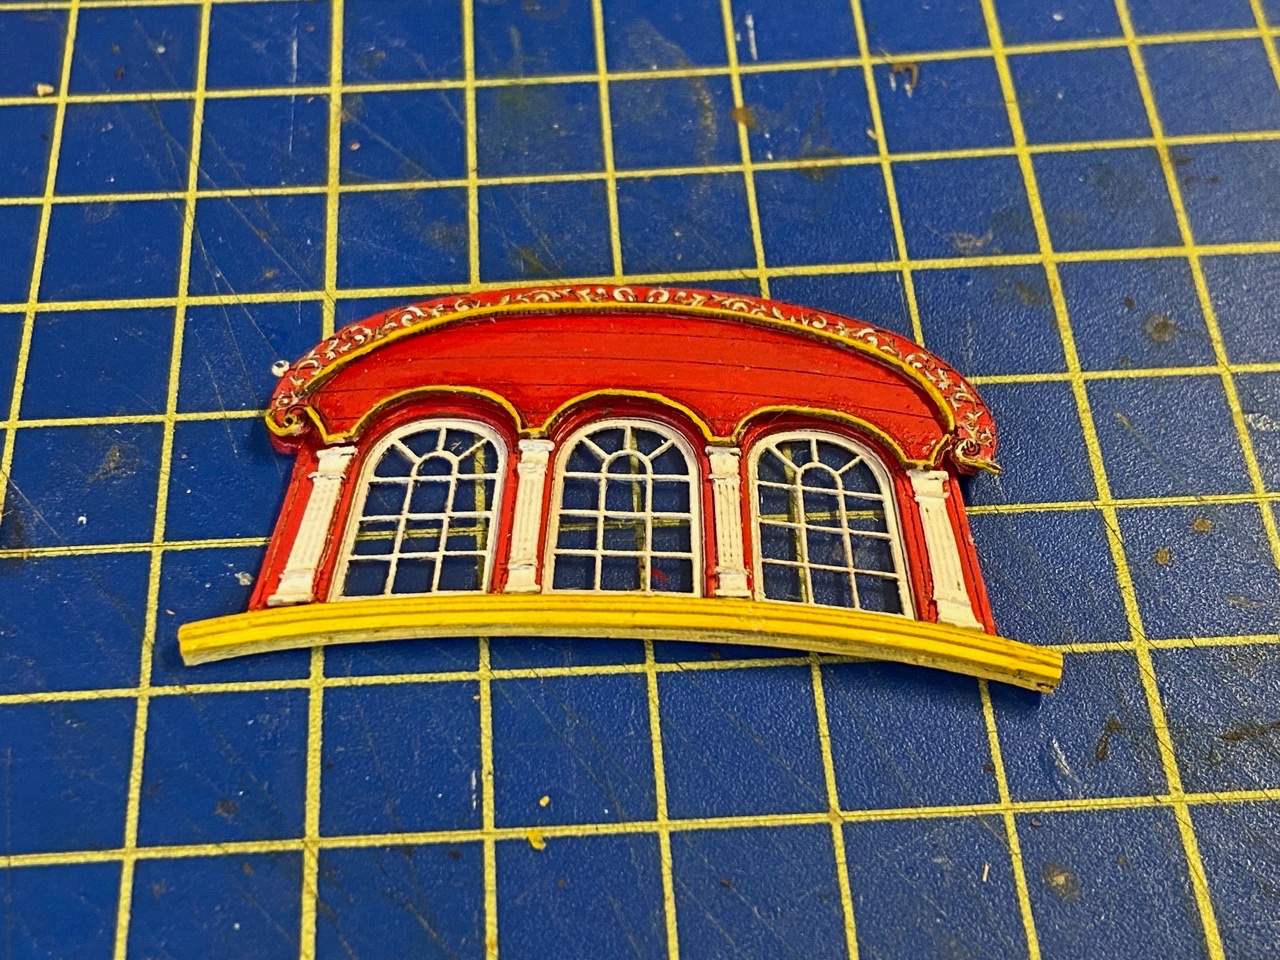
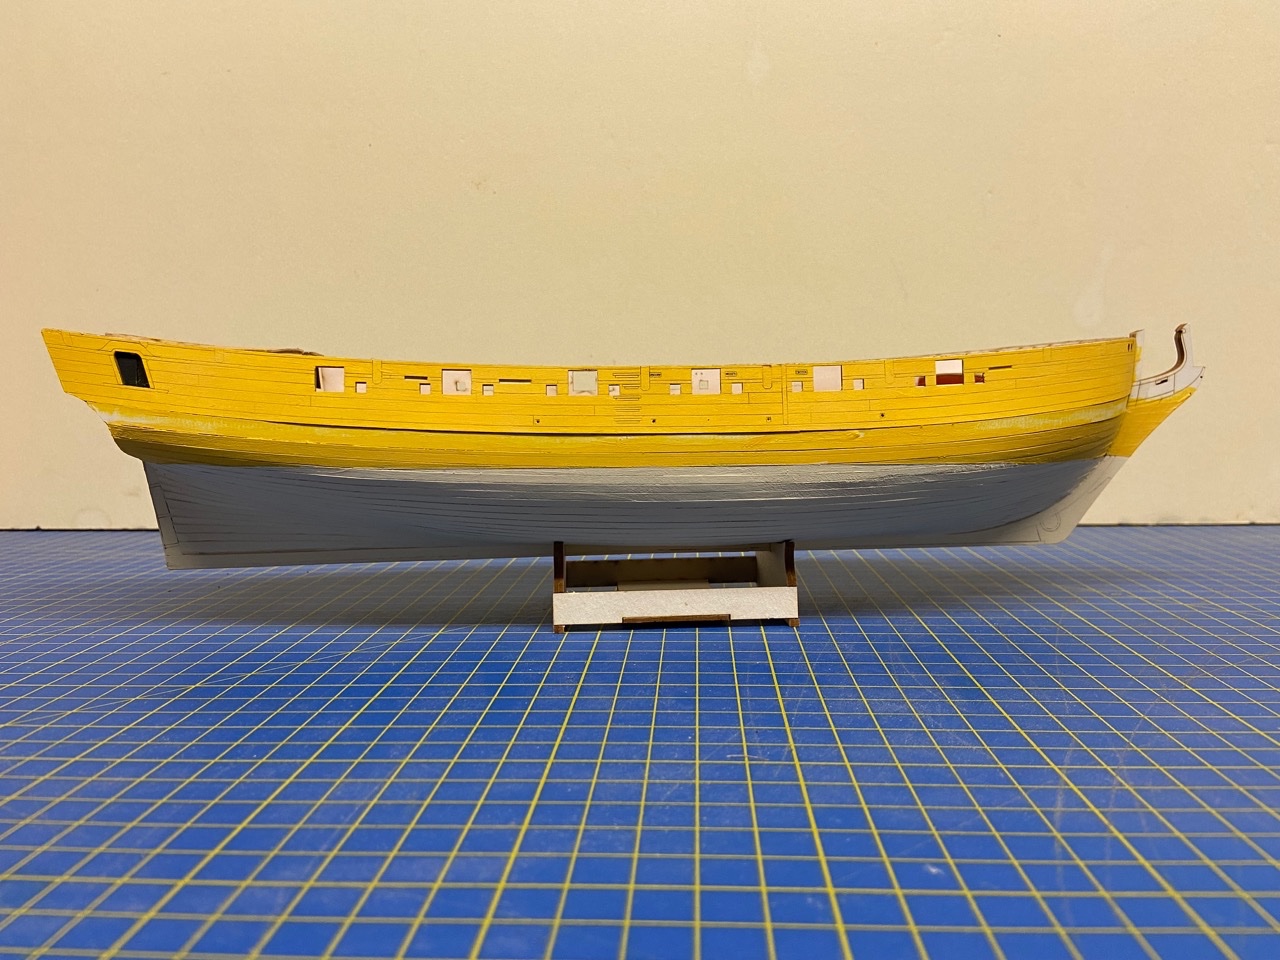
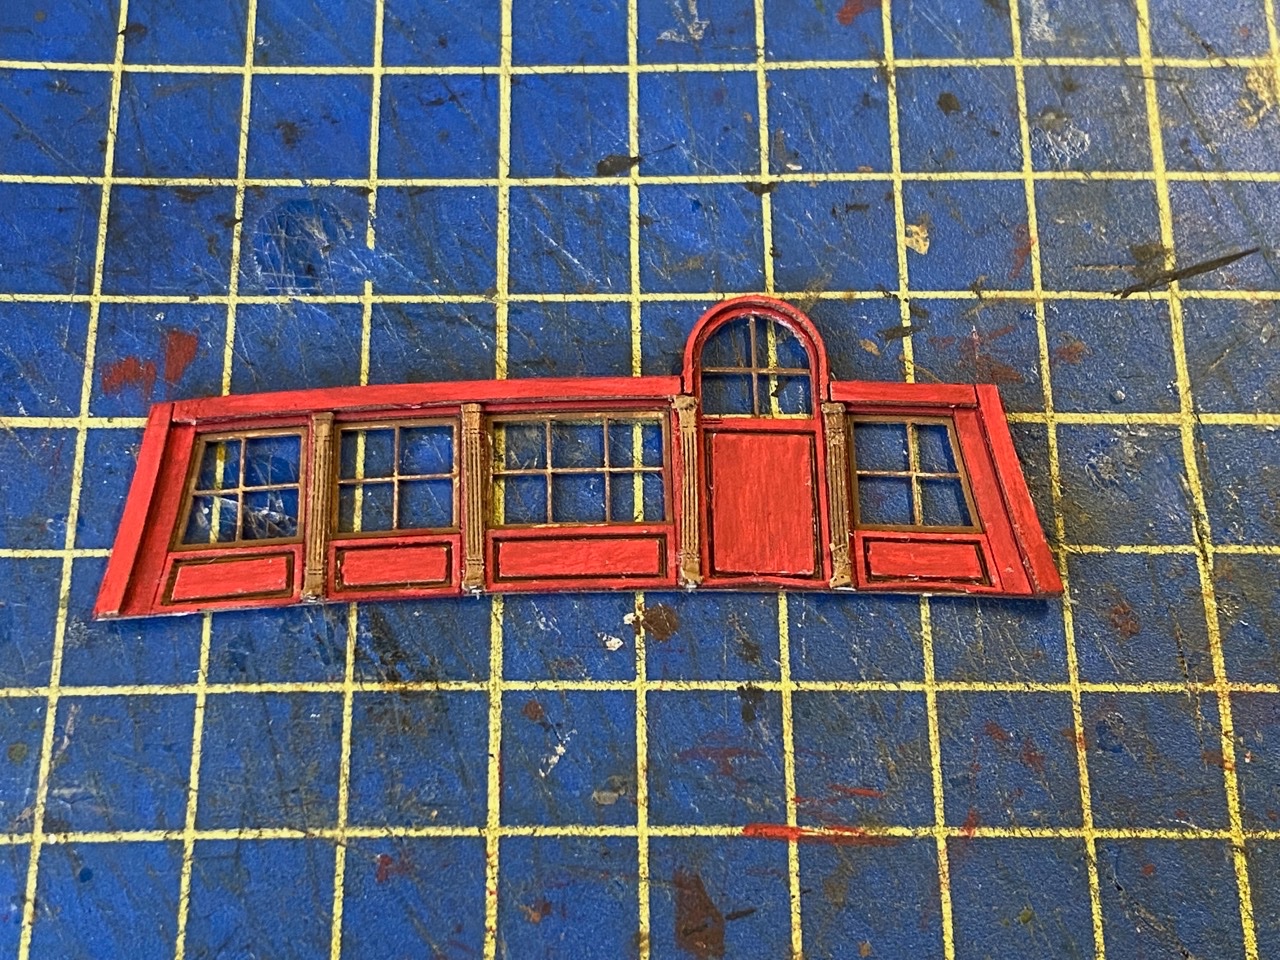
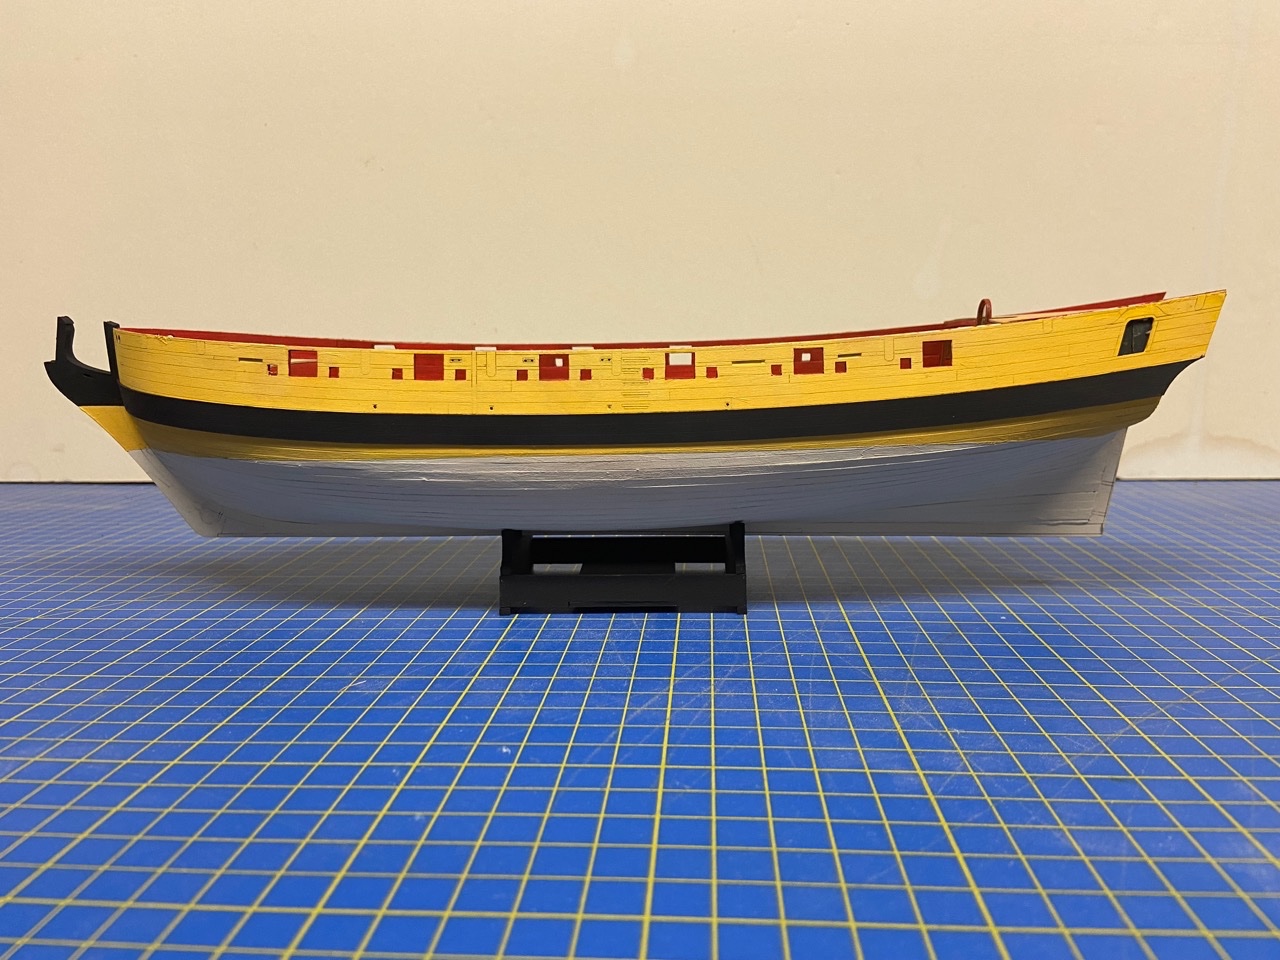
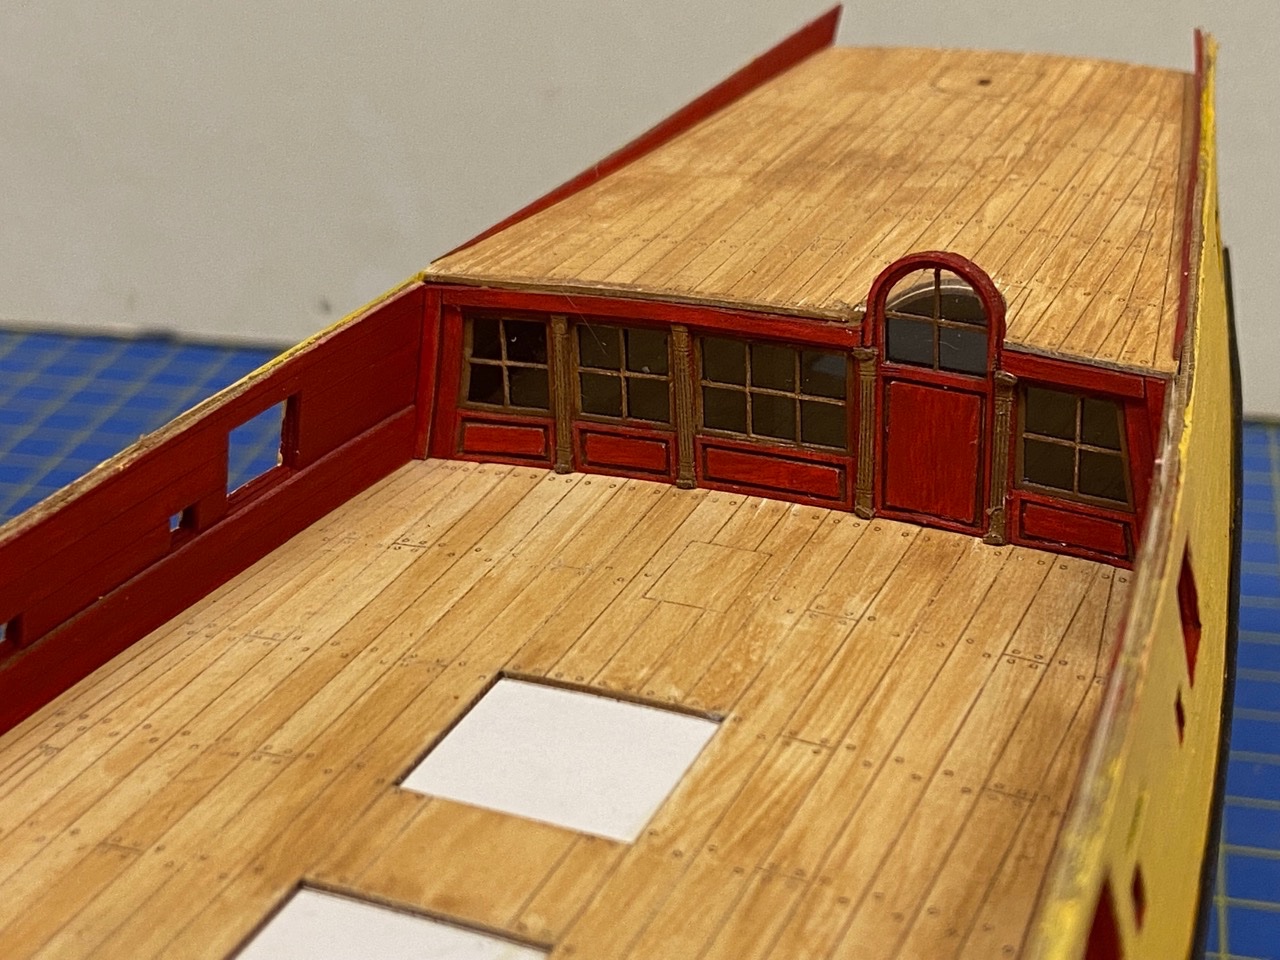
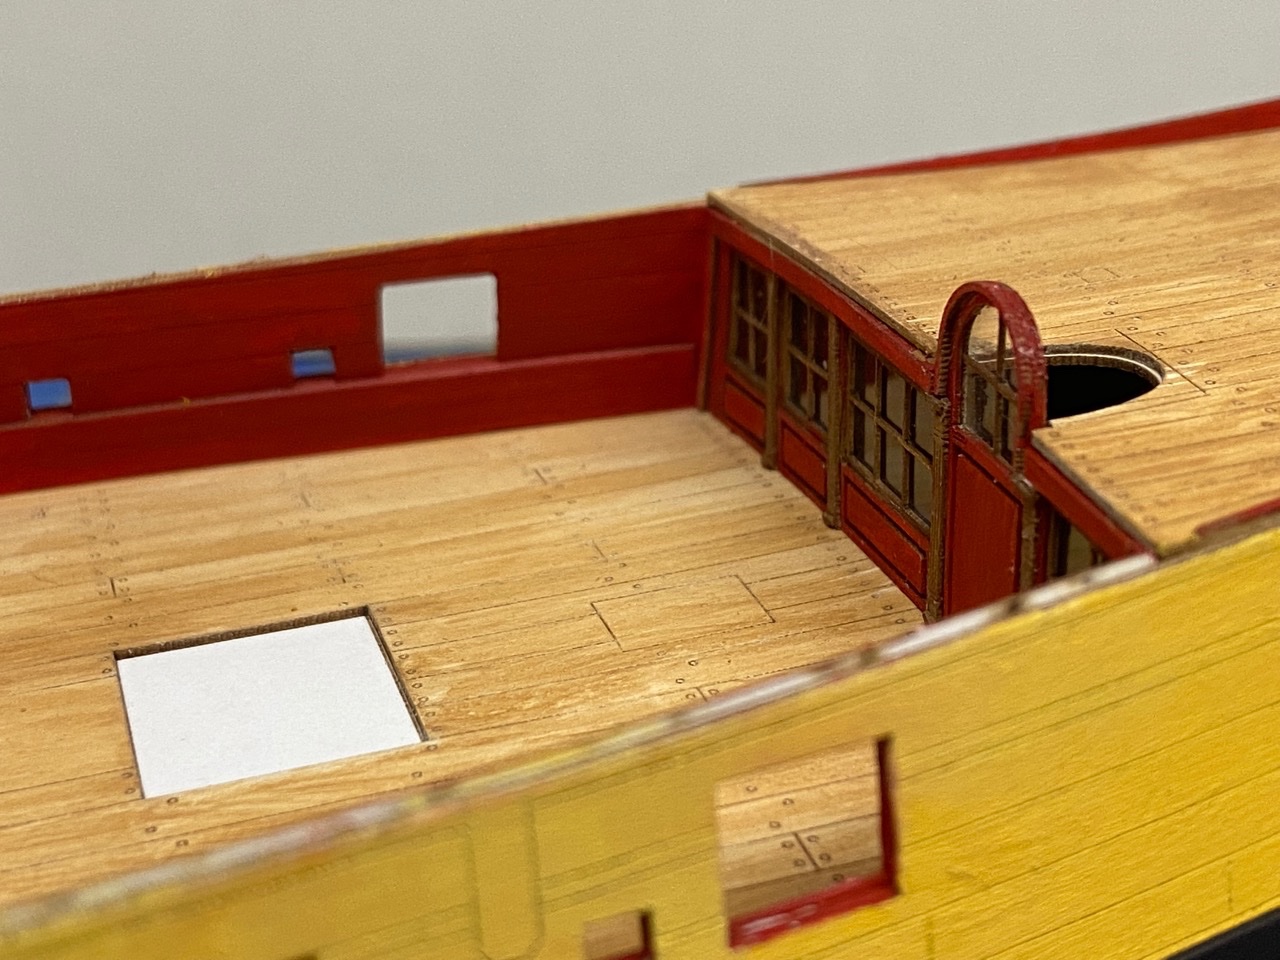
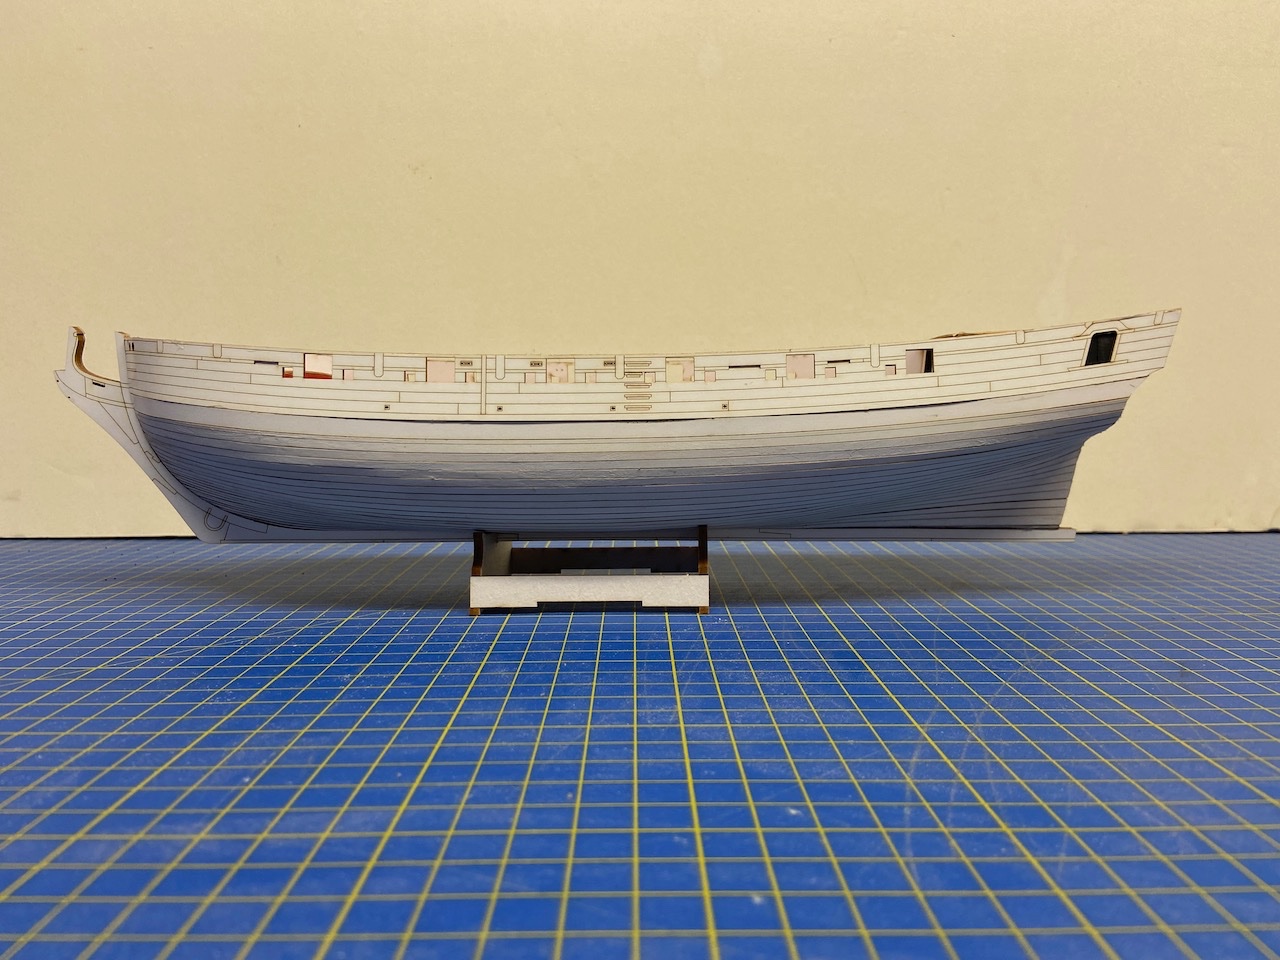
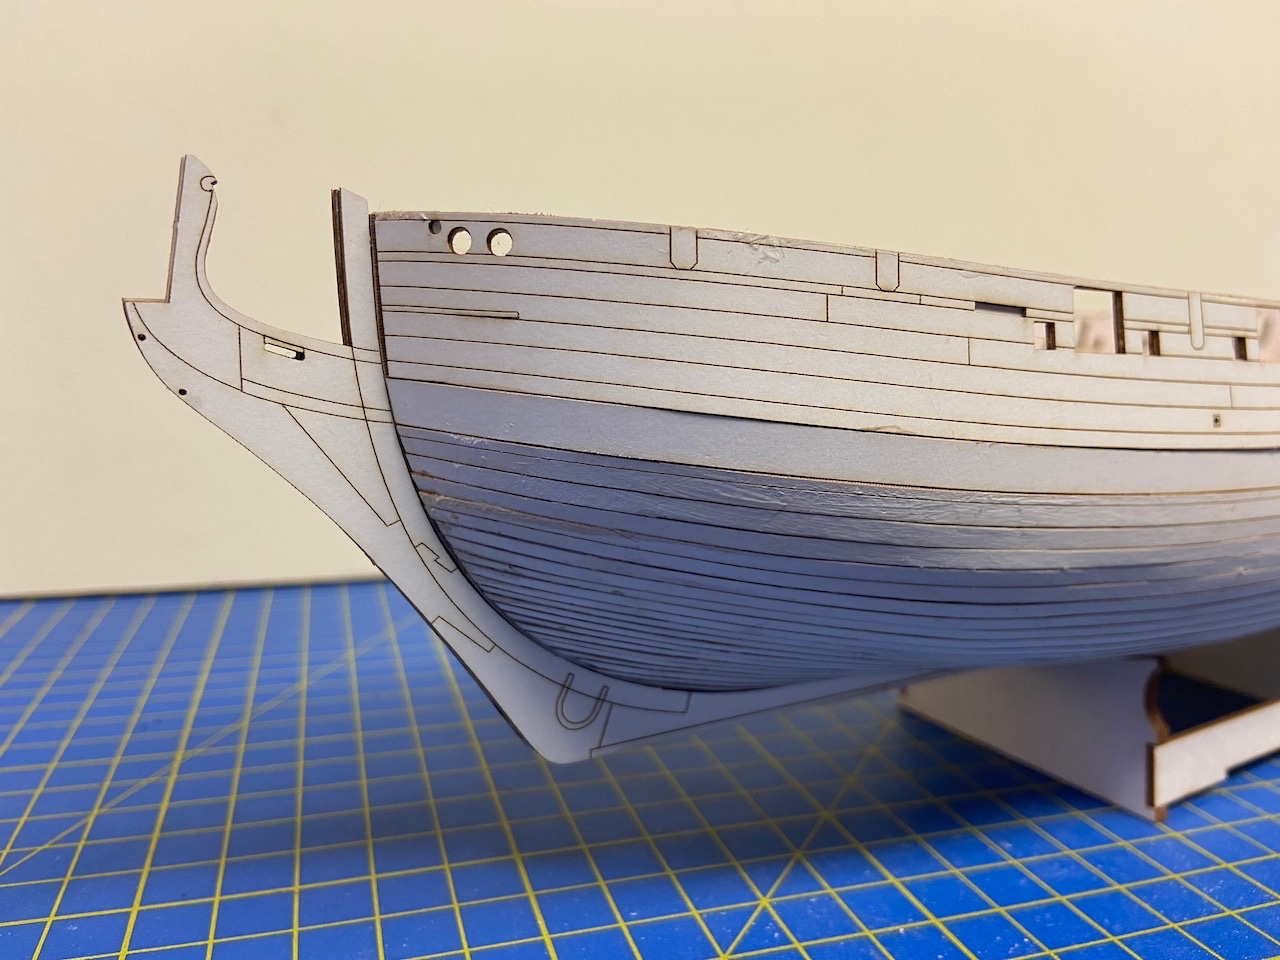
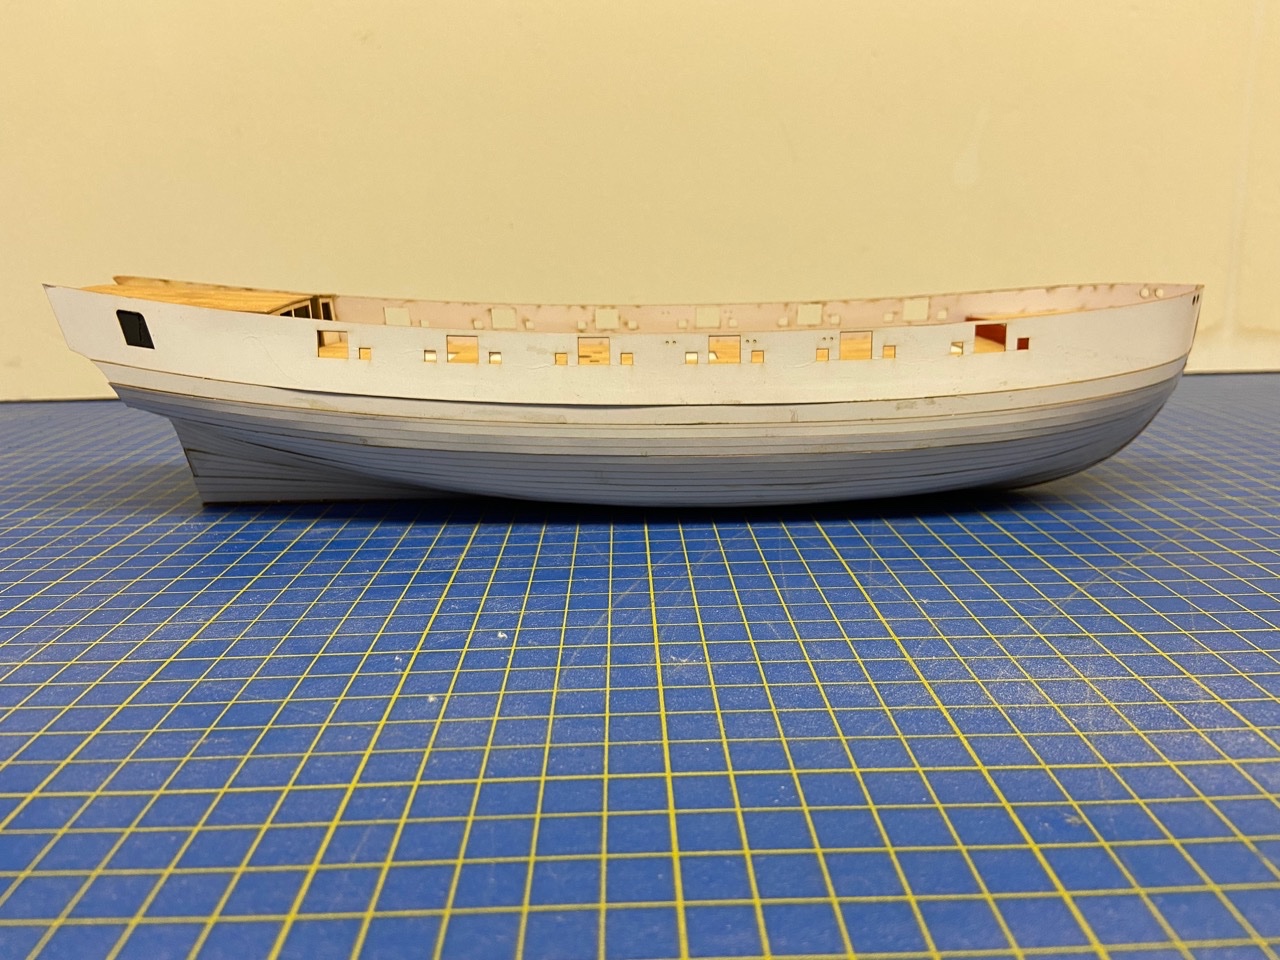
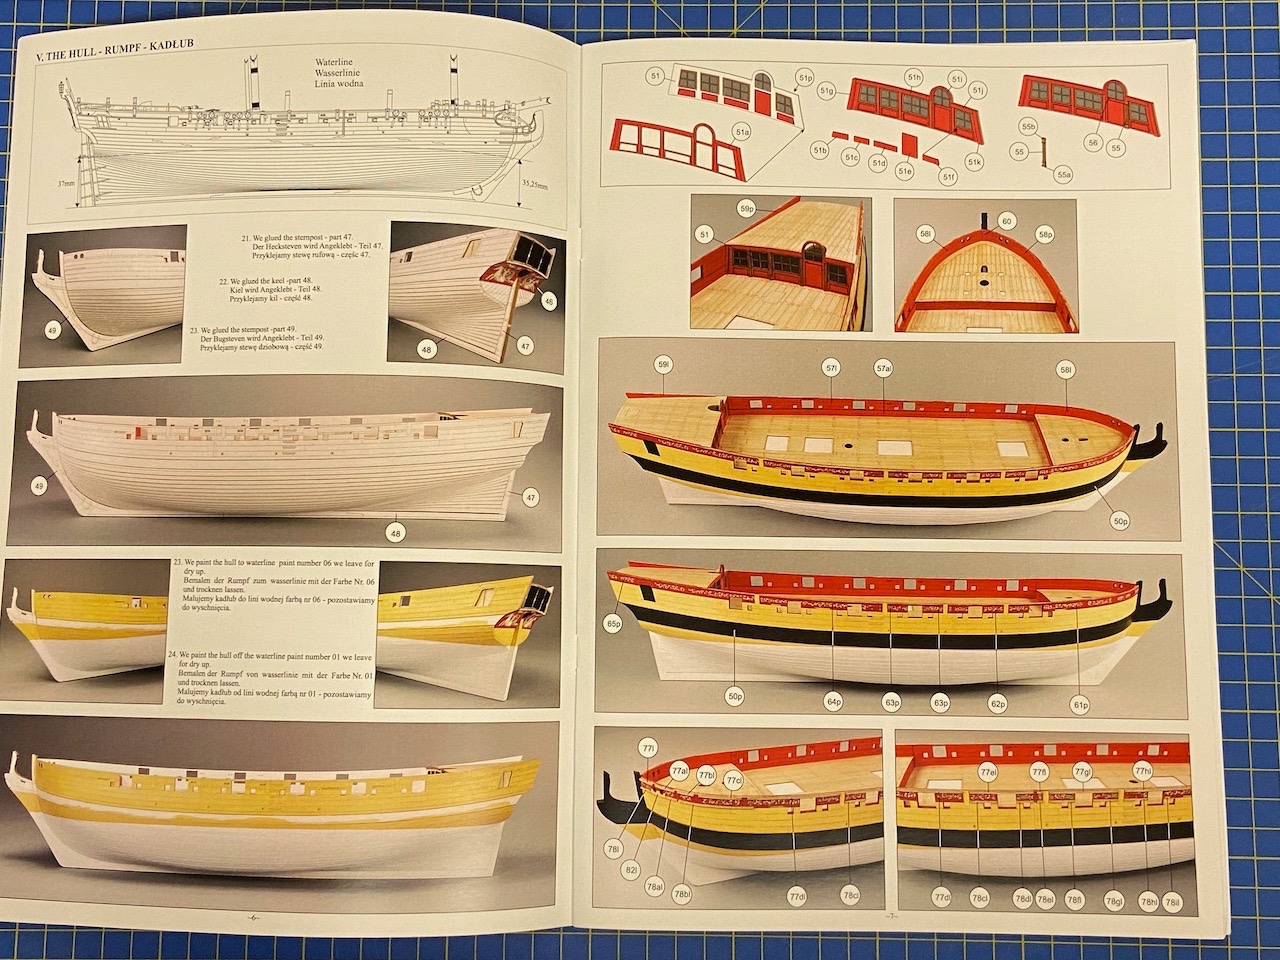
As I mentioned last time, I had some high spots with the edges of some planks, so I did a bit of light sanding, and applied some gesso to the bottom of the hull to fill in any gaps in the planking. Finally, I used my waterline marker to define the waterline, then masked it off using some Tamiya brand masking tape. Following the kit instructions, I painted the upper hull yellow and then re-masked and painted the bottom white. I decided I didn’t want to use the paint straight out of the provided jars, as the colors seemed too intense. My initial concern was really about the use of red. The outside hull gets some pre-printed frieze design with red background that looked like it matched the color of the paint straight from the jar. Fortunately, the designs were only on the outside of the hull. All my painting of red would be on the inside of the hull. So modifying the red color shouldn't cause any issues. As for the yellow, I lightened it up to reduce the intensity a little, which I decided was only on the outer hull, so it shouldn’t be an issue there either. Below is the first piece of the printed frieze design. I don’t know if the design was actually on the operational ship, or if it only appeared in some painting somewhere of the proposed ship, or if it might have eventually been painted over. I considered not using it. But, it adds so much to the decorative nature of the model that I saw no good reason to leave it off. Sorry the lighting wasn't very good for seeing the artwork in the photo. At last, I got to work on the face of the stern cabin, which is such a cool little project and looks so nice on the model. I decided to paint it red, but to give some depth to it I painted the underlying piece a dark brown to add contrast. I also painted the columns brown as well. There are several pieces, and it was a lot of fun to put this all together. I think there were 22 or 23 pieces, not including 5 clear acetate pieces for the window glass, which was added later and glued into place using Formula ‘560’ Canopy Glue, which dries clear. After that, I added the wales, which covered up some of the irregularities in the hull that were bothering me. I painted the wales black before applying it, then I finished off painting the black portion of the stem. The inner bulwarks pieces went in just fine, though they were just a tad long. I carefully lined them up with the gunports to figure out which end I had to trim and by how much. You can’t see it in the photos, but the bottom edges at the forecastle showed a little gap, so before gluing those forward pieces into place, I painted the hull behind the pieces first where the bottom edge would show through. So, now, you can’t see the gap so well. Painting the inner edges of the gun ports and the sweep ports resulted in getting a little paint on the outside of the hull. So, I had to clean up as best I could as I went along, then touched up the outer hull with the yellow paint. I am super thrilled about how nicely this model has been turning out, and I find it just incredible to get this far so quickly, and to have something so beautiful and amazingly detailed in my hands.

- 108 replies
-
- 12
-
-
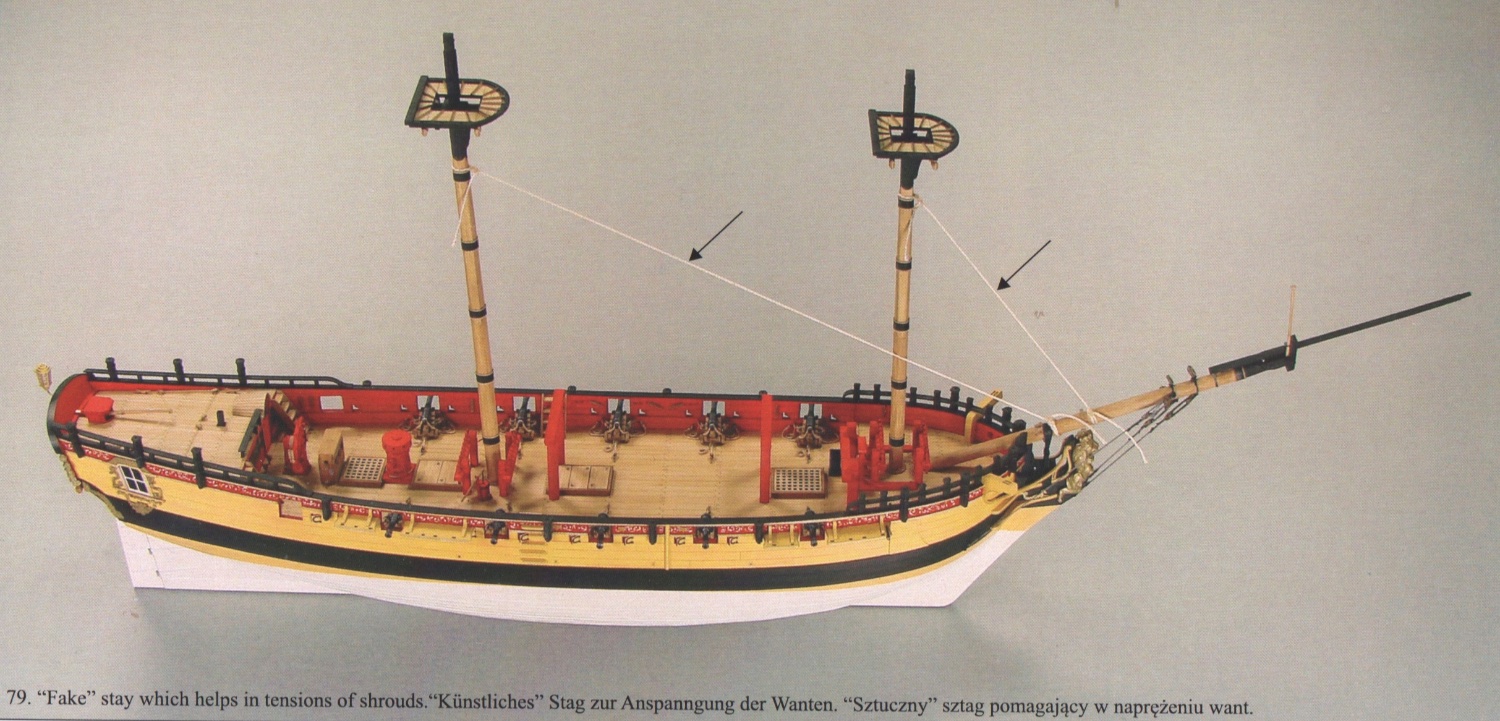
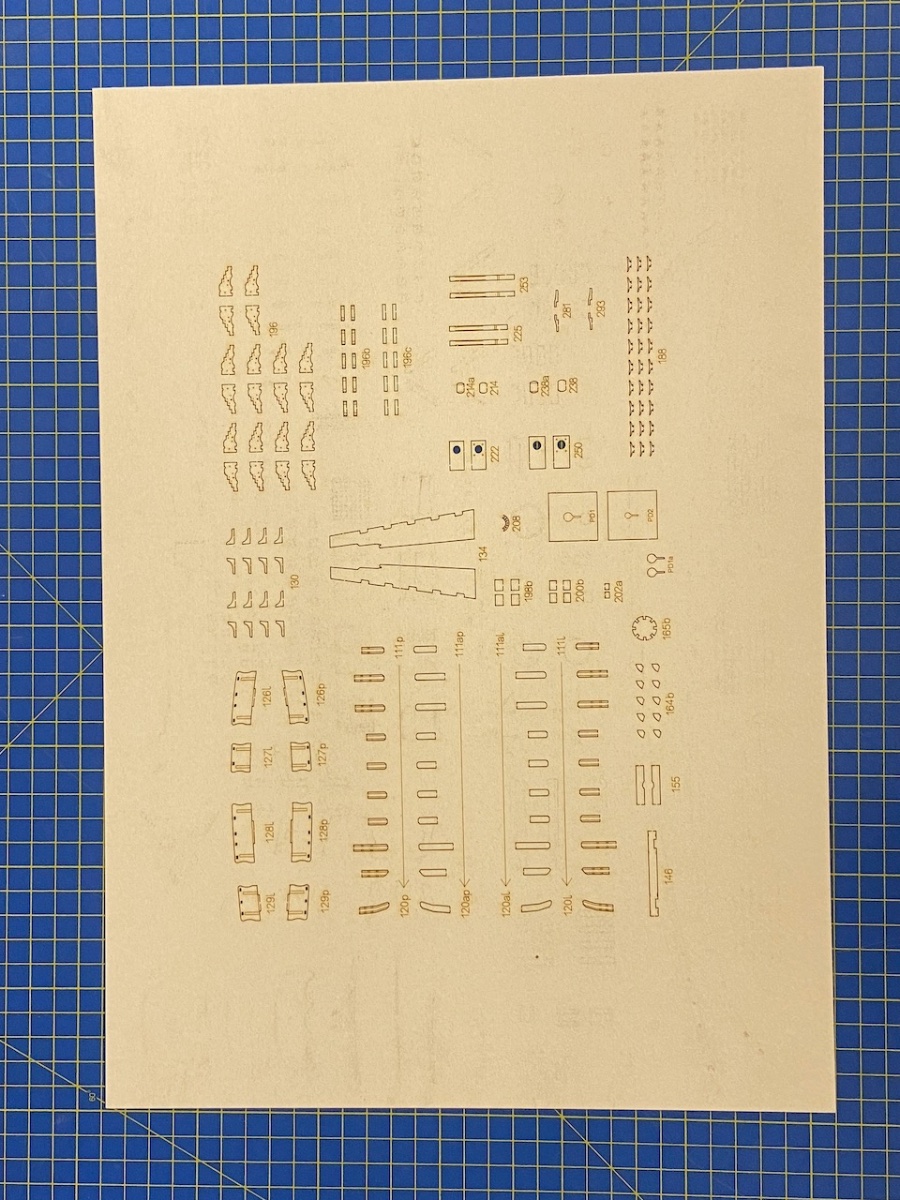
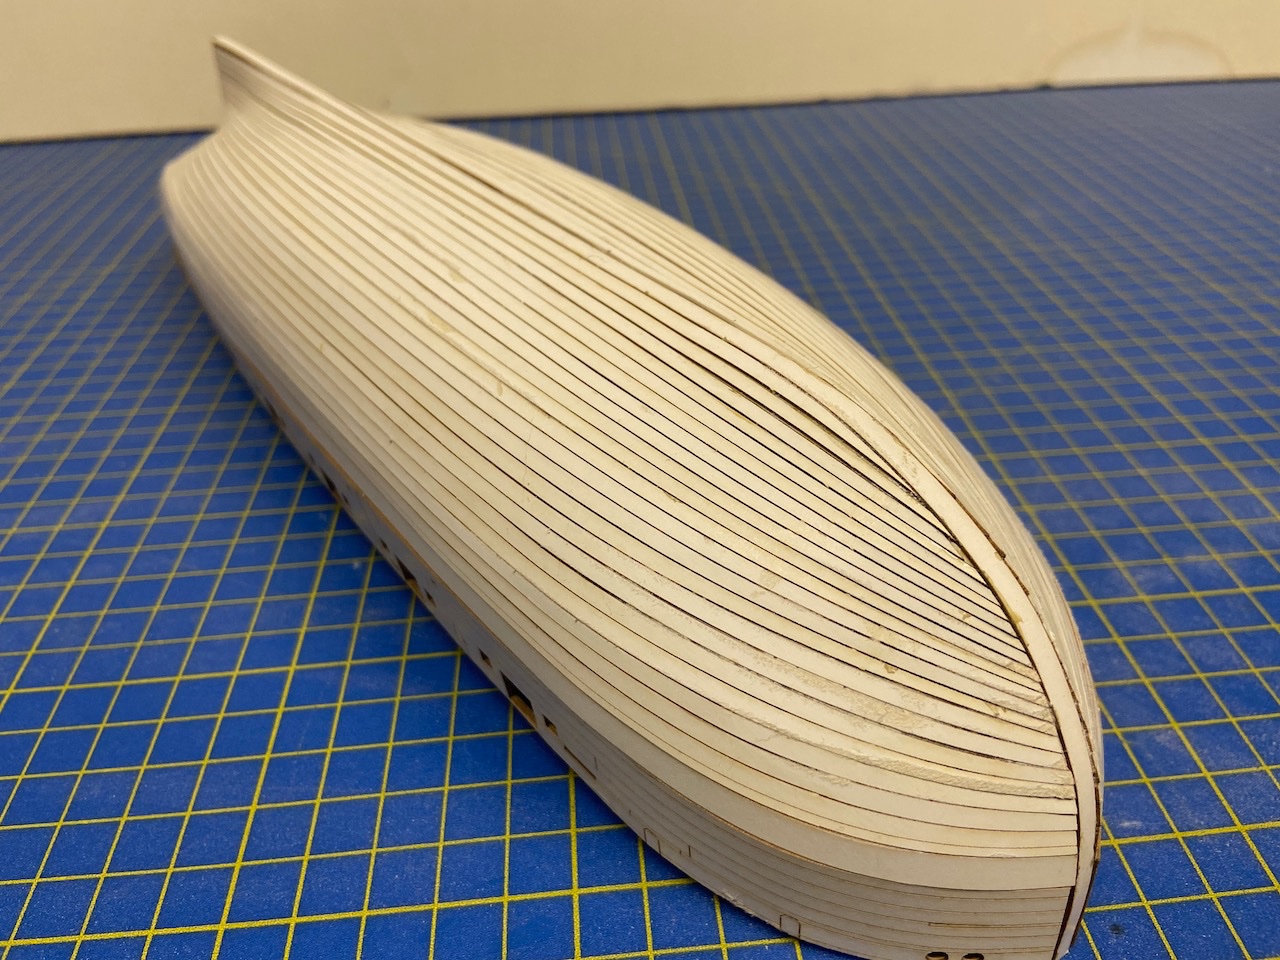
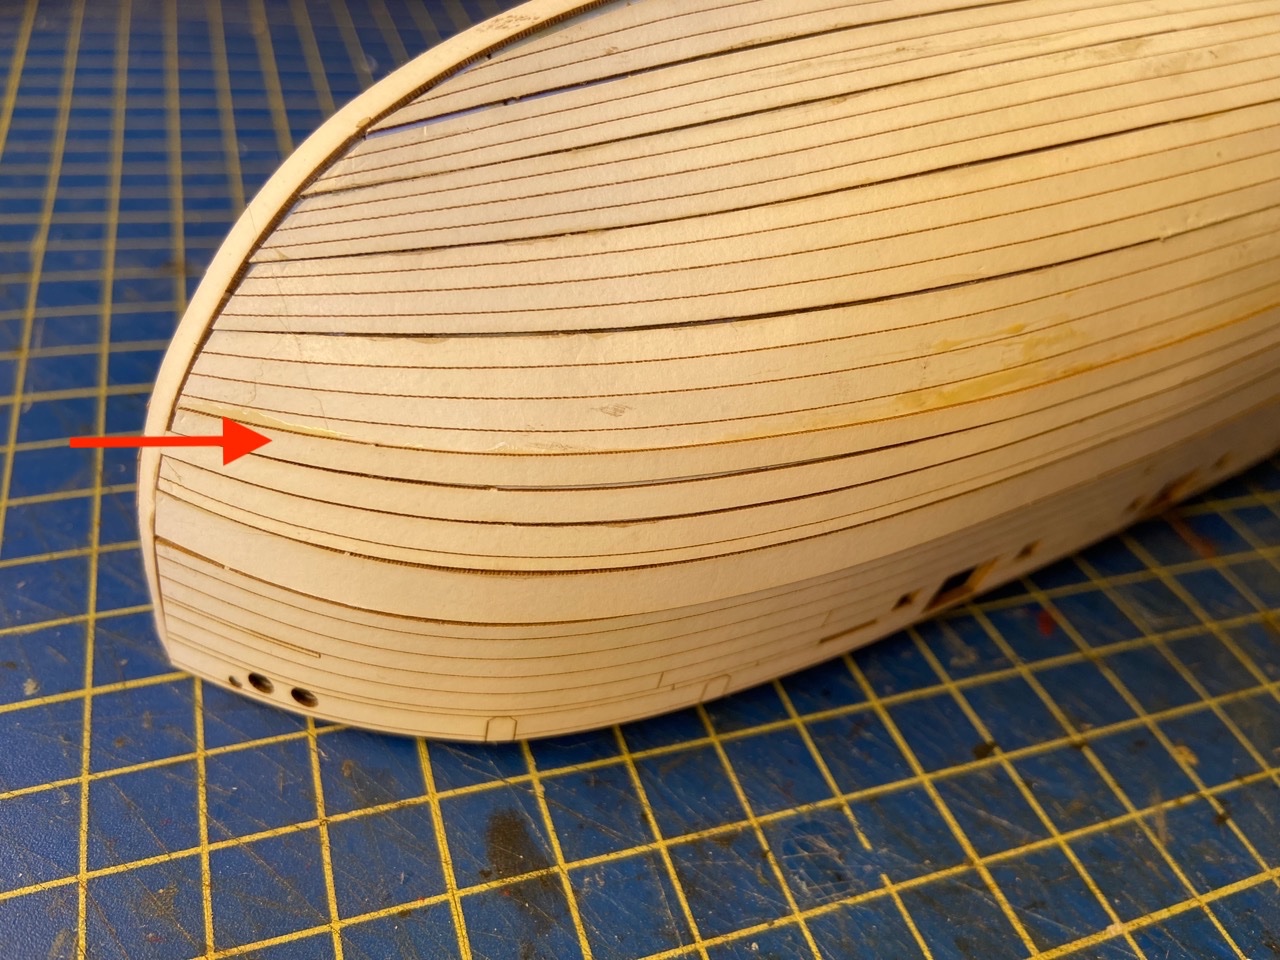
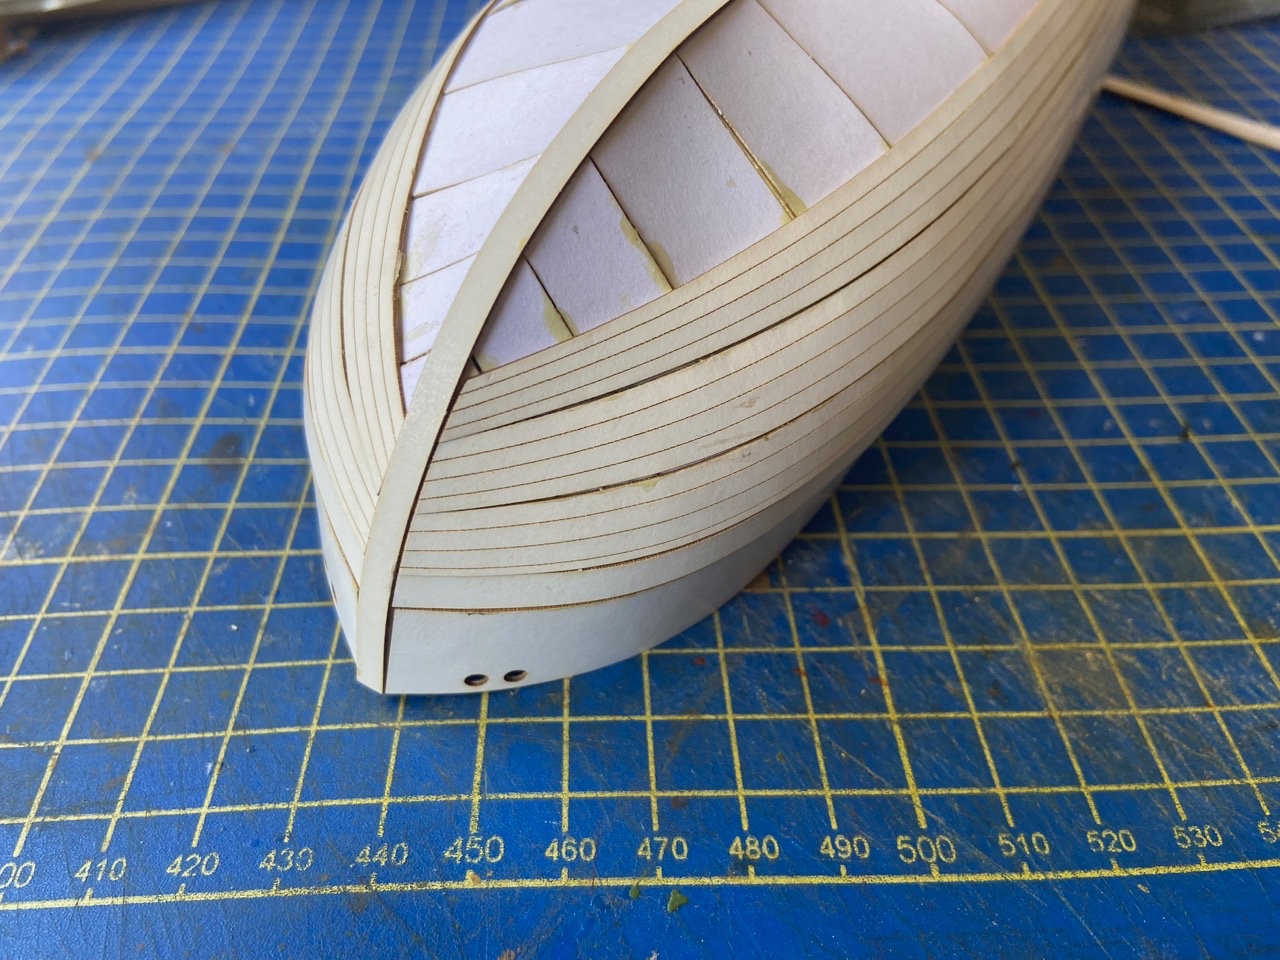
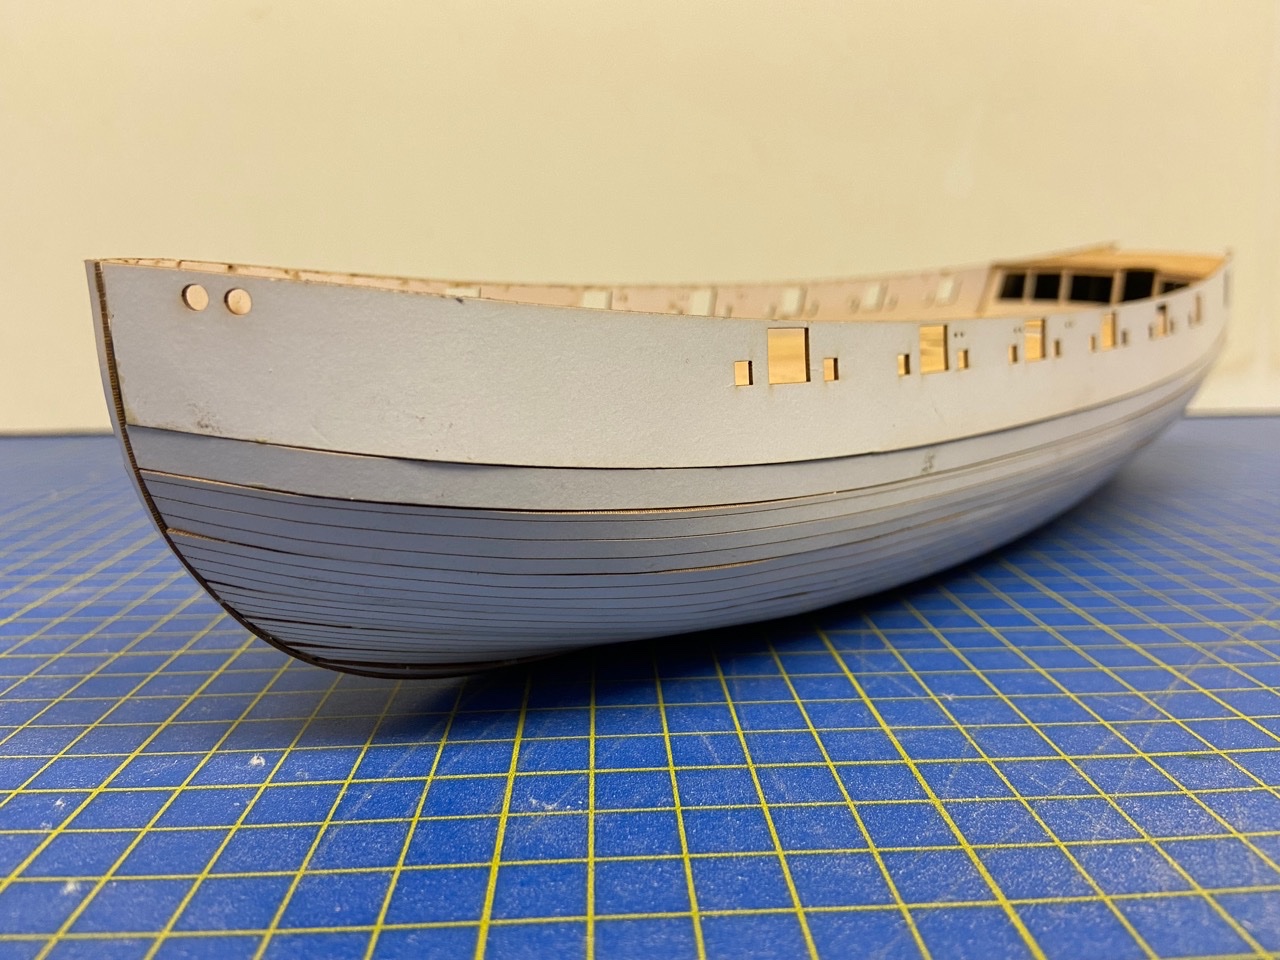
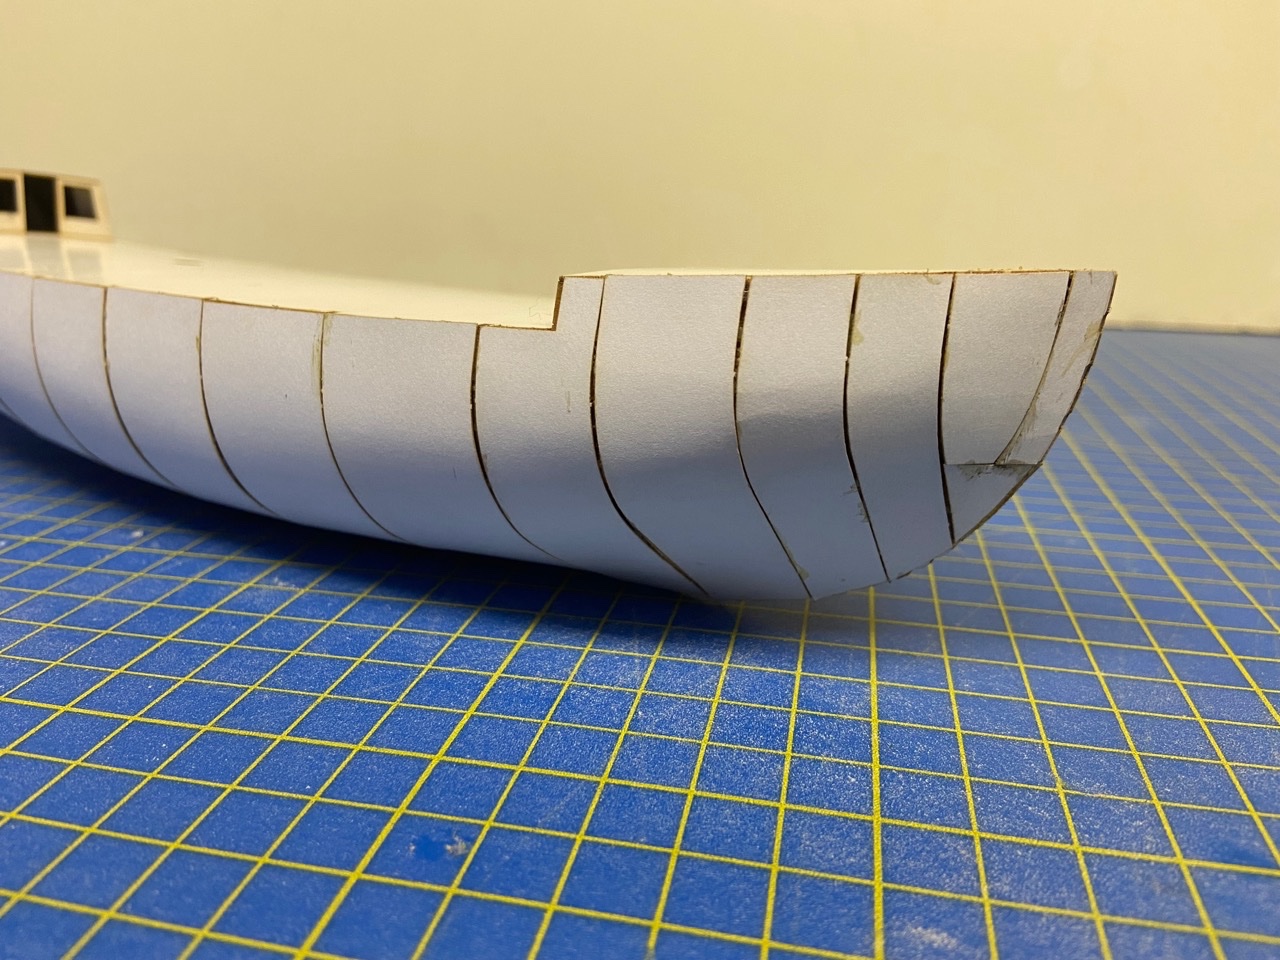
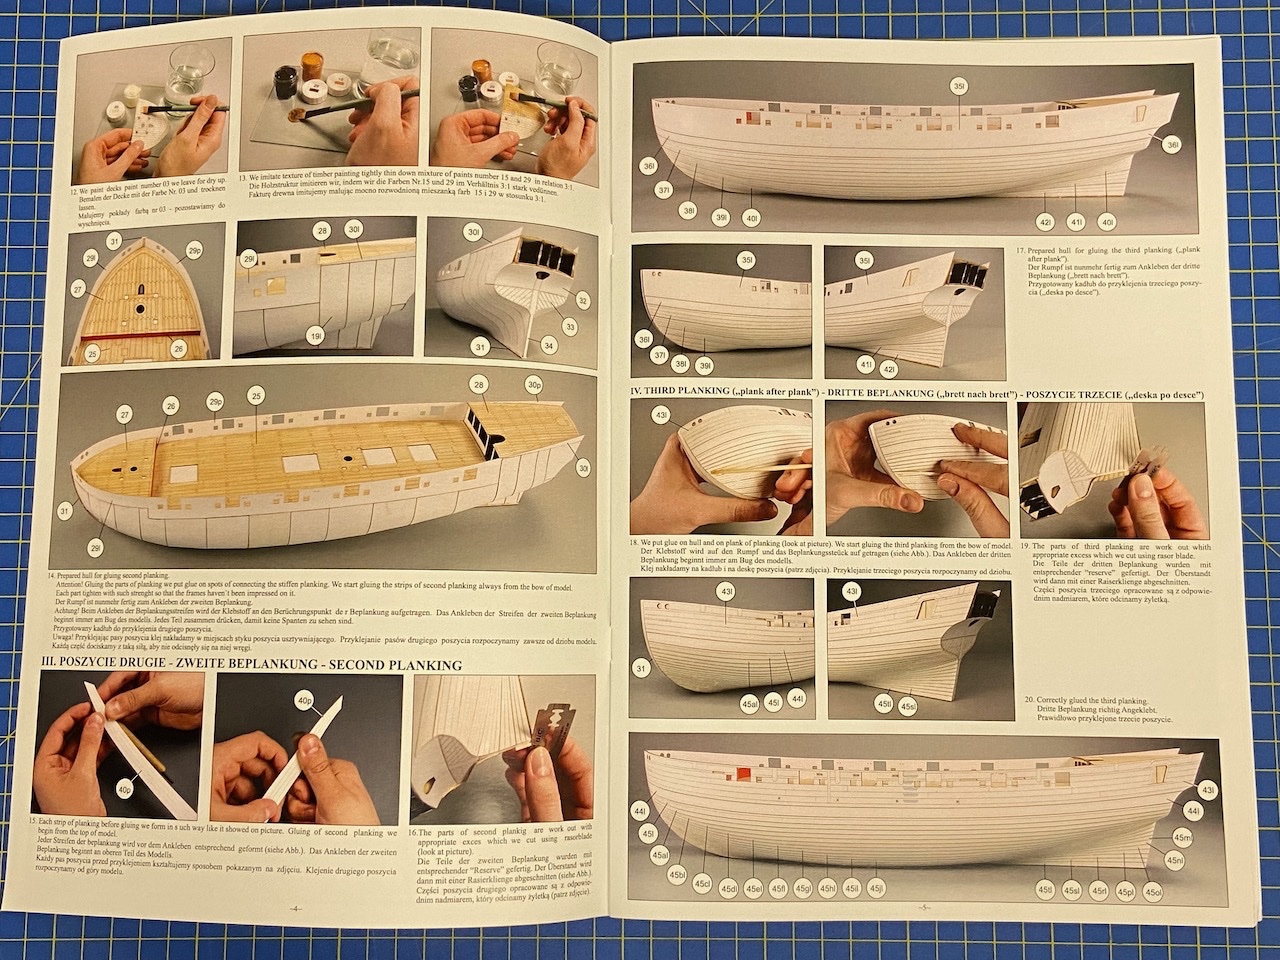
So I'm still contemplating the color of the gun carriages and hatch coamings. Also considering how I want to do the sails. The kit sails are nice, all pre-cut, and laser-etched with the panel markings and reef bands. But, I don't know how I want to present the ship just yet. I have time to think about this, but I'll need to decide on the hatch coamings and gun carriages soon. In the meantime, the addition of the hull's third layer begins. The third layer of the hull is pretty much actual, individual hull planks, with the exception of the bulwarks. There are two sheets of thin, laser-cut card stock for this layer, one for each side of the hull. It's nice how the planking is all pre-spiled, In the image below, some of the individual planks have been glued into place. To make it clearer, I marked the last plank to go on with an arrow. The planks are added from the bulwarks down toward the keel, as per the instructions. Note how the second layer's markings serve as a guide for the placing of this final layer's individual planks. But, you can see that it's a bit hard to line the pieces up exactly, as I had some trouble getting the second layer to lay down nicely at the bow. This didn't turn out to be that big an issue. It was just a matter of time before I had all the planks added. I ended up with some gaps close to the end, but the whole model gets painted later anyway so it wasn't a problem. There is some excess length to the planks, so that has to be trimmed trimmed off. Below, you can see I’ve now added the keel and stem. I had some high spots with the edges of some of the planks still, so I did a little light sanding. I also applied some gesso to the bottom of the hull to fill in some of those gaps in the planking prior to painting the hull, which will come up next. There's a little bit of unevenness at the base of the bulwarks piece, but this should be pretty well covered by the addition of the wales.
-
The second hull layer is made up of strips that resemble whole bands of hull planks. In fact, this second layer is basically the same as the final layer of most of the 1/96-scale Shipyard paper model kits. But, with the laser-cut card kits, this layer is substantially thick. It’s application stiffens the hull further, and should give the third and final layer of planking a good surface to build up from. Something I learned recently, is that it’s best to apply glue only at the frames in order to avoid what some people call the “starving cow” appearance, where the hull frames show through the hull planking, so I tried the technique. It seemed to work pretty well. But, I think it also helped that the layer was fairly thick card stock. Note that the kit has you apply these layers starting at the bottom of the bulwarks piece and working towards the keel. This worked okay, but I can’t help wondering if it would be better to start at the keel and work upwards. Any gaps or overlap would then be covered up by the wide strake at the base of the bulwarks which represents the thick planking of the wales. When I got all done with this layer, the hull was definitely a lot sturdier. In the photo below, you can still see a lilttle amount of waviness, where the frames poke through a little, but it’s not very pronounced. In my experience, this should be taken care of by the time I get the third and final layer on. The main issue I had was that the bottom edge of the bulwarks piece protruded just a little bit. But, at this stage, you can actually do a little trimming and sanding. And, by the time the last layer goes on, things like this should be pretty well evened out. The first of the third layer pieces is shown below, ready to apply to the hull.

- 108 replies
-
- 11
-
-
Also, thinking ahead, I PLAN on adding sails and stowing the sweeps that are shown in the box art. I'm figuring I'll close all the sweep ports, except for one, just to show what it is. I think the one thing missing from the kit is that it really should have a ship's boat or two.
-
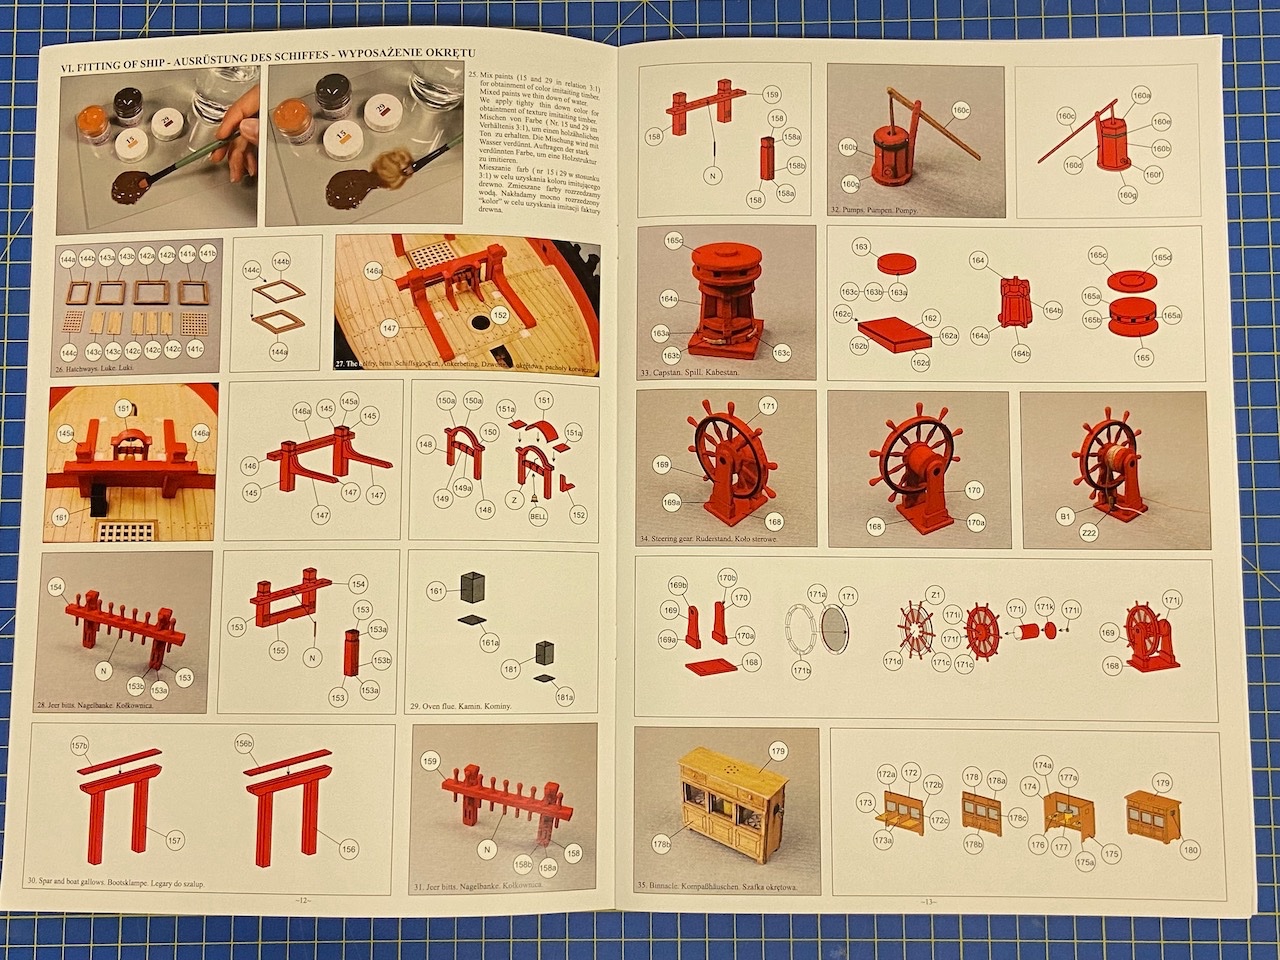
Thinking ahead here, this kit calls for the hatch coamings and the gun carriages to be painted a natural wood color. Is there some discussion around here regarding the color of gun carriages and hatch coamings, particularly in the 1750s? There seems to be some variation and I don't know if there are any rules about it, but I'm considering painting both of these the same red as everything else. Below is a photo from the kit instructions. I suppose an option would have been to present the ship in more of a working appearance. I presume that might have less red on deck. A varnished wooden ship's wheel, more natural wood or more black paint? I think I'm beyond that point anyway, with all the decorative work at the stern, etc.

-
Looks great Snug, though I can see how it could give you some headaches. That thin cypress can be awfully delicate. Hope that was the excess CA and not the finger. But, that would be REALLY dedicated...
- 63 replies
-
- 2
-
-
- Finished
- Khufus Solar Boat
- (and 1 more)
-
review HMS Wolf 1754, 10-gun Brig (Snow) - Shipyard - 1/72 - CARD
catopower replied to catopower's topic in REVIEWS: Model kits
Hi Ben, when you get around to it, maybe you can add to this review and include the contents of the boxes and things I didn't take photos of and post here? -
Hi Chris, I agree. Also, to mitigate some of the blotchiness, I masked off individual planks, and applied addition thin washes of paint to them. That's the main problem with blotchiness, is that it helps to kill the illusion of actual separate planks. Using wood strips is one way to go, though you'd have to be very careful about not bulking up the deck. You wouldn't want to plank over the laser-etched deck, as it would end up raising the deck. Plus, the deck detail is so well done, it would be a shame to lose it. However, a wood deck would make anyone looking at the model think that the whole this is done in wood, since the deck would essentially be the only unpainted part of the ship, except for the masts and spars, which are wood also. In fact, someone here I believe posted this link to a presentation by a ship modeler, who built the 1/96-scale paper model versions of HMS Wolf, and maybe HMS Alert, but used thin wood for the deck and the hull planking. I found it a very interesting presentation:
-
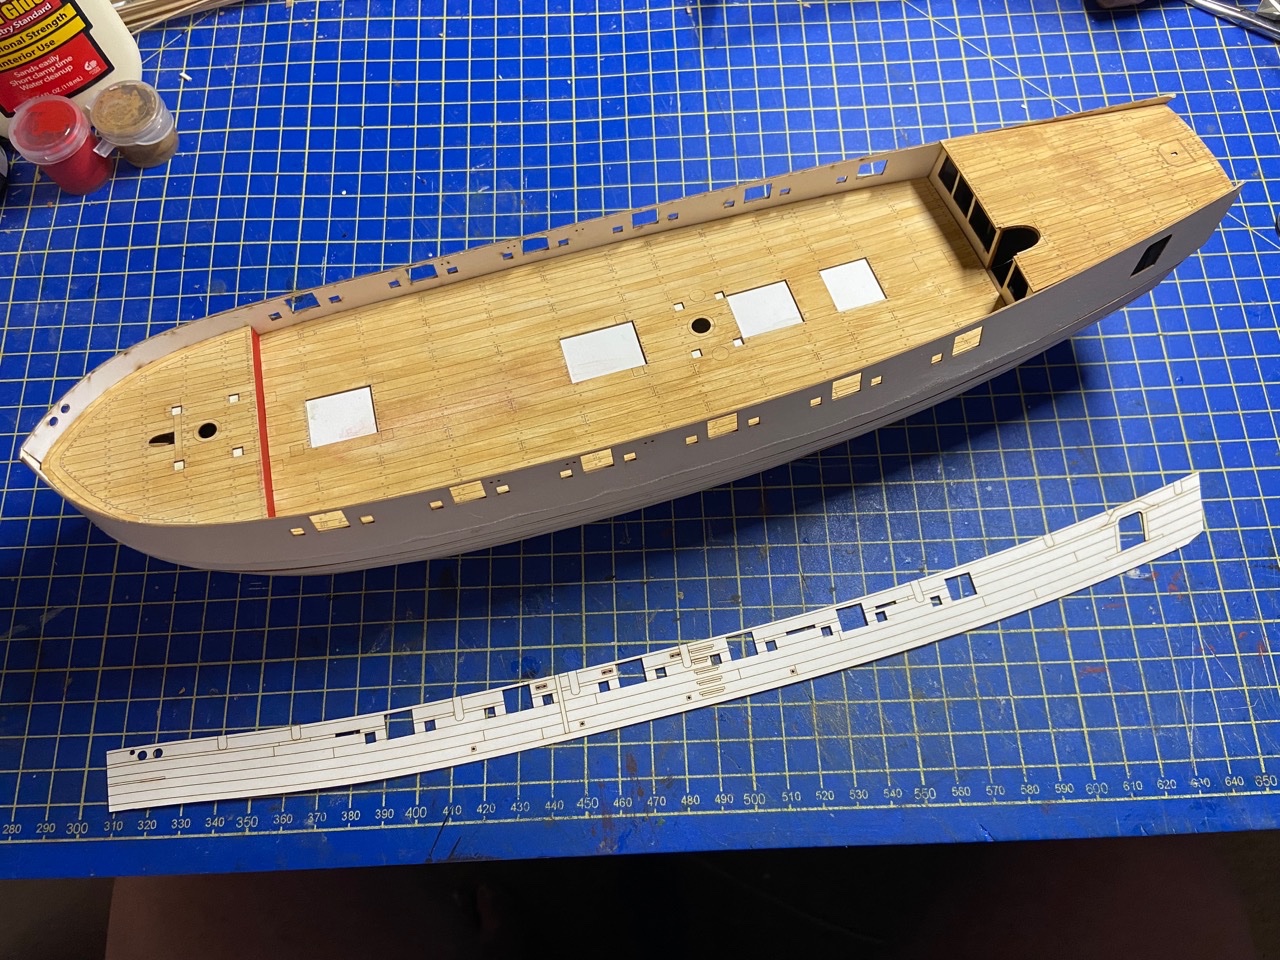
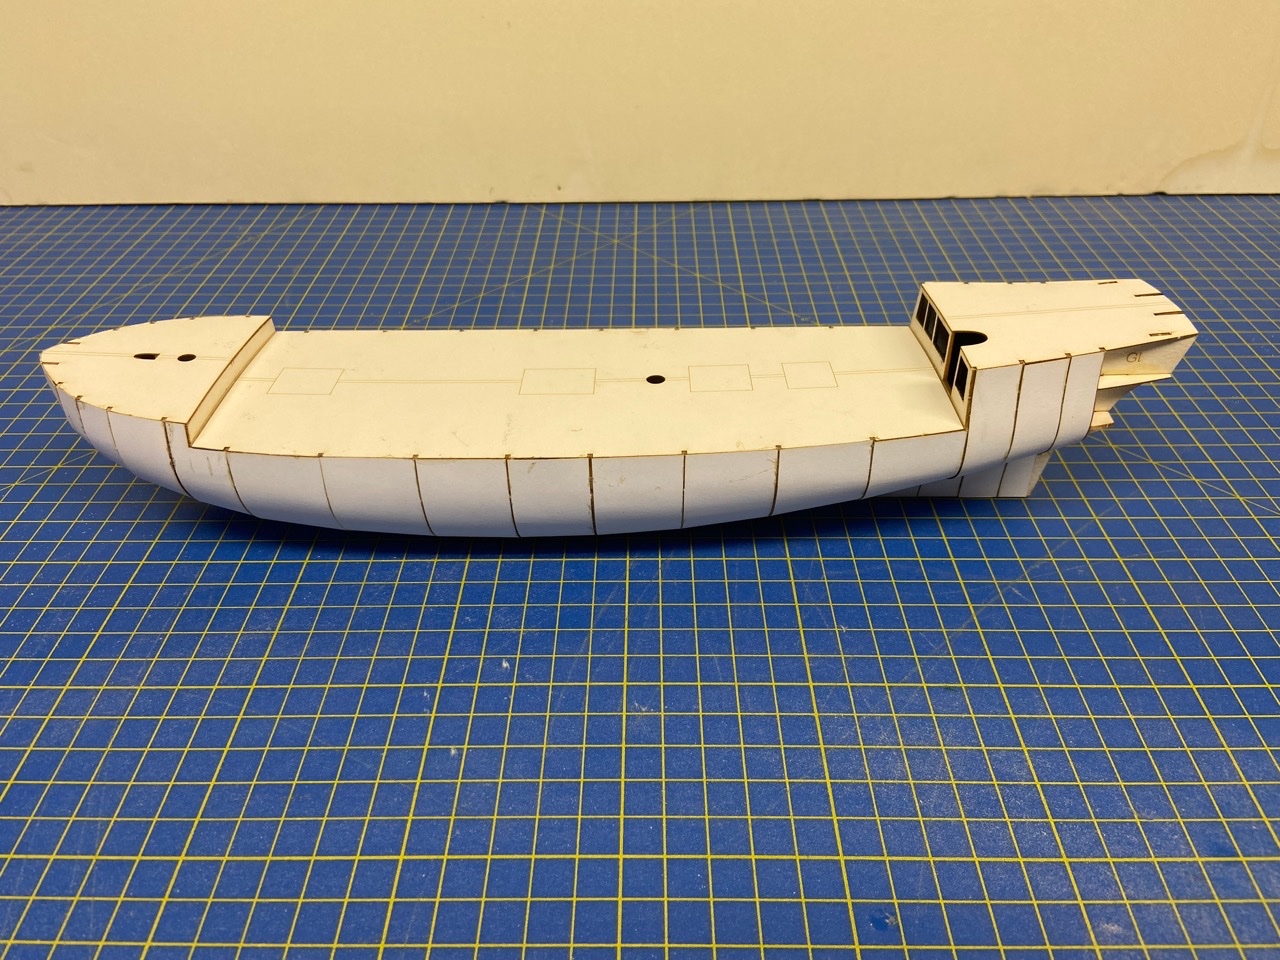
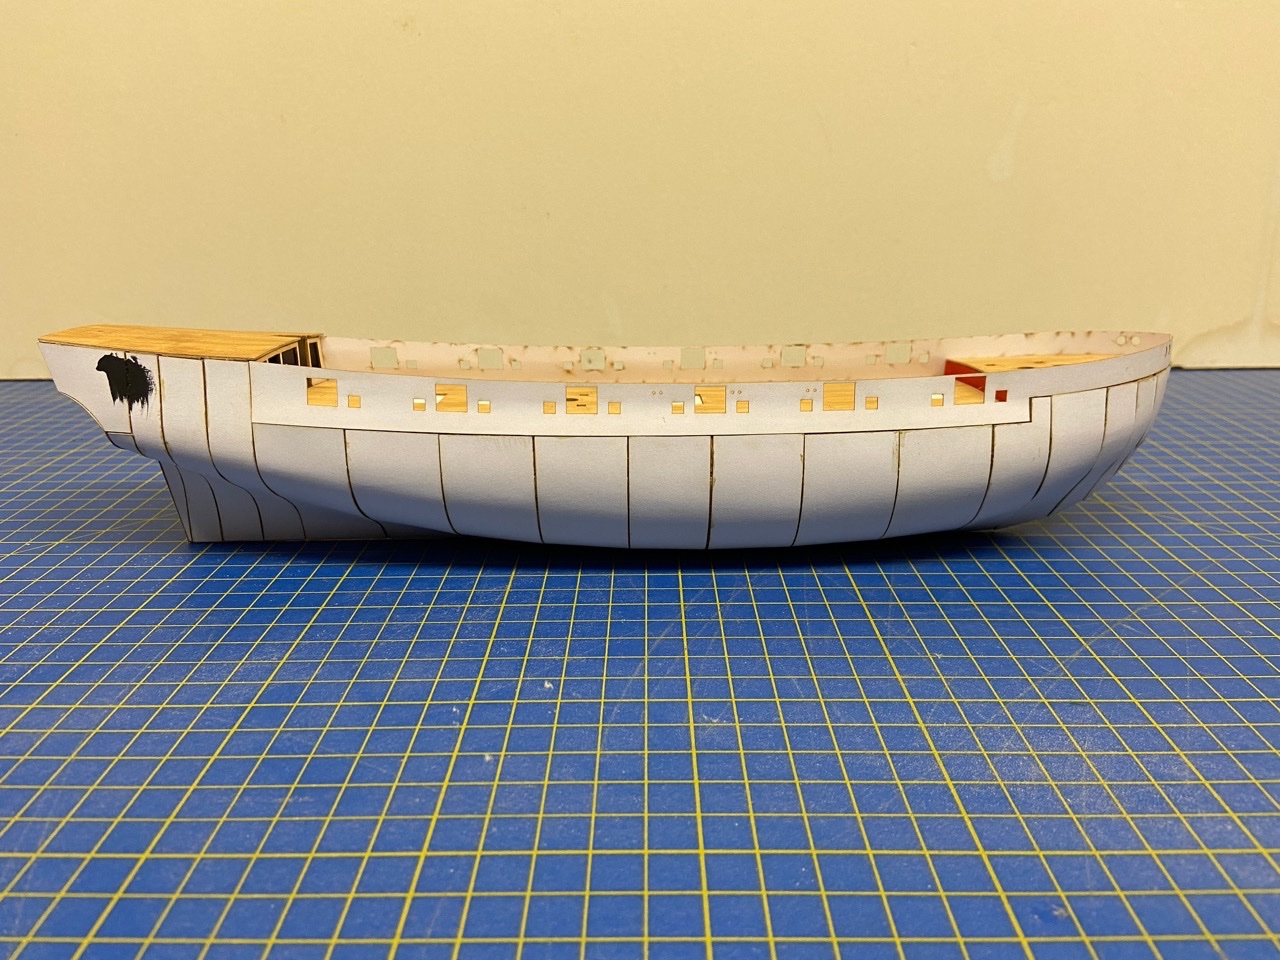
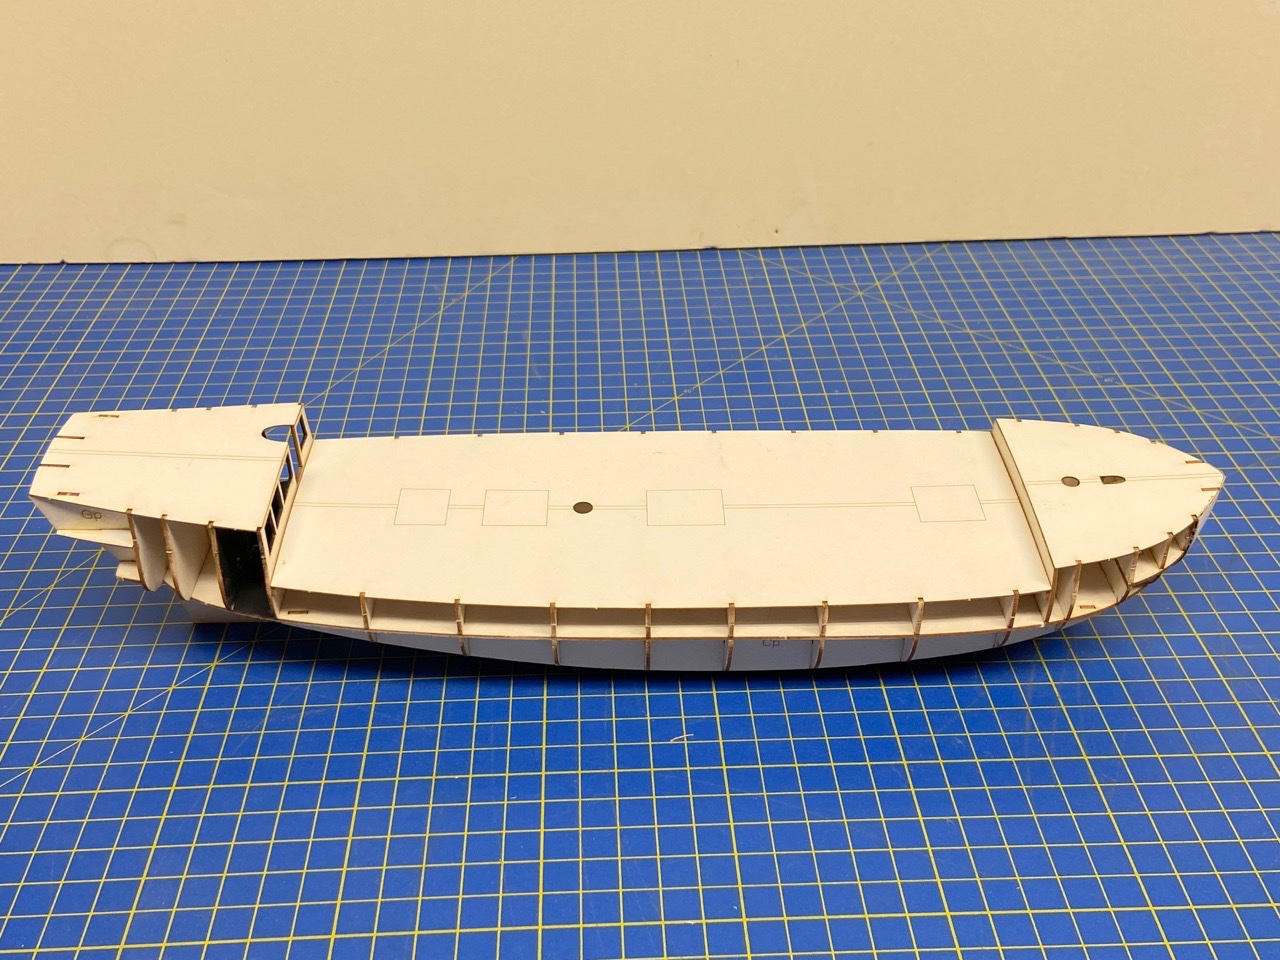
Next comes the process of adding the first layer of the hull covering, or "skin" as some people like to call it. With this kit, the process is made simpler by the fact that all the paper parts are pre-cut to proper shape. This speeds up the build, though I found I still took a lot of time making sure that the pieces went on correctly and were well shaped. At this stage, I tend to use contact cement to put these strips into place, but I apply it more like rubber cement, just to one surface, and put them together while it's mostly wet. This is why you'll notice some staining of the paper, left over from the wiping off of excess cement. Some modelers like to add some kind of filler between the bulkheads before they start putting on this layer. But, since this kit has three layers applied, I didn't bother. Other models I've built with three layers, tend to turn out with relatively smooth hulls. The danger is building a model and having the ribs show through. Something that many refer to as the starving cow look. But, more on this later. I took a couple breaks during the process of adding this first layer. For one thing, experience with past paper and wooden models taught me to consider well in advance how I intend to mount the completed model. I'm still not sure how I'm going to mount the model, so just in case, I decided to cut a few blocks of wood and glue them into the hull, to provide a little more solid support for possible screws or posts. I realize that the weak point here is the cardboard between the wooden blocks, but at least these should help with whatever method I end up going with. Anyway, with the blocks in place, I could continue with the hull covering. The final part of this first layer was the bulwarks piece. To be honest, this is the part that worried me most. Beside the Shipyard kits I mentioned completing, there have been a couple stalled projects and one of the things I had issue with was with the bulwarks construction. So, when I got to this step, I wanted to be sure that I did everything correctly. So, I pre-bent the pieces as indicated in the instructions and glue them into place. Actually, before I did this, you may notice that I have the deck in place. These decks are laser cut and etched with the planking and treenail details, but are left to be painted. The instructions provided information on the color mix to use and how to pre-paint with a provided light color which serves like a primer. Having experience painting card stock, I knew that technique is everything here, as it's easy to end up with a blotchy looking deck. So, I was as careful as I could be. And yet, I ended up with a blotchy looking deck! At least for the moment. I've since don't some work to clean it up and even it out somewhat, but it's still blotchy. I'm just hoping that over time, as I add deck details, the blotchiness will end up less noticeable and, in the long run, just look a bit weathered. I didn't do too much more as it's a short journey from blotchy to ruined. So, the decks were glued into place and the bulwarks pieces were glued into place. You'll notice that the model also has it's first big splash of color at the break of the forecastle. The initial red color provided seemed way too bright to me. It's straight out of the jar of red paint that the paint manufacturer calls cynober or cinnabar. I wanted my ship to look a little less than brand new, and I figured the red color should appear a little duller, due to oxidation. So, I mixed up a jar of the color toned down just slightly. At this stage, the model is pretty delicate, as it's only covered by a thin layer of paper. I'm anxious to get the second layer on, as that will make the whole think a lot sturdier. Unlike the 1/96 scale version of this kit, there is also a third layer with actual individual planks. I'm hoping this will make the model very solid. I know it will make it visually more like an actual planked ship model. The whole time I'm building this kit, I'm always thinking about the HMS Mercury kit I started. So, I'm applying things I've learned there, and also thinking of how I can apply some of the things I'm learning here for when I eventually get back to that build.
- 108 replies
-
- 11
-
-
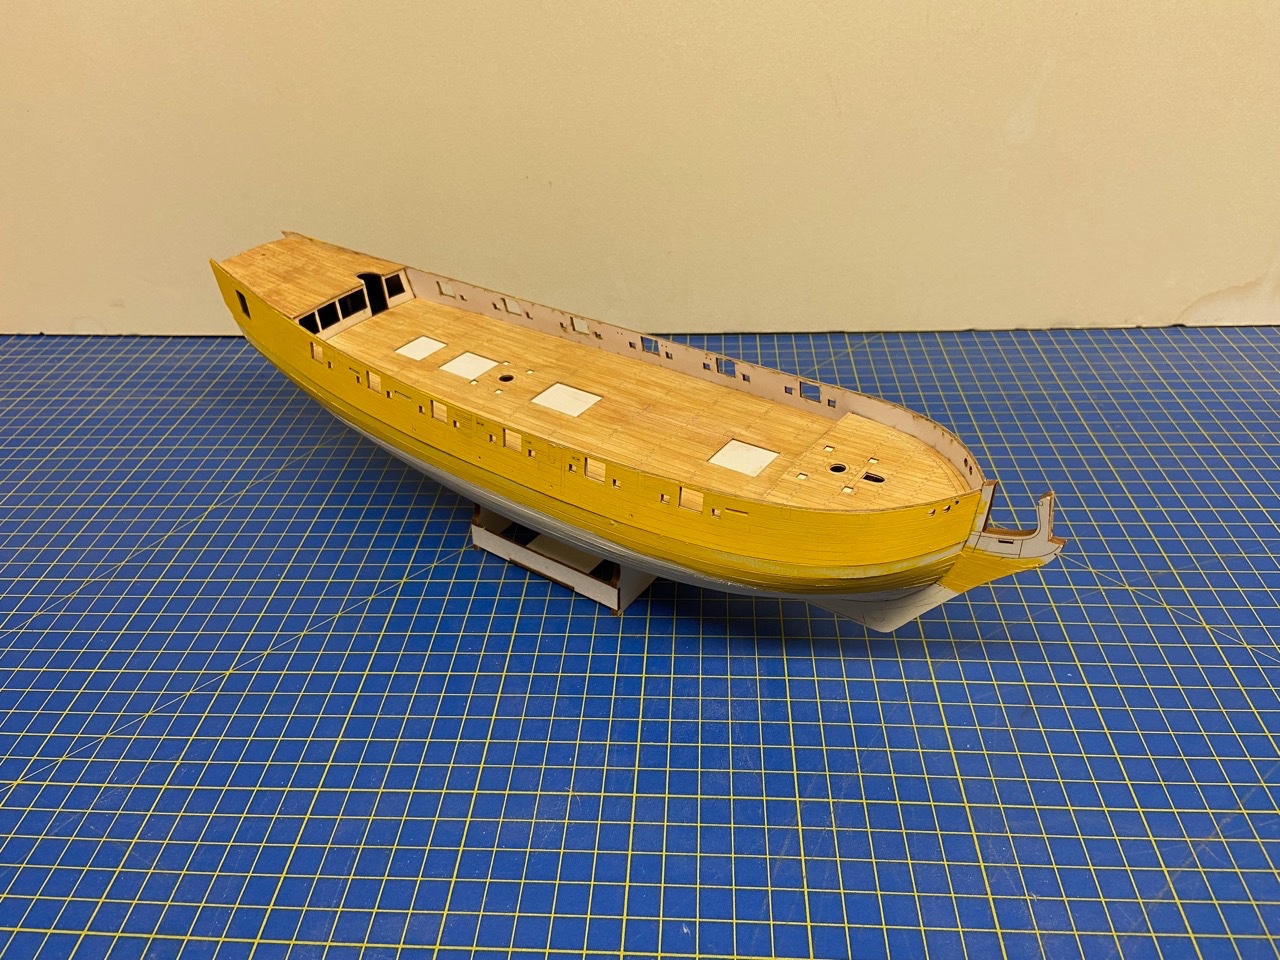
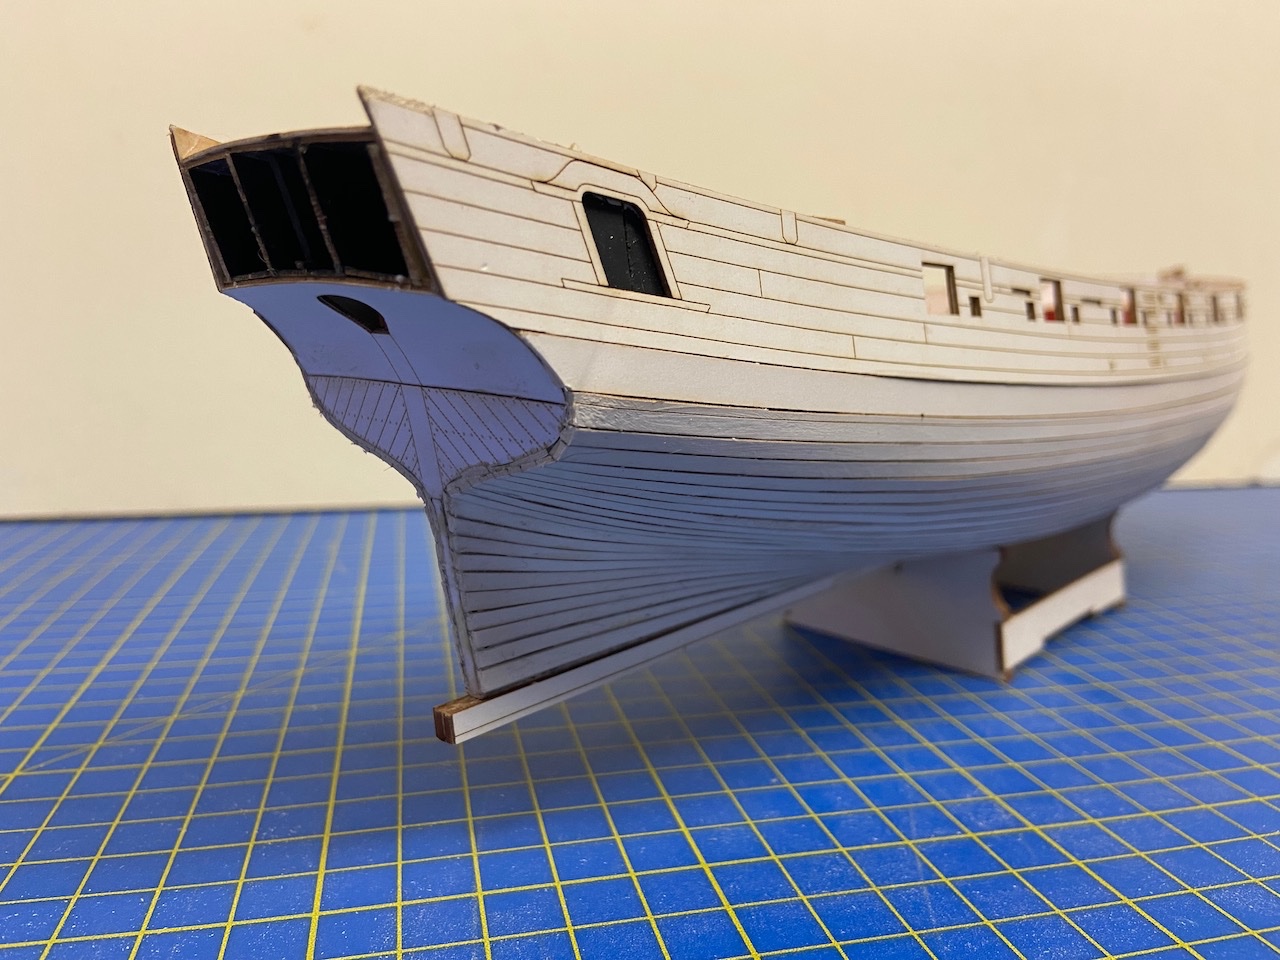
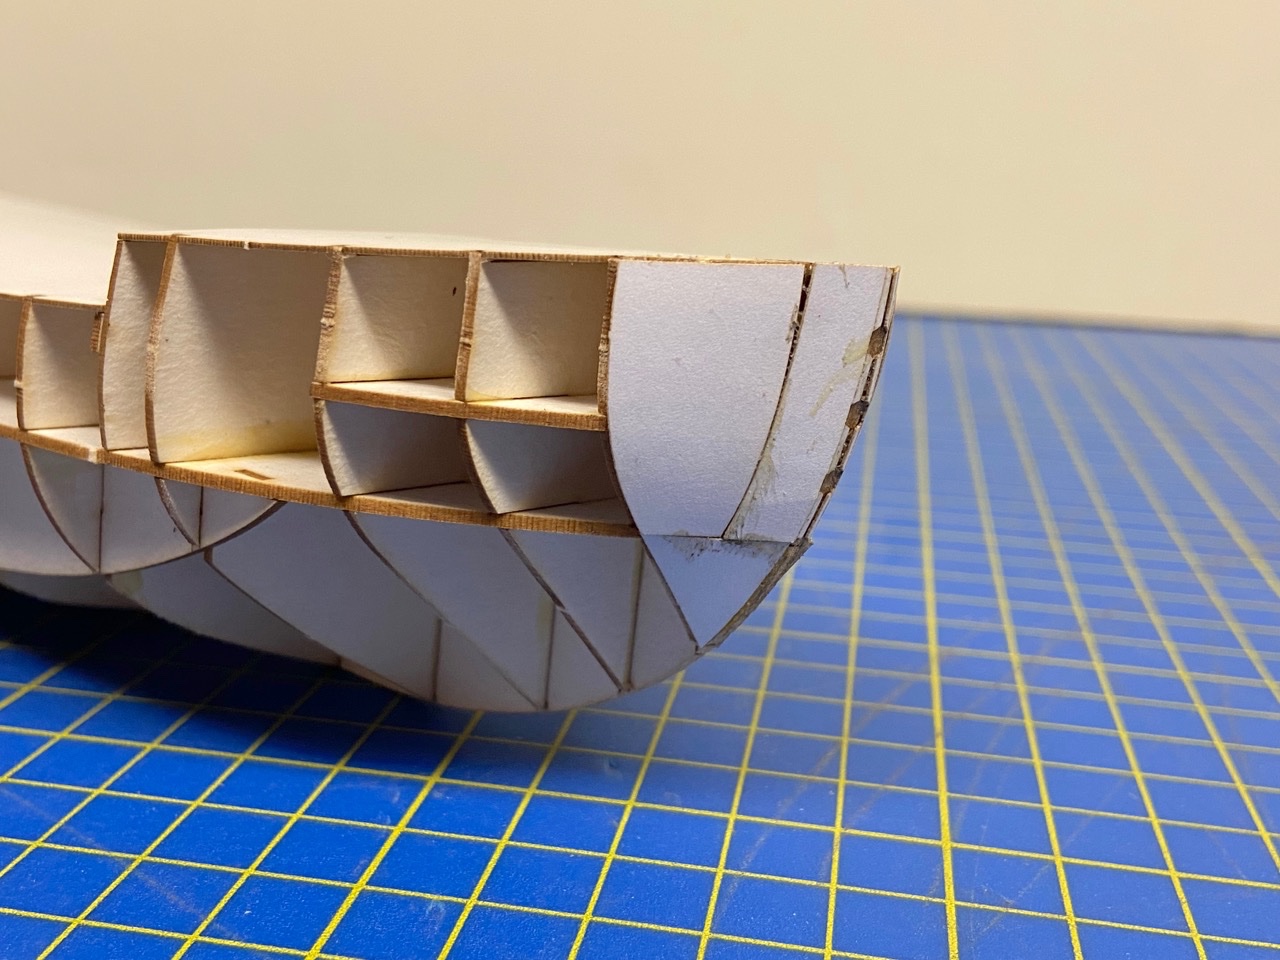
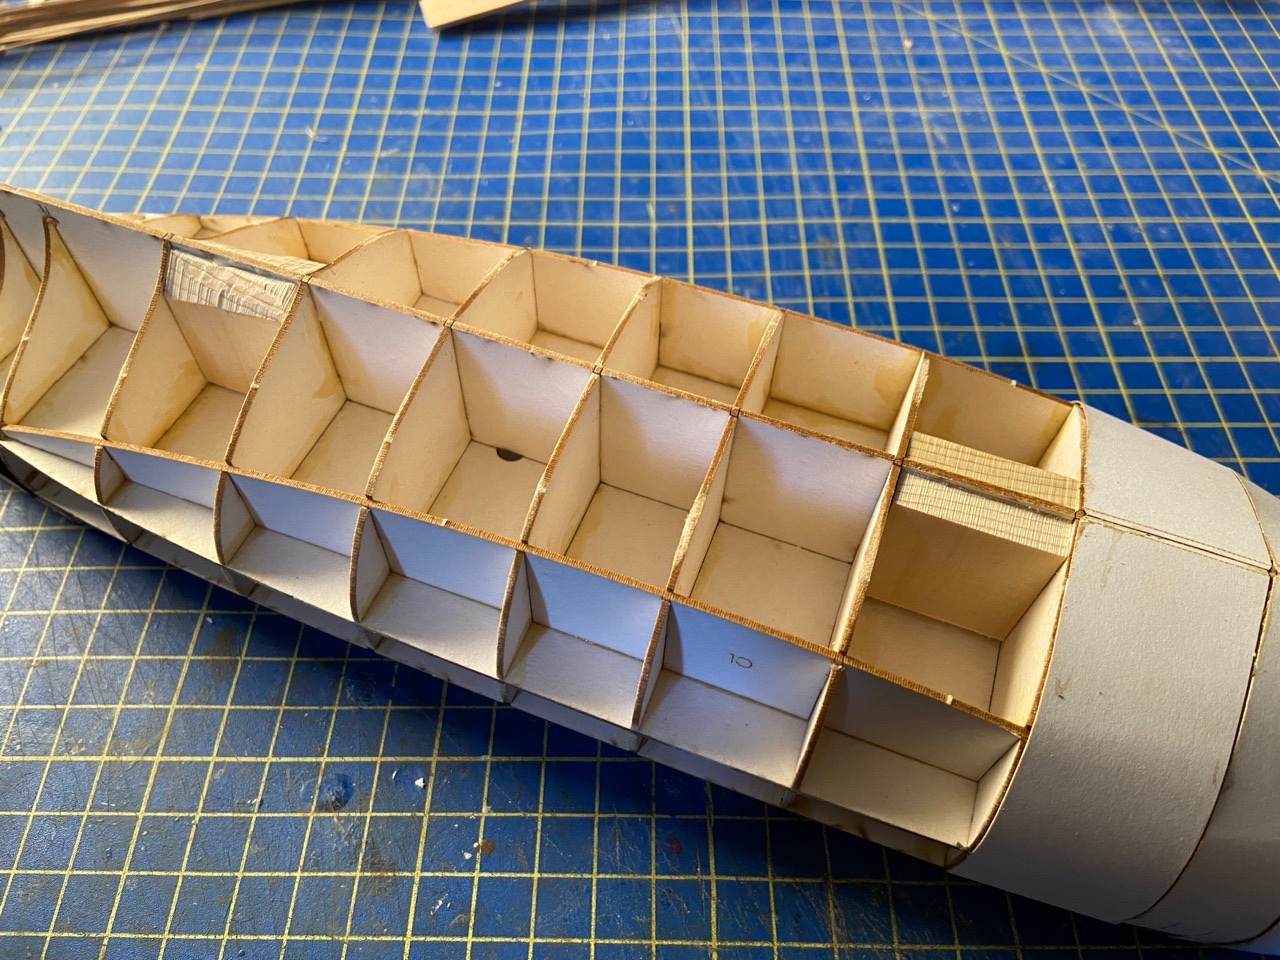
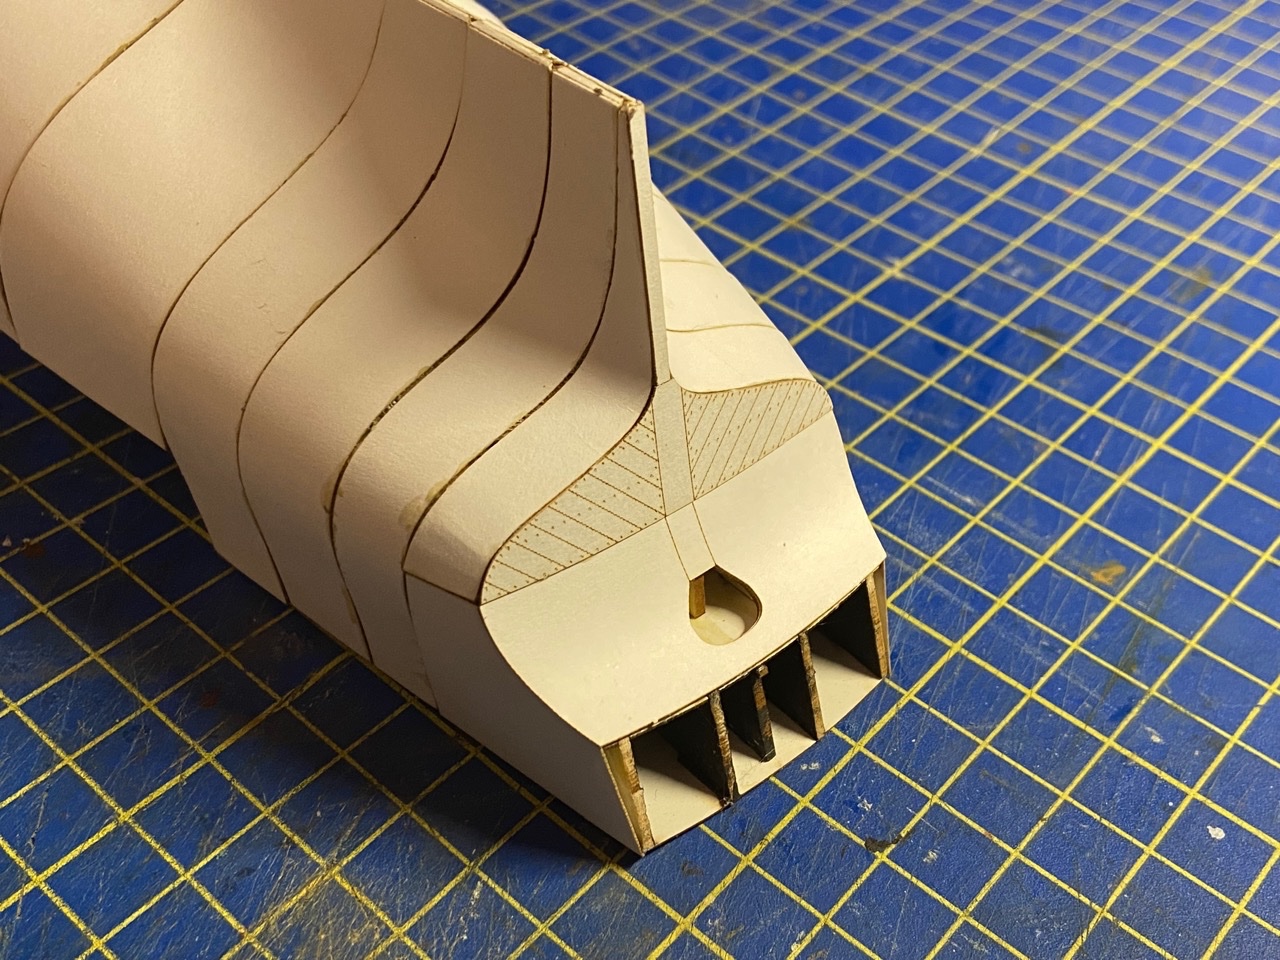
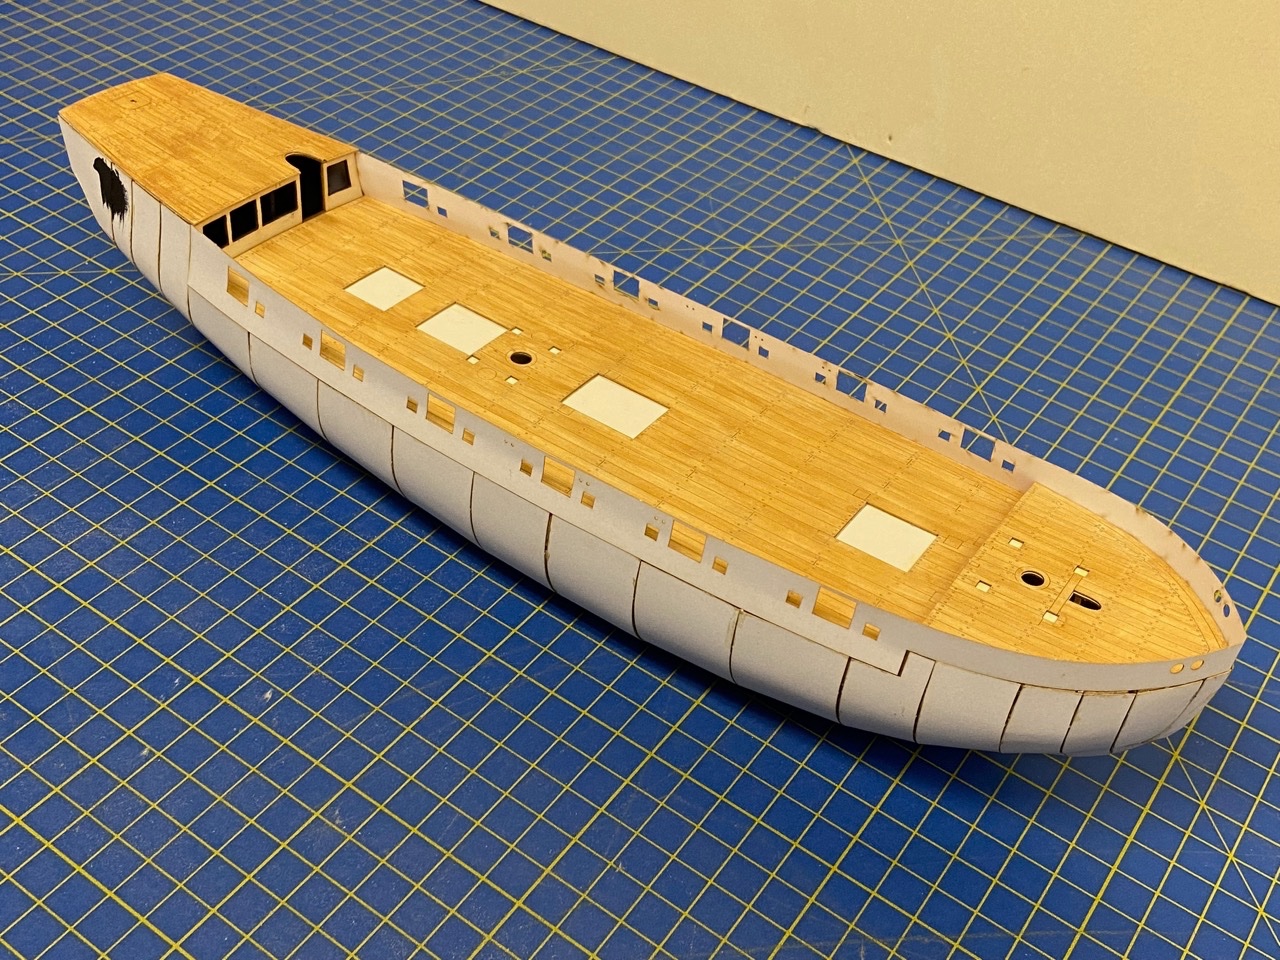
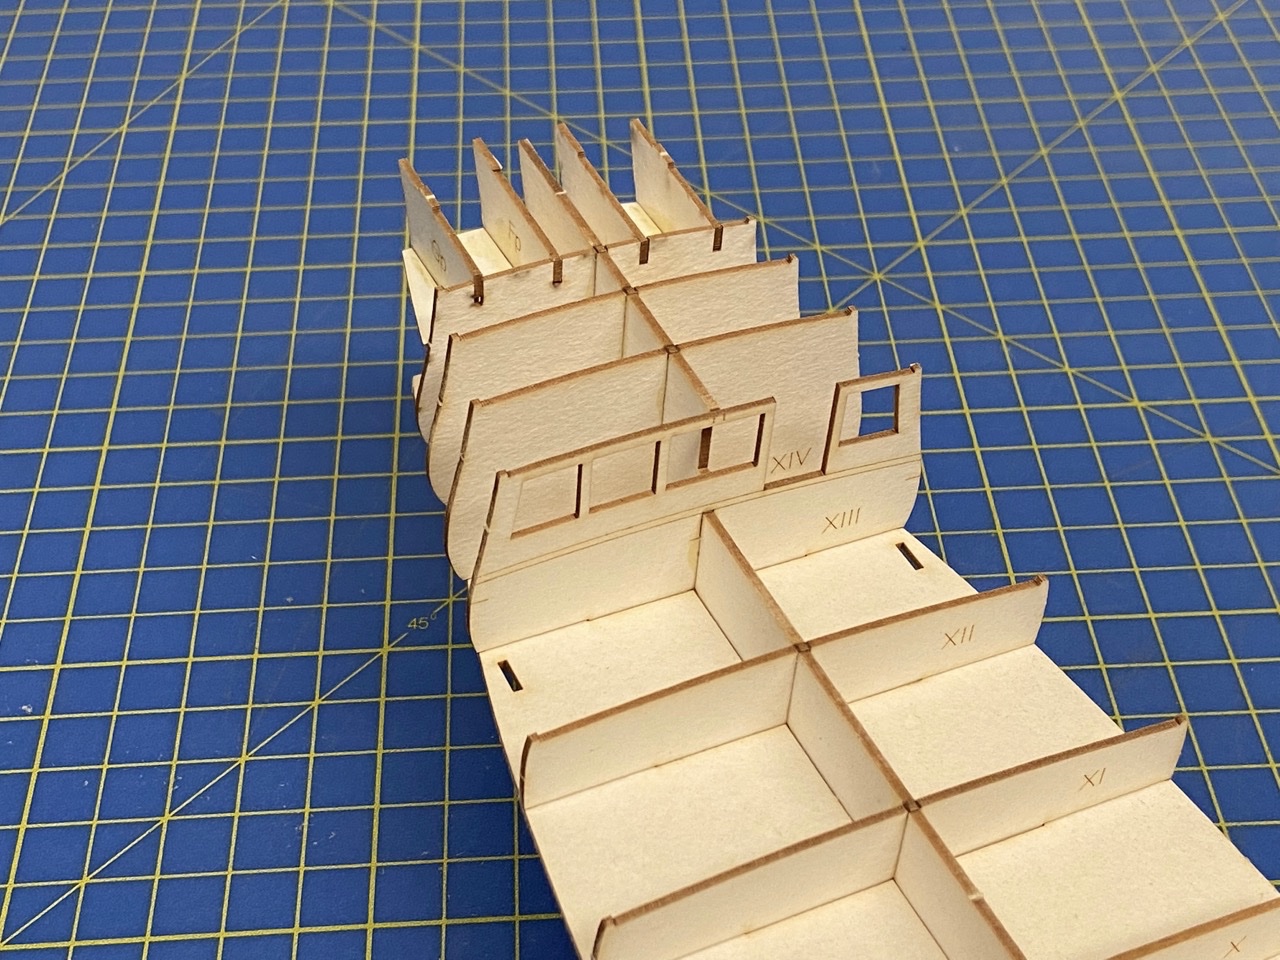
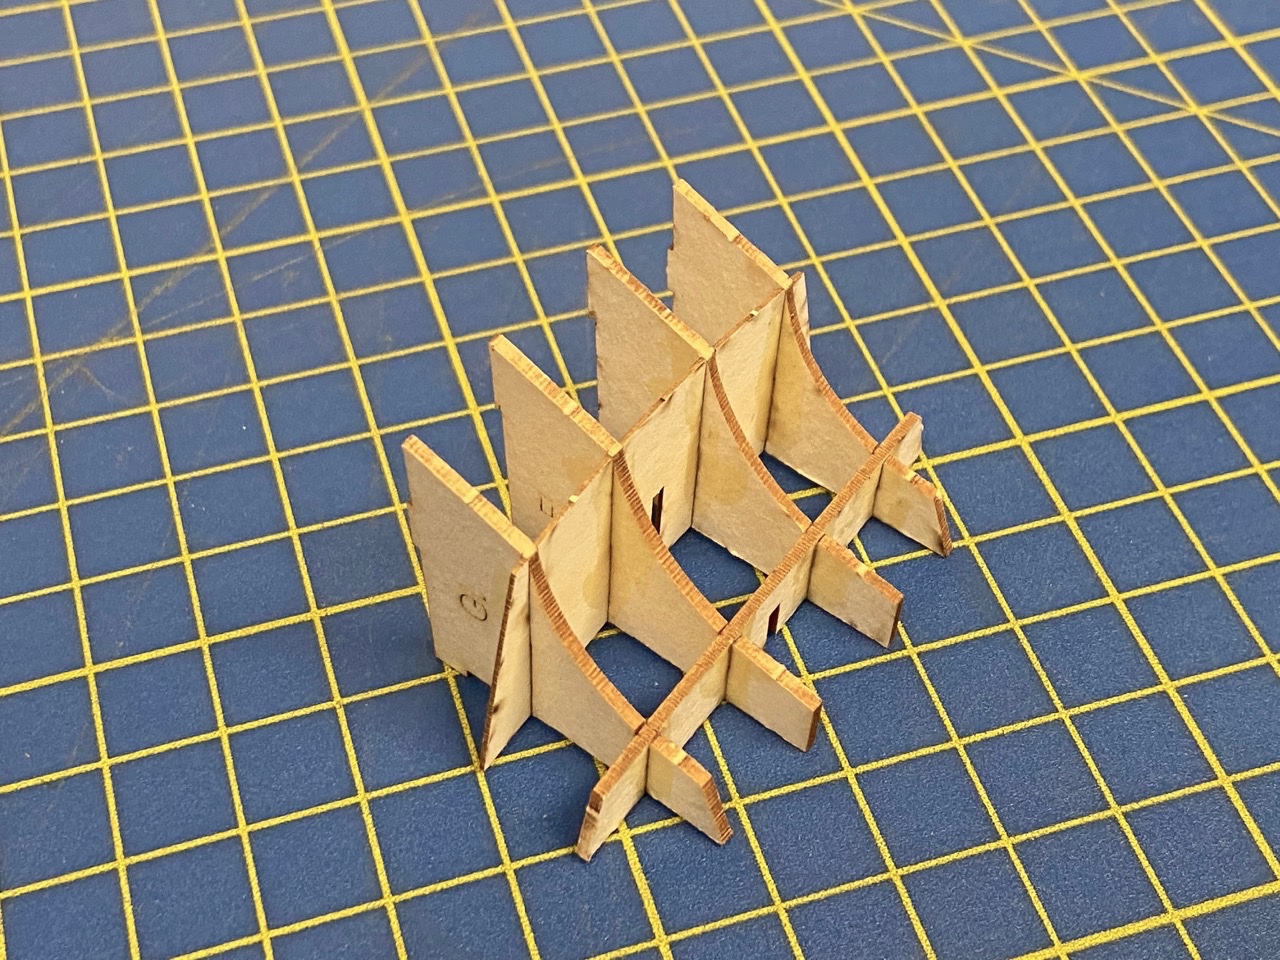
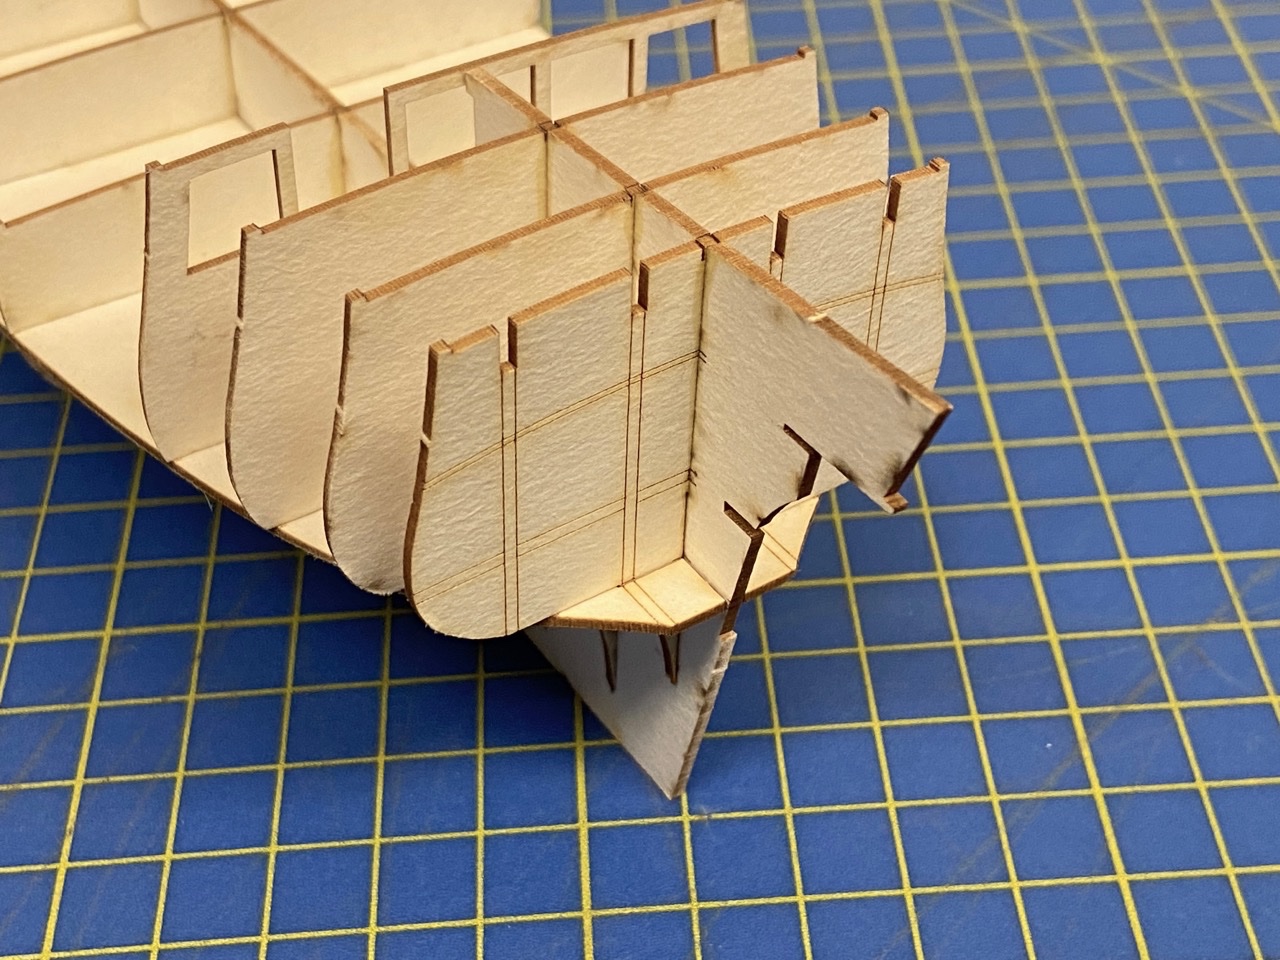
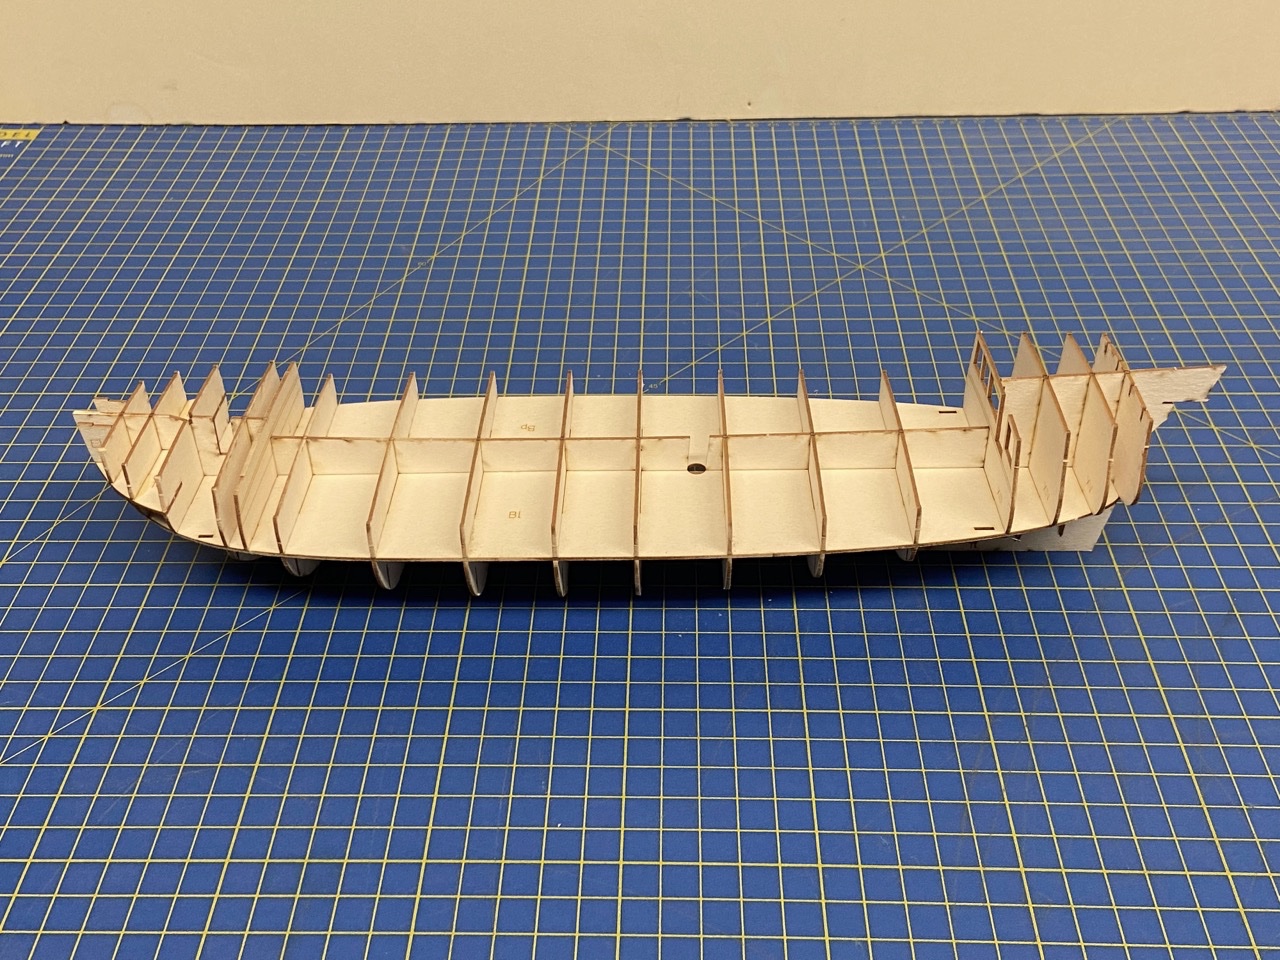
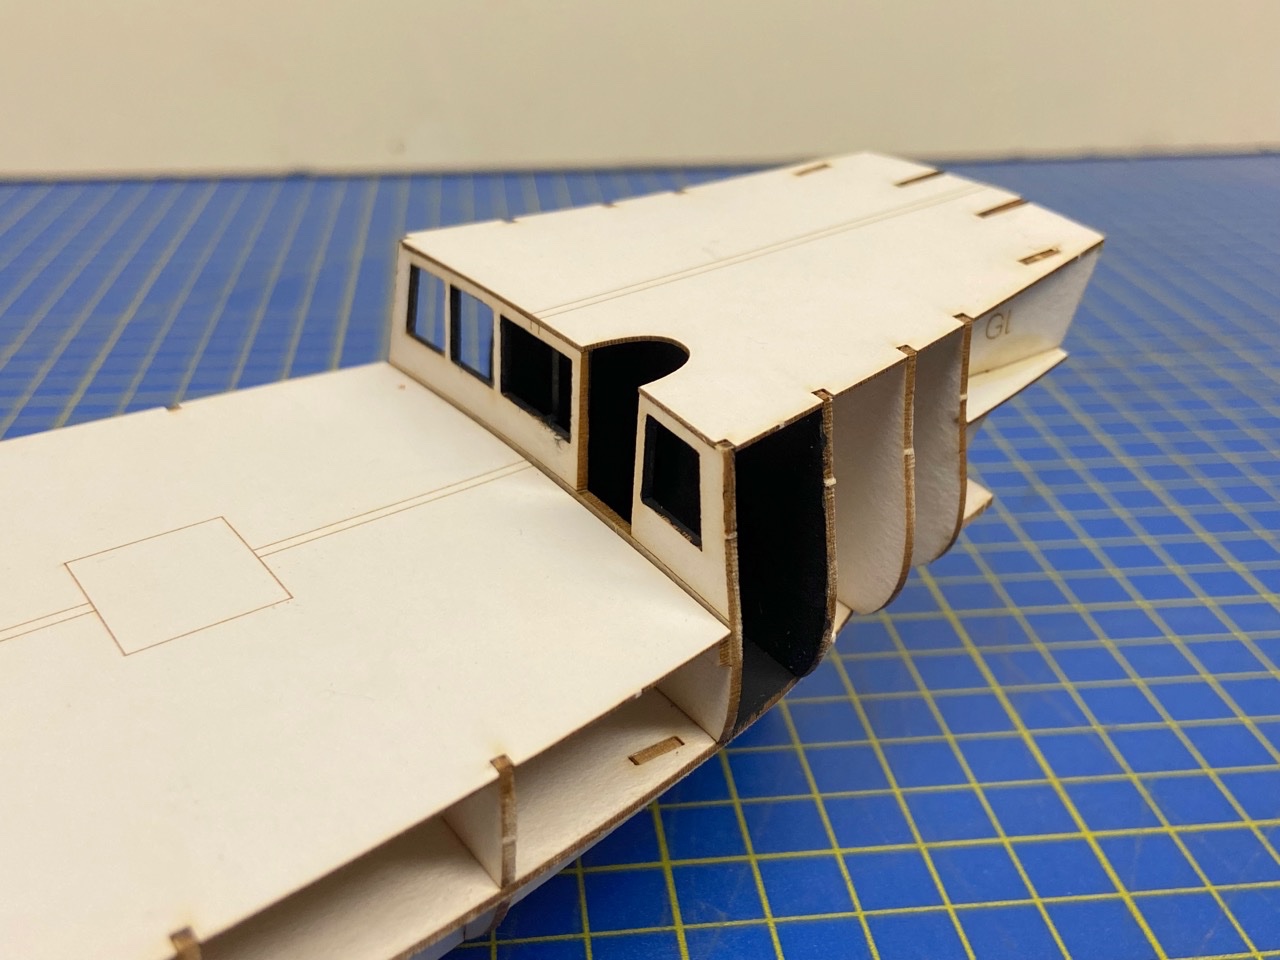
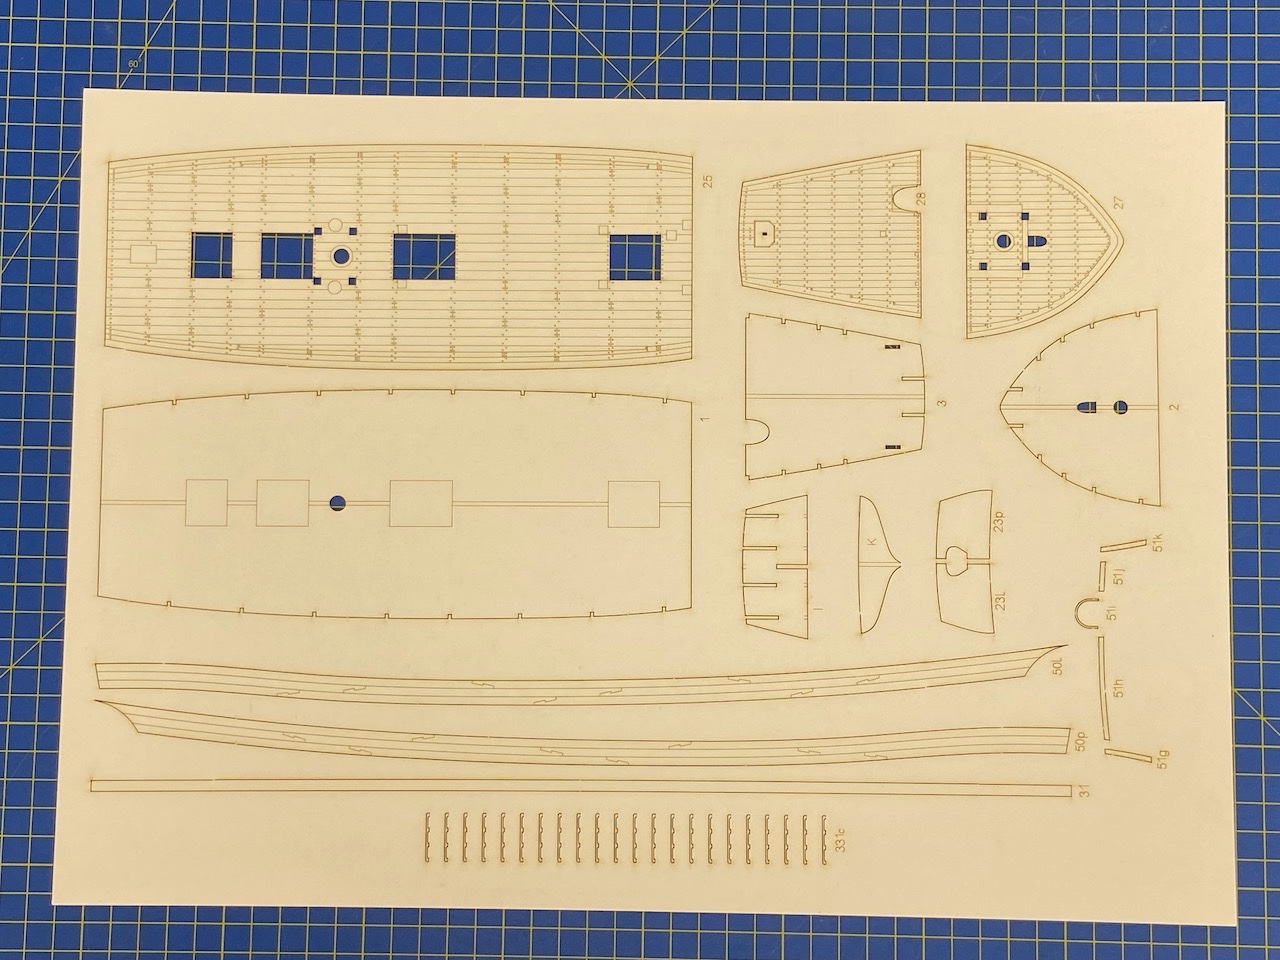
Building the hull of this Shipyard kit is really a lot like building the hull of any of their kits in that the skeletal structure of the model is very well engineered. As with just about all Shipyard ship model kits, there is a main keel piece and a series of bulkheads, much like with any wooden ship model kit. But, Shipyard kits often then have a longitudinal piece that crosses the frames, horizontally, and often another piece that crosses most of the frames vertically as well. This kit is no different. Certain critical bulkheads are laser-etched with reference lines for aligning other parts The parts all go together quite well. I don't think I ever had a bulkhead taken right out of the parts sheet that didn't line up exactly like it was supposed to. I'm not quite sure why the instruction have you do this, but the stern assembly is built separately and added to the model later. Here, you can see the stern assembly is now in place. You can also clearly see the bulkhead numbers that are laser-etched on the parts. Getting this far takes a very short time, and begins with simply test fitting all the parts of the framework together. Once satisfied, it was all glued together, making sure the keel was nice and straight, with no bends or twists in the hull. You’ll note that there is a row of windows in the bulkhead at the back of the main deck. The instructions don’t say anything about this, but show that they painted the interior of the space behind the windows black, as well as the space a the stern where the stern gallery windows will show through. So, I painted these spaces black before I added the quarter deck. The next step will be to begin adding the first hull layer onto the model. There will be three layer for the hull, which should go a long ways towards making a smoothly curved hull. The process is referred to by some as "skinning", though to me the term conjures up the opposite image.
- 108 replies
-
- 11
-
-
Thanks Druxey, did you miss me? I don't know how accurate the kit is, but I really like the ship. It reminds me a lot of your Speedwell. Also, I find it's just an incredibly fun kit to build. I'm actually quite amazed at how much fun I'm having with it. More on that later...
-
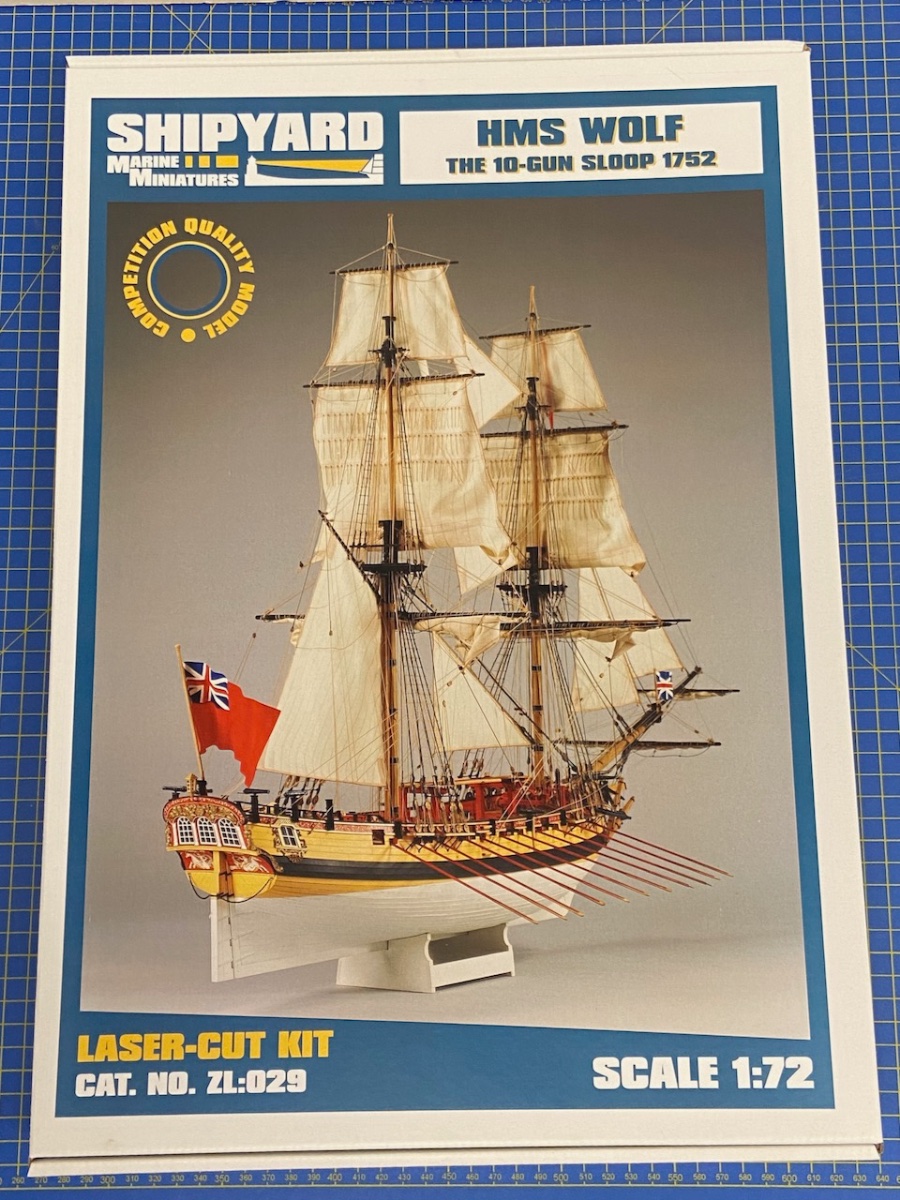
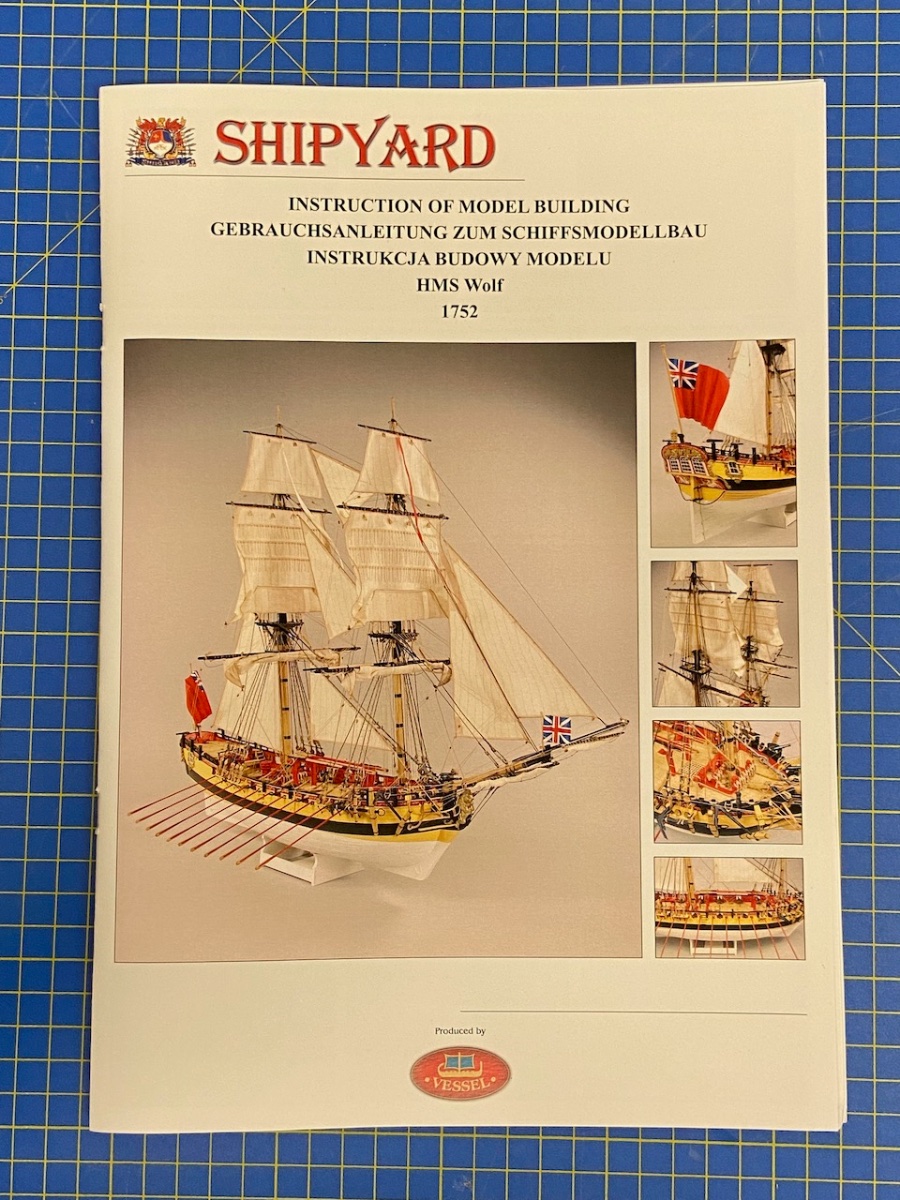
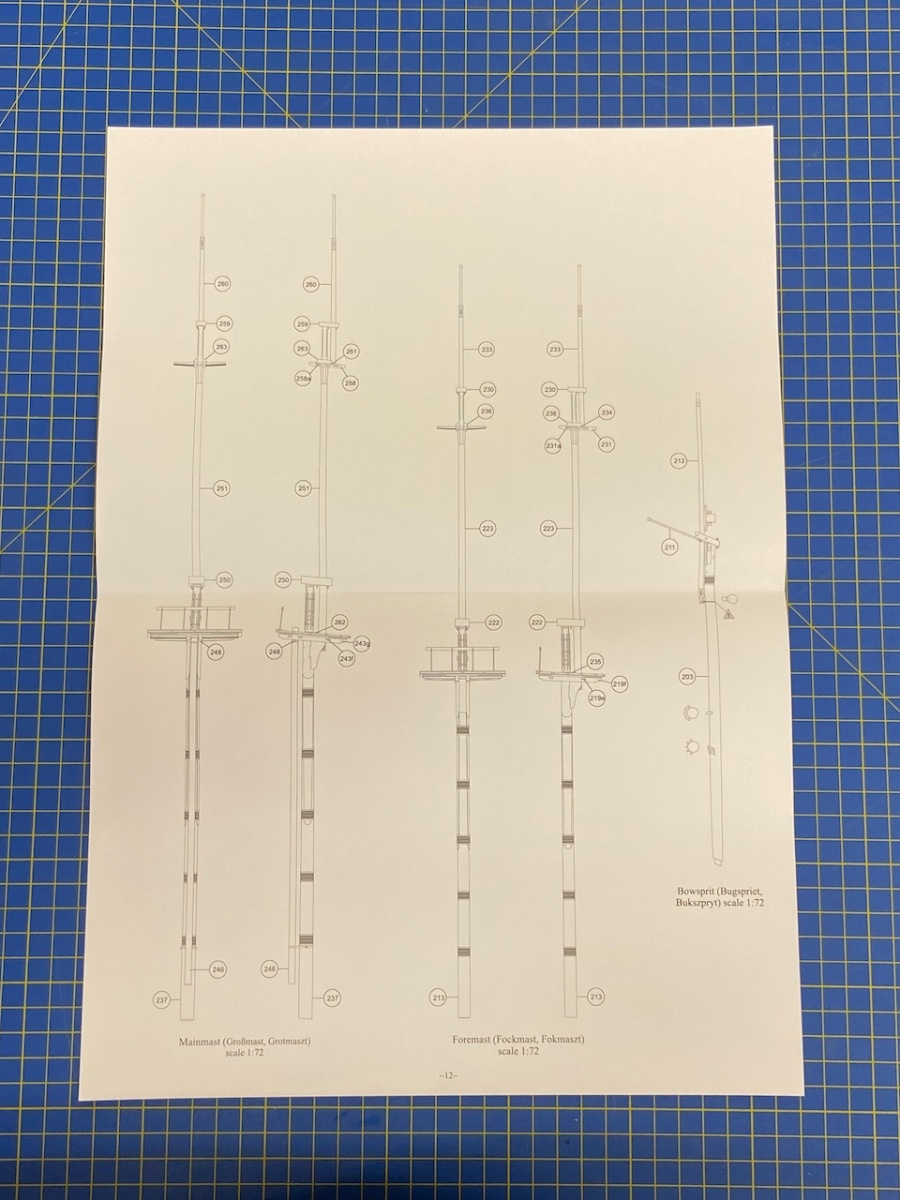
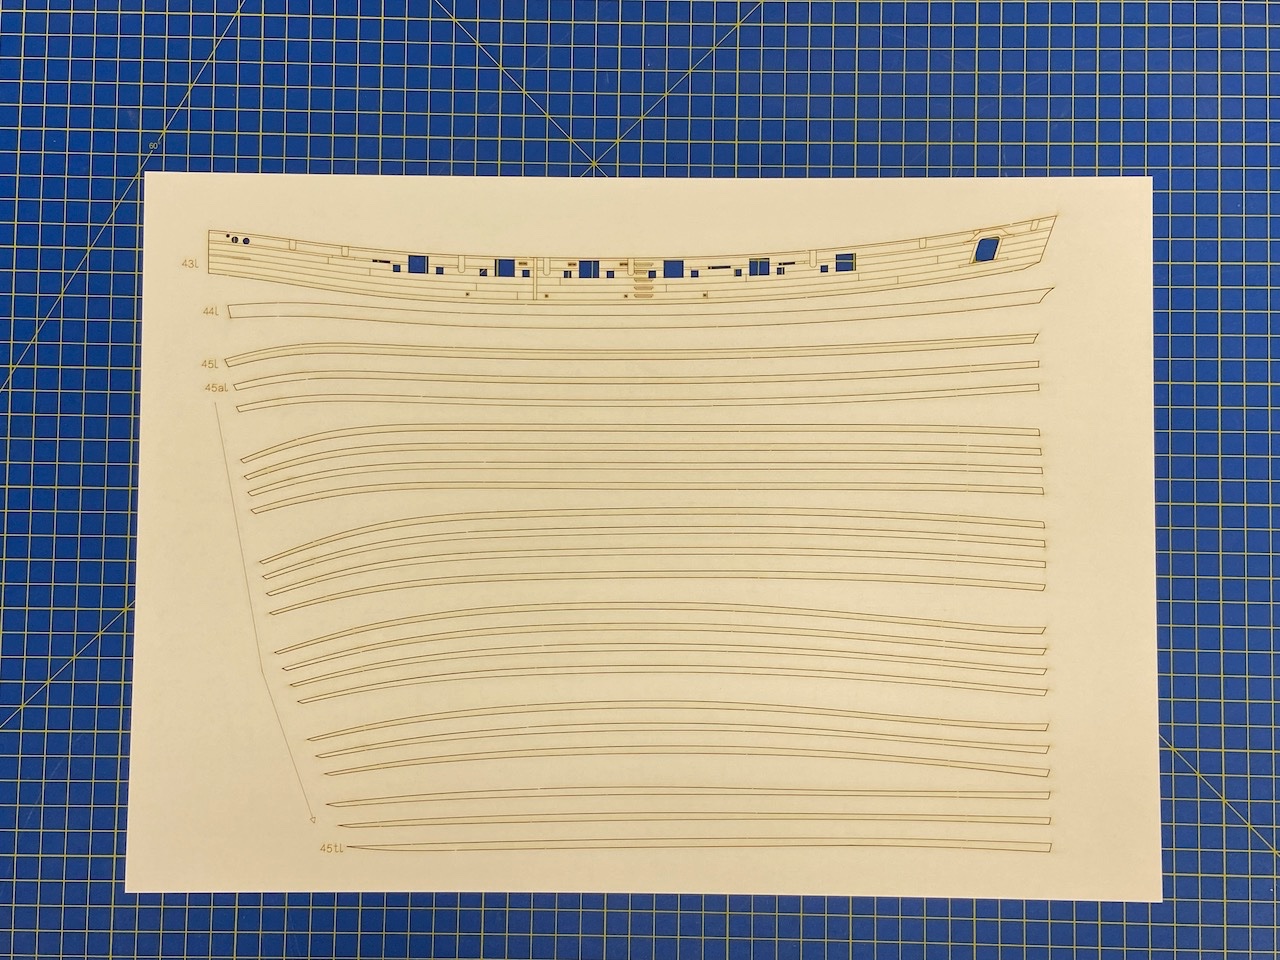
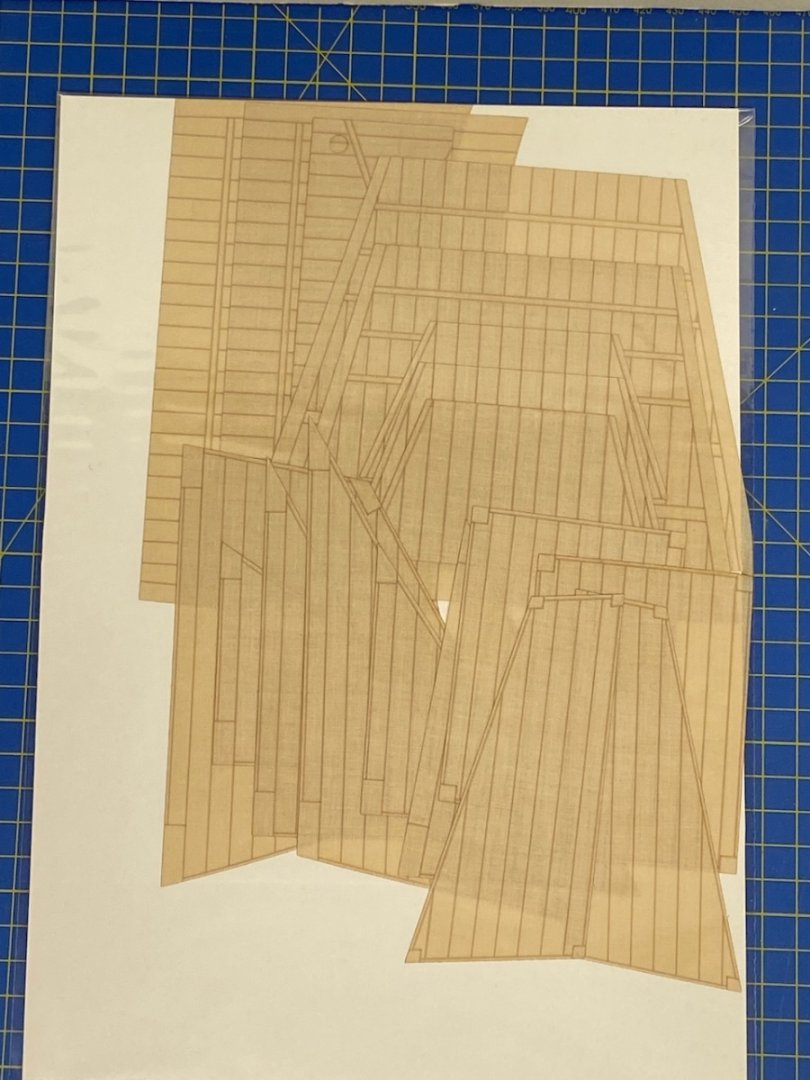
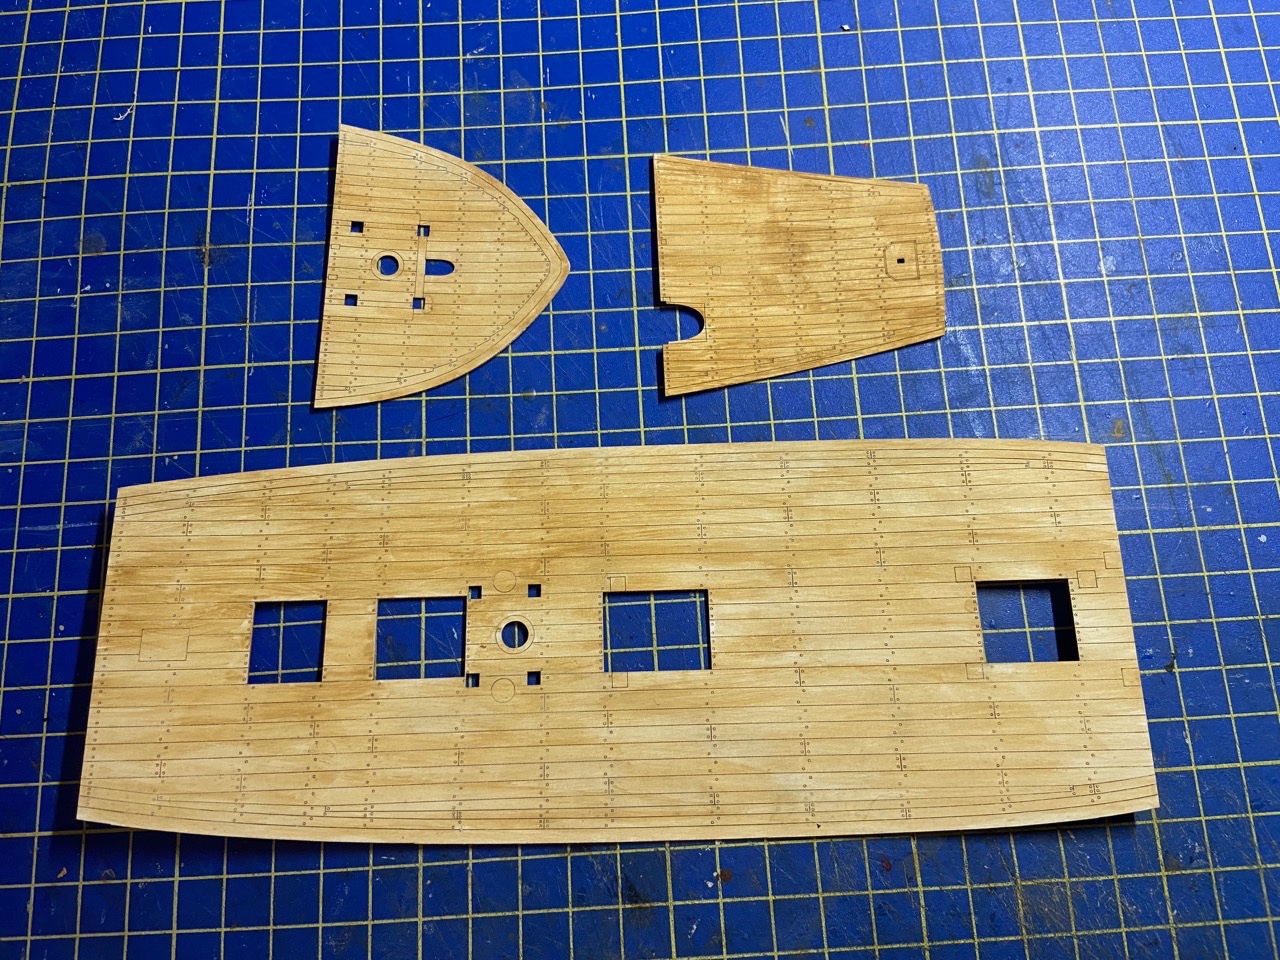
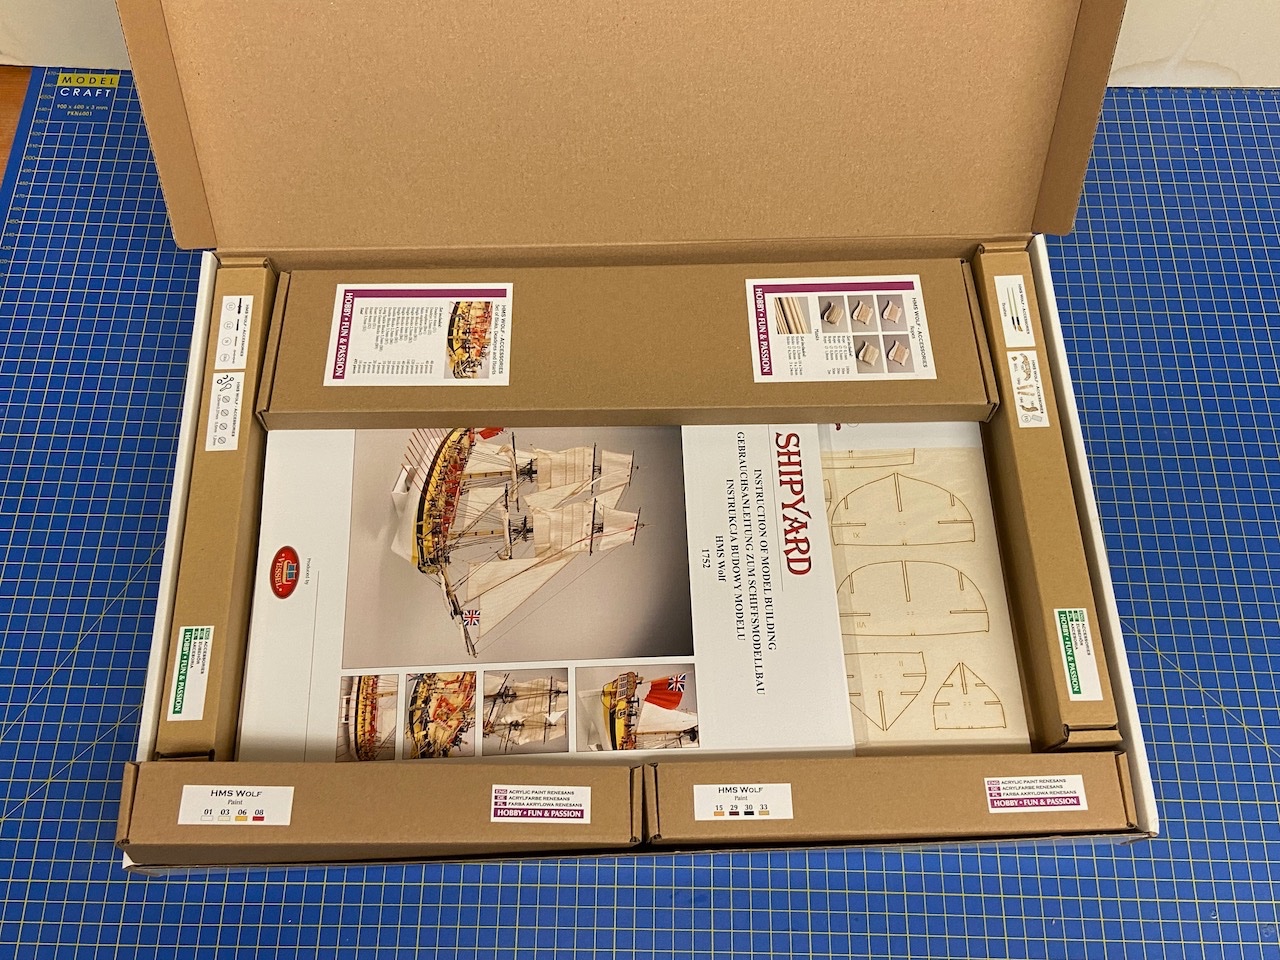
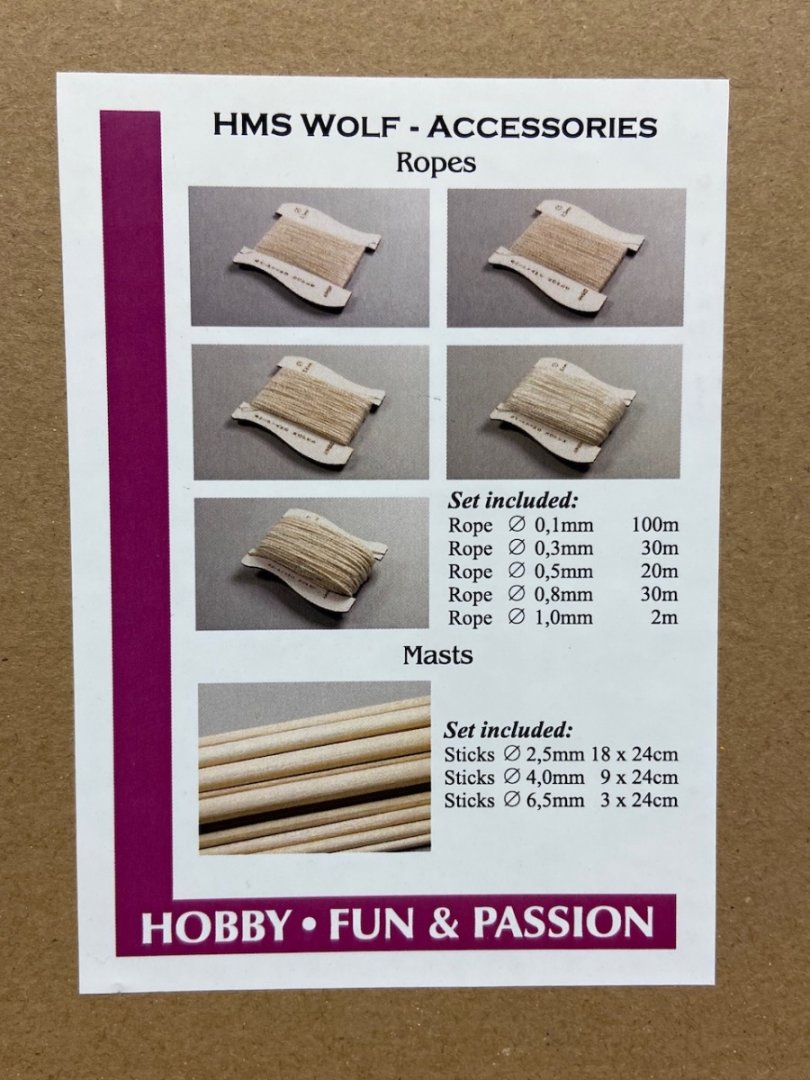
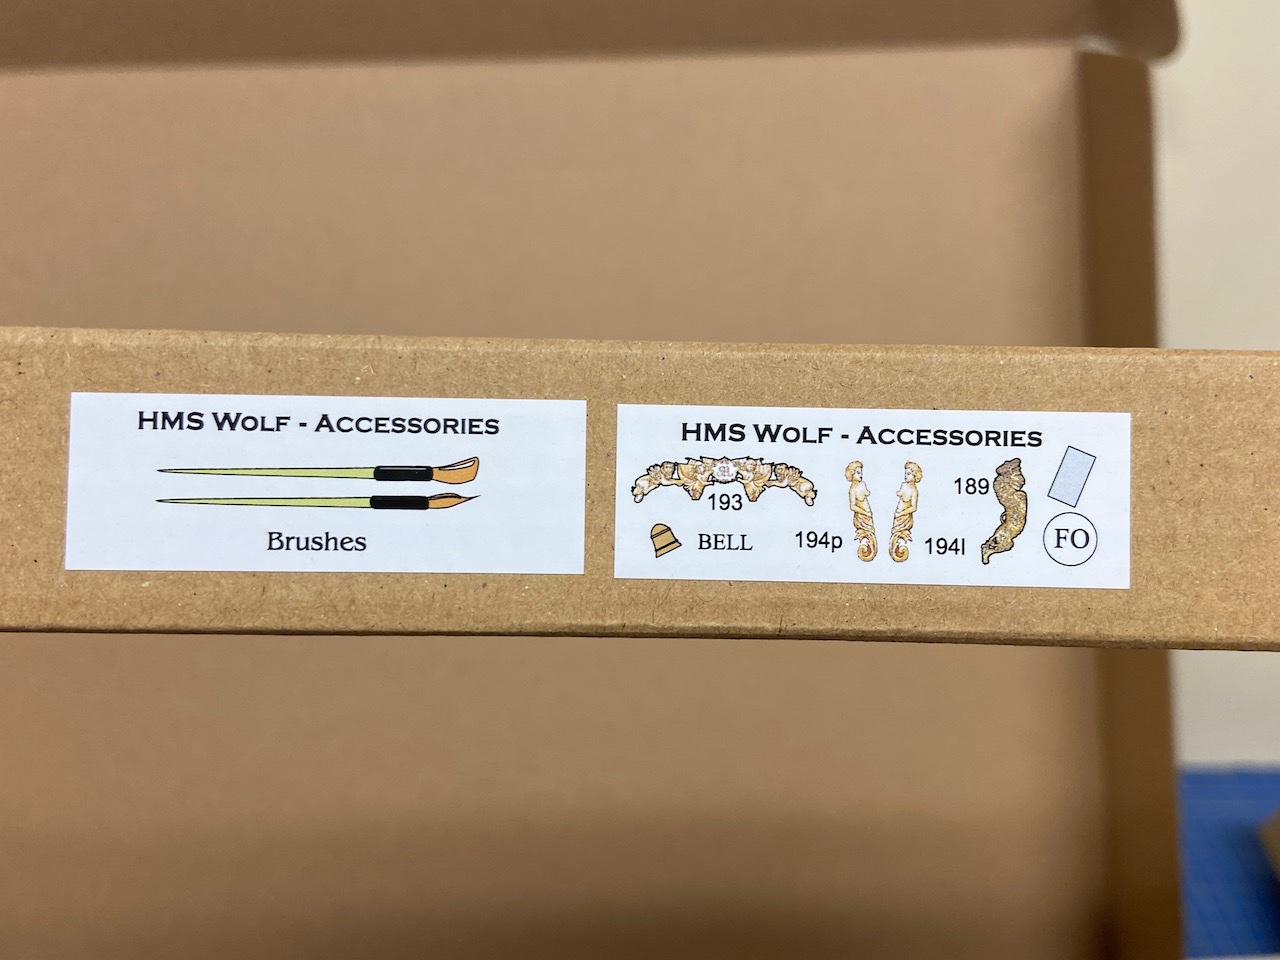
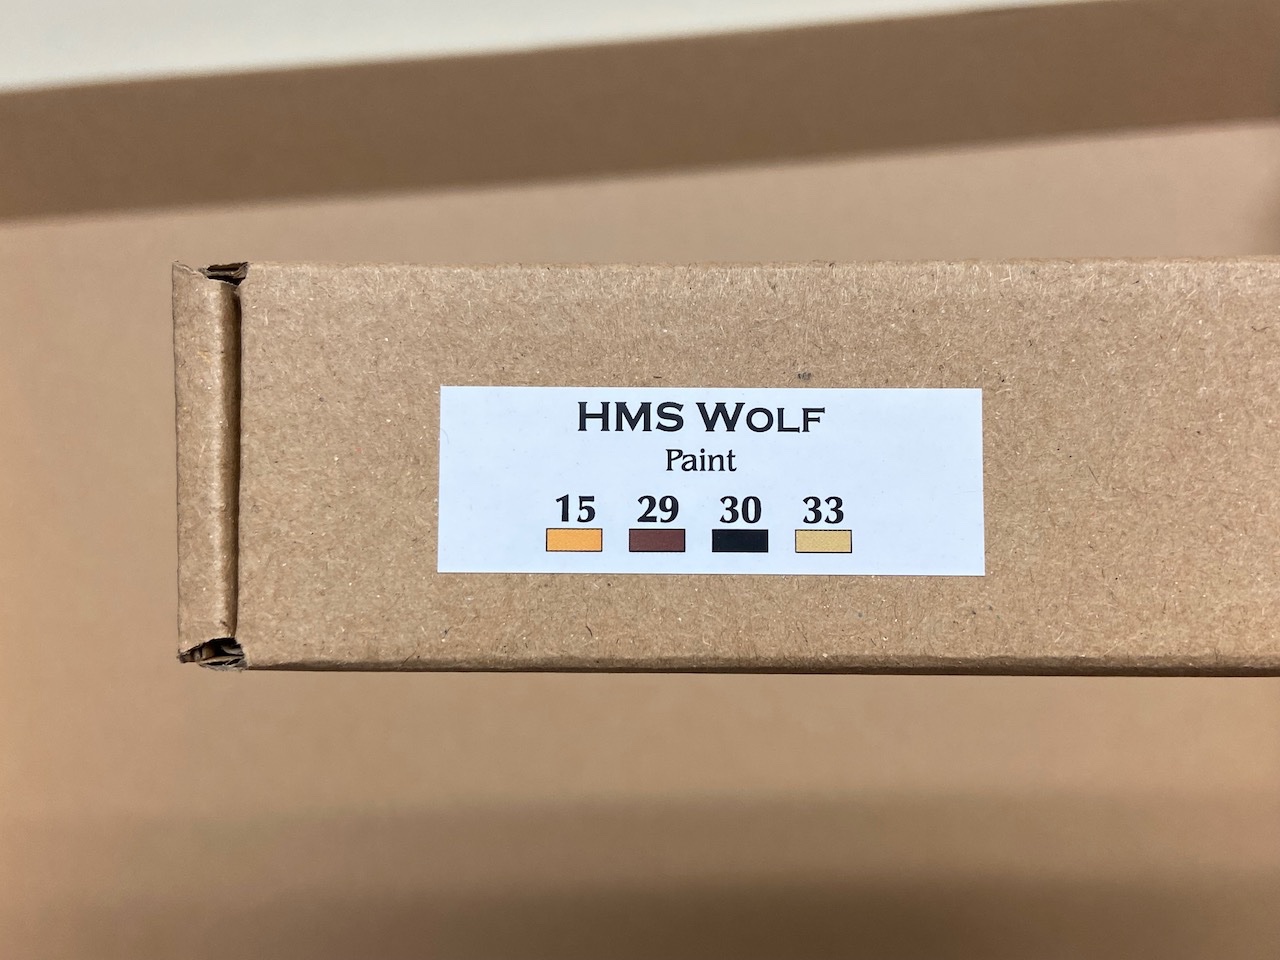
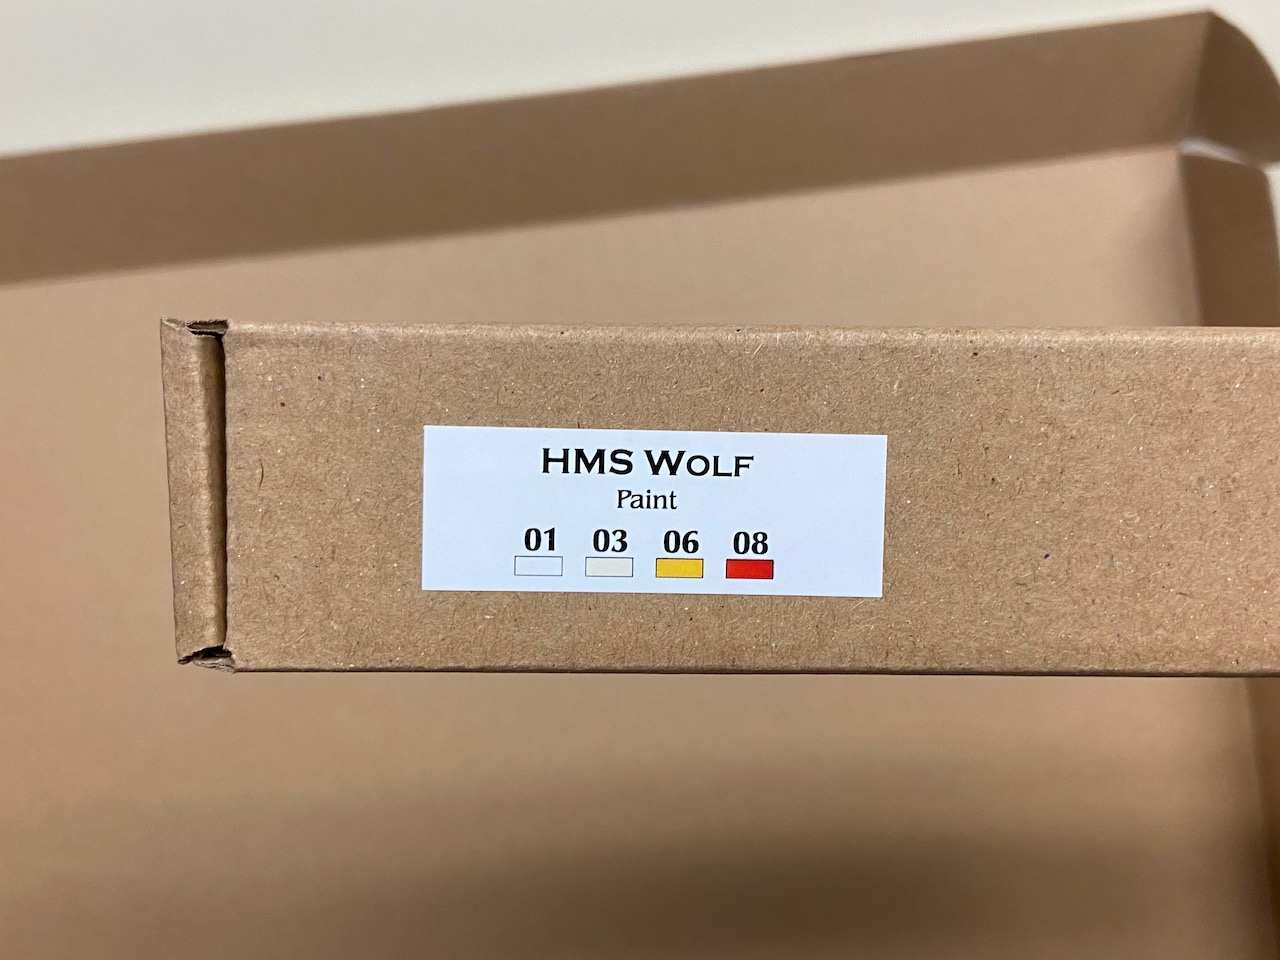
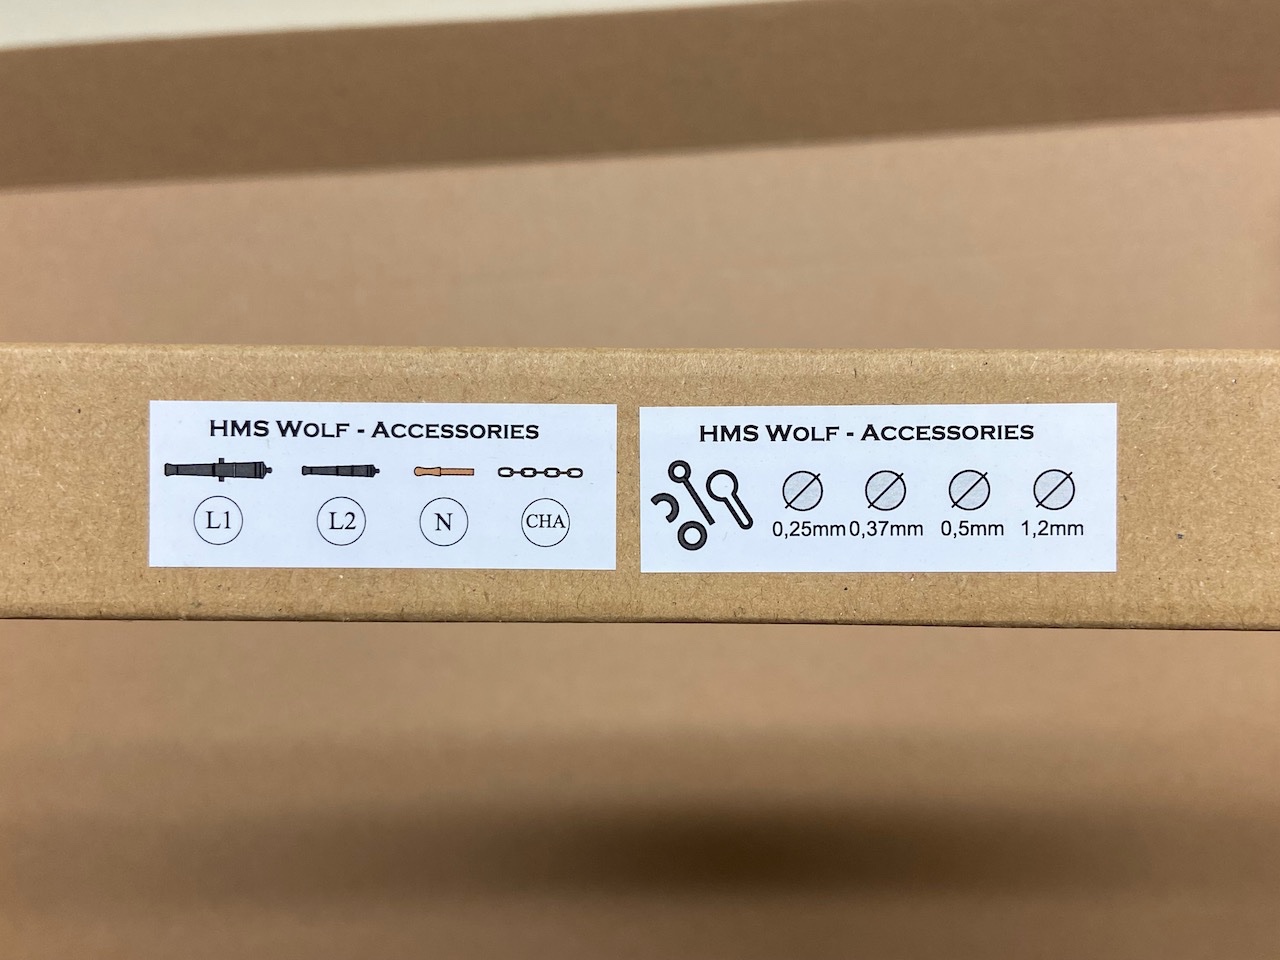
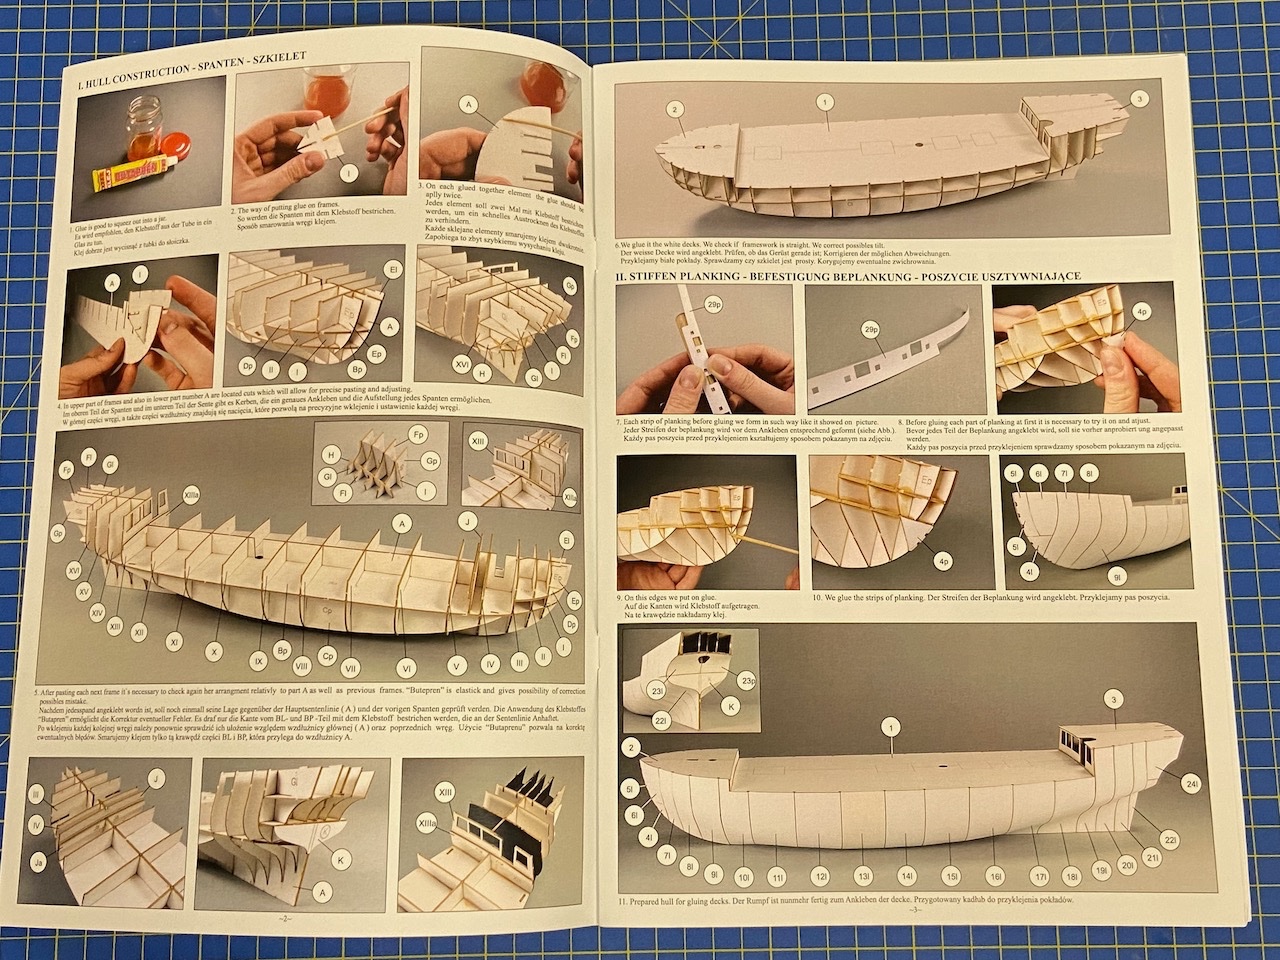
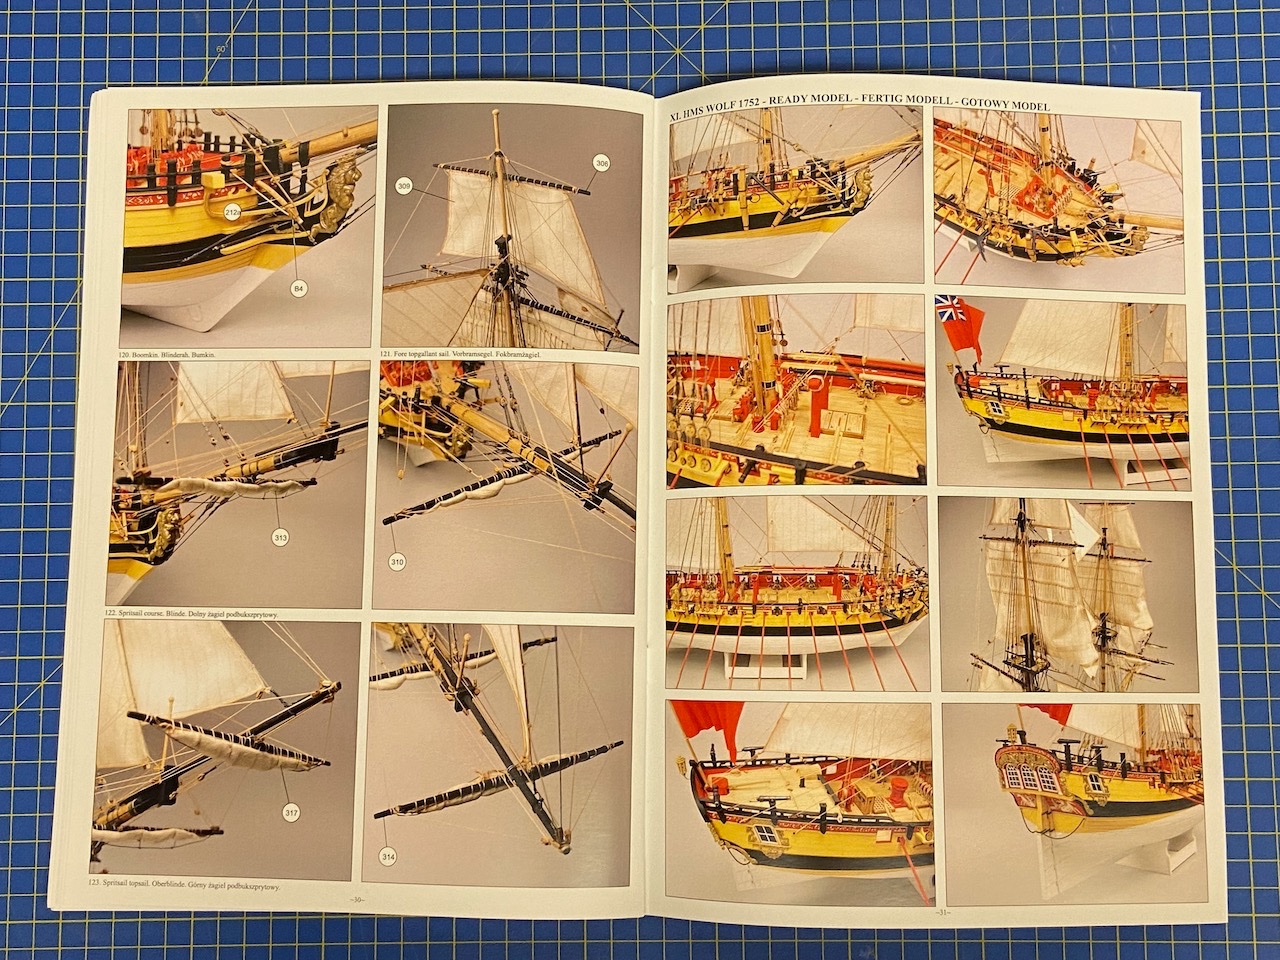
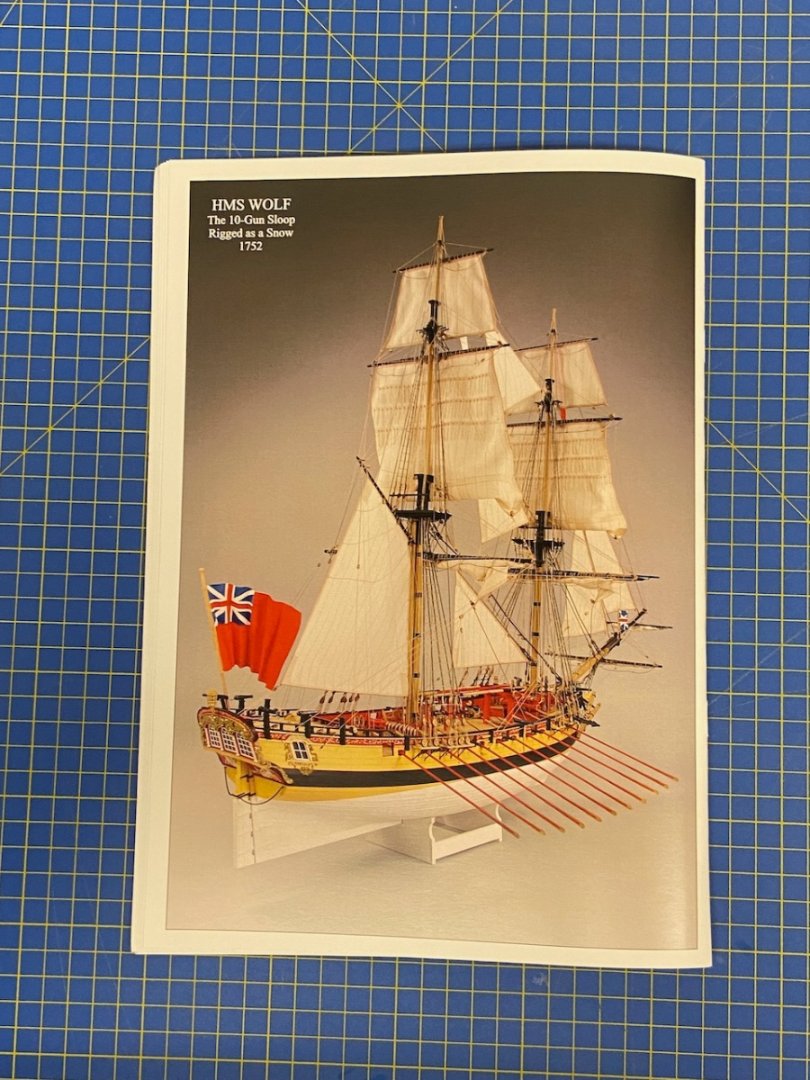
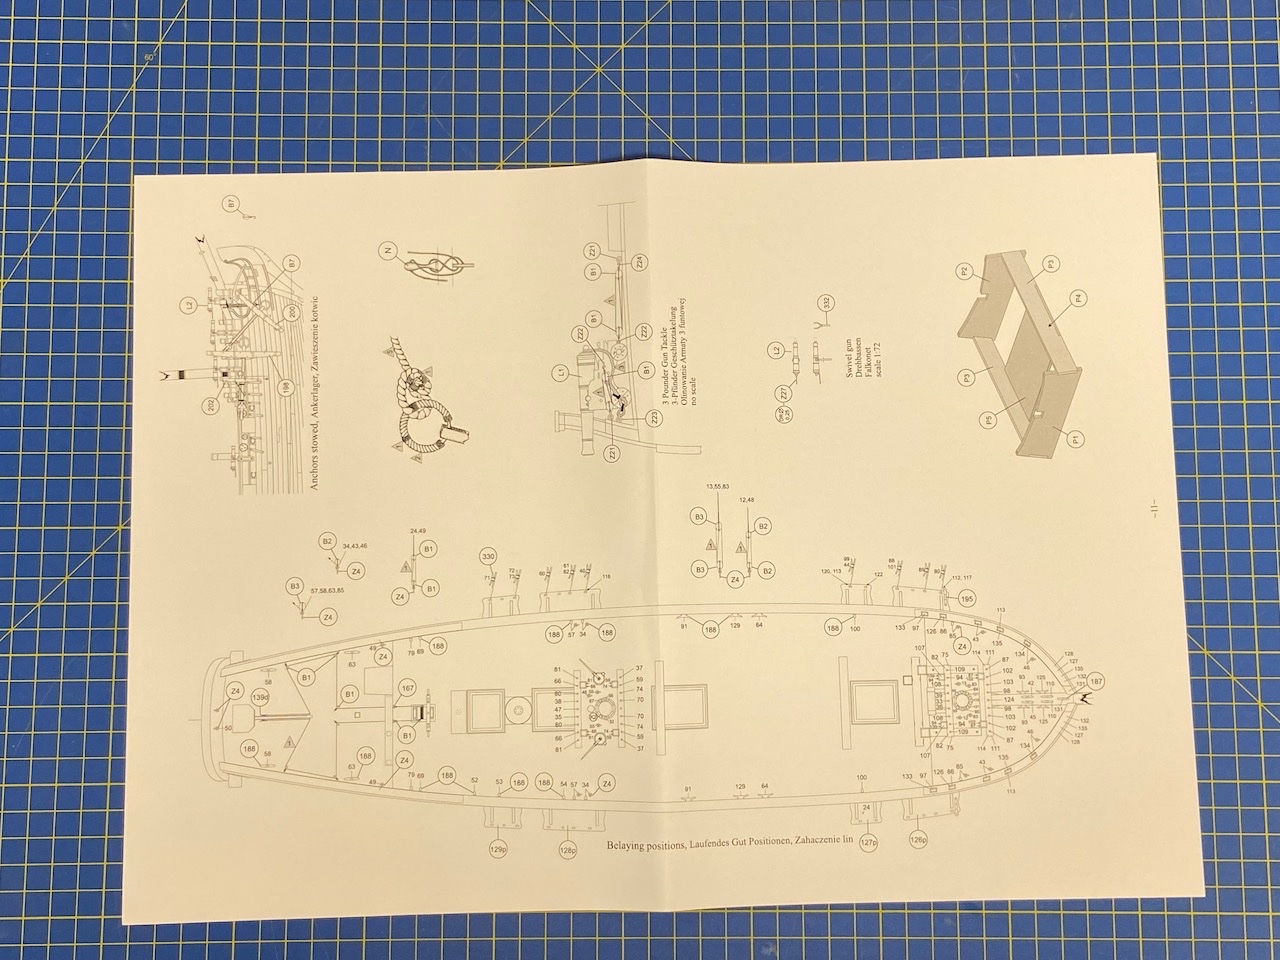
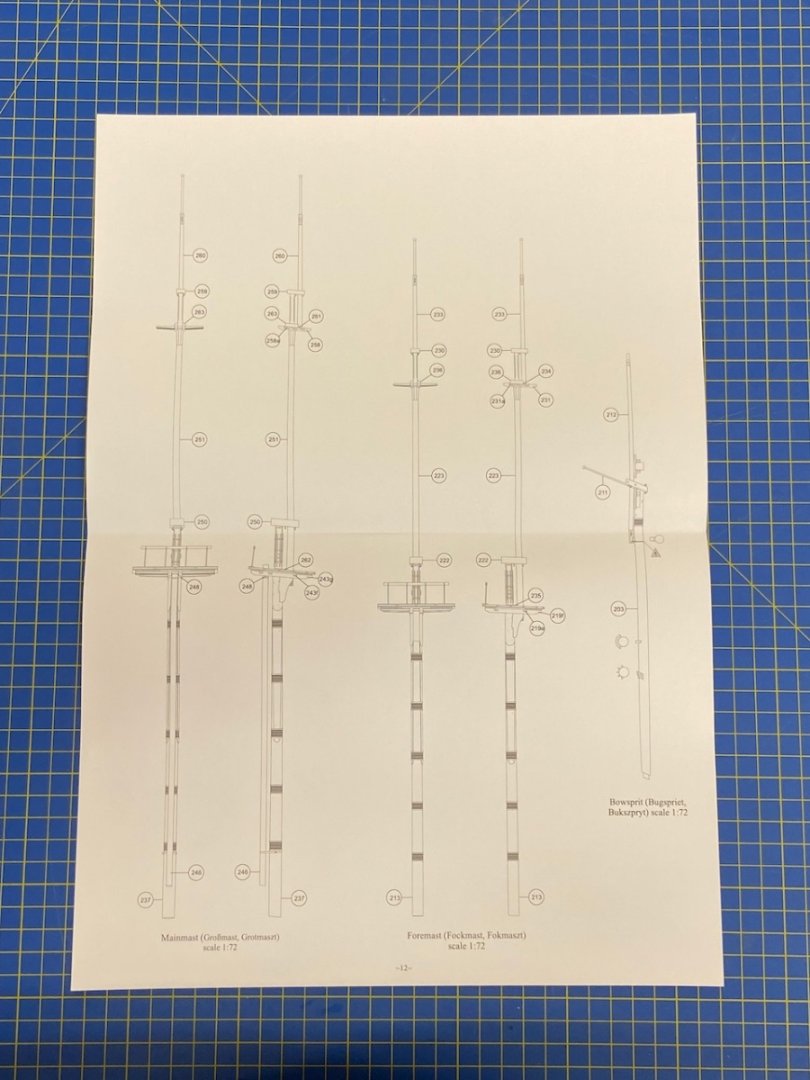
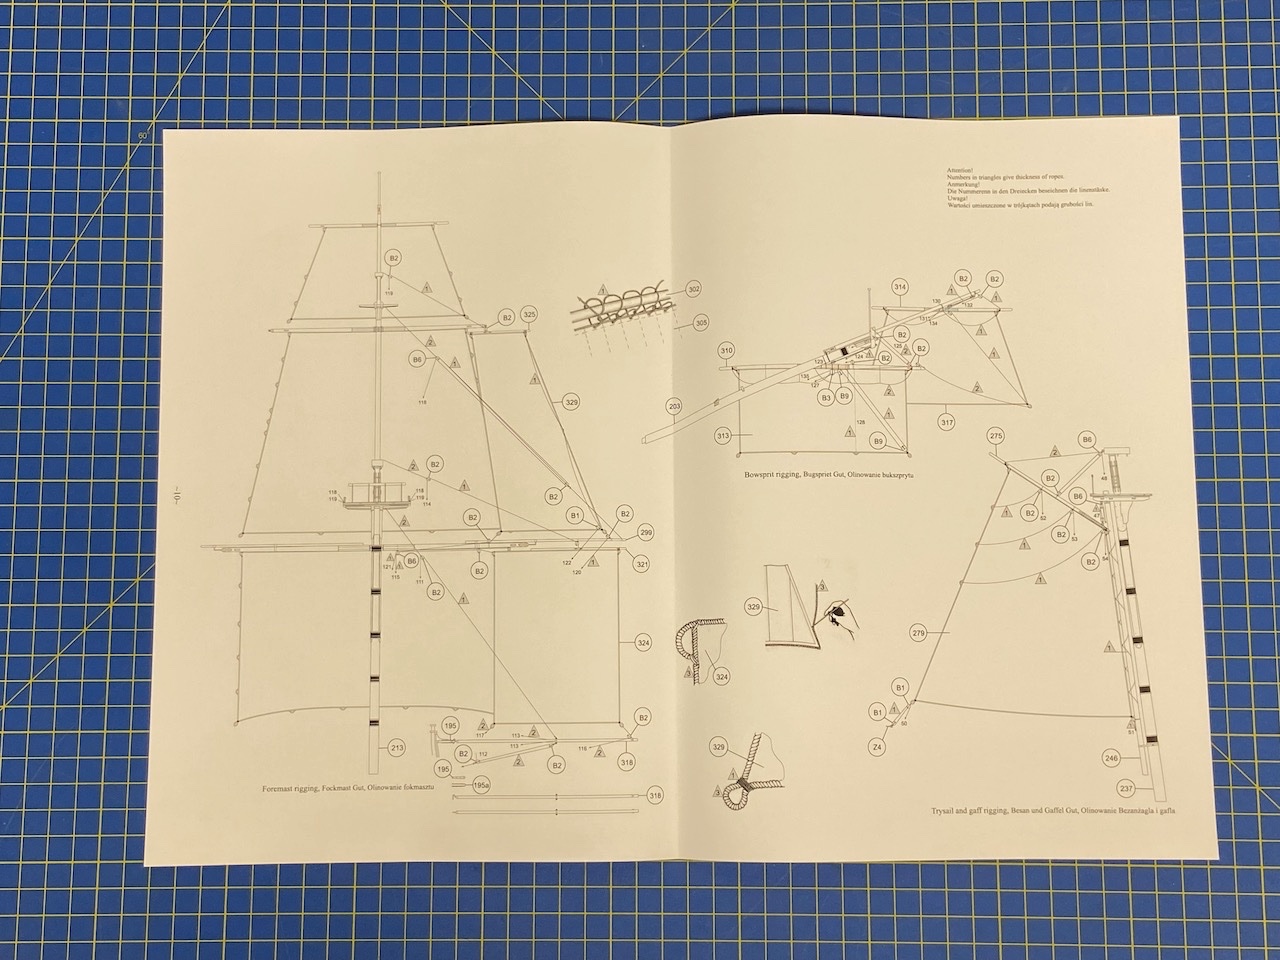
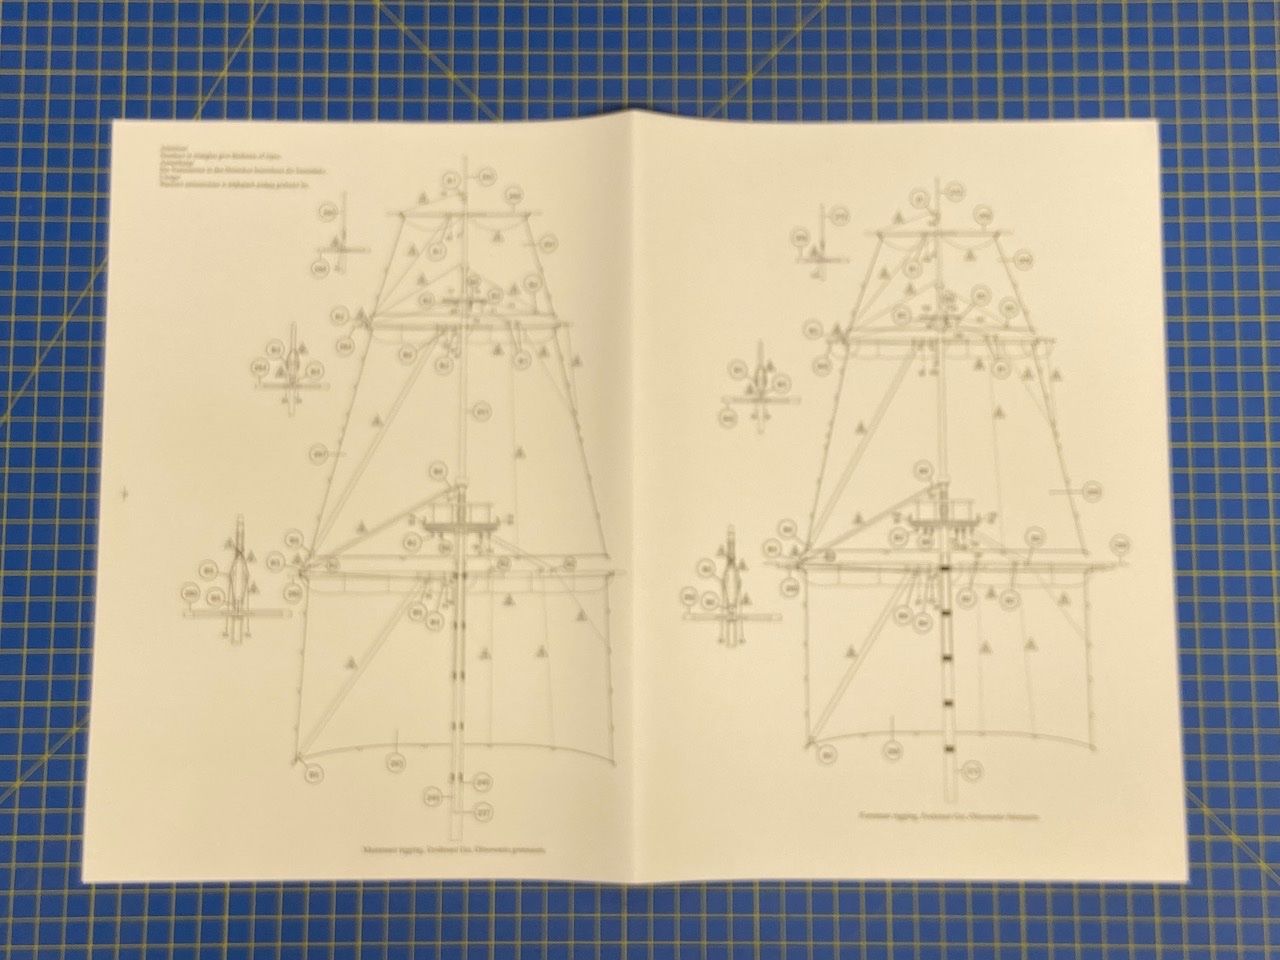
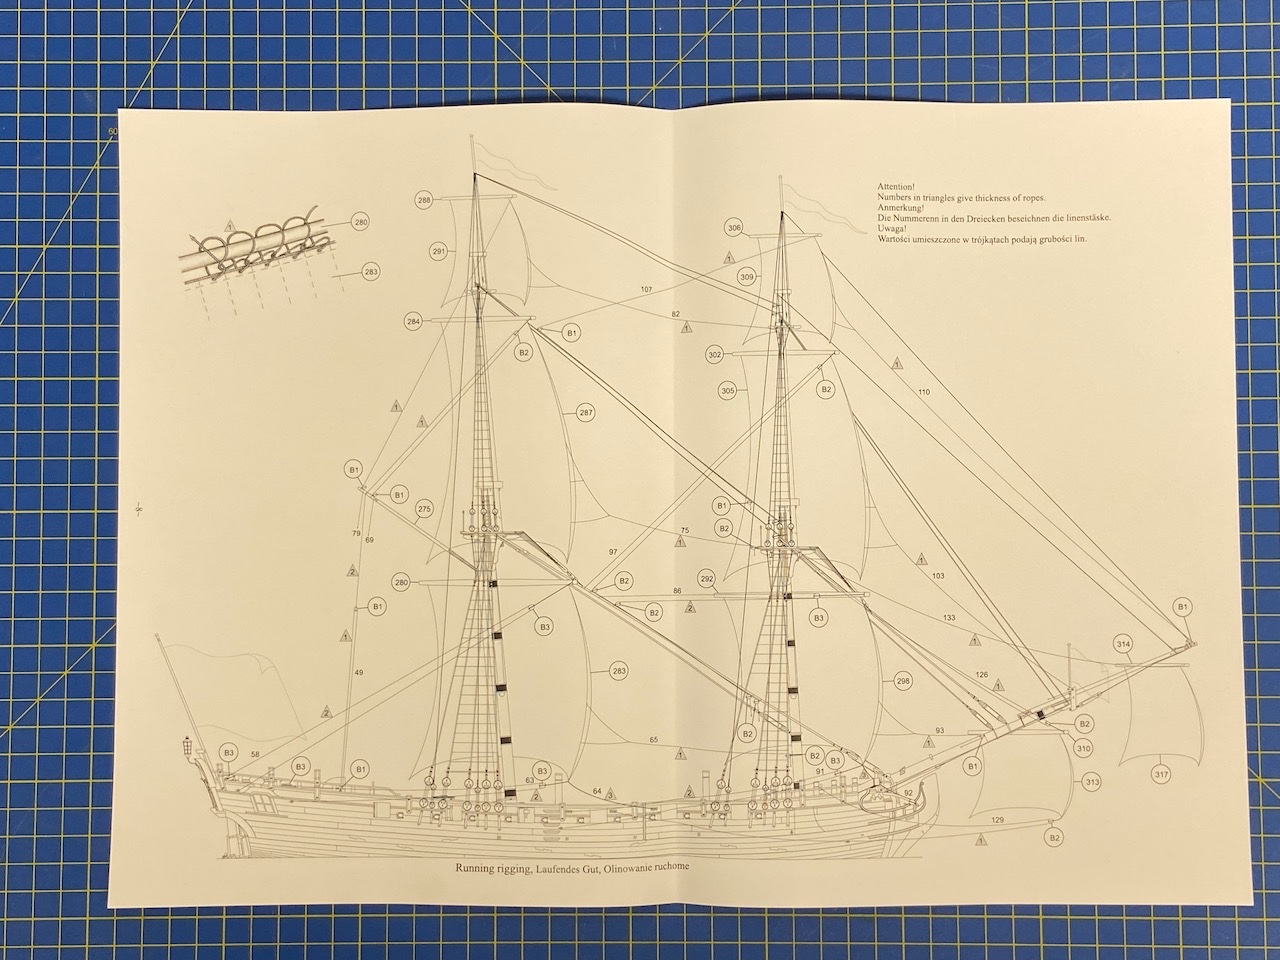
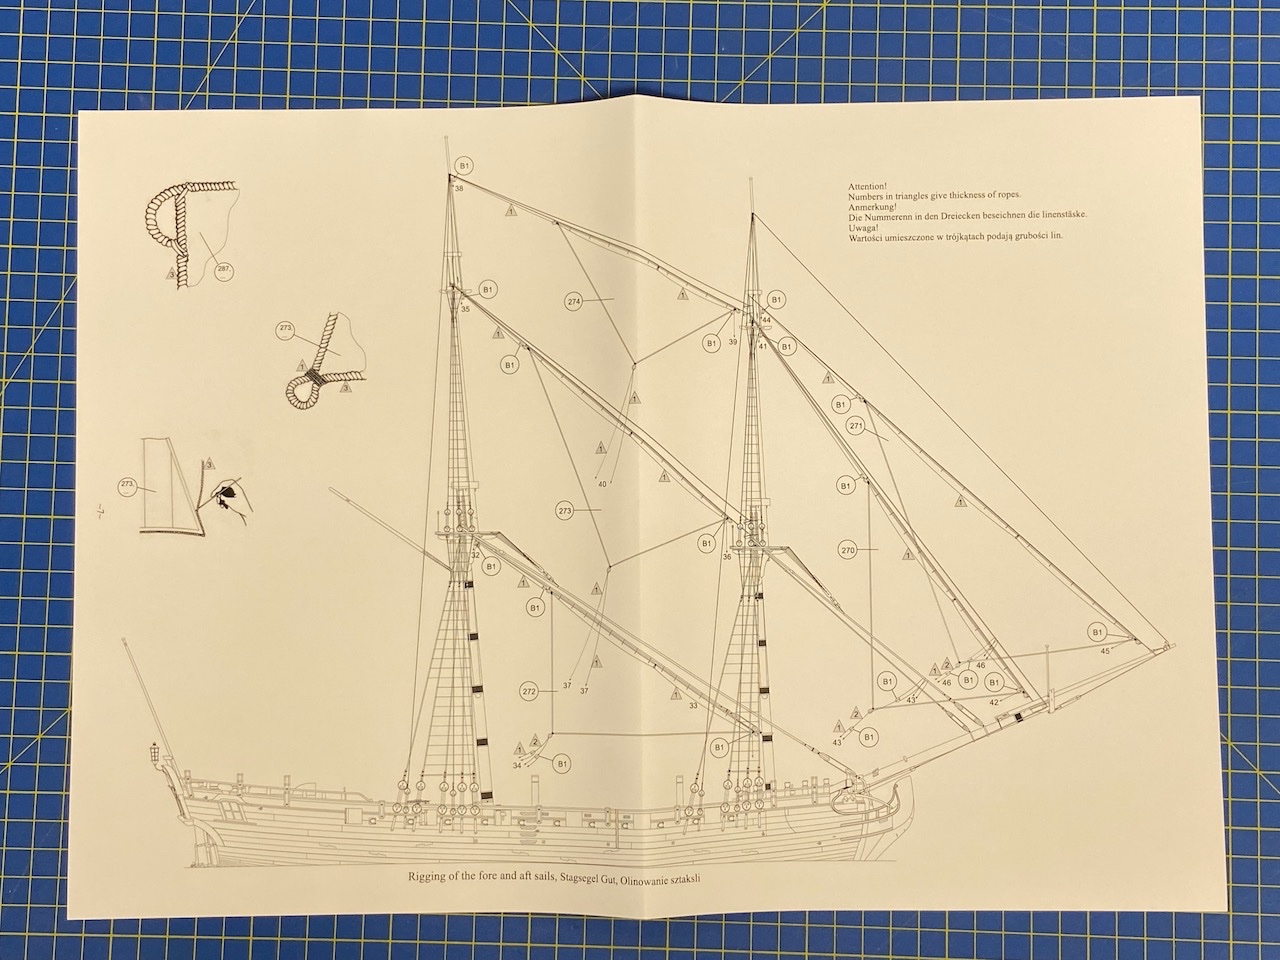
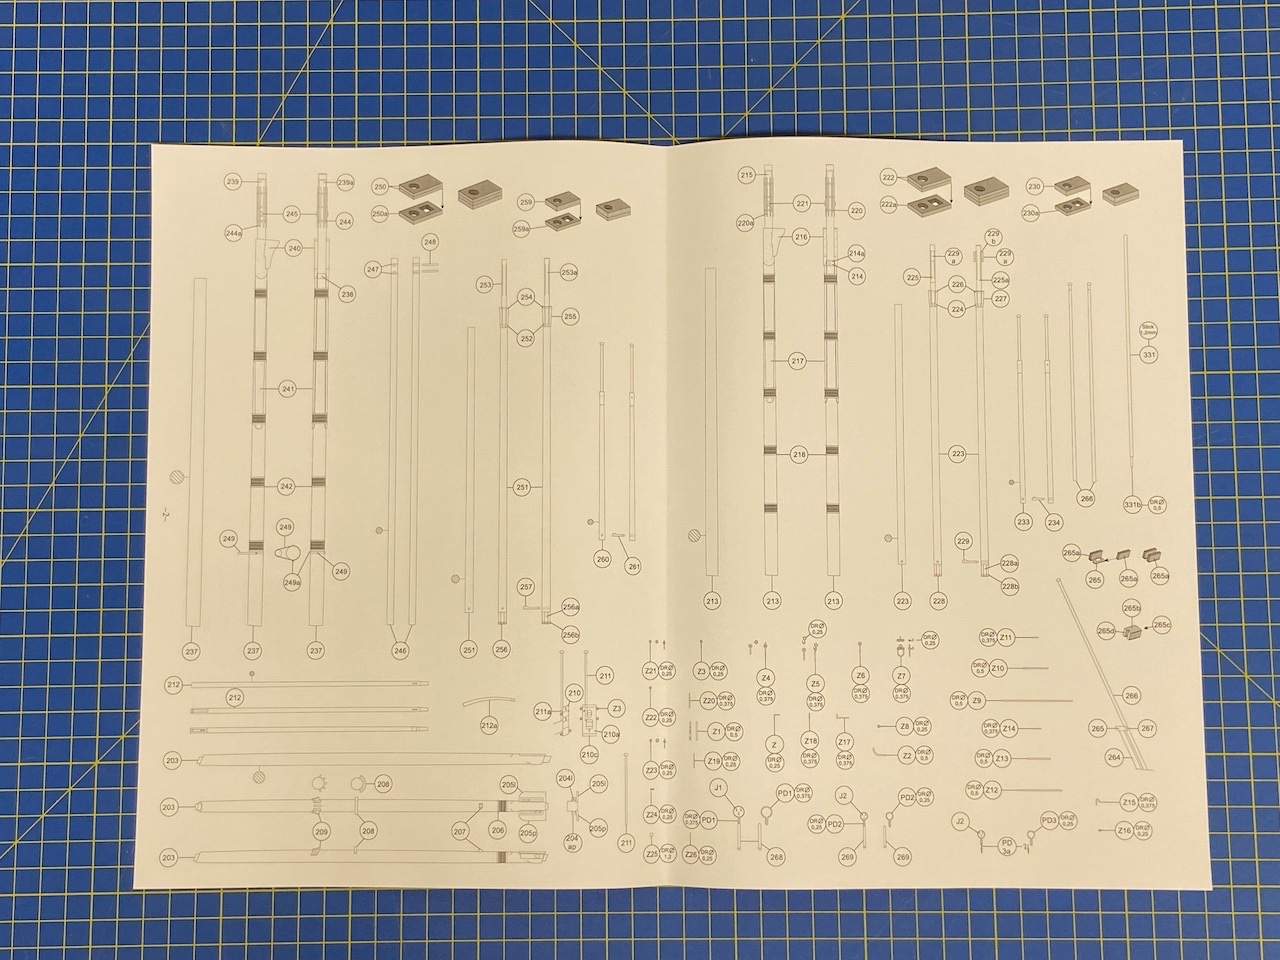
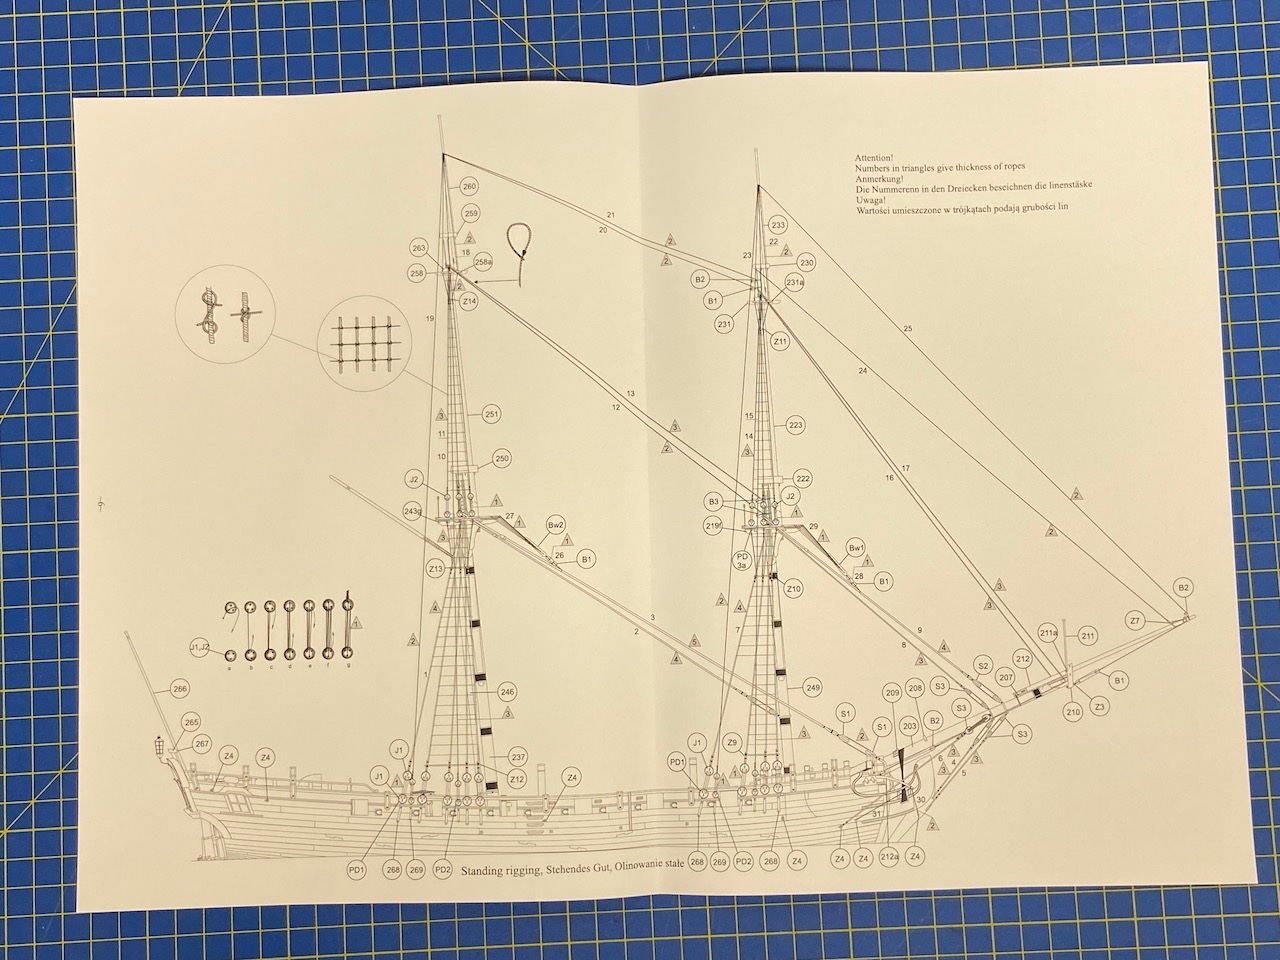
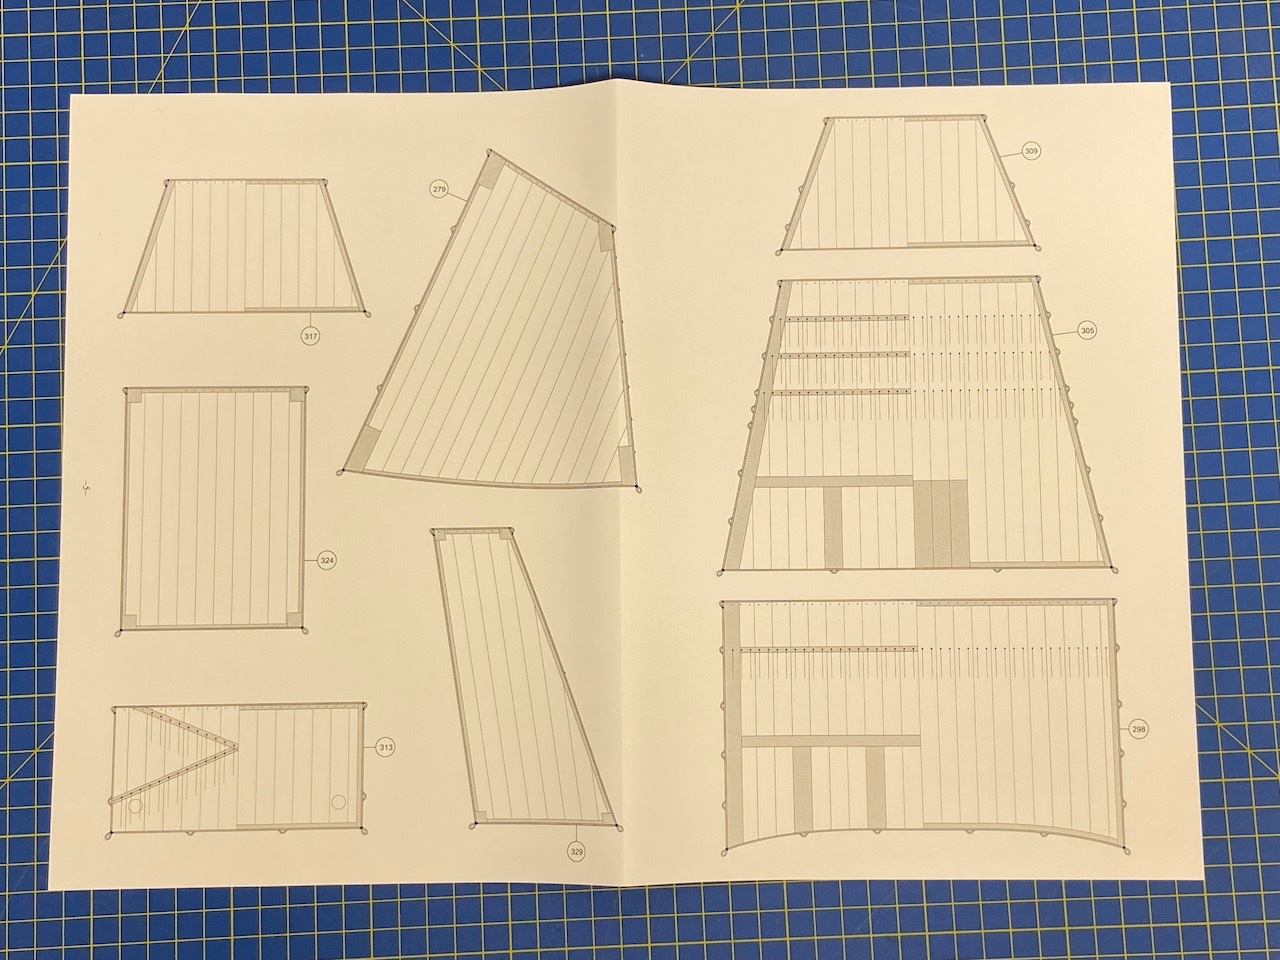
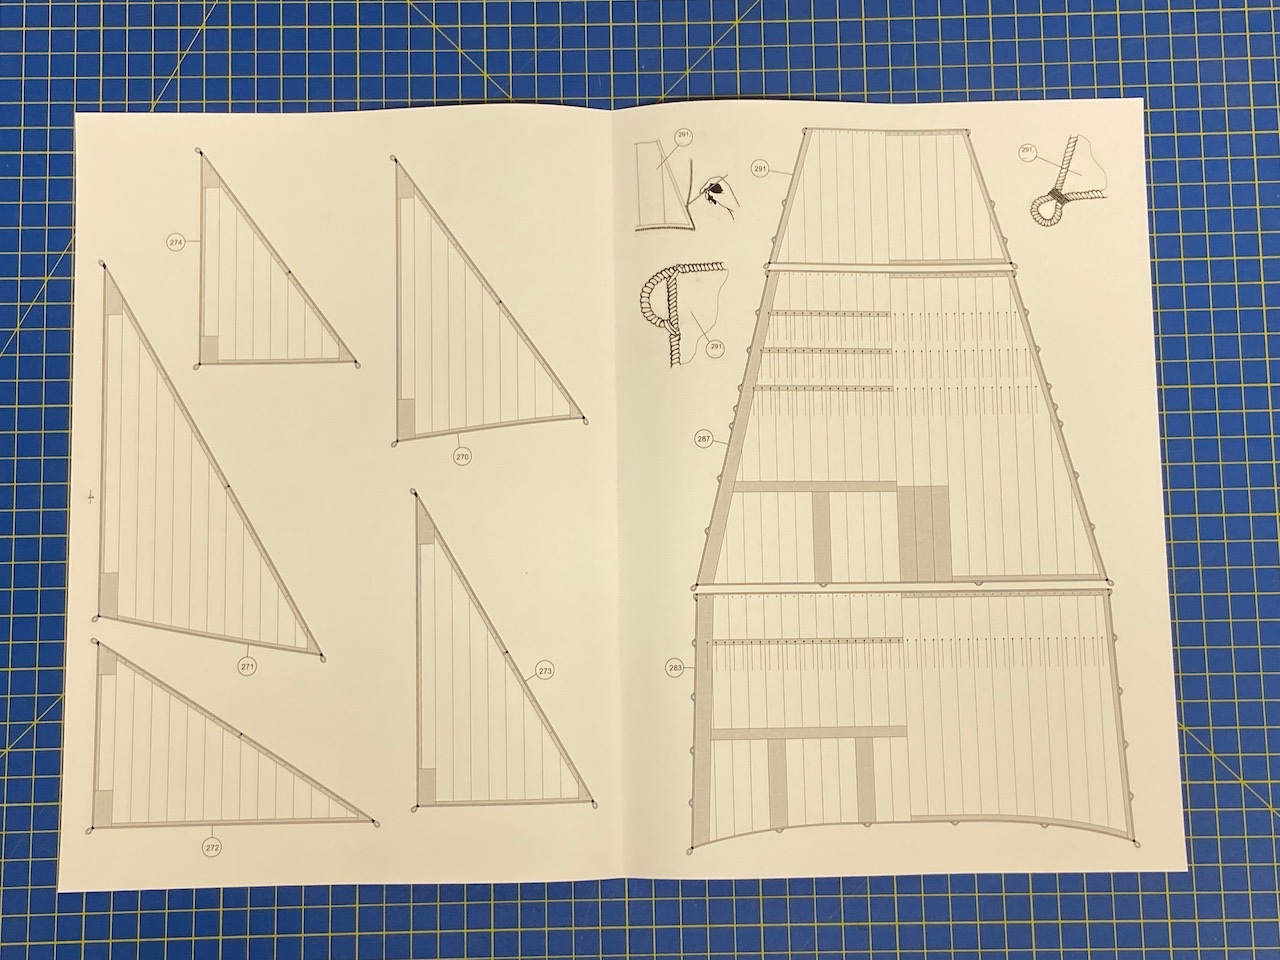
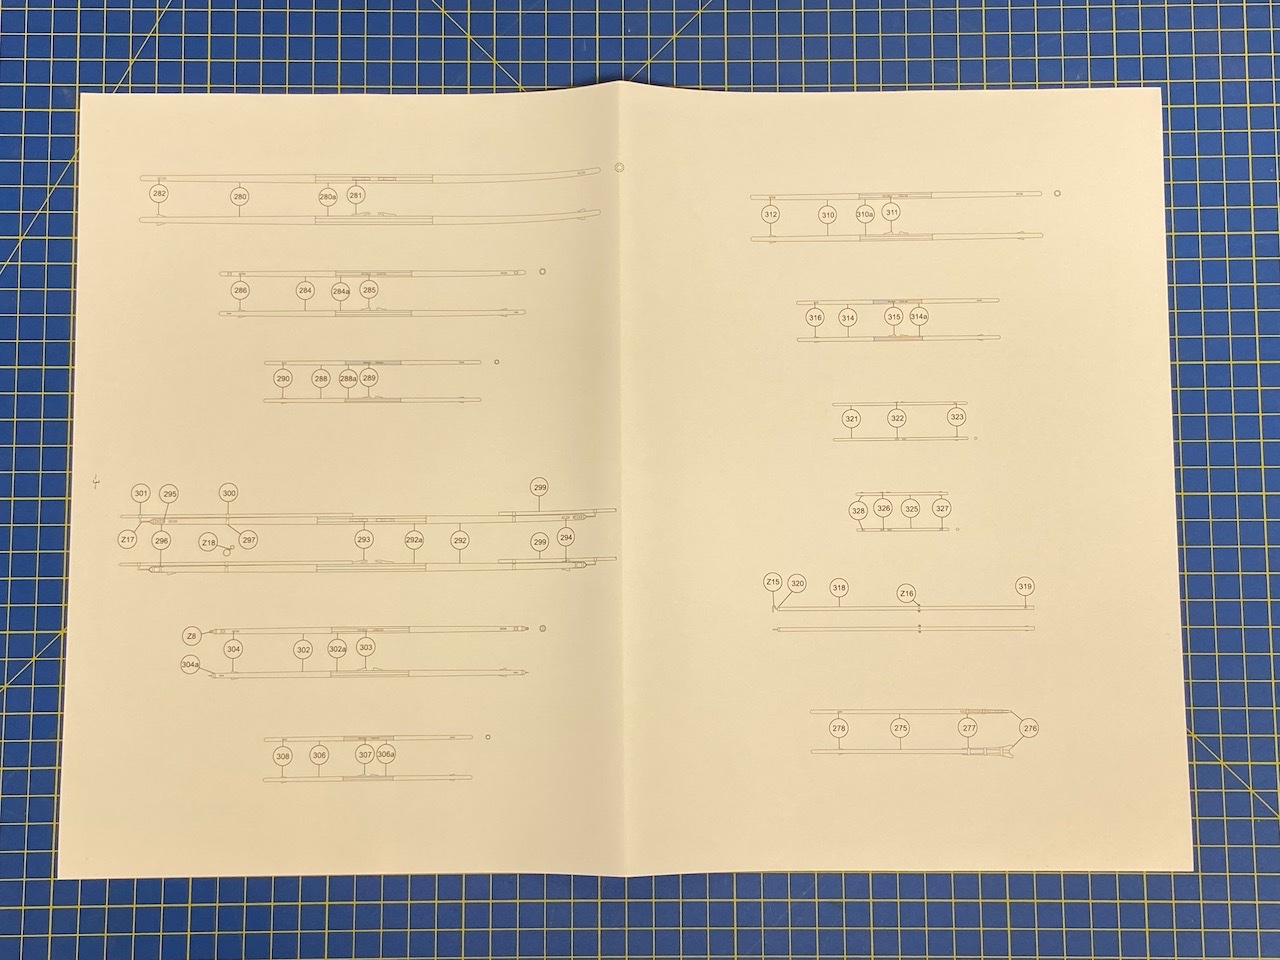
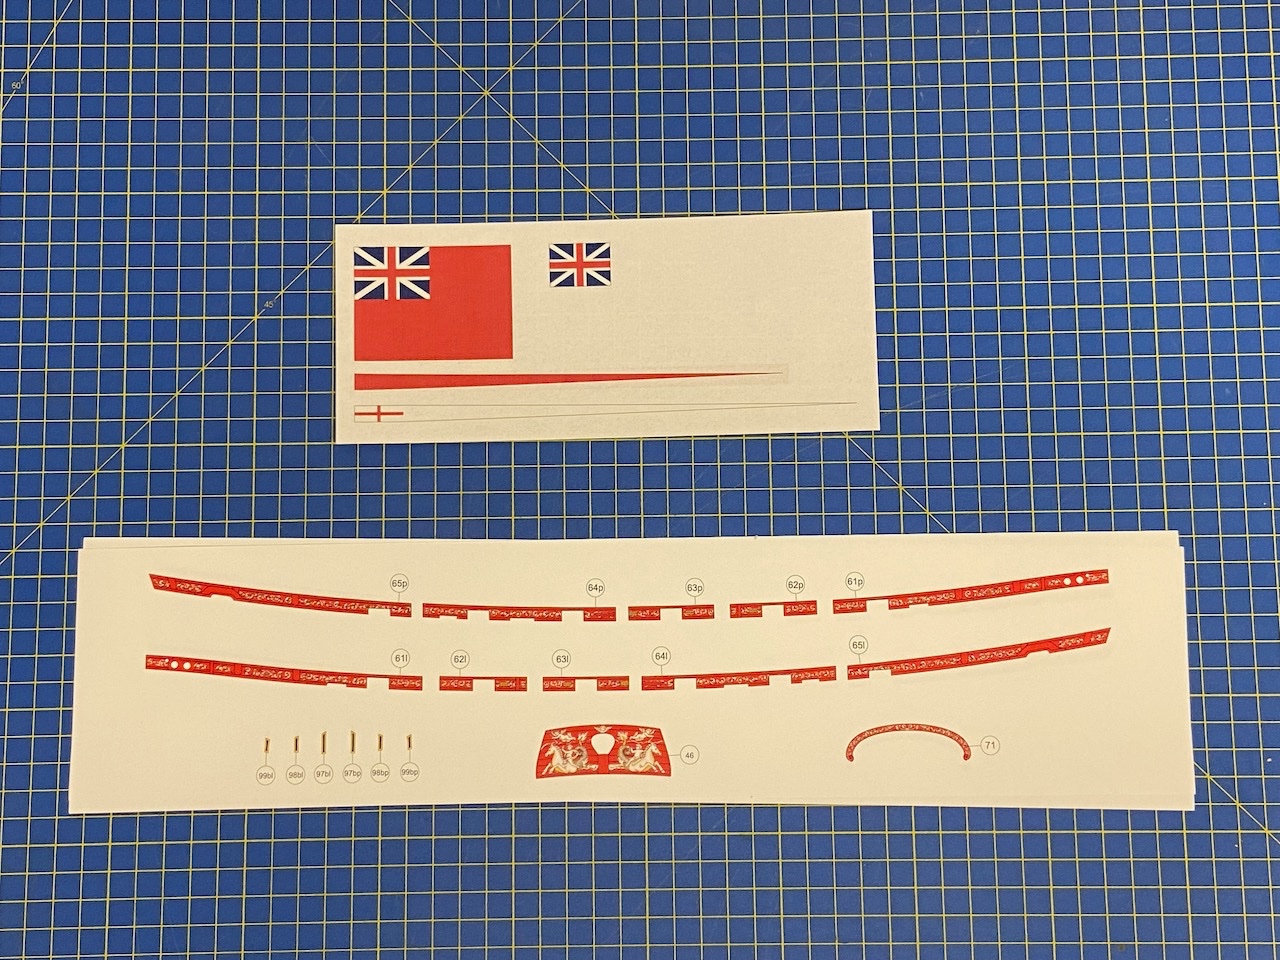
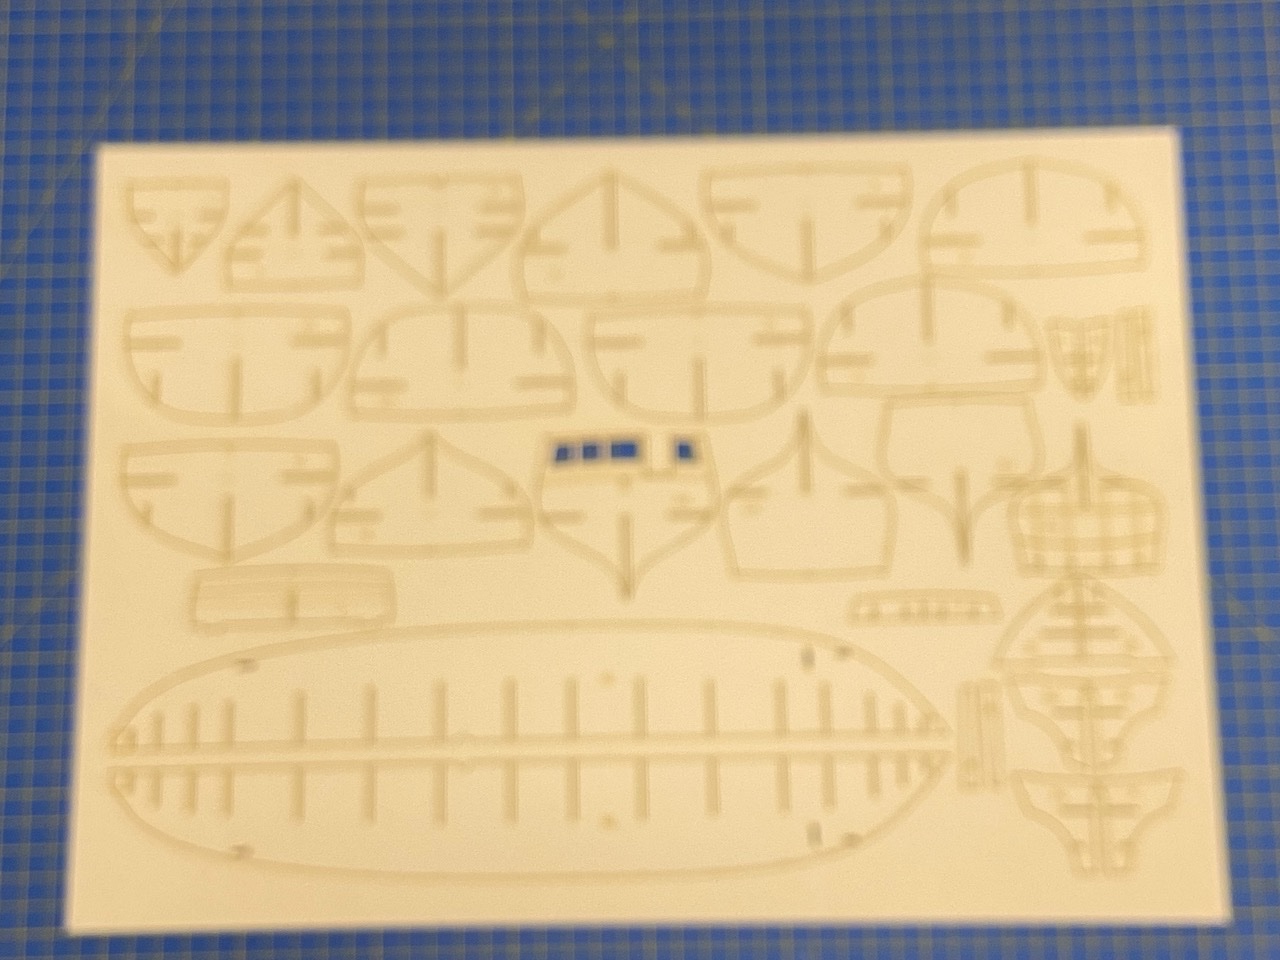
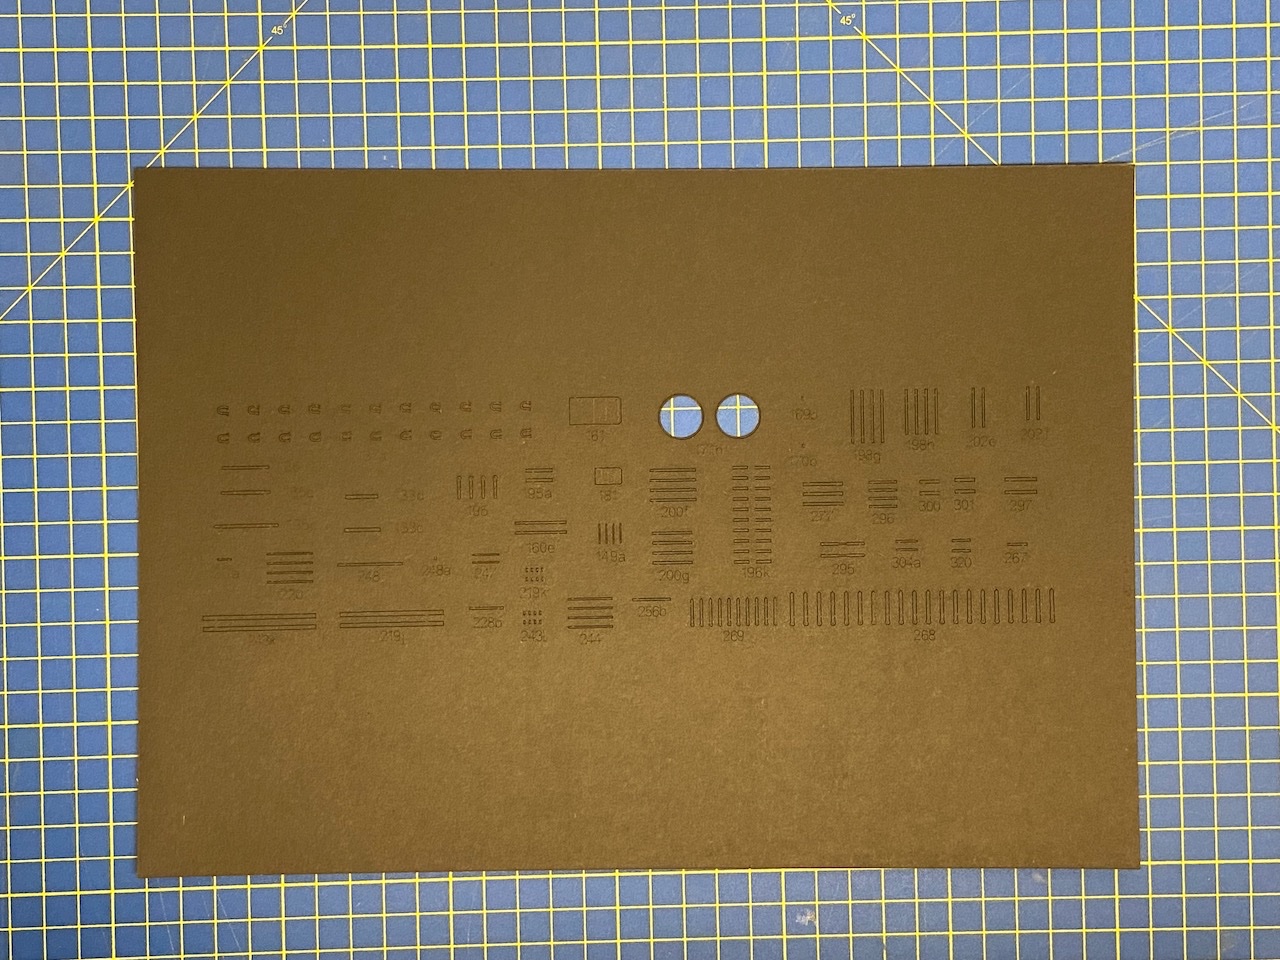
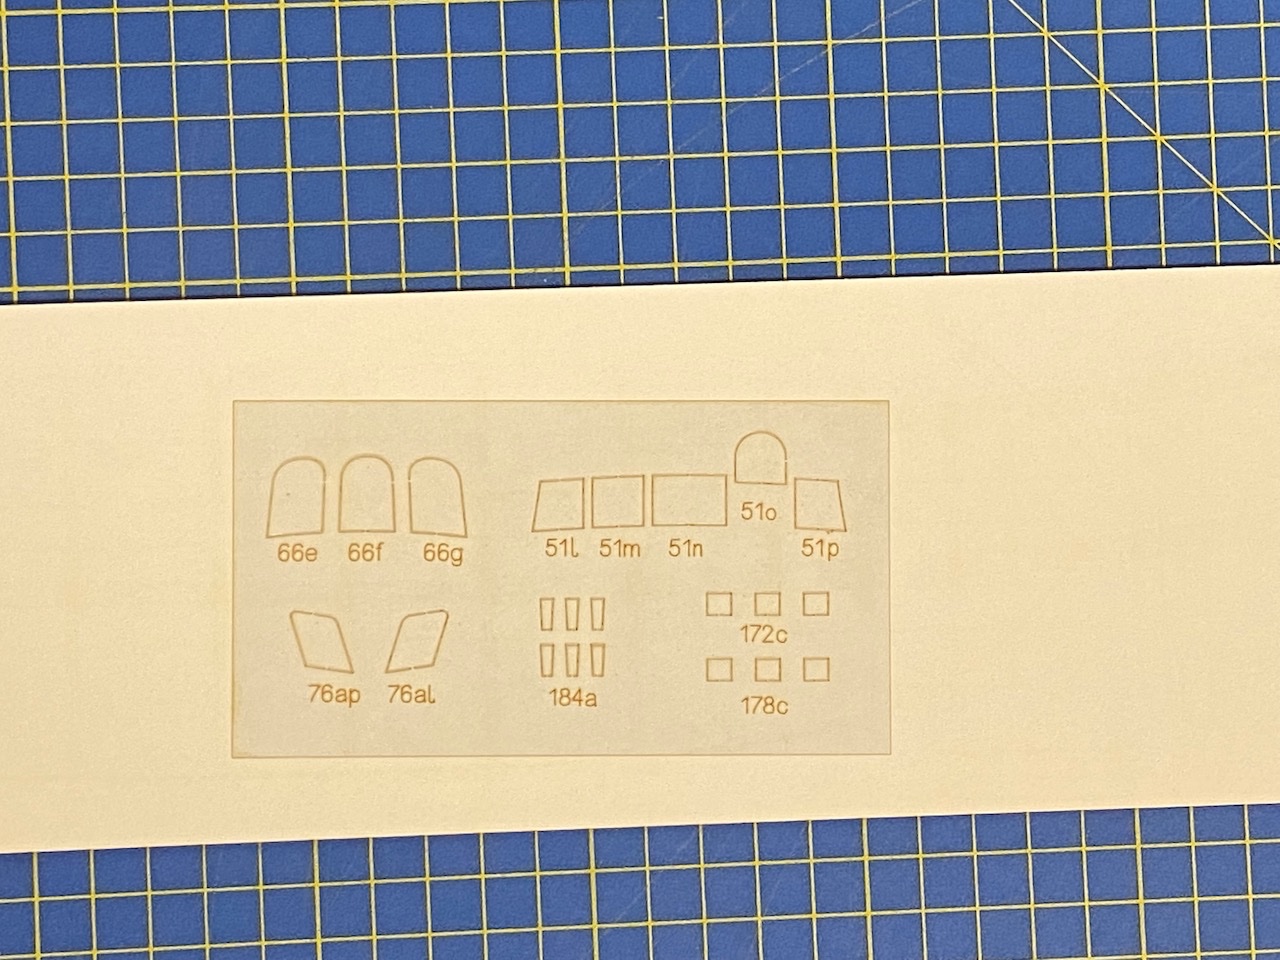
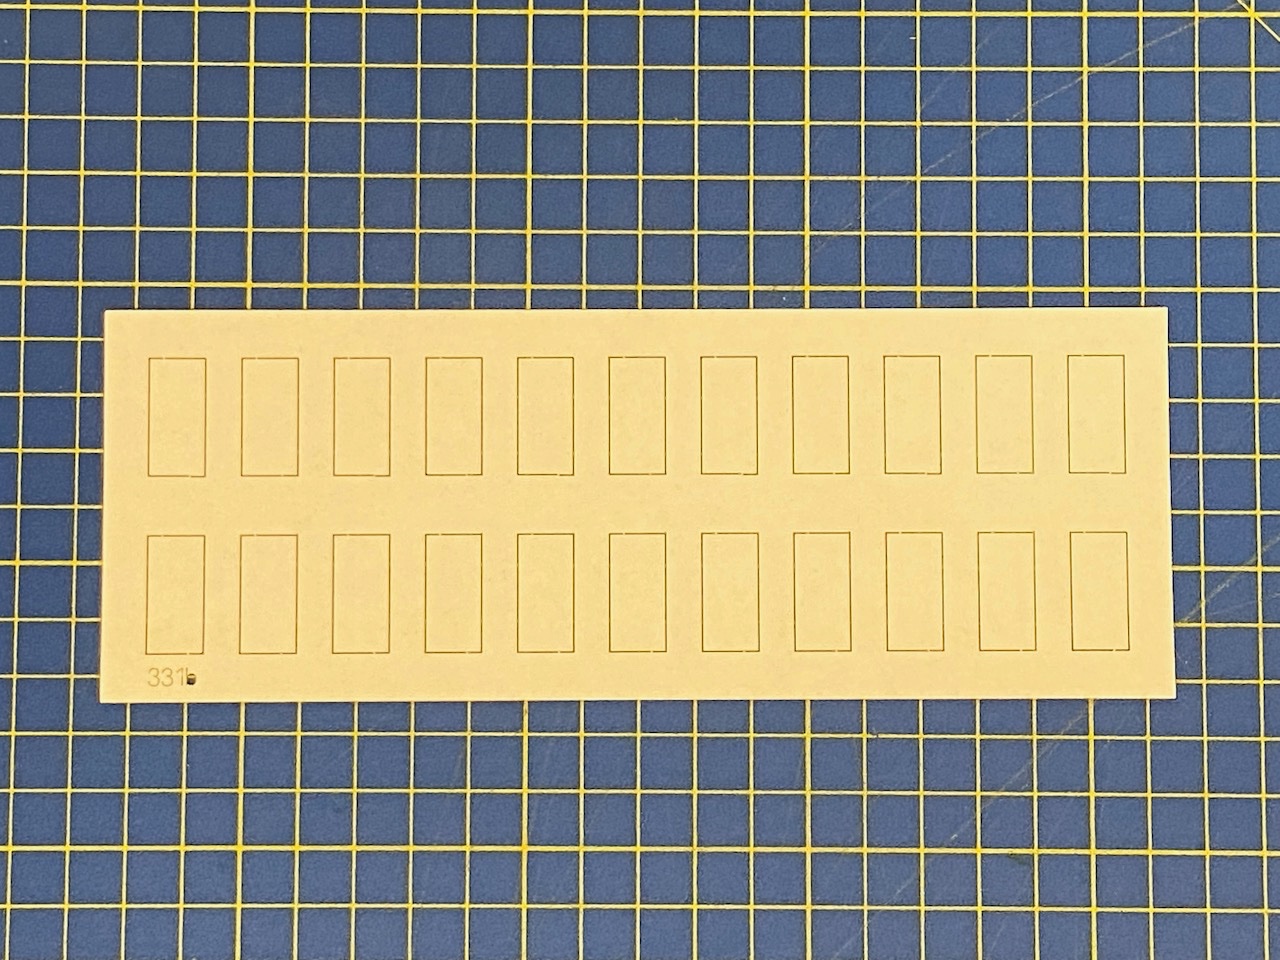
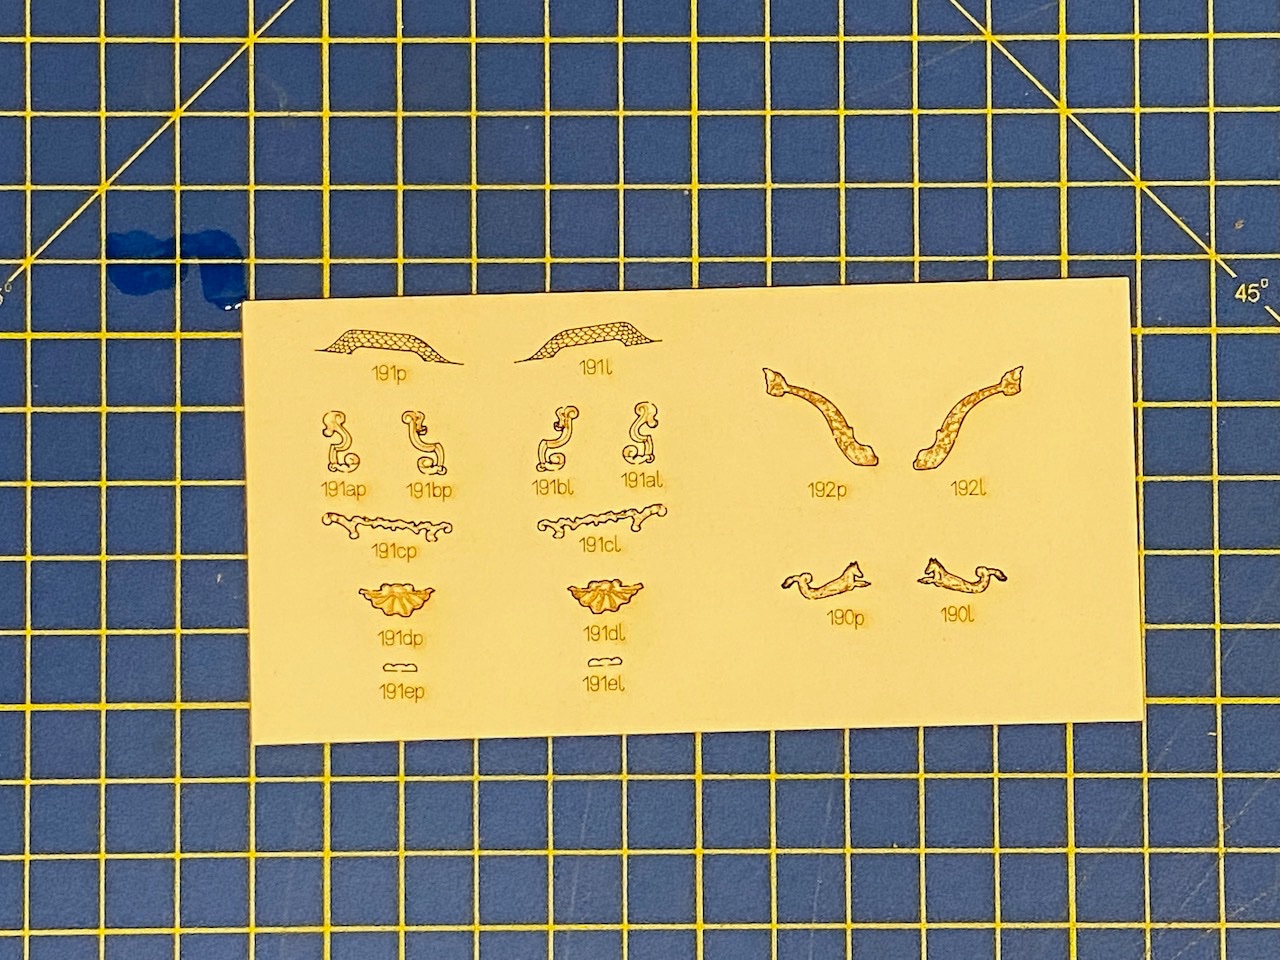
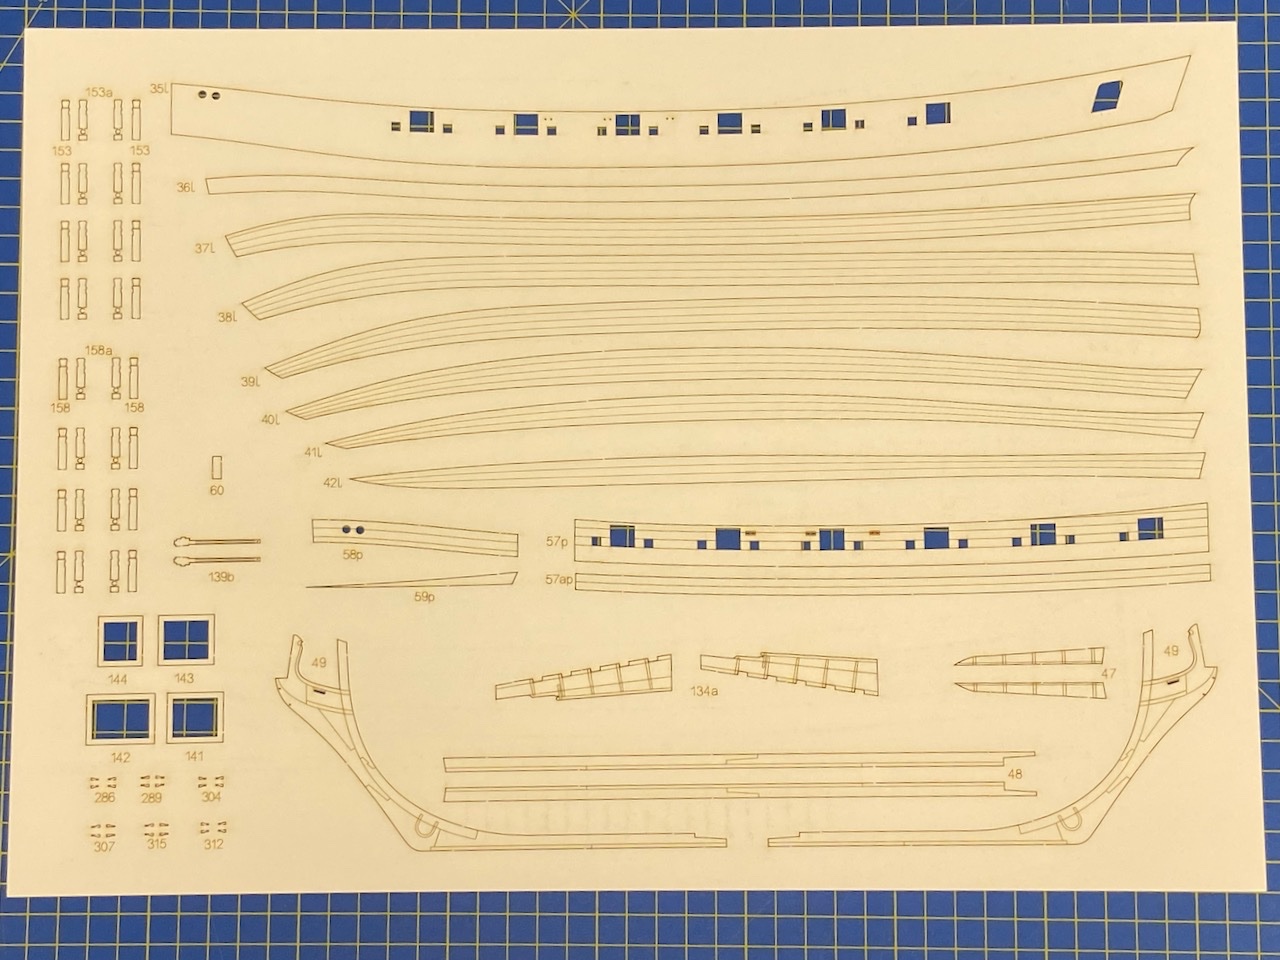
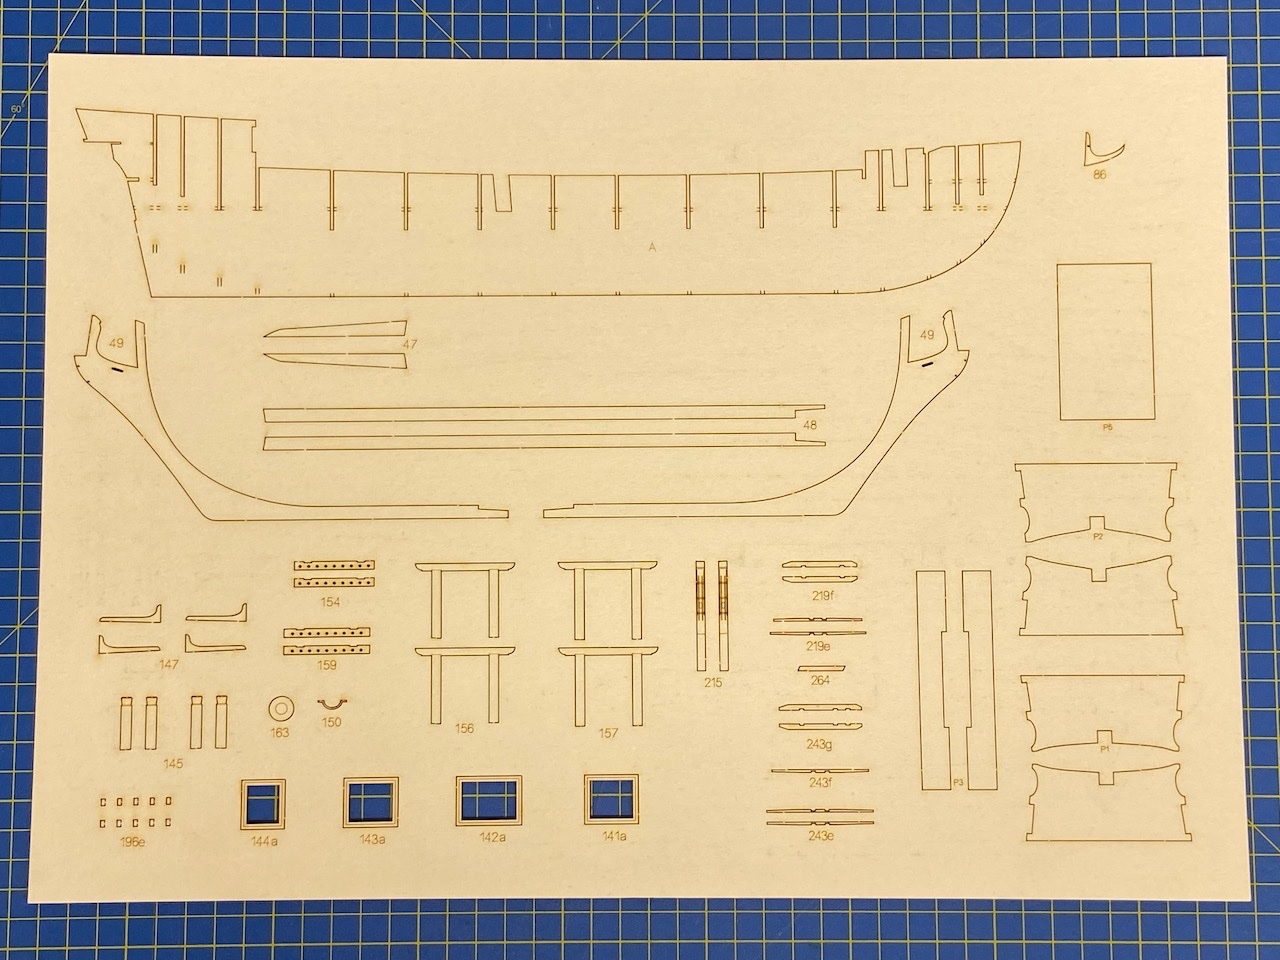
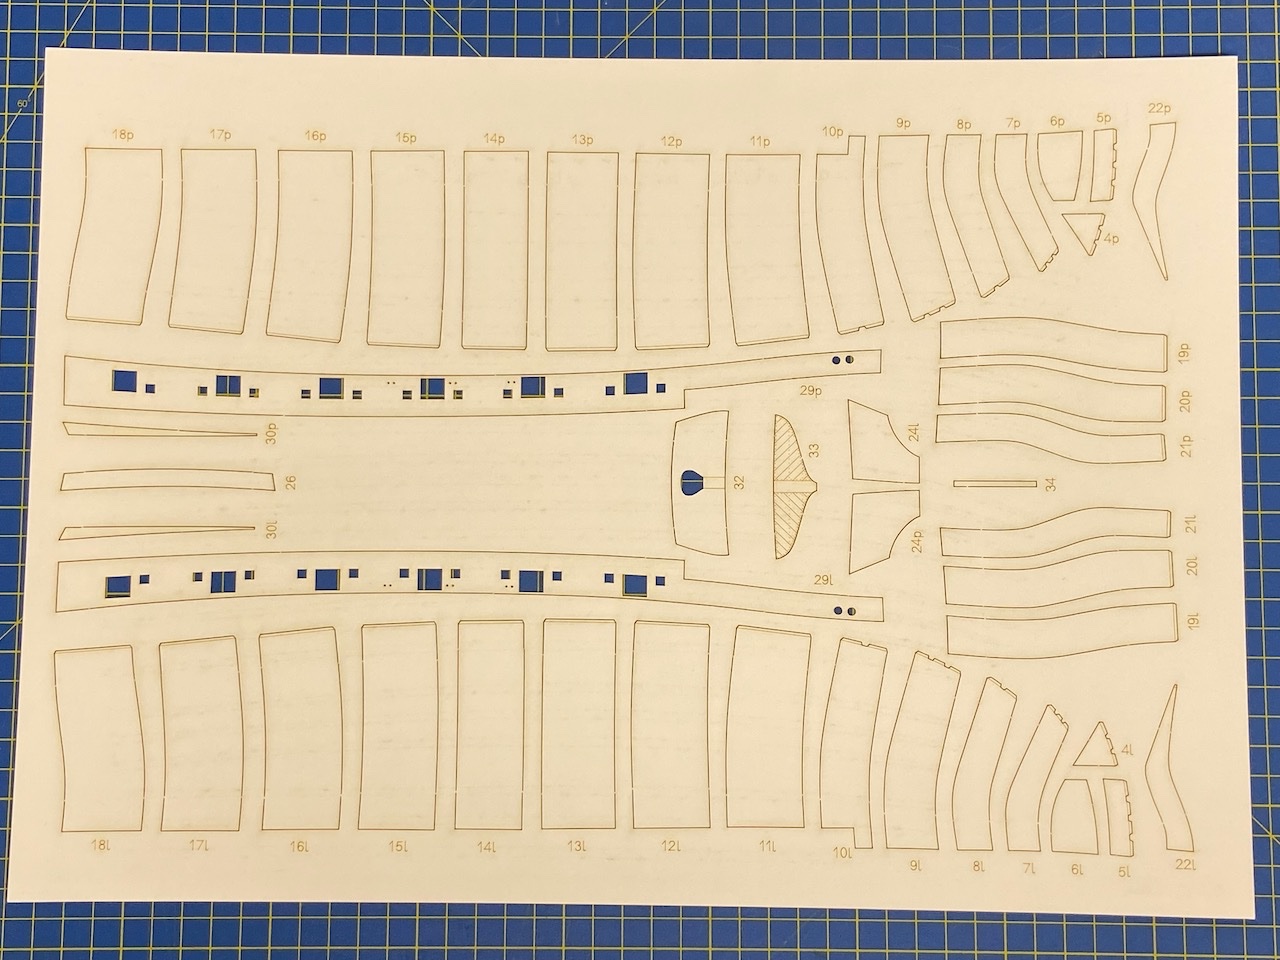
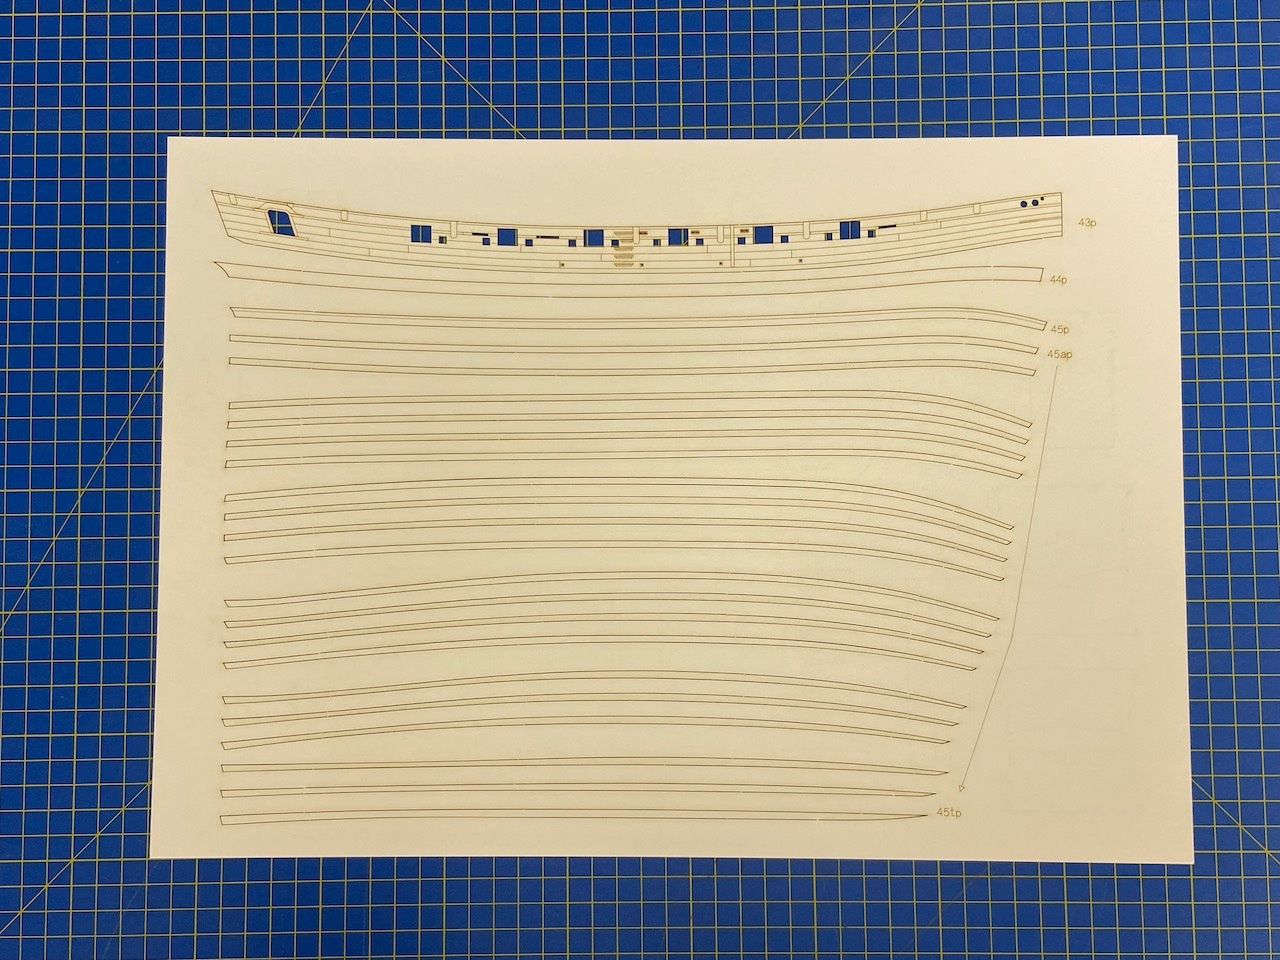
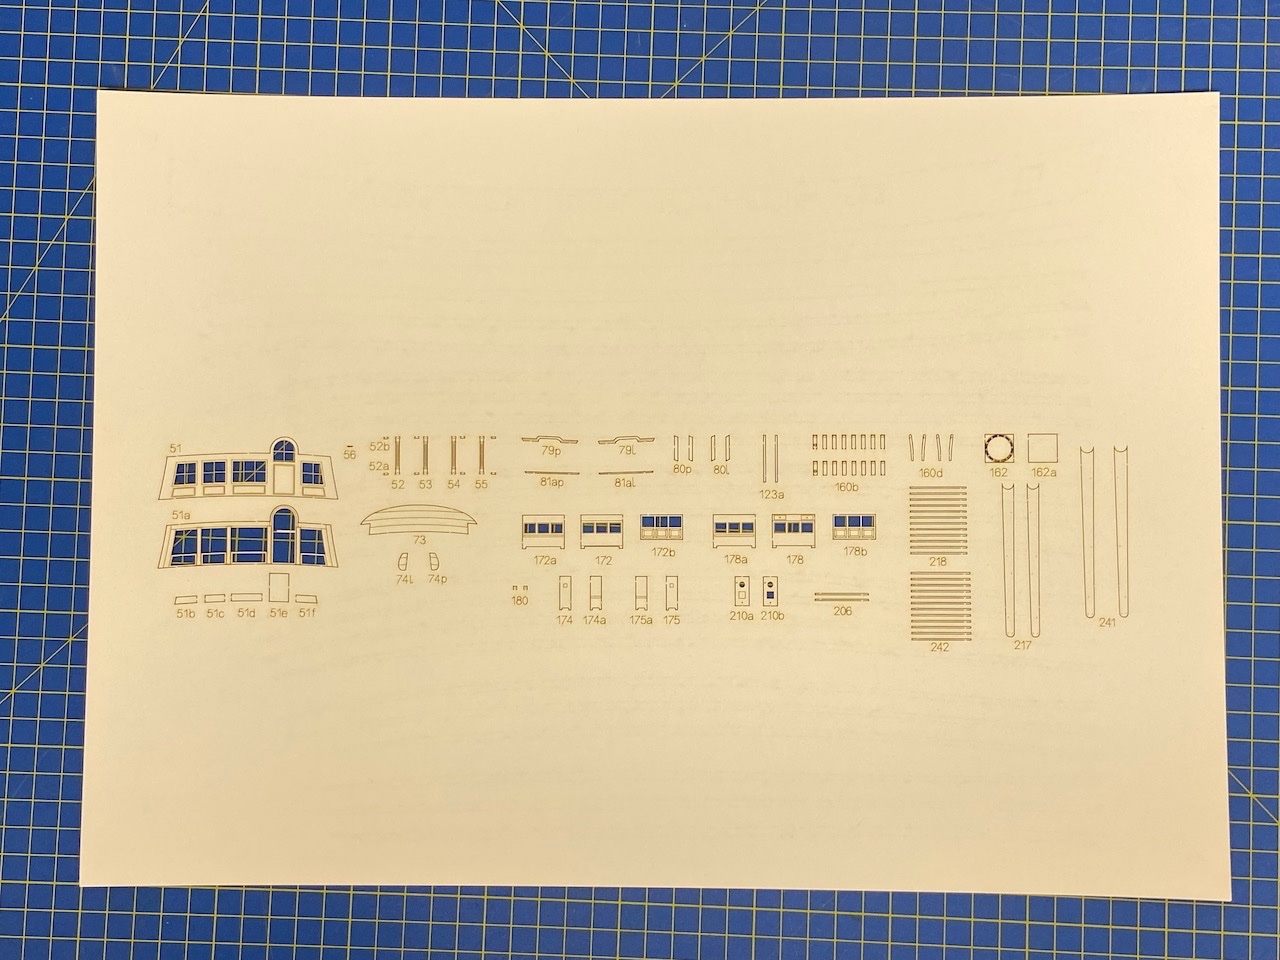
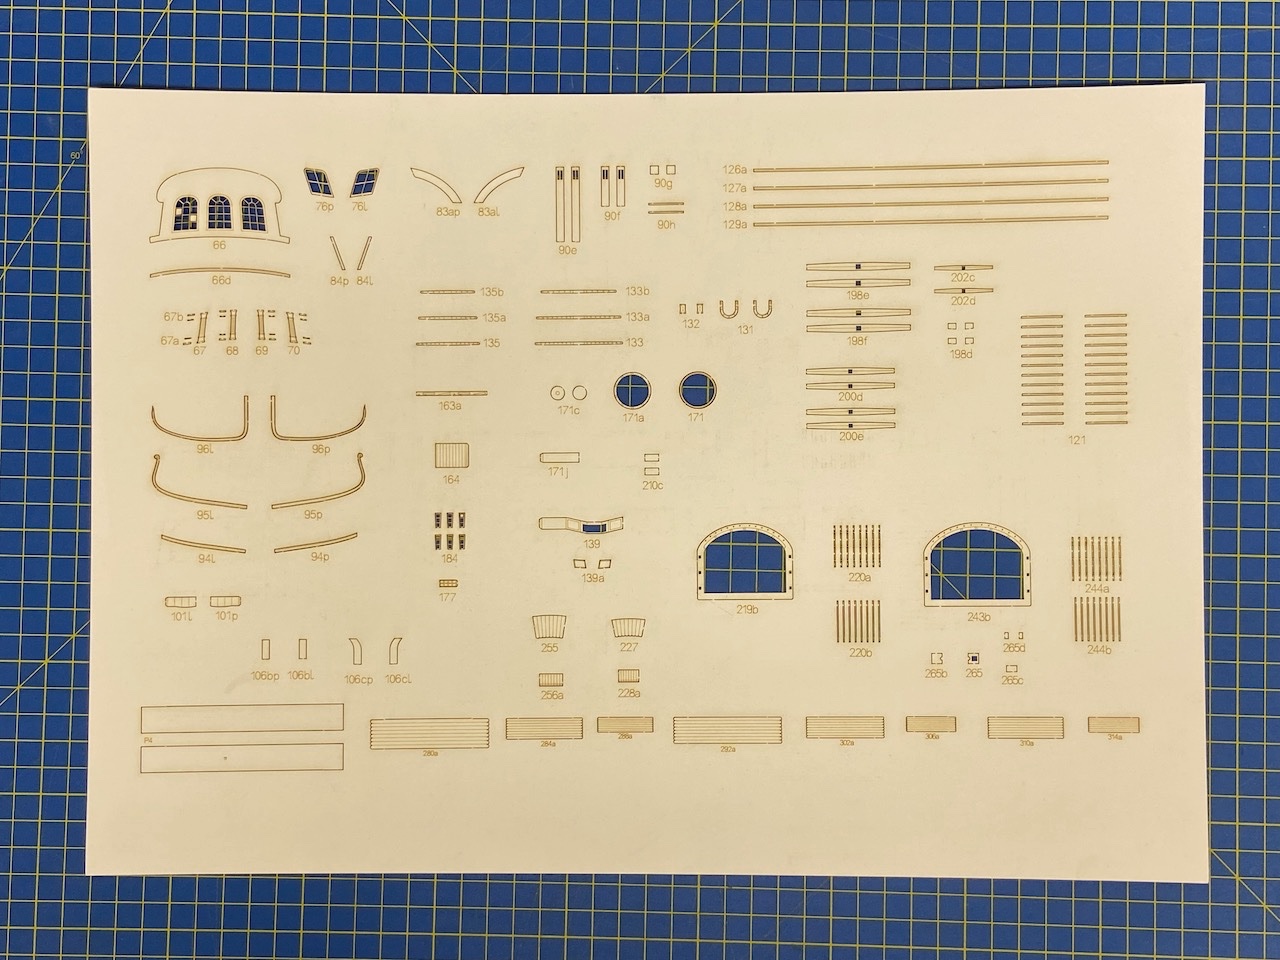
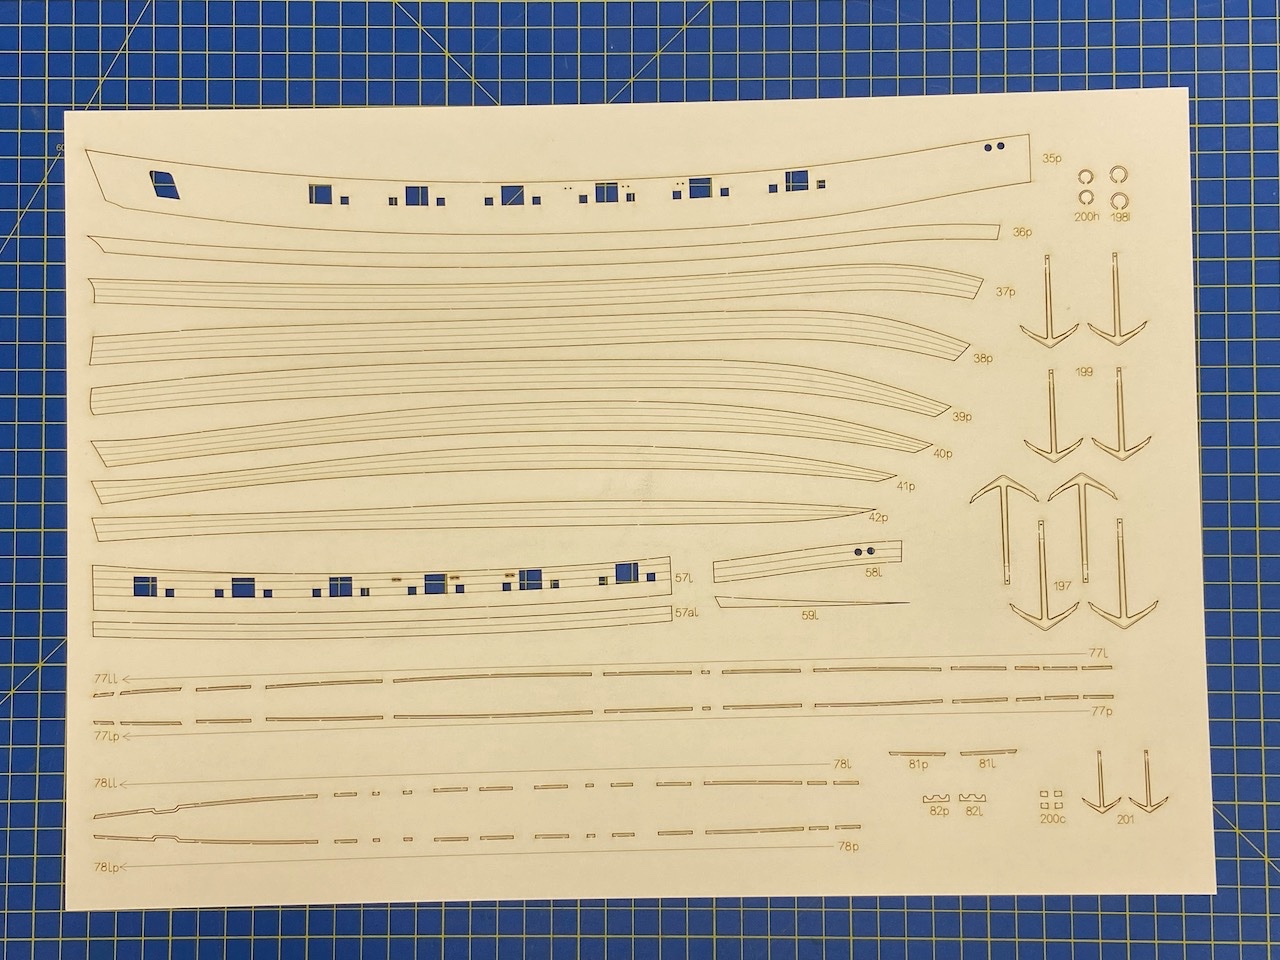
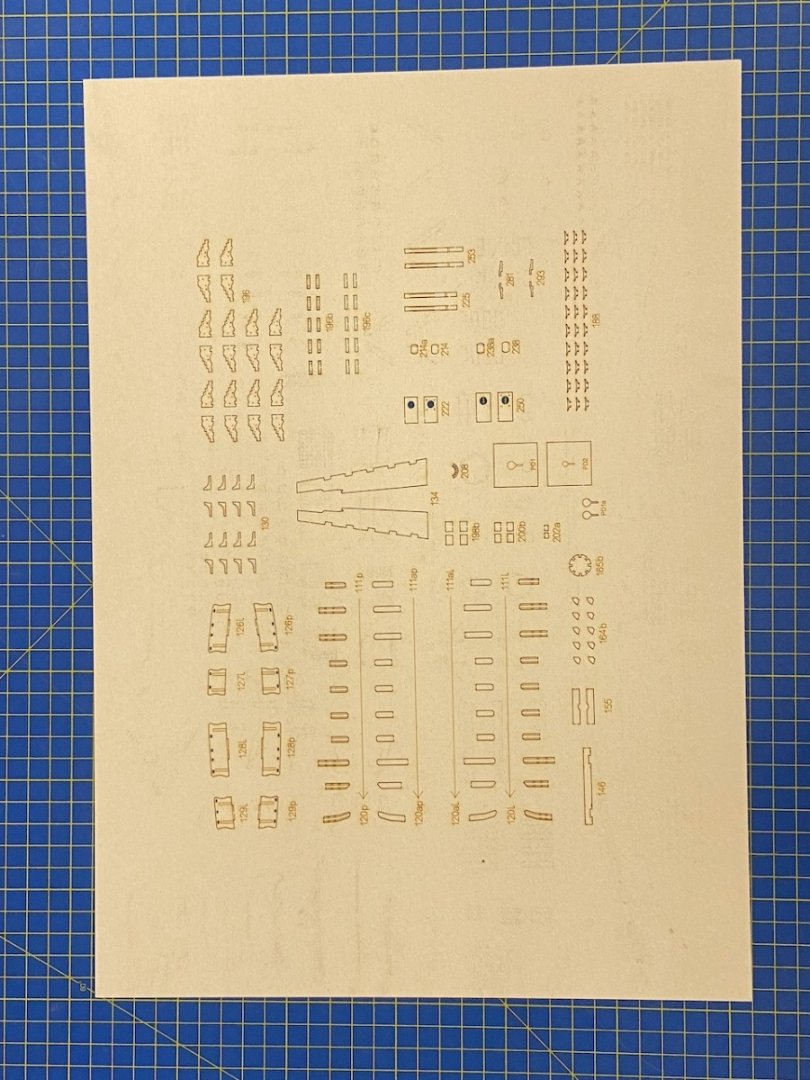
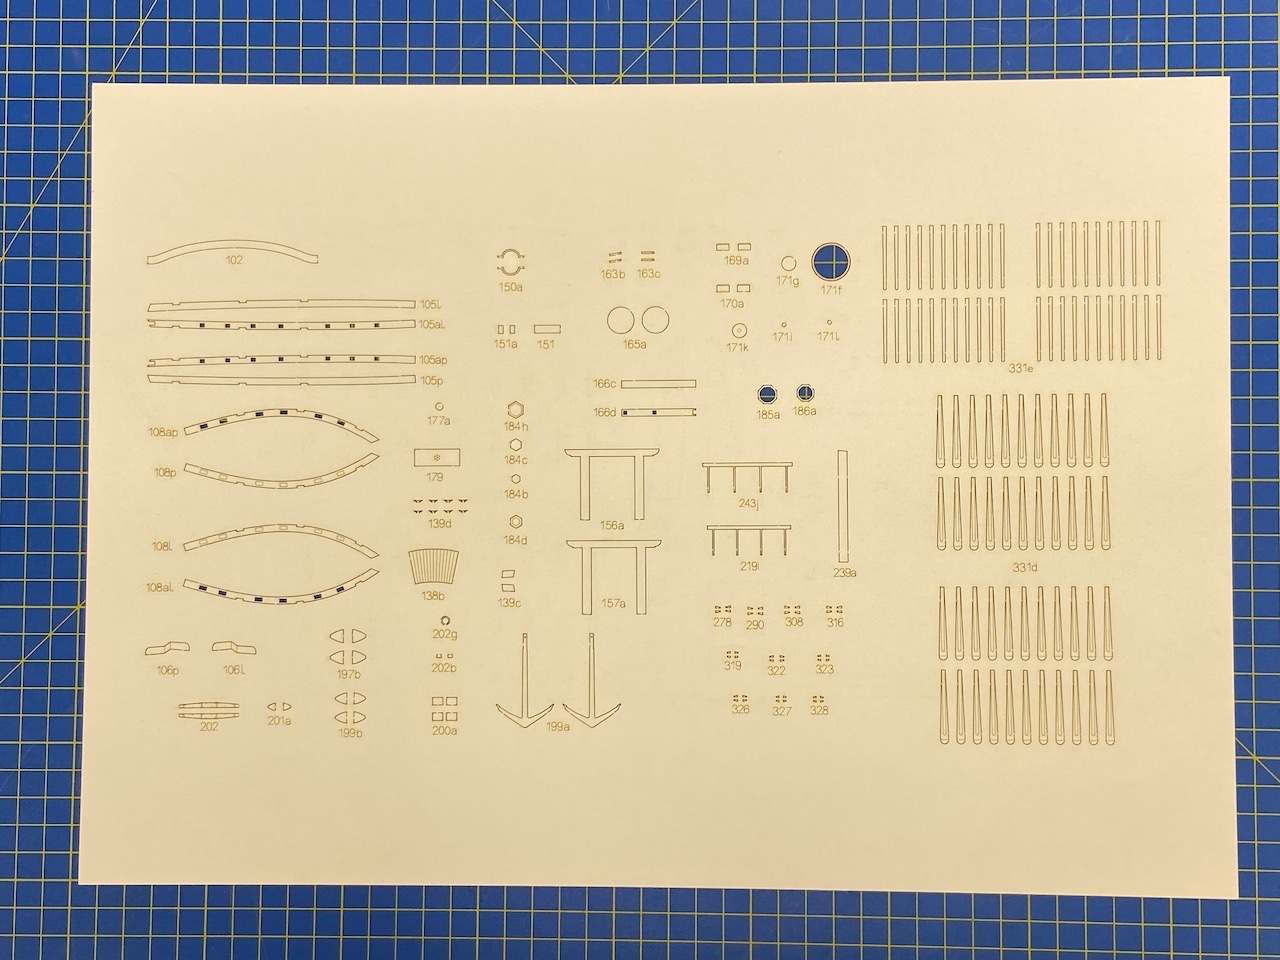
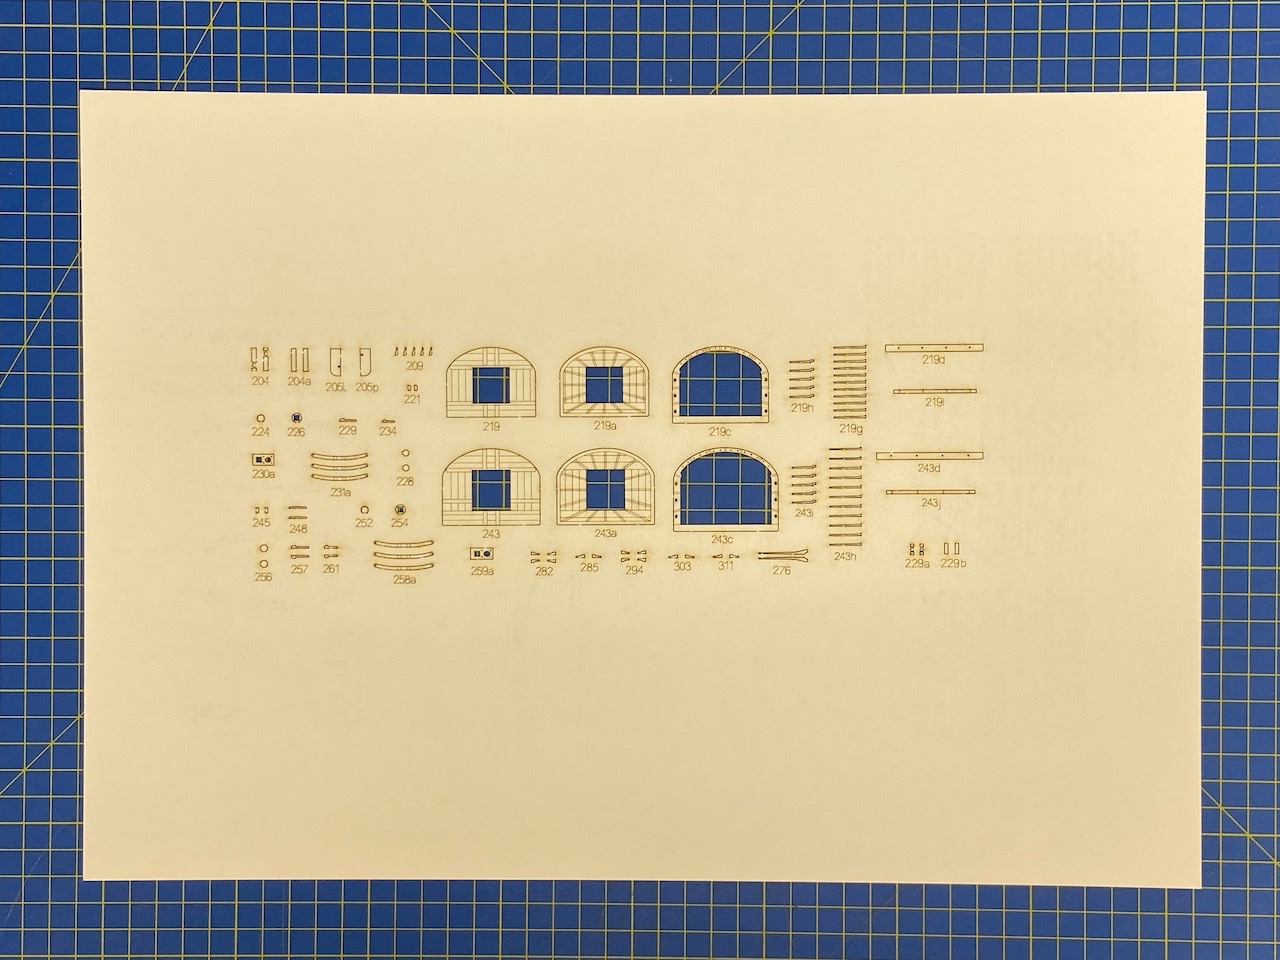
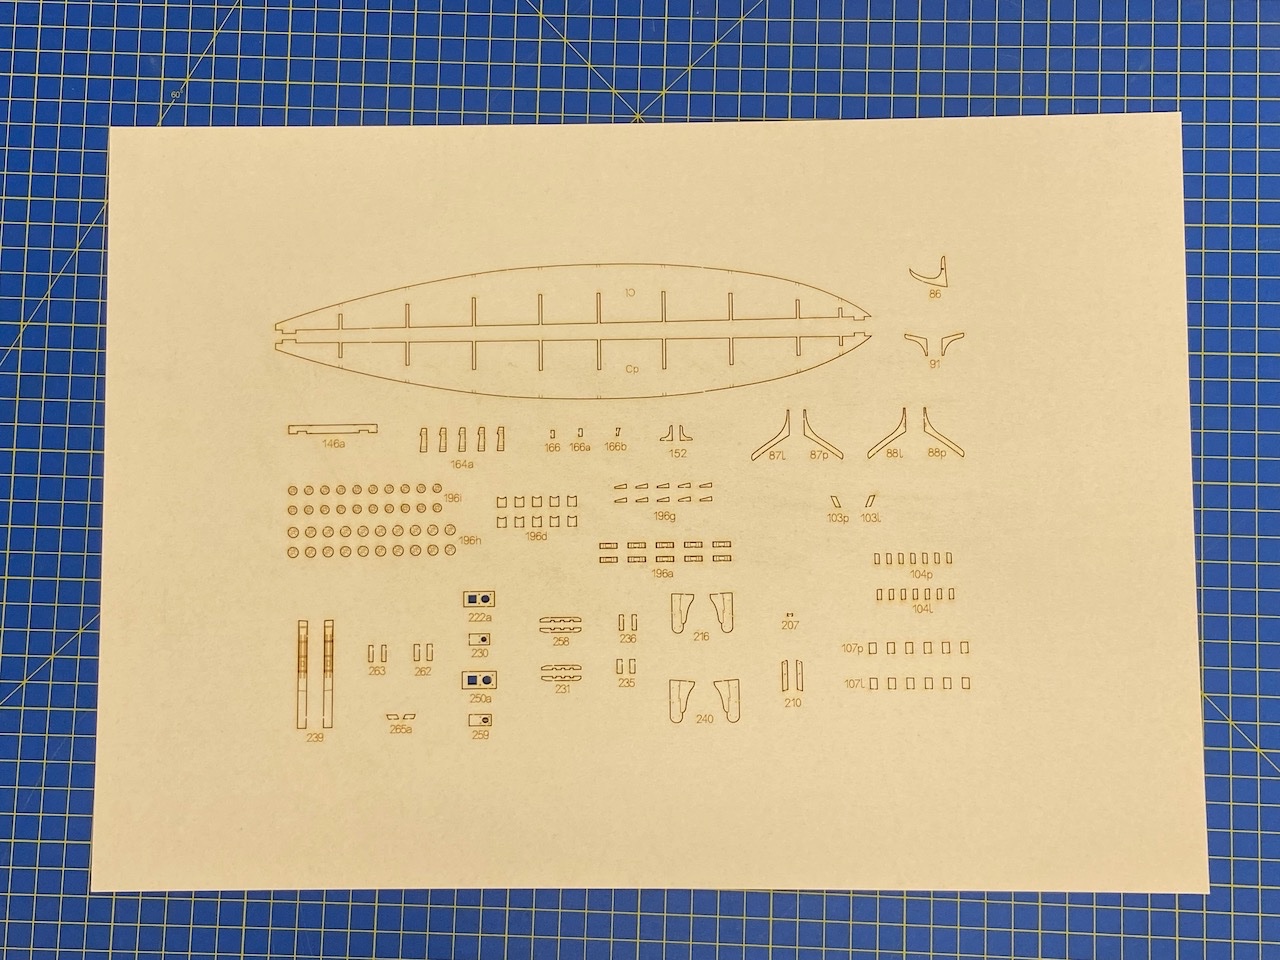
Shipyard is a line of paper/card models from Poland, where paper models seem to be so prevalent. Shipyard includes kits of sailing ships, world lighthouses, dockyard structures, and more. But, this review is a look at one of their higher end products – one of their kits which, rather than featuring printed paper parts that must be cut out from their sheet, instead provides laser-cut parts that must be cut loose from their sheets and painted. The range includes the small schooner Berbice, the Santa Maria, the cutter HMS Alert, all the way up in size to the 28-gun frigate HMS Mercury. The HMS Wolf kit, released around 2015, is about as close as one can get in size and complexity to the HMS Mercury kit, though their kit of the Dutch pinnace Papegojan is probably just about as detailed and complex. All of Shipyard's laser-cut card kits are made in 1/72 scale. They all come in large, flat boxes that contain all the laser-cut components, plus color printed instructions, some plan sheets that are mostly for the rigging, laser-cut and etched sails, color printed flag sheets, wooden dowels for masts and yards, laser-cut blocks and deadeyes kits, white linen rigging cord, turned brass cannon and swivel gun barrels, cast resin decorative pieces, several jars of acrylic paint, a couple nice paint brushes, and more. Everything comes pretty neatly packed with various components stored in separate cardboard boxes, which helps protect all the parts during shipping. The instruction book is 32-pages in full color, including the cover, and is mostly photos at each stage, with the significant parts labeled by their part numbers. There is some text, but not much. What there is is in Polish, with German and English translations also given. The Instruction Booklet The one thing that is not included that I think would be really helpful, is a parts list that shows the numbers, where in the instructions the part is called for, and on what sheet to find the part. I'll come back to this later. The Plan Sheets Masting and rigging is detailed in the separate plans sheets. There is no one overall profile plan sheet, these are all just detail sheets. But, if you look closely, you'll notice that some assemblies, like the gun carriage are more fully detailed in the plans sheets. Also, the metal parts that you need to make, like hooks and eyebolts and such, are identified on one of these sheets, not in the instruction booklet. So, it's a very good idea to study these sheets to see what's described on them. The kit contains no eyebolts, split rings, hooks or things of that nature. Instead, a couple sizes of copper wire are provided, and the plan sheet below identifies the small metal parts you must make in various sizes. These are all identified in the plans with the letter 'Z' as a prefix. The instruction manual will call for these parts, and you will find no part with this number. Again, that's because you have to make all the Z parts yourself from wire. If you prefer to make your own sails out of, say, paper, some nicely detailed patterns are provided, showing locations of reinforcements, cringles, reef bands, etc. The Parts As you can see here, there are a lot of parts sheets, and on each of those there are a lot of parts. There's a LOT of detail here, and just seeing how much detail there is in the kit makes the kit really exciting to work on. By the way, my apologies – these photos are on the blue background of my cutting mat and the photos were taken with an iPhone, which does it's own automatic color balance, so all the sheets look kind of yellowish here, which they are not. The only color printed parts in this kit include the flags sheet, which is printed double-sided, and the decorative friezes. I don't know if this was intentional, but my kit included two copies of this sheet. Apologies too for the bad focus on this photo – I don't know what happened here. In a sharper world, you'd see all the bulkhead parts and hull stiffeners. Those who've built Shipyard's paper models probably know already about how well these laser-cut parts fit together, and form a very stable hull structure. This odd, brownish looking sheet is actually dead black. But, at least here you can see that the part numbers are there. When I looked at this sheet, I had to hold it at an angle, under a bright light in order to see the number or to even identify the part. There is one small sheet of clear acetate for the windows and the stern lantern. Note that the deck planking is engraved onto the card pieces, with nicely located butt joints, nibbed plank ends, proper scarf joints, and treenails. Lots of parts make for lots of details and lots of work. But there's no shaping, drilling, milling, filing, sanding, carving, required. it's all mostly cutting, gluing, and painting. Sorry, I didn't take pics of the cannon barrels, resin "carvings", brushes, rigging line, or the paint jars. But, I will mention that earlier kits of this line had jars of paint that could easily dry up. I'd mentioned this problem to Shipyard years ago. They have since gotten jars with rubber grommets in the lids to create a better seal, and this seems to have alleviated the problem. Speaking of paints, those included in the kit are apparently some decent quality artist's acrylics. They go on dead flat and have some transparency to them, so you should be able to see some of the laser-etched details through the paint. The paint is a Polish brand called Renesans. I like them, but they hard to find, except on some European online art supply stores. Summing it Up This is a pretty well detailed looking kit. It, and the entire line of Shipyard laser-cut kits, are very different from most paper model kits, given that nearly every paper model kit is mostly paper that has to be cut, rolled, folded, or curved, and may have a laser-cut skeleton for strength. This kit is entirely laser-cut, but includes parts using other materials for best appearance or easiest construction. The heavy use of laser cutting comes at a cost, and these laser cut kits are a lot more expensive than traditional paper models, and this kit is no exception. This kit has a cost that's somewhere in the neighborhood of $200, give or take, depending on where you purchase it. That's a lot more than a traditional paper kit, but not really much different from a comparable wooden kit, and there's a lot more to it than a box of wood with some laser-cut pieces. The kit is available from a number of online shops, including Ages of Sail, where I got mine, Cornwall, Shipyard's online shop, and maybe someone will chime in about a Canadian shop. Did I miss anything?


-
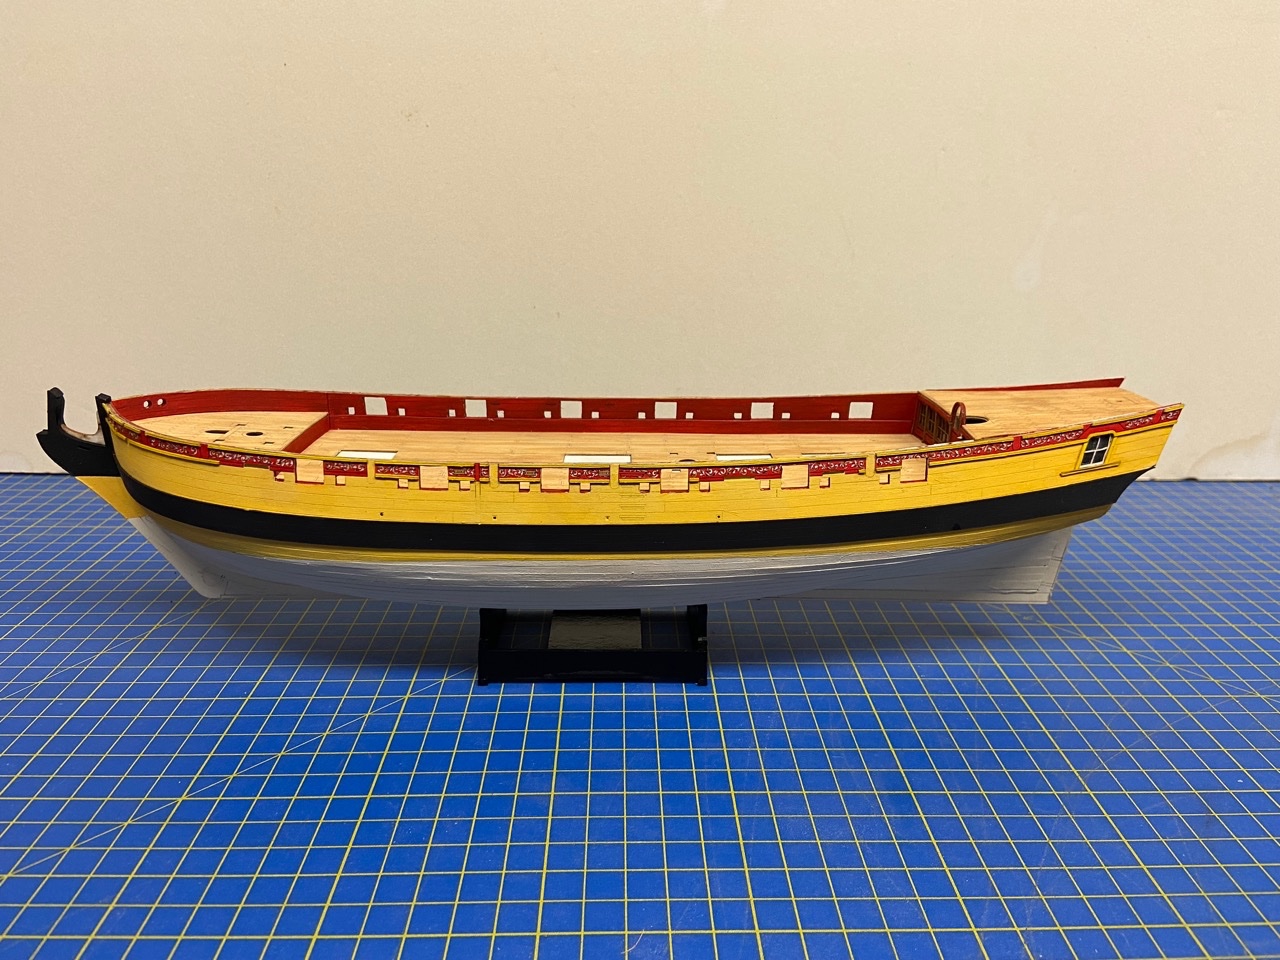
I know I've got some other things in progress, and a couple of them are paper/card models. But, I've been trying to promote card model products for Ages of Sail, and I finally couldn't stand it any more, so I broke down and bought one of Shipyard's laser-cut card kits that I've been eyeing ever since it came out. In this case, it's Shipyard's 1/72-scale laser-cut card kit of the 10-gun snow-rigged (brig) sloop, HMS Wolf, 1754. Now, this has been something of a "closet" project, in that I hadn't posted any build log details, though I've been working on the kit since July 23. So, I'm going to maintain on this first page, an up-to-date photo of the build. Then, I'll go back to the beginning and share my build details from there, working my way forward. Someday, there will be a great convergence in the Universe, you will all feel a strange shift in the Force, and the build log will get caught up with the build... Photo taken 9/23/22: I bought Shipyard's 1/72-scale HMS Wolf kit from Ages of Sail. Officially, the US Distributor for Shipyard products. Yes, I do some work for Ages of Sail, and this build just shows how dangerous that situation is for me. But, I also build some things to make myself better acquainted with the products. At least that's my excuse for some of my partial builds. This build, however, has been so much fun and it's come along so nicely that I'm really looking forward to completing this model. In order to simplify this build log, I posted all my components photos into a kit review, which you can now find here:

- 108 replies
-
- 14
-
-
Polaris by JDillon - OcCre
catopower replied to JDillon's topic in - Kit build logs for subjects built from 1801 - 1850
Hi JDillon, I wouldn't worry too much about little errors here and there, especially if you are trying out new skills/features like joggled planking. It's why we have "first builds"! 🙂 It gets easier and better as you go. Might be too late to comment, but you know there's no reason the bulwarks planking has to be the same as the deck planking. In reality, they'd be very different looking after a while, even if they started off being the same wood. Plus, if you're painting... paint, as they say, covers a multitude of sins. Black is a very common color for early 19th century ships hulls, often with the sheer molding painted another color, so it's not so stark. Inside bulwarks were often white or green. But, similarly to what Chris wrote, it's your ship and you can paint it however you see fit. Many people like the look of natural wood, and like to just put a finish on it - a more stylized approach to ship modeling. Looking forward to seeing what you come up with. -
LOL. I didn't know what this was, so I looked it up... Oh, that's what I have! I do wish I had an x-y table for it though.
- 9 replies
-
- 3
-
-
- Vanda-Lay Industries
- Drill Press
- (and 2 more)
-
I have a Vanda-Lay Acra-Mill Plus and the Drill Press. I did quite a bit using the setup when I was scratch building my Mary Taylor and Lively models. I set it up to scratch build my rigging blocks, to thickness sand a small number of small strips, and even used it cut planking strips. Everything that's been said about it here sounds correct to me. I had older Dremels and they worked just fine – don't know about newer ones. I think the best aspect of the Acra-Mill, etc., is that you can use them in a small space. So, if you're in an apartment, or just don't have workshop space, it's quite handy. Also, if you really don't need to do a lot of cutting, milling, etc., then it can be quite handy to have. However, after a while, it becomes a pain to have to take it apart to reconfigure it and put it back together every time you need a different set up. I still have mine, but haven't used it in years now. Myself, I never liked using a Dremel except for use as part of the Acra-Mill set up. Personally, I think the most useful item would probably be a decent micro drill press and X-Y table. Or, even just any micro drill press. As Roger suggests, I got a cheap one that was made in China, and it works great and gets more use than 3/4 of my other power tools. However, I got one with electronic speed control. Has worked great for 4 or 5 years now.
- 9 replies
-
- 7
-
-
- Vanda-Lay Industries
- Drill Press
- (and 2 more)
-
Hi Snug, I love the way this model is coming along. I really like your choice of finishes. It looks nice and it looks very real to me. I expect any day now to see "The Mummy" emerge from that cabin 😁 I have to thin out my stockpile of Woody Joe kits first, but this one will probably be my next purchase from them.
- 63 replies
-
- 2
-
-
-
- Finished
- Khufus Solar Boat
- (and 1 more)