catopower
-
Posts
1,900 -
Joined
-
Last visited
Content Type
Profiles
Forums
Gallery
Events
Everything posted by catopower
-
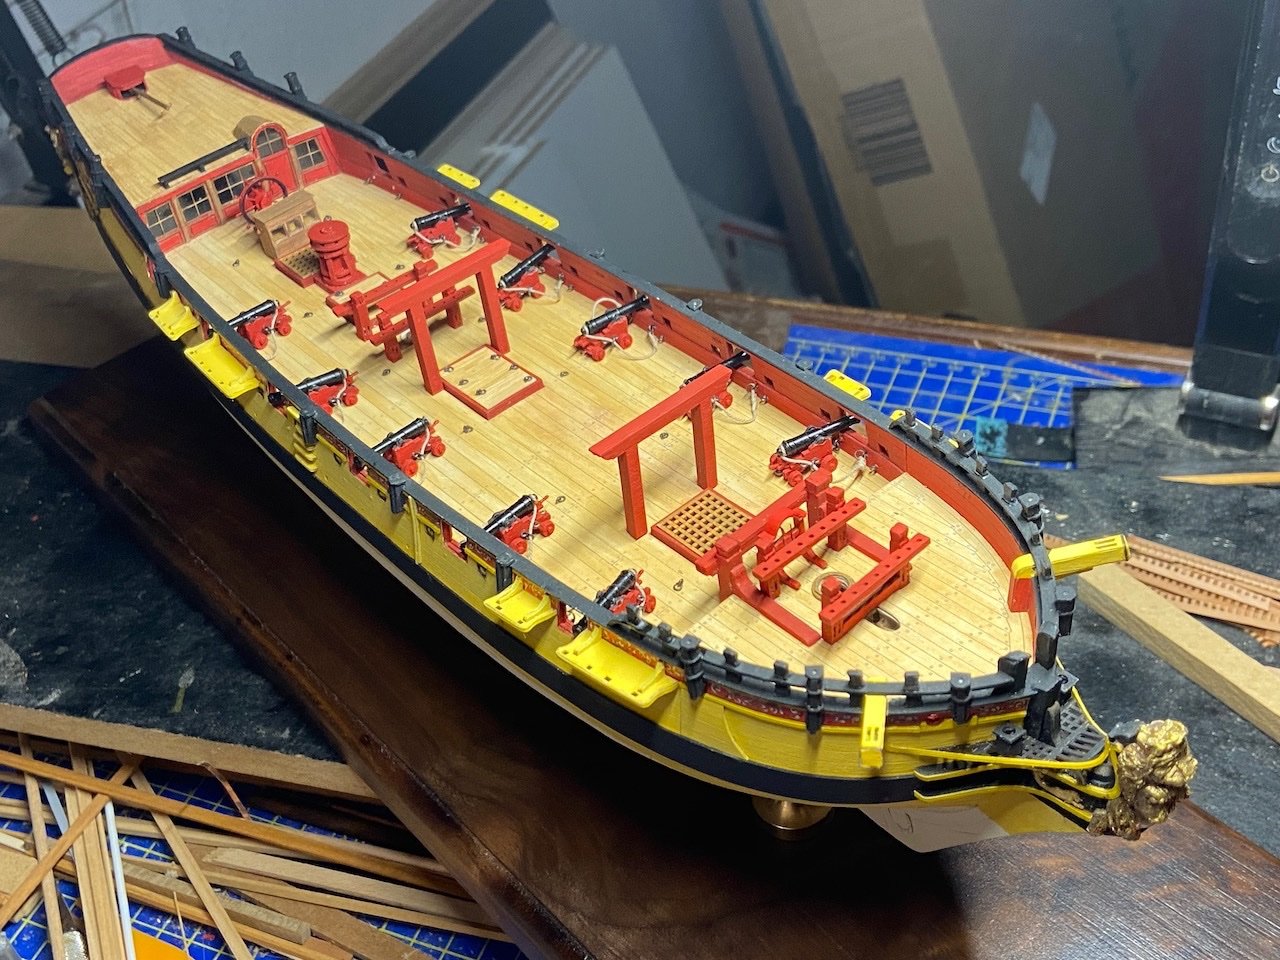
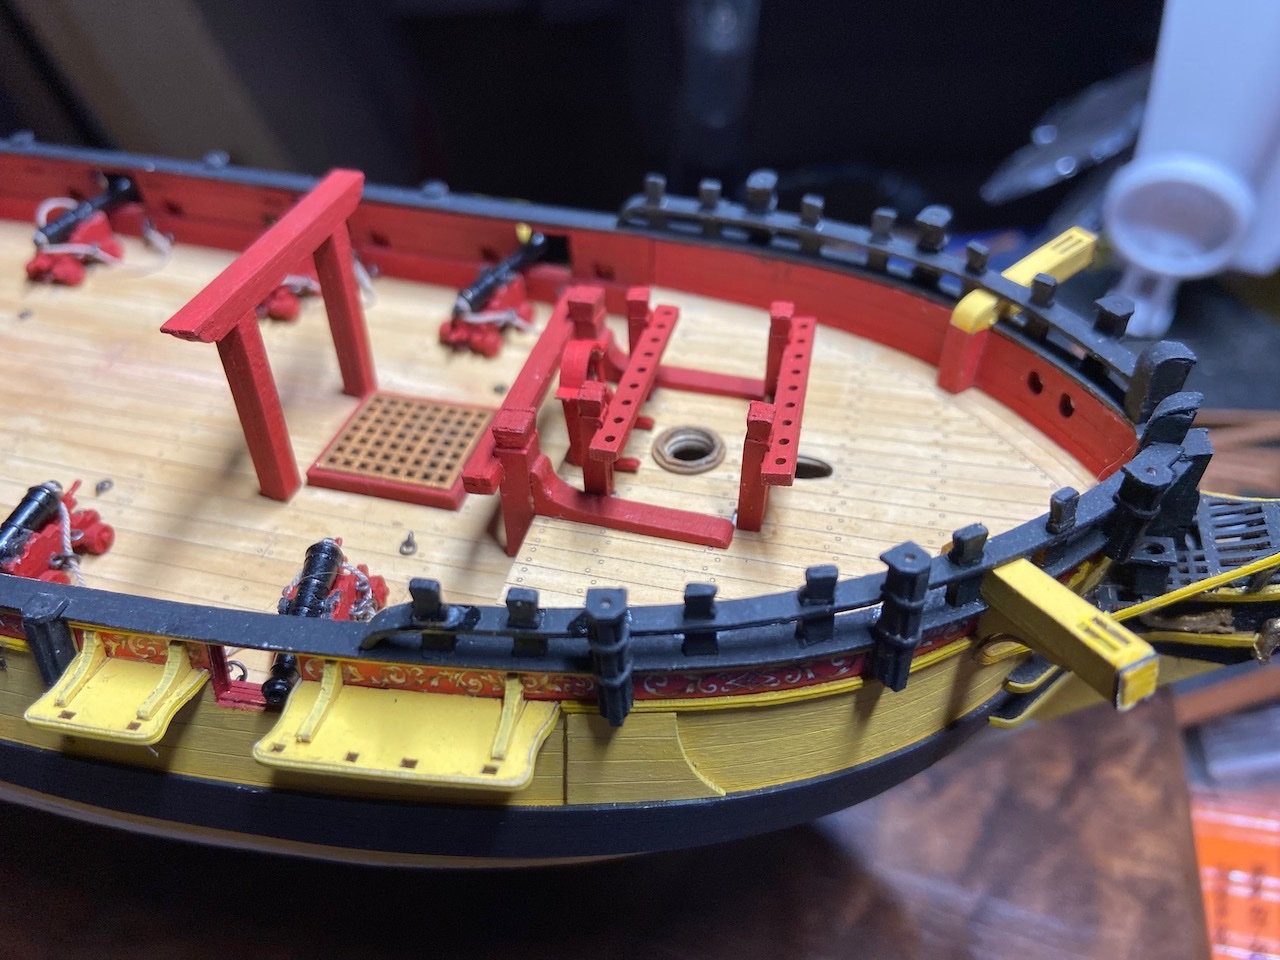
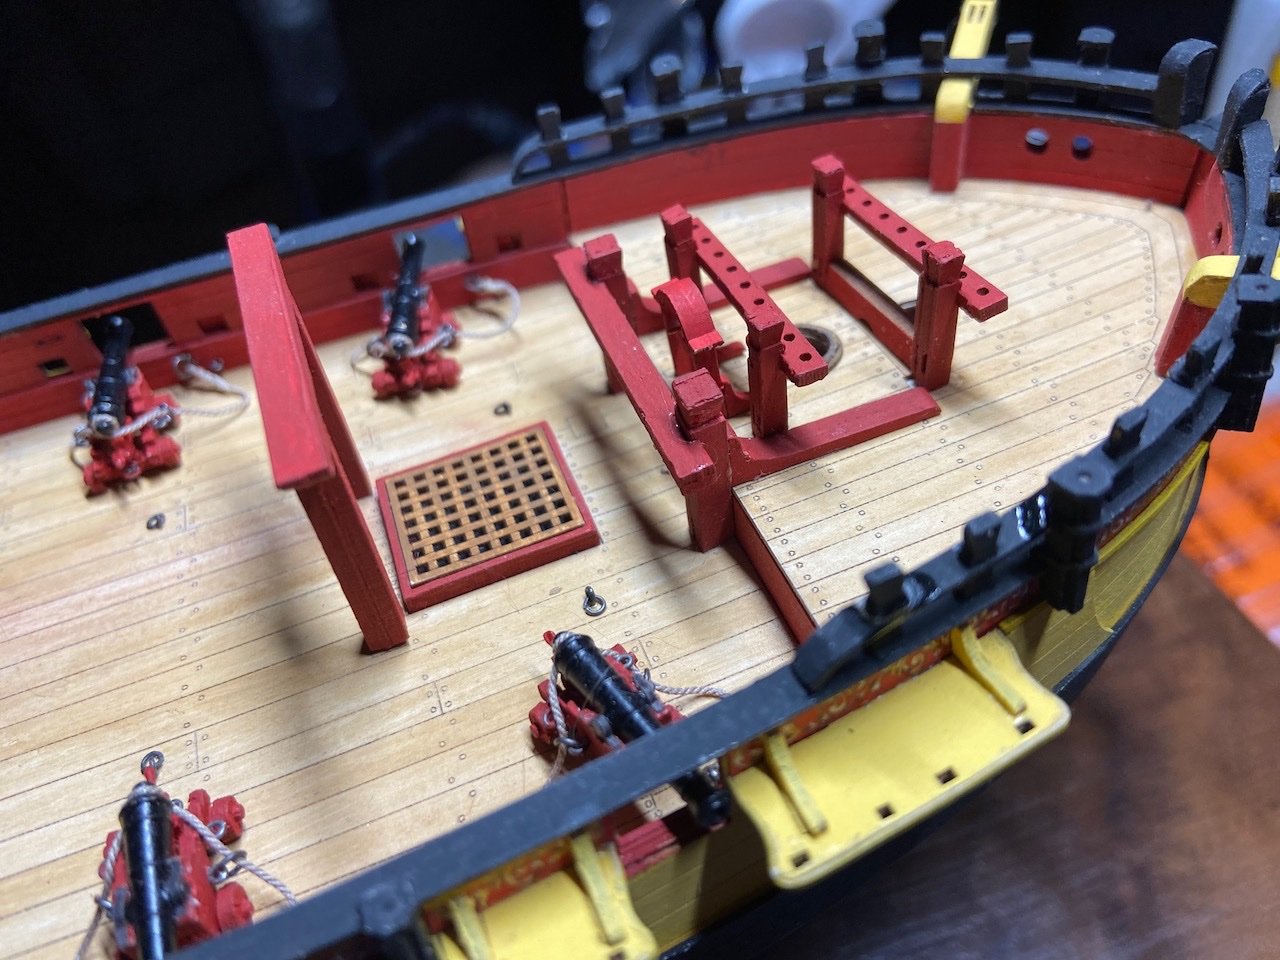
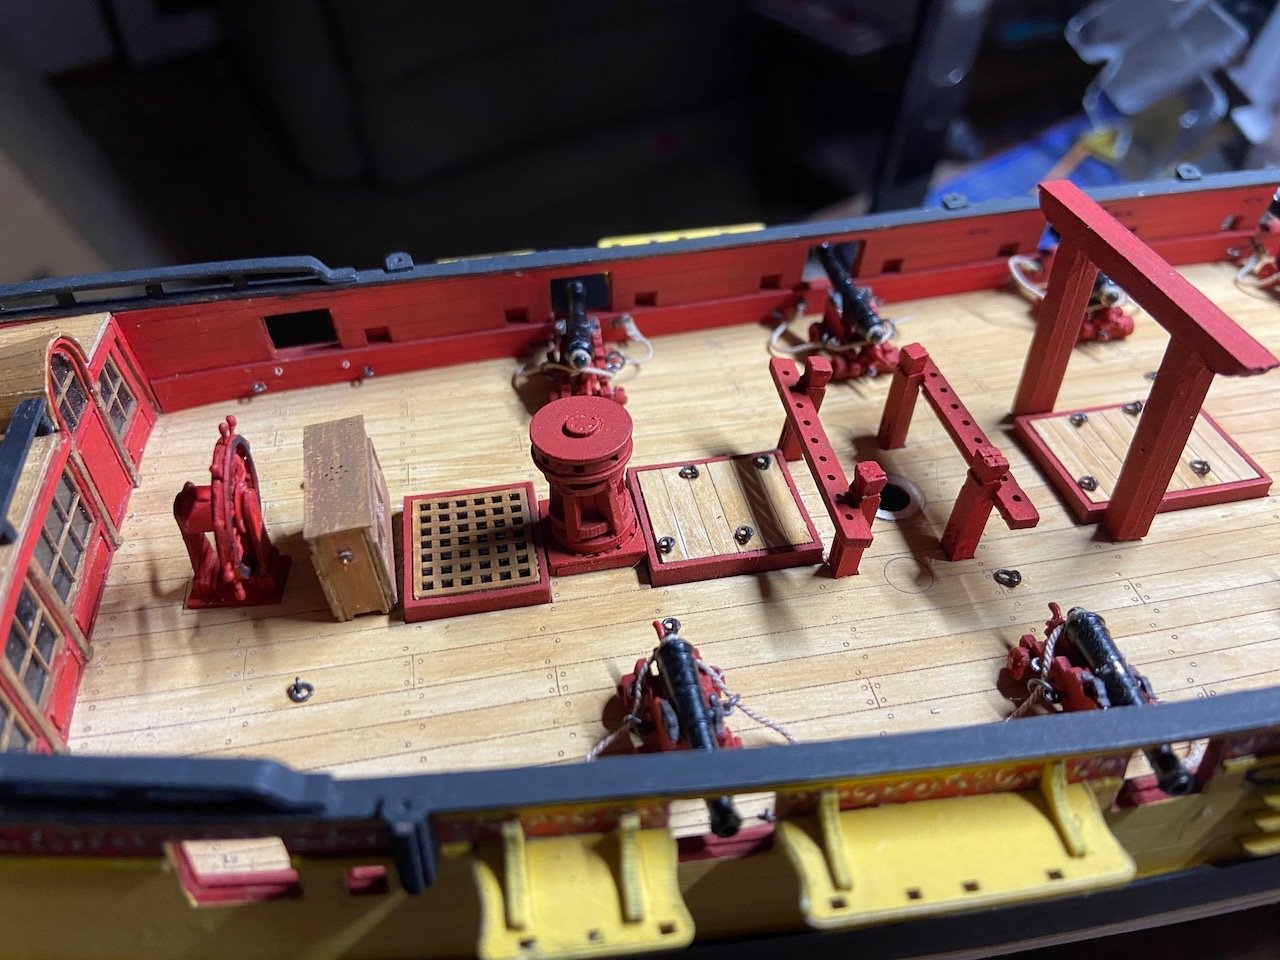
 I'm starting to work on some of the various tackles on deck. I'm going to try to make the train tackles for the guns, but I also need to rig the tiller ropes, so I've pulled out the cardboard blocks I made using the laser-cut block sets that are included in the kit. I used wooden blocks on my 1/96 scale HMS Alert paper model, and I've always felt I had to qualify my descriptions of the model to mention them. So far, this is an "out of the box" build. Might as well keep it going, if I can, though I'm already using some rigging line that wasn't in the kit. I haven't decided if I'll continue using 3rd party rigging line or start using the kits rigging line, which appears to be nice quality linen. The definition doesn't look great at the larger sizes though, and it'll need staining as well. I could just use the smallest sizes, which are 0.1mm and 0.3mm, but they'd still need staining. I'd just have to figure out what to stain them with. I have some stains on hand, so I guess I can try those. It may not look the best, but there's a certain challenge and ideal of building a model like this using kit materials. I'm almost sorry I used the 3rd party line for the cannon breeching ropes. Anyway, here's the updated build photos. Many things aren't not permanently in place yet, so I can simplify access to the deck are for adding some small details yet. Looking at it now, I think I can secure everything shown in place and leave off the boat gallows and the capstan for now. These are easily put into place, even if there's a lot of rigging in the way. The gallows stick up and I can see them getting easily snagged and damaged during the rigging process. The capstan is just really simple to drop into place later.
.jpeg.098be7bbf27ecd0e7589a86794e07e4f.jpeg)
-
Thank you druxey. I guess 1 year between posts is better than 2 years between posts. And, I'm certainly guilty of that and worse!
-
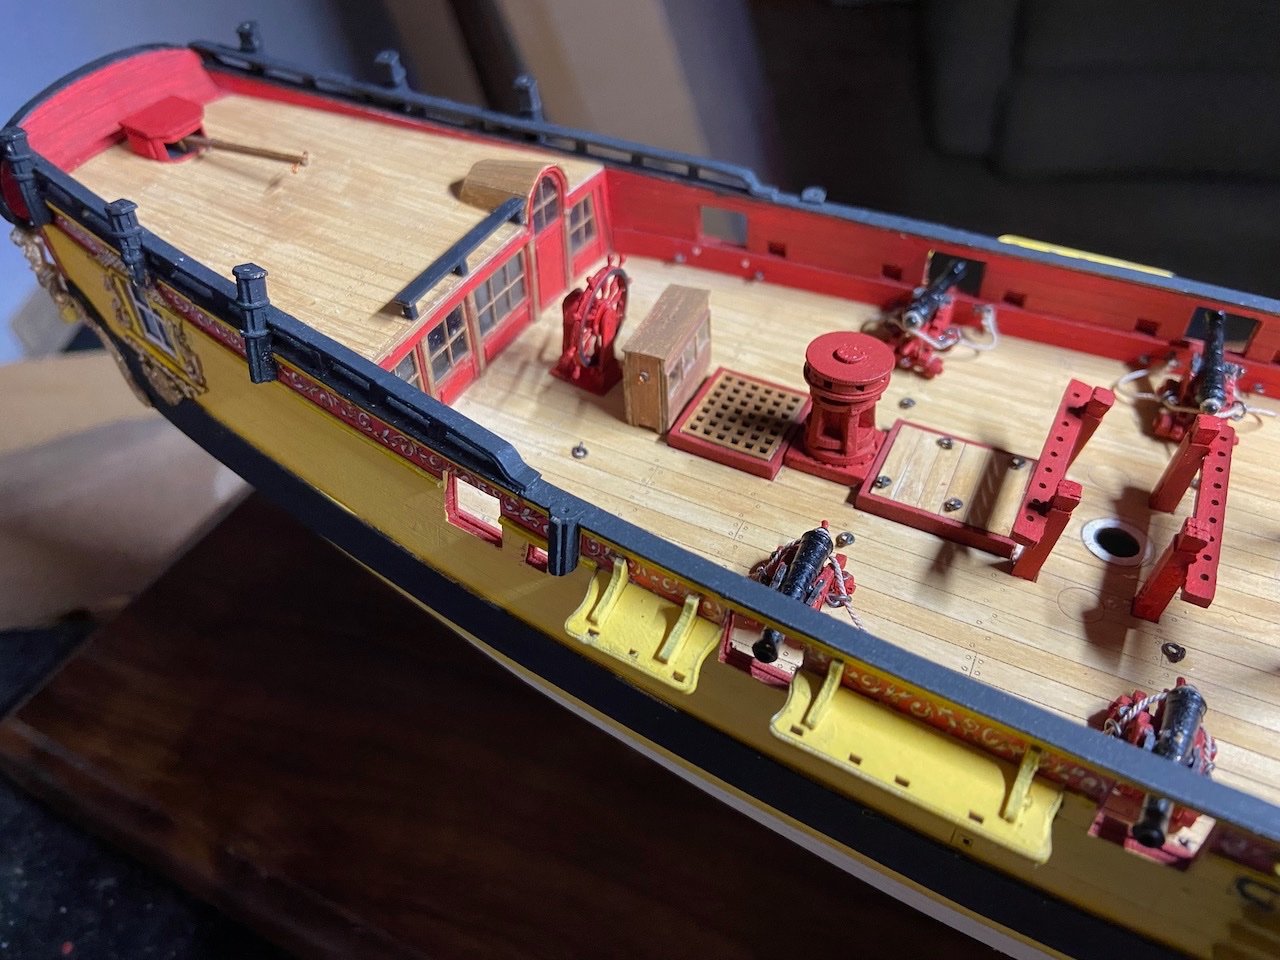
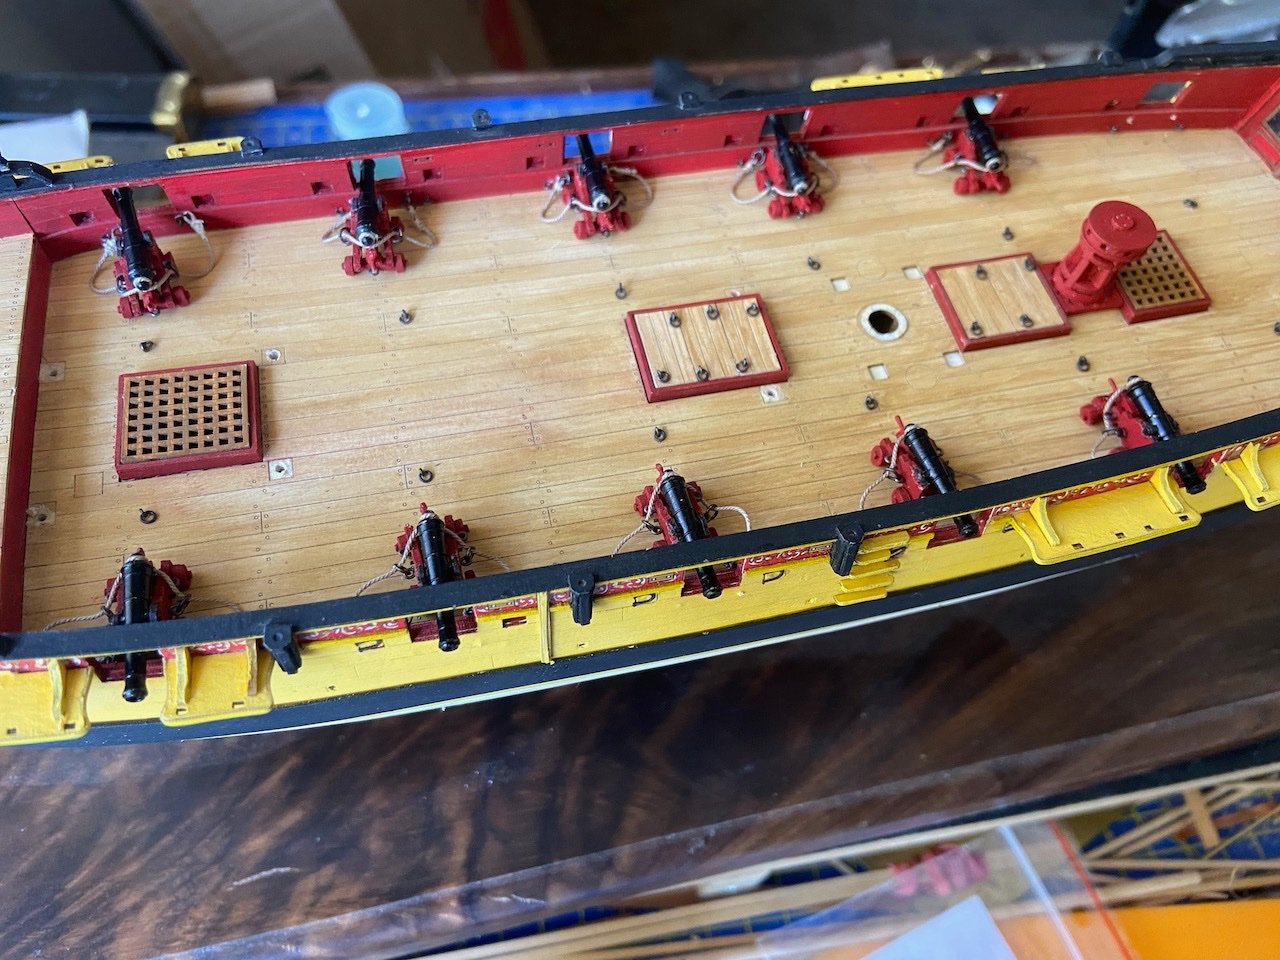
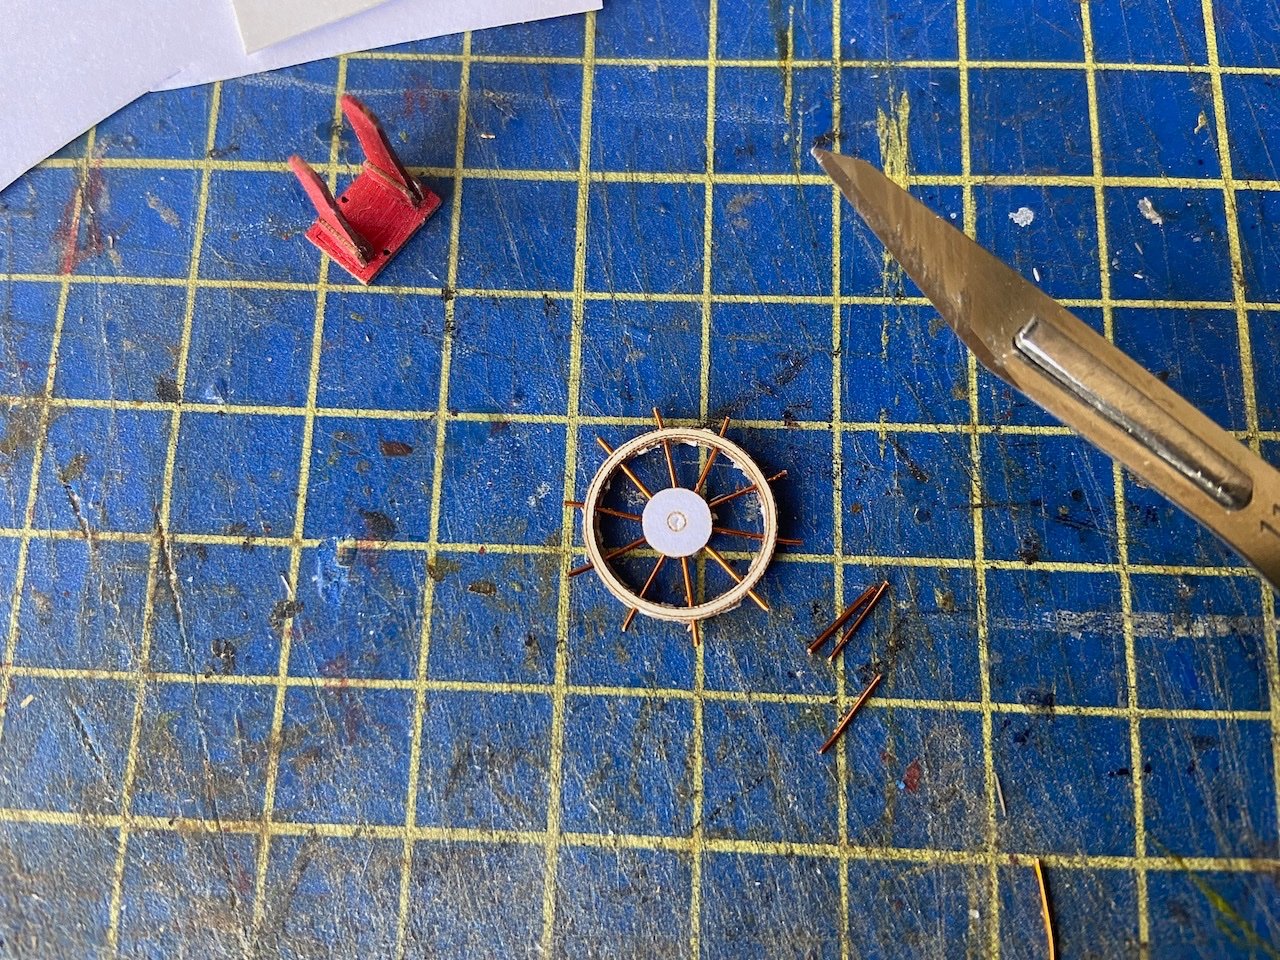
Yikes! It's been a long time since I posted an update on HMS Wolf... The project continues, somewhat in the background and temporarily shelved at times as I work on other things. However, I turned my attention to it again recently and have been making a fair amount of progress. I didn't like the breeching ropes I had on the model as they looked too thin. So, I ended up replacing them, which mean re-rigging all the ring bolts. It kind of helped that I was similarly rigging some cannons on another model, so I was in the "mode" anyway. Moving forward, I also went ahead and mounted the guns into place, though I haven't glued them down or rigged train tackles. I'll start making those. Since these will be my first blocks on the kit, I hadn't fully decided if I'm going to use the card blocks or wooden ones. But, I expect I'll use the card blocks, so I'll try making some train tackles using them. With these in place, I feel more free to start adding some more of the deck details. I have to add the tiller and all the associated steering lines that stretch across the quarter deck. But, I figured that first I'd make the ship's wheel. The ships wheel was a new challenge for me, as I've only ever used purchase fittings for it. With card models, it's necessary to build them, and it was an intimidating detail. When I finally got around to it, though, it was quite fun. Below, you can see the wheel, which consists of at least 6 pieces for the rim and hub, with wire cut for the spokes. I used tiny drops of Aleene's tacky glue on the spokes to give them the nice turned wood look, after which I painted it as per the kit instructions. Below, you can see the completed wheel with drum attached and mounted on its stand. I think the spokes turned out quite well and I'm surprised at how easy construction actually turned out to be. You can also see the binnacle box going together. The binnacle box you see here consists of 17 parts, not including the 6 acetate windows which have been installed. There is yet a 2-piece lantern and a roof to install, plus the eyebolts on the sides for the tie-downs. More soon, I'm on a roll...

- 108 replies
-
- 12
-

-
Moonbus from 2001: A Space Odyssey by catopower
catopower replied to catopower's topic in Non-ship/categorised builds
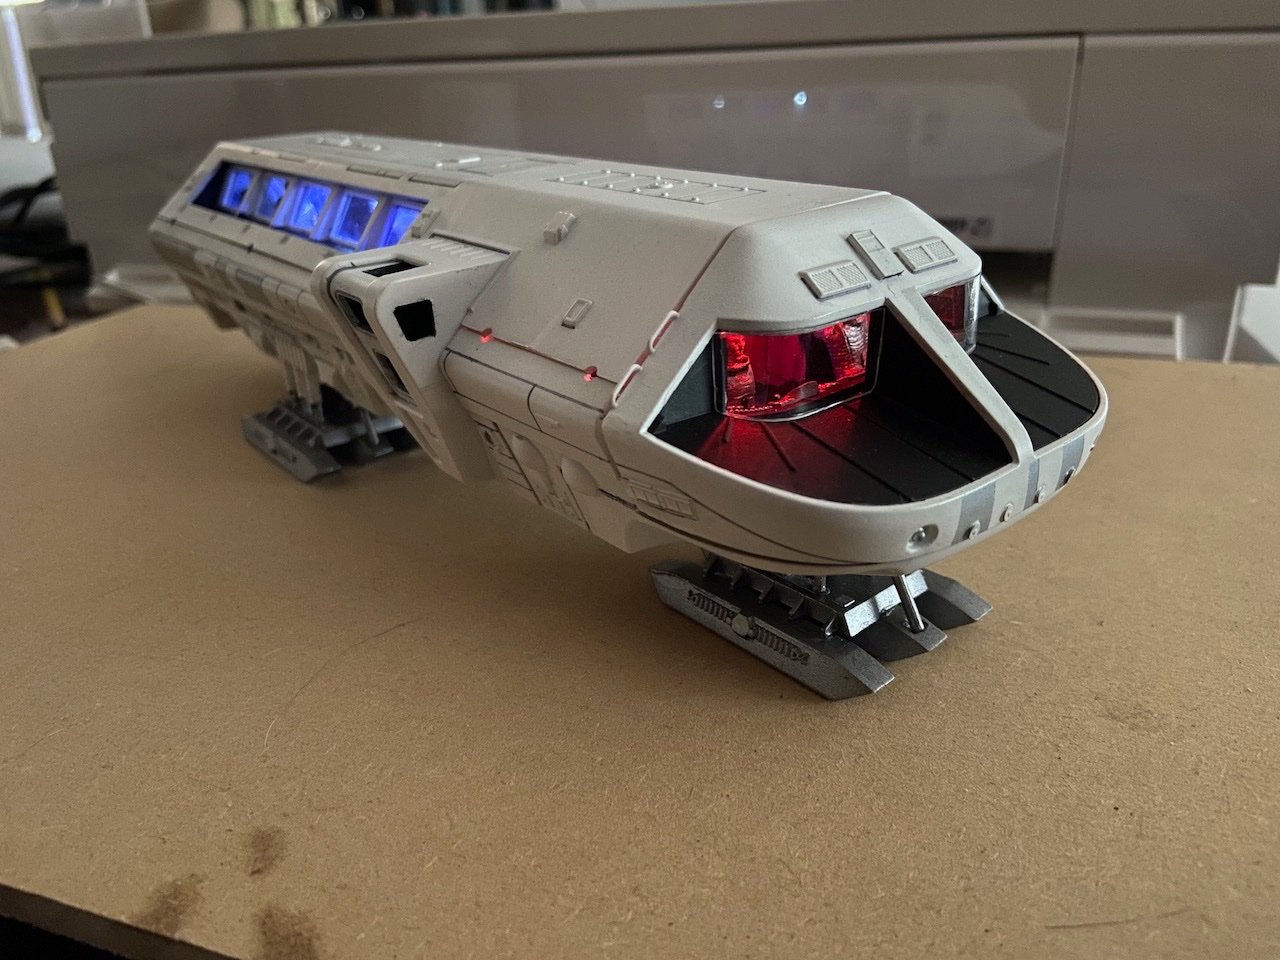
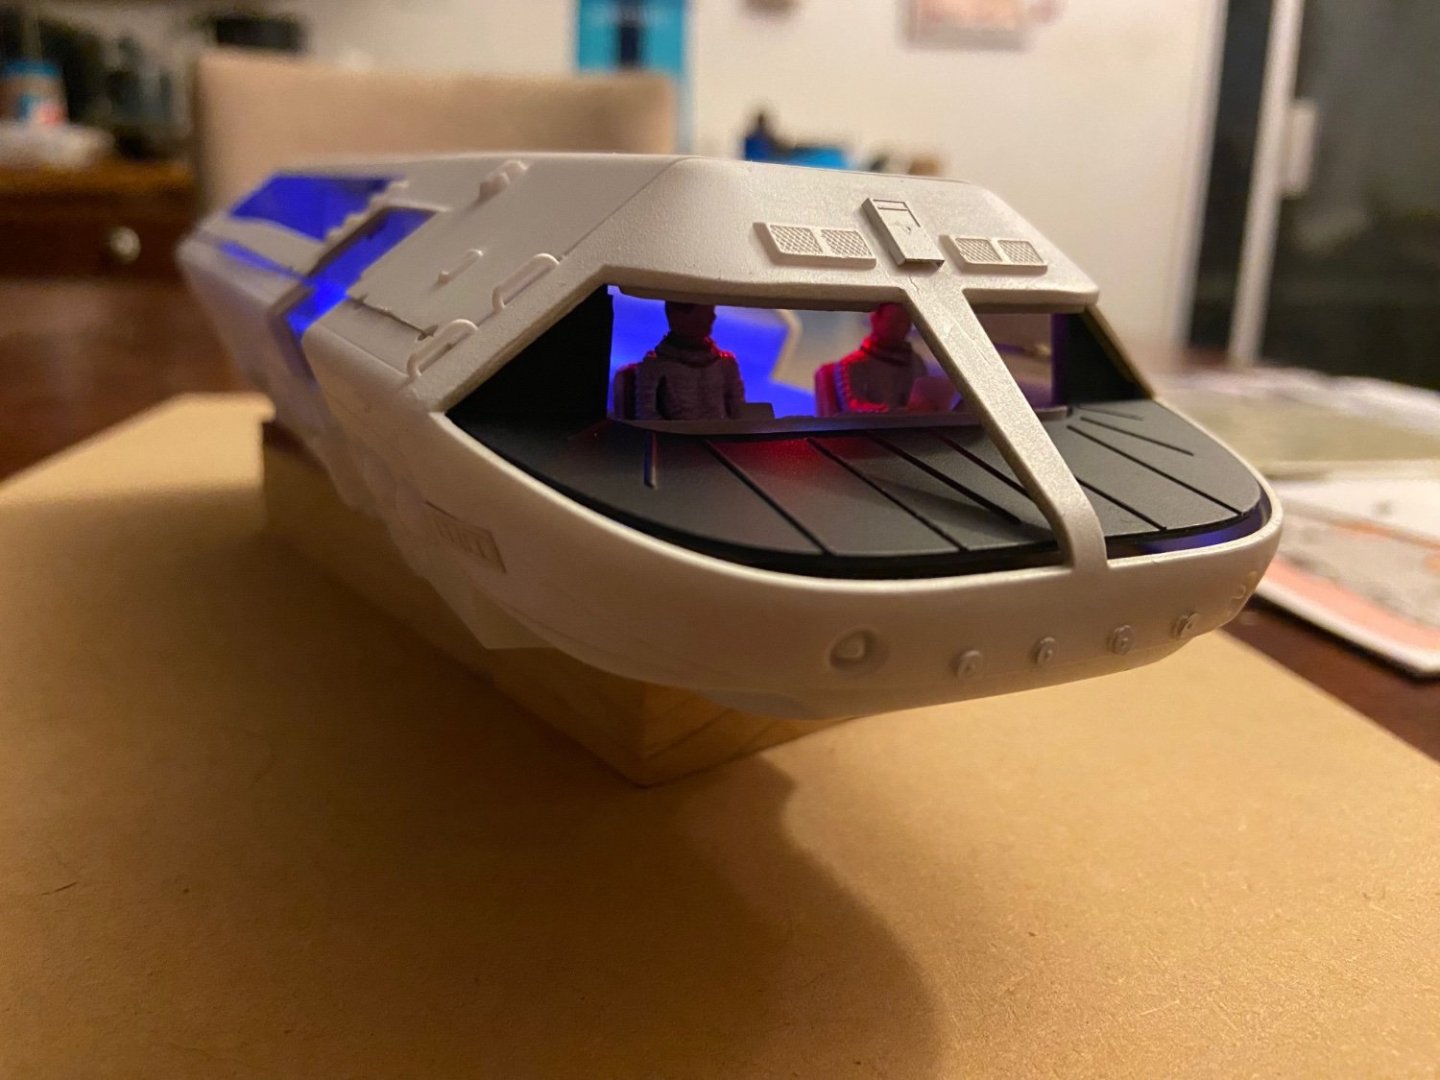
Not too much to report on the Moon Bus progress. I'm working on painting the new astronaut figure I'm going to be using with the model display, but I have yet to add the interior cargo or to add the rocket nozzles on the underside. The main issue I have with the rocket nozzles is getting the correct angles on them. The film shows them canted outward, while the kit has you install them pointing straight down. In the end, it probably doesn't matter as my guess is that they were supposed to be mounted on gimbals, so they could be adjusted as needed. In any case, I did add the strip that covers the seam between the hull top and bottom. I ended up using the kit supplied parts rather than the photo etched brass parts as the photo etch seemed just way too flat. Here's the model on its temporary display base. It's in a case that I will probably go ahead and use, but I will need to make a base that will house the induction coil, etc. This interior photo was taken about a month ago and doesn't show some of the small modifications I've done to the bulkhead behind the cockpit. I had to trim a little so that the top would fit better. I also strategically added some plastic strips to help prevent any light leakage. The walls of the passenger/cargo section are now fixed in place, but at the time of the photo, I hadn't yet added some details. Those gray strips you see have been continued all the way down to the floor. Finally, here's the final placement of the wireless LEDs. The four on the right are red LEDs. The ones on the left that look kind of green and yellow are actually white LEDs, while the remaining three are blue LEDs. I decided not to place any LEDs on the light panel between the two sections. It should be white/blue, but it tends to wash out the red cockpit LEDs. Note that there are also two LEDs in the nose section of the cockpit. You can just make them out in the second photo. These point directly onto the faces of the pilots, which gives more of the look of the film. Because these are not perpeducular to the induction coil as it will be positioned in the base, these two LEDs will be slightly dimmer than the others. I'm not thinking about the decals. There are three of them, all reading USAA (United States Astronautics Agency). The problem is that I can't see them in the film. There are some dark details where they're supposed to go, but I can't make out any details. They kind of really stand out on the model and I'm wondering if I should just leave them off? Any thoughts?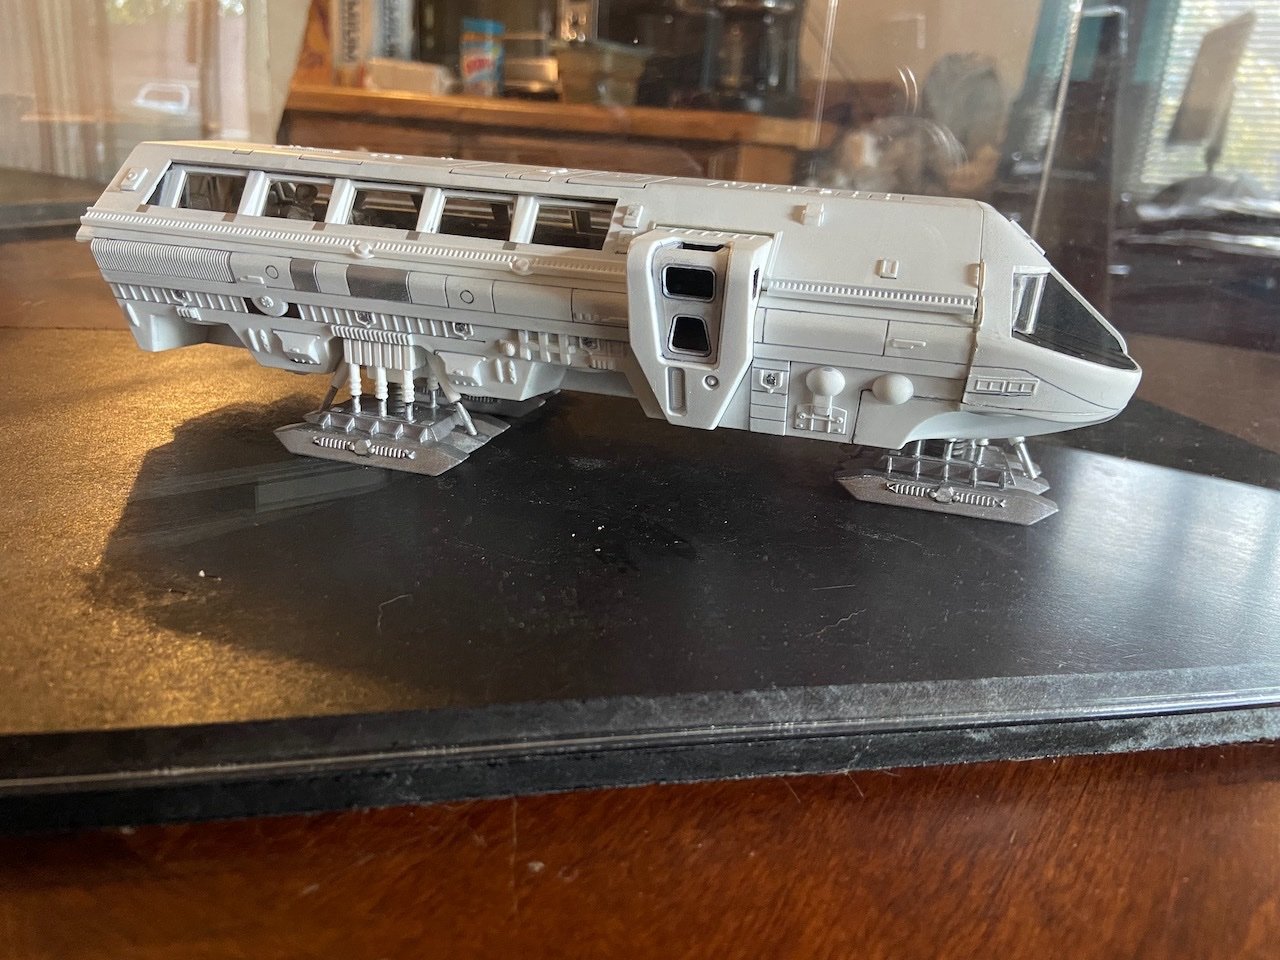
- 17 replies
-
- 11
-
-
Moonbus from 2001: A Space Odyssey by catopower
catopower replied to catopower's topic in Non-ship/categorised builds
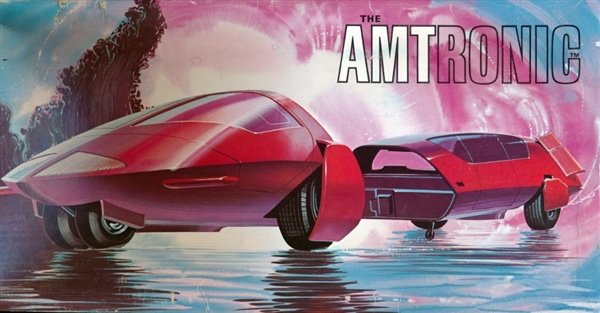
Hi Ziggy, I know what you mean! (But, I DO have that extra kit... PM me if you're interested in it). When I saw that one of these old kits was available, I couldn't help but think how cool it would be to build. This, of course, is a modern re-release, but I've been seeing more and more of these new re-releases and whole new kits of old subjects, and it's kind of driving me crazy. I also remember building the PanAm Space Clipper from the same film, the Submarine Seaview and the Flying Sub from Voyage to the Bottom of the Sea, the Lost in Space Robot. Now, I see that the old U.S. Navy Sea Lab III kit is being re-released and I remember building that one too. So far, I've limited myself to picking up a model of the old AMT Amtronic Car of the Future" kit, and the small Discovery XD-1 kit. But, I'm mostly getting the nostalgic build bug out of my system so I'm now able to make some sailing ship mode progress again!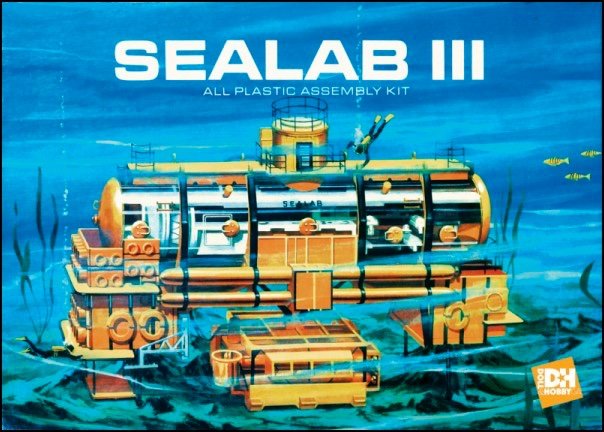
-
kit review 1/50 Hercules Tug Boat- Occre - by Kevin
catopower replied to Kevin's topic in REVIEWS: Model kits
As Roger points out, the HAER has a report on the Hercules. Nice thing about this subject is that the actual ship is docked in San Francisco, so a lot of photos are available. Here's a link to the files in the Library of Congress: https://www.loc.gov/item/ca1507/ -
I've always liked this ship, and you are doing a wonderful job on your build!
- 50 replies
-
- 1
-
-
- le Coureur
- Mamoli
- (and 1 more)
-
Vanguard Models doesn't make any galleon kits. However, Chris Watton of Vanguard Models did design the Amati kit. So, Ron's plug for Vanguard Models might be considered a plug for the Amati Revenge(?). Another potential plug for the Amati Revenge. Chris Watton used to be with Caldercraft and also designed that Sherbourne kit, and he's made a lot of design enhancement to his kit designs since then.
-
Moonbus from 2001: A Space Odyssey by catopower
catopower replied to catopower's topic in Non-ship/categorised builds
Minor update here. I'm trimming the interior walls and such, so that the top of the Moon Bus will fit better. Also, finished adding the trim to the interior walls. I think I'll go ahead and add the trim piece that covers that big seam. Probably just gluing it to the top piece for now, so I can keep the top removable and continue working on some of the interior details. In the meantime, the new 3D printed lunar astronaut figures arrived the other day. These 1/48-scale figures are a MUCH better fit for the Moon Bus and its crew, even though the kit is stated to be 1/55 scale. Below, are a couple of the figures I got. I'll only be using one of them for my model display. Very happy with this latest set. I guess I'm making a standalone 1/55-scale TMA-1/Monolith diorama at some point. What else to do with those figures? I now have a complete, open but unstarted Moon Bus kit, with VooDooFX lighting kit and Paragraphix 3D-printed parts, and some 3D-printed astronaut figures. Not sure what I'll do with them...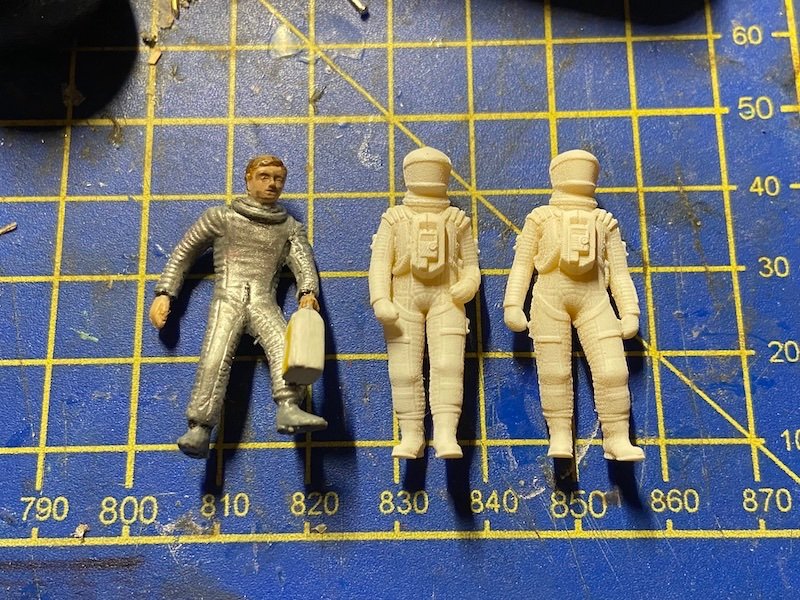
-
Moonbus from 2001: A Space Odyssey by catopower
catopower replied to catopower's topic in Non-ship/categorised builds
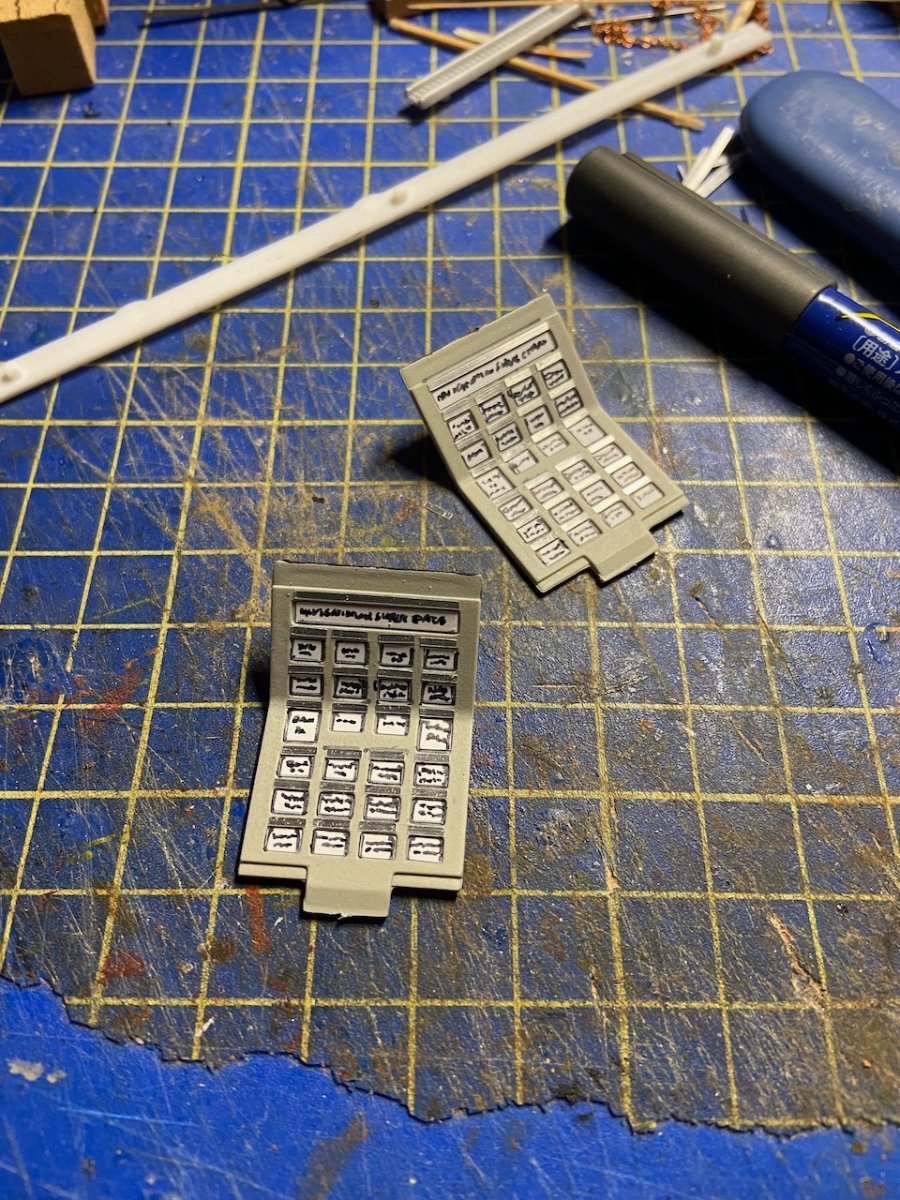
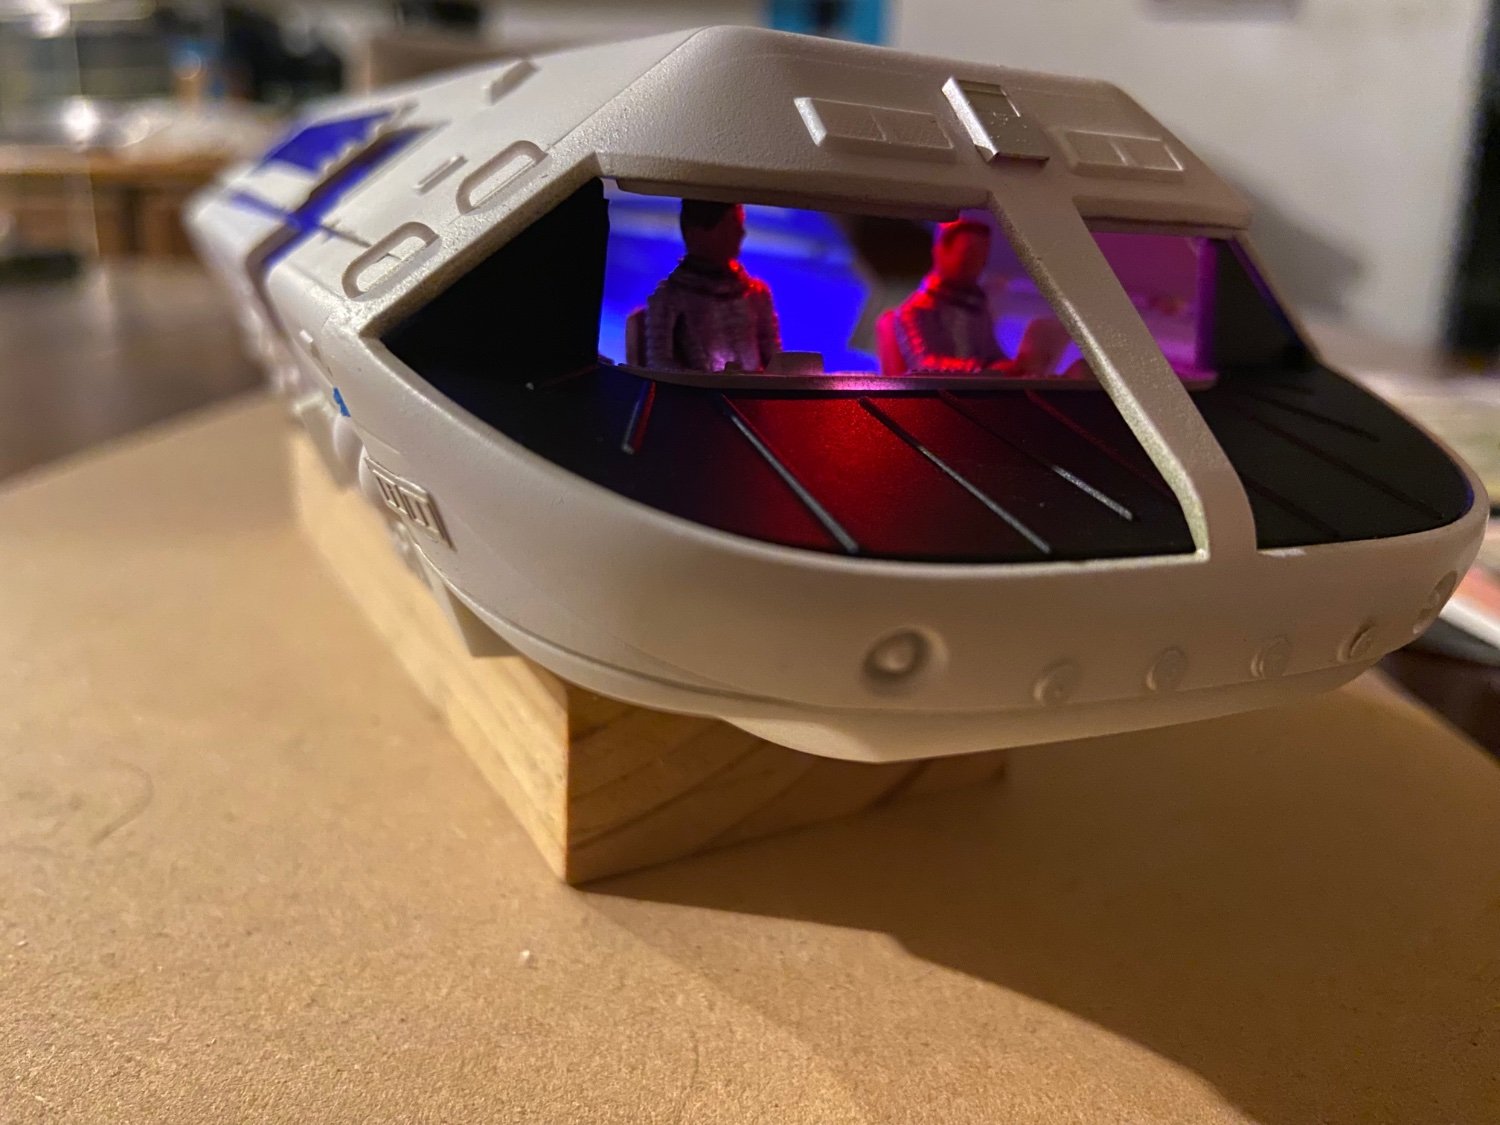
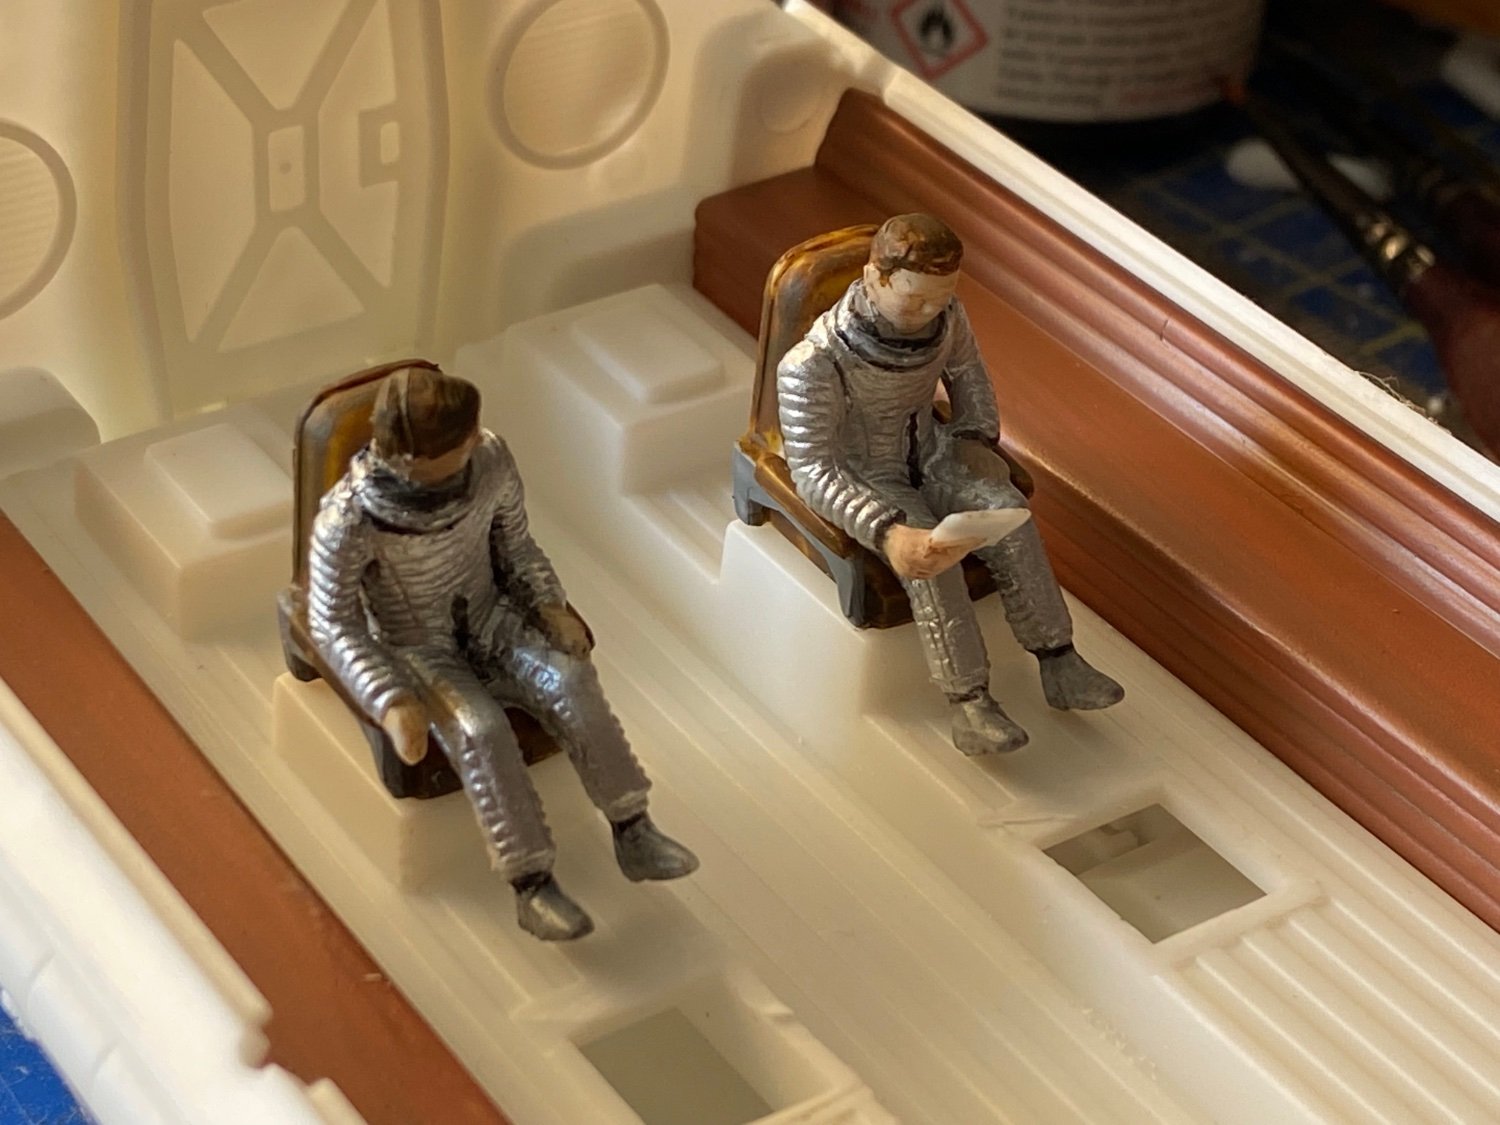
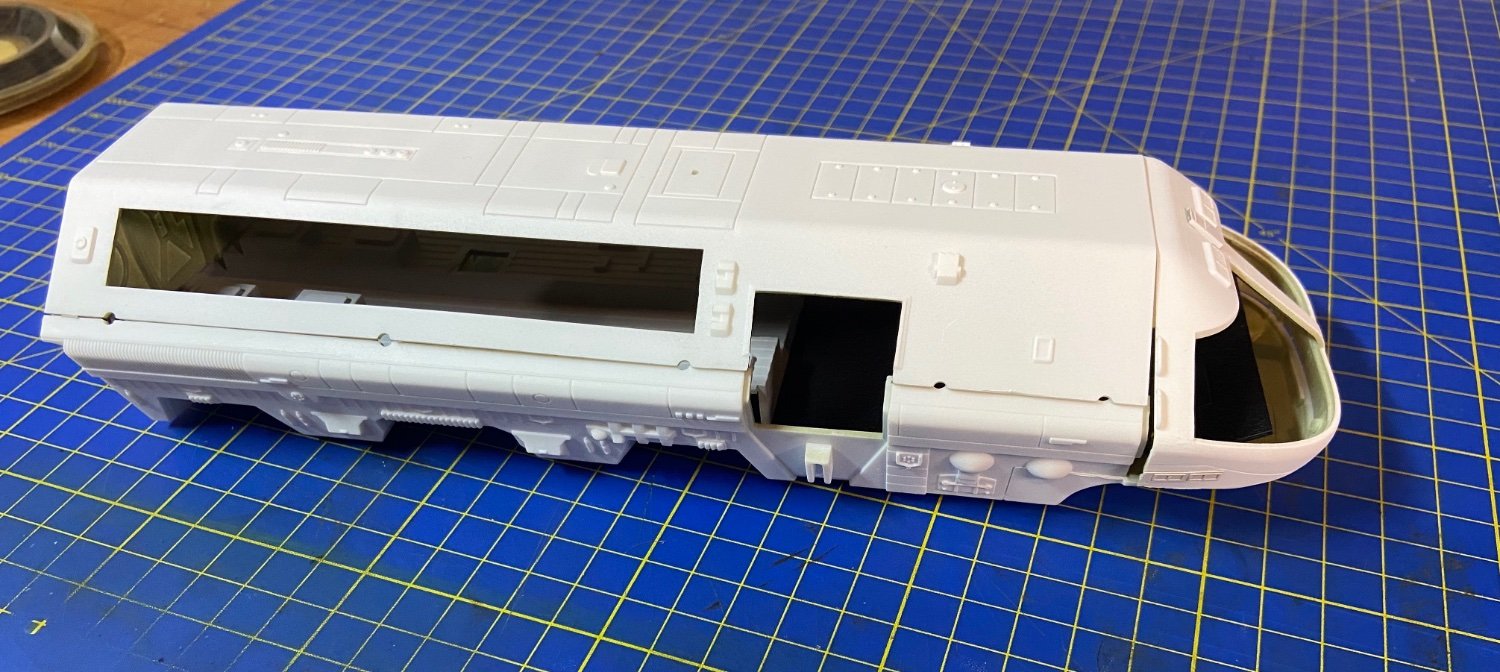
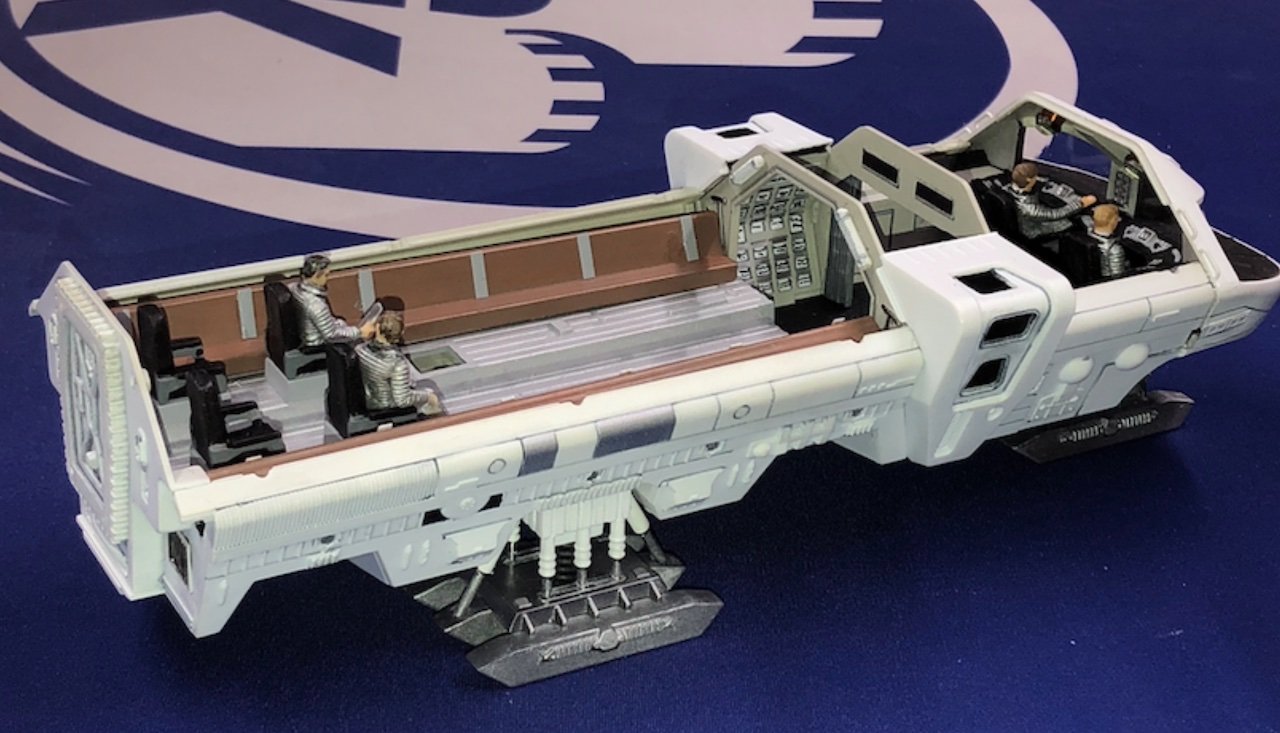
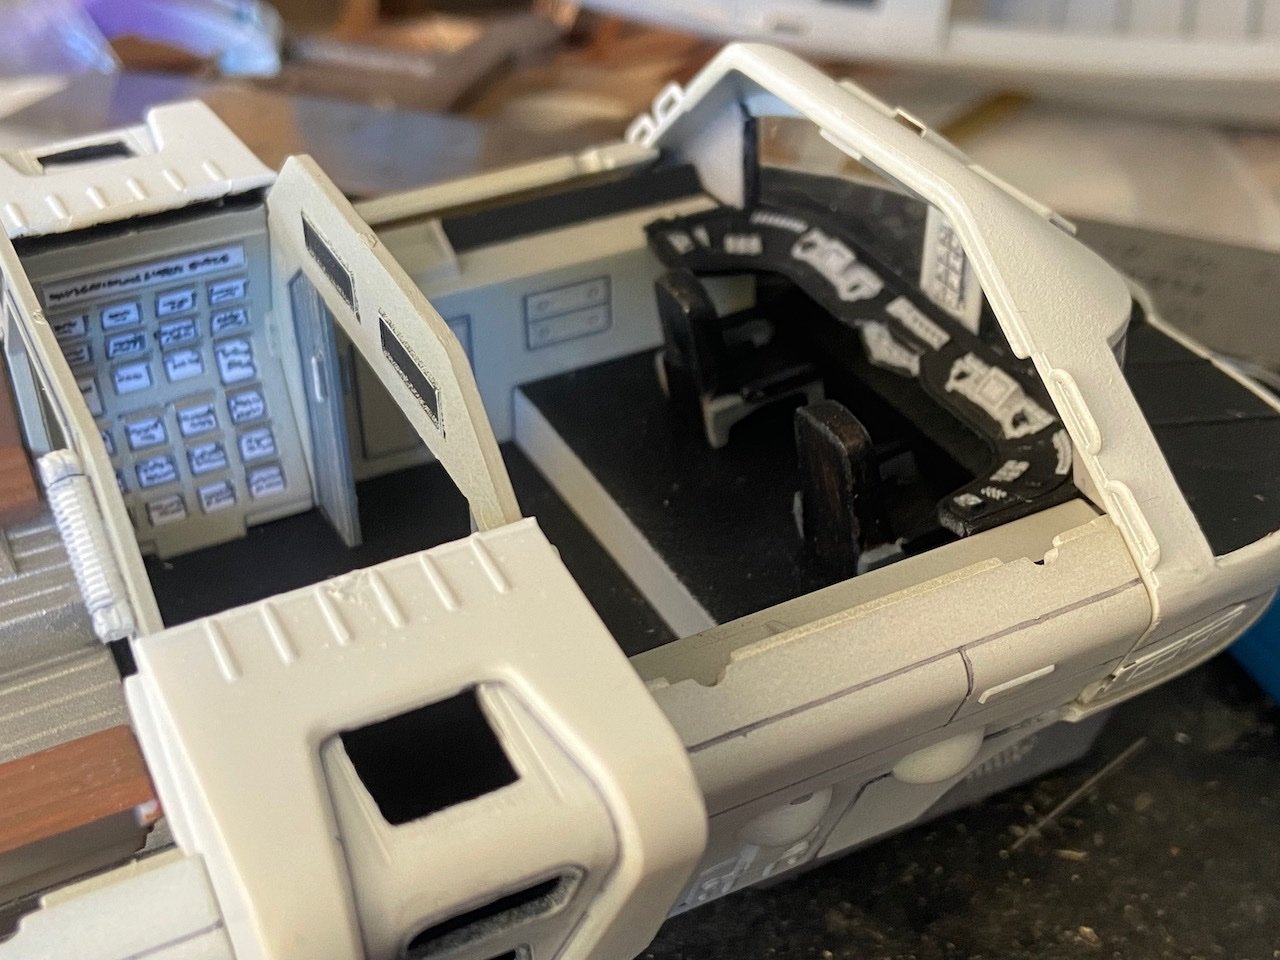
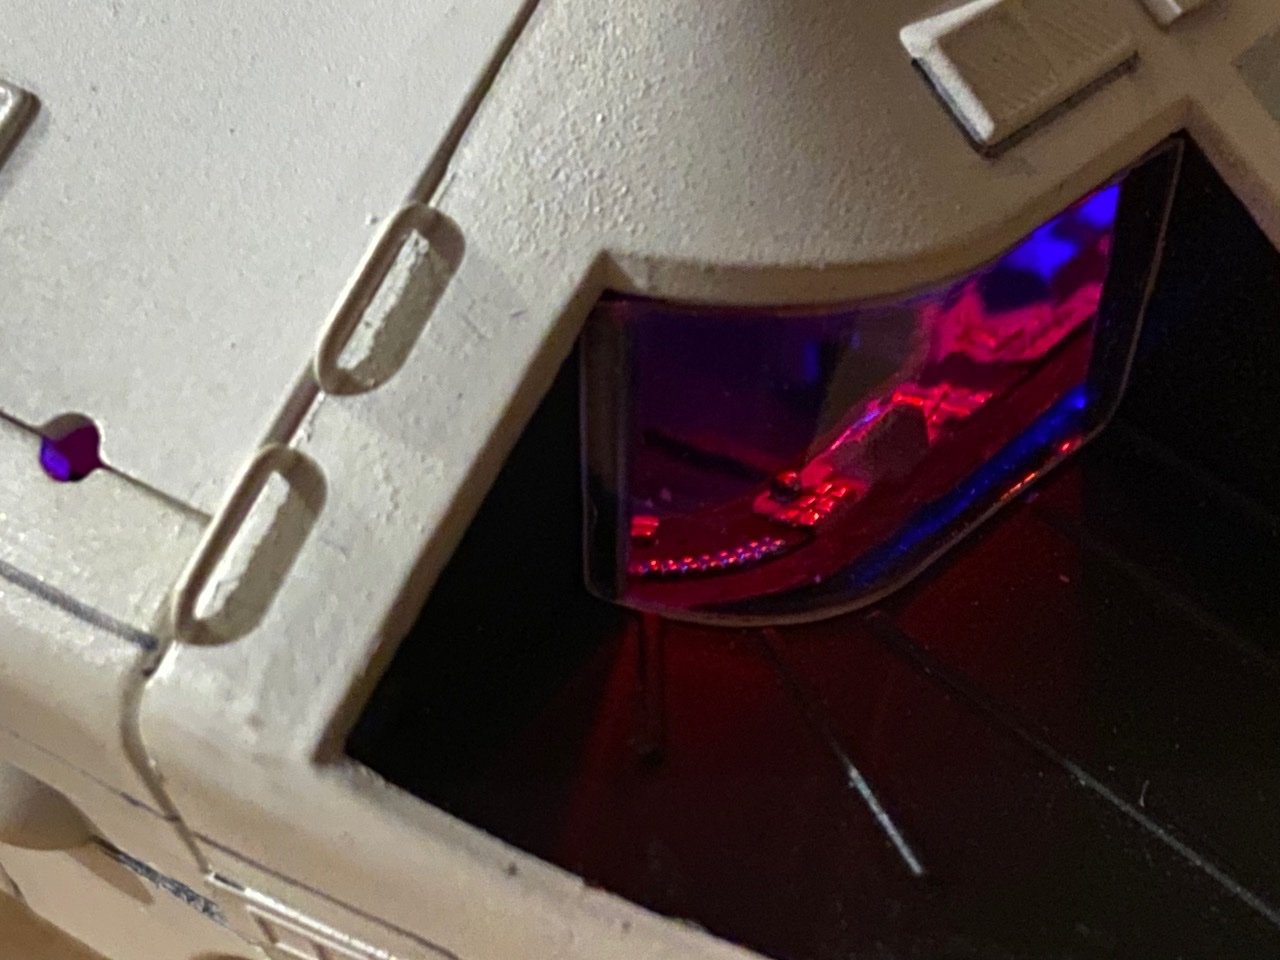
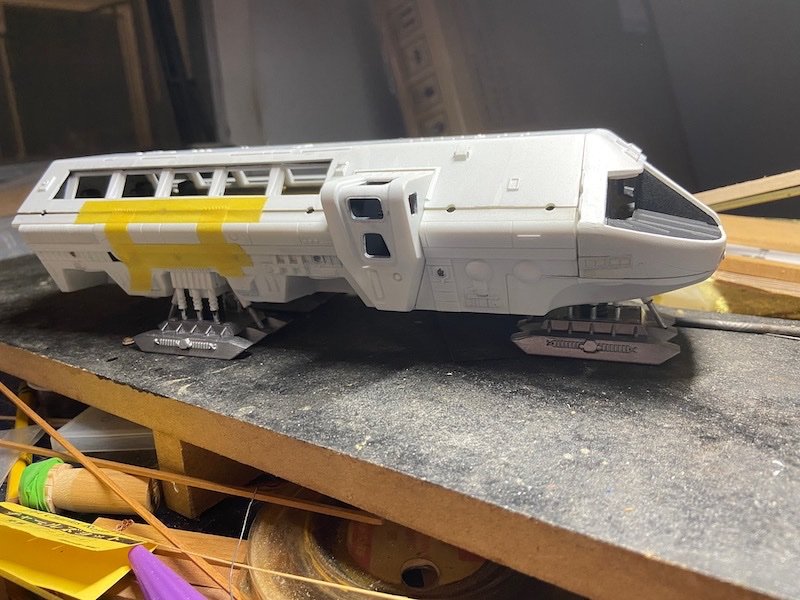
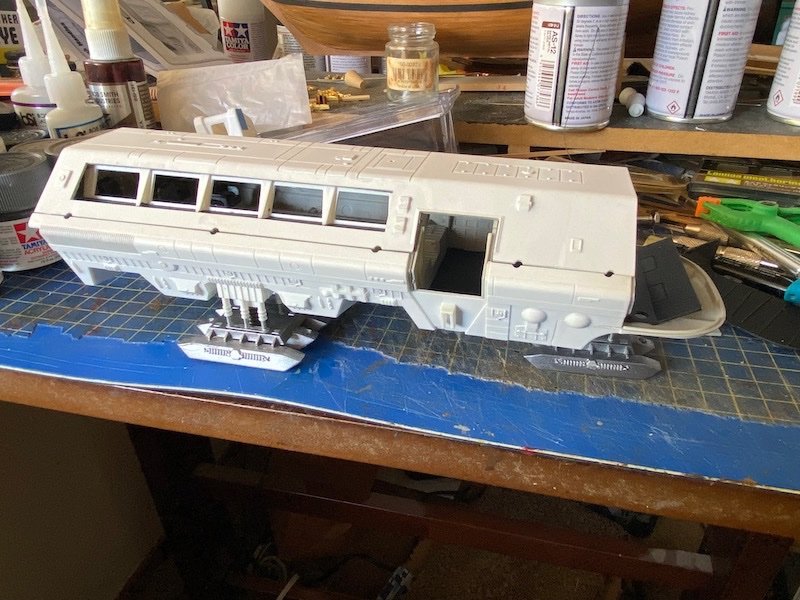
I broke down and ordered the larger astronaught figures from Shapeways. It sounds like the order was processed and they were shipped out a couple days ago, so I should be getting them soon. Meanwhile, I looked further into the interior details of the moonbus and looked a what appears to be a cargo door on the sides of the interior. Reviewing the film, I finally learned that these are storage drawers for navigational and survey charts. As far as I could tell, these should only be on the port side. Opposite that, there appears to be a computer terminal. However, in the kit, both sides have the same pieces representing the storage drawers. I thought about modifying the starboard side piece to make a computer terminal. But, given that this is my first plastic kit in many, many years, I thought I'd better leave well enough alone. I was already making enough modifications. I did want to detail what I had though, so I measured out the molded recesses for the drawers and used my Silhouette Cameo 3 vinyl cutter to cut some pieces for the drawer faces using matte white adhesive-backed vinyl. I also measured out pieces for the drawer handles, which appear to be at the top edges of the drawers. For these, I had some metallic vinyl that worked well. Since the drawers were all labeled in the film, I figured I should label these, but given their small sizes, I figured I would just do some "faux writing" on them using a ultra fine black marker. I I know the handwriting looks like handwriting, but inside the model and at this size, I wasn't too worried about it. You can see that I've painted and detailed the cockpit a bit. The cockpit chairs were originally smaller and with no armrests, so I replaced them with the spares I had from removing that extra row of passenger seats earlier. I later decided to go over the control buttons using a chrome paint pen. This made them reflect the cockpit lighting a bit, causing them to stand out more. You can see here some blue lighting leaking under the control panel. I fixed the light leakage, but I was originally experimenting with putting one blue LED under the panel, but it seemed too much blue initially. I may revisit the idea later, but for now I'm more interested in intensifying the red lighting to balance out the overall look of the model lighting. Finally, here's the current state of the lighting with the light leakage under the control panel fixed and the pilot figures test fit into position. I had to cut off their legs to simplify their fit, as I'm not using the original chairs or figures. Also, the arms have not yet been attached. But, you can get a pretty good idea of the overall appearance of the model with figures and lighting. Next, I'll be cementing the nose permanently into place and finishing the pilot figures and cementing them into place as well. Still some exterior details to do, plus I still have to make a final call on the interior walls, and the addition of cargo and a few other internal details I've been thinking of as well.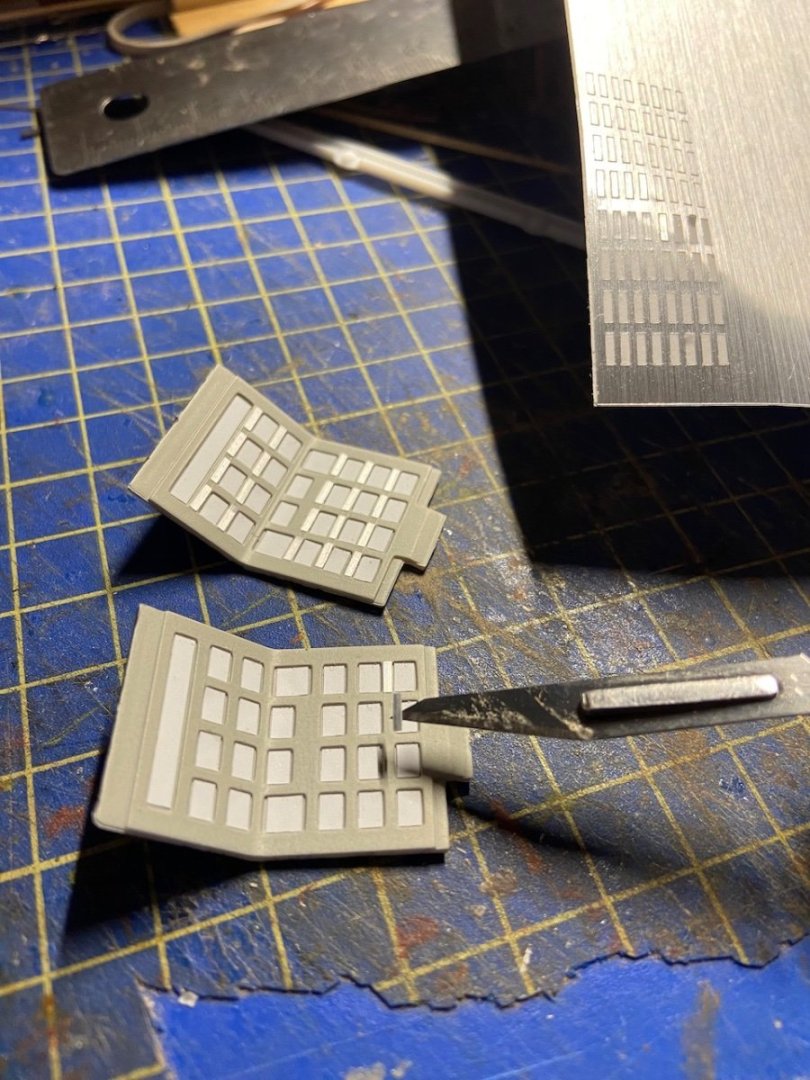

- 17 replies
-
- 12
-
-
Sorry to be jumping into this discussion kind of late, and maybe I missed this already, but what about Battle Sail? The state of the sails as they would be set for combat. I believe the lower courses would be, perhaps not furled exactly, but clewed up, so they could be dropped down quickly and easily. Isn't that what's depicted in the videos that Bill97 shared links to and what he wants for his sail configuration?
-
Nice review James. I really like what Artesania has done with their lineup since the big changeover some years ago. Single planking, it's very common. All the large OcCre kits, all the Billing Boats kit, Woody Joe kits, and many others are single planked. Should be easy enough to cover with a layer of veneer if desired. It's okay, Keith. Many modelers shudder at the thought of rigging a sailing ship model, but we do it because we are ship modelers! 😁
-
Moonbus from 2001: A Space Odyssey by catopower
catopower replied to catopower's topic in Non-ship/categorised builds
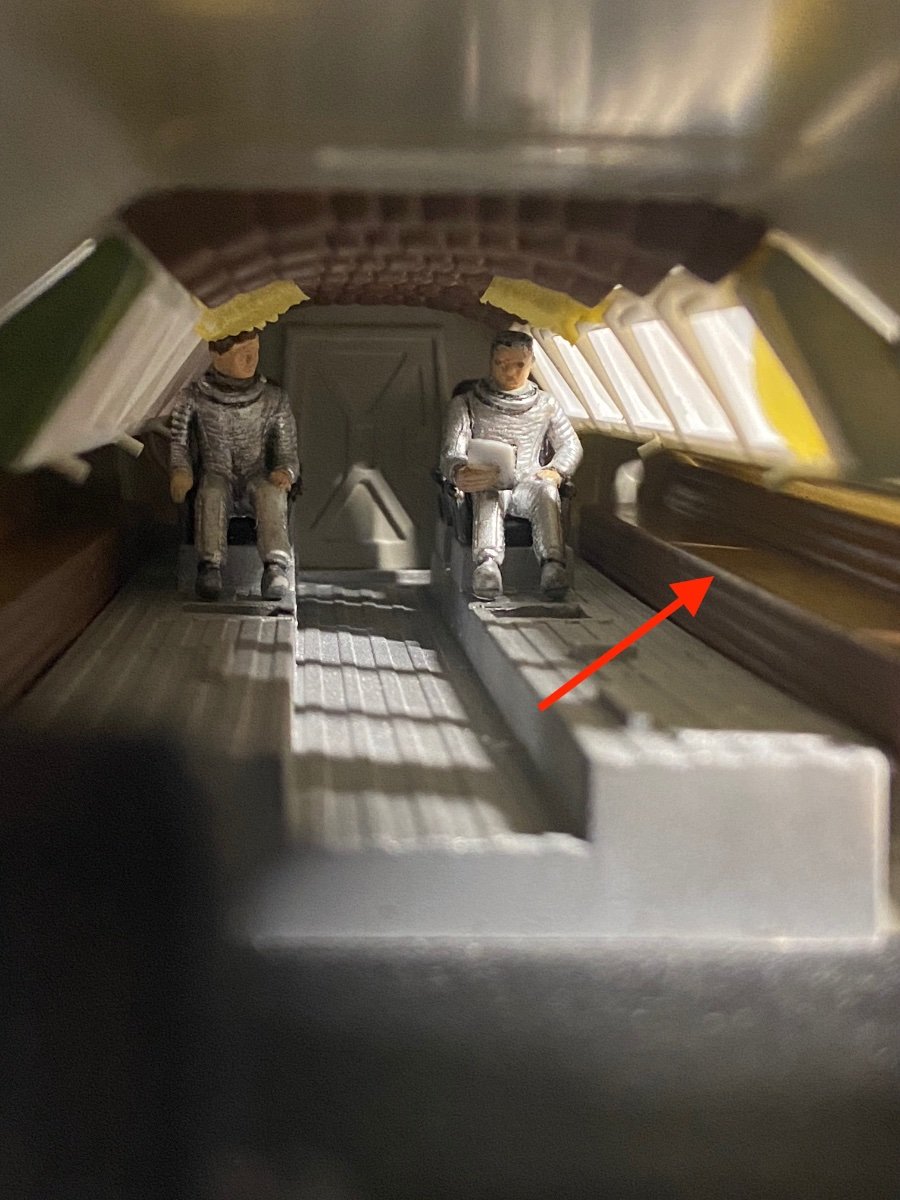
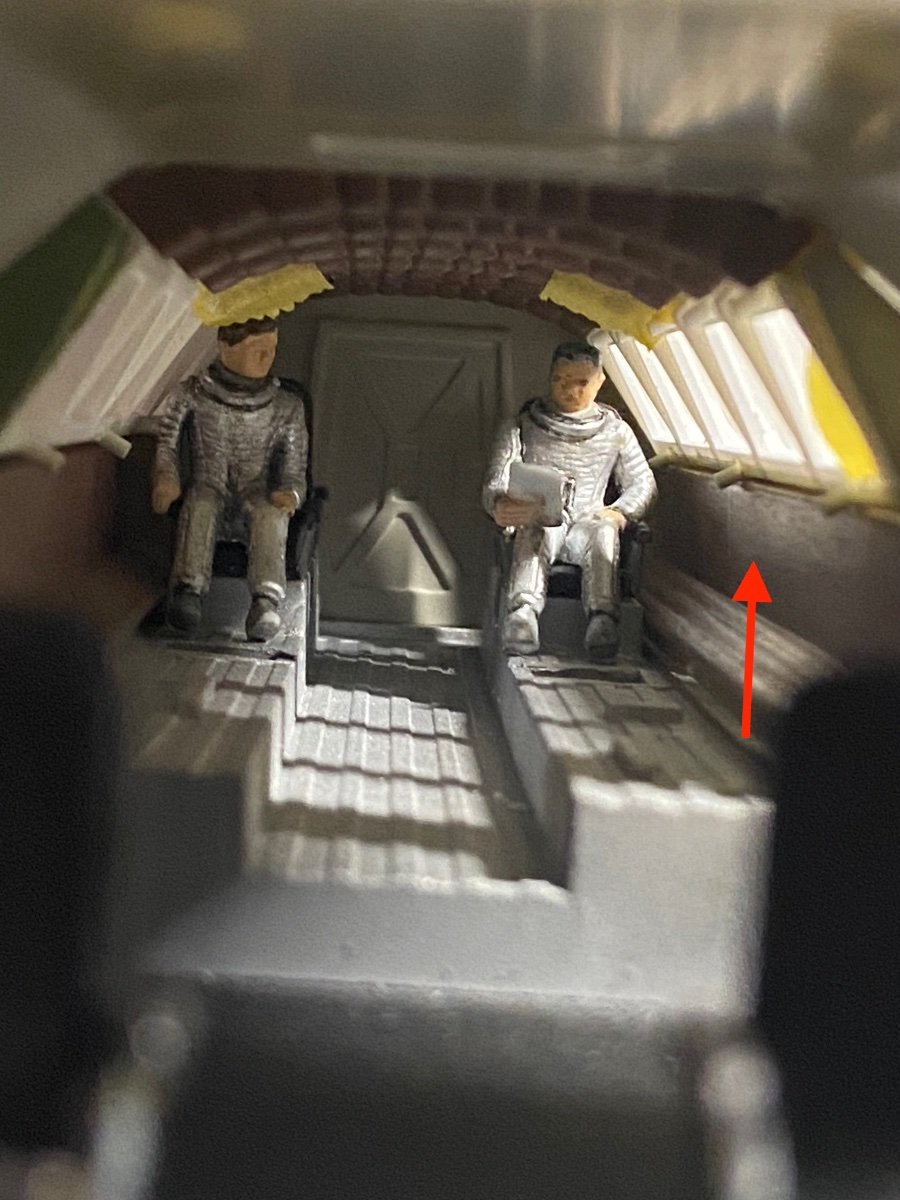
Well, I went ahead and ordered the larger set of astronaut figures. I really only plan on one for the final display, so they won't affect the build itself. However, in the film, among the cargo the moonbus is transporting is the life support gear and helmets for the five astronauts aboard. I haven't been able to see where the helmets are, I assume they're probably in a protective box or two. But, the backpacks are lined up in front of Dr. Floyd. So, I'm thinking I need to make a buch of these somehow. I suppose I could kind of fake the backpacks out of wood, as you won't notice small details through the windows. But, I'm also thinking that maybe I can make a simple mold, using the astronaut figures, and just do some resin castings. I'll have to wait for the new figures to arrive though. In the meantime, there is more to do on the model. There are more inaccuracies in the model kit that I've been seeing. One is that the interior layout is off. The cockpit area should be much smaller, and the passenger/cargo area should be longer. There is a little utility section in between these two. On the model this section lies directly between those protruding thruster pods. But, in the film, it appears that this section really takes up the back half of the model's cockpit area. This issue isn't really a big deal unless you're planning to open up the model for display, which I'm not. There's another feature that does bother me a little, and that's the part of the interior walls beneath the side windows. In the kit, there is a piece that fits beneath the windows and it forms this deep shelf under the windows, which is not how the film shows. In the film, the wall is kind of a continuation of the surface formed by the windows. I found a way to kind of fake this by simply reversing the included parts. It's not a perfect solution, but it looks more accurate. Here are the before and after pics. I've drawn arrows to point out the issue. Note that this is all being done while a lot of parts are still being test fit. Before: After: This fix also has the benefit of narrowing the interior to look more as it does in the film. There are details I'd like to add to the interior as well. For instance, there are what I presume are emergency oxygen bottles located on the frames between each of the windows. The face of the frames between the windows also continue all the way down those wall pieces I've been illustrating here. More soon...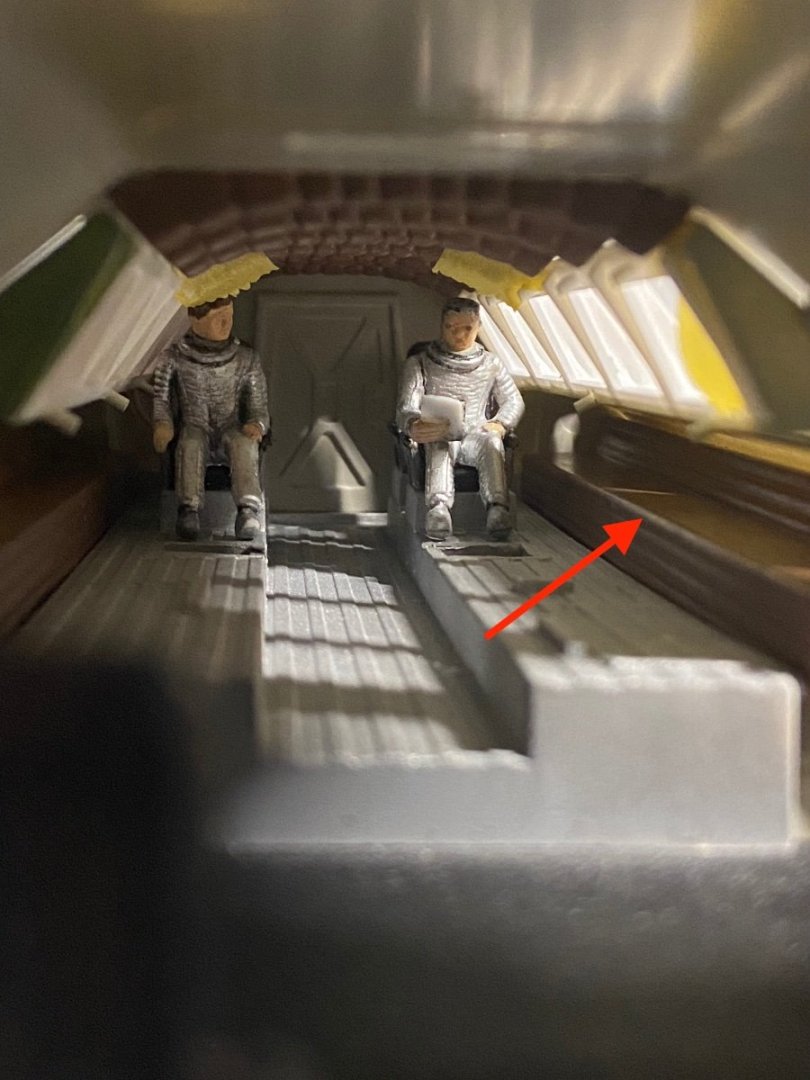

- 17 replies
-
- 10
-
-
Moonbus from 2001: A Space Odyssey by catopower
catopower replied to catopower's topic in Non-ship/categorised builds
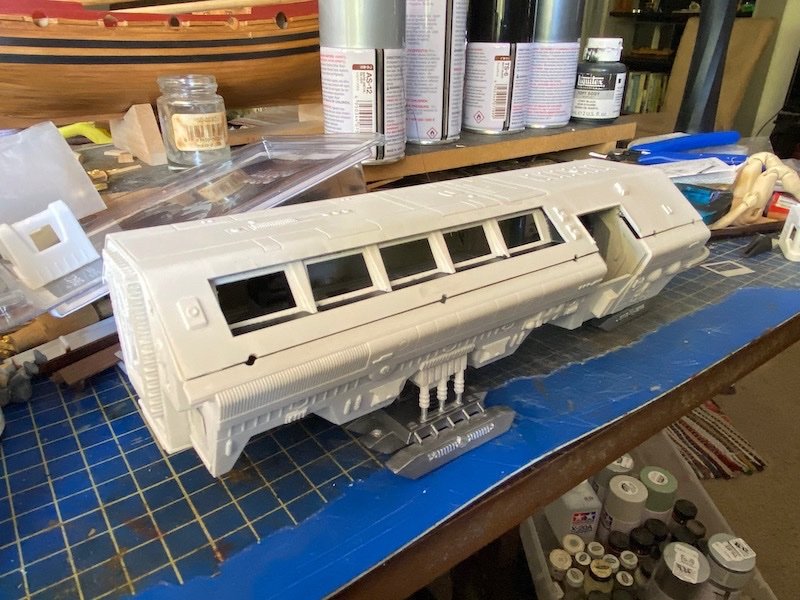
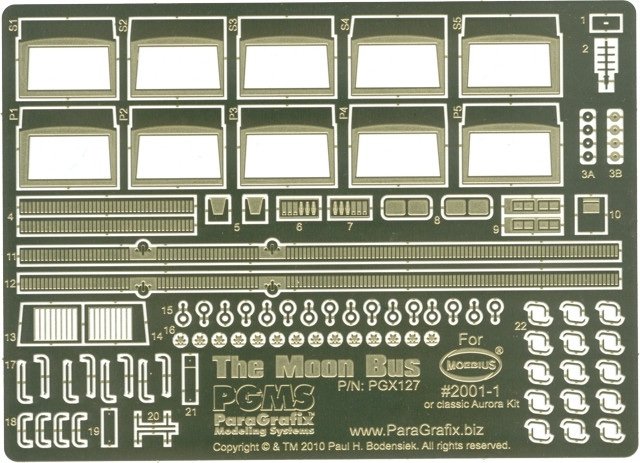
Working on the painting, mostly using spray cans and brush for now. My airbrushing skills are WAY out of practice, and I was never very good with it, particularly with plastic models. Some assemblies are getting glued together, but most at this stage are test fittings. I started using the aftermarket photo etch parts set I got Paragrafix. I'm using some of them, but I don't think I like the way all the parts look, as they're too flat. I'm supposed to remove some plastic raised detail and replace it with these very flat parts, and I just feel that I don't like the look in all cases. Below there are two horizontal rectangles above the cockpit windows and they are separated by a vertical rectangle. No idea what they represent, perhaps some kind of radar units. The center rectangle is a photo etch part that has folded edges, giving some thickness. The outer ones are the original plastic, which I'm leaving in place. Maybe I'm just accustomed to the way the old model looked, but I like this better. There are two handles on either side of the cockpit and these were supposed to be replaced, but again, I didn't like the 2D look of the handles. If I were to replace these, I'd just use brass wire, but I think they're fine as is. The film shows some non-white panels in various places on the moonbus, so I'm adding those details. There aren't too may really clear shots of the craft, so it's hard to see exactly where these all are. There are some on the front of the cockpit and there is a row of squares panels under the side windows as well. Again, mostly test fitting, but you can see I've completed the landing legs and am starting to detail the body a little. On the sides of the craft are what I used to think were airlock hatches. Later, I thought maybe they were instrument pods. But, I guess they are actually a strangely shaped thruster pack to aid in maneuver the craft in the airless environment of the moon. The film clearly shows some burn marks along the hull in front of the modules, but the kit doesn't have any opening on the front side of these modules. So, I created a pattern for them using adhesive backed vinyl and drilled and cut them to size. They may be a little on the small side, but I'm happy with them.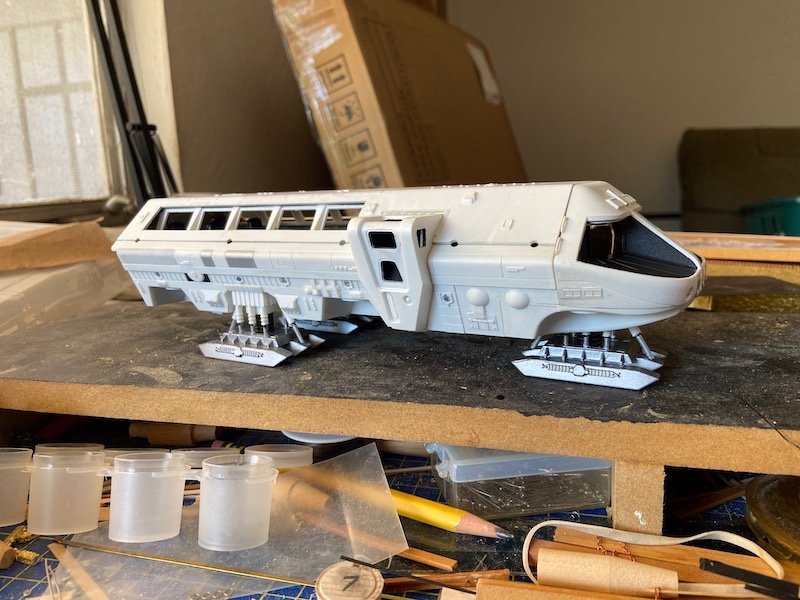
- 17 replies
-
- 11
-
-
OcCre HMS Victory Limited edition
catopower replied to modeller_masa's topic in Wood ship model kits
And, it's $1700 on OcCre's online shop. -
Moonbus from 2001: A Space Odyssey by catopower
catopower replied to catopower's topic in Non-ship/categorised builds
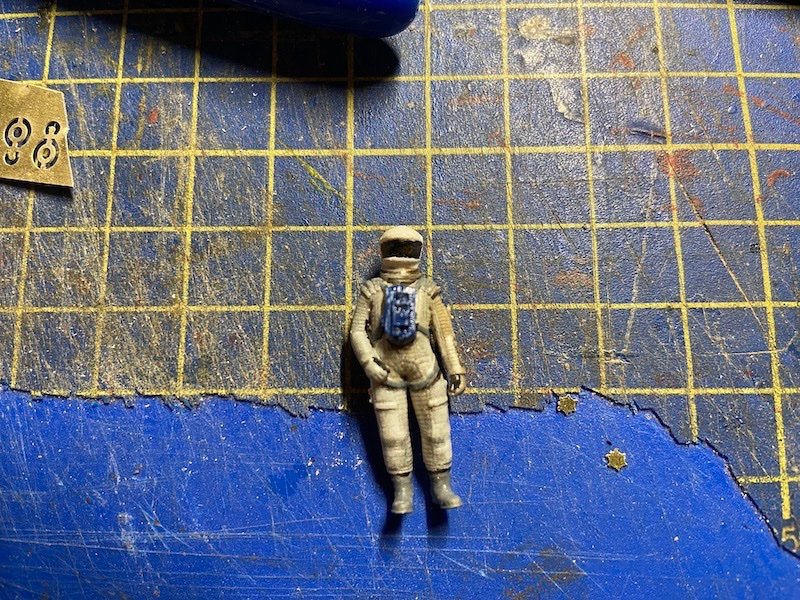
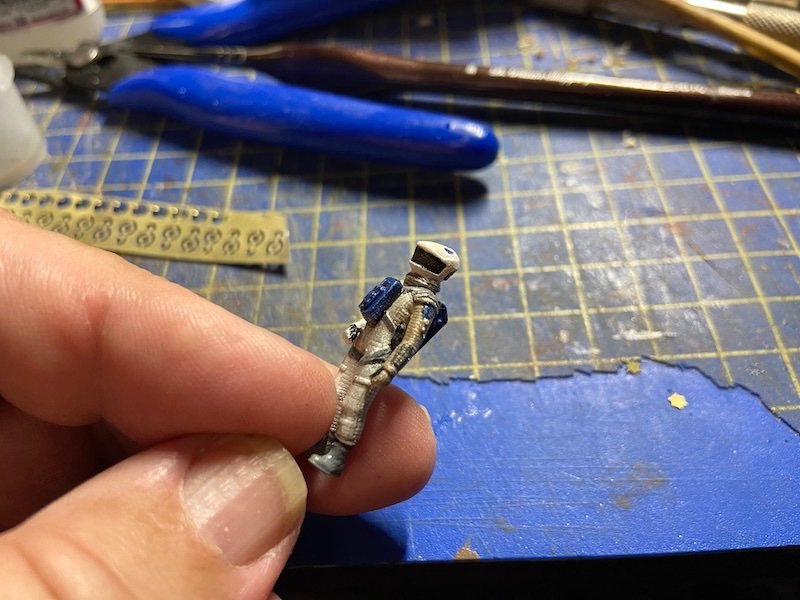
While not part of the kit, I got the 3D printed astronauts and they look really good. I immediately selected and painted one of the figures to use as my TMA-1 astronaut. The only problem with the new figures is that they introduce questions about the scale of the Moonbus kit. The kit states it's 1/55 scale, so do the astronaut figures I bought. But, if you compare the kit figures with the 3D printed figures, they are way off. Working through the measurements, the figures in the kit seem like they'd be closer to 1/48 scale. With printing, service fees, and shipping, the 3D printed figures weren't cheap, about $50 total as I recall. But, I'm wondering if I should spring for the 1/48 scale figures. I'm also wondering if that's why the designer even made 1/48 scale figures available. We'll see. It doesn't affect the model's construction progress (except when I stop to paint them!). If I get them and don't use them, maybe I'll make a tiny monolith diorama. Let's see, that's 1 by 4 by 9...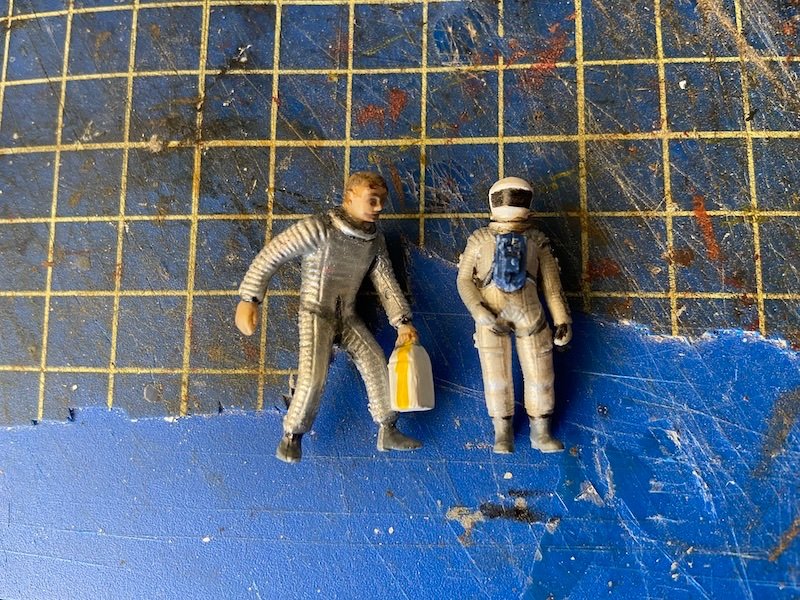
- 17 replies
-
- 11
-
-
OcCre HMS Victory Limited edition
catopower replied to modeller_masa's topic in Wood ship model kits
My main beef with OcCre is why they can not or will not create a kit with any attempt at showing something as simple, but as obvious (to me, anyway) as deck camber. I can't think of any other manufacturer that ignores this feature of sailing ships. 🤔 Well, I'm sure it will be fun build to many. -
Moonbus from 2001: A Space Odyssey by catopower
catopower replied to catopower's topic in Non-ship/categorised builds
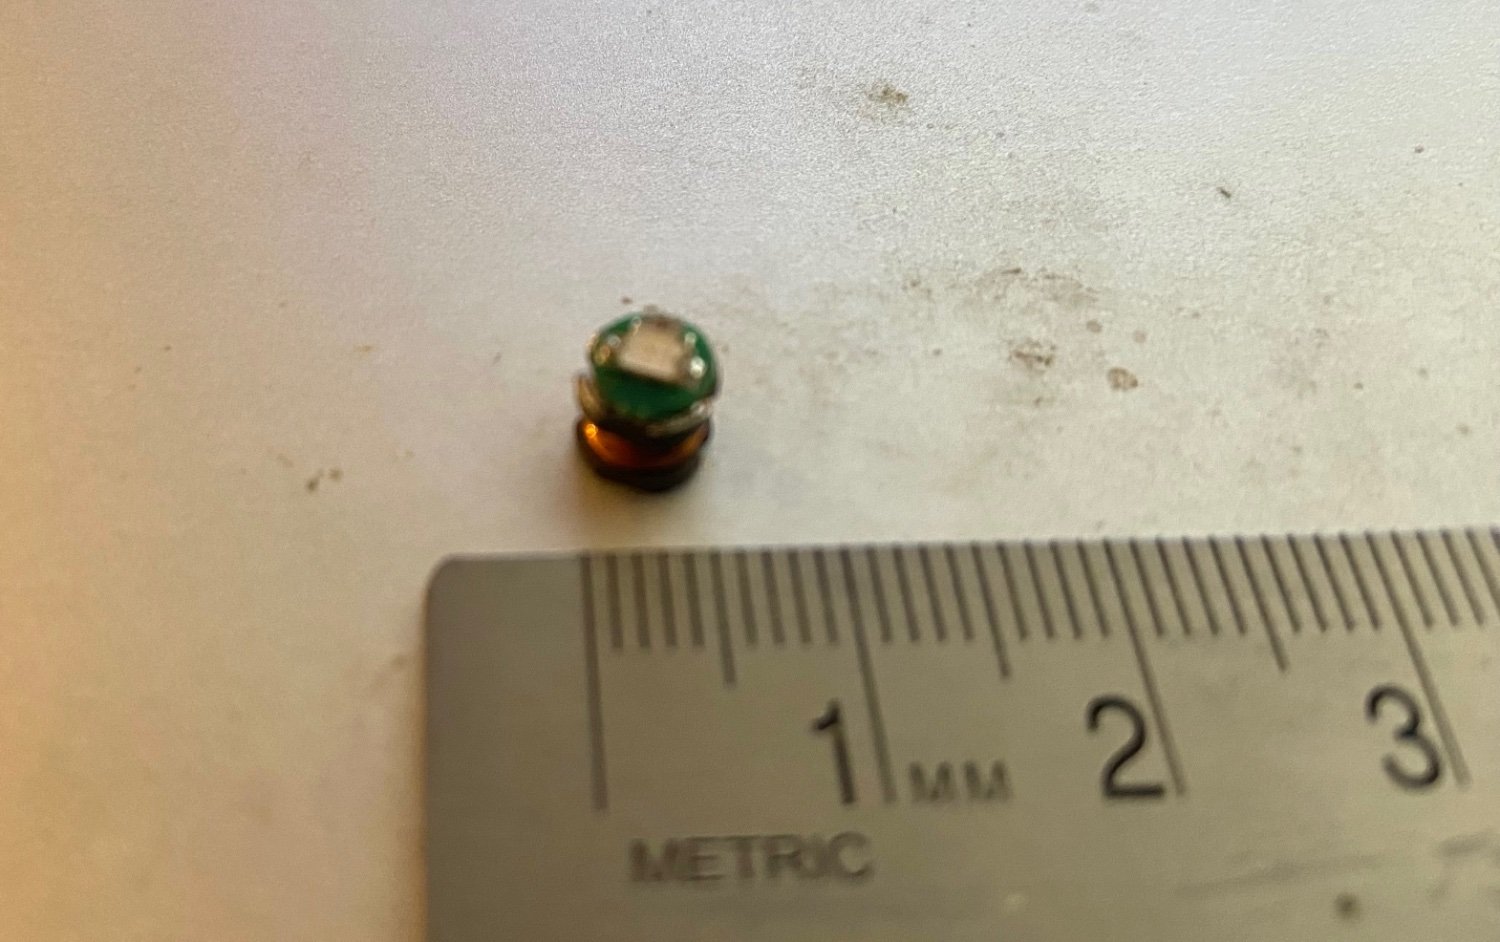
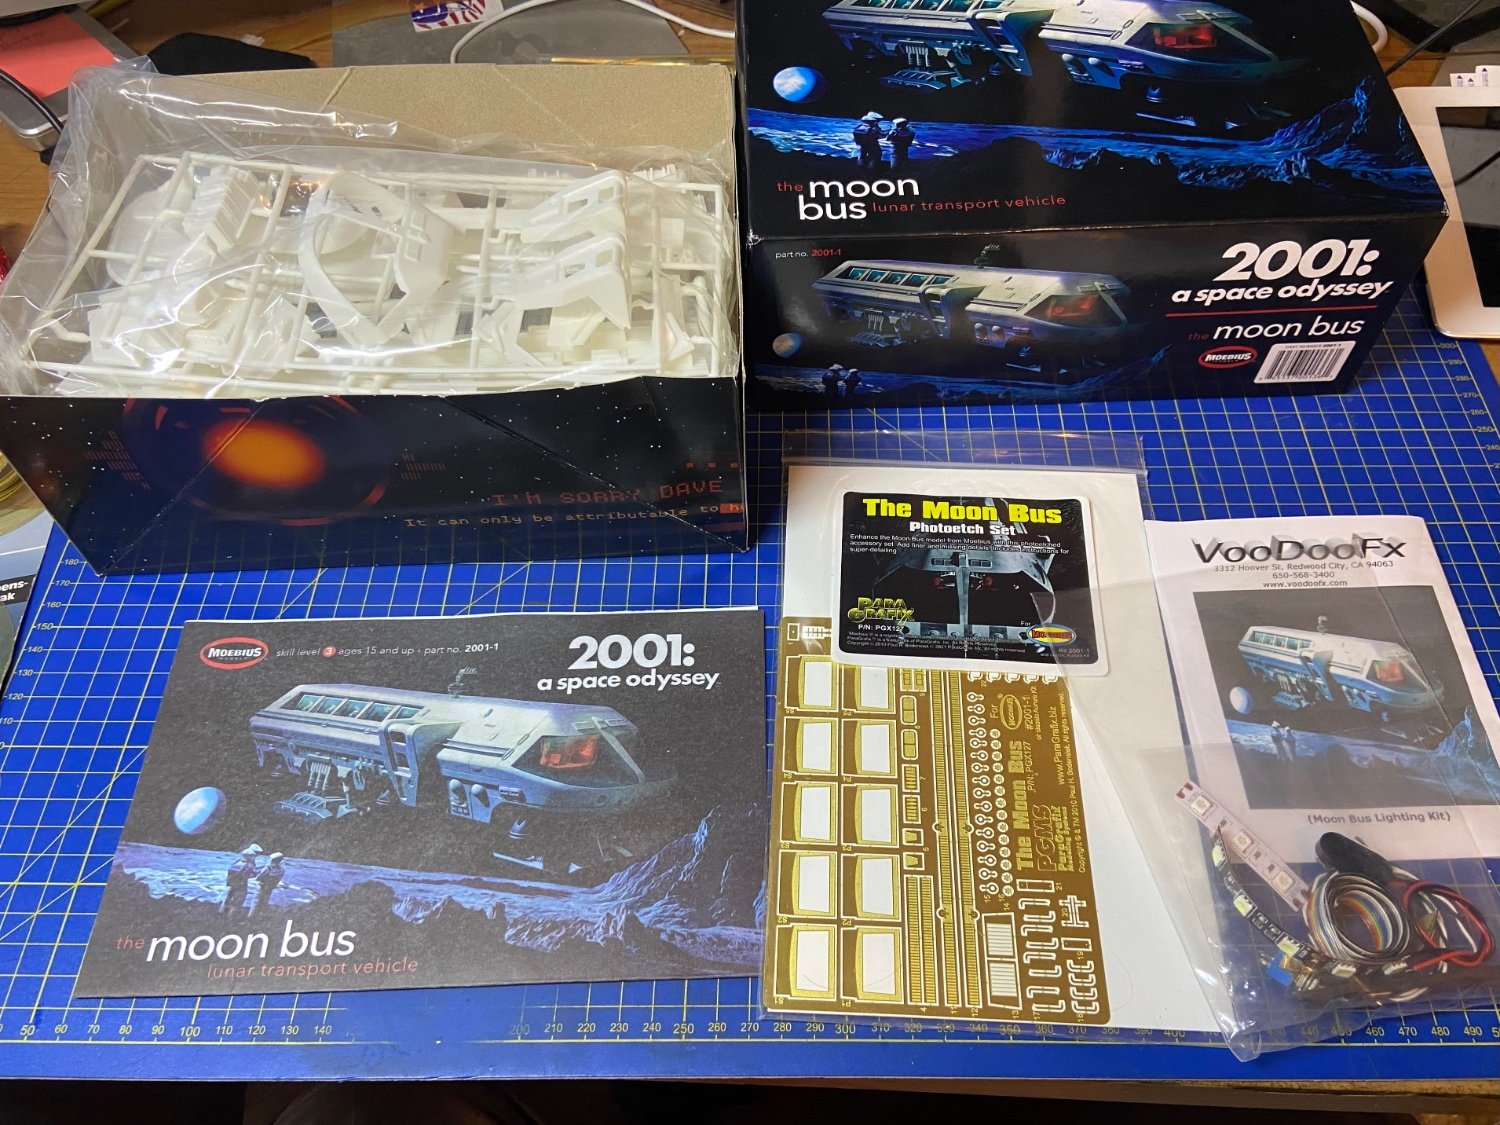
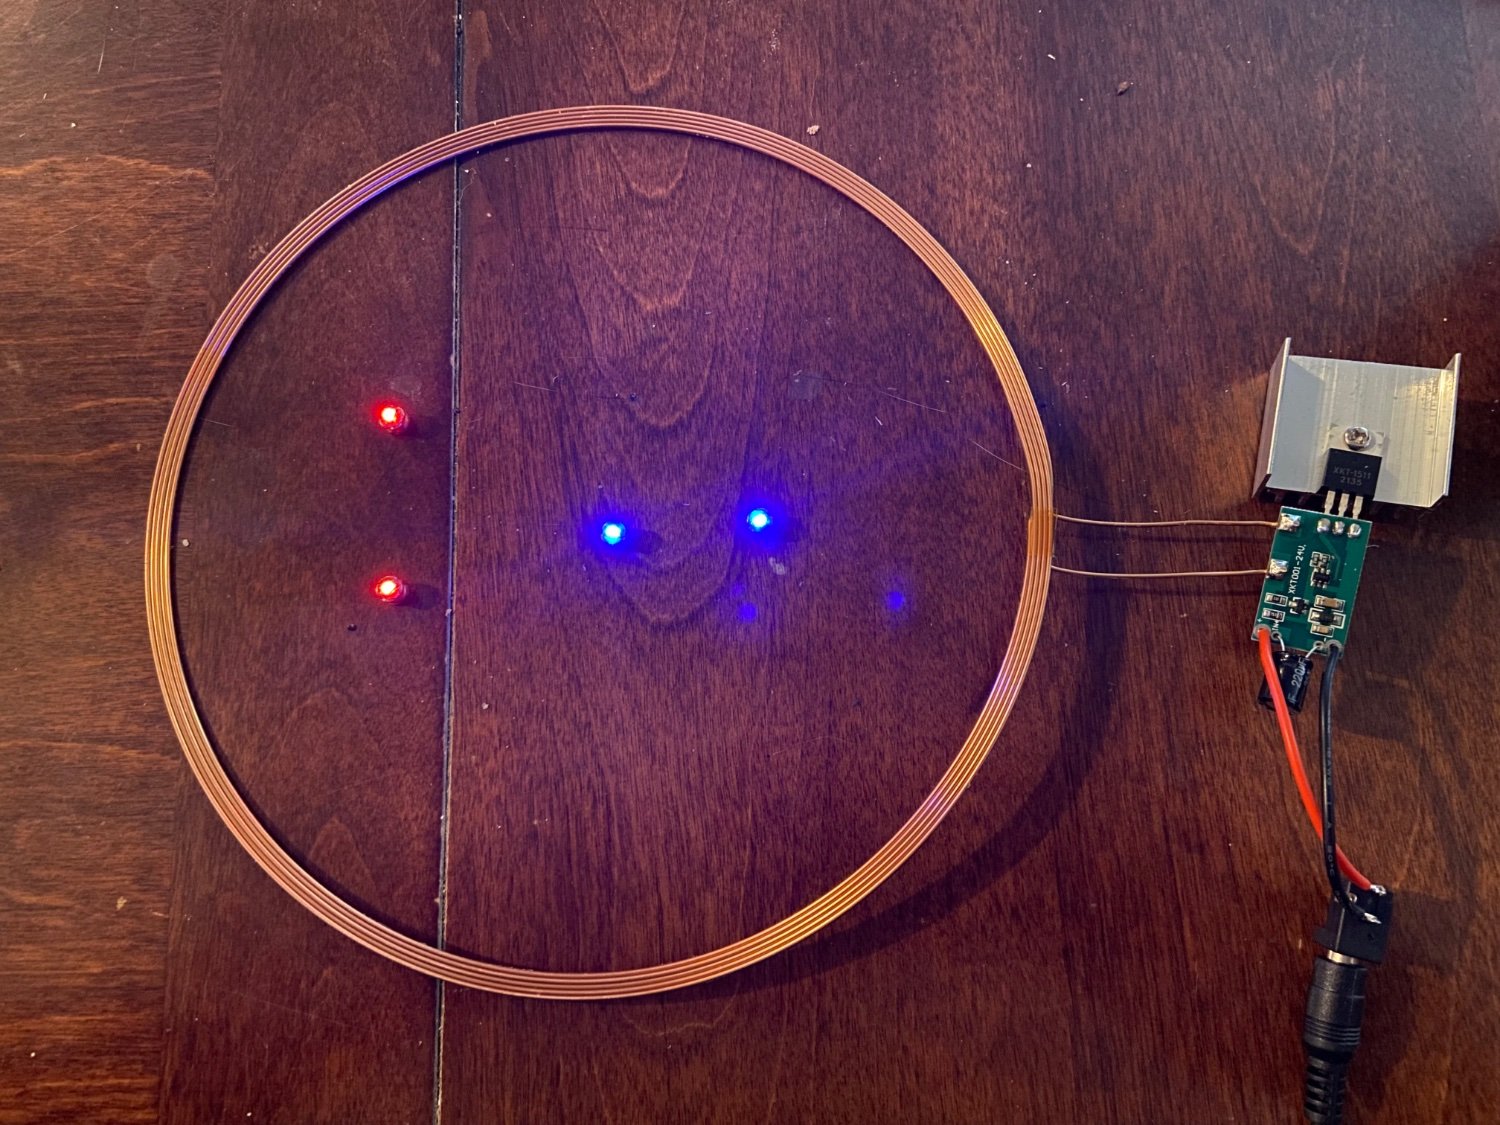
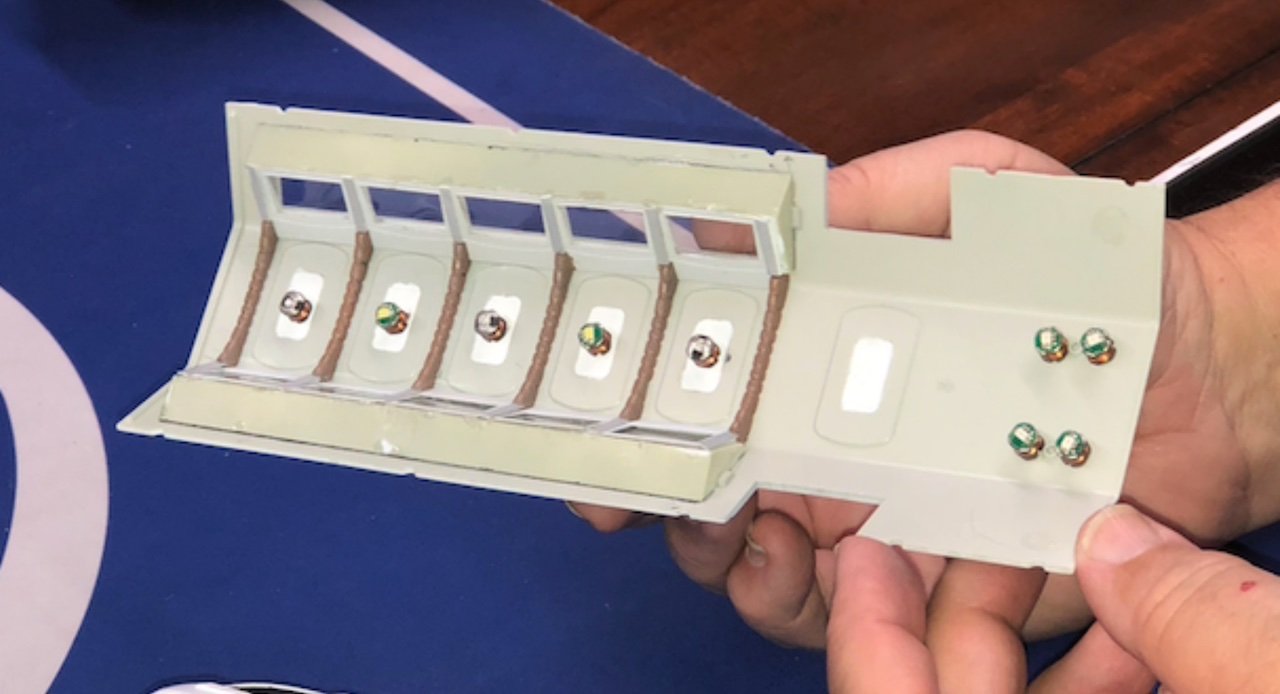
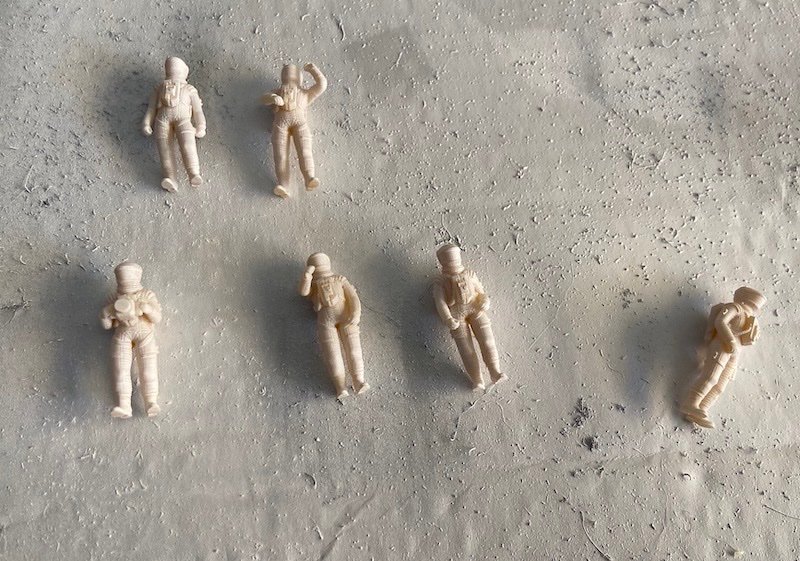
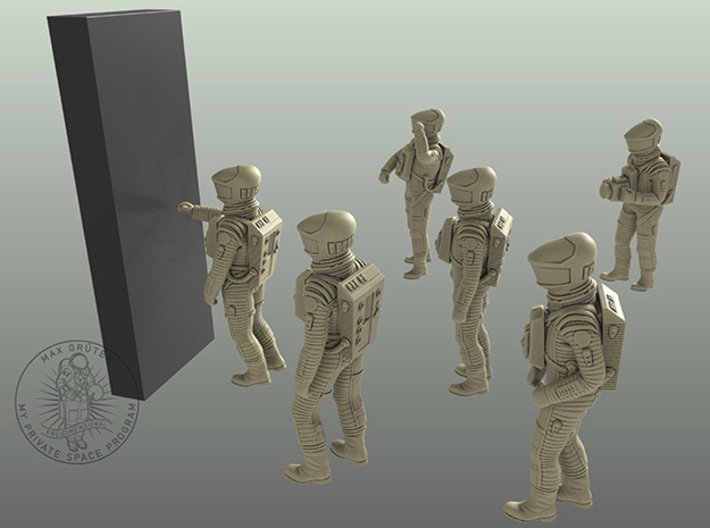
It didn't take me long to discover that there was a whole sprue of parts missing from my kit. I'd bought it off of Ebay, and it turned out to be an open box, but all the parts were in sealed bags, so the issue appeared to be with Moebius. Just in case, I actually purchased a second kit so I wouldn't lose any time on the build, but I still had to wait a few days for the kit to arrive. In the meantime, I thought I'd try out the wireless LEDs to see if they would work well enough with the model. The wireless LED is a very small surface mount LED, glued to the top of a tiny spool, about 5mm tall. the spool is wrapped with copper wire, which are soldered to the leads of the LED. The above was the first lighting experiment. The LEDs were glued into place using rubber cement. The model is sitting on a block to hold it about the right height (landing legs to be added later), and the main coil is directly beneath the sheet of 1/4" MDF board, which will be the base for the model. The blue light was a bit too strong and the red lighting too weak. I originally had 5 blue LEDs in the passenger/cargo section and 2 LEDs in the cockpit. This basically matches the number of light panels in the passenger/cargo section and the two lights in the cockpit ceiling. The lighting of the original film gave everything in the rear cabin a washed out bluish tint, but this is too strong. I've since replaced a couple of the blue LEDs with white ones, so it should tone down the tint a bit. I'm also at least doubling the number of red LEDs in the cockpit. They must have use a strong red light projector in front of the pilots in the movie, because they actually cast a shadow against the back wall. The upped amount of red lighting in the cockpit was much better, but I'll be experimenting with it all for a while. No rush, as the model's a long way to go before I have to make the final decisions. By the way, I found a set of 3D printed lunar astronaut figures on Shapeways.com that are perfect. SF Lunar Set 1- 48 - 1-55 - 1-72 (MWUZ2B6Y9) by MaxGrueter.webloc They're available in 3 scales: 1/72, 1/55, and 1/48. They are very similar to the astronauts on the Discovery, but they have the correct backpacks and front packs for the moon astronauts. The Moebius kit is described as 1/55 scale, so I got the set of 1/55 figures. The figure set includes all six astronauts that went to the TMA-1 excavation site. I'm presuming that 3 were the moonbus passengers, 2 were the moonbus pilot and co-pilot, so one must be working at the station itself. There is a scene in the film with someone watching the moonbus land, and he's not suited up. I'm presuming there's more than one person working at the station, and will go out to greet Doctors Floyd and Halvorsen, and that he will end up being the 6th astronaut in the TMA-1 excavation scene. So, I plan to have one astronaut figure at the edge of the landing pad for the final model display.


- 17 replies
-
- 12
-
-
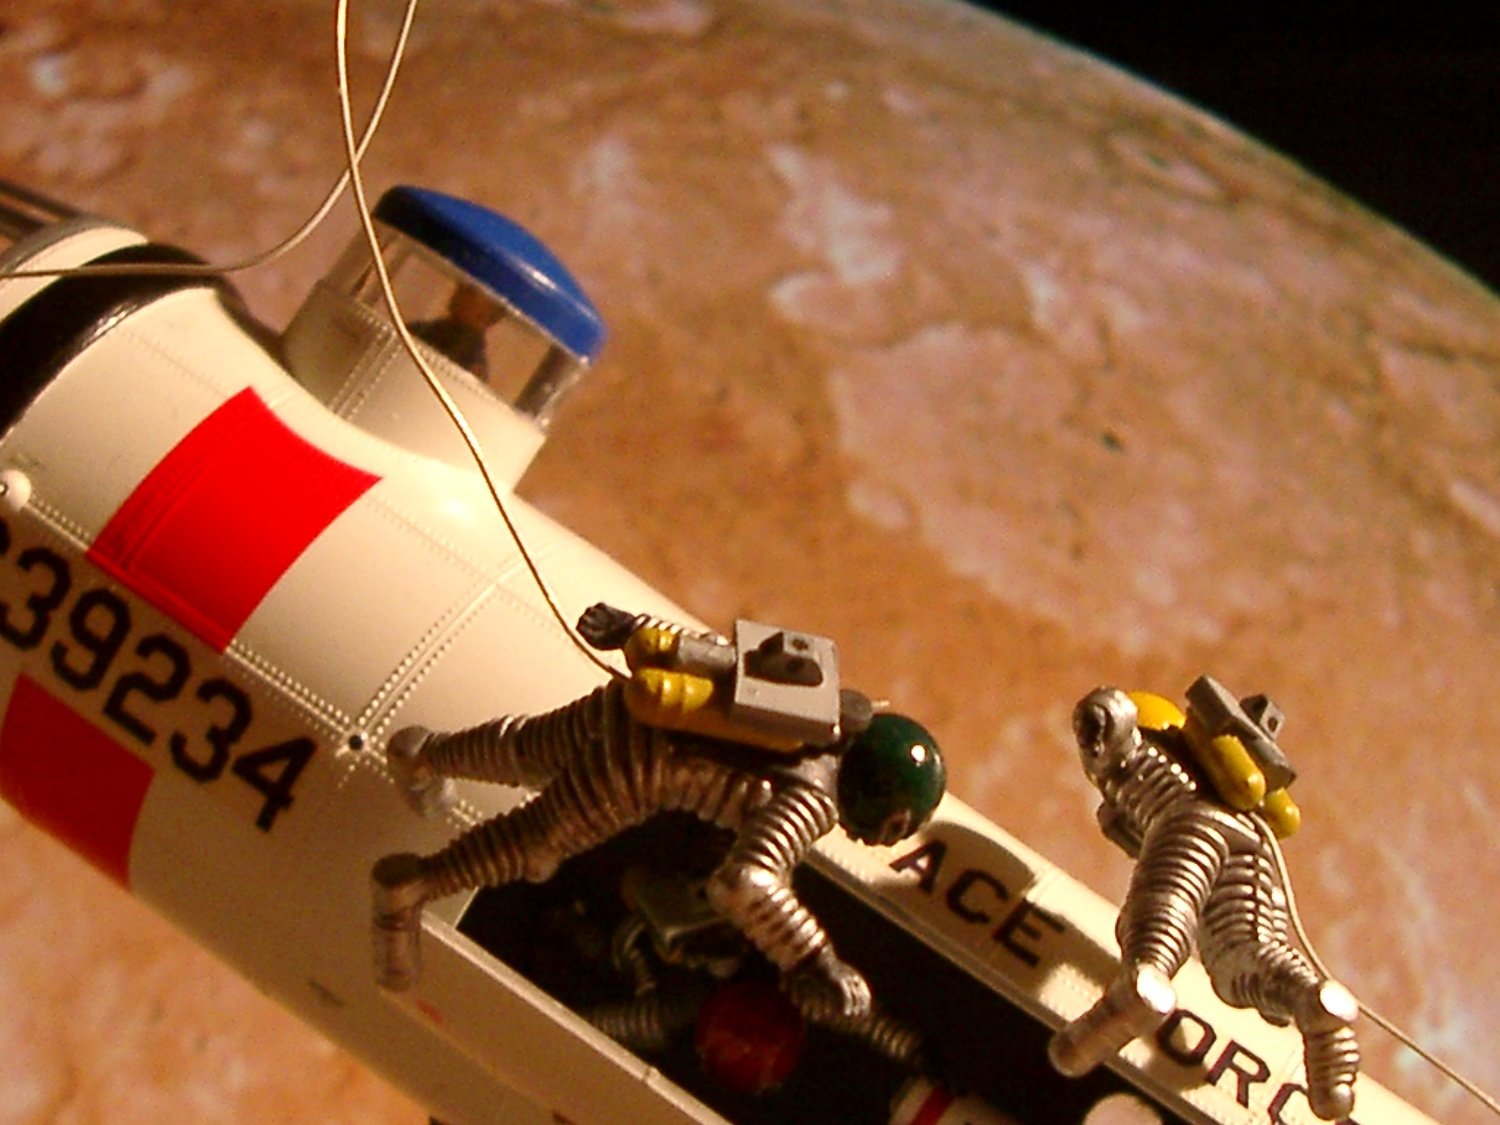
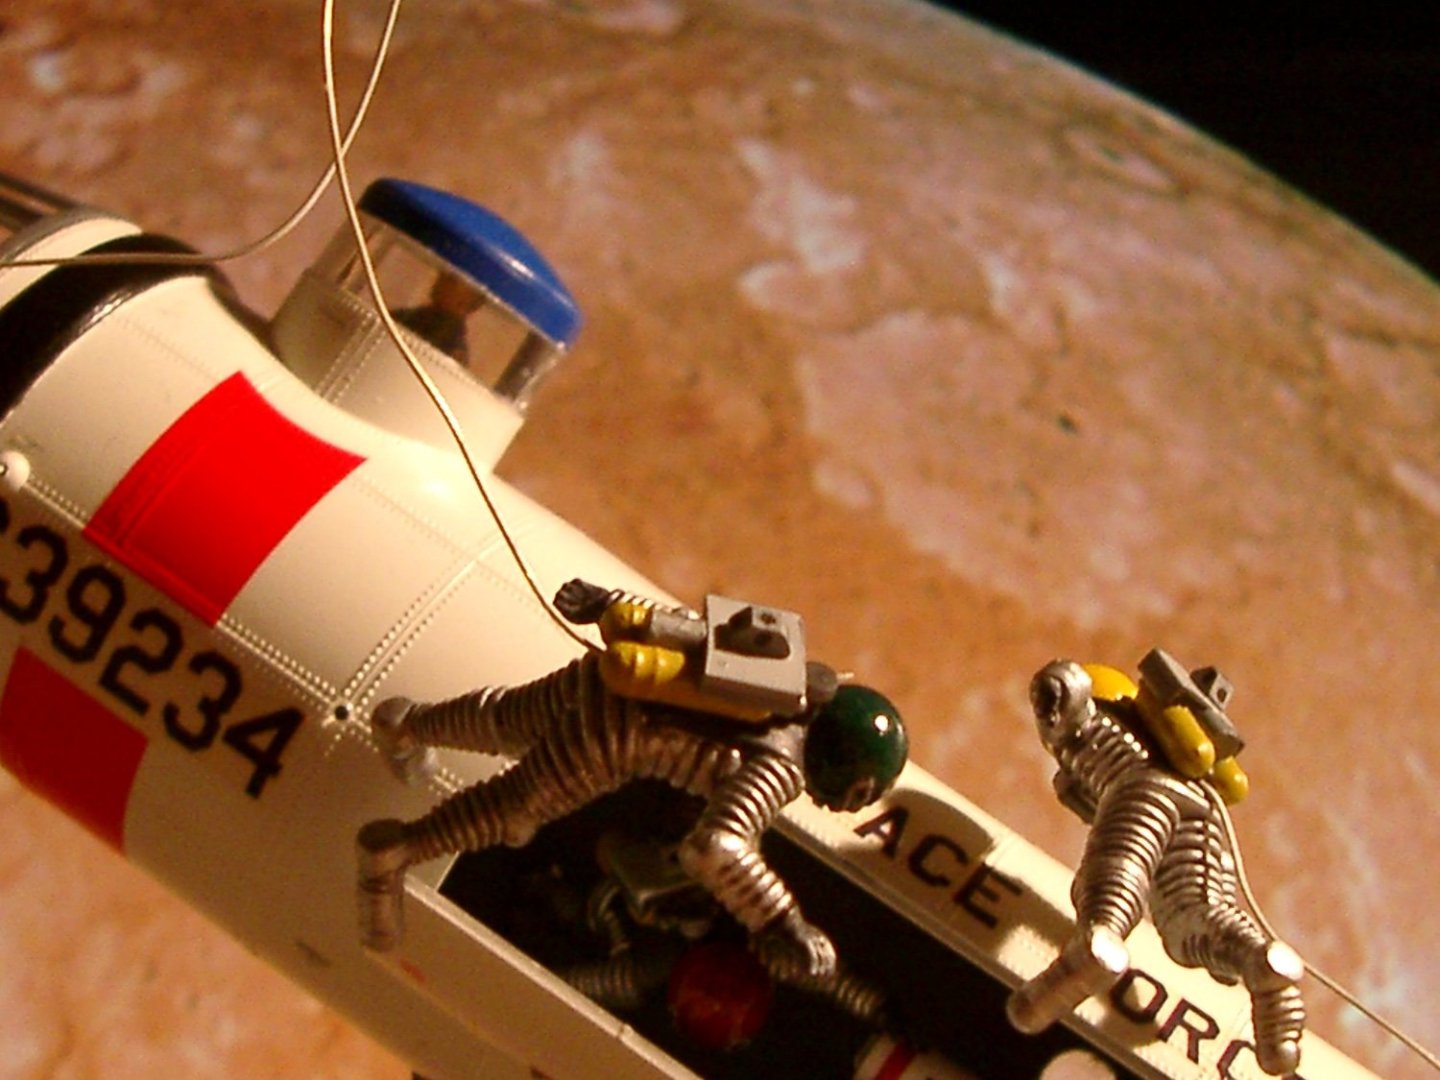
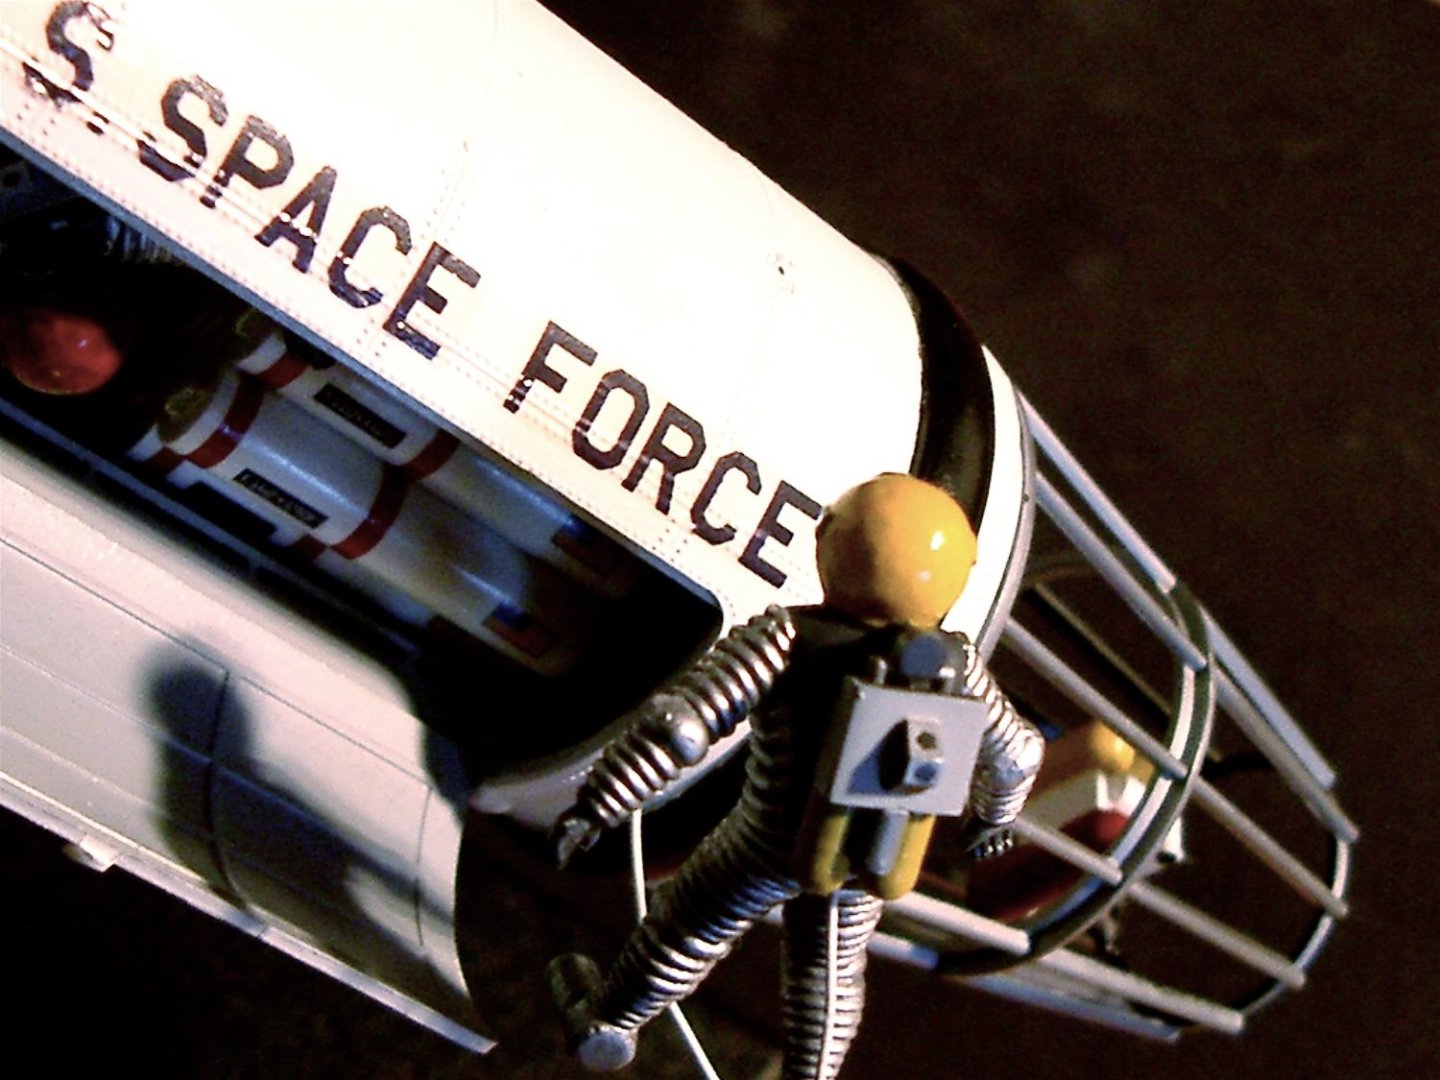
Moonbus from 2001: A Space Odyssey by catopower
catopower replied to catopower's topic in Non-ship/categorised builds
Hi Ron, thanks for coming aboard. This will be my second Moonbus. I remember building quite a few of those old Aurora kits, including the Pan Am Space Clipper, the Lost in Space Robot, and the Flying Sub from Voyage to the Bottom of the Sea. I also recall building the Starship Enterprise and a Klingon Battlecruiser, both of which included internal lighting at the time. One model that stuck in my mind was one I decided to take on again back around 2005. That was the last time I had the plastic kit bug. The model was one of those space concept models and I think it was produced by Monogram. I believe it was originally called the Space Taxi. I built the model and kind of did a little "upgrade" to the cargo bay and cargo and added some lights, but the lights were too dim to be very interesting. Here are a few shots of the model. The first is just the model on the stand I made for it... Oddly enough, modern history has caught up with this model of the craft, operated by the U.S. Space Force! Here's a closeup of the cargo bay, along with my little scratch built cargo modules somewhere in space. Note that I modified the astronauts' back packs to include a small maneuvering thruster. A second astronaut's head is seen peeking out of the cargo bay. Here's a closeup of the Space Taxi operating in Mars orbit... I took other pics of the Space Taxi in orbit around earth, the moon, and Jupiter, but this shot was the best. All were done in front of a large computer screen displaying the appropriate image. That one was a fun project, again, the second of these models that I'd built, the first one built when I was 10 or 11, I believe. I could modify this kit any way I wanted since it was only based on a concept. The Moonbus model is different, since it's based on a film prop. It's been close to 20 years since I touched a plastic kit. How will it go? Test fitting the major components began, and I started rewatching the moonbus scenes of the film repeatedly. I tried watching on the computer, but discovered that the resolution was so much better on the HD TV that I was able to see some small details that I had never noticed before, even though I've seen the film a gazillion times. The first thing I did was to start working on the figures, since figure painting was something I'd always loved doing. Clearly out of practice, but I had to start somewhere. Anyway, since my first kit had an extra parts sprue, which included most of the figures, I went ahead and started experimenting with it. One thing I realized was that I didn't have very many model paints for plastics, so I had to start collecting those again, plus glues, etc. I test fit pieces and painted some parts as best I could, using the paints available to me. They'll all get cleaned up, touched up, or completely redone later. Note the holes in the floor. The kit has 3 rows of seats, but there are only 2 rows in the film, so I removed the front row, to be covered with cargo, etc. I also noticed that those tan color pieces that form the padded inner wall of the moonbus don't look like that in the film, so I started thinking of way to modify that. More on that later. I did have some gray primer, so I began by premiering the interior hull and the floor that you see above. The cockpit floor is supposed to get painted flat black, which this passenger cargo section floor is supposed to be silver, which basically matches the film. Here's an early test fitting of parts... More soon...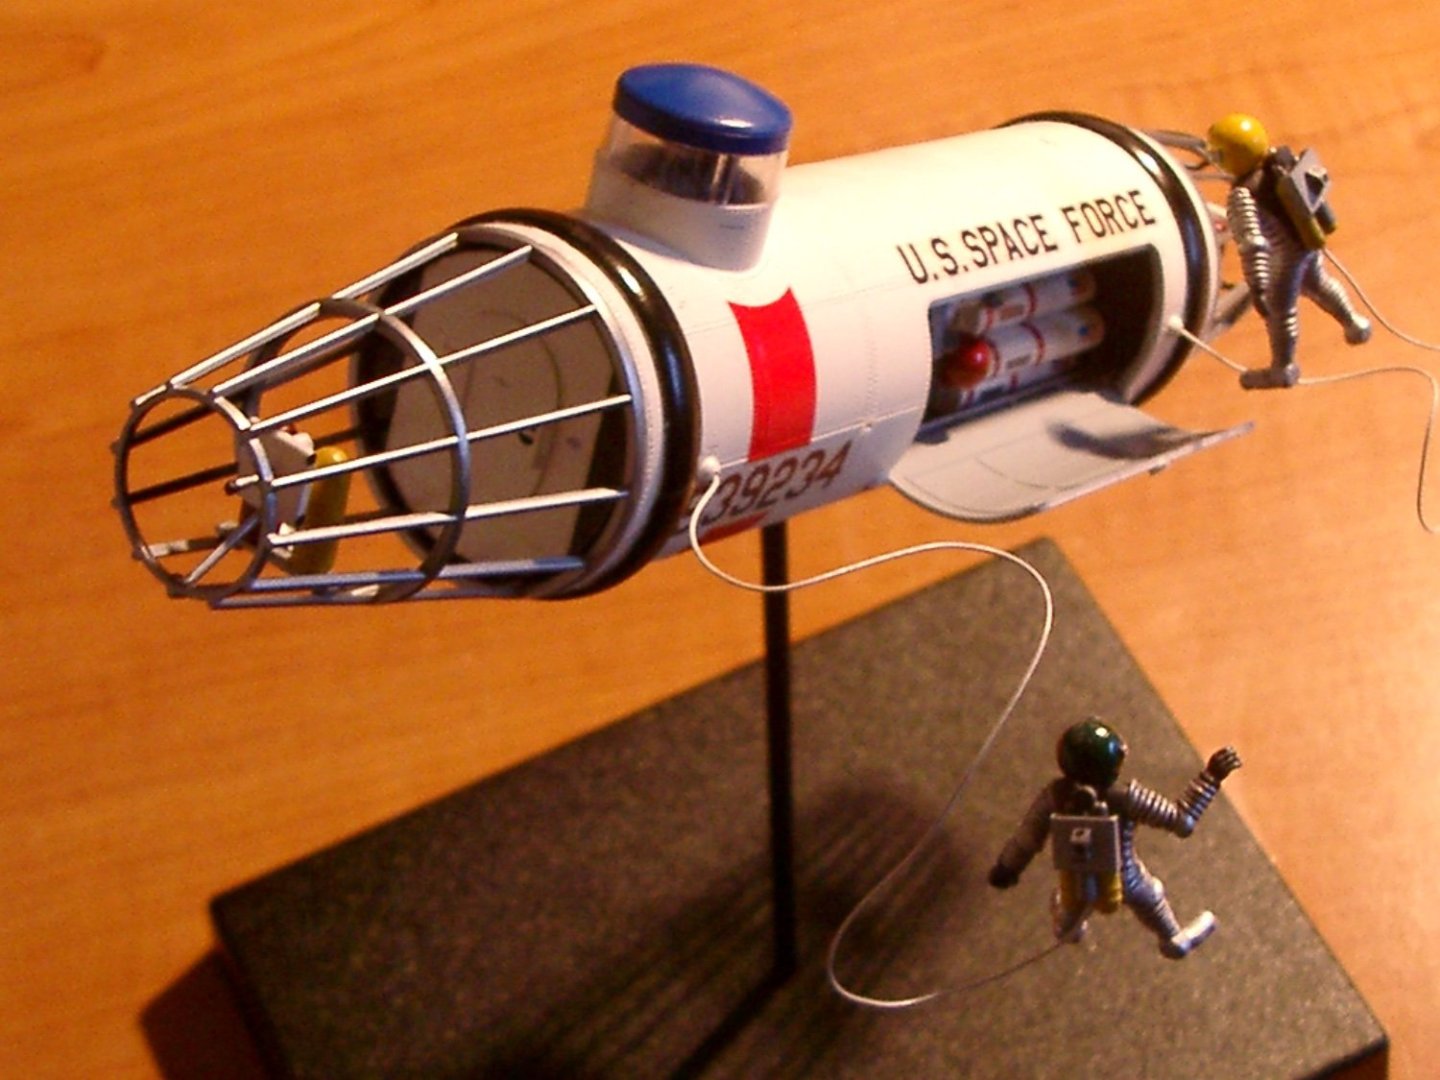


- 17 replies
-
- 12
-
-
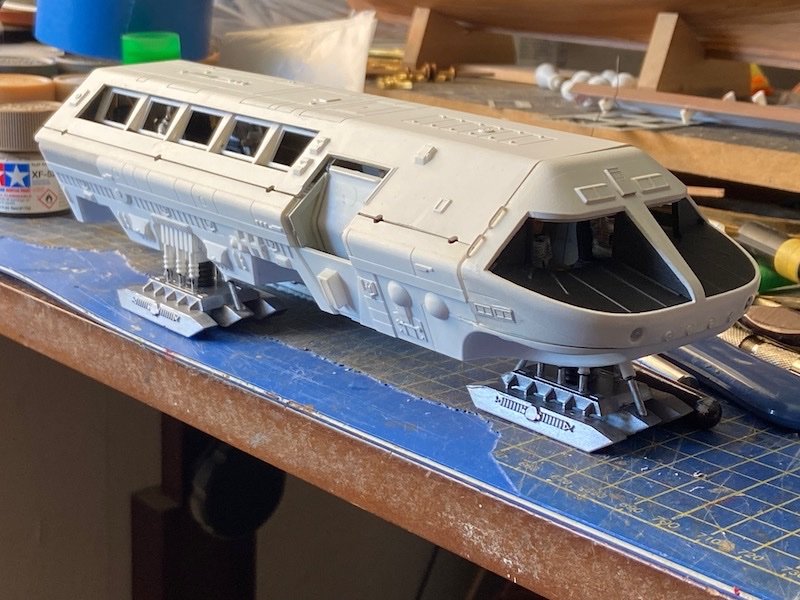
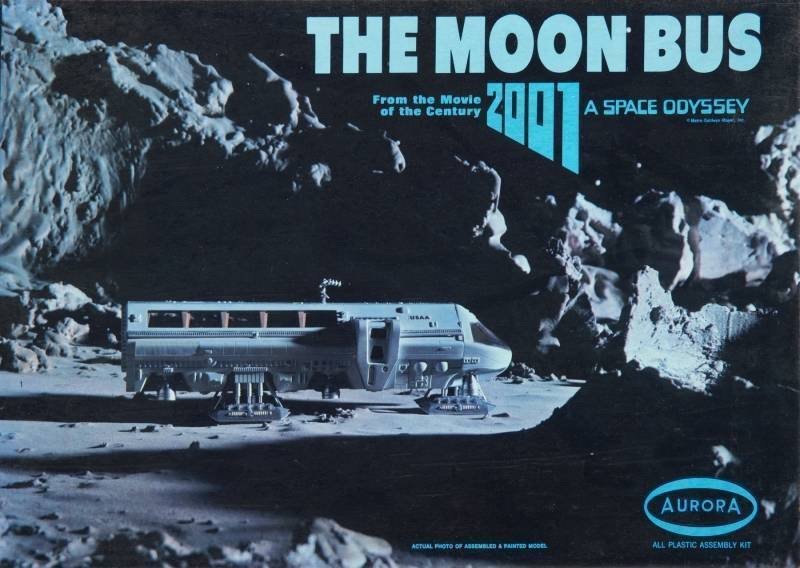
Taking a short break from wooden sailing ship model making, I've ventured back to my days of plastic modeling. The last time I built such a model was close to 20 years ago, when I built a model of a fictional (or should I say, prototype) spacecraft called the Space Taxi. This new project, the Moonbus from 2001: A Space Odyssey, is one that I've been interested in taking on for several years. I built the original Aurora model kit when I was around 10 years old. I was particularly interested in the movie, which my older sister took me to see in the theater, and it made a lifelong impression on me. Fortunately (not so fortunately for my wallet), the model company Polar Lights, and later, Moebius Models, rereleased the kit and created a number of new kits based on the film. I bought the kit on Ebay some time ago, and later picked up add-on items, including an LED lighting kit and photo-etch details set. I've made a lot of progress on the model and it's actually nearly done. When I started the kit, I'd discovered that my kit was missing one whole sprue of parts, having instead an double of another sprue. I took photos and using the contact page on Moebius Models' website and a couple weeks later, I had my replacement parts. However, I didn't think this was going to happen, and I'd found another kit available, so I went ahead and got it. This prevented me from having to pause the build. Below is actually the second kit I bought, to make up for the missing parts of the first kit. You can also see the LED lighting kit I got, produced by VooDooFx, at the bottom right. I ended up not using this kit, opting for some wireless LEDs instead. Below, I'm testing out the wireless LED set that I bought off of Amazon.com. My plan is to mount the large coil into a base. The model will be sitting on the base, putting the LEDs within about 3" of the coil, which is close enough for them to light up. The best part is that I don't need to do any special wiring inside the model. I'm figuring the base will be made as the landing pad at the TMA-1 site. As I said, I'm actually quite far along. I'll post progress photos soon.


- 17 replies
-
- 13
-
-
Love seeing your progress GranpaPhil, it's inspiring. I've had to put my current paper model project on hold for a while, but I'm hoping to start making some progress again soon. In the meantime, I can enjoy watching yours!
-
This is a great beginner book, and it's still actively published today. Even for an experienced ship modeler, I find books like this handy to have around to give to aspiring new ship modelers, looking to tackle their first kit.
-
A little late here, and may be better solutions already mentioned, but Ages of Sail's realistic blocks are same as ME's "beautiful blocks", etc., all from Master Korabel. Most sizes are still available, but supplies are running thin and no word as to when they can be restocked.
-
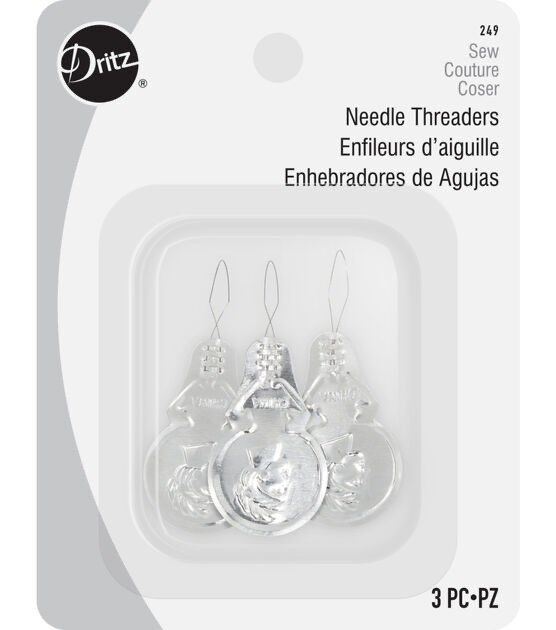
how to work with teeny blocks???
catopower replied to achuck49's topic in Masting, rigging and sails
As Allan suggests, I would try the CA glue on the thread end, turning the end into a needle. He also makes a good point about rigging sizes. Artesania Latina is well known for providing rigging line that's too large in diameter. However, if you need to use it, then you might also try a needle threader. This is a simple, age old tool, used in sewing. You used to be able to buy these for 25 cents each at the corner drug store. Today, you pretty much have to get them in packages of 3 or more from Joann Fabrics or any other store that carries sewing supplies. Just pinch the fine wire end through the hole in the block, run the line through the wire loop, and pull the line back through the hole in the block. Artesania Latina line is usually very soft and puffy. It should squeeze down to fit through the hole in the block, even doubled over. Hope that helps! Clare