jre8655
-
Posts
154 -
Joined
-
Last visited
Content Type
Profiles
Forums
Gallery
Events
Everything posted by jre8655
-
Adam, I've been reading through your build log. I just finished the Model Shipways Bluenose 1:100 scale and have been tying to decide which model to build next. You have inspired me to take up building the Mayflower as my second build. In going over the plans and reading through the assembly manual I've noticed an eyebolt incorporated into the keel just aft of the fore mast. I didn't see that in your photos and don't think I read anything about it in your posts. Do you have any clarification on this piece? I will be following your build and starting my build log shortly. Thanks for helping me decide. I hope I can approach your level of detail.
-
Airbrush results in "fuzz"
jre8655 replied to jmorgan11's topic in Painting, finishing and weathering products and techniques
Typically when painting soft woods you really need to seal the grain with sanding sealer and/or a primer coat. This coat should be applied, sanded, reapplied, then a final sanding. The end result is a very smooth surface to apply your color over. Using an airbrush, you should thin the paint to about a 50/50, paint to water, ratio. Apply a light first coat, let dry, sand with 800 grit, then apply a second coat. This second coat should dry overnight before being lightly sanded. Apply a third coat and you should have a very smooth color finish. This approach has served me very well with several projects. -
That particular site provided me with a great deal of information when I built my Bluenose. I used every photo to help augment the kit and add various parts that were not in the kit or instructions. Get all the photos you can.
-
I believe that the props, as well as other details, have been built into the Bluenose II because of U.S. Coast Guard Regulations. These had to be added in order to receive a seaworthy certification. It's the same situation I saw with the San Salvador that the San Diego Maritime Museum is building. They had to add all the updates to have it certified. I would think that with some kit bashing you could make it look more like the original Bluenose if that's your intention.
-
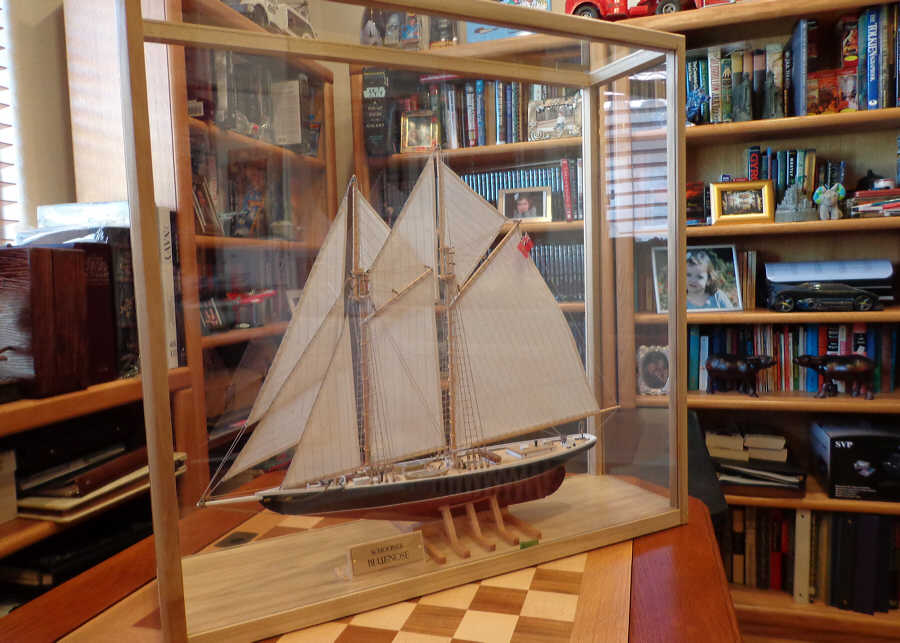
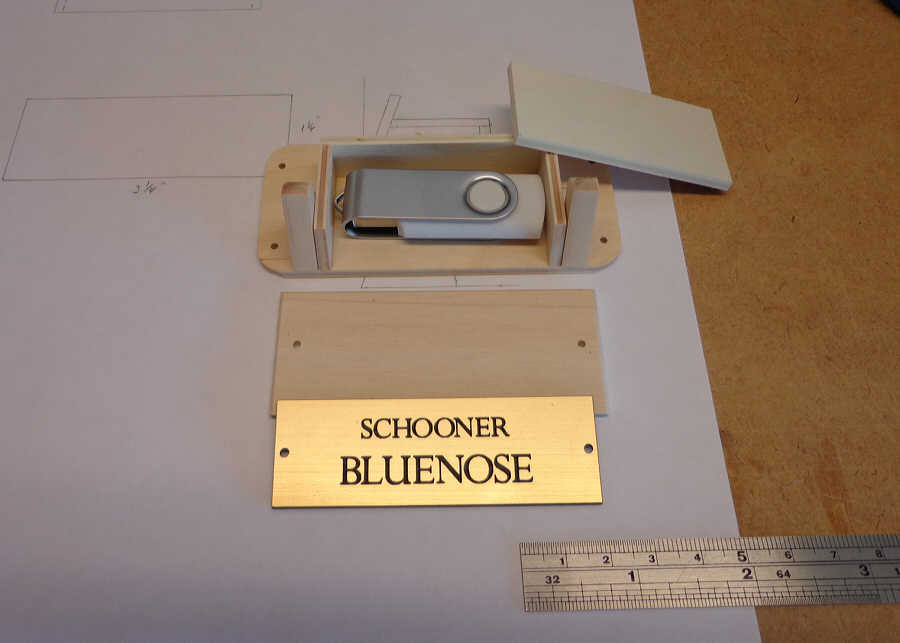
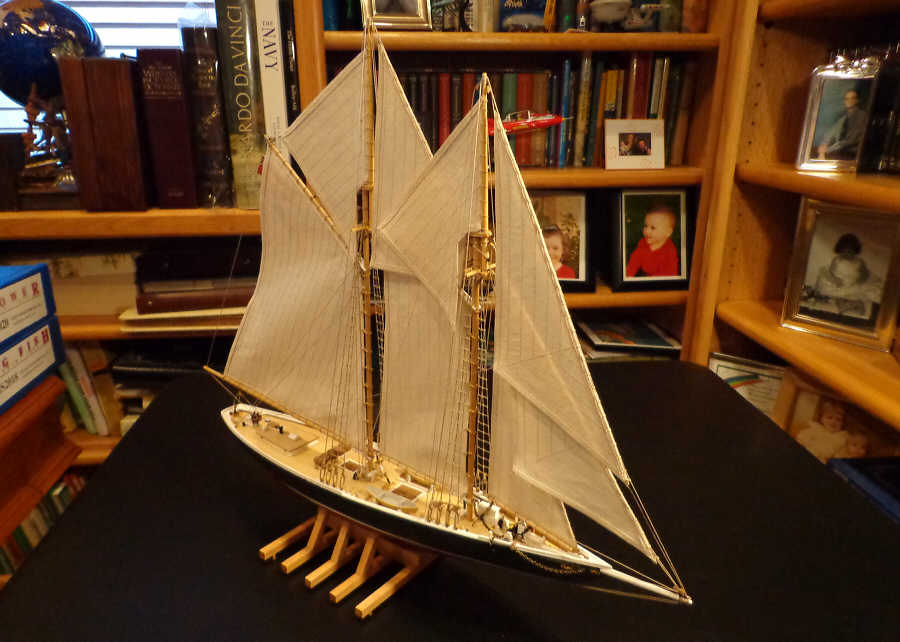
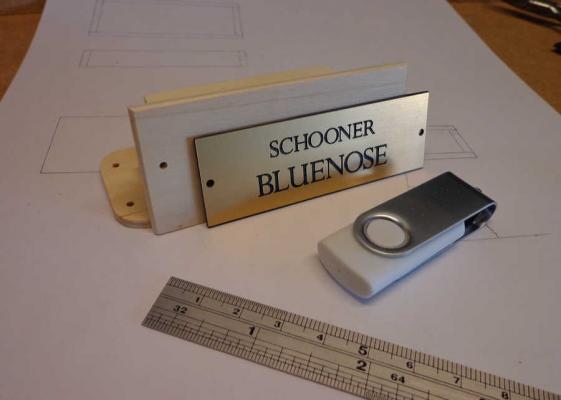
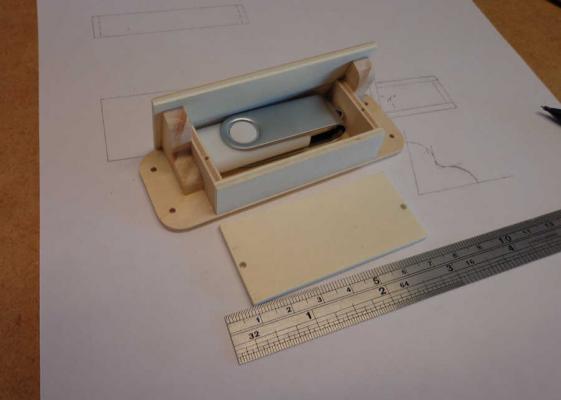
I pretty much have to say that at this point my build of the Bluenose is finished. There is nothing else I can do except put it on the shelf and admire the finished product. All the pieces of the display case were cut at our community woodshop. That kept all the sawdust out of my garage and house. All the parts were tested to see if everything went together as planned. I had to make a small adjustment to the groves in the base, but other than that it went together nicely. Here is the finished build. There really is nothing else to write down. I will post some photos in the Gallery of competed models. Note the nameplate holder. The USB Flash Drive with my complete build log, resource material, and all photos is encased in the box built into the holder.


- 152 replies
-
- 13
-

-
- bluenose
- model shipways
- (and 1 more)
-
The flash drives are inexpensive and available through Amazon. The ones I bought were a 1 GB and were $3 apiece. As far as finding a Canadian to authenticate your Bluenose, it's not mandatory, but fun! My neighbor has been following my build for some time now and even brought his son over to see it. It seems that this is a very well known ship in Canada. Even my neighbor's wife knew about it. I do plan on making a drawing of the nameplate/USB holder for future reference.
-
Welcome aboard! I literally just finished a 1:100 scale model of the Bluenose by Model Shipways. Speaking from the experience I had with that model I'm sure you're going to enjoy building the Bluenose II. I look forward to following your build. Jack
-
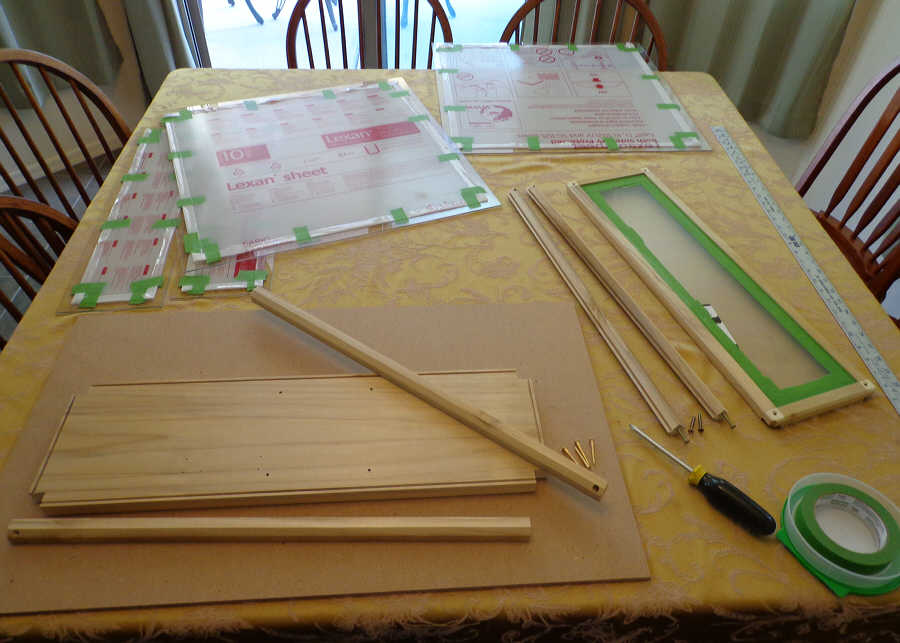
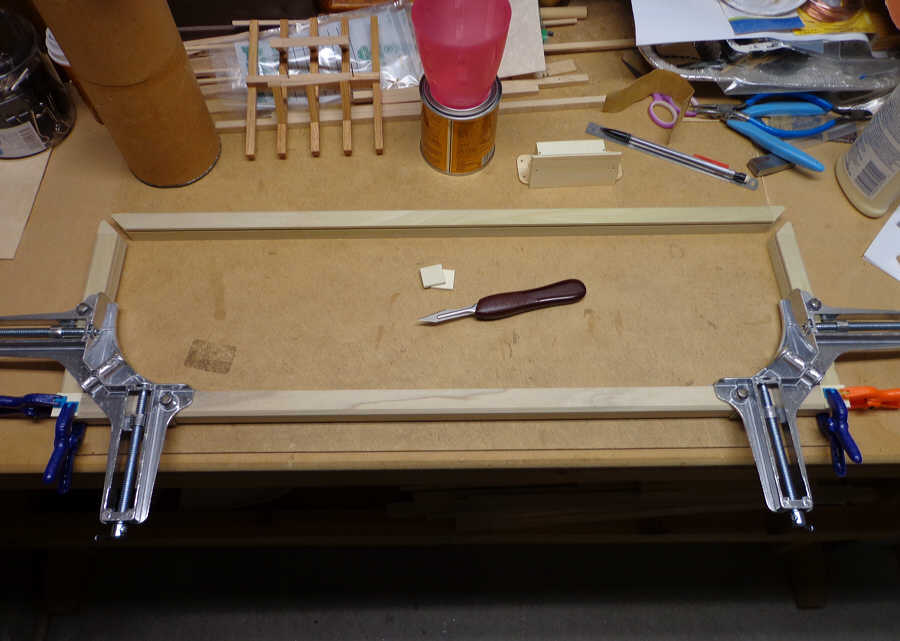
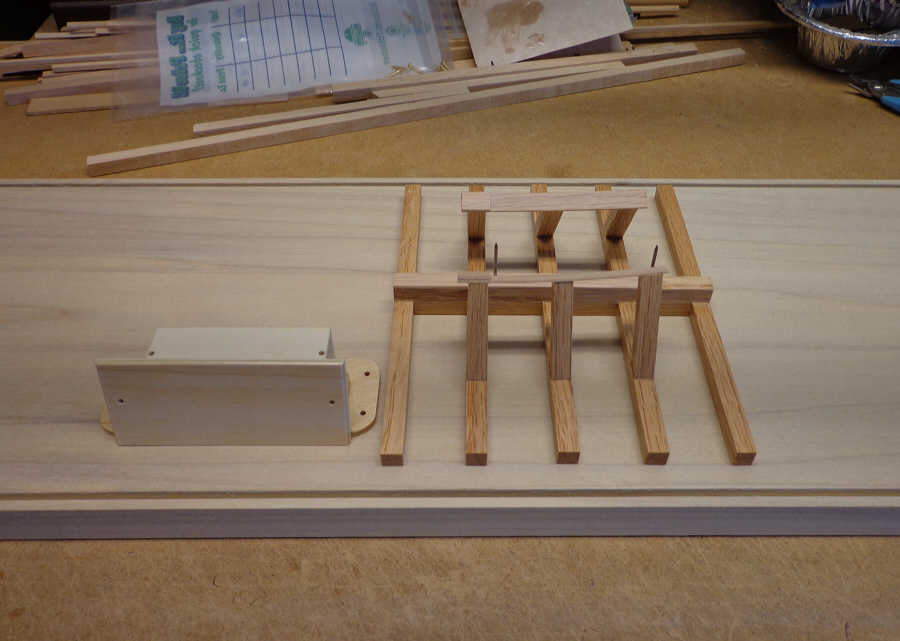
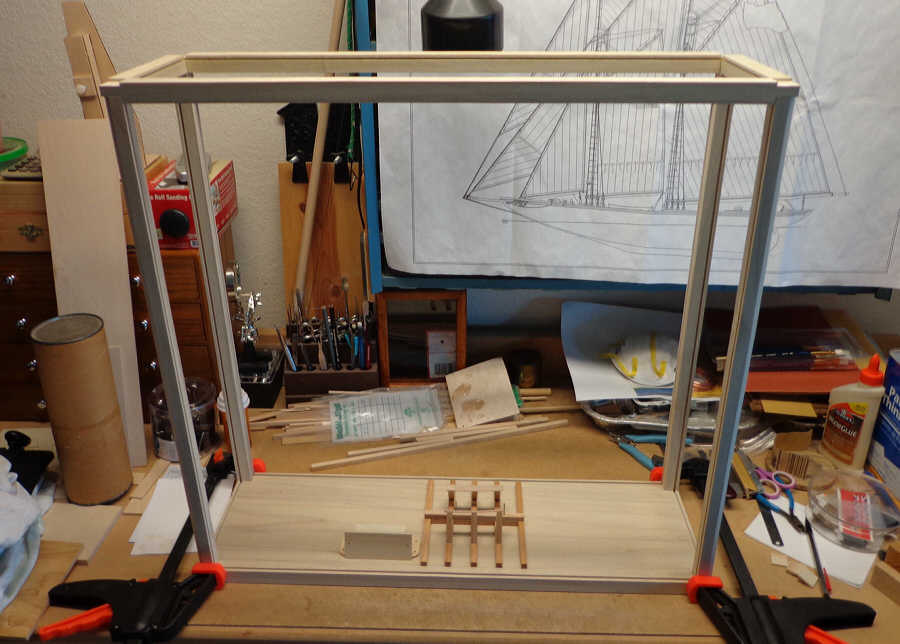
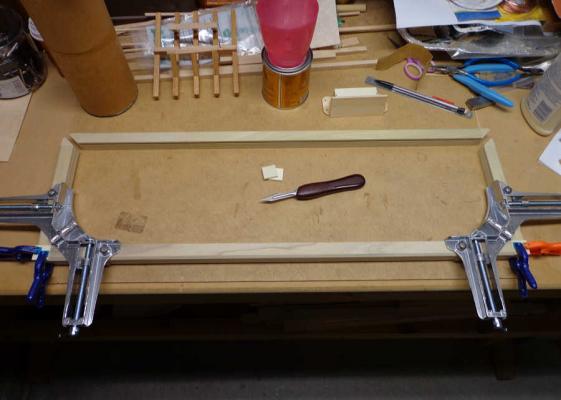
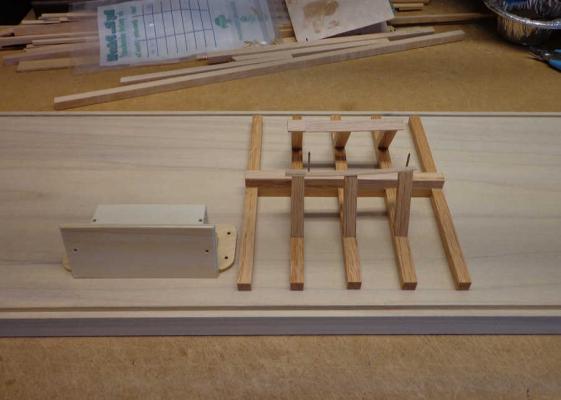
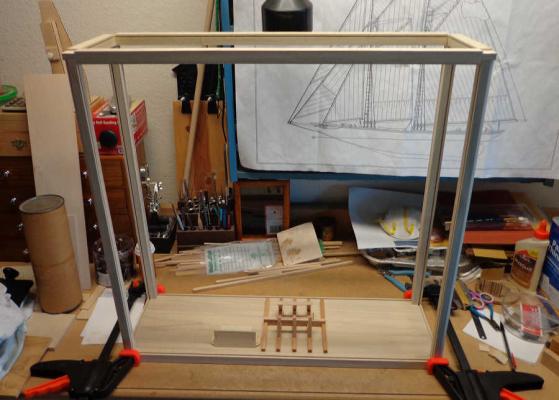
I used the time between building phases to get over to the community woodshop and whack out some lumber for a display case. As Yambo pointed out, I wanted to get her under cover before any dust, or fingerprints from the grandkids, settles on the rigging. I used Poplar for my display case because it was readily available in the sizes I wanted and gives a nice contrast to the darkness of the Bluenose paint scheme. The case is designed to be assembled around the model once it is secured to the base. The corner rails are secured to the base with brass wood screws and the top is then fitted to the corner rails and secured with brass wood screws. I looked into purchasing glass for the display case, but found it to be very cost prohibitive. Regular single strength glass is too fragile and would break very easily and tempered glass is outrageously priced. I discussed the use of various materials with a tech at Lowe’s and finally settled on using 1/8th inch Lexan instead of glass. At least I know it isn’t going to break and it will be indoors and out of the sun so I’m not too concerned about yellowing or clouding. A while back I read a post describing some of the ways various builders put little treasures in their models. As the discussion progressed it was suggested that the build log for the model be somehow incorporated into the display. There were several suggestions including CD ROMs and then the use of a USB Flash Drive that could be encased with the model. I purchased a number of 1 Gigabyte USB Flash Drives through Amazon and then set about designing a combination nameplate holder and USB box. This is my final result. The USB Flash Drive, containing all my photos of the build and the complete build log, will be placed into the box and then the construction will be secured to the Display Case floor with brass screws. Once the model is secured to the base of the display case and the nameplate/USB box is in place I’ll assemble the sides and secure the top. This will finish my build log. My next post will be in the “Gallery of COMPLETED Kit-Built Ship Models” with the finished display case.

- 152 replies
-
- 3
-
-
- bluenose
- model shipways
- (and 1 more)
-
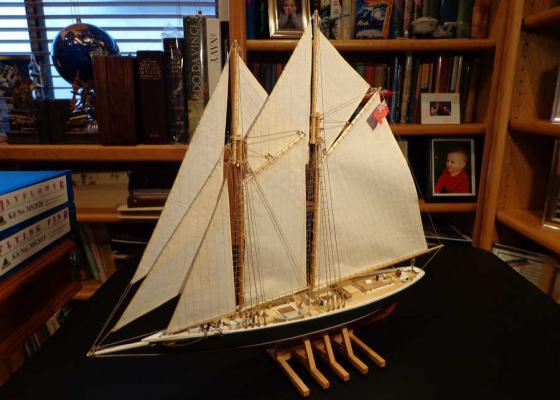
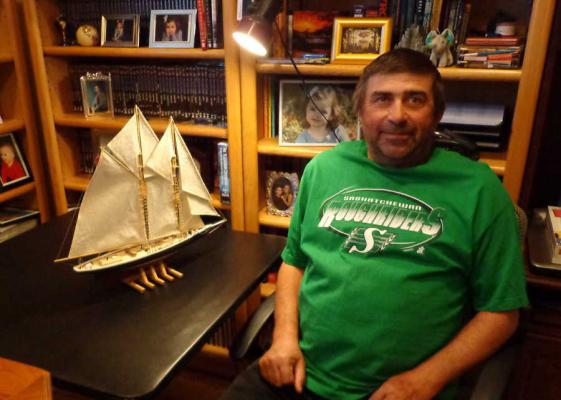
I present, for your inspection and critique, my completed rendition of the Canadian Schooner Bluenose. I tied the last knot at 1730 hour MST this evening. Just to add a bit of authenticity and acquire official approval of the model, I asked my neighbor to come over. He, being from Canada, inspected the model and gave me a thumbs up. From start to finish this has been an adventure. I am very pleased with the Model Shipways Kit and the quality woods and especially the building manual. Granted, there are a number of improvements that can be made to any kit, but overall this is a well thought out product. I’ve learned to bend and shape various woods, sew sails, and above all patience! My next step is to complete the display case and mount the Bluenose. To all of you that have followed this build and provided instruction, and inspiration, I thank you.

- 152 replies
-
- 8
-
-
- bluenose
- model shipways
- (and 1 more)
-
Tying Ratlines is slow and tedious. My assistant seems to have abandoned ship! Using the jigs I constructed, the Ratlines are going in evenly. It’s taken me 10 days to complete the Port Side. I’m switching my jigs over to the Starboard Side now and hopefully will have everything completed within the next week.

- 152 replies
-
- 3
-
-
- bluenose
- model shipways
- (and 1 more)
-
The time has come for the tedious part of the build. The Ratlines! This is probably going to take me longer than I am anticipating, but I want to make sure that at this stage of the build I don’t do something that is going to detract from the overall appearance of the model and I sure don’t want to damage any of the other structures or rigging. I used the jigs I made for the Deadeyes and glued a horizontal guide to them to provide uniform spacing for the Ratlines. I did a little research, both here in the forum and in two of Lennarth Petersson’s books on rigging, to get an idea of just how to properly tie the Ratlines. I have also secured the expertise of a Ratline expert. He assures me that he is the one that put the “Rat” in Ratline.

- 152 replies
-
- 6
-
-
- bluenose
- model shipways
- (and 1 more)
-
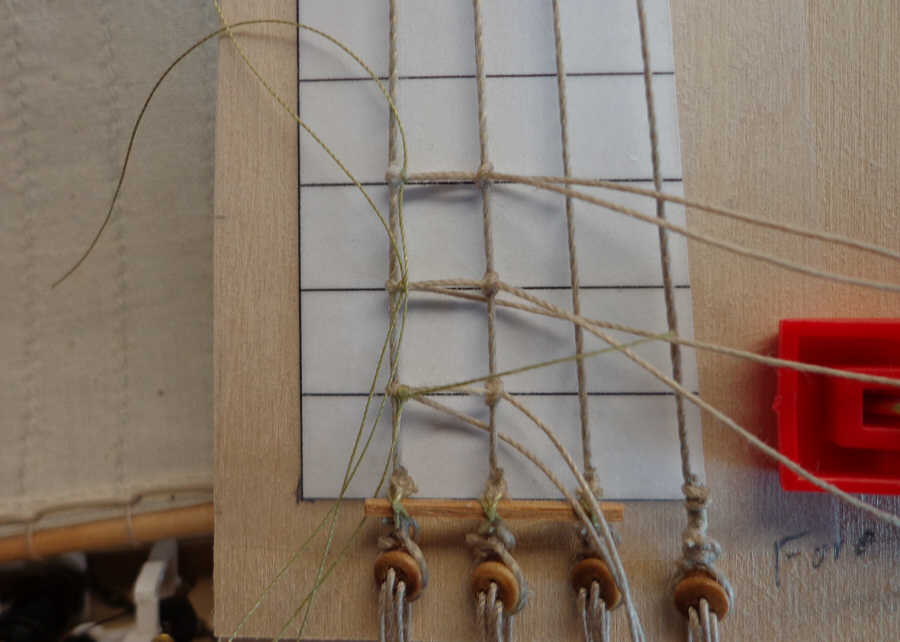
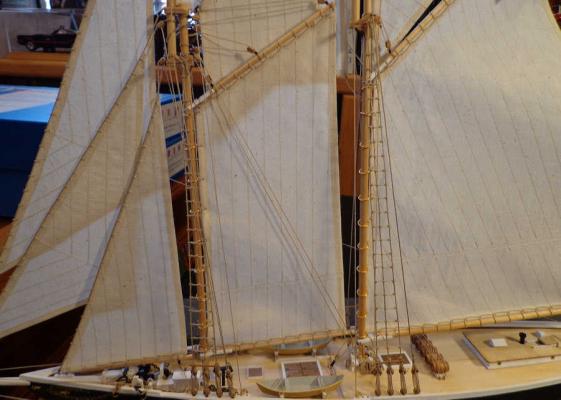
Using the jig I made, I rigged all the Shrouds on the Post Side to the Deadeyes. It wasn’t as difficult as I originally thought; especially with everything held in place with the jig. Once I had the Port Side Deadeyes seized to the Shrouds I removed the jig and lashed the Deadeyes. I’ve moved the jigs to the Starboard Side. The way I made the jigs, all I had to do was flip the pieces over and they fit. I’ll begin seizing the Starboard Side Shrouds today. One thing I noticed was that as I’m getting very close to finishing the Bluenose now, I have to really slow myself down to make sure I don’t rush these last few building steps and destroy some of the underlying work.


- 152 replies
-
- 1
-
-
- bluenose
- model shipways
- (and 1 more)
-
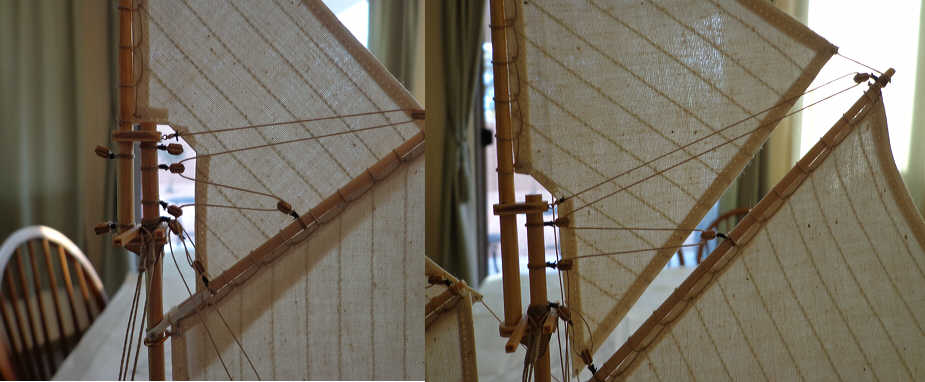
All the running rigging is now complete. I added rope coils to every belayed line to give it a touch of realism. Now it’s on to the standing rigging. I needed some way to hold the Deadeyes in place while seizing the shrouds. Came up with an idea for a set of jigs to help me. Using 3mm and 5mm thicknesses of Basswood I constructed two jigs to help hold the Deadeyes in place. One for the Fore Mast and one for the Main Mast. A closer look at the Fore Mast Jig: I pinned the Deadeyes to the 5mm Basswood and clamped the upper section of the jig to hold everything in place. Had to use two pins to keep the Deadeyes from rolling while being seized. With everything in place I began the seizing process. Once I have the Port Side finished I will flip the jigs and repeat the process on the Starboard Side.


- 152 replies
-
- 1
-
-
- bluenose
- model shipways
- (and 1 more)
-
The Admiral says that is not official; I’m insane! I finished belaying all the running rigging. Looks nice, but not realistic enough. I remembered reading a post some time ago concerning the coiling and securing of ropes. I found it and set about trying to add coiled lines to the model. Like I said, when the Admiral saw what I was doing she said I’m out of my mind. Toward the stern there just isn’t enough clearance between the pin rail and the deck to allow for a hanging coil. I’ll have to come up with something; maybe just place a rounded coil over the Belaying Pin.

- 152 replies
-
- 3
-
-
- bluenose
- model shipways
- (and 1 more)
-
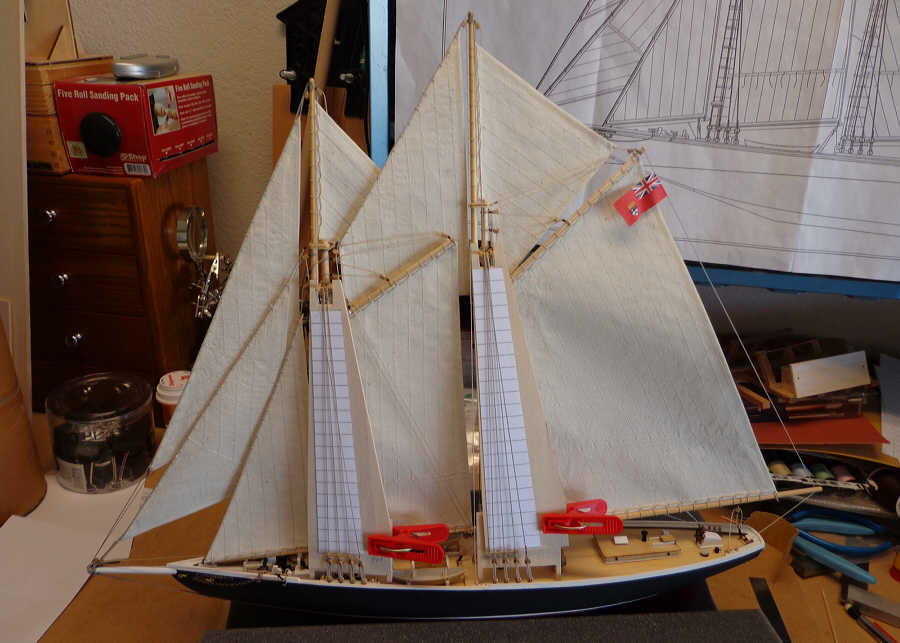
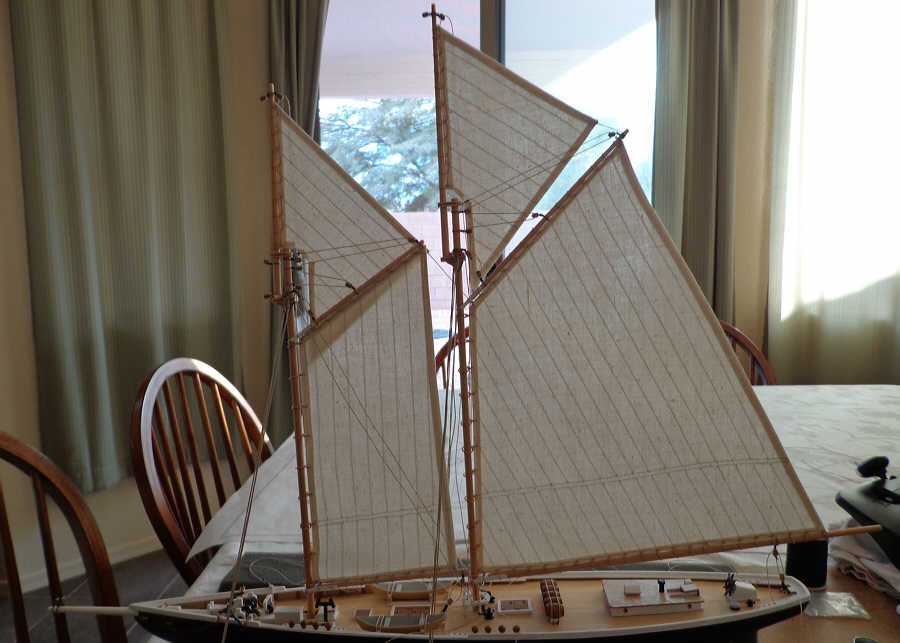
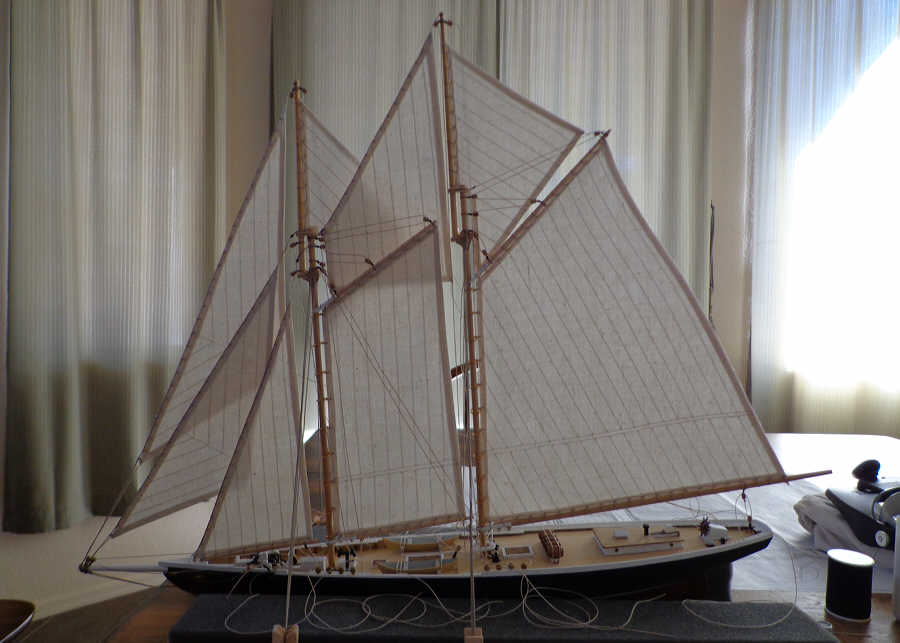
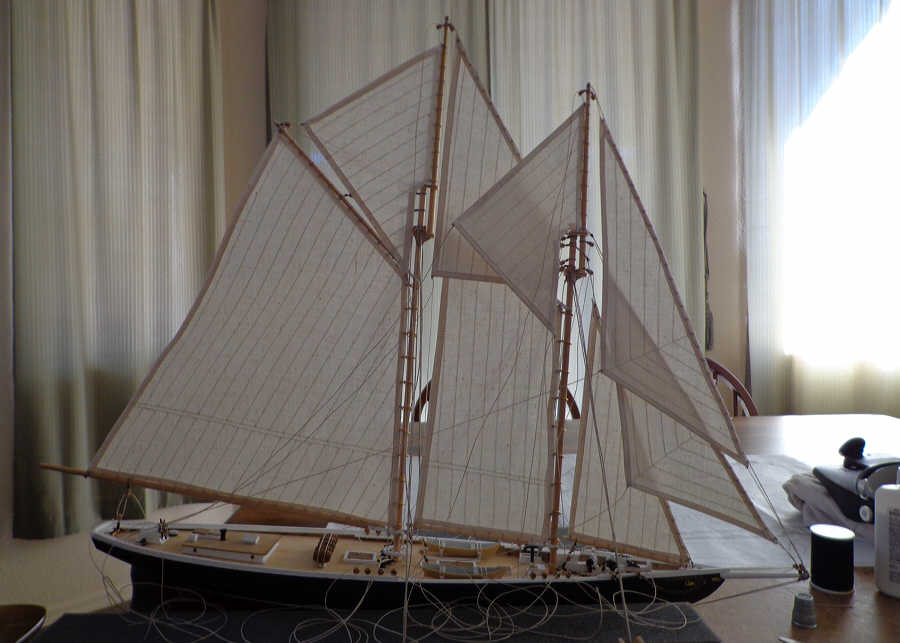
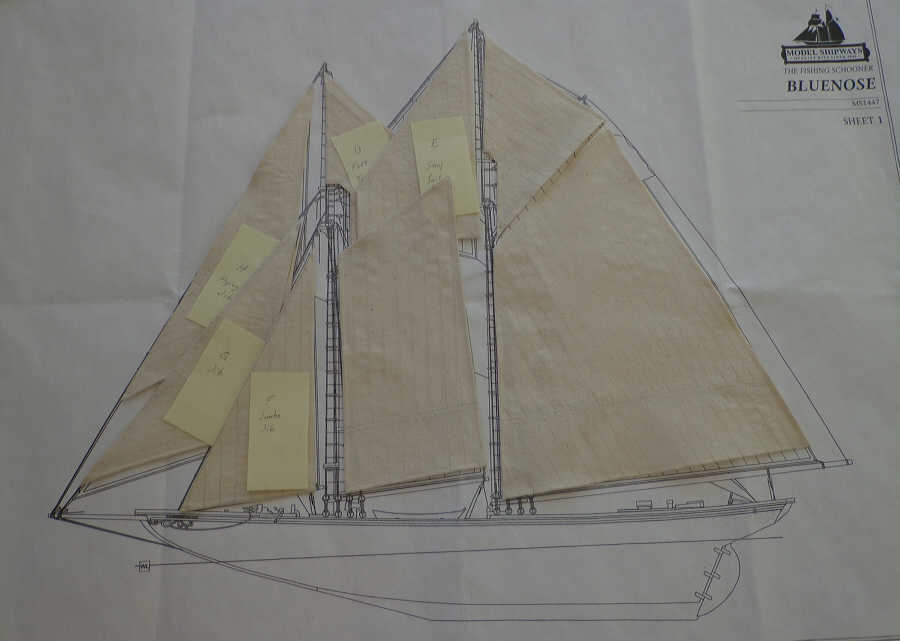
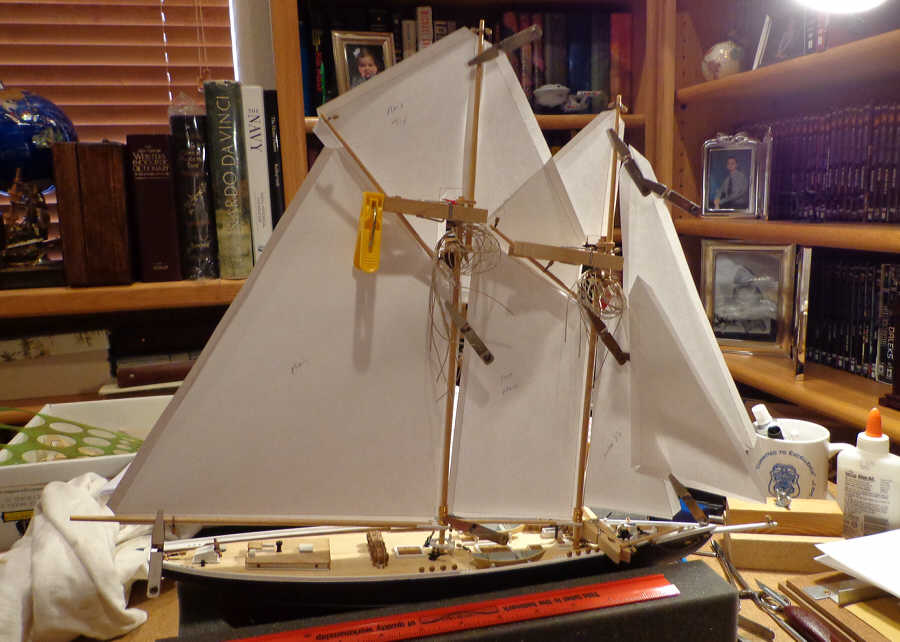
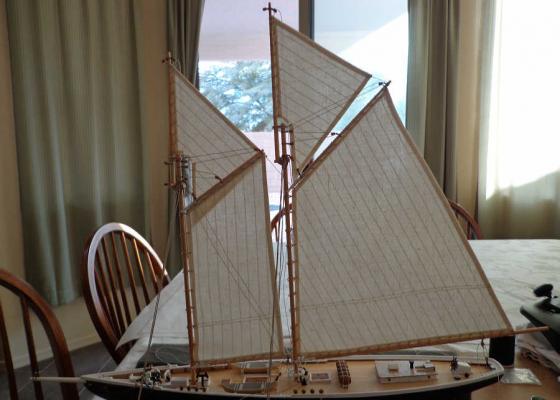
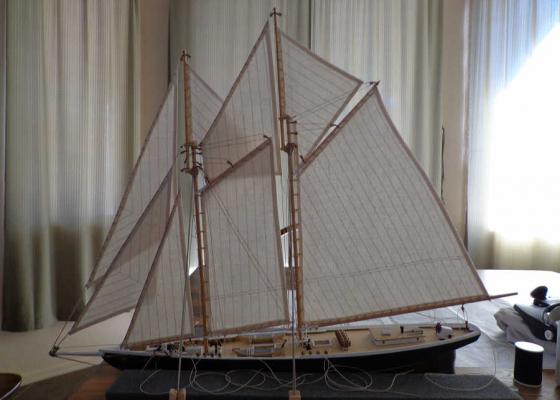
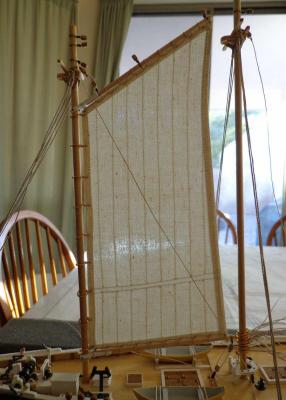
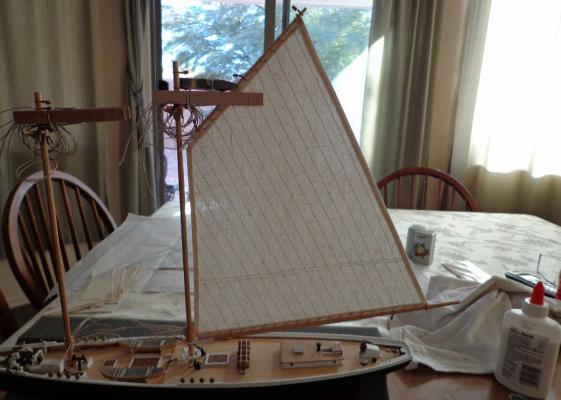
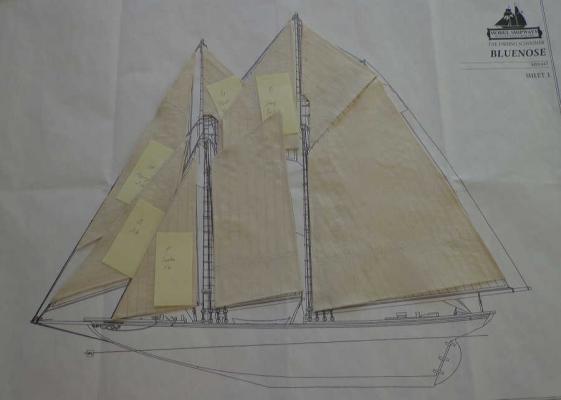
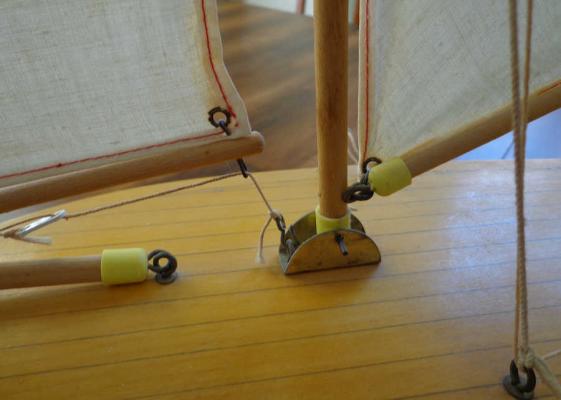
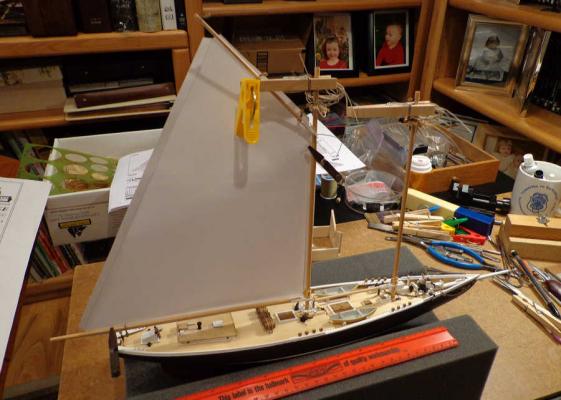
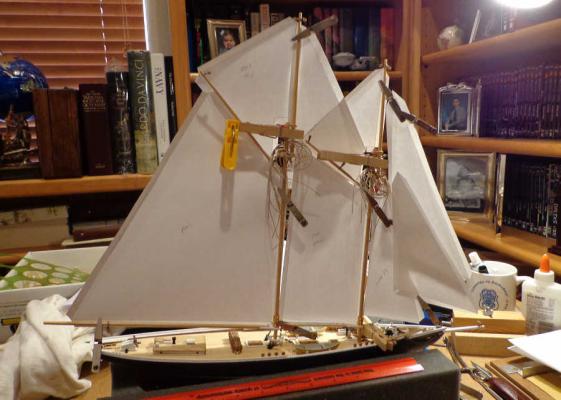
I present, for your perusal, my Schooner Bluenose with a full set of sails. After attaching the Fore Sail, I rigged up the Main Sail, and then added the Fore Top and the Main Top Sails. At this point I was able to rig the two Gaffs. With the top masts in place, it allowed me to proceed to the Stay Sail then add the three Jib Sails. Port Side: Starboard Side: < All the running rigging is in place and routed to their respective belaying points. I now have to install the Belaying Pins, tie off the various lines, and add rope coils. The Admiral was looking over my shoulder while I was finishing up the Bow Sprit and asked if the model was finished. It took a little while to explain that I still have belay all the running rigging the lash the Deadeyes to the standing rigging and tie the ratlines. There’s still a bit of building yet.

- 152 replies
-
- 8
-
-
- bluenose
- model shipways
- (and 1 more)
-
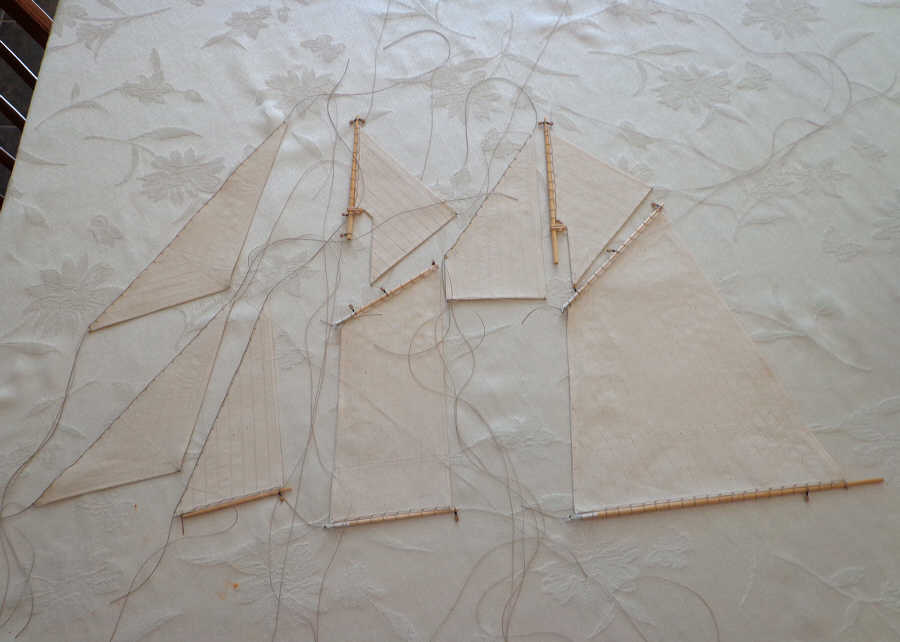
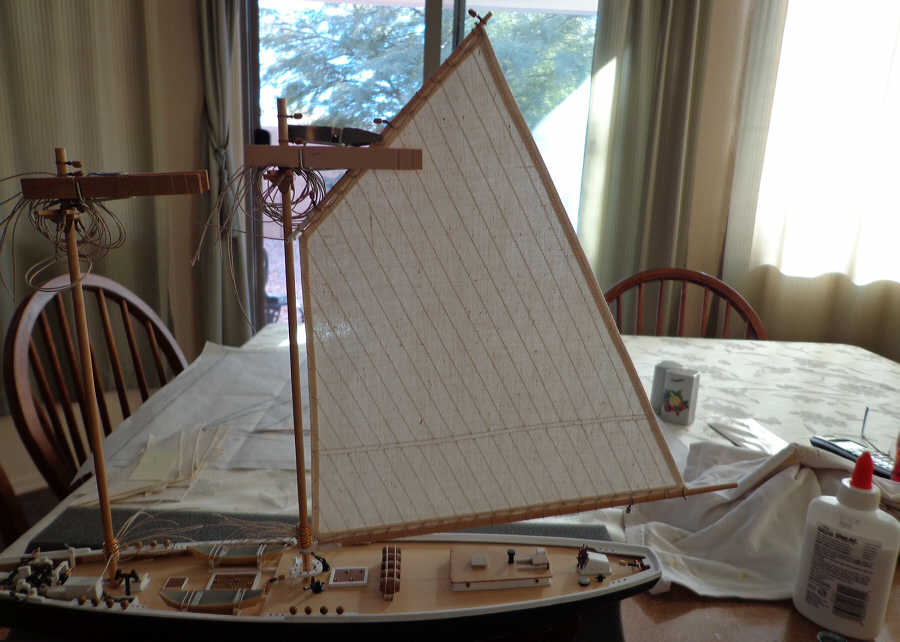
I’ve attached all the standing and running rigging to the sails and am ready to begin attaching the sails to the model. I opted to begin with the Fore Sail. It just seemed to me that this was the logical sail to start with because I have to get in pretty close to tie the Mast Hoops to the sail. Looks like it’s all coming together. At least this one. All in all, it took the better part of two hours to get this sail in place. I’ll move on to the Main Sail next.

- 152 replies
-
- 6
-
-
- bluenose
- model shipways
- (and 1 more)
-
Dave, Hey, it was your idea that saved my bacon on the Mast Hoops! I have been keeping my friend up on this build and she was surprised at the hem preparation technique. She said she was going to try it on some small project of her own.
-
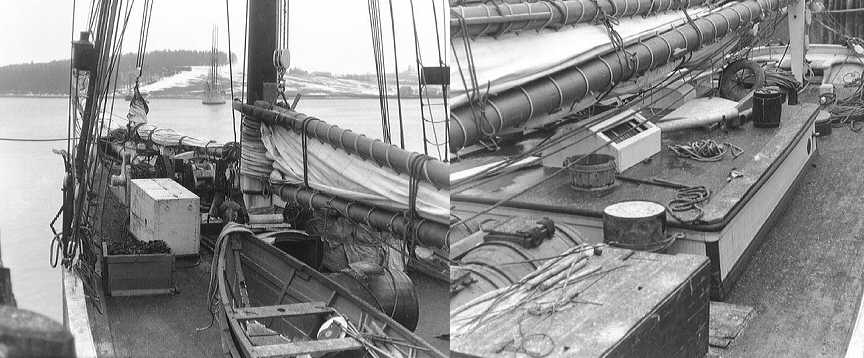
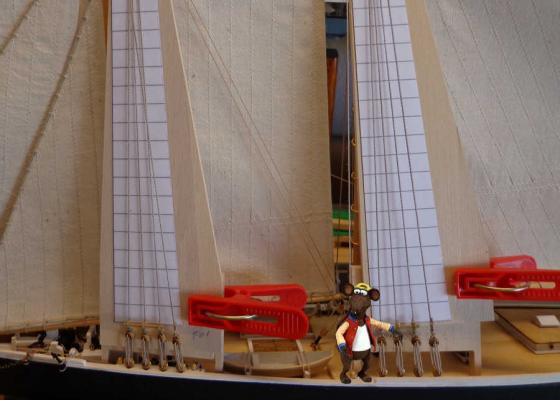
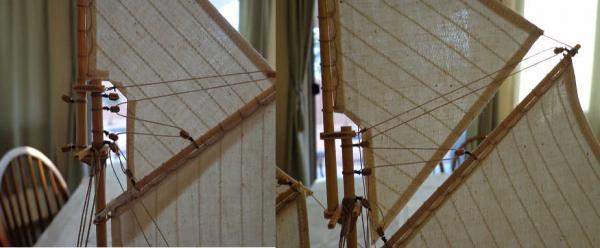
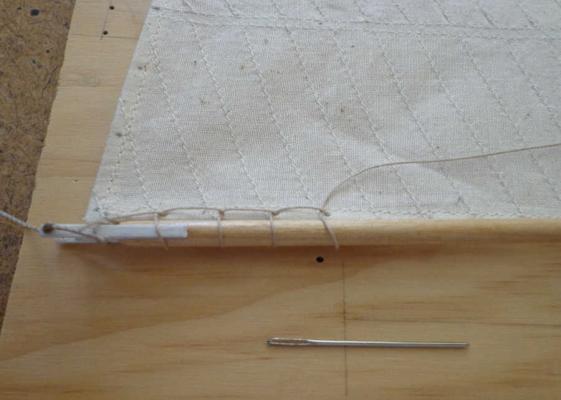
I began the rigging process yesterday. I began by lashing the Main and Fore Sails to their respective booms and gaffs. The instructions and plans show the Main and Fore Sails lashed to the gaffs, but are secured to the booms only at the corners. Looking at the photos of the actual Bluenose it shows that these sails were lashed along the entire boom. I decided to lash my sails to the booms and gaffs, but opted for a running stitch. Using a Tapestry Needle gave me enough of an eye in the needle to use 0.25mm rigging line. The running stitch also allowed me to adjust the tension on the lashing for a uniform appearance. I used the same running stitch for the Fore Sail. Because I already had the Mast Hoops in place I used a method described by Dave Borgens back in August. His method uses a simple cow hitch to secure the line on the Mast Hoop then running these lines through the sail to secure it to the Mast Hoop. Couldn’t wait to see how the Main Sail looked on the model. Now it’s just a matter of securing the appropriate rigging lines to the other sails.

- 152 replies
-
- 12
-
-
- bluenose
- model shipways
- (and 1 more)
-
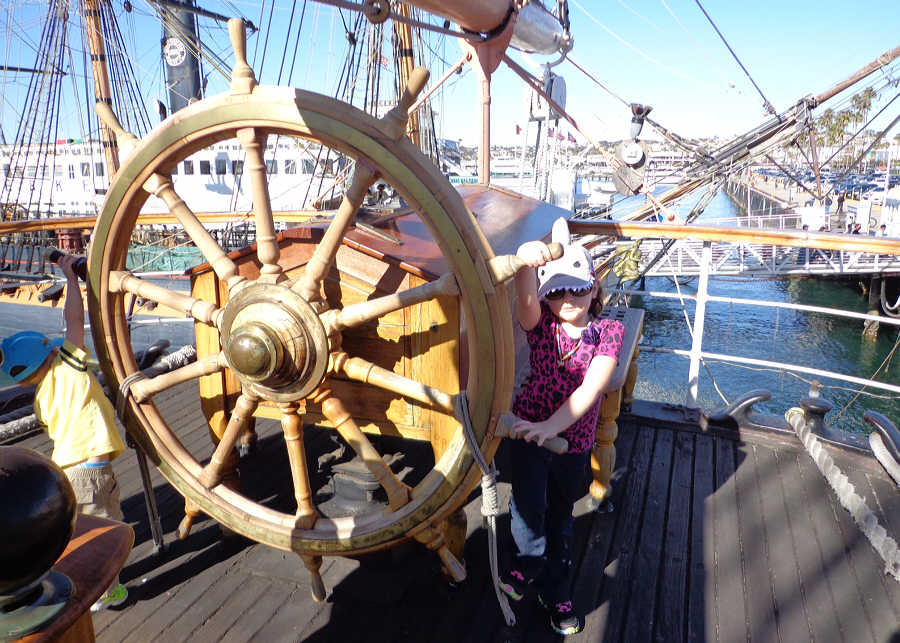
Our San Diego vacation has produced what I can only hope is a future ship modeler:

- 152 replies
-
- 4
-
-
- bluenose
- model shipways
- (and 1 more)
-
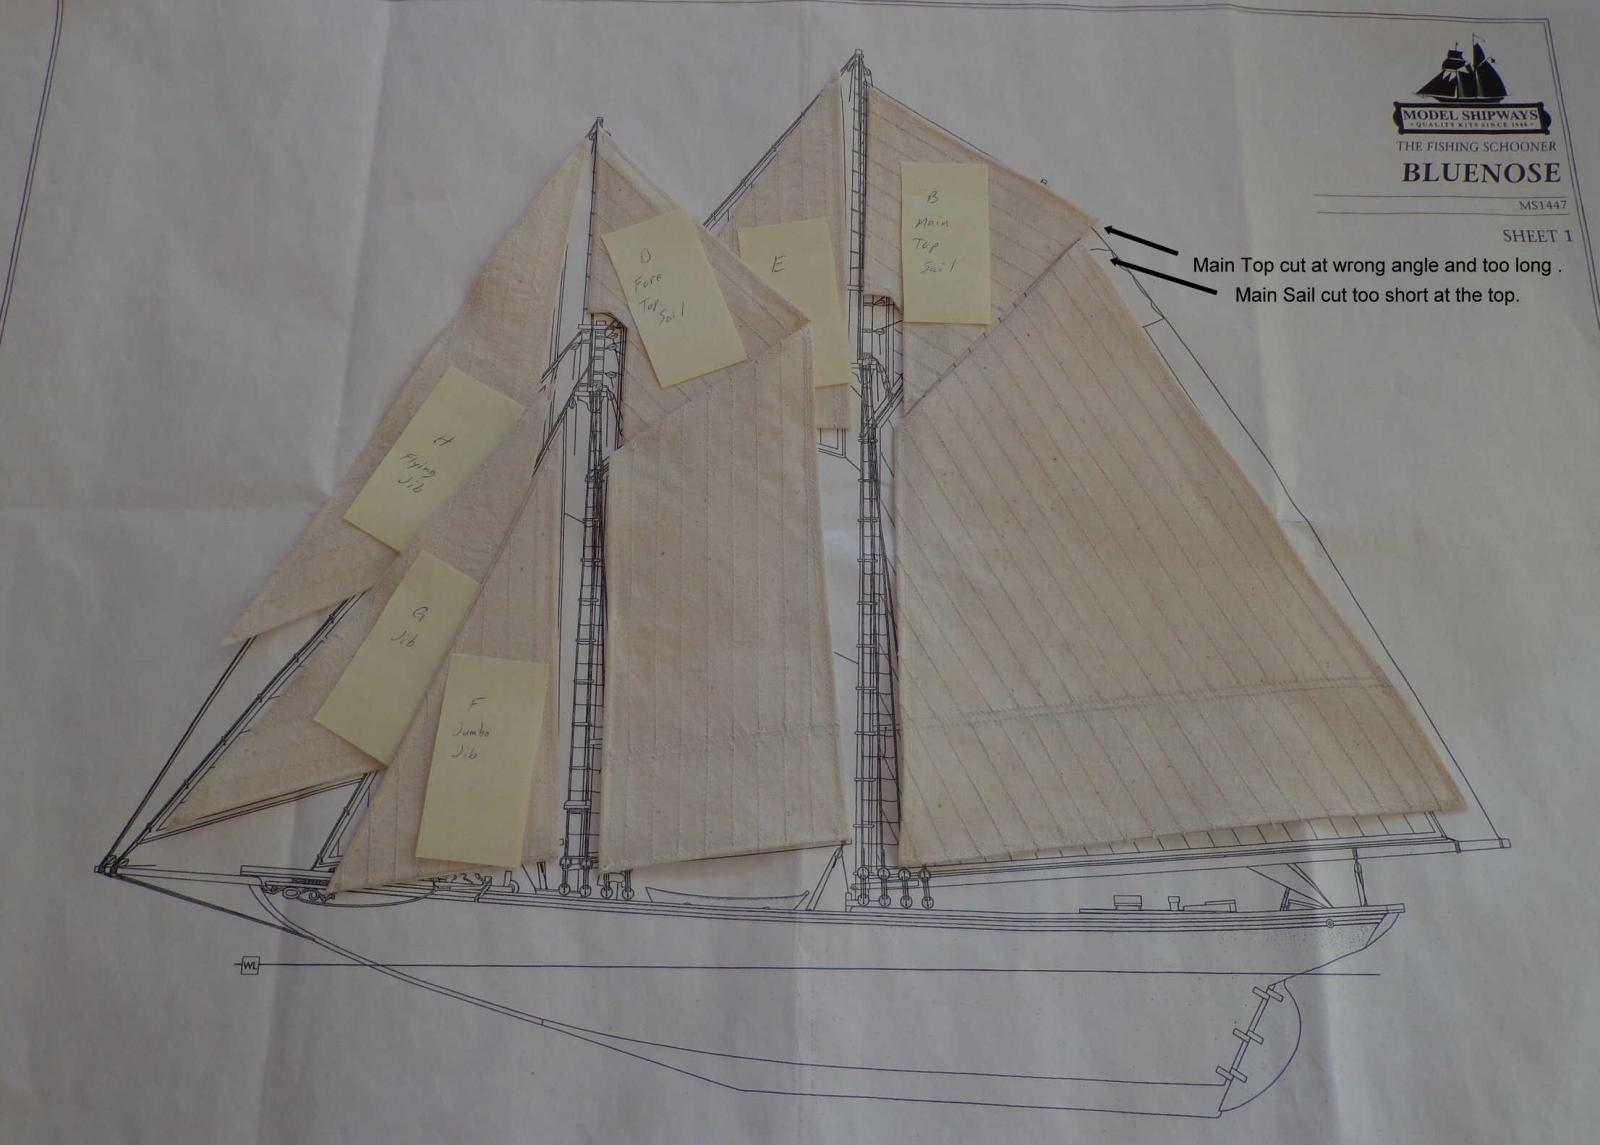
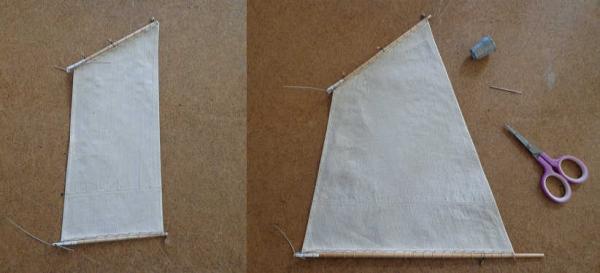
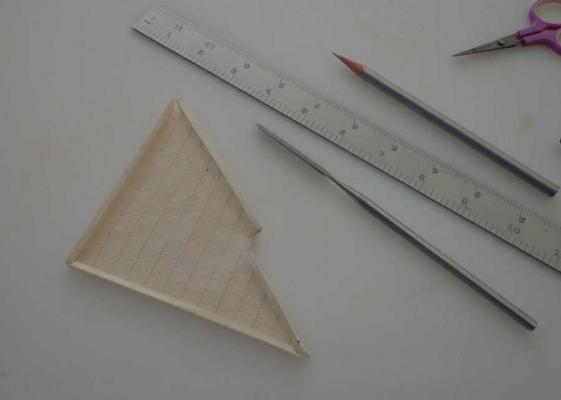
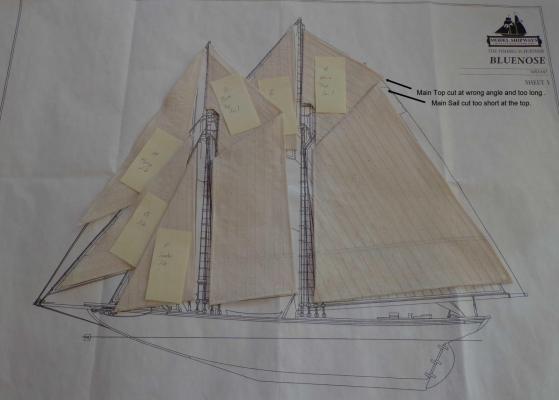
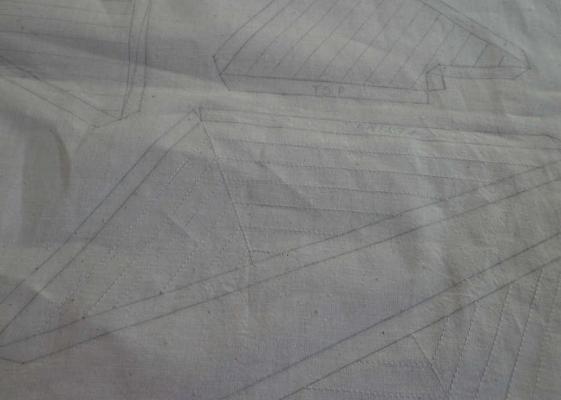
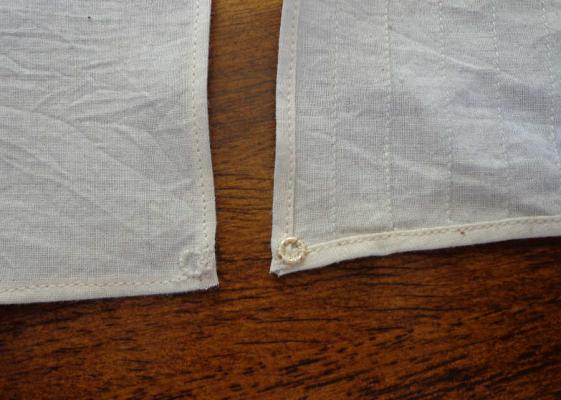
The Holidays, with all the family activities, do not lend themselves to model ship building. Throw in a week-long trip to San Diego, a birthday for our granddaughter, and things very rapidly come to a halt. I’m not complaining. It’s been wonderful having all the family over for the various celebrations and I’ve been able to get in an hour or two of building every couple of days. As stated in a previous post, after the seams were sewn in, I painted the hems with a 50% solution of white glue and water. The result was that the sail cloth took on the texture of light construction paper. I used a dental spatula to score the hem fold lines. This made for a very nice, sharp crease in the cloth. The crease made it fairly easy to hold the hem fold while sewing and the result was a very nice hem line. < When I finished the hems I laid out all the sails and discovered that the Main and Main Topsail didn’t match up where they will be secured to the Main Mast Gaff. I had to recalculate the two sail patterns then completely remake these two sails. They now align where they should.

- 152 replies
-
- 3
-
-
- bluenose
- model shipways
- (and 1 more)
-
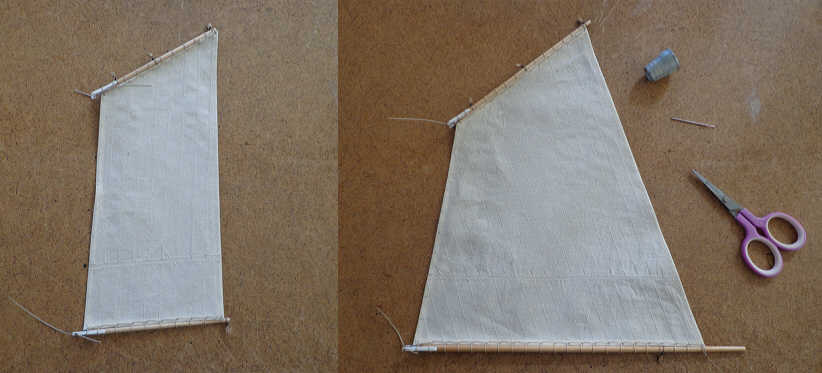
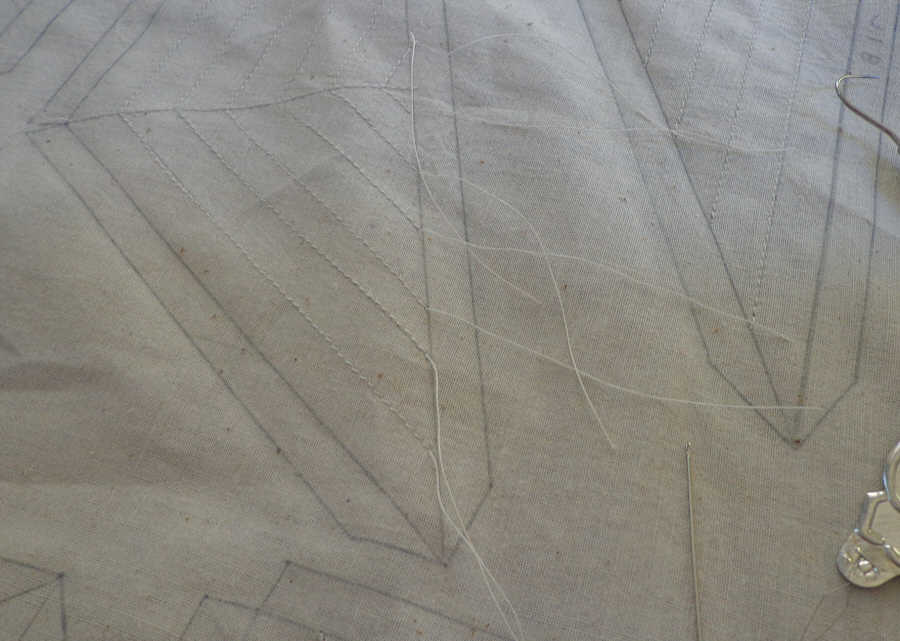
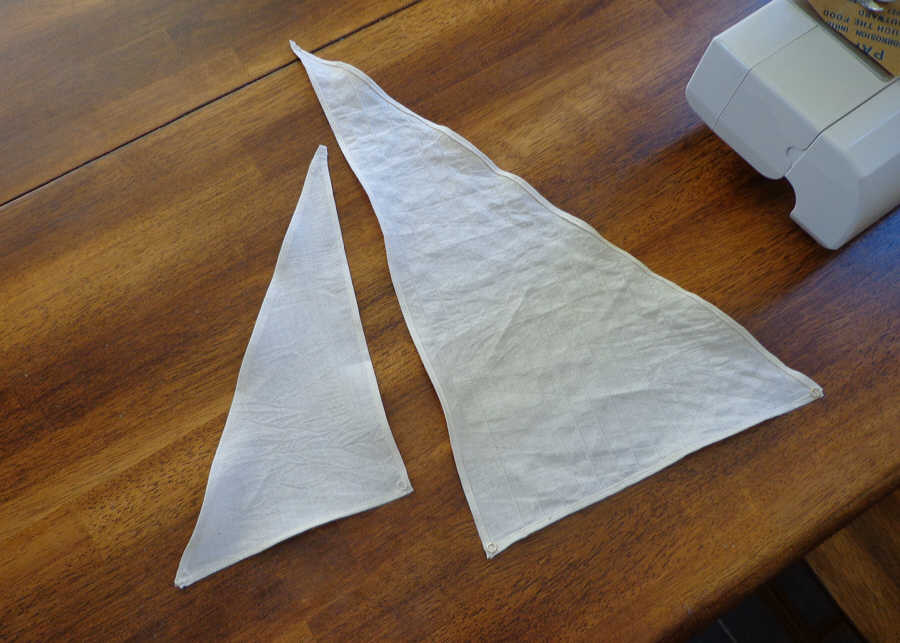
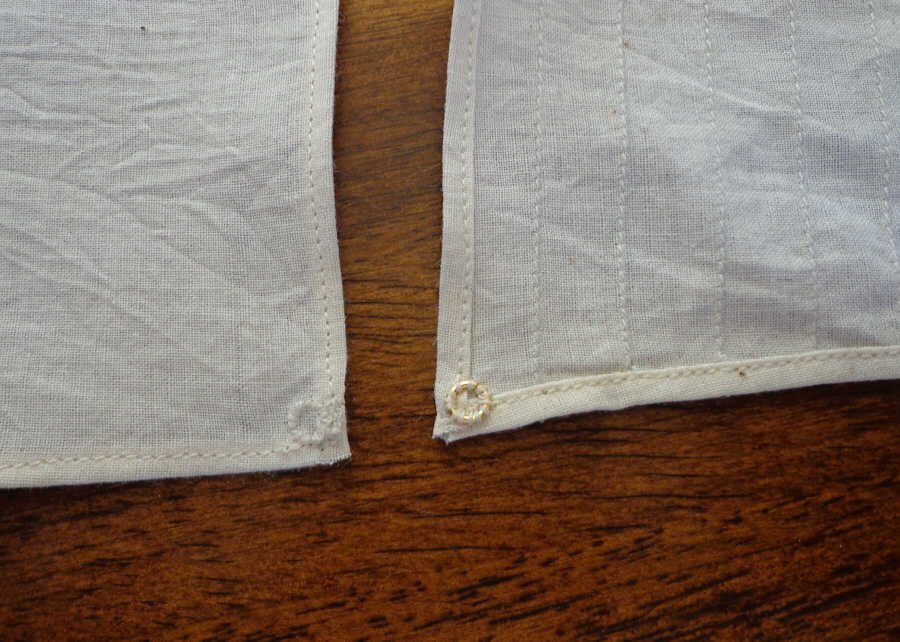
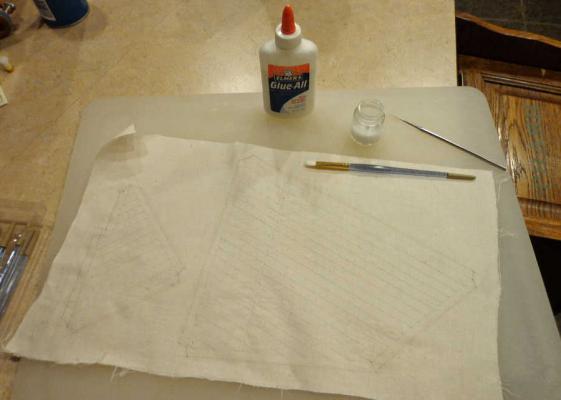
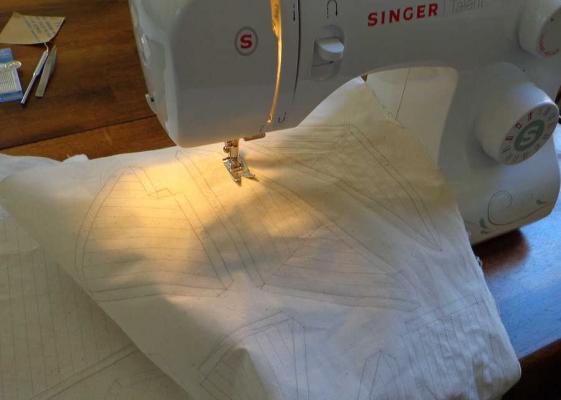
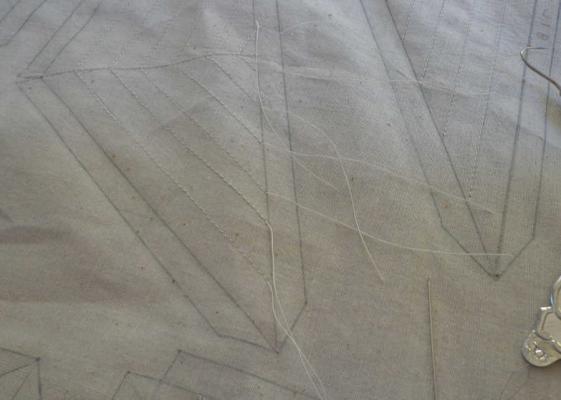
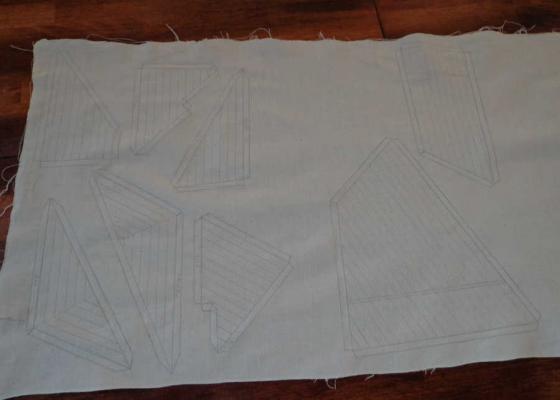
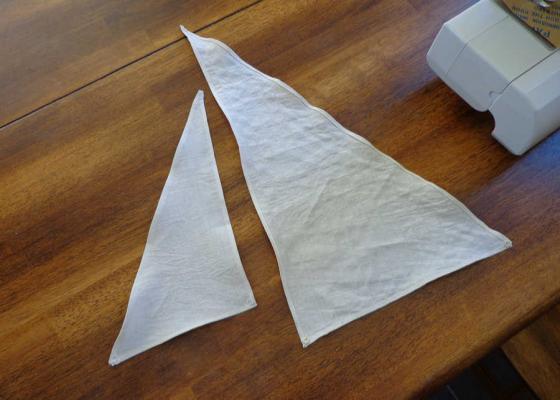
Sewing progresses very slowly. I’m still learning how to handle the sewing machine. You would think this would be fairly simple, but no! I’m finding that the most difficult part of sewing the seams in the sails is starting a line to stitching. If you don’t control the top and bottom threads, keeping them taught with a finger as you begin the stitch, the bottom thread will sometimes snag the top thread and pull it under the cloth. This causes it to be tangled into the stitching. Of course you don’t discover this until after you’ve finished the entire line of stitching. Sometimes I can very carefully pull the thread out and tighten the stitching. Sometimes I can’t and then it requires taking out the entire line of stitching and doing it over again. I’m learning! Once I have the seams sewn into the sail pattern it leaves “Irish Pennants” along the hem line. Using a regular sewing needle I bring the top thread back through the cloth and tie it to the bottom thread with a square knot. Once all the seams are sewn in I dampened the sail cloth and ironed all the wrinkles out. Now it’s time to start cutting out the patterns. I’ve used Fray Check along all the sail pattern outlines to prevent the cloth from unraveling after it’s cut. I also painted a thin solution of white glue to all the outside areas that will be folded to form the hems. I’m hoping this will add just enough stiffness to allow for a nice crisp fold. As I said; slow progress, but, “softly, softly, catchee monkey.”
- 152 replies
-
- 6
-
-
- bluenose
- model shipways
- (and 1 more)
-
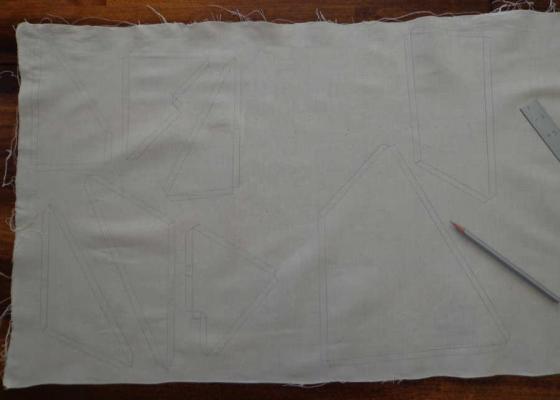
I’ve been going back over the information I have on sail making and have found it somewhat lacking when it comes to washing and treating the cloth. My first mistake was to hand-wash the cloth then fully dry it before ironing. This just produced wrinkles that would not iron out. Fortunately I have a female friend that, among other things, is a seamstress and artist. She sent me the following information on handling linen (it also applies to muslin): “When hand-washing linen for the first time, you need to soak it briefly in lukewarm water before washing. When washing, use natural soap and cold water. Linen will shrink anywhere from 4 - 6%. As you now know, linen wrinkles readily. Linen fabrics also soften with age. Bast/plant based fibers such as linen require a little more care when laundering (i.e., bleach will weaken natural fibers and it yellows linen). You need to dry wet linen on a flat surface, using towels underneath; unless you have access to new printmaking felts, which would be the very best choice for water absorption. I suspect you may have gently hand twisted the fabric to remove excess water and also used a dryer. Either one would have added to the fabric wrinkling. You can avoid wrinkling by placing the wet linen flat, smoothing it with your hands if needed, on a layer of cotton bath towels. You may need to pick up the linen by the corners and transfer it to a new stack of towels or roll it inside a layer of towels to wick the moisture from the fabric. Back to the fabric drying…while the linen is still damp, not dry in any areas, this is the time to get out that friendly iron and iron the cloth while it is still damp with an iron setting of medium or high heat. Begin with medium heat, moving to high is my suggestion. Preparing the linen fabric before cutting the shapes is the better way to go. You can store the remainder of the linen fabric by rolling it over a 100% cotton towel with a smooth surface and it will be ready for your next ship sail project.” I applied her information to the muslin I have for the Bluenose Sails. Using a Quilter’s Marking Pencil I transferred the sail patterns to the muslin and added the seam lines.
- 152 replies
-
- 3
-
-
- bluenose
- model shipways
- (and 1 more)
-
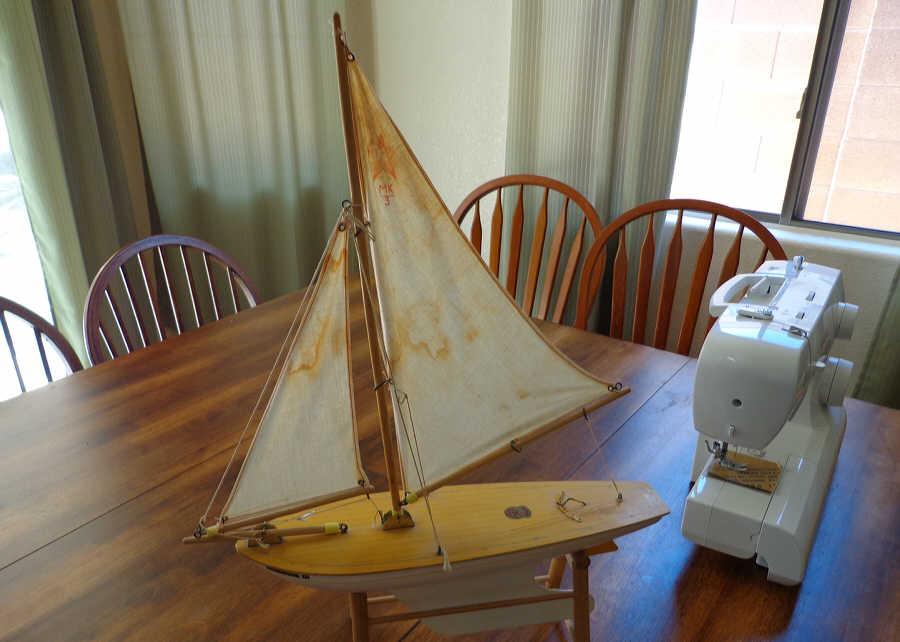
How do you get to Carnegie Hall? Practice, man, practice! How do you make ship model sails? Practice, swear, remake, practice, swear, etc! I’m relieved that I didn’t attempt the Bluenose sails first. My practice sail construction is to replace the original sails on a toy boat we purchased in Dunoon, Scotland, in 1981. Time and water have damaged the sails and it makes an excellent subject for simple sails. I hand washed the sail cloth, dried, and ironed it. Traced the pattern onto the cloth, using a Quilter’s Marking Pencil, then used Fray Check along all the outlines. Once I had that done I lightly penciled in the seams on the main sail. Sewing the seams seemed fairly easy and I was able to keep the seam lines straight. I used a small spatula to crease the hem folds then ironed and pinned the hems. I only burned my fingers four or five times. I used the instructions posted by DBorgens in his Lessons Learned Sewing Sails, posted 19 April 2013. His method provides for a 1/8 inch hem when finished. Now came the fun part! I set up and began sewing the hems. It’s not as easy to sew along a hem fold as it would appear. I drifted off the hem line several times and when I tried to rip out the stitches it looked horrible. Fortunately I had enough practice material to remake the sails a couple of times. I hand finished the corners and sewed in the grommets. Hopefully the Bluenose sails will go a little better and the end product will be much straighter.

- 152 replies
-
- 2
-
-
- bluenose
- model shipways
- (and 1 more)
-
My Model Expo bender hasn't smoked at all. I did notice a smell from the plastic the first two times I used it, but there was no smoking. I absolutely am going to try the curling iron!
-
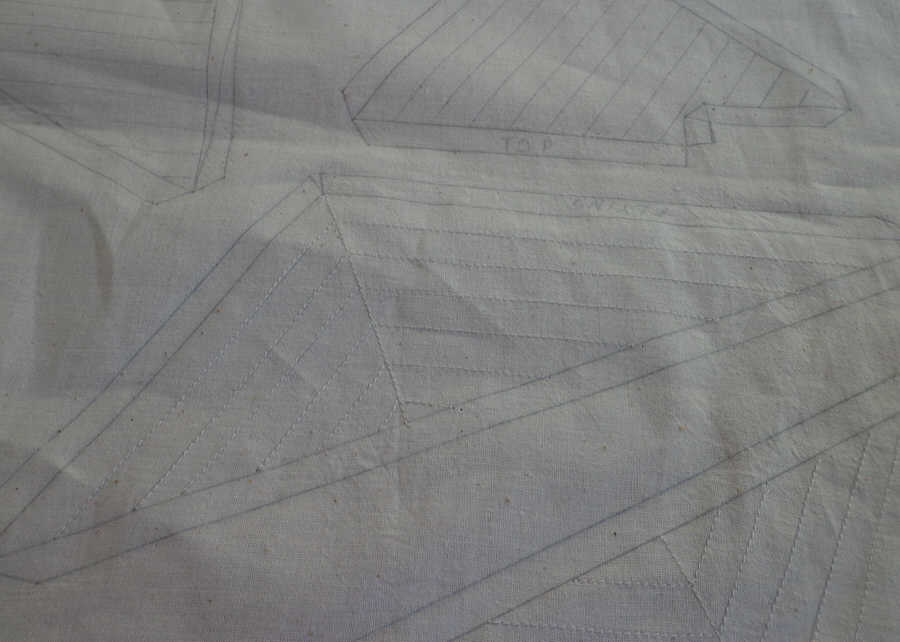
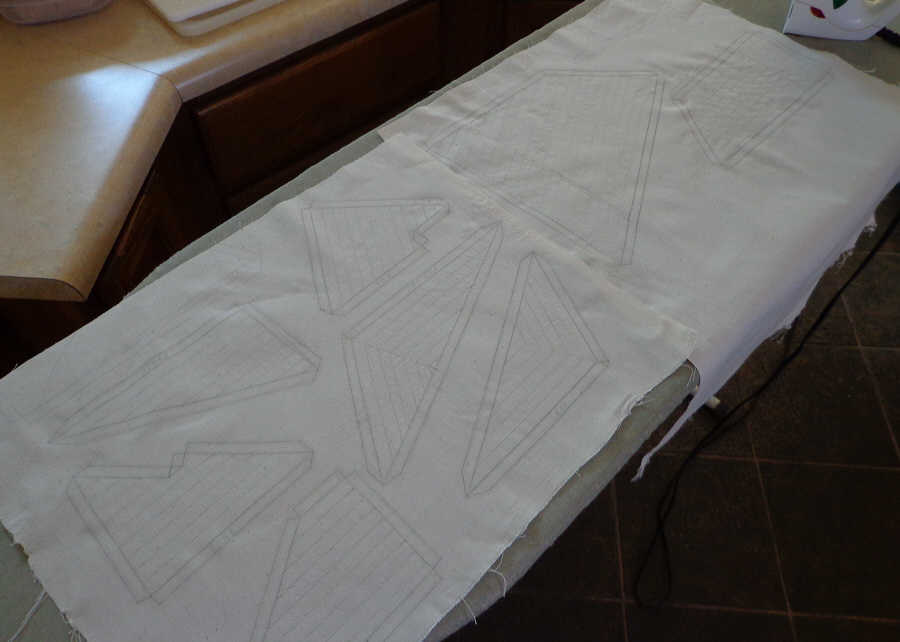
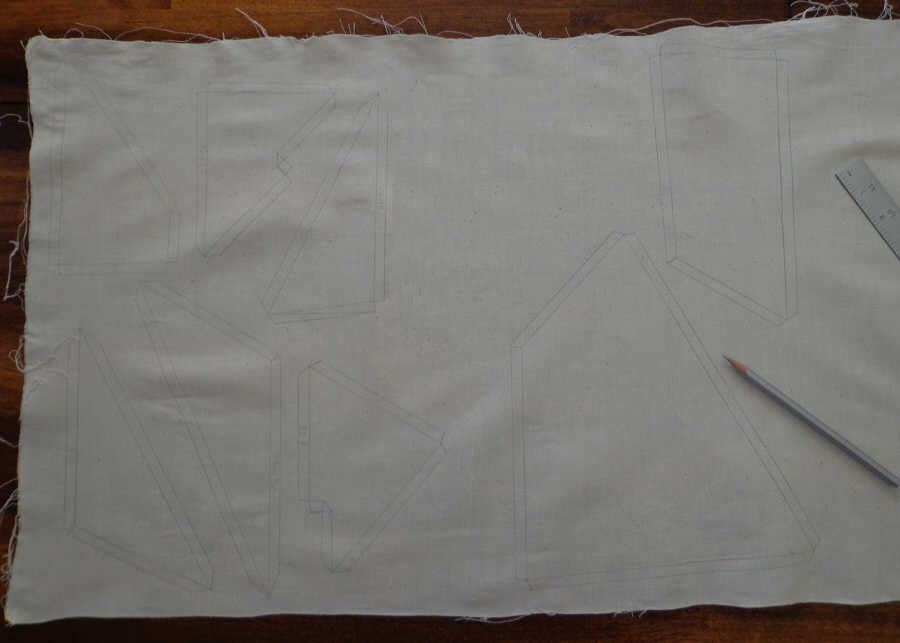
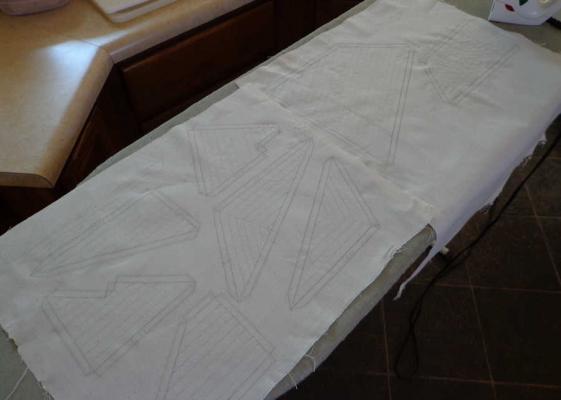
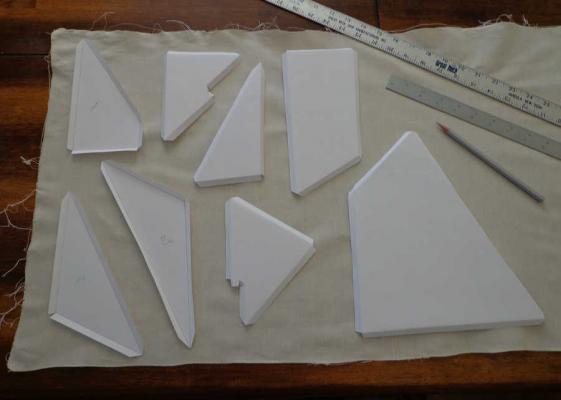
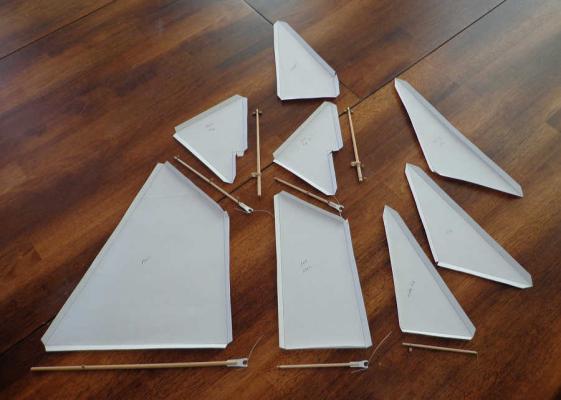
It’s taken me 4 days to complete the paper patterns for the sails. I started with the Main Sail and it took me 5 tries to get it right. The Main Top Sail was next and it took 4 attempts before it was right. Pretty much, it took me at least 2 tries on each one to get the dimensions correct. Now comes the fun part! I’m going to go to a fabric shop and purchase some of the lightest muslin I can find. That seems to be the preferred fabric in all the reading I’ve done on sail making. I plan on spending a couple of days playing with it to practice using the sewing machine. I do have a toy sail boat that needs a new set of sail and I thought I would use that as practice before attempting the sails for the Bluenose.
- 152 replies
-
- 4
-
-
- bluenose
- model shipways
- (and 1 more)