Glenn-UK
-
Posts
3,175 -
Joined
-
Last visited
Content Type
Profiles
Forums
Gallery
Events
Everything posted by Glenn-UK
-
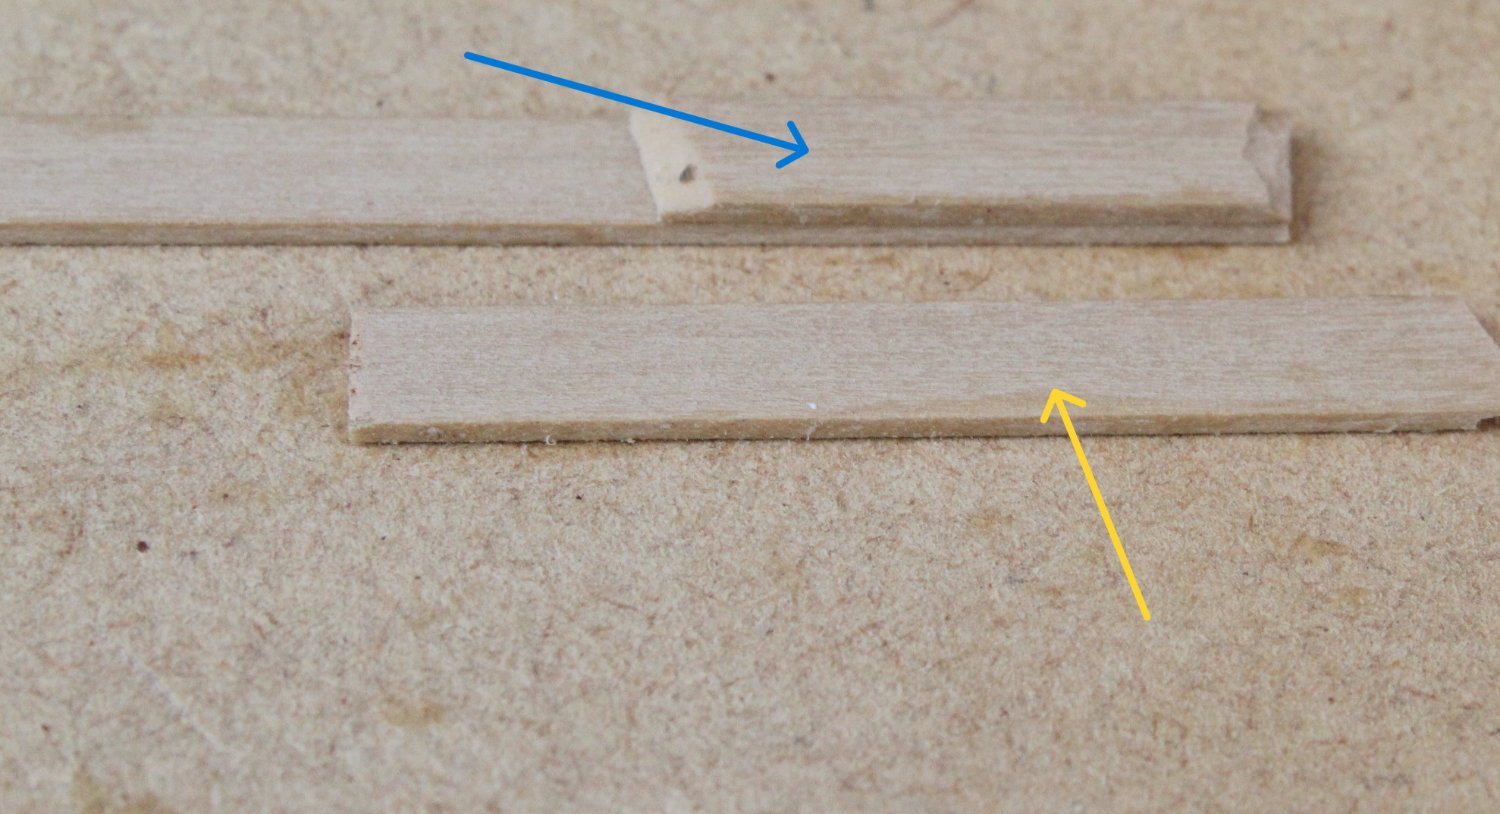
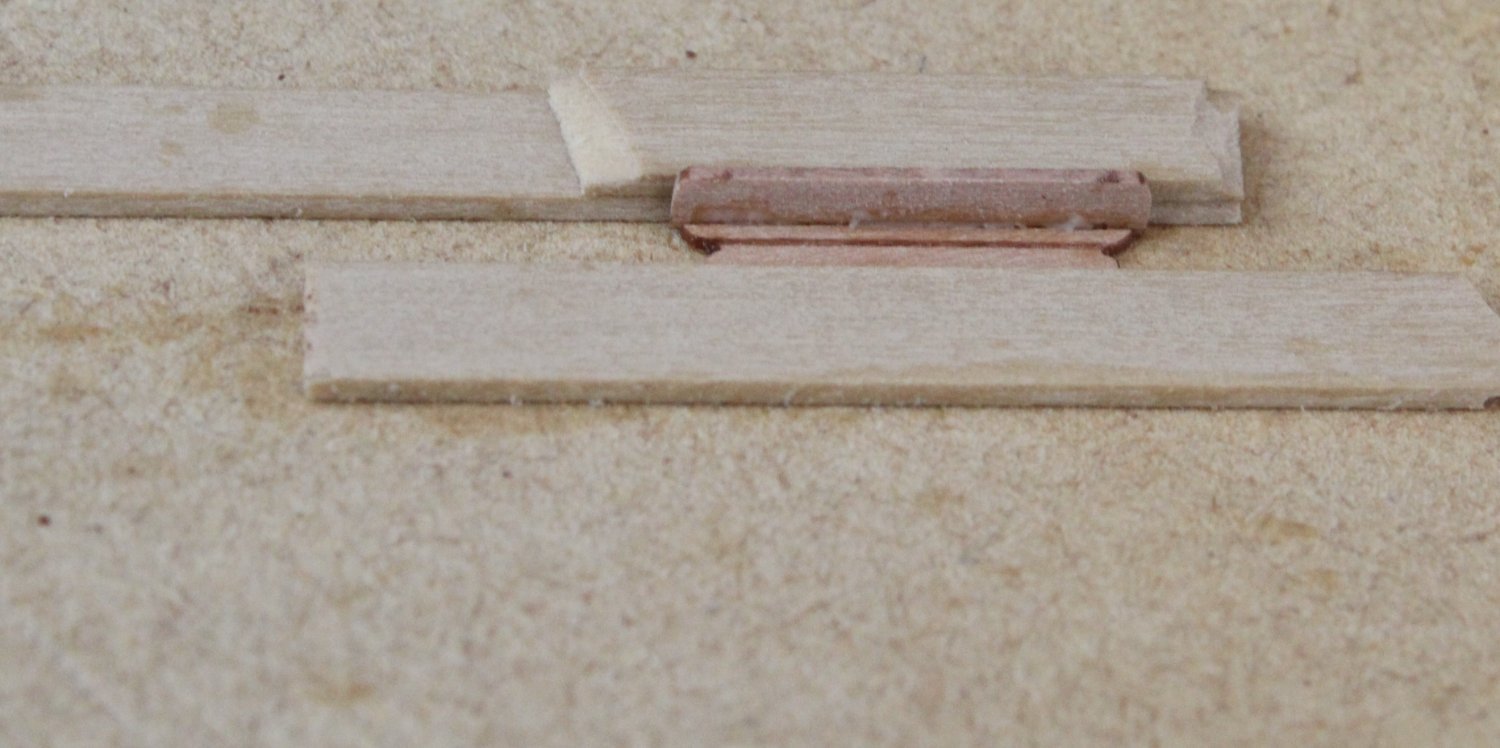
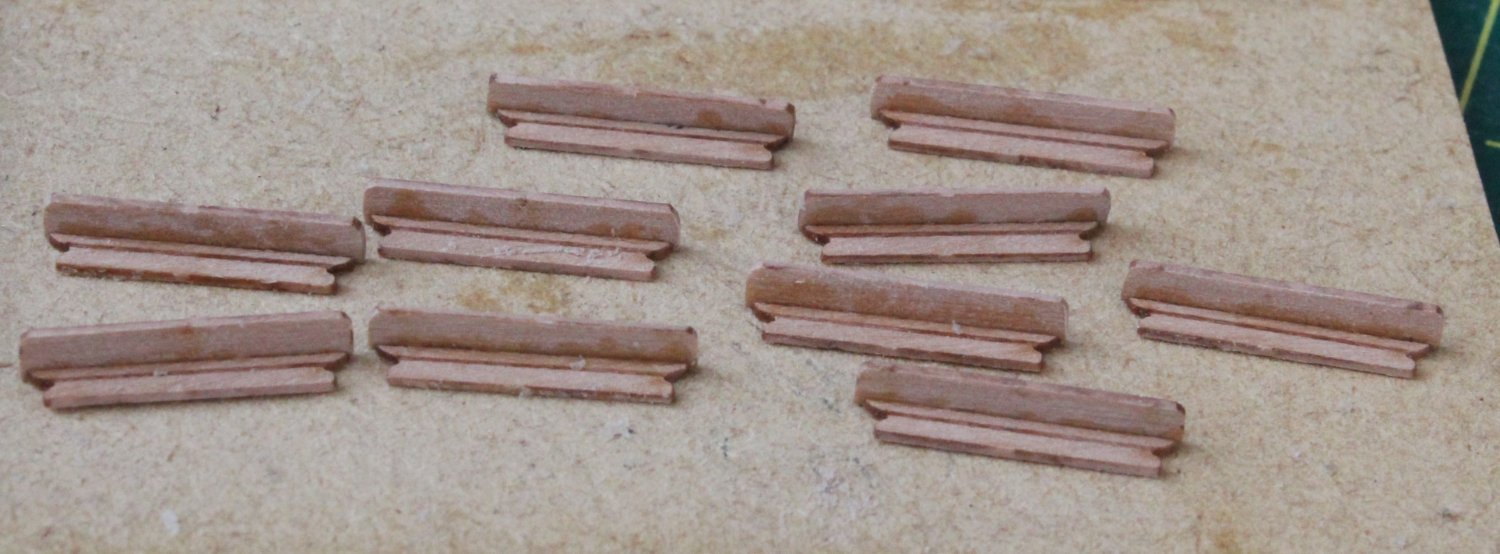
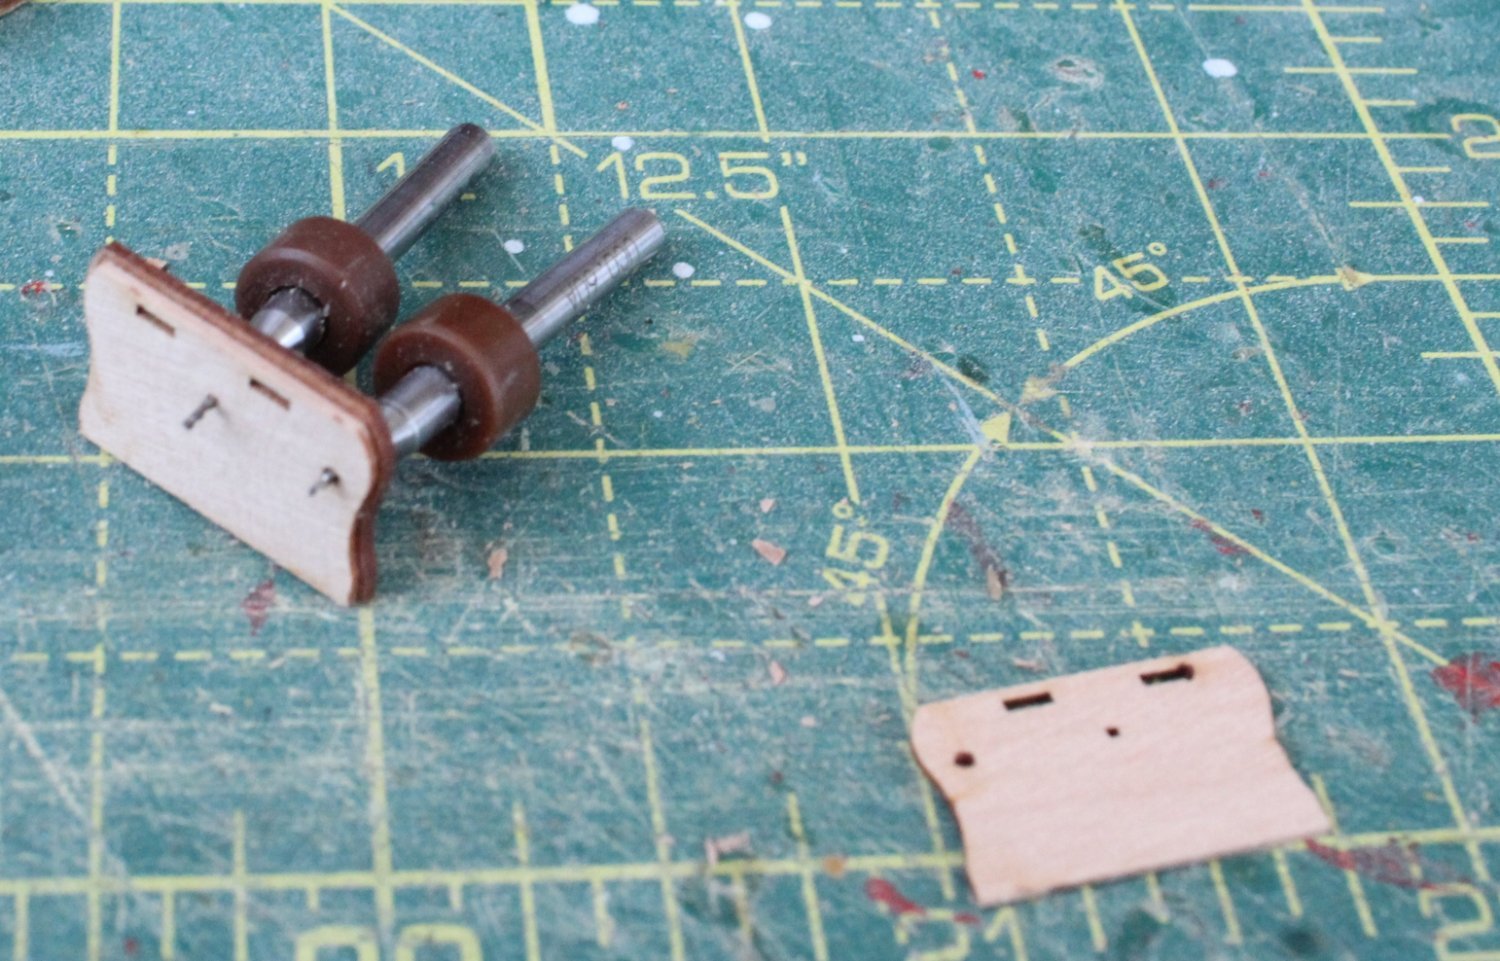
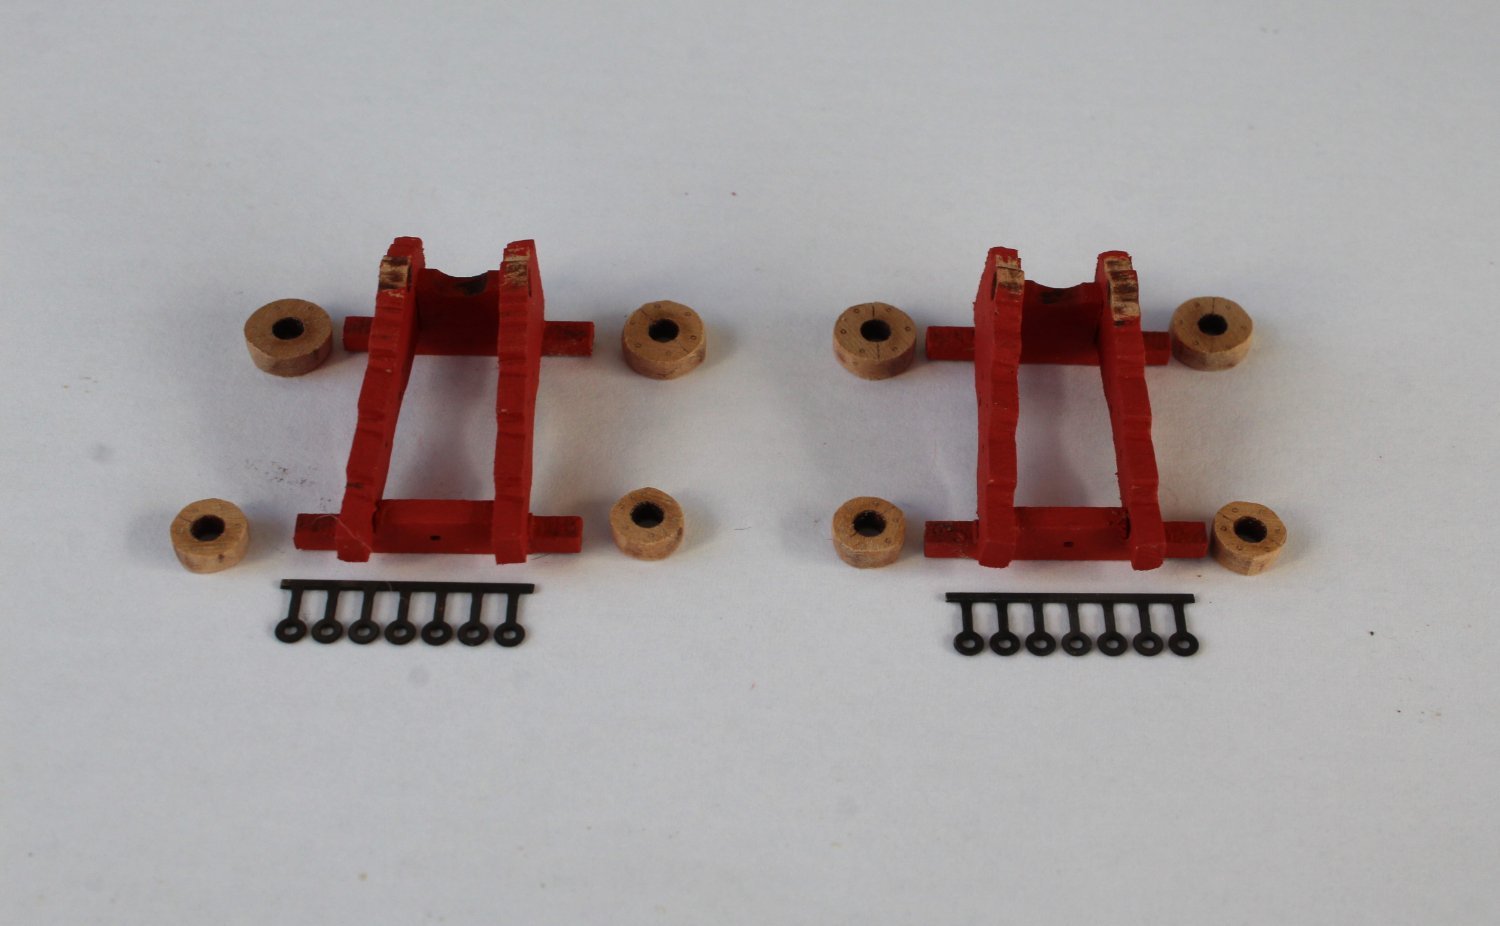
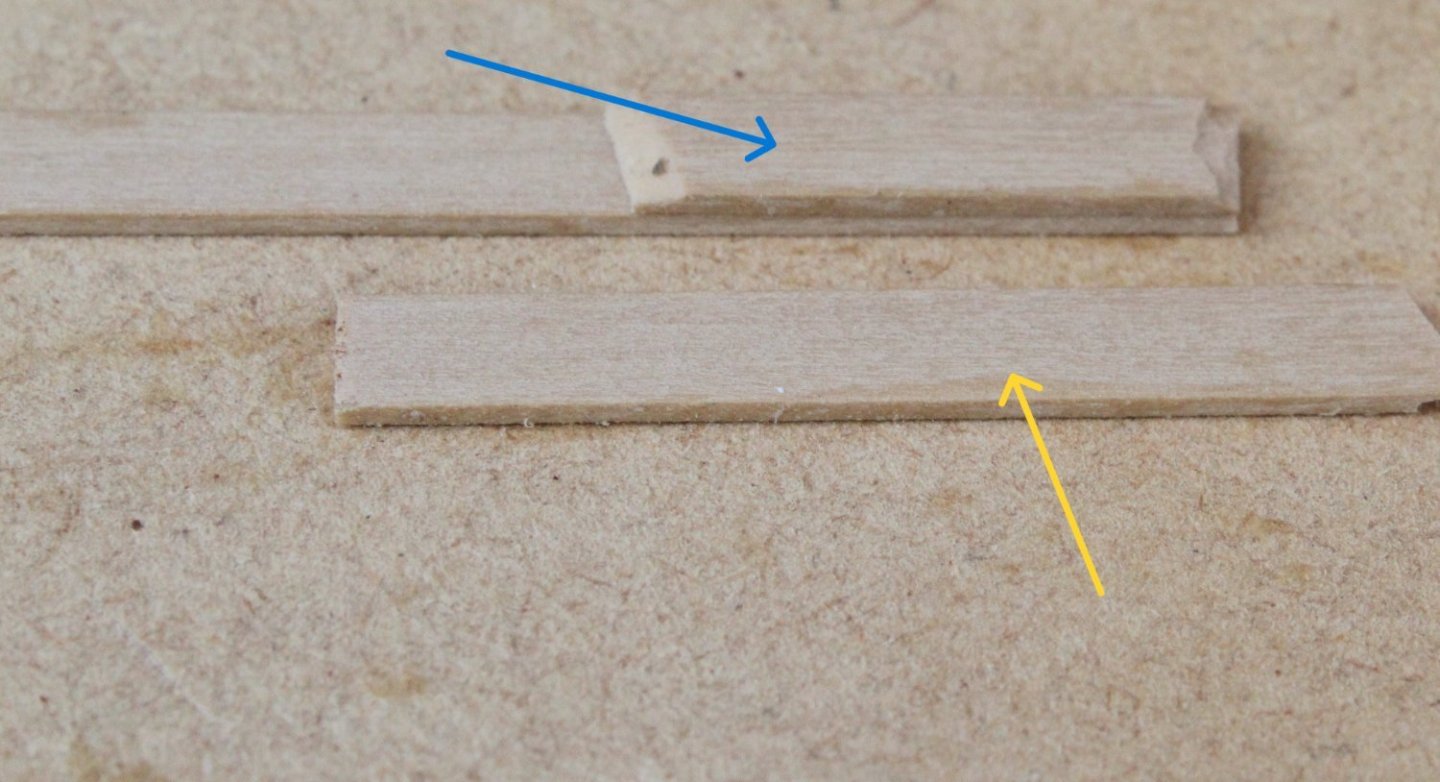
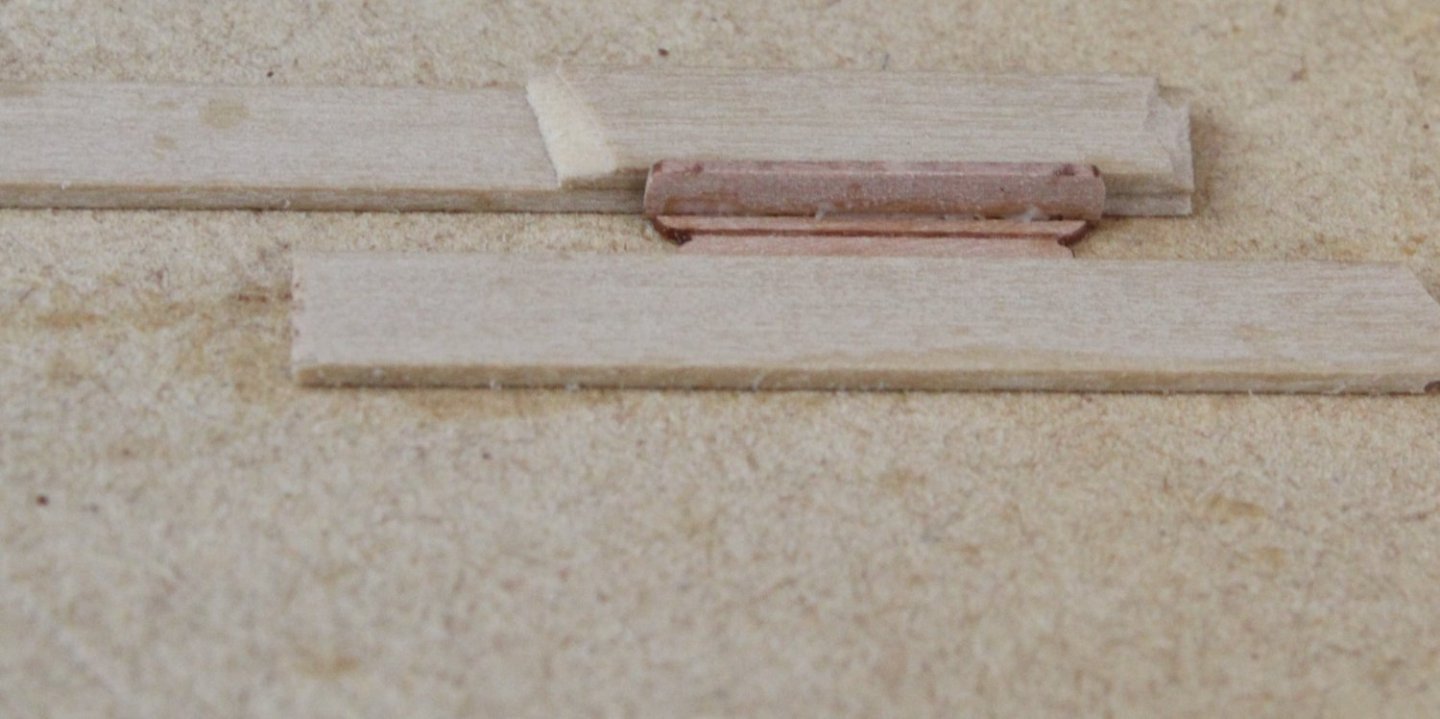
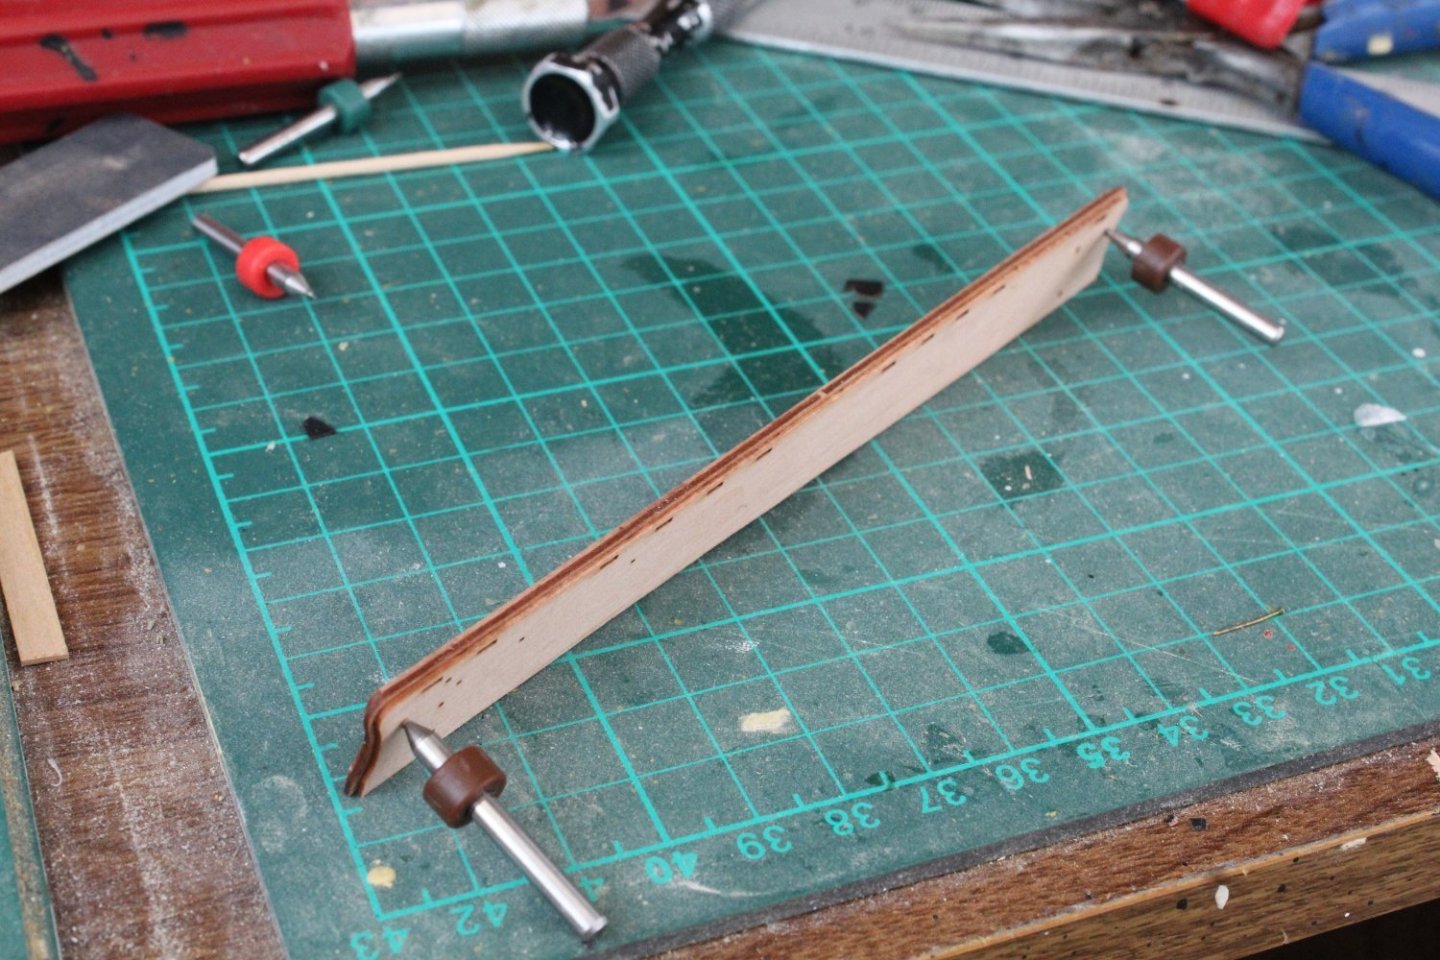
 In todays build log post I have detailed the method I used to assembly the ship's steps and the channels. Indy's Steps Assembly There are 10 steps required per side and each step comprises two 0.6mm pear wood pieces which have be assembled at right angles to each other. As these are quite small and fiddly pieces I decided to make a simple jig to assist me with the assembly process. I glued two small lengths of scrap planking material to a wooden base, as indicated by the blue arrow in the photo below. A second length of planking material (yellow arrow) is not glued and will be used as brace. Once the laser char had been removed wood glue is added to the lower part of the back section before it is positioned in the jig, as shown below. The other step part is then slowly pushed into position using the brace and is adjusted left / right as necessary. Once the parts are properly aligned pressure is applied to the brace for a few seconds. The brace can then be removed so the step can be gently eased out and left to cure. It was a fairly quick process to produce the first 10 steps. Channel Assembly There are 5 channel assemblies required per side and each channel comprises three wooden parts, one is the central section and the other two are slightly smaller and to be glued either side of the central piece. It is essential that these parts are correctly aligned so the various iron work parts can be added, such as the strops and eyebolts. A layer of wood glue is applied to one side of the central channel section and using some old broken micro drill bits, located in the holes the first two parts are aligned. Glue was then quickly applied to the other side of the central section and the remaining part was positioned, once again using the drill bits as a guide. It was then a case of adding clamps to the assembly. Once the glue had been given time to cure, the clamps were removed. The locating pins (were added (but not glued at this stage) so a test fit of the channels could be made.
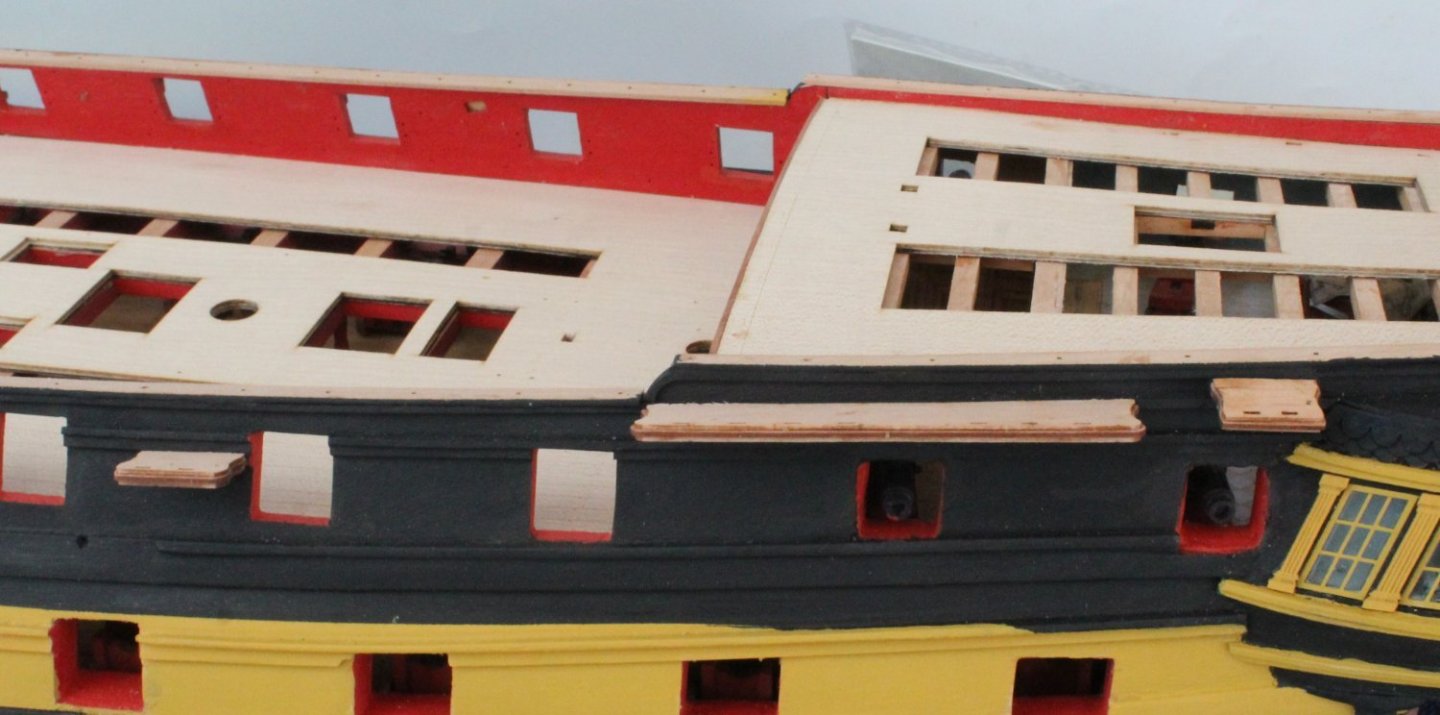


- 587 replies
-
- 11
-

-
- Indefatigable
- Vanguard Models
- (and 1 more)
-
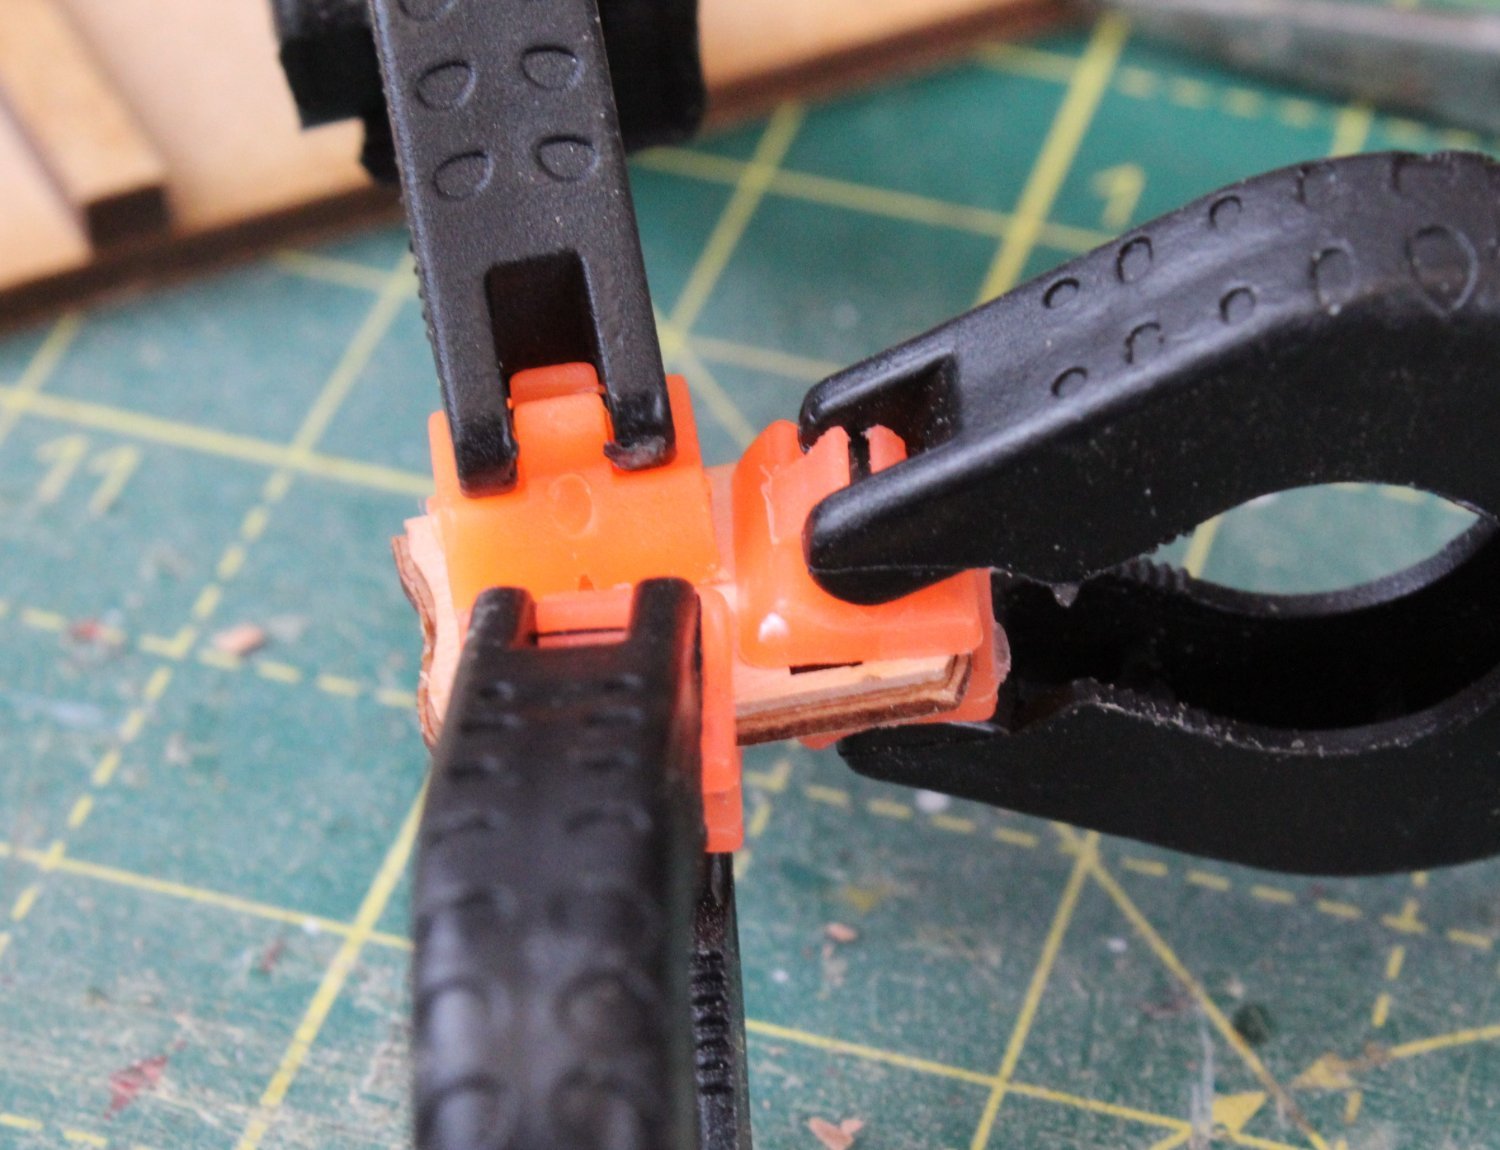
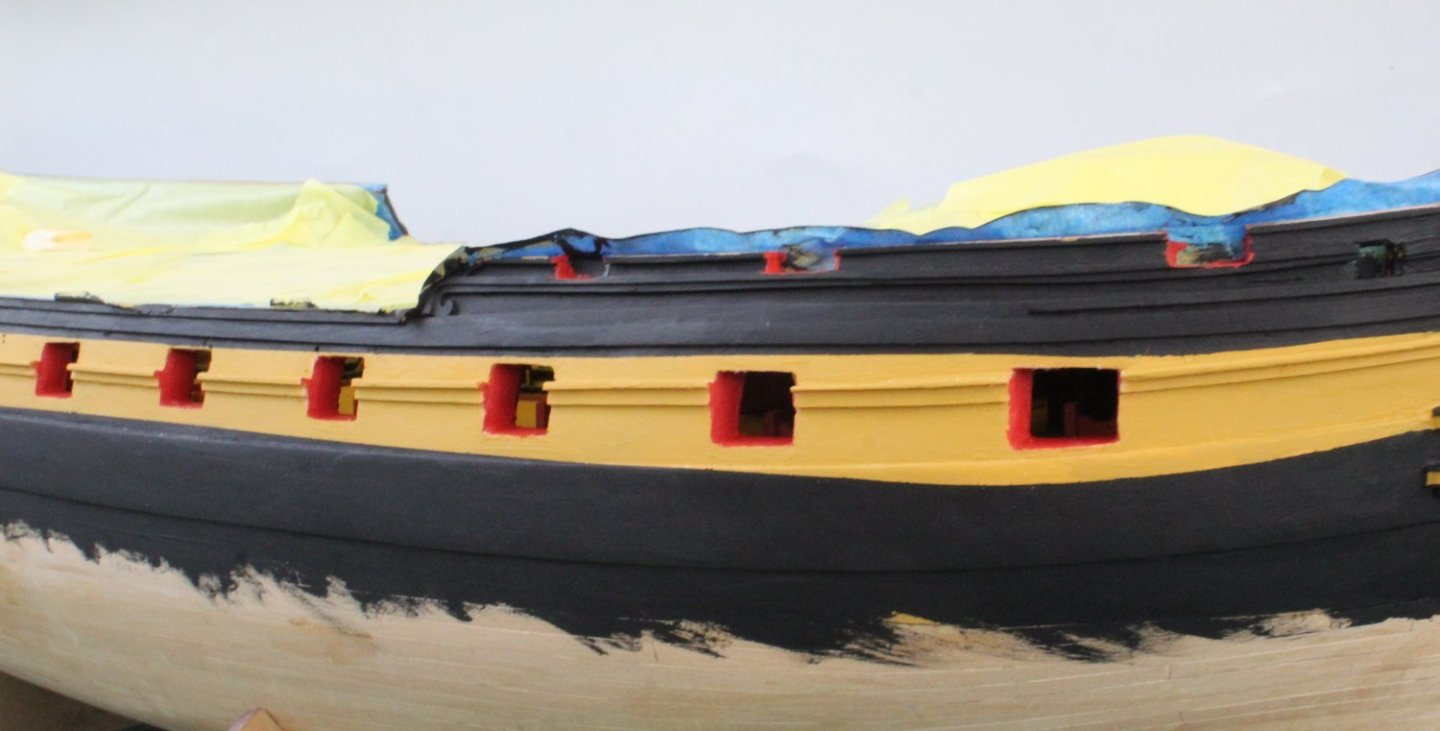
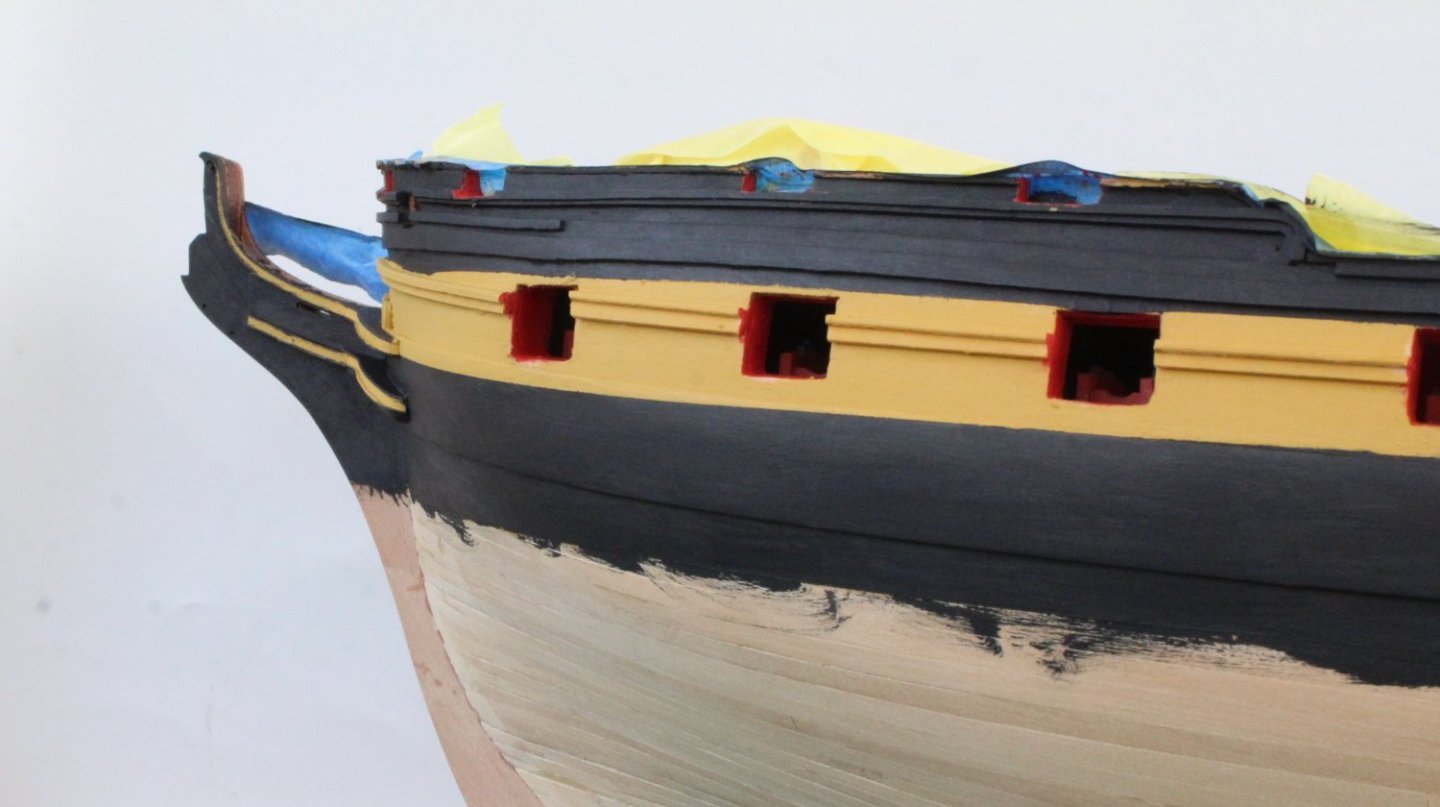
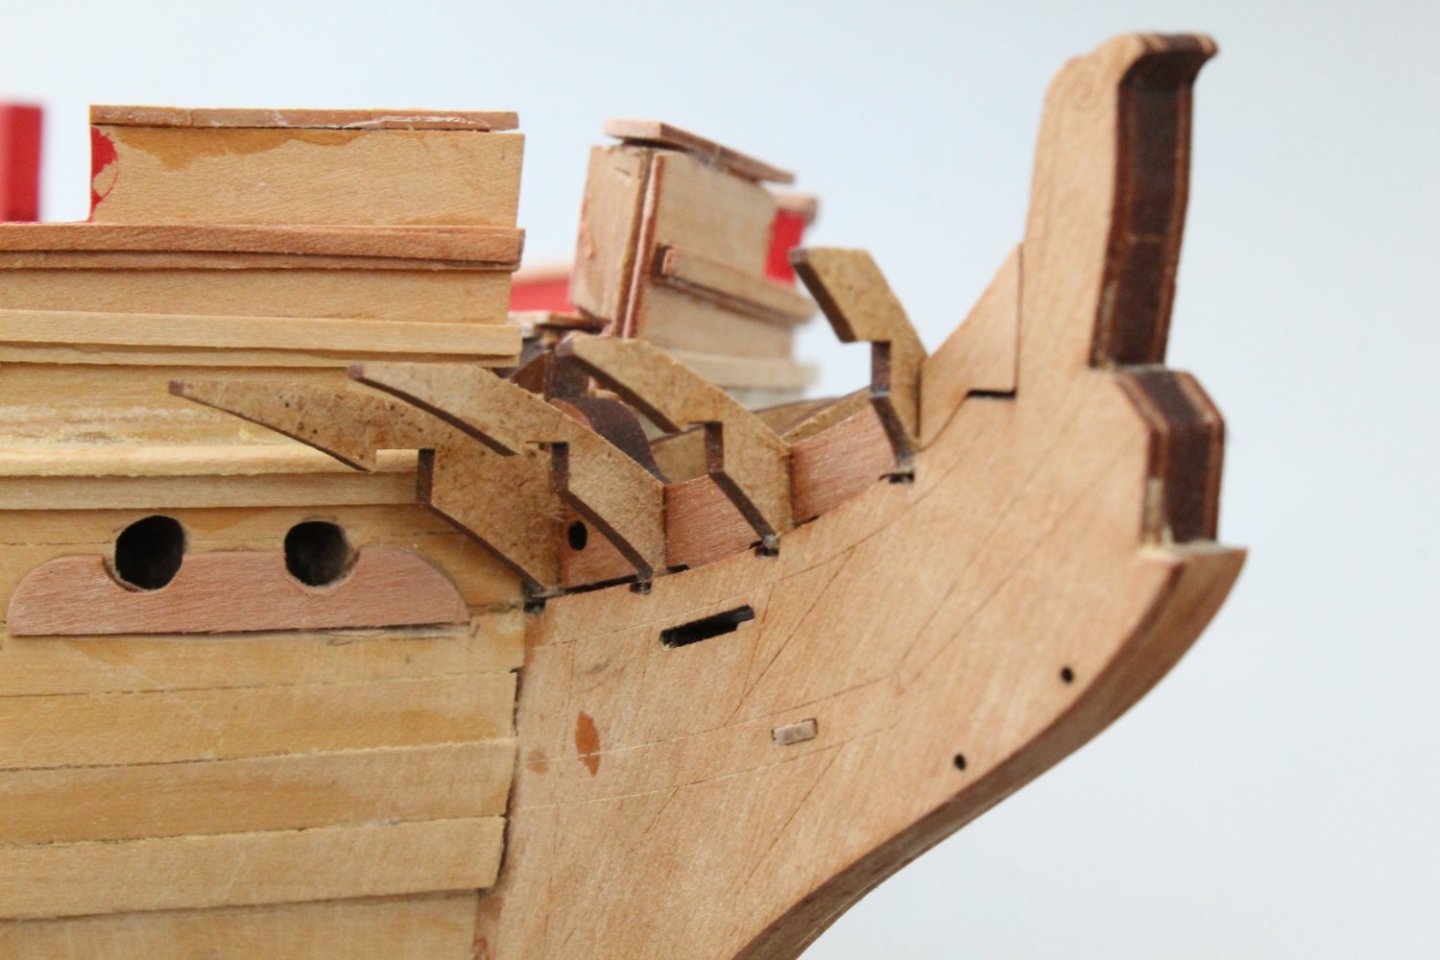
Chesstrees and Side Fenders There is one chesstree and two side fenders to be fitted each side of the hull. The kit supplied parts required various notches cutting so the parts would fit over the rails. I took my time and regularly checked the fitting as I was creating the required notches. Once I was happy with the fit the parts were painted, noting the black and yellow hull colour bands. The parts were then glued in place. As recommended in the build manual I used a scrap length of 4mmW planking to set the distance between the two side fenders. The hull does require a bit of cleaning to remove the unwanted debris.
- 587 replies
-
- 3
-
-
- Indefatigable
- Vanguard Models
- (and 1 more)
-
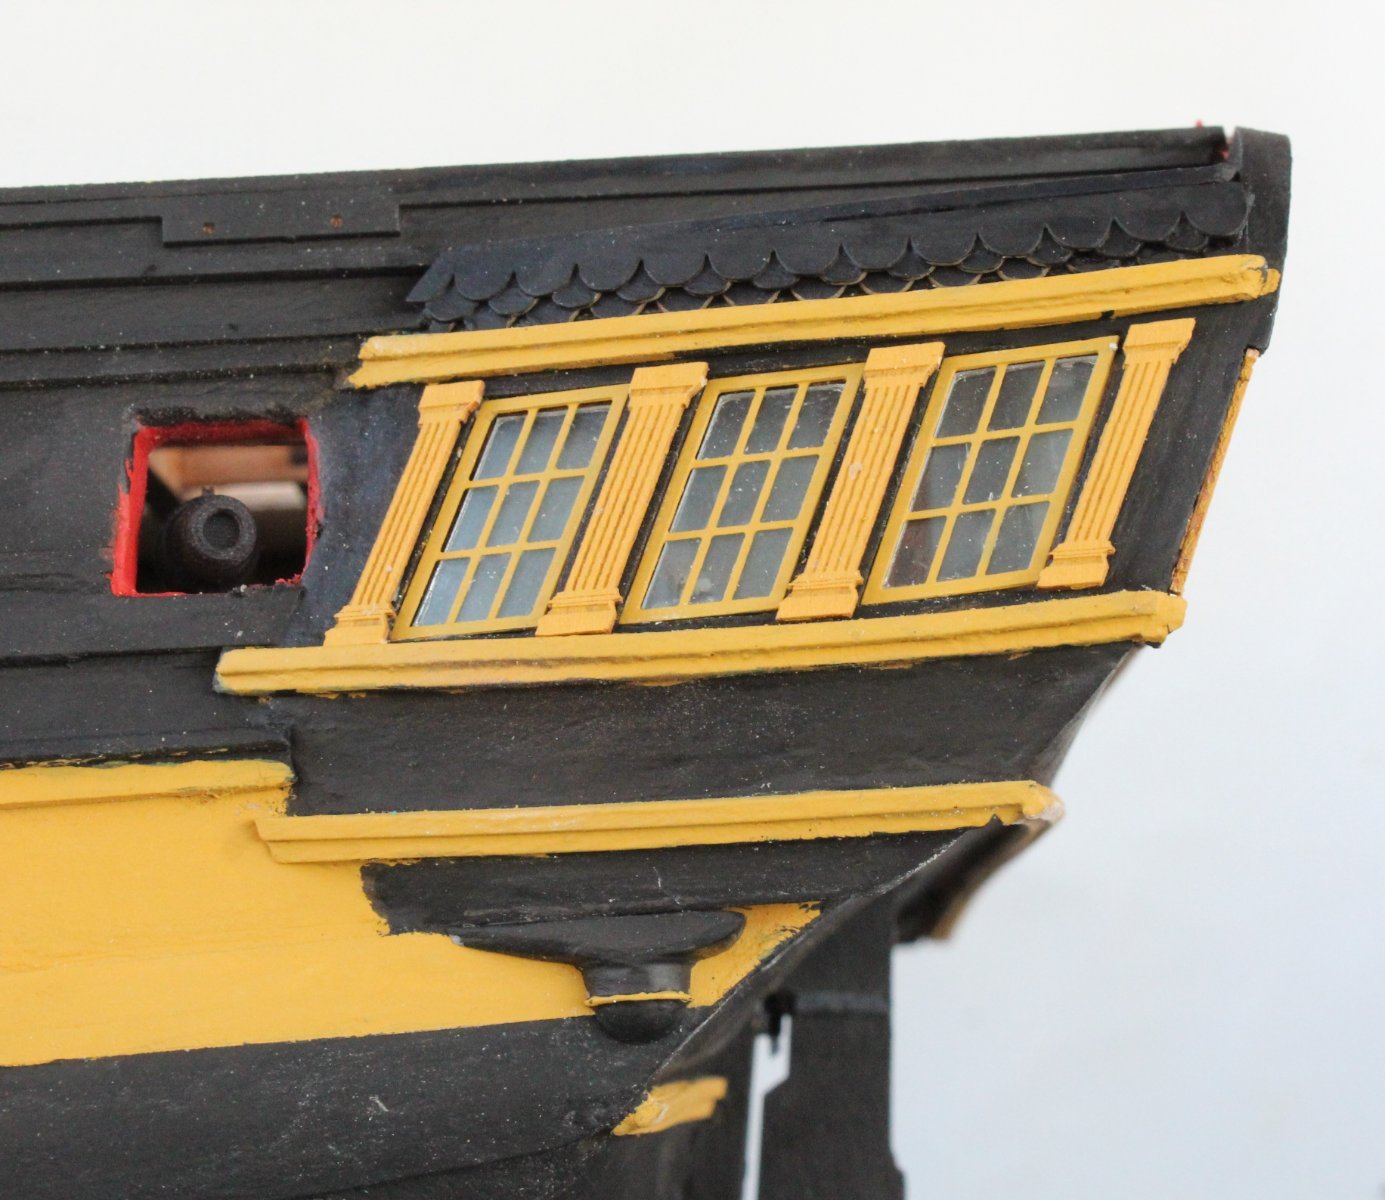
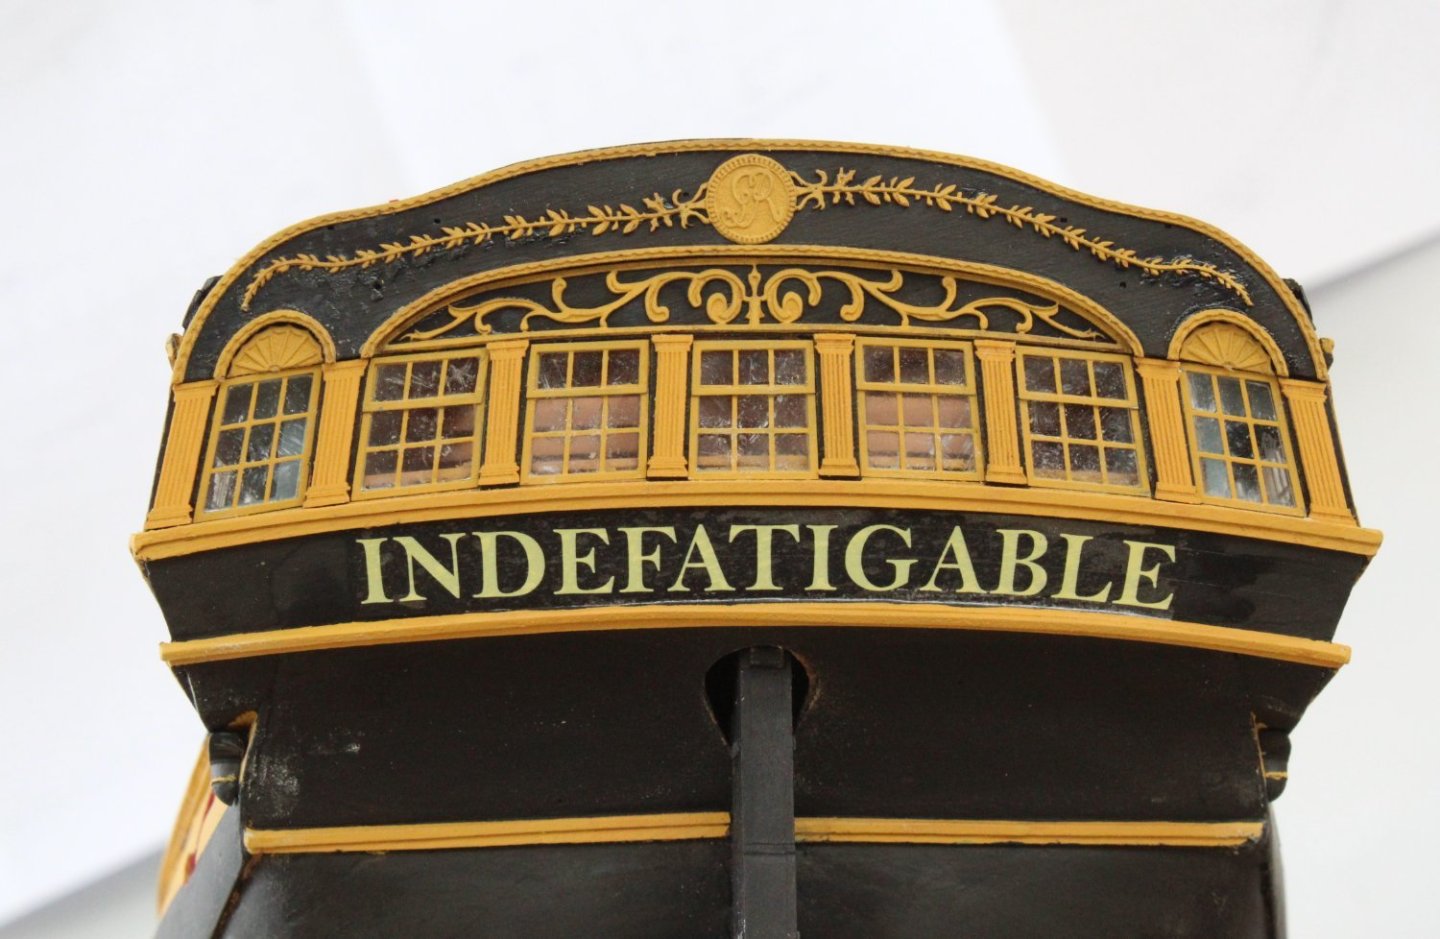
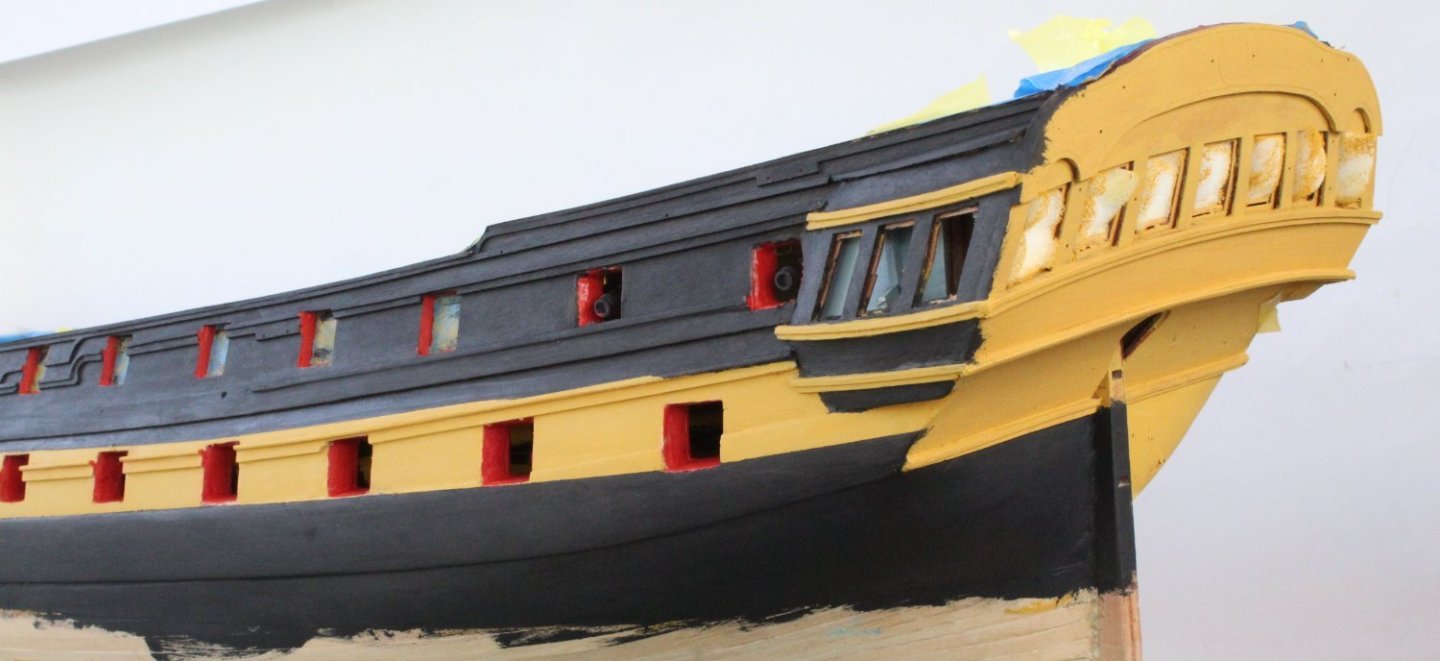
Stern Decorations The various stern decorations patterns were painted yellow ochre and then affixed in place. I did not encounter any problems with fitting the PolyBak decorations. I did have wet and reposition the nameplate transfer as I noticed that it was slightly off centre. Overall the stern does not look too bad but Captain Pellow needs to get a crew member to clean the cabin windows. The two rear fitting lanterns will be added later on in the build
- 587 replies
-
- 8
-
-
- Indefatigable
- Vanguard Models
- (and 1 more)
-
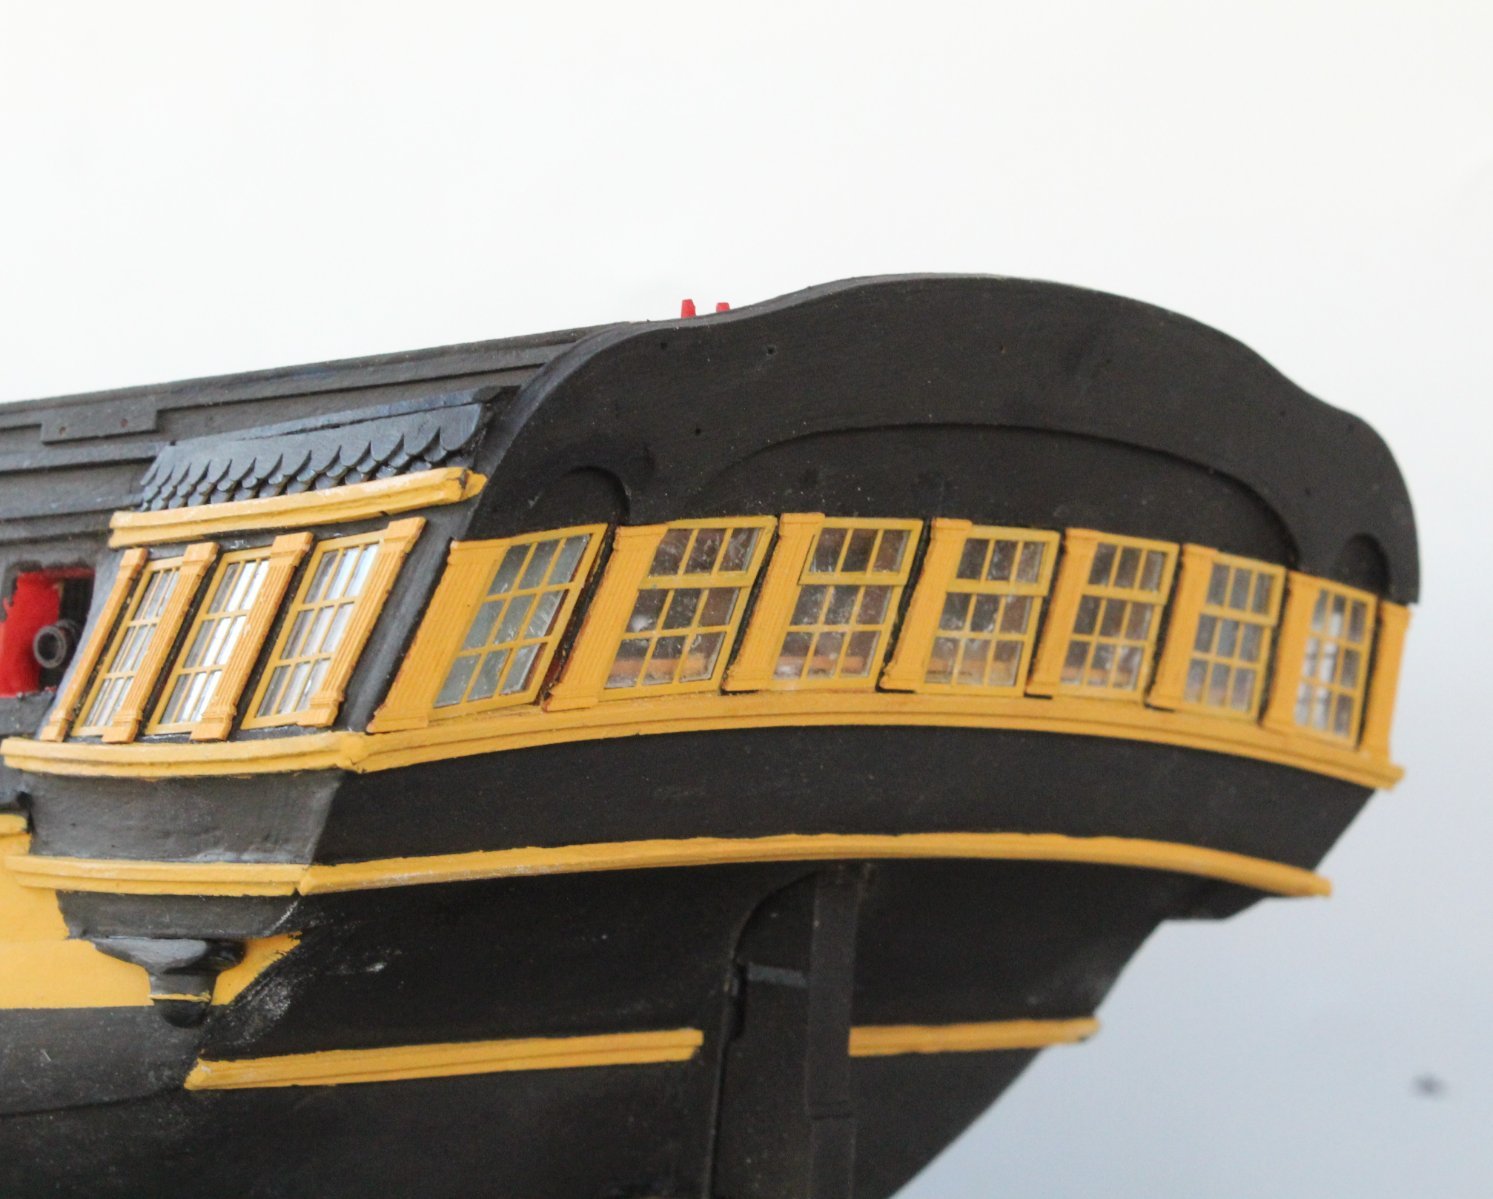
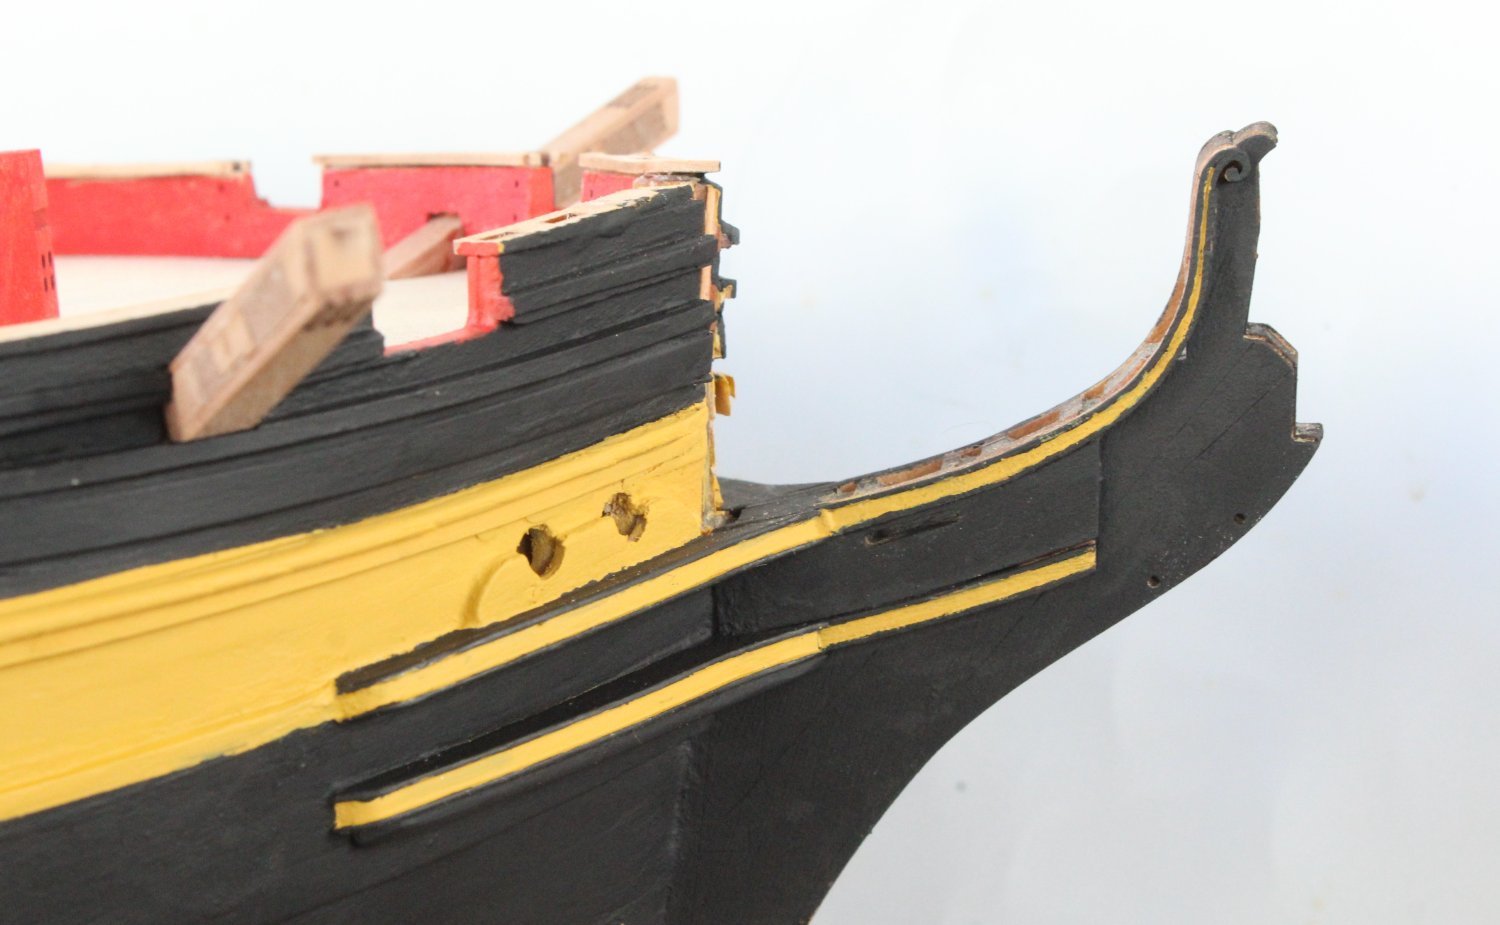
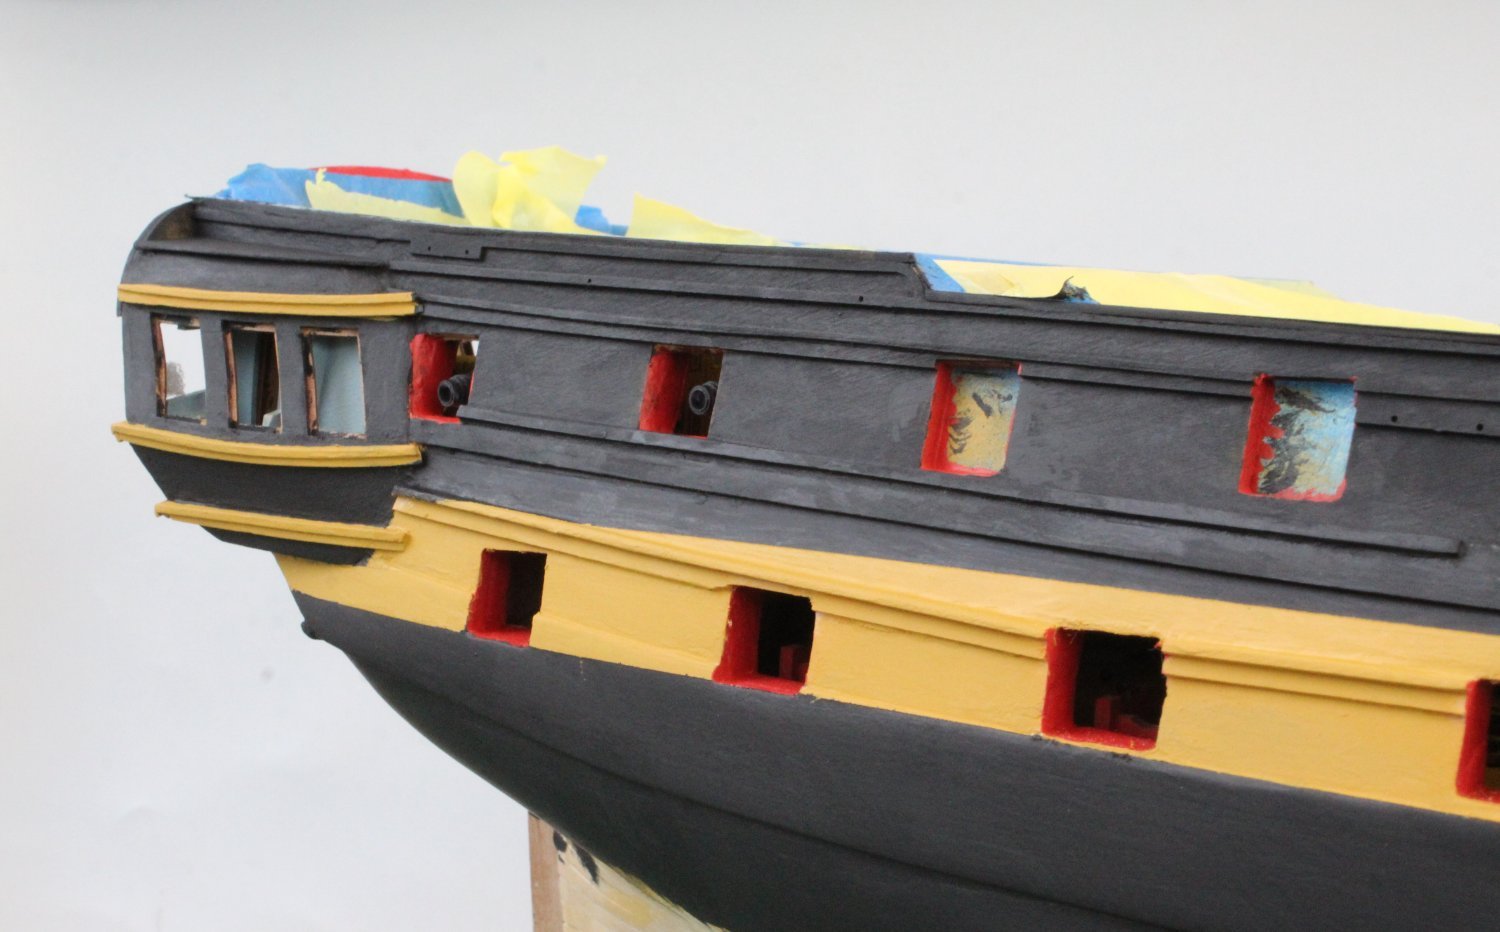
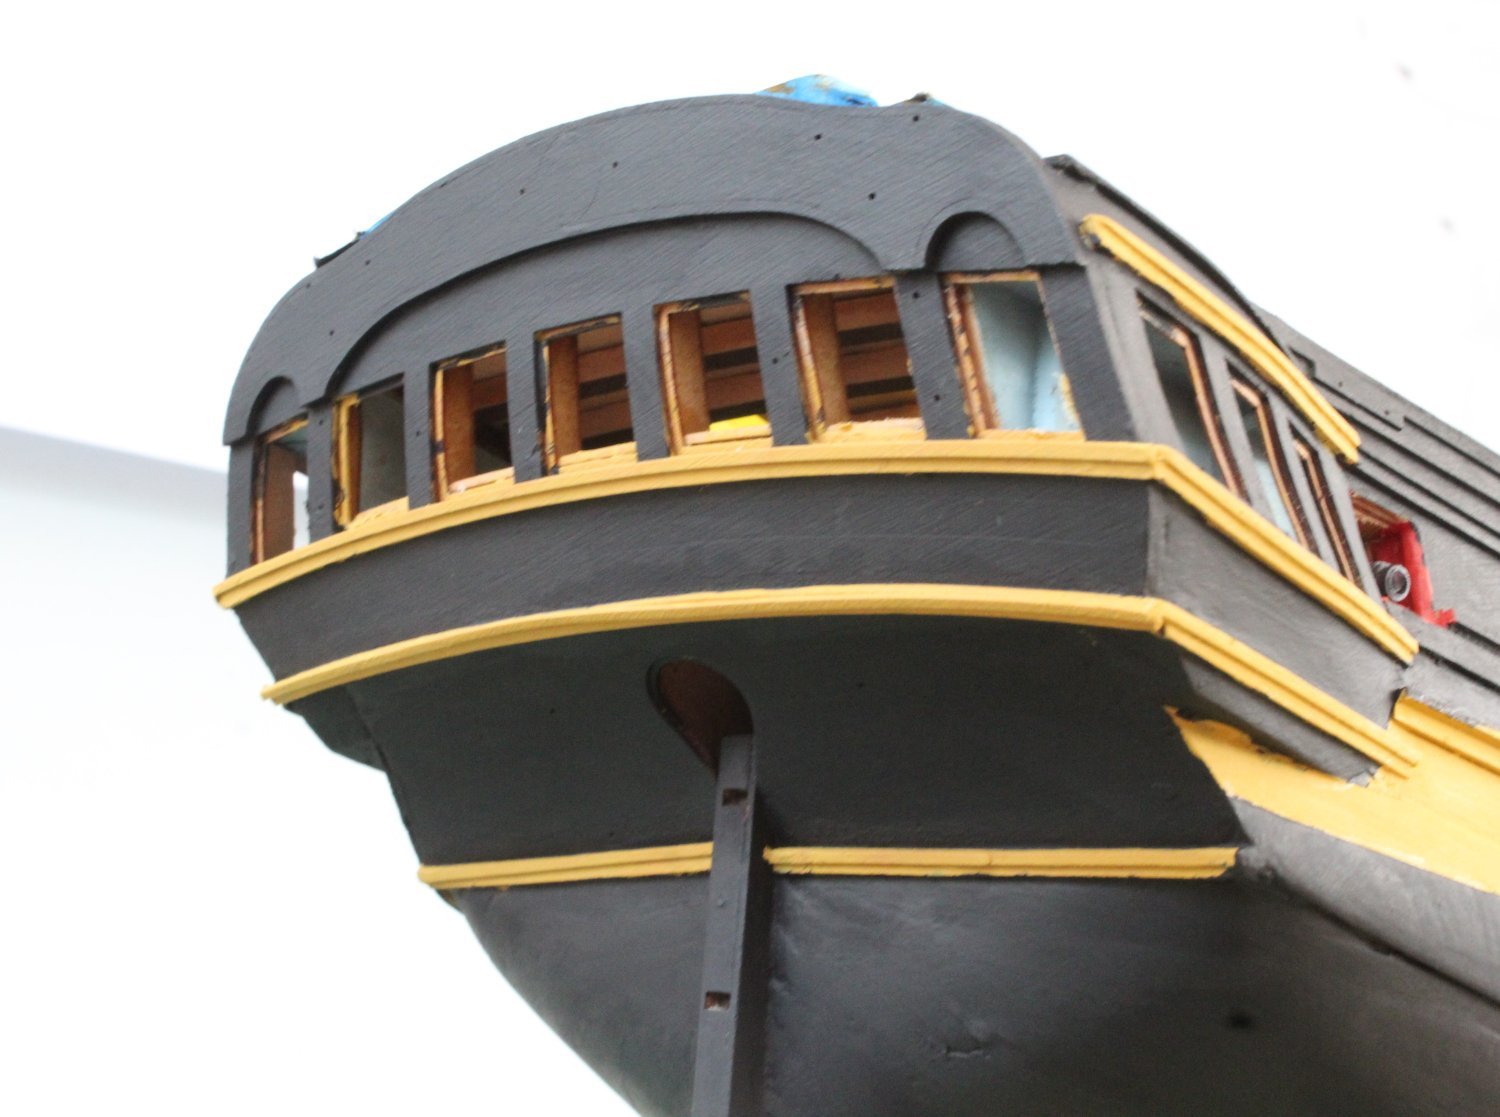
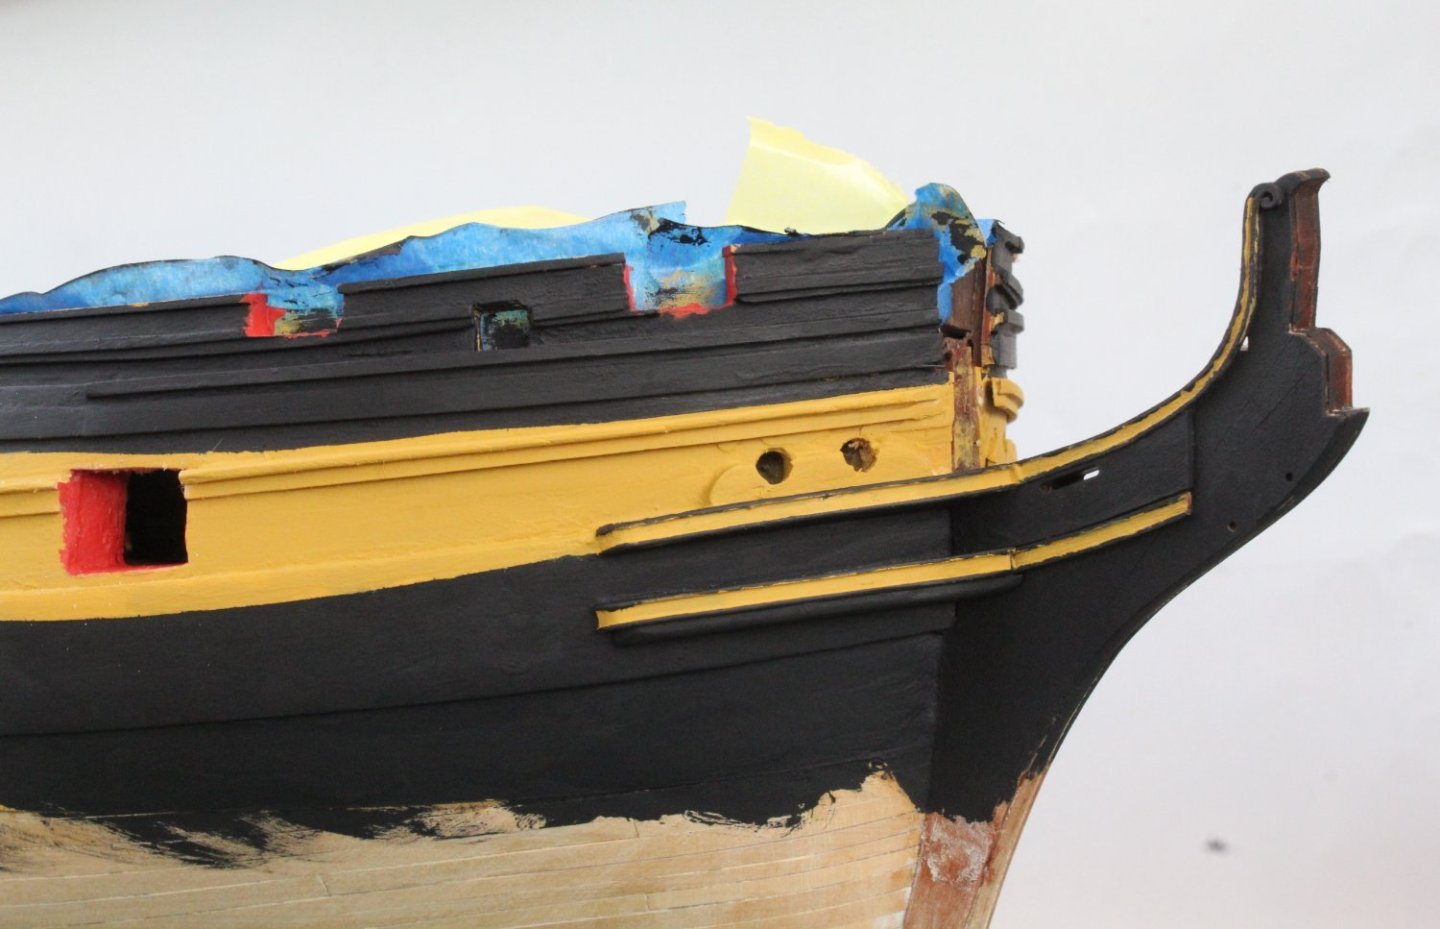
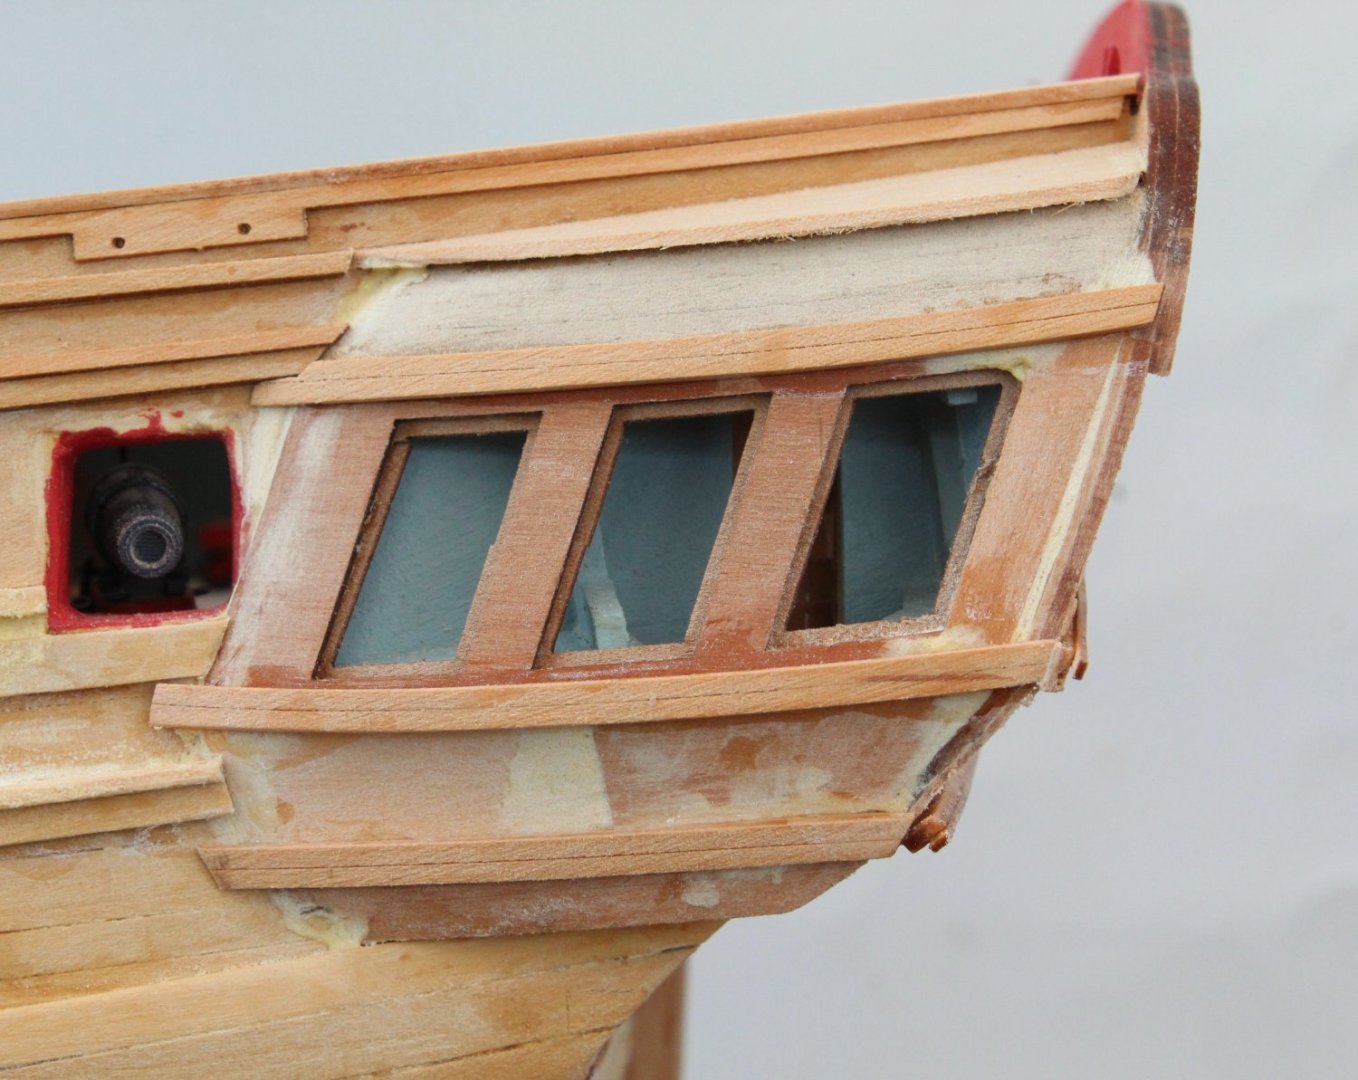
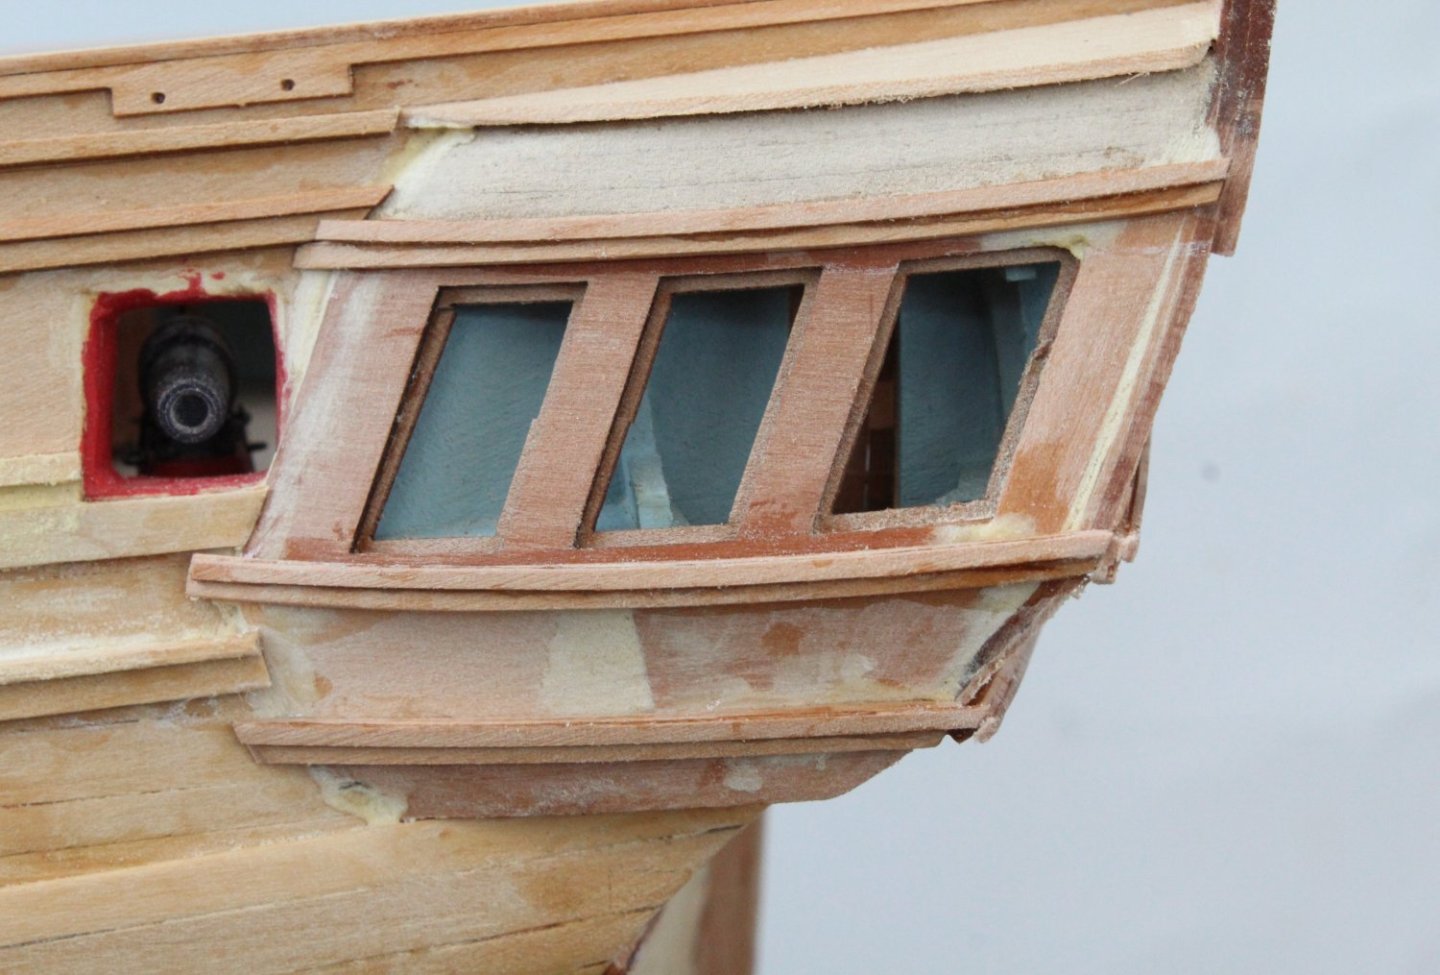
Quarter Galleries and Stern Work I have now completed the work on adding the window frames and decorations to the quarter galleries and stern area. I opted for the closed window option for the stern windows. I really liked the kit supplied black card roof shingles which made fitting them so much easier than PE parts. There are more some decorations to be added to the upper area of the stern and the ships name decal also needs to be added. I have added the depth marking decals to the stern and bow areas. The two attached photo's amplifies the imperfections of my workmanship but I am happy with how it looks with the naked eye.


- 587 replies
-
- 9
-
-
- Indefatigable
- Vanguard Models
- (and 1 more)
-
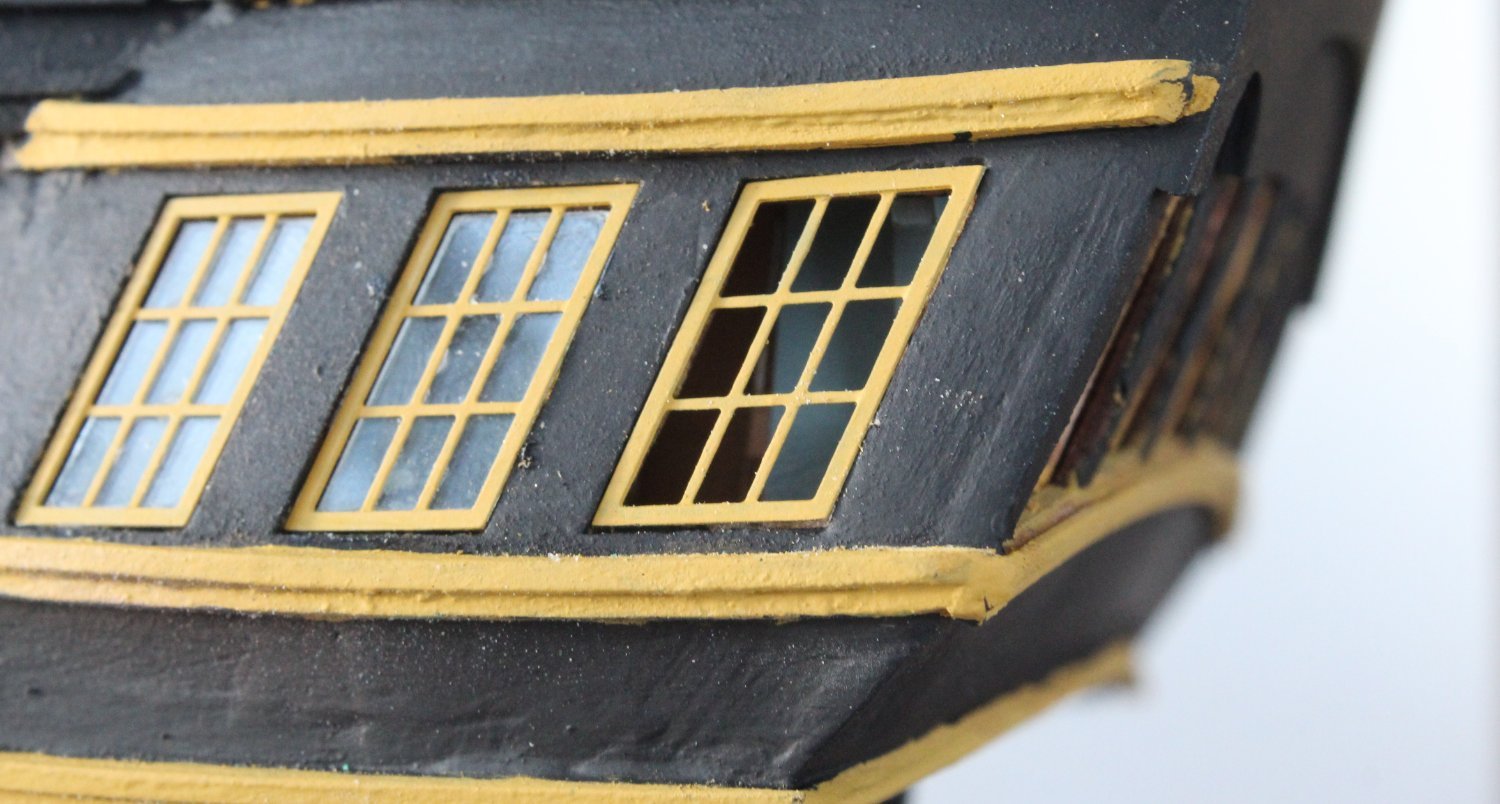
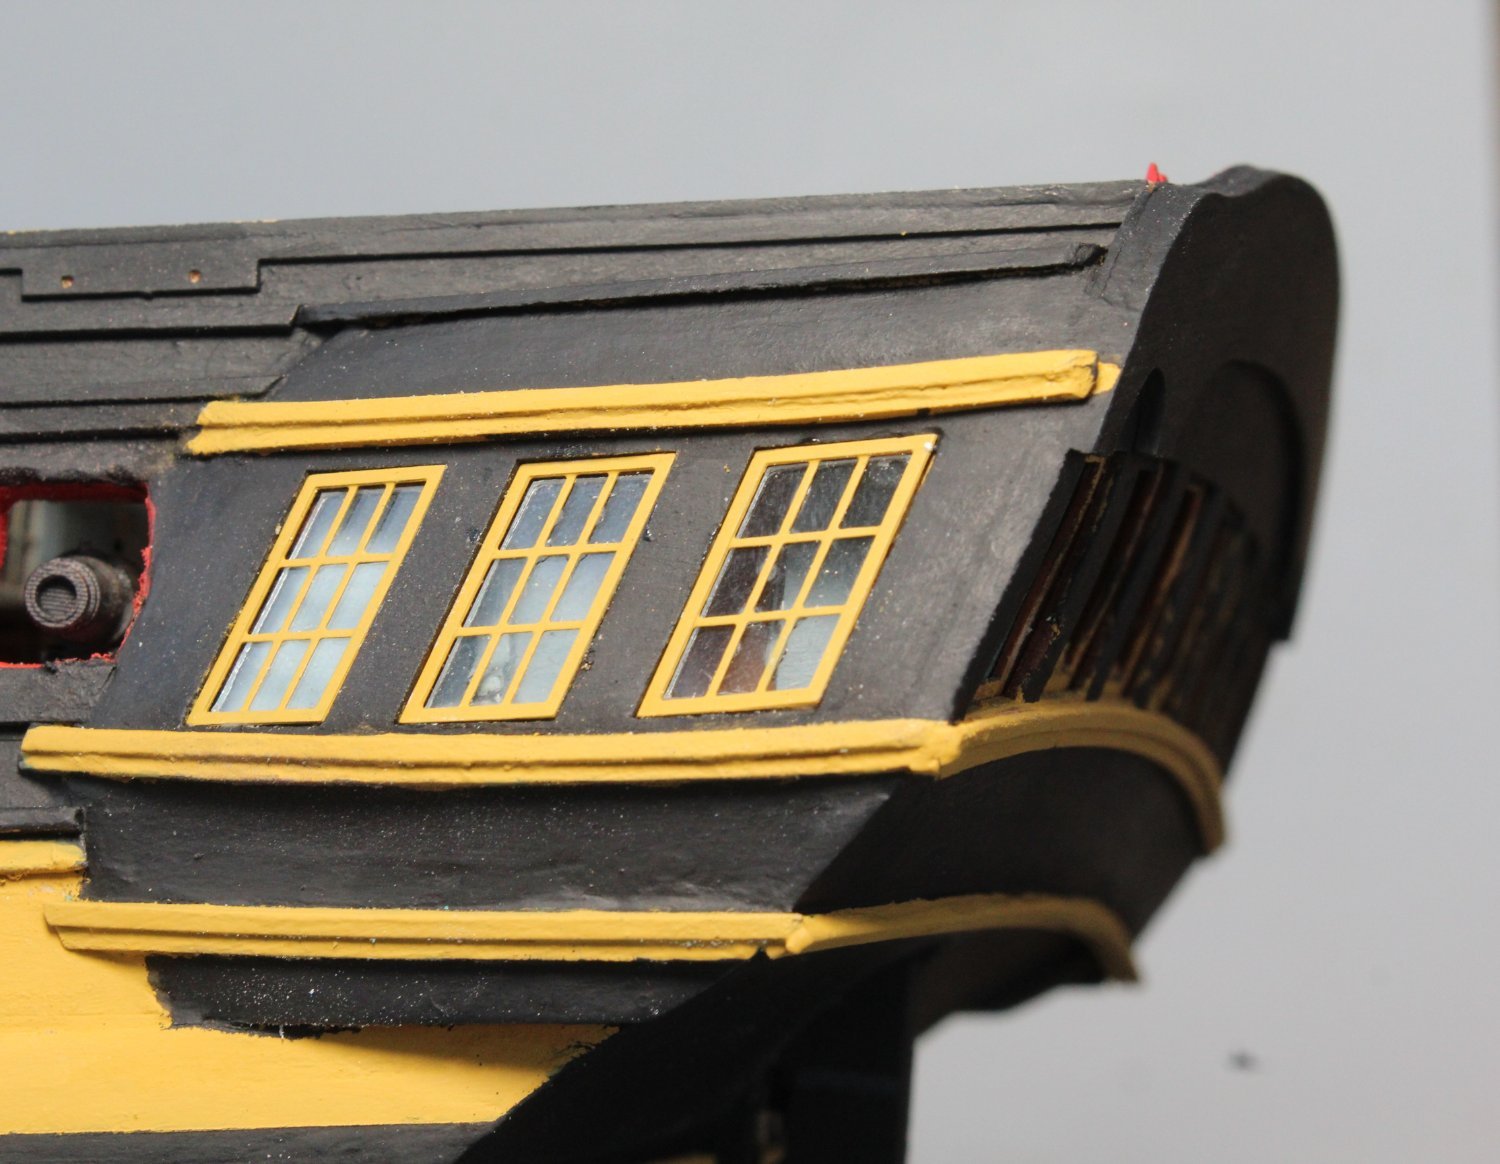
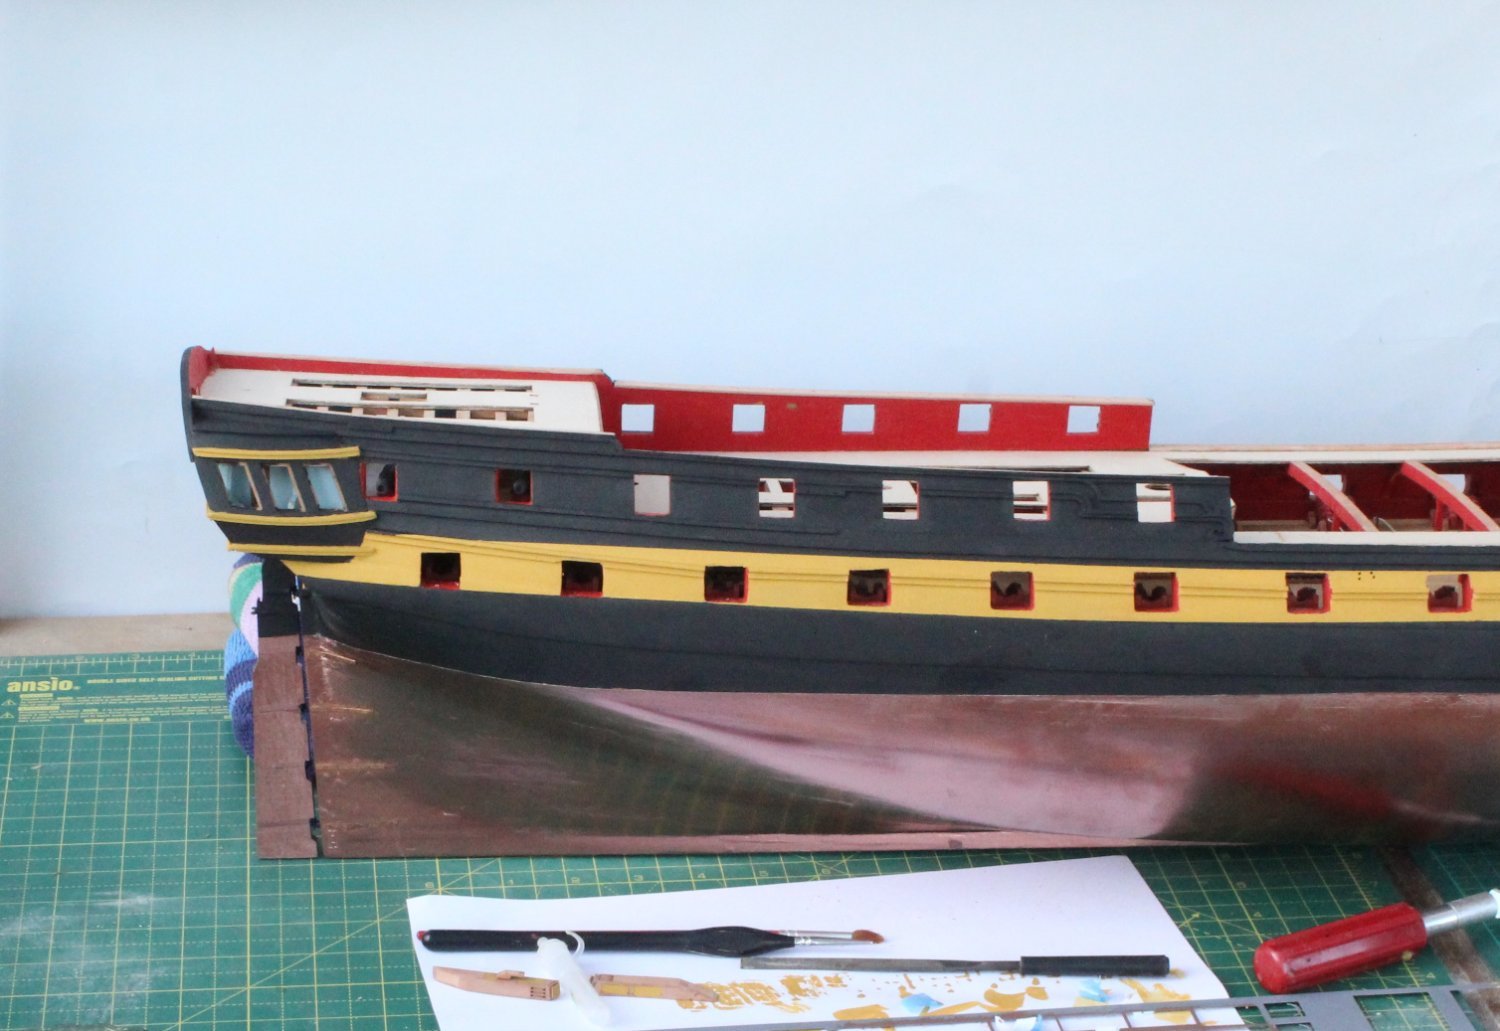
Rudder Firstly I must apologise to Chris and Jim for not fitting the copper plates to my build and that my copper painted hull does not show off the lower half of my Indy build in the best light. I fully accept that this might distract from the wonderful design of the Indy which was not my intention. My models are not being built for display on completion, I just enjoy building them therefore I can accept some limitations with my model(s). With that said I have assembled and fitted the rudder, and I did not account any problems with the assembly and fitting. I really liked the kit supplied 0.2mm black card for the rudder gudgeon and pintles which were so much easier to fit. I have added one photo showing the rudder in position, noting I still have to fit the depth marking decals. Fitting Quarter Gallery Windows and Frames This turned out to be an interesting task with regards to fitting the window panes. As can be seen in the first photo there is an opening for the window frame and pane. The window frame will sit with the recessed area and the window pane fills the open space. The window frame was dry fitted to make sure it would fit within the recess. At this stage the window pane has not been installed. I could not find an easy method to fit the window panes in the opening so I opted to fit them to the back of the window frame, using very small amounts of glue to hold them in place. The window frame & pane assembly was then glued in place. I just have to repeat the process as I fit the stern and right-hand side gallery window frames and panes.


- 587 replies
-
- 10
-
-
- Indefatigable
- Vanguard Models
- (and 1 more)
-
Many thanks, it was not my original plan but I am happy with the end result
- 587 replies
-
- 2
-
-
- Indefatigable
- Vanguard Models
- (and 1 more)
-
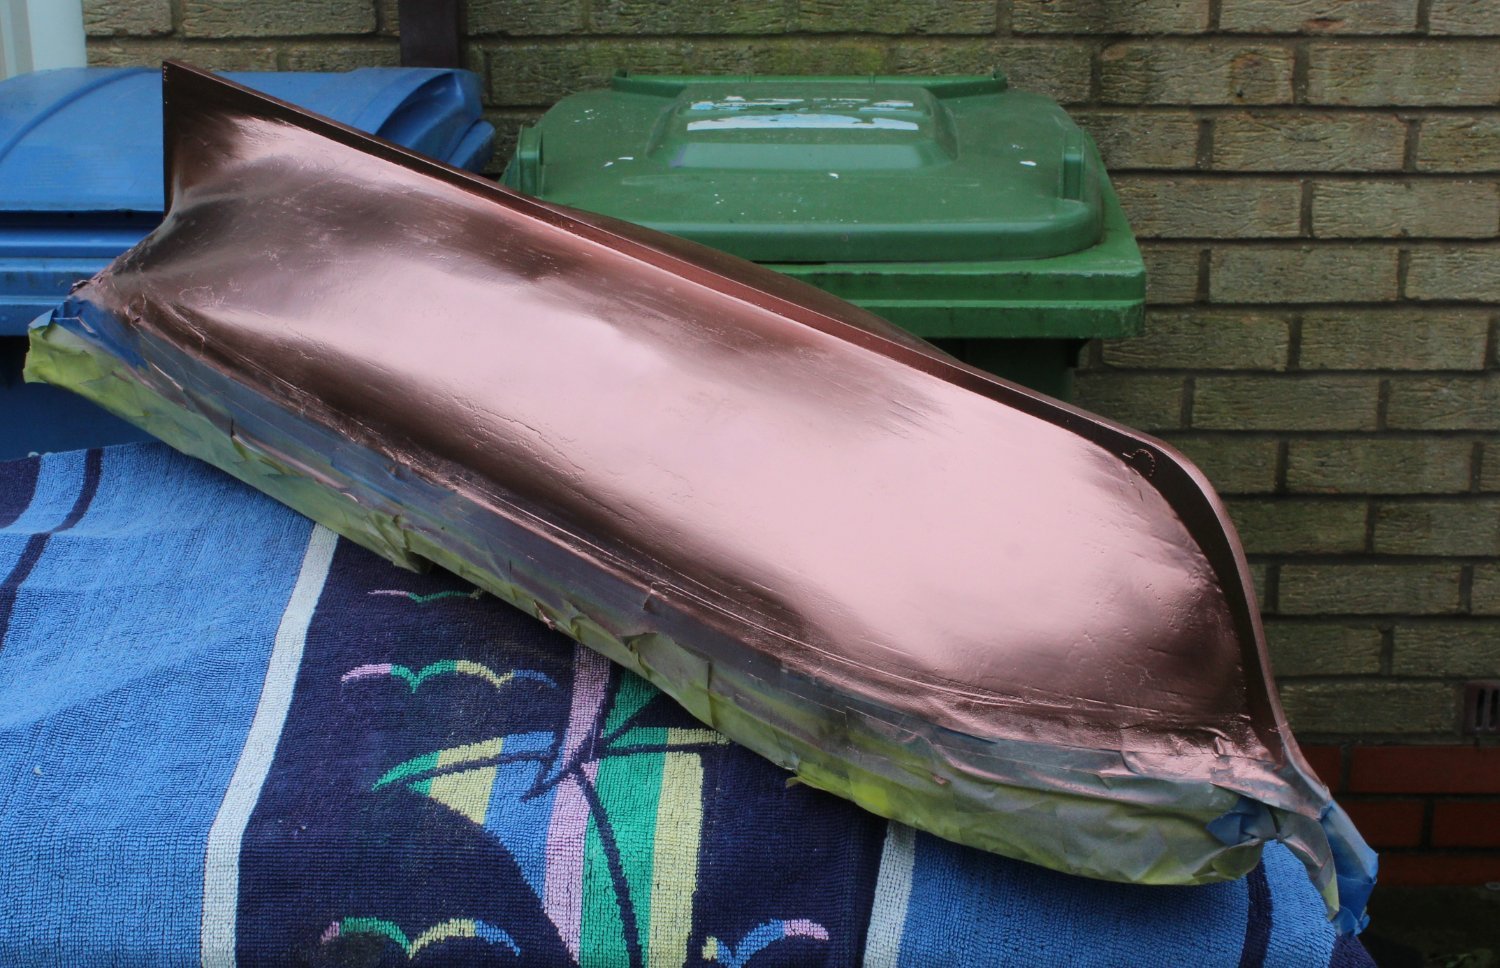
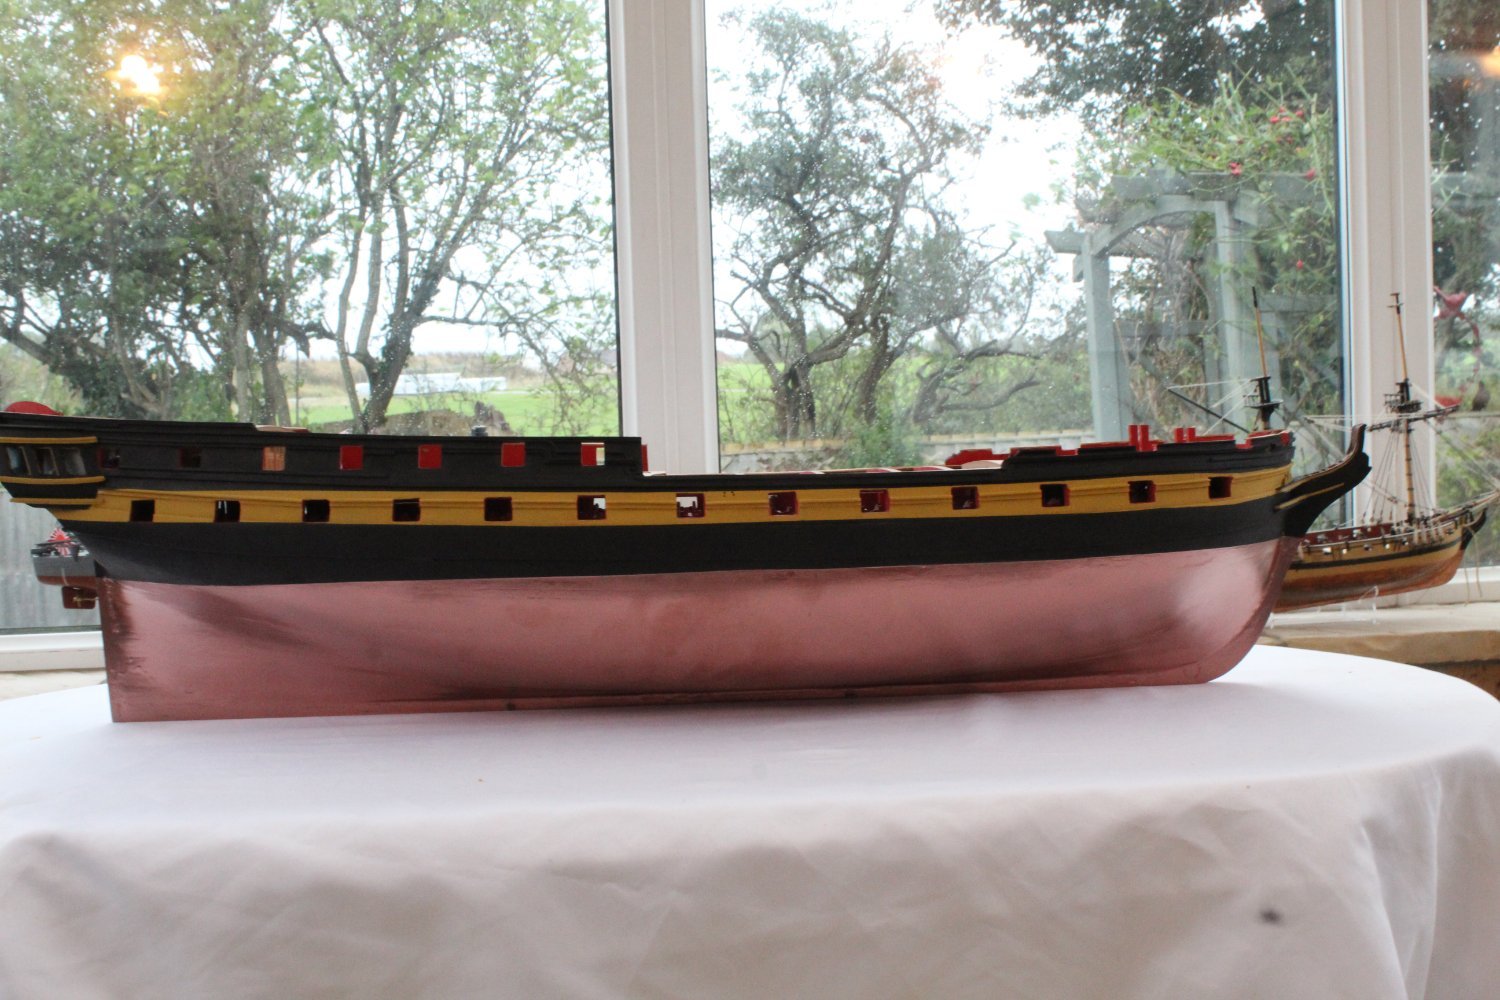
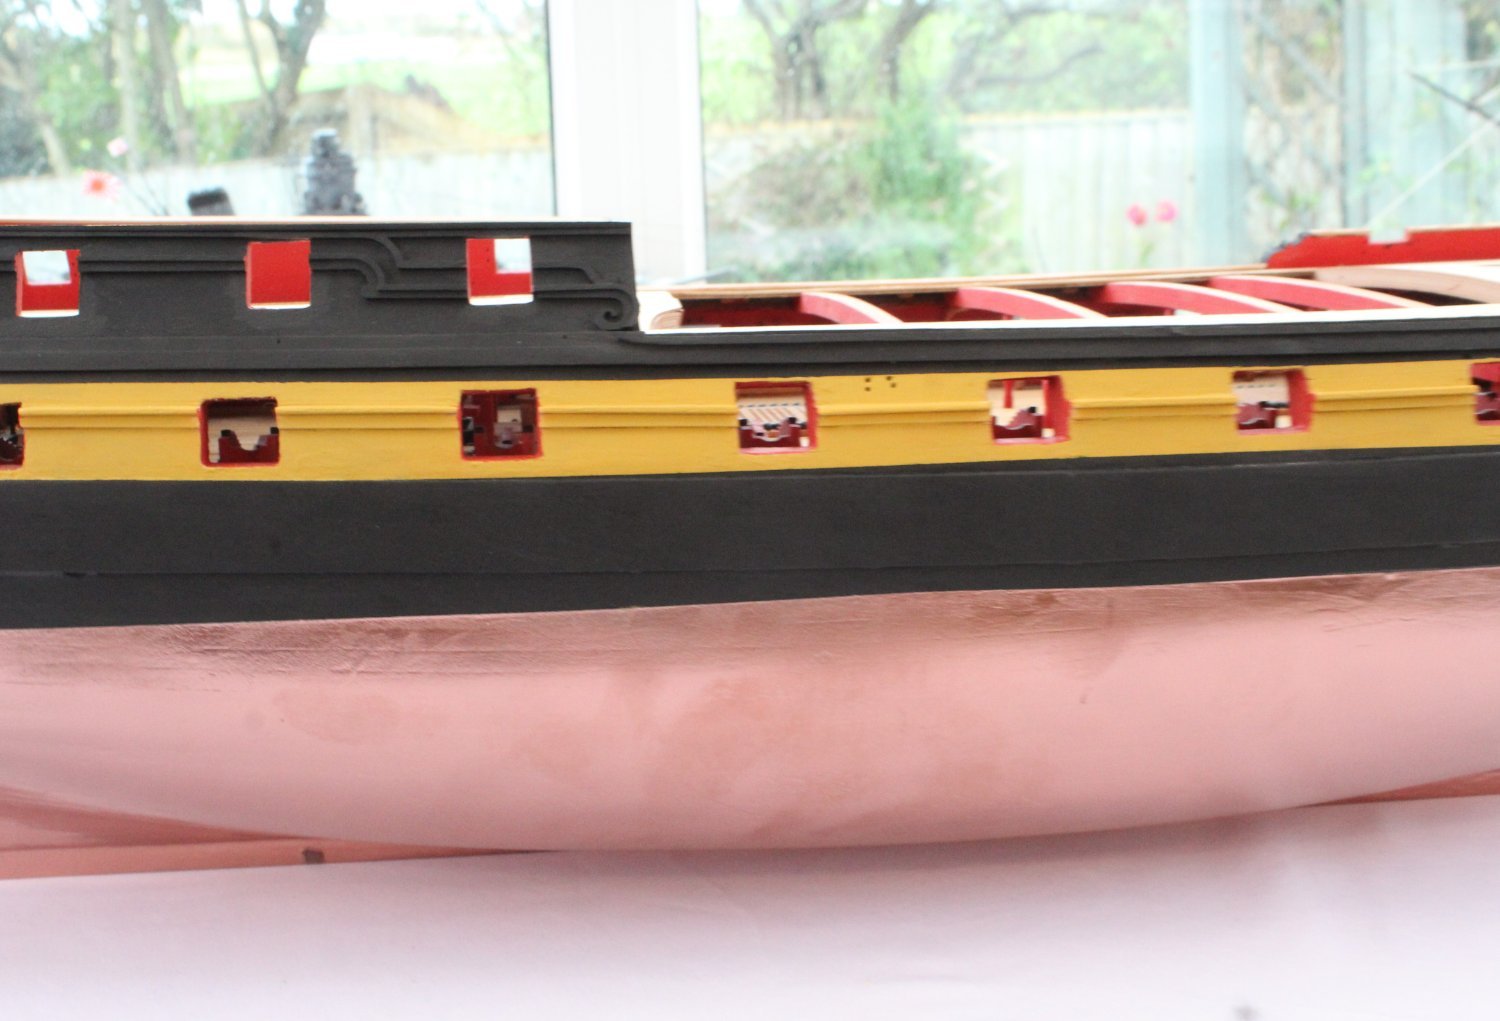
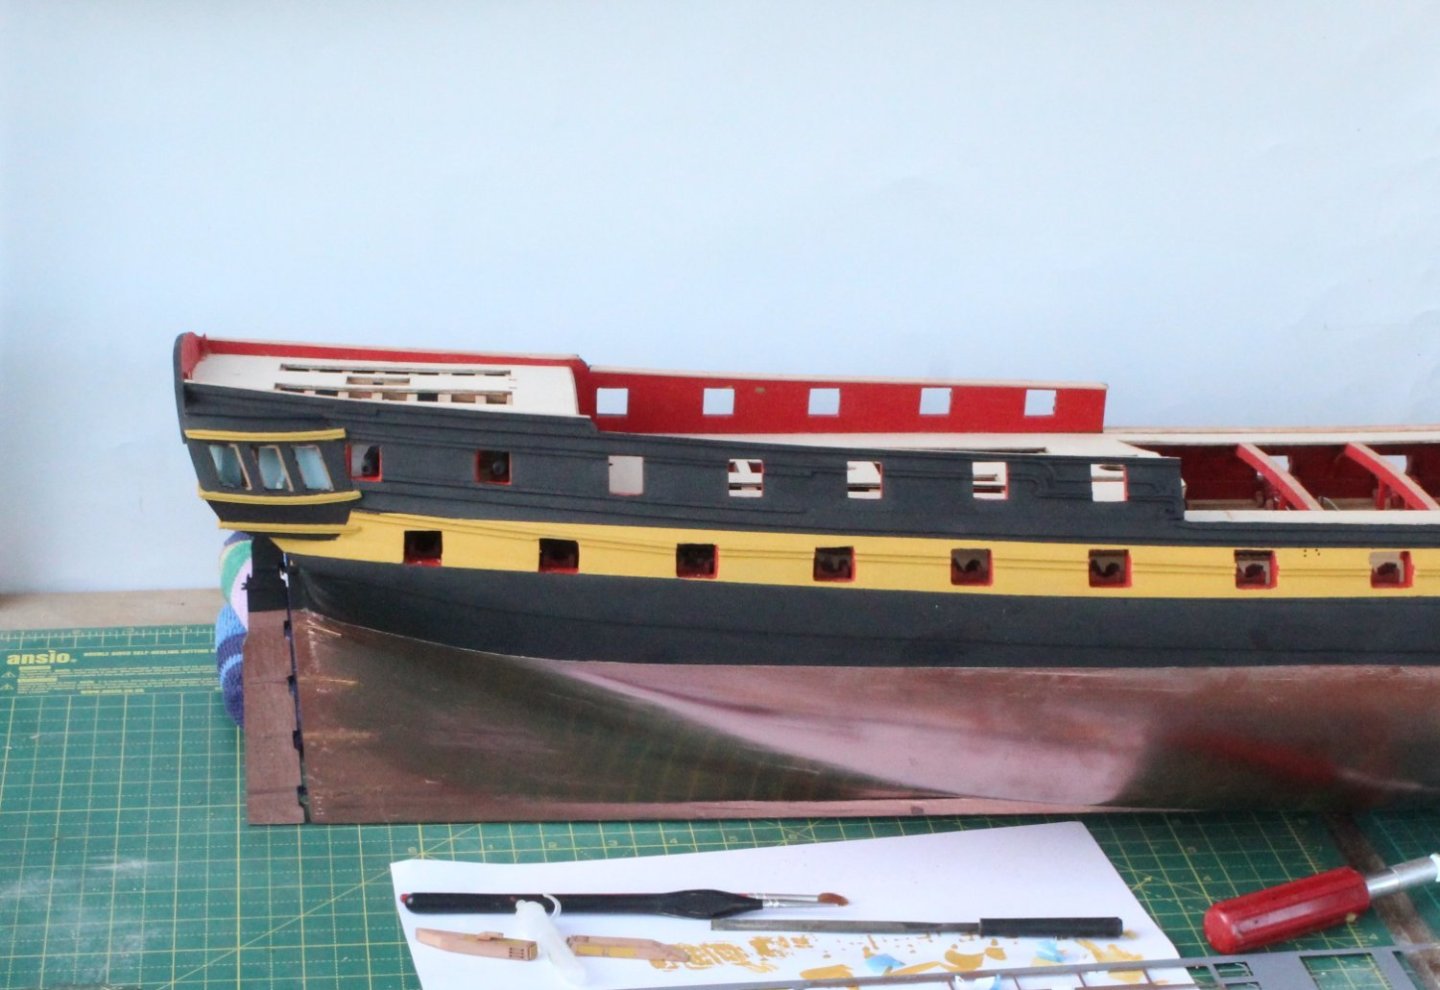
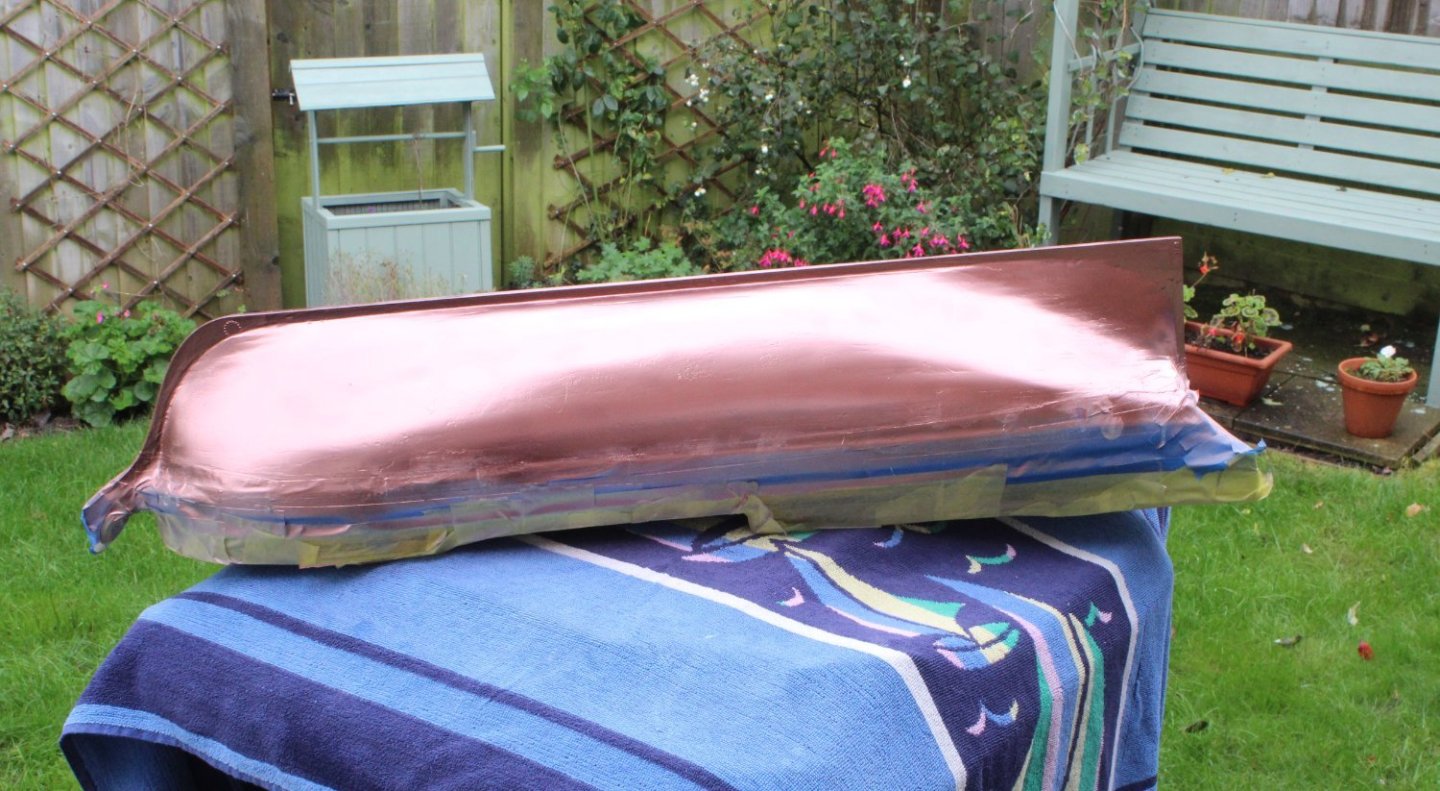
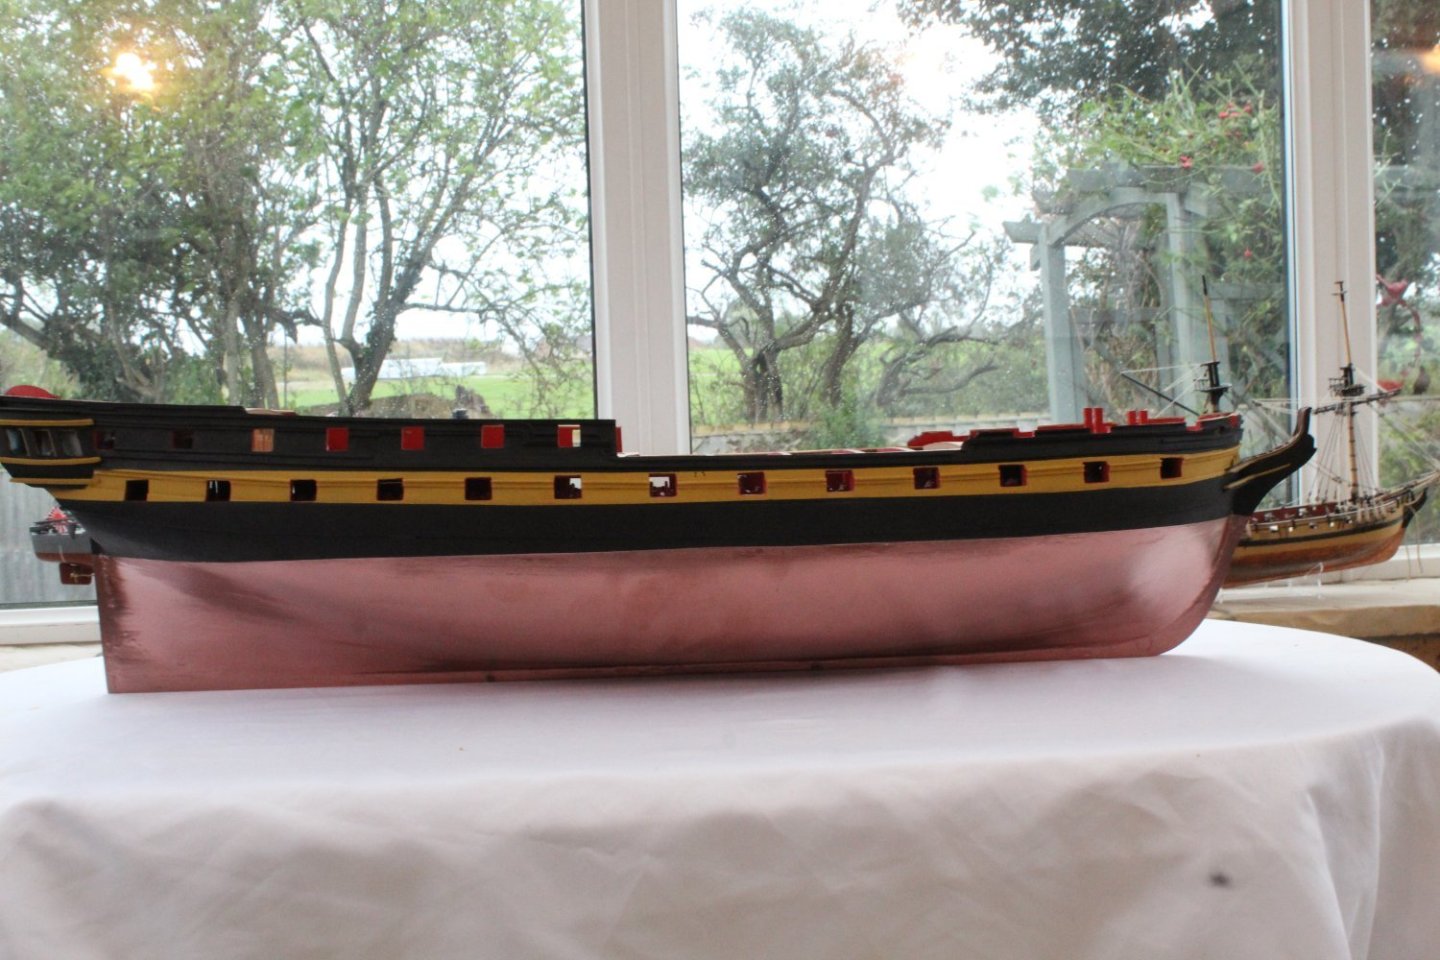
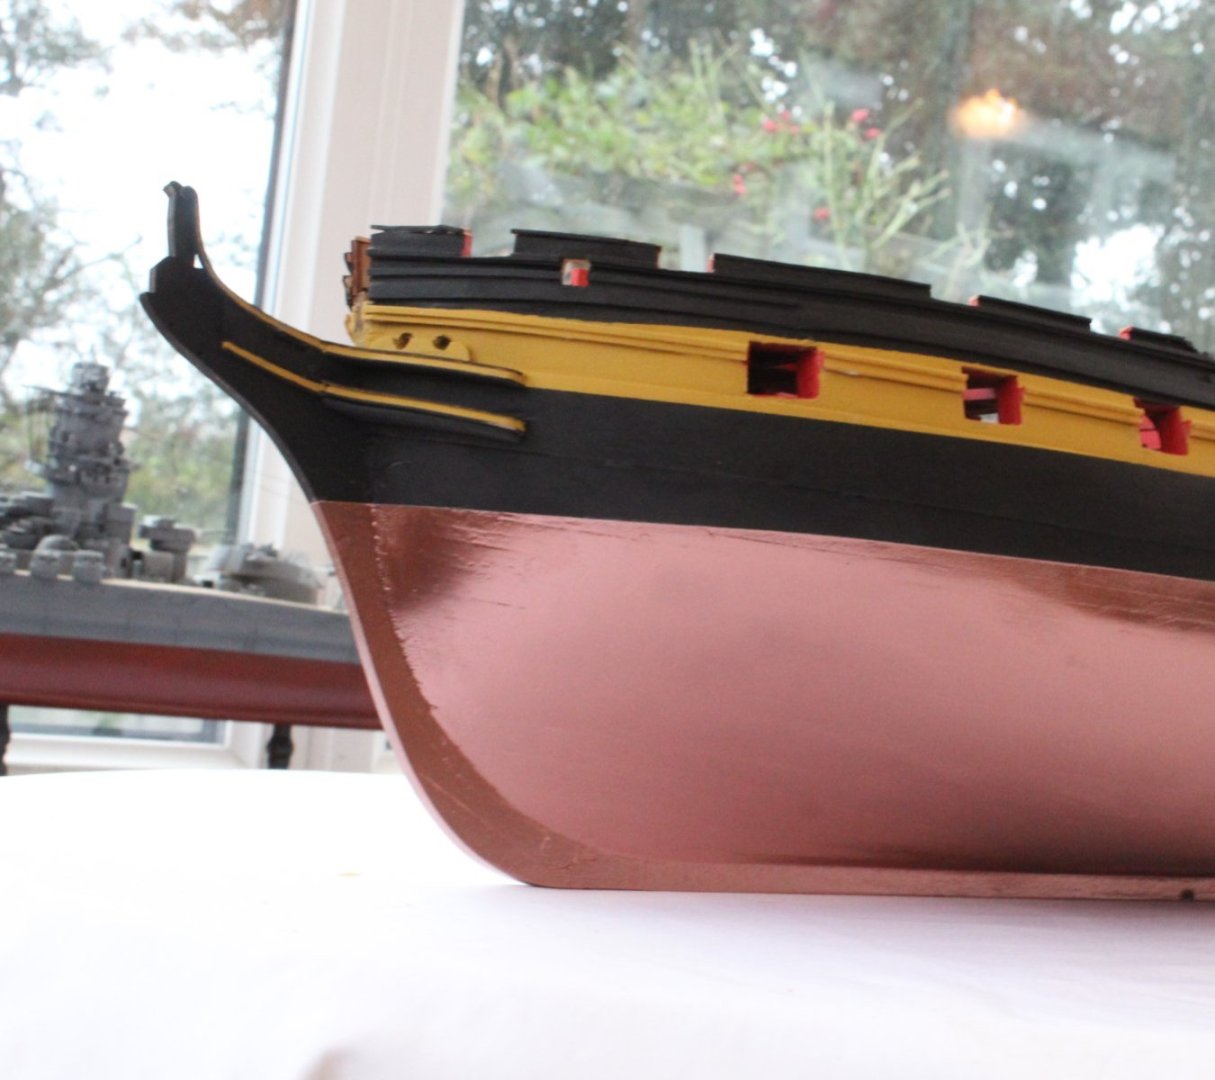
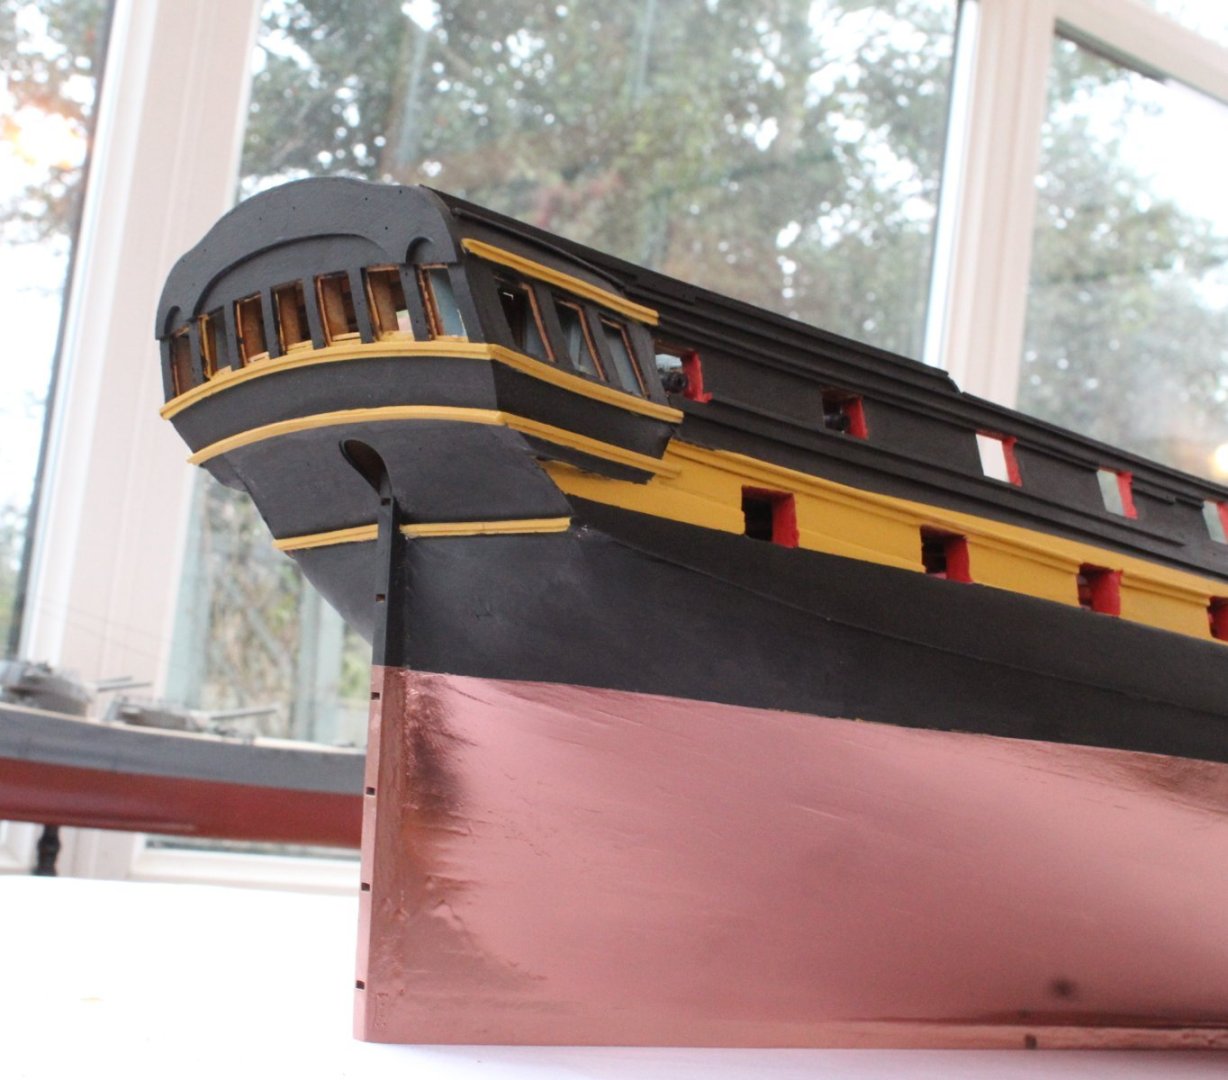
Copper Plating The Hull (below the waterline) This kit is supplied with 50m of copper tape and this needs to be cut in to approximately 2400 plates, each plate 18mm L. As noted in a previous post I bought a great tool that enabled me to cut the required plates accurately and efficiently. I thought it would be a simple task to fit the copper plates as they are self-adhesive backed. I started by fitting plates on the bottom of the keel. One plate long edge was aligned with the centre line which allows the other plates long edge to be folded over on to the hull. When I looked Jim’s build log photos this appears to be the same method he used on the prototype build. I also used cotton buds to help smooth the copper plates in place. I found it very difficult to get the plates to line up as I wanted, and I did try several different methods and many plates were ripped off as I was not happy with how they looked. I found my progress was extremely slow and much slower than when I was fitting copper plates with super glue to both my Caldercraft’s HMS Victory and Vanguard Models Speedy models. I did consider if I should switch to fitting actual copper plates. I noted that Cornwall Model Boats has a nice selection of suitable copper plates in stock, but as they are quite expensive, I ended up rejecting this as an option. I then decided to experiment with applying a metallic copper paint. I bought a can of Plasti-Kote Brilliant Metallic Spray Paint – Copper. After taping the hull above the water line the hull was coating with a WOP. I then sprayed the hull with a light grey primer. I then filled and sanded the hull and then resprayed with the light grey primer. After a couple of these fill, sand and paint interations the hull was looking much smoother. I then applied a couple of coats of the copper paint. I was not looking for a perfect smooth finish and was happy to retain some some imperfections for the Indy. I have taken a couple of pictures once I started to apply the copper paint. I have now removed the masking tape and I am pleased with the end result. I have not been able to take any decent pictures due to the low lighting levels and reflections on the copper painted surface(s). The following are the best of a bad bunch. I have been striving to improve my skill set and techniques with each model and I’m generally pleased with my progress in that respect. I only tend to only look at the rigging and the decks on my completed models. Therefore, as much as I would like to add the copper tiles for historical accuracy and for improving my modelling skill set I am more than happy with a simple copper painted hull below the waterline. My models, once built, are not prominently displayed in our house so the only real critics of my models of the readers of my build log(s).


- 587 replies
-
- 14
-
-
- Indefatigable
- Vanguard Models
- (and 1 more)
-
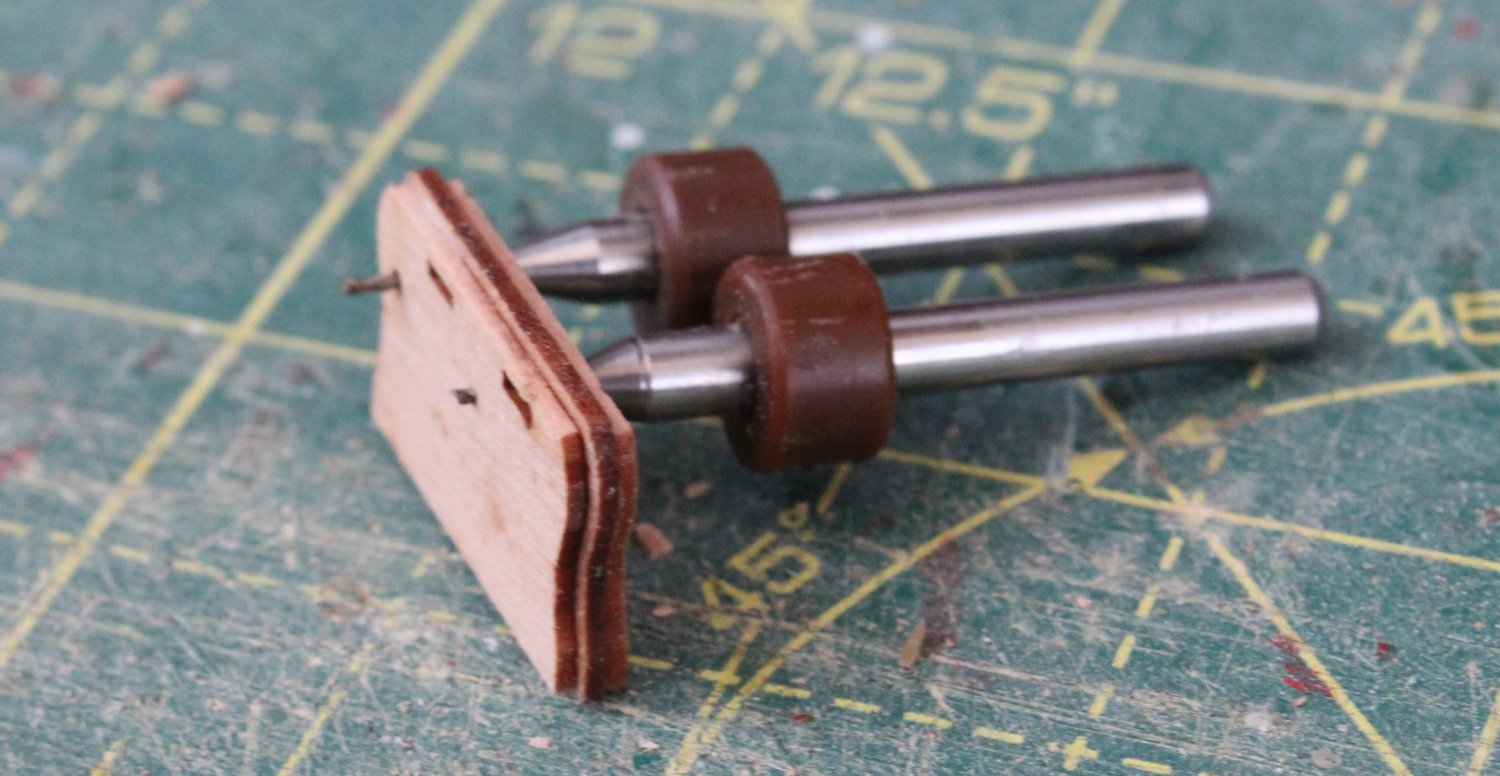
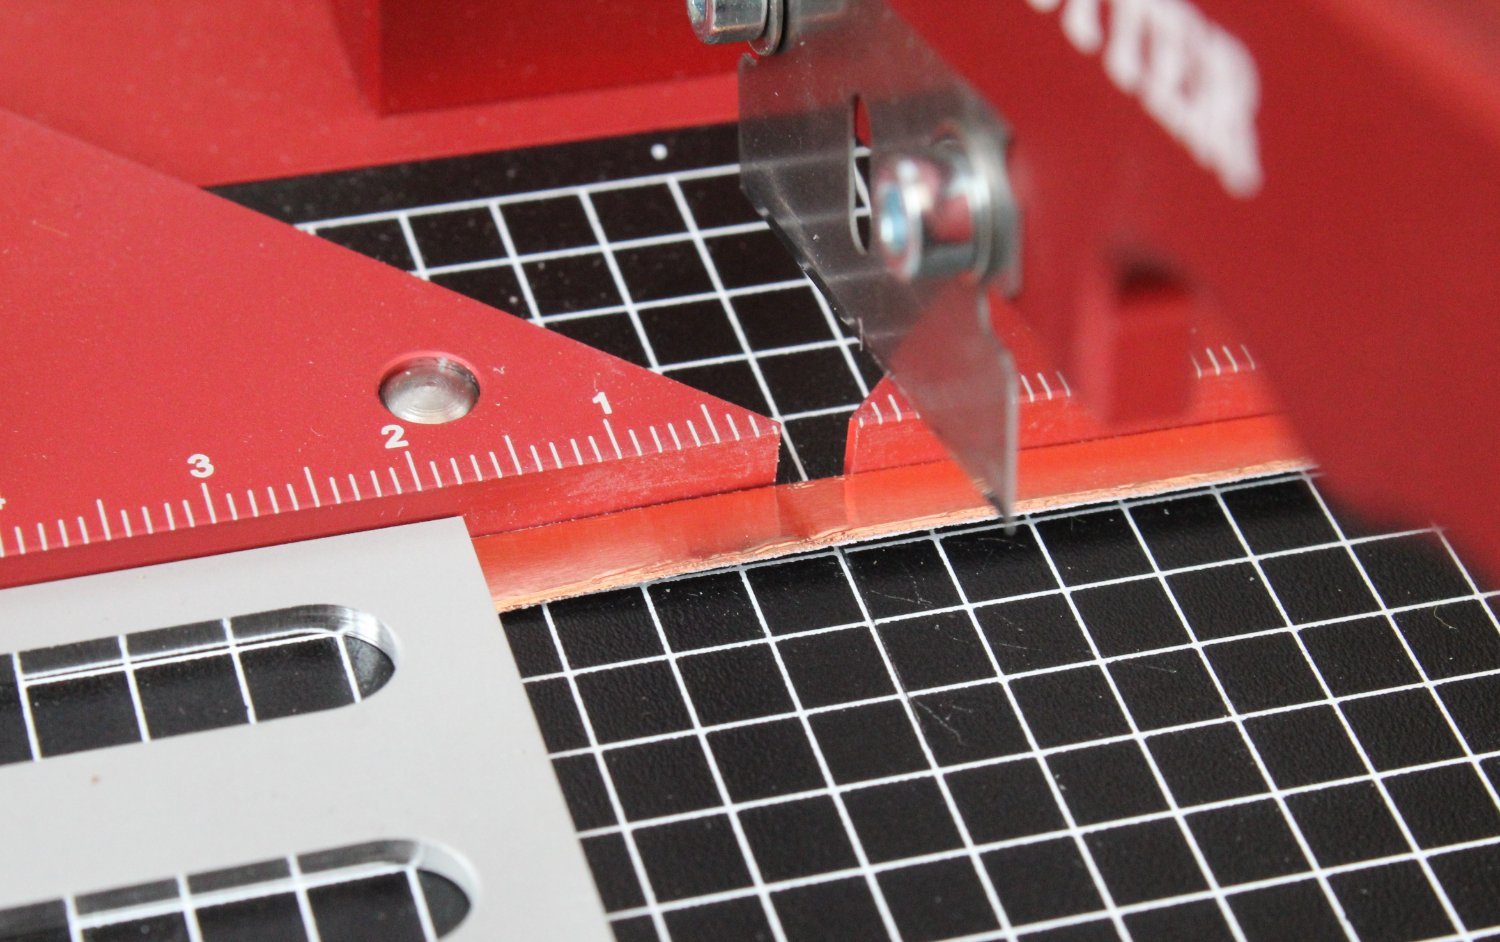
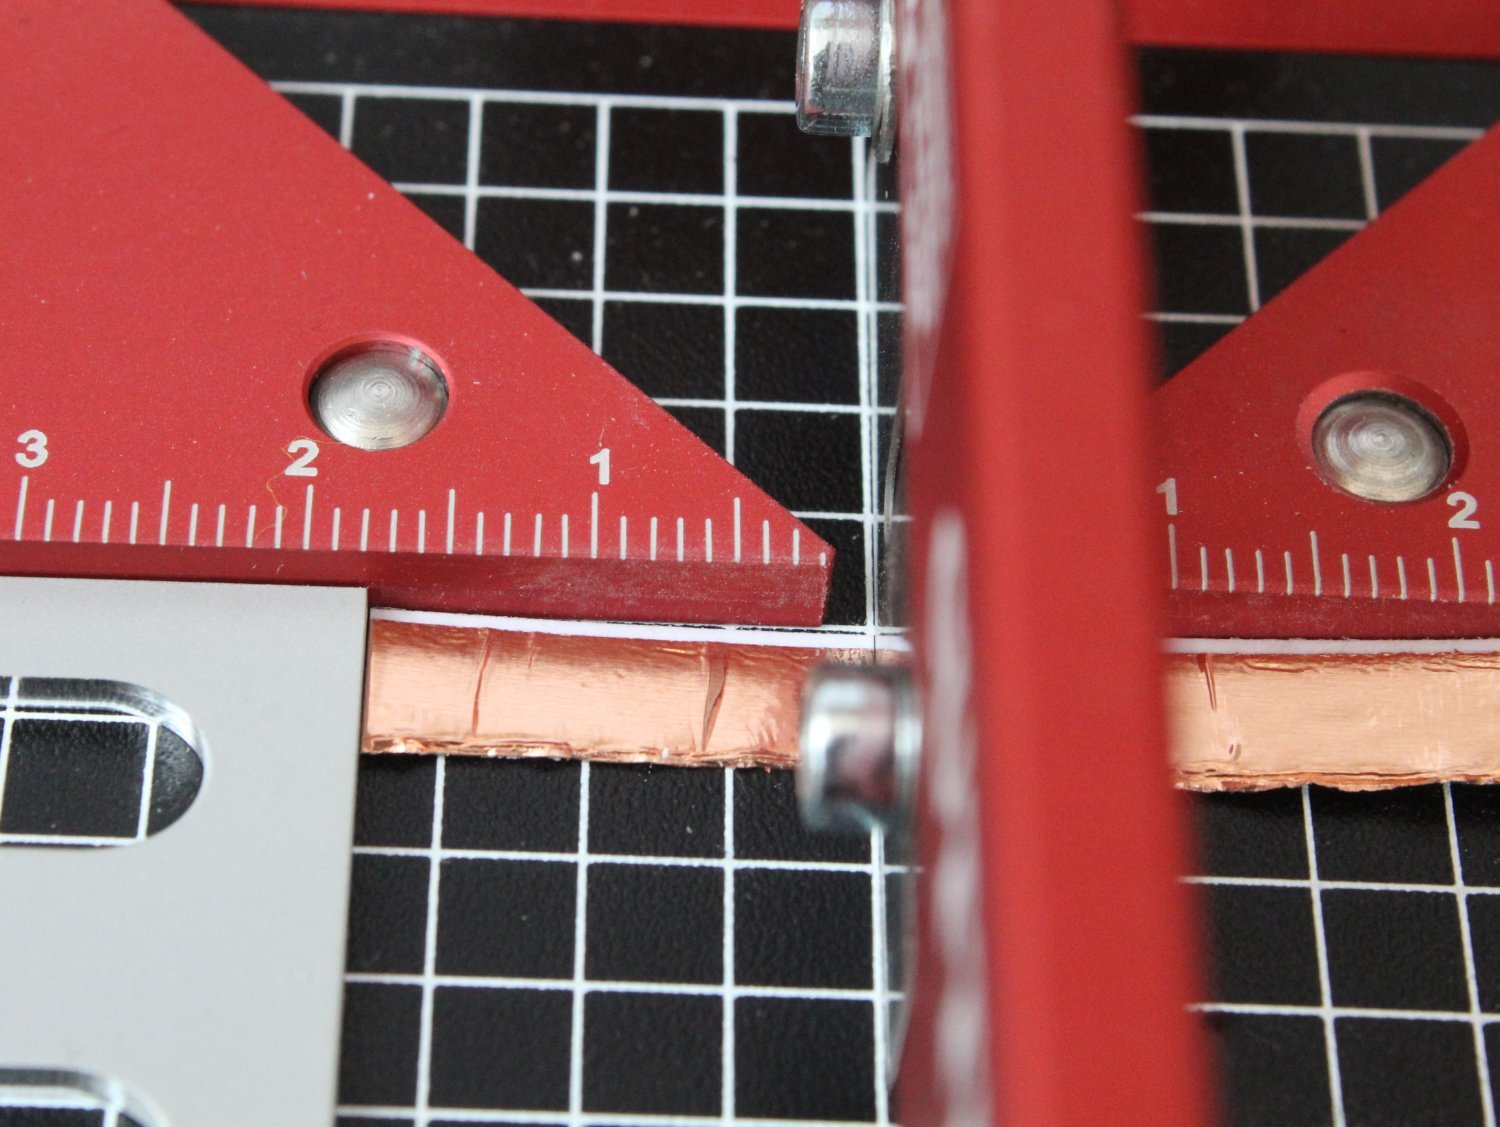
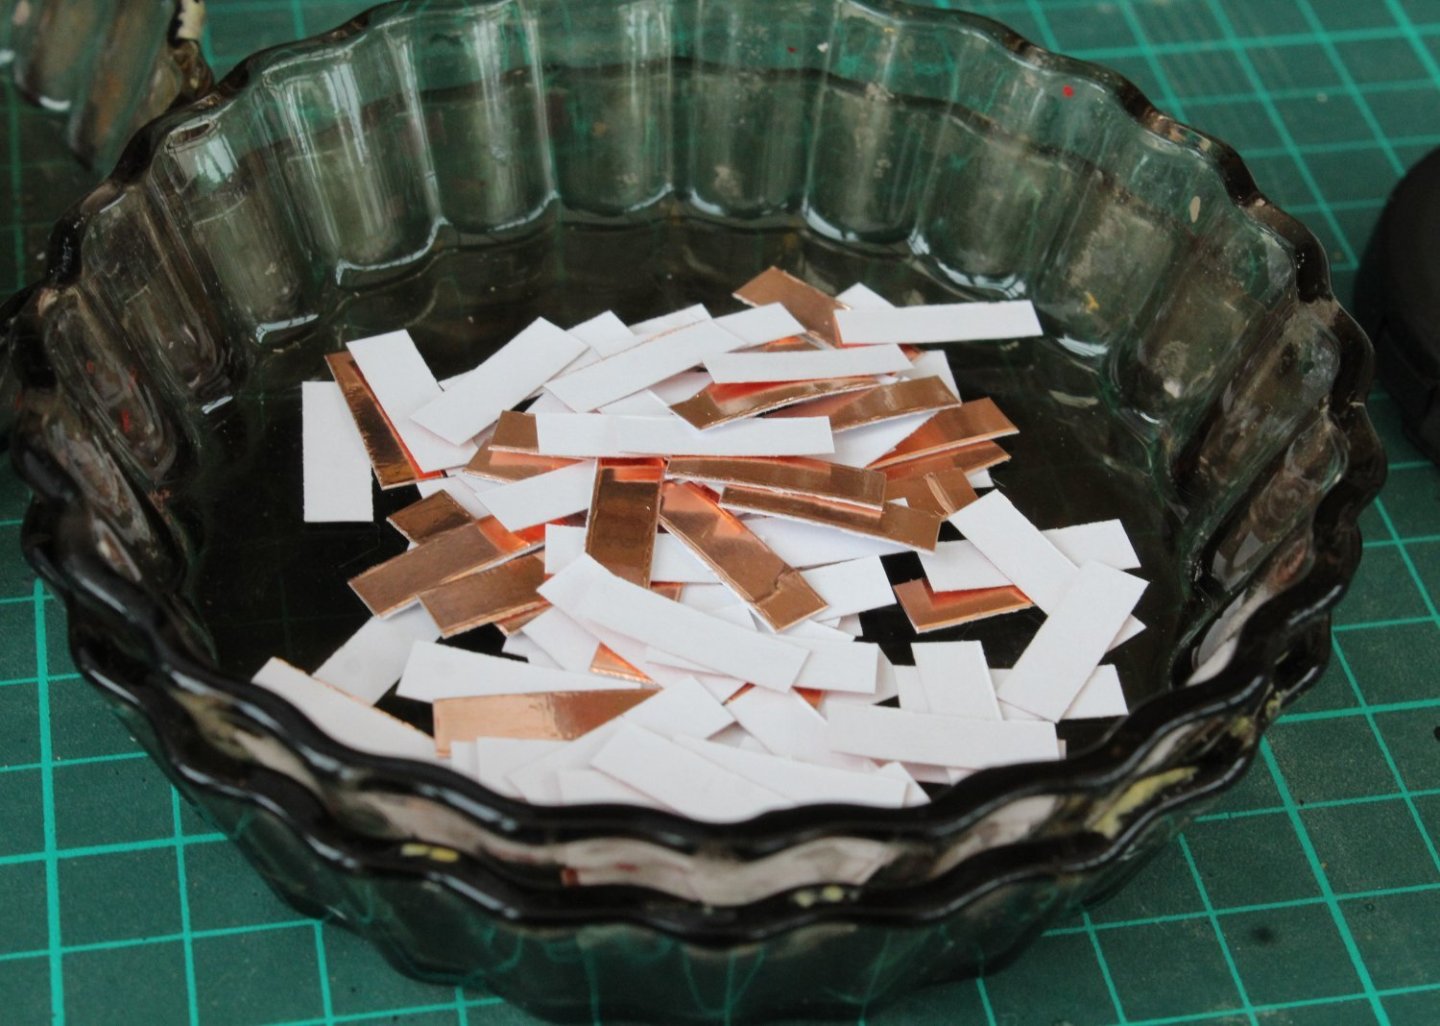
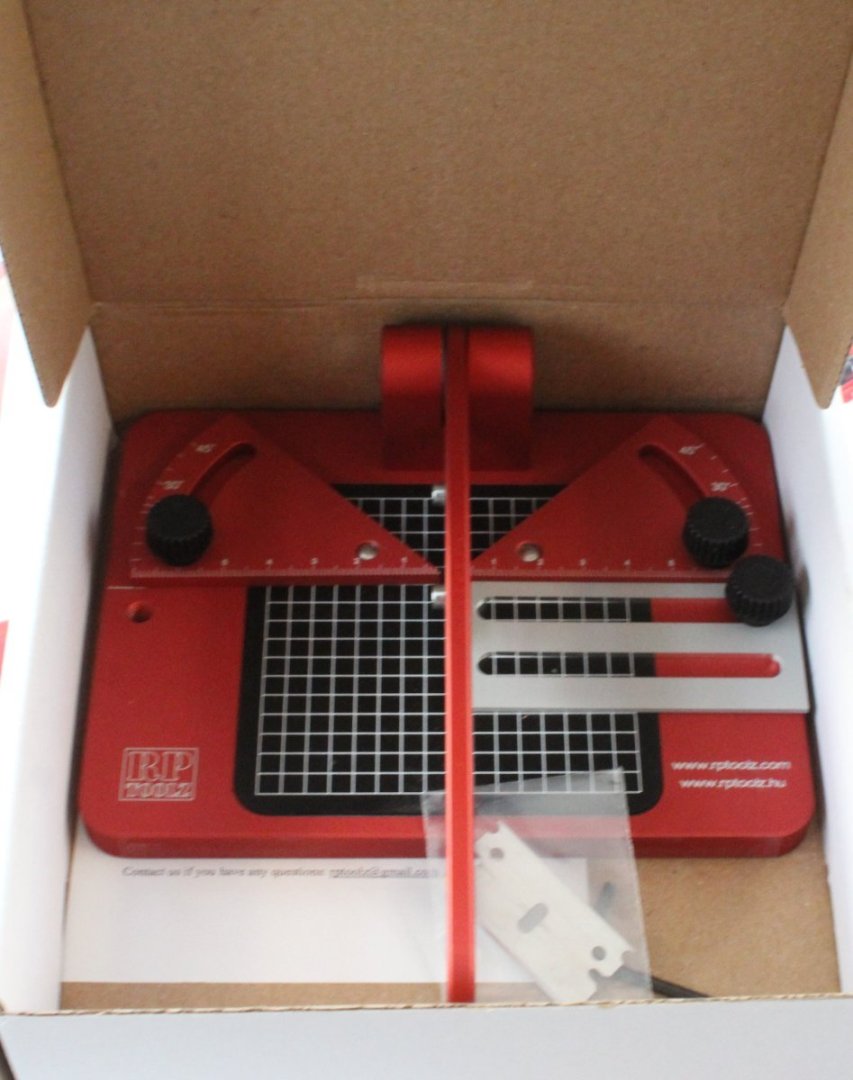
Copper Plate Production The kit is supplied with a 50m length of copper tape. It is estimated that between 2200 and 2400 copper plates, 18mmL will be required. Based on a quick time and motion study I am able to cut between 6 to 8 plates per min. Therefore it will take me approx. 6 hours to cut the required number of plates. I have been debating if I should bite the bullet and just get all the plates cut over the next couple of days or to alternate between cutting plates and adding them to the hull. The cutter tool (£85) I bought has proven to be a very wise investment. I set the end stop to 18mm and then positioned the tape in place, as shown in the photo below. The copper tape was then cut with very little effort and produced a nice looking copper plate. After about 30 mins of cutting I had a nice collection of copper plates, with a very consistent size profile. The copper tape supplied is 50mL so I should have the capacity to cut 2750 copper plates, which means I should have more than 350 spare copper plates. This is good news as I am having to use a little bit of quality control as can be seen in the next photo, where there are some sections where the copper tape manufacturing process is not so good. I am still cutting the tape from the affected sections in to plates, but they are being placed in a separate container and they will only be used if absolutely necessary.


- 587 replies
-
- 11
-
-
- Indefatigable
- Vanguard Models
- (and 1 more)
-
Oh Joy!🤣 I guess it will not be too bad once I get going.
- 587 replies
-
- 2
-
-
- Indefatigable
- Vanguard Models
- (and 1 more)
-
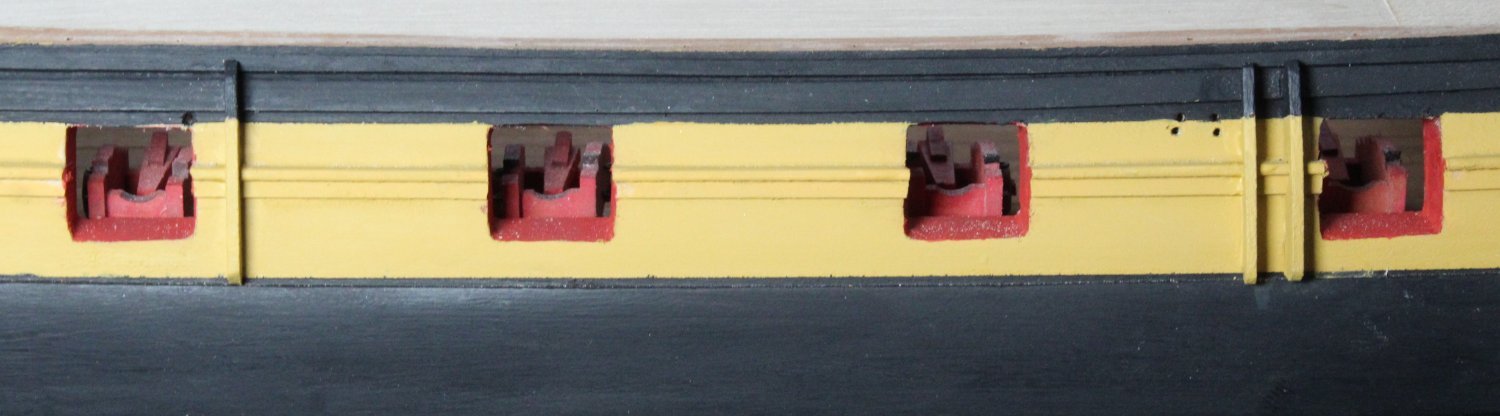
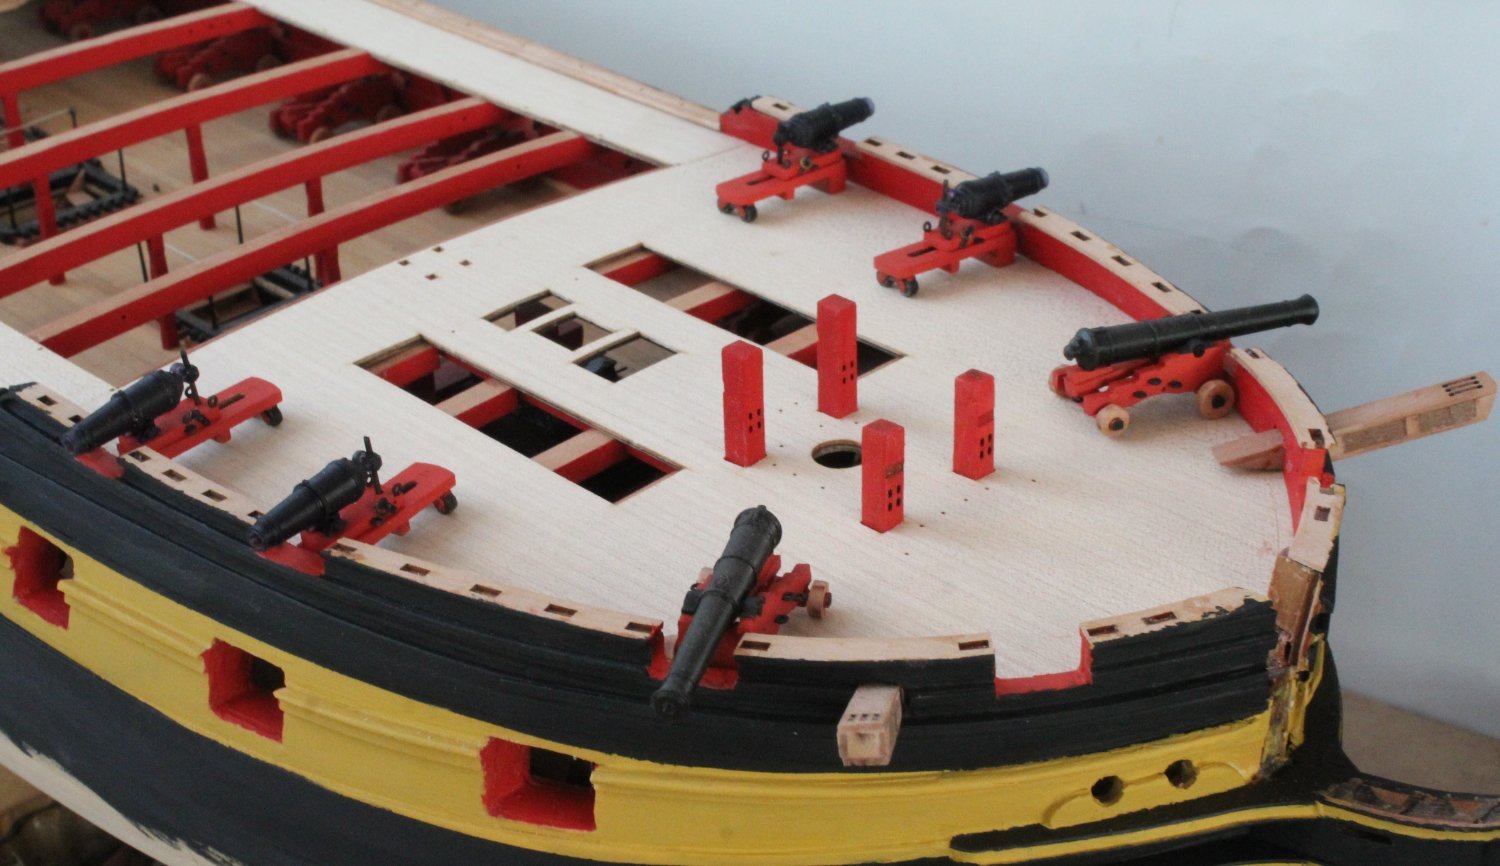
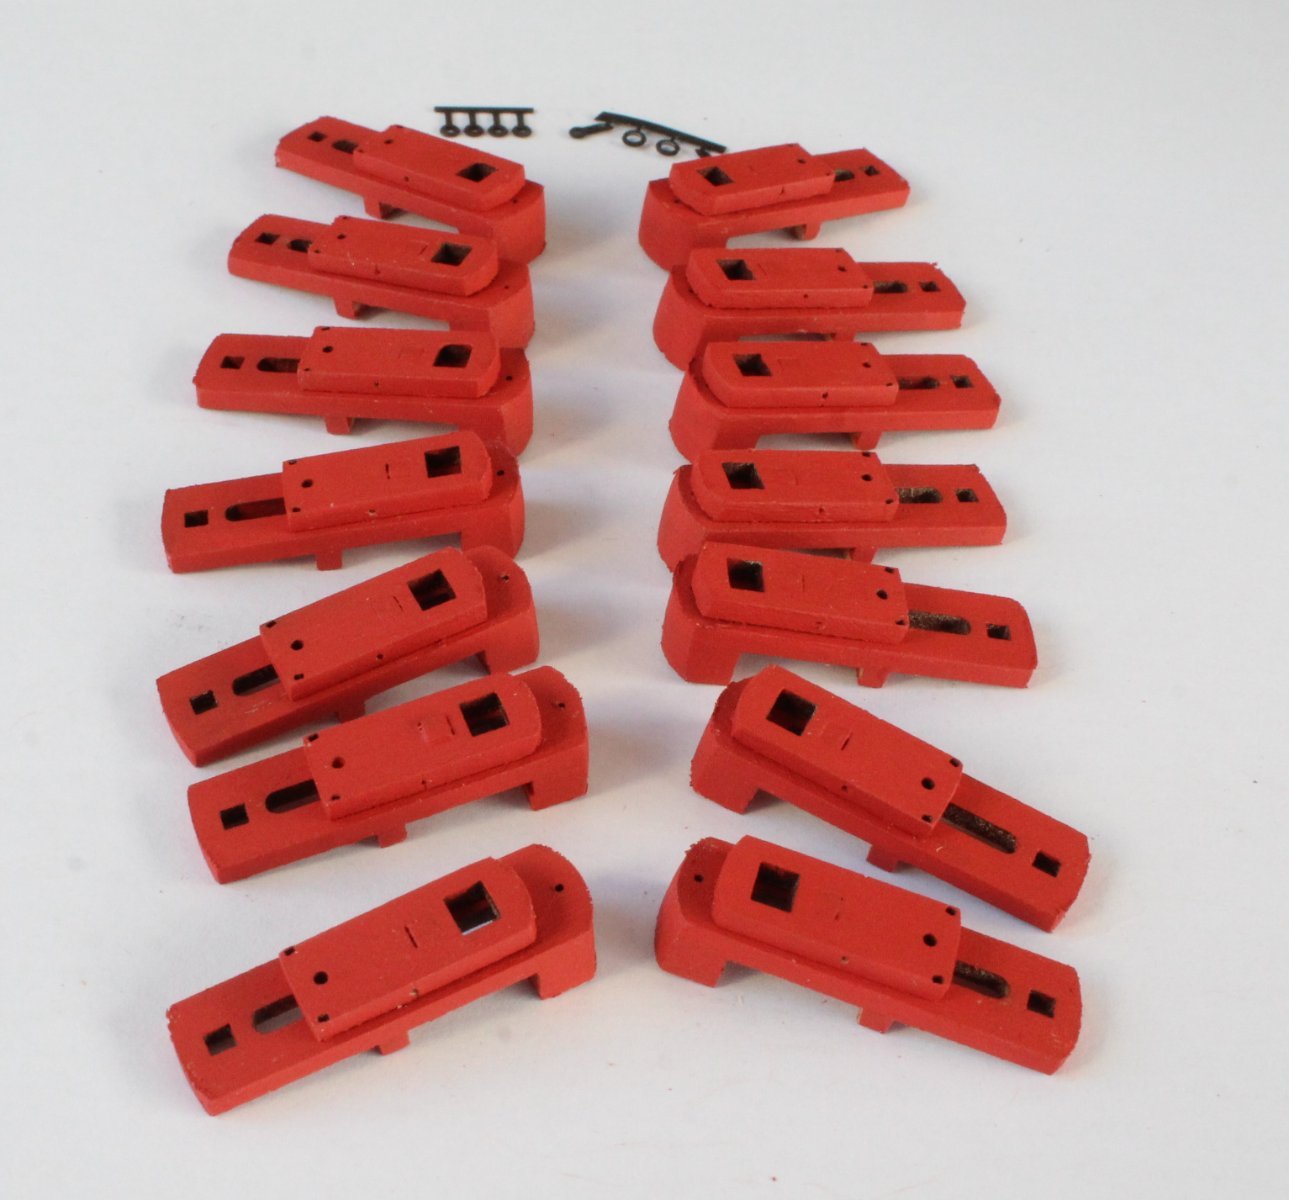
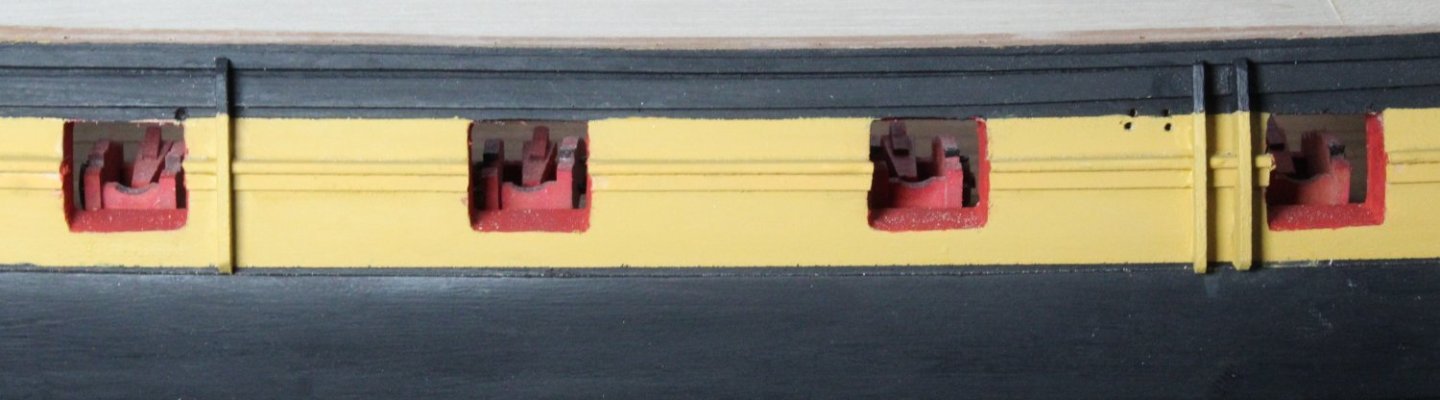
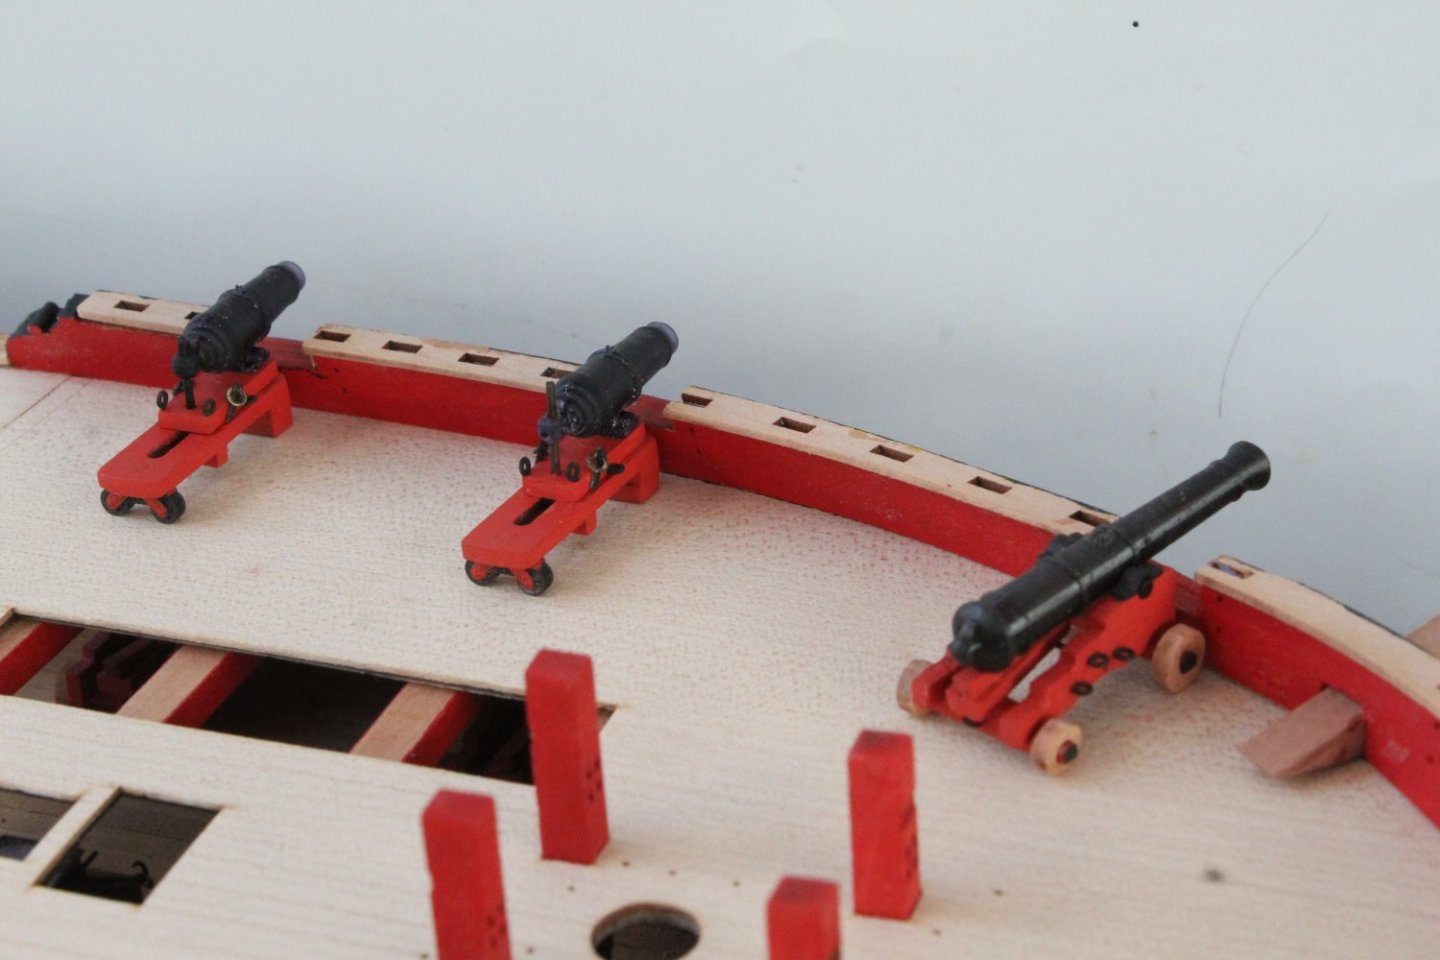
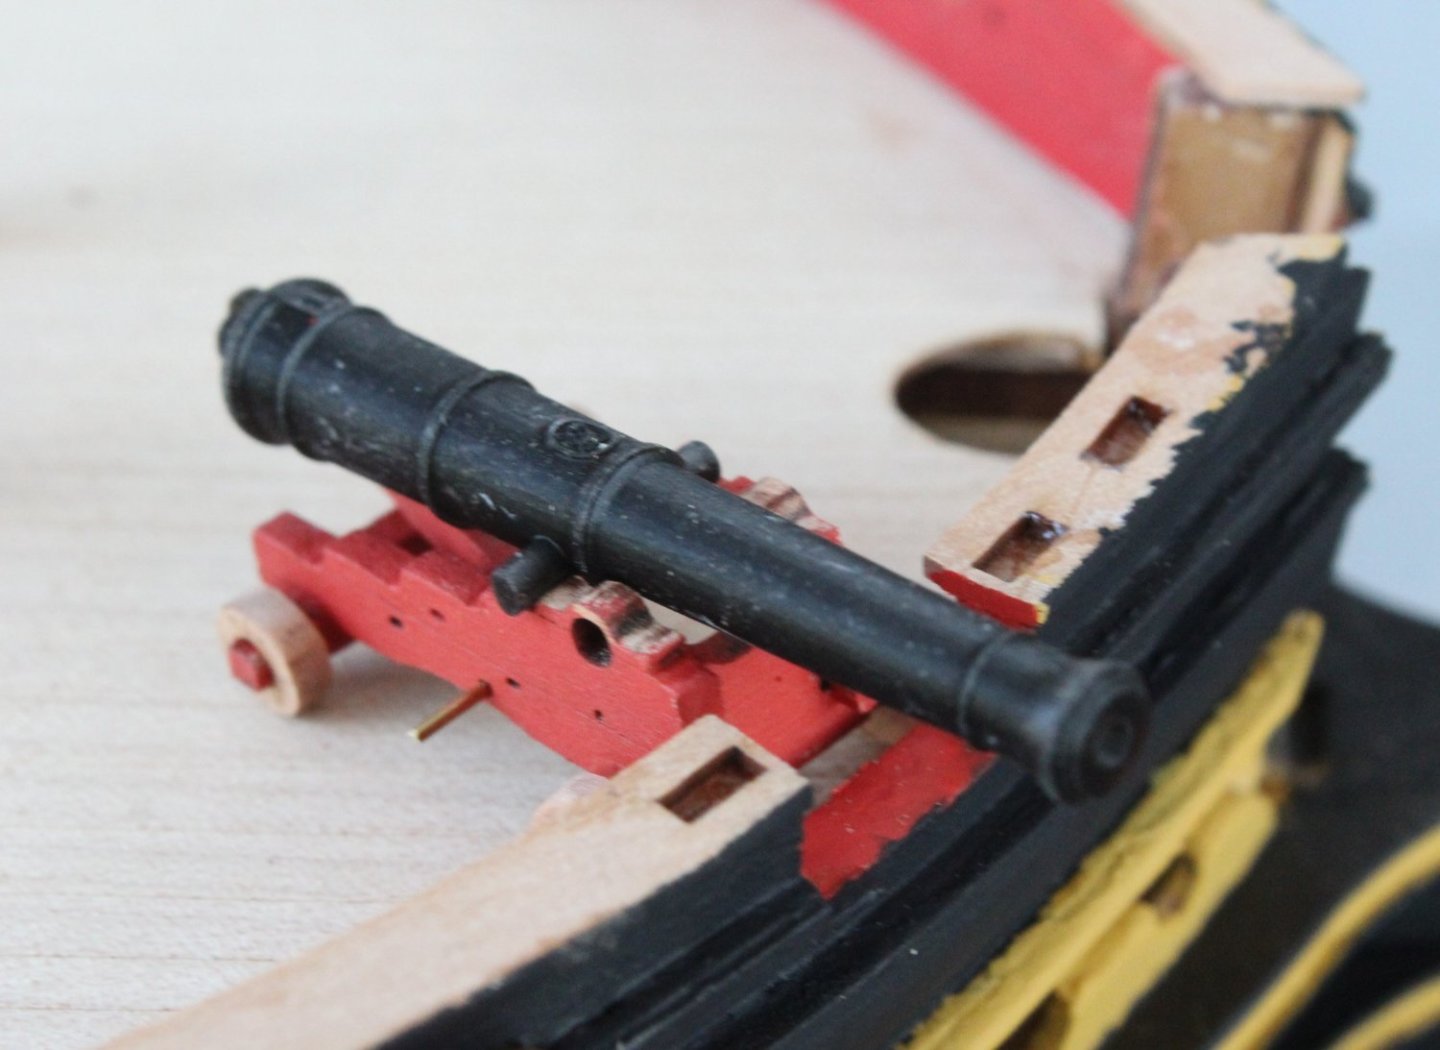
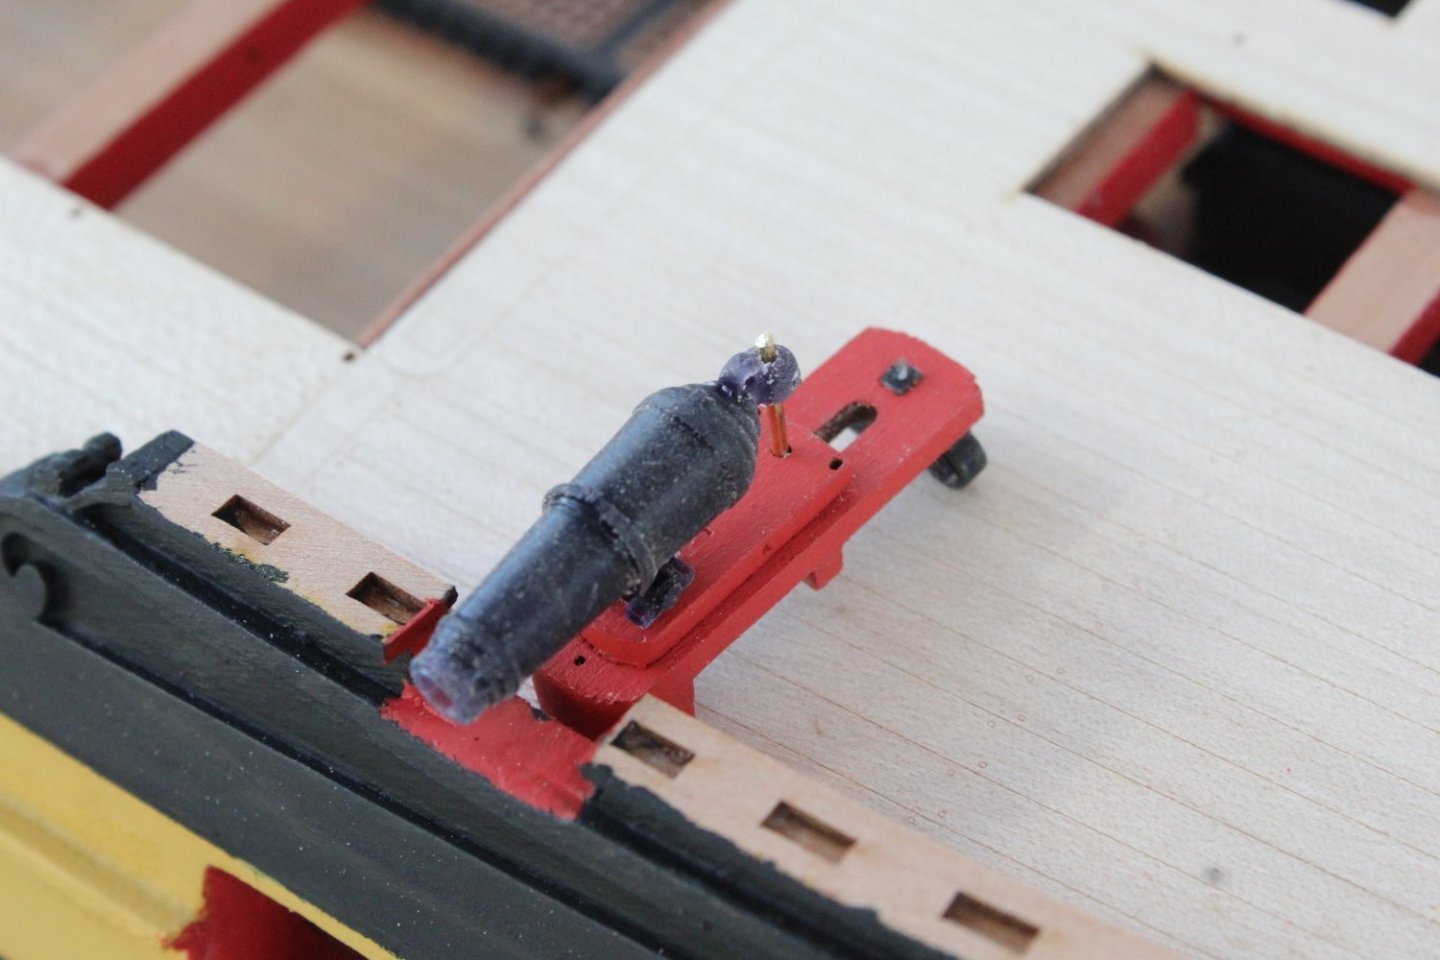
New Tool Alert The cutter for the copper tape arrived this afternoon. It looks nice and study. I plan to start creating the copper tiles from the kit supplied tape on Monday, as our youngest grandson (2 1/2 years old) is coming to stay for the weekend so I doubt there will be any time for me to sneak off to the shipyard. Carronades and Cannons I completed the build of the carronades ad cannons. As reported in my last post I had to remake the cannon carriages as I forgot to fit the actual cannons. Thankfully this was accomplished without any problems. It took quite a bit of time to add the ironwork to the carronades. I have added a collection of photos with the carronades and cannon in place (dry fitted only). I still have to add the eyebolts to the bulwarks. Forecastle Area The catheads are only dry fitted, as I wanted to check the openings were still Ok after the hull painting phase. The gunwales will be painted black after the timberheads are fitted. Quarterdeck Area


- 587 replies
-
- 9
-
-
- Indefatigable
- Vanguard Models
- (and 1 more)
-
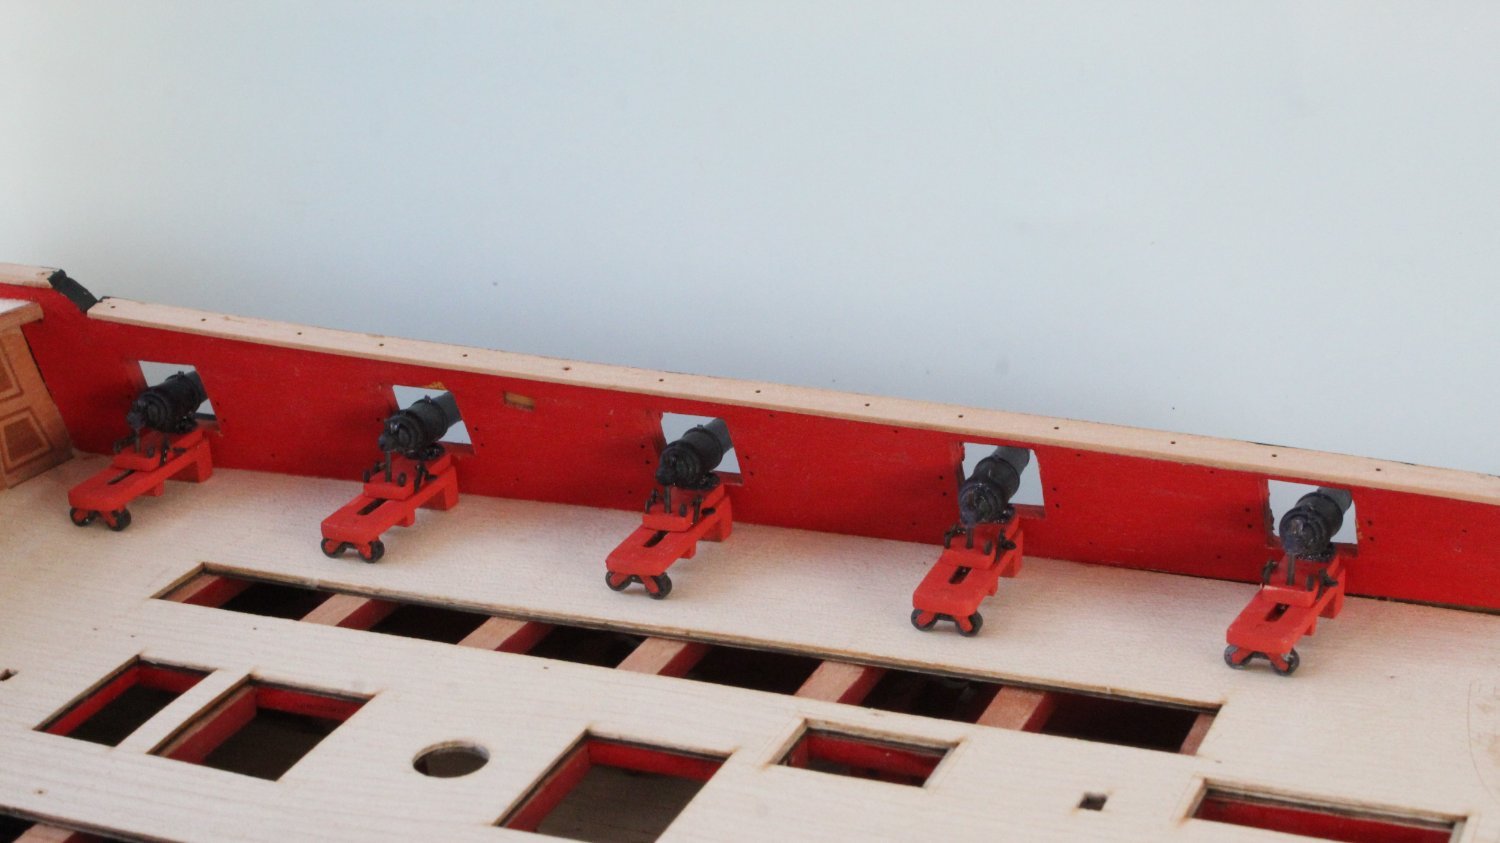
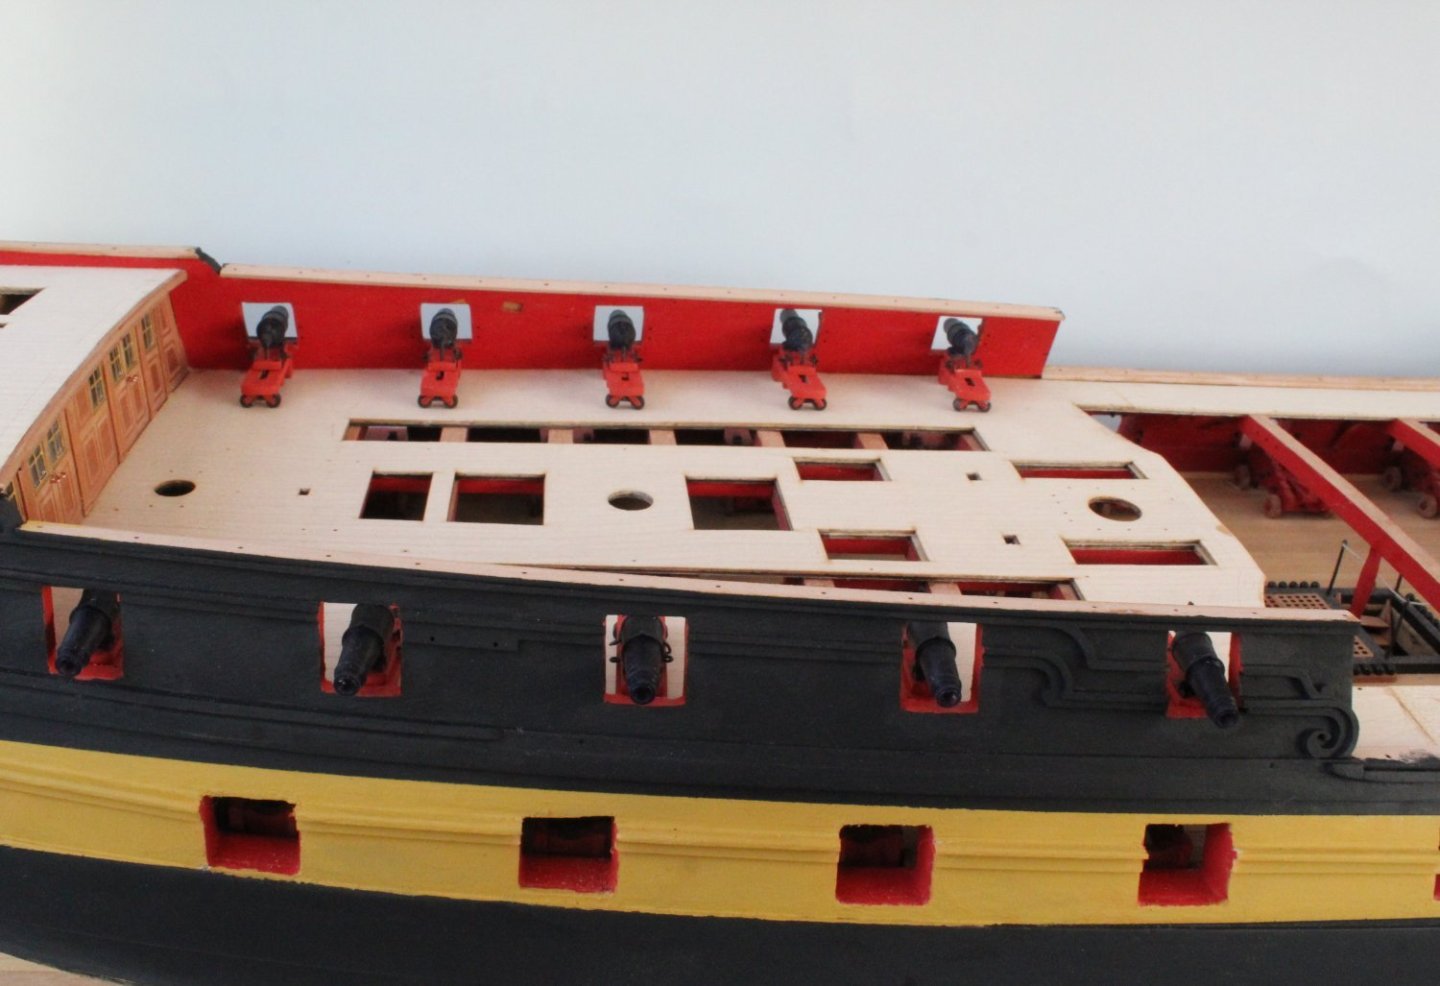
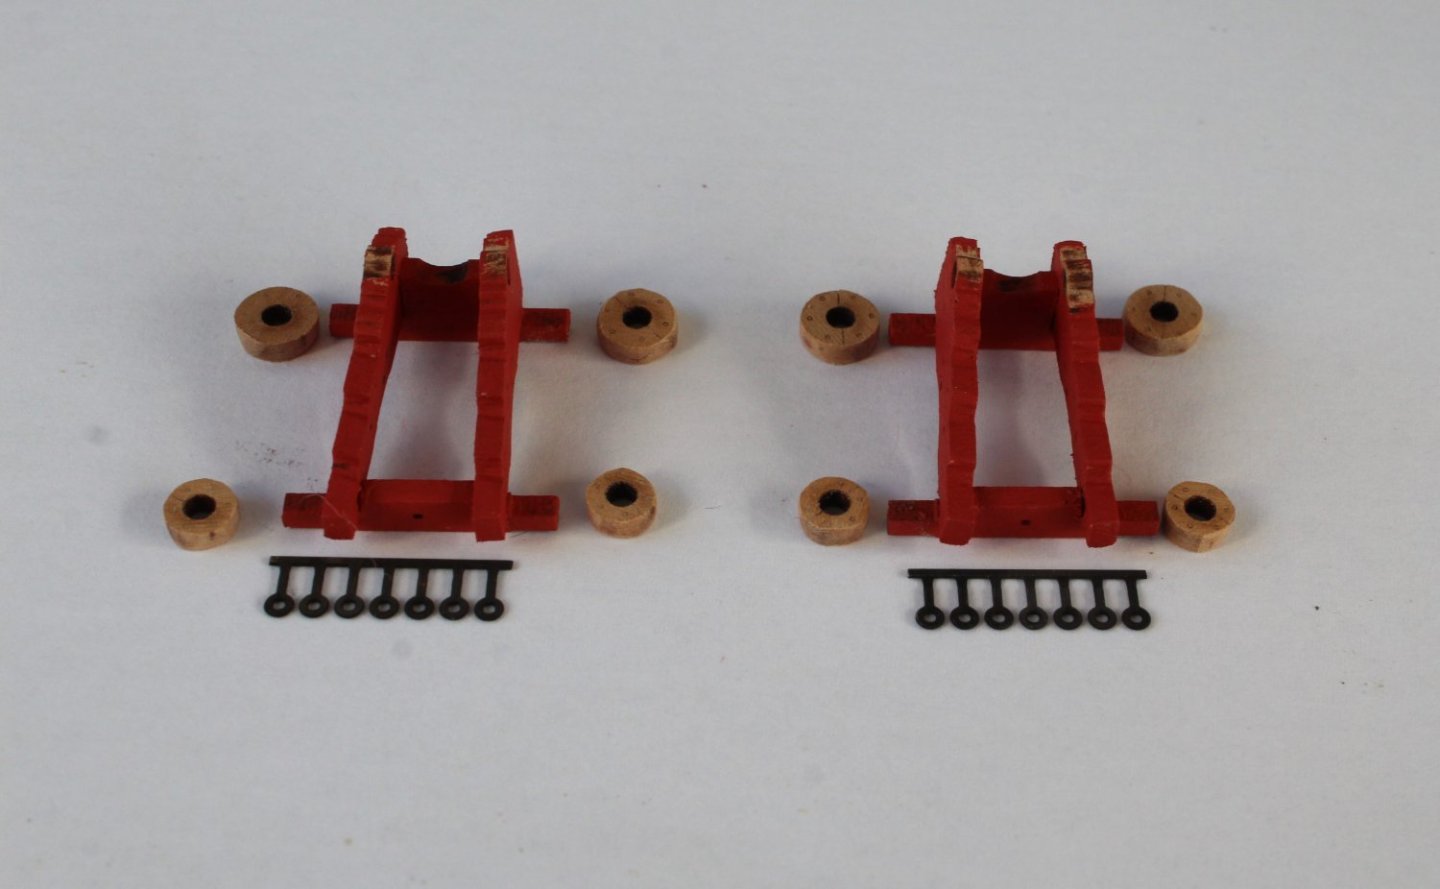
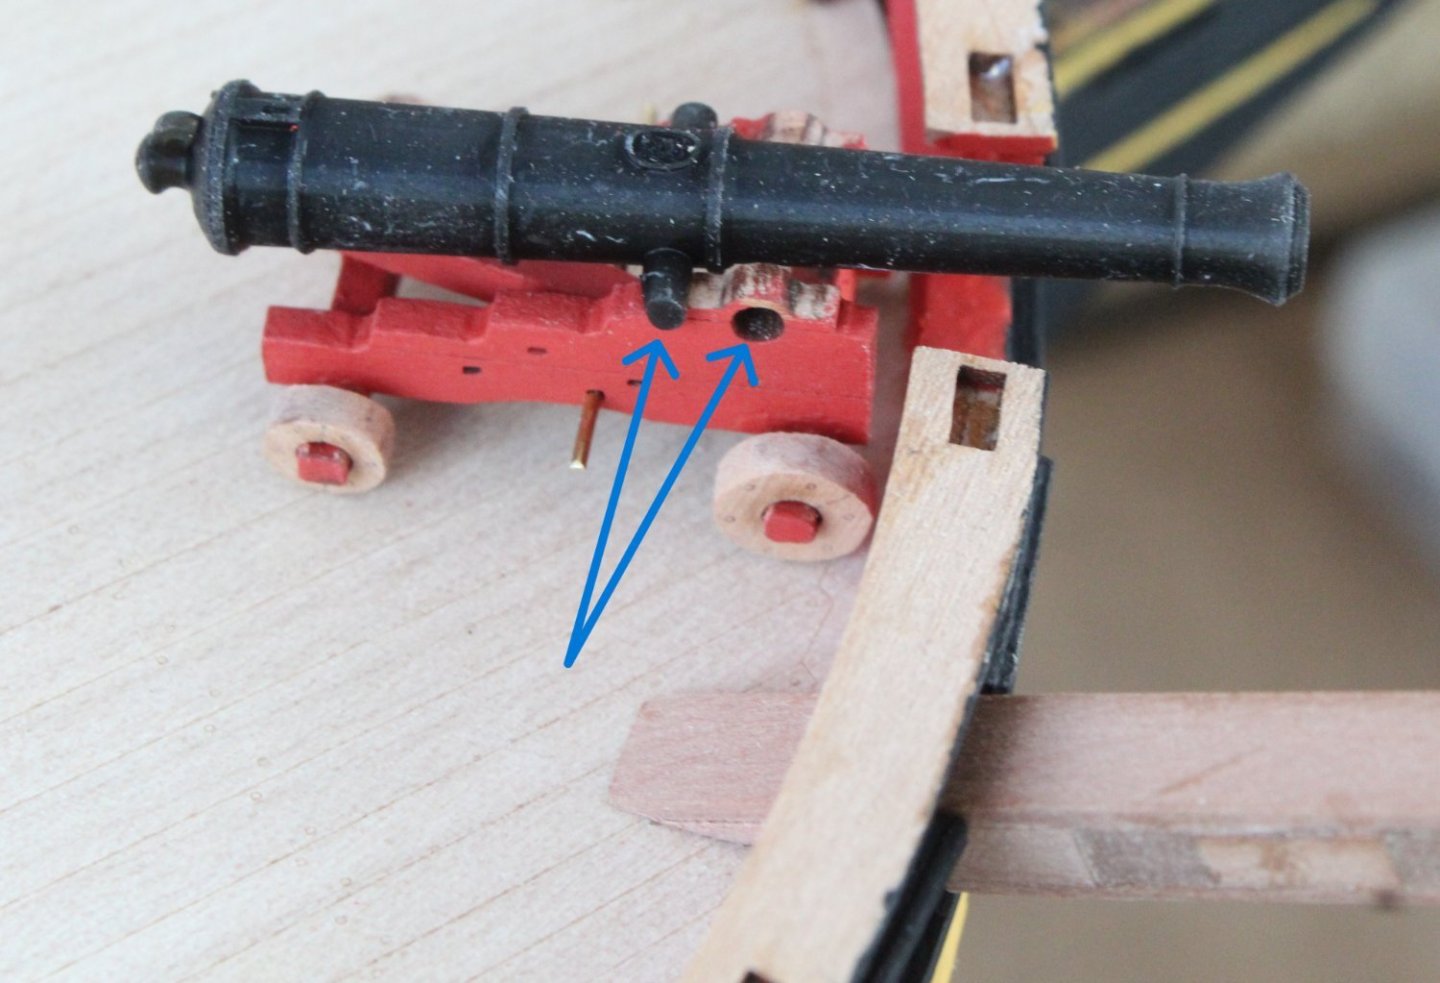
Touch-Up Painting I have spent a bit more time reworking the paint work in various areas. The bow area is now looking much better. New Tool The next build task is to add the coppering to the hull below the water line. Approximately 2200-2400 copper tiles are required. I am going to follows Jim's method and will use the RP Toolz Mitre Cutter RP-CUTR to cut the copper tape in to 18mmL tiles. The cutter is due to be delivered in the next day or two. Cannons & Carronades I decided to use my free time to build the remaining 2 cannons and 14 carronades. Starting with the cannons the basic cannon carriages were assembled and iron work chemically blackened. The laser char was also removed from the wheels. When a test fit, with the cannon in place, was made on the deck I soon realised I had made an error. Unlike the cannons on the gundeck, where the cannons are added after the carriages have been built, these cannons need to be slotted in place as the carriage is assembled. This can be seen in the photo below, as indicated by the blue arrows. It will be an easy task to release the parts, using warm water. Once the carriages have been reworked so the cannons can be added the iron work will be added. I also need to cut and chemically blacken two lengths of copper bars. You will also note I have not painted the gunwales black. I decided I would do this after the timberheads have been fitted. The 14 carronades frame assemblies were build and painted the red. The iron work was chemically blackened. This looks good with a test fit on the deck. I now need to cut 14 lengths of copper bar, approx 15mm long and chemically blacken. The iron work parts also need to be fitted.


- 587 replies
-
- 7
-
-
- Indefatigable
- Vanguard Models
- (and 1 more)
-
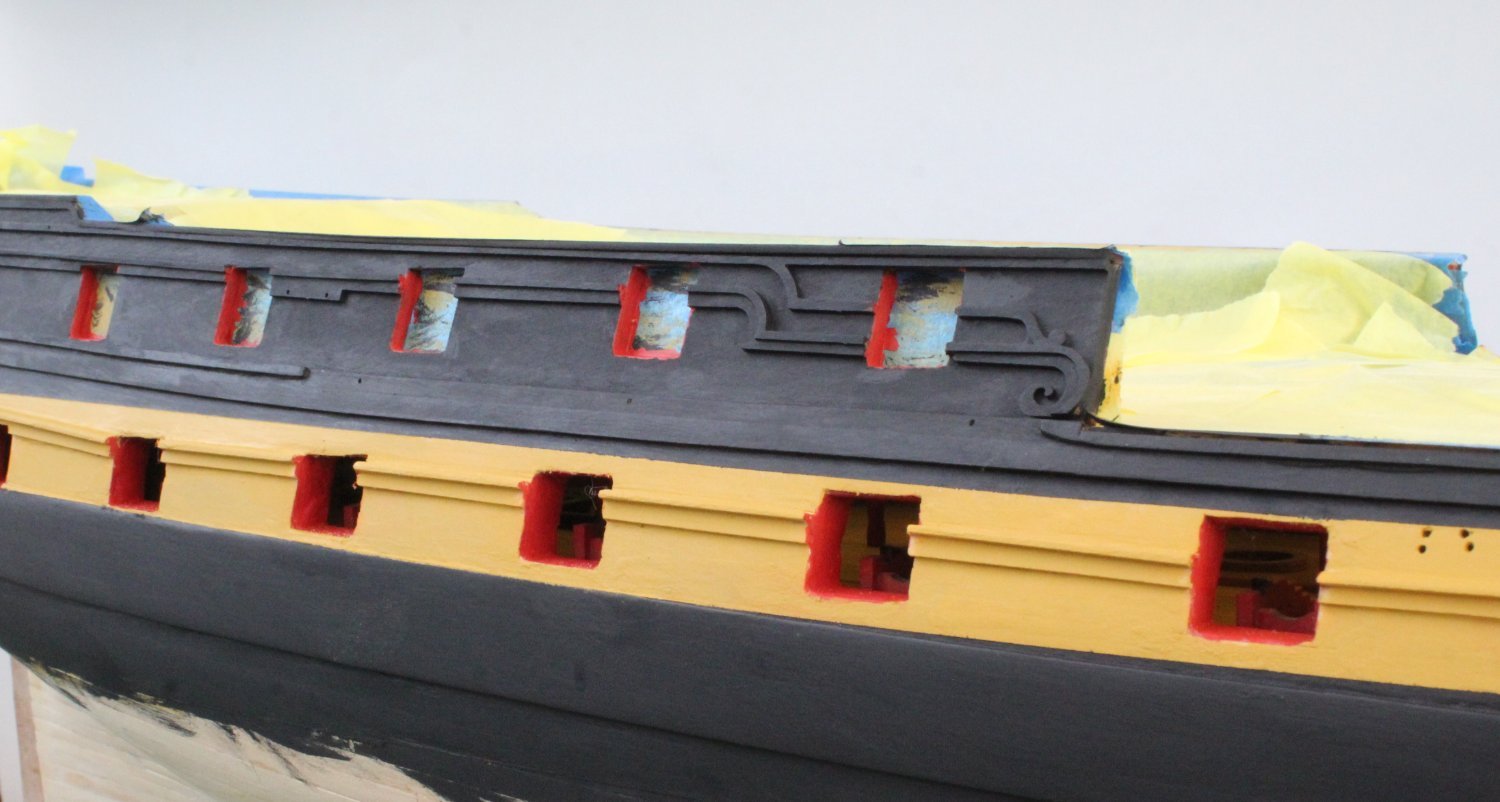
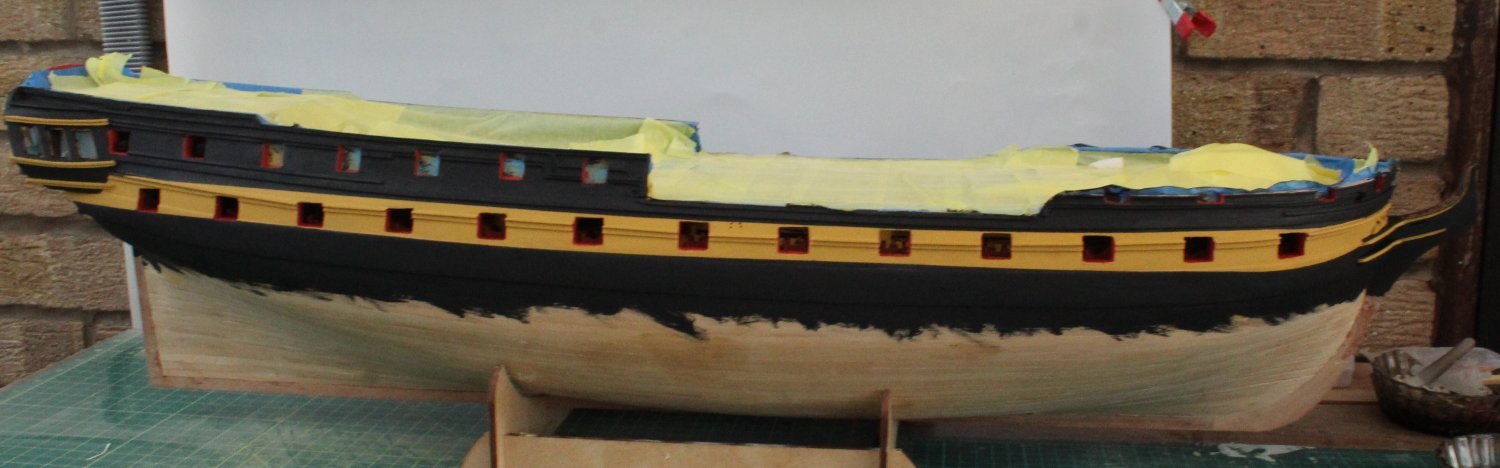
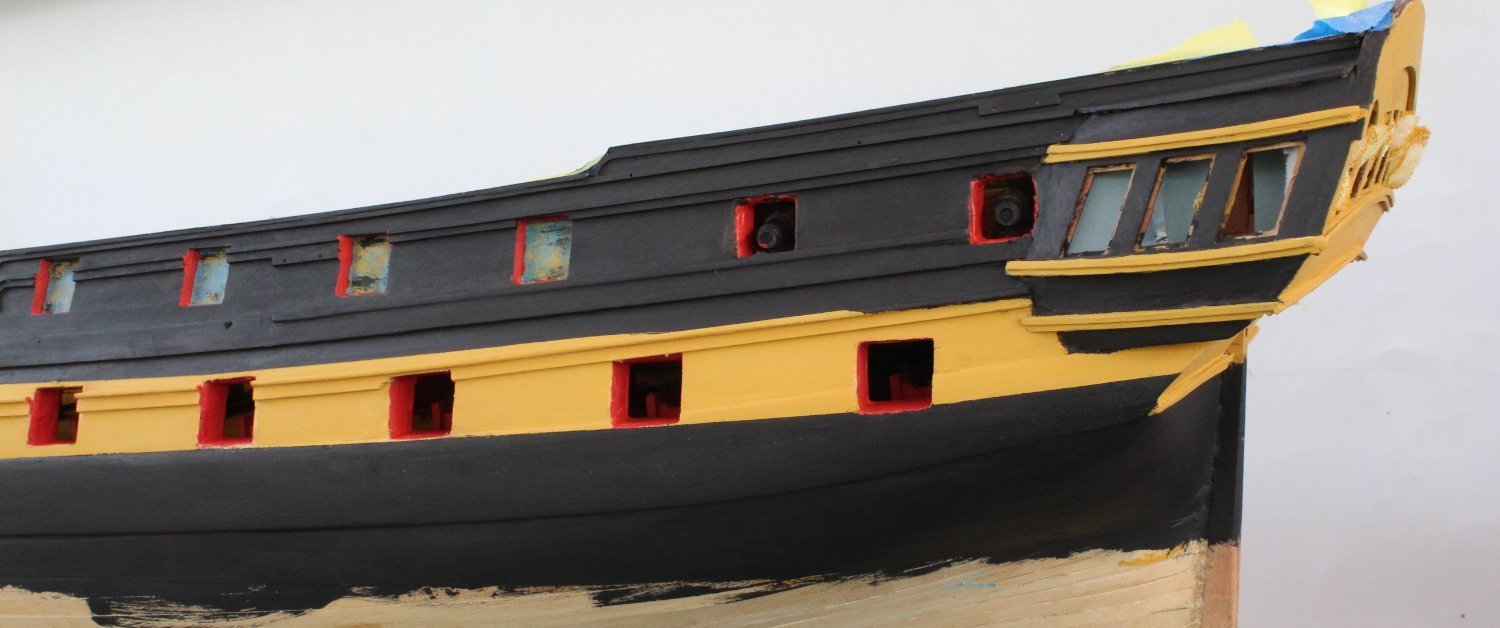
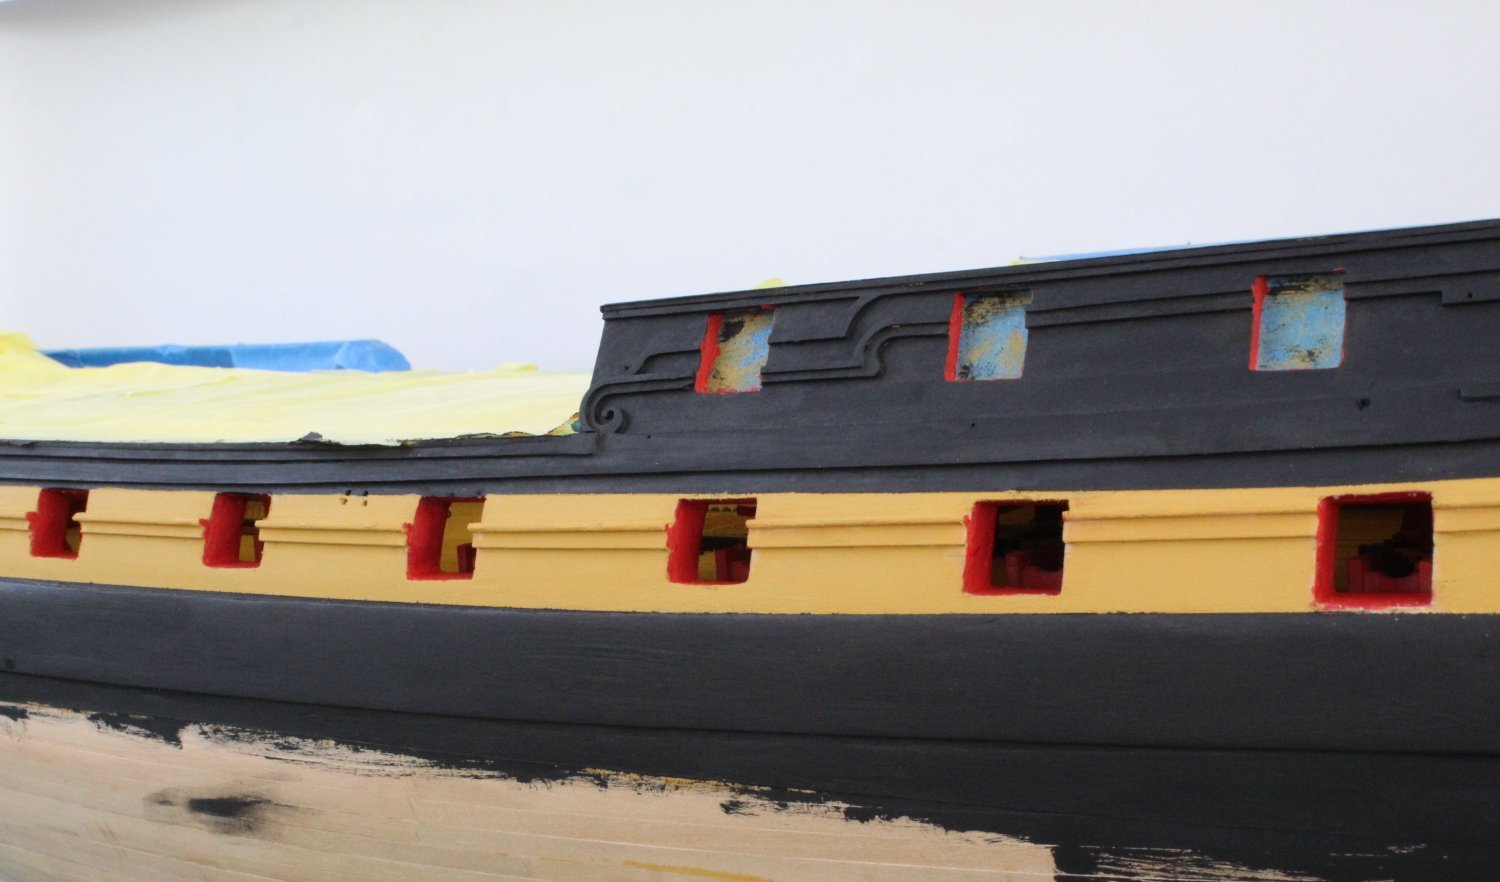
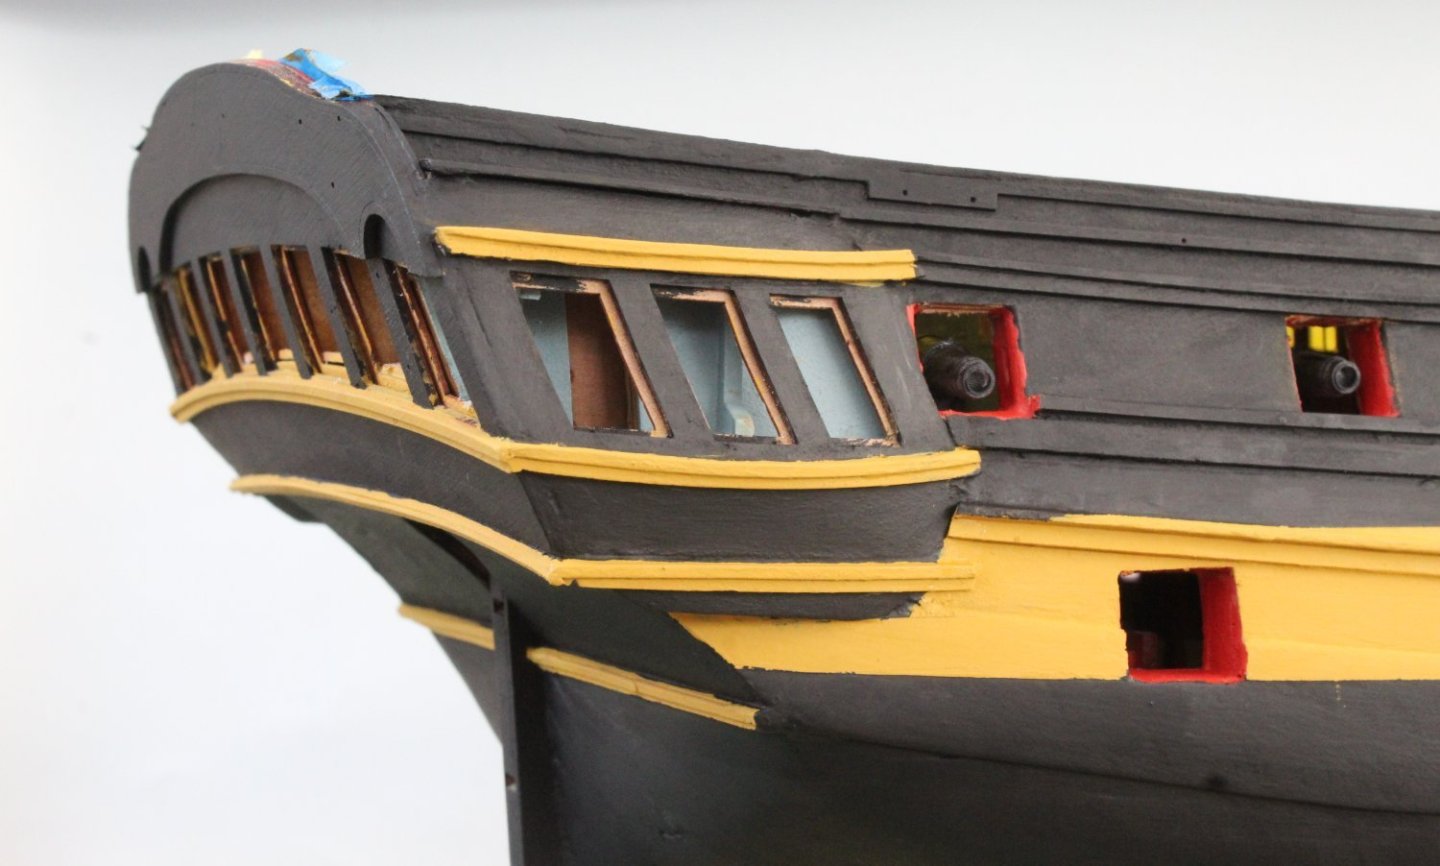
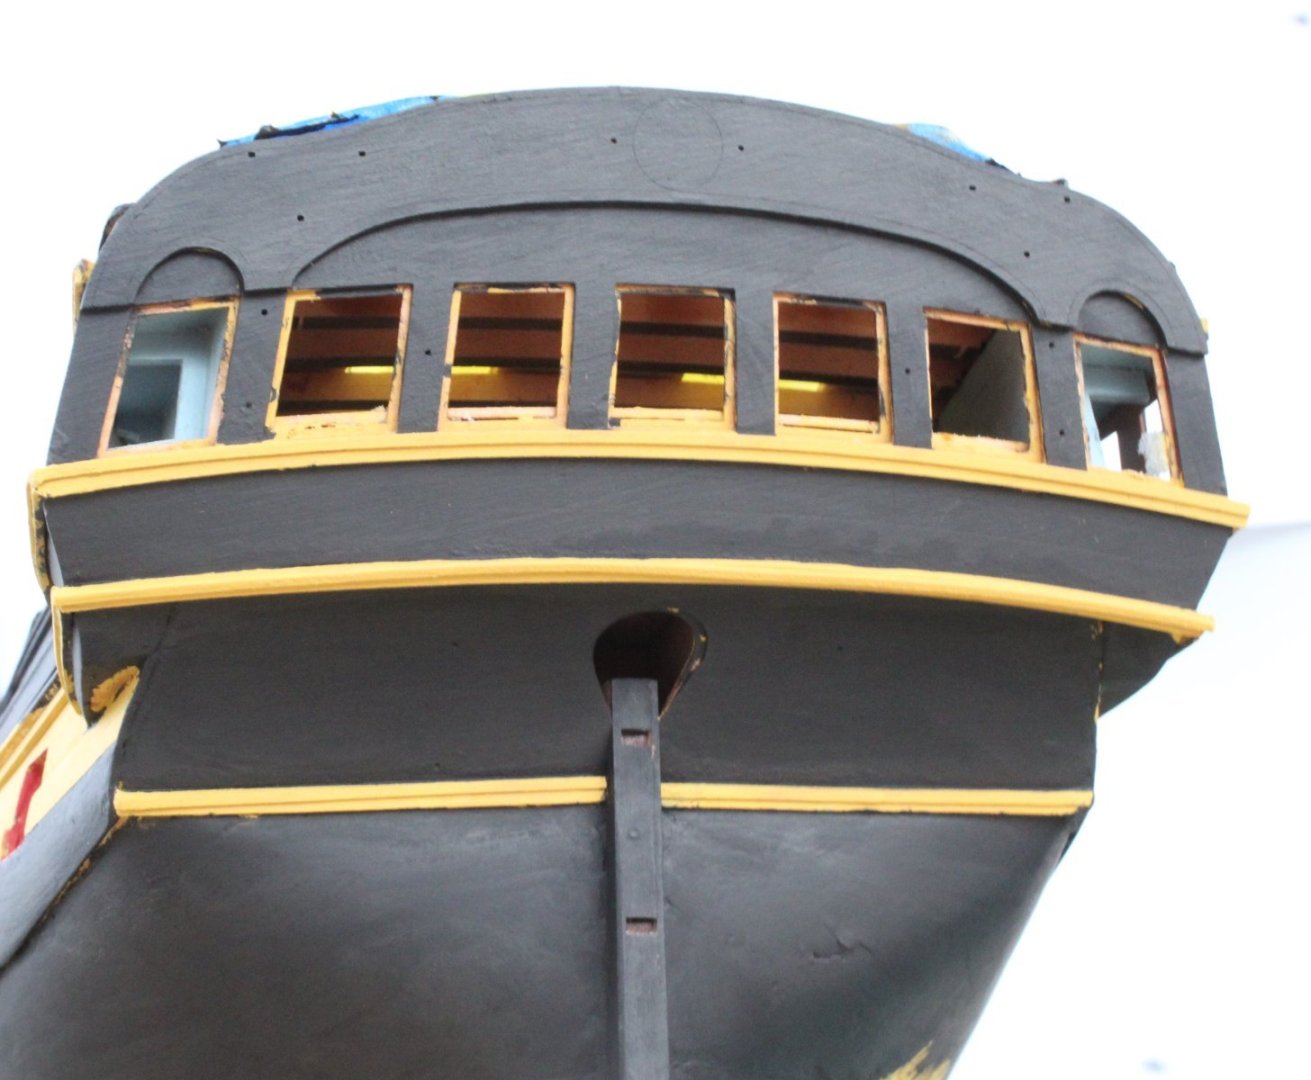
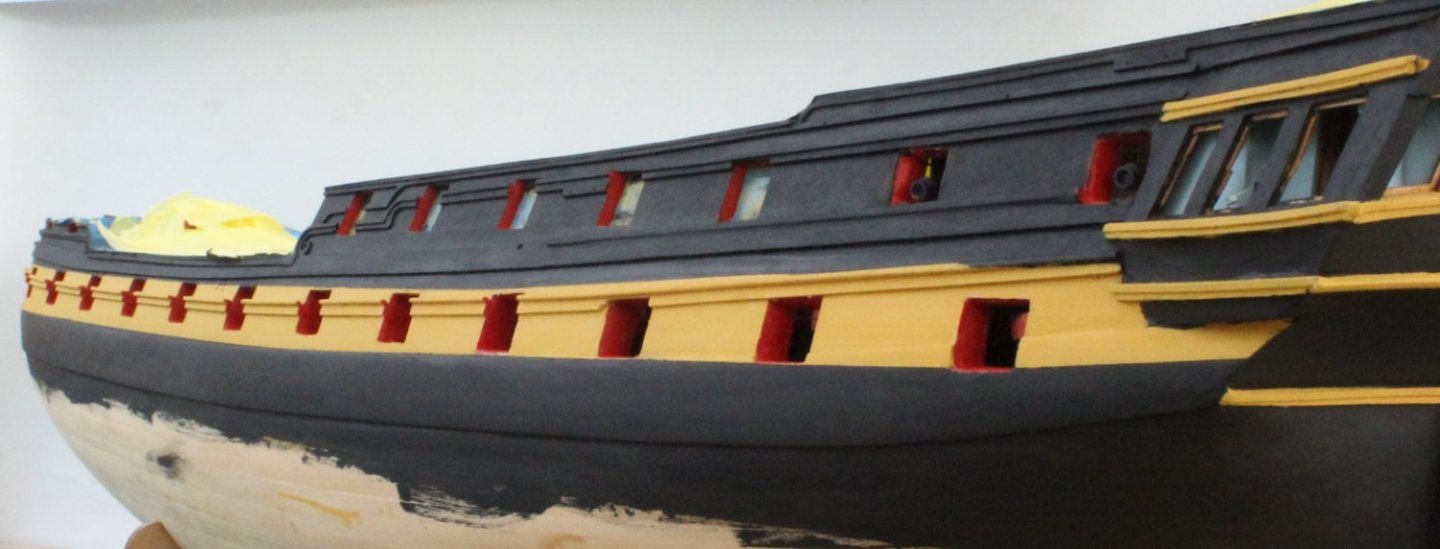
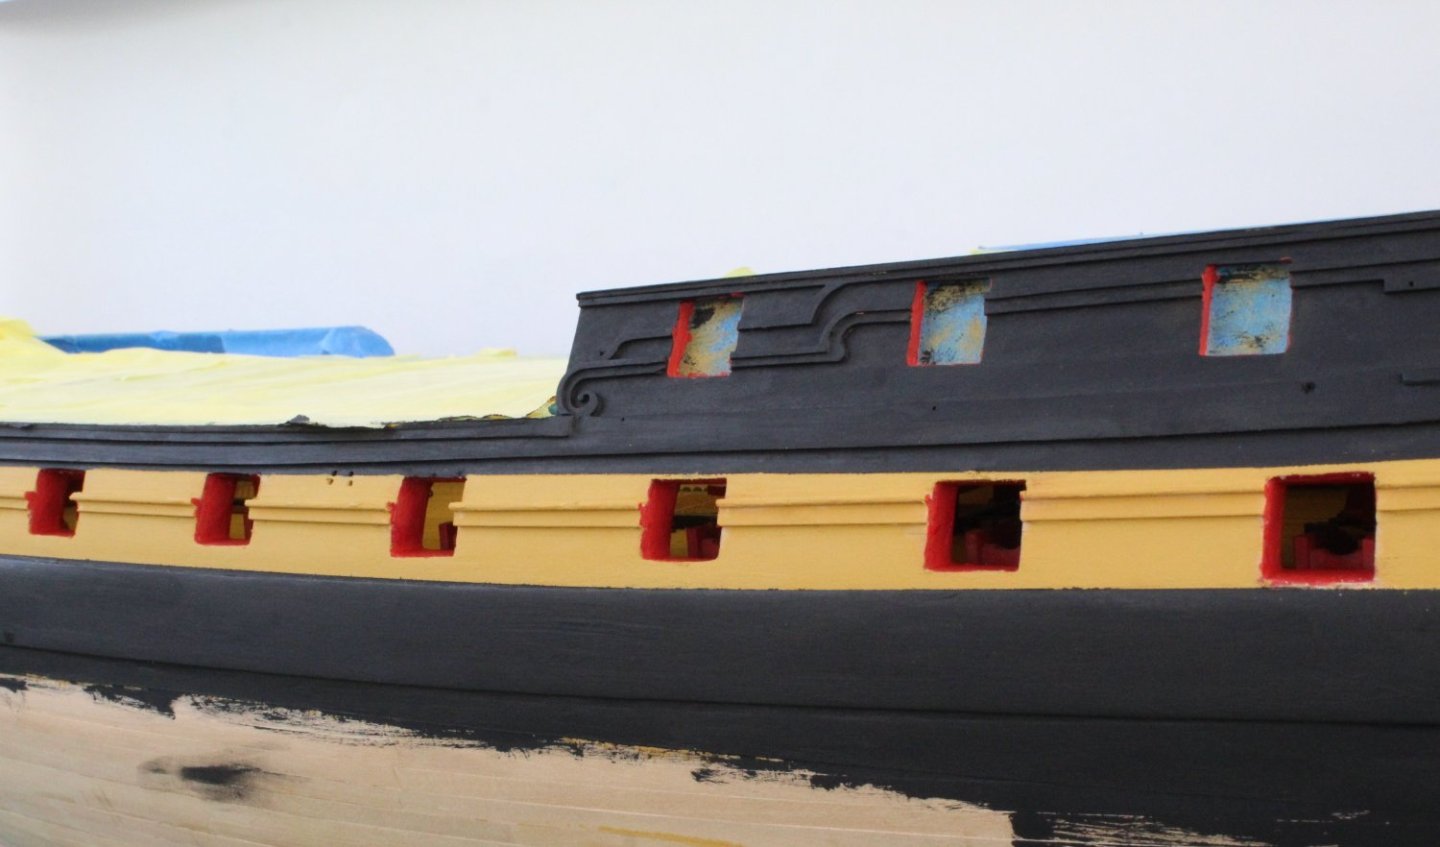
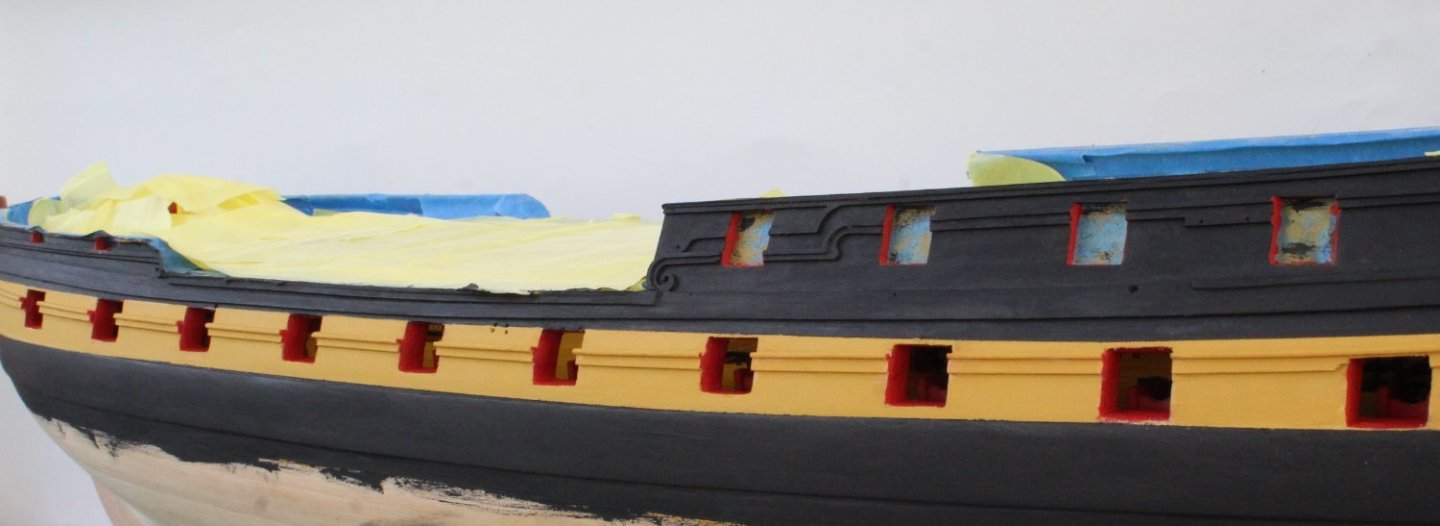
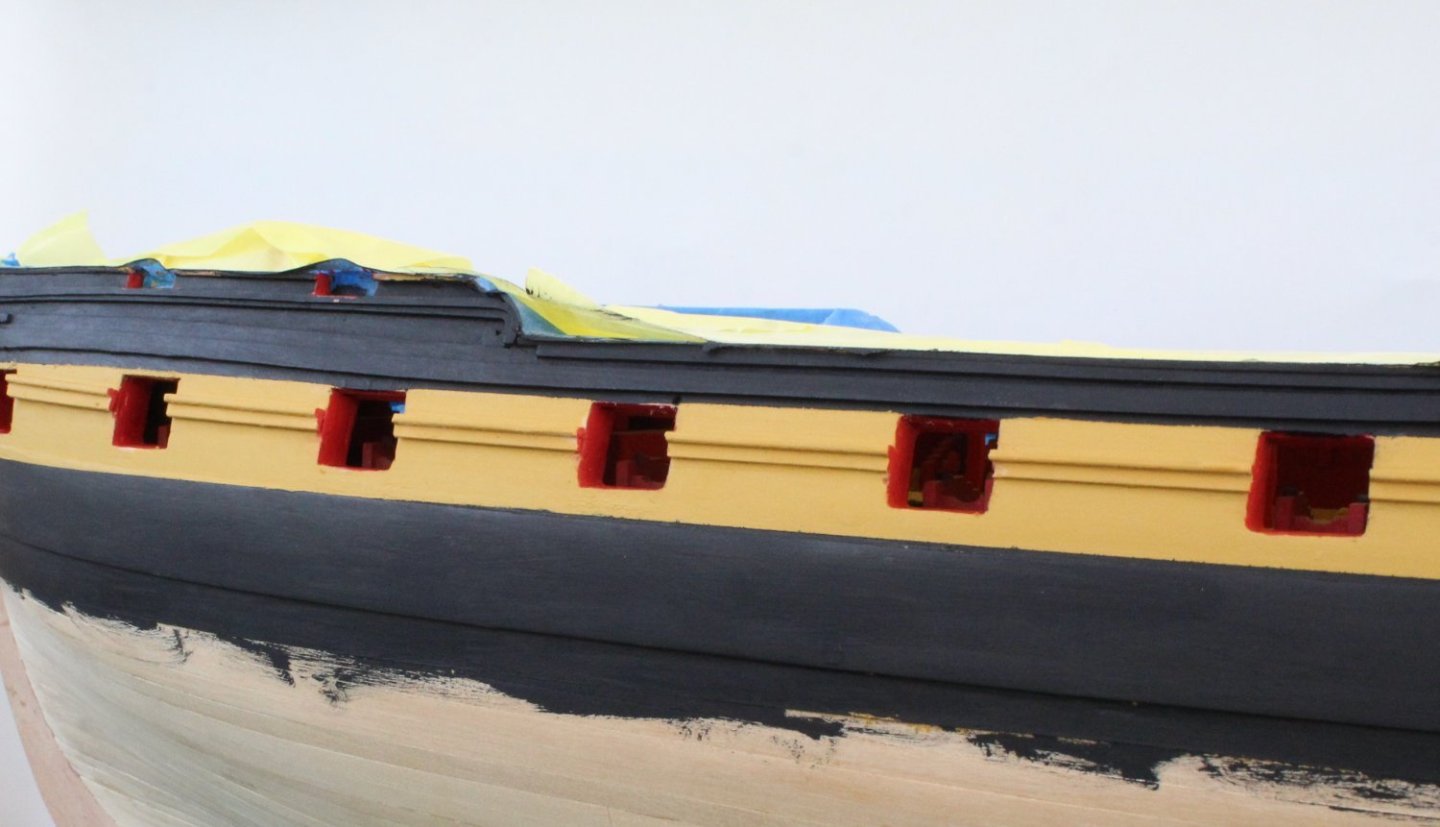
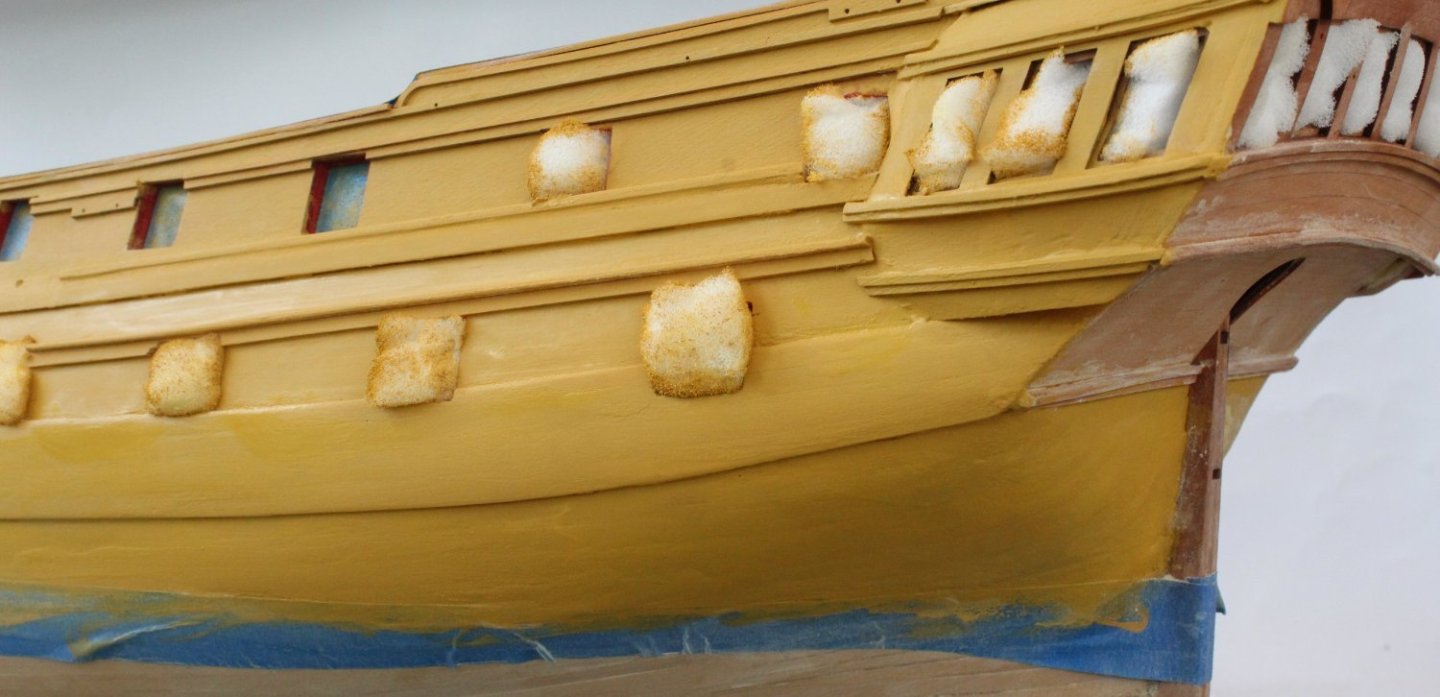
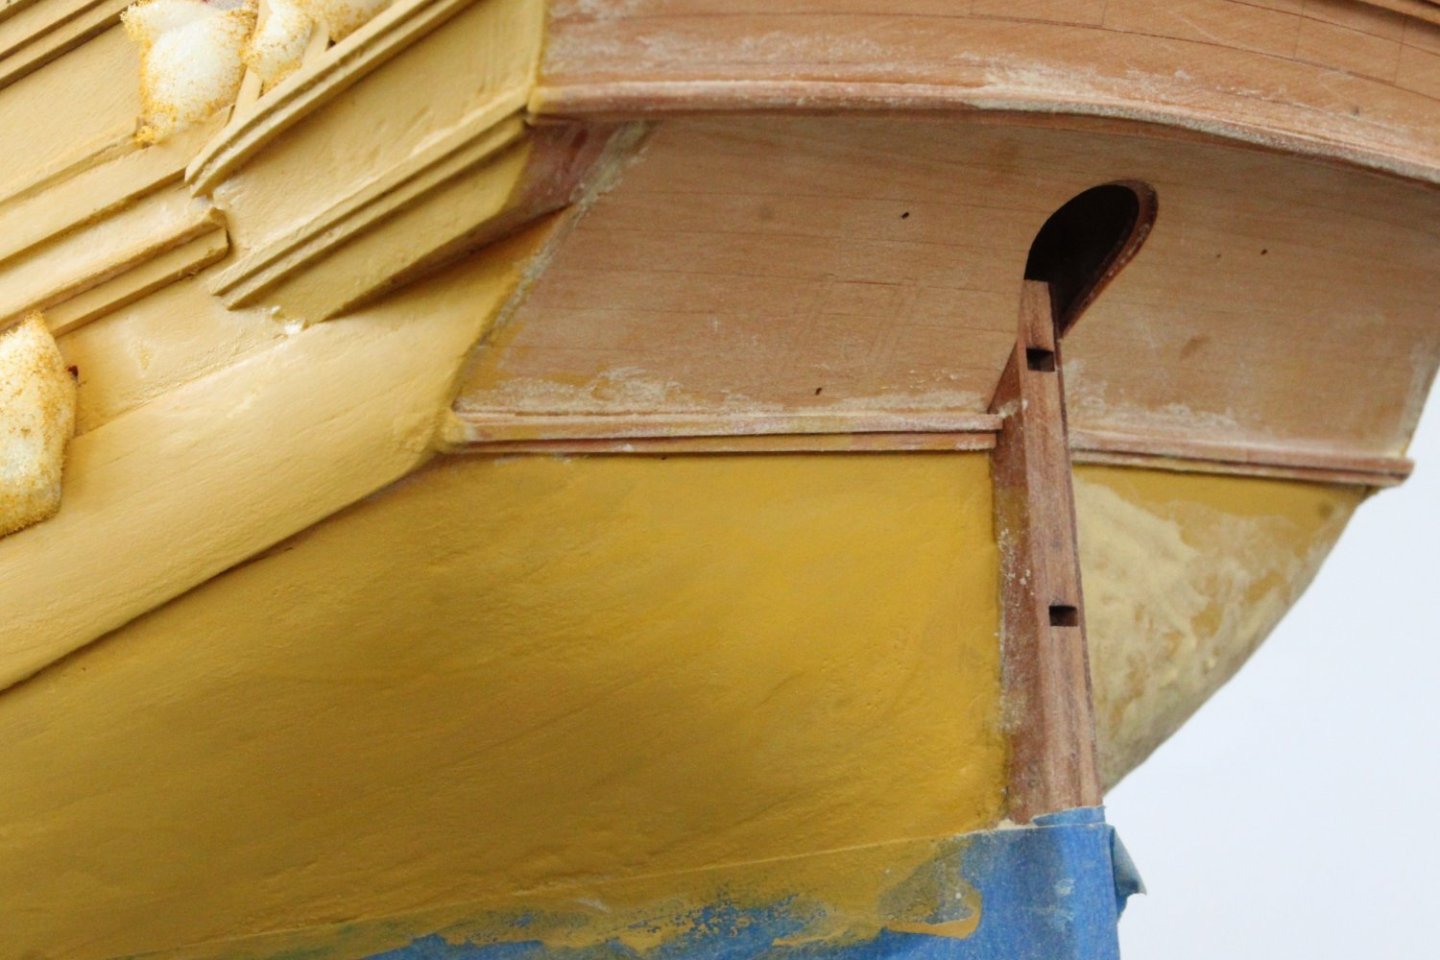
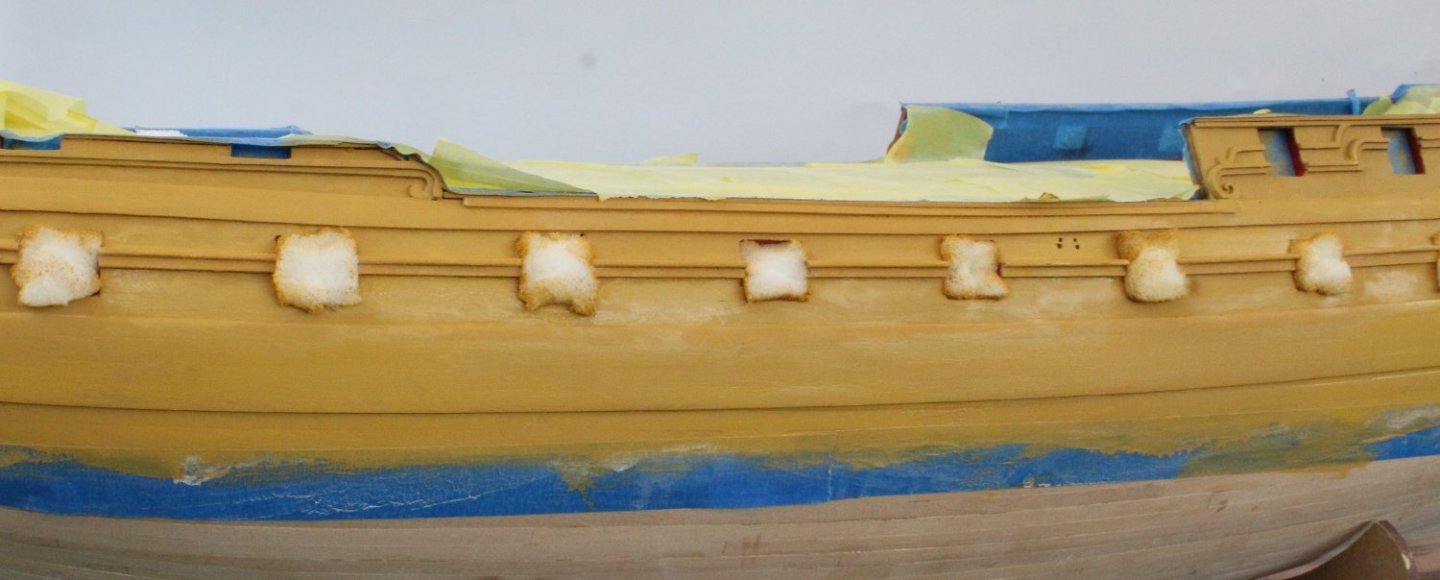
Hull Painting - Stern & Right-Hand Side Work continued with the painting of the hull. The stern area was the next area I painted. Always when taking photo's they seem to show areas which requires touching up which are missed when looking with the naked eye, such as the underside of the left-hand arch in the first photo. The next set of photo's shows the right-hand side. Bow Area - I thought this looked OK but the photo shows there is more work required. In the next photo I think the bottom yellow line needs a slight readjustment under the right hand gun port Midships Stern Area Side On Photos


- 587 replies
-
- 8
-
-
- Indefatigable
- Vanguard Models
- (and 1 more)
-
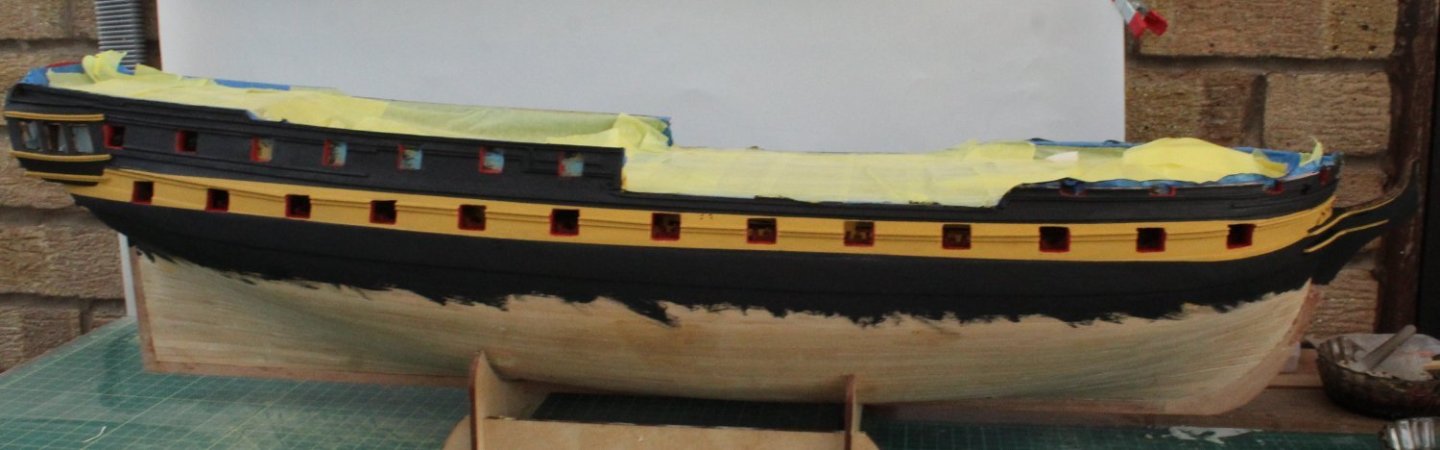
Hull Painting - Left Hand Side The painting of the hull (left hand side) continues at a slow pace. The black painting was added after the yellow central section taped. I did not end with perfect clean cut lines once the tape was removed but it now looks much better after some rework. The gunport openings were then retouched with red paint. I don't think I can get it too much better unless I strip back and start again. I will now be moving on to painting the stern area and after that the right-hand side of the hull. Midship Photos Bow Area Photos


- 587 replies
-
- 12
-
-
- Indefatigable
- Vanguard Models
- (and 1 more)
-
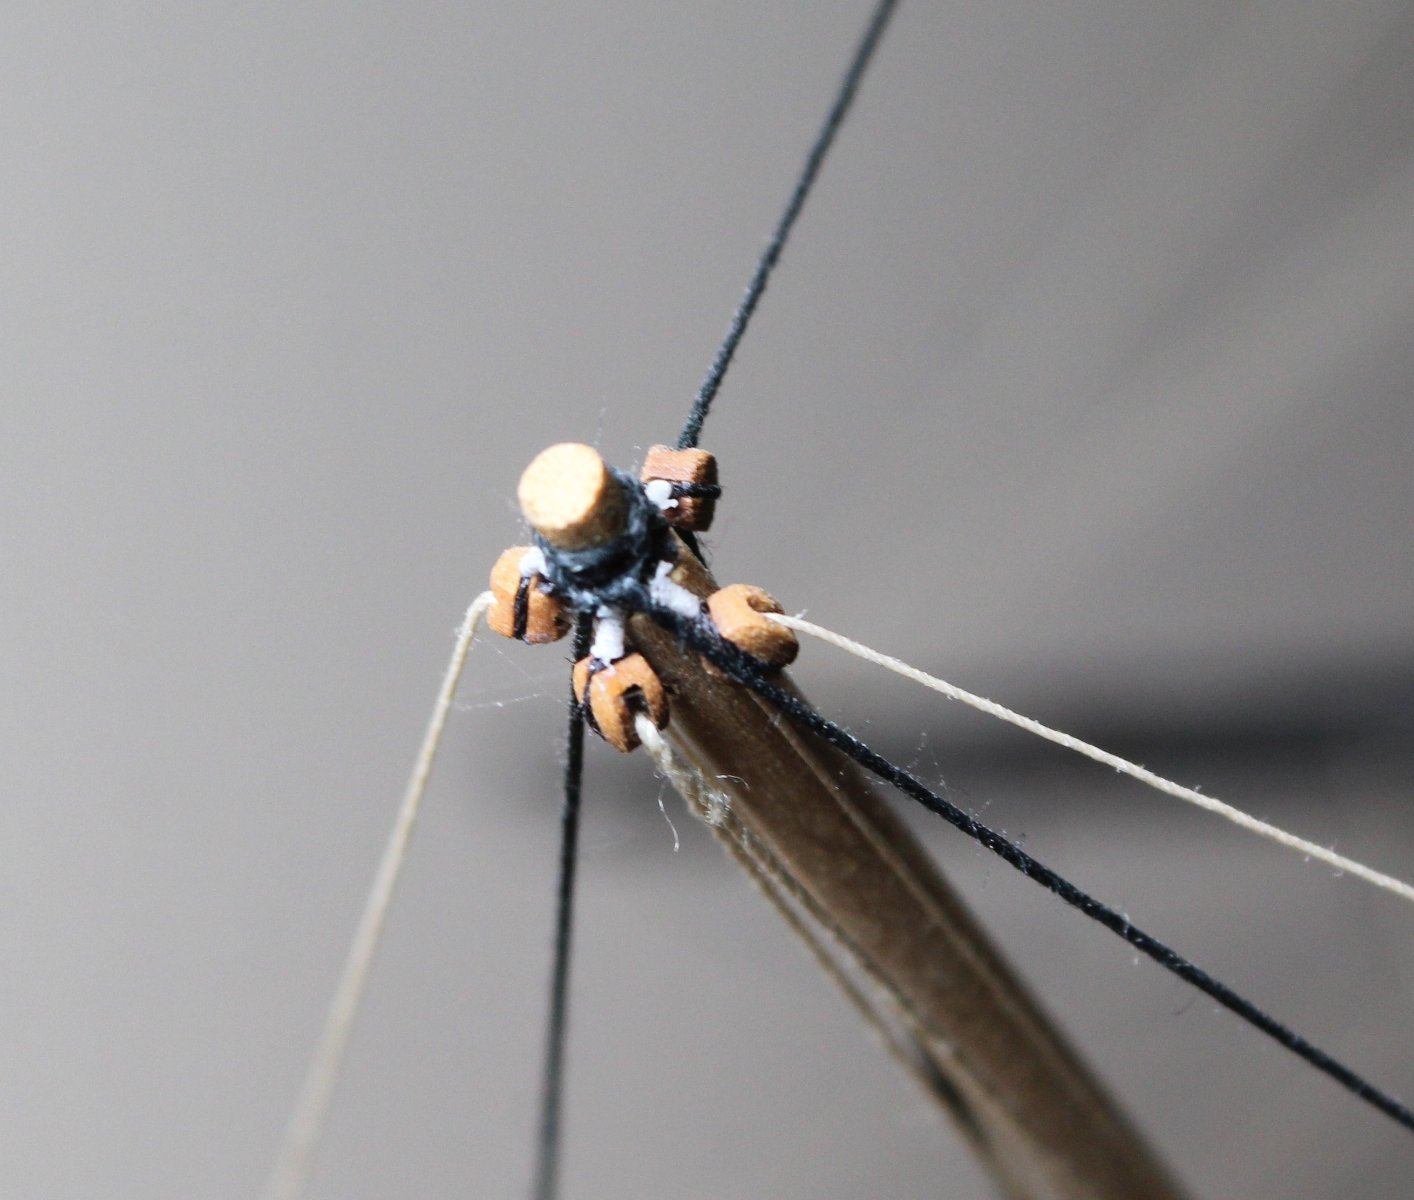
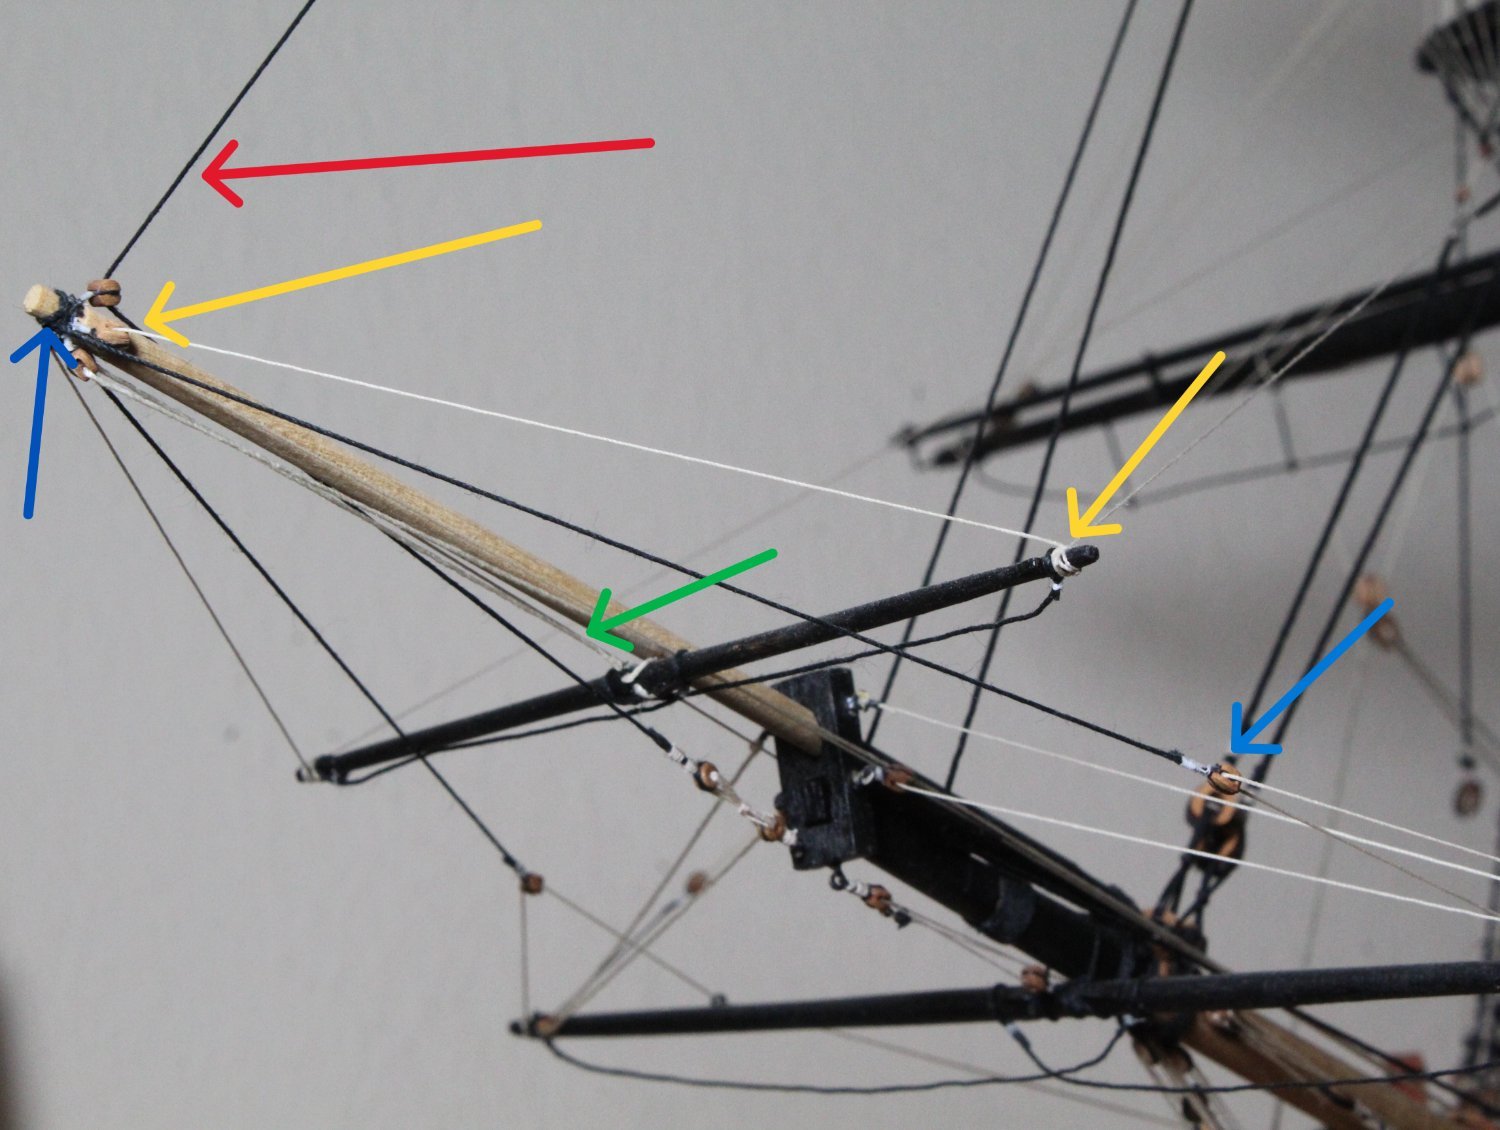
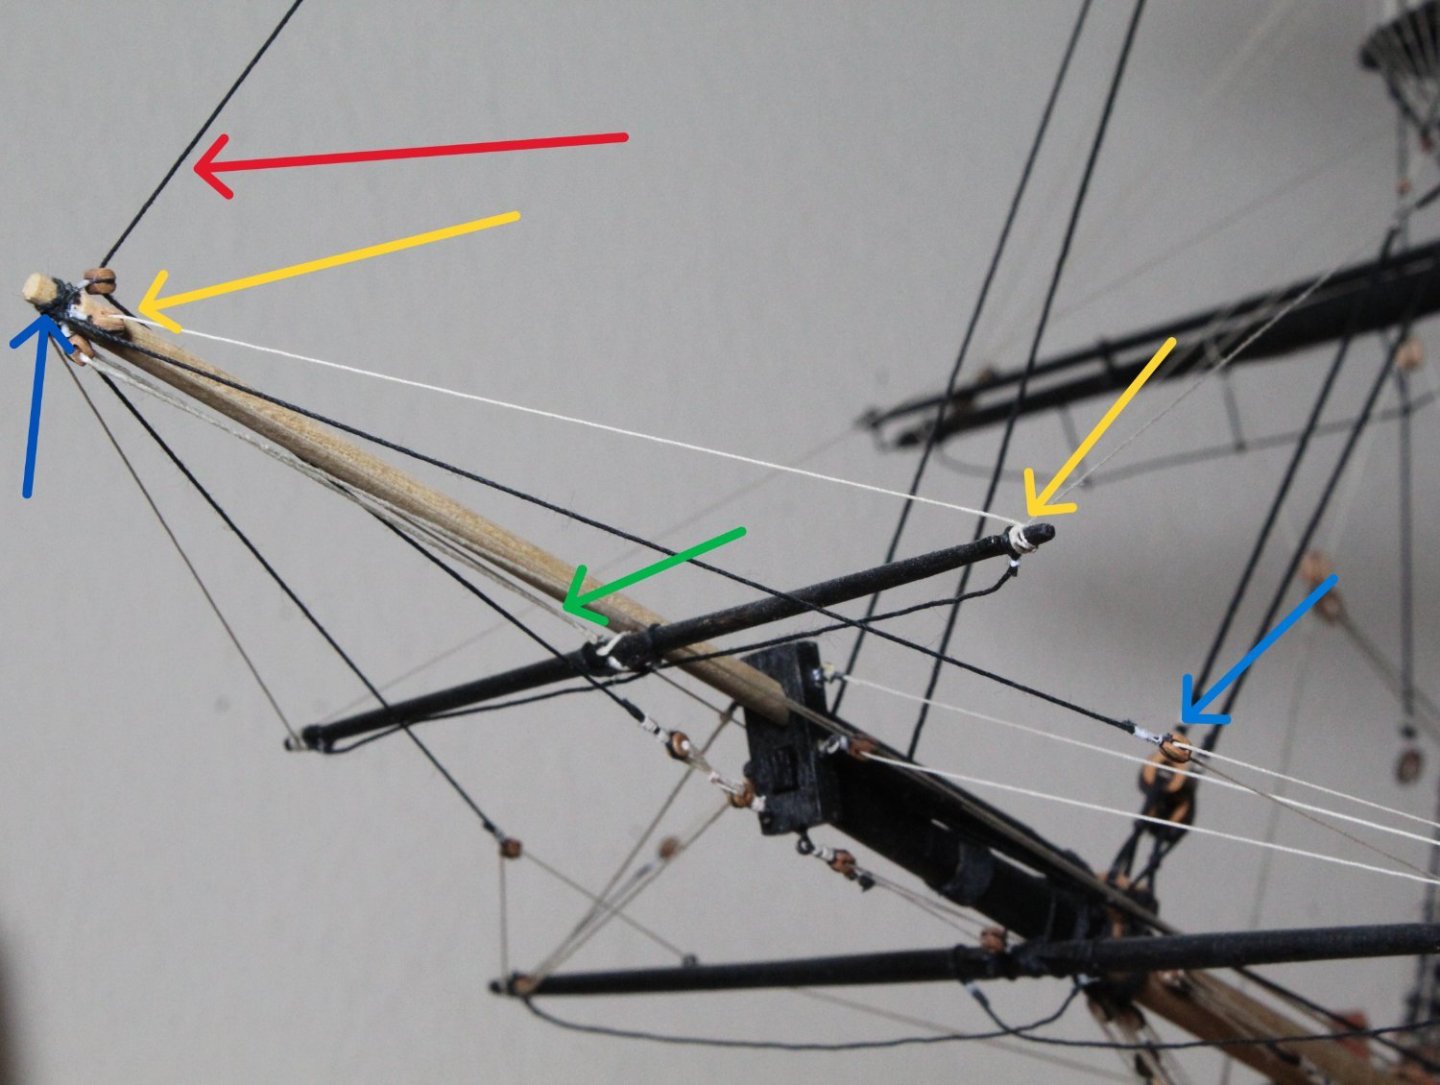
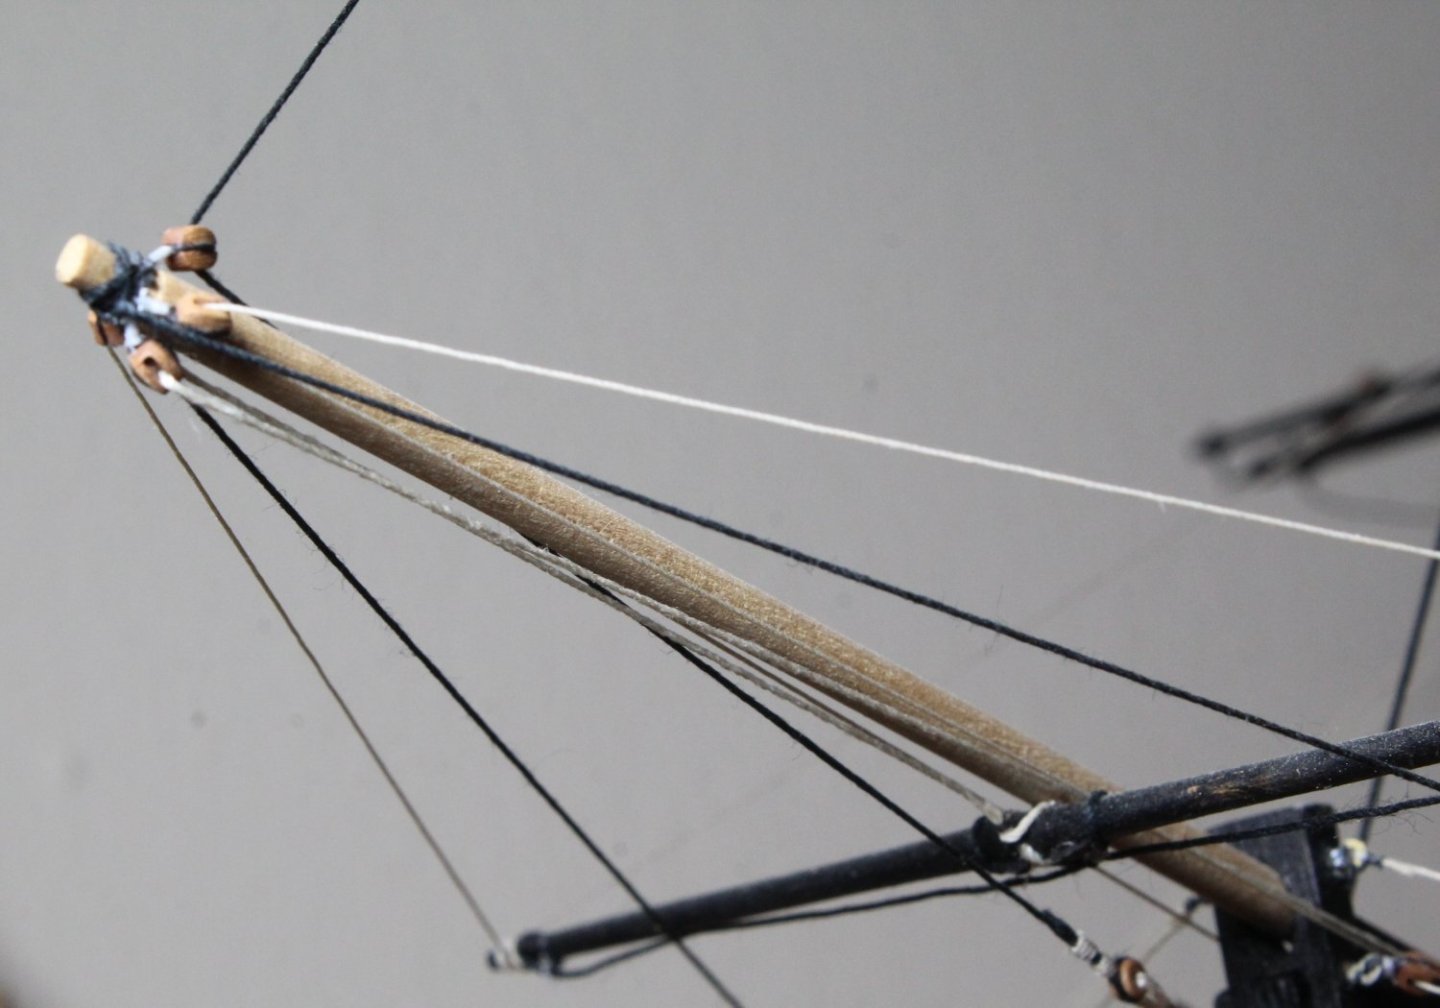
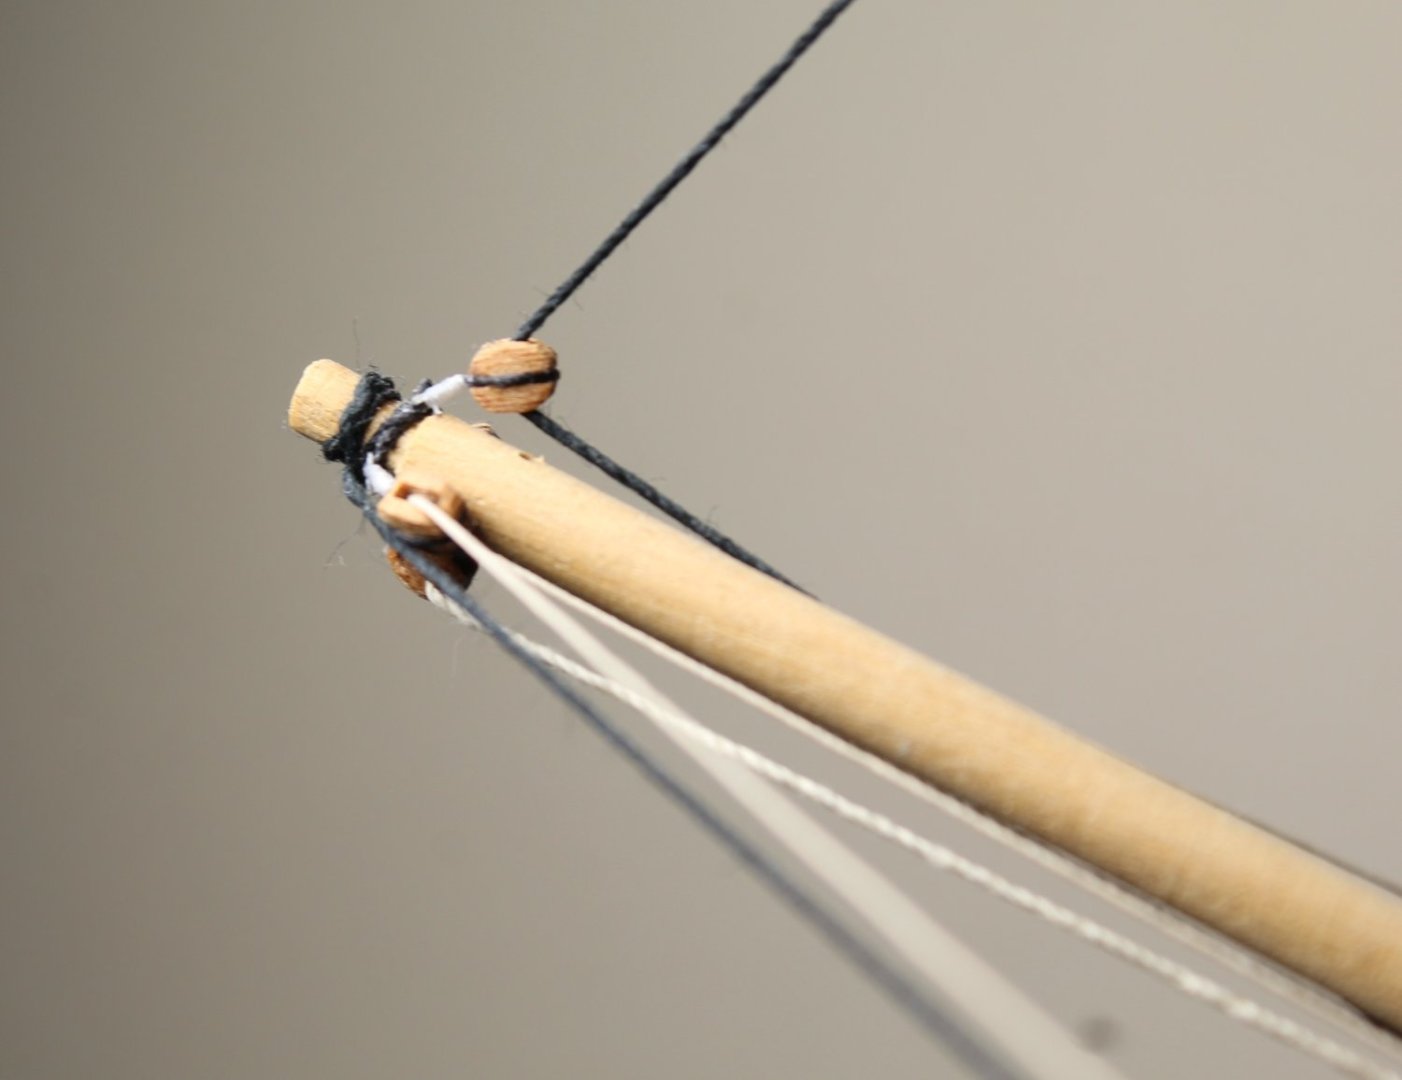
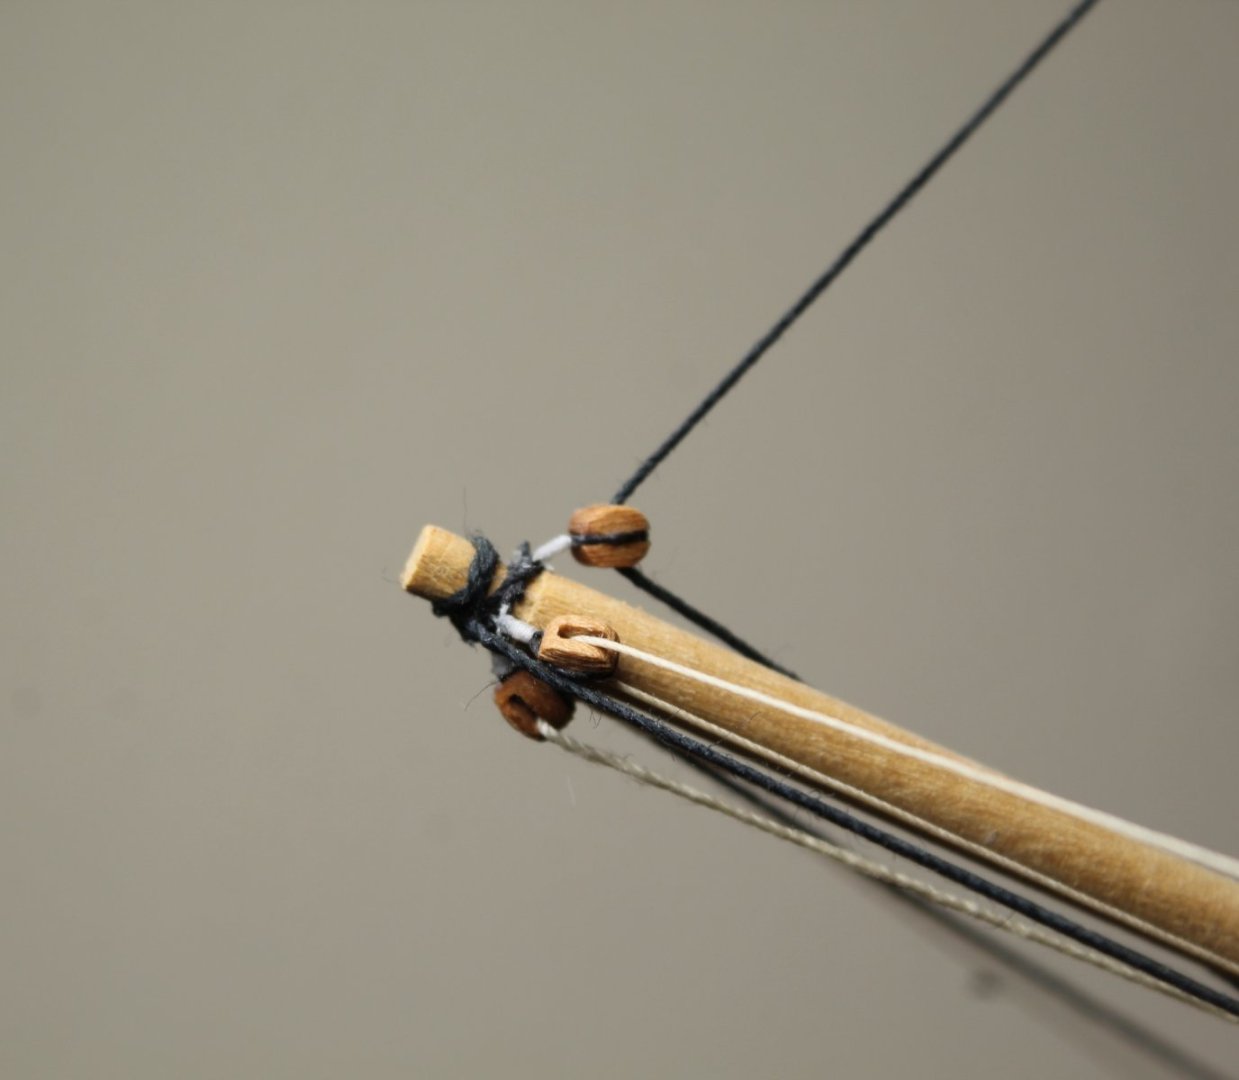
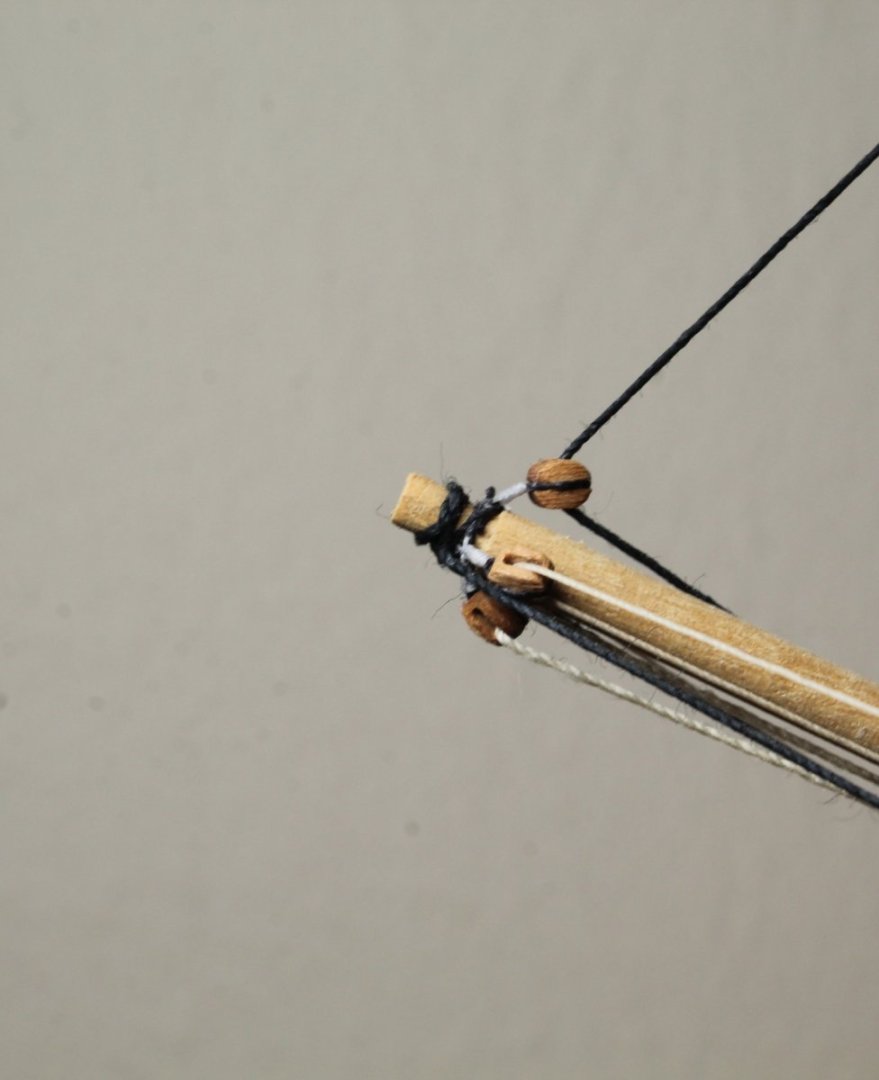
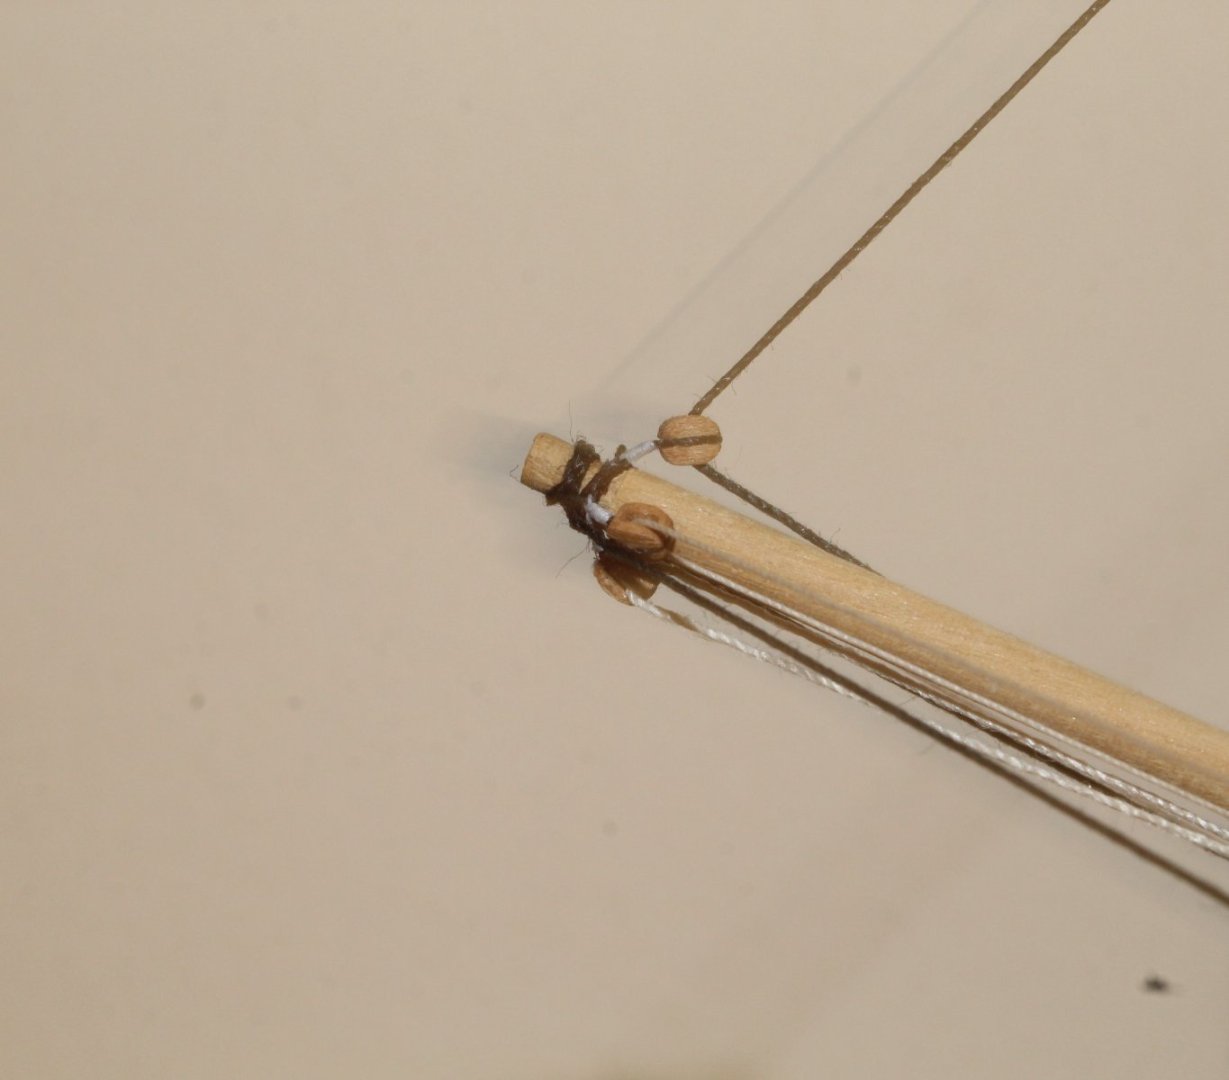
I added 4 blocks to the end of the bowsprit. All the other rigging was looped with a hitch type knot. The first photo shows the 4 blocks and other rigging at the end of the bowsprit The next two photos shows the block rigging. The top block was used for the red arrow (stay). The left and right blocks (yellow arrow) were for the braces. The bottom block (green arrow) took the rigging line that sets the position of the yard along the bowsprit. Hope that helps

- 426 replies
-
- 5
-
-
- Vanguard Models
- Sphinx
- (and 1 more)
-
I have taken some pictures of what I did, hope they help. I think they were looped with a half hitch (or maybe a clove hitch)
- 426 replies
-
- 1
-
-
- Vanguard Models
- Sphinx
- (and 1 more)
-
Hello You need to look at plan sheet 18 (Mizzen and Bowsprit) as these show the rigging threads for the spritsail yard braces. Hope this helps Glenn(UK)
- 426 replies
-
- 1
-
-
- Vanguard Models
- Sphinx
- (and 1 more)
-
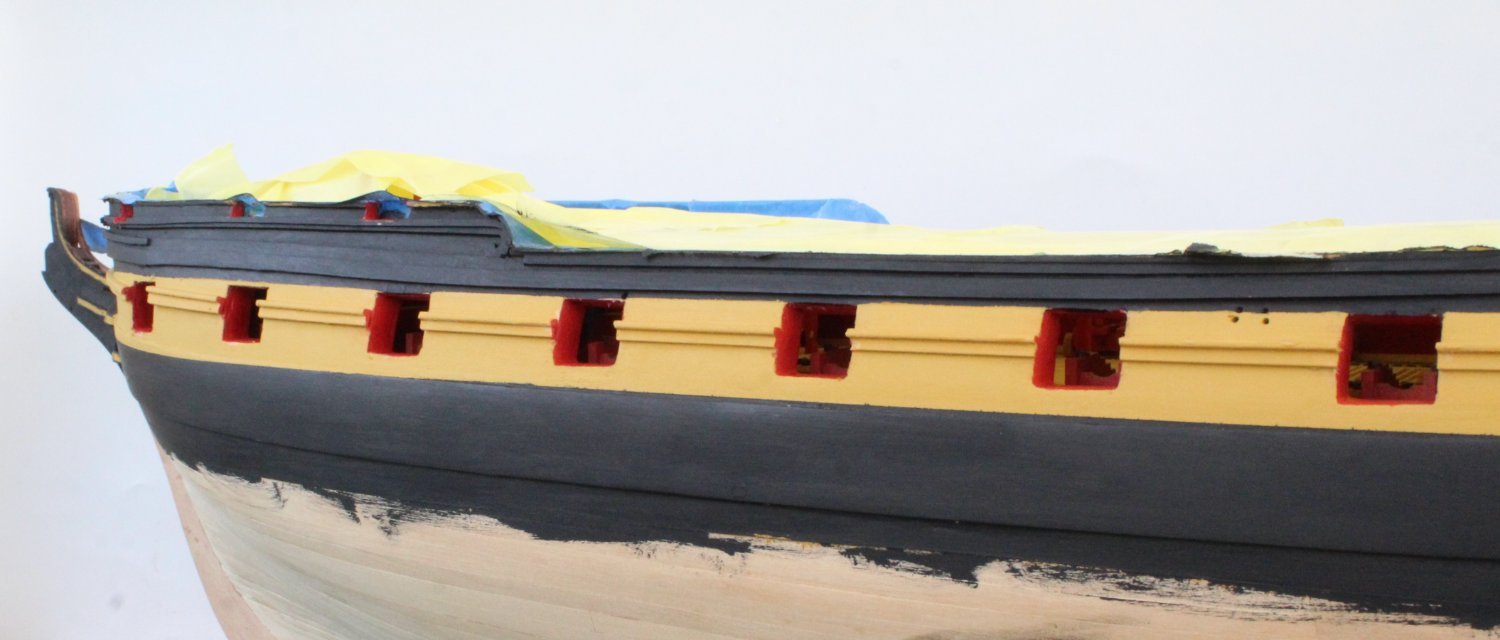
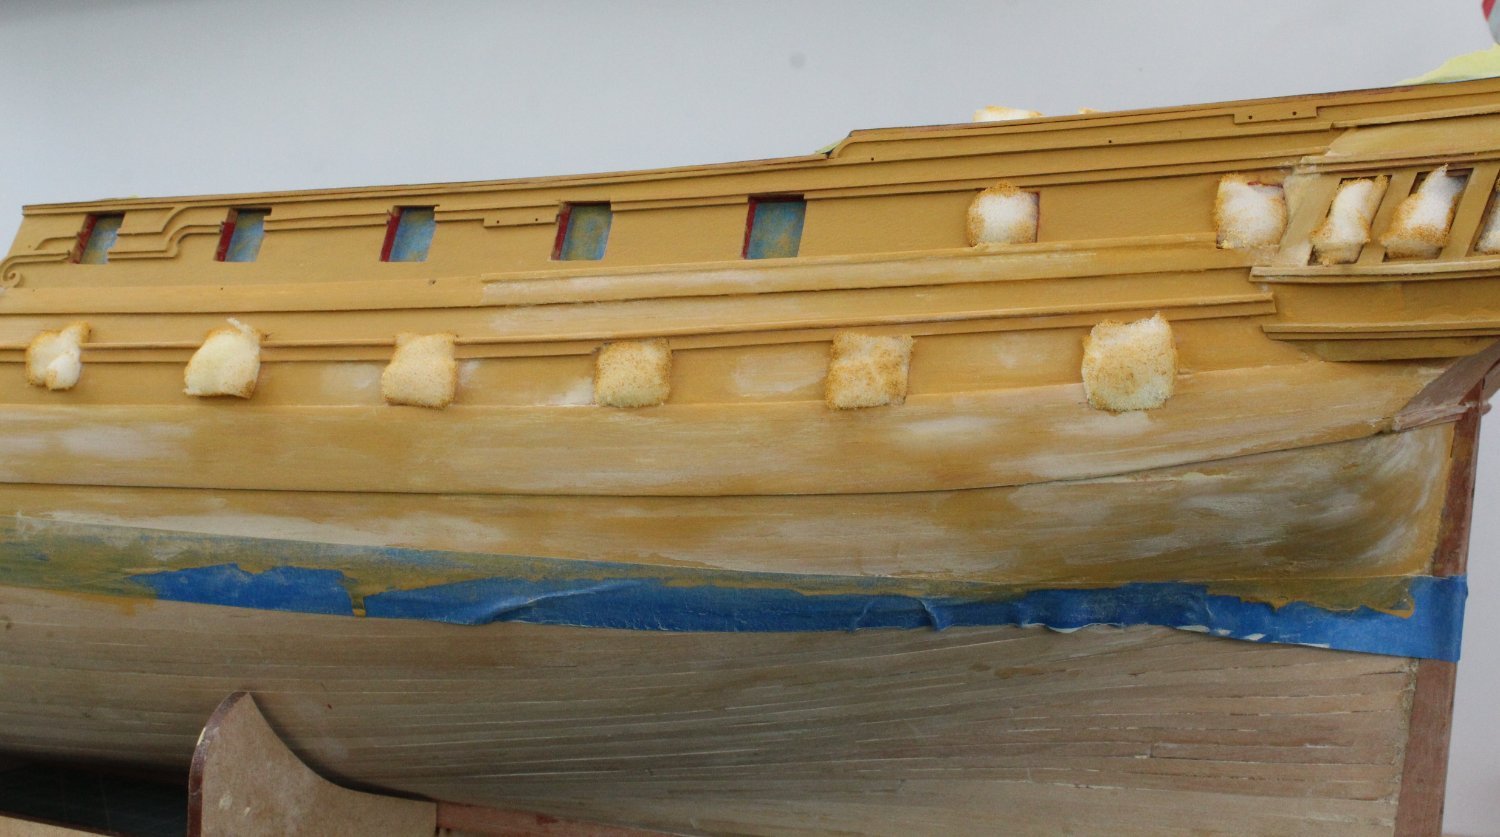
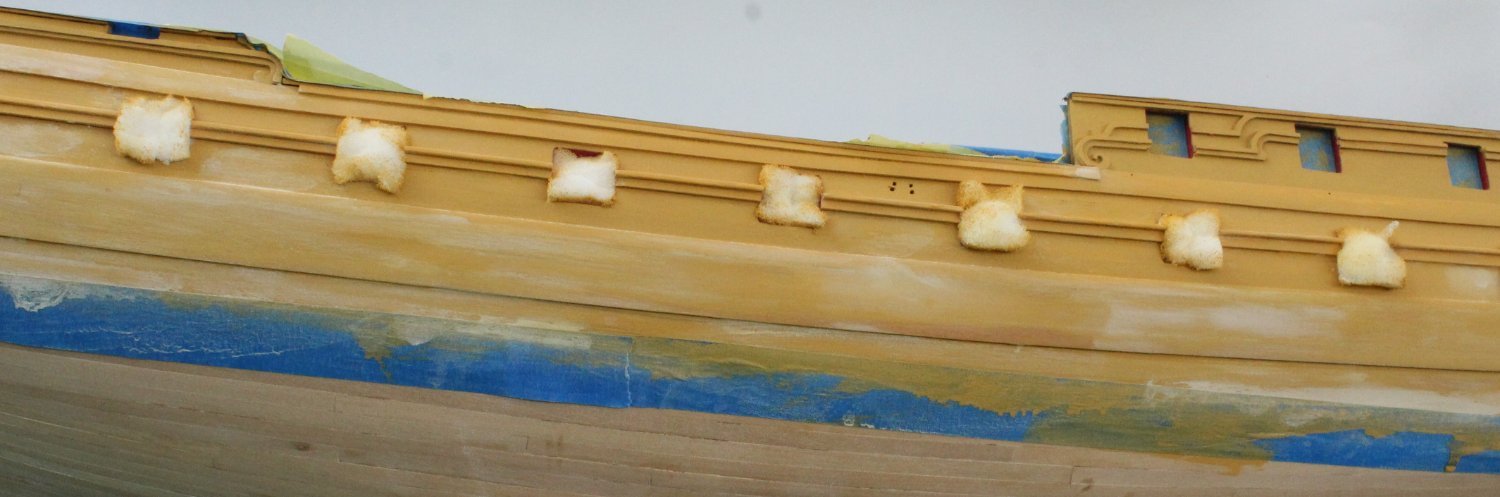
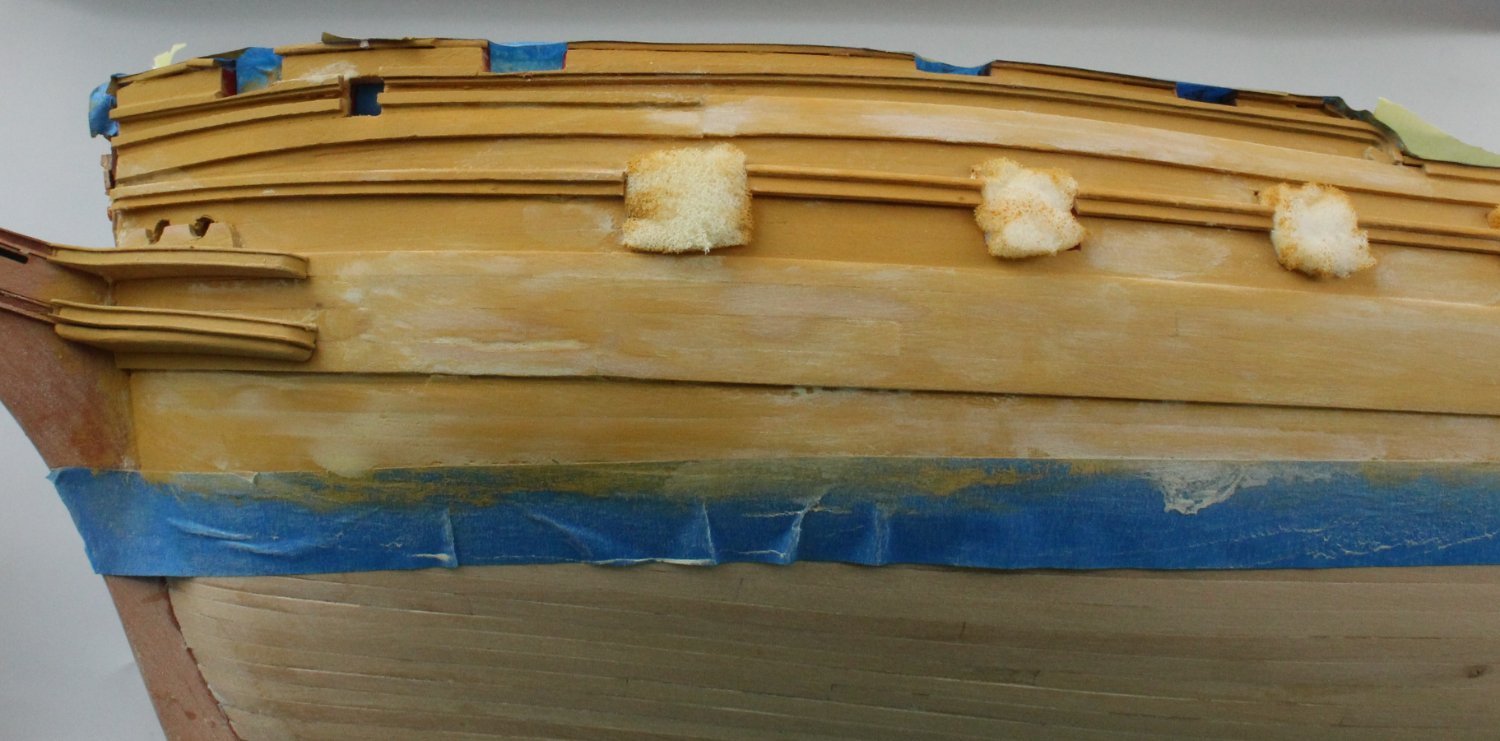
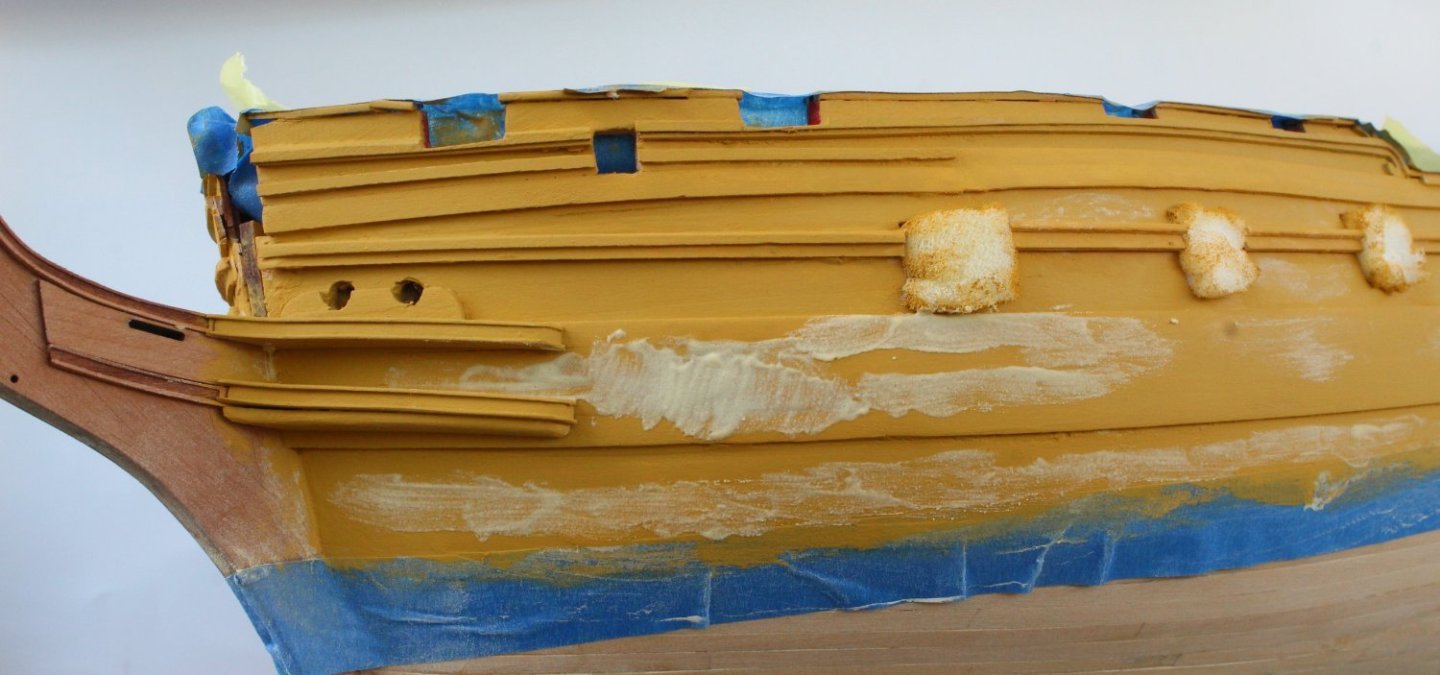
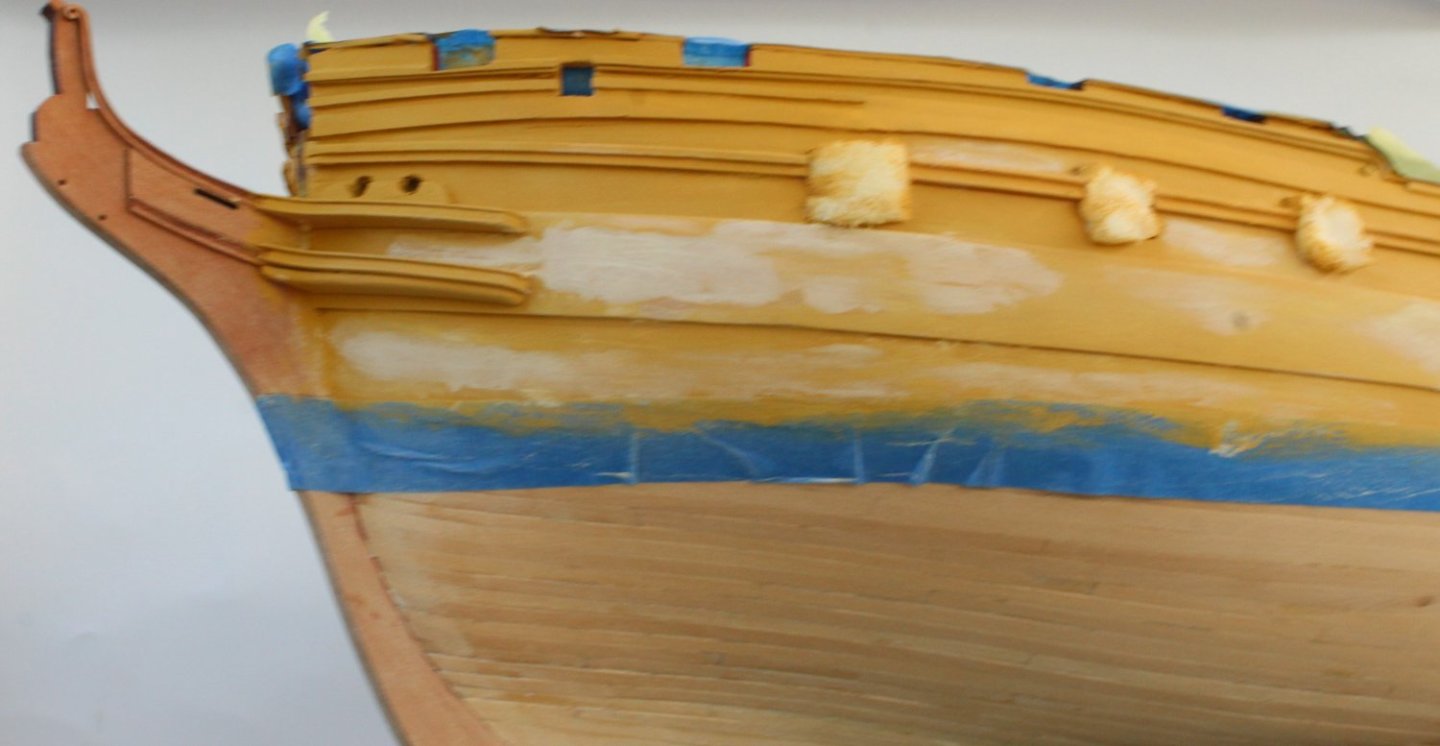
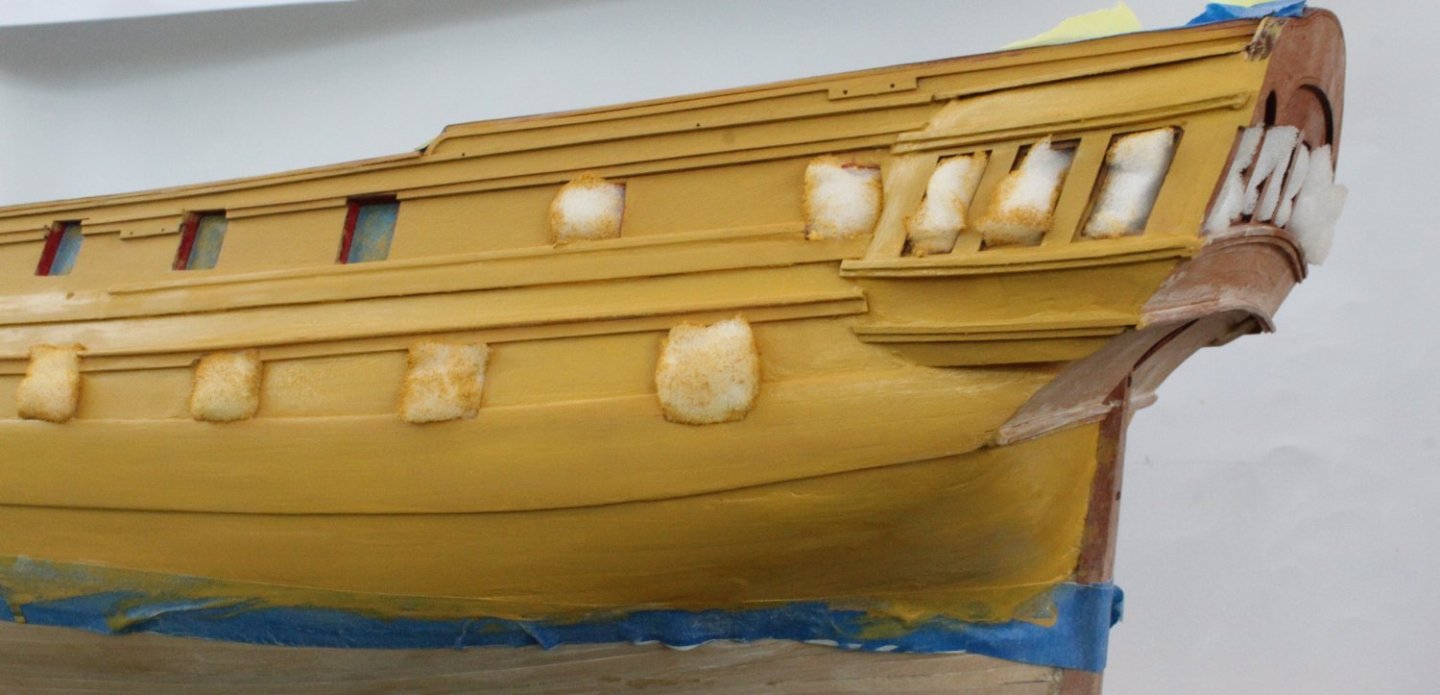
Hull Painting Continues The left hand side of the hull has had another fill, sand and paint process and is looking much smoother but there is still a little bit more work required as can be noted from the attached photo's. Bow Area With reference to my last post it could be seen that the bow area required more work, especially on the wales near the hawse bolster area. I mixed some filler with water and Titebond to get a smooth paste. In the photo below I have brushed some of the filler mix around the bow area. Once the filler had been given time to harden the area was sanded, using a mix of sandpaper and sanding sticks (120 to 600 grit). The next photo was taken partway through the sanding process. Once the bow area looked smooth another coat of yellow ochre was applied. For the most part this area is now looking smooth but still requires a little bit more work. For example there is an area at the top of the lower hawse bolster which need a bit more filling and sanding. Midships This area did not require a great deal of filler and once I had sanded it and then added a new coat of paint it is now looking smooth. I think it will require one more fill and sand as there is still a bit with the upper section of the upper wale (below the 4 holes) which needs to be sorted. Quarter Gallery I am reasonably happy with this section. There is one area which will need filling and sanding before the black paint is added, which is quite evident from the attached photo. I also need to remove the unwanted debris from the upper rail. Stern Area This is the section which requires the most work to get a nice smooth finish. I am slowly getting there but I think it will require a couple more sessions of filling and sanding before I can move on.


- 587 replies
-
- 10
-
-

-
- Indefatigable
- Vanguard Models
- (and 1 more)
-
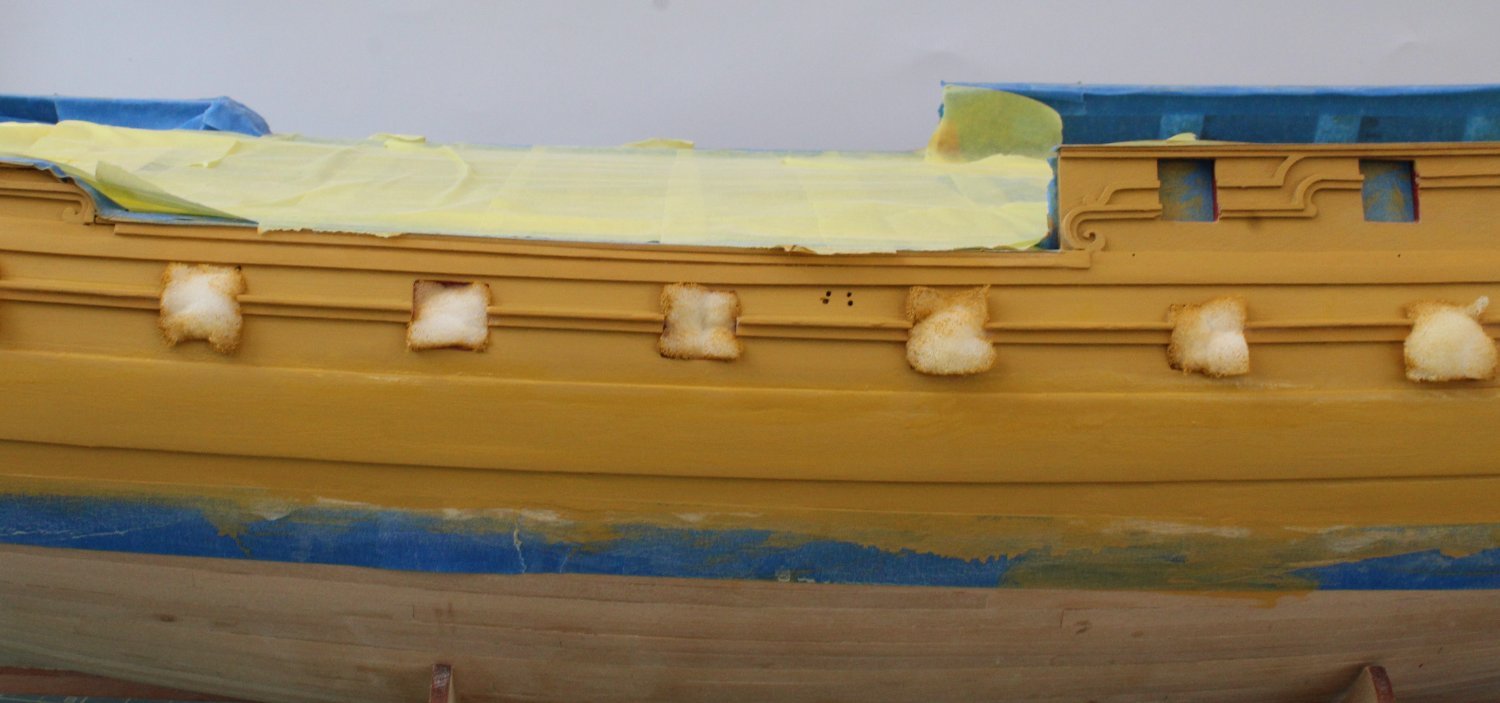
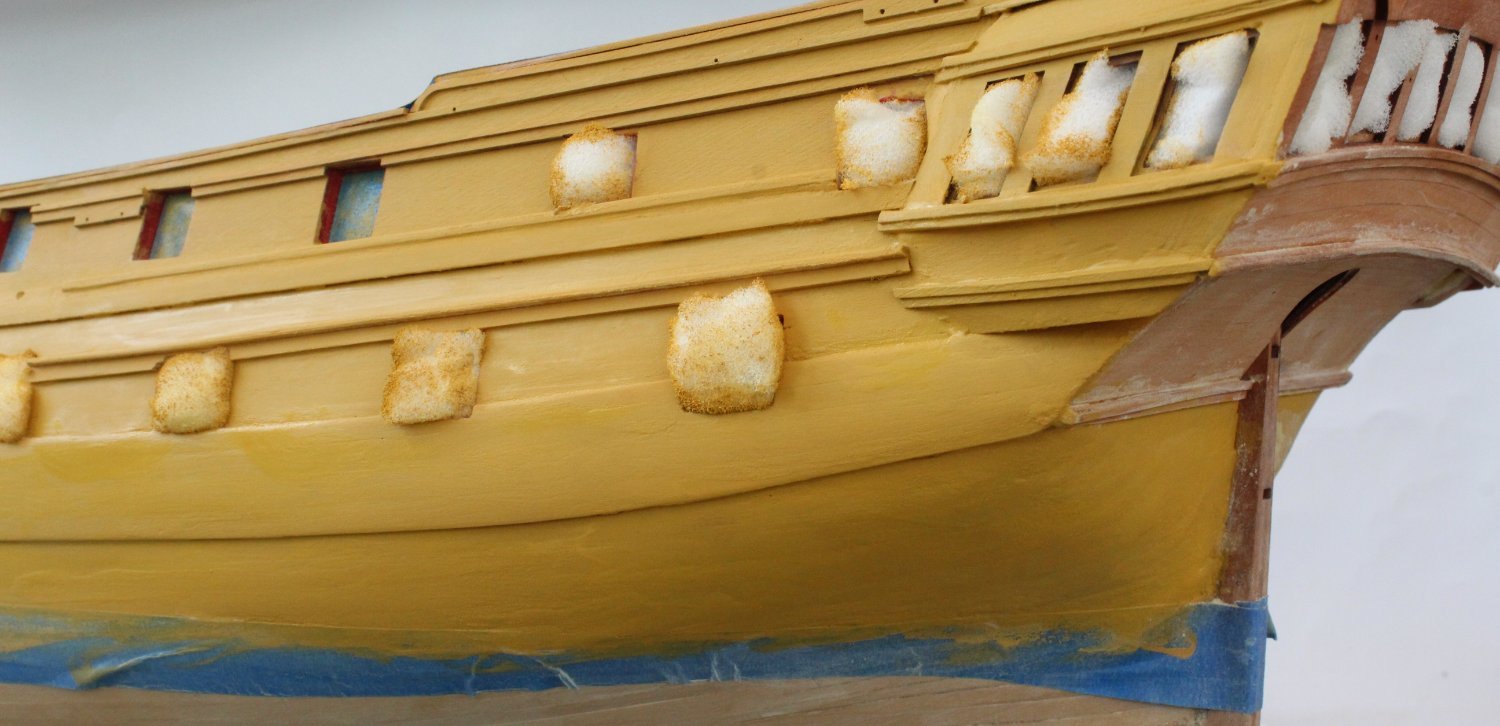
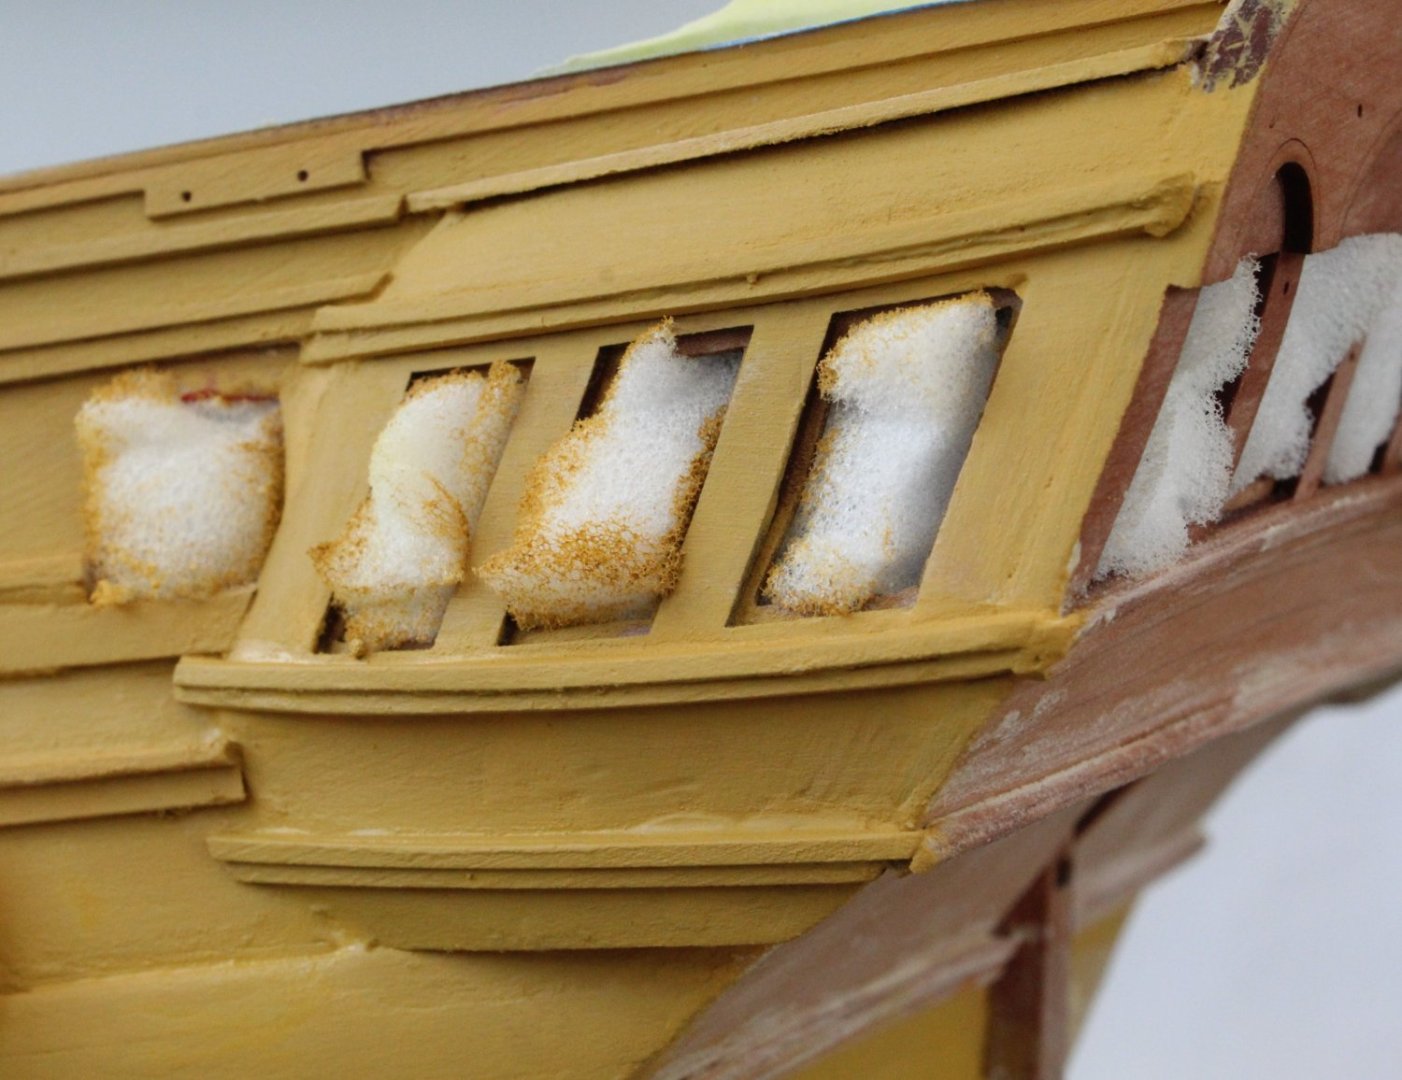
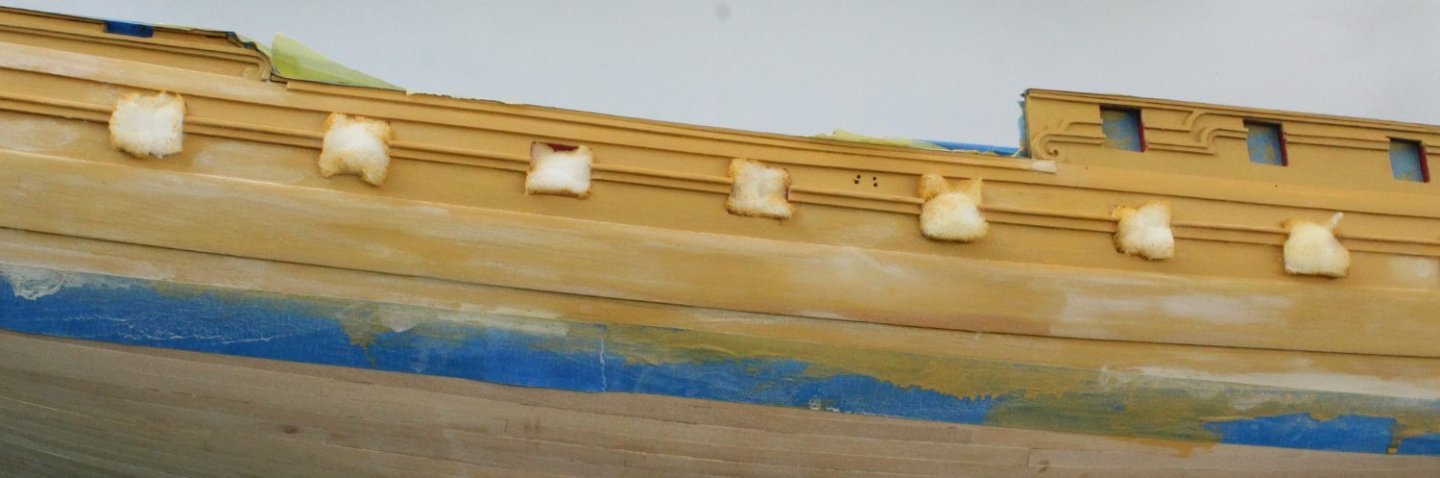
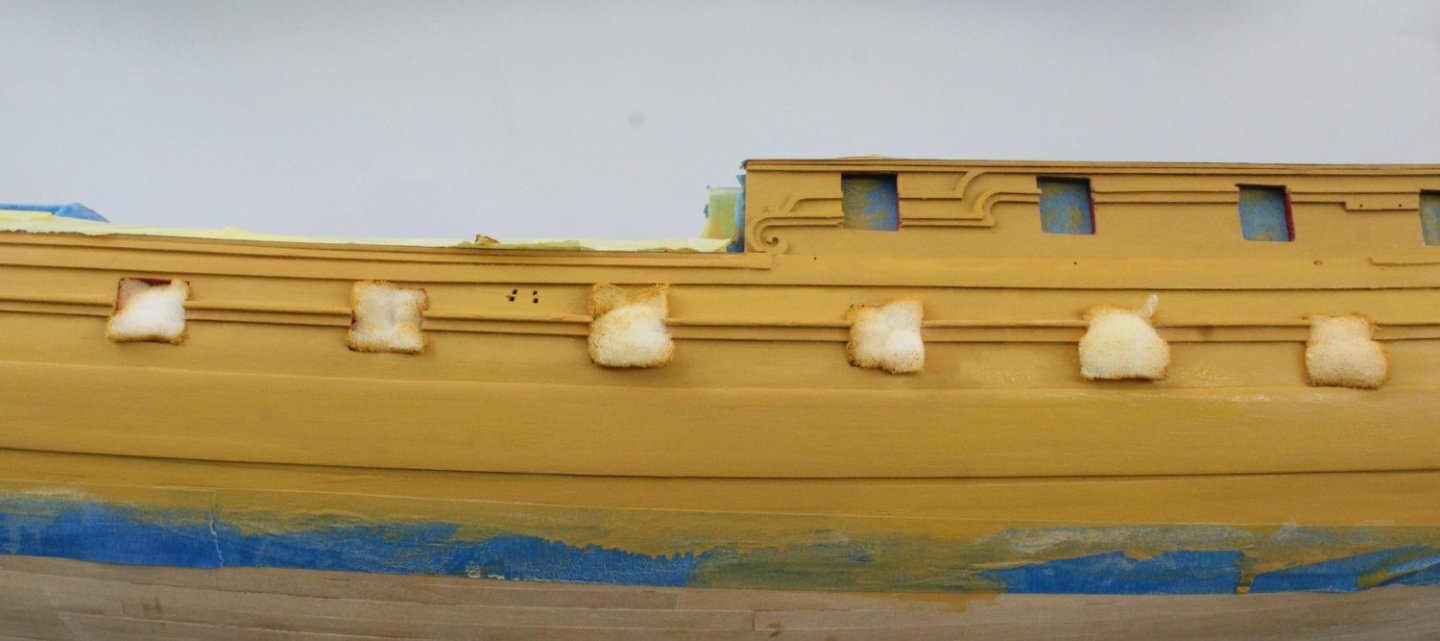
Start of Painting The Hull Yesterday I was able to return to the boat yard after returning home from a short holiday. The next task to undertake is to paint the hull. This is not a task that can be rushed and will take a few days to complete. I have to allow time for the wood filler to set before it can be sanded smooth. I then, after a new coat of paint has been added, I have to allow time for the paint to dry before it can be inspected and new filler applied to any remaining defects. Task 1 - Tape the hull. This took quite a bit of time. Foam padding was added to the gun ports. Once the hull painting is complete I will have to touch up the gun gun ports. Task 2 - Add a coat of WOP to the areas to be painted and allow it to fully dry overnight. Task 3 - Apply a coat of yellow ochre to the area to be painted. As explained by Jim in the build manual the lighter colour helps to show the defects. Task 4 - Inspect the painted hull and applied wood filler as required. Task 5 - After sanding the wood filler take a few photo's Task 6 - After the dust removal apply a second coat of yellow ochre paint. Task 7 - Take some more photo's Stern Area Photo As can be seen there is much more filling and sanding required around the stern area. I think this area will take the most effort to get the desired smooth finish and will no doubt end being a real labour of love. Midship Photo's The midships area does not look too bad, but it still requires a little bit more work to get the required smooth finish. Please note the paint is still wet the photos below. Bow Photos Still a bit more work required to get the bow area looking smooth, especially on the wales. As you will also note the hull rail workmanship above the hawse area is not my best work. Waterline The top edge of the lower blue tape is set along the waterline. Once I am happy with the how the hull looks, and before the black paint is applied I will remove the tape. Time to go for a run.


- 587 replies
-
- 7
-
-
- Indefatigable
- Vanguard Models
- (and 1 more)
-
I always fully insert, the internal framework is designed for this.
- 426 replies
-
- 2
-
-
- Vanguard Models
- Sphinx
- (and 1 more)
-
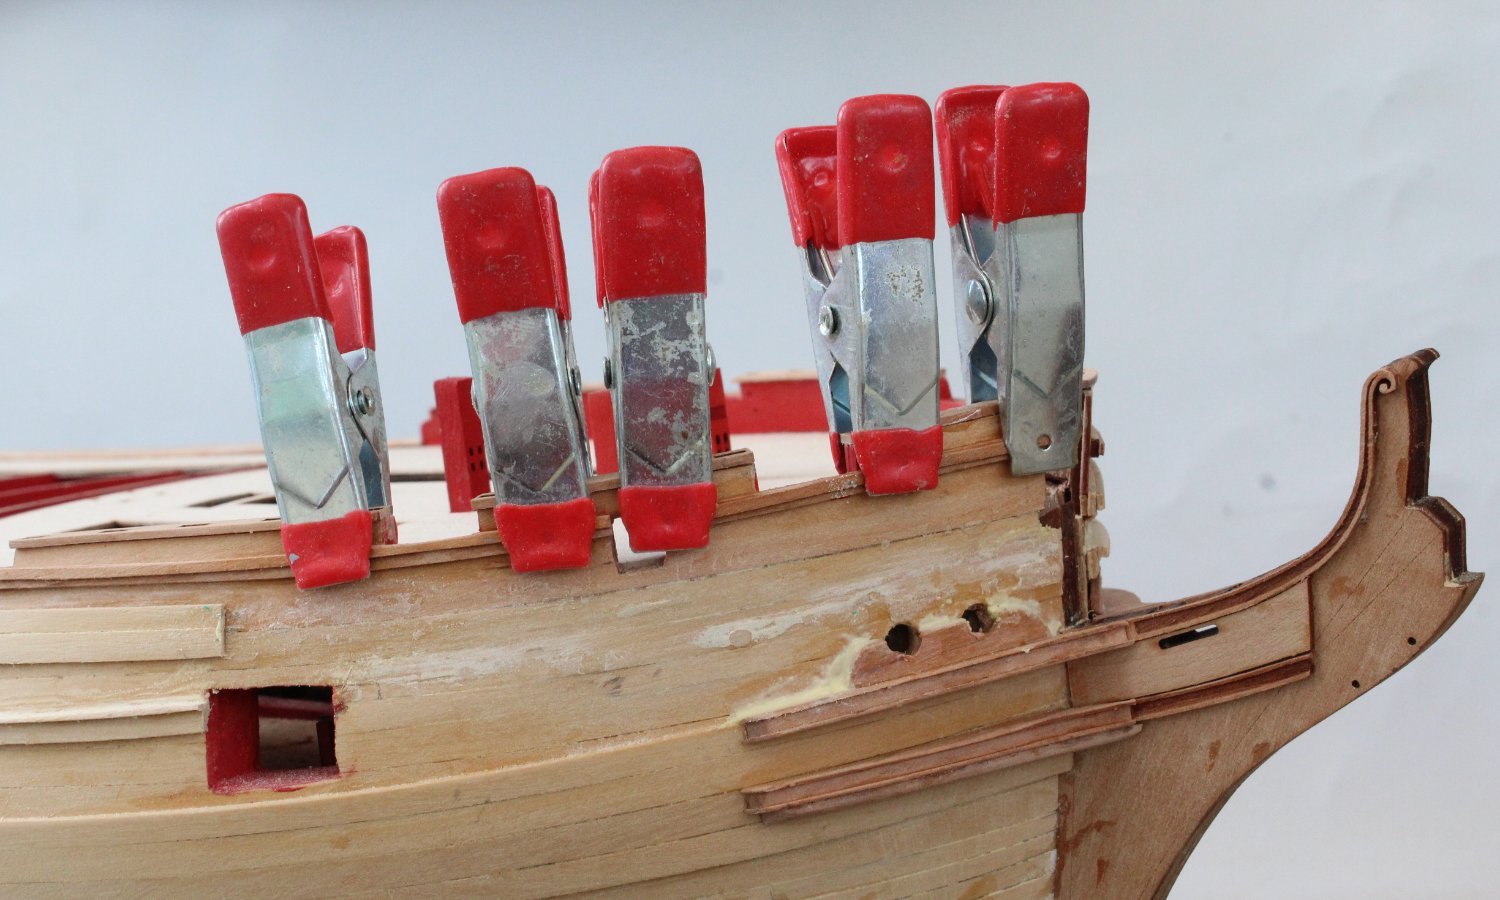
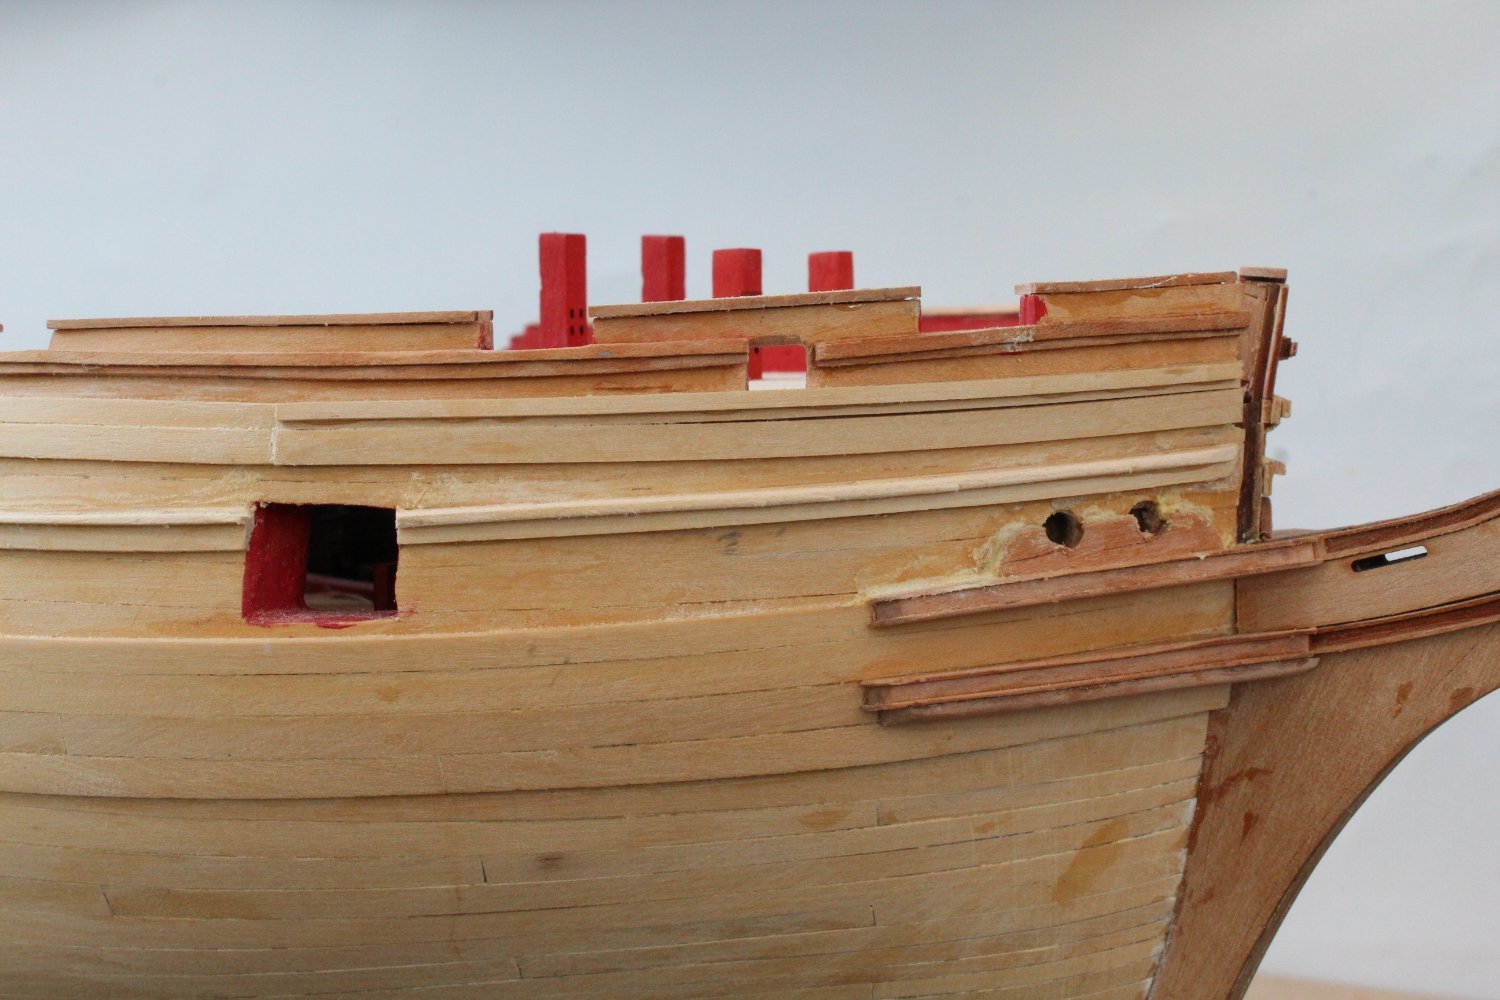
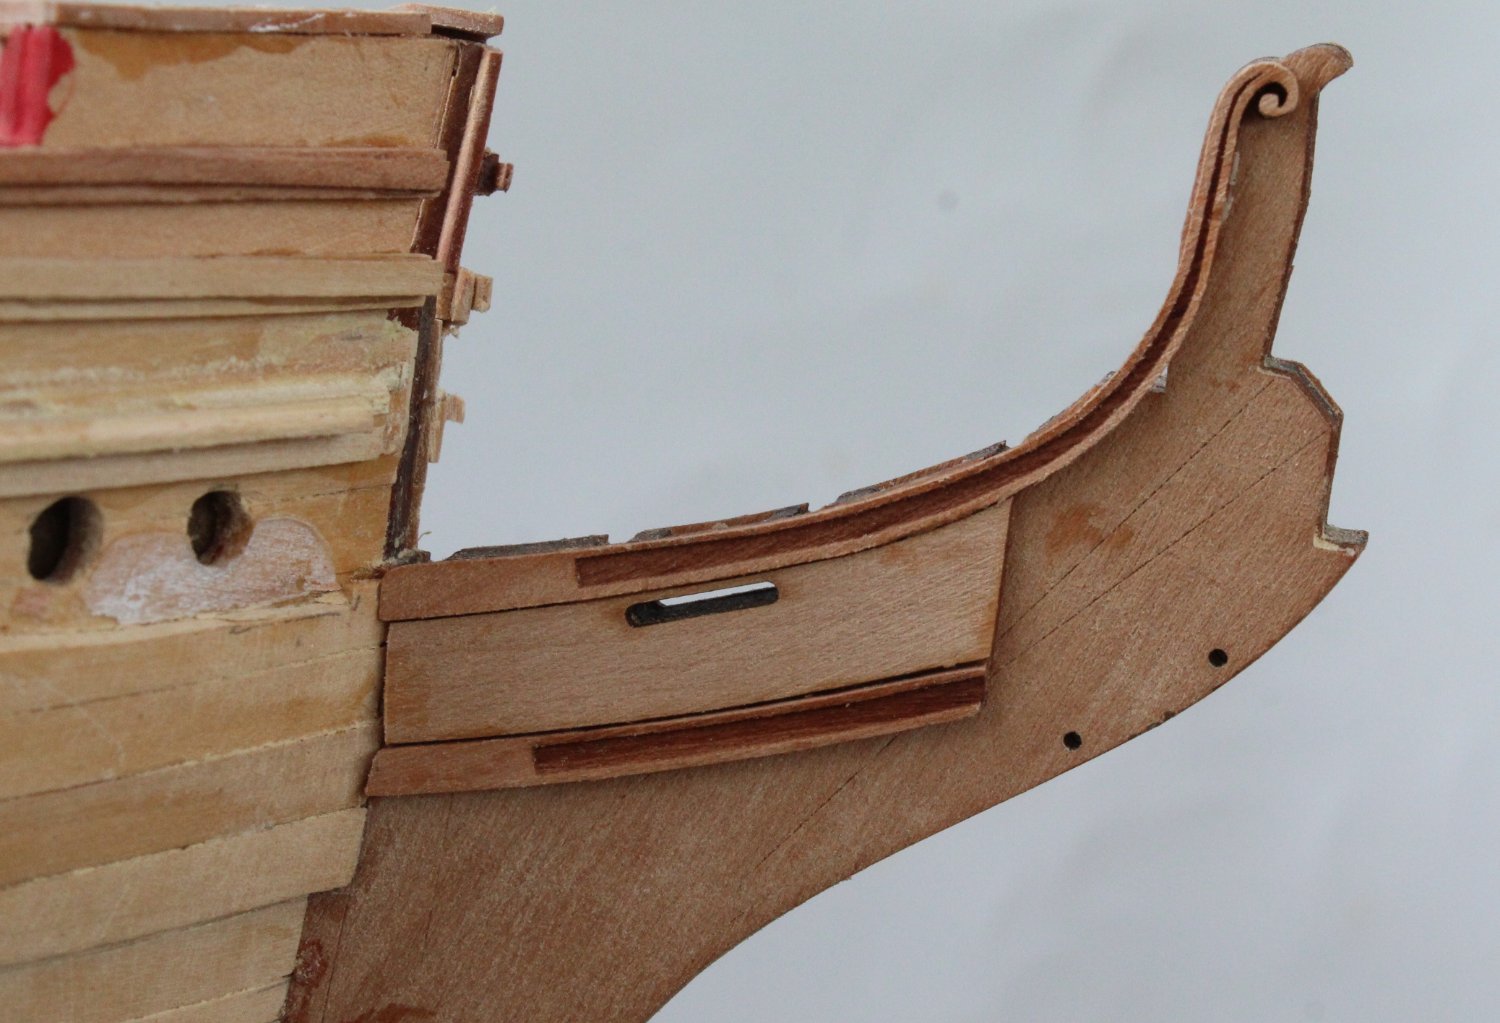
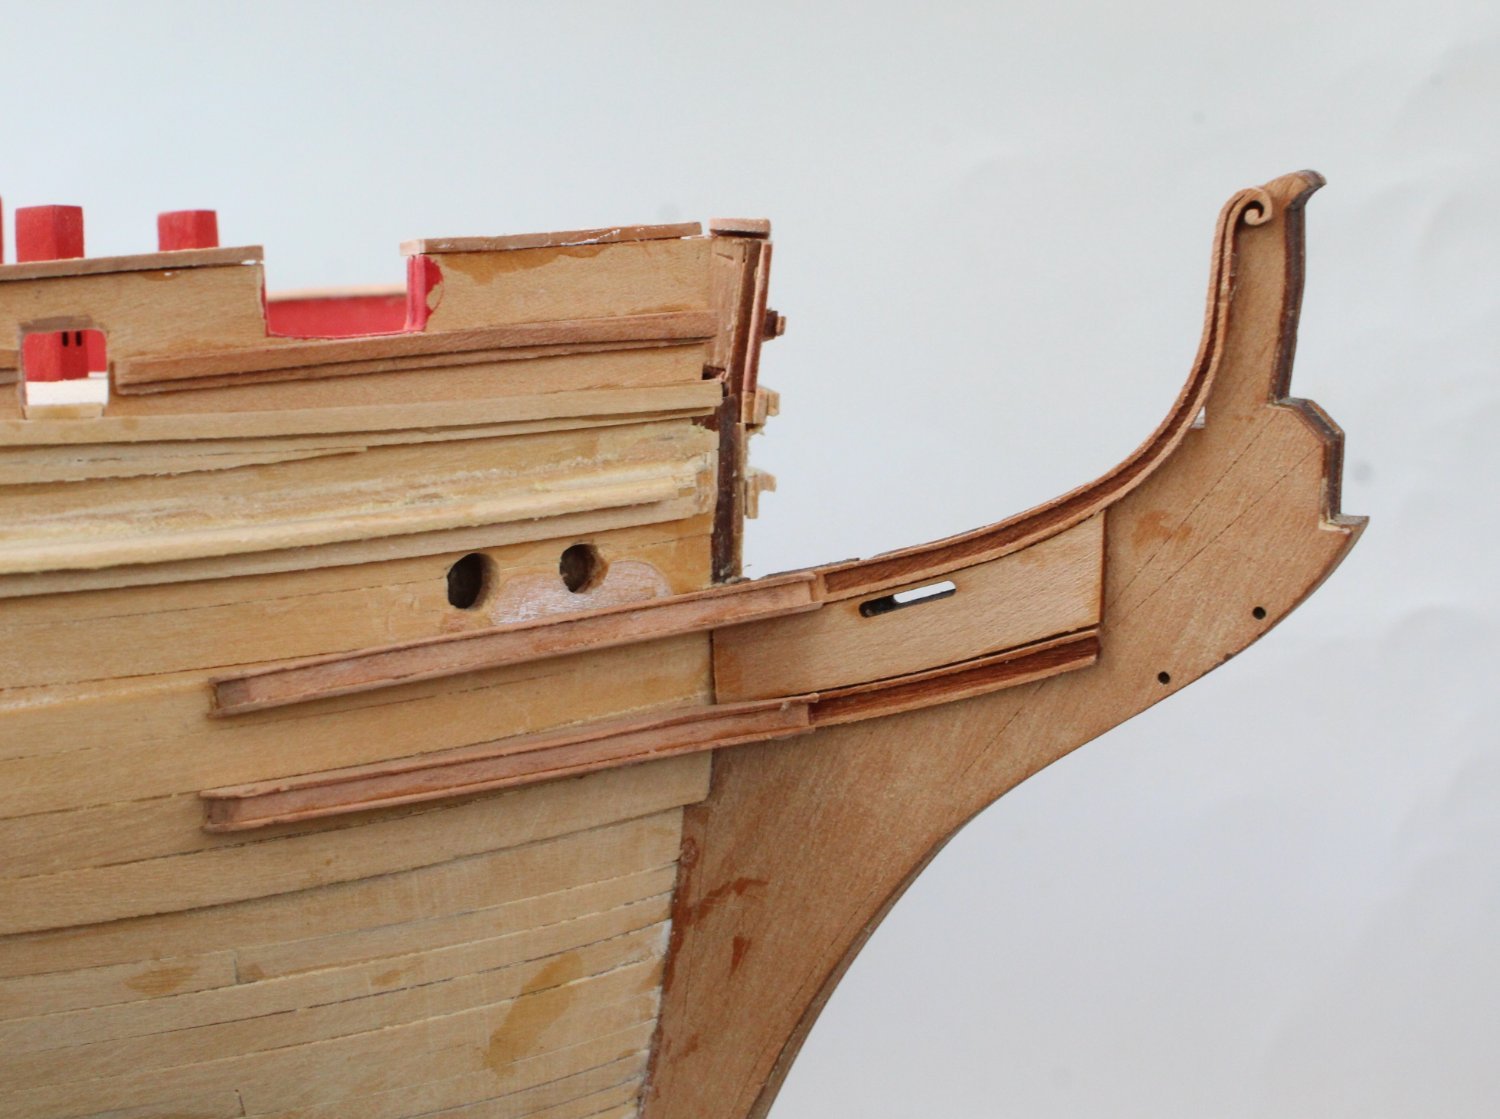
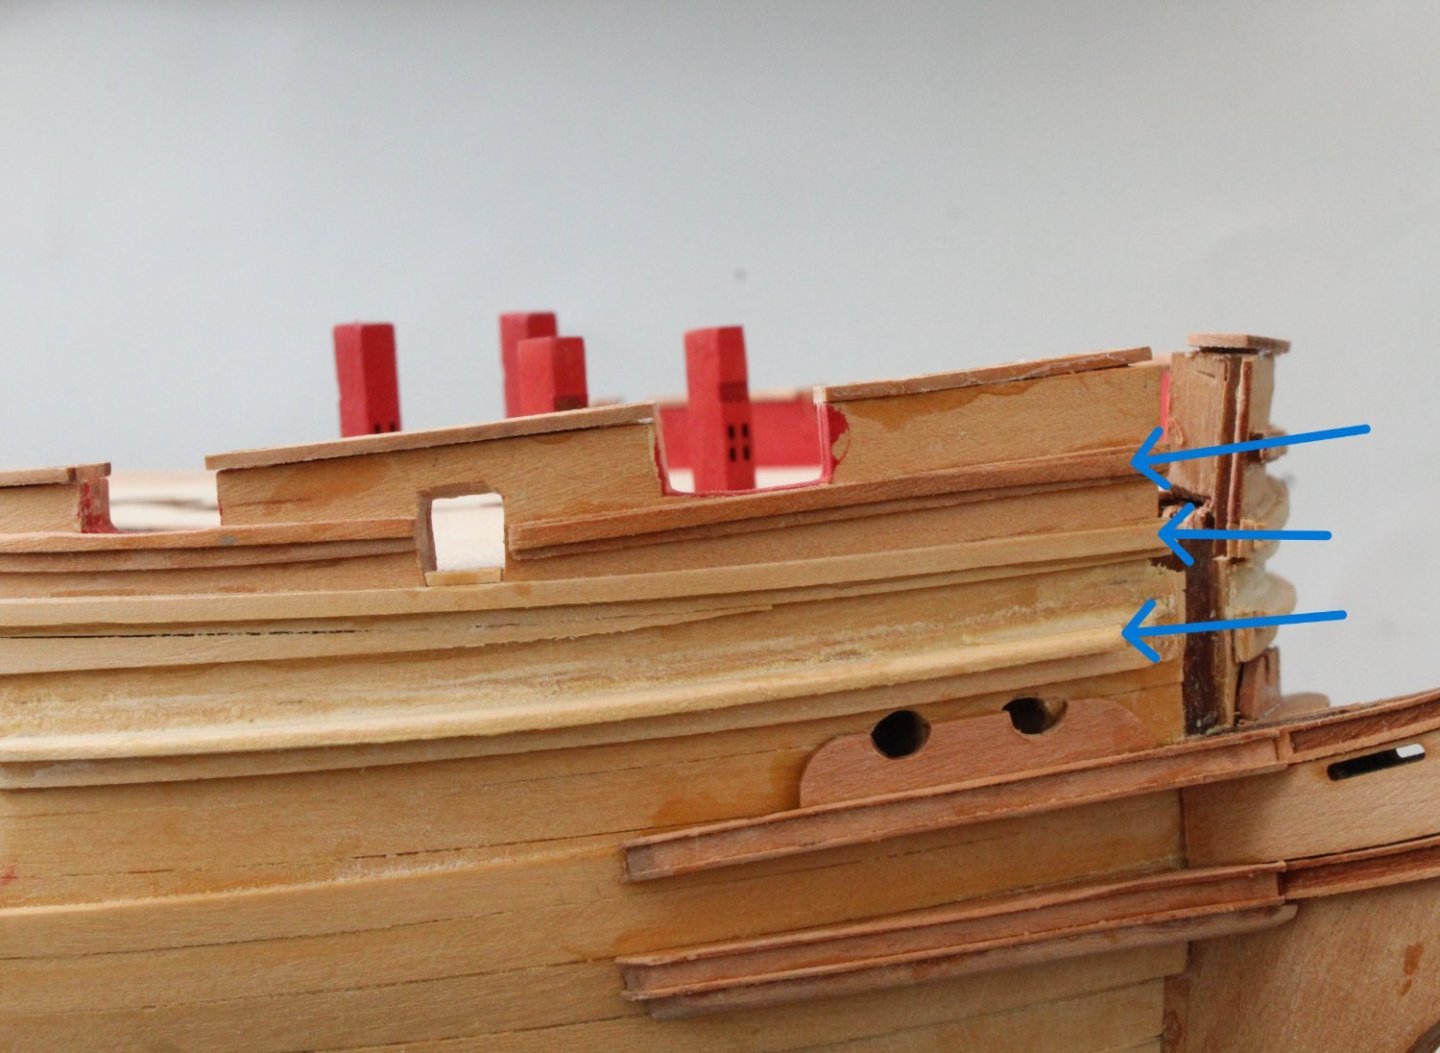
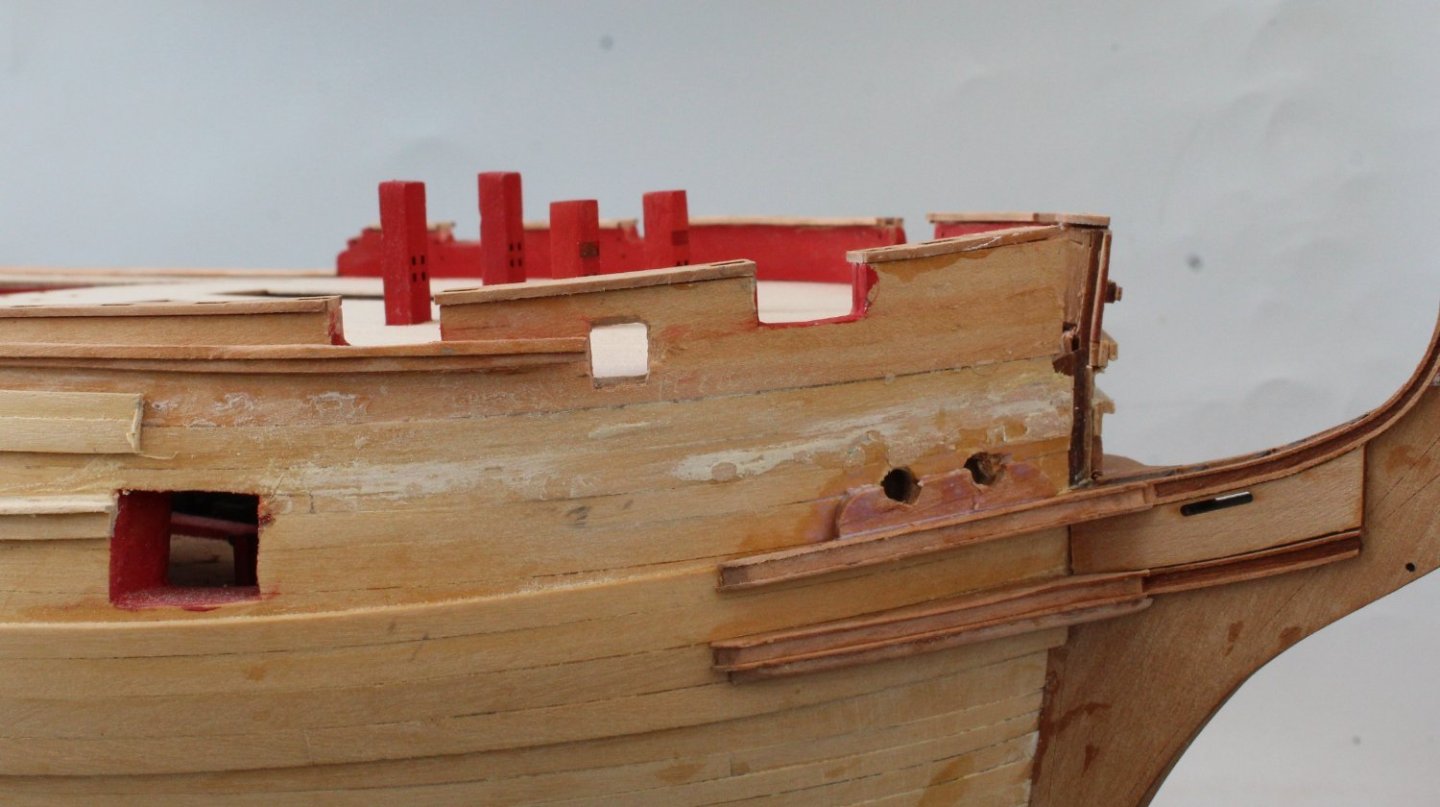
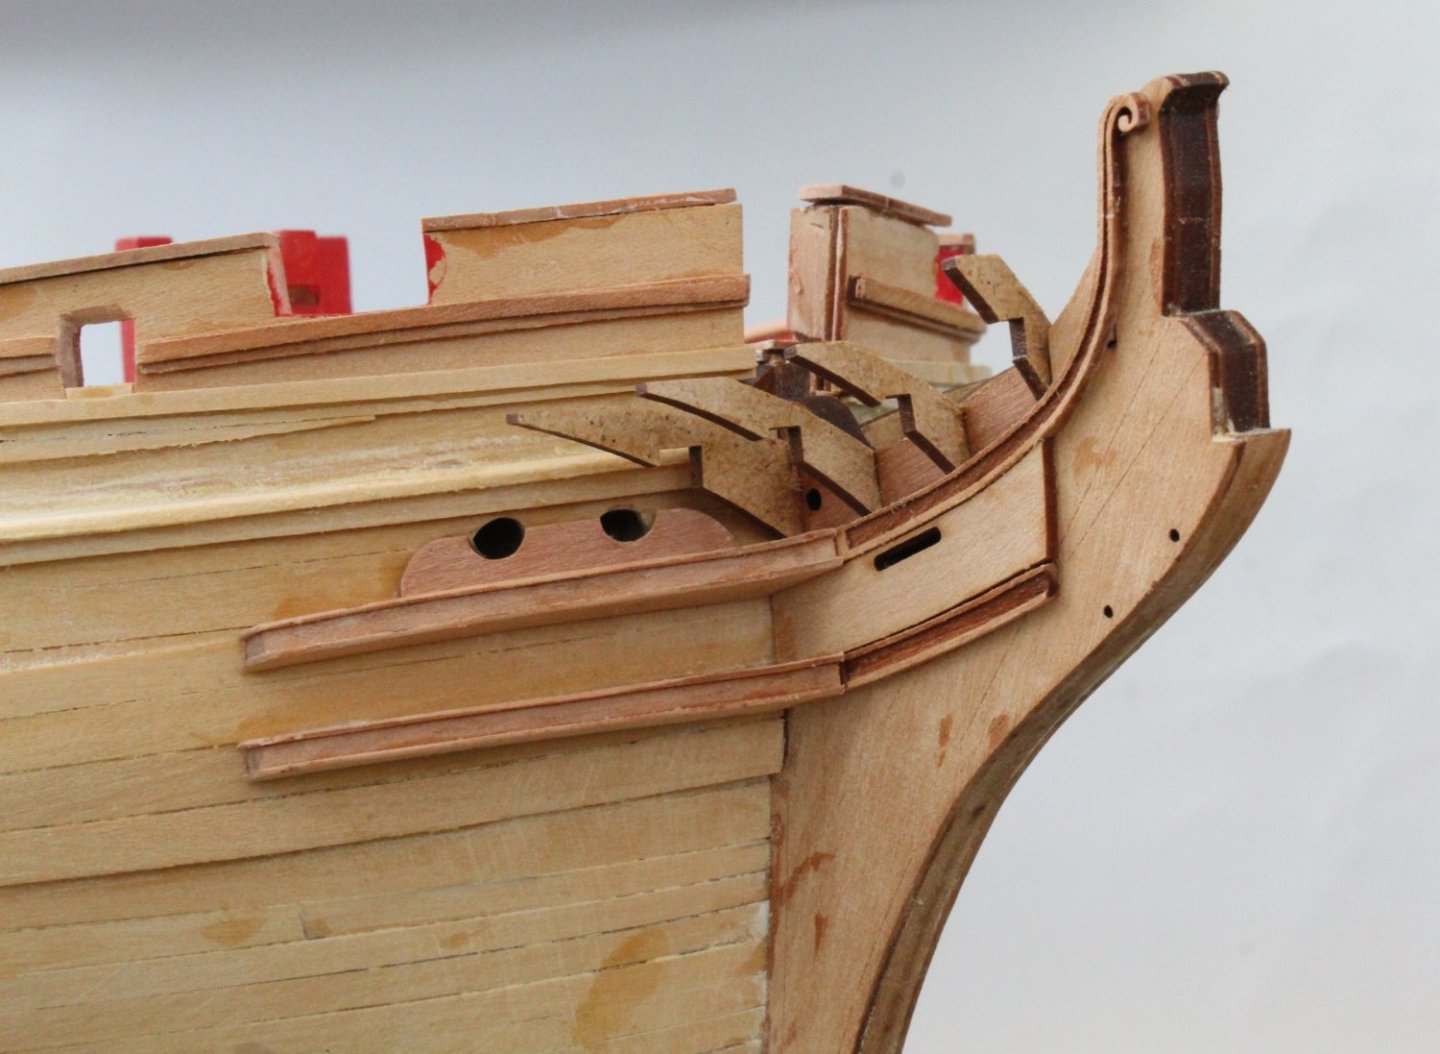
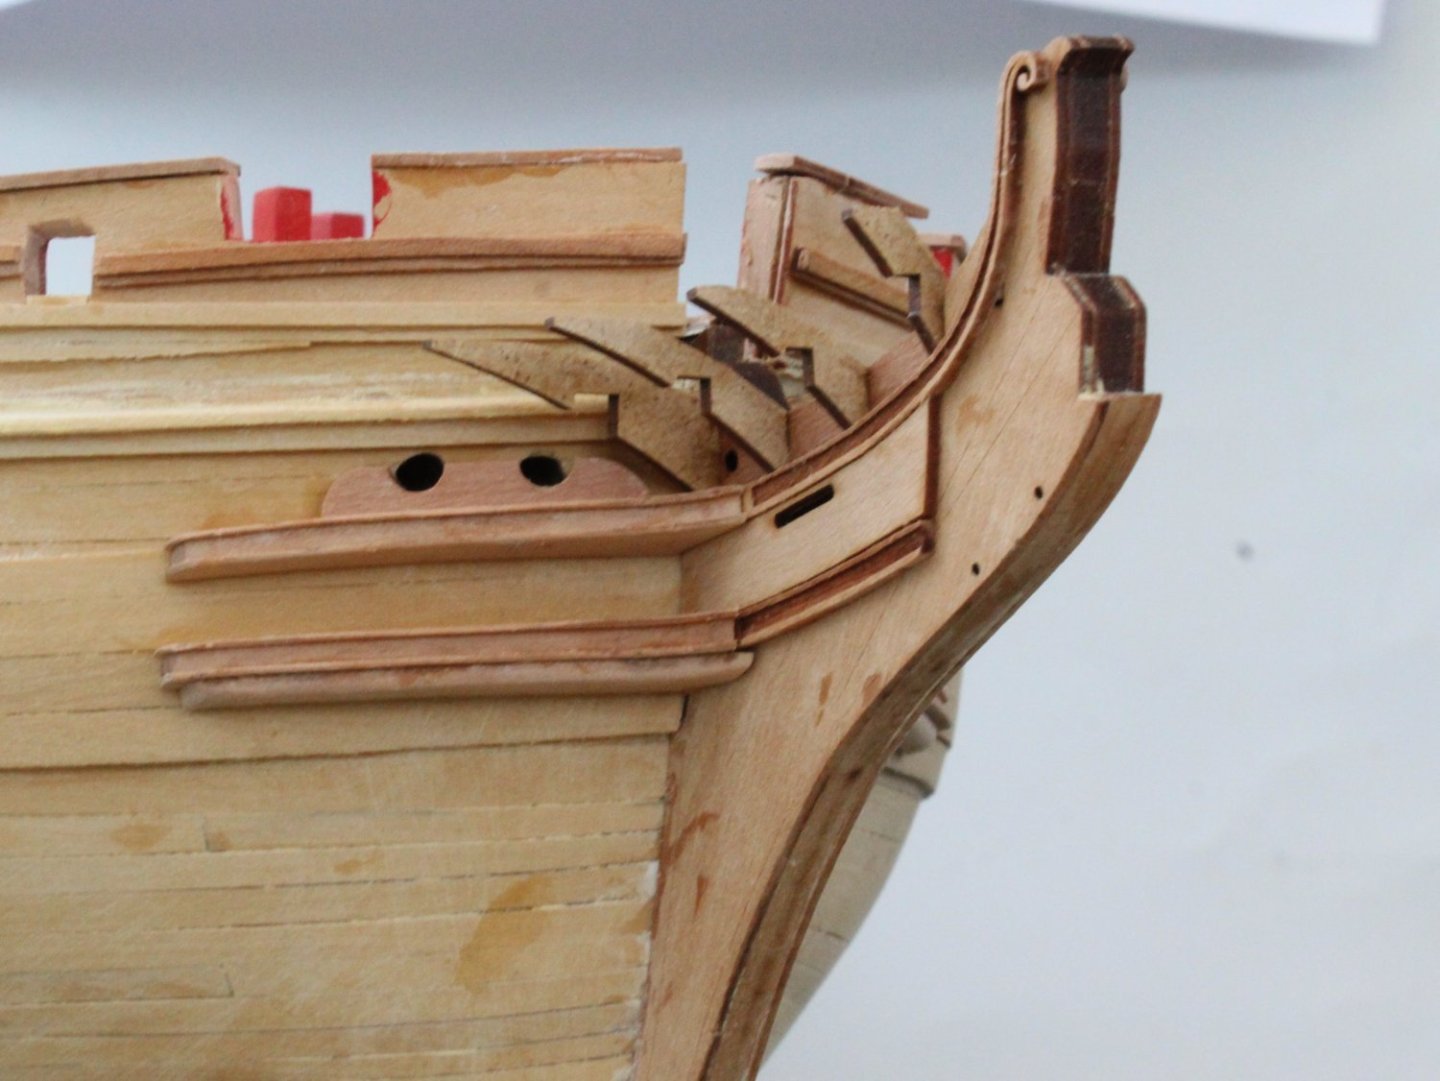
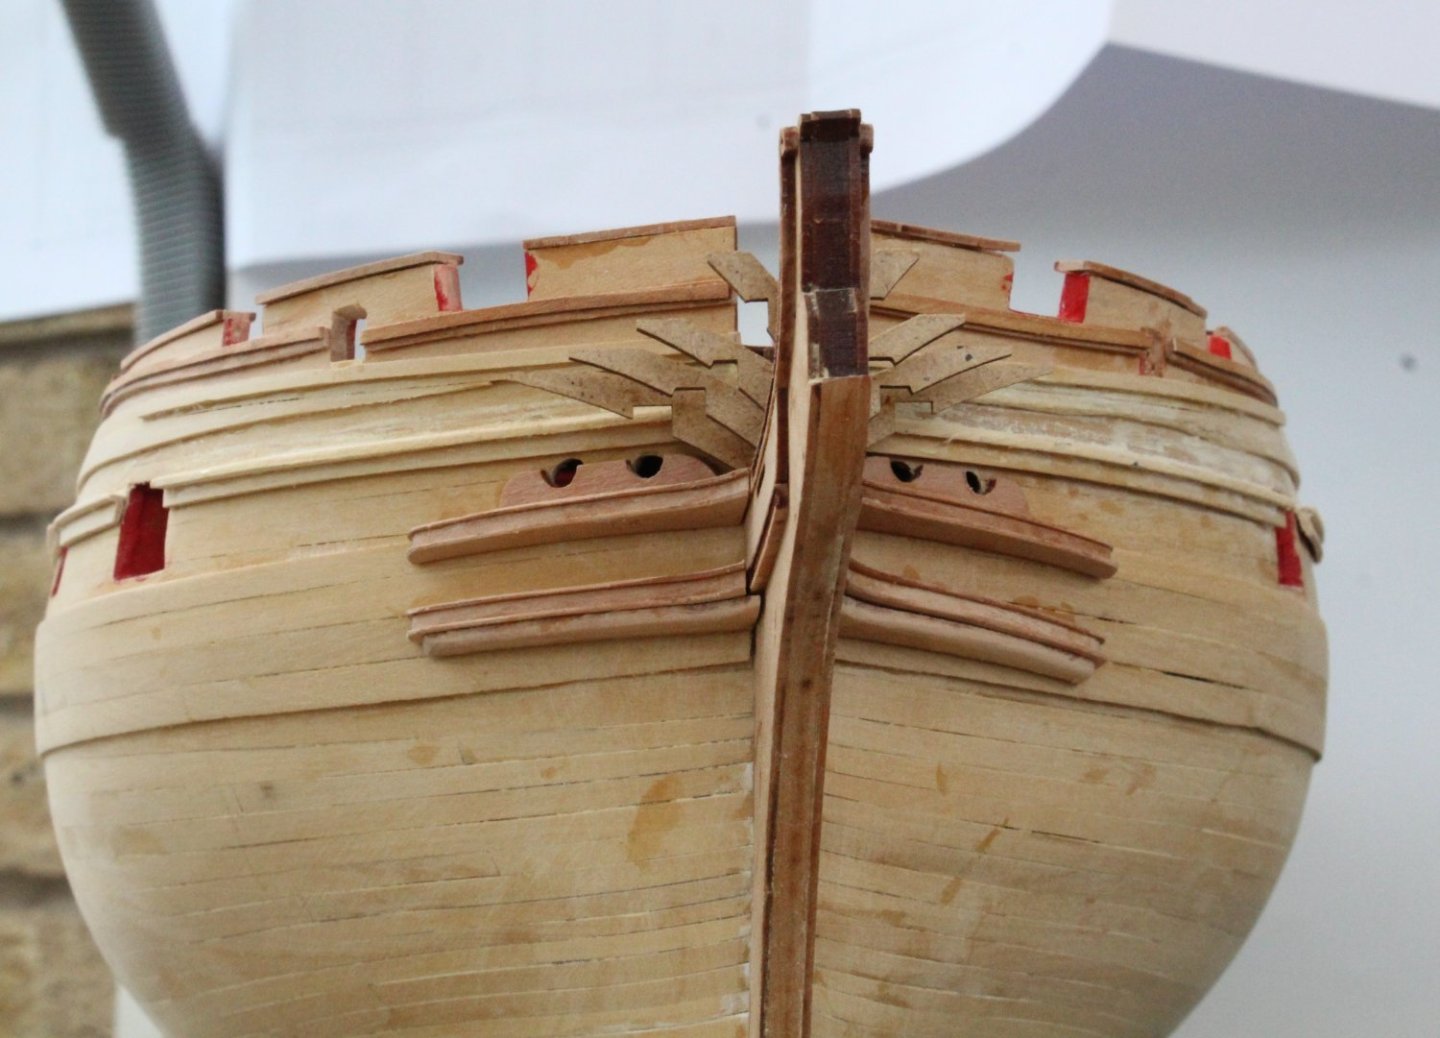
Hull Rails Rework As I highlighted in a previous post I misaligned the hull rails around the bow area (both sides). Initially I was going to accept my error so I could move forward with the build. However on reflection I decided I should try to rectify the error. The rails (blue arrows in photo below) are set too low. I ended up trimming the bottom edge of the middle plank so the low rail could be added. Not my best idea but it was a workable solution. It was not very pleasant to look at however. With a dish of acetone and a sharp craft knife blade I removed the right-hand side rails. I decided to remove all the middle rail from the front edge of where the fore channel will be positioned. Thankfully the rails came away and the hull just needs a bit of cleaning up. Using wood glue the top rail was clamped in its new position. I also reworked the hawse holes and adding a bit of filler to hide some of the gaps. I am much happier with the top rail position. I used some tape to get an idea where the remaining two rails should be positioned. The new middle and lower rails were then added and overall I think it looks better. Given how I was able to rework the right-hand side I am confident I will be able to readjust the left-hand side rails. My final check of the new rails was to see if the cathead would still fit. Once the rail section sitting over the cathead opening was trimmed the cathead seems to be a good fit.


- 587 replies
-
- 8
-
-
- Indefatigable
- Vanguard Models
- (and 1 more)
-
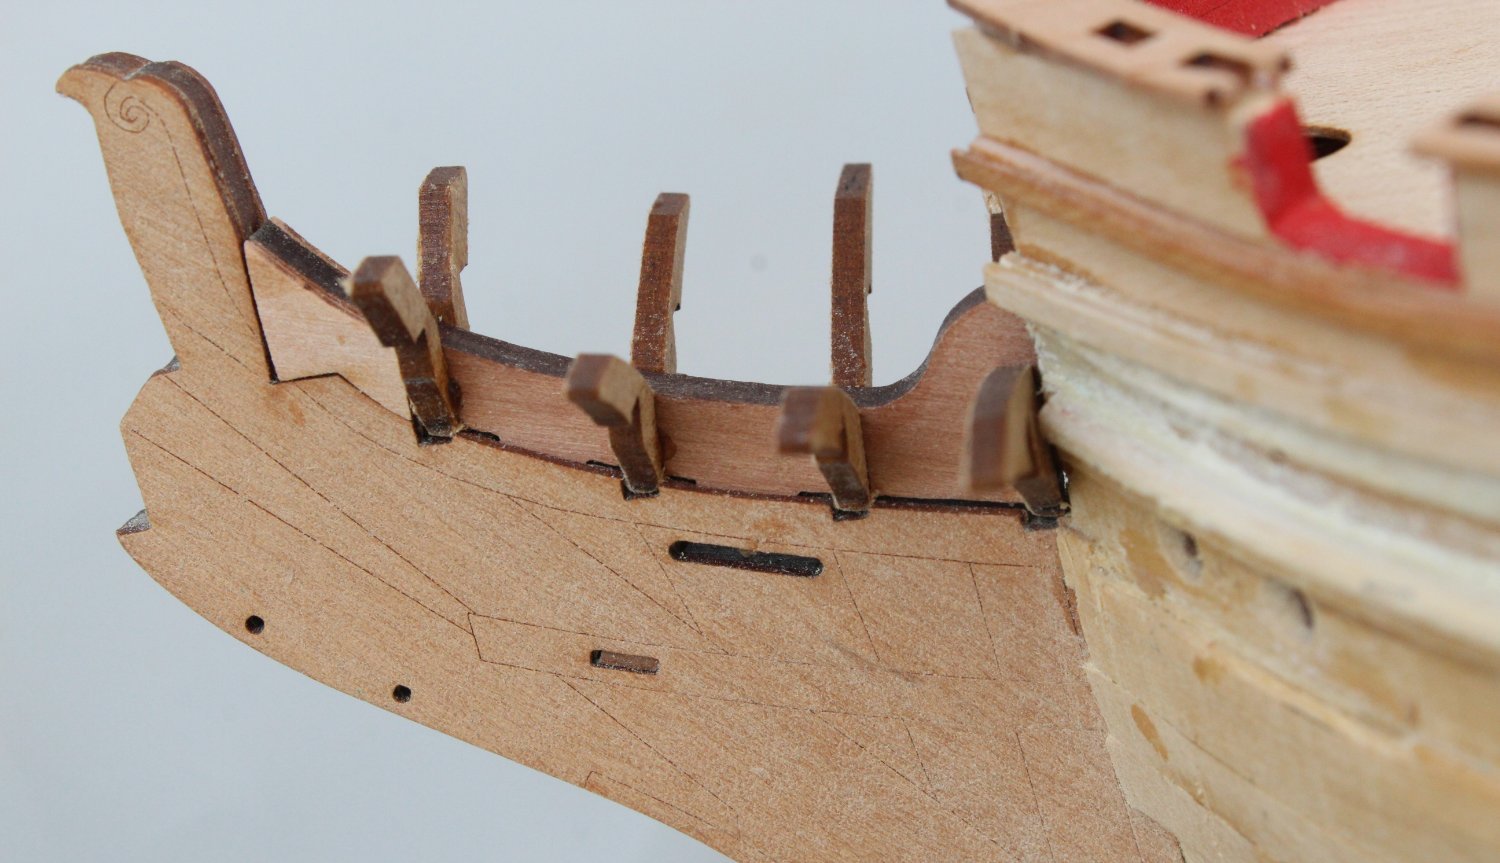
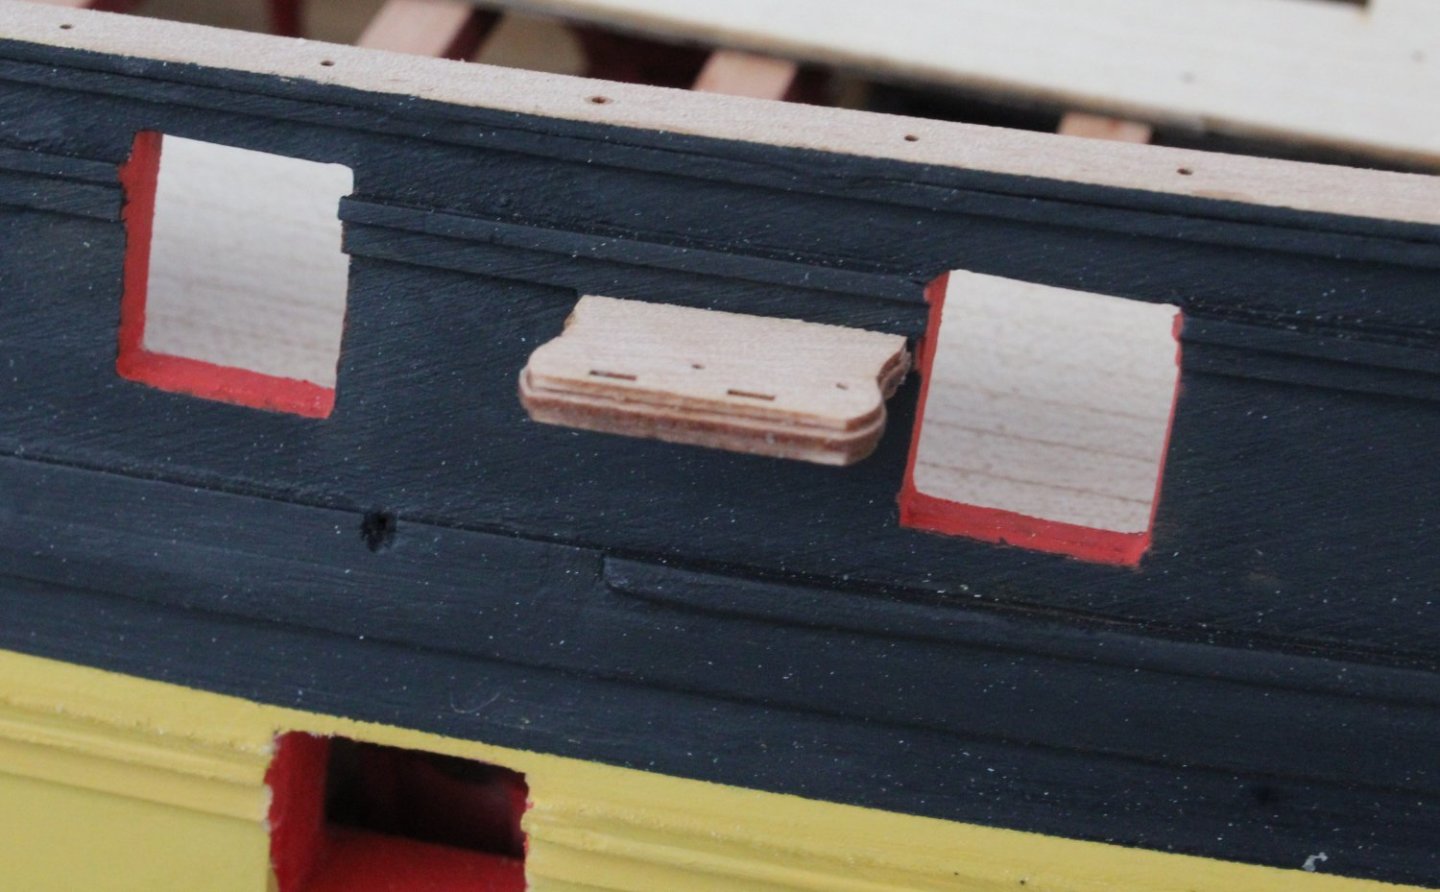
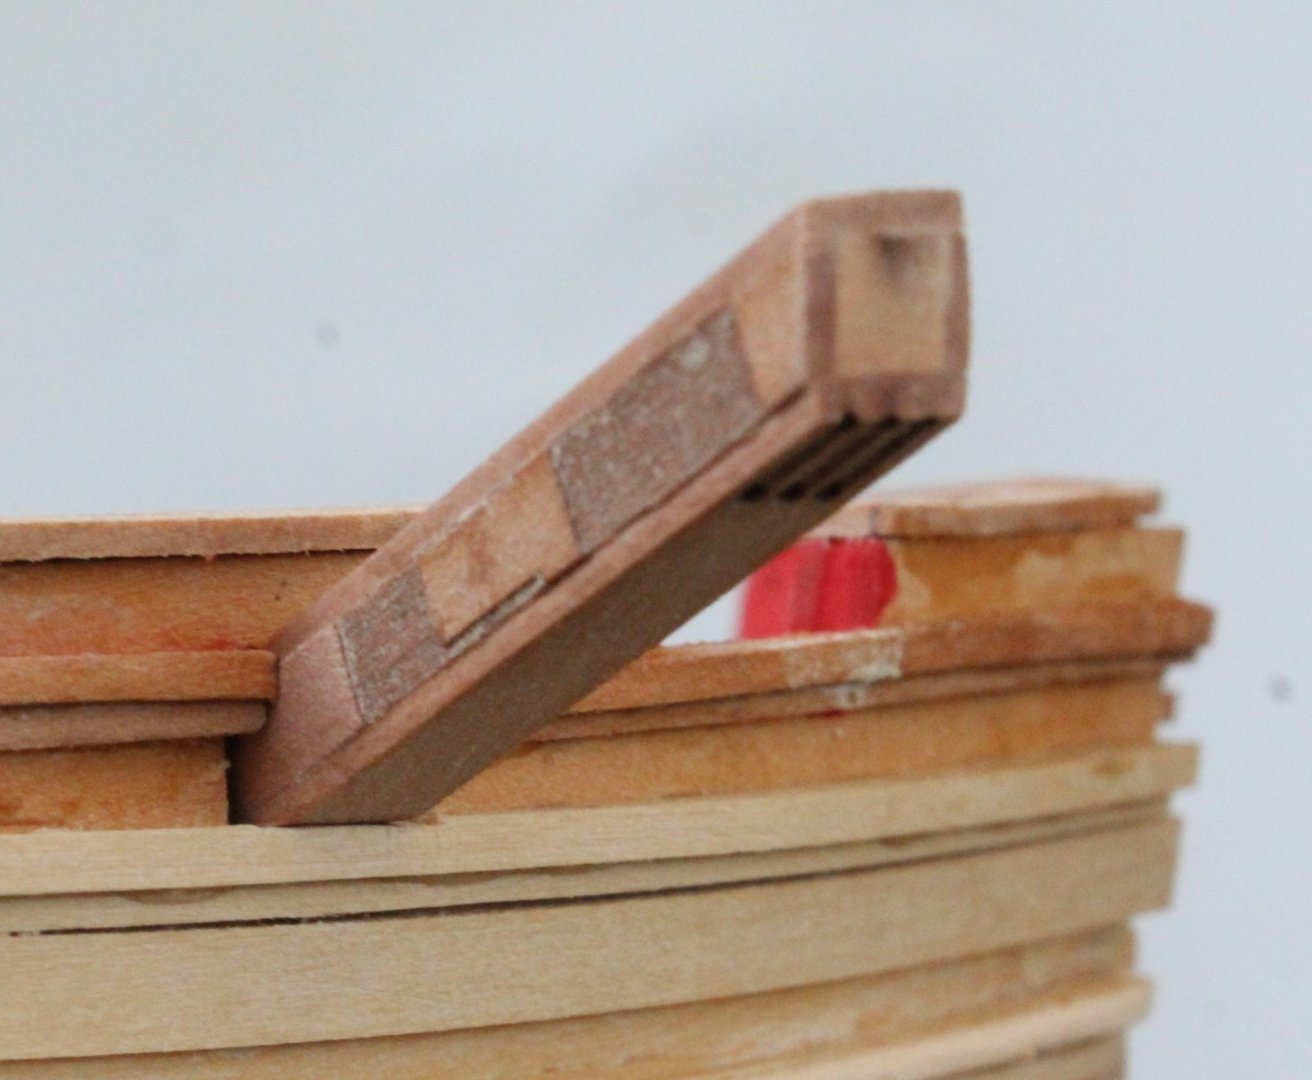
Bow Area Work Adding the various items around the bow went much quicker than I was expecting and only took me an hour this morning to complete. Once I had carefully removed the laser char from the various patterns a test fit was carried out of the bow gammoning bolster and the bow cheek rails. The patterns did require a little bit of trimming before I was happy with the test fit, as shown below. These patterns were then coated with wood glue and affixed to the bow stem. You will notice in the next photo that I also had to remove the right-hand side hawse bolster pattern. When I tried a test fit with the upper bow cheek assembly the hawse bolster pattern needed to be positioned a tad higher. Once I was happy with the fit of the upper bow cheek it was glued to the hull using wood glue. This was swiftly following by adding the lower bow cheek pattern. Finally the hawse bolster pattern was refitted, noting I might need to adjust the hawse holes in the hull. I might also see if I can readjust the position of the two upper hull rails. The gammon knee assembly was also retested. The final task was to shape and fit the bottom bow cheeks. With the work completed it was time for a cup of green tea followed by an easy paced 50 min stamina building run to celebrate. Yesterday I came first in my age category (65-70) at a local parkrun. For those of you who do not know a parkrun is a free community event where you can walk, jog or run a 5km course and takes place every Saturday morning. There are currently 1,215 weekly events in the UK but there are only 64 events in the USA. I also need to source some foam packing so I can block off the gun ports prior to the painting phase. Also should I invest in a air brush system, as I think this will be much better for painting the hull. I'm now heading back to the shipyard to see if I can do something with repositioning the two upper hull rail assemblies.


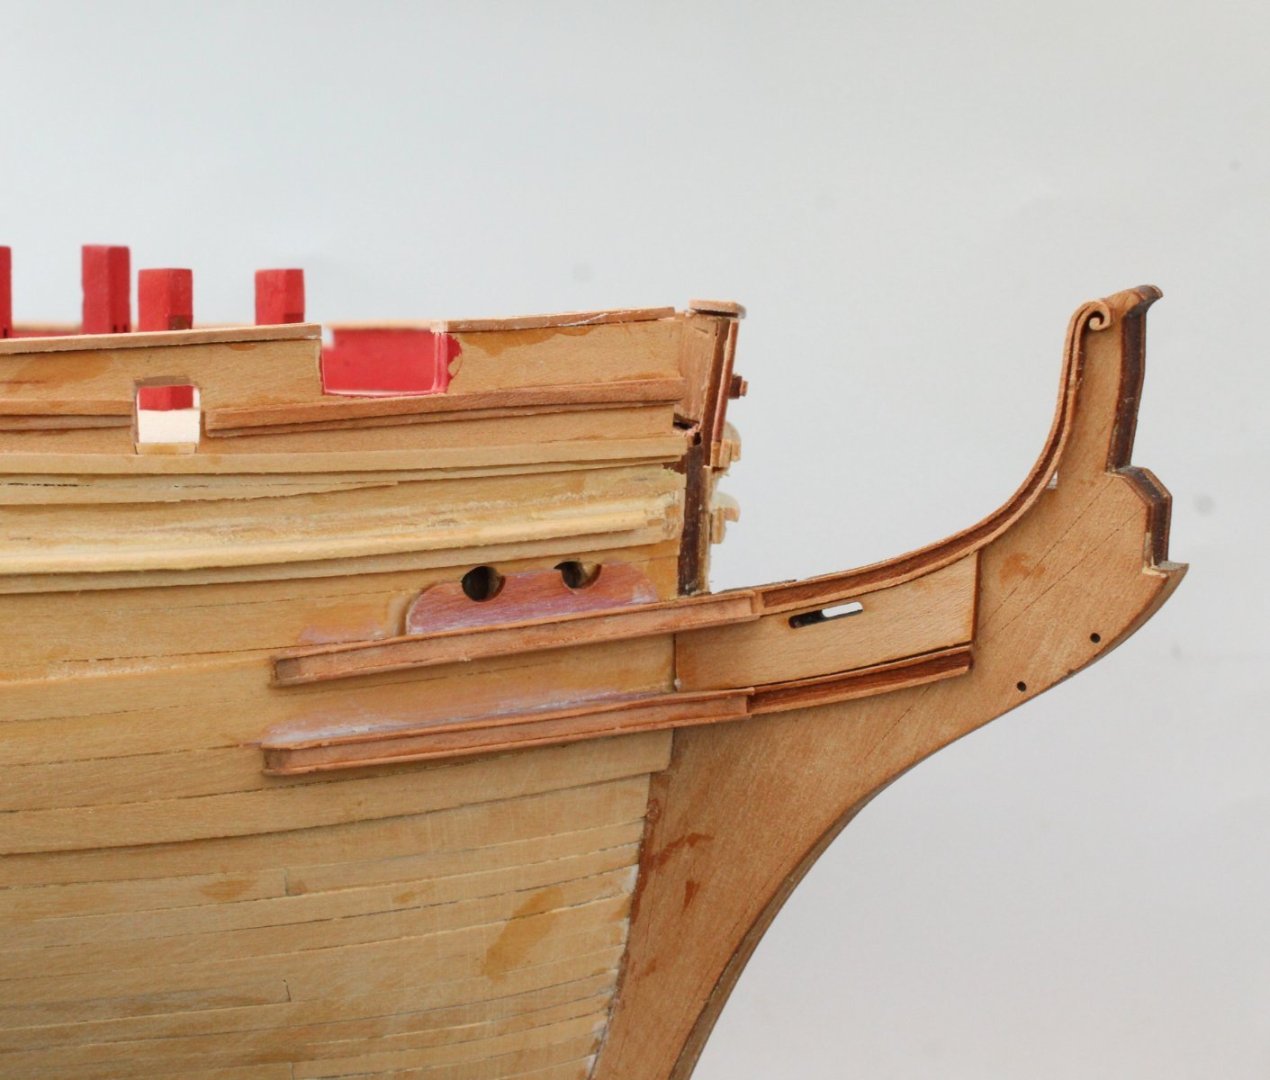
- 587 replies
-
- 5
-
-
- Indefatigable
- Vanguard Models
- (and 1 more)
-
Nicely done, looks great.
-
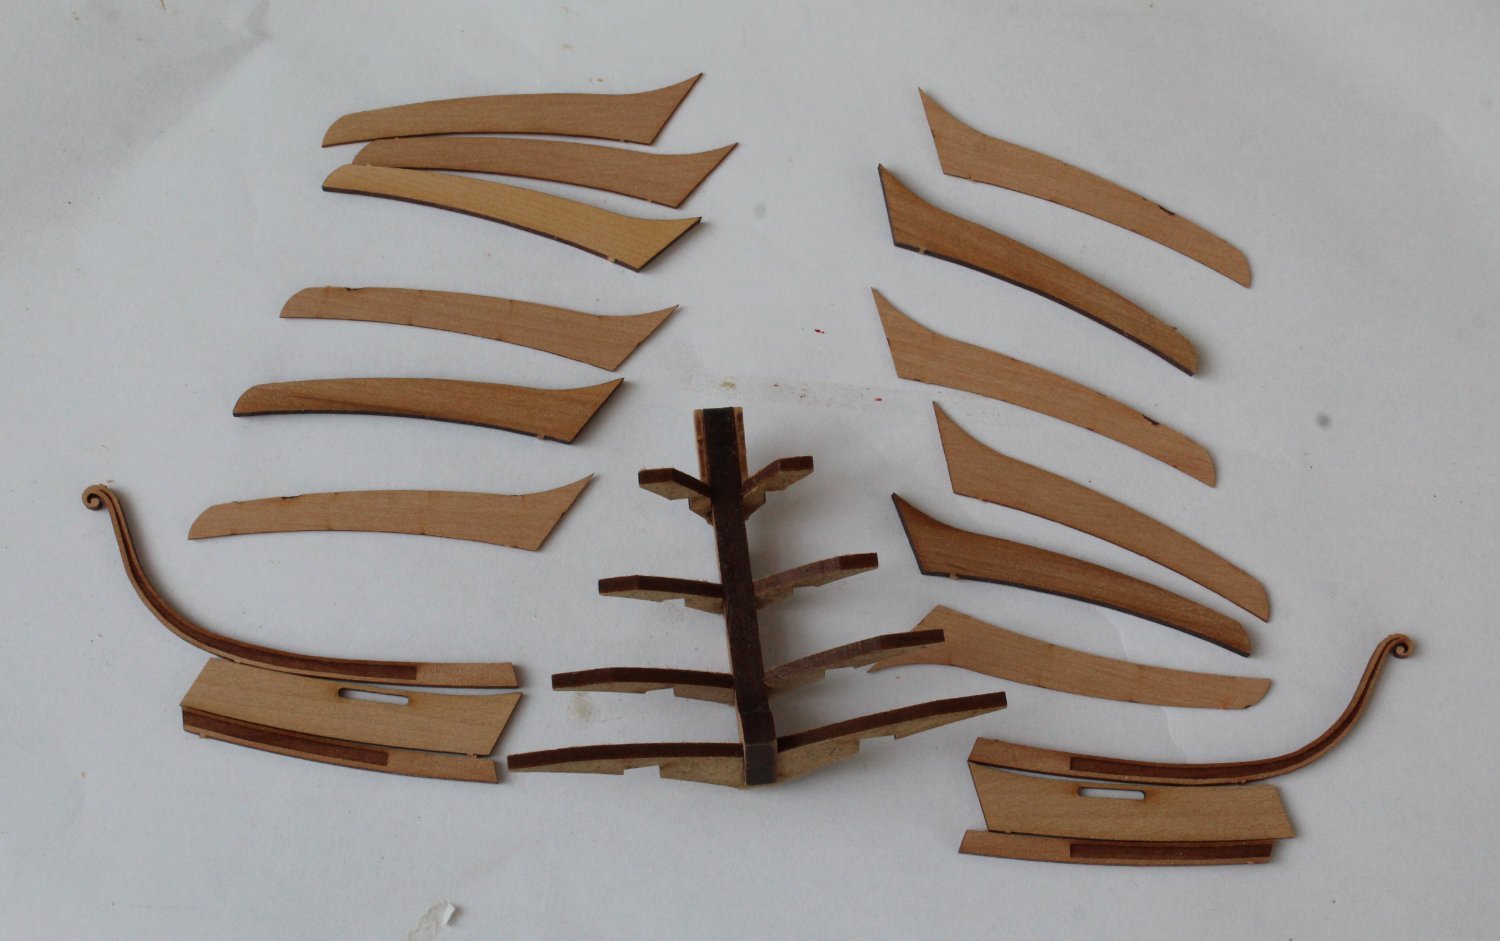
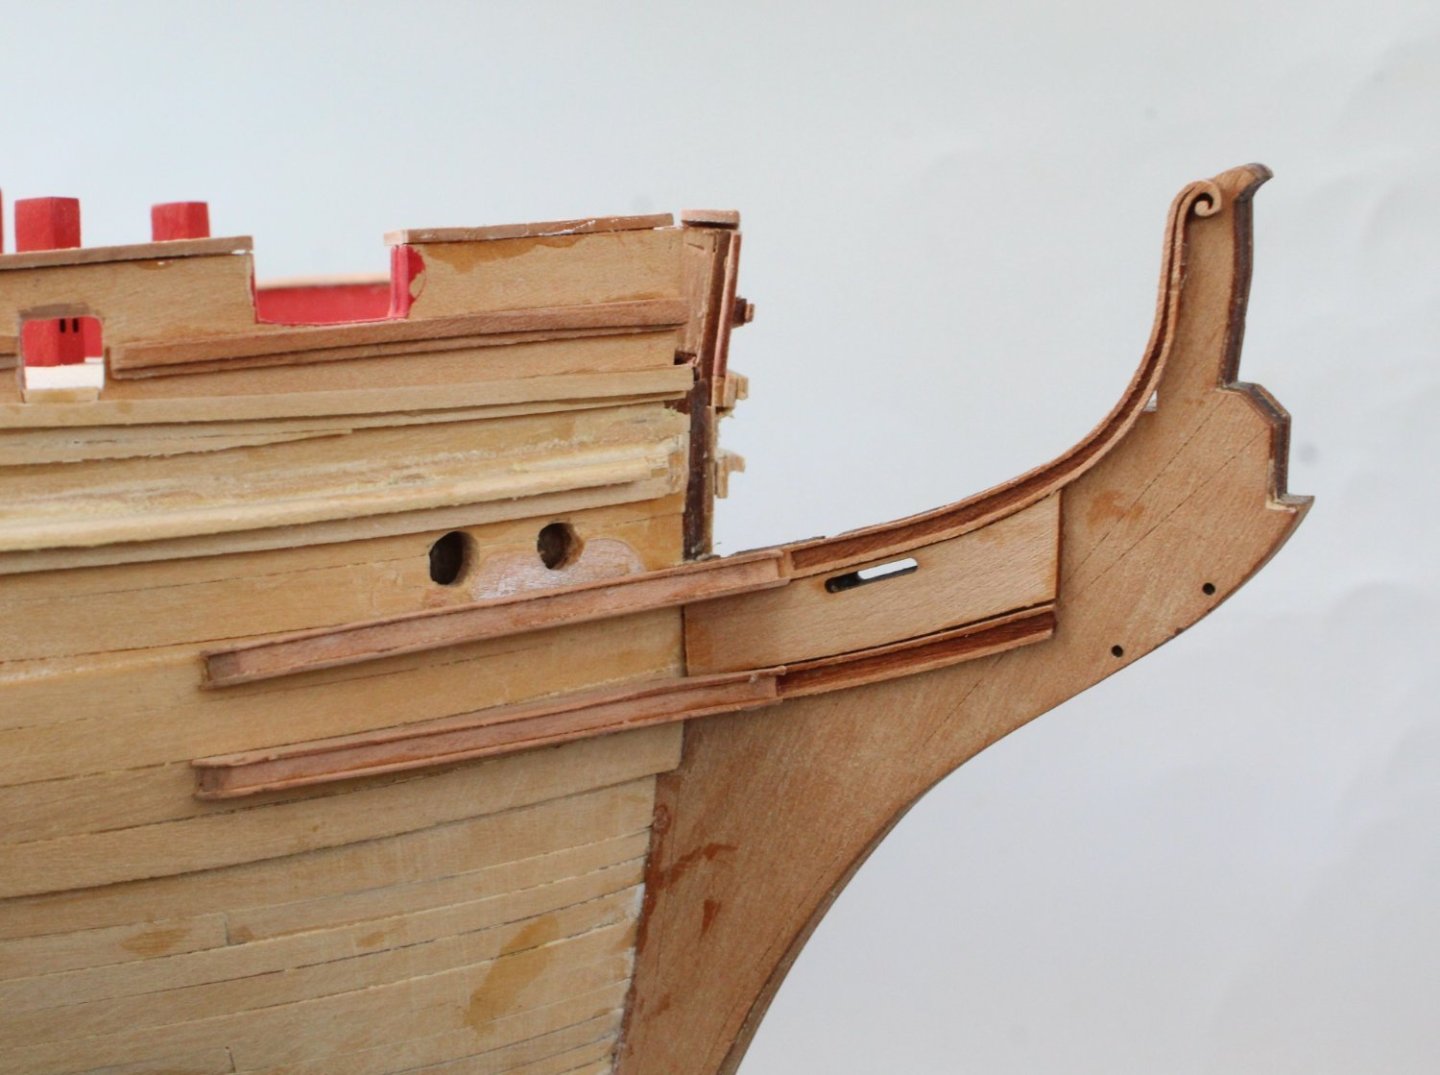
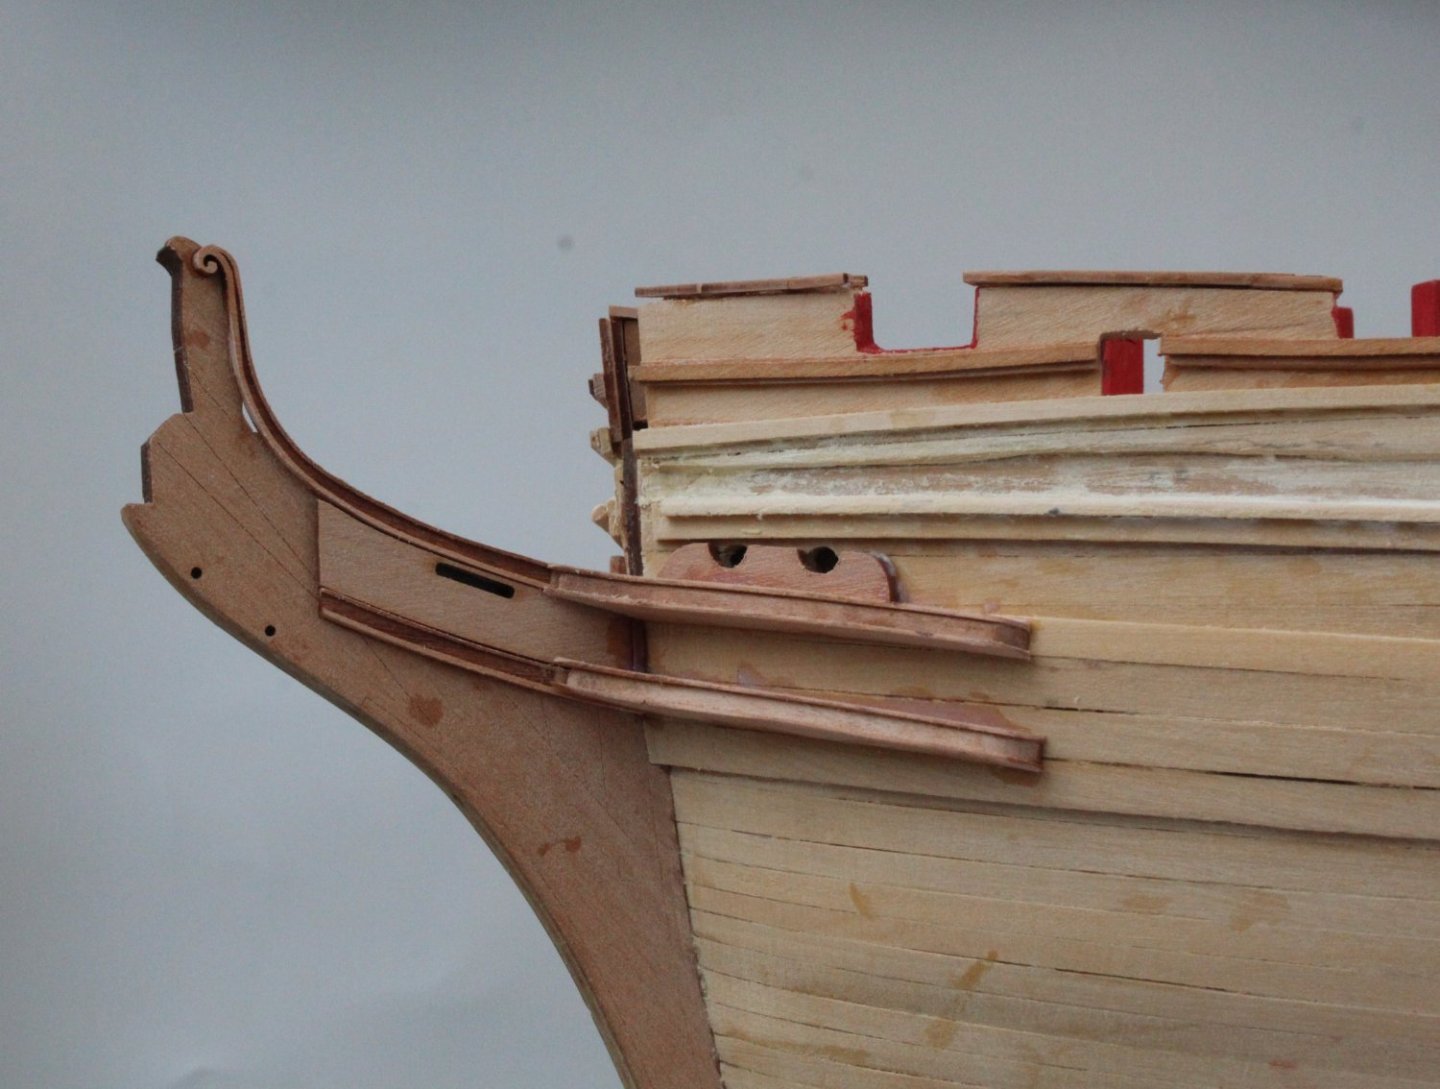
Quarter Galleries and Bow Work I have now added the 3D rails to the quarter galleries. I started with adding the wider 1mm patterns. I am pleased with how these patterns have lined up with both the stern counter and hull rails. There will be a bit of tiding up required however. The next picture shows the 0.6mm patterns added to the top of the 1mm rails. It looks much better now. It will look even better when the paint has been applied, as the imperfection will be hidden (hopefully). With the bow cheeks added to the gammoning knee, the assembly was test fitted. The prow outer patterns were then added. The completed assembly is dry fitted in the next photo as it need to be removed for the next build phase and will be fitted after the painting phase is complete. I did notice that the left-hand hawse bolster pattern was set too low and would a problem when fitting the 2 bow cheeks to the bow. As can be seen in the next photo I have been able to remove the hawse bolster pattern and this will be repositioned when fitting the bow cheeks. The rest of the bow parts have been assembled and I am hoping to be able to get these parts fitted before my trip to Norfolk. Once these parts have been fitted the hull painting activities will commence.


- 587 replies
-
- 10
-
-
- Indefatigable
- Vanguard Models
- (and 1 more)