HOLIDAY DONATION DRIVE - SUPPORT MSW - DO YOUR PART TO KEEP THIS GREAT FORUM GOING! (Only 13 donations so far - C'mon guys!)
×


shihawk
-
Posts
709 -
Joined
-
Last visited
Content Type
Profiles
Forums
Gallery
Events
Everything posted by shihawk
-
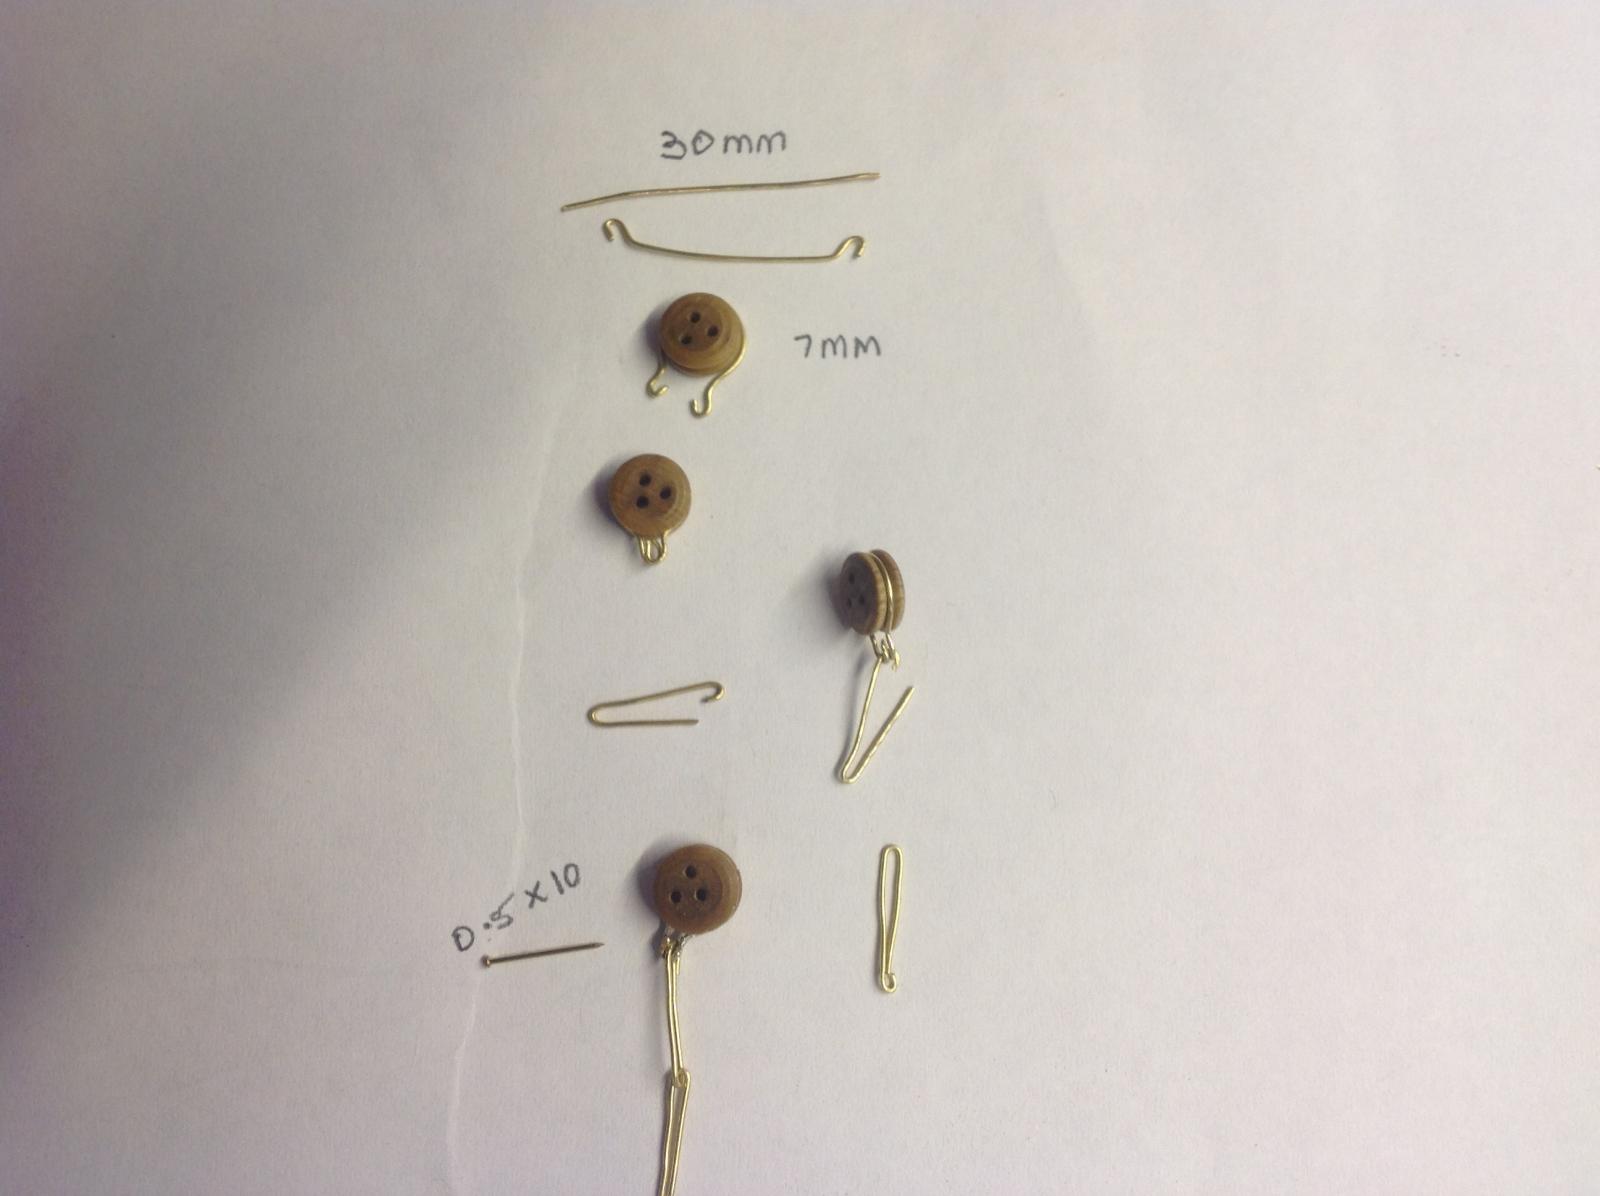
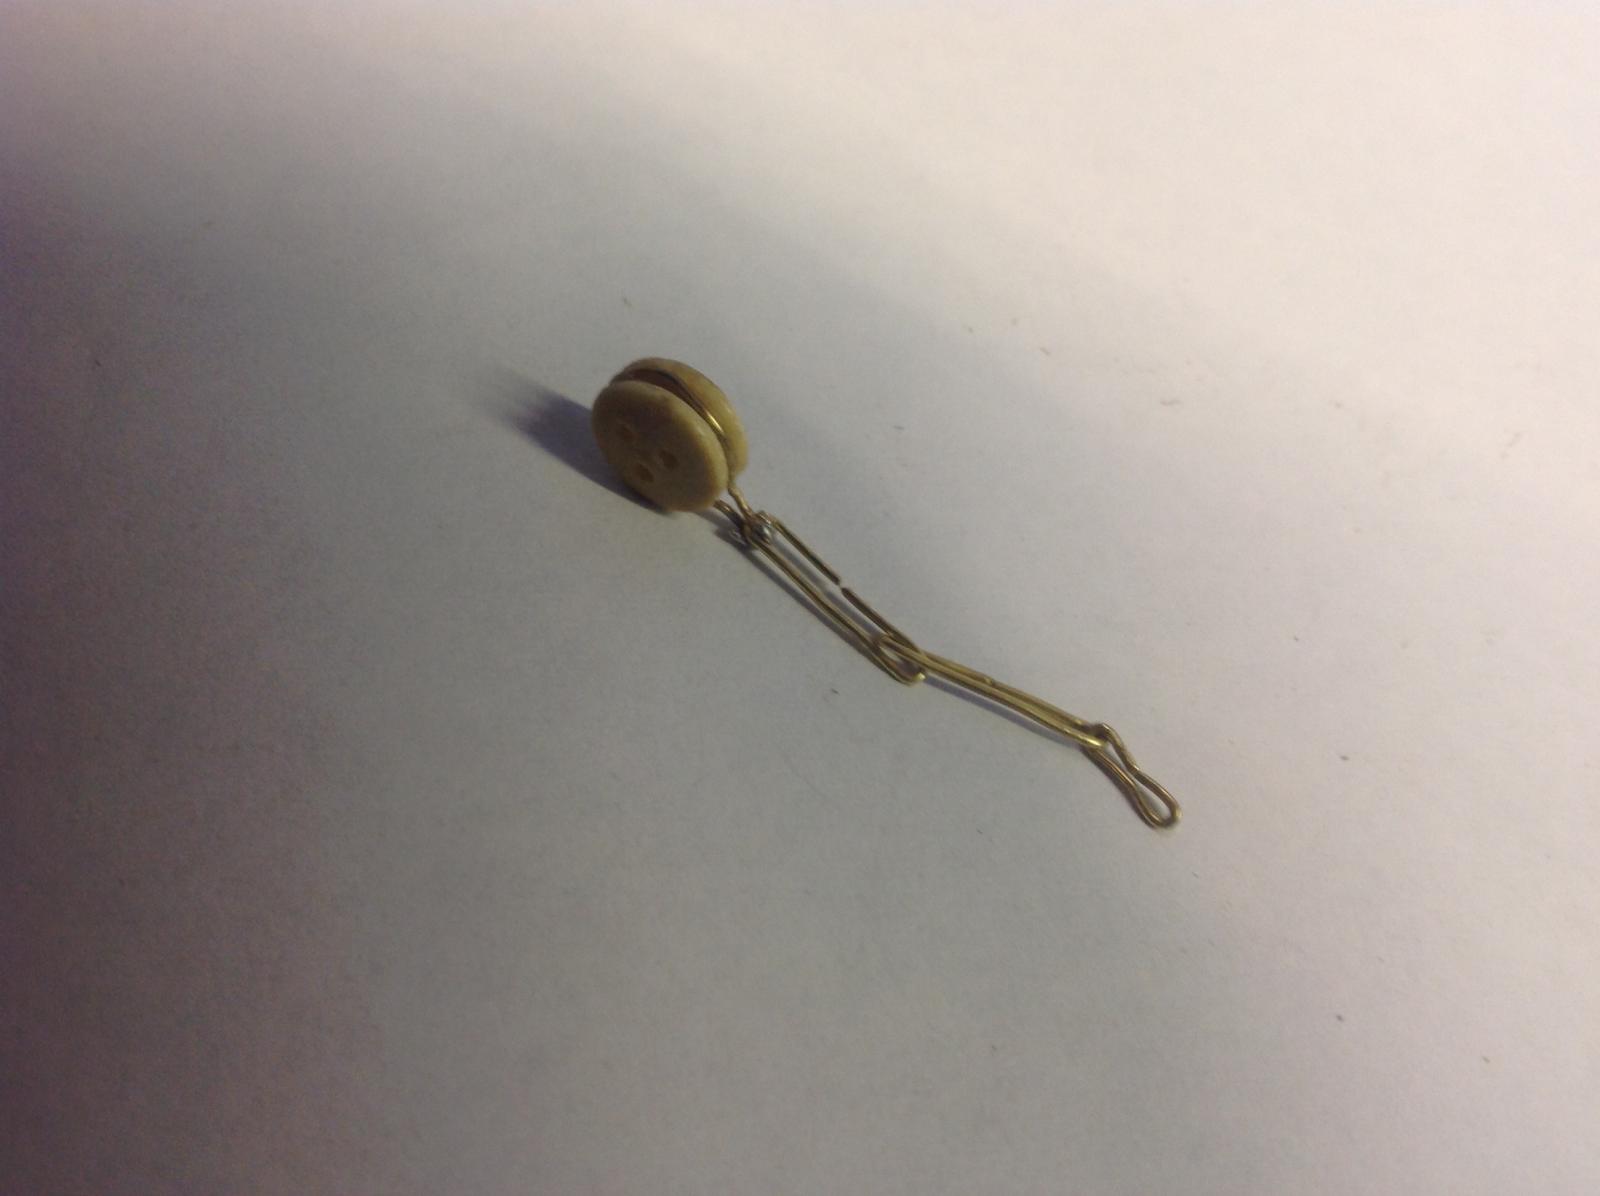
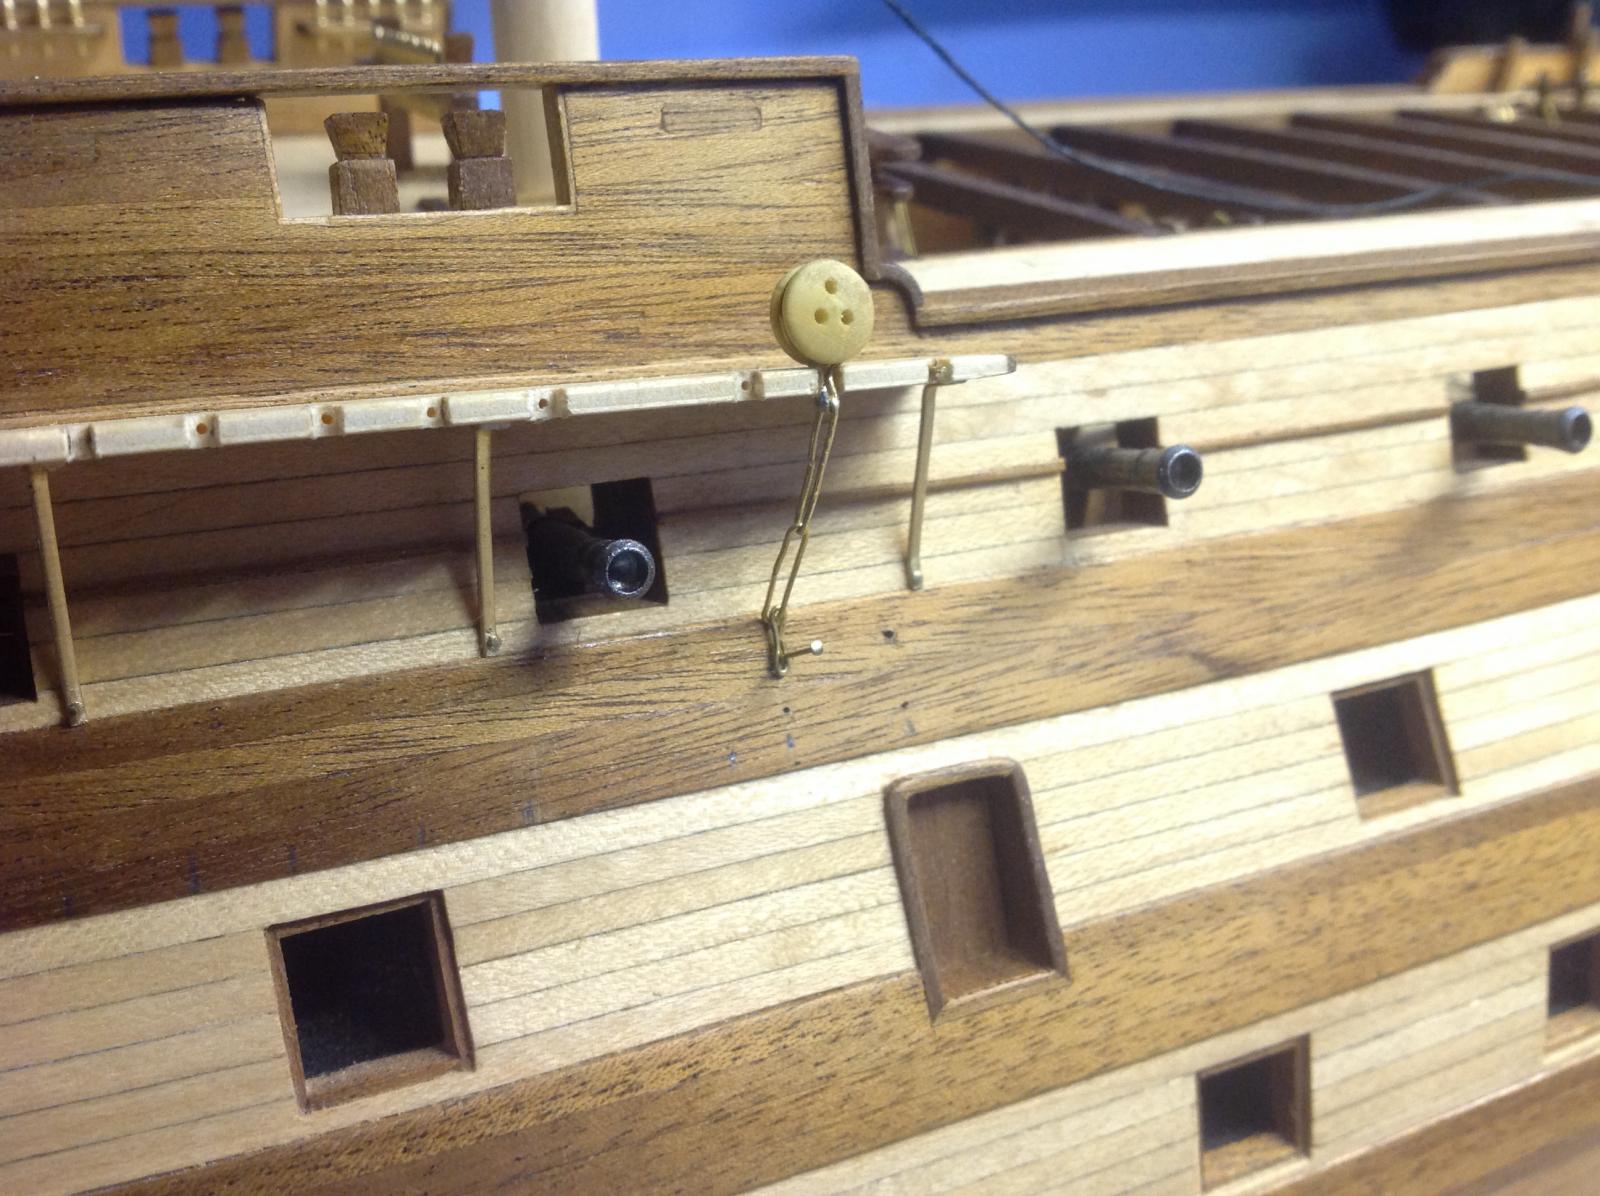
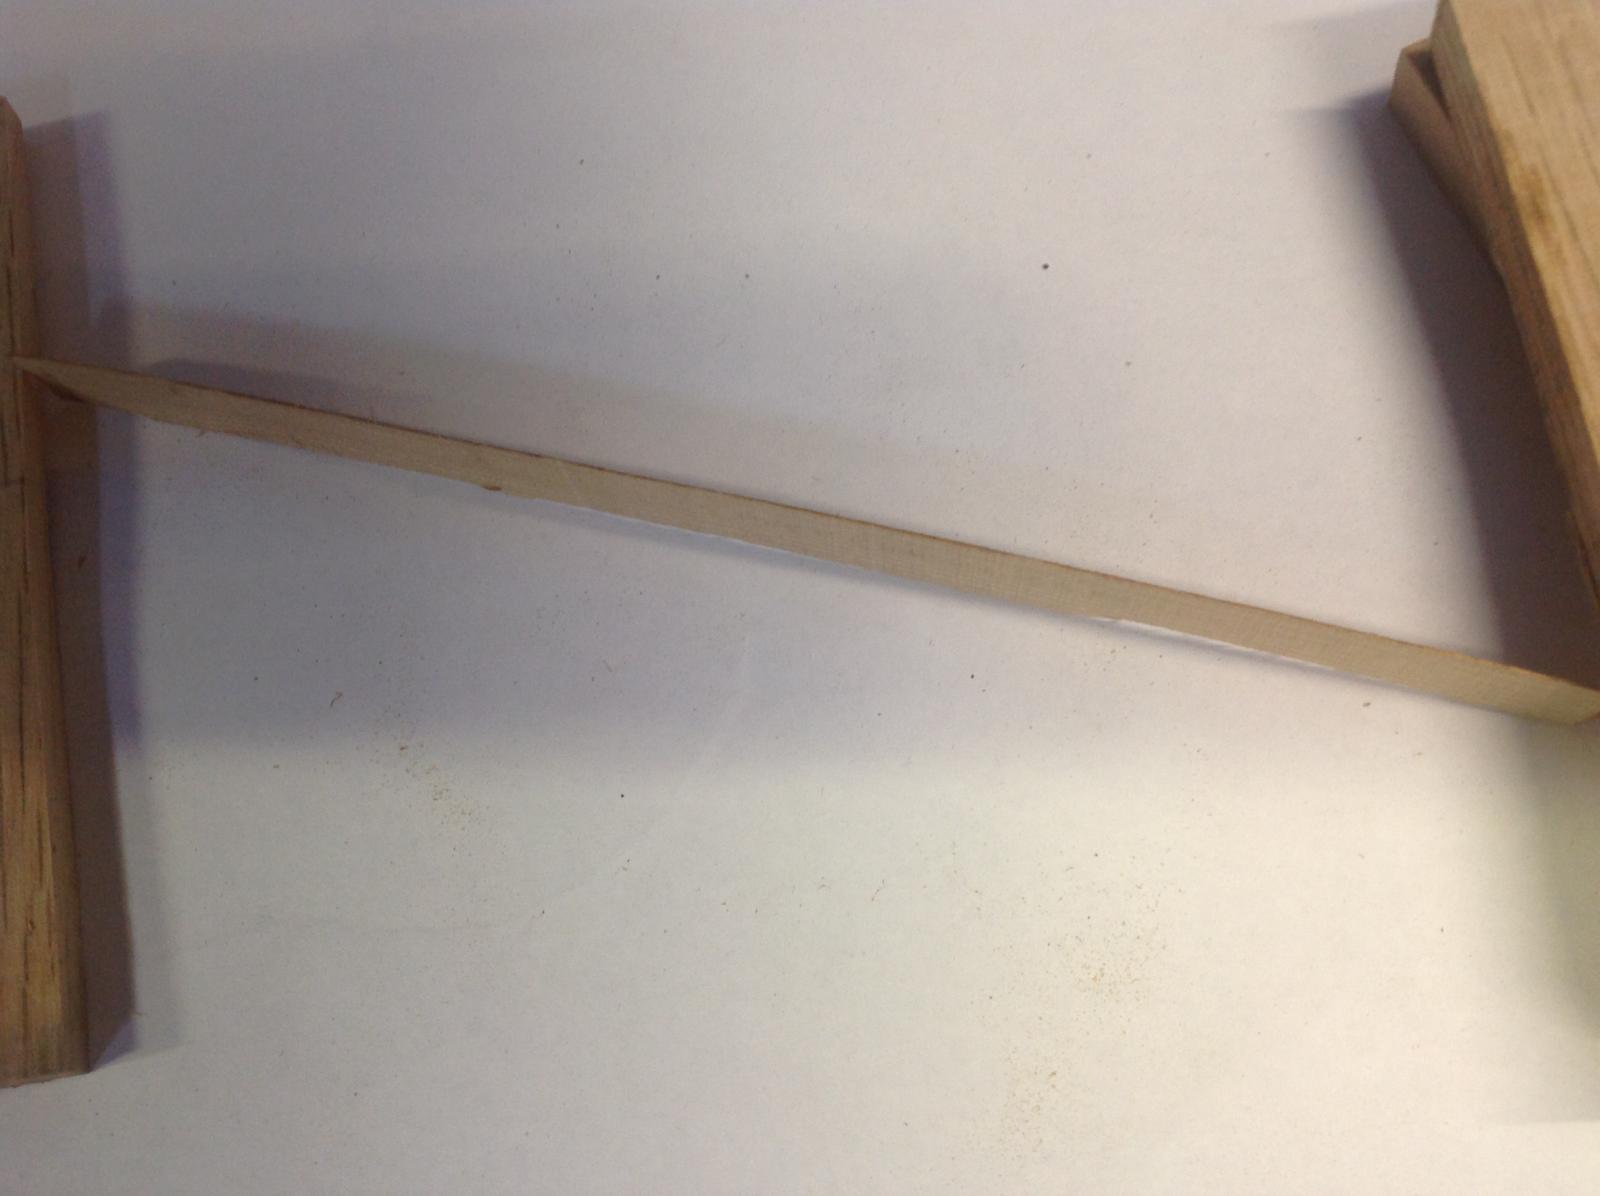
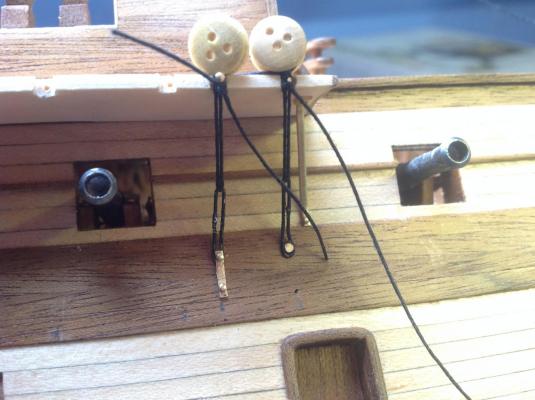
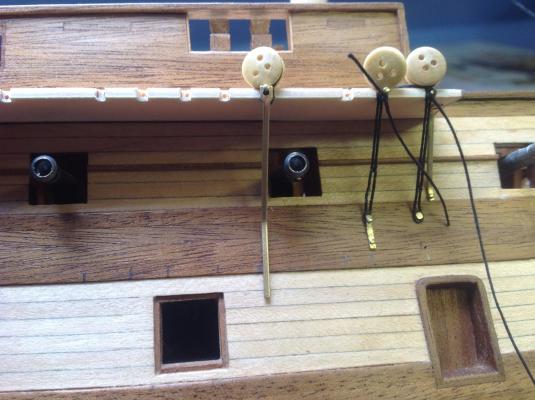
 Been trying out numerous versions of stroping deadeyes and chainplates . Soldering the links just didn,t work for me by the time i filed them down there was no solder left and tried painting over the solder but still wasn,t happy. Fussy or what !! Forgetting the solder i tryed upping the thickness of the wire to 0.75 which held it,s shape better but looked big to me and was more difficult to bend and shape . The following pic shows what i have come up with and would welcome any improvement suggestions ,sometimes when i get a idea in my head i miss the obvious solutions ?? The aim is to strop a deadeye without soldering and still be certain that when rigging the deadeyes don,t start poping .I could buy them but many of them also need soldering or are etched and squared . Now working with 0.5mm brass wire . Click on pic to enlarge . I tested the strength of the strop and think it is strong enough and will be even stronger when wedged in the channel . Because the pin holds the deadeye there is very little pressure on the links so soldering should not be necessary also rather than split the link half way i split it near one end which means the join is less visible and also by closing the end of the bottom link the join is covered by the bottom plate . I,m not happy with the bottom plates and may buy more rounded replacements . What i,m thinking now is i will fit the deadeyes and leave the chains unfitted utill i get the precise line of the shrouds ? Next pic shows a few fitted and also shows another reason for leaving the chains till later , if they are out of line the drill holes will need filling !!!! the strip along the edge of the channel will hide the pin and keep it from coming out , I did try soldering a few of the first strops but now don,t think it,s necessary .I did cosider cutting the pin down to 5mm but thought the longer the stronger ? The bottom plates don,t look right and are a pain to drill so will probably change them . I,ll be building this ship for ever ??????????????????????????????????
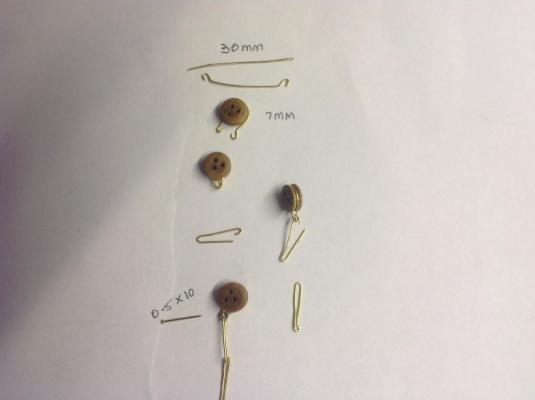

-
What,s a mm between friends , if you hadn,t mentioned it no one would have known . Believe me i know the frustration of spending hours on pieces that then don,t fit or just don,t look right ,i think we all do !. I also varnish as i go along mainly through impatience to see the final look but am finding that much of it will need another coat at the end when cleaned and dusted . Stair case looks impressive and i really like the finished deck .I won,t advise on the warped piece others will know more ,there is bound to be a solution ? Bad weather next week so you will have plenty of time to find it .
- 44 replies
-
- 2
-

-
- robert e lee
- constructo
- (and 1 more)
-
There is no easy way , painting also has it,s problems ,i assune ?? Rained here all day and moving your way ,next week cold so you may buy a tent and a heater !!!!!!
-
Wise move with the guns , I went to a lot of bother full rigging them and most of it was wasted cause they don,t really be seen and i suspect wnen the gigging etc is finished they will be seen even less ,but at least i learned how to rig a cannon ?
- 117 replies
-
- 1
-
-
- victory
- billing boats
- (and 1 more)
-
Not something i have any experience of but it sounds like a plan to me . Go for it !! The plinth was one area i neglected at the beginning of the build and have a feeling it will come back to bite me later on ,must consider something before rigging . Time spent planning ahead in my opinion is time well spent and can save a lot more time and hassel later on. There should be no reason that your plan can,t hide everything ,check a few other builds for tips where lighting was fitted if your still unsure. Have FUN .
-
Some progress made on the chainplates I thought i had it all figured out in my head before i even started ,but putting it into practice has been a different story . the thread theory just didn,t work out when painted and my link soldering couldn,t take the strain ,So then i considered using the plain straps provided with the kit and to be honest with the pin into the channels to hold the deadeye they didn,t look to bad , but because i was using the same ones for the straps under the channels i felt it might not look right . Bought a new soldering iron !!!!! Keith suggested that the links might not need soldering and as i prefere to keep the brass color this got me thinking that if i could at least form a strop that the pin into the channel would hold it would take the pressure of the links . I think with a little tinkering this method may work ,the trim on the channel will hide the dodgy soldering and when i get some 0.75 mm wire the links may hold their shape a bit better,at present i am using 0.5 ,tried 1mm but it was to thick looking Thanks Keith !! I figured i should fit any of the gunport hatches which will be covered by the chainplates so as a distraction from the soldering i tried making one using bought brass hindges .,also ordered a few walnut deadeyes to see how they look ,might come to-morrow .


-
Thanks Jaager , you have been a great help . As you will have realised i know nothing about the different woods ,my only experience is with bought strips . What i have been thinking of are some of the fantastic POF builds i have seen and am assuming that these require larger pieces of wood than the normal kits ,.Even on my present build i am constantly glueing 2 pieces together to get the required width or thickness and thought that milling my own wood would be a good way to practice a scratch build , Of cource i could buy the timber required and as you advise i should probably try some of the others before spending to much time on the oak even if i do have a shed full of it .Will try to source some others locally as it will be a couple of years before i,m ready to start . It was just a thought that i couldn,t leave .!! Cheers .
-
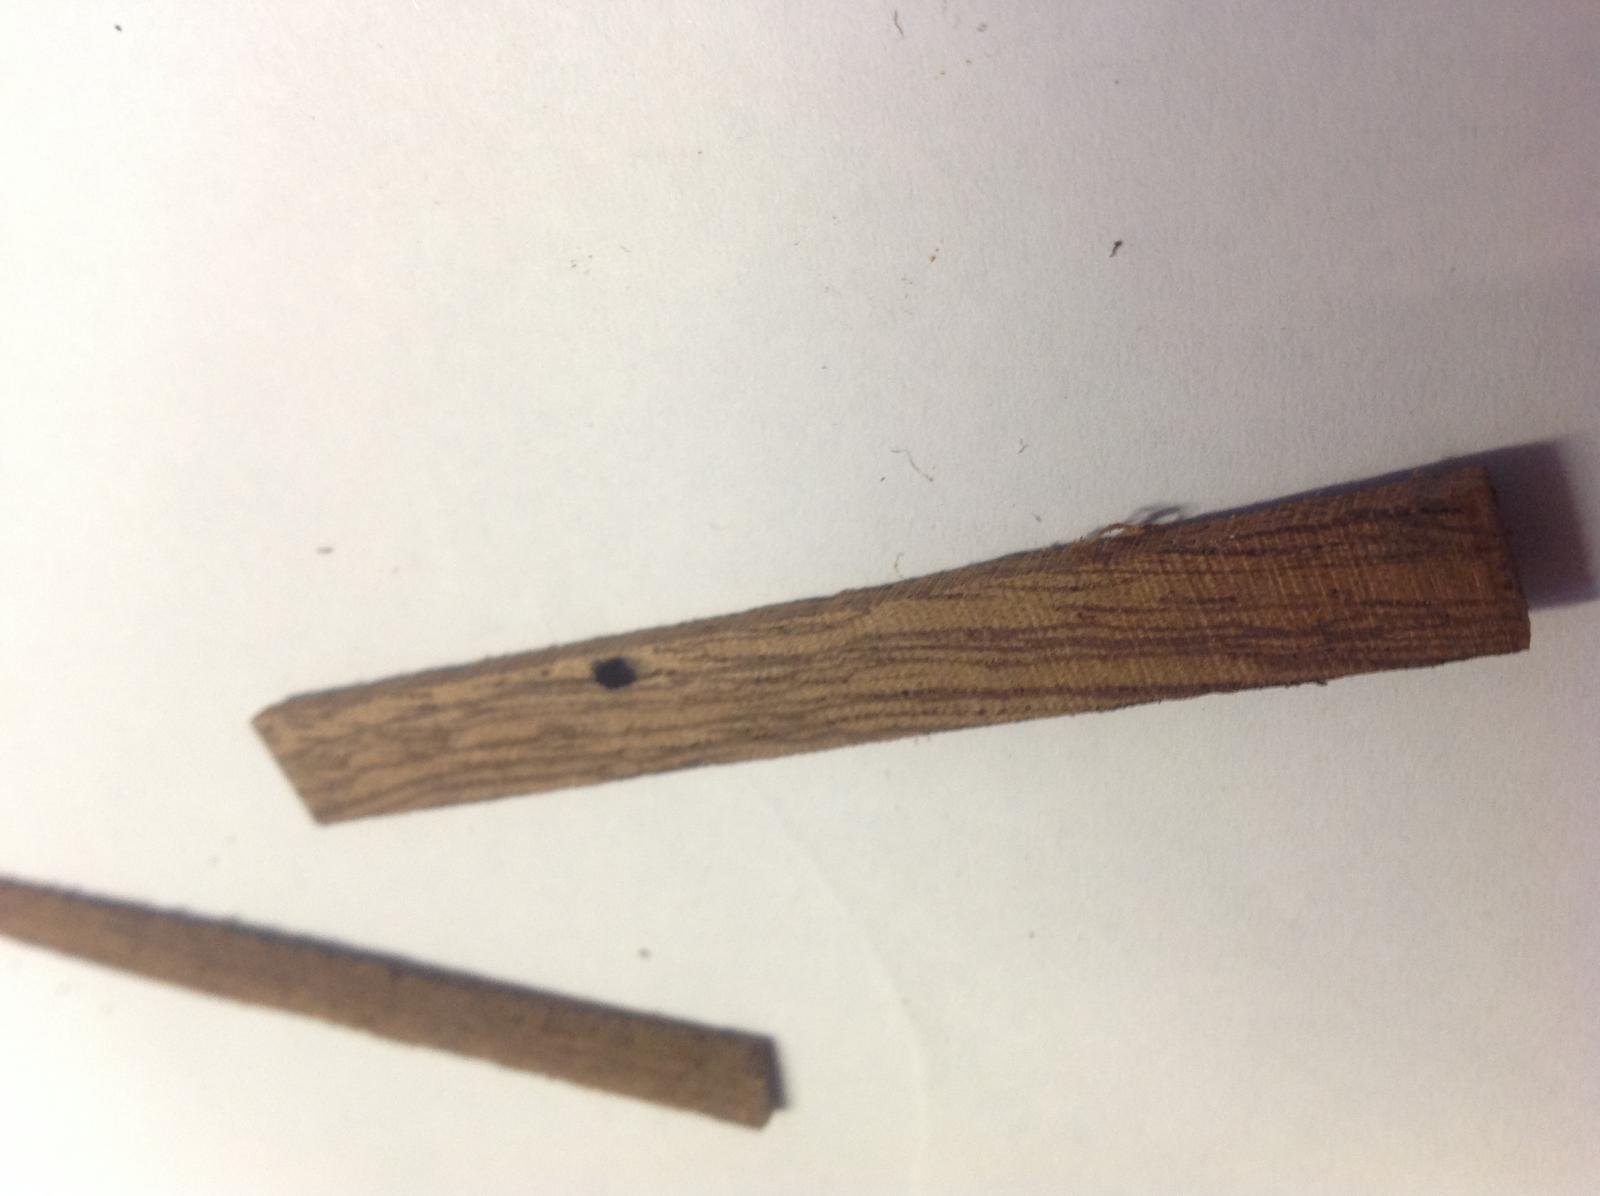
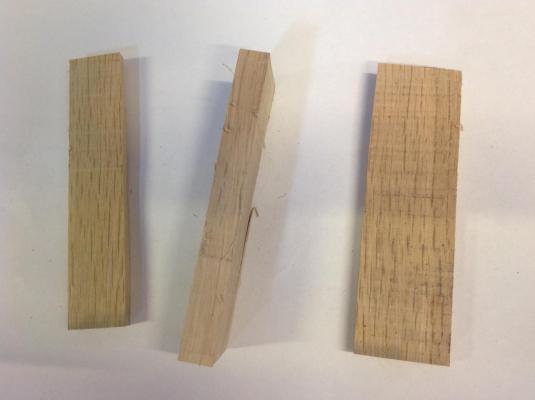
Been trying cutting a piece of the oak and was wondering if going by the pics anyone can tell me if this looks like suitable wood or am i wasting my time continueing with this idea . Would 6"x2"and as long as possible be a good size to leave the blocks for drying ? Stored indoors could they be ready for use in a couple of years ? this is the rough piece i cut them from ,the cut blocks are only about 6" long . the fungus talked about earlier can be clearly seen on the rough log . Tried cutting as fine a piece as possible to see if it would work with the band saw Got 0.63 first try and recon wnen cleaned could be 0.5 . didn,t think this would work on a band saw ?


-
Thanks for the demo of the jig ,Im still not happy with the way the links etc are turning out and to make matters worse i have taken it into my head that i want to keep the chainplates brass !! .My soldering is useless to say the least ,have spent a lot of time learning about tinning and several other methods but none seem to work so i may resort to a variation with the Billings parts. I need to think about it for a while so sorry to have wasted your time . Your galleries look great ,seems a long time ago since i was at mine . Funny you should mention the smokes ,as a 40 aday man i.m trying e-lights and am down to 20 ,but patience and concentration are suffering . Well done for stoping ,i have been trying for years !!!
-
Tks GLakie .One of the things i learned the hard way on my last build ,was to make sure the shrouds and the chainplates ran in line , it looks so much better., and if the gunports ain,t in the right place the gunners could blow the rigging to shreads ,so it will be double checked before drilling
-
Hi Keith .I seem to remember you mentioned replacing the chainplates and wondered if you had any simple solutions . I have just spent a couple of days trying to figure the best method and to be honest ,although i have just posted my attempt , i,m not convinced it,s the best way . Just wondered if you had any tricks up your sleave before i go much further . Good to see we have another Billings Vic builder joining us !!
-
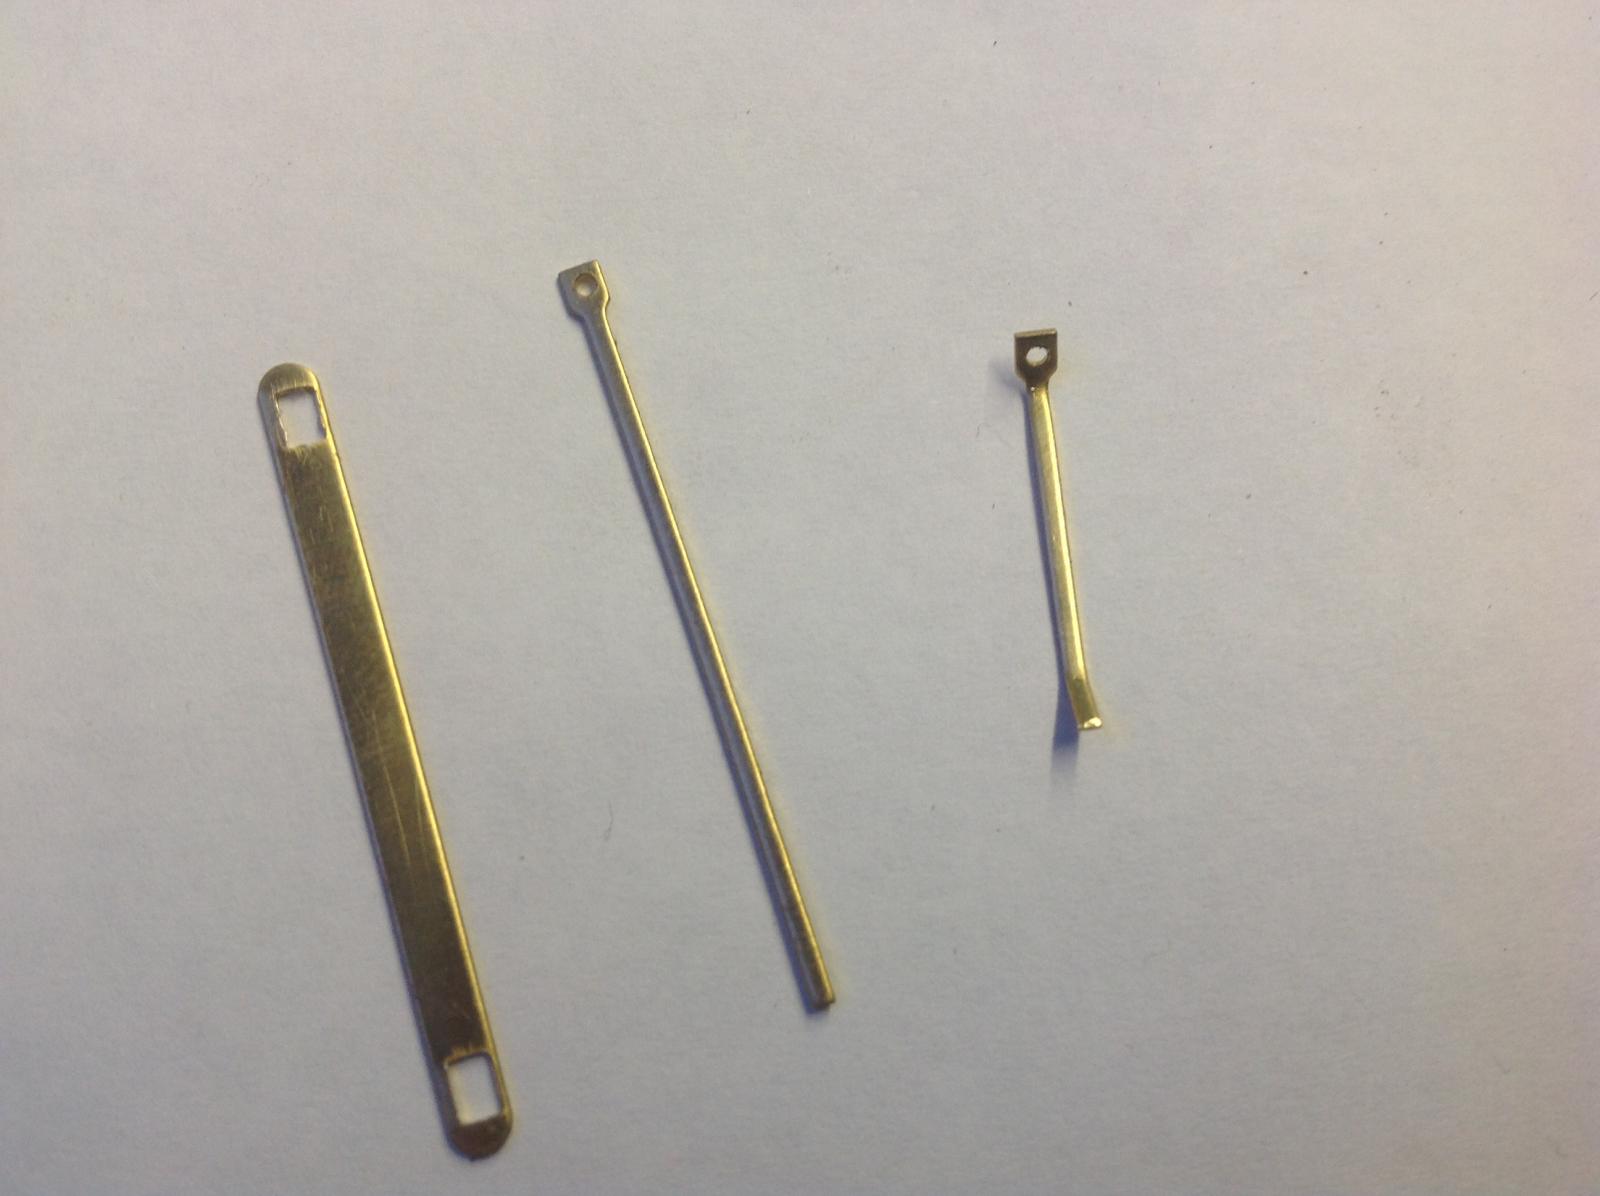
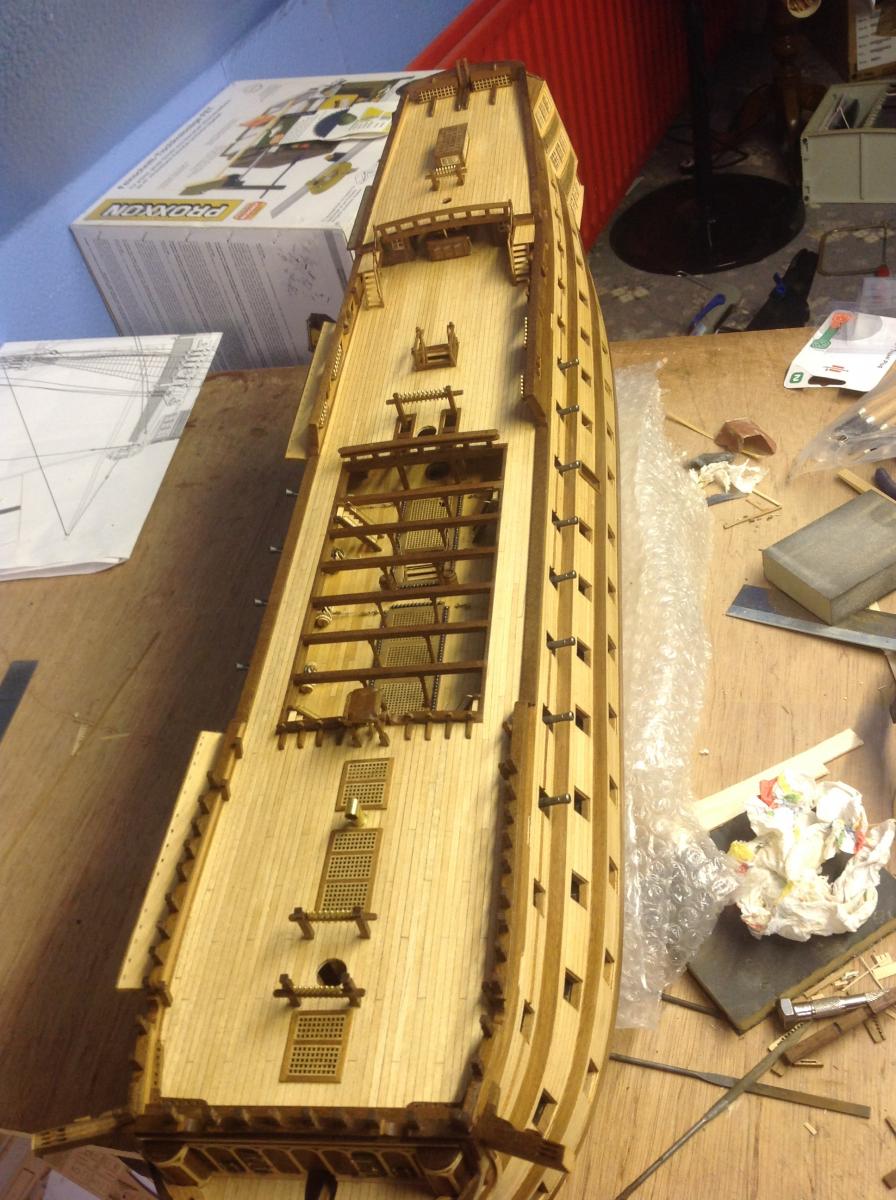
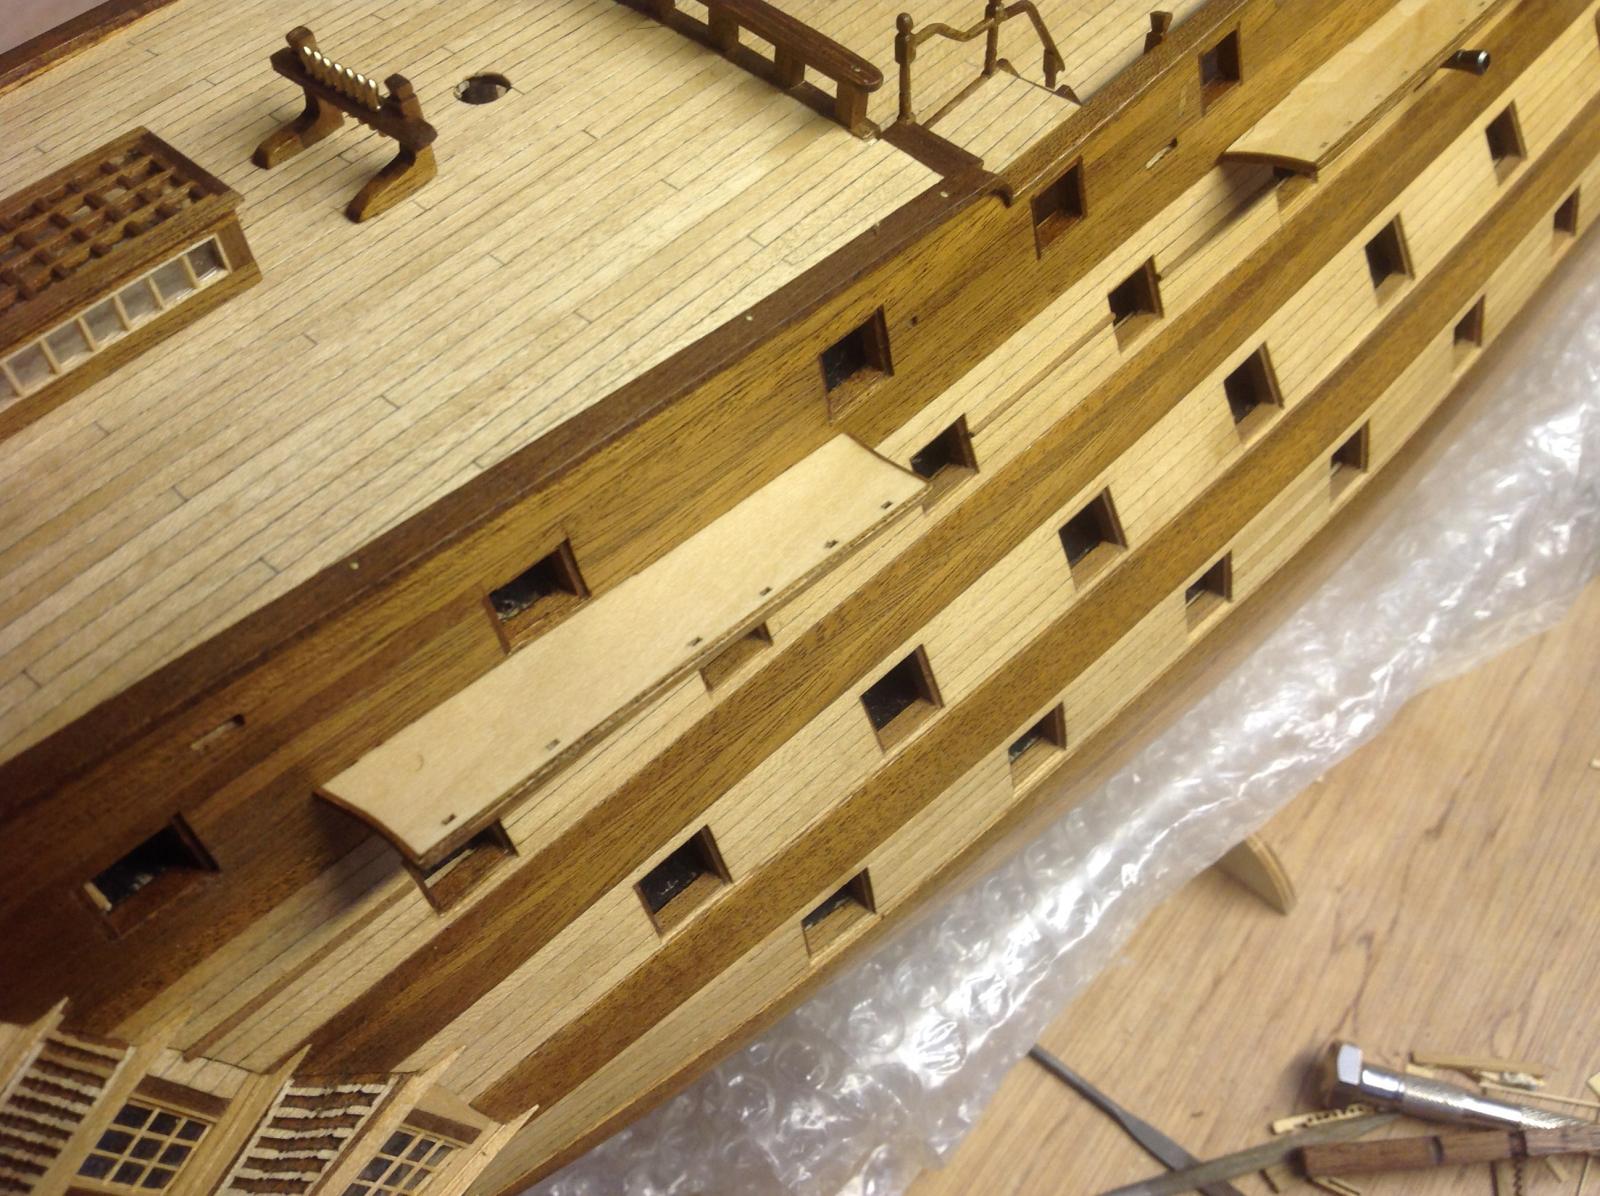
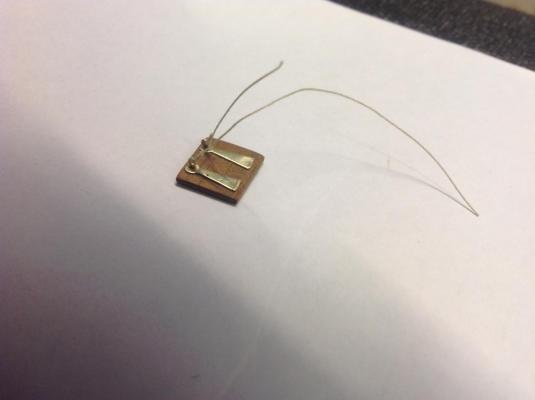
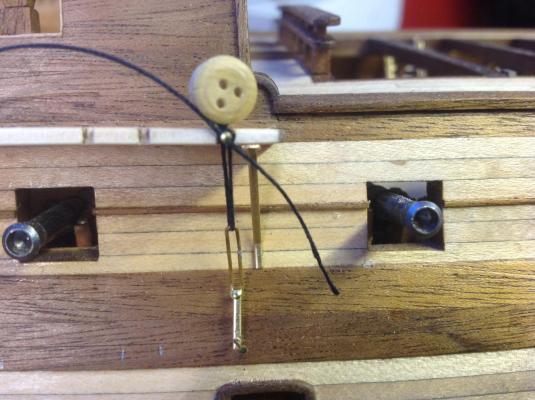
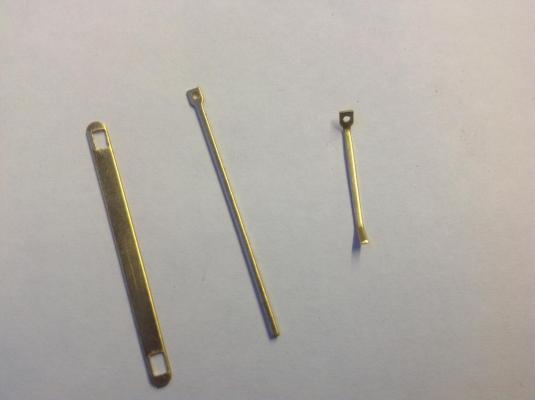
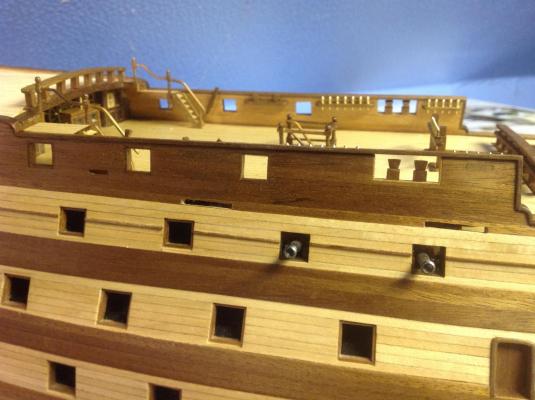
The next stage is one i have been thinking about for some time , the channels and chainplates . As usual i will dry fit as much as possible and was glad the channels are a tight fit as i don,t want to glue them until i have to ,just in case . In my last post i had lined the ply edges to cover them and i still intend to go this route ,however i removed the outer one and trimed the channel back a couple of mm and then cut into the holes premarked for the chainplates .At this stage i checked to see if my messing with the gunports had distorted my alignment for the chainplates and thankfully they seem ok . I have never soldered before and after a few tries was searching CMB for some ready made ones , but i couldn,t find anything that i could use . So back to learning to solder and finally managed to make a succesfull link . I mentioned before that i read on some ones log about making the top link from thread the advantage being that the whole linkage can be tightened with the deadeyes . A pic will explain better than i can .the brass link will be blackened and the thread painted to look hopefully more like metal .I hope to fit a fine nail into the channel between the chainplates and the deadeyes , the intention is to spread the pressure when rigging .When the trim is added it will cover this pin and the knot in the thread . thats the plan anyway ???? For all you non Billings builders i thought i would show the supplied parts From what i can figure out ,and i could be wrong the wide brass strip on the left is the main strap under the channels .To big me thinks . The fine strip in the middle is the chain plate . To plain me thinks . The piece on the left is is the chainplate cut down and will be used to replace the wide strap and the piece cut from will be used to secure the bottom of the chainplate Waste not want not!! Now all remains to do is make another 70 or so links by which time my soldering should have improved .

-
Greetings Philg88 . I,m glad to see another Billings Vic build , am not sure how many there are now . You seem to have all the research under control and from your intro i think your build will be complete opposite from mine which i might add will make it all the more interesting . Mine is slowly decending into fantasy whereas you seem set on the authentic route ,it will certainly be interesting to see the comparisons when finished , years from now !!! .I to have been useing books and pictures to supplement the meager instructions and i,m sure you realise by now there are big variations on a lot of aspects of the build .At least you have a set plan to build as she now looks which will lay down some rules . I will follow your progress with great interest and if i can be of any assistance it will be a pleasure . Good luck and Have Fun !! Oh , by the way ,check the direction of your ladders , if i remember correctly one goes down from left to right and the other from right to left ?
-
For sealing the ends is varnish sufficient of would i need a wood preservative ????
-
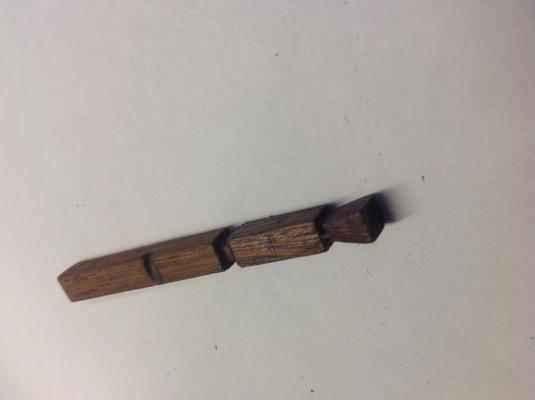
Been trying out a piece of the mahogany and it seem not to bad , it keeps an edge and cuts well might try a piece on the lathe when i get time . John , no furniture will be safe from this on !!!!!


-
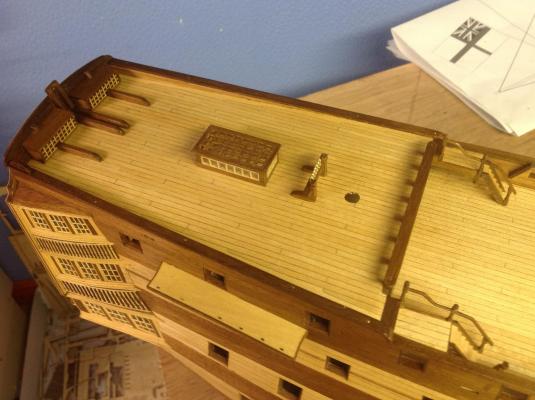
Finally got round to finishing the main parts of the deck furnishings . The poop deck skylight took a fair bit of time ,most of it spent figuring out the best way to make it . I still think if i was building this again i could do it in a quarter of the time ,when i knew what i was doing . I finished up doing the top like gratings and the side windows in a similiar way to the gallery windows,piece by piece . i also messed about with the flag lockers and finaly settled on a trimed version of the grates provided . I keep forgetting that the parts supplied can sometimes be used !! i used Clearfix for the window pains ,with care it works . No flags in the lockers yet . Now i can move on to the channels ,and again thought on making my own but i was worried about joining 2 strips of 7 mm in case when i put pressure on from rigging i could have problems ,so i decided to use the ply parts but covered the edges with darker strips . A coat of varnish shows they blend in ok color wise , i think ?and saves a lot of work !! I try to look in front of myself all the time so am now wondering if the fact that i messed about with the gunports so much will it affect the run of the chainplates , I will have to spend a bit of time lining them up before i commit to anything . Can,t decide yet how to make up the chainplates ,i did see a method using thread for the last link to keep everything nice and tight ,but will see how the soldering goes ?


-
thanks Jaager , Thats a lot of usefull info and enough to wet my appetite that further down the line i may be able to provide at least some of my own wood .As for the oak i assume the sooner i try to cut it into smaller pieces the quicker it will dry , the mahogany is already in aprox 4x4 pieces so i guess i could try it through a band or table saw and see what i finish with. Can beech and birch also be dried naturally the same as oak ???
-
This is a question for all the wood experts out there as my knowledge is very limited . I recently removed mahogany windows from my fathers house which could be 40 years old and although some parts are rotten (,the reason for replacing them ) most is as sound as the day it went in . It seems very fine grained and redish in color although this may be the result of countless coats of varnish etc over the years . Could this be used for ship modeling ,planks, posts etc or is it the wrong type of mahogany ??? Also about 2 years ago i had reason to cut down a large oak tree which has been stored in lengths and blocks in a shed which means it has been kept dry , is this usable or does it need more intense drying ?? I don,t want to waste time cutting it into useable lengths if it is not suitable ,also i may have to buy a saw especially for the purpose . All opinions welcome
-
I can only agree with hornet , i,m building a billings Victory and again the writen instructions are vague but with the help of this site and a little basic research i have overcome the intimidation and am now really enjoying the build . A build log is helpfull if only to explain your questions . Best of luck !!!
-
I now know that the roundhouses are not on the poop deck , sorry for any confusion ,(although i still think it should be called the poop deck) .Hope you got the jist of my explanation , as you are painting fillers could also be used to smooth them of ? Boyd
- 117 replies
-
- 2
-
-
- victory
- billing boats
- (and 1 more)
-
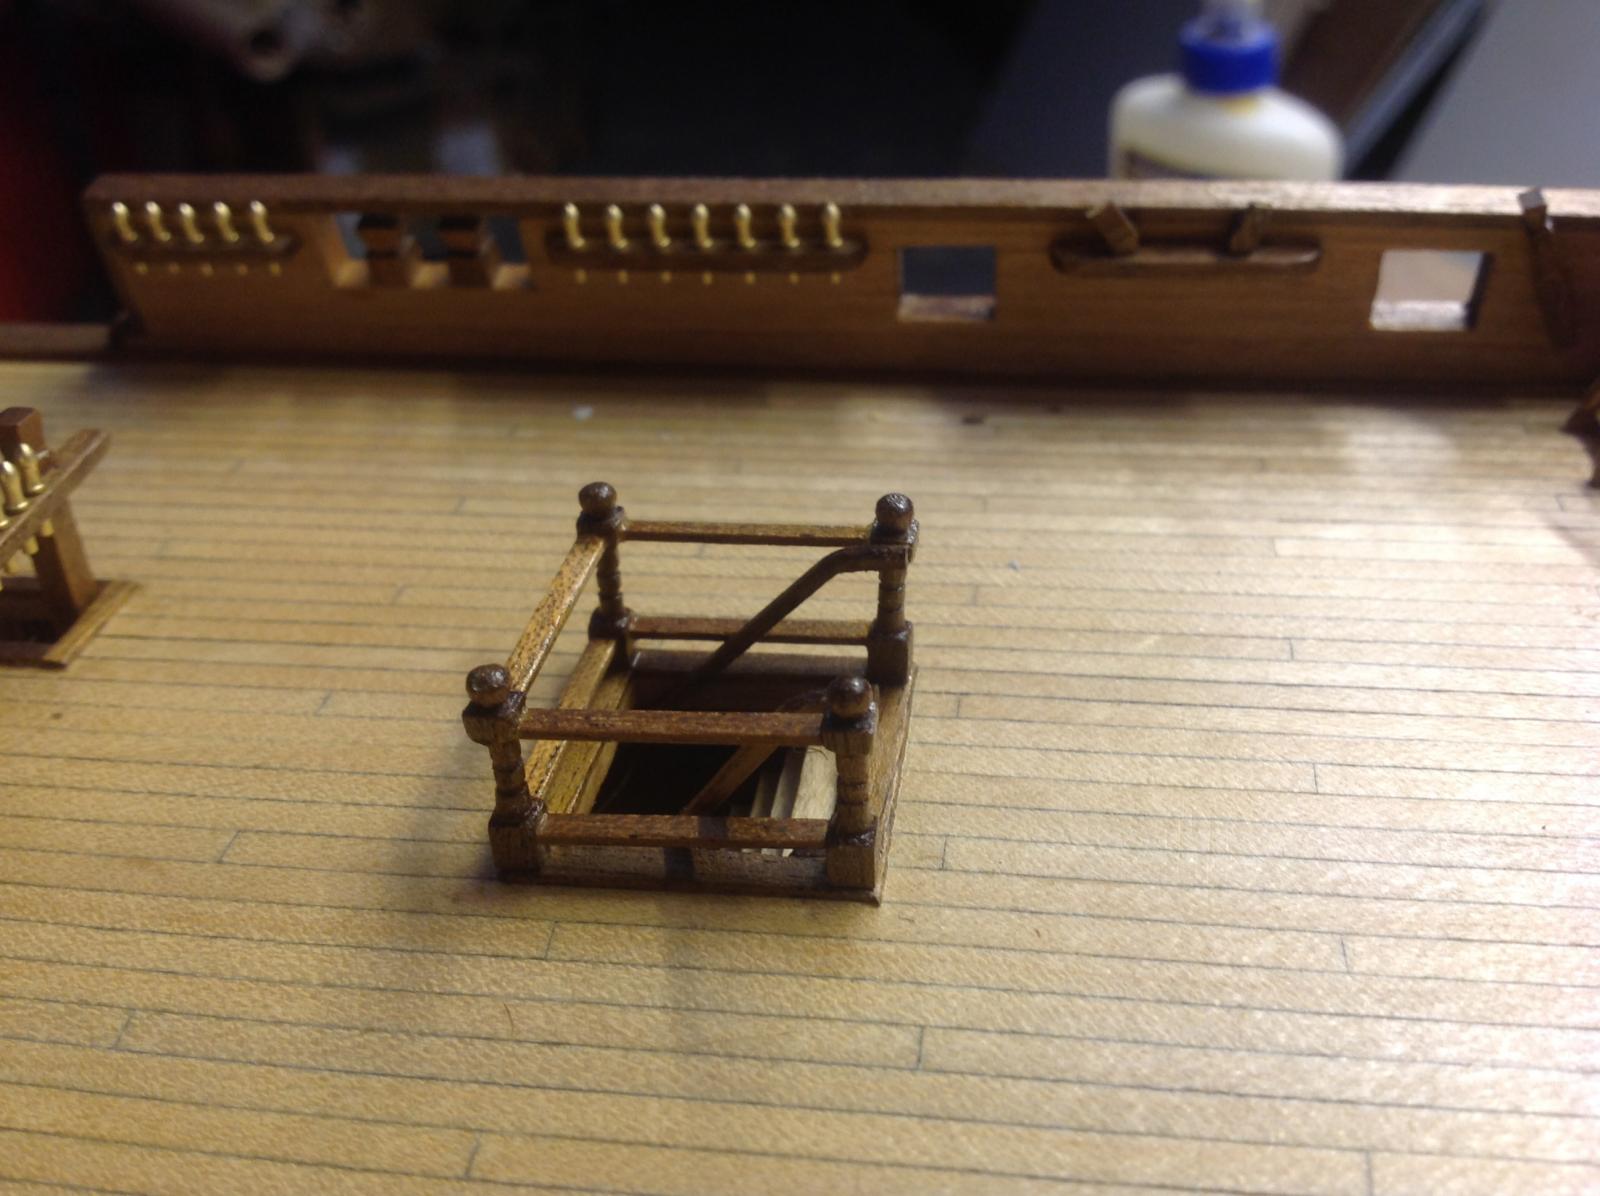
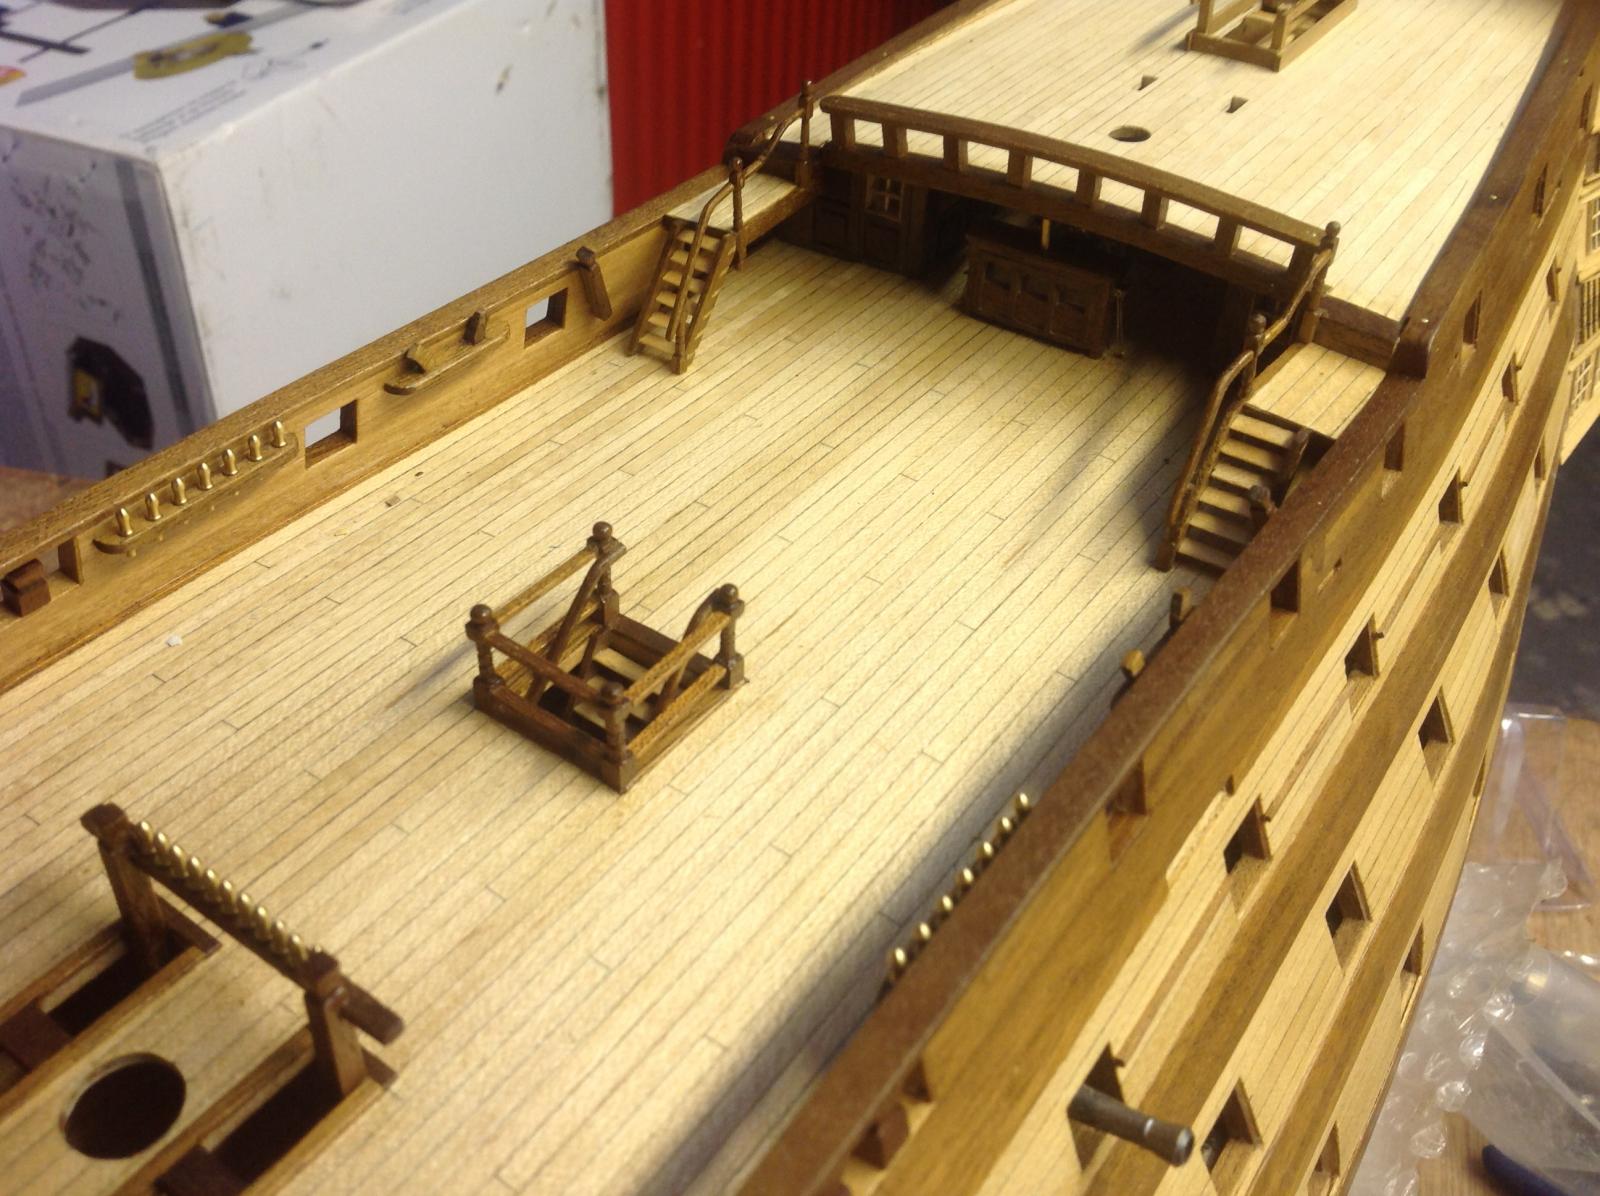
Decided to go ahead and change the staircase surround ,maybe if the brass was painted it would have been ok but thats against my rules when i see it finished i,m glad i changed it ,fits in better with this type of build ? I filled in the slots i had stupidly cut through and although not invisible i think by the time the rigging is on they won,t be noticable . Thought on replacing the plank instead of filling the hole but matching timber was a problem so i took the easy route !! Just a couple of pieces to fit on the poop deck,the skylight and flag lockers and as usual i will use the ply pieces as guides to scratch build them and then i hope to move on to the channels,chainplates etc might need to practice my soldering ,again something new !! Knotty74 , my apologies for saying that the roundhouses were on the poop deck ,( i assumed that was what it was called for obvious reasons ) i hope my lack of knowledge did not cause any confusion. Is there a name for the small deck at the bow where the roundhouses are ???


-
Roundhouses ,i assume you mean the ones on either side on the poop deck . I didn,t even attempt to bend the wood provided . I used the 2 slotted frames provided and built them up with 1x3mm strips running vertically ,then filed and sanded them to the rounded shape . if this is not clear let me know ,i,m not very good at explaining things but glad to be of help .
-
The problems of being the captain is you have to take the decisions !!!
-
Thanks John , I bought the vice to go with the table and was having diffs figuring out how to work with bigger pieces ,how to attach them to the table .I bought a couple of books but they seem mainly for metal milling so not really much help . I haven,t spent much time yet finding out what exactly i can do with but you have given me some idea of how to start . Like all new tools it will take a while to figure out . It seems a lot of people use them to make jigs for window frames ,ladders and that sort of thing . I really like the table ,i used it on the drill stand and makes drilling holes in a straight ,evenly spaced line childs play . I will start by making a jig like yours and try from there , Thanks for taking the time with the pics ,i,ll understand better when i try it myself . Boyd
-
I don,t know how you stayed away so long ??good to see you back ,now get some work done !!!