HOLIDAY DONATION DRIVE - SUPPORT MSW - DO YOUR PART TO KEEP THIS GREAT FORUM GOING! (Only 13 donations so far - C'mon guys!)
×


shihawk
-
Posts
709 -
Joined
-
Last visited
Content Type
Profiles
Forums
Gallery
Events
Everything posted by shihawk
-
 Great work . Have you considered a jig or frame to make up your windows ,I,m assuming they are all a similiar size ?
 -
Hi Rich Here,s a couple of pics showing the tulle David mentioned , it will give you an idea of how it looks

- 414 replies
-
- 1
-

-
- caldercraft
- victory
- (and 1 more)
-
Brian , I bought one a while back and used it a fair bit . It is handy for small cuts but don,t expect to cut anything to big , I bought finner blades for cutting sharper corners and they worked well but you need the bigger blade supplied to cut straight . The blades are cheap and easily replaced . The hole around the blade is to big and small pieces will fall through and if you have the vac connected they will dissappear but this can be easily solved . It has a variable speed which is usefull and although noisey i think i could call it value fo money . Boyd .
-
Tks George , i,m hoping they will get better with practice . Mike ,It is hard to keep the motivation going at times and i have fought the urge a few times to start another project but am afraid i won,t finish the Vic if i do , I,m beginning to understand why some people keep 2 or 3 builds going at once . As for the tools , they are not really necessary and in fact the mill and table saw have hardly been used although i,m hoping they will be usefull in the future , at least thats what i keep telling myself .There is no tool for tying ratlines ???? Deciding the next build is a common problem . some days i,m convinced i,ll start a scratch build and then i think a small straight from the box build would be a lot less hassel ,The only thing i,m faily sure is my next build will be smaller in size and bigger in scale ,1:60 or maybe even 1:40 so at least i have narrowed it down a bit !!! It,s a case of an easy build and getting bored or a challange and getting frustrated ,which is the most enjoyable ????
-
Mike , I do a few then leave it for a while and it,s not so bad. What you workin on now ??
-
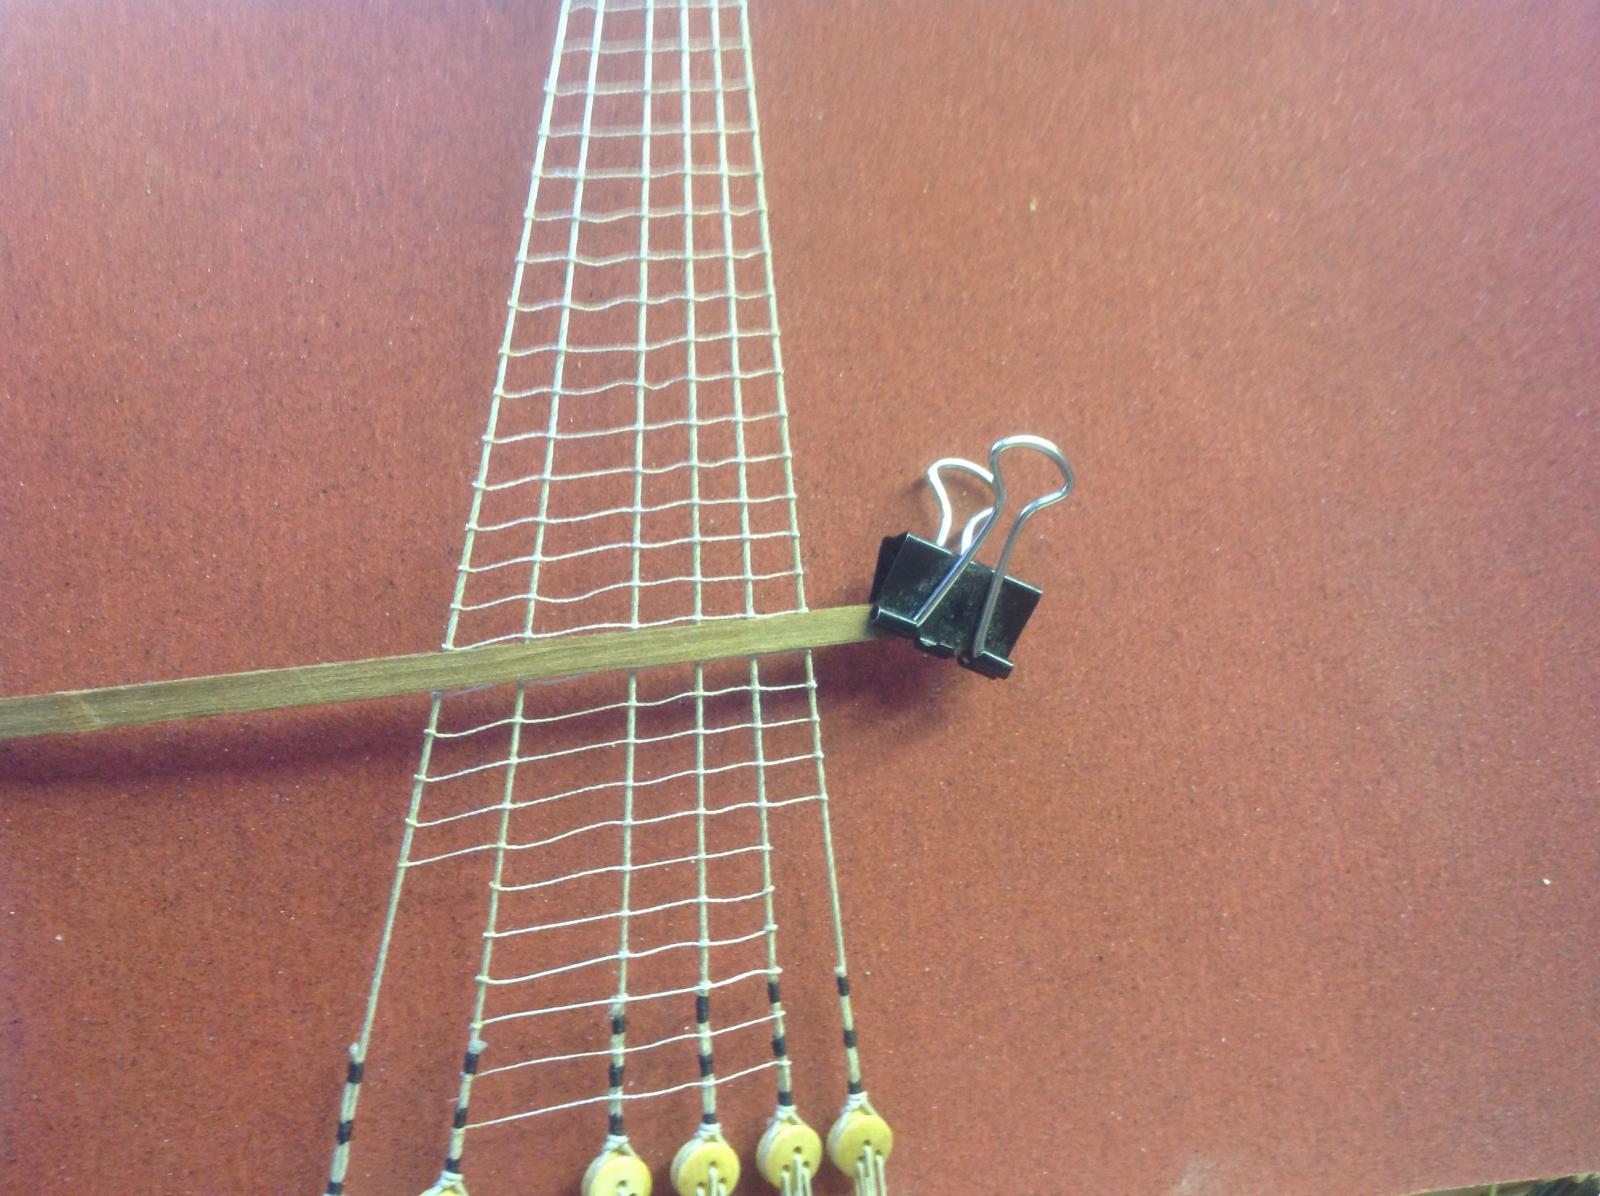
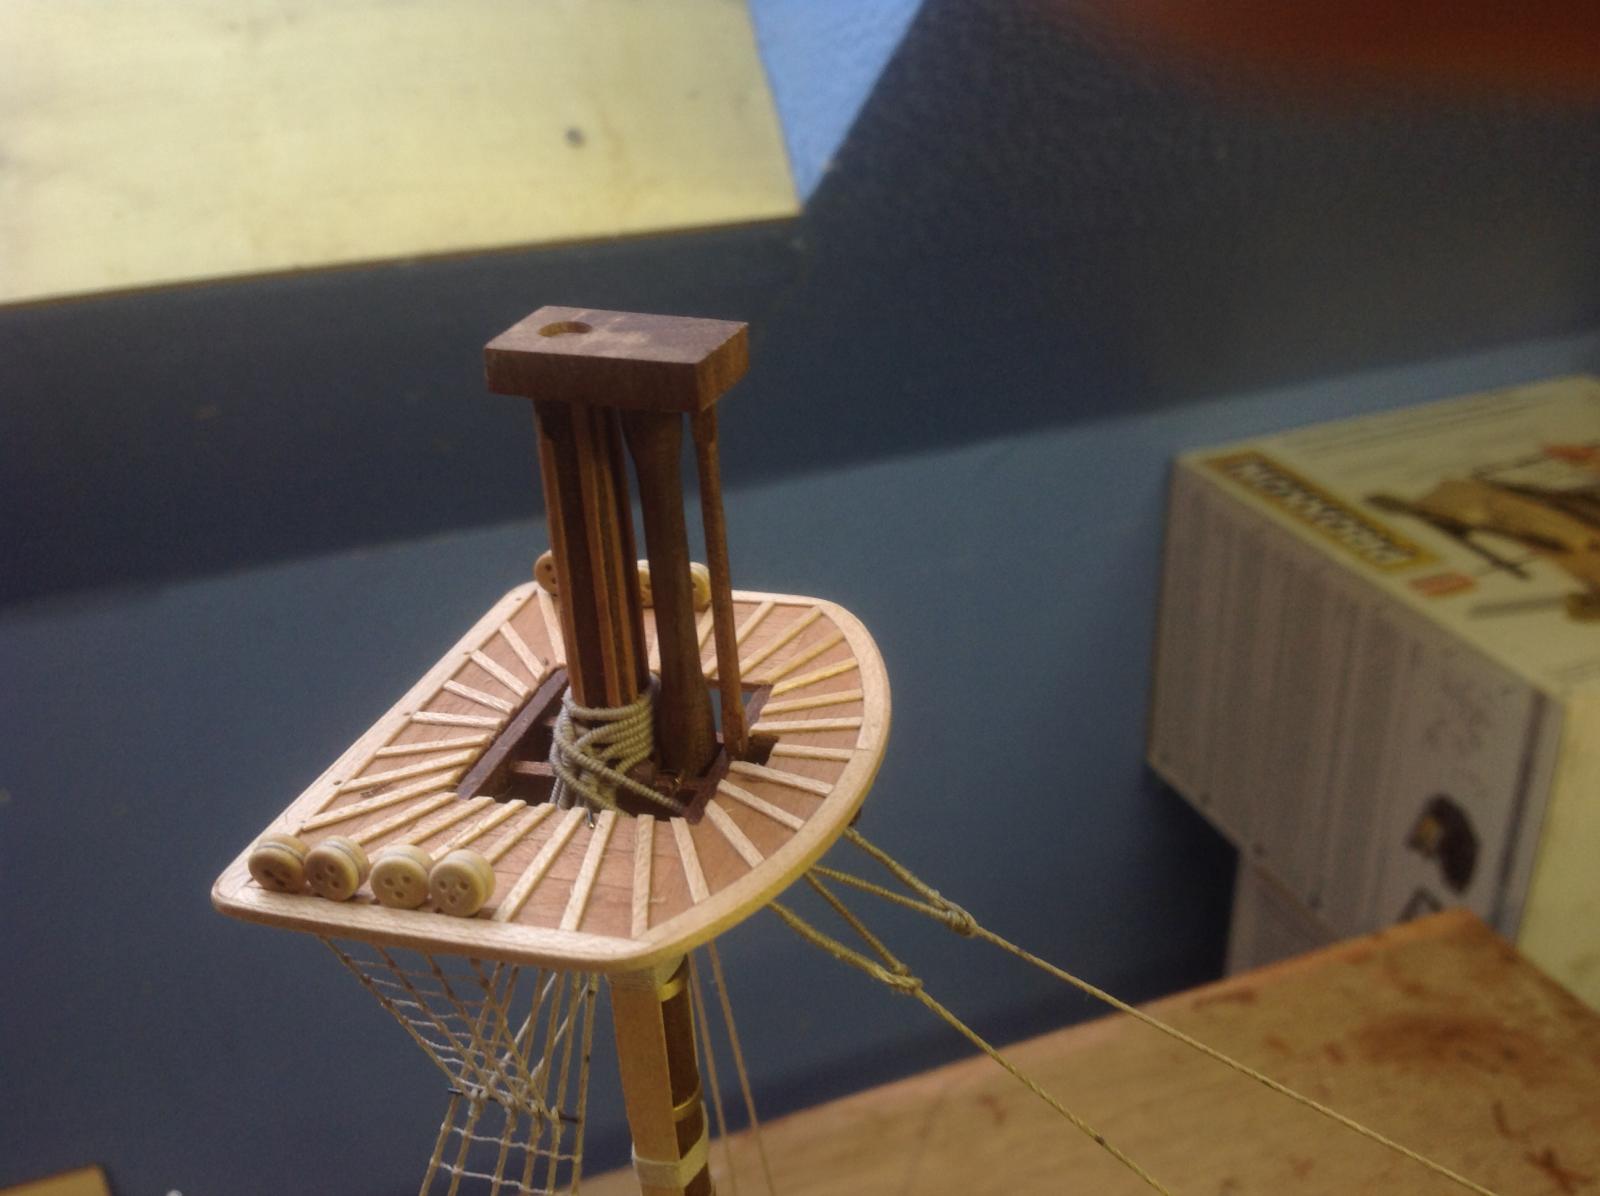
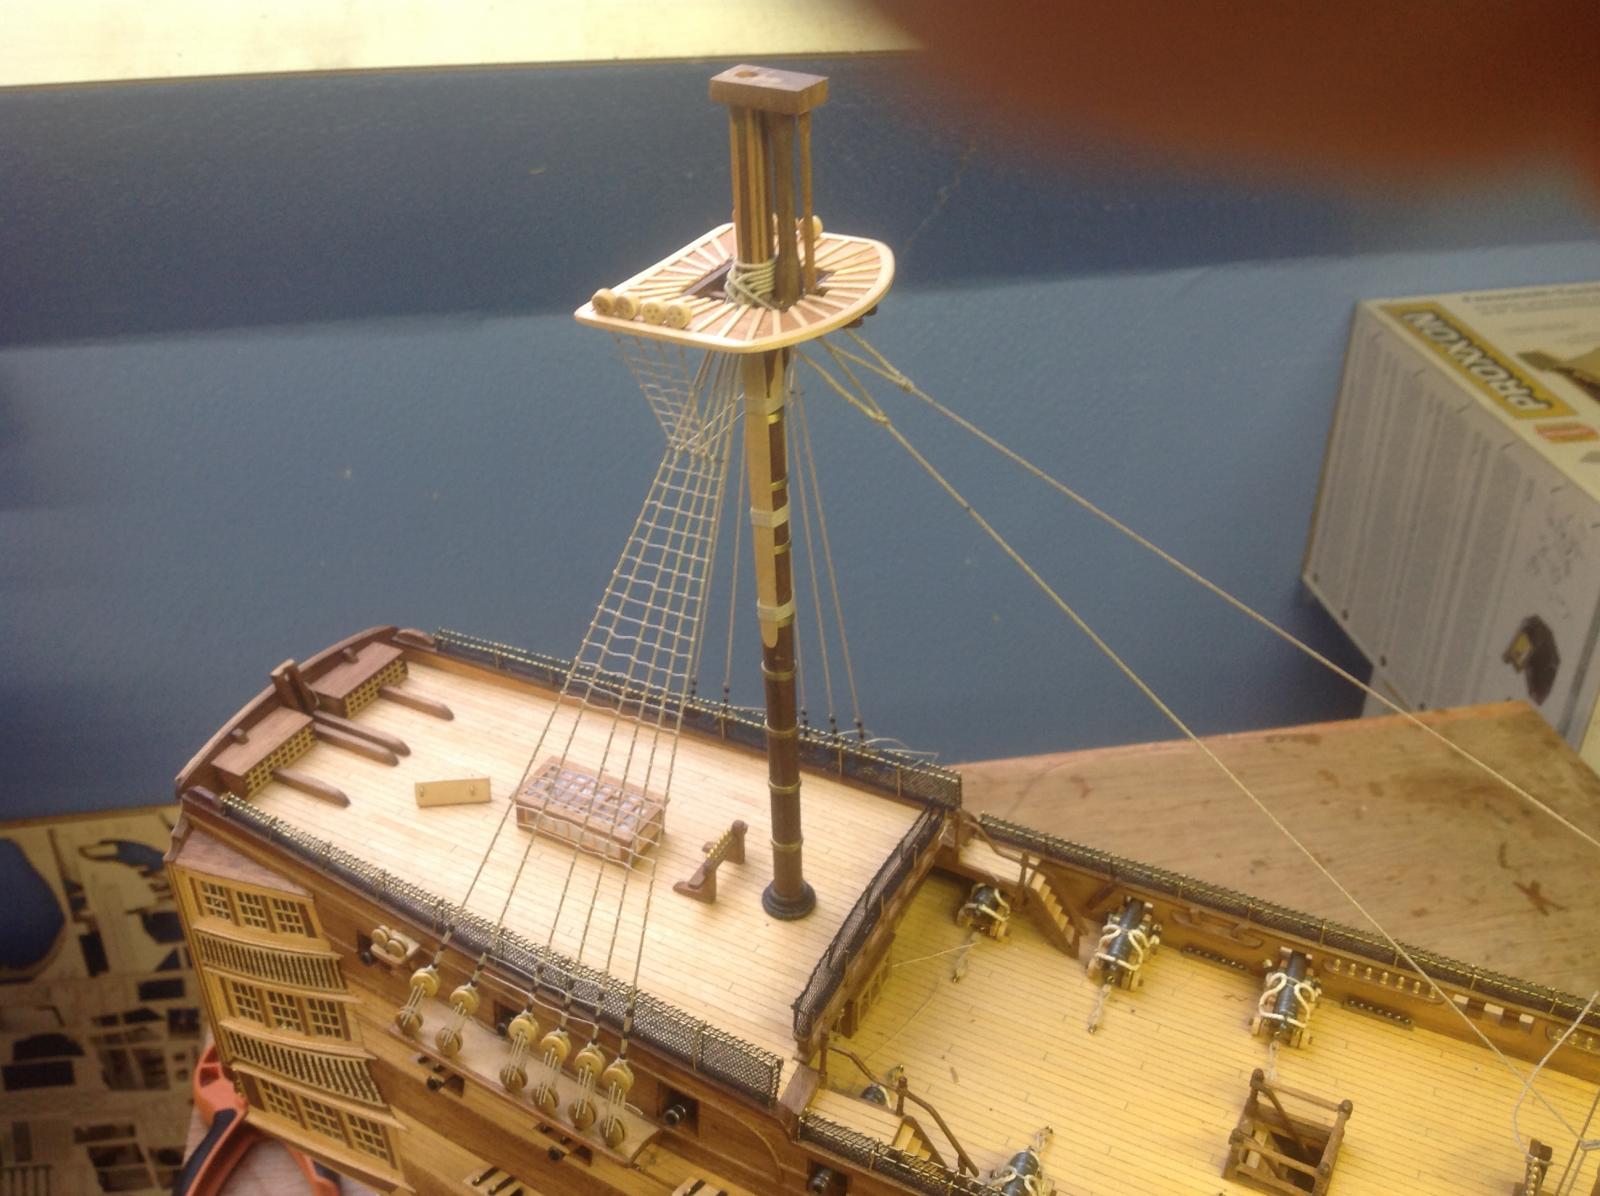
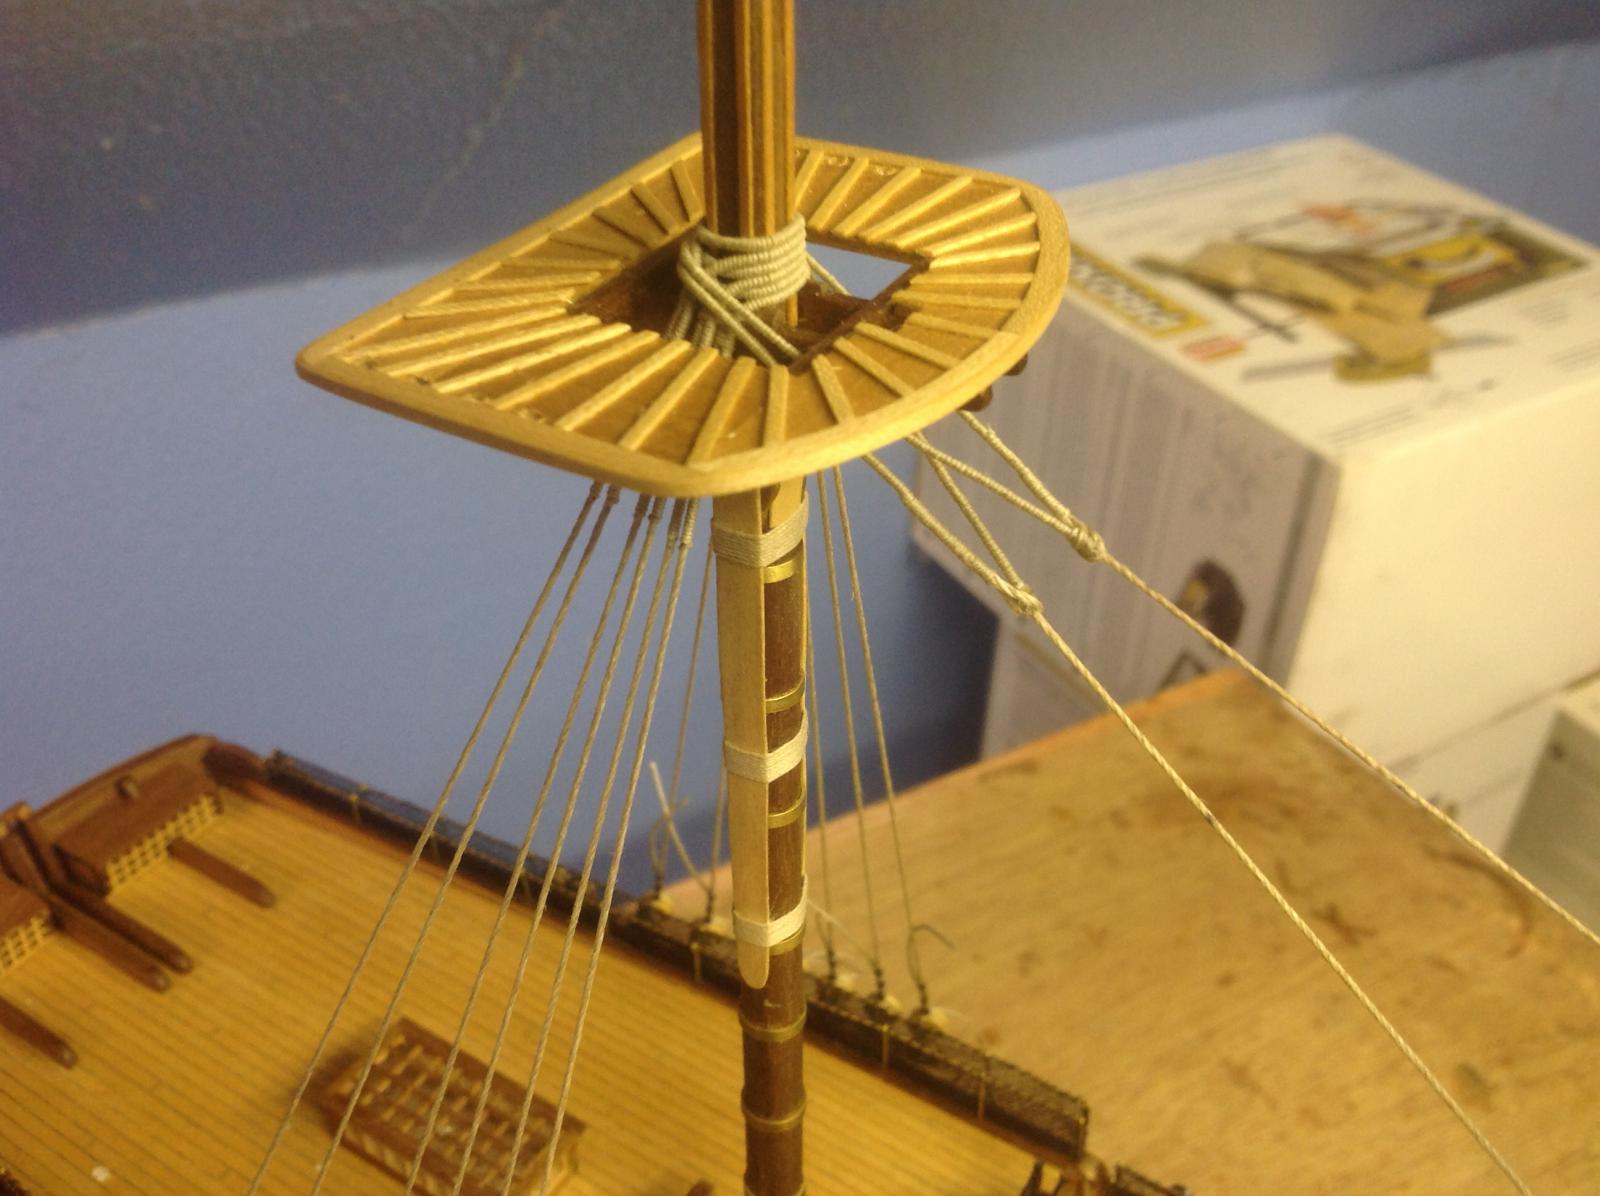
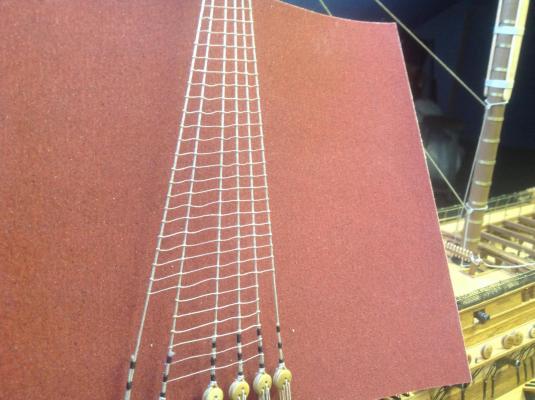
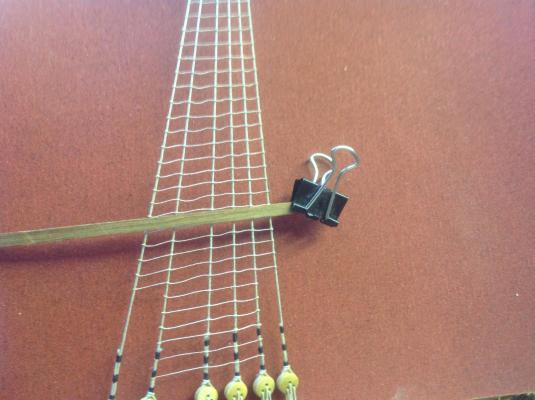
After trying several variations which included served futtock shrouds ,black futtock shrouds with white seizing and the other way round ,attached with hooks and without hooks i finally settled for a fairly simple method which was within my abilities . the ratlines are tied with a clove hitch i found the overhand knot difficult to keep tight , and although not perfect i will have to be content I used 2 4mm strips cliped together to roughly measure the spacing Been trying to work out how to finish the mast top , getting there but is still ongoing


-
Hi Ian ,Unless i,m mistaken i think i see you already have line marks on you hull and have been using steelers at the bow section so i wouldn,t panic yet about the run of the planking although i don,t know how much prep you made for this??? having had problems with colors in Maple decking i was wondering could your problem be caused by simply turning the run of the grain ,otherwise i would agree with Heinz and replace them as they will always haunt you . It, a big hull to plank and there are bound to be problems but you are doing a great job!!!! Boyd
- 191 replies
-
- 3
-
-
- victory
- caldercraft
- (and 1 more)
-
Welcome to the world of ship building ,things seldom run smoothly all the time ,but once you accept that you are better prepared !!!! Where would we be without the clothespeg ?????
-
Maybe i,m wrong in my method but as i,m at a similiar stage ,masts and rigging , i found that if you can possibly leave off the fittings on the top section of the mast untill the shrouds are fitted ,it means they can be slid on and off easily meaning tying the deadeyes can be done off ship on the bench ,if that makes sense ????
- 708 replies
-
- 2
-
-
- victory
- constructo
- (and 1 more)
-
Keith , don,t know about the busy , still waiting for the winter to start when i get more build time ,maybe this week ? Don, glad to have your interest , there are no rules on this one ,some parts authentic but most pure fiction !!!!
-
Hi Philthy , the most common method used is to temporarily pin three planking strips to each side of the hull ,one near the top ,one middle ,and one near the bottom ,You can then tell if some of the frames are too big or too small by the bumps or depressions in the strips. Fill the depressions by gluing a 0.5 filler strip on the frame edge and sanding or filing it back to shape . A sanding block long enough to cover 3 or 4 bulkheads can be used to "fair" the curve over the frames ,repeatly checking with the planking strips to pick out any areas that need more sanding . the aim is to get a good contact between your first planking and the bulkheads . The more time spent on getting this process correct will make your planking easier or at least smoother . Use a coarse sandpaper and be gentle ?? It can take hours of sanding and checking but worth it in the end ,just don,t overdo it and spoil the line of your hull .
-
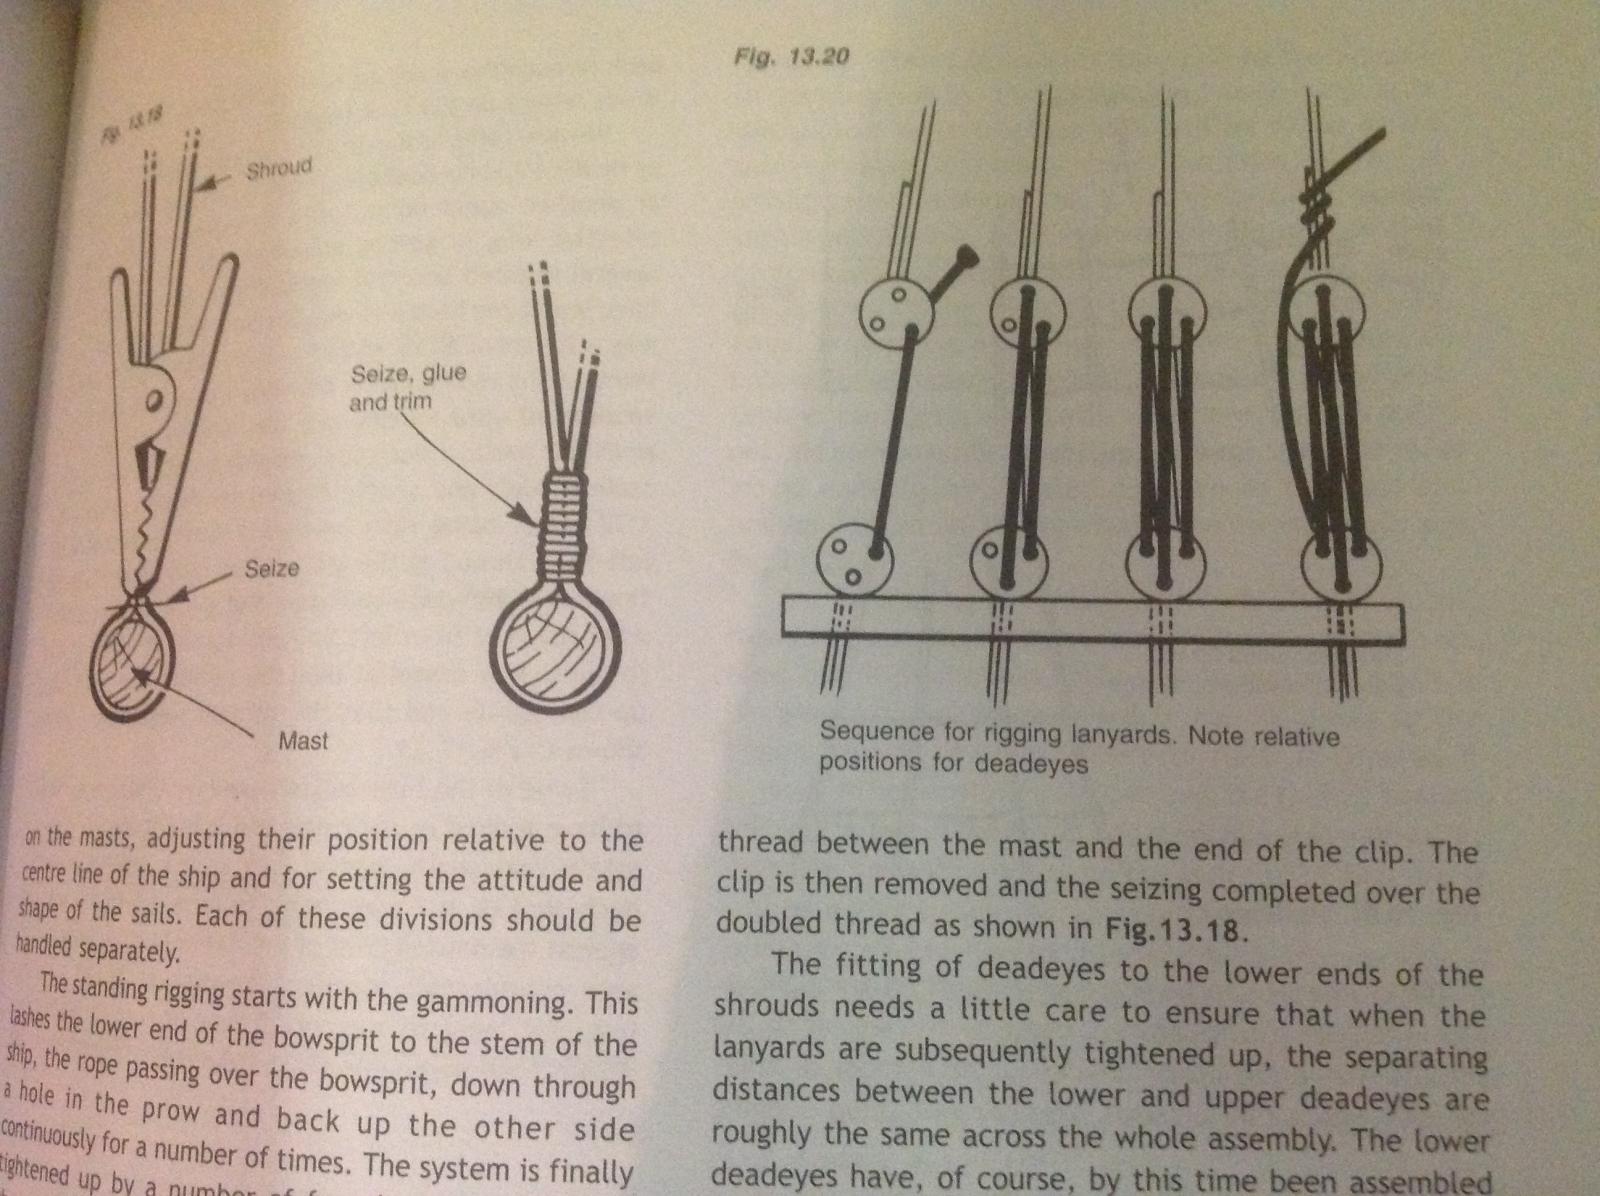
Mike I,m always glad to help in any way as others have helped me even without knowing it . I thank you for your interest as i know i don,t always explain my methods well ,mainly cause they don,t always work !!!! I left the top of my mast clear so i can slip the finished shrouds on and off easily, it would certainly be more difficult to tie the deadeyes with the shrouds fixed .I think thats where we differ . The book i took the diagram from is the Period ship Handbook by Keith Julier ,I bought it because it has an accessment on the CC Victory kit and a step by step guide to building it . To be honest it was not much use to me as the Billings kit is very different . A book i would recomend is Ship Modeling Simplified by Frank Mastini , deals with most aspects of model building rather than individual kits.
-
Thanks David ,i hope it will all be worth it . Mike I,m not sure how you fit your shrouds but i measure them on the ship first then remove them to attach the deadeyes . i fit the lanyards by tying a double knot ,a spot of ca to harden and then feed through trom left to right
-
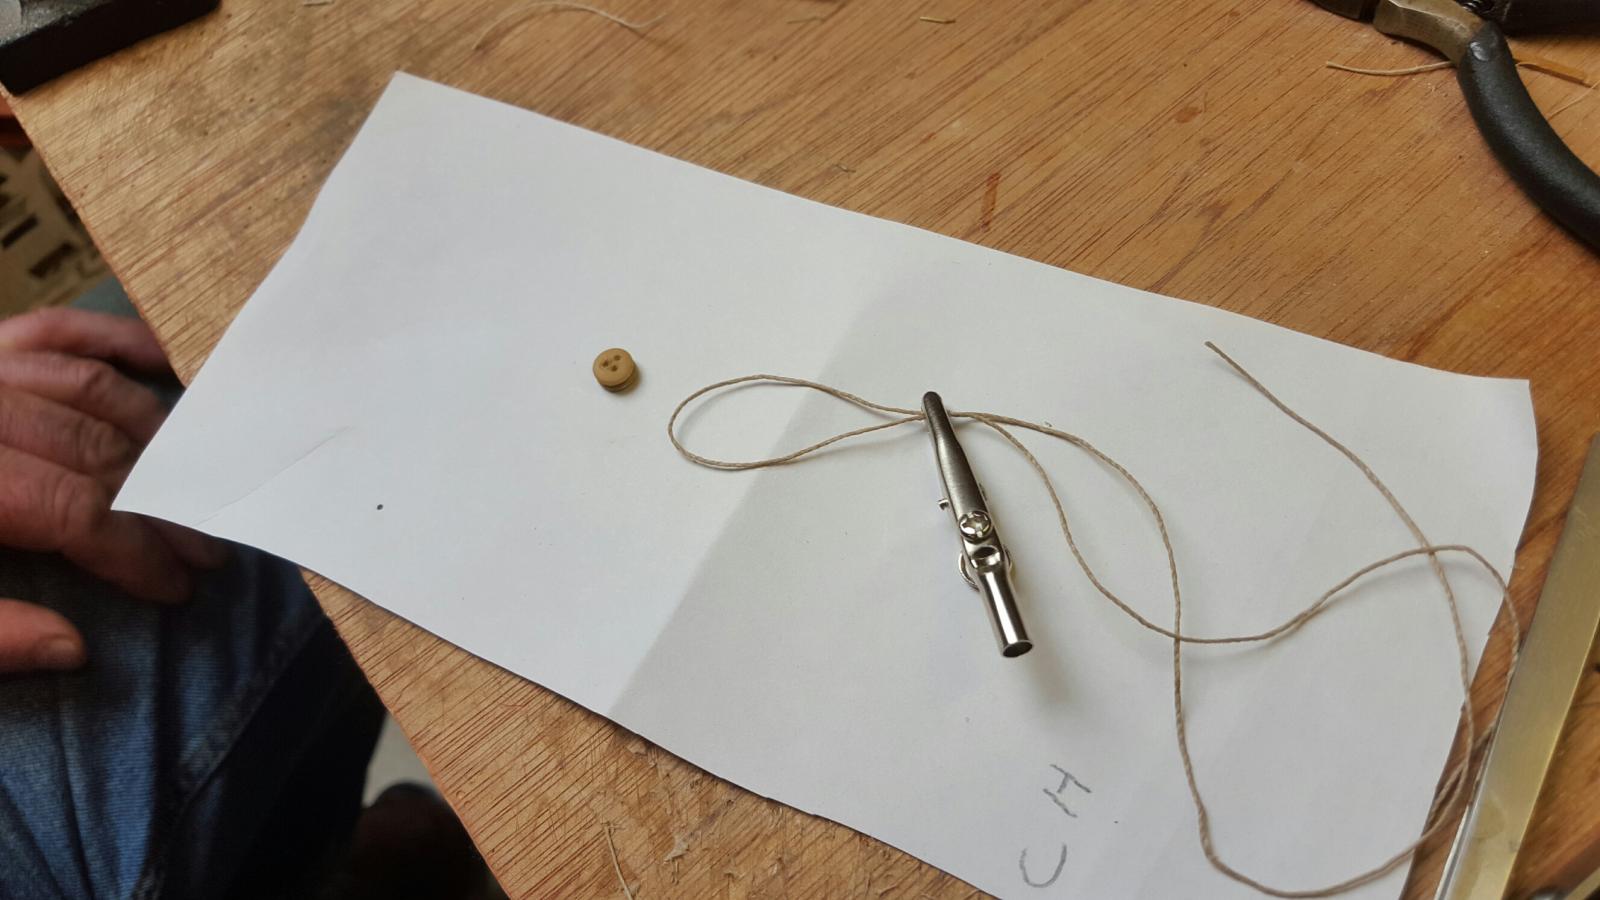
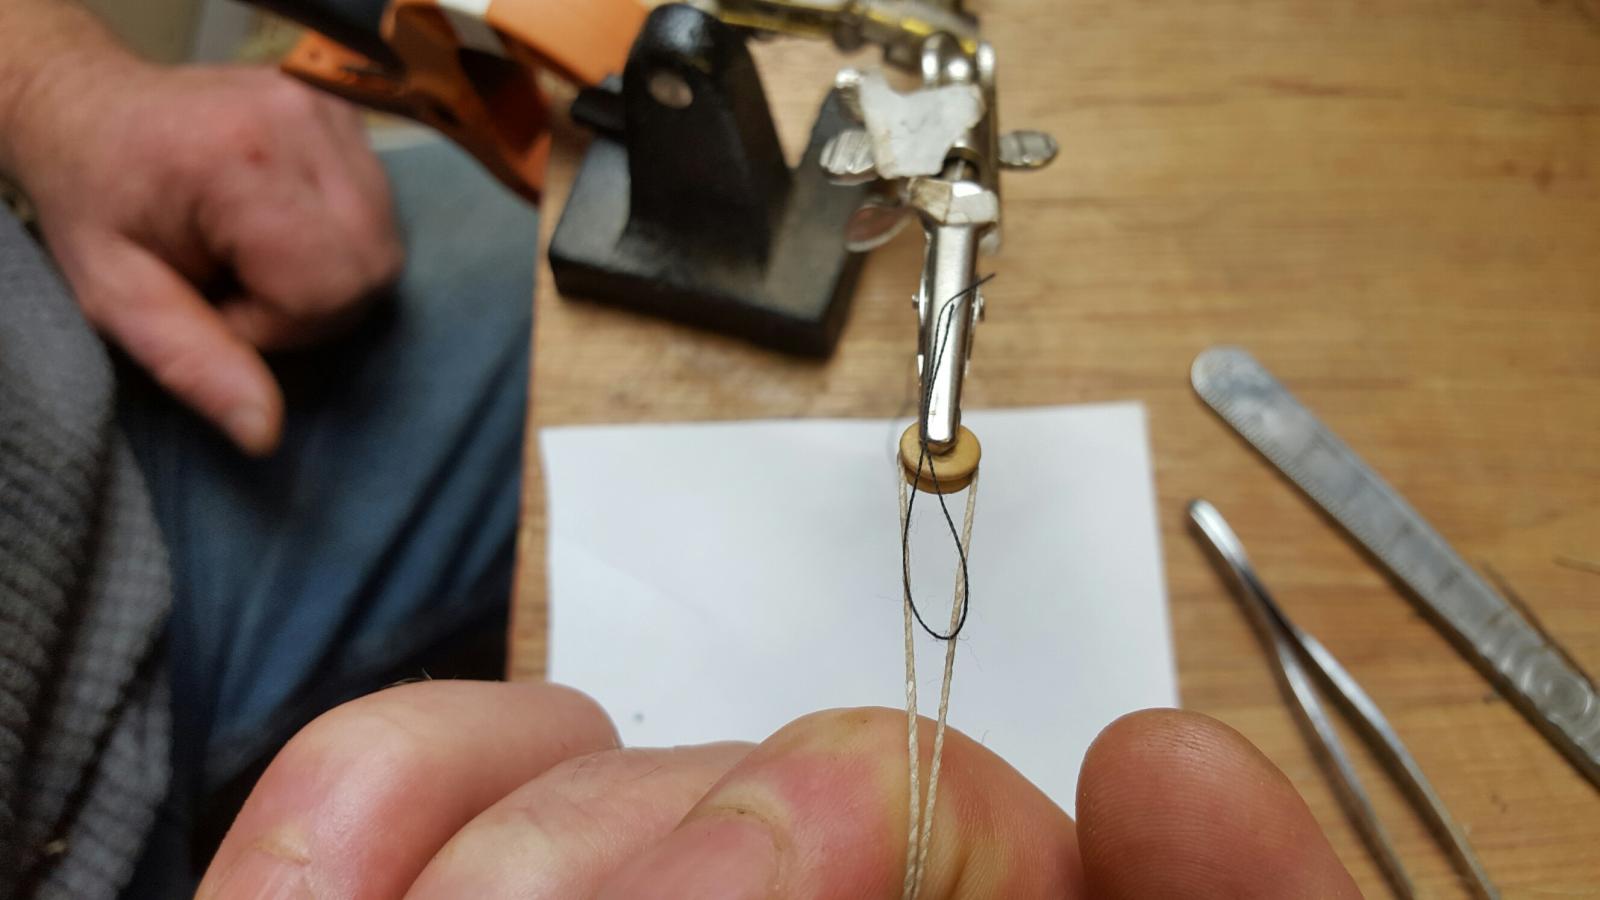
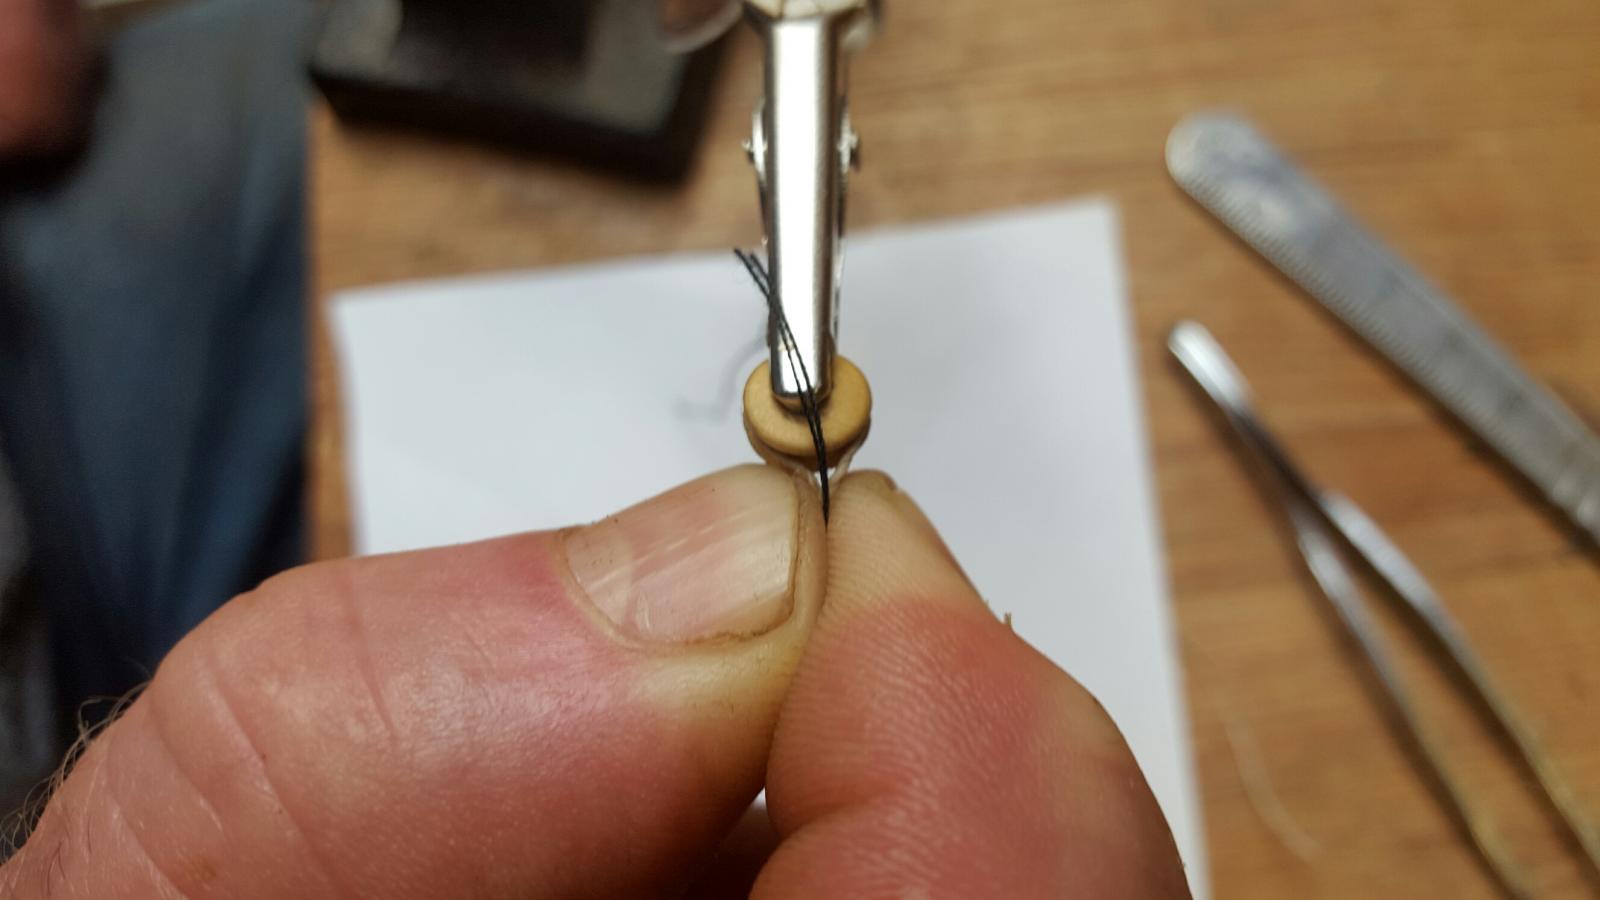
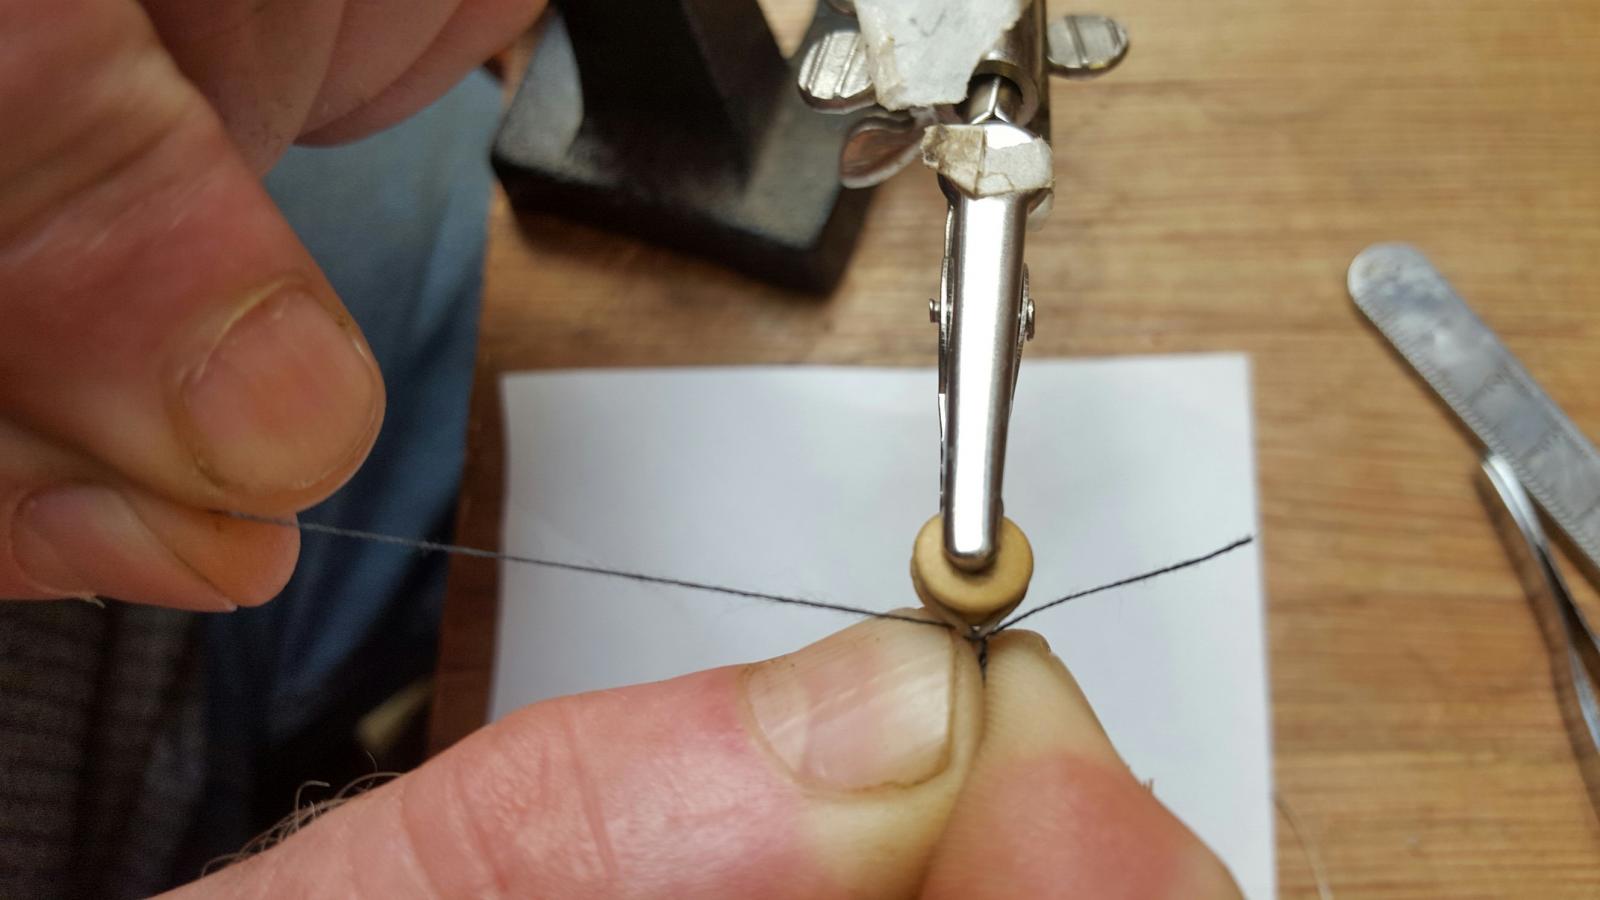
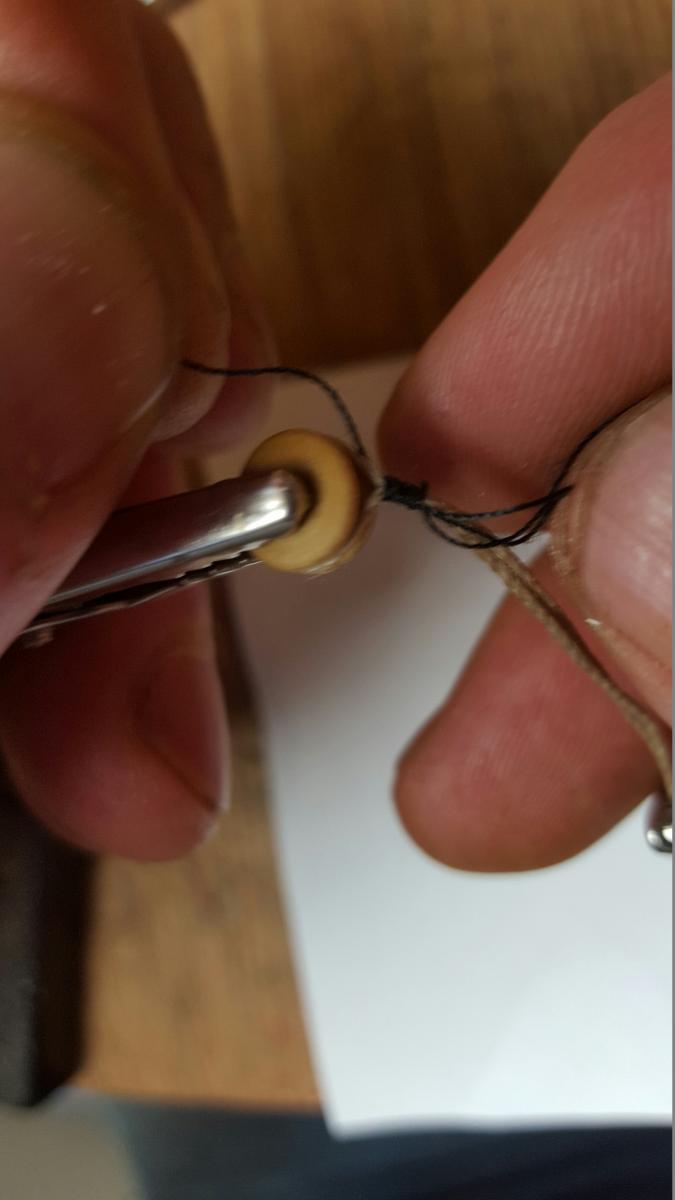
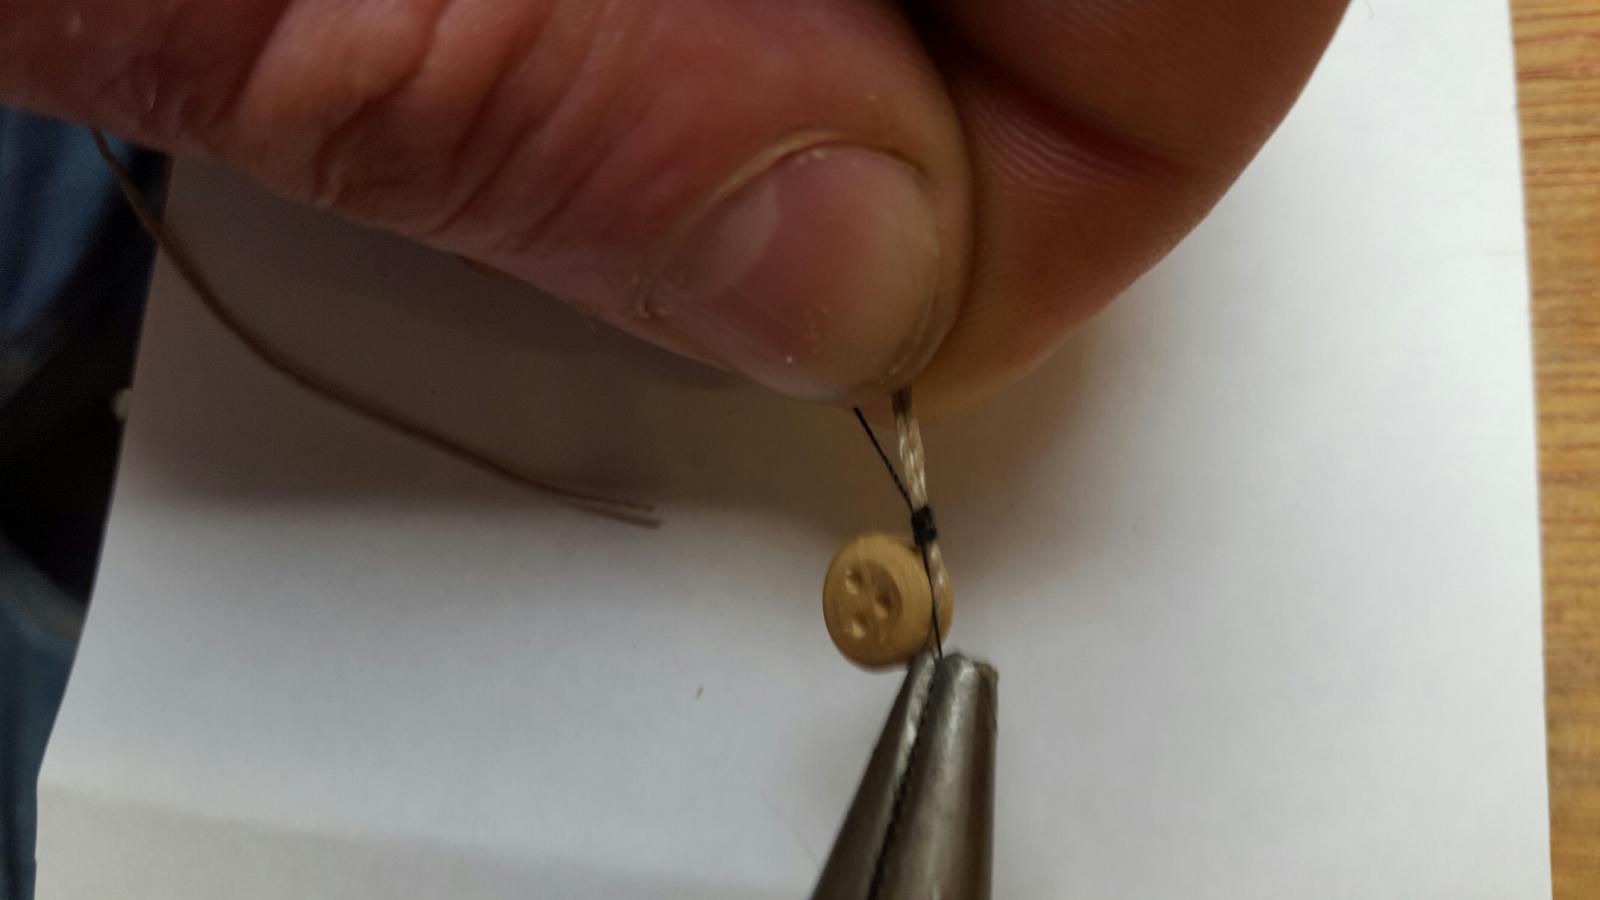
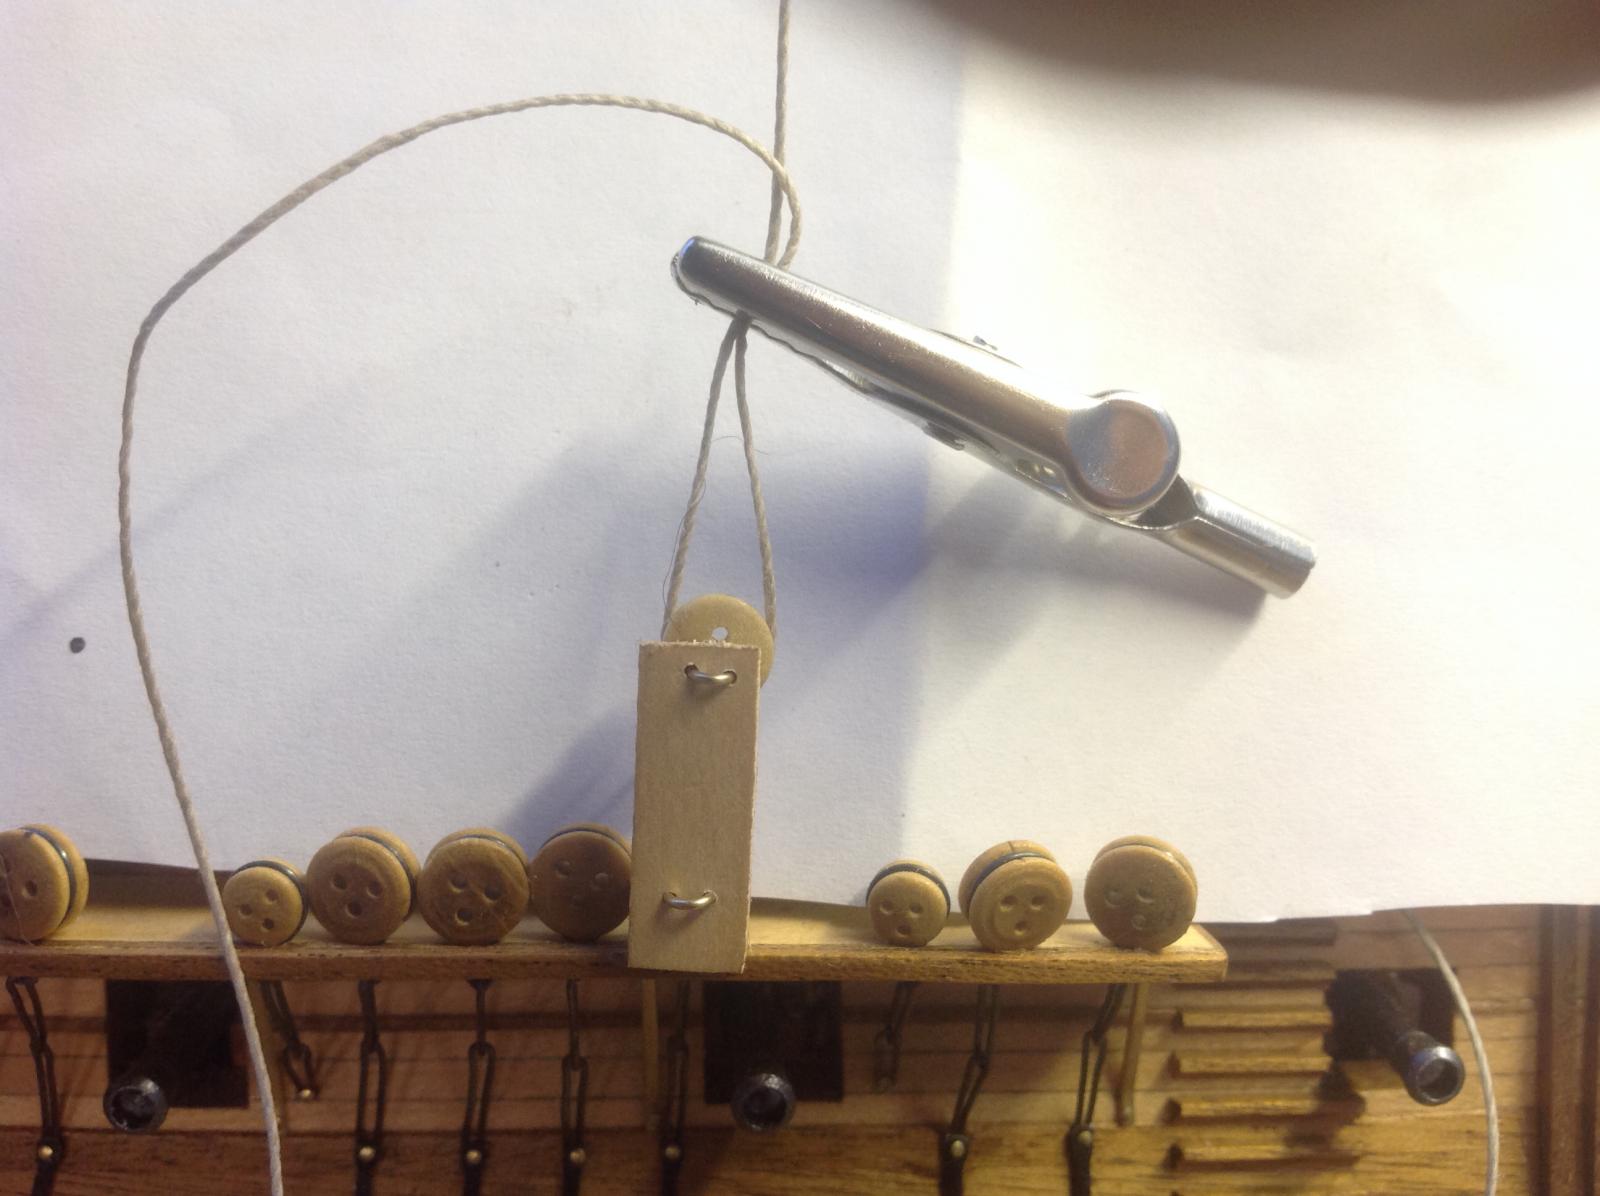
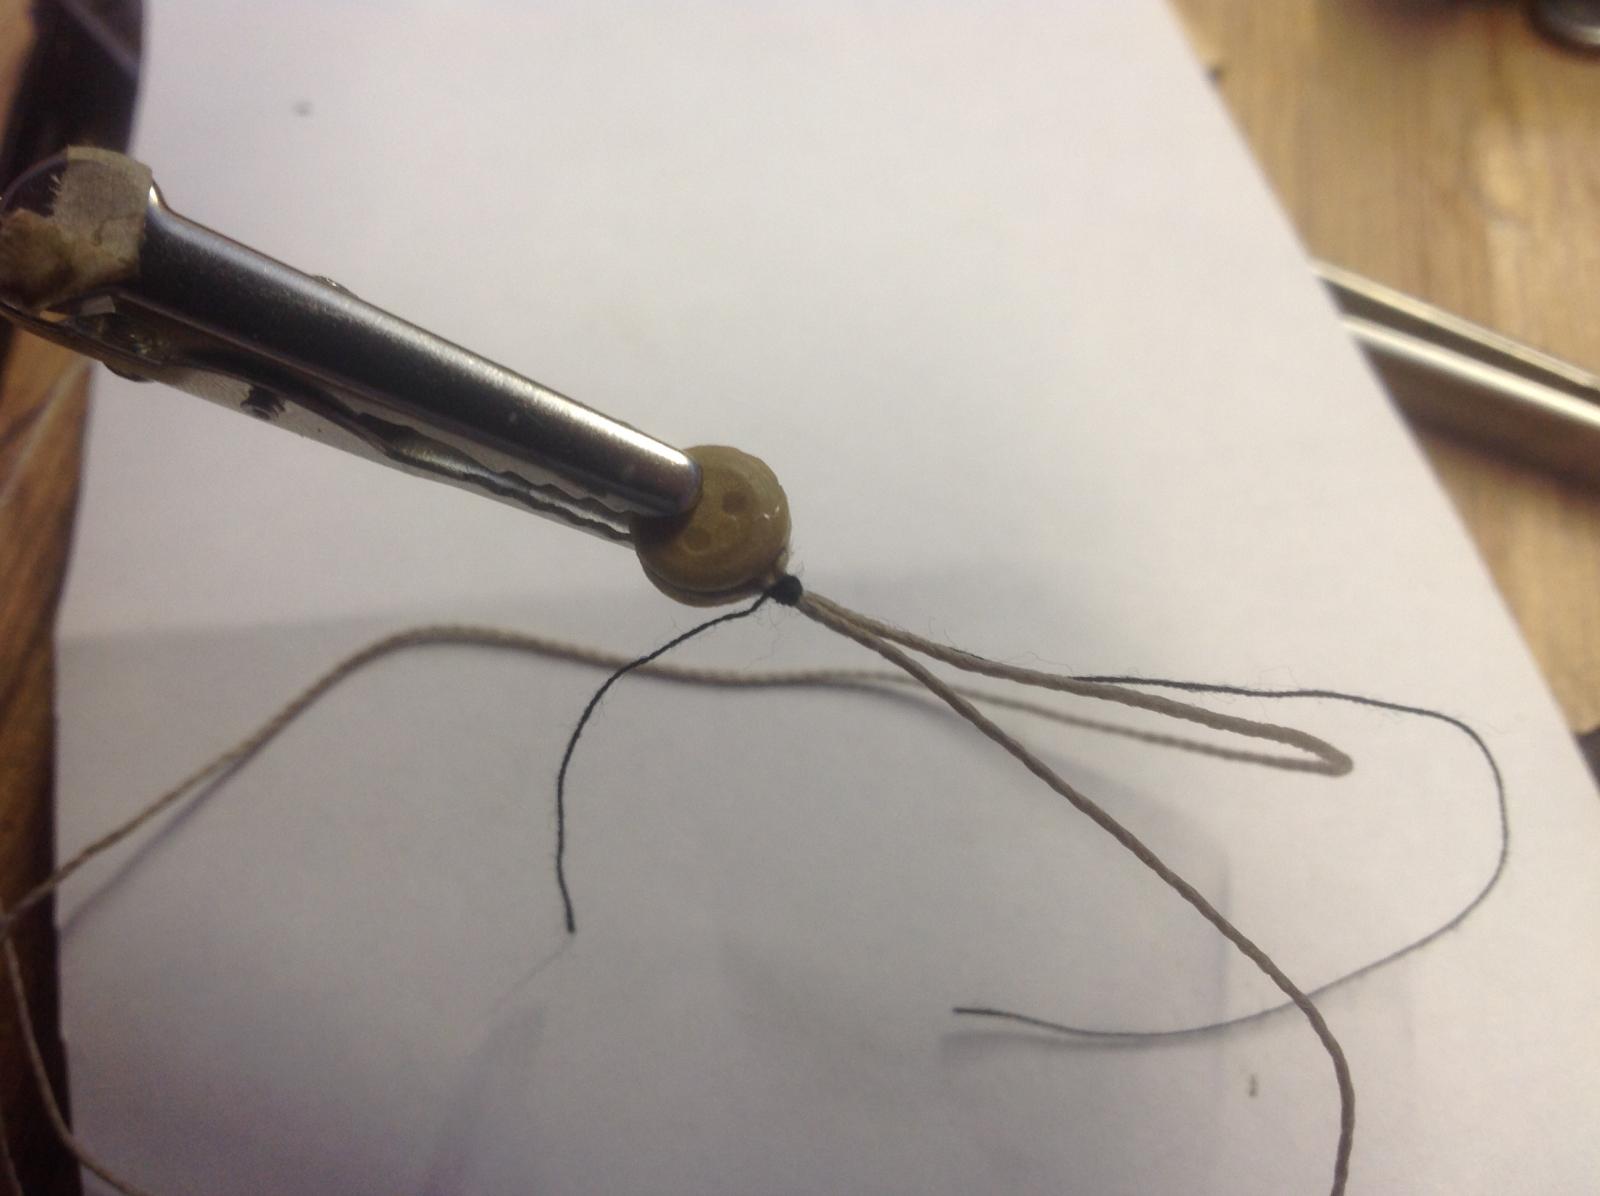
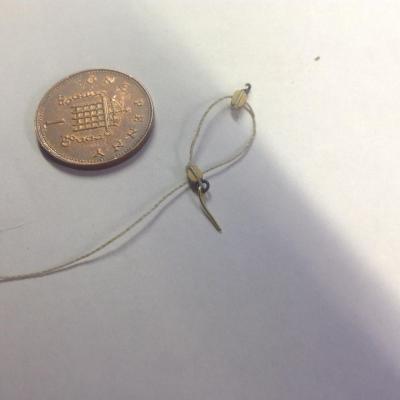
hi Mike I have seen several methods of seizing demonstrated but be prepared for one of the most hi-tec yet . I think i will call it the "finger and thumb" method . the clip holds the shroud at the correct length secure the deadeye in another clip or vice of some kind and make sure the loop is even around the deadeye prepare your seizing thread and grip the now four threads tightly between finger and thumb firmly run your thread around the tip of your finger and after twice around slip your fingers back slightly to leave room to continue the seizing Once you have the required number of turns finish the seizing in the usual way , i normally pull the slack by hand and then finish pulling with pliers ,for better grip snip the ends of and i don,t normally bother with glue and they seem to hold As i said earlier there are several methods some of which i have tried but this works for me and is simple with no set up time and although went wrong sometimes i now can tie them without thinking . Hope this helps ,sometimes the easy way is best . I had to get my son to take the pics with his new phone ,even better quality than the usual i-pad ones ,might try and use it from now on?


-
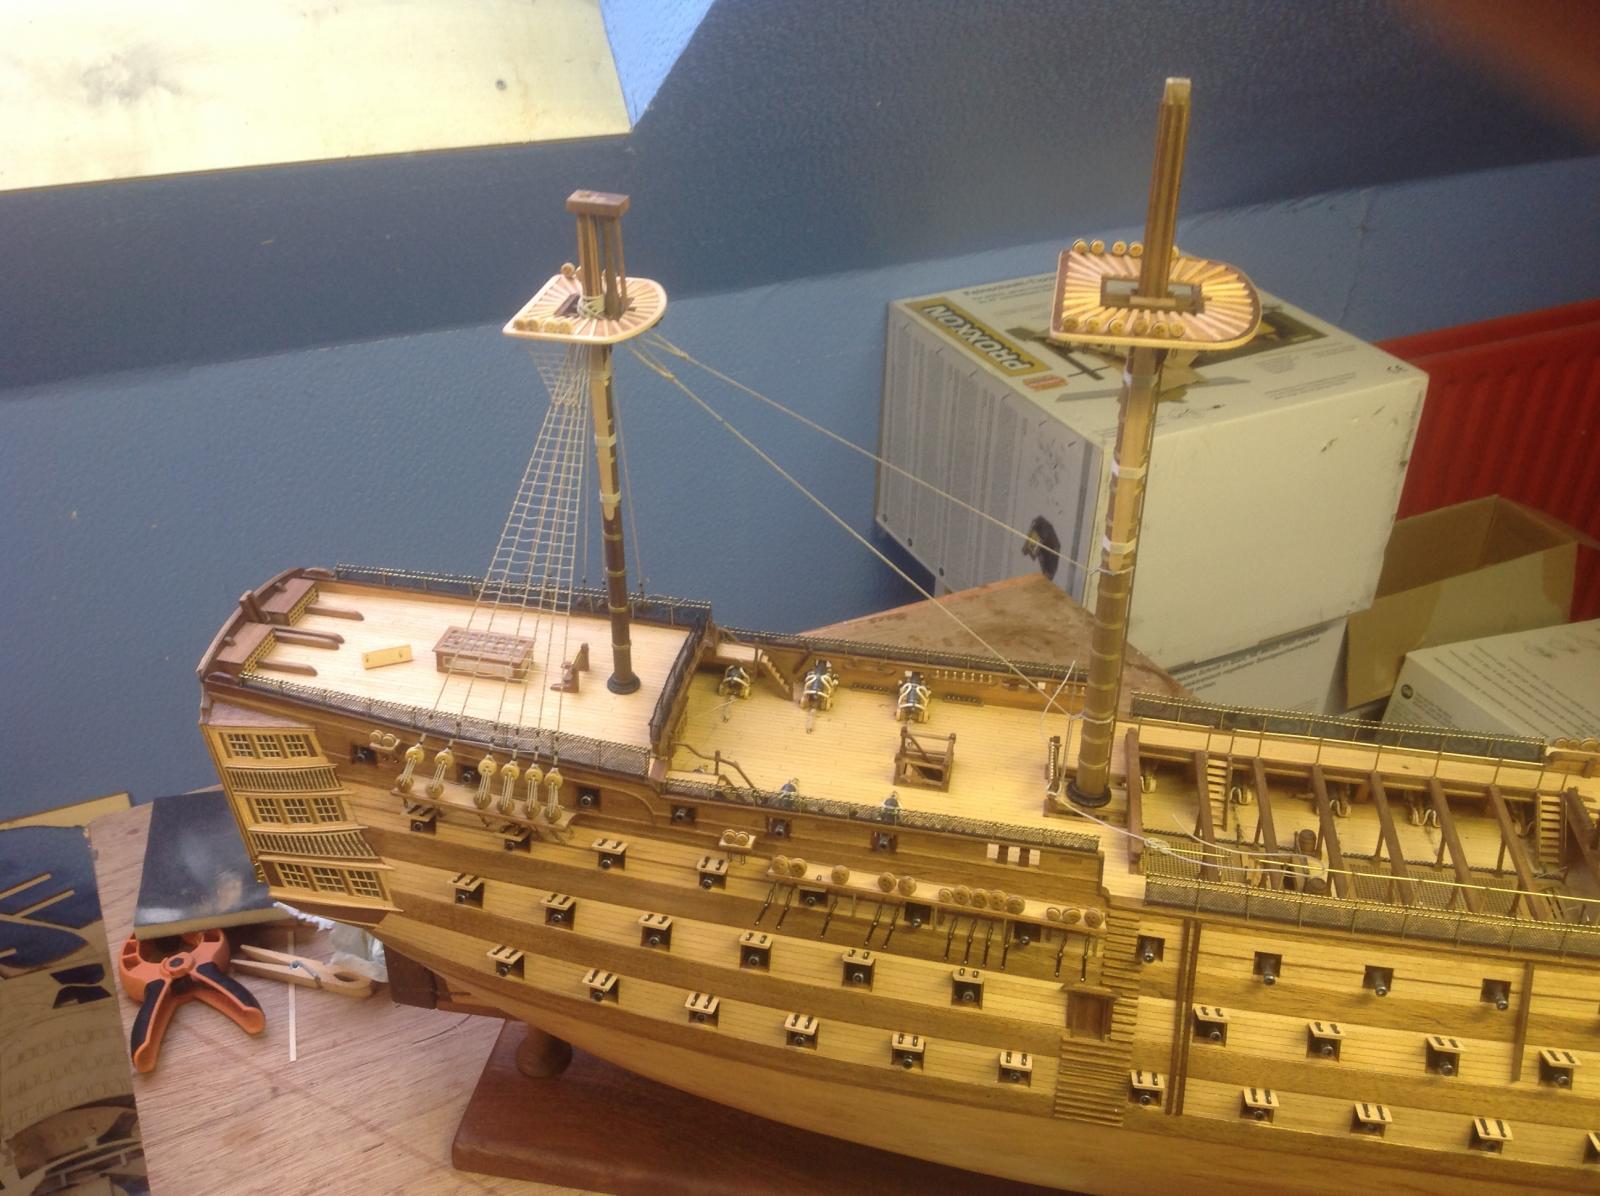
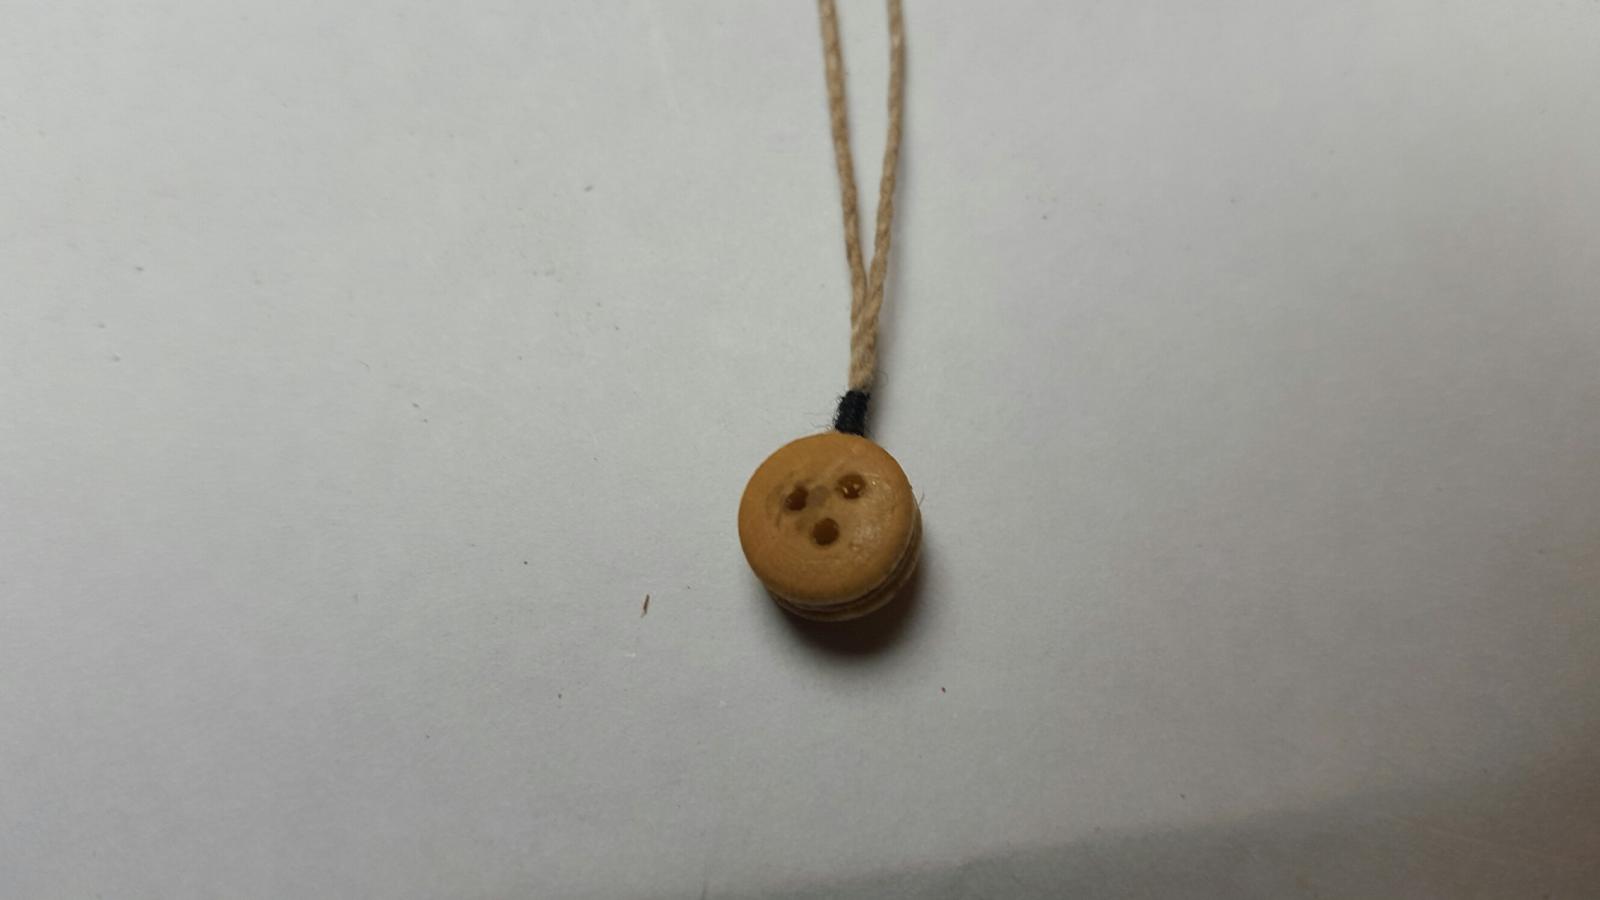
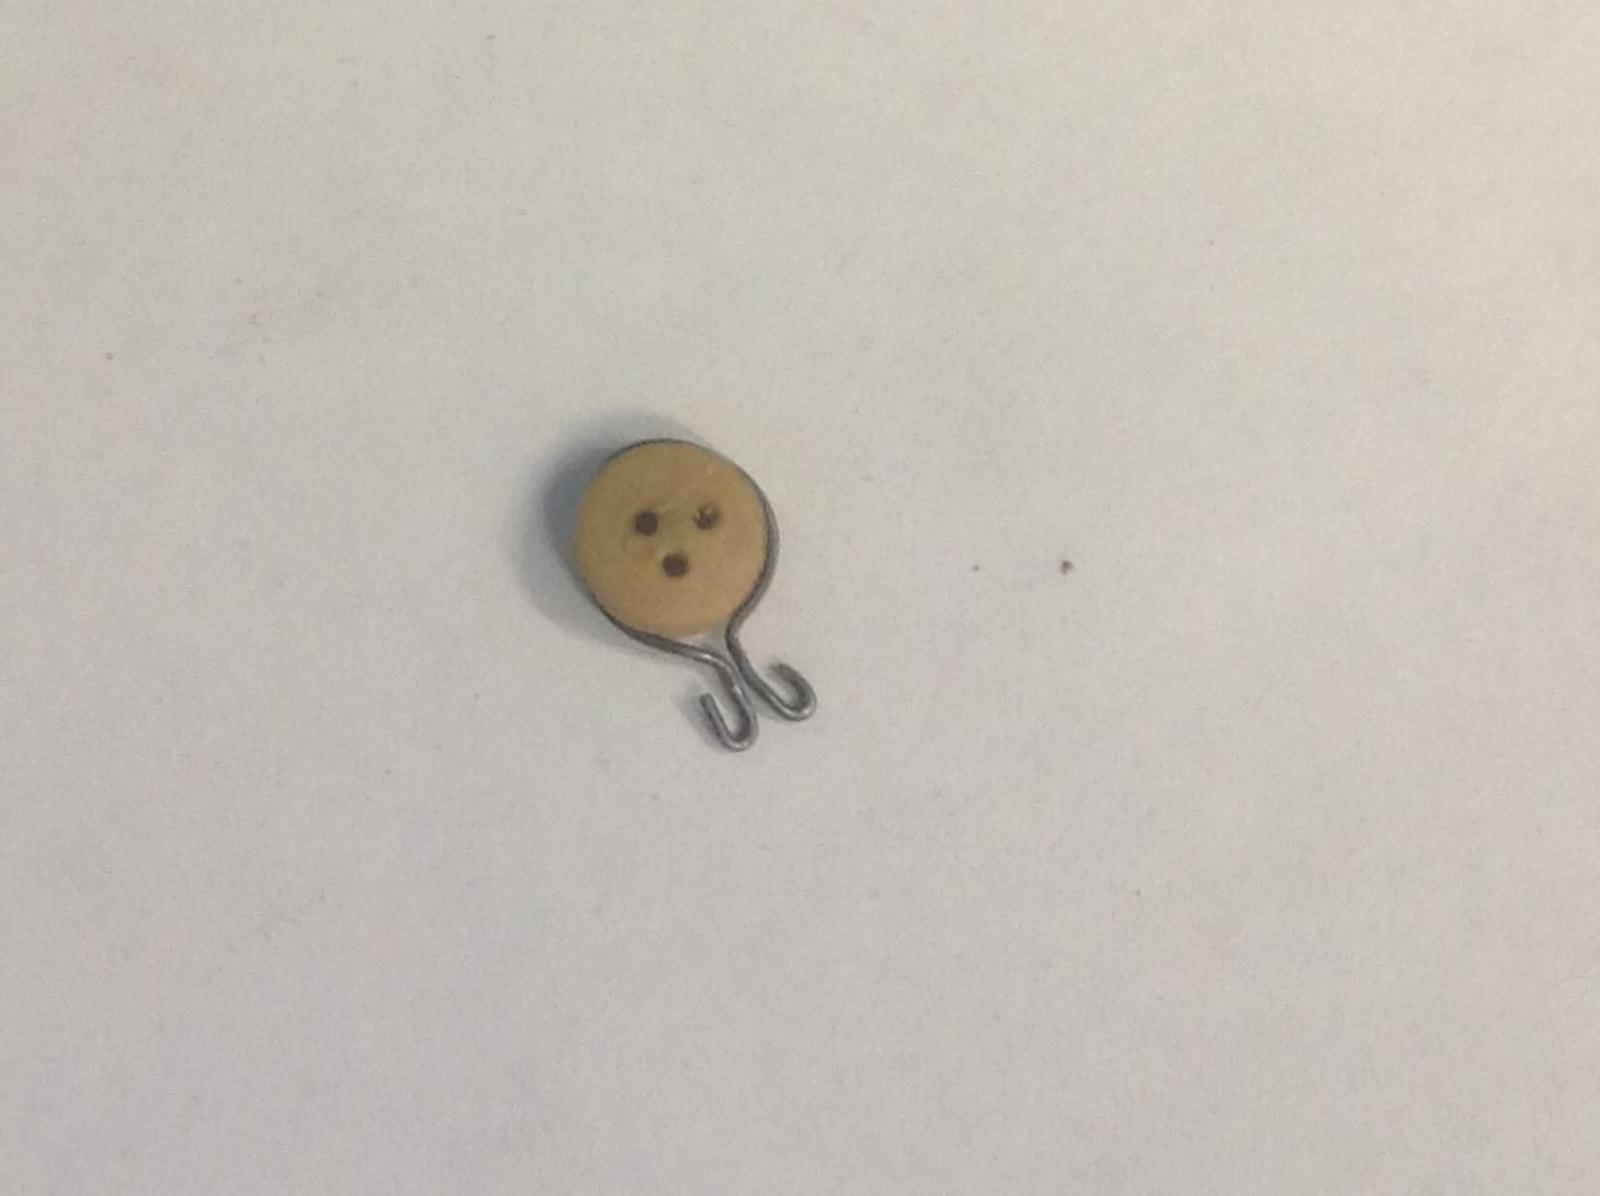
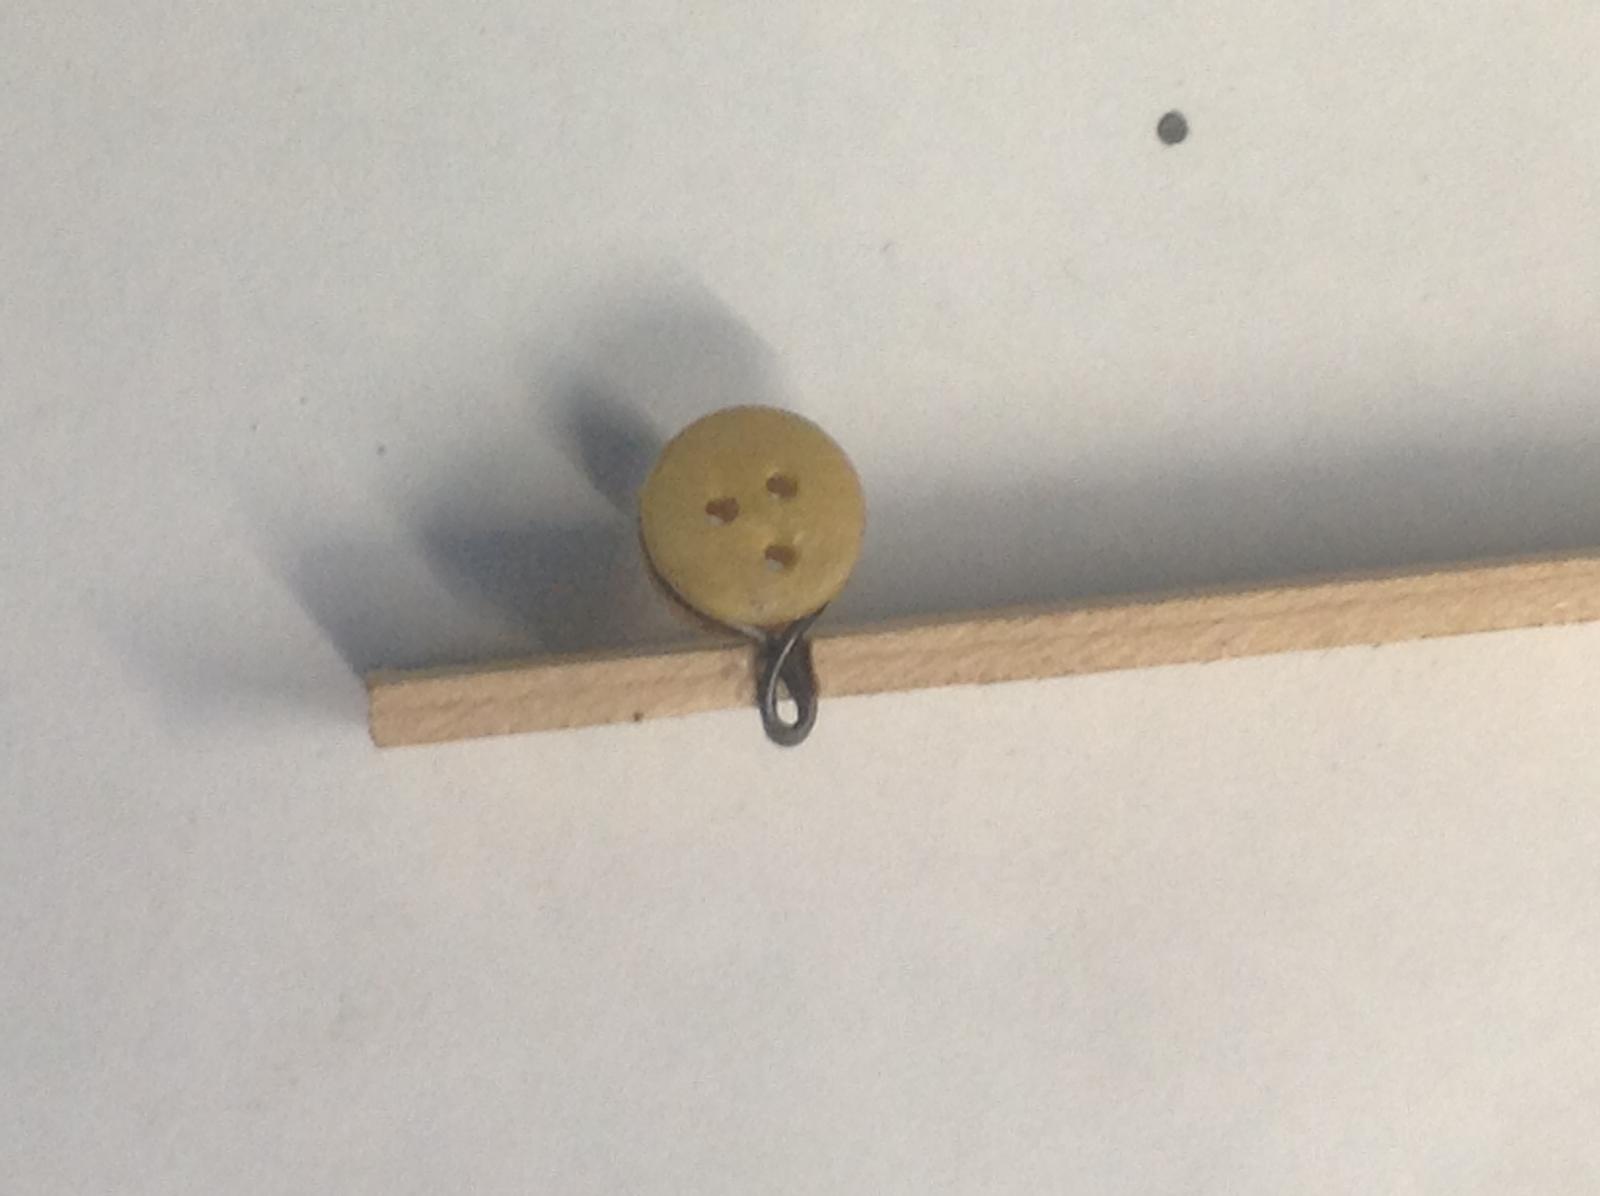
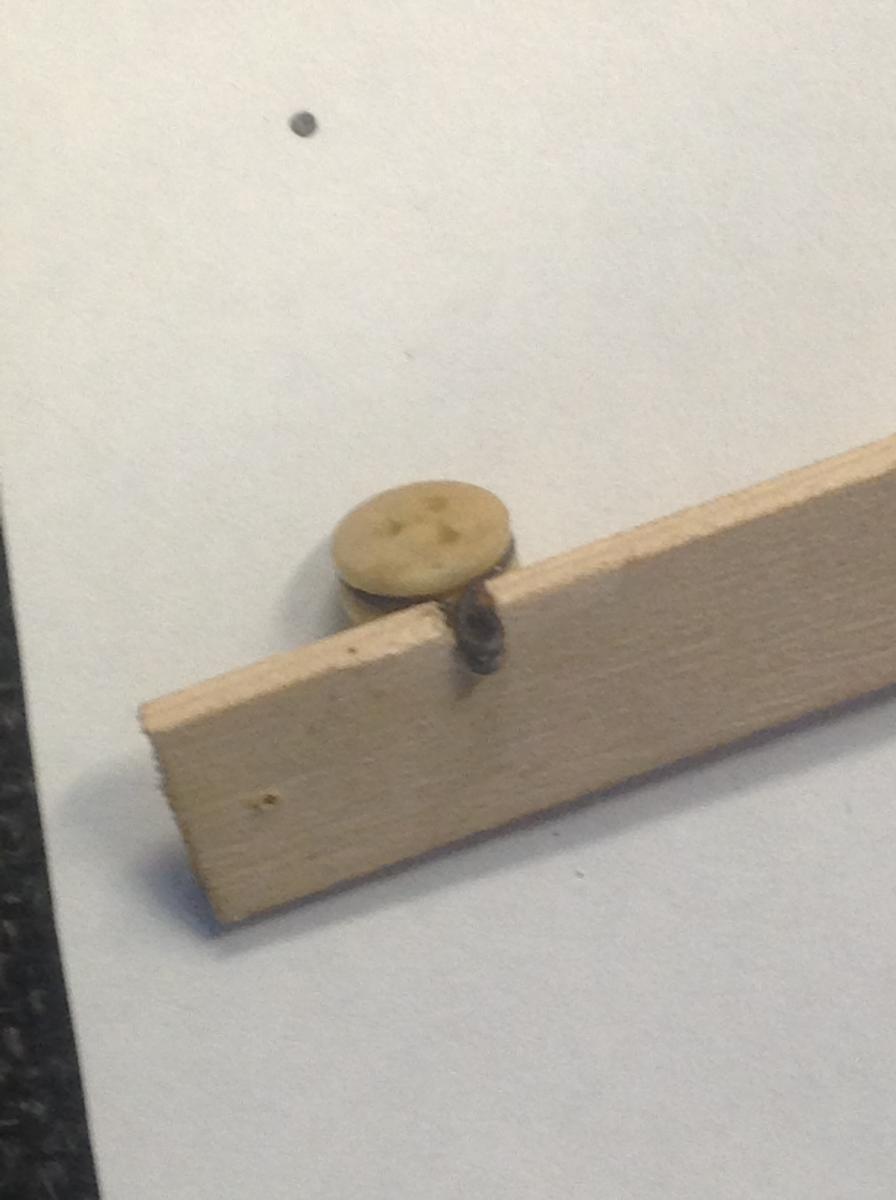
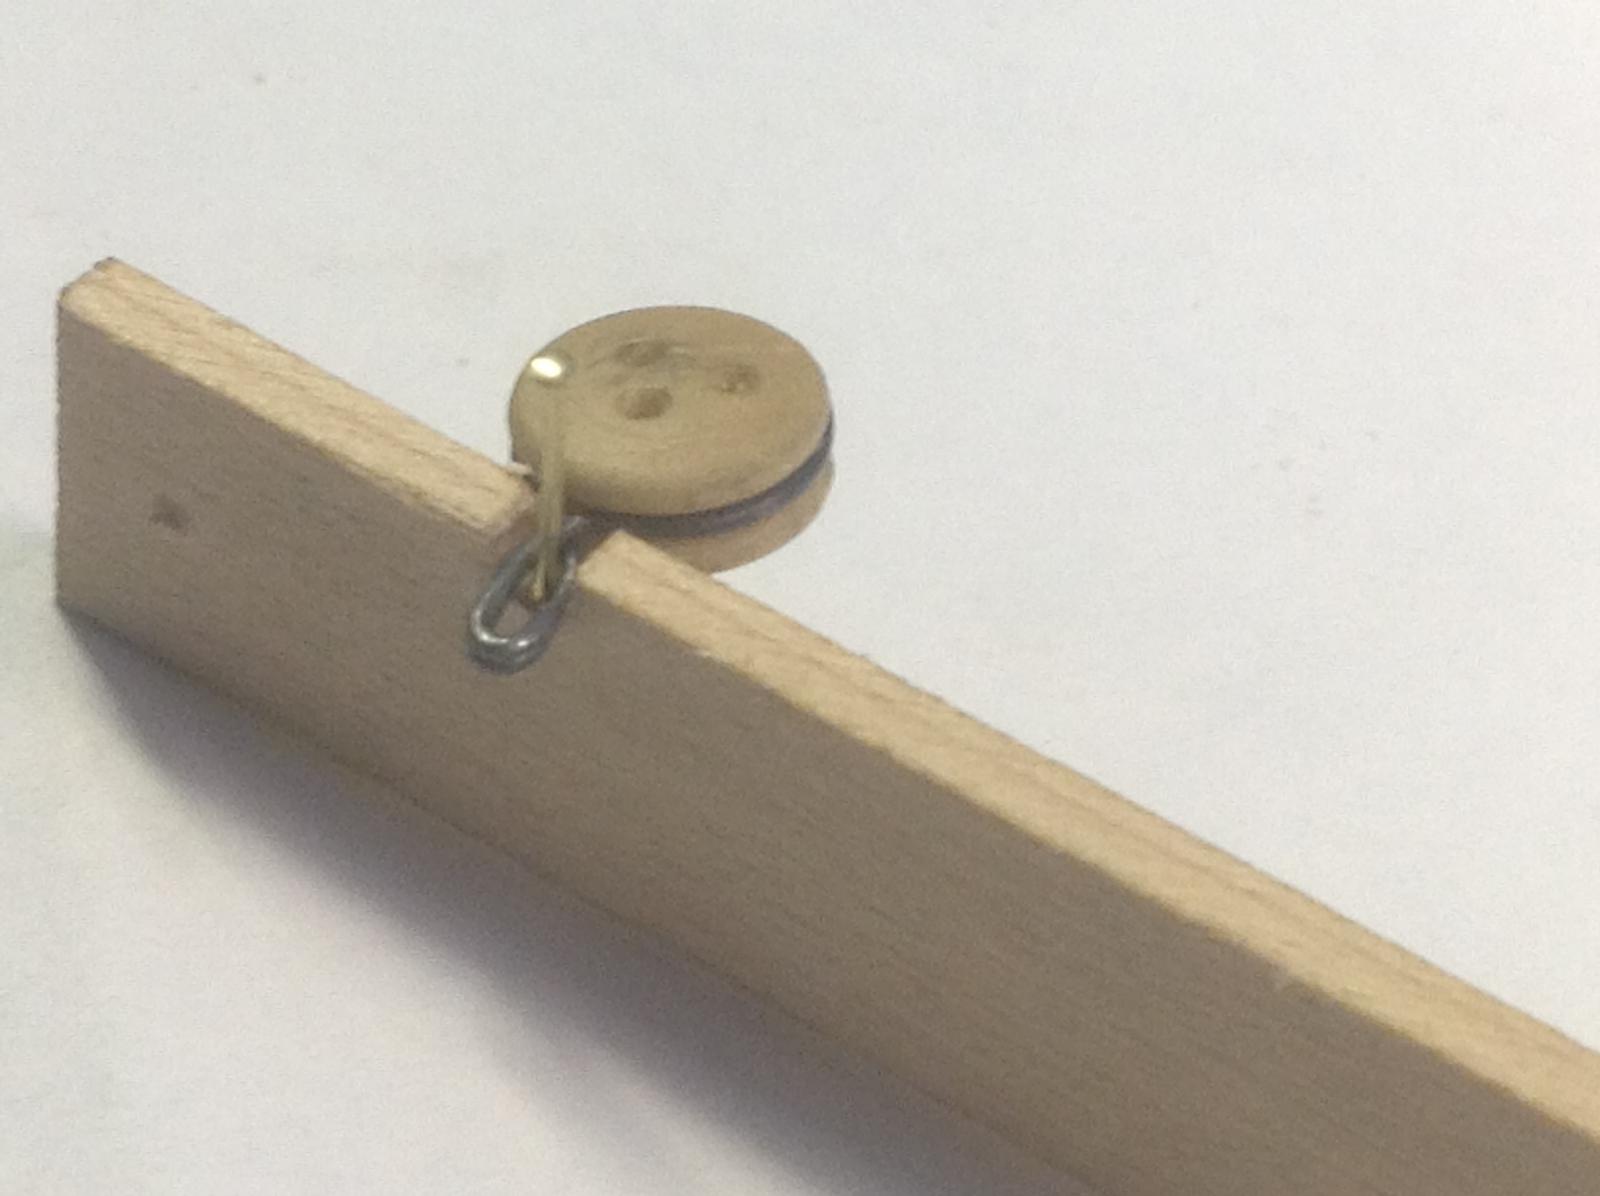
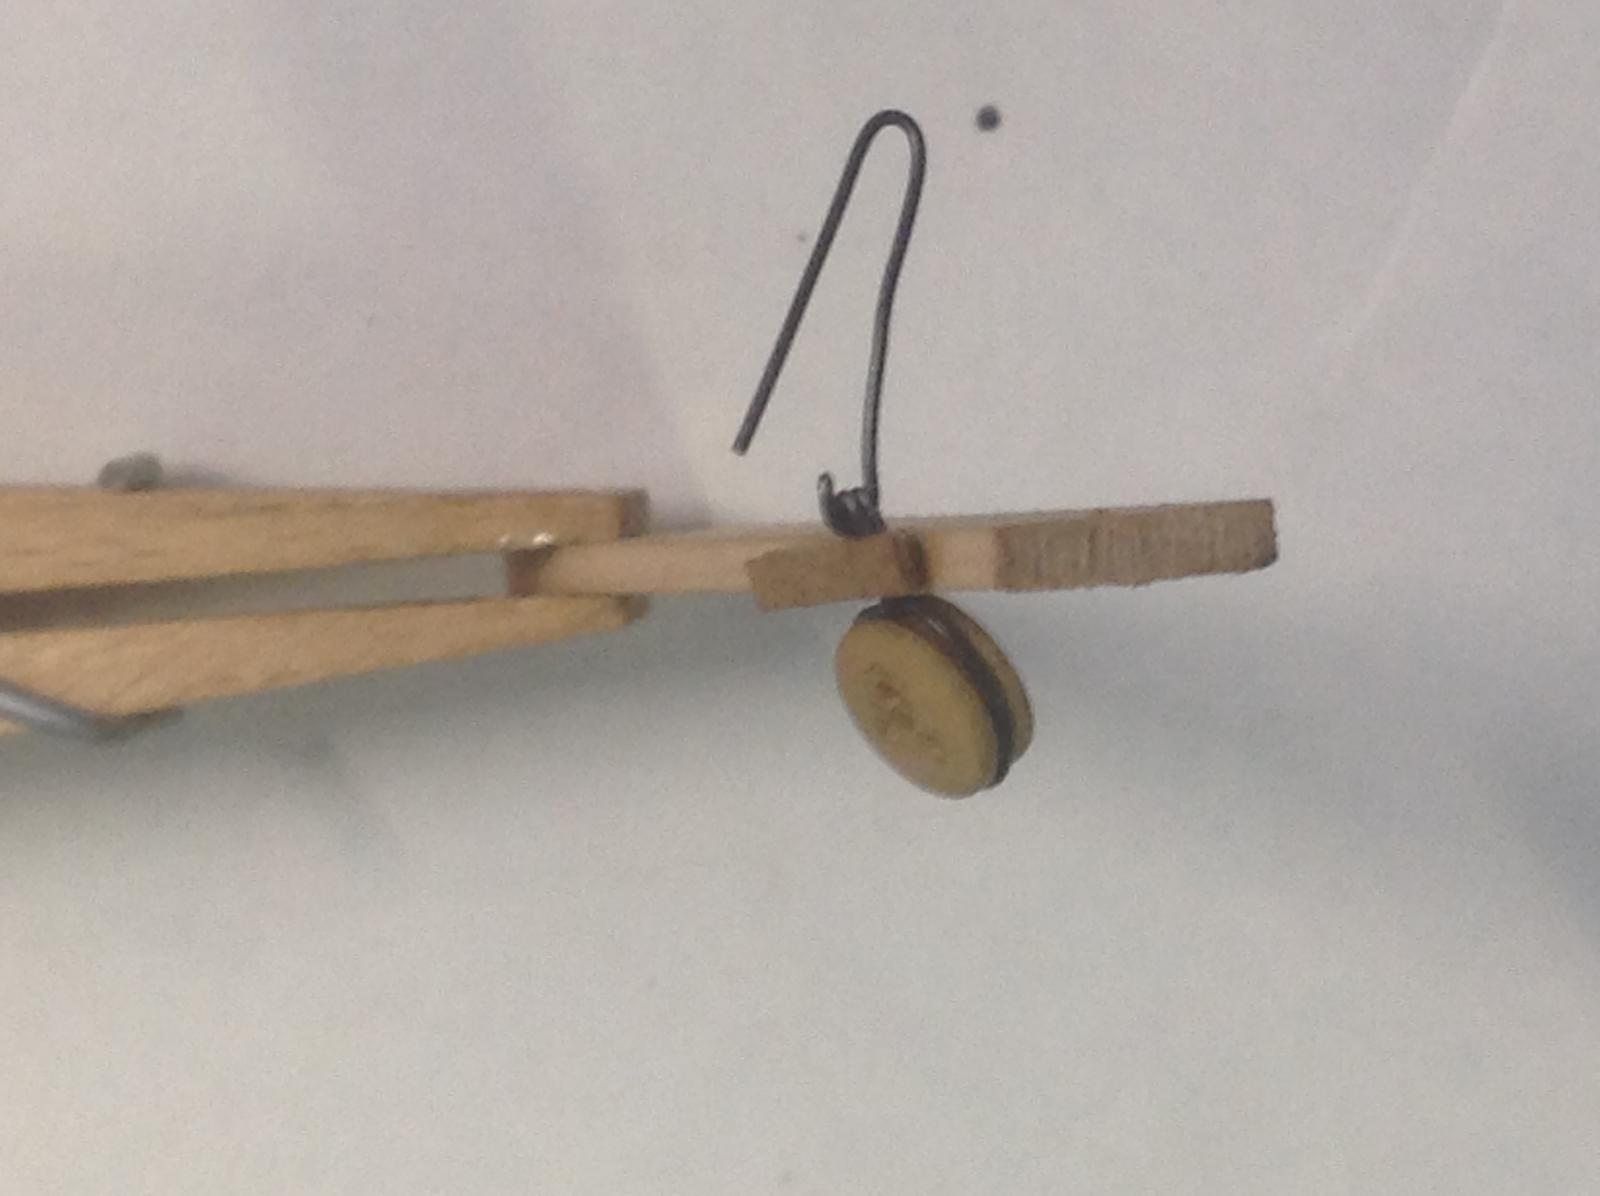
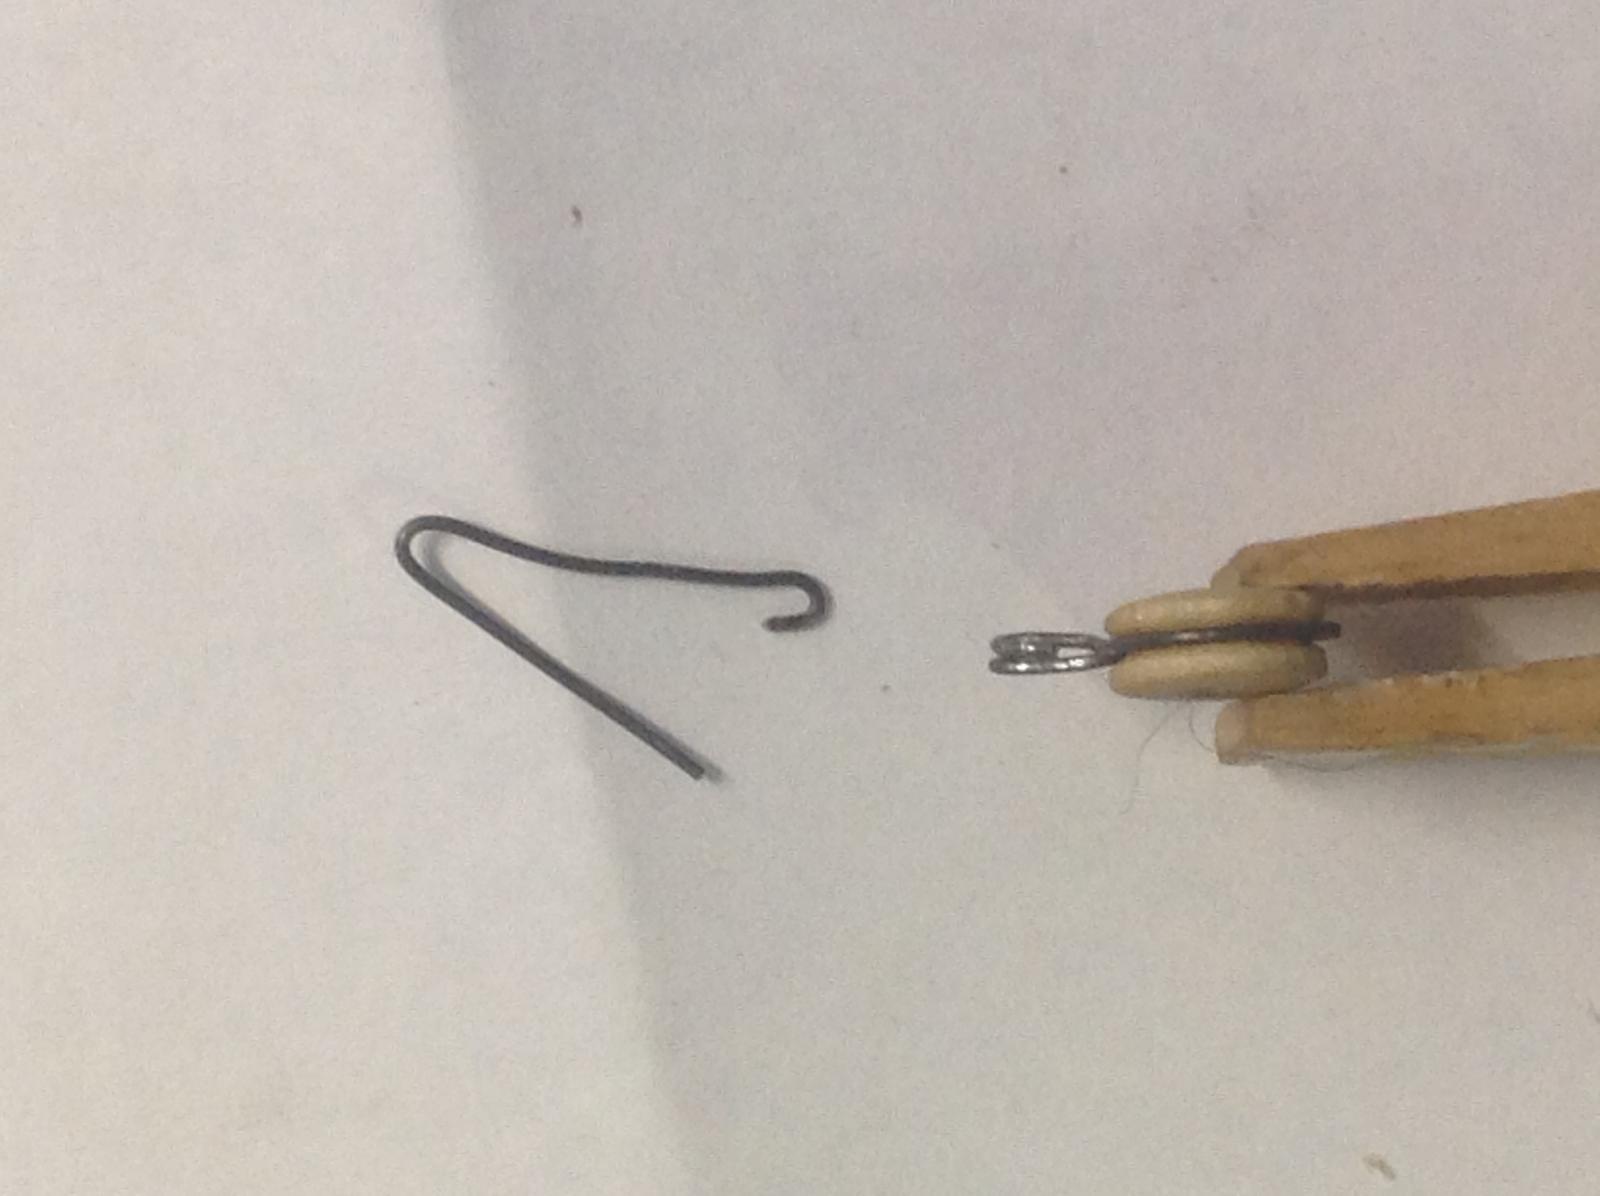
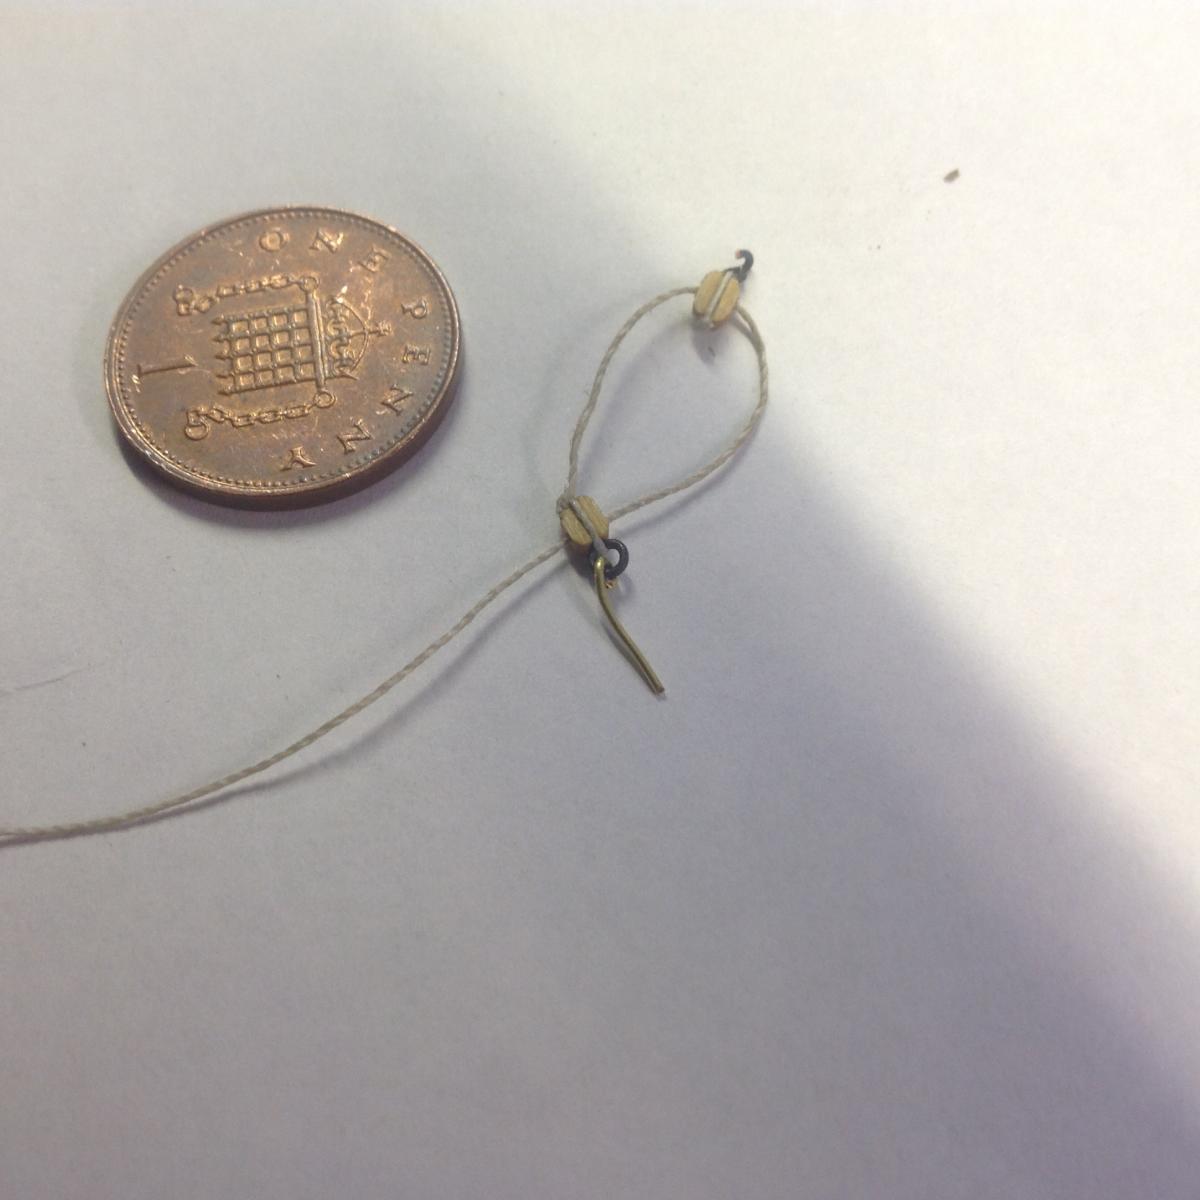
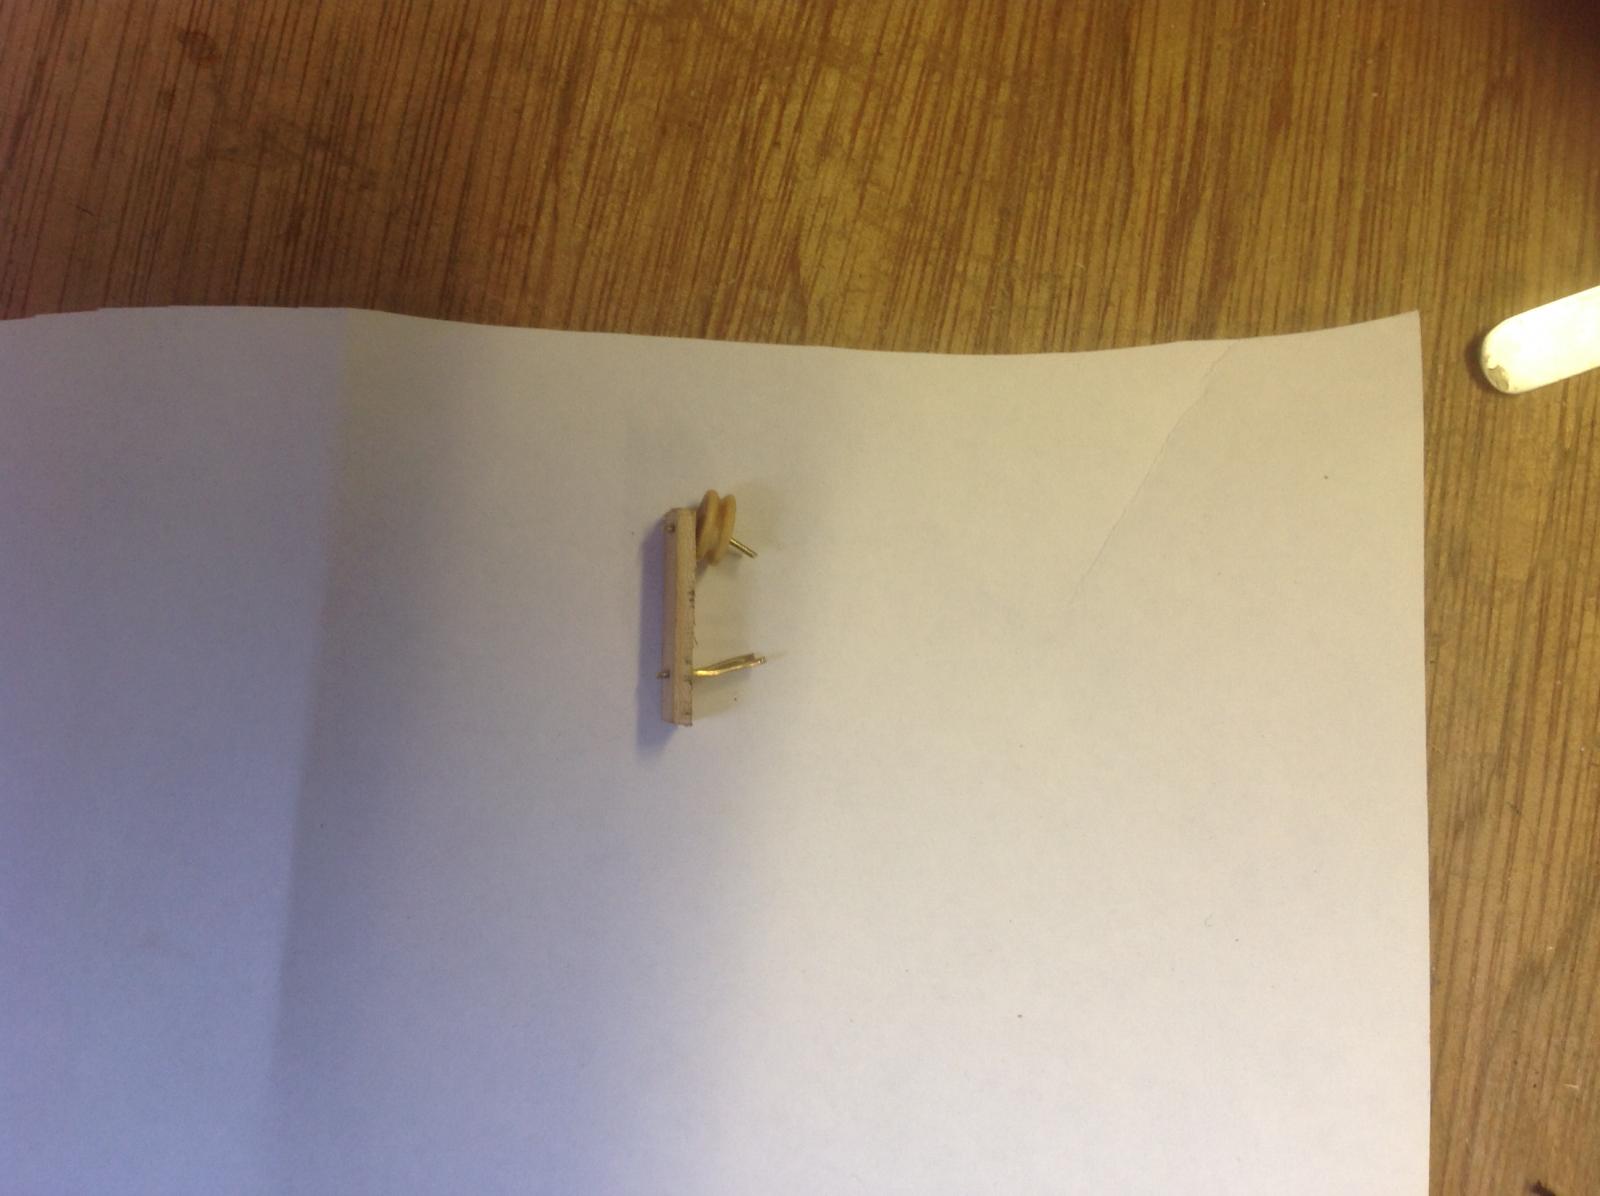
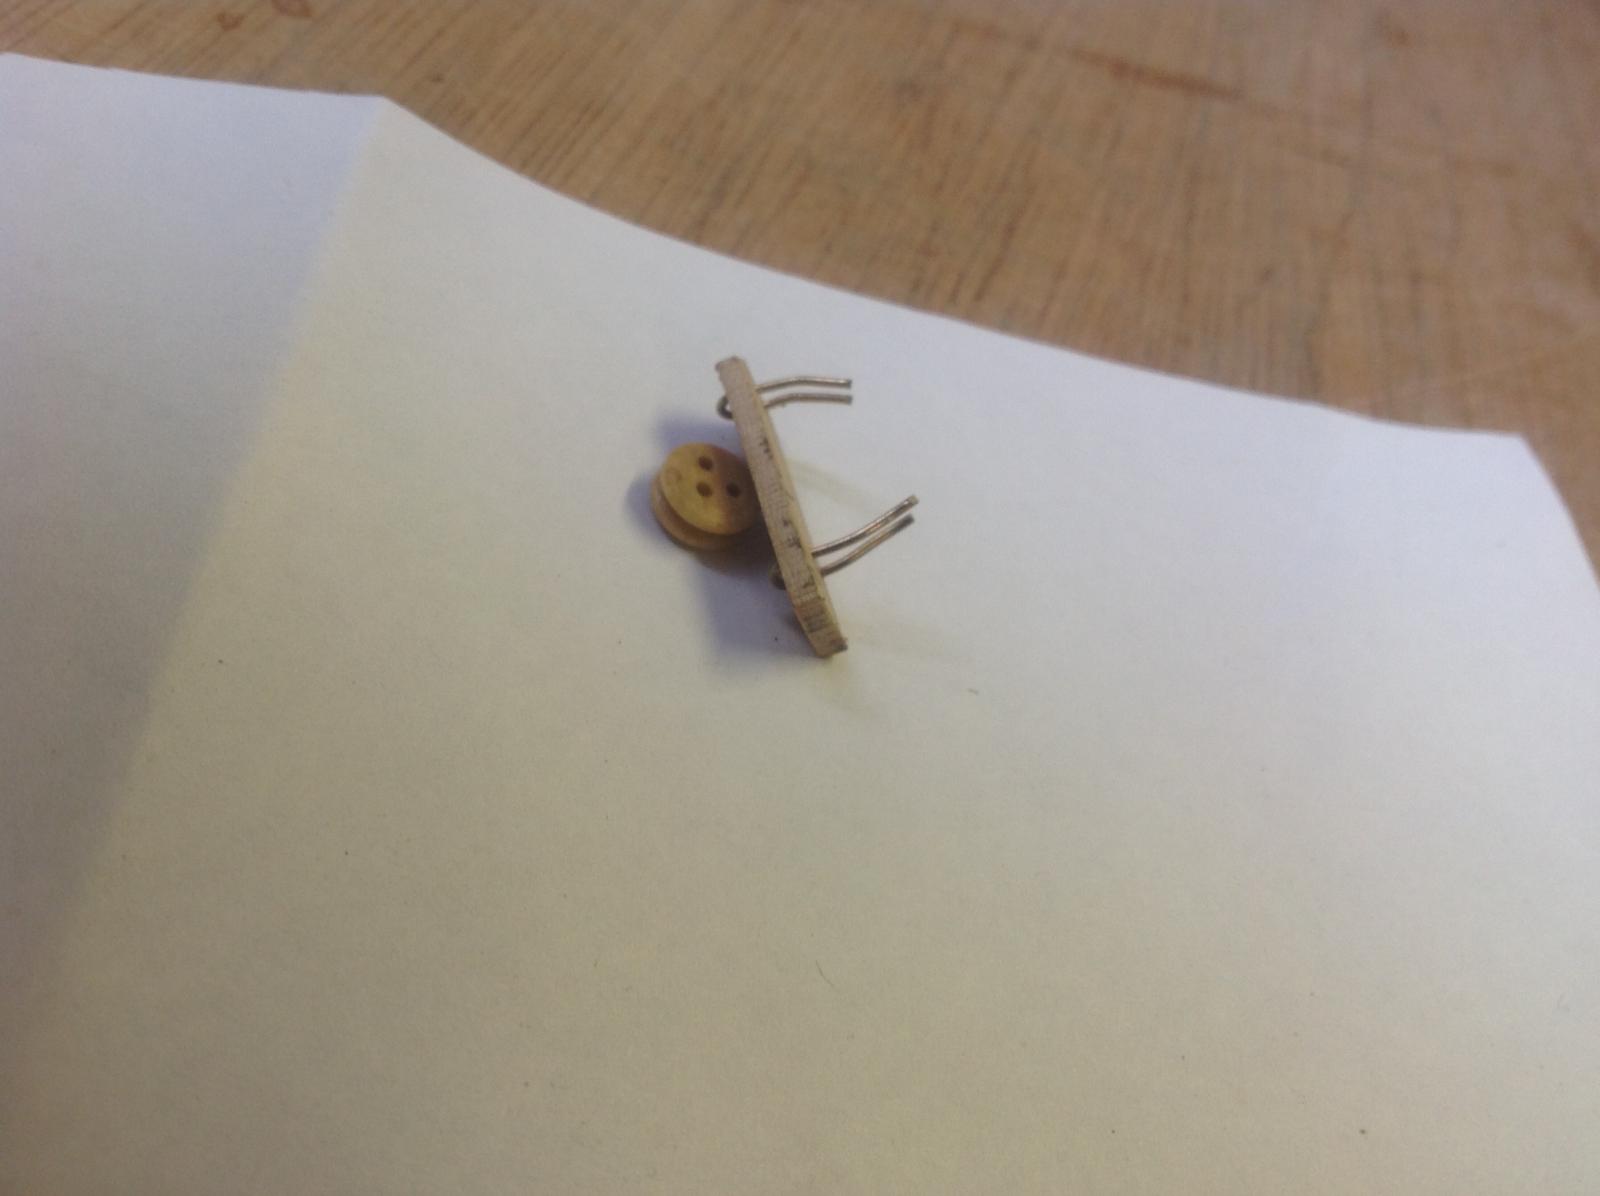
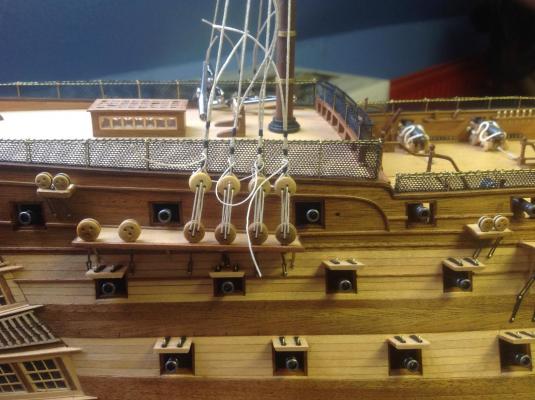
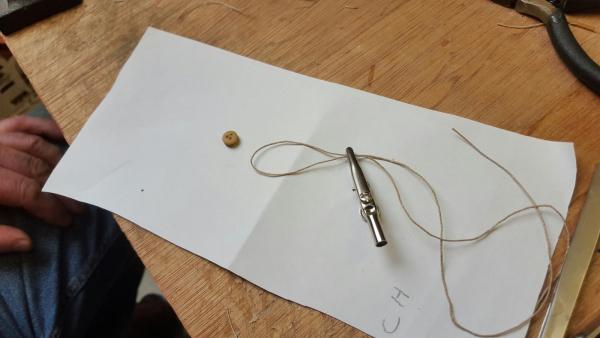
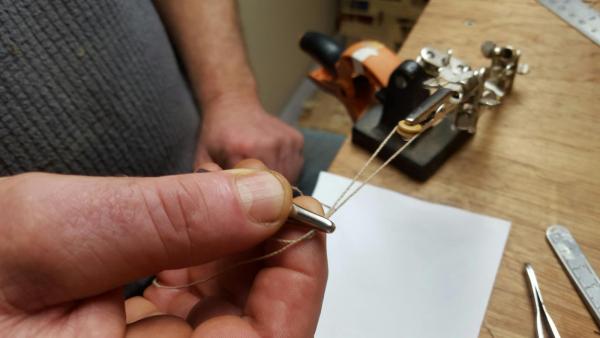
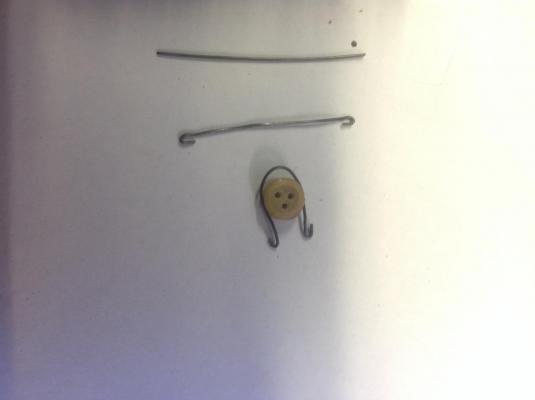
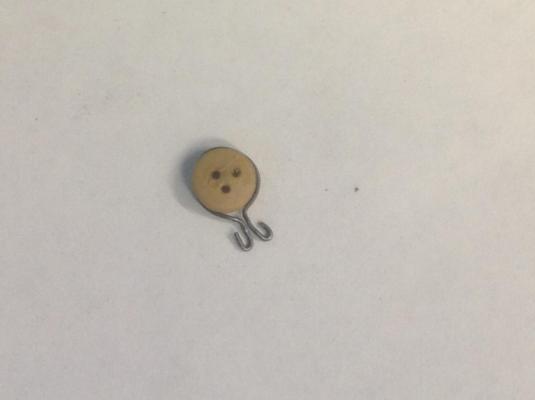
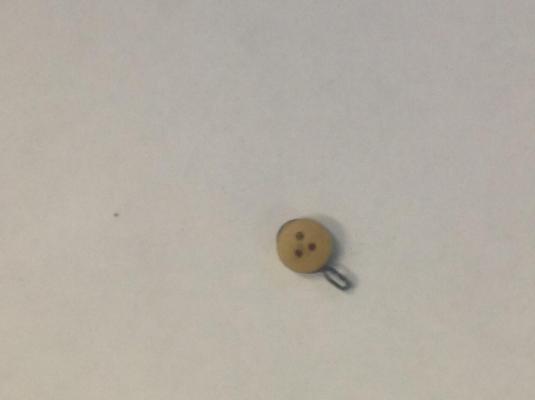
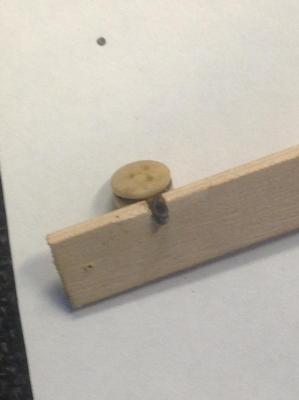
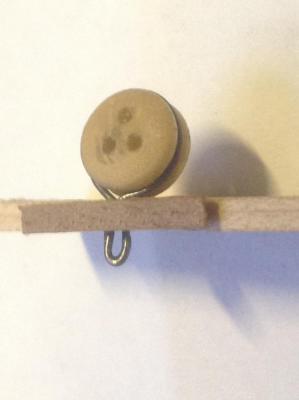
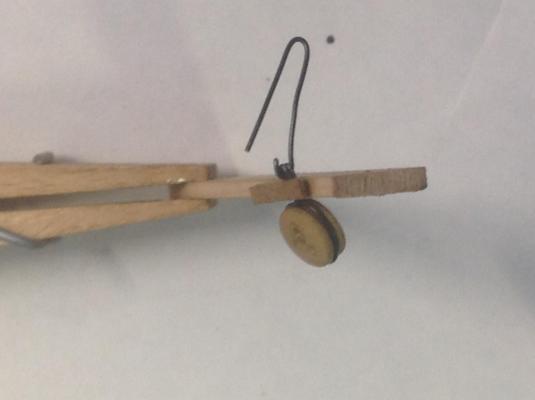
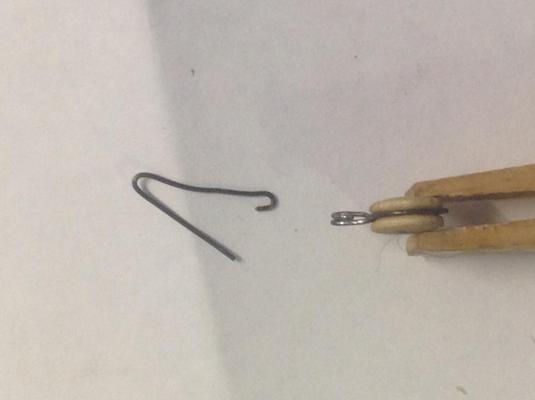
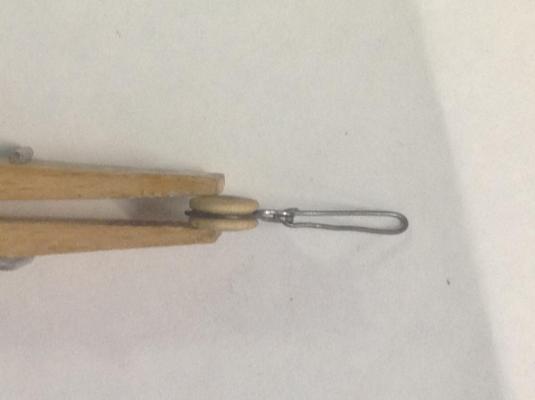
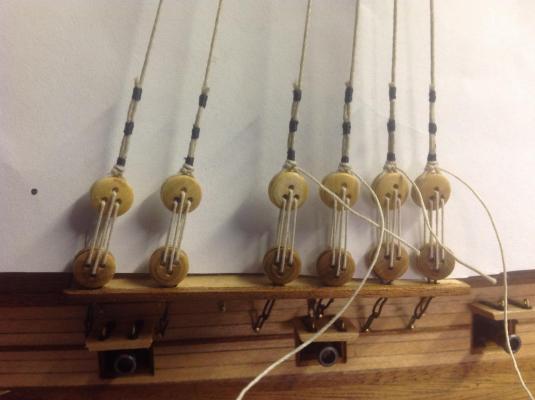
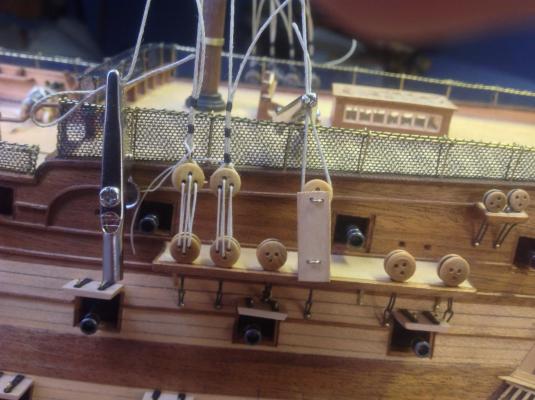
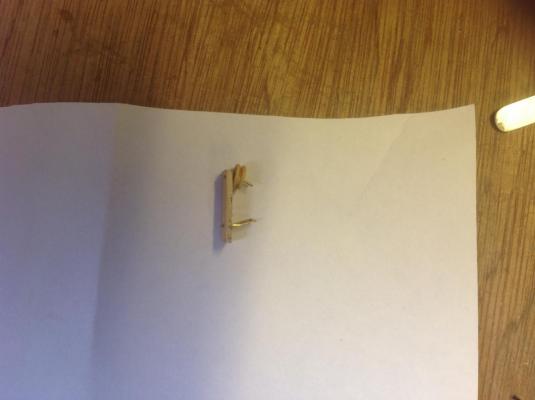
This post was prompted by a request to further explain my rigging of deadeyes and i must admit when i looked back over my log my previous post on that stage where slightly confusing with my many wandering ideas . As i am at the rigging stage at present it seemed a good idea to explain more full my method and hope it may be usefull to others who like myself have not mastered soldering . Excuse the many pics but i find it the best way to explain . this is .5 mm coated brass wire ,any finer may not hold it,s shape , any stronger is too hard to bend . once you have the correct length they are simple to mass produce . the 2 ends are pushed past each other which leaves a double thickness at the bottom of the hook this then fits snugly into the slot in the channels I then drilled and put a very fine pin in to hold the deadeye in place and take the pressure of the chainplates the cap on the channels then covers everything the first link of the chainplates is then hooked in and the end closed in , No solder was used at this stage either as the pin inserted earlier will take the pressure of the chain , I hope . The top deadeye was measured for length using the simple tool and then siezed in place I didn,t worry about leaving a small space at the top of the deadeye as it turned out usefull when finishing tieing the lanyards . 2 further seizings finished the process The 2 on the left have been trimed and are hopefully finished .When tieing off the lanyards i brought the line through the space between the deadeye end the first seizing on the shrouds , this kept it in line and ment the final tieing is on the back of the deadeye . Hope that makes sence ? I,m pleased to say that the solderless stroups held up under the strain of tightening the shrouds so i think i can safely say they work !!!! Any further expanation needed i will gladly provide ? last 2 pics show the mainstays from the missen mast ,i have been warned they are better fitted now than when the shrouds are on the mainmast .


- 413 replies
-
- 10
-
-
pear wood
shihawk replied to kier's topic in Building, Framing, Planking and plating a ships hull and deck
Have you tried twigfolly . com . I haven,t used them but others have . -
I wonder what sieze of magnifiers he is wearing ????
-
I feel troubled looking at those pictures . maybe i should quit this hobby right now , cause that is just scary ????!!!!!!!!!!!
-
Help with Proxxon MF70
shihawk replied to Bluto 1790's topic in Modeling tools and Workshop Equipment
I can,t remember exactly where the play was in mine when it was new but i solved it by adjusting ,tighting the 3 adjusters you show . There is an explanation on how to do this in the instructions ,i suggest you read them first . -
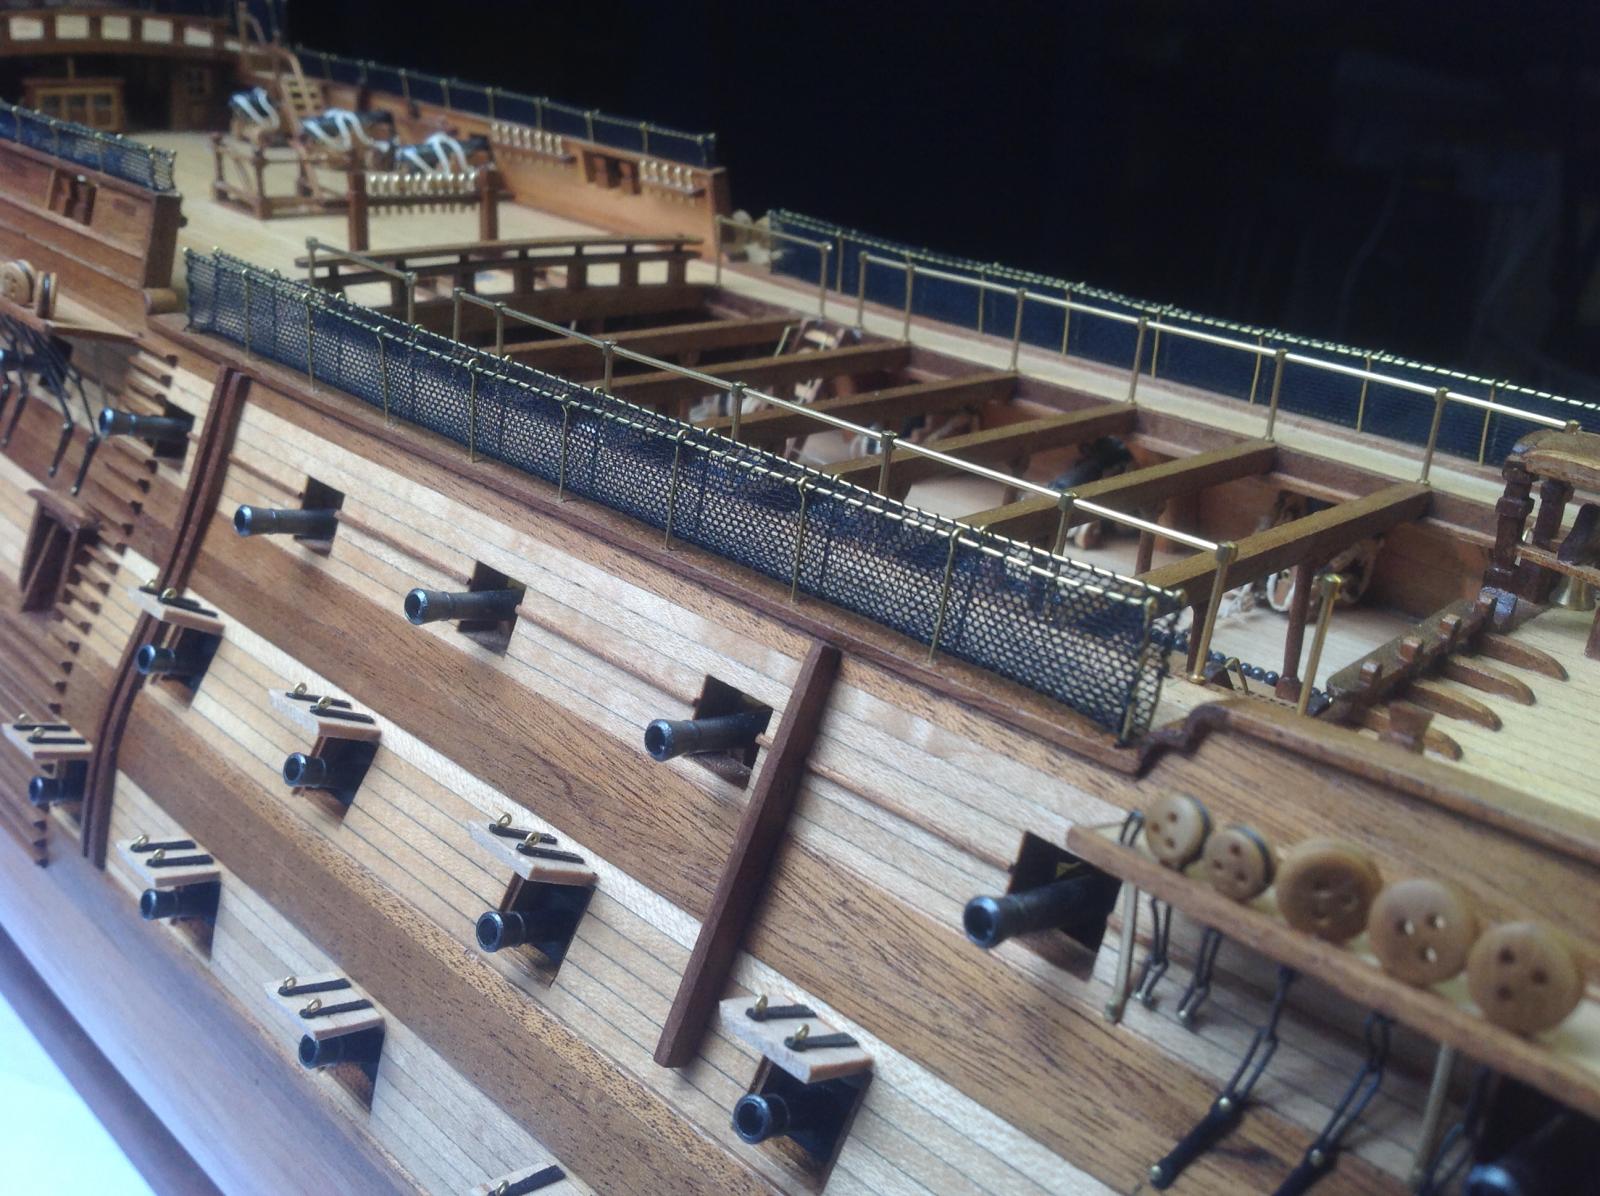
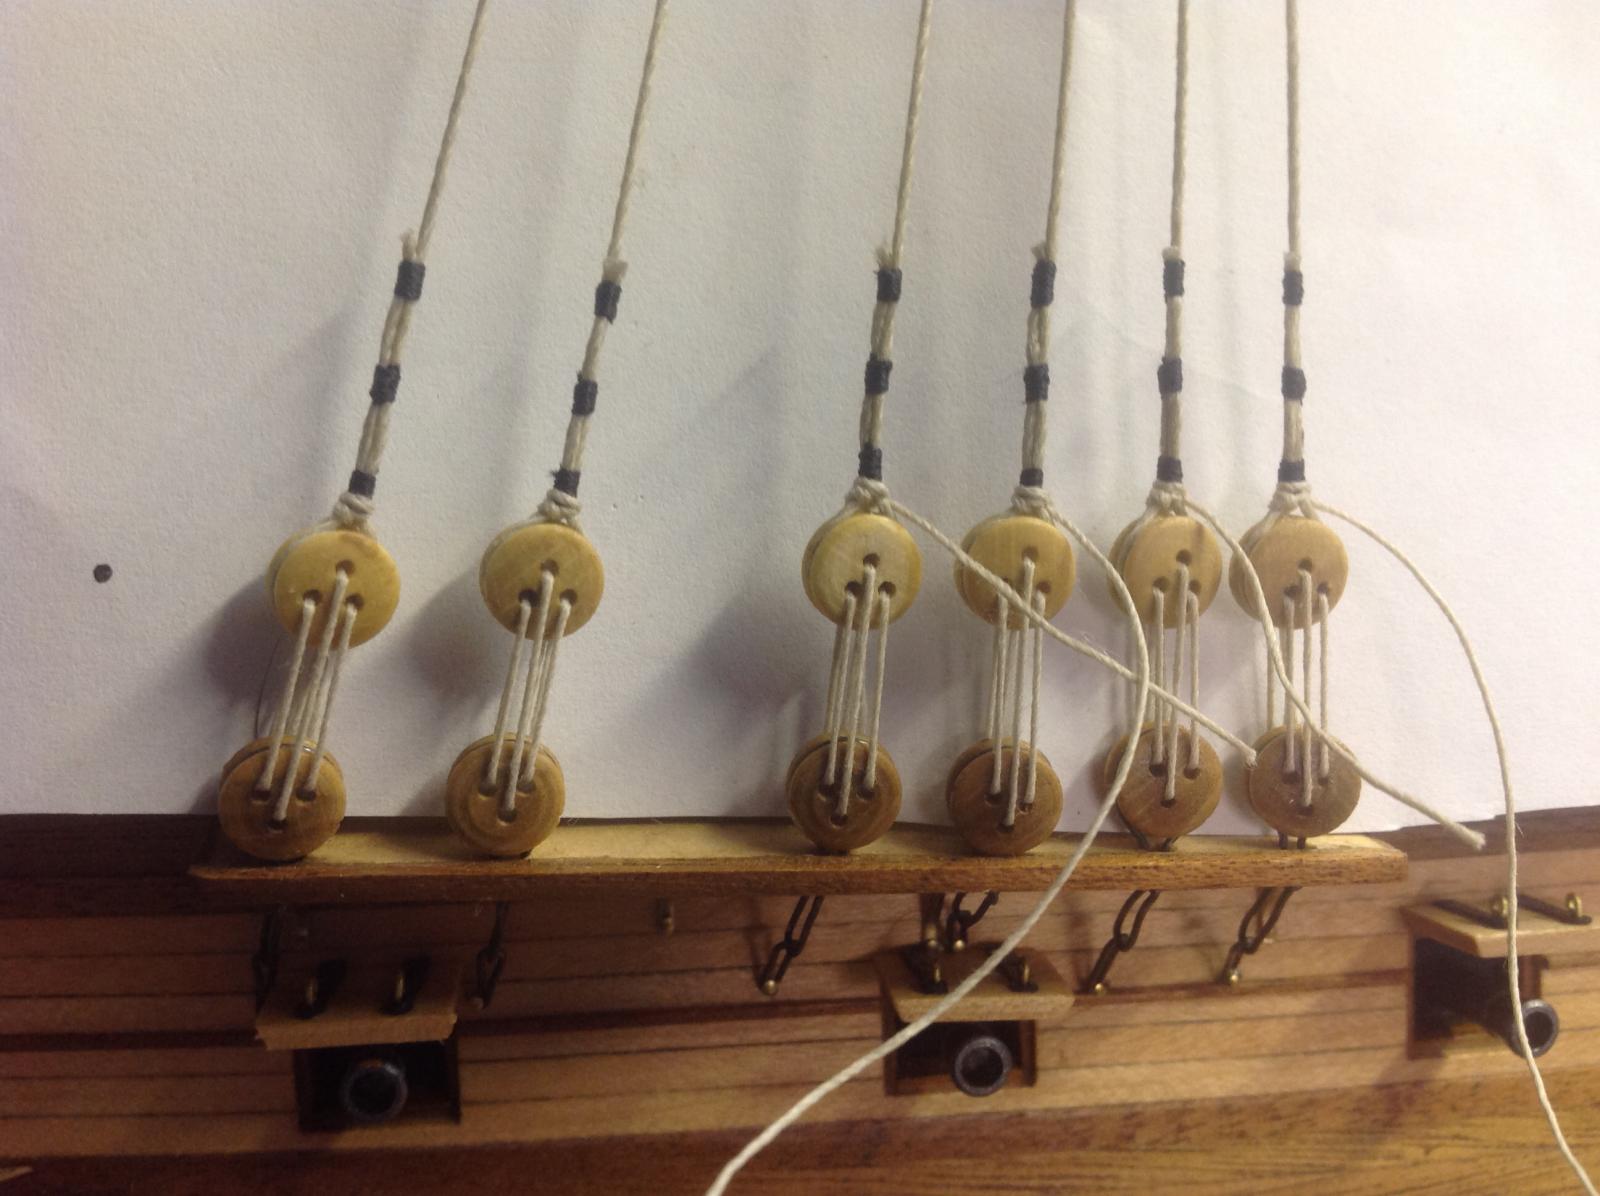
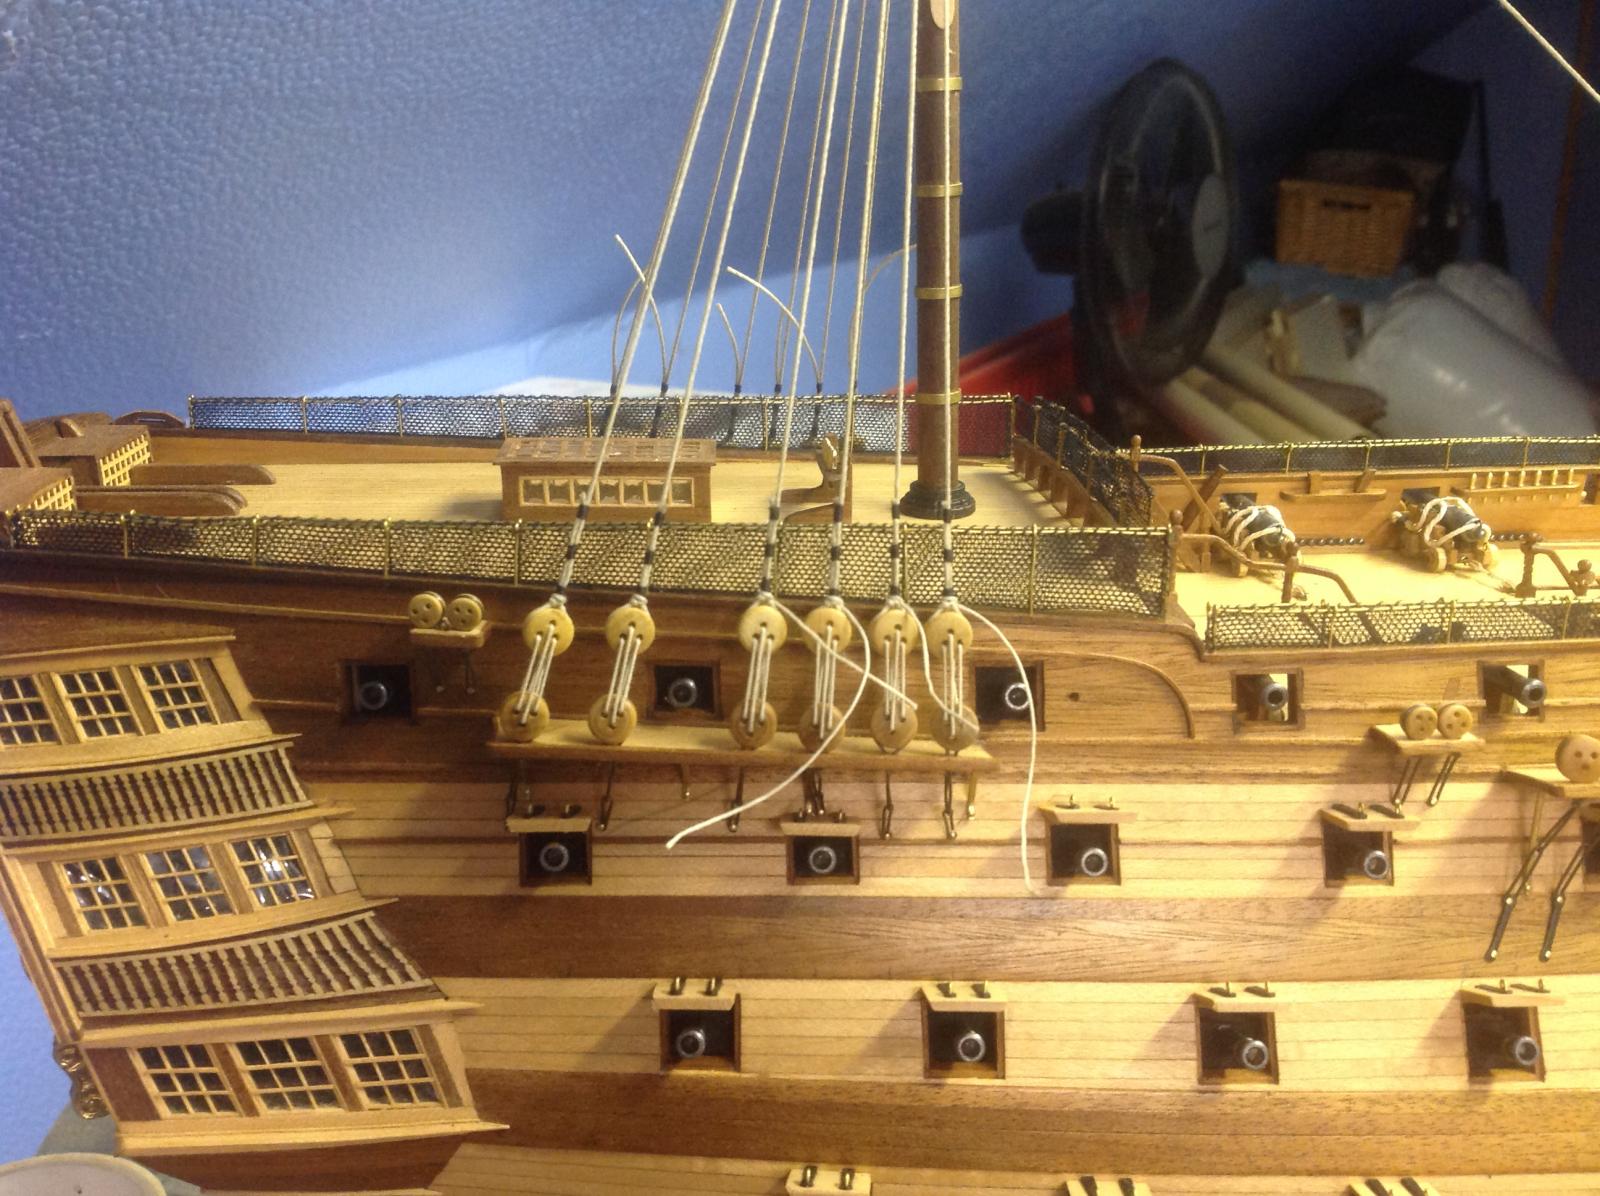
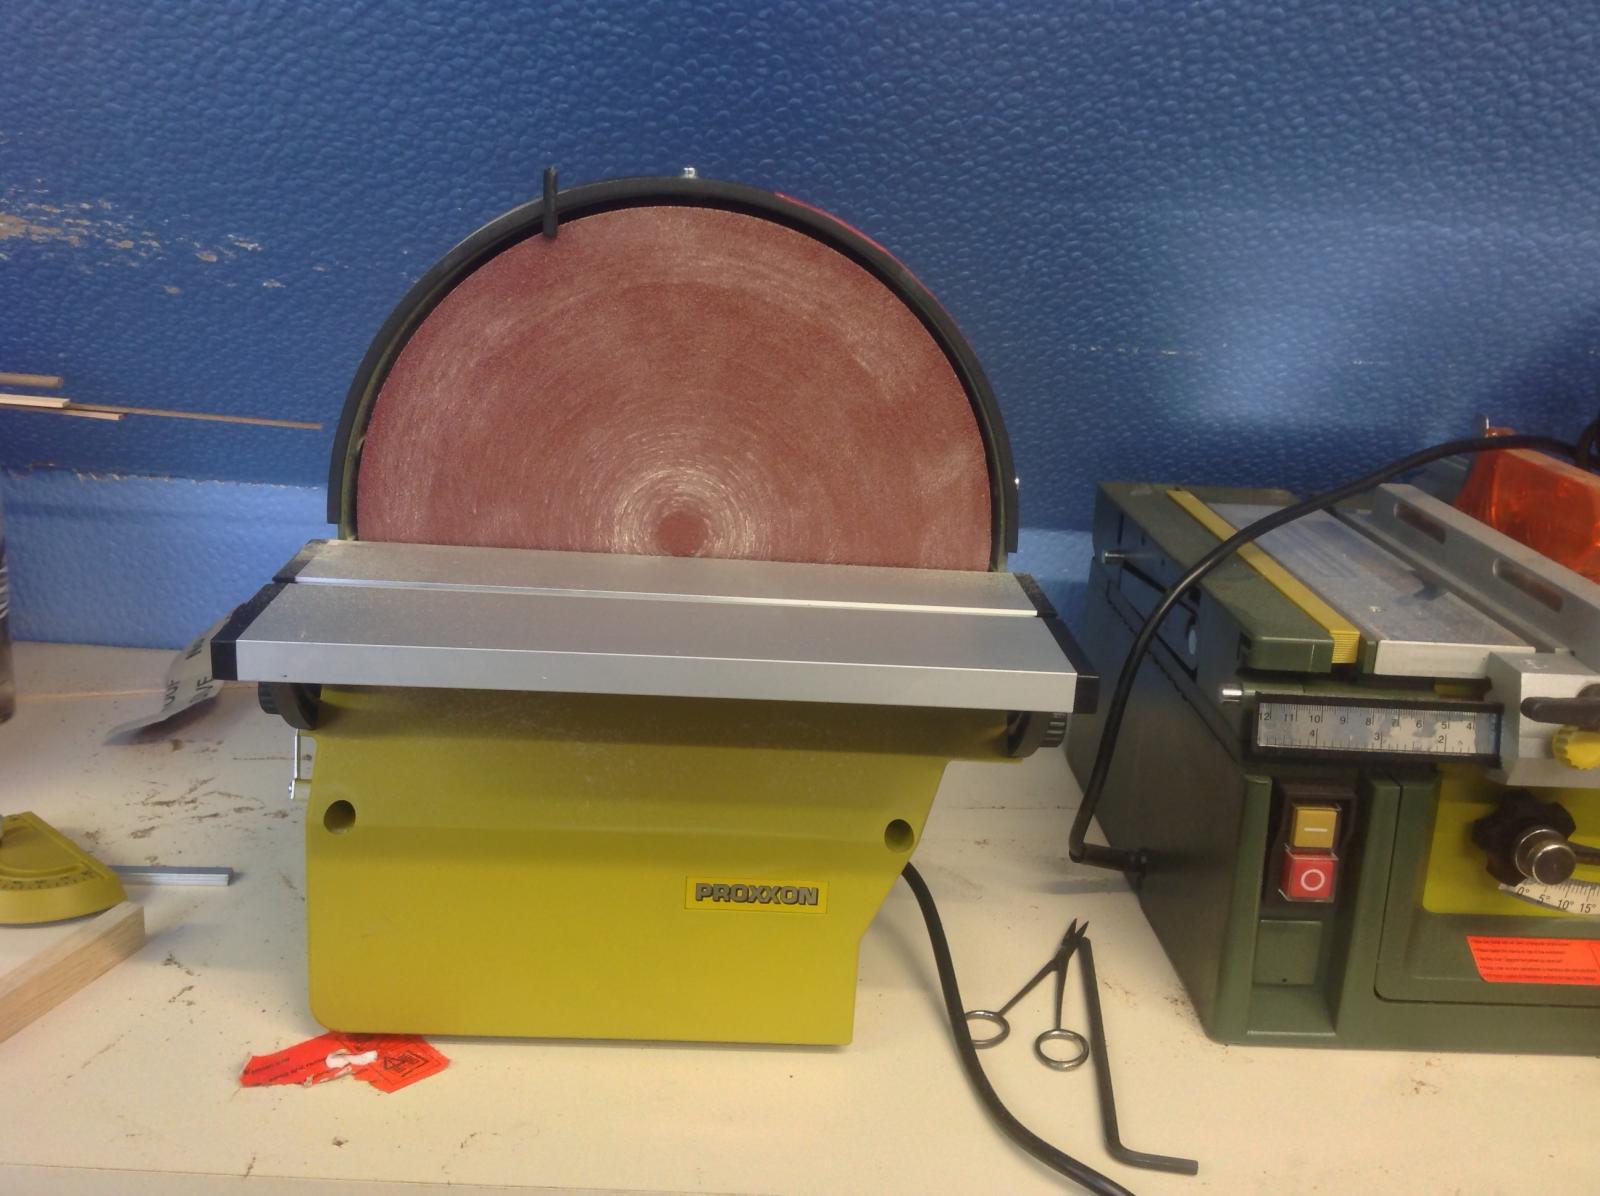
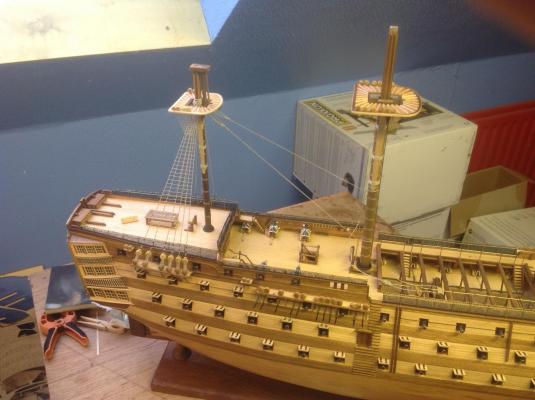
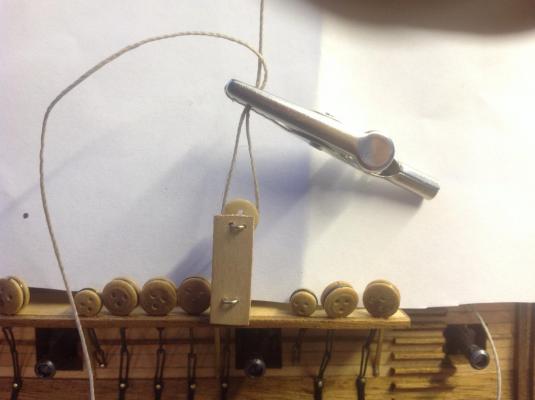
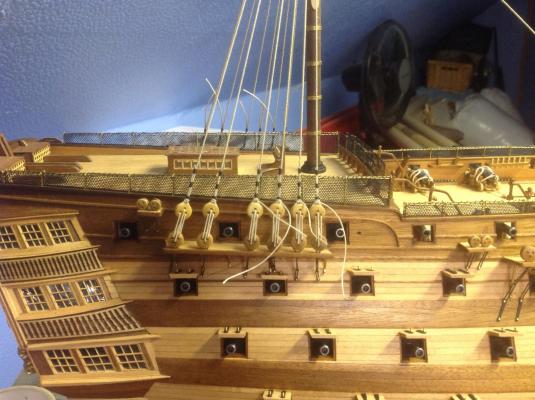
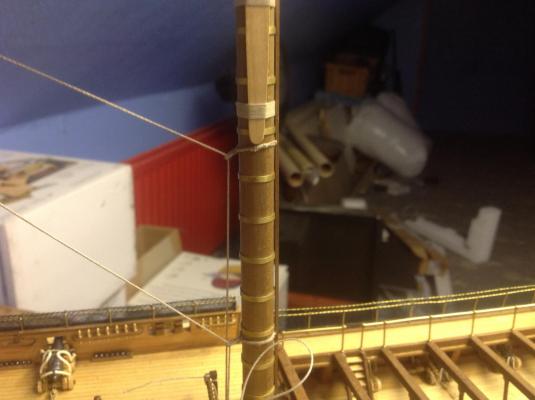
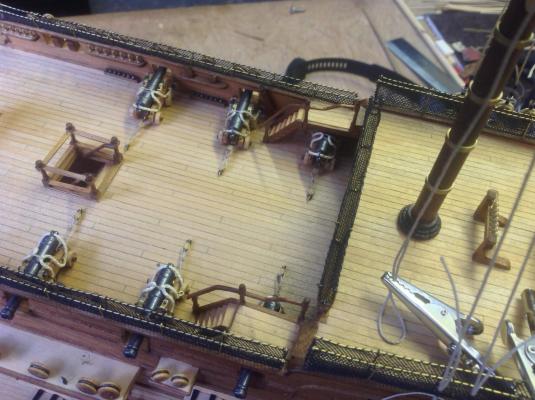
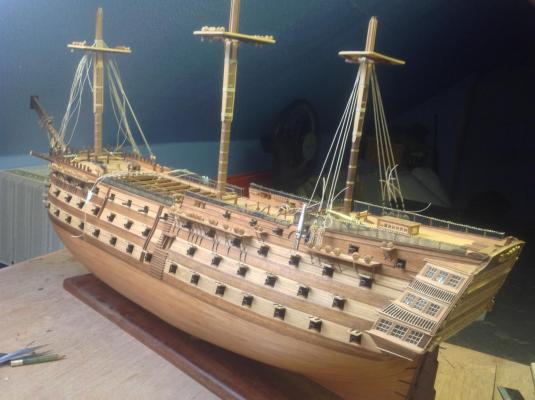
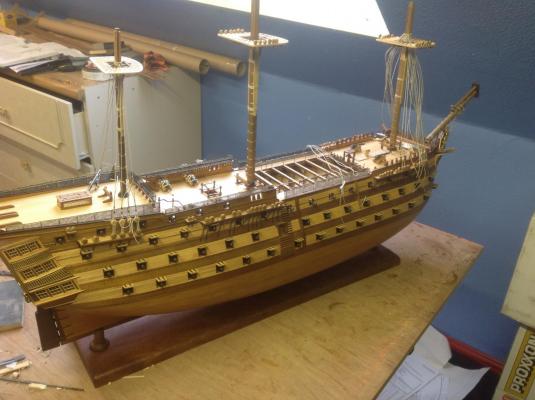
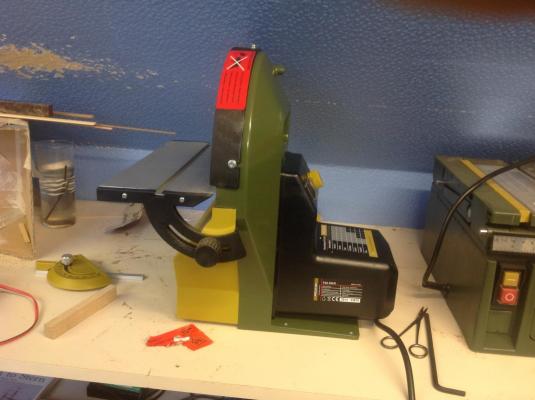
Hi all, seems like a long time since my last post but thought i would wait till i had something to show . I wanted to make sure i had the deck finished before i fixed the masts so i revisited the cannons and decided to add a simple back tackle , just to take the bare look of it ,also added a few cannon ball racks and think i will leave it at that . these are made with 2 mm blocks with a hook at one end and a 2mm ring on the deck end I now have the 3 masts ready for rigging , i left the top fittings off untill the shrouds etc are fitted which means a lot of the work can be done off ship I decided to go with the black seizing on the natural shrouds and am happy with the result but won,t tie anything permenantly untill later in case i need to make a few adjustments the next few pics are of the simple tool i used to keep the deadeyes a constant distance . I have seen several variations on many logs so nothing new ,but they are a must so worth mentioning. Next pics show masts in place although not yet permanent or squared I,m sorry my pictures seem to be mixed up at least in the preview , the last 2 were supposed to be of my latest tool purchase , the Proxxon sander . I was thinking ahead to my next build which will probably be an attempt at a Triton cross section and am hoping this will do as a thickness sander as well , time will tell ? I haven,t used it yet but i think it will be usefull


- 413 replies
-
- 11
-
-
You may find in quite a few cases that some of your best work will be covered up at a later stage ,remember this when rigging the cannons ?Only consolation is you know it,s there . Still lookin great !!!!!
- 708 replies
-
- 3
-
-
- victory
- constructo
- (and 1 more)
-
Your logo looks great ,. Patience and skill must be a good combination !
-
My reply is on my log
-
Mike , I can,t remember exactly what i payed ,but i bought it from Cornwall Model Boats and at present it can be bought for £286.00 and i assume free delivery , i think that was roughly what i paid nearly 2 years ago . When you say larger scale . If you mean the overall size of the finished model ,it is hugh ,not only will you need a lot of build space but i have read where some builders of the CC Victory ran into problems with display space ,never mind the cost of a display case £500----- £1000 .partly the reason for my "half rigging thingy " If you mean the 1:75 scale i know i wouldn,t go any smaller like 1:90 or 1:100 because of eyesight and extremely small parts , IMO. My last build was a 1:64 Cruiser by CC and i find very little difference in part sizes detail etc . I did complain in the early part of my log about this kit ,lack of instructions and ply parts etc but it is advertised for the experienced builder and you get what you pay for !! Your painting skills should mean that you could build straight from the box if you wish ? If you are considering building with a natural wood finish like mine then be prepared to spend at least the same again as the kit price on timber and other extras . I wonder could the CC version be built with a natural wood finish straight from the box ?? I doubt it . Without flattery it is very hard to say if you will make a decent jod of it ?? Of course you will . I only wish you had bought yours first so i could have got some tips from you .If you want to build an authentic Victory with every bucket and nail in exactly the correct place your probably better starting with the CC version but if you are open to artistic interpitation and a challange at a budget price go for the Billings . Part of the reason i bought the Billings was i wasn,t sure i had the ability .I,m glad now i did i don,t think i would ever fork out big money for a kit again . If this long winded reply is not enough please feel free to ask or PM me if you like. Let me know what you decide , if it,s less than £300 you get a lot of kit for the money ??