
HOLIDAY DONATION DRIVE - SUPPORT MSW - DO YOUR PART TO KEEP THIS GREAT FORUM GOING!
×
.jpg.f4fa790b1fa2f0e00e3d149ed7bdd37c.jpg)

shipaholic
-
Posts
540 -
Joined
-
Last visited
Content Type
Profiles
Forums
Gallery
Events
Everything posted by shipaholic
-
 A bit of spare time over the Easter break to work on the ship. Standing rigging completed yesterday with the last of the ratlines done. Bowsprit all fitted out now. Today I fitted the shroud cleats and some cleats on the rail stanchions. All ready to get stuck into the running rigging now.
.jpg.51e82dc9bc48c0960e231dac8ba71d06.jpg)
.jpg.b544c622aefbc1a84081b772960422bb.jpg)
.jpg.26576f51b2e7f4e016c84c4a7b09c7d9.jpg)
-
Artsy shot. I think that getting the scale of everything right, including rigging sizes, gives a more realistic appearance
.jpg.b86ff97678418ae335b9aa05ea796fc9.jpg)
-
Thanks Mike, good to see you back into it. I have been very slow on my build, I don't get to it very often, too much other stuff to do. Dashi, I don't know either way on the gaff. I have just followed the AOTS for all my masts and yards, because it was easy to photocopy the drawings and enlarge them to the correct scale. I have mostly finished the standing rigging, except for some ratlines on the fore and mizzen topmast shrouds. I have started ading all the footropes and various blocks to the yards, starting at the bowsprit. Cheers
.jpg.1c11e491172889b9acf3dc4487c7e39d.jpg)
.jpg.5591bfc919a9d3d4103bfc35c266123e.jpg)
-
Mast Lengths and their above deck heights for HMB Endeavour
shipaholic replied to dashi's topic in Masting, rigging and sails
I haven't seen that draught before. Can you post more sections of it please? or send the image in a PM if you don't want to post in on here- 63 replies
-
- 1
-

-
- HMB Endeavour mast lengths
- above deck mast heights
- (and 3 more)
-
Mast Lengths and their above deck heights for HMB Endeavour
shipaholic replied to dashi's topic in Masting, rigging and sails
Hello Mark Is this the draught you refer to different to this one? This one is the original draught showing how she was as the Earl of Pembroke, with the proposed alterations. The companion in front of the helm was removed at the refit before Cook's voyage. I didn't know there was another with the writing you describe. I'm eager to see it Cheers Steve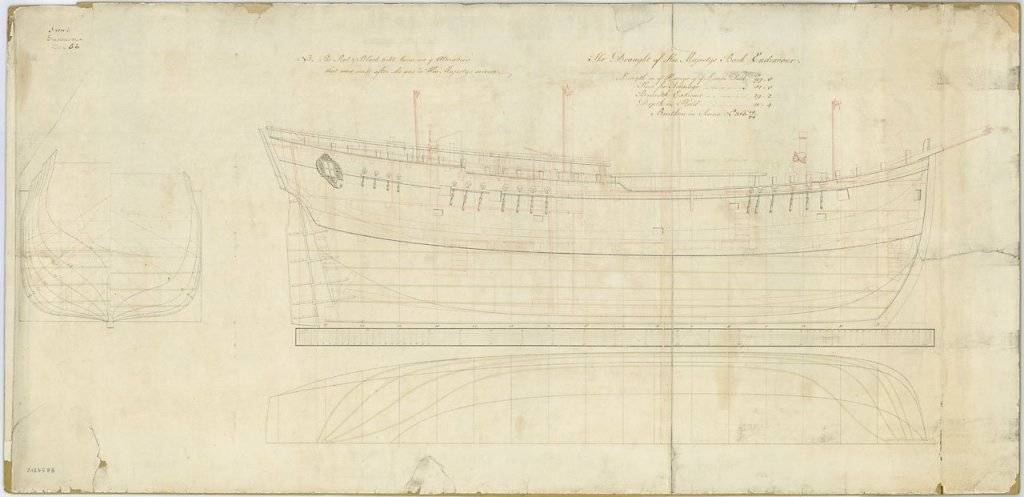
- 63 replies
-
- 3
-
-
- HMB Endeavour mast lengths
- above deck mast heights
- (and 3 more)
-
Welcome back Mike, I was just thinking about you, wondering what happened to your build
-
Continuing on in bits and pieces when I have time. Today I made the parral and fitted the spritsail topsail yard, the first running rigging being the spritsail topsail halyard and I had a crack at making my first rope coil at the belaying pin.
.thumb.jpg.bb7983d6f17082c9840cf0094f197cfe.jpg)
.jpg.6d3cdd0742eb4be1f10b3eae371ba040.jpg)
.jpg.54c217d9ff213ca82dbcd09ec284c763.jpg)
-
A bit more work today, finished off the footropes on the spritsail yard and finished fitting the fore topmast stays
.thumb.jpg.501d130101ef59241d8786ffcfa4ef4e.jpg)
-
Hi Mark Thanks. The nail marks in the planks were done using a 6B pencil, just position it on the plank, press and rotate. Practice on a scrap to get good at it, and keep the pencil sharp. Cheers Steve
-
I haven't posted on here for a while but I have been plugging away doing bits and pieces when time permits. I have been working on the rigging and have almost finished the topmast standing rigging. This week a little diversion, I bought a ships wheel kit from Syren. Its the correct size and looks much better than the metal one I had there. Great kit from Chuck - everything goes together so precisely. First pic is the metal wheel I replaced.
.thumb.jpg.78358613c71b827d5d453e91cd10fae5.jpg)
.thumb.jpg.67165c78022b9606c6375e0c6aa4a54c.jpg)
.thumb.jpg.cc1dea362770d6ef37963ebb84607fe3.jpg)
.thumb.jpg.ad999514fa5255b4dd8448dec46754e3.jpg)
.thumb.jpg.b87d5255e6feda9331fa9ec1634f9aef.jpg)
-
Mast Lengths and their above deck heights for HMB Endeavour
shipaholic replied to dashi's topic in Masting, rigging and sails
Here is his website http://karl-heinz-marquardt.com/ Cheers- 63 replies
-
- 1
-
-
- HMB Endeavour mast lengths
- above deck mast heights
- (and 3 more)
-
Hi Dave Yes they are burton pendants, the bloocks would be hooked to them. The two blocks between the topmast shrouds are called sister blocks, for the topsail lifts. The AOTS has long stropped blocks hanging from the masthead
.jpg.98375a7f6adea36791822306b7d9523c.jpg)
.jpg.4df46d771e1de7385e0fccc9d27583b5.jpg)
-
Hi Dave I followed the AOTS and My mast tackles are a little lower than the yard arms. The yards will sit just below the top woolding. Be aware that the topmost tackles in the AOTS have a block, but most likely had a thimble for a block to hook into, according to several other sources. cheers Steve
-
Not a silly question Karl. I used water based paint. French Blue from Admiralty Paints by Jokita. I got it from an online Hobby Store here in Australia. You shouldn't have any problems gluing things on oil paint especially if you use CA
.jpg.6d776d9aeecc33d4abb0c033dd8d0cba.jpg)
-
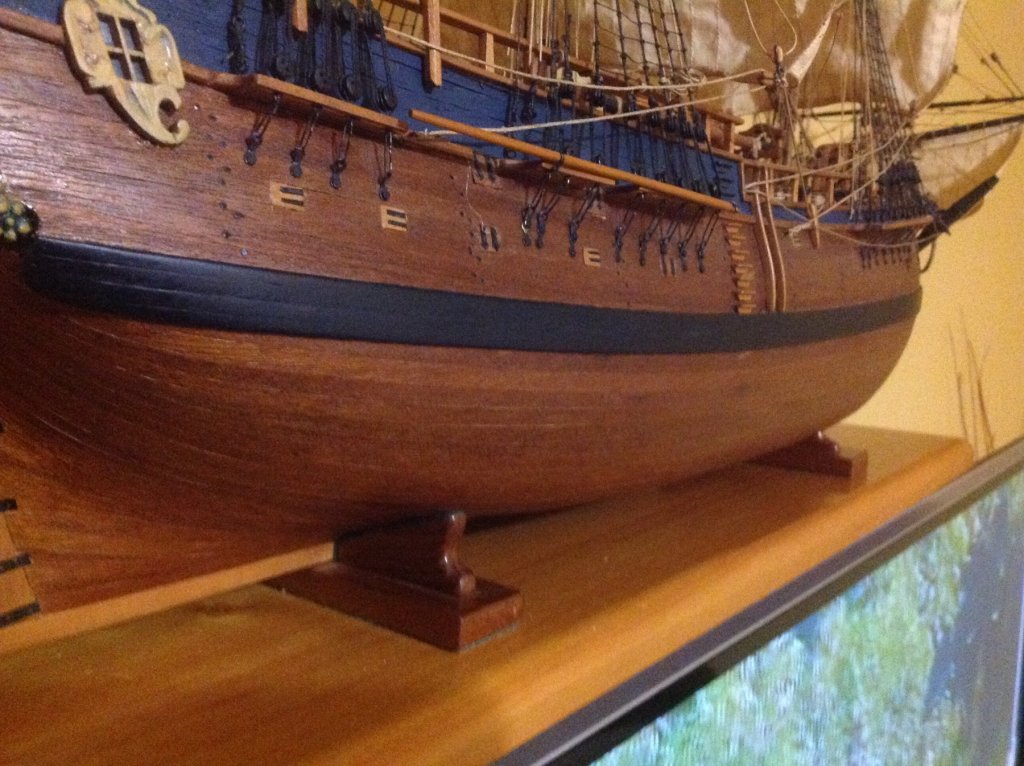
The stand is a rough one I made out of mdf just to hold the ship during construction. I will make a proper stand when I'm finished, probably like the small supports I made for my first Endeavour in this pic
-
Thanks for answering that Greg
-
Thanks Mike and Michael. Yes soldering is very tricky and takes a bit of practice, yes the hardest part is holding very small pieces together whilst soldering. One trick is to pin the parts onto a sacrificial piece of wood that will inevitably scorch. If the solder is a bit thick or lumpy I just file off the excess. I have a great little blow torch thats good for small work.
.jpg.186c7eccd5e9fddeea1d889634d137e9.jpg)
.jpg.0e81e79a698a20b9e28f2c32f711bc0c.jpg)
-
I have been working on the topmast shrouds recently. I used two single blocks to simulate the sister blocks on the shrouds. For the thimbles in the pendants I cut a short piece off thin copper tubing.
.jpg.66afc7f8c42a97bb379a96ebd718ae9c.jpg)
.jpg.6d96570ad8d2c7910c2476b0a82ea188.jpg)
.jpg.75d7c178193c2d283ae0e289c8c2cb01.jpg)
-
Welcome back Rexy. Beautiful neat planking job. I'd like to spend every weekend on my build but my missus usually has other ideas. Cheers Steve
-
Good job Dave but a lot of work, did you see my post on using fabric band-aid material for the meeces?
-
Hi Steve I am building this same model, however I am doing a lot of scratch building and have not followed the instructions very much. This is because I am an experienced builder. I have found that although detailed, the instructions aren't very good in places. I assume that the only deck you have already planked is the lower deck and will not be seen very well, if so just leave it and move on. Cutting the deck planks short as in the instructions in not a very good way to do it, I left most of my planks their original length. The planking pattern in the instructions is also wrong. Do not use contact adhesive, it looks like your planks are sitting up because there is too much glue under them that has partially hardened before you laid the planks . Use white PVA glue. Check out my build log to see the decking pattern I used. A lot of the joins are just drawn on in pencil. If there is any thing you need to know, just ask, we are here to help each other. Cheers Steve
-
Hi Dave I also did a lot of research before I did my lower shrouds, and concluded that putting rat lines only every sixth between the aft two shrouds was most likely correct. I personally think the AOTS shroud/deadeye arrangement is wrong, it's allowing for two back stays on each side because Cook mentioned in his log on one occasion that both back stays broke, I think Cook meant one on each side not both on one side. cheers Steve
-
Hi Dave thanks Yes the battens aren't mentioned or shown in the AOTS, I think the AOTS drawings are based on the drawings etc in Steel here http://www.hnsa.org/resources/manuals-documents/age-of-sail/the-elements-and-practice-of-rigging-and-seamanship/page-1/ scroll down theres some great drawings of masts and yards with more detail than AOTS. Like I've said before the AOTS is not gospel Cheers

.jpg.803aad07dcc686c13c395d497f79ba2c.jpg)

.jpg.817f3c7b4c68f7a8c80ab728ffab954f.jpg)
.jpg.bbca786f7d7e488963cfbc54f52e550e.jpg)
.jpg.a0ed433f65e07de2e48c9756d4564287.jpg)
.jpg.be83dc8f45fa9f851d9a86f597428fce.jpg)
.jpg.204b4ac095a1565920bb188a785f1223.jpg)
.jpg.8dbf3eb8845913e733a6e9e07d464bec.jpg)
.jpg.3dfea23b7a90ebca45b63405e7a7cda5.jpg)
