

scratch
-
Posts
86 -
Joined
-
Last visited
Reputation Activity
-

 scratch reacted to ringbolt2013 in HM Colonial Cutter Mermaid by olliechristo - FINISHED - Modellers ShipYard -
Beeswax is THE thing for the ropes it takes all the fuzz and lays it.......BUT it also catches dust floating in the air so the model should be cased!
Does that make sense with anybody??
By the way I still think you are doing a splendid job on the Ship Ollie!!
Tom
-
scratch reacted to olliechristo in HM Colonial Cutter Mermaid by olliechristo - FINISHED - Modellers ShipYard -
I made up my culverins, at the end of the barrel they had more of a protrusion than anything, so I filed and started drilling them out with a 0.5 mm bit.. They look alright...Ollie
-
scratch reacted to olliechristo in HM Colonial Cutter Mermaid by olliechristo - FINISHED - Modellers ShipYard -
Made up the lower deadeyes and straps
-
scratch reacted to Jeronimo in LE BONHOMME RICHARD by Jeronimo - FINISHED
Hello friends.
Thanks to all for his kinds comments.
Cannon barrel and gun carriage in the scale of 1:24,
built in between for demonstration purpose.
Karl
-
scratch reacted to Parsifal in Cutty Sark by Parsifal - Sergal - 1:78
Good evering to all the forum upgrade works on the Cutty whitt a brass wire frame .
I made the structure of the figurehead and Das modeled the ninfi Nannie finished
and Painted and made a bow hact and grating .
Hello to all and good model
Giancarlo
-
scratch reacted to mtaylor in Licorne 1755 by mtaylor - 3/16" scale - French Frigate - from Hahn plans - Version 2.0 - TERMINATED
The mold is almost done. I cut out the lifts and glued them together then sanded and shaped and sanded some more. I'm in the process of cutting in the slots for the stem, keel, and stempost.
The first figure shows how I jigged up a sled on the saw and cut the slot using a 1/16" dado washer. MM doesn't do dado blades, you add an appropriate washer next to blade and since the washer is cut on an angle, the blade is angled and cuts a slot. The rest of the pictures show the mold with the slots cut and being cleaned up. There's still more work on the mold before I start laying the frames.
It's a fun but nerve-wracking process (to me at least) as I'm in unknown territory here.
-
scratch reacted to Trussben in HMS Pegasus 1776 by Trussben - 1:48 - Swan-class sloop based on TFFM
Hi and thanks for the comments and likes.
As well as making the acrylic stands that will hold the stem/stern in place on the buildboard I have also started the stern framing.
Here is the all important Wing transom cut out of 18" stock and the 3" roundup sanded in so the piece is 15" all the way across. Now to start the shaping. I have left the ends 1/32 oversize to allow adjustment with the cant frame.
Ben
-
scratch reacted to tlevine in HMS Atalanta 1775 by tlevine - FINISHED - 1:48 scale - from TFFM plans
Druxey and David, thanks. The only thing I could think of as I finished the deck was...thank god this isn't a frigate!
I deferred making any of the items that attach on to the upper deck (except for the fore and main mast partners) until the entire deck was completed. Now it is time for some small projects which will vastly improve the monotony of the appearance of beams and scantlings. The first thing made was the capstan step. The shape of the step varied among the Swan class ships. In TFFM, David shows a three piece rectangular step. Atalanta has a tear-drop shaped step. At this point I was still psyched from finishing the deck, so I forgot to take pictures of the step fabrication. The step is made of three pieces of wood rabbeted together. The inner piece was 14" thick and the outer pieces were 10" thick. The edge of the 14" thick wood was highlighted on both sides with archival ink. The top of the step is flat, stands 7" proud of the beam and is parallel to the waterline, not to the deck. There is a hole in the middle for the capstan post. The step is secured to the beams and carlings with bolts.
The mizzen partner is a simple plank, in contrast to the complex structures of the fore and main partners. The most difficult part is placing the hole in the correct location because of the rake of the mizzen mast. I do not plan on masting and rigging Atalanta so I took the location of the opening off the plan rather than make a dummy mast.
-
scratch reacted to tlevine in HMS Atalanta 1775 by tlevine - FINISHED - 1:48 scale - from TFFM plans
I have finally finished the upper deck framing. The first three photos show the deck before final fairing. The last two are after everything has been sanded down. I started with 100 grit and progressively sanded down to 400 grit. I finished with a razor blade scraper. There was a slight hump in beam 20 which was corrected with the sanding.
-
scratch reacted to mtaylor in Licorne 1755 by mtaylor - 3/16" scale - French Frigate - from Hahn plans - Version 2.0 - TERMINATED
Thanks for the "likes"...
Sam,
I'm happy with the way this is going. Really happy.
Mobbsie,
I was hoping for some wise words... but I'm glad you like what you see.
Update time, yippee!!!
The backbone is complete. (Almost.. forgot to finish trim the keel at the stern according to the picture). The stem has been appropriately (I think) tapered and now attached to the keel. The deadwood was made from the cherry since I didn't have any boxwood thin enough and attached along with the sternpost. And, an rudder blank has been made.
I discovered that misinterpreted the plans on V 1.0 for the stern deadwood and the sternpost. The deadwood on V 2.0 isn't tapered but the sternpost and keel need to be. It appears that the best way will be after planking when the planks, keel and sternpost can all be done at once. Or least that's the way it appears in the Hahn photos....
I can now go wander off and fiddle with cleaning up the salvage parts, maybe make some bits and pieces, etc. while waiting for my framing wood to show up.
-
scratch reacted to augie in USF Confederacy by Augie & Moonbug - FINISHED - Model Shipways - 1:64
The finishing of the lower hull has been completed. In addition, all of the touching up on the painted areas has been done.
I decided to retain the natural finish of the lower hull. As I wanted it lighter to contrast the above wale hull, I gave it a coat of Minwax Pre-Stain (I always use this on basswood), one coat of plain 'natural' stain. 2 coats of poly and one coat of dull acrylic. It actually looks almost untreated but that's what I wanted. In the photos it's the final one that shows the finished effect.
Thanks to everyone for offering your suggestions on the color. I'll save the 'white stuff' idea for another model. The Admiral is steaming but nothing that dinner and a show won't solve. She has also decided that I'm planning on displaying her 'in the wrong direction ...... again !! But that's normal. No sense having those exposed framing beams on 'the wall side'.
Need to add those moldings we made weeks ago and then onto the stern galleries
-
scratch reacted to Remcohe in HMS Kingfisher 1770 by Remcohe - 1/48 - English 14-Gun Sloop - POF
Thanks for all the kind comments
Elia, its the effect of a little water on 120 gr paper
Mark, no need to keep a book of photo's we have MSW
Druxey, I thought the tally's were to big to, but TFFM describes them 3" 0' and I blindly followed this. So new ones are made(point taken)
Michael, it's not a loose thread but a cringle (really!)
Unfortunately the sails and tally's were already glued in place. Getting the tall's off did damage the sails a little
Top to bottom, the original I used yesterday in 3pt font, then 1,5pt font and 1pt font, I'll use the smalles although the text is almost not readable, but who cares
Remco
-
 scratch got a reaction from korablik1979 in Carving from Belgorod
Just had a quick flick through this thread and WOW , you guys are truly amazing . One day I say to myself , one day .
David
-
scratch reacted to Remcohe in HMS Kingfisher 1770 by Remcohe - 1/48 - English 14-Gun Sloop - POF
Greg, correct the blade has the same width as the index in strip. I made a second one for paralel cuts to make the beds for the sails. At first I tried to glue the battens with temporary spacers, but it wasn't as evenly spaced as I had hoped. cutting mortices for the battens made assembly a lot easier.
For the sails I first got a piece of silk used for model airplanes. Although the fabric is great I could not fold them neatly even with an iron I could not get something I liked. Pretty expensive experiment actually, now I have a very big silk handkerchief with a hole in it...... So thick tinted paper was used. The writing on the tally's are home made decals.
I'm not sure if I will build the other walls of the sail room or leave it open like this, I actually like it the way it is now having a better view to the storage racks.
Remco
-
scratch reacted to olliechristo in HM Colonial Cutter Mermaid by olliechristo - FINISHED - Modellers ShipYard -
Also roped up my scratched water keg for interior and fitted it.. Ollie
-
scratch reacted to olliechristo in HM Colonial Cutter Mermaid by olliechristo - FINISHED - Modellers ShipYard -
I also scratched a tiller and fitted it.. everything you see here now is fitted..
I made the bulwark steps and fitted my scratch stairs.. Progress will be slow for a while now, but i will be back soon enough.. Ollie
-
 scratch got a reaction from newbuilder101 in San Felipe by newbuilder101 (Sherry) – Scale 1:96
Beautiful work Sherry , my hat off to you .
David
-
scratch reacted to Trussben in HMS Pegasus 1776 by Trussben - 1:48 - Swan-class sloop based on TFFM
The sternpost has been glued and pinned to the keel and aft deadwood now, I have to finish refining the shape back there and then I will start making the rising wood pieces.
Ben
-
 scratch got a reaction from BANYAN in Perseverance by scratch - Modellers Shipyard -1:48 - Colonial Brig
Thank you very much Pat . I had a sneak peek at your Endeavour , lovely work . I was thinking about this as a build but I want to try my hand at a scratch build next . That's if I can convince the lovely wife to a couple more power tools .
David
-
scratch reacted to BANYAN in Perseverance by scratch - Modellers Shipyard -1:48 - Colonial Brig
A nice looking build David, I have added you to my watch list
cheers
Pat
-
scratch reacted to Modeler12 in A review of a Mini Mill from Little Machine Shop
Earlier I mentioned this little mill from Little Machine Shop and got several responses including a request to review this mill when I received and tried it out. Here is the start of this (perhaps ongoing) subject.
I will explain why I chose this model a bit later, but let me mention now that I had ordered the machine and tooling kit last Thursday. Today, Monday, it was at my front door. Not bad for a weekend delivery.
When I opened the smaller package of accessories I found the parts were all there as ordered. However, the first thing I noticed is that most metal parts were liberally coated with grease. Nothing new, of course, and perhaps necessary since all (or most) parts are made and shipped this way from China. I will be spending some time tomorrow 'degreasing'.
The same applies, of course, to the base and to a smaller extend to the top with its motor etc.
Overall, things are OK. The instruction manual, I am reading now, included a spare fuse on top. Not sure yet where it goes, if needed.
I am going to skip over a lot of details later on and get into the guts of this thing (including why I think it is a neat little item for modeling work).
-
 scratch got a reaction from Senior ole salt in Perseverance by scratch - Modellers Shipyard -1:48 - Colonial Brig
Hello every-one
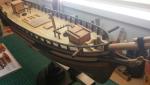
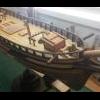
Now onto the Figure head and head rails . I had a lot of cutting to get the figure head to sit properly (she was painted with a gold leaf and attached with 5 minute epoxy ) . I set my figure head more horizontal than what it shows so the gown flows better with the heads rails . The head rails need to have a curve in them so some soaking and drying is needed .
The channels were next on . I wanted to put these on now so i could get a coat of vanish on the hull .
Now i can tackle all of the deck furniture .
The main companionway was assemble with the kit parts and then planked in the Tanganika on the sides , rear and top(i planked the top even tho they say to leave it ) . A strip of 2x2 walnut was placed around the edge of the roof . 2X2 shaped walnut was glued on the vertical edges and some 2x1 around the base . I changed the way the doors were to be done from the instructions because i couldn't see how they would function , especially the Forward companionway . I used some strips of 1 mm thick lime wood stained a Baltic stain . The part of the hinges that bolt to the frames are made out of black card . Once finished a coat of Matt varnish was applied .
The Forward companionway was done the same way . Again i strayed from the plans here . Especially how the hatch cover was done . They have the front trim running all the way across the front .
David
-
 scratch got a reaction from Aussie048 in Perseverance by scratch - Modellers Shipyard -1:48 - Colonial Brig
By all means Rod , if you would like to copy them , go for it . For the caulking I used a pencil as well . If you do use a pencil to simulate the caulking don't use any sand paper to smooth it down . All it does is smear the graphite all over the planking and is a nightmare to clean up . I used a a razor blade ( you can get a pack of 100 for $20 at www.mytoolstore.com.au ) or you can also use a piece of glass as well and scrap it smooth .I laid the planks in full lengths then marked the scale length when all had dried . The butt joints were made with a chisel exacto blade that was ground down to the width of the planks . then i simulated the butt joints with the pencil again not using sand paper but a razor blade to smooth it all out .Make sure the pencil is sharp .
Thank you very much Bindy for your kind words . Modelers Shipyard have great after sales service.
David
-
scratch got a reaction from BANYAN in Perseverance by scratch - Modellers Shipyard -1:48 - Colonial Brig
By all means Rod , if you would like to copy them , go for it . For the caulking I used a pencil as well . If you do use a pencil to simulate the caulking don't use any sand paper to smooth it down . All it does is smear the graphite all over the planking and is a nightmare to clean up . I used a a razor blade ( you can get a pack of 100 for $20 at www.mytoolstore.com.au ) or you can also use a piece of glass as well and scrap it smooth .I laid the planks in full lengths then marked the scale length when all had dried . The butt joints were made with a chisel exacto blade that was ground down to the width of the planks . then i simulated the butt joints with the pencil again not using sand paper but a razor blade to smooth it all out .Make sure the pencil is sharp .
Thank you very much Bindy for your kind words . Modelers Shipyard have great after sales service.
David
-
scratch reacted to Bindy in Perseverance by scratch - Modellers Shipyard -1:48 - Colonial Brig
Hi David,
And thank you for starting this log! I think what you have done so far looks fantastic and I genuinely look forward to seeing you progress from here.
I am not too surprised to read of your happiness with Modeller's Shipyard as I have found them just as helpful and considerate