

scratch
-
Posts
86 -
Joined
-
Last visited
Reputation Activity
-

 scratch reacted to RodR in Perseverance by scratch - Modellers Shipyard -1:48 - Colonial Brig
Hi David,
I will be watching closely to see how you deal with the plastic boats.
I hope you don't mind if I copy your companionways. They look so much better than the way the instructions say to do it.
Also how did you simulate the caulking on your deck planking? It looks very neat, especially the butt joins.
I did mine with a 6B pencil but I found that the graphite got into the grain on the timber. I guess it gives it a more weathered appearance but the rest of the boat will look brand new.
Cheers
Rod
-
scratch reacted to petervisser in Zeeschouw by petervisser - FINISHED - Billing Boats - Scale 1:22 - Small
Funny you should ask Nils! I just put on her name boards and now she has a proper name. "IRENE".
I named her after my sister. The kit's name is "BIANCA" but I don't know anyone personally by that name so I decided "Irene" had more significance. Here are some pictures with the new name board.
Now I have to start work on the sails. I have put another coat of paint on the masts and they are drying in front of the gas fire. Billing has supplied a sheet with the pattern of the sails inked on them. However, the material is a bit too white and stiff. So I will use them as pattern pieces and use muslin cloth instead. I am hoping to get a sewing lesson from my wife who has a sewing machine and a serger. I will do a little experimenting and come up with the best solution. Stay tuned to this channel....
-
scratch reacted to petervisser in Zeeschouw by petervisser - FINISHED - Billing Boats - Scale 1:22 - Small
A quick little update guys while the paint on the mast and spars are drying. The rudder minus the flag is finally finished. Boy, what alot of steps for finishing this one piece. Cutting out the rudder, laminating the strips of mahogeny, fitting the tiller, multi-layers of different colour paints and lacquer, fitting the pintles and gudgeons and aplying the decals. It took days and days! The decals were a bit challenging because I had not done any for many many years. They were applied and then I coated them with a few coats of varathane. They're not going anywhere!
Well here is the finished product and the rudder dry fitted to the transom...
Cheers,
Peter
-
scratch reacted to mobbsie in HMS Agamemnon by mobbsie - FINISHED - Caldercraft / Jotika - 1/64
Hi Guys,
Thank you all very much for the very kind words and your concerns, and of course the like buttons, I really do appreciate it.
John, great to see you again mate, you've been missed, thanks for the kind words buddy.
Kevin, You have been side tracked by a small plastic matter I believe, You'll soon catch up mate.
I do have a small update, the ratlines for the Fore Lower Mast are completed now, for a while it seemed 3 steps forward and 2 back with me ripping out completed rows, mainly because they looked like jungle vines rather than ratlines, more droop in them than a bloke on the booze for a week.
Some Pics
So that's a small stage completed now, next step is to make the Bowsprit and Jib Boom, with all the accompanying tackle, I want to have a go at making a slider for the Jib Boom which will be a first for me, there are some very good ideas on site so as long as I don't have to do any welding I should be ok.
I have to practice with my micro wood chisel's I bought a week or so ago, with the 2 foot long handles and 18 inch blades I will have plenty to get hold of, my mistake of the year so-far, hopefully I will be able to work with them, if I cant then they didn't cost a lot so little lost.
OK guys that me done, your all up to date, most of you will be way ahead of me knowing what's going to happen but still, I need to find out for myself.
Be Good
Stay Warm / Cool, depending on your hemisphere.
mobbsie
-
scratch reacted to popeye the sailor in Half Moon by popeye the sailor - Billing Boats - 1:40 scale kit
now.......for the main update. I began to assemble the pump
then I started to paint some of the decoration parts. I need to do some painting........before I do though, I want to look around some more, for more pictures. but, I think I'm only going to find the more 'up to date' version of this ship.
there are to be a couple of Sampson posts for the bow
these are the parts that I have for the crow's nests......I'm missing quite a few of the hoops
so, instead of using these parts, and having them look 'off', I am going to make the fore and main nests from scratch. I began with the posts.
this is the main mast nest........I soaked some strip stock to make the lower railings
the upper railing is going to be a bit wider. it will be sanded down after the nest is assembled, to give it a more rounded look to it.
I will use a little filler to close up the gaps....then, of course a little sanding to round it up and even out the appearance. it looks a little out of round at the moment.......I did it by eye .
still more to do on it......as well as assemble the fore nest. I may have to paint......I fear many glue blotches.........perhaps I can match the color.
-
 scratch got a reaction from Senior ole salt in Perseverance by scratch - Modellers Shipyard -1:48 - Colonial Brig
Hello every-one
Now onto the Figure head and head rails . I had a lot of cutting to get the figure head to sit properly (she was painted with a gold leaf and attached with 5 minute epoxy ) . I set my figure head more horizontal than what it shows so the gown flows better with the heads rails . The head rails need to have a curve in them so some soaking and drying is needed .
The channels were next on . I wanted to put these on now so i could get a coat of vanish on the hull .
Now i can tackle all of the deck furniture .
The main companionway was assemble with the kit parts and then planked in the Tanganika on the sides , rear and top(i planked the top even tho they say to leave it ) . A strip of 2x2 walnut was placed around the edge of the roof . 2X2 shaped walnut was glued on the vertical edges and some 2x1 around the base . I changed the way the doors were to be done from the instructions because i couldn't see how they would function , especially the Forward companionway . I used some strips of 1 mm thick lime wood stained a Baltic stain . The part of the hinges that bolt to the frames are made out of black card . Once finished a coat of Matt varnish was applied .
The Forward companionway was done the same way . Again i strayed from the plans here . Especially how the hatch cover was done . They have the front trim running all the way across the front .
David
-
 scratch got a reaction from GrandpaPhil in Perseverance by scratch - Modellers Shipyard -1:48 - Colonial Brig
Hello every-one
Nothing really to explain with the pin rail stands or the ships bell . Both done out of walnut . I left the ships bell as is and just gave it a little polish to shine it up a bit .
The fore and main mast pin rails are all standard . Nothing to say to paint it black , but i prefer the black than to leave it just as ply .
The Davits , again i changed from the ply parts . I think they look a lot better than the kit supplied one's .
The transom decoration was a cast part . ( i would of liked to have tried to carve one but my skill is nowhere near that type of detail yet ) a bit of scraping to get all the burs off then a good clean , under coat and then a couple of top coats of gold leaf . I used a 5 minute epoxy to attatch it to the transom .
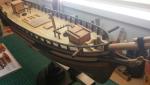
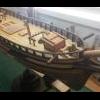
Now this is where i am up to now . The next step is the ships boats . These might take a while as i don't like all the ply with them . Will see what happens .
David
-
 scratch got a reaction from newbuilder101 in Perseverance by scratch - Modellers Shipyard -1:48 - Colonial Brig
Hello every-one
I made my main cargo hatch and forward cargo hatch out of lime wood and stained Baltic . The gratings are from the kit ..I haven't shown it but i also painted under the gratings black The ring bolts were blackened .
The winch is from the kit . Nothing hard here , just glue on the ends.
The tiller was out of walnut , shaped and installed .
The catheads are straight forward . Made out of 5x5 walnut .The cat head knees needed some shaping around the cap rail . I should say at this point all the deck fittings have had pins install in the bases to give them more strength when glue to the deck .
David
-
 scratch got a reaction from olliechristo in Perseverance by scratch - Modellers Shipyard -1:48 - Colonial Brig
Hello every-one
Now onto the Figure head and head rails . I had a lot of cutting to get the figure head to sit properly (she was painted with a gold leaf and attached with 5 minute epoxy ) . I set my figure head more horizontal than what it shows so the gown flows better with the heads rails . The head rails need to have a curve in them so some soaking and drying is needed .
The channels were next on . I wanted to put these on now so i could get a coat of vanish on the hull .
Now i can tackle all of the deck furniture .
The main companionway was assemble with the kit parts and then planked in the Tanganika on the sides , rear and top(i planked the top even tho they say to leave it ) . A strip of 2x2 walnut was placed around the edge of the roof . 2X2 shaped walnut was glued on the vertical edges and some 2x1 around the base . I changed the way the doors were to be done from the instructions because i couldn't see how they would function , especially the Forward companionway . I used some strips of 1 mm thick lime wood stained a Baltic stain . The part of the hinges that bolt to the frames are made out of black card . Once finished a coat of Matt varnish was applied .
The Forward companionway was done the same way . Again i strayed from the plans here . Especially how the hatch cover was done . They have the front trim running all the way across the front .
David
-
scratch got a reaction from newbuilder101 in Perseverance by scratch - Modellers Shipyard -1:48 - Colonial Brig
Hello every-one
The banister stanchions were on the laser ply sheet . Even tho i painted these black , i still replaced them as i didn't like the shape of them . And they weren't very uniform . I made new ones out of some lime wood . I made one master , then made all the others from this one . No special way of doing this , i just used a razer saw , sand paper and a file , taking a little bit off at a time and checking them with the master .
Banister rail installed next . I went my own way on how they finished up on the bow . It said to cut them at 45 , but they weren't long enough to make this possible so i made them to sit flush with the front of the bowsprit cradle .
The upper and lower gunwales were next and these were soaked in water then clamped on the hull to dry over night . A paint then glued and clamped on .
Now the transom can be fitted . The ply transom is soaked in water and then i used 2 pieces of 4 mm square timber placed under each end with a clamp down the middle to get the right curviture that i needed Lined the inside and out side of the transom in the tanganika , sanding flush when dry .Here it says to use strips of veneer over the tuck of the transom to build it up then paint it . To me that would look shocking . So i used some 4x2 lime wood . the usual soaking and clamping for the night .. After my sand and paint routine , it was glued then clamped , then the transom was fixed on .
I fitted the netting next . So far it's just sitting there with a couple of daubs of CA . I would assume it would have to be tied to the banister rail and staunchions . Any ideas anyone ?
Mast heals were shaped around the edge , painted and glued on .
I blackened the cargo ports . In fact all the brass fittings have been blackened except for the ships bell .( I use a blackening agent called Birchwood Casey's Berma blue . It's a blueing agent for firearms and can be found at any local gun shop . I use a 50/50 mix of the berma blue and water . First i put the parts in the mixture for about 20 seconds , then i rinse them in water and give them a wipe . I do this about 3 or 4 times untill I'm satisfied of the finish ). I drilled holes where the ports had to be then used a file and sanding sticks to get the correct opening .
David
-
scratch got a reaction from newbuilder101 in Perseverance by scratch - Modellers Shipyard -1:48 - Colonial Brig
Hello every-one
The coppering of the hull was next . I have never attempted to copper plate a hull before and wanted to try it at least once , so i thought why not on this model . I think i need a lot more pratice . Not to bad but not good either . I didn't get the kit that came with copper plates , i thought they looked way to big for the scale so i got some from some where else . Next time i might try the copper tape with the adhesive backing , might be less messy and a bit thinner to be able to over lap .
The rudder post was also redone in the walnut , dry fitted , coppered , then placed on .This might seem obvious to every-one (but me it seems ) but make sure you mount it with the 4 rudder hinges and not 3 like i did . A big miss by me but whats done is done .
Those that do build this model will also noticed i haven't glued the transom on yet as it says to in the instructions . I decided to leave this untill i had put in place the aft deck cap rail and banister rails.
The forward deck cap rail , cap rail upright and aft deck cap rail were next to install . These came in the laser cut ply wood which i left as is because they are to be painted anyway . Make sure these sit flush with the inner side of the bulwark as you have to fit the banister stanchions later. Dry fitted first to make sure every thing sits well , then paint (a fine grade sand paper then an under coat then another light sand then a top coat then another fine sand and then the final top coat ) , then glue into place .
The bowsprit and jib boom were shaped and assembled then installed .
The instructions have the bowsprit stopping at the knight heads but i ran mine all the way down on the deck to give the illusion it was coming out of the deck .
The knight heads were shaped and fitted . I had to remake the bow sprit cradle , the one that came with the kit wasn't even close . I used some limewood i had and painted it black before installing .The height of the bowsprit cradle has to end up the same height of the aft deck cap rail .
David
-
scratch reacted to WackoWolf in Perseverance by scratch - Modellers Shipyard -1:48 - Colonial Brig
Very beautiful build, love the detail you have done. I know from the pictures that when you do the boats they will also be excellent because of the way you do the detail for the extra step. Keep the pictures coming, and thank you for sharing this fine ship with us.
-
scratch got a reaction from newbuilder101 in Perseverance by scratch - Modellers Shipyard -1:48 - Colonial Brig
Hello every-one
Nothing really to explain with the pin rail stands or the ships bell . Both done out of walnut . I left the ships bell as is and just gave it a little polish to shine it up a bit .
The fore and main mast pin rails are all standard . Nothing to say to paint it black , but i prefer the black than to leave it just as ply .
The Davits , again i changed from the ply parts . I think they look a lot better than the kit supplied one's .
The transom decoration was a cast part . ( i would of liked to have tried to carve one but my skill is nowhere near that type of detail yet ) a bit of scraping to get all the burs off then a good clean , under coat and then a couple of top coats of gold leaf . I used a 5 minute epoxy to attatch it to the transom .
Now this is where i am up to now . The next step is the ships boats . These might take a while as i don't like all the ply with them . Will see what happens .
David
-
 scratch got a reaction from WackoWolf in Perseverance by scratch - Modellers Shipyard -1:48 - Colonial Brig
Hello every-one
I made my main cargo hatch and forward cargo hatch out of lime wood and stained Baltic . The gratings are from the kit ..I haven't shown it but i also painted under the gratings black The ring bolts were blackened .
The winch is from the kit . Nothing hard here , just glue on the ends.
The tiller was out of walnut , shaped and installed .
The catheads are straight forward . Made out of 5x5 walnut .The cat head knees needed some shaping around the cap rail . I should say at this point all the deck fittings have had pins install in the bases to give them more strength when glue to the deck .
David
-
scratch got a reaction from newbuilder101 in Perseverance by scratch - Modellers Shipyard -1:48 - Colonial Brig
Hello every-one
Now onto the Figure head and head rails . I had a lot of cutting to get the figure head to sit properly (she was painted with a gold leaf and attached with 5 minute epoxy ) . I set my figure head more horizontal than what it shows so the gown flows better with the heads rails . The head rails need to have a curve in them so some soaking and drying is needed .
The channels were next on . I wanted to put these on now so i could get a coat of vanish on the hull .
Now i can tackle all of the deck furniture .
The main companionway was assemble with the kit parts and then planked in the Tanganika on the sides , rear and top(i planked the top even tho they say to leave it ) . A strip of 2x2 walnut was placed around the edge of the roof . 2X2 shaped walnut was glued on the vertical edges and some 2x1 around the base . I changed the way the doors were to be done from the instructions because i couldn't see how they would function , especially the Forward companionway . I used some strips of 1 mm thick lime wood stained a Baltic stain . The part of the hinges that bolt to the frames are made out of black card . Once finished a coat of Matt varnish was applied .
The Forward companionway was done the same way . Again i strayed from the plans here . Especially how the hatch cover was done . They have the front trim running all the way across the front .
David
-
scratch reacted to RodR in Perseverance 1807 by Rodr - Modellers Shipyard - Scale 1:48 - Colonial Brig - first build
Finally managed to find some time to continue with my hull planking.
After doing the "easy" planks I had to begin the tapering process.
I divided the remainder of the hull up into three sections using a planking batten as suggest in the article on MSW and this seemed to make it a bit easier.
After what seemed like 5 hours I had completed a grand total of 10 planks!
I hope I get faster at this!
Anyway, I'm pretty happy with the way its turning out. After a good sand it should come out pretty smooth.
If its raining tomorrow, I wont be going fishing so hopefully can finish off this side of the hull, so long as the better half doesn't find a whole lot of other jobs for me.
Cheers
Rod
-
scratch reacted to edmay in Perseverance by scratch - Modellers Shipyard -1:48 - Colonial Brig
Hello David,That's one of the neatest,cleanly built models on MSW,with the extra detailing,nice coloring,she will be a masterpiece,thanks for the info on blackening,etc.Edwin.
-
scratch reacted to RodR in Perseverance by scratch - Modellers Shipyard -1:48 - Colonial Brig
Hi David
I'm building the same kit but for me it's a first build so it's great to see your photos and how you've deviated from the kit instructions.
Your model looks really nice.
Cheers
Rod
-
scratch reacted to Dan Vadas in Perseverance by scratch - Modellers Shipyard -1:48 - Colonial Brig
Nicely done David, especially where you differed from the kit's instructions with the linings of the Companionways - yours look much better.
That kit-supplied Windlass looks like nice quality - certainly better than some of the cast metal offerings of other kits .
Danny
-
scratch got a reaction from WackoWolf in Perseverance by scratch - Modellers Shipyard -1:48 - Colonial Brig
Hello every-one
Nothing really to explain with the pin rail stands or the ships bell . Both done out of walnut . I left the ships bell as is and just gave it a little polish to shine it up a bit .
The fore and main mast pin rails are all standard . Nothing to say to paint it black , but i prefer the black than to leave it just as ply .
The Davits , again i changed from the ply parts . I think they look a lot better than the kit supplied one's .
The transom decoration was a cast part . ( i would of liked to have tried to carve one but my skill is nowhere near that type of detail yet ) a bit of scraping to get all the burs off then a good clean , under coat and then a couple of top coats of gold leaf . I used a 5 minute epoxy to attatch it to the transom .
Now this is where i am up to now . The next step is the ships boats . These might take a while as i don't like all the ply with them . Will see what happens .
David
-
scratch got a reaction from WackoWolf in Perseverance by scratch - Modellers Shipyard -1:48 - Colonial Brig
Hello every-one
Now onto the Figure head and head rails . I had a lot of cutting to get the figure head to sit properly (she was painted with a gold leaf and attached with 5 minute epoxy ) . I set my figure head more horizontal than what it shows so the gown flows better with the heads rails . The head rails need to have a curve in them so some soaking and drying is needed .
The channels were next on . I wanted to put these on now so i could get a coat of vanish on the hull .
Now i can tackle all of the deck furniture .
The main companionway was assemble with the kit parts and then planked in the Tanganika on the sides , rear and top(i planked the top even tho they say to leave it ) . A strip of 2x2 walnut was placed around the edge of the roof . 2X2 shaped walnut was glued on the vertical edges and some 2x1 around the base . I changed the way the doors were to be done from the instructions because i couldn't see how they would function , especially the Forward companionway . I used some strips of 1 mm thick lime wood stained a Baltic stain . The part of the hinges that bolt to the frames are made out of black card . Once finished a coat of Matt varnish was applied .
The Forward companionway was done the same way . Again i strayed from the plans here . Especially how the hatch cover was done . They have the front trim running all the way across the front .
David
-
-
scratch reacted to Dan Vadas in HMS Vulture 1776 by Dan Vadas - FINISHED - 1:48 scale - 16-gun Swan-class sloop from TFFM plans
Thank you Mark, overdale, Grant, John, Duff and Richard.
Entry Steps to the Waist
There are two sets of Entry Steps attached to the fixed gangways, one either side. These have "Winding" treads to transition from the curve in the gangways - quite tricky things to get right as the angles for the slots in the fore stiles are different to the aft ones.
I cut the fore slots at 30 degrees, and the aft ones at 27.5 degrees. This gave the required "twist" in the steps.
The pics will tell the story of how I made them :
Danny
-
scratch reacted to guraus in HMS Victory by guraus - scale 1:48 - plank on frame
Another small update...
-
scratch reacted to Remcohe in HMS Kingfisher 1770 by Remcohe - 1/48 - English 14-Gun Sloop - POF
Thanks, funny how problems create new idea's.
I laid just one strake of the deck planking and wil only add partials to support the bulkheads for the cabins. I'll try to keep as much view to the hold as possible.
The caulking is very thin paper blackened with a sharpy.
Added some of the furniture just for fun and to see how things start to look 'dressed up' it will be pretty crowded once the bulkheads are in
Remco