Captain Al
-
Posts
613 -
Joined
-
Last visited
Content Type
Profiles
Forums
Gallery
Events
Everything posted by Captain Al
-
Good point Allan ....(I spell my name Alan cause my parents couldn't afford the extra L). What I think you are saying in a different way is that the garboard strake should not have been run so far up the bow. I did recognize that early on and mentioned it in my first post starting this topic. That as well as not tapering the upper strakes soon enough is what I believe was at the heart of the space problem. You are so right about the angst society. A friend and I keep asking ourselves, isn't a hobby supposed to be fun? It sure has taught me a lot of geometry though.
-
Would you suggest this dgbot knowing that the model is open hull on starboard? This is maybe why the kit provided 2mm thick planking strips. I do plan to put a bit more filler up in the bow where the strakes will come to a point, but that seems to me the only place I could add much without it becoming unsightly from the open side (and obviously unnecessary on the open side).
-
Appreciate the advice, but I've read it probably 3 times a day (my wife says). In truth, I've read it several times but putting it all into practice is the tricky part. Especially after you (I) didn't follow the instructions from the outset.
-
Well I thought the last post would be it and I'd jump into the actual work, but looking at the pictures once more I had a thought. It might look better to end the upper band (closest to the deck) at a point higher up the bow, and leave some open space at the stem for the middle band planks to end. Any thoughts?
-
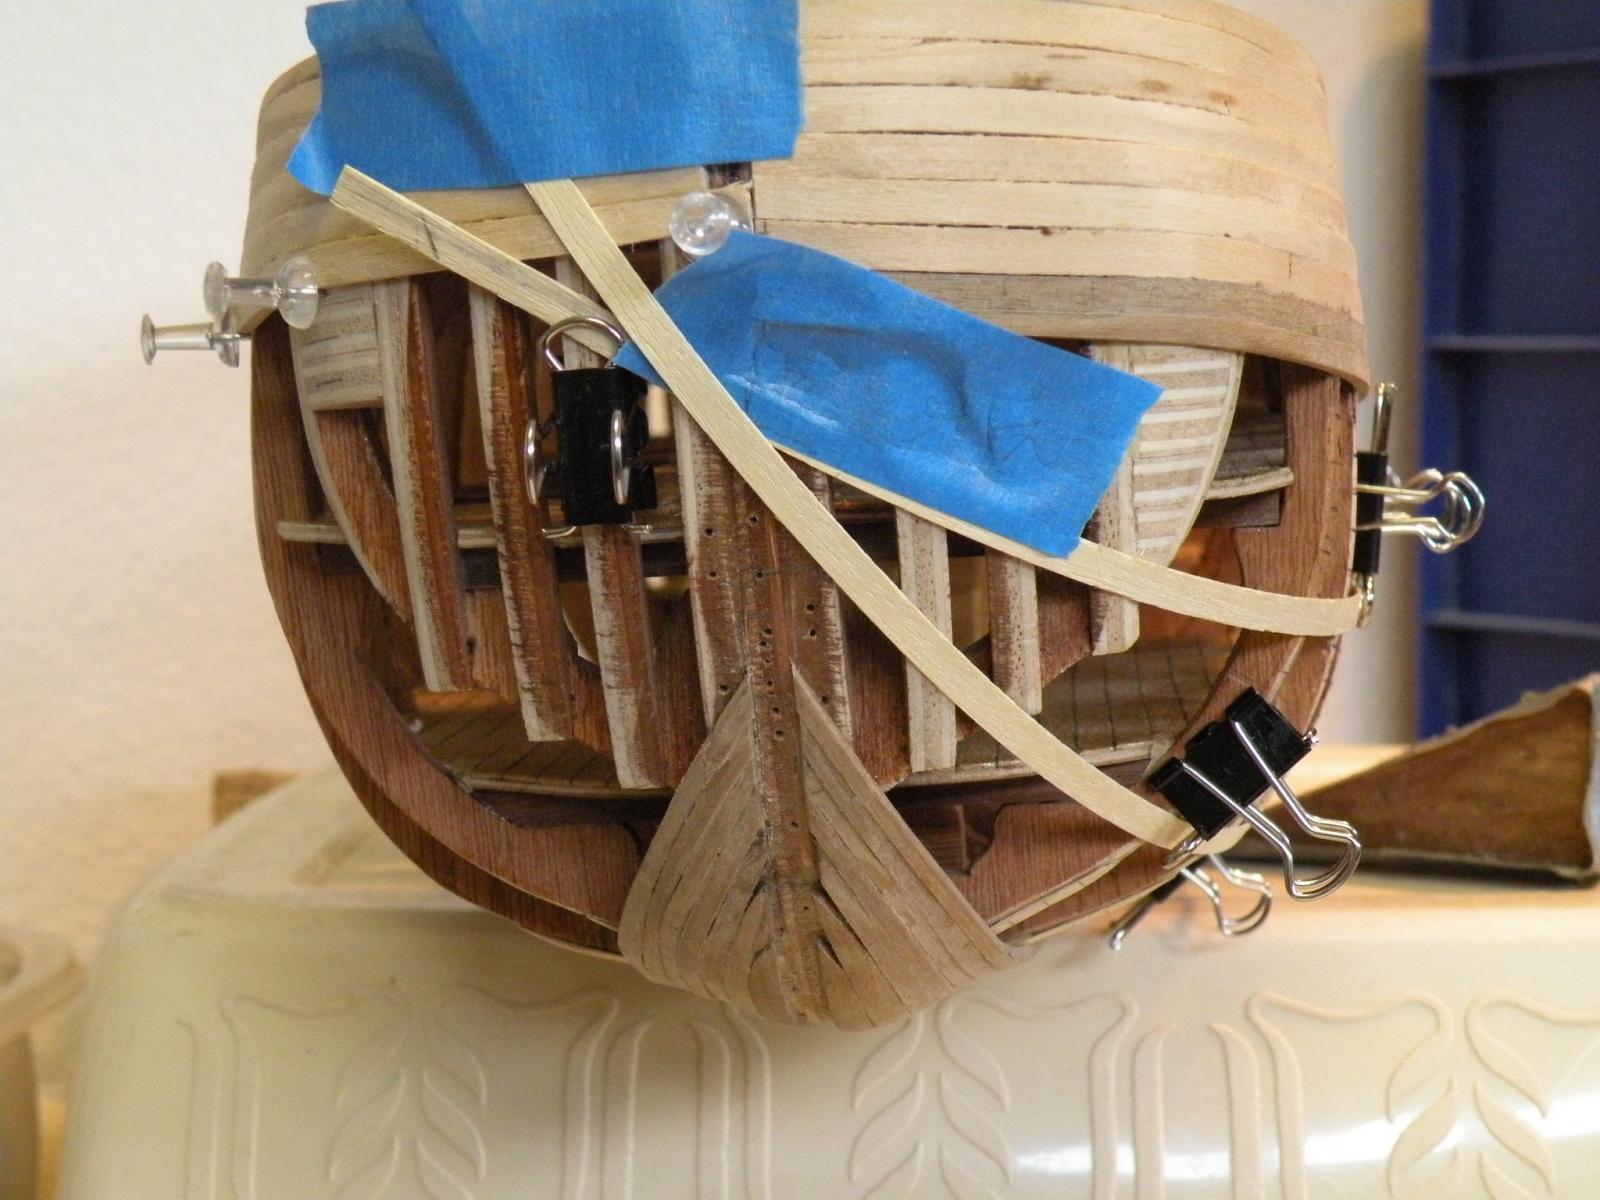
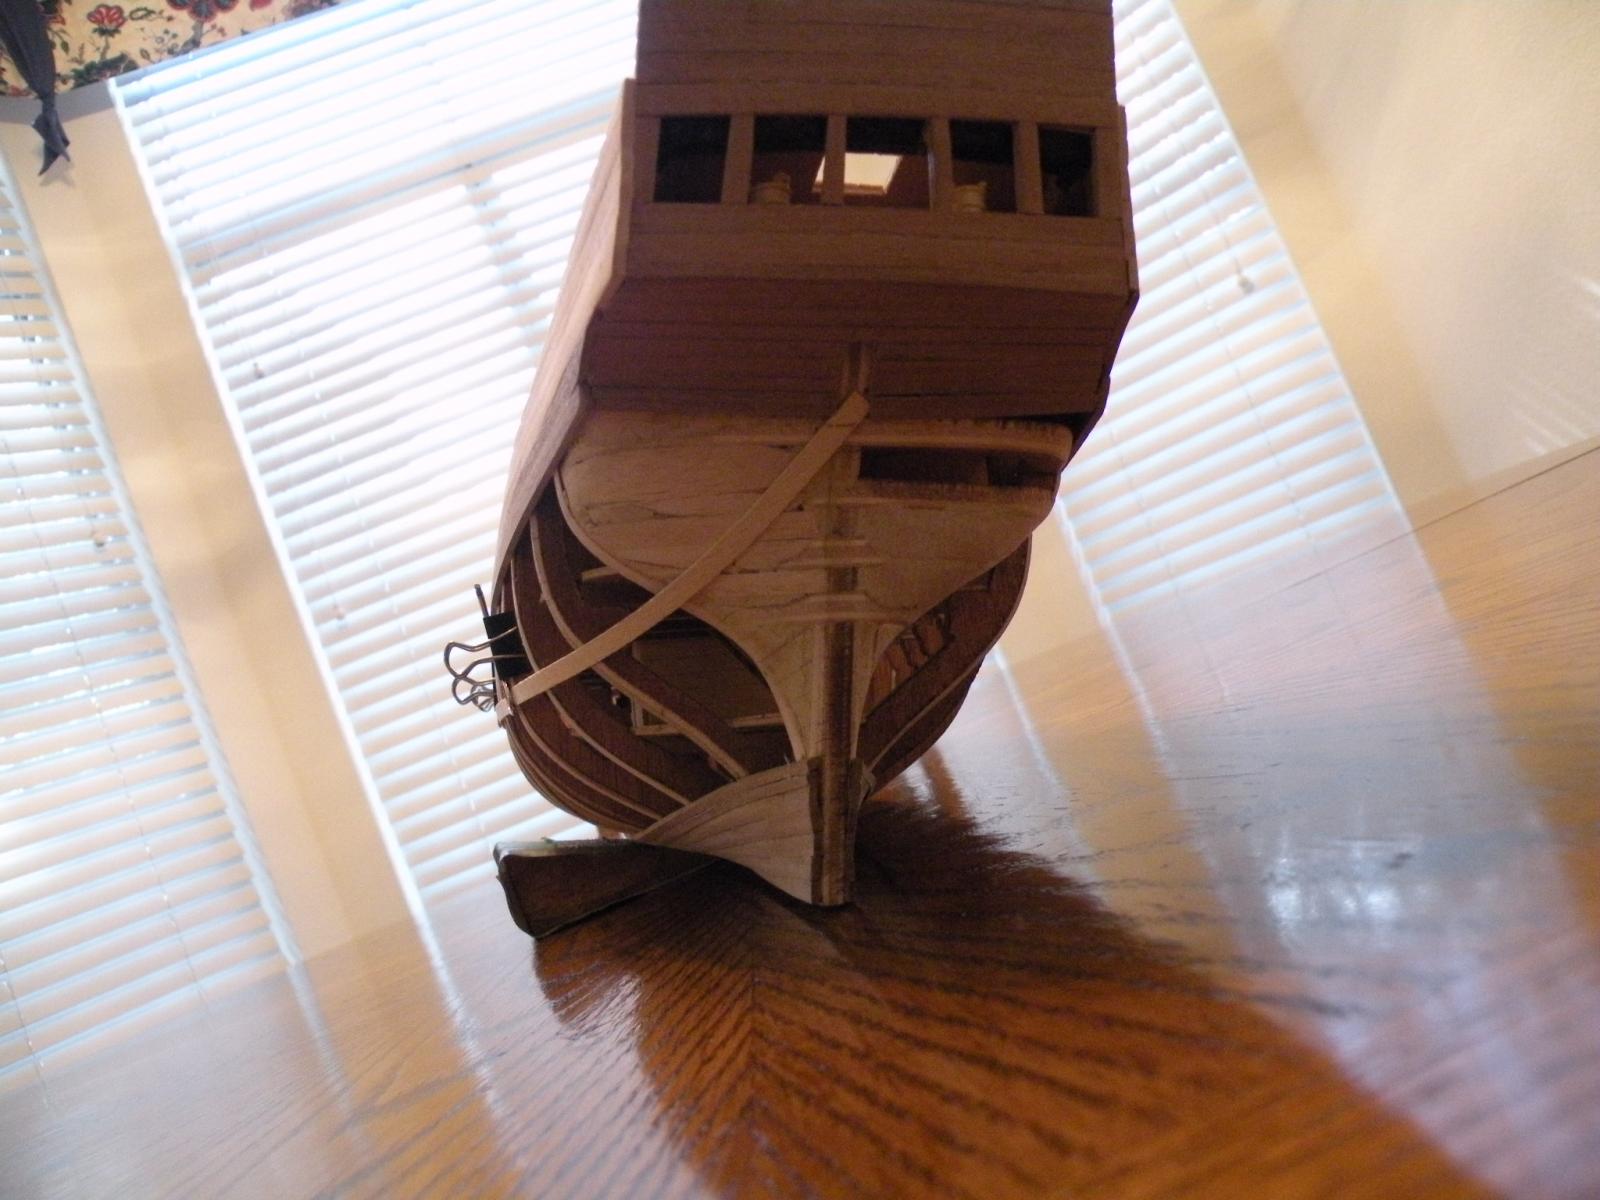
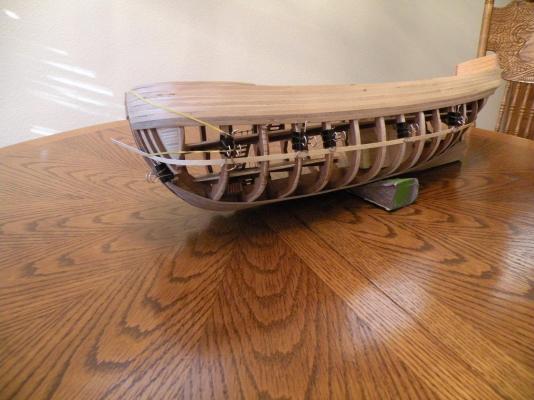
I wanted to drop by this topic one last time to say thanks again to those who've offered advice and encouragement. I think I have lined out the remainder of the hull in such a way that I can now take some accurate measurements and begin to shape and taper my planks to make it work. I think it looks pretty good. There may be some flaws (if anyone would point them out I'd be appreciative) but if it ended up looking as good in wood as it does in cotton shoestring batten, I will be most pleased. I have learned a lot from this. The lining out and spilling should have been done from the start. But its never too late. Anyway, thanks for your help.

-
It all comes clear. Thanks for your response. Its funny how much I've learned by building a model. I owned 2 sailboats for years and even replaced the bowsprits on both, but I never knew that ships were built with bowsprits offset like that. Live and learn.
-
Yes Nigel you are right on all points. I noticed the fairing of the last frame this afternoon and thought I would fair it down more or fill in the blanks so to speak. But I decided to wait til I was sure how the planks will run cause they may just cross that frame and have plenty of gluing surface just beyond it. If that's the case I just need to make sure the frame isn't standing proud. I've never heard of hooded drop planks so I will quickly add that to my "to do" list and look over your build log. Thanks so much for the suggestions.
-
Keith, in reply to your Q re painting....I am holding that option in reserve for a worst case outcome to the full planking job. I have also considered a second layer of planking. But my preference now is to complete it and then stain (maybe not stain, maybe the natural color of the sanded wood will be nice enough) and varnish. I'm actually happier with the results so far than I ever thought I would be. A month ago I was having nightmares. Now I'm just dreaming about how to make the planks work. At first I was using a full length plank to go from stem to stern. Now that I've discovered how to spill and taper I find its easier to do both of those tasks with partial length planks.
-
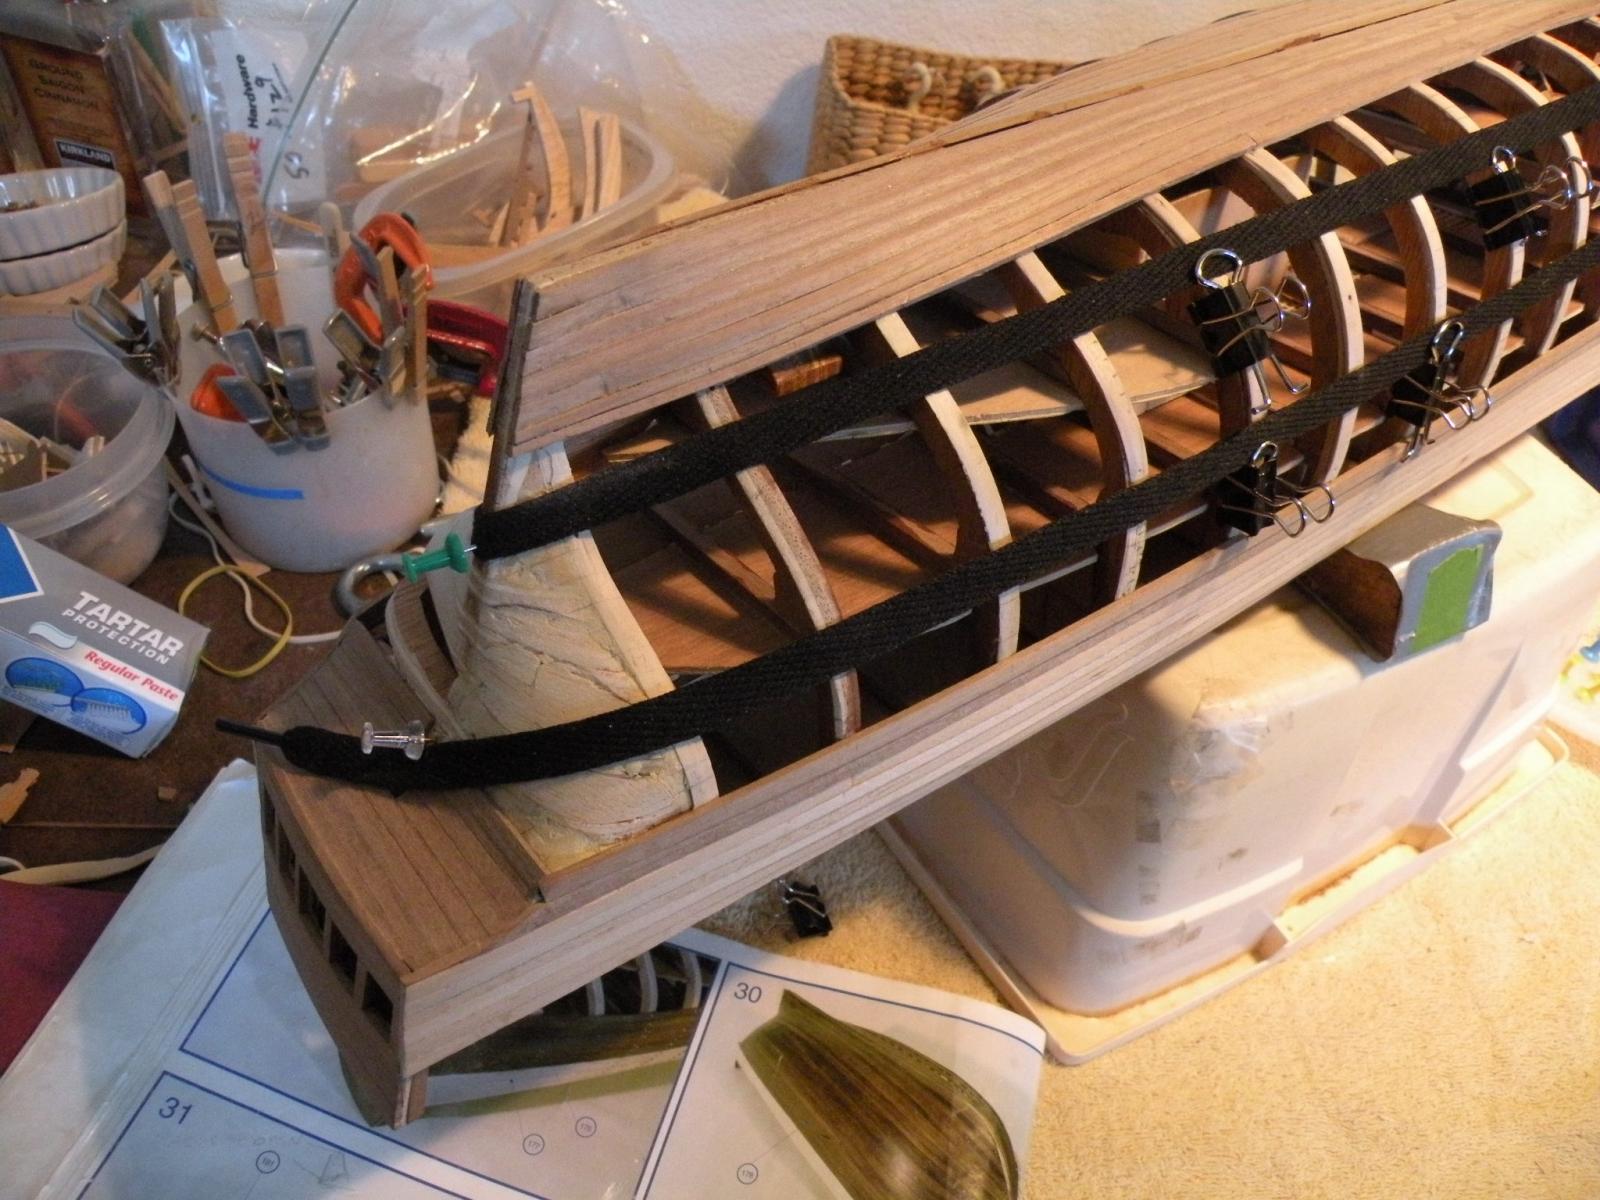
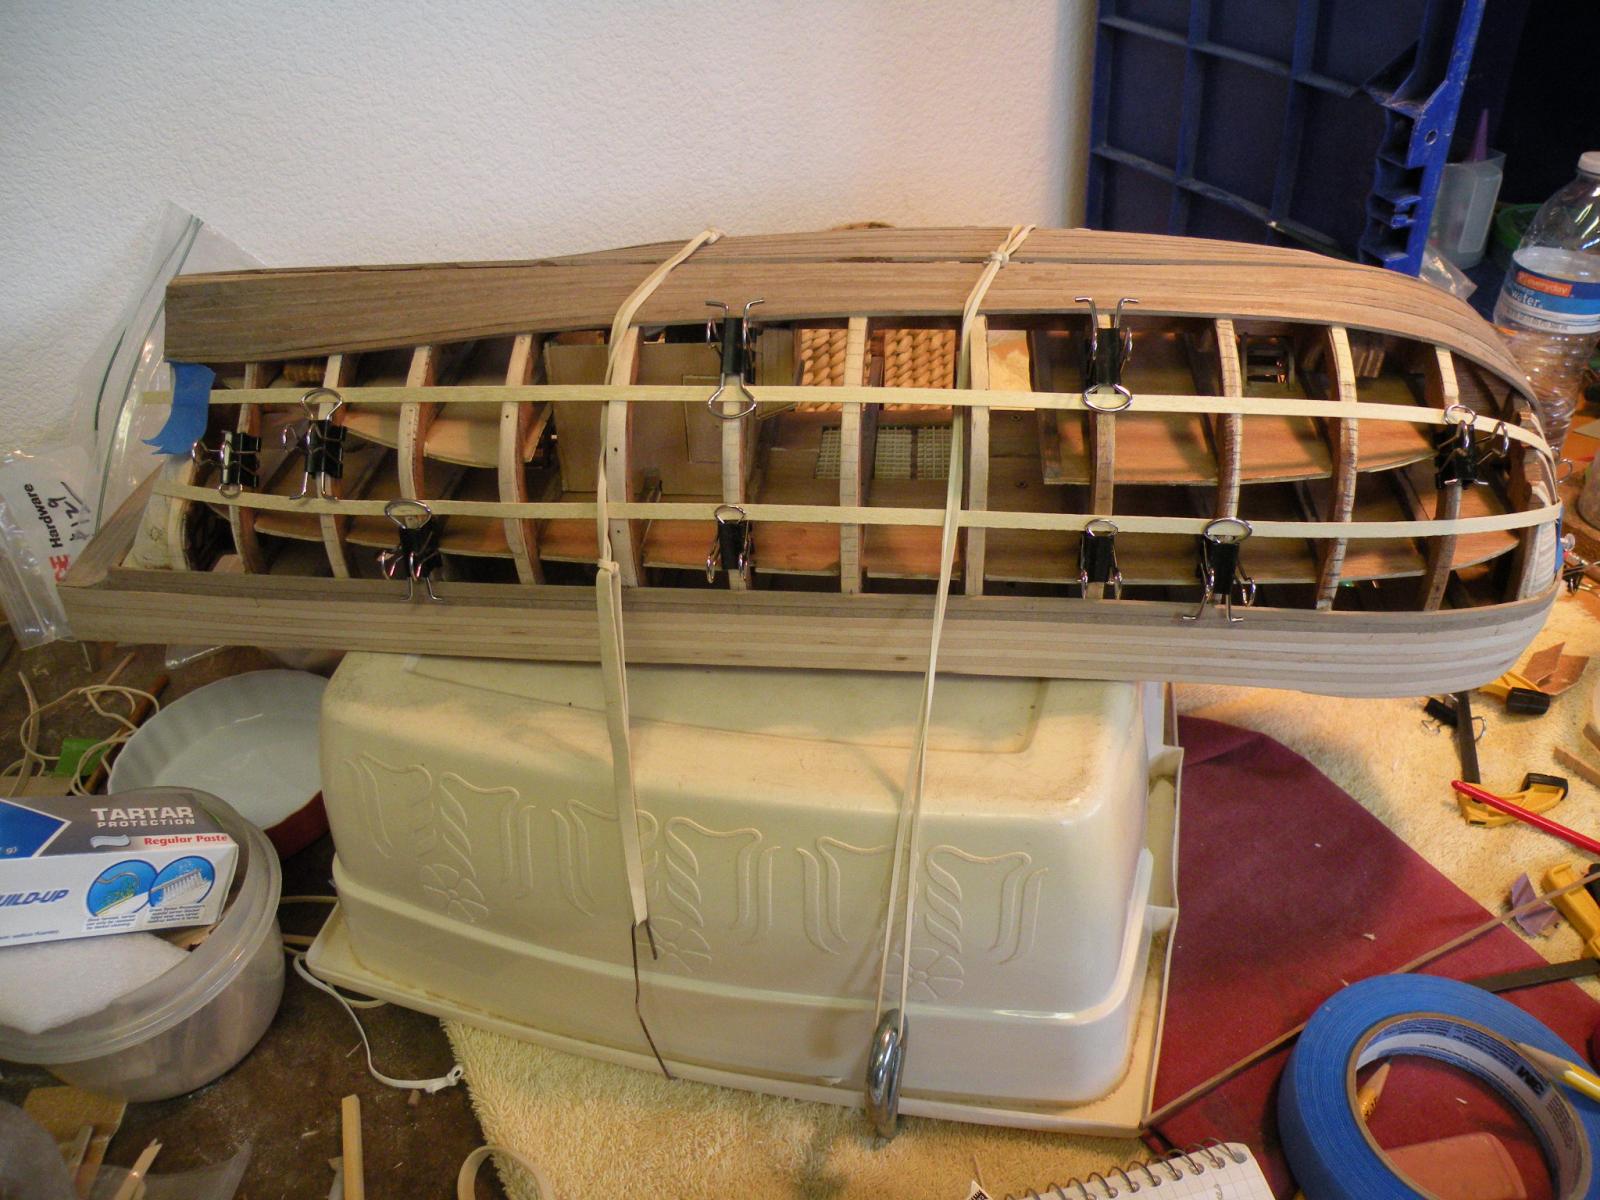
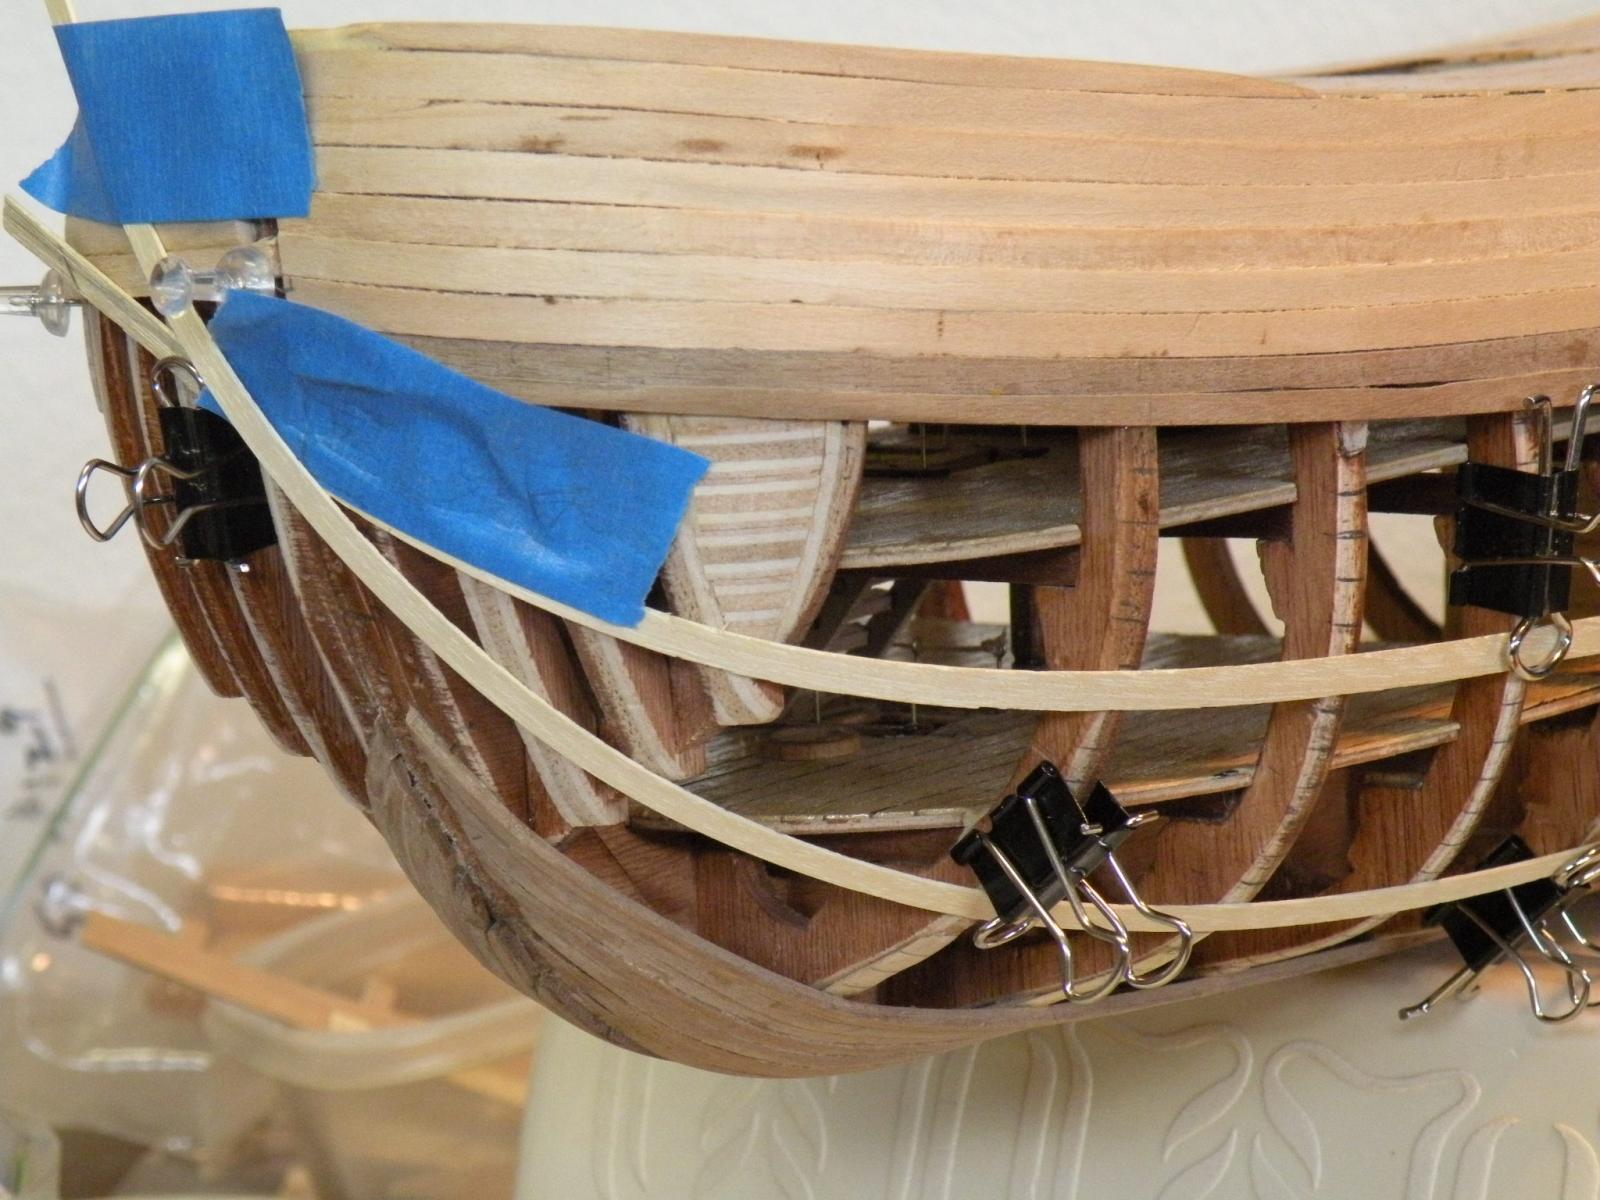
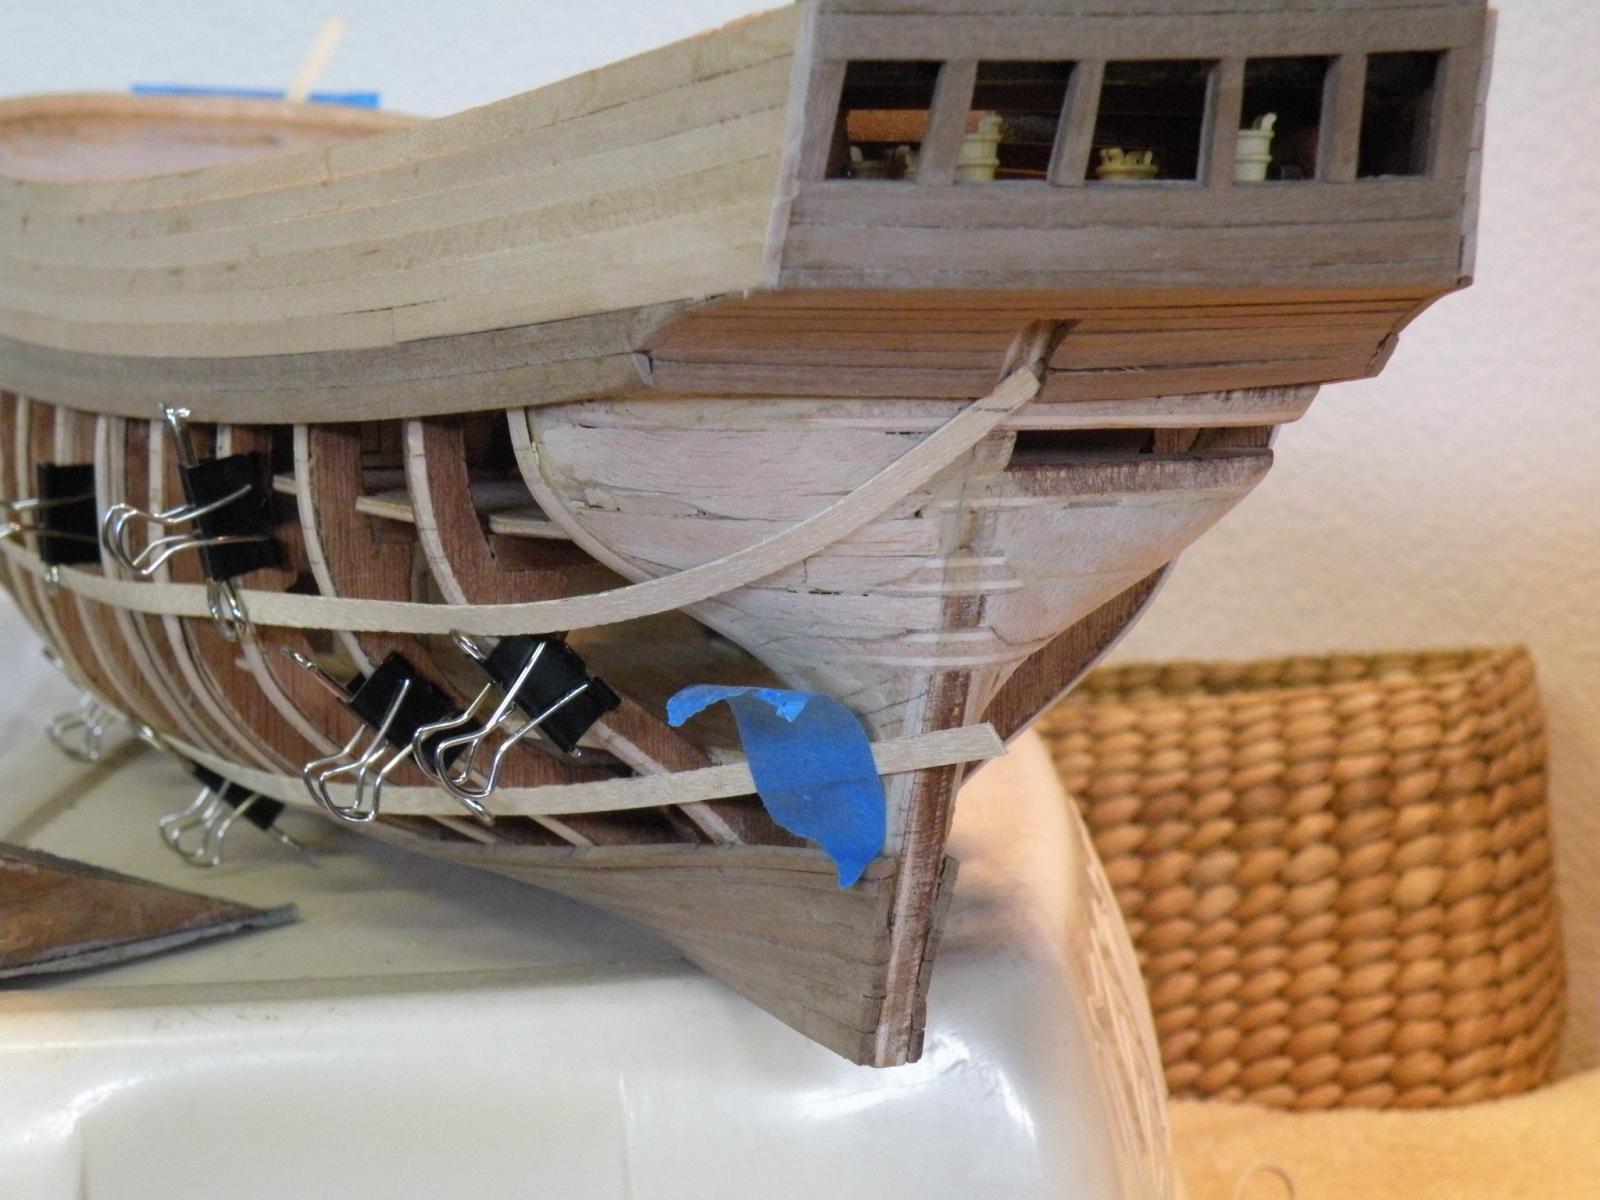
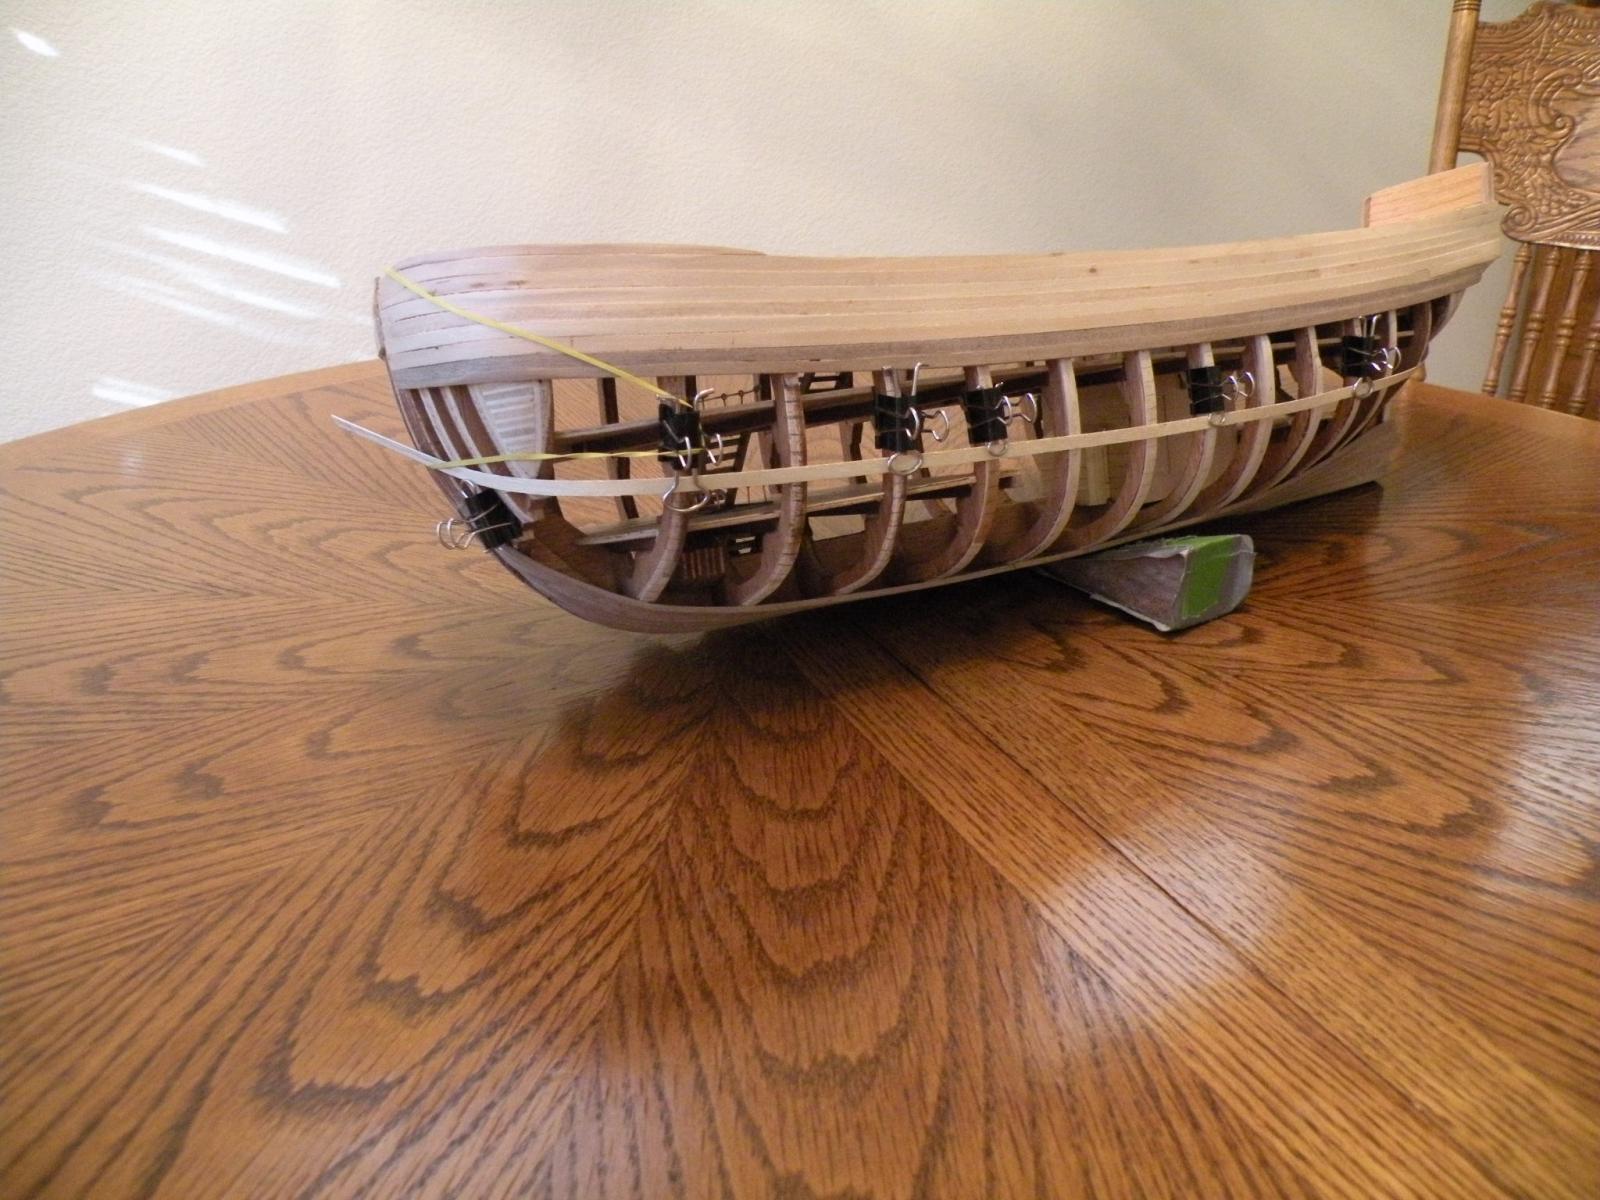
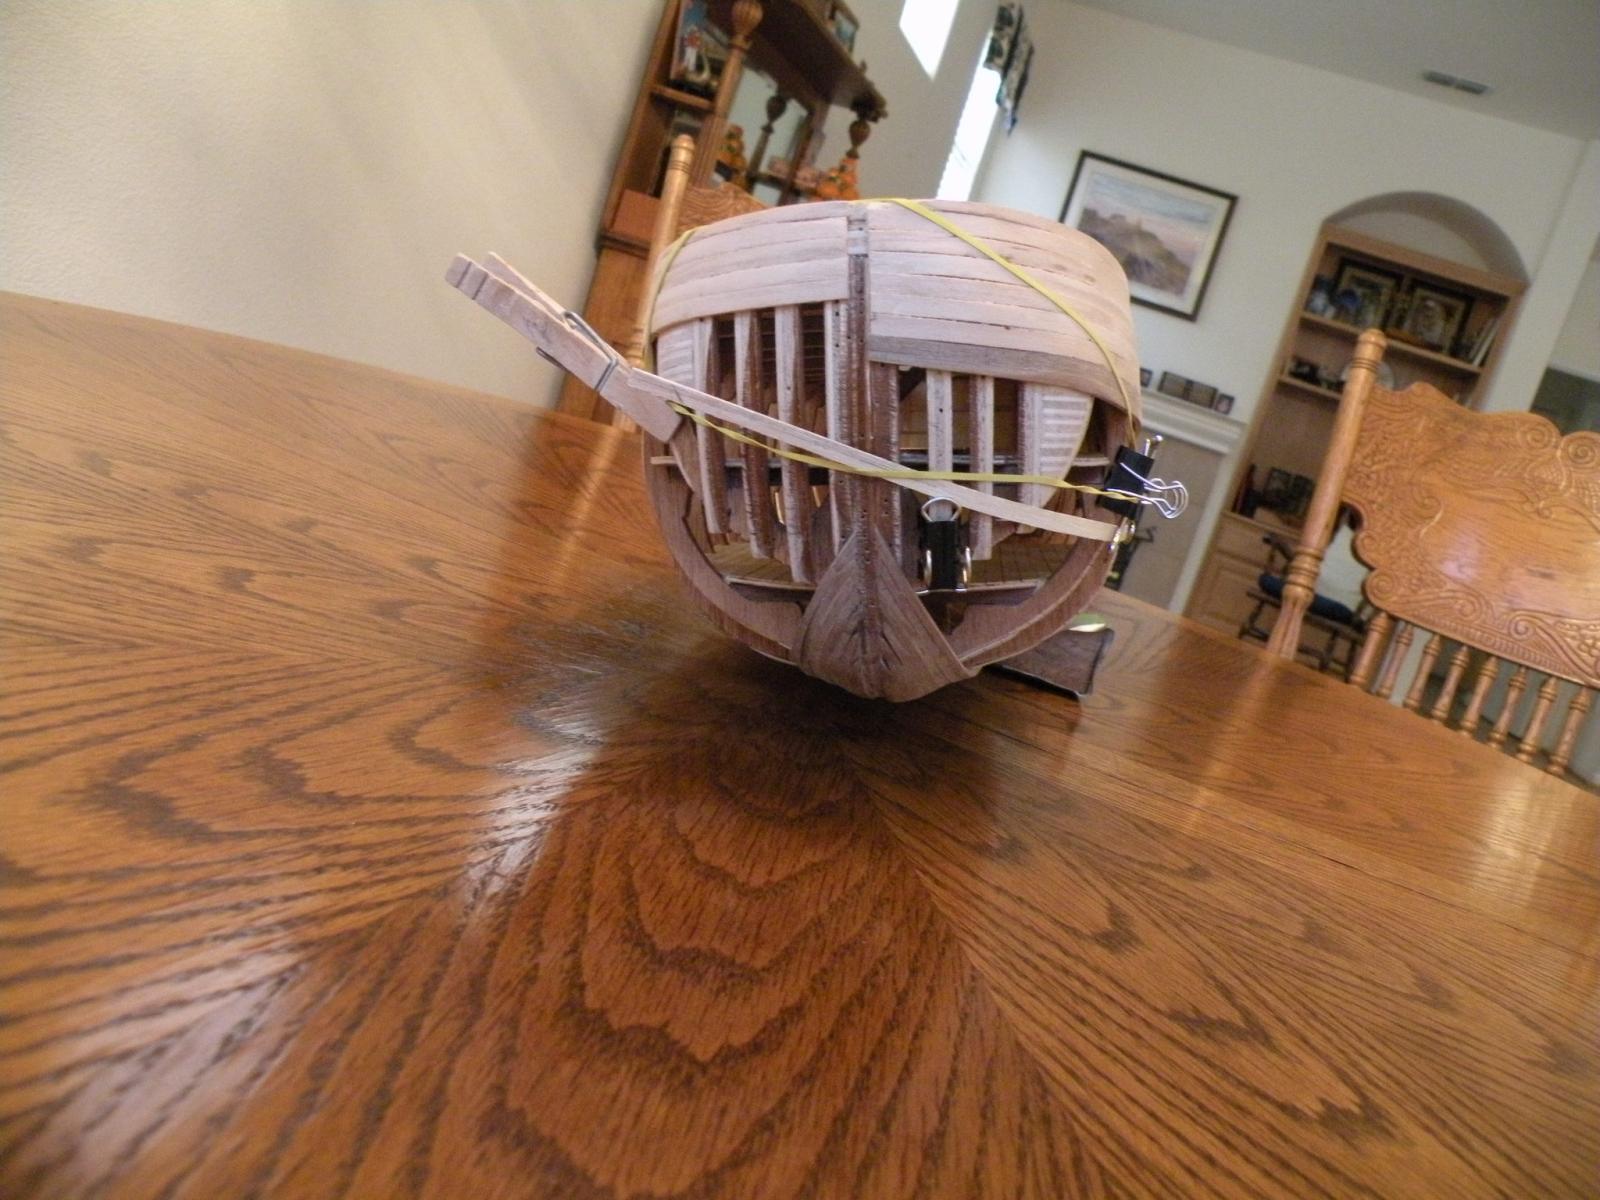
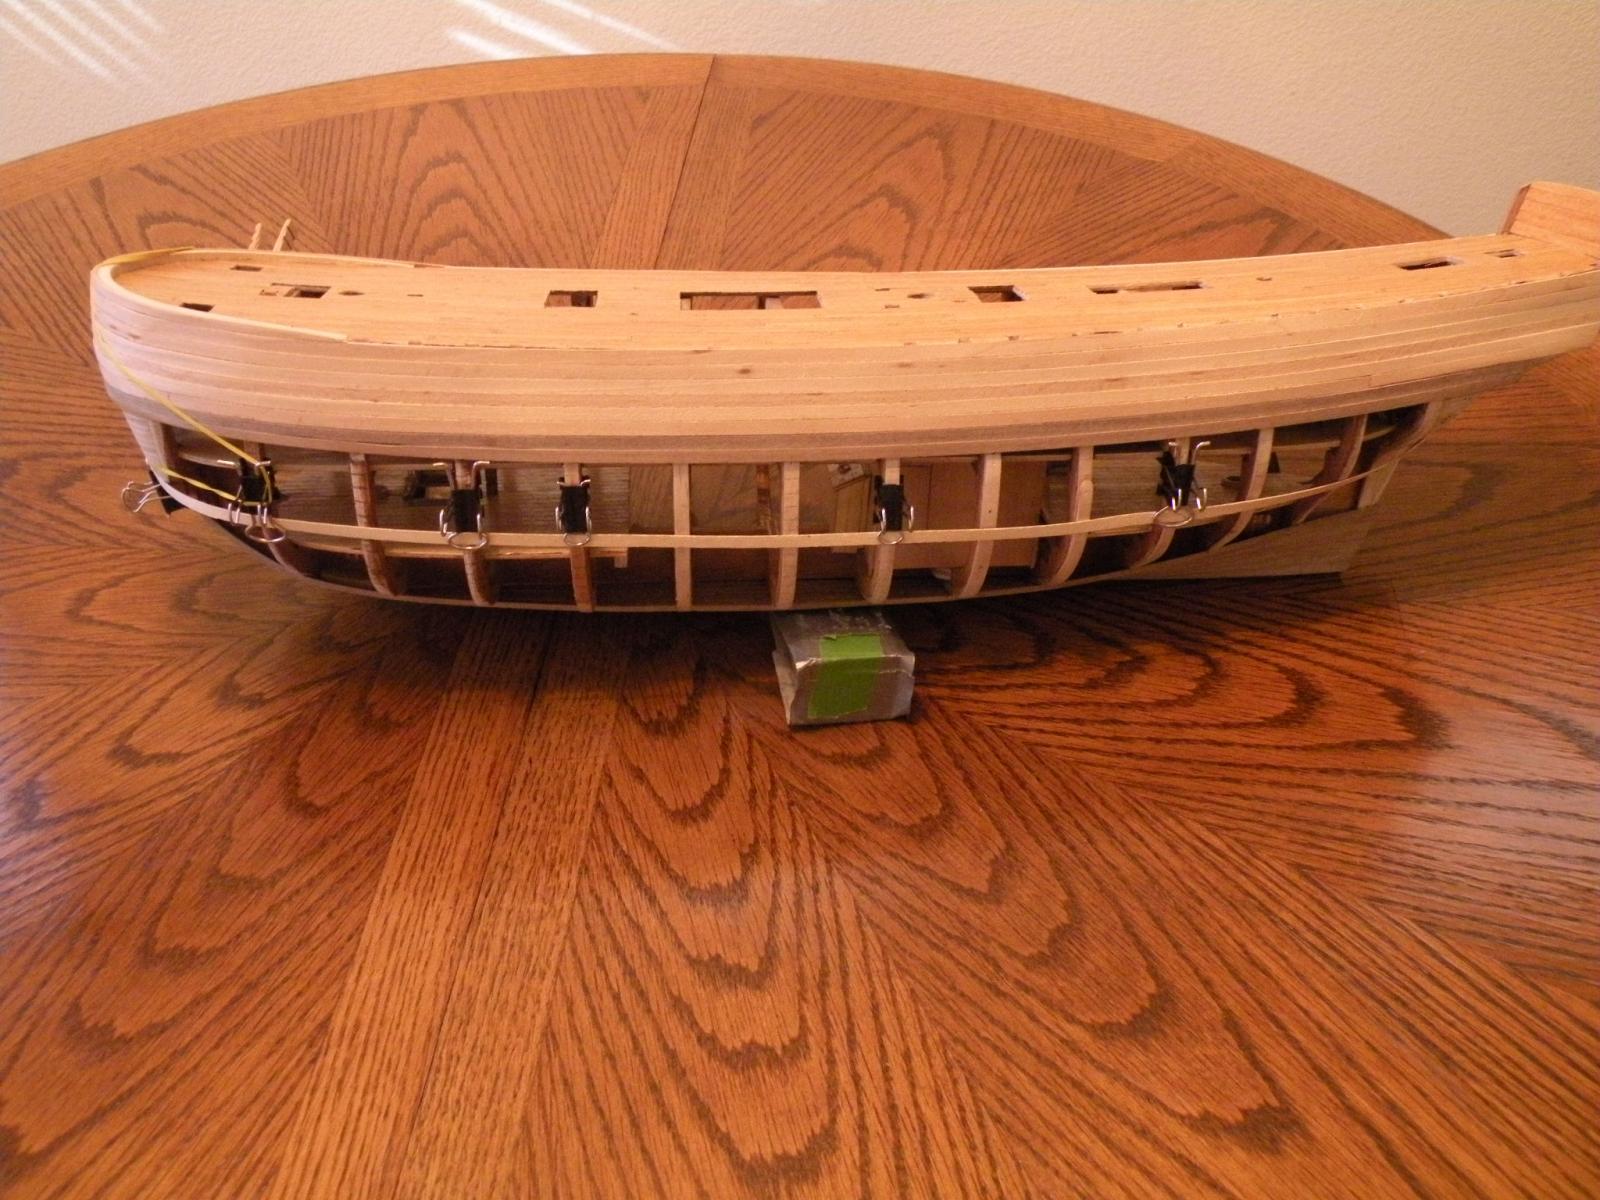
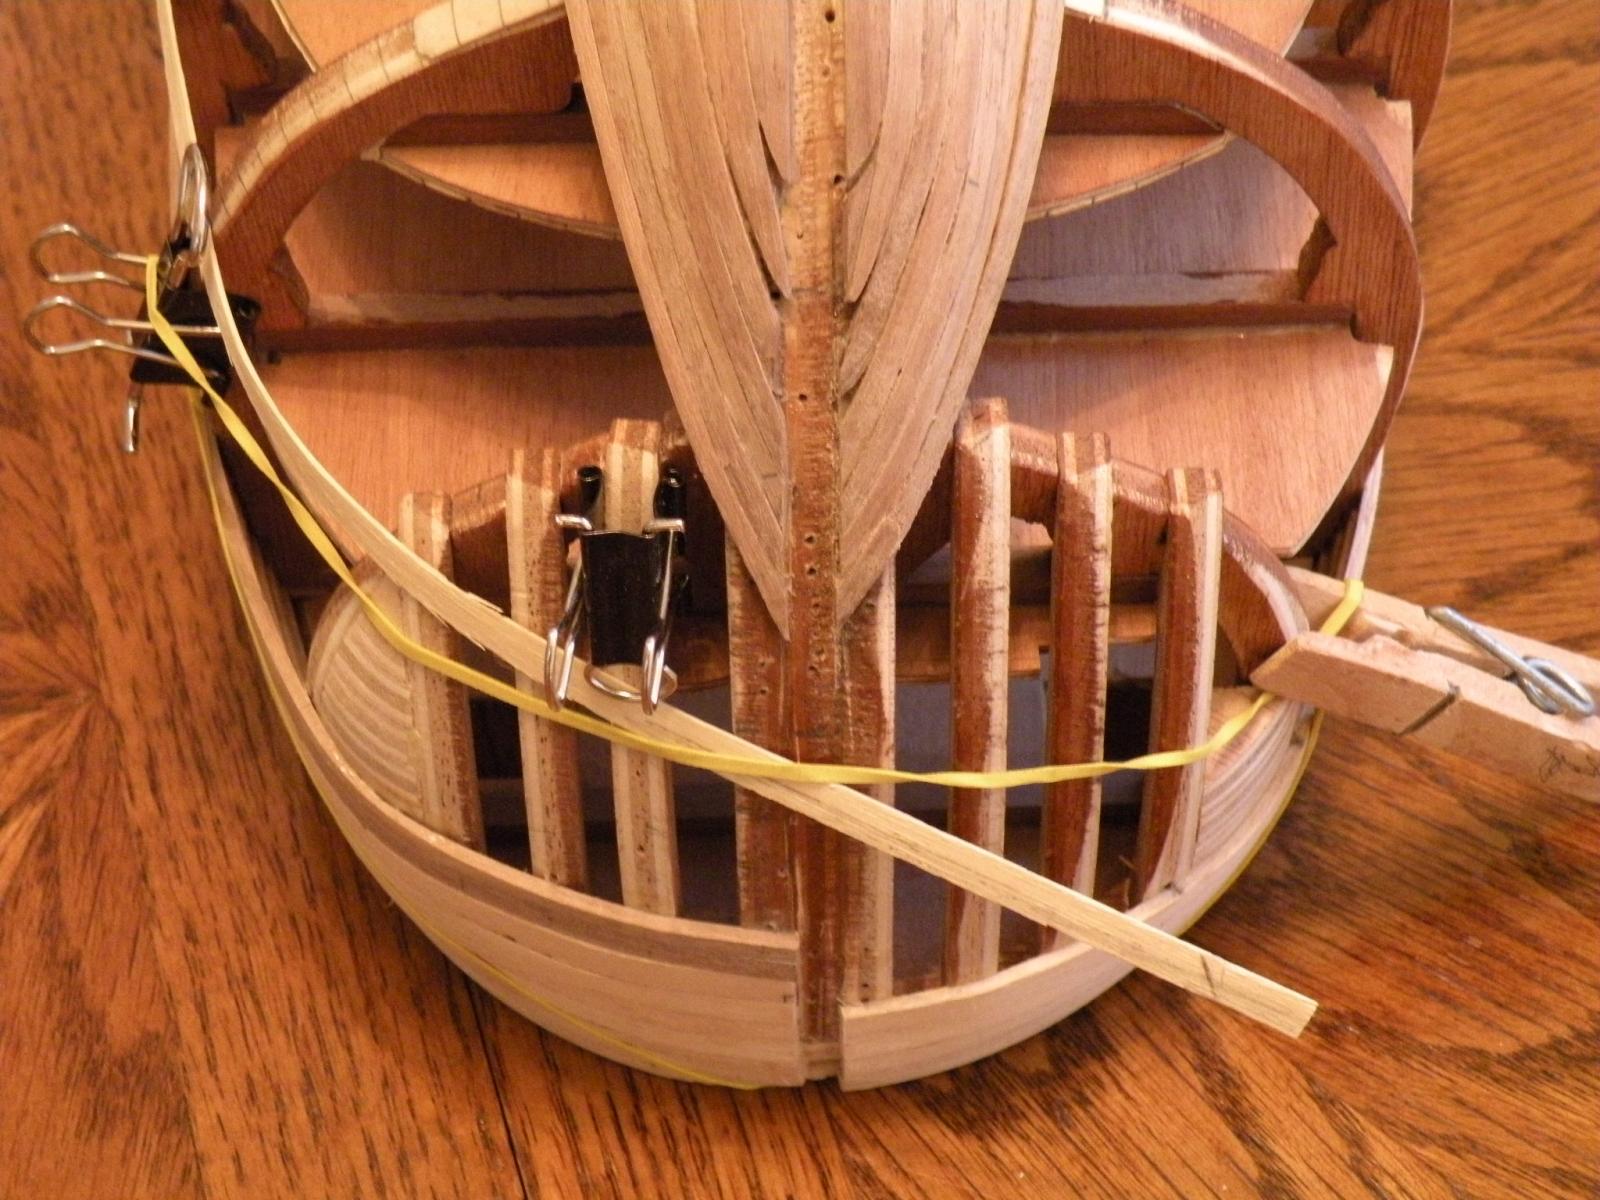
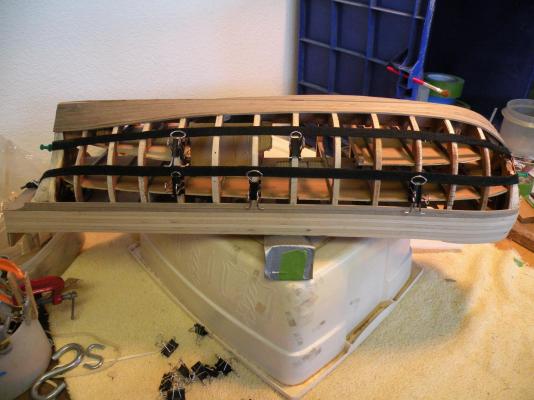
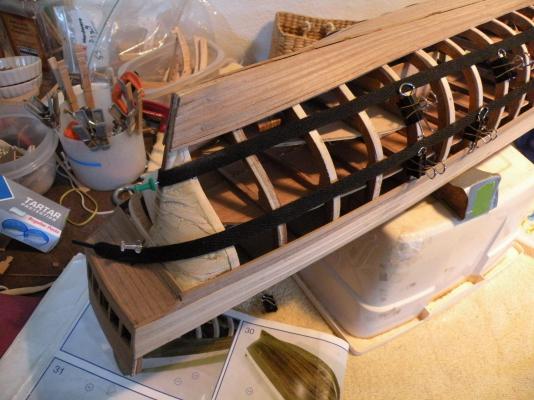
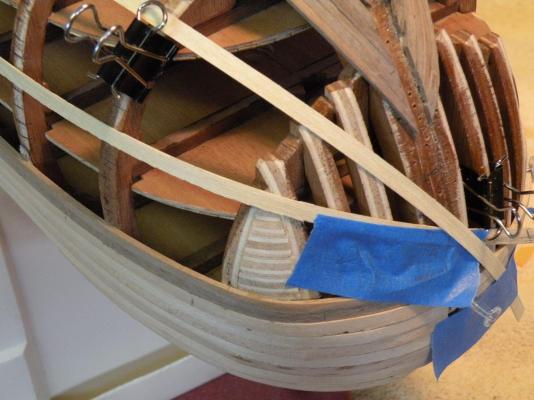
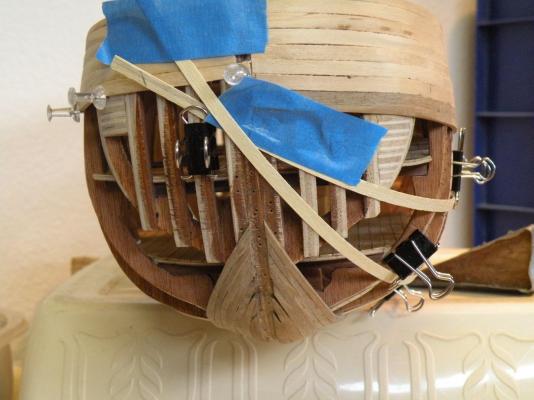
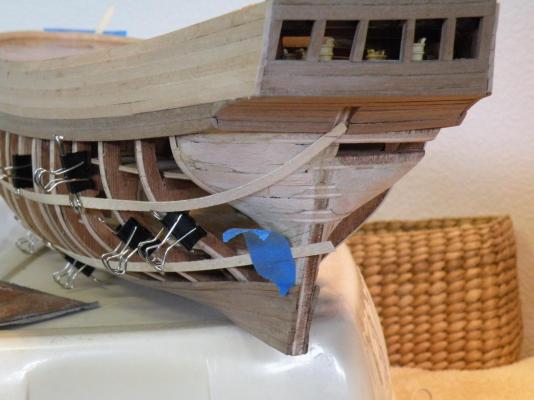
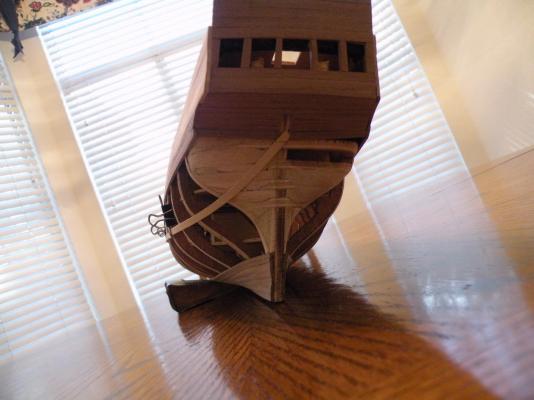
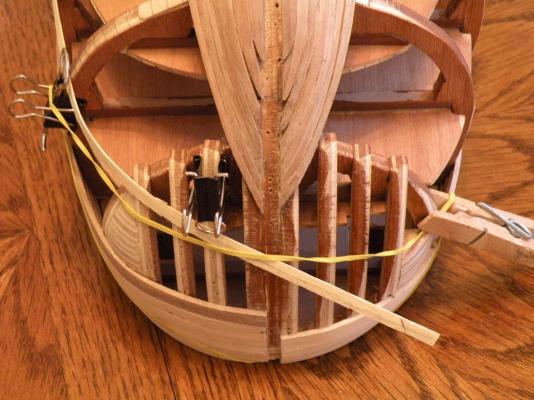
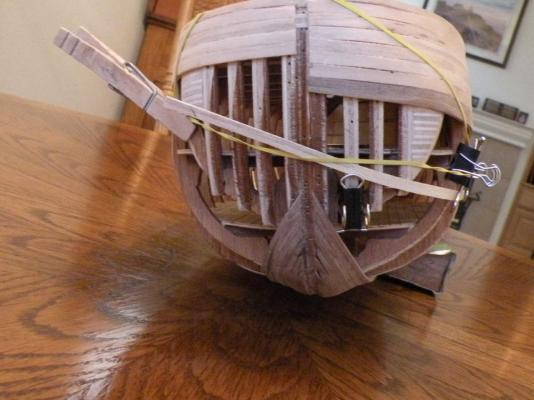
Here are a few more pictures. I am using two battens now to line out the 3 bands that remain to be planked. At mid ship and most of the way forward, the width of these bands are 35mm. So they should accommodate 7 strakes. Toward the bow in the top and bottom band I will use a drop strake and taper the ends to 2.4 or thereabouts (almost half width) and I can make those bands work with no pointy planks. Its the middle band that won't fit. And its really only the area from frame 5 forward that I don't know what to do with. The bow is so fat that 7 strakes will fit fine up to frame 5, but then it drops off radically to that point where I have been forced to end the lowest strake of the top band and the highest strake of the bottom band at a point. I think if I hadn't run the garboard up so high and if I'd tapered earlier up top I would have been able to round out that bow with no wedges or triangular shaped planks. Now I can't see how I can avoid that.


-
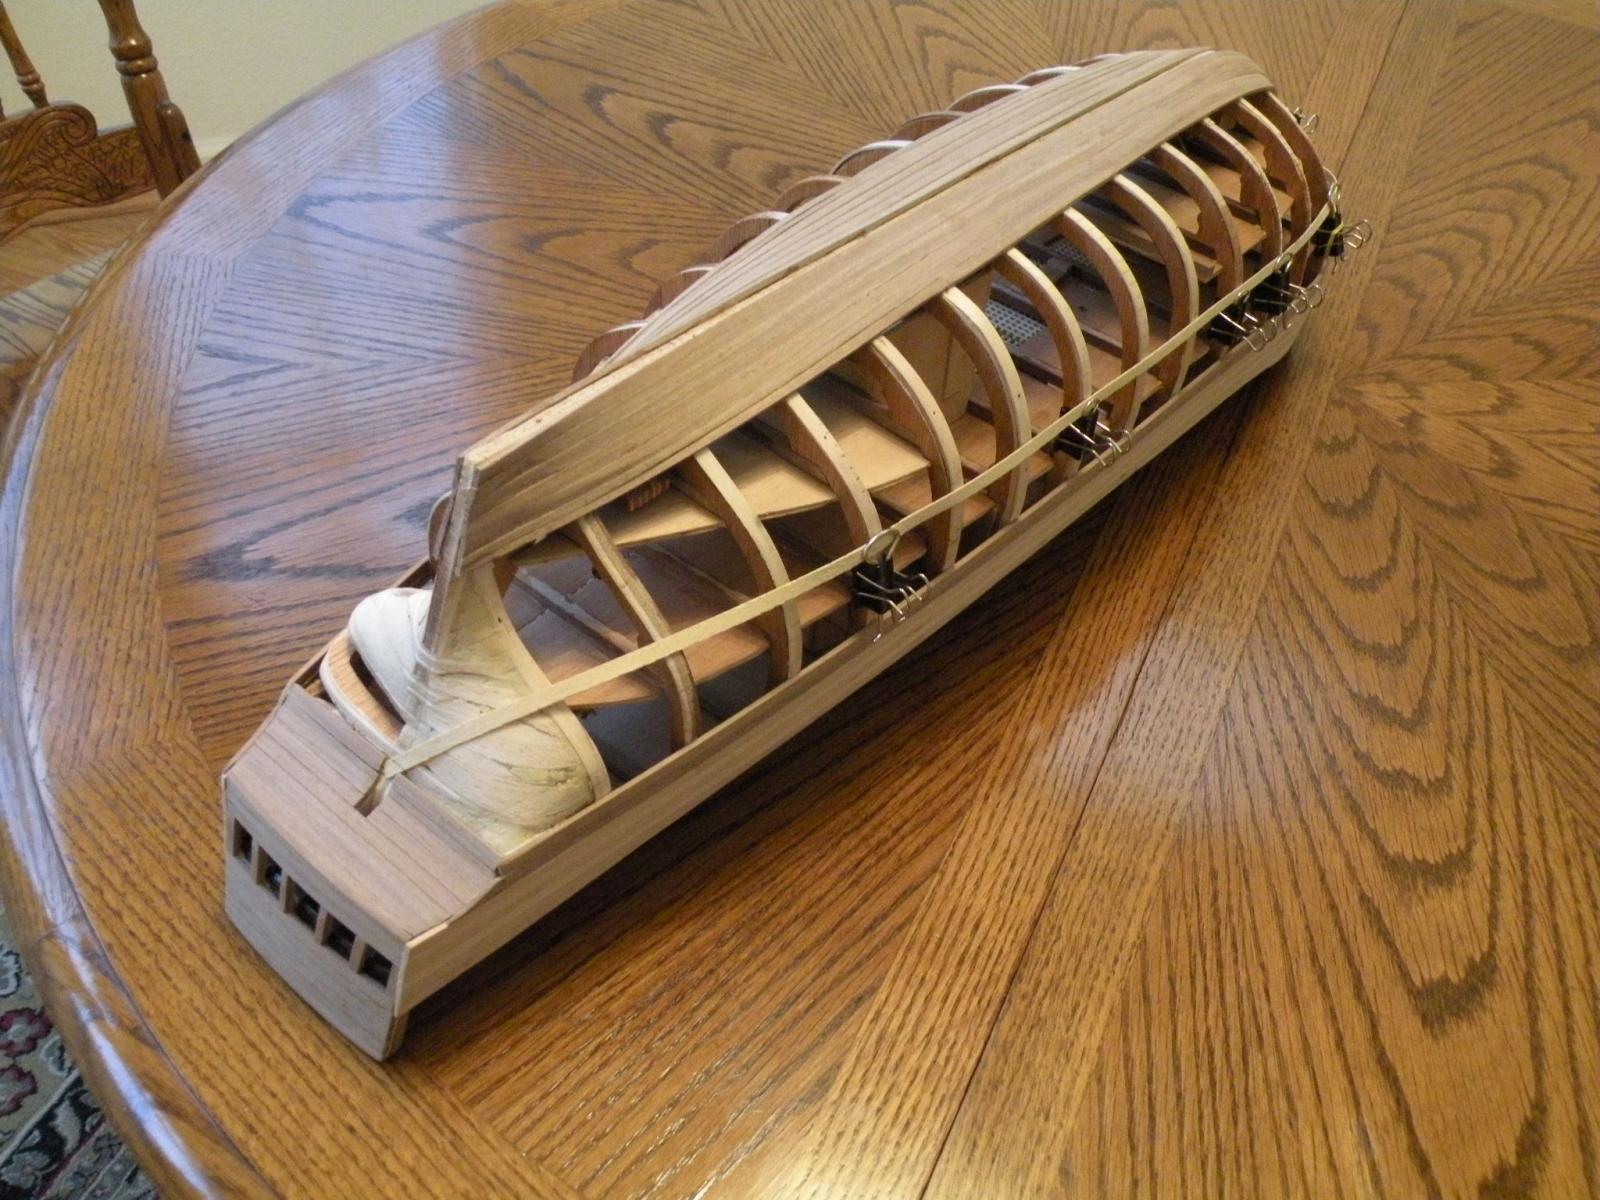
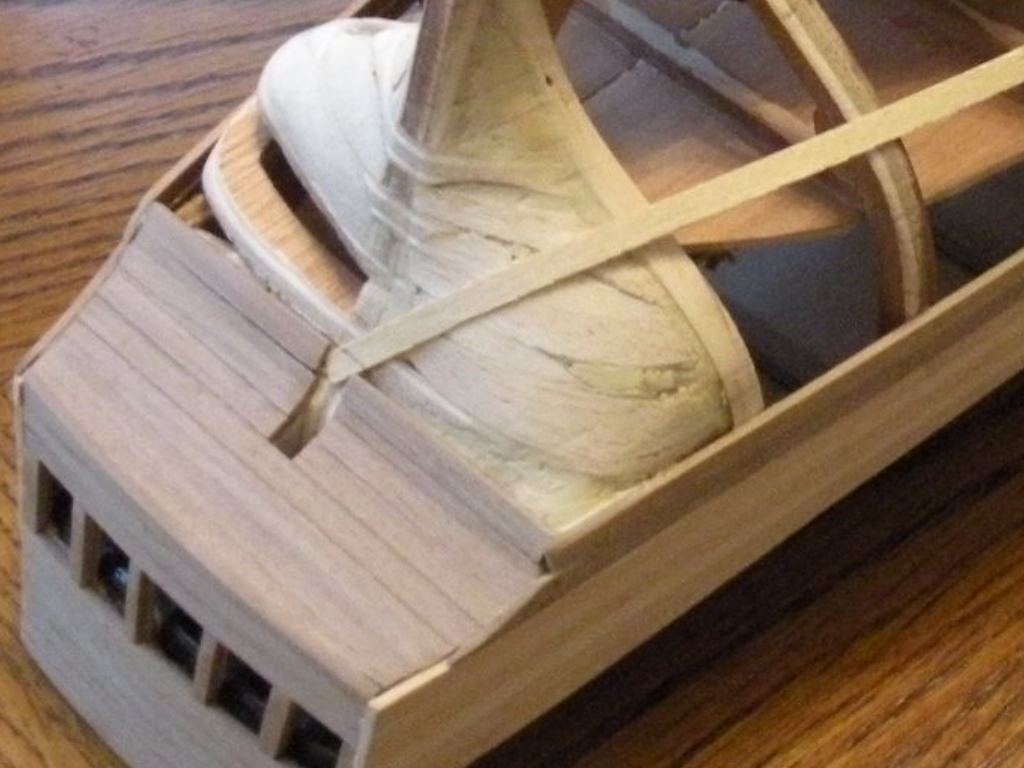
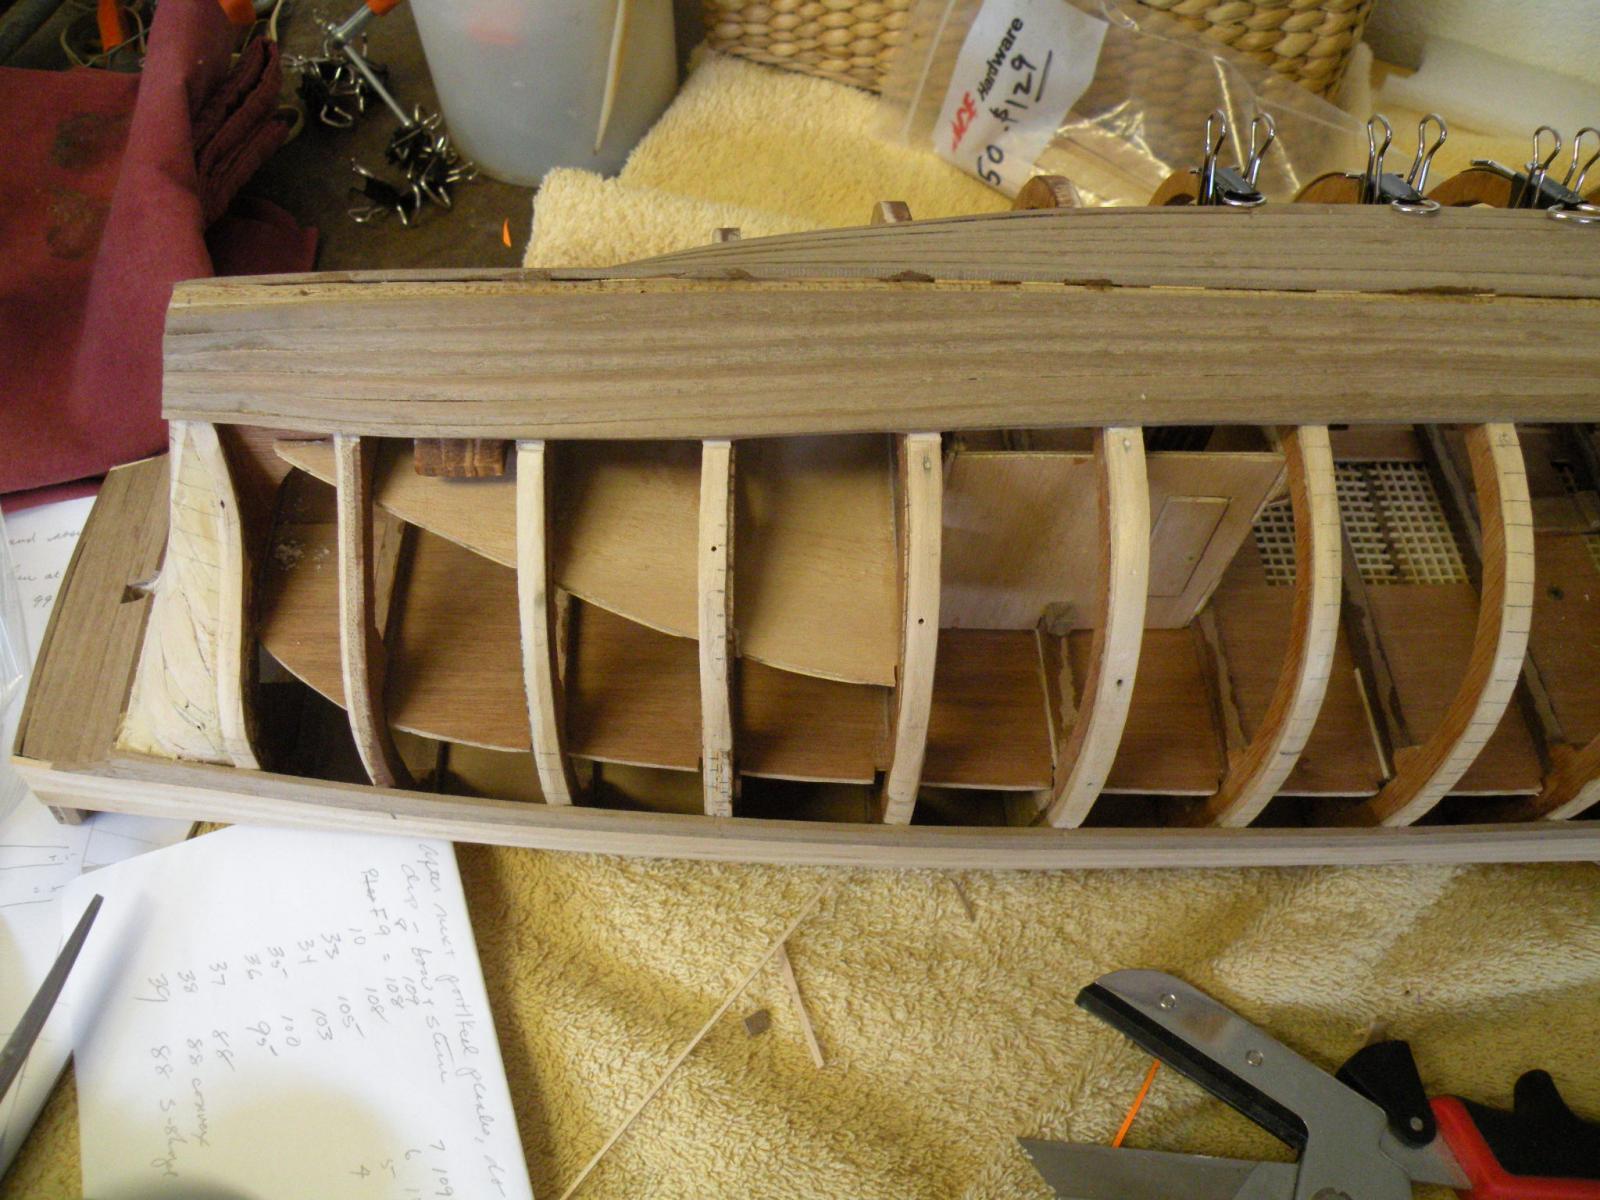
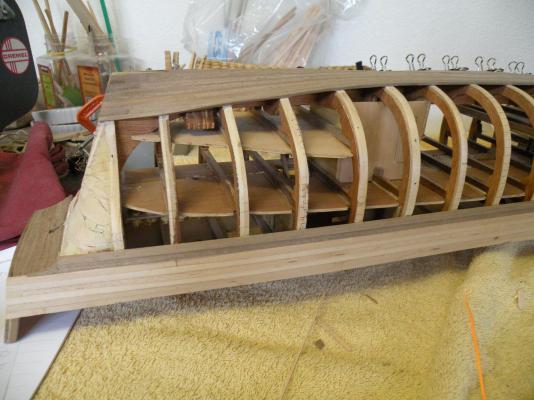
I guess I forgot to mention that this is a single planking job and it uses basswood ( 2x5mm) down from the deck 6 planks, and then African walnut the rest of the way to the keel, also 2x5mm. I will post another picture in a few minutes with a second batten which will show the last problematic triangle that needs to be filled in the mid section toward the bow. Thanks for your attention Brian.
-
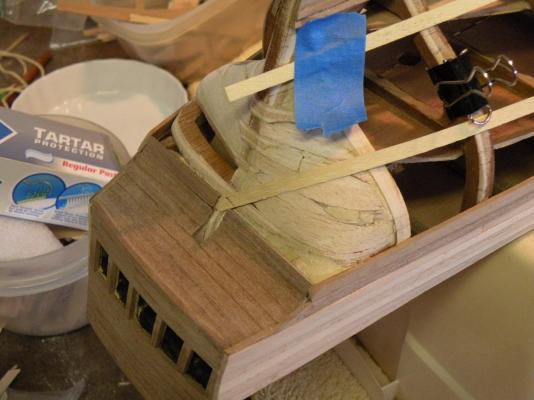
I am in the last stage of planking my model of HMS Bounty and because no-one is perfect, let alone a newbie like me, I can see some trouble looming ahead. I will attach some photos to show where I'm at right now and where I think I can go with it. The main point and reason for seeking help is that I can see that I will run out of space for planks at the bow even if I taper them from their 5mm width to 2.5mm. I have learned (should have paid more attention in high school geometry) that since these planks will be cut on a diagonal where they end at the bow, they will in fact take up 3.5mm each and not the 2.5 mm they will be tapered to. After reading all the tutorials and more build logs than I can count, I reach these conclusions as to what I have done wrong so far to cause this situation: (1) ran the garboard strake too far up the bow (even though I was trying to be careful not to), (2) did not start tapering my planks soon enough; coming down from the deck they should probably all have been tapered. Perhaps with such a bluff bow it was inevitable that space would run out. Its been suggested that I remove some strakes and do it over, but I cannot get my head behind this for many reasons (all of them left unsaid). So I intend to continue and believe that using a combination of correct techniques and ingenuity I can finish it up looking pretty good, even if not perfect from a theoretical standpoint. I've read all about drop planks and plan to start incorporating them soon, but I believe it would take too many to actually end up with few enough planks forward that they'd fit. I still need to fill the space at midships and that space does not really drop off much until the second frame from the stem. My planning is this: The next seven strakes down will need to be full width at the stern in order to be cut on a diagonal and fill the space of the apron (hope I'm using the term correctly). Running forward, these seven will be tapered to 2.5mm and cut diagonally and will fill 7x3.7mm or 24.5 mm, lets call it 25 mm -- out of the total of 52 mm of space there is left to fill. After that I will have about 14 planks left to fill up the midsection of the ship. If I can use drop planks to reduce the number of planks reaching the stem to 9 (ie 5 drop planks), I could fit them in if I taper them to 2.1 mm which breaks the rule of no more than half the width of the plank. And I realize that these math numbers will not work perfectly, so lets just say its all an approximation, albeit close theoretically. From midships aft, I think I can work it to fit all 14 planks, so I'll not go into that. Can someone please advise me if 5 drop planks in that space will look OK and if there is a particular place where they should go. I know I have to put them over a frame, but would it be better to bunch them low or spread them over the 14 planks. More importantly though, I would like advice on where to go with this if drop planks are not the answer or if it turns out even 5 does not do the job. I would then end up with a mid section that comes to a point and my thinking is that the only solution would be to taper the planks to points to make them fill the space. Can someone tell me if there are other solutions that I just don't see? I thank in advance anyone who spends the time to view my pics and offer some critique of my work so far, and suggestions for how to proceed. This site has been invaluable in my 9 month career as a modelist, and I truly appreciate all the work that goes into and the free time and advice that members offer.


-
Maybe this is a dumb question, but here goes anyway. You said you put the deck on upside down. And then you said the fixes were easy. Here's my question....isn't the deck symmetrical from side to side? If so, is there really a right side and wrong side to the false deck? What were the fixes you needed to make? You did not remove the deck and reglue it right side up did you? On my current build the only issue with the false deck having a right or a wrong side was that it was warped so I needed to match the warp of the deck to the sheer of the ship itself.
-
Size of planks on a 18th century ship
Captain Al replied to Captain Al's topic in Nautical/Naval History
Thanks Mick. I was pretty sure they'd go larger than 9 so I could work with slightly larger than 5 mm. I have McKay's book; maybe I need to take a magnifying glass to some of the drawings. So far I haven't been able to locate that dimension. This is really an academic question for the time being since I will finish Bounty with the 5s they provided. In the future though I may choose to either mill my own or try to buy a wider plank if the scale will allow for it. -
I'm wondering what the maximum width of hull planking might have been back in say 1783-1800 or thereabouts. I'm working on a 1:48 scale model of HMS Bounty and the material provided for the hull is 5mm wide. This would work out to only 9 1/2 inch wide planking on the real ship. As I work with it I am finding that if these planks were 6 or even 7 mm wide they would be much easier to shape. A 7 mm wide plank at 1:48 would be 13 1/4 inch wide plank in reality. Would this be too large to be authentic? Perhaps its for aesthetics that 5mm is used? Maybe 6 or 7 would not look right despite it being historically accurate?
-
Again, thanks Russ. You've been a great help. I haven't posted to my build log in months but you might be interested in the trials and tribulations of my Bounty by A.L. I've been at it for 9 months now and will never give it up.
-
Russ, thanks so much for paying attention to me. One more thing and I'll leave you be. I went on line to get some scalpels and didn't realize there were so many sizes and shapes and brands. Can you tell me what number scalpel you use mostly? It looks like the number 11 is the same as a number 1 exacto blade (but probably sharper). I was wondering if for purposes of cutting a straight line through 2mm wood a curved blade might be stronger and not break as easily. But for curves, it would seem that the pointed tip #11 might work best. As for brands, Amazon lists Swan Morton for very reasonable prices -- $25 for 100. Do you know this brand? Thanks again.
-
I can see where it would or could be very satisfying and fun provided you are using the right tools and technique. Where I'm at as far as possessing tools is that I have to use the exacto knife or the dremel. There doesn't seem to be an in between. And the exacto is very tiring (even with brand new blades) and the placement of my steel rule guide is very tricky and time consuming. That's why I'm desperately seeking advice on the best tool to use.
-
I've learned a thing or two about my camera, so I think I can upload these photos.

-
Following on with this. Did my wavy problem start because I was forcing each plank to conform its shape to the previous one? I have been soaking the planks and they were easy enough to push into place and even twist 90 degrees to lay against the tail end of the false keel. I think this is called edge bending. In this case, was I wrong to do it even if it was possible? Is it ever OK to edge bend instead of spilling (if I am using the term edge bending properly)?
-
Guys, thank you both for your explanations. I've been experimenting with Starbucks swizzle sticks and I think I understand. These sticks are easy to cut with an exacto knife. I am wondering though how best to cut the curve into a 5mm wide piece of African Walnut. I've had decent luck with the knife in straight tapers using a clamped on steel rule as a guide, but cutting a curve is another thing entirely. What methods or tools work best? If the planks were wider I might think about using my dremel attached to a router table with a sanding drum. Maybe a straight bit but that's scary. But at 5mm, shaping down to even less, its hard to think how I'll control the feed. I'm finding that while model building uses a lot of the same techniques as cabinetry, the size requires a completely different approach. To add another problem to the mix, I have already laid 6 planks up from the keel without doing any spiling. And I probably waited a plank or two to start tapering. But it is what it is. And what it is is a nice looking hull but with a slightly wavy effect. Its been recommended that I take off some planks and start over. Even though I know this is the best way to fix things, I am against this for a lot of reasons which would take too long to explain. So I'm trying to see if I can gradually reduce the wave by tapering and now spilling. Is that possible or is it in there permanently without removing them? I've also thought that a way to just stop it in its tracks so to speak is to leave a gap between the last (wavy) plank and the next one, filling it with a shaped plank later. Its still pretty far under the hull that it wouldn't be too visible. I'm working on Bounty and its a tough planking job and I don't expect it to end perfectly. I'm trying to use this build (my first) as a learning experience and it sure has been. But like I said, I'm aiming to finish it within my lifetime and plank removal doesn't square with that objective. I am going to try to attach a photo to give you an idea of where I stand. I want to again thank you for your time. Each increment of additional knowledge helps me along. Well it seems my files are too big to upload. I now have to learn how to take pictures that don't use up so much space.
-
Thanks Russ. I may need to get myself another piece of reference material. I made a typo mistake in my last post.....I meant to say "they (the drop planks) can not go anywhere." But I think you got my point. Can you tell me what the difference between spiling and tapering is? I can't seem to get straight what spiling is -- I thought it was the process of taking measurements to see what width and number of planks would fit in a given space. Then I thought you tapered to that width. But you seem to be saying that spiling is also a process of cutting the plank -- more or less shaping the top edge and using some method of transferring the curve above it to the plank being "spiled." Does this contradict the rule of thumb that only the top edge of the plank should be tapered?
-
No comments on this so far, so I guess I'll just proceed with the assumption I am correct on most parts. I've found in laying out where the drop planks should go that it is not such a straight forward simple issue. They can go anywhere. Besides having to be on a frame, they seem to have to go where there is at least a drop of a full plank in the amount of space to fill. If you are using 5mm planks and you do a drop plank where the difference is only 4 mm, you will have created a 1 mm gap.
-
I should have added that if I can be of any help, don't hesitate to ask. I also have McKay's book but I will not send it to you. Did your kit provide enough wood? Cause of what I've read on this site, I'm beginning to worry that I may run out. It seems that A.L. can be overly conservative.
-
Nice to know you're still working on Bounty. So am I, but I'm still bogged down in the planking phase. You've done fantastic in all phases of your build. What would you say was the hardest part so far? Its great that you can get such good support here on MSW. I don't post to my log any more cause it seems no-one is watching. But I do get answers to questions if I post them in other forums. BTW, just a rough count but it looks like you must have 1112 knots just to complete the ratlines. That doesn't include attachment points or any other lines.
-
Before I embark on cutting and installing drop planks on my Bounty, I wonder if someone can confirm for me that I understand it fully. Clearly the idea is to reduce the number of planks (strakes) running to a given area when that area to be filled is too narrow to accommodate the number of planks required further back toward midship, and the taper to make it work would be too radical (more than half the width of the planks). In looking over the pictures in the tutorials, it appears to me that the process is like: (1) two planks are tapered down to where they are half the width of the drop plank where they will join the drop plank. (2) a 45 degree cut is made to the ends of each of these planks, forming a 90 degree rebate where the two come together. (3) the drop plank is cut to a 90 degree point to fit into the end of the original two planks. (4) the drop plank is itself tapered down to an appropriate width at its end point. The part that I am unsure of is this.... do the rules of tapering apply still? Are the original two planks tapered only on their top edge? And is the drop plank also tapered only on the top? Is there any rule of thumb that the first two planks should be tapered to half of a full plank so that the drop plank can start by being a full width plank (with of course the 90 degree point cut)? If the first two taper less than half a plank, then it would be impossible for a full width drop plank to fill up that 90 degree rebate. But if the taper goes to more than half the plank width, then the drop plank must also be cut to less than its full width where it joins them. In other words, is it true that the first two planks must taper to exactly half the width of the drop plank and that width cannot exceed (obviously) the width of the planks being used.