HOLIDAY DONATION DRIVE - SUPPORT MSW - DO YOUR PART TO KEEP THIS GREAT FORUM GOING! (83 donations so far out of 49,000 members - C'mon guys!)
×


Captain Al
-
Posts
613 -
Joined
-
Last visited
Content Type
Profiles
Forums
Gallery
Events
Everything posted by Captain Al
-
Good picture Keith. Now, LA have fun cutting those tiny little angles. Ultimately its knowing or sensing where to do the drop plank that is tough. You'll figure out a way to cut them nicely I'm sure. Read up on tapering! Its really the key to planking around the bow and stern. Don't wait too long to start the tapering. I think I waited til the sixth or seventh plank down from the deck and that might have been one or two planks too late. It seems like none of the top basswood planks need tapering, but I think a couple do.
-
Morning LA....very nice work. I planked my deck also using permanent marker and I guess I got lucky that it didn't run when I (also) used poly on it. That would have been heart breaking. It looks like your deck lay down upon the timbers very nicely and those little rebates for stanchions look clean and square. You shouldn't have problems like I did later on. I would think about adding some filler before you start planking (good decision to do single planking), particularly in the stern. If I recall (it was almost a year ago) when the planks start wrapping around and up to the apron, you might find yourself with very little gluing surface if you rely only on those horizontal frames (there's a name for those but I forget it). You also have not mentioned the whole fairing process. Have you done it already? Your frames in the pictures I've seen are really nice, but in all my experience (LOL, LOL) I haven't heard of anyone not having to fair them at least a bit here and there. And if you do add filler, you'll need to fair/blend that into the smooth lines of the framing. When you lay the first plank around the bow, be really careful as to how high you place it. The instructions are clear enough (says not to go above deck level) but I wasn't sure how that related to the bow boards (which I see you haven't yet laid on). I ended up having to add a partial plank which, if I recall also had to be tapered back, to cover these bowboards. I don't know if your kit's picture book is the same as mine, but perhaps look at pic 26, and get those bowboards in place before you start planking. Looking at the pix again I remember that I did put filler into the bow. I don't know if my log shows it or not, but I made the filler for the bow out of little triangles of soft pine (get some paint stirrers from Home Depot for free) stacked upon themselves. Anyway LA, you'll find a way. You're doing great so far, and it only gets harder (LOL). Are you deviating from the instructions very much? I followed them pretty religiously step by step until I got to the deck fixtures etc. Then I began doing things in the order I thought was best. I spent half the summer trying to work out a planking plan using all the techniques I read here and elsewhere. A lot of the theory worked; a lot didn't. Practice doing drop planks on scrap wood...it becomes fun when you get it right, and you'll definitely need to use them. As for bending the basswood and walnut -- I made a soaking tube out of pvc pipe with a cap. I tied a little weight (non ferrus metal) to the end of a plank so it wouldn't float to the top of the tube and uncover some of it if I didn't fill the tube to the brim), and I tied a piece of dental floss to the upper end and draped it over the edge of the tube (the cap will still fit over) so I could extract the planks. I dropped the planks into the tube and poured boiling water over them then capped it. I usually let it sit in the water for 12-18 hours. Sounds like a lot and most people would say it was, but it worked well and I really didn't break many planks. The basswood was obviously easier to bend. Got to run. I'll be following closely.
-
Darn it Dan....I thought there was no cheating goin on around here. As usual, simple seems to be best. Thanks a ton. I'm thinking of a way to make a continuous loop out of thread without actually splicing it to itself. Do you think this would work --- cross the two ends over each other forming the loop. Then wrap each end through the loop several times -- each one wraps in opposite direction, spreading these wraps along the loop (ie the wraps aren't bunched tightly together). Then coat with glue. I take it you prefer diluted PVA to CA when gluing down knots and other applications to thread. Is this because it dries less rigid or because of the color change the CA usually causes? Or maybe just cause its cleaner to work with? I always appreciate your attention to my problems and foibles. Thanks Dan.
-
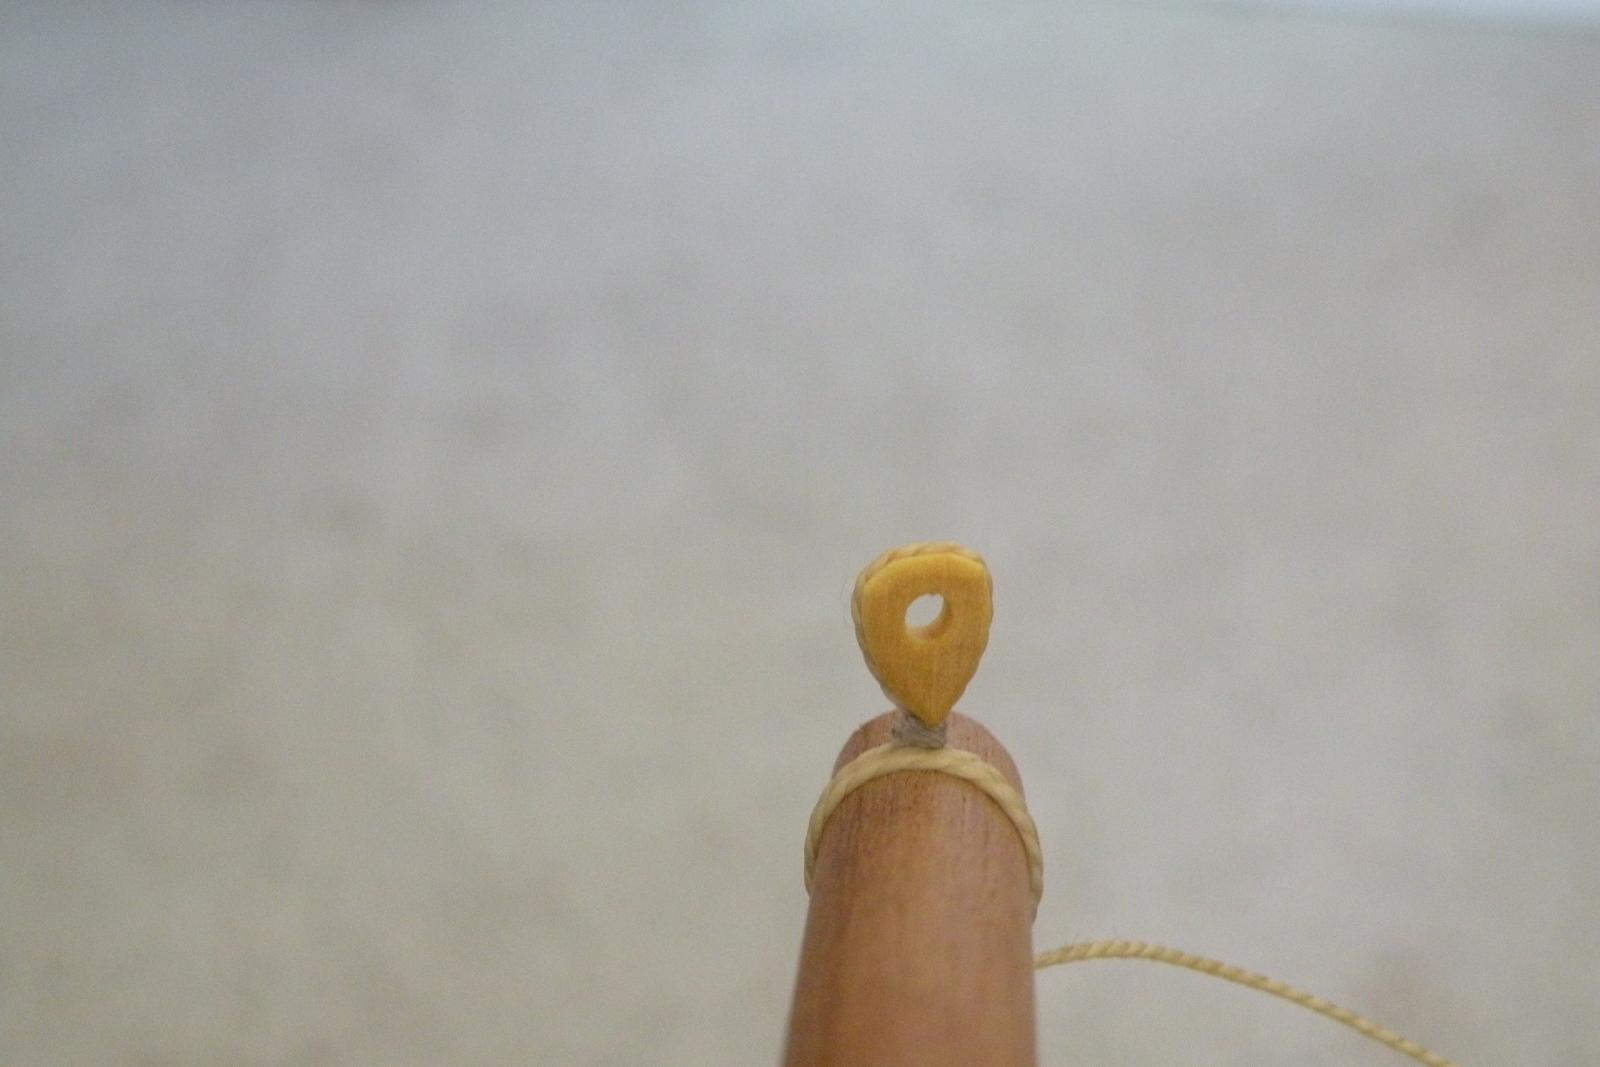
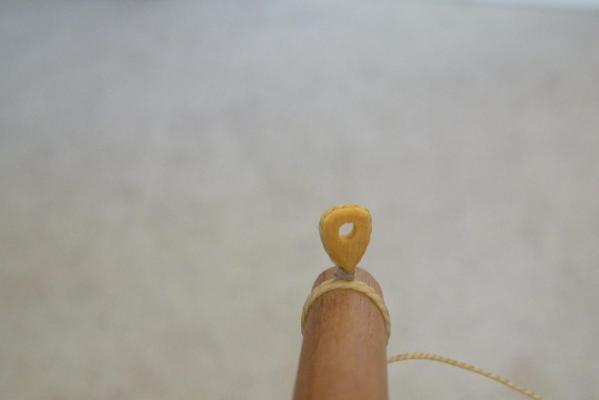
OK, strike that question about block contacting boom. I think I figured out how to avoid that. I've seized the stropping between the boom and the block to create a bit of a cushion for the block to sit on. Then I wrapped the pigtails of the stropping around the boom. Is this correct? See pic...
-
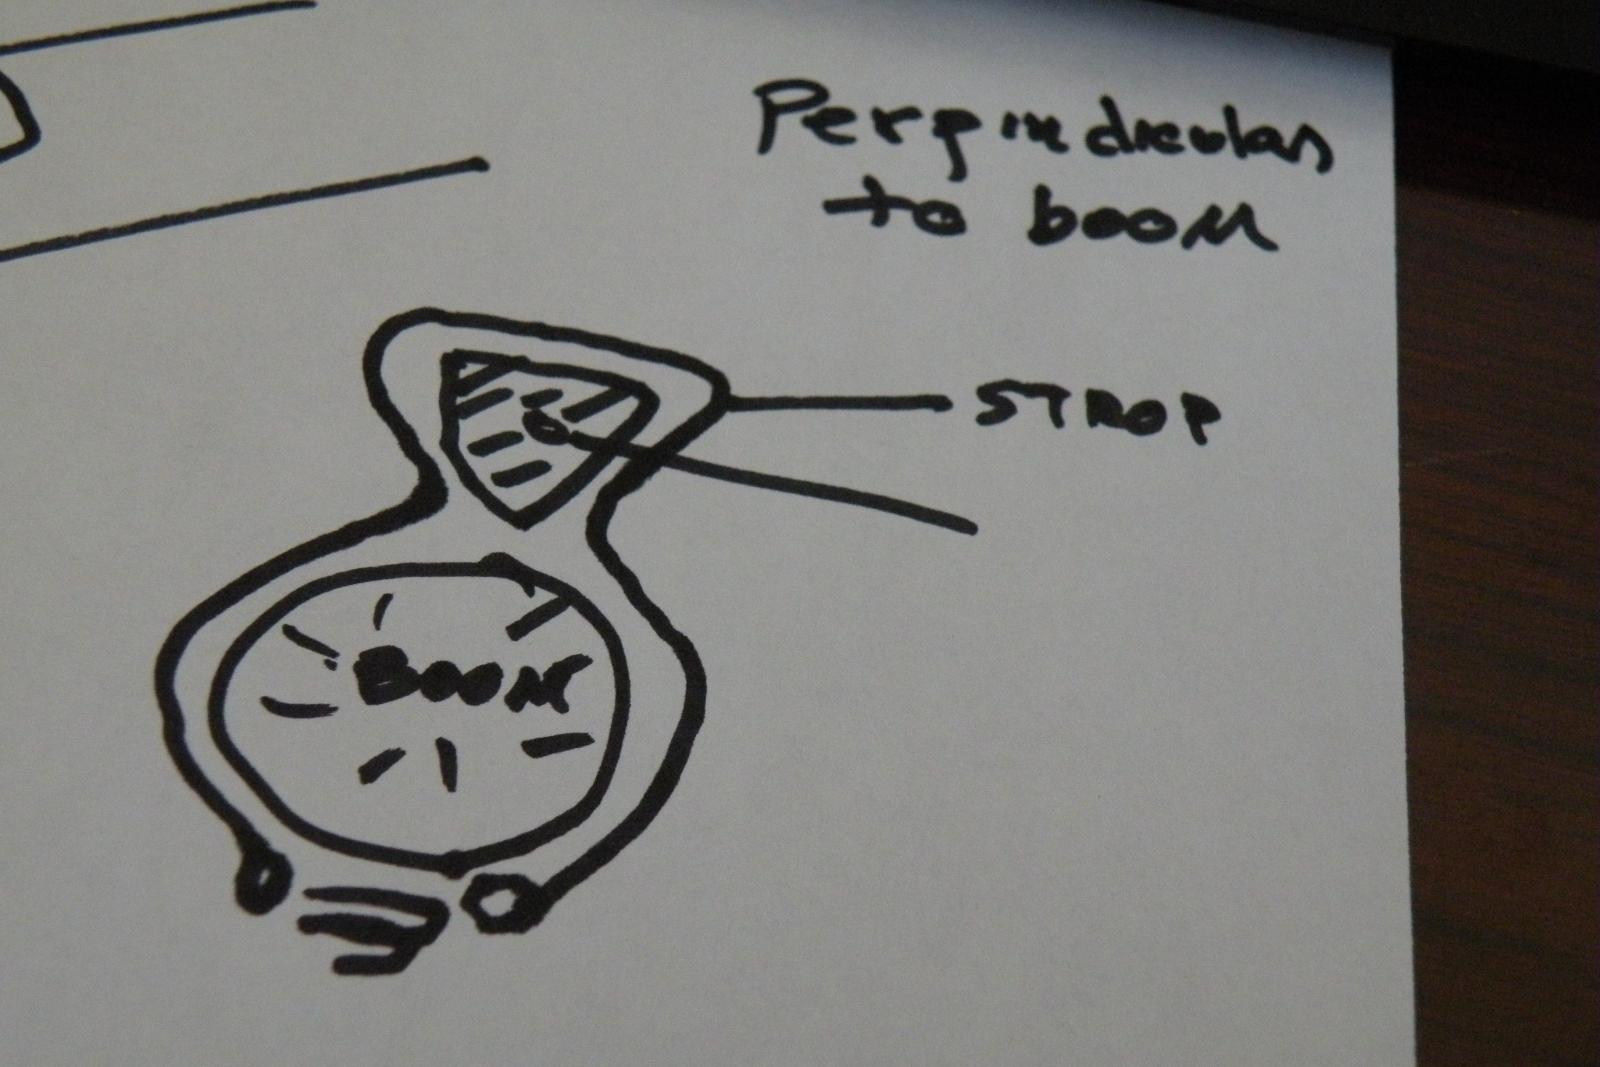
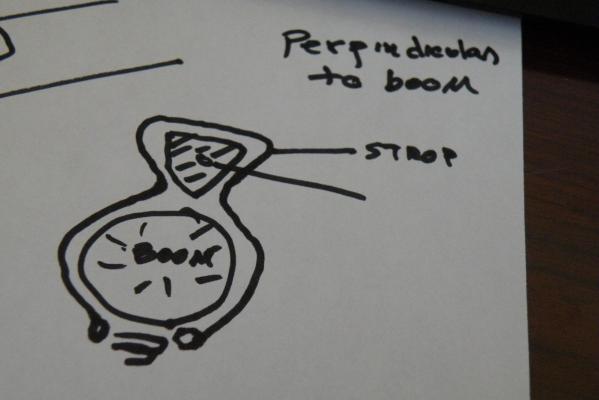
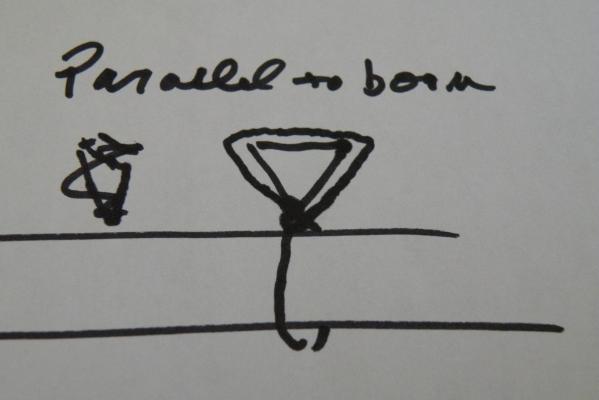
My original question seems to have been lost in all this, so I'll hop back a few posts and see if I can summarize what I've learned. I was inquiring as to how you make a block sit parallel to a boom rather than perpendicular to it. Druxey provided the answer right off the bat.... you need an eye at the bottom of the block in order to make it sit parallel. What I guess I lost was that to sit perpendicular, no eye (or becket) is needed. To sit perpendicular to the boom, all that seems to be needed is for the stropping to have 2 pigtails which wrap around the boom (question: how many times?) and are lashed together. Now, for the lazy builder (not saying I'm one of those) would it be acceptable to just knot the two pigtails under the boom? Maybe a reef knot (square knot) with a dab of CA? And does this mean that the tip of the block is actually contacting the boom? To sit the block parallel, you need to strop the block leaving an eye in the bottom. Then a lashing is passed through the eye and wrapped around the boom as before. Again, the pigtails might be tied off or lashed together. This way there is no contact between the wooden block and the wooden boom, cause the becket or eye is between them. I've unskillfully sketched this out. See pix below. Am I getting warm or still missing some things? Once I have it in theory I can continue to practice applying it.
-
I love puns Dwaing. Good one. I'm doing everything I can to learn how to put a becket on to a block without wasting all the good kit supplied thread I have. I think this is the more difficult thing for me. If I can see a good picture or drawing (pix are better for me) then eventually I'll figure out where things go. I thought I had a handle on terminology from owning my own boat, but this stuff is way beyond what I needed to know re modern sailing vessels.
-
They go to the stem. I've looked up what a martingale is and now I'm pretty sure there isn't one. I'll consult McKay as well. I do thank you for your help. I'm also looking closely at that 488 issue and will try to resolve that. I suppose I could always add the additional eyebolts when and if they are needed. I doubt if I'll be able to have all my blocks everywhere ready to rig when the time comes. And I'll probably find I've put some in the wrong places. I was warned that rigging the Bounty was beyond a novice's skill level but I went ahead with this build anyway. We shall see. So far the structural construction has gone quite well despite some major hurdles. See my build log if you're interested. I'd appreciate any commentary and suggestions.
-
Darn, I did something and erased my whole reply to you Popeye. So here goes again -- thank you so much!! This gives me what I needed to proceed. I am only quizzical as to one item -- the 4 eyebolts on the cap -- two on each side, top and bottom. The one's at the top -- could that just be the label 488 you're seeing (488 being the cap itself)? That's how I have seen it til now, but then again, why did I post the question in the first place? A 332 is a becket for blocks and double blocks. I'm not sure why this one block in the drawing has 332 labeled when to me it looks like all the other lashings. Perhaps its the becket through which the lashings go? A lot of my problem with reading these plans is that they label stuff in one place only and assume you will identify all the other places for the same part visually. That has led me to question whether virtually everything on a ship is symmetrical and is it a good assumption that if something is shown on star. side its also going to be on port? Works 99% of the time but not invariably. I'll have to look up 'martingale' since I haven't seen it mentioned yet in this kit. Thanks for complicating matters --LOL. Could it be the sea-bird that sits on top of the jackstay? No that would be the albatross.
-
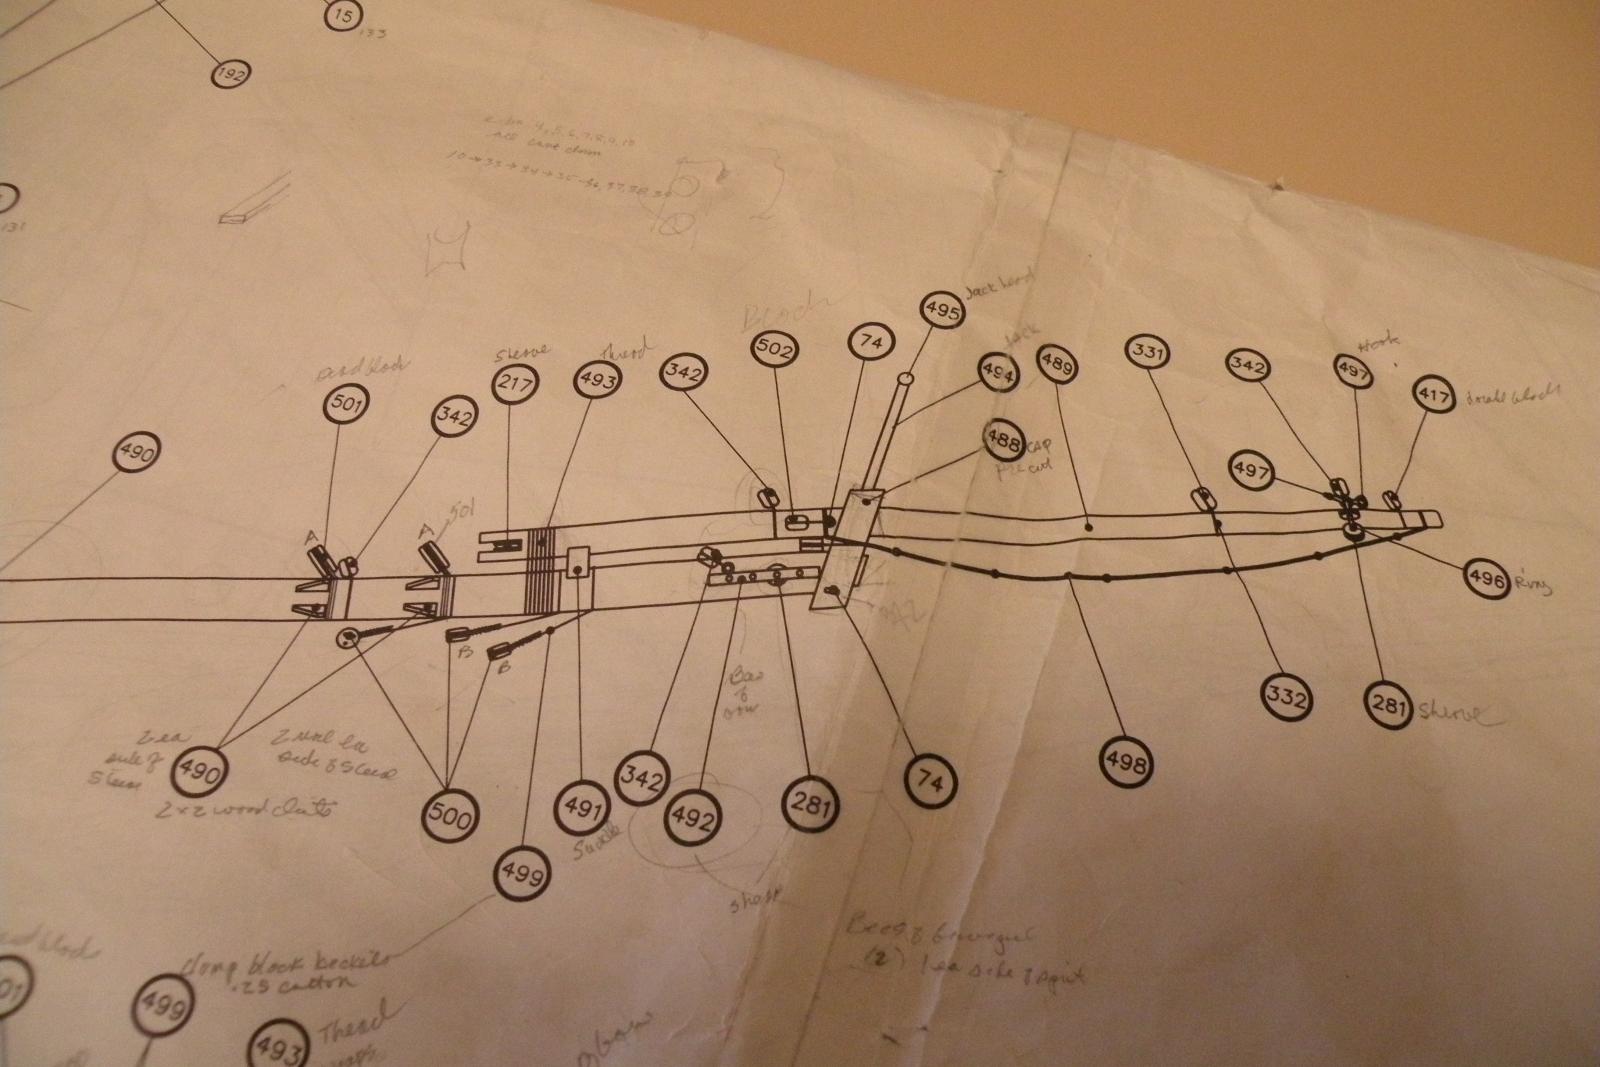
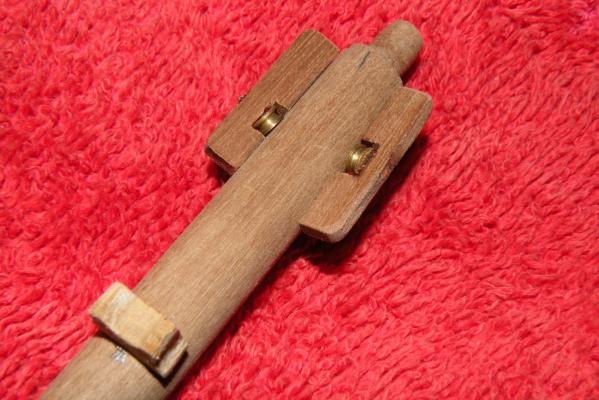
Since you guys have been so helpful, maybe you could give me some advice on my "bees of bowsprit." I'm attaching a couple pictures of the steeve section of the bowsprit so far. The bees have not yet been glued on. They're being held in place by the shaft of the sheaves which I deliberately left extended so I could use them for support. Anyway, I don't know what more to do with the bees. I can't figure out the plans. If there are more eyebolts or rings to attach to the bees I'd like to find out before I glue on the bees as it will be much easier. Maybe you could take a look at the attached drawings and give me some direction. In the drawings, 492 is the bees themselves. 281 is a 4mm sheave which I've put in. 342 is a single block and 75 is a ring. 74 an eyebolt. I see these parts on the drawings, but can't decipher the two different view and determine where things go -- do they go on the bees or on the cap? Anything would help. I failed mechanical drawing in grade school and haven't gotten much better at it since.


-
Thanks guys for your replies. Very helpful. As you said Druxey, tedius but worth the effort.
-
So essentially you're saying that the stropping needs to have an eye in it for the lashing to go through?
-
I hope the title to this topic explains my question. This keeps coming up and I can't figure it out. When I've stropped a block (any type) the knot at the bottom of it wants to sit in a particular way (for example, a reef knot sitting parallel to the face of the block). But if I want the block to sit on a spar with the face of the block perpendicular to the spar, I can't figure out how to tie it onto the spar. I've been relying on the lashing to be able to twist 90 degrees. Is there a better way? A particular knot that would end up perpendicular to the face of the block rather than parallel to it?
-
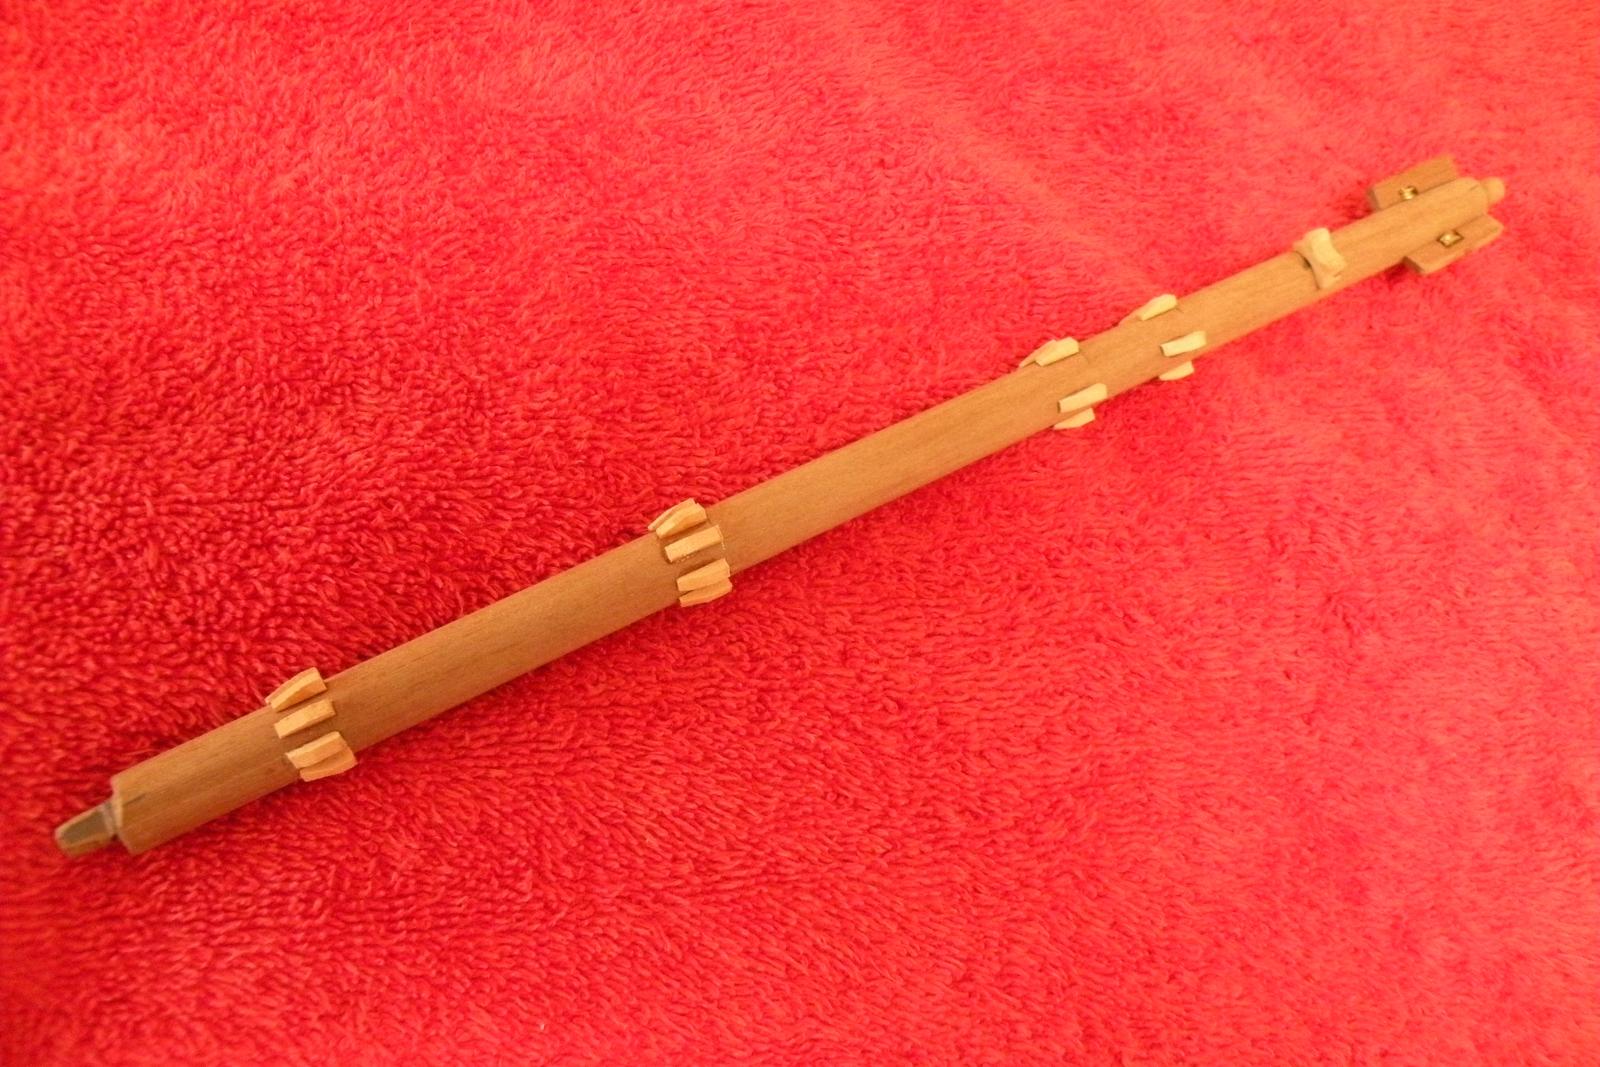
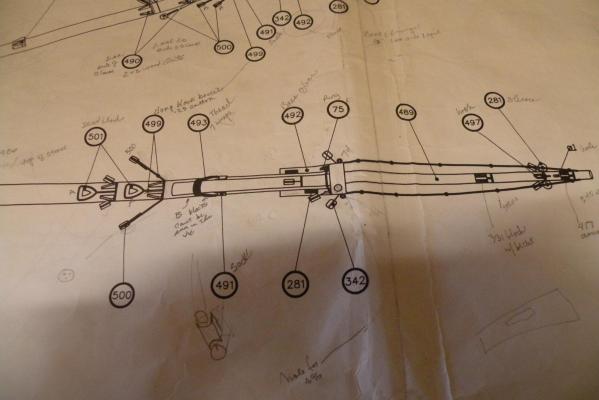
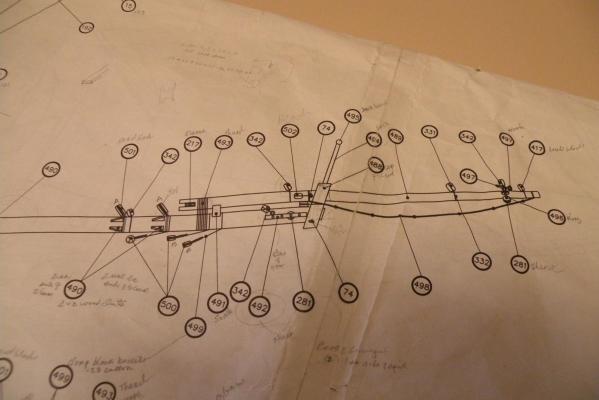
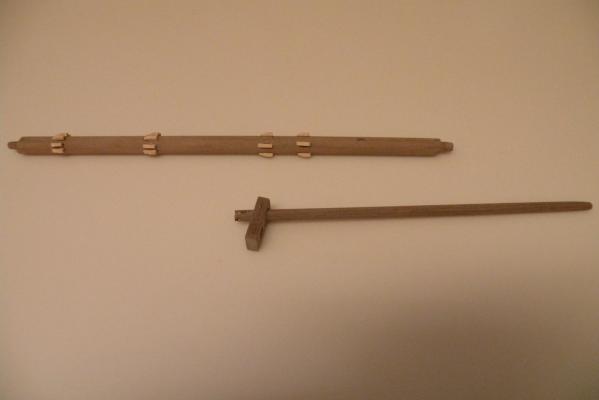
I'm back at it after a bit of a lapse -- I put all the half pounders on the ship and I think the top deck is mostly finished. I'm now working on (struggling with) the bowsprit. I want to build the two parts mostly off the boat and then connect them via the cap, saddle and gammoning as I place them on the ship. I've got the tapering done as well as the tenoning of the ends and I've slotted and inserted a sheave at the inboard end of the sprit. The trickiest part was angling the holes in the cap so that it would sit perpendicular to the water line and not angled upward as the bowsprit itself is. I wish the mfr had made the holes (precut part) properly angled. Instead I had to file and sand down their 90 degree holes to make it work right. As I learned from another build log (think it was Vulture) it would have been easier and better looking to just make a new piece and drill the holes properly to begin with. I may still do it over but right now that's the least of my worries. HELP! I've never been great at reading plans and reconciling two views (top down v. side) of the same thing. This bowsprit is driving me nuts trying to figure out where to put blocks on it. Some fairly obvious while others I just can't visualize. I wonder if someone can lend a hand based on the photos I'm attaching. The one's I'm really not sure of are the 3 #500 blocks shown on the side view (in the area where the steeve and sprit overlap) compared to the two shown on the overhead view (one of which is left unlabeled as its a symmetrical part). I'm not sure how many of these #500 blocks there really are. The two that are most forward in the side view are not shown on the overhead view -- so I would think they hang straight down (and are blocked from view by the sprit itself). But then, what about the third (aft most) 500 in the side view? Is that the same block as one of the 500s in the overhead view? It looks like its hung below the steeve (like the other two) and if so wouldn't be seen in the overhead view. But if it is one of the two shown on the OH view, wouldn't it be shown attached to the side of the steeve and not underneath it? So now I'm thinking that there are 3 500s hung below the steeve (as in the side view) and also TWO MORE attached to the sides of the steeve (lashed immediately fwd of the forward most cleats). For a total of 5 of these #500s. Can someone please help me on this? Moving forward, I'm having trouble figuring out how many and where the #342 blocks go. The side view shows one on the top of the sprit and one at the aft end of the bees of bowsprit (hereinafter referred to as just the bees) I would then say that the port bee would also have the same block just blocked from view. But then I wonder why these two, attached to the bees, aren't shown on the OH view. The OH view shows two more 342s but they seem to be attached to the sides of the cap and not to the bees. I've thought that maybe the sides of the sprit are not symmetrical and there is only one 342 on the starboard bee but not on the port bee. But when I look closely at the side view the 342 is attached to the bees while in OH view the unlabeled 342 is attached to the aft face of the cap. So is there 5 342s or just 4? And where exactly do they go -- on the bees or on the cap? Or maybe the drawings are bad? Wouldn't be the first time.

- 265 replies
-
- 3
-

-
- finished
- artesania latina
- (and 1 more)
-
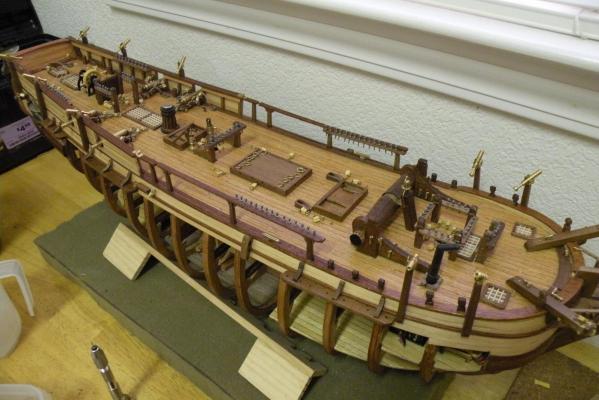
Looking good LA. Just two comments -- if I read your comment (19) above correctly about "some form of shipboard storage" .... I think you are referring to the pot racks. These will be filled with 30 or so little breadfruit pots. Otherwise I don't know what you are referring to. The other comment is to remember to test all those little cutouts so they are big enough to accommodate the 3x5 and 5x5mm Samson posts and stanchions. You won't want to have to enlarge them once the planking covers their 4th side.
-
I should have figured that it was detail and more detail that's kept you busy. I can't wait to see the work; particularly the features that I'm sure you've added to the kit's. I hear what you're saying about spending more time in the planning than in the doing. That was particularly true of me with the planking where every strake was a calculated design.
-
Whats up with you Boyd? Lazy or just busy? I found LADons log in which you posted several comments and got to wondering where you were on your build. I'm determined to get back to the bench today. I've been off for sometime dealing with issues. I can't decide whether to begin work on the bowsprit or start on the launch. Launch would be easier from the standpoint of understanding the plans and doing things I've already done elsewhere. But the bowsprit is really next in line. Thank you for your remarks in LAD's re. my "tips". I never really think that I am tipping others off to a good thing; just making commentary on how I managed to get through a tough situation.
-
I was just going to mention that Boyd...yeah, don't overlook things that have to go down through two or three layers of deck. This probably goes without asking, but have you been checking the alignment of your mast holes and mast steps? Do that and make sure its good to go before you put your top deck on. In my case, with all the problems of aligning the decks with the frames etc. etc., getting those masts (still just dowels) to slide down through each hole was a major problem. I had to do a lot of filing with both super long files and ultra short ones. Otherwise from another AL Bounty builder its looking great. I notice your using the term 'basswood' for your decking. Is this the same wood as 'ramin' (it looks similar) which is what my kit calls it. And you are using fractions of inches instead of millimeters to describe sizes. Is that from the kit or have you just done the translation to inches. My kit uses mm for everything. I'm wondering if your's, probably being much newer than mine (mine was about 7 years old before I even got it) has not gone to inches or both and maybe has improved the translation of instructions. Overall I think the AL kit is very good and would recommend it to other prospective builders. As for planking with 2 mm walnut. Yes it is a chore. But if I can do it -- with zero experience in soaking or steaming wood -- so can you. There will be places where the bend is tight and short and the trick will be not so much to get the wood pliable enough but to find a way to clamp it down while it dries. And don't forget your filler material. There are going to be plenty of places where you won't have framing to back your planks and will need to add the filler. Last tip for the morning -- no need to use filler on the open side like I stupidly did and then had to remove it later. Good luck; its a great build so far. Glad I found your log. I've been off the site for a couple months as well as off the work bench. Maybe your build will inspire me to get going again.
-
Speaking of CA glues....I totally agree that no two glues are the same. It must be slight differences in the formulas used. The real surprise for me is that the Dollar Store and elsewhere sells CA for $1.00 for the same quantity that my hobby shop or Home Depot sells it for $5.00. And its just as good (maybe it won't be after its been on the boat for a couple years??). My best discovery for using CA when planking the hull was Loctite gel. Its quite thick so it allows precise placement and doesn't run. It allows for repositioning for at least 10-15 seconds. And it holds really well. What I would do when putting down a plank (or strake) was to apply PVA glue to the edges and at the spots where the plank would contact the frames (always coating both surfaces). But I would leave bare the first, middle and last frame point. When all was ready I'd put a drop of this Loctite gel on the first frame and press down the plank up to the middle. Then a drop of gel in the middle, and on to the last frame. This often was sufficient to hold tight the planks, but usually I'd add some clamps. This technique also allowed me to use much longer strips than otherwise since I would have more flexibility in the strip to insert the second and third drops of CA.
- 265 replies
-
- 1
-
-
- finished
- artesania latina
- (and 1 more)
-
Morning Boyd, I thought I'd jump into the breadfruit discussion...as you've seen on my log, I left the pots empty. I wish I hadn't but I was really in the midst of much larger problems to solve at that point. And my rationalization for my laziness I still think is somewhat solid: my Bounty model shows the ship on its outbound journey, prior to landing in Tahiti and obtaining the fruit plants. Can anyone argue with that?
-
Shame on you for using plastic furniture! Just kidding. Magnificent work all around. You are taking an already detailed kit and making it into a museum piece. I really wish I'd watched your build before starting mine; so many great ideas and your execution is great. I'm very impressed as to how you aligned your top deck. Harking back to mine so many months ago I recall the difficulty and frustrations in this particular step. I don't think you need much advice from me, but here's a tidbit I'll throw your way from my experience -- you will later be placing stanchions and Samson posts in the little rebate holes along the edge of the deck. Before you put the deck down permanently, make sure the holes are big enough to accommodate the 3x5mm stanchions and 5x5 mm Samson posts. Mine were not and it was a real chore to enlarge them. It would have been simple if I'd checked this before gluing down the deck. Keep on posting Boyd -- it won't be long til you've caught up with me. But then again, you have the planking coming up soon.
-
Difference between a deadeye and a clump block
Captain Al replied to Captain Al's topic in Masting, rigging and sails
Interesting bit of history Bob. Thanks for the post. -
Well done Mike. Thanks for sharing your photos and thoughts.
- 44 replies
-
- 1
-
-
- robert e lee
- constructo
- (and 1 more)
-
Anthony, thanks for the compliment and for following the build log.
-
Guess we're all in the same boat -- ha ha.
-
Thanks guys. Will search for these loopers. BTW, is there something amiss with the notification system -- regarding builds or threads we want to "follow?" I've had no notices via email for weeks but when I look at My Content I find replies to lots of things I'm supposed to be following? Also, the private email system seems not to be functioning either. Any knowledge of those issues?