Jond
-
Posts
876 -
Joined
-
Last visited
Content Type
Profiles
Forums
Gallery
Events
Everything posted by Jond
-
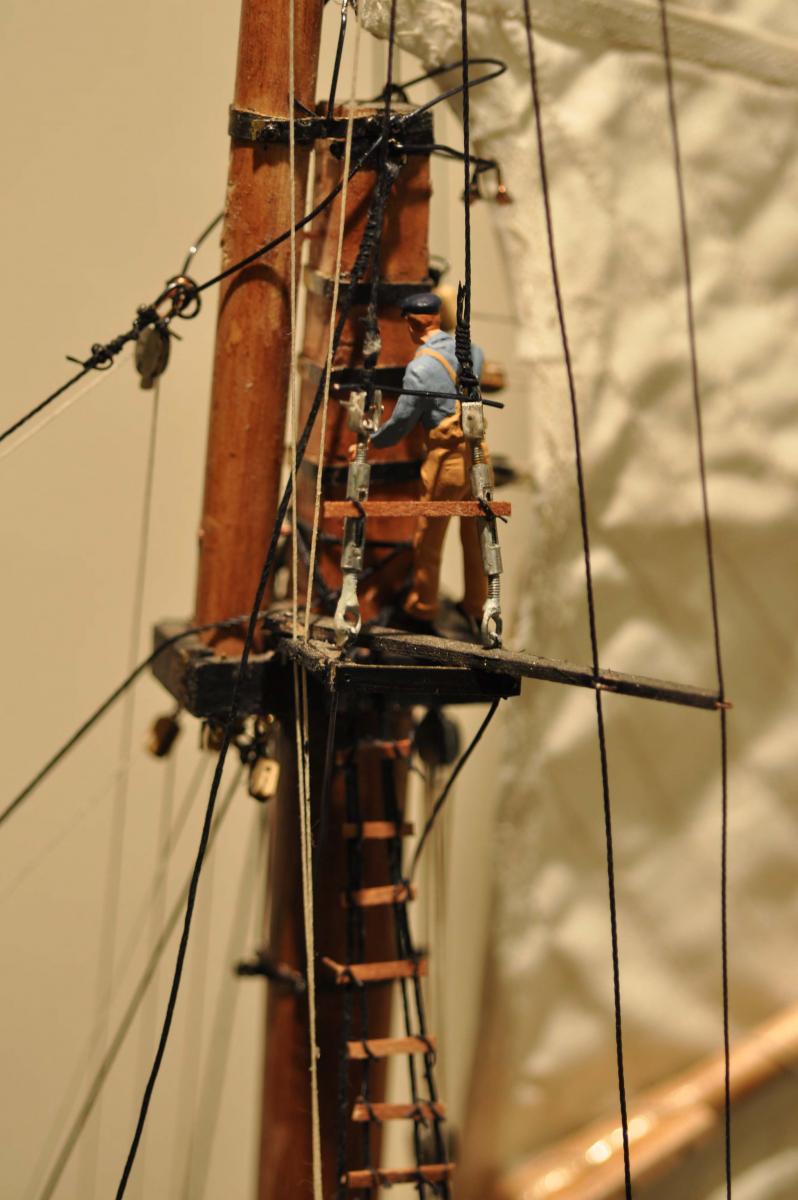
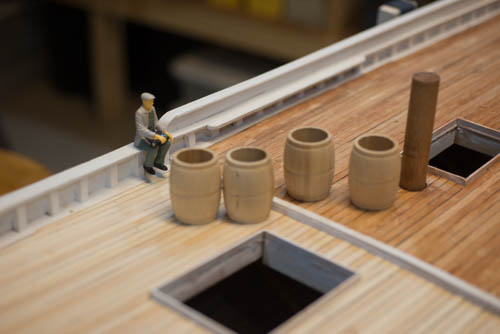
 Jeff and Michael thanks for your comments more coming as my build is currently still ahead of my posting. I am struggling making the break levers for the anchor winch and getting chain to stay on gears. The figures came from my brothers model train shop. I am told they are g scale I think. Not sure what is in the brief case of the commuter I have used so far. I will be adding some standing figures that are not painted.... a whole new area. cheers
 -
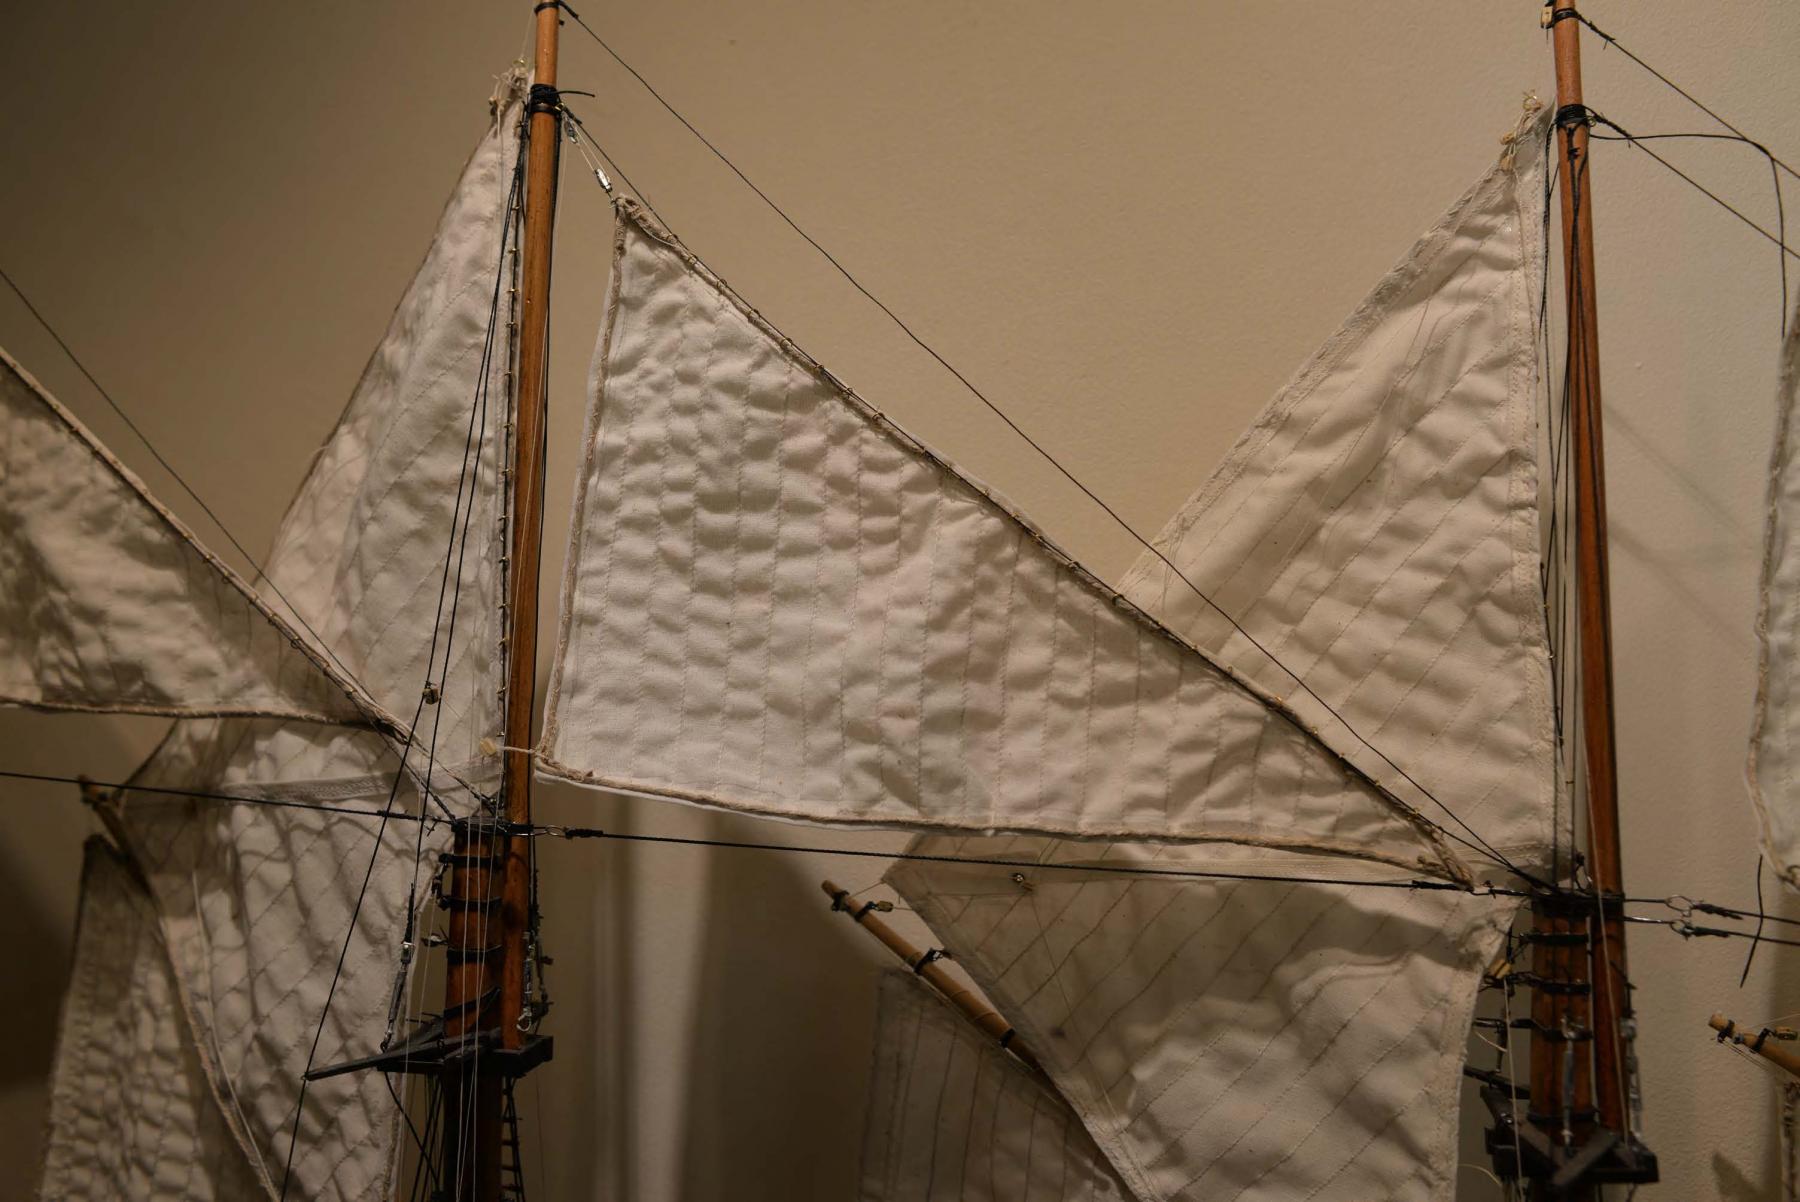
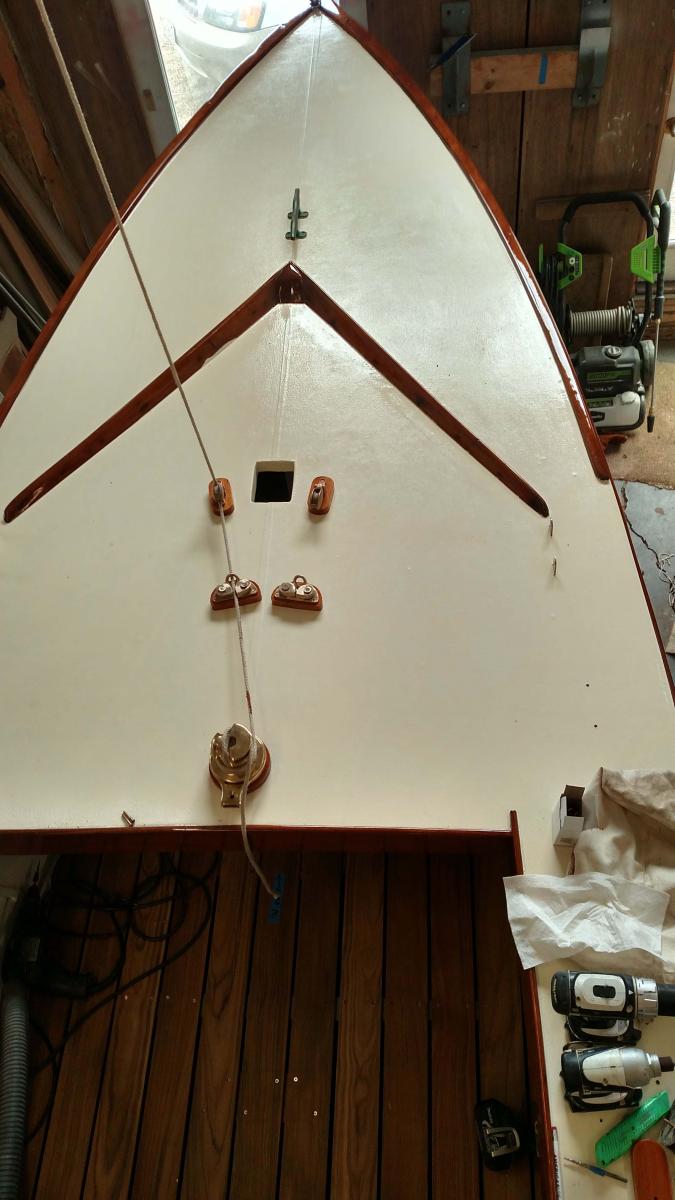
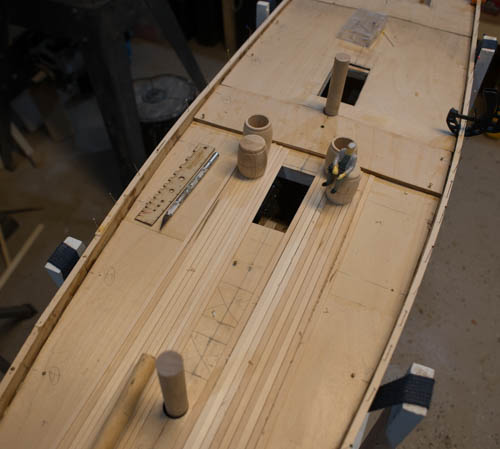
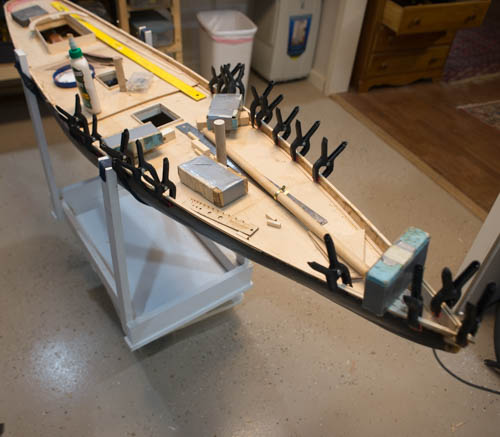
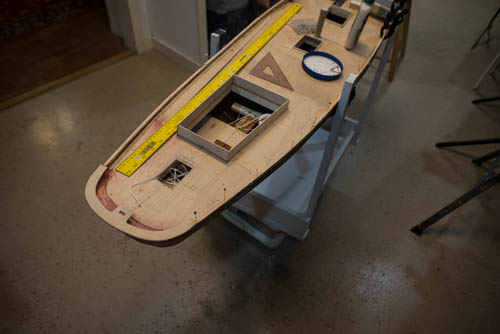
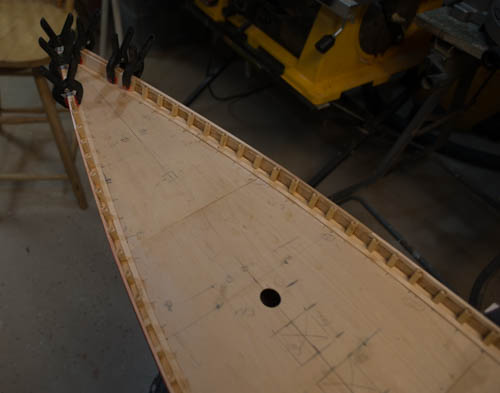
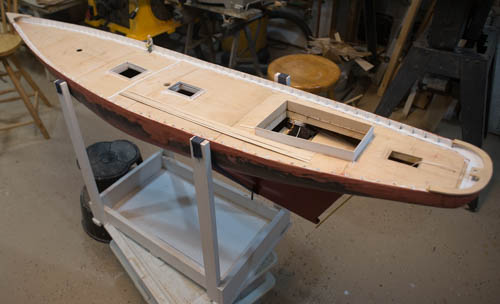
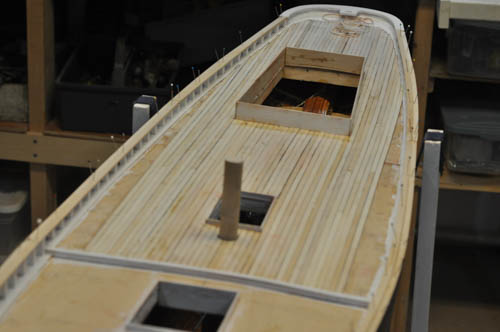
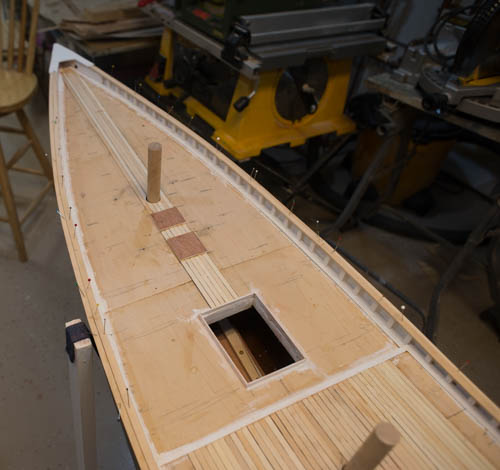
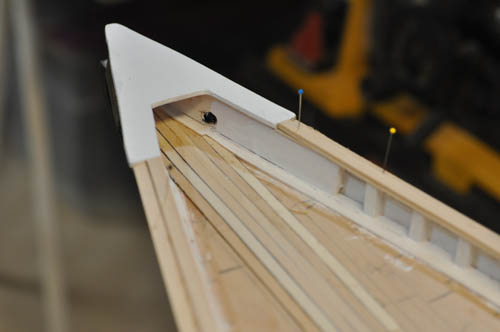
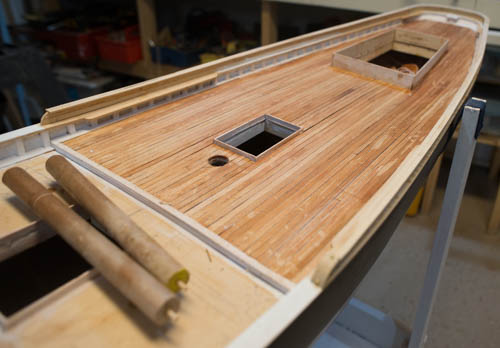
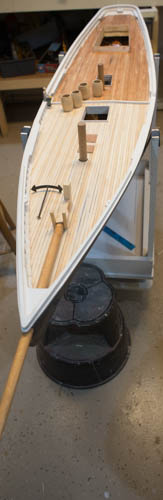
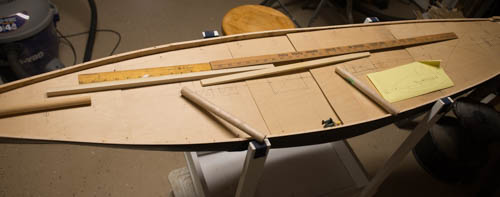
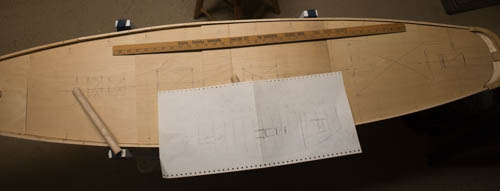
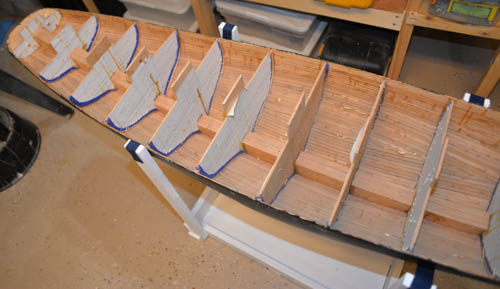
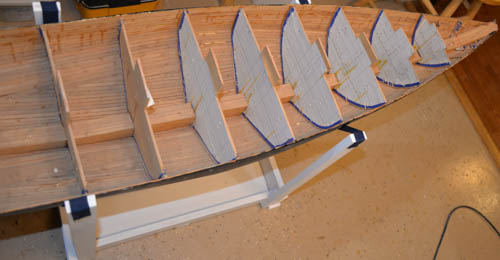
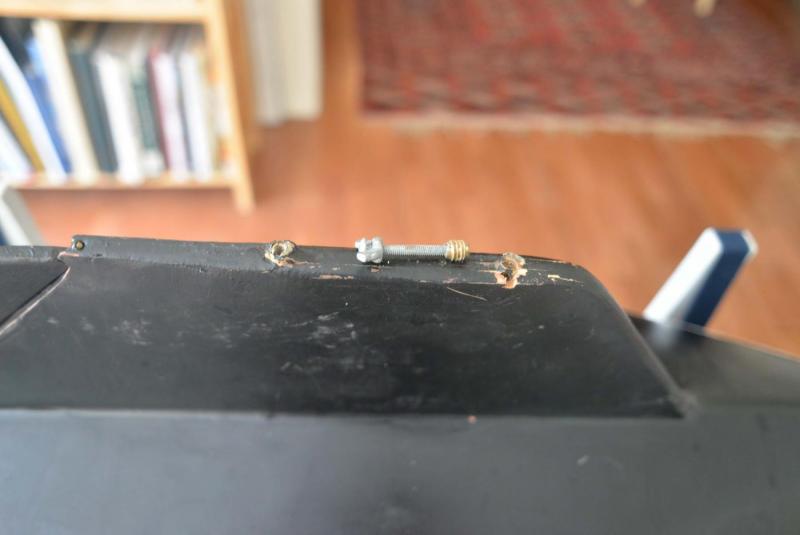
Now that we have the sailing components figured out, we can continue to build out the deck. It is possible due to the large size of this model, that I will only build a deck model including stub masts just tall enough to hold the booms. We'll see. There is one option then to have removable masts, more in a pond yacht style, with attachable rigging only for sailing. With the plywood sub deck in place, it is now time to figure our the water ways, stanchions, bulkheads and planking. To complete the study and decide on a color scheme I followed this thought process: I chose to rely on the Phillip Eisnor model and plans I bought viewable on the modelshipbuilder site I read and re read the wonderful practicum, written by Gene Bodner and edited by site manager Winston Scoville of Modelshipworld for many of my thoughts. In the Nova Scotia photo archive view 200330717 shows tones. under the light snow the water way is clearly darker than the white. It is very similar to the deck tone and obviously lighter than the black associated with the winch posts etc. This finding means for older boat...darker older decks and not black water way may be right. Bluenose II chose black water way and curbs and 6 inch dark shinny planking. The Eisnor model photos clearly used brown as the interpreted color for water ways and curbs. the Gene Bodnar practicum used a light brown stain for water ways. the model in the Lunenburg Fishermans Museum used green for both waterways and cabin roof I took these sources and decided I was going to try to achieve and older boat, A little beat up with oil tanks on deck and fish barrels more than racing colors. I am not sure how this will come out but that is where I am starting here we have a photo I took of Bluenose ll deck. They have a high gloss finish on dark stained plank that when counted supports 6 inch width. Comparing the 3/16 plans and the 1/4 scale plans counting planks we also get a 6 inch planking. So we decide on 1/4" planking and shall use 1/32" bass wood strips with black magic marker on one side edge. next we have to figure out the planking lay out. The practicum says we should figure out and install nibbing strakes first and plank to them. I agree and I hope a few years from now i get good enough to do that. I chose here to figure out the deck hatches and laying the planks based on that. I start in the center and cut nibs in the waterway plank when I get there. On the fore deck shown here, the hatch is 1-1/2" or 6 planks. Therefore a joint is dead center and then planks spread outward. before setting any decking we need to get the water way and stanchions all set. While doing this I also have to build up the bulkheads to get the grades all right. Here we are putting the first waterway that rides under the stanchions. Here you can see strips being added for shaping of the bulkhead. Wet strips are held by pins until the wood drys to shape. The glue and pin again. I snipped and kept the pins in many connections for strength. Here the outer waterway and stanchions are all in. I must say taking 1/4" square stock, cutting and canting and installing is so much easier than the tiny 3/32" square strips on the small scale boats. I can use push pins and even leave them in for strength where I feel it is needed. here we go forward and complete this phase. Now we have all the waterways and stanchions painted out in white. It's time for the rails. The after deck is a little different. It is 9 planks to cover the hatch and the after deck behind the cabin is all tapered to keep consistent planking. I chose here to follow my logic of whole planks for the hatch and openings. I needed a center plank unlike the forward deck as 9 planks spread the hatch opening and 23 planks at the cabin forward corners. here all the planks are in going aft. I covered the rudder opening and that is a knock out I will show later. Here we go starting to install the forward decking. You can see more clearly what I meant about my using the hatch dimensions as a control. I approached as I would planking a deck. I hope the difference in two decks gets lost. While installing deck planking we need to get rails on. I chose to build this realistically. to side bend 12 inch planks may have happened. I chose to bend 6 inch [ 1/4" in scale and to do inner and outer rail halves. With ammonia water only I would lay out inner rail with push pins down into the stanchions. After the glue set I snipped the pin and hammered it home to stay and strengthen the rails. As glue was drying on the inner plank I would set the wet outer plank and pin it to dry to shape before gluing it. The rails are two layers of 1/16" to get the right 1/8" thickness. to get an older deck my process has been a two step staining. Here I used a cherry stain to get the warm color as seen in the Bluenose ll. call it step 1. I will play with this color choice a lot. Here one can see the light color that could alternately take clear finish. I feel that would demonstrate a nice new deck and I want to replicate a boat of some age. looking at this overview I decided to go. forward with the second step which is an over wash of walnut stain on the cherry [ charles notman deck] all for now cheers


- 168 replies
-
- 12
-

-
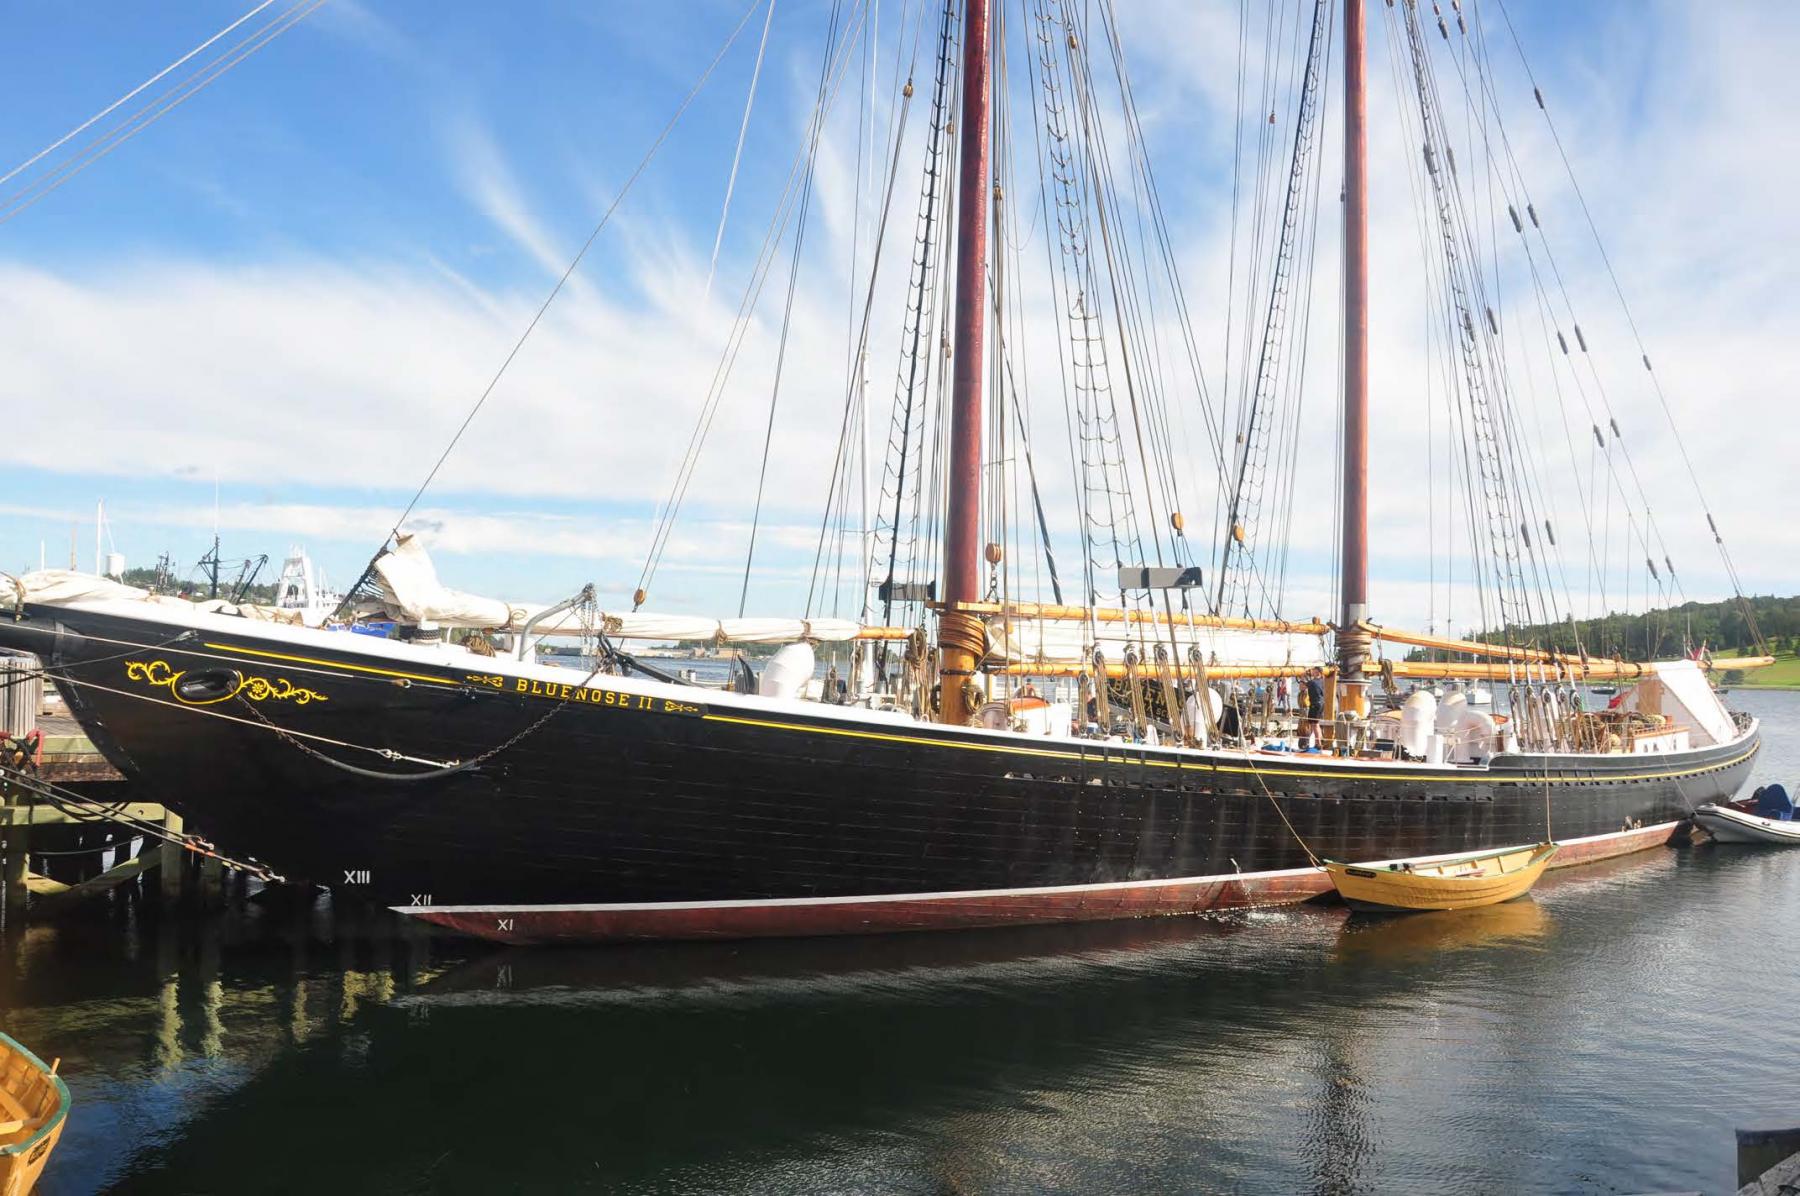
Dave I would like to follow up on a detail that comes through on Dave Borgens post 61 above. I hope he is still following. the water way in the embeded photo are brown...I think the B&W photos of Bluenose, in the Nova Scotia archive, and obviously in later life, show them similar tone to the decking but lighter than the black. Bluenose ll used black the main model inside Lunenberg Museum has them and the roof tops two tones of green do you have any more info that that? cheers Jon
- 245 replies
-
- 2
-
-
- bluenose
- model shipways
- (and 1 more)
-
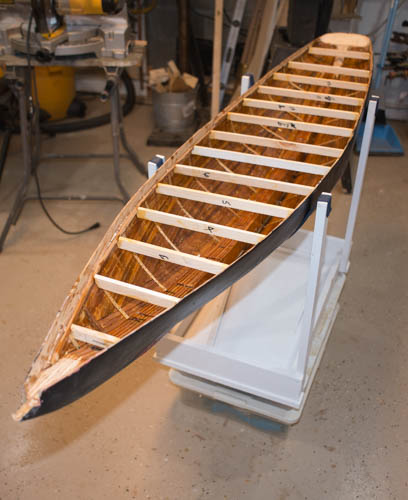
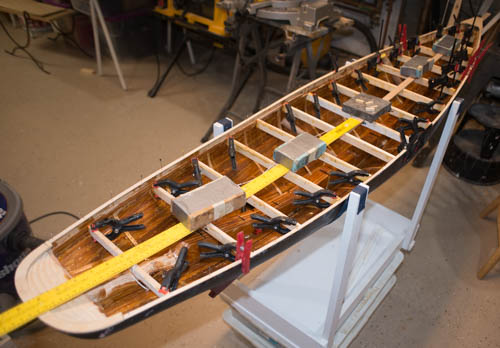
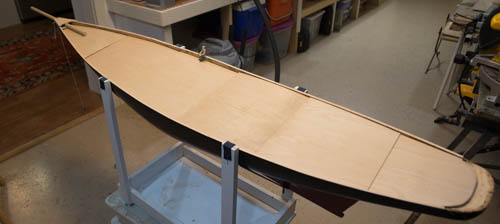
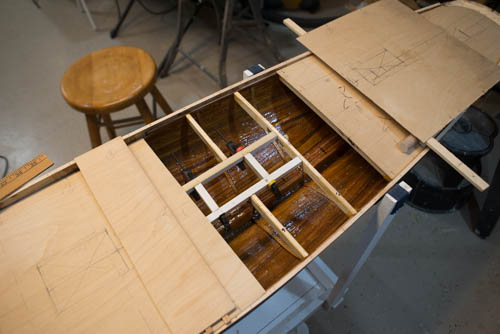
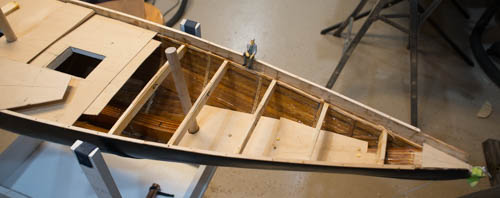
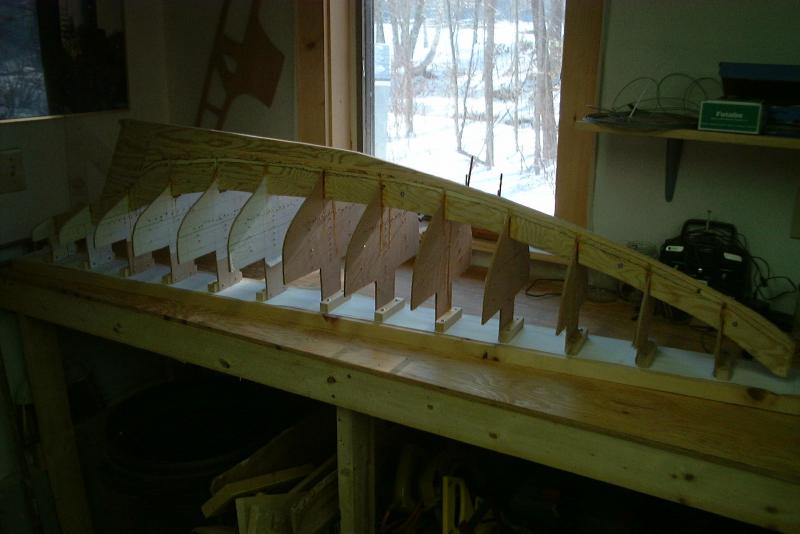
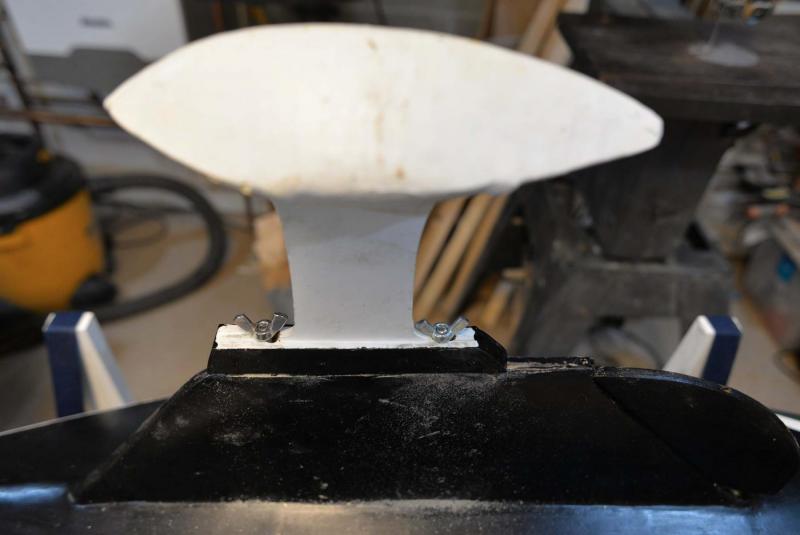
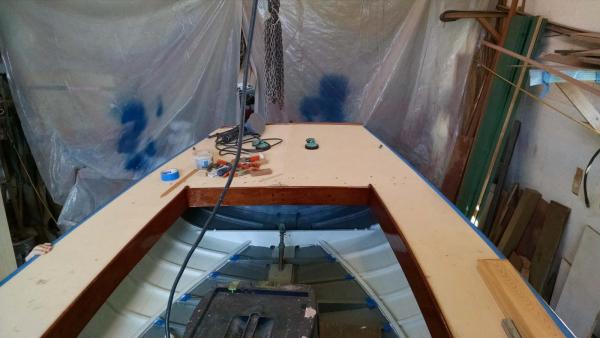
Moving forward I recall my first intent was to work through September and get a deck on. Funny how we get sucked in more and more. The first thing is to lay out the deck beams and then figure out openings that will be used for sailing. . I ripped stock to create a supply of deck beams. they are 3/4" by 5/16". My thought was as before they are deep enough that I can cut them to camber. I then chose a production method on a trial basis to see if it saves time. I used the cedar planks to double the shear line and set the deck line fore and aft. Then I laid out the deck beams on an common span same as frame stations of the 1/4 inch scale plans. Notice the beams have no camber cut and they are notched into the sides. I then added 1/16 "by 1/4" strips, edge to edge on top of the beams and a second to the mid point base on center . I then carved and sanded the cambers. It was actually quite fast, but I think not much time saving over cambering all the beams first. I had chosen this method because of the small camber on this boat compared to others I have done. If I ever do this way again I would delay this camber step until all the RC adjustments were made. That will be clear in the next sequence. My bottom line is not a great alternate.....camber first! The sub deck here is agian 1/16" birch plywood. The sections are laid out to allow working one at a time to coordinate revisions in frame needed for RC Here is the first lay out to use the two center hatches for access. beams had to be moved around. the two sticks could be screwed together through a mid hatch. The forward end will have a block attached to a shock [ bungee] cord and be pushed way up to the bow. This makes a loop that goes of a drum winch and controls the sail sheets. [ not flying, or working jib] here is the other second design for the servo location and sail sheet loop etc. This sheet has the worked out framing changes, and is what I meant about designing the deck. Here I have made the framing for the small hatch opening. This hatch gives access to the rudder servo. unfortunately the sharp angle of the rudder does not allow direct connection like most pond yachts where the rudder post is vertical. here is a lesson learned from my marbleheads. I took scrap 1/16 plywood and laid in a lower deck so the sticks holding sail loop block can slide on it as they are pushed forward from the aft hatch access. You can also see in this shot the first section of under deck including the small hatch is secured, so this forward section will be made to it. Here is the adjustments to the after deck house opening and the rudder access. The issue of using flat beams and then adding strips etc. just adds another nuisance step to get these right. One thing to notice here and the previous two photos is the darker color of the interior of the hull. It has a complete coat of resin to totally seal up the hull. Also in this photo you can see the internal carving of the 1.5 inch plywood keelson assembly and the block transom to fit the RC equipment and make the inside shape of the transom work. We are getting to the point where I originally planned to hang up the model for another year. but I find doing these steps my mind is on the three or four next steps and it gets harder to stop. It was at this time that I decided to use 1/32 decking [not a great decision by the way] and ordered it along with many strips to allow building up the bulkheads. I started looking at the deck equipment and at this scale knowing I needed to figure out gears and things.....but the masts? I can make them but where would I put this boat???? You can see the two short dowels sitting in place......??? Also for sailing, the two jibs have sheets that go on outer sides of the forestaysail rigging, so I cannot sail them like other boats with a single loop. I would need a 3rd Servo and all that logic. Alternately ones leaves them furled or worse choses to shrink them to self tack. I leave this stage with enough room in the after deck house opening to put a servo on each side and try to do that, That is the point of this build ....I am building it so it could sail, I am not committed yet to take it that far. I may not even put in real masts. all for now cheers . . .

- 168 replies
-
- 14
-
-
Dave I wanted to say hello. I have been going through different logs to see how others interpreted this wonderful Schooner. Your build is great to watch and I look forward to following along. I am currently doing a scratch build in 1:24 scale. I am also favoring the look of an older version boat....more beat up so to speak, maybe a few fish on board. I too am painting and then repainting. I have latched onto the photos in the Nova Scotia archive to think about details. I share this thought because this boat and others likely had changes through the years. One example I just figured out this week is the 'buffalo rail". It is shown in a photo...obviously years later,... to have a cap piece on top painted white all around.and the lower section is black outboard. I am sure the cap piece was added to repair damage. Most photos show this rail all white and on most models and the real BN II it is a one large all white piece. anyway great to watch you and the others too cheers jon
- 245 replies
-
- 3
-
-
- bluenose
- model shipways
- (and 1 more)
-
Starting again 2016 OK it is August this year and I am playing around in between projects. I decided first to give myself 6 weeks to get a deck on Gerturde and then hang her up again. Let's see what happens. the first thing to do is to cut off the building board and build her a stand. This style stand I now use regularly because the straps allow rotation to get gunnels up and free for work and way down the line to put a heel on the boat.[ very helpful while working on rigging] It is also good for carrying around, setting on the ground etc. Best of all it allows using up those many cut offs and scraps of lumber in the shop. next step....probably several days later... it is time to cut out the interior molds leaving the strip ribs. This removal starts rough and then ends with sanding to get ready to receive a coat of resin. let's see what we have. All the interior is clean and we are ready to go forward. Here we are visiting Charles Notman while I go sailing in the real Boothbay Harbor One design. Just FYI here we are sailing Bittersweet the real BHOD. You can see now why summer is not a productive modeling season. now we have the real test. I have set up with levels and squares to measure everything before we get into deck design.....and what does one find when this step is added.....the mysterious truth I stater scratching my head when the deck dimension was 71.5 inches. the beam maxed out around just under 14 inches lets see....gertrude is how long????? 135 feet on deck or....ah ah ah..67.5 iches let's see gertrude is how wide 23.5..................or ah ah ah 11.75 Ok I said I was over my head 15 years ago when I started this. I made a beginners mistake......I should have reduced the molds for the 1/32 strip ribs and 1/8 planking and say 1/32 fiberglass. I did not, so I should accept....and admit I am too wide by 2 times 3/16 or up to 3/8........ The truth so to speak...... if i had scanned an plotted the other set of plans that I bought at the same time 15 years ago it would have been Bluenose. let's see Bluenose is how long??? 143 on deck or ah .....71.5 inches let's see Bluenose is how wide 27 feet or ah...... 13.5 inches......add up to 3/8 for my begineer mistake ont he sizing of the forms= 13.78 inches Bingo... I am building....a 143 foot boat. I thought for a few seconds about switching to Columbia. The other American boat but decided against it. Let's face it... Nova Scotia and better Lunenburg created the best and fastest schooner. She beat the US boats in all matched races except one set. Therefore I am rescuing and building out Bluenose there you have it cheers

- 168 replies
-
- 11
-
-
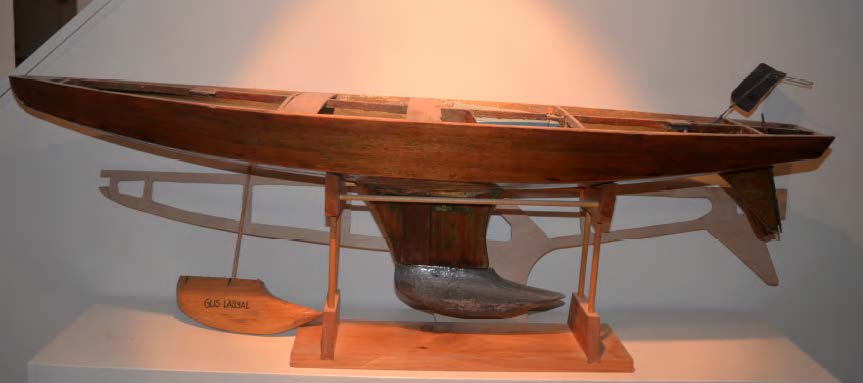
Jeff you are looking at a theodolite. they are for surveying. We used them in school 50 years ago and working both summers on property survey and for the first year or so in construction. They became antiques quickly as technology improved in the early 70's. You can check out pond yachts through AMYA.org the major site is focused on all classes and racing. Then go to the Vintage model yacht class to find the beautiful pond yachts that survive. In the early 20th century, central park NYC, and other similar ponds in Boston etc were filled with vane controlled models. the Marblehead class was one considered for the 1936 Olympics. Some of the old timers I met with while working there in say 2000 were founding members of what remains a very active group and club in Marblehead, MA.. easy to fine on the web cheers
-
Thanks Patrick and Hamilton I am working on building the winch and other gear. One good thing about this large scale is you can get you fingers onto the parts. I have taken the photos from the Nova Scotia archive and find the late timing , post racing,wonderful. With all the grit and oil tanks and other stuff on the deck. even light snow in one picture. Looking closely I now believe by example that under light snow, the waterways were dark......unfortunately mine are still white...oops. more later cheers
-
Hamilton I look forward to following along. I am scratch building Bluenose as well but at a large scale 1:24 for possible RC sailing. Cheers
-
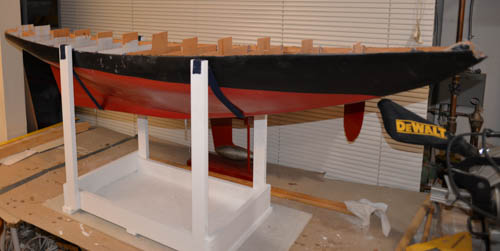
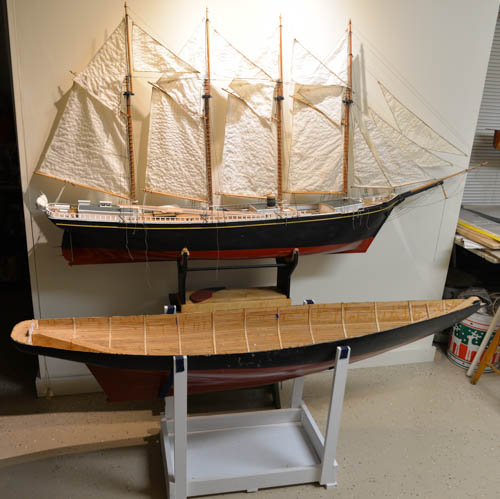
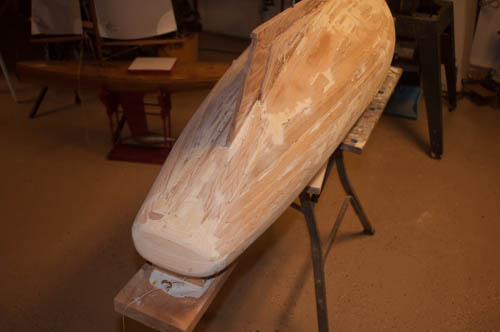
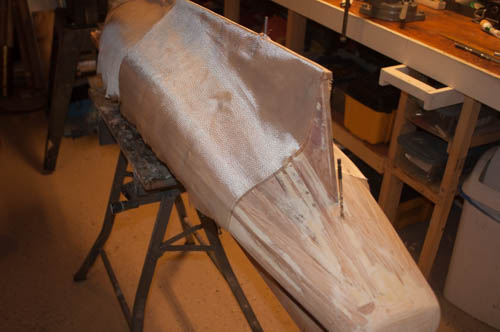
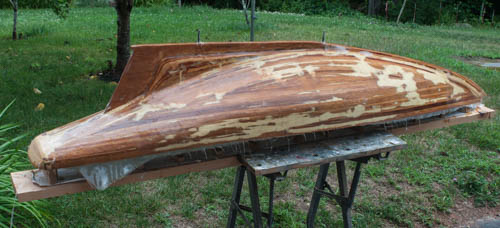
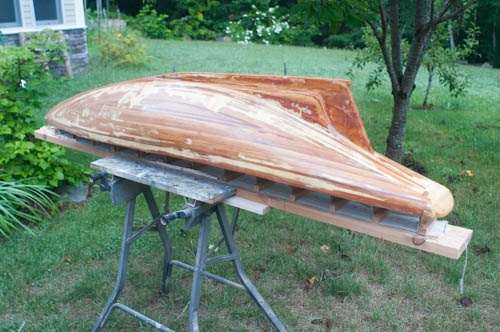
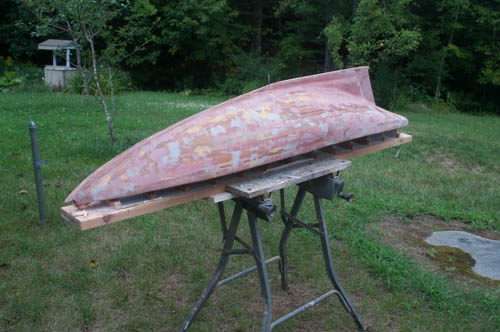
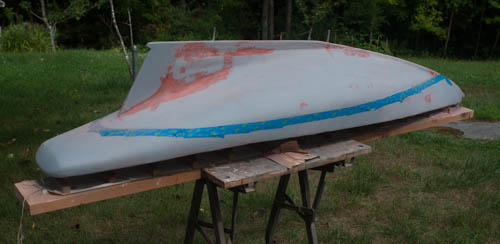
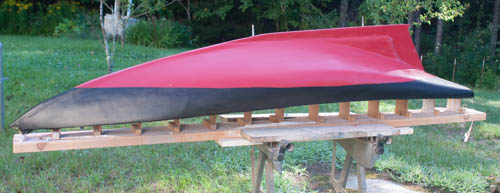
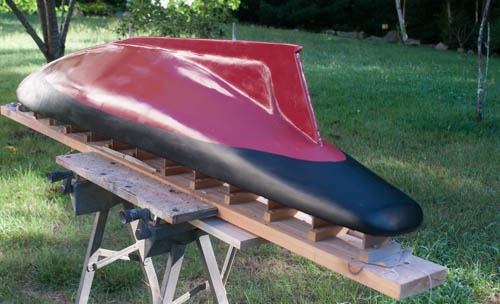
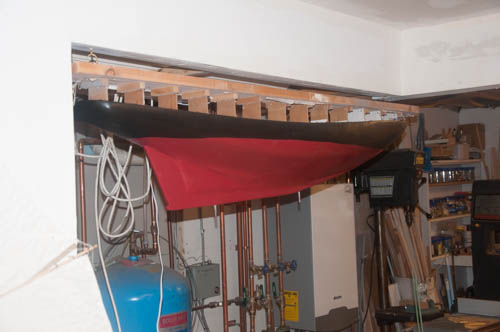
CATCH UP POST 2...2013-2015 Progress in 2013/14 I retired in 2013 and started on many projects. I started the year building 3 kits in 1/4 scale to teach myself the skills needed before the big build of Charles Notman. I also spent a lion share of the year working on dancing feather making sails, and continuing the study of large Downeast schooners. In 2014, I not only began Charles Notman, but made a trip that I recommend to everyone who loves schooners. We took the fancy ferry from Portland, Me to Yarmouth, Nova Scotia and drove to Lunenburg. Wow three times over. Later in the build I will share some photos that help one study both schooners and all fishing vessels especially of the early vintage. One of the models of 2013 was a Gloucester Schooner, so I was up on detail and felt I knew what to look for in Lunenburg. You can learn much there from both the model collection and the schooners dockside to help understand deck level detail. Bluenose II was there and I photoed all I could and had fun talking with the crew. Let's build a skin 2015.. Well here we are in the late summer of last year. Charles Notman had sailed and was set in her new place of honor. I will continue to build her out and that story is in its own log. I was also gathering information and getting ready to build the Boothbay Harbor One Design racing sloops, so what to do during those warm days of September when I can take it outside....let's work on fiberglass skils needed to improve for the next builds and get 'gertude??' skinned up. Starting off we had to rescue the transom. Setting blocks with dowels and then carving with files and sanding has gotten easier for me. This build will be a possible sailing boat [ the hull at least] and it will have a fiber-glassed hull, so nice planking detail is not a focus.here. With the transom done we have also used water putty and wood fillers to prep for glass and resin. Putty has the risk of being tougher than the cedar, so I would not use it for a static model. It is the best though for filling gaps at this scale. Here again we are using 6 oz cloth for strength to the hull to sail. the first coat of resin is rough. I was told by a true artist who makes amazing hulls for RC to take coarse 40 and 120 grit sanding and don't be bashful in between coats of resin. . here is coat three done and sanded with120 to 240 grit. here is good old bondo full coat sanded with 400 and then solid coat of auto body putty at 600 grit. finally here is the auto body filler primer. Here I like to do the base with two coats of rattle can red. It will get over coats but is a good base. Here we are again with a double base coat of black. This will get painted again a few times as we build the deck, add chain plates etc. I love the shape overall . But here one can see 15 years ago when I started this build, the over simple lamination for the keelson assembly will make her sail well, but was not feathered out as it should have been. I love this view of the hull...it looks just like a graceful dolphin breaching..... Well here we are, it is fall 2015 and it was time to start Boothbay harbor one designs and put what I still thought to be Gertrude back up on the ceiling. The surprise is still coming cheers


- 168 replies
-
- 11
-
-
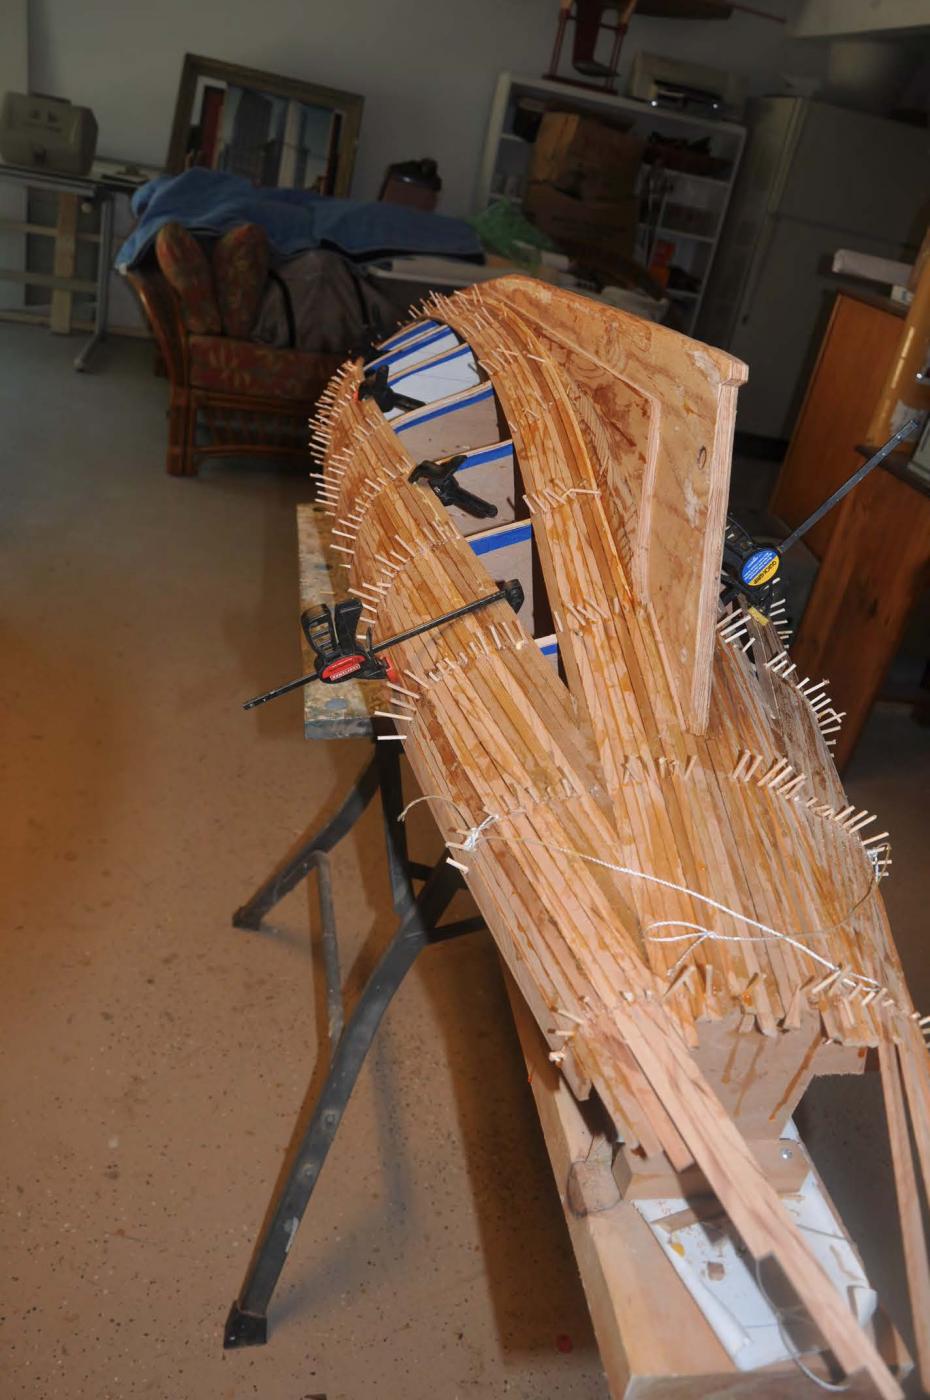
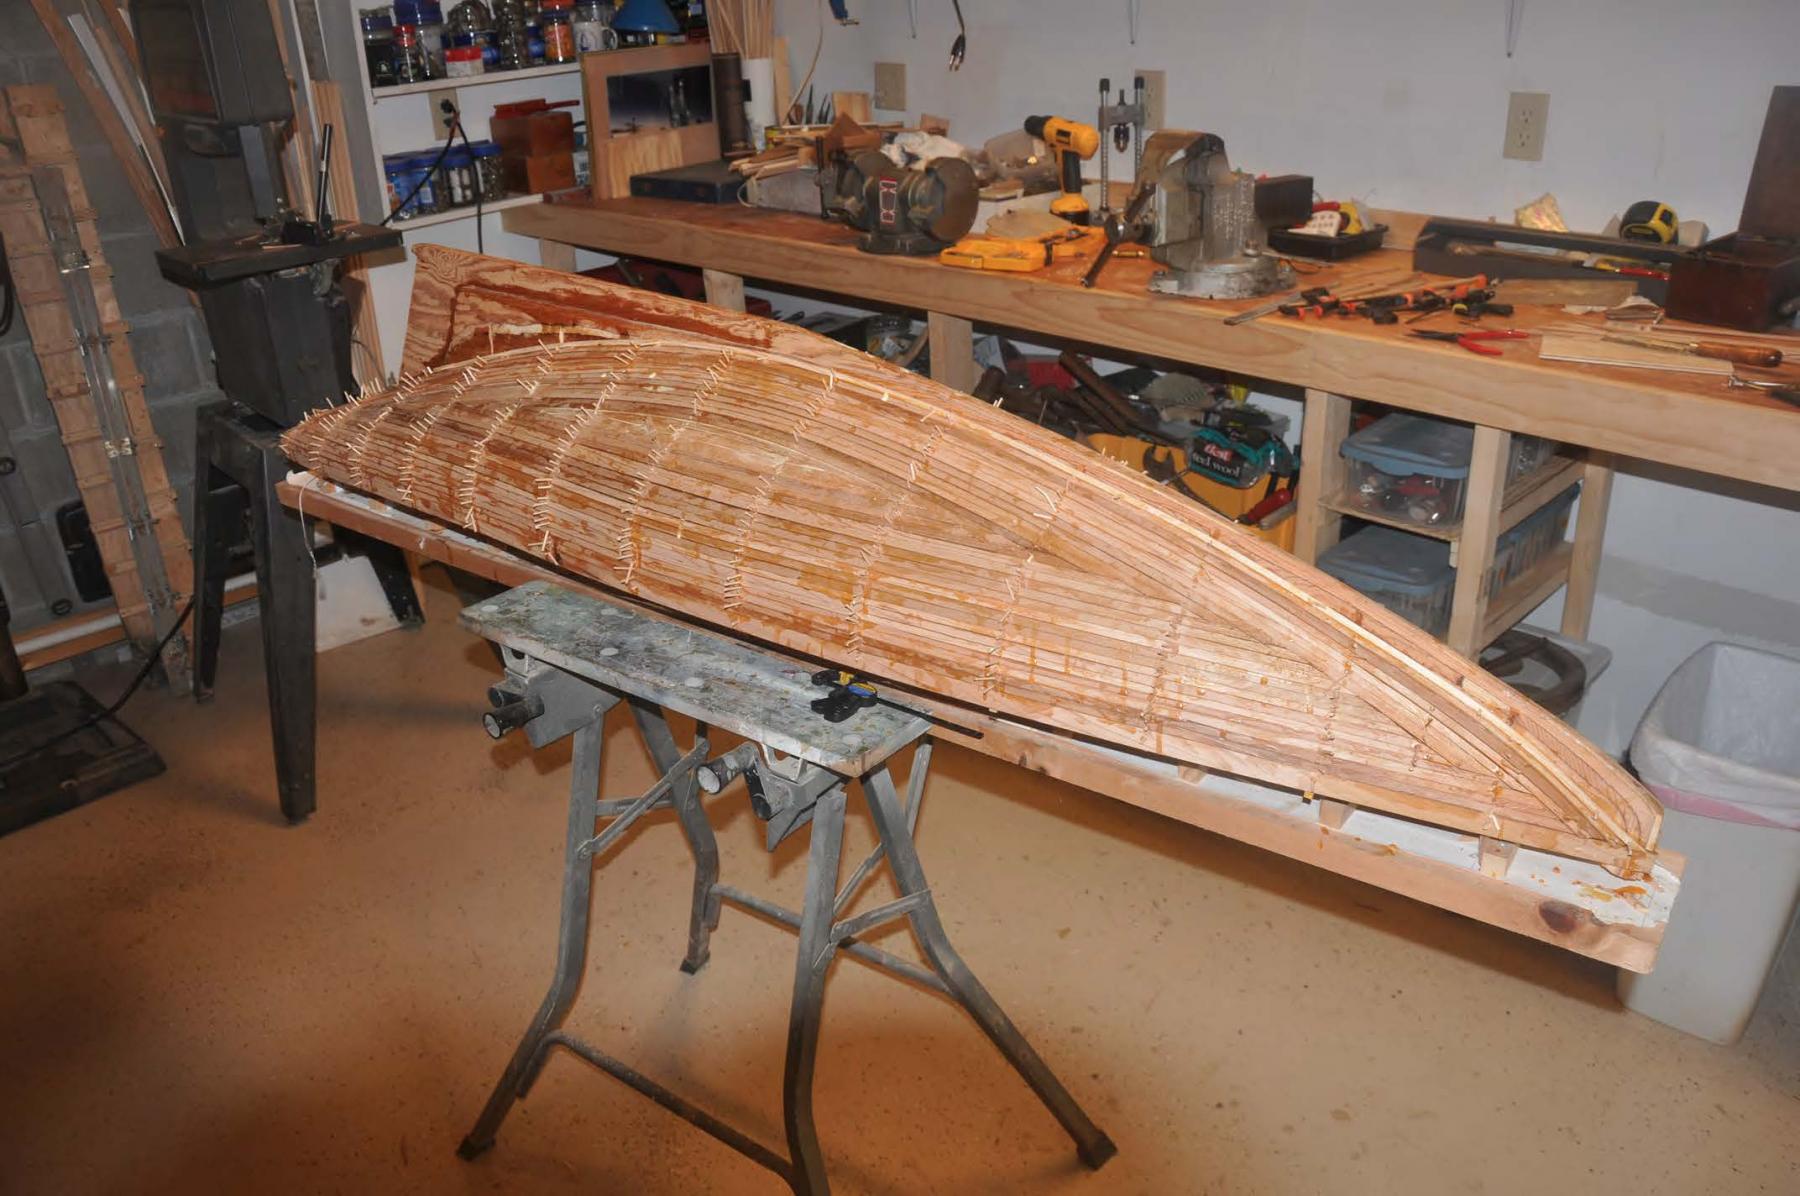
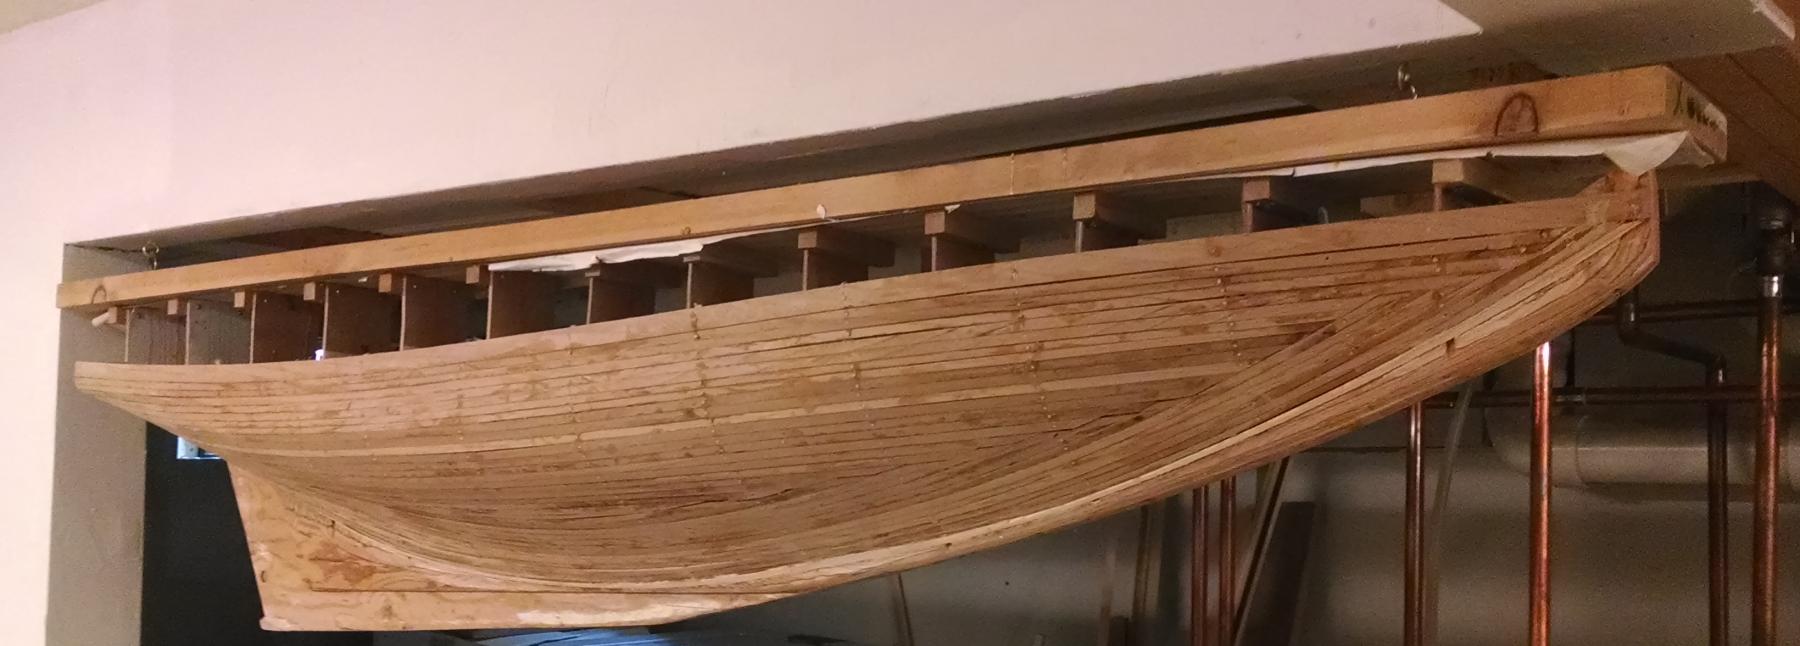
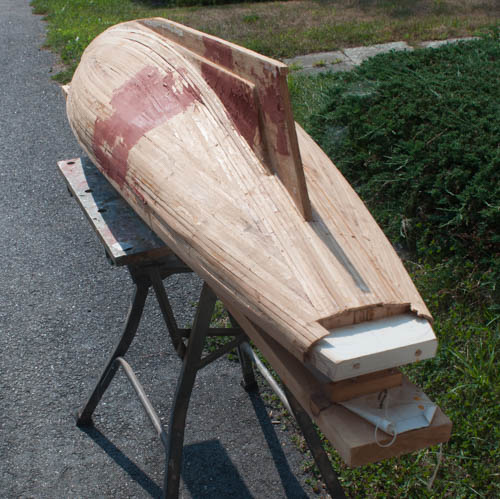
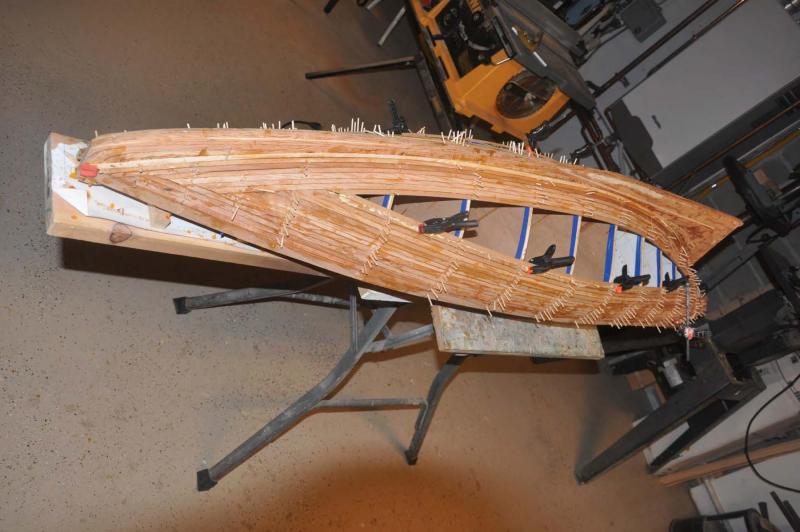
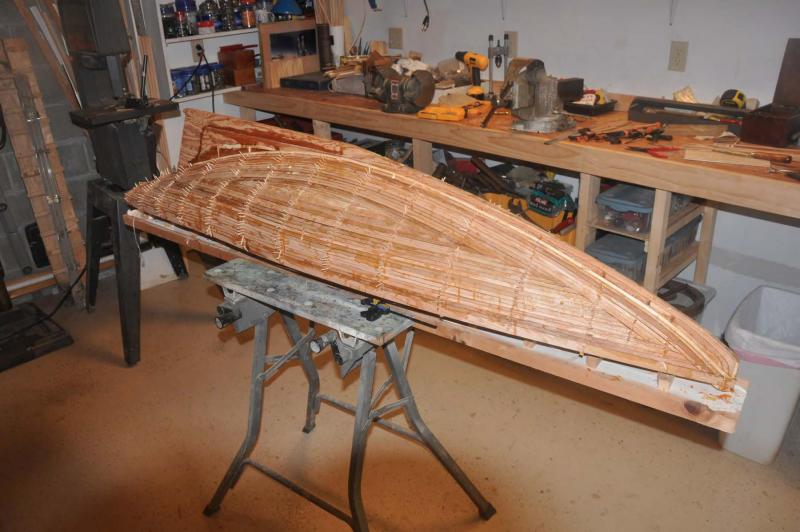
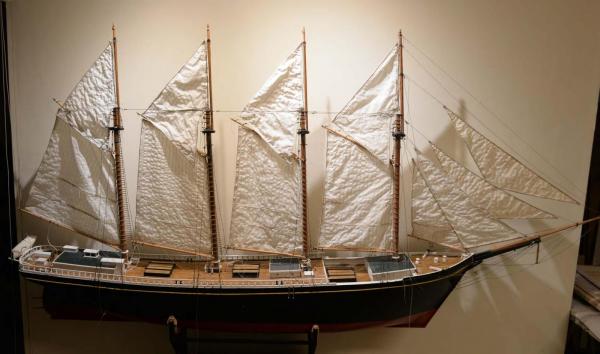
This new building log is meant to tell a long and broken tale of model building. The serious work began a few months ago when I decided to try to rescue this model and take it further along. Perhaps to stop it with a deck only completion since it would be so big to include rigging, or to breeze through and design removable rigging to allow sailing. Before we get in to that dialogue I thought it best to tell the saga of the 15 years to get it here. Fortunately that will only take a few posts. so here we go again I started to learn the trade, and truly I still am really only learning, by setting up a small shop in the early 1990's, at a former summer home here in Maine and building a wooden kit of a Dark Harbor 17 at 1:12 scale sometime in the later 90's. Like many I was working away and had dreams to be relaxing in a shop but realty kept us away. I never worked closer than 3 hours from this summer home and usually further. During these years I thought about wanting to build models that would sail. I had roughly ten years to go before retirement and thought that was time to try a few things and figure it out. My first venture was to buy an Antique Marblehead Pond yacht, vintage 1936. I restored it partially and then copied it building a new replica. In august 2001 I went to the wooden boat school in Brooklin Maine with my son for a fun vacation and learned to build a 50 inch new Marblehead class pond yacht. They were called Naskeags. They are pretty but built purely for the challenge of sailing. Then looking at the half built dark harbor hull, at 17 inches, and the half built Marblehead Naskeag at 50 inches I decided on a goal. I would continue to build kits or scratch of classic boats to develop some skill. I would continue to read and read some more about the maritime history as well as model building, and thirdly i would continue to build sailable pond yachts to get some to sail. Ultimately I would learn to scratch build classic boats at a large enough scale that would respect the design but also try their luck in the sea....harbor or pond at least. Gloucester Schooners were also first on my mind for a challenge. When did we start this build??? Some of you have followed my earlier attempts with a four masted schooner the Charles Notman and the classic 1938 Boothbay Harbor One design racing sloops . Well here we have a boat construction that spans the whole period of 2001 until now. Here we see the 1992 to 2004 shop. I got to spend a few weeks a year there prior to 2000 and then weekends. You can see the two Marblehead pond yachts that filled much of my time . Hidden just out of the picture on the right is the partially built Dark harbor model. Most important on the back left is the building board and stations for a scratch build Gloucester fishing schooner that will become the basis of this build. This photo is dated 2002 At the time I built this frame, my memory tells me incorrectly as I recently figured out, that is built it up form Gertrude's lines. With the outgrowth of windows 98 and Auto CAD lt 97 it is not surprising that I no longer have any of the cad I did for this build. Here you can see the roughness of the build. I was clearly over my head at the time and fortunately stopped. The keelson assembly is made of three laminated 1/2 sheets of plywood so it is strong and true. [ It includes keel, stem, keelson and made up structure up to the the transom based on pond yacht construction methods... See my other log for detail] This method is Good for sailing but the forward stem is a problem [ you will see later]. Is she Gertrude Thebaud, Columbia or Bluenose??? I could write for pages but the short version is as follows. I read that Columbia was the same size as Bluenose and considered to be the fastest ever built. Unfortunately she died young. Here is the text from Ship Wiki ...remember length on deck 141 feet · Columbia is a Gloucester Fishing Schooner. It was built by Arthur Dana Story from the design of Starling Burgess, at Essex, MA, 1923. The Columbia represents the final development of the Gloucester fishing schooner, famous for speed and seaworthiness. It participated a number of international races, including the one against Bluenose in Halifax. In August 1927 when it was hit by the two Gales, the well-known "Graveyard of the Atlantic", Columbia was lost with all hands off Sable Island. · For years my memory was I had decided to build Gertrude. All my files said it etc. anyway part of the reason is in the following text from wikipedi....remember length on deck 135 feet · \Gertrude L. Thebaud was an American fishing and racing schooner built and launched in Essex, Massachusetts in 1930. A celebrated racing competitor of the Bluenose,[1] it was designed by Frank Paine and built by Arthur D. Story for Louis A. Thebaud, and named for his wife, Gertrude Thebaud.[2] In their first meeting at Gloucester, Massachusetts, in October 1930, the Gertrude L. Thebaud bested the Bluenose 2-0 to win the Sir Thomas Lipton International Fishing Challenge Cup.[3] However, in 1931, two races to none, and again in 1938, three races to two, the Bluenose defeated the Gertrude L. Thebaud to remain the undefeated holder of the International Fisherman's Trophy.[4] I further learned that she went to the arctic in 1934 with MacMillan one year as Bowdoin stayed home. I continued to think I was going to build her and I remembered incorrectly that I had taken measurements from her scanned set of prints when I built the frame.......you'll see Bluenose. Here is intro from wiki pedia ....and again please remember length on deck 143 feet · Bluenose was designed by William Roué and built by Smith and Rhuland in Lunenburg, Nova Scotia. She was launched on 26 March 1921, and christened by Audrey Marie Smith.[citation needed] She was built to be a racing ship and fishing vessel, in response to the defeat of the Nova Scotian fishing schooner Delawana by the Gloucester, Massachusetts fishing schooner Esperanto in 1920, in a race sponsored by the Halifax Herald newspaper.[citation needed] Bluenose vs. Gertrude L. Thebaud, International Fishermen's Trophy, 1938, final race ·After a season fishing on the Grand Banks of Newfoundland under the command of Angus Walters, Bluenose defeated Elsie (out of Gloucester), returning the International Fishermen's Trophy to Nova Scotia. In 1930, off Gloucester, Massachusetts, she was defeated 2–0 in the inaugural Sir Thomas Lipton International Fishing Challenge Cup by perhaps her most celebrated competitor, the Gertrude L. Thebaud.[2] However, over the next seven years of racing, no challenger, American or Canadian, could take the title from her.[3] The question again...which to build There are so many Bluenose models I thought for a long time about making an American boat. The designers Starling Burgess and Frank Paine come up again and again. The 1937 Ranger for us here in Maine is a big deal. The fact a new replica of Columbia sails and all who see her say she is a marvel. [ Images of the replica is easy to find on the net]. Well to be honest there is a funny story here on me how in the end the model became Bluenose. To make the original frame in 2001-2002 I obtained the 3/16 scale rough model plans from Piel Craftman in Newburyport, MA for both models BN and GT. While I was in his shop however I fell in love with another boat named Dancing feather. My rear admiral feels the feather is one of prettiest schooners she has seen so guess what took priority. On again off again working on vacations and moving houses to our current home [ means rebuild a shop] only it took from 2004 to 2012 to get this one far along and it was a real rough job much of which may be redone. Here she is a year ago moving away to live in the new sail loft and thus make room for Charles Notman to hold the shop entrance way display area. I had made her 3/4 scale to size at 50 inches on deck. I will never work in that odd scale again. In the mean time, I was assigned to work in Canada for 3 plus years and while I was there came across a set of really nice 1/4 scale drawings of Bluenose. These I now see are easy to get on line as are similar plans for Columbia. They are both drawing by Philip Eisnor and available though a sister site modleshipbuilder. Finally...we start again It is summer 2012. I am assigned to travel overseas but spend several weeks through the summer here in Maine. What to do...... Please look at my other two builds [ Charles Notman and Boothbay Harbor one design] for detailed discussions on the sailable hull build method. The plans were scanned, plumbed and inserted to CAD. The white paper inside on aft stations was printed off and attached to luan plywood. Blue tape separated a 1/32 birch plywood strip rib. The cedar is rough milled from 1"/6" stock to be 5/32 [ which only means 1/8 - 0 +1/16 tolerance] by 5/16 . We want to start faring the hull with no less than 1/8th wood thickness. Planks soaked in ammonia water then wood glue and toothpick pinning to the sstations through the ribs.. Here the laminations for the Keelson assembly are clear [see Notman build] . Notice there is no transom at this point. almost finished. See the roughness of the bow. As I said i was way over my head when I started this hull. Here we have all planking on and sanded. And here she goes back up to the ceiling for storage....it's 2012. and I am still thinking we are building Gertrude Thebaud. They sent me away for work again and it was another year before I could really focus on my modeling goals. This was the year I found forums like this one and started reading articles , sites like models of dummies, practicums and building logs. I was getting ready cheers


- 168 replies
-
- 15
-
-
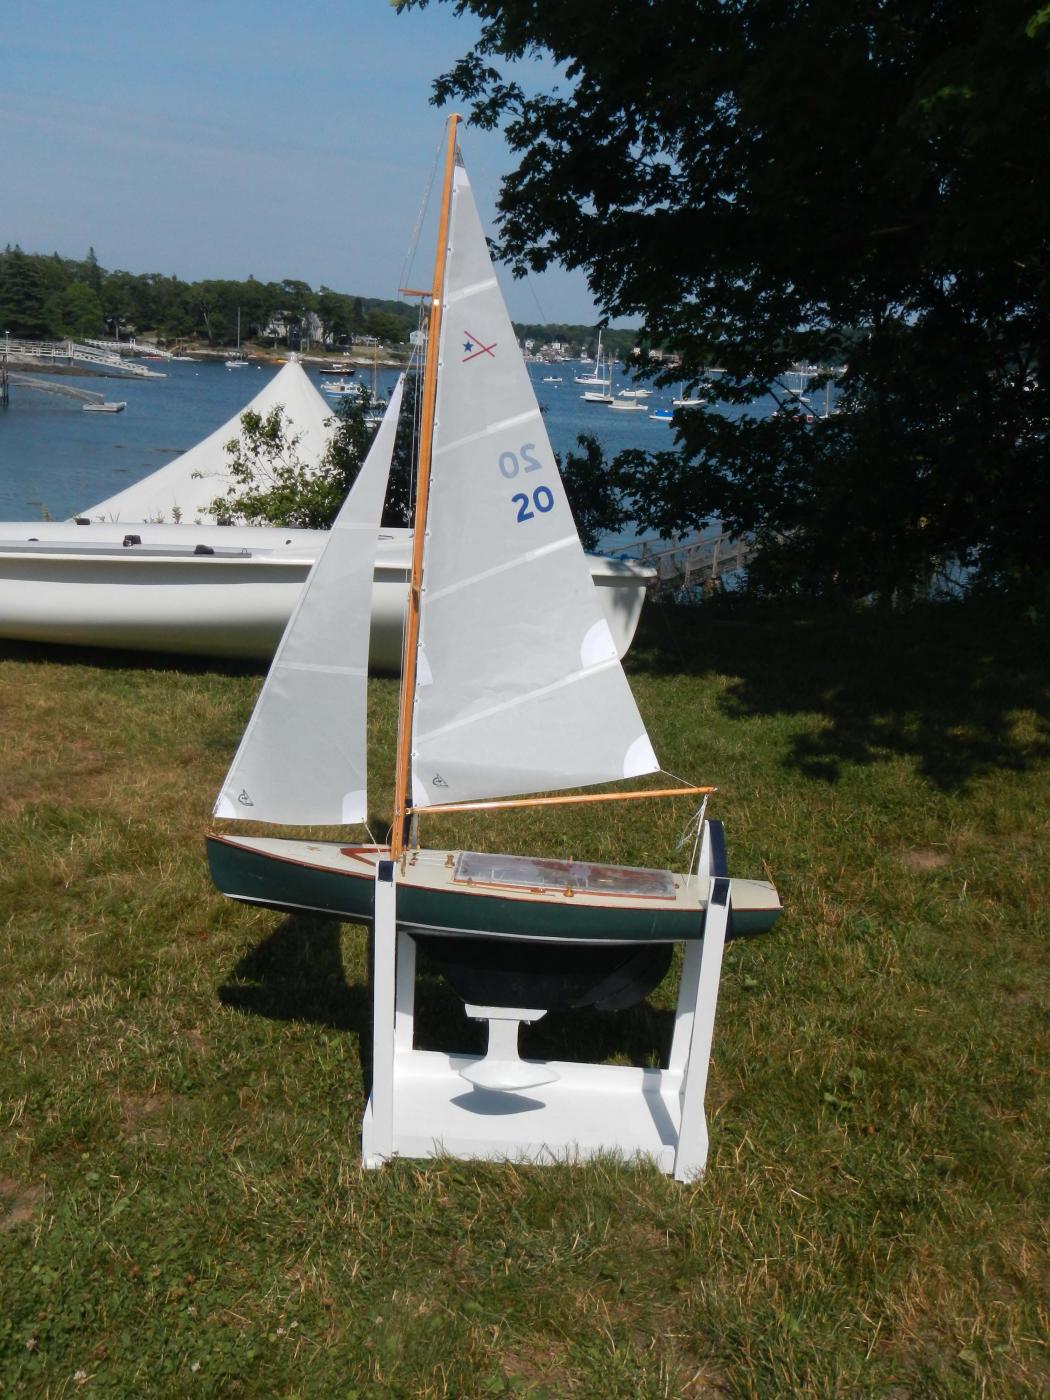
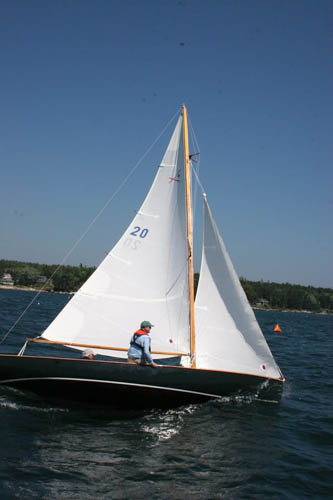
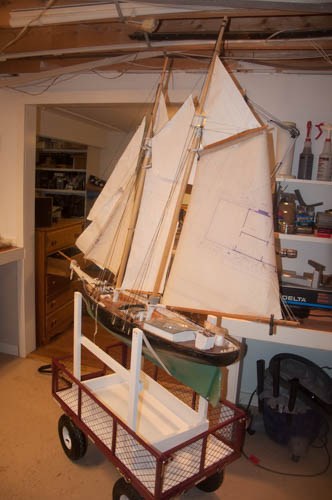
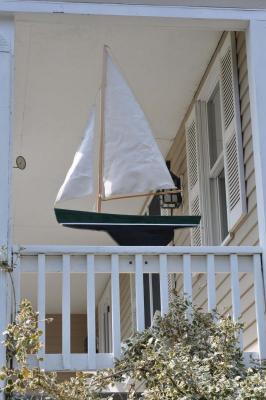
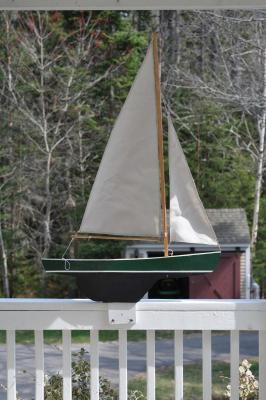
Wow summer is ending quickly. Yesterday we had our final sail in real Bittersweet and it was great. I just wanted to share a final posting on the resolution of the sailing of the Bittersweet model that under performed previously in the log above. I first took the advice given and reset up the boat to check the rake, I found it was incorrect. i reset it at the 4 degrees. aft...thank you Cap 'n' Bob for suggesting it. You were right on! I then attached a line to hold the out haul snug to the boom. This is because shortening the main sail foot to keep in balance with the smaller jib allowed the out haul to ride up....thank You Mark for pointing it out. the light designed insert connection for the sailing keel failed and ripped out while in the car coming home from a previous sail. Here I copied old design of placing a #8 lag bolt [hanger] into the keel and then using a wing nut to add the sailing keel. This method works best for a boat that will be sailed a lot. For display we have the two bolts to look at if we remove the white sailing keel. Here we are on the working stand at the yacht club and I plan to display her mostly like this with the sailing keel in place. Here we have gone to our pond and found she sailed really well after re-raking the mast and yes she came about too. The line holding the out haul came off and she still performed, so I guess the rake was the real issue. I plan to have fun and sail these for the next few summers . Thanks to those who followed along and gave me encouragement and tips as I find my way in this great new challenge of building classics boats that can actually sail. I am playing with the 1:24 Bluenose listed on my signature right now, but am not sure if it is ready for a log yet. If I decide to keep going to complete it I shall post it. If I hang it back up to the ceiling for another year I will move on to other ventures. i want to try some smaller scale boats to to figure out how to do that because these big models are just that..BIG. cheers

-
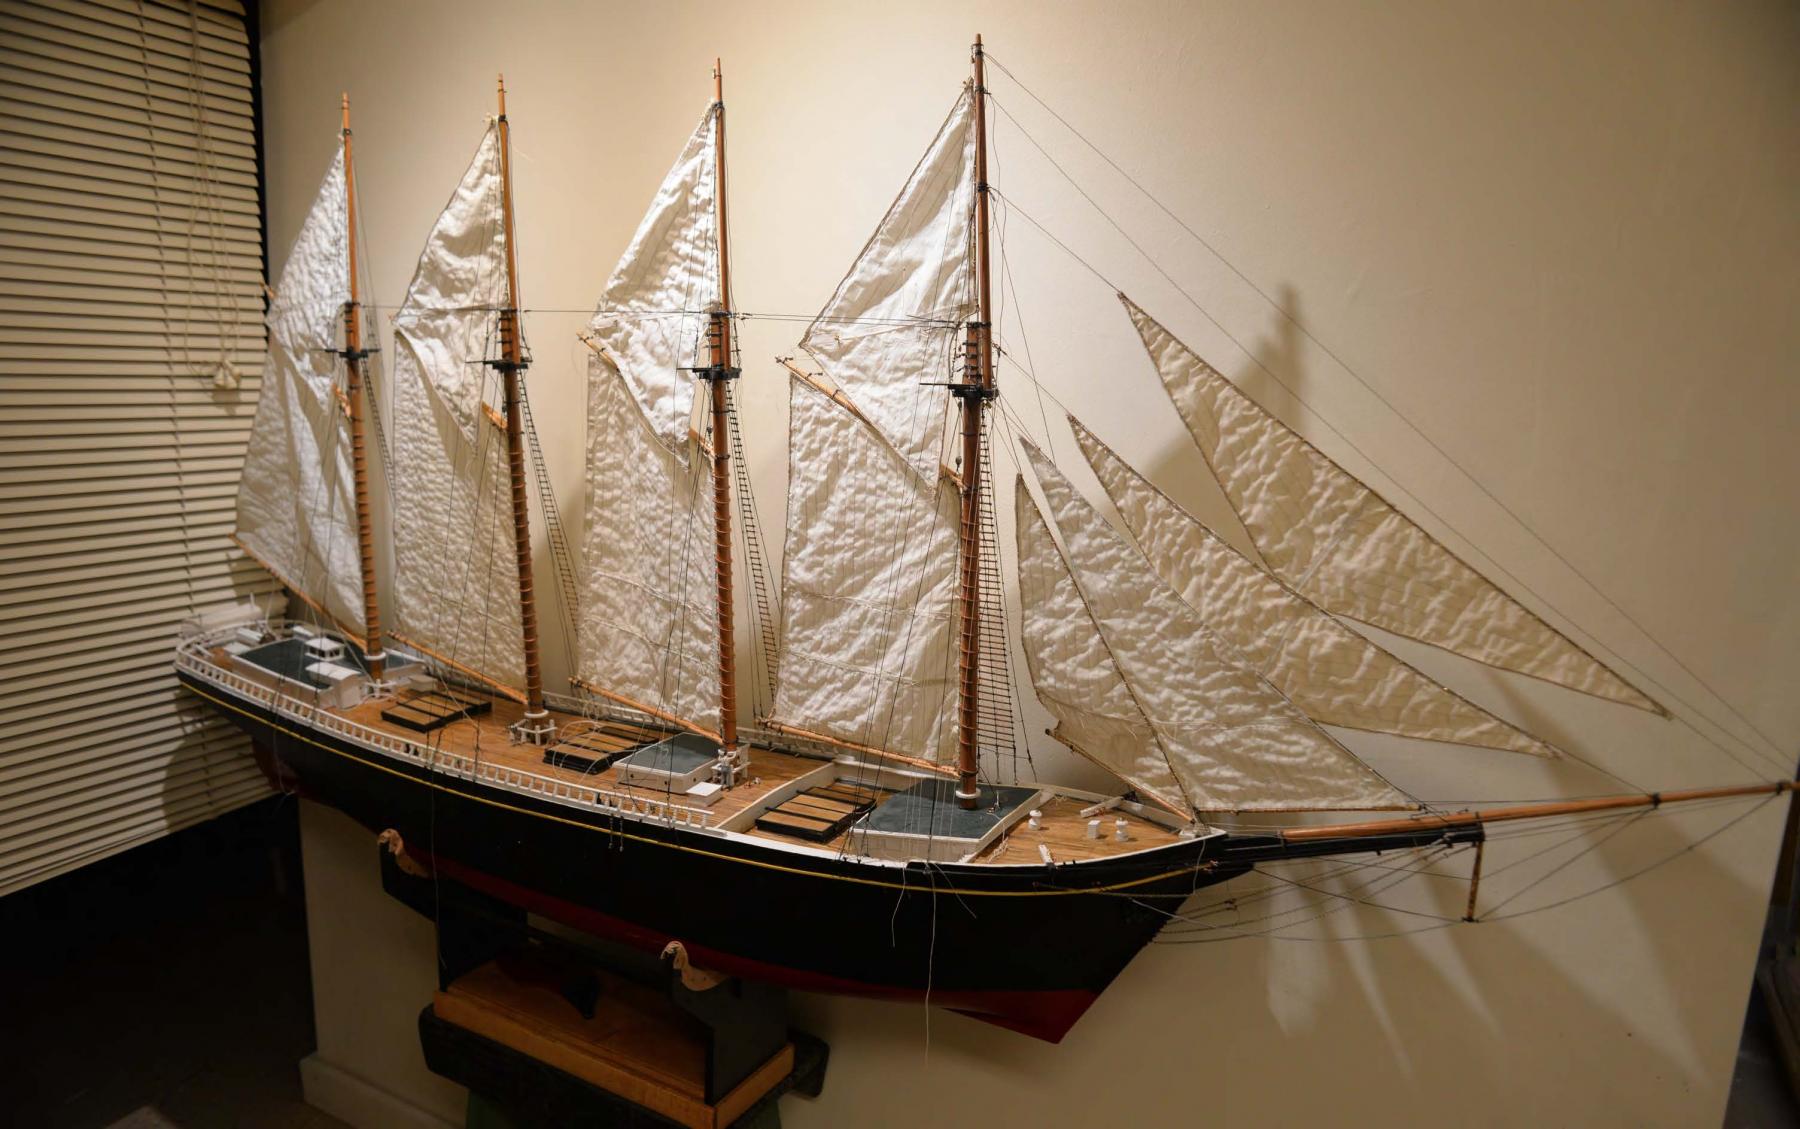
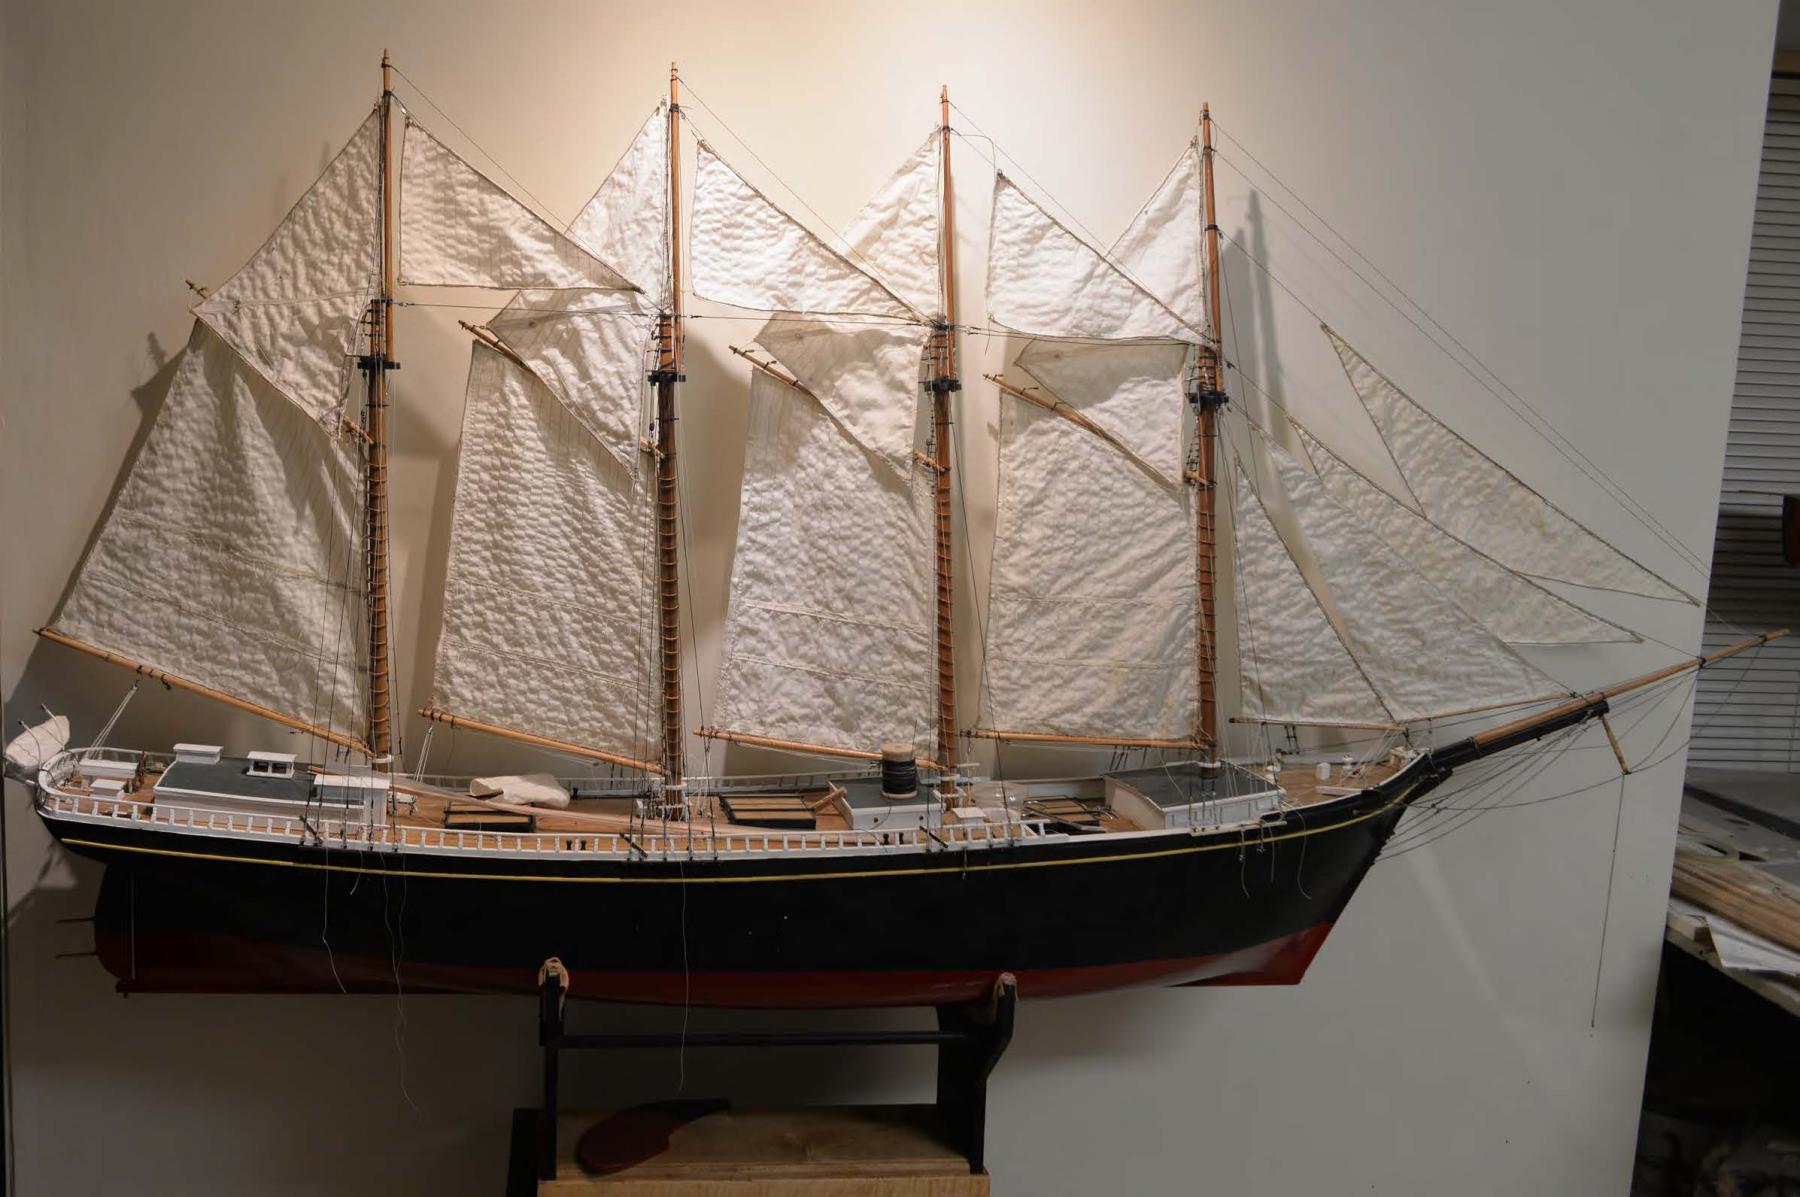
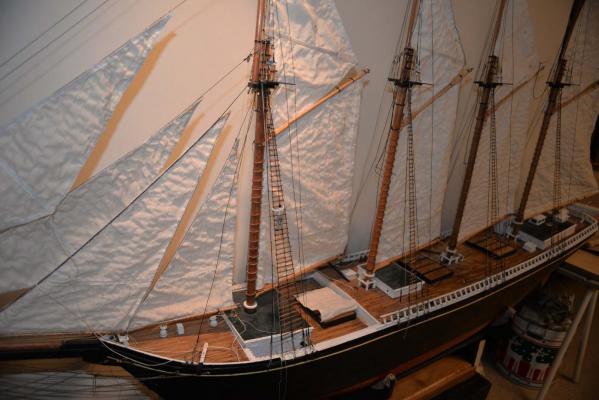
wow In only a few more weeks summer is coming to a close, and it is time to figure out projects for next winter. I want to share a few photos of the work i did last spring getting Charlie to a fun place before resting this summer. There are tons to do however before we say done. I will continue from time to time to get back on this project and update. I have a few other of these bigger boats I want to get further along with, so when the snow comes, I can move into new territory. As spring was ending and summer beckoned, I had sorted out [ that means figured out mistakes and redid] ratlines on the port side...the intended display back side. I put on running lines that i thought were on the port side and then turned the model around. This was to be a milestone. Here we have all the ratlines on and various running lines intended for this side all in place. Here we are turned around, new LED lighting is in place and we are ready. she is not done but this is where she will live. wait for oops we are not done turning here I sent the crew up because it was time to figure out how to bend the top stay sails. Alright three cheers all CN sails are now on The next thing I carefully did was to install the clew lines just like I did on the top sails. If you look at the top sail behind you can see the small block and the clew line that lives on the starboard side and goes down to be made off. I then , thinking I wanted all the lines on the exposed side, installed the similar clew lines for the top stay sails. oops they are supposed to be on the port side, so here in the photo they are removed. a job for next winter. Finally after a bit of study I figured out the top stay sail trip lines and show one off in this photo. I finally interpreted the detailed Cora Cressy sail plan to have the block tied off to the top mast stay, so that point of purchase is higher than the jack stays and can thus pull the sheets over when tacking. So this is how she sits and I hope as summer activities run down through the next month or so we can get back to this fun build. cheers


-
Bob and Mark Thanks so much for your advice. A new sail is $$$ so i will definitely try your ideas. The loose clue was due to a dock side fix to the out haul. it is interesting because on my real BHOD I am having an issue that with only a sheave, I can not loosen or tighten the out haul controlling the foot for either down or up wind during a race. The red boat [champion of the fleet mentioned above] has added cheek blocks, one double and one single to the side of boom to allow aide in adjusting the sail after rounding the windward mark. I watched them do it as I followed them 5 miles around the outer island and back last Friday in the classic boat race. Because I cut down the sail as mentioned on the model, the distance from the sail to the end of the boom to too long and the clew rides up. Mark great observation. for now i will add a lashing to bring the sail to the boom. as too pulling the mast aft, a little bit is fine as that is what we do with pond yachts. my thoughts to keep the scale however will be to maintain the rake of just under 4 degrees...[.3/4" in 1'] that was part of logic to resize the main. My first sizing was trial and error. the too comments together however explain why one boat sailed OK [ still Lee helm trouble in light air] and the other not even in good air. My family is gone now and I have some time. First up is to reattach the sailing keel by installing permanent bolts. It is not good for display version but a need I think to continue sailing. I will then follow above and go back to the water. My big dead line in only two weeks away. cheers
-
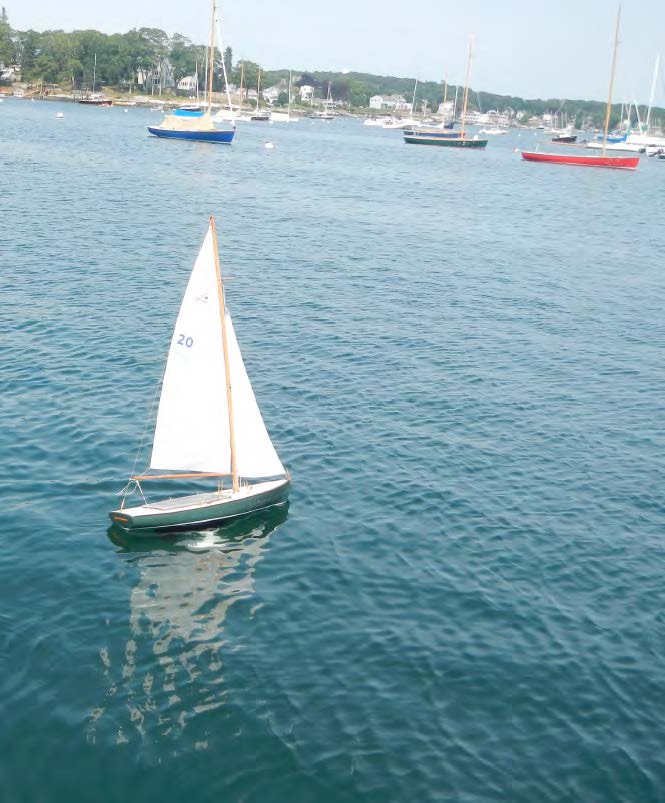
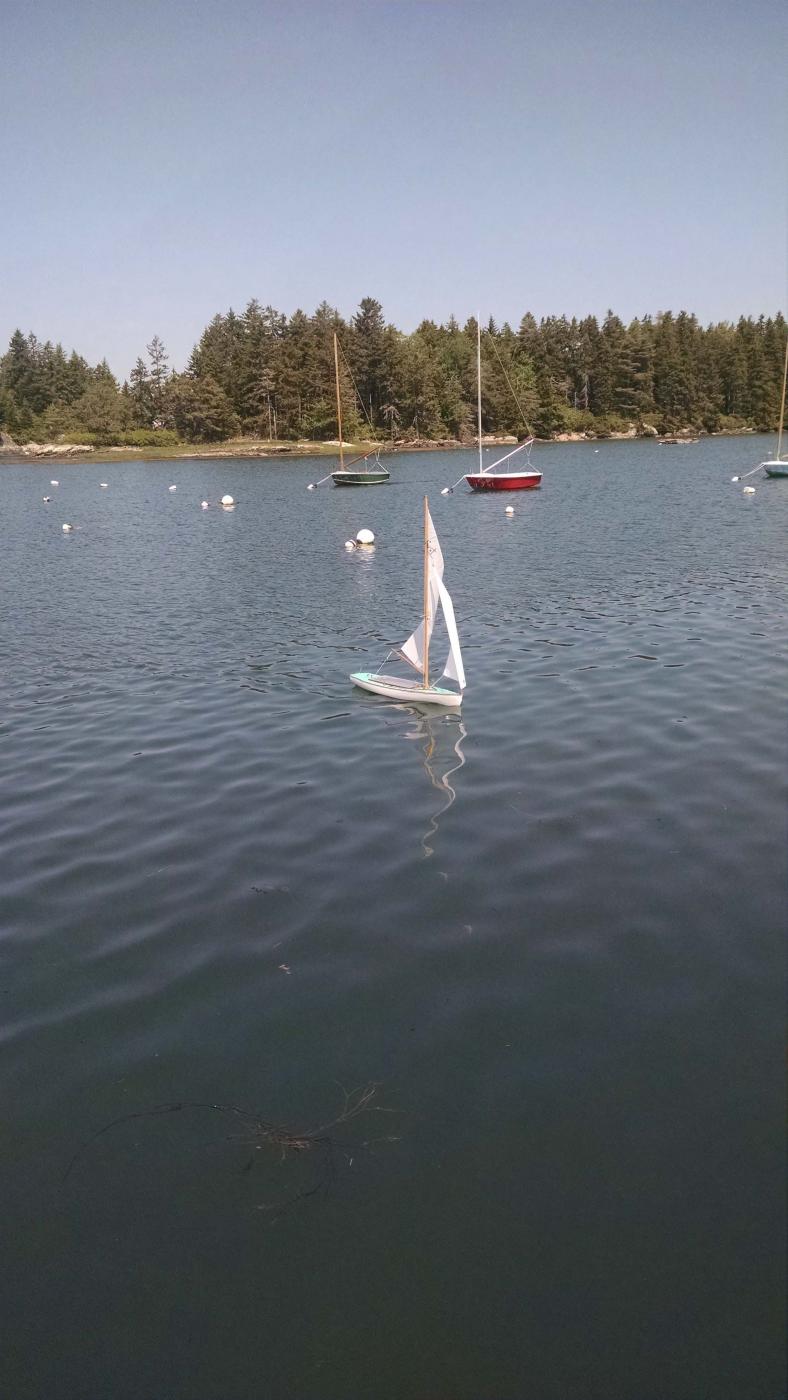
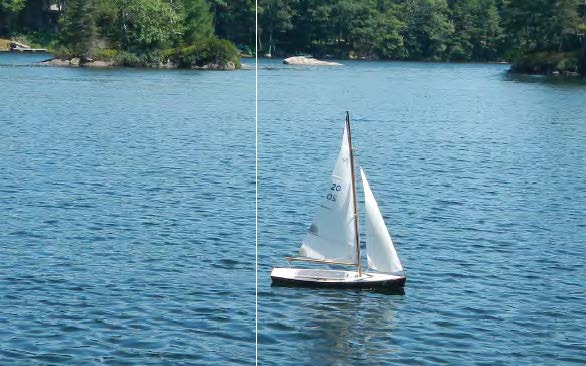
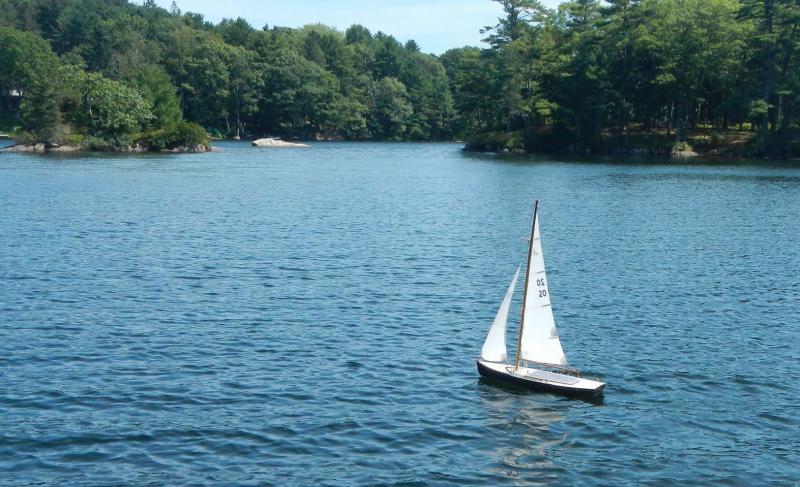
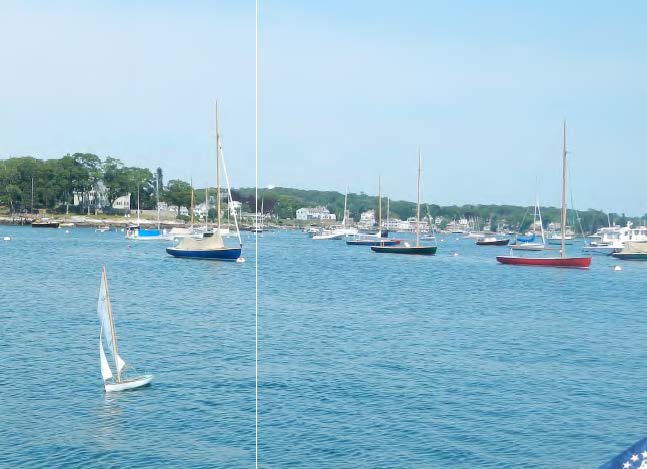
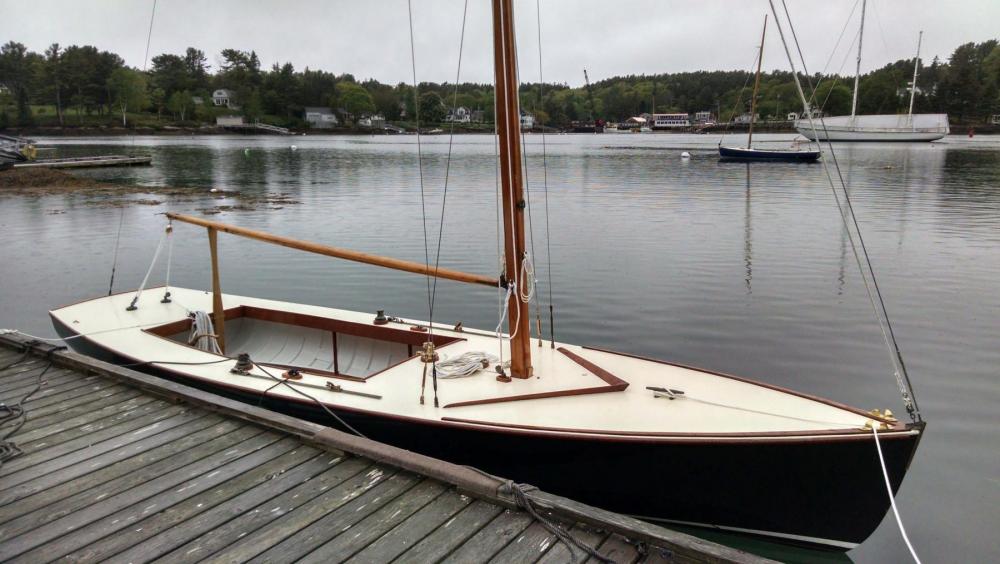
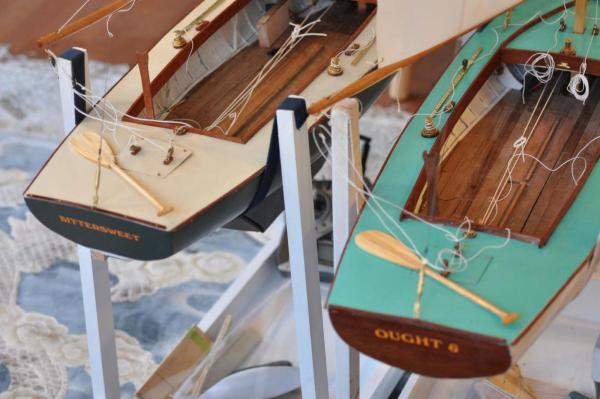
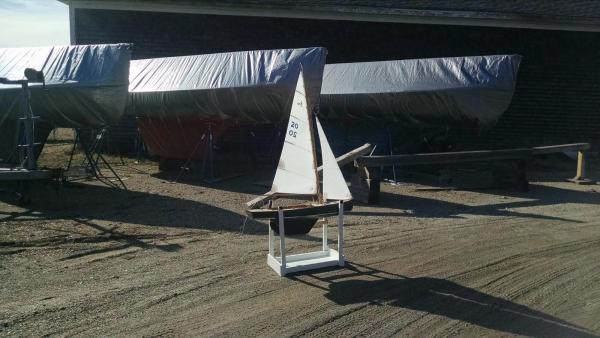
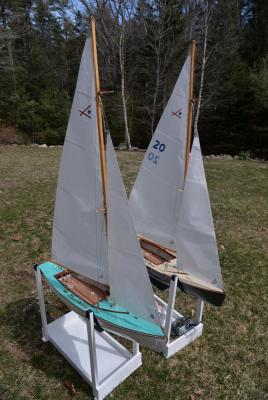
Thanks Patrick Bittersweet also sailed and we have a film...but she would not come around and I will wait to solve the helm before posting... I am back to the drawing board. The consensus of sailors here is to solve the lee helm, I should get a new mainsail enlarged to full size. That is what I think I will do. In my early posts, I had cut the mainsail down to match the reduced size jib. After receiving the first sail, I cut further for the look...[ that might be why the first sail worked better on Ought 6 and this one did not on Bittersweet] It seems the added sailing keel hurt the trim and to compensate I will enlarge the mainsail back to its true scaled size. This is part of the challenge to scratch build and make her actually sail well. Here Bittersweet the model is sailing and you can also see the fleet of BHOD's moored behind her. Bittersweet is the green hull and tan sail cover behind the green Eight bells in the foreground. Wildfire, the red hull in the fore ground is the club champion and she often is the lead boat in weekly races. Also my cute little brass inserts holding the 6 pound sailing keel failed on the way home in the car. I need to address that too and go back to more robust inserted bolts. Here is a still of Ought 6 sailing . It was fun when the youth sailing group came in and sailed with her as seen in the video. They all came over to see and discuss....future modelers?? cheers

-
Here we go with a video. Bittersweet has a lee helm. she is sailing with a second sail cut down a bit and still dos not go well. Ought 6 with the first proto type sail did well and here is a video sailing at the dock of the Boothbay Harbor Yacht Club
-
tada!!!!! we are not home yet but both models have been sailed. I took Bittersweet to the yacht club dock as that is where in the future we hope to race. there was not enough breeze and the performance was not great but she did sail. here i took Ought 6 over to the Southport yacht club and there was a a good breeze. she sailed great after i got the hang of it and then the rudder line broke at the knot on the servo. Here one can see three of the four issues that I need to fix. I need to upgrade the line or connection fo the rudder lines. the black sting in the photo. I found the cute little stand up blocks on the after deck hatch cover catch the main sheet. I will need two hatch covers, one plain to sail and one as is for show. the nice looking hooks to connect the sheets to the boom hook should be more secure, perhaps a fishing lure clip like on the forestay. I also need to improve the connections to the sail clues and mainsail tack. the cute shackel I made up did not hold. I had a lot of problem with lee helm with little wind on the first day but no problem once we got a breeze. I look forward to working through the details cheers
-
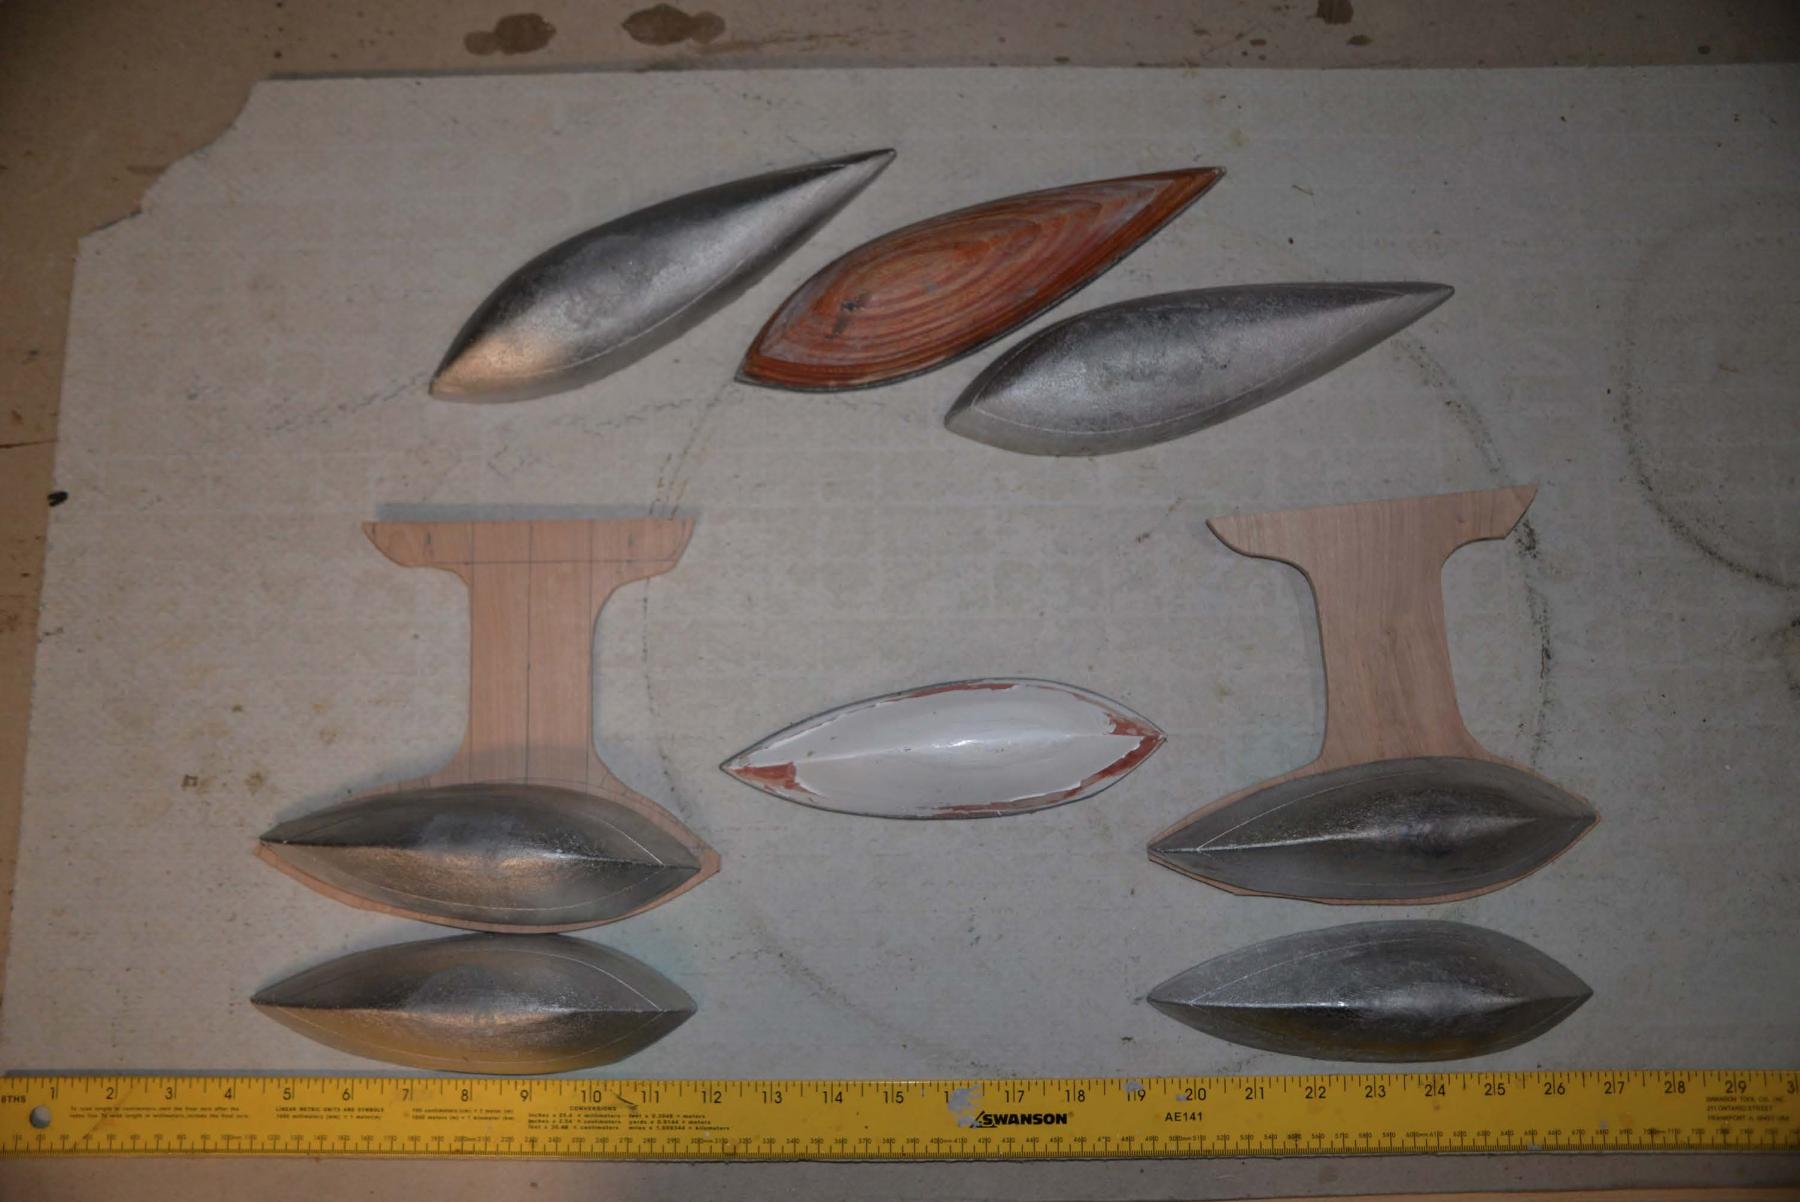
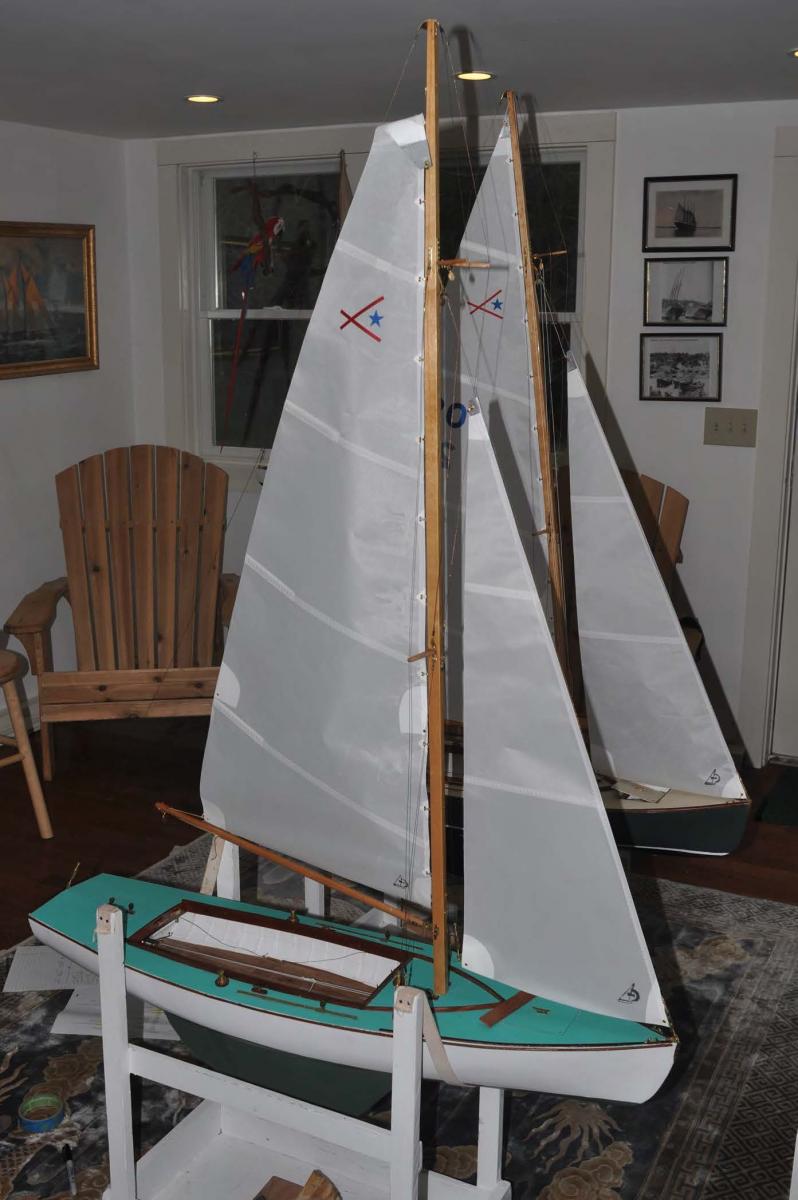
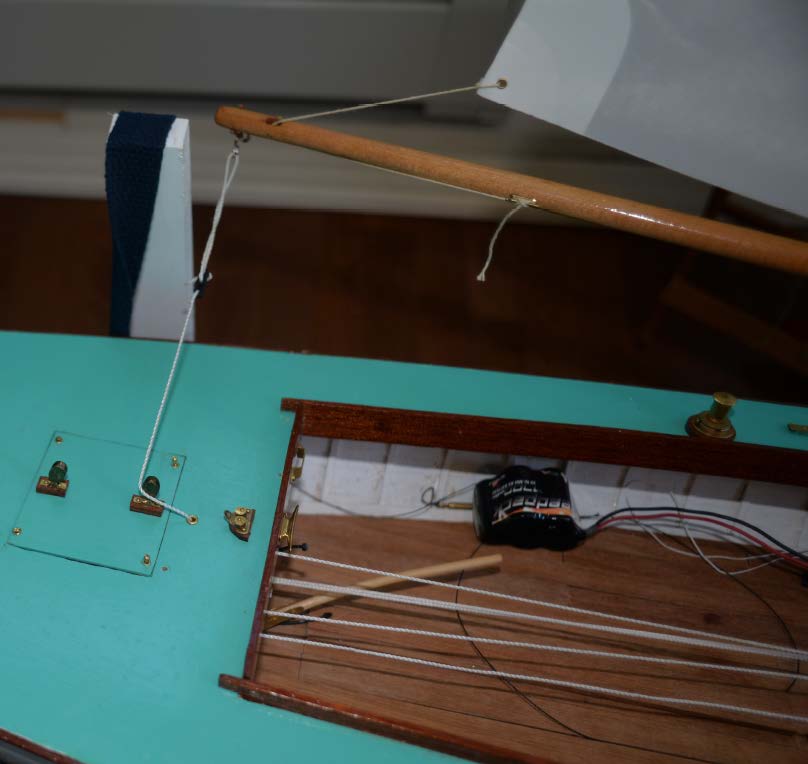
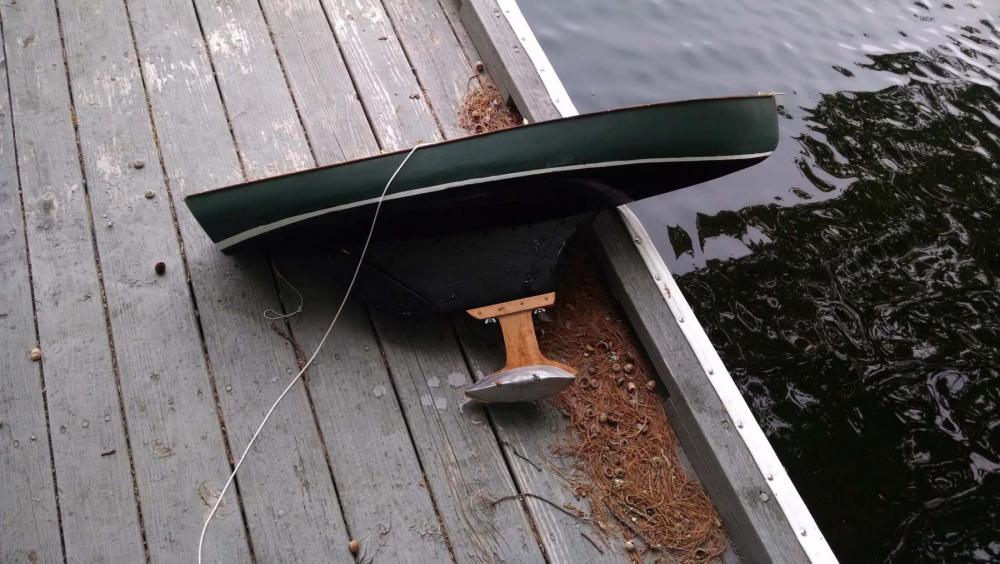
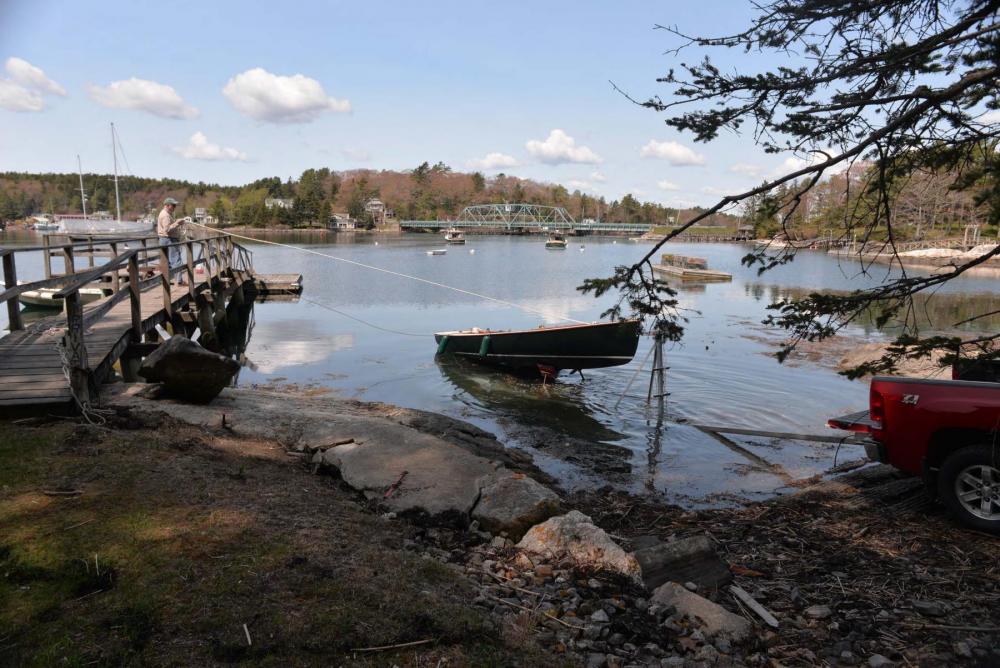
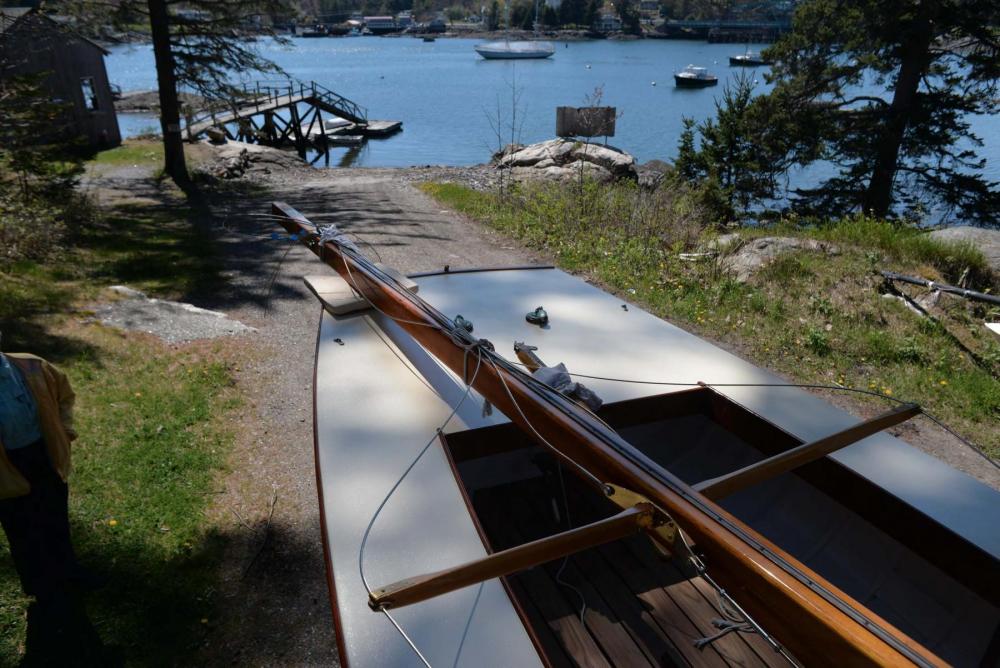
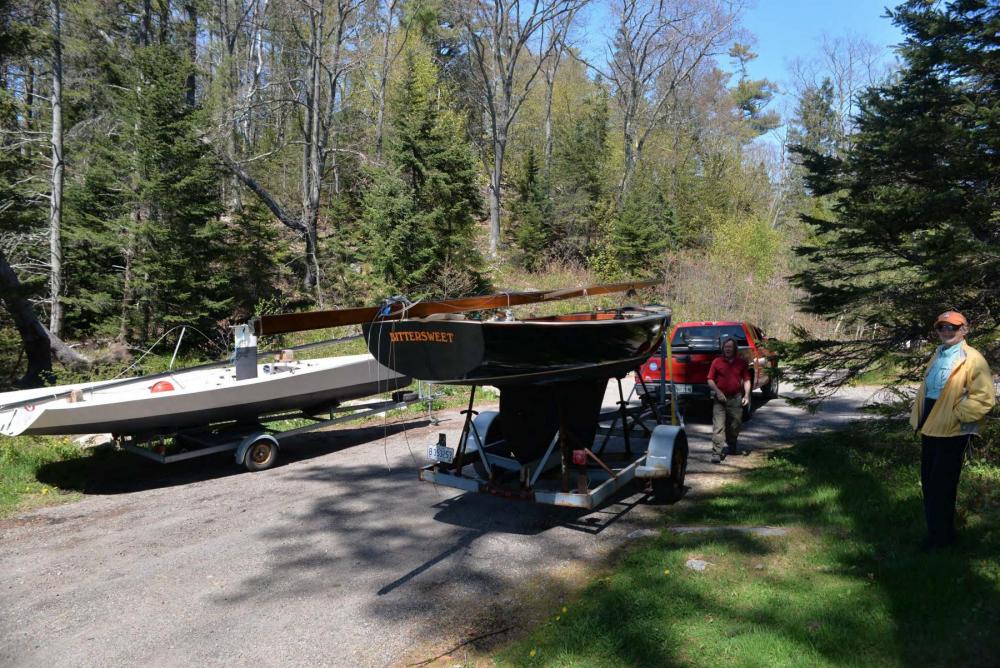
It is now time to get these boats sailing. I spent the last few days tuning up my other two pond yachts, 50 inch Marbleheads. It is important to have something to compare. I then moved to update and tune up the rigging I have done to make these two BHOD's ready to sail. The main sail loop now has its end block attached via shock cord to the transom. This finally clears the tiller lines. all sail sheets are now connected by hook to allow simple take down I redid the jib tack connection, so it can also be removed for travel. I need to have two boats plus all the RC stuff in one car so I need them to be able to set up quickly. The show lines [ sheets] all come off for sailing I reworked the jib sheet so it is off a second return loop and the sheets goes out 1/2 of the mainsail. This is a limitation of using a single drum winch as opposed to older designed arms. I have a programmable radio [ a must for scratch build] and trimmed the travel for the 3.5 turn drum winch to 80% to stay in the boat some day after it works. I will write it up and do a diagram. In the mean time, today was a big day. I was able to go up to Rockport and get my lead ballasts made from molds I made earlier. Here you see six new half keels bulbs. The two larger ones are supposed to be 5 pounds each and they are for one to the two larger schooners I never finished. The design is for the marble head. The four halves are for the BHOD and were designed on Cad to be 2.75 #. Richard told me he would add a little to compensate for shrinkage, so when I drill holes I should be fine. He showed me the 1/16 layer he added to the forms . oops. .... the haves weighed as is ..3 at just over 4# and one at 3.25#. so off to the immediate fix up and float test. I drilled 1/4" connection holes into two of the 4+ pounders. That brought them down to 3.25. if I use a dowel to connect instead of brass I really don't add weight back. So let's see what happens in the water and if 6.5 is still too heavy here we are through the woods to the dock and in for a bath. I moved her around and found the water is above the boot top, and that is not good either for speed performance or the look. You can see the the hull is wet well up the side. also note there are two holes in the lead. Since one of the remaining half bulbs is already 3.25 with no holes, I plan to do the following: Cut a thrid connection hole through the center of this pair. That hole should do away with 3/4 # and get us both back to what I had planned for and give me a method to deal with the two other half bulbs that are not currently balanced. This is a little bit of a trial and error approach. After the next go around I still may not be as high as would want to get the boot top up and visible. It is important however to keep this strong moment arm to keep the model more upright while sailing and that may be a comprise. I still have the possibility add on to the rudder. If I get a lee helm, with this new keel I will use that to try to trim since I can not do anything above deck. Just to keep up with her big sister. Real Bittersweet is now at her mooring. Here she is going in ...splashing in local talk here the mast is stepped and rigging ready for a sail cheers


-
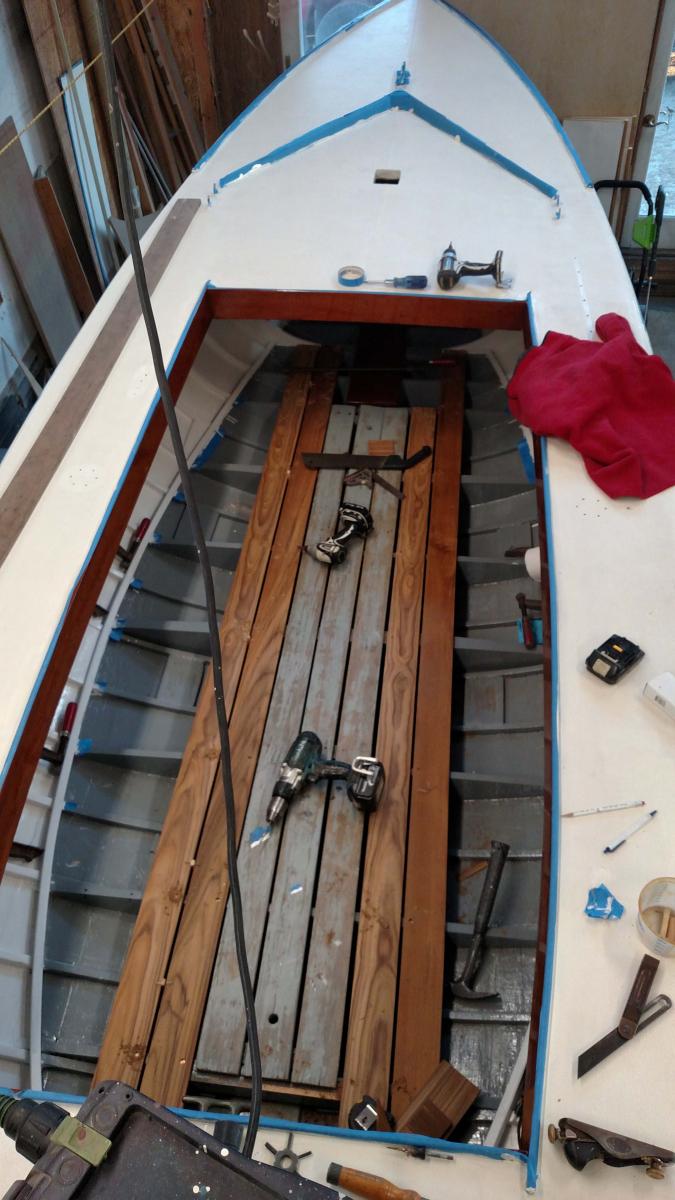
I need to update some progress. As spring arrives, I am waiting to hear the casting of the keel ballasts is done so I can get to water testing before the audience arrives. we have a big show on June 23 and I need to get them both sailing before that dock party. The casting was supposed to be last week and then by today; let's hope for next week. In the mean time the real Bittersweet came out of the barn and got ready to launch. Here she is getting her first breath of great spring air after winter inside. I still think her lines are just great. Not bad looking for a 75 year old girl! Then the next day she went to a boat yard with a crane for a quick set of her mast to measure the rigging and then go to stay at David's cottage to wait for launching. It is almost launch day....said up here..we are going to splash her when we get the right tide. her mast enjoyed the ride but it's time to take her off. We are splicing all the lines at home on the kitchen table. the new shrouds should come in a day or two. here is a view of the completed fore deck. Isn't that teak sole sweat! Here is a great view aft as you can enjoy David's dock, his 50 foot ketch that he sailed around the world with his family a few years ago and his work redoing the inside of the hull. Now we have measurement we need to complete the boom crutch too. ....and surprise the rear admiral came and approved all the work so far...that is big I will post the real launch and obviously the models' launches , but I need the keels! I include these because this story is both the building of the two models and also the restoration of the real boat in the same winter. cheers


-
Robin you are right is was truly a joy. My son came with his family from the deserts of Arizona and we were able to share. This is now my screen background note we are towing her back up wind cheers


-
Spring is coming. i took burlap off the rhodies today and more important ..... i took the tarp off the chase boat. Now paint and varnish and get ready to go During this slow period I did make the auxiliary power for the boats here you can see we are now equipped with our paddles. Last week we had the annual show up at Owl's head museum Killing more time i decided to upgrade our previously generic house sign with a scaled BHOD profile in the correct Bittersweet color scheme. here we are with a light breeze off the cove. The numbers are on order and will go on the keel. ..up on the porch one thing led to another and I had to scrape and paint the railing. this is very early for us to get outside. We are normally inside until early May I had some fun making the mast to scale this time. I may add the upper jumper stays later Here I put together a goose neck from parts. I chose to make the sail hanks from twisted copper. the sails are sunbrella and are usually good for two seasons. They are removed for winter. Today I went upstate to visit the foundry and drop off the keel bulb patterns. we are getting closer to launch day but much to do first. cheers

-
Mark thanks. I planned it for several years as I got ready to retire. then off i went building through winter and sailing her last summer. I was tipped off early in the process that she would not sail well. She was beautiful to watch but could not head up enough to tack...that means come back to the dock I retired her and now I am learning more about finishing working rigging for these vintage schooners and focusing on my other build ....BHOD racing sloop for sailing this summer. cheers
-
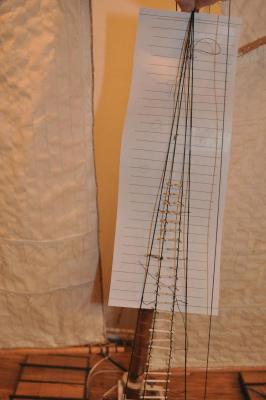
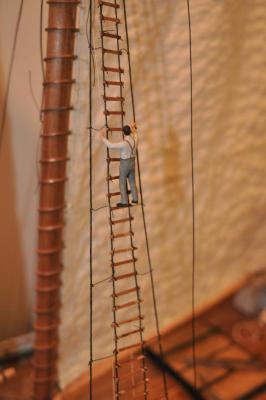
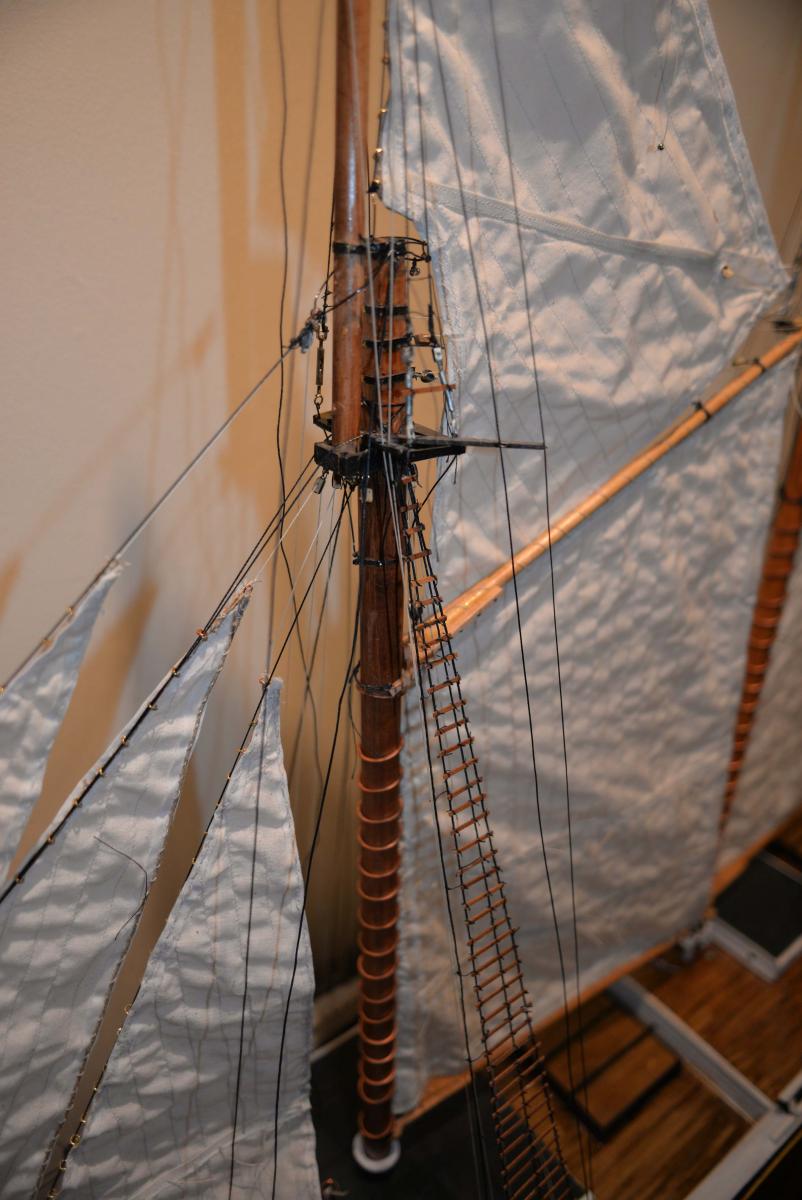
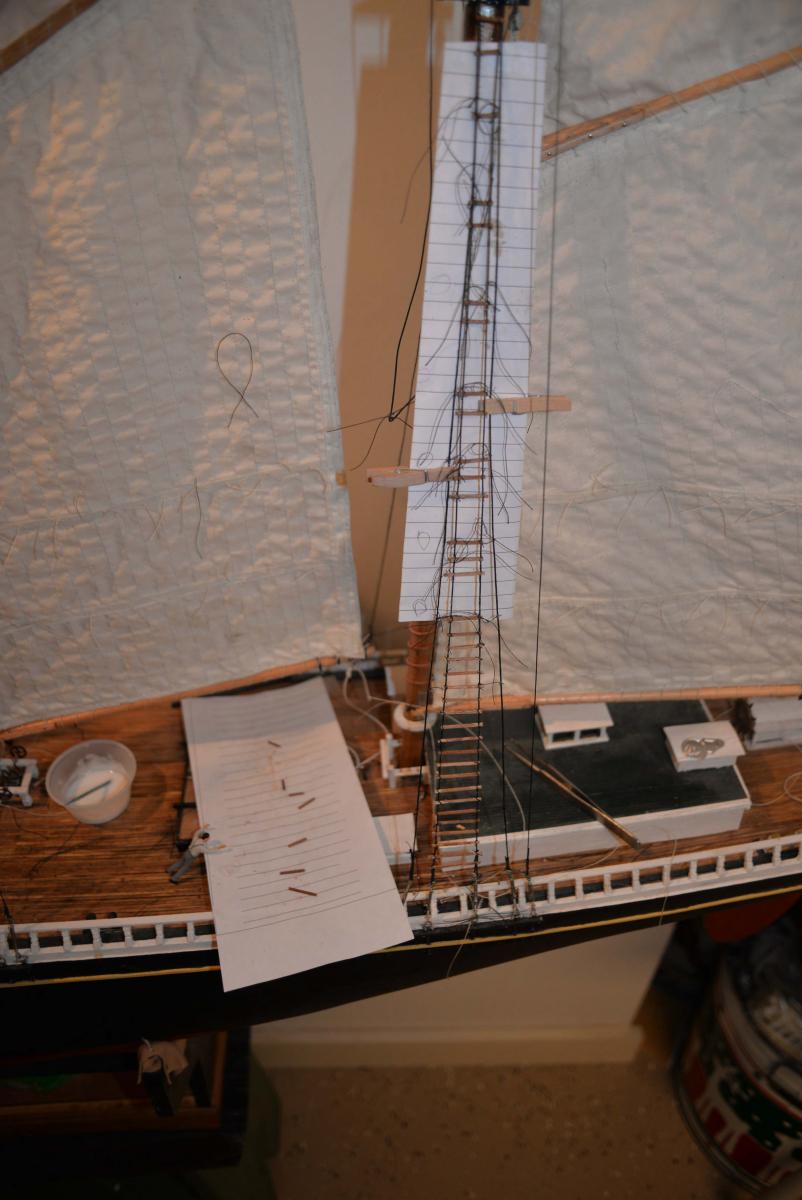
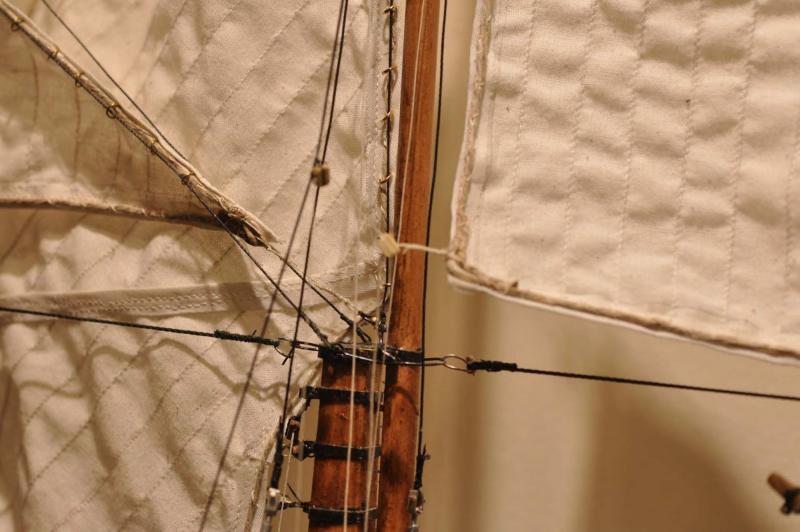
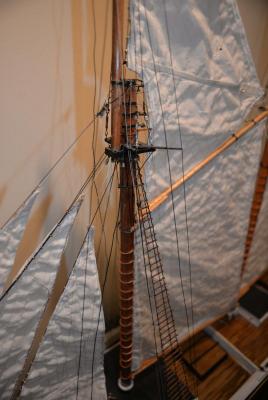
Here is an update as I am using available time before summer to work away on the rigging of the Schooner. As I stated in the last post, I started on the port side as I was learning how to complete turnbuckles shrouds and ratlines. That side will be the back side. Here we are with all the lower ratlines in place on the port side. the foremast gets double width. Note in the picture bright light on the foresail and jibs and a bit dark aft. This is how the peak came out with the ratlines including more shrouds at the top. I know most experts know that , but I had to learn by doing it twice. Now the crew can get up here, I need to complete the running rigging and upper ratlines. The upper area are not slats but lines. I struggled with lighting as this area of the shop does not have natural light. I had been using Halogen lights. After study and walking around Lowes, I came home with small replacement day light LED bulbs and wow what a difference. Here I have turned the boat around to the final display side and added the new LED lighting. I strongly recommend this upgrade for those doing rigging work away from large windows. Here we are cleaned up a bit with work beginning on completing the detailed running rigging that was left off for RC sailing. Adding the shrouds and ratlines makes a lot of difference. next up is three new top stay sails to mount off the top mast stays yet to be installed.


-
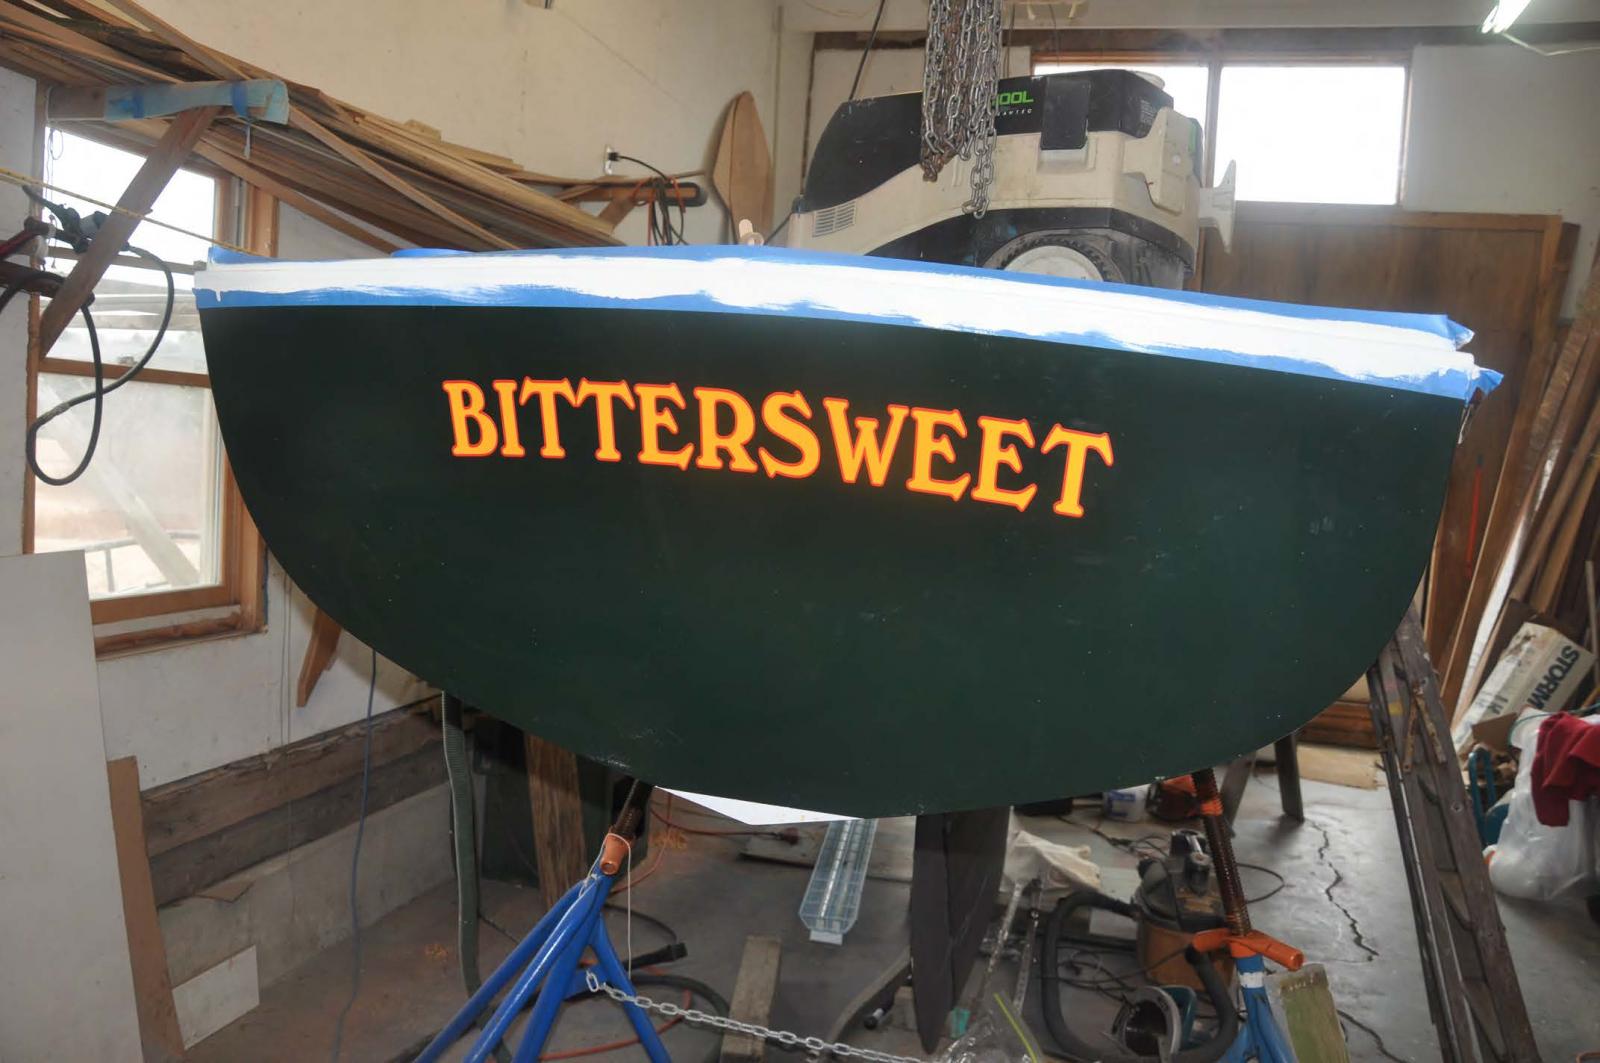
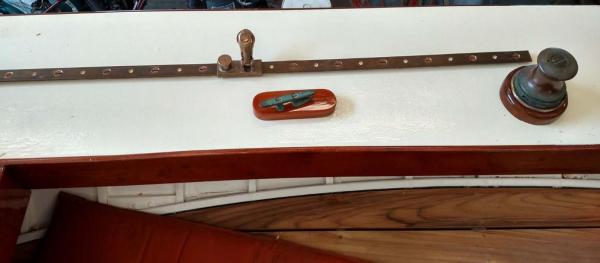
I need to update a few things that are happening as we are waiting for spring. We are still waiting for the foundry to reopen next month. Here area few photos of the restoration continuing on the real Bittersweet. It is fun to compare. I took Bittersweet junior up to David's shop. She enjoyed seeing many of her big sisters resting for winter. all those floors are in, the keel glassed and the bilge hard coated[ the gray]. The inside planks and under deck are painted and we are ready for the new teak sole. here is the hard part done getting the layout for all that new teak. I love it. He is also working to restore the deck painted finish. David had given me scrap teak wood to copy for the model. Look as those fittings...I made the bases. I note David turned the blocks to align, so pulling the halyard to the new winch is a straight line. oops I did not do that on the model. Here is the real jib track in Bronze. I think we came out OK on the model. I am so glad we made this change on the boat. It was stainless. After much talk we agreed not to reinstall the old Bittersweet mahogany sign board. My rear admiral chose the red outline and font for the gold letters and we have real Bittersweet. What I liked was I was able to order small sized letters at the same time so the model name is exactly like the real thing. OK back in the shop. I got the sails and rigging on and mostly done on Ought 6. There are a few more clevises and things to make to complete the work. Today I took them out side to get a little sun. It was still cool but they were happy in the breeze. This Photo is for the sign board as i will take Bittersweet to the Owls Head Transportation Museum annual show on Saturday in Rockland. cheers


-
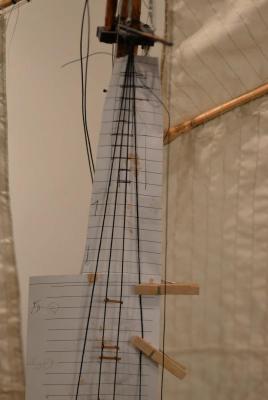
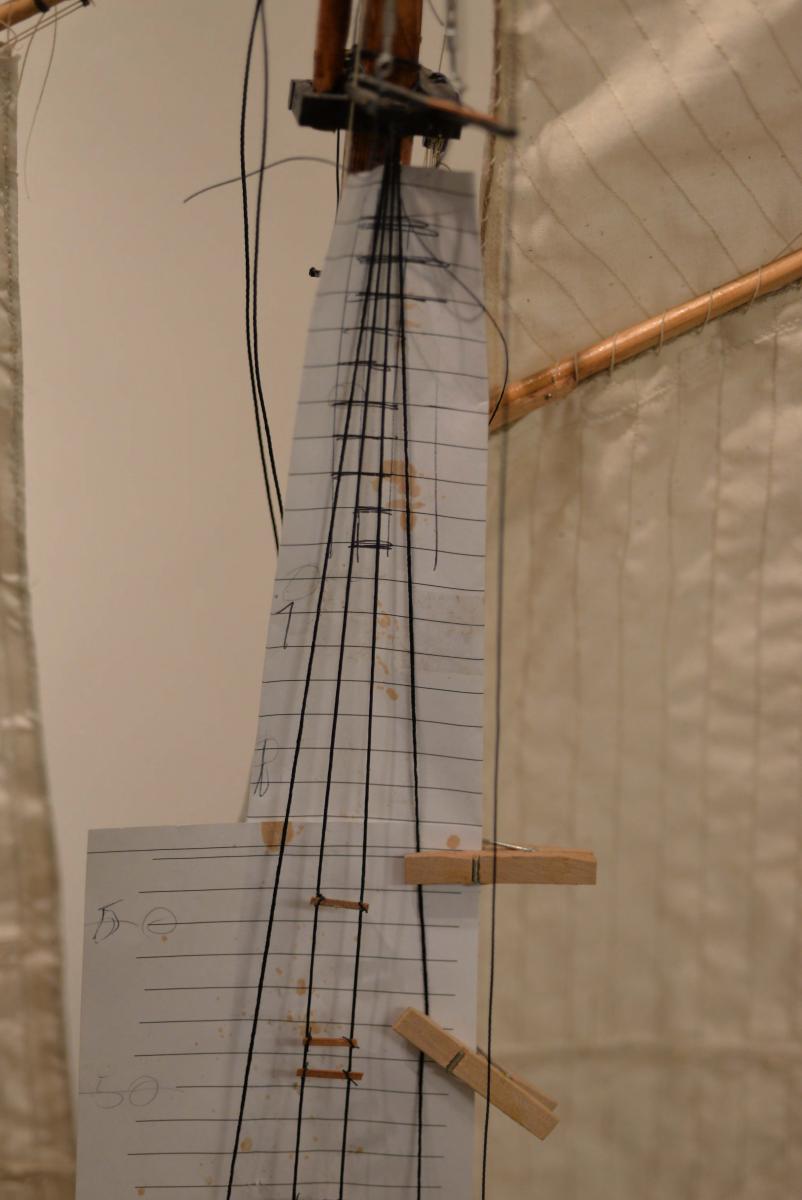
wow ratlines are not easy. I got near the top of the first line and realized that no one could climb these because the shrouds were all gathered and too tight. i was at 1/4 inch and had ten to go. oops here I had cut out the top half of installed ratlines because the angle would not work. I learned at this point too that putting on the slats with no stain caused another lessen learned. the little bit of white glue inhibits the stain and I can not do the back side. So next time stain all the slats! I am glad I am doing the intended back side first. I also needed to order 1/16 x 1/32 stock. Oh my 7 dollars for material and 7 dollars to ship ? with the shrouds loosened, I was able to complete the first mast. I love the sailor's shadow on the sail I even figured out how to approach this as a more successful production. By staggering up to every fifth slat I could set a pattern as follows. cut threads for all ties and then tie the surgeons knot loose for up to seven slats.They are tied and rady in the photo measure and cut seven slats...yes pre-stained this time ...and lay then out as in the photo dab of watered white glue and set the slat and pull tight the two threads, add another dab of glue and work up This way I could work two masts at a time. I did two sessions each or up to 28 in one day. As I got better it looks like a possible job to achieve time wise. I realized however that even this approach was just not right, so I went back and dug out the more detailed plans for the Cora Cressy to see how this works. yes the shrouds are bunched but only at the highest possible point as they come around the mast. this is to keep the loops horizontal. So on the third mast I carefully counted and saw that the top slats cover more shrouds. Here I marked the paper pattern for the slats going up. first we cover to the forward shroud and then cover all 4. let's see how they come out. cheers