Jond
-
Posts
876 -
Joined
-
Last visited
Content Type
Profiles
Forums
Gallery
Events
Everything posted by Jond
-
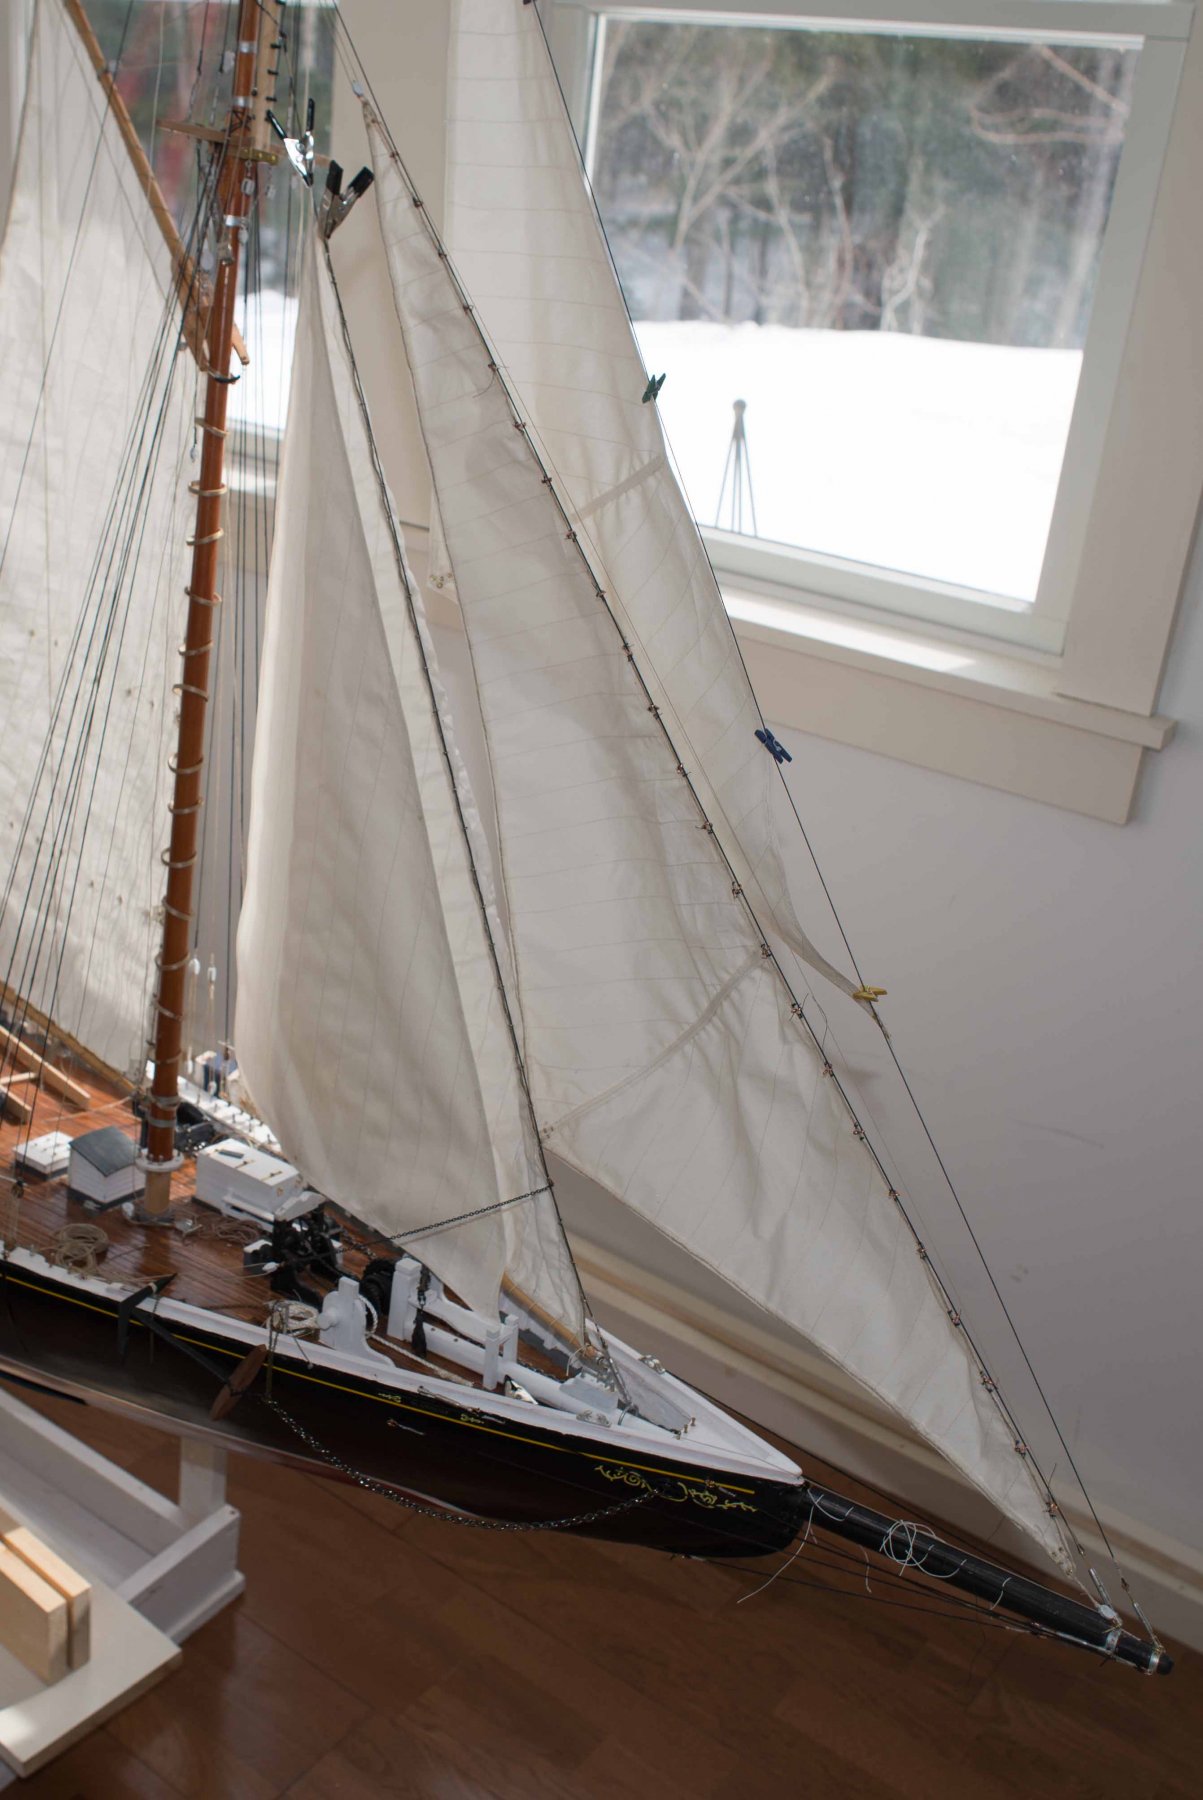
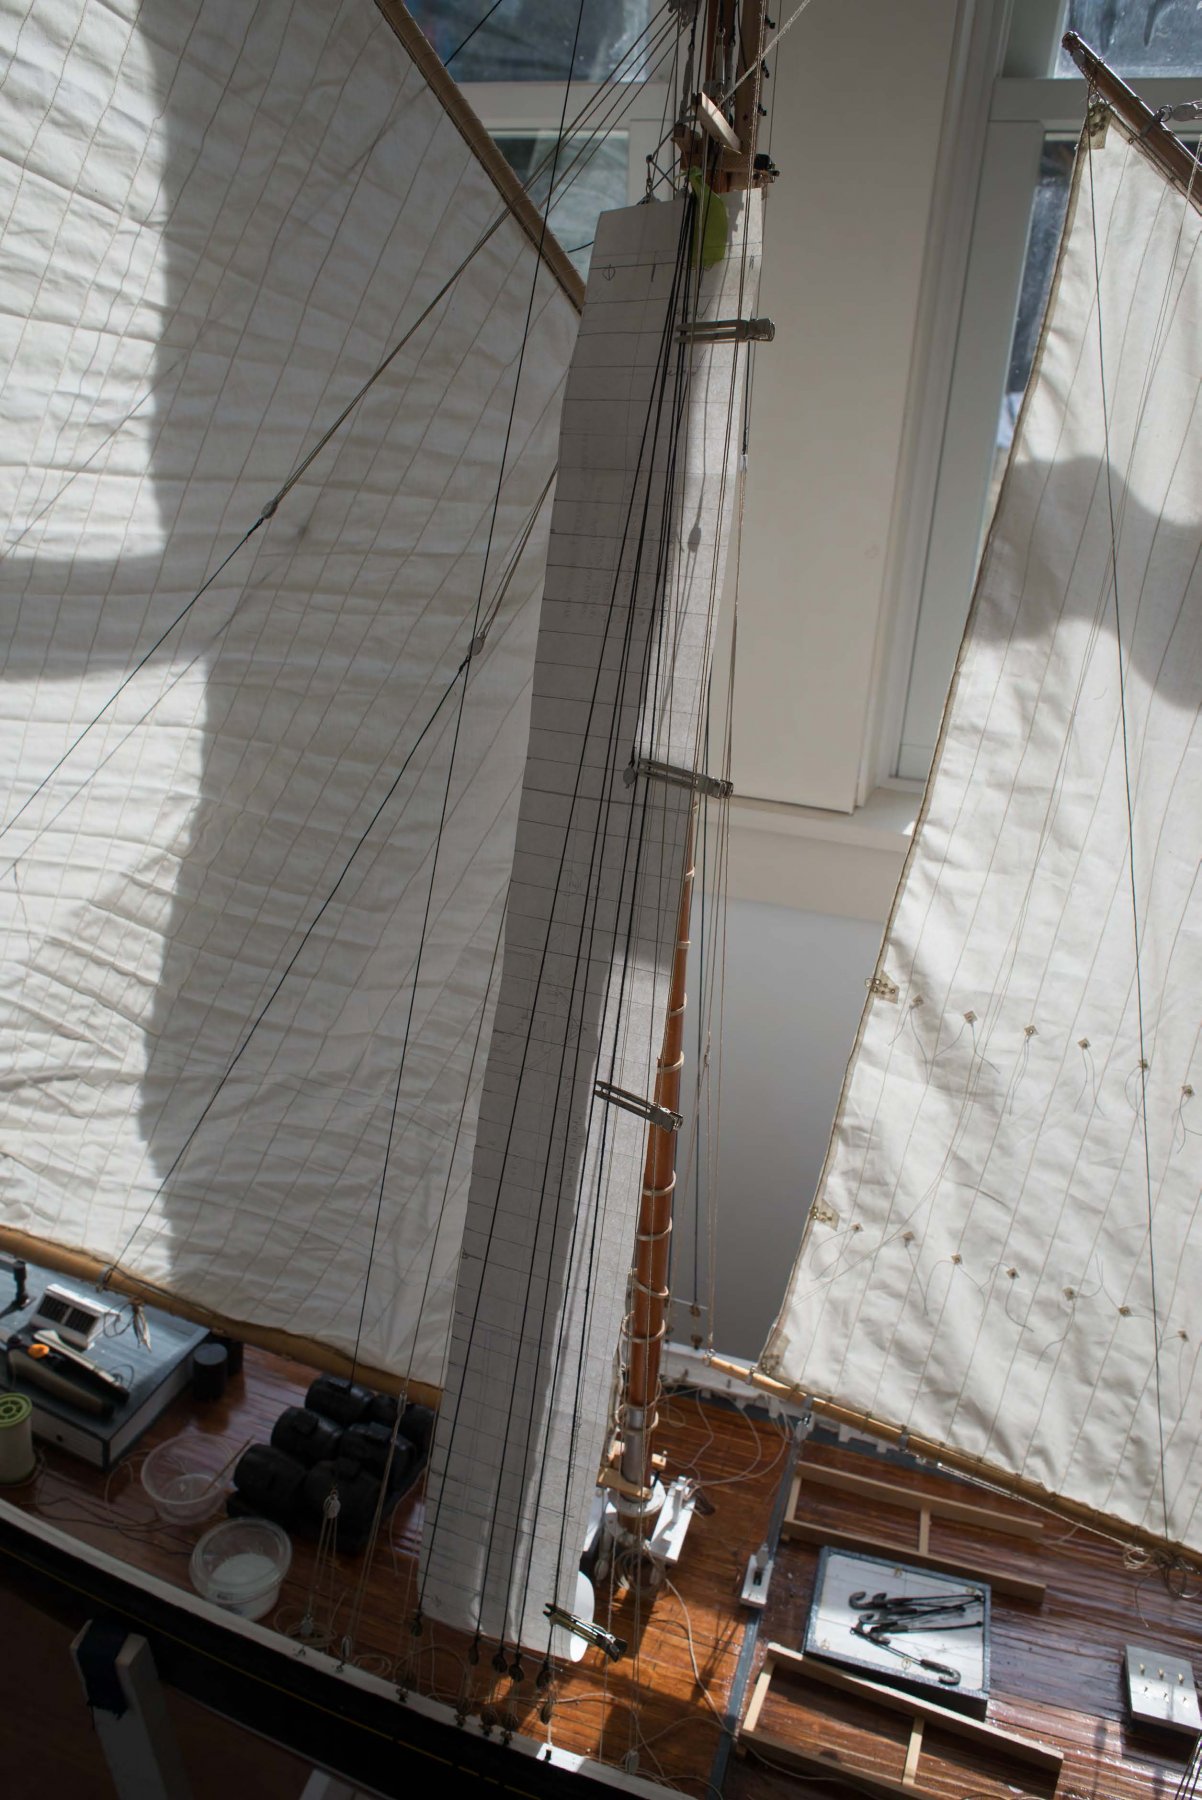
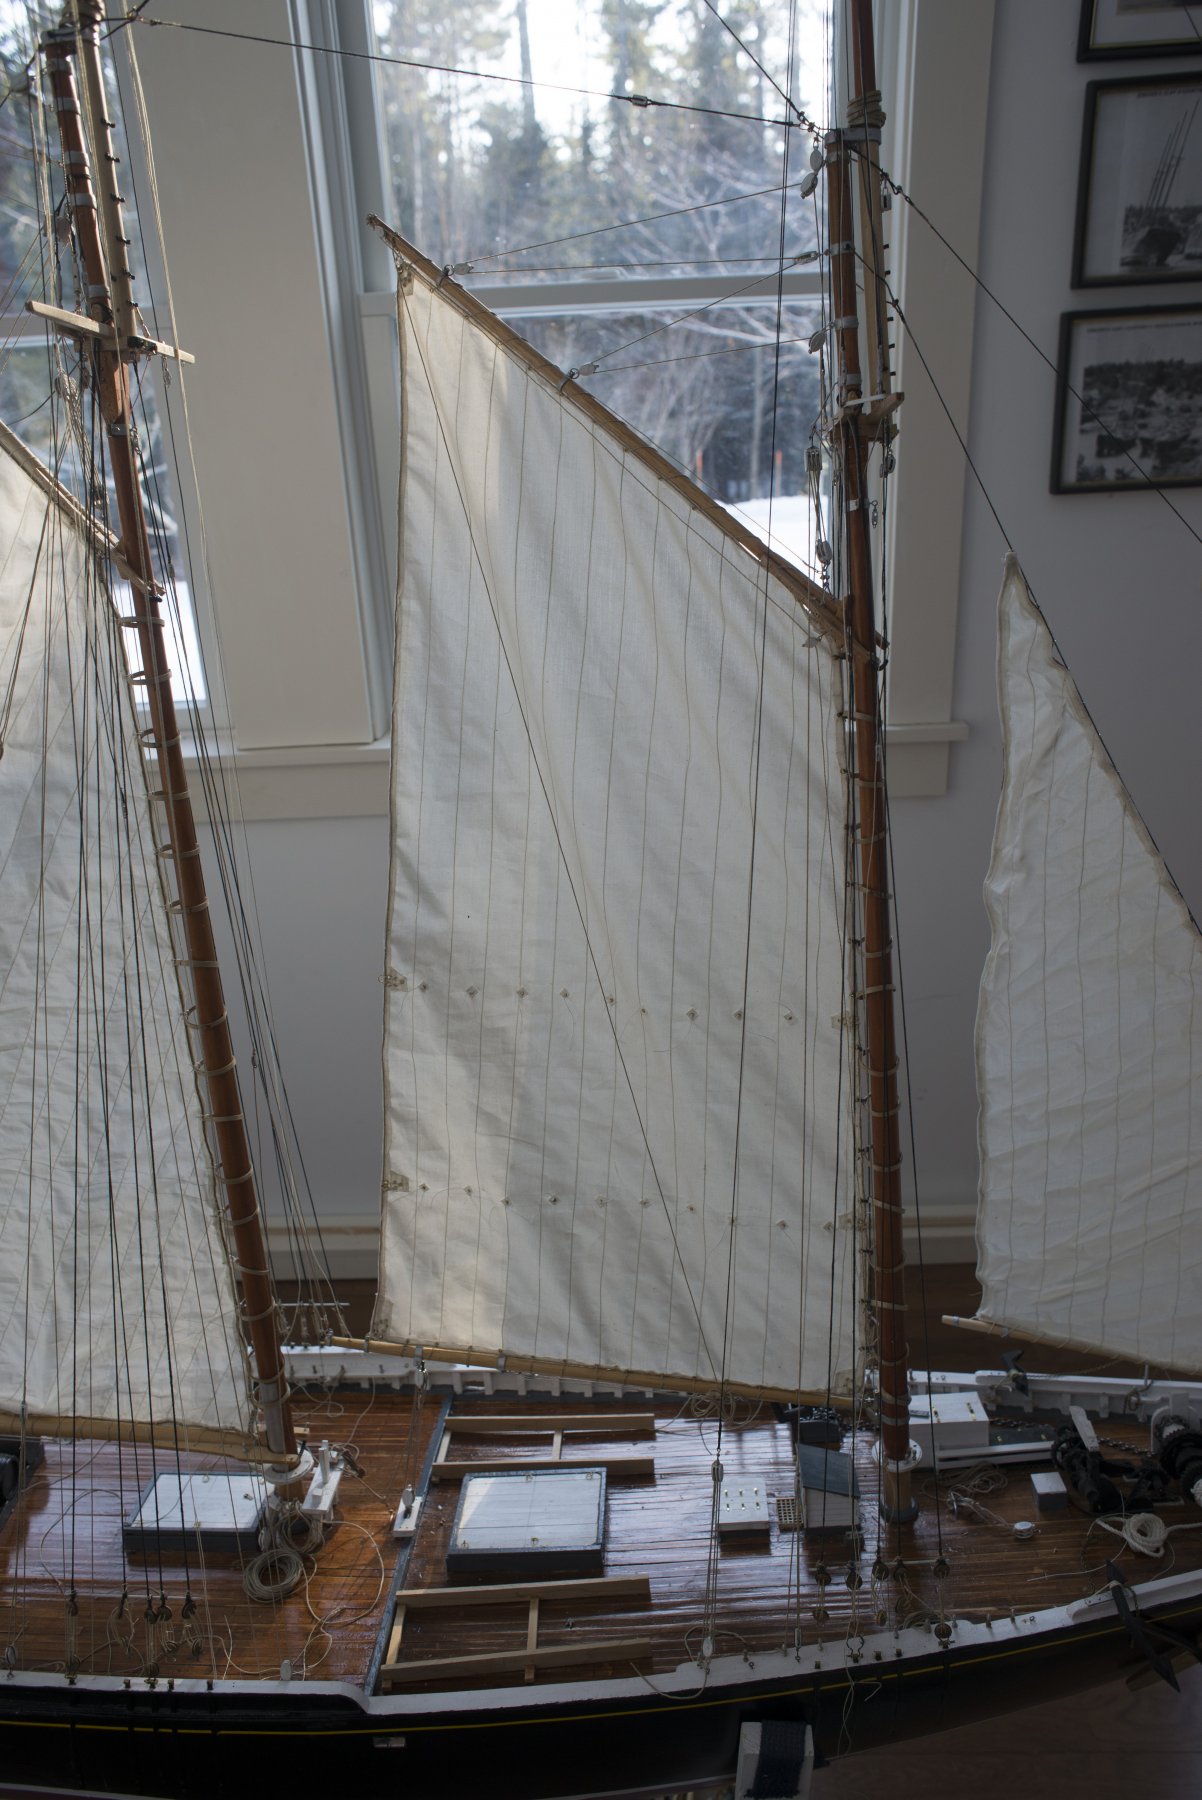
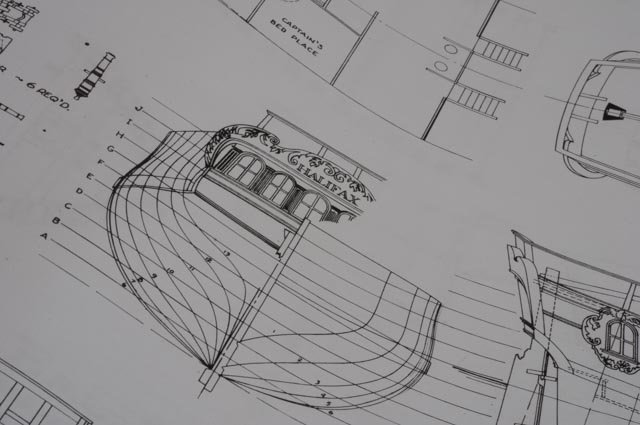
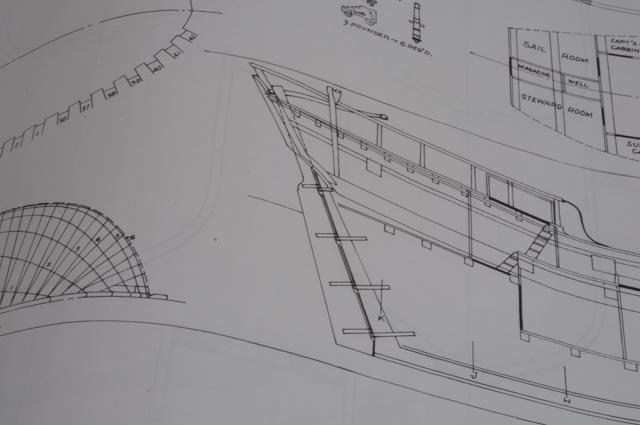
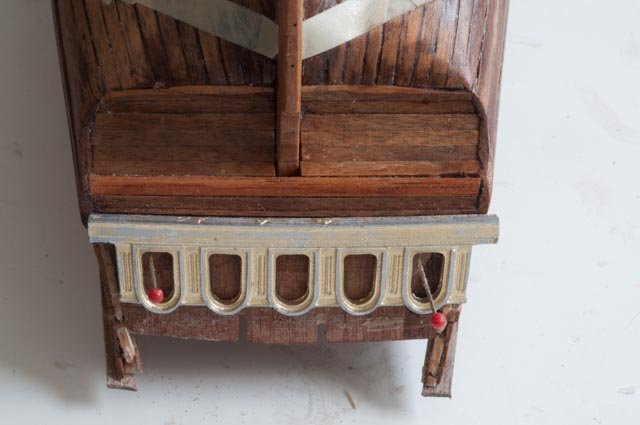
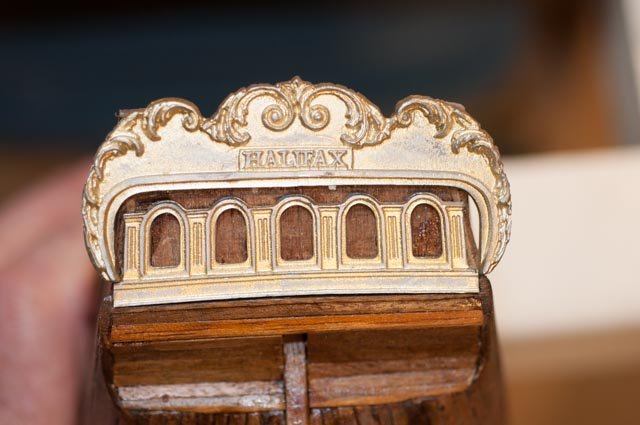
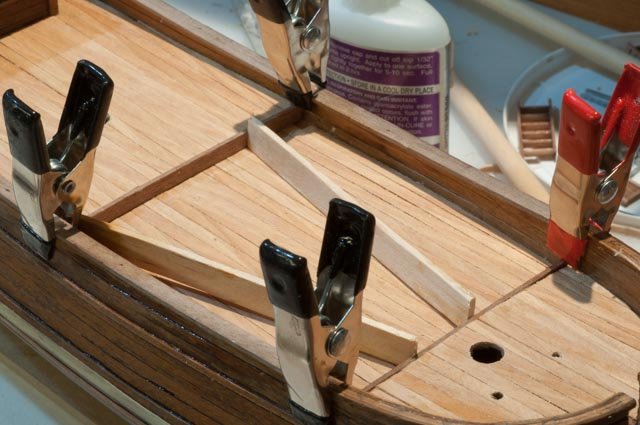
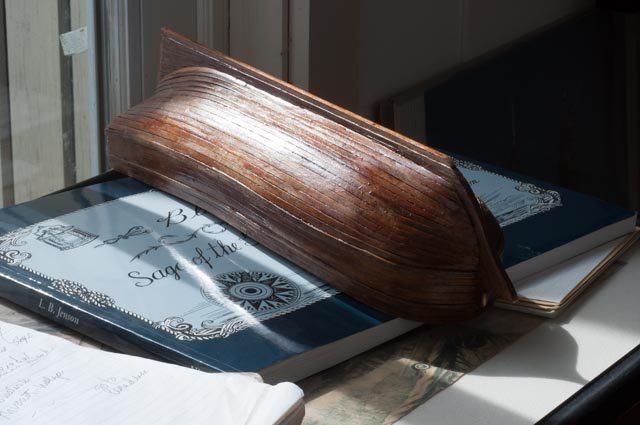
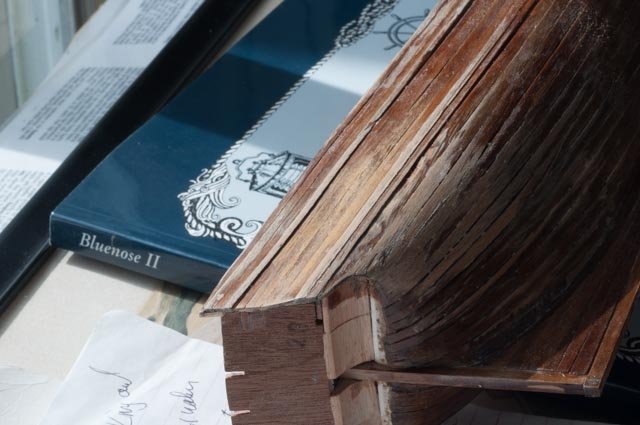
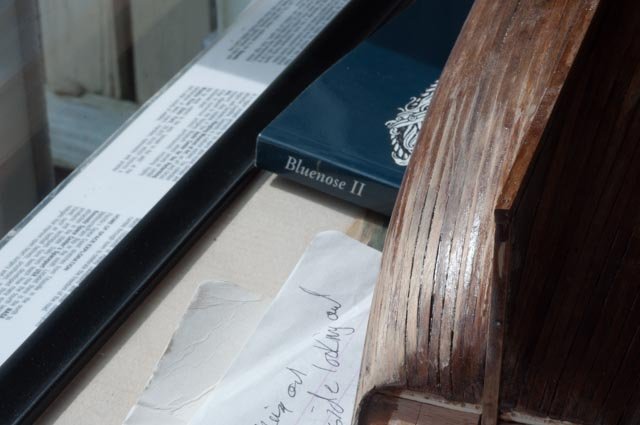
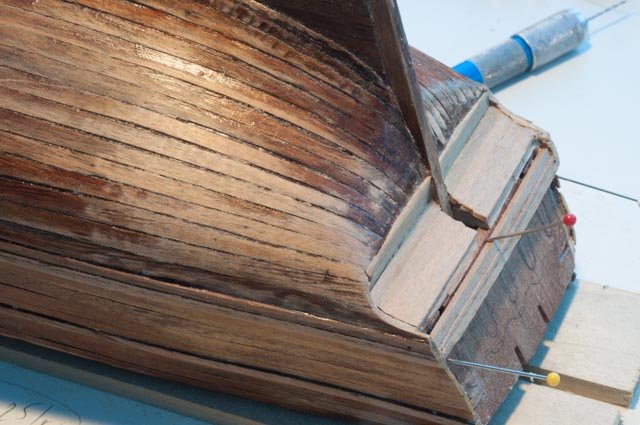
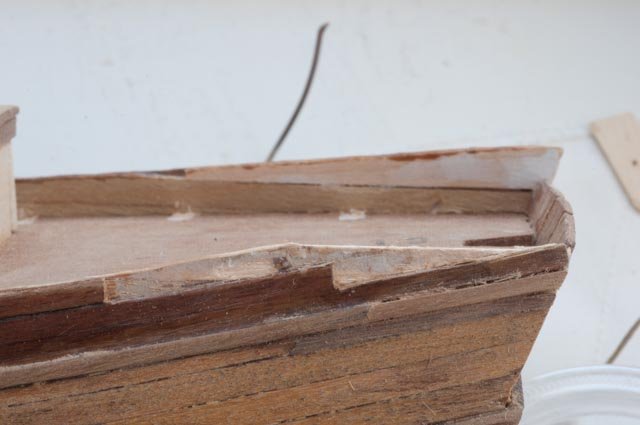
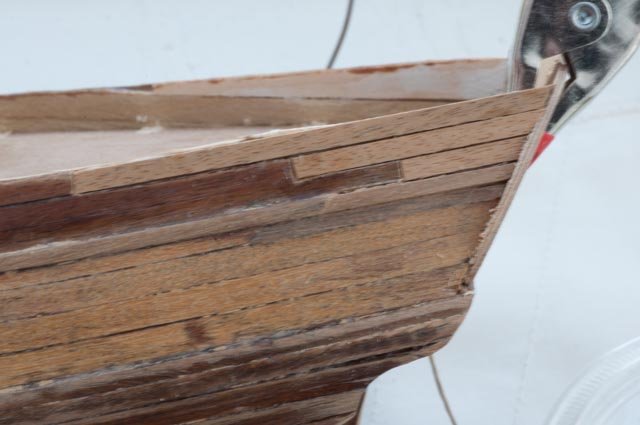
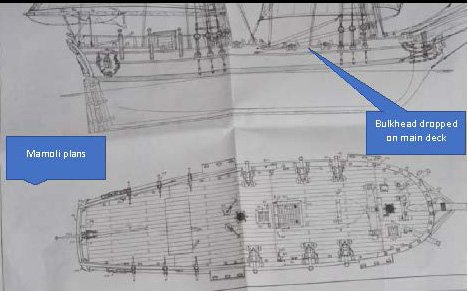
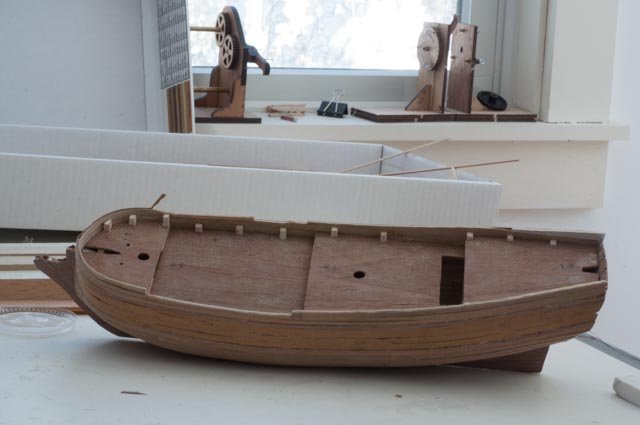
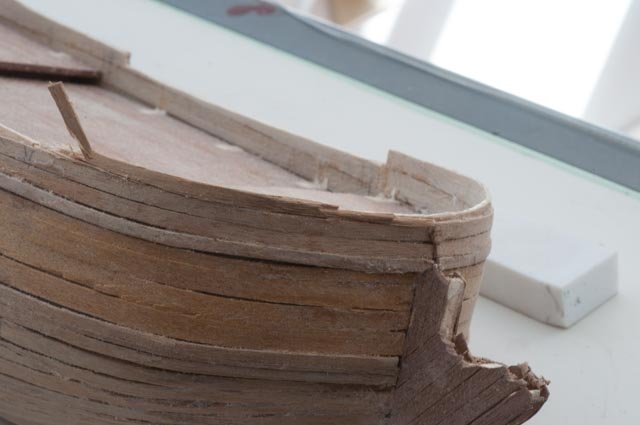
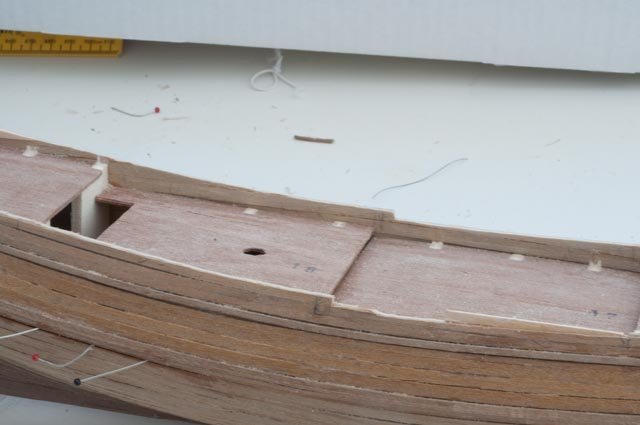
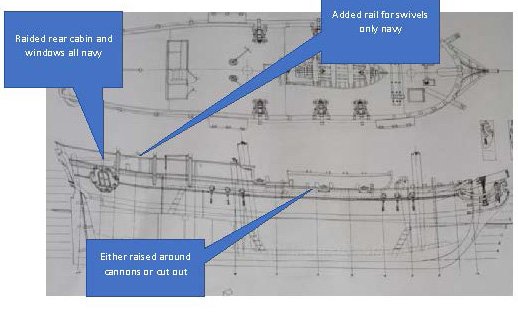
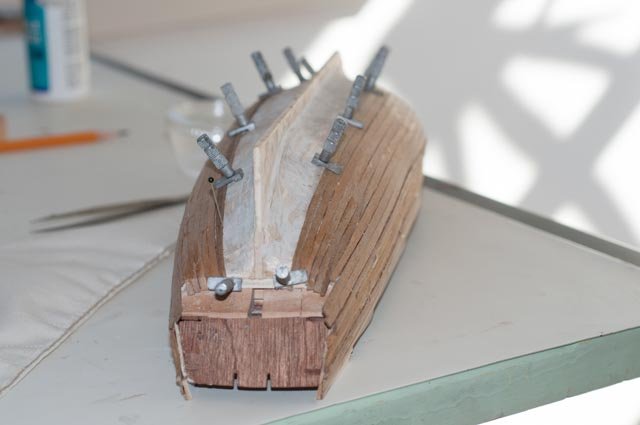
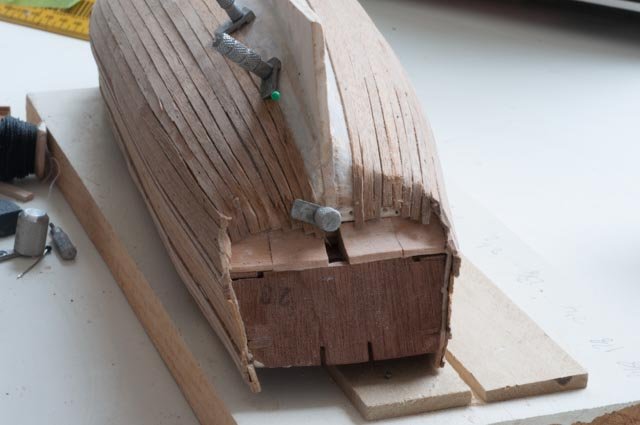
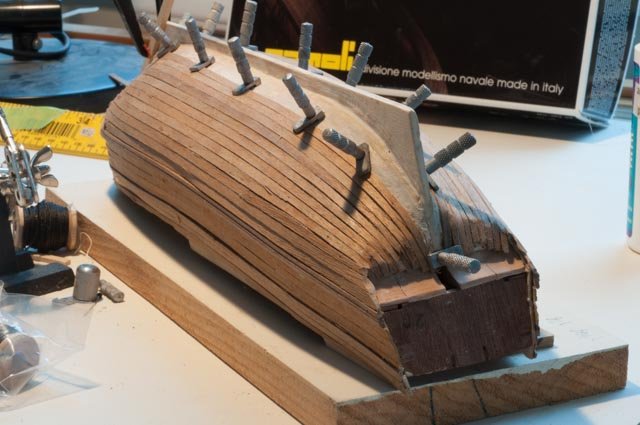
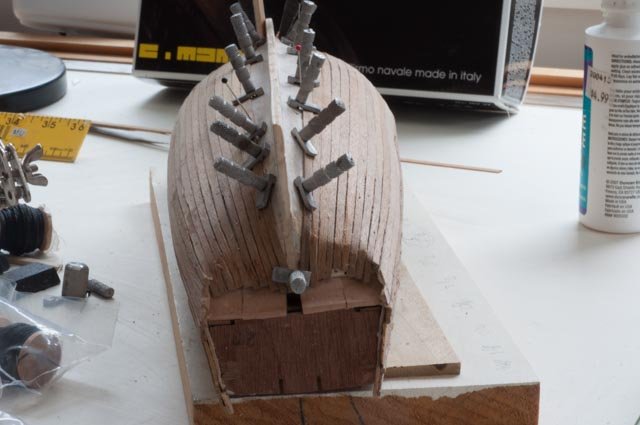
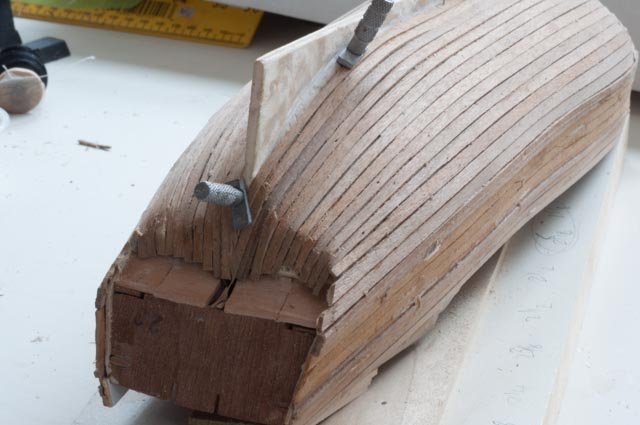
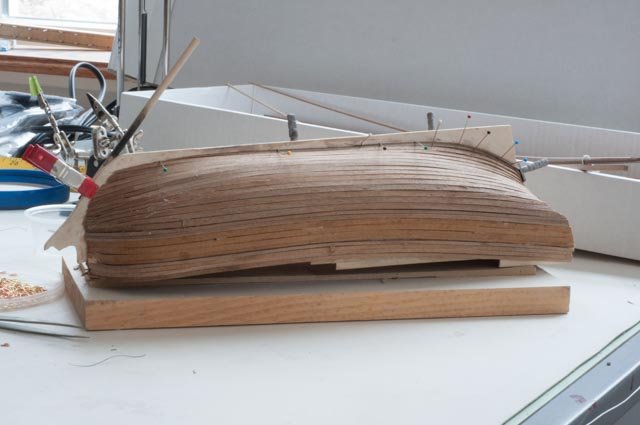
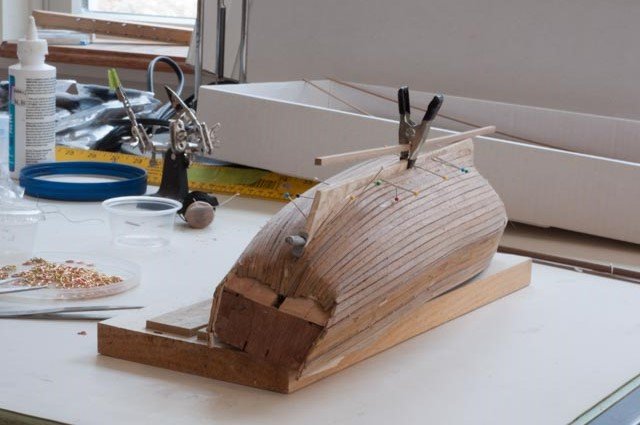
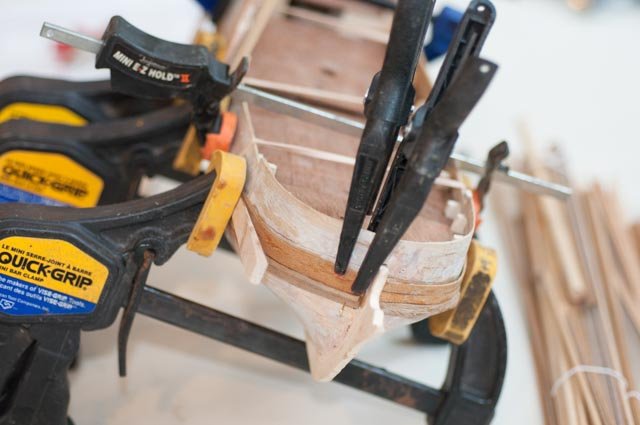
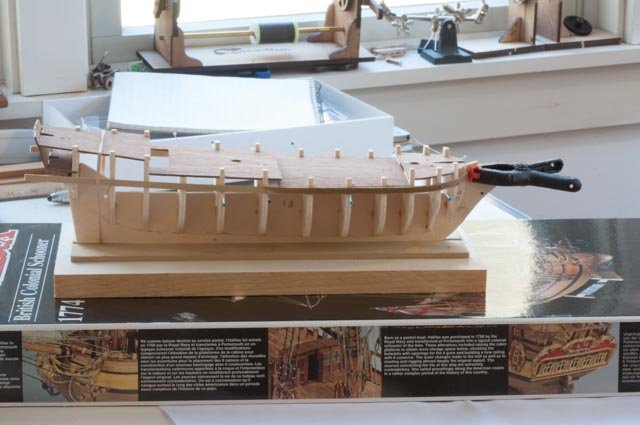
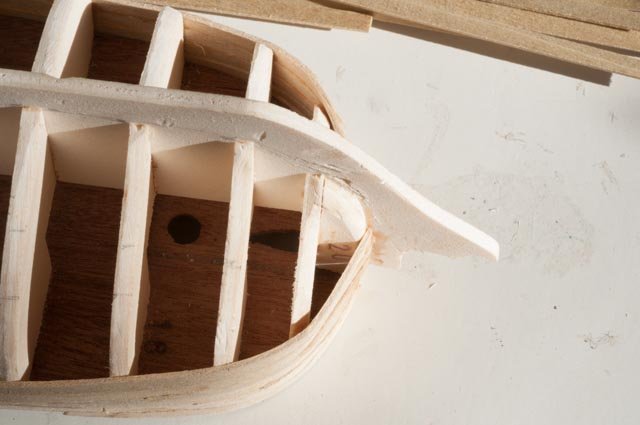
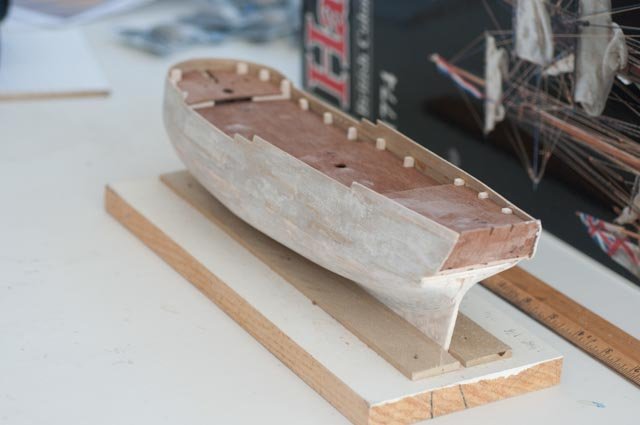
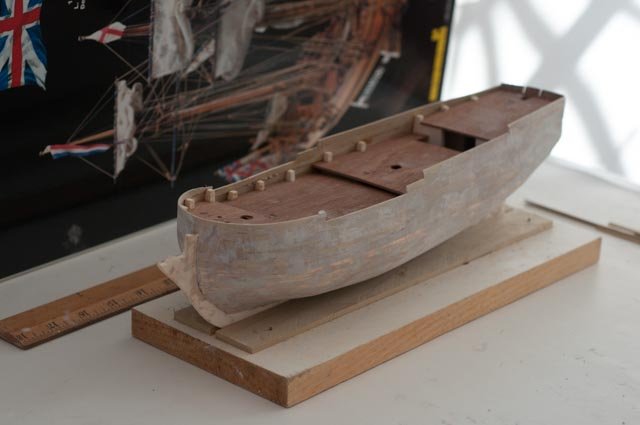
 Time for an update I want to try to better understand some of the common items between schooners and what might separate them. In the search I was amused to find that different companies provide plans that don’t necessarily agree. For example, let’s take the transom and the tie into the wales. Please excuse my amateur vocabulary naming these parts · Here we see the Mamoli elevation. The kit is like this. The lower wale comes aft to meet the top of the rudder and the bottom of the horizontal beam under the windows · Here we see both transom and side view of the Harold Hahn drawing. The wale clearly is lower. A curved trim board come sweeping up maybe 4 feet to meet the horizontal beam under the windows So what is right if I am trying to make a typical 18th century new England packet schooner. Both I suspect · Here is the drawing from Harold Hahn of Chaleur. He favored the sweeping approach · Here is a photo of the sultana kit plan by MSW. It is the same period. I went through Chapelle's books again and he clearly shows both being used on different ships. he agrees with Hahn on Halifax. He also offers plans showing before and after navy upgrades and arming. More importantly in his research of Halifax none of the major exterior pieces are significantly changed when the navy took it over. So I am on the right track. Back to the hull and question ....do I try to keep artistic natural woods of go for trying to be more historical with the painted solution? · Before I go crazy and do too much sanding to get all the shellac I put on off [ or use some acetone] I want to see a few things. Here I have taped the top of the waterline as if I were going to paint the bottom white · I need to build up the transom. Am I going to try to hand make all the windows or use the kit metal parts · Just get an idea I tried to apply hand rub on poly, one coat. Easy to remove if I want to go back to cleaning up the walnut. · Here we see better where I did remove the shellac, the wood looks good and the gaps are nice and dark · Still undecided I plan to keep going and adding some more wood before committing to redo the hull finish, at the moment I am voting for paint Time to add rails decks transom · I added the interior bulk head. It is simple enough that if I choose to paint later I should be OK. I learned a lesson before that when using decking as thin as .5 mm one should finish it first. Using all the care in the world, I still get glue on top and wiping it off with wet paper towel does not get it out. Therefore, I put hand rub poly on the decking first. Comically I put 2 coats on one side and one on the side to be the bottom. Naturally I cannot tell. · The rails are walnut and needed to be shaped. The forward rail was laminated. There was no good way to hold. I used about 6 pins · I added the small planks on the top to hold it flat · Here we are a few days later gluing down the rails. Also, you can see more deck is in place Time to decide on the transom · I went around and around and finally made the call. I will cut in the windows and use the kit casting. It looks pretty good and let’s me move on into the rigging and operating issues that are more important to me · Here you can see one of the problems. The upper part is just a bit too big. See the day light coming through the right side. Also, there are no planking lines visible in the casting. · Here I am installing the walnut deck beams · Here I am working out the transom. I have added vertical walnut planks on the outside forward sides. I have added a rail on the transom and believe I should also plank out the inside of the casting. That leaves only the filigree and hand rails . Another item in this view is the continued rise cause by the exterior planking. The side rails are controlled by the sweep of the planks. If i cut them to coordinate with the lower transom rail that would be awful. If I raise the deck the slope would be unrealistic. This is just the kit design. I believe if the kit design had the wales going after to reach the curved trim board likes Hahn's design , this would all have worked out better. All for now
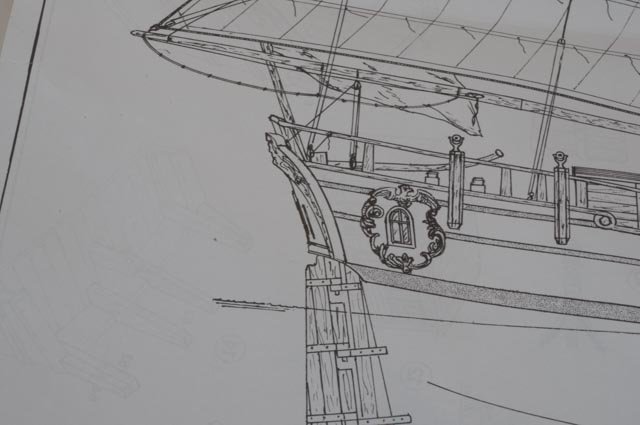


-
Keith Thanks for the tip I kept sanding remnents from anthrr model needing the Lazer cut clean up. A darkened cherry. I foolishly mixed it with Tite bond wood glue about 50:50. Then put it in. A bit of a mess near the bow. I will try using the diluted CA for some of the isolated remaining gaps. I also wonder if putting the sawdust into the shellac does anything. Any way I love the experiments Cheers
-
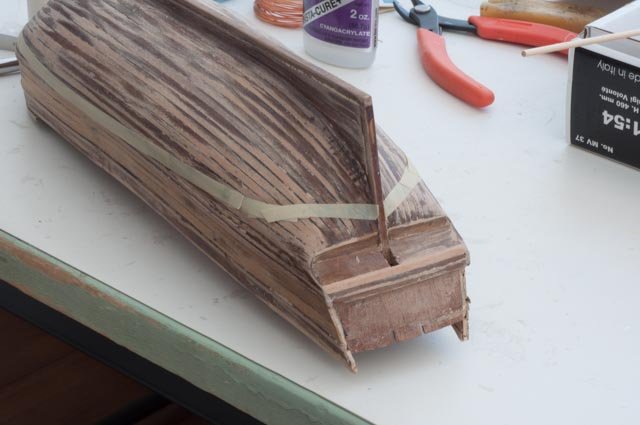
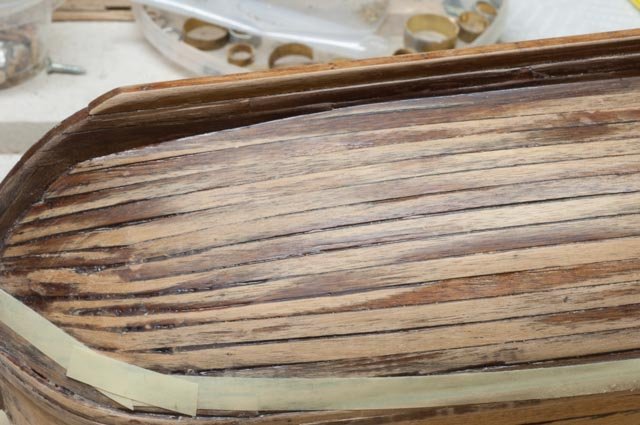
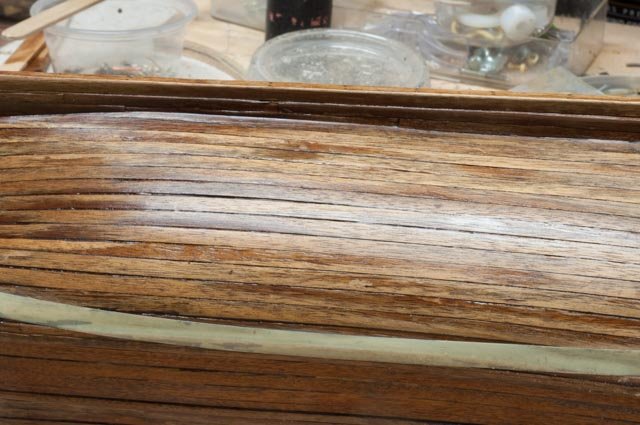
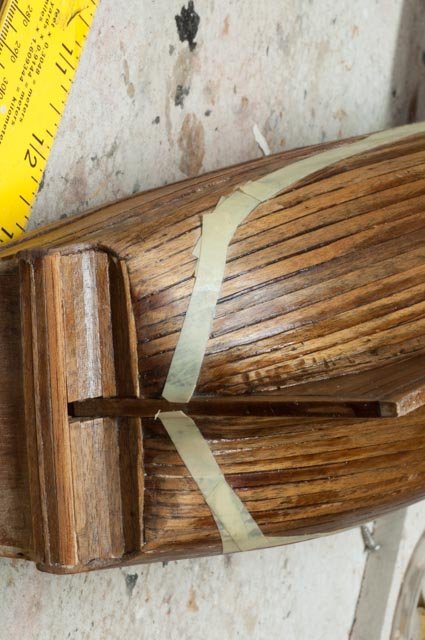
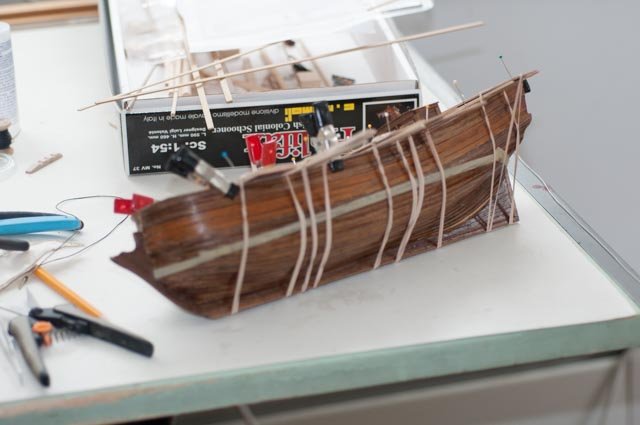
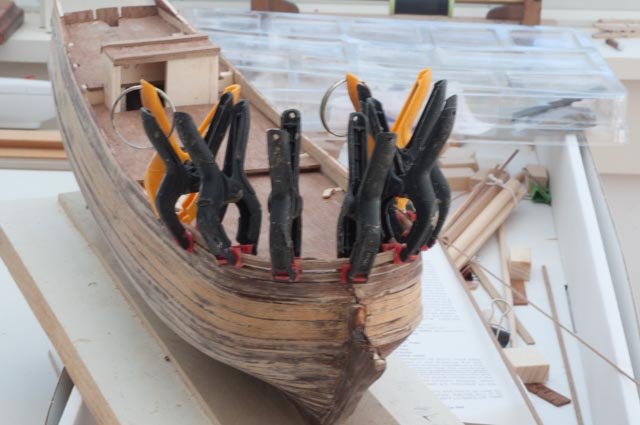
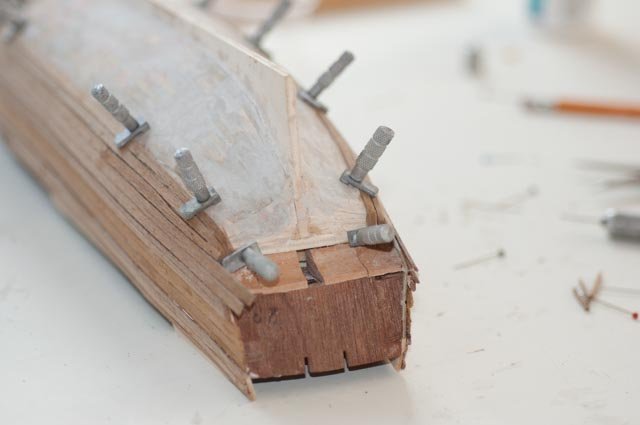
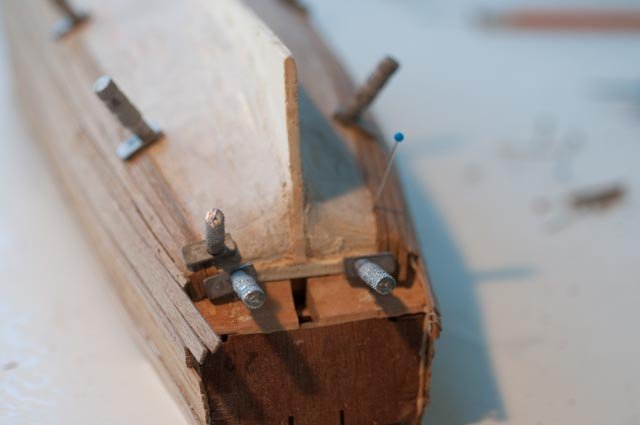
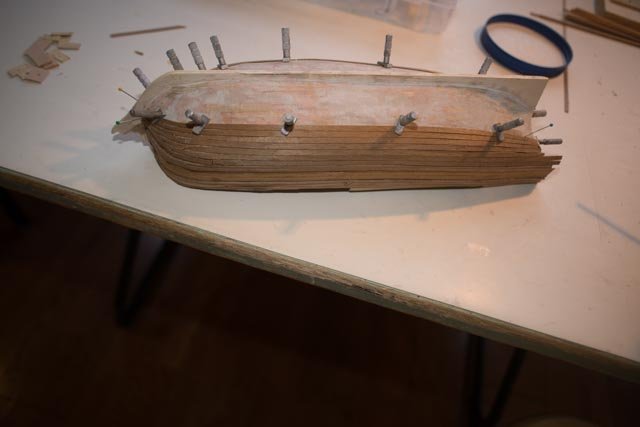
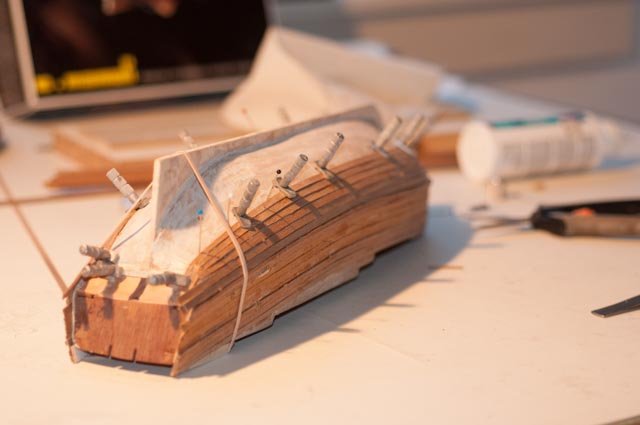
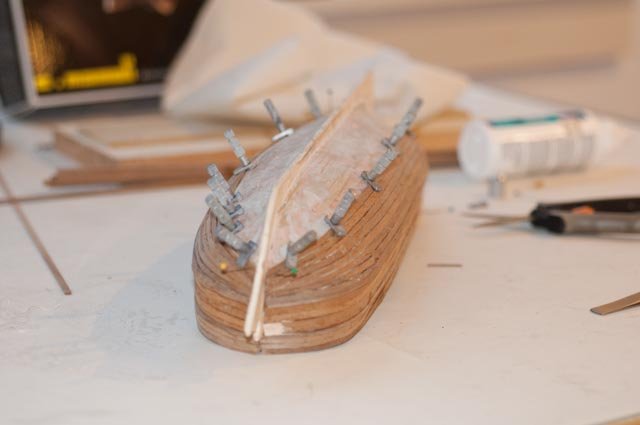
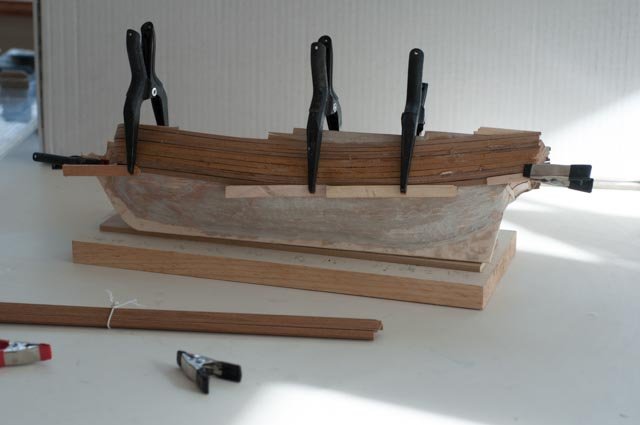
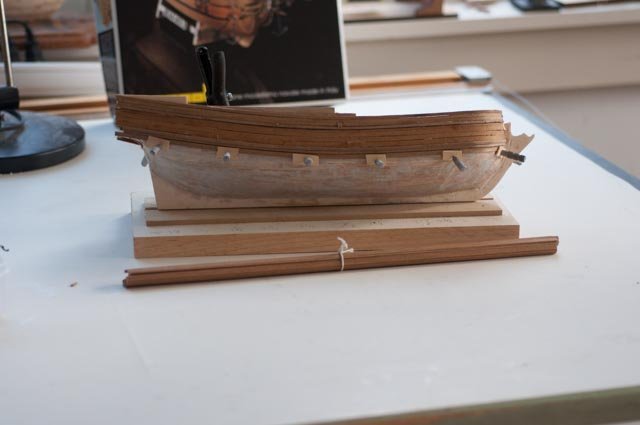
fix up planking gaps and work on the outside I went to our monthly Downeast Shipmodelers Guild meeting and passed around the hull. I expressed my concern that the thin walnut veneer had gaps. I wanted the joints to show through finish if painted or be black if I choose to leave the wood natural. After some discussion about the typical materials all being harder than the wood, two guys recommended the following. Coat the hull with about three coats of shellac. It will fill in most of the gaps and without light look very dark... brown/black. Then sand off the shellac. Then use a rub on wax finish not poly varnish. The varnish they say is also harder than the wood and not good for thin woods that move differently . I asked about hand rub min-wax varnish and they thought it to be much better than the typical hard water base we often buy. So …this is a learning process. If this shellac process does not work out, I can always paint the hull as Harold Hahn did his. Paraffin waterline down yellow/ cream above and cream bulkheads. All rails and trim black. · Here we are with shellac coat number one · Here on coats 2, 3 and 4 I used a smaller artist brush to try to pour the shellac into what seemed to be bottomless gaps. Then after four and even a little more I said enough · Ok another day passed, so let’s try to sand and scrape without doing damage. First up is the pear sides. · Here is the tail end. The gaps do indeed look black. If this works out perhaps a few more coats of shellac in these big turns as a rework effort. We’ll see Let’s start shaping up the top of the hull. · Here I need to figure out how the wale wraps. I am working the Mamoli plan and chose for the moment not to use the metal rear wale and windows. I may change my mind, but for now I am using wood Here a wale does not reach far enough aft. Thank goodness we can get scalpels for these tight cuts · Here we are replaced · Now the free board is also too short if I follow the sweep of the planks. This gives a nice raise all the way back. I will discuss more in the next post · Here is the structure cur and ready. [ see far side] I added a piece here under the planks. · Here is the new planking. You can also see the plywood transom clamped in place. I have made it as I work on what to do back there. I am not sure I want the metal pieces. · Finally, here is the first shaping of the laminated forward rail. It will be 5 each 1mm x2mm planks with dummy stanchions on top. In a plank on frame build, I believe this would be made around the stanchions and filled in like the real boat. One of the things that hit me at this stage is the alignment of the wale at the transom. Different drawings show differences…I need more study then will post what I figure out. All for now

-
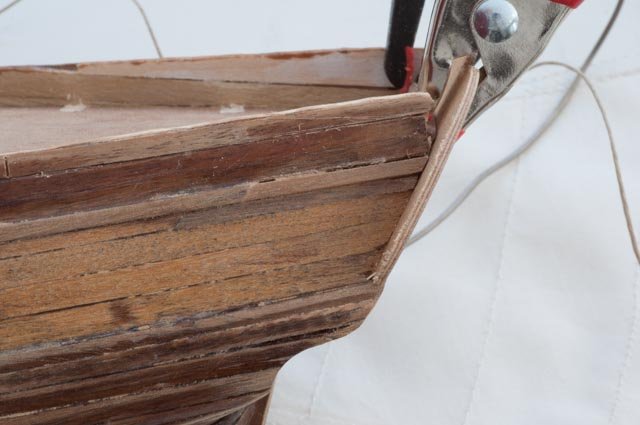
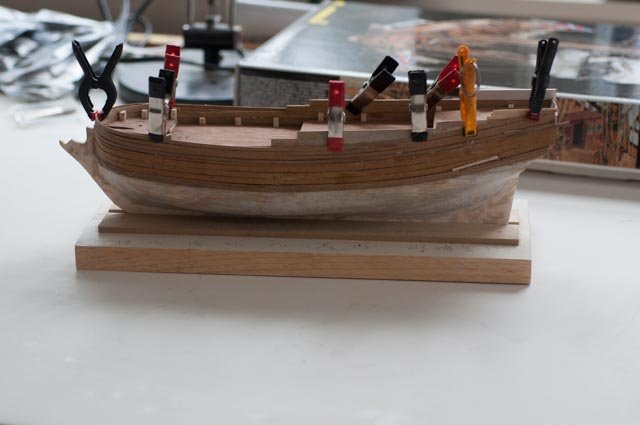
Finish planking....first pass anyway It’s time to complete my first pass of the upper planking, which includes figuring out what I am building for a gunnel. · Here we plank up the keel and dead rise. · Here we clad the stem · Now we look at the alternate plans. Here the Mamoli plans show cutting the freeboard down a bit for placement of cannons on the main deck. · In this shot you see that I followed that before completely researching what a packet schooner might have been. · In this view one sees the upper poop deck raised. In Harold Hanh review this raising of the poop deck might have been done by the navy to give more room below. I am not sure have looking a few models and similar boats as to what would have been original. · This view show damage to the top plank that occurred while the boat was upside down getting its bottom planked. Oh well…it won’t be the last repair · Next step is to get rid of the temporary bulkhead tops. Now we have another question./ the photos of the models and the mamoli plan show an inner lining covering up the extended ribs. Harold H shows them in his open version of the model but closes them in the competed version. So would a coasting packet schooner spend that money? I don’t think so. I am thinking about what to show….install dummy raised frames [ stanchions] and leave them like on a modern fishing schooner or make the insides smooth covering the theoretical stanchions like the navy ship. · This is a distorted photo of the Harold Hahn boat as included in his book. The height of the gunnel clearly is not dropped like the Mamoli design. · This is a distorted photo of the Harold Hahn plan of Challeur, a sister boat so to speak. The sweeping shear line form the bow goes all the way aft to where the poop deck is located. The fact that both of these boats have the raised poop deck, suggests to me that the original schooner was built that way. · This is another view on a distorted photo of HH’s plan. It confirms to me that he gunnels should be continuous from the bow aft and not dropped like Mamoli plans. · Here we are repairing by adding in the missing free board on the main deck. · Here I am rebuilding the bow planking. One can see many gaps in the planking. I am off to the monthly Downeast shipmodeler's guild meeting and shall ask for advice. If I choose to keep the wood look, I want the gaps filled with black. If I choose to paint the paraffin and topsides I still need the lines to show. Wood filler is too hard and not black. All for now Cheers
-
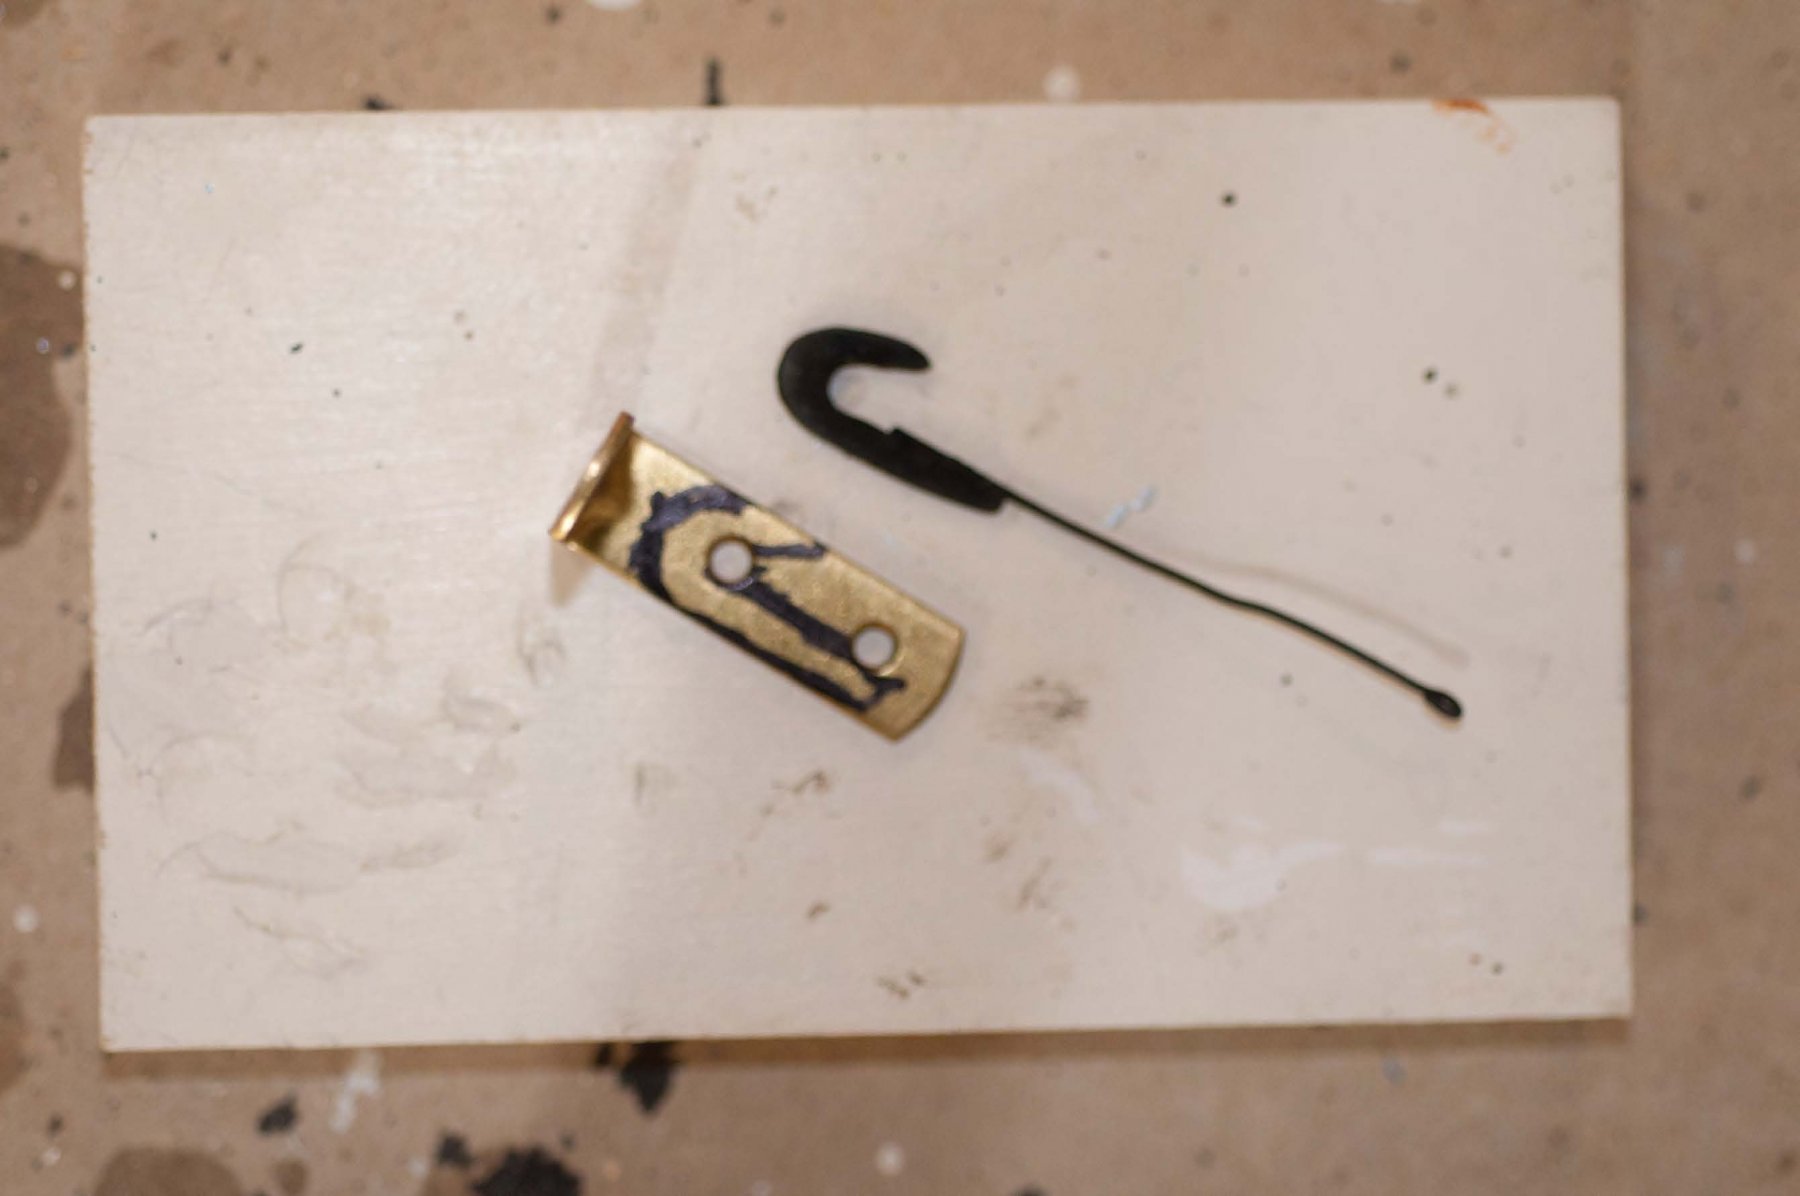
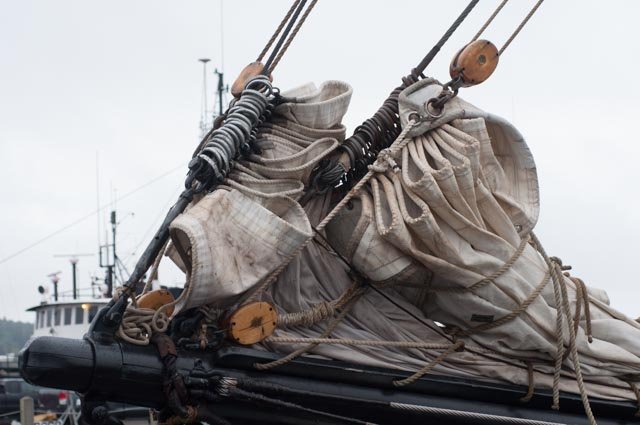
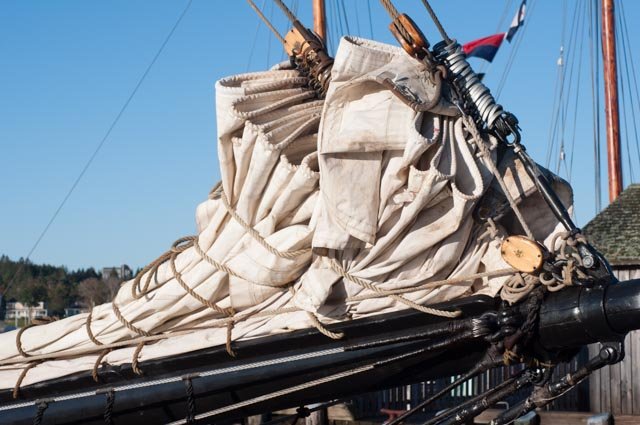
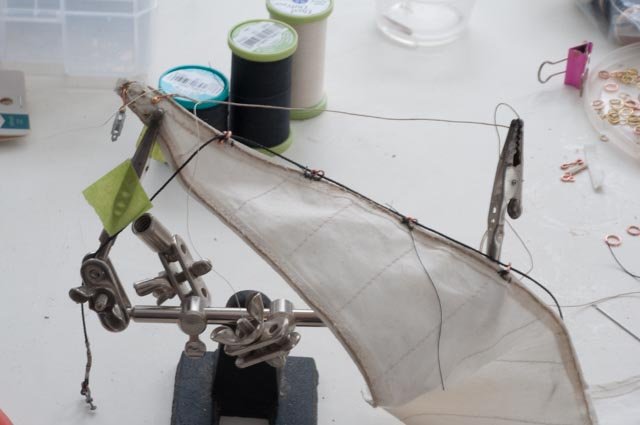
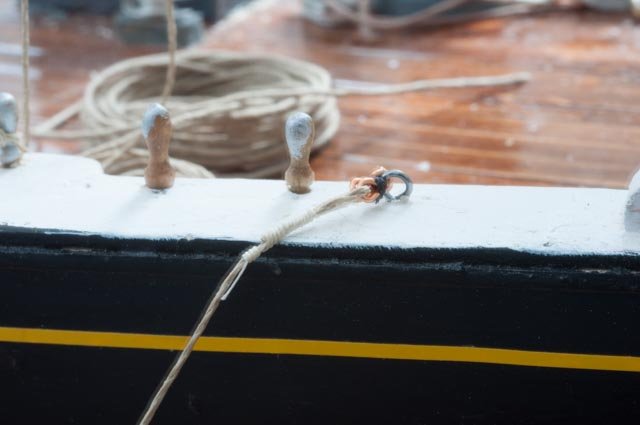
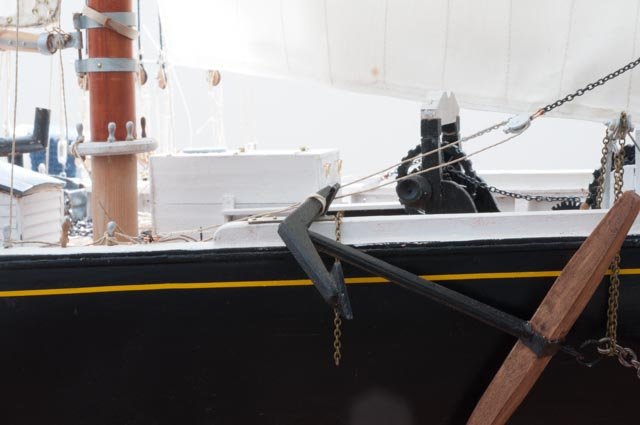
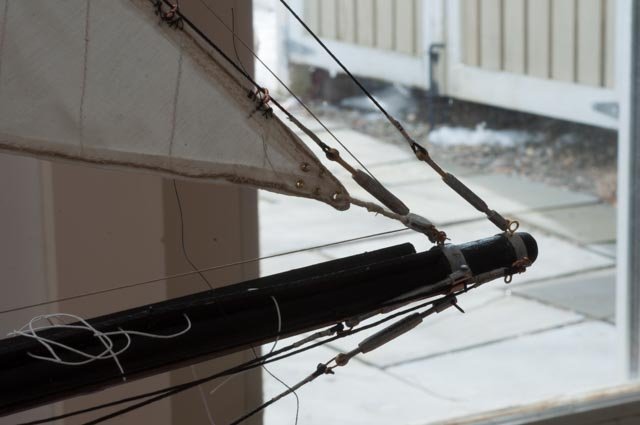
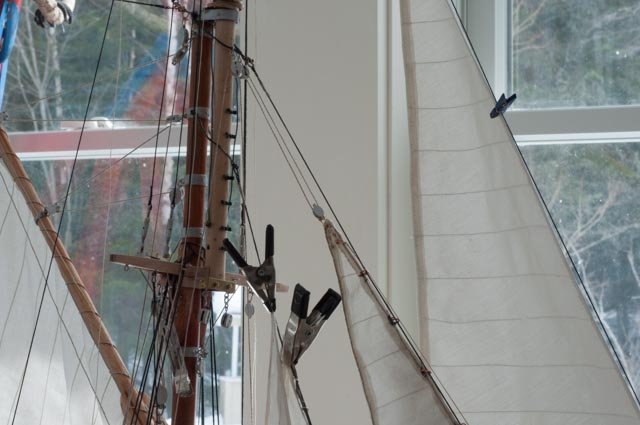
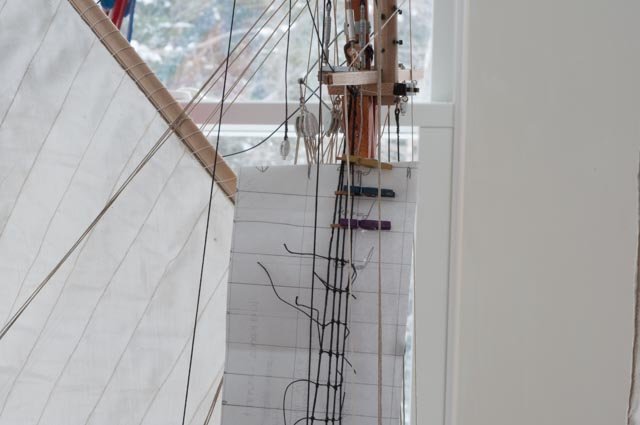
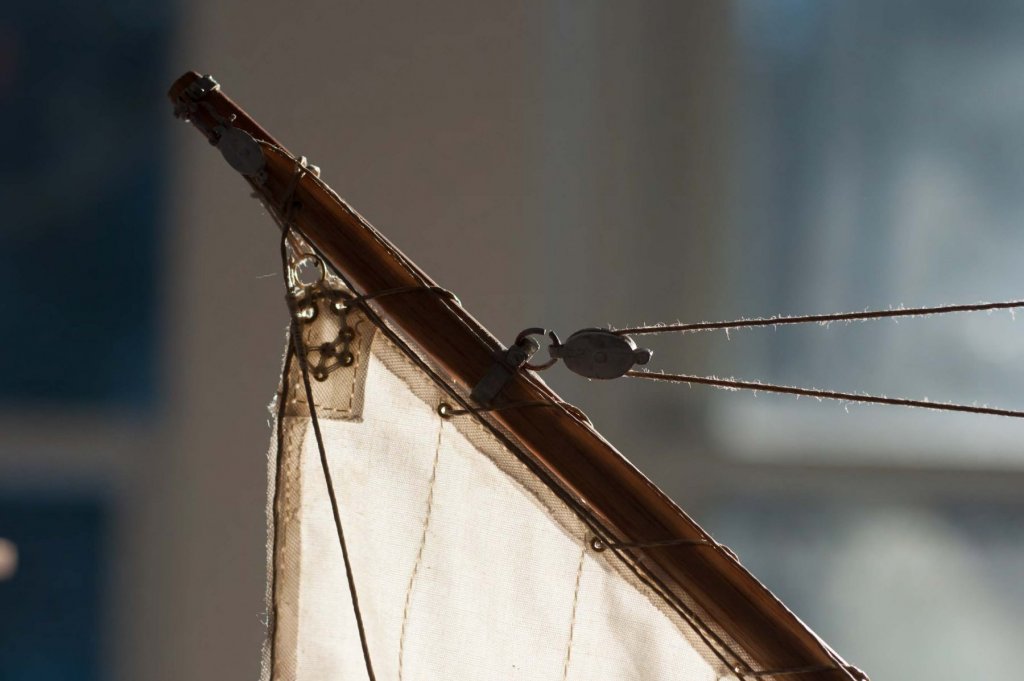
Bluenose jib installation Perhaps in honor of st Patrick, more likely as a result of three nor'-easter snow storms, I completed the jib installation and want to log it. First let's look and see what are some of the details we learned both in Nova Scotia and from the book. Here we see the real thing. note the following details. the hanks are reverse bent rings sewn to the bolt rope there are several grommets lashed together at the head of the sail. [ typical of all corners on all the sails] The halyard block is lashed to the top grommet with two lashed eye hooks. the down haul on the jib is tied to a lower grommet and the line comes to port... the down haul block is shackled to a separate eye bolt coming out of the bowsprit next to the stay eye bolt, the jib is lashed with spliced line to the becket on that block Lets look on the other side and be sure the jib topsail is the same. just reverse down haul to starboard....yes it is lets make those hanks. I have too size rings that i bent. I liked the small ones to start but after a few I changed to the larger ones. Here were my first few attempts to sew them on. Like all things, the first 5 are really tough. then like magic you figure it out. 8-9 at a sitting take an hour when you can concentrate. I had to learn the best way is to remove the stay and fit it inside each hank as you progress. here we are at the head of the sail. i have lashed the grommets. Here at the head we have attached the halyard block as well ans the down haul shackled line. I am not sure why i chose the shackle. I should remove it and tie a bowline. here we have the starboard sheet. one end is spliced to two reversed eye hooks. they go through the eye bolt from opposite sides and then are lashed [ moused]. The sheet feeds forward and up to the block at the end of a twenty foot length of chain. the chain goes around the stay and is shackled to a ring on the clew of the jib[ the jib clew is currently port side. here the tack is lashed to the down haul block. you see the taught down haul returning to pins just inside the rail. Here you see a few things. the halyard block shackeled to the sail, then the twin blocks coming off the bale. they are supported by a forged barb in the bale. the whip for this halyard is to port and the free line to haul the sail falls to starboard. This sail was raised by the crew when we sailed...no winch. here we see the jib in place , the sheet chain around the fore stay and the hanks with their blackened sewn lashing. the jib topsail is pinned in place hoping the same treatment before spring. There is snow out the window so a chance all for now cheers


-
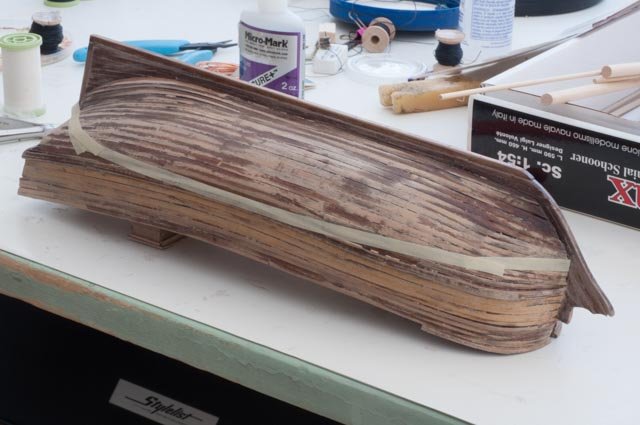
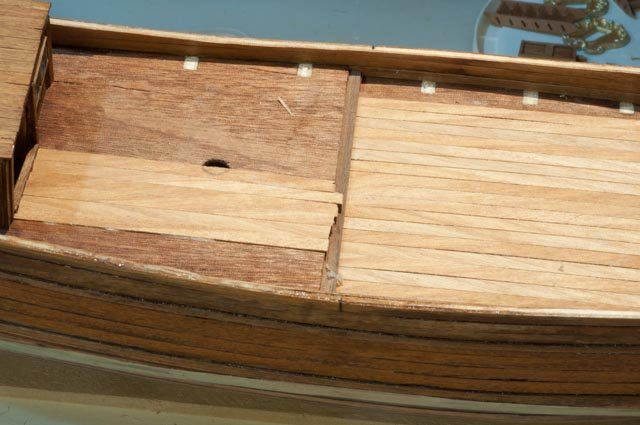
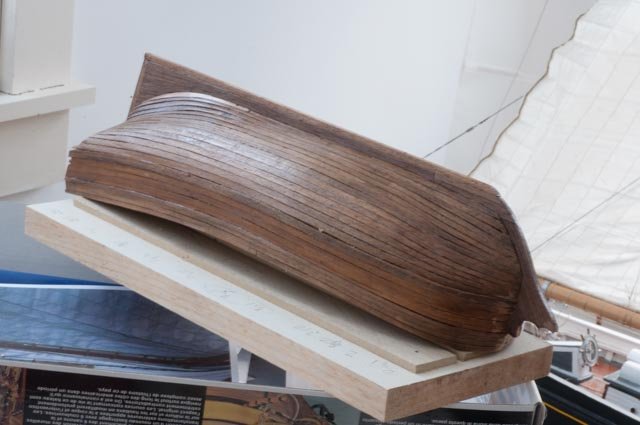
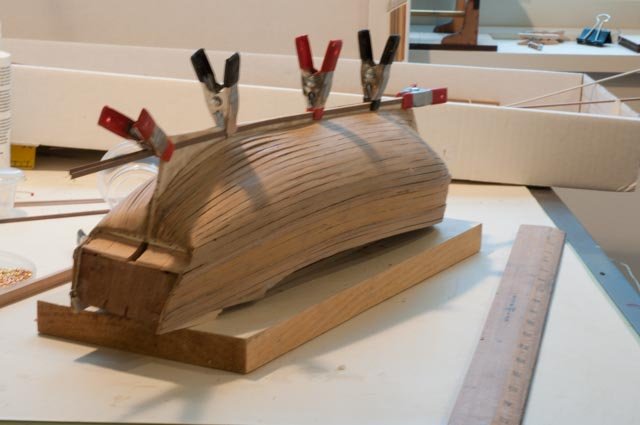
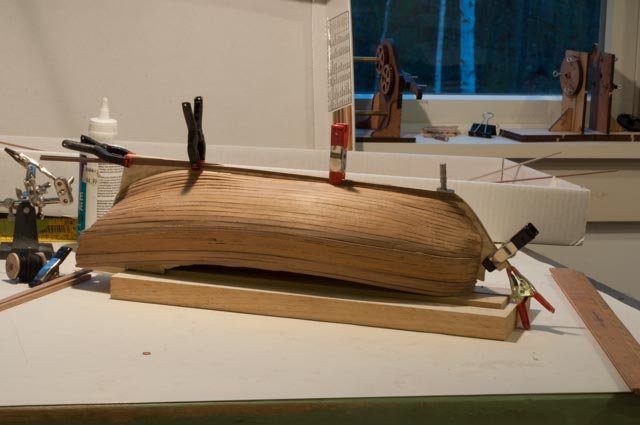
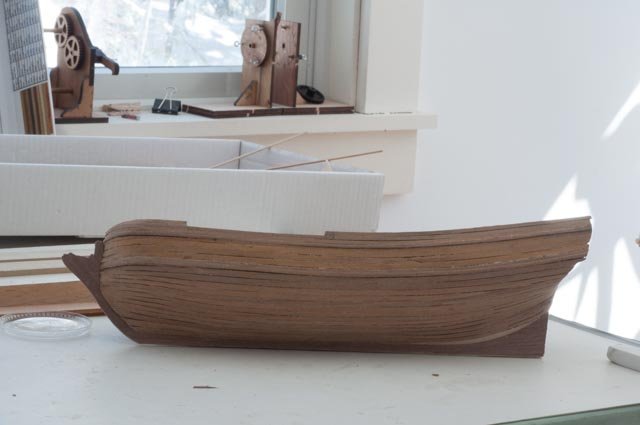
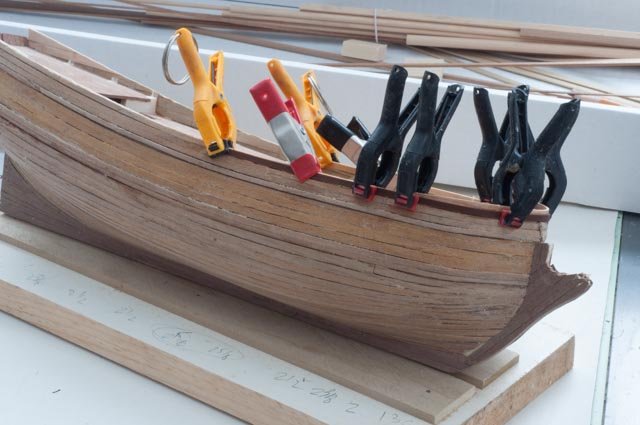
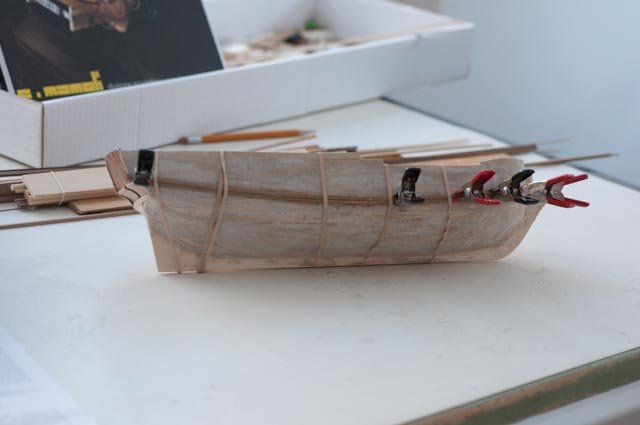
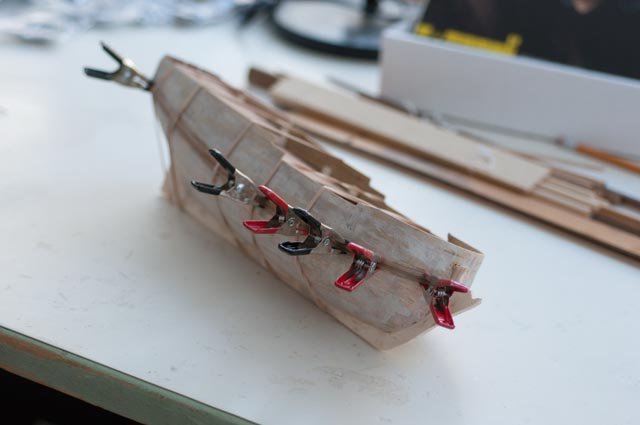
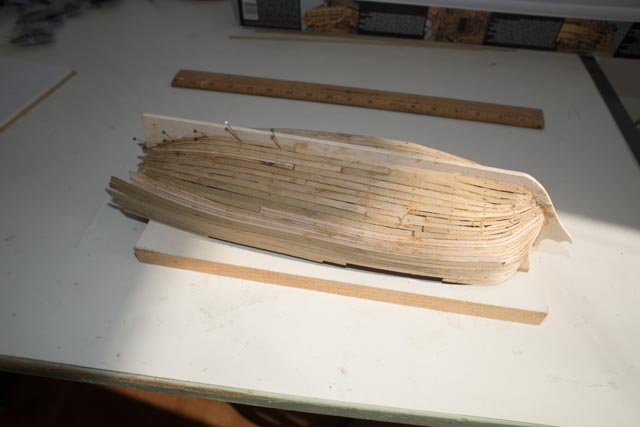
Lower hull planking I have stated before on my other builds that I am more interested in learning the history of these boats; that's how they were made and how they sailed. The walnut veneer was OK but gap issues as it seemed to dry narrower than it laid up. Also the bends we ok unless one wants a perfect surface as Mr Hahn used to do. Real planks were thick enough to bevel and for cleaning up and making smooth. The under layer is 1.5 mm thick same as our 1/16 and that gives much more to work with than 1 mm walnut. also they use 3 mm wide [ easy] and 4mm wide a bit tough for twisting. Anyway here we go. We know if we don't like it, we can sand and paint to look like paraffin. Mr Hahn's navy version was paraffin below, and the topside yellow as they would have been painted too. I do understand that for beautiful models walnut is nice. I am researching more about colors of the time to see what merchants would be. Chappell's book on overall history of sailing is my current source . so lets see if we can do walnut for the hull I am using thumb screws. every once and a while the planks was quite stubborn and a pin was needed. Here I have hard bent the first plank leading up to the transom spiling begins immediately to both ends here the starboard side is glue up and the port side is shaping the wet plank. again only ammonia water in a roasting pan. if I can sand we are ok here, but it will get tougher as we approach the keel. there were several stubborn planks . another day a few more planks the back end shaping up.here you see the splitting of the walnut in its final dry out. also the opening of some gaps. another day and another plank. here the connection at the transom gets tight we are now cutting in the end. this gets trimmed out again for the stern post. almost home. last plank starboard glue up. we're done gluing...now to rescuing, and figuring our how to build out the stern. i shall not build the navy gallery modifications. I also need to sort out the bulk head dimensions. all for now cheers
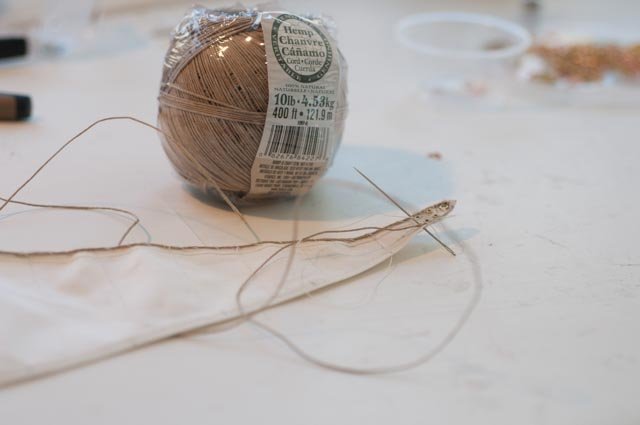
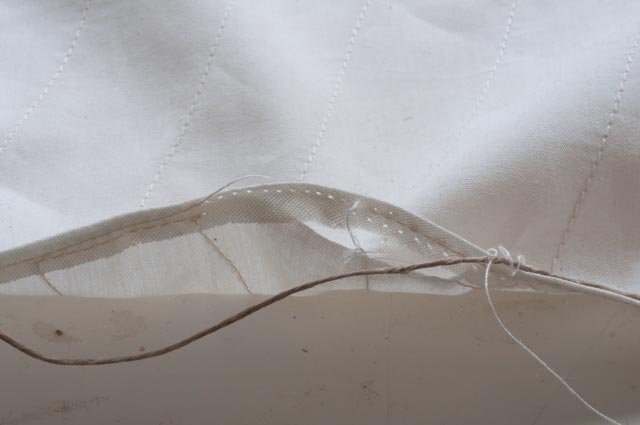
-
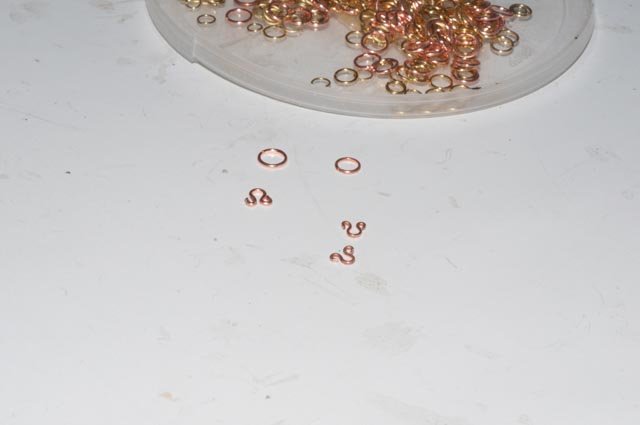
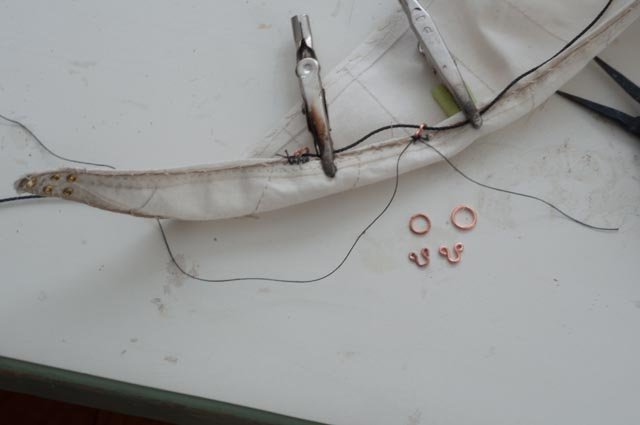
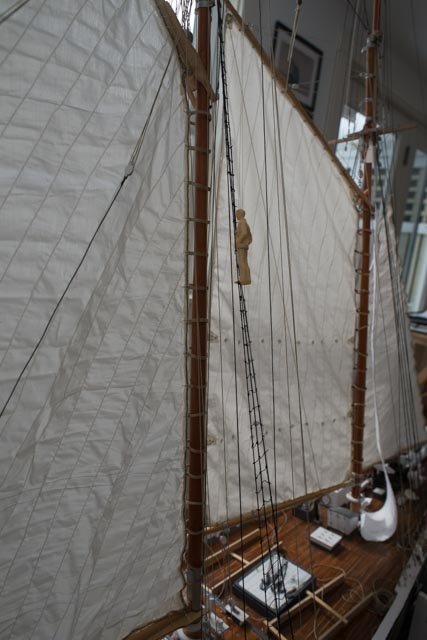
Well we got more snow, so a little more work. I wanted to start the tedious ratline knot project and get the first jib on. Several sessions of knots and we got to the top of the first mast one side . Per photos we took in Canada, the top three ratlines are slats. Looking at the scale and size , I have to imaging the original was as well. there is very little movement that high in the shrouds to have snapped the slats. Here we see a scale figure. i wish there was an easy way to make figures . Having some one up in the rigging explains so much about scale. Having one's hands in one's pocket however , is not very realistic. On to the bolt rope. As we learned before, the 10lb lines works well. The newer boat and sales are Dacron, but the photos of 1940 show twisted lines darker than the sail cloth. I love the hemp because we can see it. I came across a tear where the bias tape was not sewn in properly. I later took it apart, added a new piece of bias and went to the sewing machine for a quick fix. after adding the bolt rope, hanks and stay it won't show....I hope Now to make the hanks . I will show in the next posting the three different set ups for the two jibs and jumbo. To make the hanks I tried two sizes of copper rings to back twist. working on hanks next cheers
-
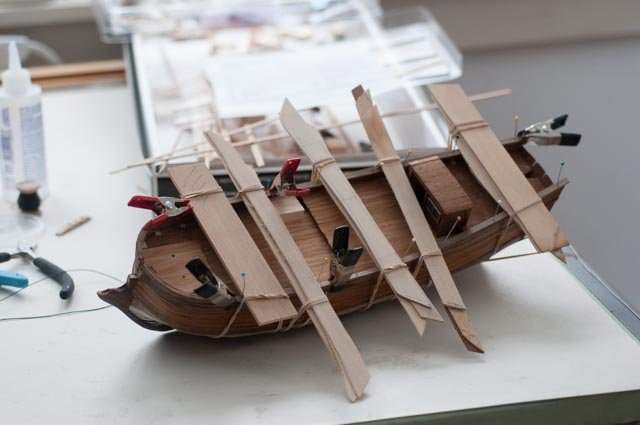
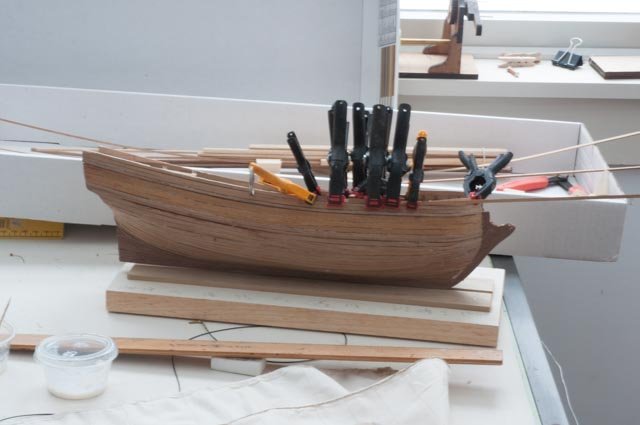
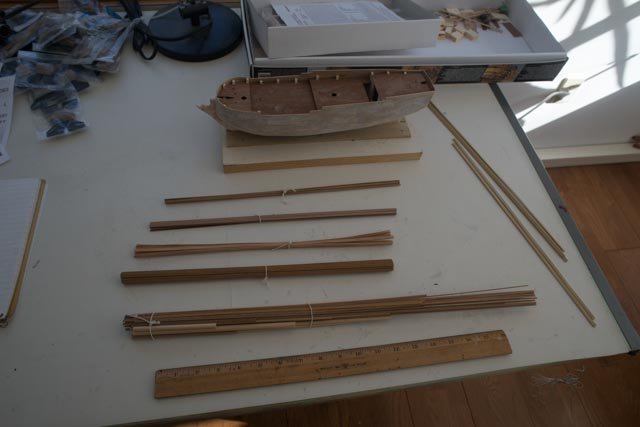
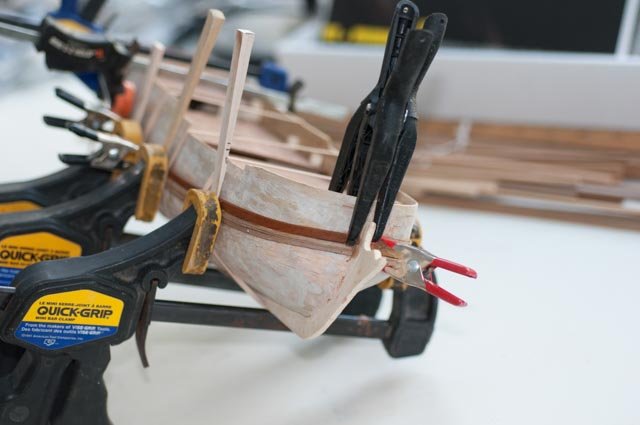
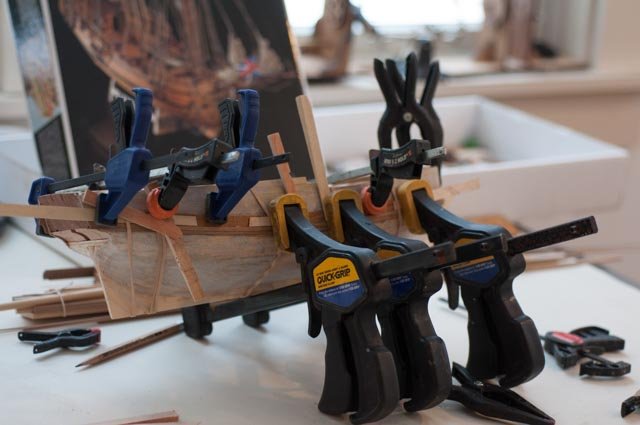
Step 3 outer planking topsides Here my status of student comes out clearly. My previous models were all painted hulls and most focused on actual radio sailing. Thus, the perfect spline, bevel and twist were not that critical. I believe something would have been put on the outer finish of merchant [ packet Schooners] and fishing boats, so nice walnut planking is for the model and not the history. I need to learn anyway, so off we go on this adventure. I have read in magazines and other blogs that many European boxed kits have wood that might be a bit dry. Well I am out of my league so who knows. There are actually four pieces of pear for the topsides included, so I need to treat them well. So here we go on the topsides. · Here is the wood pile as the pieces come tied together. With a little guessing I hopefully and choosing the right wood for each step. The wale and hull planking are listed to be walnut and the topsides yellowish pear. · OK the wales are in place drying. They were very dry and although soaked for hours still split on me. Hopefully the thinner walnut will have more flex. · Here we are glued up · Now to the topsides. It was interesting to figure out a way to clamp. I chose not to use the thumb screws because they would penetrate above the deck line. This pear plank is drying to shape · Here is the glue up. The pear was a joy to work with compared to the dry walnut. · Here I found I needed spacers to thicken the plank to match the wale to hold. The long strip wedges I made for another project saved the day. · Now well into the second plank I was getting the hang of it. Of course, it is easy if run full width for the two pear planks. · Now we’re back to thin 3mm strips of walnut. They went reasonably well. You will see later the issues because I was doing a little guess work on height of the bulkhead, especially forward. Here could reach the first 4mm wide plank going down the hull below the wale. I used the clamps for dry out and shaping Gluing this first plank i switched to thumb screws to try to twist and hold the shape. I made up some wood shoes just to try but as you shall see quickly went back to metal. time to turn her over All for now Cheers
-
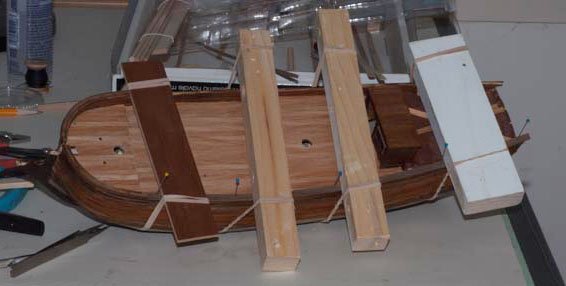
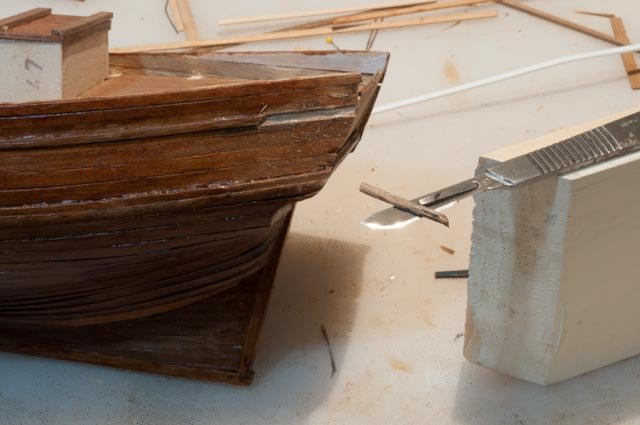
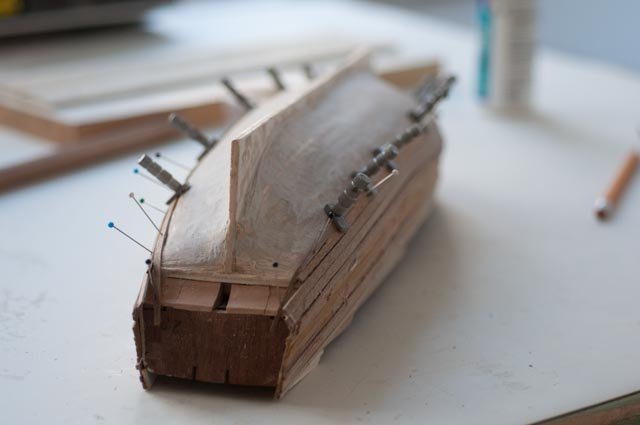
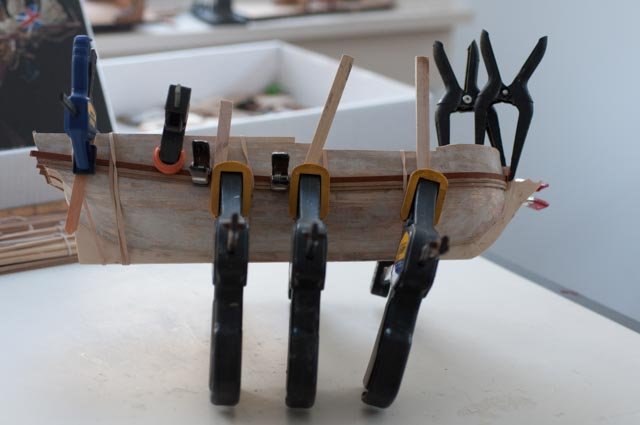
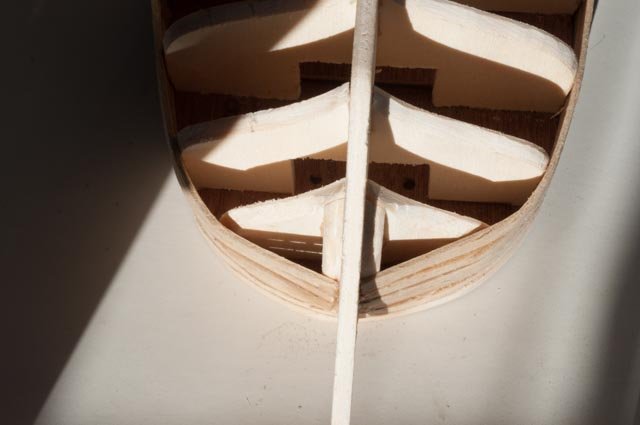
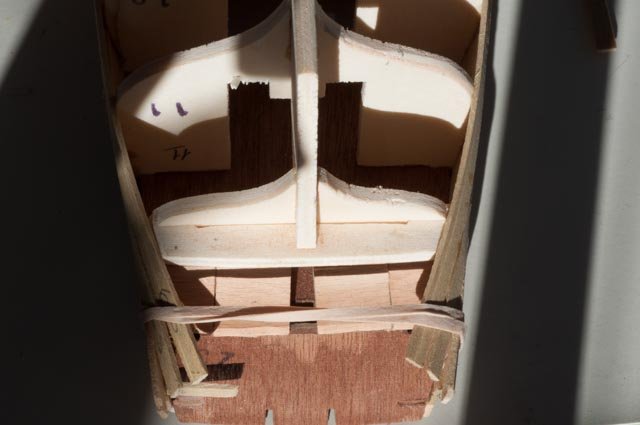
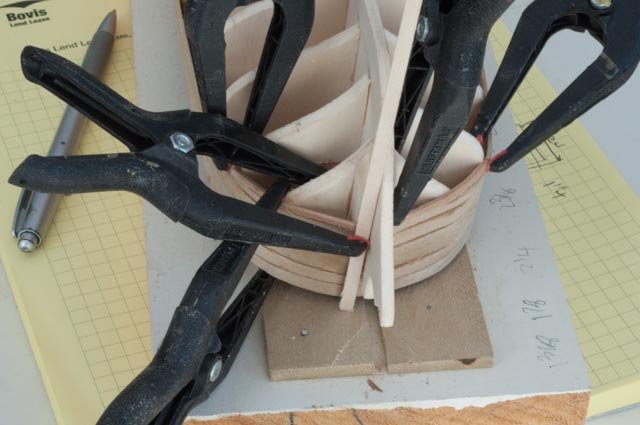
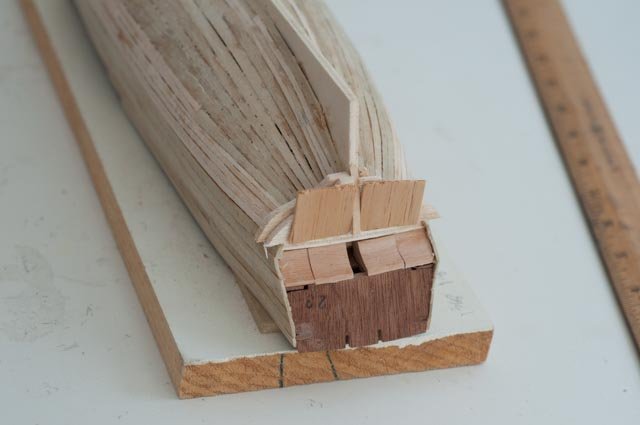
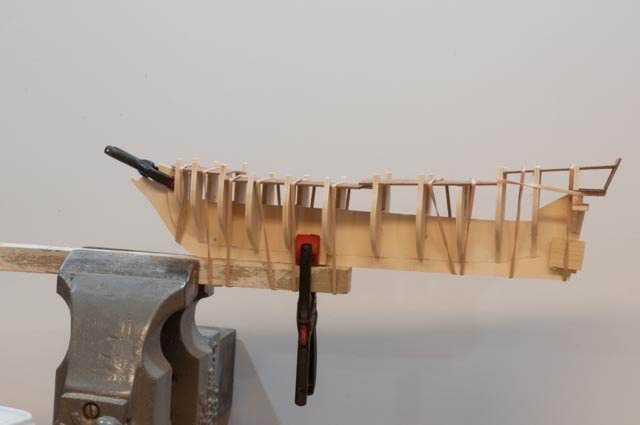
Step 2 get ready for outer planking The first thing I did was to put together the under planking [ first planking]. The Kit provided 1x4 mm planks which makes sharp corners a bit tough · Here we see the shear in place. It is pretty much a single bend, and a little ammonia water in a roasting pan is my only preparation · Aha. The first problem. 4 mm is too wide for the bow. I tried rolling it but to no avail. · And yes both sides are suffering · The aft lines seem fine for these first few planks and I let them run full. · My attempted fix at the bow was to take 1/16 x 1/16 bass wood and double up a bit. They are just a hair thicker than 1mm so in the sanding filling we should be ok · I chose to build this area up with soft balsa and then to shape it for the roll up coming with the walnut planking to come in the next step. the curved four little blocks were interesting to get into place. · Ok the first run under planking before sanding is fill with spiling fore and aft to make the curves. See the bass wood is a bit thicker at the major curve. · Here we are filled and cleaned up ready for the over planking. The aft section has a tight roll up to end with future cross planking on the curved area below the transom. · Looking from forward we hope we are Ok. As it turned out the tops of the bulkhead forward and far aft was too low. Following mamoli at this point the inner bulkhead on the lower main deck is also dropped a bit.....more on that later All for now Cheers
-
Thank You Keith and Mike Today I was sewing away on the new jib bolt rope and found a tare when the bias tape was not sewn in properly . I had to take out one inch of all thread , add in some new tape and go up to stairs to the sewing machine to mend. A lot easier than at sea. I'll show a photo of the fix next time. cheers
-
Thank you Keith. yes I like to have several things burning at the same time. It takes longer for each but we shall get there. Today I had a tare in the Bluenose jib that I had to repair, and then I did several ratlines as well as work on this one. It is supposed to snow tonight, so tomorrow I can get a long a bit here and shall try to update. cheers
-
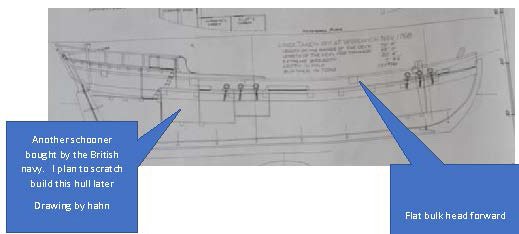
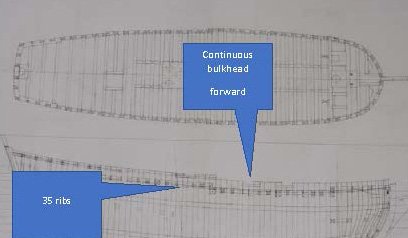
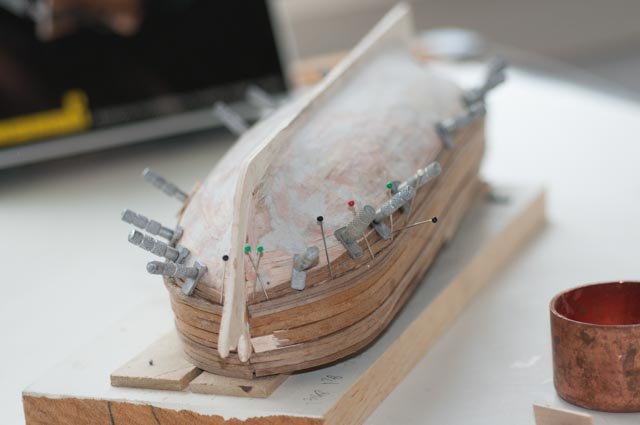
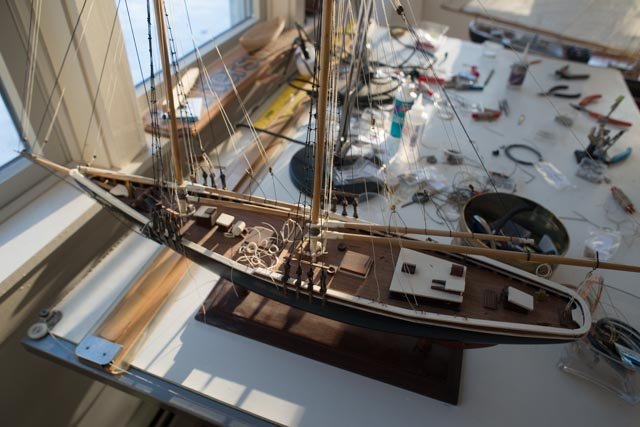
Build Packet Schooner from Mamoli Halifax kit Here we go again on another adventure. After building schooners of 1802, 1853, and downeast Schooners 1894, 1906 and 1921, I wanted to get back and learn about the design of the early schooners. I shall put together a brief posting with some of the references I have been reading. Today I just want to get the general introduction as to what I am building and why. I live in Maine and shall remain most interested in the maritime history of this region. I include all New England and maritime Canada as the region. I shall leave it to the true authors to record all the real back ground, and shall simply summarize a few points…….again from what I have read and seen to date. I always look forward to more research in this area and appreciate some tips already received through these logs. It is well recorded in Boothbay, Maine that starting in early 19th century 'Pinky' and similar schooners were being built . So, where I am going is to build a few known designs taking some liberties to improve my understanding of the evolution of the coasting schooners. I would like then to build some representative schooners that were built here. That starts with pre-Pinky and ends with the 10 four masters built in 1921. See my Charles Notman where I built it to be a prototype for sailing size models . It had a documented design I could use to learn. I chose the kit Halifax as a first build in this adventure because she represents several things of interest to me: · She was built I believe in Nova Scotia as a Packet in 1768.…Harold Hahn's book on Colonial Schooners gives a great history of her. · She was taken over by the British navy in 1770, which means there are very accurate drawings. I believe it should not be too difficult using common sense to reverse engineer and remove features that would only have been done for a navy vessel and I shall speak of that in the bashing process. Harold Hahn said if one goes to the actual admiralty drawings there are tick marks indicating what was to be changed in the lines. He then listed several items that he believes were added. · There is a fun Maine story that she sailed into Machias, Maine trying to recover stolen cannons . Unsuccessful, she hired a pilot to get back to sea. The naughty pilot reportedly steered her onto a reef and the ran away in the night…….She was lost to the US...wow score one for new England rebels. · She was a subject of the renown Harold Hahn. I was able to get plans of her as well as Challeur, a sister ship in the small British group in late 1770’s. This gives us accurate drawings of another boat a little bigger. Apparently there was a second Halifax commissioned by the British navy after the first one was lost in Machias, and some confusion that i plan to evade So what am I building? Each Christmas time I have fun on ebay as a flurry of models seem to come available and if you are diligent a good deal is in the offing. A few years ago, I bought the Mamoli kit, and it has been sitting on a shelf. So, as I continue to work more sparingly on Bluenose, I have started this kit. I am also bashing another kit of a plank on frame version of a similar schooner. i feel it is important to learn how to build the whole frame, so concurrent with this build, an unrecorded first attempt of plank on frame is also on the bench. I plan to use that partially built model as a partial framed out hull in a dock yard diorama, so it shall not have a build log or name. Working on it in parallel does help explain though the slow pace this build might take on this kit. I must also say I plan to ignore what I call the navy embellishments. So I shall take images from a few Harold Hahn diorama views to confirm what I believe to be pretty straight forward. Fishermen nor early 'packetmen' did not have great windows in the cabins, lions on the stem nor guns on the decks. Also as a yank and building a representative boat using the Halifax kit, I see no reason not to take liberty and declare I am in 1:48 scale. The kit as being metric is 1:50. Yes I have metric rulers!! I may change my mind later but what I am building is 53 feet on deck and not 55+. Again I will also need to change the sailing rig to represent the commercial Canadian build and not the British Navy redrawn sail plan with top square sails etc.. That change could be challenging, but it is my goal. lets start....Step one the frame So first of all I opened the kit and found myself amused by the way they [ mamoli ] do things. The drawings are exploded isometric views, the instructions are pretty basic and off you go. I bought a set of Harold Hahn plans and I go there for questions. I cleaned up the bulkheads and keelson assembly ready to put together. This model is small compared to my usual work, so I made up mini blocks to use to square up the bulk heads. Surprise. The interlocking under deck ties everything together. So without too much trouble we get the bulkheads on in the first day. I wonder how true they are?...we'll see Cheers
-
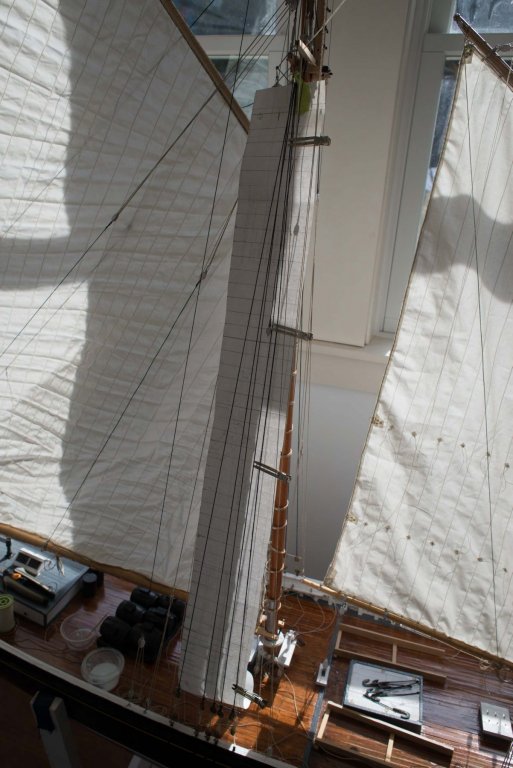
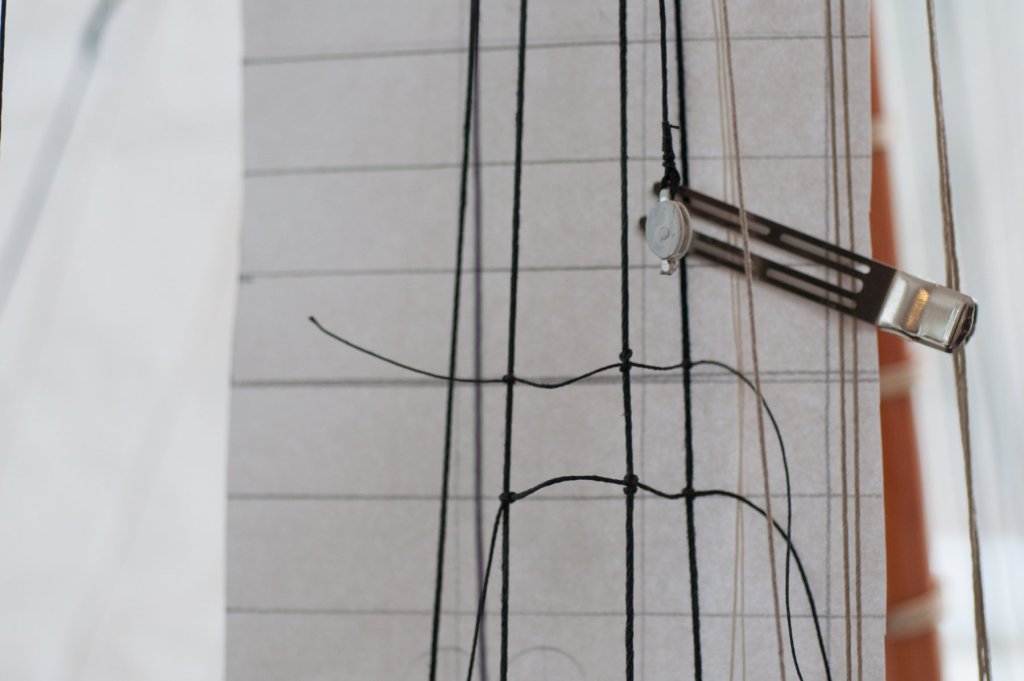
As winter moves along in it's slow pace, we have divided our work into several areas. Finally as planned, I am able to come around and work slowing on getting things further wrapped up. I have a chance to show off in late July so there is now some pressure. Fortunately that crowd is more about real boating and not modelling, so i should do just fine. One requirement though will definitely be to have more sails. As planned I have started two kit bashing exercises on 18th century schooners. I will start a log there too one of these days, as soon as I figure out where I am going with it. I also keep looking at Charles Notman that needs more work too, as do the sailing one designs that need to be in the water in late June Bluenose, I have the following update: here is an image showing the corrected peak halyard without a bridle and the lacing of the sail. I add this as it shows the job facing me on more sails. I may compromise a bit......yes i should have soldered the ring! Here i have remade the fore sails . One of them twice as I scorched with the iron trying to get the blue desolvable ink out. My rear admiral took over the iron so the two jibs are fine here I have cut out and blackened my first attempt of making the dory hooks. Some times trying to use up things in the shop helps , here i think they did not come out too well. maybe with some grinding.....we'll see this may be compromise one. Finally I have set the patterns for the ratlines. I have great photos of the Bluenose ll so I can see which few change to slats etc. I have also redone all the chain plate connections that were removed a few times. here I am debating line weights and knots. The aft connection is a splice into a wrap holding a ring on the shroud; the center a clear clove hitch; and the forward another spliced connection. This is definitely an area for compromises. I shall attempt to make ' beckets' spliced at each end and hitched in the center, but maybe not 175 plus of them. they all have to be perfect lengths. I will do several with the lighter line and see how they look but assume knots and imagination will work here. cheers for now


-
Wow. Just found this build. I look forward to learning as you put this back together. Thanks Jon
-
Beautiful. My problems included getting ca glue to set to hold prebent planks, since they are quite large they over powered glue and I had solid plug for a form. I assume the small planks held well since there's no mention of the glue up. Anyway when I get back home I am inspired to try again. Thanks for the lesson Happy New year Jon
-
Thank you for sharing this build. I am starting to move into these 18th century schooners . I have read some of the history and have a few kits to play with. I can't wait to get going and shall start right after the holidays, and you log is a great help Thanks for sharing Happy holidays Jon
-
This is a wonderful build. I am getting ready to build some of these early schooners. I have two kits of Halifax , one bulk head and the second plank on frame. I look forward following your progress for this is a new area for me. One goal will be to learn how they sailed. I just visited Washington and saw similar class models at both museums. I can't wait to get going. Happy holidays Jon
- 682 replies
-
- 6
-

-
- halifax
- lumberyard
- (and 1 more)
-
Great looking sails. These schooners remain amongst the prettiest while under sail. Enjoy the end run Cheers
- 245 replies
-
- 3
-
-
- bluenose
- model shipways
- (and 1 more)
-
Very impressive painting. I hope you get a sunny day and we can see it outside. I used tape for the boot top and gold cove... Enjoy the holidays Jon
-
Kieth Wow I love the production plank method. My failed dories started cutting each plank on the scroll saw. My issue there is the two direction teeth on many blades grab the wood. I am going to try to get one way blades. By slowing down the stroke I feel safer making these small cuts on the skroll than on the big band saw. I need 12 of each side plank for six dories, so it must be easier to try your method. We'll see I hope you Christmas dinner went well. I look forward to follow-up in the new year Cheers
-
Michael It's always a pleasure to find one of you builds and leaf through it. I love seeing you successfully removed and reinstalled the mast. I am also envious to see machining parts. I have so much to learn. Happy new year Jon
-
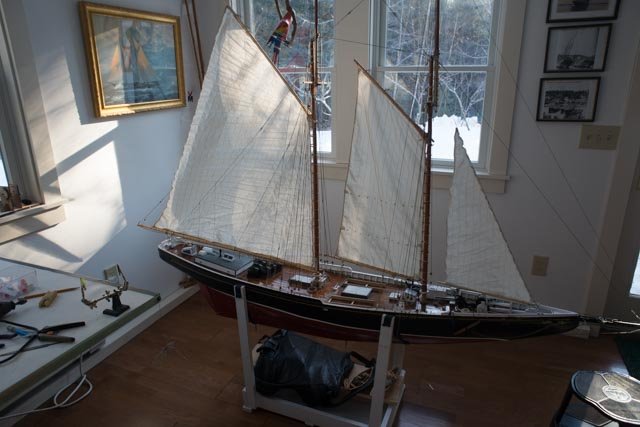
Wrap up Bluenose for year end In this post I just want to share a few items as I clean up and get ready to continue at slower pace as I begin a new area. · Here we have remade the foresail and gaff and got them reinstalled. This was a full eight hours due to many issues I spoke of before. · Here she is sort of coming at you. Unfortunately it is easy to see the wrinkled jumbo which will be replaces and up graded. The main is wrinkled because it was furled. Not sure what to do there. They have photos of Bluenose sailing with only the main but never with the main furled. Someday next year we shall replace it or furl it up and add a storm sail · Here is full shot of the new sail and new rigging. It is a medium file size so can blow up to better see details · One of the fun things is I used 1 mm halyards and ran enough to raise using the winch. Here once we raise the sail the coils become huge · Here you so two halyards looking forward from port side. So what’s next A The list to finish is long , I will stretch it out a bit, but here are some items that I shall plod on with and update next year: 1. I have the next three sails under way, jumbo jib and jib topsail. They get chain sheets and things and will be fun to rig. 2. Top sails... 3. Fisherman sail 4. Dory rigging under way: hooks made and ready to rig lines 5. Oil barrels and one more wooden barrel forward. I want to learn what it was for too 6. Remake mainsail and gaff 7. Remake all dories and fit them out. 8. Decide if I am not going to dissemble to move, tighten up and coil all lines. 9. Make flags 10. Make people….currently have stiff railroad figures. I would like to learn to make figures doing things 11. Consider changing out sailing turnbuckles for more realistic look. Currently have that standard issue of getting shrouds to stay tight. 12. Possible...........Make sailing mast and spars. I am drifting away from sailing again B help my friend continue his restoration of his wife’s 1960 ish Bluenose model · Here in the photo you can that she rests on the shop rigging table. We plan to upgrade his deck furniture and add lines like back stays, dories and their rigging etc. we also tell a few stories when he visits. C. next build. I shall start a series of builds of 18th century new England [ + nova scotia] schooners. Again, I want to learn how they sailed. I ‘ll start with some kit bashing then eventually get to plank on frame. Happy holidays Jon
-
thanks Keith I hope we can all continue. I mean why not? and for me I have a lot more to learn. This year has been just great and I am getting excited about branching out next year. Merry Christmas
-
Great bench. I bought a scroll saw for last year because my band saw is a big old 10 inch and I want to learn plank on frame. I am thrilled to see I can watch you make frames because I struggle using the saw. The up stroke grabs my wood. I will look to see how you work with delicate wood. Thanks jon
-
Thanks Keith and Jeff I have come to a resting point I think, as we approach the holiday break. I went to our monthly Guild meeting this week, and many members agreed. These huge models are too consuming, and the product is one that cannot travel or do much but take up too much time and space. It is a wonderful learning process, as we can see the detail so much better; but maybe it's too much. I need to make simple boats large to sail and then smaller scale for all this detail and learning how the sails worked. Yesterday, I just replaced the fore mast for the third time. A few things broke, tiny pieces disappeared and needed remaking, and most lines needed untangling and fixing. It was a full day to get it back to when it was before. And that is nice to be able to do but not practical. I am thinking of slowing a bit on this build and stretching it out, so yes I eventually complete it but in the coming new year I can start new things. I love this model. Today I laid out three new sails, replacement jumbo and the jibs. I am just not going to rush to get them done. 2018 planning I want to build older 18th century schooners like Halifax using Hahn's books and to learn again how they sailed. I bought a Halifax kit to play with first. Then I want to learn plank on frame. If I keep going backward on Bluenose, I just won't get there. I shall continue to plod along here part time. There are new sails to make , I may go back and redo the main. I might furl is again and rig a storm sail and reef the foresail. I have to do the jumbo as the attachment is cringles on the sail, rings on the shroud and continuous lashing. also, I need to shrink the bolt rope and improve the three corner connections. I'll never be satisfied with the existing sails. Last winter I totally failed on dories and I need to do them again too. Then I want to rig them, so perhaps one is being launched. I made the hooks today. More importantly is a the 3/16” [1:64] scale Bluenose that belongs to my friend and is still in the shop on my main table. We just met to review this winter and we agreed to rebuild all his deck furniture and add several lines that are not on the simple kit rigging. So to all happy holiday. I shall post more pictures as I get her cleaned up. Cheers