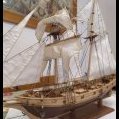
Geowolf Posted May 29, 2020 Share #1 Posted May 29, 2020 Hi all again, i'll try to put some photos about my current Project, step by step. I think it's not difficult model but they have a lot of job (and time, and fun,...). They Will be painted at black/white traditional pattern like the original boat, this is a challenge for me because i have no experience painting Wood. First, the deck finished with matte varnish not colored. I'm giving a small curvature to the stern mirror (i think this word is not correct...) Second, i'm testing chalk paint brown color (chocolate) for inside, i'll try to put first layer brown and a second layer black, degraded with the sandpaper. Third, my workplace 😄 Please if you have more ideas about painting, i'll make some test with spare wood. I know that i want but i'm not sure about the way 😅 regards and keep safe, ccoyle, Keith S and GrandpaPhil 3 Quote Link to comment Share on other sites More sharing options...
Wahka_est Posted May 29, 2020 Share #2 Posted May 29, 2020 Welcome to Terror club. We have some really good builds ongoing here. Let us know if you need any help! Quote Link to comment Share on other sites More sharing options...
clearway Posted May 29, 2020 Share #3 Posted May 29, 2020 welcome to the terror party. Keith Quote Link to comment Share on other sites More sharing options...
Geowolf Posted June 24, 2020 Author Share #4 Posted June 24, 2020 hi all, some photos of first stage of planking, i'm using a welder (it's the correct word?) to curve the wood slats. Previously i'm leaving the slats with water at least 12h. finally one of the small boats, painted in brown/white colour with weather effect; long long time to take this effect and i'm not very happy with the final result,... two hands of brown paint, one hand vernish, two hands of white paint, sanding and the final vernish layer to fix it. regards!! F. ObviousNewbie, Keith S and clearway 3 Quote Link to comment Share on other sites More sharing options...
clearway Posted June 24, 2020 Share #5 Posted June 24, 2020 for weathering the lifeboat try a couple of washes of diluted grey paint to tone down the effect? Keith Quote Link to comment Share on other sites More sharing options...
Geowolf Posted June 27, 2020 Author Share #6 Posted June 27, 2020 more photos about planking, please leave a comment; i'm seeing it not to bad, but this is my first planking "knowing that i'm done" hahaha. A bit tricky for me this stage,... regards to all and keep pushing, F. clearway 1 Quote Link to comment Share on other sites More sharing options...
Geowolf Posted June 27, 2020 Author Share #7 Posted June 27, 2020 On 6/24/2020 at 9:15 PM, clearway said: for weathering the lifeboat try a couple of washes of diluted grey paint to tone down the effect? Keith ahhh i wanted to do it with black paint at the junction between the hull and the benches, i'll make some test before 😅 clearway 1 Quote Link to comment Share on other sites More sharing options...
Geowolf Posted July 28, 2020 Author Share #8 Posted July 28, 2020 hi all, finishing the hull, the first plank it's not very difficult, but at the bow... what a f***** piece of wood!!! my floor seems a sawmill!! i started with the sandpaper block, but maybe i'll finish it at Christmas, so i've taken my big weapon at the balcony. First, i'll need some time with the dremel maybe half hour more or less; second, under the sunlight at 35ºC it's not a good idea, i'll wait the night 🥵 some gaps between the planks, i'm sure it's due because the planks has been in water some hours and they take water inside, so when it is dry two or three days after fix it in the hull, they leave gaps 😡; it is the first layer so no problem but with a model with only single layer, it's not acceptable for me... first picture: the completed hull ready yo sanding second picture: maybe an axe it's better for take the unnecesary wood... third picture: i scared about to retire too much wood with the dremel i need to take a beer... 😅🍺🍺 Quote Link to comment Share on other sites More sharing options...
clearway Posted July 28, 2020 Share #9 Posted July 28, 2020 Wait till you start sanding the shroud protector/ ice bumper when you come to it😉just go nice and steady- at this stage sandpaper wrapped round a piece of wood might be better for the final finish. Keith Quote Link to comment Share on other sites More sharing options...
Geowolf Posted July 29, 2020 Author Share #10 Posted July 29, 2020 12 hours ago, clearway said: Wait till you start sanding the shroud protector/ ice bumper when you come to it😉just go nice and steady- at this stage sandpaper wrapped round a piece of wood might be better for the final finish. Keith ufff i know, another amount of wood hahahaha. I'll need more beer!!! 😱 I actually use a small wood for modelist supplied with my first model Albatros, and for large surfaces i use a cork Wolcraft block, very useful because i can cut the cork to fit the curves of the model. This afternoon i'll try again with the dremel, my objective is to retire the large amount of unnecesary wood and later use the cork block i've seen your mast in your ship, well done Keith! regards, F. clearway 1 Quote Link to comment Share on other sites More sharing options...
Geowolf Posted August 17, 2020 Author Share #11 Posted August 17, 2020 hi all and good morning, i've just start the second planking, i'm not confortable about it, i don't like this planks sooo thin! maybe the result will not be as good as i wanted, but you know we're learning each day 😅 I'll relate my own "terror" film: i've prepared a large surface with all the thin planks attached, to vernish it as i've seen in the Occre webpage videos. Baaaaad idea!! the planks has been attached when the vernish dried to the support (an old carton box), impossible to take the planks! i've lost more than 30 planks "glued" to the box by the vernish, bad starting. Second mistake (the sequel of my terror film hahah), i've buyed contact glue thinking it's more easy to use because the plank is fixed very quickly; well, i've started with three / four first planks but the contact glue is drying very quickly, the spare glue is added to the planks and the final result was bad, with the four planks spotted with contact glue (well fixed at least). I've finished the plank with my well know wood glue, it need more time to dry. some photos with final sanding, i'm thinking the first planking is better than the second one 😒, this afternoon i'll try to upload some photos of second plank, good summer!! Wahka_est 1 Quote Link to comment Share on other sites More sharing options...
Geowolf Posted August 17, 2020 Author Share #12 Posted August 17, 2020 hi all good afternoon, finally one side of my second plank, if you see the pictures in detail you'll find my mistakes, i'm not happy 😔😔 maybe the other side will be better. I think the stern can be well finished i need to cut the remain planks and clean all, but the bow,... i think it can't be repaired. At least each day i'm learning a bit more 😌 regards! Horatio Hornblower, DanielD, clearway and 1 other 4 Quote Link to comment Share on other sites More sharing options...
clearway Posted August 17, 2020 Share #13 Posted August 17, 2020 you might be able to tidy it up when the capping rail is added, you can always cut out planking and replace it. Keith Quote Link to comment Share on other sites More sharing options...
Geowolf Posted August 17, 2020 Author Share #14 Posted August 17, 2020 24 minutes ago, clearway said: you might be able to tidy it up when the capping rail is added, you can always cut out planking and replace it. Keith yep, i'm thinking about cut some planks and replace it, but i used sandpaper in all and the rest of planks are very thiiiin like a cigarette paper, ufff i like thickness planks it's easy to fix something! I'm not made for these delicate things! hahaha i've the hull in my office table near to the PC, i'm seeing all the time, i think i must to go biking and take it out from my mind thanks a lot for your comments clearway 🤗 F. clearway 1 Quote Link to comment Share on other sites More sharing options...
clearway Posted August 17, 2020 Share #15 Posted August 17, 2020 yes i agree the supplied planking is very thin, that is why i used some 0.5mm walnut to 2nd plank mine. sometimes eureks moments happen when you spend time away😉 Keith Geowolf 1 Quote Link to comment Share on other sites More sharing options...
Wahka_est Posted August 17, 2020 Share #16 Posted August 17, 2020 Nice work. Sanding will make it look better. If you plan to paint then it hides some mistakes. Geowolf 1 Quote Link to comment Share on other sites More sharing options...
Keith S Posted August 19, 2020 Share #17 Posted August 19, 2020 There's nothing wrong with your bow planking that can't be fixed with a bit of sanding. The plank that is sticking out a little can be fixed down by applying a little thin CA glue and holding it down with your fingernail until the glue grabs. Anyway, don't worry about the bow, it will be covered by the metal armour anyway. Nobody will be able to see it. Geowolf 1 Quote Link to comment Share on other sites More sharing options...
Geowolf Posted August 20, 2020 Author Share #18 Posted August 20, 2020 hi all, thanks a lot for your kind words!! i think i'll try the Keith S solution, if the plank is too thin or damaged, i'll replace it as clearway says. I had a problem with the planks in my first model Albatros (single plank, no way to mistakes), and i left it, abandoned, one year more or less.... but with this model no! thanks for your words, they're pushing me to continue! this weekend i'll continue with the other side, meanwhile i make advances in the model, i show you my ebike (picture taken this summer in Barbastro - Huesca), for me it's a good way to disconnect from all 😊 regards and take care! clearway 1 Quote Link to comment Share on other sites More sharing options...
ObviousNewbie Posted August 30, 2020 Share #19 Posted August 30, 2020 Looking good Geowolf, I had the same issue with one of my planks on the bow, followed Keith's advice, and after painting the hull nothing was visible, so don't worry, it can be corrected 🙂 Geowolf and clearway 2 Quote "Whatever does not kill you, only makes you stranger." Current build: Finished builds:Calella by Occre - Greek Bireme by Amati - HMS Terror by Occre - Frigate Diana by Occre Link to comment Share on other sites More sharing options...
Geowolf Posted August 31, 2020 Author Share #20 Posted August 31, 2020 13 hours ago, ObviousNewbie said: Looking good Geowolf, I had the same issue with one of my planks on the bow, followed Keith's advice, and after painting the hull nothing was visible, so don't worry, it can be corrected 🙂 thanks a lot for your comment, well at this moment i'm making the other side and the result is slightly better (at least i think i'm improving my skills hahaha), but still i've some planks "above or under" the adjacents. I think about two possible reasons: first, the first hull is smooth and clean but it has depressions or hills (maybe due for sanding or the adjustment between the solid bow and the hull planks); the second reason, i tried to force the planks of the second layer to make the way i wanted, and it's not correct, the plank must to follow his own natural way and it must be fit naturally without elevations above the first layer... well, in any case i think this week i'll finish with the planks, some photos with the other side! thanks for your comments and regards, stay safe! Quote Link to comment Share on other sites More sharing options...
clearway Posted August 31, 2020 Share #21 Posted August 31, 2020 it all takes practice, but looks like they are sitting nicely (don't forget as keith s states the bows will be hidden by the plating anyways. keith Geowolf 1 Quote Link to comment Share on other sites More sharing options...
Geowolf Posted September 12, 2020 Author Share #22 Posted September 12, 2020 hi all and good morning! some photos of the ice protectors, i thought it would be difficult but this side has been easy. I'm understand the clearway comment about the large amount of wood need to be removed here 😅 thanks a lot for your comments and regards, Quote Link to comment Share on other sites More sharing options...
Geowolf Posted September 12, 2020 Author Share #23 Posted September 12, 2020 for me, the best way to curve the planks is put it above boling water 15-20 min, for this purpose the grill of the oven is perfect (i'm retired the cover for the photo) and later curve it with the electric solder clearway 1 Quote Link to comment Share on other sites More sharing options...
Geowolf Posted September 26, 2020 Author Share #24 Posted September 26, 2020 hi all good afternoon, working a bit on the kit, all wood work is finished, some pictures of the stern. I'm not happy with the handrail, not well finished, i'll try to fill with something to avoid gaps before final painting... i've made the windows of the stern with a pattern bubbles finded in internet and printed with a laser printer; quickly and easy but sure it's better to use a more noble material hahaha. With the vernish i think it'll be better. thanks a lot for your comments and regards, take care! clearway 1 Quote Link to comment Share on other sites More sharing options...
clearway Posted September 26, 2020 Share #25 Posted September 26, 2020 looks neat and tidy geowolf, the stern davits will also hide some of the gap when they are in place (i havn't done these or the catheads yet as they always get "knocked" so will leave them as late as possible. Keith Geowolf 1 Quote Link to comment Share on other sites More sharing options...
Geowolf Posted September 27, 2020 Author Share #26 Posted September 27, 2020 hi Keith, thanks a lot for your comment, i had some problems with the handrails, very difficult for me to take the curve and they are not very well placed, but with a lot of sandpaper it looks better hehehe. I'm thinking about to follow with the metal plating of the bow and painting all and finish all the hull before start with small pieces above the deck. Are you starting with the wiring? i think all the wire between the hull and the masts it's going to be a lot of fun 😅, i my first model only a few wires was not very difficult to fix it tight but in this model, uffff 😭 i think all the wires and ropes must to be as tight as possible, i hate soft ropes... regards!! Quote Link to comment Share on other sites More sharing options...
clearway Posted September 27, 2020 Share #27 Posted September 27, 2020 it is a knack getting the tension on the rigging just right. i will not be putting any rigging in place for a long time yet (always like to get the masts done early to get a feel of how the ship will look), i still have wire eyes to install at the base of the masts to take rigging before i finally glue the fife rails in place as well. Are you going to alter your terror along the same ideas as keith s and myself? Keith Geowolf 1 Quote Link to comment Share on other sites More sharing options...
Geowolf Posted September 29, 2020 Author Share #28 Posted September 29, 2020 hi Keith good morning, i think i'll use the parts included in the kit, i know are very simple and not accurate, in fact i'm not working in the model these days... at this moment i'm a bit depressed, last sunday i fell off my ebike and my left knee is in bad condition 😔, at least i can work from home, but the knee it's a torture.. well i think in some days i'll be better i'm seeing your advances in your Terror, well done! 🏅 regards, Quote Link to comment Share on other sites More sharing options...
ObviousNewbie Posted September 30, 2020 Share #29 Posted September 30, 2020 Hi Geowolf, sorry to hear about the knee, get well soon! Nice work on the ice-shocks, they were a challenge to get right, I know I had my fair share of problems with them. If it can help, I did most of my mast construction off-boat, rigging the blocks on the yardarms, attaching them to the masts, and only then did I mount them on the ship itself. I thought this would give me more control of the alignment between the mast elements, it also gave me a crash course in detailed rigging, something I put to good use afterwards 🙂 Anyway, just my two cents, again, I'm only starting, so take anything I say with a pinch of salt... Geowolf 1 Quote "Whatever does not kill you, only makes you stranger." Current build: Finished builds:Calella by Occre - Greek Bireme by Amati - HMS Terror by Occre - Frigate Diana by Occre Link to comment Share on other sites More sharing options...
clearway Posted September 30, 2020 Share #30 Posted September 30, 2020 ouch bad news with the knee having had problems now and again with my own i know the pain! get better soon and ty for the compliment. Keith Geowolf 1 Quote Link to comment Share on other sites More sharing options...

Recommended Posts
Join the conversation
You can post now and register later. If you have an account, sign in now to post with your account.