KeithAug Posted October 7, 2021 Share #31 Posted October 7, 2021 The sweep of the hull is very attractive. Nice job so far. Quote Keith Current Build:- Cangarda (Steam Yacht) - Scale 1:24 Previous Builds:- Schooner Germania (Nova) - Scale 1:36 https://modelshipworld.com/topic/19848-schooner-germania-nova-by-keithaug-scale-136-1908-2011/ Schooner Altair by KeithAug - Scale 1:32 - 1931 http://modelshipworld.com/index.php/topic/12515-schooner-altair-by-keithaug-scale-132-1931/?p=378702 J Class Endeavour by KeithAug - Amati - Scale 1:35 - 1989 after restoration. http://modelshipworld.com/index.php/topic/10752-j-class-endeavour-by-keithaug-amati-scale-135-1989-after-restoration/?p=325029 Other Topics Nautical Adventures http://modelshipworld.com/index.php/topic/13727-nautical-adventures/?p=422846 Link to comment Share on other sites More sharing options...
jlefever Posted February 8, 2022 Author Share #32 Posted February 8, 2022 It's been a while since I posted progress on my Dove. In reality, up to now the posts have largely been a summary of the steps taken long ago with the principal effort being to sort and edit my images and write a bit of text to go with them. Progress on the Dove has always been a bit intermittent but hasn't stopped. I'm not approaching a convergence between modeling and writing. At any rate, thank you for your patience. Paint – A Splash of Color Above the “copper line” and below the rail cap, the hull and railing were painted black. The Bead running along the planksheer was gold and the rail cap was “bright” wood. Figure 15‑2 - Paint on the solid hull model At appropriate moments during construction, I have painted the insides of the railings, cabin and hatches white. I’ve assumed the trim at the bow also included gold highlights. On my model, yellow paint is used in place of gold, brown paint takes the place of the “bright wood”. I believe these solid colors present better on the model than real gold and stained wood. Finishes that can draw the eye and fight the scale effect. Two enlarged views follow. Figure 15‑3 - Paint at the Stern I see that I’ve missed a splash of paint on the horse beam. I hope to not forget this discovery and pick it up later. Figure 15‑4 - Enlarged view of the Bow So far, despite the fits and starts, this has been a fun project. I hope my enjoyment comes through and you readers take something from these postings. KeithAug, ccoyle, bruce d and 2 others 5 Quote My Current Project is the Pinky Schooner Dove Found here: Dove Build Log Previously built schooners: Benjamin Latham Latham's Seine Boat Prince de Neufchatel Link to comment Share on other sites More sharing options...
Wintergreen Posted February 8, 2022 Share #33 Posted February 8, 2022 I think you are doing a sensible choice in painting instead of stain. Also replace the gold for yellow works well. The scale effect speaks in favour for painting on your little build. And yes, a big post-it: "Note to self - paint beam!" 😄 Quote Happy modelling! Håkan __________________________________________ Current build: Atlantica by Wintergreen Previous builds Kågen by Wintergreen Regina by Wintergreen Sea of Galilee boat, first century, sort of... Billing Boats Wasa Gallery: Kågen (Cog, kaeg) by Wintergreen - 1:30, Billing Boats Regina - 1:30, Billing Boats Dana, Link to comment Share on other sites More sharing options...
KeithAug Posted February 9, 2022 Share #34 Posted February 9, 2022 She has quite an attractive rear, do you know if it severed a particular purpose? Quote Keith Current Build:- Cangarda (Steam Yacht) - Scale 1:24 Previous Builds:- Schooner Germania (Nova) - Scale 1:36 https://modelshipworld.com/topic/19848-schooner-germania-nova-by-keithaug-scale-136-1908-2011/ Schooner Altair by KeithAug - Scale 1:32 - 1931 http://modelshipworld.com/index.php/topic/12515-schooner-altair-by-keithaug-scale-132-1931/?p=378702 J Class Endeavour by KeithAug - Amati - Scale 1:35 - 1989 after restoration. http://modelshipworld.com/index.php/topic/10752-j-class-endeavour-by-keithaug-amati-scale-135-1989-after-restoration/?p=325029 Other Topics Nautical Adventures http://modelshipworld.com/index.php/topic/13727-nautical-adventures/?p=422846 Link to comment Share on other sites More sharing options...
jlefever Posted February 10, 2022 Author Share #35 Posted February 10, 2022 Håkan - Thanks for the positive feedback... but I don't know what to stick the Post-it on. In any case I'll have the painter pick up the omission shortly and will post an amended image. Keith - The back end was a form common to most of the New England / Canadian pinkies of the time. I suspect it was largely a style but the round hole (in my case a little too big and too far forward) served as a "seat of ease" and the notch in the transom/tombstone piece served as a boom crotch so it wasn't completely without purpose. Jim KeithAug and Wintergreen 2 Quote My Current Project is the Pinky Schooner Dove Found here: Dove Build Log Previously built schooners: Benjamin Latham Latham's Seine Boat Prince de Neufchatel Link to comment Share on other sites More sharing options...
jlefever Posted February 12, 2022 Author Share #36 Posted February 12, 2022 This week I'm looking at how I finished the bottom of the solid hull model. Copper bottom Most fishing schooners like the Dove would have a painted bottom, as near as I can tell including copper and a variety of toxic materials intended to protect the hull from worms and rot. This paint had a reddish-brown color. In my case I’ve made a bit of a leap of faith. The Chapelle drawings indicate a “copper line” and “Copper” in a couple locations. My assumption, either as a working pilot boat or later as a planned yacht, the Dove was intended to have an actual copper bottom. There’s a good chance that I’m wrong but I wanted to try a copper bottom so I did. After looking around at the various embossed commercial plate system and after seeing historic copper plated hull parts in museums that had been recovered in various archeologic excavations, I elected to use a copper foil without any representation of nails. I believe most modeled nails were too overstated. The simplest solution was the use of copper foil strips with pre-applied adhesive (Intended for the electronics industry). The roll I obtained from McMaster-Carr was ¼” wide and .03” thick (with adhesive.) It had a paper backing over the adhesive. My approach plan was to cut the foil into 1-inch long plates (scale 48” x 12” x 0.14”).These seemed reasonable close to the plates commonly used. In the industry. Figure 15‑5 - Copper Bottom, Bow Quarter I found it a bit ticklish peeling the backing of the individual plates but other than that the process of applying them to the Dove’s hull was pretty uneventful. Working from the keel up and from the stern to stem and overlapping the plates a tiny fraction as I went the plating followed the lines of the hull without too much drama. I finished up with two bands of plated following the water line avoiding making many diagonal cuts. This seems to be the method often used in reality. The plates were shingled fore to aft and top to bottom, respecting the movement of the hull through the water. In keeping with this idea, the plates on the stem post and keel overlapped the hull plates and the plates on the stern post were overlapped by the hull plates. Figure 15‑6 - Copper Bottom, Stern Quarter The finished product was pretty shiny, and the plates have proven to be somewhat given to peeling at the overlaps but generally I like the look. My plan is to allow the plates to naturally weather a bit, to lose a bit of shine and achieve a dull copper patina (brown, not green), then to apply a clear coat to freeze the look and minimize the tendency to peel. A word of caution. Copper, especially this thin, is quite soft. It’s easy to mar the surface even with fairly careful handling. I figure a working boat gets dinged about. If it gets too bad, I can peel off selected plates and patch. Figure 15‑7 - Stern So that's this my report for this week. I always appreciate comments and suggestions. Jim GrandpaPhil, Wintergreen, DanB and 1 other 4 Quote My Current Project is the Pinky Schooner Dove Found here: Dove Build Log Previously built schooners: Benjamin Latham Latham's Seine Boat Prince de Neufchatel Link to comment Share on other sites More sharing options...
Wintergreen Posted February 12, 2022 Share #37 Posted February 12, 2022 The last photo is really nice. Your plating turned out very well and I also liked that you omitted nail patterns. They often take over otherwise nice plated hulls. Probably the best way to mimic nails would be to use a fine tipped marker and just do a dotted line. But not on your lovely little ship though. It is good as it is. Keep it up! bruce d 1 Quote Happy modelling! Håkan __________________________________________ Current build: Atlantica by Wintergreen Previous builds Kågen by Wintergreen Regina by Wintergreen Sea of Galilee boat, first century, sort of... Billing Boats Wasa Gallery: Kågen (Cog, kaeg) by Wintergreen - 1:30, Billing Boats Regina - 1:30, Billing Boats Dana, Link to comment Share on other sites More sharing options...
allanyed Posted February 14, 2022 Share #38 Posted February 14, 2022 On 2/11/2022 at 9:39 PM, jlefever said: After looking around at the various embossed commercial plate system and after seeing historic copper plated hull parts in museums that had been recovered in various archeologic excavations, I elected to use a copper foil without any representation of nails. I believe most modeled nails were too overstated. Jim, Your comments on the copper sheathing were music to my ears!!! For the life of me I cannot understand why there is not one kit maker that supplies accurate looking sheathing material, especially the representation of the nails, which would not even be visible on the smaller scales such as 1:72 or 1:98 You were kind to use the word overstated. I was thinking something a bit more intense. Allan bruce d 1 Quote PLEASE take 30 SECONDS and sign up for the epic Nelson/Trafalgar project if you would like to see it made into a TV series. Click on http://trafalgar.tv There is no cost other than the 30 seconds of your time. THANK YOU Link to comment Share on other sites More sharing options...
Mirabell61 Posted February 19, 2022 Share #39 Posted February 19, 2022 Beautiful work Jim, I very much like the Pinky.... Nils Quote Current builds -Lightship Elbe 1 Completed - Steamship Ergenstrasse ex Laker Corsicana 1918- scale 1:87 scratchbuild - "Zeesboot" heritage wooden fishing small craft around 1870, POB clinker scratch build scale 1:24 - Pilot Schooner # 5 ELBE ex Wanderbird, scale 1:50 scratchbuild - Mississippi Sterwheelsteamer built as christmapresent for grandson modified kit build - Chebec "Eagle of Algier" 1753--scale 1:48-POB-(scratchbuild) "SS Kaiser Wilhelm der Grosse" four stacker passenger liner of 1897, blue ribbond awarded, 1:144 (scratchbuild) "HMS Pegasus" , 16 gun sloop, Swan-Class 1776-1777 scale 1:64 from Amati plan -"Pamir" 4-mast barque, P-liner, 1:96 (scratchbuild) -"Gorch Fock 2" German Navy cadet training 3-mast barque, 1:95 (scratchbuild) "Heinrich Kayser" heritage Merchant Steamship, 1:96 (scratchbuild) original was my grandfathers ship -"Bohuslän" , heritage ,live Swedish museum passenger steamer (Billings kit), 1:50 "Lorbas", river tug, steam driven for RC, fictive design (scratchbuild), scale appr. 1:32 under restoration / restoration finished "Hjejlen" steam paddlewheeler, 1861, Billings Boats rare old kit, scale 1:50 Link to comment Share on other sites More sharing options...
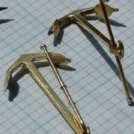
jlefever Posted May 7, 2022 Author Share #40 Posted May 7, 2022 The following is a Quick report on metal work for the Dove as she sits today. As you may see, while I continue to fight with soldering technique, my product has continued to improve. Chain plates and deadeyes The chain plates are made up from 1/16” (0.060” x 0.015”) brass strips formed into a loop to receive a 0.025” brass hinge pin at one end and drilled to simulate bolt holes along the length where fixed to the hull. The chain plates are approximately ½” long. The deadeyes were turned off the end of a 1/8” birch dowel and hand drilled in the traditional three-hole pattern. Figure 16‑9 - Chain Plate Assembly Line The remaining hardware (strap and hinge pin) was formed from fine brass rod. Here are the first 6. Eight will be needed for each schooner. I think of the oversized hinge pin as representing the bolt heads on either side of a finer pin. The pin is soldered to the strap, although just as often it’s also soldered to the chainplate. Chocks (Fairleads) Figure 16‑10 - Modeling Chocks To make the eight chocks I’ll need for my two models, I form a loop of 1/16” (0.065 x 0.015”) brass strip, crush it into an elliptic form and solder it onto a similar size brass strap. Excess solder is allowed to collect between the strap and the loop forming the fillet that gives the part a more realistic shape. Then each chock is cleaned up, sculpted with fine files and painted. The black paint covers a variety of sins. The finished parts are approximately ¼” long and, I think, look pretty close to the part sitting on the railing. Figure 16‑11 - Bow Chocks, sitting in Place In this image you can also see the brass strip representing the Gammon Iron near the pencil point. Anchors Despite its fishing boat heritage, I decided the Dove would look best with iron stock anchors rather than the oversized wood stocked hooks often seen abord fishermen. Figure 16‑12 - Making up anchors from brass rod. To model Anchors, I started with the plans found in American Fishing Schooners which were redrafted in CAD and scaled to a more appropriate size for the Dove. I cut out the printed images and glued them to brass stock to guide the shaping process. The hooks are cut from ½” Brass stock 1/16” thick, while the shanks are made from ¼” x 1/16” stock. The flukes were cut from 0.015” sheet sock while the iron stock was fashioned from 0.045” diameter brass rod and the ring from 0.032” rod. The major parts were rough cut from the stock using a handheld jig saw and a rotary tool with a grit cut off wheel (goggles definitely being a good idea). The rough parts were hand finished with a variety of mini files and abrasive cloth. I soldered the parts together using positioning jigs and low temperature electronics solder. Various loops of fine brass wire were added to the stock to simulate the ball on the crooked end, the mid stock flange and the nut on the straight end. Again, I used small files to clean up the work and give some shape to the various elements. Figure 16‑13 - Anchor Parts and Assembly Options While the low temperature solder is not especially strong, I believe it will be strong enough to withstand any storm into which these hooks will be dropped. I painted the finished anchors black, noting as I did that the dark color did in fact cause them to look slenderer than the unpainted brass. Figure 16‑14 - Painted Anchors Iron Wyes At the tip of the bowsprit is an iron fitting to which the various stays and guys that come together there are attached. The fitting takes the form of an iron ring to which four eyes are welded. The piece would be pretty tiny but also prominent and it felt like it would make a fun modeling project. Figure 16‑15 - Step by Step Modeling a Wye I started this mini project with a piece of 0.095” diameter brass tubing. Fine as the tube walls were they still seemed too thick and didn’t in any case fit over the ends of the sprit. I used a fine diamond bit in a rotary hobby tool to ream out the inside diameter. The ear like eyes attached top and bottom and to both sides were formed from my favorite 0.065” x 0.016” brass strip. I drilled a fine hole in the strip then one quadrant at a time soldered the end of the strip. Typically, the solder filled my little hole but drilling the solder out of the brass was easier than drilling the brass would have been. Each tab was cut of to the desired length and shaped with fine files. The biggest trick was working quickly enough to not melt off one tab while attaching the next. Figure 16‑16 - Wyes Finished and In Place In the end this is a tiny project that many will not notice but I get a lot of satisfaction when its installed and looks fairly close to right. Hopefully it won't be so long before I have more to post. Regards Jim Wintergreen and GrandpaPhil 2 Quote My Current Project is the Pinky Schooner Dove Found here: Dove Build Log Previously built schooners: Benjamin Latham Latham's Seine Boat Prince de Neufchatel Link to comment Share on other sites More sharing options...
Dr PR Posted May 7, 2022 Share #41 Posted May 7, 2022 Jim, The model is looking good! I would say your soldering technique is also pretty good. One trick I have learned is to use a brass or steel wire brush in a motor tool to polish the soldered joints. It makes a much shinier finish than I get with files. But you need to be careful, especially with the steel wire brushes. They can remove a lot of solder quickly if you use too much pressure. In fact, I use this technique to remove excess solder to get nice clean joints. Another trick I have used for decades to fashion things like your wyes is to cut a narrow strip of brass and fold it to make an ear. Then I clamp the ear in pliers and open the strip so I have an ear at right angles to the rest of the strip. After adding solder to the ear to prevent the sides from spreading I wrap the strip around the spar to the next point I need an ear and repeat the process. For the last ear I just bend the strap so both ends come together and solder them. Then I cut them off to the right length for the final ear. It takes a bit of practice to get the ears to come out at the right angles, but the resulting part is very strong. You can practice with a strip of paper to get the dimensions right. Finally I drill out the holes in the ears and shape them with a file. Here is a simple example at the bottom of the dolphin striker. GrandpaPhil 1 Quote Phil Current build: https://modelshipworld.com/index.php?/topic/19611-albatros-by-dr-pr-mantua-scale-140-about-1815/&tab=comments#comment-601276 Previous build: https://modelshipworld.com/index.php?/topic/19321-uss-oklahoma-city-clg-5-1971-3d-cad-model/ Link to comment Share on other sites More sharing options...
jlefever Posted May 11, 2022 Author Share #42 Posted May 11, 2022 Phil, Thank you for your comments and suggestions. I’ve taken a few minutes to review your log and find a lot to recommend your Albatross project. The work is crisp neat and interesting. Clearly you think about what the model represents and the techniques best used to depict it. There is an interesting contrast between our two small ships, each a North American schooner created less that one hundred years apart. Your model represents a type without representing a specific vessel. Mine a very specific vessel. Yours an assembly of various components which might have occurred on a single vessel, mine a boat from fairly complete plans (with some gaps). Both I think worthy projects. At approximately 16” overall and at 1:48 scale the Dove is both a smaller vessel and smaller model than your project. Her rig is also simpler and more modern than yours. Still, we are both attacking similar projects so it’s interesting to note both the similarities and the differences in our approaches. I think an important part of my approach has been to experiment with techniques. That’s in part why you see me making two models using different methods and presentations. It’s also why if I’ve done it one way before, this time I’m apt to try another. Re. the brass work, yours, like your model is crisp and neat. The technique you recommend for modeling a wye is a fine method. In fact, it is pretty much the method I used to fabricate the sprit wye and mast bands for my Benjamin Latham model. For my Dove model, the wye was based on my desire to model a piece representing a cast or forged fitting. As tiny as the piece is (1/16” x 3/16”) it was intended to look as if it were a single piece of metal. Maybe I was successful, maybe I wasn’t. I certainly don’t argue that it’s the easiest way to make the part. So, thanks for taking the time to review my project and for your suggestions, some of which will undoubtedly find their way into my work. Jim Quote My Current Project is the Pinky Schooner Dove Found here: Dove Build Log Previously built schooners: Benjamin Latham Latham's Seine Boat Prince de Neufchatel Link to comment Share on other sites More sharing options...
Dr PR Posted May 11, 2022 Share #43 Posted May 11, 2022 (edited) Jim, The two vessels do make for some interesting comparisons. The pinky schooners were a later step in the evolution of the schooner from the period I am modeling. You are right that my build is not an accurate model of a real vessel, and it is something of a hodge podge of fittings and deck furniture from the early 1800s. For me it is a learning experience, and learning new things is one of my favorite things. Edited May 11, 2022 by Dr PR jlefever 1 Quote Phil Current build: https://modelshipworld.com/index.php?/topic/19611-albatros-by-dr-pr-mantua-scale-140-about-1815/&tab=comments#comment-601276 Previous build: https://modelshipworld.com/index.php?/topic/19321-uss-oklahoma-city-clg-5-1971-3d-cad-model/ Link to comment Share on other sites More sharing options...

Recommended Posts
Join the conversation
You can post now and register later. If you have an account, sign in now to post with your account.