MORE HANDBOOKS ARE ON THEIR WAY! We will let you know when they get here.
×


Cap'n Rat Fink
-
Posts
829 -
Joined
Content Type
Profiles
Forums
Gallery
Events
Everything posted by Cap'n Rat Fink
-
Mark is giving good advice Pete. I scratch built a crabbing skiff and used water/white glue mix. it worked well. to also stop the fraying you can use two way tape along the perimeter which works well. heres a picture of my KRUSTY CRABB
-
 I agree with Mark. John maybe you should put sails, they will work double duty. Look good on the boat and keep the dust off the stag. As for your missing items, you better keep your stag close, at 1/96 they going slip that boat in their back pocket and run............haha!
 -
Dee Dee, is the rudder your looking for?

-
Hi Dee Dee, If I remember right these Smacks now are mostly used as Friendship Sloops. If you goggle it you will find a lot of info the Smacks..... have fun
-
Thank You Druxey and Jim, Nice of you guys to stop by. Hope to show all the frames raised by end of the week, if things go well. I thought I would of had a harder time with, but through the process so far. I have screwed up 2 floors 1 1st futtock 2 toptimbers, and a bunch of chocks.....
-
Just beautiful modeling skills you show there Buck. Nice finish on the boat. Your axe looks real good. It's coming along nicely. Have FUN!!!
-
Hi Keith, A combo of basswood and american mohagony, then finished with min wax sanding sealer. I hope this helps you out Keith Have Fun!!!
-
Looking real nice Dee Dee. This is one fun boat to build. Using Chapelles book for these work boats really helps out a lot. take care
-
Hi Bob, You have good start on your Lobster Smack. This is a very nice kit to have a lot of fun with. I still have several Midwest Kits I want to tinker with. I will watch your progress with great pleasure. I built mine with a day sailer in mind. My lobster wells are for beer and food....HAHA! Take care and have fun Mario(teleman)
-
Well here are the last photos of the build. I will now add a few in the complete forum..... Back to top
- 25 replies
-
- 7
-

-
- chesapeak bay flattie
- Midwest Products
- (and 1 more)
-
and a few more.................. Back to top
- 25 replies
-
- 2
-
-
- chesapeak bay flattie
- Midwest Products
- (and 1 more)
-
and more photos of my completed Flattie
- 25 replies
-
- 2
-
-
- chesapeak bay flattie
- Midwest Products
- (and 1 more)
-
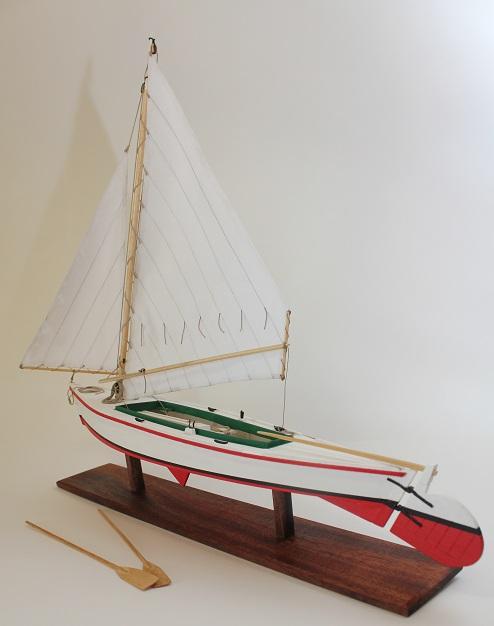
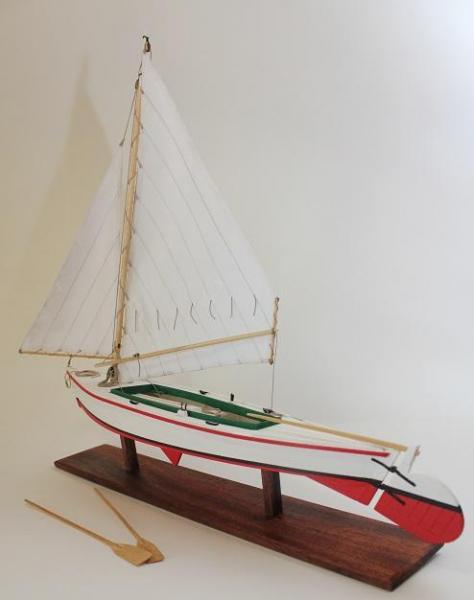
Hi guys, Oh yes i have been away. First a lot of OT at work, which has not change and will start up again tomorrow. Second trying to catch up with house chores. But first thing accomplished was take my lady to a movie and lunch. But I did have time to work on my models. My little Flattie is now completed. So i will be slowly adding pictures and catching up on my reading with all the build logs i am following here. So here are a few. Oh yea thanks Bob for your info. That is the only thing left to do the latch... LOTS N LOTS OF PICTURES!!!! Back to top
- 25 replies
-
- 1
-
-
- chesapeak bay flattie
- Midwest Products
- (and 1 more)
-
Now after completing the working companionway i was pretty much still not happy with the view of the inside. So here is what i did...Now I am happy after all the trouble to get the rope to look right. Now I can see it clearly.... now a little dinner and to bed, cause reporting to work at 230am stinks... Back to top
- 25 replies
-
- 2
-
-
- chesapeak bay flattie
- Midwest Products
- (and 1 more)
-
Well in this crazy world we live in. Were employers cut back employees and expect the few to do more then ever before.....All of a sudden I am working 12 to 14 hour days. So no time to mess with my models. Just no time. So since i finished the companionway I have a total of 19 photos and figured to thin the herd before i post the pictures, but just too plain tired! So here they are and I hope things will settle down soon so i can get back to my enjoyment... Back to top
- 25 replies
-
- 1
-
-
- chesapeak bay flattie
- Midwest Products
- (and 1 more)
-
Well another update on my Flattie.....any questions, remarks or advice is very much welcomed...
- 25 replies
-
- 1
-
-
- chesapeak bay flattie
- Midwest Products
- (and 1 more)
-
and a new update on my build of the flattie
- 25 replies
-
- 2
-
-
- chesapeak bay flattie
- Midwest Products
- (and 1 more)
-
and another installment of my progress. this one is slow going. because every piece plced needs to fit precisely since i am not going to be painting or staining....
- 25 replies
-
- 1
-
-
- chesapeak bay flattie
- Midwest Products
- (and 1 more)
-
a small update tonight..... a little update on the Flattie...
- 25 replies
-
- 1
-
-
- chesapeak bay flattie
- Midwest Products
- (and 1 more)
-
another update on my Flattie bashing using Chapelle's book... I used the plans to kinda get a guess-timet on how much of the center board went under the fore deck and how much went into the cabin. that way i could come up with a close guess has to the size of the center board trunk...
- 25 replies
-
- 1
-
-
- chesapeak bay flattie
- Midwest Products
- (and 1 more)
-
and now for the hard part. making sure all joints come together tightly. because i can not use putty and paint...remarks n questions very much welcomed...
- 25 replies
-
- 2
-
-
- chesapeak bay flattie
- Midwest Products
- (and 1 more)
-
where i am at at this moment...take care
-
ooooops for got the pic's here they are........ SO HERE IS ANOTHER PROGRESS UPDATE!!!!
- 25 replies
-
- 2
-
-
- chesapeak bay flattie
- Midwest Products
- (and 1 more)
-
Hi All, Just thought I would add back my Flattie build log that was lost from 1.0.......... Hello Friends, Another project of mind will be the Flattie from Midwest. I will be doing a little bashing. But mainly I will be going the INTARSIA(painting with wood) route. I thought I wood push myself by painting with wood. That means to me that I must be very critical with all wood seams and glueing applications. It must be a clean joint and no glue being exposed or I will fail with the Intarsia method. I decided upon this project for future projects of more difficulty to improve my model building novice skills to a level of clean and crisp joints and assemply. So I will be updating this thread very soon.... woods that will be used.... HOLLY, SWISS PEAR, BOXWOOD My plan is the flooring inside and out will be boxwood... decking will be boxwood... the white painted hull will be painted with holly... scubbers, rub rail, hatch, cleats, mast collar, trim around the cabin will be swiss pear... i have decided to show off the cabin. So i will be building a centerboard trunk out of holly and boxwood..cabin benches will be boxwood with a little trim of swiss pear....should make for a nice look... mast...boxwood i think the blocks will be swiss pear... looking into adding a bowsprit which will be boxwood... I will be looking real hard at Chapelle' book "American Small Sailing Craft" Well I have a little update. I am trying to explain my progress with remarks on the pictures themselves. but please if you have any remarks or questions are welcome....
- 25 replies
-
- 2
-
-
- chesapeak bay flattie
- Midwest Products
- (and 1 more)