


jonny.amy
-
Posts
346 -
Joined
-
Last visited
Content Type
Profiles
Forums
Gallery
Events
Posts posted by jonny.amy
-
-
Hi All,
Just a quick update....
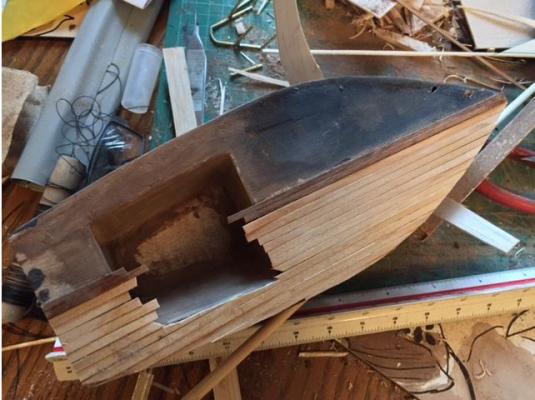
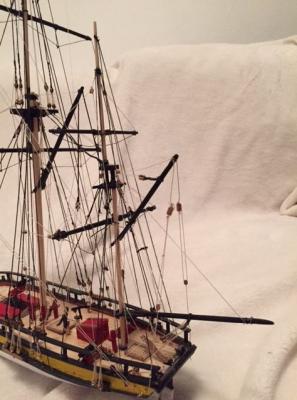
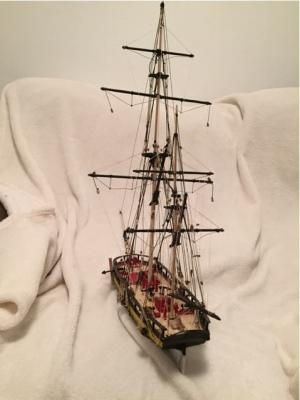
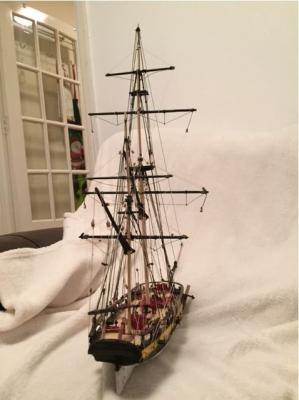
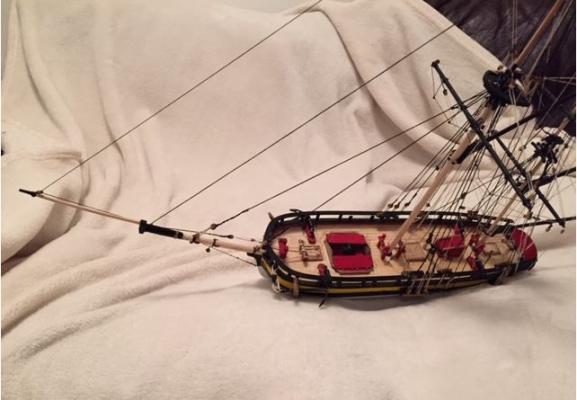
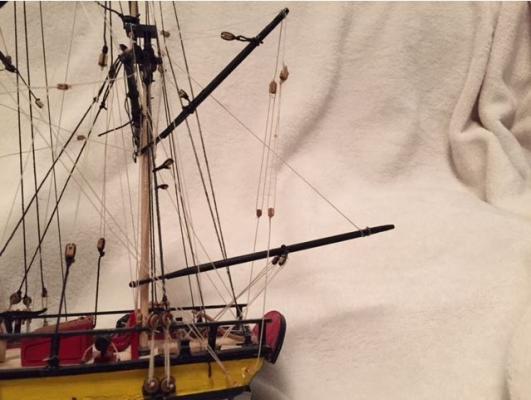
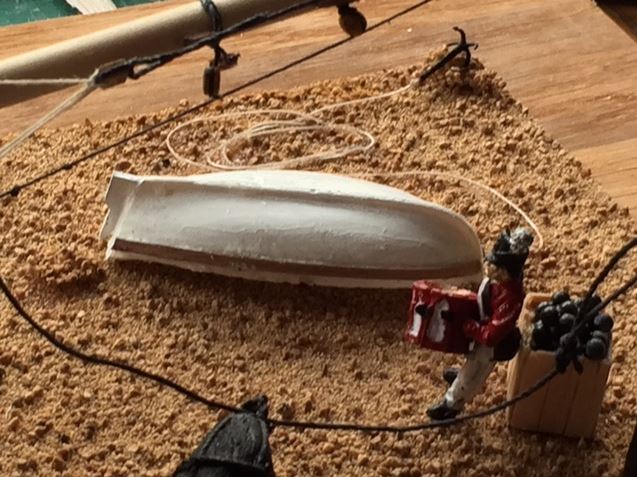
I started deck planking last night, and faired the hull a bit more with some brown wood putty. The deck needs a bit of sanding to make it look pretty, but I'm half way through the deck planking, so that will be done after I've finished.
I also soldered the pushpit for the bow last night. I've not soldered properly for about 10 years, so I've done the best I can with the brass tube and solder, but I'm not entirely pleased with the end result!
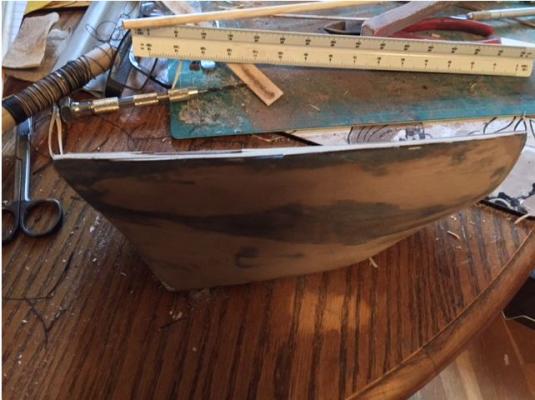
The photo's show the hull shape and the relatively shallow draught of the yacht.

Cheers,
Jonny
- egkb, michael mott, hexnut and 2 others
-
 5
5
-
-
I will do mate, I've started a quick log in the Scratch Build area....
I was meant to get some photo's last night, but we went out for dinner in town and didn't get back til late, so I'll post a few photo's up later when I'm home from work.
I'm not far off finishing the rat lines on Convulsion, I've got a few bits to tidy up after that, so I've taken on this build to break up the mind numbing process of rat line tying!
Cheers
Jonny
-
Hi All,
Things have been a bit quiet in the shipyard over the last couple of days, it's been busy at work, and I've started an interim scratch built project whilst doing the ratlines on Convulsion. I'm putting together a small Edwin Monk designed Sloop for my dear old mother! She wants something to put on her mantle piece, so I thought I'd knock up the 19 footer Vagabond for her, as it is of simple design and construction, and can be rigged with relative ease. Fingers crossed, it will be a joint effort from the Admiral as well, as I am terrible at sewing by hand! And I think the sailmakers sewing machine in my Dad's garage is probably too big for this model.
More updates on Convulsion will be coming soon!
Cheers,
Jonny
-
Kees,
The tight time schedule is due to the fact my mum is away on holiday for 2 weeks in Mid April, and I'm due to be spending a "few weeks" away with work to fix a few problems. Whether or not I will be going away with work, I want to be clear of this build by then as I'd like to start my Caldercraft/Jokita Sherbourne build. I work in the Oil & Gas Design Industry, and a present it is fairly volitile (redundandcies left, right and centre), so I may or may not be heading up to a site on the North East Coast of the UK (depends if our Client is willing to splash the cash).
I have enjoyed this build so far, and I certainly don't want to rush it, but I'm a bit up in the air with my whole whereabouts at the moment.
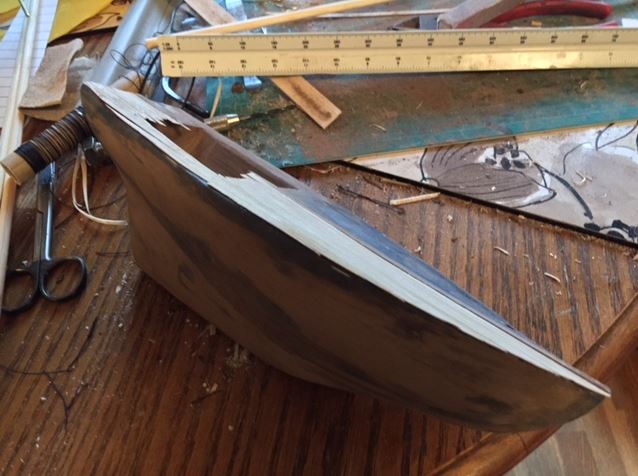
Anyway, I spent my evening sanding down the hull last night, taking off the layer of filler I added to the yacht to fair the hull. I then gave the hull a quick coat of Aegean Blue (the chosen colour for the topsides). Having given that 24 hours to dry, I'll give that a quick once over with the sanding block and clean the hull over with a damp cloth.
I'll build the pilot house and cockpit coamings tonight before deck planking.
Cheers
Jonny
-
Hi Patrick,
Thanks, I decided on Vagabond because of her beauty! I'll look for Pete48's build, and see if I can use his model as a bench mark.
I think mid April is a bit of tight time scale for the build, but I'm up for the challenge! I'll be sanding the hull down tonight, and I might start the deck structure and coamings tonight. I'll swing via my local DIY store tonight and buy the necessary parts to finish off the model, like the brass rod for the pushpits, and spray paint for the hull.
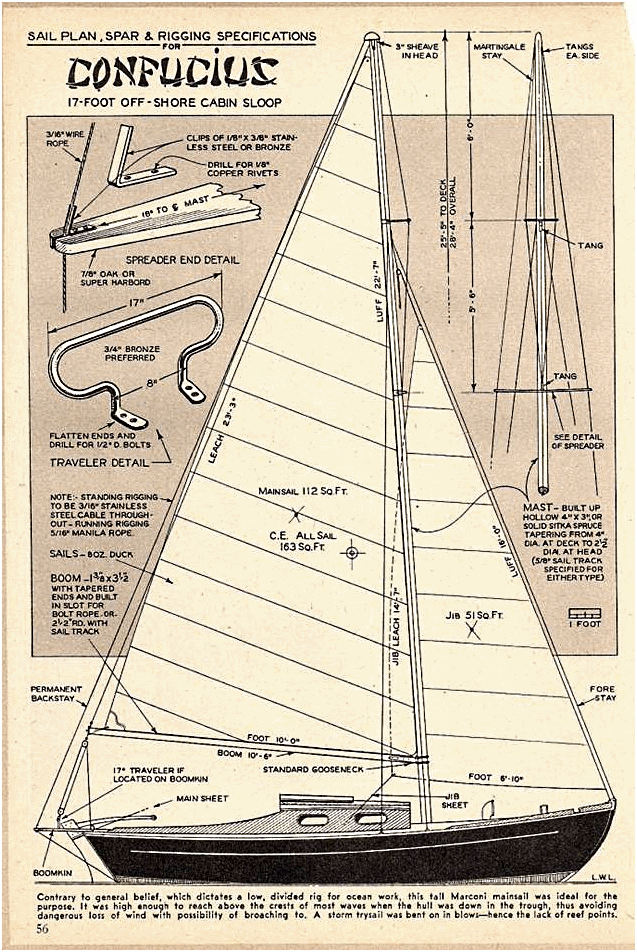
We have a four day weekend coming up, so I'll hopefully make some headway over the next few days. I really like the colours of Confucius, i.e. dark topsides, and white waterline. A real classic look. I'll get some photo's tonight of the work I've done so far.
Cheers
Jonny
- Omega1234 and qwerty2008
-
2
-
Hi All,
I've found some photo's of a similar yacht called "Confucius" which seems to be designed with a smooth hull profile, as apposed to the hard chines on Vagabond.
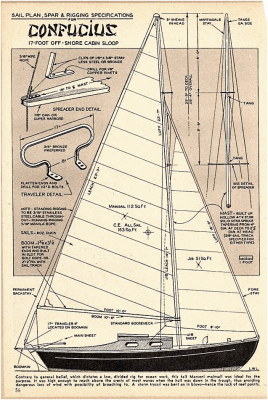
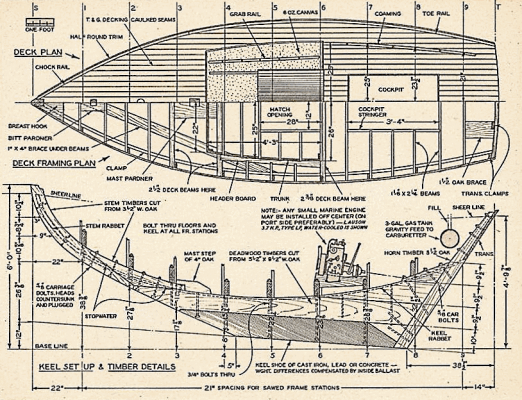
I have also found half of the study I have been working with online. I hope this gives you all a clear indication of my build.
Cheers,
Jonny
- egkb, mtaylor, qwerty2008 and 3 others
-
6
-
Hi All,
This is my first Scratch Build Log on MSW. I am currently in the closing stages of my Caldercraft/Jokita HM Mortar Vessel Convulsion build, and needed a break from the tiny bits of the build, so I started this build.
Background:
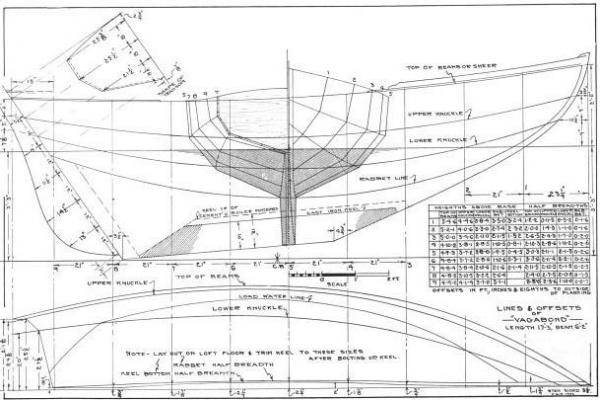
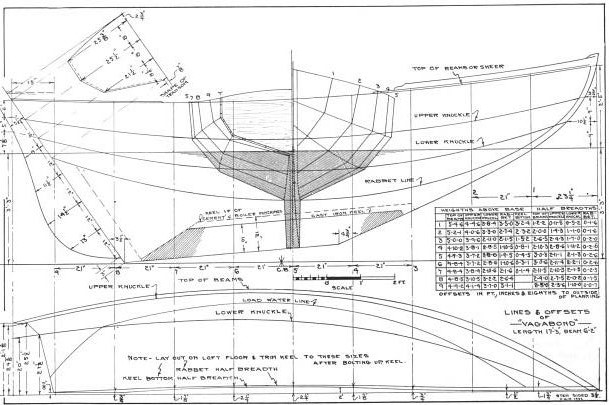
Since I was a kid, I've been building, modifying, tweeking, and sailing on sailing boats, from Optimist dinghies to large Swan 65's, but my real ambition in life is to build a sailing boat for myself. About 3 years ago I decided that I would build the Vagabond Keel Sloop designed by the Naval Architect Edwin Monk. Vagabond measures 19'-6" (6.00 metres), and the study plans were available in a book called "How to Build Wooden Boats - With 16 Small-Boat Designs", written by Edwin Monk.
The design is for a hard chine hull shape, making it easy to build for the novice boat builder, but my intention for my potential full scale build was to soften up the chines, and make her hull slightly easier on the eyes, and quicker on the water.
So why build this model? Firstly, it's is to see what the hull form looks like in reality. I can just about read hull drawings, and understand the sheer lines and profiles, but I'm not a boat builder or Naval Architect, so it's not as simple as reading the lines and putting two and two together.
Secondly, I spoke with my mother on Sunday night. She said she wanted me to build her a "little boat" that she "could put on her mantle piece". No matter how many times you say "I don't have the space for another model build", or "I don't have enough materials", you can not say "no" to your mother!
So I had a think, and thought about my aspirations with Vagabond a few years earlier, and decided to do it! I decided to build Vagabond as it seemed like an easy build, with a simple rig, and looks pretty! Meets all the criteria!
Build Process:
The plans are drawn (or have been redrawn) at a scale of 1:20, so I directly transferred the dimensions from the study plan to the model.
Having study plans readily available in the book, and having three strips of 1/8 inch Balsa (3mm Think), I started by tracing over the outline of the keel and main bulkheads, four in total, and doubled them up to make them 1/4 inch thick. Using some square stock balsa I had remaining from my Convulsion build, I used that to square up the bulkheads and attach the deck (1/8th Balsa) to the keel.
Because this boat is designed with fairly agressive chines (it was designed in the 50's or 60's, so the chines haven't been 'optimised' like modern day performance yachts), I rounded off the corners of the chines and using the study plans measured out the planks on both sides.
I ran the planks along the bulkheads and trimmed them to suit, pinning and gluing them down when happy. To give additional strength to the balsa, I squeezed a blob of PVA glue on to the planks, and ran it along all the seams between balsa planks.
After the PVA glue had 24 hours to dry, I covered the whole hull in wood filler, to smooth out any areas that may be dipping, and left out any raised areas.
I've not taken any photo's at this point as it is has been a "spur of the moment" build, it's only now that I've decided to start a build log.
Next Stage of Build:
So, my next objectives on the build are to sand the hull smooth, and then plank the hull with the remaining Walnut strips from my Convulsion and President builds. The waterline will be painted white, and the topsides either varnished or oiled. The cockpit and deck will be painted white, and the cockpit coamings and dog house will be planked in walnut as well.
I am employing my wonderful Admiral to make sails, as she is a wizard with the needle and thread! I will also build Pushpits and Pullpits from brass for the bow and stern. This is will be the first time I will have soldered brass since Secondary School, so I may be taking a few attempts with this aspect of the build.
I also have a fairly limited time scale to complete this build, as my mum wants the model before she goes away on holiday for a few weeks in the middle of April. I'm not sure if I can meet this deadline, but I certainly will try.
I will be posting photo's of the build soon.
Cheers,
Jonny
-
Ahhhh Jason I think you're right..... I've finished off the starboard main mast at the 1cm spacings, there's enough space to tie them at 5mm, but I think I'll have to compromise between having enough cord to continue, and being completely accurate.
None of the local model shops sell cord in the diameters used on the model. I'll have to order new stuff online.
-
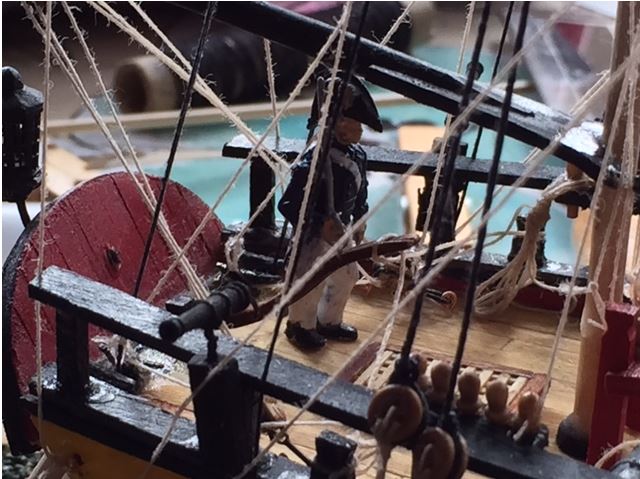
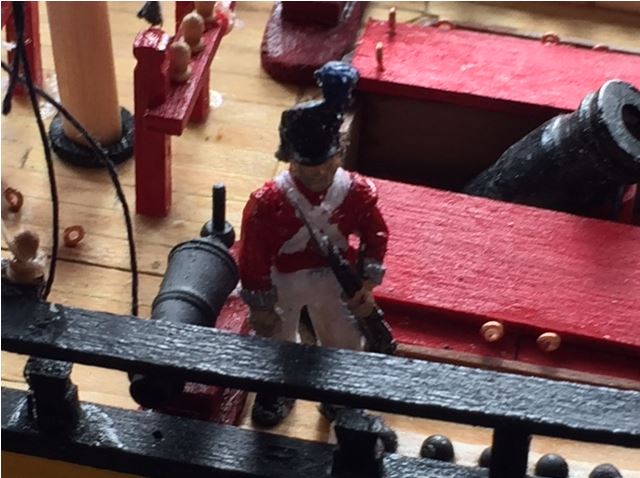
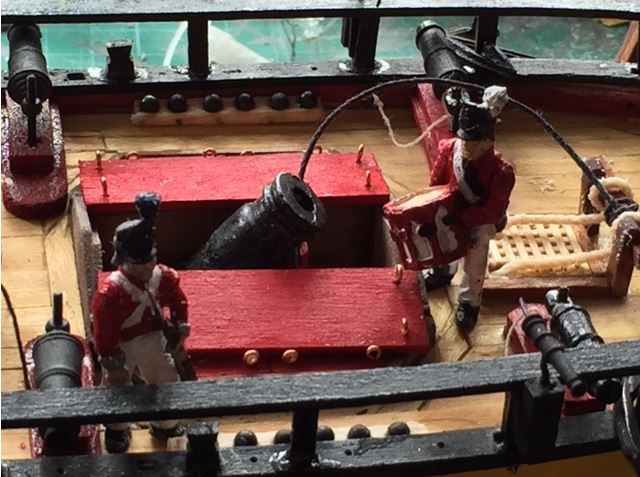
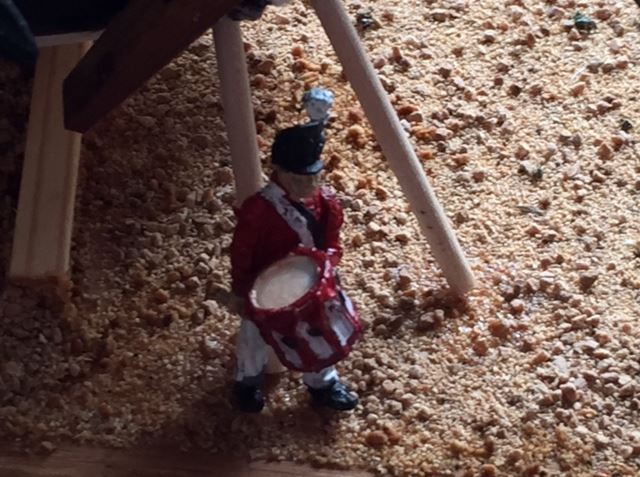
Heating and hot water now running smoothly! Had no space to work on the model, all the contents of the utility cupboard had to come in to the lounge/diner, so I popped out a bought some 1:64 scale Royal Marine figurines.
I'll treat myself to modifying them this weekend to look like naval personnel.
When the boiler repair men have gone, I've got to mop the floors where they've made some mess, then it's back on to rat line duty!
-
Morning All,
Today's the day I can have hot water and heating again! I'm really excited because I'm bloody cold!
I managed to get so rat lines on to Convulsion last night. I found some white card it the Admirals art box, and borrowed a sheet or two. I've put the rat lines at 10mm spacings. I managed to tie 8 rat lines in an hour.
I've now realised this is a task I should have done way before rigging the yards and gaffs, but I will solider on until the job is done!
Right I'm off for a cold shower!
Jonny
-
Provisionally, the boiler repairman will be rocking up at 9.00am. I'll assume he'll turn up earlier, as he's and independant contractor, and will probably want to squeeze in a job after us! Even so, he said it will be a 6 hour job, so I've got 6 hours of Convulsion time! Woohoo!
Cheers
Jonny
-
Morning All,
Last night I gave Convulsion a bit of attention whilst the Admiral went to visit her Grandmother at the hospital (She's still awaiting release from hospital, it's looking like a further 2 days at the pleasure of the NHS), and I managed to burn dinner in the process...
I added a few more timber support members for the scenic aspect of the build. I have tomorrow booked off from work so the boiler can be replaced, so I'll probably start tying ratlines with my time off. I must admit, this is not really how I wanted to use my annual leave, but if I'm house bound then I might as well do something productive.
Cheers
Jonny
-
Hi guys,
Progress on Convulsion has come to a complete standstill over the last few days, as the Admiral's Grandmother was admitted to hospital after a fall, and our combi-boiler (supplying heating and hot water) conked out on us.
So we're waiting on news from the hospital to see when she will be released (back in to wild?!), and waiting until Friday for the new boiler to be installed! Then the shipyard can open up again! The Admiral said she didn't want her workers freezing to death to complete the ship, so the project is on temporary hold until the heating can be restored!
On the to do list still are the ratlines, and finish off the Jolly Boat.
Cheers,
Jonny
-
Jonny
I received the all clear a few weeks ago re some health issues I was having and thought that I would get back into my convulsion build
but instead it seems that i had lost all motivation and interest in it. The kit has sat exactly as i had left it months ago, and until a few hours ago I thought it
likely that it would sit unfinished for evermore. HOWEVER for some reason or another i decided to catch up on your Convulsion build on MSW
and I am so impressed with your Convulsion build that I feel reinvigerated and now cant wait to get back at it. Thanks for the inspiration and congratulations for a great looking build.
cheers mate
Paul
Paul, I'm so pleased I've managed to inspire you to continue on with your build! That is great news, good luck with the rest of your build.
Cheers
Jonny
-
Jörgen, I'd suggest glueing the hem down on the cloth, and after the glue has dried, put the cloth in to hot water (for only a short amount of time) to loosen up the glue again and then stitch the sails if you want to. If not, just run the foot rope and bolt rope along the length of the cloth. It might be worth running the cloth through a sewing machine of you want the stitching to be consistent.
Cheers
Jonny
-
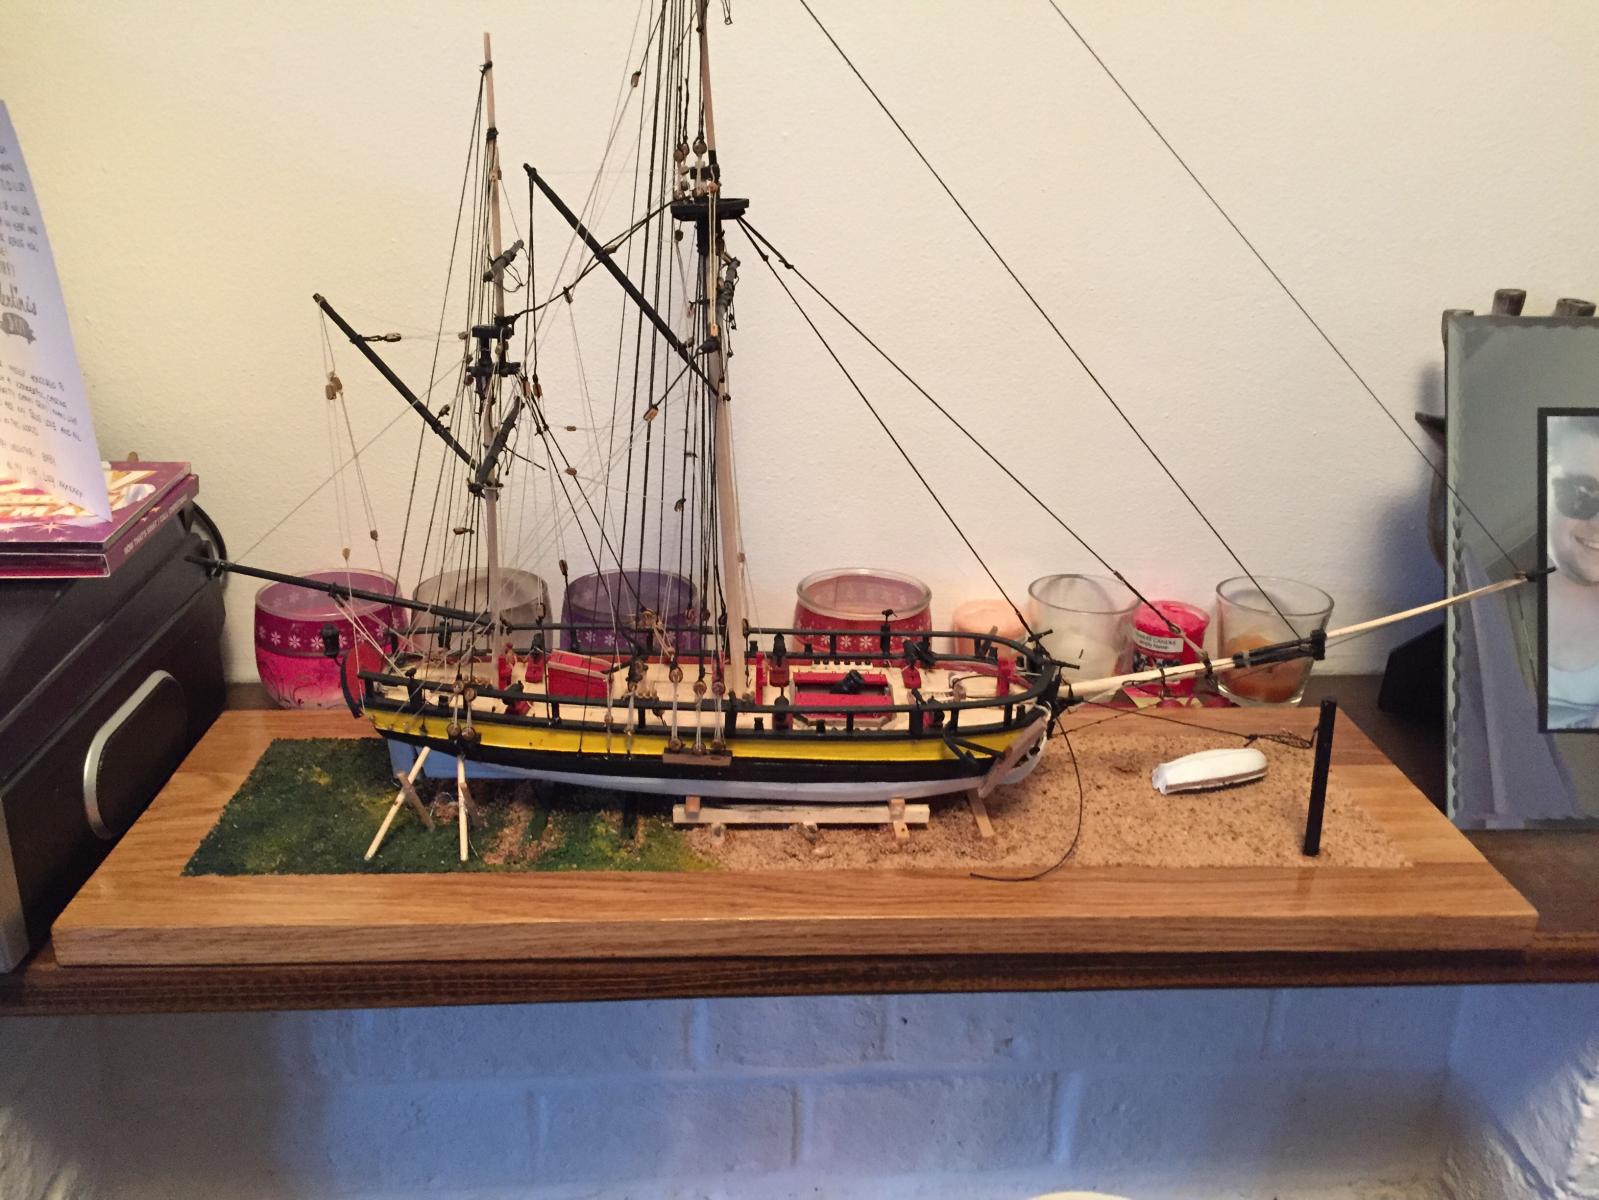
Cheers for the kind words guys! I must admit I wasn't too keen on having the model on the stand supplied with the kit, it did the job for the build and will come in handy for working on it still, but I thought I could present it in a better way.
The Admiral isn't too keen on it, but it's my build and my choice! I just think it looks a bit different.
The oak was a real find as I was looking for cabinet pieces, and I was racking my brains trying to figure out how I could do it cheap, so this solution works well for me.
Eamonn, I agree with you, the ballast is a bit hit and miss, a bit like Marmite! Personally I think it looks good, but I probably won't do it with Sherbourne. It's just too messy - I've been ordered by the Admiral to tidy up the whole house today to compensate for the mess I made with the ballast! Haha
Cheers
-
Jörgen,
My Great Grandfather used to be the Skipper of Velsheda, another famous J Class yacht, so it's always very interesting to see the models being brought to life here on this forum, and even greater to see them sailing in real life!
The sail cloth looks very heavy for the type of yacht it was, remember these yachts were the Grand Prix yachts of their time, so the lightest sail cloth available would have been used on the yachts. The sails were controlled in the same fashion as the pilot cutters and barges of the time, halyards, guys, and sheets belayed off to cleats on deck, running through wooden shelved blocks and hauled up or down by the 34 strong crew of professional yachtsman. I would suggest using a thinner gauge of canvas for Endeavour!
Cheers
Jonny
-
Hi guys,
Sorry for the late update on progress. It's bern a very busy week.
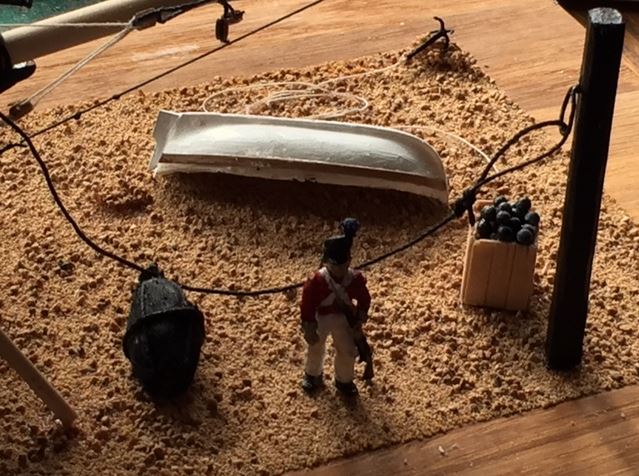
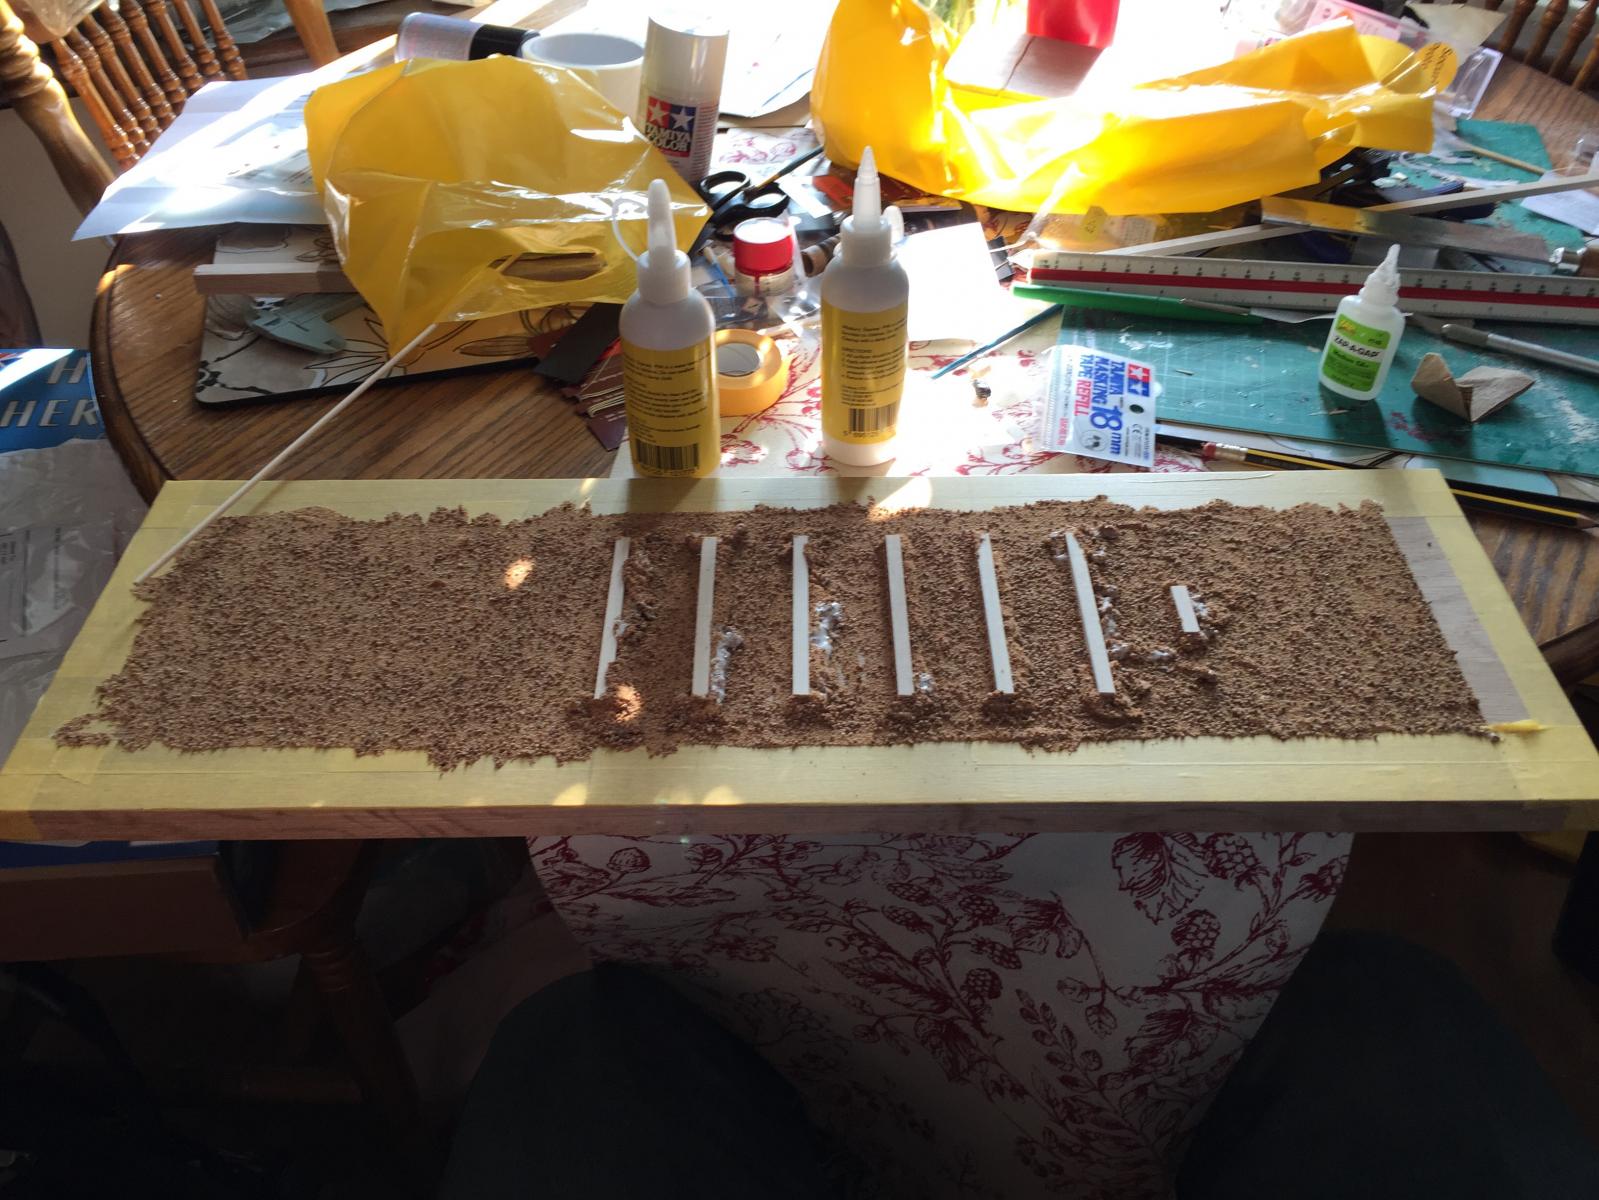
I discussed with the Admiral about building a display case for Convulsion, and after pricing it up, buying all the materials would be in excess of £150, so I decided that endeavour was a no go! So thinking on my feet in the DIY store yesterday I found a length of 25mm THK oak stair tread, with the ends squared off. They cut it in store to the 600mm length I required, and I paid £18 at the check out. I then swung via the local model shop, and bought model railway ballast in a sandy brown colour. Using my existing surplus of PVA glue, and masking tape, I masked out the area of oak around the edges of the board to make a 36mm wide boarder. Using the 6mm Square cut lime CMB sent through, I made a series of keel blocks to sit convulsion on to.

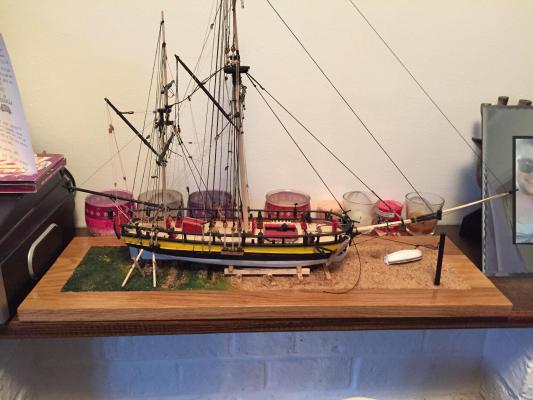
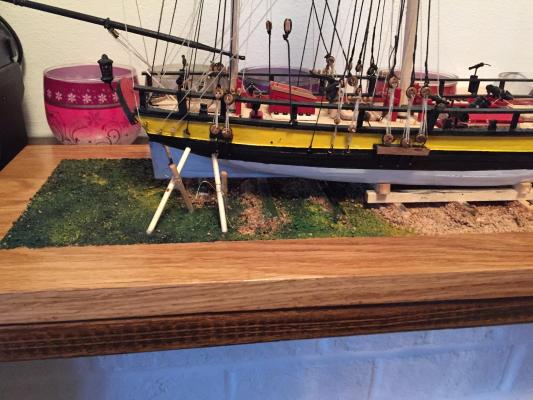
I'm having a bit of trouble uploading the rest of the photos, so I'll add more later on. But I think you get the idea of wher I'm coming from with my display board! I think it looks neat, slightly different to what everyone does. The great thing is that I now have a stretch of oak left big enough to show Sherbourne on as well.
Cheers
Jonny
- DavidM, egkb, Beef Wellington and 5 others
-
8
-
Jason / David / Eamonn - CMB are usually very helpful, in the past they've been on it straight away if theres's any issue with the order, and I can't fault them for that! But I was waiting a week for the Caldercraft parts to turn up, and I haven't even got the right parts, I'm not sending them back, I'm just using what I've got. But it's quite annoying.
Like Jason has said, I'm disappointed that my timber has not been delivered, it may not be their fault, it could be Royal Mail that's lost the items, but it's more faffing about to find the stuff! Next time, I'll UPS the delivery, at least I get a tracking number.
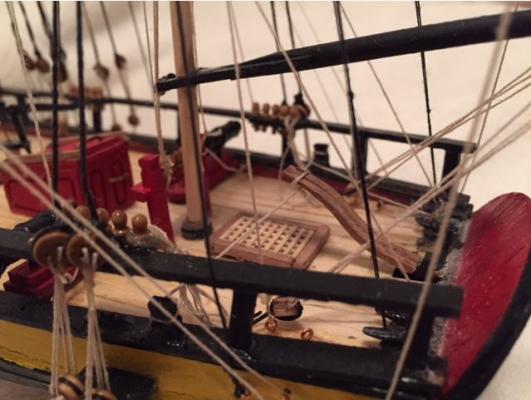
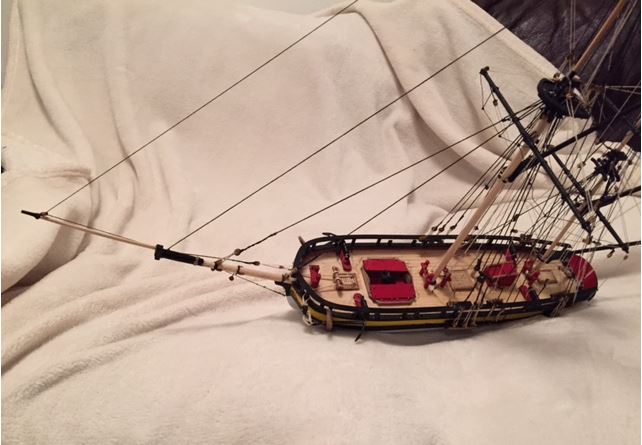
In other news, I've built up eight Swivel Guns, and placed them on the model, added the Stern light to the transom, and built gun carriages for the two 18 pounder carronades, they just need rigging up, but are in place. The construction of the Jolly Boat has been trickier than I thought, CA glue doesn't work on the resin, so I've used PVA wood glue for the cartridge paper ribs, and painted the hull with a coat of white. I hope to finish it off tonight. I have to add the stern sheets, and benches. The one thing I've noticed with the Jolly Boat is that the rudder when shipped is too short, so I've cut away some of the transom, and added a tiller to the rudder to make it more realistic.
I'll post some pictures later on tonight. By the way the Admiral is feeling better now and she's back to her usual self, moaning that I've taken up too much of the Dining Room table with my shipyard! Haha
Cheers
Jonny
-
Hi guys, small update.
Cornwall Model Boats have sent through my kit, but there are bits missing, primarily the lime strip and dowel. They've also sent through items that aren't what I ordered. For example 5 sets of swivel guns instead of 4 (not complaining), and just carronade barrels, not the kit including the truck.
So I've now got to send it all back to get my replacement parts, and the parts that have gone awol!
Has anybody else had an experience like this with CMB?
Cheers
-
David, thanks for the kind words. This has been very much a learning curve for me, as my first attempt on President was sullied by the lack of qaulity of the kit produced by Sergal / Mantura.
I'd like to say my speed of the build has been due to the fact the kit and instruction quality, all credit to Caldercraft & Jokita, is far superior than the Sergal / Mantura kits. With the lessons and mistakes I made on building President, and learning how to rectify them, has meant I have come in to this build with a slightly better understanding of how to throw these things together! You'll get there with Ballahoo, and the lessons you have learnt along the way with Ballahoo will be fresh in your mind! Before starting Convulsion I spent weeks or months trawling my way through MSW to gain tips and ideas on how to build a better kit! For example, cutting rabet-line wasn't indicated in the President "destructions", but it was a tip I picked up on here that has contributed to a really enjoyable build (thanks to Eamonn pointing that out to me)!
Thanks for having me on board, it'll be great fun!
Cheers
Jonny
-
Ken,
I've spoken with CMB and my kit will be sent off later on today, so hopefully I'll be building my new carronades, swivel guns and Jolly Boat tomorrow. Those seem to be the easiest things to crack on with, but it all depends on whether the Admiral is getting better! Fingers crossed she'll be feeling better by then!
Cheers
-
Morning Chaps,
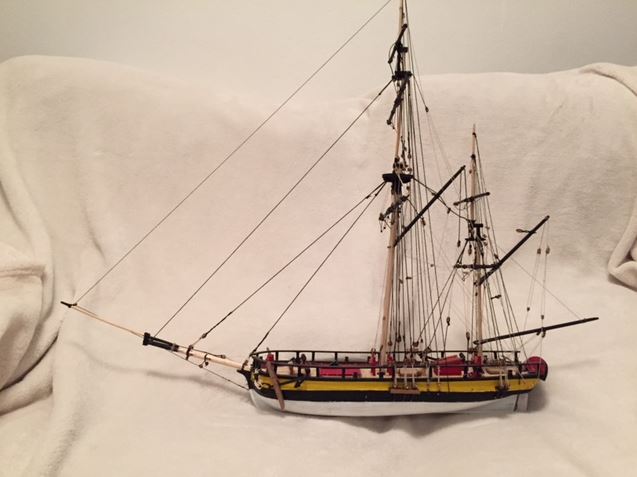
I got some time to sit down and work on Convulsion again last night, it was a bit sperodic because I was up and down all night looking after the Admiral. She's managed to get the flu, so she's been burning up, shivering, achey, and everything else under the sun! So I've not done a great deal on Convulsion this week! But I have managed to finish 99% of the Running and Standing rigging.
I've managed to rig the mainsheets on the Mizzenmast Spankerboom (Does anyone know how did it get the name "Spanker"??), and rigged the sheets on the Mainmast Gaff. Convulsion is looking great now! I'm really pleased with my efforts. It's been a real learning curve from President, and this is certainly the furthest I've managed to get with rigging so far!
I also read through Stockholm Tar's build log of Sherbourne last night, and liked how he tied off his tiller to "keep her straight and true", so I copied this idea! I'll be using his fine example on my build of Sherbourne later on.
Any way, here are some photo's:

I now have a fairly short to-do list on Convulsion, but from a kit build aspect, I only have one major task left!
- Tie Ratlines for Main & Mizzen
- (Additional Stock) Build & Rig new 12 Pounder Carronades (awaiting delivery)
- (Additional Stock) Build 0.5 Pounder Swivel Guns (awaiting delivery)
- (Additional Stock) Build 14 foot Jolly Boat (awaiting delivery)
- Fit new Jolly Boat - either on deck or hung off stern?
- (Additional Stock) Build up storage racks for cannonballs (awaiting delivery)
Seeing as the Admiral is ill, this weekend should be fairly quiet, so I should be able to make a sizable dent in the list! Fingers crossed!
Cheers,
Jonny
- Tie Ratlines for Main & Mizzen


HM Mortar Vessel Convulsion by jonny.amy - FINISHED - Caldercraft
in - Kit build logs for subjects built from 1801 - 1850
Posted
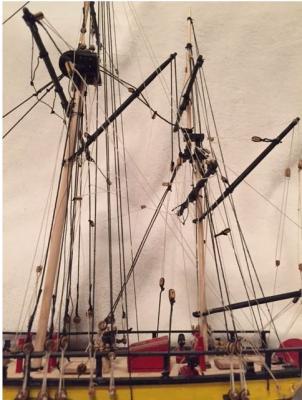
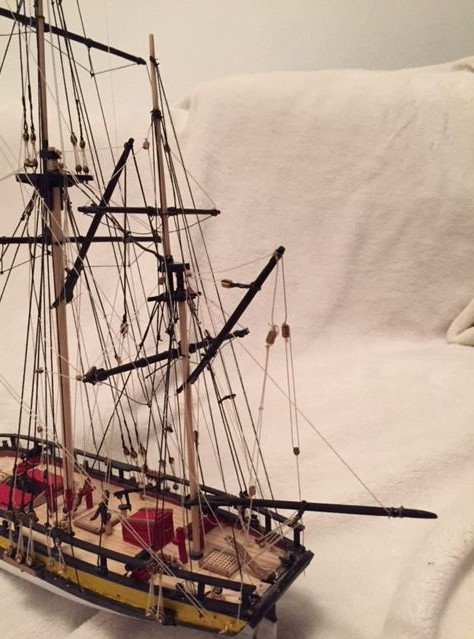
Afternoon Everyone,
I've taken a few photo's of the rat lines I've tied so far. I've got the lower main mast complete now, so it's a case of moving on up, and completing the rest over this long weekend.
Hopefully you like the job I've done so far.... I've taken Jason's comments about rat line spacing in to consideration, and I've decided for now, I'll stick to the 10mm spacings until I know I have enough spare material to continue the rat lines at 5mm spacings.
Cheers,
Jonny