usedtosail
-
Posts
2,403 -
Joined
-
Last visited
Content Type
Profiles
Forums
Gallery
Events
Everything posted by usedtosail
-
 Thank you very much Gary and k-mart. It means a lot to me coming from you.
 -
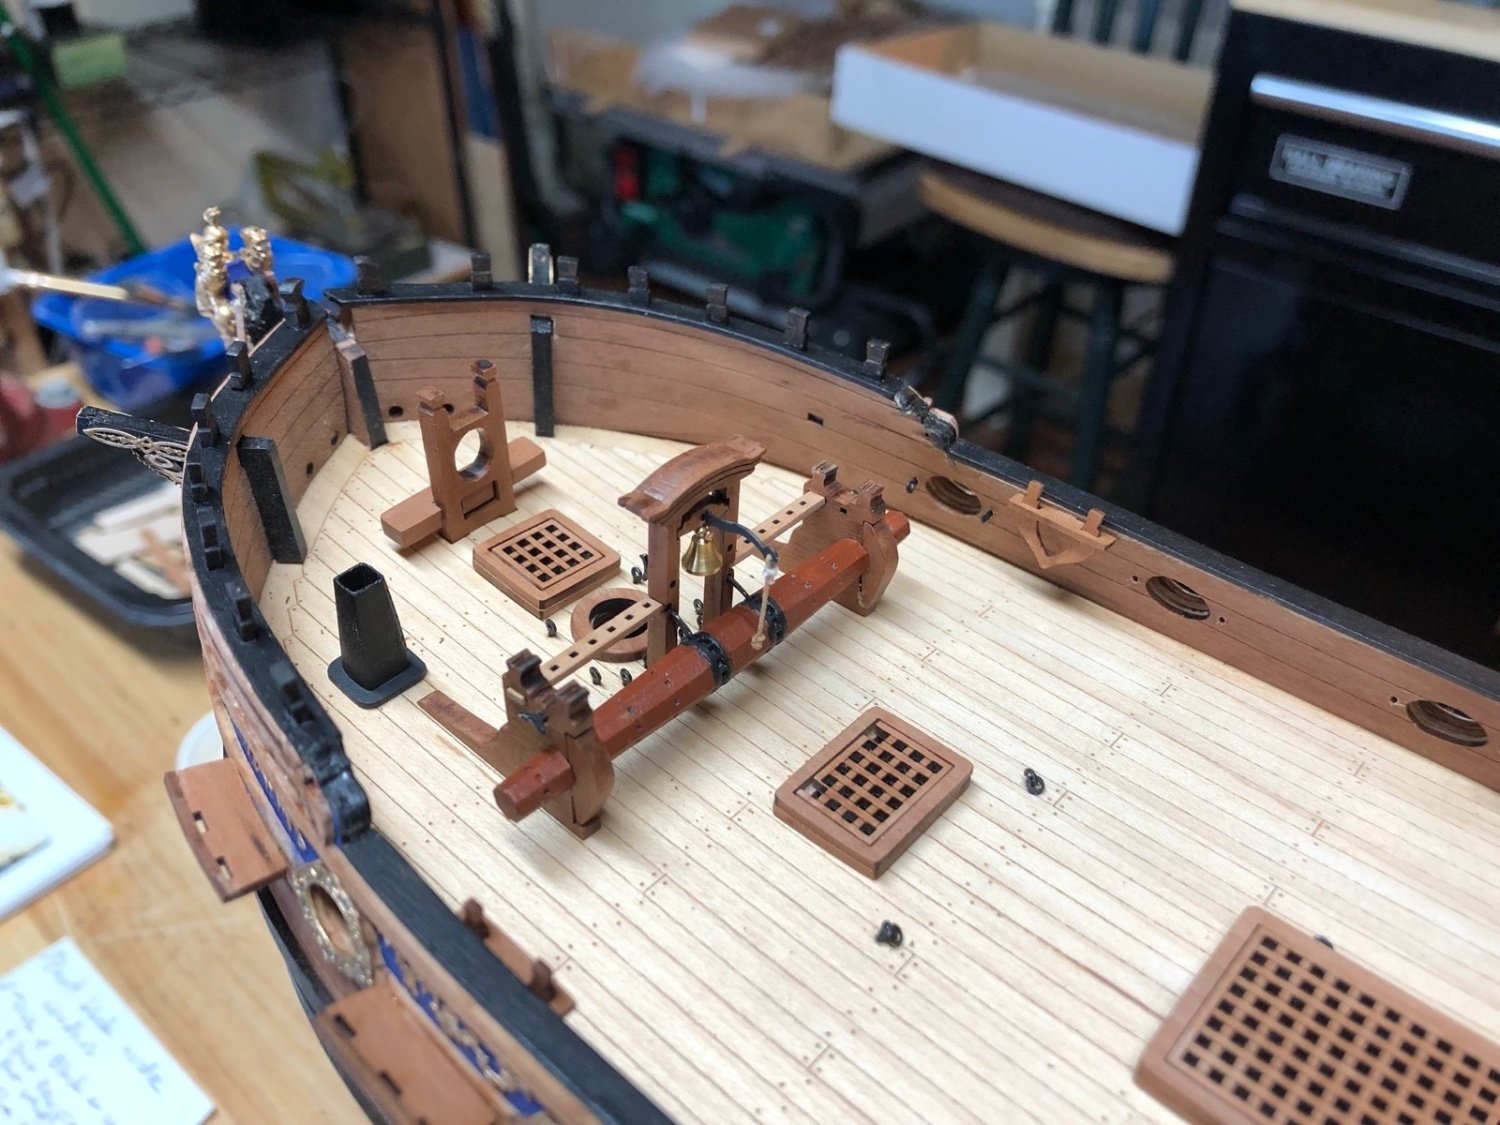
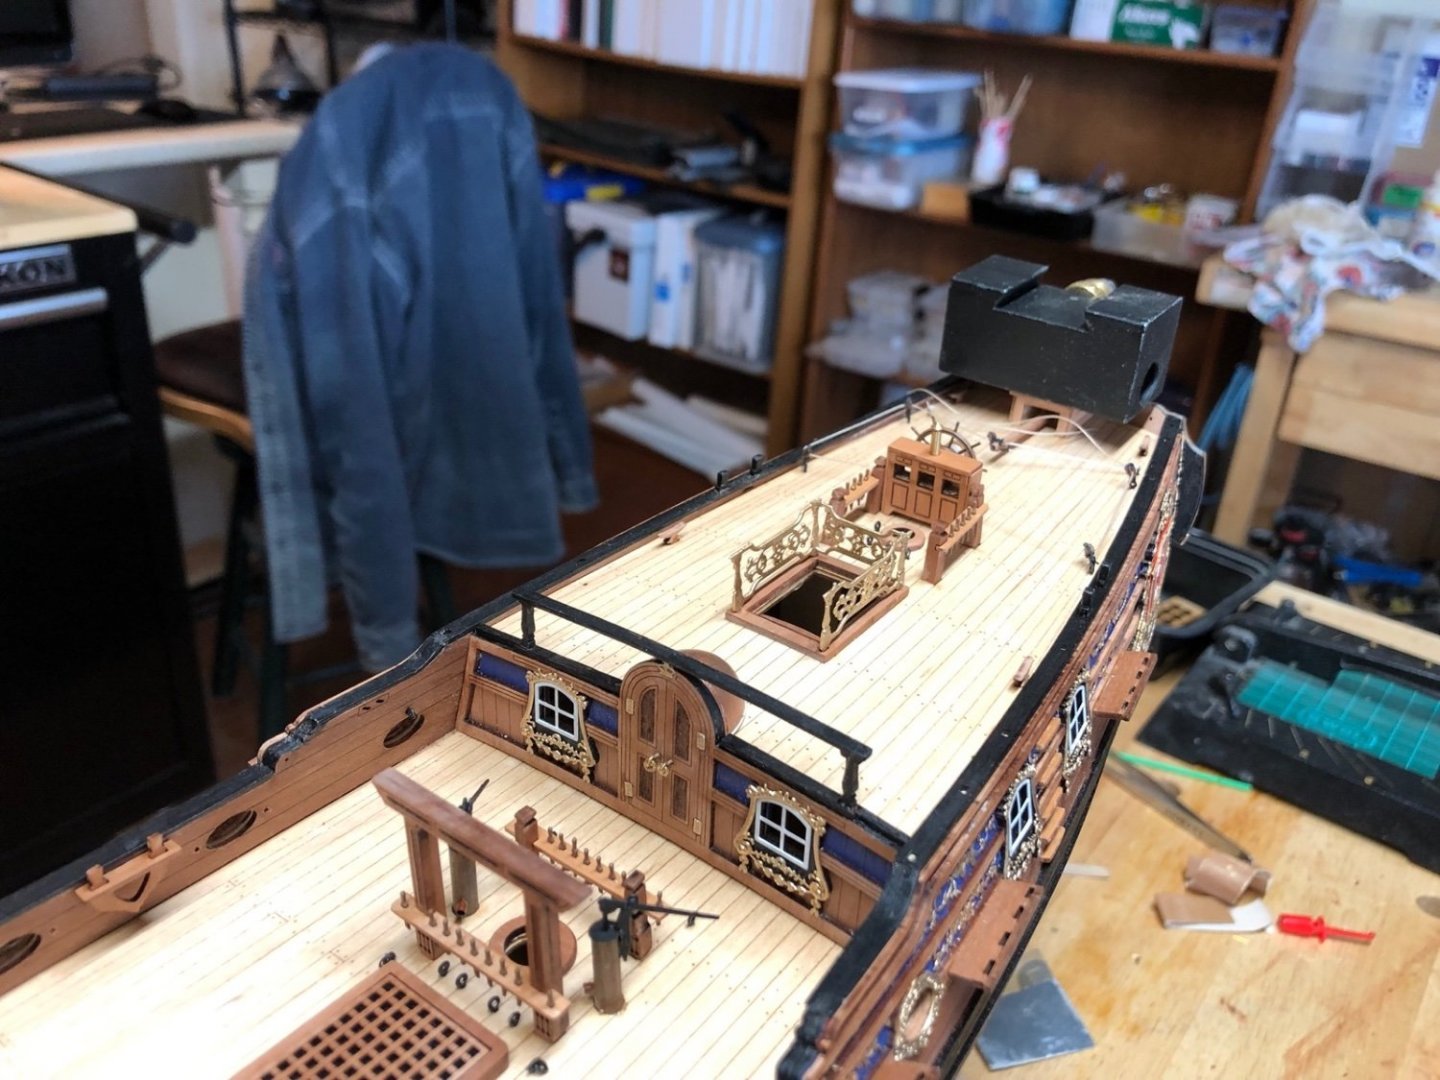
I finished the windlass and glued that into place relative to the belfry. I need to put a coat of wipe on poly on the belaying pin racks. I painted the winch with burnt Sienna and used wipe on poly to finish the supports. The chimney is completed and glued in place as well as the kevels, knight heads and bow timber heads. Further aft I have added the quarterdeck rail and the roof to the tiller house, which is not mentioned anywhere in the instructions that I could find. I am using a lathe tool holder as a weight to hold the roof while the glue dries. I am assembling the quarterdeck stairs and side railings, then I have the cannons to put together.

- 118 replies
-
- 12
-

-
- Duchess Of Kingston
- Finished
- (and 1 more)
-
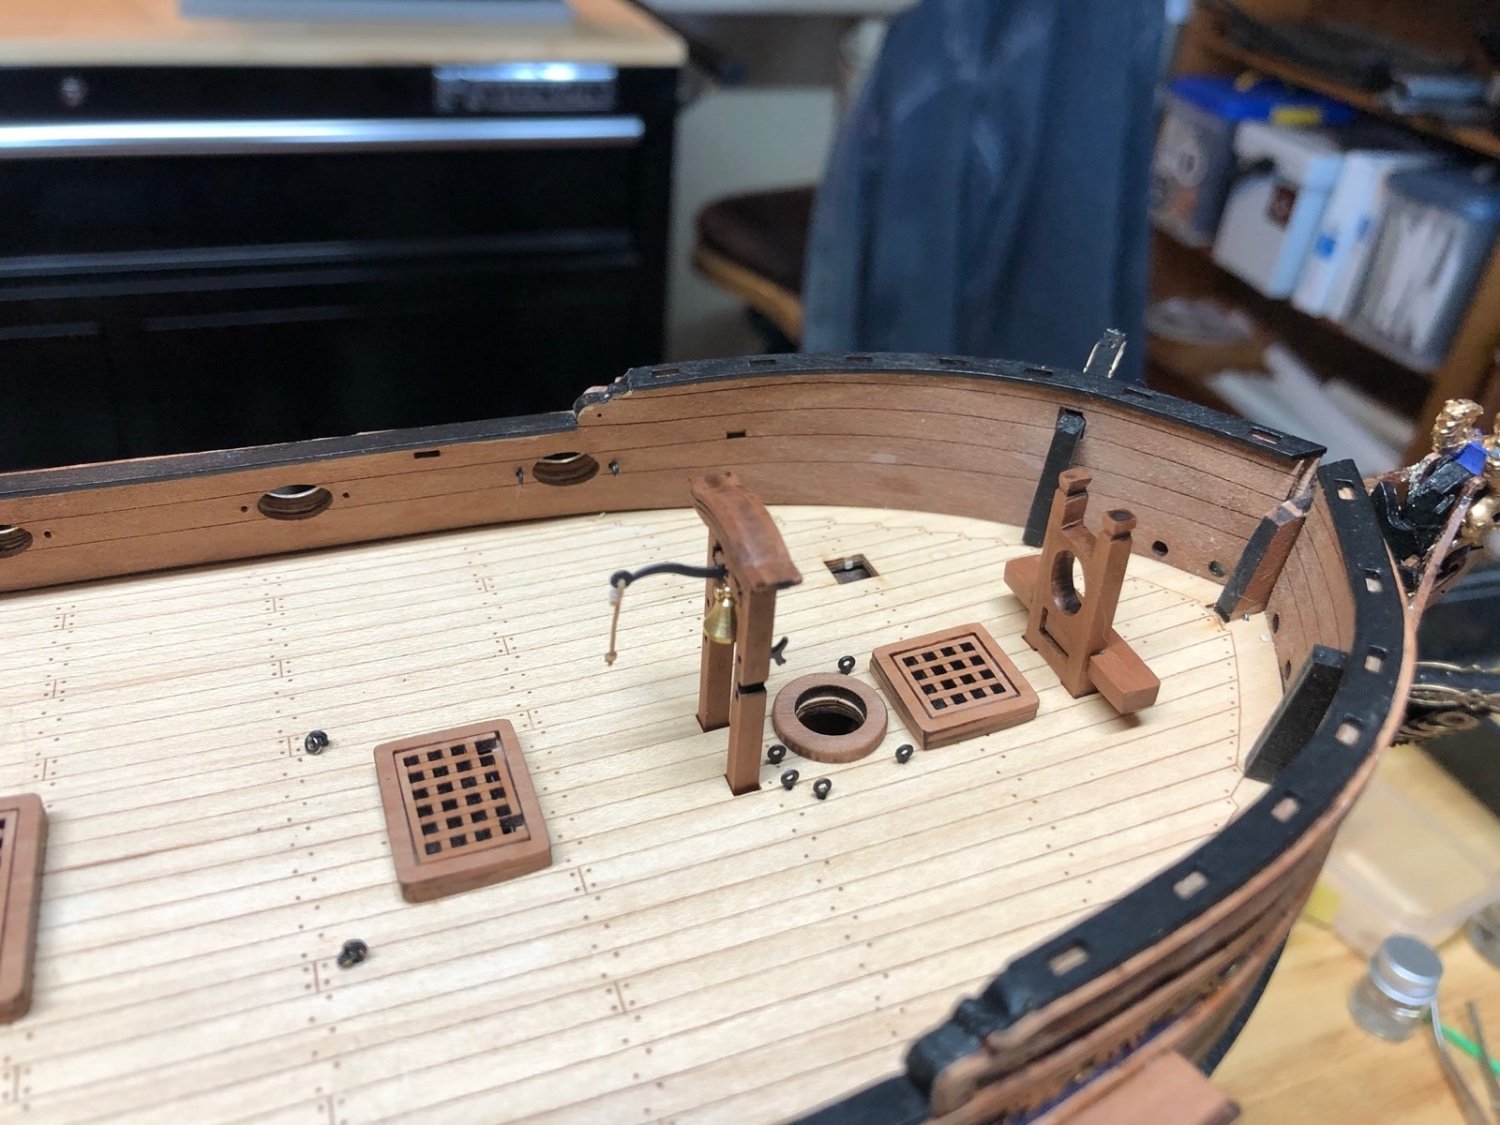
I completed the pumps and glued them into the holes in the deck. I added small pieces of brass tubing to the barrels for the dales. I also added the coamings and gratings to the deck. I added the bell to the belfry with the PE handle. I haven't added the pawls yet until I put the windlass in place. I dry fit the belfry and the bow sprit bitts for now. The mast coats are also dry fit for now until I put the masts in. I am working on the windlass and the kevels.

- 118 replies
-
- 10
-
-
- Duchess Of Kingston
- Finished
- (and 1 more)
-
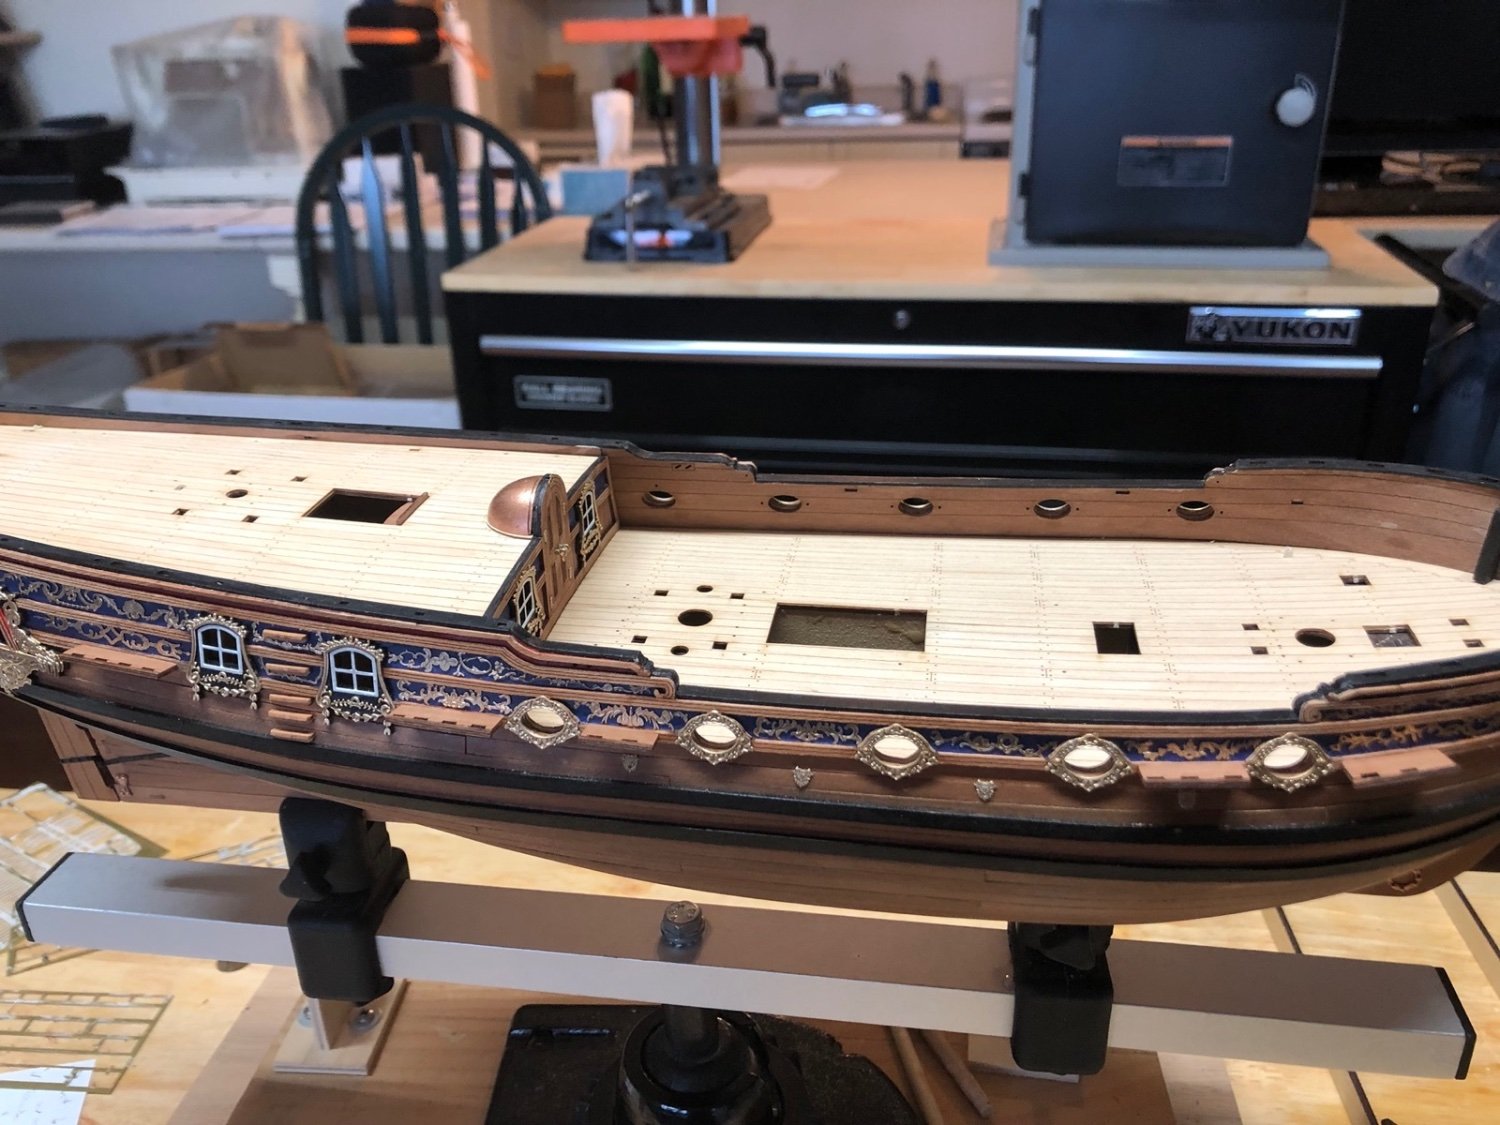
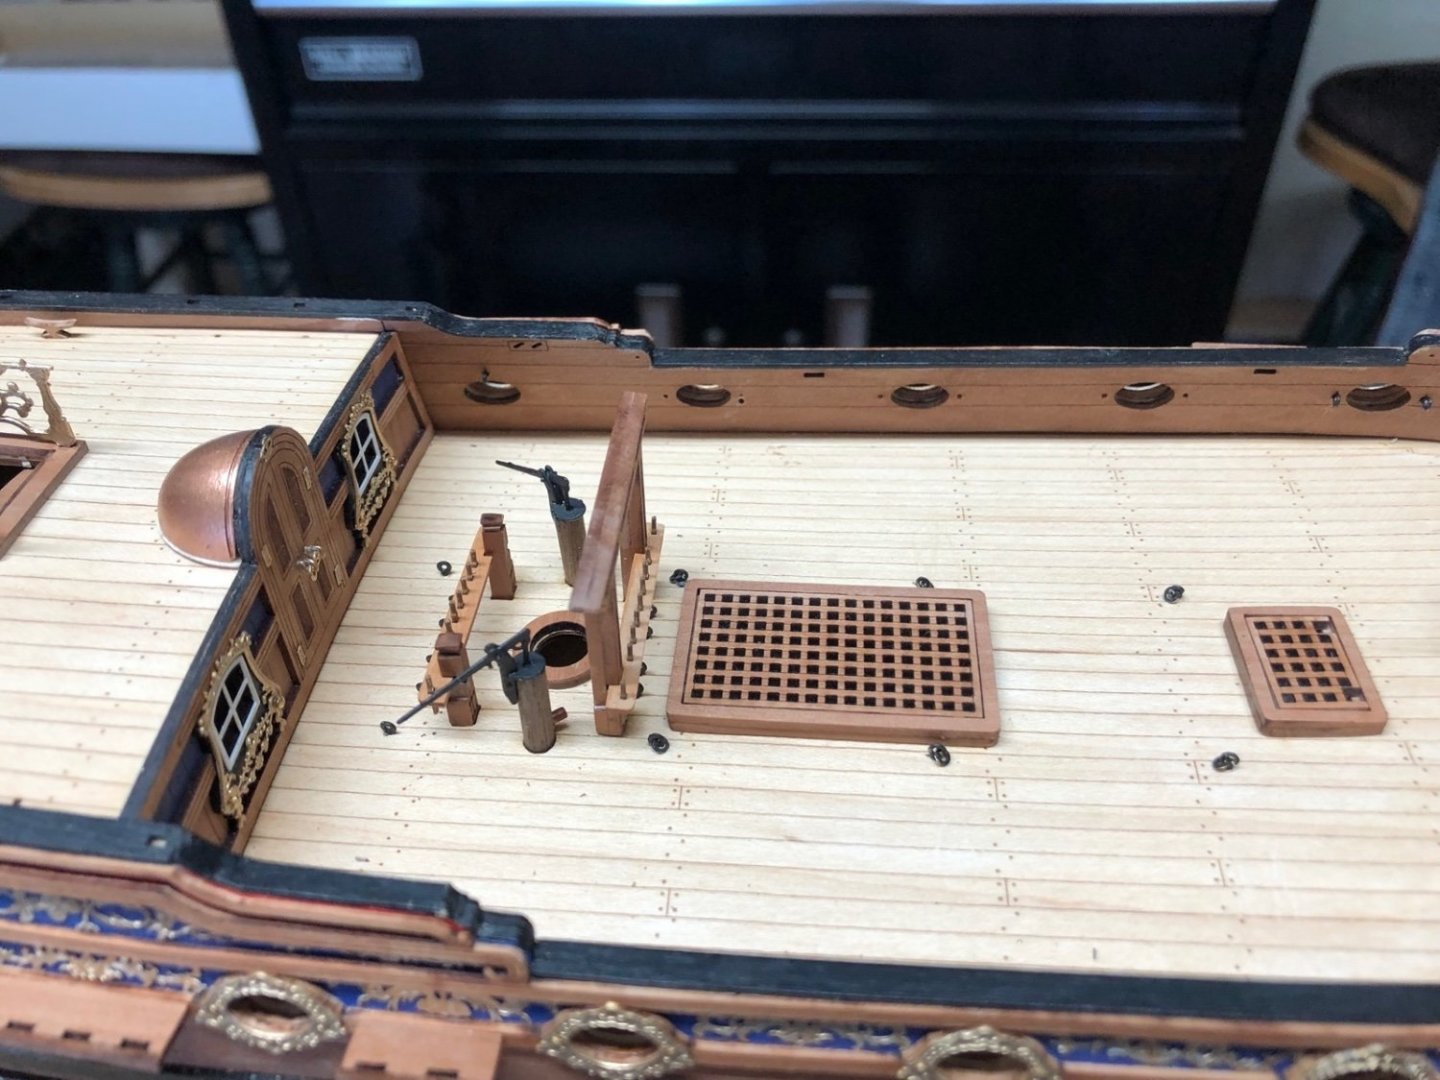
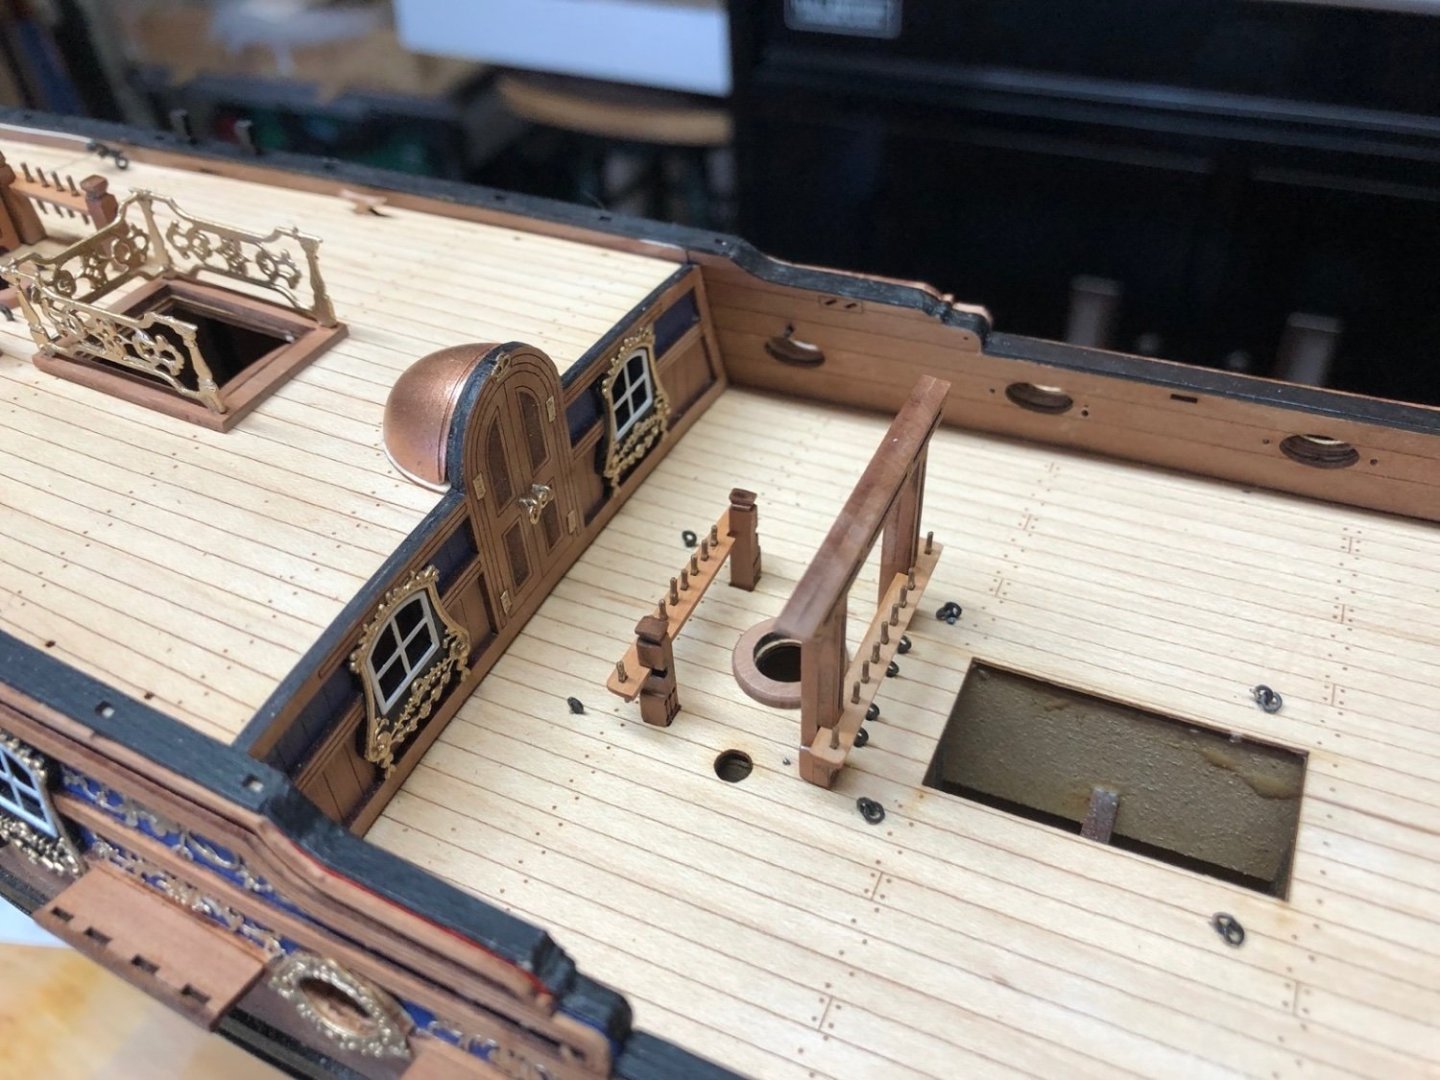
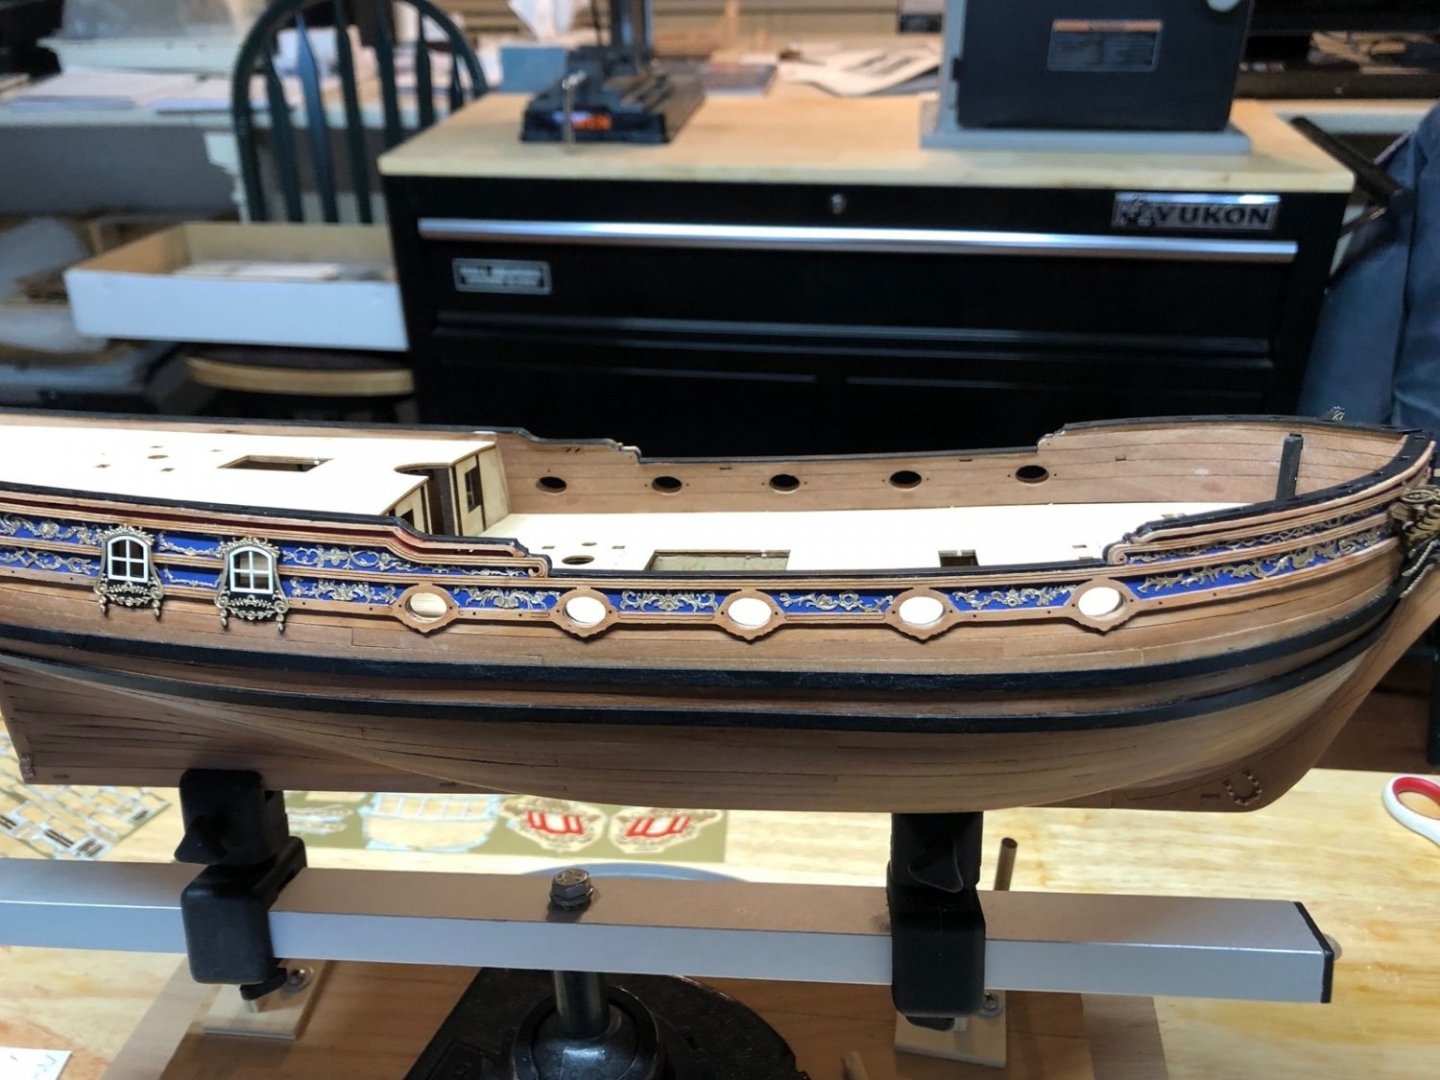
Lots of deck fittings have been added. Starting on the upper deck I added the mizzen bitts and pin rails. I am using the supplied brass belaying pins which I have painted brown. I built the binnacle and glued it to the deck. I did not like the look of the sides which showed the joints of the internal parts, so I glued some thin pear onto the sides to cover them. I shaped the three mast coats but won't glue them on until I fit the masts in place. I added the railing for the spiral staircase using the supplied parts. I like how others have substituted wood posts at the corners but I wasn't confident enough to try it. I also shaped and added the timber heads to the rail. As a reference for future builders, the first picture of these in the instructions shows them upside down. I was trying to visual how to shape them when I discovered this and it was much easier when they are right side up. On the lower deck I added the two main bitts and belaying pin racks. I have added the eyebolts next to the gun ports that won't have cannons but I will wait to add the others until I rig the breach ropes on the cannons. I also added the ring bolts to the deck, again using the supplied brass parts. I am currently building the pumps. Assembling the pump handles was a bit challenging but they are done and have been painted black. I am also cleaning up the char on the hatch coamings so should have them ready to install soon.

- 118 replies
-
- 9
-
-
- Duchess Of Kingston
- Finished
- (and 1 more)
-
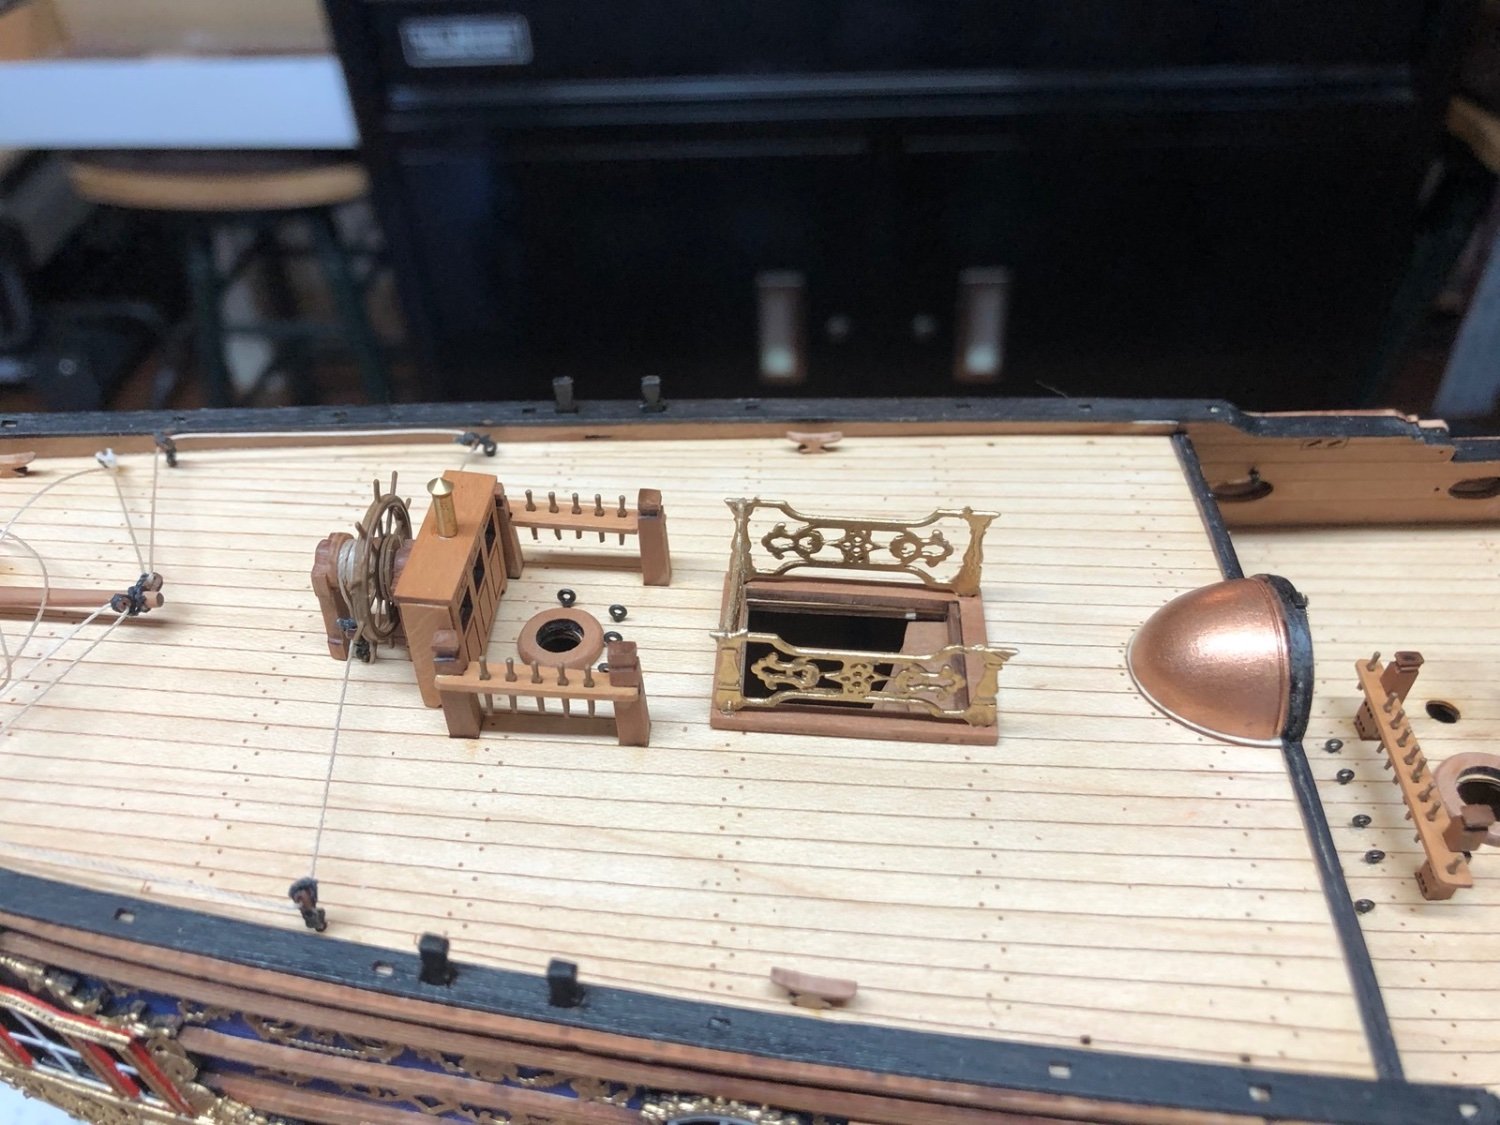
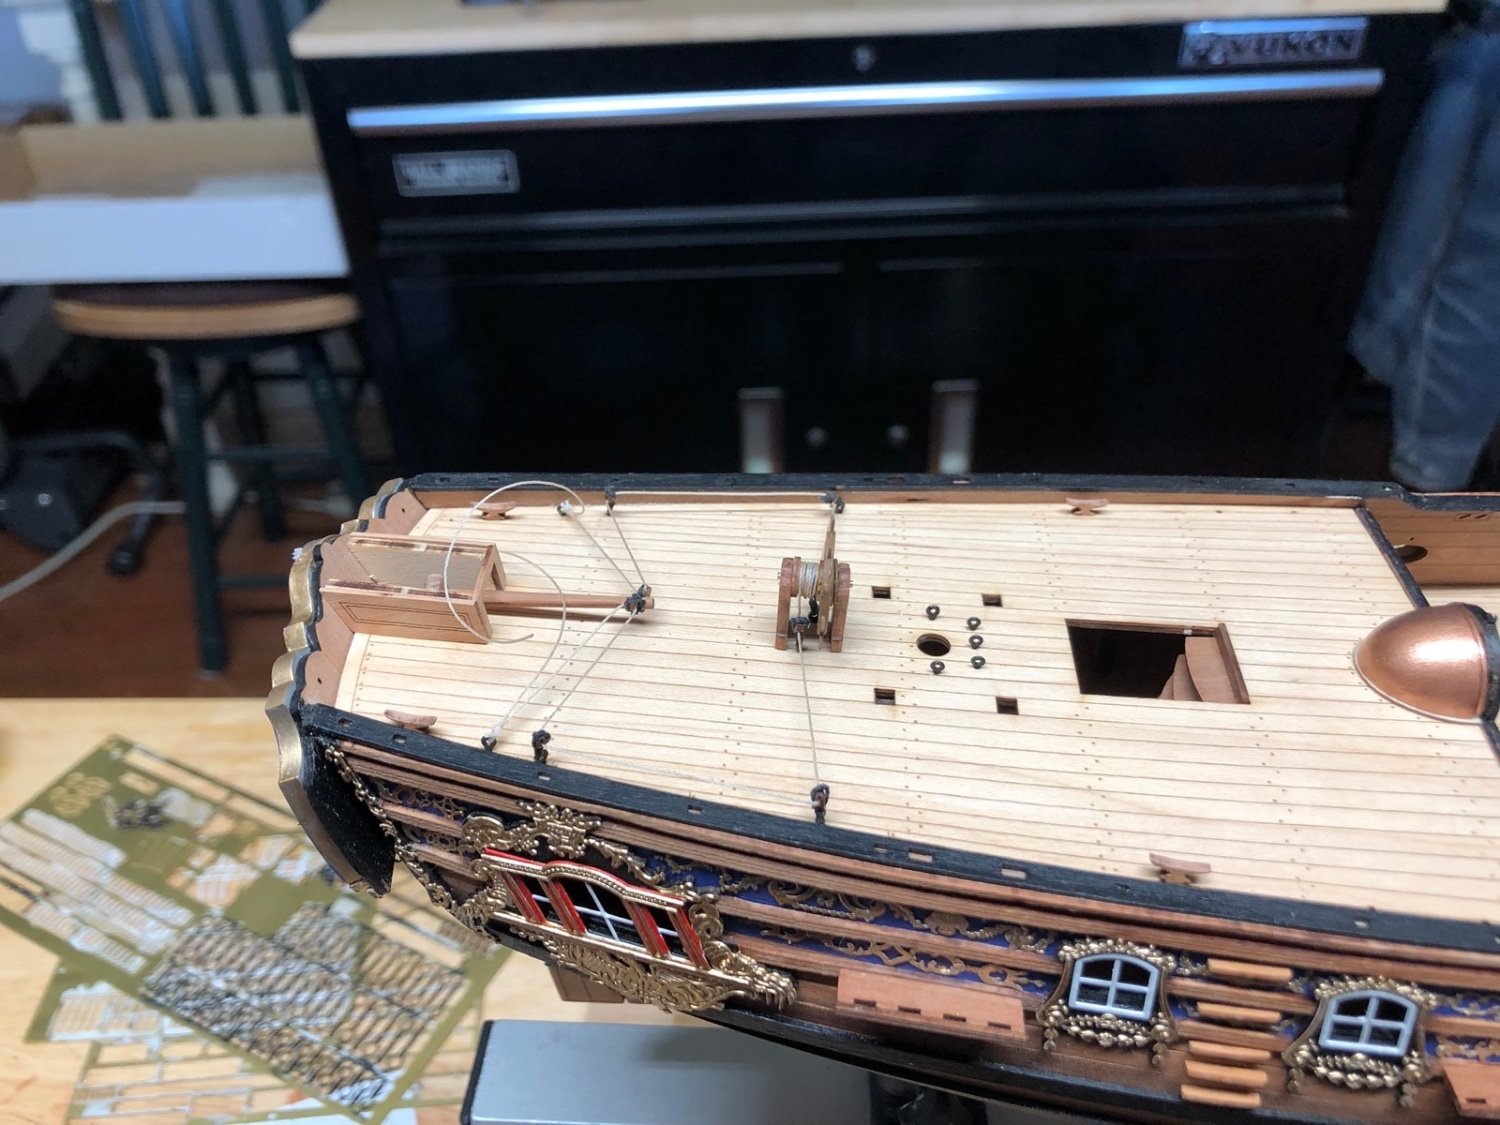
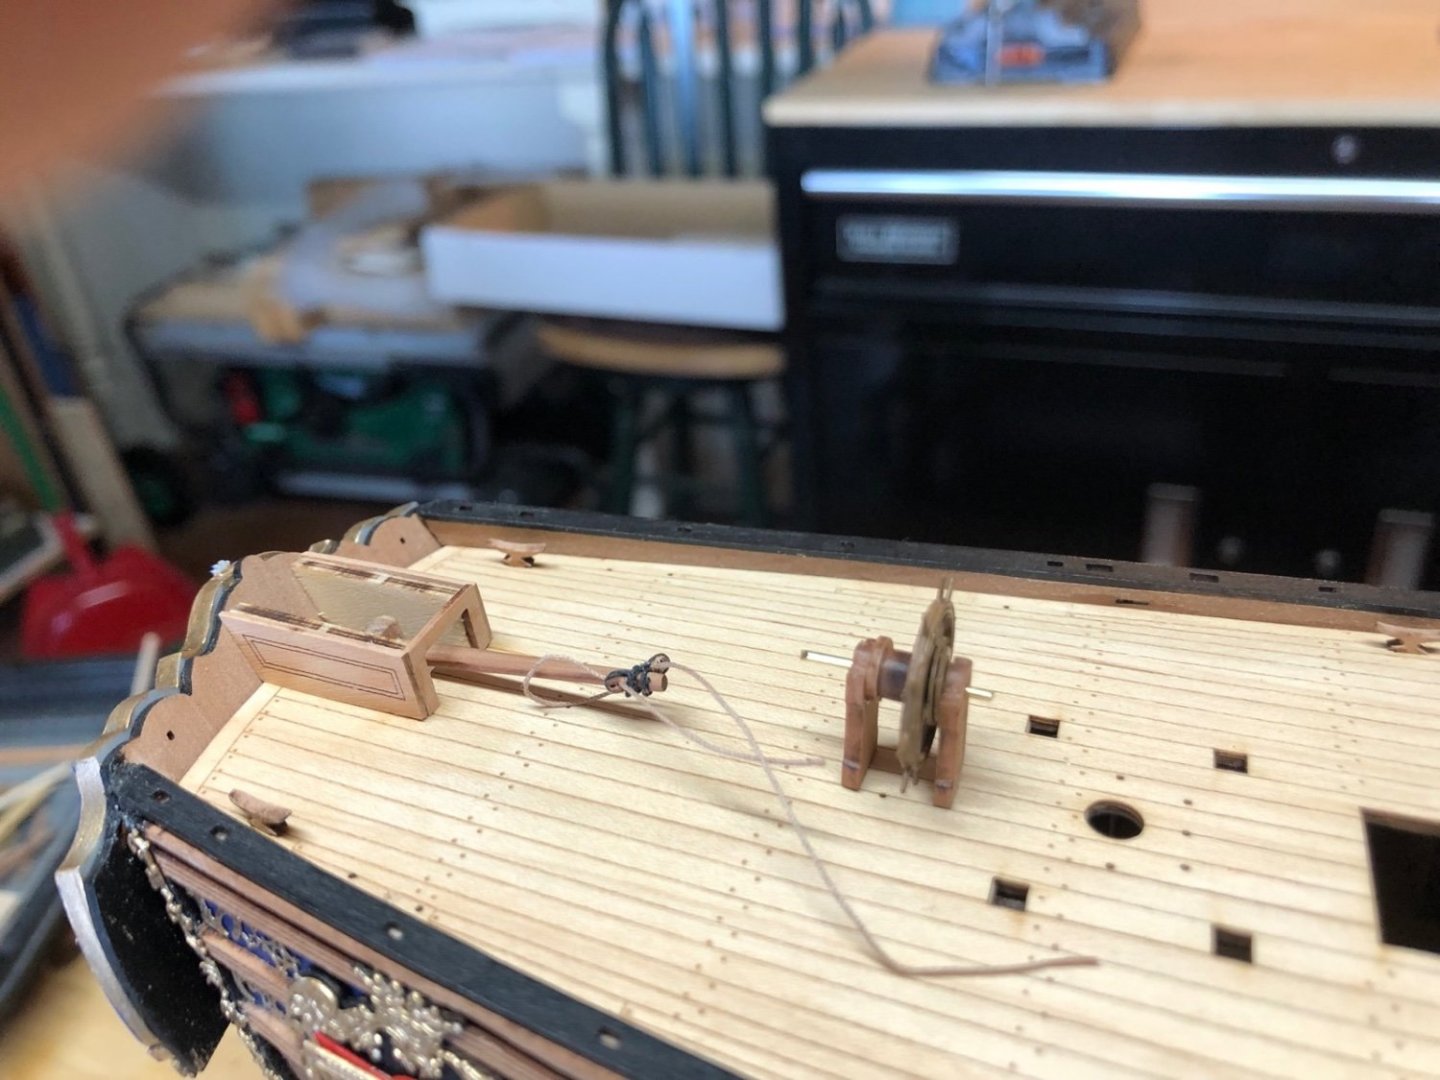
I wrapped the steering line around the wheel and fixed it with lacquer. When it was dry I slipped two of the 2mm blocks stropped to eyebolts on the line, then glued the wheel standards to the deck and the eyebolts into the holes under the wheel. I then slipped two more blocks on each side and glued them into the holes along the bulwarks. I then passed the lines though the blocks on the tiller and seized the ends to the empty eyebolts near the bulwarks. I left the ends of the steering line untrimmed for now in case I happen to catch the lines later, so I can re-seize them without having to thread a new line through all those blocks. I have started adding all the eyebolts around the mast holes. After that will be adding the coaming and railing around the circular stair opening.


- 118 replies
-
- 7
-
-
- Duchess Of Kingston
- Finished
- (and 1 more)
-
Thank you Keith and the likes. I finally got the two 2mm blocks attached to the end of the tiller. They are so tiny but the main problem was they were coming undone when I clipped the excess strops off. I am using Dullcote lacquer to fix the knots in the strops which usually works very well, as long as I give it enough time to dry. I glued the tiller to the hole in the top of the rudder. I also assembled and painted the ship's wheel. Here it is just sitting on the deck as the glue dries to make sure it is flat to the deck. Next up is adding the rest of the blocks and eyebolts then rigging the line between the wheel and the tiller. I have a short piece of line through the tiller blocks for now as it helps me see where the holes are for the real line. I had to drill these out a bit to get the .25mm line through them.
- 118 replies
-
- 5
-
-
- Duchess Of Kingston
- Finished
- (and 1 more)
-
Thank you for the kind words Keith, Cathead, Grant, and Christian. I really appreciate them.
-
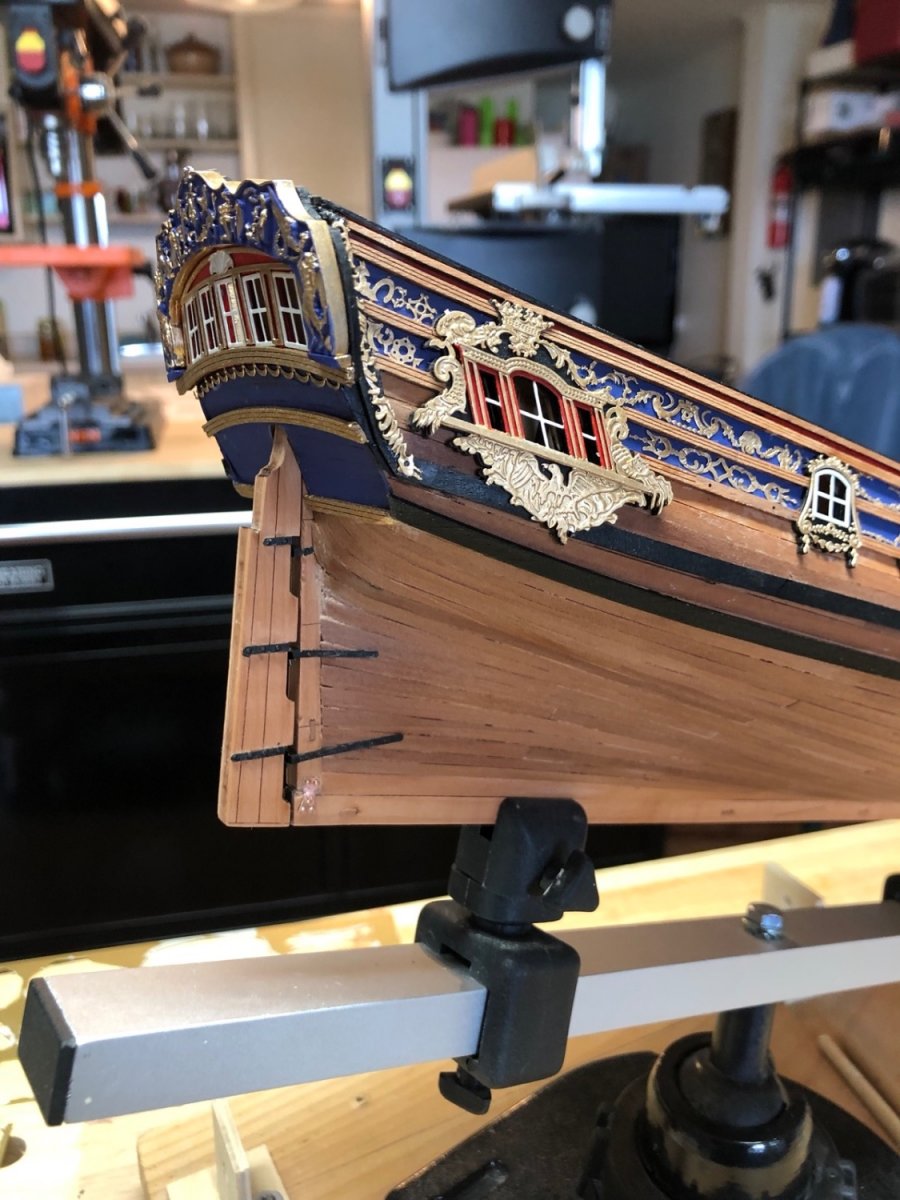
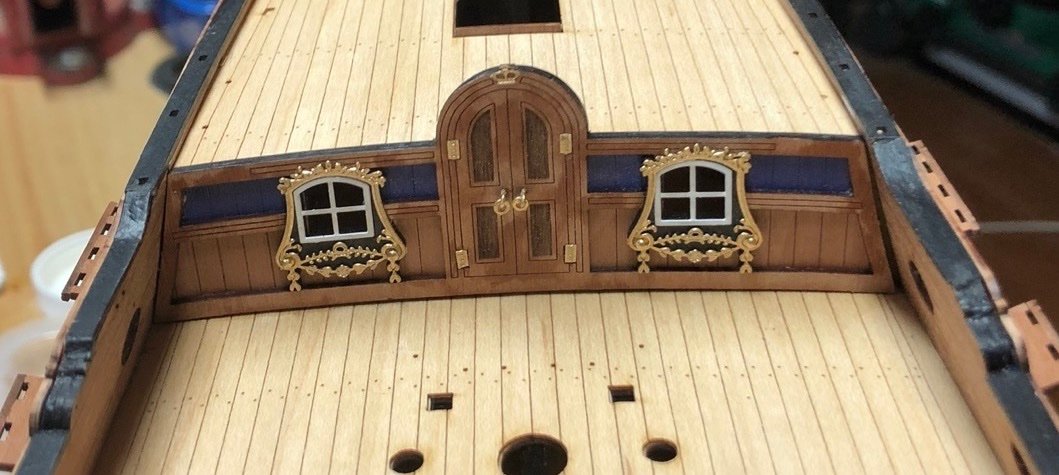
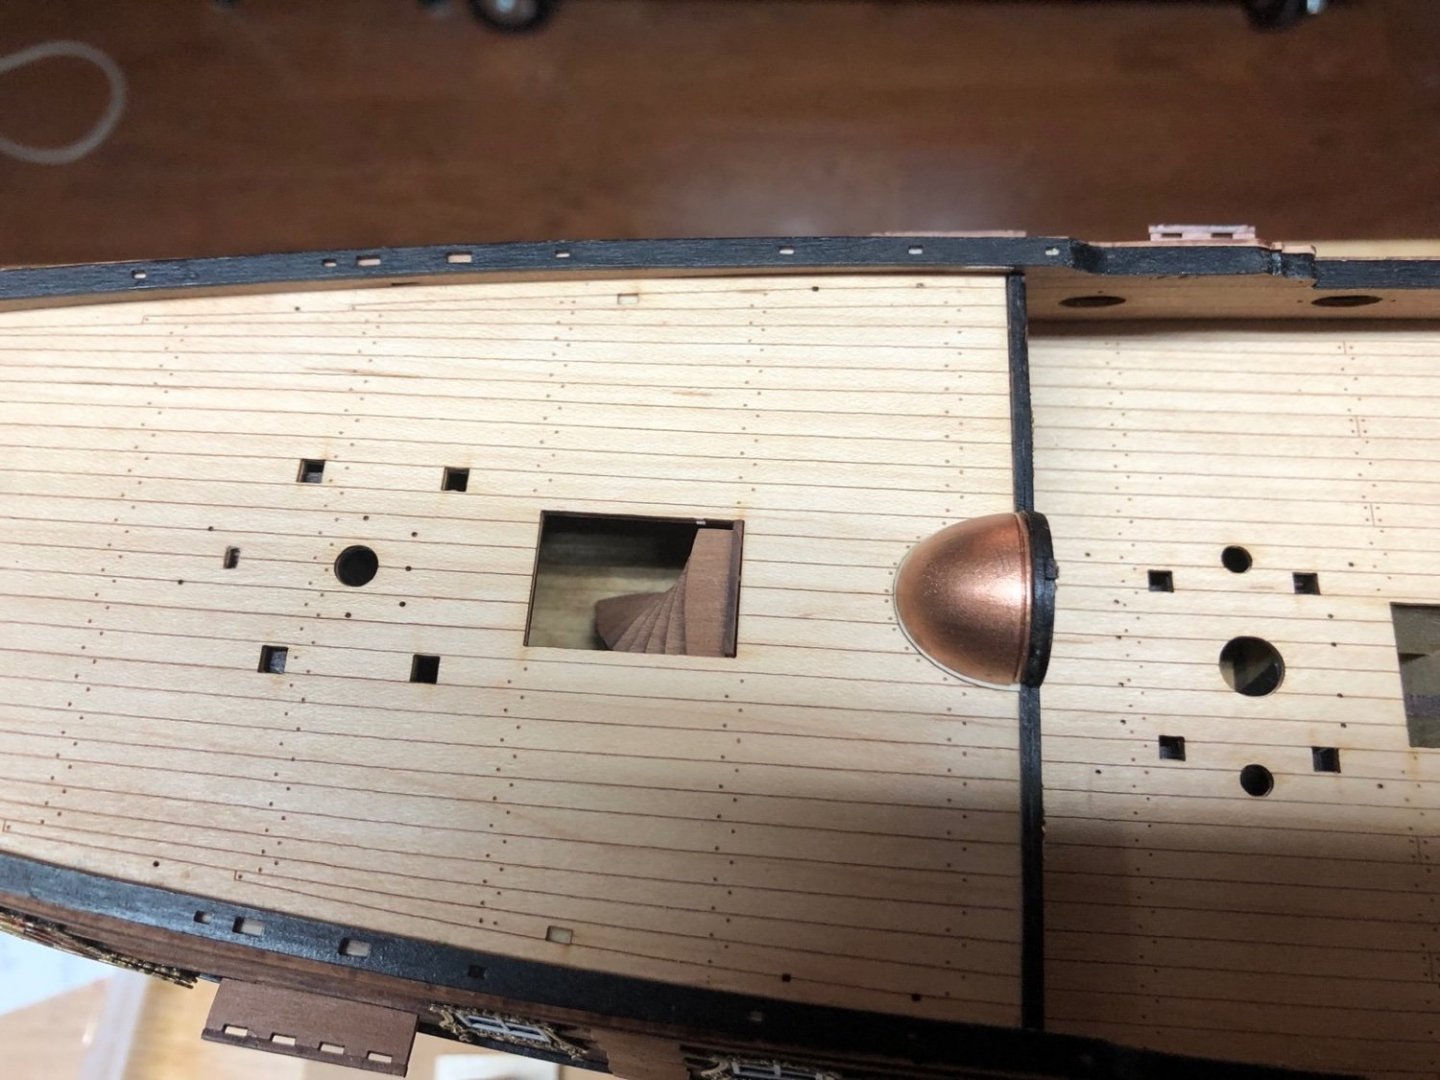
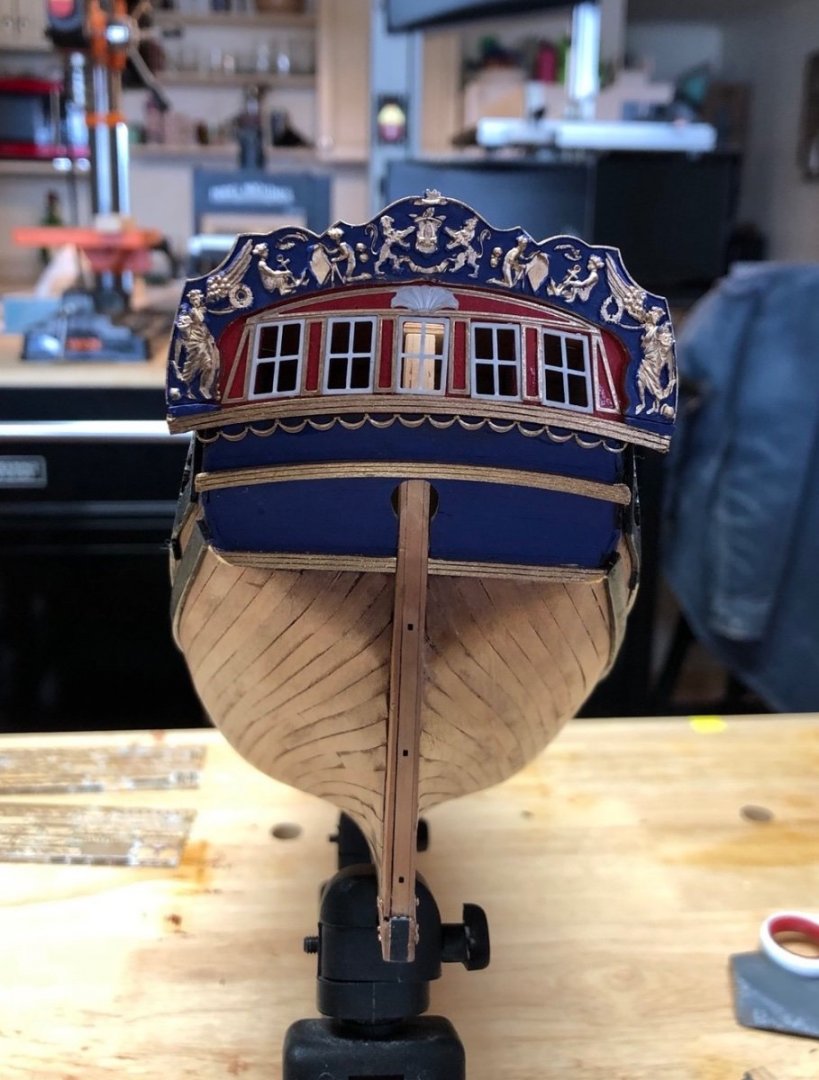
After the rudder I started working on the bulkhead that goes between the two decks. I painted the blue on the inner piece and black around the windows on the outer piece. I then glued the outer piece to the inner piece, then painted the top edge black. I added the window PE trim, the hinges and door pulls, and the decorative crown. I glued the bulkhead to the two decks using weights on either side to hold it tight to the decks and take out a slight curve in the piece. Finally I gave the wooden parts of the bulkhead a coat of wipe on poly. While I was working on the bulkhead I also assembled the spiral staircase. I gave it a coat of wipe on poly and glued it into the deck opening after I installed the bulkhead. It would have been easier to install it before the bulkhead because I could have seen the tab and the slot that it fits in better, but I was able to get it installed after a few minutes of effort. I also installed the dome canopy base after very carefully removing the char and the some after painting it copper. Also while doing all that I made up the side steps ands the channels and installed them. I gave them all a coat of wipe on poly after they were installed. I am now working on the tiller housing and tiller. I shaped the tiller and stropped two 2mm blocks to the end and glued the sides of the tiller housing in place. The next step will be to install the tiller on the top of the rudder. I have also started assembling and painting the ships wheel. I'll have pictures of those components in a day or so.

- 118 replies
-
- 7
-
-
- Duchess Of Kingston
- Finished
- (and 1 more)
-
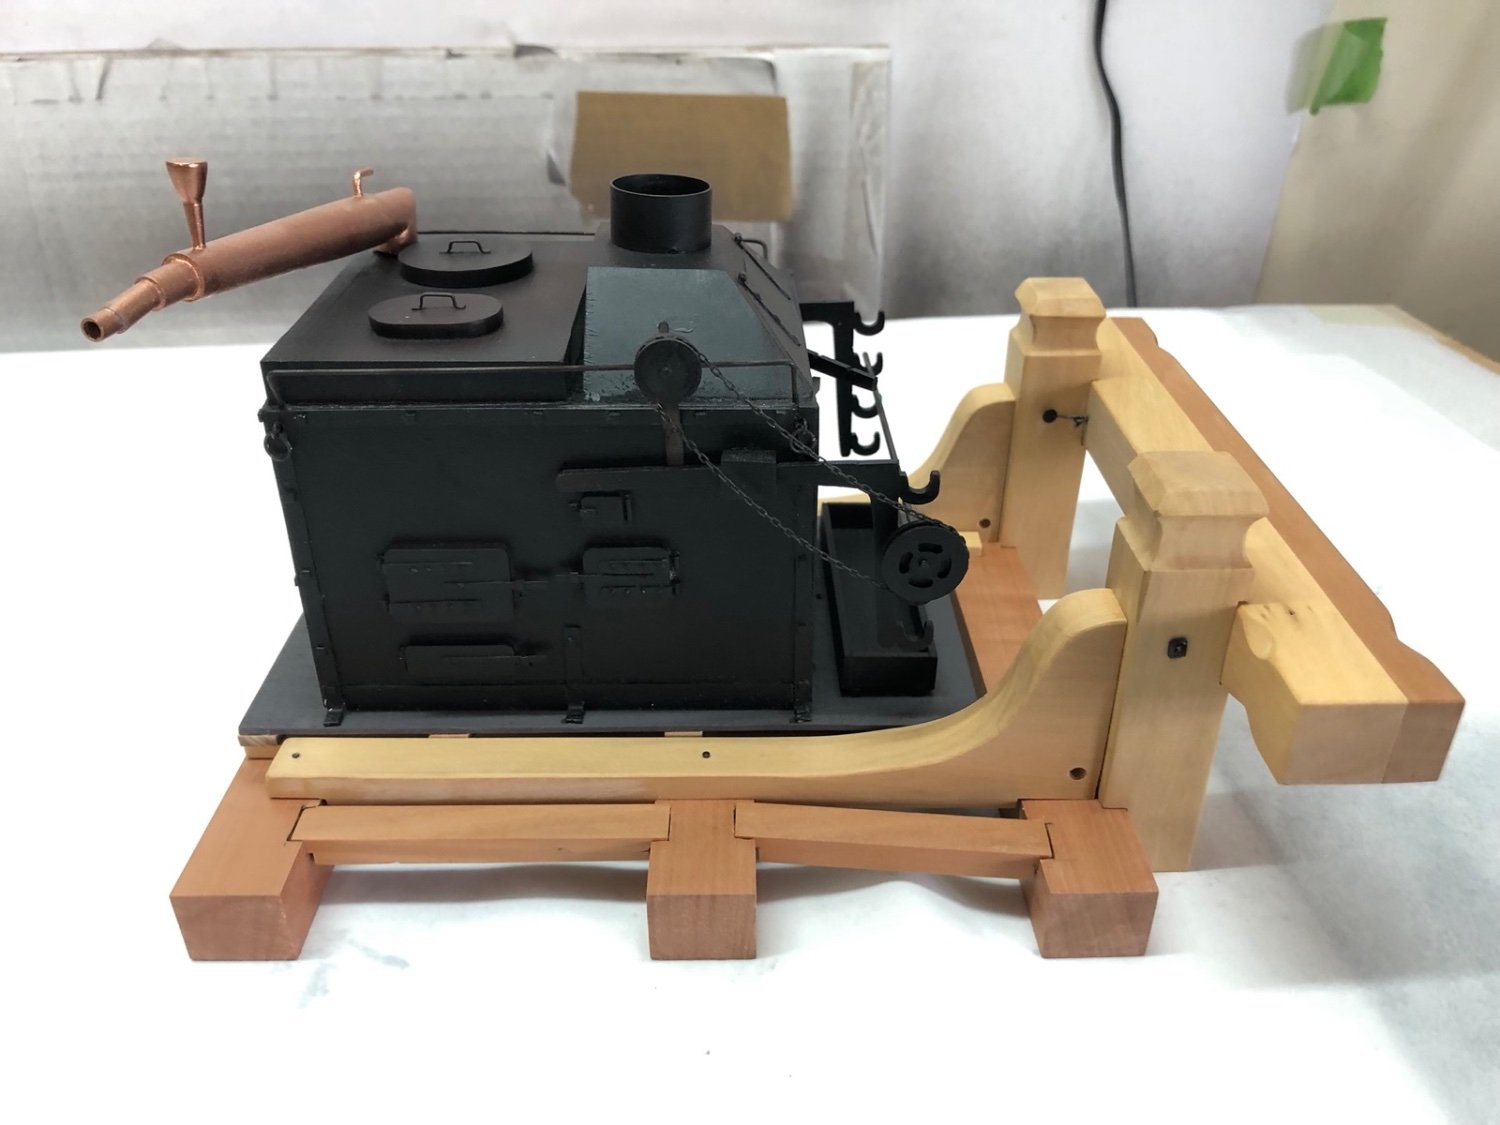
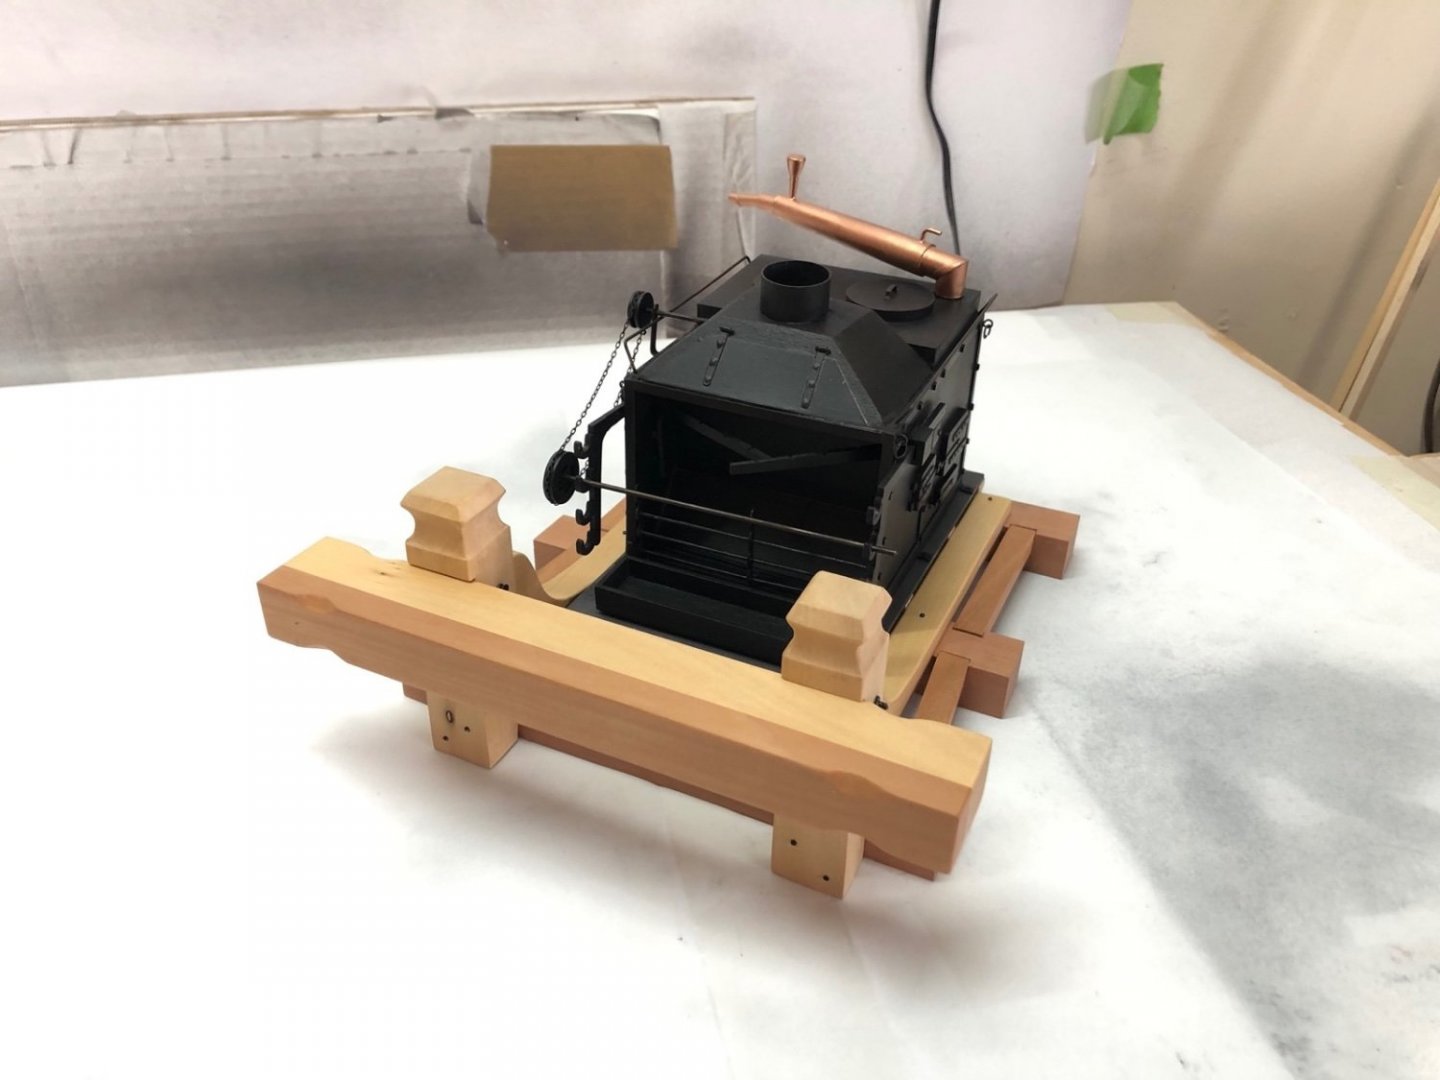
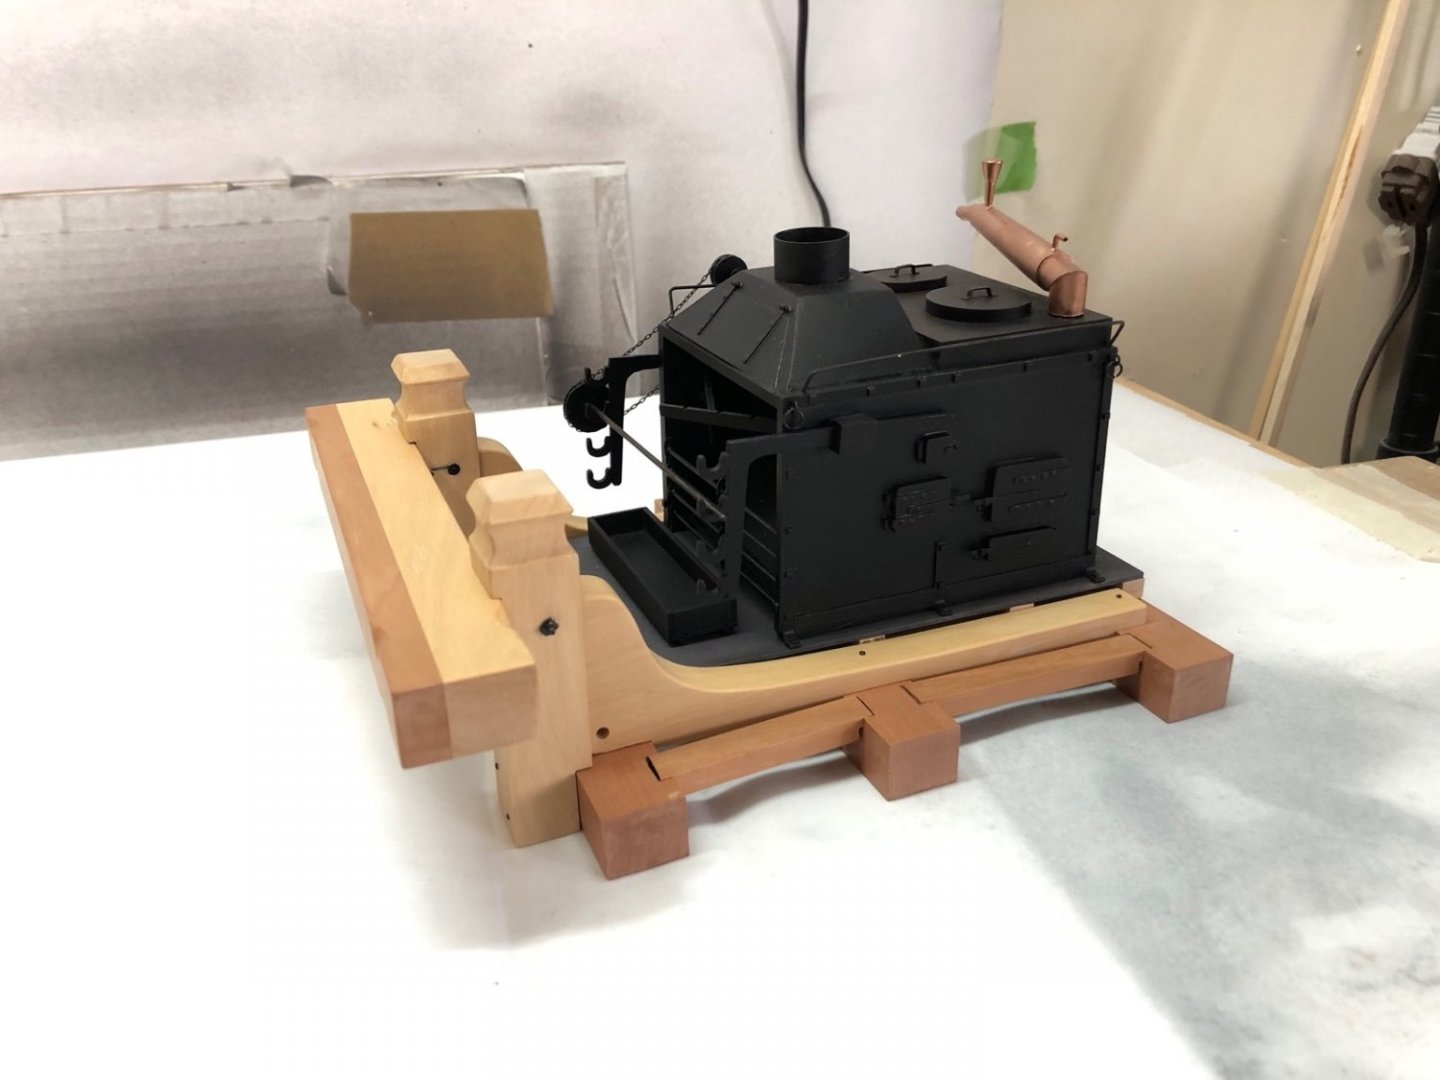
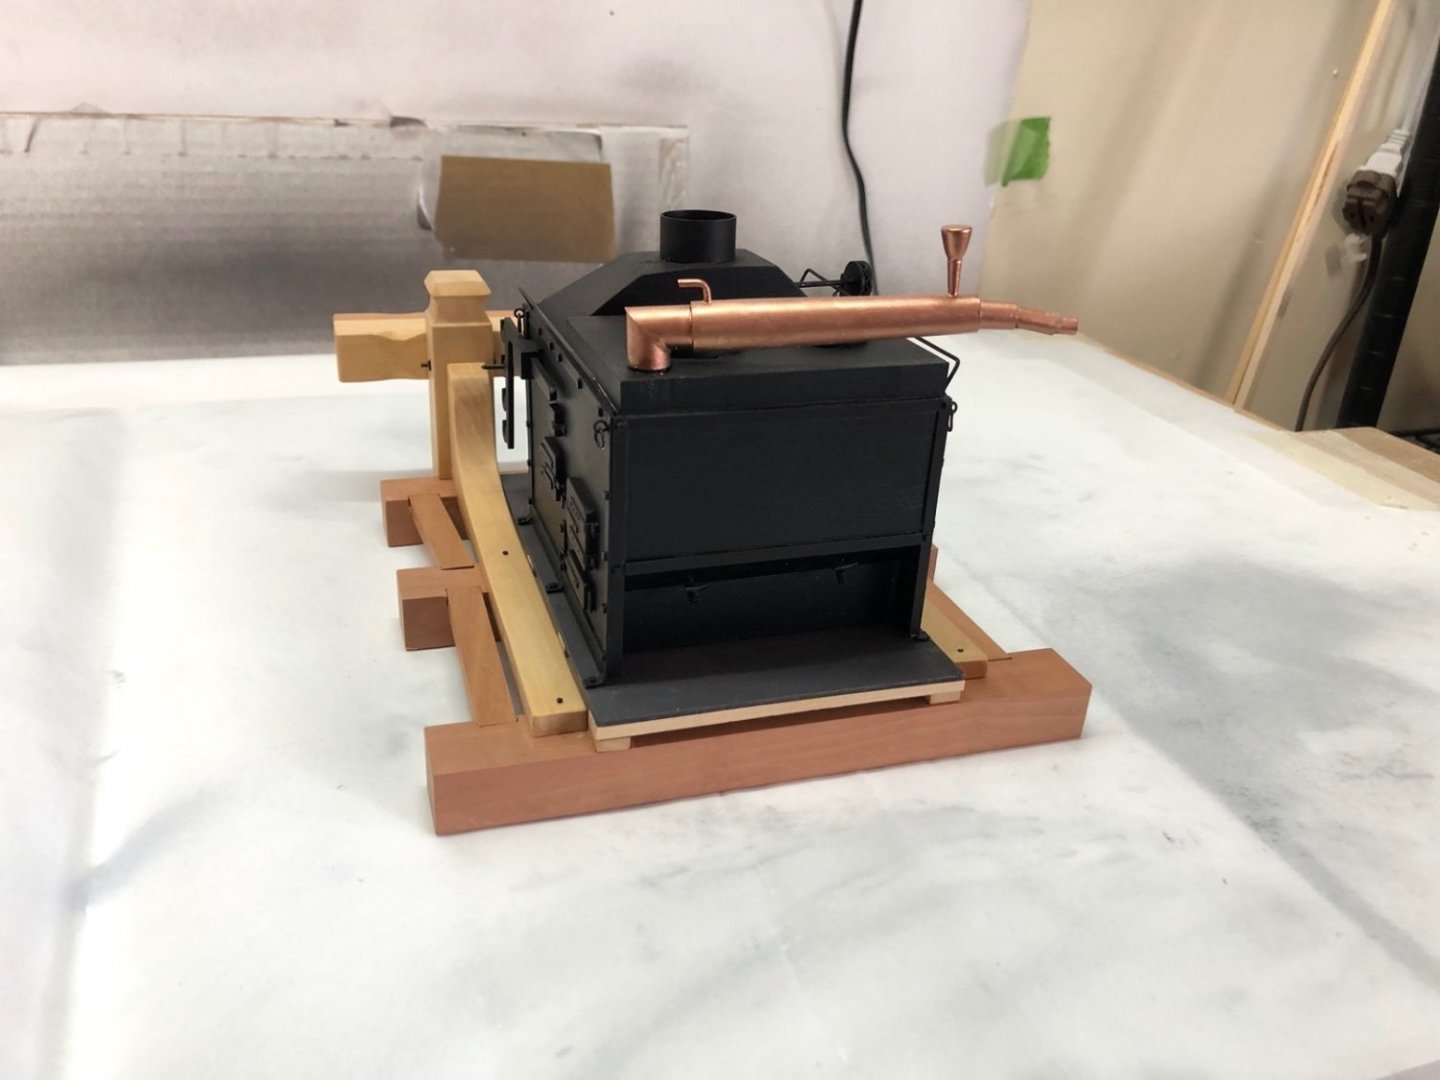
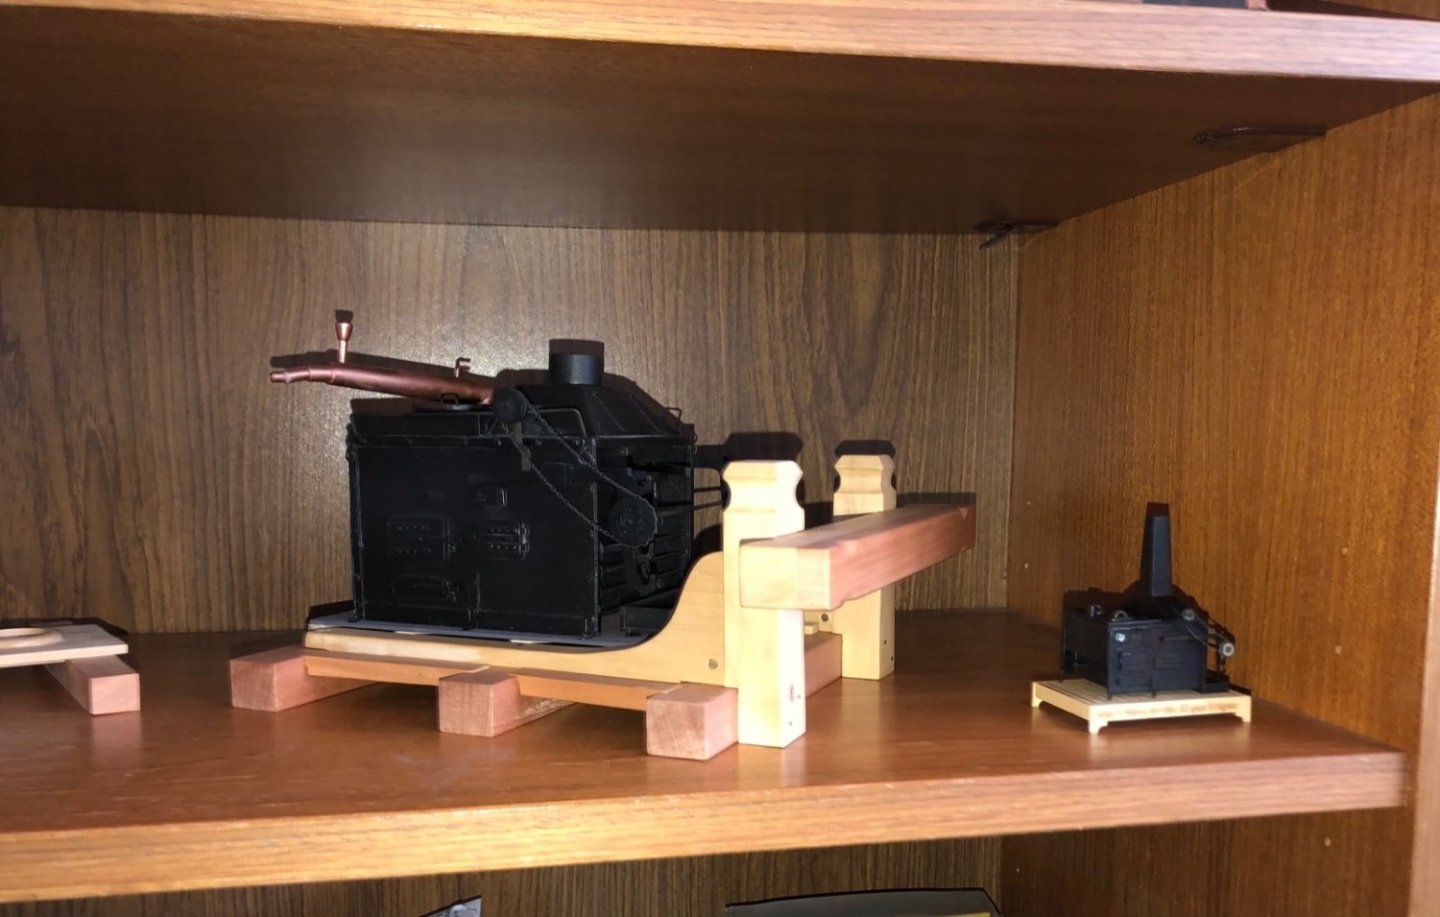
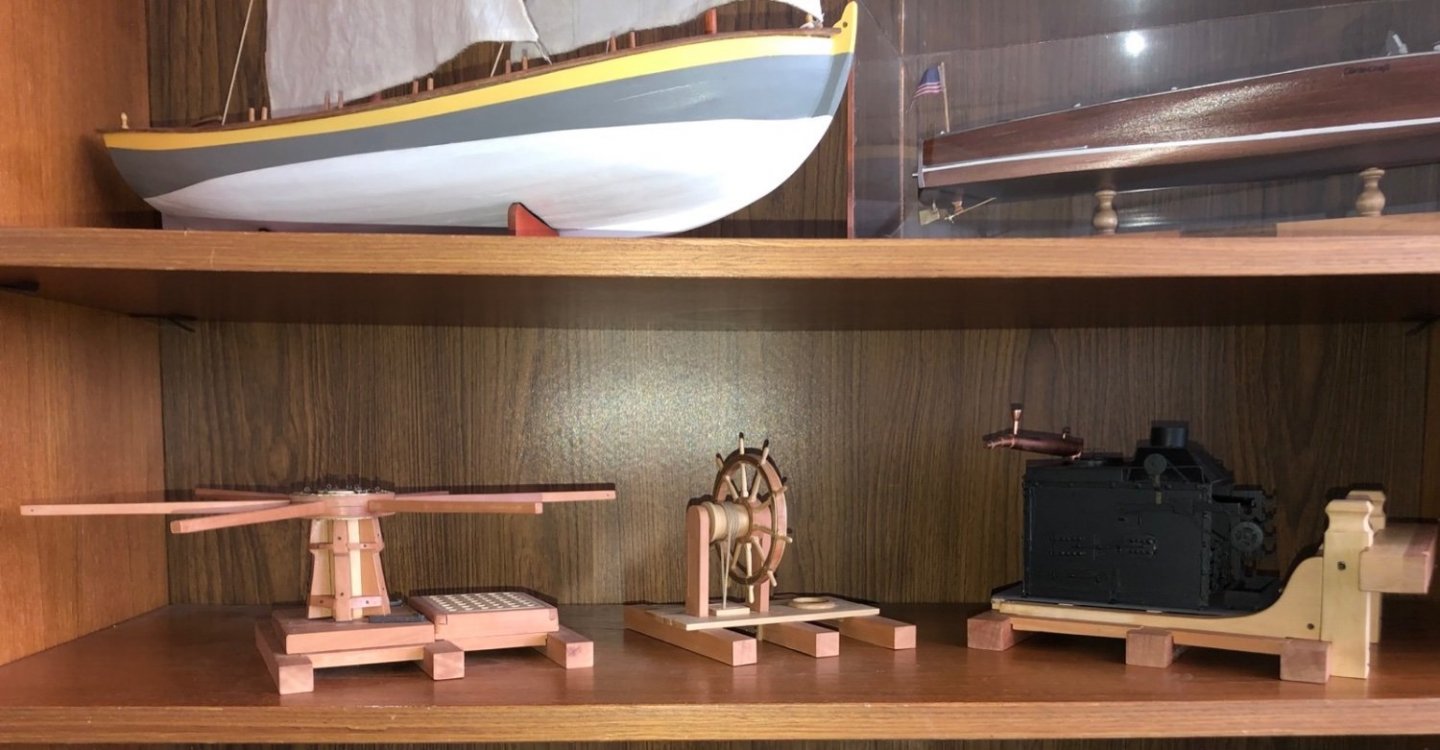
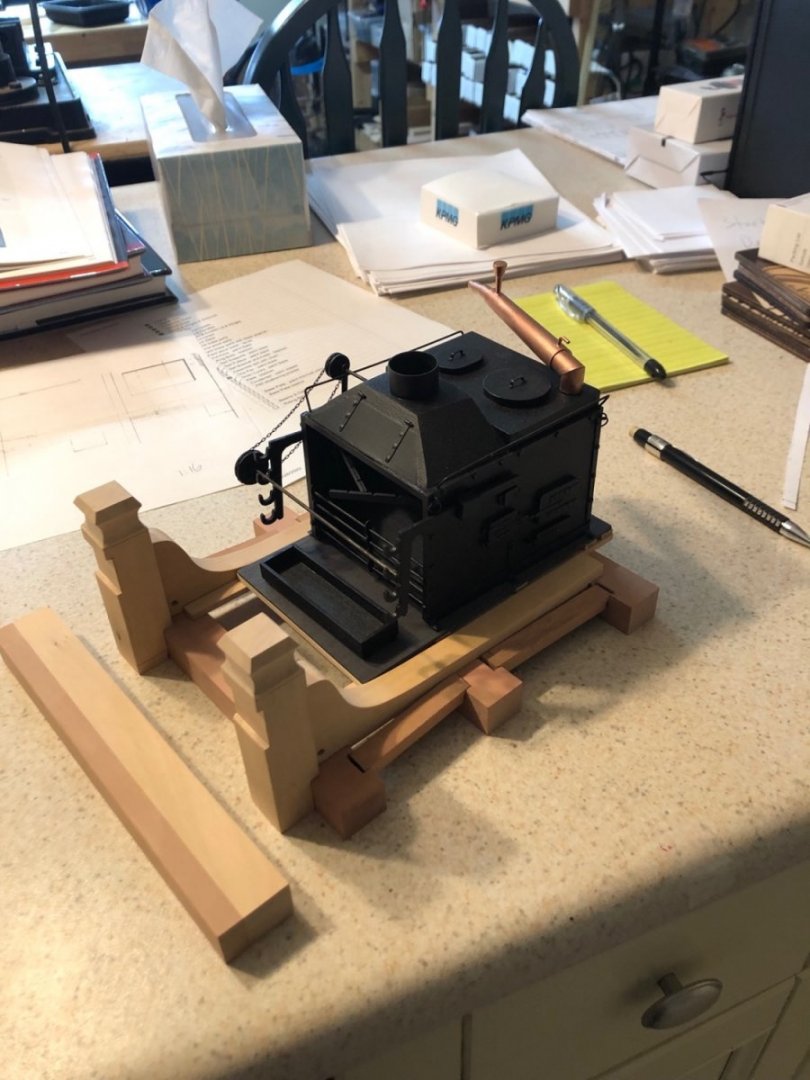
After giving the display base a coat of wipe on poly, I glued the stove to the base then the base to the supports on the beams. This completes the stove project. This was another fun scratch build. Here is the stove displayed next to the capstan and ship's wheel. And here are the two stoves together. Thanks for following along. My focus now will be on finishing up the Duchess of Kingston, but I may have another scratch build in the future.

-
I finished the rudder and glued it to the hull. I then glued the gudgeon straps to the hull.

- 118 replies
-
- 4
-
-
- Duchess Of Kingston
- Finished
- (and 1 more)
-
I assembled the three wooden parts of the rudder and removed the char. I glued the straps to each side, using one pin to align the strap to the holes. I rotated the strap on the pin, put glue on the rudder and rotated the strap back until I could see the holes were aligned. I then drilled holes in the rudder notches and glued a piece of wire in each one. I added wooden gudgeons from Syren to the wires instead of the supplied PE gudgeons as I think they look more realistic. I don't have enough brass pins left to fill all the holes in the straps but I found some brass nails that have a very similar head size so I will use them on one side. I also need to give the rudder a coat of wipe on poly before attaching it to the hull.

- 118 replies
-
- 5
-
-
- Duchess Of Kingston
- Finished
- (and 1 more)
-
The display base is assembled and is now ready for some wipe on poly.
-
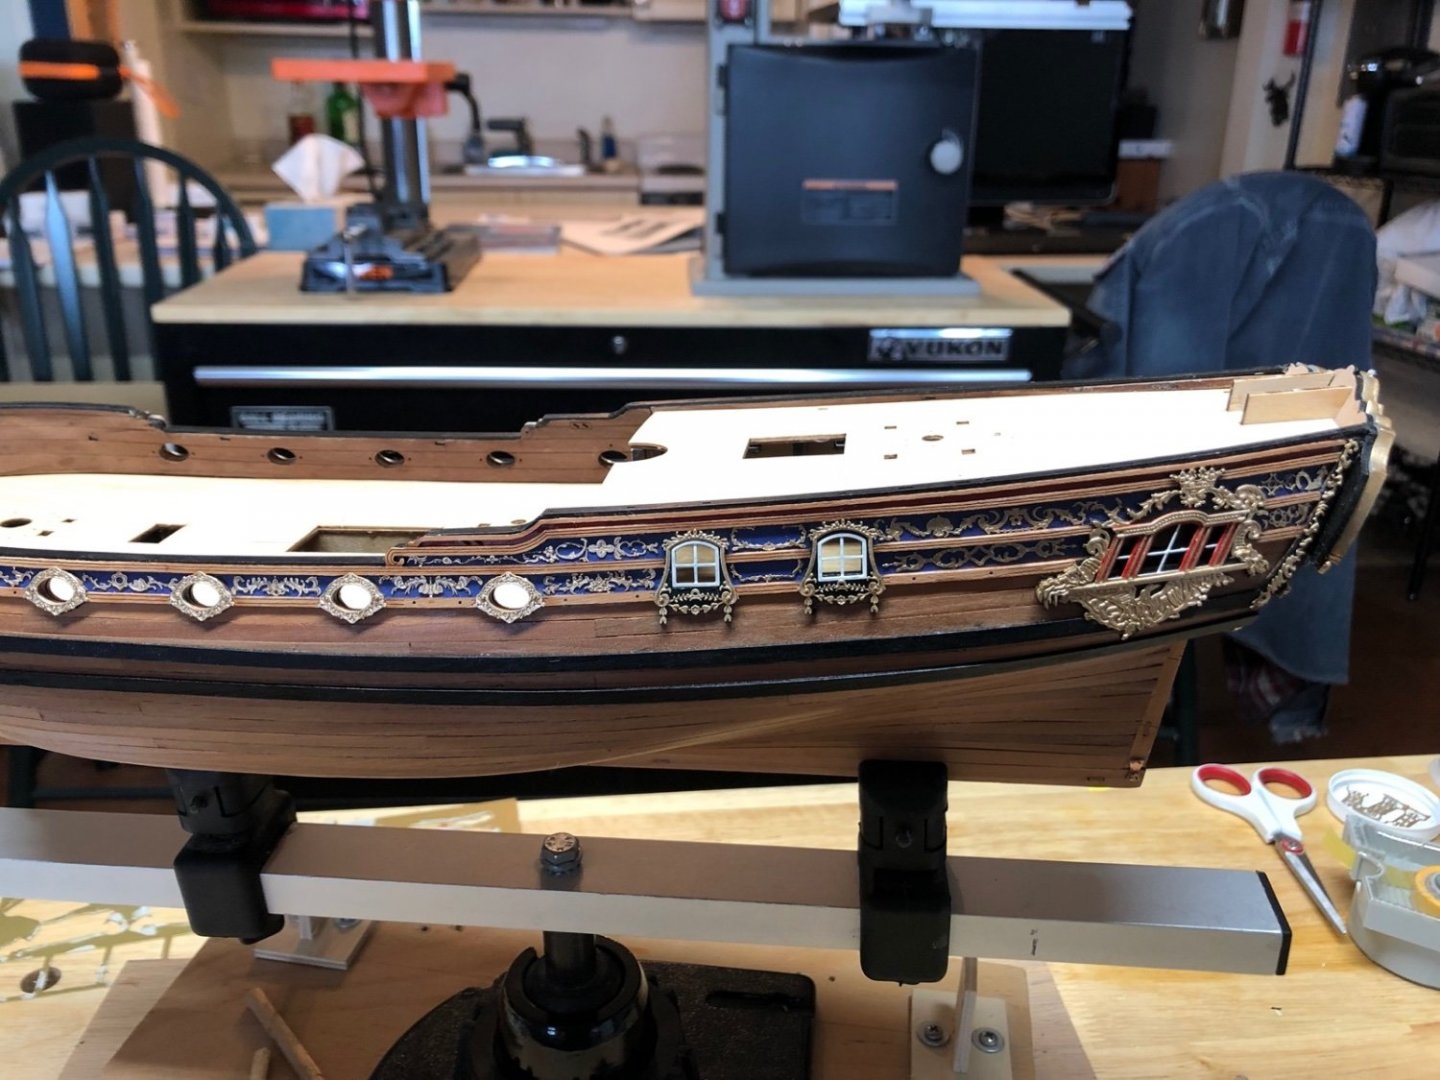
I finished adding the quarter gallery photo etch pieces, as well as the PE gun port frames. Having the holes and pins to align everything worked really well. Later I added the scupper covers to the hull too. So far I have only lost one PE piece, the cat head end, but @chris watton was kind enough to include two extras with the kit. I thought I had lost one of the scupper covers, and there are no extras included, but I found it on the bench while installing the others. I was greatly relieved. I also touched up all the nail heads with gold paint, even though the brass color blended in pretty well. Next up is assembling and installing the rudder.
- 118 replies
-
- 9
-
-
- Duchess Of Kingston
- Finished
- (and 1 more)
-
Mark, your stove looks great, as does the rest of your model. Your picture got me thinking though (not always a good thing). The references I have been using have the stove installed with the spit at the aft end. This would make it even tighter with the doors, which I think go between the bitt pin and the stove on this model, so the way you have it would make more sense. Lavery shows a stove in the orientation you show, although it is not labeled fore and aft. Is the stove orientation something that could go either way do you think?
- 505 replies
-
- 6
-
-
- vanguard models
- Sphinx
- (and 1 more)
-
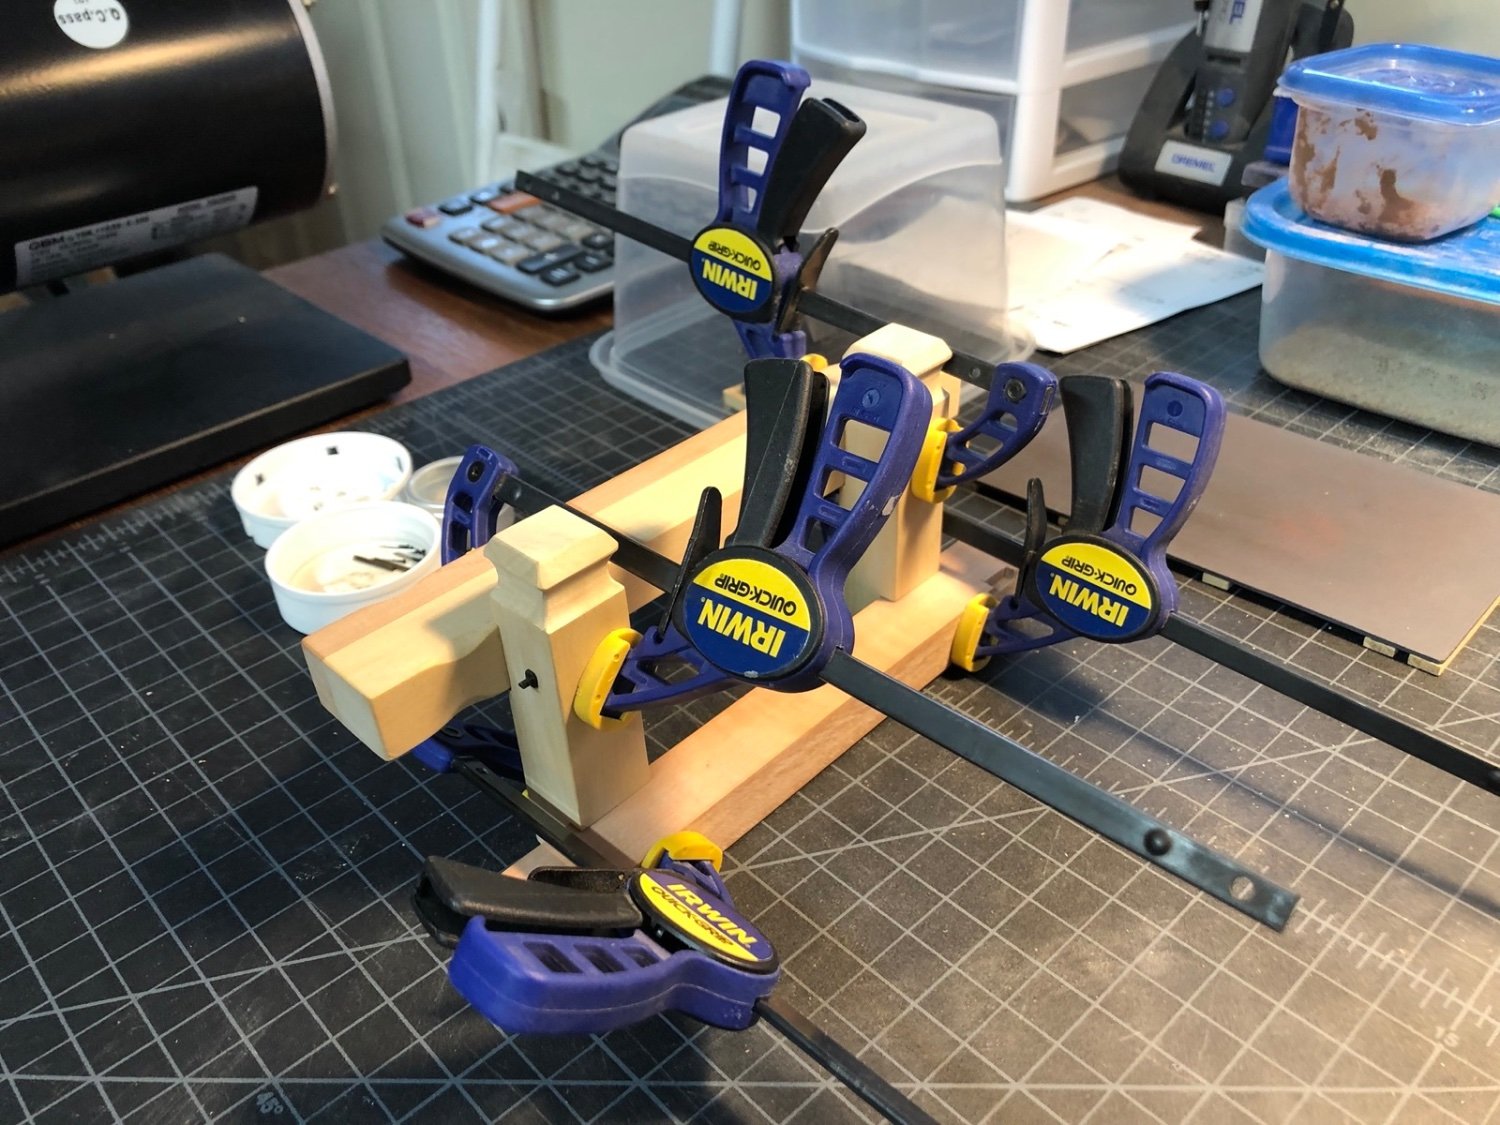
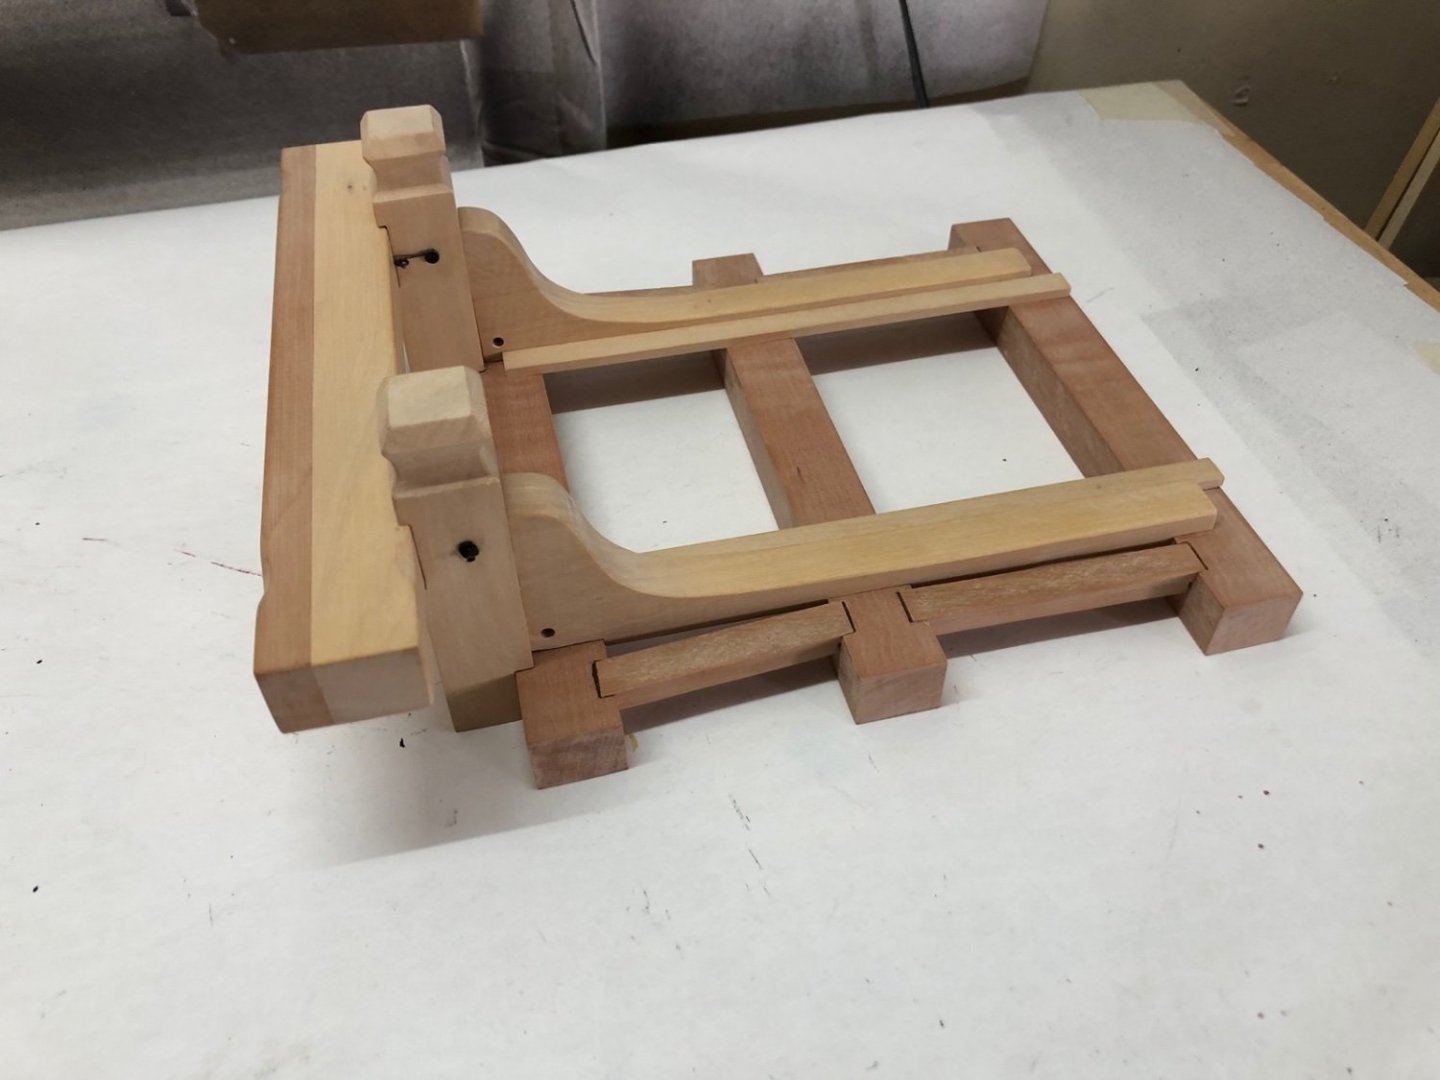
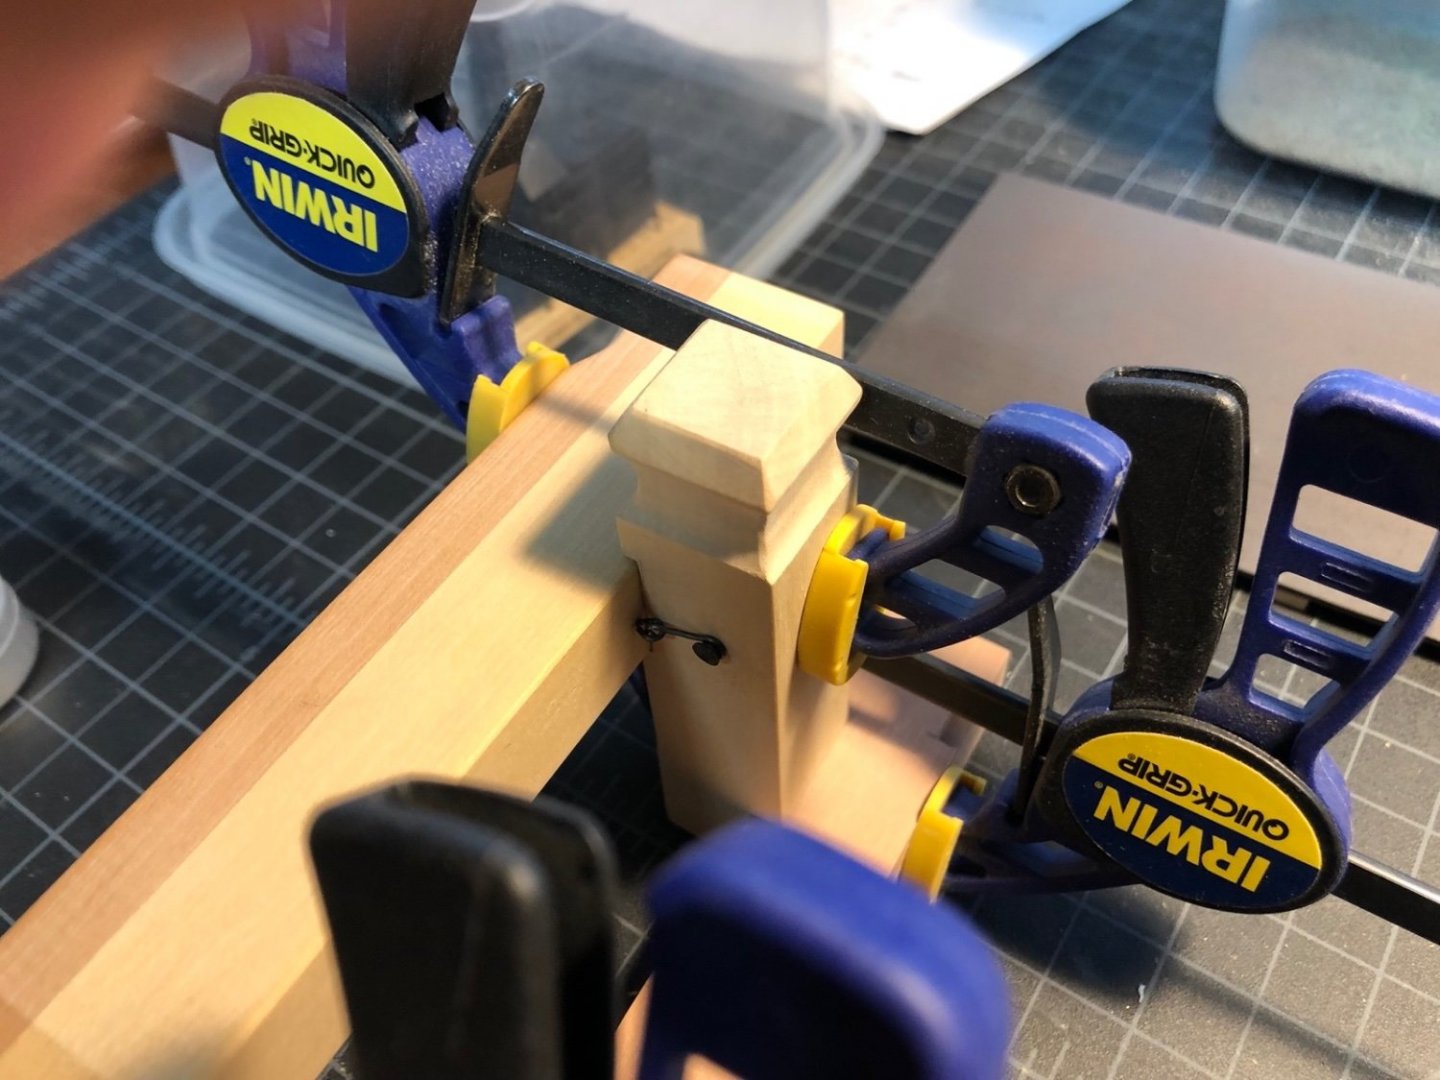
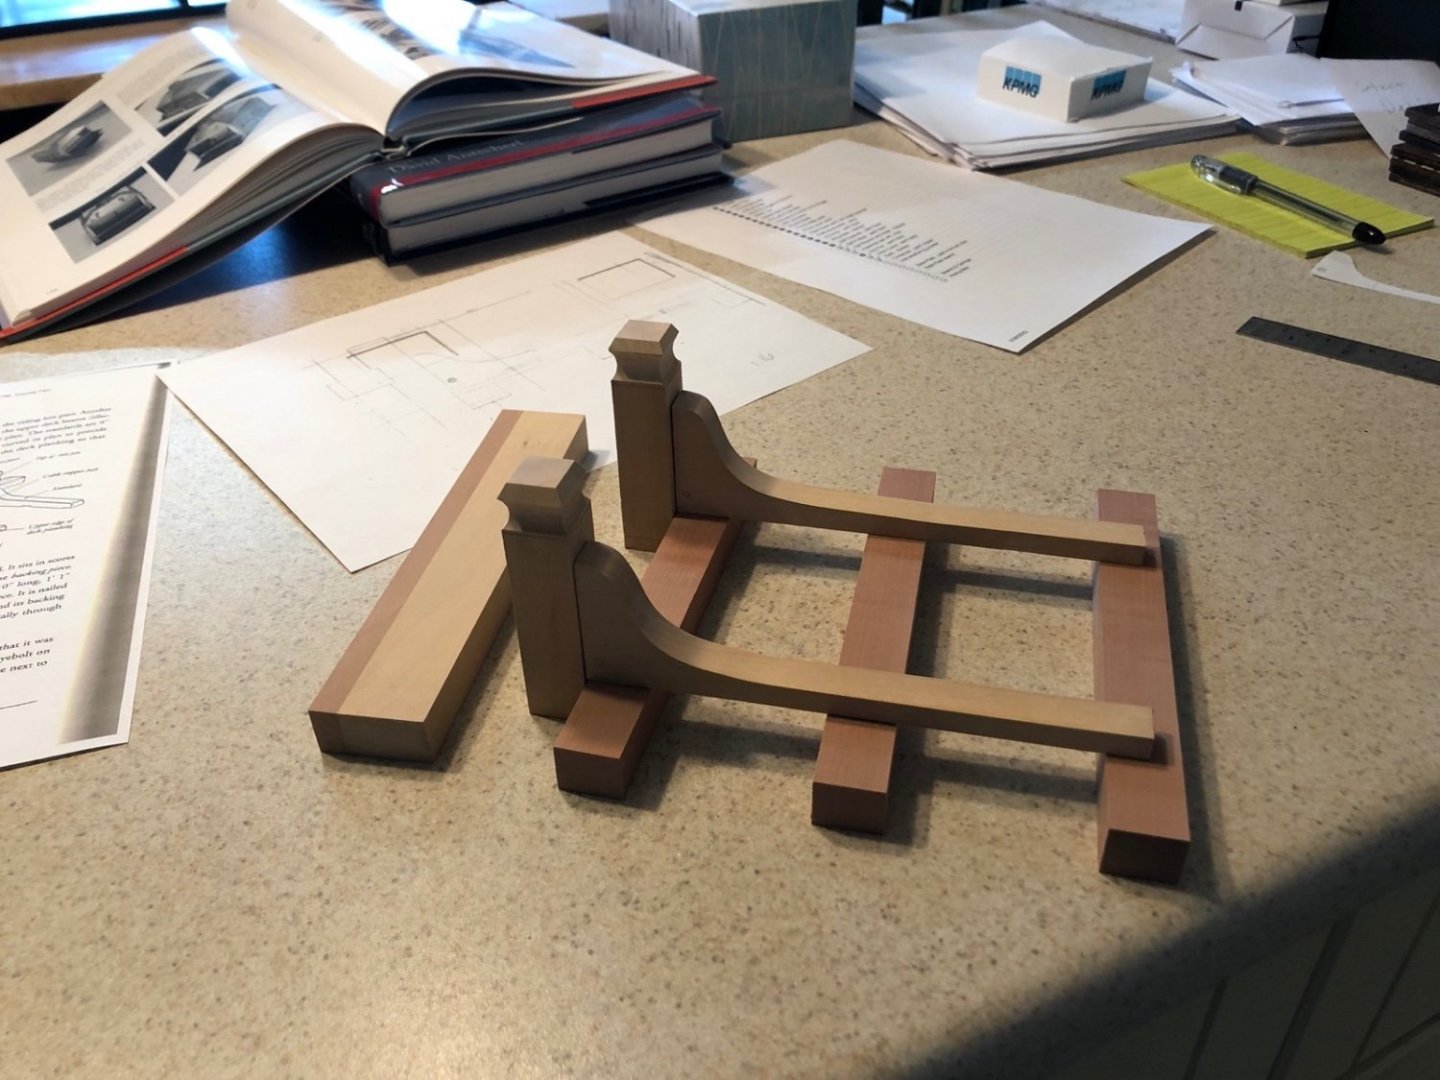
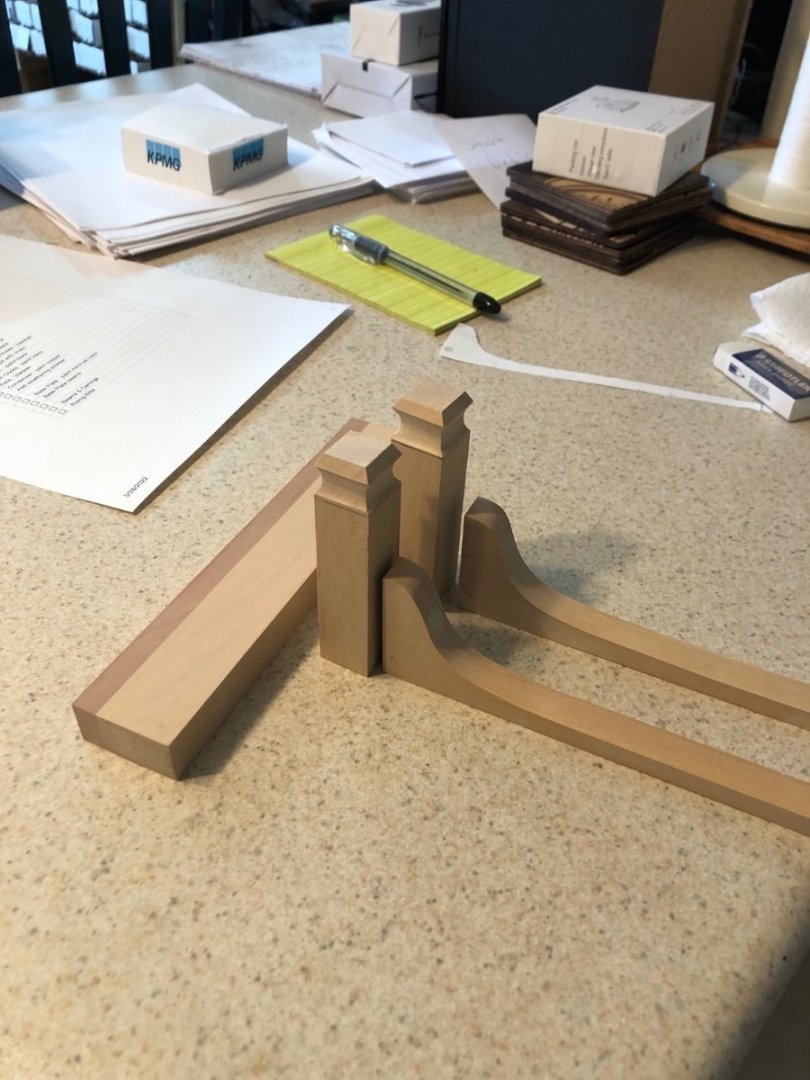
Over the last few days I have been getting everything ready to assemble. I rounded the edges of the bitt pins and standards and blackened some nails for the bolts that hold the standards to the beams. I also rounded the edges on the cross piece and filed in the round indents using a half round file. I also made the hooks and eyebolts that hold the cross piece to the bitt pins. I used 28 gauge wire for these and a larger piece of brass rod for the bolts. I also made square nuts from some brass strip. To hold the hooks to the bolts, I soldered a piece of brass to one end of the brass bolts, then rough cut it to a circular shape, chucked the rod in the lathe, and rounded the brass with a file. I placed the hook on the rod, pushed it through holes I drilled in the bitt pins, and glued the square nut to the other end to hold it all together. I then glued the eyebolts into the cross piece, lining them upon with the hooks. Today I have finally started to assemble the display for the stove. I started by gluing the bitt pins to the cross piece, clamping them together while the glue dries and clamping the bitt pins to the beam they will sit on to make sure they will sit flat to the beam. And here is a closeup of one of the hooks and eyebolts. Once this dries, I can start gluing up the beams and carlings, as I now have the spacing of the bitt pins which everything else will be based on.

-
Thank you Bob and the likes too. Much appreciated. I spent today adding the phot etch decorations down the sides of the hull. It was a tight fit for a few of them but mostly they went in without any problems. I did have to touch up the gold paint on a few of them for spots that I had missed when I first painted them. It is very hard for me to see gold on brass when I was painting them but the light I had over the model when adding them made it easier to see the spots. I again used thin CA to hold these down and the longer pieces I did in stages, which helped a lot. I still have to do the trim around the quarter galleries and the gun ports, so that will be next.
- 118 replies
-
- 8
-
-
- Duchess Of Kingston
- Finished
- (and 1 more)
-
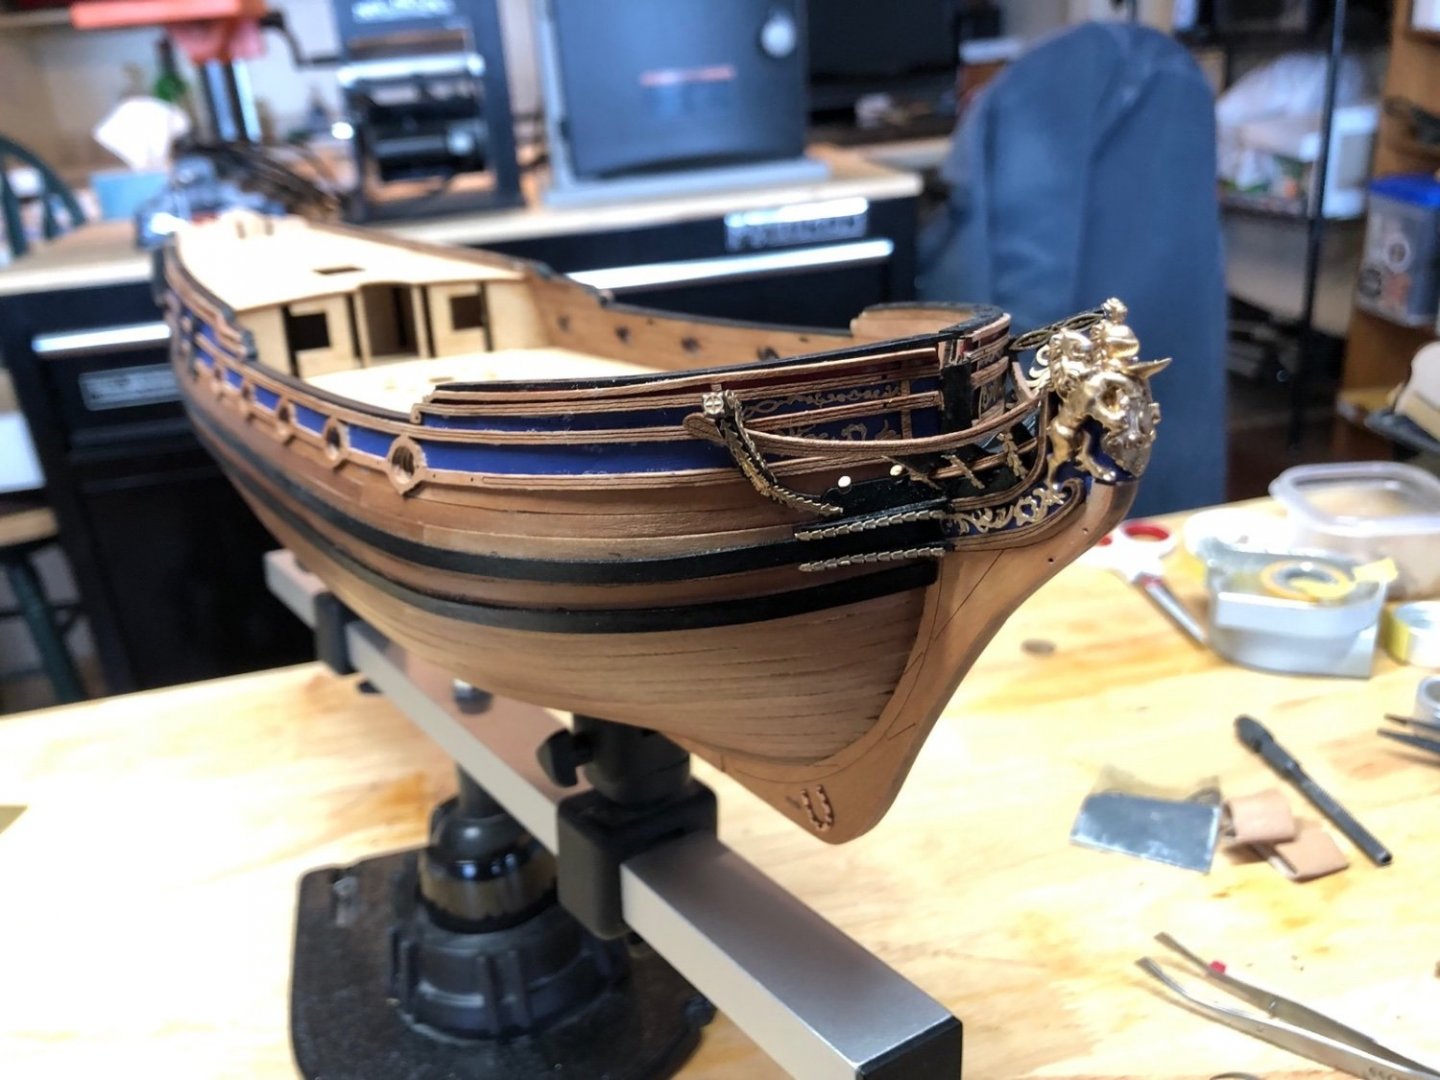
I finished up the bow section today. This entailed the catheads and their brackets, the head rails and their brackets, the hawse bolsters, and all the photo etch decorations that adorn them. I started using floor finish to glue the flat PE parts but switched back to CA as those that I glued with the floor finish had a tendency to fall off. I am not sure if I was not using enough or not holding them long enough so they set right. In any case the CA works great and holds the pieces nicely so I'll stick with it for the rest. The next step is to add the rest of the PE decorations down the sides of the hull.


- 118 replies
-
- 8
-
-
- Duchess Of Kingston
- Finished
- (and 1 more)
-
Alan, most of the reference drawings and images I am using are from The Fully Framed Model (TFFM) series of books by David Antscherl. I also have a sheer plan of a similar ship that shows the shape and location of the bitt pins and standards.
-
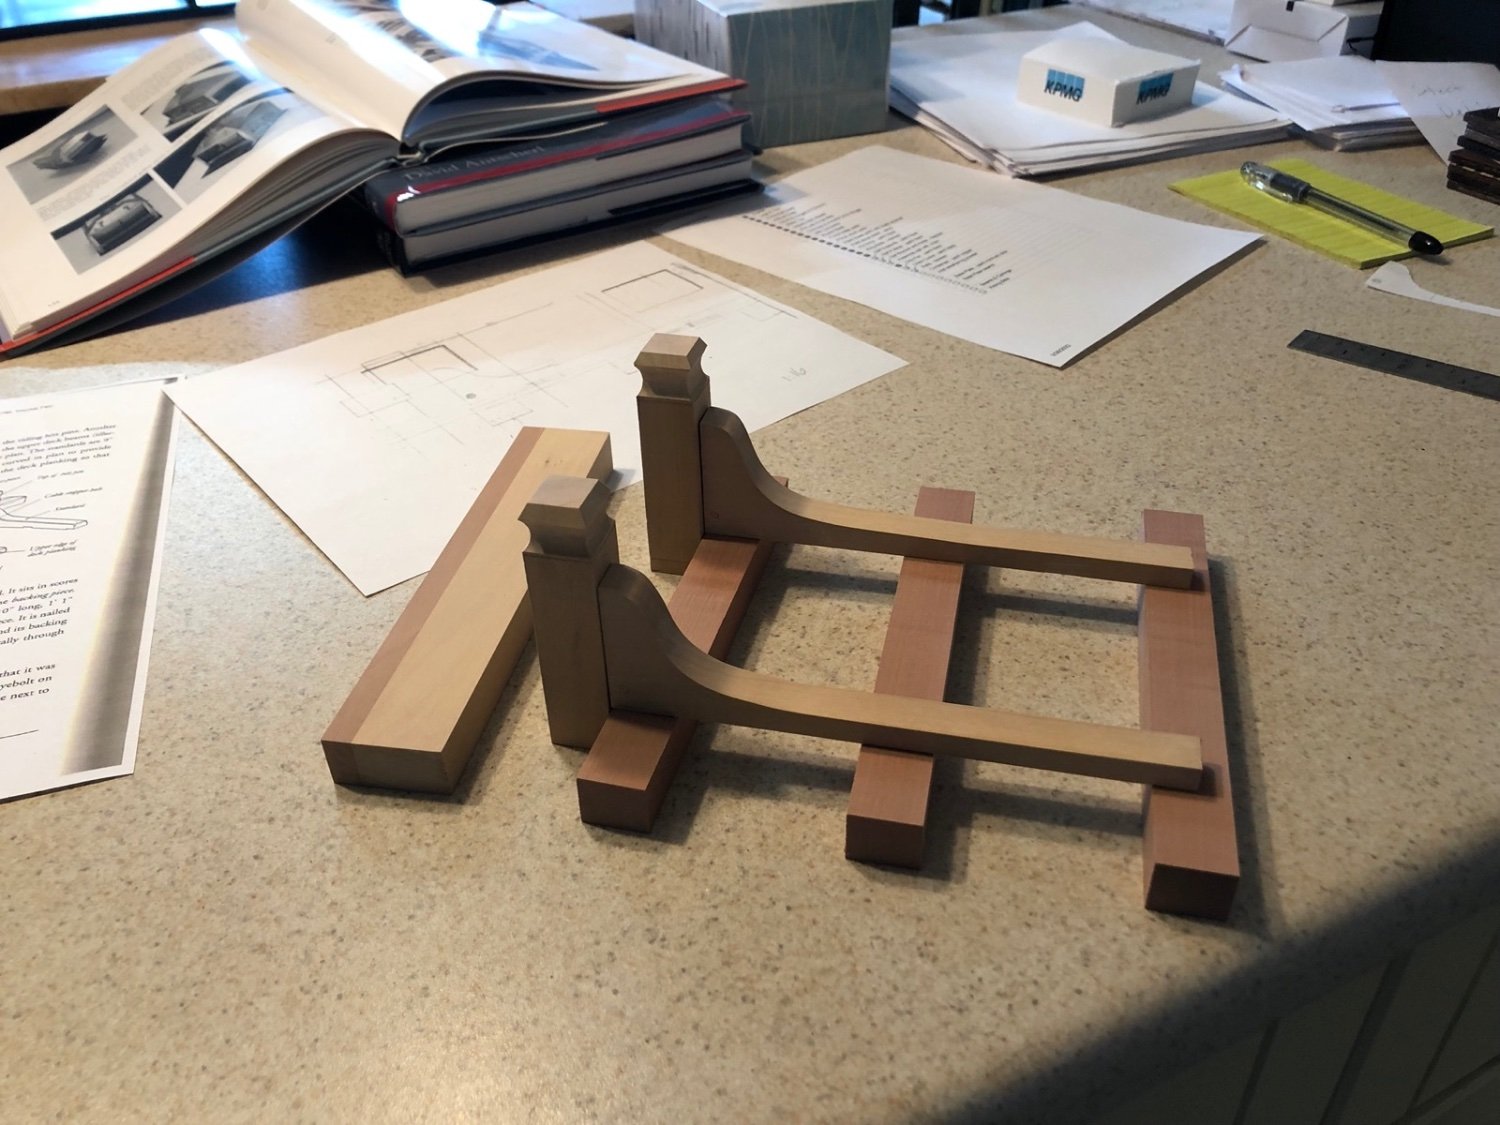
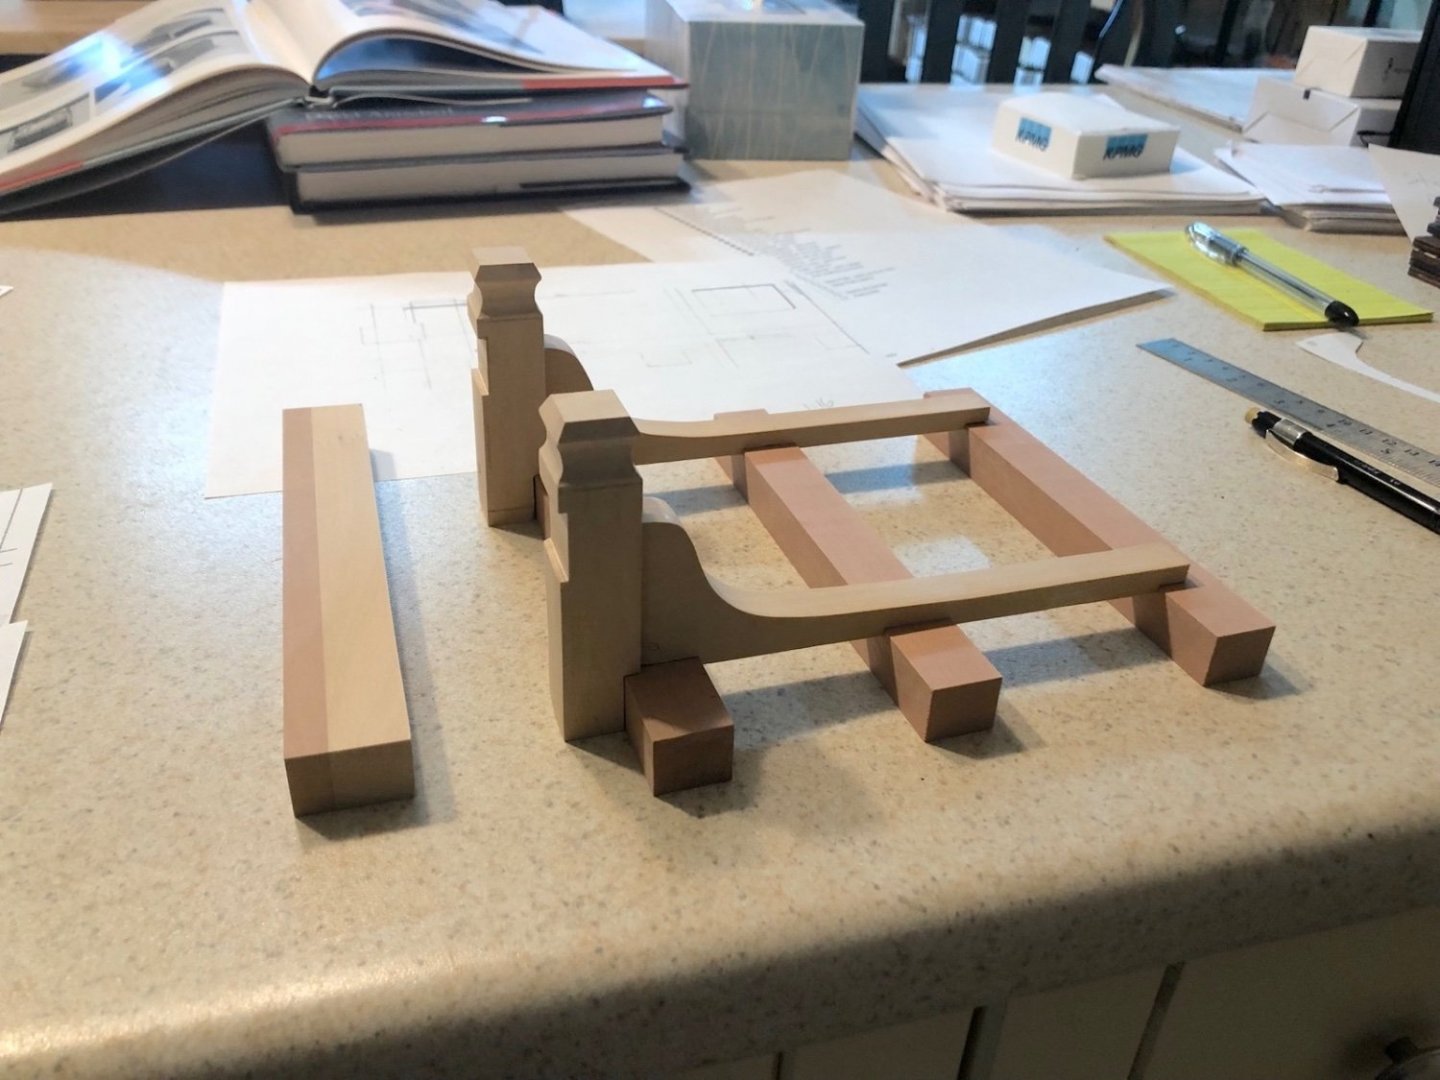
I made the carlings the same way I did on the capstan project. I first milled the notches in the beams and cleaned them up with a small chisel. I cut the tenons in the ends of the carlings with a razor saw to fit into the notches. The plans show these angling toward the center which I was able to do with the carlings between the aft and middle beams. The notices were milled at the 87 degree angle of the carlings so the ends fit correctly in them. The plans show the carlings between the middle and fore beam are also angled and go under the standards, but the standards are notched to fit down over the beams. I could either have removed some of the bottom of the standards to fit over the top of the carlings but I decided to just fit them so they didn't go under the standards. I also added two boards along the insides of the standards on the three beams that the stove base plate sits on, since it does extend all the way to the aft beam. The legs on each end of the stove line up nicely with the middle and fore beams. Here is everything so far dry fit. Next I will clean up all these pieces, round the appropriate edges, and add the details to the cross piece. Then I can start putting them all together.
-
I added notches to the front of the bitt pins for the cross piece and to the back for the beam they are attached to. I also cut down the width of the cross piece to the correct size. I then cut notches into the standards for the three beams they sit on. I will be making the carlings next.
-
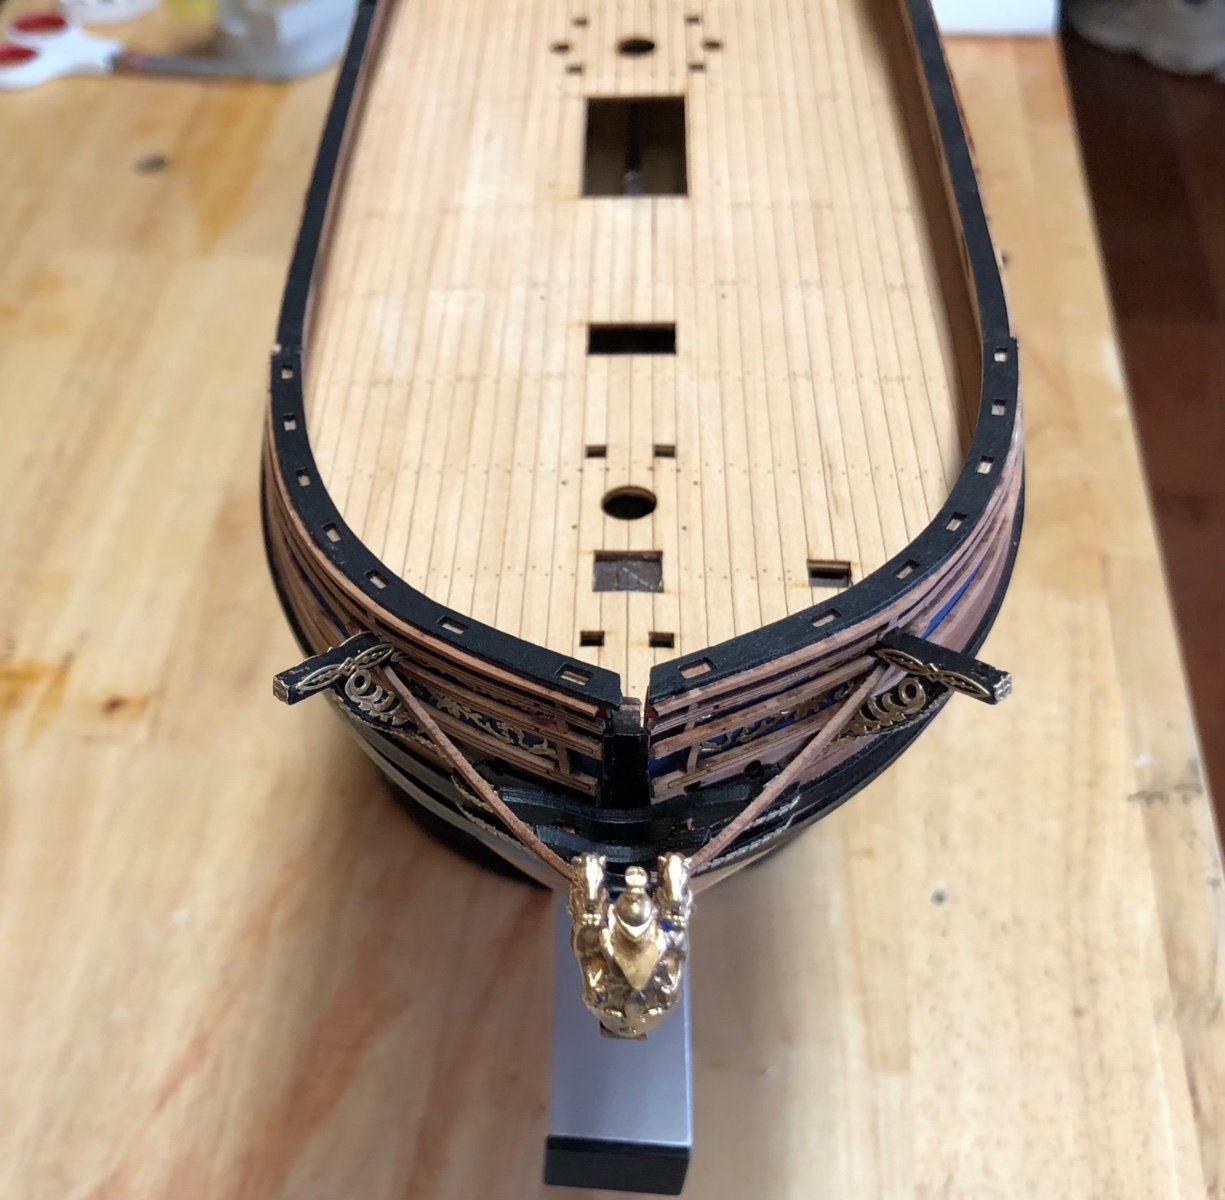
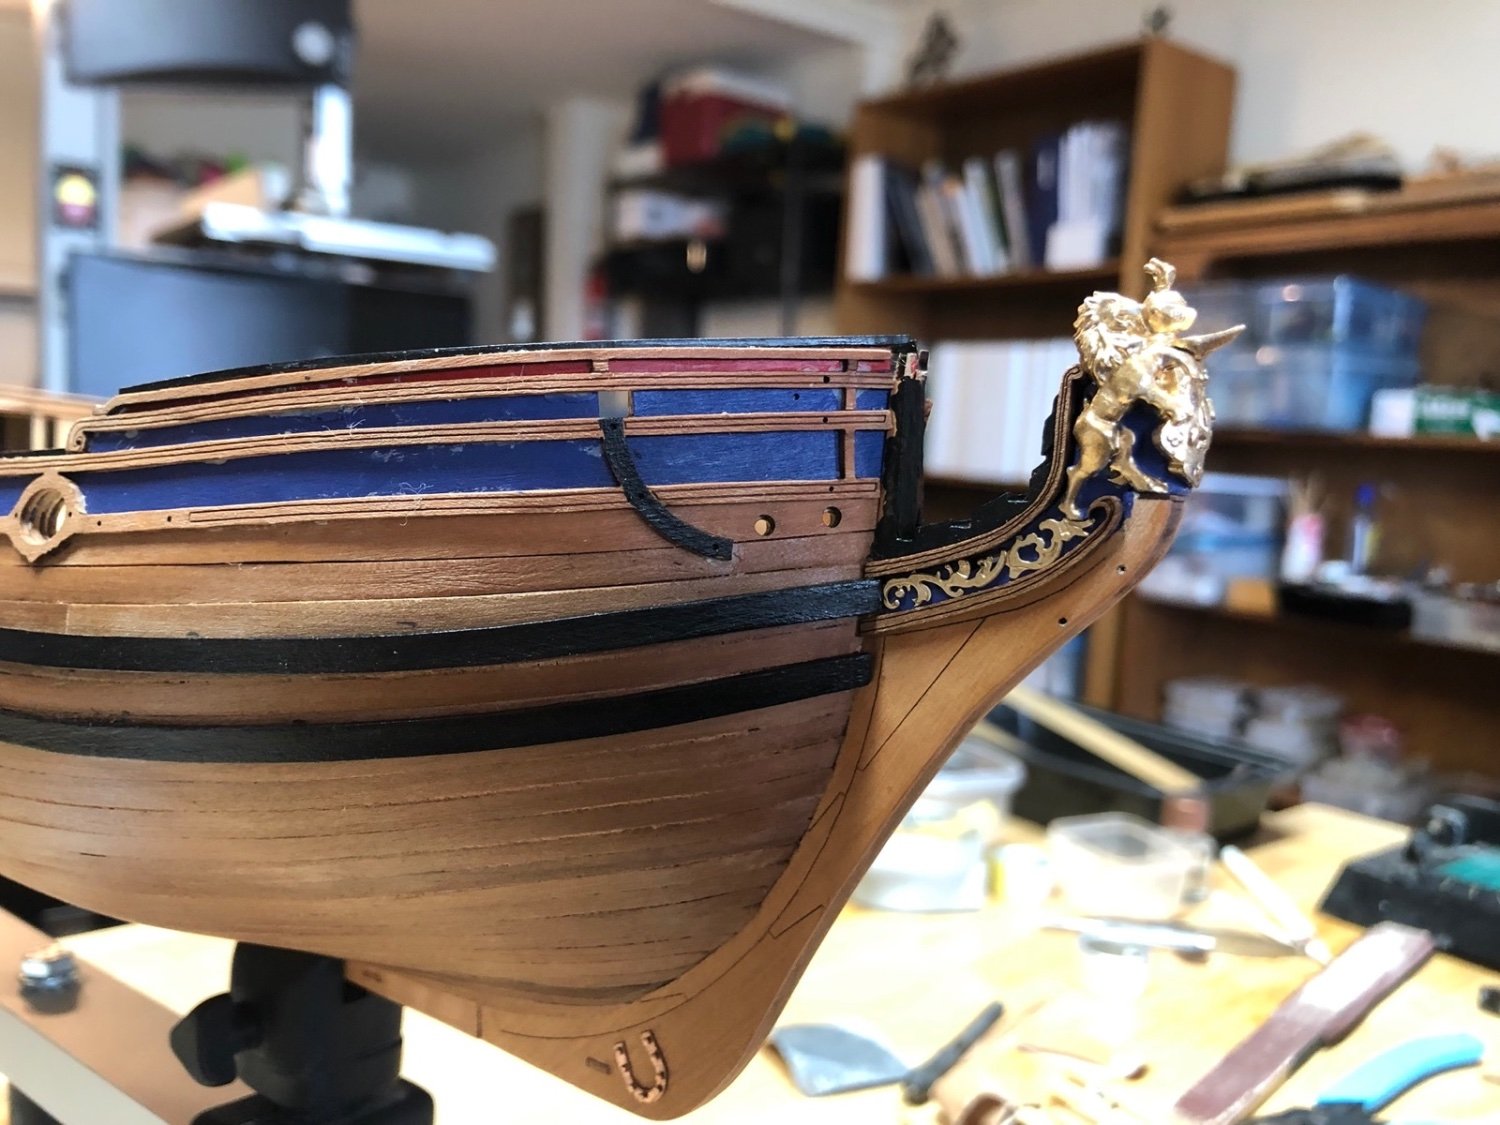
I glued the figurehead in place and cleaned up the slight gaps with the stem. I added the cheek rails and the photo etch trim that goes between them. More rails to add but first they are being painted black.

- 118 replies
-
- 8
-
-
- Duchess Of Kingston
- Finished
- (and 1 more)
-
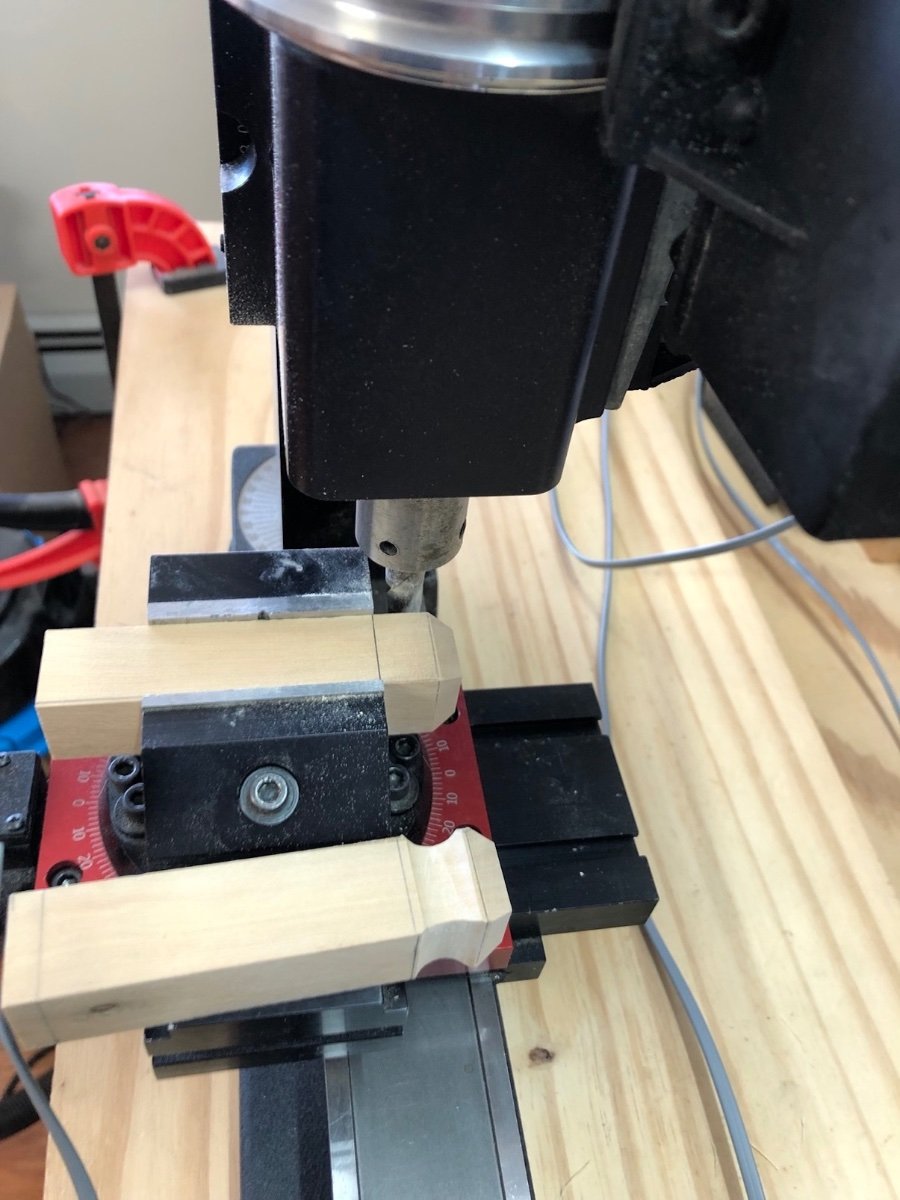
Thank you Albert, Gary, and bdgiantman2, and for those who hit the like button. A chicken might be too big but a small squab might fit. 😀 I have been working on the riding bitt pieces for the display. I glued a piece of pear to the boxwood cross piece and ran them through the thickness sander to even up the tops and bottoms. I then used the disk sander to shape the tops of the bitt pins and the mill to shape the curved section. I used the largest end mill bit I had and made two cuts of equal depth on each side then a third cut in the middle a little deeper. I used a large round file to remove the ridges and some sand paper to even out the curve. Here is the set up I used in the mill. And the result with the other riding bitt pieces. Then this afternoon the post woman showed up with three nice pieces of Swiss pear that I had ordered from the Lumberyard for Model Shipwrights. I had to cut the three beams for the display from one of the pieces. I used the bandsaw with much better success this time by not using the fence but following a straight line by hand. I then ran them through the thickness sander to get them to the right thickness and even up the tops and bottoms. I was then able to run them through the table saw to even up the sides and get them to the right width and length. So here you can get an idea of how the display is going to look. The base and stove will sit on the forward two beams between the standards. Next up is notching everything to fit together and making the carlings to go between the beams.


-
After trimming the gold wood trim pieces, one more photo etch piece, a couple of tiny wood filler pieces and some touch up painting, the transom is complete. The focus now shifts to the bow. The figurehead is painted and ready to install and I very carefully removed the char from the cheek rails and brackets. I have also started painted the blue and black areas of the stem.
- 118 replies
-
- 8
-
-
- Duchess Of Kingston
- Finished
- (and 1 more)