HOLIDAY DONATION DRIVE - SUPPORT MSW - DO YOUR PART TO KEEP THIS GREAT FORUM GOING! (Only 75 donations so far out of 49,000 members - C'mon guys!)
×


usedtosail
-
Posts
2,409 -
Joined
-
Last visited
Content Type
Profiles
Forums
Gallery
Events
Everything posted by usedtosail
-
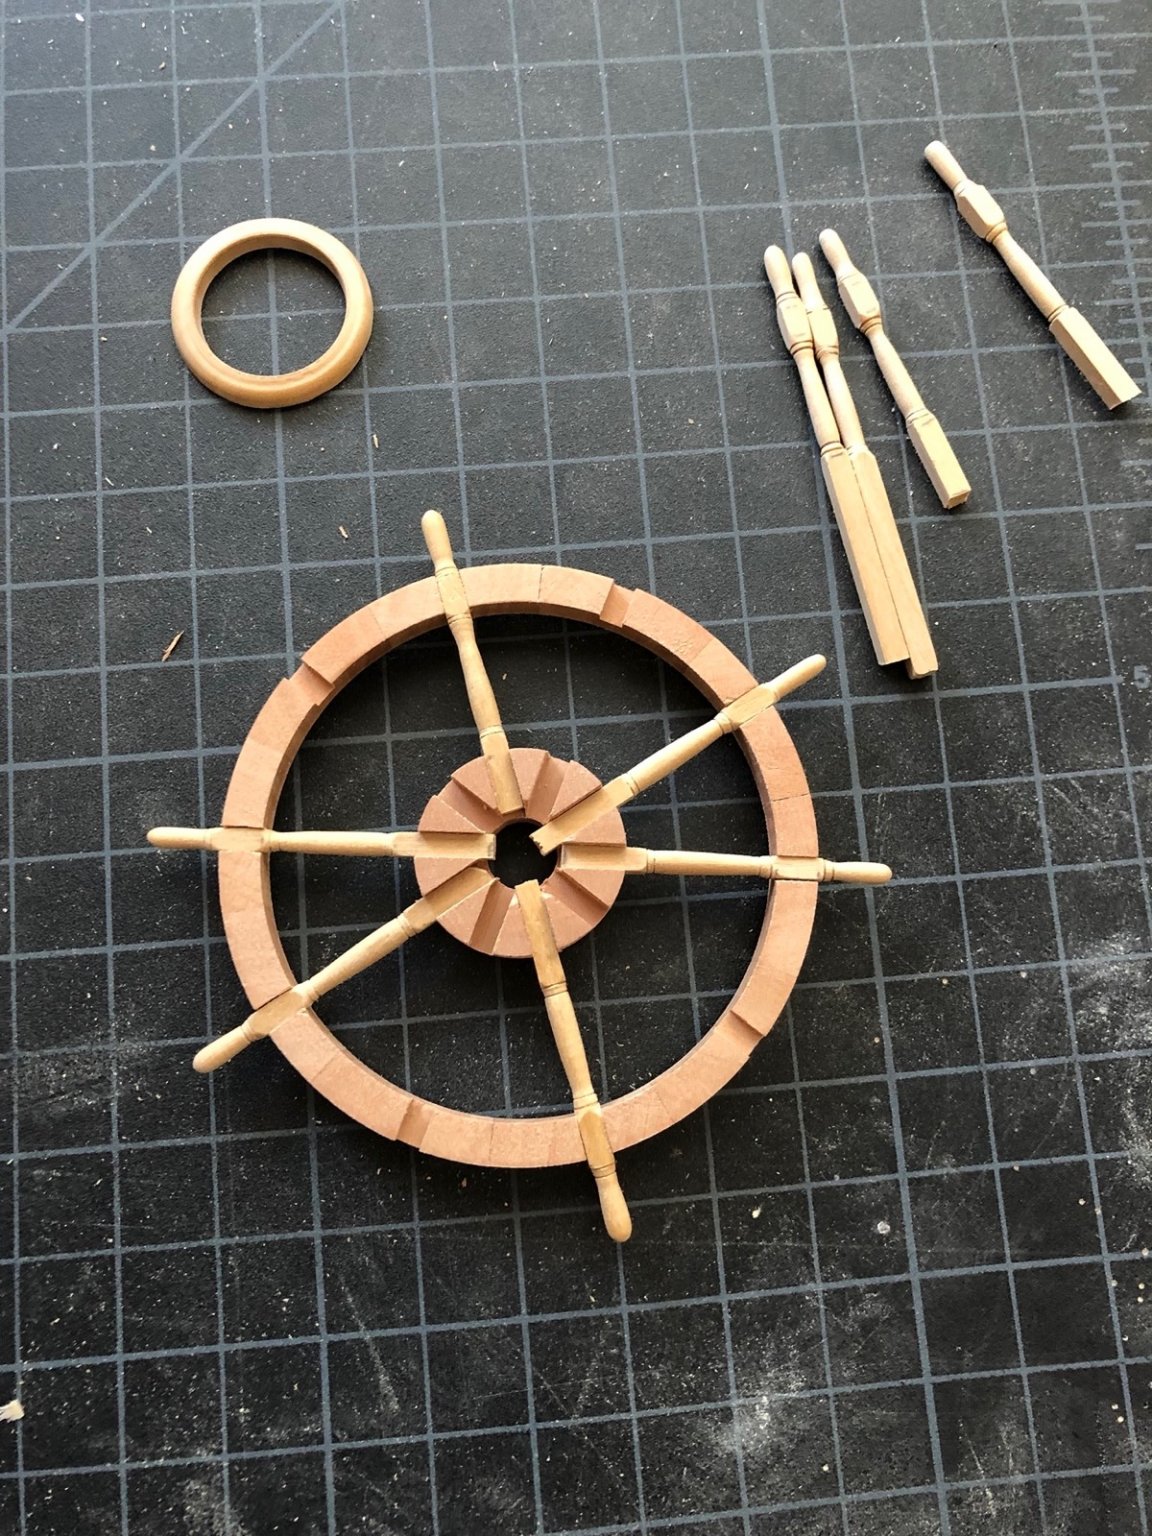
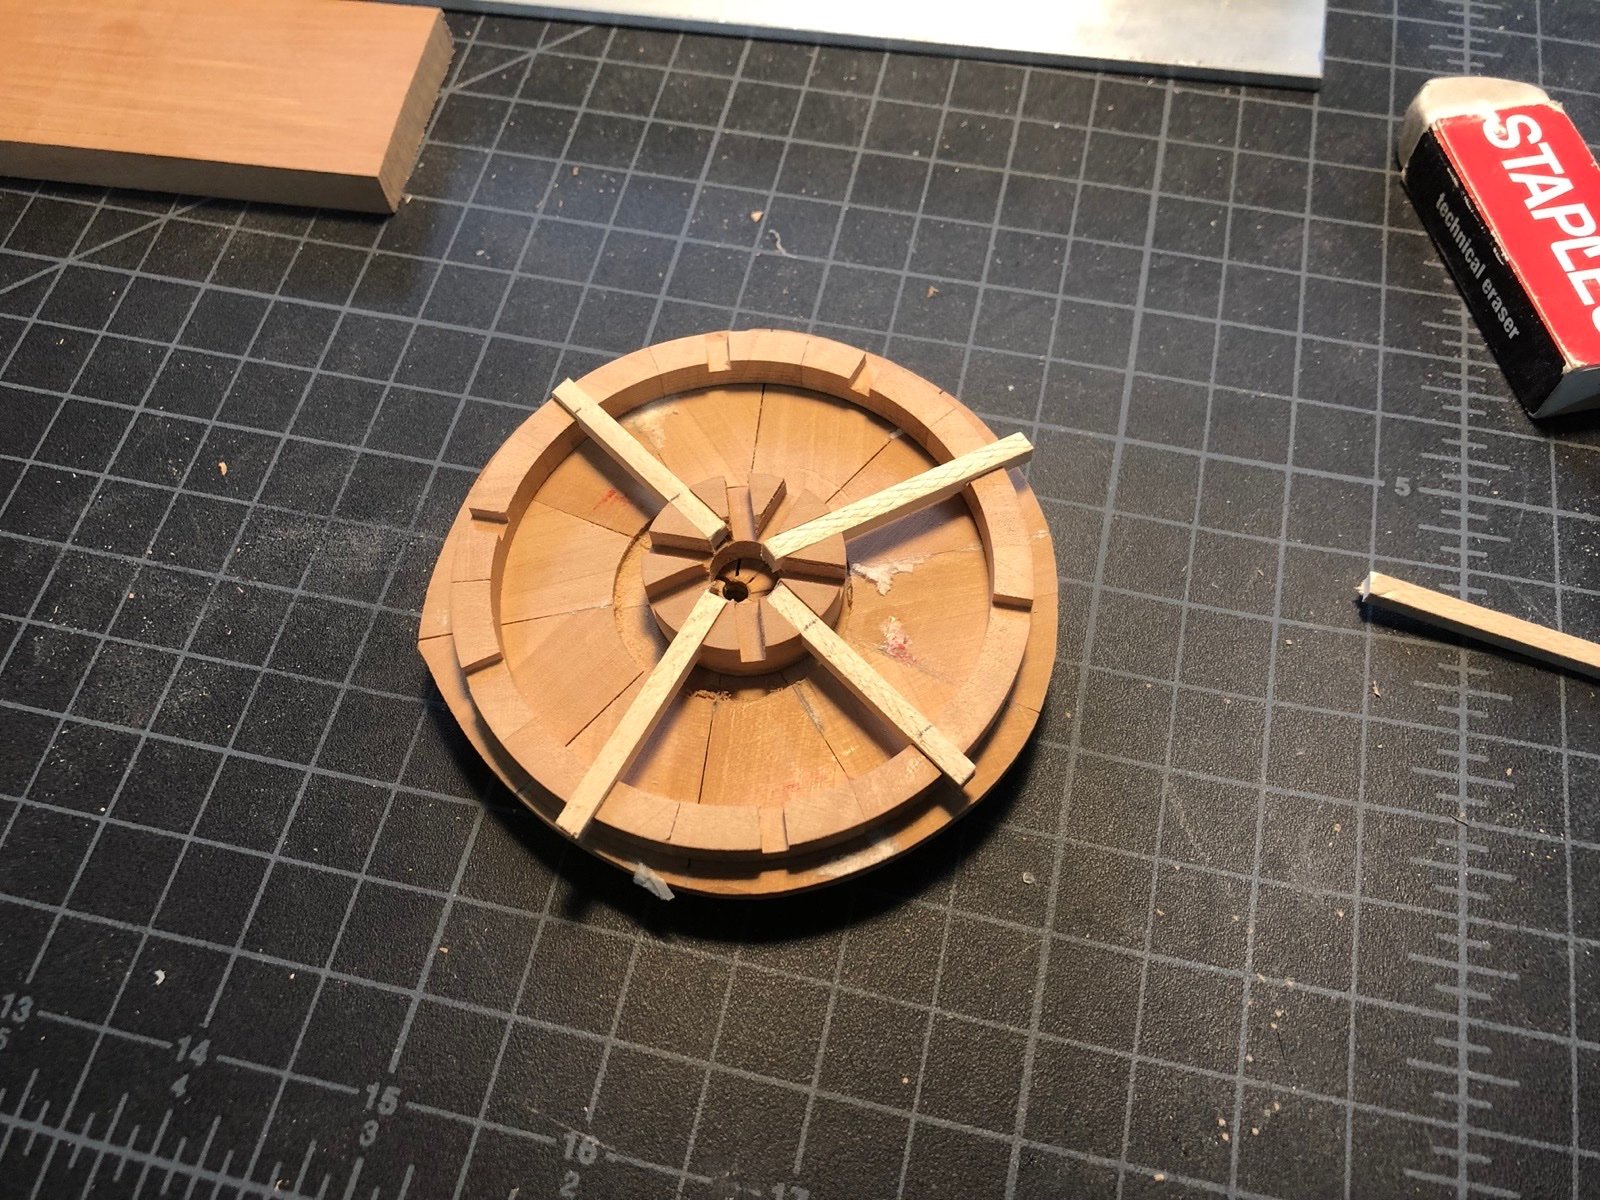
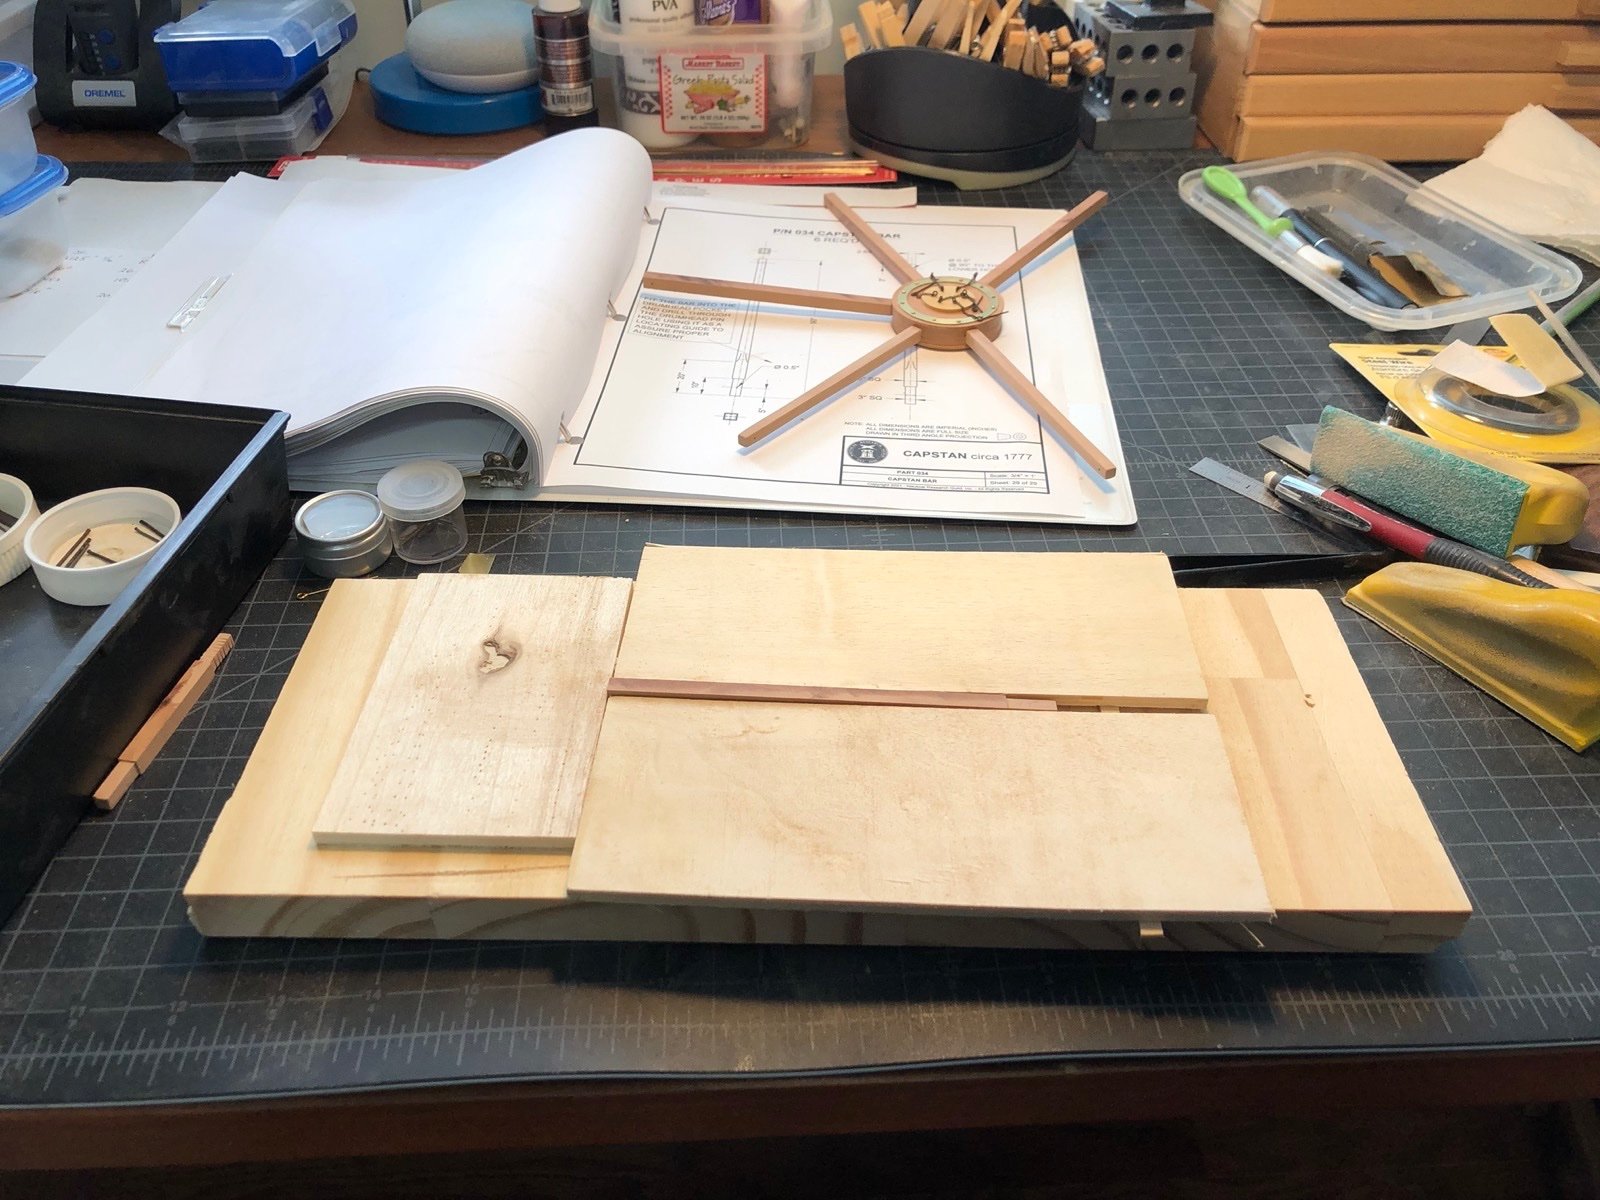
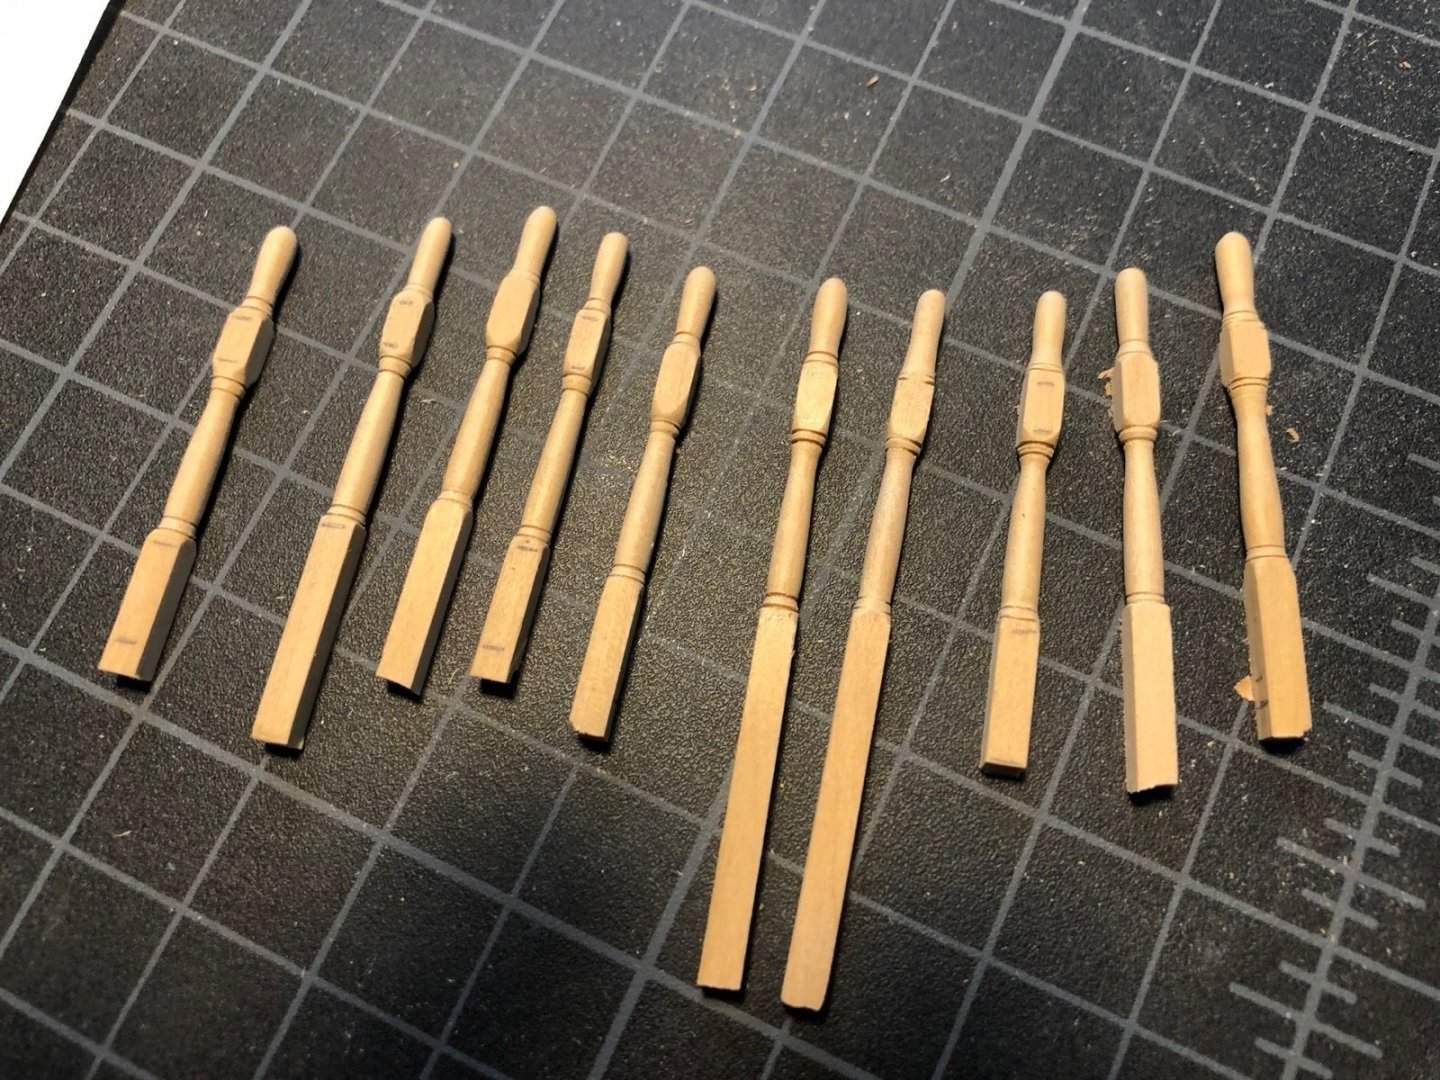
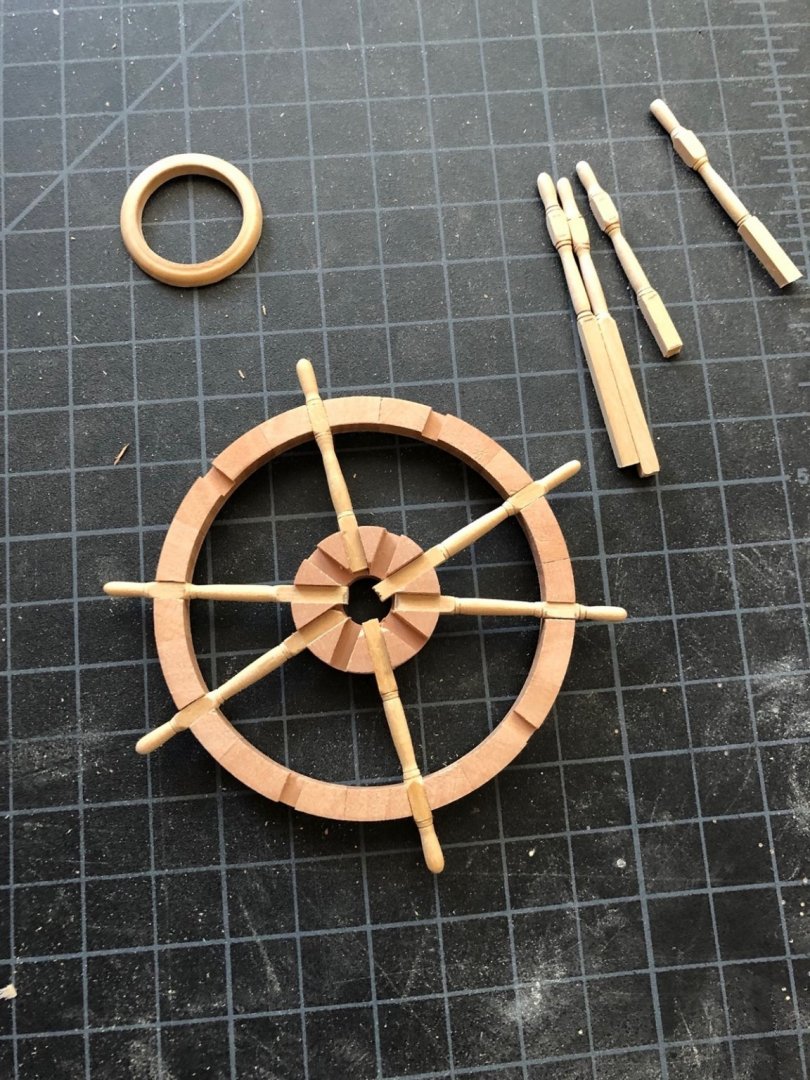
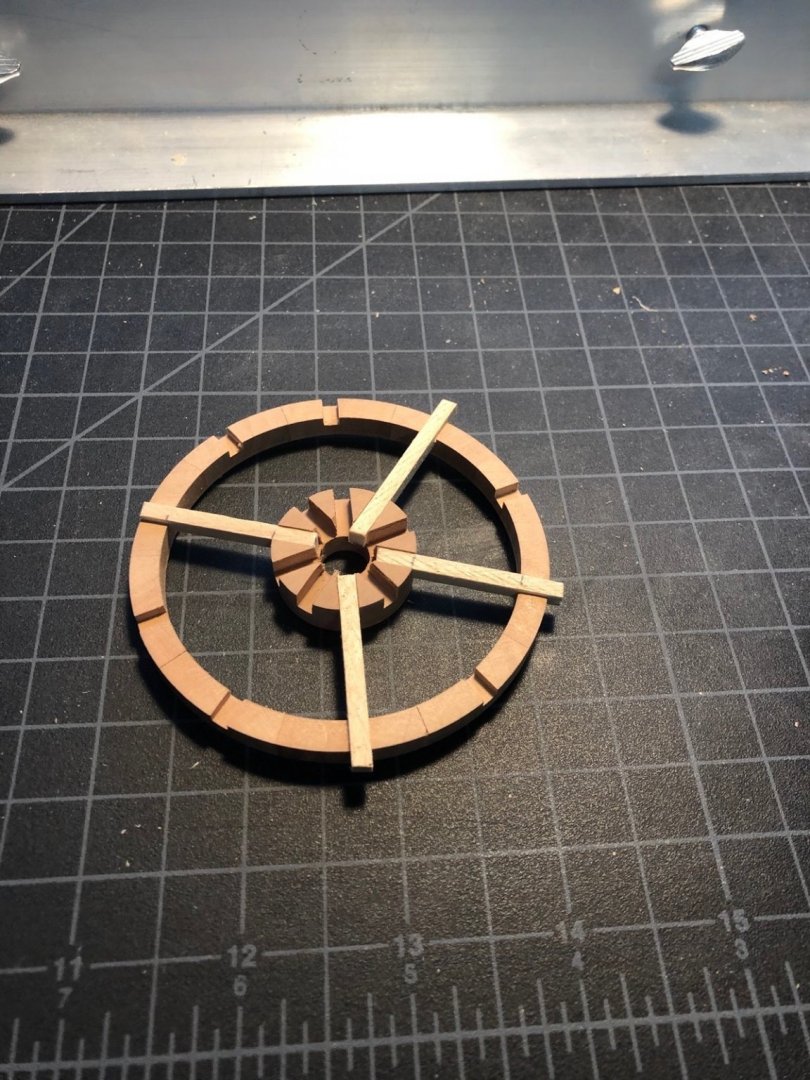
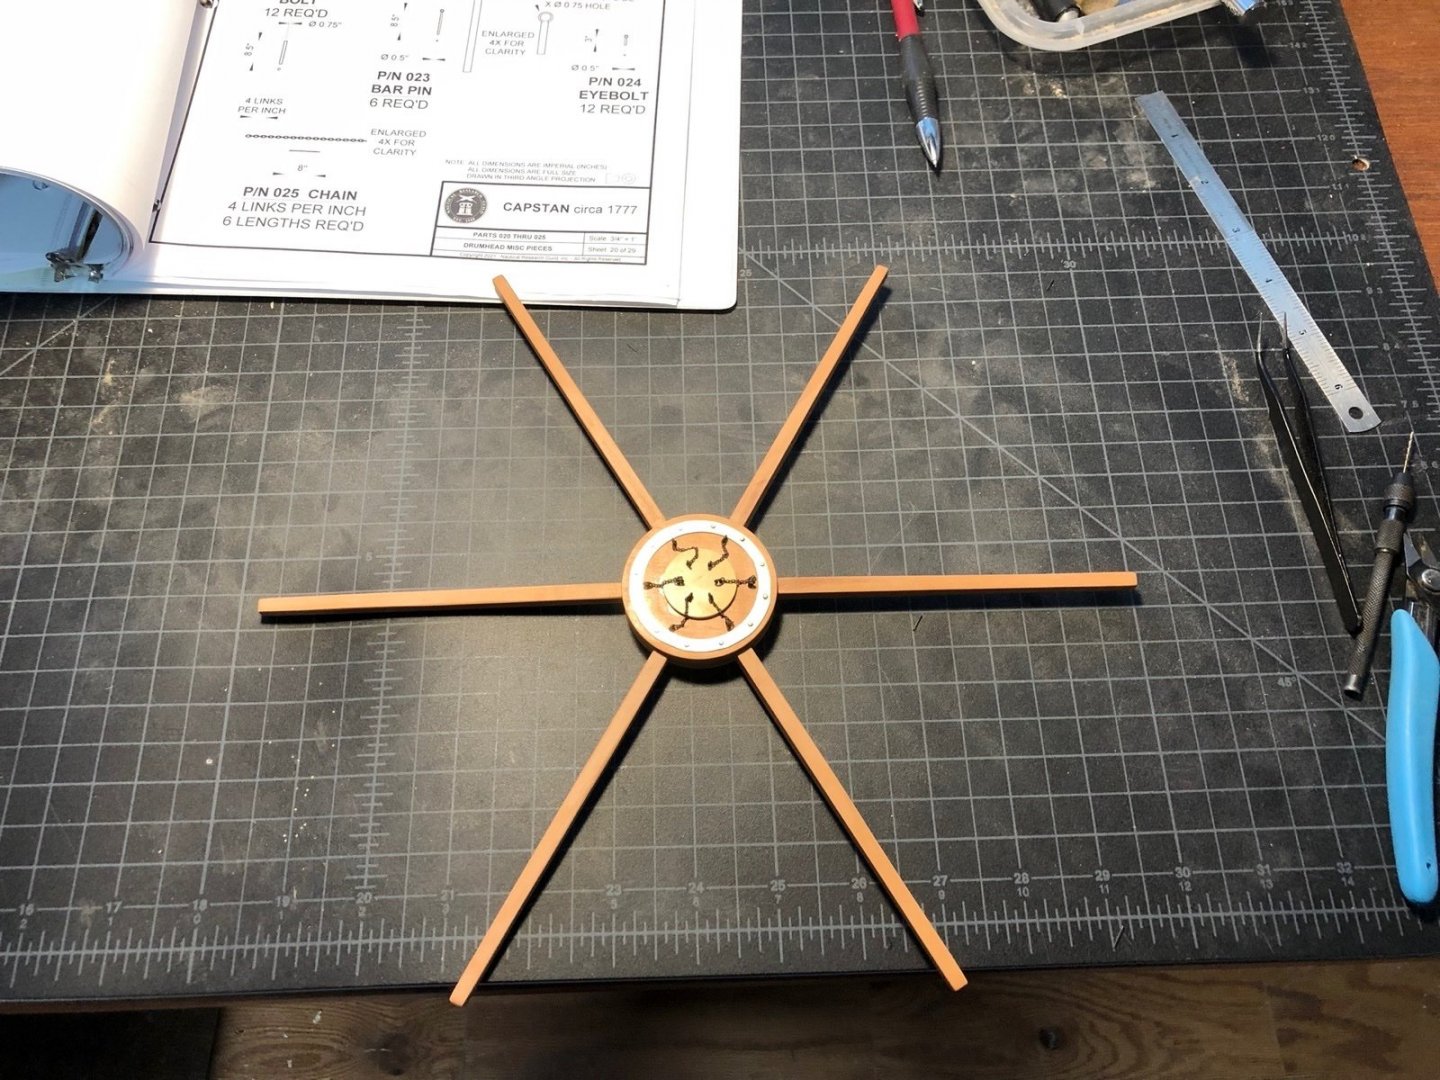
 I finished making the 10 spokes for the wheel then made one to experiment on. The plans in David's book show more detail on the spokes so I used the extra spoke to try adding detail with various small chisels. I found that using the tip of an X_Acto blade, resting on the steady rest, made a nice small groove so I added two grooves at each transition from round to square. While the spokes were in the lathe I also sanded the round sections with 400 grit sandpaper. I ended up remaking two of the spokes because I didn't like how they compared to the others. Here are the 10 spokes ready for fitting to the rim and hub. I started fitting the spokes to the rim and hub by first making sure the notches were wide and deep enough to fit the square sections of the spokes. I then filed a flat onto the back of the outer square section to fit around the rim. I then marked where the spoke met the hub and filed a flat from there to the end of the spoke. Here are the first 6 spokes dry fit. I will have to wait until tomorrow to finish the other four. You can also see the mast coat I made in the last picture. Just a simple ring really.
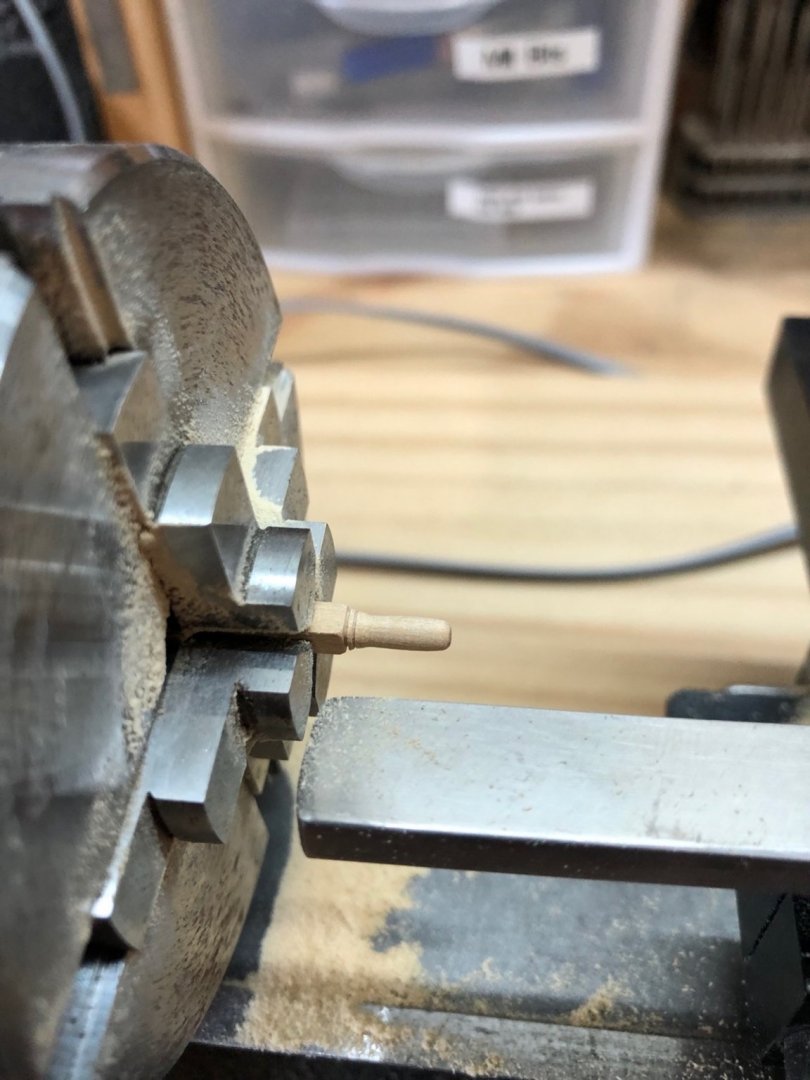
-
Nice work so far Grant. The gratings were a challenge for sure for me too. Yours look great.
-
I made the mast coat on the lathe but forgot to take pictures of the process and result. I did turn five of the 10 spokes today using the four jaw chuck in the lathe. I made one by marking off the square sections, then rounding and shaping the round sections using files and sandpaper. I used that first spoke as a guide for the others. I think these will work OK.
-
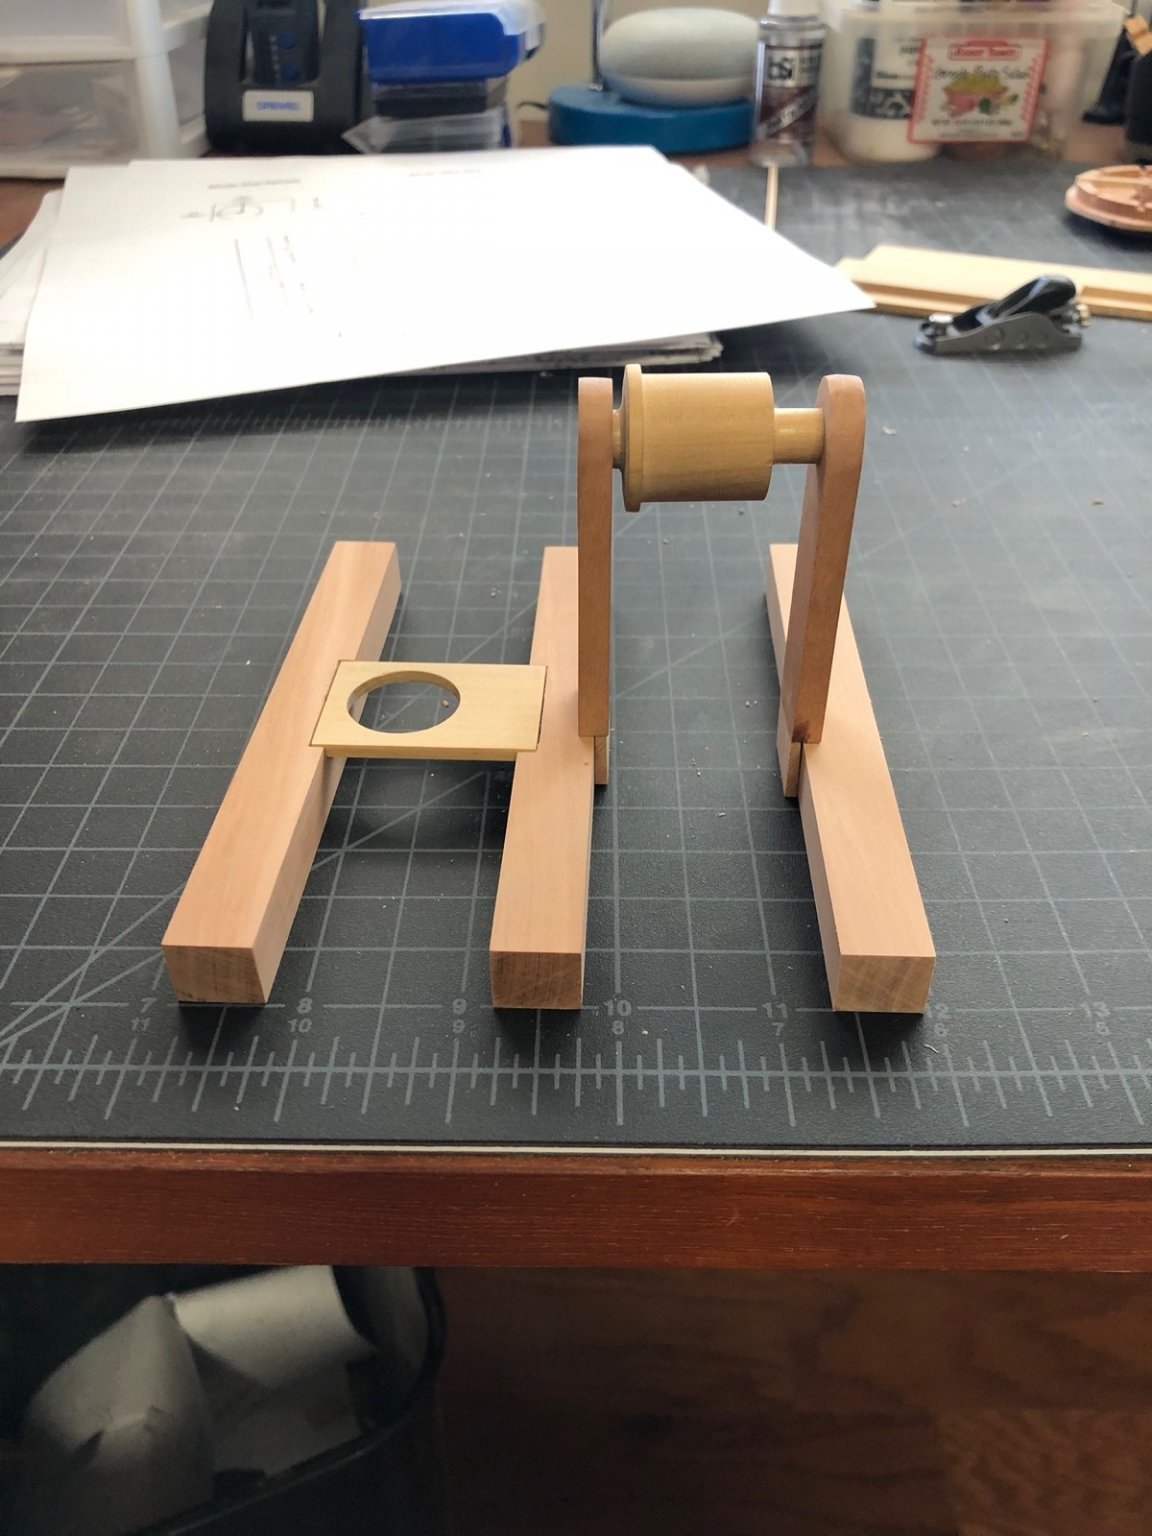
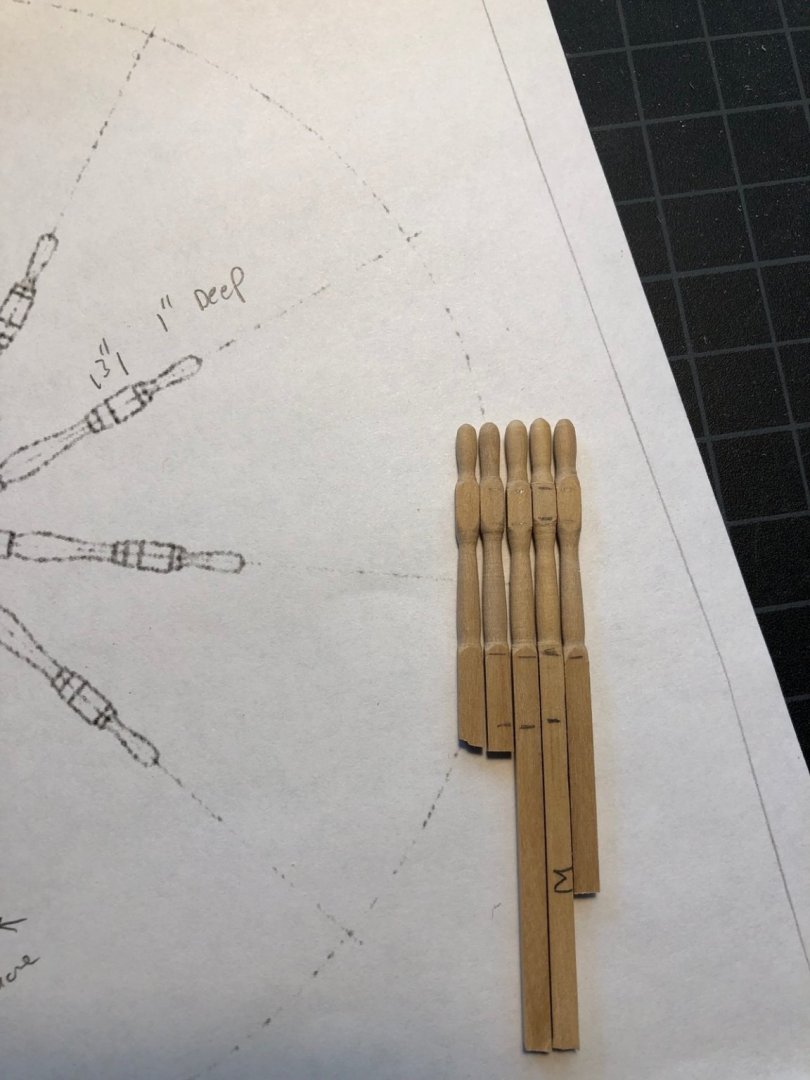
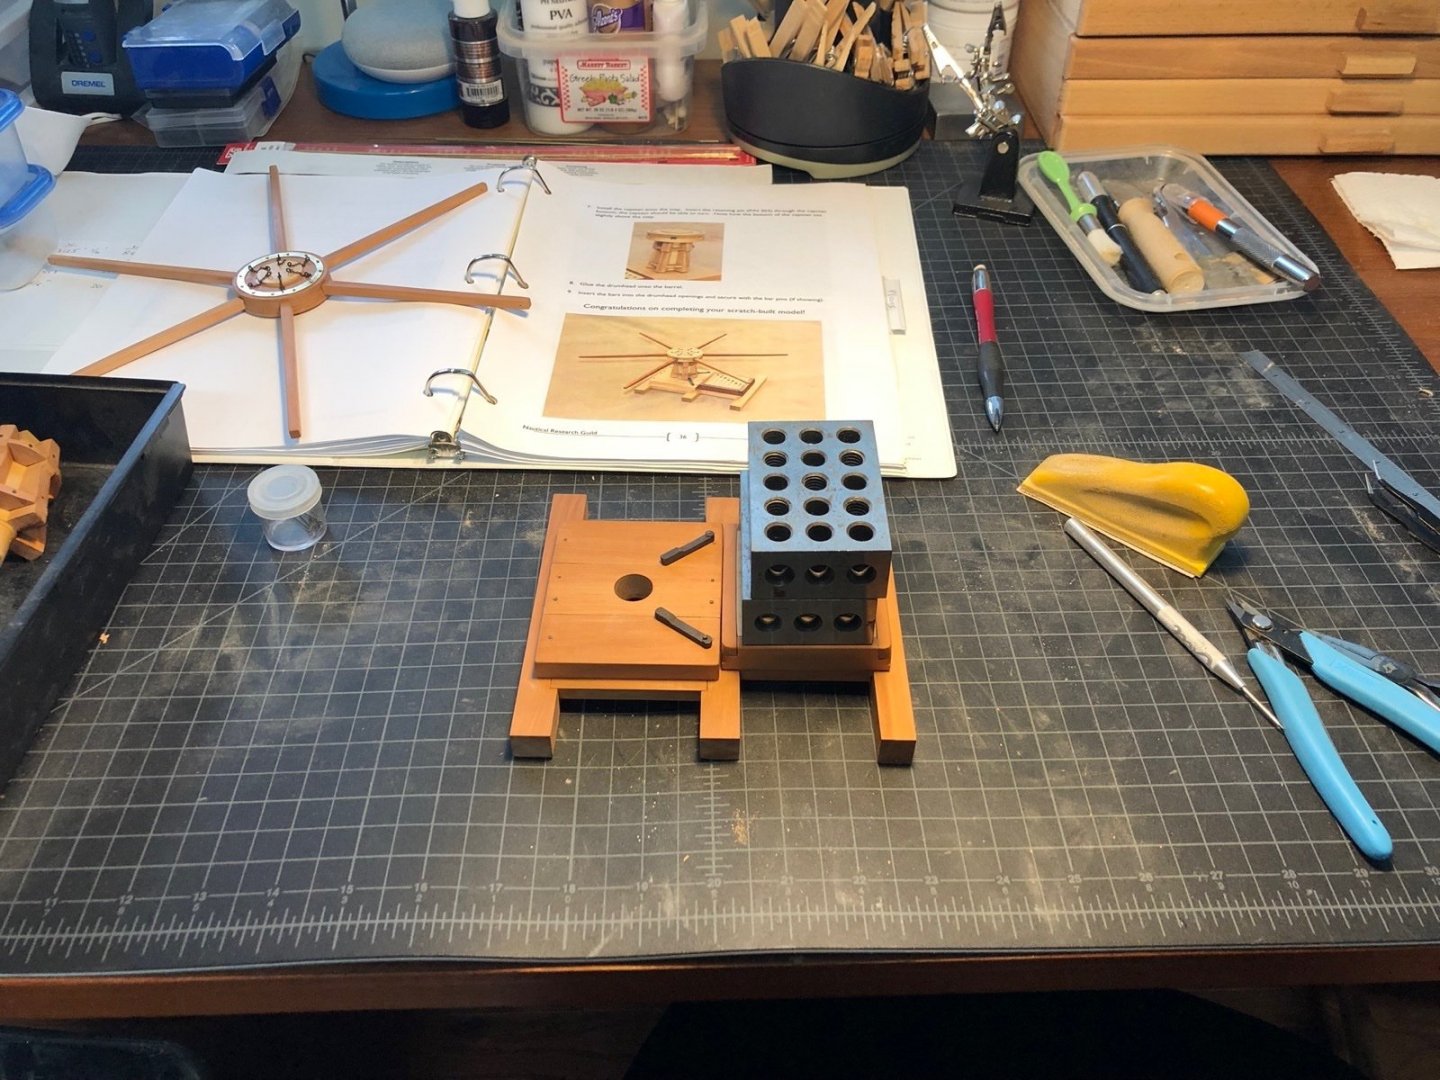
I extended the stanchions to fit between the beams, then used them and the barrel to measure the distance between beams. I made the mizzen mast partners by drilling the mast hole with a large drill bit and milling the slots in two beams so the partners were flush with the tops of the beams. Here you can get an idea of how this will be displayed, similar to the capstan project, although I will have a few planks to hold the beams together. I cut the 2" square blanks for the spokes and a 2" square for the mast coat, so these will be made next.

-
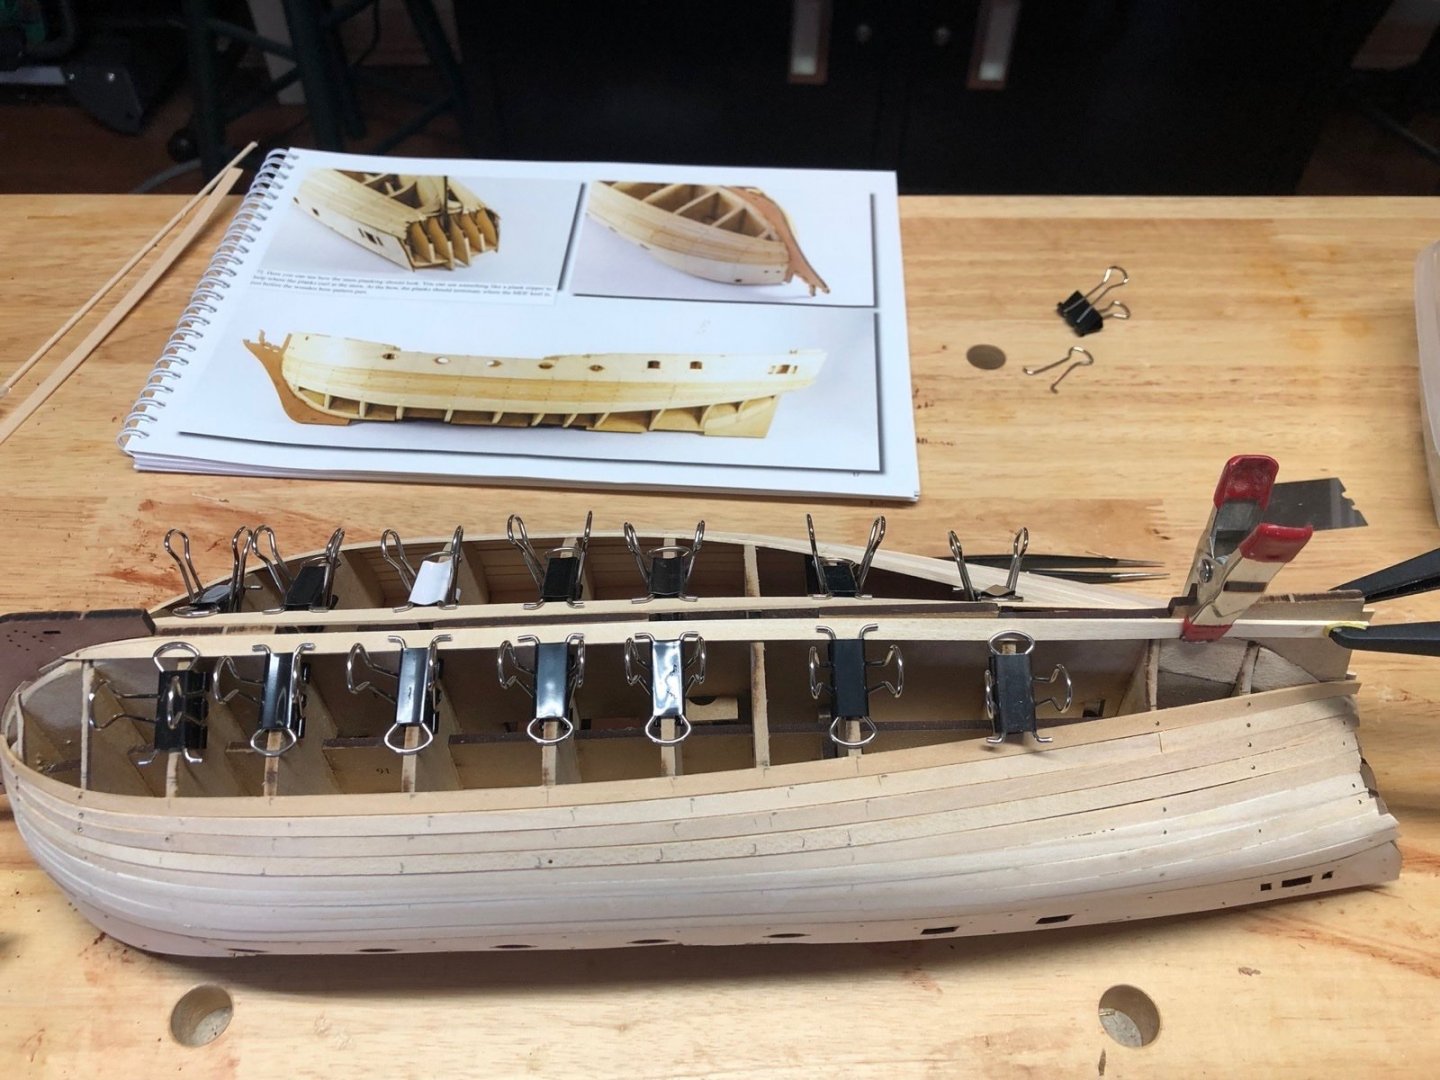
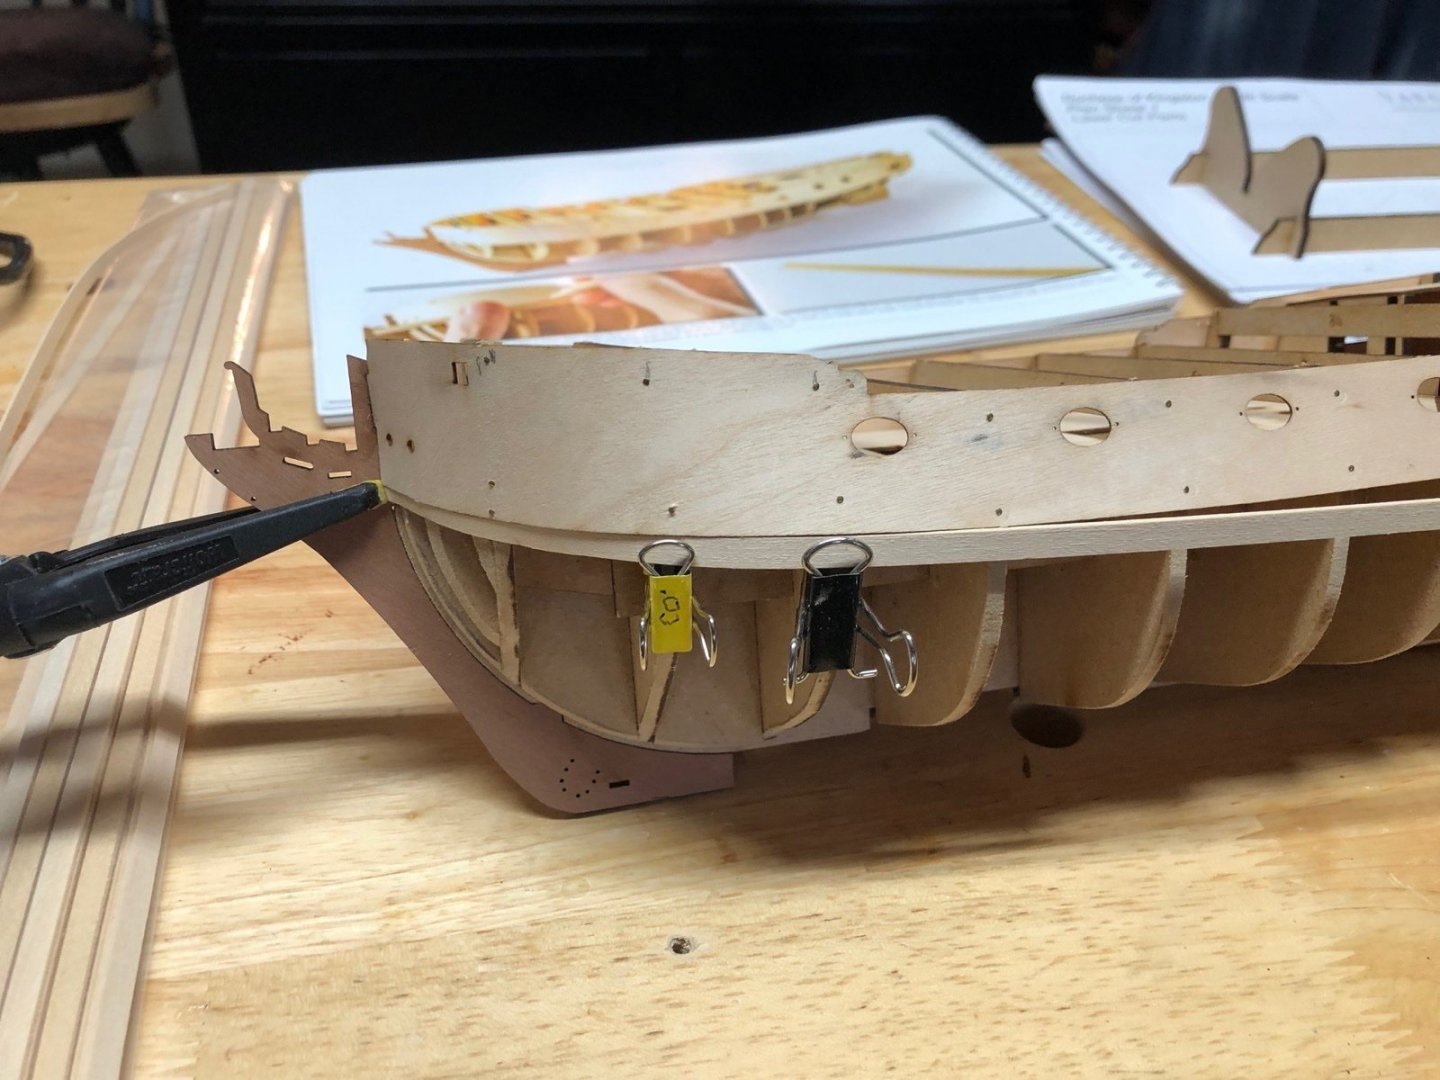
So I ended up going a few more planks down from the bulwarks, then I cut and glued on the garboard planks. I made sure they were not too far up the bow and where shaped at the front so I can sit the next plank up tight to them. Next I will measure the gaps at the bulkheads and plan the planks to fill them.
- 118 replies
-
- 8
-

-
- Duchess Of Kingston
- Finished
- (and 1 more)
-
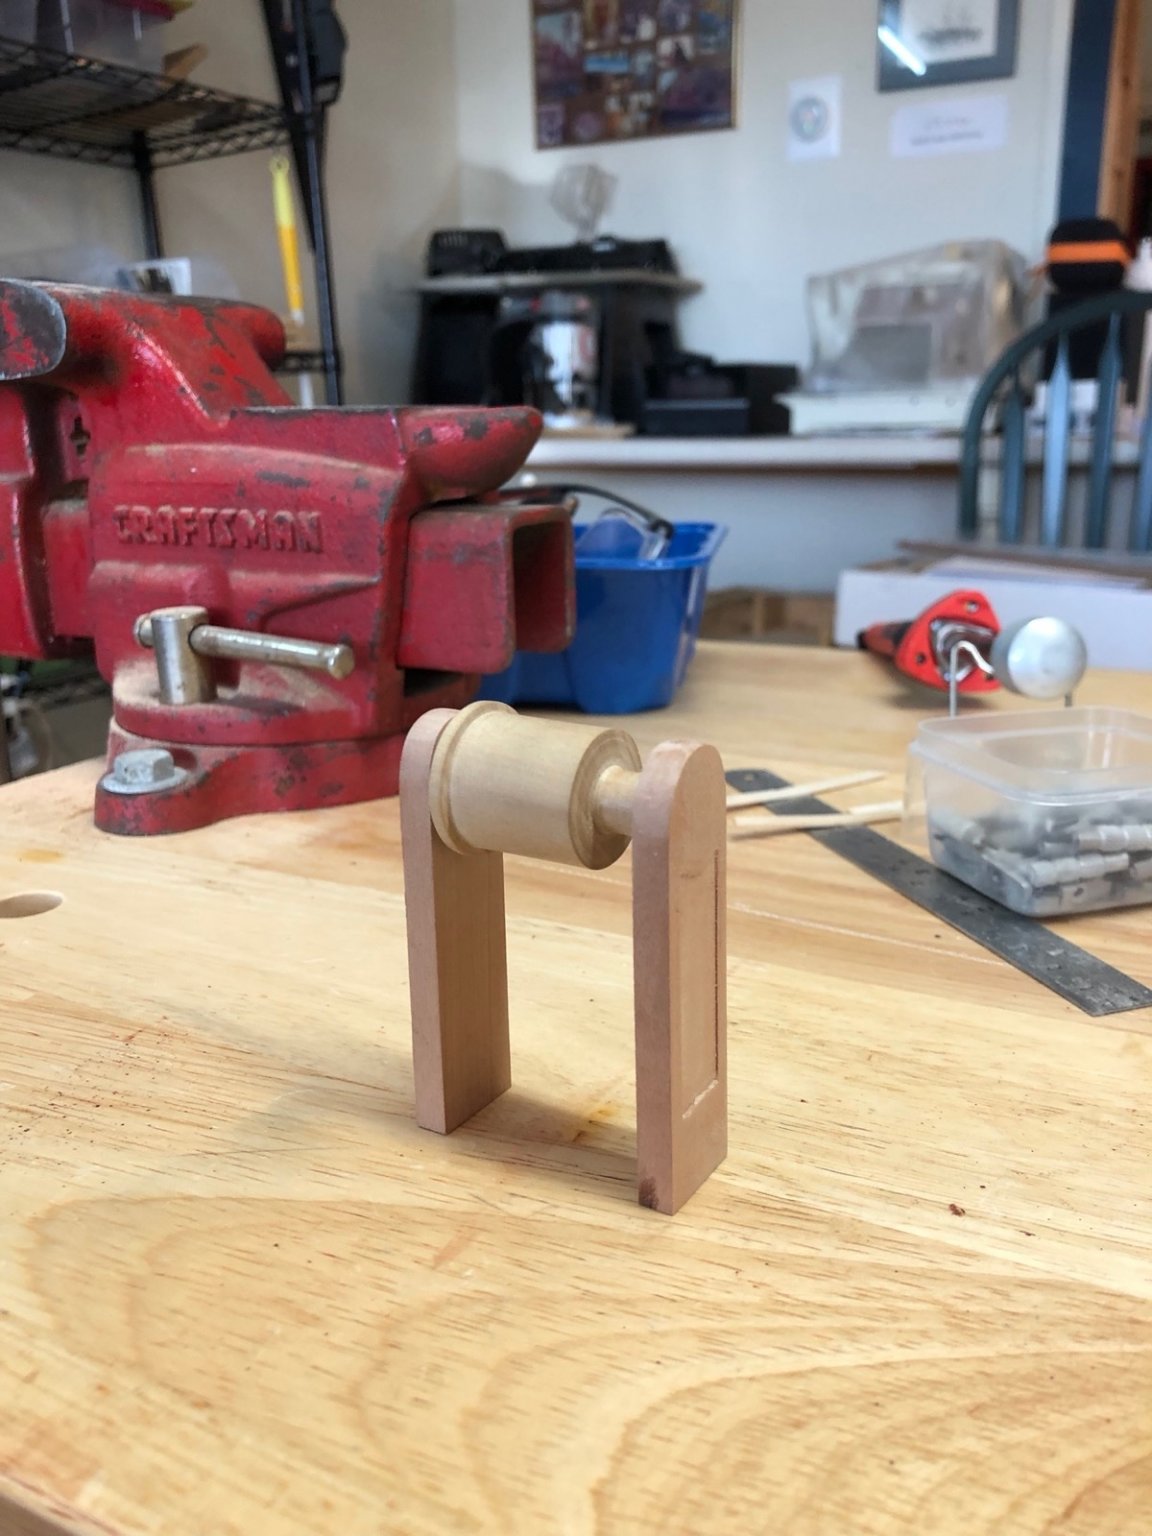
I made the stanchions today using blanks of pear wood that were cut to the correct dimensions. I first rounded the tops again using the rotary table on the mill, with a large end mill bit. I cut both blanks at the same time, then cleaned up the cuts with a sanding block. I then clamped the blanks to the cross slide and milled the inset area on the faces. I cleaned up the corners with an X-Acto knife and files. I then milled the holes for the barrel on the rotary table with a smaller end mill bit. I couldn't drill these holes because they are not all the way through and I wanted a flat bottom to the holes. Here is the barrel in the stanchions. Thanks all.

-
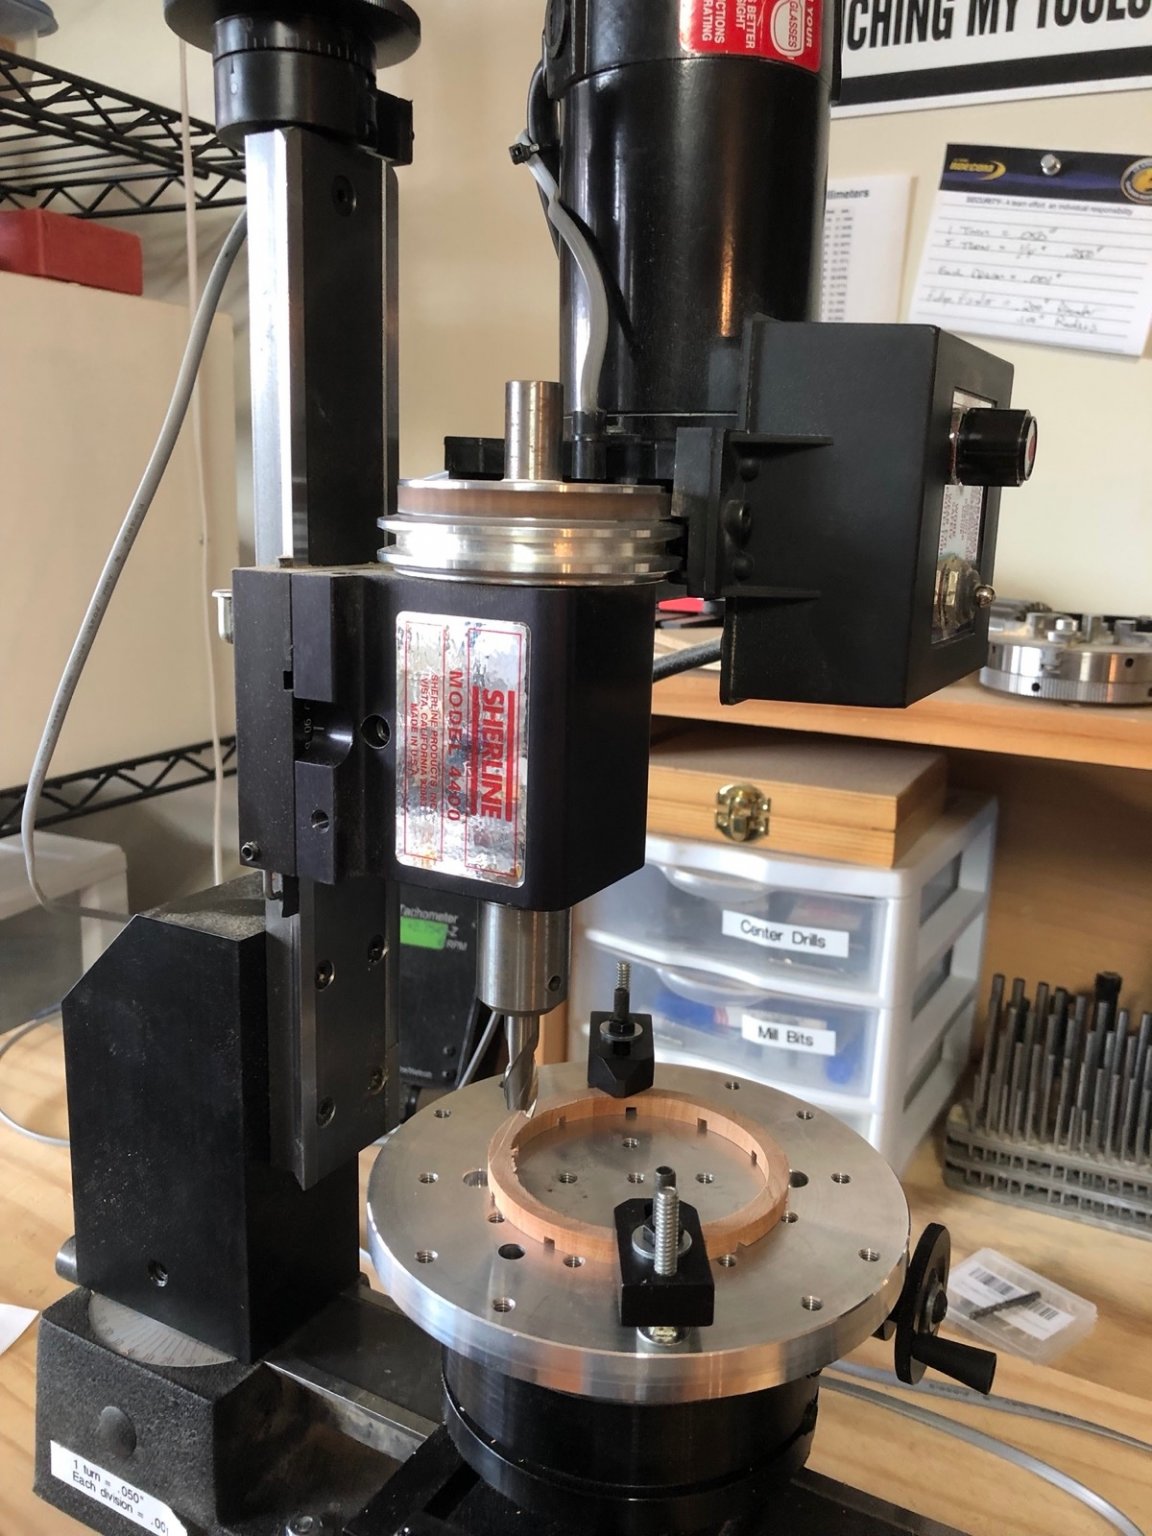
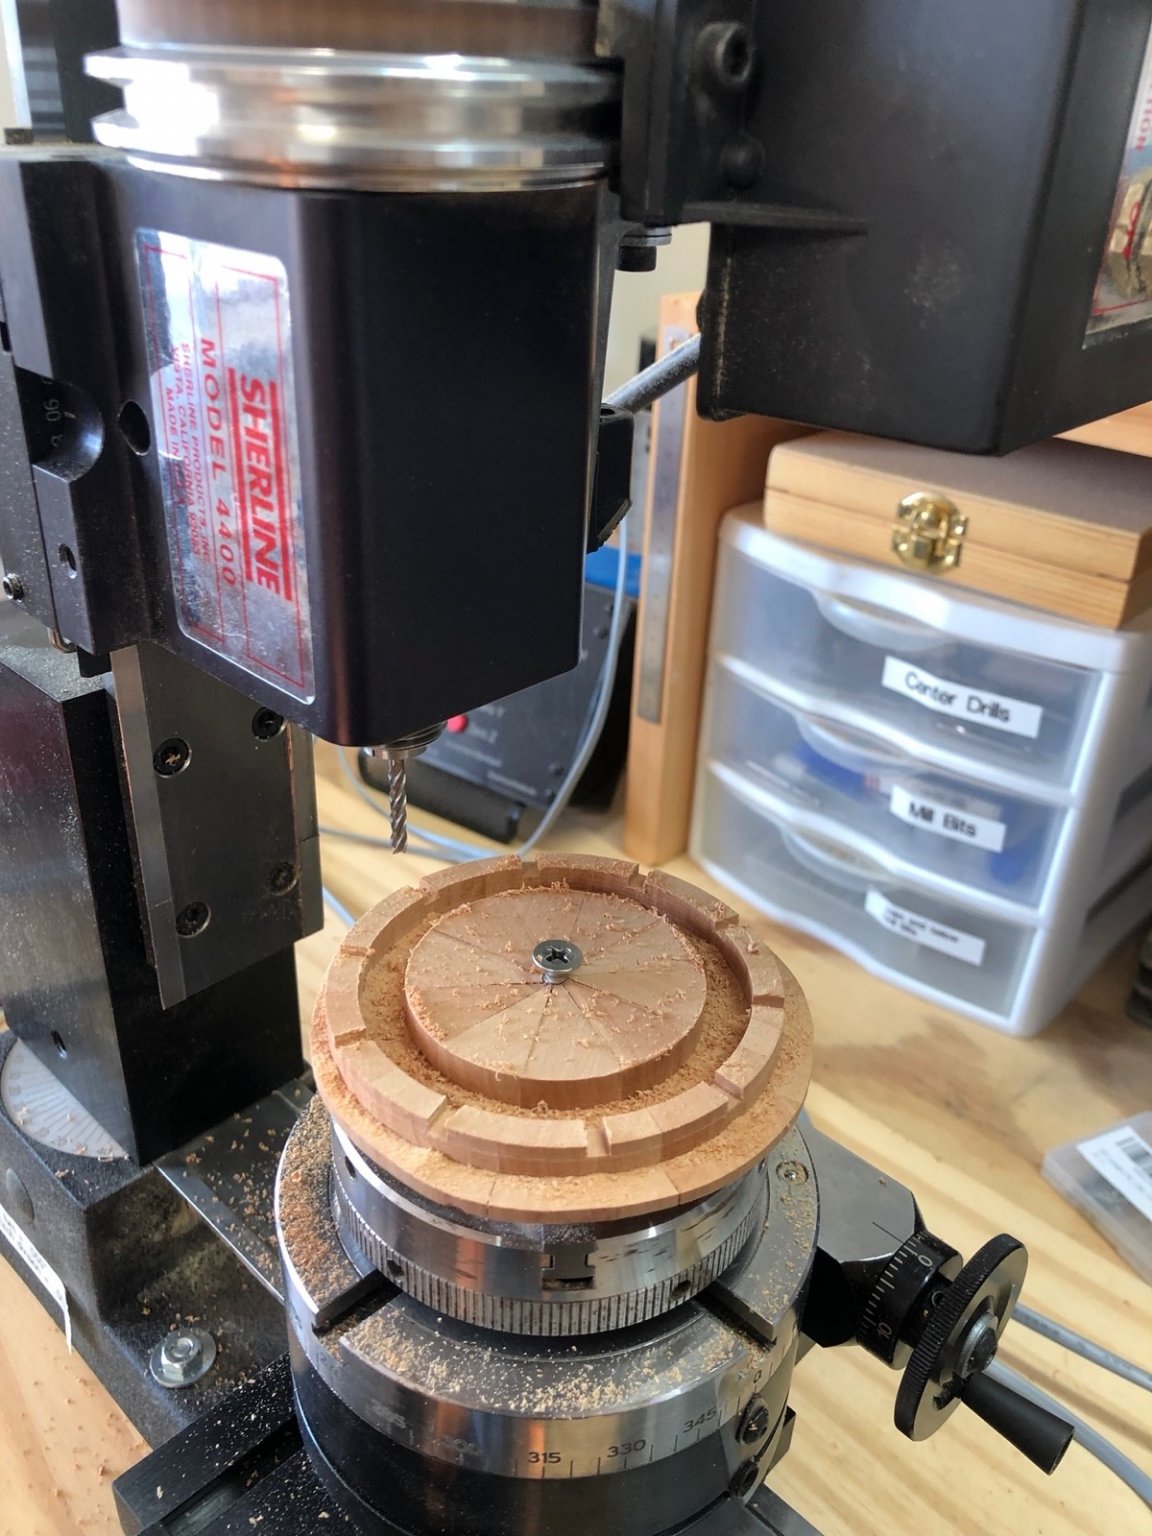
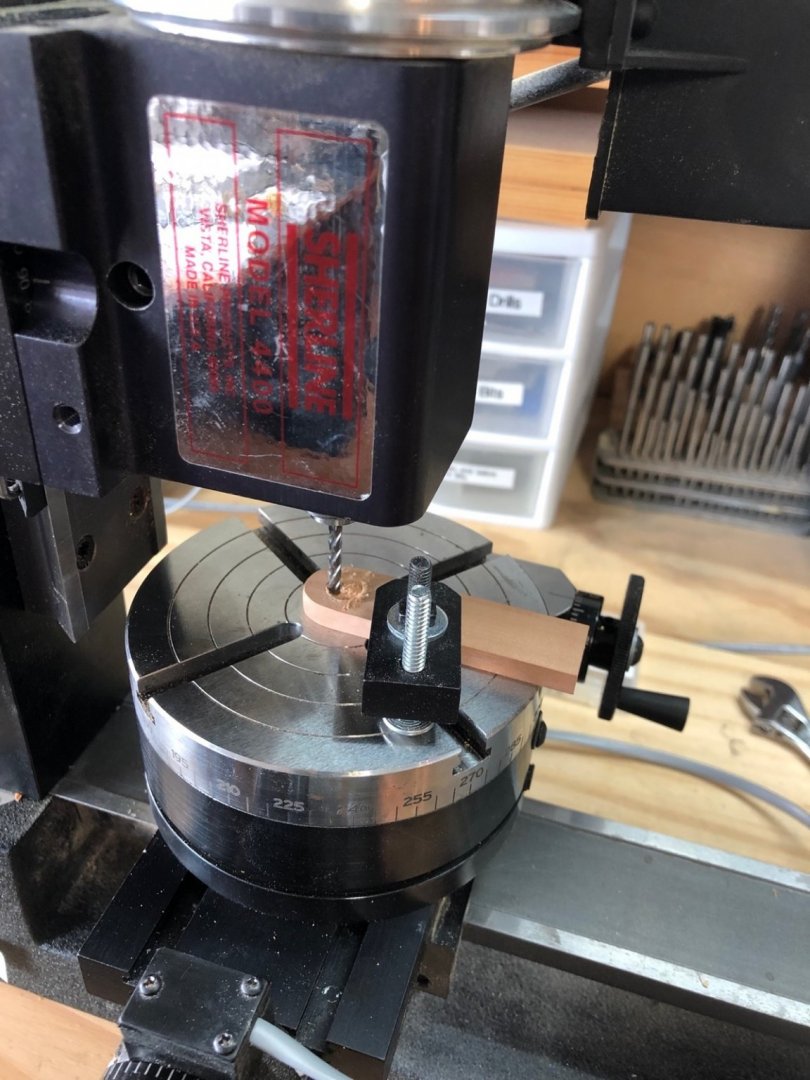
Thanks Grant. I saw this method in a video I think. I finished cutting the slots for the spokes in the hub then parted the rim from the blank. I used a razor saw up against the extra material I left, then clamped the rim with the cut side up so I could mill it to its final thickness. I milled up to the clamps then rotated the rim in the clamps to get the parts that were under the clamps. I used a wide enough end mill bit so I didn't have to have the rim exactly centered but the hole pattern on the work plate made it easy to get it close. Here is how the rim and hub turned out, with some temporary spokes of 1/8" basswood holding them together at the correct distance apart. I am going to use the rim blank as the assembly board, so I milled out the center so the thicker hub will lay at the correct height to the rim. I will be making the mizzen mast partners and the stanchions next.


-
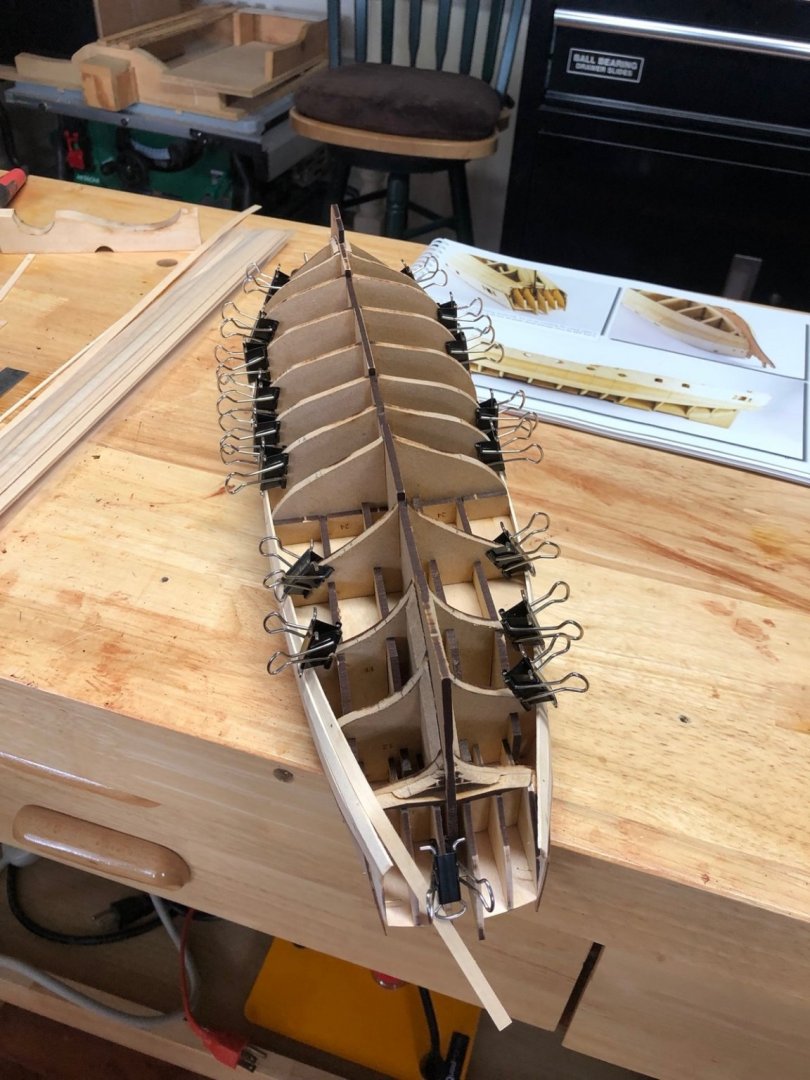
It has been a while but I am about half way finished with the first planking. I am going to stop here and add the garboard strakes, then plank up from them. I really like using the brass pins to hold those parts of the planks against the frames that need a little extra clamping, mostly at the bow and stern.

- 118 replies
-
- 9
-
-
- Duchess Of Kingston
- Finished
- (and 1 more)
-
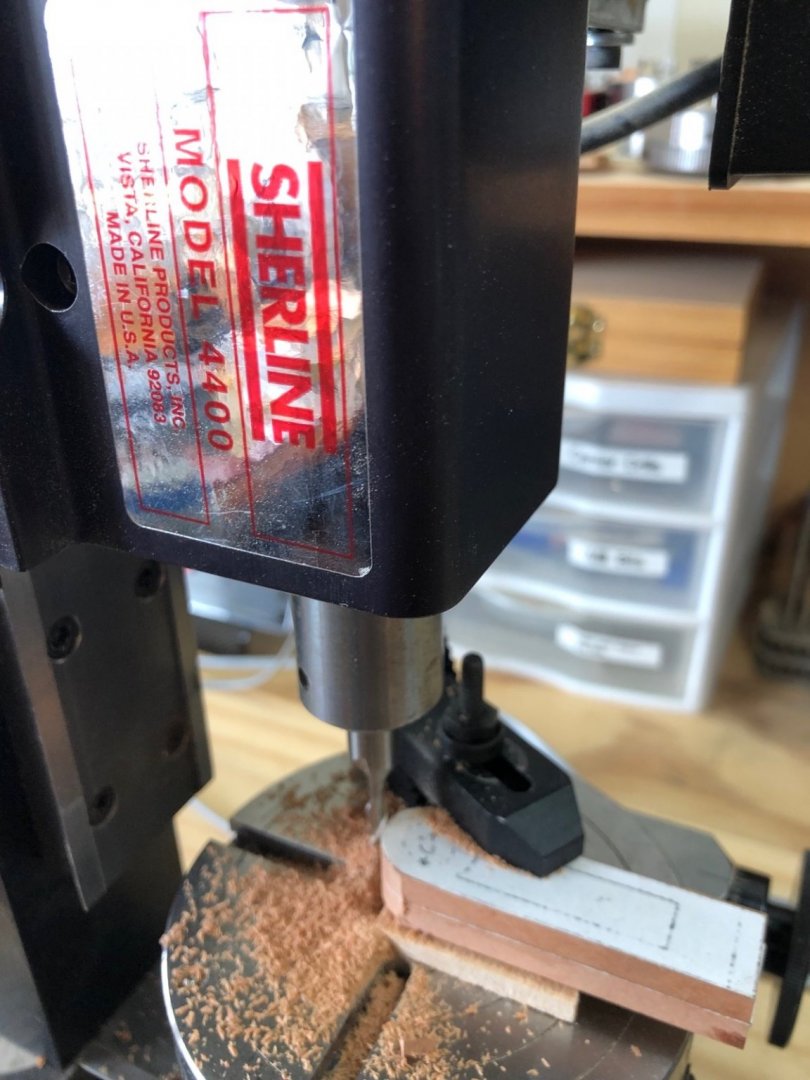
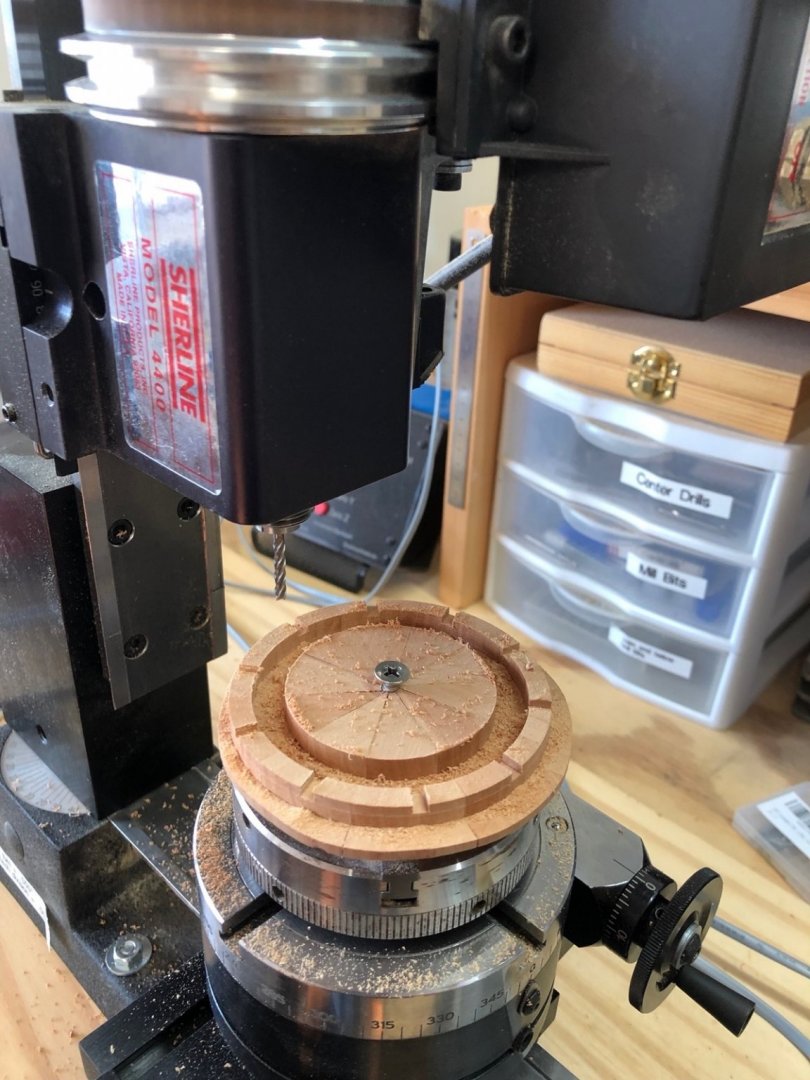
I started turning the rim on the lathe but didn't like how it was cutting so I converted the lathe to the mill and chucked the rim blank on the rotary table, then turned the outside edge of the rim using a large end mill bit. It cut much better and left a nice surface on the edge. I then used the same end mill bit to cut the inner edge. You can see the big screw I put through the blank and the round holder that is in the chuck because I did not want these to separate during the cutting process. I left a bit of material on the back side to use as a guide when I cut the rim from the blank. I then changed to a smaller end mill for the slots for the spokes. I cut these at 36 degree increments half way in between the joints. I am in the process of cutting the slots in the hub using the same method.
-
Yes Jim it would have been better that way. but I didn't have a chunk of pear wide enough to cut them that way. I'll try this one as is and see how it turns out. At least it will be practice for the real one.
-
Welcome Bob. I glued the wedges together and was deeply saddened to see that they fit together nicely near the outer edges, so I can use it for the outer rim, but there were too many cracks near the center to use it for the hub. I will use a square piece of pear instead for the hub. The wedges are also just small enough to fit on the lathe, but I can also use the mill and the rotary table to cut the rim instead. I haven't decided yet. I now have a dimensioned set of plans for most of the various pieces, so I won't have to work off hand drawings.
-
Confession time. While looking at the capstan yesterday I realized I had installed the end beam under the grating the wrong way, i.e. the wider dimension was up and down not cross wise like the other two beams. If you look closely at the last pictures of the capstan you can just see it. I was able to gently remove the end beam, turn it 90 degrees, clean up the slots so the carlings would fit, and glue it back together. Whew! I feel better now.
-
Thank you Eric and Bob.
-
Grant that sounds like the way to go. I just ordered a sliding bevel and will try it out. I also ordered a Digital protractor since I had no protractors in the shop or house.
-
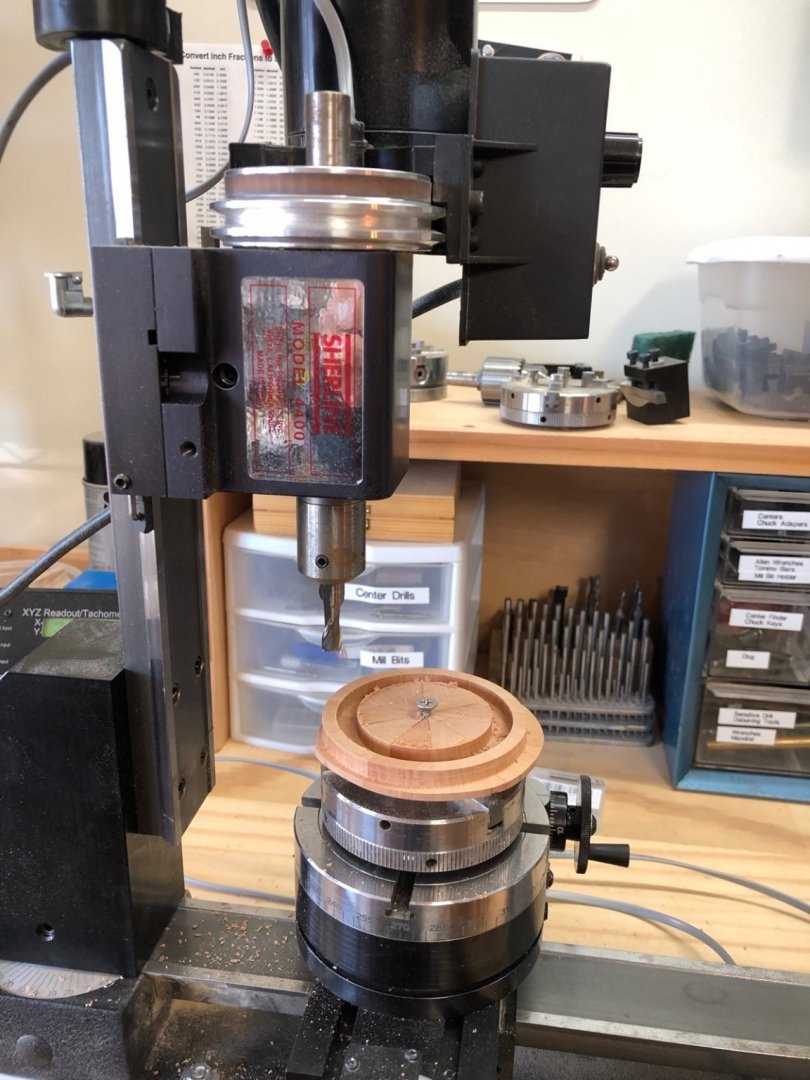
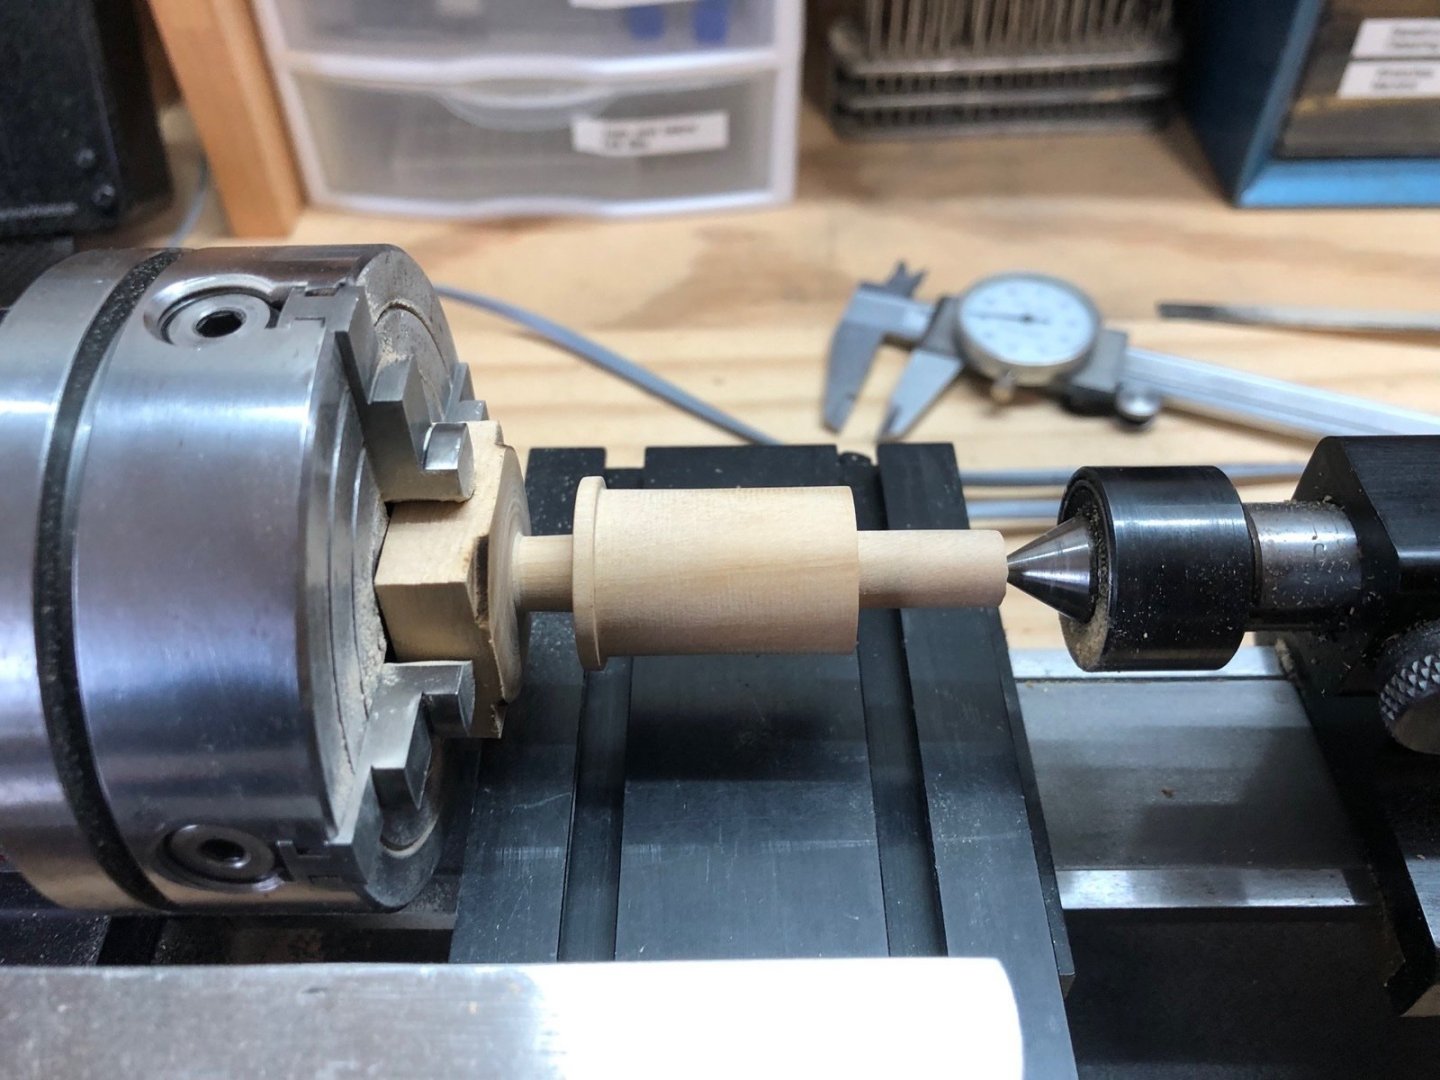
Welcome Grant and thank you for the likes. I guess I better get to it. I turned the barrel from a square length of boxwood on the lathe. Nothing too difficult here. I used a combination of the lathe cutting tool when I could fit it and files of various widths to get the final result. The middle part of the barrel is still too long in this shot but I turned it down to the correct length after I took it. Today I cut 10 wedges of pear wood that I will glue together to make the blank for the hub and rim. I had some trouble getting the 36 degree angle right on these pieces. I need to find a good tool for setting the angle of the bar on the Byrnes saw sliding table. Any suggestions would be welcome. Here they are along with the finished barrel. I think the hardest part of this project is going to be making the 10 identical spokes. I am working through the best way to turn them. There is a thread on this site that discusses lathe duplicators but it seems people haven't had much success with them. I will have to do some experimenting to see if I can get satisfactory results using a brass template.

-
Thanks Justin. So I am planking the Duchess of Kingston but I find I have more time in the day between planks, so I have decided to try something along the lines of this capstan project. Have a look here. I hope this works out.
-
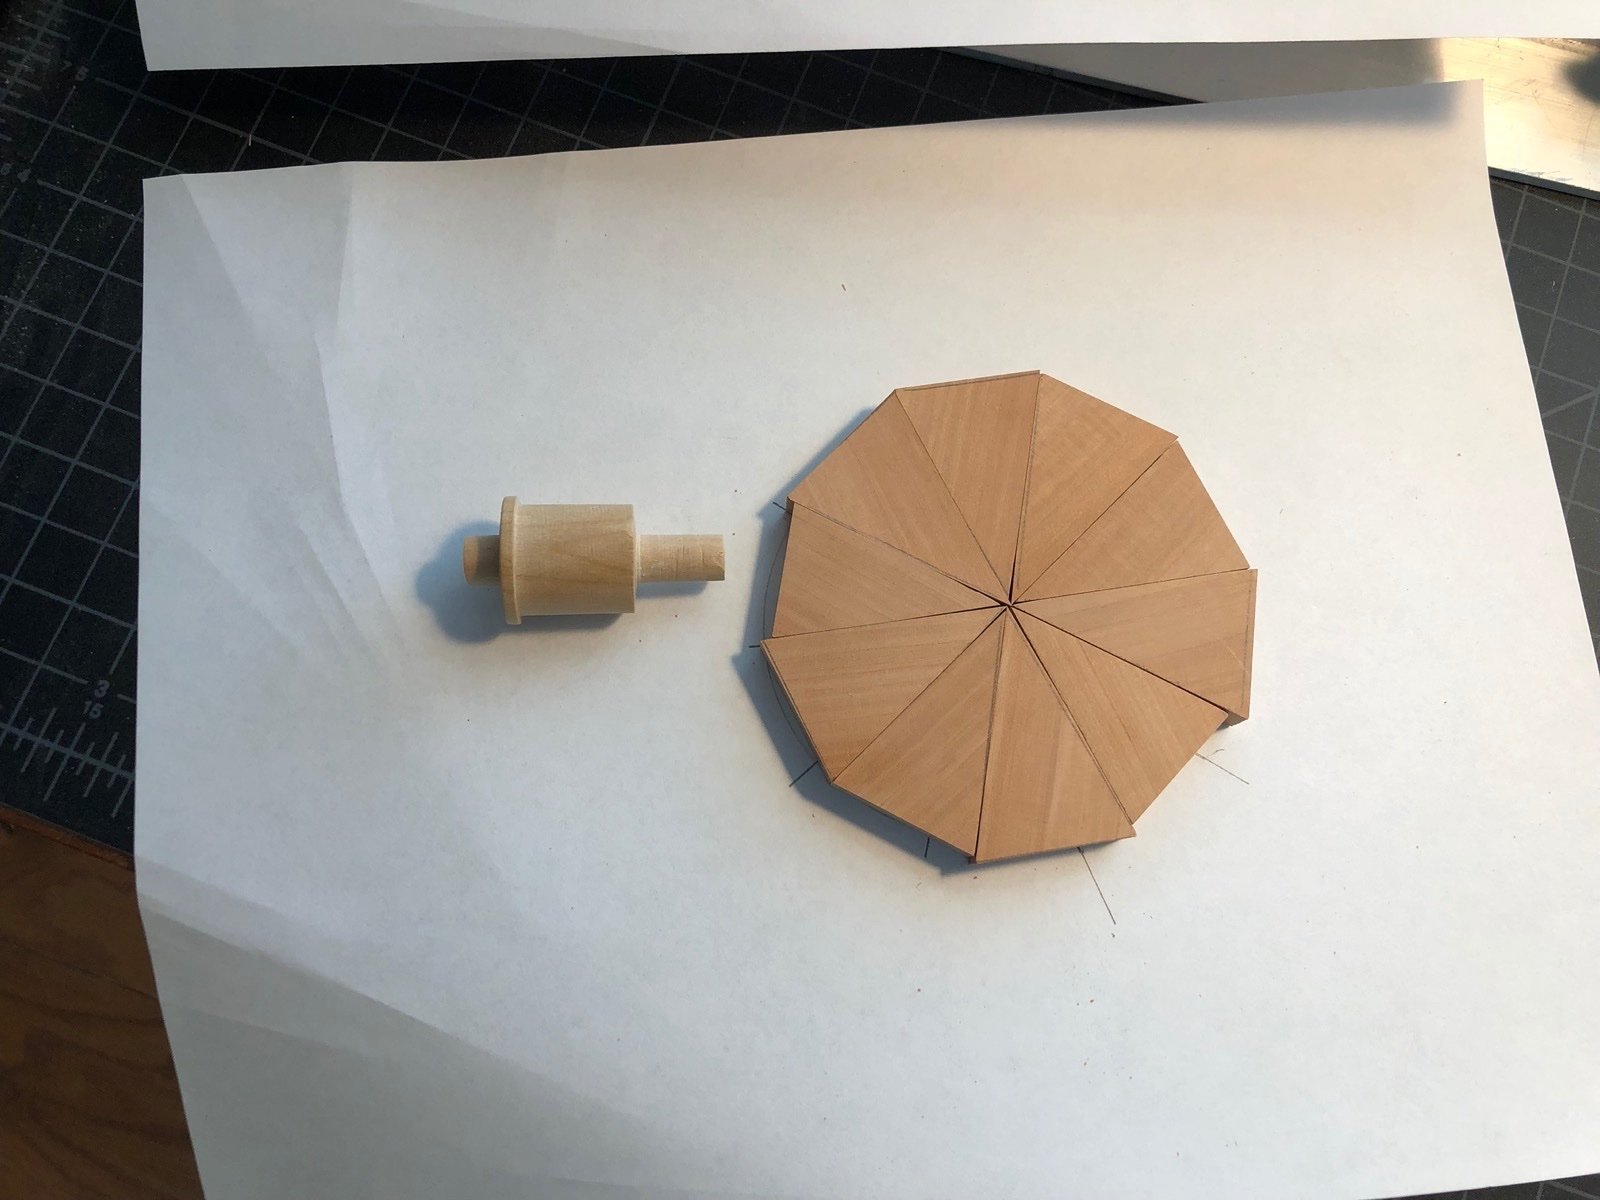
I really enjoyed building the 1:16 capstan from the NRG plans and instructions, and the planking on the Duchess is a slow process, so I thought why not build another ships component in the same scale at the same time. There are very good instructions in TFFM vol. 2 for building a ships wheel, so I am going to use them to attempt to build a 1:16 ships wheel with a similar display as the capstan. I'll have three quarterdeck beams held together with some planking with the wheel between two of them and the hole for the mizzen mast between the middle beam and the other beam. I dimensioned out the drawings from the book for 1:16 scale and started cutting blanks of wood for the barrel, stanchions, beams, and planks, mostly from pear, except for boxwood for the barrel. I am thinking of using brass rings to cover the openings in the outer ring of the wheel but that is assuming I can cut good rings that big. I'll again mostly be using the lathe and the mill for this project, along with the bandsaw and Byrnes saw and thickness sander for cutting the blanks.
-
NRG Capstan Project
usedtosail replied to tlevine's topic in - Build logs for subjects built 1751 - 1800
I did adjust the dimensions of the grating pieces to fit into the coaming, which I made first. -
After I glued the first planks on each side I used a batten to find the run of the planks about mid way down on each side. I measured the distance from the bottom of the first planks to the top of the batten on each bulkhead using a tick strip, then divided those distances by the number of 5mm planks that would fit, which in this case was 9 planks exactly from bulkhead 9 to the transom. For the bulkheads from the bow to 9 there is a taper, although slight after bulkhead 3. I cut the next few planks to these tapers using a jig to hold the plank on edge while I planed in the taper. I soaked the next planks on each side and bent them to the frames, then glued them on when they had dried. I am using wood glue for most of the frames and CA at the transom. I then soaked and bent the next frame on the starboard side, which is where the planks have a severe bend at the transom. I was able to put the bend in as I clamped the plank to dry as you can see here. So now I will continue to plank to the batten line, then start planking up from the keel, starting with the garboard planks.
- 118 replies
-
- 6
-
-
- Duchess Of Kingston
- Finished
- (and 1 more)
-
Thank you Paul and GL and for the likes.
-
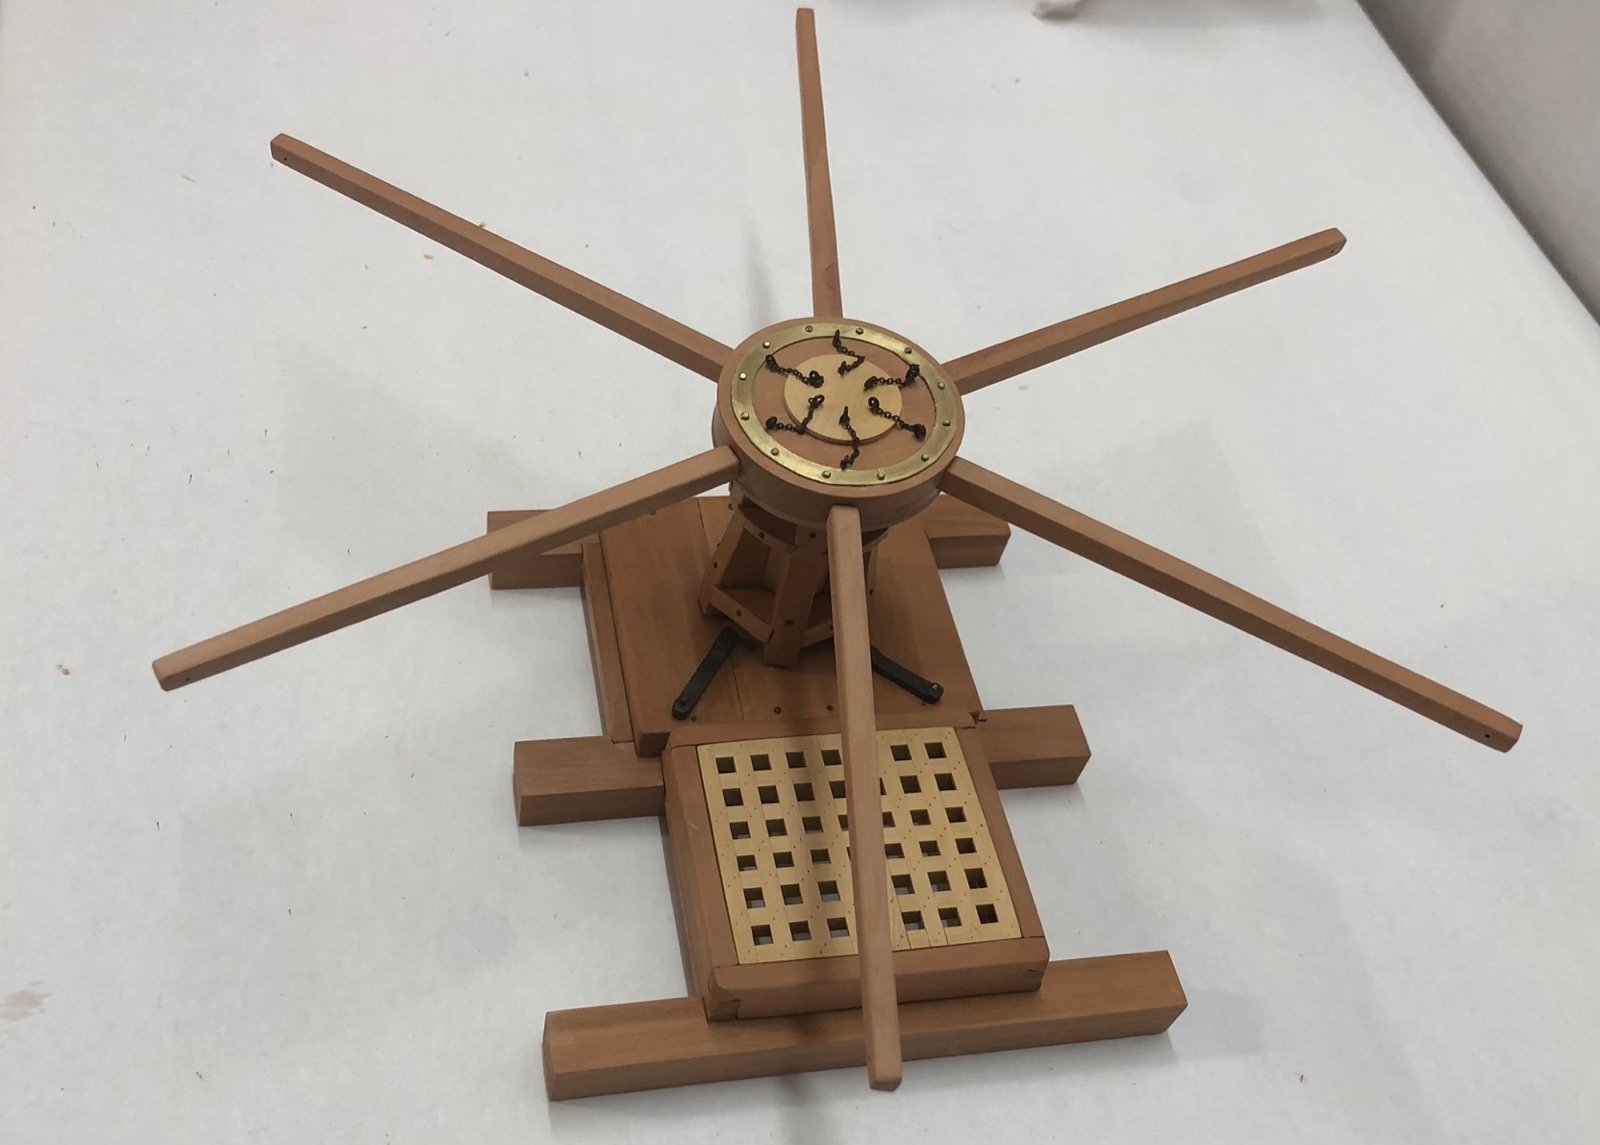
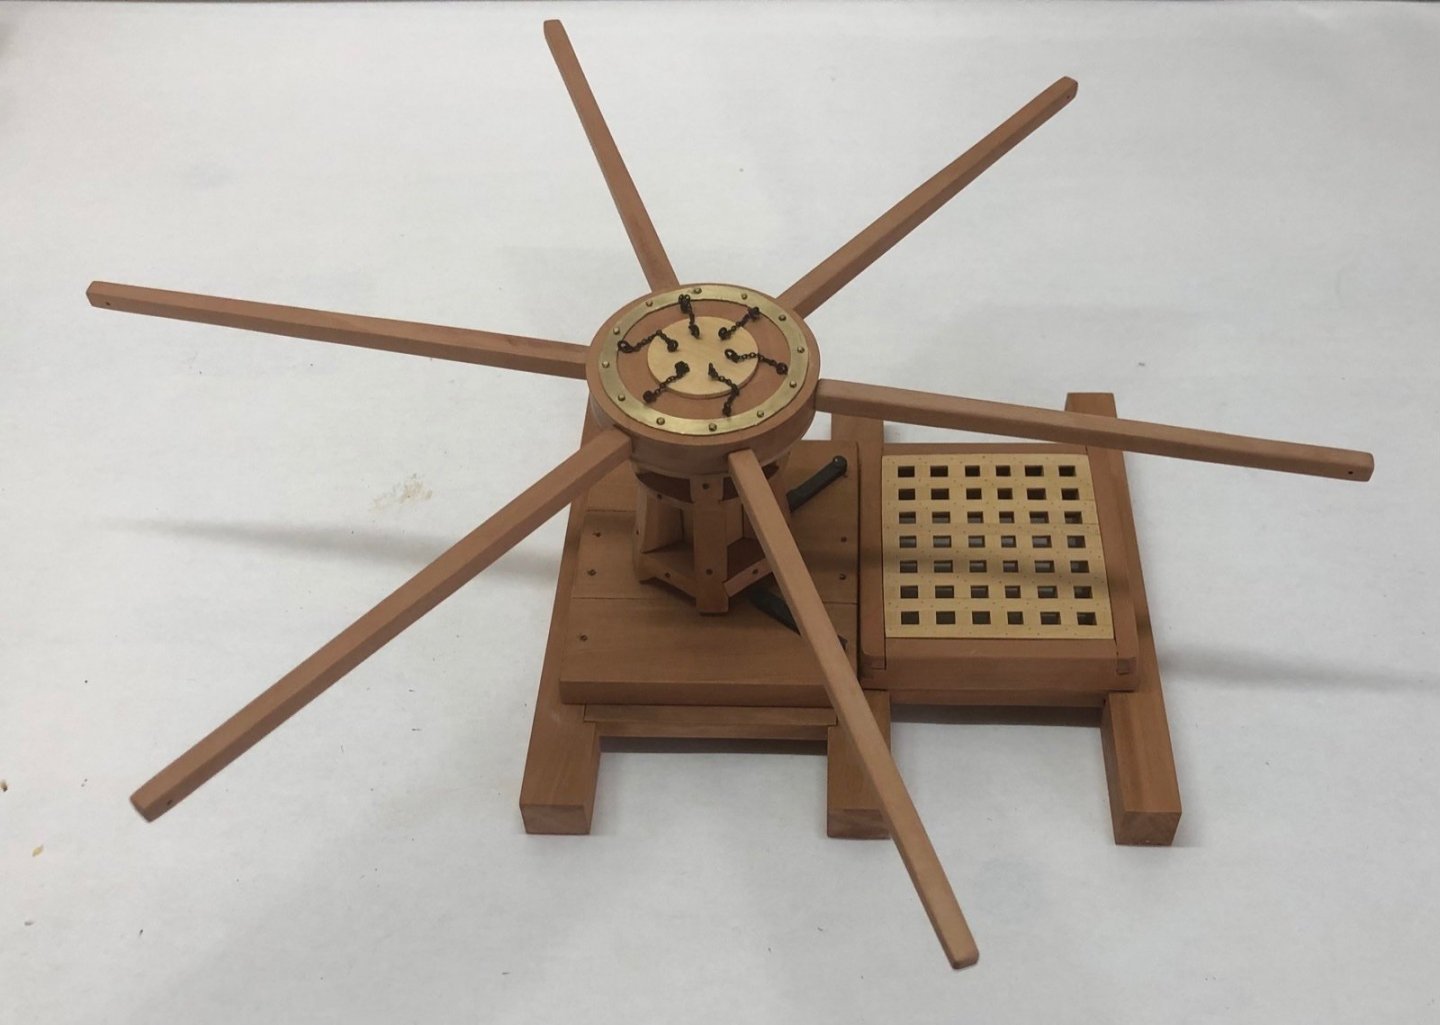
I installed the capstan barrel and drum head, which completes the capstan project. This was a fun project and I especially enjoyed the scratch build aspect. I am not sure I am ready to tackle a whole ship as a scratch build project but it is not out of the question in the future. Thanks to the NRG and especially Toni Levine for her great instructions and plans, and her help during this build.


-
I tapered the first planks on each side, soaked them in water and bent them for the bow using an electric plank bender. I clamped them to the bulkheads to dry. This morning I started gluing the port side plank to the frames, starting with the first three bulkheads at the bow.
- 118 replies
-
- 6
-
-
- Duchess Of Kingston
- Finished
- (and 1 more)
-
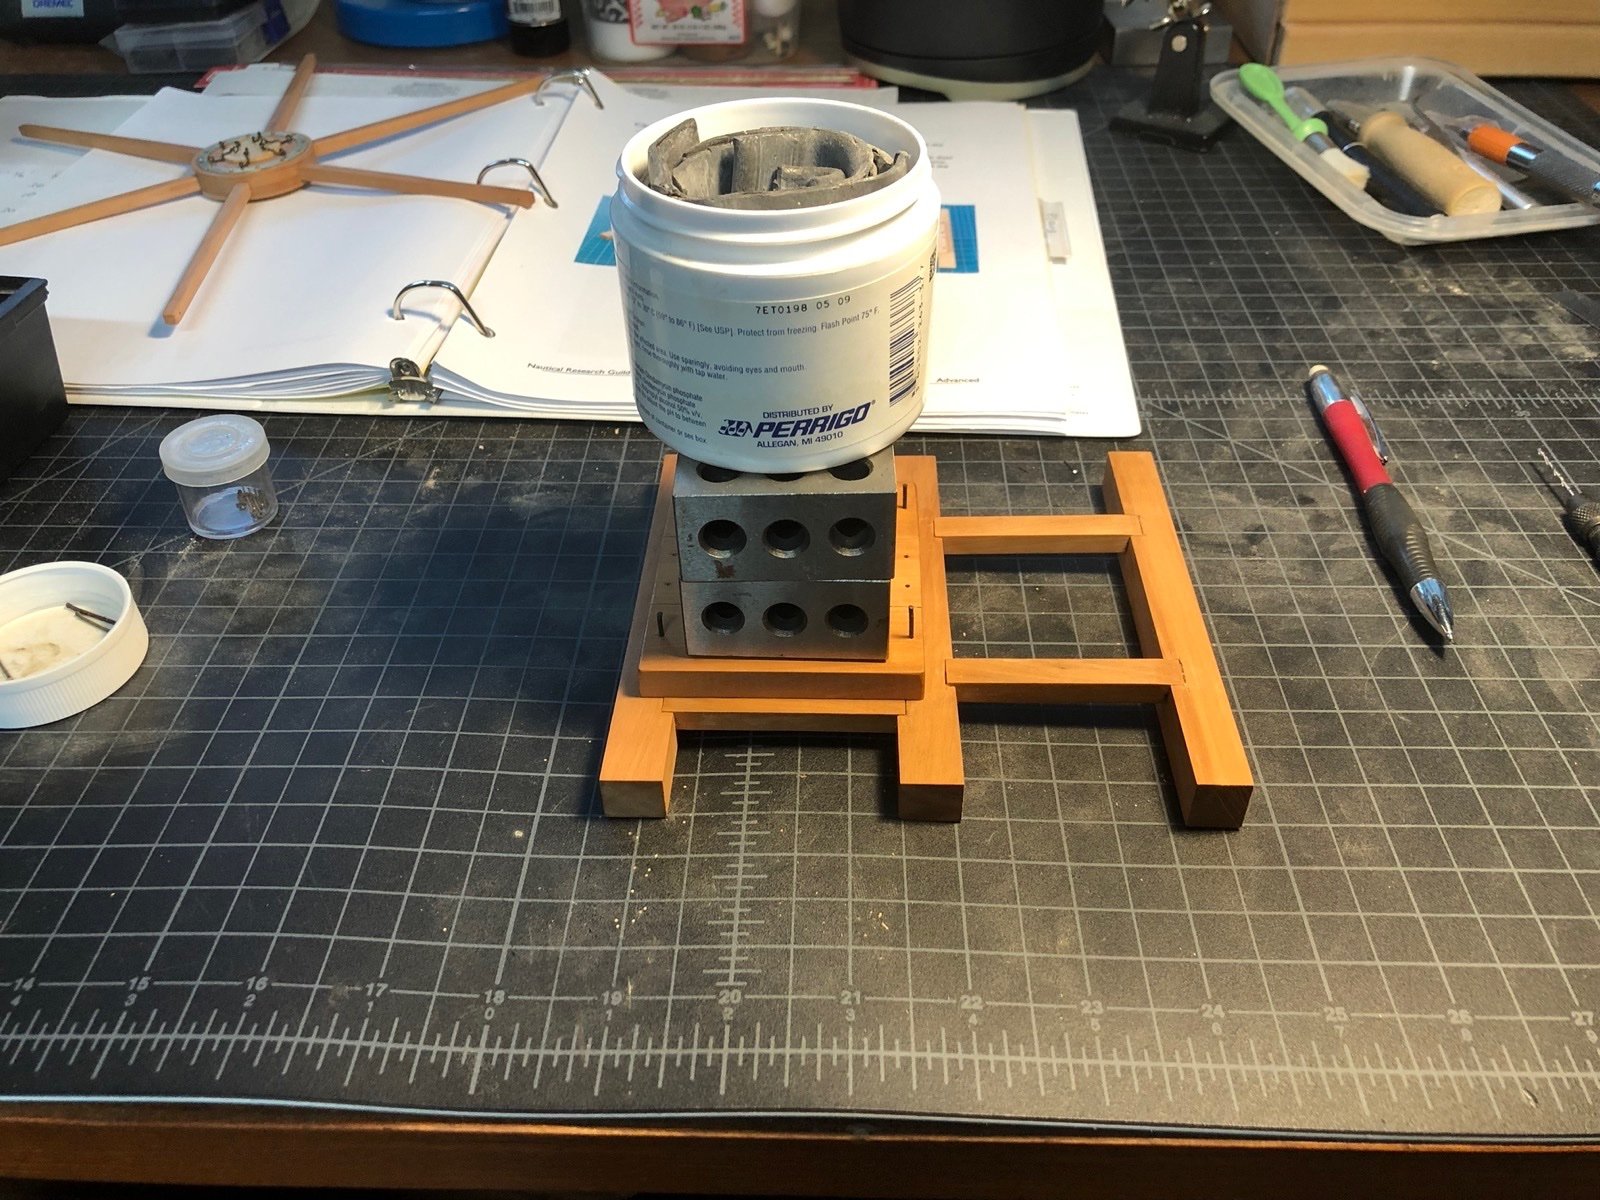
I gave all the assemblies a coat of wipe on poly then finished adding the pins to hold the bars in place. I glued the capstan base to the beams using the corner bolts to locate it to the holes I had already drilled. I used some weights to hold it down while the glue dried. This morning I started the assembly of the capstan model. I first trimmed the bolts for the capstan base and added them to the base. I then drilled the holes for the brakes and added the pins for them. I put the hatch into the coaming and glued the coaming to the base, again using weights to hold it down.

-
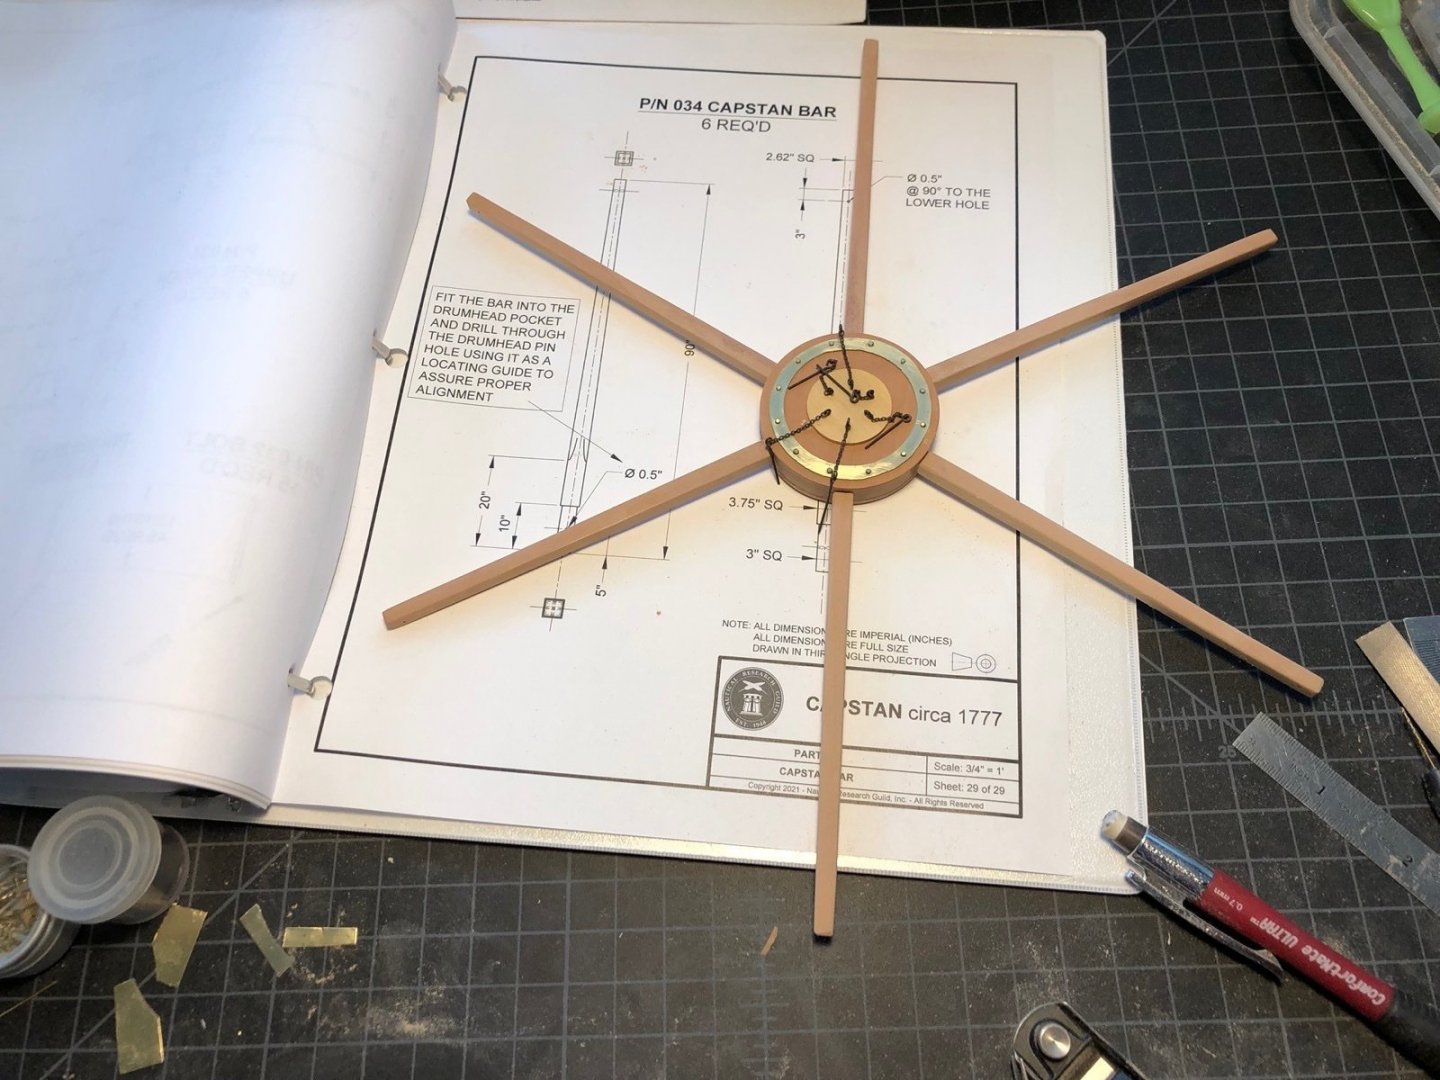
Here is the jig I made to help taper the capstan bars. The two side pieces are glued to the base board at an angle with just enough room between them for the untapered bar to fit. The board at the top just keeps the bar from moving in the slot. I start by tapering two sides with a small plane, then put a brass shim at the stop to hold the bar a little higher when I plane the other two untapped sides. Then I put another shim over the first and sand all four sides with coarse sand paper, then finish with medium and fine paper. And here are all six bars tapered and ready to finish.

-
Thanks guys. All good information. I had seen those washers in the Micro Mark catalog but didn't know how they would perform.