HOLIDAY DONATION DRIVE - SUPPORT MSW - DO YOUR PART TO KEEP THIS GREAT FORUM GOING! (Only 75 donations so far out of 49,000 members - C'mon guys!)
×


usedtosail
-
Posts
2,409 -
Joined
-
Last visited
Content Type
Profiles
Forums
Gallery
Events
Everything posted by usedtosail
-
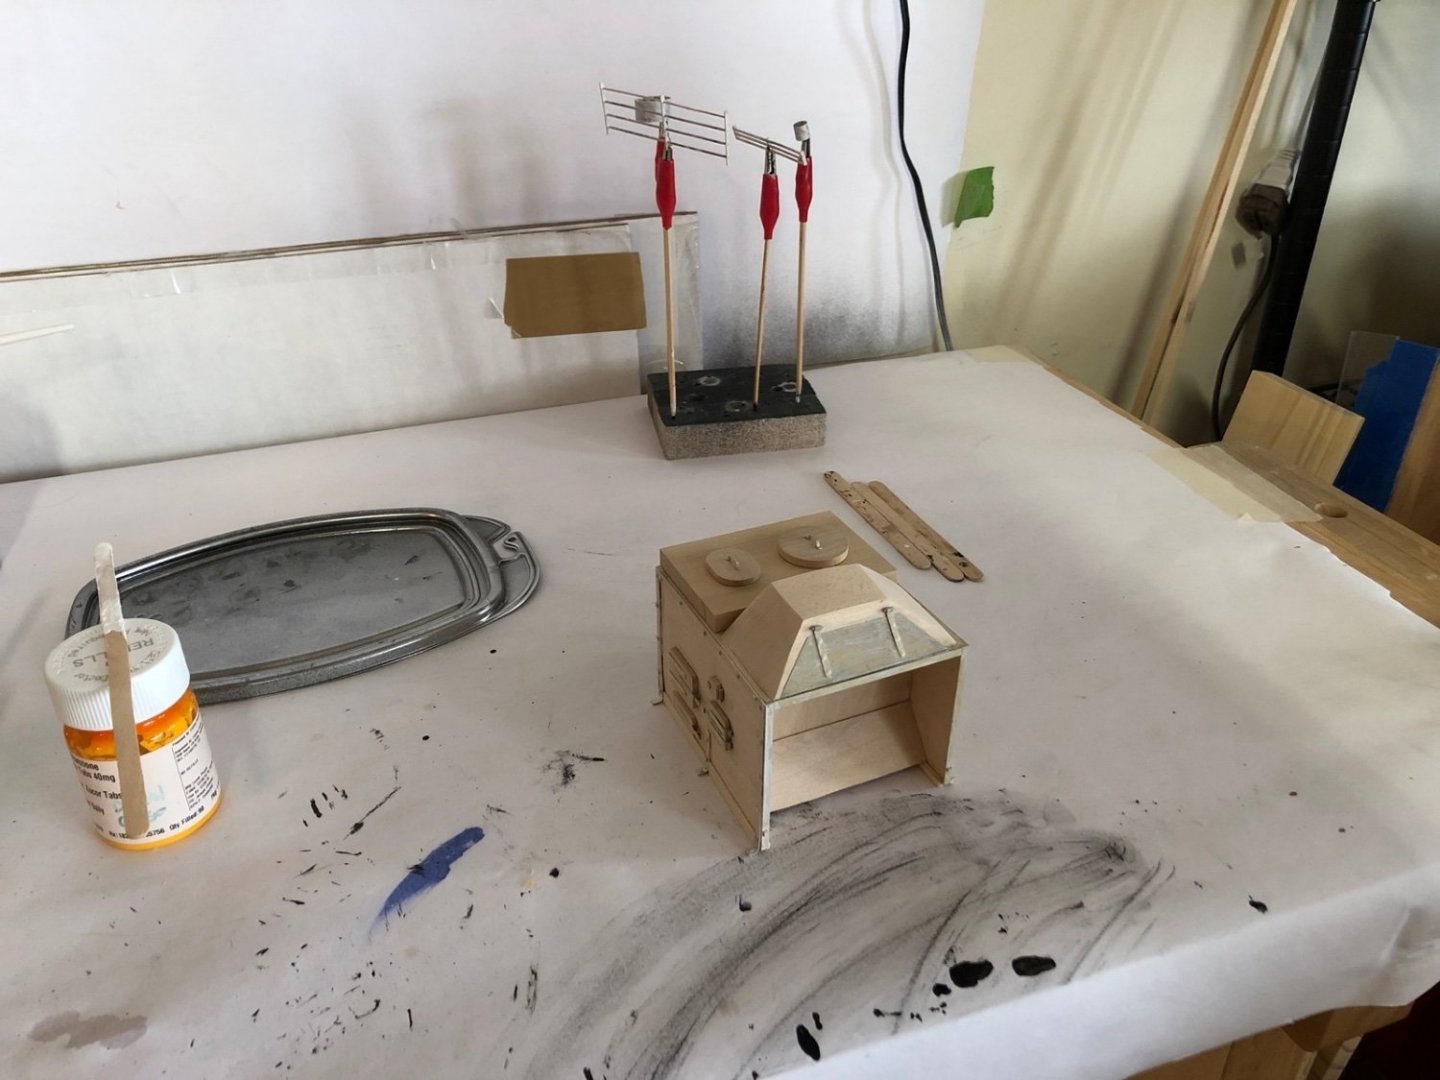
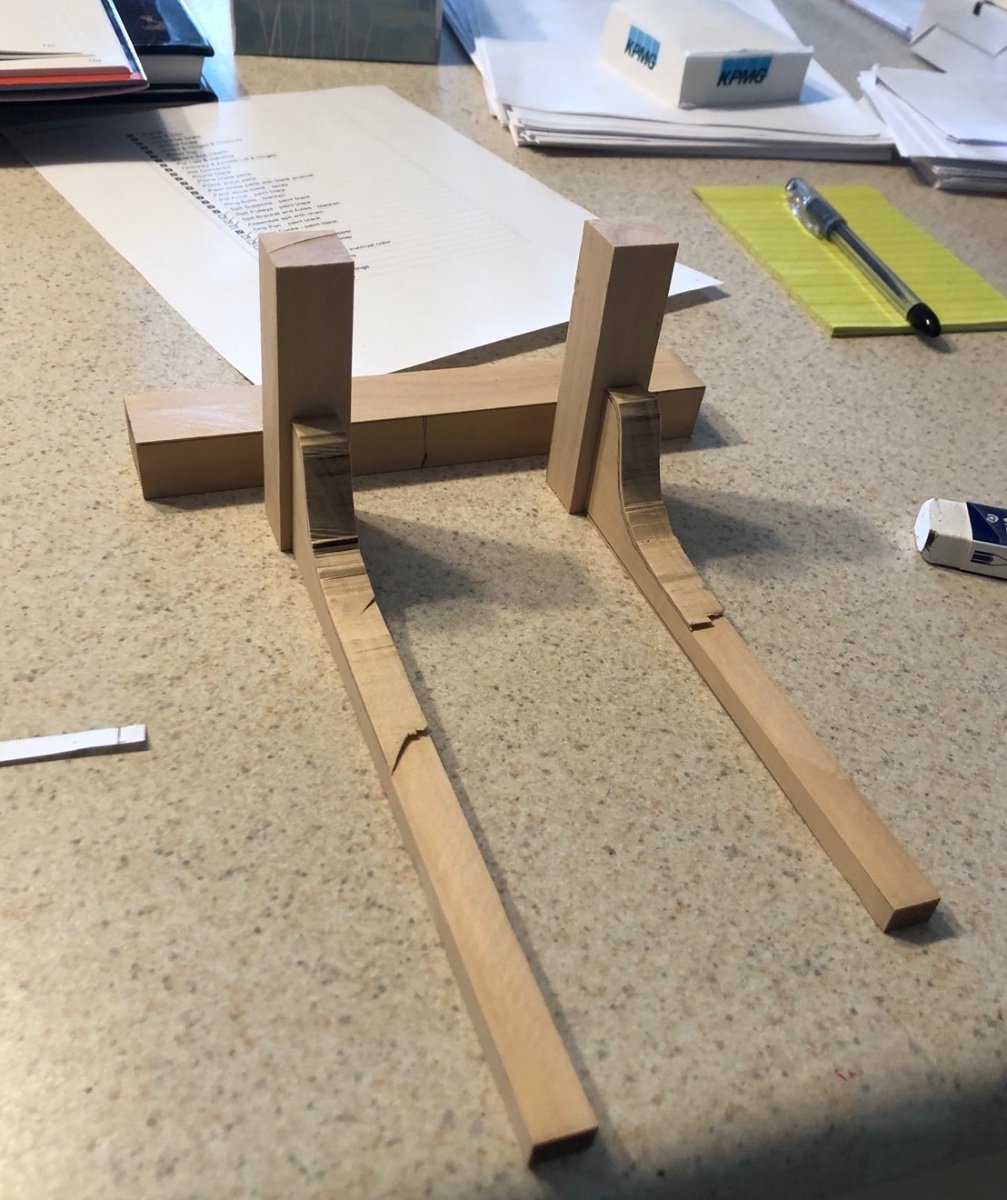
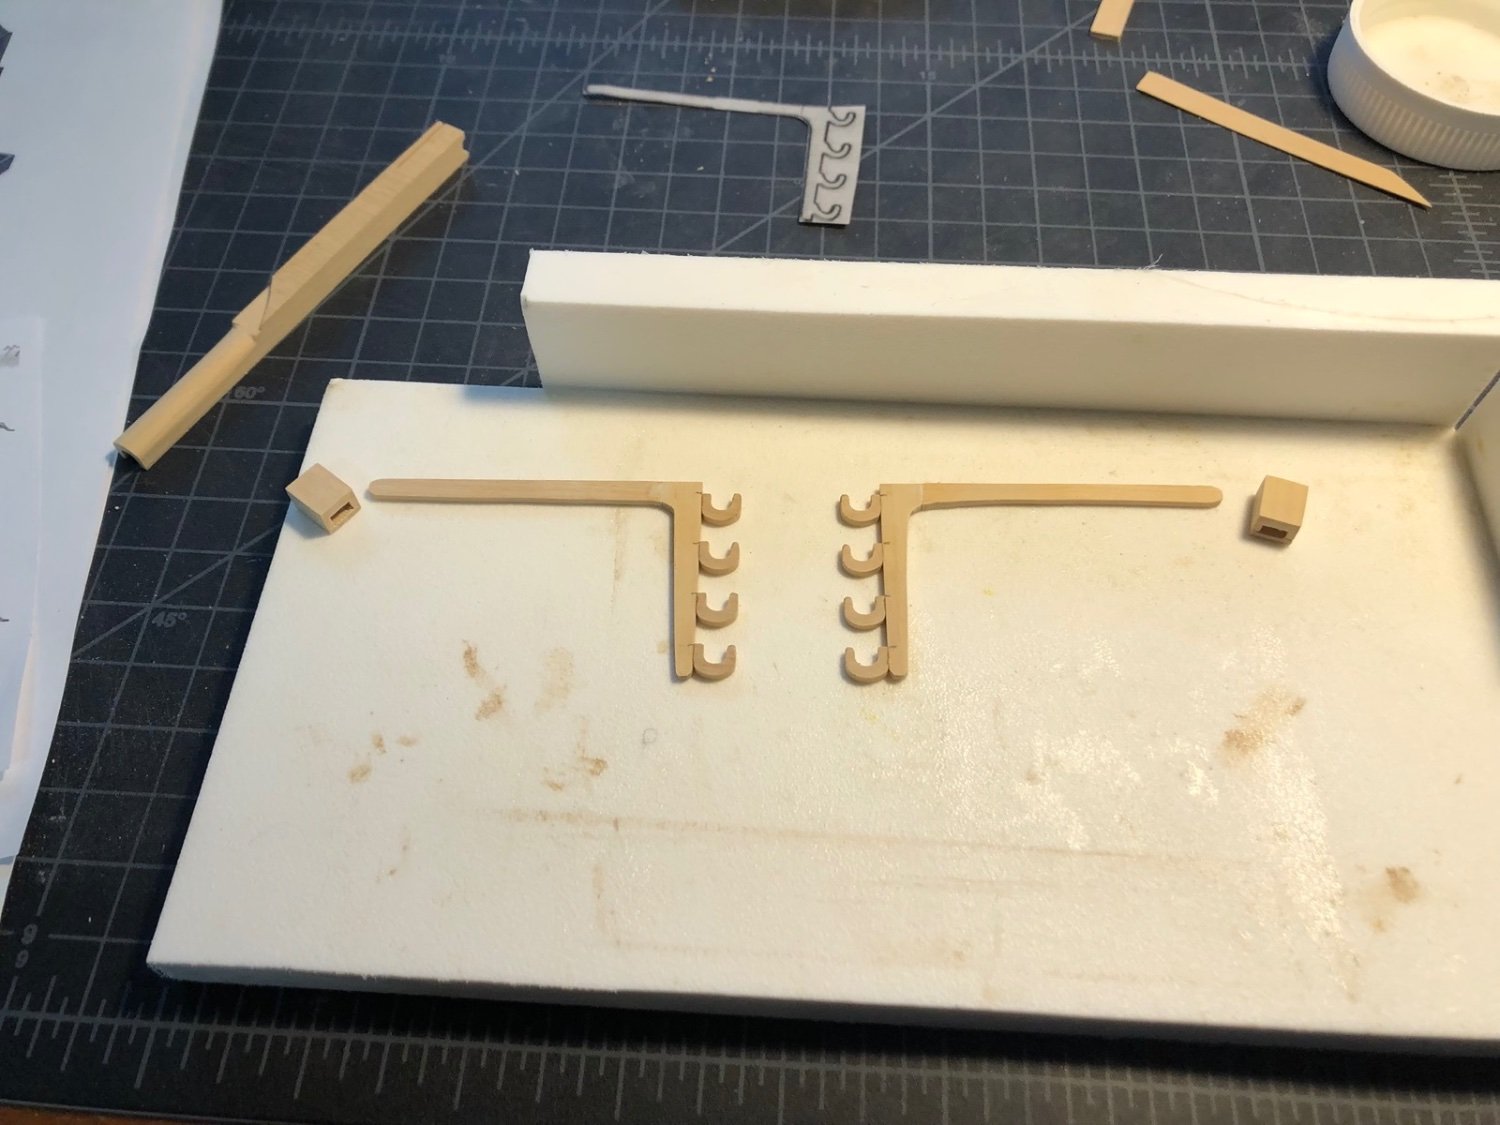
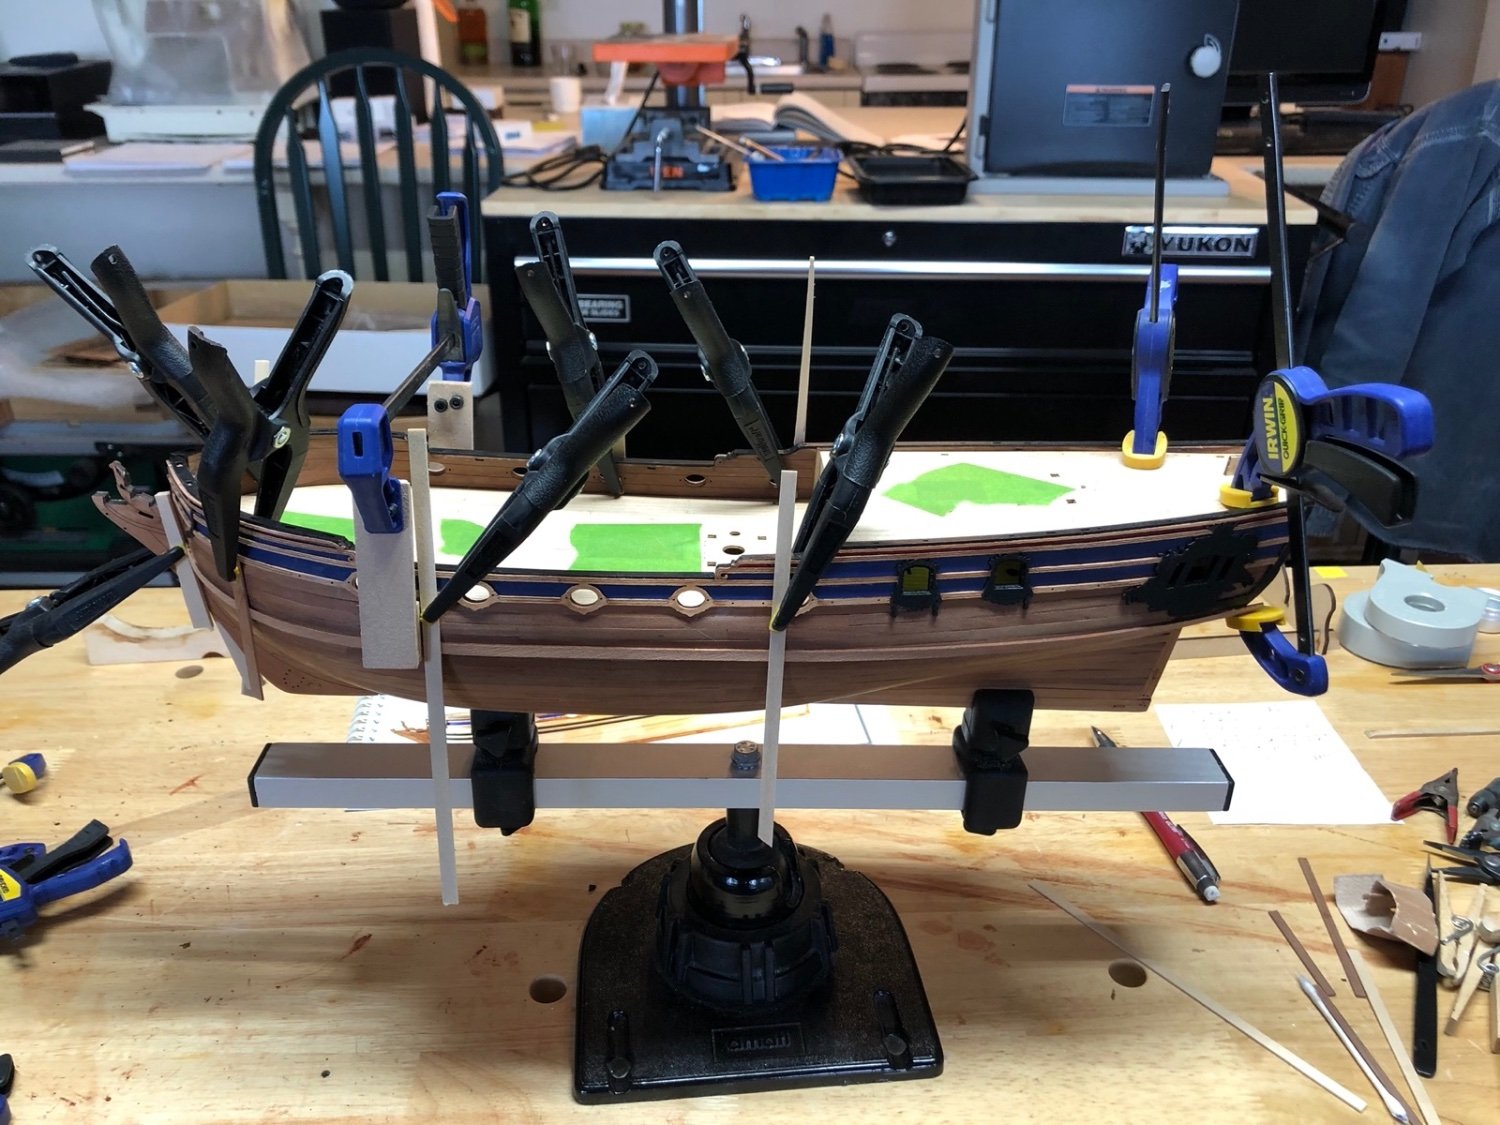
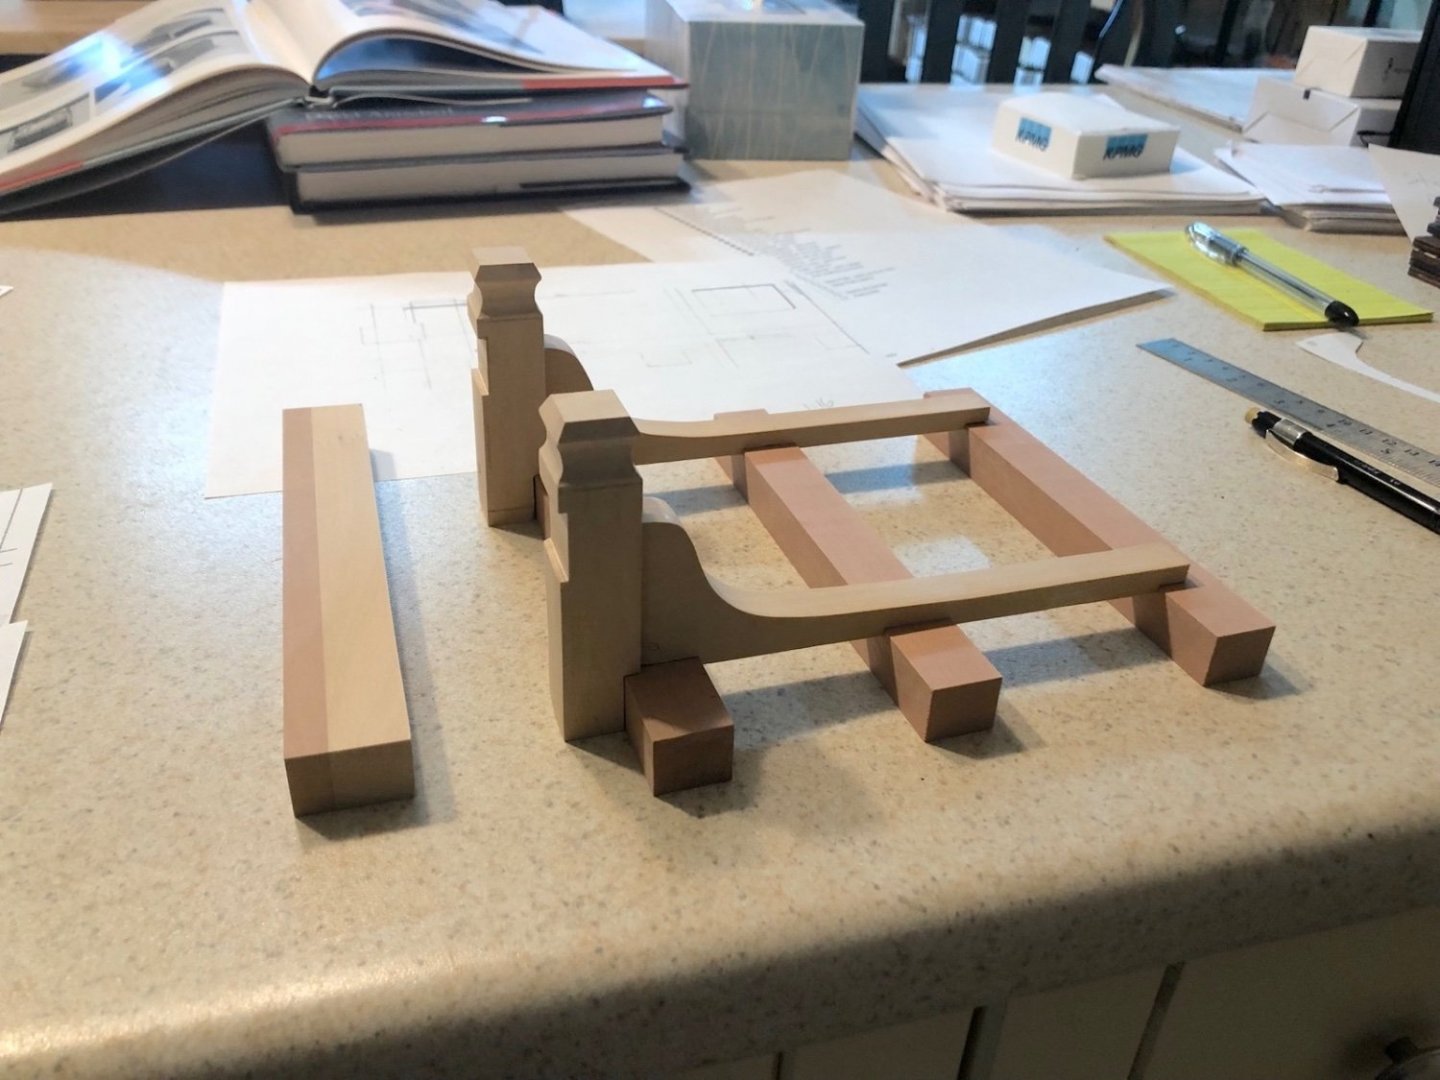
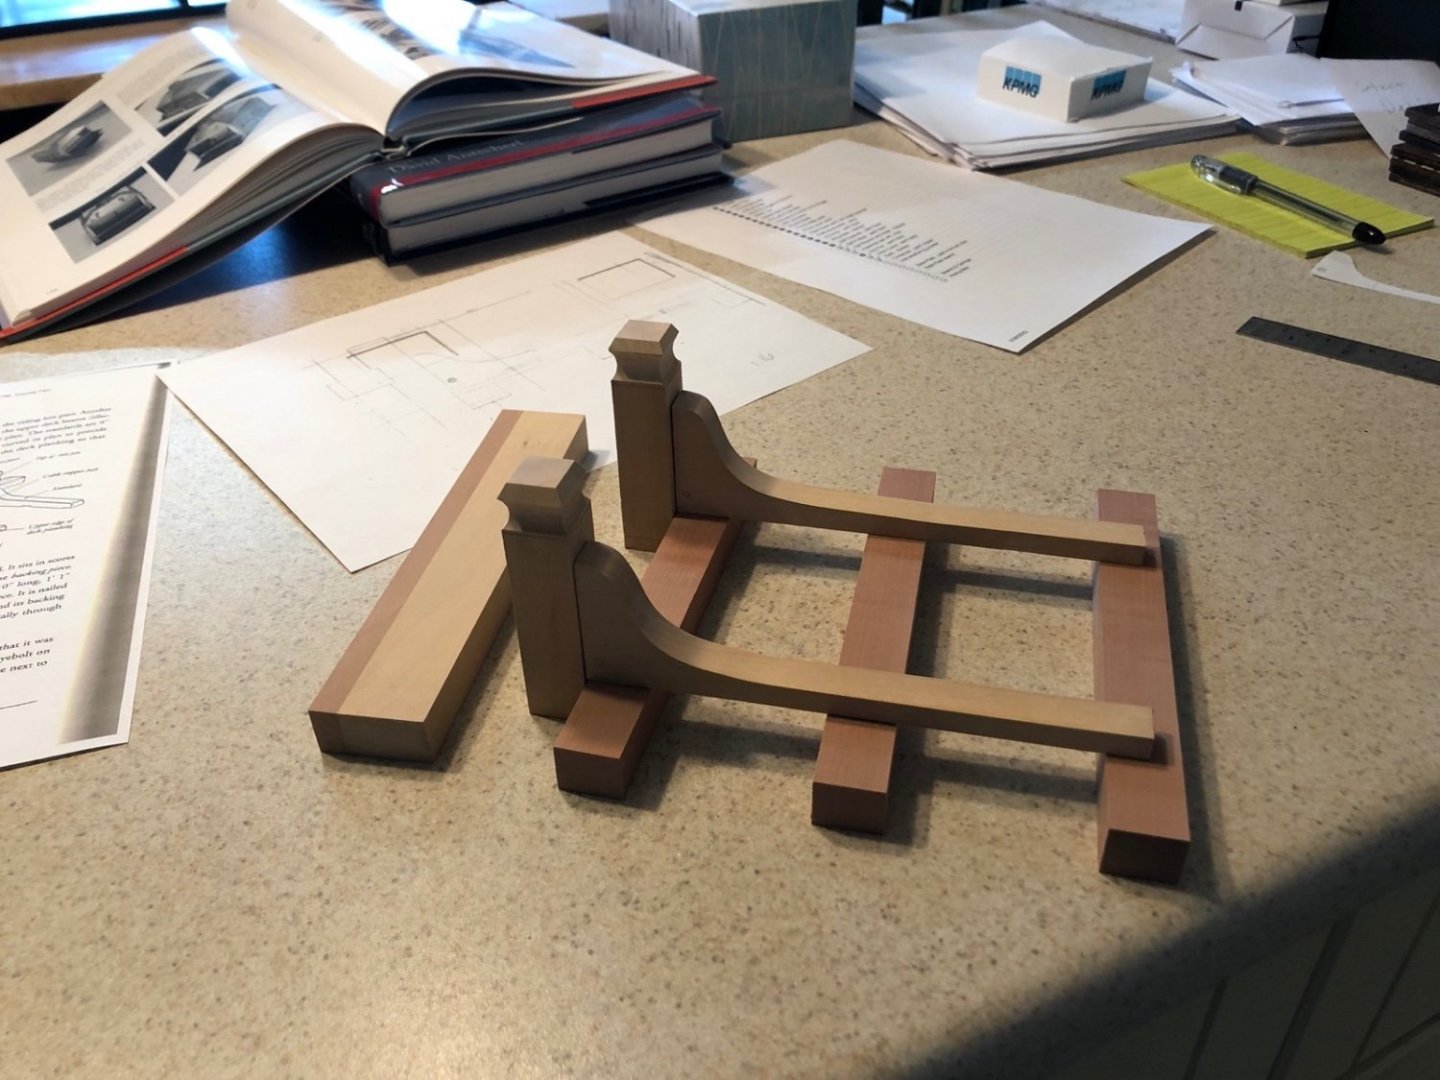
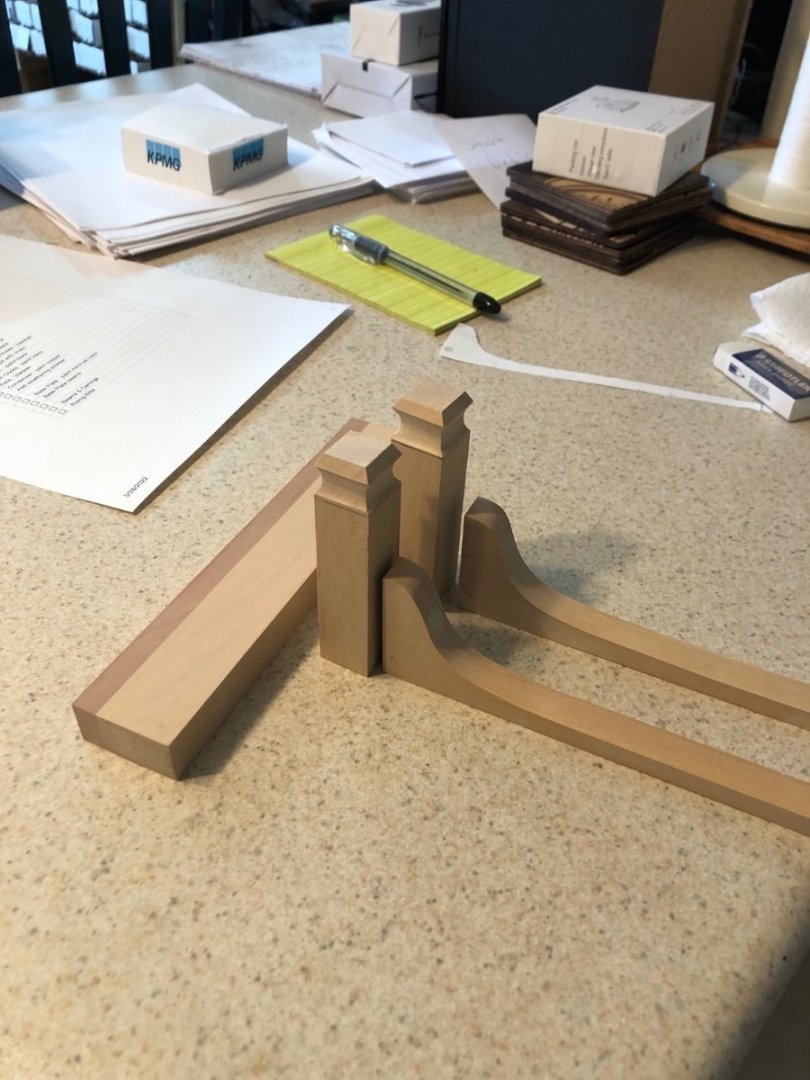
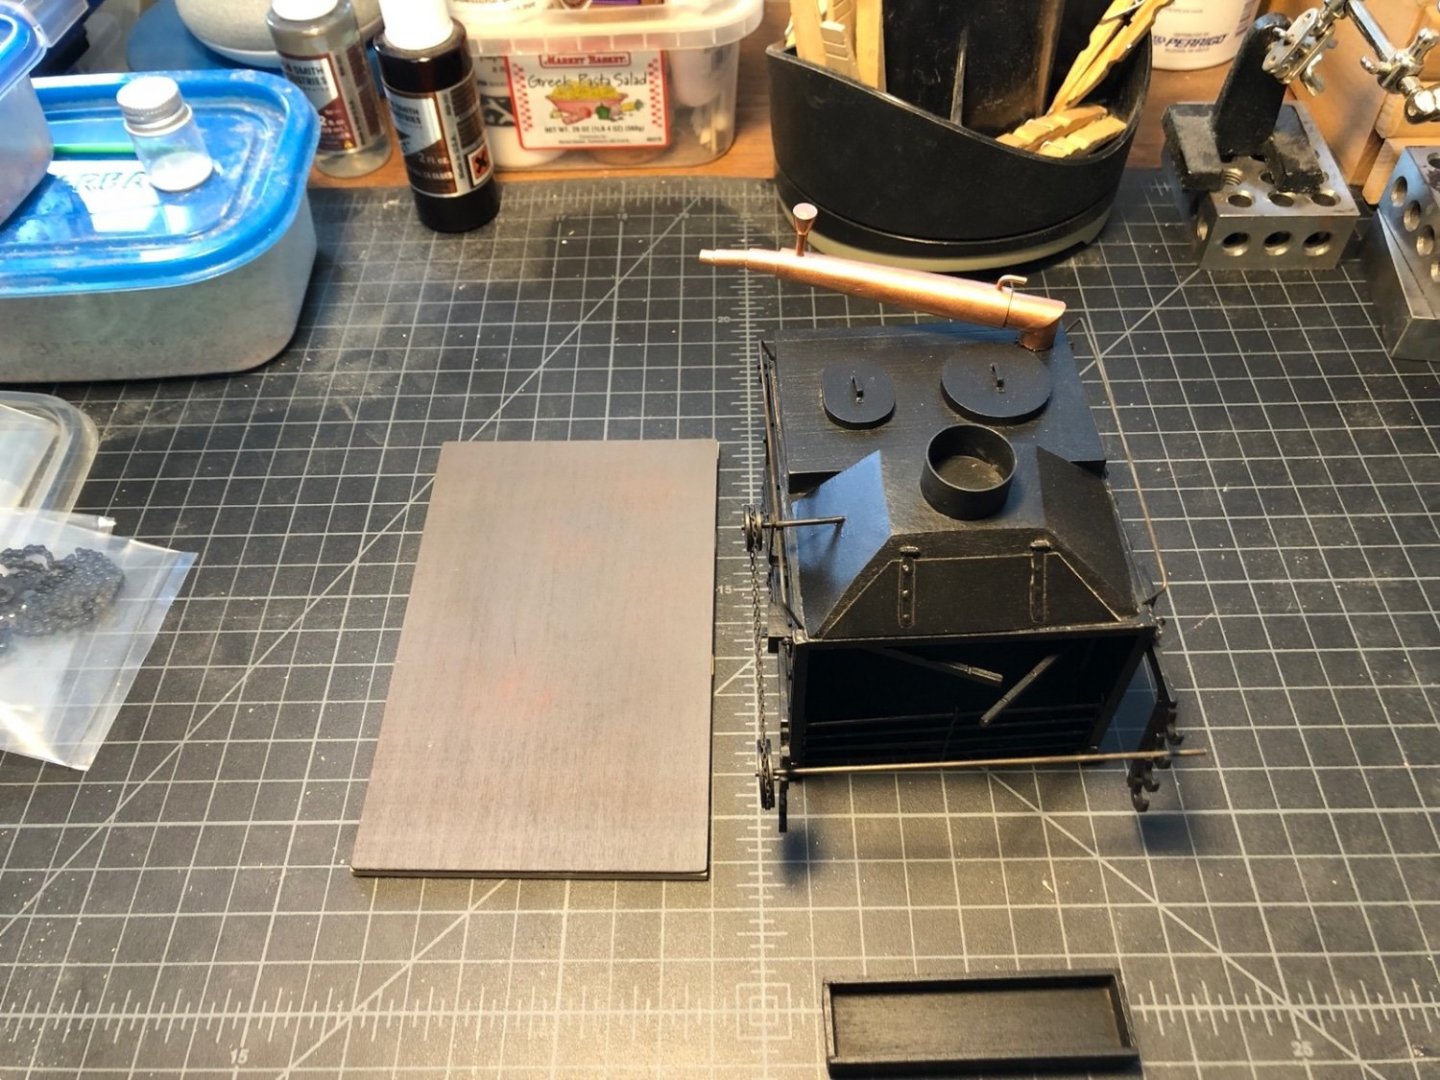
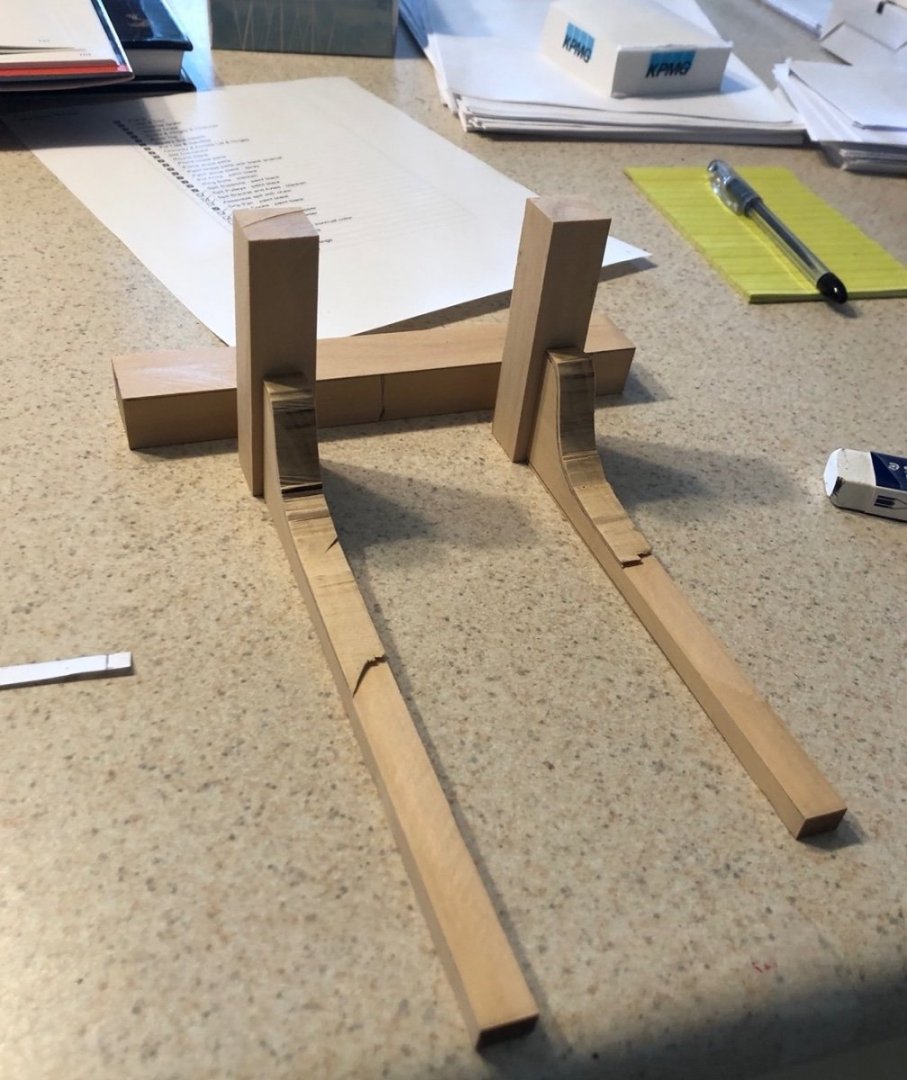
 I made the carlings the same way I did on the capstan project. I first milled the notches in the beams and cleaned them up with a small chisel. I cut the tenons in the ends of the carlings with a razor saw to fit into the notches. The plans show these angling toward the center which I was able to do with the carlings between the aft and middle beams. The notices were milled at the 87 degree angle of the carlings so the ends fit correctly in them. The plans show the carlings between the middle and fore beam are also angled and go under the standards, but the standards are notched to fit down over the beams. I could either have removed some of the bottom of the standards to fit over the top of the carlings but I decided to just fit them so they didn't go under the standards. I also added two boards along the insides of the standards on the three beams that the stove base plate sits on, since it does extend all the way to the aft beam. The legs on each end of the stove line up nicely with the middle and fore beams. Here is everything so far dry fit. Next I will clean up all these pieces, round the appropriate edges, and add the details to the cross piece. Then I can start putting them all together.
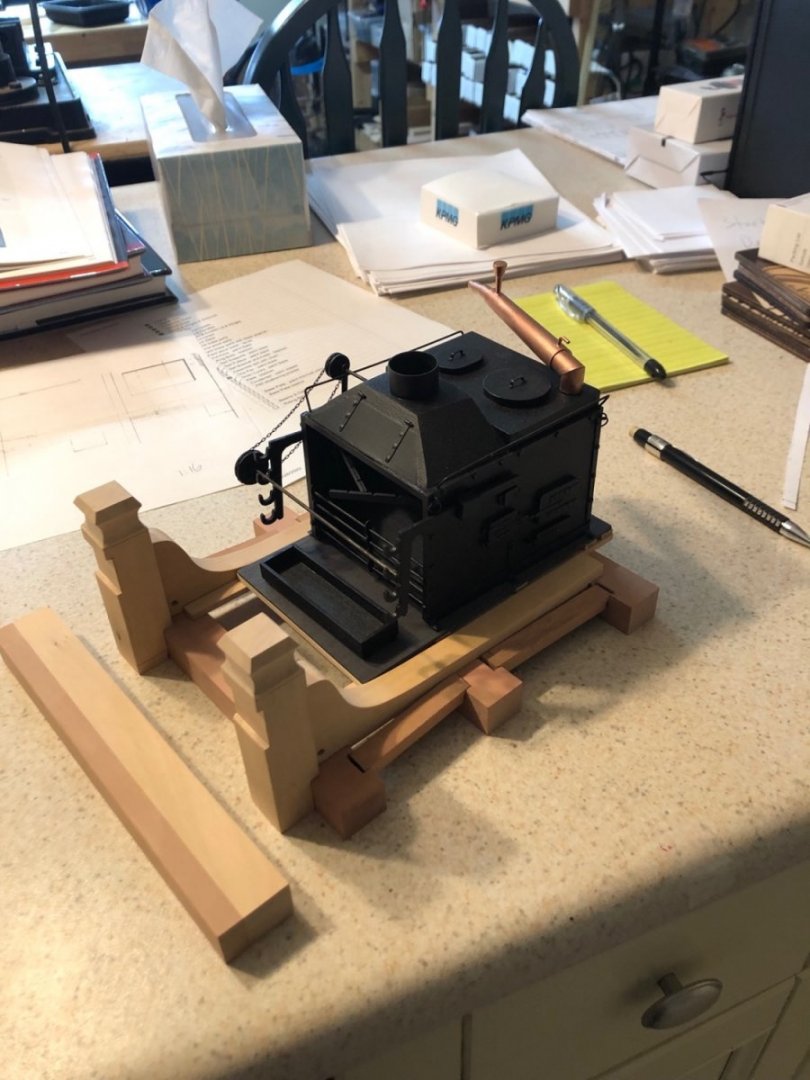
-
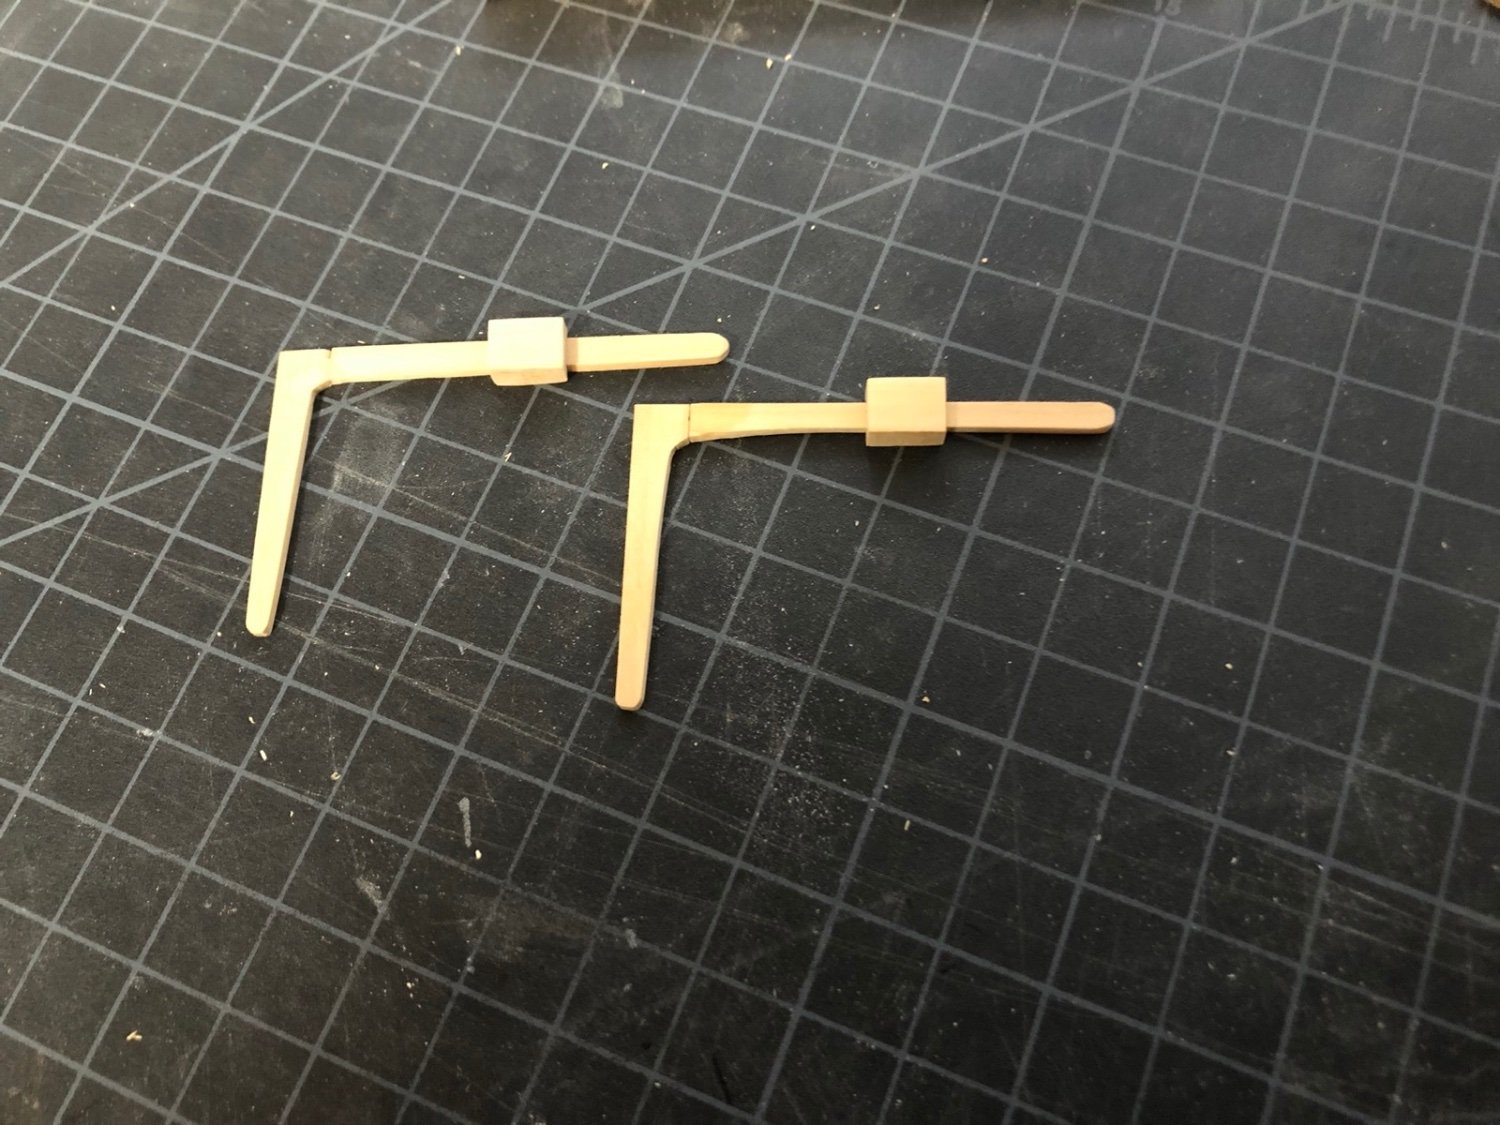
I added notches to the front of the bitt pins for the cross piece and to the back for the beam they are attached to. I also cut down the width of the cross piece to the correct size. I then cut notches into the standards for the three beams they sit on. I will be making the carlings next.
-
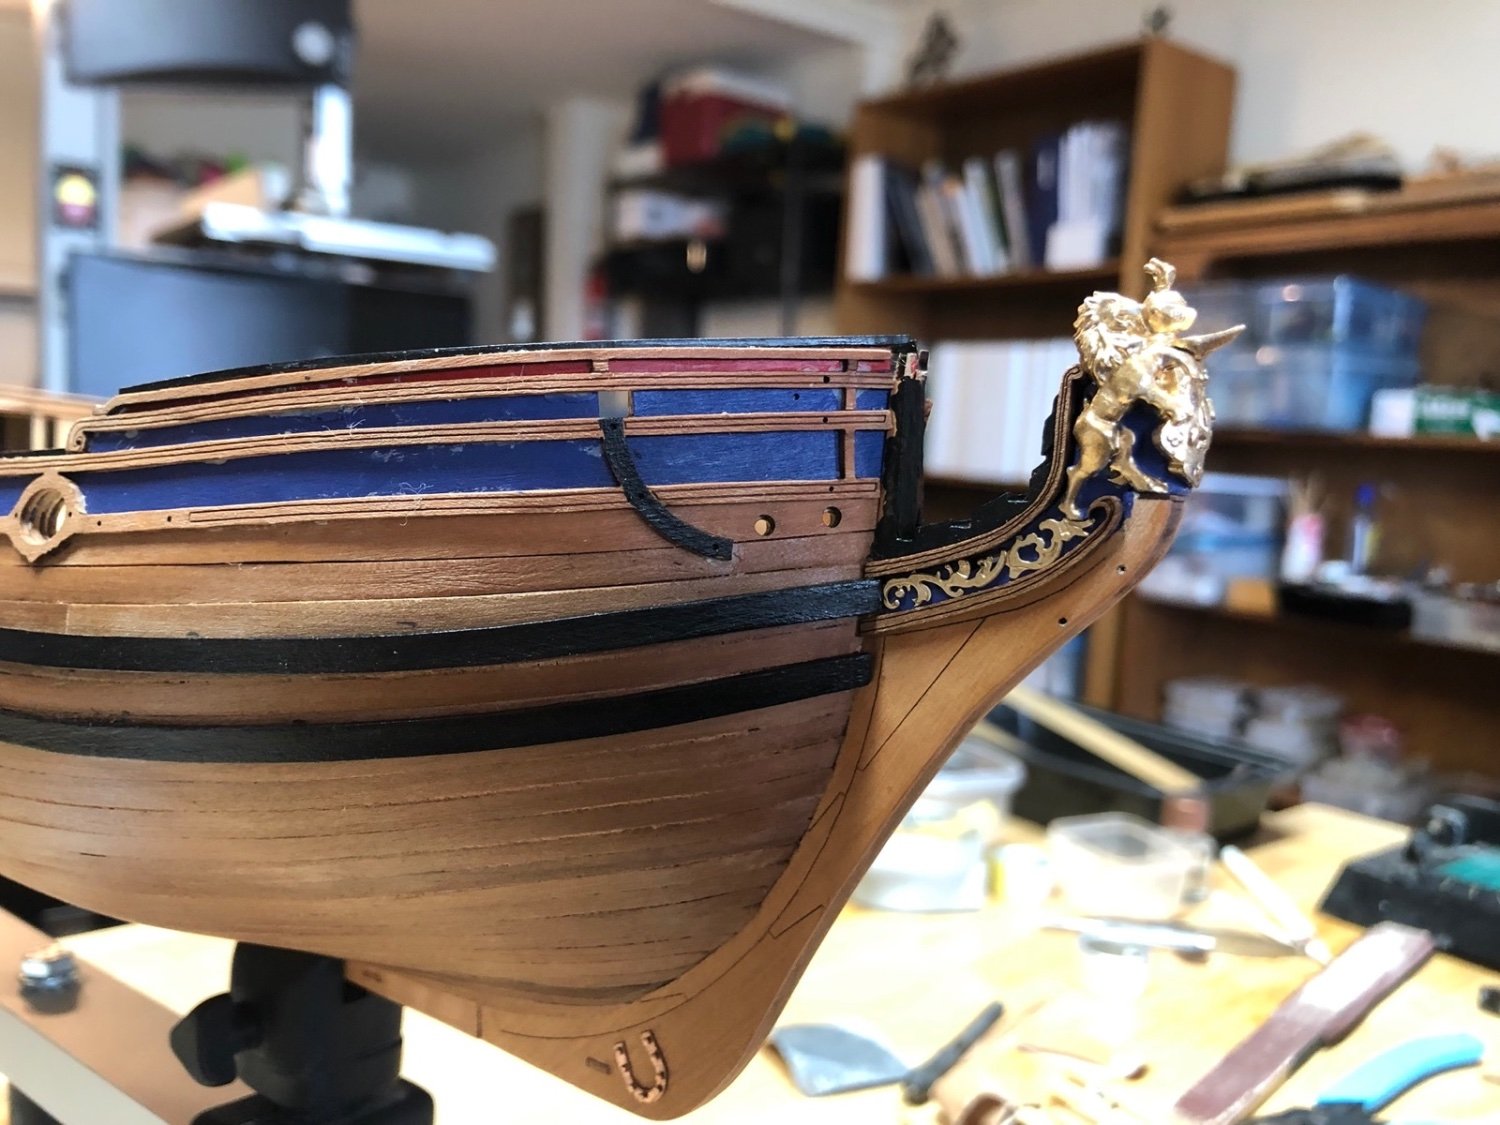
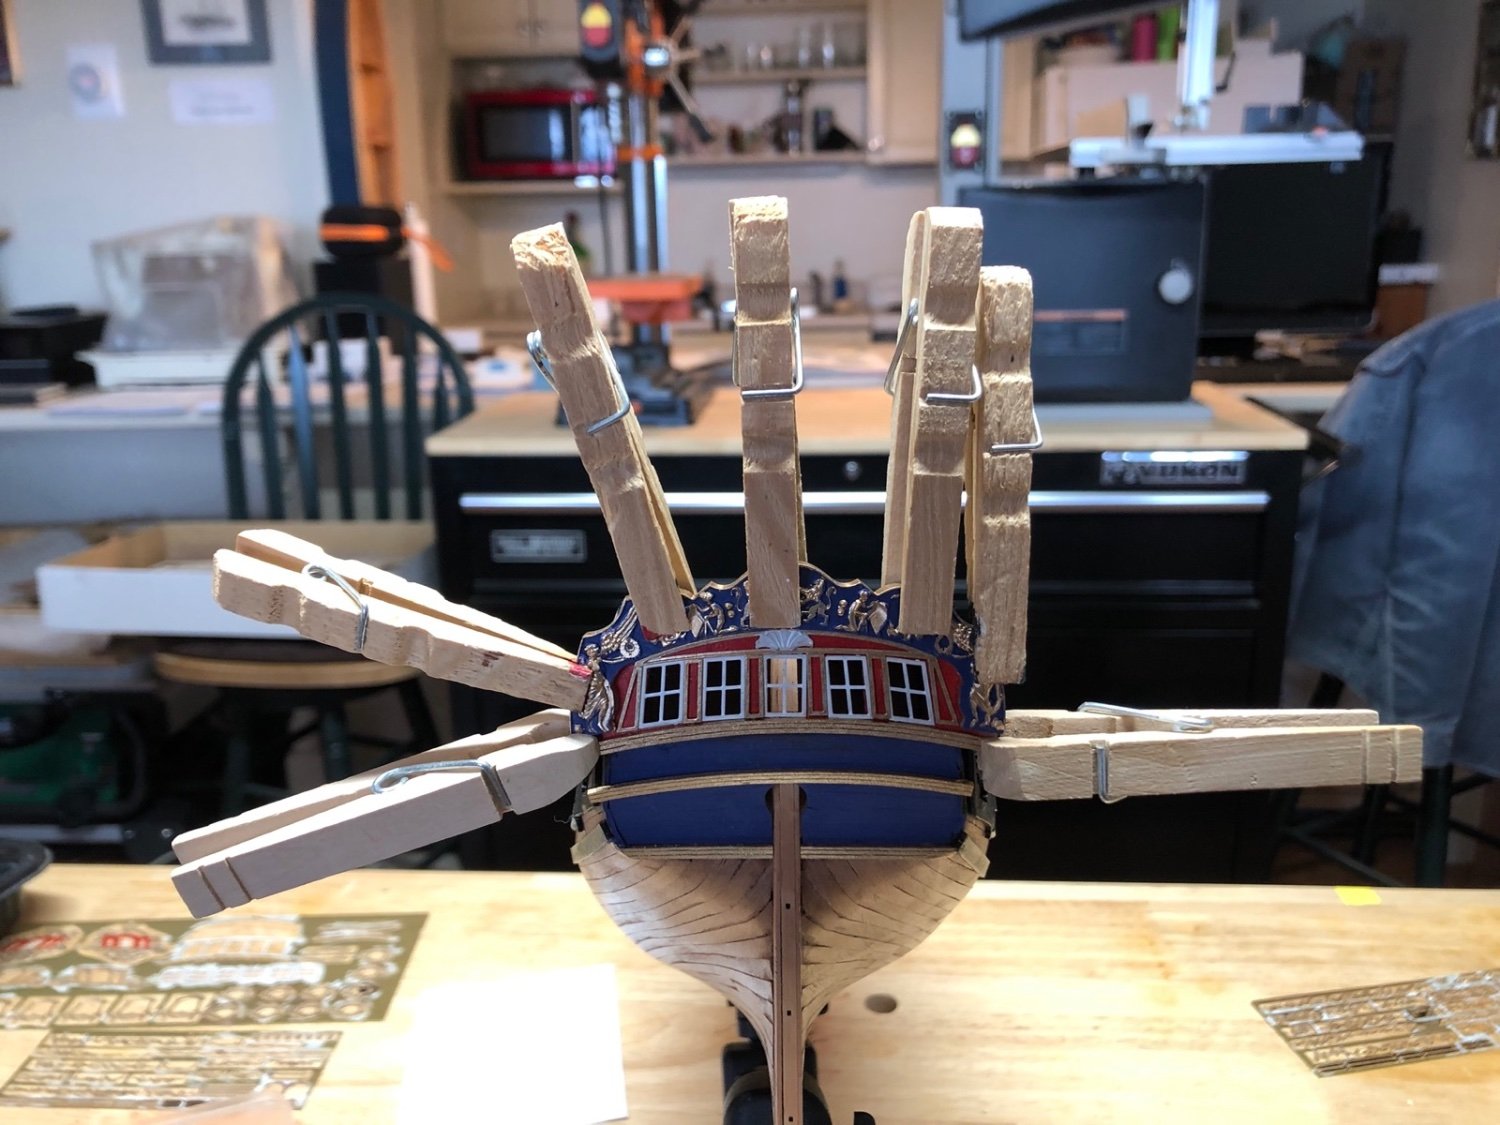
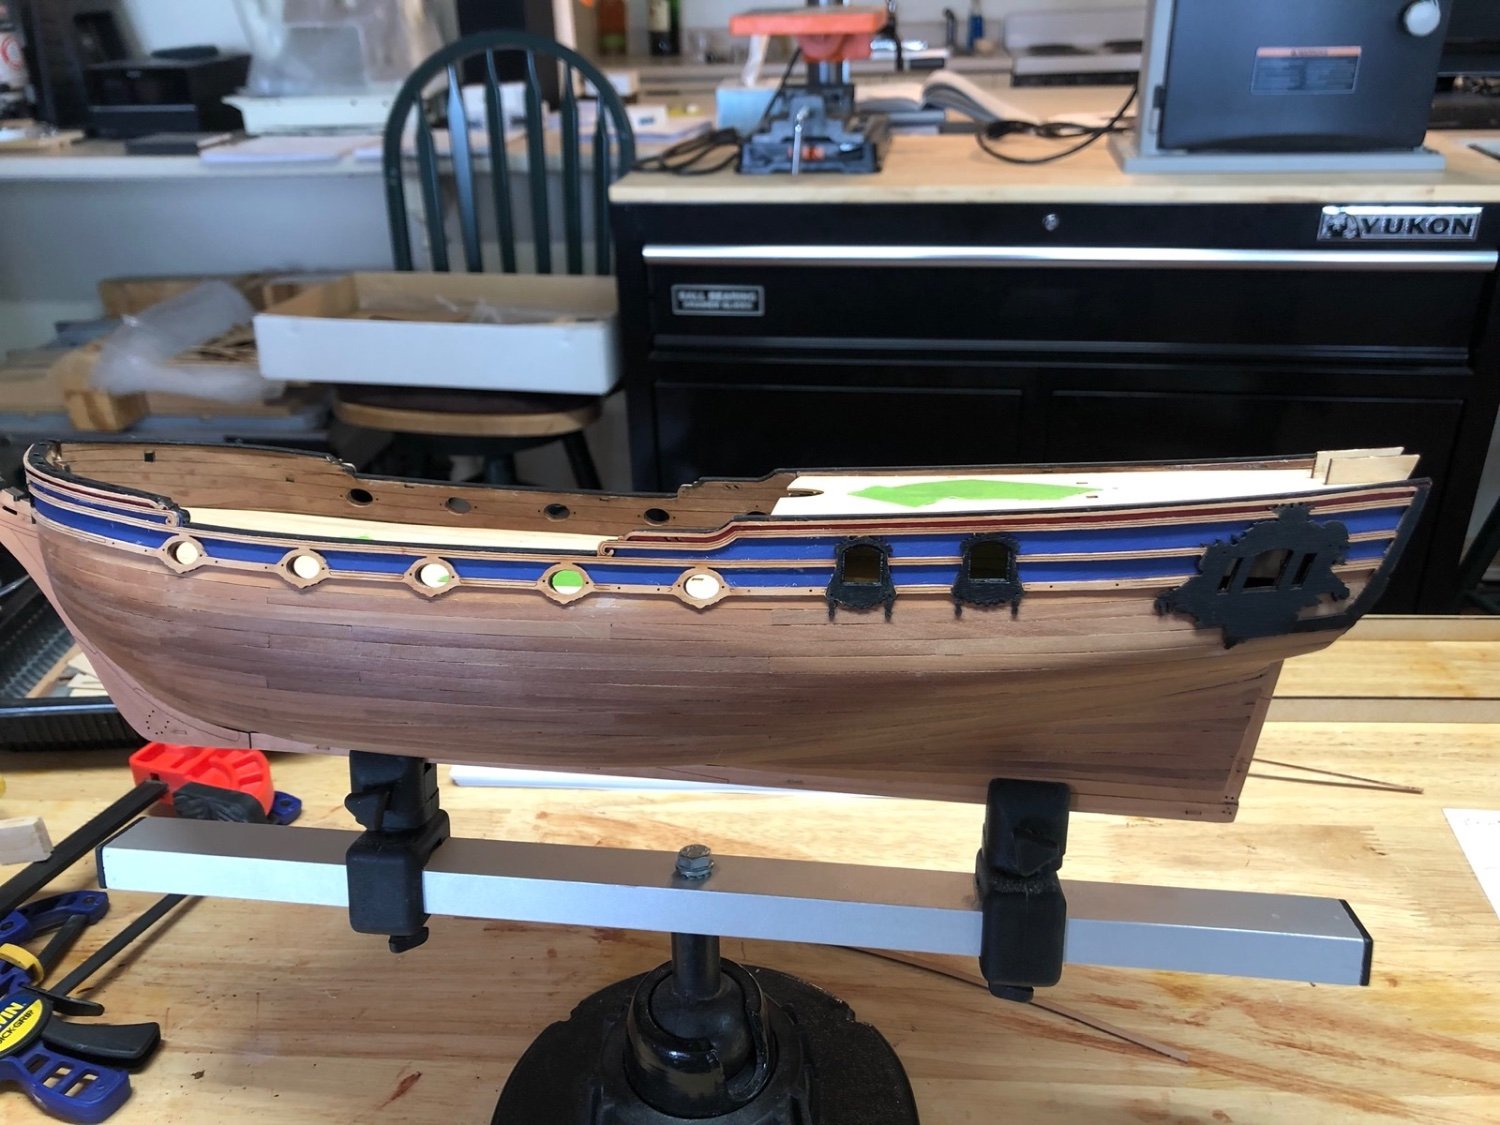
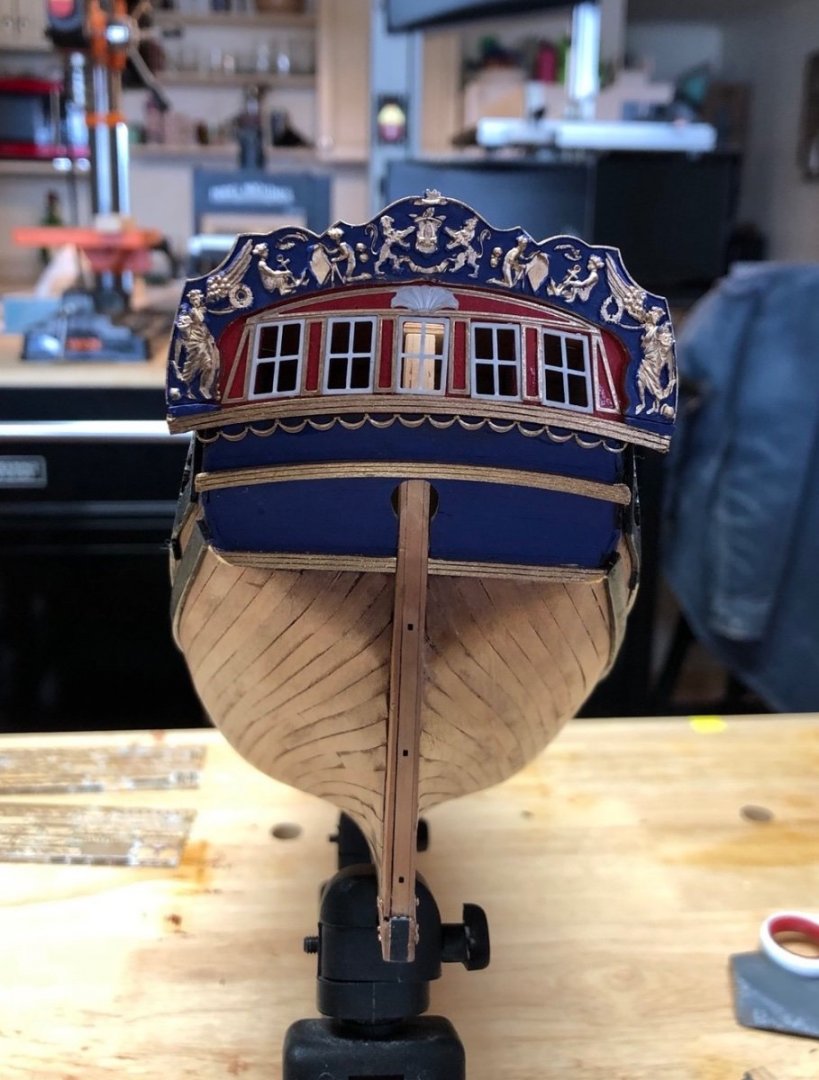
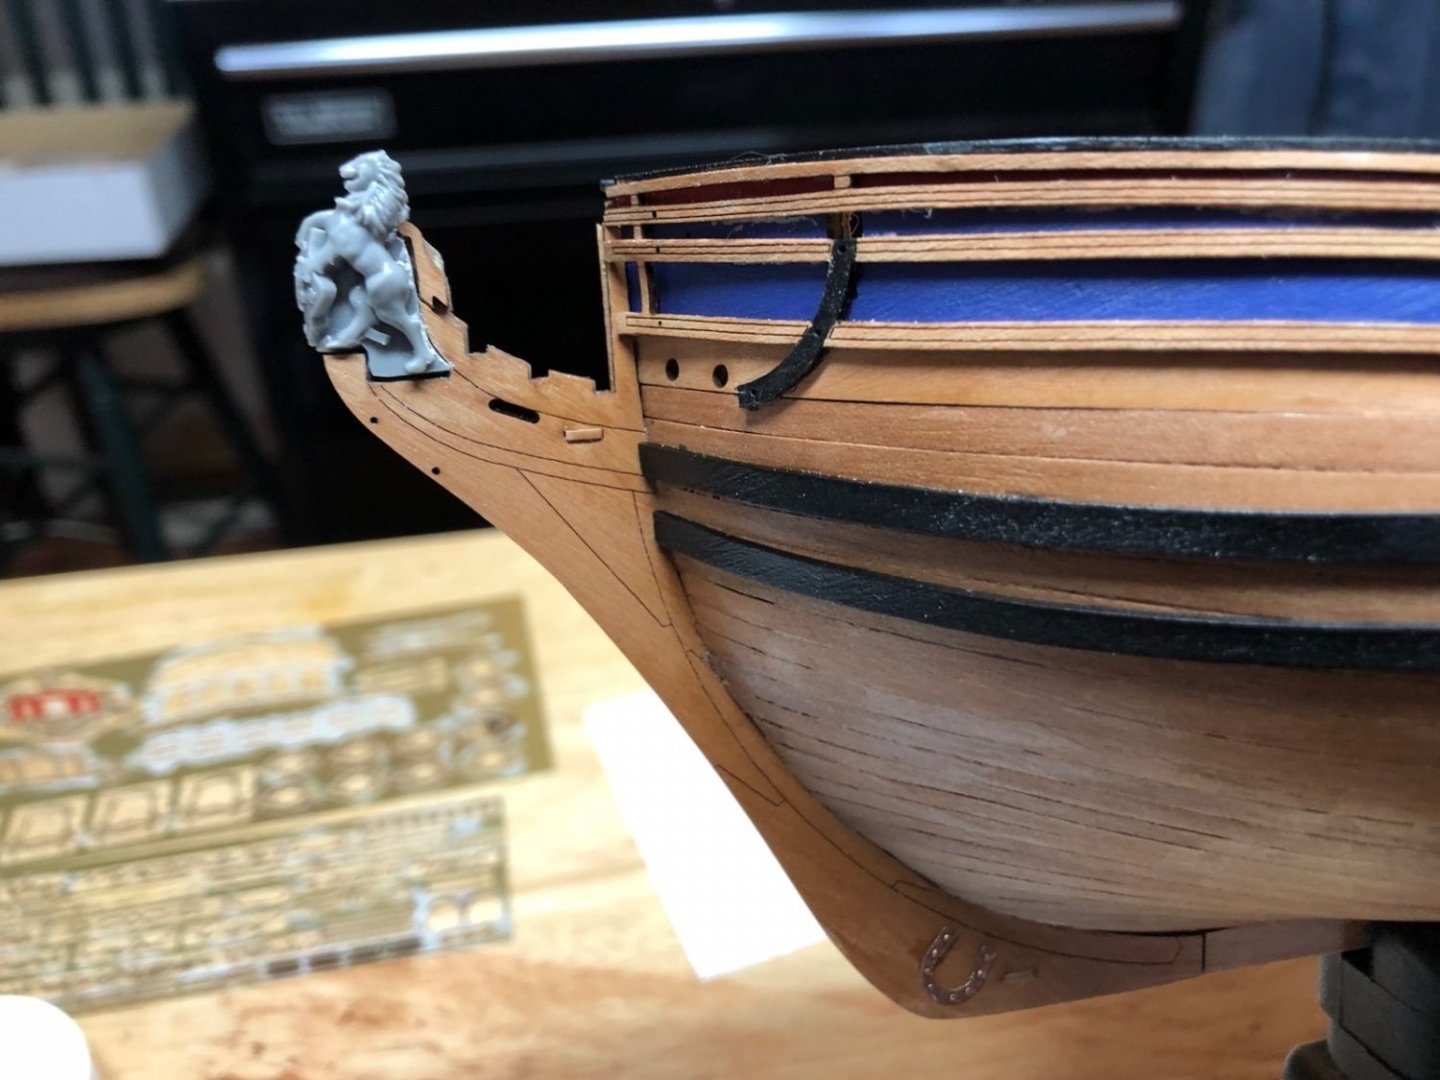
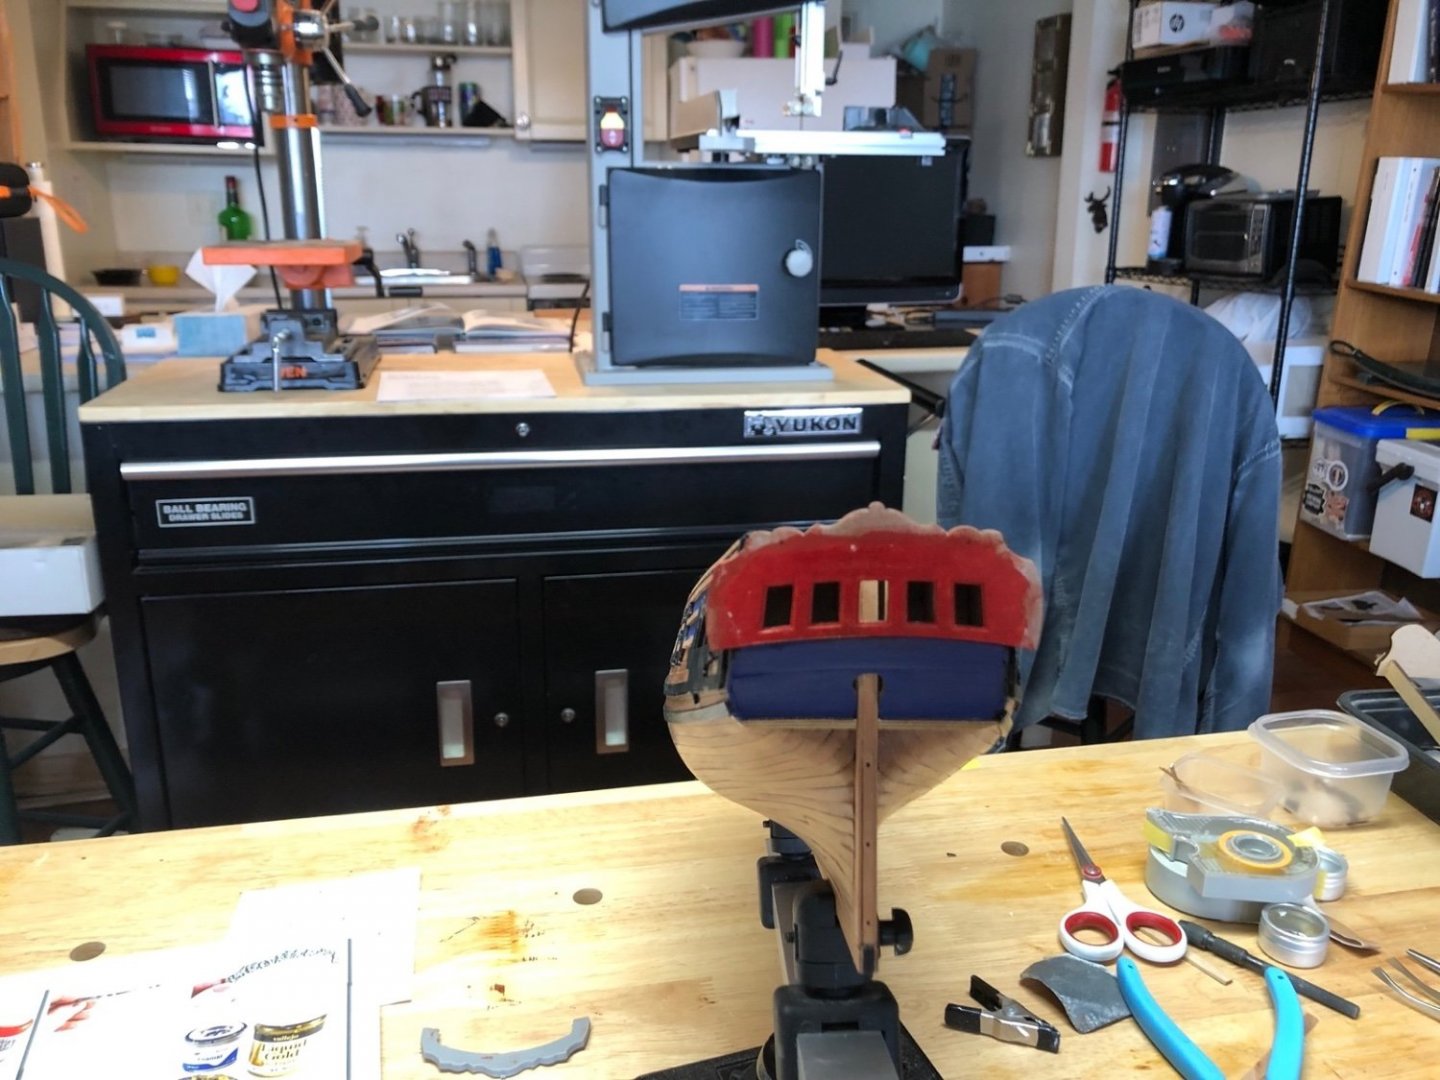
I glued the figurehead in place and cleaned up the slight gaps with the stem. I added the cheek rails and the photo etch trim that goes between them. More rails to add but first they are being painted black.

- 118 replies
-
- 8
-

-
- Duchess Of Kingston
- Finished
- (and 1 more)
-
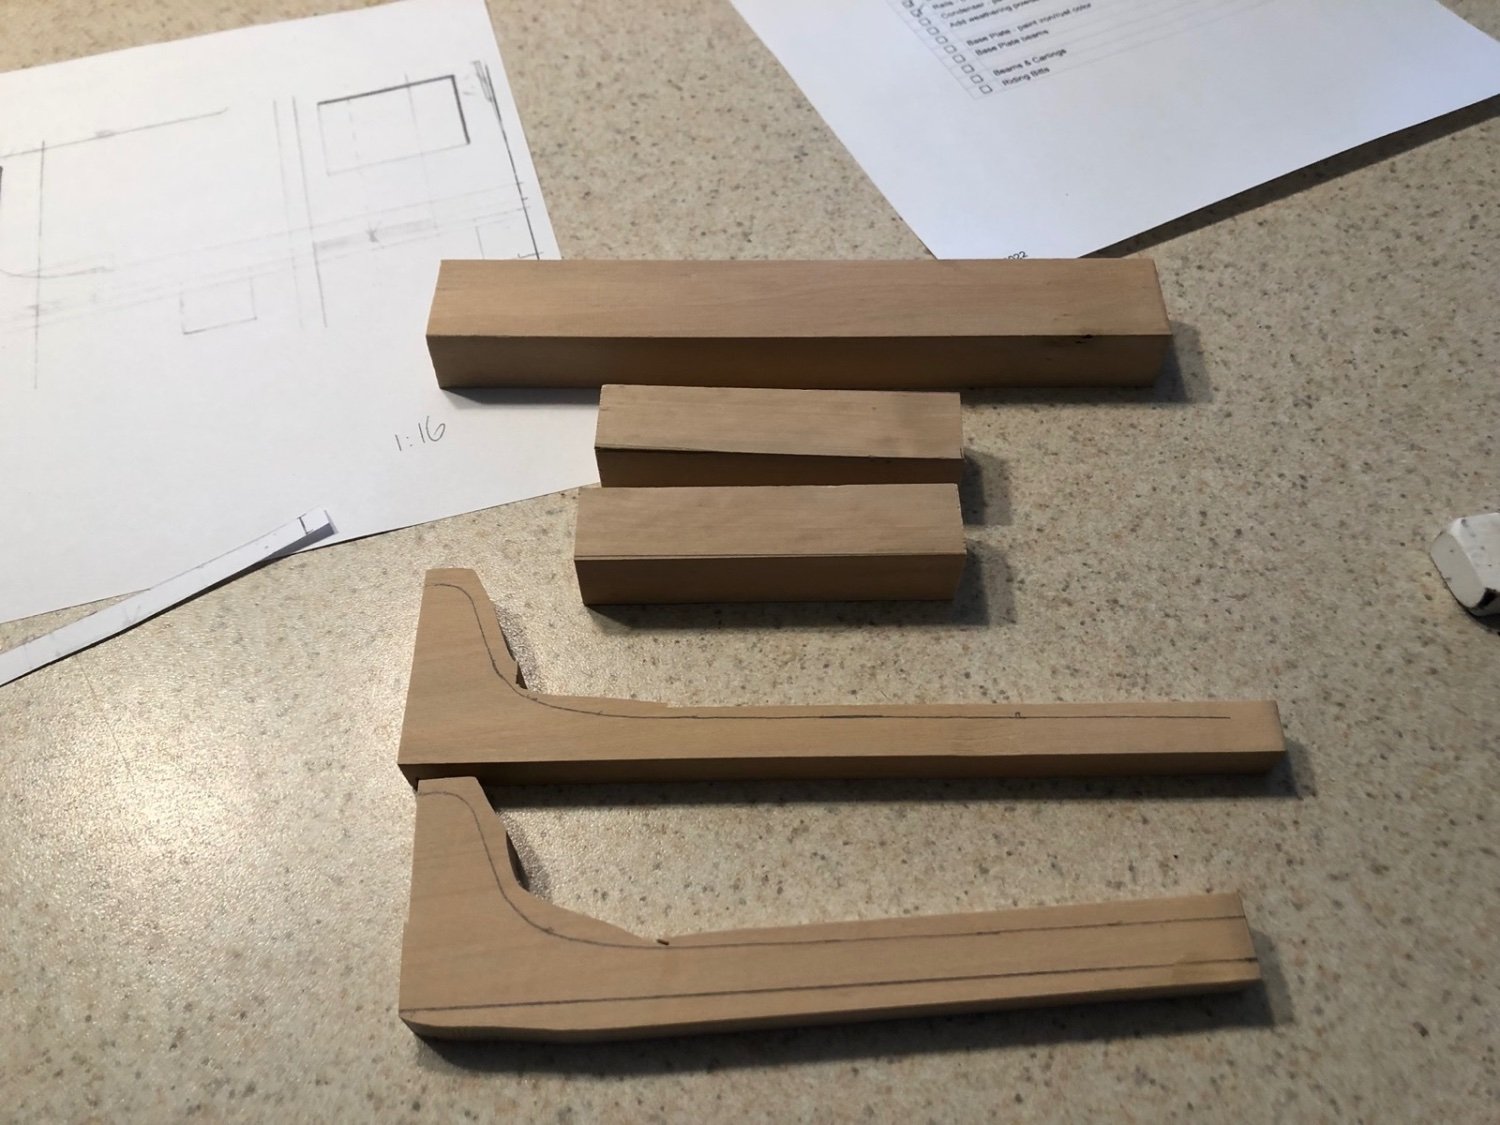
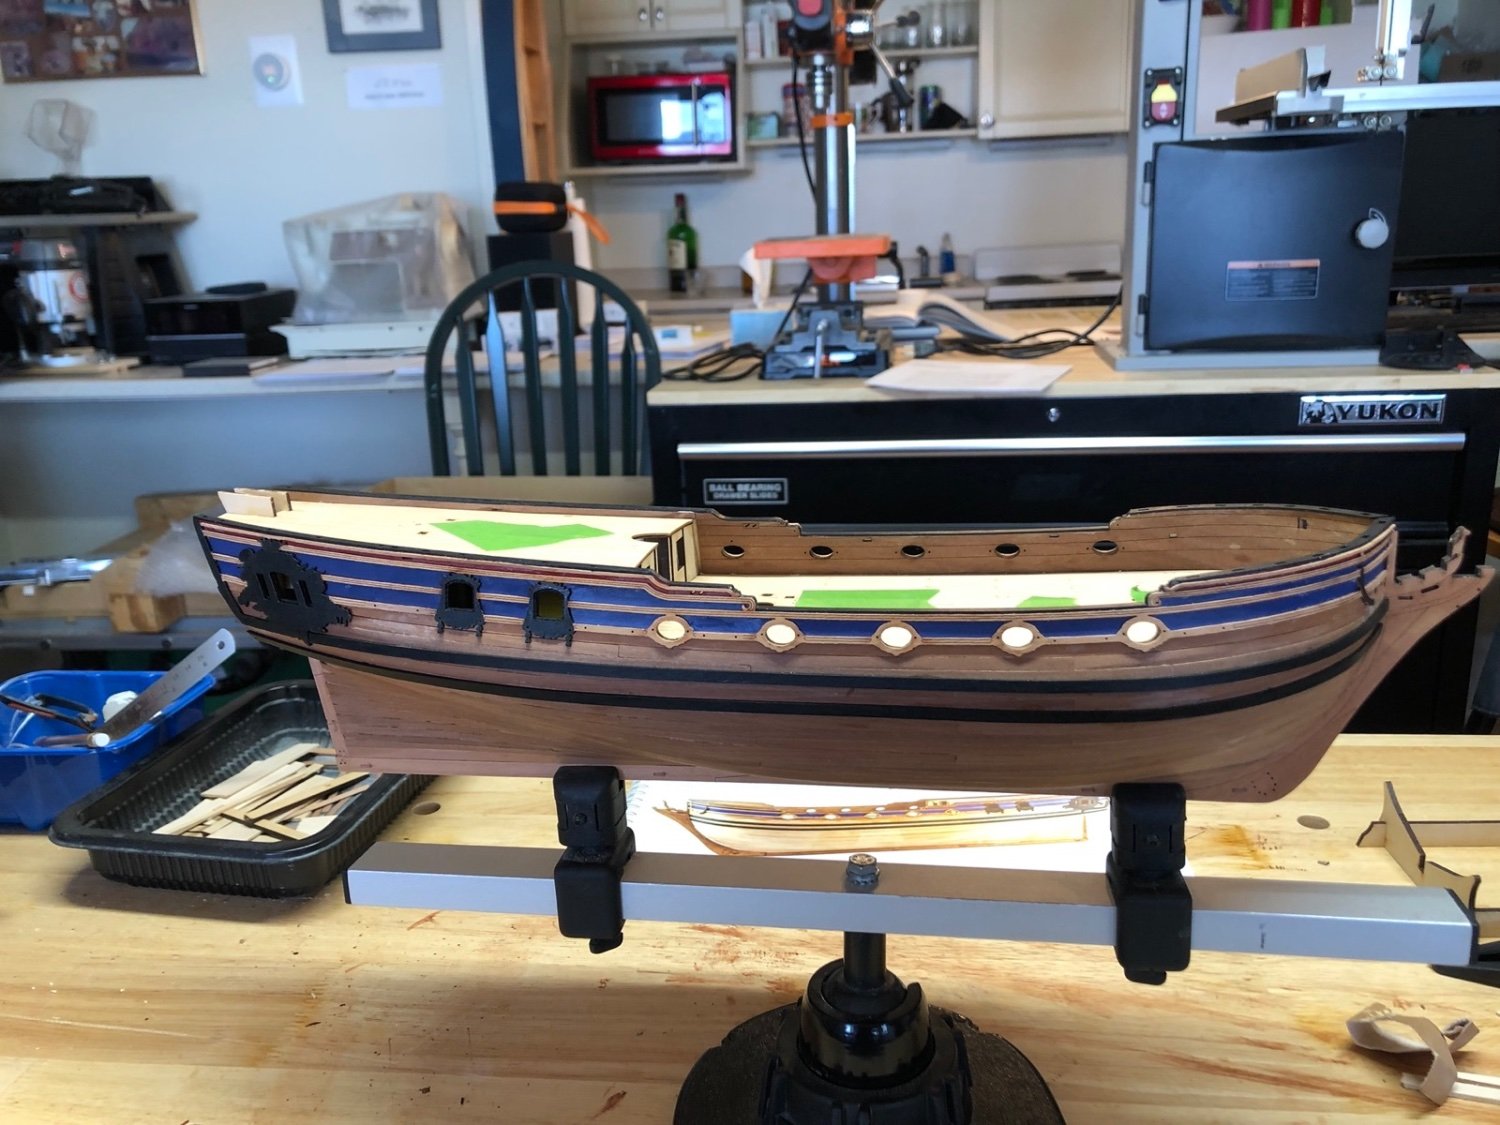
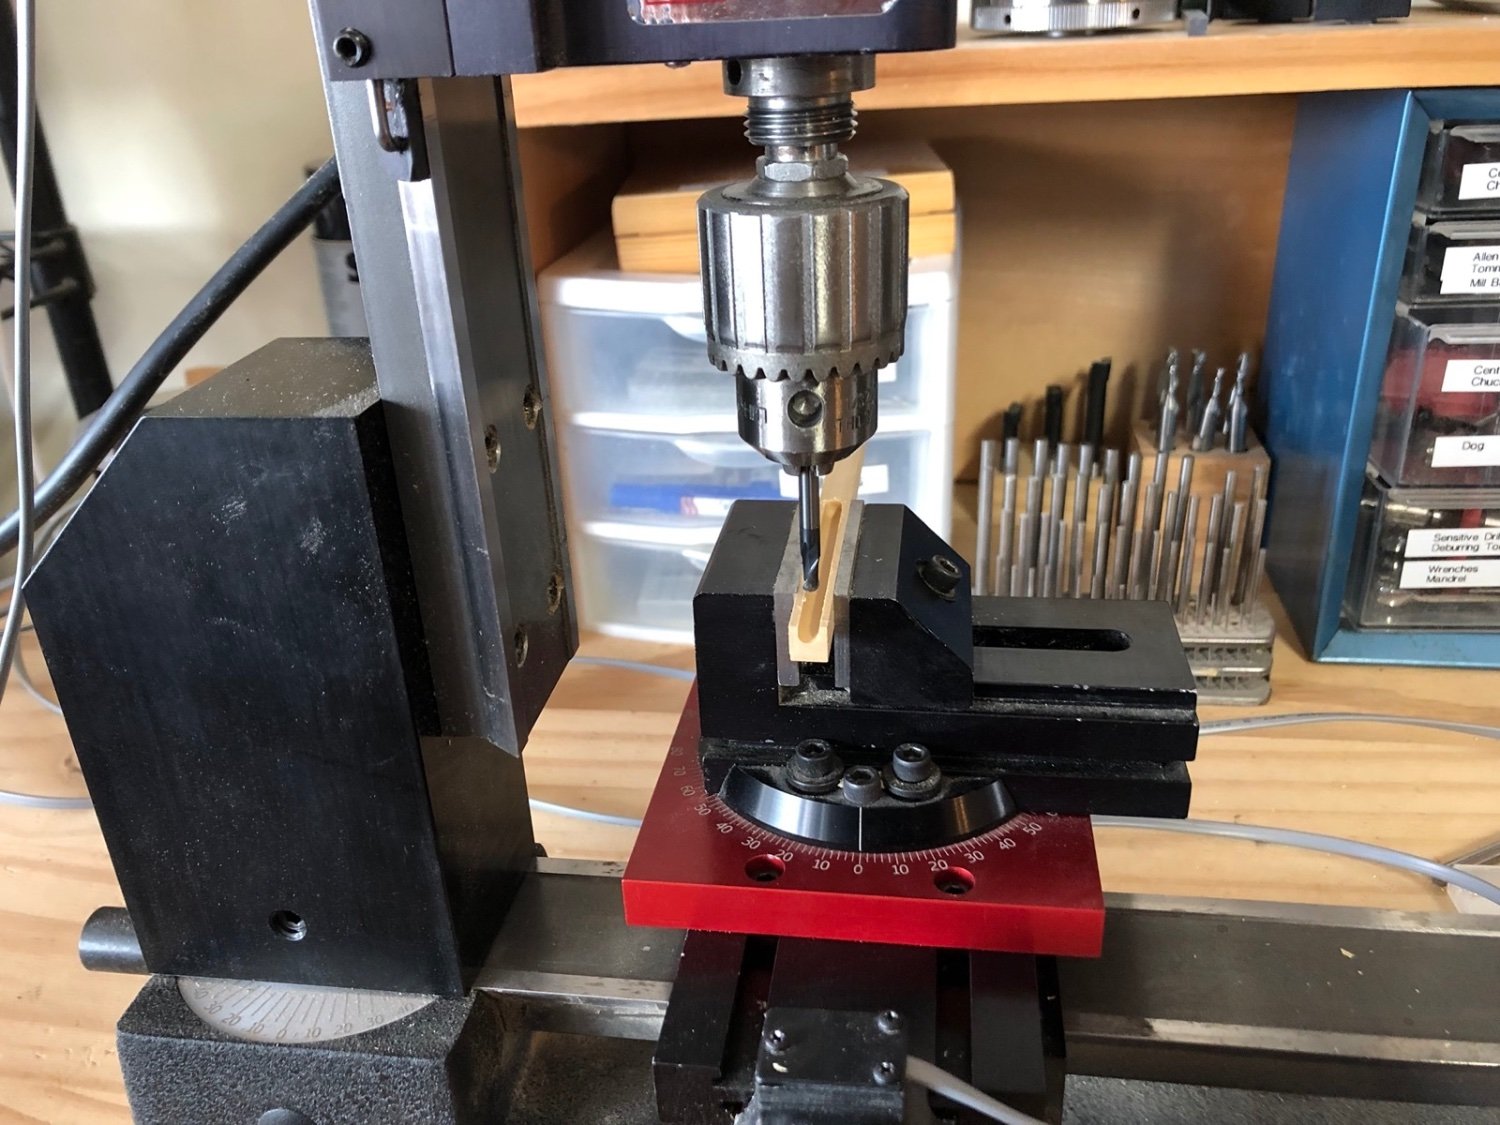
Thank you Albert, Gary, and bdgiantman2, and for those who hit the like button. A chicken might be too big but a small squab might fit. 😀 I have been working on the riding bitt pieces for the display. I glued a piece of pear to the boxwood cross piece and ran them through the thickness sander to even up the tops and bottoms. I then used the disk sander to shape the tops of the bitt pins and the mill to shape the curved section. I used the largest end mill bit I had and made two cuts of equal depth on each side then a third cut in the middle a little deeper. I used a large round file to remove the ridges and some sand paper to even out the curve. Here is the set up I used in the mill. And the result with the other riding bitt pieces. Then this afternoon the post woman showed up with three nice pieces of Swiss pear that I had ordered from the Lumberyard for Model Shipwrights. I had to cut the three beams for the display from one of the pieces. I used the bandsaw with much better success this time by not using the fence but following a straight line by hand. I then ran them through the thickness sander to get them to the right thickness and even up the tops and bottoms. I was then able to run them through the table saw to even up the sides and get them to the right width and length. So here you can get an idea of how the display is going to look. The base and stove will sit on the forward two beams between the standards. Next up is notching everything to fit together and making the carlings to go between the beams.


-
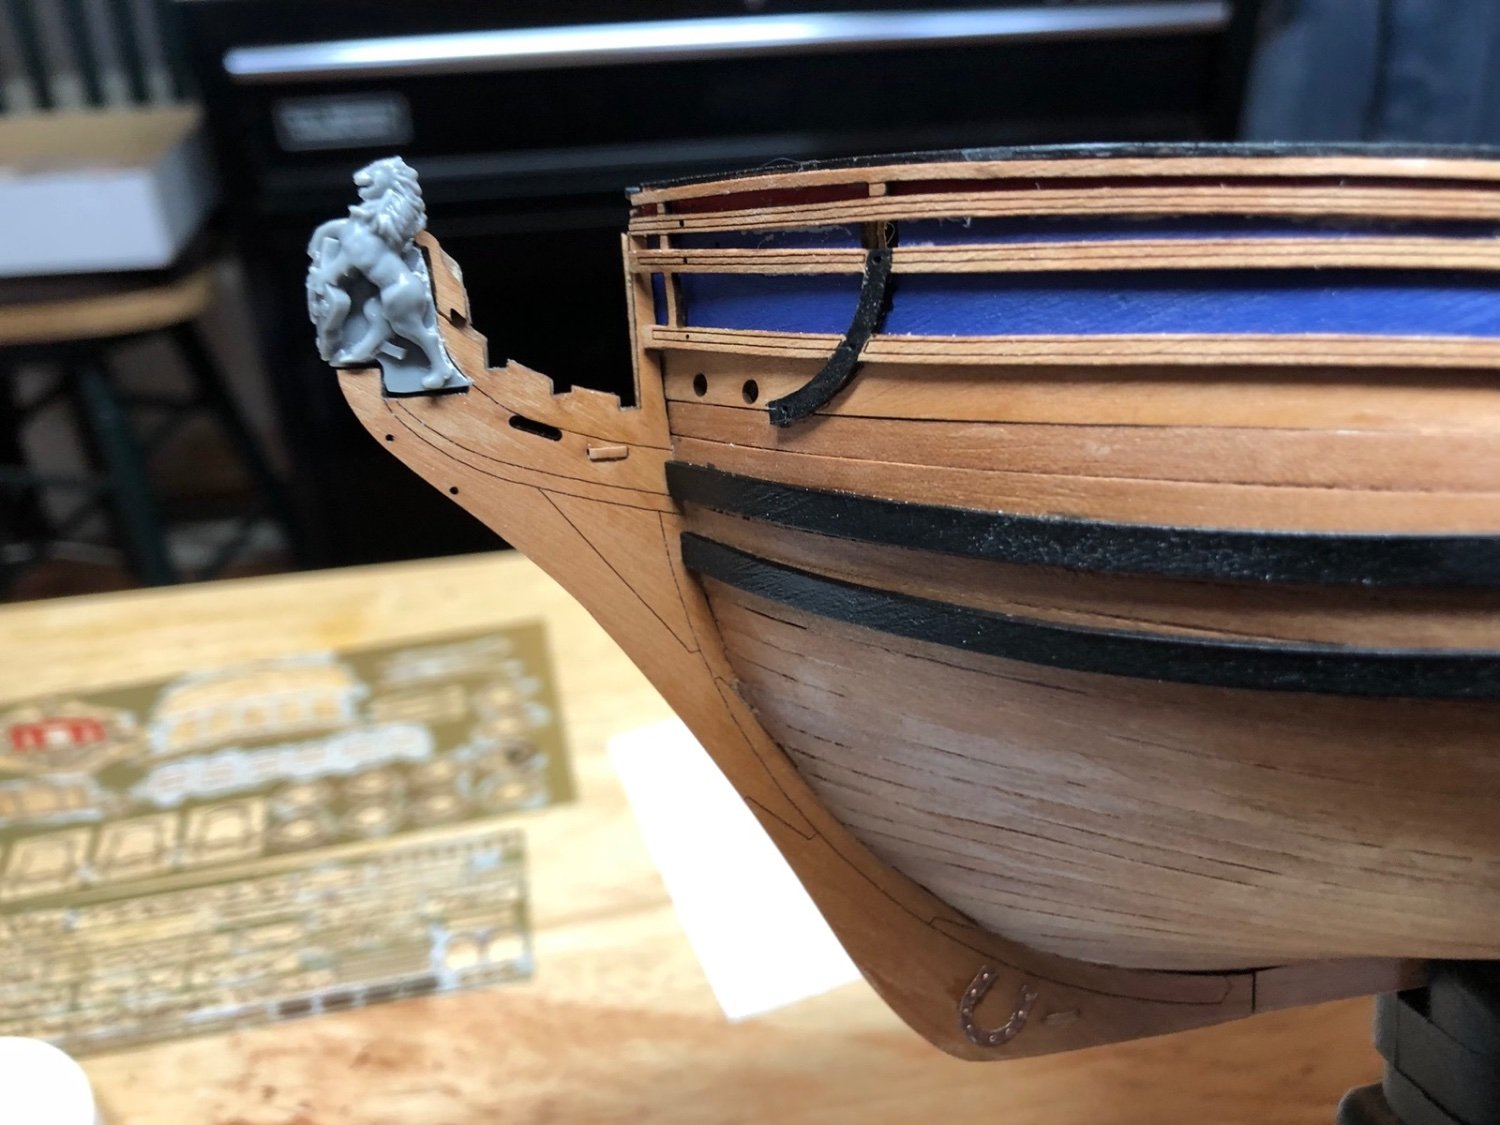
After trimming the gold wood trim pieces, one more photo etch piece, a couple of tiny wood filler pieces and some touch up painting, the transom is complete. The focus now shifts to the bow. The figurehead is painted and ready to install and I very carefully removed the char from the cheek rails and brackets. I have also started painted the blue and black areas of the stem.
- 118 replies
-
- 8
-
-
- Duchess Of Kingston
- Finished
- (and 1 more)
-
Spiny Norman indeed! Great work there Michael.
-
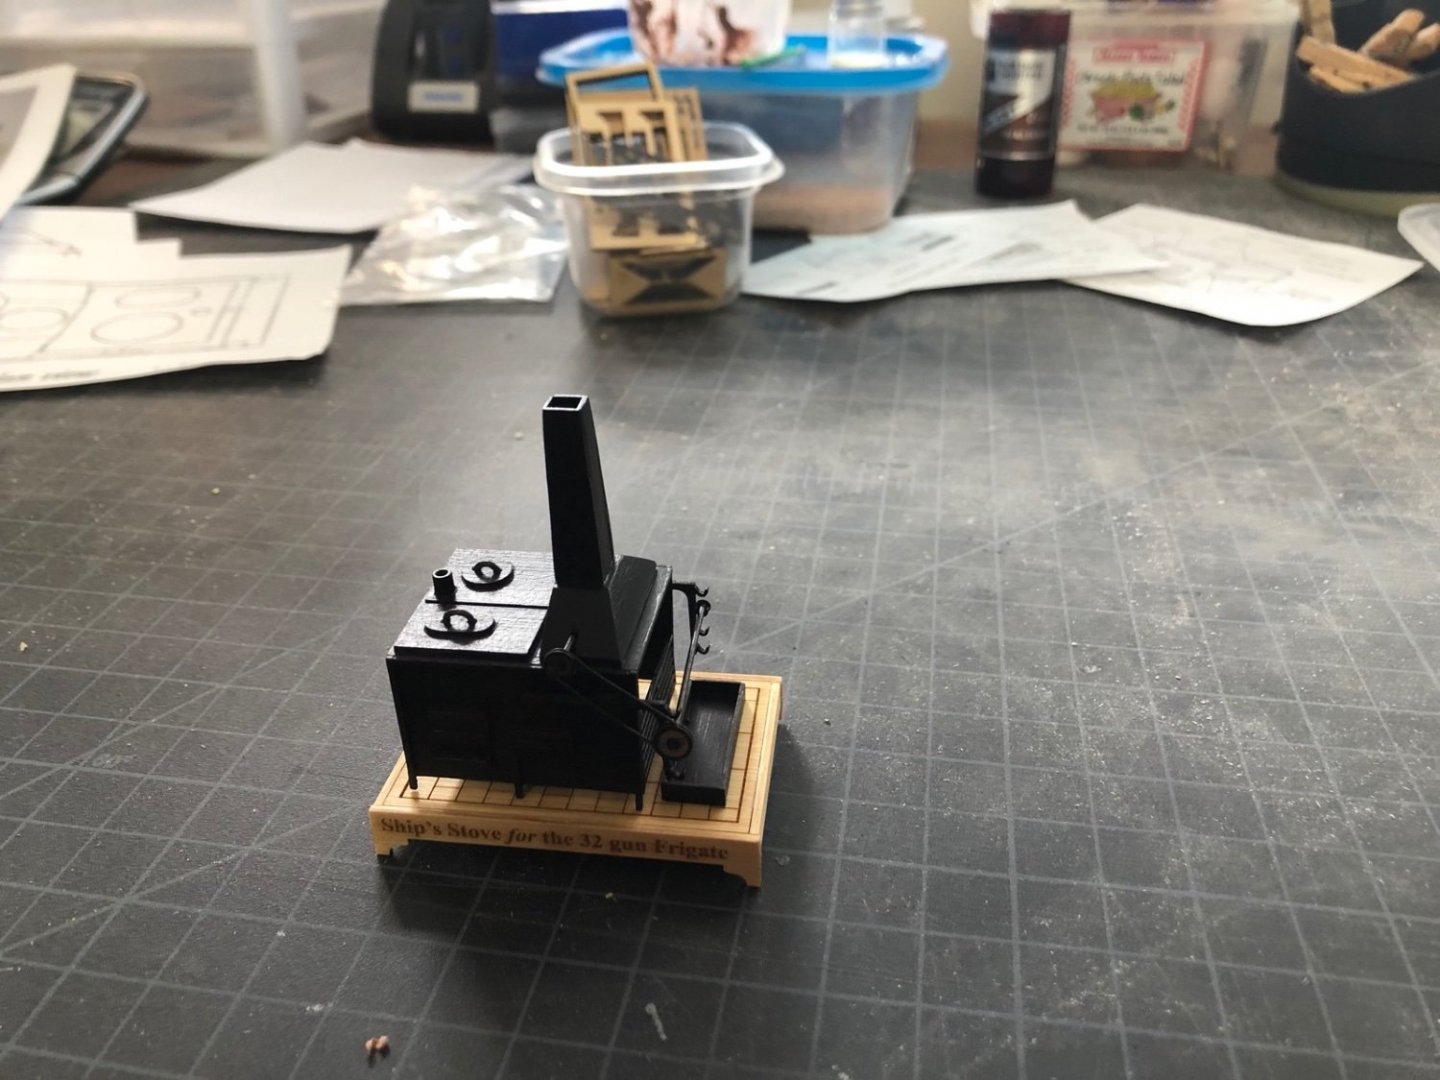
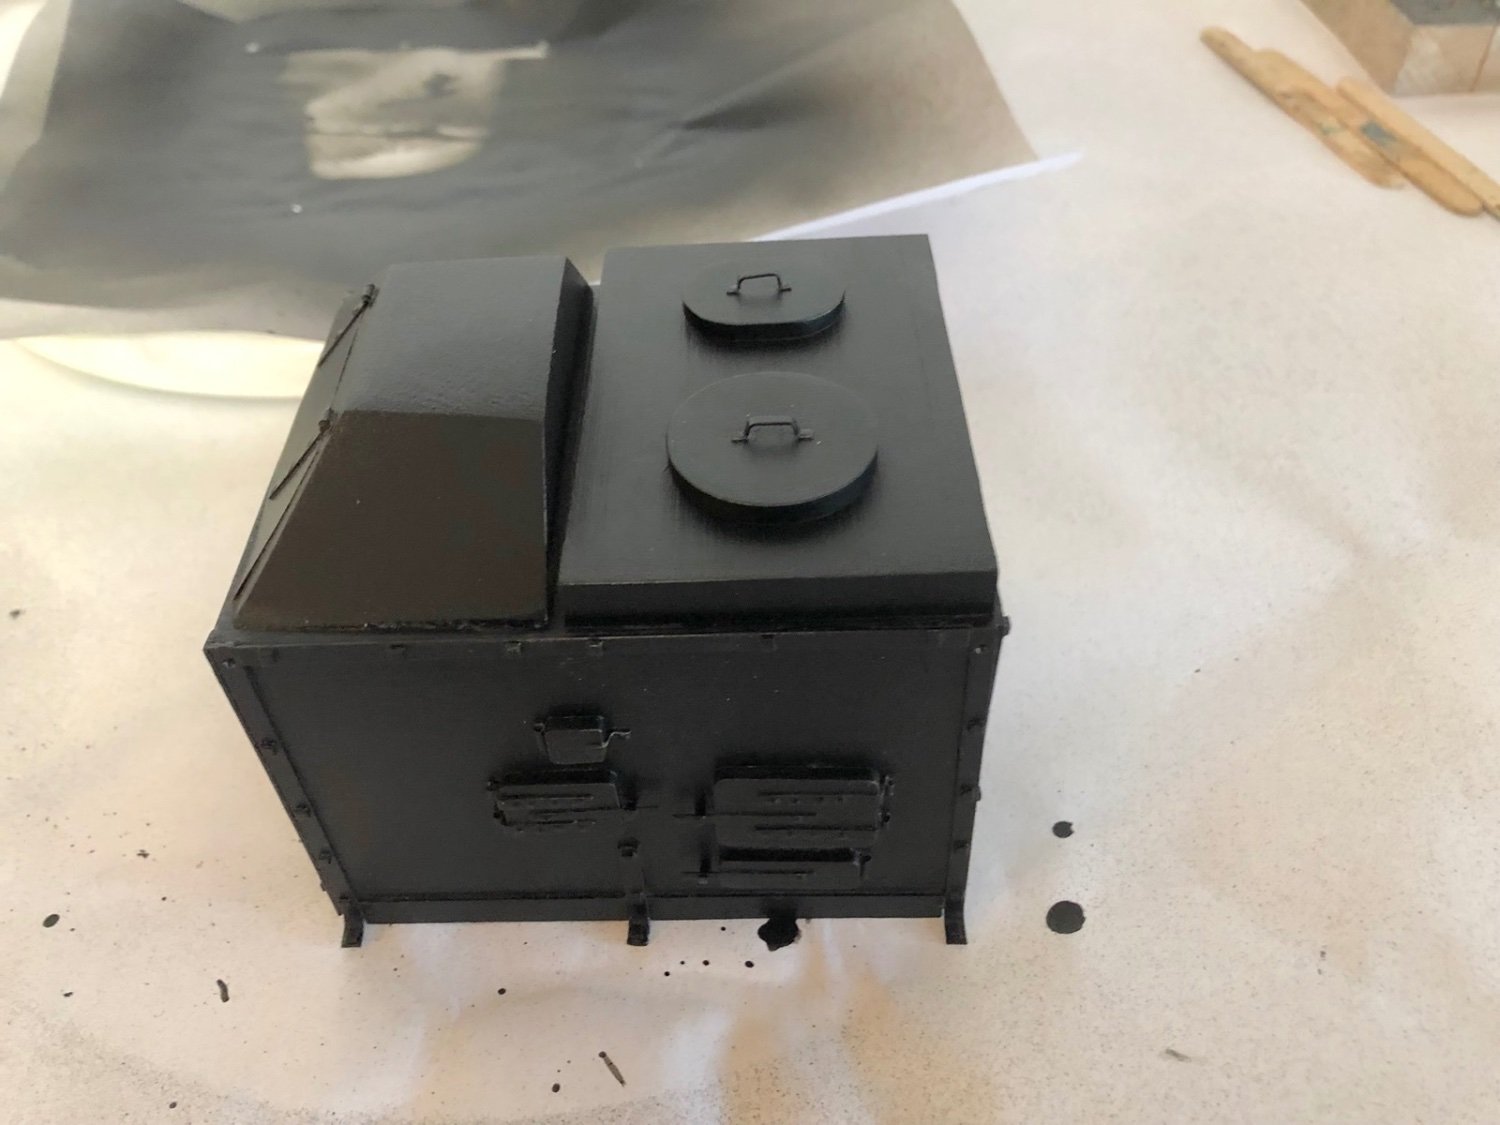
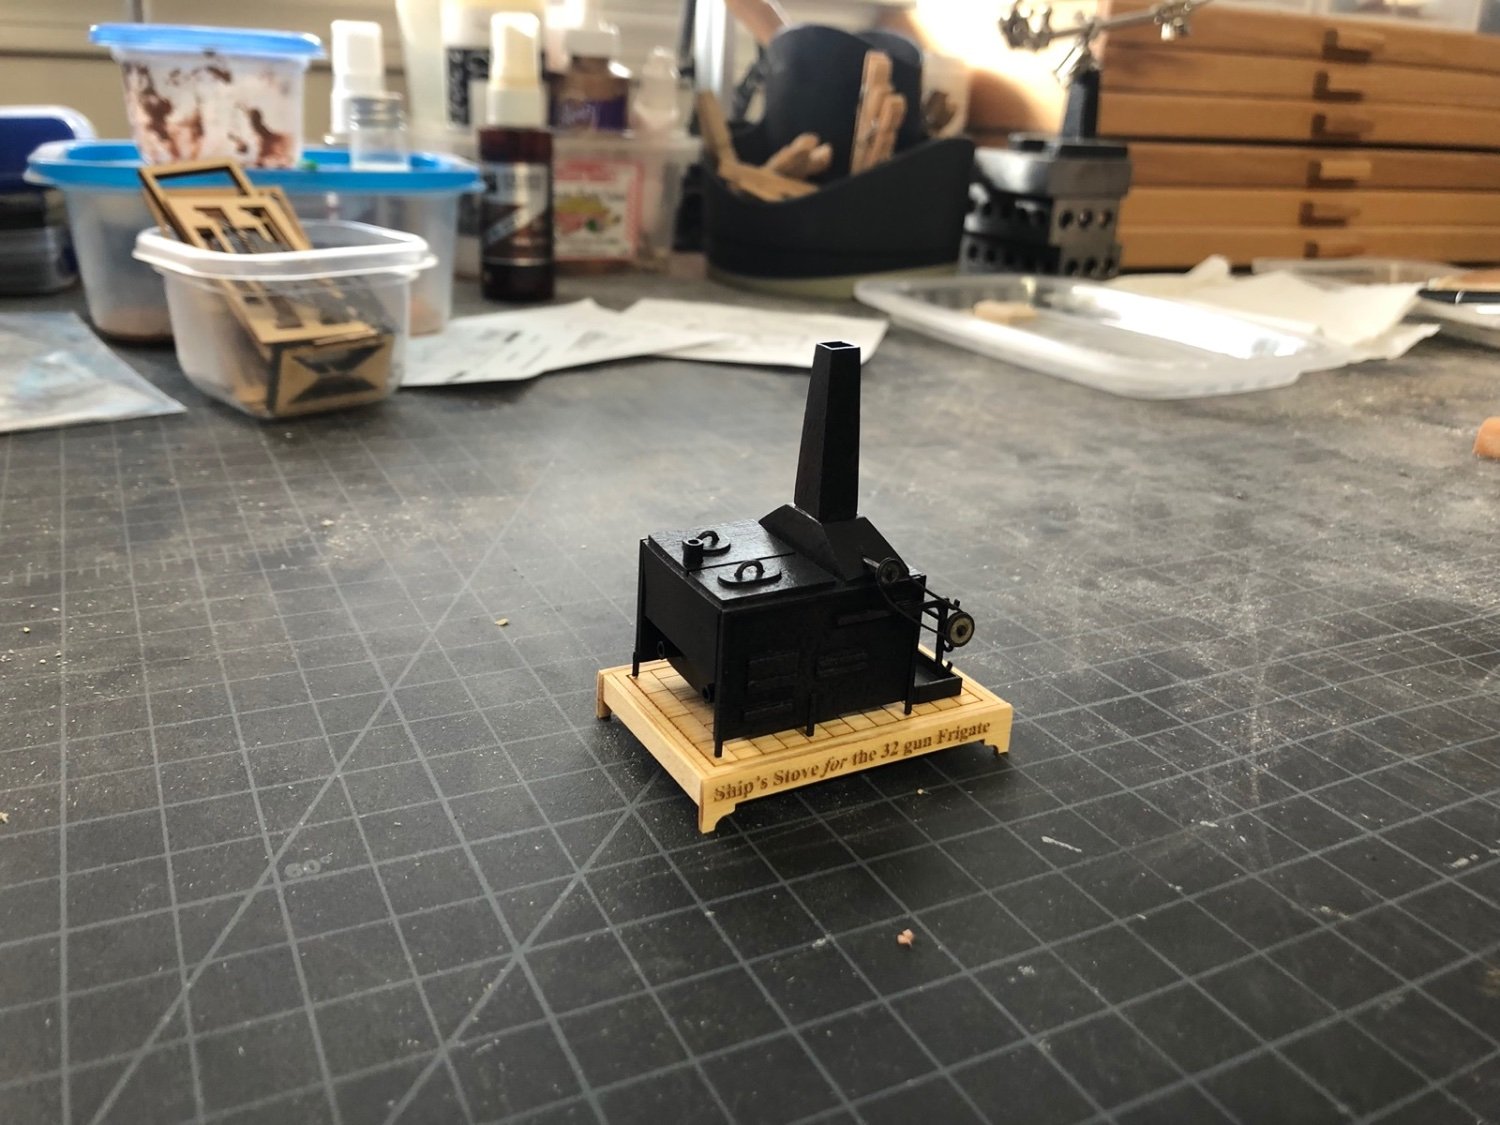
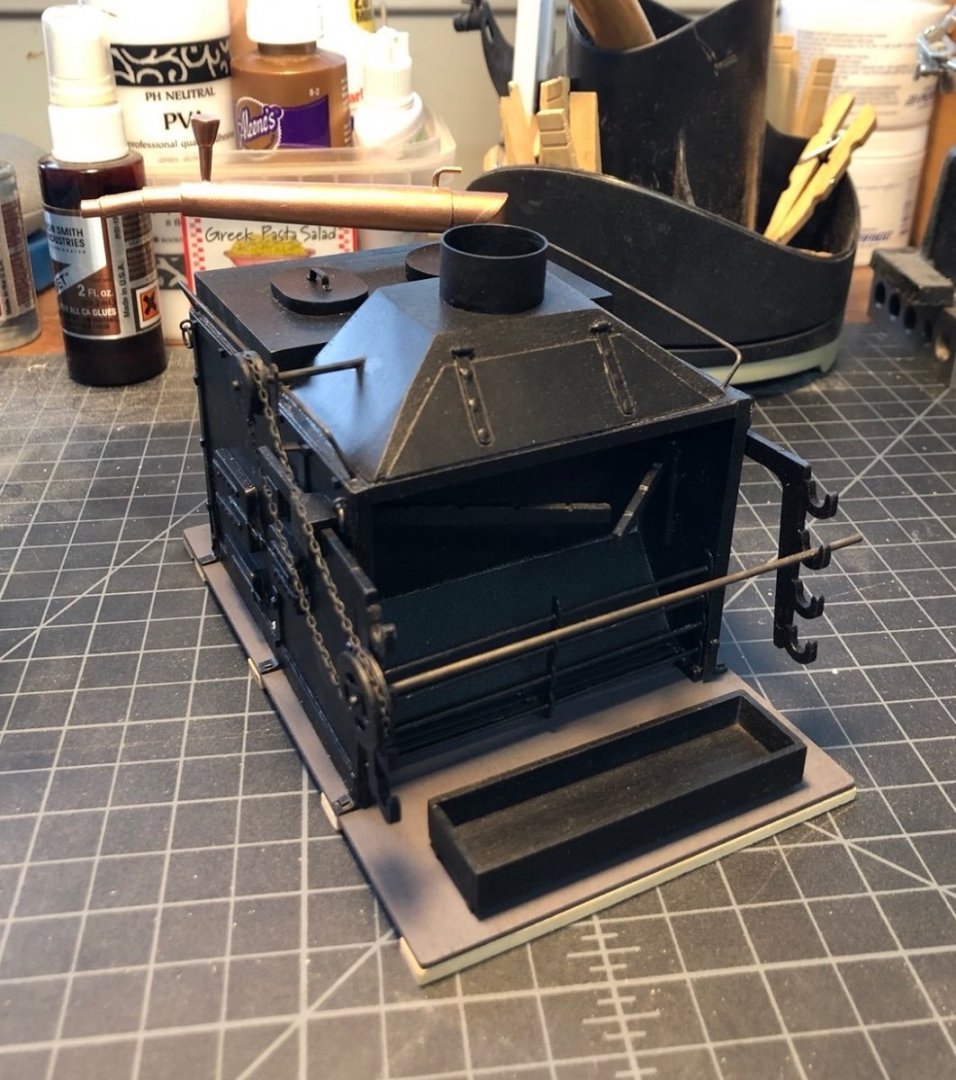
The riding bitt standards have been smoothed out with a sanding drum so they are ready for the edges to be beveled and other details. I finished the stove base and used some black and rust weathering powder to make it look more like metal. I am not sure I achieved that but at least it is more interesting to look at now. The color in the images is too brown for what it looks like in real life, which is more grey.
-
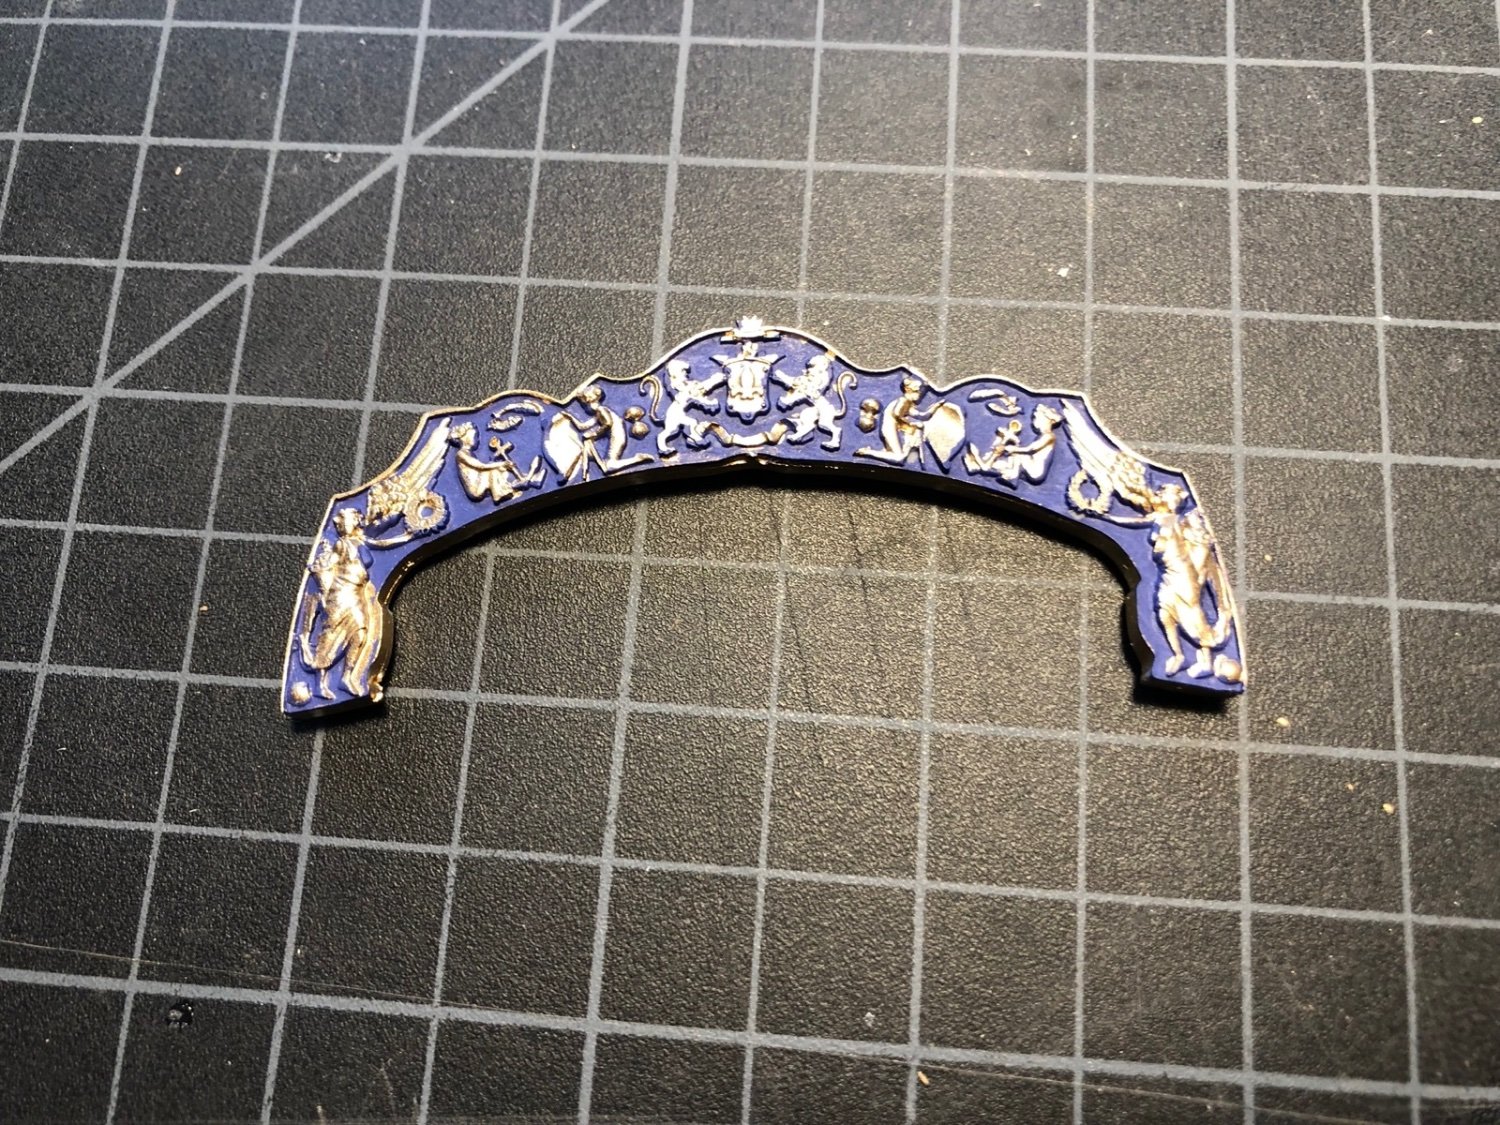
I painted the transom decoration piece, first the background blue, then the raised components and the edges gold. I used a small pointed brush and took my time. I did have to go back and touch up a couple of spots with blue. I was very happy with the result. Before I glued it to the transom I painted the top of the back of the transom with black paint to provide a better background for the decoration piece. When that dried I glued the decoration piece to the transom, then the other two gold trim pieces. I have one more photo etch piece to add to the transom and I need to trim the gold trim pieces and the transom will be done for now. I then added the horseshoe and fish plates using the small pins in the kit. I used a small drill bit in a pin vise to open the holes for the pins through the keel. After I glued the plates to the keel, I clipped off and filed the ends of the pins and touched them with copper paint to match the plates. The next step in the instructions calls for gluing the cheek rails to the stem. But as other build logs have noted there are different and better instructions in Plan Sheet 5 for the bow area. The figurehead slides into a slot on the stem and if you glue the cheek rails first it won't fit into the slot. I trimmed the excess plastic on the base of the figurehead until it fit into the slot. You can also see the horseshoe plate in this picture. I glued the head to the figurehead and painted the background blue. I paint the raised portions gold when that dries.


- 118 replies
-
- 6
-
-
- Duchess Of Kingston
- Finished
- (and 1 more)
-
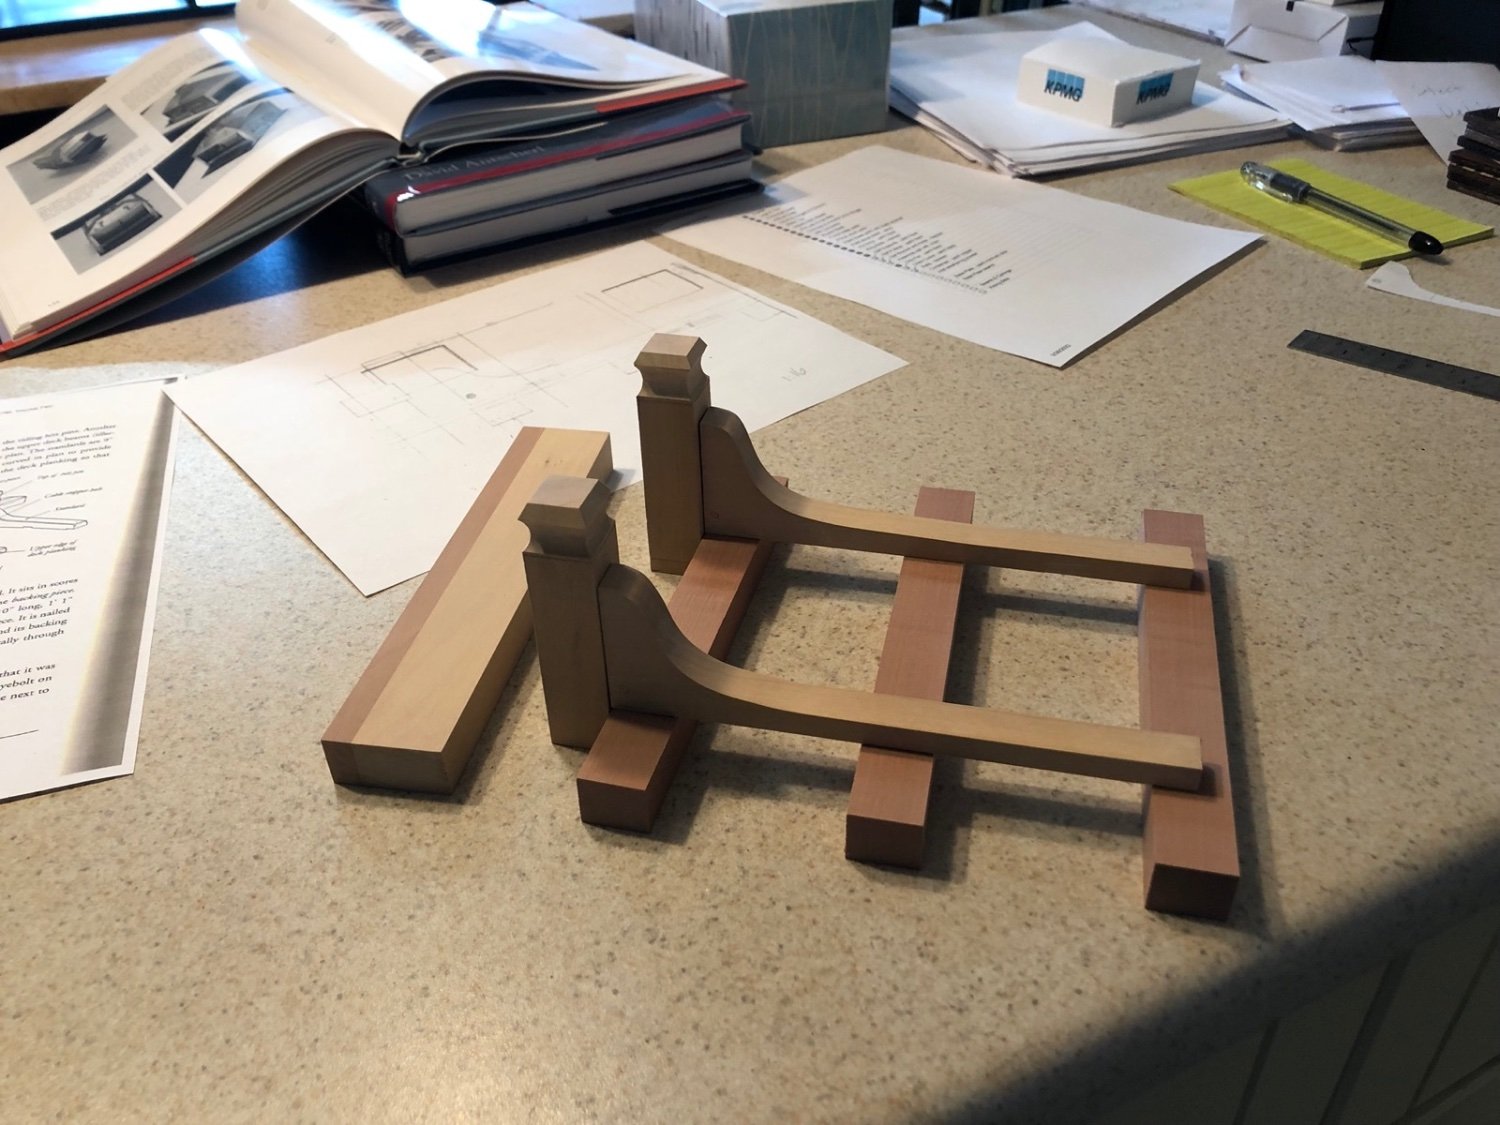
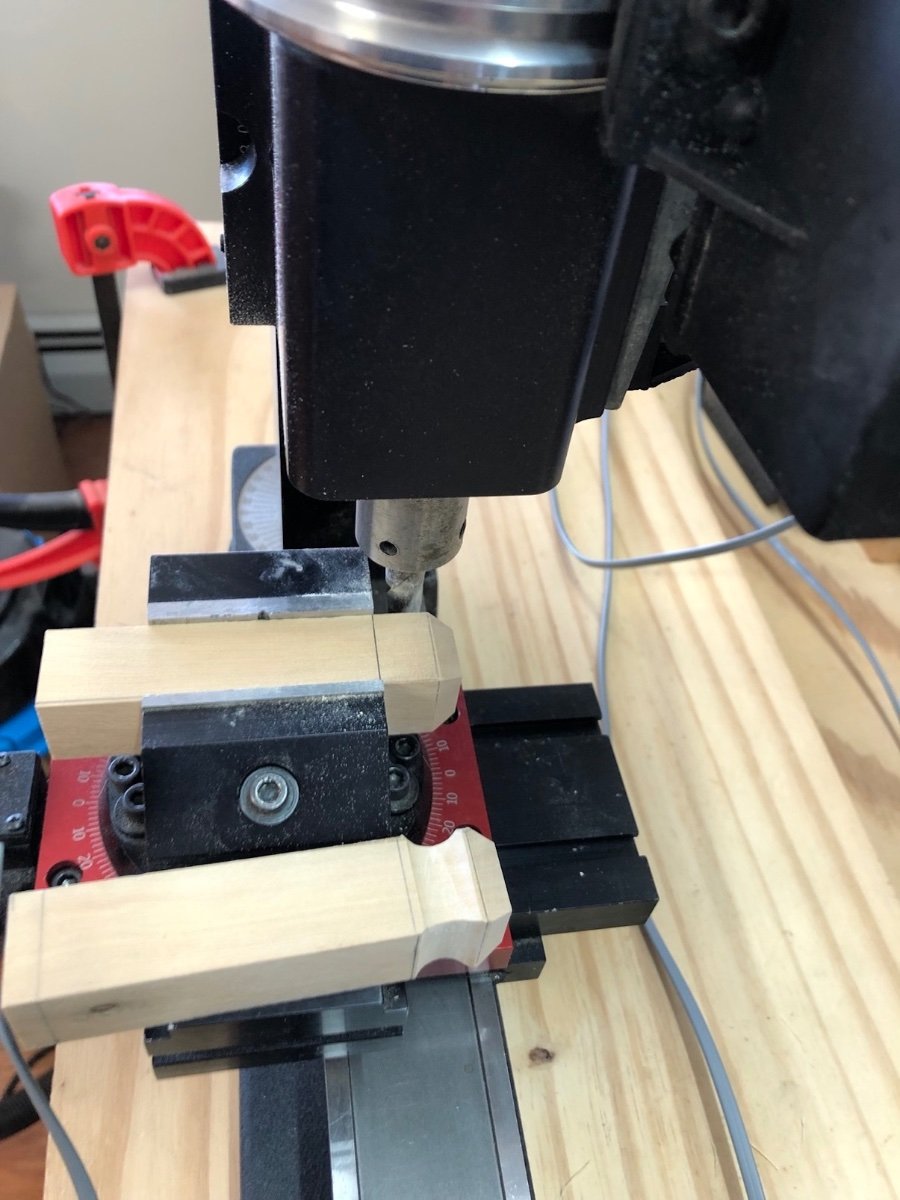
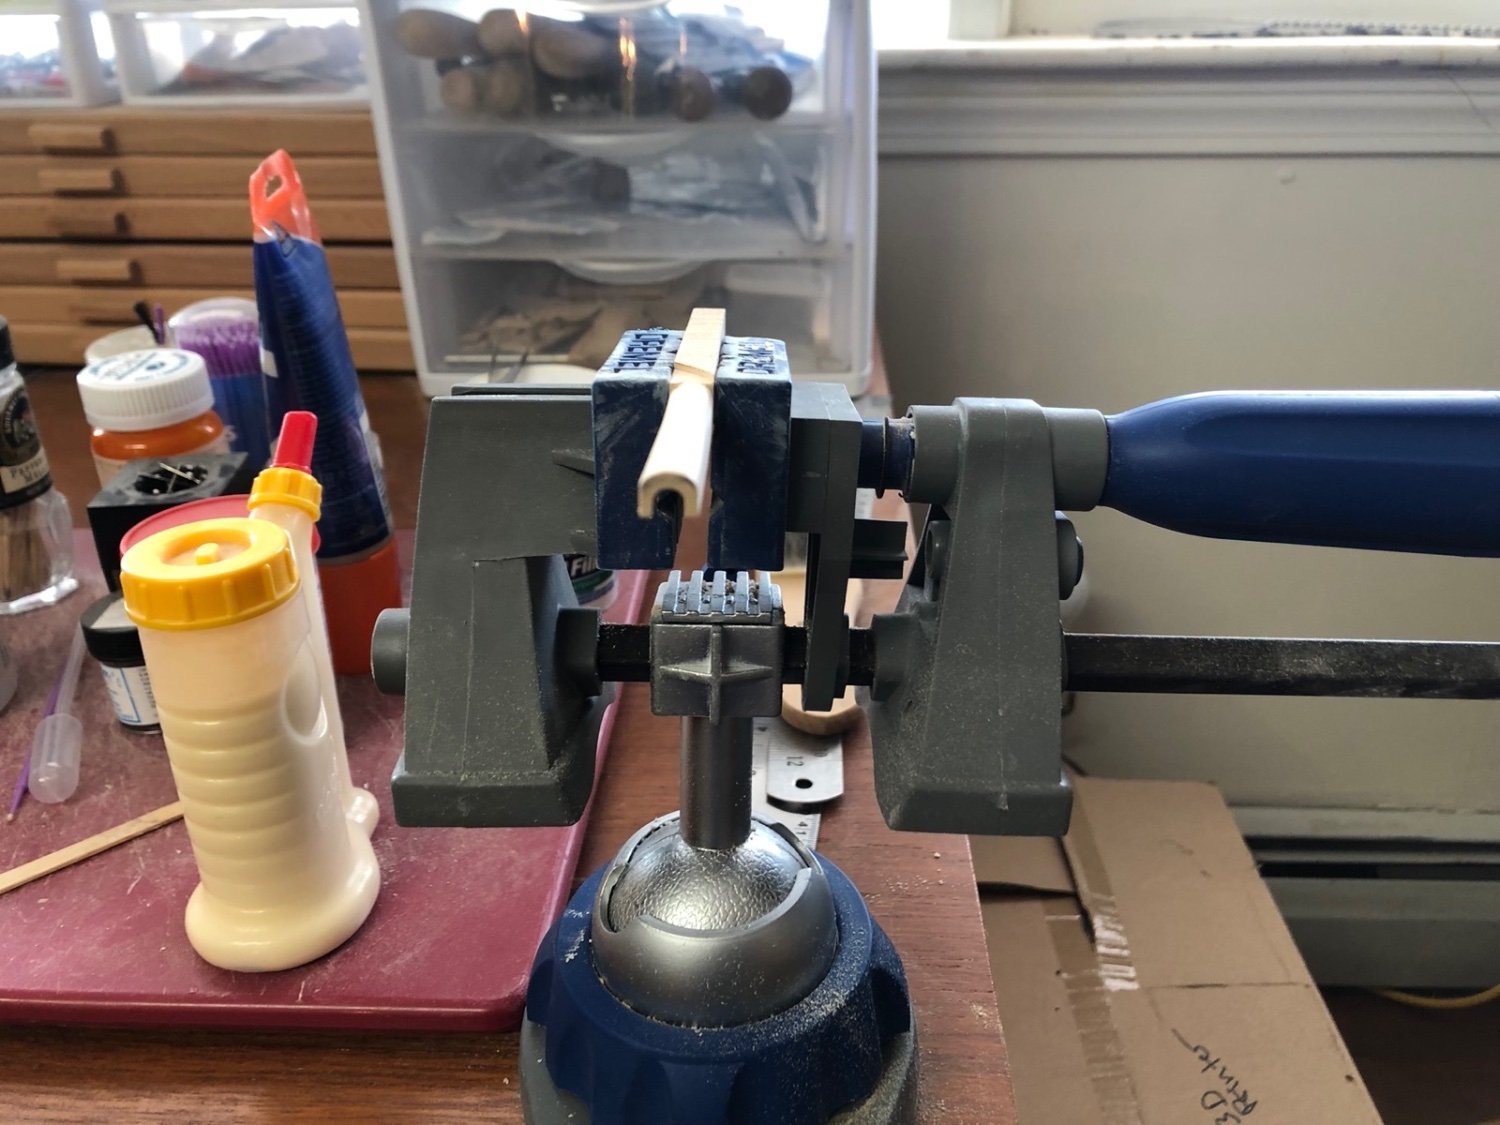
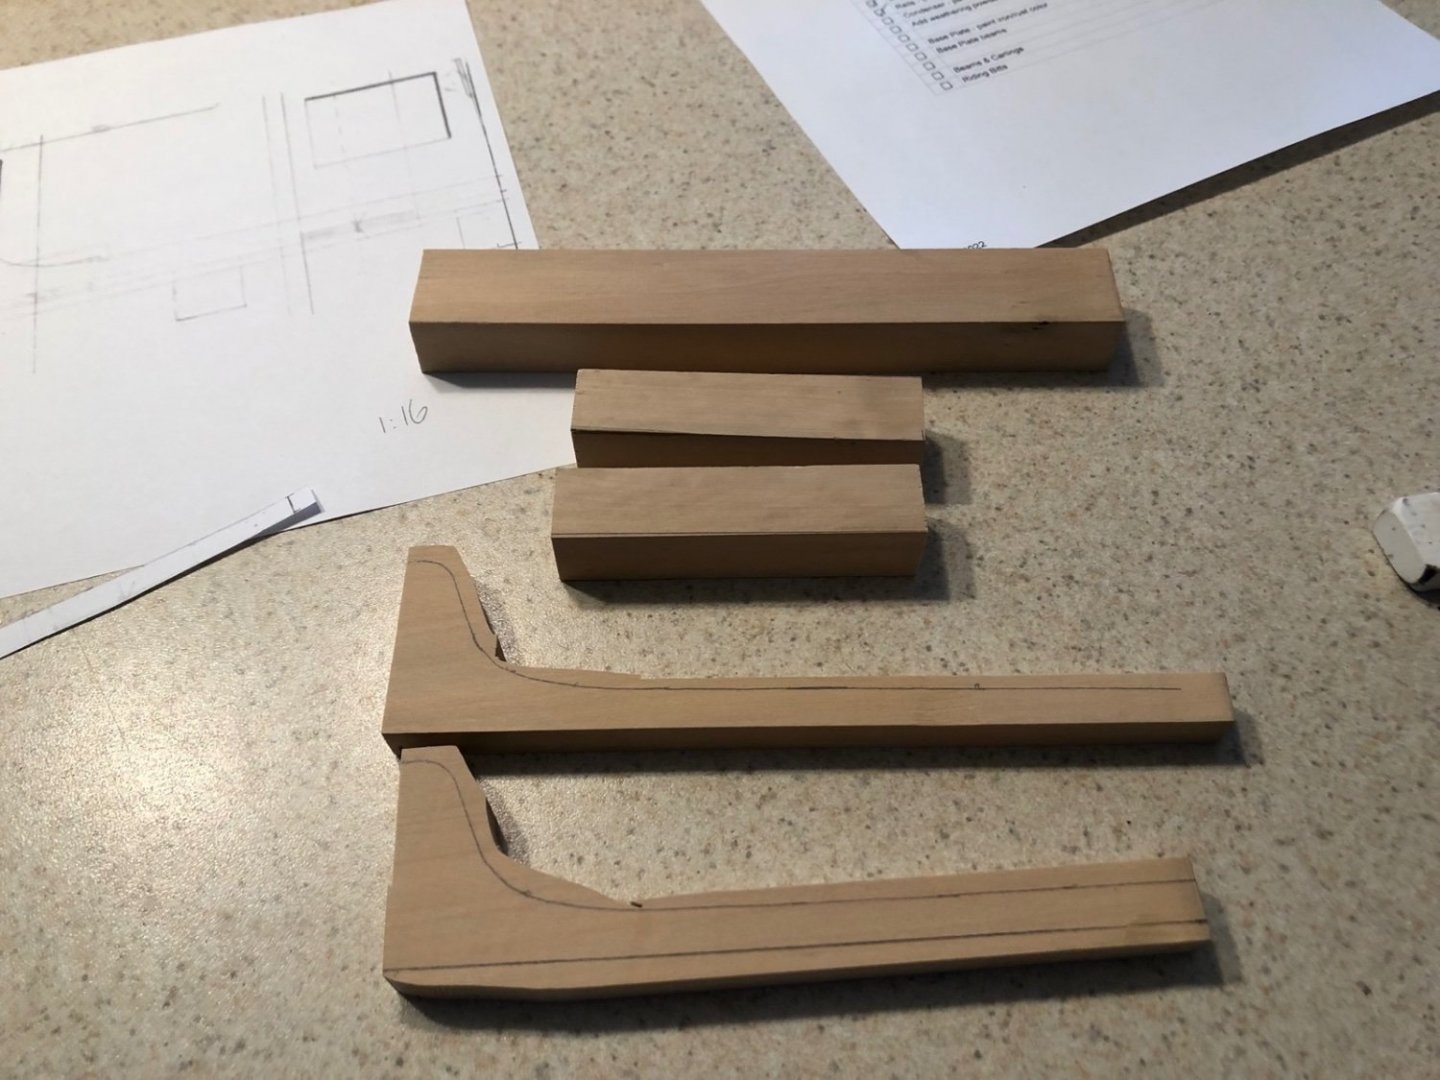
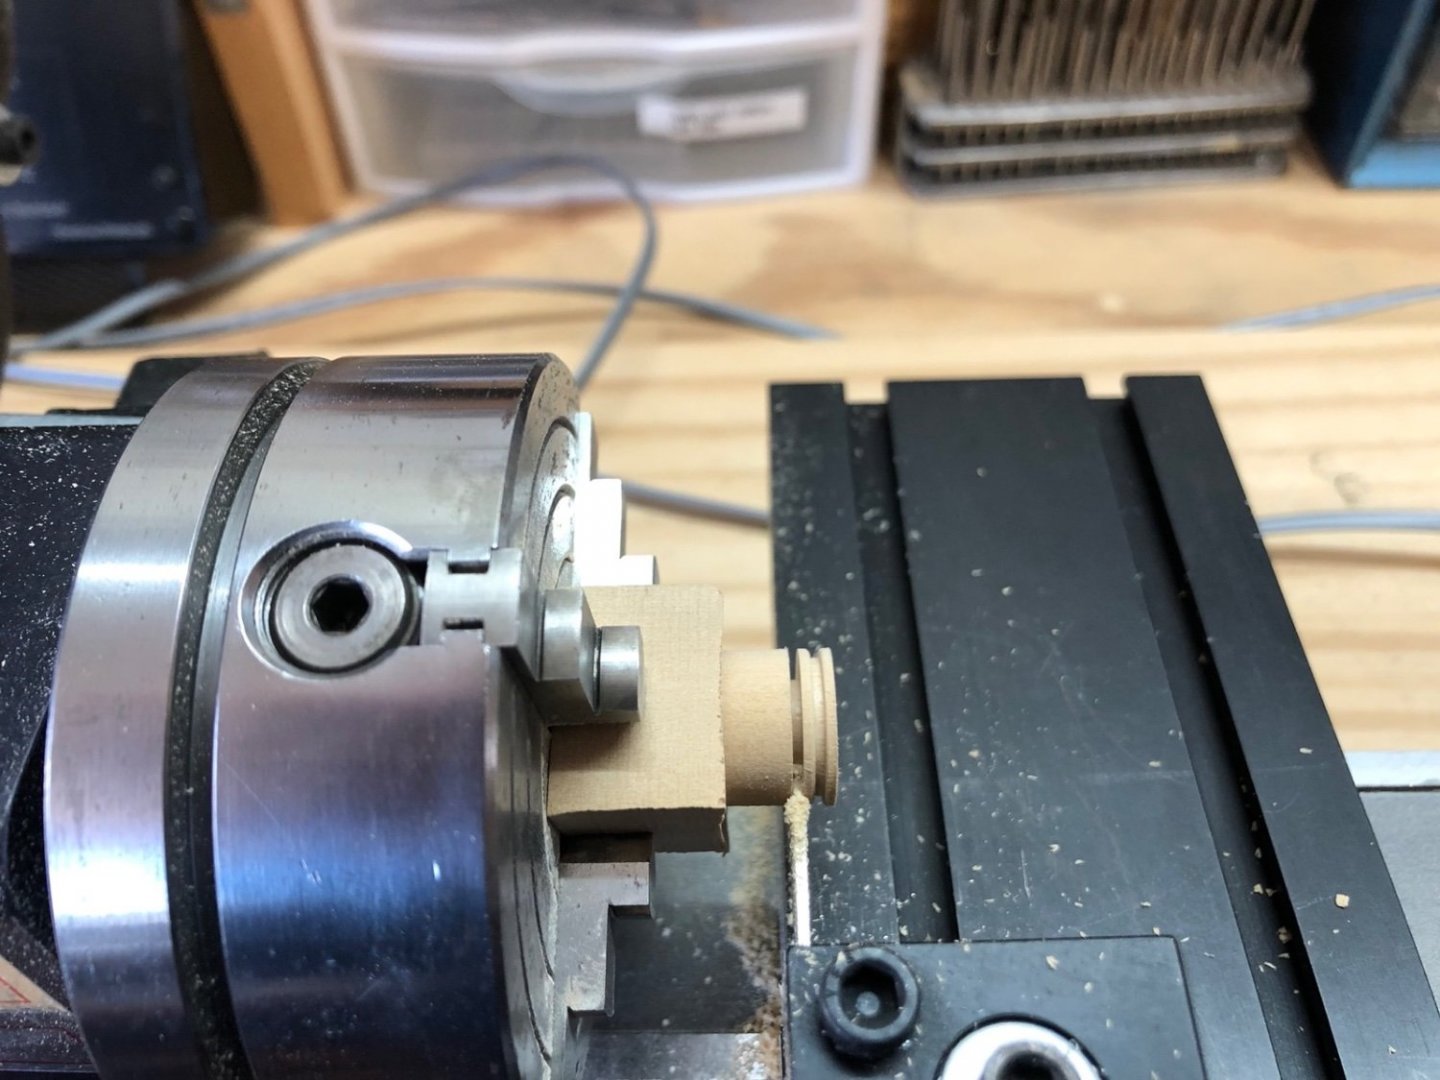
I have started working on the riding bitts, which I am making out of a big chunk of boxwood I had. I first sliced off a piece big enough for both standards using the band saw. The cut was very uneven as the blade was wandering a lot. I managed to get it sliced off but it was too thick over most of it. In fact, it was too thick to fit into the Byrnes thickness sander so I used the mill with a big end mill bit to reduce it so it would bit in the thickness sander and sanded it to the correct thickness. I then used the Byrnes Saw and band saw to rough out the standards. I also used the Byrnes Saw to cut out the bitt pins and cross piece. I was able to square up the aft edge, bottom, and the straight part of the top of the standards on the Byrnes Saw, then removed more material in the curved part on the band saw. I will finish up the curves using a sanding drum in the drill press. I am also working on the base for the stove. I have the base plate painted and the beams that go underneath it are glued to it. I just need to touch up the paint and it will be ready to go. I am waiting for some pear billets I ordered to arrive to start on the beams.
-
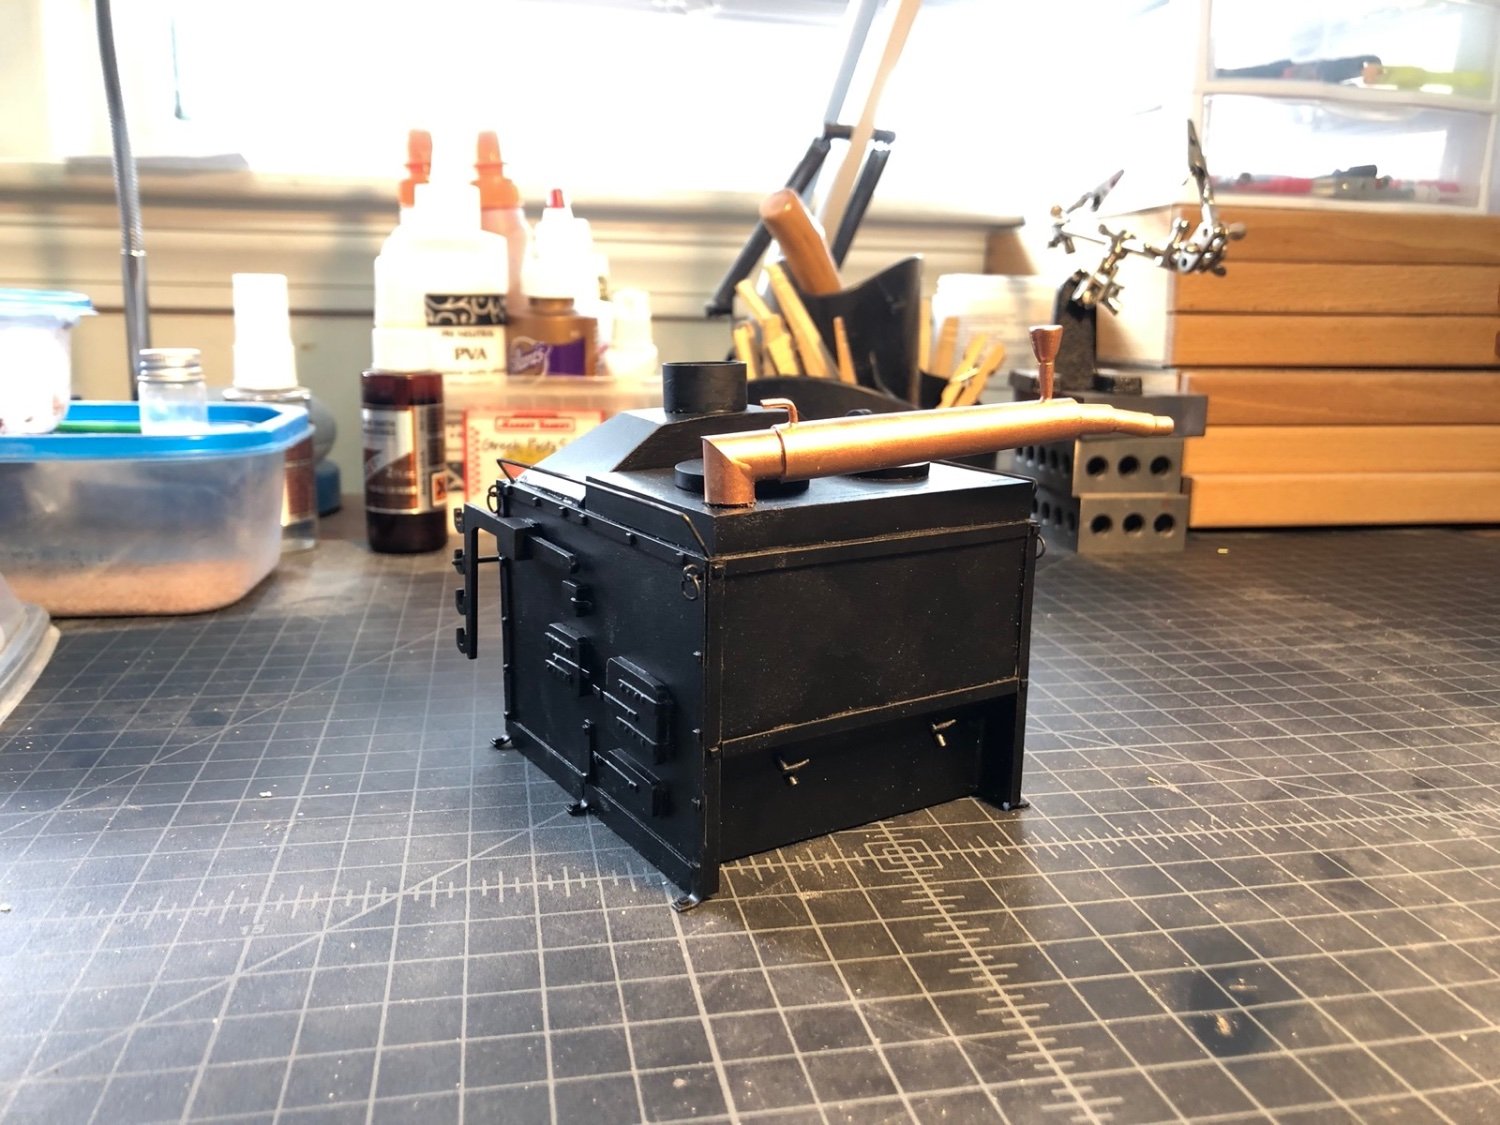
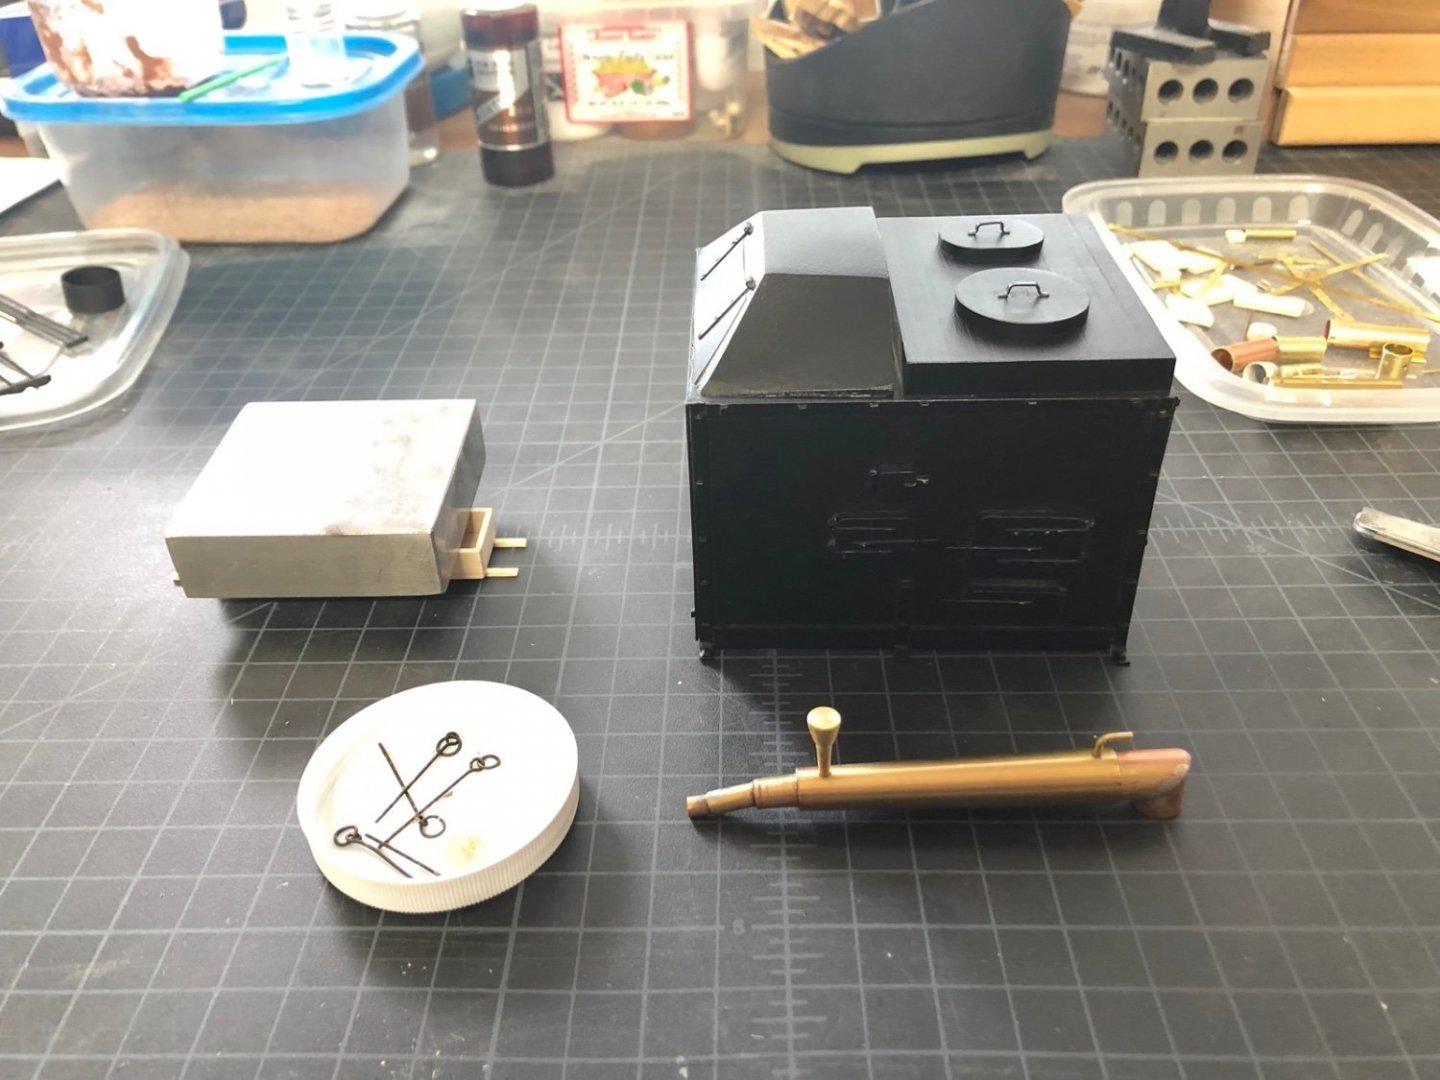
Sure. I added the condenser too. You can see the drain cocks underneath. And here is a shot from above, for completeness.


-
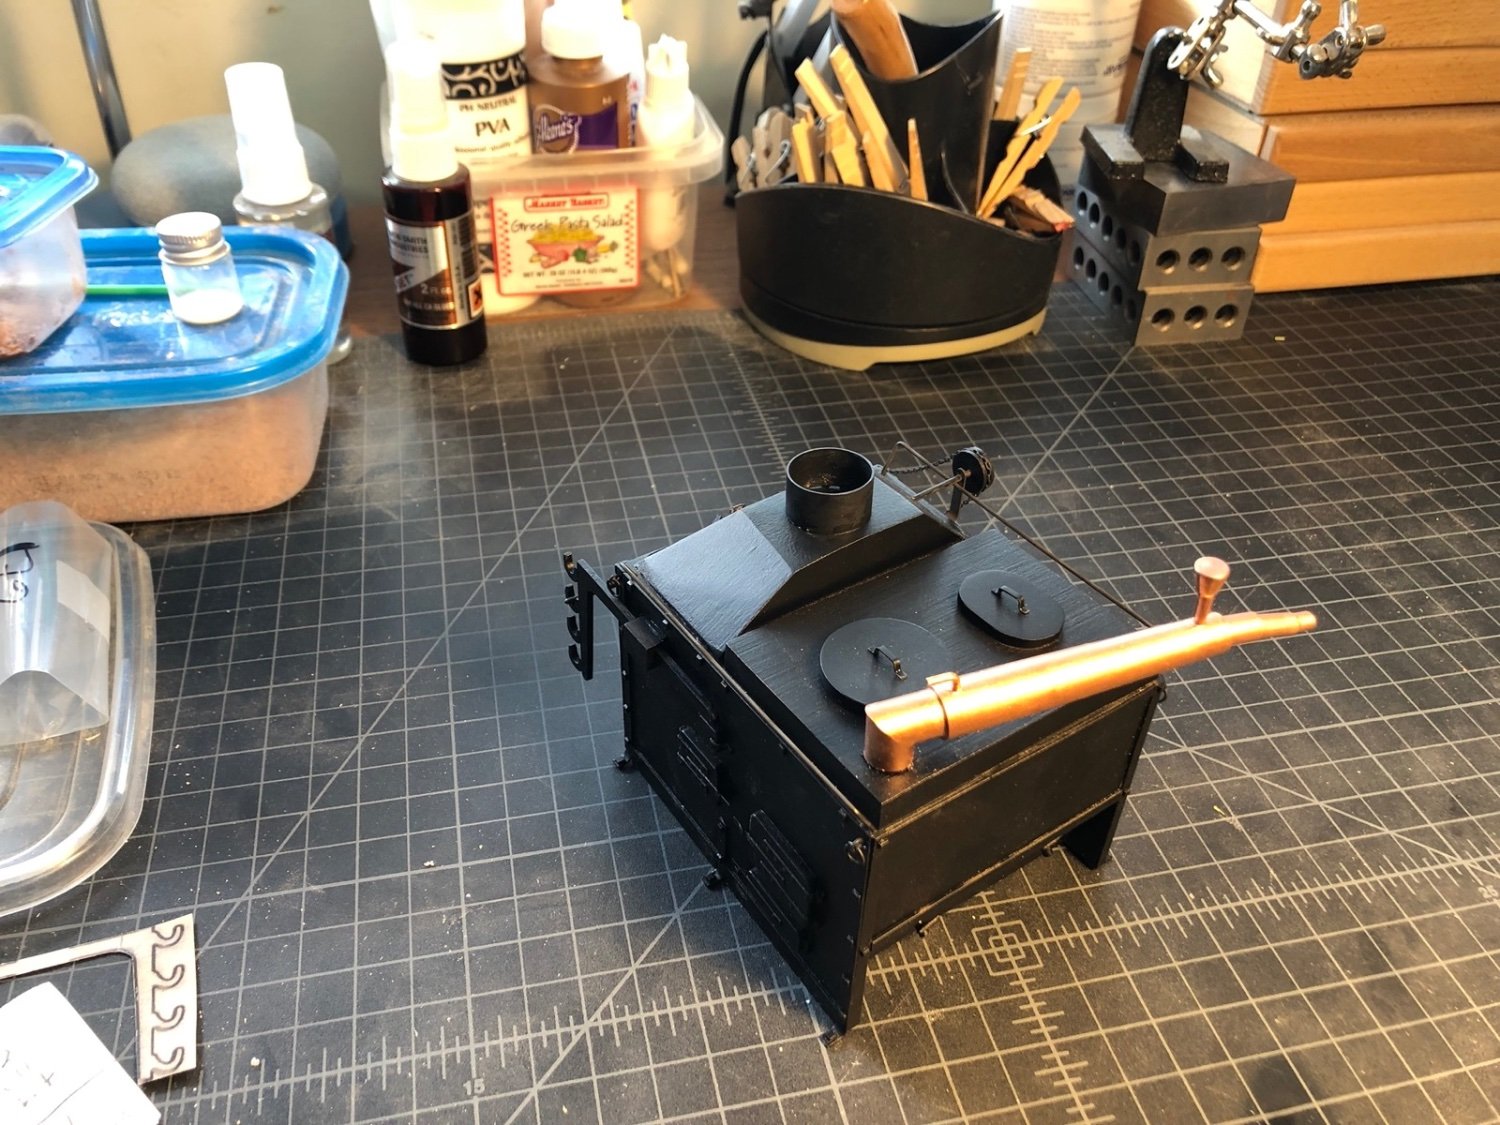
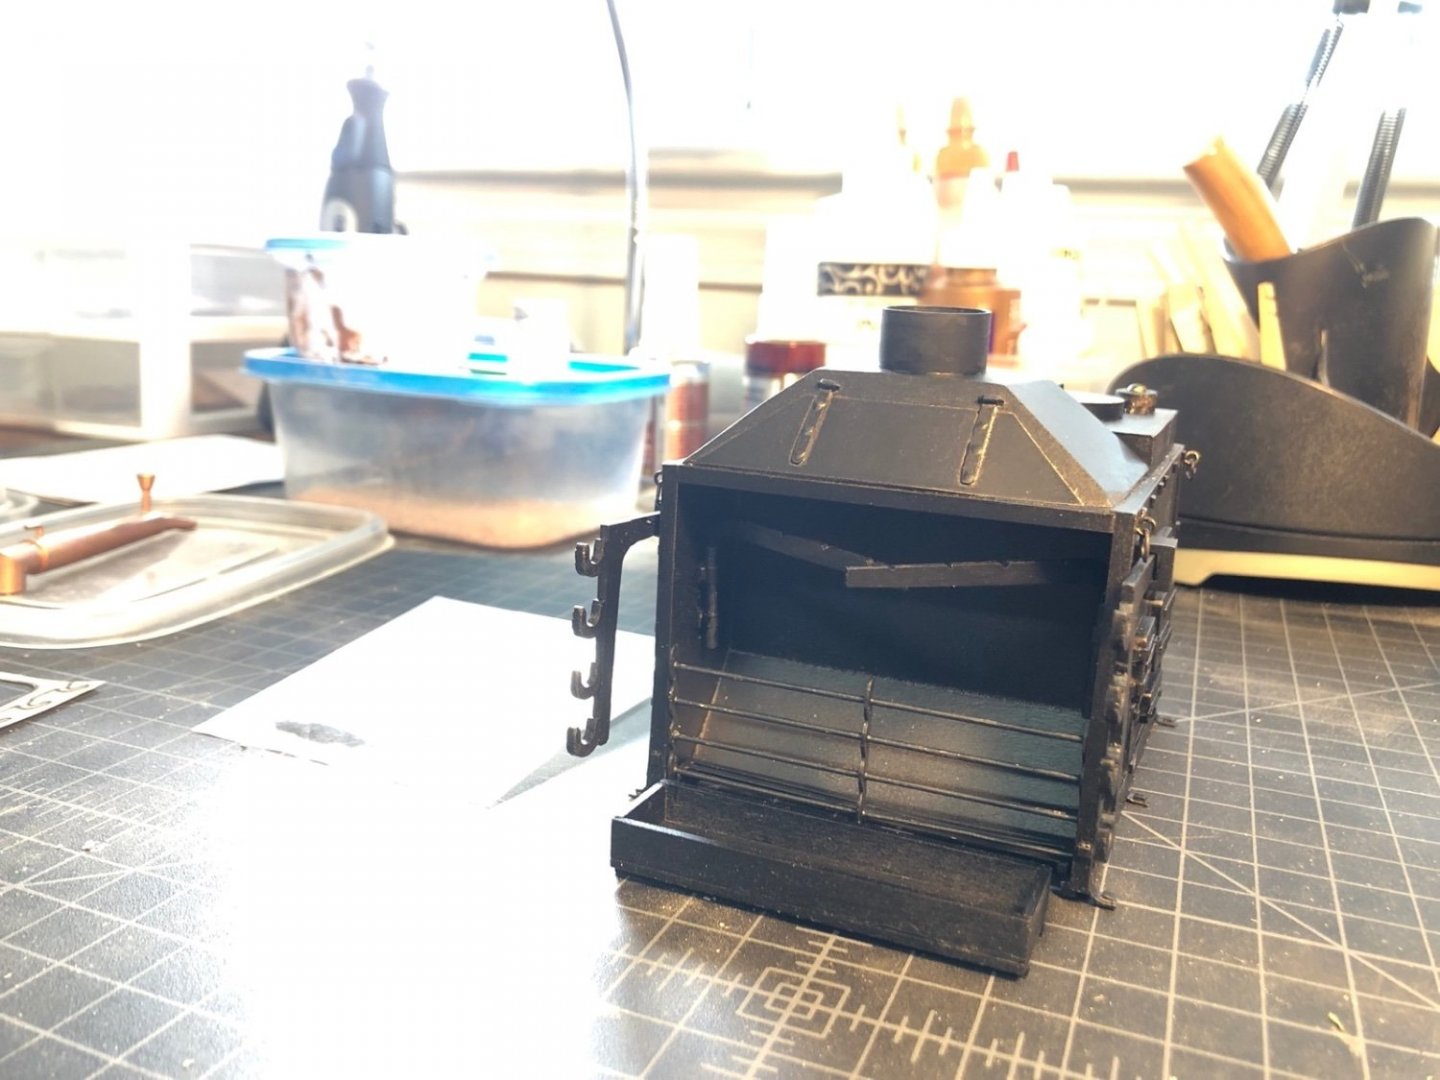
Thanks very much Alan. I could build you one, but I wouldn't want to deprive you of all the fun building your own. What scale do you need? Today I glued the drain cocks into place. I also made the two rails, drilled the holes in the stove for them, blackened them, and glued them in place. I then glued the pulleys to their shafts and glued the small pulley shaft into the chimney. There is a bracket that holds up the shaft behind the pulley which I glued to the side of the stove. The spit is not glued to anything so I was able to adjust the size of the chain until I had a good fit then add it to the pulleys. I held the ends of the chain together with a loop of wire, which is hidden under the small pulley. That completes the construction of the stove itself. I will do some weathering on it at some point. I am now painting and constructing the base for the stove. Once that is finished I'll start on the riding bitts, then the beams and carlings for the display.

-
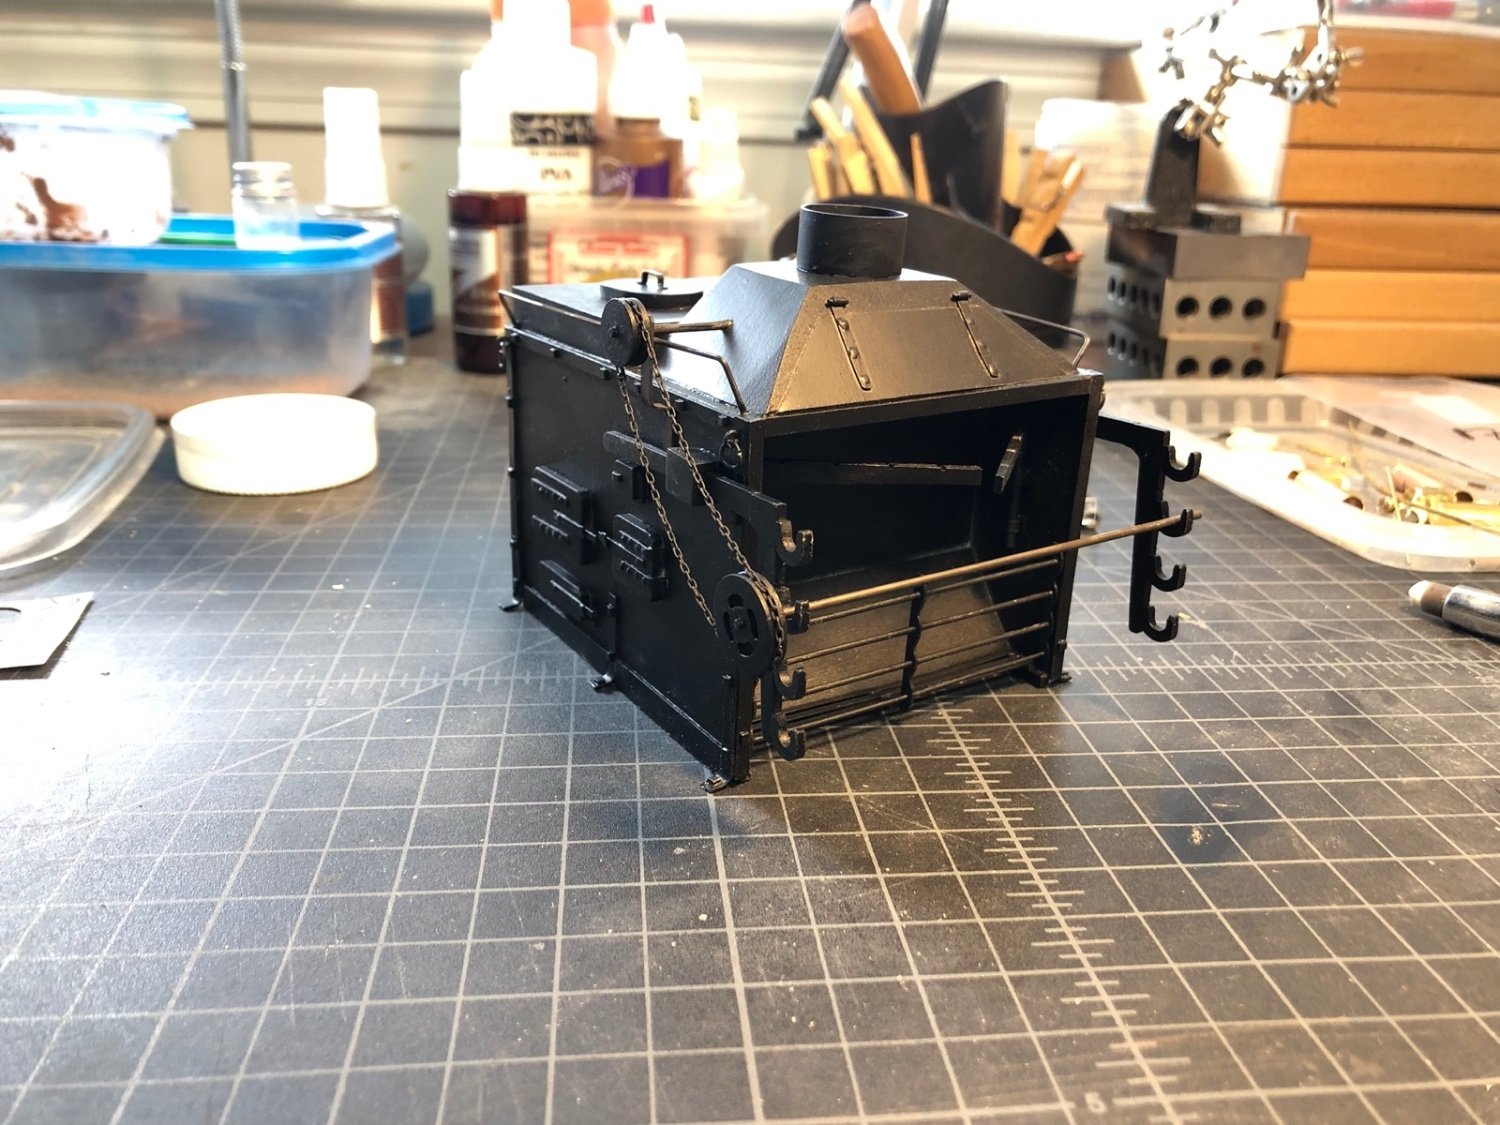
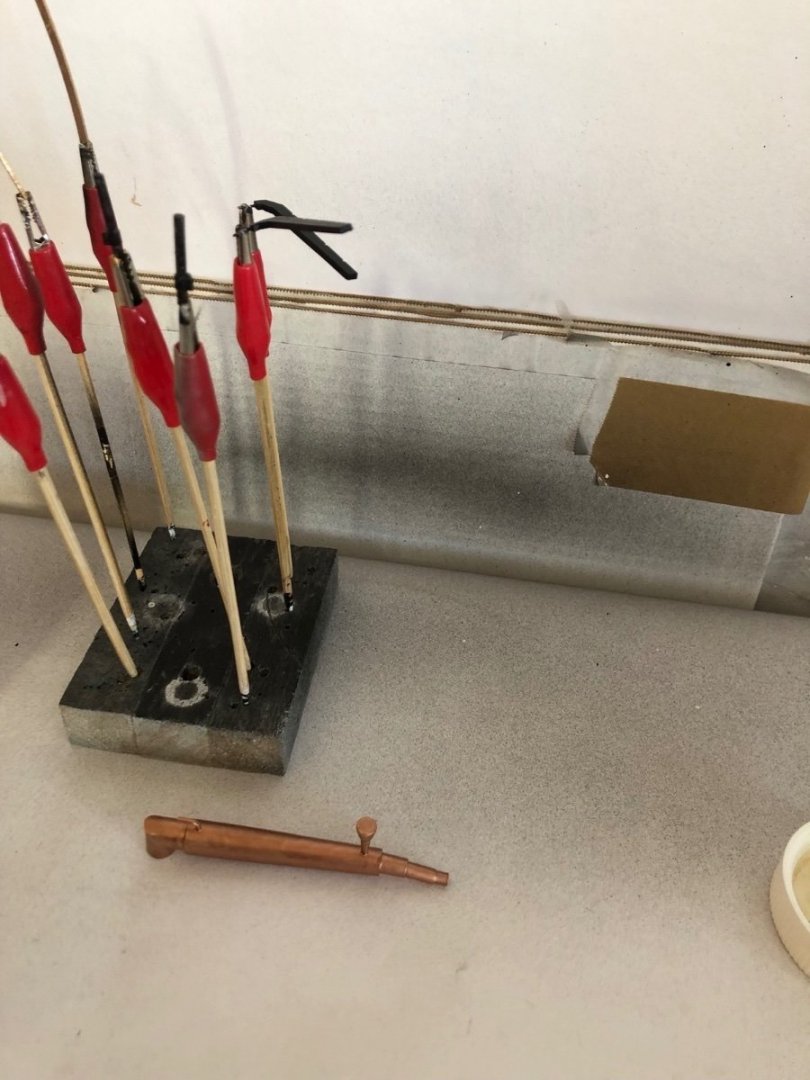
I have started the final assembly for the stove itself. I glued the stack to the top and the brackets for the spit arms to the sides. I also glued the brackets for the pot arms inside the stove and added the pot arms. The two grates are also now glued in place. I have the pulleys ready to install with the chain, but first I need to add the drain cocks. I first made simple handles for these by soldering two pieces of brass rod together but then I tried making them a little fancier by hammering both ends of a small brass rod flat and rounding off the edges with a file. I then soldered these to another small piece of brass rod and painted them black. You can see them here in the drain cocks with the rest of the parts to be installed. I have also been designing how I want to display the stove. I am making an iron base from a piece of basswood sheet which will sit on three beams, between the riding bitt standards. I will also have the riding bitt pins and cross piece on the aft side of the aft beam. I don't have enough pear wood left to make all three beams so I just ordered some 1x3 inch blocks for them. I am also thinking about the next component model so I bought enough for it too, if I decide to go ahead with it.

-
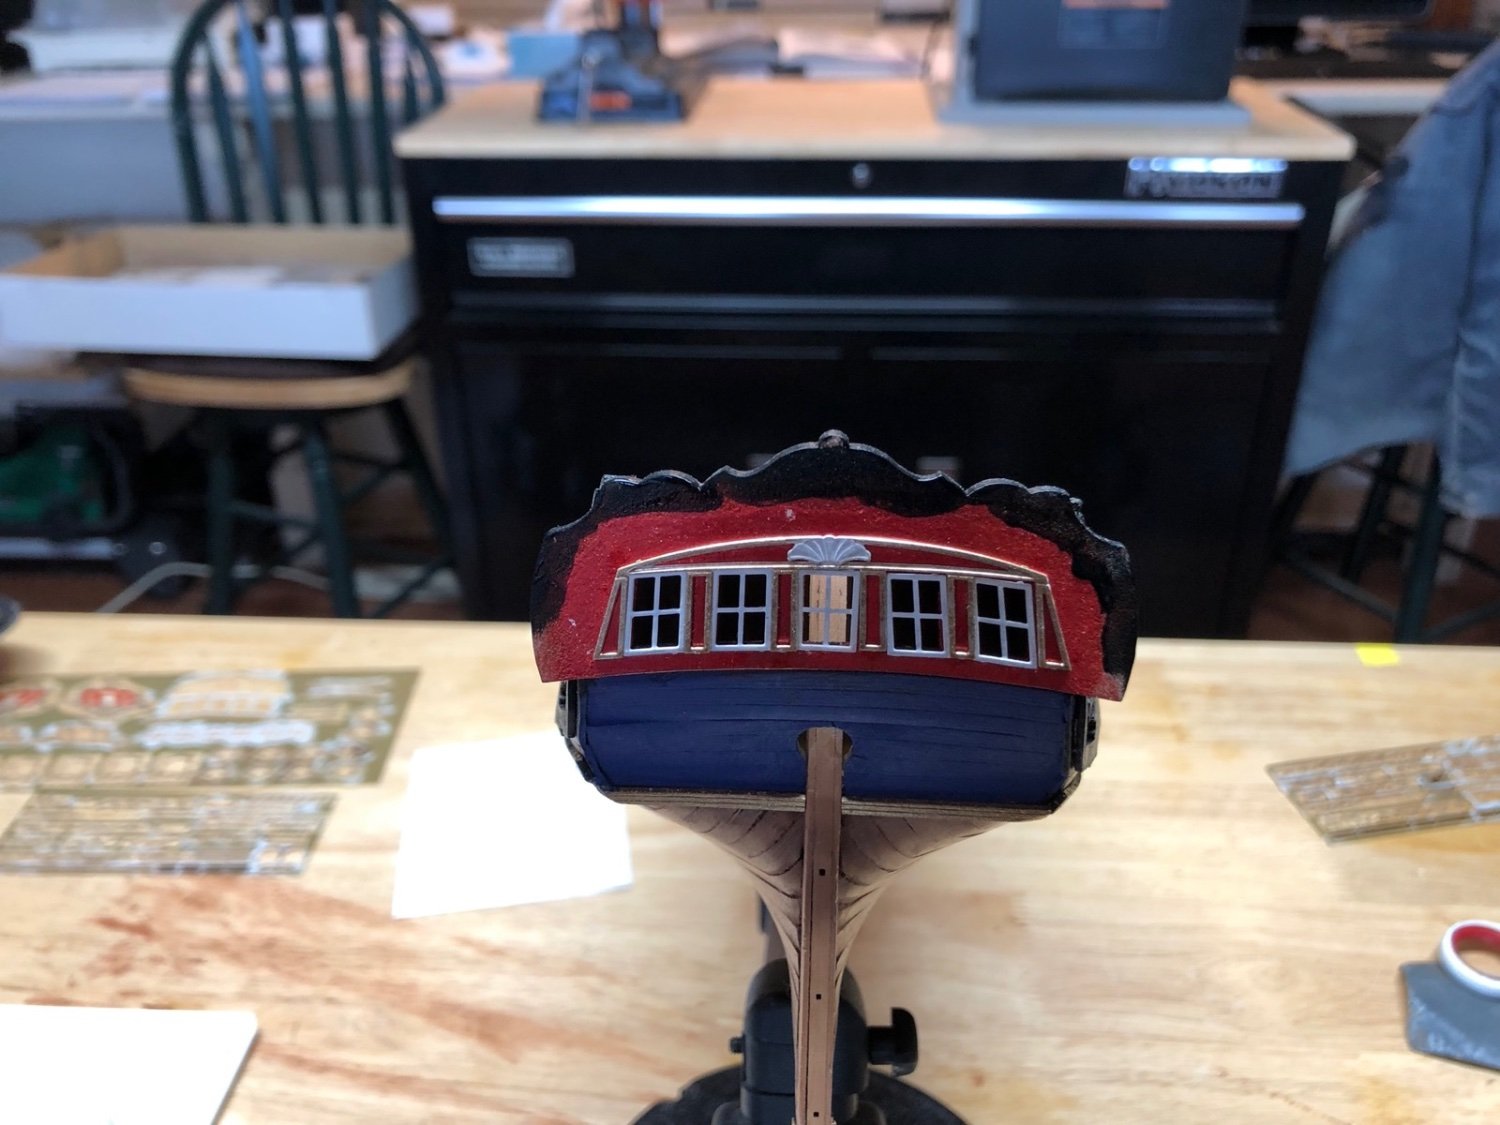
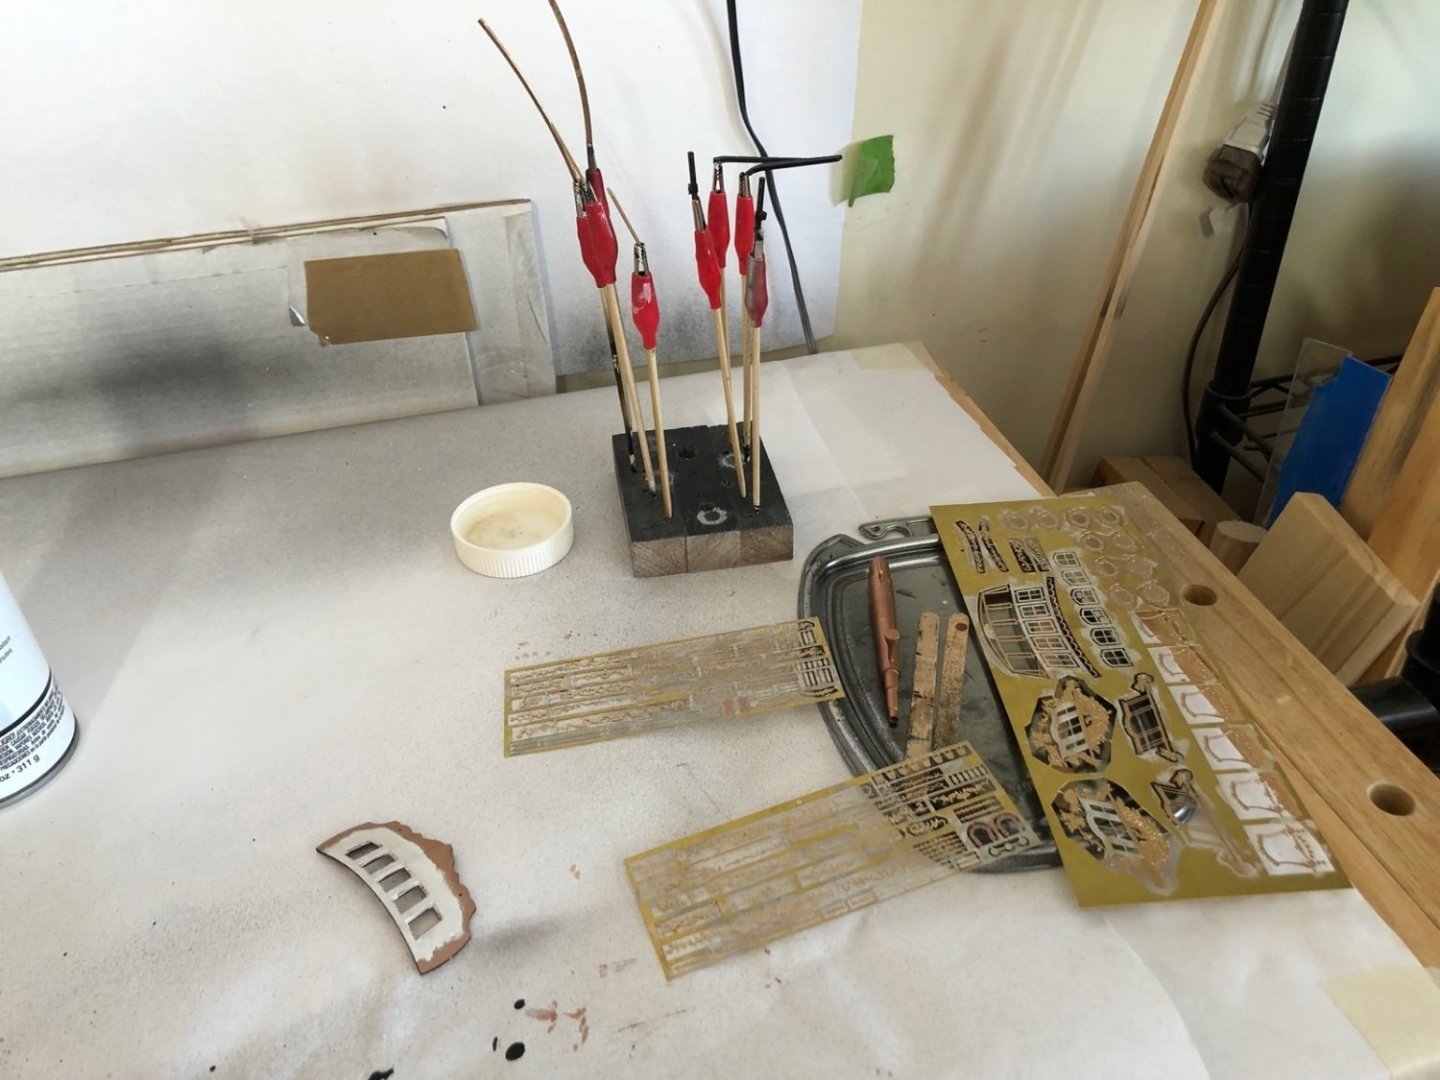
I have finally finished painting all the photo etch parts I am going to need for a while. I will give them a coat of matte finish tomorrow. I glued the wing transom pieces to the transom and also added the piece with the window openings. There is a plastic trim piece that fits over the top of that piece which I bent to follow the curve of the transom. I now have to paint it before it gets installed.

- 118 replies
-
- 5
-
-
- Duchess Of Kingston
- Finished
- (and 1 more)
-
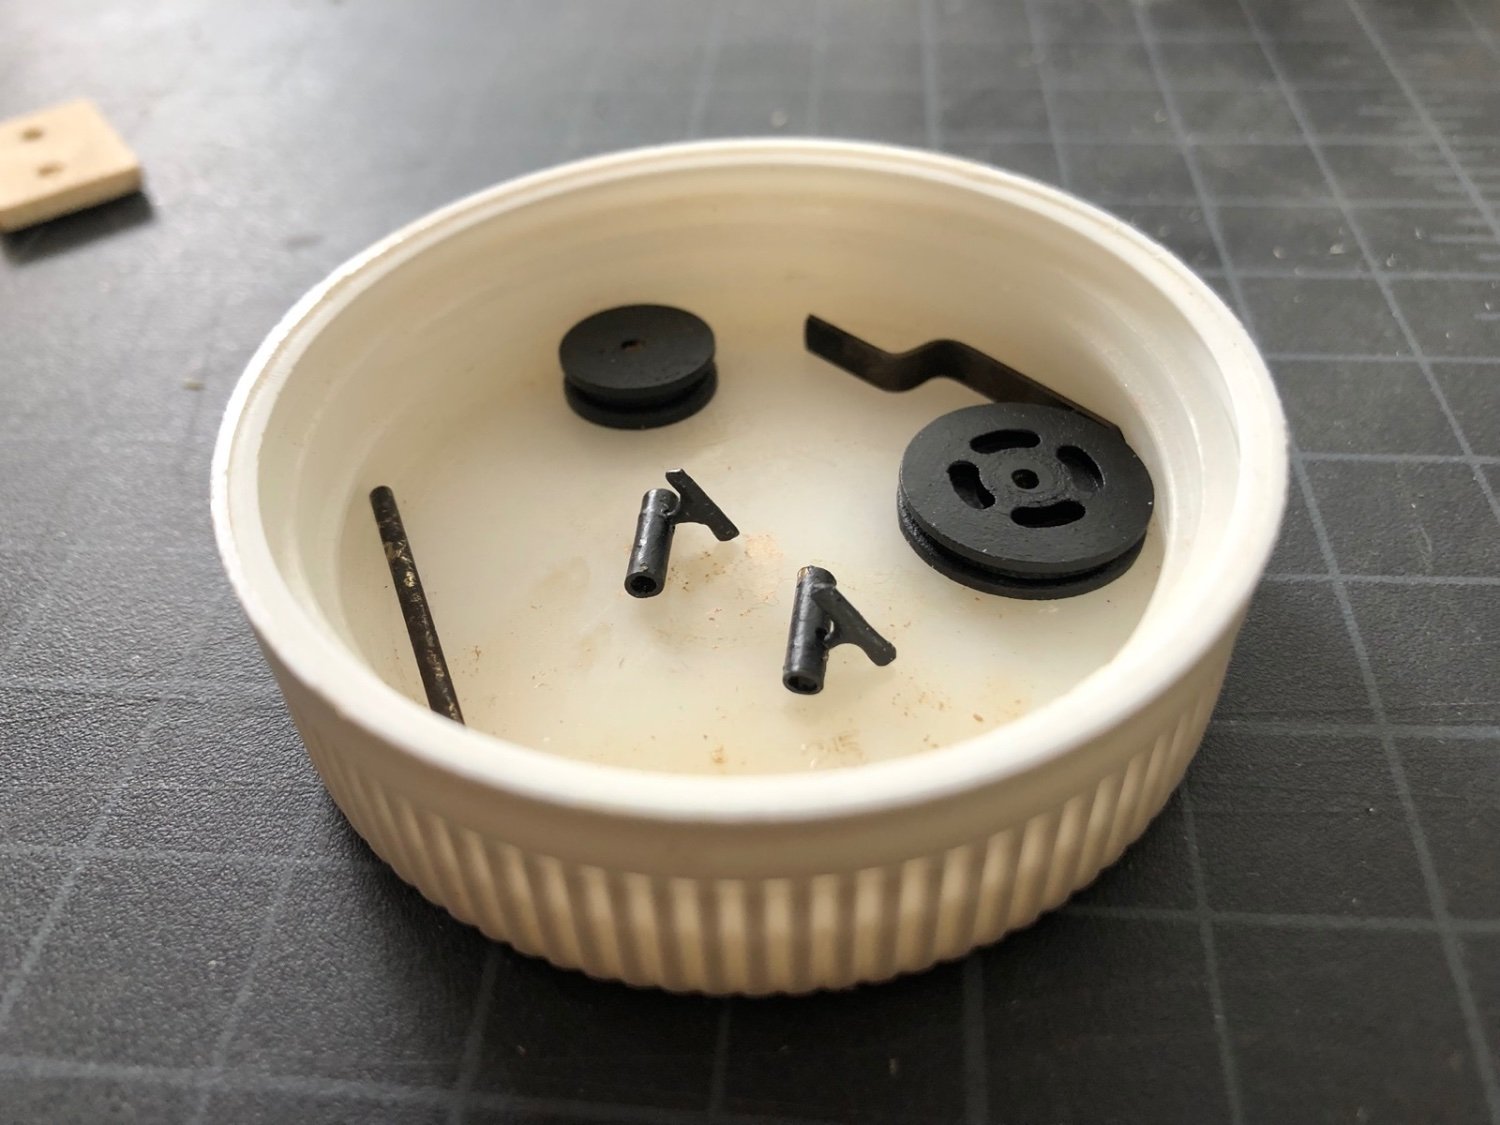
Thank you potash and the likes too. I finished the spit support arms and made the pot arms that go inside the stove opening. I again used boxwood for the arms themselves and brass rod for the bottom vertical piece and the brackets that these fit into that will be glued to the inside walls of the stove. I painted these pieces black but have not assembled them yet. I also gave the condenser a couple of coats of copper enamel. I then made the pulleys for the chain drive for the spit. I again used boxwood that I turned in the lathe and used the cut off tool to make the slot for the chain. I used a half round file to open up the slot at the edges then parted off the disks. I put the large (driven) pulley into the mill. where I cut the four curved slots. I cut these on both sides but not all the way through so the disk has more strength. I drilled holes for the axles and will now make the bracket that holds the drive pulley up.

-
I am mostly getting parts ready for the next steps. I painted the primed photo etch parts with gold paint mostly, but a few parts have white, red or copper paint too. I also painted the wooden transom trim pieces with gold paint. The upper transom piece that you can see in the photo below needs a slight curve to fit properly so I gave it a quick water bath then bent it to the hull to dry. After it dried it had a nice curve so I primed the area that will be painted red. The other parts being painted are for the stove project. On the hull, I cleaned up a few CA spots from gluing the wales on, touched up a few spots of black paint on the wales, and gave it another coat of wipe on poly, so it is ready for the next steps.
- 118 replies
-
- 5
-
-
- Duchess Of Kingston
- Finished
- (and 1 more)
-
The lower wales went on today. The spacing is a bit off but once I had the first one started I didn't want to try to release it for fear of really messing up the planking. I started getting the photo etch trim pieces ready by cleaning them with acetone then brushing on a coat of Bin primer. I wasn't sure how the primer would affect the small details but it was thin enough so they still look good.

- 118 replies
-
- 6
-
-
- Duchess Of Kingston
- Finished
- (and 1 more)
-
So I tried making the spit arms from brass sheet but I gave up on that because I could not make the hooks look the same. I then decided to try making them out of wood. I started with a square piece of boxwood that I milled a slot down one side. I then filed and sanded the other side into a curve. I cut off 1/16" slices with a slitting disk on the Byrnes saw to make the hooks. I cut the arms themselves in two pieces each from a 1/16" strip of boxwood on the scroll saw and filed them to shape. I glued the two halves together and cleaned up the joint. I also milled a slot into the other end of the square strip and cut off two piece for the brackets to hold the arms to the stove. I covered the back of the brackets with a small piece of wood to offset them from the sides of the stove to clear the brass on the sides of the stove. I then glued four hooks to each arm, making sure they were the same on each arm. I used medium CA to glue them on. The next step will be to paint these all black then glue them to the stove.


-
I glued the upper wales to both sides of the hull using medium CA. I started at the bow and worked my way back to the stern gluing a few inches each time. I trimmed the aft end of the wales just before I glued the last couple of inches to fit nicely into the window trim. I then touched up the black paint on the wales. I have the lower wales painted and will glue them on tomorrow.

- 118 replies
-
- 9
-
-
- Duchess Of Kingston
- Finished
- (and 1 more)
-
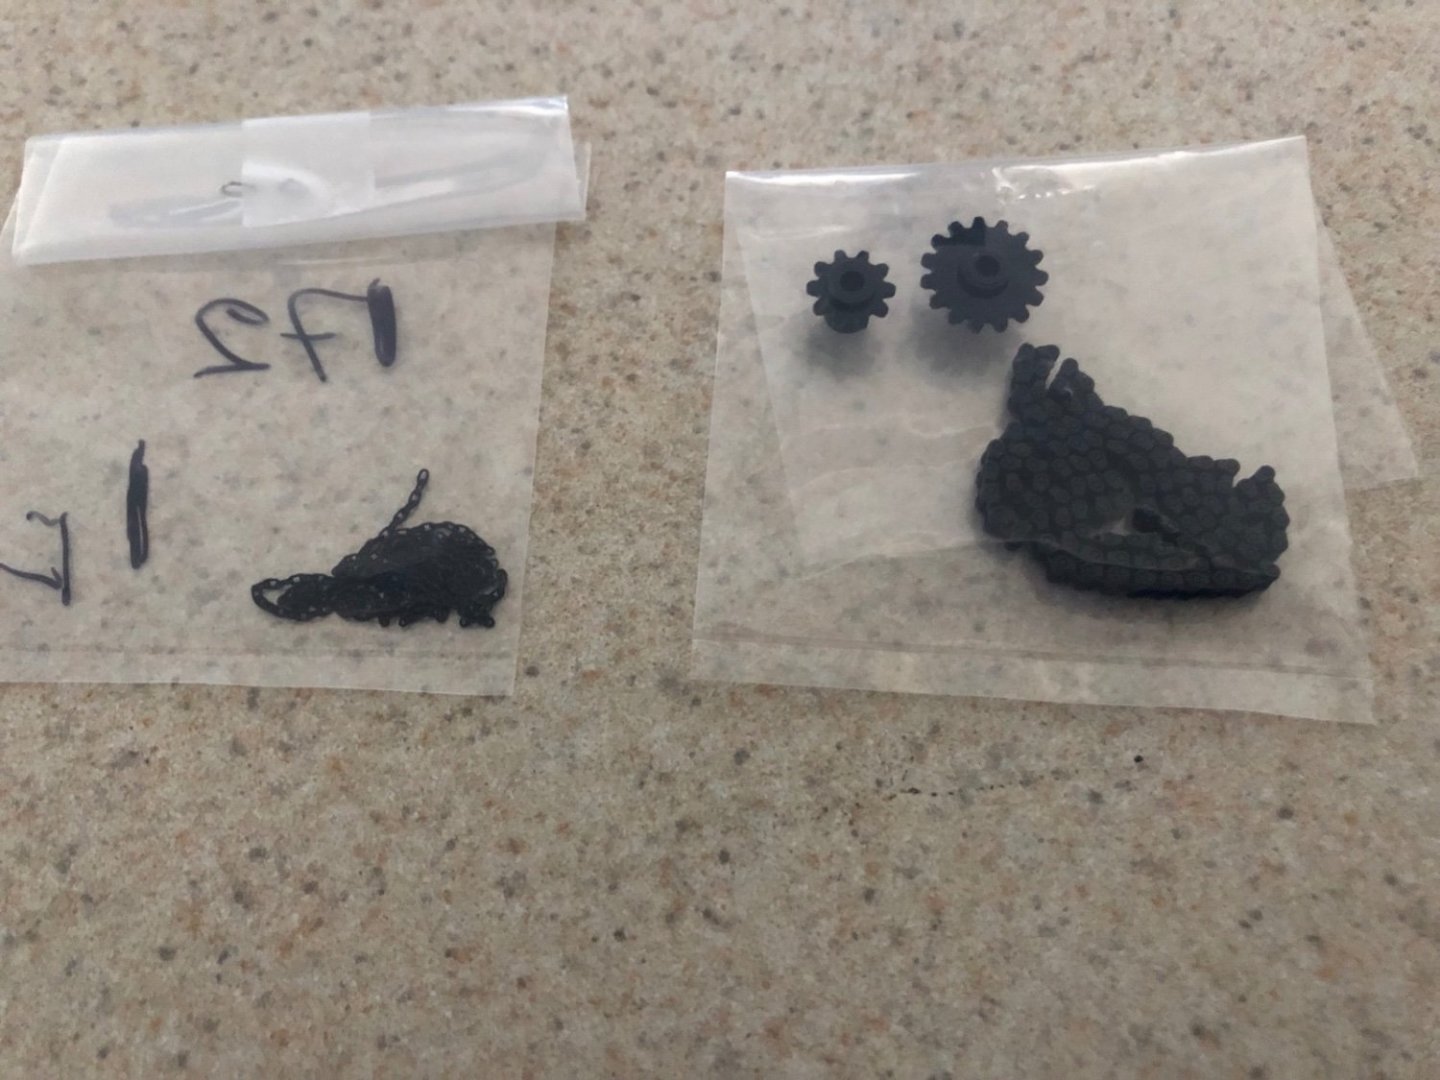
I gave the stove a few more coats of black paint but with the stove on its side so I could get underneath the doors and inside the openings at the ends. Here are the components I am working on at this time, including the drip pan (under the weight), the lifting bolts, condenser with all trim added, and the stove itself. The next step will be to make the support arms for the spit, which I will make from sheet brass. I am also still working on the design for the spit rotating mechanism. I just received this thinner chain (on the left) that I may use instead of the thicker drive chain (on the right). The thinner chain will fit into pulley wheels better which I think is more authentic than the gears.


-
The upper wales were soaked and bent to the hull. After soaking I used my electric plank bender to put the bow curve in, then clamped them to the hull to dry. Clamping was a bit of a challenge but I improvised as you see below with the lower wales. I ended and painted the upper wales black then soaked and bent the lower wales to the hull in the same way. I have marked the hull for the upper wales so after the lower wales dry I can glue the uppers on.

- 118 replies
-
- 6
-
-
- Duchess Of Kingston
- Finished
- (and 1 more)
-
The window trim is attached on both sides now and I touched up the black paint on it. I also painted inside the three large windows with black paint, and touched up the blue paint a bit. Next step is to soak and clamp the upper wales to the hull to bend them.

- 118 replies
-
- 7
-
-
- Duchess Of Kingston
- Finished
- (and 1 more)
-
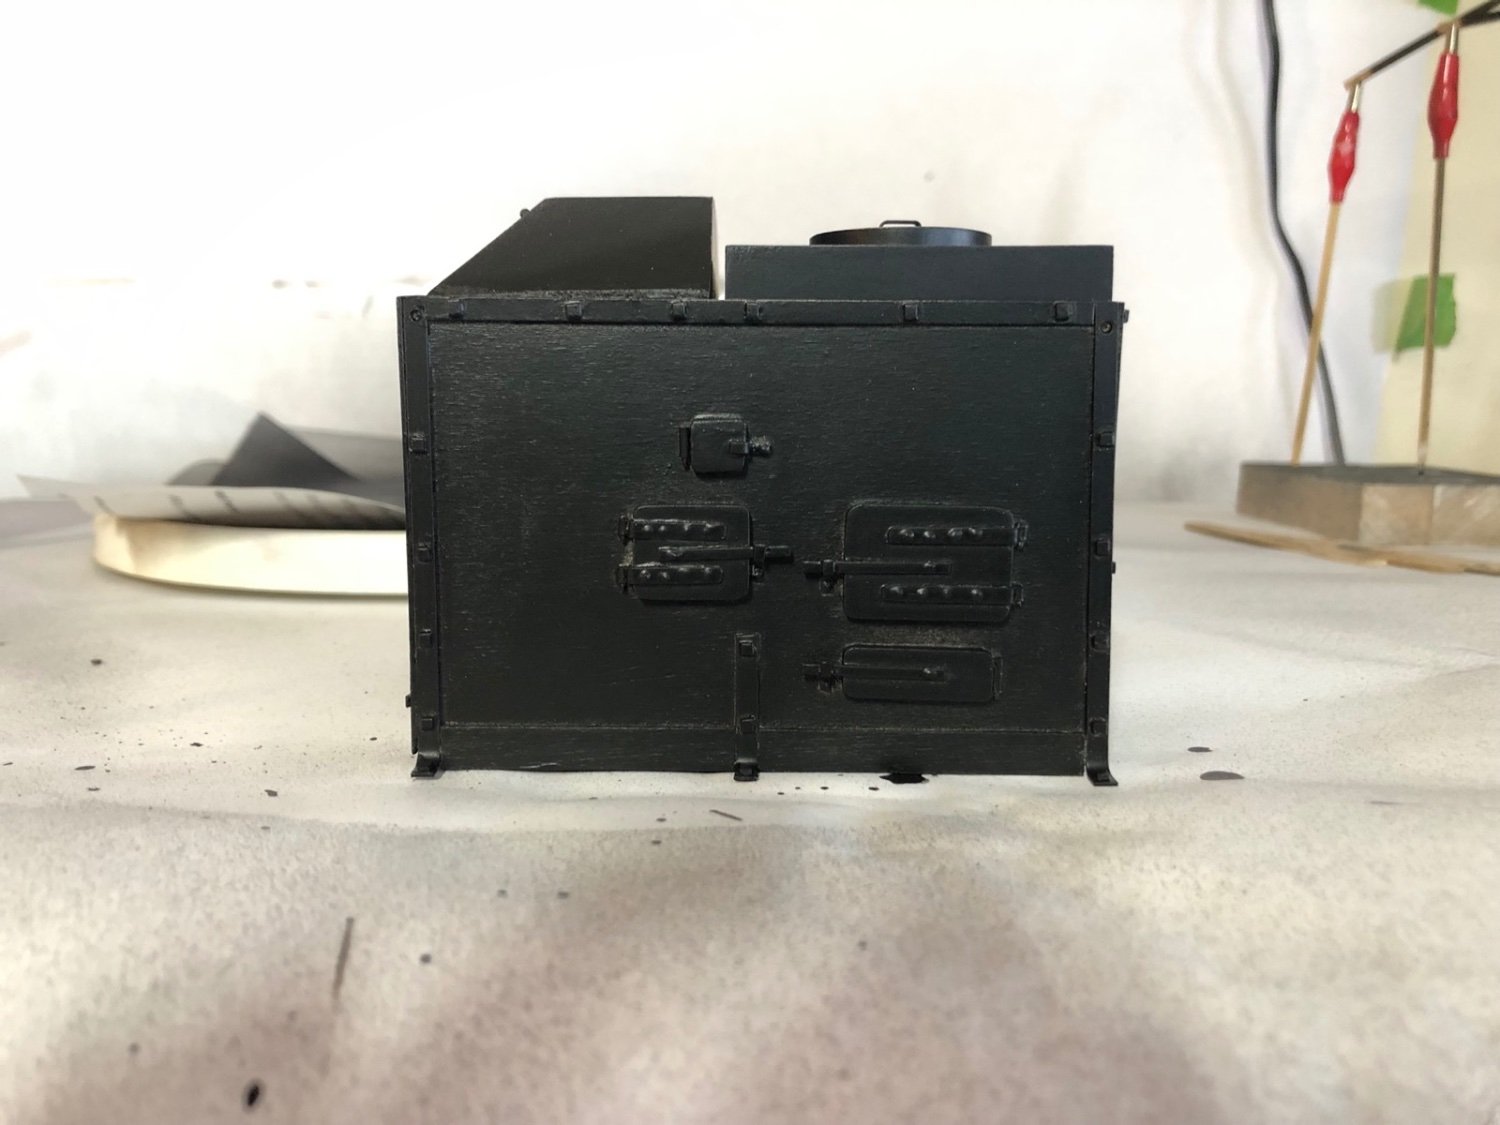
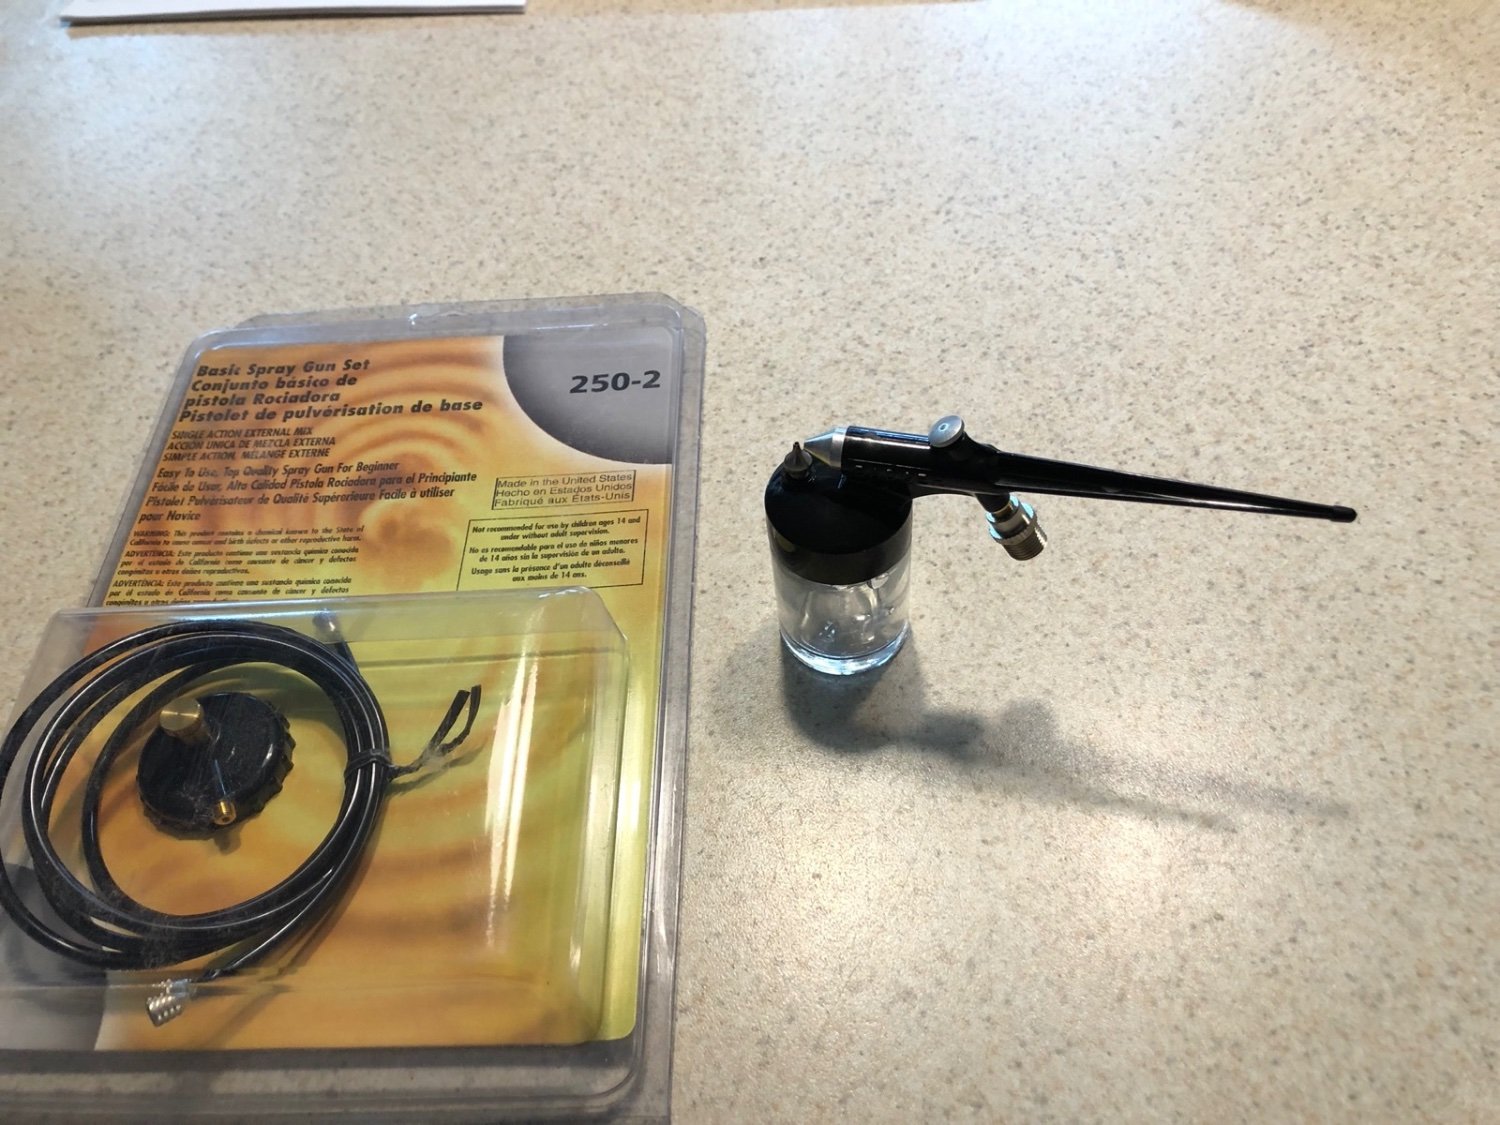
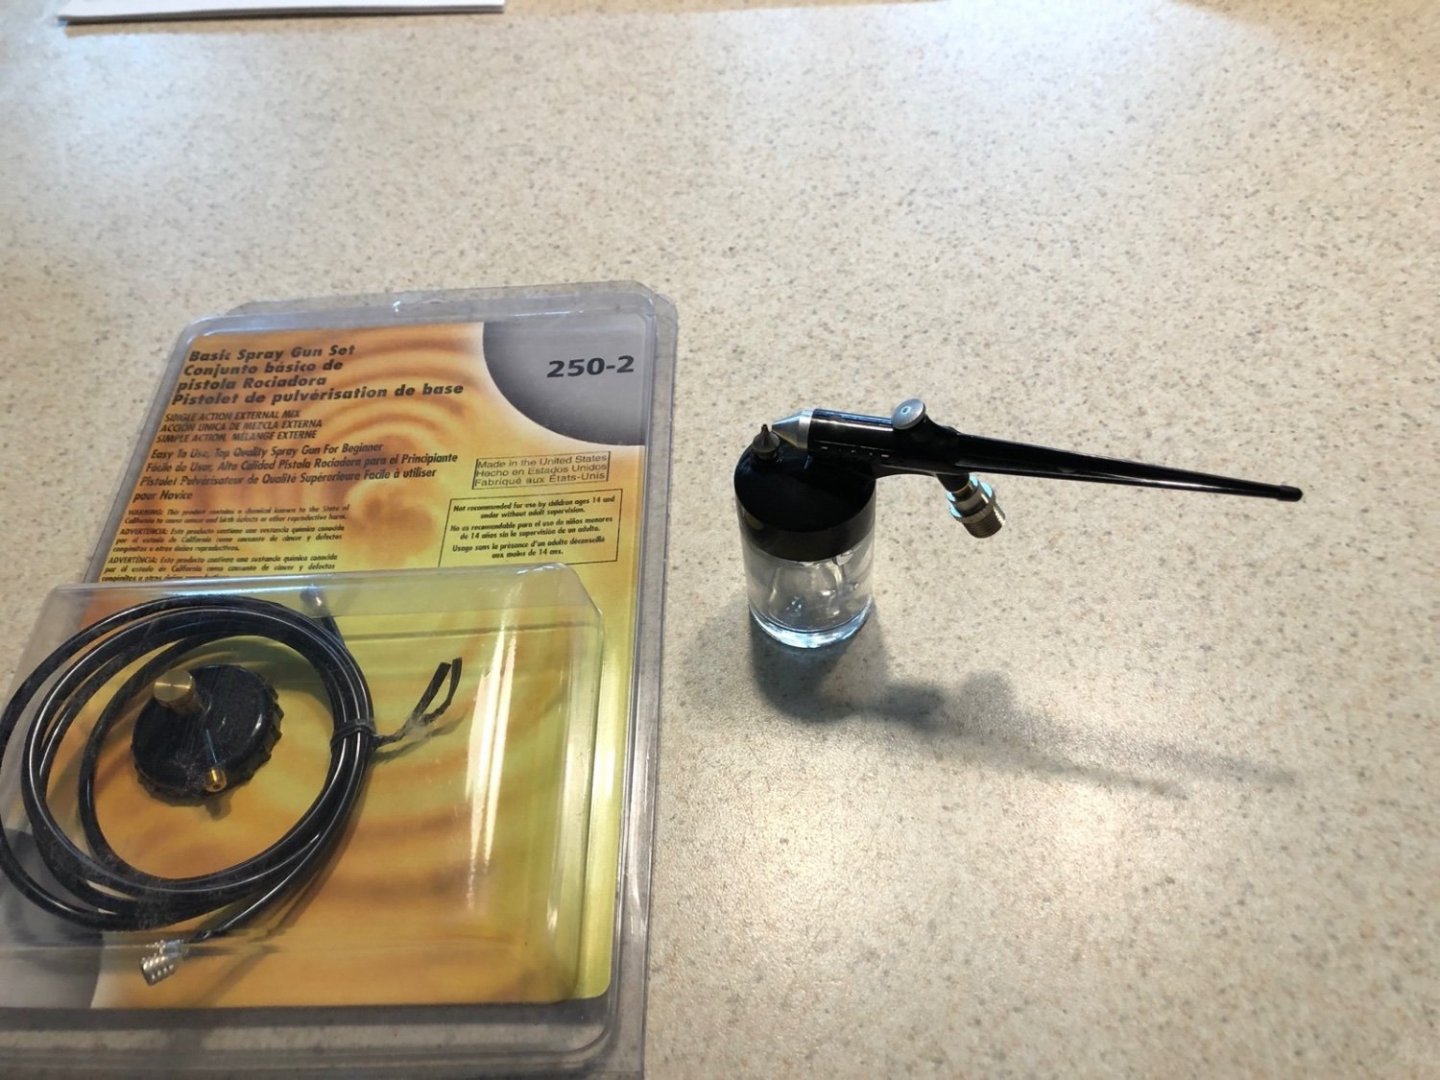
I gave the stove a couple of coats of black acrylic paint. I am using a Badger spray gun set that I bought a few years ago but never used it. It is provided with hardware to hook up to an aerosol can of air, but I put an adapter on it so I can use it with a small air brush compressor. It really worked well, much better than trying to use an air brush with a needle for this job. No clogs and easy clean up too. While that was drying I started making the drip pan. I also blackened large eye bolts and added rings to them for the lifting rings. I then turned the handle for the condenser on the lathe, from a solid piece of brass. I was going to turn the top and use some brass rod for the bottom but it was easier to turn it as one piece and I think it looks better too. I drilled a hole in the condenser and, since it was a tight fit, I glued the handle in with CA. I need to spray the stove from underneath tomorrow. I was worried that the acrylic paint would raise the grain a lot but with the gesso primer there was little if any grain raised. I am still give the whole stove a light sanding between coats but the surfaces are looking smooth already.
-
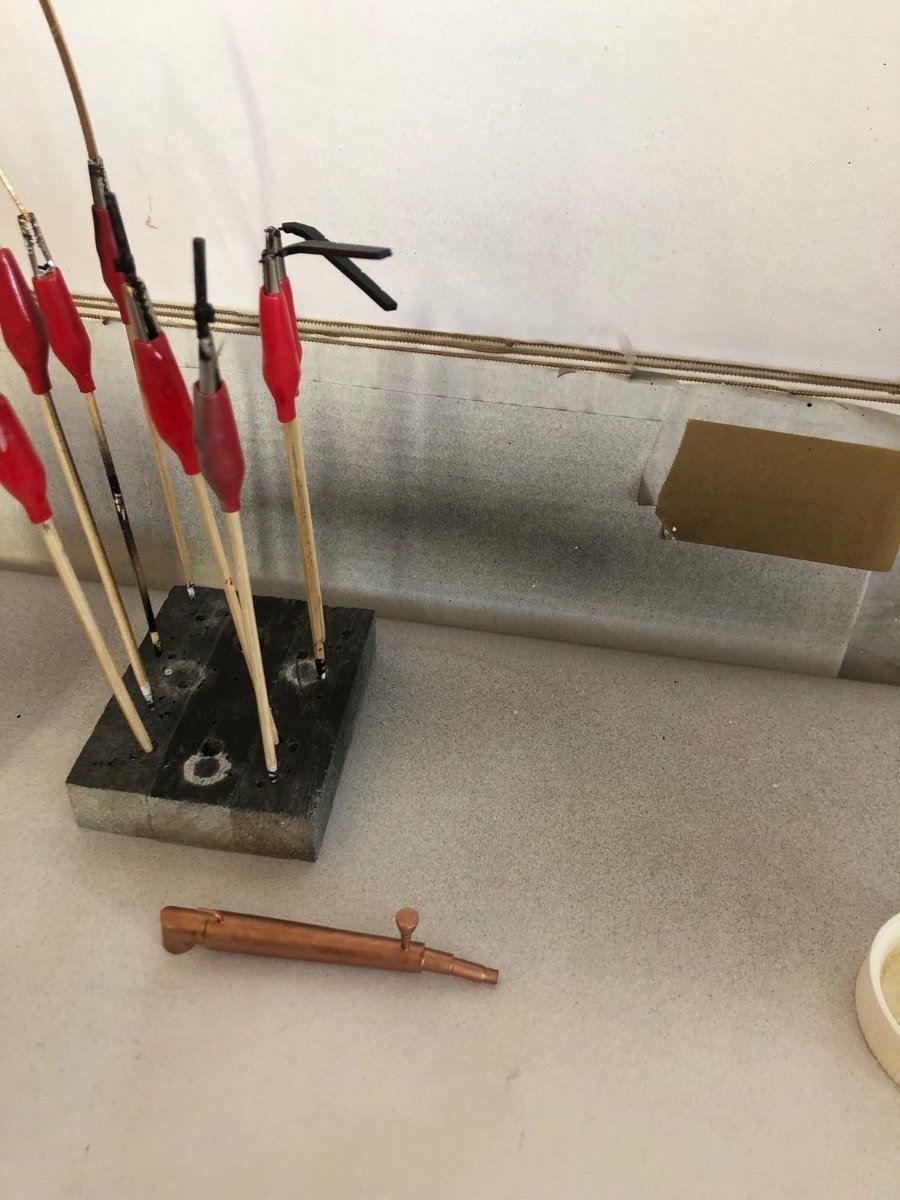
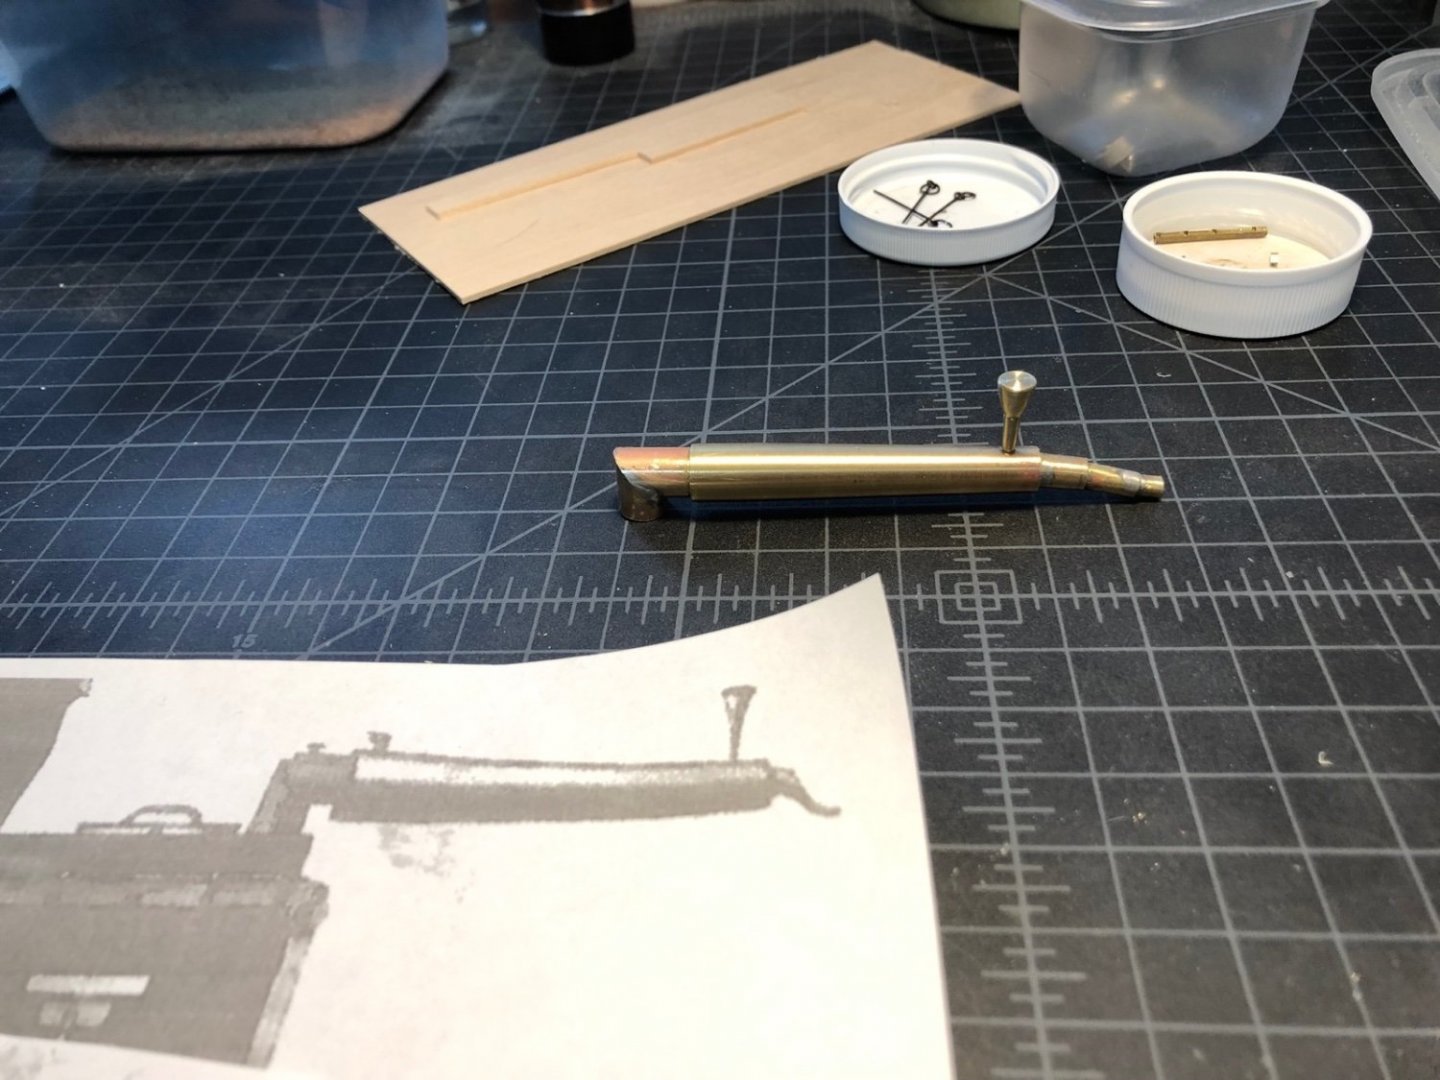
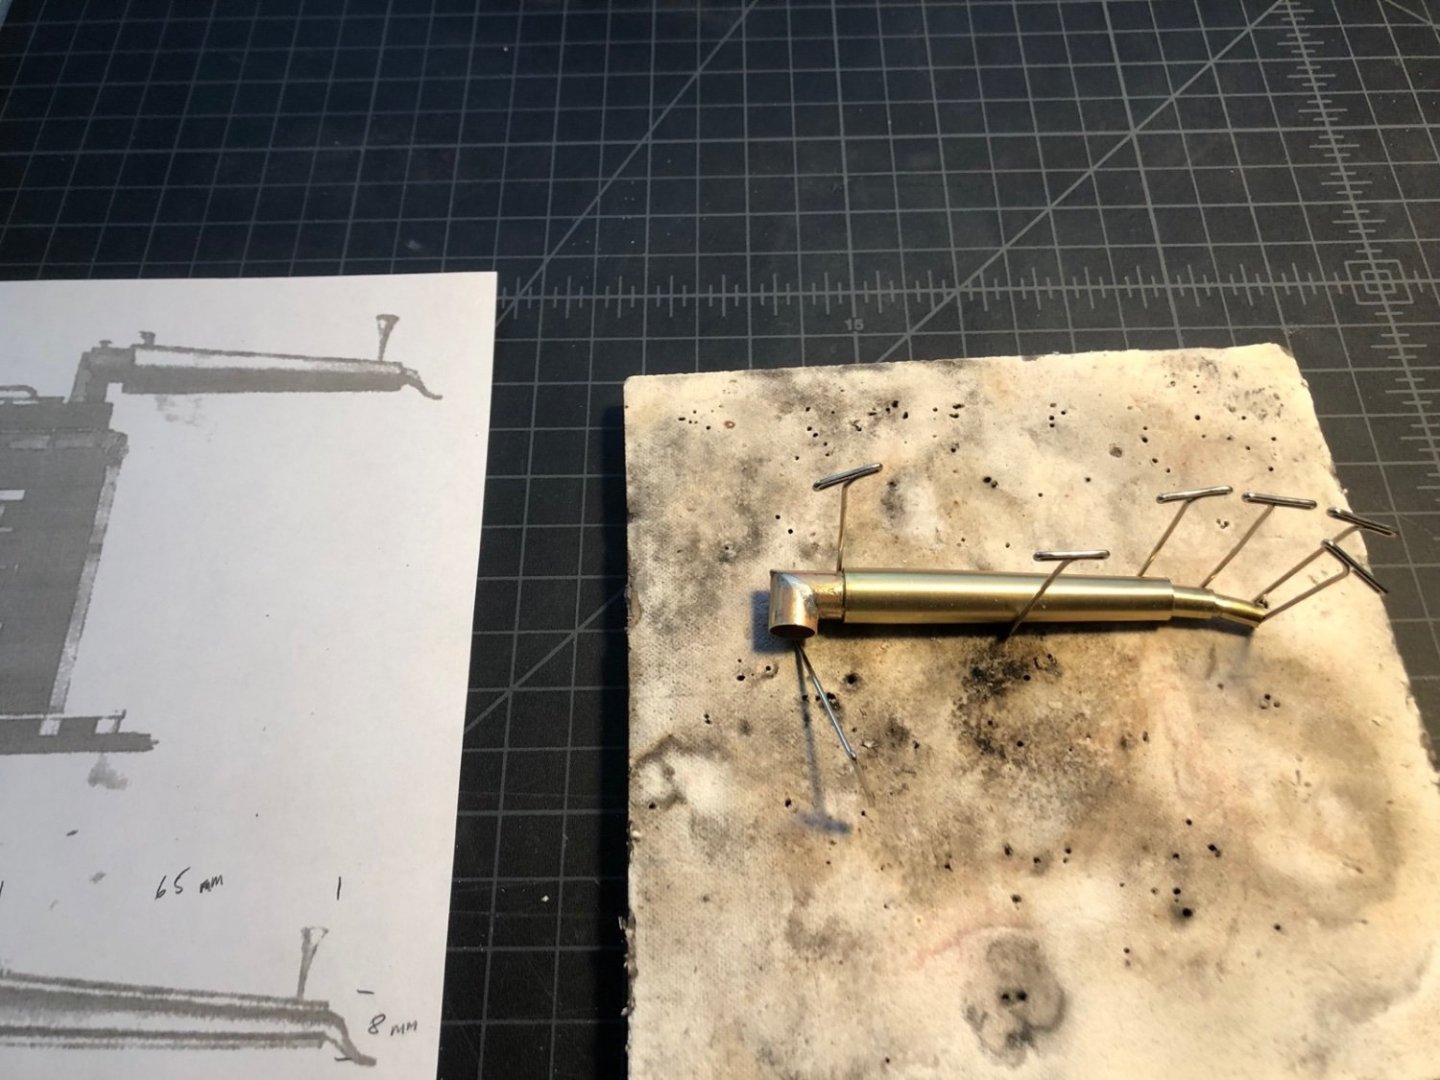
While priming the stove I have continued working on the condenser. I cut a piece of brass tubing at a 45 degree angle in a mitre box and soldered the two halves together to make the 90 degree elbow for the stove end and soldered a series of smaller tubing together for the spigot end. Here is the set up for part of the soldering using push pins in a soldering board to hold everything together. Because the turned part is a bit heavy I made a wooden plug that I can screw into stove top for the connector instead of just gluing a piece of tubing to the top. This will hold the condenser much more securely. I still need to make the parts shown at the top of the condenser as shown in the picture I am using as a guide, like the handle and vent.
-
Thanks so much Gary. I really appreciate the tips and help and I think they will help me a lot.
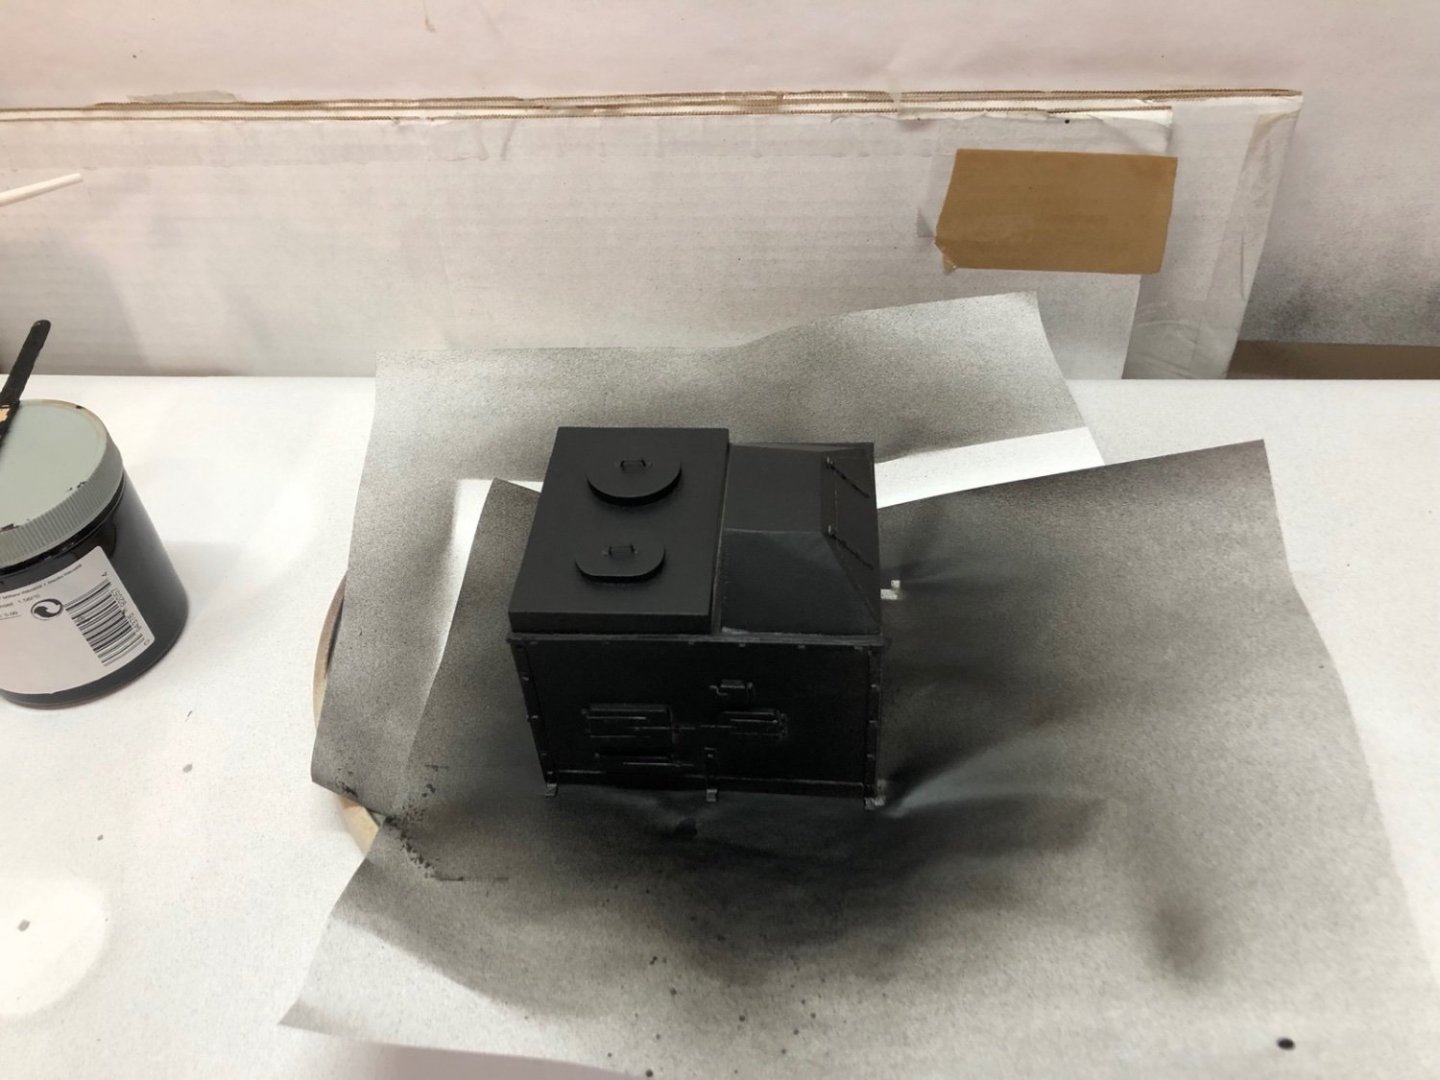
-
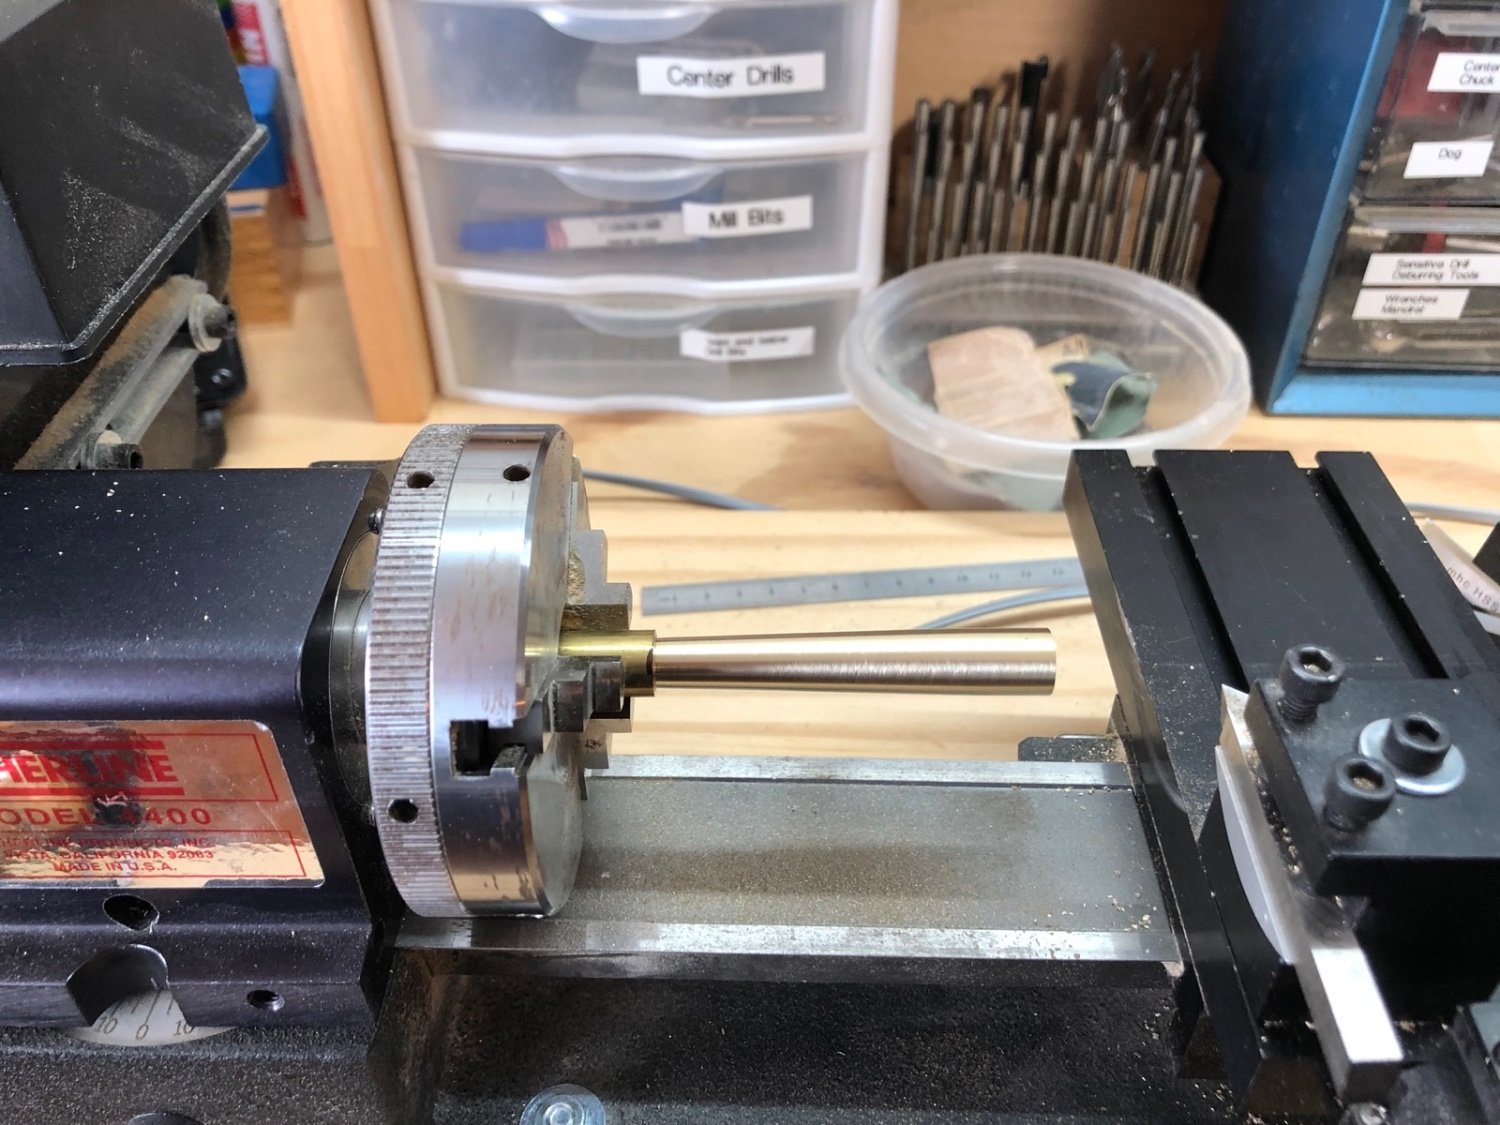
I finished up the small kit stove by applying some gritty black and rust red weathering powders to the stove and drip pan, then giving them a light spray of matte finish. I glued then to the display board after I gave it a coat of wipe on poly. I can now focus on the 1:16 scale stove. I gave all the brass parts that I have attached to the stove a coat of Binn primer. I also primed the grates, stack, and a piece of brass tubing for the still connector. When this dries I will give the wood a coat of diluted gesso as a primer. I starting working on the still while the primer was drying. I was thinking I would use brass tubing for all the components but then I found a piece of solid brass rod that was thick enough so that I could turn the outside piece in the lathe. I turned the head slightly so I could cut the taper into it, then drilled holes in each end for tubing to connect to it.