


JPett
-
Posts
881 -
Joined
-
Last visited
Content Type
Profiles
Forums
Gallery
Events
Posts posted by JPett
-
-
-
-
Ahoy Eric

She is "looooking good"

I see you went with a 3 step on your gunwale and side planking. I went with the traditional 4. I think yours looks nicer at this scale. It better highlights the symmetry used in planking. I might borrow this
As for the gunports. When I "beefcaked" mine I did the "little bit here, little bit there" thing to even out the mistakes, not fix them. Yea mine are a bit off too. They were way off but because people see contrast by "blending them", my mistakes are far less noticeable. I just made sure the big ones were surrounded by the second biggest ones and so forth. I don't think any two are really the same size. Did the same to even out the angle of the sills and make them appear to be "more" in line. They are not though.

I also see you added a wall on the "L" bulkhead and painted it black which I am if I am not mistaken means you are going to add the extra cannons "yes"
Ahoy Martin: Sorry to hear about your gunport lid incident "lol". I can see me doing this. Sorry not laughing at you, laughing at myself
-
-
-
-
-
Hi Larry
Treenails are much more complicated then many modelers think. Many patterns have a purpose, some do not. I have found that on a model it can be very difficult to find a compromise between accuracy and what looks good and not overdone at the scales we work in.
Dan Vadas does some of the best looking tree nails. How he gets that spacing and uniformity I don't know. I would paste a link but Billy Gates did something to my computer with his last update.
Search for his Vulture build.
-
Ahoy Mates
Popeye: Thx
Jason: I wise man told me if you want to win the war, pick your battles. I may have recently forgot this.
Pat. The sheave was not as hard as I thought either. I still need to make one more though.
Augie: Your turn
Sam: Nice to see you again THX for the compliment
Ben: U2
Bill: Thank you very much. Your comments meant a lot. Good luck on your build.
Martin. I still need to do the other side. Due to my wales being wrong it is slightly off in height and I may need to delete the trim that should run directly above it. All my attempts to include it looked awful so far.
Sport: Thx, Yours looks great too and has inspired my work.
Back to the build

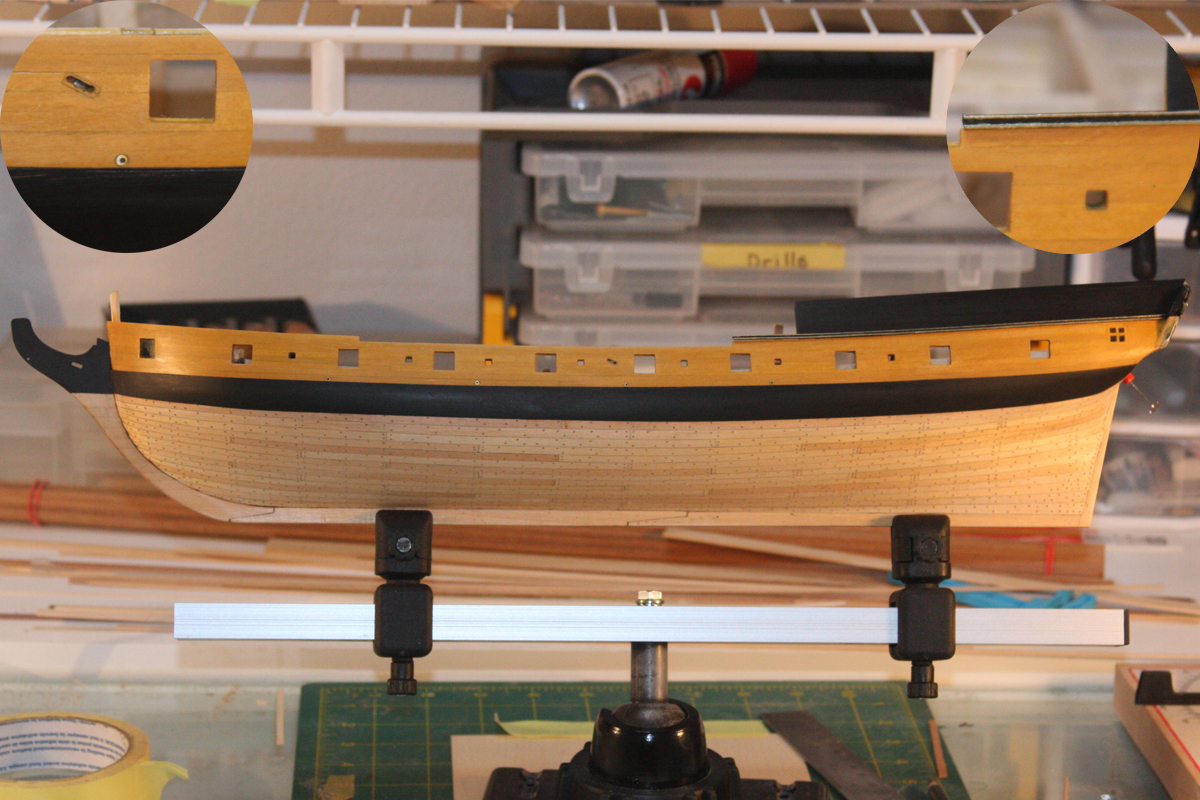
Well I must say that finishing my gunports has really tested my resolve. Well it still is. I am redoing the starboard side for the fifth time. Finding the motivation has been difficult but I am not a quitter. Just someone who knows when to take a break.
In typical JPett fashion I painted the gunwales and wales three times. If it helps it was not hard to do. Just let the paint you want to remove completely dry for a few days before sanding it off. Best to put the model somewhere that you can not see it too. I am very happy with my choices. I spent a considerable amount of time experimenting with paints to achieve this look. The gunwales are Windsor and Newton water based Oil, (Yellow ochre) Thinned 75% and around three coats. I painted the bare wood then sealed it with WOP after painting. I wanted to stain the wood with the paint. The wales are Windsor and Newton Acrylic (Mars Black). Originally sealed first with the WOP then painted with enamel, this took around four days. I did not like the contrast however. That and screwing up the step in my wales meant I needed to paint anyways.
As for the Step, painting this side without having completed the other, which BTW is "out of order and bad practice" needed to be done. It was a low point in the build when I felt I had to sand off this step which I spent so many hours on. Seeing that I could still produce a kit I would be satisfied with, with all the mistakes I have made so far was important. Call it a test before proceeding with the other side.
I need to keep things in perspective here. Had I not been satisfied the picture posted there would have been a completely different model shown. One with some of the first planks I ever laid ripped out. In all honesty I feel that, that redo is above my skill level and may have resulted in my permanently damaging this kit.
I will continue to pay for this as without this 'lip" the anchor guard may also have to be either just painted on or removed. Suggestions welcome
And some of you were wondering

-
-
Ahoy Adam
I see that "Sterling" is not mentioned
Not sure if they are still in business but I do see their kits sold on EBay every now and then. Sometimes even on this site.
-
-
-
So here's what I've been thinking of trying;
Rubbing the wood down heavily and generously with Kiwi brand black shoe polish. Wrap the planks in wet cheese cloth then baking them in the oven at 180-200 degrees F.
Afterwards, rubbing them out with linseed oil.
Bill
Ahoy Bill
I think you have a great idea. I believe that wrapping the wood/ wetted cheese cloth in a dark towel and exposing it to direct sunlight might keep the Admiral happier. God forbid. Either that or make sure you hide any cast iron cookware before you start.
PS: I heard but could be wrong, that Walnut and Pear was easier to do. Comments welcome
-
Thx Doc
I think I might order this one instead. Slightly cheaper but has a higher tooth count and should also work with my miter box.
http://www.japanwoodworker.com/product/157068/434-Detail-Saw-for-Hardwoods.aspx
Excellent Link and Site THX
-
Ahoy Peter
I have also had very good success with the "pin wash" which is also very similar and simple to do. It is used to highlight parts that connect at different angles. Mixed the same way as a wash but applied to the "seam" at one point and allowed to run down it.
Speaking of which
Using White glue is an excellent way to hide the gaps you sometimes get mounting the structures on top of each other or on the ship itself. It dries clear and causes the colors of the parts to be reflected into it hiding the glue and filling the seam.
But
NO: it won't fill the big ones, just the little ones . Applied the same way as the pin wash. Thin the glue
-
Ahoy Dr.
Can you post a link to the one you have
-
Ahoy Kevin
A trick borrowed from the plastic airplane community, now used by many plastic ship builders is to use different color primers. It will allow you to use the same color but in a different tone to better bring out the gray item, against the gray background or separate the two gray structures. A problem modeling modern ships. Done correctly this can really give the model a lot of depth. I use the Tamiya and Mr. Hobby primers and adding a some flat black causes a subtle but noticeable difference in the final coat/color.
Another; easier trick is to buy a "boat load" of your color. Mix it all up, split it in two and add either flat white or flat black to one. Just a tiny bit.. Do not eyeball the wet paint but do side by side test strips of the two colors. Check them once dry. For a realistic effect it needs to be barely noticeable. Too much and it looks unrealistic.
You also have dry brushing which can be used to really pull out the sharp edges that are commonly lost in the sea of gray. I use artist oils and found the titanium white to be one of my favorites. The oils take much longer to dry and can be removed without damaging the paint underneath. The white can be applied so thin it only lightens the base color. I prefer the water based Windsor & Newton.
PS: Your log is killing me. I so want to start another plastic model ship.
-
Ahoy Mates
I looked into these saws, which BTW are not cheap but do cut unbelievably well
The problem I found and my reason for not buying one for ship modelling (I went with the Zona 42T Kerf saw) was I could not find one with a tooth count that did not splinter the wood when cutting across the grain. This was especially true for smaller pieces. The good people at Rocklers did a full demo for me. The saws are amazing.
If anyone knows of one with a higher tooth count please post it. I would love to get one.
Just a side note. The saw I bought http://www.zonatool.net/35-550.html and their 37-240 miter box http://www.zonatool.net/37-240.html is excellent and a slightly cheaper solution for the modeler on a budget. Light years better then the cheap hobby saw it replaced that cost "just about the same". I still want one of those saws though. Actually "amazing" barely covers it.
-
Ahoy Mog
It really does have a great "look"
Beautiful job.
-
Ahoy Andy
I am with Augie
Clean and Sweet
-
Ahoy Ben
Love it. The way you have displayed the model is brilliant
-
Ahoy Andy
I have only used water and alcohol with the water based Acrylics. With the water based oils I have used the Windsor and Newton Safflower Oil, mineral spirits, water, alcohol, and enamel thinners. I have even used it to dye the WOP.
Lots of fun
-
Ahoy Tyleen
You could also use the search function on this site. Most of the parts listed for the MS Rattlesnake are generic and used on other kits. Some will be slightly different but you should be able to get a general idea.
Click on the advanced search (little gear to the right of the search bar) and choose "As Posts" for the Display Results. It will return just the posts where many have pictures, which will make it much easier.
If it helps I had an issue with my MS Ratt regarding the bulkheads. It is a common with kits but can be confusing for the newbie. When you align the bulkheads on the Keel section use the deck and then shim or sand the lower portions to match the rabbet. If this doesn't make sense right now don't worry. It will when you get there. It is touched on in Fig 6 and 7 of your manual. If you check my build log you will see I had a "bit" of an issue at this point. I did not use the deck BTW
PS: I am very pleased with the kit and look forward to seeing your build log here on MSW

HMS Snake by Beef Wellington - FINISHED - Caldercraft - Scale 1: 64 - First wooden ship build
in - Kit build logs for subjects built from 1751 - 1800
Posted · Edited by JPett
Ahoy Jason
You really are setting a standard here with your build